

Sony MD Walkman MZ-G755 User Manual
3-239-281-12(1)
FM/AM Portable
MiniDisc Recorder
Operating Instructions
“WALKMAN” is a trademark of Sony Corporation.
MZ-G755
©2002 Sony Corporation
WARNING
To prevent fire or shock
hazard, do not expose the
unit to rain or moisture.
Do not install the appliance in
a confined space, such as a
bookcase or built-in cabinet.
To prevent fire, do not cover the
ventilation of the apparatus with
news papers, table cloths,
curtains, etc. And don’t place
lighted candles on the apparatus.
To prevent fire or shock hazard,
do not place objects filled with
liquids, such as vases, on the
apparatus.
Certain countries may regulate
disposal of the battery used to
power this product. Please
consult with your local
authority.
CAUTION — INVISIBLE
LASER RADIATION WHEN
OPEN
AVOID EXPOSURE TO
BEAM
Information
IN NO EVENT SHALL
SELLER BE LIABLE FOR
ANY DIRECT,
INCIDENTAL OR
CONSEQUENTIAL
DAMAGES OF ANY
NATURE, OR LOSSES OR
EXPENSES RESULTING
FROM ANY DEFECTIVE
PRODUCT OR THE USE
OF ANY PRODUCT.
The CE mark is valid
only for products
marketed in the
European Union.
2

3

Table of contents
Looking at the controls ........................................................ 6
Getting started! ................................................................... 10
Recording an MD right away! ............................................ 13
Playing an MD right away! ................................................. 17
Listening to the radio .........................................................20
Various ways of recording
Two ways of connecting to a sound source ..........................................22
Recording with analog input (line cable required) ................................ 24
Long-time recording (MDLP) ...............................................................25
To start/stop recording in sync with the source player (Synchro-recording)
Recording without overwriting existing material ................................. 28
Recording from a microphone .............................................................. 29
Adding track marks automatically (Auto Time Stamp) ........................ 30
Adjusting the recording level manually (Manual recording) ................ 32
Checking the remaining time or the recording position ........................ 34
Various ways of playback
Playing tracks repeatedly ...................................................................... 36
Emphasizing bass (DIGITAL MEGA BASS) ......................................37
Checking the remaining time or the playing position ...........................39
Protecting your hearing (AVLS) ........................................................... 40
Locking the controls (HOLD) ............................................................... 41
Connecting to a stereo system ............................................................... 42
Various way to use the radio
Presetting radio stations automatically ..................................................44
Presetting radio manually ......................................................................45
Listening to the preset radio stations ..................................................... 46
Receiving stations outside your country (Excluding European, Saudi
.................................................................................................26
Arabian, and Chinese model) ................................................. 46
4

Editing recorded tracks
Erasing tracks ........................................................................................ 48
To erase a track .............................................................................. 48
To erase the whole disc ................................................................. 49
Adding a track mark .............................................................................. 51
Erasing a track mark .............................................................................. 52
Moving recorded tracks .........................................................................53
Labeling recordings ...............................................................................54
Power sources
Battery life ............................................................................................. 57
Additional information
Precautions ............................................................................................ 59
System limitations ................................................................................. 63
Troubleshooting .................................................................................... 65
Messages ...............................................................................................68
Specifications ........................................................................................ 71
Explanations ..........................................................................................73
5
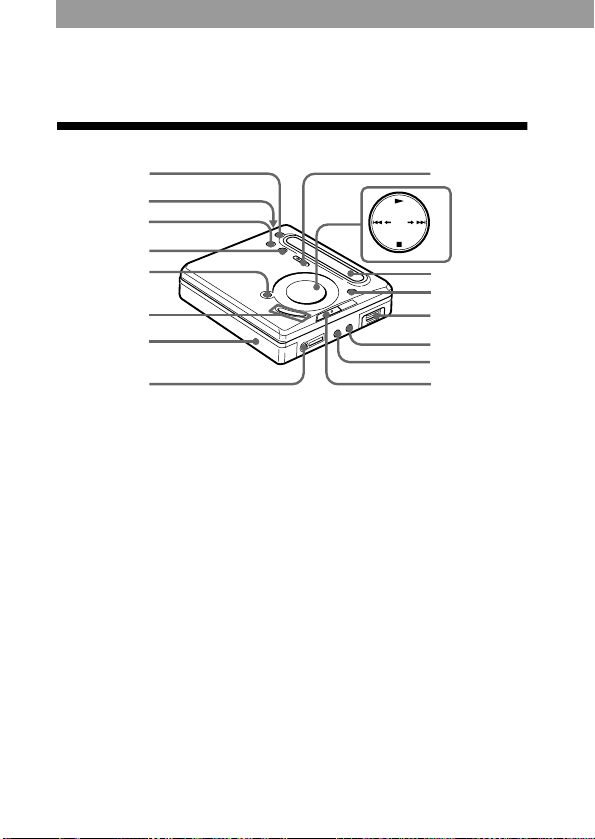
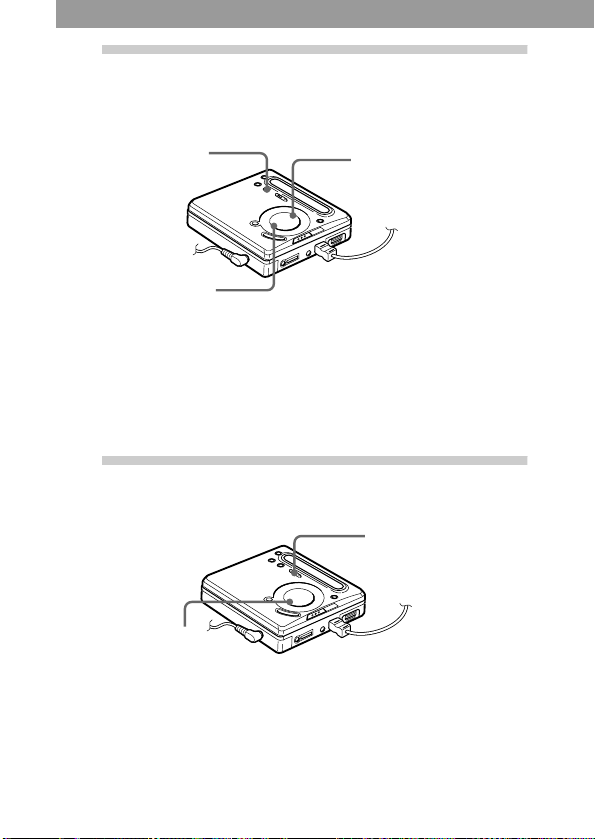
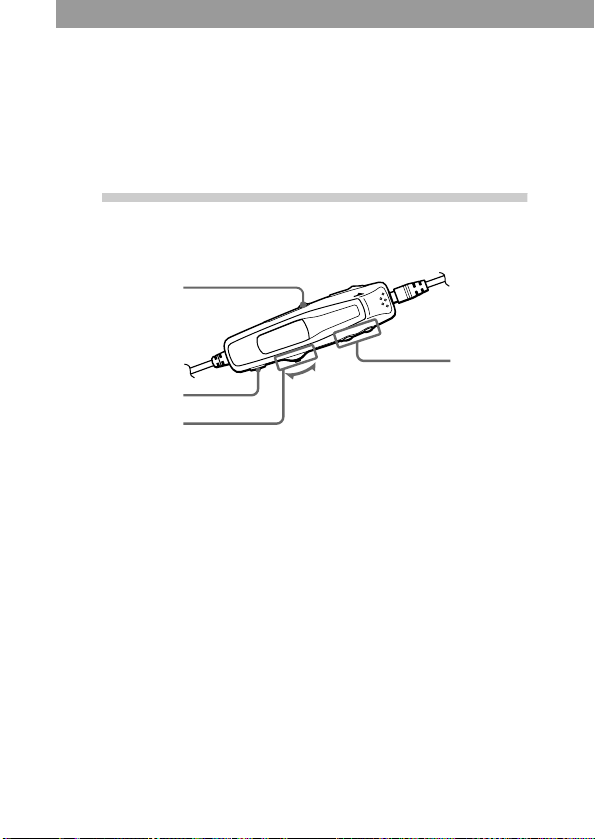
Looking at the controls
See pages in ( ) for more details.
The recorder
A
B
C
D
E
F
G
H
A REC MODE button (25)
B OPEN button (11)
C T MARK button (51)
D END SEARCH button
(14)(55)
E X (pause) button
(15)(18)(32)(55)
F VOL +/– button (17)(55)
The VOL + button has a
tactile dot.
G DC IN 3V jack (10)(13)
H i (headphones/earphones)
jack (11)(42)
I REC (record) switch
(14)(24)
J <SELECT, button
(27)(36)(49)
6
K Display window (27)(36)
L MENU/ENTER button
M Battery compartment (10)
N LINE IN (OPTICAL) jack
O MIC (PLUG IN POWER)
P HOLD switch (11)(41)
SELECT
CHARGE
N (play) button (14)(17)
The N button has a tactile
dot.
./> (search/AMS)
button (15)(18)(52)(55)
CHARGE/x (stop) button
(10)(14)(17)(26)(49)
(26)(36)(48)
(13)(24)
jack (29)
There is a tactile dot beside
the MIC (PLUG IN POWER)
jack.
I
J
K
L
M
N
O
P

The display window
AB
E
F
A Character information
G
H
display (34)(39)
Displays the disc and track
names, error messages, track
numbers, etc.
B Play mode indication (36)
Shows the play mode of the
MD.
C Time display
D Battery indication (58)
Shows approximate battery
condition.
E Mega bass indication (38).
F Level meter (33)
Shows the volume of the
MD being played or
recorded.
G Recording mode (LP2/LP4/
MONO) indication (25)
H SYNC (synchro-recording)
indication
C
I
J
I REC indication (14)
Lights up while recording.
When flashing, the recorder
is in record standby mode.
J REC REMAIN/REMAIN
(remaining time/tracks)
indication (34)(39)
Lights up along with the
remaining time of the track,
the remaining time of the
MD, or the remaining
number of tracks.
K Disc indication
Shows that the disc is
rotating for recording,
playing or editing an MD.
D
K
7
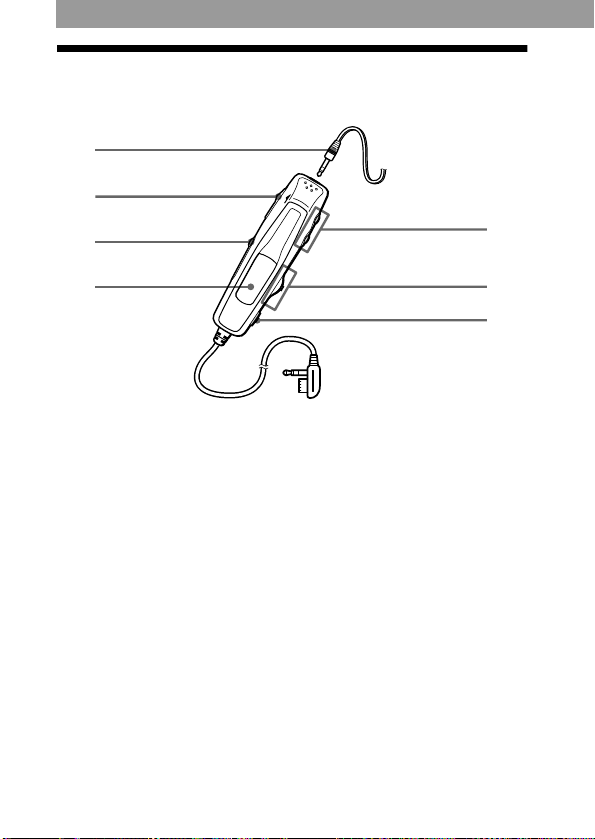
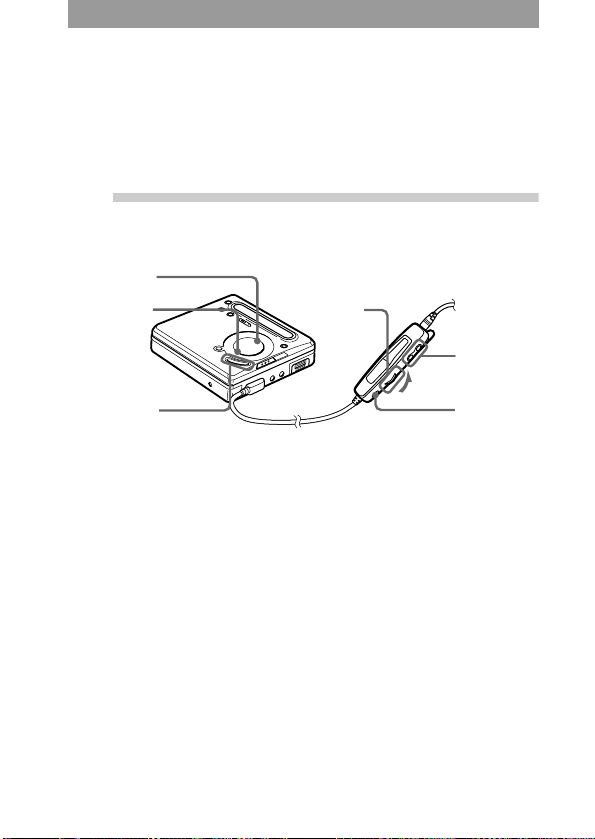
The remote control with built-in digital tuner
A
B
C
E
D
A Headphones/earphones
Can be replaced with
optional headphones/
earphones.
B HOLD switch (11)(41)
Slide to lock the controls of
the remote control.
C RADIO ON/BAND button
(20)(44)
FM MODE button (21)
D Display window (44)
8
F
G
E VOL +/– buttons (17)(20)
F Jog lever
X (pause)/MODE (18)(44)
>N (AMS/search,
play)/F+ button (17)(20)(45)
. (AMS/search)/F–
button(18)(20)(45)
G x (stop)/RADIO OFF
button (17)(21)(47)
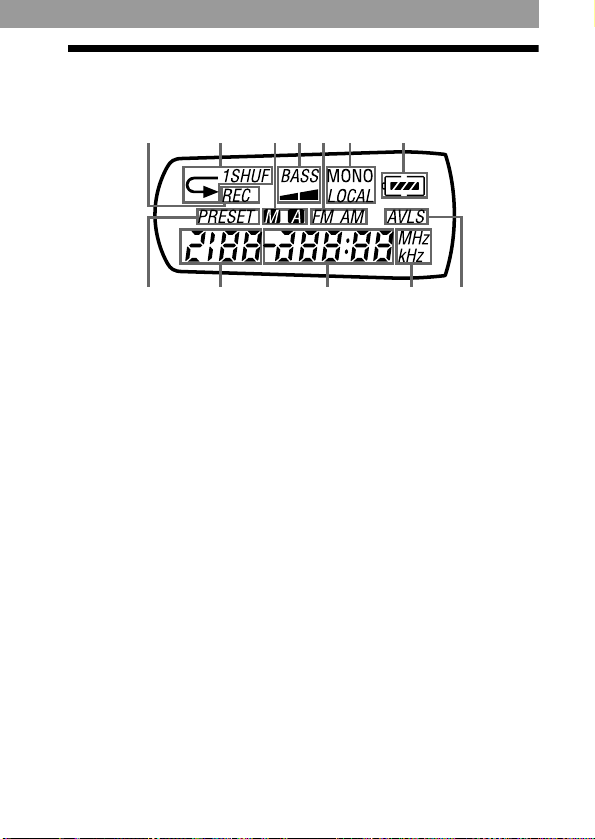
The display window of the remote control
A
HI J KL
A REC indication (14)
BCDEFG
Lights up while recording.
When flashing, the recorder
is in record standby mode.
B Play mode indication (36)
Shows the play mode of the
MD.
C Manual/Auto indication
D Mega Bass indication (38)
E FM/AM indication (44)
F MONO (monaural)/LOCAL
indication
G Battery indication
H PRESET indication (44)
Lights up while preset radio
station is turned on.
I Number display
Displays the preset numbers,
track numbers, etc.
J Time/Frequency display
K MHz/kHz indication (44)
MHz lights up when FM
station is turned on and kHz
lights up when AM station is
turned on.
L AVLS indication (40)
9
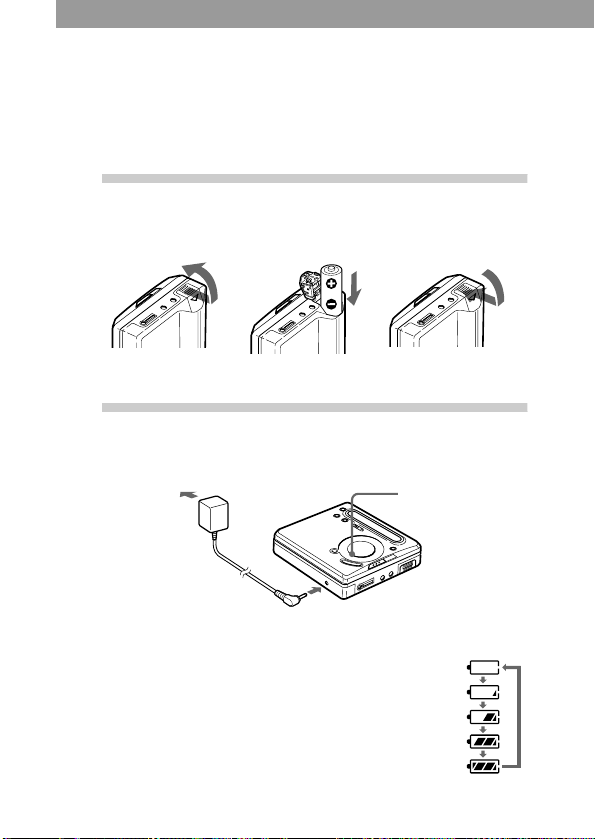
Getting started!
Charge the rechargeable battery before using. Even if the
rechargeable battery is not charged, you can use the recorder as long
as the AC power adaptor is connected.
1
Insert the rechargeable
battery.
(Insert the rechargeable battery minus end first)
2
Charging the rechargeable
battery.
to a wall outlet
to DC IN 3V
1 Connect the supplied AC power adaptor.
2 Press CHARGE (x).
“Charging” flashes, e appears in the display, and
charging starts. When charging is completed, the battery
indication disappears. Full charging of a completely
discharged rechargeable battery takes about 3 hours.To
cancel charging, press CHARGE (x).
3 Disconnect the supplied AC power adaptor.
CHARGE (x)
10
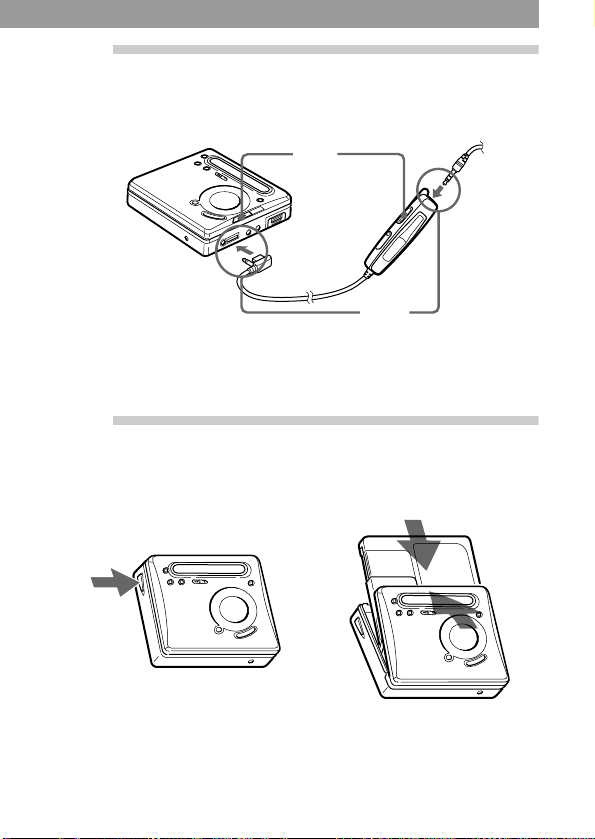
3
Make connections and
unlock the control.
HOLD
to i
1 Connect the supplied
headphones/earphones with
the remote control to i.
4
1
Insert an MD.
(Use a recordable MD for recording.)
Press OPEN to open the lid. 2 Insert an MD with the label
2 Slide HOLD in the opposite
direction of the arrow (.)
to unlock the controls.
side facing front, and press
the lid down to close.
11

Using on a dry battery
Insert one LR6 (SG) alkaline dry battery (not supplied) instead of the
rechargeable battery.
Notes
• If you press CHARGE (x) immediately after charging has completed,
charging will begin again. If this happens, press CHARGE (x) again to stop
the charging operation since the battery is already fully charged.
• Charging stops when you try to operate the recorder during charging.
• B
e sure to use the supplied AC power adaptor.
• Charging time may vary depending on the battery condition.
• When a rechargeable battery is charged for the first time or charged after a
long period of disuse, battery life may be shorter than usual. Repeat
discharging and recharging a few times. The battery life should return to
normal.
• When the battery life of a fully charged rechargeable battery becomes about
half the normal life, replace it.
• When carrying the rechargeable battery, keep it in the supplied battery
carrying case. It is dangerous to carry the battery out of the case in your
pocket or a bag together with metallic objects such as key rings, as this may
cause a short circuit.
• Remove the rechargeable battery from the recorder when it is not to be used
for a long time.
12
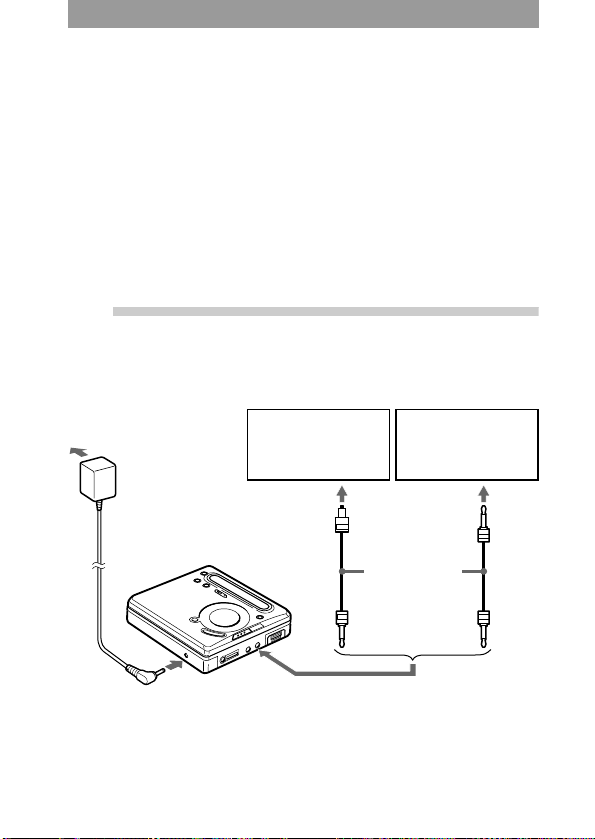
Recording an MD right away!
Connect to a digital source using an optical cable (supplied) to make
digital recordings. Digital recording is possible even from digital
equipment with different sampling rates, such as a DAT deck or a BS
tuner, using the built-in sampling rate converter. To record from an
analog source, see “Recording with analog input (line cable
required)” (page 24). To record from an MD, see “Note on digital
recording” (page 62). Using the AC power adaptor (supplied) is
recommended for recording.
Note that you cannot record a radio broadcast that is
being received on the remote control.
1
Make connections.
(Insert the cables firmly and completely
into the appropriate jacks.)
to a wall outlet
AC power adaptor
(supplied)
to DC IN 3V
∗ The supplied cable consists of one or the other of these cables. The shape of
the plugs on the supplied cable may differ, depending on where the recorder
was purchased.
CD player, MD
player, DVD video
player, etc.
Optical
plug
to LINE IN (OPTICAL)
to DIGITAL OUT
(OPTICAL)
Portable CD
player, etc.
Optical
miniplug
Optical cable
(supplied)*
13
2
Placing the recorder into
recording-standby mode.
END SEARCH
x
1 Press N, and then press
x.
The display window on the
recorder and the remote
control light up.
3
Record an MD.
x
1 Press and slide REC to the
right.
REC indication lights up in
the display and recording
starts.
14
N
2 Press END SEARCH.
The recorder goes to the end
of the previously recorded
material.
To search for another place,
press N, >, or ..
REC
2 Play the source you want to
record.
To stop recording, press x.
After you press x, the recorder will automatically turn off after:
— about 5 minutes when using AC power adaptor.
— about 10 seconds when using batteries.
Notes
• “Data Save” or “TOC Edit” flashes while data of the recording (the track’s
start and end points, etc.) is being recorded. Do not move or jog the recorder
or disconnect the power source while the indication is flashing in the display.
• The lid does not open until “TOC Edit” disappears in the display.
To Press
Record from the end of the
previous recording
Record partway through the
previous recording
1)
1)
END SEARCH, and then press and
slide REC.
N, > or . to find the start
point of recording and press x to
stop. Then press and slide REC.
Pause X
2)
Press X again to resume recording.
Remove the MD x and open the lid.3) (The lid does
not open while “TOC Edit”
flashing in the display.)
1)
By setting “REC-Posi” to “From End”, recording operations will always start
from the end of the previously recorded material (page 28).
2)
A track mark is added at the point where you press X again to resume
recording while pausing; thus the remainder of the track will be counted as a
new track.
3)
If you open the lid and re-insert the same disc while “REC-Posi” is set to
“From Here,” recording will continue from the point where it last ended. If
you insert another disc, recording will start from the beginning of the disc.
Check the point to start recording on the display.
If the recording does not start
• Make sure the recorder is not locked (page 41).
• Make sure the MD is not record-protected (page 61).
• Premastered MDs cannot be recorded over.
For models supplied with the AC plug adaptor
If the AC power adaptor does not fit the wall outlet, use the AC plug adaptor.
15

About the DSP TYPE-R for ATRAC
“TYPE-R” is a high-level Sony specification used in the Digital Signal
Processor (DSP), which is heart of the MiniDisc sound. This technology gives
the MiniDisc recorder twice the signal processing capability as previous
MiniDisc Walkman models, producing a sound quality close to that of
MiniDisc decks. This unit supports the “TYPE-R” function only during
recording or playback in normal stereo mode. It does not support this function
in MDLP mode.
Notes
• If the power supply is disrupted (i.e. the battery is removed or becomes
exhausted or the AC power adaptor is disconnected) during a recording or
editing operation, or while “TOC Edit” appears in the display, then it will not
be possible to open the lid until power is restored.
• You can make a digital recording only from an optical type output.
• When recording from a portable CD player, set the CD player to pause, and
then do the recording procedure on the recorder.
• Note the following when recording from a portable CD player:
—Some portable CD players may not be capable of digital out unless
powered by the AC power.
—Connect the AC power adaptor to the portable CD player and use it on AC
power as the power source.
—Disable any anti-skip function (such as ESP*) on the portable CD player.
∗ Electronic Shock Protection
z
• LINE IN (OPTICAL) jack is for both digital and analog input. The recorder
automatically recognizes the type of line cable and switches to digital or
analog input.
• The level of the recorded sound is adjusted automatically.
• You can monitor the sound during recording. Connect the supplied
headphones/earphones with remote control to i and adjust the volume by
pressing VOL +/–. This does not affect the recording level.
16
Playing an MD right away!
To use the recorder on a rechargeable battery or dry battery, see
“Power sources” (page 57).
When you operate the recorder with the supplied remote control, use
the buttons and control shown in parentheses.
1
1 Press N (flip the jog lever
To stop play, press x.
A long beep sounds in the headphones/earphones when you operate
on the remote control.
Playback starts from the point you last stopped playing.
After you press x, the recorder will automatically turn off after:
Play an MD.
N
x
VOL +/–
towards >N).
A short beep sounds in the
headphones/earphones when
you operate on the remote
control.
— about 5 minutes when using AC power adaptor.
— about 10 seconds when using batteries.
>N
2 Press VOL +/– to adjust the
volume.
The volume will be shown in
the display.
VOL +/–
x
17
To Press (Beeps in the headphones/
earphones
Find the beginning of
the current track
Find the beginning of
the next track
. once (Flip the jog lever towards
.). (Three short beeps)
> once (Flip the jog lever towards
>N). (Two short beeps)
2)
)
Pause X (Press X on the jog lever). (Continuous
short beeps)
Press X again to resume play.
Go backwards while
1)
playing
Go forward while
1)
playing
Remove the MD x (a long beep) and open the lid.
1)
To go backward or forward quickly without listening, press X and press and
hold . or > (flip and hold the the jog lever towards . or >N
on the remote control).
2)
You can turn off the beep sound (page 42).
3)
Once you open the lid, the point to start play will change to the beginning of
the first track.
Press and hold . (Flip and hold the jog
lever towards .).
Press and hold > (Flip and hold the jog
lever towards >N).
3)
Suppressing the skips of the sound (G-PROTECTION)
The G-PROTECTION function was developed to provide a higher level of
shock resistance than that of existing players.
Note
The playback sound may skip if:
• the recorder receives stronger continuous shock.
• a dirty or scratched MiniDisc is played.
If play does not start
Make sure the recorder is not locked (page 41).
18

z
Playback will switch automatically to match the recording mode of the
material (stereo, LP2, LP4, or monaural).
Note
To prevent recorder malfunction, do not use a remote control that was supplied
with another Sony portable MD model.
19
Listening to the radio
You can listen to the radio through the built-in digital tuner in the
remote control.
You cannot use the recorder to record a radio broadcast
that is being received on the remote control.
1
Turn on the radio.
RADIO ON/BAND
FM MODE
RADIO OFF (x)
Jog lever
(F+/F–)
1 Press RADIO ON/BAND.
The radio turns on.
The frequency and “FM” or
“AM” appears in the display.
2 Press RADIO ON/BAND to
change the band (“FM” or
“AM”).
20
VOL +/–
3 Flip the jog lever towards F+
or F– repeatedly to tune in
the desired radio station.
4 Press VOL +/– to adjust the
volume.

To turn off the radio
Press RADIO OFF (x).
To tune in a station quickly
In step 3, flip and hold the jog lever towards F+ or F– until the
frequency indication begins to change. The remote control
automatically scans the radio frequencies and stops when it finds a
clear station. A short beep will sound in the headphones/earphones
and the radio station begins playing.
To improve broadcast reception
• For AM: Orient the built-in AM antenna inside the remote control
horizontally to obtain optimum AM reception.
• For FM: Extend the headphones/earphones cord, which act as the
FM antenna.
If the reception is still not good, press and hold FM MODE
(RADIO ON/BAND) until “MONO”(monaural) or “LOCAL”
appears in the display for best reception.
When you cannot operate the radio
Make sure the remote control is not locked (page 41).
Notes
• When you use the radio, it is recommended that you use a fully charged
rechargeable battery or a new dry battery since more power is consumed by
the radio than by MD playback.
• The radio will not operate if the remote control is not connected to the
recorder.
• Do not place the remote control close to another electronic device, such as
the recorder itself, another radio, a TV, or a computer, as this may cause noise
in the reception.
• Playback or recording stops when you use the radio.
• Use VOL +/– on the remote control to adjust the radio volume.
21

Various ways of recording
Check menu items in the display window on the recorder, since they
are displayed only there.
Two ways of connecting to a sound source
The input jack of this recorder works as both digital and analog input
jacks. Connect the recorder to a CD player or a cassette recorder
using either digital (optical) input or analog (line) input. To record,
see “Recording an MD right away!” (page 13) to record using digital
(optical) input, and “Recording with analog input (line cable
required)” (page 24) to record using analog (line) input.
Difference between digital (optical) and analog
(line) inputs
Difference Digital (optical) input Analog (line) input
Connectable
source
Usable cord Optical cable (with an
Signal from
the source
Equipment with a digital
(optical) output jack
optical or an optical-mini
plug) (page 13)
Digital Analog
Equipment with an
analog (line) output
jack
Line cable (with 2
phono plugs or a
stereo-mini plug)
Even when a digital
source (such as a CD)
is connected, the
signal sent to the
recorder is analog.
22

Difference Digital (optical) input Analog (line) input
Recorded
track numbers
Marked (copied)
automatically
• at the same positions as
the source (when the
sound source is a CD or
an MD).
• after more than 2 seconds
of blank or low-level
segment (with a sound
source other than CD or
MD).
• when the recorder is
paused during synchro-
Marked
automatically
• after more than 2
seconds of blank or
low-level segment.
• when the recorder is
paused while
recording.
You can erase
unnecessary marks
after recording
(“Erasing a track
mark”, page 52).
recording (the recorder
pauses automatically
when it encounters a
section with no audio
signal for 3 seconds or
more).
You can erase unnecessary
marks after recording.
(“Erasing a track mark”,
page 52).
Recorded
sound level
Same as the source.
Can also be adjusted
manually (Digital REC
level control) (“Adjusting
the recording level
manually
(Manual recording)”,
page 32).
Note
Track marks may be copied incorrectly:
• when you record from some CD players or multi disc players using digital
(optical) input.
• when the source is in shuffle or program play mode while recording using
digital (optical) input. In this case, play the source in normal play mode.
• when programs with audio that is digitally broadcast (e.g., digital TV) are
recorded through the digital (optical) input.
Adjusted
automatically. Can
also be adjusted
manually (“Adjusting
the recording level
manually
(Manual recording)”,
page 32).
23
 Loading...