

Page 1

3-224-742-12(1)
Cordless Stereo
Headphone System
Operating Instructions
Mode d’emploi
Bedienungsanleitung
Manual de instrucciones
GB
FR
DE
ES
MDR-IF630RK
© 2001 Sony Corporation
Page 2

WARNING
To prevent fire or shock hazard, do not
expose the unit to rain or moisture.
To avoid electrical shock, do not open the
cabinet. Refer servicing to qualified
personnel only.
For the customers in the U.S.A.
WARNING
You are cautioned that any changes or
modifications not expressly approved in this
manual could void your authority to operate this
equipment.
Owner’s Record
The model and serial numbers are located at the
bottom of the transmitter and the left inner side
of the head band.
Record these numbers in the spaces provided
below. Refer to them whenever you call upon
your Sony dealer regarding this product.
Model No.
Transmitter TMR-IF630R
Headphones MDR-IF630R
Serial No.
Transmitter
Headphones
GB
2
Page 3

Welcome!
Table of contents
Thank you for purchasing the Sony
MDR-IF630RK Cordless Stereo Headphone
System. Before operating the unit, please read
this manual thoroughly and retain it for future
reference.
Some features are:
• Cordless system that allows you to listen to a
program free from the restriction of a cord
• The infrared rays from the transmitter cover a
broad horizontal listening area with a
maximum distance of 10 m (32.8 ft.).
• Comfortable Circum-aural headphones with
self adjusting head band
• Noise reduction system to reproduce a clear
sound with minimum transmission noise
• The voice enhance mode of the audio mode
switch allows clear hearing of the human
voice.
• Automatic ON/OFF function on headphones
to preserve battery power
• The VOL control adjusts the volume level of
both channels.
• Powered by built-in Ni-MH (nickel-hydrogen)
rechargeable batteries.
Note
This headphone system cannot be used with the
headphones or transmitter of cordless headphone
systems which do not employ the noise reduction
system.
Getting started
Unpacking ............................................... 4
Setting up the transmitter ..................... 4
Charging the headphone batteries....... 7
Operating the system
Listening to a program .......................... 8
The effective areas of the transmitter .. 9
Additional information
Precautions ............................................ 10
Disposing of the headphones ............. 10
Troubleshooting .................................... 11
Specifications ........................................ 13
GB
GB
3
Page 4

DC IN 9V
RBAL
AUDIO IN
PHONESLINE
INPUT SOURCE
N Getting started
Setting up the
Unpacking
Check that you have the following items:
• The headphones
• The transmitter
• AC power adaptor
• Unimatch plug adaptor (stereo mini jack y
stereo phone plug)
• Connecting cord (phono plugs y stereo mini
plug), 1 m
transmitter
1 Connect the transmitter to audio/video
equipment. Select one of the hookups
below depending on the jack type:
A To connect to a headphones jack
Set the INPUT SOURCE selector to
PHONES.
Transmitter
to AUDIO IN A jacks
Right channel
(red)
Connecting cord
(supplied)
Unimatch plug
adaptor
(supplied)
to headphones
jack (stereo
phone jack)
* WALKMAN is a registered trademark of Sony
Corporation.
Left channel
(white)
to headphones
jack (stereo
mini jack)
CD Walkman,
MD Walkman,
WALKMAN*,
TV, VCR, etc.
• AC plug adaptor (tourist model in Japan only)
GB
4
Page 5

DC IN 9V
RBAL
AUDIO IN
PHONESLINE
INPUT SOURCE
B To connect to an audio output jack other
than a headphones jack
Set the INPUT SOURCE selector to
LINE.
INPUT SOURCE
PHONESLINE
to AUDIO IN A jacks
Right channel
(red)
Connecting cord
(supplied)
RBAL
AUDIO IN
Transmitter
DC IN 9V
Left channel
(white)
to an audio output
jack other than a
headphones jack
CD Walkman,
MD Walkman,
etc.
Left channel
(white)
Transmitter
to AUDIO IN B jack
Connecting cord
(supplied)
Right channel
(red)
to an audio output
jack other than a
headphones jack
Stereo system,
TV, VCR, etc.
continue to next page
GB
5
Page 6

Continued
2 Connect the supplied AC power
adaptor to the transmitter.
Transmitter
5 If your AC power adaptor is equipped
with an on/off switch, set it to ON.
The power is supplied to the
transmitter.
On/off switch
DC IN 9V
to DC IN
9 V jack
AC power adaptor
(supplied)
RBAL
AUDIO IN
3 If your AC power adaptor is equipped
with a voltage selector, before
connecting the AC power adaptor to an
AC outlet, set it to the operating
voltage in your area with a
screwdriver.
to an AC outlet
If the plug of the AC power adaptor
does not fit in the AC outlet, use the
supplied AC plug adaptor.
Notes
• Do not connect to the AUDIO IN A and B jacks at
the same time. If you do so, the audio signals may be
mixed.
• Use only the supplied AC power adaptor. Do not use
any other AC power adaptor.
Polarity of the plug
• Keep the AC power adaptor cord as far away from the
transmitter as possible. If the cord is positioned near
the transmitter, noise may occur.
• When you connect the transmitter directly to a
monaural earphone jack, the audio signal will not be
output through the right channel. In such a case, use
the separately sold PC-236HG plug adaptor.
• If the connected equipment has the AVLS (Automatic
Volume Limiter System) function, be sure to turn the
function off when using the transmitter. Otherwise,
you will have to turn up the volume of the
headphones, and that may cause noise.
4 Connect the AC power adaptor to an
AC outlet.
GB
6
Page 7

Charging the
headphone batteries
When the charge indicator is not lit
Check the connection to make sure that the
contact pins are properly fitted into the contact
holes on the headphones, or if the headphones
are rested on the transmitter correctly.
Using the headphones for the first time
When you use the headphones for the first time,
charge the batteries in the following manner.
1 Connect the transmitter to a power
source.
Transmitter
DC IN 9V
to DC IN
9 V jack
to an AC outlet
RBAL
AUDIO IN
AC power adaptor
(supplied)
2 Place the headphones on the
transmitter so that the charging pins on
the transmitter engage the charging
contacts on the bottom of the
headphones.
The CHG (charge) indicator on the
transmitter will light in green to
indicate that the batteries are being
charged.
To recharge the headphone batteries
after use
This system automatically stops charging by the
built-in timer to prevent the risk of damage to the
headphones due to overcharging. For this
reason, we recommend that you rest the
headphones on the transmitter whenever you do
not use the headphones.
Charging and using hours
Approx. charging
hours
1
14**
* at 1 kHz, 1 mW + 1 mW output
** The hours required to fully charge empty batteries
Check the remaining power of the
headphone batteries
Pull up the suspender, and check that the
headphones’ power indicator lights in red. You
can now use the headphones.
Charge the batteries or install new batteries, if the
power indicator light is weak or turned off and
the sound become distorted or has a lot of noise.
Approx. using time*
3 hours
33 hours
POWER
CHG
The charge indicator goes off after
about 14 hours when the charging is
completed.
Note
During recharging, the transmitter is turned off
automatically.
GB
7
Page 8

ATT
–12dB0dB
N Operating the system
Listening to a program
Audio mode switch
Depress the audio mode switch (VOICE mode) to
emphasize the human voice. Press to release it
(NORMAL mode) for normal tone quality.
1 Turn on the audio/video equipment
connected to the transmitter.
When the audio signal is input, the
transmitter turns on automatically and
the infrared emitters glow. If the
transmitter is connected to the
headphones jack, set the volume
control of the audio source equipment
as high as possible but not so high
that the audio signal gets distorted.
2 Put on the headphones and the power
turns on automatically.
The power indicator glows red when
the power turns on.
3 Adjust the volume.
Audio mode switch
NORMAL VOICE
ATT (attenuator) selector
If a loud sound is distorted when the transmitter
is connected to an audio output jack other than
the headphones jack, set the ATT selector on the
transmitter to -12 dB. The default setting of the
ATT selector is 0 dB.
ATT selector
Auto power on/off function
When you remove the headphones, the power
turns off automatically. Do not allow the
suspender to be pulled up, otherwise the
headphones will be switched on.
Suspender
High
Low
GB
8
Page 9

Mute function
If a hissing noise is heard when the infrared rays
are obstructed, or the headphones are used
outside of the effective range (see right column),
the mute function will be activated and the
sound will not be heard from the headphones.
To restore the sound, move nearer toward the
transmitter or remove the obstruction.
When no audio signal is received for
more than approximately five minutes
The transmitter will be turned off automatically.
When an audio signal is intermittent or a
low-level audio signal continues for more
than approximately five minutes
The transmitter may be turned off automatically.
In this case, turn up the volume of the connected
equipment while turning down the volume of the
headphones.
After listening to a program
Take the headphones off and rest them on the
transmitter. Then turn off the connected audio/
video equipment. The transmitter power will be
turned off automatically if no audio signal is
input from the audio/video equipment for more
than approximately five minutes.
Note
The infrared emitters light up when the transmitter is
turned on. The brightness of the emitters may not be
uniform, however, this is not a malfunction.
The effective areas of
the transmitter
The illustration below shows the approximate
area covered by the infrared rays emitted from
the transmitter.
Approx. 4 m
1
(157
/2 in.)
Transmitter
Approx. 4 m
(1571/2 in.)
Notes
• This system utilizes infrared rays for communication
so noise (hissing) can be heard from the headphones
as you move farther away from the transmitter. The
sound will also be cutoff and noise will be heard if the
infrared rays are blocked. These are characteristics of
infrared ray communication and do not indicate
malfunction.
• The infrared rays will not penetrate walls or opaque
glass, therefore, be sure to stay within sight of the
transmitter.
• When you use the headphones inside the area
illustrated in the diagram, the transmitter can be
placed in the front, behind or by the side of the
listener.
• The sound you hear varies according to your position
and the transmitter position. Try finding a position
which yields the best sound.
• Do not cover the infrared sensors with your hands or
hair.
Infrared ray
Approx. 10 m (32.8 ft.)
GB
9
Page 10
N Additional information
Disposing of the
Precautions
• The CE mark on the unit is valid only for
products marketed in the European Union.
• When the transmitter is not to be used for a
long period of time, disconnect the AC power
adaptor from the AC outlet holding the plug.
Do not pull on the cord. If your AC power
adaptor is equipped with an on/off switch, set
it to off.
• Do not leave the cordless stereo headphone
system in a location subject to direct sunlight,
heat or moisture.
Notes on headphones
Preventing hearing damage
Avoid using headphones at high volume.
Hearing experts advise against continuous, loud
and extended play. If you experience a ringing in
your ears, reduce the volume or discontinue use.
Caring for others
Keep the volume at a moderate level. This will
allow you to hear outside sounds and to be
considerate to the people around you.
If you have any questions or problems
concerning the system that are not covered in this
manual, please consult the nearest Sony dealer.
headphones
For environmental conservation, be sure to
remove the built-in rechargeable batteries from
the headphones before you dispose of the
headphones, and dispose of the batteries
appropriately.
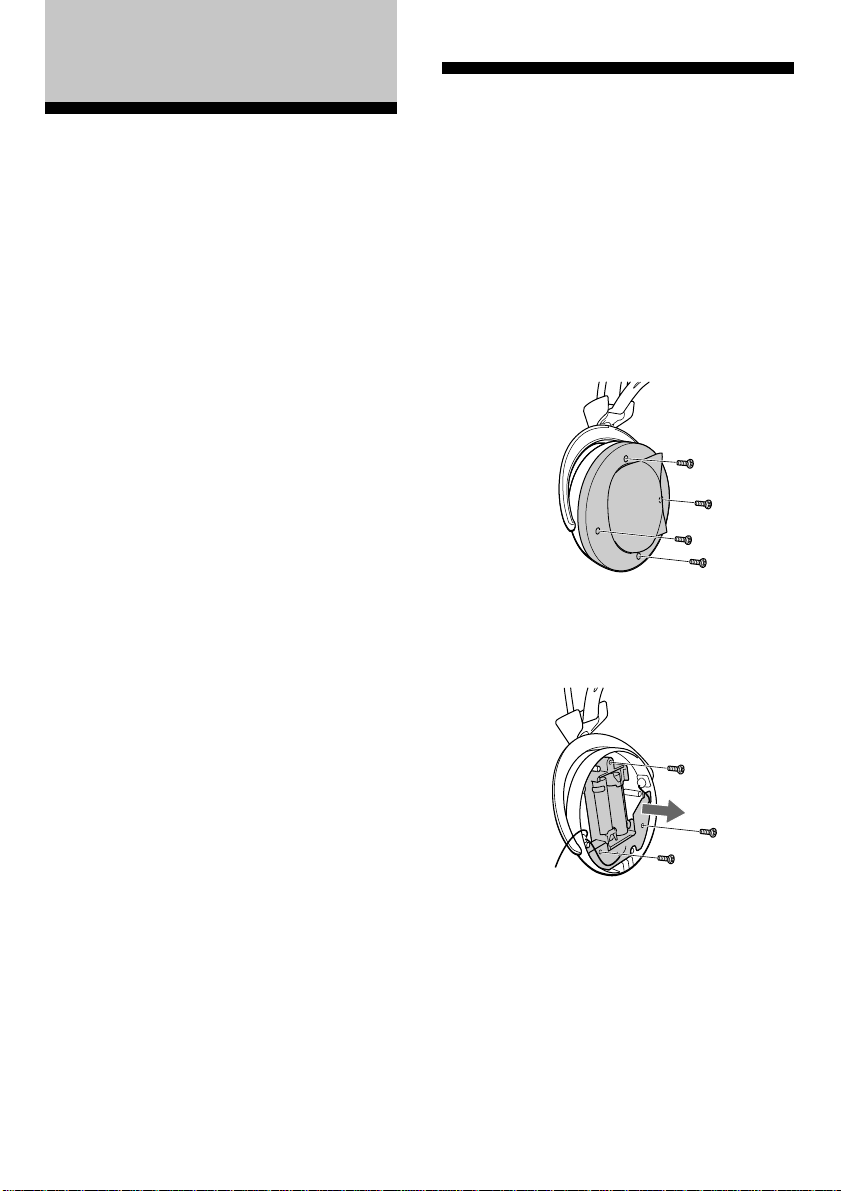
1 Remove the left headphone’s ear pad.
Then remove the four screws from the
housing and open the housing.
2 Remove the three screws from the
battery box and circuit board, and take
out the battery box together with the
circuit board from the housing.
Be sure to bring the headphones and the
transmitter to the Sony dealer when requiring
repair work.
Replacing the ear pads
When the ear pads become dirty or damaged,
you can get replacements from your Sony dealer.
GB
10
Page 11
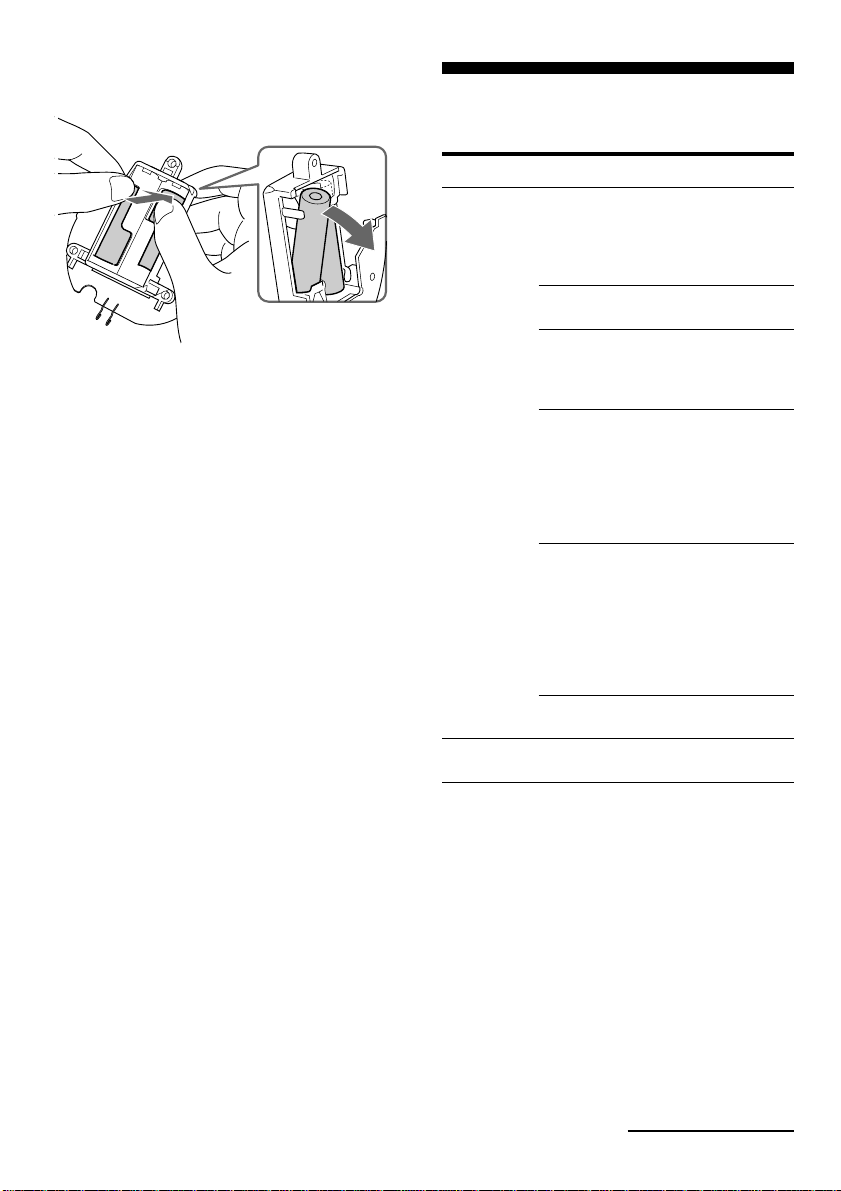
3 Push to remove the batteries from the
rear of the battery box.
Troubleshooting
Note
Be careful not to touch the circuit board attached to the
battery box. Hold the battery box (black plastic box)
when you remove them.
Problem
No sound/
Muffled
sound
Weak sound
Solution
Check the connection of the audio/
video equipment or the AC power
adaptor. If your AC power adaptor is
equipped with an on/off switch,
check that the switch is set to ON.
Check that the audio/video
equipment is turned on.
Turn up the volume on the connected
audio/video equipment, if the
transmitter is connected to the
headphones jack.
The mute function is activated.
•Check if there is any object between
the transmitter and the headphones.
•Use the headphones near the
transmitter.
•Change the position and angle of
the transmitter.
The headphones’ power indicator
light is weak or turned off.
•Charge the headphone batteries or if
the power indicator is still off after
charging the headphone batteris,
take the headphones to a Sony
dealer for replacements of the
batteries.
Check if the INPUT SOURCE selector
is set to the correct position.
Set the ATT selector on the
transmitter to 0 dB.
continue to next page
GB
11
Page 12

Continued
Problem
Distortion
Loud
background
noise
Solution
If the transmitter is connected to the
headphones jack, turn down the
volume of the connected audio/video
equipment.
If the transmitter is connected to an
audio output jack other than the
headphones jack, set the ATT selector
to -12 dB.
The headphones’ power indicator
light is weak or turned off.
•Charge the headphone batteries or if
the power indicator is still off after
charging the headphone batteries,
take the headphones to a Sony
dealer for replacements of the
rechargeable batteries.
Check if the INPUT SOURCE selector
is set to the correct position.
The headphones of another
headphone system which does not
employ the noise reduction system
are used with the transmitter of this
system.
•Use the headphones of this system.
The transmitter of another headphone
system which does not employ the
noise reduction system is used with
the headphones of this system.
•Use the transmitter of this system.
Move closer to the transmitter. As
you move away from the transmitter,
more noise is likely to be heard. This
is inherent to infrared ray
communication and does not mean
that there is a problem with the unit
itself.
Check that there is no object between
the transmitter and the headphones.
Check that the infrared sensors are
not covered with your hands or hair.
Problem
Loud
background
noise
The batteries
cannot be
charged.
Solution
Change the position or angle of the
transmitter.
•The headphones are used by a
window where the sunlight is too
strong.
t Draw the curtains/blind to shut
out the direct sunlight, or use the
headphones away from the
sunlight.
If the transmitter is connected to the
headphones jack, turn up the volume
of the connected audio/video
equipment.
The headphones’ power indicator
light is weak or turned off.
•Charge the headphone batteries or if
the power indicator is still off after
charging the headphone batteries,
take the headphones to a Sony
dealer for replacements of the
batteries.
When using more than two
transmitters, turn off the power of the
second transmitter or move it so that
the area covered by the infrared rays
does not overlap each other.
Noise is heard from the connected
audio equipment.
•Check if the INPUT SOURCE
selector is set to the correct position.
•Disconnect the connecting cord with
the power of the transmitter on and
check if the noise is heard from the
headphones. If the noise
disappears, the connected
equipment is the cause to make that
noise.
Check if the charge indicator lights
on. If not, put the headphones on the
transmitter correctly so that the
charge indicator lights on.
12
GB
Page 13

Specifications
General
Modulation system
Frequency modulation
Carrier frequency
Right 2.8 MHz
Left 2.3 MHz
Transmitter
Power source DC IN 9V jack accepts power
Where purchased
U.S.A.
U.K.
European countries
Japan (exept for Japanese
domestic model)
Other countries
supplied from the AC power
adaptor for use on the following
voltages:
Operating
voltage
120 V AC, 60 Hz
220 – 230 V AC, 50 Hz
220 – 230 V AC, 50 Hz
110 V/120 V/220 V/240
V AC, 50/60 Hz
220 – 230 V AC, 50/60
Hz or 120 V AC, 60 Hz
Built-in rechargeable batteries
Model name NH-AAC
Type Ni-MH
Voltage 1.2 V
Capacity 1000 mAh
Optional accessories
Plug adaptor PC-236HG
(stereo mini jack y monaural mini plug)
Connecting cords
RK-C510HG/RK-C515HG/RK-C520HG
(phono plug x 2 y phono plug x 2)
RK-G136HG
(stereo mini plug y stereo mini plug)
RK-G129HG
(stereo mini plug y phono plug x 2)
Design and specifications are subject to change without
notice.
Audio input Phono jacks/stereo mini jack
Dimensions Approx. 130 x 135 x 150 mm
(5 1/4 x 5 3/8 x 6 in) (w/h/d)
Mass Approx. 200 g (7 oz)
Headphones
Type Closed, dynamic
Driver unit 30 mm dia. with neodymium
magnet
Frequency response
12 – 24,000 Hz
Power source DC 2.4 V: Built-in rechargeable
batteries
Mass Approx. 310 g (10.9 oz)
13
GB
Page 14

AVERTISSEMENT
Afin d’éviter tout risque d’incendie ou
d’électrocution, ne pas exposer cet
appareil à la pluie ni à l’humidité.
Afin d’écarter tout risque d’électrocution,
garder le coffret fermé. Ne confier
l’entretien de l’appareil qu’à un
personnel qualifié.
FR
2
Page 15

Bienvenue!
Table des matières
Nous vous remercions d’avoir acheté ce système
de casque stéréo infrarouge Sony MDR-IF630RK.
Avant la mise en service de cet appareil, veuillez
lire attentivement ce mode d’emploi et de le
conserver pour toute référence ultérieure.
Cet appareil offre les fonctions suivantes:
• Système de casque infrarouge vous permettant
d’écouter un programme sans être gêné par un
cordon.
• A une distance de 10 mètres (maximum), les
rayons infrarouges émis par le transmetteur
offrent une large portée horizontale.
• Casque acoustique confortable avec serre-tête
autoréglable
• Système de réduction du bruit permettant de
reproduire un son clair avec le minimum de
bruit de transmission
• Le mode de renforcement des voix du mode
audio permet d’écouter distinctement les voix
humaines.
• Mise sous et hors tension automatique du
casque permettant d’économiser la pile.
• Réglage du niveau sonore des deux canaux.
• Alimentation par des piles rechargeables Ni-
MH (nickel-hydrogène) intégrées.
Remarque
Ce système de casque ne peut pas être utilisé
avec les écouteurs ou le transmetteur d’un casque
sans fil n’utilisant pas le système de réduction du
bruit.
Préparatifs
Déballage ................................................. 4
Raccordement du transmetteur............ 4
Recharge des piles du casque ............... 7
Utilisation du système
Ecoute d’un programme ....................... 8
Zones d’action du transmetteur ........... 9
Informations complémentaires
Précautions ............................................ 10
Elimination du casque ......................... 10
Guide de dépannage ............................ 11
Spécifications ........................................ 13
FR
FR
3
Page 16

N Préparatifs
DC IN 9V
RBAL
AUDIO IN
PHONESLINE
INPUT SOURCE
Raccordement du
Déballage
Vérifiez que tous les éléments suivants vous ont
été livrés :
• Casque
• Transmetteur
• Adaptateur secteur
transmetteur
1 Raccordez le transmetteur à l’appareil
audio/vidéo. Suivant le type de prise,
choisissez l’un des raccordements
suivants:
A Raccordement à une prise de casque
Réglez le sélecteur INPUT SOURCE sur
PHONES.
Transmetteur
vers les prises AUDIO IN A
Canal droit
(rouge)
Cordon de liaison
(fourni)
Canal gauche (blanc)
vers la prise de
casque
(miniprise stéréo)
• Adaptateur de fiche unimatch (miniprise
stéréo t fiche 6,35 stéréo)
• Cordon de liaison (fiches phono y minifiche
stéréo), 1m
• Adaptateur de prise secteur (modèle pour
touristes, disponible au Japon uniquement)
FR
4
Adaptateur de
fiche unimatch
(fourni)
vers la prise de
casque
(prise 6,35
stéréo)
* WALKMAN est une marque déposée de Sony
Corporation.
CD Walkman,
MD Walkman,
WALKMAN*,
téléviseur,
magnétoscope,
etc.
Page 17

DC IN 9V
RBAL
AUDIO IN
PHONESLINE
INPUT SOURCE
B Raccordement à une autre prise de sortie
audio que la prise de casque
Réglez le sélecteur INPUT SOURCE sur
LINE.
INPUT SOURCE
PHONESLINE
Vers les prises AUDIO IN A
Canal droit
(rouge)
Cordon de liaison
(fourni)
Vers une autre prise
de sortie audio
qu’une prise de
casque
RBAL
AUDIO IN
Transmetteur
DC IN 9V
Canal gauche
(blanc)
CD Walkman,
MD Walkman,
etc.
Canal gauche
(blanc)
Transmetteur
Vers la prise AUDIO IN B
Cordon de liaison
(fourni)
Canal droit
(rouge)
Vers une autre prise de
sortie audio qu’une
prise de casque
Chaîne stéréo, téléviseur,
magnétoscope, etc.
Passer à la page suivante
FR
5
Page 18

Suite
2 Raccordez l’adaptateur secteur fourni
au transmetteur.
Transmetteur
5 Si votre adaptateur secteur est équipé
d’un interrupteur marche/arrêt, réglez
celui-ci en position marche.
Le transmetteur est alimenté.
Interrupteur marche/arrêt
AUDIO IN
Adaptateur secteur
(fourni)
RBAL
DC IN 9V
vers la prise
DC IN 9V
3 Si votre adaptateur secteur possède un
sélecteur de tension, réglez-le sur la
tension du courant secteur locale à
l’aide d’un tournevis avant de brancher
l’adaptateur.
vers une
sortie secteur
Si la fiche de l’adaptateur secteur ne
s’insère pas dans la prise, utilisez
l’adaptateur de fiche secteur fourni.
Remarques
• Ne raccordez pas les prises AUDIO IN A et B en
même temps, car ceci pourrait mélanger.
• Utilisez uniquement l’adaptateur secteur fourni à
l’exclusion de tout autre.
Polarité de la fiche
• Eloignez autant que possible l’adaptateur secteur du
transmetteur. Des nuisances sonores peuvent être
occasionnées si le cordon se trouve à proximité du
transmetteur.
• Lorsque vous raccordez directement le transmetteur à
une prise de casque monaurale, le signal audio ne sort
pas du canal droit. Dans ce cas, utilisez l’adaptateur de
fiche PC-236HG vendu séparément.
• Si le matériel raccordé possède la fonction AVLS
(Automatic Volume Limiter System, système de
limitation automatique du volume), désactivez cette
fonction lorsque vous utilisez le transmetteur. Sinon,
vous devrez augmenter le volume du casque, ce qui
peut entraîner des bruits parasites.
4 Raccordez l’adaptateur secteur à une
prise secteur.
FR
6
Page 19

Recharge des piles du
casque
Si l’indicateur ne s’allume pas
Vérifiez si les broches de contact sont bien
insérées dans les orifices de contact du casque ou
si le casque est correctement posé sur le
transmetteur.
Première utilisation du casque
Lorsque vous utilisez le casque pour la première
fois, chargez les piles de la façon suivante.
1 Raccordez le transmetteur à une source
d’alimentation.
Transmetteur
RBAL
AUDIO IN
vers la prise DC IN 9V
vers une sortie secteur
Adaptateur
secteur (fourni)
DC IN 9V
2 Placez le casque sur le transmetteur de
sorte que les broches de charge du
transmetteur soient en contact avec
celles situées sous le casque.
L’indicateur de charge CHG du
transmetteur s’allume en vert pour
indiquer que les piles sont en cours de
charge.
Pour recharger les piles du casque après
utilisation
Ce système arrête automatiquement la recharge
grâce à un chronomètre incorporé afin d’éviter
tout risque d’endommagement du casque dû à
une surcharge. Nous vous recommandons par
conséquent de poser le casque sur le
transmetteur dès que vous ne vous en servez
plus.
Heures de recharge et d’autonomie
Heures de
recharge approx.
1
14**
* à 1 kHz, sortie de 1 mW+1 mW
** nombre d’heures nécessaires pour recharger
complètement des piles vides
Vérification du niveau de charge des piles
du casque
Tirez sur la suspension. Si l’indicateur est allumé
en rouge, vous pouvez utiliser le casque.
Rechargez les piles ou installez des nouvelles
piles sèche si l’indicateur s’allume faiblement ou
s’éteint et si le son se déforme ou qu’il est très
parasité.
Autonomie
approximative*
3 heures
33 heures
CHG
L’indicateur de charge s’éteint après
environ 14 heures lorsque la charge est
terminée.
POWER
Remarque
Le transmetteur s’éteint automatiquement pendant la
recharge.
FR
7
Page 20

ATT
–12dB0dB
N Utilisation du système
Ecoute d’un
programme
1 Mettez sous tension l’appareil audio/
vidéo raccordé au transmetteur.
Commutation du mode audio
Enfoncez le commutateur du mode audio (mode
VOICE) pour renforcer les voix. Appuyez sur ce
bouton pour le relâcher (mode NORMAL) et
passer en qualité de son normale.
Commutateur du
mode audio
Lorsque le signal audio est entré, le
transmetteur se met automatiquement
sous tension et les émetteurs
infrarouges s’allument. Si le
transmetteur est raccordé à la prise de
casque, réglez le volume de la source
audio aussi haut que possible mais
sans provoquer de distorsion du
signal audio.
2 Mettez le casque. Il se met
automatiquement sous tension.
L’indicateur d’alimentation s’allume en
rouge lorsque le casque est sous
tension.
3 Réglez le volume.
NORMAL VOICE
Sélecteur ATT (atténuateur)
En cas de distorsion d’un son fort lorsque le
transmetteur est raccordé à une autre prise de
sortie audio que la prise de casque, réglez le
sélecteur ATT du transmetteur sur -12 dB. Le
réglage par défaut du sélecteur ATT est 0 dB.
Sélecteur ATT
Mise sous tension et hors tension
automatique
Le casque se met automatiquement hors tension
lorsque vous l’enlevez. Ne tirez pas sur la
suspension, sinon le casque se mettra sous
tension.
Suspension
Haut
Bas
FR
8
Page 21

Silencieux
Si un sifflement est audible lorsque les rayons
infrarouges sont entravés, ou si vous utilisez le
casque en dehors de la portée des rayons (voir la
colonne de droite), le silencieux est
automatiquement activé et le son du casque est
coupé. Pour rétablir le son, rapprochez-vous du
transmetteur ou enlevez l’objet qui gêne la
réception des rayons.
Si aucun signal audio n’est reçu pendant
au moins cinq minutes
Le transmetteur se met automatiquement hors
tension.
Si un signal audio est intermittent ou si
un signal audio faible est audible
pendant plus de cinq minutes environ
Il est possible que le transmetteur soit
automatiquement mis hors tension. Dans ce cas,
augmentez le volume des appareils raccordés
tout en baissant le volume du casque.
Après avoir écouté un programme
Quittez le casque et posez-le sur le transmetteur.
Mettez ensuite les appareils audio/vidéo
raccordés hors tension. Le transmetteur est
automatiquement mis hors tension si aucun
signal audio ne provient des appareils audio/
vidéo pendant plus de cinq minutes environ.
Remarque
Les émetteurs infrarouges s’allument lorsque le
transmetteur est sous tension. La luminosité des
émetteurs peut varier, mais ceci ne constitue
aucunement un dysfonctionnement.
Zones d’action du
transmetteur
L’illustration ci-dessous indique la portée
approximative des rayons infrarouges émis par le
transmetteur.
Env. 4 m
1
/2 po.)
(157
Transmetteur
Env. 4 m
(1571/2 po.)
Remarques
• Ce système utilisant la communication par rayons
infrarouges, le sifflement augmente à mesure que vous
vous éloignez du transmetteur, même si vous vous
trouvez dans la zone indiquée sur l’illustration. Si un
objet se trouve entre le récepteur et le transmetteur, le
son risque d’être interrompu. Ces phénomènes sont
inhérents à la communication par rayons infrarouges
et ne signifient pas que le système présente un
dysfonctionnement.
• Les rayons infrarouges ne traversent ni les murs ni le
verre opaque. Le récepteur infrarouge doit par
conséquent être à portée de vue du transmetteur.
• Lorsque vous utilisez le casque dans la zone indiquée
sur l’illustration, vous pouvez placer le transmetteur
devant ou derrière vous, ou à votre droite ou votre
gauche.
• Le son du casque peut varier en fonction de la position
et de l’environnement. Nous vous conseillons
d’utiliser le système à l’endroit où vous obtenez le
meilleur son.
• Ne pas couvrir les capteurs infrarouges avec les mains
ou les cheveux.
Rayons infrarouges
Env. 10 m (32.8 pi.)
FR
9
Page 22

N
Informations complémentaires
Elimination du casque
Précautions
• La marque CE sur l’appareil s’applique
uniquement aux produits commercialisés sur
le marché commun européen.
• Si vous ne comptez pas utiliser le transmetteur
pendant longtemps, débranchez l’adaptateur
secteur de la prise murale en tirant sur la fiche
et non pas sur le cordon. Si votre adaptateur
secteur est équipé d’un interrupteur marche/
arrêt, réglez celui-ci en position arrêt.
• Ne laissez pas le système de casque stéréo
infrarouge dans un endroit exposé au soleil, à
la chaleur ou à l’humidité.
Remarques sur le casque
Prévention des dommages auditifs
Evitez d’utiliser le casque à un volume élevé. Il
est déconseillé par les médecins d’utiliser le
casque pendant longtemps et sans interruption à
un volume élevé. Si vous percevez un
bourdonnement dans les oreilles, réduisez le
volume ou faites une pause.
Civisme
Utilisez un volume modéré. Vous pourrez ainsi
entendre les sons extérieurs et vous ne
dérangerez pas les personnes qui sont près de
vous.
Afin de préserver l’environnement, retirez les
piles rechargeables intégrées du casque avant de
le jeter et éliminez les piles de façon appropriée.
1 Retirez l’oreillette gauche du casque.
Retirez ensuite les quatre vis de
l’écouteur et ouvrez celui-ci.
2 Retirez les trois vis du logement de la
pile et de la carte circuit et sortez ces
derniers.
Pour toute question ou problème au sujet de ce
casque non mentionnés dans ce mode d’emploi,
veuillez contacter votre revendeur Sony.
Portez le casque et le transmetteur ensemble chez
votre revendeur Sony pour toute réparation.
Remplacement des oreillettes
Si les oreillettes sont sales ou abîmées, vous
pouvez vous en procurer des neuves auprès de
votre revendeur Sony.
FR
10
Page 23

3 Exercez une pression afin de sortir la
pile de l’arrière du logement.
Guide de dépannage
Remarque
Prenez garde de ne pas toucher la carte circuit
fixée sur le logement de la pile. Maintenez le
logement de la pile (boîtier en plastique noir)
lorsque vous retirez celle-ci.
Problème
Pas de
son/son
étouffé
Son faible
Solution
Vérifiez les branchements de
l’appareil audio/vidéo ou de
l’adaptateur d’alimentation secteur.
Si votre adaptateur secteur est équipé
d’un interrupteur marche/arrêt,
vérifiez que l’interrupteur est réglé en
position marche.
Assurez-vous que l’appareil audio/
vidéo est sous tension.
Augmentez le volume de l’appareil
audio/vidéo raccordé, si le
transmetteur est raccordé à la prise de
casque.
Le silencieux est activé.
•Assurez-vous qu’il n’y a pas
d’obstacle entre le transmetteur et le
casque.
•Approchez-vous du transmetteur
lorsque vous utilisez le casque.
•Changez la position et l’angle du
transmetteur.
Le témoin d’alimentation du casque
est faible ou hors tension.
•Rechargez les piles du casque et
portez le casque à votre représentant
Sony afin de remplacer les piles si le
témoin reste éteint après les avoir
rechargées.
Vérifiez que le sélecteur INPUT
SOURCE est réglé sur la bonne
position.
Réglez le sélecteur ATT du
transmetteur sur 0 dB.
Passer à la page suivante
11
FR
Page 24

Suite
Problème
Distorsion
Bruit de
fond
important
Solution
Si le transmetteur est raccordé à la
prise de casque, baissez le volume de
l’appareil audio/vidéo raccordé.
Si le transmetteur est raccordé à une
autre prise de sortie audio que la prise
du casque, réglez le sélecteur ATT sur
-12 dB.
Le témoin d’alimentation du casque
est faible ou hors tension.
•Rechargez les piles du casque et
portez le casque à votre représentant
Sony afin de remplacer les piles si le
témoin reste éteint après les avoir
rechargées.
Vérifiez que le sélecteur INPUT
SOURCE est réglé sur la bonne
position.
Le casque d’un autre système
d’écouteurs n’utilisant pas le système
de réduction du bruit est utilisé avec
le transmetteur de ce système.
•Utilisez le casque de ce système.
Le transmetteur d’un autre système
de casque qui n’utilise pas le système
de réduction du bruit est utilisé avec
le casque de ce système.
•Utilisez le transmetteur de ce
système.
Rapprochez-vous du transmetteur.
Plus vous vous éloignez du
transmetteur, plus le bruit de fond
augmente. Ceci est inhérent à la
communication infrarouge et ne
signifie pas que l’appareil présente un
dysfonctionnement.
Vérifiez qu’il n’y a aucun obstacle
entre le transmetteur et le casque.
Vérifiez que les capteurs infrarouges
ne sont pas couverts par votre main
ou une mèche de cheveux.
Problème
Bruit de
fond
important
Impossible
de recharger
la pile
Solution
Changez la position ou l’angle du
transmetteur.
•Vous utilisez le casque près d’une
fenêtre donnant une luminosité trop
importante.
t Fermez les rideaux/stores de la
fenêtre ou éloignez-vous des
rayons du soleil.
Si le transmetteur est raccordé à la
prise de casque, augmentez le volume
de l’appareil audio/vidéo raccordé.
Le témoin d’alimentation du casque
est faible ou hors tension.
•Rechargez les piles du casque et
portez le casque à votre représentant
Sony afin de remplacer les piles si le
témoin reste éteint après les avoir
rechargées.
Si vous utilisez plus de deux
transmetteurs, éteignez le second
transmetteur ou déplacez-le pour que
les zones couvertes par les deux
transmetteurs ne se chevauchent pas.
Bruit émis par l’appareil audio
raccordé
•Vérifiez que le sélecteur INPUT
SOURCE est réglé sur la bonne
position.
•Débranchez le cordon de liaison en
laissant le transmetteur sous tension
et vérifiez si le bruit est audible dans
le casque. Si le bruit disparaît, c’est
l’appareil raccordé qui est la cause
du bruit.
Vérifiez si l’indicateur de recharge
s’allume. S’il ne s’allume pas, posez le
casque correctement sur le
transmetteur de façon que l’indicateur
de recharge s’allume.
12
FR
Page 25

Spécifications
Généralités
Système de modulation
Modulation de fréquence
Fréquence porteuse
Droite : 2,8 MHz
Gauche : 2,3 MHz
Transmetteur
Source d’alimentation
La prise DC IN 9 V accepte
l’adaptateur secteur fourni pour
une utilisation avec les tensions
suivantes :
Lieu d’achat
Etats-Unis
R.U.
Pays européens
Japon (à l’exception
du modèle pour le
marché intérieur
japonais)
Autres pays
Tension de
fonctionnement
CA 120 V, 60 Hz
CA 220 - 230 V, 50 Hz
CA 220 - 230 V, 50 Hz
CA 110 V/120 V/220 V/
240 V, 50/60 Hz
CA 220-230 V, 50/60 Hz
ou CA 120 V, 60 Hz
Piles rechargeables intégrées
Nom du modèle
NH-AAC
Type Ni-MH
Tension 1,2 V
Capacité 1 000 mAh
Accessoires en option
Adaptateur de fiche PC-236HG
(miniprise stéréo y minifiche mono)
Cordons de liaison
RK-C510HG/RK-C515HG/RK-C520HG
(2 prises phono y 2 prises phono)
RK-G136HG
(minifiche stéréo y minifiche stéréo)
RK-G129HG
(minifiche stéréo y 2 prises phono)
La conception et les spécifications sont sujettes à
modification sans préavis.
Entrée audio Prises phono/miniprise stéréo
Dimensions 130 x 135 x 150 mm
(5 1/4 x 5 3/8 x 6 po)
(l/h/p)
Poids Env. 200 g (7 on)
Casque
Type Fermé, dynamique
Pilote 30 mm de diamètre, aimant en
néodyme
Réponse en fréquence
12 – 24 000 Hz
Source d’alimentation
Courant continu 2,4 V : Piles
rechargeables intégrées
Poids 310 g (10,9 on)
13
FR
Page 26

VORSICHT
Um Feuergefahr und die Gefahr eines
elektrischen Schlages zu vermeiden, darf
das Gerät weder Regen noch Feuchtigkeit
ausgesetzt werden.
Um einen elektrischen Schlag zu
vermeiden, darf das Gehäuse nicht
geöffnet werden. Überlassen Sie
Wartungsarbeiten stets nur einem
Fachmann.
Entsorgungshinweis: Bitte werfen Sie nur
entladene Batterien in die Sammelboxen beim
Handel oder den Kommunen. Entladen sind
Batterien in der Regel dann, wenn das Gerät
abschaltet und signalisiert “Batterie leer” oder
nach längerer Gebrauchsdauer der Batterien
“nicht mehr einwandfrei funktioniert”. Um
sicherzugehen, kleben Sie die Batteriepole z.B.
mit einem Klebestreifen ab oder geben Sie die
Batterien einzeln in einen Plastikbeutel.
DE
2
Page 27

Herzlichen
Inhaltsverzeichnis
Glückwunsch!
Wir beglückwünschen Sie zu diesem InfrarotStereo-Kopfhörersystem MDR-IF630RK von
Sony. Lesen Sie diese Anleitung vor der
Inbetriebnahme sorgfältig durch, und bewahren
Sie sie zum späteren Nachschlagen gut auf.
Das System zeichnet sich durch folgende
Merkmale aus:
• Drahtlose Infrarot-Übertragung; Sie können
sich frei bewegen, ohne durch ein Kabel
behindert zu werden.
• Großer horizontaler Hörbereich; die
Reichweite in horizontaler Richtung beträgt
maximal 10 m.
• Bequeme Kopfhörer mit Rundumklang und
selbsteinstellendem Kopfband
• Ein Rauschunterdrückungssystem sorgt für
klare Tonwiedergabe mit minimalen
Übertragungsstörgeräuschen.
• Dank der Stimmverstärkungsfunktion des
Audiomodusschalters sind Stimmen besser
verständlich.
• Die automatische Ein-/Ausschaltfunktion der
Kopfhörer schont die Akkus.
• Gleichzeitige Pegeleinstellung beider Kanäle
mit VOL-Regler.
• Stromversorgung über integrierte Ni-MHAkkus (Nickel-Wasserstoff)
Vor dem Betrieb
Auspacken ............................................... 4
Vorbereitung der Sendeeinheit............. 4
Laden der Kopfhörer-Akkus ................ 7
Betrieb
Wiedergabe einer Signalquelle ............. 8
Reichweite der Sendeeinheit ................ 9
Zusatzinformationen
Zur besonderen Beachtung................. 10
Entsorgen der Kopfhörer..................... 10
Störungsbehebung ............................... 11
Technische Daten .................................. 13
DE
Hinweis
Dieses Kopfhörersystem kann nicht zusammen
mit Kopfhörern oder Sendeeinheiten von
drahtlosen Kopfhörersystemen verwendet
werden, die nicht über ein
Rauschunterdrückungssystem verfügen.
DE
3
Page 28

DC IN 9V
RBAL
AUDIO IN
PHONESLINE
INPUT SOURCE
N Vor dem Betrieb
Vorbereitung der
Auspacken
Überprüfen Sie nach dem Auspacken, ob die
folgenden Teile vorhanden sind:
• Kopfhörer
• Sendeeinheit
• Netzadapter
• Universal-Steckeradapter (Stereo-Ministecker
y Stereo-Klinkenstecker)
• Verbindungskabel (Cinchstecker y Stereo-
Ministecker), 1m
Sendeeinheit
1 Schließen Sie die Sendeeinheit je nach
den Anschlußbuchsen des Audio/
Video-Geräts auf eine der folgenden
Arten an:
A Anschluß an Kopfhörerbuchse
Stellen Sie den INPUT SOURCE-Schalter
auf PHONES.
Sendeeinheit
an AUDIO IN A-Buchsen
rechter Kanal (rot)
Verbindungskabel
(mitgeliefert)
UniversalSteckeradapter
(mitgeliefert)
an
Kopfhörerbuchse
(StereoKlinkenbuchse)
linker Kanal (weiß)
an
Kopfhörerbuchse
(StereoMinibuchse)
CD-Walkman,
MD-Walkman,
WALKMAN*,
Fernsehgerät,
Videorecorder
usw.
• Netzadapterstecker (nur Touristenmodell in
Japan)
DE
4
* WALKMAN ist ein eingetragenes Warenzeichen der
Sony Corporation.
Page 29

DC IN 9V
RBAL
AUDIO IN
PHONESLINE
INPUT SOURCE
B Anschluß an eine andere
Audioausgangsbuchse als eine
Kopfhörerbuchse
Stellen Sie den INPUT SOURCE-Schalter
auf LINE.
INPUT SOURCE
PHONESLINE
Sendeeinheit
Sendeeinheit
an AUDIO IN A-Buchsen
rechter
Kanal (rot)
Verbindungskabel
(mitgeliefert)
RBAL
AUDIO IN
DC IN 9V
linker Kanal
(weiß)
an eine andere
Audioausgangsbuchse
als eine
Kopfhörerbuchse
CD-Walkman,
MD-Walkman
usw.
linker Kanal
(weiß)
an AUDIO IN B-Buchse
Verbindungskabel
(mitgeliefert)
rechter Kanal
(rot)
an eine andere
Audioausgangsbuchse als
eine Kopfhörerbuchse
Stereoanlage, TV-Gerät,
Videorecorder usw.
Fortsetzung auf der nächsten Seite
DE
5
Page 30

Fortsetzung
2 Schließen Sie den mitgelieferten
Netzadapter an die Sendeeinheit an.
Sendeeinheit
5 Wenn der Netzadapter mit einem Ein-/
Aus-Schalter versehen ist, stellen Sie
diesen auf ON.
Die Sendeeinheit wird jetzt mit Strom
versorgt.
Ein-/Aus-Schalter
RBAL
AUDIO IN
Netzadapter (mitgeliefert)
DC IN 9V
an DC IN
9V-Buchse
3 Wenn Ihr Netzadapter mit einem
Spannungswähler versehen ist, stellen
Sie ihn mit einem Schraubenzieher auf
die richtige Spannung ein, bevor Sie
ihn an die Steckdose anschließen.
an eine
Netzsteckdose
Wenn der Stecker des Netzadapters
nicht in die Steckdose paßt, verwenden
Sie den mitgelieferten Steckeradapter.
Hinweise
• An den Buchsen AUDIO IN A und B darf nicht
gleichzeitig ein Anschluß vorgenommen werden, da
man sonst ein gemischtes Audiosignal erhält.
• Verwenden Sie nur den mitgelieferten Netzadapter.
Ein anderer Netzadapter darf nicht verwendet
werden.
Steckerpolarität
• Halten Sie das Kabel des Netzadapters möglichst weit
von der Sendeeinheit fern. Wenn sich das Kabel zu
nahe an der Sendeeinheit befindet, kann es zu
Störrauschen kommen.
• Wenn Sie die Sendeeinheit direkt an eine monaurale
Ohrhörerbuchse anschließen, ist über den rechten
Kanal kein Ton zu hören. Verwenden Sie in diesem
Fall den gesondert erhältlichen Steckeradapter PC236HG.
• Wenn das angeschlossene Gerät über die AVLSFunktion (Automatic Volume Limiter System =
automatisches Lautstärkebegrenzungssystem) verfügt,
schalten Sie diese Funktion unbedingt aus, wenn Sie
die Sendeeinheit verwenden. Andernfalls müssen Sie
die Lautstärke der Kopfhörer erhöhen, und dies kann
Störrauschen verursachen.
4 Schließen Sie den Netzadapter an eine
Wandsteckdose an.
DE
6
Page 31

Laden der Kopfhörer-
Akkus
Wenn Sie den Kopfhörer zum ersten
Mal benutzen
Wenn Sie die Kopfhörer zum ersten Mal
benutzen, laden Sie die Akkus folgendermaßen.
1 Schließen Sie die Sendeeinheit an eine
Stromquelle an.
Sendeeinheit
RBAL
AUDIO IN
DC IN 9V
Wenn die Anzeige nicht leuchtet
Vergewissern Sie sich, daß der Kopfhörer richtig
auf die Sendeeinheit aufgelegt wurde und die
Kontaktstifte einwandfrei in die Kontaktlöcher
des Kopfhörers greifen.
Laden der Kopfhörer-Akkus nach
Gebrauch
Bei diesem System wird der Ladevorgang über
einen integrierten Timer automatisch beendet,
um eine Beschädigung der Kopfhörer durch
Überladen zu vermeiden. Es empfiehlt sich
daher, die Kopfhörer immer auf die Sendeeinheit
zu setzen, wenn Sie sie nicht benutzen.
Lade- und Betriebszeiten
Ungef. Ladezeit
1 Std.
14** Std.
Ungef. Betriebszeit*
3 Std.
33 Std.
an eine
Netzsteckdose
2
Setzen Sie den Kopfhörer auf die
an DC IN
9V-Buchse
Netzadapter
(mitgeliefert)
Sendeeinheit, so daß die Ladestifte an
der Sendeeinheit in die Ladekontakte an
der Unterseite der Kopfhörer greifen.
Die Ladeanzeige CHG an der
Sendeeinheit leuchtet grün und zeigt
damit an, daß die Akkus geladen
werden.
CHG
* bei 1 kHz, 1 mW+1 mW Ausgangsleistung
** Benötigte Zeit zum vollständigen Laden leerer Akkus
Überprüfen der Restladung der
Kopfhörerakkus
Ziehen Sie den Bügel hoch. Wenn die
Kontrollanzeige rot leuchtet, ist der Akku in
Ordnung und der Kopfhörer betriebsbereit.
Wenn die Betriebsanzeige nur schwach oder gar
nicht leuchtet, der Ton verzerrt oder verrauscht
ist, laden Sie die Akkus auf, oder setzen Sie neue
Batterien ein.
POWER
Hinweis
Während des Ladens wird die Sendeeinheit automatisch
ausgeschaltet.
Wenn die Akkus nach etwa 14 Stunden
vollständig geladen sind, erlischt die
Ladeanzeige.
DE
7
Page 32

ATT
–12dB0dB
N Betrieb
Wiedergabe einer
Signalquelle
Audiomodusschalter
Drücken Sie den Audiomodusschalter nach
unten (Modus VOICE), wenn die Stimmen betont
werden sollen. Drücken Sie den Schalter, so daß
er herausspringt (Modus NORMAL), wenn Sie
eine normale Tonwiedergabe erzielen wollen.
1 Schalten Sie das an der Sendeeinheit
angeschlossene Audio/Video-Gerät
ein.
Wenn der Sendeeinheit ein
Audiosignal zugeleitet wird, schaltet
sie sich automatisch ein, und die
Infrarotstrahler leuchten. Ist die
Sendeeinheit an der Kopfhörerbuchse
des Geräts angeschlossen, stellen Sie
den Lautstärkeregler des Geräts
möglichst hoch ein, ohne daß es
jedoch zu Verzerrungen kommt.
2 Setzen Sie den Kopfhörer auf; er
schaltet sich dabei automatisch ein.
Im eingeschalteten Zustand leuchtet
die Anzeige rot auf.
3 Stellen Sie die Lautstärke ein.
Audiomodusschalter
NORMAL VOICE
Wählschalter ATT (Abschwächer)
Wenn die Sendeeinheit an eine andere
Audioausgangsbuchse als eine Kopfhörerbuchse
angeschlossen ist und laute Töne verzerrt sind,
stellen Sie den Wählschalter ATT an der
Sendeeinheit auf -12 dB. Standardmäßig ist der
Wählschalter ATT auf 0 dB eingestellt.
Wählschalter ATT
Automatische Ein-/Ausschaltfunktion
Beim Aufsetzen schaltet sich der Kopfhörer
automatisch ein und beim Abnehmen wieder
aus. Achten Sie darauf, daß der Bügel nicht nach
oben gezogen ist, da der Kopfhörer sonst
eingeschaltet wird.
Bügel
Erhöhen
Verringern
DE
8
Page 33

Stummschaltfunktion
Wenn die Wiedergabe verrauscht ist, da der
Infrarotstrahl durch ein Hindernis abgeschattet
wird oder da sich der Kopfhörer außerhalb des
Infrarotstrahlbereichs (siehe rechte Spalte)
befindet, spricht die Stummschaltfunktion an
und schaltet den Ton vollständig ab. Damit der
Ton wieder zu hören ist, entfernen Sie das
Hindernis bzw. gehen Sie dichter mit dem
Kopfhörer an die Sendeeinheit heran.
Wenn etwa fünf Minuten lang kein
Audiosignal anliegt
Die Sendeeinheit schaltet sich automatisch aus.
Wenn das Audiosignal mindestens fünf
Minuten lang immer wieder aussetzt bzw.
mit niedrigem Pegel eingespeist wird
Die Sendeeinheit schaltet sich möglicherweise
automatisch aus. Erhöhen Sie in diesem Fall die
Lautstärke am angeschlossenen Gerät, und
verringern Sie gleichzeitig die
Kopfhörerlautstärke.
Nach dem Betrieb
Nehmen Sie den Kopfhörer ab, und legen Sie ihn
auf die Sendeeinheit. Schalten Sie dann das
angeschlossene Audio/Video-Gerät aus. Wenn
mindestens fünf Minuten lang kein Audiosignal
vom Audio/Video-Gerät eingeht, schaltet sich
die Sendeeinheit automatisch aus.
Hinweis
Bei eingeschalteter Sendeeinheit leuchten die
Infrarotstrahler auf. Die Helligkeit der einzelnen
Strahler ist möglicherweise unterschiedlich. Es handelt
sich dabei nicht um eine Störung.
Reichweite der
Sendeeinheit
Die folgende Abbildung zeigt den ungefähren,
von den Infrarotstrahlen der Sendeeinheit
abgedeckten Bereich.
ca. 4 m
Sendeeinheit
ca. 4 m
Hinweise
• Auch innerhalb des oben dargestellten Bereiches kann
der Ton teilweise verrauscht sein. Das Rauschen
nimmt zu, je weiter Sie sich von der Sendeeinheit
entfernen. Befindet sich ein Hindernis zwischen
Kopfhörer und Sendeeinheit, kann der Ton vollständig
unterbrochen sein. Es handelt sich dabei nicht um
eine Störung des Systems.
• Wände, Milchglas usw. können vom Infrarotstrahl
nicht durchdrungen werden. Zwischen der
Sendeeinheit und dem Kopfhörer muß “Sichtkontakt”
bestehen.
• Sofern man sich innerhalb des im obigen Diagramm
dargestellten Bereichs befindet, kann die Sendeeinheit
vor, hinter oder an der Seite des Benutzers aufgestellt
werden.
• Die Tonqualität ist nicht an allen Stellen gleich.
Halten Sie sich möglichst in dem Bereich auf, in dem
die Tonqualität optimal ist.
• Achten Sie darauf, daß die Infrarotsensoren nicht
durch Ihre Hände oder Haare verdeckt sind.
Infrarotstrahl
ca. 10 m
DE
9
Page 34

N Zusatzinformationen
Entsorgen der
Zur besonderen
Beachtung
• Das CE-Zeichen am Gerät gilt nur für Geräte,
die für die EU bestimmt sind.
• Bei längerer Nichtverwendung der
Sendeeinheit trennen Sie den Netzadapter von
der Wandsteckdose ab. Ziehen Sie niemals am
Kabel. Wenn der Netzadapter mit einem Ein-/
Aus-Schalter versehen ist, schalten Sie ihn aus.
• Stellen Sie das System nicht an Orte, die
direktem Sonnenlicht, Wärmequellen oder
Feuchtigkeit ausgesetzt sind.
Hinweise zu den Kopfhörern
Vermeidung von Hörschäden
Betreiben Sie den Kopfhörer nicht über längere
Zeit mit hoher Lautstärke, da dies schädlich für
Ihre Hörorgane ist. Bei einem dumpfen Gefühl in
den Ohren reduzieren Sie die Lautstärke, oder
brechen Sie den Betrieb ab.
Rücksicht auf andere
Stellen Sie stets nur einen mäßigen
Lautstärkepegel ein, um Umgebungsgeräusche
noch wahrnehmen zu können und Leute in lhrer
Umgebung nicht zu stören.
Bei weiterführenden Fragen wenden Sie sich bitte
an den nächsten Sony-Händler.
Kopfhörer
Zum Schutz der Umwelt entfernen Sie bitte
unbedingt die integrierten Akkus aus dem
Kopfhörer, bevor Sie die Kopfhörer entsorgen.
Sorgen Sie für eine ordnungsgemäße Entsorgung
der Akkus.
1 Nehmen Sie das Ohrpolster am linken
Kopfhörer ab. Lösen Sie die vier
Schrauben am Gehäuse, und öffnen Sie
das Gehäuse.
2 Lösen Sie die drei Schrauben an der
Akkuhalterung und an der Platine, und
nehmen Sie die Akkuhalterung
zusammen mit der Platine aus dem
Gehäuse.
Wenn eine Reparatur erforderlich ist, bringen Sie
stets sowohl den Kopfhörer als auch die
Sendeeinheit zur Sony-Kundendienststelle.
Auswechseln der Ohrpolster
Wenn die Ohrpolster verschmutzt oder
beschädigt sind, können Sie bei Ihrem SonyHändler neue besorgen.
DE
10
Page 35

3 Drücken Sie die Akkus von hinten aus
der Akkuhalterung heraus.
Störungsbehebung
Hinweis
Berühren Sie auf keinen Fall die Platine an der
Akkuhalterung. Fassen Sie beim Entfernen der Akkus
immer nur die Akkuhalterung (schwarze
Kunststoffhalterung) an.
Problem
Kein Ton/
schlechter
Ton
Leiser Ton
Abhilfe
Den Anschluß des Audio/VideoGeräts und des Netzadapters prüfen.
Wenn der Netzadapter mit einem
Ein-/Aus-Schalter versehen ist,
achten Sie darauf, daß dieser auf ON
gestellt ist.
Überprüfen, ob das Audio/VideoGerät eingeschaltet ist.
Wenn die Sendeeinheit an der
Kopfhörerbuchse des Audio/VideoGeräts angeschlossen ist, die
Lautstärke am Audio/Video-Gerät
höher einstellen.
Die Stummschaltfunktion ist aktiviert.
•Überprüfen, ob sich ein Hindernis
zwischen Sendeeinheit und
Kopfhörer befindet.
• Mit dem Kopfhörer dichter an die
Sendeeinheit herangehen.
• Position und Winkel der
Sendeeinheit ändern.
Die Netzanzeige des Kopfhörers
leuchtet schwach oder gar nicht.
• Laden Sie die Kopfhörer-Akkus,
oder - wenn die Netzanzeige nach
dem Laden der Kopfhörer-Akkus
immer noch nicht leuchtet - bringen
Sie die Kopfhörer zu einem SonyHändler, um die Akkus austauschen
zu lassen.
Überprüfen, ob der INPUT SOURCESchalter in der richtigen Position
steht.
Stellen Sie den Wählschalter ATT an
der Sendeeinheit auf 0 dB.
Fortsetzung auf der nächsten Seite
DE
11
Page 36

Fortsetzung
Problem
Verzerrungen
Laute
Störgeräusche
Abhilfe
Wenn die Sendeeinheit an der
Kopfhörerbuchse des Audio/VideoGeräts angeschlossen ist, die
Lautstärke am Audio/Video-Gerät
reduzieren.
Wenn die Sendeeinheit an eine andere
Audioausgangsbuchse als eine
Kopfhörerbuchse angeschlossen ist,
stellen Sie den Wählschalter ATT auf
-12 dB.
Die Netzanzeige des Kopfhörers
leuchtet schwach oder gar nicht.
• Laden Sie die Kopfhörer-Akkus,
oder - wenn die Netzanzeige nach
dem Laden der Kopfhörer-Akkus
immer noch nicht leuchtet - bringen
Sie die Kopfhörer zu einem SonyHändler, um die Akkus austauschen
zu lassen.
Überprüfen, ob der INPUT SOURCESchalter in der richtigen Position
steht.
Kopfhörer eines Kopfhörersystems
ohne Rauschunterdrückungssystem
werden zusammen mit der
Sendeeinheit dieses Systems
verwendet.
•Die Kopfhörer dieses Systems
verwenden.
Die Sendeeinheit eines
Kopfhörersystems ohne
Rauschunterdrückungssystem wird
zusammen mit dem Kopfhörer dieses
Systems verwendet.
•Die Sendeeinheit dieses Systems
verwenden.
Dichter an die Sendeeinheit
herangehen. Wenn der Kopfhörer zu
weit von der Sendeeinheit entfernt ist,
kann der Ton verrauscht oder gestört
sein. Es handelt sich dabei nicht um
eine Störung des Geräts.
Überprüfen, ob sich ein Hindernis
zwischen Sendeeinheit und Kopfhörer
befindet.
Darauf achten, daß die
Infrarotsensoren nicht durch Ihre
Hände oder Haare verdeckt sind.
Problem
Laute
Störgeräusche
Der Akku
wird
nicht geladen.
Abhilfe
Die Position und den Winkel der
Sendeeinheit ändern.
•Der Kopfhörer wird in der Nähe
eines sonnigen Fensters benutzt.
t Mit den Vorhängen oder der
Jalousie für Schatten sorgen oder
den Kopfhörer an einer anderen
Stelle benutzen.
Wenn die Sendeeinheit an der
Kopfhörerbuchse des Audio/VideoGeräts angeschlossen ist, die
Lautstärke am Audio/Video-Gerät
höher einstellen.
Die Netzanzeige des Kopfhörers
leuchtet schwach oder gar nicht.
• Laden Sie die Kopfhörer-Akkus,
oder - wenn die Netzanzeige nach
dem Laden der Kopfhörer-Akkus
immer noch nicht leuchtet - bringen
Sie die Kopfhörer zu einem SonyHändler, um die Akkus austauschen
zu lassen.
Bei Verwendung von zwei oder mehr
Sendeeinheiten die Sendeeinheiten
weit genug voneinander entfernt
aufstellen, damit sich die
Infrarotstrahlbereiche nicht
überlappen.
Störgeräusche vom angeschlossenen
Audiogerär
•Überprüfen, ob der INPUT
SOURCE-Schalter in der richtigen
Position steht.
•Bei eingeschalteter Sendeeinheit das
Netzkabel abtrennen und
überprüfen, ob das Störgeräusch im
Kopfhörer noch zu hören ist. Wenn
das Störgeräusch nicht mehr zu
hören ist, wurde es vom Audiogerät
verursacht.
Überprüfen, ob die Ladeanzeige
leuchtet. Falls sie nicht leuchtet, den
Kopfhörer so auf der Sendeeinheit
ablegen, daß die Anzeige leuchtet.
12
DE
Page 37

Technische Daten
Allgemeines
Modulationssystem
Frequenzmodulation
Trägerfrequenz
rechts 2,8 MHz
links 2,3 MHz
Sendeeinheit
Stromversorgung
an DC IN 9V-Buchse
anschließbarer Netzadapter
(mitgeliefert) für folgende
Betriebsspannungen:
Integrierte Akkus
Modell NH-AAC
Typ Ni-MH
Spannung 1,2 V
Kapazität 1 000 mAh
Sonderzubehör
Steckeradapter PC-236HG
(Stereo-Ministecker y Mono-Ministecker)
Verbindungskabel
RK-C510HG/RK-C515HG/RK-C520HG
(Cinchstecker x 2 y Cinchstecker x 2)
RK-G136HG
(Stereo-Ministecker y Stereo-Ministecker)
RK-G129HG
(Stereo-Ministecker y Cinchstecker x 2)
Bezugsland
USA
Großbritannien
Europa
Japan (außer
Inland-Modell)
Andere Länder
Audioeingang Cinchbuchsen/Stereo-
Abmessungen 130 x 135 x 150 mm
Gewicht ca. 200 g
Kopfhörer
Typ Geschlossen, dynamisch
Tonerzeugende Komponente
Frequenzgang 12 – 24 000 Hz
Stromversorgung
Gewicht ca. 310 g
Betriebsspannung
120 V Wechselspannung, 60 Hz
220 V - 230 V
Wechselspannung, 50 Hz
220 V - 230 V
Wechselspannung, 50 Hz
110 V/120 V/220 V/240 V
Wechselspannung, 50/60 Hz
220 - 230 V Wechselspannung,
50/60 Hz oder 120 V
Wechselspannung, 60 Hz
Minibuchse
30 mm Durchmesser mit
Neodymmagnet
2,4 V Gleichstrom: Integrierte
Akkus
Änderungen, die dem technischen Fortschritt dienen,
bleiben vorbehalten.
13
DE
Page 38

ADVERTENCIA
Para evitar incendios o el riesgo de
electrocución, no exponga la unidad a la
lluvia ni a la humedad.
Para evitar descargas eléctricas, no abra
la unidad. En caso de avería, solicite los
servicios de personal cualificado.
ADVERTENCIA
Tenga en cuenta que cualquier cambio o
modificación no expresamente aprobado en este
manual puede anular su autoridad para utilizar
este equipo.
IMPORTADOR:
SONY ELECTRÓNICOS DE MÉXICO, S.A.
DE C.V. HENRY FORD # 29, FRACC, IND.
SAN NICOLAS TLALNEPANTLA EDO. DE
MÉXICO, C.P. 54030 R.F.C. SEM 941001 BJA
TEL. 5321-1000
POR FAVOR LEA DETALLADAMENTE
ESTE MANUAL DE INSTRUCCIONES
ANTES DE CONECTAR Y OPERAR ESTE
EQUIPO.
RECUERDE QUE UN MAL USO DE SU
APARATO PODRÍA ANULAR LA
GARANTÍA.
ES
2
Page 39

¡Bienvenido!
Índice
Muchas gracias por la adquisición del sistema de
auriculares estéreo inalámbrico MDR-IF630RK
Sony.
Antes de utilizar el sistema, lea detenidamente
este manual y consérvelo para futuras
referencias.
Algunas de las características son:
• Sistema inalámbrico que le permitirá escuchar
un programa sin verse restringido por un
cable.
• Los rayos infrarrojos procedentes del
transmisor cubren una amplia área horizontal
de escucha a una distancia de 10 m (máximo).
• Auriculares Circum-aurales cómodos con
casco autoajustable
• Sistema de reducción de ruido para reproducir
un sonido claro con una transmisión mínima
de ruido
• El modo de potenciación de voz del
interruptor de modo de audio permite
escuchar la voz humana claramente.
• Función de activación y desactivación
automática en los auriculares para ahorro de la
energía de las baterías
• El control VOL ajusta el nivel de volumen de
ambos canales.
• Alimentación mediante baterías recargables
Ni-MH (níquel-hidrógeno).
Preparativos
Desembalaje ............................................ 4
Preparación del transmisor................... 4
Carga de las baterías de los
auriculares ........................................ 7
Utilización del sistema
Escucha de un programa....................... 8
Áreas efectivas del transmisor.............. 9
Información adicional
Precauciones.......................................... 10
Desecho de los auriculares.................. 10
Solución de problemas ........................ 11
Especificaciones .................................... 13
ES
Nota
Este sistema de auriculares no puede utilizarse
con otros auriculares o transmisores de sistemas
de auriculares inalámbricos que no empleen el
sistema de reducción de ruido.
ES
3
Page 40

DC IN 9V
RBAL
AUDIO IN
PHONESLINE
INPUT SOURCE
N Preparativos
Preparación del
Desembalaje
Compruebe si ha recibido lo siguiente:
• Auriculares
• Transmisor
• Adaptador de alimentación de ca
• Adaptador universal de clavija (minitoma
estéreo y clavija telefónica estéreo)
transmisor
1 Conecte el transmisor al equipo de
audio/vídeo. Elija una de las
conexiones siguientes dependiendo del
tipo de clavijas:
A Conexión a una toma para auriculares
Ponga el selector INPUT SOURCE en
PHONES.
Transmisor
a las tomas AUDIO IN A
Canal derecho
(roja)
Cable conector
(suministrado)
Adaptador
universal de clavija
(suministrado)
Canal izquierdo
(blanca)
a la toma para
auriculares
(minitoma
estéreo)
• Cable conector (clavijas fono y miniclavija
estéreo), 1 m
• Adaptador de enchufe de ca (modelo turista en
Japón solamente)
ES
4
a la toma para
auriculares (toma
telefónica estéreo)
* WALKMAN es marca registrada de Sony Corporation.
CD Walkman,
MD Walkman,
WALKMAN*,
TV, VCR,
etc.
Page 41

DC IN 9V
RBAL
AUDIO IN
PHONESLINE
INPUT SOURCE
B Para conectar a una toma de salida de
audio diferente de una toma de
auriculares
Ponga el selector INPUT SOURCE en
LINE.
INPUT SOURCE
PHONESLINE
Transmisor
Transmisor
a las tomas AUDIO IN A
Canal derecho
(roja)
Cable conector
(suministrado)
RBAL
AUDIO IN
DC IN 9V
Canal izquierdo
(blanca)
a una toma de salida
de audio distinta de
una toma de
auriculares
CD Walkman,
MD Walkman,
etc.
Canal
izquierdo
(blanca)
a la toma AUDIO IN B
Cable conector
(suministrado)
Canal
derecho
(roja)
a una toma de salida de
audio distinta de una
toma de auriculares
Sistema estéreo, televisor,
videograbadora, etc.
Continúa en la página siguiente
5
ES
Page 42

Continuación
2 Conecte el adaptador de alimentación
de ca suministrado al transmisor.
Transmisor
5 Si el adaptador de alimentación de ca
está equipado con un interruptor de
activación/desactivación, ajústelo en
ON.
Se suministra la alimentación al
transmisor.
Interruptor de activación/
desactivación
RBAL
AUDIO IN
Adaptador de alimentación
de ca (suministrado)
DC IN 9V
a la toma
DC IN 9V
3 Si el adaptador de alimentación de ca
dispone de selector de tensión, antes de
conectarlo a un tomacorriente de ca,
ajústelo a la tensión de su zona con un
destornillador.
a una toma
de ca
Si el enchufe del adaptador de
alimentación de ca no encaja en el
tomacorriente de ca, utilice el
adaptador de enchufe de ca
suministrado.
Notas
• No realice la conexión a las tomas AUDIO IN A y B al
mismo tiempo. Si lo hiciese, las señales de audio
podrían mezclarse.
• Utilice solamente el adaptador de alimentación de ca
suministrado. No utilice ningún otro tipo de
adaptador de alimentación de ca.
Polaridad de la clavija
• Mantenga el cable del adaptador de alimentación de
ca lo más alejado posible del transmisor. Si coloca el
cable cerca del transmisor, puede producirse ruido.
• Cuando conecta el transmisor directamente a una
toma monofónica de auriculares de introducción en
oído, la señal de audio no saldrá a través del canal
derecho. En tal caso, utilice un adaptador de clavija
PC-236HG vendido aparte.
• Si el equipo al que se conecta tiene la función AVLS
(Sistema de limitación automática del volumen),
asegúrese de desactivar esta función al utilizar el
transmisor. En caso contrario, deberá aumentar el
nivel de los auriculares y es posible que se oiga ruido.
4 Conecte el adaptador de alimentación
de ca a una toma de ca.
ES
6
Page 43

Carga de las baterías
de los auriculares
Uso de los auriculares por primera vez
Cuando utilice los auriculares por primera vez,
cargue las baterías de la forma siguiente.
1 Conecte el transmisor a una fuente de
alimentación.
Transmisor
DC IN 9V
a una toma de ca
Adaptador de
alimentación de
ca (suministrado)
RBAL
AUDIO IN
a la toma
DC IN 9V
2 Coloque los auriculares en el
transmisor de forma que los contactos
de carga de éste encajen en los de la
parte inferior de los auriculares.
El indicador CHG (carga) del
transmisor se iluminará con color verde
para indicar que se están cargando las
baterías.
Si el indicador no se enciende
Compruebe si los pasadores de contacto están
adecuadamente encajados en los orificios de
contacto de los auriculares, o si los auriculares
están correctamente colocados sobre el
transmisor.
Para recargar las baterías de los
auriculares después del uso
El temporizador incorporado del sistema detiene
automáticamente la carga para evitar la
posibilidad de dañar los auriculares debido a una
sobrecarga. Por este motivo se recomienda que
deje los auriculares en el transmisor siempre que
no los utilice.
Horas de carga y utilización
Horas
aproximadas de
carga
1
14**
* a 1 kHz, una salida de 1 mW+1 mW
** Horas necesarias para cargar totalmente unas baterías
sin carga
Compruebe la energía restante de las
baterías de los auriculares
Tire hacia arriba del suspensor. Y compruebe si
el indicador de alimentación de los auriculares se
enciende en rojo. En este caso, podrá utilizar los
auriculares.
Cuando el indicador de alimentación se ilumine
débilmente o se apague, y el sonido se vuelva
distorsionado o tenga mucho ruido, cargue las
baterías o instale otras nuevas.
Horas aprox. de
utilización*
3 horas
33 horas
CHG
El indicador de carga se apaga al
transcurrir aproximadamente 14 horas
y finalizar la carga.
POWER
Nota
Durante la recarga, la alimentación del transmisor se
desconectará automáticamente.
ES
7
Page 44

ATT
–12dB0dB
N Utilización del sistema
Escucha de un
programa
Interruptor de modo de audio
Presione hasta que quede hundido el interruptor
de modo de audio (modo VOICE) para potenciar
la voz humana. Presione hasta liberarlo (modo
NORMAL) para obtener la calidad normal de
tono.
1 Conecte la alimentación del equipo de
audio/vídeo conectado al transmisor.
Cuando entre una señal de audio, la
alimentación del transmisor se
conectará automáticamente y se
encenderán los emisores de rayos
infrarrojos. Si el transmisor está
conectado a la toma para auriculares,
ajuste el control de volumen del
equipo fuente lo más alto posible pero
de forma que la señal de audio no se
distorsione.
2 Colóquese los auriculares, y su
alimentación se conectará
automáticamente.
Cuando se conecte la alimentación, el
indicador de alimentación se encenderá
en rojo.
Interruptor de modo de
audio
NORMAL VOICE
Selector ATT (atenuador)
Si se distorsiona un sonido fuerte cuando el
transmisor se conecta a una toma de salida de
audio distinta de una toma de auriculares, ajuste
el selector ATT del transmisor en -12 dB. El
ajuste de fábrica del selector ATT es 0 dB.
Selector ATT
Función de conexión/desconexión
automática de la alimentación
Cuando se quite los auriculares, su alimentación
se desconectará automáticamente. No tire del
suspensor hacia arriba, ya que de lo contrario se
conectaría la alimentación de los mismos.
Suspensor
3 Ajuste el volumen.
Aumento
Reducción
ES
8
Page 45

Función de silenciamiento
Si se oye ruido de siseo cuando se obstruyan los
rayos infrarrojos, o cuando utilice los auriculares
fuera del alcance efectivo (consulte la columna
derecha), se activará la función de silenciamiento
y no se oirá sonido a través de los auriculares.
Para restablecer el sonido, acérquese al
transmisor o elimine la obstrucción.
Cuando no se reciba señal de audio
durante más de aproximadamente cinco
minutos
La alimentación del transmisor se desconectará
automáticamente.
Cuando una señal de audio es
intermitente o se recibe una señal de
audio de bajo nivel durante más de cinco
minutos aproximadamente
El transmisor puede desactivarse
automáticamente. En este caso, aumente el
volumen del equipo conectado conforme lo
reduce en los auriculares.
Después de haber escuchado un
programa
Quítese los auriculares y colóquelos sobre el
transmisor. Después, apague el equipo de
audio/vídeo. La alimentación del transmisor se
desactiva automáticamente si no se recibe
ninguna señal de audio desde el equipo de
audio/vídeo durante aproximadamente cinco
minutos.
Nota
Cuando conecte la alimentación del transmisor se
encenderán los emisores de rayos infrarrojos. El brillo
de los emisores puede no ser uniforme, pero esto no
significa mal funcionamiento.
Áreas efectivas del
transmisor
En la ilustración siguiente se muestra el área
aproximada cubierta por los rayos infrarrojos
emitidos por el transmisor.
Aprox. 4 m
Transmisor
Aprox. 4 m
Notas
• Como este sistema utiliza la comunicación por rayos
infrarrojos, el ruido de siseo aumentará a medida que
se aleje del transmisor, incluso aunque se encuentre
dentro del área mostrada en la ilustración.
Si existe algún objeto entre el receptor y el transmisor,
el sonido puede interrumpirse. Estos fenómenos son
inherentes a la comunicación por rayos infrarrojos y
no significan problema alguno del propio sistema.
• Los rayos infrarrojos no atravesarán paredes ni vidrios
opacos. Por lo tanto, cerciórese de permanecer en la
línea de visión del transmisor.
• Cuando utilice los auriculares dentro del área
mostrada en el diagrama, el transmisor podrá
colocarse delante, detrás, o al lado del oyente.
• El sonido de los auriculares puede variar dependiendo
de la posicón y del medio ambiente. Le sugerimos que
utilice este sistema en la posición que ofrezca el mejor
sonido posible.
• No cubra los sensores de rayos infrarrojos con las
manos ni con el pelo.
Rayos infrarrojos
Aprox. 10 m
ES
9
Page 46

N Información adicional
Desecho de los
Precauciones
• La marca CE de la unidad solamente será
válida para productos vendidos en la Unión
Europea.
• Cuando no vaya a utilizar el transmisor
durante mucho tiempo, desconecte el
adaptador de alimentación de ca del
tomacorriente de ca sujetando el enchufe. No
tire del cable.
Si el adaptador de alimentación de ca está
equipado con un interruptor de activación/
desactivación, ajústelo en la posición de
desactivación.
• No deje el sistema de auriculares estéreo
inalámbrico en un lugar sometido a la luz solar
directa, al calor, ni a la humedad.
Notas sobre los auriculares
Cuidado de sus oídos
Evite utilizar los auriculares a gran volumen. Los
expertos en oídos aconsejan no utilizar
auriculares para escuchar continuamente a gran
volumen. Si experimenta un silbido en sus oídos,
reduzca el volumen o deje de utilizar los
auriculares.
Respeto a los demás
Mantenga el volumen a un nivel moderado. Esto
le permitirá escuchar los sonidos del exterior y no
molestar a quienes se encuentren a su alrededor.
auriculares
Para preservar el medio ambiente, asegúrese de
extraer las baterías recargables incorporadas de
los auriculares antes de deshacerse de éstos y de
desecharlas convenientemente.
1 Retire la almohadilla del auricular
izquierdo. Después, extraiga los cuatro
tornillos del alojamiento y ábralo.
2 Retire los tres tornillos de la caja de las
baterías y la placa del circuito y
extraiga la caja de baterías junto con la
placa del circuito del alojamiento.
Si tiene alguna pregunta o problema en relación
con este sistema que el manual no pueda
resolver, póngase en contacto con su proveedor
Sony.
Cuando los auriculares o el transmisor necesiten
reparación, lleve ambos a su proveedor Sony.
Reemplazo de las
almohadillas auriculares
Cuando las almohadillas auriculares se ensucien
o dañen, adquiera otras en su proveedor Sony.
ES
10
Page 47

3 Presione para extraer las baterías de la
parte trasera de la caja de baterías.
Solución de problemas
Nota
Tenga cuidado de no tocar la placa del circuito unida a
la caja de las baterías. Sujete la caja de baterías (caja de
plástico negro) al extraerlas.
Problema
Carencia de
sonido/
sonido
amortiguado
Sonido débil
Solución
Compruebe la conexión del equipo de
audio/vídeo o del adaptador de
alimentación de ca. Si el adaptador de
alimentación de ca está equipado con
un interruptor de activación/
desactivación, compruebe que dicho
interruptor está ajustado en ON.
Compruebe si la alimentación del
equipo de audio/vídeo está
conectada.
Si el transmisor está conectado a la
toma para auriculares, aumente el
volumen del equipo de audio/vídeo.
La función de silenciamiento está
activada.
•Compruebe si hay algún objeto
entre el transmisor y los auriculares.
•Utilice los auriculares cerca del
transmisor.
•Cambie la posición y el ángulo del
transmisor.
El indicador de alimentación de los
auriculares es débil o está apagado.
•Cargue las baterías de los
auriculares o, si el indicador de
alimentación sigue apagado después
de cargar las baterías de los
auriculares, llévelos a un
distribuidor Sony para que sustituya
las baterías.
Compruebe que el selector INPUT
SOURCE está ajustado en la posición
correcta.
Ajuste el selector ATT del transmisor
en 0 dB.
Continúa en la página siguiente
11
ES
Page 48

Continuación
Problema
Distorsión
Ruido fuerte
de fondo
Solución
Si el transmisor está conectado a la
toma para auriculares, reduzca el
volumen del equipo de audio/vídeo
conectado.
Si el transmisor se conecta a una toma
de salida de audio distinta de una
toma de auriculares, ajuste el selector
ATT en -12 dB.
El indicador de alimentación de los
auriculares es débil o está apagado.
•Cargue las baterías de los
auriculares o, si el indicador de
alimentación sigue apagado después
de cargar las baterías de los
auriculares, llévelos a un
distribuidor Sony para que sustituya
las baterías.
Compruebe que el selector INPUT
SOURCE está ajustado en la posición
correcta.
Se utilizan auriculares de otro sistema
de auriculares que no emplea el
sistema de reducción de ruido con el
transmisor de este sistema.
•Utilice los auriculares de este
sistema.
Se utiliza el transmisor de otro
sistema de auriculares que no emplea
el sistema de reducción de ruido con
los auriculares de este sistema.
•Utilice el transmisor de este sistema.
Acérquese al transmisor. A medida
que se aleje del transmisor, es posible
que oiga más ruido. Esto es inherente
a la comunicación por rayos
infrarrojos, y no significa un problema
de la propia unidad.
Compruebe si hay algún objeto entre
el transmisor y los auriculares.
Compruebe si los sensores de rayos
infrarrojos están cubiertos con sus
manos o su pelo.
Problema
Ruido fuerte
de fondo
Las baterías
no pueden
cargarse.
Solución
Cambie la posición o el ángulo del
transmisor.
•Está utilizando los auriculares cerca
de una ventana en la que la luz del
sol es demasiado intensa.
t Corra las cortinas o cierre la
persiana para cortar la luz solar,
o utilice los auriculares alejados
de la luz solar.
Si el transmisor está conectado a la
toma para auriculares, aumente el
volumen del equipo de audio/vídeo.
El indicador de alimentación de los
auriculares es débil o está apagado.
•Cargue las baterías de los
auriculares o, si el indicador de
alimentación sigue apagado después
de cargar las baterías de los
auriculares, llévelos a un
distribuidor Sony para que sustituya
las baterías.
Cuando utilice más de dos
transmisores, desconecte la
alimentación del segundo transmisor
o aléjelo de forma que el área cubierta
por los rayos infrarrojos de cada uno
de ellos no quede superpuesta.
Se oye ruido a través del equipo de
audio conectado.
•Compruebe que el selector INPUT
SOURCE está ajustado en la
posición correcta.
•Desconecte el cable conector con la
alimentación del transmisor
conectada y compruebe si se oye
ruido a través de los auriculares. Si
el ruido desaparece, el equipo
conectado será la causa de tal ruido.
Compruebe si el indicador de carga se
enciende. Si no se enciende, coloque
los auriculares correctamente en el
transmisor de forma que se encienda
el indicador.
12
ES
Page 49

Especificaciones
Generales
Sistema de modulación
En frecuencia
Frecuencia portadora
Canal derecho: 2,8 MHz
Canal izquierdo: 2,3 MHz
Transmisor
Fuente de alimentación
La toma DC IN 9V acepta la
alimentación suministrada por el
adaptador de alimentación de ca
para utilizarse con las tensiones
siguientes:
Lugar de
adquisición
EE.UU.
Reino Unido
Europa
Japón (excepto el
modelo para Japón)
Otros países
Tensión de
alimentación
ca 120 V, 60 Hz
ca 220 – 230 V, 50 Hz
ca 220 – 230 V, 50 Hz
ca 110 V/120 V/220 V/
240 V, 50/60 Hz
ca 220 – 230 V, 50/60 Hz
o ca 120 V, 60 Hz
Baterías recargables incorporadas
Nombre del modelo
NH-AAC
Tipo Ni-MH
Tensión 1,2 V
Capacidad 1 000 mAh
Accesorios opcionales
Adaptador de clavija PC-236HG
(minitoma estéreo y miniclavija monoaural)
Cables conectores
RK-C510HG/RK-C515HG/RK-C520HG
(clavija fono x 2 y clavija fono x 2)
RK-G136HG
(miniclavija estéreo y miniclavija estéreo)
RK-G129HG
(miniclavija estéreo y clavija fono x 2)
Diseño y especificaciones sujetos a cambio sin previo
aviso.
Entrada de audio
Tomas fono/minitoma estéreo
Dimensiones Aprox. 130 x 135 x 150 mm
(an/al/prf)
Peso Aprox. 200 g
Auriculares
Tipo Cerrados, dinámicos
Altavoz 30 mm de diámetro con imán de
base química
Respuesta en frecuencia
12 – 24 000 Hz
Fuente de alimentación
cc 2,4 V: Baterías recargables
incorporadas
Peso Aprox. 310 g
13
ES
Page 50

14
ES
Page 51

15
ES
Page 52

Sony Corporation Printed in Korea
 Loading...