

Page 1
3-862-873-16(1)
Cordless Stereo
Headphone System
Operating Instructions page 2
Mode d’emploi page 14
Manual de instrucciones página 26
MDR-IF230RK
© 1998 by Sony Corporation
3
Page 2

WARNING
For the customers in the U.S.A. and
Canada
To prevent fire or shock hazard, do
not expose the unit to rain or
moisture.
To avoid electrical shock, do not
open the cabinet. Refer servicing to
qualified personnel only.
WARNING
You are cautioned that any changes or
modifications not expressly approved in
this manual could void your authority to
operate this equipment.
Owner’s Record
The model number is located on the top of
the transmitter and on the headphones
housing.
The serial number is located at the bottom
of the transmitter and the inner side of the
headband.
Record these numbers in the spaces
provided below. Refer to them whenever
you call upon your Sony dealer regarding
this product.
Model No. MDR-IF230RK
Transmitter TMR-IF230R
Headphones MDR-IF230
Serial No.
Transmitter
Headphones
RECYCLING NICKEL-CADMIUM
BATTERIES
Nickel Cadmium batteries are
recyclable. You can help preserve our
environment by returning your
unwanted batteries to your nearest
point for collection, recycling or proper
disposal.
Note: In some areas the disposal of
nickel cadmium batteries in
household or business trash may
be prohibited.
RBRC (Rechargeable Battery Recycling
Corporation) advises you about spent
battery collection by the following
phone number.
Call toll free number: 1-800-822-8837
(United States and Canada only)
Caution: Do not handle damaged or
leaking nickel-cadmium batteries.
2
Page 3

Welcome!
Table of contents
Thank you for purchasing the Sony MDRIF230RK Cordless Stereo Headphone
System. Before operating the unit, please
read this manual thoroughly and retain it
for future reference.
Some features are:
• Cordless system that allows you to listen
to a program free from the restriction of a
cord.
• Broad horizontal listening area that gives
you superb sound virtually anywhere in
the room.
• Self-adjusting headband for fitting your
head perfectly.
• The power of the headphones turns on
and off automatically every time you put
the headphones on and off (Auto power
on/off function).
• The VOL control adjusts the volume level
of both channels.
• The power source of the headphones can
be selected from either a supplied
rechargeable battery or a commercially
available R6 (size AA) dry battery.
Getting started
Unpacking.................................................. 4
Setting up the transmitter ........................ 4
Charging the rechargeable battery ......... 6
Setting up the headphones ...................... 7
Operating the system
Listening to a program..............................8
About the infrared rays
communication .......................................9
Replacing the ear pads ..............................9
Additional information
Precautions ...............................................10
Troubleshooting .......................................11
Specifications ............................................ 12
3
Page 4
( Getting started
Unpacking
Check that you have the following items:
• Transmitter
TMR-IF230R
• AC power adaptor
• Connecting cord (phono plugs ˜ stereo
mini plug)
• Ni-Cd Rechargeable battery
NC-AA (HJ)
• Headphones
Setting up the
transmitter
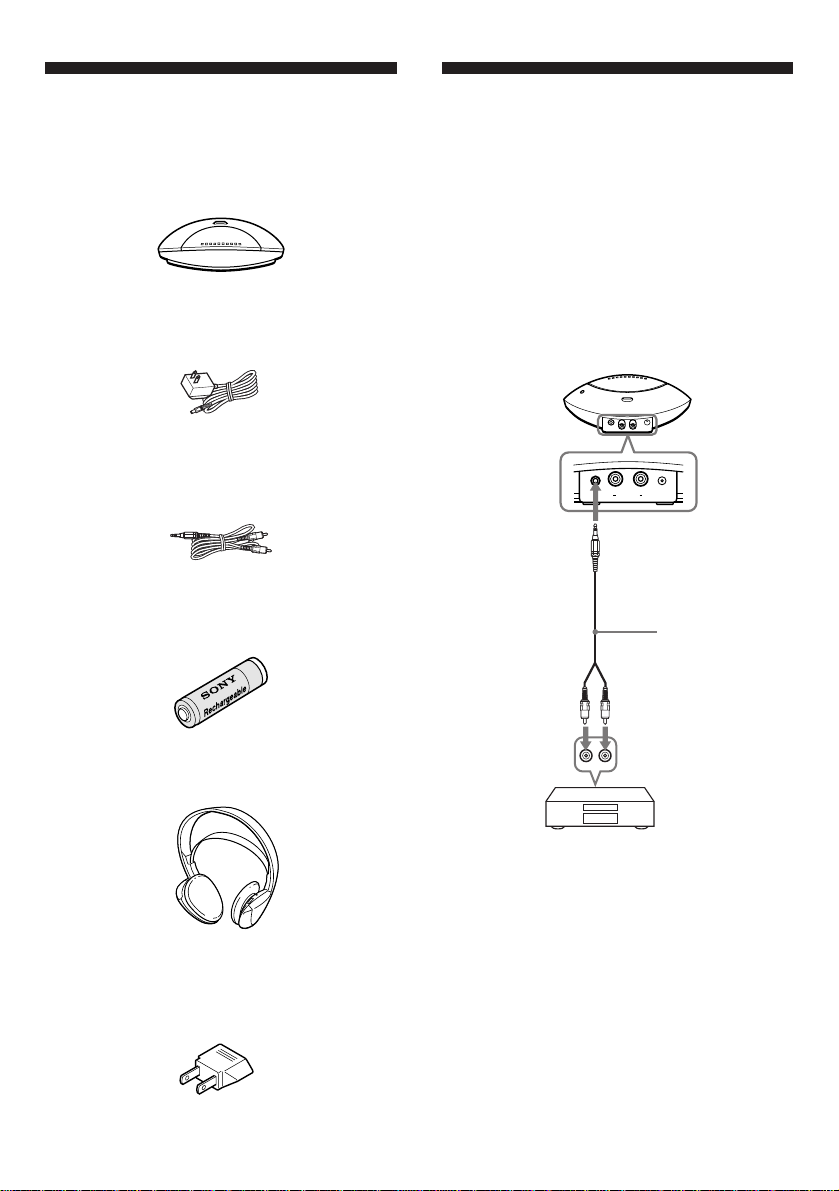
1 Connect the transmitter to audio/video
equipment.
a When connecting to your audio/video
system's LINE OUT or REC OUT jacks,
connect the cord to the transmitter's
LINE IN jack only.
Transmitter
¥
RLINE IN
L
PHONES IN
DC IN 9V
to LINE IN jack
Connecting cord
(supplied)
Left channel
(white)
Right channel
(red)
to LINE OUT or
REC OUT jacks
• AC plug adaptor
(tourist model only)
4
MDR-IF230
Stereo system, TV, VCR, etc.
Note
If your audio/video equipment has a stereo mini
jack(LINE OUT), connect the stereo mini
jack(LINE OUT) to LINE IN of the transmitter by
using optional connecting cord RK-G136HG.
Connecting the LINE OUT jack of your audio/
video equipment to PHONES IN of the
transmitter will cause low or muffled sound. To
connect to PHONES IN of the transmitter with
the supplied cord, use a headphones jack on the
audio/video equipment.
Page 5
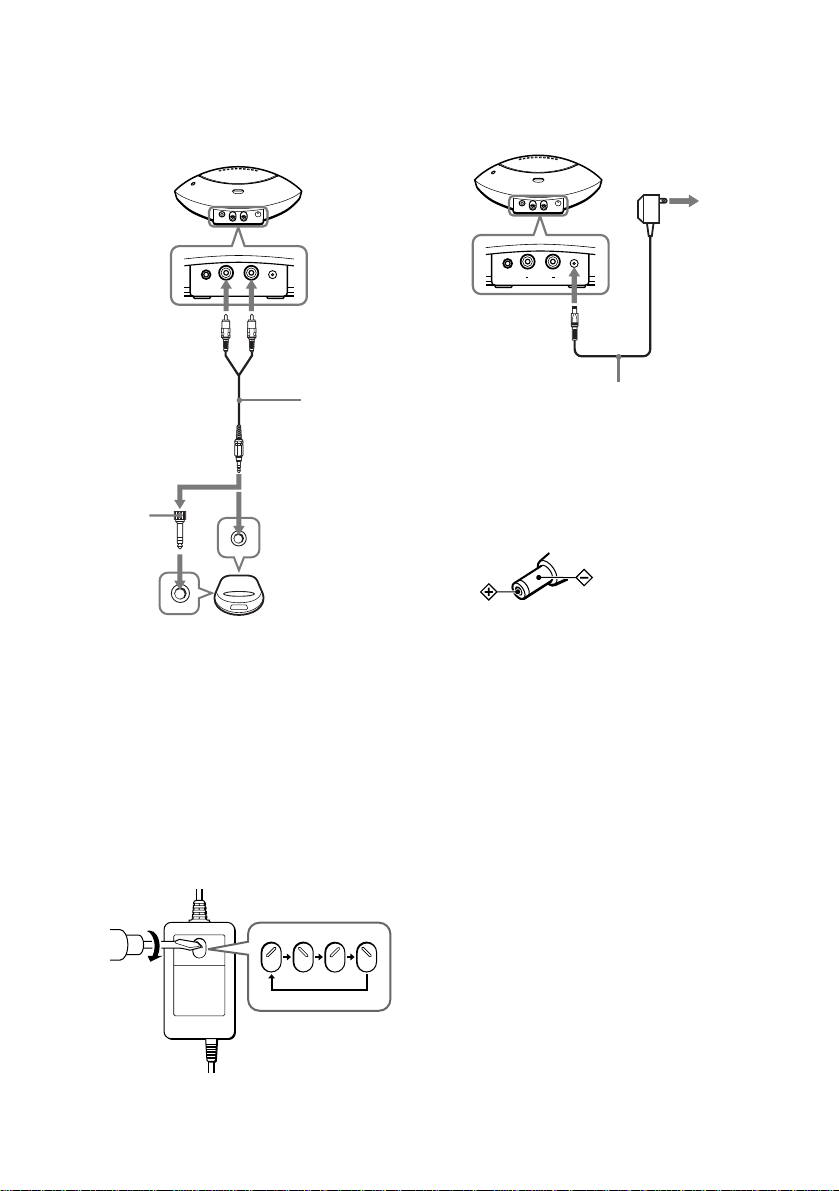
b When connecting to your Discman's
RLINE IN
DC IN 9V
L
¥
PHONES IN
headphones jack, connect the cord to the
transmitter's PHONES IN jack only.
Transmitter
¥
RLINE IN
L
PHONES IN
DC IN 9V
to PHONES IN jacks
Right channel
(red)
Left channel
(white)
Connecting
cord
(supplied)
Unimatch
plug adaptor
(not supplied)
to a headphones
jack (stereo mini
jack)
3 Connect the transmitter to a power
source.
Transmitter
to an AC
outlet
to DC IN 9 V
jack
AC power adaptor (supplied)
Notes
•Do not connect to the PHONES IN jacks and
LINE IN jack at the same time. If you do so, the
audio signals may be mixed.
•Use only the supplied AC power adaptor. Do
not use any other AC power adaptor.
Discman,
WALKMAN*,
to a headphones
TV, VCR, etc.
jack (stereo
phone jack)
2 If your AC power adaptor is equipped
with a voltage selector, before
connecting the AC power adaptor to an
AC outlet, set it to the operating
voltage in your area with a screw
driver.
AC power adaptor (supplied)
220V
VOLTAGE SELECT
240V
220V
120V
110V
Polarity of the plug
•If the plug of the AC power adaptor does not fit
in the AC outlet, use the supplied AC plug
adaptor. (tourist model only)
•When you connect the connecting cord directly
to an earphone jack, the audio signal will not be
output through the right channel. In such a
case, use the separately sold PC-236HG plug
adaptor.
* WALKMAN is a registered trademark of Sony
Corporation.
5
Page 6
Charging the
4 Close the battery charger lid on the
transmitter.
rechargeable
battery
The headphones are powered by a
rechargeable battery NC-AA (HJ)
(supplied) or a dry cell battery (not
supplied). Charge the rechargeable battery
before use.
NC-AA (HJ) is applicable only for Sony
cordless/wireless headphone systems.
Never use for any other purpose.
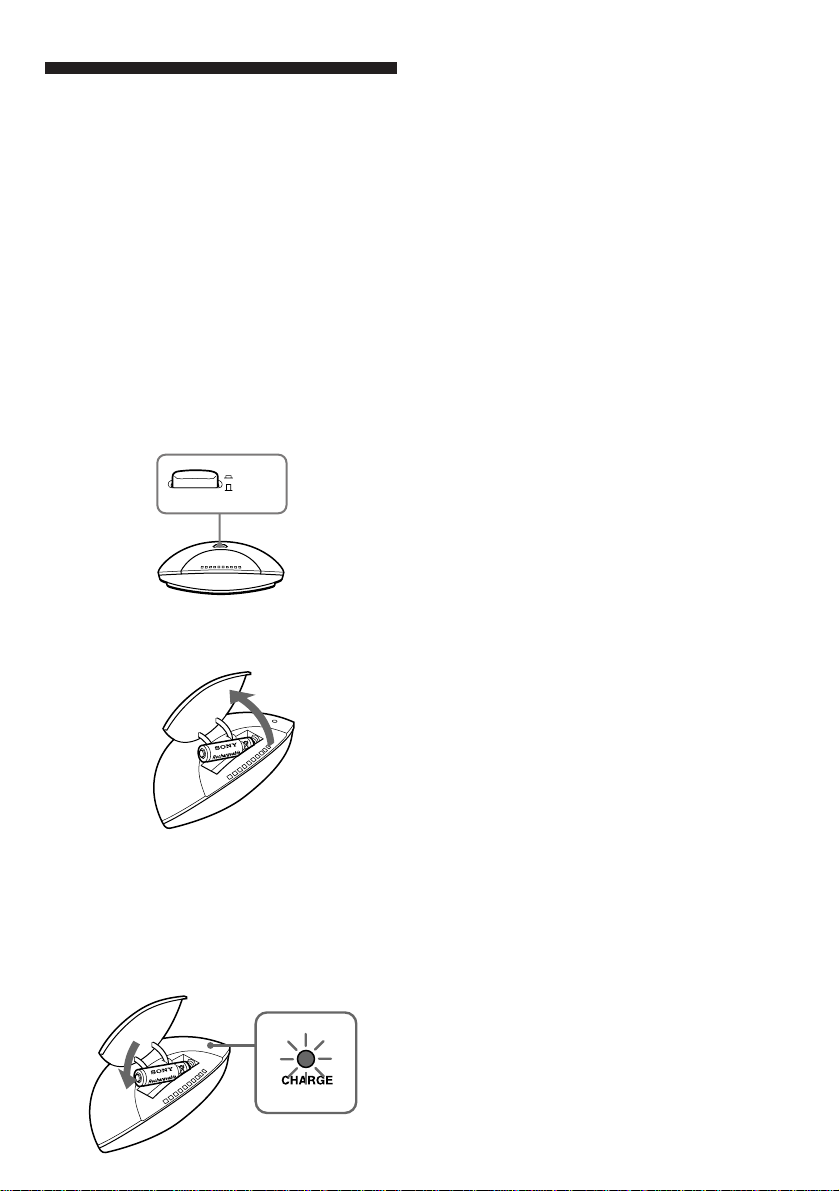
1 Check that the transmitter power is off.
ON
OFF/CHG
POWER
2 Open the battery charger lid on the
transmitter.
Charging time and battery life
About 24 hours is required to fully charge
the rechargeable battery. Once fully
charged, the battery provides about 30
hours of operation.
One hour charging of the rechargeable
battery enables about 1 hours and 30
minutes of operation.
Notes
•This system is designed to charge only the
supplied rechargeable battery for safety. This
system cannot charge other batteries even if
they have the same shape.
•Since little electric current is used for charging,
there is no need to worry about overcharging.
•As this system is not affected by the memory
effect of the Ni-Cd battery, recharging the
supplied battery before it is completely
discharged is not a problem.
•When the transmitter power is turned on, the
battery charger does not operate.
When to recharge the battery
Recharge the supplied battery when the
POWER indicator on headphones dims,
and hissing or noise occurs.
If the POWER indicator dims even after full
charging, the battery is completely dead.
To purchase a new rechargeable battery,
consult your nearest Sony dealer.
3 Insert the supplied rechargeable battery
NC-AA (HJ), making sure to match
battery polarity with the ] and }
marks on the charger case.
The CHARGE indicator then lights up
and charging starts.
6
Page 7
Setting up the
headphones
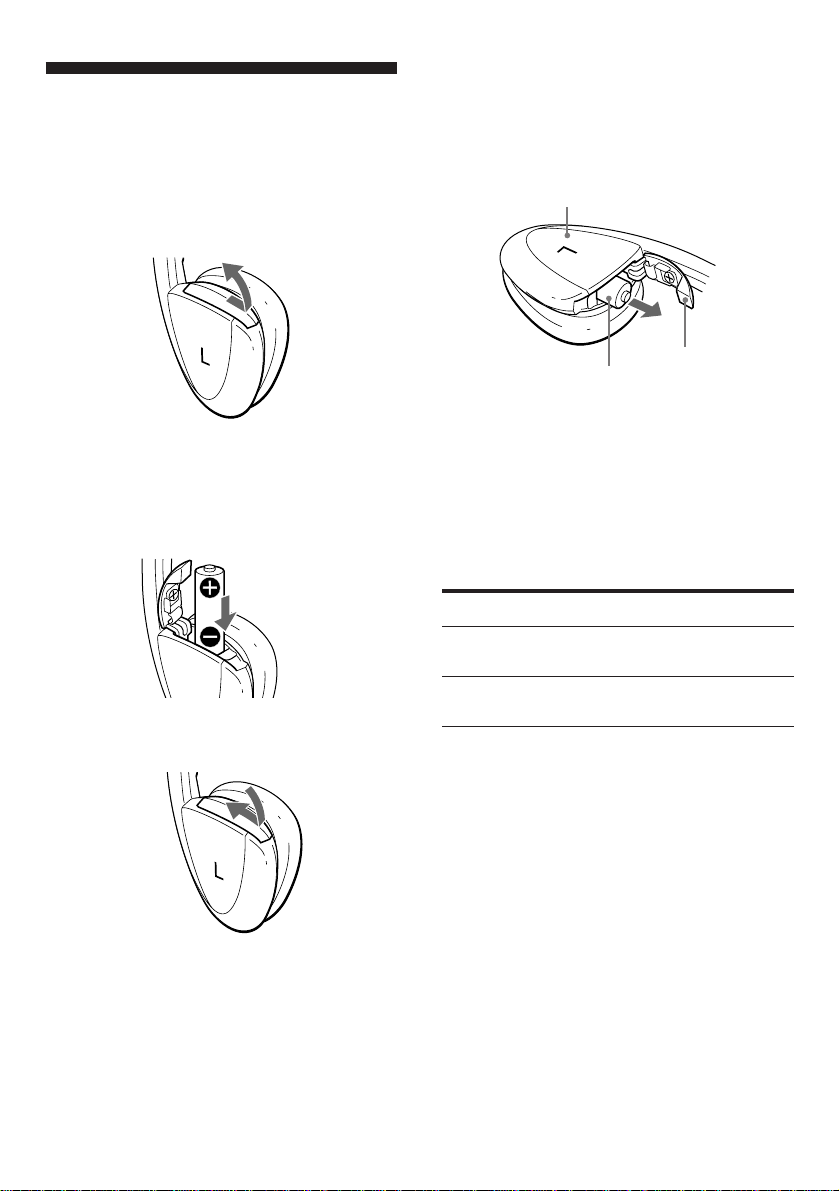
Removing the battery
Open the battery compartment lid, while
keeping the housing level and remove the
battery from the battery compartment as
illustrated below.
1 Open the battery compartment lid on
top of the left housing.
2 Insert the supplied rechargeable battery
NC-AA (HJ) by matching the ] on the
battery to the ] terminal on the lid.
Make sure that the battery is charged.
3 Close the battery compartment lid.
Housing (left)
Battery
Battery
compartment lid
Using a dry cell battery
Insert the dry cell battery into the
headphone battery compartment in the
same way as when inserting the
rechargeable battery.
Battery life
Battery
Sony alkaline battery
LR6/AM3 (N)
Sony battery
R6P/SUM-3 (NS)
When to replace the battery
Replace the battery with a new one when
the POWER indicator on the headphones
dims, and a hissing noise increases.
Approx. hours
100
50
7
Page 8
( Operating the system
Listening to a
program
1 Turn on the audio/video equipment
connected to the transmitter.
2 Turn on the transmitter. The infrared
emitters light up.
ON
OFF/CHG
POWER
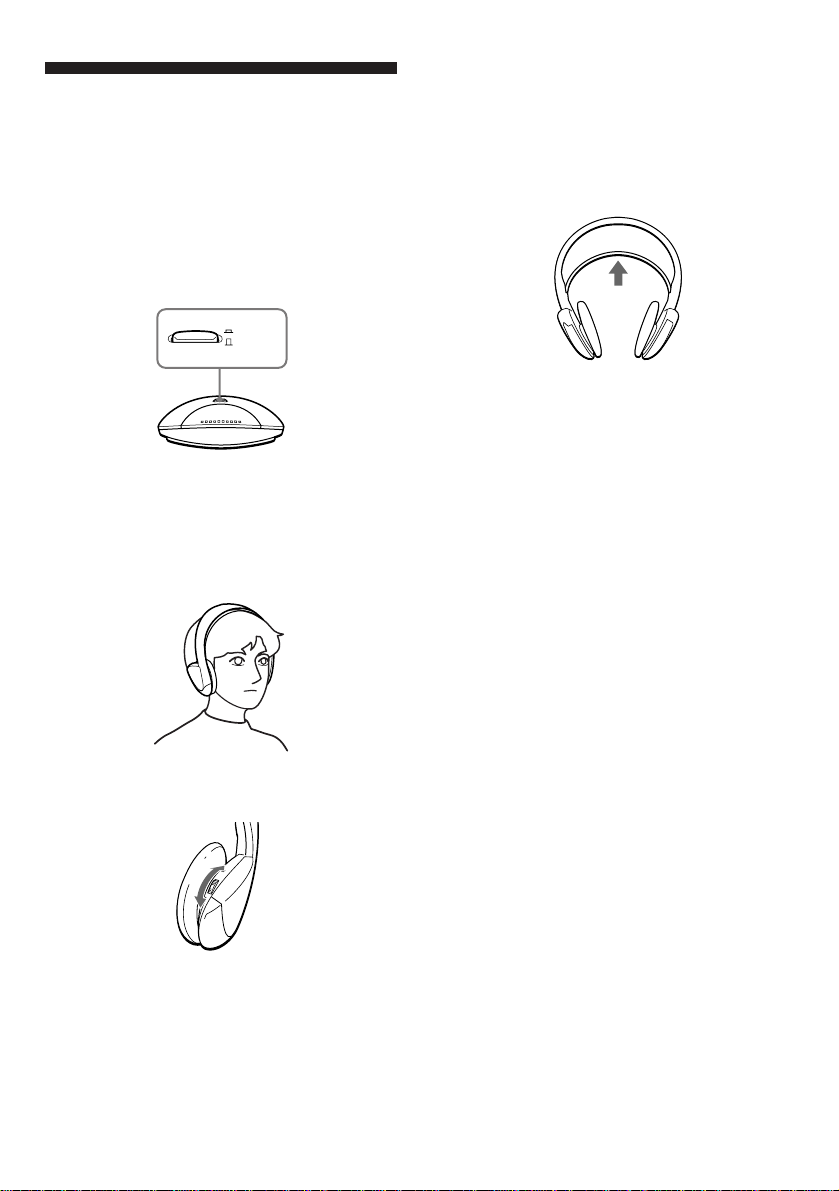
3 Put on the headphones and the power
turns on automatically. The power
indicator glows red when the power
turns on.
Auto power on/off function
When you remove the headphones, the
power turns off automatically. Do not pull
up the self adjusting band when not using
the headphones, otherwise the headphones
will be switched on.
Mute function
If a hissing noise is heard when the infrared
rays are obstructed, or the headphones are
used outside of the effective range (see
“About the infrared rays communication”),
the mute function will be activated and the
sound will not be heard from the
headphones. To restore the sound, move
nearer toward the transmitter or remove
the obstruction.
4 Adjust the volume.
8
After listening to a program
Take the headphones off before turning off
the transmitter. Otherwise you may hear
some noise when the infrared rays are
suddenly cut off.
Note
The infrared emitters light up when the
transmitter is turned on. The brightness of the
emitters may not be uniform, however, this is not
a malfunction.
Page 9
About the infrared
Replacing the Ear
rays communication
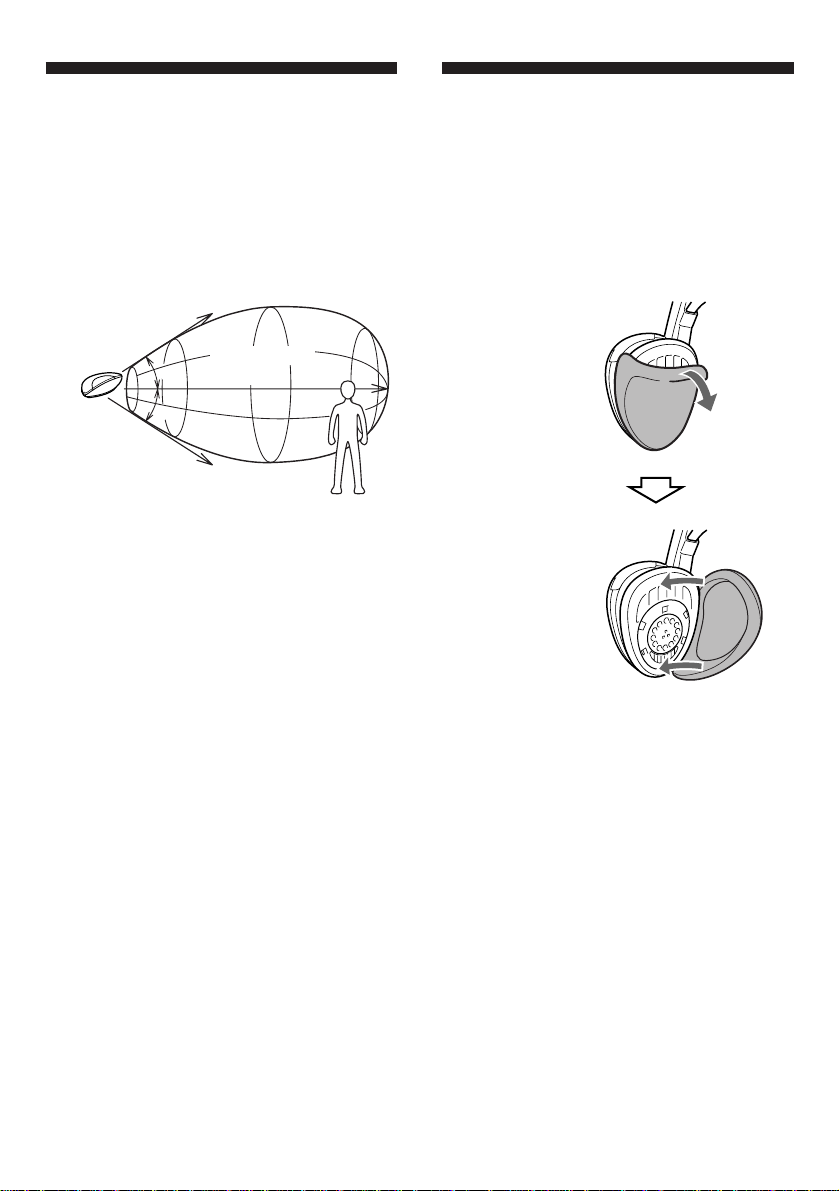
The illustration below shows the
approximate area covered by the infrared
rays emitted from the transmitter.
Transmitter
Approx. 3 m
1
(118
/8 in.)
45°
45°
Approx. 3 m
1
(118
/8 in.)
Notes
•If you use the headphones at too great a
distance from the transmitter, you may hear a
hissing noise and if there is an object between
the receiver and the transmitter, the sound may
be interrupted. These phenomena are inherent
to infrared ray communication and do not
mean that there is a problem with the unit
itself.
•The infrared rays will not penetrate walls or
opaque glass, therefore, be sure to stay within
sight of the transmitter.
•When you use the headphones inside the area
illustrated in the diagram, the transmitter can
be placed in the front, behind or by the side of
the listener.
•The sound you hear varies according to your
position and the transmitter position. Try
finding a position which yields the best sound.
Infrared ray
Approx. 7 m
(23 ft.)
Pads
When the ear pads become dirty or
damaged, consult your nearest Sony dealer
and replace them as illustrated below.
Remove the old
ear pad by
pulling it out.
Place the new ear
pad around the
driver unit as
illustrated.
9
Page 10

( Additional information
Precautions
• Before operating the system, check that
the operating voltage of your system is
identical with the voltage of your local
power supply.
• The CE mark on the unit is valid only for
products marketed in the European
Union.
• When the headphones is not to be used
for a long period of time, remove the
battery to avoid damage caused by
battery leakage and subsequent
corrosion.
• When the transmitter is not to be used for
a long period of time, disconnect the AC
power adaptor from the AC outlet
holding the plug. Do not pull on the
cord.
• Do not leave the cordless stereo
headphone system in a location subject to
direct sunlight, heat or moisture.
Notes on headphones
Preventing hearing damage
Avoid using headphones at high volume.
Hearing experts advise against continuous,
loud and extended play. If you experience
a ringing in your ears, reduce the volume or
discontinue use.
Caring for others
Keep the volume at a moderate level. This
will allow you to hear outside sounds and
to be considerate to the people around you.
If you have any questions or problems
concerning the system that are not covered
in this manual, please consult the nearest
Sony dealer.
Be sure to bring the headphones and the
transmitter to the Sony dealer when
requiring repair work.
10
Page 11

Troubleshooting
No sound/Muffled sound
/ Turn on the transmitter and the
headphones first, then put on the
headphones.
/ Check the connection of the audio/video
equipment or the AC power adaptor.
/ Check that the audio/video equipment is
turned on.
/ Turn up the volume on the connected
audio/video equipment, if the transmitter
is connected to the headphones jack.
(Around level 5 or 6 on the volume control
should be appropriate.)
/ The mute function is activated.
• Check if there is any object between the
transmitter and the headphones.
• Use the headphones near the transmitter.
• Change the position and angle of the
transmitter.
/ The headphones’ power indicator light is
weak or turned off.
• Charge the rechargeable battery because
the headphones’ battery is weak, or if the
power indicator is still off after charging
the battery, take the headphones to a
Sony dealer for a replacement of the
rechargeable battery.
• If you are using the conventional dry
battery, replace it with a new one.
/ When the LINE OUT jack of your audio/
video equipment is connected to PHONES
IN jack of the transmitter, the sound will be
low. Connect the LINE OUT jack to the
LINE IN jack as described in “Setting up
the transmitter”.
Distortion
/ If the transmitter is
connected to the headphones jack, turn
down the volume of the connected audio/
video equipment. (Around level 5 or 6 on
the volume control should be appropriate.)
/ The headphones’ power indicator light is
weak or turned off.
• Charge the rechargeable battery because
the headphones’ battery is weak, or if the
power indicator is still off after charging
the battery, take the headphones to a
Sony dealer for a replacement of the
rechargeable battery.
• If you are using the conventional dry
battery, replace it with a new one.
/ When the headphone’s jack output is
connected to the LINE IN jack of the
transmitter, increasing the volume of the
connected audio/video equipment may
cause distortion. Connect the headphones
jack output instead to PHONES IN jack as
described in “Setting up the transmitter”.
Loud background noise
/ Move closer to the transmitter. As you
move away from the transmitter, more
noise is likely to be heard. This is inherent
to infrared ray communication and does
not mean that there is a problem with the
unit itself.
/ Check that there is no object between the
transmitter and the headphones.
/ Check that the infrared sensors are not
covered with your hands or hair.
/ Change the position or angle of the
transmitter.
• The headphones are used by a window
where the sunlight is too strong.
n Draw the curtains/blind to shut out
the direct sunlight, or use the
headphones away form
the sunlight.
/ If the transmitter is connected to the
headphones jack, turn up the volume of the
connected audio/video equipment.
(Around level 5 or 6 on the volume control
should be appropriate.)
/ The headphones’ power indicator light is
weak or turned off.
• Charge the rechargeable battery because
the headphones’ battery is weak, or if the
power indicator is still off after charging
the battery, take the headphones to a
Sony dealer for a replacement of the
rechargeable battery.
• If you are using the conventional dry
battery, replace it with a new one.
11
Page 12

Specifications
General
Modulation system
Frequency modulation
Carrier frequency
Right 2.8 MHz
Left 2.3 MHz
Frequency response
18 – 22,000 Hz
Transmitter TMR-IF230R
Power source DC IN 9 V jack accepts power
Where purchased
U.S.A./Canada
U.K.
European countries
Other countries
Japan (Except for
Japanese domestic
model)
supplied from the AC power
adaptor for use on the following
voltages:
Operating
voltage
120 V AC, 60 Hz
230 – 240 V AC, 50 Hz
220 – 230 V AC, 50 Hz
220 – 230 V AC,
50/60 Hz or 120 V AC,
60 Hz
110 – 120 V/
220 – 240 V AC,
50/60 Hz
Supplied Ni-Cd rechargeable battery
Model name NC-AA (HJ)
Type Ni-Cd
Voltage 1.2 V
Capacity 600 mAh
Optional accessories
Plug adaptor
PC-236HG
(stereo mini jack ˜ monaural mini plug)
PC-234HG
(stereo mini jack ˜ stereo phone plug)
Connecting cords
RK-G136HG
(stereo mini plug ˜ stereo mini plug)
RK-G129HG
(stereo mini plug ˜ phono plug × 2)
Design and specifications are subject to change
without notice.
Audio input Phono jacks/stereo mini jack
Dimensions Approx. 152 × 40 × 72 mm
(6 × 1 1/2 × 2 3/4 in.) (w/h/d)
Mass Approx. 85 g (3.0 oz.)
Headphone MDR-IF230
Power source Supplied Ni-Cd rechargeable
Mass Approx. 180 g (6.4 oz.) including
battery NC-AA (HJ) or
DC 1.5 V, 1 × R6 (size AA)
battery
battery
12
Page 13

Page 14

AVERTISSEMENT
Pour les utilisateurs aux Etats-Unis
et au Canada
Pour éviter tout risque de feu ou de
décharge électrique, ne pas exposer
l’appareil à la pluie ni à l’humidité.
Pour éviter tout risque de décharge
électrique, ne pas ouvrir le boîtier.
Confier l’entretien exclusivement à
un personnel qualifié.
AVERTISSEMENT
Toute altération ou toute modification non
expressément approuvée dans ce manuel
pourrait rendre l’autorisation d’utiliser
l’appareil nulle et non avenue.
RECYCLAGE DES BATTERIES AU
NICKEL-CADMIUM
Les batteries au nickel-cadmium sont
recyclables. Vous pouvez contribuer à
préserver l’environnement en
rapportant les batteries usées dans un
point de ramassage, recyclage ou
retraitement.
Remarque: Dans certain pays, il est
interdit de jeter les batteries
au nickel-cadmium avec les
ordures ménagères ou dans
les poubelles de bureau.
Questionnez chez RBRC (Rechargeable
Battery Recycling Corporation) pour les
batteries usées.
14
Le numéro est: 1-800-822-8837 (EtatsUnis et Canada uniquement)
Avertissement: Ne pas utiliser des
batteries au nickel-cadmium qui sont
endommagées ou qui fuient.
Page 15

Bienvenue!
Table des matières
Nous vous félicitons pour l’achat de ce
système de casque stéréo sans cordon Sony
MDR-IF230RK. Avant la mise en service de
cet appareil, prière de lire attentivement ce
mode d’emploi et de le conserver pour
toute référence ultérieure.
Cet appareil offre, entre autres, les fonctions
suivantes :
• Système sans cordon vous permettant
d’écouter un programme sans être gêné
par un cordon.
• Portée horizontale étendue assurant un
son superbe pratiquement n’importe où
dans la pièce.
• Serre-tête auto-réglable s’adaptant
parfaitement à la forme de la tête.
• Le casque se met automatiquement sous
et hors tension chaque fois que vous le
mettez ou enlevez (Mise sous/hors
tension automatique).
• La commande VOL permet de régler le
volume des deux canaux.
• Vous pouvez utiliser la pile rechargeable
fournie ou une pile sèche R6 (format AA)
en vente dans le commerce comme source
d’alimentation du casque.
Préparatifs
Déballage.................................................. 16
Raccordement du transmetteur ............ 16
Recharge de la batterie
rechargeable ......................................... 18
Préparation du casque............................ 19
Utilisation du système
Ecoute d’un programme ......................... 20
A propos de la communication par rayons
infrarouges
Remplacement des oreillettes ................21
............................................21
Informations complémentaires
Précautions ...............................................22
Guide de dépannage ...............................23
Spécifications ............................................ 24
15
Page 16

( Préparetifs
Déballage
Vérifiez que tous les éléments suivants se
trouvent dans l’emballage:
• Transmetteur
TMR-IF230R
• Adaptateur secteur
• Cordon de liaison (fiches cinch ˜
minifiche stéréo)
• Batterie rechargeable Ni-Cd
NC-AA(HJ)
Raccordement du
transmetteur
1 Raccordez le transmetteur à l’appareil
audio/vidéo.
a Lorsque vous raccordez le système aux
prises LINE OUT ou REC OUT de votre
appareil audio/vidéo, branchez le
cordon sur la prise LINE IN du
transmetteur seulement.
Transmetteur
¥
RLINE IN
L
PHONES IN
DC IN 9V
vers la prise
LINE IN
Cordon de
liaison (fourni)
• Casque
MDR-IF230
• Adaptateur de fiche secteur
(modèle pour les touristes seulement)
16
Canal gauche
(blanc)
Chaîne stéréo, téléviseur,
magnétoscope, etc.
Remarque
Si votre appareil audio/vidéo a une miniprise
stéréo (LINE OUT), raccordez la miniprise stéréo
(LINE OUT) à LINE IN du transmetteur à l’aide
du cordon de liaison optionnel RK-G136HG. Si
la prise LINE OUT de votre appareil audio/
vidéo est raccordée à PHONES IN du
transmetteur, le son sera faible ou étouffé.
Pour relier la prise PHONES IN du transmetteur
avec le cordon fourni, utilisez la prise de casque
de l’appareil audio/vidéo.
Canal droit
(rouge)
vers les prises LINE
OUT ou REC OUT
Page 17

RLINE IN
DC IN 9V
L
¥
PHONES IN
b Quand vous raccordez le système à la
prise de casque de votre Discman,
branchez le cordon sur la prise
PHONES IN du transmetteur seulement.
Transmetteur
¥
RLINE IN
L
PHONES IN
vers les prises
DC IN 9V
PHONES IN
Canal droit
(rouge)
Canal gauche
(blanc)
Cordon de
liaison (fourni)
Adaptateur
de fiche
unimatch
(non fourni)
vers la prise de
casque (minijack
stéréo)
Discman,
vers la prise de
casque (prise
cinch stéréo)
WALKMAN*,
téléviseur,
magnétoscope,
etc.
2 Si votre adaptateur secteur possède un
sélecteur de tension, réglez-le sur la
tension du courant secteur local à l’aide
d’un tournevis avant de le brancher.
Adaptateur secteur (fourni)
3 Branchez le transmetteur sur une
source d’alimentation.
Transmetteur
vers une
prise
secteur
vers la prise
DC IN 9 V
Adaptateur secteur (fourni)
Remarques
•Ne raccordez pas les prises PHONES IN et
LINE IN en même temps, car les signaux audio
seraient mélangés.
•Utilisez uniquement l’adaptateur secteur
fourni, à l’exclusion de tout autre.
Polarité de la fiche
•Si la fiche de l’adaptateur secteur ne rentre pas
dans la prise, utilisez l’adaptateur de fiche
secteur fourni. (modèle pour les touristes
seulement)
•Quand vous raccordez directement le cordon
de liaison à une prise de casque, le signal audio
ne sort pas du canal droit. Dans ce cas, utilisez
l’adaptateur de fiche vendu séparément
PC-236HG.
* WALKMAN est une marque déposée de Sony
Corporation.
220V
VOLTAGE SELECT
240V
220V
120V
110V
17
Page 18

Recharge de la
4 Refermez le couvercle du chargeur de
batterie du transmetteur.
batterie
rechargeable
Le casque est alimenté soit par la batterie
rechargeable fournie NC-AA (HJ), soit par
une pile sèche (non fournie). Rechargez la
batterie fournie avant de l’utiliser.
NC-AA (HJ) ne doit être utilisée qu’avec les
systèmes de casque sans fil Sony. Ne pas
utiliser dans d’autres buts.
1 Vérifiez que le transmetteur est éteint.
ON
OFF/CHG
POWER
2 Ouvrez le couvercle du chargeur de la
batterie du transmetteur.
3 Insérez la pile rechargeable fournie
NC-AA (HJ), en veillant à faire
correspondre les pôles ] et } avec les
indications dans le boîtier.
Le témoin CHARGE s’allume et la
recharge commence.
Durée de recharge et cwtonomie de
la batterie
Il faut environ 24 heures pour que la
batterie soit complètement rechargée. Une
batterie complètement chargée alimentera
le casque pendant environ 30 heures.
Une recharge d’une heure de la batterie
rechargeable permettra d’utiliser le casque
pendant environ 1 heure et 30 minutes.
Remarques
•A des fins de sécurité, ce système est conçu
pour ne recharger que la batterie rechargeable
fournie. Il ne pourra pas recharger d’autres
batteries, même si elles ont la même forme.
•La recharge ne faisant intervenir qu’un faible
courant électrique, vous n’avez pas à vous
préoccuper des surcharges.
•Ce système ne subissant pas l’effet de mémoire
de la batterie Ni-Cd, vous pouvez recharger la
batterie fournie avant qu’elle ne soit
complètement déchargée.
•Lorsque le transmetteur est sous tension, la
fonction de recharge de la batterie ne s’active
pas.
Quand recharger la batterie
Rechargez la batterie fournie lorsque le
voyant POWER du casque devient sombre
et que le sifflement augmente.
Si le voyant POWER devient sombre alors
que la batterie est complètement rechargée,
c’est que la batterie est morte. Consultez
votre revendeur Sony pour vous procurer
une batterie neuve.
18
Page 19

Préparation du
casque
Retrait de la pile
Ouvrez le couvercle du logement de la pile,
tout en tenant droit le boîtier et enlevez la
pile du logement de la façon indiquée.
1 Ouvrez le couvercle du logement de la
pile sur le haut du boîtier gauche.
2 Insérez la pile rechargeable fournie
NC-AA (HJ) en dirigeant le pôle ] de
la pile du côté de l’indication ] dans le
logement.
Vérifiez que la batterie est chargée.
3 Refermez le couvercle du logement de
la batterie.
Boîtier (gauche)
Couvercle du
logement de la
Pile
pile
Utilisation d’une pile sèche
Insérez-la dans le logement de la batterie
du casque de la même manière que la
batterie rechargeable.
Autonomie de la pile
Pile
Pile alcaline Sony
LR6/AM3(N)
Pile Sony
R6P/SUM-3 (NS)
Quand remplacer la pile
Remplacez la pile par une neuve lorsque le
voyant POWER du casque devient sombre
et que le sifflement augmente.
Heures approx.
100
50
19
Page 20

( Utilisation du système
Ecoute d’un
programme
1 Mettez l’appareil audio/vidéo raccordé
au transmetteur sous tension.
2 Allumez le transmetteur.
L’émetteur infrarouge s’allume.
ON
OFF/CHG
POWER
3 Posez le casque sur la tête. Il se mettra
automatiquement sous tension. Le
témoin d’alimentation s’allume en
rouge quand le casque est sous tension.
Mise sous et hors tension
automatique
Quand vous enlevez le casque, il s’éteint
automatiquement. Ne tirez pas sur le
bandeau auto-ajustable quand vous
n’utilisez pas le casque, sinon le casque se
mettra sous tension.
Silencieux
Si un sifflement est audible quand les
rayons infrarouges sont entravés, ou si vous
utilisez le casque en dehors de la portée des
rayons (voir “A propos de la
communication par rayons infrarouges”), le
silencieux est automatiquement activé et le
son du casque est coupé. Pour rétablir le
son, approchez-vous du transmetteur ou
enlevez l’objet qui gêne la réception des
rayons.
4 Réglez le volume.
20
Après l’écoute d’un programme
Enlevez le casque avant d’éteindre le
transmetteur, sinon vous entendrez du
bruit quand les rayons infrarouges seront
subitement coupés.
Remarque
Les émetteurs infrarouges s’allument quand le
transmetteur est sous tension. La luminosité des
émetteurs varie, mais ceci est normal.
Page 21

A propos de la
Remplacement des
communication par
rayons infrarouges
L’illustration ci-dessous indique la portée
approximative des rayons infrarouges émis
par le transmetteur.
Transmetteur
Env. 3 m
1
(118
/8 po.)
Env. 3 m
(118 1/8 po.)
Remarques
•Si vous vous éloignez trop du transmetteur
quand vous écoutez par le casque, vous
entendrez un sifflement. En outre si un objet se
trouve entre le récepteur et le transmetteur, le
son risque d’être interrompu. Ces phénomènes
sont inhérents à la communication infrarouge et
ne signifient pas que le système fonctionne mal.
•Comme les rayons infrarouges ne traversent ni
les murs ni le verre opaque, le récepteur
infrarouge doit être placé “en vue” du
transmetteur.
•Quand vous utilisez le casque dans la zone
indiquée sur l’illustration, vous pouvez placer
le transmetteur devant ou derrière vous, ou à
votre droite ou gauche.
•Le son du casque peut varier en fonction de la
position et de l’environnement. Nous vous
conseillons d’utiliser le système à l’endroit où
vous obtenez le meilleur son.
Rayons infrarouges
45°
Env. 7 m (23 pi.)
45°
oreillettes
Quand les oreillettes sont sales ou abîmées,
contactez le revendeur Sony le plus proche
et remplacez les oreillettes comme illustré
ci-dessous.
Enlevez
l’oreillette usée
en tirant.
Posez la nouvelle
oreillette sur le
transducteur
comme indiqué
sur l’illustration.
21
Page 22

(
Informations complémentaires
Précautions
• Avant de mettre le système en marche,
vérifiez si la tension de fonctionnement
est identique à celle de l’alimentation
secteur locale.
• La marque CE sur l’appareil est valide
uniquement pour les produits
commercialisés dans l’Union européenne.
• Si vous ne comptez pas utiliser le casque
pendant longtemps, enlevez la pile pour
éviter tout dommage dû au suintement
de l’électrolyte et à la corrosion.
• Si vous ne comptez pas utiliser le
transmetteur pendant longtemps,
débranchez l’adaptateur secteur de la
prise murale, en tirant sur la fiche et non
pas sur le cordon.
• Ne laissez pas le système de casque
stéréo sans cordon dans un endroit situé
en plein soleil, à la chaleur ou à
l’humidité.
Remarques sur le casque
Prévention des dommages auditifs
Evitez d’écouter à un volume élevé. Il est
déconseillé par les médecins d’écouter
pendant longtemps et sans interruption à
un volume élevé. Si vous percevez un
bourdonnement dans les oreilles, réduisez
le volume ou cessez d’écouter.
Civisme
Ecoutez à un volume modéré. Vous
pourrez ainsi entendre les sons extérieurs,
et vous ne dérangerez pas les personnes qui
sont près de vous.
Pour toute question ou problème au sujet
de ce casque non mentionnés dans ce mode
d’emploi, veuillez contacter votre
revendeur Sony.
Pour toute réparation, pensez bien à porter
le casque et le transmetteur ensemble à
votre revendeur Sony.
22
Page 23

Guide de
dépannage
Pas de son/son voilé
/ Mettez d’abord le transmetteur et le casque
sous tension, puis posez le casque sur la
tête.
/ Vérifiez les branchements de l’appareil
audio/vidéo ou de l’adaptateur
d’alimentation secteur.
/ Assurez-vous que l’appareil audio/vidéo
est sous tension.
/ Augmentez le volume de l’appareil audio/
vidéo raccordé, si le transmetteur est
raccordé à la prise de casque.
(Un niveau de volume autour de 5 ou 6
devrait convenir.)
/ Le silencieux est en service.
• Assurez-vous qu’il n’y a pas d’obstacle
entre le transmetteur et le casque.
• Approchez-vous du transmetteur quand
vous utilisez le casque.
• Changez la position ou l’angle du
transmetteur.
/ Le témoin d’alimentation du casque luit
faiblement ou est éteint.
• Chargez la pile rechargeable car sa
capacité est faible, ou si le témoin
d’alimentation reste éteint après la
recharge de la pile, apportez le casque à
votre revendeur Sony pour faire
remplacer la pile rechargeable.
• Si vous utilisez une pile sèche ordinaire,
remplacez-la par une neuve.
/ Si la prise LINE OUT de votre appareil
audio/vidéo est reliée à la prise PHONES
IN du transmetteur, le son sera faible.
Reliez la prise LINE OUT à la prise LINE
IN comme décrit dans “Raccordement du
transmetteur”.
Distorsion
/ Si le transmetteur est raccordé à la prise de
casque, baissez le volume de l’appareil
audio/vidéo raccordé. (Un niveau de
volume autour de 5 ou 6 devrait convenir.)
/ Le témoin d’alimentation du casque luit
faiblement ou est éteint.
• Chargez la pile rechargeable car sa
capacité est faible, ou si le témoin
d’alimentation reste éteint après la
recharge de la pile, apportez le casque à
votre revendeur Sony pour faire
remplacer la pile rechargeable.
• Si vous utilisez une pile sèche ordinaire,
remplacez-la par une neuve.
/ Quand la prise de casque est reliée à LINE
IN du transmetteur, l’augmentation du
volume de l’appareil audio/vidéo raccordé
peut causer de la distorsion. Reliez la prise
de casque à PHONES IN, comme décrit
dans “Raccordement du transmetteur”.
Bruit de fond important
/ Rapprochez-vous du transmetteur. Plus
vous vous éloignez du transmetteur, plus le
bruit de fond augmente. Ceci est inhérent à
la communication par rayons infrarouges et
ne signifie pas que l’appareil ne fonctionne
pas.
/ Vérifiez qu’il n’y a pas d’obstacle entre le
transmetteur et le casque.
/ Vérifiez que les capteurs infrarouges ne
sont pas couverts par votre main ou une
mèche de cheveux.
/ Changez la position ou l’angle du
transmetteur.
• Vous écoutez au casque près d’une
fenêtre qui réfléchit trop les rayons du
soleil.
n Fermez les rideaux/stores de la
fenêtre ou éloignez-vous des rayons
du soleil.
/ Si le transmetteur est raccordé à la prise de
casque, augmentez le volume de l’appareil
audio/vidéo raccordé. (Un niveau de
volume autour de 5 ou 6 devrait convenir.)
/ Le témoin d’alimentation du casque luit
faiblement ou est éteint.
• Chargez la pile rechargeable car sa
capacité est faible, ou si le témoin
d’alimentation reste éteint après la
recharge de la pile, apportez le casque à
votre revendeur Sony pour faire
remplacer la pile rechargeable.
• Si vous utilisez une pile sèche ordinaire,
remplacez-la par une neuve.
23
Page 24

Spécifications
Généralités
Système de modulation
Modulation de fréquence
Fréquence porteuse
Droite : 2,8 MHz
Gauche : 2,3 MHz
Réponse en fréquence
18 – 22 000 Hz
Transmetteur TMR-IF230R
Source d’alimentation
La prise DC IN 9 V accepte
l’adaptateur secteur fourni pour
une utilisation sur les tensions
suivantes :
Pile rechargeable Ni-Cd fournie
Nom du modèle
NC-AA (HJ)
Type Ni-Cd
Tension 1,2 V
Capacité 600 mAh
Accessoires en option
Adaptateur de fiche
PC-236HG
(minijack stéréo ˜ minifiche mono)
PC-234HG
(minijack stéréo ˜ fiche cinch stéréo)
Cordons de liaison
RK-G136HG
(minifiche stéréo ˜ minifiche stéréo)
RK-G129HG
(minifiche stéréo ˜ 2 fiches cinch)
Lieu d’achat
Tension de
fonctionnement
Etats-Unis/Canada
R-U
Pays européens
Autres pays
Japon (sauf modèle
pour le marché
intérieur japonais)
Entrée audio Prises cinch/minijack stéréo
Dimensions Env. 152 × 40 × 72 mm
(6 × 1 1/2 × 2 3/4 po.) (l/h/p)
Poids Env. 85 g (3,0 on.)
CA 120 V, 60 Hz
CA 230 – 240 V, 50 Hz
CA 220 – 230 V, 50 Hz
CA 220 – 230 V, 50/60
Hz ou CA 120 V, 60 Hz
CA 110 – 120 V/
220 – 240 V, 50/60 Hz
Casque MDR-IF230
Source d’alimentation
Pile rechargeable au nickelcadmium NC-AA (HJ) fourni ou
1 pile R6 (format AA) CC 1,5 V
Poids Env. 180 g (6,4 on.) avec la pile
La conception et les spécifications sont
modifiables sans préavis.
24
Page 25

Page 26

Para clientes en EE UU. y Canadá
ADVERTENCIA
Para evitar incendios o el riesgo de
electrocución, no exponga la unidad
a la lluvia ni a la humedad.
Para evitar descargas eléctricas, no
abra la unidad. En caso de avería,
solicite los servicios de personal
cualificado.
ADVERTENCIA
Tenga en cuenta que cualquier cambio o
modificación no expresamente aprobado en
este manual puede anular su autoridad
para utilizar este equipo.
RECICLAJE DE PILAS DE NÍQUELCADMIO
Las pilas de níquel-cadmio son
reciclables. Puede ayudar a conservar
el medio ambiente devolviendo las
pilas que no desee al punto de recogida
o de reciclaje más próximo.
Nota: En ciertas zonas, el desecho de
pilas de níquel-cadmio en
contenedores domésticos o
industriales puede estar
prohibido.
La RBRC (Rechargeable Battery
Recycling Corporation) le aconsejará
sobre la recogida de pilas usadas en el
siguiente número de teléfono:
26
Llamada gratuita: 1-800-822-8837
(sólo Estados Unidos y Canadá)
Aviso: No maneje pilas de níquelcadmio dañadas o con fugas.
Page 27

¡Bienvenido!
Índice
Muchas gracias por la adquisición del
sistema de auriculares estéreo inalámbrico
MDR-IF230RK. Antes de utilizar el sistema,
lea detenidamente este manual y
consérvelo para futuras referencias.
Algunas de las características son:
• Sistema inalámbrico que le permitirá
escuchar un programa sin verse
restringido por un cable.
• Área amplia de escucha horizontal, que
ofrece un excelente sonido en
prácticamente cualquier lugar de la sala.
• Casco autoajustable para adaptarse
perfectamente a su cabeza.
• La alimentación de los auriculares se
conectará/desconectará automáticamente
cada vez que se los ponga/quite (Función
de conexión/desconexión de la
alimentación).
• Control VOL (volumen) que ajusta el
nivel de volumen de ambos canales.
• La fuente de alimentación de los
auriculares podrá seleccionarse entre la
batería suministrada o una pila R6
(tamaño AA) adquirida en un
establecimiento del ramo.
Preparativos
Desembalaje ............................................. 28
Preparación del transmisor ................... 28
Carga de la batería ................................... 30
Preparación de los auriculares...............31
Utilización del sistema
Escucha de un programa ........................32
Comunicación a través de rayos
infrarrojos ..............................................33
Reemplazo de las almohadillas
auriculares .............................................33
Información adicional
Precauciones .............................................34
Solución de problemas ............................35
Especificaciones.................. contraportada
27
Page 28

( Preparativos
Desembalaje
Compruebe si ha recibido lo siguiente:
• Transmisor
TMR-IF230R
• Adaptador de alimentación de CA
• Cable conector (clavijas fono ˜
miniclavija estéreo)
• Batería de níquel-cadmio
NC-AA (HJ)
Preparación del
transmisor
1 Conecte el transmisor al equipo de
audio/vídeo.
a Para realizar la conexión a las tomas
LINE OUT o REC OUT de su sistema de
audio/vídeo, conecte el cable a la toma
LINE IN del transmisor solamente.
Transmisor
¥
RLINE IN
L
PHONES IN
DC IN 9V
a la toma LINE IN
Cable conector
(suministrado)
• Auriculares
MDR-IF230
• Adaptador de enchufe de CA
(modelo para turistas solamente)
28
Canal izquierdo
(blanca)
Sistema estéreo, televisor,
videograbadora, etc.
Nota
Si su equipo de audio/vídeo posee minitoma
estéreo (LINE OUT), conéctela a LINE IN del
transmisor utilizando un cable conector
RK-G136HG opcional. La conexión de la toma
LINE OUT de su equipo de audio/vídeo a
PHONES IN del transmisor causaría sonido bajo
o apagado. Para realizar la conexión a PHONES
IN del transmisor utilizando el cable
suministrado, utilice una toma para auriculares
del equipo de audio/vídeo.
Canal derecho
(roja)
a las tomas LINE
OUT o REC OUT
Page 29

b Para realizar la conexión a la toma para
RLINE IN
DC IN 9V
L
¥
PHONES IN
auriculares de su Discman, conecte el
cable a la toma PHONES IN del
transmisor solamente.
Transmisor
3 Conecte el transmisor a una fuente de
alimentación.
Transmisor
a un
tomacorriente
de CA
¥
RLINE IN
L
PHONES IN
a las tomas
DC IN 9V
PHONES IN
Canal derecho
(roja)
Canal izquierdo
(blanca)
Cable conector
(suministrado)
Adaptador
universal de
clavija (no
suministrado)
a la toma para
auriculares
(minitoma
estéreo)
a la toma para
auriculares
(toma telefónica
estéreo)
Discman, WALKMAN*,
televisor,
videograbadora, etc.
2 Si el adaptador de alimentación de CA
dispone de selector de tensión, antes de
conectarlo a un tomacorriente de CA,
ajústelo a la tensión de su zona con un
destornillador.
a la toma
DC IN 9 V
Adaptador de alimentación
de CA (suministrado)
Notas
•No realice la conexión a las tomas PHONES IN
y LINE IN al mismo tiempo. Si lo hiciese, las
señales de audio podrían mezclarse.
•Utilice solamente el adaptador de alimentación
de CA suministrado. No utilice ningún otro
tipo de adaptador de alimentación de CA.
Polaridad de la clavija
•Si el enchufe del adaptador de alimentación de
CA no encaja en el tomacorriente de CA, utilice
el adaptador de enchufe de CA suministrado.
(modelo para turistas solamente)
•Cuando haya conectado el cable conector
directamente a una toma para auriculares, la
señal de audio no saldrá a través del canal
derecho. En tal caso, utilice un adaptador de
clavija PC-236HG vendido aparte.
* WALKMAN es marca registrada de Sony
Corporation.
Adaptador de alimentación de CA
(suministrado)
220V
VOLTAGE SELECT
240V
220V
120V
110V
29
Page 30

Carga de la batería
Los auriculares pueden alimentarse con la
batería suministrada NC-AA (HJ) o con una
pila (no suministrada). Antes de utilizar la
batería suministrada, cárguela.
NC-AA (HJ) es para utilizarse solamente
con sistemas auriculares inalámbricos Sony.
No intente utilizarla nunca para ningún
otro fin.
1 Cerciórese de que la alimentación del
transmisir esté desconectada.
ON
OFF/CHG
POWER
2 Abra la tapa del compartimiento de la
batería/pila del caragador del
transmisor.
4 Cierre la tapa del compartimiento de la
batería/pila del cargador del
transmisor.
Tiempo de carga y duración de la
batería
La carga completa de la batería durará unas
24 horas. La batería completamente
cargada podrá alimentar los auriculares
durante unos 30 horas.
Una hora de carga de la batería permitirá
hacer que los auriculares funcionen durante
aproximadamente 1 hora y 30 minutos.
minutos.
Notas
•Por motivos de seguridad, este sistema ha sido
diseñado para cargar solamente la batería
suministrada. Este sistema no podrá cargar
otras baterías, incluso aunque posean la misma
forma.
•Como para la carga se utiliza una corriente
pequeña, no hay necesidad de preocuparse por
la sobrecarga.
•Como este sistema no se ve afectado por el
efecto de memoria de la batería de níquelcadmio, la recarga de la batería suministrada
antes de que se haya descargado
completamente no supone ningún problema.
•Cuando conecte la alimentación del transmisor,
el cargador de la batería no funcionará.
3 Inserte la batería NC-AA (HJ)
suministrada, haciendo coincidir su
polaridad con las marcas ] y } de la
caja del cargador.
El indicador CHARGE se encenderá y
se inciará la carga.
30
Cuándo recargar la batería
Recargue la batería suministrada cuando el
indicador POWER de los auriculares se
ilumine débilmente, y aumente el ruido de
siseo.
Si el indicador POWER se ilumina
débilmente con una batería completamente
cargada, habrá finalizado su duración útil.
para adquirir una nueva batería, consulte a
su proveedor Sony.
Page 31

Preparación de los
auriculares
Extracción de la pila
Abra la tapa del compartimiento de la
batería/pila manteniendo la caja nivelada y
extraiga la batería del compartimiento
como se muestra en la ilustración.
1 Abras la tapa del compartimiento de la
pila de la parte superior de la caja.
2 Inserte la batería NC-AA (HJ)
suministrada haciendo coincidir ] de
la batería con el terminal ] de la tapa.
Cerciórese de que la batería esté
cargada.
3 Cierre la tapa del compartimiento de la
batería/pila.
Caja (izquierda)
Tapa del
compartimiento
Pila
de la pila
Utilización de una pila
Inserte la pila en el compartimiento de la
batería/pila de los auriculares de la misma
forma que la batería.
Duración de la pila
Pila
Pila alcalina LR6/AM3 (N)
Sony
Pila R6P/SUM-3 (NS)
Sony
Cuándo reemplazar la pila
Reemplace la pila por otra nueva cuando el
indicador POWER de los auriculares se
encienda débilmente y el ruido de siseo
aumente.
Horas
aproximadas
100
50
31
Page 32

( Utilización del sistema
Escucha de un
programa
1 Conecte la alimentación del equipo de
audio/vídeo conectado al transmisor.
2 Conecte la alimentación del transmisor.
Los emisores de rayos infrarrojos se
encenderán.
ON
OFF/CHG
POWER
3 Colóquese los auriculares, y la
alimentación se conectará
automáticamente. Cuando se conecte
la alimentación, el indicador de
alimentación se encenderá en rojo.
Función de conexión/desconexión
automática de la alimentación
Cuando se quite los auriculares, la
alimentación se desconectará
automáticamente. No tire de la banda
autoajustable hacia arriba cuando no utilice
los auriculares, porque se conectaría su
alimentación.
Función de silenciamiento
Si oye un ruido de siseo cuando se
obstruyan los rayos infrarrojos, o cuando
utilice los auriculares fuera del alcance
efectivo (consulte “Comunicación a través
de rayos infrarrojos”), se activará la función
de silenciamiento y no se oirá sonido a
través de los auriculares. Para restablecer el
sonido, acérquese al transmisor o elimine la
obstrucción.
4 Ajuste el volumen.
32
Después de haber escuchado un
programa
Desconecte la alimentación de los
auriculares antes de desconectar la del
transmisor. De lo contrario podría pír
cierto ruido cuando se cortasen
repentinamente los rayos infrarrojos.
Nota
Cuando conecte la alimentación del transmisor,
se encenderán los emisores de rayos infrarrojos.
El brillo de los emisores puede no ser uniforme,
pero esto no significa mal funcionamiento.
Page 33

Comunicación a
Reemplazo de las
través de rayos
infrarrojos
En la ilustración siguiente se muestra el
área aproximada cubierta por los rayos
infrarrojos emitidos por el transmisor.
Rayos infrarrojos
Transmisor
Aprox. 3 m
45°
Aprox. 7 m
45°
Aprox. 3 m
Notas
•Si utiliza los auriculares demasiado lejos del
transmisor, es posible que oiga ruido de siseo, y
si existe algún objeto entre el receptor y el
transmisor, el sonido puede interrumpirse.
Estos fenómenos son inherentes a la
comunicación por rayos infrarrojos y no
significan problema alguno de la propia
unidad.
•Los rayos infrarrojos no atravesarán paredes ni
vidrios opacos. Por lo tanto, cerciórese de
permanecer en la línea de visión del transmisor.
•Cuando utilice los auriculares dentro del área
mostrada en el diagrama, el transmisor podrá
colocarse delante, detrás, o al lado del oyente.
•El sonido de los auriculares puede variar
dependiendo de la posición y del medio
ambiente. Le sugerimos que utilice este sistema
en la posición que ofrezca el mejor sonido
posible.
almohadillas
auriculares
Cuando las almohadillas auricualres se
ensucien o dañen, póngase en contacto con
su proveedor Sony y reemplácelas como se
muestra en la ilustración siguiente.
Extraiga la
almohadilla
auricular firando
de ella.
Coloque la nueva
almohadilla
auricular alrededor
de la unidad
auricular como se
muestra en la
ilustración.
33
Page 34

( Información adicional
Precauciones
• Antes de utilizar el sistema, compruebe si
la tensión de alimentación del mismo es
idéntica a la de la red local.
• La marca CE del sistema solamente será
válida para productos vendidos en la
Unión Europea.
• Cuando no vaya a utilizar los auriculares
durante mucho tiempo, extráigales la pila
para evitar el daño que podría causar el
electrólito de la misma en caso de
fugarse.
• Cuando no vaya a utilizar el transmisor
durante mucho tiempo, desconecte el
adaptador de alimentación de CA del
tomacorriente de CA tirando del enchufe.
No tire nunca del propio cable.
• No deje el sistema de auriculares estéreo
inalámbrico en un lugar sometido a la luz
solar directa, al calor, ni a la humedad.
Notas sobre los auriculares
Cuidado de sus oídos
Evite utilizar los auriculares a gran
volumen. Los expertos en oídos
desaconsejan utilizar los auriculares para
escuchar continuamente a gran volumen.
Si experimenta un silbido en sus oídos,
reduzca el volumen o deje de utilizar los
auriculares.
Respeto a los demás
Mantenga el volumen a un nivel moderado.
Esto le permitirá escuchar los sonidos del
exterior y no molestar a quienes se
encuentren a su alrededor.
Si tiene alguna pregunta o problema en
relación con este sistema que el manual no
pueda resolver, póngase en contacto con su
proveedor Sony.
Cuando los auriculares o el transmisor
necesiten reparación, lleve ambos a su
proveedor Sony.
34
Page 35

Solución de
problemas
Carencia de sonido/sonido
amortiguado
/ Conecte en primer lugar la alimentación del
transmisor y de los auriculares, y después
colóquese los auriculares.
/ Compruebe la conexión del equipo de
audio/vídeo o del adaptador de
alimentación de CA.
/ Compruebe si la alimentación del equipo de
audio/vídeo está conectada.
/ Si el transmisor está conectado a la toma
para auriculares, aumente el volumen del
equipo de audio/vídeo conectado. (El nivel
apropiado será alrededor de 5 o 6 del
control de volumen.)
/ La función de silenciamiento está activada.
• Compruebe si hay algún objeto entre el
transmisor y los auriculares.
• Utilice los auriculares cerca del
transmisor.
• Cambie la posición y el ángulo del
transmisor.
/ El indicador de alimentación de los
auriculares se ilumina débilmente o se
apaga.
• Cargue la batería, porque está débil, o si
el indicador de alimentación permanece
apagado después de haberla cargado,
lleve los auriculares a su proveedor Sony
para que se la reemplace.
• Si está utilizando una pila, reemplácela
por otra nueva.
/ Cuando haya conectado la toma LINE OUT
de su equipo de audio/vídeo a la toma
PHONES IN del transmisor, el sonido será
bajo. Conecte la toma LINE OUT a la toma
LINE IN como se describe en "Instalación
del transmisor".
Distorsión
/ Si el transmisor está conectado a una toma
para auriculares, reduzca el volumen del
equipo de audio/vídeo conectado. (El nivel
apropiado será alrededor de 5 o 6 del
control de volumen.)
/ El indicador de alimentación de los
auriculares se ilumina débilmente o se
apaga.
• Cargue la batería, porque está débil, o si
el indicador de alimentación permanece
apagado después de haberla cargado,
lleve los auriculares a su proveedor Sony
para que se la reemplace.
• Si está utilizando una pila, reemplácela
por otra nueva.
/ Cuando la toma de salida para auriculares
esté conectada a la toma LINE IN del
transmisor, si aumenta el volumen del
equipo de audio/vídeo conectado, es
posible que se produzca distorsión.
Conecte la toma de salida para auriculares
en vez de la toma PHONES IN como se
describe em "Instalación del transmisor".
Ruido fuerte de fondo
/ Acérquese al transmisor. A medida que se
aleje del transmisor, es posible que se oiga
más ruido. Esto es inherente a la
comunicación por rayos infrarrojos, y no
significa un problema de la propia unidad.
/ Compruebe si hay algún objeto entre el
transmisor y los auriculares.
/ Compruebe si los sensores de rayos
infrarrojos están cubiertos con sus manos o
con su pelo.
/ Cambie la posición o el ángulo del
transmisor.
• Está utilizando los auriculares cerca de
una ventana en la que la luz del sol es
demasiado intensa.
n Corra las cortinas o cierre la persiana
para cortar la luz solar, o utilice los
auriculares alejados de la luz solar.
/ Si el transmisor está conectado a la toma
para auriculares, aumente el volumen del
equipo de audio/vídeo. (El nivel
apropiado será alrededor de 5 o 6 del
control de volumen.)
/ El indicador de alimentación de los
auriculares se ilumina débilmente o se
apaga.
• Cargue la batería, porque está débil, o si
el indicador de alimentación permanece
apagado después de haberla cargado,
lleve los auriculares a su proveedor Sony
para que se la reemplace.
• Si está utilizando una pila, reemplácela
por otra nueva.
35
Page 36

Especificaciones
Generales
Sistema de modulación
En frecuencia
Frecuencia portadora
Canal derecho: 2,8 MHz
Canal izquierdo: 2,3 MHz
Respuesta en frecuencia
18 – 22.000 Hz
Transmisor TMR-IF230R
Fuente de alimentación
La toma DC IN 9 V acepta la
alimentación suministrada por el
adaptador de alimentación de
CA para utilizarse con las
tensiones siguientes:
Batería de níquel-cadmio
suministrada
Nombre del modelo
NC-AA (HJ)
Tipo Níquel-cadmio
Tensión 1,2 V
Capacidad 600 mAh
Accesorios opcionales
Adaptador de clavija
PC-236HG
(minitoma estéreo ˜ miniclavija monoaural)
PC-234HG
(minitoma estéreo ˜ clavija telefónica estéreo)
Cables conectores
RK-G136HG
(miniclavija estéreo ˜ miniclavija estéreo)
RK-G129HG
(miniclavija estéreo ˜ clavija fono × 2)
Lugar de
adquisición
EE.UU./Canadá
Reino Unido
Europa
Otros países
Japón (excepto el modelo
para el territorio de
Japón)
Entrada de audio
Tomas fono/minitoma estéreo
Dimensiones Aprox. 152 × 40 × 72 mm
(an/al/prf)
Masa Aprox. 85 g
Tensión de
alimentación
120 V CA, 60 Hz
230 – 240 V CA, 50 Hz
220 – 230V CA, 50 Hz
220 – 230 V CA,
50/60 Hz o 120 V CA,
60 Hz
110 – 120 V/
220 – 240 V CA,
50/60 Hz
Auriculares MDR-IF230
Fuente de alimentación
Masa Aprox. 180 g, incluyendo la pila
Batería de níquel-cadmio NC-AA
(HJ) suministrada, o 1,5 V CC,
1 pila R6 (tamaño AA)
El diseño y las especificaciones están sujetos a
cambio sin previo aviso.
Sony Corporation Printed in China
2
 Loading...