

Page 1
Help Guide
Search
MDR-HW700DS
Getting Started
Connection
Operation
Others
Troubleshooting
Specifications
Important information
© 2014 Sony Corporation
Use this manual if you encounter any problems, or have any questions.
Contents list
Page 2

Table of Contents
TOC-1
Help Guide i.......................................................................................................................................
Getting Started 1...............................................................................................................................
Before first use 11.......................................................................................................................
Features 12.................................................................................................................................
Location and function of parts 1..................................................................................................
DP-HW700 Processor 14......................................................................................................
MDR-HW700 Headphones 16...............................................................................................
Power 1.......................................................................................................................................
Charging the headphones 17................................................................................................
Checking the remaining battery power of the headphones 19..............................................
Turning the system on or off 1.....................................................................................................
Turning on the processor 20..................................................................................................
Setting the processor to standby mode 21............................................................................
Turning off the processor 22..................................................................................................
Turning on the headphones 23..............................................................................................
Turning off the headphones 24..............................................................................................
Connection 2.....................................................................................................................................
Connecting digital devices with HDMI jacks 2.............................................................................
Notes on HDMI connections 25.............................................................................................
What is ARC? 26...................................................................................................................
Connection example 1: Connecting the processor with devices without
using an AV amplifier (ARC equipped TV) 27.......................................................................
Connection example 2: Connecting the processor with devices without
using an AV amplifier (TV not equippedwith ARC) 29...........................................................
Connection example 3: Connecting the processor with devices via an AV
amplifier (ARC equipped TV) 31............................................................................................
Connection example 4: Connecting the processor with devices via an AV
amplifier (TV not equipped with ARC) 33..............................................................................
Connection example 5: Connecting playback devices to the processor via
an AV amplifier 35.................................................................................................................
Connecting other devices 38.................................................................................................
Connecting digital devices without HDMI jacks 2........................................................................
Connecting devices without HDMI jacks 39...........................................................................
When the volume of analog devices is too low 41.................................................................
Notes on the digital and analog audio connections 2..................................................................
When you connect a device to the TV (OPT) jacks 42..........................................................
Connecting a device with a stereo mini jack to the LINEIN jacks 43.....................................
Operation 3........................................................................................................................................
Page 3

Enjoying audio and video entertainment 3..................................................................................
TOC-2
Watching a TV 44..................................................................................................................
Enjoying audio and video entertainment of other devices than the TV 46.............................
Using HDMI devices efficiently 48.........................................................................................
The audio output settings of the devices connected 50.........................................................
When you finished using the system 51................................................................................
Selecting the audio effects 3.......................................................................................................
Setting the sound field mode (EFFECT) 53...........................................................................
Setting the matrix decoder (MATRIX) 54...............................................................................
Selecting a dynamic range (COMPRESSION) 55.................................................................
Selecting the frequency band 57.................................................................................................
Using the menu 3........................................................................................................................
What you can do with the menu 58.......................................................................................
Using the menu on the processor 60.....................................................................................
Using the menu on the headphones 62.................................................................................
Displaying the current status of the system 64......................................................................
Adjusting the volume level of the center channel 66.............................................................
Adjusting the volume level of the subwoofer channel 67.......................................................
Synchronizing the sound and the image (A/V Sync) 68........................................................
Selecting a channel when receiving a multiplexbroadcast signal 69.....................................
Selecting simultaneous audio output to a TV speaker andthe headphones 70.....................
Selecting the Control for HDMI function 71...........................................................................
Selecting the HDMI Pass Through function 72......................................................................
Selecting the front display mode of the processor 73............................................................
Resetting the settings 74.......................................................................................................
Others 4.............................................................................................................................................
Warning beeps and operation beeps of the headphones 75.......................................................
Audio format supported by the processor 76...............................................................................
Precautions 4...............................................................................................................................
Handling and installing the system 78...................................................................................
Headphones and earpads 79................................................................................................
RF signal transmission area 80.............................................................................................
The characteristics of sound of the system 81......................................................................
On cleaning 82.......................................................................................................................
Troubleshooting 5..............................................................................................................................
What can I do to solve a problem? 83.........................................................................................
Possible causes of symptoms 5..................................................................................................
Table of contents for symptoms and possible causes 84......................................................
No sound 85..........................................................................................................................
No sound, no video 86...........................................................................................................
Page 4

No TV sound can be heard on the system 87.......................................................................
TOC-3
No sound is output from the TV or the AV amplifier connected to the
HDMI OUT jack of the processor 88......................................................................................
No sound from the device connected to the AV amplifieris heard on the
system 89..............................................................................................................................
The CONTROL FOR HDMI switch is set to “MODE1,” but the headphone
volume cannot be adjusted from the TV 90...........................................................................
The TV is turned on, but the processor does not turn on automatically. 91..........................
Wireless LAN of the TV is difficult to connect 92...................................................................
Distorted or intermittent sound (sometimes with noise) 93....................................................
Low sound 94........................................................................................................................
The surround sound effect is not obtained. 95......................................................................
The MATRIX indicator does not turn on, or flashes 96..........................................................
The audio is not played back in the desired audio format 97................................................
The battery cannot be charged; the charge indicator flashes. 98..........................................
No signal is output from the TV (OPT) OUT (THROUGH) jack of the
processor 99..........................................................................................................................
Beeps are heard from the headphones 100..........................................................................
No sound is heard from either the TV or the headphones. 101.............................................
The menu screen does not appear on the TV 102................................................................
No sound (When devices are connected to the HDMI jacks) 103.........................................
The power off interlock function does not work 104..............................................................
The Control for HDMI function (“BRAVIA” Sync) does notwork properly 105.......................
The processor turns off when you turn off the TV. 106..........................................................
Specifications 6.................................................................................................................................
Digital surround processor (DP-HW700) 107..............................................................................
Wireless stereo headphones (MDR-HW700) 110.......................................................................
Contents 111...............................................................................................................................
Recommended accessory (sold separately) 112........................................................................
Important information 7......................................................................................................................
Copyrights 113............................................................................................................................
Contents list 8....................................................................................................................................
Page 5
Help Guide
1
Search
MDR-HW700DS Top >
Getting Started
Getting Started
Connection
Operation
Others
Troubleshooting
Specifications
Important information
Contents list
Before First Use
Before first use
Features
Features
Location and function of parts
DP-HW700 Processor
MDR-HW700 Headphones
Power
Charging the headphones
Checking the remaining battery power of the headphones
Turning the system on or off
Turning on the processor
Setting the processor to standby mode
Turning off the processor
Turning on the headphones
Turning off the headphones
© 2014 Sony Corporation
Page 6
Help Guide
2
Search
MDR-HW700DS Top >
Connection
Getting Started
Connection
Operation
Others
Troubleshooting
Specifications
Important information
Contents list
Connecting digital devices with HDMI jacks
Notes on HDMI connections
What is ARC?
Connection example 1: Connecting the processor with devices without
using an AV amplifier (ARC equipped TV)
Connection example 2: Connecting the processor with devices without
using an AV amplifier (TV not equipped with ARC)
Connection example 3: Connecting the processor with devices via an
AV amplifier (ARC equipped TV)
Connection example 4: Connecting the processor with devices via an
AV amplifier (TV not equipped with ARC)
Connection example 5: Connecting playback devices to the processor
via an AV amplifier
Connecting other devices
Connecting digital devices without HDMI jacks
Connecting devices without HDMI jacks
When the volume of analog devices is too low
Notes on the digital and analog audio connections
© 2014 Sony Corporation
When you connect a device to the TV (OPT) jacks (optical digital
audio input/output jacks)
Connecting a device with a stereo mini jack to the LINE IN jacks
Page 7
Help Guide
3
Search
MDR-HW700DS Top >
Operation
Getting Started
Connection
Operation
Others
Troubleshooting
Specifications
Important information
Contents list
Enjoying audio and video entertainment
Watching a TV
Enjoying audio and video entertainment of other devices than the TV
Using HDMI devices efficiently
The audio output settings of the devices connected
When you finished using the system
Selecting the audio effects
Setting the sound field mode (EFFECT)
Setting the matrix decoder (MATRIX)
Selecting a dynamic range (COMPRESSION)
Selecting the frequency band
Selecting the frequency band
Using the menu
What you can do with the menu
Using the menu on the processor
Using the menu on the headphones
Displaying the current status of the system (Status screen)
Adjusting the volume level of the center channel
Adjusting the volume level of the subwoofer channel
Synchronizing the sound and the image (A/V Sync)
Selecting a channel when receiving a multiplex broadcast signal
Selecting simultaneous audio output to a TV speaker and the
headphones
Selecting the Control for HDMI function
Selecting the HDMI Pass Through function
Selecting the front display mode of the processor
Resetting the settings
© 2014 Sony Corporation
Page 8
Help Guide
4
Search
MDR-HW700DS Top >
Others
Getting Started
Connection
Operation
Others
Troubleshooting
Specifications
Important information
© 2014 Sony Corporation
Warning beeps and operation beeps
Warning beeps and operation beeps of the headphones
Audio format supported
Audio format supported by the processor
Precautions
Handling and installing the system
Headphones and earpads
RF signal transmission area
The characteristics of sound of the system
On cleaning
Contents list
Page 9
Help Guide
5
Search
MDR-HW700DS Top >
Troubleshooting
Getting Started
Connection
Operation
Others
Troubleshooting
Specifications
Important information
Contents list
To deal with a trouble
What can I do to solve a problem?
Possible causes of symptoms
Table of contents for symptoms and possible causes
No sound
No sound, no video
No TV sound can be heard on the system.
No sound is output from the TV or the AV amplifier connected to the
HDMI OUT jack of the processor.
No sound from the device connected to the AV amplifier is heard on
the system.
The CONTROL FOR HDMI switch is set to “MODE1,” but the
headphone volume cannot be adjusted from the TV.
The TV is turned on, but the processor does not turn on automatically.
Wireless LAN of the TV is difficult to connect.
Distorted or intermittent sound (sometimes with noise)
Low sound
The surround sound effect is not obtained.
The MATRIX indicator does not turn on, or flashes.
The audio is not played back in the desired audio format.
The battery cannot be charged; the charge indicator flashes.
No signal is output from the TV (OPT) OUT (THROUGH) jack of the
processor.
Beeps are heard from the headphones.
No sound is heard from either the TV or the headphones.
The menu screen does not appear on the TV.
No sound (When devices are connected to the HDMI jacks)
The power off interlock function does not work.
The Control for HDMI function (“BRAVIA” Sync) does not work
properly.
The processor turns off when you turn off the TV.
© 2014 Sony Corporation
Page 10
Help Guide
6
Search
MDR-HW700DS Top >
Specifications
Getting Started
Connection
Operation
Others
Troubleshooting
Specifications
Important information
© 2014 Sony Corporation
Specifications
Digital surround processor (DP-HW700)
Wireless stereo headphones (MDR-HW700)
Contents
Recommended accessory (sold separately)
Contents list
Page 11
Help Guide
7
Search
MDR-HW700DS Top >
Important information
Getting Started
Connection
Operation
Others
Troubleshooting
Specifications
Important information
© 2014 Sony Corporation
Important information
Copyrights
Contents list
Page 12
Help Guide
8
Search
MDR-HW700DS Top >
Contents list
Getting Started
Connection
Operation
Others
Troubleshooting
Specifications
Important information
Contents list
Getting Started
Before First Use
Before first use
Features
Features
Location and function of parts
DP-HW700 Processor
MDR-HW700 Headphones
Power
Charging the headphones
Checking the remaining battery power of the headphones
Turning the system on or off
Turning on the processor
Setting the processor to standby mode
Turning off the processor
Turning on the headphones
Turning off the headphones
Connection
Connecting digital devices with HDMI jacks
Notes on HDMI connections
What is ARC?
Connection example 1: Connecting the processor with devices without
using an AV amplifier (ARC equipped TV)
Connection example 2: Connecting the processor with devices without
using an AV amplifier (TV not equipped with ARC)
Connection example 3: Connecting the processor with devices via an
AV amplifier (ARC equipped TV)
Connection example 4: Connecting the processor with devices via an
AV amplifier (TV not equipped with ARC)
Connection example 5: Connecting playback devices to the processor
via an AV amplifier
Connecting other devices
Connecting digital devices without HDMI jacks
Connecting devices without HDMI jacks
Page 13

When the volume of analog devices is too low
Notes on the digital and analog audio connections
9
Search
When you connect a device to the TV (OPT) jacks (optical digital
audio input/output jacks)
Connecting a device with a stereo mini jack to the LINE IN jacks
Operation
Enjoying audio and video entertainment
Watching a TV
Enjoying audio and video entertainment of other devices than the TV
Using HDMI devices efficiently
The audio output settings of the devices connected
When you finished using the system
Selecting the audio effects
Setting the sound field mode (EFFECT)
Setting the matrix decoder (MATRIX)
Selecting a dynamic range (COMPRESSION)
Selecting the frequency band
Selecting the frequency band
Using the menu
What you can do with the menu
Using the menu on the processor
Using the menu on the headphones
Displaying the current status of the system (Status screen)
Adjusting the volume level of the center channel
Adjusting the volume level of the subwoofer channel
Synchronizing the sound and the image (A/V Sync)
Selecting a channel when receiving a multiplex broadcast signal
Selecting simultaneous audio output to a TV speaker and the
headphones
Selecting the Control for HDMI function
Selecting the HDMI Pass Through function
Selecting the front display mode of the processor
Resetting the settings
Others
Warning beeps and operation beeps
Warning beeps and operation beeps of the headphones
Audio format supported
Audio format supported by the processor
Precautions
Handling and installing the system
Headphones and earpads
Page 14

RF signal transmission area
The characteristics of sound of the system
10
Search
On cleaning
Troubleshooting
To deal with a trouble
What can I do to solve a problem?
Possible causes of symptoms
Table of contents for symptoms and possible causes
No sound
No sound, no video
No TV sound can be heard on the system.
No sound is output from the TV or the AV amplifier connected to the
HDMI OUT jack of the processor.
No sound from the device connected to the AV amplifier is heard on
the system.
The CONTROL FOR HDMI switch is set to “MODE1,” but the
headphone volume cannot be adjusted from the TV.
The TV is turned on, but the processor does not turn on automatically.
Wireless LAN of the TV is difficult to connect.
Distorted or intermittent sound (sometimes with noise)
Low sound
The surround sound effect is not obtained.
The MATRIX indicator does not turn on, or flashes.
The audio is not played back in the desired audio format.
The battery cannot be charged; the charge indicator flashes.
No signal is output from the TV (OPT) OUT (THROUGH) jack of the
processor.
Beeps are heard from the headphones.
No sound is heard from either the TV or the headphones.
The menu screen does not appear on the TV.
No sound (When devices are connected to the HDMI jacks)
The power off interlock function does not work.
The Control for HDMI function (“BRAVIA” Sync) does not work
properly.
The processor turns off when you turn off the TV.
Specifications
Specifications
Digital surround processor (DP-HW700)
Wireless stereo headphones (MDR-HW700)
Contents
Recommended accessory (sold separately)
Important information
Page 15
Help Guide
11
Search
MDR-HW700DS Top > Getting Started > Before First Use >
Before first use
Getting Started
In addition to this Help Guide, read the printed manuals supplied: “Quick Start Guide” and
Connection
“Reference Guide.”
Operation
Others
Troubleshooting
Specifications
Important information
© 2014 Sony Corporation
Contents list
Quick Start Guide
Provides you with instructions on how to connect the processor with digital devices and
basic operations.
Reference Guide
Provides you with precautions, location and function of parts, menu operations, and
troubleshooting.
For information about the customer support Web site, access:
http://www.sony.net/
About battery charging
See “Charging the headphones” on how to charge the battery.
Features
Page 16
Help Guide
12
Search
MDR-HW700DS Top > Getting Started > Features >
Features
Getting Started
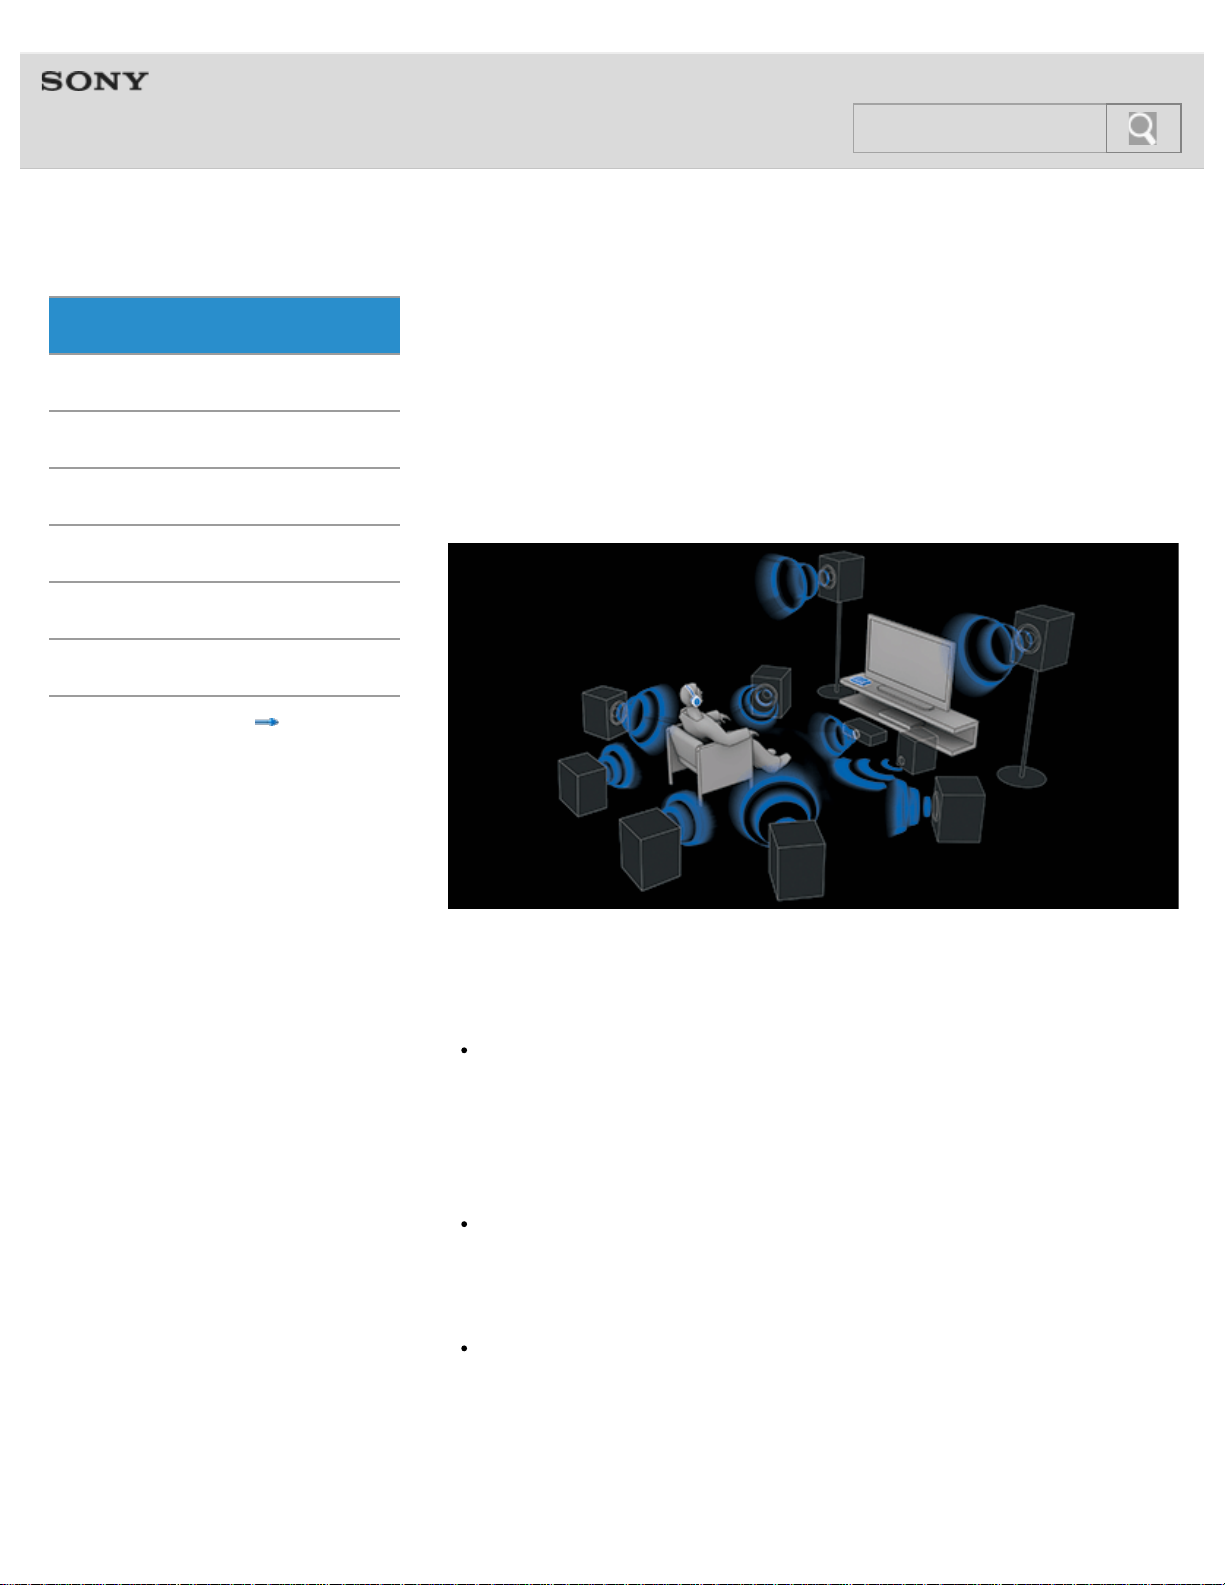
9.1ch VPT (Virtualphones Technology)* reproduces realistic surround sound
Connection
Operation
Others
Troubleshooting
Specifications
Important information
In addition to 5.1ch surround, surround-back (2ch) and front-high speakers (2ch) add
vertical / depth sound effects to horizontal direction and deliver you a realistic and
expressive sound field experience.
* VPT (Virtualphones Technology)
VPT is Sony’s proprietary virtual surround technology that enables listeners to enjoy a
movie-theater-like “live” surround sound.
Contents list
Various effect modes (Sound field modes)
MDR-HW700DS has incorporated various enjoyable effect modes made possible only by
Sony Group.
CINEMA mode
Enhanced features such as CINEMA mode were created with the support of Sony Pictures
Entertainment (SPE). CINEMA mode ensures an authentic theater sound experience, with
the combination of Sony’s unique Virtualphones Technology (VPT), and virtual sound field
that is based on an analysis of the prestigious sound dubbing theater used for the production
of major motion pictures.
GAME mode
Multi-channel surround games are reproduced with the feeling of accurate direction.
GAME mode was developed under the supervision of a Sony Computer Entertainment sound
designer.
VOICE mode
Suitable for news programs, etc., allowing you to listen to a clearer human voice.
Dual band wireless transmission system to avoid sound interruption
2.4 GHz transmission for insulation from the influence of obstacles and 5 GHz transmission
for prevention of radio wave interference are used for the wireless connection between the
processor and the headphones. Real-time automatic tuning chooses a free channel
Page 17
automatically without any sound interruption before the signal can be blocked out. Those
features deliver degradation-free sound quality using uncompressed wireless audio
13
Search
transmission.
Noise generated by other devices
Switches channels when noise detected
High quality HD audio formats supported
The system is compatible with high quality sources of a maximum of 192 kHz, 24 bit,
non-compressed sound, that contains about six times more information than conventional
DVD sound. The processor has three HDMI inputs, allowing you to enjoy both audio and
video entertainment by connecting a BD/DVD device, a game device, a set top box, or other
devices.
HDMI connections
You can connect HDMI devices to the processor using HDMI cables. The processor is
compatible with the Audio Return Channel (ARC [Details]) technology*, enabling TV sound
to be input to the processor without connecting an optical digital cable. The processor has a
“FAST VIEW” function that registers the HDMI devices connected to the processor. This
function shortens the time required to switch inputs, allowing you to switch between content
from multiple devices quickly.
Also, the system supports 4K images in addition to 3D images. The processor passes
through 4K signals as-is from a video device to a TV or a projector compatible with 4K
technology.
* The processor must be connected with an ARC [Details] compatible TV.
© 2014 Sony Corporation
DP-HW700 Processor
Page 18
Help Guide
14
Search
MDR-HW700DS Top > Getting Started > Location and function of parts >
DP-HW700 Processor
Getting Started
Functions of buttons, indicators, and other parts on the processor are explained here.
Connection
Operation
Others
Troubleshooting
Specifications
Important information
Contents list
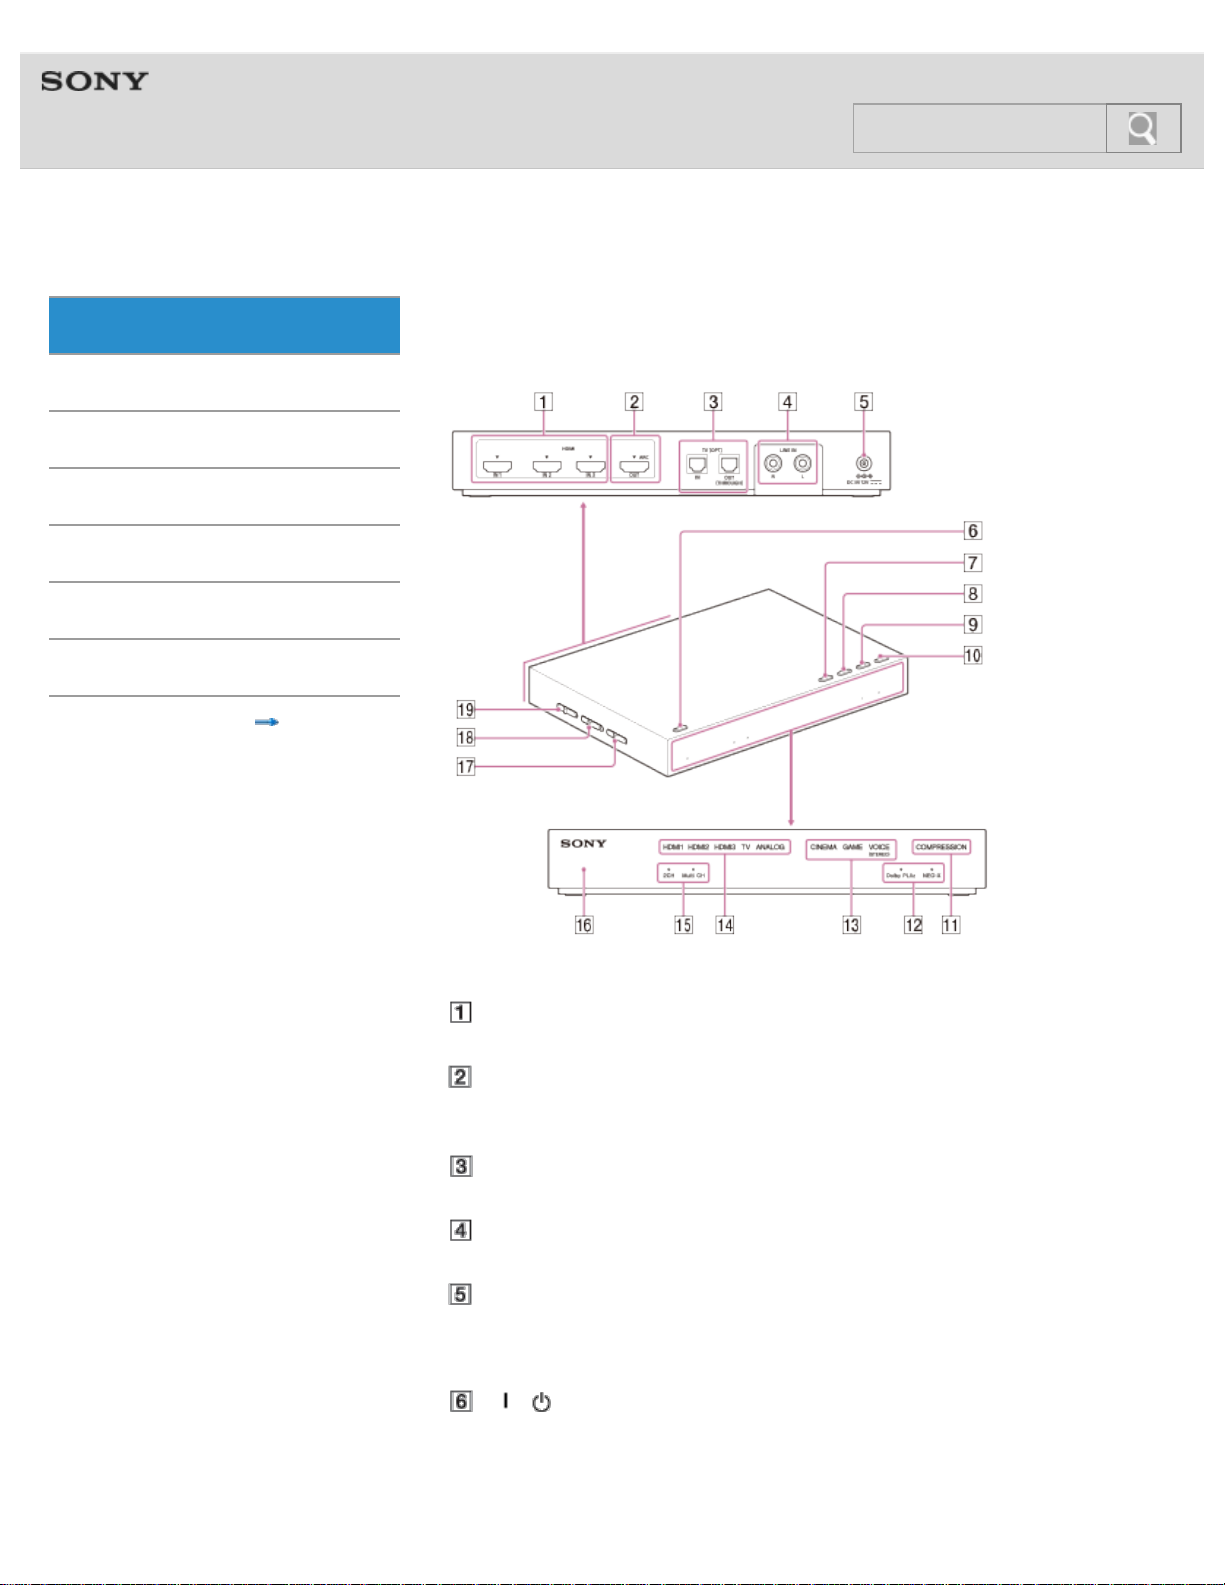
Rear
HDMI IN jacks (IN 1/IN 2/IN 3)
These jacks input HDMI signals.
HDMI OUT jack
Outputs HDMI signals. This jack is compatible with ARC (Audio Return Channel)
[Details].
TV (OPT) IN/OUT (THROUGH) jacks
Inputs or outputs optical digital audio signals.
LINE IN (L/R) jacks
These jacks input analog audio signals.
DC IN 12V jack
Connect the AC adaptor supplied to this jack.
Top
/ (power) button (power on [Details]/standby [Details]/power off [Details])
The processor turns on or enters standby mode alternately as you press the button.
Hold the button down for 3 seconds or longer to turn off the processor completely
(power off).
Page 19

INPUT button
15
Search
Allows you to select an input. [Details]
EFFECT/
Allows you to select a sound field. [Details]
Allows you to select one of the items below the current item (
[Details]
MATRIX/
Allows you to select a matrix decoder*. [Details]
Allows you to select one of the items above the current item (
[Details]
* You can select a matrix decoder when the sound field mode is “CINEMA” or “GAME.”
The matrix decoder function expands an audio input signal format up to 9.1-channel
surround format.
COMPRESSION/MENU/ENTER button
Allows you to select a dynamic range. [Details]
Hold this button down for about 2 seconds to display the menu on the screen of a TV
connected to the processor. When you are using the menu, press this button to enter
the selection. [Details]
Front
COMPRESSION indicator
The indicator lights up when the compression function is set to on. [Details]
MATRIX indicators
The indicator of the matrix decoder selected lights up (or flashes). [Details]
button
) on the menu.
button
) on the menu.
EFFECT indicators
The indicator of the sound field mode selected lights up. [Details]
INPUT indicators
The indicator of the input selected lights up.
2CH/Multi CH indicators
2CH or Multi CH lights up according to the input signal (stereo or multi-channel).
Power indicator
This indicator lights up in green when the power is turned on, in orange in standby
mode, and goes off when the power is turned off.
Left
CONTROL FOR HDMI switch
Set this switch to accommodate the type of HDMI devices you want to connect to the
processor.
Note
Changing the CONTROL FOR HDMI switch position is not effected when the processor
is on. Turn off the processor or set it to standby mode before you operate the CONTROL
FOR HDMI switch.
WIRELESS BAND switch [Details]
Selects the frequency band you want to use. When you select AUTO, an optimum
frequency band is selected automatically (default setting).
Note
Make sure that you select 2.4 GHz when you use the processor outdoors.
ATT (LINE IN) switch
Set this switch to “0dB” if the volume is too low for analog output. [Details]
Page 20
Help Guide
16
Search
MDR-HW700DS Top > Getting Started > Location and function of parts >
MDR-HW700 Headphones
Getting Started
Functions of buttons, indicators, and other parts on the headphones are explained here.
Connection
Operation
Others
Troubleshooting
Specifications
Important information
Contents list
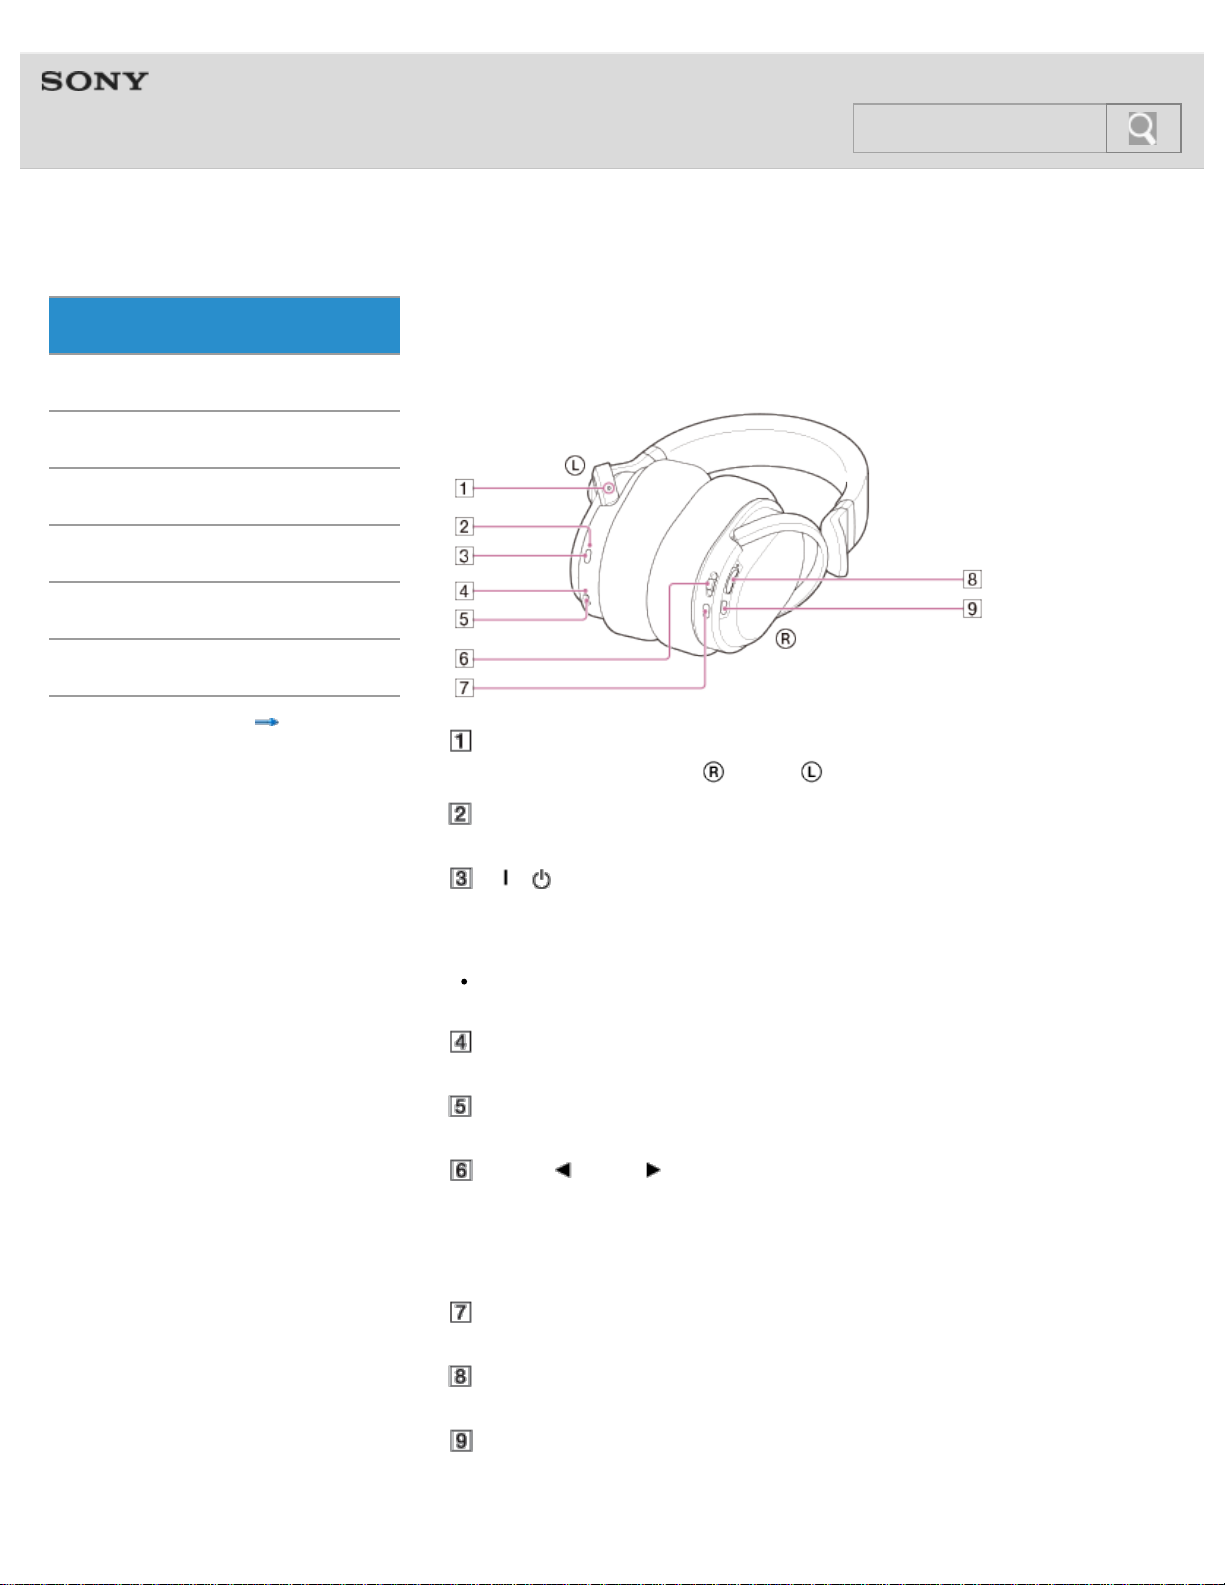
Tactile dot (to distinguish the left side)
Be sure to match the right
Power indicator
This indicator lights up in green when the power is on.
/ (power) button
Press the button for about 1 second to turn the headphones on [Details] or off [Details].
Tip
The headphones turn on when you put them on, and turn off when you remove them
(Auto power on function).
Charge indicator
This indicator lights up in red while the headphones are being charged.
Micro-USB jack (for charging the battery only)
Connect the micro-USB cable supplied to this jack to charge the headphones. [Details]
MENU/
Press the switch to display the menu of the system on the screen of a TV connected to
the processor. Slide the switch up or down to select a setting item on the menu, and
press it to enter the selection. Then, slide the switch up or down again to select the
option. [Details]
ENTER switch
and left side of the headphones with your ears.
INPUT button
Allows you to select an input. [Details]
VOL (volume) control
Adjusts the volume.
EFFECT button
Allows you to select a sound field. [Details]
Page 21
Help Guide
17
Search
MDR-HW700DS Top > Getting Started > Power >
Charging the headphones
Getting Started
The headphones contain a lithium ion rechargeable battery, which should be charged before
Connection
using the headphones for the first time.
Operation
Others
Troubleshooting
Specifications
Important information
Contents list
System requirements for battery charge using USB
Personal Computer with pre-installed with any of the following operating systems and USB
port:
Operating Systems
(when using Windows)
Windows® 8 / Windows® 8 Pro
Windows® 7
Home Basic / Home Premium / Professional / Ultimate
Windows Vista® (Service Pack 2 or later)
Home Basic / Home Premium / Business / Ultimate
Windows® XP (Service Pack 3 or later)
Home Edition / Professional / Media Center Edition 2004 / Media Center Edition 2005
(when using Macintosh)
Mac OS X (version.10.3 or later)
Note
The system does not support the audio and video playback on a computer via USB
connection.
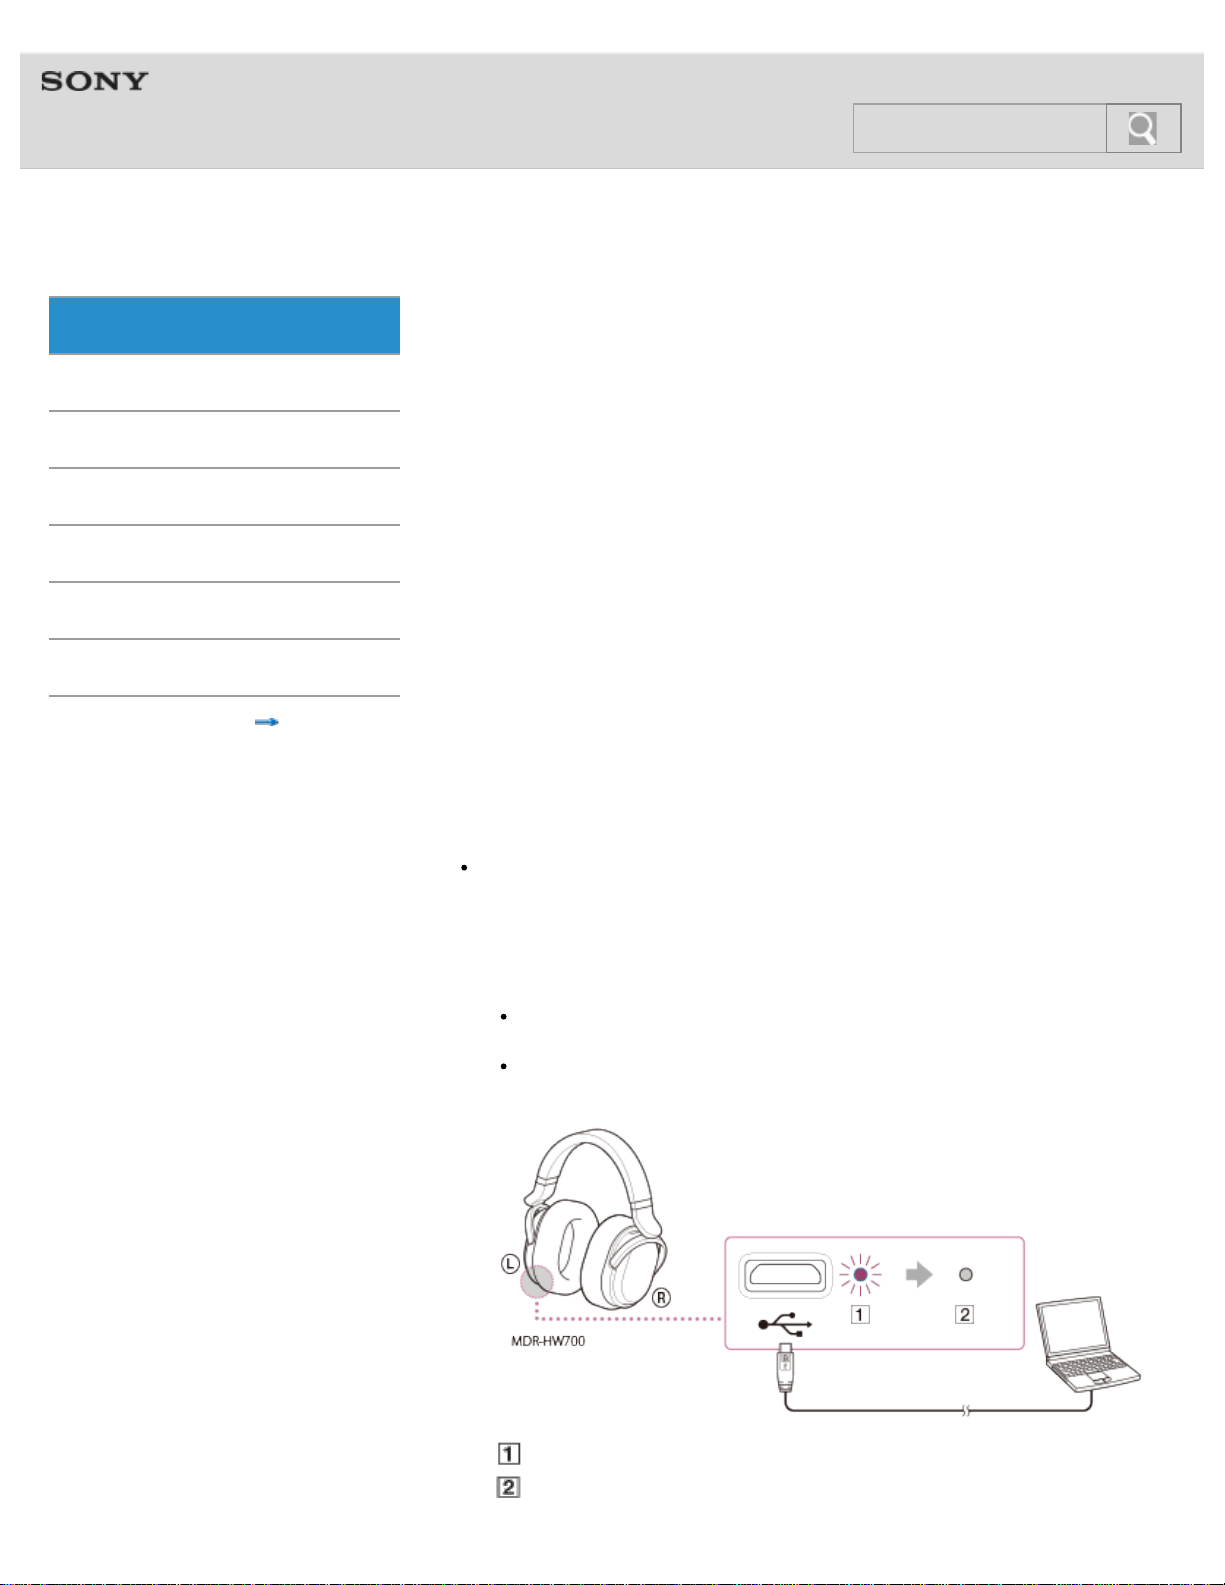
Charging the headphones
1. Connect the headphones and the booted computer using the micro-USB cable
supplied.
Use the micro-USB cable supplied for charging the headphones only. (You may not
be able to charge the headphones with other cables.)
A computer with a USB jack or a USB Charging AC Power Adaptor AC-UD11 (sold
separately) is required to charge the headphones.
The charge indicator is lit in red during charging.
It goes off when charging is completed.
Page 22

2. When the charge indicator goes off, disconnect the micro-USB cable.
Notes
18
Charge the battery in an ambient temperature of between 5 °C and 35 °C (between
41 °F and 95 °F). If you charge it outside the recommended temperature range, the
charge indicator flashes and the battery may not be charged.
When the rechargeable battery of the headphones has been consumed, a warning beep
(about 2 seconds) sounds and the headphones are turned off.
You can charge the headphones while using them. The charging time will be longer than
those listed below.
Estimated charging time and battery life
Charging time Battery life 1)
About 3 hours 2) About 12 hours 3)
About 30 minutes 4) About 2 hours 3)
1) At 1 kHz, 1 mW + 1 mW output
2) Time required to fully charge an empty battery
3) Time may vary, depending on the temperature or conditions of use.
4) Time spent to charge an empty battery
Checking the remaining battery power of the headphones
© 2014 Sony Corporation
Page 23
Help Guide
19
Search
MDR-HW700DS Top > Getting Started > Power >
Checking the remaining battery power of the headphones
Getting Started
You can check the remaining battery power by displaying the Status screen of the menu on
Connection
Operation
Others
Troubleshooting
Specifications
Important information
Contents list
the TV connected to the processor. [Details]
Charge the battery of the headphones under following situations.
When the headphones sound a long beep (about 2 seconds) and turn off.
The power indicator [Details] of the headphones is dim or does not light up.
[Charge Level Low] is displayed at [Headphones] on the Status screen.
Notes
If you do not use the headphones for a long period of time, the life of the rechargeable
battery may become short. The life of the rechargeable battery improves when you
repeat the charging and discharging process several times.
If you store the headphones for more than a year, charge the battery once a year to
prevent over-discharge.
If the length of time you can use the headphones became extremely short, the
rechargeable battery should be replaced with a new one. Please contact your nearest
Sony dealer for a battery replacement.
© 2014 Sony Corporation
Turning on the processor
Page 24
Help Guide
20
Search
MDR-HW700DS Top > Getting Started > Turning the system on or off >
Turning on the processor
Getting Started
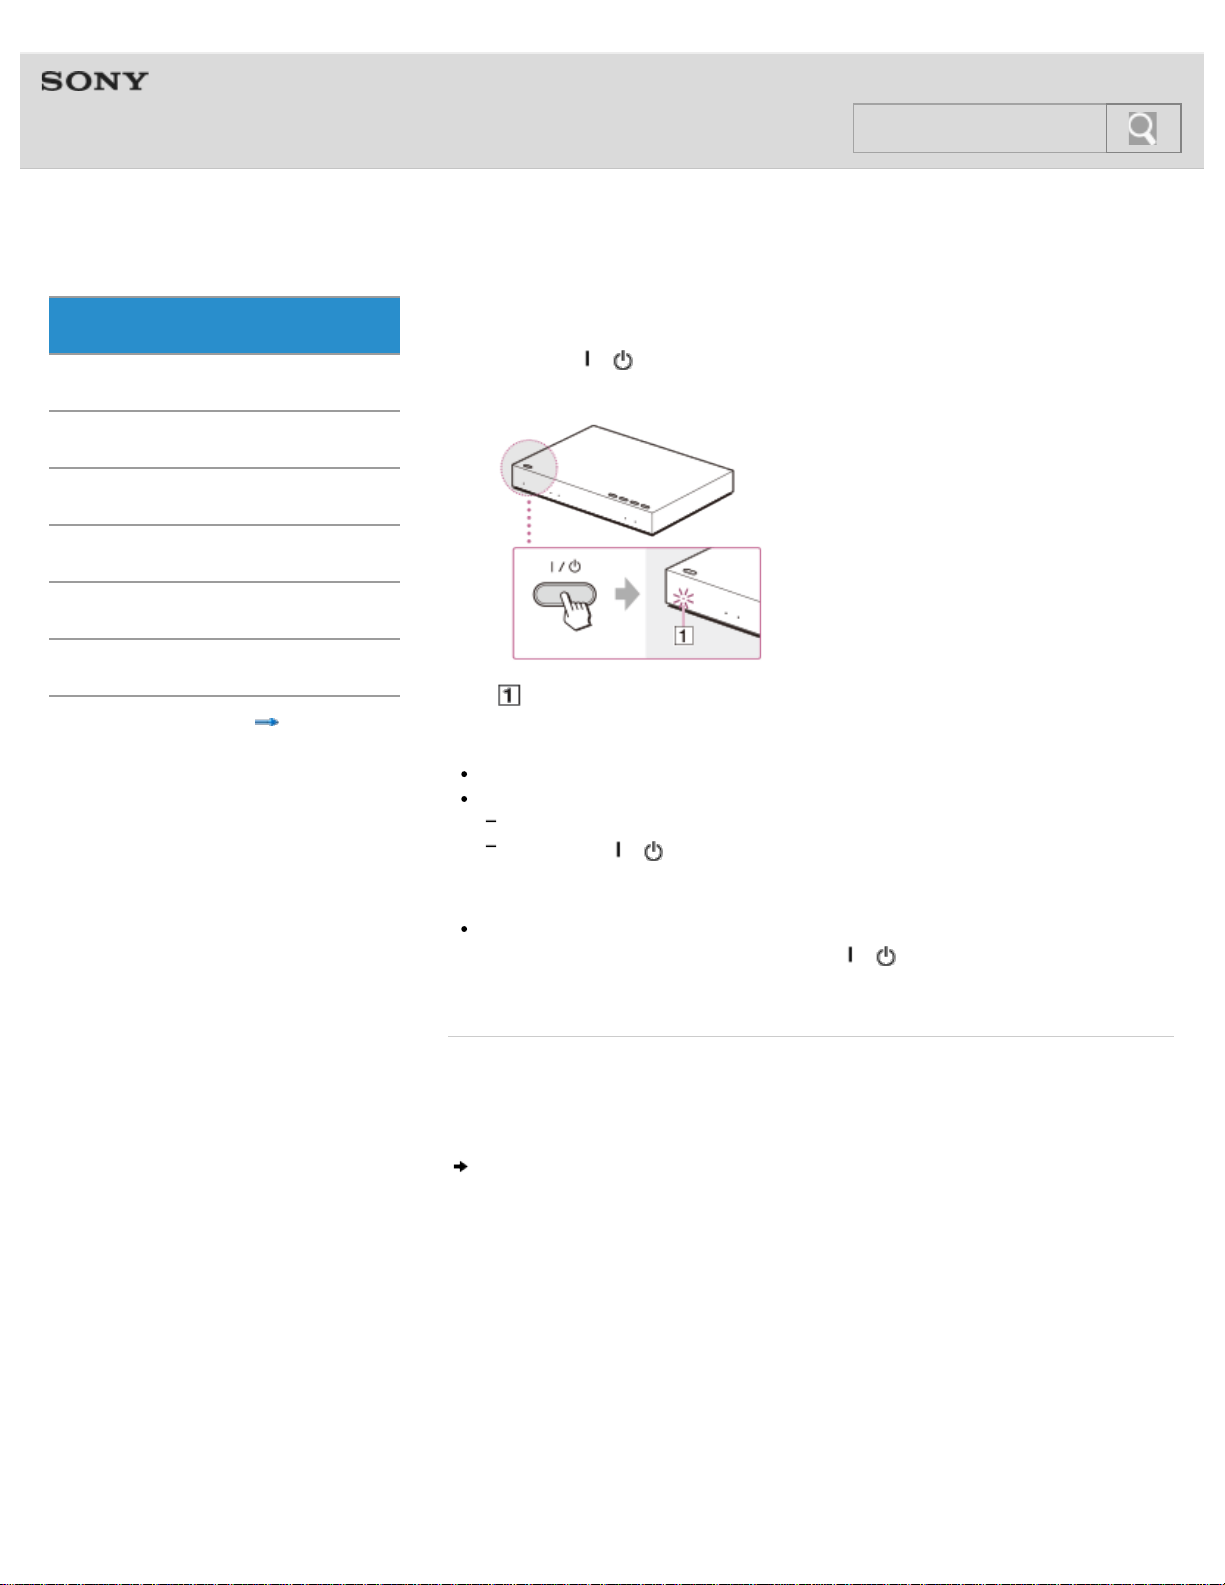
1. Press the / (power) button.
Connection
Operation
Others
Troubleshooting
Specifications
Important information
Contents list
The power indicator lights up in green.
Lights up in green.
Tips
The processor turns on or enters standby mode alternately as you press the button.
When the processor is in standby mode, you can turn on the processor by:
putting on the headphones
pressing the / (power) button on the headphones
© 2014 Sony Corporation
Note
If the processor has been turned off (the power indicator is not lit), it does not turn on
when you turn on the headphones. Press the
to turn it on.
Related topic
Turning off the processor
Setting the processor to standby mode
/ (power) button on the processor
Page 25
Help Guide
21
Search
MDR-HW700DS Top > Getting Started > Turning the system on or off >
Setting the processor to standby mode
Getting Started
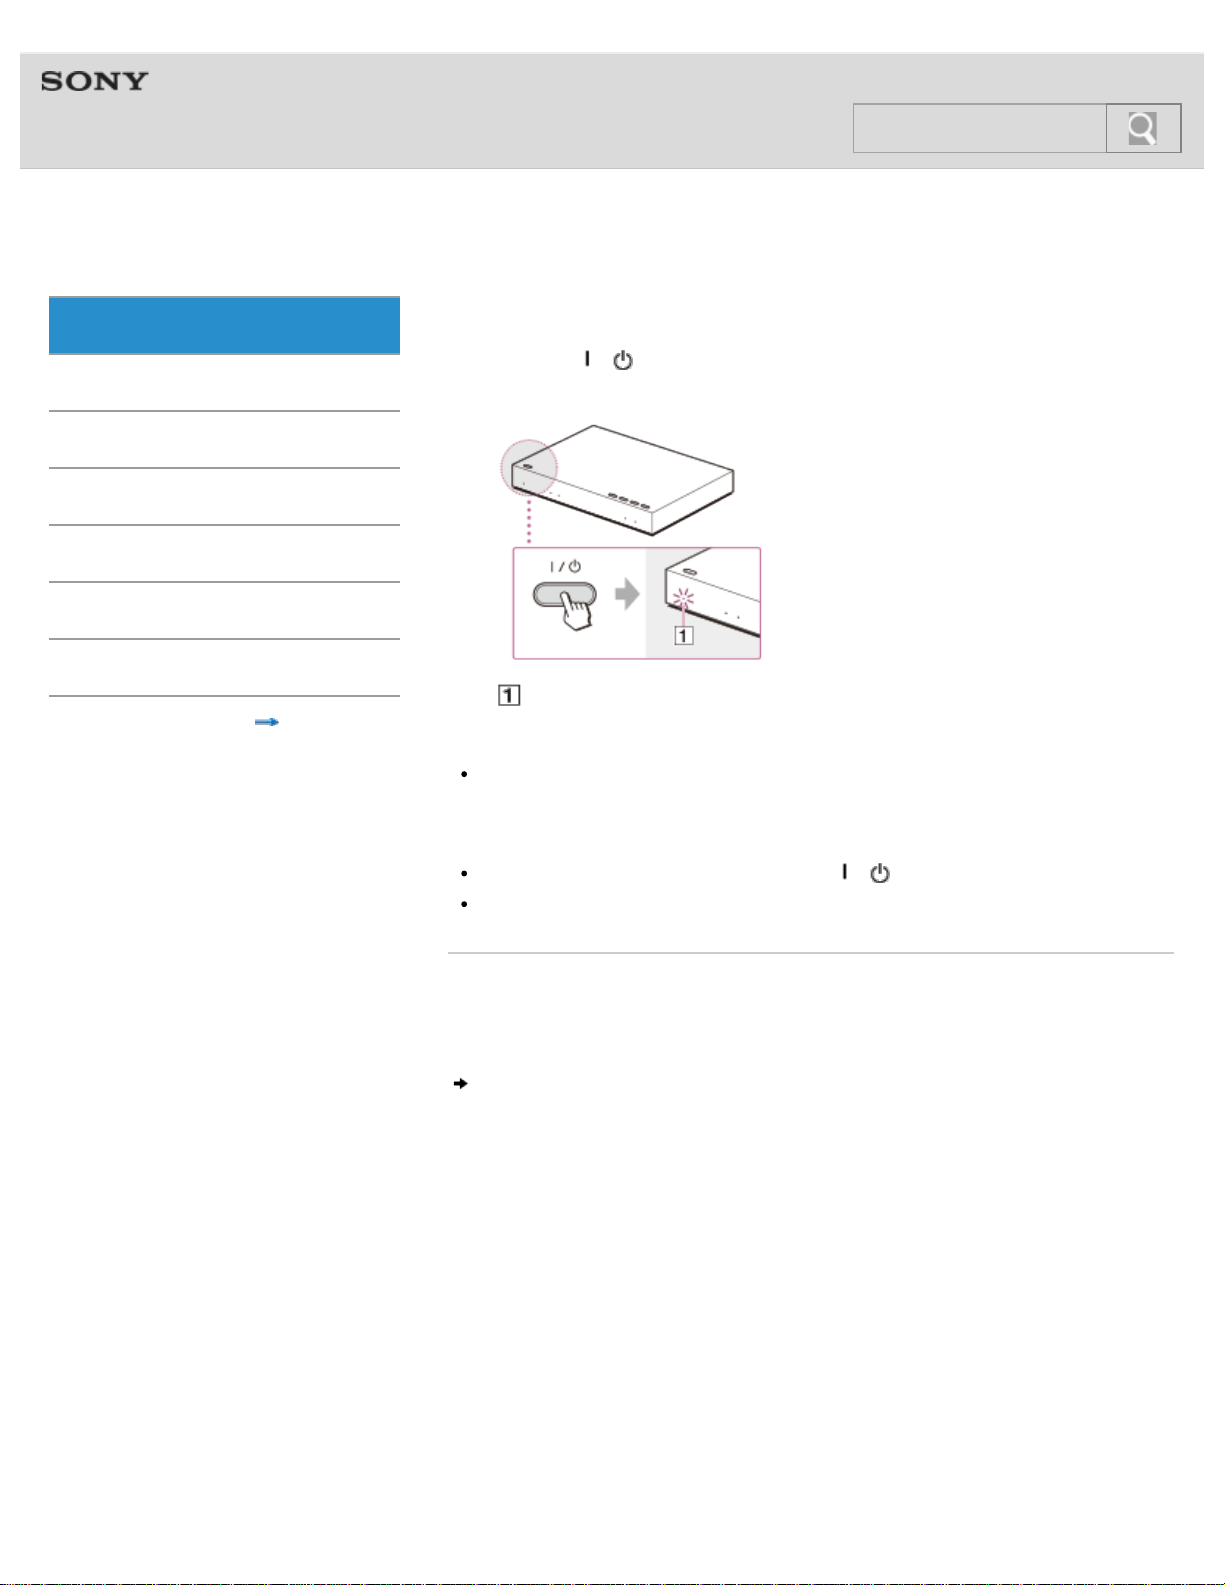
1. Press the / (power) button.
Connection
Operation
Others
Troubleshooting
Specifications
Important information
Contents list
The power indicator lights up in orange.
Lights up in orange.
Tip
The processor turns on or enters standby mode alternately as you press the button.
© 2014 Sony Corporation
Power saving function of the processor
The processor turns to standby mode automatically when:
you turn off the headphones by pressing the / (power) button for about 1 second.
about 5 minutes have passed after you remove the headphones.
Related topic
Turning on the processor
Turning off the processor
Page 26
Help Guide
22
Search
MDR-HW700DS Top > Getting Started > Turning the system on or off >
Turning off the processor
Getting Started
Power saving function of the processor
Connection
Operation
Others
Troubleshooting
Specifications
Important information
If you are not using the system for the time being or for a long time, you can reduce the
power consumption of the system, if necessary.
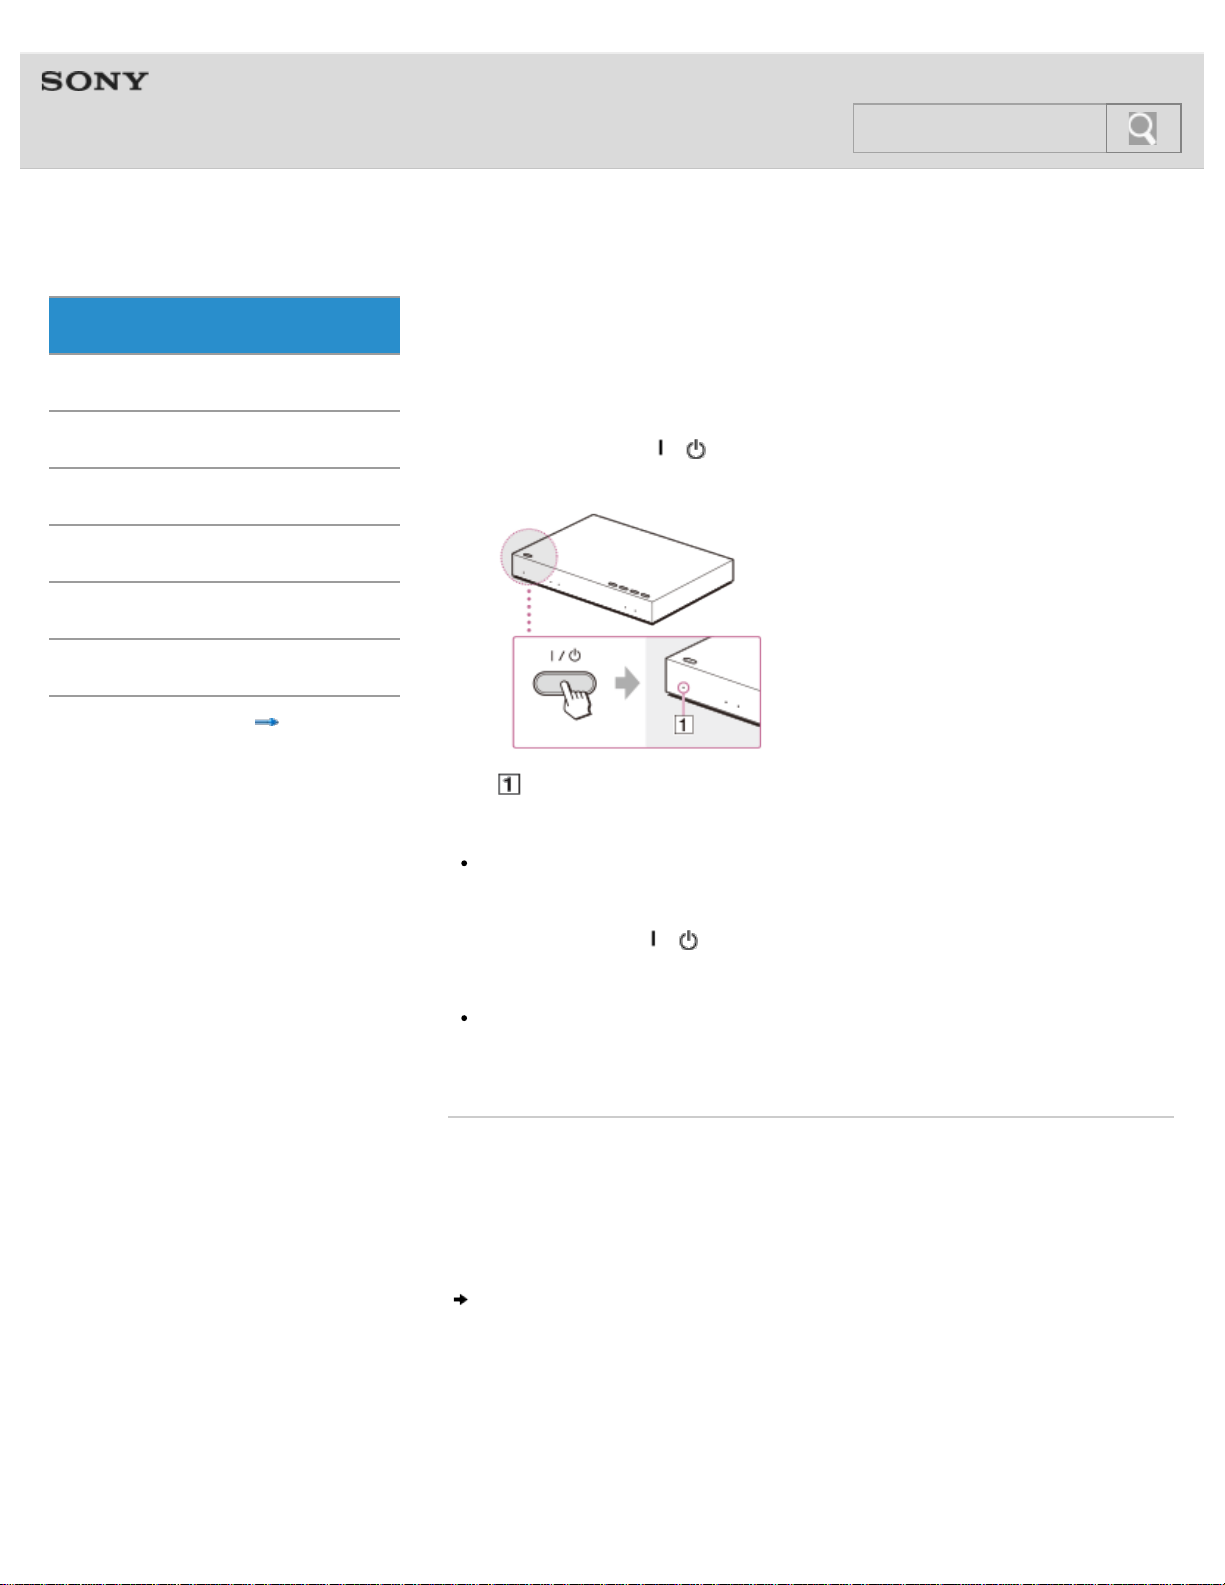
1. Press and hold the
(more than 3 seconds).
/ (power) button down until the power indicator goes off
Contents list
Goes off
Note
When the processor is turned off, the transmission of HDMI output signals also stops so
the HDMI Pass Through function [Details] is disabled. In this state, the processor is not
turned on automatically when you next turn on the headphones. You must turn on the
processor using the
Tip
When the processor and headphones are on, if no signal is input to the selected input
jack and no operation is attempted on the system for more than 20 minutes, the
processor turns off automatically.
Related topic
Using HDMI devices efficiently
Turning on the processor
Setting the processor to standby mode
Turning on the headphones
/ (power) button or the Control for HDMI function.
© 2014 Sony Corporation
Page 27
Help Guide
23
Search
MDR-HW700DS Top > Getting Started > Turning the system on or off >
Turning on the headphones
Getting Started
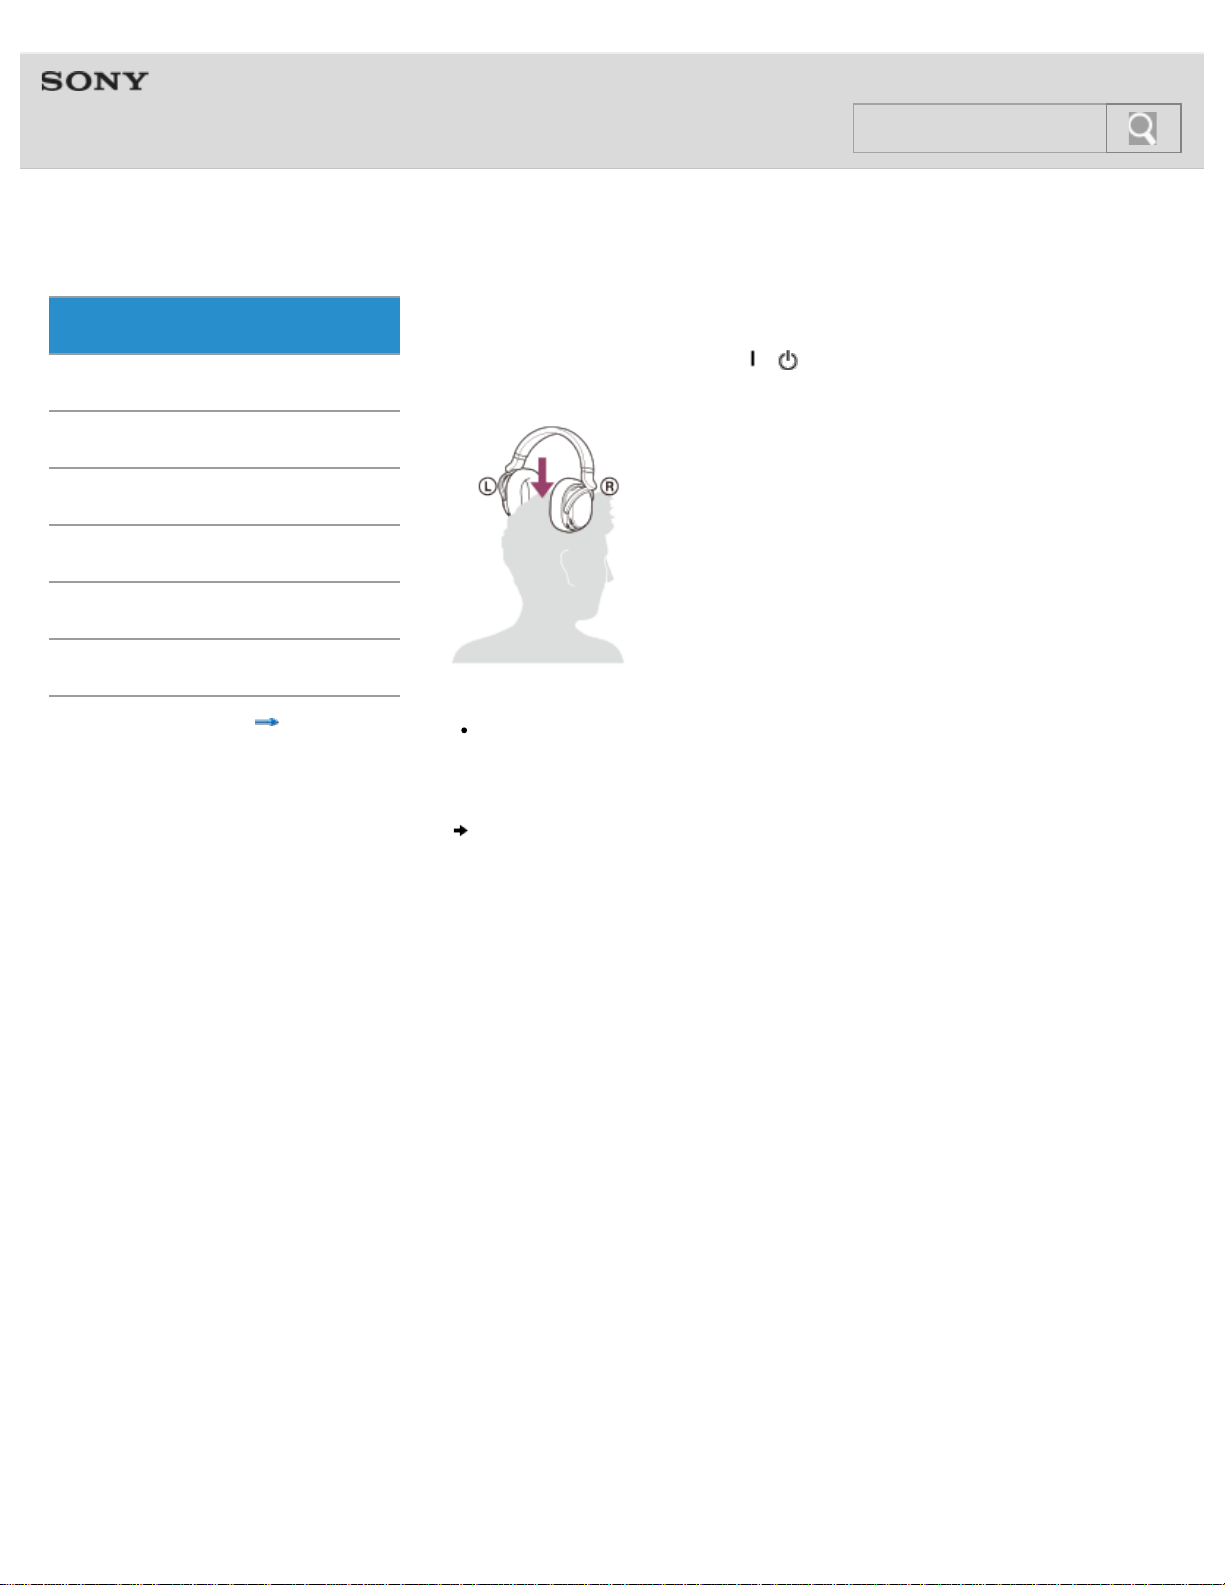
Put on the headphones, or press the / (power) button on the headphones for about
Connection
Operation
Others
Troubleshooting
Specifications
Important information
1 second.
© 2014 Sony Corporation
Contents list
Tip
When the processor is in standby mode, it also turns on when you turn on the
headphones.
Turning off the headphones
Page 28
Help Guide
24
Search
MDR-HW700DS Top > Getting Started > Turning the system on or off >
Turning off the headphones
Getting Started
Remove the headphones. The headphones are turned off after about 5 seconds
Connection
Operation
Others
Troubleshooting
Specifications
Important information
Contents list
automatically.
Tip
You can turn off the headphones by pressing the / (power) button on the
headphones for about 1 second, also. In this case, the processor becomes standby
mode automatically.
© 2014 Sony Corporation
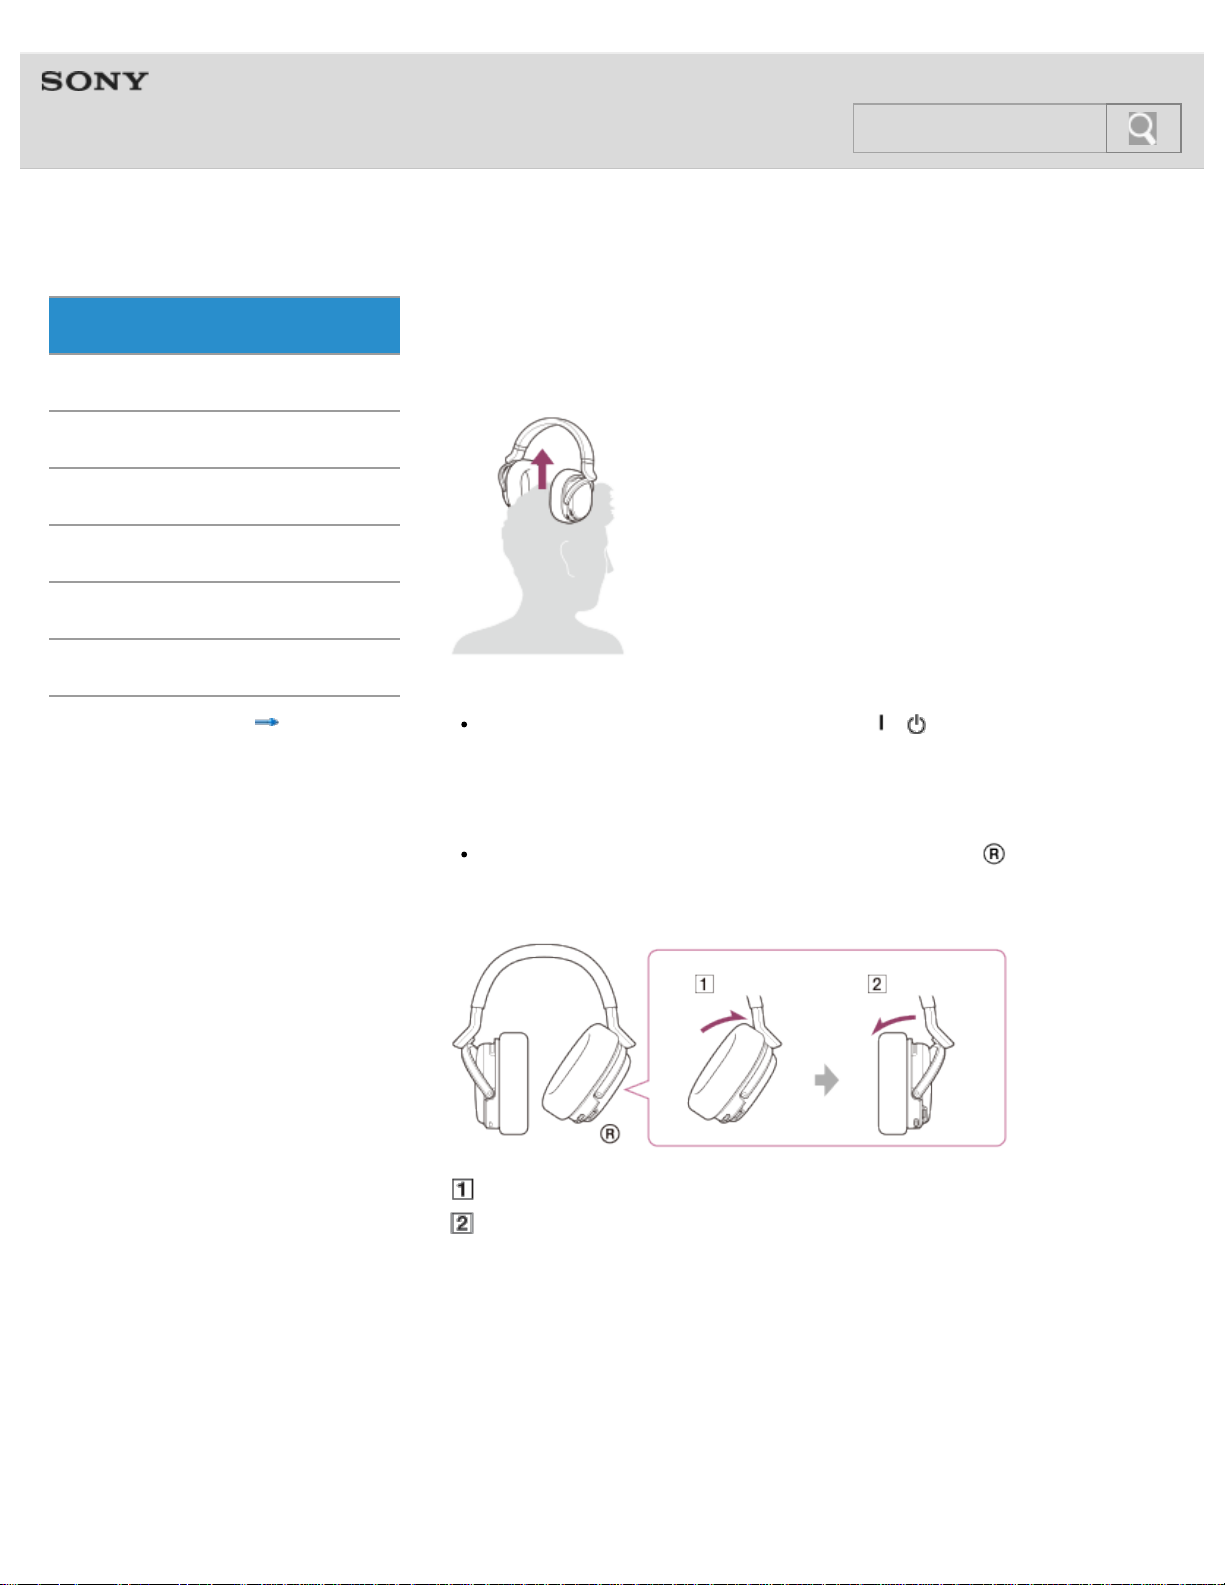
Note
After removing the headphones, do not leave the right housing ( ) at the angle shown
below. If you leave it like this, the power of the headphones might remain on due to the
auto power on function.
Power on
Power off
Page 29
Help Guide
25
Search
MDR-HW700DS Top > Connection > Connecting digital devices with HDMI jacks >
Notes on HDMI connections
Getting Started
HDMI (High-Definition Multimedia Interface) is an interface to send both video and
Connection
Operation
Others
Troubleshooting
Specifications
Important information
Contents list
digital audio signals simply by connecting an HDMI cable.
Use a High Speed HDMI cable. If you use a Standard HDMI cable, 1080p, Deep Color,
3D, and 4K images may not be displayed properly.
Use an HDMI-authorized cable. Use a Sony High Speed HDMI cable with Cable Type
Logo.
Check the setup of the connected device if an image is poor or the sound does not come
out of the device connected via an HDMI cable.
Audio signals (sampling frequency, bit length, etc.) transmitted from an HDMI jack may
be suppressed by the connected device.
Sound may be interrupted when the sampling frequency or the number of channels of
audio output signals from the playback device is switched.
When the connected device is not compatible with copyright protection technology
(HDCP), the image and/or the sound from the HDMI OUT jack of the processor may be
distorted or may not be output. In this case, check the specifications of the connected
device.
We do not recommend using an HDMI-DVI conversion cable.
Even if an input other than HDMI is selected on the processor, the video signal of one of
the devices connected to the HDMI IN jacks is output from the HDMI OUT jack.
This processor supports Deep Color, x.v.Color, 3D, and 4K transmission.
To enjoy 3D images, connect a 3D-compatible TV and video device (Blu-ray Disc
player, PlayStation®3, etc.) to the processor using HDMI cables, put on 3D glasses, and
then play back a 3D compatible Blu-ray Disc.
To enjoy 4K images, the TV and players that are connected to the processor must be
compatible with the 4K images.
Connection to audio and video jacks on your personal computer is not guaranteed to
work with this system.
© 2014 Sony Corporation
What is ARC?
Page 30
Help Guide
26
Search
MDR-HW700DS Top > Connection > Connecting digital devices with HDMI jacks >
What is ARC?
Getting Started
The system supports ARC (Audio Return Channel). The ARC function sends TV sound from
Connection
a TV’s HDMI input jack to an AV device (this system, an AV amplifier, or a sound bar, etc.)
via an HDMI cable.
Operation
Others
Troubleshooting
Specifications
Important information
© 2014 Sony Corporation
Contents list
To check whether your TV supports ARC or not
If you can find “ARC” printed next to an HDMI input jack on your TV, your TV supports ARC.
If you are not sure, refer to the manual supplied with your TV, or contact the manufacturer of
your TV.
Tip
Normally, only the Number 1 jack of the HDMI input jacks on a TV supports ARC. Make
sure that you are connecting the processor to the correct HDMI input jack on the TV.
Note on connection of the processor and a TV
The connection method to be used between the processor and your TV differs, depending
on whether your TV supports ARC or not.
If your TV supports ARC and you want to use the ARC function on the processor, connect
them as shown in Connection example 1: Connecting the processor with devices without
using an AV amplifier (ARC equipped TV) or Connection example 3: Connecting the
processor with devices via an AV amplifier (ARC equipped TV).
Connection example 1: Connecting the processor with devices without using an AV
amplifier (ARC equipped TV)
Page 31

Help Guide
27
Search
MDR-HW700DS Top > Connection > Connecting digital devices with HDMI jacks >
Connection example 1: Connecting the processor with
Getting Started
devices without using an AV amplifier (ARC equipped TV)
Connection
Operation
Others
Troubleshooting
Specifications
Important information
The Control for HDMI function of the processor works most effectively with this connection.
When you connect an AV amplifier, a theater rack, or a sound bar with HDMI jacks, etc., see
Connection example 3: Connecting the processor with devices via an AV amplifier (ARC
equipped TV) or Connection example 4: Connecting the processor with devices via an AV
amplifier (TV not equipped with ARC).
Tip
What is ARC? [Details]
1. Set the CONTROL FOR HDMI switch to “MODE1” (default setting).
Contents list
2. Connect a TV, a BD/DVD device and/or a game device to the jacks on the rear of the
DP-HW700 processor.
If the devices are connected to the TV, disconnect them from the TV, and connect
them to the processor.
: audio signal
: video signal
: audio signal of TV
HDMI IN: HDMI input
HDMI OUT: HDMI output
OPTICAL OUT: optical digital output
Page 32

Connect a TV with an HDMI cable (High Speed type) (sold separately).
28
The TV sound is sent to the processor via the HDMI cable.
Normally, only the Number 1 jack of the HDMI input jacks on a TV supports ARC.
Make sure that you are connecting the processor to the correct HDMI input jack on the
TV.
Connect a BD/DVD device and/or a game device with an HDMI cable (High Speed
type) (sold separately).
Connect the AC adaptor supplied.
Note
Turn off the processor or set it to standby mode before you operate the CONTROL FOR
HDMI switch.
© 2014 Sony Corporation
Connection example 2: Connecting the processor with devices without using an AV
amplifier (TV not equipped with ARC)
Page 33

Help Guide
29
Search
MDR-HW700DS Top > Connection > Connecting digital devices with HDMI jacks >
Connection example 2: Connecting the processor with
Getting Started
Connection
Operation
Others
devices without using an AV amplifier (TV not equipped
with ARC)
The Control for HDMI function of the processor works most effectively with this connection.
When you connect an AV amplifier, a theater rack, a sound bar with HDMI jacks, etc., see
Connection example 3: Connecting the processor with devices via an AV amplifier (ARC
equipped TV) or Connection example 4: Connecting the processor with devices via an AV
amplifier (TV not equipped with ARC).
Troubleshooting
Specifications
Important information
Tip
What is ARC? [Details]
1. Set the CONTROL FOR HDMI switch to “MODE1” (default setting).
Contents list
2. Connect a TV, a BD/DVD device and/or a game device to the jacks on the rear of the
DP-HW700 processor.
If the devices are connected to the TV, disconnect them from the TV, and connect
them to the processor.
: audio signal
: video signal
: audio signal of TV
HDMI IN: HDMI input
HDMI OUT: HDMI output
Page 34

OPTICAL OUT: optical digital output
Connect a TV with an HDMI cable (High Speed type) (sold separately).
30
Connect a BD/DVD device and/or a game device with an HDMI cable (High Speed
type) (sold separately).
Connect the optical digital output on the TV with the optical digital cable (supplied).
Connect the AC adaptor supplied.
Note
Turn off the processor or set it to standby mode before you operate the CONTROL FOR
HDMI switch.
© 2014 Sony Corporation
Connection example 3: Connecting the processor with devices via an AV amplifier (ARC
equipped TV)
Page 35

Help Guide
31
Search
MDR-HW700DS Top > Connection > Connecting digital devices with HDMI jacks >
Connection example 3: Connecting the processor with
Getting Started
devices via an AV amplifier (ARC equipped TV)
Connection
Operation
Others
Troubleshooting
Specifications
Important information
Contents list
See this connection example when you connect an AV amplifier between the processor and
a TV. This connection is recommended when you want to connect 3 or fewer HDMI devices
(BD device, etc.), except for an AV amplifier. When you connect a theater rack or a sound
bar with HDMI jacks instead of an AV amplifier, this connection is recommended.
Tip
What is ARC? [Details]
1. Set the CONTROL FOR HDMI switch to “MODE2.”
2. Connect an AV amplifier, a TV, a BD/DVD device and/or a game device to the jacks on
the rear of the DP-HW700 processor.
If the devices are connected to the TV, disconnect them from the TV, and connect
them to the processor.
: audio signal
: video signal
: audio signal of TV
Page 36

HDMI IN: HDMI input
HDMI OUT: HDMI output
32
OPTICAL IN: optical digital input
OPTICAL OUT: optical digital output
Connect a TV with the optical digital cable (supplied).
Tip
The optical digital cable must be connected to listen to TV sound on this system.
Connect a TV and an AV amplifier with an HDMI cable (High Speed type) (sold
separately).
The TV sound is sent to the AV amplifier via the HDMI cable.
Connect the processor and the AV amplifier with an HDMI cable (High Speed type)
(sold separately).
© 2014 Sony Corporation
Connect a BD/DVD device and/or a game device to the processor with an HDMI
cable (High Speed type) (sold separately).
Connect the AC adaptor supplied.
Notes
Turn off the processor or set it to standby mode before you operate the CONTROL FOR
HDMI switch.
The ARC function does not work on the processor when the CONTROL FOR HDMI
switch is set to “MODE2.” To listen to TV sound on this system, connect the processor
and the TV with the optical digital cable, even if the TV supports ARC.
Connection example 4: Connecting the processor with devices via an AV amplifier (TV
not equipped with ARC)
Page 37

Help Guide
33
Search
MDR-HW700DS Top > Connection > Connecting digital devices with HDMI jacks >
Connection example 4: Connecting the processor with
Getting Started
devices via an AV amplifier (TV not equipped with ARC)
Connection
Operation
Others
Troubleshooting
Specifications
Important information
Contents list
See this connection example when you connect an AV amplifier between the processor and
a TV. This connection is recommended when you connect 3 or fewer HDMI devices (BD
device, etc.), except for an AV amplifier. When you connect a theater rack or a sound bar
with HDMI jacks instead of an AV amplifier, this connection is recommended.
1. Set the CONTROL FOR HDMI switch to “MODE2.”
2. Connect an AV amplifier, a TV, a BD/DVD device and/or a game device to the jacks on
the rear of the DP-HW700 processor.
If the devices are connected to the TV, disconnect them from the TV, and connect
them to the processor.
: audio signal
: video signal
: audio signal of TV
HDMI IN: HDMI input
HDMI OUT: HDMI output
OPTICAL IN: optical digital input
Page 38

OPTICAL OUT: optical digital output
Connect a TV with the optical digital cable (supplied).
34
Tip
The optical digital cable must be connected to listen to TV sound on this system.
Connect a TV and an AV amplifier with an HDMI cable (High Speed type) (sold
separately).
Connect the processor and the AV amplifier with an HDMI cable (High Speed type)
(sold separately).
Connect a BD/DVD device and/or a game device to the processor with an HDMI
cable (High Speed type) (sold separately).
Connect the optical digital input on the AV amplifier with the optical digital cable
(sold separately).
Only one optical digital cable is supplied.
Tip
The signal input to the TV (OPT) IN jack is passed through as-is from the TV (OPT) OUT
(THROUGH) jack (Optical pass-through function).
Connect the AC adaptor supplied.
Notes
Turn off the processor or set it to standby mode before you operate the CONTROL FOR
HDMI switch.
The ARC function does not work on the processor when the CONTROL FOR HDMI
switch is set to “MODE2.” To listen to TV sound on this system, connect the processor
and the TV with the optical digital cable, even if the TV supports ARC.
Connection example 5: Connecting playback devices to the processor via an AV
amplifier
Page 39

Help Guide
35
Search
MDR-HW700DS Top > Connection > Connecting digital devices with HDMI jacks >
Connection example 5: Connecting playback devices to
Getting Started
the processor via an AV amplifier
Connection
Operation
Others
Troubleshooting
Specifications
Important information
See this connection example when you connect playback devices via an AV amplifier, not
directly to the processor. The connection method is the same as when you use a theater
rack or a sound bar with HDMI jacks instead of an AV amplifier.
Note
In the HDMI transmission system, the sender device transmits the signals in video/audio
formats to the receiver device, according to the video/audio formats supported and
indicated by the receiver device. This means that, in this type of connection, only the
audio formats supported by the AV amplifier are transmitted to the processor. Therefore,
the audio formats may be limited to fewer than those supported by the processor. Note
that you may not be able to enjoy the full advantage of the processor with this type of
connection.
1. Set the CONTROL FOR HDMI switch to “MODE2.”
Contents list
2. Connect the DP-HW700 processor, an AV amplifier, a TV, a BD/DVD device and/or a
game device.
If the devices are connected to the TV, disconnect them from the TV, and connect
them to the processor.
Page 40

: audio signal
36
: video signal
: audio signal of TV
HDMI IN: HDMI input
HDMI OUT: HDMI output
OPTICAL IN: optical digital input
OPTICAL OUT: optical digital output
Connect the processor and a TV with an HDMI cable (High Speed type) (sold
separately).
Connect the optical digital output on the TV with the optical digital cable (supplied).
Tip
The optical digital cable must be connected to listen to TV sound on this system.
Connect the processor and an AV amplifier with an HDMI cable (High Speed type)
(sold separately).
Page 41

Connect the processor and the AV amplifier with the optical digital cable (sold
37
separately).
Only one optical digital cable is supplied.
Tip
The signal input to the TV (OPT) IN jack is passed through as-is from the TV (OPT) OUT
(THROUGH) jack (Optical pass-through function).
Connect a BD/DVD device and/or a game device to the AV amplifier with an HDMI
cable (High Speed type) (sold separately).
Connect the AC adaptor supplied.
Notes
Turn off the processor or set it to standby mode before you operate the CONTROL FOR
HDMI switch.
The ARC function does not work on the processor when the CONTROL FOR HDMI
switch is set to “MODE2.” To listen to TV sound on this system, connect the processor
and the TV with the optical digital cable, even if the TV supports ARC.
© 2014 Sony Corporation
Connecting other devices
Page 42

Help Guide
38
Search
MDR-HW700DS Top > Connection > Connecting digital devices with HDMI jacks >
Connecting other devices
Getting Started
See Connection example 3: Connecting the processor with devices via an AV amplifier (ARC
Connection
Operation
equipped TV) or Connection example 4: Connecting the processor with devices via an AV
amplifier (TV not equipped with ARC) when you connect a theater rack or a sound bar with
HDMI jacks.
Others
Troubleshooting
Specifications
Important information
© 2014 Sony Corporation
Connecting devices without HDMI jacks
Contents list
Page 43

Help Guide
39
Search
MDR-HW700DS Top > Connection > Connecting digital devices without HDMI jacks >
Connecting devices without HDMI jacks
Getting Started
The TV (OPT) IN jack (optical digital audio input jack) of the processor should be connected
Connection
Operation
Others
Troubleshooting
Specifications
Important information
to the optical digital output jack on a TV only.*
Connect analog devices (VTR, TV, etc.) to the jacks on the rear of the DP-HW700 processor
using an analog audio cable (sold separately).
* Connection to optical digital output jacks on your personal computer is not guaranteed to
work with this system.
Contents list
: TV with optical digital audio output
: TV with analog audio output
: audio signal
Connect an AV amplifier with the optical digital cable (supplied).
Connect a TV with an optical digital cable (sold separately).
Page 44

Only one optical digital cable is supplied.
© 2014 Sony Corporation
40
Tip
The signal input to the TV (OPT) IN jack is passed through as-is from the TV (OPT) OUT
(THROUGH) jack (Optical pass-through function).
Connect analog devices (VTR, TV, etc.) with an analog audio cable (sold separately).
Note
An analog signal input via the LINE IN jacks is not output via the TV (OPT) OUT jack
(optical digital audio output jack).
Connect the AC adaptor supplied.
When the volume of analog devices is too low
Page 45

Help Guide
41
Search
MDR-HW700DS Top > Connection > Connecting digital devices without HDMI jacks >
When the volume of analog devices is too low
Getting Started
Change the ATT (LINE IN) switch on the left side of the processor to “0dB.”
Connection
Operation
Others
Troubleshooting
Specifications
Important information
© 2014 Sony Corporation
Switch position Devices connected
0dB Devices with low output level, such as portable devices
–8dB (default setting) Other devices
Contents list
Notes
Make sure that you turn down the volume before using the ATT (LINE IN) switch.
When the sound of analog devices is distorted (with noise, etc.), change the ATT (LINE
IN) switch to “–8dB.”
When you connect a device to the TV (OPT) jacks (optical digital audio input/output
jacks)
Page 46

Help Guide
42
Search
MDR-HW700DS Top > Connection > Notes on the digital and analog audio connections >
When you connect a device to the TV (OPT) jacks
Getting Started
(optical digital audio input/output jacks)
Connection
Operation
Others
Troubleshooting
Specifications
Important information
Contents list
Notes on connecting a device to the TV (OPT) jacks (optical digital audio input/output
jacks)
The optical digital cable is an extremely high-precision device and is sensitive to jolts
and external pressure. Therefore, be careful when inserting and removing the cable
plug.
You may need to make optical digital output settings on the device connected to the TV
(OPT) jacks of the processor. Refer to the manual supplied with the device.
The TV (OPT) OUT (THROUGH) jack outputs signals only when the AC adaptor is
connected to the processor.
The TV (OPT) IN jack (optical digital input jack) of the processor is to be connected with
a TV only. Connecting the jack to an optical digital output on your computer is not
guaranteed to work with this system.
Notes on connecting a device with an optical mini digital output jack
When you connect an optical mini digital plug of a portable device, etc., with the TV
(OPT) IN jack, use a POC-5AB cable (optical mini plug
(sold separately).
Remove the protective cap at the ends of the cable, if any.
optical rectangular plug)
Notes on handling the optical digital cable
Do not drop objects on the optical digital cable or expose the cable to shock.
Grasp the plug to connect or disconnect the cable.
Be sure that the ends of the optical digital cable are kept clean. Dust at the ends of the
cable can degrade performance.
When storing the cable, attach the cap to the end of the plug and be careful not to fold
or bend the optical digital cable with a bend radius less than 25 mm (1 inch).
The bend radius of the optical digital cable should be no less than 25 mm (1 inch).
Connecting a device with a stereo mini jack to the LINE IN jacks
Page 47

Help Guide
43
Search
MDR-HW700DS Top > Connection > Notes on the digital and analog audio connections >
Connecting a device with a stereo mini jack to the LINE
Getting Started
IN jacks
Connection
Operation
Others
Troubleshooting
Specifications
Important information
© 2014 Sony Corporation
Use an analog audio cable (stereo mini plug pin plug × 2) (sold separately), etc., when
you connect a stereo mini jack (headphone jack, etc.) to the LINE IN (L/R) jacks.
In this case, set the volume on the connected device at a medium level. Noise can occur if
the volume on the device is set too low.
Contents list
Page 48

Help Guide
44
Search
MDR-HW700DS Top > Operation > Enjoying audio and video entertainment >
Watching a TV
Getting Started
1. Turn on the processor and the TV.
Connection
Operation
Others
Troubleshooting
Specifications
Important information
Contents list
2. Select “TV” for the input on the processor.
Select an audio output other than the TV speaker on the TV.
3. Select a TV program using the TV’s remote control.
4. Put on the headphones, and adjust the volume.
The headphones are turned on when you put them on or press the
button for about 1 second.
/ (power)
Tips
When you put on the headphones when the processor is in standby mode, the processor
is turned on automatically.
When the transmission is unstable (intermittent sound, etc.), slide the WIRELESS BAND
switch on the processor and find an appropriate channel. [Details]
You can check the status of the system on the Status screen. [Details]
When the processor and the headphones are turned on, you can select the input by
using the INPUT button [Details] on the headphones.
Page 49

© 2014 Sony Corporation
45
Notes
If the TV does not support ARC, connect the processor and the TV with an optical digital
cable. (Connection example 2 [Details], Connection example 4 [Details])
Use the headphones within the signal transmission range. [Details]
When you listen to the sound of movies, if you turn up the volume too much at quiet
scenes, the sound of the noisy scenes, such as explosions, will be so loud that it may
damage your ears. Pay attention to the volume level.
Enjoying audio and video entertainment of other devices than the TV
Page 50

Help Guide
To check the audio format
46
Search
MDR-HW700DS Top > Operation > Enjoying audio and video entertainment >
Enjoying audio and video entertainment of other devices
Getting Started
than the TV
Connection
Operation
Others
Troubleshooting
Specifications
Important information
Contents list
1. Turn on the all devices connected to the processor.
2. Select an input on the processor and the TV.
Select a device you want to listen to on the system.
Set the TV input to HDMI1. If you connect the processor to an input other than
HDMI1 on the TV, select that input.
Select an audio output other than the TV speaker on the TV.
Check the audio output settings on the BD/DVD device or the game device.
[Details]
3. Start playback on the device you want to view movies, etc.
After the playback has started, display the status of the processor on the TV screen
and check whether or not the desired audio format is being output.
Page 51

Displaying the current status of the system (Status screen)
47
If the format is not the correct one, check the settings on the devices connected.
[Details]
SACD and DVD audio are not compatible with the processor via the HDMI connection.
[Details]
4. Put on the headphones, and adjust the volume.
The headphones are turned on when you put them on or press the
/ (power)
button on the headphones for about 1 second.
Tips
When you put on the headphones when the processor is in standby mode, the processor
is turned on automatically.
When the transmission is unstable (intermittent sound, etc.), slide the WIRELESS BAND
switch on the processor and find an appropriate channel. [Details]
You can check the status of the system on the Status screen. [Details]
When the processor and the headphones are turned on, you can select the input by
using the INPUT button [Details] on the headphones.
© 2014 Sony Corporation
Notes
Use the headphones within the signal transmission range. [Details]
When you listen to the sound of movies, if you turn up the volume too much at quiet
scenes, the sound of the noisy scenes, such as explosions, will be so loud that it may
damage your ears. Pay attention to the volume level.
Using HDMI devices efficiently
Page 52

Help Guide
Setting this system with the TV’s remote control (Audio device control)
48
Search
MDR-HW700DS Top > Operation > Enjoying audio and video entertainment >
Using HDMI devices efficiently
Getting Started
The Control for HDMI function of the system complies with the Consumer Electronics Control
Connection
Operation
Others
Troubleshooting
Specifications
Important information
Contents list
(CEC) standards.
If you connect the processor with a TV, or a BD/DVD device, etc., of Sony or other
manufacturers that supports the CEC standards, by connecting an HDMI cable, you can use
the interlock function as described below. (The control functions of other manufacturers’
products are not guaranteed to work.)
To use the Control for HDMI function on the processor, set [Control for HDMI:] to [On] on the
menu. [Details]
The “MODE1” and “MODE2” positions on the CONTROL FOR HDMI switch
In the CEC standards, only one audio system (an AV amplifier, headphones, etc.) should be
connected to a TV, etc. Therefore, when an AV amplifier (theater rack), home theater
system, etc., that supports CEC is connected to the TV, etc., you must use the processor as
an audio selector (MODE2), not as an audio system (MODE1). The following functions work
in each mode. When you do not use an AV amplifier (theater rack), home theater system,
etc., it is recommended that you set the CONTROL FOR HDMI switch to “MODE1.”
Operating connected devices (BD/DVD device, etc.) (One-touch play)
When you start playback on a connected device, the TV turns on automatically, and while
the processor is in standby mode, the audio and video of the connected device are output
from the TV. When the CONTROL FOR HDMI switch is set to “MODE1,” and the speaker
setting on the TV is set to audio system, this system is turned on and the sound is heard
from the headphones of this system.
Note
The very beginning of the audio and video may not be output, depending on the TV.
Listening to the TV sound on this system (System audio control)
(Available when the CONTROL FOR HDMI switch is set to “MODE1”)
If the speaker setting on the TV is set to audio system, the TV sound is heard from the
headphones of this system when you turn on this system.
When you set this system to standby mode, the sound is heard from the TV speaker.
When this system is turned on, if you switch the audio output to the TV speaker, no
sound is heard from this system.
For more details, refer to the manual supplied with your TV.
Turning off this system, the TV, and other connected devices automatically (Power off
interlock function)
When you turn off the TV with the TV’s remote control, this system and other connected
devices are turned off automatically. The power indicator of this system turns from green to
orange, and this system turns to standby mode.
Switching the input of this system automatically when the input is switched on the TV
(Connected device selection)
When you select a device connected to this system on the TV screen, the input of this
system also switches to the HDMI input to which the selected device is connected.
Page 53

© 2014 Sony Corporation
49
When you connect this system with a TV supporting the audio device control function, an
application icon available via the Internet will appear on the TV screen. You can select an
input or sound field mode of this system with the TV’s remote control. In addition, you can
set the MATRIX decoder [Details], Center channel volume level [Details], Subwoofer
channel volume level [Details], Dynamic range (Compression) [Details], Dual channel audio
setting (Dual/Mono) [Details], and adjust the discrepancies between video and audio signals
(A/V Sync) [Details].
To use the audio device control function, the TV must be connected to a broadband service.
The audio output settings of the devices connected
Page 54

Help Guide
50
Search
MDR-HW700DS Top > Operation > Enjoying audio and video entertainment >
The audio output settings of the devices connected
Getting Started
Set the digital audio output on the device connected so that sound processed in “Dolby
Connection
Operation
Digital” or “DTS” format is output. You may need further settings to output multi-channel
surround sound. For details, refer to the manual supplied with the device.
Others
Troubleshooting
Specifications
Important information
© 2014 Sony Corporation
When you finished using the system
Contents list
Page 55

Help Guide
51
Search
MDR-HW700DS Top > Operation > Enjoying audio and video entertainment >
When you finished using the system
Getting Started
1. Turn off the headphones.
Connection
Operation
Others
Troubleshooting
Specifications
Important information
The headphones are turned off after about 5 seconds automatically after you remove
them.
Contents list
You can turn off headphones by pressing the / (power) button on the
headphones for about 1 second, also. In this case, the processor becomes standby
mode automatically. Step 2 is not necessary.
Note
After removing the headphones, do not leave the right housing ( ) at the angle shown
below. If you leave it like this, the power of the headphones might remain on due to the
auto power on function.
Power on
Power off
2. Press the
/ (power) button on the processor.
Page 56

© 2014 Sony Corporation
52
The processor turns to standby mode.
The sound of the device will be output from the TV automatically.
If sound is not output from the TV automatically, check the audio output settings on the
TV.
Note
If you disconnect the AC adaptor from the processor before removing the headphones,
noise may be heard.
Setting the sound field mode (EFFECT)
Page 57

Help Guide
© 2014 Sony Corporation
53
Search
MDR-HW700DS Top > Operation > Selecting the audio effects >
Setting the sound field mode (EFFECT)
Getting Started
By selecting a sound field mode suitable to the programs and content, you can enjoy the
Connection
feeling of being present in movie theaters, listening to news with a clearer announcer’s
voice, etc.
Operation
Others
Troubleshooting
Specifications
Important information
Contents list
Press the EFFECT button on the processor repeatedly.
Each time you press the button, the sound field mode changes as shown below and the
indicator of the currently selected mode lights up. Select the desired mode.
You may use the EFFECT button [Details] on the headphones, too.
Off
The
EFFECT
indicator
CINEMA
GAME
VOICE
(STEREO)
Off Normal playback of the headphones.
The sound field and suitable sound source
Provides a surround-sound environment with a more natural sound
quality (particularly in dialog).
Produces a high sound quality that is found in the latest movie theaters.
Creates an accurate spatial sound and provides a clear sense of
direction.
Produces powerful and realistic sound for multi-channel surround sound
video games. Suitable for video games with multi-channel sound sources.
Produces a clearer announcer’s voice.
Normal stereo sound, not virtual surround of CINEMA and GAME.
Note
The volume of the headphones may vary, depending on the input signal and the sound
field mode.
Setting the matrix decoder (MATRIX)
Page 58

Help Guide
54
Search
MDR-HW700DS Top > Operation > Selecting the audio effects >
Setting the matrix decoder (MATRIX)
Getting Started
When the sound field mode is “CINEMA” or “GAME,” you can select a sound processing
Connection
format to play the sound back in 9.1-channel surround format.
Operation
Others
Troubleshooting
Specifications
Important information
Contents list
Press the MATRIX button on the processor repeatedly.
Each time you press the button, the matrix decoder mode changes as shown below and the
indicator of the currently selected mode lights up. Select the desired mode.
Off
The
MATRIX
indicator
Dolby
PLIIz
NEO:X
Off Turns off the matrix decoder.
Audio processing type and effects
Process the audio signal using Dolby ProLogic IIz. Expands the input sound of
2-channel, 5.1-channel, or 7.1-channel sound up to the 9.1-channel surround
format by adding front-high channels (L/R) and surround-back channels (L/R).
Process the audio signal using DTS NEO:X. Expands the input sound of 2channel, 5.1-channel, or 7.1-channel sound up to the 9.1-channel surround
format by adding front-high channels (L/R) and surround-back channels (L/R).
© 2014 Sony Corporation
Note
The matrix decoder may not work, depending on the format of the audio input to the
processor. In this case, the MATRIX indicator flashes.
Selecting a dynamic range (COMPRESSION)
Page 59

Help Guide
55
Search
MDR-HW700DS Top > Operation > Selecting the audio effects >
Selecting a dynamic range (COMPRESSION)
Getting Started
Press the COMPRESSION button on the processor.
Connection
Operation
Others
Troubleshooting
Specifications
Each time you press the button, the compression function is turned on or off.
Important information
Contents list
Off
The
COMPRESSION
indicator
On
Off
Tip
When you turn the compression function on or off, the average volume level may
change. In this case, adjust the volume again.
Illustration of the compression process
Playback effect
The compression function is on.
With the sound field mode selected with the EFFECT button (including
when the indicator is off), this function maintains the overall level of
program material: explosive sounds are attenuated while lower level
sounds (dialog, etc.) are enhanced.
Effective for audio signals with a wide dynamic range such as movies
and classical music.
The compression function is off.
The sound field mode changes to the effect selected with the EFFECT
button. [Details]
Page 60

© 2014 Sony Corporation
56
Dynamic range compression by built-in DSP processor
Startling level
Easy to hear level
Difficult to hear level
Selecting the frequency band
Page 61

Help Guide
57
Search
MDR-HW700DS Top > Operation > Selecting the frequency band >
Selecting the frequency band
Getting Started
Select the frequency band with the WIRELESS BAND switch.
Connection
Operation
Others
Troubleshooting
Specifications
Important information
Contents list
The WIRELESS BAND switch
position
AUTO (default)
2.4 GHz The 2.4 GHz band is used.
5 GHz The 5 GHz band is used.
Tip
When the transmission is unstable (intermittent sound, etc.), set the switch to “2.4 GHz”
or “5 GHz” whichever improves the situation.
Note
Make sure that you select “2.4 GHz” when you use the system outdoors.
Related topic
RF signal transmission area
What you can do with the menu
Frequency band used
An optimum frequency band is selected
automatically.
© 2014 Sony Corporation
Page 62

Help Guide
58
Search
MDR-HW700DS Top > Operation > Using the menu >
What you can do with the menu
Getting Started
You can make settings or check the current status of the system on the menu displayed on
Connection
Operation
Others
Troubleshooting
Specifications
Important information
the screen of a TV connected to the processor.
The default settings are as follows.
Contents list
Setting items Settings
Exit Turns off the menu.
Status: Displays the status of the system.
Center Level: 1)
LEF Level: 1)
A/V Sync:
Dual Mono: Selects a channel when receiving a multiplex broadcast signal.
TV+HP Audio Out:
Control for HDMI: Selects the Control for HDMI function.
HDMI Pass
Through:
Front Display
Mode:
Reset Resets the settings.
Adjusts the volume level of the center channel.
Switchable between 0 dB and +8 dB.
Adjusts the volume level of the subwoofer channel.
Switchable between –6 dB and +6 dB.
You can adjust the sound when the image and the sound are not in
sync.
Adjustable between 0 msec and 300 msec.
Selects simultaneous audio output to a TV speaker and the
headphones. 2)
Selects the HDMI Pass Through function.
Selects the front display mode of the processor.
1) This item is not displayed when “VOICE” or “OFF” is selected for the sound field mode.
2) In the case of [On], set the audio output setting on the TV to TV speaker to output audio
simultaneously.
Note
If you display the menu while one of the following video signals is being input to the TV,
the image will disappear, and the menu will appear on a blank screen.
3D video signal
Page 63

4K video signal
© 2014 Sony Corporation
59
480i or 576i video signal
Using the menu on the processor
Page 64

Help Guide
60
Search
MDR-HW700DS Top > Operation > Using the menu >
Using the menu on the processor
Getting Started
1. Switch the input on the TV to which the processor is connected.
Connection
Operation
Others
Troubleshooting
Specifications
Important information
2. Press and hold the COMPRESSION/MENU/ENTER button until the menu is displayed
on the TV screen.
Contents list
3. Select a setting item using the MATRIX/ or EFFECT/ buttons, and then press
the COMPRESSION/MENU/ENTER button.
4. Select the desired option using the MATRIX/ or EFFECT/ buttons, and then
press the COMPRESSION/MENU/ENTER button.
When an operation has not been attempted for about 30 seconds, the menu turns off
automatically.
Page 65

© 2014 Sony Corporation
61
Using the menu on the headphones
Page 66

Help Guide
62
Search
MDR-HW700DS Top > Operation > Using the menu >
Using the menu on the headphones
Getting Started
1. Switch the input on the TV to which the processor is connected.
Connection
Operation
Others
Troubleshooting
Specifications
Important information
2. Turn on the headphones, and press the MENU/
menu on the TV screen.
ENTER switch to display the
Contents list
3. Select a setting item by sliding the MENU/ ENTER switch up or down ( ), and
then press the MENU/
4. Select the desired option by sliding the MENU/ ENTER switch up or down ( ),
and then press the MENU/
ENTER switch ( ).
ENTER switch ( ).
When an operation has not been attempted for about 30 seconds, the menu turns off
automatically.
Page 67

© 2014 Sony Corporation
63
Displaying the current status of the system (Status screen)
Page 68

Help Guide
64
Search
MDR-HW700DS Top > Operation > Using the menu >
Displaying the current status of the system (Status
Getting Started
screen)
Connection
Operation
Others
Troubleshooting
Specifications
Important information
Contents list
The current status appears when [Status] is selected on the Menu screen.
Items Meanings Status displayed
Dolby TrueHD
Dolby Digital+
Dolby Digital EX
Dolby Digital
DTS-HD MSTR
DTS-HD HI RES
Decode: Identifies the audio format of the audio input signal.
Audio CH:
Identifies the channel composition of the audio input
signal.
DTS-HD LBR
DTS 96/24
DTS-ES Discrete
DTS-ES Matrix
DTS
LPCM
Unknown Stream
No Stream
Mono
Dual Mono
2.0ch(LtRt)
2.0ch
2.1ch
3.0ch
3.1ch
4.0ch
4.1ch
5.0ch
5.1ch
6.0ch
6.1ch
7.0ch
7.0ch(Front High)
7.1ch
7.1ch(Front High)
Multi ch
---ch
Page 69

Matrix: Identifies the matrix decoder function selected.
Dolby PLIIz
65
DTS Neo:X
Off
HDMI1
HDMI2
Input: Identifies the input selected.
HDMI3
TV
ANALOG
CINEMA
Effect: Identifies the sound field mode selected.
GAME
VOICE(STEREO)
Off
Compression: Reports whether the compression function is on or off.
On
Off
Center Level: Reports the volume level of the center channel. 0dB - +8dB
LEF level: Reports the volume level of the subwoofer channel. –6dB - +6dB
Auto (2.4GHz
Band)
Wireless: Identifies the wireless frequency used.
Auto (5GHz Band)
2.4GHz Band
5GHz Band
Charge Level High
Charge Level Mid
Charge Level Low
USB Connected
Headphones:
Identifies the battery power of the headphones
remaining.
Charge Level ----
© 2014 Sony Corporation
When an operation has not been attempted for about 30 seconds, the Status screen turns
off automatically.
Adjusting the volume level of the center channel
Page 70

Help Guide
66
Search
MDR-HW700DS Top > Operation > Using the menu >
Adjusting the volume level of the center channel
Getting Started
When “CINEMA” or “GAME” is selected for the sound field mode, you can adjust the volume
Connection
Operation
Others
Troubleshooting
Specifications
Important information
level of the dialog in movies and the narrantion in sports programs.
1. Select [Center Level:] on the menu.
© 2014 Sony Corporation
Contents list
2. Select a value.
You can select a value between 0 dB and +8 dB.
0 dB is set as the default setting.
You can check the current value on the Status screen.
Note
This item is not displayed when “VOICE” or “OFF” is selected for the sound field mode.
Related topic
Using the menu on the processor
Using the menu on the headphones
Displaying the current status of the system (Status screen)
Adjusting the volume level of the subwoofer channel
Page 71

Help Guide
67
Search
MDR-HW700DS Top > Operation > Using the menu >
Adjusting the volume level of the subwoofer channel
Getting Started
When “CINEMA” or “GAME” is selected for the sound field mode, you can adjust the volume
Connection
Operation
Others
Troubleshooting
Specifications
Important information
level of the subwoofer channel.
1. Select [LFE Level:] on the menu.
© 2014 Sony Corporation
Contents list
2. Select a value.
You can select a value between –6 dB and +6 dB.
0 dB is set as the default setting.
You can check the current value on the Status screen.
Note
This item is not displayed when “VOICE” or “OFF” is selected for the sound field mode.
Related topic
Using the menu on the processor
Using the menu on the headphones
Displaying the current status of the system (Status screen)
Synchronizing the sound and the image (A/V Sync)
Page 72

Help Guide
68
Search
MDR-HW700DS Top > Operation > Using the menu >
Synchronizing the sound and the image (A/V Sync)
Getting Started
You can adjust the sound when the image and the sound are not in sync.
Connection
Operation
Others
Troubleshooting
Specifications
Important information
Contents list
1. Select [A/V Sync:] on the menu.
2. Select a value.
You can select a value between 0 msec and 300 msec.
0 ms is set as the default setting.
You can check the current value on the Status screen.
© 2014 Sony Corporation
Related topic
Using the menu on the processor
Using the menu on the headphones
Displaying the current status of the system (Status screen)
Selecting a channel when receiving a multiplex broadcast signal
Page 73

Help Guide
69
Search
MDR-HW700DS Top > Operation > Using the menu >
Selecting a channel when receiving a multiplex
Getting Started
broadcast signal
Connection
Operation
Others
Troubleshooting
Specifications
Important information
Contents list
You can select a channel when you listen to audio recorded in a multi-channel audio format,
such as Dolby Digital.
When you play back a multiplex broadcast recorded without being compressed on a Blu-ray
Disc player, select a channel with this item.
1. Select [Dual Mono:] on the menu.
2. Select a setting.
Back Returns to the previous screen.
Main
(default)
Sub Only the sub channel is output.
Main/Sub
Only the main channel is output.
Main sound is output from the left side and sub sound is output from the
right side.
© 2014 Sony Corporation
Related topic
Using the menu on the processor
Using the menu on the headphones
Selecting simultaneous audio output to a TV speaker and the headphones
Page 74

Help Guide
70
Search
MDR-HW700DS Top > Operation > Using the menu >
Selecting simultaneous audio output to a TV speaker and
Getting Started
the headphones
Connection
Operation
Others
Troubleshooting
Specifications
Important information
You can selects whether or not audio is output to a TV speaker and the headphones
simultaneously.
1. Select [TV+HP Audio Out:] on the menu.
Contents list
2. Select a setting.
Back Returns to the previous screen.
On Audio is output to a TV speaker and the headphones simultaneously.
Off (default) Audio is output to a TV speaker or the headphones.
Notes
Set the audio output setting on the TV to TV speaker.
When the CONTROL FOR HDMI switch is set to “MODE1” and you set this item to [On],
the audio output from the device connected to the processor is influenced by the TV
specifications. If the TV has stereo speakers, the audio output from the connected
device is output as 2-channel-stereo, the same as that of the TV, even if you are playing
multi-channel audio. To listen to multi-channel audio on this system, set this item to
[Off]. (In this case, audio is not output to the TV speakers and the headphones
simultaneously.)
When the CONTROL FOR HDMI switch is set to “MODE1” and you switch this item from
[On] to [Off], audio is output either to the TV speakers or the headphones. To listen to
sound from the headphones, set the processor to standby mode once, then turn it on
again.
Related topic
Using the menu on the processor
Using the menu on the headphones
Selecting the Control for HDMI function
Page 75

Help Guide
71
Search
MDR-HW700DS Top > Operation > Using the menu >
Selecting the Control for HDMI function
Getting Started
This item allows you to enable the Control for HDMI function between the devices connected
Connection
Operation
Others
Troubleshooting
Specifications
Important information
via an HDMI cable.
1. Select [Control for HDMI:] on the menu.
Contents list
2. Select a setting.
Back Returns to the previous screen.
On (default) Enables the Control for HDMI function.
Off Disables the Control for HDMI function.
Note
The Control for HDMI function works differently according to the specifications of the TV
or other devices connected to the processor. For details, see “Using HDMI devices
efficiently.”
Related topic
Using HDMI devices efficiently
Using the menu on the processor
Using the menu on the headphones
Selecting the HDMI Pass Through function
© 2014 Sony Corporation
Page 76

Help Guide
72
Search
MDR-HW700DS Top > Operation > Using the menu >
Selecting the HDMI Pass Through function
Getting Started
You can select whether or not to use the HDMI Pass Through function. This function allows
Connection
Operation
Others
Troubleshooting
Specifications
Important information
video and audio signals input through the HDMI IN jacks on the processor to be output to the
TV connected to the HDMI OUT jack on the processor, even if the processor is in standby
mode.
1. Select [HDMI Pass Through:] on the menu.
Contents list
2. Select a setting.
Back Returns to the previous screen.
Auto
On
(default)
Tip
Note
Related topic
Using the menu on the processor
Using the menu on the headphones
Optimizes the HDMI Pass Through function of the processor according to the
TV’s power status.
Video and audio signals input through the HDMI IN jacks on the processor are
output to the TV connected to the HDMI OUT jack on the processor, even if the
processor is in standby mode.
The [Auto] setting alllows the processor to consume less power compared to the [On]
setting. Select [Auto] when you want to save on power consumption.
When the CONTROL FOR HDMI switch is set to “MODE1” and you set this item to
[Auto], the HDMI Pass Through function is turned off a short time (about 30 seconds)
after you turn off the TV, thus power is saved. The orange power indicator dims.
Selecting the front display mode of the processor
Page 77

Help Guide
73
Search
MDR-HW700DS Top > Operation > Using the menu >
Selecting the front display mode of the processor
Getting Started
You can turn off the display of the processor.
Connection
Operation
Others
Troubleshooting
Specifications
Important information
Contents list
1. Select [Front Display Mode:] on the menu.
2. Select a setting.
© 2014 Sony Corporation
Back Returns to the previous screen.
On
(default)
Auto Off
Tip
Related topic
Using the menu on the processor
Using the menu on the headphones
The indicators and characters on the front panel of the processor are lit when the
processor is on.
Only the power indicator is lit on the front panel of the processor. Other
indicators and characters light up for about 3 seconds when you operate the
system.
Select [Auto Off] when you want to save on power consumption.
Resetting the settings
Page 78

Help Guide
74
Search
MDR-HW700DS Top > Operation > Using the menu >
Resetting the settings
Getting Started
1. Select [Reset] on the menu.
Connection
Operation
Others
Troubleshooting
Specifications
Important information
© 2014 Sony Corporation
2. Select [Execute].
Contents list
The menu settings are reset to the default settings. [Details]
Select [Cancel] to cancel the operation.
Select [Back] to return to the previous screen.
Related topic
Using the menu on the processor
Using the menu on the headphones
Page 79

Help Guide
75
Search
MDR-HW700DS Top > Others > Warning beeps and operation beeps >
Warning beeps and operation beeps of the headphones
Getting Started
The status of the headphones is reported by the beeps as follows.
Connection
Operation
Others
Troubleshooting
Specifications
Important information
Contents list
Repeated short beeps.
The headphones are not receiving the RF signal from the processor.
Use the headphones in the RF signal transmission area.
Turn on the processor.
Check the connections between the processor, the AC adaptor, and the AC outlet
(mains).
Set the WIRELESS BAND switch to “AUTO.”
Make sure there are no other wireless devices using the 2.4 GHz or 5 GHz wireless
frequency band, or there are no electromagnetic waves being generated from a
nearby microwave oven.
Change the processor position.
A long beep (about 2 seconds) sounds and the headphones turn off.
When the rechargeable battery of the headphones has been consumed, a warning beep
(about 2 seconds) sounds and the headphones are turned off. The headphones can be
turned on even when there is no battery power remaining, but they turn off almost
immediately. Charge the headphones.
Short beeps sound twice and the headphones turn on.
This indicates that the headphones have been turned on. This is not a malfunction.
Short beeps sound 3 times and the headphones turn off.
This indicates that the headphones have been turned off properly. This is not a
malfunction.
© 2014 Sony Corporation
Audio format supported by the processor
Page 80

Help Guide
76
Search
MDR-HW700DS Top > Others > Audio format supported >
Audio format supported by the processor
Getting Started
List of the audio format supported
Connection
Note
Operation
Others
Troubleshooting
Specifications
Important information
You cannot play programs that are protected by copyright protection technology (HDCP)
and are prohibited to be output via digital jacks (SACD, DVD audio discs, etc.).
Audio format
Dolby Digital
Maximum number of
channels
5.1
Supported by this
system
Contents list
Dolby Digital EX
6.1
Dolby Digital Plus*
7.1
Dolby TrueHD*
7.1
DTS
5.1
DTS-ES (Discrete, Matrix)
6.1
DTS 96/24
5.1
DTS Express (DTS-HD LBR)
Page 81

5.1
77
DTS-HD High Resolution Audio*
7.1
DTS-HD Master Audio*
7.1
DSD* (SACD, etc.)
Multi-channel Linear PCM 7.1
* If the playback device does not support the above format, the processor outputs audio in
another format.
© 2014 Sony Corporation
Handling and installing the system
Page 82

Help Guide
78
Search
MDR-HW700DS Top > Others > Precautions >
Handling and installing the system
Getting Started
On safety
Connection
Operation
Do not drop, hit, or otherwise expose the processor or headphones to strong shock of
any kind. This could damage the product.
Do not disassemble or attempt to open any parts of the system.
Others
Troubleshooting
Specifications
Important information
Contents list
On placement
Do not place the system in any of the following locations.
Location exposed to direct sunlight, near a heater, or other extremely high-
temperature location
Dusty location
On an unsteady or inclined surface
Location exposed to large amounts of vibration
Bathroom or other high-humidity locations
On the AC adaptor
Be sure to use the supplied AC adaptor. Using AC adaptors with different plug polarity or
other characteristics can cause product failure. Even AC adaptors having the same
voltage and plug polarity can damage this product due to the current capacity or other
factors.
Polarity of the plug
If you are not going to use the system for a long time, unplug the AC adaptor from the
AC outlet (mains). When removing the plug, grip the AC adaptor. Do not pull on the
cord.
© 2014 Sony Corporation
Headphones and earpads
Page 83

Help Guide
79
Search
MDR-HW700DS Top > Others > Precautions >
Headphones and earpads
Getting Started
On headphones
Connection
Operation
Others
Be sure to match the right and left side of the headphones with your ears.
When the volume is too high, the sound leaks outside the headphones. Be careful not to
raise the volume so high that it bothers people around you. There is a tendency to raise
the volume when using in noisy places. However, for reasons of safety, it is advised to
keep the volume at a level whereby you can still hear sounds around you.
The earpads may deteriorate due to long term storage or use.
Troubleshooting
Specifications
Important information
© 2014 Sony Corporation
Contents list
On the built-in rechargeable battery of the headphones
Charge the battery in an ambient temperature of between 5 °C and 35 °C (between
41 °F and 95 °F). If you charge it outside the recommended temperature range, the
charge indicator flashes and the battery may not be charged.
If you store the headphones for more than a year, charge the battery once a year to
prevent over-discharge.
If the length of time you can use the headphones became extremely short, the
rechargeable battery should be replaced with a new one. Please contact your nearest
Sony dealer for a battery replacement.
On replacing the earpads
If the earpads become dirty or worn out, please contact your nearest Sony dealer for a
replacement. The earpads are not intended to be replaced by the user.
RF signal transmission area
Page 84

Help Guide
80
Search
MDR-HW700DS Top > Others > Precautions >
RF signal transmission area
Getting Started
The approximate RF signal transmission area from the processor to the headphones is up to
Connection
30 m (98 ft), but it varies depending on whether obstacles (human body, metal, wall, etc.) are
present and the reception conditions.
Operation
Others
Troubleshooting
Specifications
Important information
© 2014 Sony Corporation
Notes
This system uses a signal in the 2.4 GHz or 5 GHz frequency band, so the sound may
be interrupted if the signal of this system is blocked by an obstacle. This phenomenon is
due to the characteristics of RF signals, and is not a malfunction.
The sound may be affected depending on the location and the conditions where the
processor is installed. Use the processor and the headphones in a place where you can
hear the audio without interference.
The sound may be interrupted if you use the processor and the headphones in a location
where other 2.4 GHz or 5 GHz wireless devices, for example, a microwave oven, etc.,
are used nearby.
Contents list
The characteristics of sound of the system
Page 85

Help Guide
81
Search
MDR-HW700DS Top > Others > Precautions >
The characteristics of sound of the system
Getting Started
In the case of a source without video, such as an audio CD, it may be difficult to
Connection
Operation
Others
Troubleshooting
Specifications
Important information
recognize the localization of sound.
This system simulates the average HRTF (Head Related Transfer Function) of people,
however, since HRTF varies from person to person, how the effects are felt depends on
the individual.
On cleaning
© 2014 Sony Corporation
Contents list
Page 86

Help Guide
82
Search
MDR-HW700DS Top > Others > Precautions >
On cleaning
Getting Started
Use a soft cloth slightly moistened with mild detergent solution. Do not use solvents such as
Connection
Operation
Others
Troubleshooting
Specifications
Important information
thinner, benzene or alcohol as these may damage the surface.
© 2014 Sony Corporation
Contents list
Page 87

Help Guide
83
Search
MDR-HW700DS Top > Troubleshooting > To deal with a trouble >
What can I do to solve a problem?
Getting Started
If the system does not function as expected, try the following steps to resolve the issue.
Connection
Operation
Others
Troubleshooting
Specifications
Important information
1. Find the symptoms of the issue in this manual, and try any corrective actions listed.
[Details]
2. Connect the headphones to your computer to charge the battery. [Details]
You may be able to resolve some issues by charging the battery.
3. Reset the system.
Settings (audio volume, etc.) are reset to the default settings.
4. Look up information on the issue on the customer support Web site.
http://www.sony.net/
5. If the approaches listed above fail to resolve the issue, consult your nearest Sony
dealer.
© 2014 Sony Corporation
Contents list
Table of contents for symptoms and possible causes
Page 88

Help Guide
84
Search
MDR-HW700DS Top > Troubleshooting > Possible causes of symptoms >
Table of contents for symptoms and possible causes
Getting Started
The following topics show possible causes and remedies for symptoms. See an appropriate
Connection
Operation
Others
Troubleshooting
Specifications
Important information
Contents list
topic according to your problem.
No sound
No sound, no video
No TV sound can be heard on the system.
No sound is output from the TV or the AV amplifier connected to the HDMI OUT jack of
the processor.
No sound from the device connected to the AV amplifier is heard on the system.
The CONTROL FOR HDMI switch is set to “MODE1,” but the headphone volume cannot
be adjusted from the TV.
The TV is turned on, but the processor does not turn on automatically.
Wireless LAN of the TV is difficult to connect.
Distorted or intermittent sound (sometimes with noise)
Low sound
The surround sound effect is not obtained.
The MATRIX indicator does not turn on, or flashes.
The audio is not played back in the desired audio format.
The battery cannot be charged; the charge indicator flashes.
No signal is output from the TV (OPT) OUT (THROUGH) jack of the processor.
Beeps are heard from the headphones.
No sound is heard from either the TV or the headphones.
The menu screen does not appear on the TV.
No sound (When devices are connected to the HDMI jacks)
The power off interlock function does not work.
The Control for HDMI function (“BRAVIA” Sync) does not work properly.
The processor turns off when you turn off the TV.
© 2014 Sony Corporation
No sound
Page 89

Help Guide
85
Search
MDR-HW700DS Top > Troubleshooting > Possible causes of symptoms >
No sound
Getting Started
Check the connections between the processor and the AV devices.
Connection
Operation
If the optical digital output jack of a digital device is connected to the TV (OPT) OUT
(THROUGH) jack of the processor, re-connect it to the TV (OPT) IN jack of the
processor.
Others
Troubleshooting
Specifications
Important information
© 2014 Sony Corporation
Contents list
Turn on the AV devices connected to the processor, and start the playback again.
Turn on the processor.
Check that the INPUT button on the processor is set to the device you want to listen to.
If you have connected the headphone jack of the AV device to either of the LINE IN (L/R)
jacks of the processor, raise the volume level on the connected AV device.
Turn on the headphones again.
Raise the headphone volume.
Charge the battery of the headphones.
If the power indicator is still off after you have charged the battery, take the headphones
to your nearest Sony dealer.
If no sound is heard from the TV, check the connection of the ARC jack on the TV, or the
connection of the optical digital cable.
No sound, no video
Page 90

Help Guide
86
Search
MDR-HW700DS Top > Troubleshooting > Possible causes of symptoms >
No sound, no video
Getting Started
Use an HDMI-authorized cable. Use a Sony High Speed HDMI cable with Cable Type
Connection
Operation
Others
Troubleshooting
Specifications
Important information
Contents list
Logo.
When you switch sound from a TV to an AV amplifier, or when you put the headphones
on when sound is being output from a TV, the TV screen becomes blank and sound is
muted for a moment. This is not a malfunction.
Make sure that the processor is turned on.
If the processor is turned off, the HDMI Pass Through function does not work. Therefore,
the video and audio signals from the connected device is not input to the TV. Turn on the
processor, or set it to standby mode.
Check the connection. (Connection example 1 [Details]. Connection example 2 [Details],
Connection example 3 [Details], Connection example 4 [Details], Connection example 5
[Details])
If the HDMI Pass Through function does not work properly when the processor is in
standby mode, set [HDMI Pass Through:] to [On] on the menu. [Details]
© 2014 Sony Corporation
No TV sound can be heard on the system.
Page 91

Help Guide
87
Search
MDR-HW700DS Top > Troubleshooting > Possible causes of symptoms >
No TV sound can be heard on the system.
Getting Started
In the case of Connection example 1 [Details]
Connection
Operation
Others
Troubleshooting
Set the processor to standby mode first, and then set the CONTROL FOR HDMI switch
on the processor to “MODE1,” and select “TV” with the INPUT button. Then, turn on the
Control for HDMI function and the ARC setting on the TV.
In the case of Connection example 2 [Details]
Check the connection of the optical digital cable or the analog audio cable between the
TV and the processor. Check the audio output setting on the TV, also. If you have
connected them using an optical digital cable, changing the setting will improve the
situation.
Specifications
Important information
© 2014 Sony Corporation
Contents list
In the case of Connection example 3 [Details] or Connection example 4 [Details]
Check the connection of the optical digital cable or the analog audio cable between the
TV and the processor. Check the audio output setting on the TV, also.
Make sure that “TV” is selected with the INPUT button on the system.
If no sound is heard from the TV, check the connection of the ARC jack on the TV, or the
connection of the optical digital cable. When the processor is set to “MODE2,” you cannot
use the ARC function. Connect the TV with an optical digital cable.
Make sure that the menu of the processor is not displayed on the TV screen.
If you turn on the menu of the processor when the processor is set to “MODE1,” the TV
switches the input to that the processor is connected in order to display the menu.
Therefore, you will not hear TV sound if you turn on the menu while watching the TV. This
is not a malfunction.
No sound is output from the TV or the AV amplifier connected to the HDMI OUT jack of
the processor.
Page 92

Help Guide
88
Search
MDR-HW700DS Top > Troubleshooting > Possible causes of symptoms >
No sound is output from the TV or the AV amplifier
Getting Started
connected to the HDMI OUT jack of the processor.
Connection
Operation
Others
Troubleshooting
Specifications
Important information
© 2014 Sony Corporation
When sound is output from the headphones, an audio signal is not output from the HDMI
OUT jack. If you want to listen via the TV or the AV amplifier, set the system to standby
mode.
Set the audio output setting to TV speaker on the TV.
If the HDMI Pass Through function does not work when the processor is in standby
mode, set [HDMI Pass Through:] to [On] on the menu.
No sound from the device connected to the AV amplifier is heard on the system.
Contents list
Page 93

Help Guide
89
Search
MDR-HW700DS Top > Troubleshooting > Possible causes of symptoms >
No sound from the device connected to the AV amplifier
Getting Started
is heard on the system.
Connection
Operation
Others
Troubleshooting
Specifications
Important information
© 2014 Sony Corporation
In the case of Connection example 5 [Details]
You can hear sound from the devices connected to the AV amplifier on the AV amplifier
or a TV only. If you want to hear them on this system, connect the device to the
processor using an optical digital cable or an analog audio cable.
The CONTROL FOR HDMI switch is set to “MODE1,” but the headphone volume cannot
be adjusted from the TV.
Contents list
Page 94

Help Guide
90
Search
MDR-HW700DS Top > Troubleshooting > Possible causes of symptoms >
The CONTROL FOR HDMI switch is set to “MODE1,” but
Getting Started
the headphone volume cannot be adjusted from the TV.
Connection
Operation
Others
Troubleshooting
Specifications
Important information
© 2014 Sony Corporation
The volume of the headphones of the system cannot be adjusted using the remote
control of a TV. Adjust the volume using the VOL control on the right-side housing of the
headphones.
The TV is turned on, but the processor does not turn on automatically.
Contents list
Page 95

Help Guide
91
Search
MDR-HW700DS Top > Troubleshooting > Possible causes of symptoms >
The TV is turned on, but the processor does not turn on
Getting Started
automatically.
Connection
Operation
Others
Troubleshooting
Specifications
Important information
© 2014 Sony Corporation
The CONTROL FOR HDMI switch is set to “MODE2,” or [Control for HDMI:] is set to [Off]
on the menu. In this case, the processor is not turned on when you turn on the TV.
When the CONTROL FOR HDMI switch is set to “MODE1,” check the audio output
settings on the TV. The processor turns on or off in conjunction with the audio output
settings on the TV. If sound was being output from the TV speaker when you turned off
the TV last time, the processor will not turn on even if you turn on the TV.
Wireless LAN of the TV is difficult to connect.
Contents list
Page 96

Help Guide
92
Search
MDR-HW700DS Top > Troubleshooting > Possible causes of symptoms >
Wireless LAN of the TV is difficult to connect.
Getting Started
Move the processor away from the TV.
Connection
Operation
Others
Troubleshooting
Specifications
Install the access point (wireless LAN router, etc.) and the TV as close to each other as
possible.
Change the channel of the access point (wireless LAN router, etc.). Refer to the manual
supplied with the access point.
Change the frequency band of the processor with the WIRELESS BAND switch.
If the switch is set to “AUTO,” set it to “2.4 GHz” or “5 GHz.”
If the wireless LAN function of the TV supports the 2.4 GHz band only, try “5 GHz” of
the WIRELESS BAND switch. [Details]
Important information
© 2014 Sony Corporation
Distorted or intermittent sound (sometimes with noise)
Contents list
Page 97

Help Guide
93
Search
MDR-HW700DS Top > Troubleshooting > Possible causes of symptoms >
Distorted or intermittent sound (sometimes with noise)
Getting Started
Charge the battery of the headphones.
Connection
If the power indicator is still off after you charge the battery, take the headphones to your
nearest Sony dealer.
Operation
Others
Troubleshooting
Specifications
Important information
© 2014 Sony Corporation
Contents list
Make sure there are no other wireless devices using the 2.4 GHz or 5 GHz wireless
frequency band, or there are no electromagnetic waves being generated from a nearby
microwave oven.
Change the position of the processor.
When “ANALOG” is selected with the INPUT button, set the ATT (LINE IN) switch on the
processor to “–8dB.”
If you connect the headphone jack of the AV device to either of the LINE IN (L/R) jacks of
the processor, lower the volume level on the connected AV device.
Try other positions of the WIRELESS BAND switch.
When the WIRELESS BAND switch is set to “AUTO,” and the channel changes
automatically, sound may cut out momentarily. This is not a malfunction.
Low sound
Page 98

Help Guide
94
Search
MDR-HW700DS Top > Troubleshooting > Possible causes of symptoms >
Low sound
Getting Started
When “ANALOG” is selected with the INPUT button, set the ATT (LINE IN) switch on the
Connection
Operation
processor to “0dB.”
If you connect the headphone jack of the AV device to either of the LINE IN (L/R) jacks of
the processor, raise the volume level on the connected AV device.
Others
Troubleshooting
Specifications
Important information
© 2014 Sony Corporation
Raise the headphone volume.
The surround sound effect is not obtained.
Contents list
Page 99

Help Guide
95
Search
MDR-HW700DS Top > Troubleshooting > Possible causes of symptoms >
The surround sound effect is not obtained.
Getting Started
Select “CINEMA” or “GAME” for the sound field mode.
Connection
Operation
Others
Troubleshooting
Specifications
The sound being played is not a multi-channel signal.
Depending on the audio output setting on the TV or HDMI device, multi-channel signals
are down-mixed to 2-channel to be output. In this case, change the setting on the device
so that a multi-channel signal is output.
Set [TV+HP Audio OUT:] to [Off] on the menu of the processor.
If it is set to [On], the audio output from the device connected to the processor is
influenced by the TV specifications. If the TV has stereo speakers, the audio output from
the connected device becomes stereo (2-channel), the same as that of the TV, even if
you are playing multi-channel programs.
Important information
© 2014 Sony Corporation
The MATRIX indicator does not turn on, or flashes.
Contents list
Page 100

Help Guide
96
Search
MDR-HW700DS Top > Troubleshooting > Possible causes of symptoms >
The MATRIX indicator does not turn on, or flashes.
Getting Started
Select “CINEMA” or “GAME” for the sound field mode.
Connection
Operation
The matrix decoder may not work, depending on the format of the audio input to the
processor. In this case, the MATRIX indicator flashes.
Others
Troubleshooting
Specifications
Important information
© 2014 Sony Corporation
The audio is not played back in the desired audio format.
Contents list
 Loading...