

Page 1
3-238-629-13(1)
Digital Surround
Headphone
System
Operating Instructions
Mode d’emploi
Manual de instrucciones
GB
FR
ES
MDR-DS8000
© 2001 Sony Corporation
Page 2

WARNING
NOTICE FOR THE CUSTOMERS IN THE
U.S.A.
To prevent fire or shock
hazard, do not expose the unit
to rain or moisture.
To prevent fire or shock hazard, do not
place objects filled with liquids, such as
vases, on the apparatus.
To avoid electrical shock, do not open
the cabinet. Refer servicing to qualified
personnel only.
Do not install the appliance in a
confined space, such as a bookcase or
built-in cabinet.
For the customers in the USA
Owner’s Record
The model number is located on the back
of the processor and the right inner side
of the headband.
The serial number is located at the
bottom of the processor and the inner
side of the battery compartment.
Record these numbers in the spaces
provided below. Refer to them whenever
you call upon your Sony dealer
regarding this product.
NOTE
This equipment has been tested and found to
comply with the limits for a Class B digital
device, pursuant to Part 15 of the FCC Rules.
These limits are designed to provide
reasonable protection against harmful
interference in a residential installation. This
equipment generates, uses, and can radiate
radio frequency energy and, if not installed
and used in accordance with the instructions,
may cause harmful interference to radio
communications. However, there is no
guarantee that interference will not occur in a
particular installation. If this equipment does
cause harmful interference to radio or
television reception, which can be determined
by turning the equipment off and on, the user
is encouraged to try to correct the interference
by one or more of the following measures:
– Reorient or relocate the receiving antenna.
– Increase the separation between the
equipment and receiver.
– Connect the equipment into an outlet on a
circuit different from that to which the
receiver is connected.
– Consult the dealer or an experienced radio/
TV technician for help.
You are cautioned that any changes or
modifications not expressly approved in this
manual could void your authority to operate
this equipment.
Model No. MDR-DS8000
Processor DP-IF8000
Headphones MDR-IF8000
Serial No.
Processor
Headphones
GB
2
Page 3
For the customers in the USA and Canada
RECYCLING NICKEL METAL
HYDRIDE BATTERIES
Table Of Contents
Main features............................... 4
Nickel Metal Hydride
batteries are recyclable.
You can help preserve our
environment by returning
your used rechargeable
batteries to the collection
and recycling location
nearest you.
For more information regarding recycling
of rechargeable batteries, call toll free
1-800-822-8837, or visit http://www.rbrc.org/
Caution: Do not handle damaged or
leaking Nickel Metal Hydride batteries.
Checking the Components and
Accessories ................................ 5
Location and Function of Parts ... 6
Front Panel of the Processor .............. 6
Rear Panel of the Processor ............... 7
Headphone Parts Descriptions .......... 8
Charging the rechargeable
Batteries .................................... 9
Inserting the rechargeable batteries
into the battery charger ..................
Charging............................................. 10
Connecting the Headphone
System ..................................... 12
Setup ................................................... 12
Connecting the processor to
digital components .......................
Connecting the processor to
analogue components...................
Plugging into the wall outlet ........... 15
Inserting the batteries in the
headphones ....................................
13
14
16
Listening to the Sound of a
Connected Component .......... 17
Additional Headphones .................. 24
9
GB
Troubleshooting......................... 25
Precautions................................. 28
Specifications ............................. 29
3
GB
Page 4

Main features
The MDR-DS8000 is a digital surround headphone system using digital infrared
transmission.
You can enjoy multichannel surround sound with headphones by simply connecting
the digital surround processor to a DVD player or a Digital TV, a Digital Broadcasting
Satellite Receiver, etc., with the supplied optical digital connecting cable.
• Compatible with Dolby Digital*, Dolby Pro Logic II*, DTS-ES*, DTS*, and MPEG-2
AAC* (Even the “Dolby Digital Surround EX” software can be fully reproduced by
a unique algorithm).
• Dolby Digital/Dolby Pro Logic II and DTS Virtual certified.
• Signal processing by the Logic 3D processor creates surround sound for the
headphones that simulates a movie theatre.
• Cordless headphones using a digital infrared transmission system which provides
the same sound quality as compact discs, resistant to external noise and
interference. (uncompressed transmission)
• Equipped with the head tracking system in the headphones to create more realistic
sound.
• Wide infrared reception range of up to 10 m.
• Self-adjusting mechanism eliminating the need for headband adjustment.
• Auto Power On/Off Function to automatically turn on the headphones when they
are put on and to turn them off when they are taken off.
• VOL control for adjusting both the right and left volume of the headphones.
• Additional MDR-IF8000 headphones (sold separately) can be used at the same time
so that more than one person can enjoy the surround sound experience.
• Rechargeable nickel-metal hydride batteries (supplied and sold separately) or R6
(size AA) alkaline batteries (sold separately) can be used to power the headphones.
* The digital surround processor for this system incorporates the Dolby Digital decoder,
the Dolby Pro Logic II decoder, the DTS-ES decoder, the DTS decoder, and the MPEG-2
AAC decoder.
Manufactured under license from Dolby Laboratories and Digital Theater Systems, Inc.
“Dolby”, “AC-3”, “Pro Logic”, the “AAC” logo and the double-D symbol ; are trademarks
of Dolby Laboratories.
“DTS” and “DTS VIRTUAL ” are trademarks of Digital Theater Systems, Inc.
AAC patent marking
Pat. 5,848,391; 5,291,557; 5,451,954; 5 400 433; 5,222,189; 5,357,594; 5 752 225; 5,394,473;
5,583,962; 5,274,740; 5,633,981; 5 297 236; 4,914,701; 5,235,671; 07/640,550; 5,579,430;
08/678,666; 98/03037; 97/02875; 97/02874; 98/03036; 5,227,788; 5,285,498; 5,481,614;
5,592,584; 5,781,888; 08/039,478; 08/211,547; 5,703,999; 08/557,046; 08/894,844
CE mark
The CE mark is valid for products marketed in the European Union only.
GB
4
Page 5
1 Preparation
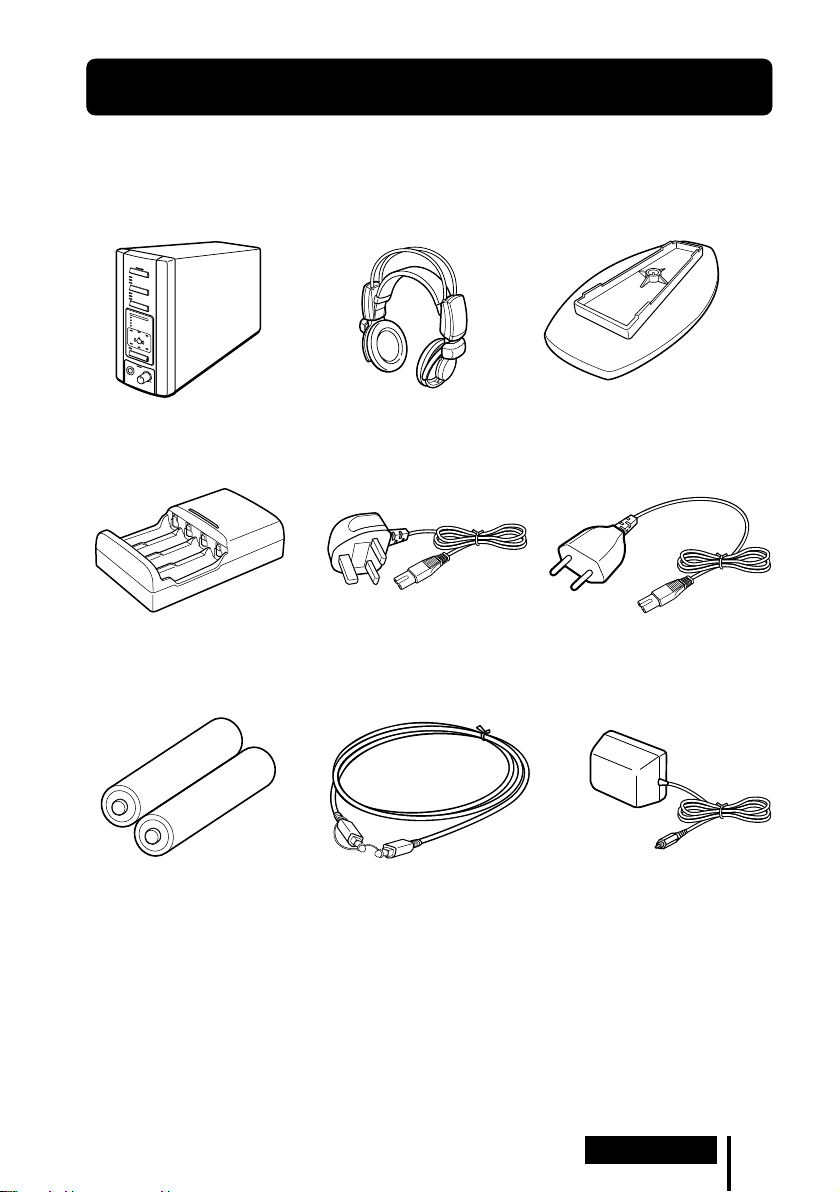
Checking the Components and Accessories
Before setting up the system, check that all of the components are included.
Cordless stereo headphones (1)Processor (1)
Battery charger (1) Charging plug (for battery
Rechargeable nickel-metal
hydride batteries NH-AA (2)
charger) (1)
(UK and Hong Kong model only)
Optical digital connecting cable
(rectangular type y rectangular
type) (1)
Stand (for the processor) (1)
Charging plug (for battery
charger) (1)
(European model only)
AC power adaptor (1)
Preparation
GB
5
Page 6
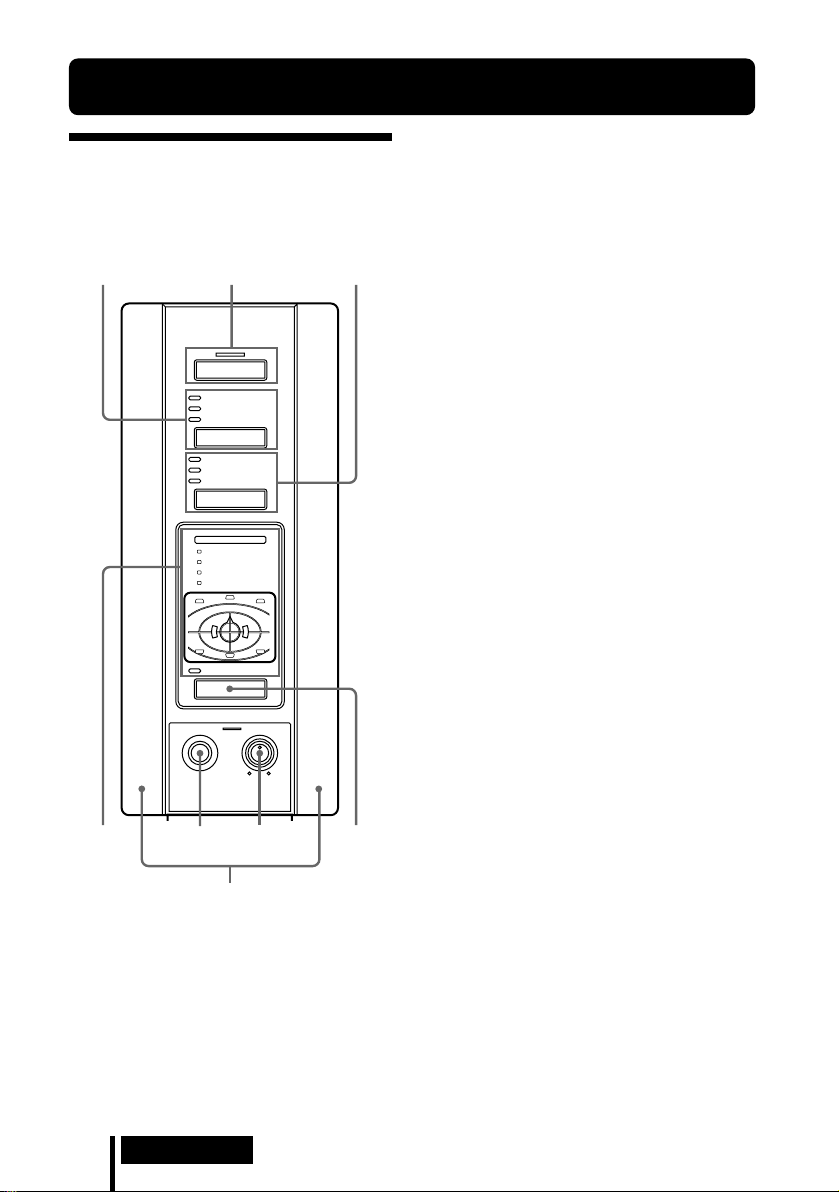
Location and Function of Parts
1 DIGITAL 1,2 input indicator
Front Panel of the Processor
123
POWER
DIGITAL 1
DIGITAL 2
ANALOG
INPUT
CINEMA 1
CINEMA 2
MUSIC
EFFECT
DECODE MODE
DOLBY DIGITAL
DOLBY PRO LOGIC II
DTS
MPEG-2 AAC
C
CS
VIRTUAL
OUTPUT
8
R
MIN MAX
6
7
4
L
LS RS
PHONES LEVEL
5
ANALOG input indicator
INPUT button
Press to select the input source (DIGITAL
1/DIGITAL 2/ANALOG).
2 POWER indicator
This indicator lights green when you
turn on the processor.
POWER switch
Press to turn on and off the processor.
3 CINEMA 1,2 indicator
MUSIC indicator
EFFECT button (see page 20
details)
Press to select the sound field (CINEMA
1/CINEMA 2/MUSIC).
4 Decode mode indicator (see page
19 for details)
5 PHONES jack (see page 20, 24 for
details)
Connect your headphones to this jack.
Connect the MDR-F1 headphone (sold
separately) for optimum surround effect.
6 PHONES — LEVEL control
Turn to adjust the volume of the
headphones (sold separately) connected
to the PHONES jack.
7 OUTPUT button
Press to select the output mode (OFF/
VIRTUAL FRONT/VIRTUAL
SURROUND).
8 Infrared emitter
Set the emitter in a position so that there
is a straight, unobstructed path to the
sensor.
for
GB
6
Preparation
Page 7
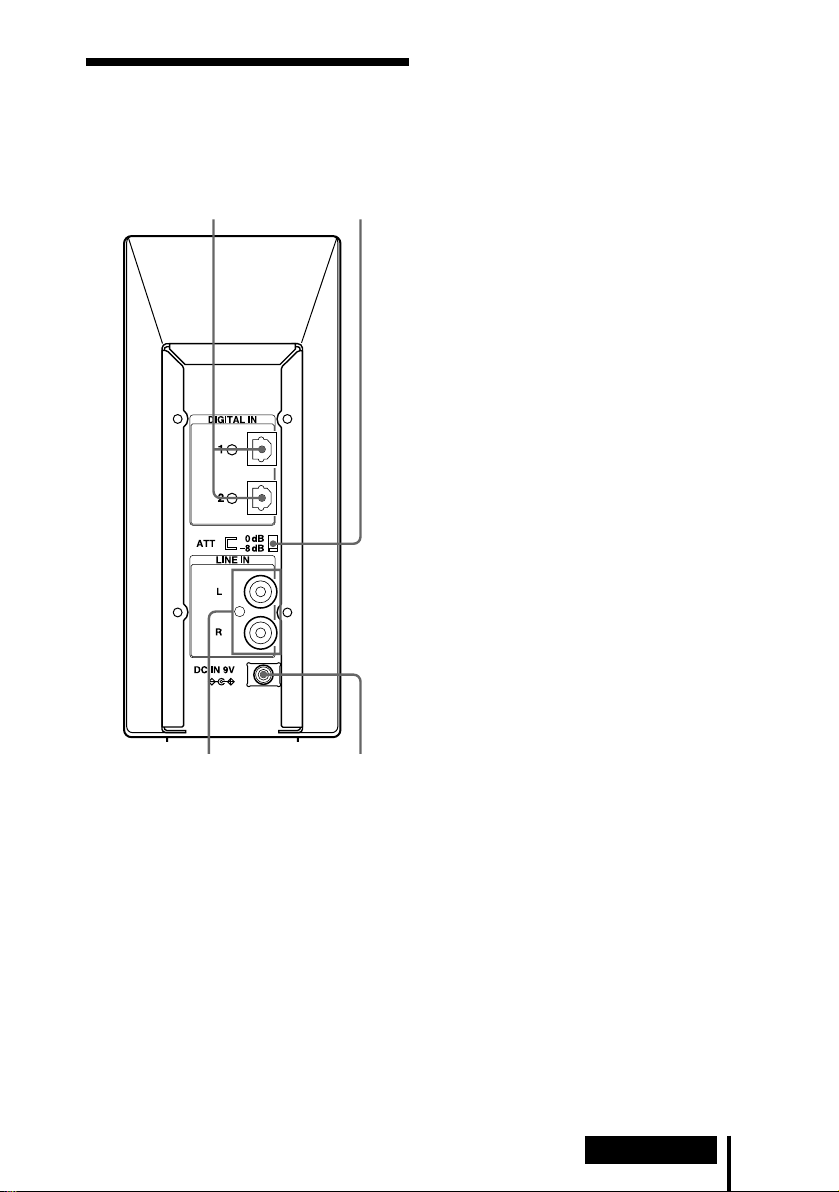
Rear Panel of the Processor
12
1 DIGITAL IN 1,2 jack (see page 13 for
details)
Connect a DVD player, Digital TV,
Digital Broadcasting Satellite Receiver,
LD player, or other digital component
(sold separately) to this jack.
2 ATT (attenuator) switch
Set this switch to 0dB when the volume is
too low at analogue input. Normally, this
switch should be set to –8dB.
3 LINE IN jack (see page 14 for details)
Connect the audio output jack on audio/
video equipment (sold separately), such
as a video cassette player or TV, to this
jack.
4 DC IN jack
Connect the supplied AC power adaptor
to this jack. (Be sure to use the supplied
AC power adaptor. Using products with
different plug polarity or other
characteristics can cause a malfunction.)
34
Preparation
GB
7
Page 8

Headphone Parts Descriptions
5
4
3
2
1
1 Infrared sensor
There are infrared sensors in two
locations on both sides.
2 Battery case
Press and lift up the lid to open it. This
battery case is for the supplied
rechargeable batteries and R6 (size AA)
alkaline batteries only.
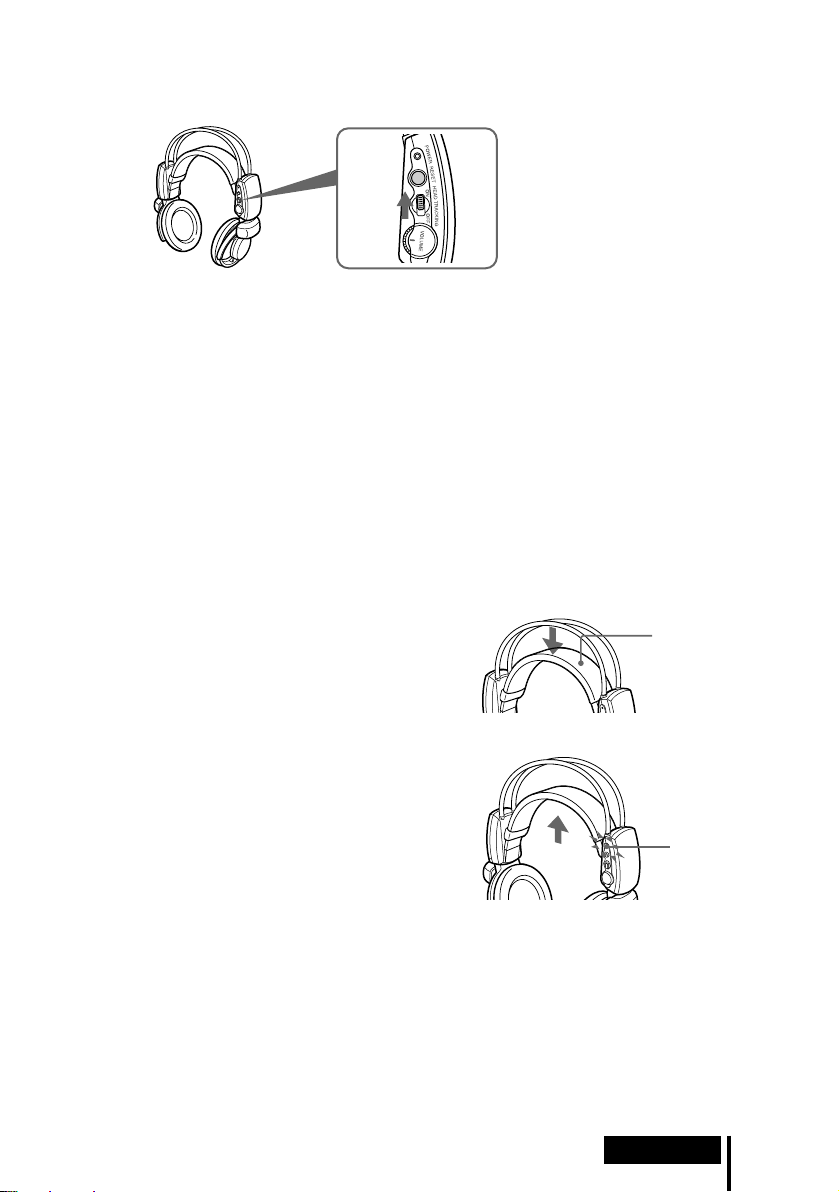
3 Self-adjusting band
The headphones automatically turn on
when you put on the headphones.
4 POWER indicator
By pulling up the self-adjusting band, the
indicator lights red when battery power
is sufficient.
6
7
1
8
9
5 RESET button (See page 21 for
details)
Use to reset the location information of
the head tracking function.
6 HEAD TRACKING switch (See page
21 for details)
To activate the head tracking function,
switch it to ON when the output mode of
the processor is set to VIRTUAL (other
than OFF).
7 VOL (Volume) control
Use to adjust the volume.
8 Ear pad (right)
9 Ear pad (left)
GB
8
Preparation
Page 9
Charging the Rechargeable Batteries
The supplied rechargeable batteries should be recharged before using them for the
first time.
Be sure to use the supplied battery charger. Up to four batteries can be charged at
once.
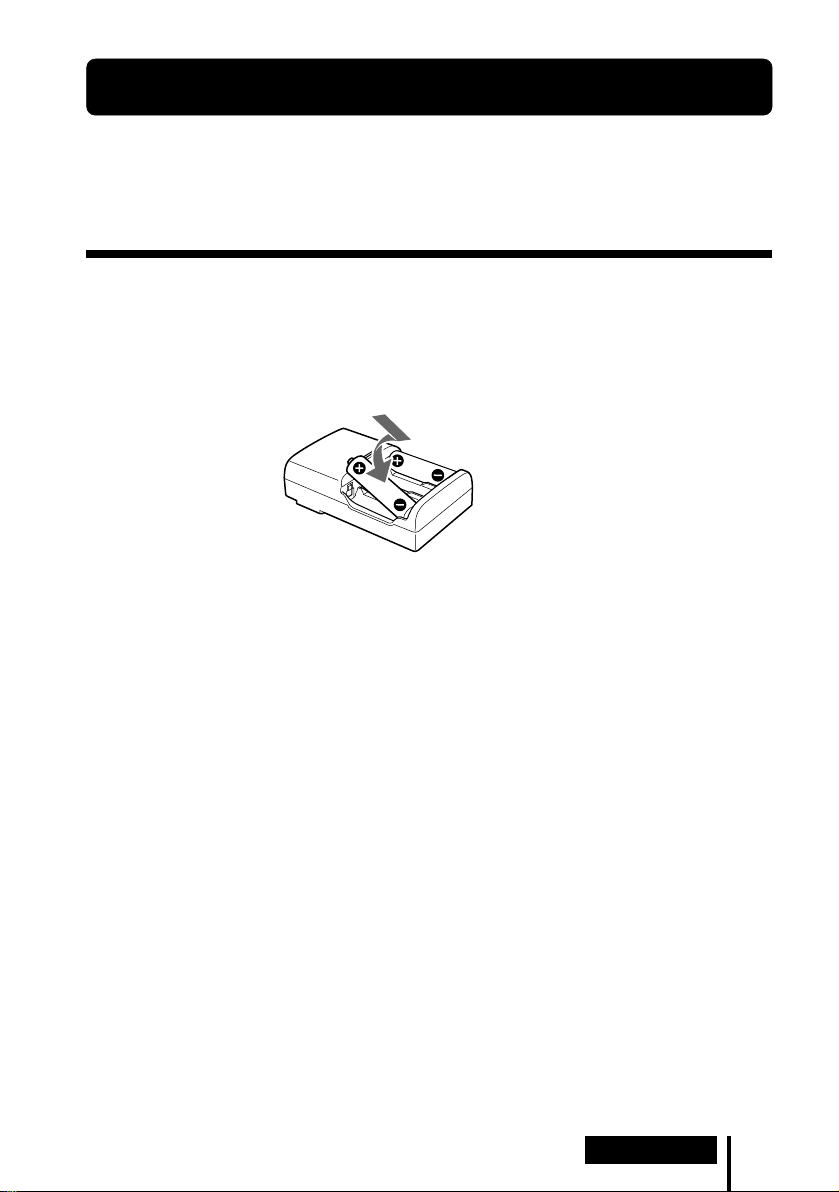
Inserting the rechargeable batteries into the battery charger
Insert the two supplied rechargeable nickel-metal hydride batteries with the 3 and #
ends in the correct direction.
Insert the # end first.
Notes
• Press the rechargeable nickel-metal hydride batteries into the charger until they fit into place.
• When charging two batteries, the charge mode becomes high-speed and completes charging in
approximately 90 minutes.
Preparation
GB
9
Page 10
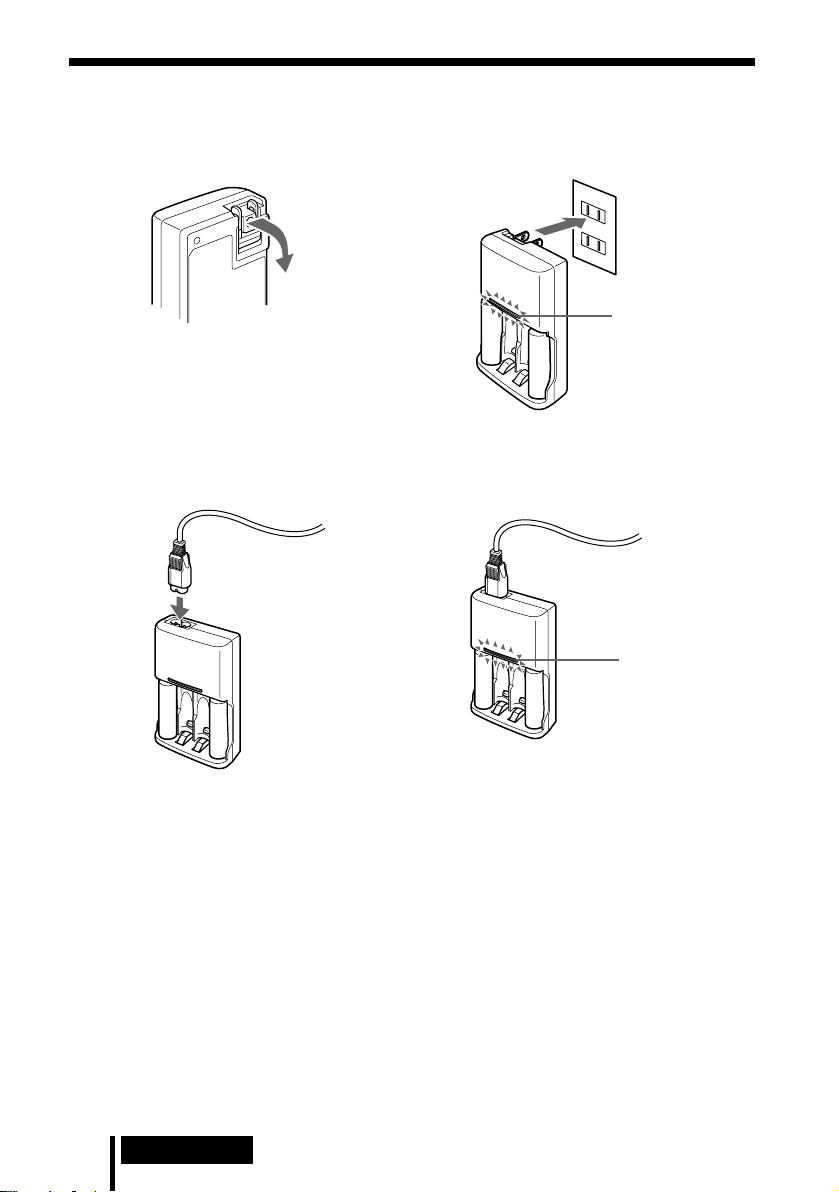
Charging
(US and Canadian model only)
1 Pull out the charging plug. 2 Insert into the wall outlet.
Charge indicator
lights up.
(UK, Hong Kong and European model)
1 Attach the charging plug to the battery charger. 2 Insert into the wall outlet.
, to the wall
outlet
Charge indicator
lights up.
Charging is completed in about 90 minutes*.
The charge indicator goes off when charging is completed. Unplug the charger from
the outlet, and take out the rechargeable batteries.
* In high-speed charging mode.
Usage time
Approx. 7 hours*
* The usage time stated above is attainable only when the fully charged batteries are used. The
time may alter according to the temperature or conditions of use.
GB
10
Preparation
Page 11

Notes
• Up to four batteries can be charged at once with the supplied battery charger. The charging
time for the batteries varies according to the number of batteries at the same time.
- When charging one or two rechargeable batteries in the battery charger : Approx 90 minutes
(high-speed charging mode)
- Other than above : Approx 180 minutes
• During charging, the charger and the batteries become slightly warm. This is not a
malfunction.
• Be sure to unplug the charger when it is not being used.
• Do not use or leave the charger near heating components, hot areas exposed to direct sunlight,
or damp areas.
• The charging indicator may turn off sooner than usual when charging batteries that have not
been completely discharged.
• The rechargeable nickel-metal hydride batteries should be replaced with new ones when they
last only half the expected time when fully charged. Purchase Sony R6 (size AA) rechargeable
nickel-metal hydride batteries (NH-AA). You can order the batteries from the store where you
purchased this unit, or at your nearest Sony dealer.
• This power unit is intended to be correctly orientated in a vertical or floor mount position.
WARNING
The supplied battery charger can charge Sony R6 (size AA), R03 (size AAA) rechargeable
nickel-metal hydride batteries (NH-AA, NH-AAA). Never attempt to charge other types of
rechargeable batteries or dry-cell batteries. Using them in combination with other batteries
may cause leakage, overheating and explosion.
Preparation
11
GB
Page 12
1 Connection
Connecting the Headphone System
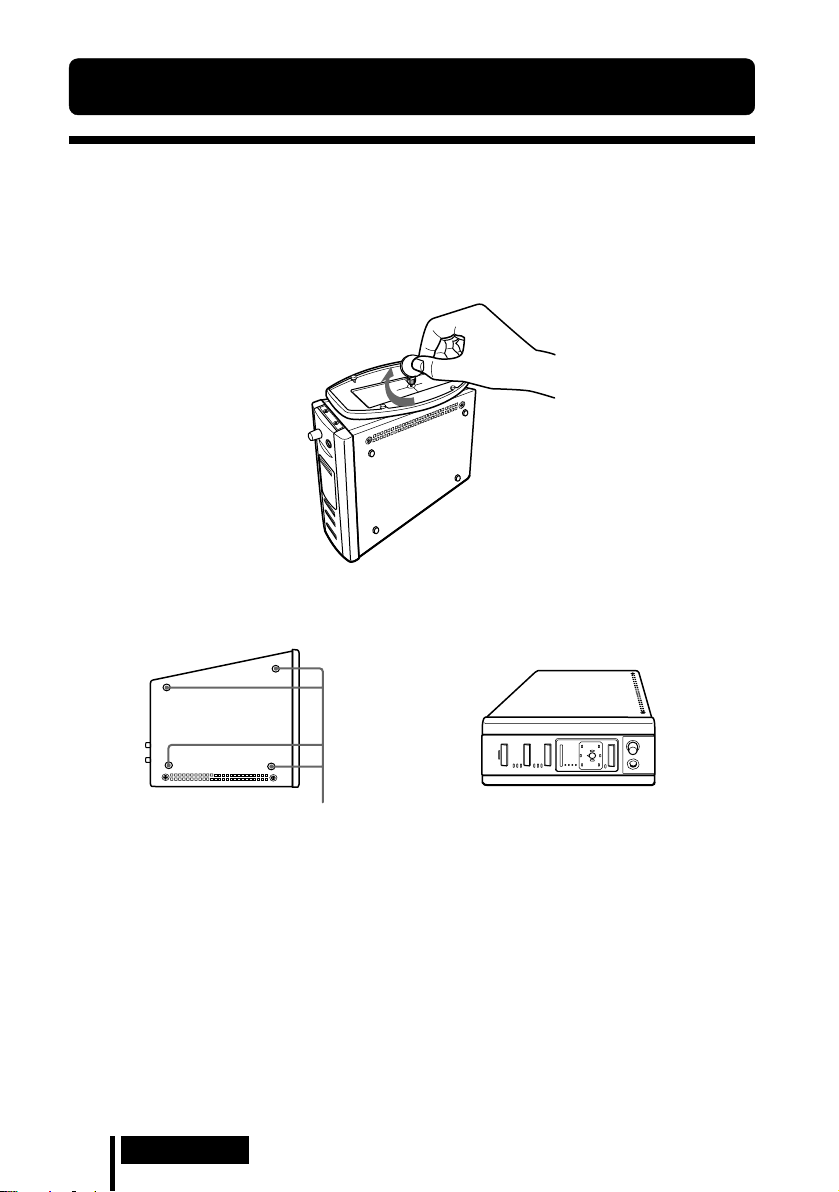
Setup
You can place the processor in an upright position or on its side.
To use in an upright position:
Use a coin to attach the supplied stand to the bottom of the processor.
To use on its side:
Place the processor so that the four rubber supports are at the bottom.
,
Rubber supports
Notes
• Install the processor in a location where there are no obstructions between the processor and
headphones when used.
• Do not install the processor in unstable locations, such as on top of the TV. If the processor
falls down, it could cause an injury or be damaged.
• If the processor is placed in an upright position, always attach the stand for added safety.
• If the processor is placed on its side, the full infrared transmission range may not be obtained
depending on installation conditions.
• If the processor is placed on its side, do not place the processor on the side not having the
rubber supports.
GB
12
Connection
Page 13
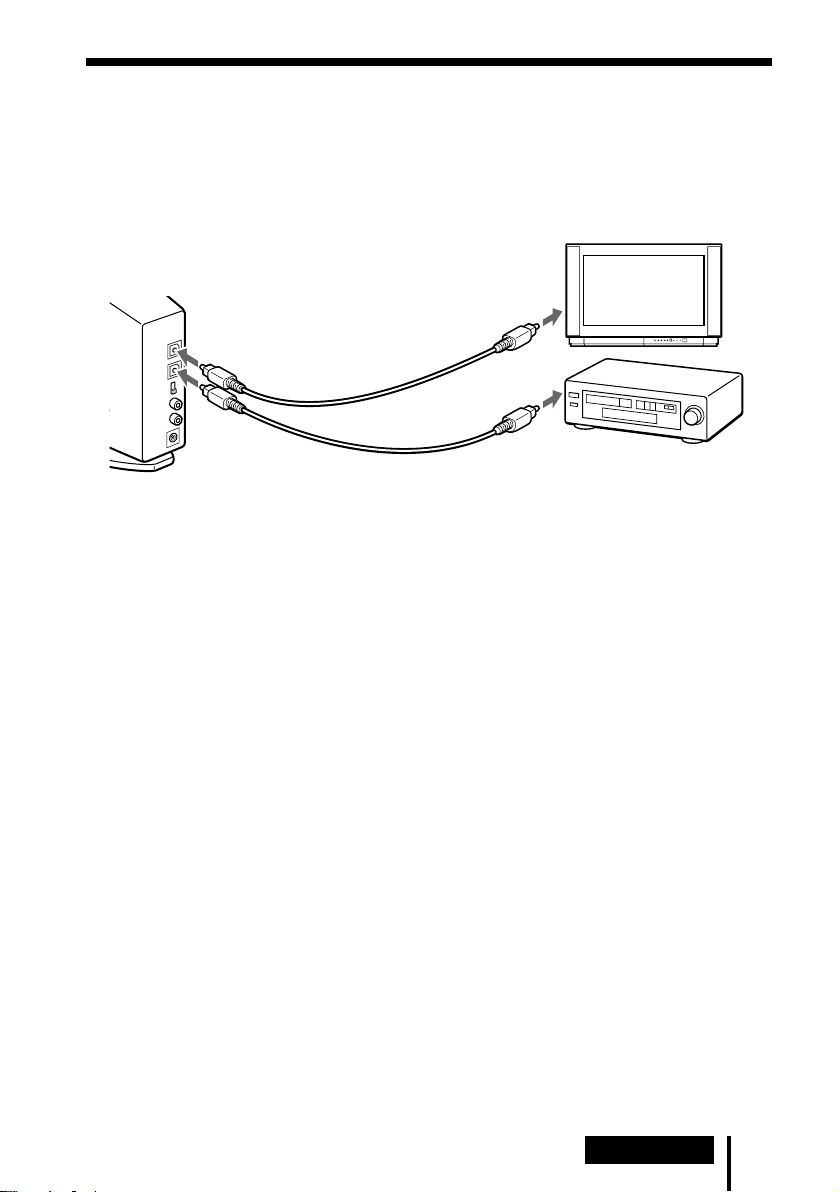
Connecting the processor to digital components
Use the supplied optical digital connecting cable to connect the optical digital output
jack on a DVD player (or LD player), Digital TV, or other digital component to the
DIGITAL IN 1 or 2 jack of the processor.
Processor
To DIGITAL
IN jack
Notes
• The optical digital connecting cable is an extremely high-precision device and is sensitive to
jolts and external pressure. Therefore, be careful when inserting and removing the cable plug.
• This system is not provided with AC-3 RF jacks, and so AC-3 RF signals from LD players
cannot be directly input.
• The digital input for the processor does not support sampling frequencies of 96 kHz. Set the
digital output setting for the DVD player to 48 kHz when using this system. Noise may be
heard when a 96 kHz digital signal is input.
DTS
•A DTS-compatible DVD player is required for the playback of DVDs recorded in DTS audio.
(For more details, see the instruction manual of the DVD player.)
• When playing LDs and CDs recorded in DTS format, noise may occur when fast forwarding or
rewinding. This is not a malfunction.
• If the DTS digital output is set to “OFF” on the DVD player, no sound may be heard even if the
DTS output is selected in the DVD menu.
• No sound may be heard when a DVD player and this unit is analogue connected. In this case,
use a digital connection.
Optical digital connecting
cable (supplied)
Match the orientation of
the plug with the jack, and
then insert until the plug
fits into place.
(sold separately)
To optical
digital
output jack
DVD player, LD player, BS digital
tuner, or other digital component
having an optical digital output
jack
(Continued)
Connection
13
GB
Page 14
Connecting cables (sold separately)
• Use an optical cable (POC-5A, etc., sold separately) to connect more than two external
components.
• Use the POC-5AB (mini-plug y rectangular plug, sold separately) when connecting the
digital output mini-jack on portable DVD players, portable CD players, or other digital
components to the DIGITAL IN jack.
Optical digital selector (sold separately)
Use of the SB-RX100P (Optical digital selector (4-line input, 3-line output), sold separately) is
recommended when connecting more than one digital
component.
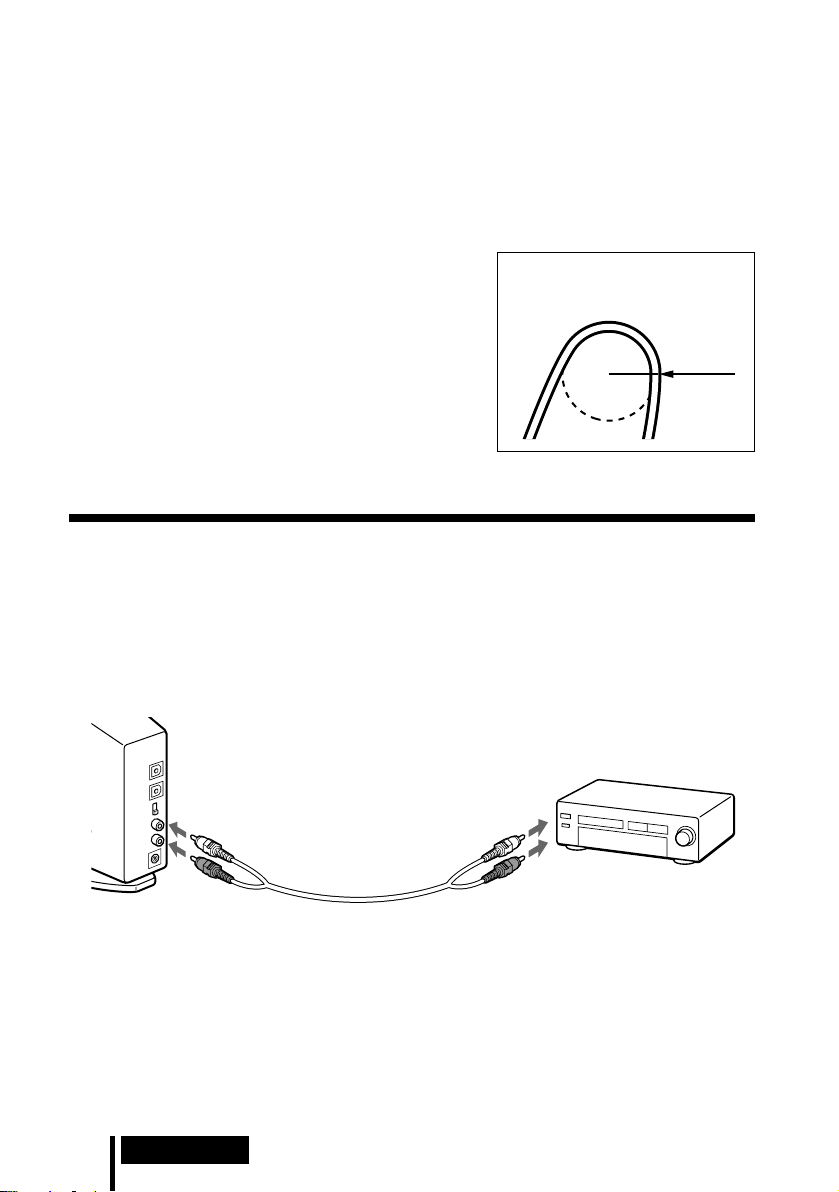
Notes on optical digital connecting cable
• Do not drop objects on the optical digital connecting
cable or expose the cable to shocks.
• Grasp the plug to connect or disconnect the cable.
• Be sure that the ends of the optical digital connecting
cable are kept clean. Dust at the ends of the cable can
degrade performance.
• When storing the system, attach the cap to the end of the
plug and be careful not to fold or bend the optical digital
connecting cable with a bend radius less than 25 mm.
The bend radius of the optical
digital connecting cable should be
no less than 25 mm.
25 mm
Connecting the processor to analogue components
Use an audio cord (sold separately) to connect to the audio output jacks on the VCR,
TV, or other component to the LINE IN (L/R) jacks on the processor.
Processor
VCR, TV, or other
To LINE IN jacks
Audio left (L, white) Audio left (white)
Audio cord
(sold separately)
Audio right (R, red)
Connecting cables (sold separately)
Use the RK-G129 cable (stereo mini-plug y pin plug x 2) when connecting a stereo mini-jack
(line out jack or headphones jack) to the LINE IN jacks.
In this case, set the volume on the player at a medium level. Noise can occur if the volume on the
player is set too low.
See page 29 for details about other connecting cables (sold separately).
GB
14
Connection
To audio output jacks
Audio right (red)
component
Page 15
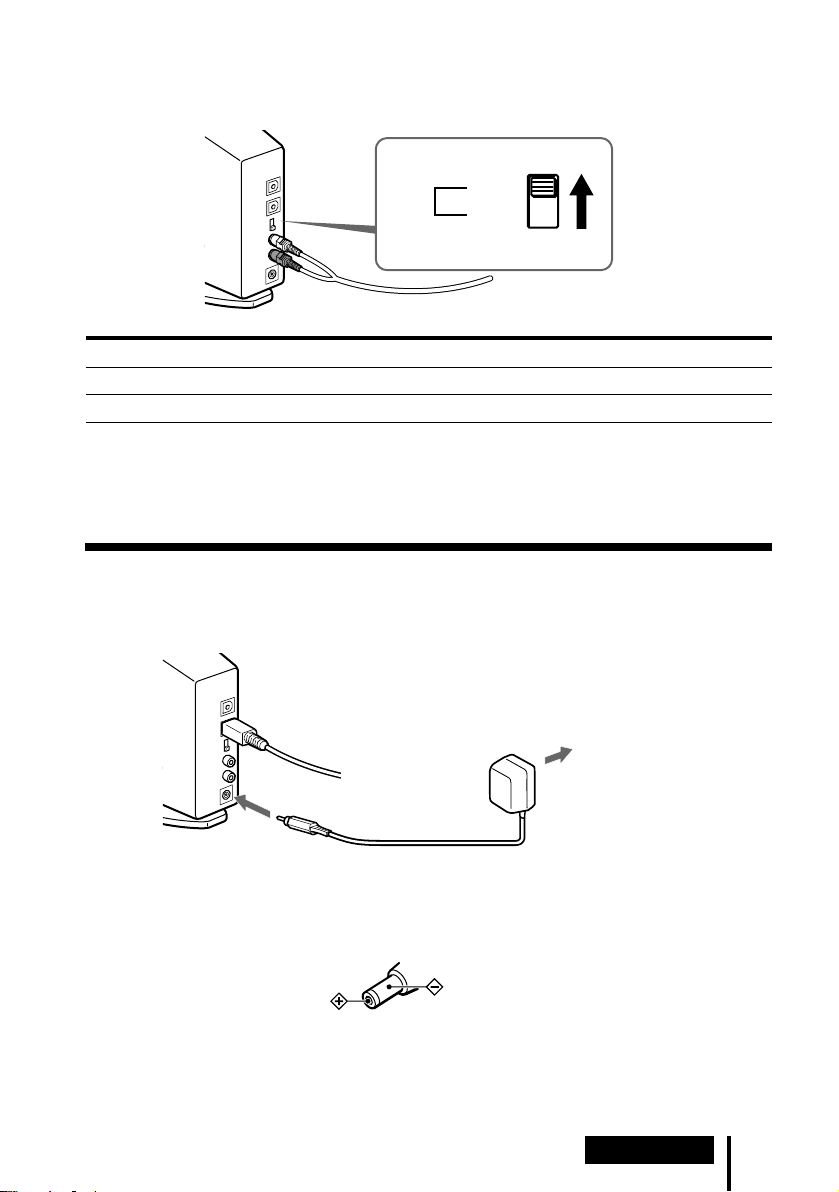
Setting the input level
If the volume is low using analogue input, set the ATT (attenuator) switch to “0dB”.
ATT
0dB
–8dB
Setting Connected components
0dB TV, portable components, and other components with a low output level
–8dB Other components (initial settings)
Notes
• Be sure to lower the volume before setting the ATT switch.
• If audio input to the LINE INPUT jacks is distorted (sometimes, noise can be heard at the same
time.), set the ATT switch to “–8dB”.
Plugging into the wall outlet
Processor
AC power
adaptor
To the wall outlet
To DC IN jack
Notes
• Be sure to use the supplied AC power adaptor. Using AC adaptors with different plug polarity
or other characteristics can cause product failure.
Unified polarity plug
• Be sure to always use the supplied AC power adaptor. Even AC power adaptors having the
same voltage and plug polarity can damage this product due to the current capacity or other
factors.
Connection
15
GB
Page 16
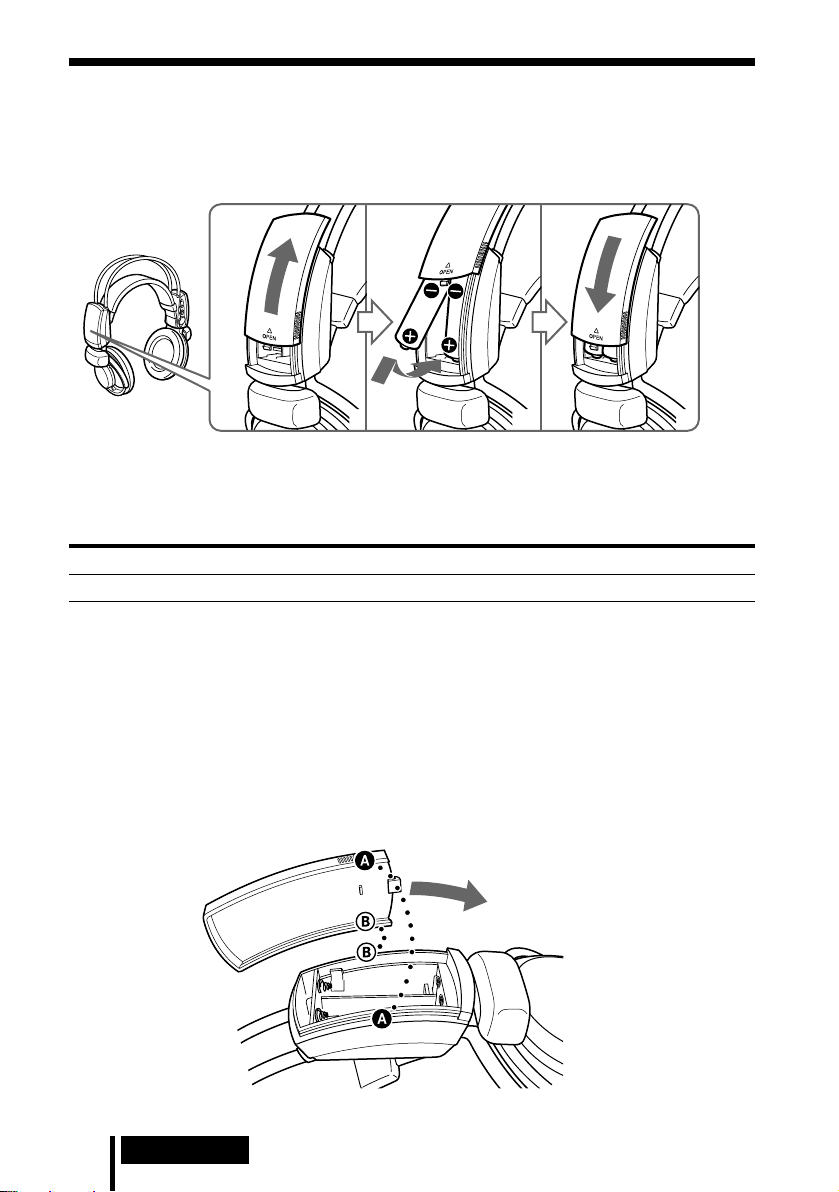
Inserting the batteries in the headphones
As shown in the illustration below, insert two fully-charged (page 9) rechargeable
nickel-metal hydride batteries with the 3 and # ends in the correct direction, and
insert the # side first.
1
When using optional batteries
You can also use R6 (size AA) alkaline batteries. Insert the batteries as shown above.
Usage times for dry-cell batteries
Battery type Usage time
Sony alkaline battery LR6 (SG) Approx. 7 hours*
23
* Usage time stated above may vary according to the temperature or conditions of use.
Note
Manganese batteries cannot be used with this unit.
How to reattach the battery cover should it come off
As shown in the illustration, align A with A, and B with B, reattach, and then slide
the cover in place.
16
GB
Connection
Page 17
1 Operation
Listening to the Sound of a Connected Component
Before starting operation, be sure to read “Connecting the
Headphone System” (pages 12 to 16) and make the proper
connections.
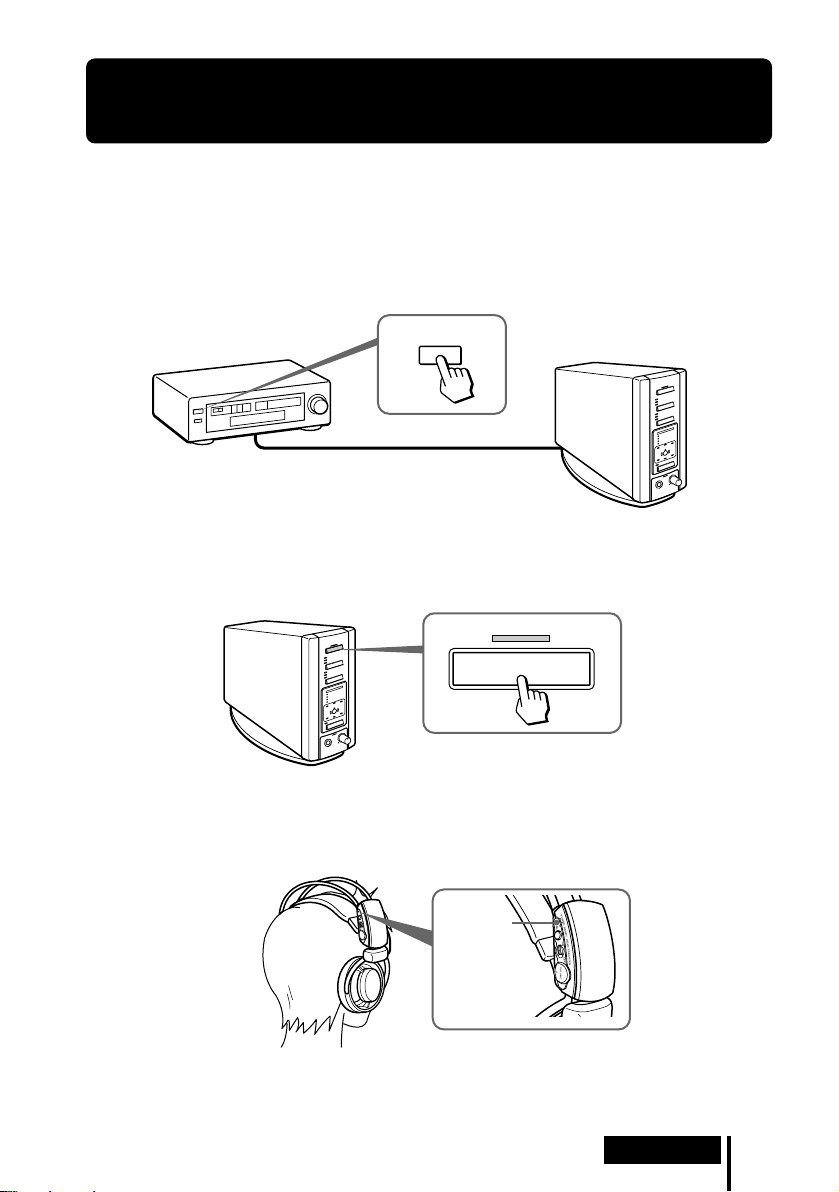
1 Turn on the component connected to the processor.
DVD player or other audio
and video component
POWER
2 Press POWER to turn on the processor.
The POWER indicator lights green.
POWER
3 Put on the headphones.
The POWER indicator lights red, and the headphones automatically turn on.
POWER
indicator
(Continued)
Operation
17
GB
Page 18
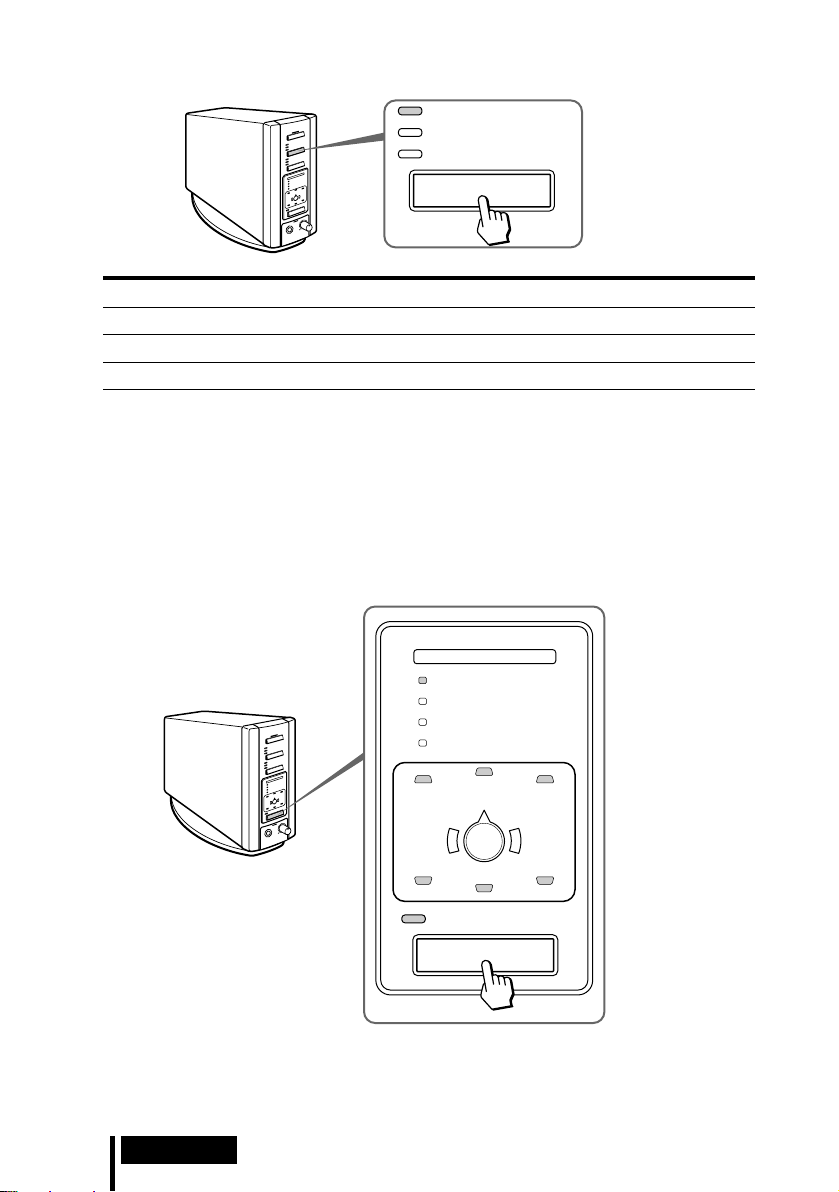
4 Press INPUT to select the component you want to listen to.
DIGITAL 1
DIGITAL 2
ANALOG
INPUT
Indicator light Selected sound source
DIGITAL 1 Sound of the component connected to DIGITAL IN 1 jack
DIGITAL 2 Sound of the component connected to DIGITAL IN 2 jack
ANALOG Sound of the component connected to LINE IN jacks
Note
To listen to dual audio (MAIN/SUB) sound sources, connect to the LINE IN jacks, and then
select the sound source you want to listen to on the player, TV, or other component.
5 Start playback of the component selected in step 4.
6 Press OUTPUT repeatedly to select the output mode (surround effect) (see
page 19).
18
GB
Operation
DECODE MODE
DOLBY DIGITAL
DOLBY PRO LOGIC II
DTS
MPEG-2 AAC
C
L
LS RS
CS
VIRTUAL
OUTPUT
R
Page 19
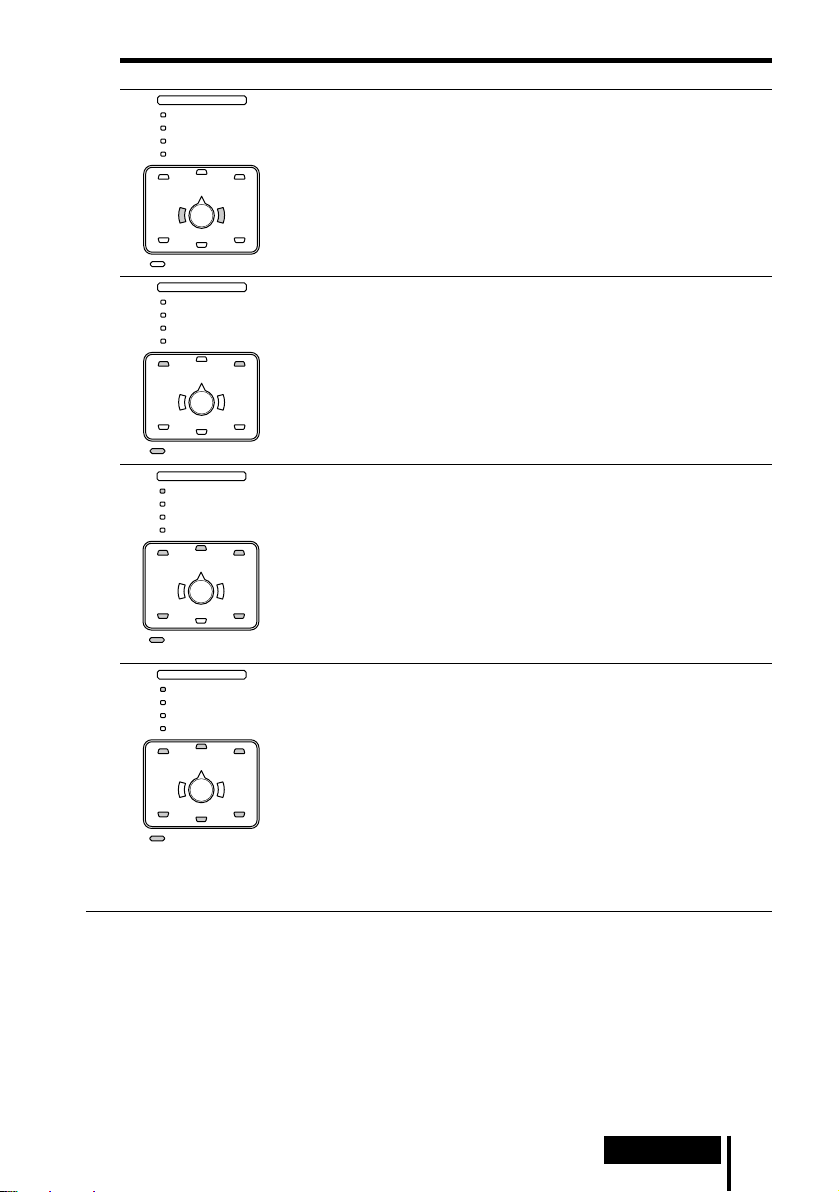
Indicator light Output mode (surround effect)
DECODE MODE
DOLBY DIGITAL
DOLBY PRO LOGIC II
DTS
MPEG-2 AAC
C
L
LS RS
CS
VIRTUAL
DECODE MODE
DOLBY DIGITAL
DOLBY PRO LOGIC II
DTS
MPEG-2 AAC
C
L
LS RS
CS
VIRTUAL
DECODE MODE
DOLBY DIGITAL
DOLBY PRO LOGIC II
DTS
MPEG-2 AAC
C
L
LS RS
CS
VIRTUAL
DECODE MODE
DOLBY DIGITAL
DOLBY PRO LOGIC II
DTS
MPEG-2 AAC
C
L
R
R
R
R
OFF
Regular headphone playback.
VIRTUAL FRONT
Virtual effect where the sound seems to be coming from two
speakers (right and left) located in front of you.
VIRTUAL SURROUND 5.1
Virtual surround effect where the sound seems to be coming from
not only two front speakers (right and left), but also from one centre
speaker, two rear speakers (right and left), and a subwoofer.
VIRTUAL SURROUND 6.1
This mode can be selected only when the input signal is multi
channel source of DOLBY DIGITAL or DTS.
Virtual surround effect where the sound seems to be coming from
three front speakers (right, left and centre), and three rear speakers
(right, left and centre), and a subwoofer.
LS RS
CS
VIRTUAL
Note
Select this mode in playback mode of the multichannel source of
DOLBY DIGITAL or DTS (Make sure that the DECODE MODE
indicator lights up). This mode cannot be selected in the other modes
(stop mode, menu display, etc.).
DECODE MODE indication
When the output mode is set to VIRTUAL SURROUND 5.1 or VIRTUAL SURROUND 6.1, the
processor automatically identifies the format of the input audio signal and the corresponding
indicator lights up. Switch the audio between Dolby Digital, DTS, MPEG-2 AAC, etc., on the
connected equipment (DVD player, Digital Broadcasting Satellite Receiver, etc.).
• DOLBY DIGITAL: Input signal recorded in the DOLBY DIGITAL format.
• DOLBY PRO LOGIC II: Input 2-channel signal (digital or analogue) processed by DOLBY PRO
LOGIC II.
• DTS: Input signal recorded in the DTS format.
• MPEG-2 AAC: Input signal recorded in the MPEG-2 AAC format.
(Continued)
Operation
19
GB
Page 20
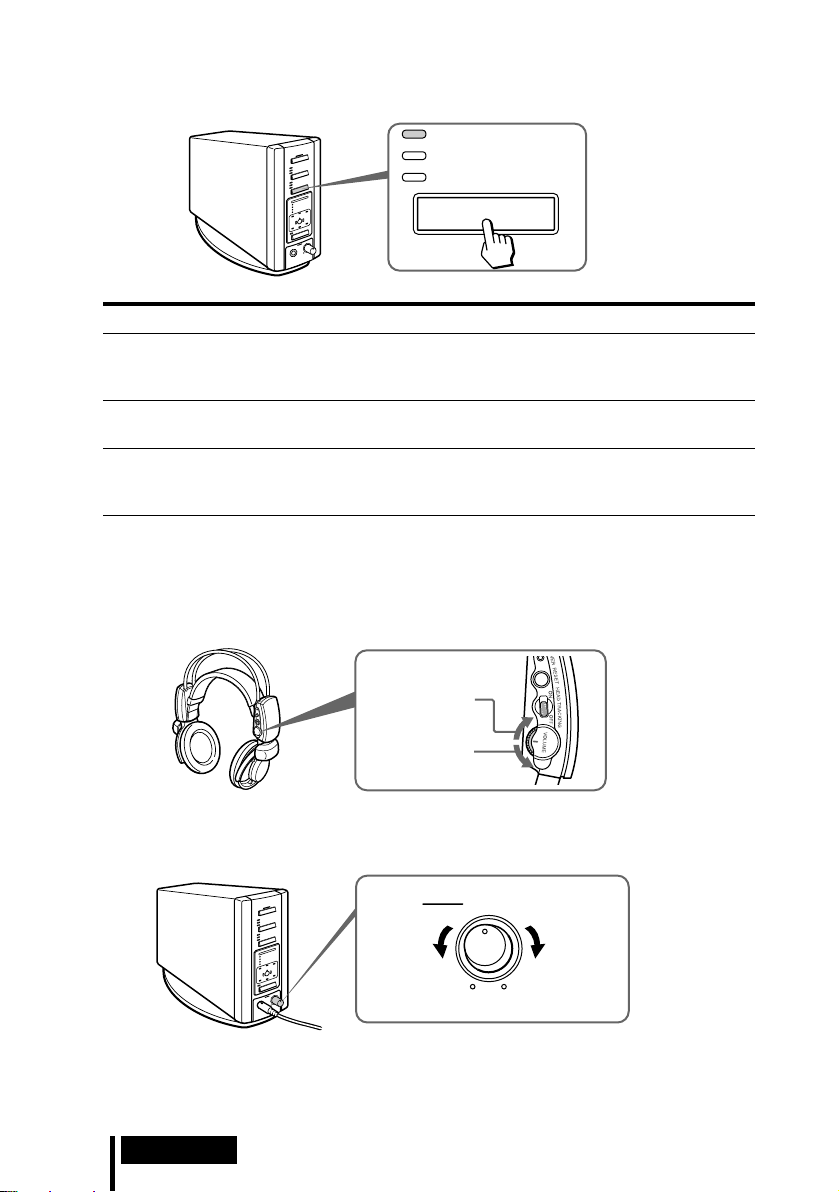
7 Press EFFECT to select the desired sound field. (Only when an item other
than “OFF” is selected in step 6 on page 18.)
CINEMA 1
CINEMA 2
MUSIC
EFFECT
Indicator light Sound field and suitable sound source
CINEMA 1 Mode which reproduces the sound field of a wide room like a movie
CINEMA 2 Mode which produces more realistic sound than CINEMA 1, as if
MUSIC Mode which reproduces the sound field of a listening room with a
Note
If the output mode (sound effect) is set to “OFF” in step 6 on page 18, you cannot select a
sound field, even if you press EFFECT.
theatre or a concert hall.
This mode is suitable for movie sound sources.
you are in the movie. This mode is suitable for movie sound sources.
good acoustic environment.
This mode is suitable for music sources.
8 Adjust the volume.
Raise the
volume
Lower the
volume
To adjust the volume of headphones (sold separately) connected to the
PHONES jack
Turn PHONES—LEVEL to adjust the volume.
MIN
LEVEL
MAX
Raise the
volume
PHONES
Lower the
volume
Note
When watching movies, be careful not to raise the volume too high in quiet scenes. You can
hurt your ears when a loud scene is played.
GB
20
Operation
Page 21
9 Set the head tracking function to ON. (Only when an item other than “OFF”
is selected in step 6 on page 19.)
Face the source (for example,
your TV) and switch the
HEAD TRACKING switch
to ON. Wait for 2 seconds
without moving.
Do not move your head until
the head tracking system is
stabilized. No sound is
output for this period.
After the head tracking system stabilizes, playback sound can be heard.
After this, even if you turn your head in any directions, the sound will be heard as if from
the front.
Notes
• Always wear the headphones vertically (as shown on page 17) so that the head
tracking system will be stable.
• Whenever the HEAD TRACKING switch is set to ON, and whenever you put on the
headphones with its power on, always wait for 2 seconds without moving your head as
the head tracking system newly stabilizes each time.
• If the sound from the headphones (while facing your TV) seems to be different from the
actual direction of your TV, face forwards and press the RESET button on the
headphones.
The headphones automatically turn off when they are taken off
— Auto Power On/Off Function
When not in use, be careful not to hang the
headphones in such a way as to activate the
Auto Power On function, as this will
consume battery power.
Self-adjusting
band
To check the remaining battery power
Pull up the self-adjusting band and check
the POWER indicator. The batteries are still
serviceable when the POWER indicator
lights red.
Charge the rechargeable batteries or use
POWER
indicator
new alkaline batteries if the POWER
indicator flashes and an intermittent beep
sound is heard from the headphones.
Transition time between modes
When pressing buttons on the processor to change to new modes, the transition time
between modes may vary. This is due to differences in system control between
modes.
(Continued)
Operation
21
GB
Page 22
If no sound is heard from the headphones
A short beep sound is heard repeatedly and the Muting Function is automatically
activated if the sound output from the headphones is cut off when the headphones
are outside the infrared transmission area, or when the infrared signals are
interrupted. The Muting Function is automatically cancelled when you get closer to
the processor or there is no longer anything in the way of the infrared signals.
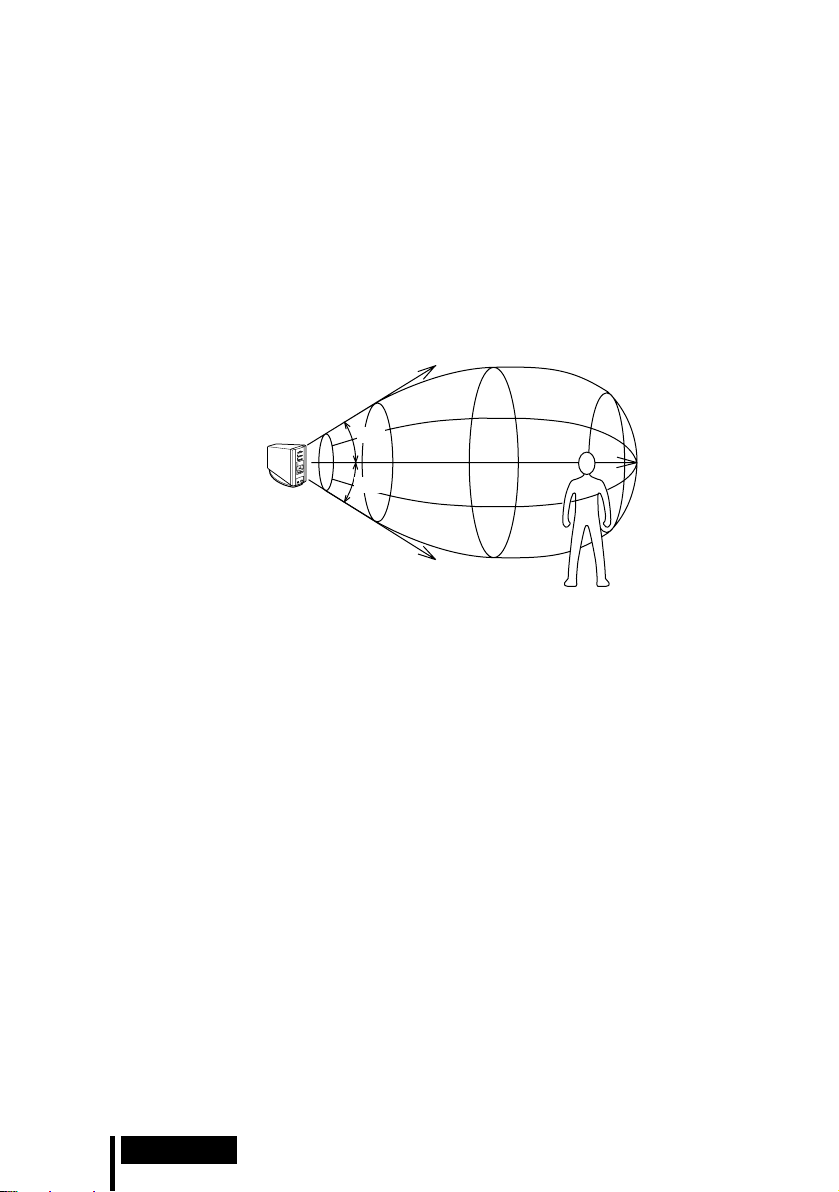
Infrared transmission area
The approximate infrared transmission area from the processor is shown in the
illustration below.
Infrared signal
Approx.
Digital surround
processor
Notes
• Because this system uses infrared signals, sound may be interrupted if these signals are
obstructed. This is due to the infrared signal characteristics, and is not a malfunction.
• Do not cover the infrared signal sensor with your hand or hair.
• As long as the headphones are in the transmission area shown in the illustration above, the
headphones can have any orientation with respect to the processor (facing, turned 90°, or
turned 180°).
• The sound may differ depending on the processor position and conditions in the room. It is
recommended that you place the processor in the location which produces the clearest sound.
• Mixed signals may result if the processor is used with other processors or transmitters.
4 m
Approx.
4 m
45°
45°
Approx.
10 m
22
GB
Operation
Page 23

If an audio signal is not input for 10 minutes
Infrared signal emission from the processor automatically stops when an audio signal
is not input for 10 minutes. The infrared signals are automatically emitted when an
audio signal is input again. The emission of the infrared signals may stop when an
extremely low sound is emitted for about 10 minutes during analogue input. If this
happens, raise the volume of the connected audio and video component and lower
the volume of the headphones.
Notes
• There may be differences in brightness of the infrared emitter on the digital surround
processor. However, this does not affect the transmission area.
• The headphones should be used within the infrared transmission area (see “Infrared
transmission area” on page 22).
• Do not use this system in areas exposed to direct sunlight or strong light. The sound may be
interrupted.
• These open-air headphones are so designed that sound may also leak outside the headphones.
Be careful not to turn up the volume too high that it bothers people around you.
• The surround sound effect may not be obtained from sound sources which do not incorporate
video, such as music CDs.
• This system simulates the average HRTF* common to most people. However, the effect can
differ from person to person since the HRTF can vary between individuals.
* Head Related Transfer Function
Operation
23
GB
Page 24
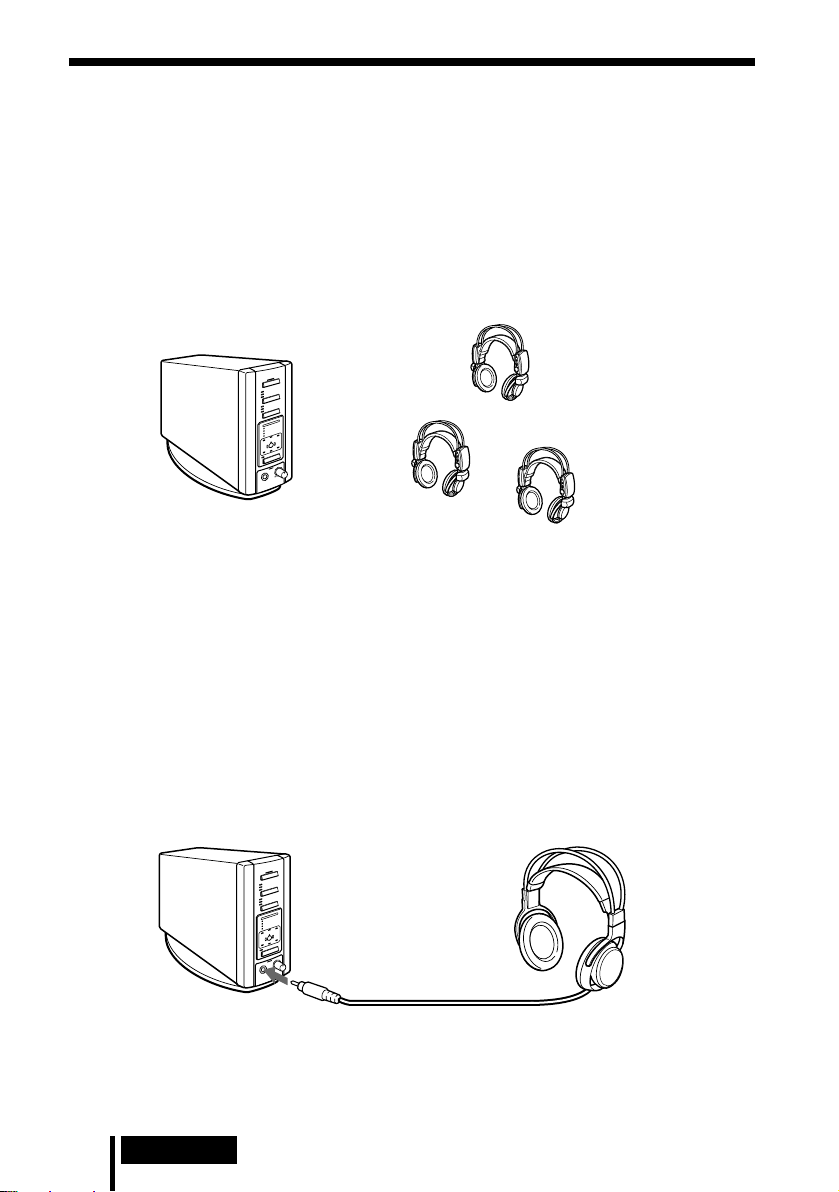
Additional Headphones
Headphones can be added to this system in one of two ways.
To enjoy surround sound using cordless headphones with more than one person
t By using additional MDR-IF8000 cordless infrared headphones (sold separately),
more than one person can enjoy the surround sound experience at the same time.
* There is no limit to the number of headphones that can be used within the
infrared transmission area.
Processor
Note
Because this unit employs a digital infrared transmission system, cordless infrared analogue
headphones (MDR-IF5000, etc.) cannot be used.
MDR-IF8000 (sold separately)
To connect normally wired headphones
t The PHONES jack is adjusted for the MDR-F1 corded full-open air type
headphone (sold separately), so connecting the MDR-F1 allows you to enjoy high
quality surround sound. You can also use any corded open-air headphones with
this system.
To obtain sufficient surround sound effect, use of MDR-IF8000 cordless stereo
headphones or MDR-F1 corded full-open type headphones is recommended.
Processor
MDR-F1 corded full-open air type
headphones (sold separately) or other
corded open-air headphones
To PHONES jack
Notes
• When removing the headphones from the PHONES jack, always grip the plug. Never pull on
the cord.
• The surround effect may not be obtained when using closed-type and in-ear headphones.
GB
24
Operation
Page 25

1 Additional Information
Troubleshooting
If you run into any problems using this headphone system, use the following
checklist. Should any problem persist, consult your nearest Sony dealer.
Symptom Cause and remedy
No sound
Distorted sound
(sometimes with
noise)
Low sound
, Check the connection between the processor and the AV component.
, Turn on the AV component connected to the processor, and start the
programme (playback).
, Check that you have selected the component you want to listen to.
, If you connect the processor to an AV component using the headphone jacks,
raise the volume level on the connected AV component.
, Raise the headphone volume.
, The batteries of the headphones are completely exhausted.
Pull up the self-adjusting band and if the POWER indicator is turned off,
charge the rechargeable batteries or replace the alkaline batteries. If the
POWER indicator is still turned off, take the unit to your nearest Sony dealer.
, You are trying to play a DTS audio track on a DVD player that does not
support DTS.
Either use a DVD player that supports DTS, or select a Dolby Digital or PCM
audio track.
, You are playing back a DVD disc recorded in DTS when DTS digital output
setting for the DVD player (including game machines) is “OFF”.
Refer to the operating instructions of the DVD player, and change the DTS
digital output setting to “ON”.
, You are playing back a DVD disc (including game machines) recorded in DTS
when the DVD player and the processor are analogue connected.
Connect them in digital. (Analogue sound may not be output from the DVD
player.)
, The head tracking function does not work correctly.
When the HEAD TRACKING switch is set to ON after putting the
headphones on your head, or when you put them on with the HEAD
TRACKING switch ON, wait for 2 seconds without moving your head. If you
hear no sound even after tying this, take off the headphones, and then put
them on again.
, Set the ATT switch on the processor to “–8dB”.
, If you connect the processor to an AV component using the headphone jacks,
lower the volume level on the connected AV component.
, When using DTS audio sources, set the processor output mode to VIRTUAL
SURROUND (page 19).
, Set the ATT switch on the processor to “0dB”.
, If you connect the processor to an AV component using the headphone jacks,
raise the volume level on the connected AV component.
, Raise the headphone volume.
(Continued)
Additional Information
25
GB
Page 26

Symptom Cause and remedy
Short beep sound
is heard.
Long beep sound
is heard
The surround
sound effect is
not obtained
The sound from the
headphones seems
to be different from
the actual direction
of your TV.
The DOLBY
DIGITAL indicator
does not turn on
DTS indicator light
does not turn on
MPEG-2 AAC
indicator does not
light up.
, The headphones cannot receive infrared rays from the processor.
• Turn on the processor.
• Check the connection between the processor and the AC power adaptor,
between the AC power adaptor and the AC power socket.
• Check if there is an obstacle between the processor and the headphones.
• Use the headphones nearer to the processor.
• Change the position or angle of the processor.
• Check if your hand or hair covers the infrared signal sensor of the
headphones.
• If you use the headphones near a window exposed to direct sunlight, draw
a curtain or a blind to block the sunlight. Or use the headphones where you
are not exposed to the direct sunlight.
• If you use this system near a plasma display panel, move away from it.
, The batteries of the headphones are exhausted. Pull up the self-adjusting
band and if the POWER indicator is flashing, charge the rechargeable batteries
or replace the alkaline batteries. If the POWER indicator is still flashing and
beep sound is still heard, take the unit to your nearest Sony dealer.
, Press the OUTPUT button to select VIRTUAL SURROUND mode (page 18,19).
, The audio being played is not a multichannel signal.
The surround effect does not work for monaural sound sources.
, Face forward (e.g. to your TV) and press the RESET button on the
headphones.
, The digital audio output setting for the DVD player (including game
machines) may be set to “PCM”.
Refer to the operating instructions supplied with the DVD player, and change
the setting (such as “Dolby Digital/PCM” or “Dolby Digital”) for usage with
components having built-in Dolby Digital decoders.
, Playback signals are not recorded in Dolby digital format.
, The audio for the chapter being played is not a Dolby Digital signal.
, The DTS digital output setting on the DVD player (including game machines)
is set to OFF. Refer to the operating instructions supplied with the DVD
player, and set the DTS digital output setting to ON.
, Playback signals are not recorded in DTS format.
, The audio for the chapter being played is not a DTS signal.
, The DVD player does not support DTS format.
Use a DVD player that supports DTS.
, Playback signals are not recorded in MPEG-2 AAC format.
26
GB
Additional Information
Page 27

Symptom Cause and remedy
CS (back surround)
indicator does not
light up.
, The format of input signal is other than Dolby digital (multi channel) or DTS
(multi channel).
• Play a DVD software of Dolby digital (multi channel) or DTS (multi
channel) format.
• Change the setting on the output component so that the correct format is
input.
, Dolby digital (multi channel) or DTS (multi channel) sound is not played back.
First start playback on the connected component, and make sure that the
DECODE MODE indicator lights up, then change the output mode.
The batteries
cannot be
charged
, Dry-cell batteries are being used.
Insert the supplied or optional rechargeable batteries.
, Rechargeable batteries other than supplied or specified batteries are being
used.
Insert the supplied or specified rechargeable batteries.
Additional Information
27
GB
Page 28

Precautions
On safety
• Do not drop, hit, or otherwise expose the
processor or headphones to strong shocks
of any kind. This could damage the
product.
• Do not disassemble or attempt to open any
parts of the system.
On power sources and placement
• If you are not going to use the system for a
long time, unplug the AC power adaptor
from the outlet. When removing the plug,
grip the AC power adaptor. Do not pull on
the cord.
• Do not place the system in any of the
following locations.
– Location exposed to direct sunlight, near
a heater, or other extremely high-
temperature location
– Dusty location
– On an unsteady or inclined surface
– Location exposed to large amounts of
vibrations
– Bathroom or other high-humidity
locations
On headphones
Act considerately
When the volume is too high, the sound leaks
outside the headphones. Be careful not to
raise the volume too high that it bothers
people around you.
There is a tendency to raise the volume when
using in noisy places. However, the volume
should be kept at a level where you can
respond when called while listening to the
headphones.
On ear pads
The ear pads are replaceable. Replace them
when they are worn out. To replace the ear
pads, consult your nearest Sony dealer.
On cleaning
Use a soft cloth slightly moistened with mild
detergent solution. Do not use solvents such
as thinner, benzene or alcohol as these may
damage the surface.
When the product breaks
• When the product breaks, or if a foreign
object gets inside the unit, immediately turn
off the power and consult your nearest
Sony dealer.
• When taking the system to a Sony dealer,
be sure to take both the headphones and
processor.
28
GB
Additional Information
Page 29

Specifications
Digital surround processor (DP-IF8000)
Decoder functions Dolby Digital
Dolby Pro Logic II
DTS
DTS-ES 6.1ch
MPEG-2 AAC
Virtual sound function OFF
Modulation System DQPSK
Secondary carrier wave frequency
Transmission distance Approx. 10 m to the
Transmission range 12 – 24,000 Hz
Distortion rate 1% or less (1 kHz)
Audio inputs Optical input
Power requirements DC 9 V (from the
Dimensions (w/h/d) Approx. 85 × 190 × 200
Mass Approx. 1.0 kg
Virtual front
Virtual surround 5.1 &
6.1
4.5 MHz
front
(rectangular-type) × 2
Analogue input (pin
jack left/right) × 1
supplied AC power
adaptor)
mm (3 3/8 × 7 1/2 × 7
1
/8 inch)
(2 lb 30 oz)
Cordless stereo headphones
(MDR-IF8000)
Playback frequency range
Power requirements Rechargeable nickel-
Mass Approx. 350 g (10 oz)
12 – 24,000 Hz
metal hydride
batteries (supplied or
sold separately) or R6
(size AA) alkaline
batteries
(including the
supplied rechargeable
nickel-metal hydride
batteries)
Supplied accessories
Stand for digital surround processor (1)
AC power adaptor (9 V) (1)
Rechargeable nickel-metal hydride
batteries NH-AA(1,700 mAh) (2)
Battery charger (1)
Charging plug for battery charger (1)
(UK, Hong Kong and European model
only)
Optical digital connecting cable
(rectangular plug y rectangular plug,
1.5 m) (1)
Operating Instructions (1)
Product Information (1)
Recommended accessories
Connecting cables
RK-C310, RK-C315, RK-C320, RK-C330
(pin plug × 2 y pin plug × 2)
RK-G129 (stereo mini-plug y pin
plug × 2)
Optical digital selector
SB-RX100P
Optical digital connecting cable
POC-5A, POC-10A, POC-15A (optical
rectangular plug y optical
rectangular plug)
POC-5AB, POC-10AB, POC-15AB
(optical rectangular plug y optical
mini-plug)
Design and specifications are subject to
change without notice.
Additional Information
29
GB
Page 30

AVERTISSEMENT
Pour éviter tout risque
d’incendie ou d’électrocution,
n’exposez pas cet appareil à la
pluie ni à l’humidité.
Pour éviter tout risque d’incendie ou
d’électrocution, ne posez pas de
récipients remplis d’eau (p. ex. des
vases) sur l’appareil.
Pour éviter tout risque d’électrocution,
n’ouvrez pas le coffret. Ne confiez les
réparations qu’à un technicien qualifié.
N’installez pas l’appareil dans un
espace restreint, comme une
biblioth
è
que ou un meuble encastré.
Pour les utilisateurs aux Etats-Unis et
au Canada
RECYCLAGE DES ACCUMULATEURS
À HYDRURE MÉTALLIQUE DE NICKEL
Les accumulateurs à
hydrure métallique de
nickel sont recyclables.
Vous pouvez
contribuer à préserver
l’environnement en
rapportant les piles
usées dans un point de
collection et recyclage
le plus proche.
Pour plus d’informations sur le recyclage
des accumulateurs, téléphonez le
numéro gratuit 1-800-822-8837 (EtatsUnis et Canada uniquement), ou visitez
http://www.rbrc.org/
Avertissment: Ne pas utilliser des
accumulateurs à hydrure métallique
de nickel qui sont endommagées ou
qui fuient.
FR
2
Page 31

Table des matières
Caractéristiques principales ........ 4
Inventaire des composants
et des accessoires .................... 5
Position et fonctions
des pièces .................................. 6
Panneau avant du processeur ........... 6
Panneau arrière du processeur ......... 7
Description des pièces du
casque d’écoute ................................8
Charge des piles rechargeables .. 9
Insertion des piles rechargeables
dans le chargeur ..............................
Charge ................................................ 10
9
Raccordement du système de
casque d’écoute ...................... 12
Installation du système .................... 12
Raccordement du processeur à des
appareils numériques ...................
Raccordement du processeur à des
appareils analogiques ...................
Branchement sur la prise murale.... 15
Pose des piles dans le
casque d’écoute .............................
13
14
16
Ecoute du son provenant d’un
appareil raccordé .................... 17
Casques d’écoute
supplémentaires ............................
24
Dépannage ................................. 25
Précautions d’utilisation ........... 28
Caractéristiques techniques ...... 29
FR
FR
3
Page 32

Caractéristiques principales
Le MDR-DS8000 est un système de casque d’écoute ambiophonique numérique
utilisant la transmission infrarouges numérique.
Vous pouvez profiter des avantages d’un son ambiophonique multicanal (le son
“surround” avec ce casque d’écoute en raccordant tout simplement le processeur
ambiophonique numérique sur un lecteur de DVD, un téléviseur numérique, un
récepteur de diffusion numérique par satellite, etc., à l’aide du câble de raccordement
numérique optique fourni.
• Compatible Dolby Digital*, Dolby Pro Logic II*, DTS-ES*, DTS* et MPEG-2 AAC*
(Même le logiciel “Dolby Digital Surround EX” peut être reproduit dans sa totalité
par un algorithme unique).
• Homologué Dolby Digital/Dolby Pro Logic II et DTS Virtual.
• Traitement du signal par processeur Logic 3D créant, au casque d’écoute, un son
ambiophonique reproduisant l’environnement d’une salle de cinéma.
• Casque d’écoute sans fil utilisant un système de transmission numérique à
infrarouges dont la qualité sonore égale celle des disques compacts. Ce casque isole
des bruits extérieurs et des interférences (transmission non compressée).
• Afin d’offrir un son plus réaliste, un système de détection des mouvements de la
tête est intégré au casque.
• Portée de réception des signaux infrarouges atteignant 10 m.
•Mécanisme auto-ajustable qui évite à l’utilisateur d’avoir à régler la taille du serre-tête.
• Fonction de mise sous tension et hors tension automatique : le casque se met
automatiquement sous tension lorsqu’il est posé sur la tête et hors tension lorsqu’il
est retiré.
• Commande de volume pour ajuster le volume aux oreillettes gauche et droite du
casque.
• Il est possible d’utiliser simultanément des casques supplémentaires MDR-IF8000
(vendus séparément) afin de permettre à plus d’une personne de profiter du son
ambiophonique produit.
• Casque d’écoute alimenté avec des piles rechargeables nickel-hydrure métallique
(fournies et vendues séparément) ou des piles alcalines R6 de taille AA (vendues
séparément).
* Le processeur ambiophonique numérique de ce système intègre les décodeurs Dolby
Digital, Dolby Pro Logic II, DTS-ES et DTS ainsi que le décodeur MPEG-2 AAC.
Fabriqué sous licence de Dolby Laboratories et de Digital Theater Systems, Inc.
“Dolby”, “AC-3”, “Pro Logic”, le logo “AAC” et le symbole double-D ; sont des marques
commerciales de Dolby Laboratories.
“DTS” et “DTS VIRTUAL” sont des marques commerciales de Digital Theater Systems, Inc.
Numéro du brevet AAC
Brevet 5,848,391 ; 5,291,557 ; 5,451,954 ; 5,400,433 ; 5,222,189 ; 5,357,594 ; 5 752 225 ; 5,394,473 ;
5,583,962 ; 5,274,740 ; 5,633,981 ; 5 297 236 ; 4,914,701 ; 5,235,671 ; 07/640,550 ; 5,579,430 ; 08/
678,666 ; 98/03037 ; 97/02875 ; 97/02874 ; 98/03036 ; 5,227,788 ; 5,285,498 ; 5,481,614 ;
5,592,584 ; 5,781,888 ; 08/039,478 ; 08/211,547 ; 5,703,999 ; 08/557,046 ; 08/894,844
Symbole CE
Le symbole CE est valable uniquement pour les produits vendus au sein de l’Union européenne.
FR
4
Page 33

1 Préparation
Inventaire des composants et des accessoires
Avant d’installer le système, vérifiez que tous les composants sont présents.
Processeur (1)
Chargeur de piles (1) Fil d’alimentation du chargeur
Piles rechargeables nickelhydrure métallique de
type NH-AA (2)
Casque d’écoute stéréo
sans fil (1)
de piles (1)
(Modèle destiné au RoyaumeUni et à Hongkong
uniquement)
Câble de raccordement
numérique optique (de type
rectangulaire y de type
rectangulaire) (1)
Support (pour le processeur) (1)
Fil d’alimentation (du chargeur de
piles) (1)
(Modèle destiné à l‘Europe
uniquement)
Adaptateur secteur (1)
Préparation
FR
5
Page 34

Position et fonctions des pièces
1 Témoins DIGITAL 1 et 2 (entrées
Panneau avant du processeur
123
POWER
DIGITAL 1
DIGITAL 2
ANALOG
INPUT
CINEMA 1
CINEMA 2
MUSIC
EFFECT
DECODE MODE
DOLBY DIGITAL
DOLBY PRO LOGIC II
DTS
MPEG-2 AAC
C
CS
VIRTUAL
OUTPUT
8
R
MIN MAX
6
7
4
L
LS RS
PHONES LEVEL
5
numériques)
Témoin ANALOG (entrée analogique)
Touche INPUT (entrée)
Appuyez sur cette touche pour
sélectionner la source d’entrée (DIGITAL
1, DIGITAL 2 ou ANALOG).
2 Témoin POWER (alimentation)
Ce témoin s’allume en vert lorsque vous
allumez le processeur.
Interrupteur de marche/arrêt
(POWER)
Appuyez sur cette touche pour mettre le
processeur sous tension ou hors tension.
3 Témoins CINEMA 1 et 2
Témoin MUSIC
Touche EFFECT (pour plus de
détails, reportez-vous à la page 20)
Appuyez sur cette touche pour
sélectionner le champ acoustique
(CINEMA 1, CINEMA 2 ou MUSIC).
4 Témoin du mode de décodeur
(pour plus de détails, reportez-vous
à la page 19)
5 Prise PHONES (casque d’écoute)
(pour plus de détails, reportez-vous
aux pages 20 et 24)
Branchez votre casque d’écoute sur cette
prise. Branchez le casque MDR-F1
(vendu séparément) pour obtenir le
meilleur son ambiophonique possible.
6 Commande PHONES — LEVEL
Tournez cette commande pour régler le
volume du casque d’écoute (vendu
séparément) branché sur la prise PHONES.
7 Touche OUTPUT (sortie)
Appuyez sur cette touche pour
sélectionner le mode de sortie (OFF,
VIRTUAL FRONT ou VIRTUAL
SURROUND).
8 Emetteur à infrarouges
Placez l’émetteur en ligne droite avec le
capteur et de façon à ce qu’il n’y ait pas
d’obstacle entre eux.
FR
6
Préparation
Page 35

Panneau arrière du processeur
12
1 Prises DIGITAL IN 1 et 2 (entrées
numériques) (pour plus de détails,
reportez-vous à la page 13)
Branchez sur cette prise un lecteur DVD,
un téléviseur numérique, un récepteur de
diffusion numérique par satellite, un
lecteur LD ou tout autre appareil
numérique (vendus séparément).
2 Commutateur ATT (atténuateur)
Réglez ce commutateur sur 0 dB lorsque
le volume de l’entrée analogique est trop
faible. Normalement, ce commutateur
doit être réglé sur –8 dB.
3 Prise LINE IN (entrée ligne) (pour
plus de détails, reportez-vous à la
page 14)
Branchez la fiche de sortie audio de
l’appareil audio/vidéo utilisé (vendu
séparément), tel qu’un magnétoscope ou
un téléviseur sur cette prise.
4 Prise DC IN (alimentation CC)
Branchez l’adaptateur secteur fourni sur
cette prise. (N’utilisez pas d’autre
adaptateur secteur que celui fourni.
L’utilisation de produits dont la polarité
de fiche ou d’autres caractéristiques
diffèrent de celles de cet adaptateur peut
entraîner des problèmes de
fonctionnement).
34
Préparation
FR
7
Page 36

Description des pièces du casque d’écoute
5
4
3
2
1
1 Capteur d’infrarouges
Des capteurs d’infrarouges sont placés à
deux endroits, des deux côtés de l’appareil.
2 Logement des piles
Pour ouvrir le logement, appuyez sur le
couvercle et soulevez-le. Ce logement est
conçu uniquement pour les piles
rechargeables fournies et pour les piles
alcalines R6 de taille AA.
3 Serre-tête auto-ajustable
Le casque d’écoute se met
automatiquement sous tension lorsqu’il
est posé sur la tête.
4 Témoin POWER (alimentation)
Lorsque vous soulevez le serre-tête autoajustable, le témoin s’allume en rouge si
les piles sont suffisamment chargées.
6
7
1
8
9
5 Touche RESET (pour plus de
détails, reportez-vous à la page 21)
Utilisez cette touche pour réinitialiser les
informations de position de la fonction
de détection des mouvements de la tête.
6 Interrupteur HEAD TRACKING
(pour plus de détails, reportezvous à la page 21)
Pour activer la fonction de détection des
mouvements de la tête, mettez cet
interrupteur sur ON lorsque le mode de
sortie du processeur est réglé sur
VIRTUAL (autre que OFF).
7 Commande VOL (volume)
Utilisez cette commande pour régler le
volume.
8 Oreillette (droite)
9 Oreillette (gauche)
FR
8
Préparation
Page 37

Chargement des piles rechargeables
Avant d’utiliser pour la première fois les piles rechargeables fournies, chargez-les.
N’utilisez pas d’autre chargeur que celui qui vous a été fourni. Il permet de charger
jusqu’à quatre piles à la fois.
Insertion des piles rechargeables dans le chargeur
Insérez les deux piles nickel métal hydrure rechargeables fournies en mettant les
polarités 3 et # dans le bon sens.
Insérez polarités # en premier.
Remarques
• Placez les piles rechargeables nickel-hydrure métallique dans le chargeur et appuyez dessus
jusqu’à ce qu’elles la polarité.
• Pour recharger deux piles, le mode de charge bascule sur grande vitesse et les piles sont
rechargées complètement en 90 minutes environ.
Préparation
FR
9
Page 38

Chargement
(modèle pour les Etats-Unis et le Canada uniquement)
1 Basculez la fiche de charge vers
l’extérieur.
(Modèle pour le Royaume-Uni, Hongkong et l’Europe)
2 Branchez la fiche dans la prise
murale.
Le témoin de
charge s’allume.
1 Raccordez le fil d’alimentation
au chargeur.
2 Branchez la fiche dans la prise
murale.
, vers la prise
Le témoin de
charge s’allume.
murale
Les piles sont rechargées en 90 minutes environ*.
Le témoin de charge s’éteint lorsque la recharge est terminée. Débranchez le chargeur
de la prise murale et retirez les piles rechargeables.
* En mode de charge à grande vitesse.
Durée d’utilisation
Environ 7 heures*
* La durée d’utilisation indiquée ci-dessus est valable uniquement si les piles sont utilisées
après avoir été complètement rechargées. La durée d’utilisation peut varier selon la
température ou les autres conditions d’utilisation.
10
FR
Préparation
Page 39

Remarques
• Jusqu’à quatre piles peuvent être chargées en même temps avec le chargeur fourni. La durée
de charge des piles varie selon le nombre de piles mises à recharger en même temps.
- Pour recharger une ou deux piles rechargeables dans le chargeur : environ 90 minutes
(mode de charge à grande vitesse)
- Autres circonstances : environ 180 minutes
• Pendant la charge, la température du chargeur et des piles augmente légèrement. Ceci n’a rien
d’anormal.
• Débranchez le chargeur lorsque vous ne l’utilisez pas.
• N’utilisez pas et ne rangez pas le chargeur à proximité d’appareils de chauffage, dans des
endroits chauds exposés à la lumière directe du soleil ou dans des endroits humides.
• Le témoin de charge peut s’éteindre plus tôt que d’habitude lorsque vous rechargez des piles
qui n’étaient pas complètement déchargées.
• Les piles rechargeables nickel-hydrure métallique doivent être remplacées lorsque leur durée
est inférieure à la moitié du temps prévu ci-dessus même après avoir été complètement
rechargées. Achetez des piles rechargeables nickel-hydrure métallique R6 de taille AA de Sony
(NH-AA). Commandez ces piles dans le magasin où vous avez acheté cet appareil ou chez
votre revendeur agréé Sony.
AVERTISSEMENT
Le chargeur de piles fourni peut recharger les piles aux hydrures métalliques de nickel R6 (taille
AA), R03 (taille AAA) (NH-AA, NH-AAA) de Sony. Ne jamais essayer de recharger d’autres
types de piles rechargeables ou des piles sèches. L’emploi de ce chargeur avec d’autres types de
piles peut causer une fuite, une surchauffe, surchauffe et une explosion.
Préparation
11
FR
Page 40

1 Raccordement
Raccordement du système de casque d’écoute
Installation du système
Vous pouvez installer le processeur en position verticale ou horizontale.
Pour l’utiliser en position verticale :
Utilisez une pièce de monnaie pour fixer le support fourni à la base du processeur.
Pour l’utiliser en position horizontale :
Placez le processeur de manière à ce que les quatre tampons en caoutchouc soient
placés vers le bas.
,
Tampons en caoutchouc
Remarques
• Installez le processeur dans un endroit où aucun obstacle ne le sépare du casque pendant
l’utilisation.
• N’installez pas le processeur en position instable, par exemple sur un téléviseur. En tombant,
le processeur pourrait s’endommager ou entraîner des blessures.
• Si le processeur est installé en position verticale, fixez toujours le support pour plus de
sécurité.
• Selon les conditions d’installation, si le processeur est en position horizontale, il est possible
que la portée de transmission d’infrarouges n’atteigne pas la valeur maximale.
• Si vous installez le processeur en position horizontale, ne le posez pas sur le côté non muni de
tampons en caoutchouc.
FR
12
Raccordement
Page 41

Raccordement du processeur à des appareils numériques
Utilisez le câble de raccordement numérique optique fourni pour brancher la prise de
sortie numérique optique d’un lecteur de DVD (ou d’un lecteur de LD), d’un
téléviseur numérique ou d’autres appareils numériques sur la prise DIGITAL IN 1 ou
2 du processeur.
Processeur
Vers la prise
DIGITAL IN
Remarques
• Le câble de raccordement numérique optique est un appareil de très haute précision sensible
aux secousses et aux pressions externes. Par conséquent, faites attention lors du branchement
et du débranchement de la fiche du câble.
• Ce système n’est pas muni de prises AC-3 RF. Les signaux AC-3 RF provenant des lecteurs de
LD ne peuvent donc pas être reçus directement.
• L’entrée numérique du processeur ne lit pas les fréquences d’échantillonnage de 96 kHz.
Réglez la sortie numérique du lecteur de DVD sur 48 kHz lorsque vous utilisez ce système.
Des parasites peuvent se faire entendre à la réception d’un signal numérique de 96 kHz.
DTS
• Un lecteur de DVD compatible DTS est nécessaire pour la lecture de disques DVD enregistrés
en mode audio DTS. (Pour plus de détails, reportez-vous au mode d’emploi du lecteur de
DVD.)
• Lors de la lecture de disques LD et CD enregistrés au format DTS, des parasites risquent de se
produire pendant l’avance rapide ou le rembobinage. Ceci n’a rien d’anormal.
• Si la sortie numérique DTS est réglée sur “OFF” sur le lecteur de DVD, aucun son ne se fait
entendre, même si la sortie DTS est sélectionnée dans le menu de DVD.
• Il se peut qu’aucun son ne se fasse entendre lorsque le lecteur de DVD et cet appareil sont
raccordés par une connexion analogique. Dans ce cas, utilisez une connexion numérique.
Câble de raccordement
numérique optique
(fourni)
Faites correspondre
l’orientation de la fiche à
celle de la prise, puis
branchez la fiche.
(vendu séparément)
Vers la prise
de sortie
numérique
optique
Lecteur de DVD, lecteur de LD,
syntoniseur numérique BS ou
autre appareil numérique équipé
d’une prise de sortie numérique
optique
(Suite à la page suivante)
Raccordement
13
FR
Page 42

Câbles de raccordement (vendus séparément)
• Utilisez un câble optique (POC-5A ou autre, vendu séparément) pour raccorder plus de deux
appareils externes.
• Utilisez le POC-5AB (mini-prise y prise rectangulaire, vendu séparément) pour raccorder la
mini-prise de sortie numérique des lecteurs de DVD ou de CD portables ou d’autres appareils
numériques à la prise DIGITAL IN.
Sélecteur numérique optique (vendu séparément)
Lors du raccordement de plusieurs appareils numériques, il est recommandé d’utiliser le SBRX100P (sélecteur numérique optique (entrée à 4 lignes,
sortie à 3 lignes), vendu séparément.)
Remarques sur le câble de raccordement numérique
optique
• Ne faites pas tomber d’objets sur le câble de
raccordement numérique optique et ne le soumettez pas
à des chocs.
• Lorsque vous branchez ou débranchez le câble, tenez-le
par la prise.
• Assurez-vous que les extrémités du câble de
raccordement numérique optique restent propres. Si de la poussière s’accumule sur les
extrémités du câble, son efficacité risque de diminuer.
• Lorsque vous rangez le système, placez le protège-fiche sur la fiche et ne pliez pas le câble de
raccordement numérique optique à un rayon inférieur à 25 mm.
Le rayon de pliure du câble de
raccordement numérique optique
ne doit pas être inférieur à 25 mm.
25 mm
Raccordement du processeur à des appareils analogiques
Utilisez un cordon audio (vendu séparément) pour raccorder les prises de sortie
audio du magnétoscope, du téléviseur ou d’autres appareils aux prises LINE IN (L/R)
(gauche/droite) du processeur.
Processeur
Magnétoscope,
téléviseur ou autre
Vers les prises LINE IN
Fiche audio gauche (L, blanche)
Cordon audio
(vendu séparément)
Fiche audio droite (R, rouge)
Câbles de raccordement (vendus séparément)
Pour raccorder une mini-prise stéréo (prise de sortie de ligne ou prise de casque d’écoute) à une
prise LINE IN, utilisez le câble RK-G129 (mini-fiches stéréo y prise à broche x 2).
Dans ce cas, réglez le volume du lecteur à un niveau moyen. Des parasites peuvent se produire
si le volume du lecteur est réglé trop bas.
Pour plus de détails sur les autres types de câbles de raccordement (vendus séparément),
reportez-vous à la page 29.
FR
14
Raccordement
Vers les prises de sortie audio
Fiche audio gauche
(blanche)
Fiche audio droite
(rouge)
appareil
Page 43

Réglage du volume d’entrée
Si le volume est bas lorsque vous utilisez une connexion analogique, réglez le
commutateur ATT (atténuateur) sur “0dB”.
ATT
0dB
–8dB
Réglage Appareils raccordés
0dB Téléviseur, appareils portables et autres appareils à faible niveau de sortie
–8dB Autres appareils (réglages initiaux)
Remarques
• Baissez le volume avant de régler le commutateur ATT.
• Si le son reçu par les prises LINE INPUT est déformé (il peut arriver que des parasites se
fassent entendre en plus du son émis), réglez le commutateur ATT sur “–8 dB”.
Branchement sur la prise murale
Processeur
Adaptateur
secteur
Vers la prise murale
Vers la prise DC IN
Remarques
• N’utilisez pas d’autre adaptateur secteur que celui qui vous a été fourni. L’utilisation
d’adaptateurs secteur dont la polarité de fiche ou d’autres caractéristiques diffèrent de celles
de cet adaptateur peut entraîner une panne de l’appareil.
Fiche à polarité unifiée
• N’utilisez que l’adaptateur secteur fourni. Même les adaptateurs secteur dont la tension et la
polarité de fiche sont les mêmes que celles de cet adaptateur risquent d’endommager
l’appareil à cause de leur capacité électrique ou d’autres facteurs.
Raccordement
15
FR
Page 44

Pose des piles dans le casque d’écoute
Comme indiqué dans le schéma ci-dessous, insérez deux piles rechargeables nickelhydrure métallique complètement rechargées (page 9) en plaçant les extrémités 3 et
# dans la bonne direction. Insérez le côté # en premier.
1
Utilisation de batteries en option
Vous pouvez également utiliser des piles alcalines R6 de taille AA. Insérez les piles
comme indiqué ci-dessus.
Durée d’utilisation pour des piles sèches
Type de pile Durée d’utilisation
Pile alcaline LR6 (SG) de Sony Environ 7 heures*
23
* La durée d’utilisation indiquée ci-dessus peut varier selon la température ou les conditions
d’utilisation.
Remarque
N’utilisez pas de piles au manganèse dans cet appareil.
Réinstallation du couvercle du logement des piles si celui-ci
se détache
Comme indiqué dans le schéma ci-dessous, alignez A avec A et B avec B, rattachez
puis faites glisser le couvercle pour le remettre en place.
16
FR
Raccordement
Page 45

1 Fonctionnement
Ecoute du son provenant d’un appareil raccordé
Avant de commencer à utiliser l’appareil, lisez la section
“Raccordement du système de casque d’écoute” (pages 12
à 16) et effectuez les raccordements appropriés.
1 Mettez sous tension l’appareil raccordé au processeur.
Lecteur de DVD ou autre
appareil audio-vidéo
POWER
2 Appuyez sur la touche POWER pour mettre le processeur sous tension.
Le témoin POWER s’allume en vert.
POWER
3 Placez le casque sur la tête.
Le témoin POWER s’allume en rouge et le casque se met automatiquement sous
tension.
Témoin
POWER
(Suite à la page suivante)
Fonctionnement
17
FR
Page 46

4 Appuyez sur INPUT pour sélectionner la source que vous souhaitez écouter.
DIGITAL 1
DIGITAL 2
ANALOG
INPUT
Témoin allumé Source sonore sélectionnée
DIGITAL 1 Son de l’appareil raccordé à la prise DIGITAL IN 1
DIGITAL 2 Son de l’appareil raccordé à la prise DIGITAL IN 2
ANALOG Son de l’appareil raccordé aux prises LINE IN
Remarque
Pour écouter des sources sonores doubles (MAIN/SUB), raccordez l’appareil aux prises
LINE IN, puis sélectionnez la source sonore que vous souhaitez écouter sur le lecteur, le
téléviseur ou tout autre appareil.
5 Lancez la lecture de la source sélectionnée à l’étape 4.
6 Appuyez plusieurs fois sur OUTPUT pour sélectionner le mode de sortie
(effet ambiophonique) (voir page 19).
18
FR
Fonctionnement
DECODE MODE
DOLBY DIGITAL
DOLBY PRO LOGIC II
DTS
MPEG-2 AAC
C
L
LS RS
CS
VIRTUAL
OUTPUT
R
Page 47

Témoin allumé Mode de sortie (effet ambiophonique)
DECODE MODE
DOLBY DIGITAL
DOLBY PRO LOGIC II
DTS
MPEG-2 AAC
C
L
LS RS
CS
VIRTUAL
DECODE MODE
DOLBY DIGITAL
DOLBY PRO LOGIC II
DTS
MPEG-2 AAC
C
L
LS RS
CS
VIRTUAL
DECODE MODE
DOLBY DIGITAL
DOLBY PRO LOGIC II
DTS
MPEG-2 AAC
C
L
LS RS
CS
VIRTUAL
DECODE MODE
DOLBY DIGITAL
DOLBY PRO LOGIC II
DTS
MPEG-2 AAC
C
L
LS RS
CS
VIRTUAL
R
R
R
R
OFF
Ecoute normale avec le casque.
VIRTUAL FRONT
Effet virtuel par lequel le son semble provenir de deux haut-parleurs
(droit et gauche) placés devant vous
VIRTUAL SURROUND 5.1
Effet ambiophonique virtuel par lequel le son semble provenir non
seulement de deux haut-parleurs avant (droit et gauche), mais aussi
d’un haut-parleur central, de deux haut-parleurs arrière (droit et
gauche) et d’un caisson de basses.
VIRTUAL SURROUND 6.1
Il est possible de sélectionner ce mode uniquement lorsque le
signal est reçu d’une source multicanal au format DOLBY
DIGITAL ou DTS.
Effet ambiophonique virtuel par lequel le son semble provenir de
trois haut-parleurs avant (droit, gauche et centre), de trois
hautparleurs arrière (droit, gauche et centre) et d’un caisson de
basses.
Remarque
Le mode VIRTUAL SURROUND 6.1 ne peut être sélectionné
que lorsque la source multicanal est en mode de lecture au
format DOLBY DIGITAL ou DTS (assurez-vous que le témoin
DECODE MODE s’allume). Il est impossible de sélectionner
VIRTUAL SURROUND 6.1 dans les autres modes (mode d’arrêt,
écran de menu, etc.).
Témoin DECODE MODE
Lorsque le mode de sortie est réglé sur VIRTUAL SURROUND 5.1 ou VIRTUAL SURROUND
6.1, le processeur identifie automatiquement le format du signal audio reçu et le témoin
correspondant s’allume. Réglez le mode audio sur l’un des formats disponibles (Dolby Digital,
DTS, MPEG-2 AAC, etc.) sur l’appareil raccordé (lecteur de DVD, récepteur de diffusion
numérique par satellite, etc.).
• DOLBY DIGITAL : Signal reçu au format DOLBY DIGITAL.
• DOLBY PRO LOGIC II : Signal reçu à 2 canaux (numérique ou analogique) au format DOLBY
PRO LOGIC II.
• DTS : Signal reçu au format DTS.
• MPEG-2 AAC : Signal reçu au format MPEG-2 AAC.
(Suite à la page suivante)
Fonctionnement
19
FR
Page 48

7 Appuyez sur EFFECT pour sélectionner le champ acoustique souhaité
(uniquement lorsqu’un paramètre autre que “OFF” est sélectionné à l’étape
6 de la page 18).
CINEMA 1
CINEMA 2
MUSIC
EFFECT
Témoin Champ acoustique et source sonore appropriée
CINEMA 1 Ce mode reproduit le champ acoustique d’une grande pièce telle
CINEMA 2 Ce mode produit un son plus réaliste que le mode CINEMA 1, ce qui
MUSIC Ce mode reproduit le champ acoustique d’une pièce possédant une
Remarque
Si le mode de sortie (effet sonore) est réglé sur “OFF” à l’étape 6 de la page 18, vous ne
pouvez pas sélectionner le champ acoustique, même si vous appuyez sur EFFECT.
qu’une salle de cinéma ou de concert.
Ce mode convient aux sources sonores des films.
vous donne l’impression d’être dans le film lui-même. Ce mode
convient aux sources sonores des films.
bonne acoustique.
Ce mode convient aux sources musicales.
8 Réglez le volume.
Pour augmenter
le volume
Pour baisser le
volume
Réglage du volume du casque d’écoute (vendu séparément) branché sur la
prise de casque (PHONES)
Pour régler le volume, tournez la commande PHONES—LEVEL.
MIN
LEVEL
MAX
Pour
augmenter
le volume
PHONES
Pour
baisser le
volume
Remarque
Lorsque vous regardez un film, n’augmentez pas trop le volume pendant les scènes calmes.
Lors de la scène bruyante suivante, le son pourrait endommager votre ouïe.
FR
20
Fonctionnement
Page 49

9 Réglez la fonction de détection des mouvements de la tête sur ON
(uniquement lorsqu’un paramètre autre que OFF est sélectionné à l’étape 6
de la page 19).
Placez-vous face à la source sonore (par
exemple votre téléviseur), puis réglez
l’interrupteur HEAD TRACKING sur la
position ON. Attendez 2 secondes sans
bouger.
Ne bougez pas la tête jusqu’à ce que le
système de détection des mouvements
de la tête se soit stabilisé. Pendant cette
période, aucun son n’est émis.
Lorsque le système de détection des mouvements de la tête s’est stabilisé, le son de lecture
se fait entendre.
Ensuite, même si vous tournez la tête dans toutes les directions, le son se fait entendre
comme s’il provenait de l’avant.
Remarques
• Portez toujours le casque en position verticale (comme indiqué à la page 17) de manière à
ce que le système de détection des mouvements de la tête reste stable.
• Lorsque l’interrupteur HEAD TRACKING est réglé sur ON, et lorsque vous mettez le
casque alors qu’il est sous tension, attendez toujours deux secondes sans bouger la tête
car le système de détection des mouvements de la tête doit se stabiliser à chaque fois.
• Si le son du casque d’écoute (pendant que vous êtes face à votre téléviseur) semble
différer de la direction réelle du téléviseur, placez-vous face au téléviseur et appuyez sur
la touche RESET du casque.
Lorsque vous l’enlevez, le casque se met automatiquement hors tension :
— fonction Auto Power On/Off
Lorsque vous ne l’utilisez pas, faites
attention de ne pas suspendre le casque de
manière à activer la fonction Auto Power
On, ce qui déchargerait la batterie.
Serre-tête autoajustable
Pour vérifier le niveau de charge de la pile
Soulevez le serre-tête auto-ajustable et
vérifiez le témoin d’alimentation POWER.
Si le témoin POWER s’allume en rouge, les
piles sont encore bonnes.
Témoin POWER
Si le témoin POWER clignote et qu’un bip
sonore intermittent provient du casque,
rechargez les piles rechargeables ou
remplacez les piles alcalines.
Période de transition entre les modes
Lorsque vous appuyez sur les touches du processeur pour changer de mode, le temps
de transition entre les modes peut varier. Ce phénomène est dû aux différences de
contrôle du système entre les modes.
(Suite à la page suivante)
Fonctionnement
21
FR
Page 50

Si aucun son ne se fait entendre dans le casque
Un bip sonore bref et répétitif se fait entendre et la fonction de coupure du son est
activée automatiquement lorsque la sortie sonore du casque est désactivée parce que
le casque se trouve en dehors de la zone de transmission à infrarouges ou que les
signaux infrarouges sont interrompus. La fonction de coupure du son est
automatiquement désactivée lorsque vous vous rapprochez du processeur ou que
l’obstacle empêchant les infrarouges d’atteindre le casque est éliminé.
Zone de transmission à infrarouges
La zone approximative de transmission à infrarouges à partir du processeur est
indiquée dans le schéma ci-dessous.
Signal infrarouges
Environ
4 m
Processeur
ambiophonique
numérique
Environ
4 m
Remarques
• Etant donné que ce système utilise des signaux à infrarouges, il est possible que le son soit
interrompu si les signaux sont bloqués. Ce phénomène est dû aux caractéristiques des signaux
à infrarouges, et n’a rien d’anormal.
• Ne couvrez pas le capteur de signaux infrarouges avec la main ou les cheveux.
• Tant que le casque se trouve dans la zone de transmission indiquée dans le schéma ci-dessus,
l’orientation du casque par rapport au processeur ambiophonique numérique n’a pas
d’importance (de face, tourné à 90° ou à 180°).
• Le son peut varier selon la position du processeur et les conditions de la pièce. Il est
recommandé de placer le processeur à l’endroit offrant la meilleure clarté sonore.
• Les signaux risquent d’être mélangés si le processeur est utilisé en présence d’autres
processeurs ou transmetteurs.
45°
45°
Environ
10 m
22
FR
Fonctionnement
Page 51

Si aucun signal audio n’est reçu pendant 10 minutes
L’émission de signaux infrarouges à partir du processeur cesse automatiquement
lorsque aucun signal audio n’est reçu pendant 10 minutes. Les signaux infrarouges
sont émis automatiquement lorsque la réception d’un signal audio reprend.
L’émission de signaux infrarouges peut s’arrêter lorsqu’un son extrêmement faible est
émis pendant environ 10 minutes en mode de réception de signaux analogiques. Dans
ce cas, augmentez le volume de l’appareil audio-vidéo raccordé et baissez le volume
du casque.
Remarques
• La luminosité de l’émetteur d’infrarouges du processeur ambiophonique numérique peut
varier. Cependant, cela n’affecte pas la zone de transmission.
• Utilisez le casque à l’intérieur de la zone de transmission des signaux infrarouges (voir la
section “Zone de transmission à infrarouges” à la page 22).
• N’utilisez pas ce système dans des zones exposées au rayonnement direct du soleil ou à une
lumière puissante. Cela peut entraîner une coupure du son.
• Ce casque à oreillettes ouvertes est conçu de telle manière que le son peut être entendu même
par les personnes qui ne portent pas le casque. N’augmentez pas trop le volume afin de ne pas
déranger les gens qui se trouvent autour de vous.
• L’effet de son ambiophonique peut ne pas être obtenu à partir de sources sonores ne
comprenant pas d’élément vidéo, telles que des CD audio.
• Ce système simule le niveau moyen de HRTF* commun à la plupart des gens. Cependant,
comme le niveau de HRTF varie selon la personne l’effet peut varier d’une personne à une
autre.
* Head Related Transfer Function (Fonction de transfert de l’oreille externe)
Fonctionnement
23
FR
Page 52

Casques d’écoute supplémentaires
Vous pouvez ajouter des casques au système de deux manières différentes.
Pour profiter avec d’autres personnes du son ambiophonique avec des casques
sans fil
t Plusieurs personnes peuvent profiter du son ambiophonique en même temps avec
des casques à infrarouges sans fil MDR-IF8000 supplémentaires (vendus séparément).
* Le nombre de casques pouvant être utilisés dans la zone de transmission à
infrarouges est illimité.
Processeur
Remarque
Les casques sans fil à infrarouges analogiques (MDR-IF5000, etc.) ne peuvent pas être utilisés
parce que cet appareil fonctionne avec un système de transmission à infrarouges numérique.
Pour raccorder un casque à fil
t La prise de casque PHONE est réglée pour accueillir le casque MDR-F1 à fil à
oreillettes ouvertes (vendu séparément), afin de vous offrir un son ambiophonique
de haute qualité. Vous pouvez également utiliser n’importe quel casque à fil à
oreillettes ouvertes sur cet appareil.
Pour obtenir un effet de son ambiophonique suffisant, il est recommandé d’utiliser le
casque stéréo sans fil MDR-IF8000 ou le casque à fil MDR-F1 à oreillettes ouvertes.
Processeur
MDR-IF8000 (vendu séparément)
Casque à fil MDR-F1 à oreillettes ouvertes
(vendu séparément) ou autre casque équipé
d’un fil et d’oreillettes ouvertes
Vers la prise PHONE
Remarques
• Lorsque vous débranchez le casque de la prise PHONES, tirez toujours en tenant la fiche. Ne
tirez jamais sur le cordon.
• L’effet ambiophonique peut ne pas être disponible lorsque vous utilisez un casque à oreillettes
internes ou fermées.
FR
24
Fonctionnement
Page 53

1 Informations complémentaires
Dépannage
Si vous rencontrez un problème pendant l’utilisation de ce système de casque d’écoute,
vérifiez la liste ci-dessous. Si le problème persiste, consultez votre revendeur Sony.
Symptôme Cause et solution
Aucun son
Son déformé
(parfois
accompagné de
parasites)
Son faible
, Vérifiez le branchement entre le processeur et l’appareil audio/vidéo.
, Allumez l’appareil audio-visuel raccordé au processeur et lancez la lecture.
, Vérifiez que vous avez sélectionné l’appareil que vous souhaitez écouter.
, Si vous raccordez le processeur sur un appareil audio/vidéo à l’aide des prises
du casque, augmentez le volume de l’appareil audio/vidéo raccordé.
, Augmentez le volume du casque.
, Les piles du casque sont complètement à plat.
Soulevez le serre-tête auto-ajustable. Si le témoin POWER reste éteint, rechargez
les piles rechargeables ou remplacez les piles alcalines. Si le témoin POWER
reste toujours éteint, faites réviser votre appareil par votre revendeur Sony.
, Vous essayez de lire une plage audio DTS sur un lecteur de DVD qui ne peut
pas lire le format DTS.
Utilisez soit un lecteur de DVD pouvant lire les enregistrements au format
DTS ou sélectionnez une plage au format Dolby Digital ou PCM.
, Vous lisez un disque DVD enregistré au format DTS alors que la sortie
numérique DTS du lecteur de DVD, y compris celles des jeux, est réglée sur
“OFF”.
Reportez-vous au mode d’emploi du lecteur de DVD et réglez la sortie
numérique DTS sur “ON”.
, Vous lisez un disque DVD, y compris des jeux, enregistré au format DTS alors
que le lecteur de DVD et le processeur sont raccordés par une connexion
analogique.
Raccordez-les avec une connexion numérique. (Le son analogique peut ne pas
pouvoir être émis à partir du lecteur de DVD).
, La fonction de détection des mouvements de la tête ne fonctionne pas
correctement.
Si vous réglez l’interrupteur HEAD TRACKING sur ON après avoir mis le
casque ou si vous le mettez alors que l’interrupteur HEAD TRACKING est
réglé sur ON, attendez 2 secondes sans bouger la tête. Si vous n’entendez
aucun son, même après avoir tenté cette opération, enlevez le casque d’écoute,
puis remettez-le.
, Sur le processeur, mettez le commutateur ATT en position “–8dB”.
, Si vous raccordez le processeur sur un appareil audio/vidéo à l’aide des prises
du casque, baissez le volume de l’appareil audio/vidéo raccordé.
, Lorsque vous utilisez des sources audio au format DTS, réglez le mode de
sortie du processeur sur VIRTUAL SURROUND (page 19).
, Sur le processeur, mettez le commutateur ATT en position “0dB”.
, Si vous raccordez le processeur sur un appareil audio/vidéo à l’aide des prises
du casque, augmentez le volume de l’appareil audio/vidéo raccordé.
, Augmentez le volume du casque.
(Suite à la page suivante)
Informations complémentaires
25
FR
Page 54

Symptôme Cause et solution
Un bref bip sonore
se fait entendre.
Un long bip sonore
se fait entendre.
L’effet de son
ambiophonique n’est
pas disponible
Le son du
casque semble
différer de la
direction réelle de
votre téléviseur.
Le témoin
DOLBY DIGITAL
ne s’allume pas
Le témoin DTS
ne s’allume pas
Le témoin
MPEG-2 AAC
ne s’allume pas.
, Le casque ne peut recevoir les rayons infrarouges provenant du processeur.
• Mettez le processeur sous tension.
• Vérifiez le branchement entre le processeur et l’adaptateur secteur, puis
entre l’adaptateur secteur et la prise secteur.
• Vérifiez s’il y a un obstacle entre le processeur et le casque.
• Rapprochez-vous du processeur
• Modifiez la position ou l’angle du processeur.
• Vérifiez que vous ne couvrez pas le capteur de signaux infrarouges du
casque avec la main ou les cheveux.
• Si vous utilisez le casque à proximité d’une fenêtre exposée aux rayons
directs du soleil, tirez les rideaux ou descendez le store pour empêcher le
soleil d’entrer ou, utilisez le casque dans un endroit non exposé au soleil.
• Si vous utilisez ce système près d’un écran d’affichage au plasma, éloignezvous de cet écran
, Les piles du casque sont à plat. Soulevez le serre-tête auto-ajustable. Si le témoin
POWER clignote, rechargez les piles rechargeables ou remplacez les piles
alcalines. Si le témoin POWER continue de clignoter et qu’un bip sonore continue
de se faire entendre, faites réviser votre appareil par votre revendeur Sony.
, Sélectionnez le mode VIRTUAL SURROUND en appuyant sur la touche
OUTPUT (pages 18 et 19).
, La plage audio en cours de lecture ne compte pas de signal multicanal.
L’effet ambiophonique ne fonctionne pas pour les sources sonores monaurales.
,
Tournez-vous face à l’appareil (p. ex : votre téléviseur) et appuyez sur la
touche RESET du casque d’écoute.
, Le réglage de sortie audio numérique du lecteur de DVD, y compris les jeux,
est peut-être réglé sur “PCM”
Reportez-vous au mode d’emploi fourni avec le lecteur de DVD, puis
modifiez le réglage, par exemple “Dolby Digital/PCM” ou “Dolby Digital”,
pour pouvoir utiliser le lecteur de DVD avec des appareils à décodeur Dolby
Digital intégré.
, Les signaux de lecture ne sont pas enregistrés au format Dolby Digital.
, La partie audio du chapitre en cours de lecture n’est pas au format Dolby Digital.
, Le réglage de sortie numérique DTS du lecteur de DVD, y compris les jeux, est
réglé sur OFF. Reportez-vous au mode d’emploi fourni avec le lecteur de DVD
et réglez la sortie numérique DTS sur ON.
, Les signaux de lecture ne sont pas enregistrés au format DTS.
, La partie audio du chapitre en cours de lecture n’est pas au format DTS.
, Le lecteur de DVD ne peut pas lire le format DTS.
Utilisez un lecteur de DVD qui puisse lire le format DTS.
, Les signaux de lecture ne sont pas enregistrés au format MPEG-2 AAC.
26
FR
Informations complémentaires
Page 55

Symptôme Cause et solution
Le témoin CS
(ambiophonique
arrière) ne s’allume
pas.
, Le format du signal reçu n’est pas Dolby Digital (multicanal), ni DTS
(multicanal).
• Lisez plutôt un logiciel DVD au format Dolby Digital (multicanal) ou DTS
(multicanal).
• Modifiez le réglage de l’appareil de lecture de manière à recevoir le format
correct.
, Le son au format Dolby Digital (multicanal) ou DTS (multicanal) n’est pas lu.
Lancez d’abord la lecture sur l’appareil raccordé, assurez-vous que le témoin
DECODE MODE s’allume, puis modifiez le mode de sortie.
Impossible de
charger les piles
, Des piles sèches ont été placées dans le chargeur.
Insérez les piles rechargeables fournies ou en option.
, Des piles rechargeables autres que celles fournies ou recommandées ont été
placées dans le chargeur.
Insérez les piles rechargeables fournies ou recommandées.
Informations complémentaires
27
FR
Page 56

Précautions d’utilisation
Sécurité
• Ne faites pas tomber le processeur ou le
casque, ne les frappez pas et ne leur faites
pas subir de chocs violent de quelque sorte
que ce soit. Ceci pourrait endommager le
produit.
• Ne démontez pas le système et n’essayez
pas d’en ouvrir quelque partie que ce soit.
Sources d’alimentation et
• Si vous prévoyez de ne pas utiliser le
système pendant une période prolongée,
veillez à débrancher l’adaptateur secteur de
la prise murale. Lorsque vous le
débranchez, tenez l’adaptateur secteur par
la fiche. Ne tirez pas sur le cordon.
• N’entreposez pas le système dans un
emplacement :
– exposé à la lumière directe du soleil, à
proximité d’un chauffage ou dans tout
autre endroit dont la température est très
élevée.
– poussiéreux
– instable ou sur une surface inclinée
– sujet à d’importantes vibrations
– très humide, par exemple une salle de
bain
rangement
Casque
Respectez votre entourage
Lorsque le volume est trop élevé, le son est
audible même pour ceux qui ne portent pas le
casque. Ne montez pas trop le volume afin de
ne pas déranger les gens qui se trouvent
autour de vous.
Dans des endroits bruyants, la première
réaction est généralement d’augmenter le
volume. Cependant, maintenez le volume à
un niveau auquel, pendant que vous portez le
casque, vous pouvez entendre lorsque vous
êtes appelé.
Oreillettes
Les oreillettes peuvent être remplacées
lorsqu’elles sont usées. Pour obtenir des
oreillettes de rechange, consultez votre
revendeur Sony.
Nettoyage
Utilisez un chiffon doux légèrement imbibé
d’une solution détergente douce. N’utilisez
pas de solvants tels que des diluants, de la
benzine ou de l’alcool qui pourraient
endommager la surface de l’appareil.
L’appareil est défectueux
• Si l’appareil se brise ou qu’un corps
étranger pénètre à l’intérieur, mettez
immédiatement l’appareil hors tension et
consultez votre revendeur Sony.
• Lorsque vous apportez le système chez
votre revendeur, apportez également le
casque et le processeur.
28
FR
Informations complémentaires
Page 57

Spécifications
Processeur ambiophonique numérique
(DP-IF8000)
Fonctions de décodeur Dolby Digital
Dolby Pro Logic II
DTS
DTS-ES 6.1ch
MPEG-2 AAC
Fonction de son virtuel OFF
Système de modulation DQPSK
Fréquence de l’onde porteuse secondaire
Portée de transmission Environ 10 m vers
Fréquences de transmission
Déformation 1 % ou moins (1 kHz)
Entrées audio Entrée optique
Alimentation 9 V CC (de
Dimensions (l/h/p) Environ 85 × 190 × 200
Poids Environ 1.0 kg
Virtual front
Virtual surround 5.1 &
6,1
4.5 MHz
l’avant
12 – 24 000 Hz
(type rectangulaire) × 2
Entrée analogique
(
prise à broches
gauche et droite
l’adaptateur secteur
fourni)
mm (3 3/8 × 7 1/2 × 7
1
/8 inch)
(2 lb 30 on)
) × 1
Casque d’écoute stéréo sans fil (MDRIF8000)
Fréquences de lecture 12 – 24 000 Hz
Alimentation Piles rechargeables
Poids Environ 350 g (10 on)
nickel-hydrure
métallique (fournies
ou vendues
séparément) ou piles
alcalines R6 de taille
AA
(y compris les piles
rechargeables nickelhydrure métallique
fournies)
Accessoires fournis
Support pour processeur
ambiophonique numérique (1)
Adaptateur secteur (9 V) (1)
Piles rechargeables nickel-hydrure
métallique de type NH-AA
(1 700 mAh) (2)
Chargeur (1)
Fil d’alimentation du chargeur (1)
(Modèle pour le Royaume-Uni,
Hongkong et l’Europe continentale
uniquement)
Câble de raccordement numérique
optique (fiche rectangulaire y fiche
rectangulaire, 1,5 m) (1)
Mode d’emploi (1)
Informations concernant le produit (1)
Accessoires recommandés
Câbles de raccordement
RK-C310, RK-C315, RK-C320, RK-C330
(prise à broche × 2 y prise à broche × 2)
RK-G129 (mini-prise stéréo y prise à
broche × 2)
Sélecteur numérique optique
SB-RX100P
Câble de raccordement numérique optique
POC-5A, POC-10A, POC-15A (prise
rectangulaire optique y prise
rectangulaire optique)
POC-5AB, POC-10AB, POC-15AB
(prise rectangulaire optique y miniprise optique)
La conception et les spécifications sont
sujettes à modification sans préavis.
Informations complémentaires
29
FR
Page 58

ADVERTENCIA
Para evitar incendios o el
riesgo de electrocución, no
exponga la unidad a la lluvia ni
a la humedad.
Para evitar el riesgo de incendio o
electrocución, no coloque sobre el
aparato objetos que contengan líquidos
como, por ejemplo, un jarrón.
Para evitar descargas eléctricas, no abra
la unidad. En caso de avería, solicite los
servicios de personal cualificado
solamente.
No sitúe el aparato en un espacio
cerrado, como una estantería o un
armario empotrado.
Para clientes en EE.UU. y Canadá
RECICLADO DE BATERÍAS DE
HIDRURO DE METAL DE NÍQUEL
Las baterías de
hidruro de metal de
níquel son reciclables.
Usted podrá ayudar a
conservar el medio
ambiente devolviendo
las baterías usadas al
punto de recogida y
reciclaje más próximo.
Para más información sobre el
reciclado de baterías, llame al número
gratuito 1-800-822-8837, o visite
http://www.rbrc.org/
Precaución: No utilice baterías de
hidruro de metal de níquel dañadas o
con fugas.
ES
2
Page 59

Tabla de contenido
Características principales ........... 4
Comprobación de
componentes y accesorios ....... 5
Ubicación y función
de las piezas .............................. 6
Panel frontal del procesador ............. 6
Panel trasero del procesador ............. 7
Descripción de las piezas de los
auriculares ........................................
Carga de las pilas recargables .... 9
Inserción de pilas recargables en el
cargador de pilas .............................
Carga................................................... 10
Conexión del sistema de
auriculares ............................... 12
Configuración .................................... 12
Conexión del procesador a
componentes digitales ..................
Conexión del procesador a
componentes analógicos ..............
Conexión a la toma de pared .......... 15
Inserción de las pilas
en los auriculares...........................
13
14
16
8
9
ES
Escuchar el sonido de un
componente conectado.......... 17
Auriculares adicionales.................... 24
Solución de problemas .............. 25
Precauciones .............................. 28
Especificaciones ......................... 29
3
ES
Page 60

Características principales
MDR-DS8000 es un sistema de auriculares digitales de sonido envolvente que utiliza
la transmisión por infrarrojos digital.
Podrá disfrutar de un sonido multicanal envolvente mediante auriculares
simplemente conectando el procesador de sonido envolvente digital al reproductor de
DVD, a un televisor digital, a a un receptor satélite de emisiones digitales, etc., a
través del cable de conexión digital óptica suministrado.
• Compatible con Dolby Digital*, Dolby Pro Logic II*, DTS-ES*, DTS* y MPEG-2
AAC* (incluso el software “Dolby Digital Surround EX” se puede reproducir
completamente mediante un algoritmo único).
• Con certificación Dolby Digital/Dolby Pro Logic II y DTS Virtual.
• Proceso de señales a través del procesador Logic 3D que crea un sonido envolvente
a través de los auriculares que simula una sala de cine.
• Auriculares inalámbricos que utilizan un sistema de transmisión digital por
infrarrojos que proporciona la misma calidad de sonido que los discos compactos,
resistente a los ruidos externos y a las interferencias. (transmisión sin comprimir)
• Equipado con el sistema de rastreo de cabeza en los auriculares para crear un
sonido más realista.
• Amplia recepción de infrarrojos con un alcance de hasta 10 m.
• Mecanismo de autoajuste que elimina la necesidad del ajuste de la cinta para la cabeza.
• Función automática de conexión/desconexión para conectar los auriculares en el
momento de colocárselos y desconectarlos en el momento de quitárselo.
• Control VOL para ajustar el volumen de los auriculares derecho e izquierdo.
• Auriculares adicionales MDR-IF8000 (vendidos por separado) que se pueden
utilizar al mismo tiempo para que varias personas puedan disfrutar de la
experiencia del sonido envolvente.
• Para proporcionar alimentación a los auriculares se pueden utilizar pilas de hidruro
metálico de níquel recargables (suministradas y vendidas por separado) o pilas
alcalinas R6 (tamaño AA) (vendidas por separado).
* El procesador de sonido envolvente digital para el sistema incluye el decodificador
Dolby Digital, el decodificador Dolby Pro Logic II, DTS-ES, DTS y MPEG-2 AAC.
Fabricado bajo la licencia de Dolby Laboratories y Digital Theater Systems, Inc.
“Dolby”,“AC-3”,“Pro Logic”, el logotipo “AAC” y el símbolo de la doble D ; son marcas
comerciales propiedad de Dolby Laboratories.
”DTS” y “DTS VIRTUAL“ son marcas comerciales de Digital Theater Systems, Inc.
Marca de patente AAC
Pat. 5,848,391; 5,291,557; 5,451,954; 5 400 433; 5,222,189; 5,357,594; 5 752 225; 5,394,473;
5,583,962; 5,274,740; 5,633,981; 5 297 236; 4,914,701; 5,235,671; 07/640,550; 5,579,430;
08/678,666; 98/03037; 97/02875; 97/02874; 98/03036; 5,227,788; 5,285,498; 5,481,614;
5,592,584; 5,781,888; 08/039,478; 08/211,547; 5,703,999; 08/557,046; 08/894,844
Marca CE
La marca CE es válida únicamente para productos comercializados en la Unión Europea.
ES
4
Page 61

1 Preparación
Comprobación de componentes y accesorios
Antes de instalar el sistema, compruebe que se han incluido todos los componentes.
Procesador (1)
Cargador de pilas (1) Enchufe de carga
Pilas de hidruro metálico de
níquel recargables NH-AA (2)
Auriculares estéreo
inalámbricos (1)
(para el cargador de pilas) (1)
(Sólo para modelos del Reino
Unido y de Hong Kong)
Cable de conexión digital óptica
(tipo rectangular y tipo
rectangular) (1)
Soporte (para el procesador) (1)
Enchufe de carga (para el
cargador de pilas)
(Sólo para el modelo europeo)
Adaptador de alimentación de
ca (1)
Preparación
ES
5
Page 62

Ubicación y función de las piezas
1 Indicador de entrada DIGITAL 1,2
Panel frontal del procesador
123
POWER
DIGITAL 1
DIGITAL 2
ANALOG
INPUT
CINEMA 1
CINEMA 2
MUSIC
EFFECT
DECODE MODE
DOLBY DIGITAL
DOLBY PRO LOGIC II
DTS
MPEG-2 AAC
C
CS
VIRTUAL
OUTPUT
8
R
MIN MAX
6
7
4
L
LS RS
PHONES LEVEL
5
Indicador de entrada ANALOG
Botón INPUT
Pulse para seleccionar la fuente de
entrada (DIGITAL 1/DIGITAL 2/
ANALOG).
2 Indicador POWER
Este indicador se encenderá en verde
cuando conecte el procesador.
Selector POWER
Pulse para conectar y desconectar el
procesador.
3 Indicador CINEMA 1,2
Indicador MUSIC
Botón EFFECT (consulte la página 20
para más información)
Pulse para seleccionar el campo de sonido
(CINEMA 1/CINEMA 2/MUSIC).
4 Indicador del modo de
descodificación (consulte la página
19 para más información)
5 Toma PHONES (consulte las páginas
20, 24 para más información)
Conecte los auriculares a esta toma.
Conecte los auriculares MDR-F1
(vendidos por separado) para obtener un
efecto de sonido envolvente óptimo.
6 Control PHONES — LEVEL
Gírelo para ajustar el volumen de los
auriculares (vendido por separado)
conectados a la toma PHONES.
7 Botón OUTPUT
Púlselo para seleccionar el modo de
salida (OFF/VIRTUAL FRONT/
VIRTUAL SURROUND).
8 Emisor de infrarrojos
Ajuste el emisor en una posición directa
y sin obstáculos al sensor.
ES
6
Preparación
Page 63

Panel trasero del procesador
12
1 Toma DIGITAL IN 1,2 (consulte la
página 13 para más información)
Conecte a esta toma un reproductor de
DVD, un televisor digital, un receptor
satélite de emisiones digitales, un
reproductor de LD u otros componentes
digitales (vendidos por separado).
2 Interruptor ATT (atenuador)
Ajuste este interruptor en 0dB si el
volumen es demasiado bajo en una
entrada analógica. Normalmente, este
interruptor debe estar ajustado en -8dB.
3 Toma LINE IN (consulte la página 14
para más información)
Conecte a esta toma la toma de salida de
audio del equipo de audio/vídeo
(vendida por separado) como, por
ejemplo, un reproductor de casetes de
vídeo o un televisor.
4 Toma DC IN
Conecte a esta toma el adaptador de
alimentación de CA suministrado.
(Asegúrese de utilizar el adaptador de
alimentación de CA suministrado. Si
utiliza productos con distintas
polaridades de enchufe u otras
características, puede provocar un mal
funcionamiento.)
34
Preparación
ES
7
Page 64

Descripción de las piezas de los auriculares
5
4
3
2
1
1 Sensor de infrarrojos
Hay sensores de infrarrojos en dos
ubicaciones a ambos lados.
2 Compartimento de pilas
Pulse y abra la tapa hacia arriba. Este
compartimento de pilas es solamente
para las pilas recargables suministradas y
las pilas alcalinas R6 (tamaño AA).
3 Cinta autoajustable para la cabeza
Los auriculares se encienden
automáticamente al colocárselos.
4 Indicador POWER
Si se tira de la cinta autoajustable para la
cabeza, el indicador se ilumina en rojo
cuando la alimentación de las pilas es
suficiente.
6
7
1
8
9
5 Botón RESET (consulte la página
21 para más información)
Utilícelo para restablecer la información
de ubicación de la función de rastreo
automático.
6 Interruptor HEAD TRACKING
(consulte la página 21 para más
información)
Para activar la función de rastreo
automático, conecte el interruptor en ON
si el modo de salida del procesador está
ajustado en VIRTUAL (distinto de OFF).
7 Control VOL (volumen)
Utilícelo para ajustar el volumen.
8 Almohadilla para el oído (derecho)
9 Almohadilla para el oído
(izquierdo)
ES
8
Preparación
Page 65

Carga de las pilas recargables
Las pilas recargables suministradas deberán recargarse antes de utilizarlas por
primera vez.
Asegúrese de utilizar el cargador de pilas suministrado. Se pueden cargar hasta
cuatro pilas a la vez.
Inserción de las pilas recargables en el cargador de pilas
Inserte las dos pilas recargables de hidruro de níquel metálico con los extremos 3 y
# en la dirección correcta.
Introduzca el extremo # primero.
Notas
• Presione las pilas recargables de hidruro de níquel metálico en el cargador hasta que queden
bien Si carga más pilas.
• Cuando cargue dos pilas, el modo de carga de alta velocidad completa la carga en
aproximadamente 90 minutos.
Preparación
ES
9
Page 66

Carga
(solamente en el modelo para EE.UU. y Canadá)
1 Tire del enchufe de carga. 2 Insértelo en la toma de pared.
El indicador de
carga se ilumina.
(solamente en el modelo para el Reino Unido, Hong Kong y
Europa)
1 Conecte el enchufe de carga
al cargador de pilas.
2 Insértelo en la toma de pared.
, a la toma de
pared
El indicador de
carga se ilumina.
La carga se completa en aproximadamente 90 minutos*.
El indicador de carga se apaga cuando se ha completado la carga. Desenchufe el
cargador de la toma y extraiga las pilas recargables.
* En el modo de carga de alta velocidad.
Tiempo de uso
Aprox. 7 horas*
* El tiempo de uso indicado solamente se consigue si se utilizan pilas completamente cargadas.
El tiempo puede verse alterado por la temperatura y las condiciones de uso.
ES
10
Preparación
Page 67

Notas
• Con el cargador de pilas suministrado se pueden cargar hasta cuatro pilas a la vez. El tiempo
de carga de las pilas varía según el número de pilas que se recarguen al mismo tiempo.
- Si carga una o dos pilas recargables en el cargador de pilas: aproximadamente 90 minutos
(modo de carga de alta velocidad)
- Si carga más pilas: aproximadamente 180 minutos
• Durante la carga, tanto el cargador como las pilas se calientan ligeramente. No se trata de un
mal funcionamiento.
• Asegúrese de desenchufar el cargador cuando no lo utilice.
• No utilice ni deje el cargador cerca de calefactores, lugares calientes expuestos a la luz solar
directa o lugares húmedos.
• El indicador de carga se puede desconectar antes de lo habitual si se cargan pilas que no se han
agotado completamente.
• Las pilas recargables de hidruro metálico de níquel se deben sustituir por pilas nuevas cuando
duren la mitad del tiempo que se espera de unas pilas completamente cargadas. Compre pilas
recargables de hidruro metálico de níquel Sony R6 (tamaño AA) (NH-AA). Puede solicitar las
pilas en el establecimiento donde adquirió esta unidad o a su distribuidor Sony más cercano.
ADVERTENCIA
El cargador de pilas suministrado puede cargar pilas recargables de hidruro de níquel metálico
Sony R6 (tamaño AA), R03 (tamaño AAA) (NH-AA, NH-AAA). No intente cargar otros tipos de
pilas recargables o secas. Si se combinan diferentes tipos de pilas podrían producirse fugas,
sobrecalentamientos y explosiones.
Preparación
11
ES
Page 68

1 Conexión
Conexión del sistema de auriculares
Configuración
Puede situar el procesador en posición vertical o de lado.
Para utilizarlo en posición vertical:
Utilice una moneda para unir el soporte suministrado con la parte inferior del
procesador.
Para utilizarlo de lado:
Sitúe el procesador de modo que los cuatro soportes de goma estén en la parte
inferior.
,
Soportes de goma
Notas
• Instale el procesador en una ubicación donde no haya obstáculos entre el procesador y los
auriculares en el momento de su utilización.
• No instale el procesador en ubicaciones inestables como, por ejemplo, encima del televisor. Si
el procesador se cae, podría causar lesiones o dañarse.
• Si el procesador se sitúa en posición vertical, únalo siempre al soporte para mayor seguridad.
• Si el procesador está situado de lado, podría no obtenerse el rango completo de transmisión de
infrarrojos, en función de las condiciones de instalación.
• Si el procesador se sitúa de lado, no lo coloque del lado en que no hay soportes de goma.
ES
12
Conexión
Page 69

Conexión del procesador a componentes digitales
Utilice el cable de conexión digital óptica para conectar la toma de salida digital óptica
de un reproductor DVD (o reproductor LD), televisor digital u otros componentes
digitales a la toma DIGITAL IN 1 ó 2 del procesador.
Procesador
A la toma
DIGITAL IN
Notas
• El cable de conexión digital óptica es un dispositivo de una gran presión y es sensible a golpes
y a presión externa. Por lo tanto, tenga cuidado cuando inserte y retire el enchufe del cable.
• Este sistema no se proporciona con tomas AC-3 RF, por lo tanto, las señales AC-3 RF de los
reproductores LD no pueden enviarse directamente.
• La entrada digital para el procesador no soporta frecuencias de muestreo de 96 kHz. Ajuste la
configuración de la toma digital para el reproductor de DVD a 48 kHz cuando utilice este
sistema. Cuando entre una señal digital de 96 kHz se pueden oír ruidos.
DTS
• Se requiere un reproductor de DVD compatible con DTS para reproducir DVD grabados en
sistema de audio DTS. (Para obtener más información, consulte el manual de instrucciones del
reproductor de DVD.)
• Si reproduce LD y CD grabados en formato DTS, se pueden producir ruidos al avanzar y
rebobinar con rapidez. No se trata de un mal funcionamiento.
• Si la salida digital DTS está ajustada en la posición “OFF” en el reproductor DVD, no se oirá
ningún sonido, aunque se seleccione la salida DTS en el menú del DVD.
• No se oirá ningún sonido si se conecta analógicamente un reproductor DVD y esta unidad. En
este caso, utilice una conexión digital.
Cable de conexión digital
óptica (suministrado)
Haga coincidir la
orientación del enchufe con
la toma e inserte el enchufe
hasta que quede bien fijado
en su lugar.
(vendido por separado)
A la toma
de salida
digital
óptica
Reproductor DVD, reproductor
LD, sintonizador digital BS u
otros componentes digitales que
dispongan de una toma de salida
digital óptica
(continuación)
Conexión
13
ES
Page 70

Cables de conexión (se venden por separado)
• Utilice un cable óptico (POC-5A, etc., vendido por separado) para conectar más de dos
componentes externos.
• Utilice POC-5AB (mini enchufe y enchufe rectangular, vendido por separado) si conecta la
mini toma de salida digital a reproductores de DVD portátiles, reproductores de CD portátiles
u otros componentes digitales a la toma DIGITAL IN.
Selector digital óptico (se vende por separado)
Se recomienda utilizar SB-RX100P (selector digital óptico de 4 líneas de entrada y 3 de salida,
vendido por separado) si conecta más de un componente
digital.
Notas sobre el cable de conexión digital óptica
• No deje caer objetos sobre el cable de conexión digital
óptica ni lo exponga a golpes.
• Sujete el enchufe para conectar o desconectar el cable.
• Asegúrese de que los extremos del cable de conexión
digital óptica se mantienen siempre limpios. El polvo en
los extremos del cable puede deteriorar su rendimiento.
• Cuando guarde el sistema, coloque el capuchón en el
extremo del enchufe y procure no doblar el cable de
conexión digital óptica con un radio de plegado inferior a
25 mm.
El radio de plegado del cable de
conexión digital óptica no debe ser
inferior a 25 mm.
25 mm
Conexión del procesador a componentes analógicos
Utilice un cable de audio (se vende por separado) para conectar las tomas de salida de
audio de la videograbadora, el televisor u otro componente a las tomas LINE IN (L/
R) del procesador.
Procesador
Videograbadora,
televisor u otros
A las tomas LINE IN
Audio izquierdo (L, blanco) Audio izquierdo
Cable de audio
(vendido por separado)
Audio derecho (R, rojo)
Cables de conexión (se venden por separado)
Utilice el cable RK-G129 (mini enchufe estéreo y 2 enchufes de terminales) si conecta una mini
toma estéreo (toma de salida de línea o toma de auriculares) a las tomas LINE IN.
En este caso, ajuste el volumen del reproductor en un nivel medio. Si el volumen del reproductor
se ajusta demasiado bajo, se pueden producir ruidos.
A las tomas de salida de audio
(blanco)
Audio derecho (rojo)
componentes
Consulte la página 29 para obtener más información acerca de otros cables de conexión
(vendidos por separado).
ES
14
Conexión
Page 71

Ajuste del nivel de entrada
Si el volumen es demasiado bajo utilizando una entrada analógica, ajuste el
interruptor ATT (atenuador) en la posición “0dB”.
ATT
0dB
–8dB
Ajuste Componentes conectados
0dB Televisor, componentes portátiles y otros componentes con nivel de salida bajo
–8dB Otros componentes (ajustes iniciales)
Notas
• Asegúrese de bajar el volumen antes de ajustar el interruptor ATT.
• Si la entrada de audio a las tomas LINE INPUT es distorsionada (a veces, se puede oír ruido al
mismo tiempo), ajuste el conmutador ATT en “–8dB“.
Conexión a la toma de pared
Procesador
Adaptador de
alimentación
de CA
A la toma de pared
A la toma DC IN
Notas
• Asegúrese de utilizar el adaptador de alimentación de CA suministrado. Si utiliza adaptadores
de CA con distintas polaridades de enchufe u otras características, puede provocar un fallo en
el producto.
Enchufe de polaridad unificada
• Asegúrese de utilizar siempre el adaptador de alimentación de CA suministrado. Incluso los
adaptadores de alimentación de CA con un mismo voltaje y polaridad de enchufe pueden
dañar este producto debido a la capacidad de corriente u otros factores.
Conexión
15
ES
Page 72

Inserción de las pilas en los auriculares
Siga las indicaciones de la siguiente ilustración e inserte dos pilas recargables de
hidruro metálico de níquel completamente cargadas (página 9) con los extremos 3 y
# en la dirección correcta. Inserte primero el lado #.
1
Si utiliza pilas opcionales
Puede utilizar también pilas alcalinas R6 (tamaño AA). Inserte las pilas como se indica
en la instrucción anterior.
Tiempos de uso para las pilas secas
Tipo de pila Tiempo de uso
Pila LR6 alcalina de Sony (SG) Aprox. 7 horas*
23
* El tiempo de uso que se indica anteriormente puede variar en función de la temperatura y las
condiciones de uso.
Nota
Las pilas de manganeso no se pueden utilizar con esta unidad.
Cómo volver a unir la tapa del compartimento de pilas en
caso de que se desprenda
Siga las indicaciones de la ilustración y haga coincidir A con A y B con B, vuelva a
unir la tapa y desplácela hasta colocarla en su sitio.
16
ES
Conexión
Page 73

1 Operación
Escuchar el sonido de un componente conectado
Antes de iniciar el funcionamiento, asegúrese de leer
“Conexión del sistema de auriculares” (páginas 12 a 16) y
realice las conexiones adecuadas.
1 Encienda el componente conectado al procesador.
Reproductor DVD u otro
componente de audio y vídeo
POWER
2 Pulse POWER para conectar el procesador.
El indicador POWER se iluminará en verde.
POWER
3 Colóquese los auriculares.
El indicador POWER se iluminará en rojo y los auriculares se conectarán
automáticamente.
Indicador
POWER
(continuación)
Operación
17
ES
Page 74

4 Pulse INPUT para seleccionar el componente que desee escuchar.
DIGITAL 1
DIGITAL 2
ANALOG
INPUT
Luz del indicador Fuente de sonido seleccionado
DIGITAL 1 Sonido del componente conectado a la toma DIGITAL IN 1
DIGITAL 2 Sonido del componente conectado a la toma DIGITAL IN 2
ANALOG Sonido del componente conectado a las tomas LINE IN
Nota
Para escuchar fuentes de sonido audio dual (MAIN/SUB), conéctelo a las tomas LINE IN y,
a continuación, seleccione la fuente de sonido que desee escuchar en el reproductor, en el
televisor o en otro componente.
5 Inicie la reproducción del componente seleccionado en el paso 4.
6 Pulse OUTPUT varias veces para seleccionar el modo de salida (efecto de
sonido envolvente) (consulte la página 19).
18
ES
Operación
DECODE MODE
DOLBY DIGITAL
DOLBY PRO LOGIC II
DTS
MPEG-2 AAC
C
L
LS RS
CS
VIRTUAL
OUTPUT
R
Page 75

Luz del indicador Modo de salida (efecto de sonido envolvente)
DECODE MODE
DOLBY DIGITAL
DOLBY PRO LOGIC II
DTS
MPEG-2 AAC
C
L
LS RS
CS
VIRTUAL
DECODE MODE
DOLBY DIGITAL
DOLBY PRO LOGIC II
DTS
MPEG-2 AAC
C
L
LS RS
CS
VIRTUAL
DECODE MODE
DOLBY DIGITAL
DOLBY PRO LOGIC II
DTS
MPEG-2 AAC
C
L
LS RS
CS
VIRTUAL
DECODE MODE
DOLBY DIGITAL
DOLBY PRO LOGIC II
DTS
MPEG-2 AAC
C
L
LS RS
CS
VIRTUAL
R
R
R
R
OFF
Reproducción de auriculares estándar.
VIRTUAL FRONT
Efecto virtual mediante el cual se obtiene la sensación de que el
sonido proviene de dos altavoces (derecho e izquierdo) situados
enfrente del usuario.
VIRTUAL SURROUND 5.1
Efecto de sonido envolvente virtual mediante el cual se obtiene la
sensación de que el sonido proviene no sólo de dos altavoces
(derecho e izquierdo), sino también de un altavoz central, dos
altavoces posteriores (derecho e izquierdo) y un altavoz potenciador
de graves.
VIRTUAL SURROUND 6.1
Este modo sólo se puede seleccionar si la señal de entrada es de
origen multicanal DOLBY DIGITAL o DTS.
Efecto de sonido envolvente virtual mediante el cual se obtiene la
sensación de que el sonido proviene de tres altavoces frontales
(derecho, izquierdo y central), tres altavoces posteriores (derecho,
izquierdo y central) y un altavoz potenciador de graves.
Nota
Seleccione este modo en el modo de reproducción de la fuente
multicanal de DOLBY DIGITAL o DTS (Asegúrese de que se
ilumina el indicador DECODE MODE). Este modo no se puede
seleccionar en los otros modos (modo de parada, modo de
visualización del menú, etc.).
Indicación DECODE MODE
Si el modo de salida está ajustado en VIRTUAL SURROUND 5.1 o VIRTUAL SURROUND 6.1, el
procesador automáticamente identifica el formato de la señal audio de entrada y se ilumina el
indicador correspondiente. Alterne el audio entre Dolby Digital, DTS, MPEG-2 AAC, etc., de los
equipos conectados (reproductor DVD, receptor satélite de emisiones digitales, etc.).
• DOLBY DIGITAL: Señal de entrada grabada en formato DOLBY DIGITAL.
• DOLBY PRO LOGIC II: Señal de 2 canales de entrada (digital o analógica) procesada por
DOLBY PRO LOGIC II.
• DTS: Señal de entrada grabada en formato DTS.
• MPEG-2 AAC: Señal de entrada grabada en formato MPEG-2 AAC.
(continuación)
Operación
19
ES
Page 76

7 Pulse EFFECT para seleccionar el campo de sonido deseado. (Sólo cuando en
el paso 6 de la página 18 se ha seleccionado un elemento distinto a “OFF”.)
CINEMA 1
CINEMA 2
MUSIC
EFFECT
Luz del indicador Campo de sonido y fuente de sonido adecuada
CINEMA 1 Modo que reproduce el campo de sonido de una habitación amplia,
CINEMA 2 Modo que produce sonido más realista que CINEMA 1, como si
MUSIC Modo que reproduce el campo de sonido de una sala de audición
Nota
Si el modo de salida (efecto de sonido) está ajustado en “OFF” en el paso 6 de la página 18,
no podrá seleccionar un campo de sonido, aunque pulse EFFECT.
como una sala de cine o de conciertos.
Este modo es adecuado para fuentes de sonido de película.
estuviera dentro de la película. Este modo es adecuado para fuentes
de sonido de película.
con un buen entorno acústico.
Este modo es adecuado para escuchar música.
8 Ajuste del volumen.
Subir el
volumen
Bajar el
volumen
Para ajustar el volumen de los auriculares (vendidos por separado)
conectados a la toma PHONES.
Gire PHONES—LEVEL para ajustar el volumen.
MIN
LEVEL
MAX
Subir el
volumen
PHONES
Bajar el
volumen
Nota
Cuando mire películas, procure no subir demasiado el volumen en las escenas silenciosas.
Cuando se pase a una escena de más volumen podría dañar sus oídos.
ES
20
Operación
Page 77

9 Ajuste la función de rastreo de cabeza en la posición ON. (Sólo cuando en el
paso 6 de la página 19 se ha seleccionado un elemento distinto a “OFF”.)
Mire hacia la fuente de sonido (por
ejemplo el televisor) y ajuste el
interruptor HEAD TRACKING en
la posición ON. Espere 2 segundos
sin moverse.
No mueva la cabeza hasta que el
sistema de rastreo de cabeza esté
estabilizado. En este periodo no se
emite ningún sonido.
En cuanto se estabiliza el sistema de rastreo de cabeza, se puede escuchar el sonido de
reproducción.
A continuación, el sonido se oirá como si viniera de la parte frontal, incluso si gira la cabeza
en todas las direcciones.
Notas
• Colóquese siempre los auriculares verticalmente (como se indica en la página 17) para
que el sistema de rastreo de cabeza sea estable.
• Siempre que el interruptor HEAD TRACKING esté en la posición ON y se coloque los
auriculares conectados, espere 2 segundos sin mover la cabeza, puesto que el sistema de
rastreo de cabeza se estabiliza nuevamente cada vez.
• Si el sonido de los auriculares (mientras mira hacia el televisor) parece distinto a la
dirección real del televisor, mire hacia adelante y pulse el botón RESET de los auriculares.
Los auriculares se desconectarán automáticamente cuando se los quite
— Función de conexión y desconexión automática
Cuando no utilice los auriculares,
cuélguelos de forma que no se active la
función de conexión automática, puesto que
se consumirían las pilas.
Cinta
autoajustable
para la cabeza
Para comprobar la energía restante de las pilas
Tire de la cinta autoajustable y compruebe
el indicador POWER. Cuando el indicador
POWER se enciende en rojo, las pilas
todavía se pueden utilizar.
Cargue las pilas recargables o utilice pilas
alcalinas nuevas si el indicador POWER
Indicador
POWER
parpadea y los auriculares emiten un
pitido intermitente.
Tiempo de transición entre modos
Cuando pulse botones en el procesador para cambiar de modo, el tiempo de
transición entre modos puede variar. Esto se debe a las diferencias en el control del
sistema entre modos.
(continuación)
Operación
21
ES
Page 78

Si no se oye ningún sonido a través de los auriculares
Se oye un pitido corto repetidamente y la función de silencio se activa
automáticamente si el sonido que emiten los auriculares se corta cuando los
auriculares se encuentran fuera del área de transmisión de infrarrojos o cuando se
interrumpen las señales de infrarrojos. La función de silencio se cancela
automáticamente cuando se acerca al procesador o cuando ya no hay ningún
obstáculo que se interponga en la dirección de las señales de infrarrojos.
Área de transmisión de infrarrojos
El área aproximada de transmisión de infrarrojos desde el procesador se muestra en la
siguiente ilustración:
Señal de infrarrojos
Aprox.
4 m
Procesador de sonido
envolvente digital
Aprox.
4 m
Notas
• Dado que el sistema utiliza señales de infrarrojos, el sonido se puede interrumpir si se
obstruyen dichas señales. Esto se debe a las características de la señal de infrarrojos y no se
trata de un mal funcionamiento.
• No cubra el sensor de la señal de infrarrojos con la mano o con el pelo.
• Mientras los auriculares se encuentran en el área de transmisión que muestra la anterior
ilustración, pueden orientarse como se desee respecto al procesador de sonido envolvente
digital (mirando hacia él, a un ángulo de 90˚, o uno de 180˚).
• El sonido puede variar en función de la posición del procesador y las condiciones de la
habitación. Se recomienda situar el procesador en la ubicación que genere un sonido más claro.
•Si se utiliza el procesador con otros procesadores o transmisores, se pueden mezclar las señales.
45°
45°
Aprox.
10 m
22
ES
Operación
Page 79

Si no se emite ninguna señal de audio durante 10 minutos
La emisión de señales de infrarrojos desde el procesador se detiene automáticamente
cuando no se introduce ninguna señal de audio durante 10 minutos. Las señales de
infrarrojos se emiten automáticamente cuando se introduce de nuevo una señal de
audio. La emisión de señales de infrarrojos se puede detener si un sonido
extremadamente bajo se emite durante aproximadamente 10 minutos en una señal de
entrada analógica. Si esto ocurre, suba el volumen del componente de audio y vídeo y
baje el volumen de los auriculares.
Notas
• Pueden producirse diferencias en el brillo del emisor de infrarrojos del procesador de sonido
envolvente digital. Sin embargo, esto no afecta al área de transmisión.
• Los auriculares se deben utilizar dentro del área de transmisión de infrarrojos (consulte “Área
de transmisión de infrarrojos” en la página 22).
• No utilice este sistema en áreas expuestas a la luz directa del sol o a fuerte iluminación. El
sonido se puede interrumpir.
• Estos auriculares abiertos están diseñados para que el sonido se propague también fuera de los
mismos. Tenga cuidado de no subir demasiado el volumen porque podría molestar a la gente
de su alrededor.
• El efecto de sonido envolvente puede que no se obtenga de fuentes que no incorporen vídeo
como, por ejemplo, discos CD de música.
• Este sistema simula la media HRTF* igual en la mayoría de la gente. Sin embargo, el efecto
puede diferir de una persona a otra ya que el HRTF puede variar entre personas.
* Head Related Transfer Function (Función de transferencia relacionada con la cabeza)
Operación
23
ES
Page 80

Auriculares adicionales
Los auriculares se pueden incorporar al sistema de una o dos maneras.
Para disfrutar del sonido envolvente utilizando auriculares inalámbricos con más
de una persona
t Utilizando los auriculares inalámbricos con infrarrojos MDR-IF8000 adicionales
(vendidos por separado), más de una persona puede disfrutar de la experiencia
del sonido envolvente a la vez.
* El número de auriculares que se pueden utilizar dentro del área de transmisión
de infrarrojos es ilimitado.
MDR-IF8000 (vendido por separado)
Procesador
Nota
Dado que esta unidad emplea un sistema de transmisión de infrarrojos digital, los auriculares
analógicos inalámbricos con infrarrojos (MDR-IF5000, etc.) no se pueden utilizar.
Para conectar auriculares alámbricos
t La toma PHONES está ajustada para los auriculares MDR-F1 abiertos y
alámbricos (vendidos por separado). Por lo tanto, si conecta los auriculares MDRF1, podrá disfrutar de la alta calidad del sonido envolvente. Con este sistema
también puede utilizar cualquier tipo de auriculares abiertos alámbricos.
Para obtener suficiente efecto de sonido envolvente, utilice los auriculares estéreo
inalámbricos MDR-IF8000 o los auriculares completamente abiertos y alámbricos
MDR-F1.
Procesador
Auriculares alámbricos de tipo completamente
abierto MDR-F1 (vendidos por separado) u otros
auriculares abiertos alámbricos
A la toma PHONES
Notas
• Cuando retire los auriculares de la toma PHONES, tire siempre del enchufe. No tire nunca del
cable.
• El efecto de sonido envolvente podría no obtenerse si utiliza auriculares de tipo interno.
ES
24
Operación
Page 81

1 Información complementaria
Solución de problemas
Si surge algún problema al utilizar este sistema de auriculares, utilice la lista de comprobación
siguiente. Si el problema persiste, consulte con su proveedor Sony más cercano.
Problema Causa y solución
No se oye el sonido
Sonido distorsionado
(a veces con ruidos)
Sonido bajo
, Compruebe la conexión entre el procesador y el componente AV.
, Encienda el componente AV conectado al procesador e inicie el programa
(reproducción).
, Compruebe que ha seleccionado el componente que desea escuchar.
, Si conecta el procesador a un componente AV utilizando las tomas de los
auriculares, suba el volumen del componente AV conectado.
, Suba el volumen de los auriculares.
, Las pilas de los auriculares están completamente agotadas. Tire de la cinta
autoajustable de cabeza y, si el indicador POWER está desactivado, cargue las
pilas recargables o reemplace las pilas alcalinas. Si el indicador POWER
todavía no se activa, lleve la unidad al proveedor Sony más cercano.
, Está intentando reproducir una pista audio DTS en un reproductor de DVD
que no soporta DTS. Utilice un reproductor de DVD que soporte DTS o bien
seleccione una pista de audio Dolby Digital o PCM.
, Está reproduciendo un disco DVD grabado en DTS y el ajuste de la salida
digital DTS del reproductor de DVD (incluyendo las máquinas de juegos) está
en la posición “OFF”. Consulte el manual de instrucciones del reproductor
DVD y cambie el ajuste de la salida digital DTS en la posición “ON”.
, Está reproduciendo un disco DVD (incluyendo las máquinas de juegos)
grabado en DTS y el reproductor DVD y el procesador están conectados
analógicamente. Conéctelos digitalmente. (El sonido analógico podría no
emitirse a través del reproductor de DVD.)
, La función de rastreo de cabeza no funciona correctamente. Si el interruptor
HEAD TRACKING está en la posición ON después de colocarse los
auriculares o cuando se los coloca con el interruptor HEAD TRACKING en la
posición ON, espere durante 2 segundos sin mover la cabeza. Si no oye
ningún sonido incluso después de intentar realizar este paso, deje de utilizar
los auriculares y, a continuación, vuelva a emplearlos.
, Ajuste el interruptor ATT del procesador en la posición “-8dB”.
, Si conecta el procesador a un componente AV utilizando las tomas de los
auriculares, baje el volumen del componente AV conectado.
, Si utiliza fuentes de audio DTS, ajuste el modo de salida del procesador en la
posición VIRTUAL SURROUND (página 19).
, Ajuste el interruptor ATT del procesador en la posición “0dB”.
, Si conecta el procesador a un componente AV utilizando las tomas de los
auriculares, suba el volumen del componente AV conectado.
, Suba el volumen de los auriculares.
(continuación)
Información complementaria
25
ES
Page 82

Problema Causa y solución
Se oye un pitido
corto.
Se oye un pitido
largo
No se obtiene el
efecto del sonido
envolvente
El sonido de los
auriculares
parece ser
distinto a la
dirección real del
televisor.
El indicador
DOLBY DIGITAL
no se enciende
La luz del indicador
DTS no se enciende
El indicador
MPEG-2 AAC no se
enciende.
, Los auriculares no reciben los rayos infrarrojos del procesador.
• Encienda el procesador.
• Compruebe la conexión entre el procesador y el adaptador de alimentación
de CA, entre el adaptador de alimentación de CA y el enchufe de
alimentación de CA.
• Compruebe si hay obstáculos entre el procesador y los auriculares.
• Coloque los auriculares más cerca del procesador.
• Cambie la posición o el ángulo del procesador.
• Compruebe si la mano o el pelo cubren el sensor de la señal de infrarrojos
de los auriculares.
• Si utiliza los auriculares cerca de una ventana expuesta a luz solar directa,
tire la cortina o la persiana para impedir que llegue la luz solar. Si lo
prefiere, utilice los auriculares en lugares que no estén expuestos a la luz
solar directa.
• No utilice este sistema cerca de una pantalla de plasma.
, Las pilas de los auriculares están agotadas. Tire de la cinta autoajustable de
cabeza y, si el indicador POWER parpadea, cargue las pilas recargables o
reemplace las pilas alcalinas. Si el indicador POWER todavía parpadea y se
oye un pitido, lleve la unidad al proveedor Sony más cercano.
, Pulse el botón OUTPUT para seleccionar el modo VIRTUAL SURROUND
(páginas 18, 19).
, El audio que se reproduce no es de señal multicanal.
El efecto de sonido envolvente no funciona en fuentes de sonido monofónico.
, Mire hacia delante (por ejemplo, hacia el televisor) y pulse el botón RESET de
los auriculares.
, Es posible que el ajuste de la salida de audio digital del reproductor de DVD
(incluyendo las máquinas de juegos) se encuentre en posición “PCM”.
Consulte el manual de instrucciones suministrado con el reproductor de DVD
y cambie los ajustes (“Dolby Digital/PCM” o “Dolby Digital”) para utilizar
componentes con descodificadores Dolby Digital integrados.
, Las señales de reproducción no se graban en formato Dolby digital.
, El audio del capítulo que se reproduce no corresponde a una señal Dolby Digital.
, El ajuste de la salida digital DTS del reproductor de DVD (incluyendo las
máquinas de juegos) está en la posición OFF. Consulte el manual de
instrucciones suministrado con el reproductor DVD y ajuste la salida digital
DTS en la posición ON.
, Las señales de reproducción no se graban en formado DTS.
, El audio del capítulo que se reproduce no corresponde a una señal DTS.
, El reproductor de DVD no soporta el formato DTS.
Utilice un reproductor de DVD que soporte el formato DTS.
, Las señales de reproducción no se graban en formato MPEG-2 AAC.
26
ES
Información complementaria
Page 83

Problema Causa y solución
El indicador CS
(sonido envolvente
posterior) no
se enciende.
Las pilas no se
pueden cargar
, El formato de la señal de entrada no es a Dolby digital (multicanal) ni DTS
(multicanal).
• Reproduzca un software DVD de formato Dolby digital (multicanal) o DTS
(multicanal).
• Cambie el ajuste del componente de salida para que se introduzca el nuevo
formato.
, El sonido Dolby digital (multicanal) o DTS (multicanal) no se reproduce.
Primero inicie la reproducción en el componente conectado y asegúrese de
que el indicador DECODE MODE se ilumina. A continuación, cambie el modo
de salida.
, Se utilizan pilas secas.
Inserte las pilas recargables suministradas u opcionales.
, Se utilizan pilas recargables distintas a las suministradas o especificadas.
Inserte las pilas recargables suministradas o especificadas.
Información complementaria
27
ES
Page 84

Precauciones
Seguridad
• No deje caer, golpee ni exponga el
procesador o los auriculares a golpes
fuertes de ningún tipo. Podría dañar el
producto.
• No desmonte ni intente abrir ninguna de
las piezas del sistema.
Sobre las fuentes de alimentación y la
ubicación
• Si no va a utilizar el sistema durante un
período de tiempo largo, desenchufe el
adaptador de alimentación de CA de la
toma. Cuando retire el enchufe, sujete bien
el adaptador de alimentación de CA. No
tire del cable.
• No sitúe el sistema en ninguna de las
ubicaciones siguientes:
– Lugares expuestos a luz solar directa,
cerca de sistemas de calefacción o
ubicaciones con temperaturas
extremadamente altas
– Lugares polvorientos
– Superficies no estables o inclinadas
– Lugares expuestos a muchas vibraciones
– En el baño o ubicaciones similares
sometidas a gran humedad
Sobre los auriculares
Actúe con consideración
Si el volumen es demasiado alto, el sonido se
emite fuera de los auriculares. Tenga cuidado
de no subir demasiado el volumen porque
podría molestar a la gente de su alrededor.
Hay tendencia a subir el volumen cuando se
utiliza en lugares ruidosos. Sin embargo, el
volumen se debe mantener a un nivel
adecuado para responder cuando le llaman
mientras escucha a través de los auriculares.
Sobre las almohadillas para los oídos
Las almohadillas para los oídos se pueden
sustituir. Sustitúyalas cuando estén gastadas.
Para sustituir las almohadillas para los oídos,
consulte con su proveedor Sony más cercano.
Limpieza
Utilice un paño suave ligeramente
humedecido con una solución de detergente
suave. No utilice disolventes como
diluyentes, bencina o alcohol puesto que
pueden dañar la superficie.
Si el producto se rompe
• Si el producto se rompe o un objeto extraño
entra en la unidad, desconecte la
alimentación inmediatamente y consulte
con su proveedor Sony más cercano.
• Cuando lleve el sistema al proveedor Sony,
asegúrese de llevar tanto el procesador
como los auriculares.
28
ES
Información complementaria
Page 85

Especificaciones
Procesador de sonido envolvente
digital (DP-IF8000)
Funciones del descodificador
Dolby Digital
Dolby Pro Logic II
DTS
DTS-ES 6.1 canales
MPEG-2 AAC
Función de sonido virtual
OFF
Virtual frontal
Virtual envolvente 5,1
y 6,1
Sistema de modulación DQPSK
Transportador secundario de frecuencia de ondas
Distancia de transmisión
Velocidad de transmisión
Porcentaje de distorsión 1% o inferior (1 kHz)
Entradas de audio
Requisitos de alimentación
Dimensiones (a/a/p) Aprox. 85 × 190 × 200
Masa Aprox. 1,0 kg
4,5 MHz
Aprox. 10 m en
dirección frontal
12 – 24.000 Hz
Entrada óptica (tipo
rectangular) × 2
Entrada analógica
(enchufe macho
izquierdo/derecho) × 1
cc de 9 V (del
adaptador de
alimentación de ca
suministrado)
mm
Auriculares estéreo inalámbricos
(MDR-IF8000)
Velocidad de frecuencia de reproducción
Requisitos de alimentación
Masa Aprox. 350 g
12 – 24.000 Hz
Pilas de hidruro
metálico de níquel
(suministradas o
vendidas por separado)
o pilas alcalinas R6
(tamaño AA)
(incluyendo las pilas
recargables de hidruro
metálico de níquel
suministradas)
Accesorios suministrados
Soporte para el procesador de sonido
envolvente digital (1)
Adaptador de alimentación
de ca (9 V) (1)
Pilas recargables de hidruro metálico
de níquel NH-AA(1.700 mAh) (2)
Cargador de pilas (1)
Enchufe cargador para cargador de
pilas (1)
(Sólo modelo del Reino Unido, Hong
Kong y Europa)
Cable de conexión digital óptica
(enchufe rectangular y enchufe
rectangular, 1,5 m) (1)
Manual de instrucciones (1)
Información sobre el producto (1)
Accesorios recomendados
Cables de conexión
RK-C310, RK-C315, RK-C320, RK-C330
(enchufe macho × 2 y enchufe macho
× 2)
RK-G129 (miniclavija estéreo y
enchufe macho × 2)
Selector digital óptico
SB-RX100P
Cable de conexión digital óptica
POC-5A, POC-10A, POC-15A (enchufe
rectangular óptico y enchufe
rectangular óptico)
POC-5AB, POC-10AB, POC-15AB
(enchufe rectangular óptico y mini
enchufe óptico)
El diseño y las especificaciones están sujetos a
cambios sin previo aviso.
Información complementaria
29
ES
Page 86

30
ES
Información complementaria
Page 87

Información complementaria
31
ES
Page 88

Printed in Korea
 Loading...