

2-650-483-11(1)
Digital Surround
Headphone
System
Operating Instructions
Mode d’emploi
Manual de instrucciones
GB
FR
ES
KR
MDR-DS1000
© 2006 Sony Corporation

WARNING
NOTICE FOR THE CUSTOMERS IN THE
U.S.A.
To reduce the risk of fire or
electric shock, do not expose
this apparatus to rain or
moisture.
To reduce the risk of fire or electric
shock, do not place objects filled with
liquids, such as vases, on the apparatus.
To avoid electrical shock, do not open
the cabinet. Refer servicing to qualified
personnel only.
Do not install the appliance in a
confined space, such as a bookcase or
built-in cabinet.
NOTE
This equipment has been tested and found to
comply with the limits for a Class B digital
device, pursuant to Part 15 of the FCC Rules.
These limits are designed to provide
reasonable protection against harmful
interference in a residential installation. This
equipment generates, uses and can radiate
radio frequency energy and, if not installed
and used in accordance with the instructions,
may cause harmful interference to radio
communications. However, there is no
guarantee that interference will not occur in a
particular installation. If this equipment does
cause harmful interference to radio or
television reception, which can be determined
by turning the equipment off and on, the user
is encouraged to try to correct the interference
by one or more of the following measures:
– Reorient or relocate the receiving antenna.
– Increase the separation between the
equipment and receiver.
– Connect the equipment into an outlet on a
circuit different from that to which the
receiver is connected.
– Consult the dealer or an experienced radio/
TV technician for help.
You are cautioned that any changes or
modifications not expressly approved in this
manual could void your authority to operate
this equipment.
GB
2
For the customers in the USA and Canada
RECYCLING NICKEL METAL
HYDRIDE BATTERIES
Table Of Contents
Main Features .............................. 4
Nickel Metal Hydride
batteries are recyclable.
You can help preserve our
environment by returning
your used rechargeable
batteries to the collection
and recycling location
nearest you.
For more information regarding recycling
of rechargeable batteries, call toll free
1-800-822-8837, or visit http://www.rbrc.org/
Caution: Do not handle damaged or
leaking Nickel Metal Hydride batteries.
Disposal of Old Electrical
& Electronic Equipment
(Applicable in the
European Union and
other European
countries with separate
collection systems)
This symbol on the product or on its
packaging indicates that this product shall not
be treated as household waste. Instead it shall
be handed over to the applicable collection
point for the recycling of electrical and
electronic equipment. By ensuring this
product is disposed of correctly, you will help
prevent potential negative consequences for
the environment and human health, which
could otherwise be caused by inappropriate
waste handling of this product. The recycling
of materials will help to conserve natural
resources. For more detailed information
about recycling of this product, please contact
your local Civic Office, your household waste
disposal service or the shop where you
purchased the product.
Checking the Components and
Accessories ................................ 5
Location and Function of Parts ... 6
Front Panel of the Processor .............. 6
Rear Panel of the Processor ............... 7
Connecting the Headphone
System ....................................... 8
Connecting the processor to
digital components .........................
Connecting the processor to
analogue components.....................
Connecting the supplied AC
power adaptor to the processor ....
11
Listening to a Connected
Component ............................. 12
Using Additional Headphones.. 15
Replacing the Ear Pads .............. 16
Troubleshooting......................... 17
Precautions................................. 19
Specifications ............................. 20
8
9
GB
GB
3

Main Features
The MDR-DS1000 is a digital surround headphone system.
You can enjoy multi-channel surround sound with headphones by simply connecting
the digital surround processor to a DVD device etc., with the supplied optical digital
connecting cable.
• Compatibility of MDR-DS1000 with a wide variety of audio formats. Compatible
with Dolby Digital*
marked with “Dolby Digital Surround EX” and “DTS-ES”.)
• Dolby Digital/Dolby Pro Logic II and DTS Virtual certified.
• Superior “Virtualphones Technology”*
headphones with realistic presence.
•Reproduction of movie sound quality by XD technology headphones.
The headphones provided use long-stroke diaphragms with wide-diameter 40mm
driver units for a broad dynamic range. Their ear-conscious design ensures comfort
for long-term viewing and listening by reducing pressure and weight on the ears.
The digital surround processor for this system incorporates the Dolby Digital decoder,
the Dolby Pro Logic II decoder and the DTS decoder.
1
*
Manufactured under licence from Dolby Laboratories and Digital Theater Systems, Inc.
“Dolby,” “Pro Logic”, and the double-D symbol are trademarks of Dolby Laboratories.
“DTS” and “DTS Virtual” are trademarks of Digital Theater Systems, Inc.
*2“Virtualphones Technology” is a registered trademark of Sony Corporation.
1
, Dolby Pro Logic II*1, and DTS*1 formats. (Can play media
2
creates a surround sound field within the
The validity of the CE marking is restricted to only those countries where it is legally enforced,
mainly in the countries EEA (European Economic Area).
GB
4
1 Preparation
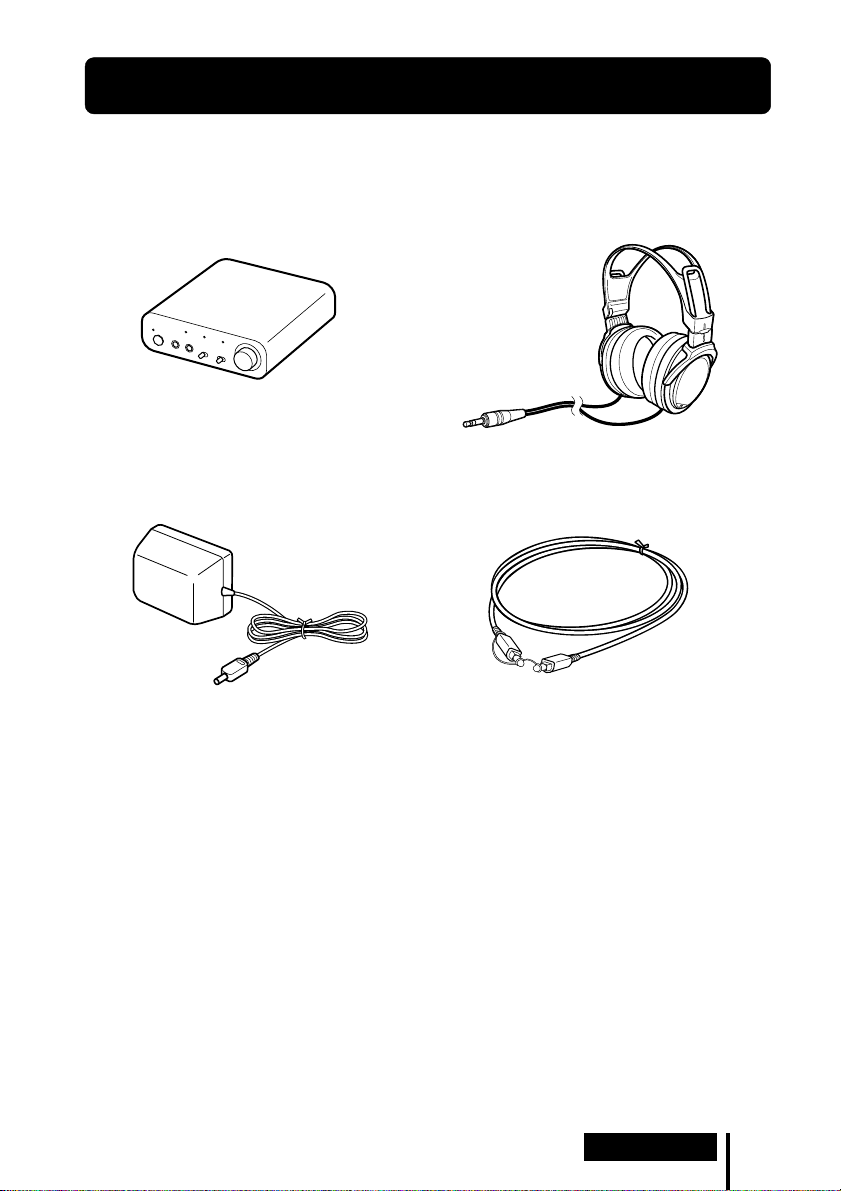
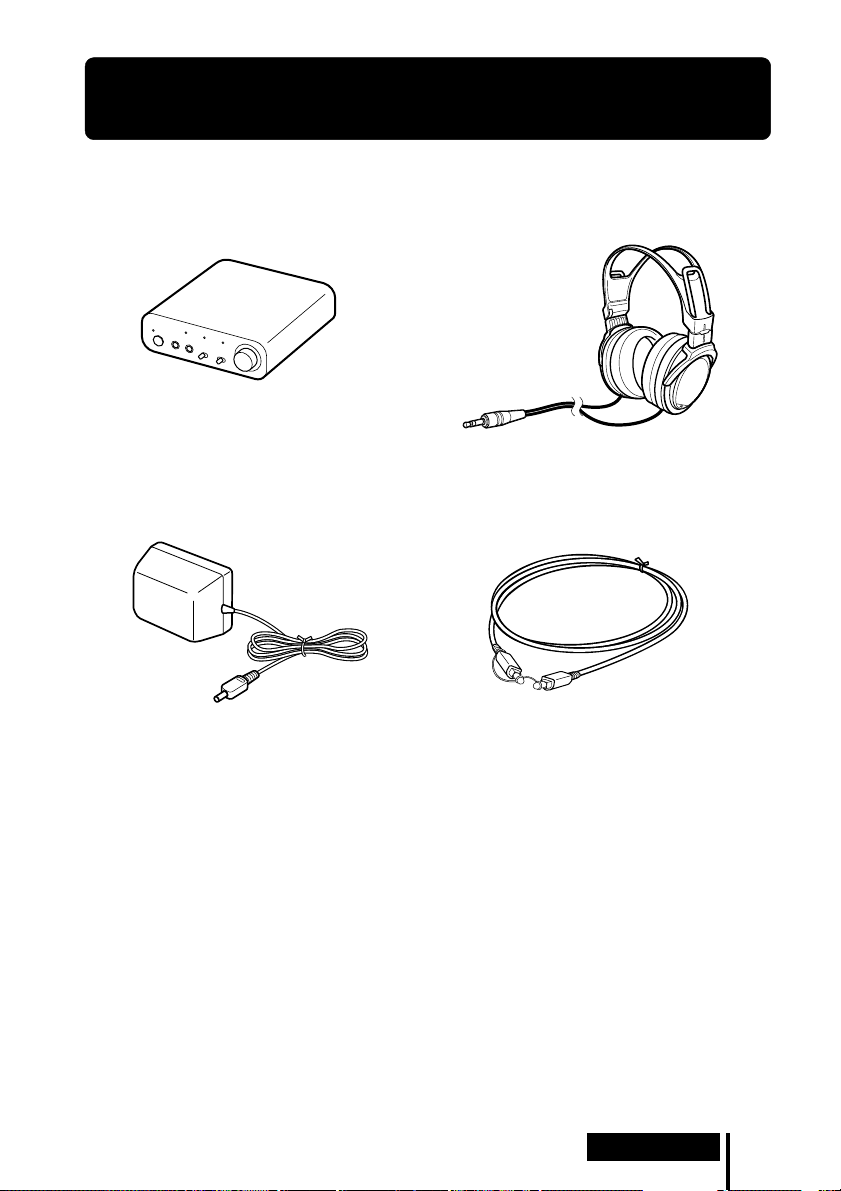
Checking the Components and Accessories
Before setting up the system, check that all of the components are included.
Stereo headphones MDR-XD050 (1)Processor DP-1000 (1)
AC power adaptor (1) Optical digital connecting cable
(rectangular type y rectangular type) (1)
Preparation
GB
5

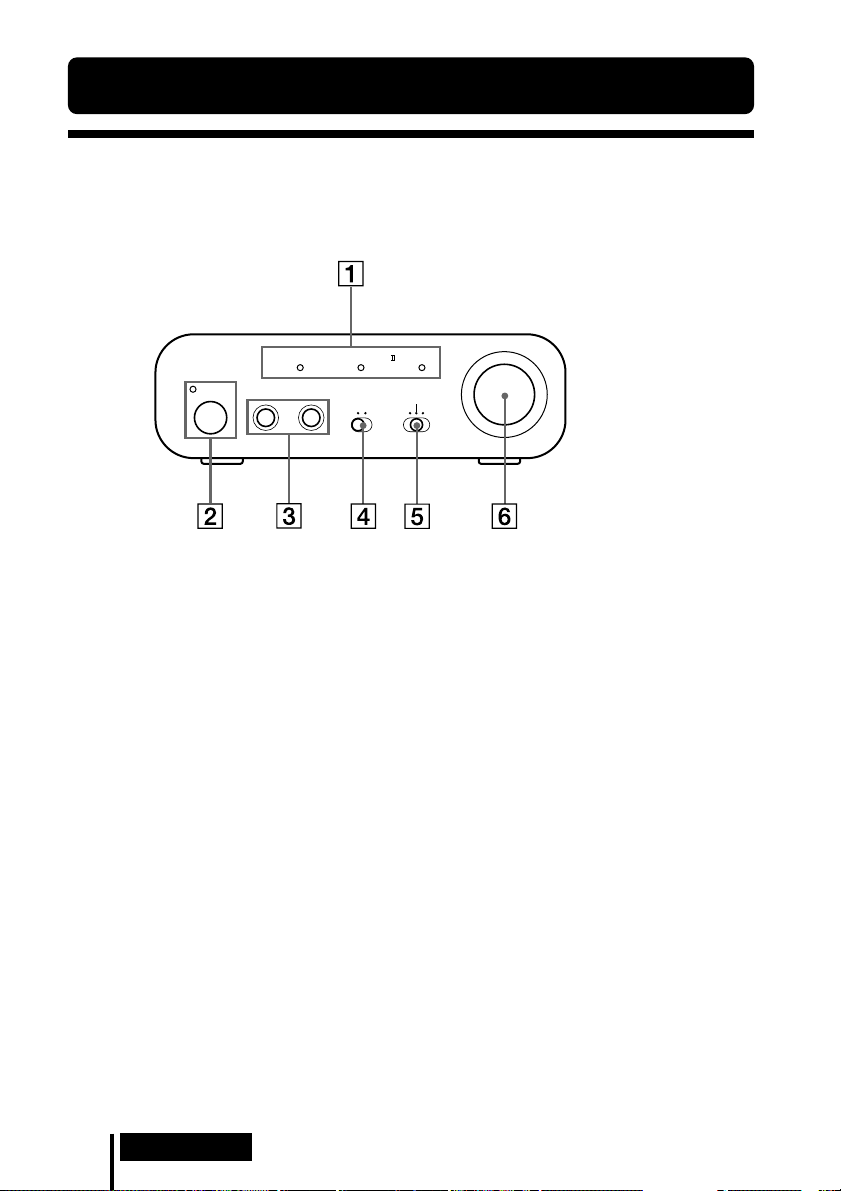
Location and Function of Parts
Front Panel of the Processor
DOLBY DIGITAL DOLBY PRO LOGIC
POWER 1 PHONES 2
1 DECODE MODE indicators
(See page 14
for details.)
2 POWER indicator
Lights green when the processor is turned
on.
POWER (power) switch
Press to turn the processor on/off.
3 PHONES jack
Connect the supplied headphones.
INPUT SELECT
DIGITAL ANALOG
LEVEL
MIN MAX
EFFECT
CINEMA
DTS
OFF
MUSIC
4 INPUT SELECT switch
Slide to select the input source
(ANALOG/DIGITAL).
5 EFFECT switch
(See page 13
Slide to select the sound field (CINEMA/
OFF/MUSIC).
6 Volume control
Adjusts the volume of the headphones
connected to the PHONES jack.
for details.)
GB
6
Preparation
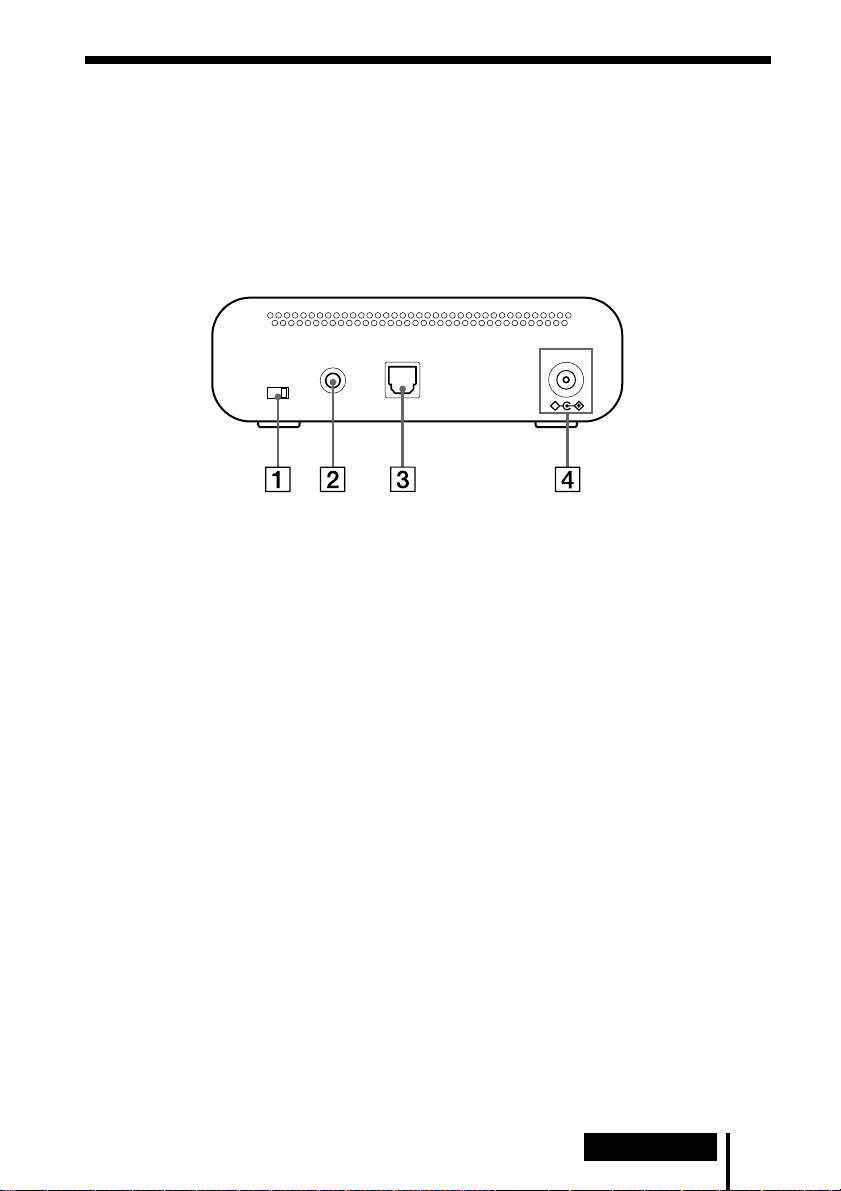
Rear Panel of the Processor
LINE IN
ATT
0dB -8dB
1 ATT (attenuator) switch
Set this switch to “0 dB” if the volume is
too low for analogue input. Normally, this
switch should be set to “–8 dB.”
2 LINE IN jack
(See page 9 for details.)
Connect the audio output jacks on an
audio or video component (sold
separately), such as a video cassette
player or TV, to these jacks.
DC IN9V
DIGITAL IN
3 DIGITAL IN jack
(See page 8 for details.)
Connect a DVD device or other digital
component (sold separately) to this jack.
4 DC IN 9V jack
Connect the supplied AC power adaptor
to this jack. (Be sure to use the supplied
AC power adaptor. Using products with a
different plug polarity or other
characteristics can cause a malfunction.)
Preparation
GB
7
1 Connection
Connecting the Headphone System
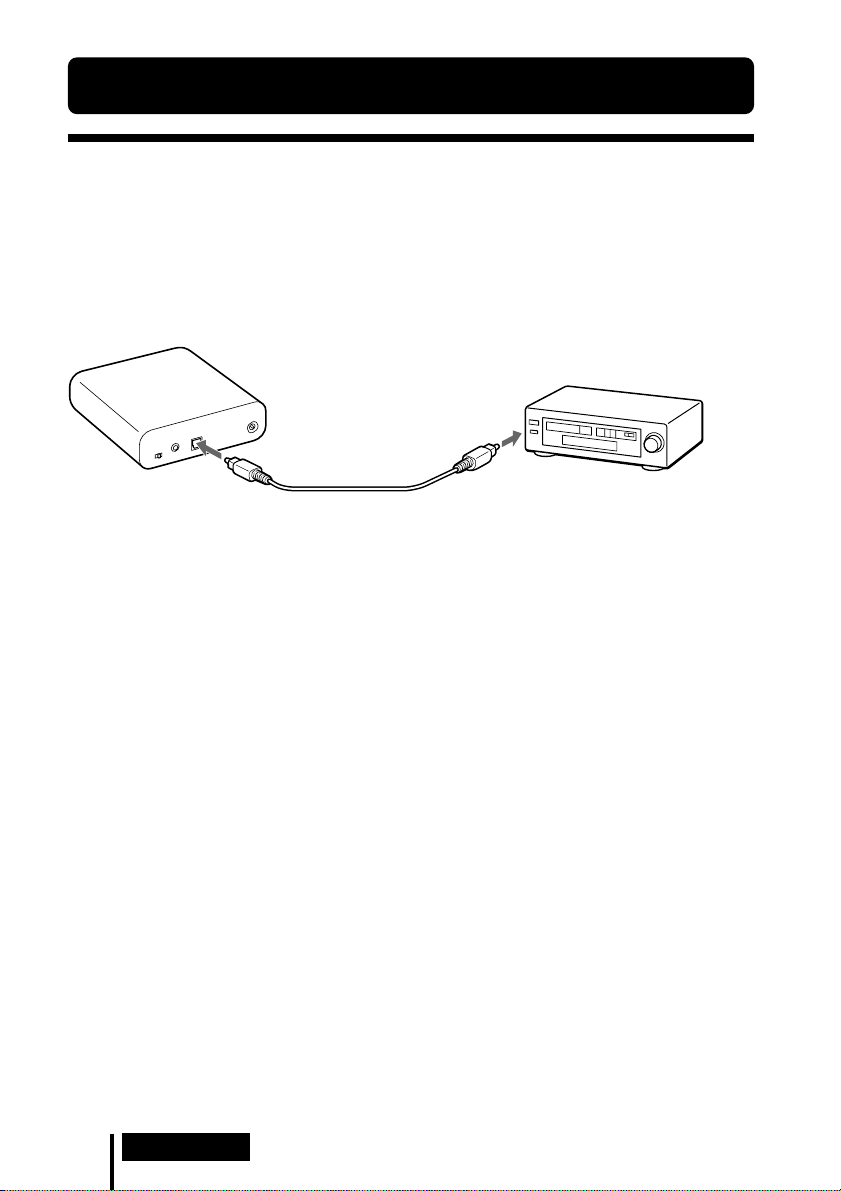
Connecting the processor to digital
components
Use the supplied optical digital connecting cable to connect the optical digital output
jack* on a DVD device or other digital component to the DIGITAL IN jack of the
processor.
Processor
To optical digital
output jack
To DIGITAL IN
jack
Notes
• The optical digital connecting cable is an extremely high-precision device and is sensitive to
jolts and external pressure. Therefore, be careful when inserting and removing the cable plug.
• The digital input for the processor does not support sampling frequencies of 96 kHz. Set the
digital output setting of the DVD device to 48 kHz when using this system. Noise may be
heard when a 96 kHz digital signal is input.
* If the connected equipment supports PCM output only, all surround sound effects will be
processed by DOLBY PRO LOGIC II.
DTS
•A DTS-compatible DVD device is required for playback of DVDs recorded in DTS audio. (For
more details, see the instruction manual of your DVD device.)
• When playing CDs recorded in DTS format, noise may occur when fast forwarding or
rewinding. This is not a malfunction.
• If the DTS digital output is set to “OFF” on the DVD device, no sound may be heard even if the
DTS output is selected in the DVD menu.
• No sound may be heard when a DVD device and this unit is analogue-connected. In this case,
use a digital connection.
Optical digital connecting cable (supplied)
Match the orientation of the plug with the
jack, and then insert until the plug fits into
place.
DVD device or other digital
component having an optical
digital output jack
GB
8
Connection
Connecting cables (sold separately)
Use the optical digital connecting cable POC-15AB (mini-plug y rectangular plug) when
connecting the optical digital output mini-jack on portable DVD players, portable CD players, or
other digital components to the DIGITAL IN jack.
Notes on optical digital connecting cable
• Do not drop objects on the optical digital connecting
cable or expose the cable to shock.
• Grasp the plug to connect or disconnect the cable.
• Be sure that the ends of the optical digital connecting
cable are kept clean. Dust at the ends of the cable can
degrade performance.
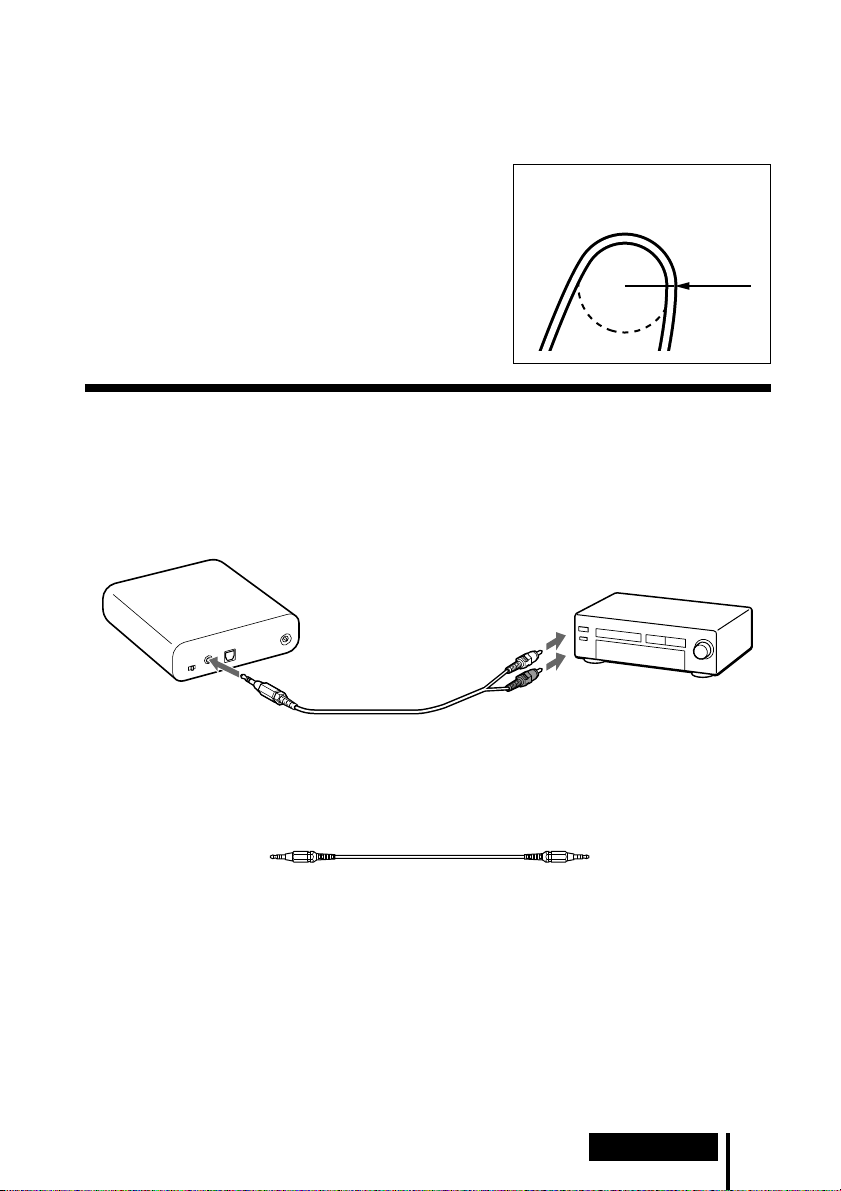
•When storing the system, attach the cap to the end of the plug
and be careful not to fold or bend the optical digital
connecting cable with a bend radius less than 25 mm (1 inch).
The bend radius of the optical
digital connecting cable should be
no less than 25 mm
(1
inch).
25 mm
(1
inch
Connecting the processor to analogue
components
Use an audio cord (sold separately) to connect the audio output jacks on a VCR, TV,
or other component to the LINE IN (stereo mini-jack) jack on the processor.
Processor
LINE IN jack
To audio output jacks
Audio left
(white)
Audio right (red)
Audio cord
(sold separately)
VCR, TV, or other
component
)
Connecting cables (sold separately)
Use the connecting cable RK-G136 (stereo mini-plug y stereo mini-plug) when connecting a
stereo mini-jack (line out jack or headphone jack) to the LINE IN jack.
In this case, set the volume on the player at a medium level. Noise can occur if the volume on the
player is set too low.
See “Specifications: Recommended accessories” (page 20) for details about other connecting
cables (sold separately).
(Continued)
Connection
9
GB
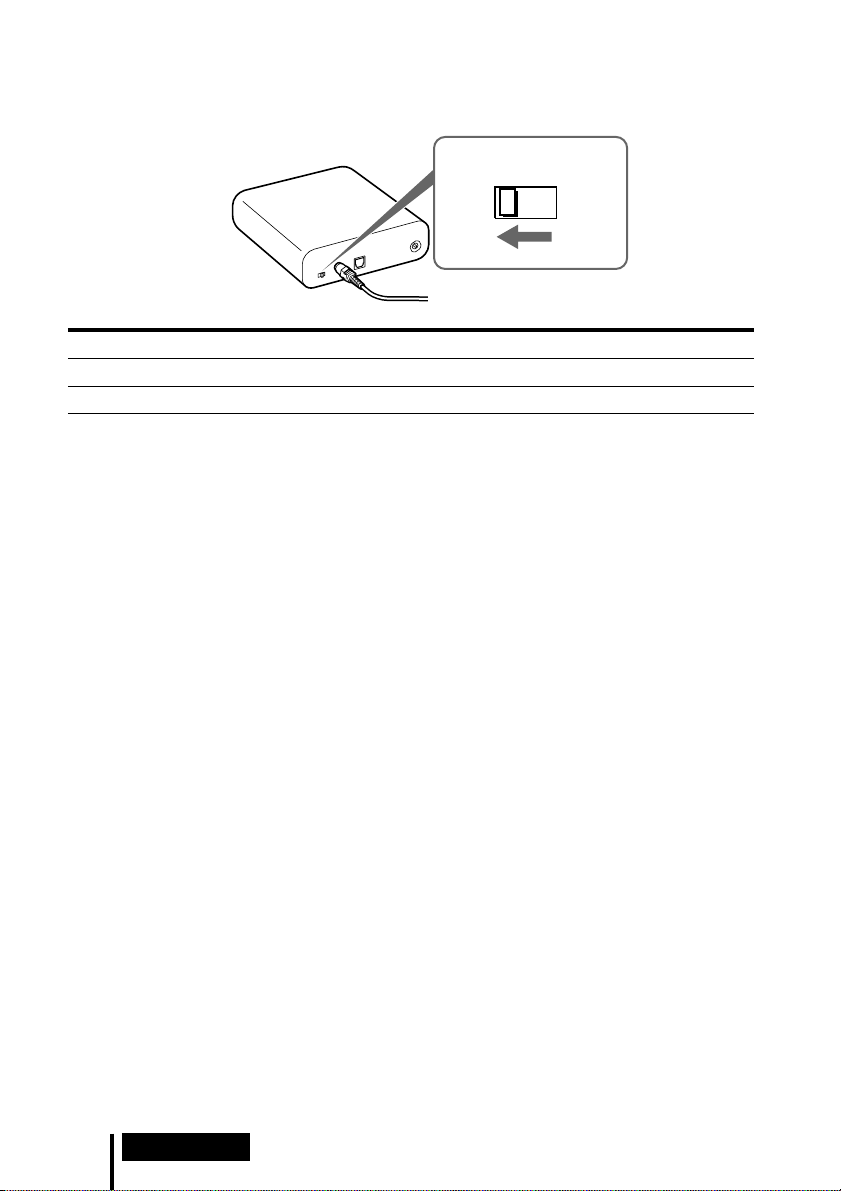
Setting the input level
If the volume is low using the analogue input, set the ATT (attenuator) switch to “0 dB.”
ATT
0dB -8dB
Setting Connected components
0 dB TV, portable components, and other components with a low output level
–8 dB Other components (initial settings)
Notes
• Be sure to lower the volume before setting the ATT switch.
• If audio input to the LINE IN jack is distorted (sometimes, noise can be heard at the same
time), set the ATT switch to “–8 dB.”
10
GB
Connection
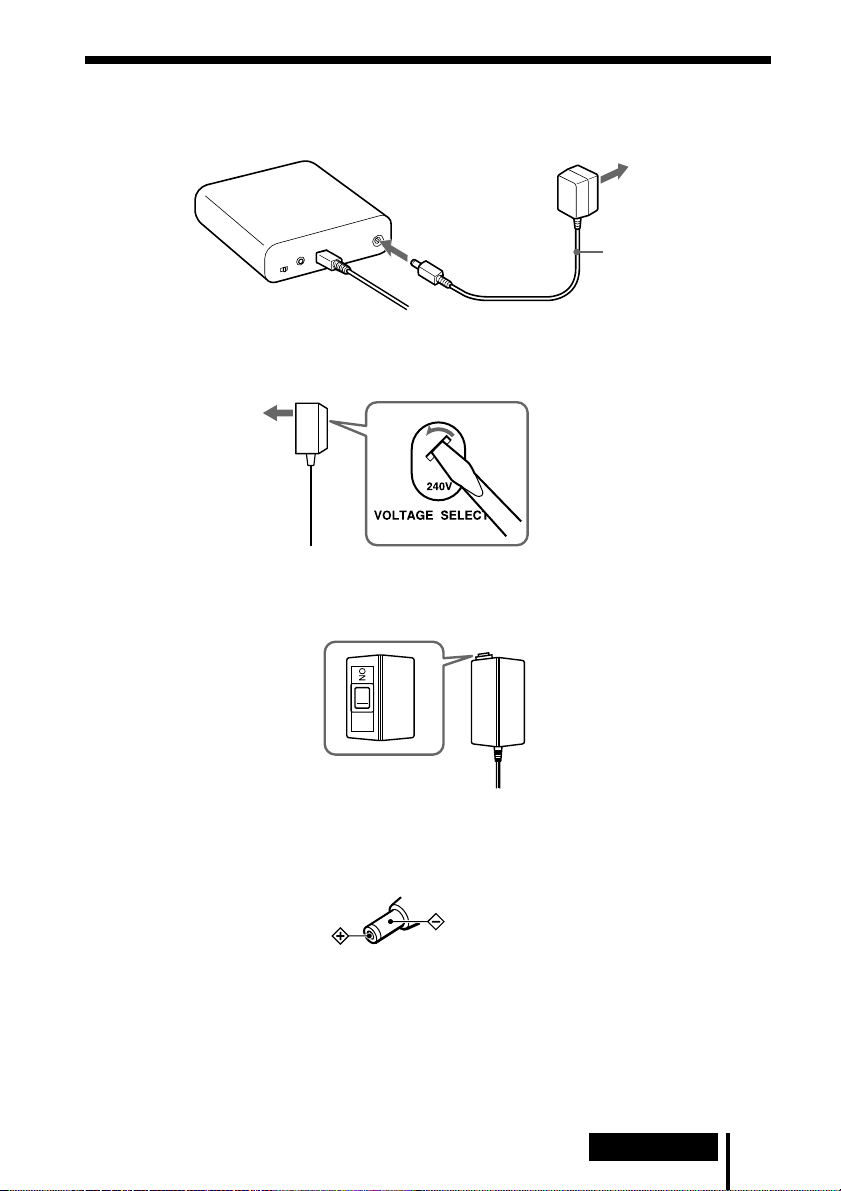
Connecting the supplied AC power adaptor to
the processor
Processor
To DC IN 9V jack
Tips
• If your AC power adaptor is equipped with a voltage selector, first be sure that it is set to
the correct voltage for your area before connecting it to an AC outlet.
• If your AC power adaptor is equipped with an on/off switch, set it to ON.
The power is supplied to the processor.
To an AC outlet
AC power
adaptor
(supplied)
On/off switch
Notes
• Be sure to use the supplied AC power adaptor. Using AC adaptors with different plug
polarity or other characteristics can cause product failure.
Unified polarity plug
• Be sure to always use the supplied AC power adaptor. Even AC power adaptors having
the same voltage and plug polarity can damage this product due to the current capacity
or other factors.
• Connect the AC power adaptor to an easily accessible AC outlet. Should you notice an
abnormality in the AC power adaptor, disconnect it from the AC outlet immediately.
Connection
11
GB
1 Operation
Listening to a Connected Component
Before starting, be sure to read “Connecting the
Headphone System” (pages 8 to 11) and make the proper
connections.
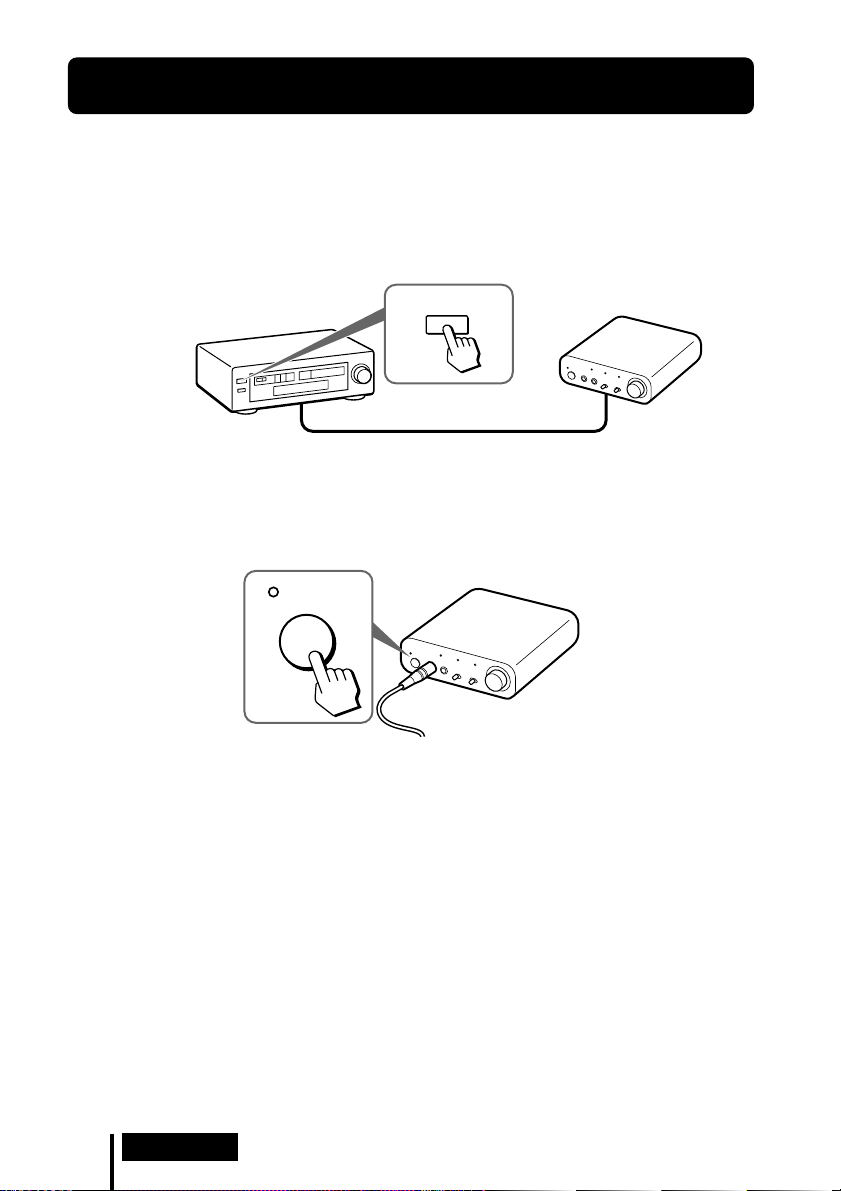
1 Turn on the component connected to the processor.
DVD device or other audio or video
component
2 Connect the headphones to the PHONES jack, and turn on the processor.
The DECODE MODE indicator lights up, depending on the audio signal input
from the connected audio or video component and the setting of the EFFECT
switch.
POWER
POWER
3 Put on the headphones.
Wear the headphones’ (R) on your right ear and (L) on your left ear.
GB
12
Operation
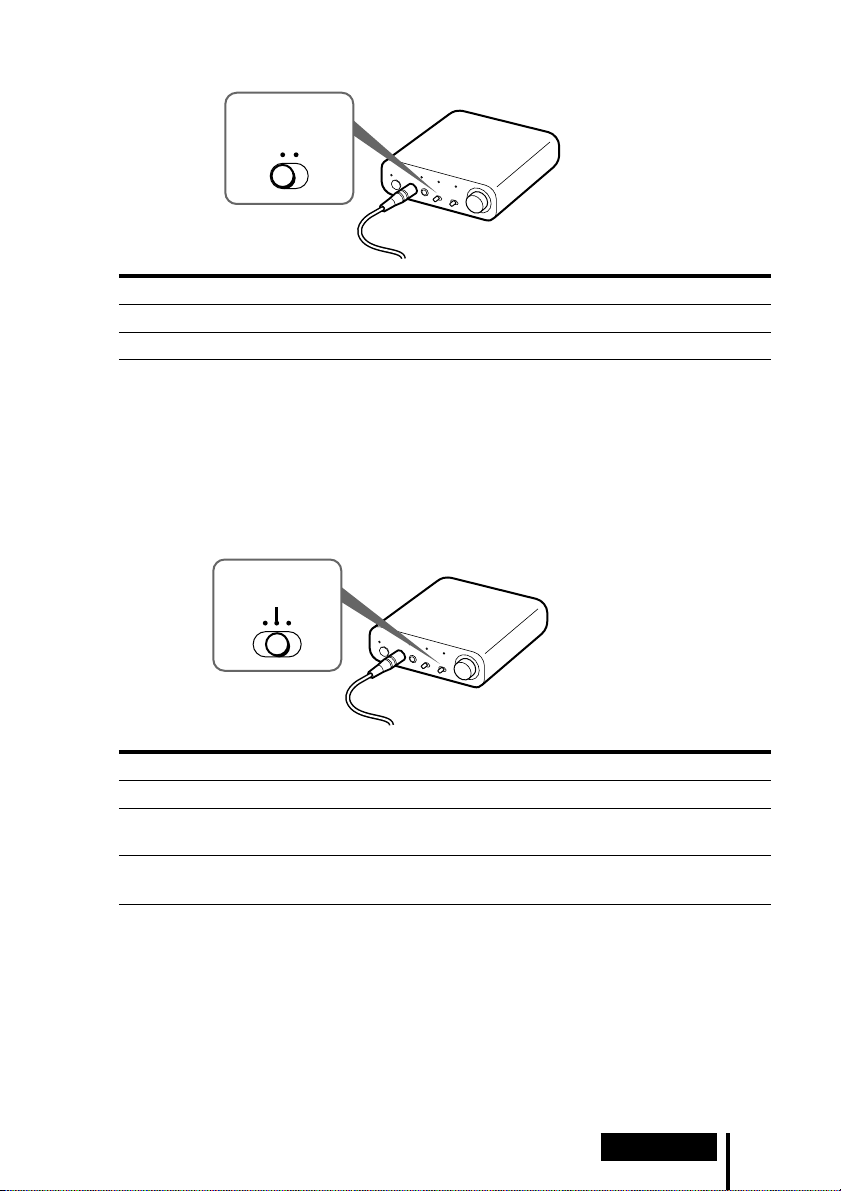
4 Slide the INPUT SELECT switch to select the component you want to listen to.
INPUT SELECT
DIGITAL ANALOG
Position of switch Selected sound source
DIGITAL Sound of the component connected to DIGITAL IN jack.
ANALOG Sound of the component connected to LINE IN jack.
Note
To listen to dual audio (MAIN/SUB) sound sources, connect to the LINE IN jack, and then
select the sound source you want to listen to on the player, TV, or other component.
5 Start playback of the component selected in step 4.
6 Slide the EFFECT switch to select the desired sound field.
EFFECT
OFF
CINEMA
MUSIC
Position of switch Sound field and suitable sound source
OFF Normal playback of the headphones.
CINEMA Produces the kind of surround sound that is found in a typical movie
theatre. Suitable for movie sound sources.
MUSIC Produces the kind of sound field that would be found in a listening
room with good acoustics. Suitable for music sources.
Note
The volume of the headphones may vary, depending on the input signal and the setting of
the EFFECT switch.
(Continued)
Operation
13
GB
DECODE MODE indicators
The processor automatically identifies the format of the input audio signal and the
corresponding indicator lights up. Switch the audio between Dolby Digital, DTS, etc., on the
connected equipment (DVD device etc.).
• DOLBY DIGITAL: Input signal recorded in the DOLBY DIGITAL format.
• DOLBY PRO LOGIC II: Analogue input signal, digital input PCM signal, or Dolby
Digital 2-channel signal processed by DOLBY PRO LOGIC II.
(If the sound field is set to ”OFF,” it is not processed by DOLBY PRO LOGIC II.)
• DTS: Input signal recorded in the DTS format.
Note
If the equipment connected to the DIGITAL IN jack is not playing back (fast forwarding,
rewinding, etc.), the DECODE MODE indicators may not light up correctly.
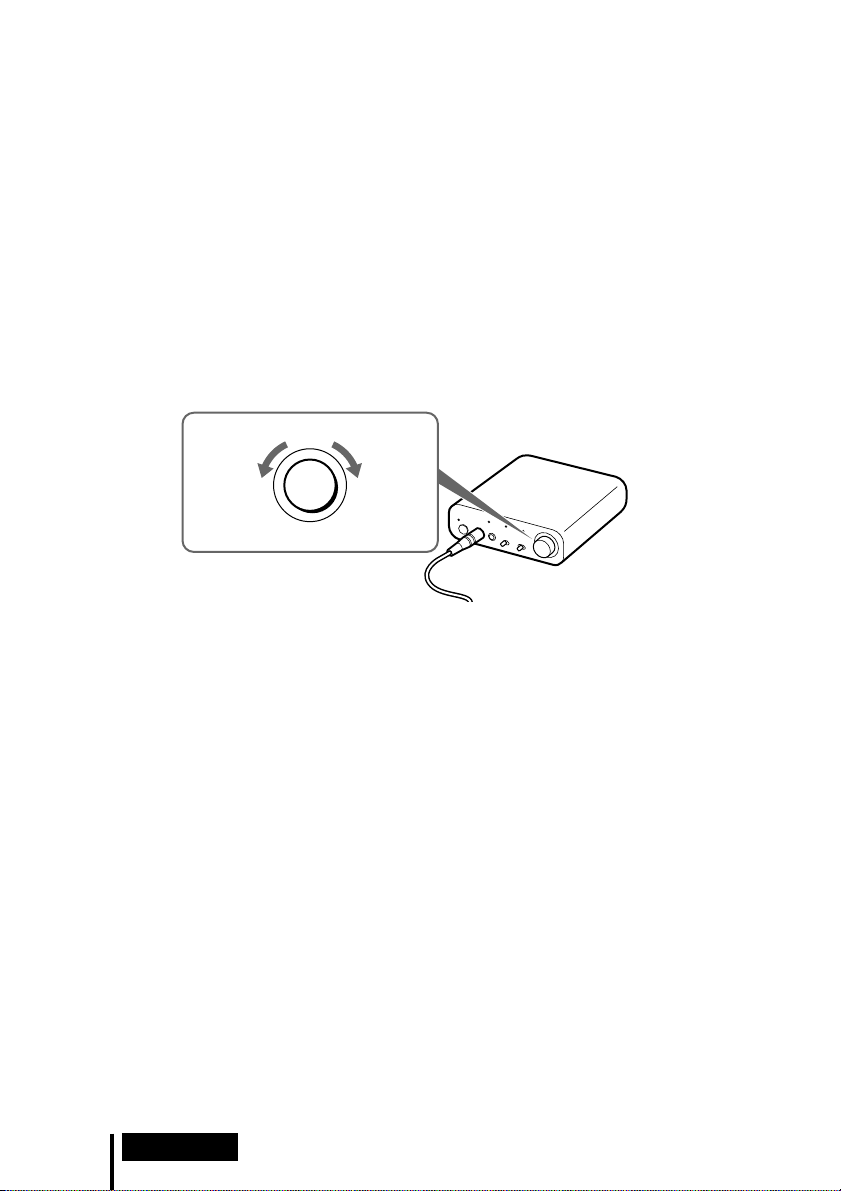
7 Adjust the volume.
Lower the
volume
Notes
• When watching films, be careful not to raise the volume too high in quiet scenes. You
may hurt your ears when a loud scene is played.
• You may hear some noise when you disconnect the AC power adaptor from the
processor before removing the headphones.
LEVEL
MIN MAX
Raise the
volume
Transition time between modes
When sliding switches on the processor to change to new modes, the transition time
between modes may vary. This is due to differences in system control between
modes.
Notes
• The surround sound effect may not be obtained from sound sources that do not incorporate
video, such as music CDs.
• This system simulates the average HRTF* common to most people. However, the effect can
differ from person to person since the HRTF can vary between individuals.
* Head Related Transfer Function
14
GB
Operation
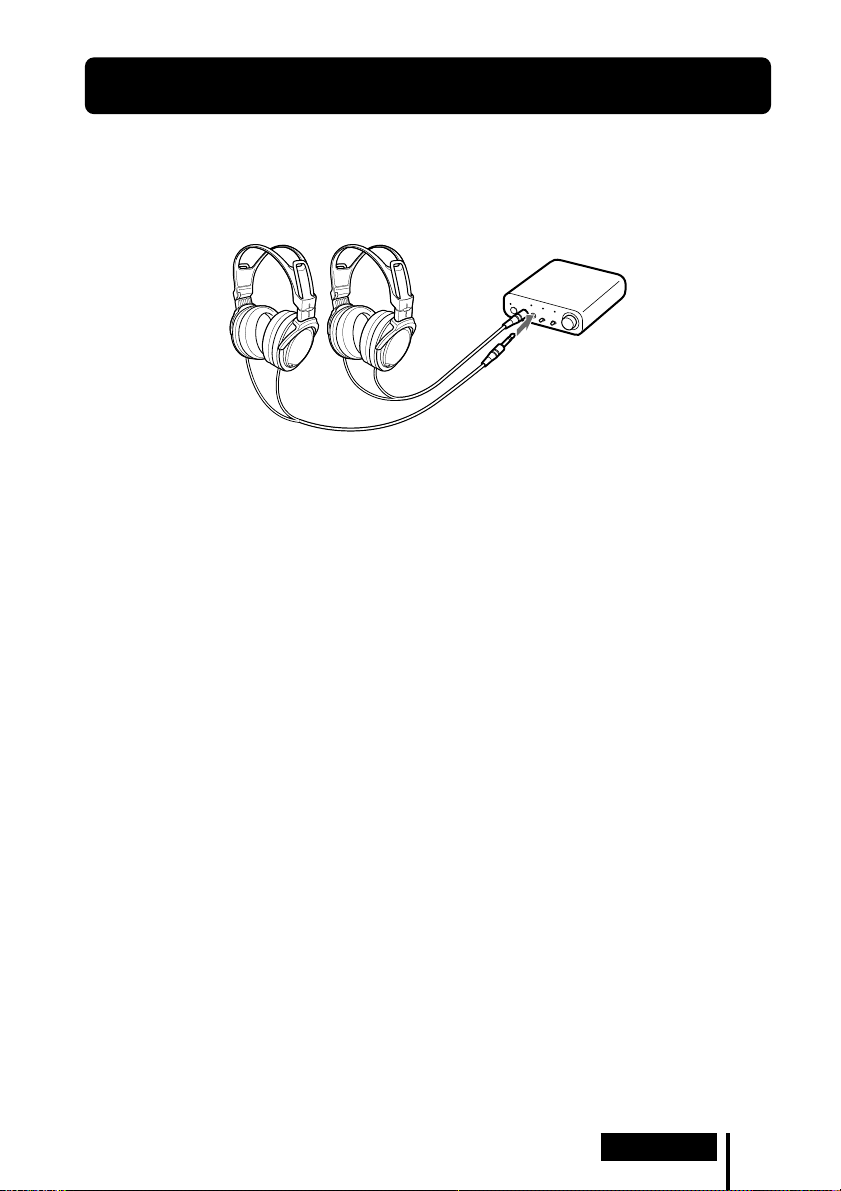
Using Additional Headphones
In this system, by using additional stereo headphones (MDR-XD100, sold separately),
two persons can enjoy the surround sound experience at the same time.
MDR-XD100
(sold separately)
Processor
Operation
15
GB
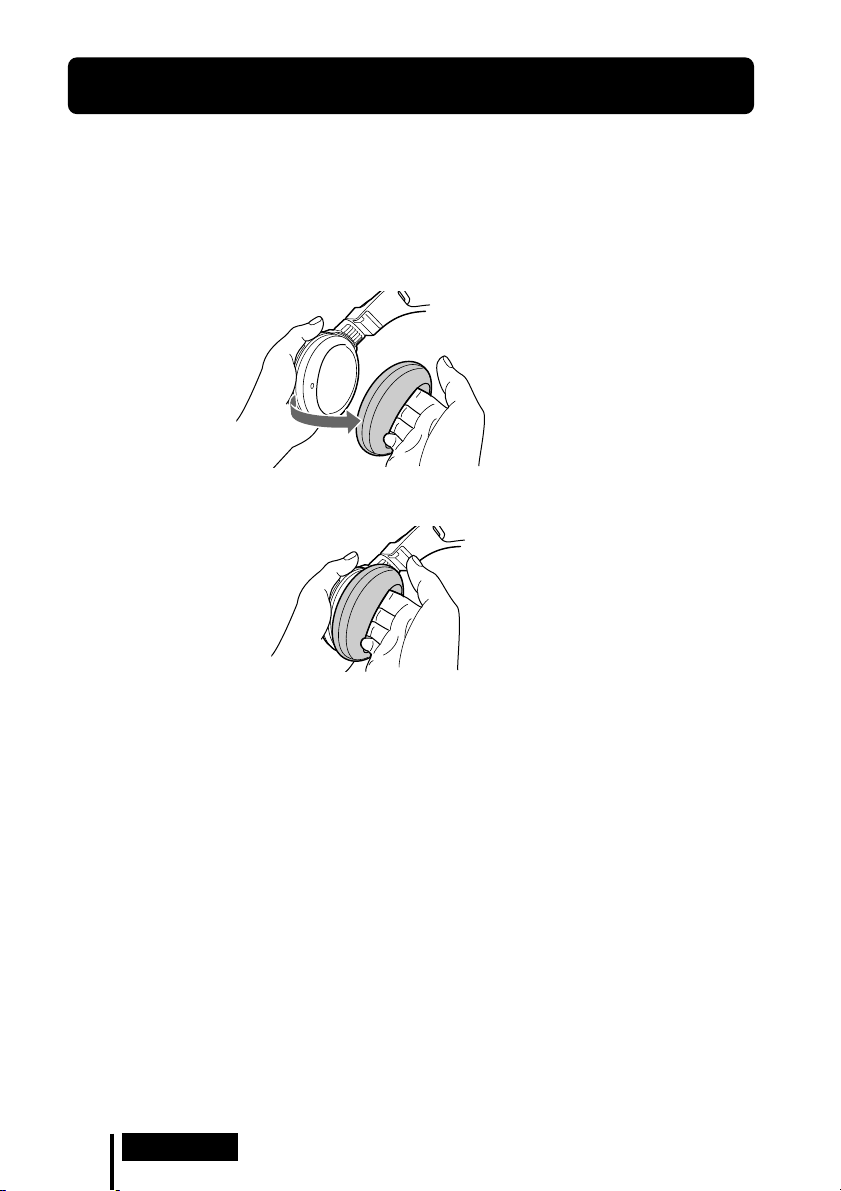
Replacing the Ear Pads
The ear pads are replaceable. If the ear pads become dirty or worn out, replace them
as illustrated below. The ear pads are not commercially available. You can order
replacements from the store where you purchased this system, or at your nearest
Sony dealer.
1 Remove the old ear pad by pulling it off.
2 Place the new ear pad around the housing.
16
GB
Operation

1 Additional Information
Troubleshooting
If you run into any problems using this headphone system, use the following
checklist. Should any problem persist, consult your nearest Sony dealer.
Symptom Cause and remedy
No sound
Distorted or
intermittent sound
(sometimes with
noise)
Low sound
, Check the connection between the processor and the AV component.
, Check that the connected AV component's optical digital output is set to "ON"
when selecting digital input.
, Turn on the AV component connected to the processor, and start the playback.
, Check that the INPUT SELECT switch on the processor is set to the
component you want to listen to.
, If you connect the processor to an AV component using the headphone jack,
raise the volume level on the connected AV component.
, Raise the headphone volume.
, You are trying to play a DTS audio track on a DVD device that does not
support DTS.
• Either use a DVD device that supports DTS, or select a Dolby Digital or
PCM audio track.
, You are playing back a DVD disc recorded in DTS when DTS digital output
setting for the DVD device (including game machines) is “OFF.”
• See the instruction manual of your DVD device, and change the DTS digital
output setting to “ON.”
, You are playing back a DVD disc recorded in DTS when the DVD device
(including game machines) and the processor are analogue-connected.
• Use the digital connection. (Analogue sound may not be output from the
DVD device.)
, When analogue input is selected, change the ATT switch on the processor to
"–8 dB."
, If you connect the processor to an AV component using the headphone jack,
lower the volume level on the connected AV component.
, When using DTS audio sources, set the EFFECT switch on the processor to
“CINEMA” or “MUSIC” mode (page 13).
, When analogue input is selected, change the ATT switch on the processor to
"0 dB."
, If you connect the processor to an AV component using the headphone jack,
raise the volume level on the connected AV component.
, Raise the headphone volume.
(Continued)
Additional Information
17
GB

Symptom Cause and remedy
Loud background
noise
The surround
sound effect is
not obtained
The DOLBY
DIGITAL indicator
does not turn on
The DOLBY PRO
LOGIC II indicator
does not turn on
The DOLBY PRO
LOGIC II indicator
turns on
The DTS indicator
does not turn on
Bilingual sound
cannot be selected
when using digital
input. (Both MAIN
and SUB can be
heard at the same
time.)
, If you connect the processor to an AV component using the headphone jack,
raise the volume level on the connected AV component.
, Check if the plugs of the connecting cable or headphones are dusty.
, Set the EFFECT switch on the processor to “CINEMA” or “MUSIC” mode
(page 13).
, The audio being played is not a multi-channel signal.
• The surround effect does not work for monaural sound sources.
, The digital audio output setting for the DVD device (including game
machines) may be set to “PCM.”
• See the instruction manual of your DVD device, and change the setting
(such as “Dolby Digital/PCM” or “Dolby Digital”) for usage with
components having built-in Dolby Digital decoders.
, Playback signals are not recorded in Dolby Digital format.
, The audio for the chapter being played is not a Dolby Digital signal.
, The EFFECT switch on the processor is set to “OFF.”
, Analogue input signal, digital input PCM signal or Dolby Digital 2-channel
signal is not input.
, The EFFECT switch on the processor is set to “CINEMA” or “MUSIC” mode.
, Analogue input signal, digital input PCM signal or Dolby Digital 2-channel
signal is input.
, The DTS digital output setting on the DVD device (including game machines)
is set to “OFF.”
• See the instruction manual of your DVD device, and change the DTS digital
output setting to “ON.”
, Playback signals are not recorded in DTS format.
, The audio for the chapter being played is not a DTS signal.
, The DVD device does not support DTS format.
• Use a DVD device that supports DTS.
, Connect the analogue out to the LINE IN jack, and select the sound on the
connected component.
18
GB
Additional Information

Precautions
On safety
• Do not drop, hit, or otherwise expose the
processor or headphones to strong shock of
any kind. This could damage the product.
• Do not disassemble or attempt to open any
parts of the system.
On power sources and placement
• If you are not going to use the system for a
long time, unplug the AC power adaptor
from the AC outlet. When removing the
plug, grip the AC power adaptor.
Do not pull on the cord.
• Do not place the system in any of the
following locations.
– Location exposed to direct sunlight, near
a heater, or other extremely high-
temperature location
– Dusty location
– On an unsteady or inclined surface
–Location exposed to large amounts of
vibration
– Bathroom or other high-humidity
locations
On headphones
Act considerately
When the volume is too high, the sound leaks
outside the headphones. Be careful not to
raise the volume so high that it bothers
people around you.
There is a tendency to raise the volume when
using in noisy places. However, for reasons of
safety, it is advised to keep the volume at a
level whereby you can still hear sounds
around you.
On cleaning
Use a soft cloth slightly moistened with mild
detergent solution. Do not use solvents such
as thinner, benzene or alcohol as these may
damage the surface.
When the product breaks
• When the product breaks, or if a foreign
object gets inside the unit, immediately turn
off the power and consult your nearest
Sony dealer.
• When taking the system to a Sony dealer,
be sure to take both the headphones and
processor.
Additional Information
19
GB

Specifications
Digital surround processor (DP-1000)
Decoder functions Dolby Digital
Dolby Pro Logic II
DTS
Virtual surround function
OFF
CINEMA
MUSIC
Frequency response 12 – 22,000 Hz
Distortion rate 1% or less (1 kHz)
Audio inputs Optical digital input
(rectangular-type) × 1
Analogue input (stereo
mini-jack) × 1
Audio outputs Headphone jacks
(stereo mini-jack) × 2
Power requirements DC 9 V (from the
supplied AC power
adaptor)
Dimensions Approx. 120 × 35 ×
120 mm
(4 3/4 × 1 7/16 × 4 3/4 in)
(w/h/d)
Mass Approx. 200 g
(7.06 oz)
Stereo headphones (MDR-XD050)
Playback frequency range
12 – 22,000 Hz
Mass Approx. 175 g
(6.18 oz)
(without cord)
Supplied accessories
AC power adaptor (9 V) (1)
Optical digital connecting cable
(optical rectangular plug y optical
rectangular plug, 1.5 m) (1)
Operating Instructions (this manual)
(1)
Recommended accessories
Optical digital connecting cable
POC-15AB (1.5 m) (mini-plug y
rectangular plug)
Connecting cable
RK-G136 (1.5m) (stereo mini-plug y
stereo mini-plug)
Design and specifications are subject to
change without notice.
20
GB
Additional Information

AVERTISSEMENT
Afin de réduire les risques
d’incendie ou de choc
électrique, n’exposez pas cet
appareil à la pluie ni à
l’humidité.
Pour réduire les risques d’incendie ou
d’électrocution, ne placez pas de
récipients remplis de liquides (vases,
etc.) sur l’appareil.
Pour éviter tout risque d’électrocution,
n’ouvrez pas le coffret. Ne confiez les
réparations qu’à un technicien qualifié.
N’installez pas l’appareil dans un
espace restreint, comme une
biblioth
è
que ou un meuble encastré.
Pour les utilisateurs aux Etats-Unis et
au Canada
RECYCLAGE DES
ACCUMULATEURS À
HYDRURE MÉTALLIQUE DE
NICKEL
Les accumulateurs à
hydrure métallique de
nickel sont recyclables.
Vous pouvez
contribuer à préserver
l’environnement en
rapportant les piles
usées dans un point de
collection et recyclage
le plus proche.
Pour plus d’informations sur le recyclage
des accumulateurs, téléphonez le
numéro gratuit 1-800-822-8837 (EtatsUnis et Canada uniquement), ou visitez
http://www.rbrc.org/
Avertissment : Ne pas utilliser des
accumulateurs à hydrure métallique
de nickel qui sont endommagées ou
qui fuient.
FR
2

Traitement des appareils
électriques et
électroniques en fin de
vie (Applicable dans les
pays de l'Union
Européenne et aux autres
pays européens
disposant de systèmes de
collecte sélective)
Ce symbole, apposé sur le produit ou sur
son emballage, indique que ce produit ne
doit pas être traité avec les déchets
ménagers. Il doit être remis à un point de
collecte approprié pour le recyclage des
équipements électriques et électroniques.
En s'assurant que ce produit est bien mis
au rebut de manière appropriée, vous
aiderez à prévenir les conséquences
négatives potentielles pour
l'environnement et la santé humaine. Le
recyclage des matériaux aidera à
préserver les ressources naturelles. Pour
toute information supplémentaire au
sujet du recyclage de ce produit, vous
pouvez contacter votre municipalité,
votre déchetterie ou le magasin où vous
avez acheté le produit.
Table des matières
Principales caractéristiques ...... 4
Inventaire des composants et
des accessoires ....................... 5
Position et fonctions des
pièces ........................................ 6
Face avant du processeur................... 6
Face arrière du processeur................. 7
Raccordement du système de
casque d’écoute ....................... 8
Raccordement du processeur à des
appareils numériques .....................
Raccordement du processeur à des
appareils analogiques .....................
Raccordement de l’adaptateur
secteur fourni au processeur .......
Ecoute du son provenant d’un
appareil raccordé ................... 12
Utilisation d’un casque
supplémentaire ...................... 15
11
8
9
FR
Remplacement des oreillettes .. 16
Dépannage ................................. 17
Précautions d’utilisation .......... 19
Spécifications ............................ 20
3
FR

Principales caractéristiques
Le MDR-DS1000 est un système de casque ambiophonique numérique.
Vous pouvez profiter des avantages d’un son ambiophonique multicanal (le son
« surround ») avec ce casque d’écoute en raccordant tout simplement le processeur
ambiophonique numérique à un appareil DVD, etc., à l’aide du câble de raccordement
numérique optique fourni.
•Le MDR-DS1000 est compatible avec une grande variété de formats audio,
notamment Dolby Digital*1, Dolby Pro Logic II*1 et DTS*1 (il peut lire les supports
portant la mention « Dolby Digital Surround EX » et « DTS-ES ».)
• Homologué Dolby Digital/Dolby Pro Logic II et DTS Virtual.
• La « Virtualphones Technology » *
casque un champ acoustique plus réaliste.
• Reproduction de la qualité sonore des films cinématographiques grâce au casque
XD.
Le casque fourni utilise des diaphragmes à longue course avec des transducteurs de
40 mm de large pour une large gamme dynamique. Sa conception parfaitement
adaptée aux oreilles assure un confort de visionnage et d’écoute longue durée en
réduisant la pression et le poids sur les oreilles.
Le processeur ambiophonique numérique de ce système intègre les décodeurs Dolby
Digital, Dolby Pro Logic II et DTS.
*1Fabriqué sous licence de Dolby Laboratories et de Digital Theater Systems, Inc.
Les termes « Dolby » et « Pro Logic », ainsi que le sigle double D sont des marques
commerciales de Dolby Laboratories.
« DTS » et « DTS Virtual » sont des marques commerciales de Digital Theater Systems, Inc.
*2« Virtualphones Technology » est une marque déposée de Sony Corporation.
2
(technologie téléphonique virtuelle) crée dans le
La validité du marquage CE est limitée uniquement aux pays dans lesquels il fait force de loi,
c’est-à-dire principalement dans les pays de I’EEE (Espace économique européen).
FR
4
1 Préparation
Inventaire des composants et des
accessoires
Avant d’installer le système, vérifiez que tous les composants sont présents.
Casque stéréo MDR-XD050 (1)Processeur DP-1000 (1)
Adaptateur secteur (1)
Câble de raccordement numérique optique
(type rectangulaire y type rectangulaire) (1)
Préparation
FR
5
Position et fonctions des pièces
Face avant du processeur
DOLBY DIGITAL DOLBY PRO LOGIC
POWER 1 PHONES 2
INPUT SELECT
DIGITAL ANALOG
1 Témoins DECODE MODE
(Pour plus de détails, reportez-vous à la
page 14)
2 Témoin d’alimentation POWER
S’allume en vert lorsque le processeur est
sous tension.
Interrupteur POWER (alimentation)
Appuyez sur cet interrupteur pour mettre
le processeur sous/hors tension.
3 Prise PHONES (casque)
Raccordez le casque d’écoute fourni.
LEVEL
MIN MAX
EFFECT
CINEMA
DTS
OFF
MUSIC
4 Commutateur INPUT SELECT
Faites glisser ce commutateur pour
sélectionner la source d’entrée
(ANALOG/DIGITAL).
5 Commutateur EFFECT
(Pour plus de détails, reportez-vous à la
page 13)
Faites glisser ce commutateur pour
sélectionner le champ acoustique
(CINEMA/OFF/MUSIC).
6 Commande du volume
Permet de régler le volume du casque
d’écoute raccordé à la prise PHONES.
FR
6
Préparation
 Loading...