

Page 1
Help Guide
Search
1
MDR-AS700BT
Getting Started
BLUETOOTH
One-touch connection (NFC)
Music
Phone calls
Multi point connection
Troubleshooting
Important information
Copyright 2013 Sony Corporation
Page 2

Help Guide
Search
Top >
2
Getting Started
Before First Use
Features and location of parts
Power
Copyright 2013 Sony Corporation
Page 3

Help Guide
Search
Top >
3
BLUETOOTH
BLUETOOTH
BLUETOOTH connection
Copyright 2013 Sony Corporation
Page 4

Help Guide
Search
Top >
4
One-touch connection (NFC)
One-touch connection (NFC)
One-touch connection
Copyright 2013 Sony Corporation
Page 5

Help Guide
Search
Top >
5
Music
Listening to music
Copyright 2013 Sony Corporation
Page 6
Help Guide
Search
Top >
6
Phone calls
Phone calls
Copyright 2013 Sony Corporation
Page 7

Help Guide
Search
Top >
7
Multi point connection
Multi point connection
Copyright 2013 Sony Corporation
Page 8

Help Guide
Search
Top >
8
Troubleshooting
To deal with a trouble
Possible causes of symptoms
Copyright 2013 Sony Corporation
Page 9

Help Guide
Search
Top >
9
Important information
Important information
Copyright 2013 Sony Corporation
Page 10

Help Guide
Search
Top > Getting Started >
10
Before First Use
Before first use
Copyright 2013 Sony Corporation
Page 11
Help Guide
Search
Top > Getting Started >
11
Features and location of parts
Features
Location and function of parts
Copyright 2013 Sony Corporation
Page 12

Help Guide
Search
Top > Getting Started >
12
Power
Charging the headset
Copyright 2013 Sony Corporation
Page 13
Help Guide
Search
Top > BLUETOOTH >
13
BLUETOOTH
What is BLUETOOTH wireless technology?
What you can do with BLUETOOTH function
Steps to BLUETOOTH function
Copyright 2013 Sony Corporation
Page 14

Help Guide
Search
Top > BLUETOOTH >
14
BLUETOOTH connection
Pairing and connecting with an Android smartphone
Connecting with a paired Android smartphone
Pairing and connecting with an iPhone
Connecting with a paired iPhone
Pairing and connecting with other BLUETOOTH devices
Connecting with a paired BLUETOOTH device
Indications of BLUETOOTH function
Copyright 2013 Sony Corporation
Page 15

Help Guide
Search
Top > One-touch connection (NFC) >
15
One-touch connection (NFC)
Compatible smartphones
Preparation on the smartphone
About “NFC Easy Connect” App
Copyright 2013 Sony Corporation
Page 16

Help Guide
Search
Top > One-touch connection (NFC) >
16
One-touch connection
Connecting with a smartphone by one-touch functions
Disconnecting the smartphone by one-touch functions
Switching the device by one-touch functions
Copyright 2013 Sony Corporation
Page 17

Help Guide
Search
Top > Music >
17
Listening to music
Listening to music
Controlling the audio device
Selecting the sound quality mode of music playback
Copyright 2013 Sony Corporation
Page 18

Help Guide
Search
Top > Phone calls >
18
Phone calls
Making a call
Receiving a call
Controlling the smartphone or mobile phone
Copyright 2013 Sony Corporation
Page 19
Help Guide
Search
Top > Multi point connection >
19
Multi point connection
Connecting the headset with a music player and a smartphone
(mobile phone)
Connecting the headset with 2 Android smartphones
Connecting the headset with an Android smartphone and an
iPhone
Copyright 2013 Sony Corporation
Page 20

Help Guide
Search
Top > Troubleshooting >
20
To deal with a trouble
What can I do to solve a problem ?
Copyright 2013 Sony Corporation
Page 21
Help Guide
Search
Top > Troubleshooting >
21
Possible causes of symptoms
Table of contents for symptoms and possible causes
Power and charging
BLUETOOTH connection
One-touch connection (NFC)
Music
Phone calls
Copyright 2013 Sony Corporation
Page 22

Help Guide
Search
Top > Important information >
22
Important information
License and trademark notice
Copyright 2013 Sony Corporation
Page 23
Help Guide
Search
Top > Getting Started > Before First Use >
23
Before first use
In addition to this Help Guide, read the printed manuals supplied: “Quick Start
Guide” and “Reference Guide.”
Quick Start Guide
This covers initial settings and basic operations.
Reference Guide
This includes information about using your wireless stereo headset safely, and
specifications of your wireless stereo headset.
For information about the customer support Web site, access:
http://www.sony.net/
About battery charging
See “Charging the headset” on how to charge the battery.
Features
Copyright 2013 Sony Corporation
Page 24
Help Guide
Search
Top > Getting Started > Features and location of parts >
24
Features
Water resistant specification against sweat or a spray
Neck band style for comfortable listening and stable fitting
One-touch connection (NFC)
BLUETOOTH version 3.0 for higher quality audio with less interference, lower
power consumption and easy connection
AAC Codec supported
Plays music compressed in AAC format with high quality sound.
Enjoy music wirelessly from BLUETOOTH Stereo–enabled music players and
mobile phones.
Embedded microphone enables hands–free conversation from BLUETOOTHenabled mobile phone.
Noise suppression and echo cancellation functions for superior conversation
sound quality
Enjoy basic remote control operation (play, pause , etc.) of music player
functions via BLUETOOTH connection.
Multi pairing and multi point connection supported
Up to 9 hours of listening time
Easy USB recharging using the provided micro- USB cable
Location and function of parts
Copyright 2013 Sony Corporation
Page 25

25
Page 26
Help Guide
Search
Top > Getting Started > Features and location of parts >
26
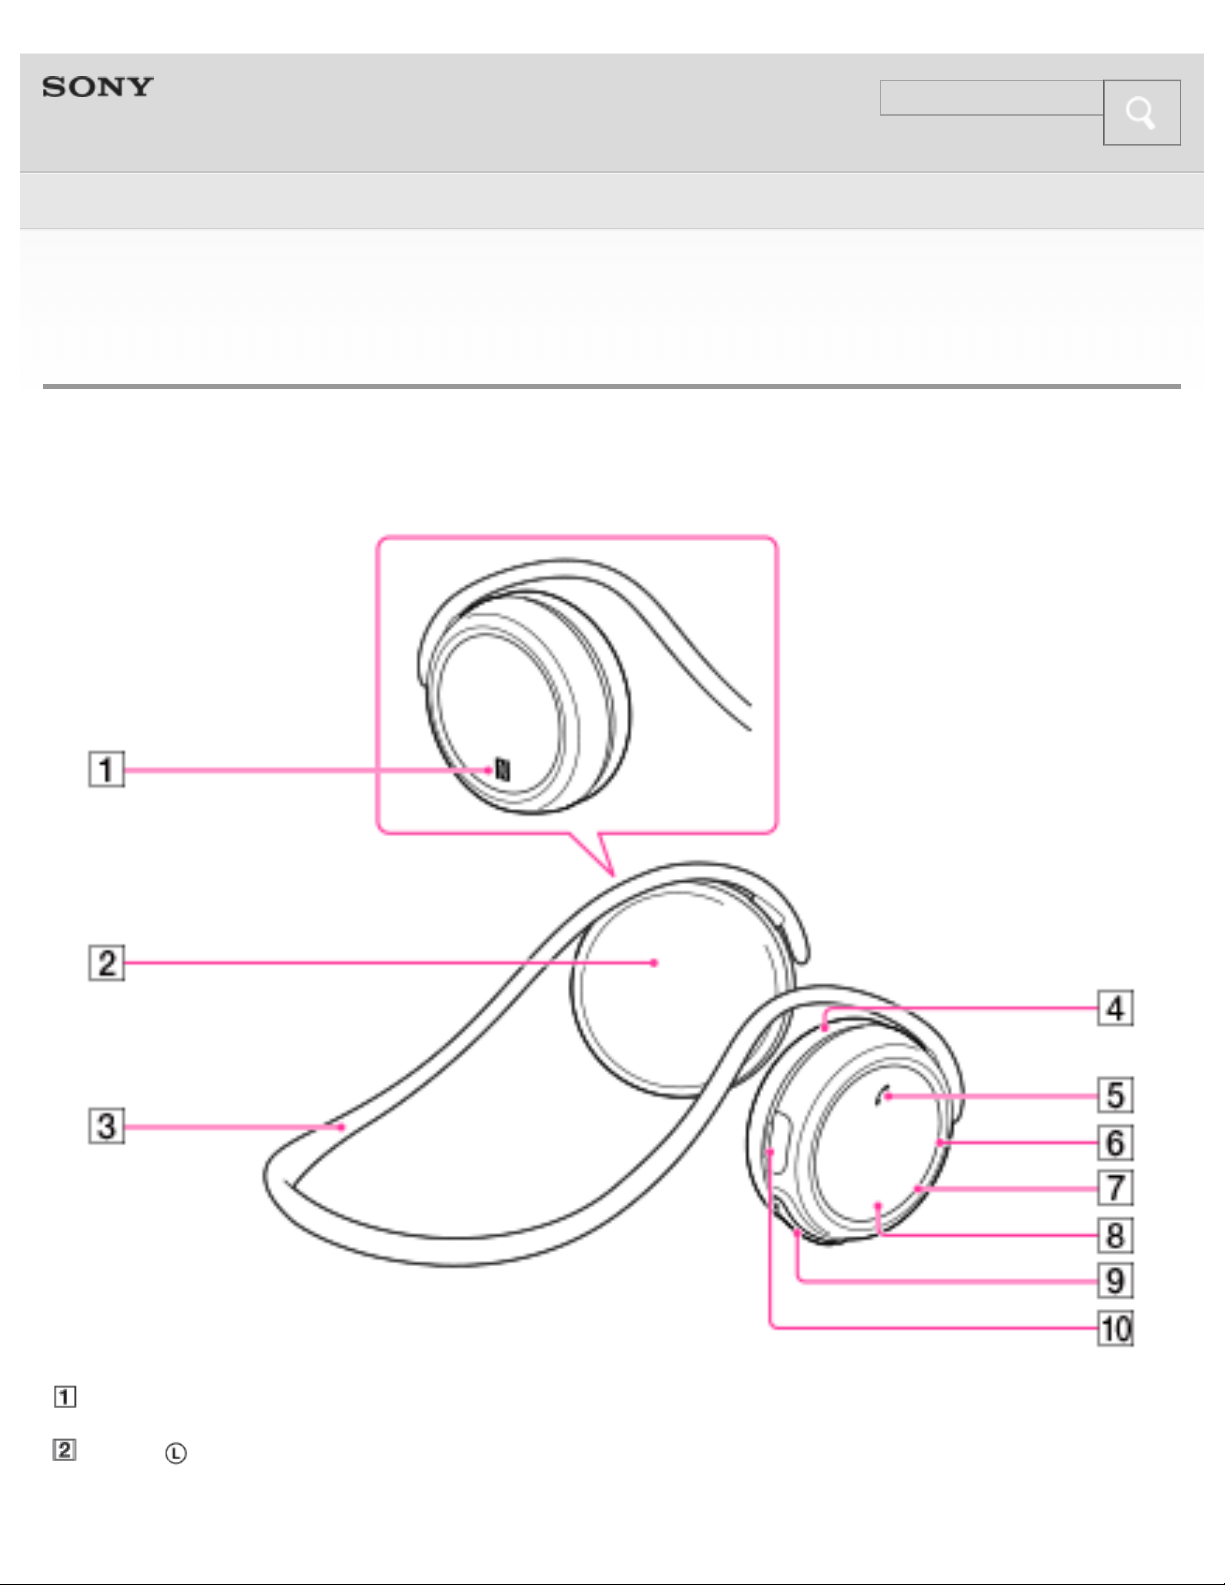
Location and function of parts
Functions of buttons, indicators, and other parts on your wireless stereo headset
are explained here.
N mark [Details]
Left ( ) unit
Page 27
Neck band
Right ( ) unit
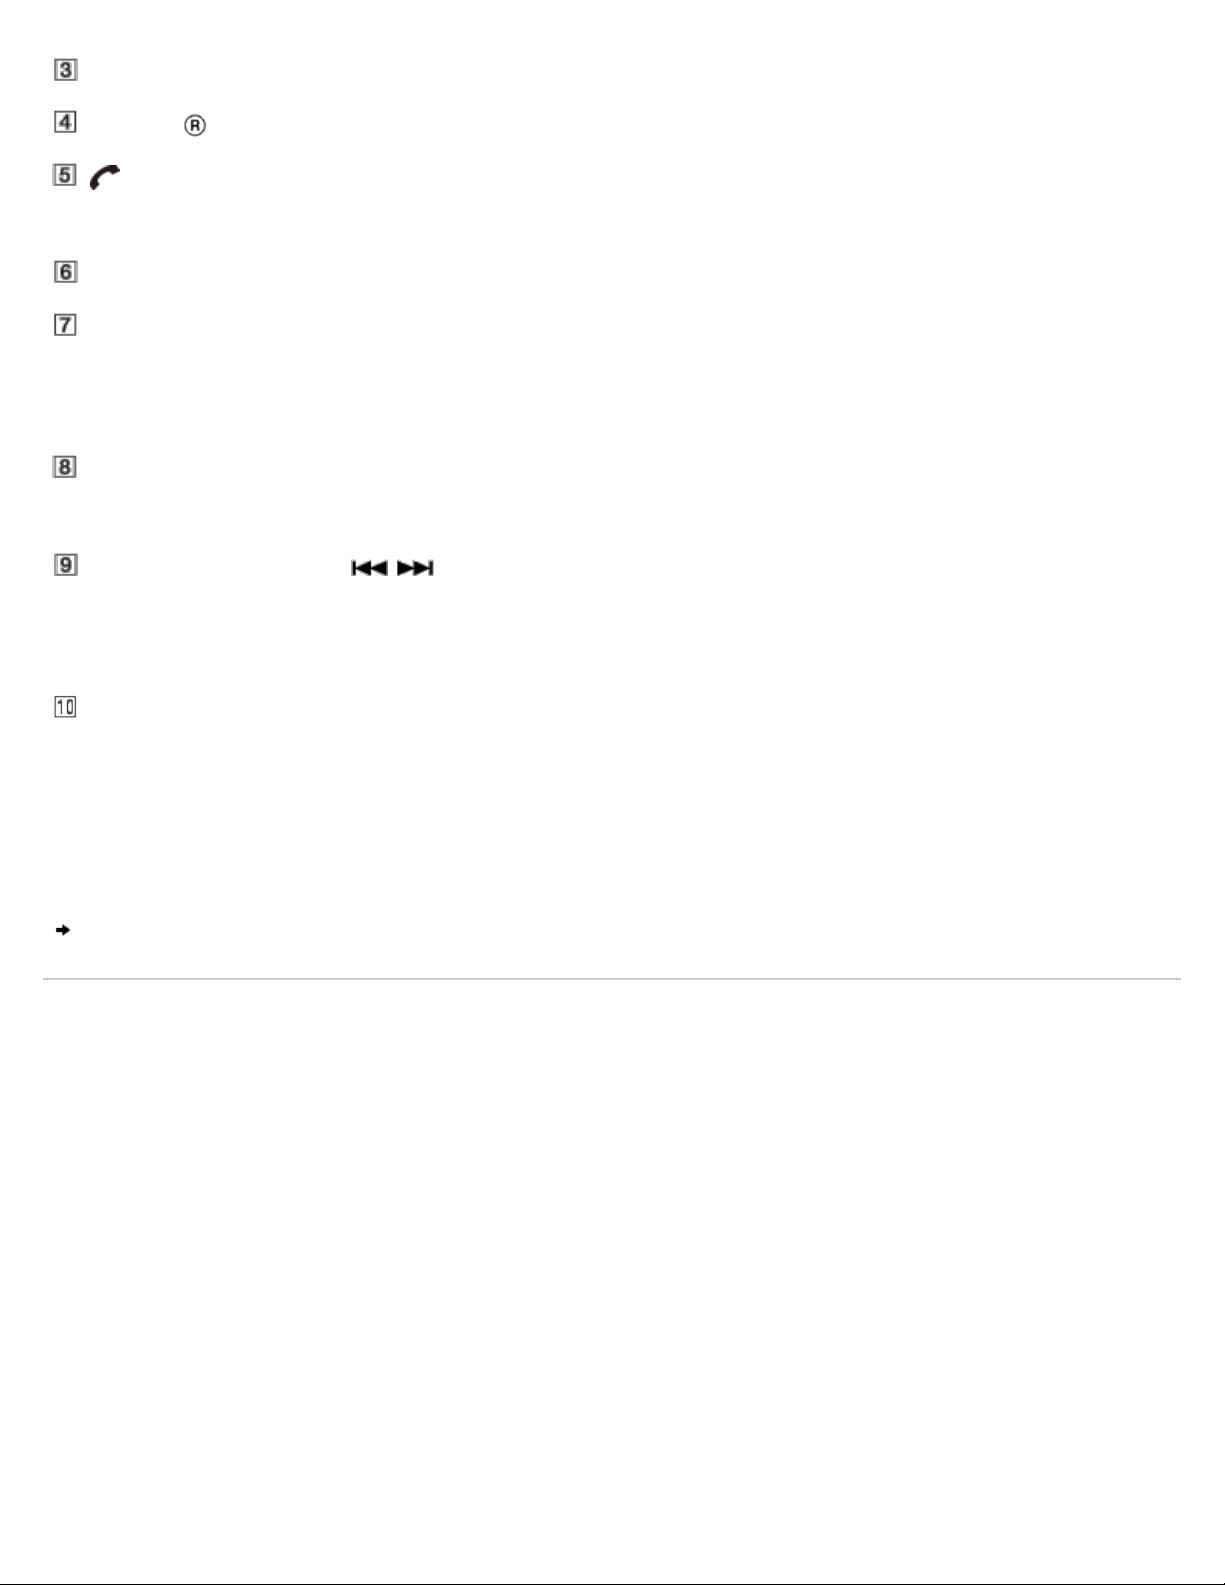
27
POWER button
Controls various call and playback functions.
Microphone
Indicator
Lights up in red or blue to indicate the power or communication status of the
headset.
Built-in antenna
The BLUETOOTH antenna is built into the headset.
VOL (volume) +/– ( / ) buttons
Controls various functions when listening to music.
The + button has a tactile dot.
Micro-USB port [Details]
Connect a computer to this port with the supplied micro-USB cable to charge the
headset.
Charging the headset
Copyright 2013 Sony Corporation
Page 28

Help Guide
Search
Top > Getting Started > Power >
28
Charging the headset
The headset contains a lithium ion rechargeable battery, which should be charged
before using the headset for the first time.
System requirements for battery charge using USB
Personal Computer with pre- installed with any of the following operating systems
and USB port:
Operating Systems
(when using Windows)
Windows® 8 / Windows® 8 Pro
Windows® 7
Home Basic / Home Premium / Professional / Ultimate
Windows Vista® (Service Pack 2 or later)
Home Basic / Home Premium / Business / Ultimate
Windows® XP (Service Pack 3 or later)
Home Edition / Professional / Media Center Edition 2004 / Media Center Edition
2005
(when using Macintosh)
Mac OS X (version.10.3 or later)
Charging the headset
1. Open the cover of the micro- USB port.
2. Connect the supplied micro -USB cable to the headset, and then connect the
other end to a computer booted.
Page 29

Make sure that you connect the plug of the micro- USB cable in the direction as
shown in the illustration below.
If the headset detects a problem while charging, the indicator (red) may turn off,
29
Charging starts when the headset and the computer are connected.
Make sure that the indicator (red) lights up. Charging is completed in about
1.5 hours* and the indicator (red) goes off automatically.
* Time required to charge the empty battery to its full capacity
Notes
Use the micro- USB cable supplied. You may not be able to charge the headset
with other cables.
If the headset is not used for a long time, the indicator (red) may not light up
when you connect the micro- USB cable to charge the headset. In this case, do
not disconnect the micro -USB cable from the headset and wait until the indicator
(red) lights up.
Tips
If the micro- USB cable is connected to a computer while the headset is turned
on, the headset will be turned off automatically.
To charge the headset from an AC outlet, use USB AC Adaptor* (sold
separately). For details, refer to the manuals supplied with the USB AC Adaptor.
The headset cannot be turned on while charging the battery.
* Refer to the Reference Guide on the recommended adapter.
Caution
Page 30

although charging is not complete.
30
Check for the following causes:
Ambient temperature exceeds the range of 5 °C – 35 °C (41 °F – 95 °F).
There is a problem with the battery.
In this case, charge again within the above - mentioned temperature range. If the
problem persists, consult your nearest Sony dealer.
Notes
If the headset is not used for a long time, the battery may be quickly depleted,
however, after a few recharges, the battery life will improve.
Even if you do not intend to use the headset for a long time, charge the battery
to its full capacity once every 6 months to maintain its performance.
If the headset is not used for a long time, it may take longer to charge the
battery.
If the life of the built - in rechargeable battery drops to half the normal length, the
battery should be replaced. Consult your nearest Sony dealer for replacement of
the rechargeable battery.
Avoid exposure to temperature extremes, direct sunlight, moisture, sand, dust or
mechanical shock. Never leave the headset in a car parked in the sun.
If the computer enters into hibernation mode while connected to the headset,
charging will not be completed properly. Check the setting of the computer
before charging. The indicator (red) will go off automatically even if the computer
enters into hibernation mode. Charge the headset again in this case.
Use the supplied micro- USB cable only, and connect directly to a computer.
Charging will not be completed properly by an indirect connection, such as via a
USB hub.
Usage hours
Status
Communication time (including music playback time) (up
to)
Approx. usage
hours
9 hours
Page 31

Standby time (up to) 120 hours
31
Time stated above may vary, depending on ambient temperature or conditions of
use.
Checking the remaining battery
When you turn on the headset by pressing the POWER button, the indicator
(red) flashes. You can check the remaining battery by the number of times the
indicator (red) flashes.
Indicator (red) Status
3 times Full
2 times Mid
1 time Low (needs to charge)
When the battery is almost empty
The indicator turns red. When the battery becomes empty, the headset sounds a
beep and turns off automatically.
Copyright 2013 Sony Corporation
Page 32

Help Guide
Search
Top > BLUETOOTH > BLUETOOTH >
32
What is BLUETOOTH wireless technology?
Bluetooth® wireless technology is a short - range wireless technology that enables
wireless data communication between digital devices, such as a computer or digital
camera. BLUETOOTH wireless technology operates within a range of about 10
meters (about 30 feet).
Connecting 2 devices as necessary is common, but some devices can be
connected to multiple devices at the same time.
You do not need to use a cable for connection, nor is it necessary for the devices
to face one another, such is the case with infrared technology. For example, you
can use such a device in a bag or pocket.
BLUETOOTH standard is an international standard supported by thousands of
companies all over the world, and employed by various companies worldwide.
Communication System and Compatible BLUETOOTH Profiles of
the headset
Profile is standardization of the function for each BLUETOOTH device specification.
The headset supports the following BLUETOOTH version and profiles:
Communication System :
BLUETOOTH Specification Ver. 3.0
Compatible BLUETOOTH Profiles:
A2DP (Advanced Audio Distribution Profile): Transmitting or receiving audio
content of high -quality.
AVRCP (Audio Video Remote Control Profile): Controlling A/V equipment;
pausing, stopping, starting playback, etc.
HSP (Headset Profile)*: Talking on the phone/Operating the phone.
Page 33

HFP (Hands-free Profile)*: Talking on the phone/Operating the phone by
hands-free.
33
* When you use a BLUETOOTH mobile phone supported by both HFP (Hands-free
Profile) and HSP (Headset Profile), set it to HFP.
Notes
To use the BLUETOOTH function, the BLUETOOTH device to be connected
requires the same profile as that of the headset. Even if the device has the same
profile, functions may vary depending on the specifications.
Due to the characteristic of BLUETOOTH wireless technology, the sound played
on the headset is slightly delayed from the sound played on the BLUETOOTH
device during talking on the telephone or listening to the music.
Do not use the BLUETOOTH function on an airplane. The radio waves may
cause malfunction of the airplane and result in hazardous accidents.
What you can do with BLUETOOTH function
Copyright 2013 Sony Corporation
Page 34

Help Guide
Search
Top > BLUETOOTH > BLUETOOTH >
34
What you can do with BLUETOOTH function
The headset uses BLUETOOTH wireless technology. You can enjoy music
wirelessly from a smartphone, mobile phone, or music player. Also, you can make
or receive a call by operating the headset.
Listening to music
You can enjoy music wirelessly from a smartphone, mobile phone, or music player.
[Details]
Talking on the phone
You can make and receive a call with your hands free, while leaving your
smartphone or mobile phone in your bag or pocket. [Details]
Page 35

Steps to BLUETOOTH function
35
Copyright 2013 Sony Corporation
Page 36

Help Guide
Search
Top > BLUETOOTH > BLUETOOTH >
36
Steps to BLUETOOTH function
To listen to music played, or make a call on a BLUETOOTH smartphone or mobile
phone, you must establish a BLUETOOTH connection between the headset and
the BLUETOOTH device.
There are following 2 ways to establish a BLUETOOTH connection:
One-touch connection (NFC): You can connect the headset with a device by
one touch using the NFC function. [Details]
Paring the headset with a BLUETOOTH device by operating the BLUETOOTH
device [Details]
In the case of the one - touch connection, you can perform steps 1 and 2 below by
a one-touch operation.
1. Register (pair) a BLUETOOTH device (smartphone, mobile phone, etc.) and the
headset with each other.
2. Use the BLUETOOTH device to make a BLUETOOTH connection.
Page 37

3. Listen to music played on the BLUETOOTH device, or make and receive a call
37
by operating the headset.
The headset supports the following BLUETOOTH version and profiles:
Communication System :
BLUETOOTH Specification Ver. 3.0
Compatible BLUETOOTH Profiles:
A2DP (Advanced Audio Distribution Profile): Transmitting or receiving audio
content of high -quality.
AVRCP (Audio Video Remote Control Profile): Controlling A/V equipment;
pausing, stopping, starting playback, etc.
HSP (Headset Profile)*: Talking on the phone/Operating the phone.
HFP (Hands-free Profile)*: Talking on the phone/Operating the phone by
hands-free.
* When you use a BLUETOOTH smartphone or mobile phone supported by both HFP
(Hands-free Profile) and HSP (Headset Profile), set it to HFP.
Notes
To use the BLUETOOTH function, the BLUETOOTH device to be connected
requires the same profile as that of the headset. Even if the device has the same
profile, functions may vary depending on the specifications.
Due to the characteristic of BLUETOOTH wireless technology, the sound played
on the headset is slightly delayed from the sound played on the BLUETOOTH
Page 38

device during talking on the telephone or listening to the music.
Do not use the BLUETOOTH function on an airplane. The radio waves may
38
cause malfunction of the airplane and result in hazardous accidents.
Pairing and connecting with an Android smartphone
Copyright 2013 Sony Corporation
Page 39

Help Guide
Search
Top > BLUETOOTH > BLUETOOTH connection >
39
Pairing and connecting with an Android smartphone
It is necessary to pair BLUETOOTH devices to establish a BLUETOOTH
connection. When pairing the headset with a smartphone, place the smartphone
within 1 meter (3 feet) of the headset.
1. Enter pairing mode on the headset.
Press and hold the POWER button for more than 7 seconds.
Make sure that the indicator flashes blue and red alternately after you release
the button.
Page 40

Note
40
If pairing is not established within about 5 minutes, pairing mode will be
cancelled and the headset will turn off. In this case, start over from step 1.
2. Select the BLUETOOTH setting on the smartphone.
Select [Settings] [Bluetooth].
3. Turn on the BLUETOOTH function on the smartphone.
Touch the button next to [Bluetooth] to turn on [Bluetooth].
Page 41

4. Search for this headset on the smartphone.
41
Touch [Bluetooth] [Search for devices].
Page 42

5. Touch [MDR - AS700BT].
42
If passkey input is required, input “0000.”
A Passkey may be called a “Passcode,” a “PIN code,” a “PIN number,” or a
“Password.”
Page 43

43
The above procedure is an example. For details, refer to the manual supplied
with your smartphone.
The headset and the smartphone are paired each other and connected.
If they are not connected, see step 2 of “Connecting with a paired Android
smartphone.”
Tip
Page 44

To delete all pairing information, see “ What can I do to solve a problem ?”
44
Note
Once BLUETOOTH devices are paired, there is no need for pairing again,
except in the following cases:
Pairing information is deleted after repair, etc.
The headset is paired with 9 or more devices. The headset can be paired with
up to 8 devices; if a new device is paired after 8 devices have been paired, the
device whose latest connection time is the oldest among the 8 paired devices
is replaced by the new one.
When recognition of the headset by the device to be connected is deleted.
The headset is initialized. All pairing information is deleted.
Connecting with a paired Android smartphone
Copyright 2013 Sony Corporation
Page 45

Help Guide
Search
Top > BLUETOOTH > BLUETOOTH connection >
45
Connecting with a paired Android smartphone
1. Turn on the headset.
Press and hold the POWER button for about 2 seconds.
Make sure that the indicator (blue) flashes after you release the button.
Page 46

The headset may be connected with the smartphone as soon as you turn on
both devices.
46
Check the connecting status on the smartphone. If not connected, proceed to
step 2.
2. Make the BLUETOOTH connection from the smartphone.
Touch [Settings] [Bluetooth]. Make sure that [Bluetooth] is set to on, then
touch [MDR -AS700BT].
Page 47

47
Pairing and connecting with an iPhone
Copyright 2013 Sony Corporation
Page 48

48
Page 49

Help Guide
Search
Top > BLUETOOTH > BLUETOOTH connection >
49
Pairing and connecting with an iPhone
It is necessary to pair BLUETOOTH devices to establish a BLUETOOTH
connection. When pairing the headset with an iPhone, place the iPhone within 1
meter (3 feet) of the headset.
1. Enter pairing mode on the headset.
Press and hold the POWER button for more than 7 seconds.
Make sure that the indicator flashes blue and red alternately after you release
the button.
Page 50

Note
50
If pairing is not established within about 5 minutes, pairing mode will be
cancelled and the headset will turn off. In this case, start over from step 1.
2. Select the BLUETOOTH setting on the iPhone.
Select [Settings] [Bluetooth].
Page 51

3. Turn on the BLUETOOTH function on the iPhone.
51
Touch [OFF] to change it to [ON].
Page 52

4. Touch [MDR - AS700BT].
52
If passkey input is required, input “0000.”
A Passkey may be called a “Passcode,” a “PIN code,” a “PIN number,” or a
“Password.”
Page 53

53
The above procedure is an example. For details, refer to the manual supplied
with your iPhone.
The headset and the iPhone are paired each other and connected.
If they are not connected, see step 2 of “Connecting with a paired iPhone.”
Tip
To delete all pairing information, see “ What can I do to solve a problem ?”
Page 54

Note
54
Once BLUETOOTH devices are paired, there is no need for pairing again,
except in the following cases:
Pairing information is deleted after repair, etc.
The headset is paired with 9 or more devices. The headset can be paired with
up to 8 devices; if a new device is paired after 8 devices have been paired, the
device whose latest connection time is the oldest among the 8 paired devices
is replaced by the new one.
When recognition of the headset by the device to be connected is deleted.
The headset is initialized. All pairing information is deleted.
Connecting with a paired iPhone
Copyright 2013 Sony Corporation
Page 55

Help Guide
Search
Top > BLUETOOTH > BLUETOOTH connection >
55
Connecting with a paired iPhone
1. Turn on the headset.
Press and hold the POWER button for about 2 seconds.
Make sure that the indicator (blue) flashes after you release the button.
Page 56

The headset may be connected with the iPhone as soon as you turn on both
devices.
56
Check the connecting status on the iPhone. If not connected, proceed to step 2.
2. Make the BLUETOOTH connection from the iPhone.
Touch [Settings] [Bluetooth]. Make sure that [ON] is selected, then touch
[MDR-AS700BT].
Page 57

Pairing and connecting with other BLUETOOTH devices
57
Copyright 2013 Sony Corporation
Page 58

Help Guide
Search
Top > BLUETOOTH > BLUETOOTH connection >
58
Pairing and connecting with other BLUETOOTH devices
It is necessary to pair BLUETOOTH devices to establish a BLUETOOTH
connection. When pairing the headset with a BLUETOOTH device, place the
BLUETOOTH device within 1 meter (3 feet) of the headset.
1. Enter pairing mode on the headset.
Press and hold the POWER button for more than 7 seconds.
Make sure that the indicator flashes blue and red alternately after you release
the button.
Page 59

Note
59
If pairing is not established within about 5 minutes, pairing mode will be
cancelled and the headset will turn off. In this case, start over from step 1.
2. Perform the pairing procedure on the BLUETOOTH device to search for this
headset.
“MDR- AS700BT” will be displayed on the list of detected devices on the screen
of the BLUETOOTH device. If “MDR-AS700BT” is not displayed, repeat from
step 1.
3. Select “MDR - AS700BT” on the screen on the BLUETOOTH device to pair both
devices.
If passkey input is required on the display of a BLUETOOTH device, input
“0000.”
A Passkey may be called a “Passcode,” a “PIN code,” a “PIN number,” or a
“Password.”
4. Make the BLUETOOTH connection from the BLUETOOTH device.
Depending on the BLUETOOTH device, the headset may be connected with
the device automatically as soon as they are paired.
Tip
To delete all pairing information, see “ What can I do to solve a problem ?”
Notes
For details, refer to the manual supplied with the BLUETOOTH device.
When pairing with a BLUETOOTH device that cannot display a list of detected
devices or that has no display, you may pair the device by setting both the
Page 60

headset and the BLUETOOTH device to pairing mode. At this time, if passkey is
set besides “0000” on the BLUETOOTH device, pairing cannot be done with the
60
headset.
Once BLUETOOTH devices are paired, there is no need for pairing again,
except in the following cases:
Pairing information is deleted after repair, etc.
The headset is paired with 9 or more devices. The headset can be paired with
up to 8 devices; if a new device is paired after 8 devices have been paired, the
device whose latest connection time is the oldest among the 8 paired devices
is replaced by the new one.
When recognition of the headset by the device to be connected is deleted.
The headset is initialized. All pairing information is deleted.
Connecting with a paired BLUETOOTH device
Copyright 2013 Sony Corporation
Page 61

Help Guide
Search
Top > BLUETOOTH > BLUETOOTH connection >
61
Connecting with a paired BLUETOOTH device
1. Turn on the headset.
Press and hold the POWER button for about 2 seconds.
Make sure that the indicator (blue) flashes after you release the button.
Page 62

The headset may be connected with the BLUETOOTH device as soon as you
turn on both devices.
62
Check the connecting status on the BLUETOOTH device. If not connected,
proceed to step 2.
2. Make the BLUETOOTH connection from the BLUETOOTH device.
For details, refer to the manual supplied with your BLUETOOTH device.
Indications of BLUETOOTH function
Copyright 2013 Sony Corporation
Page 63

Help Guide
Search
Top > BLUETOOTH > BLUETOOTH connection >
63
Indications of BLUETOOTH function
The indicator flashes in red or blue to indicate the BLUETOOTH connection status.
Status
Pairing mode
Connectable
Connecting
Connected (HFP/HSP or A2DP)
Connected (HFP/HSP and A2DP)
Playing music or During a call (Connected HFP/HSP
or A2DP)
Playing music or During a call (Connected HFP/HSP
and A2DP)
Incoming call
Flashing pattern
: blue/ : red
When the remaining battery power becomes low, the indicator turns from blue to
red, except for pairing mode.
Copyright 2013 Sony Corporation
Page 64

Help Guide
Search
Top > One-touch connection (NFC) > One-touch connection (NFC) >
64
Compatible smartphones
NFC (Near Field Communication) is a technology enabling short - range wireless
communication between various devices, such as mobile phones and IC tags.
Thanks to the NFC function, data communication can be achieved easily just by
touching the relevant symbol or designated location on NFC compatible devices.
By using the NFC function, the headset is turned on automatically and then paired
and connected with a BLUETOOTH device.
Compatible smartphones
Smartphones with the NFC function built- in (OS: Android 2.3.3 or later, excluding
Android 3.x)
Preparation on the smartphone
Copyright 2013 Sony Corporation
Page 65

Help Guide
Search
Top > One-touch connection (NFC) > One-touch connection (NFC) >
65
Preparation on the smartphone
1. Download and install the app “NFC Easy Connect” in your smartphone.
Access the following Web site:
https://play.google.com/store/apps/details?id=com.sony.easyconnect
The App may not be available in some countries and/or regions.
By the two- dimensional code:
Use a two- dimensional code reader app.
Page 66

66
Tip
If your smartphone has an NFC function, such as that of Android 4.1 or later,
you may not need to install “NFC Easy Connect” to connect the headset with
your smartphone by one touch. In that case, you do not need to perform step 1,
above. The operation and specifications may be different from the description
here. For details, refer to the manual supplied with your smartphone.
Page 67

2. Set the smartphone so that the NFC function can be used.
For details, refer to the manual of the smartphone.
67
About “NFC Easy Connect” App
Copyright 2013 Sony Corporation
Page 68

Help Guide
Search
Top > One-touch connection (NFC) > One-touch connection (NFC) >
68
About “NFC Easy Connect” App
“NFC Easy Connect” is Sony’s original app for Android Phone available at Google
Play Store.
To find out more about the functions, search for “NFC Easy Connect” and
download the free app.
The App may not be available in some countries and/or regions.
Connecting with a smartphone by one -touch functions
Copyright 2013 Sony Corporation
Page 69

Help Guide
Search
Top > One-touch connection (NFC) > One-touch connection >
69
Connecting with a smartphone by one-touch functions
By touching the headset with a smartphone, the headset is turned on automatically
and then proceeds to pairing and BLUETOOTH connection.
1. Unlock the screen of the smartphone.
If you installed the “NFC Easy Connect” App in the smartphone, start the “NFC
Easy Connect” App.
2. Touch the headset with the smartphone.
Touch the smartphone on the N marked part of the headset.
Refer to the manual of the smartphone for the designated location to be
touched on the smartphone.
Page 70

70
Follow the on - screen instructions to complete the connection.
Disconnecting the smartphone by one -touch functions
Copyright 2013 Sony Corporation
Page 71

Help Guide
Search
Top > One-touch connection (NFC) > One-touch connection >
71
Disconnecting the smartphone by one-touch functions
You can disconnect the headset from the smartphone by touching the headset with
it.
1. Unlock the screen of the smartphone.
If you installed the “NFC Easy Connect” App in the smartphone, start the “NFC
Easy Connect” App.
2. Touch the headset with the smartphone.
Touch the smartphone on the N marked part of the headset.
Page 72

72
Note
Even if you disconnect the headset from the smartphone, the headset is not
turned off. To turn off the headset, press and hold the POWER button for
about 2 seconds. The indicator (blue) goes off and the headset turns off.
Switching the device by one - touch functions
Copyright 2013 Sony Corporation
Page 73

Help Guide
Search
Top > One-touch connection (NFC) > One-touch connection >
73
Switching the device by one-touch functions
When the headset is connected with a BLUETOOTH device, if you touch an
NFC compatible smartphone on the headset, the headset is connected with the
smartphone that touched on the headset most recently.
If you touch the smartphone that is connected with the headset on another NFC
compatible BLUETOOTH headset or BLUETOOTH speaker, the smartphone is
disconnected from the headset, and connected with the BLUETOOTH device
touched.
Note
Unlock the screen of the smartphone beforehand. If you installed the “NFC Easy
Connect” App in the smartphone, start the “NFC Easy Connect” App.
Copyright 2013 Sony Corporation
Page 74

Help Guide
Search
Top > Music > Listening to music >
74
Listening to music
You can enjoy listening to music and basic remote control operation of a
BLUETOOTH device via a BLUETOOTH connection. The BLUETOOTH device is
required to support the following BLUETOOTH profiles.
A2DP (Advanced Audio Distribution Profile): enables you to enjoy high- quality
audio content wirelessly.
AVRCP (Audio Video Remote Control Profile): enables you to enjoy basic
remote control operation (play, stop, etc.) of a BLUETOOTH device.
The headset supports SCMS- T content protection. You can enjoy music, etc., from
a device such as a mobile phone or portable TV that supports SCMS- T content
protection.
The operation may vary depending on the BLUETOOTH device. Refer to the
manual supplied with your BLUETOOTH device.
1. Connect the headset with a BLUETOOTH device.
2. Wear the headset.
Put the headset with indication on your left ear and indication on your
right ear.
Page 75

3. Play back music or video on the BLUETOOTH device.
75
Tip
Depending on the BLUETOOTH device, it may be necessary to adjust the
volume or set the audio output setting on the connected device.
After use
1. Terminate the BLUETOOTH connection by operating the BLUETOOTH device.
Page 76

2. Press and hold the POWER button for about 2 seconds.
The indicator (blue) goes off and the headset turns off.
76
Tip
When you finish playing music, the BLUETOOTH connection may terminate
automatically, depending on the BLUETOOTH device.
Related topic
Pairing and connecting with an Android smartphone
Pairing and connecting with an iPhone
Pairing and connecting with other BLUETOOTH devices
Controlling the audio device
Copyright 2013 Sony Corporation
Page 77

Help Guide
Search
Top > Music > Listening to music >
77
Controlling the audio device
If the BLUETOOTH device supports AVRCP, you can control it by the buttons on
the headset. The functions available may vary depending on the BLUETOOTH
device. Refer to the manual supplied with your BLUETOOTH device.
To play/pause
Press the POWER button.
To adjust the volume
Press the VOL +/– ( / ) button.
To skip to the next/previous song
Press and hold the VOL +/– ( / ) button. Release it when a beep sounds.
To fast - forward/fast-reverse
Press and hold the VOL +/– ( / ) button.
Page 78

Note
78
If the communication condition is poor, the BLUETOOTH device may react
incorrectly to the operation on the headset.
Selecting the sound quality mode of music playback
Copyright 2013 Sony Corporation
Page 79

Help Guide
Search
Top > Music > Listening to music >
79
Selecting the sound quality mode of music playback
The sound quality is set to the “Standard” mode (SBC high quality mode) as the
default setting.
When using an AAC compatible device, select the “Priority on sound quality”
mode.
If the connection is unstable, such as when producing only intermittent sound,
select the “Priority on stable connection” mode.
Sound quality and the indicator (blue) of each mode
When the sound quality mode is switched, the headset indicates the remaining
battery capacity by flashing the indicator in red first, and then in blue to indicate the
sound quality mode. You can check the current sound quality mode by the number
of flashes of the indicator (blue).
Number of flashes
Mode Sound quality
(blue)
Priority on sound
SBC (high quality) or AAC selected
3 times
quality
automatically
Standard SBC (high quality) Twice
Priority on stable
SBC Once
connection
Note
When you turn on the headset by pressing the POWER button only, the
headset does not indicate the sound quality mode with flashes of the indicator
Page 80

(blue).
80
Selecting the sound quality mode
Turn on the headset by pressing the POWER button for more than 2 seconds
while holding the VOL + or VOL – button down.
To select the “Priority on sound quality” mode
When the headset is in the “Standard” mode, turn it on while holding the VOL +
button down. The “Priority on sound quality” mode is selected.
From the “Priority on stable connection” mode, turn on the headset while holding
the VOL + button down. Turn off the headset once, then turn it on while holding the
VOL + button down again.
To select the “Priority on stable connection” mode
When the headset is in the “Standard” mode, turn it on while holding the VOL –
button down. The “Priority on stable connection” mode is selected.
From the “Priority on sound quality” mode, turn on the headset while holding the
VOL – button down. Turn off the headset once, then turn it on while holding the
VOL – button down again.
Notes
The playback time may become shorter, depending on the sound quality and the
conditions under which you are using the headset.
Page 81

Depending on the ambient conditions in the area where you are using the
headset, intermittent sound may still occur, even if the “Priority on stable
81
connection” mode is selected.
Copyright 2013 Sony Corporation
Page 82

Help Guide
Search
Top > Phone calls > Phone calls >
82
Making a call
You can enjoy a hands- free call with a BLUETOOTH smartphone or mobile phone
that supports the BLUETOOTH profile HFP (Hands-free Profile) or HSP (Headset
Profile), via a BLUETOOTH connection.
If your BLUETOOTH smartphone or mobile phone supports both HFP and HSP, set
it to HFP.
1. Connect the headset with a BLUETOOTH smartphone or mobile phone.
2. Use the buttons on your smartphone or mobile phone when making a call.
If no dial tone is heard via the headset, switch the call device to the headset
using your smartphone or mobile phone. With an HFP connection, you can do
this by pressing the POWER button on the headset for about 2 seconds.
Refer to the manual supplied with your smartphone or mobile phone for the
details of the operation.
Page 83

To adjust the volume
83
Press the VOL +/– button.
Tips
You cannot adjust the volume when not talking.
Volume for a call and listening to music can be adjusted independently. Even if
you change the volume while playing back the music, the volume of a call does
not change.
To end a call
Press the POWER button on the headset.
After use
1. Disconnect the BLUETOOTH connection using the smartphone or mobile
phone.
2. Press and hold the POWER button on the headset for about 2 seconds.
The indicator (blue) goes off, and the headset turns off.
Page 84

Related topic
Pairing and connecting with an Android smartphone
84
Pairing and connecting with an iPhone
Pairing and connecting with other BLUETOOTH devices
Receiving a call
Copyright 2013 Sony Corporation
Page 85

Help Guide
Search
Top > Phone calls > Phone calls >
85
Receiving a call
1. Connect the headset with a BLUETOOTH device in advance.
2. When there was a call, press the POWER button on the headset and receive
the call.
Receive a call in the same way when a call arrives while you are listening to
music.
The music stops while you are talking, and resumes automatically when you end
the call.
The ring tone differs in the following ways, depending on your smartphone or
Page 86

mobile phone.
ring tone set on the headset
86
ring tone set on the smartphone or mobile phone
ring tone set on the smartphone or mobile phone only for a BLUETOOTH
connection
Note
If you received a call using your smartphone or mobile phone, some
smartphones or mobile phones may have handset use priority. In the case of the
HFP connection, talk on the headset by pressing the POWER button on the
headset for about 2 seconds, or using your smartphone or mobile phone. For
details, refer to the manual supplied with your smartphone or mobile phone.
To adjust the volume
Press the VOL +/– button.
Tips
You cannot adjust the volume when not talking.
Volume for a call and listening to music can be adjusted independently. Even if
you change the volume while playing back the music, the volume of a call does
not change.
To end a call
Press the POWER button on the headset.
After use
1. Disconnect the BLUETOOTH connection using the smartphone or mobile
phone.
2. Press and hold the POWER button on the headset for about 2 seconds.
The indicator (blue) goes off, and the headset turns off.
Controlling the smartphone or mobile phone
Page 87

Copyright 2013 Sony Corporation
87
Page 88

Help Guide
Search
Top > Phone calls > Phone calls >
88
Controlling the smartphone or mobile phone
The function available may vary depending on the profile supported by your
BLUETOOTH smartphone or mobile phone. Even if the phone has the same
profile, functions may vary depending on the specifications. Refer to the manual
supplied with your smartphone or mobile phone.
Supported profile: HFP
Status POWER button
Press once to cancel outgoing call.
Outgoing
Press for about 2 seconds to change call device between the headset
call
and the smartphone or mobile phone.
Incoming
call
Press once to answer call.
Press for about 2 seconds to reject call.
Press once to finish call.
During
Press for about 2 seconds to change call device between the headset
call
and the smartphone or mobile phone.
Supported profile: HSP
Status POWER button
Outgoing call Press once to cancel outgoing call.
Incoming call Press once to answer call.
During call Press once to finish call.
Page 89

Copyright 2013 Sony Corporation
89
Page 90

Help Guide
To receive a call
Search
Top > Multi point connection > Multi point connection >
90
Connecting the headset with a music player and a
smartphone (mobile phone)
To call using a BLUETOOTH smartphone or mobile phone while listening to music
played on another BLUETOOTH compatible music player, the headset needs to be
connected with each device with a BLUETOOTH connection.
1. Pair the headset with a BLUETOOTH music player and a smartphone (mobile
phone), respectively.
2. Make an A2DP BLUETOOTH connection between the headset and the
BLUETOOTH music player.
3. Make an HFP or HSP BLUETOOTH connection between the headset and the
BLUETOOTH smartphone or mobile phone.
Note
If you have previously connected this BLUETOOTH device, an HFP or HSP
connection is made automatically when you turn on the headset. At the same
time, an A2DP connection may also be made automatically. If this happens,
disconnect the headset from the smartphone or mobile phone once using the
phone, then connect the devices again by repeating the process from step 2.
To call during playback
Make a phone call by operating the smartphone or mobile phone.
If no dial tone is heard via the headset, switch the call device to the headset
using your smartphone or mobile phone. With an HFP connection, you can do
this by pressing the POWER button on the headset for about 2 seconds.
Page 91

When an incoming call arrives, the music playback pauses, and a ring tone is
91
heard via the headset.
Press the POWER button on the headset and talk using the microphone.
To end a call, press the POWER button on the headset to switch back to
music playback.
Note
When no ring tone is heard even if an incoming call arrives, stop music
playback. When ringing, press the POWER button and talk.
To disconnect the call
Press the POWER button on the headset to switch back to music playback.
Related topic
Pairing and connecting with an Android smartphone
Pairing and connecting with an iPhone
Pairing and connecting with other BLUETOOTH devices
Connecting with a smartphone by one -touch functions
Connecting the headset with 2 Android smartphones
Copyright 2013 Sony Corporation
Page 92

Help Guide
Search
Top > Multi point connection > Multi point connection >
92
Connecting the headset with 2 Android smartphones
When you connect the headset with a smartphone, usually the music playback
function and the phone call function are both connected automatically. To make a
multi point connection with 2 smartphones separately, one for listening to music
and the other for making phone calls, change the settings of the smartphones so
that only one of the functions is connected for each smartphone.
1. Pair the headset with both smartphones, respectively.
2. Use one of the smartphones to establish a BLUETOOTH connection with the
headset.
3. On the smartphone connected to the headset, uncheck either [Phone audio]
(HFP) or [Media audio] (A2DP).
Example: To connect “Media audio” (A2DP) only
Touch [Settings] [Bluetooth] the setting icon next to [MDR-AS700BT].
Page 93

93
On the [Paired Bluetooth device] screen, uncheck [Phone audio].
Page 94

4. Terminate the BLUETOOTH connection of the smartphone.
6. In the same way, uncheck the function that you did not uncheck in step 3.
94
5. Use the other smartphone to establish a BLUETOOTH connection with the
headset.
Page 95

7. Use the first smartphone to establish a BLUETOOTH connection again.
95
Both smartphones are connected with the headset with only one function
enabled.
To call during playback
Make a phone call using the smartphone designated for making a phone call.
If no dial tone is heard via the headset, switch the call device to the headset
using your smartphone or mobile phone. With an HFP connection, you can do
this by pressing the POWER button on the headset for about 2 seconds.
To receive a call
When an incoming call arrives, the music playback pauses, and a ring tone is
heard via the headset.
Press the POWER button on the headset and talk using the microphone.
To end a call, press the POWER button on the headset to switch back to
music playback.
Note
When no ring tone is heard even if an incoming call arrives, stop music
playback. When ringing, press the POWER button and talk.
To disconnect the call
Press the POWER button on the headset to switch back to music playback.
Related topic
Pairing and connecting with an Android smartphone
Pairing and connecting with an iPhone
Connecting with a smartphone by one -touch functions
Connecting the headset with an Android smartphone and an iPhone
Copyright 2013 Sony Corporation
Page 96

96
Page 97

Help Guide
Search
Top > Multi point connection > Multi point connection >
97
Connecting the headset with an Android smartphone and an
iPhone
When you connect the headset with a smartphone, usually the music playback
function and the phone call function are both connected automatically. To make a
multi point connection using an Android smartphone and an iPhone separately for
listening to music and making phone calls, change the settings on the Android
smartphone so that only one of the functions is connected. Connect the Android
smartphone first, and then connect the iPhone.
You cannot set the iPhone to connect one function only.
1. Pair the headset with both smartphones, respectively.
2. Use the Android smartphone to establish a BLUETOOTH connection with the
headset.
3. On the smartphone connected to the headset, uncheck either [Phone audio]
(HFP) or [Media audio] (A2DP).
Example: To connect “Media audio” (A2DP) only
Touch [Settings] [Bluetooth] the setting icon next to [MDR-AS700BT].
Page 98

98
On the [Paired Bluetooth device] screen, uncheck [Phone audio].
Page 99

4. Use the iPhone to establish a BLUETOOTH connection with the headset.
99
The iPhone is connected with the headset with both functions, but you can only
use the function that you did not uncheck in step 3.
To call during playback
Page 100

Make a phone call using the smartphone designated for making a phone call.
If no dial tone is heard via the headset, switch the call device to the headset
100
using your smartphone or mobile phone. With an HFP connection, you can do
this by pressing the POWER button on the headset for about 2 seconds.
To receive a call
When an incoming call arrives, the music playback pauses, and a ring tone is
heard via the headset.
Press the POWER button on the headset and talk using the microphone.
To end a call, press the POWER button on the headset to switch back to
music playback.
Note
When no ring tone is heard even if an incoming call arrives, stop music
playback. When ringing, press the POWER button and talk.
To disconnect the call
Press the POWER button on the headset to switch back to music playback.
Related topic
Pairing and connecting with an Android smartphone
Pairing and connecting with an iPhone
Connecting with a smartphone by one -touch functions
Copyright 2013 Sony Corporation
 Loading...