

Page 1
® 1990 by Sony Corporation
HILE ^ О Г v;
l>(» Tif-t
Page 2
Owner’s Record
The model number is located at the rear. The serial
number is located on the top panel. Record the serial
number in the space provided below.
Refer to them whenever you call upon your Sony dealer
regarding this product.
Model No. Serial No.
WARNING
To prevent fire or shock hazard, do not expose the unit to rain or moisture.
CAUTION
RISK OF ELECTRIC SHOCK
DO NOT OPEN
CAUTION : TO REDUCE THE RISK OF ELECTRIC SHOCK,
DO NOT REMOVE COVER (OR BACK).
NO USER-SERVICEABLE PARTS INSIDE.
REFER SERVICING TO QUALIFIED SERVICE PERSONNEL.
This symbol is intended to alert the user
to the presence of uninsulated “dangerous
voltage” within the product’s enclosure
that may be of sufficient magnitude to
constitute a risk of electric shock to
persons.
This symbol is intended to alert the user
to the presence of important operating and
maintenance (servicing) instructions in the
literature accompanying the appliance.
INFORMATION
This equipment generates and uses radio frequency energy
and if not installed and used properly, that is, in strict
accordance with the manufacturer's instructions, may
cause interference to radio and television reception. It has
been type tested and found to comply with the limits for a
Class B computing device in accordance with the
specifications in Subpart J of Part 15 of FCC Rules, which
are designed to provide reasonable protection against such
interference in a residential installation. However, there is
no guarantee that interference will not occur in a particular
installation. If this equipment does cause interference to
radio or television reception, which can be determined by
turning the equipment off and on, the user is encouraged
to try to correct the interference by one or more of the
following measures:
Reorient the receiving antenna
Relocate the equipment with respect to the receiver
Move the equipment away from the receiver
Plug the equipment into a different outlet so that
equipment and receiver are on different branch circuits.
If necessary, the user should consult the dealer or an
experienced radio/television technician for additional
suggestions. The user may find the following booklet
prepared by the Federal Communications Commission
helpful:
“How to Identify and Resolve Radio-TV Interference
Problems”. This booklet is available from the U.S.
Government Printing Office, Washington, DC 20402, Stock
No. 004-000-00345-4.
CAUTION
The use of optical instruments with this product will
increase eye hazard.
As the laser beam used in this videodisc player is
harmful to the eyes, do not attempt to disassemble the
cabinet. Refer servicing to qualified personnel only.
- CAUTION:
TO PREVENT ELECTRIC SHOCK, DO NOT USE THIS
POLARIZED AC PLUG WITH AN EXTENSION CORD,
RECEPTACLE OR OTHER OUTLET UNLESS THE
BLADES CAN BE FULLY INSERTED TO PREVENT
BLADE EXPOSURE.
-------------------------------------------------------
NOTICE FOR THE CUSTOMERS IN CANADA
This apparatus complies with the Class B limits for radio
noise emissions set out in Radio Interference Regulations.
Page 3

Contents
This manual covers the MDP-333 verified to the FCC rules and available in the U.S.A. and Canada, the MDP-355GX
available in other countries and the PX model of MDP-355GX. Operations are the same regardless of the model name.
Specifications vary only with regard to power requirements and AC outlet on the unit.
Introduction
Connections
LD
CD
LD/CD/CDV
Precautions....................................................
Operating voltage .......................................................................................................................... O
Features .......................................................................................................................................... @
Location and function of controls................................................................................................ ©
Front panel .................................................................................................................................................... ®
Remote commander....................................................................................................................................... ©
Connections .................................................................................................................................... ©
To connect to audio system and to TV with video inputs
To connect to TV without audio/video inputs ............................................................................................. ©
To play an LD ................................................................................................................................. ©
To change playback speed and direction - Speed play................................................................................... ©
To play frame by frame - Freeze-frame, STEP playback............................................................................... ©
To search for a particular scene-Dual speed clear scan ................................................................................. ©
Searching by chapter number - Chapter search ........................................................................................... ©
Searching by frame number/time - Frame/time search
To play repeatedly - Repeat playback........................................................................................................... @
To play only certain chapters - Program playback ...................................................................................... ©
To play a CD ................................................................................................................................... ©
To search for a particular selection - Search ................................................................................................ ®
To play repeatedly - Repeat playback............................................................................................................ ®
To play only certain selections - Program playback..................................................................................... ©
To play only certain selections within a designated time
- Auto program playback .............................................................................................................. ®
To change time display - Time counter ...................................................................................... ®
To pause after a each selection - Auto pause
To insert a blank space between selections - Auto space
To playback an introduction of each chapter/track - INTORO scan
To set an Index at a desired point - Custom index
Playing in a random order - Sufflè playback ............................................................................. ©
To play a CDV.................................................................................................................................. ®
................................................................................
...........................................................................
...............................................................................
............................................................................
........................................................
.........................................
...................................................................
@
©
©
®
®
©
©
Others
Specifications.................................................................................................................................. ®
Notes on handling discs ................................................................................................................ ®
Glossary ........................................................................................................................................... ®
Troubleshooting ............................................................................................................................ ©
Page 4
Precautions
On safety
• Should any solid object or liquid enter the cabinet, unplug
the unit and have it checked by qualified personnel
before operating it any further.
• Unplug the unit from the wall outlet if it is not to be used
for an extended period of time.
To disconnect a cord, pull it out by the plug. Never pull
the cord itself.
• One blade of the plug is wider than the other for the
purpose of safety and will fit into the power outlet only
one way. If you are unable to insert the plug fully into the
outlet, contact your dealer.
On installation
• Avoid placing the player in a location subject to:
— high humidity
— high temperature
— excessive dust
— mechanical vibration
— direct sunlight
• Allow adequate air circulation to prevent internal heat
buildup. Do not place the unit on surfaces (rugs, blankets,
etc.) or near materials (curtains, draperies) that may block
the ventilation holes.
• The unit will be unsteady, if it is not placed on a
horizontal level surface. To avoid being unsteady, adjust
the thickness of the supplied spacer to fill the gap and
insert it under the unit.
______________________
Spacer sheet
0.1 mm width
j fill the gap.
proper thickness to
Make spacer
(Thickness can be
adjusted between
0.1 mm and 1 mm)
On moisture condensation
• Do not operate the unit right after having transported it
from a cold location to a warm location or in a room
where the temperature rises suddenly, because moisture
may condense in the operating section of the unit. Wait
for about an hour before turning the power on in the new
location or keep the rise in room temperature gradual. If
the unit is operated with moisture condensation, the unit
and the disc may be damaged. Therefore remove the
disc immediately when there is a possibility of moisture
condensation and no picture is obtained. To evaporate
the moisture rapidly, leave the player turned on without a
disc loaded.
On operation
• Remove the disc from the tray after playing it, if the unit
will not be used for any length of time. Do not transport
the set with a disc in place.
• When the disc tray is in the open position, do not press
down on it strongly, or place heavy objects on it.
On cleaning
Clean the cabinet, panel and controls with a dry soft cloth,
or a soft cloth lightly moistened with a mild detergent
solution. Do not use any type of solvent, such as alcohol
or benzine, which may damage the finish.
On repacking
Do not throw away the carton and the packing material.
They make an ideal container to transport the unit in.
If you have any question or problem concerning your unit,
please contact your nearest Sony dealer.
For the customers In the USA
For detailed safety precautions see the leaflet
“IMPORTANT SAFEGUARDS”.
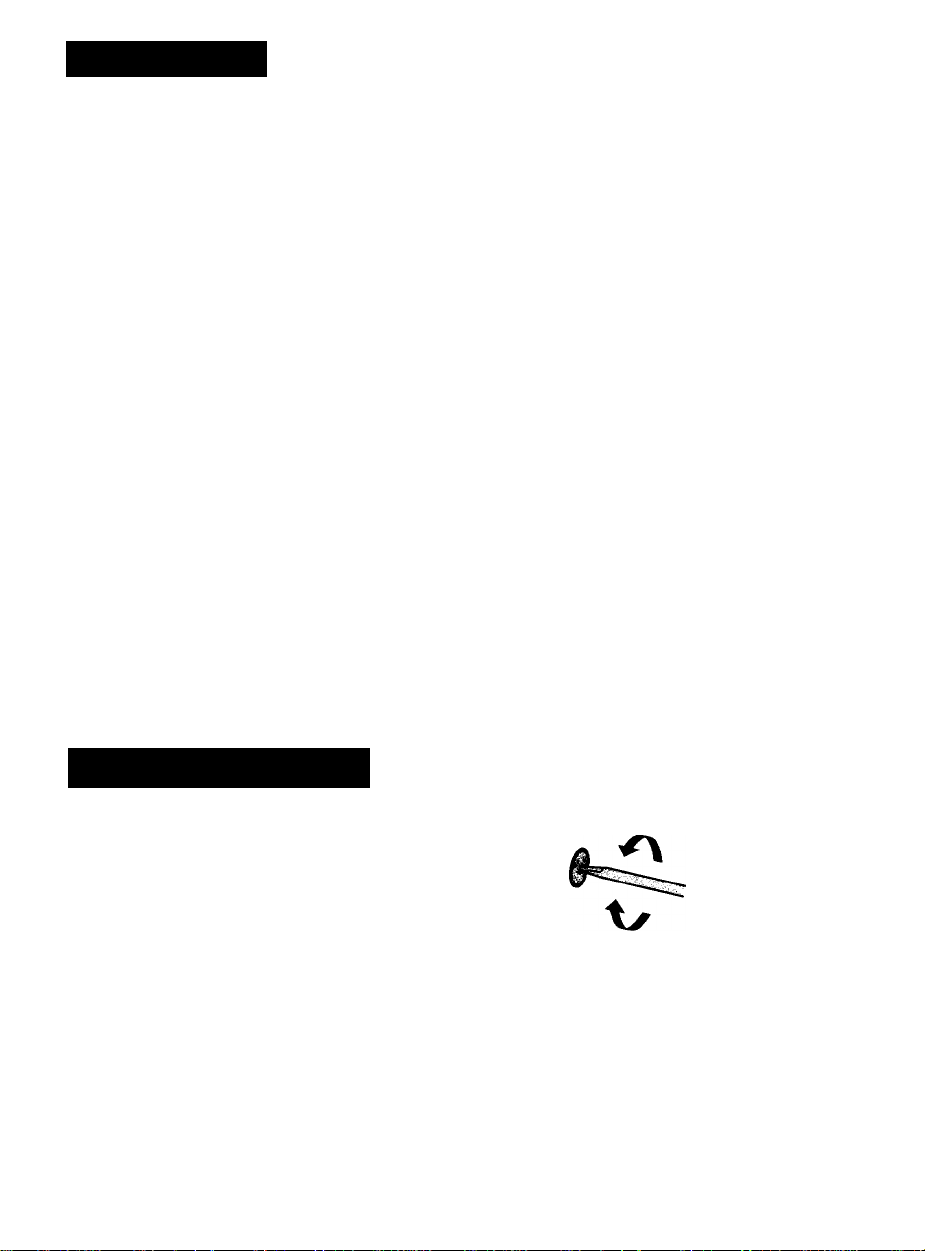
Operating Voltage
Before operating the unit, be sure that the operating
voltage of your unit is identical with that of your local
power supply.
MDP-333: 120 V AC, 60 Hz,
MDP-355GX: 100, 120, 220, 240 V AC, 50/60 Hz.
For the MDP-355GX, the voltage selector is located at
the rear.
If the selector must be reset, disconnect the AC
power cord and turn the selector with a minus
screwdriver so that the arrow on the selector points to
the appropriate voltage.
o
How to use the AC power plug adaptor (supplied with
the MDP-3S5GX)
If the AC plug of your unit does not fit the wall outlet,
attach the supplied AC plug adaptor.
Page 5

Features
This CD/CDV/LD Player can play all six types of optical discs currently available for home entertainment use:
CD single
8 cm/3 in
Digital audio
Max. 20 min.
single-sided
The following functions are available with this unit.
For the CDV disc, CD functions can be used on the audio portion and LD functions can be used on the video
portion.
LD/CD/CDV
• Custom Index
Specify up to six index marks at any point on the disc, for
convenient piayback start at the push of a button.
• Program play
Play back chapters or tracks in any desired order.
• Shuffle play
Play all selections on a disc in a random order.
• Auto disc protection
Prevents damage to the disc during stop.
• AV calendar display
Shows the number of tracks (up to 20) on a disc and the
total playing time at a glance.
• Auto program
Play back chapters or tracks within a designated time.
• INTRO scan
Play only the beginning (introduction) of the chapters or
tracks on a disc in order.
Video
Digital and/or analog audio
LD single disc can be played
back without using adaptors.
-t-
Max. 14/20 min.
single-sided
LD/CDV (Video Portion)
> Variable speed playback (LD CAV only)
11 speed settings for normal and reverse playback, step
(frame-by-frame) playback and high-quality freeze-frame.
> Clear scan
Fast scan without picture distortion even on CLV discs.
CDV
> video portion
All LD (CLV) functions are available.
> Audio portion
All CD functions are available.
Video
+
Digital and/or
analog audio
Max. 14/20 min.
(CAV/CLV) per side
Digital and/or analog audio
Max. 30/60 min.
(CAV/CLV) per side
Video
+
This unit plays back discs with any of the following logos on the
label.
CD ViDEO
dUU cliEitnL
• It cannot play back CED or VHD discs or discs with PAL,
SECAM, or video signals other than the NTSC standard.
LaserDisc
DIGITAL AUDIO
dE
The Compact Disc Video (CDV) format divides a CD into two
sections. One is 20 minutes of digital audio playable on any CD
player. The other, 5 minutes of video and digital audio, requires
a CDV player.
Page 6

Location and Function of Controls
Front panel
Disc tray (
Remote control sensor -
POWER switch 0, (
PHOICS
lJ\
-----
LEVEL
-----
J®.
T=
PHONES (headphones) jack (stereo phone plug) ■
and LEVEL control 0, 0
Repeat button 0,1
Press to repeat the entire disc side.
Display window-
Accessories
RMT-333A Remote Commander Two size AA (R6) batteries
The shipping box should contain the following accessories.
c:
pi
m
Í
Video connecting cord
(phono 1 phono 1)
Page 7

Refer to the page indicated in the black circle for details, continued oveneat •
Number and file search buttons
A Disc tray OPEN/CLOSE button
-Shuttle ring ©
Utilize for forward or reverse speed scan.
■ O Play button
■ ACS/AMS (Automatic
Chapter/Music Sensor) buttons ©, I
-II Pause button
■ STOP button ®, ®
Audio connecting cord
(phono 2 ^ phono 2)
RFU adaptor RFU-90UC (1)
(supplied with the MDP-333
and the PX model of MDP-355GX)
CUSTOM INDEX button I
FILE button @
AV/TIME button ®
AUTO PGM button ®
Spacer
e
Page 8
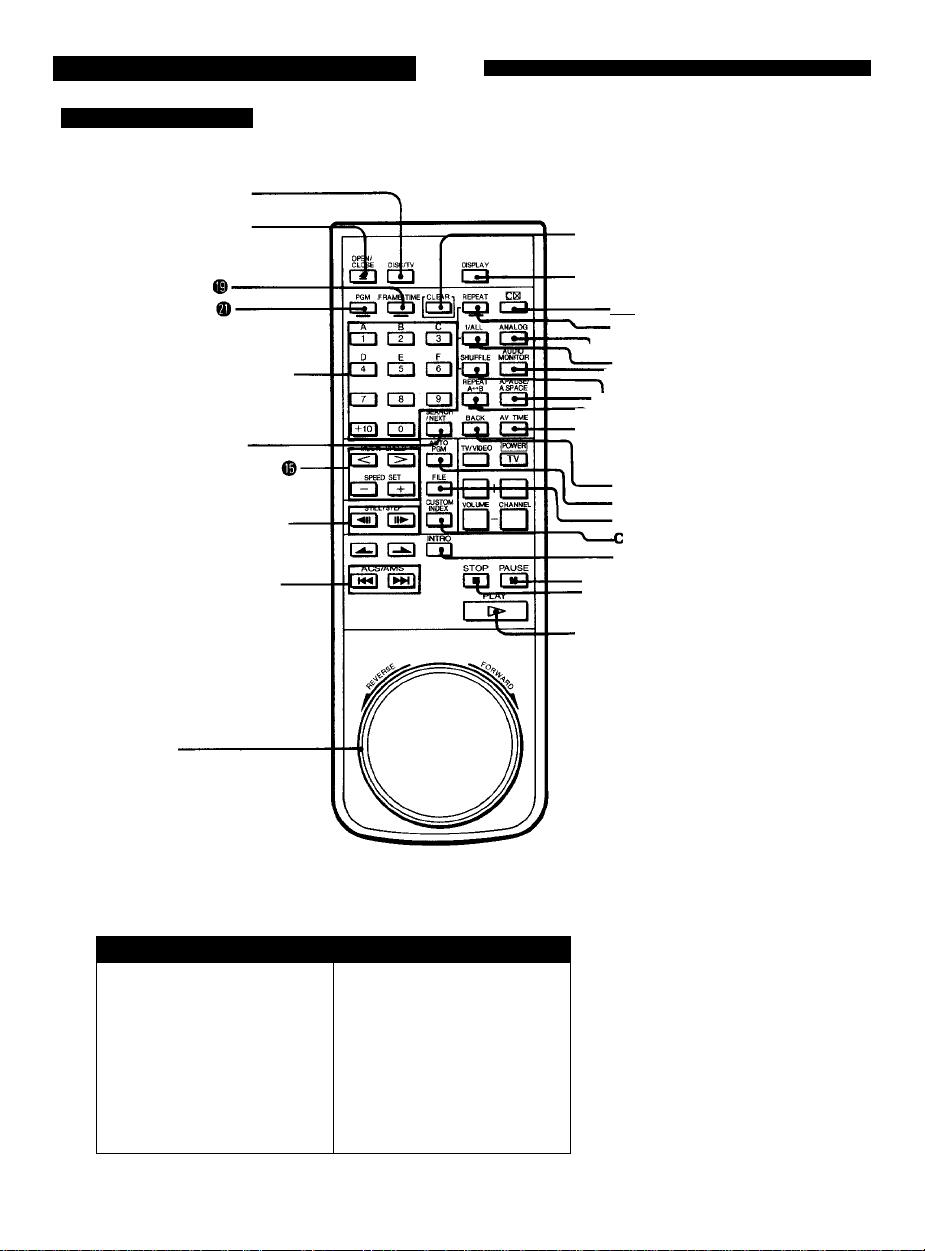
Location and Function of Controis
Remote Commander
LD Operation
DISC/TV button 0
Refer to the page indicated in the biack circie for detaiis.
± Disc tray OPEN/CLOSE
button
FRAME/TIME button
PGM program button
Number and file search (A - F)
buttons
SEARCH/NEXT button 0
</> MULTI SPEED buttons
+/- SPEED SET buttons
STILL/STEP^II/ll^ buttons
ACS/AMS 0
(Automatic Chapter/Music
Sensor) buttons
Shuttle ring 0
Utilize for forward or reverse
speed scan.
CLEAR button 0
DISPLAY button 0
iCXI button 0
REPEAT button 0
ANALOG audio button 0
1/ALL button 0
'VaUDIO monitor button 0
^SHUFFLE button 0
L_a. (Automatic) PAUSE/A.
■ VI (Automatic) SPACE button (
^—REPEAT A » B button 0
'
------
^AV/TIME button 0
SACK button 0
AUTO PGM button 0
PILE button ©
USTOM INDEX button ©
INTRO (Introduction) scan
button ©
-I ^1 PAUSE button 0
'—■ STOP button 0
[> PLAY button
Battery insertion
1
Insert the two size AA batteries
as shown, being careful to
2
match +/— polarities.
Page 9

CD, CDV, Others Operation
± Disc tray OPEN/CLOSE
button ®
PGM program button i
Number and file search(A - F) buttons
SEARCH/NEXT button I
AUTO PGM (program) button (
FILE button ®-------------------------CUSTOM INDEX button ®—
Index buttons
Press (reverse) or —
(forward) to locate the desired
index number while playing a CD.
ACS/AMS !◄ ◄ />
(Automatic Chapter/Music
Sensor) buttons
INTRO (Introduction) scanbutton ®
Shuttle ring ®-----------------------
Utilize for forward or reverse
speed scan.
-------------
-CLEAR button I
-DISPLAY button I
® a
PGM iFRAKC/TIMErCU
y
m m m
D E F
f~4~) I 5 I n~|
CZD CD
¡52LQ
SPEED SET
m CD
STTLL/STEP
im IjD
IB B
mm
-^uiu ir"““
Cp I I GD
CD
"toEX^ 'OLLWE CHANNEI
a
1/AlL ANALOG
CD CD
AUD»-
SHUFFLE MONjfOR
CD S
BACK AV TIME
IpCTVERf
giD-ai
STOP PAUSE
CD C^
-REPEAT button @
-1/ALL button @
-AUDIO MONITOR button ®
SHUFFLE button ®
-A. (Automatic) PAUSE/A.
(Automatic) SPACE button (
EPEAT A ^ B button ®
lì
I '^AV/TIME button ®
^
-----
BACK button ®
-TV operation buttons
(Can be used to control Sony TV
sets bearing the ® mark.)
CHANNEL +/- buttons
Press to select the TV channel.
VOLUME +/- buttons
Press to control the TV volume.
TV/VIDEO button
Press to switch to a video recorder
connected to the video/audio inputs
of the TV set.
(This function is available only with
certain TV models.)
TV POWER button
Hi pause button ®
■ STOP button ®
> PLAY button
Battery life
Under normal operations, the batteries will last for approximately
six months. If the operating range of the Remote Commander
becomes noticeably short, replace all the batteries with new ones.
If the Remote Commander is not to be used for a long period of
time, remove the batteries to avoid possible damage from battery
leakage.
Remote Commander Precautions
Do not let sunlight or light from a powerful artificial light source fall
directly on the Remote Commander sensor on the front panel as it
may interfere with operation or damage the sensor.
Page 10
Video and audio connection cord plug colors are indicated as yellow, white, and
red. Make sure that the jacks of the equipment are properly connected to Its
Connections
corresponding colors.
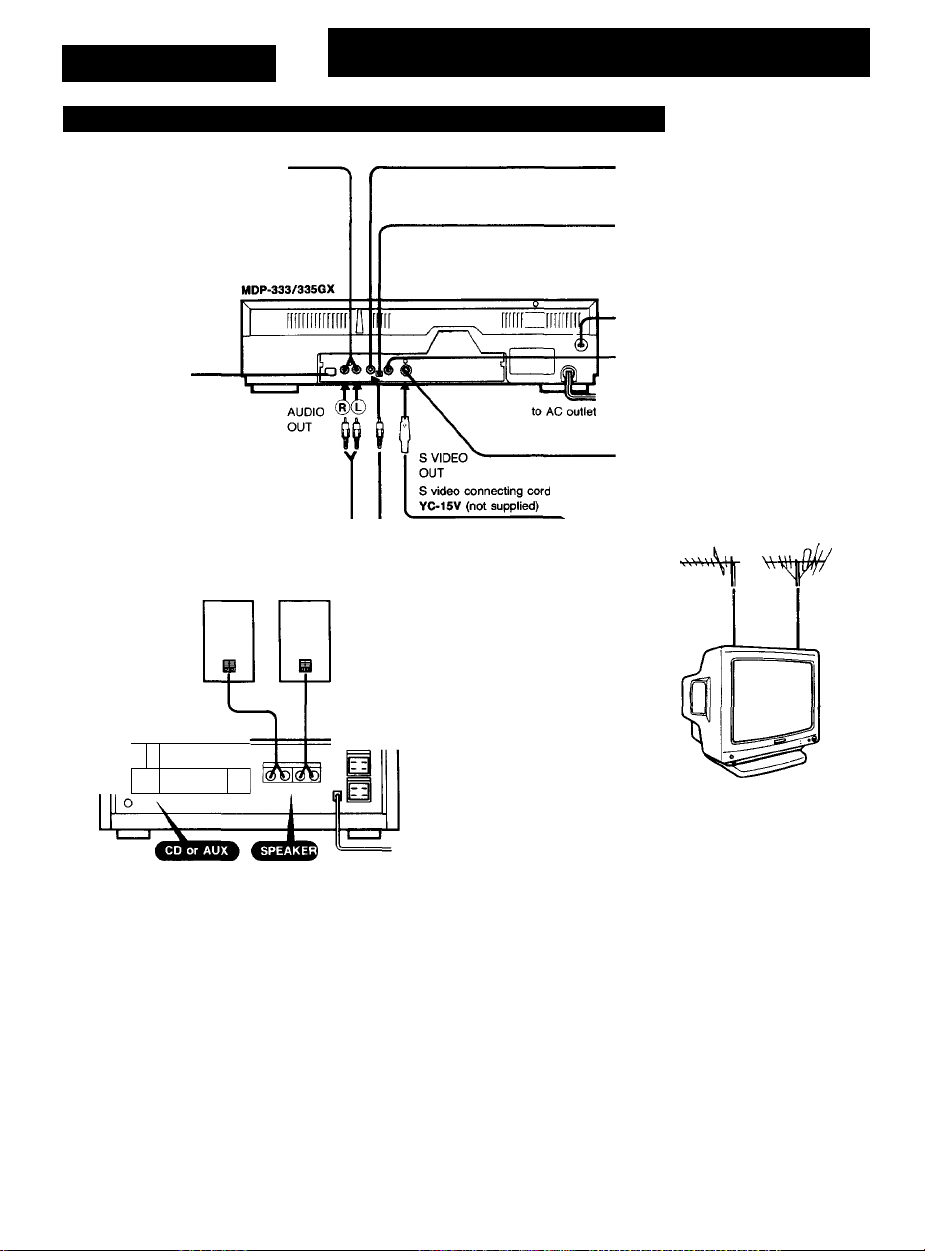
To Connect to Audio System and to TV with Video Inputs
AUDIO OUT jacks (phono jacks)
Connect to the audio input
jacks of a TV set or the AUX
input jacks of an amplifier. The
output signal will be the same that is, digital or analog -
depending on the signal
recorded on the disc.
DIGITAL OUTPUT
CONNECTOR (optical)
This jack permits optical fiber
connection to an amplifier or
D/A converter unit with optical
input. For connection, use the
optional audio fiber cable POG
15.
Discs that are not digitally
recorded will not be output.
Supplied audio connecting cord* (Red/White)
Speakers
(D®
loo I
о <
h ob о b d
) olio olio o|
о (n
о о
о О
VIDEO OUT
RK-C74
Amplifier
Supplied video connecting
cord (Yellow)
(not supplied)
VIDEO OUT jack (phono jack)
Connect to the video input jack of
a TV set or VCR.
RFU DC OUT jack (mini
mini jack)
This jack supplies power to the
(optional) RFU adaptor for TV
sets without audio/video Inputs.
Voltage selector (see page 4)
MDP-355GX only
AUDIO OUT monaural jack
(phono jack)
Connect to the audio input jack
of the TV set or the (optional)
RFU adaptor.
S VIDEO OUT jack
Connect to the S video input
jack of a TV set or VCR.
to S VIDEO IN
to VIDEO IN
to AUDIO IN
You can connect the player's audio output to the TV
instead of an audio system. If the TV set has only a
monaural phono jack for audio, use the VMC-720M/730M
connecting cord (not supplied).
Precautions on connecting
• Make sure that all equipment is turned off before connecting or
disconnecting any cables.
• Firmly insert the plugs into the jacks. A loose connection can
lead to noise.
• When unplugging a cabie, grasp the plug. Never pull the cable
itself.
• To prevent interference, turn off ail equipment connected, but
not currently in use.
• if noise is emitted from the audio or video input, try moving the
equipment further apart.
to AC outlet
Set input
selector to
“Video” to view
videodiscs.
• Connection methods differ. When in doubt, consult the
manufacturer’s manual.
Connection of optical
Remove protective cover. Plug in connector firmly.
fiber
cable
Page 11

To Connect to TV without Audio/Video Inputs
For connection, use the optional RFU adaptor RFU-90UC (supplied with the MDP-333 and the PX model of MDP-355GX).
Why is it necessary to select 3 or 4?
The videodisc player sends its output to the TV as a VHF
broadcast signal. Selecting an unused channel avoids interfering
with regular broadcasts.
When watching regular TV programs, turn the player off or press
the TV/DISC button on the Remote Commander so that you can
obtain a better picture. If TV picture quality is not satisfactory, refer
to the manufacturer’s manual and adjust the reception.
To obtain a better picture
Always switch off the player when watching a TV program.
During FM or AM reception
Turn off the power of the player to prevent the possibility of noise
interference.
To connect to the external video/audio inputs jacks of VCR.
Antenna VHF OUT terminals or
INPUT jacks
(VIDEO/AUDIO)
i
MDP-333
(MDP-355GX)
VIDEO/AUDIO
OUT jacks. ^
VIDEO OUT jack
AUDIO OUT jacks/AUDIO OUT monoral jack
TV
Page 12

To Play an LD
1 Turn on the TV and stereo system.
TV: Select the channel used for videodisc playback or the
video input (channei 3 or 4). (See p. ®, ®)
Stereo system:
Turn on the amplifier or receiver and seiect the
proper audio input [CD] or [AUX],
Turn on the player.
Main Unit
■S S s—
PGM FRAMe/TIWErCLEARi
□ a [q]
m CO GD
n~l l~5~| |~6~|
m m i~3~i
r+ioi m 1 i
c3i"m□O
Notes on disc tray
Do not insert a hand or linger in the player while it is operating.
Although the player will stop automatically if an object is inserted
while in play, serious injury may result. Be sure to place the unit
out of the reach of your child.
Insert only one disc at a time. Incorrect placement of two or more
discs may lead to malfunction.
Identical buttons on the main unit can also be used.
REPEAT CE
rO CO
o a
D E F
SHUFFLE MONITOR
a □
REPEAT AP4USEJ
o a
SEARCH
a a
TV/VIDEO
O (SD
VOLUME Channel
a
INTRO
S O
ACS/AMS STOP PAUSE
n*<1 nn nn
PLAY
1 a—i-
-DISPLAY
3 Open the disc tray.
OPEN/
CLOSE
Remote
Commander
Main Unit
4 Place the disc on the tray
Place the disc on the
center of the tray. If
the disc is not placed
correctly, playback may
not start.
Main Unit
Or push the disc tray compartment, then piayback wiil
aiso begin.
Page 13

Using an optional timer
To start playback with an optional timer automatically, leave the
POWER switch of the disc player in the depressed position.
When the timer supplies power at the preset time, the unit turns
on and playback begins.
To pause at the beginning of a disc
Press the II button on the player or the Remote Commander
instead of conducting step 5. The tray closes, and the player
pauses at the beginning of the disc.
AV calendar
When playing an LD containing TOC (Table of Contents) data,
the AV calendar shows information on the total number of
selections. A selection is played, its corresponding number on the
display disappears.
To listen with headphones
Plug stereo headphones into the PHONES jack and adjust the
listening volume with the LEVEL control.
Displays on playback messages
p
li il
Time (hr/min/sec) or frame number
Chapter number
Type of LD
Screen Messages
Information on the operating condition of the unit and
chapter numbers can be superimposed on the TV or
monitor screen. While no image is displayed, such as
during search, information tor LD is shown on a blue
background.
To show the on-screen display
Remote
Commander
Discs without time data to the second will be indicated as
"0:22:".
Message 1 (Examples)
.T Msptav i i f * •'
OPEN
CLOSE
PLAY Playback
STOP
PAUSE Pause
@ / @ Manual search
SEARCH Search
► x1/2 1/2 speed display in forward direction
Disc tray open
Disc tray closed
Stop
(Forward/reverse speed scan)
Message 2 (Examples)
mvT’r:
SIDE A CAV
SIDE B CAV
SIDE A CLV Long-play disc side A
SIDE B CLV Long-play disc side B
1/L Main soundtrack/left channel
2/L Second soundtrack/right channel
p DIGITAL
P ANALOG Analog sound
standard-play disc side A
Standard-play disc side B
Digital sound
Press the button again to
turn the display off.
fpi ayT —Message 1 (see table
■Current chapter number
below)
Current frame number
or time information*
f —Chapter numbers during
J program playback
'MSelected function
Message 2 (see table
below)
> BiplBnaikm '■' '
Precaution on LD discs
Some discs do not contain the side A or B identification code. In
this case, the disc side indication may not be correct.
Page 14

CB a
PGM fRAME/nMErCLEARl
m m ri~i
n~i CO CO
rri r~8~i CO
F“! rsn rn
MULTI SPEED
E3 ISD
co”m
STLL/STEP
rijgi
S 1^ O
ACS/AMS
nai r»»n
ABC
D E F
□ a O
AUTO
s
cb
CUSTOM
CO
REPEAT CS
o 1=1
S 3
SHUFFLE MONITOR
a IL3-
REPEAT APAUSEi
O a
Q 3
TV,VOEO M
□ CE]
VOLUME CHANNEL
STOP PAUSE
Fia. rSR-
1 O 1
Identical buttons on the main unit can also be used.
To switch between digital and analog sound on an
LD
If the LO contains a digital stereo sound signal, the
player automatically sends that to the output jacks.
Pressing the ANALOG button on the Remote
Commander switches to the analog audio signal and
turns the DIGITAL SOUND indicator off.
Press the ANALOG button again to return to digital
sound output.
With certain discs, there may be a difference in
volume between the digital and the analog sound.
Discs with Label
Discs bearing the I CXI label are recorded with the (CXI
noise reduction system, which gives lower noise levels
and higher dynamic range. The [CS indicator lights up
automatically.
Some lex] discs do not include the code necessary to
automatically activate the player’s [CX] noise reduction
system. If the ICX| indicator does not light, press the
ICXI button on the Remote Commander to manually
activate the system.
To stop playback and remove disc
OPEN/
CLOSE
Remove the disc and press the
OPEN/CLOSE button to close the empty
tray.
To play a stereo LD or a second audio
program (SAP) LD
Press the playback ([>) button, then continue to press the
AUDIO MONITOR button to display the following
information.
Press
Reproduced sound
SAP disc
Audio signal 1
(left channel)
Audio signal 2
(right channel)
Audio signal 1
(left channel)
Audio signal 2
(right channel)
AUDIO
ONITQR
s
L
Stereo disc
Stereo
r
Press ^
Left channel
Press ^ 1
Right channel
To temporarily interrupt playback
When playing CAV discs, the sound is
cut off and a still picture is shown. When
playing other discs, the unit enters the
pause mode. To resume playback from
the same point, press the II or t>
button.
To stop playback
Press the l> button to restart playback
from the beginning of the disc.
Indicator
lights
1/L
2/R
1/L
2/R
Page 15

To Change Playback Speed and Direction - Speed Play (CAV standard-play)
Speed and Direction
DISPLAY
* To select the playback direction
MULTI SPEED
• Sound during speed play
Audio output occurs only during x 1 (normal) speed
play in the forward direction. There is no sound for
other speed and direction combinations.
* Extended-play discs (CLV) (See p. ®)
Speed play, freeze frame and step playback are not
possible with CLV discs.
When a multi speed button is pressed, the indication
“SIDE A CLV” (or “SIDE B CLV”) is shown for 3
seconds. When the II button is pressed, the screen
becomes blue and the indication “SIDE A CLV” (or
“SIDE B CLV”) is shown.
Disc with automatic picture stop code
When a automatic picture stop code is encountered
during speed playback (at x 1, 1/2, 1/4, 1/8, 1/16,
1/30, 1/90), the unit automatically stops at that frame.
To resume playback, press the D> button, K4/b>l
button, < / > button, or the shuttle ring.
Reverse-
The direction can be changed regardless of playback
speed.
-Forward
To display the speed and direction
The playback speed
and direction appear.
Direction
L> : Forward
<] : Reverse
Speed
• To select the playback speed
SPEED SET
To reduce speed •To increase speed
Speed
IrxJication
ffl
Faster xl /4 1 /4 normal speed
i
k xIO 10 times normal x1/8 1/8 normal speed
Speed (approx.)
speed xl/16 1/16 normal speed
5 times normal xl/30 1/30 normal speed
x5
x3 3 times normal Slower
x2 2 times normal
Xl
speed , xl/90 1/90 normal speed
speed
speed
Normal speed
Speed
Indication
B
Speed (approx.)
x1/2 1/2 normal speed
To resume normal playback
Page 16

To Play an LD
To Play Frame by Frame - Freeze-frame, STEP playback (CAV standard play)
* During freeze-frame or step playback operation
There is no sound.
* Extended-play (CLV) discs
Speed play, freeze frame and step playback are not possible
with CLV discs.
When the II button is pressed, the screen becomes blue
and the indication "SIDE A CLV” (or "SIDE B CLV”) is
shown.
Page 17

To Search for a Particular Scene - Dual Speed Clear Scan
While scanning in either direction
* There is no sound.
* Scanning speed varies as the laser beam moves away from
the center of the CLV disc. In addition, the image during
scanning with a CLV disc will contain some instability.
* A certain amount of noise is inevitable with all scanning
operations.
Page 18

Searching by Chapter Number-Chapter Search
Chapters are contained in a disc. LDs are divided into sections called chapters. Such discs usually have a list of chapters on
the jacket or label.
Direct chapter search
Example: Locate the beginning of chapter 8.
Press the "8” button.
To check the current chapter and frame/time numbers
These numbers appear in the display window on the player.
Or to display them on the screen, press the DISPLAY button
on the Remote Commander.
To enter a number greater than 10
Use the -i-10 and 0 buttons.
Examples: 10: l+IOl — I 0 1
20: [±33 — Œ3Ô] — i~0~1
If the +10 button is pressed by mistake
Press the CLEAR button, then press +10 and other buttons
for desired number.
Notes
* The chapter search feature will not function if the disc does
not include chapter numbers. In this case, the screen
message will give only frame or time numbers.
* As for a disc with TOC (see p. 0), if a chapter number not
included in the disc is entered, the entry will be ignored.
* As for a disc without TOC, if a chapter number not included
in the disc is entered, the last picture will be displayed and
the player will stop.
If the REPEAT function is pressed (see p. 0). playback will
resume from the beginning of the disc.
If the REPEAT function is not on, press [> to resume
playback.
Searching for chapter 8
* If you have pressed the wrong number, simply press the
correct one.
» Search can be conducted while in freeze-frame, speed
play, and pause condition as well as normal playback.
When the desired chapter appears after search,
playback will continue in the same mode.
Finds Chapter 8,
and playback starts.
Skip chapter search
Press the button once to return to the'
beginning of the current chapter.
Press the button twice - before the
picture reappears - to return to the
beginning of the previous chapter.
Press the button to advance to the .
beginning of the next chapter.
Example; Current chapter = 12
Beginning Beginning
of chapter of chapter
12 13
ACS/AMS
Page 19

Searching by Frame Number/Time - Frame/Time Search
For CAV (standard-play) discs only (Frame search)
Enter the frame number to search for a particular scene.
• Each picture on a standard-play disc is called as a frame.
CLOSE
ca a
PGM FRAMÍTIMErCLEAR-i
□ (±1 [a
Afee
m m rri
D E F
nn rn ri~l
C23 1X1
f+ïôl rri
STILl/STtP
ran [Jt]
CXI 1X1 ÍZD
ACS/AWS
r»«l i>in
REPEAT CB
rO cm
SHUFFLE MONTOR
A-B A SPACE
IXI
O a
if^
a
IXI 1X1
a
CUSTOM
VOLLME CHANNEL
a
STOP PAUSE
IXI IXI
PLAY
a a
-DISPLAY
■s s
a □
□a
For CLV (extended-play) discs only (Time search)
Enter the time to search for a particular scene.
• Extended-play discs keep track of positions as elapsed
time from the beginning of the disc.
Press the FRAME/TIME button.
CAV (standard-play) disc CLV (extended-play) disc
FRAME/TIME
FRAME 00000 TIME 0 00 00
O Enter the desired frame or time ^ numerals.
• CAV (standard-play) disc
Example: Locate frame number 12340.
Press the number buttons in the following order.
• CLV (extended-play) disc
Example: Locate the 12 min 05 sec point.
Press the number buttons in the following order.
If you make a mistake
Press the FRAME/TIME button once more to return the display
indication to zero, and then enter the correct numbers as
follows.
For CAV - five digits
For CLV with seconds - four digits
For CLV without seconds - two digits
To cancel frame/time search
Before pressing the SEARCH/NEXT button, press the CLEAR
button.
After pressing the SEARCH/NEXT button, press the ■ button.
To check the current frame/time numbers
These numbers appear in the display window on the player.
Or to display them on the screen, press the DISPLAY button
on the Remote Commander.
Notes
• If a frame/time number not contained on a disc is entered,
the playback stops. If the REPEAT button is pressed and
REPEAT is shown in the display window (see p. C^),
playback will resume from the beginning of the disc.
• If the disc does not include seconds-unit time data, enter the
time in minutes only.
3 Press the SEARCH/NEXT button.
Playback starts at the specified
number in step 2.
Search can be conducted while in freeze-frame, speed
play, and pause condition as well as normal playback.
When the desired frame or time appears after search,
playback will continue in the same mode.
Page 20

To Play an LD
To Play Repeatedly - Repeat Playback
DISPLAY
To repeat the entire side of the disc
Remote Commander Main unit
REPEAT
Current chapter/track
5100 PLAY
(Shown on the screen
when DISPLAY button
Is pressed) REPEAT
lights up in the player’s
display window.
8
When the player
reaches the end of the
side, it automatically
repeats the side.
To repeat the current chapter
REPEAT
Current chapter
5100 PLAY SEARCH
SINGLE
REPEAT
(Shown on the screeh When the player
when DISPLAY button reaches the end of the
Is pressed) REPEAT, current chapter, it
SINGLE lights up in the automatically repeats
player’s display window. that chapter.
CHAPTER 2
SINGLE
REPEAT
1/ALL
C-2 5100 PLAY
SINGLE-55^
REPEAT
To cancel A -e» B repeat
Press the CLEAR button.
To cancel repeat functions other than A B
Press the REPEAT button again to cancel the REPEAT
indication in the display window. (The same button that was
used to activate repeat either from the main unit or the
Remote Commander - must be pressed to cancel the repeat
function.)
To check the current status
Check the indicators in the display window on the player. Or
to display them on the screen, press the DISPLAY button on
the Remote Commander.
To use custom repeat
To repeat playback between two predefined points on the
disc, refer to page
repeat button on the unit
Press to repeat the entire disc side.
To repeat a specific section of a disc
At the beginning of desired
section
REPEAT
B
(Shown on the screen when DISPLAY
button is pressed)
»
At the end of desired section
REPEAT
A**B
%
VJ
A B lights up in the player’s
display window.
SEARCH c-2 12345 PLAY
FRAME 12345
A-B
REPEAT
Unit returns to the beginning
of specified section and
repeats playback.
REPEAT
Page 21

To Play Only Certain Chapters - Program Playback
Example Play LD chapters 5, 4, 2, 6 - In that order.
□ □ a
AUTO
a
□
CUSTOM
a
3
•O CD
SHUFFLE MONITOR
a a
REPEAT APAUSE;
Ô a
□ S
VOLUME CHANNEL
STOP PAUSE
CZ] ÜD
PLAY
[>»-
2 Press the Number buttons 5 4 2 6.
If you make a mistake
To enter chapter numbers over 10
Use the +10 and 0 buttons.
Examples: To enter 10:1+101 ^ I 0 1
If the +10 button is pressed by mistake
Press the CLEAR button, then press +10 and other buttons
for desired number.
PGM FRAME; TIME r CLEAR
A B C
rn m i~5~i
D E F
1^ QD CO
rn m m
pFioi m
czi m
ran
S S iZD
ACS/AMS
nisi t>^
To release or cancel program playback
Press the CLEAR button or the 1 /ALL button. The unit
resumes normal playback.
To repeat program playback
Press the REPEAT button, then the REPEAT is displayed.
To move to a preceding or following programmed chapter
Press the KM or button.
To check the program contents during program playback
Press the PGM button. The program is displayed for about 3
seconds. The currently playing program number will flash.
Cautions
• When the shuttle ring is kept turned to the forward direction
during program playback and the playback comes to the end
of the current selection, the next programmed chapter will
be played back. When the shuttle ring is kept turned to the
reverse direction, the unit will not go back to previous
chapters. If you want to move a preceding programmed
chapter, keep Md button pressed until the desired
programmed number comes up.
• If not-existing chapter numbers on a disc are entered, the
program cannot be conducted.
• Programmed contents are stored until the disc is removed or
the power is switched off.
LD with TOC Data
When you program for an LD with TOC data, the following
display is shown.
Example: 5, 4, 2, 6 are entered.
mi
Currently playing
chapter
Order in which the currently playing chapter is programmed
If the chapter number 0 or chapter numbers higher than 21
are entered, or if the total pla^ack time exceeds 100
minutes, the total playback time will not be shown.
Total playback time of all
programmed chapters
After playing all programmed chapters 5, 4, 2, 6, in order,
playback stops.
Press the PGM button.
PGM
5
PGM indication lights in the player's display window.
For LDs containing TOC
(Table of Contents) data, the
total playback time of
programmed chapters is
shown.
To start ovar
Press the CLEAR and PGM
button and enter the correct advance) or BACK (to back
number. up) buttons until the incorrect
rCLEAR-i PGM
To change a numbw
Press the SEARCH/NEXT (to
number on the screen flashes.
SEARCH
/NEXT BACK
5^5 G “ 5
Then enter a new number.
To enter 14:1+101 -> I 4 I
To enter 20: [4^ [+T6I -
3 Press the [> button.
CHAPTER 5
PROGRAM
Searching for the Playback starts from
first programmed the beginning
chapter of chapter 5.
SEARCH
■ m
C-5 /-26179 PLAY
PROGRAM
Page 22

To Play a CD
1 Turn on the stereo system.
Turn on the amplifier or receiver and select [CD] or the
desired audio input.
2 Turn on the player.
clKe o6c/rv as u»Y
PGM TRAME/TIMErCLEARi
□El a cs
□ □ !□]
ABC
m rr~i
D E F
n~l l~5~l re~|
REPEAT APAUSE/
rn m [~9~i
SEARCH
Efil CT]
STIL/STEP
S 1^ o
ACS/AMS STOP PAUSE
/NEXT
o
O
CUSTOM
a
n««i f>^ rVi ran
DISPLAY
REPEAT CK
rO a
l/ALL ANALOG
o s
Shuffle monitor
a a
A-8 ASPACE
O a
a a
Tv;v|OEO |AaVEB|
CD CE]
□a
VOILME CHANNEL
□-D
PLAY
1 C»-I-
Main Unit
3 Open the disc tray.
4 Place the disc on the tray.
Place the disc on the
center of the tray.
If the disc is not
placed correctly,
playback may not start.
Notes on disc tray
Do not insert a hand or finger in the player while it is
operating. The player vnll stop automatically. If an object is
inserted while in play, serious injury may result. Be sure to
place the unit out of the reach of your child.
Insert only one disc at a time. Incorrect placement of two or
more discs may lead to malfunction.
Identical buttons on the main unit can also be used.
3 start playback.
Remote Main Unit
Commander I f>>.
G
Or push the disc tray compartment, then playback
will also begin.
Page 23

Using an optional timer
To start playback with an optional timer automatically, leave
the POWER switch of the disc player in the depressed
position. When the timer supplies power at the preset time,
the unit turns on and playback begins.
To pause at the beginning of a disc
Press the II button on the player or the Remote Commander.
The tray closes, and the player pauses at the beginning of the
disc.
AV calendar
When playing a CD, the AV calendar shows information on
the total number of selections. As selections are played, the
corresponding numbers on the display disappear.
When listening with headphones
Plug stereo headphones into the PHONES jack and adjust the
listening volume with the LEVEL control.
Screen Messages
Information on the operating condition of the unit and
track numbers can be superimposed on the TV or monitor
screen. Information for CD is shown on a green
background.
To call up the on-screen display
DISPLAY
LriJ Remote Commander
15
Press the button again to turn the
display off.
Current track number
index number
PAU5H-J—Message (see tabie
— Elapsed time per track
below)
Number of tracks and
total playing time
Track numbers during
program or delete
shuffle playback
Playback display
OP E
'—Index
-Track number
V calendar
■c
I—Elapsed time (min/sec)
for selection
Message
Display
OPEN
CLOSE
PLAY
STOP Stop
PAUSE Pause
&/&
SEARCH
Explanation
Disc tray open
Disc tray closed
Playback
Manual search
(Forward/reverse speed scan)
Search
(Examples)
Page 24

Page 25

To Search for a Particular Selection - Search
To search by track number
To play a single track once
1. Press the 1 /ALL button on the remote commander to
2. Then select the track with the number buttons.
If you press the wrong numbers,
simply press the correct ones.
To skip selections
Press once to return to the
beginning of the current
selection. Press again to
return to the previous
selection.
ABC
n~) fT~>
DBF
I 1 5 I I 6 I
rr~i rg-j
f+ïïïi rm
Enter the track number.
b
display the SINGLE display.
When the track has been played, the uhit enters the
stop mode. To release the setting, press the 1/ALL
button again.
Press to advance to the
next selection.
I ACS/AMS
I
--------
fwR
To enter track numbers over 10
Use the +10 and 0 buttons.
Examples: To enter 10:1+101 ^ I 0 j
To enter 14:1+101 -> I 4 |
To enter 20: f+T^ ^ i+Tol ^ r~0~l
If the +10 button is pressed by mistake
Press the CLEAR button, then press +10 and other buttons
for desired number.
To search for a particular point - Dual
Speed Scan
The playback speed can be changed depending on the
degree of the shuttle ring.
j
--------------
Fast speed
I'A/
To scan in reverse
Scanning continues until the shuttle ring is released.
„Higher speed
Identical speeds
are available for
reverse speed
scan.
To scan forward
Page 26

To Play a CD
To Play Repeatedly - Repeat Playback
To repeat the current selection - SINGLE
Repeat
1/ALL REPEAT
CUSTOM
a
a O
Tv/vceo
□ QD
VOLUME CHANNEL
□ □
STOP PAUSE
LLl S
PLAY
1 [> 1
CS3’g]
SPEED SET
Œ3 m□□
STILL/STEP
Tiigl
ACS/AMS
f>ii1
To cancel ALL or SINGLE Repeat
Press the REPEAT button that was used to activate repeat
either from the main unit or the remote commander - again.
repeat button on the unit
Press to repeat the entire disc side.
J
Current selection (track) is continuously repeated.
Deactivate REPEAT display to playback a selection only
once.
To repeat all selections - ALL Repeat
Remote
Commander
Main Unit
■ b
“ »a :
7 r г. 1
The entire disc is continuously repeated.
To repeat a specific section of a disc
- A B Repeat
At the beginning of desired section
A~B
ra
At the end of desired section
REPEAT
A~ B
CSC
1
Flashing of A B indicator stops
and the specified section is
continuously repeated.
» e
3m 3 8s
To cancel A •<-. B Repeat, press the
CLEAR button.
Page 27

To Play Only Certain Selections - Program Playback
You can program up to 20 tracks playback
in a specified order.
Notes
* When the shuttle ring is kept turned to the fonward
direction during program playback and the playback
comes to the end of the current selection the next
programmed track will be played back. When the
shuttle ring is kept turned to the reverse direction, the
unit will not go back to previous tracks.
« If not existing track numbers on a disc are entered,
the program may not be conducted.
To release or cancel program playback
Press the CLEAR button or the 1/ALL button. The unit
resumes normal playback.
To check track and time information on the screen
Turn on the power of the TV or monitor. Time and track
for the CD/CDV will be turn on the screen.
To repeat program playback
Use the REPEAT button to turn the REPEAT display on.
CD) repeat button on the unit
Press to repeat the entire disc side.
During program playback
The numbers on the AV calendar display disappears as
selections are played. The contents of a program are
stored until the disc is removed or the player is turned
off.
To move to a preceding programmed track
Press the 1« button.
To move to a following programmed track
Press button.
___________________________
CLOSE DISCi^
cs a
_ □ |q]
B i±i eg]
D E F
CD CD ca
m rg"! QJ
cpla
ij] cl]
SPEED SET
CD CD
STtL/STEP
nan ri?i
1^ 1^ o
ACS/AMS STOP PAUSE
BEtEAT Lia ~
CD CDD
SHUFFLE MONITOR
a CD
REPEAT A.PAUSE;
O CD
a CD
a
S S5
o
CUSTOM
yOLLME CHANNa
a
1X1 XI
PLAY
Example: Play CD tracks 5, 4, 2, 6 - In
that order.
Press the PGM button.
&
PGM indication iights in the piayer’s dispiay window.
2 Press the Number buttons [5] [4] [2] [6].
If you make a mistake
To start over
Press the CLEAR and PGM
button and enter the corect
number.
rCLEARn PGM
To change a nianber
Press the SEARCH/NEXT (to
advance) or BACK (to back
up) buttons until the incorrect
number on the screen flashes.
SEARCH
/NEXT BACK
5^5
Then enter a new number.
To enter track numbers over 10
Use the +10 and 0 buttons.
Examples: To enter 10: l^foi -* I 0 I
If the +10 button Is pressed by mistake
Press CLEAR button, then press +10 and other buttons for
desired number.
To enter 14:1+101 -* I 4 I
To enter 20: I+1QI ^ 1+101 1 0
I
3 Press the l> button.
PLAY
Program playing time
The total playing time of the program is displayed only when
tracks with numbers under 20 are programmed.
After searching and playing all
programmed selections 5, 4, 2,
in order, playback stops.
Page 28

LD/CD/CDV
To Play Only Certain Selections Within a Designated Time
- Auto Program Playback
You can designate a length of time and make 2 different programs of selections fitting within that period.
When there is only minimal time left within the designated length of time, a selection with the longest playing time shorter
than the left time will be entered.
This section explains how to conduct Auto Program Playback on a CD, but the function can also be used for LDs with TOC,
and CDVs.
Page 29

Display on TV screen
If the TV set or monitor connected to the player is on and the
DISPLAY button is pressed, the track number, time, and other
information recorded on the CD/CDV will appear on a green
background on the monitor.
Note on LD discs
The time display function is available only with LDs containing
TOC data.
First, the elapsed time or the number of frames is displayed.
Pressing the AV TIME button then changes the time display
as shown above.
AV TIME button
Pressing the AV TIME button during the stop mode will display
the total number of tracks and total playing time for CDs and
LDs with TOC data.
For CDVs, the total number of tracks and total playing time for
both audio portion and video portion are displayed alternately
in the display window on the player.
Page 30

To Pause After a Each Selection - Auto Pause
To Insert a Blank Space Between Selections - Auto Space
Auto Pause - After a selection is piayed, the piayer enters the pause mode.
Auto Space - A blank interval of 3 seconds is inserted between the playback of each selection.
Page 31

To Playback an Introduction of Each Chapter/Track-intro Scan
The INTRO scan plays back only the beginning (introduction)
of each chapter/track on a disc for approximately 8
CLCSE DISC/TV
cs a
ABC
Ш Ш Ш
D E F
Ш Ш Ш
ГП [XI CD
ij] ca
¡X] Ш
Fiol ГТТ 1 D
сЗ”ш
STILUSTEP
ГДП rii?n
ACS/AMS
n«<i
SEARCH
a
CD
cvsTOM
a
□
REPEAT CS
В
rO Cn
UALL ANALOG
SHUFFLE MONITOR
a CD
REPEAT A pause;
A-B A SPACE
O CD
TV/VIOEO
CD CD
VCLLWE CHANNEL
STOP PAUSE
CD □□
PLAY
1 ^ 1
o a
a 3
seconds. The INTRO scan will also play back the scenes of
the video chapter for LD and CDV.
LD
Chapter 1
8-second playback
Chapter 2
8-second playback
CD/CDV
Track 1
8-second playback
♦
Track 2
'^3
8-second playback
f
Chapter 3
8-second playback
After the playback of the
last chapter, the player will
be paused.
After the playback of the
last track, the player will
be paused.
• Playback will begin from
the video portion for
CDV discs.
♦
Track 3
8-second playback
To resume normal playback
PLAY
сет
\
___
To resume normal playback, Press the ■ button
press the О button. During
search functions, normal
playback will resume from the
selection to be searched when
the О button is pressed.
1
STOP
П
to stop.
,
Page 32

LD/CD/CDV
To Set an Index at a Desired Point - Custom index
What is the Custom Index?
The Custom Index function lets you set up to six index marks at any point on the disc. Playback can then be started from an
index point at the push of a button, and repeat playback between index points is also possible.
This section explains how to set custom index marks on an LDs, and the function can also be used for CDs and CDVs.
C3 3
PGM FRAUETTIMErCLElRy
a OS
3 3 3
D E F
rr~l jsl Q3
Œ1 ca gD
fTiol |~°~l f^ 'f=k
IS] CSl
3°3
3
â
CUSTOM
a
SI s 3
ACS/AMS
Fw^ r>^
□
REPEAT CB
o czi
■o S
Shuffle monitor
a CD
REPEAT APAUSE/
A- -B A SPACE
O a
TVI>i©EO 'f^ER'
□ GD
L—1 L—1
VOLUME CHANNEL
STOP PAUSE
CD CD
PLAY
1 c- 1
- CLEAR
■ SEARCH/
NEXT
To set a custom index mark
Press the FILE button during piayback.
FILE
Remote
Commander
or Main Unit
s
Up to six locations anywhere on the disc can be marked.
FILE
5
If you make a mistake
Indicators A, B, C, etc. light
up for each custom index
mark.
1 Use the SEARCH/NEXT button to cause the file
indicator to flash.
6
Note
When the disc is removed or the player is turned off, the
contents of the custom index are lost.
While custom index search is performed, the A, B, C, ... file
search indicators disappear one by one, but the indicator for
the last index point remains.
rCLEAR-i
fcni
E ■ -----------------
cl
; 1 ■
---------------
Press the CLEAR button and
then press the FILE button
at the correct location.
-
Page 33

03
SEARCH
CUSTOM
a
■a □
i;p-s
Shuffle MONtroR
a □
REPEAT APAUSE.'
Cj3 CD
a
03 03
□
□o
vollme channel
PGM l-RAMI TlMErCLEARi
Q ^
dD [±] dal
0 E F I
1*1 03 03
m
□ D
FhoI
□ 3 □ Q Q
ca
□ 3
cdi'
G3
di lj!^fS3
S Q il3
ACS/AMS
rsii riw
Index point rearrangement
The custom index points are arranged on the disc
not by the order in which they were input but by
their relative location from the start of the disc. If a
new index mark is set before an old one, the A, B,
C, ... order is rearranged.
Custom Index with a CDV disc
Although playback begins from the video portion, files will be
arranged from the audio portion in A, B, C ... order.
How is the custom index stored?
The custom index data are not actually recorded on the disc
but stored in the memory of the player.
Therefore, the custom index points set with one player cannot
be used when the disc is played on another unit.
To clear a custom index mark
Information on index marks is retained also when the player is
switched to normal playback. To cancel a stored index mark,
use the SEARCH/NEXT button to cause the corresponding
file search indicator to flash, and then press the CLEAR
button.
STOP PAUSE
CD IjD
PLAY
Custom Index Search
1 Press the CUSTOM INDEX button.
CUSTOM
INDEX
CZI
The AV calendar disappears and the number buttons 1 - 6
function as file search buttons A - F.
2 Press the file search button lor the desired
location.
_
A
____________________________
E3E®I]0
B C
□□
D
E F
Playback starts from the specified index point and
continues until the end of the disc.
To skip to another index point
Press the corresponding file search button.
To resume normal playback
Press the CUSTOM INDEX button or the CLEAR button.
To play a section between custom index points once
Press the 1/ALL button, so that the indication SINGLE is
shown on the display window. Then perform custom index
search to the desired index start point.
The section between this point and the next custom index
point is played once.
To play a section between custom index points repeatedly
Press the 1/ALL button, so that the indication SINGLE is
shown on the display window and press the REPEAT
button to activate the REPEAT display. Then perform
custom index search to the desired index start point.
The section between this point and the next custom index
point is continuously repeated.
Page 34

Playing in a Random Order - Shuffle Playback
When a LD without TOC data, the indication “NO TOC’’
appears on the display window, and shuffle playback
cannot be conducted.
To skip to the next selection during shuffle playback
Press the button. Returning to a previous selection
with the Kd button is not f
Shuffle playback with CDV discs
Selections from the audio portion and video portion are
played in random order.
SHUFFLE button timing
To ensure correct operation, do not press the SHUFFLE
button immediately after the disc tray has closed. Instead,
press the SHUFFLE button only after the ► (play)
indication in the display has stopped flashing.
The selections on the disc can be played back in a random
order.
Page 35

ciÏE]
SIILL/STEP
raí nan
S 1^ O
na<i r>^
tfï]
O
o
□□ C3
Tv/ViDEO |PWEfl|
□ QD
VOLUME CHANNEL
CD [ZD
PLAY
To play only certain selections - Delete Shuffle
1 Press the SHUFFLE button.
SHUFFLE
2 Enter the chapter number or track number of the
selection you do not wish to play.
DELETE
SHUFFLE
If you make a mistake
To start over
Press the CLEAR button and
then press the SHUFFLE
button again and enter the
correct number.
r CLEAR-I
To diange a number
Press the SEARCH/NEXT (to
advance) or BACK (to back
up) buttons until the incorrect
number on the screen
flashes.
Then enter a new number.
Delete shuffle
This function lets you exclude specific chapters or tracks from
shuffle playback. When the function is used, DELETE
SHUFFLE appears on the screen.
To repeat shuffle or delete shuffle playback
Press the REPEAT button on the Remote Commander to
activate the REPEAT indication on the display window. When
the unit is turned off or the disc is removed, shuffle functions
are cancelled.
3 Press the [> button.
The player automatically selects a random program
without the deleted selections.
To resume normal playback
Press the CLEAR button or the 1 /ALL button.
Page 36

To Play a CDV
Video portion
Audio portion
Screen Messages
Information on the operating condition of the unit and
chapter or track numbers can be superimposed on the
screen. During audio portion playback, information for
CDV is shown on a blue background.
To call up the on-screen display
DISPLAY
Remote
Commander
To turn the display off, press
the DISPLAY button again
The Compact Disc Video (CDV) format divides a CD
into two sections. One section consists of 20 minutes
of digital audio playable on any CD player. The other
section which consists of 5 minutes of video and digital
audio, requires a CDV player. Please note the following
when playing a CDV.
• Time search is not applicable for CDV.
•To display the remaining time, simply press the AV
TIME button.
• CDVs are divided into track numbers which are
assigned to each selection for the audio and video
portion. The track of the video portion corresponds to
the chapter of the LD.
To play
Press the PLAY button. Playback will begin from the
video portion. After the completion of the video portion,
the audio portion will be played back.
To play back from the audio portion, search by entering
the desired track number (see p. ®).
(CDV
I VIDEO 6
lAUDIO 1-S 20:001-
Message
OPEN
CLOSE
PLAY Playback
STOP Stop
PAUSE Pause
@/@
SEARCH
roio
4:56 I
Display
-Current track number
-Index number
-Elapsed time per track
PLAYl-l—Message (see table
below)
vNumber of tracks and
total playing time of
video portion
-Number of tracks and
total playing time of
audio portion
-Track numbers during
program or delete
shuffle playback
(Examples)
Explanation
Disc tray open
Disc tray closed
Manual search
(Forward/reverse speed scan)
Search
Page 37

Specifications
Type
Signal readout
Signal format
Playing time
Digital audio specifications
Frequency response
Signal-to-nolse ratio
Dynamic range
Total harmonic distortion
Channel separation
Wow and flutter
Video specifications
Horizontal video
resolution
Signal-to-noise ratio
Input/output specifications
Video output
Audio output
Audio digital output
(optical)
Headphone output
RFU DC output
CD/CDV/LD Player
Optical (Laser beam reflection)
EIA standard, NTSC color
system
30 cm (12 in)
double-sided
20 cm (8 in)
CAV
double-sided
20 cm (8 In)
LD
4 Hz to 20kHz (±0.2 dB)
More than 112 dB (EIAJ)*
More than 99 dB (EIAJ)
0.002% or less (at 1kHz, EIAJ)
More than 110 dB (EIAJ)
Below measurement limit
(±0.001% W.PEAK) (EIAJ)
425 lines
More than 48 dB
1.0 Vp-p, 75 ohms, unbalanced
Stereo L, R
Analog: 200 mVrms
Digital: 200 mVrms
Monaural (only for RFU adaptor)
MIX output: 77.5 mVrms
— 18 dBm, wavelength 660 nm
28 mW (32 ohms)
impedance = 8 ohms
Mini mini jack DC 5V
single-sided
30 cm (12 in)
double-sided
20 cm (8 in)
CLV
double-sided
20 cm (8 in)
single-sided
12 cm (5 in)
single-sided
CD
8 cm (3 in)
single-sided
Audio portion
CDV
Video portion 5
(1 kHz, 40% modulation)
(1 kHz, -20 dB)
(1 kHz, -20 dB)
(minutes)
60
28
14
120
40
20
74
20
20
Power requirements
Power requirements MDP-333: 120 V AC, 60 Hz
Power consumption
Weight
Dimensions
Operating temperature
Ambient humidity
Measured according to EIAJ (Electronic Industries
Association of Japan) standards.
Remote Commander RMT-333A
Principle of operation
Power requirements
Dimensions
Weight
MDP-355GX:
100/120/220/240 V AC
adjustable, 50/60 Hz
40 W
8 kg (16 lb 12 oz)
Approx. 430 X 115 X 420 mm
(w/h/d)
(17 X 4V2 X 17 inches)
+ 5 C to ±35 C
5 to 90%
Infrared pulse
3 V DC (2 size AA batteries)
Approx. 62 X 44.5 X 185 mm
(w/h/d)
(2V,6 X 1'3/i6 X 7Vs inches)
Approx. 170 g (including
batteries), (6 oz)
Supplied accessories
Remote Commander RMT-333A (1)
Size AA (R6) batteries (2)
RFU adaptor RFU-90 UC (1) (supplied with the MDP-333
and the PX model of MDP-355GX)
Video connecting cord (phono plug 1 phono plug 1) (1)
Audio connecting cord (phono plug 2 1-. phono plug 2) (1)
Operating Instructions
Spacer (1)
AC plug adaptor (MDP-355GX only) 1
Design and specifications are subject to change without
notice.
Page 38

Notes on Handling Discs
Handle the disc by its edge, and to keep the disc clean, do
not touch the rainbow colored surface.
[cdI
ICDV
Correct
Ed]
Correct
Do not stick paper or tape on the labeled surface.
Wrong
Glossary
CAV disc
The Constant Angular Velocity (CAV) or standard-play disc
rotates at a constant 1800 rpm. Each track, or the path
traced by the laser for a single rotation of the disc,
produces a single frame. Each side of the disc holds up to
54,000 frames, the equivalent of 30 minutes of playback.
Each frame has a number that is stored with the data on
the disc.
CUV disc
The Constant Linear Velocity (CLV) or extended-play disc
doubles the maximum playing time to 60 minutes by
varying the rotational speed from a maximum of 1800 rpm
to a minimum of 600 rpm as the laser beam moves away
from the center of the disc. The disc surface therefore
moves past the laser head at a constant rate, and each
track is longer than its predecessor.
Digital sound disc
Some LDs include a high-quality digital audio signal as well
as a more conventional analog signal. This unit reproduces
both signals with priority placed on the digital audio signal.
Chapter number
Some discs are divided into sections, called chapters. Such
discs usually have a list of chapters on the jacket or label.
Each chapter is numbered for easy location with the
chapter search function, or for use with the repeat and
program functions.
Do not expose the disc to direct sunlight or heat sources
such as hot air ducts, or leave it in a car parked in direct
sunlight where there can be a considerable rise in the
tennperature.
Before playing, clean the disc with the cleaning cloth. Wipe
the disc from the center out.
Do not use solvents such as benzine, thinner, commercially
available cleaners or antl-static spray intended for analog
record discs.
After piaying, remove the disc and store it in its case.
Do not use the discs with being cracked, severe damaged
on the disc repaired with adhesives.
Frame number
The frames on standard-play (CAV) discs are sequentially
numbered for rapid access with the frame search function.
Time number
Extended-play (CLV) discs calculate position in terms of
playing time from the start of the disc. The time search
function provides rapid access to desired scenes.
Track number
CD and CDV discs assign track numbers to each selection.
Rapid access to desired tracks is possible with the track
search function. Track numbers are also used with repeat
and program functions.
LD with TOC (Table of Contents)
Among various LD software, there are discs with TOC
(Table of Contents) signals recorded. When playing back
LDs with TOC signals, the additional features given below
can be enjoyed.
• Playback time display for one chapter (CAV, CLV)
• Remaining playback time (CAV, CLV)
• Time display for CAV disc
• AV calendar display
• Shuffle, delete shuffle
Page 39

Troubleshooting Check the following before requesting service
Symptom
No power
Playback O button does not
produce playback.
O indicator lights, but there Is no
picture or sound.
Poor picture or sound quality
No sound
No TV programs
Remote Commander does not
operate.
Picture distorted during scan.
Unit does not operate and LD/CD
indication in display window
flashes.
Point to check
• Power cord properly plugged into AC outlet?
• Unit correctly plugged In?
• Disc inserted?
• Disc properly seated?
• Recorded side facing upward?
• TV or monitor switched out?
• TV properly connected to player?
• Input selector of TV, TV tuner, or monitor set to required position?
TV without audio/video inputs
• Channel selectors on RFU adaptor and TV set to the same number?
• TV channel properly adjusted?
• TV/DISC selector on the remote commander set to DISC? (Is the DISC
indicator lit?)
• TV properly connected?
• Any source of noise nearby?
• Disc dirty or scratched?
• Any condensation on piayer objective iens?
TV without audio/video inputs
• Channel selectors on RFU adaptor and TV set to the same number?
• TV properly connected to player?
• Volume control on TV, monitor, TV tuner or amplifier high enough?
• Playback at normal speed? (The videodisc player produces sound only during
normal playback and speed play at normal speed in the forward direction.)
• TV properly connected RFU adaptor?
• TV/DISC selector on the remote commander set to TV? (Is the DISC
indication out?)
• Player switched on?
• Batteries correctly inserted?
• Batteries exhausted?
• Any obstacles between the Remote Commander and the player sensor?
• The remote commander is pointed at the player sensor?
• Some distortion in the lower part of the picture is normal - even for CAV discs.
• Turn power off and then on again.
 Loading...