

Page 1
MDCC-2000
SECTION 1
GENERAL
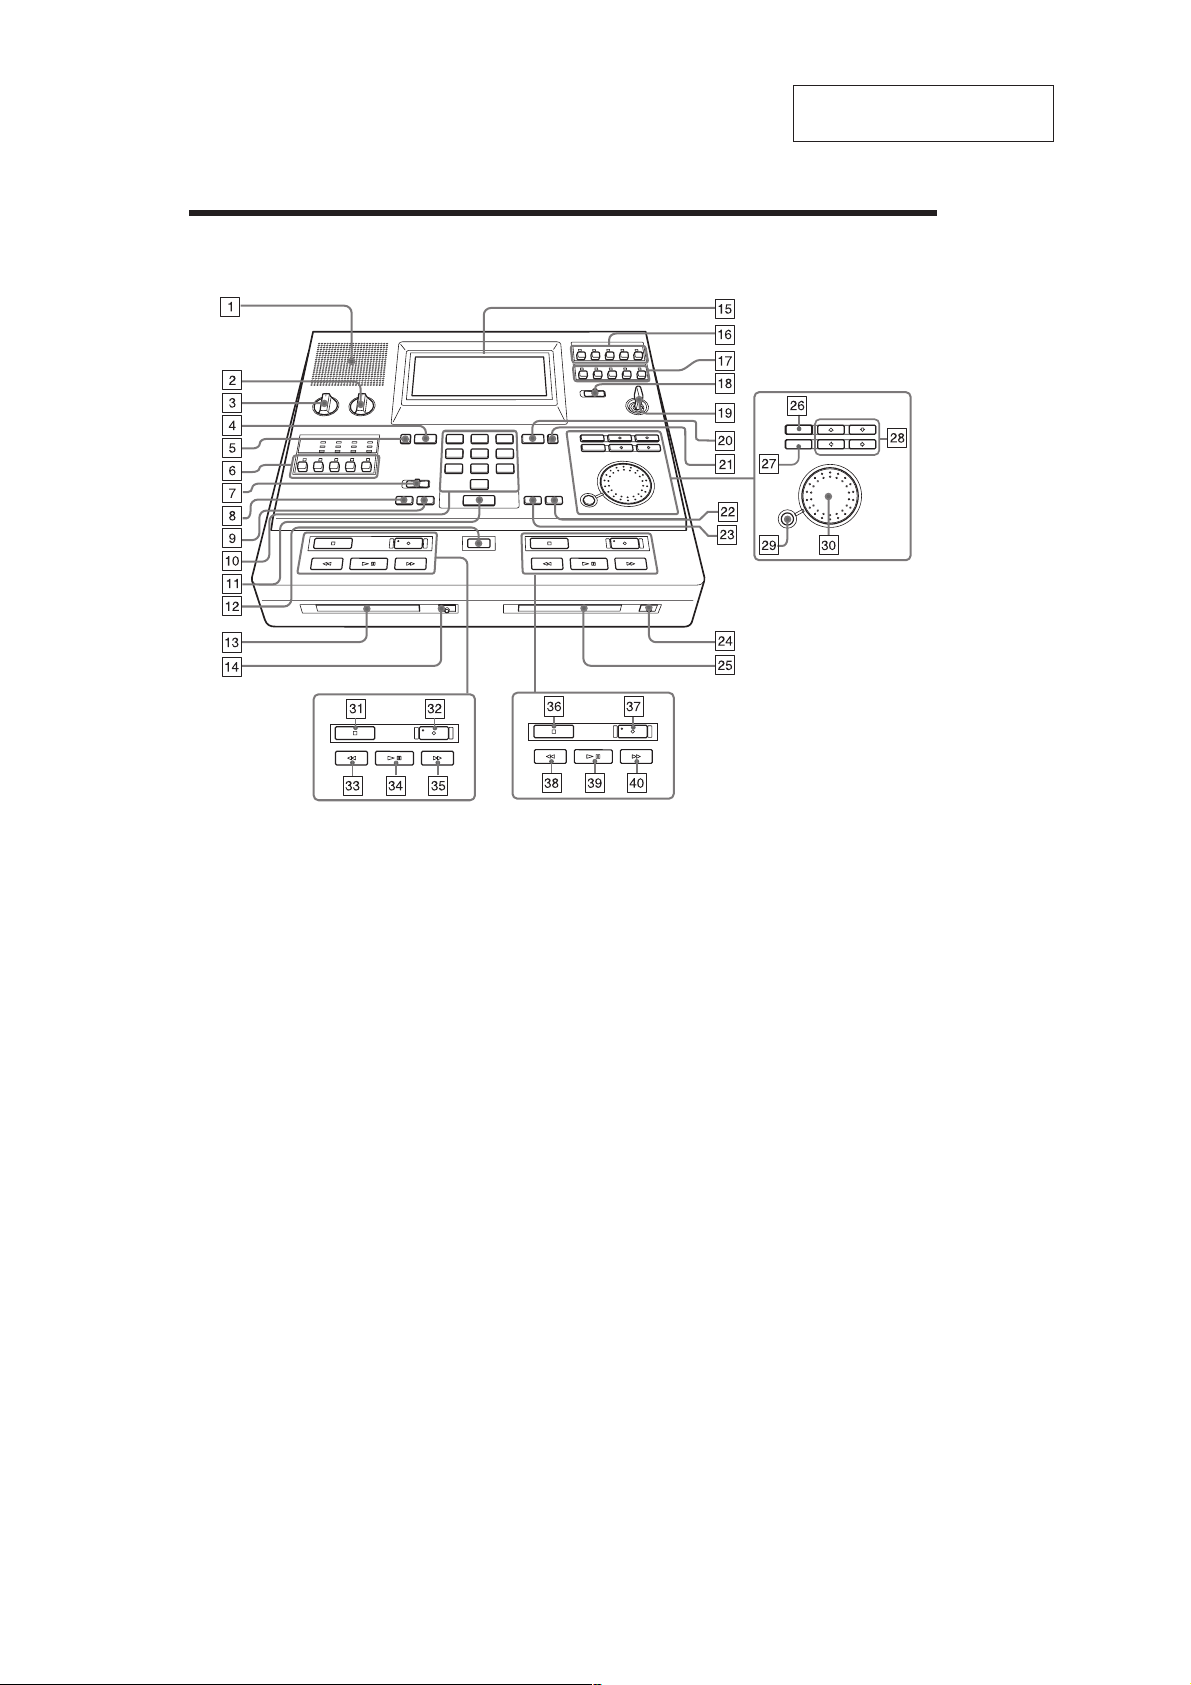
Location and Function of Controls
For details, refer to the pages indicated in ( ).
This section is extracted from
instruction manual.
1 Built-in speaker
2 LCD CONTRAST control
Adjusts the contrast of the display.
3 MONITOR VOL control
4 DECK A button (17, 18)
5 DISPLAY MODE A button (21)
6 MONITOR select buttons (ALL/1/2/3/4)
7 SEARCH selector (17, 18)
(INDEX SEARCH/TIME SEARCH)
8 POINT SEARCH·POINT button (deck A) (20)
9 POINT SEARCH·RESET button (deck A) (20)
q; Number buttons
qa SEARCH button (17, 18)
qs INDEX button (14)
qd MD insertion slot (deck A)
qf Z EJECT button (deck A)
qg LCD display
qh LINE OUT 1 select buttons (ALL/1/2/3/4) (31)
qj LINE OUT 2 select buttons (ALL/1/2/3/4) (31)
qk PA/ADA selector (OFF/ON [ADA/PA]) (30)
Switches the output to the PA/ADA jacks on
or off.
ql STANDBY switch
Introduction
4
w; DECK B button (17, 18)
wa DISPLAY MODE B button (21)
ws POINT SEARCH·RESET button (deck B) (20)
wd POINT SEARCH·POINT button (deck B) (20)
wf Z EJECT button (deck B)
wg MD insertion slot (deck B)
wh FUNCTION button
wj DELETE button
wk Arrow buttons
wl ENTER button
e; Jog dial
ea x STOP button (deck A)
es z REC button (deck A)
ed m REW/BS button (deck A)
ef u PLAY/PAUSE button (deck A)
eg M FF/FS button (deck A)
eh x STOP button (deck B)
ej z REC button (deck B)
ek m REW/BS button (deck B)
el u PLAY/PAUSE button (deck B)
r; M FF/FS button (deck B)
4
Page 2
6
Introduction
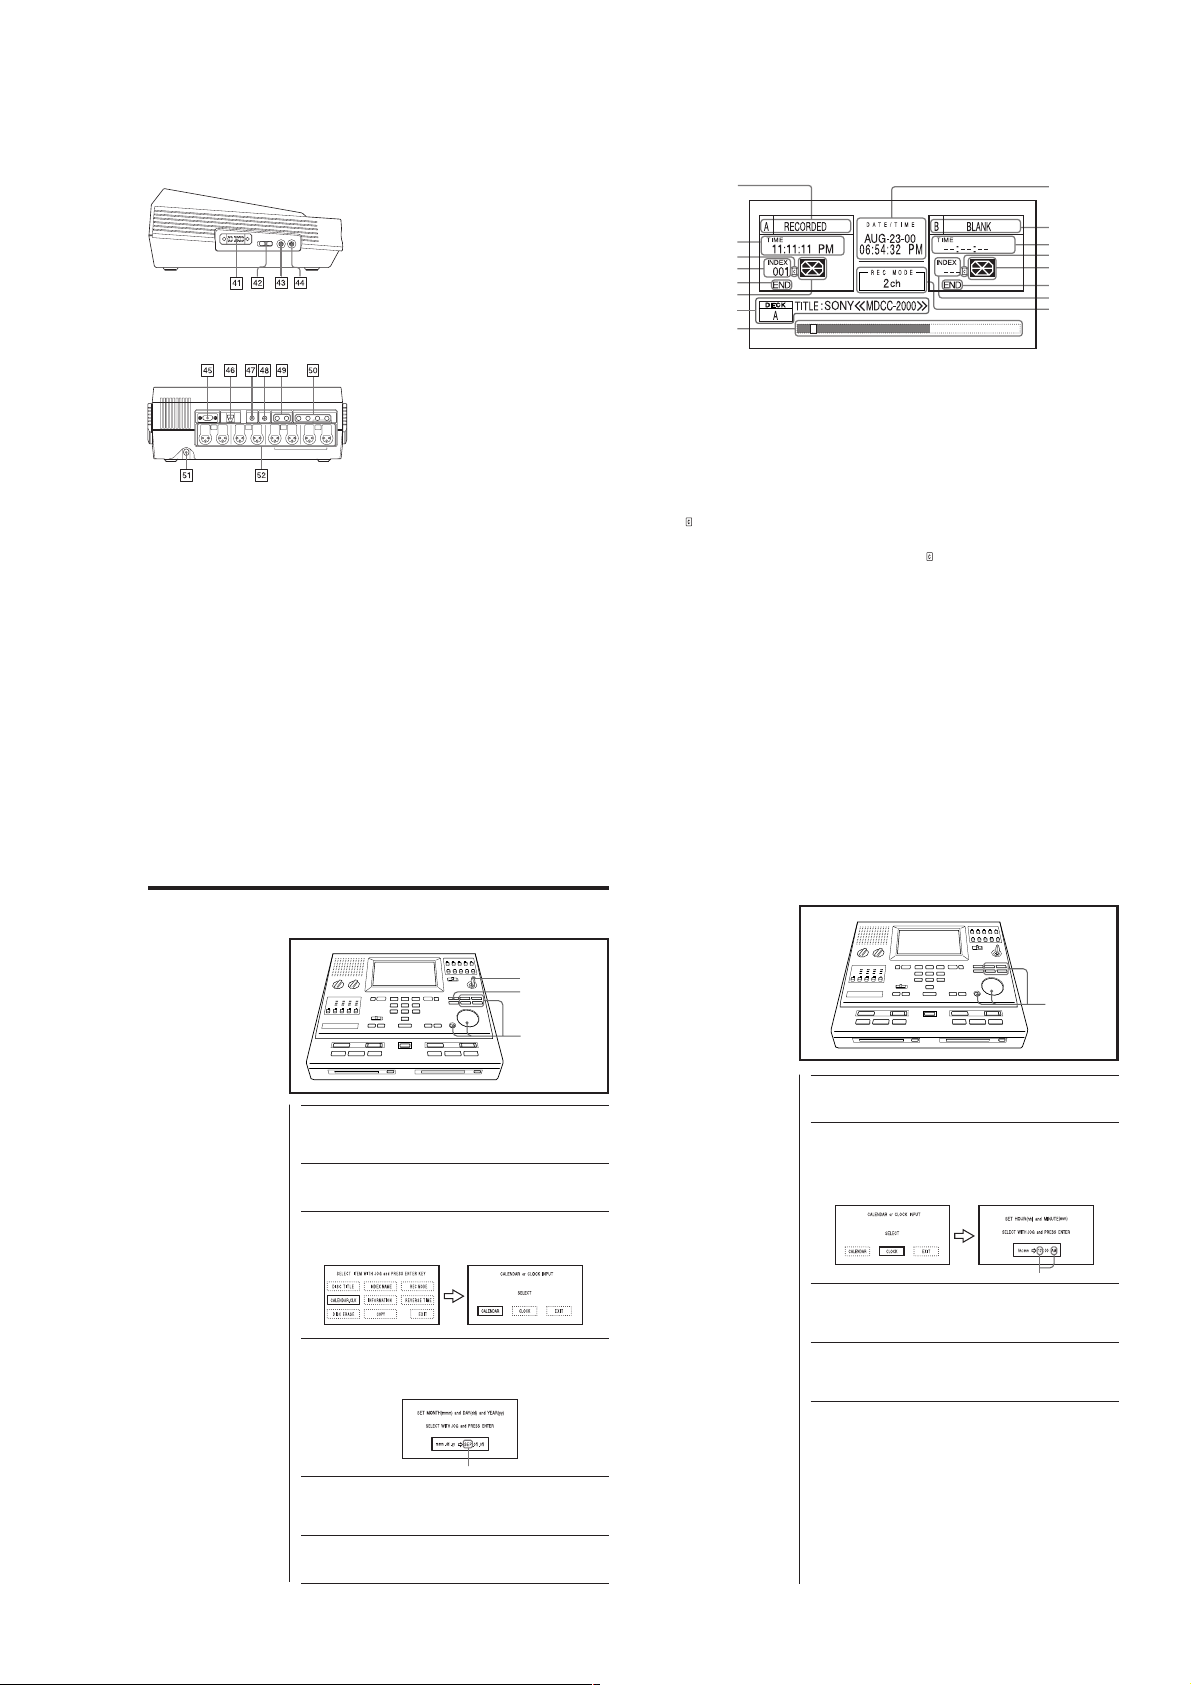
1 A: display (deck A)
Indicates the disc inserted in deck A or the
status of deck A as follows:
BLANK: a blank disc
NO DISC: no disc
PB ONLY: a commercially available recorded
disc (for playback only)
PROTECTED: a protected disc (3)
RECORDED: a recorded disc
2 TIME display (deck A)
Indicates the recorded time at the current
location for each index item. It blinks during
time search. (18)
3
(copied) display (deck A)
Indicates that a disc digitally copied with the
Copy function is inserted. (26)
4 INDEX counter (deck A)
Lights up when a disc is inserted.
Blinks during an index search. (17)
5 END display (deck A)
This shows the end of the disc.
6 Disc status display (deck A)
Indicates the status of the disc with pictures.
7 DECK A/DECK B display
Indicates various data by characters and various
error messages. (38)
8 Disc position display
Indicates the current playback/recording location
on the disc by a white box. Already recorded
parts are indicated in black. The further it is to
the right, the closer the disc is to the end.
Depending on the condition of the disc, the black
part might not reach the far right even if the disc
is full.
9 DATE/TIME display
Indicates the current date and time.
0 B: display (deck B)
Indicates the same contents as deck A.
qa TIME display (deck B)
qs
(copied) display (deck B)
qd Disc status display (deck B)
qf END display (deck B)
qg INDEX counter (deck B)
qh REC MODE display
Indicates the recording mode (2ch/4ch) currently
selected.
Display Window (Information screen)
1
2
3
4
5
6
7
8
9
0
qa
qs
qd
qf
qg
qh
9
Setting Up
1
Carry out steps 2 and 3 of “Setting the Date”.
You will see the CALENDER or CLOCK INPUT screen.
2
Select CLOCK using the jog dial or the arrow buttons, and
press ENTER.
You will see the SET HOUR (hh) and MINUTE (mm) screen with the
hours and AM/PM blinking.
3
Set the hour using the jog dial or J/j buttons, and press
ENTER.
You will see the minutes blinking.
4
Set the minutes in the same way as step 3.
The display will return to the information screen and the clock will
start.
blink
Note
You cannot use the K/k buttons
when setting the hour and minute.
Setting the Time
2, 3, 4
Left side
Rear
ra CONTROL UNIT connector (32)
rs TRANSCRIBE selector (33)
rd REMOTE jack (15)
rf EAR jack (16)
rg PC connector (RS-232C type)
rh DISPLAY connector
Used for connection of an external
counter unit.
rj ADA jack
Allows the unit to be connected to a
separately purchased amplifier
system.
rk PA (public address) jack (30)
rl LINE OUT jacks
t; LINE IN jacks
ta DC IN 12V
ts Microphone connectors
(Canon XLR-3-31 type)
MDCC-2000
Setting the Date and Time
To record the date and time
etc. on MiniDiscs when you
record, be sure to set the Date
and Time.
Note
You cannot use the K/k buttons
when setting the month, day and
year.
Setting the Date
1 Insert the key and set it to ON.
You will see the initial screen in a few seconds.
2 Press FUNCTION.
3 Select CALENDAR,CLK using the jog dial or the arrow
buttons, and press ENTER.
You will see the CALENDAR or CLOCK INPUT screen.
4 Select CALENDAR using the jog dial or the arrow buttons,
5 Set the month using the jog dial or J/j buttons, and
and press ENTER.
You will see the SET MONTH (mmm) and DAY (dd) and YEAR (yy)
screen with the name of a month blinking.
blink
press ENTER.
You will see “01” of the day blinking.
Introduction
1
2
3, 4, 5, 6
5
Setting Up
8
6 Set the day and the year in the same way as step 5.
When the year is set, the display will return to the information screen.
5
 Loading...