

Page 1
2-320-924-02 (1)
Mini CD-R Station
Operating Instructions
Mode d’emploi
Manual de instrucciones
GB
FR
FR
ES
MCS1
2004 Sony Corporation
Page 2
WARNING
To prevent fire or shock hazard, do
not expose the unit to rain or
moisture.
Dangerously high voltages are
present inside the unit. Do not open
the cabinet. Refer servicing to
qualified personnel only.
For customers in the U.S.A.
Owner’s Record
The model number and the serial number are located
on the bottom of the drive. Record the serial number
in the space provided below. Refer to this number
whenever you call your Sony dealer regarding this
product.
Model No. MCS1
Serial No. ____________________
If you have any questions about this product, you may
call; Sony Customer Information Service Center
1-866-654-SONY(7669) or
http://www.mediabysony.com
FCC Notice
This equipment has been tested and found to comply
with the limits for a Class B digital device, pursuant
to Part 15 of the FCC Rules. These limits are
designed to provide reasonable protection against
harmful interference in a residential installation. This
equipment generates, uses, and can radiate radio
frequency energy and, if not installed and used in
accordance with the instructions, may cause harmful
interference to radio communications. However, there
is no guarantee that interference will not occur in a
particular installation. If this equipment does cause
harmful interference to radio or television reception,
which can be determined by turning the equipment
off and on, the user is encouraged to try to correct the
interference by one or more of the following
measures:
– Reorient or relocate the receiving antenna.
– Increase the separation between the equipment and
receiver.
– Connect the equipment into an outlet on a circuit
different from that to which the receiver is connected.
– Consult the dealer or an experienced radio/TV
technician for help.
The supplied interface cable must be used with this
equipment in order to comply with the limits for a
digital device pursuant to Subpart B of Part 15 of
FCC Rules.
Caution:
You are cautioned that any changes or modifications
not expressly approved in this manual could void
your authority to operate this equipment.
The use of optical instruments with this product will
increase eye hazard.
For customers in Canada
This Class B digital apparatus complies with
Canadian ICES-003.
For customers in Europe
T
his equipment conforms with the following
European Directives: 89/336/EEC, 92/31/EEC (EMC
Directive), 93/68/EEC (CE Marking Directive).
This equipment complies with EN 55022 Class B and
EN 55024 for use in the following areas: residential,
commercial and light-industrial.
Audio and picture distortion may occur if this
equipment is positioned in close proximity to any
equipment emitting electromagnetic radiation.
This equipment has been tested and found to comply
with the limits set forth in the EMC Directive for
using connection cables shorter than 3 metres (9,8
feet).
This CD-R drive is classified as a CLASS 1 LASER
PRODUCT and complies with the Laser Products
Safety Standard IEC 60825-1:1993+A1:1997+A2:2001.
Repair and maintenance only by authorized Sony
technicians.
Improper use and repairs can create a safety hazard.
CLASS 1
LASER PRODUCT
LASER KLASSE 1
PRODUKT
LUOKAN 1 LASERLAITE
KLASS 1 LASER APPARAT
The CLASS 1 LASER PRODUCT label is located on
the bottom of the equipment.
Maximum optical power of MCS1 is 0.22 mW
Maximum optical power of laser diode is 26 mW.
Caution – Use of controls or adjustments or
performance of procedures other than those specified
herein may result in hazardous radiation exposure.
GB
2
Page 3

Table of Contents
Introduction
What This Product Can Do..................... 4
Compatible media and devices ........ 5
Supplied Accessories .............................. 6
Locating the Controls and Connectors ... 6
Basic Operation
Preparations ............................................ 9
Using the AC adapter ...................... 9
Using the battery pack ..................... 9
Copying Data to a CD-R ...................... 11
Inserting the CD-R ........................ 11
Copying data from a “Memory Stick”
media ........................................... 12
Copying data from a digital still
camera ......................................... 14
Viewing Digital Images on
a Television ....................................... 17
Advanced Operation
Changing the slide show time
interval ........................................ 26
Rotating an image.......................... 26
Changing the Video Signal of
the MCS1 .......................................... 27
Other Functions .................................... 28
Auto power-off .............................. 28
Switching the operation mode ....... 28
Miscellaneous
Precautions ........................................... 29
Maintenance ......................................... 30
Notes on Handling a “Memory Stick”
Media ................................................ 30
Power Supply........................................ 31
About Batteries ..................................... 31
Specifications ....................................... 32
Troubleshooting .................................... 33
Problems during copying .............. 33
Problems with displaying digital
images on a television ................. 34
Other problems .............................. 34
Message Icons ...................................... 35
GB
Various Copy Functions ....................... 19
Adding data ................................... 19
Copying the same data to multiple
CD-Rs ......................................... 20
Copying data larger than the
remaining CD-R capacity ........... 20
Finalizing a disc ............................ 22
Copying data from a USB storage
media ........................................... 23
Verifying copied data .................... 23
Various Playback Functions ................. 25
Viewing other index pages in
6-image steps .............................. 25
Viewing images as a slide show .... 25
• “Memory Stick”, , “Memory Stick
PRO”, and “Memory Stick Duo”, are
trademarks of Sony Corporation.
• All other names of systems, products and
services are trademarks of their respective
owners. In the manual, the ™ or ® marks are
not specified.
GB
3
Page 4
Introduction
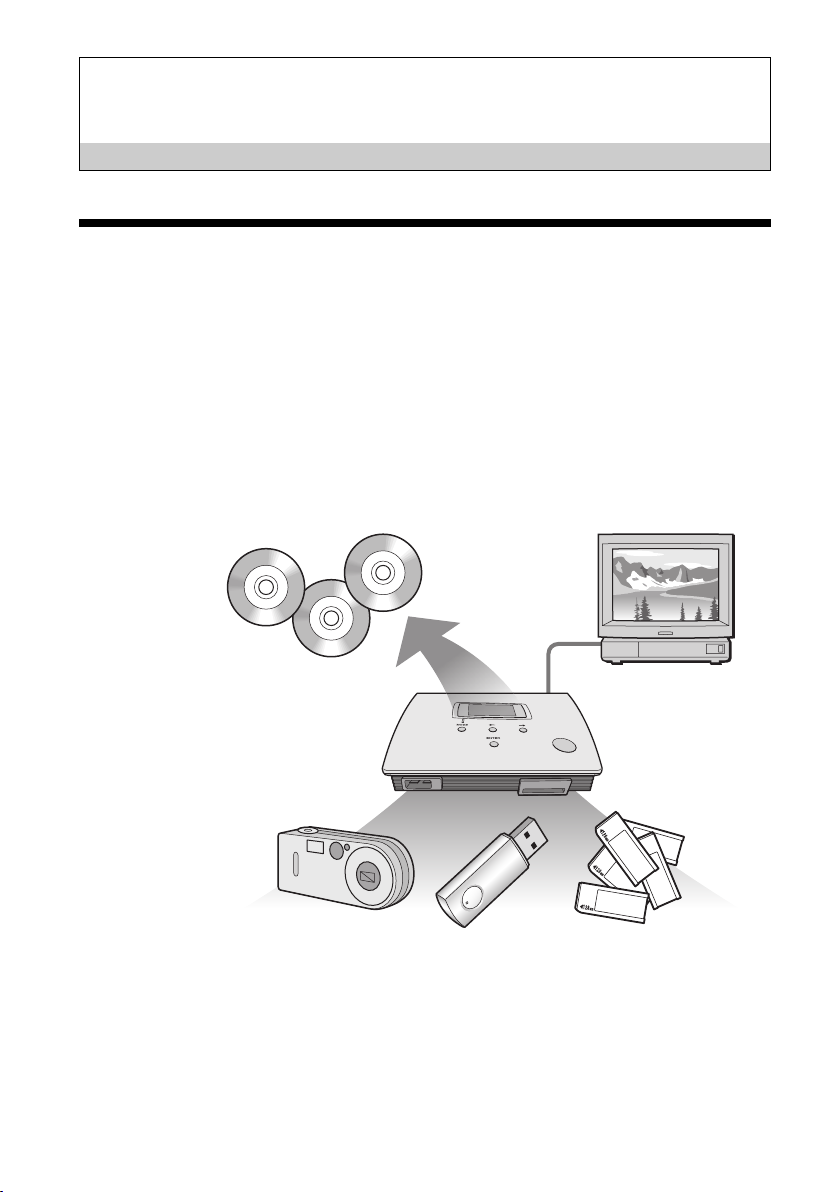
What This Product Can Do
The Mini CD-R Station MCS1 (simply called “the MCS1” in this manual)
is a backup tool specially designed to use 8 cm CD-R discs. You can copy
data from “Memory Stick” media to this small and convenient media for
safekeeping.
A built-in USB connector allows connection of digital still cameras or USB
storage media, for direct copying of data onto CD-Rs without having to use
a computer. CD-R created with the MCS1 can then be used on a computer.
The MCS1 also has an output for connection to a television, which lets you
view digital pictures (JPEG) stored on media inserted in the unit or devices
connected to it.
GB
4
Page 5

Notes
• Only still images in Baseline JPEG (EXIF) format can be viewed. The MCS1 cannot
reproduce images in other formats or play back video files.
• Depending on the JPEG format of your files, the MCS1 may not be able to display
some files.
Compatible media and devices
Copy source media and devices*
Data from the following types of media and devices can be used to copy.
Category Supported media and devices
“Memory Stick” media • “Memory Stick” media
Digital camera with USB interface • Digital still camera compatible with Mass
USB storage media • Sony USM64D/128D/256D
Introducion
• “Memory Stick Duo” media (adapter required)
• “Memory Stick PRO” media
• “Memory Stick PRO Duo” media
(adapter required)
* Parallel high-speed data transfer not supported.
Storage Class or PTP
• Sony USM128E/256E/512E
* You can find the latest information about compatibility at:
http://www.sony.net/photovault/
Note
The MCS1 cannot be connected to devices or media other than those listed above, such as
a computer or printer. It also cannot be used in conjunction with a USB hub.
Compatible CD-R
The MCS1 is compatible with 8 cm CD-R conforming to the Orange Book
Part II specifications, having a storage capacity of 156 to 210 MB. The
actual amount of data that can be stored is less than the amount shown on
the disc package.
Notes
•8 cm CD-RW cannot be used.
• Depending on the make of your 8 cm CD-R, you may not always be able to write data
to disc.
GB
5
Page 6
Supplied Accessories
After unpacking the unit, make sure that all the parts listed below are
present. If anything is missing, contact the Sony dealer where you
purchased this product or a Sony service representative in your area.
• Mini CD-R Station MCS1 • Battery pack (1)
• AC adapter (1)
• Power cord (1)
• Video output cable (1)
•8 cm CD-R (1)
• Operating Instructions (1)
• Warranty Card (1)
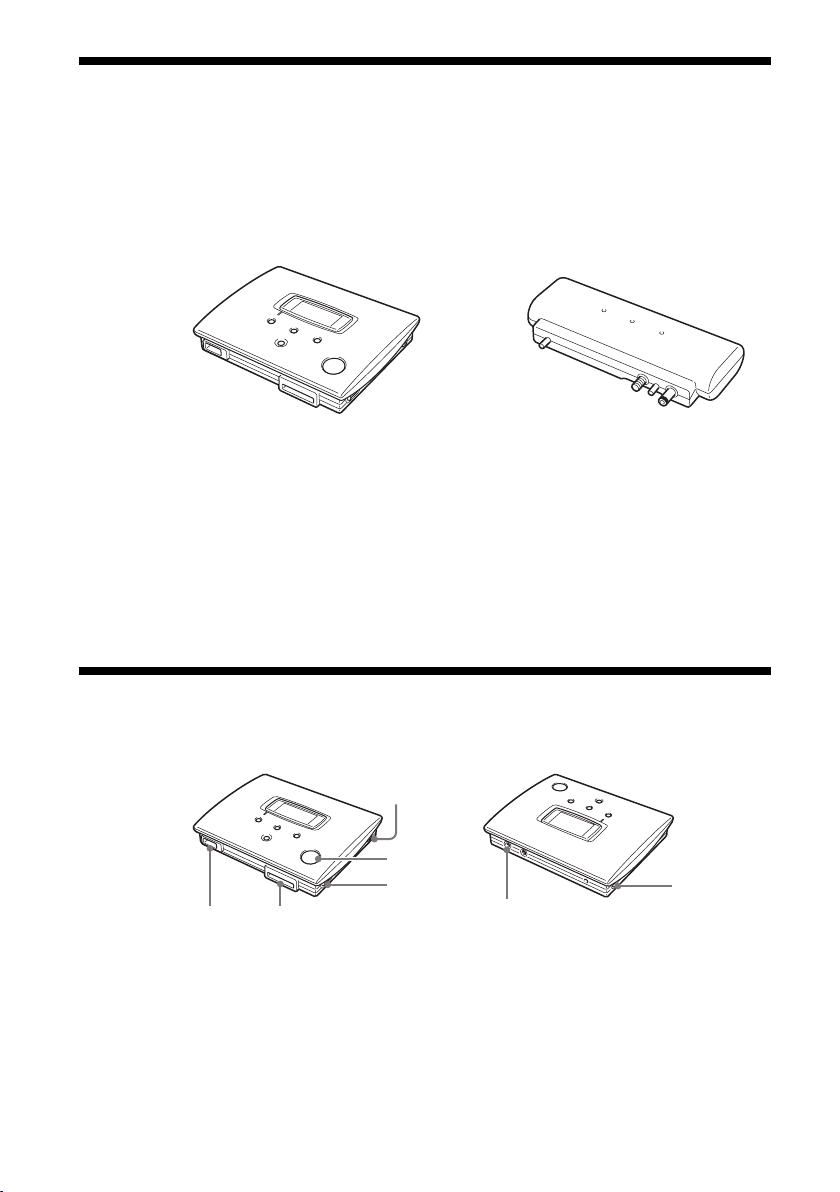
Locating the Controls and Connectors
1
2
3
45
1 POWER button
2 Disc window
3 OPEN lever
GB
6
7
4 Memory Stick slot
5 USB connector
6 VIDEO OUT connector
7 DC IN connector
6
Page 7
8
1 2
Introducion
9
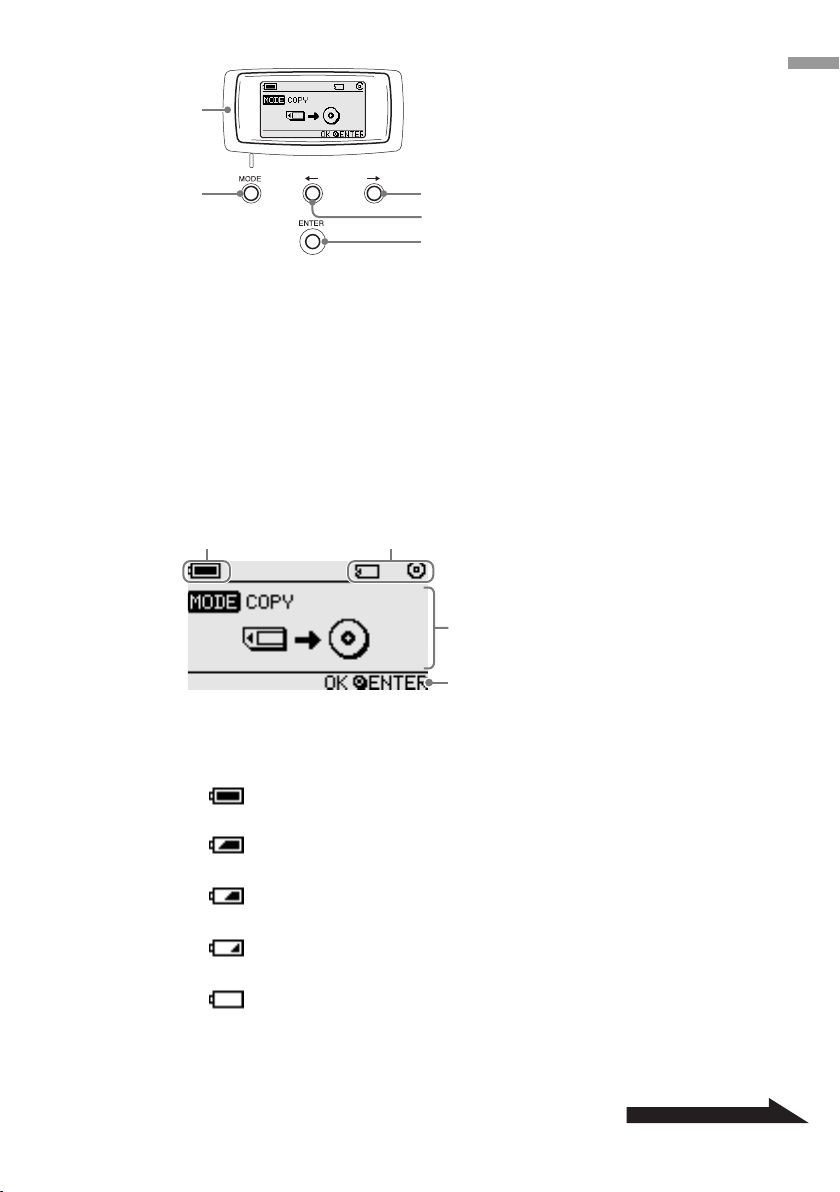
8 Display window
9 MODE button
0 t (Forward) button
qa T (Back) button
qs ENTER button
Display window
1 Remaining charge indicator
0
qa
qs
3
4
The icon shown here indicates the remaining charge of the battery pack
of the MCS1.
Indicates that the AC adapter is connected or that the battery
pack is fully charged.
Indicates that the battery pack is beginning to run low on charge.
If you are using Ni-Mn batteries, replace them.
Indicates that the battery pack is running quite low on charge.
If you are using NiMH batteries, replace them.
Indicates that the battery pack is nearly depleted of charge.
If you are using alkaline batteries, replace them.
(Flashing) Indicates that the battery pack is completely depleted
of charge. The power will shut off now.
Continued on next page
GB
7
Page 8

2 Connected device indicator
The icon shown here indicates the type of media currently inserted in or
connected to the MCS1.
“Memory Stick” media
Digital still camera and USB storage media
CD-R
Finalized CD-R. For details, see page 22.
The icon showing completion of the finalization process also appears
here. For details, see page 22.
3 Operation mode/message display
Gives information about the current operation status and shows various
messages.
4 Navigation guide indicator
Shows what functions the buttons of the unit performs in the current
operation mode.
GB
8
Page 9
Basic Operation
Preparations
The MCS1 can be powered either from the supplied AC adapter or from the
supplied battery pack. It is not possible to use both together.
Using the AC adapter
At home, the supplied AC adapter is normally used to power the unit.
1 Connect the power cord to the supplied AC adapter.
2 Plug the cable from the AC adapter into the DC IN connector
on the MCS1.
3 Plug the power cord into an AC outlet.
Basic Operation
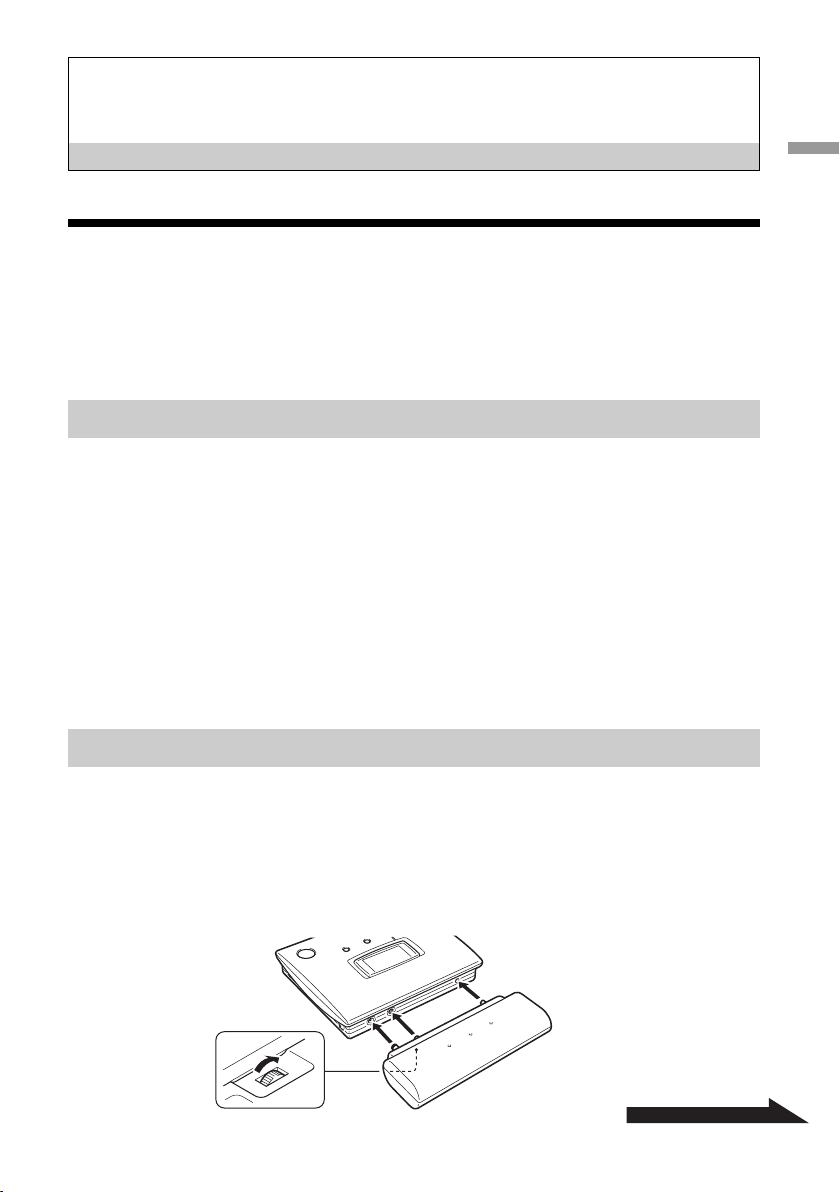
Using the battery pack
By attaching the battery pack to the unit, you can operate the MCS1 also in
places where there is no AC outlet.
1 Plug the battery pack straight into the MCS1, and turn the
fastening screw to lock the pack in place.
Continued on next page
GB
9
Page 10
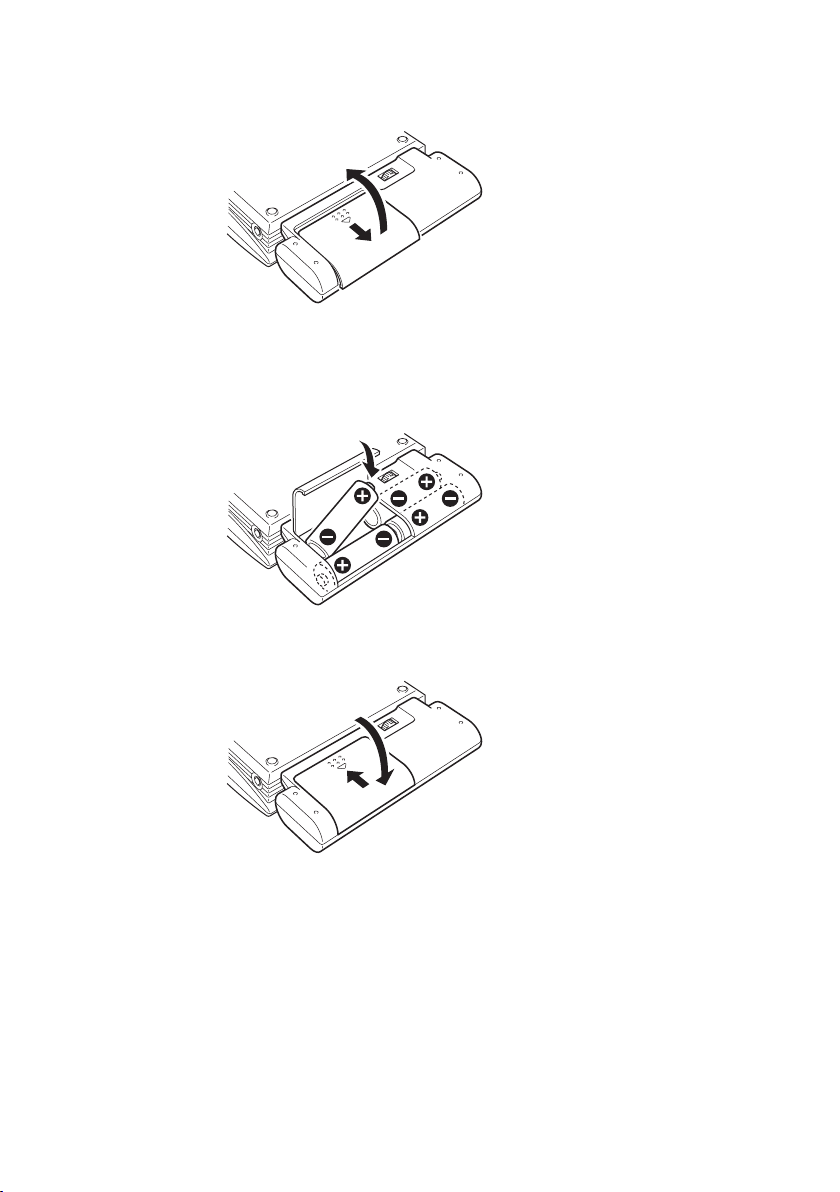
2 Slide the battery compartment lid in the direction shown by
the arrow to open it.
3 Insert four AA batteries into the battery pack.
Make sure that the plus and minus orientation of the batteries is
correct, as shown inside the compartment.
4 Close the battery compartment lid.
10
Types of batteries that can be used
Batteries are not supplied with the MCS1. Purchase one of the following
types of batteries:
• AA alkaline batteries
• AA Ni-Mn batteries
• AA NiMH rechargeable batteries (cannot be charged with this unit)
GB
Page 11

Notes
• You cannot use manganese batteries with the MCS1.
• For details on the remaining charge indicator, see the explanation on page 7.
Particularly in the case of Ni-Mn and NiMH batteries, voltage decreases rapidly when
charge runs low, so it is best to replace batteries early.
To remove the batteries
Turn the fastening screw to disengage the lock and then pull the battery
pack off the MCS1.
Copying Data to a CD-R
Inserting the CD-R
To copy data to a CD-R, proceed as follows.
Notes
• Be sure the MCS1 is placed on a flat surface.
• Do not let anything shake or strike the MCS1 during copying.
Basic Operation
1 Hold down the POWER button for at least 2 seconds to turn
on the MCS1.
2 Push and slide the OPEN lever to open the cover.
3 Insert a new CD-R and close the cover.
Notes
• Insert the CD-R with the label facing upwards.
• Do not touch the recording side of the CD-R.
• Push the cover of the MCS1 down until it audibly snaps shut.
• Due to CD-R recording characteristics, the actual amount of data that can be
stored on a disc is less than the amount shown on the disc package.
• Depending on the files you copy, the amount of space copied may be larger than
the size of the files copied.
Continued on next page
11
GB
Page 12
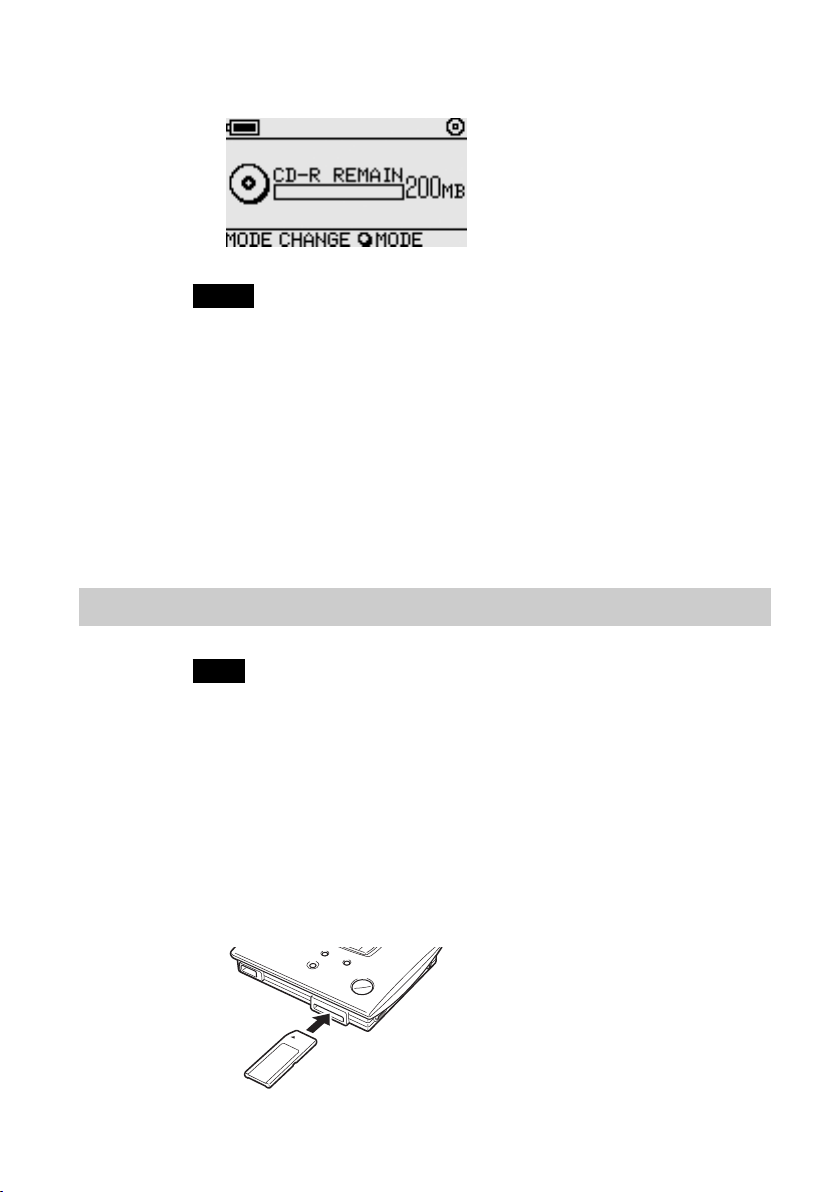
The disc is detected and its remaining storage capacity appears in the
display window.
Notes
• If you insert a CD-R that already contains data into the MCS1, it automatically enters
the video output mode. For details, see “Adding data” on page 19.
• To prevent the possibility of losing data, be sure to observe the following precautions.
– Never open the cover of the MCS1 during copying.
– While copying data from a “Memory Stick” media, do not remove the “Memory
Stick” media.
– While copying data from a digital still camera, do not turn the camera off or
disconnect the USB cable.
– While copying data from USB storage media, do not remove the USB storage media.
•A maximum of 3,000 files (including folders) can be copied.
Copying data from a “Memory Stick” media
12
Note
The entire contents of the “Memory Stick” media are copied to the CD-R in one
operation. It is not possible to selectively copy files.
1 Turn on the MCS1, insert a CD-R, and then wait for it to be
detected.
For details, see “Inserting the CD-R” on page 11.
2 Once the CD-R is detected, insert the “Memory Stick” media
into the Memory Stick slot of the MCS1.
GB
Page 13
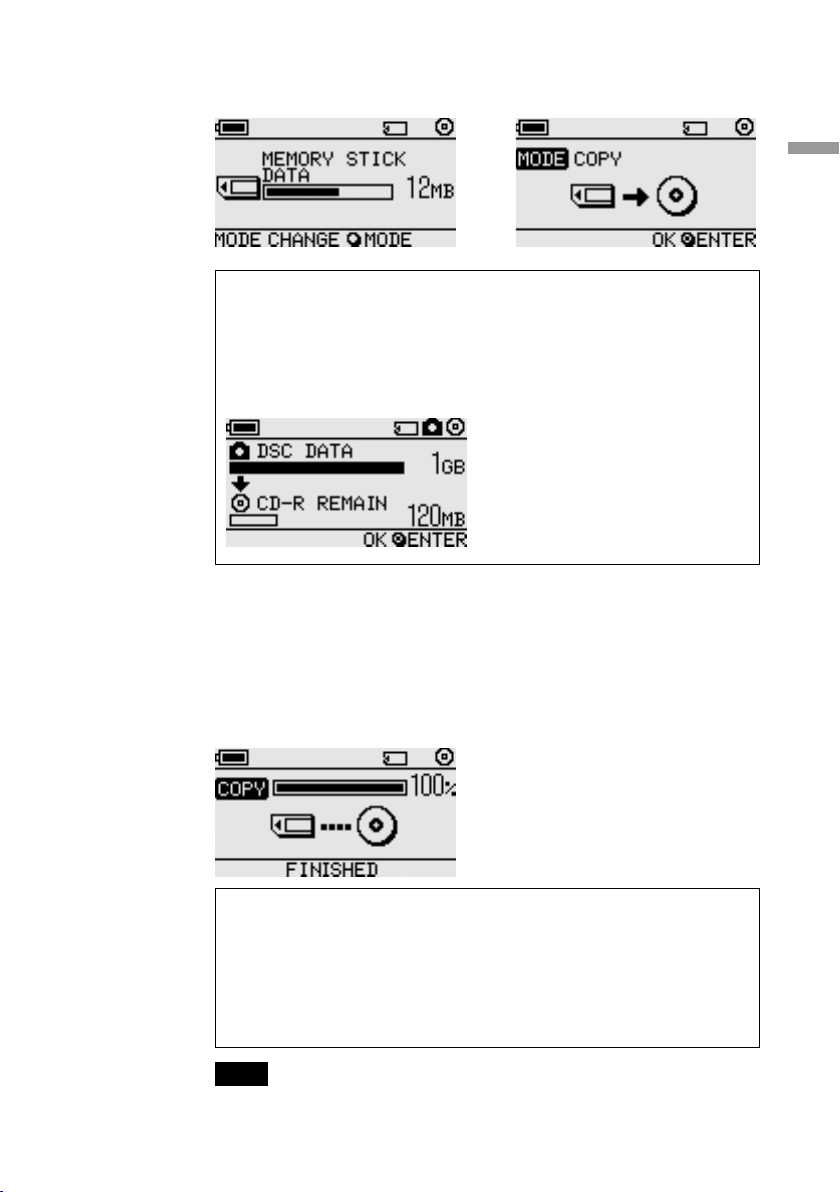
The usage status of the “Memory Stick” media is shown in the display
window. After about two seconds, the display changes as follows.
b
z Hint
If the size of the data to be copied exceeds the remaining capacity of the CD-R,
the display window shows the following. In such a case, you can split the data
over several CD-R. For details, see “Copying data larger than the remaining
CD-R capacity” on page 20.
3 Press the ENTER button.
The data copy process starts. During copying, the progress status is
shown in the display window. When copying is complete, the
indication changes as follows.
Basic Operation
z Hint
If you want to give the CD-R to other people or want to use the CD-R with
copied data in a device other than the MCS1, it is recommended to finalize the
disc. This ensures that the CD-R can be read by most computers. For details on
the finalization procedure, see page 22. Note that you are unable to add data to a
finalized disc.
Note
8 cm discs are not compatible with some computers.
13
GB
Page 14

When the copying process is finished...
You can continue to copy the same data to another CD-R. For details, see
“Copying the same data to multiple CD-R” on page 20.
To shut down the MCS1, proceed as follows.
1 Hold down the POWER button to turn the MCS1 off.
2 Pull the “Memory Stick” media straight out of the Memory
Stick slot.
Note
The MCS1 cannot erase data on a “Memory Stick” media. If you wish to erase the
contents of a “Memory Stick” media, use the digital still camera, computer or other
device where the “Memory Stick” media is normally used. Before doing so, verify
that the data was correctly written to CD-R. Verify this by playing it on the MCS1
and using the video output, or by playing it on a computer or other device.
3 Remove the CD-R.
(1) Push and slide the OPEN lever to open the cover.
(2) While pressing the center of the disc, grasp the edges of the
CD-R and lift it out.
4 Close the cover.
Copying data from a digital still camera
You can connect most USB-compatible digital still cameras to the MCS1 to
copy their data to a CD-R. Use the USB cable supplied with your camera to
make the connection.
You can find the latest information about compatible digital cameras at:
http://www.sony.net/photovault/
Note
It is not possible to copy specific files only.
GB
14
Page 15
1 Turn on the MCS1, insert a CD-R, and then wait for it to be
detected.
For details, see “Inserting the CD-R” on page 11.
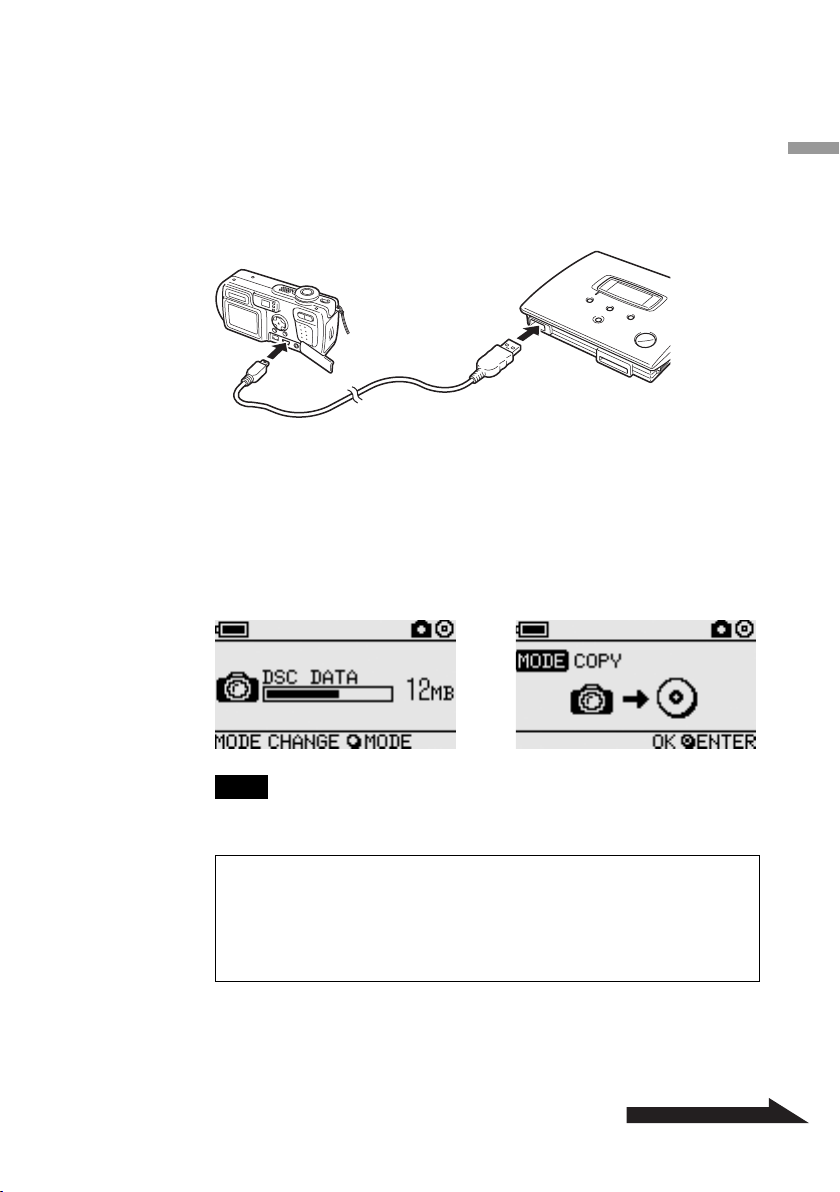
2 Using the USB cable supplied with the digital still camera,
connect the camera to the MCS1.
3 Turn the digital still camera on and set it to the PLAY* mode.
The usage status of the camera memory is shown in the display
window. After about two seconds, the display changes as follows.
* Mode for viewing images. The actual name may differ depending on the digital
still camera. For details, see the section on connecting to the computer in the
operating instructions supplied with your digital camera.
Basic Operation
b
Note
Make sure that the digital still camera has sufficient battery capacity before starting
the copy process. If the battery fails during copying, data is not written correctly.
z Hint
If the size of the data to be copied exceeds the remaining capacity of the CD-R,
you can split the data over several CD-R. For details, see “Copying data larger
than the remaining CD-R capacity” on page 20.
Continued on next page
15
GB
Page 16
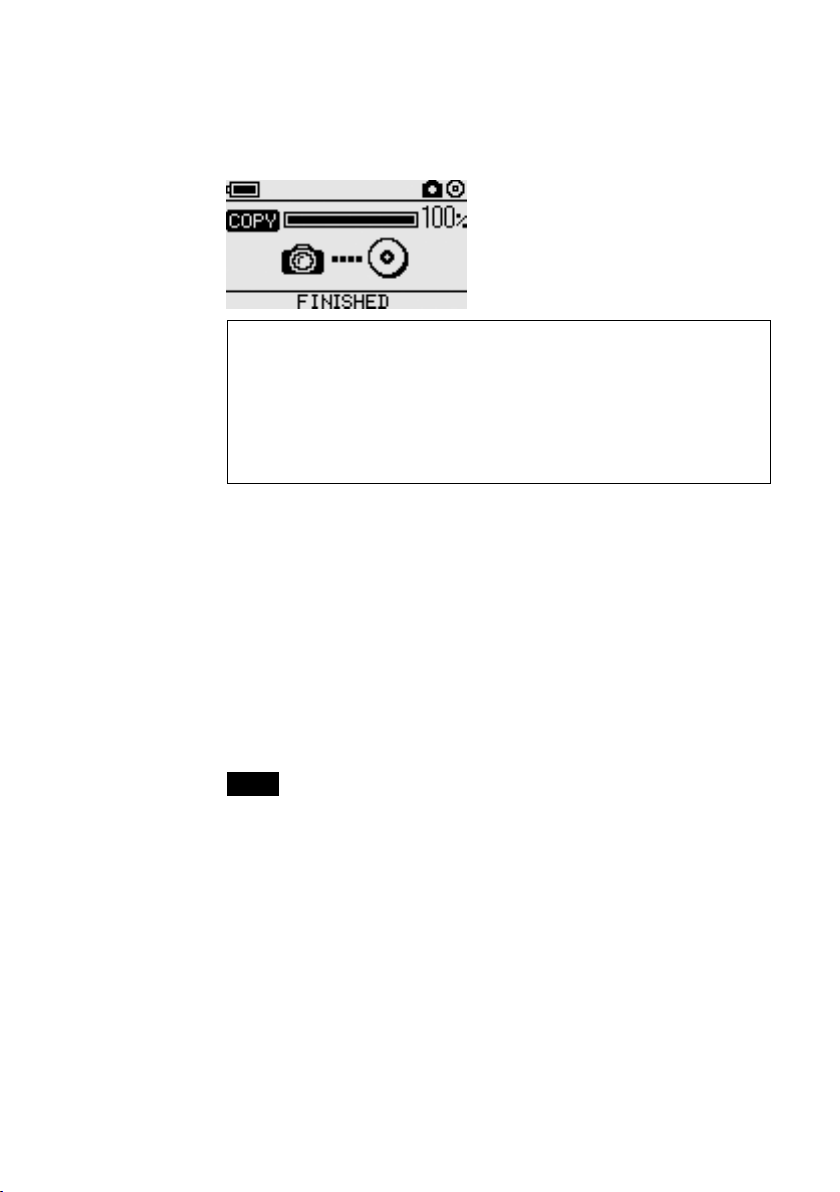
4 Press the ENTER button.
The data copy process starts. During copying, the progress status is
shown in the display window. When copying is complete, the
indication changes as follows.
z Hint
If you want to give the CD-R to other people or want to use the CD-R with
copied data in a device other than the MCS1, it is recommended to finalize the
disc. This ensures that the CD-R can be read by most computers. For details on
the finalization procedure, see page 22. Note that you are unable to add data to a
finalized disc.
When the copying process is finished...
You can continue to copy the same data to another CD-R. For details, see
“Copying the same data to multiple CD-R” on page 20.
To shut down the MCS1, proceed as follows.
16
1 Hold down the POWER button to turn the MCS1 off.
2 Turn the digital still camera off and disconnect the USB
cable.
Note
The MCS1 cannot erase data in the digital still camera. If you wish to erase the
memory contents of the camera, use the functions of the camera itself. Before doing
so, verify that the data was correctly written to CD-R. Verify this by playing it on
the MCS1 and using the video output, or by playing it on a computer or other
device.
3 Remove the CD-R.
(1) Push and slide the OPEN lever to open the cover.
(2) While pressing the center of the disc, grasp the edges of the CD-R
and lift it out.
4 Close the cover.
GB
Page 17

Viewing Digital Images on a Television
If you connect the MCS1 to a television using the supplied video output
cable, you can view digital images (JPEG images) on the television screen.
The images may come from a CD-R or a “Memory Stick” media inserted in
the MCS1, or from a digital still camera connected to it.
Notes
• Only still images in Baseline JPEG (EXIF) format can be viewed. The MCS1 cannot
reproduce images in other formats or play back video files.
• You may experience problems viewing JPEG files other than those taken with a digital
still cameras (Exif files).
• You may experience problems viewing images of 6 megapixels or greater.
1 Use the supplied video output cable to connect the VIDEO
OUT connector of the MCS1 to the video input connector on
the television.
2 Turn on the television and set the TV/Video selector to
“Video”.
Note
The selection method of the video input may differ depending on your television
model. For details, refer to the documentation supplied with your television.
Basic Operation
3 Hold down the POWER button for at least 2 seconds to turn
the MCS1 on.
4 Prepare the media containing the digital images you want to
view.
• To view digital images contained on a CD-R, insert the CD-R into
the MCS1.
• To view digital images contained on a “Memory Stick” media, insert
the “Memory Stick” media into the Memory Stick slot on the MCS1.
• To view digital images in a digital still camera, connect the camera
to the MCS1 using the USB cable supplied with the camera.
When displaying digital images from CD-R, the following indication
appears in the display window of the MCS1.
Continued on next page
17
GB
Page 18

z Hint
If several media are available to the MCS1 at the same time, you can use the
MODE button to select one of them. For details, see “Switching the operation
mode” on page 28.
When you perform this procedure, an index of six digital images first
appears on your television screen.
You can perform the following in the index with the MCS1 controls.
To display an image full-screen
1 Use the T/t buttons to move the cursor to the desired
digital image.
2 Press the ENTER button.
The selected image is shown in full size on the screen.
To display other images
While an image is displayed full-screen, you can use the T/t buttons to
display the previous or next image. To return to the index, press the
ENTER button.
18
GB
Page 19

Advanced Operation
Various Copy Functions
Adding data
As long as a disc has not been finalized, you can add more data to it until
the disc capacity is reached. The steps for adding data are basically the
same as when writing data for the first time (using a new disc), except for
the following points.
• When a non-finalized CD-R is inserted in the MCS1, the unit
automatically goes into video output mode for displaying images from
copy source media or devices. To copy new data, you must manually
switch to copy mode. To do this, press the MODE button repeatedly until
“COPY: MS” or other similar indications including the source media or
device appears in the display window. See “Switching the operation
mode” on page 28.
• The MCS1 creates a new folder each time it copies data. The name of the
folder is always the creation date of the newest file copied. For example,
if the newest file copied was created 2004/02/01, the folder name
becomes “01022004_001”. If you copy other data where the newest file
has the same date as above, the folder name becomes “01022004_002”,
and so on.
Notes
• If data was written to the CD-R in a computer or other device other than the MCS1, it
may no longer be possible to add more data using the MCS1.
• You cannot add data to finalized CD-R.
• When you copy data to a CD-R, the amount of space copied may be larger than the size
of the files copied.
Advanced Operation
19
GB
Page 20
Copying the same data to multiple CD-Rs
When you have copied some data onto a CD-R, you can copy the same data
onto another CD-R. To do this, proceed as follows after the first copy is
finished.
1 Remove the copied CD-R from the MCS1 and insert the new
CD-R.
(1) Push and slide the OPEN lever to open the cover.
(2) While pressing the center of the disc, grasp the edges of the
CD-R and lift it out.
(3) Place the new CD-R inside the MCS1 and close the cover.
2 Continue to copy data.
The method for copying data is different, depending on the type of
media or device that is used as a source. Proceed to the appropriate
page.
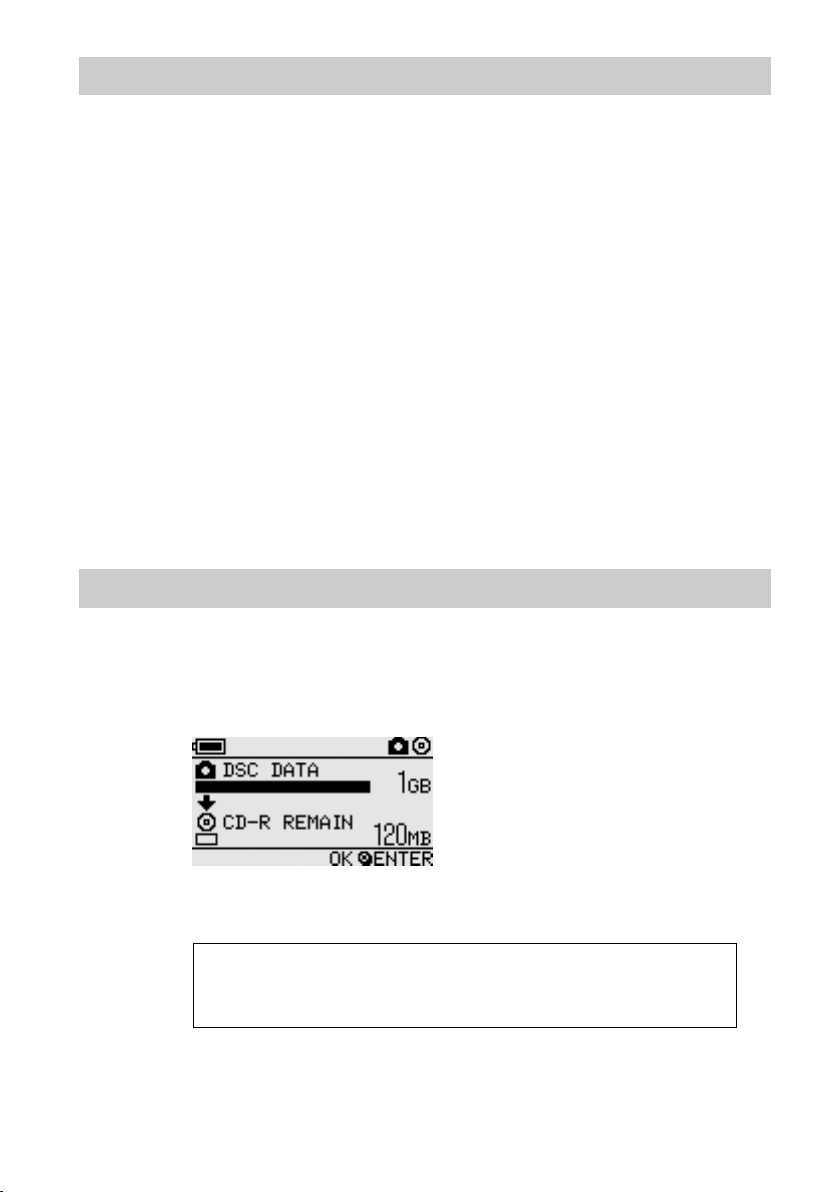
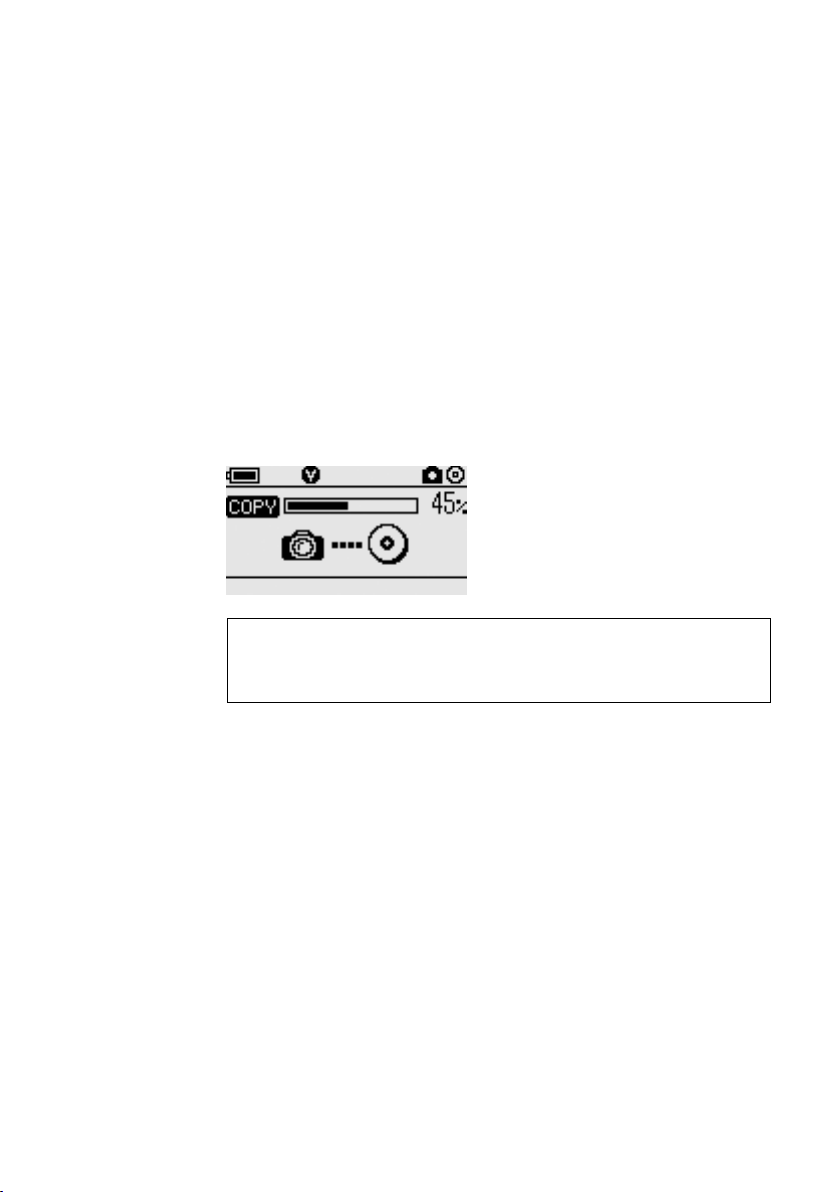
Copying data larger than the remaining CD-R capacity
When the size of the data to be copied from a digital still camera exceeds
the remaining capacity of the CD-R, the following indication appears in the
display window. We have used the copy of data from a digital still camera
to illustrate.
20
In this case, you can perform the following steps to split up the data and
copy it onto multiple CD-R.
z Hint
You can cancel the copy by pressing the MODE button.
GB
Page 21
1 Press the ENTER button.
The data copy process starts. During copying, the progress status is
shown in the display window.
Notes
• Never open the cover of the MCS1 during copying.
• Do not remove the “Memory Stick” media or disconnect the digital still camera
during copying.
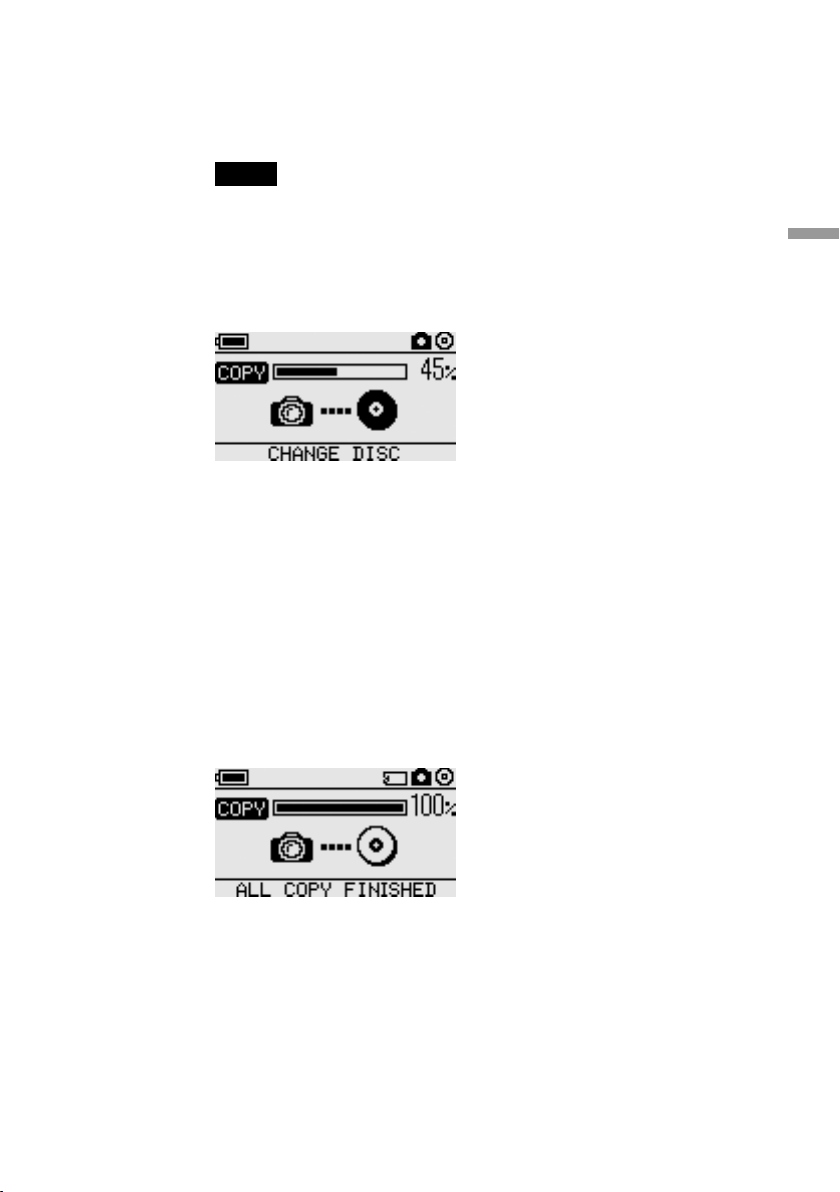
When copying of the first portion of data is complete, the indication
“CHANGE DISC” appears in the display window.
2 Remove the CD-R.
(1) Push and slide the OPEN lever to open the cover.
(2) While pressing the center of the disc, grasp the edges of the CD-R
and lift it out.
Advanced Operation
3 Place the next CD-R in the MCS1 and close the cover.
4 Repeat steps 1 to 3 until the following indication appears in
the display window.
The procedure comprised of steps 1 to 3 can be repeated until all the
data is copied. This condition is indicated by the indication “ALL
COPY FINISHED”.
21
GB
Page 22
Finalizing a disc
After data is written to a CD-R, the procedure of locking the remaining area
so that no more data can be written is called finalization. This enables most
other devices such as computers, CD-ROM drives, etc., to read the data on
the disc.
After it is finalized, no more data can be added to a CD-R, even if there is
still some free capacity.
Note
Even when a disc is finalized, some computers or CD-ROM drives may still not be able to
play the disc. If you experience problems, try reading the disc in another computer or CDROM drive.
To finalize a CD-R, proceed as follows.
1 Hold down the POWER button for at least 2 seconds to turn
the MCS1 on.
2 Push and slide the OPEN lever to open the cover.
3 Insert the CD-R to finalize and close the cover.
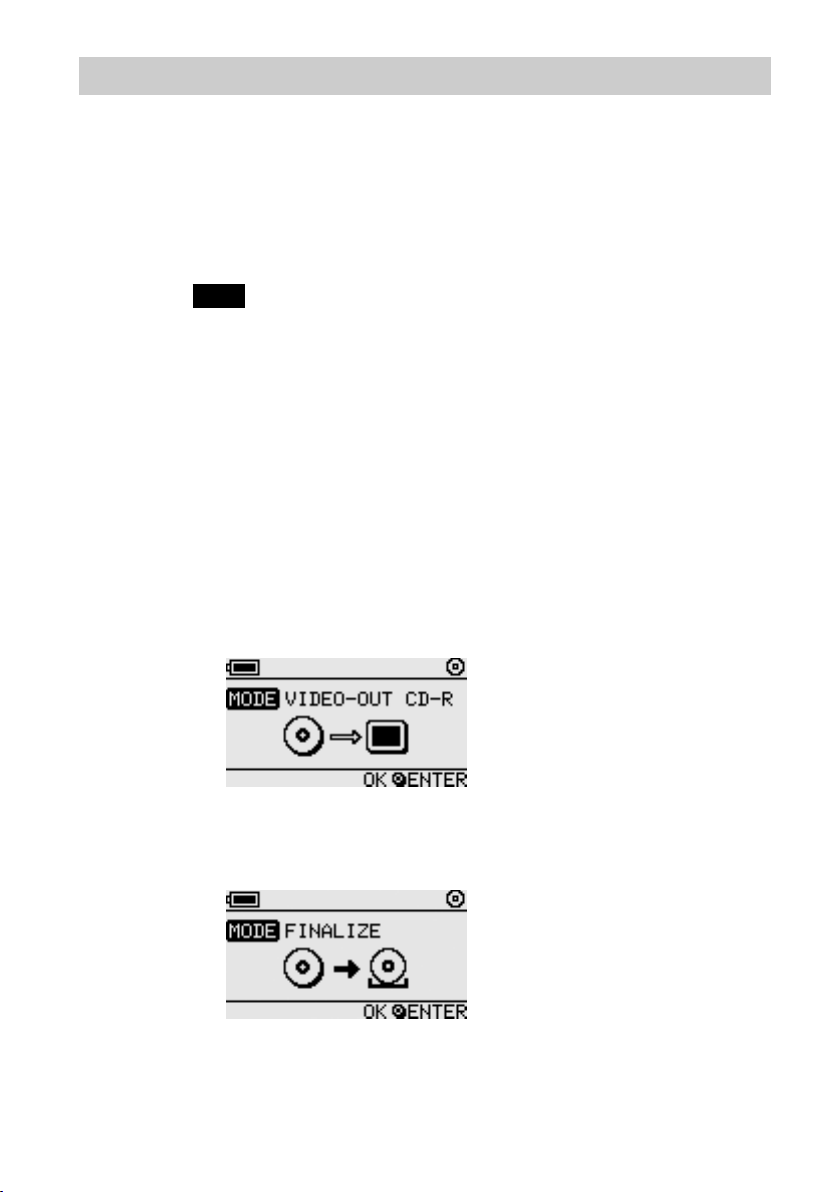
The indication “VIDEO-OUT CD-R” appears in the display window.
22
4 Press the MODE button several times until the following
indication is shown in the display window.
GB
Page 23

5 Press the ENTER button.
A confirmation message appears. Press the ENTER button and
finalization of the CD-R starts. When finalization is completed, the
display window changes to “FINISHED”.
Copying data from a USB storage media
You can connect a USB storage media to the USB connector of the MCS1,
and copy all the data it contains to CD-R. To do so, follow the same
procedure as the one outlined in “Copying data from a digital still camera”
on page 14.
You can also use the supplied video output cable to connect the MCS1 to
your television and display JPEG files on USB storage media on your
television screen. For details, see “Viewing Digital Images on a Television”
on page 17.
The MCS1 is compatible with Sony USB storage media (USM64D/128D/
256D, USM128E/256E/512E). You can find the latest information about
compatible USB storage media at:
http://www.sony.net/photovault/
Advanced Operation
Verifying copied data
By comparing the original data and the one copied to CD-R, it is possible to
verify its integrity.
Use the following procedure to configure the MCS1 to perform this
verification automatically when copy ends. If you are unable to perform
this verification from your computer, for example, we recommend
verifying the integrity of your data this way.
Note
Verifying the integrity of the data takes approximately as long as the copy itself.
23
GB
Page 24
1 Press the POWER button for more than two seconds.
The MSC1 starts. Perform the following procedure before inserting a
CD-R or connecting any type of media to the MCS1.
2 Press the ENTER button for more than two seconds.
3 Using the T and t buttons, select “VERIFY”.
By default, the verification setting is QUICK. The QUICK setting
starts data integrity verification after the copy is complete, allowing the
copy to be completed faster than with the VERIFY setting.
4 Press the ENTER button.
The “V” mark appears at the top of the display window, indicating that
data is automatically verified when copy ends.
z Hint
You can cancel the verification by pressing the MODE button.
24
GB
Page 25
Various Playback Functions
While displaying digital images stored on a media connected to or inserted
in the MCS1, you can access various functions for controlling the display
and adjusting the image shown on the television.
For details on connecting the MCS1 to a television, see “Viewing Digital
Images on a Television” on page 17.
Viewing other index pages in 6-image steps
If you press and hold the t button for 2 seconds when the index is
displayed, the next group of 6 images is displayed.
Similarly, if you press and hold the T button for 2 seconds when the index
is displayed, the previous group of 6 images is displayed.
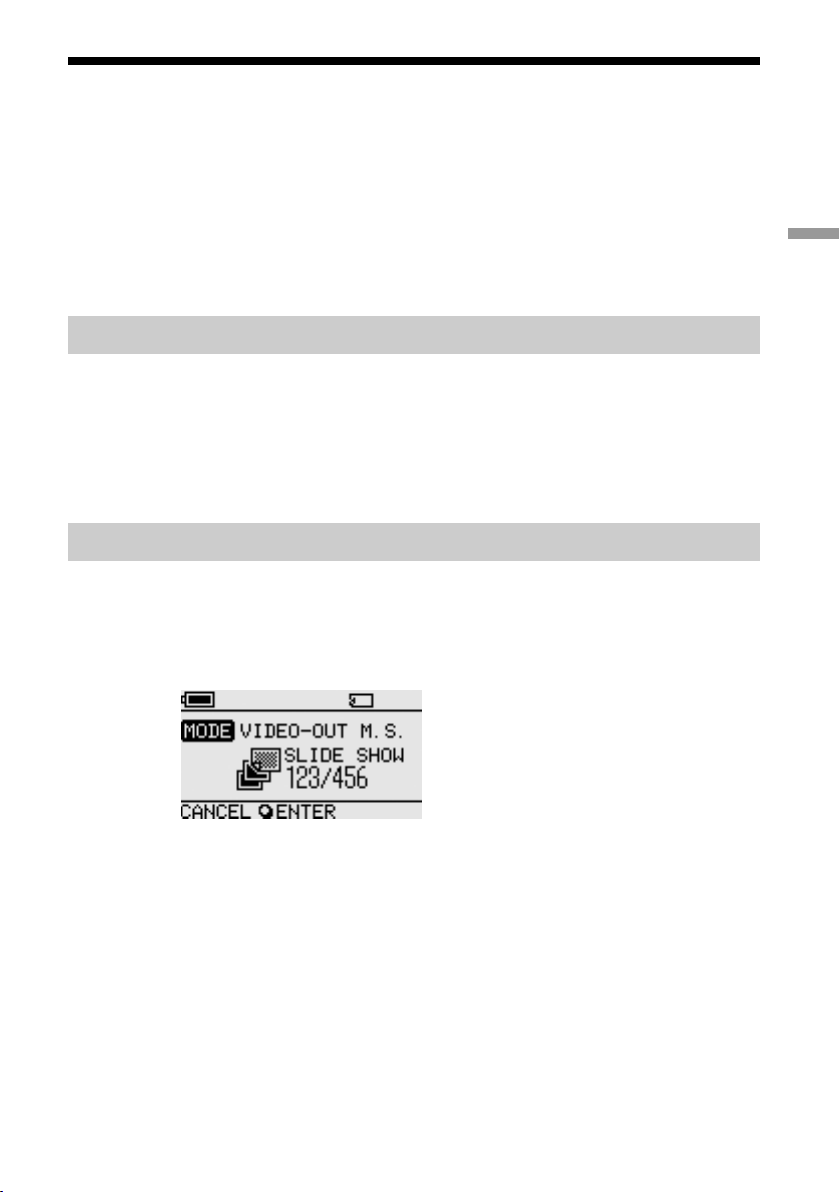
Viewing images as a slide show
When a full-screen image or the index is displayed, pressing and holding
the ENTER button for approximately 2 seconds enables the slide show
mode. If you activate this mode when the index is displayed, the slide show
begins at the currently selected image.
Advanced Operation
The default interval setting for slide show mode is approximately
5 seconds, but this varies according to the file size. Images are
automatically switched at this rate. If desired, you can change the interval
setting. For details, see “Changing the slide show time interval” on page 26.
When you press the ENTER button, the slide show mode is terminated and
regular full-screen display resumes.
GB
25
Page 26
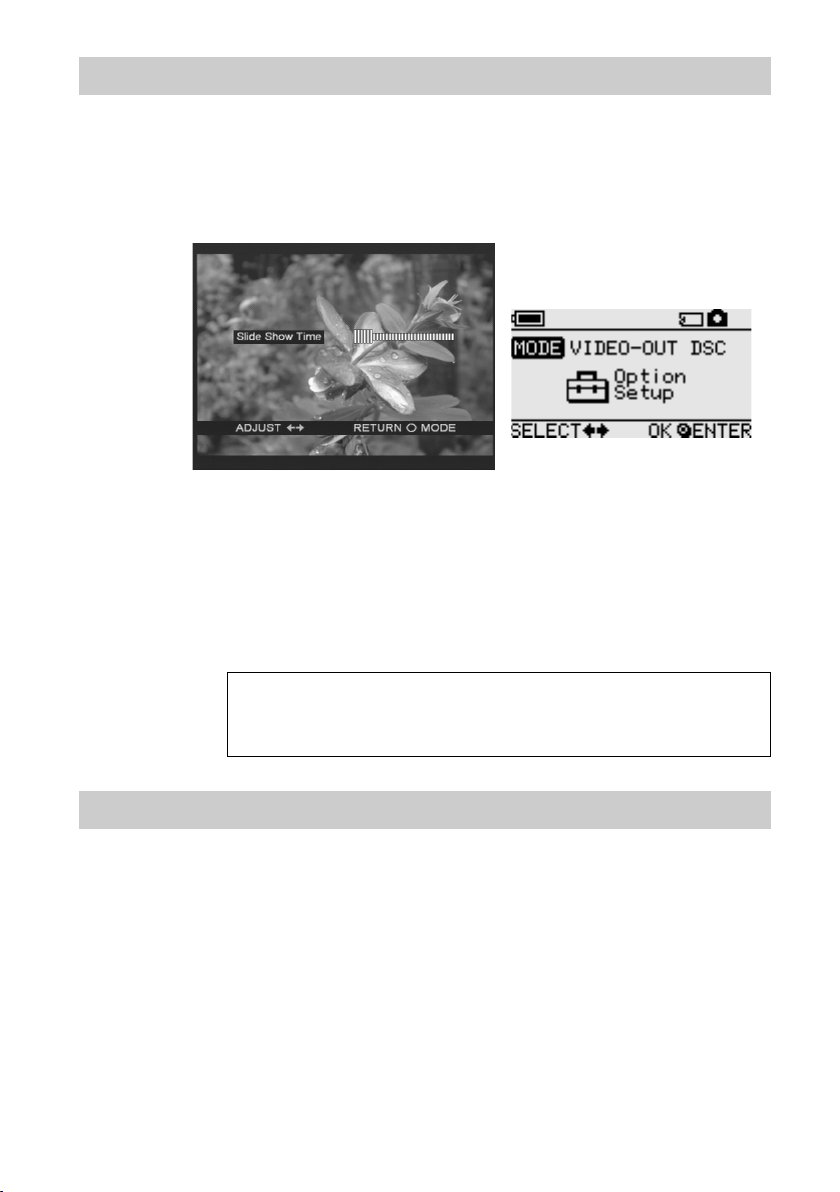
Changing the slide show time interval
1 If you press and hold the MODE button for 2 seconds during
regular full-screen display,
The slide show time interval setting appears on the television screen.
2 Use the T/t buttons to change the setting.
3 When the desired time interval has been set, press the
MODE button.
The MCS1 returns to the index.
z Hint
This setting is preserved even if the MCS1 is turned off.
Rotating an image
While a single image is being shown in full size on the screen, you can
rotate the image by pressing and holding one of the T/t buttons for 2
seconds. The image is rotated 90° at a time in the direction of the arrow.
GB
26
Page 27
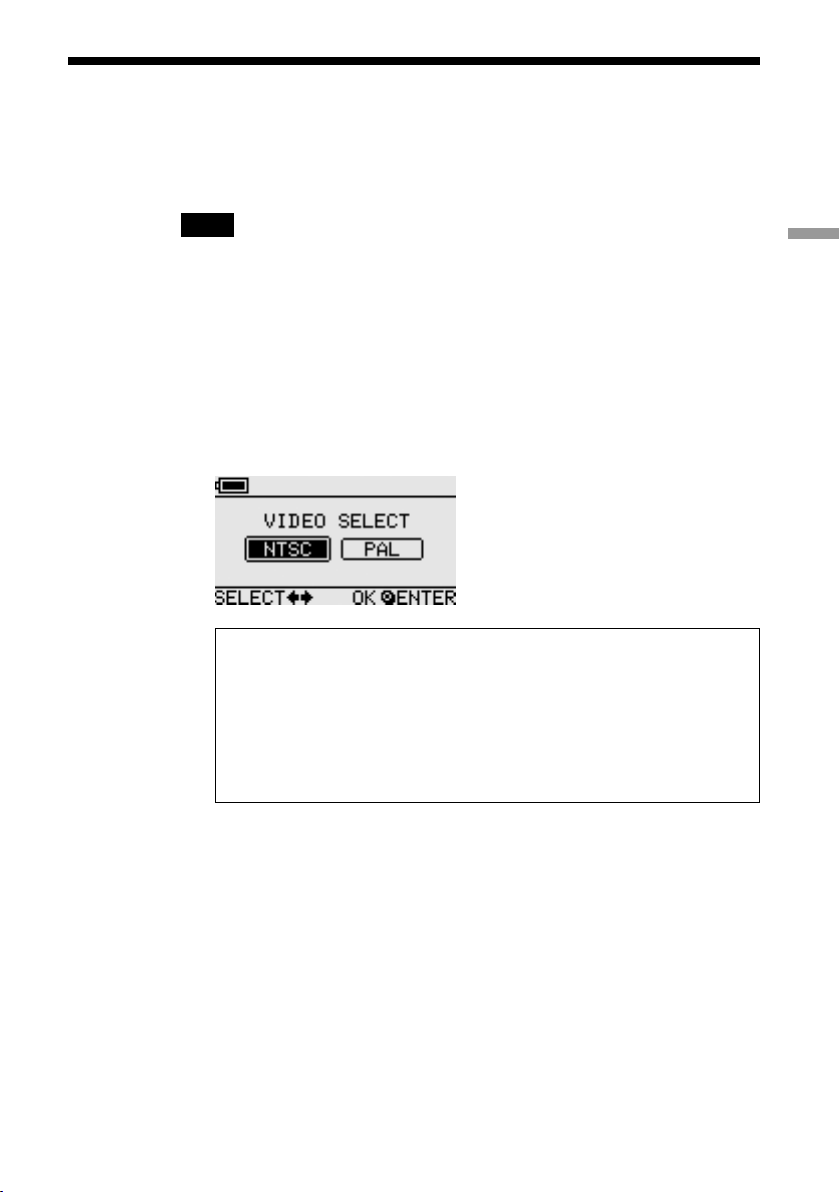
Changing the Video Signal of the MCS1
You can change the video signal used by the MCS1. You can choose
between NTSC and PAL.
Note
Perform this setup procedure while there are no CD-R or other media inserted in the
MCS1. If a CD-R or other media is inserted, the procedure below does not work.
1 Hold down the POWER button for at least 2 seconds to turn
the MCS1 on.
2 Press and hold the MODE button for at least 2 seconds.
The following indication appears in the display window.
z Hints
• The video signal that appears in the display window is the one currently in use.
• The default setting is NTSC.
• Below are some examples of regions that use these video signals.
NTSC: U.S.A., Japan, etc.
PAL: Europe, etc.
Advanced Operation
3 If you want to change the video signal, use the T/t
buttons to move the cursor to “NTSC” or “PAL”.
4 Press the ENTER button.
The video signal is changed.
27
GB
Page 28

Other Functions
Auto power-off
The MCS1 incorporates an auto power-off function.
If the MCS1 is idle for more than five minutes, the unit automatically turns
itself off. To turn it on again, hold down the POWER button for at least 2
seconds.
In the following cases, auto power-off is disabled:
• While data is copied to a CD-R
• While the slide show function is active
• During finalization
• While an error message is displayed
Switching the operation mode
The MCS1 has six operation modes. Normally, the operation mode is
selected automatically, but you may want to switch it manually in the
following cases.
• When multiple media or devices are connected at the same time
• When you want to add data to a non-finalized CD-R
• When you want to finalize a non-finalized CD-R
28
z Hint
When several media and/or devices are connected simultaneously, the priority
order becomes the following:
• With VIDEO OUT
1. Digital still camera or USB storage media.
2. “Memory Stick” media
3. CD-R
• When copying data
1. Digital still camera
2. “Memory Stick” media
The operation mode of the MCS1 can be switched using the MODE button.
Each push of the button cycles through the settings.
GB
Page 29

Miscellaneous
Precautions
Usage and storage
locations
Do not use or store this drive in locations
subject to high humidity, high
temperatures, strong vibrations, or direct
sunlight.
Operation
•
Do not move the drive during operation,
to prevent the possibility of
malfunctions.
• Place the drive on a level surface for
operation.
• Do not place any objects on top of the
drive.
• Protect the drive from sudden
temperature changes. Do not use the
drive immediately after moving it from
a cold to a warm location or after the
ambient temperature has risen
drastically. Otherwise, condensation
inside the drive can occur. If the
temperature changes drastically during
operation, stop using the drive while
keeping the drive turned on and let it
stand for about an hour before using it
again.
Lens
• If this drive no longer operates properly
because the lens is dirty, clean it with
any commercially available pressurized
air duster.
• Do not touch the lens in this drive.
Furthermore, to avoid dust sticking to
the lens, do not open the tray other than
to remove or insert the disc.
Notes on discs
Note the following to protect data stored
on discs.
• Do not stick any labels on the disc nor
scratch or otherwise damage the disc.
• Do not touch the data side of the disc
(opposite the label), and hold the disc as
shown below.
• Do not store the disc in locations subject
to high humidity, high temperatures,
direct sunlight, or high levels of dust.
• Take care not to spill any liquid on the
disc.
• Return the disc to its case when not in
use to prevent data damage.
• Use an oil-based felt pen when writing
on the label surface of a disc.
• Do not use a disc with tape, seals, or
paste on it, as the disc may damage the
drive.
Miscellaneous
29
GB
Page 30

Maintenance
Notes on Handling
a “Memory Stick”
Cleaning the cabinet
Wipe the outside of the drive with a soft,
dry cloth. To remove stubborn stains,
moisten the cloth with a mild, neutral
detergent. Do not use solvents, cleaning
alcohol, benzene or other substances that
may damage the finish.
Cleaning the disc
• Fingerprints and other contamination on
the disc surface can lead to reading
errors. Always keep the disc clean.
• To clean the disc, lightly wipe it from
the center outwards.
• To remove stubborn stains, lightly
moisten the cloth before wiping the
disc, and use a dry cloth afterwards.
• Do not use benzene, record cleaning
liquid, antistatic fluids or other
substances that may damage the surface
of the disc.
• Never use cleaners on an unused disc.
Use specific CD cleaners to take off
dust.
• You may not be able to write on the
discs if there are scratches or dust on the
unrecorded area. Be careful not to
damage the discs.
Media
• Do not touch the connector section or
allow metal objects to come into contact
with it.
• Use only the label designed for the
“Memory Stick” media to attach on its
label space.
• Attach a label only to the designated
labeling space.
• Keep the “Memory Stick” media in the
supplied storage case to carry or store.
• Do not bend, drop or apply a strong
shock to the “Memory Stick” media.
• Do not disassemble or modify the
“Memory Stick” media.
• Keep the “Memory Stick” media away
from water.
• Keep the “Memory Stick” media away
from a location subject to:
– extremely high temperature, for
example, in a car parked in the sun.
– direct sunlight.
– high humidity and corrosive
substances.
• In the following cases, data on the
“Memory Stick” media may be
damaged (erased):
– When the “Memory Stick” media is
removed or the MCS1 is turned off
while data is being read.
– When the “Memory Stick” media is
used in a location subject to static
electricity or electrical noise.
30
GB
Page 31

Notes on using the
“Memory Stick Duo”
media
• Before using the “Memory Stick Duo”
media with the MCS1, make sure to
insert the “Memory Stick Duo” media
into the Memory Stick Duo adapter. If
you insert the “Memory Stick Duo”
media directly into the Memory Stick
slot on the MCS1, you may not be able
to remove it.
• When inserting the “Memory Stick
Duo” media into the Memory Stick Duo
adapter, make sure it is inserted with
proper orientation.
• When inserting the Memory Stick Duo
adapter containing the “Memory Stick
Duo” media into the Memory Stick slot
on the MCS1, make sure it is inserted in
the correct direction. Inserting it
incorrectly may damage to the MCS1 or
the adapter.
For details, refer to the documentation of
the “Memory Stick Duo” media.
Power Supply
Power supply precautions
• Use only the supplied AC adapter.
Using any other kind of adapter is
dangerous and may lead damage or
malfunction.
• Connect the AC adapter to an outlet that
can easily be reached. If there is any
problem, immediately unplug the
adapter from the AC outlet.
• Do not place the AC adapter on a
bookshelf, in a built-in cabinet or in
another confined location.
• To prevent the risk of fire and electric
shock, do not use the AC adapter in
locations that may be subject to splashes
of water, or in locations with high
humidity. Do not place any containers
with liquids close to the AC adapter.
• AC adapter MCS-AC1
AC 100 V-240V, 50/60 Hz
5 V DC, 2A
Miscellaneous
Notes on using the
“Memory Stick PRO”
media
When the “Memory Stick PRO” media is
used in the MCS1, data read speed is the
same as for a normal “Memory Stick”
media because the MCS1 does not support
high-speed transfers.
About Batteries
The life of a set of batteries differs,
depending on ambient temperature, the
battery type, and other factors.
Operation Battery life
Copying data to
CD-R
Approx. 10 copies of a
128MB Memory Stick.
Battery life is shorter when
copying from a digital still
camera or USB storage
media.
31
GB
Page 32

Notes
• Battery life is measured with Sony Stamina
alkaline batteries LR6 (SG) (made in Japan).
• Besides AA alkaline batteries, Ni-Mn batteries,
or NiMH rechargeable batteries can also be
used. With Ni-Mn and NiMH batteries, you will
need to watch the remaining battery charge
carefully. For details, see page 7.
• The remaining battery capacity is shown in the
display window. This indication is only an
approximation. Actual remaining capacity may
be different, depending on operation status. For
details, see page 7.
•
Turn off the MCS1 before replacing the batteries.
• For prolonged use, powering the MCS1 from
the AC adapter is recommended.
• Remove the batteries when they are exhausted,
or when the MCS1 will not be in use for a long
period of time. Leaving the batteries inserted
may lead to injury or burns due to battery fluid
leaks caused by excessive discharge.
• Remove the batteries when transporting the
battery pack and MCS1, or the battery pack
alone.
Specifications
Compatible discs
8 cm CD-R conforming to Orange Book Part II
specifications.
Discs with a storage capacity of 156 to 210 MB
are supported. Depending on the manufacturer,
some 8 cm CD-R may not be usable in the MCS1.
Write speed
Maximum 4x speed
Read speed
Maximum 4x speed
Write method
Track-at-once
Laser wavelength
λ = 785 nm
Interfaces
USB connector
USB storage media, digital still camera
(compatible with Mass Storage Class or PTP)
Memory Stick slot
Compatible with standard “Memory Stick”
media,
“Memory Stick Duo” media (adapter
required),
“Memory Stick PRO Duo” media
required).
supported.
“Memory Stick PRO” media, and
(adapter
Parallel high-speed data transfer not
Video output
NTSC/PAL (switchable), Baseline JPEG (EXIF)
images only
Operating environment
41°F to 104°F (5°C to 40°C), 5% to 95% RH
(non-condensing)
Storage environment
–40°F to 140°F (–40°C to 60°C), 5% to 95% RH
(non-condensing)
Power requirements
5 V DC from the supplied AC adapter
Batteries (sold separately, for
supplied battery pack)
AA alkaline batteries
AA Ni-Mn batteries
AA NiMH rechargeable batteries
Battery life
See page 31.
External dimensions (W × H × D)
MCS1
4.4 × 0.9 × 3.6 in. (112 × 24 × 91 mm)
Battery pack
4.2 × 0.7 × 1.6 in. (107.8 × 18.3 × 40.1 mm)
Mass
MCS1 Approx. 6.7 oz. (190 g)
Battery pack Approx. 1.0 oz. (28 g) (without batteries)
Supplied accessories
MCS1, battery pack, video output cable, AC
adapter, power cord, 8 cm CD-R, operating
instructions, warranty card
32
GB
Design and specifications are subject to change
without notice.
Page 33

Troubleshooting
If a problem occurs during operation of the MCS1, read the troubleshooting
guide carefully and attempt to solve the problem. If the problem persists,
contact your Sony dealer or a Sony Service Center, or visit
http://www.sony.net/photovault/.
Problems during copying
Symptom Cause/Remedy
The “Memory Stick” media is
not detected.
The digital still camera or USB
storage media is not detected.
The CD-R is not detected.
Cannot write data.
c When the USB connector of the MCS1 is in use, it has priority over
the “Memory Stick” media, therefore it is not detected even if it is
inserted. Disconnect the device connected to the USB connector and
try inserting the “Memory Stick” media again. You can also switch
the operation mode manually by pressing the MODE button (page
28).
c The operation mode of the MCS1 may have been changed. Try
disconnecting the digital still camera or USB storage media, and then
reconnecting it. You can also switch the operation mode manually by
pressing the MODE button (page 28).
c Verify that the digital still camera is on and set to the PLAY mode.
c Some digital still cameras may not be detected by the MCS1.
c If a USB storage media other than the Sony Micro Vault USB storage
media is used, the MCS1 may not be able to detect it.
c If a disc that does not meet specifications is inserted, the MCS1 does
not detect it.
c If the disc is inserted upside down, the MCS1 does not detect it.
Make sure that the disc label is facing up and the recording side
down.
c Make sure that the cover of the MCS1 is properly closed.
c If the disc is scratched or otherwise damaged, the MCS1 may not be
able to detect it. Do not use such a disc.
c If data has already been written to the disc, there may not be
sufficient free capacity. Use a new disc or a disc with sufficient free
capacity.
Miscellaneous
33
GB
Page 34

Problems with displaying digital images on a television
Symptom Cause/Remedy
The video output mode is not
enabled.
The media with digital images
is not detected automatically.
No digital image appears on the
television screen.
The image is distorted.
c The operation mode of the MCS1 may have been changed. Switch
the MCS1 to video output mode manually by pressing the MODE
button (page 28).
c Disconnect any other storage media connected to the MCS1, and then
insert the media containing the digital images that you want to
display on your television screen. You can also change the operation
mode of the MCS1 manually by pressing the MODE button (page
28).
c Make sure that the video output cable is securely connected.
c If the image is not in JPEG format (such as TIFF or other format
files), the MCS1 cannot display it on the television.
c Make sure that the television or video to which the MCS1 is
connected is displaying the correct input channel.
c The video output signal may not be set to the correct format (NTSC/
PAL). Select the correct setting for your country or region (page 27).
Other problems
Symptom Cause/Remedy
The MCS1 does not start.
Batteries are used up very
quickly.
The MCS1 is on, but the unit
does not operate.
A CD-R to which data was
copied cannot be read on a
computer.
c Verify whether the AC adapter or battery pack is connected correctly.
c When using the battery pack, verify that the batteries are inserted
with correct orientation.
c When using the battery pack, the batteries may be exhausted. Replace
all batteries with fresh ones.
c If the MCS1 is being used at very low ambient temperature, the
battery life may be much shorter. In such a case, using the AC
adapter is recommended.
c Condensation may have occurred inside the MCS1. Remove any
CD-R and “Memory Stick” media and disconnect all other
equipment, then wait about one hour.
c Some computers and CD-ROM drives may not be able to read discs
that have not been finalized. Perform the finalization procedure.
c If you are unable to read 8 cm discs written with the MCS1, your
computer and/or CD-ROM drive may be damaged. Try reading the
disc with another computer and/or drive.
34
GB
Page 35

Message Icons
If a problem occurs during operation of the MCS1, one of the following
message icons may appear in the display window.
Icon Meaning
The disc is damaged, or device was disconnected (or cover was
opened) during copying.
The “Memory Stick” media is damaged.
The memory in digital still camera or USB storage media is damaged.
The disc was not detected correctly.
The “Memory Stick” media was not detected correctly.
The memory in digital still camera or USB storage media was not
detected correctly.
The batteries are exhausted.
Miscellaneous
35
GB
Page 36

AVERTISSEMENT
Pour prévenir tout risque
d’incendie ou d’électrocution,
garder cet appareil à l’abri de la
pluie et de l’humidité.
L’appareil contient des
composants à haute tension très
dangereux. N’ouvrez pas le
boîtier. Ne confiez l’entretien de
l’appareil qu’à un technicien
qualifié.
Attention :
L’utilisation d’instruments optiques avec cet appareil
augmente le risque de blessures aux yeux.
Pour les utilisateurs au Canada
Cet appareil numérique de la classe B est
conforme à la norme NMB-003 du Canada.
Pour les utilisateurs en Europe
Ce produit est conforme aux directives
européennes suivantes :
89/336/CEE, 92/31/CEE (Compatibilité
électromagnétique)
Cet appareil est conforme aux normes EN 55022
Classe B et EN 55024, limitant l’emploi dans les
environnements résidentiel, commerciales et
industriel léger.
Une distorsion peut perturber le son et l’image si
l’appareil est placé très près d’un appareil
émettant une radiation électromagnétique.
Cet appareil a été testé et déclaré conforme aux
limites de la directive CEM lors de l’utilisation de
câbles de liaison de moins de trois mètres.
Le graveur de CD-R est un APPAREIL À LASER
DE CLASSE 1 conforme aux normes de sécurité
EN 60825-1.
La réparation et la maintenance du graveur
doivent être confiées à des techniciens agréés par
Sony. Une mauvaise manipulation et une
réparation mal effectuée peuvent s’avérer
dangereuses.
CLASS 1
LASER PRODUCT
LASER KLASSE
PRODUKT
FR
2
Page 37

Table des matières
Introduction
Ce que fait ce produit ............................. 4
Supports et périphériques
compatibles ................................... 5
Accessoires fournis................................. 6
Emplacement des commandes et des
connecteurs ......................................... 7
Fonctions de base
Préparatifs ............................................... 9
Utilisation de l’adaptateur secteur ... 9
Utilisation de la batterie .................. 9
Copie de données sur un CD-R ............ 11
Insertion d’un CD-R ...................... 11
Copie de données à partir d’un
« Memory Stick »........................ 12
Copie de données à partir d’un
appareil photo numérique ........... 15
Visualisation d’images numériques sur un
téléviseur ........................................... 18
Fonctions avancées
Fonctions de copie diverses .................. 20
Ajout de données ........................... 20
Copie de données identiques sur
plusieurs CD-R............................ 21
Copie d’un nombre de données
supérieur à la capacité restante du
CD-R ........................................... 21
Finalisation d’un disque ................ 23
Copie de données depuis un support
de stockage USB ......................... 24
Vérification des données copiées .. 24
Fonctions de lecture diverses................ 26
Visualisation d’autres pages d’index
par groupes de 6 images .............. 26
Visualisation d’images sous forme de
diaporama .................................... 26
Modification de l’intervalle du
diaporama .................................... 27
Pivotement d’une image ................ 27
Modification du signal vidéo
du MCS1 ........................................... 28
Autres fonctions.................................... 29
Mise hors tension automatique ...... 29
Sélection du mode de
fonctionnement ........................... 29
Divers
Précautions ........................................... 30
Entretien ............................................... 31
Remarques à propos de l’utilisation d’un
« Memory Stick ».............................. 31
Alimentation ......................................... 32
A propos des piles ................................ 33
Spécifications ....................................... 34
Dépannage ............................................ 35
Problèmes lors de la copie ............. 35
Problèmes d’affichage des images
numériques sur un téléviseur ...... 36
Autres problèmes........................... 36
Icônes de message ................................ 37
•« Memory Stick », , « Memory Stick
PRO » et « Memory Stick Duo » sont des
marques commerciales de Sony Corporation.
• Les autres noms de système et de produit
mentionnés dans le présent document sont
généralement des marques déposées ou des
marques commerciales de leurs constructeurs
bien que les symboles ™ et ® ne soient pas
utilisés.
FR
FR
3
Page 38

Introduction
Ce que fait ce produit
La mini-station CD-R MCS1 (désignée plus simplement par « le MCS1 »
dans ce manuel) est un outil de sauvegarde spécialement conçu pour être
utilisé avec les disques CD-R de 8 cm. Vous pouvez copier des données de
puis un « Memory Stick » vers ce support à la fois petit et pratique pour
sauvegarder vos données.
Un connecteur USB intégré permet la connexion d’appareils photos
numériques ou de supports de stockage USB, afin de copier directement des
données sur un CD-R sans passer par un ordinateur. Le CD-R créé avec le
MCS1 peut alors être utilisé sur un ordinateur.
Le MCS1 dispose également d’une sortie pour téléviseur, ce qui vous
permet de visionner les photos numériques (JPEG) stockées sur le support
inséré dans l’appareil ou les périphériques raccordés.
FR
4
Page 39

Remarques
• Il n’est possible de visionner que les images fixes au format Baseline JPEG (EXIF). Le
MCS1 ne peut pas reproduire les images dans d’autres formats ou lire des fichiers
vidéo.
• Selon le format JPEG de vos fichiers, le MCS1 risque de ne pas pouvoir afficher
certains fichiers.
Supports et périphériques compatibles
Copie depuis le support et les périphériques source*
Il est possible de copier les données des types de supports et périphériques
suivants.
Catégorie Supports et périphériques pris en
charge
Support « Memory Stick » • Support « Memory Stick »
• Support « Memory Stick Duo »
(adaptateur requis)
• Support « Memory Stick PRO »
• Support « Memory Stick PRO Duo »
(adaptateur requis)
* Le transfert parallèle de données à grand
vitesse n’est pas pris en charge.
Appareil photo numérique avec • Appareil photo numérique compatible avec la
interface USB catégorie Mass Storage ou PTP
Support de stockage USB Sony USM64D/128D/256D
Sony USM128E/256E/512E
Introducion
* Pour obtenir les dernières informations sur la compatibilité, consultez le site
http://www.sony.net/photovault/
Remarque
Le MCS1 ne peut pas être raccordé à d’autres périphériques ou supports que ceux
énumérés ci-dessus, tels qu’un ordinateur ou une imprimante. Il ne peut pas non plus être
utilisé avec un concentrateur USB.
5
FR
Page 40

CD-R compatible
Le MCS1 est compatible avec les CD-R de 8 cm conformes à la norme
Orange Book Part II (Livre Orange partie II), dont la capacité de stockage
est comprise entre 156 et 210 Mo. La quantité réelle de données pouvant
être enregistrée est inférieure à celle indiquée sur l’emballage des disques.
Remarques
• Il n’est pas possible d’utiliser des CD-RW de 8 cm.
• Selon la marque de votre CD-R de 8 cm, il se peut que l’écriture de données sur le
disque soit impossible.
Accessoires fournis
Après avoir déballé l’appareil, vérifiez que vous disposez de l’ensemble des
éléments énumérés ci-dessous. Si l’une des pièces est manquante, contactez
le revendeur Sony chez qui vous avez acheté ce produit ou un représentant
de service après-vente Sony dans votre région.
• Mini-station CD-R MCS1 • Batterie (1)
• Adaptateur secteur (1) • Cordon d’alimentation (1)
• Câble de sortie vidéo (1) • CD-R de 8 cm (1)
• Mode d’emploi (1) • Carte de garantie (1)
FR
6
Page 41

Emplacement des commandes et des
connecteurs
1
2
3
45
7
6
Introducion
1 Touche POWER
2 Fenêtre disque
3 Levier d’ouverture (OPEN)
4 Fente pour Memory Stick
8
9
8 Ecran
9 Touche MODE
0 Touche t (Forward)
qa Touche T (Back)
qs Touche ENTER
0
qa
qs
5 Connecteur USB
6 Connecteur VIDEO OUT
7 Connecteur DC IN
FR
7
Page 42

Ecran
1 2
3
4
1 Voyant de charge
L’icône affichée ici indique le niveau de charge de la batterie du MCS1.
Indique que l’adaptateur secteur est branché ou que la batterie
est complètement chargée.
Indique que la batterie commence à se décharger.
Si vous utilisez des piles Ni-Mn, remplacez-les.
Indique que la batterie est déchargée.
Si vous utilisez des piles NiMH, remplacez-les.
Indique que la batterie est presque totalement déchargée.
Si vous utilisez des piles alcalines, remplacez-les.
(Clignotement) Indique que la batterie est totalement déchargée.
L’alimentation va être coupée immédiatement.
2 Voyant périphérique raccordé
L’icône affichée ici indique le type de support actuellement inséré dans
le MCS1 ou qui lui est raccordé.
Support « Memory Stick »
Appareil photo numérique et support de stockage USB
CD-R
CD-R finalisé. Pour de plus amples informations, reportez-vous
à la page 23.
3 Ecran mode de fonctionnement/message
4 Voyant guide de navigation
FR
8
L’icône indiquant la fin du processus de finalisation apparaît également
ici. Pour de plus amples informations, reportez-vous à la page 23.
Fournit des informations sur l’état de fonctionnement en cours et sert à
afficher différents messages.
Affiche les fonctions des touches de l’appareil dans le mode de
fonctionnement en cours.
Page 43

Fonctions de base
Préparatifs
Pour alimenter le MCS1, vous pouvez utiliser l’adaptateur secteur ou la
batterie fourni(e). Il n’est pas possible d’utiliser les deux simultanément.
Utilisation de l’adaptateur secteur
Chez vous, vous utiliserez normalement l’adaptateur secteur pour alimenter
l’appareil.
1 Branchez le cordon d’alimentation sur l’adaptateur secteur
fourni.
2 Raccordez le cordon de l’adaptateur secteur au connecteur
DC IN situé sur l’appareil MCS1.
Fonctions de base
3 Branchez le cordon d’alimentation sur une prise secteur.
Utilisation de la batterie
En fixant la batterie à l’appareil, vous pourrez utiliser le MCS1 également
dans des endroits sans prise secteur.
FR
9
Page 44

Branchez la batterie directement sur le MCS1 et tournez la
vis de fixation pour sécuriser la batterie.
2 Faites glisser le couvercle du logement des piles dans le
sens de la flèche pour l’ouvrir.
3 Insérez quatre piles AA dans la batterie.
Veillez à introduire les piles en respectant les polarités + et -, selon les
indications à l’intérieur du logement des piles.
10
4 Fermez le couvercle du logement des piles.
FR
Page 45

Types de piles pouvant être utilisées
Les piles ne sont pas fournies avec le MCS1. Achetez l’un des types de
piles suivants :
• piles alcalines AA
• piles Ni-Mn AA
• piles rechargeables NiMH AA (ne peuvent pas être rechargées sur cet
appareil)
Remarques
• Vous ne pouvez pas utiliser de piles au manganèse avec le MCS1.
• Pour obtenir des informations sur le niveau de charge de la batterie, reportez-vous aux
explications de la page 8 . Notamment dans le cas des piles Ni-Mn et NiMH, la tension
décroît rapidement lorsque la batterie est déchargée ; il est donc recommandé de
remplacer les piles le plus tôt possible.
Retrait des piles
Tournez la vis de fixation pour libérer le verrou, puis retirez la batterie du
MCS1.
Copie de données sur un CD-R
Fonctions de base
Insertion d’un CD-R
Pour copier des données sur un CD-R, procédez comme suit.
Remarques
• Le MCS1 doit être placé sur une surface horizontale.
• En cours de copie, le MCS1 ne doit pas être secoué ni heurté.
1 Mettez le MCS1 sous tension en appuyant sur la touche
POWER et en la maintenant enfoncée pendant au moins 2
secondes.
2 Appuyez sur le levier OPEN et faites-le glisser pour ouvrir le
couvercle.
suite
11
FR
Page 46

3 Insérez un nouveau CD-R et refermez le couvercle.
Remarques
• Insérez le CD-R avec l’étiquette orientée vers le haut.
• Ne touchez pas la face d’enregistrement du CD-R.
• Pour fermer le couvercle de du MCS1, rabattez-le jusqu’à ce que vous entendiez
un déclic.
• En raison des caractéristiques d’enregistrement des CD-R, la quantité réelle de
données pouvant être stockée sur un disque est inférieure à celle indiquée sur
l’emballage du disque.
• Selon les fichiers que vous copiez, il se peut que l’espace copié soit supérieur à la
taille des fichiers copiés.
Le disque est détecté et sa capacité de stockage restante s’affiche à
l’écran.
Remarques
• Si vous insérez un CD-R contenant déjà des données dans le MCS1, le mode de sortie
vidéo est automatiquement activé. Pour de plus amples informations, reportez-vous à la
section « Ajout de données » à la page 20.
• Pour prévenir toute possibilité de perte de données, suivez les précautions suivantes :
– N’ouvrez jamais le couvercle du MCS1 pendant une opération de copie.
– Lors de la copie de données à partir d’un support « Memory Stick », n’enlevez pas le
support « Memory Stick ».
– Lors de la copie de données à partir d’un appareil photo numérique, ne mettez pas
l’appareil hors tension ou ne débranchez pas le câble USB.
– Lors de la copie de données à partir d’un support de stockage USB, n’enlevez pas le
support de stockage USB.
• Il est possible de copier jusqu’à 3 000 fichiers (avec les dossiers).
Copie de données à partir d’un « Memory Stick »
Remarque
Le contenu du « Memory Stick » est copié dans son intégralité sur le CD-R en une
opération. Il n’est pas possible de copier des fichiers de manière sélective.
FR
12
Page 47

1 Mettez le MCS1 sous tension, insérez un CD-R et attendez
qu’il soit détecté.
Pour de plus amples informations, reportez-vous à la section
« Insertion du CD-R » à la page 11.
2 Une fois le CD-R détecté, insérez un « Memory Stick » dans
la fente pour Memory Stick du MCS1.
L’état du « Memory Stick » s’affiche à l’écran. Après environ deux
secondes, l’affichage change, comme suit.
b
Fonctions de base
z Conseil
Si la taille des données à copier dépasse la capacité disponible sur le CD-R,
l’écran affiche les informations suivantes. Dans ce cas, vous pouvez répartir les
données sur plusieurs CD-R. Pour de plus amples informations, reportez-vous à
la section « Copie d’un nombre de données supérieur à la capacité restante du
CD-R » à la page 21.
suite
13
FR
Page 48

3 Appuyez sur la touche ENTER.
Le processus de copie de données démarre. Au cours de la copie, l’état
d’avancement est affiché à l’écran.
Une fois la copie terminée, l’écran affiche les informations suivantes.
z Conseil
Si le CD-R est destiné à quelqu’un d’autre ou si vous souhaitez lire le CD-R et
les données copiées avec un autre appareil, il est conseillé de finaliser le disque.
Vous aurez ainsi la garantie de pouvoir lire le CD-R sur la plupart des
ordinateurs. Pour de plus amples informations sur la procédure de finalisation,
reportez-vous à la page 23. Notez qu’il n’est pas possible de copier d’autres
données sur un disque finalisé.
Remarque
Les disques de 8 cm ne sont pas compatibles avec certains ordinateurs.
Lorsque le processus de copie est terminé...
14
Vous pouvez continuer à copier les mêmes données sur un autre CD-R.
Pour de plus amples informations, reportez-vous à la section « Copie de
données identiques sur plusieurs CD-R » à la page 21.
Pour éteindre l’appareil MCS1, procédez comme suit.
1 Maintenez la touche POWER enfoncée pour mettre le MCS1
hors tension.
2 Enlevez le « Memory Stick » en le tirant directement de la
fente pour Memory Stick.
Remarque
Le MCS1 ne peut pas effacer les données contenues sur un « Memory Stick ». Si
vous souhaitez effacer le contenu d’un « Memory Stick », utilisez l’appareil photo
numérique, l’ordinateur ou tout autre périphérique avec lequel le « Memory Stick »
est habituellement utilisé. Avant de procéder à cette opération, vérifiez que les
données ont été correctement copiées sur le CD-R. Pour ce faire, lisez ce dernier sur
le MCS1 à l’aide de la sortie vidéo, ou sur un ordinateur ou un autre périphérique
adéquat.
FR
Page 49

3 Retirez le CD-R.
(1) Appuyez sur le levier OPEN et faites-le glisser pour ouvrir le
couvercle.
(2) Tout en appuyant au centre du disque, saisissez-le par les bords et
retirez-le.
4 Refermez le couvercle.
Copie de données à partir d’un appareil photo numérique
Vous pouvez raccorder la plupart des appareils photo numériques
compatibles USB au MCS1 afin de copier leurs données sur un CD-R.
Utilisez le câble USB fourni avec l’appareil photo pour effectuer le
raccordement.
Pour obtenir les dernières informations sur les appareils photo numériques
compatibles, consultez le site suivant :
http://www.sony.net/photovault/
Remarque
Il n’est pas possible de copier uniquement des fichiers particuliers.
1 Mettez le MCS1 sous tension, insérez un CD-R et attendez
qu’il soit détecté.
Pour de plus amples informations, reportez-vous à la section
« Insertion du CD-R » à la page 11.
Fonctions de base
2 Au moyen du câble USB fourni avec votre appareil photo
numérique, branchez l’appareil photo au MCS1.
suite
15
FR
Page 50

3 Allumez l’appareil photo numérique et réglez-le sur le mode
PLAY*.
L’état de la mémoire de l’appareil photo s’affiche à l’écran. Après
environ deux secondes, l’affichage change, comme suit.
* Mode servant à visionner les images. Il peut être nommé différemment selon les
appareils photo numériques. Pour obtenir plus de détails, reportez-vous à la
section relative au raccordement de l’ordinateur dans le mode d’emploi fourni
avec votre appareil photo numérique.
b
Remarque
Assurez-vous que la batterie de l’appareil photo numérique est suffisamment
chargée avant de lancer le processus de copie. Si la batterie a une défaillance
pendant la copie, les données ne seront pas copiées correctement.
z Conseil
Si la taille des données à copier dépasse l’espace disponible sur le CD-R, vous
pouvez répartir les données sur plusieurs CD-R. Pour de plus amples
informations, reportez-vous à la section « Copie d’un nombre de données
supérieur à la capacité restante du CD-R » à la page 21.
16
4 Appuyez sur la touche ENTER.
Le processus de copie de données démarre. Au cours de la copie, l’état
d’avancement est affiché à l’écran.
Une fois la copie terminée, l’écran affiche les informations suivantes.
FR
Page 51

z Conseil
Si le CD-R est destiné à quelqu’un d’autre ou si vous souhaitez lire le CD-R et
les données copiées avec un autre appareil, il est conseillé de finaliser le disque.
Vous aurez ainsi la garantie de pouvoir lire le CD-R sur la plupart des
ordinateurs. Pour obtenir de plus amples d’informations sur la procédure de
finalisation, reportez-vous à la page 23. Notez qu’il n’est pas possible de copier
d’autres données sur un disque finalisé.
Lorsque le processus de copie est terminé...
Vous pouvez continuer à copier les mêmes données sur un autre CD-R.
Pour de plus amples informations, reportez-vous à la section « Copie des
mêmes données sur plusieurs CD-R » à la page 25.
Pour éteindre l’appareil MCS1, procédez comme suit.
1 Maintenez la touche POWER enfoncée pour mettre le MCS1
hors tension.
2 Mettez l’appareil photo numérique hors tension et
débranchez le câble USB.
Remarque
Le MCS1 ne peut pas effacer les données contenues dans l’appareil photo
numérique. Si vous souhaitez effacer le contenu de la mémoire de l’appareil photo,
vous devez utiliser les fonctions propres à l’appareil photo. Avant de procéder à
cette opération, vérifiez que les données ont été correctement copiées sur le CD-R.
Pour ce faire, lisez ce dernier sur le MCS1 à l’aide de la sortie vidéo, ou sur un
ordinateur ou un autre périphérique adéquat.
Fonctions de base
3 Retirez le CD-R.
(1) Appuyez sur le levier OPEN et faites-le glisser pour ouvrir le
couvercle.
(2) Tout en appuyant au centre du disque, saisissez-le par les bords et
retirez-le.
4 Refermez le couvercle.
17
FR
Page 52

Visualisation d’images numériques sur
un téléviseur
Si vous connectez le MCS1 à un téléviseur à l’aide du câble de sortie vidéo
fourni, vous pouvez visualiser des images numériques (images JPEG) sur
l’écran du téléviseur. Les images peuvent provenir d’un CD-R ou d’un
« Memory Stick » inséré dans le MCS1 ou d’un appareil photo numérique
connecté.
Remarques
• Il n’est possible de visionner que les images fixes au format Baseline JPEG (EXIF). Le
MCS1 ne peut pas reproduire les images dans d’autres formats ou lire des fichiers
vidéo.
• Il est possible que vous ayez des difficultés à visionner des fichiers JPEG qui n’ont pas
été enregistrés avec un appareil photo numérique (fichiers Exif).
• Il est possible que vous ayez des difficultés à visionner des images de 6 mégapixels et
plus.
1 Utilisez le câble de sortie vidéo fourni pour raccorder le
connecteur VIDEO OUT du MCS1 au connecteur d’entrée
vidéo du téléviseur.
2 Allumez le téléviseur et réglez le sélecteur TV/Video sur
« Vidéo ».
18
Remarque
La méthode de sélection de l’entrée vidéo peut varier selon le modèle de votre
téléviseur. Pour de plus amples informations, reportez-vous à la documentation
fournie avec votre téléviseur.
3 Appuyez sur la touche POWER et maintenez-la enfoncée
pendant 2 secondes pour allumer le MCS1.
FR
Page 53

4 Préparez le support contenant les images numériques que
vous souhaitez visualiser.
• Pour visualiser les images numériques contenues sur un CD-R,
insérez-le dans le MCS1.
• Pour visualiser les images numériques contenues sur un « Memory
Stick », insérez-le dans la fente pour Memory Stick du MCS1.
• Pour visualiser des images numériques dans un appareil photo
numérique, raccordez l’appareil photo au MCS1 à l’aide du câble
USB fourni avec l’appareil.
Lorsque vous affichez des images numériques contenues dans le CDR, l’indication suivante apparaît sur l’écran du MCS1.
z Conseil
Si le MCS1 dispose simultanément de plusieurs supports, vous pouvez utiliser la
touche MODE pour en sélectionner un. Pour de plus amples informations,
reportez-vous à la section « Sélection du mode de fonctionnement » page 29.
Lorsque vous effectuez cette procédure, un index de six images numériques
apparaît préalablement sur l’écran de votre téléviseur.
Vous pouvez exécuter les étapes suivantes dans l’index avec les
commandes du MCS1.
Fonctions de base
Pour afficher une image en plein écran
1 Utilisez les touches T/t pour déplacer le curseur sur
l’image numérique souhaitée.
2 Appuyez sur la touche ENTER.
L’image sélectionnée s’affiche en plein écran.
Pour afficher d’autres images
Lorsqu’une image s’affiche en plein écran, vous pouvez utiliser les touches
T/t pour afficher l’image précédente ou suivante. Pour revenir à l’index,
appuyez sur la touche ENTER.
FR
19
Page 54

Fonctions avancées
Fonctions de copie diverses
Ajout de données
Tant qu’un disque n’est pas finalisé, vous pouvez y ajouter des données
jusqu’à ce que sa capacité maximale soit atteinte. Les étapes relatives à
l’ajout de données sont en fait identiques à celles de l’écriture de données
pour la première fois (avec un nouveau disque), à l’exception des points
suivants :
• Lorsque vous insérez un CD-R non finalisé dans le MCS1, l’appareil
passe automatiquement en mode de sortie vidéo pour afficher des images
du support source de copie ou d’autres périphériques. Pour copier de
nouvelles données, vous devez passer manuellement en mode de copie.
Pour ce faire, appuyez plusieurs fois sur la touche MODE jusqu’à ce que
« COPY: MS » ou d’autres indications similaires, y compris le support
source ou un autre appareil, apparaisse sur l’écran. Reportez-vous à la
section « Sélection du mode de fonctionnement » page 29.
• Le MCS1 crée un nouveau dossier chaque fois qu’il copie des données.
Le nom du dossier correspond toujours à la date de création du dernier
fichier copié. Par exemple, si le dernier fichier copié a été créé le 01/02/
2004, le dossier est nommé « 01022004_001 ». Si vous copiez d’autres
données et que le dernier fichier comporte la même date que celle
mentionnée ci-dessus, le dossier est nommé « 01022004_002 », etc.
20
Remarques
• Si vous avez écrit des données sur le CD-R sur un ordinateur ou un appareil autre que le
MCS1, vous risquez de ne pas pouvoir ajouter davantage de données à l’aide du MCS1.
• Vous ne pouvez pas ajouter de données sur un CD-R finalisé.
• Lorsque vous copiez des données sur un CD-R, l’espace copié peut être supérieur à la
taille des fichiers copiés.
FR
Page 55

Copie de données identiques sur plusieurs CD-R
Une fois que vous avez copié des données sur un CD-R, vous pouvez
copier ces mêmes données sur un autre CD-R. Pour ce faire, procédez
comme suit une fois la première copie terminée.
1
Retirez le CD-R copié sur MCS1 et insérez-le nouveau CD-R.
(1) Appuyez sur le levier OPEN et faites-le glisser pour ouvrir le
couvercle.
(2) Tout en appuyant sur le centre du disque, saisissez les bords du
CD-R et prenez-le.
(3) Placez le nouveau CD-R dans le MCS1 et fermez le couvercle.
2 Continuez la copie de données.
La méthode utilisée pour copier les données varie en fonction du type
de support ou du périphérique utilisé comme source. Reportez-vous à
la page correspondante.
Copie d’un nombre de données supérieur à la capacité
restante du CD-R
Fonctions avancées
Lorsque le volume des données à copier depuis un appareil photo
numérique dépasse la capacité restante du CD-R, l’indication suivante
apparaît sur l’écran. Nous avons utilisé la copie de données d’un appareil
photo numérique comme illustration
Dans ce cas, vous pouvez exécuter les étapes suivantes pour fractionner les
données et les copier sur plusieurs CD-R.
z Conseil
Vous pouvez annuler la copie en appuyant sur la touche MODE.
21
FR
Page 56

1 Appuyez sur la touche ENTER.
Le processus de copie de données démarre. Au cours de la copie, l’état
d’avancement est affiché à l’écran.
Remarques
• N’ouvrez jamais le couvercle du MCS1 pendant une opération de copie.
• Ne retirez pas le support « Memory Stick » et ne déconnectez pas l’appareil photo
numérique au cours de la copie.
Lorsque la copie de la première partie des données est terminée,
l’indication « CHANGE DISC » apparaît sur l’écran.
2 Retirez le CD-R.
(1) Appuyez sur le levier OPEN et faites-le glisser pour ouvrir le
couvercle.
(2) Tout en appuyant au centre du disque, saisissez-le par les bords et
retirez-le.
22
3 Placez le CD-R suivant dans le MCS1 et fermez le
couvercle.
4 Répétez les étapes 1 à 3 jusqu’à ce que l’indication suivante
apparaisse sur l’écran.
Vous pouvez répéter la procédure comprenant les étapes 1 à 3 jusqu’à
ce que toutes les données soient copiées. Cette condition est signalée
par l’indication « ALL COPY FINISHED ».
FR
Page 57

Finalisation d’un disque
Après l’écriture des données sur un CD-R, la procédure de verrouillage de
la zone restante de manière qu’aucune autre donnée ne soit écrite est
appelée finalisation. Ceci permet à de nombreux périphériques, tels que des
ordinateurs, des lecteurs CD-ROM, etc., de lire les données du disque.
Après sa finalisation, vous ne pouvez plus ajouter de données à un CD-R,
même s’il comporte encore de l’espace libre.
Remarque
Même lorsqu’un disque est finalisé, certains ordinateurs ou lecteurs CD-ROM risquent de
ne toujours pas pouvoir lire le disque. Si vous rencontrez des problèmes, essayez de lire le
disque sur un autre ordinateur ou un lecteur CD-ROM.
Pour finaliser CD-R, procédez comme suit.
1 Appuyez sur la touche POWER et maintenez-la enfoncée
pendant 2 secondes pour allumer le MCS1.
2 Appuyez sur le levier OPEN et faites-le glisser pour ouvrir le
couvercle.
3 Insérez le CD-R à finaliser et fermez le couvercle.
L’indication « VIDEO-OUT CD-R » apparaît à l’écran.
Fonctions avancées
4 Appuyez plusieurs fois sur la touche MODE jusqu’à ce que
l’indication suivante apparaisse sur l’écran.
suite
23
FR
Page 58

5 Appuyez sur la touche ENTER.
Un message de confirmation apparaît. Appuyez sur la touche ENTER
pour commencer la finalisation du CD-R. La finalisation du CD-R est
lancée. Une fois la finalisation terminée, l’écran indique
« FINISHED ».
Copie de données depuis un support de stockage USB
Vous pouvez raccorder un support de stockage USB au connecteur USB du
MSC1 et copier toutes ses données sur le CD-R. Pour ce faire, exécutez la
même procédure que celle mentionnée dans la section « Copie de données à
partir d’un appareil photo numérique » page 15.
Vous pouvez également utiliser le câble de sortie vidéo fourni pour
raccorder le MCS1 à votre téléviseur et afficher des fichiers JPEG contenus
dans le support de stockage USB sur l’écran de votre téléviseur. Pour de
plus amples informations, reportez-vous à la section « Visualisation
d’images numériques sur un téléviseur » page 18.
Le MCS1 est compatible avec les supports de stockage USB Sony
(USM64D/128D/256D, USM128E/256E/512E). Pour obtenir les dernières
informations sur la compatibilité des supports de stockage USB, consultez le site
http://www.sony.net/photovault/
Vérification des données copiées
En comparant les données originales et celles copiées sur le CD-R, il est
possible de vérifier l’intégrité des données.
Utilisez la procédure suivante pour configurer le MSC1 afin qu’il effectue
cette vérification automatiquement lorsque la copie se termine. Si vous ne
pouvez pas effectuer cette vérification depuis votre ordinateur, par
exemple, nous vous recommandons de vérifier l’intégrité de vos données de
la manière suivante.
FR
24
Page 59

Remarque
La vérification de l’intégrité des données prend environ autant de temps que la copie ellemême.
1 Appuyez sur la touche POWER pendant plus de deux
secondes.
Le MSC1 démarre. Exécutez la procédure suivante avant d’insérer un
CD-R ou de raccorder tout type de support au MSC1.
2 Appuyez sur la touche ENTER pendant plus de deux
secondes.
3 Utilisation des touches T et t, sélectionnez « VERIFY ».
Par défaut, le réglage de la vérification est QUICK. Le réglage QUICK
permet de démarrer la vérification de l’intégrité des données une fois la
copie terminée, permettant de terminer la copie plus rapidement qu’en
utilisant le réglage VERIFY.
4 Appuyez sur la touche ENTER.
La marque « V » qui apparaît en haut de l’écran indique que les
données sont vérifiées automatiquement à la fin de la copie.
Fonctions avancées
z Conseil
Vous pouvez annuler la vérification en appuyant sur la touche MODE.
25
FR
Page 60

Fonctions de lecture diverses
Lorsque vous affichez des images numériques stockées sur un support
raccordé ou inséré dans le MCS1, vous pouvez afficher les diverses
fonctions qui permettent de contrôler l’affichage et de régler l’image
affichée sur le téléviseur.
Pour de plus amples informations sur le raccordement du MCS1 à un
téléviseur, reportez-vous à la section « Visualisation d’images numériques
sur un téléviseur » page 18.
Visualisation d’autres pages d’index par groupes de 6
images
Si vous appuyez sur la touche t et que vous la maintenez enfoncée
pendant 2 secondes lorsque l’index est affiché, le groupe suivant de 6
images s’affiche.
De même, si vous appuyez sur la touche T et que vous la maintenez
enfoncée pendant 2 secondes lorsque l’index est affiché, le groupe
précédent de 6 images s’affiche.
Visualisation d’images sous forme de diaporama
26
Lorsqu’une image en plein écran ou l’index s’affiche, appuyer sur la touche
ENTER et la maintenir enfoncée pendant environ 2 secondes active le
mode diaporama. Si vous activez ce mode lorsque l’index est affiché, le
diaporama débute par l’image sélectionnée.
Le réglage de l’intervalle du mode diaporama par défaut est d’environ 5
secondes, mais il varie en fonction de la taille du fichier. Les images
défilent automatiquement à cette vitesse. Si vous le souhaitez, vous pouvez
modifier l’intervalle. Pour de plus amples informations, reportez-vous à la
section « Modification de l’intervalle du diaporama » page 27.
Lorsque vous appuyez sur la touche ENTER, le mode diaporama est
terminé et l’affichage en plein écran reprend.
FR
Page 61

Modification de l’intervalle du diaporama
1 Appuyez sur la touche MODE et maintenez-la enfoncée
pendant 2 secondes lors de l’affichage en plein écran
normal.
Le réglage de l’intervalle du diaporama apparaît sur l’écran du
téléviseur.
2 Utilisez les touches T/t pour modifier le réglage.
3 Une fois que vous avez réglé l’intervalle souhaité, appuyez
sur la touche MODE.
Le MCS1 revient à l’index.
Fonctions avancées
z Conseil
Ce réglage est mémorisé même si le MCS1 est mis hors tension.
Pivotement d’une image
Lorsque vous visualisez une image individuelle en plein écran, vous pouvez
la faire pivoter en appuyant sur l’une des touches T/t et en la maintenant
enfoncée pendant 2 secondes. L’image pivote à 90° dans le sens de la
flèche.
27
FR
Page 62

Modification du signal vidéo du MCS1
Vous pouvez modifier le signal vidéo utilisé par le MCS1. Vous avez le
choix entre NTSC et PAL.
Remarque
Exécutez cette procédure de configuration lorsqu’aucun CD-R ni aucun autre support
n’est inséré dans le MCS1. Si un CD-R ou un autre support est inséré, la procédure cidessous ne fonctionne pas.
1 Appuyez sur la touche POWER et maintenez-la enfoncée
pendant 2 secondes pour allumer le MCS1.
2 Appuyez sur la touche MODE et maintenez-la enfoncée
pendant au moins deux secondes.
The following indication appears in the display window.
28
z Conseil
• Le signal vidéo qui apparaît dans la fenêtre d’affichage est celui qui est en
cours d’utilisation.
• Le réglage par défaut est NTSC.
• Vous trouverez ci-dessous quelques exemples de régions qui utilisent ces
signaux vidéo :
NTSC : Etats-Unis, Japon, etc.
PAL : Europe, etc.
3 Si vous souhaitez modifier le signal vidéo, utilisez les
touches T/t pour déplacer le curseur sur « NTSC » ou
« PAL ».
4 Appuyez sur la touche ENTER.
Le signal vidéo est modifié.
Remarque
Si vous utilisez le MCS1 à l’étranger, alimentez-le avec la batterie.
FR
Page 63

Autres fonctions
Mise hors tension automatique
Le MCS1 dispose d’une fonction de mise hors tension automatique.
Si le MCS1 reste inactif pendant plus de cinq minutes, il s’éteint
automatiquement. Pour le rallumer, appuyez sur la touche POWER et
maintenez-la enfoncée pendant 2 secondes.
La fonction de mise hors tension automatique est inactive dans les cas
suivants :
• Lors de la copie de données sur un CD-R
• Lorsque la fonction diaporama est active
• Lors de la finalisation
• Lorsqu’un message d’erreur est affiché
Sélection du mode de fonctionnement
Le MCS1 comporte six modes de fonctionnement différents. Normalement,
le mode de fonctionnement est sélectionné automatiquement, mais vous
pouvez le sélectionner manuellement dans les cas suivants :
• Lorsque plusieurs supports ou périphériques sont raccordés
simultanément
• Si vous souhaitez ajouter des données à un CD-R non finalisé
• Si vous souhaitez finaliser un CD-R non finalisé
Fonctions avancées
z Conseil
Lorsque plusieurs supports et/ou périphériques sont raccordés simultanément,
l’ordre de priorité est le suivant :
• Avec VIDEO OUT
1. Appareil photo numérique ou support de stockage USB
2. Support « Memory Stick »
3. CD-R
• Lors de la copie de données
1. Appareil photo numérique
2. Support « Memory Stick »
Sélectionnez le mode de fonctionnement du MCS1 à l’aide de la touche
MODE. Chaque fois que vous appuyez sur cette touche, les réglages
défilent.
29
FR
Page 64

Divers
Précautions
Lieux d’utilisation et de
stockage
N’utilisez pas ou ne stockez pas ce
graveur dans des endroits soumis à une
humidité importante, des températures
élevées, de fortes vibrations ou au
rayonnement direct du soleil.
Fonctionnement
• Ne déplacez pas le graveur pendant son
utilisation pour éviter tout
dysfonctionnement.
• Posez le graveur sur une surface plane
avant de l’utiliser.
• Ne posez pas d’objets sur le graveur.
• Protégez le graveur contre les
changements brusques de température.
N’utilisez pas le graveur
immédiatement après l’avoir déplacé
d’un endroit froid vers un endroit chaud
ni après une hausse importante de la
température ambiante. Dans le cas
contraire, de la condensation risque de
se former dans le graveur. Si la
température change considérablement
pendant le fonctionnement, arrêtez le
graveur tout en le laissant sous tension
et laissez-le reposer pendant environ
une heure avant de le réutiliser.
Lentille
• Si ce lecteur ne fonctionne plus
correctement en raison d’un
encrassement de la lentille, nettoyez-la
avec un dépoussiéreur à air sous
pression en vente dans le commerce.
• Ne touchez pas la lentille du graveur.
De plus, pour éviter que de la poussière
ne colle à la lentille, n’ouvrez le plateau
que pour retirer ou insérer le disque.
Remarques sur les disques
Prenez note de ce qui suit afin de protéger
les données enregistrées sur les disques.
• Ne collez aucune étiquette sur le disque,
ne rayez pas et n’endommagez pas le
disque.
• Ne touchez pas le côté du disque
comportant les données (face opposée à
l’étiquette) et tenez le disque comme
illustré ci-dessous.
• Ne stockez pas le disque dans des
endroits soumis à une humidité
importante, des températures élevées, au
rayonnement direct du soleil ou à une
grande quantité de poussière.
• Veillez à ne pas verser de liquide sur le
disque.
• Remettez le disque dans son boîtier
lorsque vous ne l’utilisez pas afin de ne
pas endommager les données.
• Utilisez un feutre à l’huile- pour écrire
sur la surface du disque.
30
FR
Page 65

• N’utilisez pas de disque sur lequel du
ruban adhésif, des sceaux ou de la colle
sont collés car le disque endommagerait
le graveur.
Remarques à propos
de l’utilisation d’un
« Memory Stick »
Entretien
Nettoyage du boîtier
Essuyez l’extérieur du graveur à l’aide
d’un chiffon doux et sec. Pour enlever les
taches difficiles, humidifiez le chiffon à
l’aide d’un produit nettoyant doux et
neutre. N’utilisez pas de diluants, alcool,
benzine ou autres produits qui pourraient
endommager la finition.
Nettoyage du disque
• Les marques de doigts et autre souillure
de la surface du disque peuvent
entraîner des erreurs. Maintenez
toujours le disque propre.
• Pour nettoyer le disque, essuyez-le
légèrement du centre vers les bords.
• Pour enlever les taches difficiles,
humidifiez légèrement le chiffon avant
d’essuyer le disque, puis utilisez un
chiffon sec.
• N’utilisez pas de benzine, produit de
nettoyage de disques vinyles, liquides
antistatiques ou autres produits qui
pourraient endommager la surface du
disque.
• Ne jamais utiliser de produits nettoyants
sur un disque non utilisé. Utilisez des
produits spécifiques pour leur
nettoyage.
• L’écriture sur les disques présentant des
rayures ou de la poussière sur la zone
non enregistrée peut être impossible.
Veillez à ne pas endommager les
disques.
• Ne touchez pas le connecteur et
empêchez tout contact de celui-ci avec
un objet métallique.
• Utilisez uniquement l’étiquette conçue
pour le support « Memory Stick » et
collez-la à l’endroit spécialement prévu
à cet effet.
• Collez l’étiquette uniquement à
l’endroit prévu à cet effet.
• Conservez le « Memory Stick » dans
son boîtier lors du transport ou du
stockage.
• Ne pliez pas le support « Memory
Stick », ne le faites pas tomber et évitezlui tout choc violent.
• Ne démontez pas le « Memory Stick »
et ne l’altérez pas.
• Conservez le « Memory Stick » à l’abri
de l’eau.
• Ne conservez pas le « Memory Stick »
dans des endroits sujets à :
– des températures extrêmement
élevées, par exemple, dans une
voiture garée en plein soleil ;
– la lumière directe du soleil ;
– un taux d’humidité élevé ou des
substances corrosives.
• Les données du support « Memory
Stick » risquent d’être abîmées
(effacées) dans les cas suivants :
– Lorsque le « Memory Stick » est
retiré du MCS1 ou que celui-ci est
mis hors tension lors de la lecture de
données.
– Lorsque le « Memory Stick » est
utilisé dans un endroit chargé
d’électricité statique ou
d’interférences électriques.
31
Divers
FR
Page 66

Remarques à propos de
l’utilisation d’un « Memory
Stick Duo »
• Avant d’utiliser un « Memory Stick
Duo » avec le MCS1, veillez à l’insérer
dans l’adaptateur pour « Memory Stick
Duo ». Si vous insérez le support
« Memory Stick Duo » directement
dans la fente pour « Memory Stick » du
MCS1, vous risquez de ne plus pouvoir
l’en retirer.
• Lorsque vous insérez le « Memory Stick
Duo » dans l’adaptateur pour « Memory
Stick Duo », vérifiez qu’il est inséré
dans le bon sens.
• Lorsque vous insérez l’adaptateur pour
« Memory Stick Duo » contenant le
« Memory Stick Duo » dans la fente
pour « Memory Stick » du MCS1,
vérifiez qu’il est inséré dans le bon sens.
Sinon, vous risquez d’abîmer le MCS1
ou l’adaptateur.
Pour de plus amples informations,
reportez-vous à la documentation du
« Memory Stick Duo ».
Remarques à propos de
l’utilisation d’un « Memory
Stick PRO »
Alimentation
Précautions d’alimentation
• Utilisez uniquement l’adaptateur secteur
fourni. L’utilisation d’un autre type
d’adaptateur est dangereuse et risque
d’entraîner des dommages matériels ou
des problèmes de fonctionnement.
• Raccordez l’adaptateur secteur à une
prise murale facile d’accès. En cas de
problème, débranchez immédiatement
l’adaptateur de la prise secteur.
• Ne placez pas l’adaptateur secteur sur
une étagère, dans un placard encastré ou
dans un autre endroit confiné.
• Pour éviter tout risque d’incendie et de
choc électrique, n’utilisez pas
l’adaptateur secteur dans des endroits
sujets à l’aspersion d’eau ou à des
températures élevées. Ne placez aucun
récipient contenant un liquide près de
l’adaptateur secteur.
• Adaptateur secteur MCS-AC1
CA 100 V - 240 V, 50/60 Hz
5 V CC, 2A
Lors de l’utilisation du « Memory Stick
PRO » avec le MCS1, la vitesse de lecture
des données est la même que pour un
« Memory Stick » normal, car le MCS1 ne
prend pas en charge les transferts à grande
vitesse.
FR
32
Page 67

A propos des piles
La durée de vie des piles varie en fonction
de la température ambiante, de leur type et
d’autres facteurs.
Utilisation Durée de vie des
piles
Copie de données
sur un CD-R
Remarques
• La durée de vie des piles est mesurée avec des
piles alcalines LR6 Sony Stamina (SG)
(fabriquées au Japon).
• Outre des piles alcalines AA, vous pouvez
également utiliser des piles Ni-Mn ou des piles
NiMH rechargeables. Si vous utilisez des piles
Ni-Mn et NiMH, vous devez surveiller
attentivement leur autonomie. Pour de plus
amples informations, reportez-vous à la page 8.
• L’autonomie des piles est indiquée dans la
fenêtre d’affichage. Cette indication est
approximative. L’autonomie réelle peut varier
selon le fonctionnement. Pour de plus amples
informations, reportez-vous à la page 8.
Environ 10 copies d’un
Memory Stick de 128 Mo.
La durée de vie des piles
est plus courte si vous
effectuez une copie à partir
d’un appareil photo
numérique ou d’un support
de stockage USB.
• Pour une utilisation prolongée, il est
recommandé d’alimenter le MCS1 à l’aide de
l’adaptateur secteur.
• Retirez les piles lorsqu’elles sont épuisées ou si
vous prévoyez de ne pas utiliser le MCS1
pendant une période prolongée. Si vous laissez
les piles en place, une fuite de l’électrolyte
résultant d’un état de décharge excessif peut
provoquer des blessures ou des brûlures.
• Retirez les piles lorsque vous transportez la
batterie rechargeable et le MCS1 ou la batterie
rechargeable seule.
Divers
• Mettez le MCS1 hors tension avant de
remplacer les piles.
33
FR
Page 68

Spécifications
Disques compatibles
CD-R de 8 cm conformes aux spécifications du
Livret orange, Partie II.
Les disques d’une capacité de stockage de 156 à
210 Mo sont pris en charge. Selon le fabricant,
certains CD-R de 8 cm risquent de ne pas pouvoir
être utilisés avec le MCS1.
Vitesse d’écriture
Vitesse maximum 4x
Vitesse de lecture
Vitesse maximum 4x
Méthode d’écriture
Track-at-once (en une seule fois)
Longueur d’onde laser
λ = 785 nm
Interfaces
Connecteur USB
Support de stockage USB, appareil photo
numérique (compatible avec la classe de
stockage en masse ou PTP)
Fente pour Memory Stick
Compatible avec les supports standard
« Memory Stick », « Memory Stick Duo »
(adaptateur requis), « Memory Stick PRO »
et « Memory Stick PRO Duo » (adaptateur
requis). Le transfert parallèle de données à
grand vitesse n’est pas pris en charge.
Sortie Vidéo
NTSC/PAL (basculement), images Baseline JPEG
(EXIF) uniquement
Température de fonctionnement
41°F à 104°F (5°C à 40°C), 5 % à 95 % RH (hors
condensation)
Température de stockage
–40°F à +140°F (–40°C à +60°C), 5 % à 95 % RH
(hors condensation)
Alimentation requise
5 V CC via le connecteur secteur fourni
Piles (vendues séparément, pour la
batterie fournie)
Piles alcalines AA
Piles Ni-Mn AA
Piles AA NiMH rechargeables
Durée de vie des piles
Voir page 32.
Dimensions externes (l × h × p)
MCS1 112 × 24 × 91 mm
Batterie 107,8 × 18,3 × 40,1 mm
Poids
MCS1 Environ 190 g
Batterie Environ 28 g (sans les piles)
Accessoires fournis
MCS1, batterie, câble de sortie vidéo, adaptateur
secteur, cordon d’alimentation, CD-R de 8 cm,
mode d’emploi, garantie
La conception et les spécifications sont sujettes à
modifications sans préavis.
34
FR
Page 69

Dépannage
En cas de problème lors du fonctionnement du MCS1, lisez attentivement
le guide de dépannage et essayez de résoudre le problème. Si le problème
persiste, contactez votre revendeur Sony ou un service après-vente Sony ou
visitez le site http://www.sony.net/photovault/.
Problèmes lors de la copie
Symptôme Cause/Solution
Impossible de détecter le
« Memory Stick ».
Impossible de détecter
l’appareil photo numérique
ou le support de stockage
USB.
Impossible de détecter le
CD-R.
Cannot write data.
c Lors de l’utilisation du connecteur USB du MCS1, ce connecteur est
prioritaire sur le « Memory Stick », c’est pourquoi le « Memory Stick »
n’est pas détecté, même s’il est inséré. Débranchez l’appareil raccordé au
connecteur USB et essayez de nouveau d’insérer le « Memory Stick ».
Vous pouvez également modifier le mode de fonctionnement
manuellement en appuyant sur la touche MODE (page 29).
c Le mode de fonctionnement du MCS1 a été modifié. Débranchez l’appareil
photo numérique ou le support de stockage USB, puis rebranchez-le. Vous
pouvez également modifier le mode de fonctionnement manuellement en
appuyant sur la touche MODE (page 29).
c Vérifiez que l’appareil photo numérique est allumé et réglé en mode PLAY.
c Il est possible que certains appareils photo numériques ne puissent pas
être détectés par le MCS1.
c En cas d’utilisation d’un support de stockage USB autre que le support de
stockage USB Sony Micro Vault, le MCS1 risque de ne pas pouvoir le
détecter.
c En cas d’insertion d’un disque non conforme aux spécifications, il est
possible que le MCS1 ne puisse pas le détecter.
c En cas d’insertion du disque à l’envers, il est impossible au MCS1 de le
détecter. Vérifiez que l’étiquette du disque se trouve face vers le haut et la
surface d’enregistrement orientée vers le bas.
c Vérifiez que le couvercle du MCS1 est correctement fermé.
c En cas de disque rayé ou abîmé, il est possible que le MCS1 ne puisse pas
le détecter. Dans ce cas, n’utilisez pas le disque.
c Si le disque est finalisé, il n’est plus possible d’y écrire des données.
Utilisez un nouveau disque.
Divers
35
FR
Page 70

Problèmes d’affichage des images numériques sur un
téléviseur
Symptôme Cause/Solution
Impossible d’activer le
mode de sortie vidéo.
Impossible de détecter
automatiquement le
support contenant des
images numériques.
Impossible d’afficher
aucune image numérique
sur l’écran du téléviseur.
L’image est déformée.
c Le mode de fonctionnement du MCS1 a été modifié. Réglez
manuellement le MCS1 en mode de sortie vidéo en appuyant sur la
touche MODE (page 29).
c Débranchez tous les autres supports de stockage raccordés au MCS1, puis
insérez le support contenant les images numériques que vous souhaitez
visualiser sur votre écran de téléviseur. Vous pouvez également modifier
manuellement le mode de fonctionnement du MCS1 en appuyant sur la
touche MODE (page 29).
c Vérifiez que le câble de sortie vidéo est correctement raccordé.
c Si l’image n’est pas au format JPEG (s’il s’agit d’une image au format
TIFF ou à d’autres formats), le MCS1 ne peut pas l’afficher sur le
téléviseur.
c Vérifiez que le téléviseur ou l’appareil vidéo auquel le MCS1 est raccordé
affiche le canal d’entrée qui convient.
c Il est possible que le signal de sortie vidéo ne soit pas réglé au format
correct (NTSC/PAL). Sélectionnez le format correct correspondant à
votre pays ou votre région (page 28).
Autres problèmes
Symptôme Cause/Solution
Impossible d’allumer le
MCS1.
Les piles s’usent très
rapidement.
Le MCS1 est allumé, mais
l’appareil ne fonctionne
pas.
FR
36
c Vérifiez que l’adaptateur secteur ou la batterie est raccordé correctement.
c Lors de l’utilisation de la batterie, vérifiez que les piles sont insérées dans
le bon sens.
c Lors de l’utilisation de la batterie, les piles peuvent être usées. Remplacez
toutes les piles par des piles nouvelles.
c Si le MCS1 est utilisé à une température ambiante très basse, la durée de
vie des piles risque de s’en trouver raccourcie. Dans ce cas, il est
recommandé d’utiliser l’adaptateur secteur.
c De la condensation a pu se former à l’intérieur du MCS1. Retirez le CD-R
et le « Memory Stick » et débranchez tous les autres appareils, puis
attendez une heure.
Page 71

Symptôme Cause/Solution
Impossible de lire sur un
ordinateur un CD-R sur
lequel des données ont été
copiées.
c Il est possible que certains ordinateurs et certains lecteurs de CD-ROM ne
puissent pas lire des disques non finalisés. Procédez à la finalisation du
disque.
c Si vous ne pouvez pas lire des disques de 8 cm enregistrés avec le MCS1,
votre ordinateur et/ou le lecteur de CD-ROM est peut-être endommagé.
Essayez de lire le disque sur un autre ordinateur ou un autre lecteur de
CD-ROM.
Icônes de message
En cas de problème lors du fonctionnement du MCS1, il se peut que l’une
des icônes de message suivantes apparaisse dans la fenêtre d’affichage.
Icône Signification
Le disque est abîmé ou l’appareil a été déconnecté (ou le couvercle
ouvert) en cours de copie.
Le support « Memory Stick » est endommagé.
La mémoire de l’appareil photo numérique ou du support de stockage
USB est endommagée.
Divers
Le disque n’a pas été détecté correctement.
Le « Memory Stick » n’a pas été détecté correctement.
La mémoire de l’appareil photo numérique ou du support de stockage
USB n’a pas été détectée correctement.
Les piles sont usées.
37
FR
Page 72

ADVERTENCIA
Para evitar el riesgo de incendios
o electrocución, no exponga la
unidad a la lluvia ni a la humedad.
La tensión eléctrica existente
dentro de la unidad es muy
elevada y puede resultar
peligrosa.
Precaución:
El uso de instrumentos ópticos con este producto
aumentará el riesgo de daños oculares.
Para los clientes en Europa
Este producto cumple con las siguientes
directrices europeas: 89/336/EEC, 92/31/EEC
(Directivas EMC)
Este equipo cumple con las normas EN 55022
Clase B y EN 55024 que autorizan su utilización
en las siguientes áreas: áreas residenciales,
comerciales y de industria ligera.
El sonido y la imagen pueden distorsionarse si el
equipo se coloca muy cerca de aparatos que
emitan radiaciones electromagnéticas.
Este equipo se ha probado y cumple con la
normativa que establece la Directiva EMC si se
utiliza un cable de conexión de menos de 3 metros
de longitud.
Esta unidad de CD-R está clasificada como
PRODUCTO LÁSER DE CLASE 1 y cumple con
el estándar de seguridad EN 60825-1 sobre
productos de este tipo.
Su reparación y mantenimiento sólo debe llevarse
a cabo por técnicos de Sony autorizados.
Su utilización o reparación inadecuada puede
poner en peligro la seguridad del usuario.
CLASS 1
LASER PRODUCT
LASER KLASSE
PRODUKT
ES
2
Page 73

Índice
Introducción
Funciones de este producto .................... 4
Soportes y dispositivos compatibles 5
Accesorios suministrados ....................... 6
Ubicación de los controles y los
conectores ........................................... 6
Operaciones básicas
Preparativos ............................................ 9
Utilización del adaptador de ca ....... 9
Utilización del compartimiento para
pilas ............................................... 9
Copia de datos en un CD-R .................. 11
Inserción del CD-R........................ 11
Copia de datos de un soporte
“Memory Stick” .......................... 12
Copia de datos de una cámara digital
de imágenes fijas ......................... 15
Visualización de imágenes digitales en un
televisor ............................................. 18
Funcionamiento avanzado
Diversas funciones de copia ................. 20
Adición de datos ............................ 20
Copia de los mismos datos en varios
CD-R ........................................... 21
La copia de datos supera la capacidad
restante del CD-R ........................ 21
Finalización de un disco ................ 23
Copia de datos de un soporte de
almacenamiento USB.................. 24
Verificación de datos copiados ..... 25
Diversas funciones de reproducción ..... 26
Visualización de otras páginas del
índice en grupos de 6 imágenes .. 26
Visualización de imágenes como una
presentación de diapositivas ....... 26
Carga del intervalo temporal de la
presentación de diapositivas ....... 27
Girar una imagen ........................... 27
Modificación de la señal de vídeo de la
MCS1 ................................................ 28
Otras funciones ..................................... 29
Desconexión automática ............... 29
Cambio del modo de
funcionamiento ........................... 29
Varios
Precauciones ......................................... 30
Mantenimiento ...................................... 31
Notas sobre el uso de los soportes
“Memory Stick” ................................ 31
Fuente de alimentación ......................... 32
Acerca de las pilas ................................ 33
Especificaciones ................................... 34
Solución de problemas ......................... 35
Problemas durante la copia ........... 35
Problemas al visualizar imágenes
digitales en un televisor .............. 36
Otros problemas ............................ 36
Iconos de mensaje................................. 37
• “Memory Stick”, , “Memory Stick
PRO” y “Memory Stick Duo” son marcas
comerciales de Sony Corporation.
• Todos los demás nombres de sistemas,
productos y servicios son marcas comerciales
de sus respectivos propietarios. En el manual,
las marcas ™ o ® no aparecen.
ES
ES
3
Page 74

Introducción
Funciones de este producto
La miniestación de CD-R MCS1 (denominada “la MCS1” en este manual)
es una herramienta de copia de seguridad especialmente diseñada para
utilizar discos CD-R de 8 centímetros. Puede copiar datos de un soporte
“Memory Stick” a este práctico soporte de pequeño tamaño para garantizar
su seguridad.
Un conector USB integrado permite conectar cámaras digitales de
imágenes fijas o soportes de almacenamiento USB, a fin de copiar los datos
directamente en el CD-R sin tener que utilizar un ordenador. Los CD-R
creados con la MCS1 pueden utilizarse posteriormente en un ordenador.
La MCS1 también dispone de una salida de conexión a un televisor que
permite ver imágenes digitales (JPEG) almacenadas en los soportes que se
encuentren dentro de la unidad o en los dispositivos conectados a ella.
ES
4
Page 75

Notas
• Sólo pueden visualizarse imágenes fijas en formato Baseline JPEG (EXIF). La MCS1
no puede reproducir imágenes en otros formatos ni reproducir archivos de vídeo.
• Según el formato JPEG de los archivos, es posible que la MCS1 no pueda mostrarlos.
Soportes y dispositivos compatibles
Soportes y dispositivos de origen de copia*
Para la copia pueden utilizarse datos de los siguientes tipos de soportes y
dispositivos.
Categoría Soportes y dispositivos compatibles
“Memory Stick” media • Soporte “Memory Stick”
• Soporte “Memory Stick Duo”
(se precisa adaptador)
• Soporte “Memory Stick PRO”
• Soporte “Memory Stick PRO Duo”
(se precisa adaptador)
* No admite transferencias paralelas de datos de
alta velocidad.
Cámara digital con interfaz USB • Cámara digital de imágenes fijas compatible
con Mass Storage Class o PTP
Soporte de almacenamiento USB Sony USM64D/128D/256D
Sony USM128E/256E/512E
Introducción
* Puede consultar la información más reciente acerca de la compatibilidad en la dirección:
http://www.sony.net/photovault/
Nota
La MCS1 no puede conectarse a dispositivos o soportes distintos de los que aparecen en
la lista anterior, como un ordenador o una impresora. Tampoco puede utilizarse con un
concentrador USB.
Discos CD-R compatibles
La MCS1 es compatible con CD-R de 8 centímetros que cumplan con las
especificaciones de la parte II del Orange Book y presenten una capacidad
de almacenamiento entre 156 y 210 MB. La cantidad real de datos que
puede almacenarse es menor que la que aparece en el embalaje del disco.
Notas
• No pueden utilizarse CD-RW de 8 centímetros.
• Dependiendo de la marca del CD-R de 8 centímetros, es posible que no siempre se
puedan escribir datos en el disco.
ES
5
Page 76

Accesorios suministrados
Tras desembalar la unidad, asegúrese de que se incluyen todos los
componentes que se enumeran a continuación. Si falta algún componente,
póngase en contacto con el distribuidor de Sony al que adquirió este
producto o con un representante del servicio técnico de Sony de su zona.
• Miniestación de CD-R MCS1 • Compartimiento para pilas (1)
• Adaptador de ca (1) • Cable de alimentación (1)
• Cable de salida de vídeo (1) • CD-R de 8 centímetros (1)
• Manual de instrucciones (1) • Tarjeta de garantía (1)
Ubicación de los controles y los
conectores
1
2
3
45
1 Botón POWER
2 Ventana del disco
3 Palanca OPEN
4 Ranura para Memory Stick
ES
6
7
5 Conector USB
6 Conector VIDEO OUT
7 Conector DC IN
6
Page 77

8
1 2
Introducción
9
8 Ventana del visor
9 Botón MODE
0 Botón t (adelante)
qa Botón T (atrás)
qs Botón ENTER
Ventana del visor
1 Remaining charge indicator
0
qa
qs
3
4
Este icono indica la carga restante de las pilas de la MSC1.
Indica que el adaptador de ca está conectado o que las pilas
están totalmente cargadas.
Indica que las pilas están empezando a agotarse.
Si utiliza pilas de níquel manganeso, sustitúyalas.
Indica que las pilas están a punto de agotarse.
Si utiliza pilas de Níquel-Metalhidruro, sustitúyalas.
Indica que las pilas están casi agotadas.
Si utiliza pilas alcalinas, sustitúyalas.
(Parpadeo) Indica que las pilas están completamente agotadas. A
continuación, se apagará la alimentación.
Continúa
ES
7
Page 78

2 Indicador de dispositivo conectado
Este icono indica el tipo de soporte insertado o conectado actualmente a
la MCS1.
Soporte “Memory Stick”
Cámara digital de imágenes fijas y soporte de almacenamiento
USB.
CD-R
CD-R finalizado. Para obtener más información, consulte la
página 23.
El icono que indica que el proceso de finalización ha terminado también
aparece aquí. Para obtener más información, consulte la página 23.
3 Visor de modo de funcionamiento/mensajes
Proporciona información acerca del estado de funcionamiento actual y
muestra diversos mensajes.
4 Indicador de guía de navegación
Muestra las funciones que realizan los botones de la unidad en el modo
de funcionamiento actual.
ES
8
Page 79

Operaciones básicas
Preparativos
La MCS1 puede funcionar con el adaptador de ca suministrado o las pilas
del compartimiento para pilas que se incluye. No es posible utilizar ambas
opciones al mismo tiempo.
Utilización del adaptador de ca
Por lo general, para utilizar la unidad en el ámbito doméstico se recurre al
adaptador de ca suministrado.
1 Conecte el cable de alimentación al adaptador de ca
suministrado.
2 Enchufe el cable del adaptador de ca en el conector DC IN
de la MCS1.
Operaciones básicas
3 Enchufe el cable de alimentación a una toma de ca.
Utilización del compartimiento para pilas
Coloque el compartimiento para pilas en la unidad para utilizar la MCS1 en
lugares en los que no dispone de una toma de ca.
ES
9
Page 80

1 Encaje el compartimiento para pilas directamente en la
MCS1 y apriete el tornillo de fijación para sujetarlo.
2 Deslice la tapa del compartimiento para pilas en la dirección
que indica la flecha para abrirla.
3 Inserte cuatro pilas AA.
Asegúrese de que la orientación de los signos + y - de las pilas
coincida con el dibujo del interior del compartimiento.
10
4 Cierre la tapa del compartimiento para pilas.
ES
Page 81

Tipos de pilas que pueden utilizarse
Las pilas no se suministran con la MCS1. Adquiera uno de los siguientes
tipos de pilas:
• Pilas alcalinas AA
• Pilas AA de Níquel-Metalhidruro
• Pilas AA recargables de Níquel-Metalhidruro (no pueden cargarse con
esta unidad)
Notas
• No puede utilizar pilas de manganeso con la MCS1.
• Para obtener más información sobre la carga restante de las pilas, consulte la
explicación de la página 7. Especialmente en el caso de pilas de níquel manganeso y
pilas de hidruro de Níquel-Metalhidruro, el voltaje disminuye rápidamente si la carga
de la pila es baja, por lo que es mejor sustituir antes las pilas.
Para extraer las pilas
Afloje el tornillo de fijación y tire del compartimiento para pilas para
extraerlo de la MCS1.
Copia de datos en un CD-R
Operaciones básicas
Inserción del CD-R
Para copiar datos en un CD-R, realice las siguientes operaciones.
Notas
• Asegúrese de que el MCS1 está colocado sobre una superficie plana.
• No sacuda ni golpee la MCS1 durante la copia.
1 Para encender la MCS1, mantenga pulsado el botón
POWER durante un mínimo de 2 segundos.
2 Presione y deslice la palanca OPEN para abrir la cubierta.
Continúa
ES
11
Page 82

3 Inserte un nuevo CD-R y cierre la cubierta.
Notas
• Inserte el CD-R con la etiqueta hacia arriba.
• No toque la cara grabada del CD-R.
• Presione la cubierta de la MCS1 hasta que escuche un sonido que le indique que
se ha cerrado
• Debido a las características de grabación de los CD-R, la cantidad real de datos
que puede almacenarse en un disco es menor que la que aparece en la caja del
mismo.
• En función de los archivos que copie, es posible que la cantidad de espacio
copiado sea mayor que el tamaño de los archivos copiados.
Se detecta el disco y en la ventana del visor aparece la capacidad de
almacenamiento restante.
Notas
• Si inserta en la MCS1 un CD-R que ya contiene datos, ésta entra automáticamente en
modo de salida de vídeo. Para obtener más información, consulte “Adición de datos” en
la página 20.
• Para evitar la pérdida de datos, tome las siguientes precauciones.
– No abra nunca la cubierta de la MCS1 durante la copia.
– No extraiga el soporte “Memory Stick" cuando esté copiando datos del mismo.
– No apague la cámara digital de imágenes fijas cuando esté copiando datos de la
misma ni desconecte el cable USB.
– No extraiga el soporte de almacenamiento USB cuando esté copiando datos del
mismo.
• Pueden copiarse un máximo de 3.000 archivos (incluidas las carpetas).
Copia de datos de un soporte “Memory Stick”
Nota
Todo el contenido del soporte “Memory Stick” se copia en el CD-R en una única
operación. No es posible copiar archivos seleccionados.
ES
12
Page 83

1 Encienda la MCS1, inserte un CD-R y espere a que la
unidad lo detecte.
Para obtener más información, consulte “Inserción del CD-R” en la
página 11.
2 Cuando se haya detectado el CD-R, inserte el soporte
“Memory Stick” en la ranura para Memory Stick de la MCS1.
El estado de uso del soporte “Memory Stick” aparece en la ventana del
visor. Transcurridos aproximadamente 2 segundos, el visor cambia
como se indica a continuación.
b
Operaciones básicas
z Sugerencia
Si el tamaño de los datos que van a copiarse supera la capacidad restante del CD-R,
la ventana del visor mostrará la información que aparece a continuación. En ese
caso, puede dividir los datos en varios CD-R. Para obtener más información,
consulte “La copia de datos supera la capacidad restante del CD-R” en la página 21.
Continúa
13
ES
Page 84

3 Pulse el botón ENTER.
Se inicia el proceso de copia de datos cuyo progreso aparece en la
ventana del visor.
Cuando la copia finaliza, la indicación cambia como se indica a
continuación.
z Sugerencia
Si desea entregar el CD-R a otras personas o bien utilizarlo para consultar los
datos copiados en un dispositivo distinto de la MCS1, se recomienda finalizar el
disco. De esta manera, se asegurará de que el CD-R pueda leerse en la mayoría
de los ordenadores. Para obtener más información acerca del procedimiento de
finalización, consulte la página 23. Tenga en cuenta que no es posible añadir
datos a un disco finalizado.
Nota
Los discos de 8 centímetros no son compatibles con algunos ordenadores.
Cuando el proceso de copia termina...
14
Puede seguir copiando los mismos datos en otro CD-R. Para obtener más
información, consulte, “Copia de los mismos datos en varios CD-R” en la
página 21.
Para apagar la MCS1, proceda como sigue.
1 Para apagar la MCS1, mantenga pulsado el botón POWER.
2 Extraiga el soporte “Memory Stick” de la ranura para
Memory Stick.
Nota
La MCS1 no puede borrar datos de un soporte “Memory Stick”. Si desea borrar el
contenido de un soporte “Memory Stick”, recurra a una cámara digital de imágenes
fijas, un ordenador u otro dispositivo con el que se utilice normalmente el soporte
“Memory Stick”. Antes, compruebe que los datos están correctamente escritos en el
CD-R. Para ello, reproduzca este último en la MCS1 en modo de salida de vídeo, o
bien en un ordenador o en otro dispositivo.
ES
Page 85

3 Extraiga el CD-R.
(1) Presione y deslice la palanca OPEN para abrir la cubierta.
(2) Mientras presiona el centro del disco, tome el CD-R por los bordes
y retírelo.
4 Cierre la cubierta.
Copia de datos de una cámara digital de imágenes fijas
Puede conectar cualquier cámara digital de imágenes fijas compatible con
USB la MCS1 para copiar los datos que contenga en un CD-R. Utilice el
cable USB suministrado con la cámara para realizar la conexión.
Puede encontrar la información más actualizada sobre cámaras digitales
compatibles en:
http://www.sony.net/photovault/
Nota
No es posible copiar únicamente archivos concretos.
1 Encienda la MCS1, inserte un CD-R y espere a que la
unidad lo detecte.
Para obtener más información, consulte “Inserción del CD-R” en la
página 11.
Operaciones básicas
2 Utilice el cable USB suministrado con la cámara digital de
imágenes fijas para conectar esta última a la MCS1.
Continúa
15
ES
Page 86

3 Encienda la cámara digital de imágenes fijas y ajústela en
modo de reproducción (PLAY)*.
El estado de uso de la memoria de la cámara aparece en la ventana del
visor. Transcurridos aproximadamente 2 segundos, el visor cambia
como se indica a continuación.
* Modo de visualización de imágenes. El nombre real puede variar en función de la
cámara digital de imágenes fijas. Para obtener más información, consulte la
sección sobre cómo conectar el ordenador en el manual de instrucciones que se
incluye con la cámara digital.
b
Nota
Asegúrese de que la cámara digital de imágenes fijas tiene suficiente batería antes de
iniciar el proceso de copia. Si ésta falla durante la copia, los datos no se escribirán
correctamente.
z Sugerencia
Si el tamaño de los datos que van a copiarse supera la capacidad restante del CD-R,
puede dividirlos en varios discos CD-R. Para obtener más información, consulte
“La copia de datos supera la capacidad restante del CD-R” en la página 21.
16
4 Pulse el botón ENTER.
Se inicia el proceso de copia de datos cuyo progreso aparece en la
ventana del visor.
Cuando la copia finaliza, la indicación cambia como se indica a
continuación.
ES
Page 87

z Sugerencia
Si desea entregar el CD-R a otras personas o bien utilizarlo para consultar los
datos copiados en un dispositivo distinto de la MCS1, se recomienda finalizar el
disco. De esta manera, se asegurará de que el CD-R pueda leerse en la mayoría
de los ordenadores. Para obtener más información acerca del procedimiento de
finalización, consulte la página 23. Tenga en cuenta que no es posible añadir
datos a un disco finalizado.
Cuando el proceso de copia termina...
Puede seguir copiando los mismos datos en otro CD-R. Para obtener más
información, consulte, “Copia de los mismos datos en varios CD-R” en la
página 21.
Para apagar la MCS1, proceda como sigue.
1 Para apagar la MCS1, mantenga pulsado el botón POWER.
2 Apague la cámara digital de imágenes fijas y desconecte el
cable USB.
Nota
La MCS1 no puede borrar datos de una cámara digital de imágenes fijas. Si desea
borrar el contenido de la memoria de la cámara, utilice las funciones de esta última.
Antes, compruebe que los datos están correctamente escritos en el CD-R. Para ello,
reproduzca este último en la MCS1 en modo de salida de vídeo, o bien en un
ordenador o en otro dispositivo.
Operaciones básicas
3 Extraiga el CD-R.
(1) Presione y deslice la palanca OPEN para abrir la cubierta.
(2) Mientras presiona el centro del disco, tome el CD-R por los bordes
y retírelo.
4 Cierre la cubierta.
17
ES
Page 88

Visualización de imágenes digitales en
un televisor
Si conecta la MCS1 a un televisor con el cable de salida de vídeo
suministrado, podrá visualizar imágenes digitales (imágenes JPEG) en la
pantalla del mismo. Las imágenes pueden proceder de un CD-R, un soporte
“Memory Stick” insertado en la MCS1 o una cámara digital de imágenes
fijas conectada.
Notas
• Sólo pueden visualizarse imágenes fijas en formato Baseline JPEG (EXIF). La MCS1
no puede reproducir imágenes en otros formatos ni archivos de vídeo.
• Es posible que experimente algún problema al visualizar archivos JPEG realizados con
cámaras digitales de imágenes fijas (archivos Exif).
• Es posible que experimente algún problema al visualizar imágenes de 6 megapíxeles o
mayores.
1 Utilice el cable de salida de vídeo suministrado para
conectar el conector VIDEO OUT de la MCS1 al conector de
entrada de vídeo del televisor.
2 Encienda el televisor y ajuste el selector TV/Video en
“Video”.
18
Nota
El método de selección de la entrada de vídeo puede variar en función del modelo de
televisor. Para obtener más información, consulte la documentación suministrada
con el televisor.
3 Para encender la MCS1, mantenga pulsado el botón
POWER durante un mínimo de 2 segundos.
4 Prepare el soporte que contiene las imágenes digitales que
desea visualizar.
• Para visualizar las imágenes digitales de un CD-R, insértelo en la
MCS1.
• Para visualizar las imágenes digitales de un soporte “Memory Stick”,
insértelo en la ranura para Memory Stick de la MCS1.
• Para visualizar las imágenes digitales de una cámara digital de
imágenes fijas, conéctela a la MCS1 mediante el cable USB
suministrado con la misma.
ES
Page 89

Al visualizar imágenes digitales de un CD-R, en la ventana del visor de
la MCS1 aparece la siguiente indicación.
z Sugerencia
Si la MCS1 dispone de varios soportes al mismo tiempo, puede utilizar el botón
MODE para seleccionar uno de ellos. Para obtener más información, consulte
“Cambio del modo de funcionamiento” en la página 29.
Al llevar a cabo este procedimiento, en la pantalla del televisor aparecerá
primero un índice con seis imágenes digitales.
En este índice puede realizar las siguientes acciones con los controles de la
MCS1.
Para visualizar una imagen a pantalla completa
1 Utilice los botones T/t para desplazar el cursor a la
imagen digital deseada.
Operaciones básicas
2 Pulse el botón ENTER.
La imagen seleccionada aparece en la pantalla a tamaño completo.
Para visualizar otras imágenes
Cuando una imagen se visualiza a pantalla completa, puede utilizar los
botones T/t para mostrar la imagen anterior o la siguiente. Para volver
al índice, pulse el botón ENTER.
19
ES
Page 90

Funcionamiento avanzado
Diversas funciones de copia
Adición de datos
Siempre que el disco no haya sido finalizado, puede añadirle más datos
hasta alcanzar la capacidad del mismo. Los pasos para añadir datos son
básicamente los mismos que para escribir datos por primera vez (en un
disco nuevo) excepto en los puntos siguientes.
• Cuando se inserta un CD-R no finalizado en la MCS1, la unidad entra
automáticamente en modo de salida de vídeo para visualizar imágenes
desde los soportes o los dispositivos de origen de copia. Para copiar datos
nuevos, debe pasar manualmente al modo de copia. Para ello, pulse el
botón MODE varias veces hasta que “COPY: MS” o una indicación
similar que incluya el soporte o dispositivo de origen aparezca en la
ventana del visor Consulte “Cambio del modo de funcionamiento” en la
página 29.
• La MCS1 crea una nueva carpeta cada vez que copia datos. El nombre de
ésta siempre es la fecha de creación del archivo más reciente que se ha
copiado. Por ejemplo, si el archivo más reciente que se ha copiado se
creó el 1 de febrero de 2004, el nombre de la carpeta será
“01022004_001”. Si copia otros datos y el archivo más reciente presenta
la misma fecha, el nombre de la carpeta pasará a ser “01022004_002”, y
así sucesivamente.
20
Notas
• Si los datos se escribieron en el CD-R con un ordenador o un dispositivo distinto de la
MCS1, es posible que no pueda añadir más datos con la MCS1.
• No es posible añadir datos a un CD-R finalizado.
• Al copiar datos en un CD-R, es posible que la cantidad de espacio copiado sea mayor
que el tamaño de los archivos copiados.
ES
Page 91

Copia de los mismos datos en varios CD-R
Puede copiar los datos que ha copiado en un CD-R en otro CD-R. Para ello,
proceda como se indica a continuación una vez terminada la primera copia.
1 Extraiga el CD-R copiado de la MCS1 e inserte el nuevo.
(1) Presione y deslice la palanca OPEN para abrir la cubierta.
(2) Mientras presiona el centro del disco, tome el CD-R por los bordes
y retírelo.
(3) Coloque el CD-R nuevo en la MCS1 y cierre la cubierta.
2 Siga copiando datos.
El método para copiar datos varía en función del tipo de soporte o
dispositivo utilizado como origen. Consulta la página que corresponda.
La copia de datos supera la capacidad restante del CD-R
Cuando el tamaño de los datos que van a copiarse de una cámara digital de
imágenes fijas supera la capacidad restante del CD-R, en la ventana del
visor aparece la siguiente indicación. A modo de ejemplo, hemos utilizado
la copia de datos de una cámara digital de imágenes fijas.
Funcionamiento avanzado
En este caso, puede realizar los pasos siguientes para dividir los datos y
copiarlos en varios CD-R.
z Hint
Puede cancelar la copia pulsando el botón MODE.
21
ES
Page 92

1 Pulse el botón ENTER.
Se inicia el proceso de copia de datos cuyo progreso aparece en la
ventana del visor.
Notas
• No abra nunca la cubierta de la MCS1 durante la copia.
• No extraiga el soporte “Memory Stick” ni desconecte la cámara digital de
imágenes fijas durante la copia.
Cuando se haya completado la copia de la primera parte de los datos,
aparecerá la indicación “CHANGE DISC” en la ventana del visor.
2 Extraiga el CD-R.
(1) Presione y deslice la palanca OPEN para abrir la cubierta.
(2) Mientras presiona el centro del disco, tome el CD-R por los bordes
y retírelo.
22
3 Coloque el siguiente CD-R en la MCS1 y cierre la cubierta.
4 Repita los pasos 1 a 3 hasta que aparezca la siguiente
indicación en la ventana del visor.
El procedimiento descrito en los pasos 1 a 3 puede repetirse hasta que
se hayan copiado todos los datos. Cuando esto suceda, aparecerá la
indicación “ALL COPY FINISHED”.
ES
Page 93

Finalización de un disco
Una vez que se han escrito datos en un CD-R, el procedimiento de bloqueo
de las zonas restantes para que no puedan escribirse más datos se denomina
finalización. Este proceso permite que un gran número de dispositivos,
como ordenadores, unidades de CD-ROM, etc., puedan leer los datos del
disco.
Una vez finalizado, no es posible añadir más datos al CD-R aunque todavía
disponga de espacio libre.
Nota
Aunque un disco esté finalizado, puede que algunos ordenadores o unidades de CD-ROM
no puedan reproducirlo. Si tiene problemas de este tipo, intente leer el disco en otro
ordenador o unidad de CD-ROM.
Para finalizar un CD-R, realice las siguientes operaciones.
1 Para encender la MCS1, mantenga pulsado el botón
POWER durante un mínimo de 2 segundos.
2 Presione y deslice la palanca OPEN para abrir la cubierta.
3 Inserte el CD-R que desea finalizar y cierre la cubierta.
La indicación “VIDEO-OUT CD-R” aparecerá en la ventana del visor.
Funcionamiento avanzado
4 Pulse el botón MODE varias veces hasta que aparezca la
siguiente indicación en la ventana del visor.
Continúa
23
ES
Page 94

5 Pulse el botón ENTER.
Aparecerá un mensaje de confirmación. Pulse el botón ENTER y se
inicia la finalización del CD-R. Se inicia la finalización del CD-R.
Cuando se haya completado, en la ventana del visor aparecerá el
mensaje “FINISHED”.
Copia de datos de un soporte de almacenamiento USB
Puede conectar un soporte de almacenamiento USB al conector USB de la
MSC1 y copiar todos los datos que contiene en un CD-R. Para ello, siga el
mismo procedimiento descrito en “Copia de datos de una cámara digital de
imágenes fijas”, en la página 15.
También puede utilizar el cable de salida de vídeo suministrado para
conectar la MCS1 al televisor y visualizar los archivos JPEG del soporte de
almacenamiento USB en la pantalla del mismo. Para obtener más
información, consulte “Visualización de imágenes digitales en un
televisor”, en la página 18.
La MCS1 es compatible con el soporte de almacenamiento USB de Sony
(USM64D/128D/256D, USM128E/256E/512E). Puede consultar la
información más reciente acerca de la compatibilidad con el soporte de
almacenamiento USB en la dirección:
http://www.sony.net/photovault/
24
ES
Page 95

Verificación de datos copiados
Es posible verificar la integridad de los datos copiados en un CD-R
comparándolos con los originales.
Lleve a cabo el siguiente procedimiento para configurar la MSC1 a fin de
que realice esta verificación automáticamente cuando termine la copia. Si
no puede llevar a cabo esta verificación desde el ordenador, por ejemplo, le
recomendamos que lo haga de la siguiente manera.
Nota
La verificación de la integridad de los datos tarda aproximadamente el mismo tiempo que
la copia propiamente dicha.
1 Pulse el botón POWER durante más de 2 segundos.
La MSC1 se enciende. Realice el siguiente procedimiento antes de
insertar un CD-R o conectar cualquier tipo de soporte a la MSC1.
2 Pulse el botón ENTER durante más de 2 segundos.
3 Utilice los botones T y t para seleccionar “VERIFY”.
De modo predeterminado, el ajuste de verificación es QUICK. Este
ajuste inicia la verificación de la integridad de los datos una vez
terminada la copia, lo que permite que ésta se lleve a cabo más deprisa
que con el ajuste VERIFY.
Funcionamiento avanzado
4 Pulse el botón ENTER.
La marca “V” aparece en la parte superior del visor e indica que los
datos se han verificado automáticamente al finalizar la copia.
z Hint
Puede cancelar la verificación pulsando el botón MODE.
25
ES
Page 96

Diversas funciones de reproducción
Mientras visualiza las imágenes digitales de un soporte conectado a la
MCS1 o insertado en ella, puede acceder a diversas funciones de control de
visualización y de ajuste de la imagen que aparece en el televisor.
Para obtener más información sobre la conexión de la MCS1 a un televisor,
consulte “Visualización de imágenes digitales en un televisor”, en la página 18.
Visualización de otras páginas del índice en grupos de 6
imágenes
Si mantiene pulsado el botón t durante 2 segundos mientras se visualiza
el índice, aparecerá el siguiente grupo de 6 imágenes.
De manera similar, si mantiene pulsado el botón T durante 2 segundos
mientras se visualiza el índice, aparecerá el grupo de 6 imágenes anterior.
Visualización de imágenes como una presentación de
diapositivas
Cuando se visualiza el índice o una imagen a pantalla completa, puede
habilitar el modo de presentación de diapositivas manteniendo pulsado el
botón ENTER durante aproximadamente 2 segundos. Si activa este modo
durante la visualización del índice, la presentación de diapositivas
comenzará con la imagen seleccionada.
26
El ajuste predeterminado del intervalo en el modo de presentación de
diapositivas es de aproximadamente 5 segundos, pero puede variar en
función del tamaño del archivo. Las imágenes se suceden automáticamente
a este ritmo. Si lo desea, puede cambiar este ajuste. Para obtener más
información, consulte, “Carga del intervalo temporal de la presentación de
diapositivas”, en la página 27.
Al pulsar el botón ENTER, saldrá del modo de presentación de diapositivas
y volverá a la visualización normal a pantalla completa.
ES
Page 97

Carga del intervalo temporal de la presentación de
diapositivas
1 Mantenga pulsado el botón MODE durante 2 segundos
mientras visualiza una imagen a pantalla completa.
Aparecerá el ajuste del intervalo temporal de la presentación de
diapositivas en la pantalla del televisor.
2 Utilice los botones T/t para modificarlo.
3 Cuando haya ajustado el intervalo temporal que desee,
pulse el botón MODE.
La MCS1 vuelve al índice.
Funcionamiento avanzado
z Sugerencia
Este ajuste se conservará aunque se apague la MCS1.
Girar una imagen
Cuando se está visualizando una única imagen a pantalla completa, es
posible girarla manteniendo pulsado uno de los botones T/t durante 2
segundos. La imagen gira 90˚ cada vez en la dirección de la flecha.
27
ES
Page 98

Modificación de la señal de vídeo de la
MCS1
Es posible modificar la señal de vídeo utilizada por la MCS1. Puede elegir
entre los modos NTSC y PAL.
Nota
Realice este procedimiento de configuración sin CD-R u otros soportes insertados en la
MCS1. En caso contrario, el procedimiento que se describe a continuación no funcionará.
1 Para encender la MCS1, mantenga pulsado el botón
POWER durante un mínimo de 2 segundos.
2 Mantenga pulsado el botón MODE durante un mínimo de 2
segundos.
En la ventana del visor aparece la siguiente indicación.
28
z Sugerencias
• La señal de vídeo que aparece en la ventana del visor es la que se utiliza
actualmente.
• El ajuste predeterminado es NTSC.
•A continuación, aparecen algunos ejemplos de regiones que utilizan estas
señales de vídeo.
NTSC: EE.UU., Japón, etc.
PAL: Europa, etc.
3 Si desea modificar la señal de vídeo, utilice los botones T/
t para mover el cursor a “NTSC” o “PAL”.
4 Pulse el botón ENTER.
La señal de vídeo se modifica.
Nota
Cuando utilice la MCS1 en el extranjero, use el compartimiento para pilas como fuente de
alimentación.
ES
Page 99

Otras funciones
Desconexión automática
La MCS1 incorpora una función de desconexión automática.
Si la MCS1 está inactiva durante más de 5 minutos, la unidad se desconecta
automáticamente. Para volver a encenderla, mantenga pulsado el botón
POWER durante un mínimo de 2 segundos.
La función de desconexión automática se inhabilita en los siguientes casos:
• Mientras se copian datos en un CD-R
• Mientras la función de presentación de diapositivas está activa
• Durante la finalización
• Mientras se visualiza un mensaje de error
Cambio del modo de funcionamiento
La MCS1 dispone de seis modos de funcionamiento. Por lo general, el
modo de funcionamiento se selecciona automáticamente. Sin embargo,
resulta útil seleccionarlo manualmente en los siguientes casos.
• Cuando se conectan varios soportes o dispositivos al mismo tiempo
• Cuando se desea añadir datos a un CD-R sin finalizar
• Cuando se desea finalizar un CD-R sin finalizar
Funcionamiento avanzado
z Sugerencia
Cuando se hayan conectado simultáneamente varios soportes o dispositivos, el
orden de prioridad será el siguiente:
• Con VIDEO OUT
1. Cámara digital de imágenes fijas o soporte de almacenamiento USB.
2. Soporte “Memory Stick”
3. CD-R
• Al copiar datos
1. Cámara digital de imágenes fijas
2. Soporte “Memory Stick”
El modo de funcionamiento de la MCS1 puede cambiarse con el botón
MODE. Cada vez que pulse el botón, el cursor irá a uno de los ajustes.
29
ES
Page 100

Varios
Precauciones
Lugares de uso y
almacenamiento
No utilice ni almacene esta unidad en
lugares expuestos a mucha humedad,
temperaturas altas, vibraciones intensas o
la luz directa del sol.
Funcionamiento
•
No mueva la unidad durante el
funcionamiento para evitar la
posibilidad de fallos.
• Utilice la unidad encima de una
superficie estable.
• No coloque objetos de ningún tipo
encima de la unidad.
• Proteja la unidad de cambios súbitos de
temperatura. No utilice la unidad
inmediatamente después de trasladarla
de una ubicación fría a otra cálida o
después de que la temperatura ambiente
haya subido significativamente. En caso
contrario, puede producirse
condensa
Si la temperatura cambia
significativamente durante el
funcionamiento, deje de utilizar la
unidad pero manténgala encendida
durante aproximadamente una hora
antes de volver a utilizarla.
ción en el interior de la misma.
Objetivo
• Si esta unidad ya no funciona
correctamente porque el objetivo está
sucio, límpielo con un pulverizador de
aire presurizado disponible en el
mercado.
• No toque el objetivo de esta unidad.
Además, para evitar que el polvo se
adhiera al mismo, no abra la bandeja
más que para extraer o insertar discos.
Notas sobre los discos
Tenga en cuenta lo siguiente para proteger
los datos almacenados en los discos.
• No pegue ninguna etiqueta en el disco
ni lo raye o dañe en modo alguno.
• No toque la superficie en la que se
guardan los discos (la cara opuesta a la
de la etiqueta) y sujete el disco como se
muestra a continuación.
• No guarde el disco en ubicaciones
polvorientas o expuestas a mucha
humedad, altas temperaturas o luz solar
directa.
• Procure no derramar ningún líquido en
el disco.
• Cuando no utilice el disco, colóquelo en
su caja para evitar que se dañe.
• Utilice un rotulador de punta de fieltro
para escribir en la etiqueta de los discos.
• No utilice discos con cinta, adhesivos o
pegamento, ya que podrían dañar la
unidad.
30
ES
 Loading...