

Page 1

By
Pawel Mantykiewicz
Sony MAVICA FD 95/97 Tutorial
Table of contents:
Identifying parts of the camera
Getting Started
Taking a Picture
Preview a Picture
How to Use the Control Button
Advanced Functions: Image Resolution
How to Set the Resolution
Page 1
Page 1
Page 2
Page2
Page 3
Page 3
Page 4
Advanced Functions: Copying between Memory Stick and Floppy
Memory Stick vs. Floppy
Page 4
Page 5
Page 2
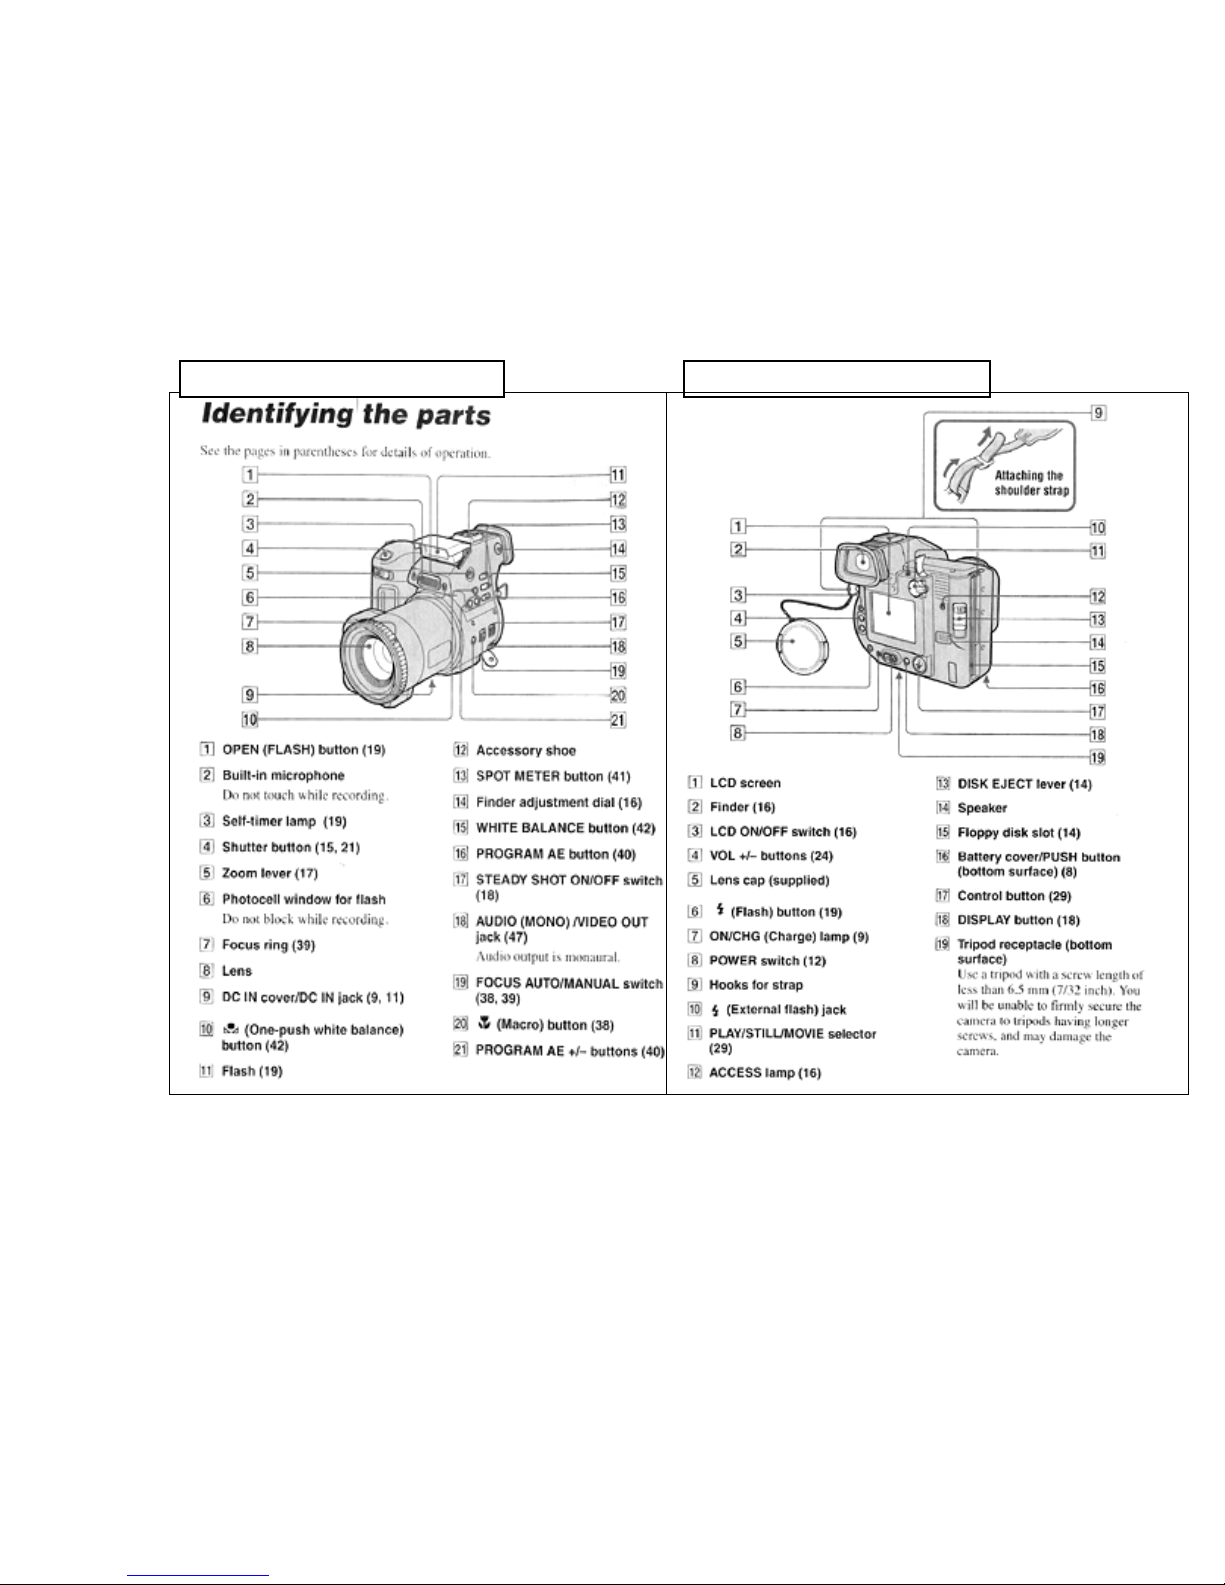
Knowing your Mavica FD 95/97 camera:
Welcome to Sony Mavica Digital Camera quick start manual. Below you will find a list
of parts and their short description. It is not necessary to know them all however it is
good to know the basic ones such as where the flash button is, or where Play/Still/Movie
selector is. Plus, it can serve you in the future when you will ask “what does this button
do?”.
1
Getting Started:
• After turning on the camera by sliding the switch to the right (#8 on the right
diagram) you will see the LCD (Liquid Crystal Display) come on and display the
picture (makes sure the lens cover is of). Also makes sure that the
Play/Still/Movie selector (#11 on the right diagram) is in “Still” position. If the
LCD does not turn on try pressing the LCD ON /OFF button #3 on right diagram.
• Slide in the diskette into the slot on the right (#15 on the right diagram), pictures
will get saved directly on it.
• When you hold the camera on the top right side there is Forward/Back slider (see
#5 on left diagram) this will zoom in and out the picture displayed on the LCD.
Page 3

Taking a Picture:
When you have the right image on the LCD gently press down on the shutter button (#4
on the left diagram). You should see the image sharpen followed by a double beep and a
green dot appearing on the top middle of the LCD, this indicates that the camera is ready
to take the picture. Press the shutter button all the way down; you will then hear a
simulated shutter sound, this will mean that the picture was taken.
Preview of the Pictures:
To Preview pictures that you took follow these simple steps below. Also familiarize
yourself with the use of the control button (see #17 on the right diagram), which acts like
a joystick, in the manner that you move it up, down, left or right with your finger.
Finder
LCD
2
Page 4

3
The Control Button is crucial to accessing more advanced camera functions, such as
Preview option, time and date stamp on the picture, filters, as well as the resolution of the
picture.
Advanced Functions:
Image resolution:
The resolution at which you are taking the picture will define the dimensions of the
picture as well as its size on the diskette. The bigger the resolution the clearer and more
precise the image will be however it will take more space on the floppy hence restricting
the amount of pictures that can fit on one disk.
The Sony Mavica takes pictures in 3 resolutions :
• 640 x 480 – smallest resolution, perfect for taking quick pictures where the detail
is less important and where speed and amount of pictures is. Good for sending
over e-mail. You are able to put about 30 pictures on a single disk using this
resolution.
• 1024 x 768 – medium resolution, greater detail, larger image dimensions (usually
almost full computer screen) good for landscapes, group photos and such. You
can put about 12 pictures on a disk using this resolution. (This is a recommended
resolution.)
• 1600 x 1200 – highest resolution, incredibly big image dimensions and detail,
those pictures will be very big and will take a lot of space. Only 3 pictures of
that resolution will fit on one disk.
Page 5

4
To set resolution:
• Position the Play/Still/Movie selector to still.
• First you want to press the control button up,
select the file
menu (left or right direction, the color of the selected item changes
(menu bar pops up) then use it to
from blue to yellow).
• Next you want to press the control button up, so the file menu pops up.
• Then press it up again to select image size menu, and press it in the right direction
so the resolution choices pops up.
• Now all you have to do is use the command button (press up or down) to select
resolution that you want and press the center of the control button. The resolution
choices should disappear, which means that you have selected your resolution.
• To exit keep pressing command button down until the menu bar disappears.
Advanced Function: Copying between Memory Stick and Floppy(Mavica FD 97 only!)
Mavica FD 97(recognizable by light silver color opposed to dark gunmetal of the FD 95)
comes equipped with both Floppy drive as well as Sony Memory stick. The FD 95 uses a
memory stick as well however it needs additional adapter disk as shown below.
To copy files from memory stick to a regular 1.44 floppy on FD 97 camera:
• Make sure both an empty floppy and memory stick with pictures on are in the
camera.
• Set the camera to Play mode using the selector.
• Press up on the control button to pull up the menu.
Page 6

5
• Select Tool menu, press up to expand it.
• Select copy and press right to expand it. The Screen should look like below.
• Options presented are MS -> MS meaning Memory stick to Memory stick or
Ms -> FD meaning Memory stick to floppy disk. Select the desired option and
press down on the button.
Memory Stick vs. Floppy
Sony Memory Stick is a Sony patented type of memory used in most of the Sony devices.
It is slim, very portable, and can carry up to 128MB of data, which in camera use
translates to over 450 pictures at 1024x768 resolution. Memory sticks are a perfect
alternative to using floppies if you need to take more than 12 pictures and would need to
take them fast, since saving a picture on a floppy takes about 5 – 10 sec, whereas saving a
picture on the Memory stick is almost instantaneous. To get the pictures from the
memory stick you can either copy them onto a floppy, use the floppy adapter, or connect
the camera to the computer using a USB cable.
 Loading...