

Page 1

DIAL PANEL
(for MAV-555 MULTI ACCESS VIDEO DISK RECORDER)
MAVE-D555
(Ver. 1.30)
電気製品は、安全のための注意事項を守らないと、火災
や人身事故になることがあります。
このオペレーションマニュアルには、事故を防ぐための重要な注意事項と製
品の取り扱いかたを示してあります。このオペレーションマニュアルをよく
お読みのうえ、製品を安全にお使いください。お読みになったあとは、いつ
でも見られるところに必ず保管してください。
OPERATION MANUAL
[Japanese/English]
1st Edition (Revised 1)
Serial No. 10001 and Higher
Page 2

English
For the customers in the U.S.A.
WARNING
This equipment has been tested and found to comply with
the limits for a Class A digital device, pursuant to Part 15 of
the FCC Rules. These limits are designed to provide
reasonable protection against harmful interference when the
equipment is operated in a commercial environment. This
equipment generates, uses, and can radiate radio frequency
energy and, if not installed and used in accordance with the
instruction manual, may cause harmful interference to radio
communications. Operation of this equipment in a residential
area is likely to cause harmful interference in which case the
user will be required to correct the interference at his own
expense.
You are cautioned that any changes or modifications not
expressly approved in this manual could void your authority
to operate this equipment.
The shielded interface cable recommended in this manual
must be used with this equipment in order to comply with the
limits for a digital device pursuant to Subpart B of Part 15 of
FCC Rules.
For the customers in Europe
This product with the CE marking complies with the EMC
Directive (89/336/EEC) issued by the Commission of the
European Community.
Compliance with this directive implies conformity to the
following European standards:
• EN55103-1: Electromagnetic Interference (Emission)
• EN55103-2: Electromagnetic Susceptibility (Immunity)
This product is intended for use in the following
Electromagnetic Environment(s):
E1 (residential), E2 (commercial and light industrial), E3
(urban outdoors) and E4 (controlled EMC environment, ex.
TV studio).
Pour les clients européens
Ce produit portant la marque CE est conforme à la Directive
sur la compatibilité électromagnétique (EMC) (89/336/CEE)
émise par la Commission de la Communauté européenne.
La conformité à cette directive implique la conformité aux
normes européennes suivantes:
• EN55103-1: Interférences électromagnétiques (émission)
• EN55103-2: Sensibilité électromagnétique (immunité)
Ce produit est prévu pour être utilisé dans les
environnements électromagnétiques suivants:
E1 (résidentiel), E2 (commercial et industrie légère), E3
(urbein extérieur) et E4 (environnement EMC contrôlé ex.
studio de télévision).
Für Kunden in Europa
Dieses Produkt besitzt die CE-Kennzeichnung und erfüllt die
EMV-Direktive (89/336/EEC) der EG-Kommission.
Die Erfüllung dieser Direktive bedeutek Konformität für die
folgenden Europäischen Normen:
• EN55103-1: Elektromagnetische Interferenz (Emission)
• EN55103-2: Elektromagnetische Empfindlichkeit
(Immunität)
Dieses Produkt ist für den Einsatz unter folgenden
elektromagnetischen Bedingungen ausgelegt:
E1 (Wohnbereich), E2 (kommerzieller und in beschränktem
Maße industrieller Bereich), E3 (Stadtbereich im Freien) und
E4 (kontrollierter EMV-Bereich, z.B. Fernsehstudio).
1 (E)
Page 3

Table of Contents
Chapter 1 Overview
1-1 MAVE-D555 Overview.................................. 1-1
1-2 Features .......................................................... 1-1
1-3 Changes from Version 1.00 ............................ 1-2
1-3-1 Changes from Version 1.00 to 1.10........ 1-2
1-3-2 Changes from Version 1.10 to 1.20........ 1-2
1-3-3 Changes from Version 1.20 to 1.30........ 1-2
1-4 Names and Functions of Parts...................... 1-4
1-4-1 Console.................................................. 1-4
1-4-2 Rear View............................................... 1-7
1-5 System Configuration Example ................... 1-8
Chapter 2 Operation
2-1 Edit Point Operations ................................... 2-1
2-1-1 Setting Edit Data with the Number
Keypad .................................................. 2-1
2-1-2 Confirming Edit Data (RECALL)......... 2-1
2-1-3 Changing Edit Data ............................... 2-1
2-1-4 Jumping to an Edit Point (GO TO) ....... 2-2
2-1-5 Clearing Edit Data (CLEAR) ................ 2-3
2-1-6 Edit Totals ............................................. 2-3
2-2 Operations for Each Function...................... 2-4
2-2-1 DMC Editing ......................................... 2-4
2-2-2 Voice Over Editing ................................ 2-5
2-2-3 Setting an Effect Pattern........................ 2-5
2-2-4 Setting Effect Parameters ...................... 2-9
2-2-5 Using a Track Ball............................... 2-12
2-2-6 Registering Effects .............................. 2-13
2-2-7 Inserting Text and Graphics ................. 2-14
2-2-8 Editing with the Player BUS................ 2-19
2-2-9 GPI Output........................................... 2-20
2-2-10 Audio Channel Mix/Swap Editing ..... 2-21
2-2-11 Support of EDL Export...................... 2-23
2-3 Using the Menus .......................................... 2-26
2-3-1 Operations and Menus ........................ 2-26
2-4 Using the MAVE-D555 with the Editing
Fader Panel .................................................. 2-29
2-4-1 Adjusting the Recording Level in
Real Time at the Recording Interval ... 2-29
Appendixes
Specifications.........................................................A-1
Menu List ..............................................................A-2
Effect Parameter List ...........................................A-4
TITLE Key, Downstream Key,
and Player BUS Setting Example........................A-7
2 (E) Table of Contents
Page 4

1-1 MAVE-D555 Overview
The MAVE-D555 is a dial panel that connects to the
MAVE-F555, an editing panel that is made for use
with the MAV-555 multi-access video disk recorder.
By using the MAVE-D555, MAVE-F555 (editing
panel for the MAV-555), and Editing Fader Panel
BKNE-1011 in an MAV-555 based editing system, we
can bring you new exciting features of the MAVED555 an enhance the features of the other units.
Notes
• Use of the MAVE-D555 requires an MAV-555 of Ver. 2.32, an MAVE-F555 of Ver. 2.30, and a BKMA-560 of
Ver. 1.10.
• For reasons of simplicity, we refer to the MAV-555, MAV-555A, MAV-555SS (SD mode), and
MAV-777 as the “MAV-555”.
For example, with the MAVE-D555 you can now:
• Set the duration and IN and OUT points from the
number keypad.
• Select and GO TO selected an IN or OUT point.
• View more information with the LCD panel.
• Adjust the recording level of the audio during
recording with the audio feed panel.
• Use effects during editing.
1-2 Features
Linear editing support function
When using the MAVE-D555 and MAVE-F555 to
operate the MAV-555, you can perform JOG dial,
PLAY, STILL, REW, FF, SHUTTLE, JOG, and DMC
operations just as with the earlier BVE series editor.
Nonlinear editing function
Operating the MAV-555 configured with the MAVED555 and the MAVE-F555, allows you to continue
using all the features of the BVE editor with the
addition of nonlinear editing which was not featured
on the previous BVE editor.
Editing fader panel
By connecting the Editing Fader Panel BKNE-1011 to
the MAVE-D555, you can control the recording level
of the recorder during editing.
Editing using effects
By installing an optional BKMA-560/561 board in the
MAV-555 and then using the MAVE-D555 configured
with an MAVE-F555 and BKNE-1011 together and
then employing this system for editing, you can select
effects from the MAVE-D555 and enter parameters for
the selected effects.
Chapter 1 Overview
Detailed LCD panel display
The MAVE-D555 LCD panel allows you to view the
status of effect settings, use a scratchpad, and confirm
each code with menus for each function during
operations. The LCD panel also displays the current
version numbers of the MAVE-D555 and the
connected MAVE-F555.
Direct numeric entry
You can now enter numbers directly from the number
keypad for IN and OUT point, duration, and time code
settings. You can also use the GO TO key to cue up as
well as enter the settings directly.
Editing mosaics and other sophisticated
effects
Using pointing device such as a track ball, you can
adjust edit special effects, such as by adjusting the
XYZ location of mosaics.
Inserting Text and Graphics
You can insert text and graphics when applying effects
(Title key) or into a cut to which effects have already
been applied (Downstream key).
Audio Channel Mix/Swap Editing
You can mix and swap audio channels in the interval
where materials are presented during editing.
Chapter 1 Overview 1-1 (E)
Page 5

1-3 Changes from Version 1.00
1-3-1 Changes from Version 1.00 to 1.10
Chapter 1 Overview
Inserting Text and Graphics (Downstream key)
Audio Channel Mix/Swap Editing
Functional Improvements when Using the Editing Fader Panel
The DSK (Downstream key) can be used to insert text and graphics into a
cut to which effects have already been applied.
The MAVE-D555 allows mixing and swapping audio channels in the
interval where materials are presented during editing.
• When setting the recording level when the AUDIO key of the MAVEF555 is lit and a Player port is selected, the fader is enabled. Therefore,
before performing a PREVIEW or EXECUTE/REC, the level can be
confirmed.
• When the Editing Fader Panel is enabled (the AUDIO key is lit),
information can be superimposed on the monitor for confirmation.
1-3-2 Changes from Version 1.10 to 1.20
Support of EDL Export from BZMA-E555
When the MAV-555 is used as a recorder during editing and used in
parallel with the BZMA-E555 file transfer program (sold separately), it is
possible to output EDL files (.edl) of editing results in the SONY BVE9100 format. Also, when the VTR is used as a player during editing, it is
possible to enter a tape’s reel name.
1-3-3 Changes from Version 1.20 to 1.30
Time Tracking Function
When you finish an editing procedure, the recorder and player OUT points
are automatically moved as the following IN points. Further, if the
recorder IN point is modified through a new editing operation, the player
IN point is modified automatically (automatic time tracking). Even if you
modify the player IN point and time tracking is lost, you can manually
return it to its original position (manual time tracking).
1-2 (E) Chapter 1 Overview
Page 6

REC OFF Function
When editing with a specified OUT point or duration, or editing without
specifying an OUT point (OPEN END Edit), pressing the MAVE-F555
EXECUTE/REC key resets the OUT point and ends the current recording.
TITLE Function
Version 1.10 only supported DSK (Downstream key). Using the TITLE
function, it is now possible to insert text and graphics while applying
effects.
Editing with a BUS Signal
It is possible to edit the external VIDEO signal input to the player BUS
from the optional BKMA-560 built-in Internal Video, or to the left SPARE
terminal on the MAV-555 connector panel (with the MAV-555SS in SD
mode or MAV-555A, the DSK IN VIDEO terminal).
Saving and Recalling Cut Point Information
When the MAV-555 is turned off, cut point and other such editing
information is cleared and cannot be retrieved. However, you can save and
recall the cut point information by pressing the STORE key while holding
the SHIFT key.
Chapter 1 Overview
Removing Recorder Port Restrictions
When erforming the following operations, it is now possible to specify the
MAV-555 RP port or a VTR as the recorder port.
• Adjusting the recording level using the Editing Fader Panel.
• Performing audio channel mix or swap editing.
Video Support of Voice Over Editing
Voice over editing can be performed and added at the end of edited
material. It is now also possible to add video in the same manner.
Chapter 1 Overview 1-3 (E)
Page 7

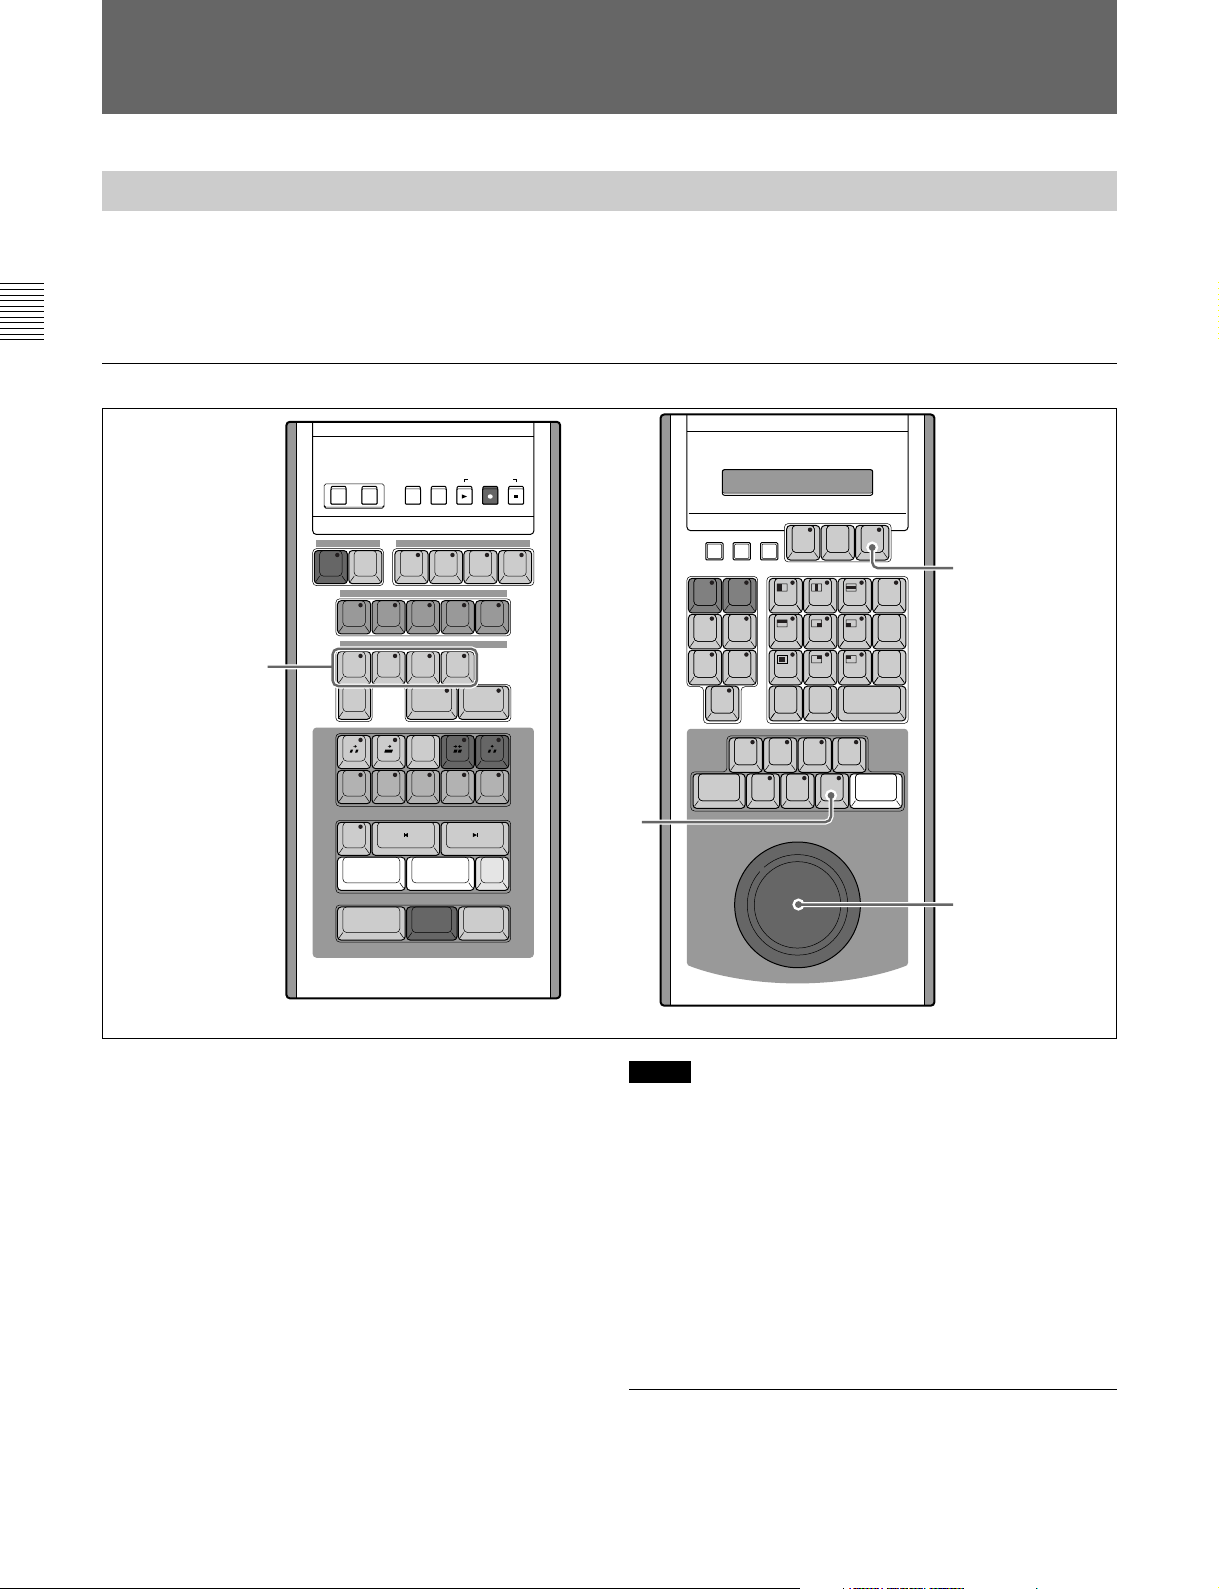
1-4 Names and Functions of Parts
1-4-1 Console
Chapter 1 Overview
1
2
3
LOC
MAN
SOFINEOF
START
TOTAL
SCR
GO TO
PRMTR
SPEED
REVSOFTBORD
PATT
OUT
DUR
STBOF
EJECT
PLAY
STILL
STOP
SHTL
EDIT
MARK
LAST
CLEAR
PQRS TUV WXYZ !
GHI JKL MNO _ / " @
SCR-C0CTL/TC
, . : ; & # * ?
JOG DMCSHIFT ALL STOP
SPEED
X
987
654
321
ABC
DEF ( ) [ ]
RETURN
ENTER
00
+
-
STEP
STEP
REW
FF
4
MENU
+
< = >
T-SET
-
T-TRACK
F/TC
5
6
* Keys With 2 or More Functions Assigned
Some keys are marked for two functions. Pressing the key executes the function labeled on the second line of the key face.
Holding down SHIFT and pressing the key executes the function labeled in small letters on the first line of the key face.
When a key lamp is lit, the function indicated on the lower side of the key top is active.
1 LCD (information display)
The LCD displays the following information:
• Status for the effect settings. Allows you confirm or
change the settings while viewing the display.
• Scratchpad
• Time codes for IN and OUT points, DUR (duration),
TOTAL (total duration of the edited material),
START (edit start point).
• Menus. Open and view the menus to confirm or
change settings.
• Current version numbers for the MAVE-F555 and
MAVE-D555.
2 Effect Editing Keys
BORD (Border) Button
Press this button so that the key lamp lights when you
want to add a border to a wipe pattern. The color and
width of the border can be adjusted with the BKNE-
1011.
For details about adjusting the border width and color, see
Section “2-2-4 Setting Effect Parameters” (page 2-9).
SOFT (Softness) Button
Press this button so that the key lamp lights when you
want to add blur to the border line of a wipe pattern.
The BKNE-1011 is used to correct blurring.
REV (Reverse) Button
Press and light this button to reverse a wipe pattern.
For details about reversing wipe patterns, see Section “2-23 Setting an Effect Pattern” (page 2-5).
1-4 (E) Chapter 1 Overview
Page 8

MAN (Manual) key
To manually perform a wipe or dissolve, press the
WIPE or DISS button on the MAVE-F555’s EFFECT
operation section, then press this button so that its key
lamp lights. Moving the fader lever on the BKNE1011 enables wipe and dissolve execution.
PRMTR (Parameter) key
Press to open the Effect Pattern Parameter Settings
screen.
PATT key (SHIFT + PRMTR)
Press to open the Effect Pattern NO. Settings screen,
and then use the number keypad to enter the number
values to set the effect pattern numbers.
LOC (Location) key (SHIFT + MAN)
Press to enable control and adjustment using the track
ball of the XYZ position of the control effect.
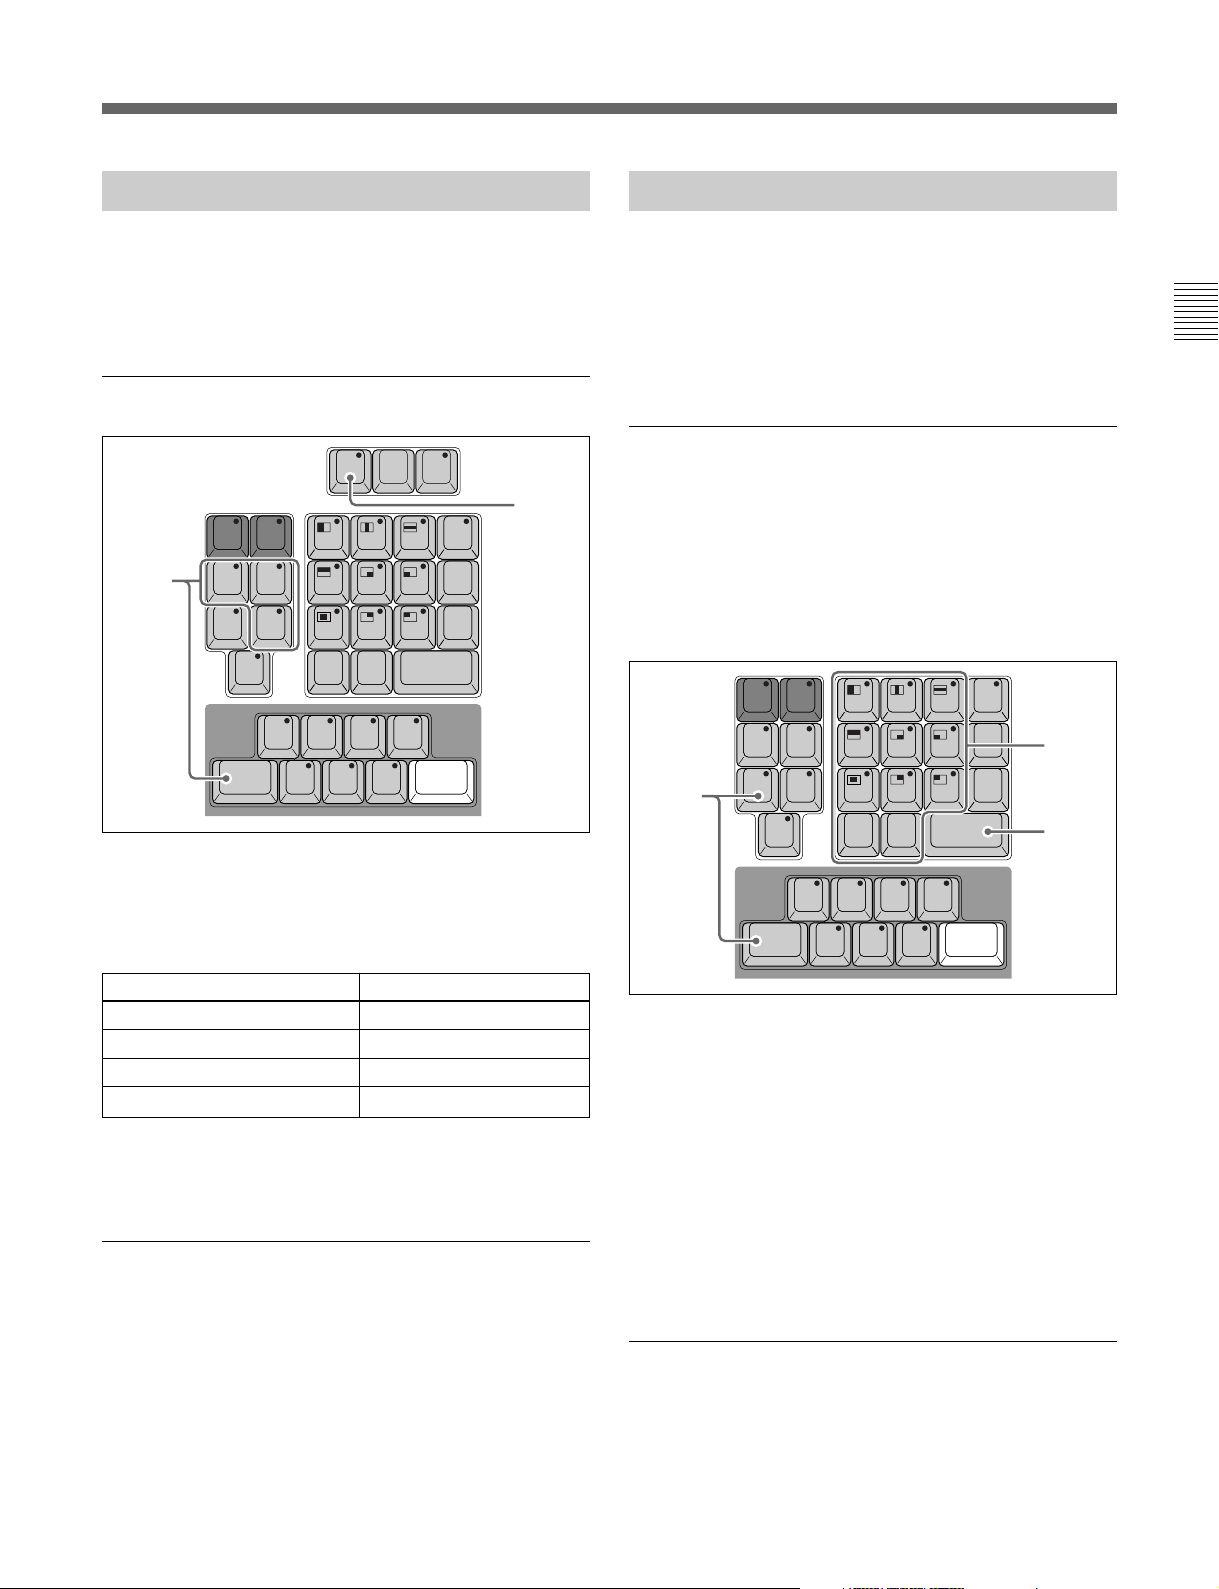
3 Recall Group
IN key
Press to display in the information display area the IN
point data .
OUT key
Press to display OUT point data on the information
display.
TOTAL key
Press to display the total duration of the edited material
in the information display.
DUR key
Press to display in the information display area the
duration.
GO TO key
Press to jump to the edit point (IN or OUT point, or the
start edit point) currently shown in the information
display area.
The following keys flash during operation. Press again
to toggle them off.
SOF key (SHIFT + IN)
Press to start the key flashing, and then use the GO TO
key to jump to the beginning of the file.
EOF key (SHIFT + OUT)
Press to start the key flashing, and then use the GO TO
key to jump to the end of the file.
START key (SHIFT + TOTAL)
Press to display in the information display area the edit
start point .
SPEED key (SHIFT + DUR)
Press to display in the information display area the
currently selected DMC playback speed .
SCR GO TO (SHIFT + GO TO)
Press to jump to the edit point currently displayed.
Chapter 1 Overview
4 Data Edit Group
CLEAR key
Select data to delete, and then press this key to delete
it. To delete all edit data, hold down CLEAR and press
SHIFT.
LAST X key
Press this key to display the previous data entry, and
then press again to display the next entry. Press this
key to toggle between the previous entry and the entry
just entered. If you make a mistake during edit point
entry, pressing this key allows you to restore the
previous editing point without making another entry .
MARK SPEED key
Press this key during DMC playback to mark the DMC
playback speed during edit. The speed at the time the
key is pressed is registered.
LAST EDIT key (SHIFT + LAST X)
Press to recall the value of the last edit point executed.
5 Number keypad and Effect Pattern Selection
Group
Wipe Pattern keys
The wipe pattern keys (the 9 keys marked with wipe
patterns) are used as wipe pattern selection keys while
working with effects on the MAVE-F555. To select a
wipe pattern, hold down the SHIFT key and press to
light the key and select the wipe pattern displayed on
the key.
Number keypad
Press the PATT key (SHIFT + PRMTR) to enter the
pattern number selection mode, and then use the
number keys to enter values of the effect patterns that
you want to recall. You can also use the number keys
to enter directly IN and OUT points, the duration
settings, etc.
Marked Alphabetic keys
Use these keys when you need to enter text to rename
a file used on the MAVE-D555.
For details about renaming files see “Renaming” (page 2-
28).
[+] key
Increments the entered time code.
[–] key
Decrements the entered time code.
F/TC key
Press the set the Frame or TC with the unit specified in
the scratchpad.
Chapter 1 Overview 1-5 (E)
Page 9

1-4 Names and Functions of Parts
MENU key (SHIFT + [+])
Opens the MENU screen.
Chapter 1 Overview
T-SET key (SHIFT + [–])
With the VTR, this functions as CTL, and with the
MAV-555 it functions as TM1 PRESET.
T-TRACK key (SHIFT + F/TC)
When the player deviates from the time track, press to
return it to the target time track.
SCR-C key (SHIFT + 0)
Clears one character of scratchpad data.
CTL/TC key (SHIFT + 00)
Sets the CTL (with a VTR), TM1 or TM2 (with the
MAV-555) used as the TC SOURCE for the currently
selected device.
ENTER key
Press to enable the data entered in the scratchpad.
RETURN key (SHIFT + ENTER)
Press to return to the normal edit mode after using the
pattern number screen, viewing a menu, or using the
parameter settings screen.
6 Control Group
PLAY key
Press to light this key and execute playback at standard
speed.
STILL key
Press to light this key and freeze a frame during
playback.
REW key
Press to light this key and rewind.
FF key
Press to light this key and fast forward.
SHIFT key
Hold down this key and then press another key to
execute the function in the first line of the key
marking.
SHTL key
Rotate the search dial to the desired location, and then
execute playback at the speed selected by the dial
(shuttle mode).
JOG key
Press this key to jog the display at the playback speed
selected by the rotated position of the search dial.
DMC key
Press and light this key to use the search dial to
conduct DMC playback or to control playback speed
during DMC editing.
ALL STOP key
Press to halt all functions at the same time during any
operation except backgrounding.
STBOF key (SHIFT + PLAY)
With the VTR in the STOP mode, press this key to
enter the standby mode.
EJECT key (SHIFT + STILL)
Ejects a cassette from the VTR (unloads file if a hard
disk is the targeted device).
STEP– key (SHIFT + REW)
Press this key to step backward from the current
position by the amount specified in the menu. This
function is not available when a VTR is selected.
STEP+ key (SHIFT + FF)
Press this key to step forward from the current position
by the amount specified in the menu. This function is
not available when a VTR is selected.
STOP key (SHIFT + SHTL)
Press this key to halt forwarding.
Search dial
Rotate when you want to search for an editing point
during playback. Rotate right to search forward and
rotate left to search backward.
1-6 (E) Chapter 1 Overview
Page 10
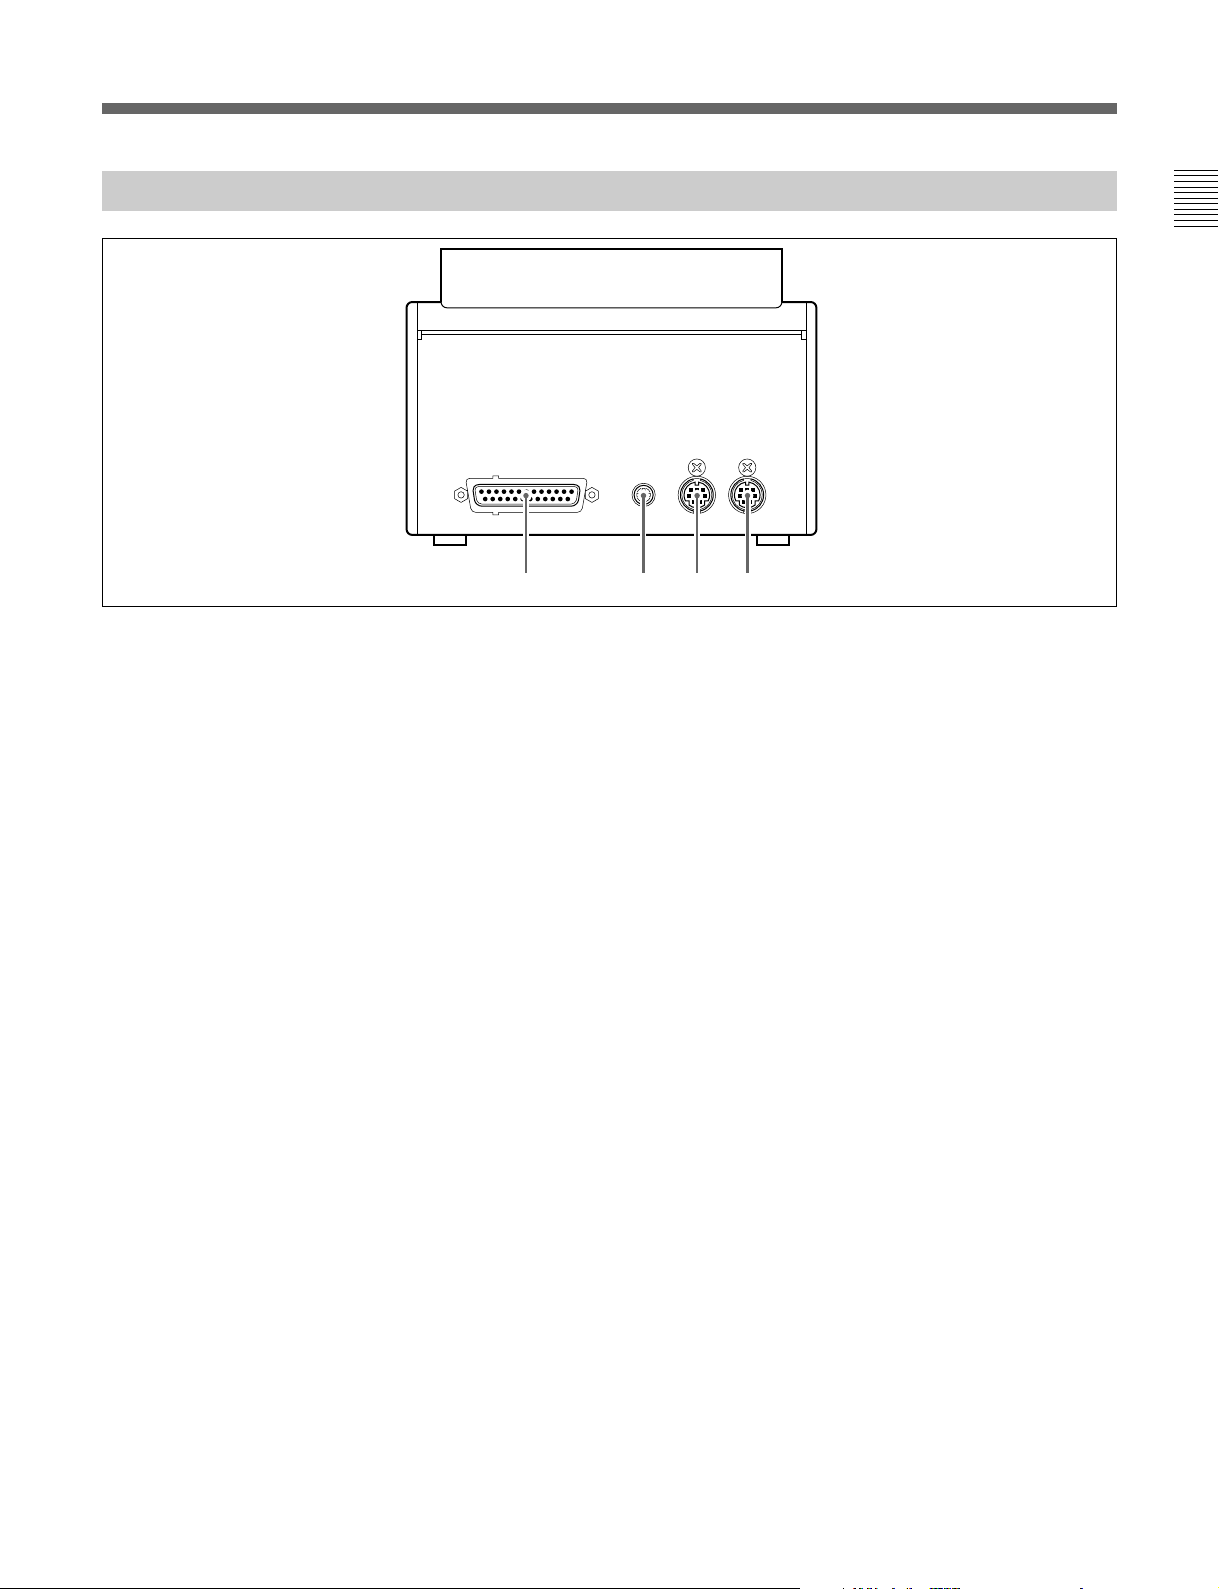
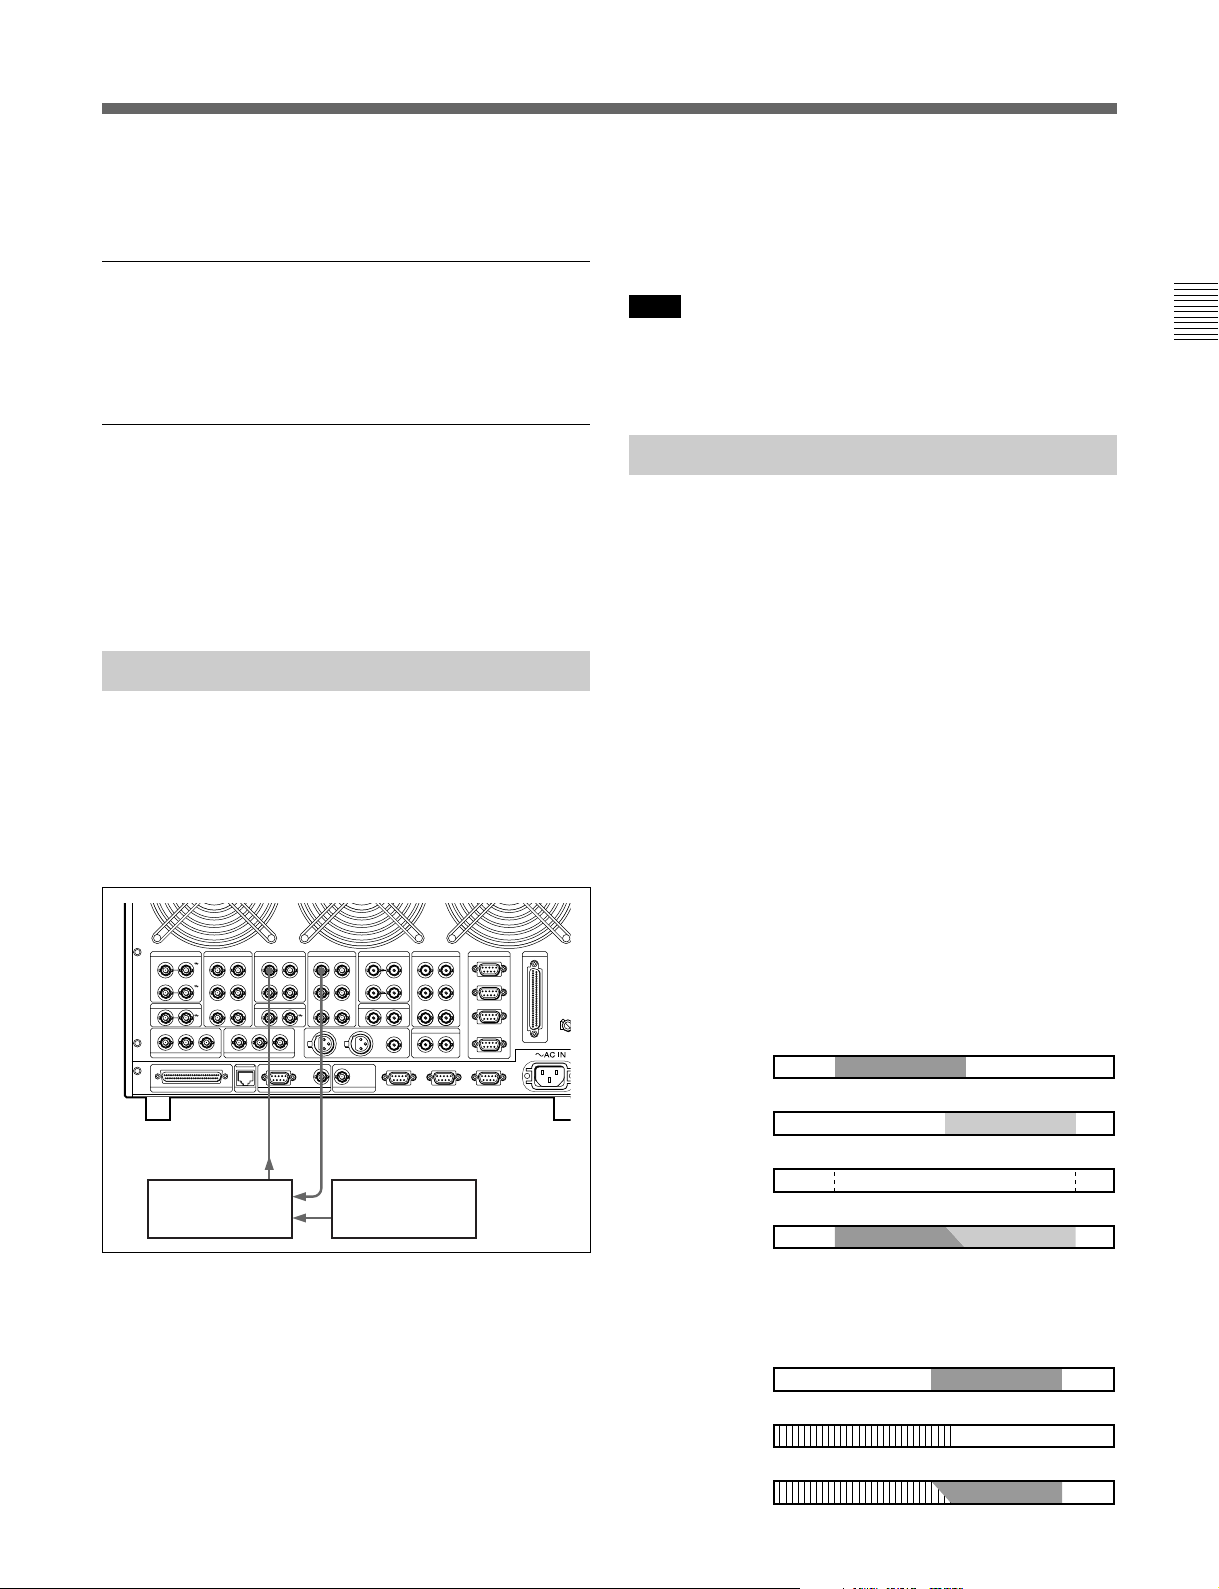
1-4-2 Rear View
MOUSE/
TRACK BALL F555 I/FLCD
CONTRASTAUDIO FADER PANEL
1234
Chapter 1 Overview
1 AUDIO FADER PANEL connector
Connects the Editing Fader Panel BKNE-1011.
2 LCD CONTRAST
Adjusts the LCD contrast.
3 MOUSE/TRACK BALL connector
Connects a mouse or track ball.
4 F555 I/F connector
Connects the Editing Panel MAVE-F555.
Chapter 1 Overview 1-7 (E)
Page 11
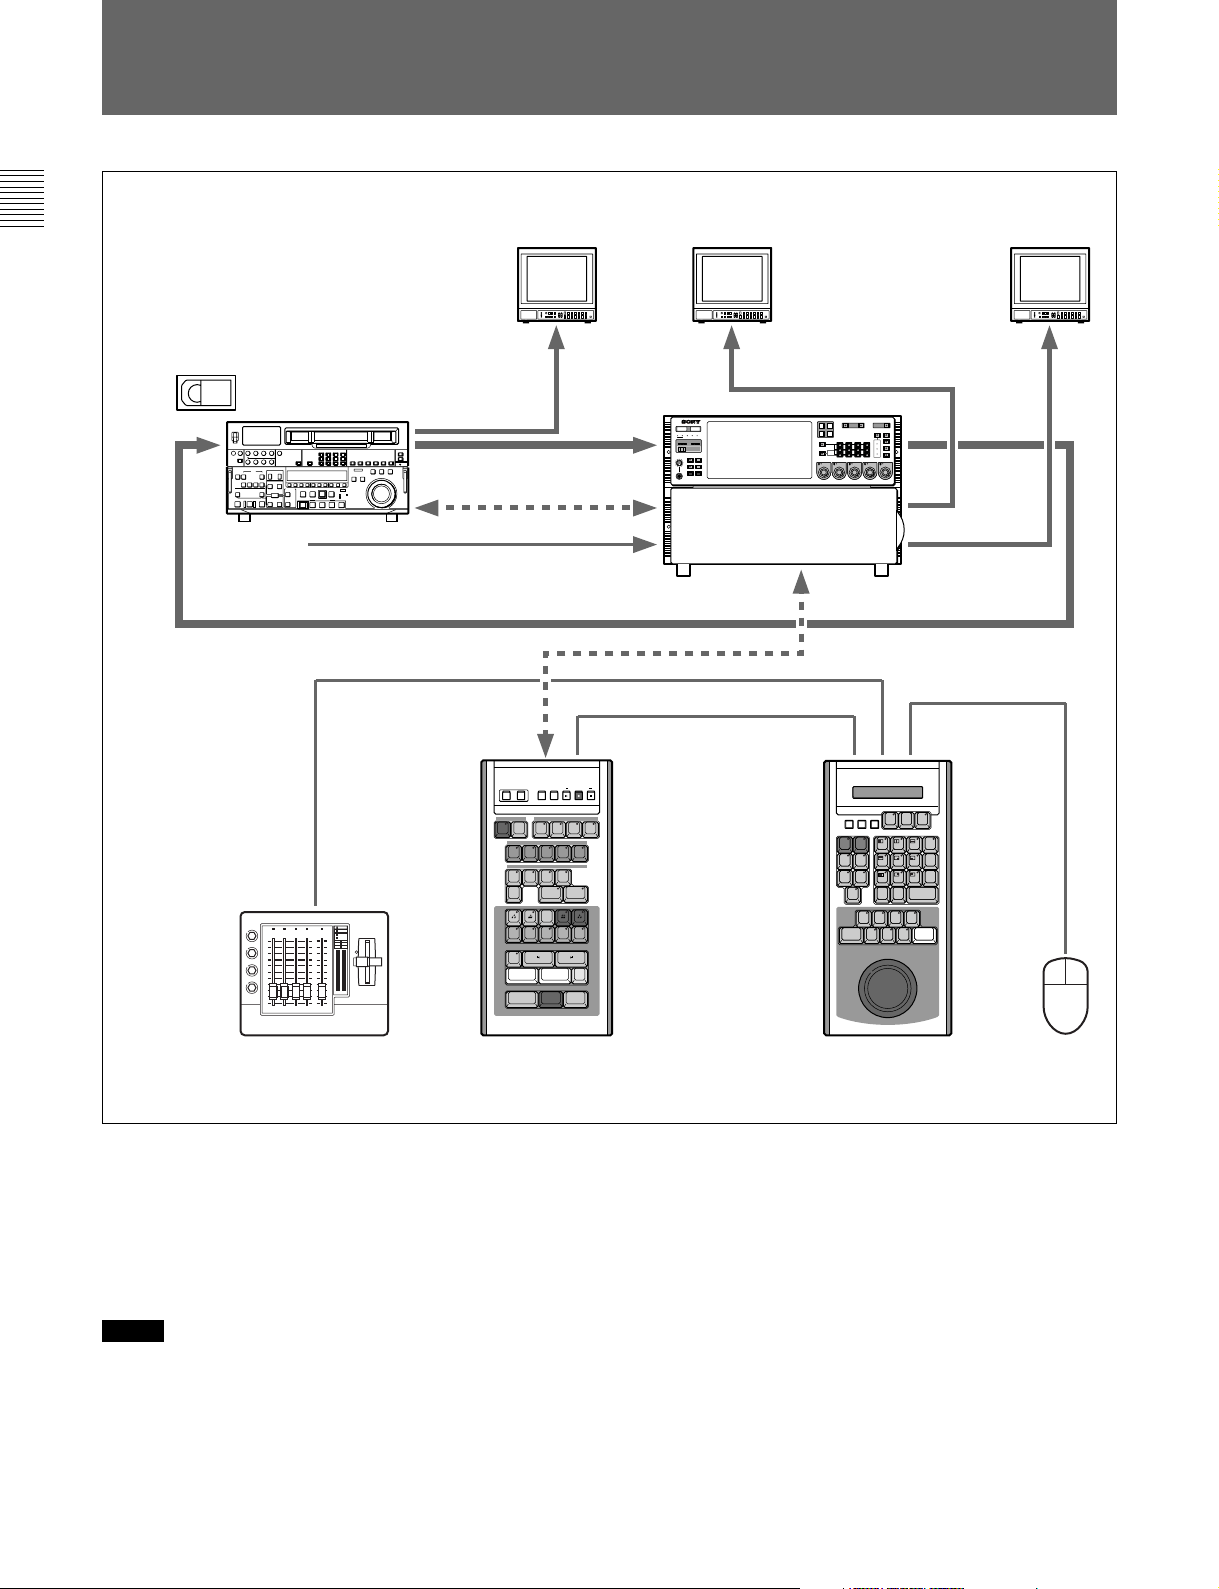
1-5 System Configuration Example
Chapter 1 Overview
LINE INPUT
CONTROL
PANEL
1
1
2 3 4 M
10
9
2
8
7
3
6
5
4
4
3
2
1
0
VTR
10
9
8
7
6
5
4
3
2
1
0
RS-422
MAV-555
METER
CONTROL
PANEL
PANEL
SETUP BANK
525
PHONES
0
625
SYSTEM HDD
10
123
HELP
TOTAL /
FULL /
REMAIN
TIME
TC/UB TC TYPE
MENU
SET
CONTROL PANEL
REAR FRONT
R1 P1
R2
COMPOSITE SDI
VIDEO
R1
P1
REMOTE
INPUT
PORT SELECT
PROCESS
CONTROL
P2
SDI
AES/EBU
L
ANALOG
R
AUDIO INPUT / MONITOR SELECT
CH1
CH2 CH3 CH4
CH2
PRESET
VIDEO
CHROMA
REMOTE
SET UP/BLACK
MENU
CHROMA/PHASE
LOCAL
CH3
CH4
VIDEO/MENU
PRESET
PRESET
PRESET
R2/
P3
INPUT
MONITOR
CH1
PRESET
P2
SETUP
PANEL SELECT CHARACTER
SELECT
1 2 3
NONE OFF ON80TH
MONITOR OUT
REMOTE
SPARE
RS-422
AUDIO FADER PANEL
MOUSE/
REVSOFTBORD
PQRS TUV WXYZ !
GHI JKL MNO _ / " @
SCR-C0CTL/TC
, . : ; & # * ?
EJECT
STEP
STILL
REW
STOP
JOG DMCSHIFT ALL STOP
SHTL
ABC
TRACK BALL
EDIT
MARK
LASTXCLEAR
SPEED
MENU
+
987
< = >
T-SET
-
654
T-TRACK
F/TC
321
DEF ( ) [ ]
RETURN
ENTER
00
-
+
STEP
FF
TO MAV
RECORDER SEL BACK GROUND
MAV VTR
FILE
DEL
NEW
FILE
FILE
CUT DISS WIPE TITLE AUDIO
R
P1 P2 BG
STORE
KNOB
LEVER
INPUT
MIX
10
12
34
LR
9
8
0
-1
7
-4
-6
6
-10
-14
5
-20
-28
4
-40
3
-52
-60
-∞
2
1
0
V A1 A2 A3 A4
TRIM
SHIFT
D555 I/F 1 F555 I/F
A
MIX
MEMORY
1 2 3 4
EFFECT
PORT/FILE ASSIGN
+
-
REDO
UNDO
MARK
MARK OUTMARK IN
SPLIT
REPLAY
EXECUTE/
PREVIEW
REC
LOC
MAN
SOFINEOF
START
TOTAL
PATT
PRMTR
OUT
SPEED
DUR
SCR
GO TO
STBOF
PLAY
BKNE-1011 MAVE-F555 MAVE-D555
MAV-555: 2 input/2 output
In the configuration above, the main feature of the MAV-555 is that it can take over the editing functions
previously done with the BVE-series editor and conduct nonlinear editing (executing cut jumps, cut insertions,
deletion, etc. with materials on the recorder). Such a configuration enables seamless operations when using the
MAVE-D555 search dial to find edit points, when selecting effects, or when specifying edit points with the
MAVE-F555 keys and allows smooth nonlinear editing.
Notes
• A VTR can be connected only to the REMOTE IN/OUT 1 (VTR) connector on the MAV-555.
• Only the D555 I/F1 connector of the MAVE-F555 is enabled.
1-8 (E) Chapter 1 Overview
Page 12
T-TRACK
F/TC
MENU
+
SCR-C0CTL/TC
00
T-S E T
-
987
654
321
RETURN
ENTER
PQRS TUV WXYZ !
< = >
GHI JKL MNO _ / " @
ABC
, . : ; & # * ?
DEF ( ) [ ]
2-1 Edit Point Operations
Before you perform any of the operations described below, make sure that the target port has been selected with
the MAVE-F555 PORT/FILE ASSIGN operation.
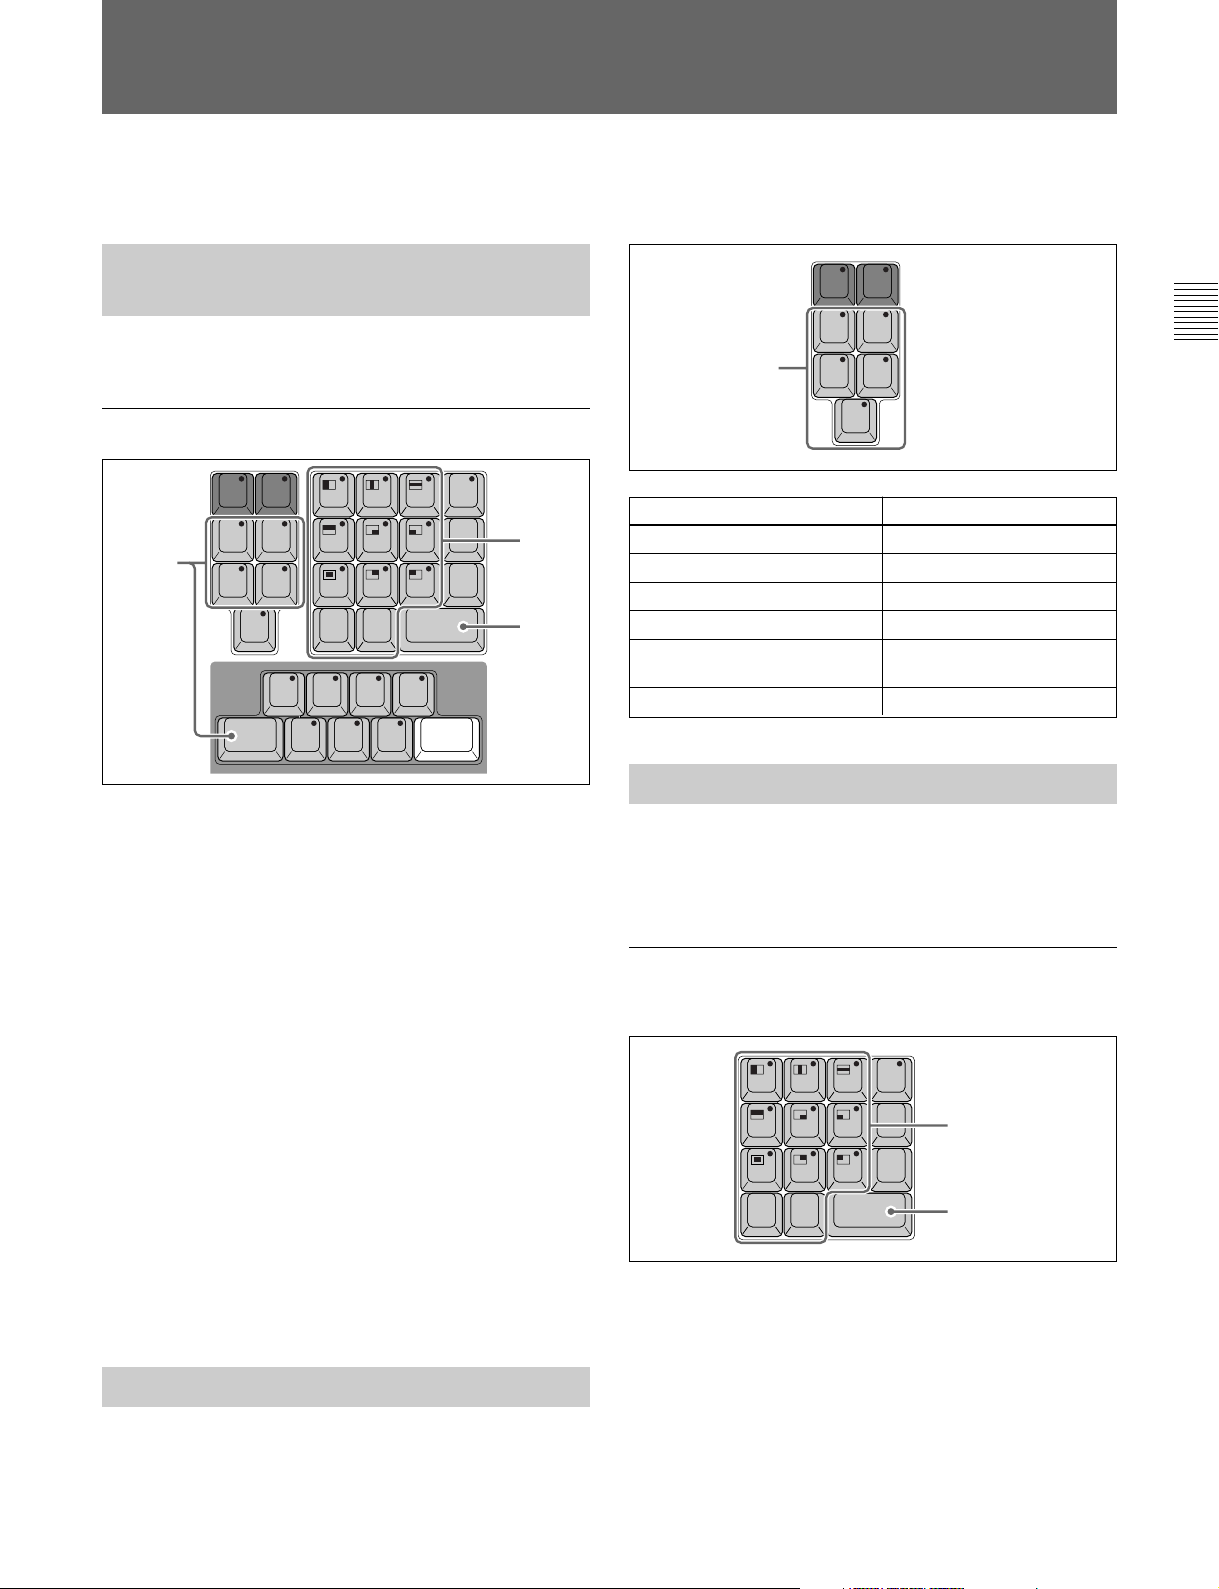
2-1-1 Setting Edit Data with the Number Keypad
While using the MAVE-D555, you can use its number
keypad to set the IN, OUT, and duration settings.
Specifying Edit Data with Number Keys
LOC
1
MAN
SOFINEOF
START
TOTAL
SCR
GO TO
PATT
PRMTR
OUT
SPEED
DUR
PQRS TUV WXYZ !
GHI JKL MNO _ / " @
SCR-C0CTL/TC
, . : ; & # * ?
STBOF
EJECT
PLAY
STILL
STOP
JOG DMCSHIFT ALL STOP
SHTL
STEP
REW
ABC
00
-
987
654
321
DEF ( ) [ ]
RETURN
ENTER
+
STEP
FF
MENU
T-SET
T-TRACK
F/TC
+
< = >
-
2
3
1 Press the IN, OUT, or DUR key for the data that
you want to specify.
The pressed key lights and the current MAVE-
D555 selections are shown in the information
display area.
-or-
Press the START key (SHIFT + TOTAL) or
SPEED key (SHIFT + DUR) for the data that you
want to specify.
The pressed key flashes and the current MAVED555 selections are shown in the information
display area.
LOC
PATT
MAN
PRMTR
SOFINEOF
OUT
START
Recall Group
TOTAL
SCR
GO TO
SPEED
DUR
Data to Confirm Key to Press
IN point data IN key
OUT point data OUT key
Total edits TOTAL key
Duration DUR key
Edit start points (START time) START key
(SHIFT+TOTAL)
DMC playback speed settings SPEED key (SHIFT+DUR)
2-1-3 Changing Edit Data
When you need to change edit data, you can either
clear the currently specified time code and set another
one, or increase or reduce the current time code.
Changing the Time Code Displayed in the
Scratchpad
2
Chapter 2 Operation
2 Press the number keys to enter the numeric values.
The entries are displayed in the information
display area.
3 After the last entry, press the ENTER key.
The new entries are stored.
2-1-2 Confirming Edit Data (RECALL)
Press the appropriate key of the Recall group when
you need to confirm specified edit data. The data
specified for the pressed key is displayed on the screen
in the information display area.
3
1 In the information display area, display the time
code that you want to change.
2 Use the number keys to enter a new time code into
the scratchpad.
3 Press the ENTER key to execute.
Chapter 2 Operation 2-1 (E)
Page 13
2-1 Edit Point Operations
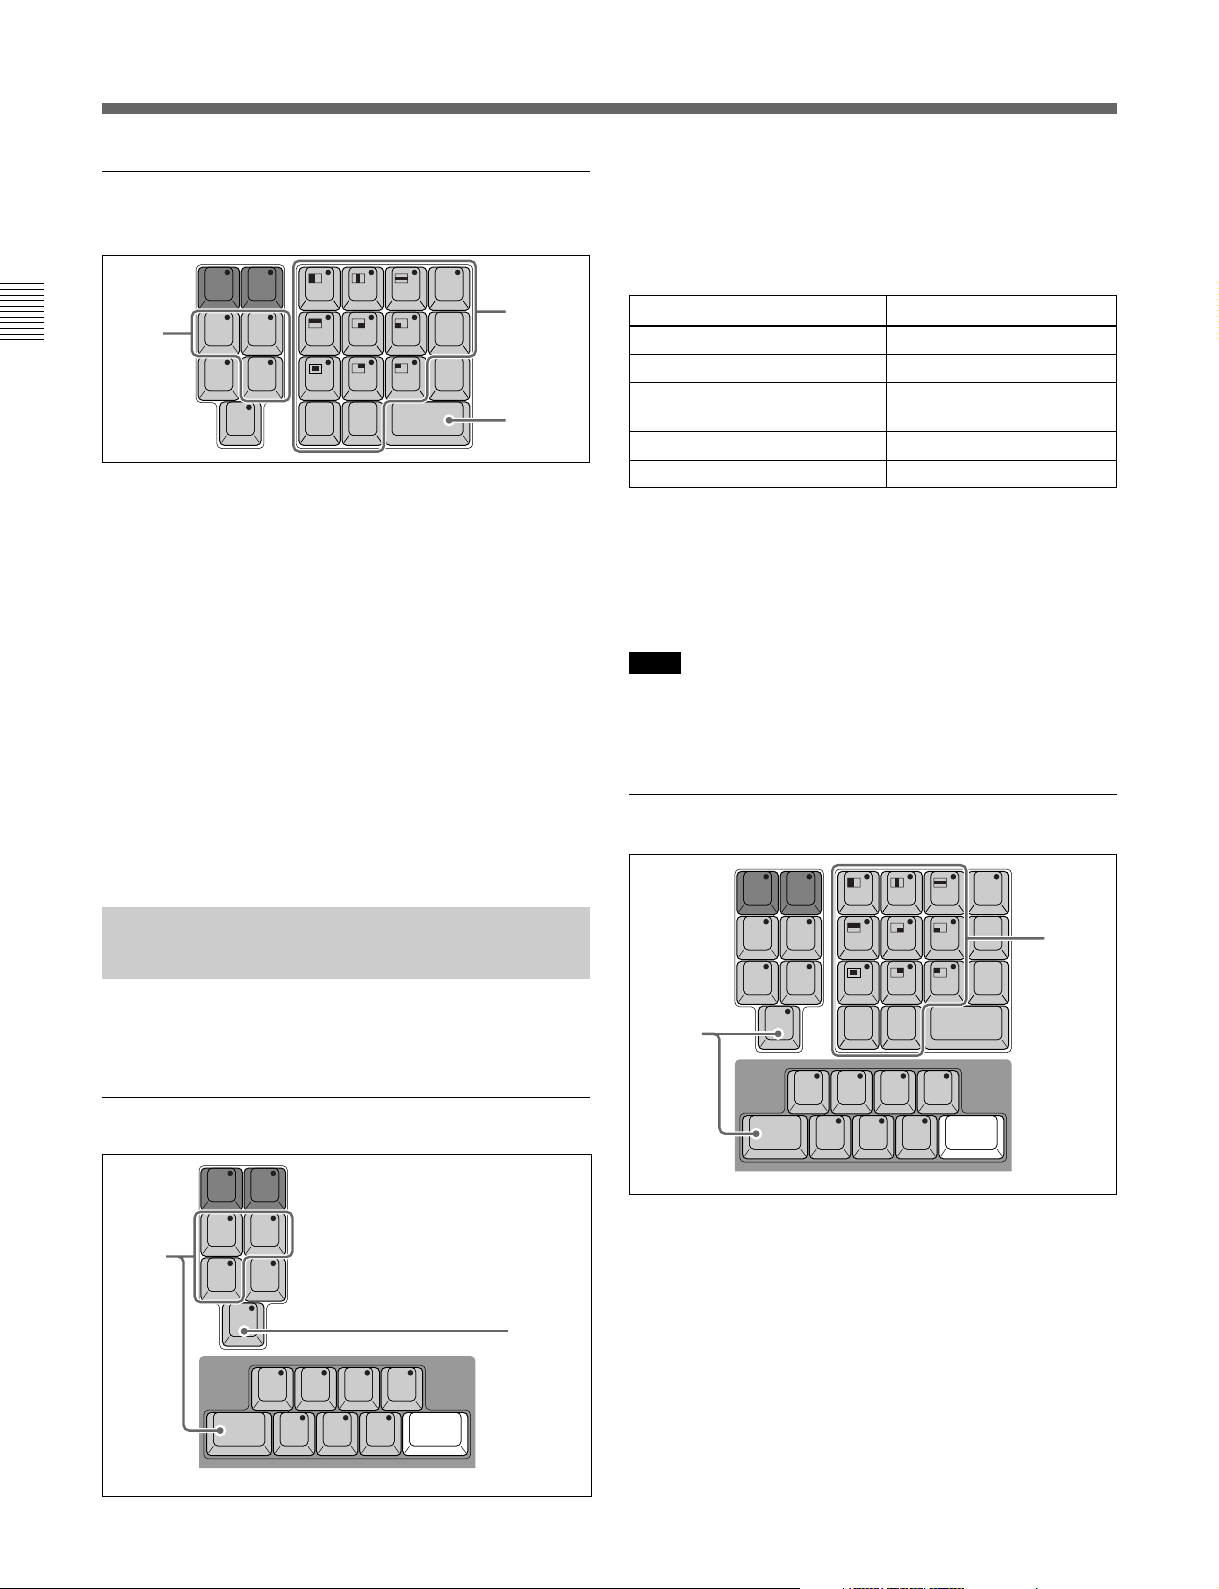
Incrementing and Decrementing the
Current Time Code
Chapter 2 Operation
1
1 Press the key (IN, OUT, DUR) for the data that
you want to change.
The pressed key lights and the current setting is
shown in the information display area.
2 Press a number key to enter the amount of change.
For example, to reduce the current setting by 1
second, press the minus key [–] on the keypad and
then press 1 then 00.
LOC
MAN
SOFINEOF
START
TOTAL
SCR
GO TO
PATT
PRMTR
OUT
SPEED
DUR
PQRS TUV WXYZ !
GHI JKL MNO _ / " @
SCR-C0CTL/TC
, . : ; & # * ?
987
654
321
ABC
DEF ( ) [ ]
RETURN
ENTER
00
MENU
T-SET
T-TRACK
F/TC
1 Press a key in the Recall group to jump to the
desired point.
The data for the pressed key is shown in the
+
< = >
2
-
3
information display area.
Jump Point Key to Press
IN point data IN key
OUT point data OUT key
Edit start point (START time) START key
(SHIFT+TOTAL)
Start of file SOF key (SHIFT+IN)
End of file EOF key (SHIFT+OUT)
2 Press the GO TO key.
The jump is executed to the point selected in Step
1. A still frame of the jump point is displayed on
the screen.
Note
If a jump destination is not specified in Step 1, the
jump is executed to the first IN point after the GO TO
key is pressed.
3 When you are finished, press the ENTER key.
The amount of change is reflected in the new
setting.
2-1-4 Jumping to an Edit Point (GO TO)
You can jump (cue up) to a desired edit point (IN,
OUT point) or other point in a specified material.
Jumping to an Edit Point
LOC
PATT
MAN
PRMTR
SOFINEOF
OUT
1
START
TOTAL
SCR
GO TO
SPEED
DUR
2
+
EJECT
STILL
STEP
REW
-
STEP
FF
STBOF
PLAY
Jumping to a Desired Point
LOC
2
MAN
SOFINEOF
START
TOTAL
SCR
GO TO
PATT
PRMTR
OUT
SPEED
DUR
PQRS TUV WXYZ !
GHI JKL MNO _ / " @
SCR-C0CTL/TC
, . : ; & # * ?
STBOF
EJECT
PLAY
STILL
STOP
JOG DMCSHIFT ALL STOP
SHTL
STEP
REW
ABC
00
-
987
654
321
DEF ( ) [ ]
RETURN
ENTER
+
STEP
FF
MENU
T-SET
T-TRACK
F/TC
+
< = >
-
1
1 Use the number keys on the keypad to enter the
number of the time data for the desired jump point.
The entered number is displayed in the scratchpad.
2 Press the SCR GO TO key (SHIFT + GO TO).
The jump executes to the point specified in Step 1.
STOP
JOG DMCSHIFT ALL STOP
SHTL
2-2 (E) Chapter 2 Operation
Page 14
2-1-5 Clearing Edit Data (CLEAR)
2-1-6 Edit Totals
When new data is specified it automatically replaces
the previous data, but if you want to delete data
without replacing it with new data follow the
procedure below.
Clearing Data
EDIT
MARK
LAST
1
LOC
MAN
SOFINEOF
START
TOTAL
SCR
GO TO
PATT
PRMTR
OUT
SPEED
DUR
CLEAR
PQRS TUV WXYZ !
GHI JKL MNO _ / " @
SCR-C0CTL/TC
, . : ; & # * ?
STBOF
EJECT
PLAY
STILL
STOP
JOG DMCSHIFT ALL STOP
SHTL
STEP
REW
SPEED
X
MENU
987
< = >
T-SET
654
T-TRACK
F/TC
321
ABC
DEF ( ) [ ]
RETURN
ENTER
00
+
-
STEP
FF
2
+
-
1 Press the key in the Recall group with the data that
you want to clear.
An editing session may require repeated editing of
many parts of successive materials. After editing on
the MAV-555, you can automatically calculate the
total duration of material edited during the previous
session and display the total in the information display
area.
Changing the Edit Start Time
With no other special settings on the MAV-555, the
time code setting specified for “SHOW TC” on the
MAV-555 Expansion Menu item 321: LINEAR EDIT
NEW FILE is used as the starting point for calculating
the duration of the edited material. Follow the
procedure below to change the edit starting point.
LOC
1
MAN
SOFINEOF
START
TOTAL
SCR
GO TO
PATT
PRMTR
OUT
SPEED
DUR
PQRS TUV WXYZ !
GHI JKL MNO _ / " @
SCR-C0CTL/TC
, . : ; & # * ?
STBOF
EJECT
PLAY
STILL
STEP
REW
ABC
00
-
987
654
321
DEF ( ) [ ]
RETURN
ENTER
+
STEP
FF
MENU
T-SET
T-TRACK
F/TC
+
< = >
-
2
3
Chapter 2 Operation
The data of the pressed key is displayed in the
information display area.
Data to Delete Key to Press
IN point data IN key
OUT point data OUT key
Duration DUR key
DMC playback speed setting SPEED key (SHIFT+DUR)
2 Press the CLEAR key.
The specified data is cleared.
Clearing all Data
To clear all data, hold down the SHIFT key and then
press the CLEAR key.
STOP
JOG DMCSHIFT ALL STOP
SHTL
1 In the Recall group press START (SHIFT +
TOTAL).
The current selected start point is displayed in the
information area display of the MAVE-D555.
2 Use the number keys to enter the starting point.
3 Press the ENTER key.
The value for the starting point specified in Step 2
is saved.
Confirming the Total Edited Duration
To confirm the duration of the edited material from the
starting point to the present time, press the TOTAL
key. The total is displayed in the information display
area of the MAVE-D555.
Chapter 2 Operation 2-3 (E)
Page 15
2-2 Operations for Each Function
2-2-1 DMC Editing
You can perform DMC editing when using the MAV-555 or a player that is equipped with the DT function. In
order to perfrom DMC editing, you must specify beforehand the DMC playback speed on the Player. The specified
speed becomes the initial DMC playback for editing. Advancing to the IN points during editing is performed at the
initial speed specified for DMC playback.
Chapter 2 Operation
Specifying the DMC Playback Speed
1
RECORDER SEL BACK GROUND
MAV VTR
FILE
DEL
FILE
CUT DISS WIPE TITLE AUDIO
STORE
TRIM
A
MIX
NEW
FILE
R
P1 P2 BG
V A1 A2 A3 A4
SHIFT
MEMORY
1 2 3 4
EFFECT
PORT/FILE ASSIGN
-
REDO
UNDO
MARK OUTMARK IN
EXECUTE/
REC
REPLAY
PREVIEW
LOC
MAN
SOFINEOF
START
TOTAL
+
GO TO
SCR
2
MARK
SPLIT
MAVE-F555 MAVE-D555
PRMTR
SPEED
REVSOFTBORD
PATT
OUT
DUR
STBOF
EJECT
PLAY
STILL
STOP
SHTL
EDIT
MARK
LAST
CLEAR
PQRS TUV WXYZ !
GHI JKL MNO _ / " @
SCR-C0CTL/TC
, . : ; & # * ?
JOG DMCSHIFT ALL STOP
SPEED
X
987
654
321
ABC
DEF ( ) [ ]
RETURN
ENTER
00
+
-
STEP
STEP
REW
FF
MENU
+
< = >
T-SET
-
T-TRACK
F/TC
4
3
1 Use the FILE/PORT ASSIGN operation on the
MAVE-F555 to select the Player port.
The pressed key lights.
2 On the MAVE-D555 press the DMC key.
3 Rotate the search dial to the desired playback
speed setting.
4 On the MAVE-D555 press the MARK SPEED
key.
The key lights and the speed specified in Step 3 is
selected as the DMC playback speed.
2-4 (E) Chapter 2 Operation
Notes
• After the DMC playback speed is set once, the speed
specified for DMC playback is used on the specified
player for subsequent editing sessions. In order to
playback at standard playback speed, erase the DMC
playback speed settings by following the procedure
described in “Deleting the DMC Playback Setting”
(page 2-5).
• After verifying the speed setting with the SPEED key
(SHIFT + DUR) on the RECALL group, you can
change the setting with the numeric keys.
Controlling Playback Speed During Editing
Use the search dial to vary the speed continuously
during an editing session using DMC playback.
Page 16
1 After passing the IN point, rotate the search dial to
IN
IN
IN
OUT
OUT
OUT
IN OUT
IN OUT
IN
IN OUT
control the speed.
Confirming the DMC Playback Speed
Press the SPEED key (SHIFT + DUR) in the Recall
group. The selected speed is shown as a percent in the
information display area.
2 On the Recorder specify the interval where you
want to add the voice over edit.
3 Press the EXECUTE/REC key to execute.
Note
To return to the normal edit mode, press and hold
down the SHIFT and press the AUDIO key on the
MAVE-555’s EFFECT operation section.
Chapter 2 Operation
Deleting the DMC Playback Setting
1 Press the CLEAR key. The pressed key lights.
2 Press the MARK SPEED key.
The DMC mode is canceled and the specified
DMC playback speed is erased.
2-2-2 Voice Over Editing
A voice over edit with audio can be added to the end of
an edited material. It is also possible to add video in
the same manner. Before you can perform this voice
over editing, it must be set up with the MAVE-D555 in
the normal mode or the pre-read mode.
Connection Example
VIDEO IN COMPOSITE
VIDEO OUT COMPOSITE
AUDIO IN (AES/EBU)
IN ——— R1 ——— OUT
A ——— P1 ——— B
IN ——— R2 ——— OUT
A ——— P2 ——— B
REFERENCE
A ——— P3 ——— B
IN OUT
R1 R2 SYSTEM
REMOTE PARALLEL I/O (50P) ETHER CONTROL PANEL MONITOR OUT
TIME CODE IN
P1 P2 P3
TIME CODE OUT
CH1/2 —— R1 —— CH3/4
CH1/2 —— R2 —— CH3/4
VS BUS
IN OUT
AUDIO OUT (AES/EBU)
Digital or
analog
audio input.
Audio Mixer
SERIAL V/A IN
SERIAL V/A OUT REMOTE AUDIO I/F
—— R1 ——
A —— P1 —— B
A —— P2 —— B
A —— P3 —— B
ANALOG
COMPOSITE
(SUPER)
Digital or analog audio
output.
—— R2 ——
SPARE
IN/OUT1(VTR)
SERIAL V/A
(SUPER)
A —— P1 —— B
A —— P2 —— B
A —— P3 —— B
OPTION
IN/OUT2(VTR) SPARE
Audio Source
IN1(R1)
IN2(P1)
IN3(R2/P3)
IN4(P2)
2-2-3 Setting an Effect Pattern
This section describes how to specify an effect pattern
during editing operations. Please keep in mind the
following important points regarding editing with
special effects:
• Special effects can be used during editing only when
editing with the MAVE-F555 in the OVERWRITE
mode.
• To return to the normal editing mode from the effect
pattern selection mode, press the RETURN key
(SHIFT + ENTER).
• AUDIO is normal set for “Fade”.
For more details about the effect patterns that can be used,
refer to the BKMA-560 operation manual.
Editing using special effects with the MAVE-D555 is
different from previous A/B Roll Editing. Editing can
be executed by selecting only one port for the Player.
Editing can be performed with an image resembling
that of the previous Pre-Read editing method.
Previous A/B Roll Editing
PLAYER 1
PLAYER 2
RECORDER
(Material Before
Edit)
RECORDER
(Material After Edit)
1 Hold down the SHIFT key and press the AUDIO
key on the MAVE-F555’s EFFECT operation
section.
The AUDIO key flashes and the unit enters the
voice over mode.
When adding video, press the MAVE-F555
channel specification V key until it lights.
Effect Editing with MAVE-D555
PLAYER
RECORDER
(Material Before
Edit)
RECORDER
(Material After Edit)
Chapter 2 Operation 2-5 (E)
Page 17

2-2 Operations for Each Function
Selecting a Wipe Pattern from a Design and Executing it
Chapter 2 Operation
2, 4
3, 5
9
1
RECORDER SEL BACK GROUND
MAV VTR
FILE
DEL
FILE
CUT DISS WIPE TITLE AUDIO
STORE
TRIM
A
MIX
NEW
FILE
R
P1 P2 BG
V A1 A2 A3 A4
SHIFT
MEMORY
1 2 3 4
EFFECT
PORT/FILE ASSIGN
-
REDO
UNDO
MARK OUTMARK IN
EXECUTE/
REC
REPLAY
PREVIEW
7
6
+
MARK
SPLIT
LOC
MAN
SOFINEOF
START
TOTAL
SCR
GO TO
MAVE-F555 MAVE-D555
PRMTR
SPEED
REVSOFTBORD
PATT
OUT
DUR
STBOF
EJECT
PLAY
STILL
STOP
SHTL
EDIT
MARK
LAST
CLEAR
PQRS TUV WXYZ !
GHI JKL MNO _ / " @
SCR-C0CTL/TC
, . : ; & # * ?
JOG DMCSHIFT ALL STOP
SPEED
X
987
654
321
ABC
DEF ( ) [ ]
RETURN
ENTER
00
+
-
STEP
STEP
REW
FF
MENU
+
< = >
T-SET
-
T-TRACK
F/TC
8
3, 5
1 Press the MAVE-F555 [ ] key to enter the
OVERWRITE mode.
2 Use the FILE/PORT ASSIGN operation on the
MAVE-F555 to select the Player.
3 Select the IN and OUT points for the interval
where you want to place the effect result.
4 Use the FILE/PORT ASSIGN operation on the
MAVE-F555 to select the Recorder.
5 Rotate the search dial on the MAVE-D555 to
select the IN point where the result of the effect
will start.
6 In the EFFECT operation section on the MAVE-
F555, press the WIPE key.
The pressed key lights.
7 On the MAVE-D555 hold down the SHIFT key,
and then press the key for the wipe pattern that you
want to select. The pressed key lights.
The pattern registered for the pressed key is
selected and the transition time of the selected
pattern is displayed in the information display area
of the MAVE-D555.
8 Use the number keys to enter the duration time in
the scratchpad, and then press the ENTER key.
The maximum value that can be set for the
transition time is 998 frames.
9 On the MAVE-F555 press the EXECUTE/REC
key to execute the edit.
2-6 (E) Chapter 2 Operation
Page 18

Notes
• During editing with selected effect patterns of picture
in a picture and other animation systems, the portion
before the transition time from the OUT point also
takes time.
• During editing with a specified mosaic effect pattern,
the Player interval specifications in Step 2 and Step 3
are not required. Effect patterns that do not require
specification of the Player interval are listed below.
Effect Pattern
Mosaic 1001,1011,1015,1016,1017,1018
Still Mirror
Y&C Modify
Strobe, Cinema
Multi Screen 1240,1241
Real Paint 1280,1281,1282,1283
Stained Glass 1285,1286,1287,1288
Pattern Number
1020,1021,1022,1023,1024,1025,1026,1027
1030,1033,1040,1043,1046,1050,1055,1056,1057,1058
1065,1066,1067
Executing in the Direction Opposite Wipe
1 Execute the procedure for “Selecting a Wipe
Pattern from a Design and Executing it” as far as
Step 8 (page 2-6).
2 Press the REV button in the MAVE-D555
operation section. The pressed button lights.
3 On the MAVE-F555 press the EXECUTE/REC
key to execute the edit.
Editing with the Dissolve Effect
1 Execute the procedure for “Selecting a Wipe
Pattern from a Design and Executing it” as far as
Step 5 (page 2-6).
2 Press the DISS key in the MAVE-F555 EFFECT
operation section. The pressed key lights.
3 Use the number keys to enter the duration into the
scratchpad and press the ENTER key.
Chapter 2 Operation
4 On the MAVE-F555 press the EXECUTE/REC
key to execute the edit.
Chapter 2 Operation 2-7 (E)
Page 19

2-2 Operations for Each Function
Setting the Number for an Effect Pattern
Chapter 2 Operation
6
RECORDER SEL BACK GROUND
MAV VTR
FILE
DEL
FILE
CUT DISS WIPE TITLE AUDIO
STORE
TRIM
A
MIX
NEW
FILE
R
P1 P2 BG
V A1 A2 A3 A4
SHIFT
MEMORY
1 2 3 4
EFFECT
PORT/FILE ASSIGN
-
REDO
UNDO
MARK OUTMARK IN
EXECUTE/
REC
REPLAY
PREVIEW
2
+
MARK
SPLIT
3
LOC
MAN
SOFINEOF
START
TOTAL
SCR
GO TO
MAVE-F555 MAVE-D555
PATT
PRMTR
OUT
SPEED
DUR
REVSOFTBORD
STBOF
EJECT
PLAY
STILL
STOP
SHTL
EDIT
MARK
LAST
CLEAR
PQRS TUV WXYZ !
GHI JKL MNO _ / " @
SCR-C0CTL/TC
, . : ; & # * ?
JOG DMCSHIFT ALL STOP
SPEED
X
987
654
321
ABC
DEF ( ) [ ]
RETURN
ENTER
00
+
-
STEP
STEP
REW
FF
MENU
+
< = >
T-SET
-
T-TRACK
F/TC
3, 5
4
1 Execute the procedure for “Selecting a Wipe
Pattern from a Design and Executing it” as far as
Step 5 (page 2-6).
2 On the MAVE-D555 press the PATT key (SHIFT
+ PRMTR) to enter the pattern number selection
mode. The PATT key flashes.
On the monitor the EE image is output, and the
BKNE-1011 transition lever is enabled.
3 Use the number keypad to enter the effect number
in the scratchpad, and then press the ENTER key.
If an enabled pattern number is entered, that
pattern number is reflected. If an disabled pattern
number is entered, the number the largest number
close to the entered number is reflected.
You can also set the number by using the minus [–]
and [+] keys on the MAVE-F555.
4 On the MAVE-D555 after pressing the RETURN
key (SHIFT + ENTER) to enter the effect mode
and then returning to the normal mode, the
transition time is shown in the information display
area of the MAVE-D555.
5 Use the number keypad to enter the transition time
in the scratchpad, and then press the ENTER key.
6 On the MAVE-F555 press the EXECUTE/REC
key to execute the edit.
2-8 (E) Chapter 2 Operation
Page 20

2-2-4 Setting Effect Parameters
Before you select an effect pattern in order to blur the
pattern at the edges, or to add a border to the edges,
you should first select the pattern and then display it on
the screen.
Displaying the Borders on the Screen
EDIT
MARK
LAST
CLEAR
2
LOC
MAN
SOFINEOF
START
TOTAL
SCR
GO TO
PATT
PRMTR
OUT
SPEED
DUR
REVSOFTBORD
STBOF
EJECT
PLAY
STILL
STOP
SHTL
PQRS TUV WXYZ !
GHI JKL MNO _ / " @
SCR-C0CTL/TC
, . : ; & # * ?
JOG DMCSHIFT ALL STOP
SPEED
X
MENU
+
987
< = >
T-SET
-
654
T-TRACK
F/TC
321
ABC
DEF ( ) [ ]
RETURN
ENTER
00
+
-
STEP
STEP
REW
FF
Note
In order to set an effect pattern, the Editing Fader
Panel BKNE-1011 is required.
For details about the Editing Fader Panel, see section “2-4
Using the MAVE-D555 with the Editing Fader Panel” (page
2-29).
3
1
1
2 3 4 M
10
9
2
8
7
3
6
5
4
4
3
2
1
0
KNOB
LEVER
INPUT
MIX
10
10
12
34
LR
9
9
8
8
0
-1
7
7
-4
-6
6
6
-10
-14
5
5
-20
-28
4
4
-40
3
3
-52
-60
-∞
2
2
1
1
0
0
Chapter 2 Operation
MAVE-D555 BKNE-1011
1 Referring the previous sections, “Selecting a Wipe
Pattern from a Design and Executing it”, (page 2-
6), and “Setting the Number for an Effect Pattern”
(page 2-8), assign an edit point to the effect and
select the effect pattern.
2 On the MAVE-D555 press the PRMTR key. The
key lights and the machine enters the parameter
setting mode.
3 Use the transition lever on the BKNE-1011 to
manually display the border of the effect pattern on
the screen.
Enabling Soft Edge and Border Edge
In order to enable the soft edge and border edge
features, in the MAVE-D555 Effect Group, press the
SOFT button to enable the soft border, or press the
BORD button to enable the border edge.
The pressed button lights.
Chapter 2 Operation 2-9 (E)
Page 21

2-2 Operations for Each Function
Specifying an Effect Parameter
Chapter 2 Operation
1 Press the PRMTR key.
The menu opens in the information display area on
the screen.
1
EDIT
MARK
LAST
CLEAR
LOC
MAN
SOFINEOF
START
TOTAL
SCR
GO TO
PRMTR
OUT
SPEED
DUR
REVSOFTBORD
PATT
STBOF
EJECT
PLAY
STILL
STOP
SHTL
PQRS TUV WXYZ !
GHI JKL MNO _ / " @
SCR-C0CTL/TC
, . : ; & # * ?
JOG DMCSHIFT ALL STOP
SPEED
X
MENU
+
987
< = >
T-SET
-
654
T-TRACK
F/TC
321
ABC
DEF ( ) [ ]
RETURN
ENTER
00
+
-
STEP
STEP
REW
FF
2
1
2
3
4
3
1
10
9
8
7
6
5
4
3
2
1
0
MAVE-D555 BKNE-1011
(Page 3)
9: TITLE +: LUM
-: CRK
2 3 4 M
10
9
8
7
6
5
4
3
2
1
0
KNOB
LEVER
INPUT
MIX
10
12
34
LR
9
8
0
-1
7
-4
-6
6
-10
-14
5
-20
-28
4
-40
3
-52
-60
-∞
2
1
0
2 Use the number keys to enter the number of the
menu.
To advance to the next menu page, press the [+]
key or the [–] key on the MAVE-F555.
1 Patt Adj 2 EDGE
3 BDR MAT 4 INT V
The following items are displayed on the menu:
(Page 1)
1: Patt Adj 2: EDGE
3: BDR MAT 4: INT V
(Page 2)
5: Light 6: Super BG
7: DSK 8: DSK MAT
2-10 (E) Chapter 2 Operation
3 Select the desired item. The machine enters the
parameter mode.
The parameters order 1 to 4 from the left
correspond to settings 1 to 4 on the knob of the
BKNE-1011. Use the knob of the BKNE-1011 to
set the parameter selections for the MAVE-D555.
Note
To clear a selected parameter, after entering the
parameter setting mode in Step 3, press the CLEAR
key on the MAVE-D555. The corresponding key for
each parameter flashes on the MAVE-D555 number
keypad. Press the number for the registered pattern that
you want to clear. After you press the key, the factory
default setting for the key is restored.
Page 22

Conducting Manual Transition
2
LOC
MAN
SOFINEOF
START
TOTAL
1 Select the effect pattern.
EDIT
MARK
LAST
CLEAR
GO TO
REVSOFTBORD
PATT
PRMTR
PQRS TUV WXYZ !
OUT
GHI JKL MNO _ / " @
SPEED
DUR
SCR
STBOF
PLAY
STOP
SHTL
SCR-C0CTL/TC
, . : ; & # * ?
EJECT
STILL
JOG DMCSHIFT ALL STOP
SPEED
X
MENU
+
987
< = >
T-SET
-
654
T-TRACK
F/TC
321
ABC
DEF ( ) [ ]
RETURN
ENTER
00
+
-
STEP
STEP
REW
FF
1
1
2 3 4 M
10
9
2
8
7
3
6
5
4
4
3
2
1
0
MAVE-D555 BKNE-1011
3 Execute the edit.
Chapter 2 Operation
3
KNOB
LEVER
INPUT
MIX
10
10
12
34
LR
9
9
8
8
0
-1
7
7
-4
-6
6
6
-10
-14
5
5
-20
-28
4
4
-40
3
3
-52
-60
-∞
2
2
1
1
0
0
2 Press the MAN key.
The key lights and the machine enters the manual
transition enabled status.
To release the machine from this status, on the
MAVE-F555 press the CUT key, the DISS key, or
the WIPE key.
The transition part of the effect is enabled by
operation of the transition lever on the BKNE-
1011. Use the lever to select the desired transition.
However, the AUDIO transition is the transition
time entered in the scratchpad.
Chapter 2 Operation 2-11 (E)
Page 23

2-2 Operations for Each Function
2-2-5 Using a Track Ball
A track ball can be attached to the MAVE-D555 and used to control mosaics and other effect patterns for which
XYZ coordinates can be adjusted. However, pointing device such as a mouse with a wheel is required in order to
adjust the Z coordinate.
Chapter 2 Operation
5
RECORDER SEL BACK GROUND
MAV VTR
FILE
DEL
FILE
CUT DISS WIPE TITLE AUDIO
STORE
TRIM
A
MIX
NEW
FILE
R
P1 P2 BG
V A1 A2 A3 A4
SHIFT
MEMORY
1 2 3 4
EFFECT
PORT/FILE ASSIGN
-
REDO
UNDO
MARK OUTMARK IN
EXECUTE/
REC
REPLAY
PREVIEW
31
+
MARK
SPLIT
LOC
MAN
SOFINEOF
START
TOTAL
SCR
GO TO
MAVE-F555 MAVE-D555
PRMTR
OUT
SPEED
DUR
REVSOFTBORD
PATT
STBOF
EJECT
PLAY
STILL
STOP
SHTL
EDIT
MARK
LAST
CLEAR
PQRS TUV WXYZ !
GHI JKL MNO _ / " @
SCR-C0CTL/TC
, . : ; & # * ?
JOG DMCSHIFT ALL STOP
SPEED
X
987
654
321
ABC
DEF ( ) [ ]
RETURN
ENTER
00
+
-
STEP
STEP
REW
FF
MENU
+
< = >
T-SET
-
T-TRACK
F/TC
4
1 On the MAVE-D555 press the PATT key (SHIFT
+ PRMTR).
The PATT key flashes and the machine enters the
pattern number selection mode.
2 Select the effect pattern for XY (or XYZ)
adjustment.
3 On the MAVE-D555 press the LOC key (SHIFT +
MAN).
“LOC” is displayed in the information display area
and the XYZ coordinates can now be controlled.
4 On the MAVE-D555 press the RETURN key
(SHIFT + ENTER) to return to the normal mode.
2-12 (E) Chapter 2 Operation
5 Execute the edit.
During PREVIEW, you can use a pointing device
such as a track ball to change the position and size
of the pattern. The changes are recorded during
PREVIEW.
Notes
• To switch off the “LOC” display at Step 3, press the
LOC key (SHIFT + MAN).
• When the effect pattern moves off-screen upon
adjusting the XYZ coordinates, you can return it to
screen center by pressing the CLEAR key on the
MAVE-D555. When the key lamp lights, left-click
the pointing device such as a track ball.
Page 24

2-2-6 Registering Effects
Frequently used effects (effect patterns, transition times, and other parameter settings) can be saved on the MAVEF555. Follow the procedure below to register effects with the MEMORY key on the MAVE-F555.
RECORDER SEL BACK GROUND
MAV VTR
A
MIX
Chapter 2 Operation
4
FILE
DEL
NEW
FILE
FILE
CUT DISS WIPE TITLE AUDIO
R
P1 P2 BG
STORE
V A1 A2 A3 A4
TRIM
SHIFT
MEMORY
1 2 3 4
EFFECT
PORT/FILE ASSIGN
-
REDO
UNDO
MARK OUTMARK IN
EXECUTE/
REC
REPLAY
PREVIEW
+
MARK
SPLIT
MAVE-F555 MAVE-D555
1 On the MAVE-D555 press the PRMTR key or the
PATT key (SHIFT + PRMTR).
2 Follow the procedure described in section “2-2-3
Setting an Effect Pattern” (page 2-5) to select the
effect that you want to register.
3 Follow the procedure described in “Specifying an
Effect Parameter” (page 2-10) to specify the
pattern.
At the same time, set the transition time.
EDIT
MARK
LAST
CLEAR
1
LOC
MAN
SOFINEOF
START
TOTAL
SCR
GO TO
PRMTR
OUT
SPEED
DUR
REVSOFTBORD
PATT
STBOF
EJECT
PLAY
STILL
STOP
SHTL
PQRS TUV WXYZ !
GHI JKL MNO _ / " @
SCR-C0CTL/TC
, . : ; & # * ?
JOG DMCSHIFT ALL STOP
SPEED
X
MENU
+
987
< = >
T-SET
-
654
T-TRACK
F/TC
321
ABC
DEF ( ) [ ]
RETURN
ENTER
00
+
-
STEP
STEP
REW
FF
4 In the FILE/PORT ASSIGN group of the MAVE-
F555, hold down the STORE key, and then press
any MEMORY key from 1 to 4.
The effect selected in Steps 2 and 3 is stored under
the MEMORY key that you press.
Notes
• Effects stored on the MAV-555 are shared in all of
the MAV-555 setup menu banks. Effects cannot be
registered individually for separate banks.
• Registered effects are cancelled if the MAV-555 is
left unused for an extended period of time after power
it off.
Chapter 2 Operation 2-13 (E)
Page 25

2-2 Operations for Each Function
Recalling Registered Effects
Chapter 2 Operation
2
RECORDER SEL BACK GROUND
MAV VTR
FILE
DEL
FILE
CUT DISS WIPE TITLE AUDIO
STORE
TRIM
A
MIX
NEW
FILE
R
P1 P2 BG
V A1 A2 A3 A4
SHIFT
MEMORY
1 2 3 4
EFFECT
PORT/FILE ASSIGN
-
REDO
UNDO
MARK OUTMARK IN
EXECUTE/
REC
REPLAY
PREVIEW
1
+
MARK
SPLIT
LOC
MAN
SOFINEOF
START
TOTAL
GO TO
SCR
MAVE-F555 MAVE-D555
PRMTR
SPEED
REVSOFTBORD
PATT
OUT
DUR
STBOF
EJECT
PLAY
STILL
STOP
SHTL
EDIT
MARK
LAST
CLEAR
PQRS TUV WXYZ !
GHI JKL MNO _ / " @
SCR-C0CTL/TC
, . : ; & # * ?
JOG DMCSHIFT ALL STOP
SPEED
X
987
654
321
ABC
DEF ( ) [ ]
RETURN
ENTER
00
+
-
STEP
STEP
REW
FF
MENU
+
< = >
T-SET
-
T-TRACK
F/TC
1 On the MAVE-D555 press the PRMTR key or
PATT key (SHIFT + PRMTR).
2-2-7 Inserting Text and Graphics
Title Key
You can insert text and graphics while applying
effects.
Notes
• You can either input the external video signal to
the left SPARE terminal on the MAV-555
connector panel (when using the MAV-555A or the
MAV-555SS in SD mode, use the DSK IN VIDEO
terminal), or make the internal MAV-555 player a
KEY signal. You can make this setting in effect
2 Press one of MAVE-F555 MEMORY keys 1 to 4,
depending on the effect to be recalled.
The current effect is replaced with the effect
recalled with the MEMORY key, and all the other
parameters (transition time, etc.) are also enabled.
parameter settings menu 9: TITLE, “SRC”
(SOURCE) setting.
• It is necessary to set the KEY signal type in effect
parameter settings menu 9: TITLE, “KEY” setting.
• The BKMA-560 Option Board must be installed in
the MAV-555.
• Editing can be done only on the recorder port.
• Editing can be done only in the OVERWRITE
mode.
• This procedure cannot be performed with the
MAV-777.
2-14 (E) Chapter 2 Operation
Page 26

2, 4
1
RECORDER SEL BACK GROUND
MAV VTR
FILE
DEL
FILE
CUT DISS WIPE TITLE AUDIO
STORE
TRIM
A
MIX
NEW
FILE
R
P1 P2 BG
V A1 A2 A3 A4
MEMORY
1 2 3 4
EFFECT
PORT/FILE ASSIGN
-
REDO
UNDO
MARK OUTMARK IN
REVSOFTBORD
LOC
PATT
MAN
SOFINEOF
START
TOTAL
SCR
GO TO
PRMTR
SPEED
DUR
OUT
STBOF
EJECT
PLAY
STILL
STOP
SHTL
PQRS TUV WXYZ !
GHI JKL MNO _ / " @
SCR-C0CTL/TC
, . : ; & # * ?
JOG DMCSHIFT ALL STOP
7
+
MARK
SPLIT
SPEED
X
MENU
+
987
< = >
T-SET
-
654
T-TRACK
F/TC
321
ABC
DEF ( ) [ ]
RETURN
ENTER
00
+
-
STEP
STEP
REW
FF
6
Chapter 2 Operation
EDIT
MARK
LAST
CLEAR
SHIFT
PREVIEW
REC
REPLAY
EXECUTE/
9
MAVE-F555 MAVE-D555
1 Press the MAVE-F555 [ ] key to enter the
OVERWRITE mode.
2 Use the FILE/PORT ASSIGN operation on the
MAVE-F555 to select the Player.
3 Select the interval (IN and OUT points) where you
want to insert text or graphics in the edited
material.
4 Use the FILE/PORT ASSIGN operation on the
MAVE-F555 to select the Recorder.
5 Using the MAVE-D555 search dial, search for the
point where you want to begin inserting text and
graphics, and then specify the IN point.
8
5
7 Press the TITLE key in the EFFECT operation
section on the MAVE-F555.
The pressed key lights.
8 Press the REPLAY/PREVIEW key on the MAVE-
F555, if desired, to preview.
9 Press the EXECUTE/REC key on the MAVE-F555
to execute editing.
The input signal is inserted and editing is finished.
When the TITLE key is lit and you want to finish
this operation without inserting text or graphics,
press the TITLE key again to turn it off.
6 Select the effect pattern and transition time to use
when inserting text and graphics.
A transition is used at the IN and OUT points
where text and graphics are inserted.
Chapter 2 Operation 2-15 (E)
Page 27

2-2 Operations for Each Function
Necessary Effect Parameter Settings
To be able to specify the source for text and graphics
that you want to insert, it is necessary to make the
following settings in the screen that appears after
pressing the MAVE-D555 PRMTR key.
Chapter 2 Operation
• KEY signal settings
(1)In effect parameter settings menu 9: TITLE, set
“KEY” to “LUM” (Luminance key) or “CRK”
(Chroma key).
(2)In effect parameter settings menu 9: TITLE,
“SRC”, set the source of the KEY signal
specified in (1) to “K-IN” (external video KEY
signal) or to “SELF” (the KEY signal itself).
If you selected “CRK” in (1) above, you can
only select “SELF”.
(3)If necessary, in effect parmeter settings menu 9:
TITLE, set “MASK” (KEY signal mask ON/
OFF) and “INV” (masked area turnover ON/
OFF), etc. Also, in effect parameter menu +:
“LUM” (Luminance key) or -: “CRK” (Chroma
key) set “Clip” (clip adjustment), “Gain” (gain
adjustment), “INV” (luminance turnover ON/
OFF), and “DNST” (image density).
Setting Examples
If the Luminance key and Fill signals are input to the
recorder from an external source, and inserted as title
information, make the following settings.
Menu Content
9: TITLE “KEY” = “LUM”
“SRC” = “K-IN”
+: LUM “FILL” = “VID”
See Section “2-2-8 Editing with the Player BUS” (page
2-19), and set MEMORY key 2: AUX for the BUS.
For details about parameter settings, see “TITLE Key,
Downstream Key, and Player BUS Setting Example” (page
A-7).
Note
If “KEY” is set to “CRK”, it is also necessary
to adjust the “Hue” and “Ang” of the color to
cut.
• FILL signal settings
(1)In effect parameter settings menu 9: TITLE, set
“KEY” to “LUM” (Luminance key) or “CRK”
(Chroma key).
(2)Depending on the setting in (1), perform the
following settings.
- If “KEY” is set to “LUM”, in menu +: LUM,
set “FILL” to “VID” (player internal BUS
signal) or to “BDRM” (border MATT).
- If “KEY” is set to “CRK”, in menu -: CRK,
set “FILL” to “VID” (player internal BUS
signal) or to “BDRM” (border MATT).
2-16 (E) Chapter 2 Operation
Page 28

Downstream Key (DSK)
The DSK (Downstream key) can be used to insert text
and graphics into cuts to which effects have been
applied and editing is finished.
Notes
• The BKMA-560 Option Board must be installed in
the MAV-555.
• The DSK KEY signal must be applied to the rightside SPARE terminal on the MAV-555 connector
panel. (With the MAV-555SS in SD mode or the
MAV-555A, the DSK IN KEY terminal.) The DSK
VIDEO signal may be applied to the left-side MAV555 SPARE terminal (with the MAV-555SS in SD
mode or the MAV-555A, the DSK IN VIDEO
terminal), but editing is possible even if it is not. In
this case, the “FILL” in the Effect Parameters menu
item 7: DSK must to be set to DSKM.
• Editing can be done only on the recorder port.
• Editing can be done only in the OVERWRITE mode.
• This procedure cannot be performed with the MAV-
777.
Chapter 2 Operation
2
1
7
RECORDER SEL BACK GROUND
MAV VTR
FILE
DEL
FILE
CUT DISS WIPE TITLE AUDIO
STORE
TRIM
A
MIX
NEW
FILE
R
P1 P2 BG
V A1 A2 A3 A4
SHIFT
MEMORY
1 2 3 4
EFFECT
PORT/FILE ASSIGN
-
REDO
UNDO
MARK OUTMARK IN
EXECUTE/
REC
REPLAY
PREVIEW
LOC
4
+
MARK
SPLIT
MAN
SOFINEOF
START
TOTAL
SCR
GO TO
6
MAVE-F555 MAVE-D555
PRMTR
OUT
SPEED
DUR
REVSOFTBORD
PATT
STBOF
EJECT
PLAY
STILL
STOP
SHTL
EDIT
MARK
LAST
CLEAR
PQRS TUV WXYZ !
GHI JKL MNO _ / " @
SCR-C0CTL/TC
, . : ; & # * ?
JOG DMCSHIFT ALL STOP
SPEED
X
987
654
321
ABC
DEF ( ) [ ]
RETURN
ENTER
00
+
-
STEP
STEP
REW
FF
MENU
+
< = >
T-SET
-
T-TRACK
F/TC
5
1 Press the MAVE-F555 [ ] key to enter the
OVERWRITE mode.
2 Use the FILE/PORT ASSIGN operation on the
MAVE-F555 to select the Recorder.
3 Select the interval (IN and OUT points) where you
want to insert text or graphics in the edited
material.
4 Press the TITLE key while pressing the SHIFT key
in the EFFECT operation section on the MAVEF555.
The pressed key blinks and “DSK” is
superimposed on the display.
TR 01:00 DSK
Chapter 2 Operation 2-17 (E)
Page 29

2-2 Operations for Each Function
5 Use the keypad keys to enter the transition time on
the scratchpad, and press the ENTER key.
6 Press the REPLAY/PREVIEW key on the MAVE-
F555, if desired, to preview.
Chapter 2 Operation
7 Press the EXECUTE/REC key on the MAVE-F555
to execute editing.
The input signal is inserted and editing is finished.
When the TITLE key is blinking and you want to
finish this operation without inserting text or
graphics, press the TITLE key again while pressing
the SHIFT key.
Notes
• When text and graphics are inserted into an interval
where a cut point exists, any existing information at
that point is cleared as the new information is
inserted. We therefore recommend inserting after
editing is finished.
• After pressing the PRMTR key to select a parameter,
press the TITLE key while pressing the SHIFT key so
that adjustment can be made while monitoring the
actual parameter. Pressing the TITLE key while
pressing the SHIFT key again reverts to the former
state.
• When pressing the TITLE key while pressing the
SHIFT key to set a downstream key, you can press
the MAN key on this unit (so that it is lit) to enable
manual downstream key switching during the interval
mentioned in step 3. The downstream key switches
on and off each time you press the TITLE key while
pressing the SHIFT key.
• FILL signal settings
(1) In effect parameter settings menu 7: DSK, set
“FILL” to “V-IN” (external VTR signal) or
“DSKM” (BKMA-560 built-in Internal Video
signal).
(2) If necessary, when “DSKM” is set adjust colors
in effect parameter settings menu 8: DSK MAT.
For details about parameter settings, see “TITLE
Key, Downstream Key, and Player BUS Setting
Example” (page A-7).
Necessary Effect Parameter Settings
To be able to specify the source for text and graphics
that you want to insert, it is necessary to make the
following settings when pressing the MAVE-D555
PRMTR key.
• KEY signal settings
(1) In effect parameter settings menu 7: DSK, set
“INV” “ON” or “OFF” to activate or deactivate
the KEY signal turnover.
(2) If a FILL signal is not input to the MAV-555,
set “FILL” to “DSKM”.
(3) If necessary, adjust “DNST” (DSK density).
2-18 (E) Chapter 2 Operation
Page 30

2-2-8 Editing with the Player BUS
Section “TITLE Key” (page 2-14) describes how to
edit and apply effects when the MAV-555 internal
player port is assigned to the BUS signal. This section
describes how to change and edit the external VIDEO
signal input to the player BUS from the optional
BKMA-560 built-in Internal Video, or to the left
SPARE terminal on the MAV-555 connector panel
(with the MAV-555A or MAV-555SS in SD mode, the
2
1
RECORDER SEL BACK GROUND
MAV VTR
FILE
DEL
FILE
CUT DISS WIPE TITLE AUDIO
STORE
A
MIX
NEW
FILE
R
P1 P2 BG
V A1 A2 A3 A4
MEMORY
1 2 3 4
EFFECT
PORT/FILE ASSIGN
-
REDO
UNDO
+
DSK IN VIDEO terminal).
Notes
• The BKMA-560 Option Board must be installed in
the MAV-555.
• The preset audio of the MAVE-F555 channels is
muted.
• This operation is not possible with the MAV-777.
EDIT
MARK
LAST
CLEAR
5
LOC
MAN
SOFINEOF
START
TOTAL
SCR
GO TO
PRMTR
OUT
SPEED
DUR
REVSOFTBORD
PATT
STBOF
EJECT
PLAY
STILL
STOP
SHTL
PQRS TUV WXYZ !
GHI JKL MNO _ / " @
SCR-C0CTL/TC
, . : ; & # * ?
JOG DMCSHIFT ALL STOP
SPEED
X
MENU
+
987
< = >
T-SET
-
654
T-TRACK
F/TC
321
ABC
DEF ( ) [ ]
RETURN
ENTER
00
-
+
STEP
STEP
REW
FF
4
Chapter 2 Operation
TRIM
MARK
MARK OUTMARK IN
SPLIT
REPLAY
EXECUTE/
SHIFT
PREVIEW
REC
7
MAVE-F555 MAVE-D555
1 Press the MAVE-F555 [ ] key to enter the
OVERWRITE mode.
2 Use the FILE/PORT ASSIGN operation on the
MAVE-F555 to select the Recorder.
3 Using the MAVE-D555 search dial, search for edit
points, and then specify the IN and OUT points.
4 Select the effect pattern and transition time.
(It is also possible to perform cut editing.)
6
3
5 In the MAVE-F555 EFFECT operation section,
press the MEMORY key while pressing the key
(CUT, DISS, WIPE) corresponding to the effect
pattern that you selected in Step 4.
The BUS signal is selected.
• MEMORY key 1: The MAV-555 internal player
or external VTR is selected (P1, R, P2, or BG).
• MEMORY key 2: The signal input at the DSK IN
VIDEO terminal of the MAV-555SS in SD mode
or the MAV-555A (with the MAV-555, the left
SPARE terminal) is selected (AUX).
• MEMORY key 3: The optional BKMA-560 builtin Internal Video signal is selected (MATT).
Chapter 2 Operation 2-19 (E)
Page 31

2-2 Operations for Each Function
6 Press the REPLAY/PREVIEW key on the MAVE-
F555, if desired, to preview.
7 Press the EXECUTE/REC key on the MAVE-F555
to execute editing.
The input signal is inserted and editing is finished.
Chapter 2 Operation
DIS TR 01:00S
R [R : MAV RP ]
OU
DU 0 0:00 : 02 : 00R
P [P : MAV P11 ]
Display Example
A
T
T
IN
R
M
0 0:10 : 01 : 00
0 0:10 : 03 : 00
T
IN 0 0:00:01:00
Note
Detailed information about the recorder and player
ports is summarized and superimposed on the display.
It is also possible to confirm the direction of the BUS
signal.
For details about parameter settings, see “TITLE Key,
Downstream Key, and Player BUS Setting Example” (page
A-7).
Display example for each
MEMORY key
• When MEMORY key 1 is selected
V 1234
R t P1 (or R, P2, BG)
• When MEMORY key 2 is selected
R t AUX
• When MEMORY key 3 is selected
R t MATT
OU
U
D
0 0:00:03:00
T
0 0:00 : 0
R
2
: 00
Ed i E t r Fu l lynt
t
Und
o
o
Cm
e
l
p
d
e
2-2-9 GPI Output
It is possible to use GPI (General Purpose Interface) output to control an external device, such as the audio signal
from a CD player.
Select “EP1” or “EP2” on the MAV-555 Expansion Menu item 224: GPI OUTPUT CONFIGURATION. Further,
you must select “config” on the Expansion Menu item 225: GPI CONFIG MODE.
Item number Display indication Settings Description
320
MAVE-F555 CONTROL
SUB MENU
BI
GPI EP1 TIME(F)
GPI EP2 TIME(F)
Sets control of MAVE-F555 when it is connected.
Performs offset control for the IN point of the GPI output. (GPI OUTPUT
CONFIGURATION item (menu 224)).
-90 .. 00 .. +90
Notes: •When the player is an external VTR or when performing DMC
editing, the PREROLL TIME + GPI EPx TIME must be set so that it
exceeds 2 seconds plus 2 frames.
• When trimming, the GPI EPx TIME must be set so that it exceeds
-28 frames (in 525 mode. -23 frames in 625 mode). In other editing
situations, PREROLL TIME + GPI EPx TIME must be set so that it
exceeds 2 frames.
2-20 (E) Chapter 2 Operation
Page 32

You can perform GPI output with the menu above within ± 90 frames of the recorder IN point. It is not possible to
perform GPI output for other intervals.
Recorder
Pre-roll time
IN OUT
GPI output
−90 frames +90 frames
−30 frames
*When the GPI EP1 (or EP2) time is -30 frames
2-2-10 Audio Channel Mix/Swap Editing
The MAVE-D555 allows mixing and swapping audio
channels in the interval where materials are presented
during editing.
1
6
RECORDER SEL BACK GROUND
MAV VTR
FILE
DEL
FILE
CUT DISS WIPE TITLE AUDIO
STORE
A
MIX
NEW
FILE
R
P1 P2 BG
V A1 A2 A3 A4
MEMORY
1 2 3 4
EFFECT
PORT/FILE ASSIGN
-
REDO
UNDO
+
4, 5
5
Note
These features are available only when using the
player port of the MAV-555.
EDIT
MARK
LAST
CLEAR
4
LOC
MAN
SOFINEOF
START
TOTAL
SCR
GO TO
PRMTR
OUT
SPEED
DUR
REVSOFTBORD
PATT
STBOF
EJECT
PLAY
STILL
STOP
SHTL
PQRS TUV WXYZ !
GHI JKL MNO _ / " @
SCR-C0CTL/TC
, . : ; & # * ?
JOG DMCSHIFT ALL STOP
SPEED
X
MENU
+
987
< = >
T-SET
-
654
T-TRACK
F/TC
321
ABC
DEF ( ) [ ]
RETURN
ENTER
00
+
-
STEP
STEP
REW
FF
2
3
4, 5
Chapter 2 Operation
8
TRIM
MARK
MARK OUTMARK IN
SPLIT
REPLAY
EXECUTE/
SHIFT
PREVIEW
REC
MAVE-F555 MAVE-D555
2, 5
Chapter 2 Operation 2-21 (E)
Page 33

2-2 Operations for Each Function
1 Press the A MIX key on the MAVE-F555 as
indicated above so that it lights.
The channels specified in the 2: Audio menu are
output at the MAV-555 player port. When the A
MIX key on the MAVE-F555 is not lit, mix/swap
editing is not available.
Chapter 2 Operation
2 On the MAVE-D555 press the MENU key (SHIFT
+ [+]). The menu category display opens.
3 Press the “2 (AUDIO)” key on the keypad from
the menu on the next page to select the category.
The menu for the selected category opens.
4 Use the keypad keys on the MAVE-D555, or the
“+” and “–” keys on the MAVE-F555 to select the
menu number, then press the ENTER key.
5 Use the channel selection keys on the MAVE-
F555 (A1 to A4 keys) and the “+” or “–” key to
specify the channels to output to each of the
AUDIO CH1 to CH4 of the recorder at the MAV555 player port. After specifying the channels,
press the RETURN key (SHIFT key + ENTER
key) on the MAVE-D555 to exit menu.
6 Select the recorder port.
7 Select the interval (IN and OUT points) for editing
specified by the menu.
8 Press the EXECUTE/REC key on the MAVE-
F555 to execute editing.
Setting Examples
• These settings edit (swap) CH1 and CH3 on the
player port of the MAV-555.
Existing Value Setting Value
1: MAV Player CH1 OUT 1 → 3
2: MAV Player CH2 OUT 2 → 2
3: MAV Player CH3 OUT 3 →
1
4: MAV Player CH4 OUT 4 → 4
• These settings edit (mix) CH1 and CH2 from the
player port of the MAV-555.
Existing Value Setting Value
1: MAV Player CH1 OUT 1 → 12
2: MAV Player CH2 OUT 2 →
12
3: MAV Player CH3 OUT 3 → 3
4: MAV Player CH4 OUT 4 → 4
Notes
• When mixing audio, the mixing method should be
set from the MAV-555 Expansion menu item 820:
AUDIO OUTPUT MIXING.
• Details of the Mix/Swap Edit can be confirmed
from the information superimposed on the display
when the TYPE is set to full in the MAV-555
Expansion menu item 323: LINEAR EDIT
MESSAGE.
1 : 0 0 A - FADER
AA0 0:04
Display
Example
] MIX++34
: 01 : 00
V 1234
Category
2: Audio
No. Name Remarks
MAV Player
1
CH1 OUT
2 MAV Player
CH2 OUT
MAV Player
3
CH3 OUT
MAV Player
4
CH4 OUT
2-22 (E) Chapter 2 Operation
Specifies the recording
channel(s) for the MAV-555
player port audio output
channel 1.
1
Specifies the recording
channel(s) for the MAV-555
player port audio output
channel 2.
2
Specifies the recording
channel(s) for the MAV-555
player port audio output
channel 3.
3
Specifies the recording
channel(s) for the MAV-555
Player port audio output
channel 4.
4
*The “+” symbol signifies that the audio is mixed.
• When editing by using both the Mix/Swap Edit and
the Editing Fader Panel, each fader in the fader panel
becomes effective to the original channel set before
the Mix/Swap Edit.
Page 34

2-2-11 Support of EDL Export
When the MAV-555 is used as a recorder during editing and used in parallel with the BZMA-E555 file transfer
program, it is possible to output EDL files (.edl) of editing results in the SONY BVE-9100 format. Also, when the
VTR is used as a player during editing, it is possible to enter a tape’s reel name.
Notes
• The sequence in which entries appear in the exported EDL file does not match that in which editing operations
are performed using the MAVE-F555/D555. Since the MAVE-F555/D555 supports nonlinear editing (which was
not possible with previous editors), the editing sequence cannot be output as is in the Sony BVE-9100 format.
The EDL files exported using this function can be used with devices such as those of the BVE-series Editor only
to replicate current editing results.
• This function can only export EDL files. Movement between pages in exported EDL files or data changes with
the MAVE-F555/D555 for the purpose of re-editing is not possible.
• Exporting EDL files is only possible when the MAV-555 is used as a recorder. When using the VTR as a
recorder EDL files cannot be exported.
• When performing the following editing operations, the exportation of EDL files cannot be performed correctly.
The sections edited as described below are exported as BLACK/MUTING.
– When animation-type effects are used
– When TITLE (DSK) are inserted
• When performing the following editing operations, the effect information is not output and transformed into cuts.
– When performing DMC editing with effects
– When performing manual effects
– When adjusting the recording level of the edit interval together with the Editing Fader Panel BKNE-1011
– When performing audio channel mix/swap editing
Chapter 2 Operation
Chapter 2 Operation 2-23 (E)
Page 35

2-2 Operations for Each Function
Setting a Reel Name
You can enter a tape’s reel name when using the BZMA-E555 to export EDL files and the VTR is used as a player
during editing.
Chapter 2 Operation
RECORDER SEL BACK GROUND
MAV VTR
FILE
DEL
FILE
CUT DISS WIPE TITLE AUDIO
STORE
TRIM
A
MIX
NEW
FILE
R
P1 P2 BG
V A1 A2 A3 A4
SHIFT
MEMORY
1 2 3 4
EFFECT
PORT/FILE ASSIGN
-
REDO
UNDO
MARK OUTMARK IN
EXECUTE/
REC
REPLAY
PREVIEW
1
+
LOC
MAN
SOFINEOF
START
TOTAL
SCR
GO TO
3
MARK
SPLIT
MAVE-F555 MAVE-D555
PRMTR
SPEED
REVSOFTBORD
PATT
OUT
DUR
STBOF
EJECT
PLAY
STILL
STOP
SHTL
EDIT
MARK
LAST
CLEAR
PQRS TUV WXYZ !
GHI JKL MNO _ / " @
SCR-C0CTL/TC
, . : ; & # * ?
JOG DMCSHIFT ALL STOP
SPEED
X
987
654
321
ABC
DEF ( ) [ ]
RETURN
ENTER
00
+
-
STEP
STEP
REW
FF
3
MENU
+
< = >
T-SET
-
T-TRACK
F/TC
2
4
5, 6
1 On the MAVE-D555 press the MENU key (SHIFT
+ [+]).
The menu categories are displayed.
2 Press the “4” key (REEL) on the keypad.
The unit enters the reel name setting mode and
goes on standby so you can enter a reel name.
3 Use the keys on the keypad to enter a new reel
name.
• Press the MARK SPEED key to switch between
the alphabetic and numeric entry modes on the
keypad.
• To move the cursor left or right, press the [?b] or
[B?] key on the MAVE-F555.
• Press the CLEAR key to delete single characters.
• Press SHIFT + CLEAR to delete an entire entry.
2-24 (E) Chapter 2 Operation
4 To register the new reel name, press the ENTER
key.
After setting a reel name, when you use the
BZMA-E555 to export EDL files, the name is
output.
5 To return to the category display, press the
RETURN key (SHIFT + ENTER).
6 To quit menu operation, at the category display
press the RETURN key (SHIFT + ENTER) again.
Page 36

Notes
• The length of a reel name is limited to 6 characters in
length.
• It is only necessary to set a reel name when using the
VTR as a player during editing. When editing MAV555 files, reel names are set automatically, and a reel
name/file name correspondence list is inserted at the
beginning of the comment of exported EDL files.
• The EDL information is cleared if it not saved before
the MAV-555 is turned off.
Chapter 2 Operation
Chapter 2 Operation 2-25 (E)
Page 37

2-3 Using the Menus
This section describes the menus that are provided on the MAVE-D555 in order to set up operation settings.
For more details about menu items, see the Menu List at the end of this manual.
2-3-1 Operations and Menus
Chapter 2 Operation
menu, first you select the category and then select the next menu from within the selected category.
Using the Menu Settings
You can perform the settings for each menu with the Main selection within the menu categories.
The MAVE-D555 menu is divided into three categories: 1: Main, 2: Rename, and 3: Version. When you use a
RECORDER SEL BACK GROUND
MAV VTR
FILE
DEL
FILE
CUT DISS WIPE TITLE AUDIO
STORE
A
MIX
NEW
FILE
R
V A1 A2 A3 A4
MEMORY
1 2 3 4
EFFECT
PORT/FILE ASSIGN
P1 P2 BG
-
REDO
UNDO
REVSOFTBORD
1
+
3, 4
LOC
MAN
SOFINEOF
START
TOTAL
SCR
GO TO
PRMTR
SPEED
PATT
OUT
DUR
STBOF
EJECT
PLAY
STILL
STOP
SHTL
PQRS TUV WXYZ !
GHI JKL MNO _ / " @
SCR-C0CTL/TC
, . : ; & # * ?
JOG DMCSHIFT ALL STOP
SPEED
X
MENU
+
987
< = >
T-SET
-
654
T-TRACK
F/TC
321
ABC
DEF ( ) [ ]
RETURN
ENTER
00
+
-
STEP
STEP
REW
FF
2
3
5, 6, 7
EDIT
MARK
LAST
CLEAR
TRIM
MARK
MARK OUTMARK IN
SPLIT
REPLAY
EXECUTE/
SHIFT
PREVIEW
REC
MAVE-F555 MAVE-D555
1 On the MAVE-D555 press the MENU key (SHIFT
+ [+]).
The menu category display opens.
2 Press the “1” key on the keypad for “Main” to
select that category.
The menu for the selected category opens.
3 Enter the menu number using the numeric keys on
the MAVE-D555 or the [+] or [–] keys on the
MAVE-F555, then press the ENTER key.
The menu data is displayed for the menu selected
by the number you entered.
4 To change a data setting, on the MAVE-F555 press
the minus key [–] or plus key [+].
2-26 (E) Chapter 2 Operation
Page 38

5 To return to the menu name display, press the
RETURN key (SHIFT + ENTER).
6 To return to the category display, press the
RETURN key (SHIFT + ENTER) again.
7 To quit the menu operation, at the category display
press the RETURN key (SHIFT + ENTER) again.
Confirming the Version Numbers for the
MAVE-D555 and the MAVE-F555
Follow this procedure to confirm the current version
numbers of the MAVE-D555 and the MAVE-F555.
1
LOC
MAN
SOFINEOF
START
TOTAL
SCR
GO TO
PATT
PRMTR
OUT
SPEED
DUR
PQRS TUV WXYZ !
GHI JKL MNO _ / " @
SCR-C0CTL/TC
, . : ; & # * ?
STBOF
EJECT
PLAY
STILL
STOP
JOG DMCSHIFT ALL STOP
SHTL
STEP
REW
ABC
00
-
987
654
321
DEF ( ) [ ]
RETURN
ENTER
+
STEP
FF
MENU
T-SET
T-TRACK
F/TC
+
< = >
-
2
3, 4
Chapter 2 Operation
1 On the MAVE-D555 press the MENU key (SHIFT
+ [+]).
The menu categories are displayed.
2 Press the “3” (Version) on the keypad.
The software version numbers of the MAVE-D555
and the MAVE-555 are displayed in the
information display area of the MAVE-D555.
3 To return to the category display, press the
RETURN key (SHIFT + ENTER).
4 To quit the menu operation, at the category display
press the RETURN key (SHIFT + ENTER) key
again.
Chapter 2 Operation 2-27 (E)
Page 39

2-3 Using the Menus
Renaming
File names cannot be renamed independently with the MAVE-F555. In order to rename files, the MAVE-D555
must be connected to the MAVE-F555.
Chapter 2 Operation
1
RECORDER SEL BACK GROUND
MAV VTR
FILE
DEL
FILE
CUT DISS WIPE TITLE AUDIO
STORE
A
MIX
NEW
FILE
R
P1 P2 BG
V A1 A2 A3 A4
MEMORY
1 2 3 4
EFFECT
PORT/FILE ASSIGN
-
REDO
UNDO
REVSOFTBORD
SPEED
X
EDIT
MARK
LAST
CLEAR
2
LOC
4
PATT
MAN
PRMTR
SOFINEOF
START
TOTAL
+
GO TO
SCR
PQRS TUV WXYZ !
OUT
GHI JKL MNO _ / " @
SPEED
DUR
SCR-C0CTL/TC
, . : ; & # * ?
STBOF
EJECT
PLAY
STILL
STOP
SHTL
ABC
-
STEP
REW
JOG DMCSHIFT ALL STOP
00
987
654
321
DEF ( ) [ ]
+
STEP
FF
RETURN
ENTER
MENU
+
< = >
T-SET
-
T-TRACK
F/TC
3
5
TRIM
MARK
MARK OUTMARK IN
SPLIT
REPLAY
EXECUTE/
SHIFT
PREVIEW
REC
4
MAVE-F555 MAVE-D555
1 Using the MAVE-F555, select the port on which the
file whose name you want to change is loaded as the
target port.
2 On the MAVE-D555 press the MENU key (SHIFT +
[+]).
The menu categories are displayed.
3 Press the “2” key (RENAME) on the keypad.
The unit enters the rename mode and standby status so
you can enter a file name.
6, 7
5 To register the new file name, press the ENTER
key.
6 To return to the category display, press the
RETURN key (SHIFT + ENTER).
7 To quit menu operation, at the category display
press the RETURN key (SHIFT + ENTER) again.
Note
The length of a file name is limited to 23 characters in
length.
4 Use the keys on the keypad to enter a new file name.
• Press the MARK SPEED key to switch between the
alphabetic and numeric entry modes on the keypad.
• To move the cursor left or right, press the [?b] or [B?]
key on the MAVE-F555.
• Press the CLEAR key to delete single characters.
• Press SHIFT + CLEAR to delete an entire entry.
2-28 (E) Chapter 2 Operation
Page 40

2-4
Using the MAVE-D555 with the Editing Fader Panel
By connecting the Editing Fader Panel BKNE-1011 to
the MAVE-D555, you can control the recording level
during editing and set effect parameters.
Track Fader
KNOB
LEVER
INPUT
MIX
10
10
12
34
LR
9
9
8
8
0
-1
7
7
-4
-6
6
6
-10
-14
5
5
-20
-28
4
4
-40
3
3
-52
-60
-∞
2
2
1
1
0
0
Transition Lever
Volume
Knob
1
1
2 3 4 M
10
9
2
8
7
3
6
5
4
4
3
2
1
0
Level Meter
Master Fader
The functions of the controls of the Editing Fader
Panel connected to the MAVE-D555 are described
below.
Track Fader and Master Fader
Control the recording level during editing of the port
targeted for operation by selection with the MAVEF555.
Volume Knobs (4)
Set the effect parameters to match the display of the
MAVE-D555 LCD.
Transition Lever
Operate as a manual fader during manual transition.
Level Meter
Not displayed (no used)
2-4-1
Adjusting the Recording Level
in Real Time at the Recording Interval
1 Before executing the edit, on the MAVE-F555
press and light the AUDIO key of the EFFECT
operation section.
2 During the PREVIEW, operate the fader and adjust
the recording level.
3 To execute the edit, press EXECUTE/REC as you
would normally.
• While the AUDIO key is lit, the edit interval of
the PREVIEW is recorded. When the EXECUTE/
REC key is pressed, the edit is executed for the
time used by the recorded material. However, if
you want to change the level of the recorded
recording level, you can press SHIFT +
EXECUTE/REC to once again record the edit
interval.
• If you adjustment of the audio level is not
required, press the AUDIO key to switch it off
and the recording procedure described above will
not be executed.
• During edit execution the recording level is
normally adjusted via the R Port.
• When setting the recording level, when the
AUDIO key of the MAVE-F555 is lit and a
player port is selected, the fader is enabled.
Therefore before performing a PREVIEW or
EXECUTE/REC, the level can be confirmed.
• When the Editing Fader Panel is enabled (the
AUDIO key is lit), information can be
superimposed on the monitor for confirmation.
Chapter 2 Operation
For details about effect parameters settings and manual
transition operations, see section “2-2-4 Setting Effect
Parameters” (page 2-9)
CUT A - FADER
Chapter 2 Operation 2-29 (E)
Page 41

Page 42

Specifications
General
Power supply voltage 12 V DC
Power consumption Max. 12 W
Operating temperature +5°C to +40°C (41°F to 104°F)
Storage temperature –20°C to +60°C (– 4°F to 140°F)
Humidity 20% to 90%
Mass 1.9 kg (1 lb 3 oz)
External dimensions 148 × 102 × 307 mm (5
(width × height × depth, excluding projections)
Remote Connection
MOUSE/TRACK BALL
Mini DIN 6-pin receptacle × 1
AUDIO FADER PANEL
D-Sub 25-pin receptacle × 1
F555 I/F Mini DIN 8-pin receptacle × 1
7
/8 x 41/8 x 121/8 in.)
Appendixes
Supplied Accessories
Operation Manual (this manual) × 1
Installation Manual × 1
MAVE-F555 connection cable × 1
MAVE-F555 connection collar × 1
MAVE-F555 fasteners (B3 × 6) × 4
Due to changes during product development, these specifications and the external appearance of the unit are
subject to change without prior notice.
Appendixes A-1 (E)
Page 43

Appendixes
Menu List
The table below lists the menu options. Please note that the settings enclosed in are the default settings.
Category No. Name Content
1: Main 1 DIAL DIRECT CONTROL When this item is on, without presssing the SHTL, JOG, or DMC key,
you can enter the dynamic motion control mode by turning the search
dial and control the playback speed.
ON
OFF
2 JOG DIAL MODE Selects whether to use the BVE-600 or BVE-9100 speed and angle
settings of the search dial when used in the DMC mode.
BVE-600
BVE-9100
3 JOG DIAL RESPONSE Sets the speed dial’s sensitivity to rotation when used in the jog mode
(the amount of playback for one turn).
HIGH
LOW
4 BUZZER MODE Sets whether the buzzer sounds at the end of the edit session.
ON
OFF
5 STEP Sets the STEP increment.
1field
2field
4field
10field
1sec
2sec
3sec
5sec
6 CONTROL PORT Determines how the control port is connected when the MONITOR port
is changed.
Separately
Same as MonitorPort
7 V.O. VIDEO INPUT Specifies the input video signal when performing voice-over editing.
SDI
AnalogComposite
8 EDL AUTO SAVE Automatically saves cut point information of a saved file when it is
edited.
OFF
MEMORY 1
MEMORY 2
MEMORY 3
MEMORY 4
2: Audio 1 MAV Player CH1 OUT Specifies the recording channel(s) for the MAV-555 player port audio
output channel 1.
1
*CH1 to CH4 can be set independently.
2 MAV Player CH2 OUT Specifies the recording channel(s) for the MAV-555 player port audio
output channel 2.
2
*CH1 to CH4 can be set independently.
3 MAV Player CH3 OUT Specifies the recording channel(s) for the MAV-555 player port audio
output channel 3.
3
*CH1 to CH4 can be set independently.
A-2 (E) Appendixes
Page 44

Category No. Name Content
2: Audio 4 MAV Player CH4 OUT Specifies the recording channel(s) for the MAV-555 player port audio
output channel 4.
4
*CH1 to CH4 can be set independently.
5 VOICE OVER MODE Specifies the mode when performing voice-over editing.
Normal
Pre-Read
6 VOICE OVER INPUT Specifies the input audio signal when performing voice-over editing.
SDI
AES/EBU
ANALOG
(You can select ANALOG when the BKMA-511 is installed in the MAV555 or the BKMA-513 is installed in the MAV-555A.)
3: Rename –– Allows you to change the file name of a material.
For more details about this operation, see “Renaming” (page 2-28).
4: Reel –– When exporting EDL files and using the VTR as a player, set a tape’s
reel name.
For more details about this operation, see “Setting a Reel Name” (page
2-24).
5: Version –– Displays the current version number of the software:
F555 Vx.xx (x.xx = current number)
D555 Vx.xx (x.xx = current number)
Notes
• When 1: Main and 2: Audio category menu data is displayed, pressing the MAVE-D555 [CLEAR] key restores
the settings of the selected menu to their default values. However, it is not possible to restore all the default
settings globally.
• During voice-over editing, the setting of menu 6: VOICE OVER INPUT in category 2: Audio takes precedence
over the MAV-555 R1 port audio input signal setting.
Appendixes
Appendixes A-3 (E)
Page 45

Appendixes
Effect Parameter List
Category Name Content
Display Details
1: Patt Adj. –– Allows making effect pattern settings, such as the level of detail of
mosaics.
2: EDGE BORD Border Adjusts the width of borders.
0 to 100
SOFT Softness Adjusts the softness.
0 to 100
CROP Crop Activates or deactivates the cropping function.
OFF
Auto
Manual
* When using Auto, effect patterns are automatically adjusted.
L Left When CROP is set to Manual, sets the area to crop.
R Right Left :-400 to 400
Top Top Right :-400 to 400
Btm Bottom Top :-300 to 300
Bottom :-300 to 300
3: BDR MAT LUM Luminance Adjusts the border colors (luminance, saturation, and hue).
SAT Saturation Luminance :0 to 100
HUE Hue Saturation :0 to 100
Hue :359 to 0
4: INT V LUM Luminance Adjusts the optional BKMA-560 built-in Internal Video signal colors
SAT Saturation (luminance, saturation, and hue).
HUE Hue Luminance :0 to 100
Saturation :0 to 100
Hue :359 to 0
TYPE Type Selects the optional BKMA-560 built-in Internal Video signal type.
Matt
Color Bar
Grid
PTN Pattern Selects the pattern for Matt or Grid.
1 to 52
5: Light Ctrl Control Activates or deactivates lighting.
OFF
ON
TYPE Type Selects the lighting type.
Spot
Line
Plane
WID Width Selects the lighting width.
Wide
Medium
Narrow
INTS Intensity Selects the lighting intensity.
High
Medium
Low
A-4 (E) Appendixes
Page 46

Category Name Content
Display Details
6:Super BG BUS BUS Selects the Super BG BUS.
FG (Foreground)
BG (Background)
Internal Video
External
*Super BG switches from foreground to background during transition
similarly to a pattern 1900. For example, if Super BG is set to Internal
Video, the transition sequence is background --> Internal Video -->
foreground.
7:DSK INV Invert Activates or deactivates DSK KEY signal turnover.
OFF
ON
FILL Fill Selects Fill signals.
V-IN :Use the external VTR Fill signal input at the left SPARE
terminal of the MAV-555 connector panel (with the MAV 555SS in SD mode or the MAV-555A, the DSK IN VIDEO
terminal of the connector panel).
DSKM :Uses the built-in SG meant for DSK Fill as a Fill signal. Color
adjustment is performed from 8: DSK MAT.
DNST Density Adjusts the DSK density.
0 to 100
8:DSK MAT LUM Luminance When FILL of item 7: DSK is set to DSKM, adjusts the DSK Matt
SAT Saturation colors.
HUE Hue Luminance :0 to 100
Saturation : 0 to 100
Hue : 359 to 0
9:TITLE KEY KEY Selects the KEY signal type.
LUM :Luminance key
CRK :Chroma key
SRC SOURCE Selects the KEY signal source. When KEY in item 9: KEY is set to
CRK, you can only select SELF.
K-IN :Use the external VIDEO signal input at the right SPARE
terminal of the MAV-555 connector panel (with the MAV555SS in SD mode or the MAV-555A, the DSK IN KEY
terminal of the connector panel).
SELF :Uses the signal from the MAV-555 internal player.
MASK MASK Activates or deactivates the KEY signal mask.
ON
OFF
L Left Sets the masked area borders.
R Right Left :-400 to 400
Top Top Right :-400 to 400
Btm Bottom Top :-300 to 300
Bottom :-300 to 300
INV Invert Activates or deactivates the masked area turnover.
ON
OFF
Appendixes
Appendixes A-5 (E)
Page 47

Appendixes
Effect Parameter List
Category Name Content
Display Details
+:LUM Clip Clip Adjusts the Luminance key clip.
0 to 100
Gain Gain Adjusts the Luminance key gain.
0 to 100
INV Invert Activates of deactivates the Luminance key turnover.
OFF
ON
FILL Fill Selects the Fill signal when using the Luminance key.
VID :Player BUS
BDRM :Border MATT
DNST Density Adjusts the density of the inserted image when using the Luminance
key.
0 to 100
-: CRK Clip Clip Adjusts the Chroma key clip.
0 to 100
Gain Gain Adjusts the Chroma key gain.
359 to 0
Hue Hue Adjusts the Chroma key hue.
359 to 0
Ang Angle Adjusts the range of the Chorma key hue.
0 to 100
FILL Fill Selects the Fill signal when using the Chroma key.
VID :Player BUS
BDRM :Border MATT
DNST Density Adjusts the density of the inserted image when using the Chroma key.
0 to 100
A-6 (E) Appendixes
Page 48

TITLE Key, Downstream Key, and Player BUS Setting Example
INPUT
RP port
* When EF editing, Player P2 only
P2 port
BG port
VTR
EF MATT (INTV)
DSK IN KEY
(With MAV-555, right SPARE terminal)
DSK IN VIDEO
(With MAV-555, left SPARE terminal)
[1]
[3] MATT
[2] AUX
[CUT]/[DISS]/[WIPE] key
MEMORY key [1]/[2]/[3]
BDR MATT
SELF
K-IN
DSK MATT
+
VIDEO
BDRM
9: TITLE
SRC
* With CRK, can only select SELF
DSKM
LUM
CRK
V-IN
+: LUM
-: CRK
FILL
9: TITLE
KEY
7: DSK
FILL
OUTPUT
Recorder
Player
TITLE
Fill
Key
DSK
DSK Key
DSK Fill
Appendixes
Printed on recycled paper
Appendixes A-7 (E)
Page 49

Page 50

The material contained in this manual consists of
information that is the property of Sony Corporation and is
intended solely for use by the purchasers of the equipment
described in this manual.
Sony Corporation expressly prohibits the duplication of any
portion of this manual or the use thereof for any purpose
other than the operation or maintenance of the equipment
described in this manual without the express written
permission of Sony Corporation.
Le matériel contenu dans ce manuel consiste en
informations qui sont la propriété de Sony Corporation et
sont destinées exclusivement à l’usage des acquéreurs de
l’équipement décrit dans ce manuel.
Sony Corporation interdit formellement la copie de quelque
partie que ce soit de ce manuel ou son emploi pour tout
autre but que des opérations ou entretiens de l’équipement
à moins d’une permission écrite de Sony Corporation.
Das in dieser Anleitung enthaltene Material besteht aus
Informationen, die Eigentum der Sony Corporation sind,
und ausschließlich zum Gebrauch durch den Käufer der in
dieser Anleitung beschriebenen Ausrüstung bestimmt sind.
Die Sony Corporation untersagt ausdrücklich die
Vervielfältigung jeglicher Teile dieser Anleitung oder den
Gebrauch derselben für irgendeinen anderen Zweck als die
Bedienung oder Wartung der in dieser Anleitung
beschriebenen Ausrüstung ohne ausdrückliche schriftliche
Erlaubnis der Sony Corporation.
Page 51

MAVE-D555 (SY
3-205-546-02(1)
, 和,英)
Sony Corporation
B & P Company
http://www.sony.net/
Printed in Japan
2002. 07.13
2001
 Loading...