

Page 1
3-859-242-31(1)
Operating Instructions
Mode d‘emploi
Manual de instrucciones (en el reverso)
Manual de instruções (no verso)
M-629V
M-679V
B
a
TAPE
SPEED
TAPE
COUNTER
BATT
b
EAR
MIC (PLUG IN POWER)
Microphone
Microphone
REC
CUE MARKER
r
C PAUSE
0 CUE/REVIEW )
p 6
VOR
M-729V
Sony Corporation ©1996 Printed in China
About This Manual
The instructions in this manual are for the M-629V, M679V and M-729V. Before you start reading, check your
model number. The M-729V is the model used for
illustration purposes. Any differences in operation are
clearly indicated in the text, for example, “M-729V only”.
A propos de ce mode d’emploi
Les instructions de ce manuel sont destinées aux modèles
M-629V, M-679V et M-729V. Avant de lire ce mode
d’emploi, vérifiez le numéro de votre modèle. Le modèle
M-729V est utilisé dans ce manuel à titre de référence
dans les illustrations. Toute différence de fonctionnement
est clairement spécifiée dans le texte, par exemple “M729V uniquement.”
C
c
m
FAST PB
TAPE
SPEED
BATT
mm
p6
m
EAR
VOL
C PAUSE
9
0 CUE/REVIEW )
p 6
m
A
a
b
c
D
a
]
}
}
]
MIC
Connecting cord RK-G64HG (not supplied)
Cordon de connexion RK-G64HG (non
fourni)
b
EAR,EARPHONE,@
Connecting cord RK-G64HG (not supplied)
Cordon de connexion RK-G64HG (non
fourni)
c
EAR
MIC
MIC
When batteries are new
Lorsque les piles sont
neuves
When batteries become
weak
Lorsque les piles s’épuisent
Replace batteries
Remplacez les piles
d
DC IN 3V
AC power adaptor (supplied with M-679V only)
or AC-E30HG AC power adaptor (not supplied)
Adaptateur CA (fourni avec M-679V
uniquement) ou adaptateur CA AC-E30HG (non
fourni)
light
allumé
flash
clignote
to the wall outlet
vers prise murale
BATT
light
allumé
BATT
go off
eteint
BATT
go off
eteint
Electret condenser microphone ECM-T110 (not
supplied)
Microphone à condensateur d’électrets ECM-T110
(not fourni)
E
Only standard
microcassette have a
Standard
Standard
small indentation of
side A.
Seules les
microcassettes
standard comportent
une petite encoche sur
la face A.
Approx. 5 mm
Approx. 5 mm
Non-standard
Non standard
Approx. 2.5 mm
Approx. 2,5 mm
F
2
1
e
1
Rechargeable
batteries NC-AA
Piles rechargeables
NC-AA
Charge adaptor
Adaptateur de recharge
to the wall outlet
vers prise murale
2
Power indicator
Témoin
d’alimentation
3
AC power
adaptor
Adaptateur CA
Page 2

English
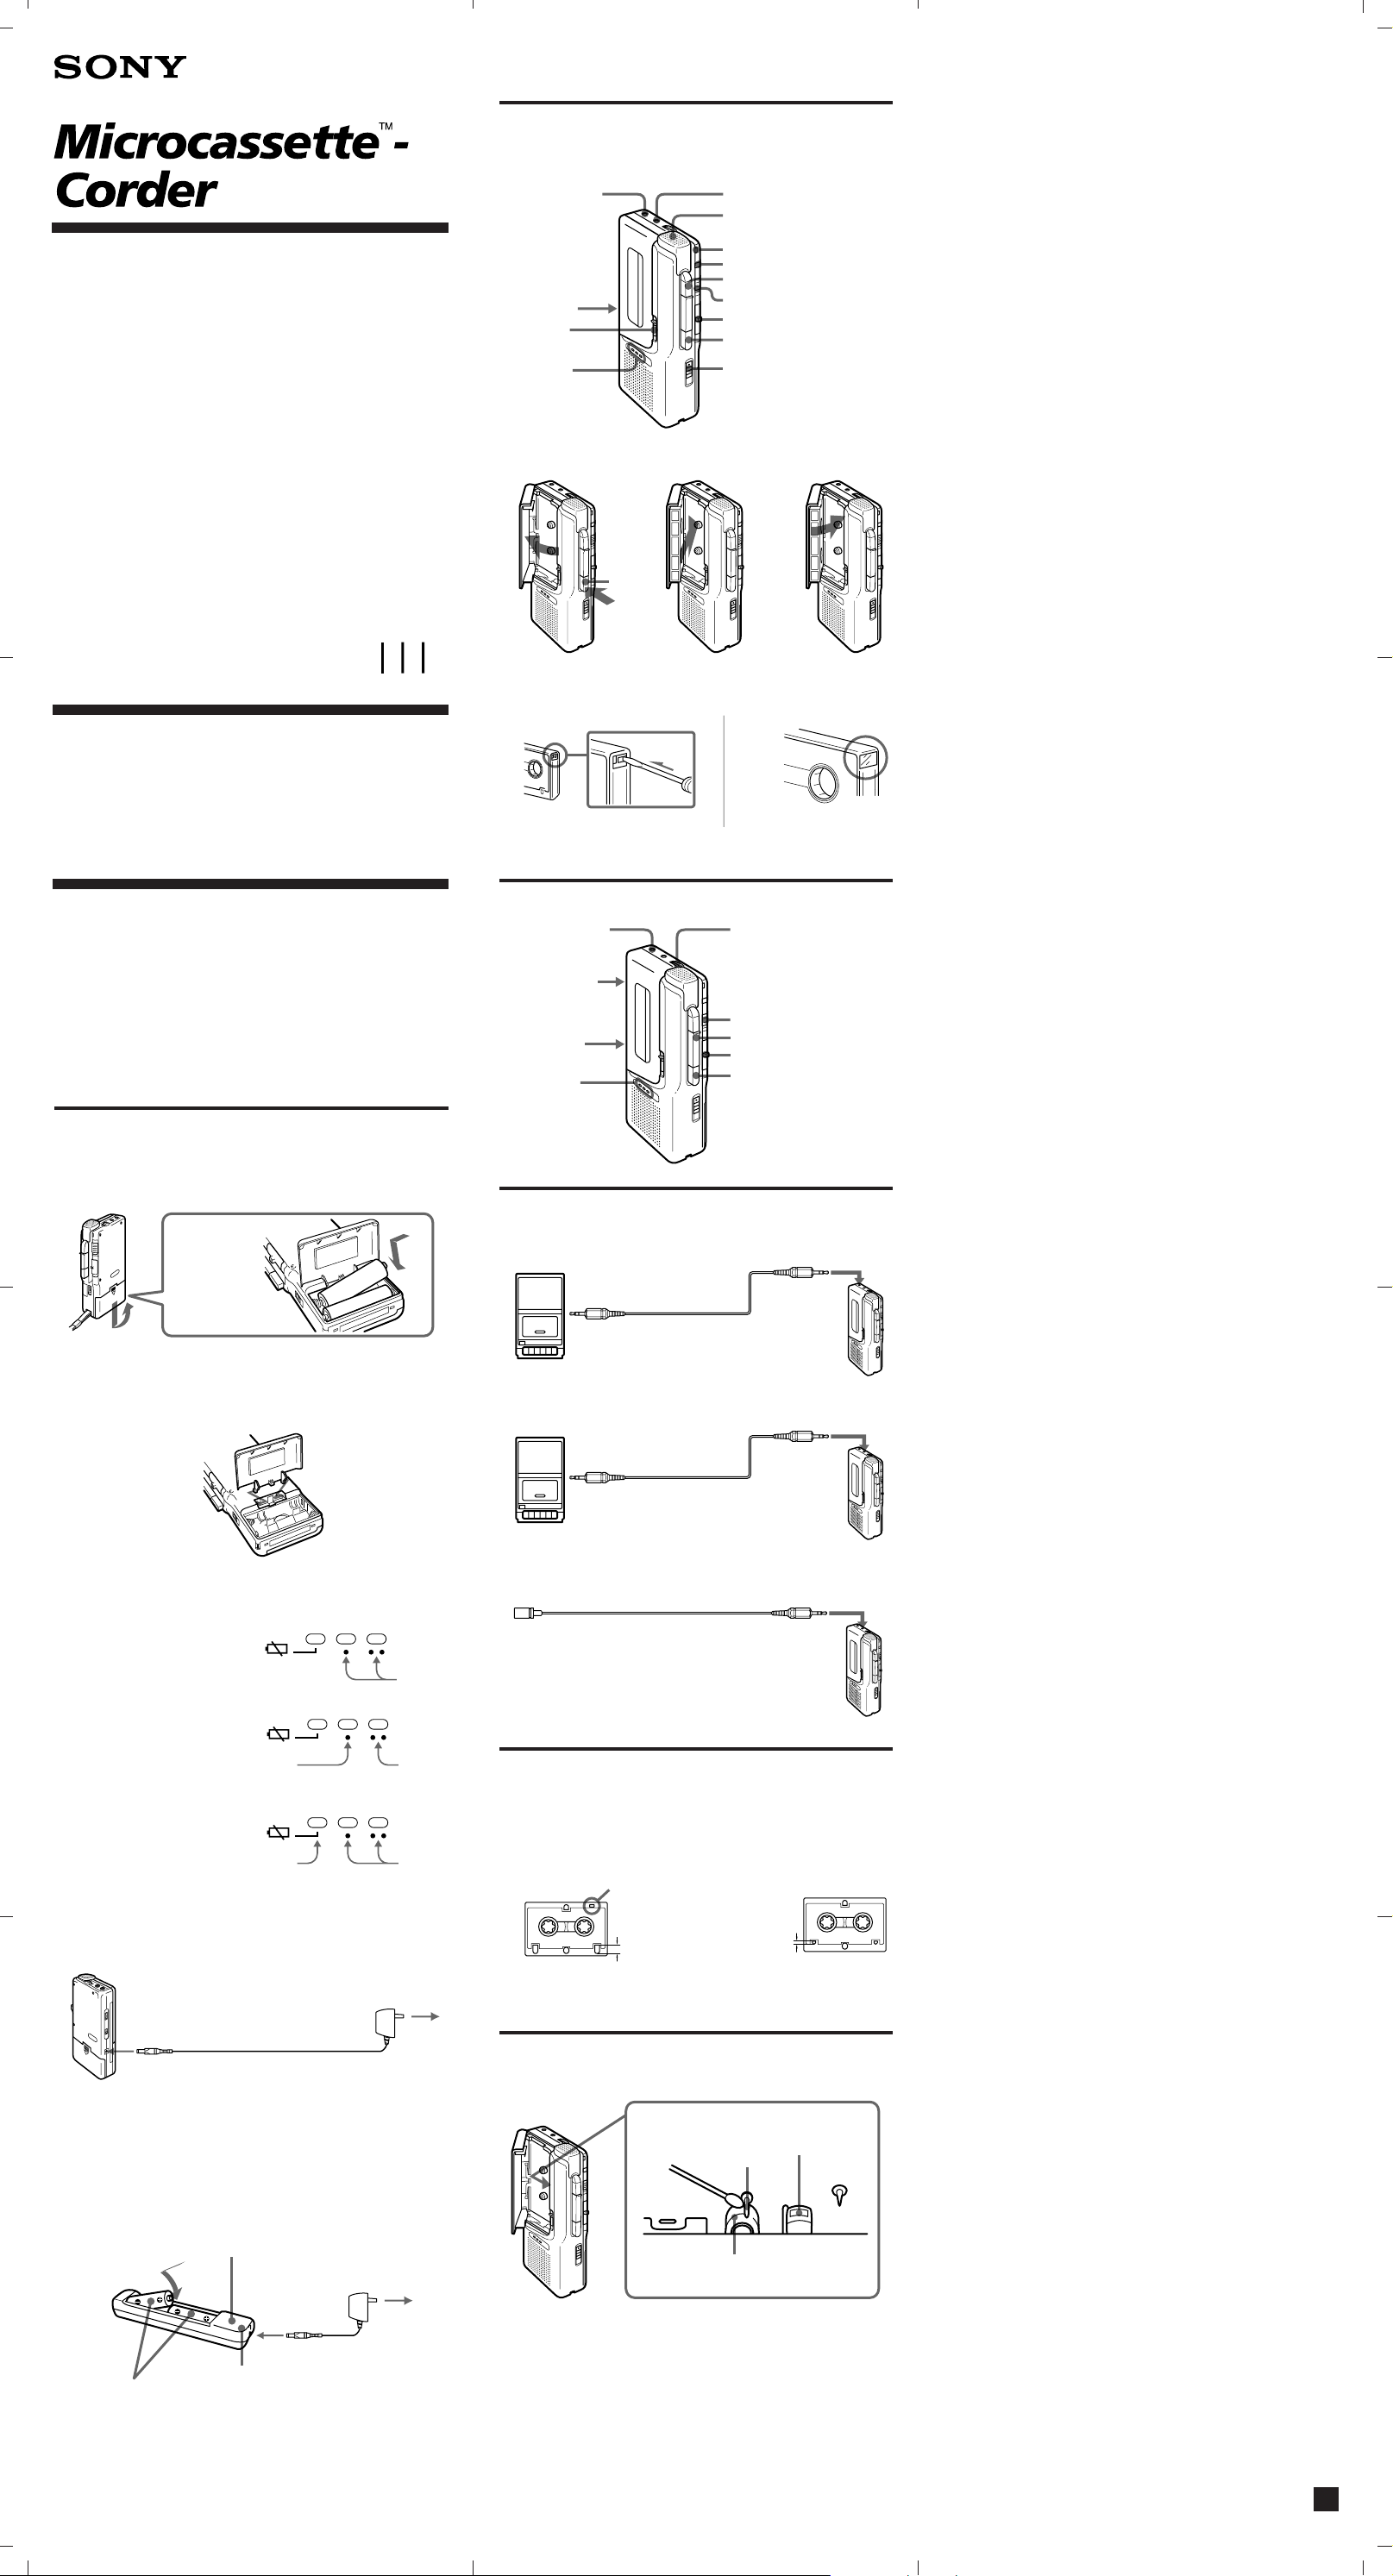
Welcome!
Thank you for purchasing the Sony MicrocassetteCorder. Some features are:
•The BATT lamps indicate remaining battery power in
two steps and the i lamp indicates when to replace the
batteries.
•The CUE MARKER (M-729V only) function locates a
specific position of a dictation.
•The FAST PB (fast playback) function enables you to
review the contents approx. 20% faster than normal
playback.
•The VOR (Voice Operated Recording) system starts and
stops recording automatically in response to the sound.
•Edit function—You can start recording directly from the
playback mode by pressing the r button to correct a
previously recorded portion.
•Tape counter
•Automatic shut-off mechanism at the end of the tape (in
the recording/playback mode only)
•Stop-pause-release function—The pause switch is
released automatically when the p6 button is
depressed, so that you don’t miss a recording chance.
Preparing Power Sources
Choose one of the following power sources.
Dry Batteries (see Fig. A-a)
Make sure that nothing is connected to the DC IN 3V
jack.
1 Open the battery compartment lid.
2 Insert two R6 (size AA) batteries with correct polarity
and close the lid.
If the battery compartment lid is accidentally
detached (see Fig. A-b)
Attach it as illustrated.
When to replace the batteries (see Fig. A-c)
Replace the batteries with new ones when the BATT
lamps go off and the i lamp flashes.
The BATT lamps change as illustrated.
Notes
•The unit will play back normally for a while, even after the i
lamp flashes. However, replace the batteries as soon as you can. If
you do not, the playback cannot be made with normal sound, noise
may be recorded and the recorded sound will not be loud enough.
•In the following cases you do not need to replace the batteries:
– if the BATT lamps flash with the playback sound when you turn
up the volume.
– if the i lamp lights momentarily when the tape starts running
or at the end of the tape.
– if the i lamp flashes during FF (CUE) or REW (REVIEW).
•In some cases when the unit is used with rechargeable batteries
(supplied with M-679V only or not supplied), only one BATT lamp
will light even though the batteries have been fully charged.
Battery life (Approx. hours)
Batteries
Sony R6P (SR)
Sony alkaline LR6 (SG)
NC-AA (M-679V only)
Recording
5.5
19.0
5.5
House Current (see Fig. A-d)
Connect the AC power adaptor to DC IN 3V and to a
wall outlet. Use the AC power adaptor (supplied with M679V only) or AC-E30HG AC power adaptor (not
supplied). Do not use any other AC power adaptor.
Polarity of the plug
Rechargeable batteries (supplied with
M-679V only)
Charge the rechargeable batteries only with the supplied
charge adaptor and the AC power adaptor. The
rechargeable batteries can be charged approximately 500
times.
Be sure to charge the rechargeable batteries for
approximately 8 hours before using them. The unit can
be used for recording for approximately 5.5 hours with
the fully charged rechargeable batteries.
To charge (see Fig. A-e)
The power indictor of the charge adaptor remains lit as
long as power is supplied from the wall outlet.
To use (see Fig. A-a)
Notes
• Use the supplied two rechargeable batteries only with the supplied
charge adaptor.
• If there is distortion of sound or excessive noise, or if the unit does
not operate properly, turn off the unit and recharge the two
rechargeable batteries together.
• The rechargeable batteries will discharge even when not in use. Be
sure to charge them before use.
• Recharge the two rechargeable batteries together. Otherwise, the
charging cannot be done.
• Be sure to remove the rechargeable batteries from the charge
adaptor to avoid overcharging (more than 20 hours) when
charging has been completed.
• Charging and operation should be made in temperature ranges 5°C
to 40°C (40°F to 104°F).
• The charge adaptor will become warm during charging but this is
not a sign of problem.
• Do not use or leave the charge adaptor in a location near heat
sources or in a place subject to direct sunlight or excessive
moisture.
• Unplug the AC power adaptor from the wall outlet when it is not
to be used for long.
• Do not attempt to charge dry batteries.
Recording (see Fig. B-a)
Make sure that nothing is connected to MIC.
1 Press the reset button of the TAPE COUNTER.
2 Press p6 and insert a standard microcassette with
the side to start recording facing the lid (see Fig. Bb).
3 Select the desired tape speed.
2.4 cm for optimum sound (recommended for normal
use): A 30-minute recording can be made using both
sides of the MC-30 microcassette.
1.2 cm for longer recording time: A 60-minute
recording can be made using both sides of the MC-30
microcassette.
4 Set VOR to H, L or OFF.
If you set VOR to H or L, the unit automatically starts
recording the sound and pauses when there is no
sound (you can save tapes and batteries).
H : To record at meetings or in a quiet and/or
spacious place.
L : To record for dictation or in a noisy place.
When the sound is not loud enough, set it to OFF, or
the unit may not start recording.
5 Press r.
Recording starts. While the tape runs, the REC lamp
lights and flashes depending on the strength of the
sound.
Recording level is fixed.
To Press or slide
p6Stop recording
Start recording during
playback
Review the portion just
recorded
Pause recording
Take out a cassette p6
Note
Select the 2.4 cm tape speed for recording, if you play back the
recorded tape with another unit. Otherwise, the sound quality may
be changed.
Notes on VOR (Voice Operated Recording)
• The VOR system depends on the environmental conditions. If you
cannot get the desired results, set VOR to OFF.
• When you use the system in a noisy place, the unit will stay in the
recording mode. If the sound is too soft, on the contrary, the unit
will not start recording. Set VOR to H (high) or L (low) depending
on the conditions.
r during playback (the unit becomes
in the recording mode)
Push up 0CUE/)REVIEW
toward )REVIEW during
recording. Release the button at the
point to start playback.
Slide CPAUSE in the direction of
the arrow. The REC and BATT lamps
go off.
To monitor the sound
Connect the earphone (not supplied) to the EAR jack. The
monitor volume cannot be adjusted by VOL.
To prevent a cassette from being accidentally
recorded over (see Fig. B-c)
Break out and remove the cassette tabs. To reuse the
cassette for recording, cover the tab hole with adhesive
tape.
Recording cue markers (M-729V only)
While recording, you can record a special signal on the
tape to mark a specific position.
At the desired position, press CUE MARKER to record a
signal. The REC lamp goes off and a signal will be
recorded on the tape. If you want to record a signal
longer than that, press CUE MARKER as long as you
want.
During cue and review, you will hear the beep sound at
the signal position. During playback, you will hear the
signal with low frequency sound at the signal position.
Notes
• We recommend recording cue markers when there is a break in the
sound.
• During cue and review, the beep sounds differently.
• The beep may sound differently depending on the marked position
on the tape because the winding speed varies from the beginning
to the end of the tape.
Playing a Tape (see Fig. C)
1 Insert a cassette with the side to start playing facing
the lid.
2 Select the tape speed to the same speed as that used
for recording.
3 Press 9.
4 Adjust the volume.
To
Stop playback/stop fast
forward or rewind*
Pause playback Slide CPAUSE in the direction of
Fast forward Slide 0CUE/)REVIEW toward
Rewind Slide 0CUE/)REVIEW toward
Search forward during
playback (CUE)
Search backward during
playback (REVIEW)
* If you leave the unit after the tape has been wound or rewound,
the batteries will be consumed rapidly. Be sure to depress p6.
** The tape moves faster in the rewind/REVIEW mode than in the
fast forward/CUE mode.
Press or slide
p6
the arrow. The BATT lamp goes off.
0CUE during stop**
)REVIEW during stop.**
Keep 0CUE/)REVIEW pushed
down during playback and release it
at the point you want.**
Keep 0CUE/)REVIEW pushed
up during playback and release it at
the point you want.**
To increase the playback speed
Slide the FAST PB switch in the direction of the arrow.
The playback speed will be increased.
To return to the original speed, slide the FAST PB switch
to the original position.
At the end of the tape
In the recording or playback mode, the tape stops at the
end of the tape and the locked buttons will be released
automatically (Automatic shut-off mechanism).
After fast forward or rewind, be sure to set 0CUE/
)REVIEW back to the center.
Recording/Playback with the
Connected Equipment
Dubbing onto another tape recorder
(see Fig. D-a)
Set this unit to the playback mode and another tape
recorder to the recording mode.
Recording from another tape recorder
(see Fig. D-b)
Set this unit to the recording mode and another tape
recorder to the playback mode. In this case set VOR to
OFF.
Recording with an External Microphone
(see Fig. D-c)
Connect a microphone to MIC. When using a plug-inpower system microphone, the power to the microphone
is supplied from this unit.
Note
When recording with an external microphone, the VOR system may
not work properly because of the difference in sensitivity.
Precautions
On power
•Operate the unit only on 3 V DC.
For AC operation, use the AC power adaptor
recommended for the unit. Do not use any other type.
For battery operation, use two R6 (size AA) batteries.
•The nameplate indicating operating voltage, etc., is
located on the bottom of the unit.
On the unit
•Use only the y(standard microcassettes)
with this unit. Non-standard cassette cannot be used
because the “L” dimension (see Fig. E) is different.
•Do not leave the unit in a location near heat sources, or
in a place subject to direct sunlight, excessive dust or
mechanical shock.
•Should any solid object or liquid fall into the unit,
remove the batteries or disconnect the AC power
adaptor, and have the unit checked by qualified
personnel before operating it any further.
•Keep personal credit cards using magnetic coding or
spring-wound watches etc. away from the unit to
prevent possible damage from the magnet used for the
speaker.
•When you do not use the unit for long, remove the
batteries to avoid damage caused by battery leakage
and subsequent corrosion.
•If the unit has not been used for long, set it in the
playback mode and warm it up for a few minutes
before inserting a tape.
If you have any questions or problems concerning your
unit, please consult your nearest Sony dealer.
Troubleshooting
Should any problem persist after you have made these
checks, consult your nearest Sony dealer.
A cassette cannot be inserted.
n The cassette is being inserted in the wrong way. (The
cassette should be inserted in the lid with the tape side
facing you.)
n 9 has been already pressed.
r cannot be pressed.
n There is no cassette in the cassette compartment.
n The cassette tab has been removed.
r or 9 cannot be pressed.
n The tape has reached the end.
n After the automatic shut-off, C PAUSE is slid in the
direction of the arrow.
The unit does not operate.
n The batteries have been inserted with incorrect polarity
n The batteries are weak. Replace both batteries with new
ones.
nC PAUSE is slid in the direction of the arrow.
n The AC power adaptor or car battery cord is connected to
the unit only and you are going to use the unit on
batteries.
No sound comes from the speaker.
n The earphone is plugged in.
n The volume is turned down completely.
The sound drops out or comes with excessive
noise.
n The volume is turned down completely.
n The batteries are weak. Replace both batteries with new
ones.
n The head is contaminated. See “Maintenance”.
Tape speed is too fast or too slow in the
playback mode.
n Improper setting of the TAPE SPEED switch. Set it to the
same speed as that used for recording.
Tape speed is faster than the normal playback
speed.
n The FAST PB switch is slid in the direction of the arrow.
n The TAPE SPEED switch is set between the 1.2 cm and 2.4
cm positions.
Recording cannot be made.
n Connection is made incorrectly.
n The batteries are weak. Replace both batteries with new
ones.
n The head is contaminated.
n Improper setting of the VOR switch. Set it to H or OFF.
Recording is interrupted.
n The VOR switch is set to H or L. When you do not use
VOR, set it to OFF.
Recording cannot be erased completely.
n The head is contaminated.
Maintenance (see Fig. F)
To clean the tape head and path
Press 9 and wipe the head 1, capstan 2 and the pinch
roller 3 with a cotton swab, moistened with alcohol
every 10 hours of use.
To clean the exterior
Use a soft cloth slightly moistened in water. Do not use
alcohol, benzine or thinner.
Specifications
Tape
y (normal position type)
Recording system
2-track 1-channel monaural
Speaker
Approx. 3.6 cm dia.
Tape speed
2.4 cm/s, 1.2 cm/s
Frequency range
250 – 4,000 Hz
Input
Microphone input jack (minijack/PLUG IN POWER)
sensitivity 0.24 mV for 3 kilohms or lower impedance microphone
Output
Earphone jack (minijack) for 8 – 300 ohms earphone
Power output (at 10% harmonic distortion)
M-629V/679V 160 mW
M-729V 260 mW
Battery life (recording)
See “Preparing Power Sources”.
Power requirements
3 V DC
Two R6 (size AA) batteries
Dimensions (w/h/d)
Approx. 65.1 × 121.4 × 25.2 mm incl. projecting parts and controls
Mass
Approx. 130 g incl. batteries
Supplied accessories
Microcassette tape MC-30 (1) (M-629V/729V European model only)
R6 (size AA) batteries (2) (M-629V/729V European model only)
AC power adaptor (1) (M-679V only)
Charge adaptor (1) (M-679V only)
Rechargeable batteries NC-AA, 1.2 V, 600 mAh, Ni-Cd (2) (M-679V
only)
Design and specifications are subject to change without notice.
Optional accessories
Microcassette MC-60, MC-30
Earphone ME-81, ME-L82
Connecting cord RK-G64HG (miniplug to miniplug with attenuator)
Electret condenser microphone ECM-T110
AC power adaptor AC-E30HG
Page 3

Français
Bienvenue !
Nous vous remercions d’avoir fait l’acquisition d’un
magnétophone à microcassettes Sony. Voici quelquesunes de ses caractéristiques fonctionnelles.
•Les témoins BATT indiquent l’état des piles en deux
étapes et le témoin i indique lorsqu’il y a lieu de
remplacer les piles.
•La fonction de signaux de positionnement CUE
MARKER (M-729V uniquement) permet de localiser un
endroit spécifique sur un enregistrement dicté.
•La fonction FAST PB (lecture rapide) vous permet
d’écouter un enregistrement à une vitesse environ 20 %
supérieure à la normale.
•Le système VOR (enregistrement commandé par
fréquence vocale) démarre et arrête automatiquement
l'enregistrement en fonction des impulsions sonores.
•Fonction de montage—Vous pouvez directement
commencer l'enregistrement depuis le mode de lecture
en appuyant sur la touche r. Cette fonction est très
pratique pour corriger une section déjà enregistrée.
•Compteur de bande.
•Mécanisme de coupure automatique (dans les modes
d'enregistrement et de lecture uniquement).
•Désactivation de pause—La touche de pause est libérée
automatiquement lorsque l’on appuie sur la touche p6
afin d’éviter de rater une opportunité d’enregistrement.
Sélection de la source
d’alimentation
Choisissez l’une des sources d’alimentation présentées cidessous.
Piles sèches (voir Fig. A-a)
Assurez-vous que rien n’est raccordé à la prise DC IN 3V.
1 Ouvrez le couvercle du logement des piles.
2 Introduisez deux piles R6 (type AA) (non fournies) en
respectant la polarité et refermez le couvercle.
Si le couvercle du logement des piles est enlevé
accidentellement (voir Fig. A-b)
Positionnez-le comme illustré.
Quand faut-il remplacer les piles ? (voir Fig. Ac)
Remplacez les piles par des neuves lorsque les témoins
BATT s’éteignent et le témoin i clignote.
Les témoins BATT changent comme illustré.
Remarques
• L’appareil continue de jouer pendant un certain temps, même
après que le témoin i clignote. Remplacez cependant les piles dès
que vous pouvez. Si vous ne remplacez pas les piles, la lecture ne
s’effectuera pas avec un son normal, il est possible que des
parasites soient enregistrés et que le son enregistré ne soit pas
suffisamment fort.
• Les cas suivants ne nécessitent pas le remplacement des piles:
– si les témoins BATT clignotent avec le son reproduit lorsque vous
augmentez le volume;
– si le témoin i s’allume brièvement lorsque la cassette se met en
route ou en fin de bande;
– si le témoin i clignote pendant l’avance rapide (FF CUE) ou le
rembobinage (REW REVIEW).
• Dans certains cas lorsque l’appareil est utilisé avec des piles
rechargeables (fourni avec M-679V uniquement ou non fourni),
seul le témoin BATT s’allumera, même si les piles ont été chargées
complètement.
Durée de vie approximative des piles (en heures) :
Piles Enregistrement
Sony R6P (SR)
Sony alcaline LR6 (SG)
NC-AA (M-679V uniquement)
5,5
19,0
5,5
Secteur (voir Fig. A-d)
Raccordez l’adaptateur secteur à la prise DC IN 3V et à
une prise murale. Utilisez l’adaptateur CA (fourni avec
M-679V uniquement) ou l’adaptateur CA AC-E30HG
(non fourni). Ne pas utiliser d’autres adaptateurs
secteur.
Polarité de la fiche
Fonctionnement sur piles rechargeables
(M-679V uniquement)
Recharger les piles rechargeables avec le chargeur et
l’adaptateur CA fournis. Les piles rechargeables peuvent
être rechargés environ 500 fois. Recharger les pilies
pendant environ 8 heures avant utilisation. Cet appareil
peut enregistrer pendant environ 5,5 heures si les piles
sont complétement rechargées.
Recharge (voir Fig. A-e)
Le témoin de CA reste allumé, tant que l’alimentation CA
est fournie.
Utilisation (voir Fig. A-a)
Remarques
•N’utiliser que le chargeur fourni pour recharger les deux piles.
• Si le son présente des distorsions ou des parasites excessifs ou si
l’appareil fonctionne mal, l’arrêter et recharger les deux piles
simultanément.
• La pile se décharge même si elle n’est pas utilisée. Ne pas oublier
de la recharger avant usage.
• Recharger les deux piles ensemble. Sinon, la recharge ne peut être
effectuée.
• Débrancher les piles du chargeur pour éviter une surcharge (plus
de 20 heures), lorsque la recharge est terminée.
• Charger les piles et faire fonctionner l’appareil dans une gamme de
température allant de 5°C à 40°C (40°F à 104°F).
• Le chargeur chauffe pendant la recharge. Ceci est normal.
• Ne pas laisser le chargeur près de sources de chaleur, exposé
directement aux rayons du soleil ou à l’humidité excessive.
• Débrancher l’adapteur CA de la prise murale, s’il n’est pas utilisé
pendant une longue période.
• Ne pas essayer de recharger les piles sèches.
Enregistrement (voir Fig. B-a)
Assurez-vous que rien n’est raccordé à la prise MIC.
1 Appuyez sur la touche de réinitialisation du
compteur de bande (TAPE COUNTER).
2 Appuyez sur la touche p6 et introduisez une
microcassette avec la face d’enregistrement côté
couvercle (voir Fig. B-b).
3 Sélectionnez la vitesse de défilement de la bande.
2,4 cm pour un son optimal (recommandé en
utilisation normale) : un enregistrement de 30
minutes peut être réalisé en utilisant les deux faces de
la microcassette MC-30.
1,2 cm pour une plus longue durée d’enregistrement :
un enregistrement de 60 minutes peut être réalisé en
utilisant les deux faces de la microcassette MC-30.
4 Placez VOR sur H, L ou OFF.
Si vous placez VOR sur H ou L, l’appareil démarre
automatiquement l’enregistrement et se met en mode
de pause lorsqu’il n’y a pas de son (ce qui vous
permet d’économiser les bandes et les piles).
H : pour enregistrer des conférences, dans un local
tranquille et/ou spacieux.
L : pour enregistrer en dictée dans un local bruyant.
Si le son n’est pas suffisamment fort, placez VOR sur
OFF, sinon l’appareil risque de ne pas démarrer
l’enregistrement.
5 Appuyez sur r.
L’enregistrement démarre. Lorsque la bande défile, le
témoin REC s’allume et clignote en fonction de
l’intensité de la source sonore.
Le niveau d’enregistrement est fixe.
Pour
Stopper l’enregistrement
Démarrer
l’enregistrement en mode
de lecture
Ecouter la dernière
séquence enregistrée
Activer la pause
d’enregistrement
Retirer une cassette
Remarque
Sélectionnez la vitesse de défilement de 2,4 cm pour l’enregistrement
si la cassette doit être lue sur un autre appareil. Sinon, la qualité
sonore pourrait s’en trouver altérée.
Remarques sur le système VOR d’enregistrement commandé
par fréquence vocale
• Le système VOR dépend des conditions ambiantes. Si vous ne
parvenez pas à obtenir le résultat désiré, placez VOR en position
OFF.
• Lorsque vous utilisez l’appareil dans un local animé, l’appareil
reste continuellement en mode d’enregistrement. En revanche, si
les sons sont trop faibles, l’enregistrement ne démarre pas. Réglez
VOR sur H (High) ou L (Low) suivant les conditions ambiantes.
Pressez ou faites coulisser
La touche p6
La touche r durant la lecture
(l’appareil passe en mode
d’enregistrement)
Relevez la touche 0CUE/
)REVIEW vers la position
)REVIEW durant l’enregistrement.
Relâchez la touche à l’endroit où vous
souhaitez commencer la lecture.
Faites coulisser la touche C PAUSE
dans le sens de la flèche. Les témoins
REC et BATT s’éteignent.
La touche p6
Contrôle de la qualité sonore
Branchez les écouteurs (non fournis) sur la prise EAR. Le
volume du moniteur ne peut pas être ajusté au moyen de
VOL.
Comment éviter d’enregistrer accidentellement
une cassette enregistrée (voir Fig. B-c)
Brisez les languettes de protection de la cassette. Si vous
souhaitez réutiliser la cassette en vue d’un
enregistrement, recouvrez de bande adhésive le logement
de la languette de protection.
Enregistrement de signaux de
positionnement (M-729V uniquement)
Pendant que vous enregistrez, vous pouvez insérer un
signal spécial sur la bande pour marquer une position
particulière.
A l’endroit désiré, appuyez sur la touche CUE MARKER
pour enregistrer un signal. Le témoin REC s’éteint et un
signal est enregistré sur la bande. Si vous souhaitez
enregistrer un signal de plus longue durée, appuyez sur
la touche CUE MARKER aussi longtemps que vous le
voulez.
Durant les recherches avant (CUE) et arrière (REVIEW),
vous entendez un bip sonore à l’endroit où le signal a été
enregistré. En mode de lecture, le signal est émis à une
faible fréquence sonore à la position d’insertion.
Remarques
• Nous vous conseillons dans ce cas d’enregistrer des signaux de
positionnement (CUE MARKER) lorsqu’il y a une interruption du
son.
• Les bips produisent un son différent durant les recherches avant
(CUE) et arrière (REVIEW).
• Le bip peut produire un son différent suivant la position marquée
sur la bande parce que la vitesse de bobinage varie suivant que la
cassette est en début ou en fin de bande.
Lecture d’une cassette (voir Fig.
C)
1 Introduisez une cassette avec la face de lecture côté
couvercle.
2 Sélectionnez la vitesse de défilement de la bande à la
vitesse utilisée pour l’enregistrement.
3 Appuyez sur la touche 9.
4 Réglez le volume.
Pour
Stopper la lecture,
l’avance rapide ou le
rembobinage (*)
Activer la pause de
lecture
L’avance rapide
Rembobiner
Recherche avant en
mode de lecture (CUE)
Recherche arrière en
mode de lecture
(REVIEW)
* Si vous laissez l’appareil après que la bande a été bobinée ou
rembobinée, les piles s’épuiseront rapidement. Veillez à appuyez
sur la touche p6.
** La bande défile plus rapidement en mode rembobiner/REVIEW
qu’en mode d’avance rapide/CUE.
Pour augmenter la vitesse de lecture
Faites glisser la touche FAST PB dans le sens de la flèche.
La vitesse de lecture augmente.
Pour revenir à la vitesse de lecture initiale, ramenez la
touche FAST PB dans sa position de départ.
Lorsque la cassette arrive en fin de bande
Dans les modes d’enregistrement ou de lecture, la
cassette s’arrête lorsqu’elle arrive en fin de bande et les
touches verrouillées sont libérées automatiquement
(mécanisme de coupure automatique).
Après une avance rapide ou un rebobinage, veillez à
ramener la touche 0CUE/)REVIEW au centre.
Pressez ou faites coulisser
La touche p6
Faites coulisser la touche CPAUSE
dans le sens de la flèche. Le témoin
BATT s’éteint.
La touche 0CUE/)REVIEW en
position 0CUE en mode d’arrêt (**)
La touche 0CUE/)REVIEW en
position )REVIEW en mode
d’arrêt(**)
Maintenez enfoncée la touche
0CUE/)REVIEW durant la lecture
et relâchez-la à l’endroit voulu.(**)
Maintenez la touche 0CUE/
)REVIEW en position relevée durant
la lecture et relâchez-la à l’endroit
voulu. (**)
Enregistrement/lecture avec un
appareil raccordé
Montage sur un autre magnétophone à
cassettes (voir Fig. D-a)
Placez votre magnétophone à cassettes en mode de
lecture et l’autre magnétophone en mode
d’enregistrement.
Enregistrer à partir d’un autre
magnétophone (voir Fig. D-b)
Réglez votre magnétophone en mode d’enregistrement et
l’autre magnétophone en mode de lecture. Dans ce cas,
réglez VOR en position OFF.
Enregistrer à l’aide d’un microphone
externe (voir Fig. D-c)
Branchez un microphone à la prise MIC. Si vous utilisez
un microphone à système d’alimentation enfichable,
l’alimentation du microphone est assurée par cet
appareil.
Remarque
Lorsque vous enregistrez à l’aide d’un microphone externe, il est
possible que le système VOR ne fonctionne pas correctement en
raison de la différence de sensibilité.
Précautions
Alimentation
•Faites uniquement fonctionner l’appareil sur une tension
continue de 3 V.
Pour un fonctionnement sur une tension alternative, utilisez
l’adaptateur secteur préconisé pour l’appareil. N’utilisez pas
d’autres types d’adaptateurs. Pour un fonctionnement sur
piles, utilisez deux piles R6 (type AA).
•La plaquette signalétique précisant la tension d’utilisation, etc.,
se situe sur la base de l’appareil.
Appareil
•Utilisez uniquement la y sur cet appareil. Utilisez
uniquement des microcassettes standard sur cet appareil. Les
cassettes non standard ne peuvent être utilisées sur cet
appareil en raison de la différence de la dimension “L” (voir
Fig. E).
•Ne laissez pas l’appareil à proximité de sources de chaleur ni
dans des endroits soumis à la lumière directe du soleil ou
excessivement poussiéreux et ne lui faites pas subir de chocs
mécaniques.
• Si des corps étrangers ou des liquides pénètrent à l’intérieur
de l’appareil, retirez les piles ou débranchez l’adaptateur
secteur et faites contrôler l’appareil par un technicien qualifié
avant de le faire fonctionner à nouveau.
•Conservez les cartes de crédit à code magnétique, les montres
à mécanisme à ressort, etc., à l’écart de l’appareil de manière à
éviter d’éventuels dommages par l’aimant du haut-parleur.
•Si l’appareil est appelé à ne pas être utilisé pendant une
période prolongée, retirez les piles afin d’éviter des dommages
par une fuite éventuelle des piles et la corrosion qui en résulte.
•Si l’appareil n’a pas été utilisé pendant une période prolongée,
placez-le en mode lecture et faites-le chauffer pendant
quelques minutes avant d’introduire une cassette.
Si vous avez des questions ou des difficultés au sujet de cet
appareil, consultez votre distributeur Sony.
Dépannage
Si les problèmes persistent après ces contrôles, consultez votre
distributeur Sony.
Impossibilité d’introduire une cassette
n La cassette est présentée dans le mauvais sens. (La
cassette doit être introduite dans le couvercle, côté bande
face à vous.)
n La touche 9 a déjà été enfoncée.
Impossibilité d’enfoncer la touche r
n Il n’y a pas de cassette dans le support de cassette.
n Les languettes de protection de la cassette ont été brisées.
Impossibilité d’enfoncer la touche r ou 9
n La cassette est en fin de bande.
n Après la coupure automatique, la touche C PAUSE est
placée dans le sens de la flèche.
L’appareil ne fonctionne pas
n La polarité des piles n’a pas été respectée.
n Les piles sont plates. Remplacez les deux piles.
n La touche C PAUSE est placée dans le sens de la flèche.
n L’adaptateur secteur ou le cordon de batterie est raccordé
à l’appareil et vous avez l’intention de faire fonctionner
l’appareil sur les piles.
Le haut-parleur ne diffuse aucun son
n Les écouteurs sont branchés.
n Le volume est réglé au minimum.
Le son baisse ou est accompagné de parasites
excessifs
n Le volume est réglé au minimum.
n Les piles sont plates. Remplacez les deux piles.
n La tête est sale. Voir “Entretien”.
La vitesse de défilement de la bande est
excessive ou insuffisante en mode lecture
n La touche TAPE SPEED n’est pas correctement réglée.
Réglez-la sur la même vitesse que pour l’enregistrement.
La vitesse de défilement de la bande est plus
rapide que la vitesse de lecture normale
n La touche FAST PB est placée dans le sens de la flèche.
n La touche TAPE SPEED est réglée entre les positions 1,2
cm et 2,4 cm.
Impossibilité d’enregistrer
n Connexions erronées.
n Les piles sont plates. Remplacez les deux piles.
n La tête est sale.
n La touche VOR n’est pas réglée correctement. Réglez VOR
en position H ou OFF.
L’enregistrement est interrompu
n La touche VOR est en position H ou L. Lorsque vous
n’utilisez pas la fonction VOR, placez la touche en
position OFF.
Impossibilité d’effacer totalement
l’enregistrement.
n La tête est sale.
Entretien (voir Fig. F)
Nettoyage de la tête et des guides de la bande
Appuyez sur la touche 9 et nettoyez la tête 1, le cabestan
d’entraînement 2 et le galet presseur 3 toutes les 10 heures de
fonctionnement à l’aide d’un coton-tige imbibé d’alcool.
Nettoyage des parties extérieures
Utilisez un chiffon légèrement imprégné d’eau. N’utilisez pas
d’alcool, d’essence ou de diluant.
Spécifications
Cassette
y (type position normale)
Système d’enregistrement
2 pistes 1 bande monaurale
Haut-parleur
Env. 3,6 cm diam.
Vitesse de défilement de la bande
2,4 cm/s, 1,2 cm/s
Plage de fréquences
250 – 4.000 Hz
Entrée
Prise microphone (miniprise / PLUG IN POWER)
sensibilité 0,24 mV pour 3 kilo-ohms ou microphone à faible
impédance
Sortie: Prise écouteurs (miniprise) pour écouteurs 8 – 300 ohms
Puissance de sortie (à 10 % de distorsion harmonique)
M-629V/679V 160 mW
M-729V 260 mW
Autonomie des piles (enregistrement)
Voir “Sélection de la source d’alimentation”.
Alimentation
CC 3 V
Deux piles R6 (type AA)
Dimensions (l x h x p)
Approx. 65,1 × 121,4 × 25,2 mm, saillies et commandes comprises
Poids
Approx. 130 g avec les piles
Accessoires fournis
Microcassette MC-30 (1) (M-629V/729V modèle européen,
uniquement)
Piles R6 (type AA) (2) (M-629V/729V modèle européen, uniquement)
Adaptateur CA (1) (M-679V uniquement)
Adaptateur de recharge (1) (M-679V uniquement)
Piles rechargeables NC-AA, 1,2 V, 600 mAh, Ni-Cd (2) (M-679V
uniquement)
La conception et les spécifications sont sujettes à modifications sans
préavis.
Accessoires optionnels
Microcassette MC-60, MC-30, Ecouteurs ME-81, ME-L82
Cordon de connexion RK-G64HG (miniprise à miniprise avec atténuateur)
Microphone à condensateur d’électrets ECM-T110
Adaptateur secteur AC-E30HG
Page 4

Acerca de este manual
B
Las instrucciones de este manual hacen referencia a los
modelos M-629V, M-679V y M-729V. Antes de comenzar
a leerlas, compruebe el número de modelo. Se ha
utilizado el modelo M-729V para las ilustraciones.
Cualquier diferencia de funcionamiento se indica
claramente en el texto, por ejemplo, “sólo para M-729V.”
Sobre este manual
As instruções contidas neste manual referem-se aos
modelos M-629V, M-679V e M-729V Antes de começar a
ler o manual, verifique o número do seu modelo. O
modelo M-729V é utilizado para fins ilustrativos. Todas
as diferenças de funcionamento entre os modelos estão
indicadas no texto de forma explícita, por exemplo, “só
no modelo M-729V.”
A
a
a
EAR
TAPE
SPEED
TAPE
COUNTER
BATT
b
MIC (PLUG IN POWER)
Micrófono
Microfone
REC
CUE MARKER
r
C PAUSE
0 CUE/REVIEW )
p 6
VOR
mm
p6
b
c
Si las pilas son nuevas
Quando as pilhas são
novas
Si las pilas se agotan
Quando as pilhas
começam a ficar gastas
se illumina
acende-se
}
]
]
}
BATT
se illumina
acende-se
BATT
se apaga
apaga-se
C
c
m
EAR
FAST PB
TAPE
SPEED
BATT
m
VOL
C PAUSE
9
0 CUE/REVIEW )
p 6
m
Sustituya las pilas
Substituir pilhas
d
DC IN 3V
Adaptador de CA (suministrado con M-679V
solamente) o adaptador AC-E30HG
(no suministrado).
Adaptador de corrente CA (fornecido apenas com
o modelo M-679V) ou o adapatdor de corrente
CA AC-E30HG (não fornecido).
e
1
parpadea
começa a piscar
a toma de alimentación
para uma tomada de parede
Adaptador de carga
Carregador
BATT
se apaga
apaga-se
a la toma mural
à tomada de parede
D
a
MIC
Cable de conexión RK-G64HG
(no suministrado)
Cabo de ligação RK-G64HG
(não fornecido)
b
EAR,EARPHONE,@
Cable de conexión RK-G64HG
(no suministrado)
Cabo de ligação RK-G64HG
(não fornecido)
c
Micrófono electrostático electreto ECM-T110
(no suministrado)
Microfone condensador Electret ECM-T110
(não fornecido)
EAR
MIC
MIC
Pilas recargables
NC-AA
Pilhas recarregáveis
NC-AA
2
Indicador de potencia
Indicador de corrente
Adaptador de CA
Adaptador de
corrente CA
E
Estándar
Standard
F
Sólo las cintas
Microcassettes
estándar tienen una
pequeña hendidura
en la cara A.
Só as microcassetes
standard têm uma
pequena reentrância
no lado A.
Aprox. 5 mm
Aprox. 5 mm
No estándar
Não standard
Aprox. 2,5 mm
Aprox. 2,5 mm
2
1
3
Page 5

Español
Bienvenido
Felicitaciones por adquirir la grabadora microcassettes de
Sony. A continuación, se explican algunas de sus útiles
funciones:
•Indicadores luminosos BATT, que muestran el estado
de las pilas en dos pasos y el indicador luminoso i,
que determina cuándo es preciso sustituirlas.
•La función CUE MARKER (sólo para M-729V) localiza
una posición específica de un dictado.
•La función FAST PB (reproducción rápida) es útil para
escuchar el contenido de una cintaun 20% aprox. más
rápido que en la reproducción normal.
•El sistema VOR (Voice Operated Recording) inicia y
detiene la grabación automáticamente en función del
sonido.
•Función de edición—Es posible iniciar la grabación
directamente desde el modo de reproducción pulsando
el botón r. Esta función resulta útil para corregir una
parte previamente grabada.
•Contador de cinta
•Mecanismo de desconexión automática al final de la
cinta (sólo en el modo de grabación/reproducción).
•Función de liberación de detención-pausa—El
interruptor de pausa se libera automáticamente cuando
el botón p6 no está pulsado, de modo que no pierde la
posibilidad de grabación.
Fuentes de alimentación
Elija una de las siguientes fuentes de alimentación.
Pilas secas (consulte la figura A-a)
Compruebe que no se ha realizado ninguna conexión al
jack DC IN 3V.
1 Abra la tapa del compartimiento de las pilas.
2 Inserte dos pilas R6 (tamaño AA) con la polaridad
correcta y cierre la tapa.
Si la tapa del compartimiento de las pilas se
desprende accidentalmente (consulte la figura
A-b)
Colóquela como se indica.
Cuándo reemplazar las pilas (consulte la figura
A-c)
Sustituya las pilas por unas nuevas cuando los indicadores
luminosos BATT se apaguen y el indicador i parpadee.
Los indicadores luminosos BATT cambian de se indica.
Notas
• La unidad reproducirá el sonido normalmente durante algún
tiempo, incluso después de que parpadee el indicador i. No
obstante, deberá sustituir la pila lo antes posible. En caso contrario,
la reproducción no podrá realizarse con sonido normal, puede
grabarse ruido y el sonido grabado puede ser demasiado débil.
• En los siguientes casos, no es necesario cambiar las pilas:
– si los indicadores BATT parpadean con el sonido reproducido al
aumentar el volumen.
– si el indicador i se ilumina momentáneamente al iniciarse la
cinta o al final de ésta.
– si el indicador i parpadea durante las operaciones de FF
(avance rápido) o REW (rebobinado).
• En algunos casos, si la unidad se utiliza con pilas recargables
(suministado con M-679V solamente o no suministrado), sólo se
ilumina un indicador BATT, aunque se hayan recargado
completamente las pilas.
Duración de las pilas (aprox. horas)
GrabaciónPilas
Sony R6P (SR)
Alcalinas Sony LR6 (SG)
NC-AA (sólo para M-679V)
5,5
19,0
5,5
Alimentación doméstica (consulte la
figura A-d)
Conecte el adaptador de alimentación CA a DC IN 3V y a
la toma de red. Utilice adaptador de CA (suministrado
con M-679V solamente) o adaptador AC-E30HG (no
suministrado). No utilice ningún otro tipo de adaptador
CA.
Polaridad del enchufe
Pilas recargables (suministradas sólo
con M-679V)
Cargue las pilas recargables sólo con el adaptador de
carga suministrado y el adaptador de alimentación de
CA. Estas pilas se pueden recargar aprox. 500 veces.
Asegúrese de que carga las pilas recargables aprox. 8
horas antes de utilizarlas. La unidad se puede utilizar
para grabar durante aproximadamente 5,5 horas con las
pilas recargables a plena carga.
Para cargar las pilas (consulte la figura A-e)
El indicador de potencia del adaptador de carga
permanece iluminado mientras se suministre corriente
desde la toma mural.
Empleo (consulte la figura A-a)
Notas
• Utilice las dos pilas recargables suministradas sólo con el
adaptador de carga que se suministra.
• Si se producen distorsiones de sonido o demasiados ruidos, o si la
unidad no funciona correctamente, desconéctela y recargue
conjuntamente las dos pilas recargables.
• Las pilas recargables se descargarán aunque no se utilicen.
Asegúrese de que las carga antes de utilizarlas.
• Recargue conjuntamente las dos pilas recargables. De lo contrario,
no se podrá realizar la carga.
• Asegúrese de que extrae las pilas recargables del adaptador de
carga para evitar que se sobrecarguen (más de 20 horas) cuando la
carga se haya completado.
• Los procesos de carga y funcionamiento se deben realizar con una
temperatura entre 5°C y 40°C (40°F y 104°F).
• El adaptador de carga se calienta durante la carga, pero esto no es
un signo de ningún problema.
• No utilice ni deje el adaptador de carga en un lugar próximo a
fuentes de calor ni en un lugar expuesto a la luz solar directa o a
excesiva humedad.
• Desenchufe el adaptador de alimentación de CA de la toma mural
si no lo va a utilizar durante mucho tiempo.
• No intente cargar pilas secas.
Grabación (consulte la figura B-a)
Asegúrese de que no hay nada conectado a MIC.
1 Pulse el botón de restauración de TAPE COUNTER.
2 Pulse p6 e inserte una microcassette estándar con la
cara que desea grabar mirando hacia la tapa (consulte
la figura B-b).
3 Seleccione la velocidad de cinta que desee.
2,4 cm para obtener un sonido óptimo (recomendado
para uso normal): Es posible realizar una grabación
de 30 minutos utilizando las dos caras de una cinta
Microcassette MC-30.
1,2 cm para mayor tiempo de grabación: Es posible
realizar una grabación de 60 minutos utilizando las
dos caras de una cinta Microcassette MC-30.
4 Sitúe VOR en la posición H, L u OFF.
Si sitúa VOR en la posición H o L, la unidad inicia
automáticamente la grabación del sonido y activa el
modo de pausa si no hay sonido (de este modo, se
ahorra cinta y pilas).
H : Para grabar en reuniones o en lugares silenciosos
y/o amplios.
L : Para grabar un dictado o en un lugar ruidoso.
Cuando el sonido no es suficientemente alto,
seleccione la posición OFF, o es posible que la unidad
no empiece a grabar.
5 Pulse r.
Se inicia la grabación. Mientras la cinta está
funcionando, el indicador REC se ilumina y parpadea
en función de la intensidad del sonido.
El nivel de grabación es fijo.
Para Pulse o deslice
Detener la grabación
Iniciar la grabación
durante la reproducción
Revisar una parte de
cinta recién grabada
Hacer una pausa en la
grabación
Nota
Seleccione la velocidad de grabación de cinta de 2,4 cm si reproduce
la cinta grabada en otra unidad. De otro modo, la calidad del sonido
puede modificarse.
Observaciones sobre VOR (Voice Operated Recording)
• El sistema VOR depende de las condiciones ambientales. Si no
obtiene los resultados deseados, sitúe VOR en la posición OFF.
• Al utilizar el sistema en un lugar ruidoso, la unidad permanecerá
en el modo de grabación. Por el contrario, si el sonido es
demasiado bajo, la unidad no comenzarà a grabar. Sitúe VOR en la
posición H (alto) o L (bajo) según las condiciones.
p6
r durante la reproducción (la unidad
activa el modo de grabación)
Empuje 0CUE/)REVIEW hacia
)REVIEW durante la grabación.
Suelte el botón para iniciar la
reproducción.
Deslice CPAUSE en la dirección de
la flecha. Se apaguen las indicadores
BATT.
p6Extraer una cassette
Para controlar el sonido
Conecte el auricular (no suministrado) al jack EAR. No es
posible ajustar el volumen de control con VOL.
Para impedir que una cassette se grabe
accidentalmente (consulte la figura B-c)
Rompa y retire las lengüetas de la cassette. Para volver a
utilizar la cassette para grabar, cubra el orificio de la
lengüeta con cinta adhesiva. El nivel de grabación es fijo.
Grabación de marcas (sólo para M729V)
Al grabar, es posible introducir una señal especial en la
cinta para marcar una posición determinada.
En la posición que desee, pulse CUE MARKER para
grabar una señal. El indicador REC se apaga y se graban
de una señal en la cinta. Si desea grabar una señal más
larga, pulse CUE MARKER tanto tiempo como quiera.
Durante la búsqueda adelante y atrás, se oirá un pitido
en la posición de la señal. Durante el modo de
reproducción, se oirá la señal con un sonido de baja
frecuencia en la posición de la marca.
Notas
• Se recomienda grabar marcas de pista cuando se produzca una
interrupción del sonido.
• Durante la búsqueda adelante y atrás, los pitidos tienen un sonido
distinto.
• El pitido puede sonar de forma distinta dependiendo de la
posición marcada en la cinta, ya que la velocidad de enrollado
varía desde el principio hasta el final de la cinta.
Reproducción de cintas (consulte
la figura C)
1 Inserte una cassette con la cara que va a reproducir
mirando a la puerta del compartimiento.
2 Seleccione la velocidad de cinta que se utilizó al
grabarla.
3 Pulse 9.
4 Ajuste el volumen.
Para Pulse o deslice
Detener la reproducción/
detener el avance o
rebobinado rápido de
cinta*
Introducir una pausa en
la reproducción
Avanzar rápido
Rebobinar Deslice 0CUE/)REVIEW hacia
Buscar hacia delante
durante la reproducción
(CUE)
Buscar hacia atrás
durante la reproducción
(REVIEW)
* Si deja la unidad encendida después de rebobinar la cinta, las
pilas se consumirán con rapidez. Asegúrese de desactivar el botón
p6.
** La cinta se desplaza con mayor rapidez en el modo rebobinar/
REVIEW que en el modo avanzar rápido/CUE.
Aumento de la velocidad de reproducción
Deslice el interruptor FAST PB en la dirección de la
flecha. La velocidad de reproducción aumentará. Para
volver a la velocidad original, deslice el interruptor FAST
PB a la posición anterior.
Al final de la cinta
En el modo de grabación o reproducción, la cinta se
detiene cuando llega al final y los botones bloqueados se
liberan automáticamente (mecanismo de desconexión
automática).
Asegúrese de ajustar el botón 0CUE/)REVIEW en
la posición central después del avance rápido o el
rebobinado.
p6
Deslice CPAUSE en la dirección de
la flecha. El indicador BATT se apaga.
Deslice 0CUE/)REVIEW hacia
0CUE durante la detención**.
)REVIEW durante la detención**.
Mantenga pulsado hacia abajo
0CUE/)REVIEW durante la
reproducción y suéltelo en la posición
que desee**.
Mantenga pulsado hacia arriba
0CUE/)REVIEW durante la
reproducción y suéltelo en la posición
que desee**.
Grabación/reproducción con el
equipo conectado
Copia en otra grabadora de cintas
(consulte la figura D-a)
Active el modo de reproducción de esta unidad y el
modo de grabación en otra unidad.
Grabación desde otra grabadora de
cintas (consulte la figura D-b)
Active el modo de grabación en esta unidad y el de
reproducción en otra unidad. En este caso, sitúe VOR en
la posición OFF.
Grabación con un micrófono externo
(consulte la figura D-c)
Conecte un micrófono a MIC. Al utilizar un micrófono
con sistema de alimentación de enchufe, la alimentación
para el micrófono se suministra desde esta unidad.
Nota
Al grabar con un micrófono externo, es posible que el sistema VOR
no funcione correctamente debido a la diferencia de sensibilidad.
Precauciones
Acerca de la alimentación
•Utilice la unidad sólo con 3V CC.
Para utilizar CA, utilice el adaptador de CA recomendado para la
unidad. No emplee otro tipo de adaptador. Si va a utilizar pilas,
emplee dos pilas R6 (tamaño AA).
•La etiqueta en la que se indica el voltaje de funcionamiento,
etc., está situada en la parte inferior de la unidad.
Acerca de la unidad
•Utilice sólo la cinta microcassette estándar y con
esta unidad. Las no estándar no pueden utilizarse porque la
dimensión "L" (consulte la figura E) es diferente.
•No coloque la unidad cerca de fuentes de calor, ni en lugares
sometidos a la luz directa del sol, al polvo excesivo o a golpes
mecánicos.
•Si cae cualquier objeto sólido o líquido dentro de la unidad,
retire las pilas o desconecte el adaptador de alimentación CA y
haga que la revise personal cualificado antes de volver a
utilizarla.
•Mantengaalejadas de la unidad tarjetas de crédito con códigos
magnéticos o relojes de cuerda para prevenir un posible daño
del imán utilizado para el altavoz.
•Si no va a utilizar la unidad durante varios días, retire las pilas
para evitar daños causados por fugas y la corrosión
consiguiente.
•Si la unidad no se ha utilizado durante varios días, active el
modo de reproducción y deje que se caliente durante unos
minutos antes de insertar una cinta.
Si tiene alguna duda o problema referentes a la unidad, póngase
en contacto con el proveedor Sony más cercano.
Solución de problemas
Si sigue teniendo problemas después de revisar esta lista,
consulte al proveedor Sony más cercano.
No es posible insertar una cassette.
n La cassette se está insertando en la posición incorrecta
(debe insertarse en la tapa con la cara de la cinta orientada
hacia fuera.)
n Ya se ha pulsado 9.
No es posible pulsar r.
n No hay ninguna cassette en el compartimiento.
n Se ha retirado la lengüeta de la cassette.
No es posible pulsar r o 9.
n La cinta ha llegado al final.
n Después de la desconexión automática, CPAUSE se la
deslizado en la dirección de la flecha.
La unidad no funciona.
n Las pilas se han insertado con la polaridad incorrecta.
n Las baterías tienen muy poca potencia. Sustitúyalas por
unas nuevas.
n Se ha deslizado CPAUSE en la dirección de la flecha.
n El adaptador de alimentación CA o el cable de batería de
automóvil sólo se ha conectado a la unidad y va a utilizar
la unidad con las pilas de ésta.
El altavoz no emite sonido.
n Los auriculares están enchufados.
n El volumen está completamente al mínimo.
El sonido desaparece o aparece con ruido
excesivo.
n El volumen está completamente al mínimo.
n Las baterías tienen muy poca potencia. Sustitúyalas por
unas nuevas.
n El cabezal está contaminado. Consulte “Mantenimiento”.
La velocidad de cinta es demasiado rápida o
lenta en el modo de reproducción.
n Ajuste incorrecto del interruptor TAPE SPEED. Seleccione
la misma velocidad que la utilizada para grabar.
La velocidad de cinta es más rápida que la de
reproducción normal.
n El interruptor FAST PB se ha desplazado en la dirección
de la flecha.
n El interruptor TAPE SPEED está situado entre las
posiciones 1,2 cm y 2,4 cm.
No es posible grabar
n La conexión es incorrecta.
n Las baterías tienen muy poca potencia. Sustitúyalas por
unas nuevas.
n El cabezal está contaminado.
n Ajuste incorrecto del interruptor VOR. Seleccione la
posición H u OFF.
Se interrumpe la grabación.
n El interruptor VOR está en la posición H o L. Cuando no
utilice VOR, sitúelo en OFF.
No es posible borrar completamente la
grabación.
n El cabezal está contaminado.
Mantenimiento (consulte la figura
F)
Para limpiar el cabezal y la pista de la cinta
Pulse 9 y limpie el cabezal 1, el cabezal móvil 2 y el cilindro
de paso 3 con un bastoncillo de algodón humedecido en
alcohol cada 10 horas de uso.
Para limpiar el exterior
Utilice un paño suave ligeramente humedecido en agua. No
emplee alcohol, bencina ni diluyentes.
Especificaciones
Cinta
y (tipo de posición normal)
Sistema de grabación
2 pistas, 1 canal monofónico
Altavoz
Aprox. 3,6 cm de diámetro
Velocidad de cinta
2,4cm/s , 1,2cm/s
Rango de frecuencia
250 – 4.000 Hz
Entrada
Jack de entrada de micrófono (minijack/PLUG IN POWER)
sensibilidad 0,24m V por 3 kiloohomios o impedancia inferior de
micrófono
Salida
Jack de auriculares (minijack) para auriculares de 8 a 300 ohmios
Salida de alimentación (al 10% de distorsión armónica)
M-629V/679V 160 mW
M-729V 260 mW
Duración de las pilas (grabando)
Consulte “Fuentes de alimentación”.
Requisitos de alimentación
3 V CC
Dos pilas R6 (tamaño AA)
Dimensiones (an/al/fn)
Aprox. 65,1 × 121,4 × 25,2 mm., incluidos componentes y controles.
Masa: Aprox. 130 g incluidas las pilas.
Accesorios suministrados
Cinta Microcassette MC-30 (1) (sólo para M-629V/729V, modelo
europeo)
Pilas R6 (tamaño AA) (2) (sólo para M-629V/729V, modelo europeo)
Adaptador de alimentación CA (sólo para M-679V)
Adaptador de carga (1) (sólo para M-679V)
Pilas recargables NC-AA, 1,2 V, 600 mAh, Ni-Cd (2) (sólo para M679V)
El diseño y las especificaciones están sujetos a cambio sin previo
aviso.
Accesorios opcionales
Cinta Microcassette MC-60, MC-30
Auriculares ME-81, ME-L82
Cable de conexión RK-G64HG (minienchufe a minienchufe con
atenuador)
Micrófono electrostático electreto ECM-T110
Adaptador de alimentación CA AC-E30HG
Page 6

Português
Bem-vindo!
Obrigado por ter adquirido o Microcassette-Corder da
Sony. Algumas das suas principais características são:
•O indicador luminoso BATT fornece indicações sobre o
estado das pilhas (dois estados) e o indicador luminoso
i indica quando é que as pilhas devem ser
substituídas.
•A função CUE MARKER (só no M-729V) localiza uma
posição específica num texto ditado.
•A função FAST PB (reprodução rápida) permite-lhe
rever o conteúdo de uma cassete com uma rapidez
cerca de 20% maior do que na reprodução normal.
•O sistema VOR (Gravação Activada por Voz) inicia e
pára a gravação automaticamente em resposta ao som.
•Função de edição—Pode iniciar a gravação
directamente do modo de reprodução carregando na
tecla r para corrigir uma parte anteriormente gravada.
•Contador de fita
•Mecanismo de fecho automático no fim da cassete
(apenas nos modos gravação/reprodução)
•Função parar-pausa-libertar—O interruptor de pausa é
automaticamente libertado quando se carrega na tecla
p6 para o utilizador não perder nenhuma gravação.
Preparar as fontes de
alimentação
Escolha uma das fontes de alimentação seguintes.
Pilhas secas(ver a Fig. A-a)
Certifique-se de que não está nada ligado ao jack DC IN
3V.
1 Abra a tampa do compartimento das pilhas.
2 Introduza duas pilhas R6 (tamanho AA), com a
polaridade correcta e feche a tampa.
Se a tampa do compartimento das pilhas se
soltar acidentalmente (ver a Fig. A-b)
Ligue como se mostra na figura.
Quando deve substituir as pilhas (ver a Fig. A-c)
Substitua as pilhas usadas por pilhas novas quando o
indicador luminoso BATT se apagar e o indicador i
começar a piscar.
O estado do indicador luminoso BATT muda da forma
mostrada na figura.
Notas
• O aparelho reproduzirá normalmente por algum tempo, mesmo
após a lâmpada i piscar. Entretanto, substitua as pilhas assim que
for possível. Do contrário, a reprodução poderá não ser executada
com som normal, ruídos poderão ser gravados e o som gravado
não será alto o suficiente.
• Nos casos a seguir, não é necessário substituir as pilhas:
– caso as lâmpadas BATT pisquem com o som de reprodução
quando se aumenta o volume;
– caso a lâmpada i se acenda momentaneamente quando a fita
inicia o movimento ou no final da fita;
– caso a lâmpada i pisque durante o funcionamento de FF (CUE)
ou REW (REVIEW).
• Em alguns casos, quando o aparelho é utilizado com pilhas
recarregáveis (fornecido apenas com o modelo M-679V ou não
fornecido), acende-se apenas um indicador luminoso BATT,
mesmo se as pilhas tiverem sido completamente recarregadas.
Duração das pilhas (Horas aproximadas)
GravaçãoPilhas
Sony R6P (SR)
Sony alkaline LR6 (SG)
NC-AA (só nos modelo M-679V)
5,5
19,0
5,5
Corrente doméstica (ver a Fig. A-d)
Ligue o adaptador de corrente CA a DC IN 3V e a uma
tomada de parede. Utilize adaptador de corrente CA
(fornecido apenas com o modelo M-679V) ou o
adapatdor de corrente CA AC-E30HG (não fornecido).
Não utilize nenhum outro adaptador de corrente CA.
Polaridade da ficha
Pilhas recarregáveis (fornecidas apenas
com o M-679V)
Carregue as pilhas recarregáveis utilizando apenas o
carregador fornecido e o adaptador de corrente CA. As
pilhas recarregáveis podem ser carregadas cerca de 500
vezes.
Carregue as pilhas durante cerca de 8 horas antes de as
utilizar. O aparelho pode ser utilizado para gravar
durante aproximadamente 5,5 horas se as pilhas
estiverem completamente carregadas.
Para carregar (ver a Fig. A-e)
O indicador de corrente do carregador mantém-se aceso
enquanto este estiver ligado à tomada de parede.
Para utilizar (ver a Fig. A-a)
Notas
• Utilize as duas pilhas recarregáveis apenas com o carregador
fornecido.
• Se ocorrer uma distorção do som, houver demasiadas
interferências ou se o aparelho não funcionar correctamente,
desligue o aparelho e volte a carregar as duas pilhas em conjunto.
• As pilhas recarregáveis descarregam-se mesmo se não forem
utilizadas. Antes de utilizar o aparelho verifique se as pilhas estão
carregadas.
• Recarregue as duas pilhas em conjunto. Se não o fizer, a carga não
pode ser efectuada.
• Verifique se retirou as duas baterias recarregáveis do carregador
para evitar uma sobrecarga (mais de 20 horas) depois de terminada
a operação de carga.
• A temperatura de carga e de funcionamento não deve execeder os
°C a 40°C (40°F a 104°F).
• O carregador aquece durante a operação de carga. Isto não é sinal
de avaria.
• Não utilize nem deixe o carregador num local perto de fontes de
calor, sujeito à exposição directa dos raios solares ou
excessivamente húmido.
• Desligue o adaptador de corrente CA da tomada de parede quando
não tencionar utilizá-lo durante muito tempo.
• Não tente carregar pilhas secas.
Gravação (ver a Fig. B-a)
Certifique-se de que não està nada ligado ao MIC.
1 Carregue na tecla de reinicialização do TAPE
COUNTER.
2 Carregue em p6 e introduza uma microcassete
standard com o lado onde vai iniciar a gravação
voltado para a tampa (ver a Fig.B-b).
3 Seleccione a velocidade de fita desejada .
2,4cm para obter um som óptimo (recomendado na
utilização normal): se utilizar ambos os lados da
microcassete MC-30 pode fazer uma gravação de 30
minutos.
1,2cm para obter um tempo de gravação mais longo:
se utilizar ambos os lados da microcassete MC-30
pode fazer uma gravação de 60 minutos.
4 Regule o VOR para H, L ou OFF.
Se regular o VOR para H ou L, o aparelho inicia
automaticamente a gravação do som e faz uma pausa
quando o som deixa de se ouvir (poupa assim a fita e
as pilhas).
H : Para gravar em reuniões ou num local silencioso
e/ou espaçoso.
L : Para gravar quando estiver a ditar ou em locais
barulhentos.
Se o som não for suficientemente audível, regule VOR
para OFF, caso contrário o aparelho pode não dar
início à gravação.
5 Carregue na tecla r.
A gravação começa. æ medida que a fita corre, o
indicador luminoso REC acende-se e pisca,
dependendo da intensidade do som.
O nível de gravação fica fixo.
Para
Parar a gravação
Iniciar a gravação
durante a reprodução
Rever a parte que
acabou de gravar
Fazer uma pausa na
gravação
Retirar uma cassete p6
Nota
Seleccione a velocidade de fita de 2,4cm para gravar, se estiver a
reproduzir a cassete noutro aparelho. Caso contrário, pode alterar a
qualidade do som.
Notas sobre o VOR (Gravação Activada por Voz)
• O sistema VOR depende das condições ambientais. Se não
conseguir obter os resultados desejados, regule o VOR para OFF.
• Quando utiliza o sistema num local ruidoso, o aparelho mantém-se
no modo de gravação. Se o som for muito baixo, o aparelho não
inicia a gravação. Regule VOR para H (alto) ou para L (baixo)
dependendo das condições.
Carregue ou faça deslizar
p6
r durante a reprodução (a unidade entra
em modo de gravação).
Empurre para cima 0CUE/)REVIEW,
na direcção de )REVIEW, durante a
gravação. Liberte a tecla no ponto onde
quer iniciar a reprodução.
CPAUSE na direcção da seta. O indicador
luminoso REC e BATT se apagar.
Como controlar o som
Ligue os auriculares (fornecidos) ao jack EAR. O volume
do monitor não pode ser regulado com VOL.
Como evitar gravar acidentalmente sobre uma
fita já gravada (ver a Fig. B-c)
Quebre e retire as patilhas da cassete. Para voltar a
utilizar a cassete para gravar, tape o orifício da patilha
com fita adesiva.
Gravar marcadores cue (só no M-729V)
Durante a gravação, pode gravar um sinal especial na fita
para marcar uma posição específica.
Na posição desejada, carregue em CUE MARKER para
gravar um sinal. O indicador luminoso REC apaga-se e
um sinal fica gravado na fita. Se quiser gravar um sinal
mais longo, mantenha o CUE MARKER carregado
durante o tempo que pretende.
Durante o CUE e o REVIEW, ouvirá um sinal sonoro
nessa posição. Durante o modo de reprodução, ouvirá o
sinal nessa posição, com baixa frequência.
Notas
• Devem gravar-se marcas de localização quando houver uma
quebra no som.
• Durante o CUE e o REVIEW, o sinal sonoro é diferente.
• O sinal sonoro pode ser diferente, dependendo da posição marcada
na fita, porque a velocidade de enrolamento varia do início até ao
fim da fita.
Reproduzir uma cassete (ver a
Fig. C)
1 Introduza uma cassete com o lado que quer
reproduzir em primeiro lugar voltado para a tampa.
2 Seleccione a mesma velocidade que utilizou na
gravação.
3 Carregue em 9.
4 Regule o volume.
Para
Parar a reprodução/
parar o avanço rápido
ou rebobinar*
Fazer uma pausa na
reprodução
Avanço rápido
Rebobinar
Pesquisar para a frente
durante a reprodução
(CUE)
Pesquisar para trás
durante a reprodução
(REVIEW)
* Se deixar o sistema ligado depois da cassete ter sido rebobinada,
as pilhas gastam-se rapidamente. Não se esqueça de carregar na
tecla p6.
** A fita move-se mais rapidamente no modo rebobinar/REVIEW do
que no modo avanço rápido/CUE.
Como aumentar a velocidade de reprodução
Faça deslizar o interruptor FAST PB na direcção da seta.
A velocidade de reprodução aumenta. Para regressar à
velocidade normal, faça deslizar o mesmo interruptor
para a posição original.
No fim da fita
Em modo de gravação ou de reprodução, a cassete pára
no fim da fita e as teclas bloqueadas são
automaticamente libertadas (mecanismo de fecho
automático).
Depois do avanço rápido ou da rebobinagem, verifique
se voltou a colocar a tecla 0CUE/)REVIEW na
posição central.
Carregue ou faça deslizar
p6
CPAUSE na direcção da seta. O
indicador luminoso BATT apaga-se.
0CUE/)REVIEW na direcção do
0CUE durante a paragem.**
0CUE/)REVIEW na direcção do
)REVIEW durante a paragem.**
Mantenha a tecla 0CUE/)REVIEW
para baixo durante a reprodução e soltea no ponto pretendido.**
Mantenha a tecla 0CUE/)REVIEW
para cima durante a reprodução e soltea no ponto pretendido.**
Gravar/reproduzir com o
equipamento ligado
Montagem noutro gravador de cassetes
(ver a Fig. D-a)
Regule este aparelho para modo de reprodução e outro
gravador de cassetes para modo de gravação.
Gravar a partir de outro gravador de
cassetes (ver a Fig. D-b)
Regule este aparelho para modo de gravação e outro
gravador de cassetes para modo de reprodução. Neste
caso, regule o VOR para OFF.
Gravar com um microfone externo
(ver a Fig. D-c)
Ligue um microfone ao MIC. Quando se utiliza um
microfone com ficha, a corrente para esse microfone é
fornecida pele aparelho.
Nota
Quando se faz uma gravação com um microfone externo, o sistema
VOR pode não funcionar correctamente devido à diferença de
sensiblidade.
Precauções
De ligação
•A unidade só deve funcionar com CC de 3V.
Para o aparelho funcionar com CA, utilize o adaptador CA
recomendado para a mesma e não outro de um tipo diferente.
Para a unidade funcionar com pilhas, utilize 2 pilhas R6
(tamanho AA).
•Na parte inferior do aparelho encontra-se a placa de
identificação com a indicação da voltagem de funcionamento,
etc.
Sobre o aparelho
•Utilize apenas y (microcassetes standard) com
este aparelho. Não podem ser utilizadas cassetes não standard
porque a dimensão “L” é diferente (ver fig.E).
•Não deixe o aparelho perto de fontes de calor, ou num local
onde esteja sujeita a luz solar directa, poeira excessiva ou
choques.
•Se deixar cair um objecto ou líquidos dentro do aparelho, retire
as pilhas ou desligue o adaptador CA e, antes de voltar a
utilizá-o, mande-o verificar por um técnico qualificado.
•Mantenha o aparelho afastada de cartões de crédito com
código magnético, de relógios de pulso com corda, etc., a fim
de evitar possíveis danos provocados pelo íman do altifalante.
•Quando não tiver que utilizar o aparelho durante um período
de tempo longo, retire as pilhas para evitar danos causados
pelo derramamento do respectivo líquido e subsequente
corrosão.
•Se o aparelho tiver estado inactivo por um período de tempo
longo, antes de introduzir uma cassete, regule-o para modo de
reprodução e deixe-a aquecer durante alguns minutos.
Se tiver dúvidas ou problemas em relação o aparelho, entre em
contacto com o agente da Sony mais próximo.
Resolução de problemas
Se, depois de proceder às verificações a seguir, algum problema
persistir, entre em contacto com o agente da Sony mais próximo.
Não é possível introduzir a cassete.
n A cassete foi introduzida de forma incorrecta (A cassete
deve ser introduzida dentro da tampa, com a face da fita
voltada para si).
n já carregou em 9.
Não é possível carregar na tecla r.
n Não há nenhuma cassete no respectivo compartimento.
n A patilha da cassete foi removida.
Não é possível carregar na tecla r ou 9.
n A fita chegou ao fim.
n Depois do fecho automático, a tecla CPAUSE foi
deslizada na direcção da seta.
O aparelho não funciona.
n As pilhas foram introduzidas com a polaridade incorrecta.
n As pilhas estão fracas. Substitua ambas as pilhas por
pilhas novas.
n A tecla CPAUSE foi deslizada na direcção da seta.
n Vai utilizar o aparelho com as pilhas mas tem o cabo para
bateria ou o adaptador de corrente CA ligado ao aparelho.
O altifalante não emite nenhum som.
n Os auriculares estão ligados.
n O volume está regulado para o mínimo.
O som desaparece ou é emitido com ruído
excessivo.
n O volume está regulado para o mínimo.
n As pilhas estão fracas. Substitua ambas as pilhas por
pilhas novas.
n A cabeça está suja. Consulte a “Manutenção”.
A velocidade da fita está muito rápida ou muito
lenta no modo de reprodução.
n TAPE SPEED não está correctamente regulado. Regule-o
para a mesma velocidade utilizada na gravação.
A velocidade da fita é mais rápida do que a
velocidade normal de reprodução
n O interruptor FAST PB foi deslizado na direcção da seta.
n O comutador TAPE SPEED regulado entre as posições 1,2
cm e 2,4 cm.
Não é possível gravar.
n A ligação está incorrecta.
n As pilhas estão fracas. Substitua ambas as pilhas por
pilhas novas.
n A cabeça está contaminada.
n VOR está incorrectamente regulado. Regule-o para H ou
OFF.
A gravação foi interrompida.
n VOR está regulado para H ou L. Quando não estiver a
utilizar VOR, regule-o para OFF.
Não é possível apagar completamente a
gravação.
n A cabeça está suja.
Manutenção (ver a Fig. F)
Limpeza das cabeças e do percurso da fita
Carregue na tecla 9 e, utilizando um algodão humedecido em
álcool, limpe a cabeça 1, o cabrestante 2 e a roda dentada 3,
após cada 10 horas de utilização.
Limpeza do exterior
Utilize um pano macio ligeiramente humedecido em água. Não
utilize álcool, benzina nem diluente.
Especificações
Cassete
y (tipo posição normal)
Sistema de gravação
2 pistas 1 canal mono
Altifalante
Aprox. 3,6cm de diâmetro
Velocidade da fita
2,4cm/s, 1,2cm/s
Frequência
250 – 4.000 Hz
Entrada
Jack de entrada de microfone (minijack/PLUG IN POWER) com
sensibilidade de 0,24 mV para 3 kilohms ou microfone de impedância
inferior.
Saída
Jack de auriculares (minijack) para auriculares de 8 – 300 ohms.
Saída de corrente (10% de distorção harmónica)
M-629V/679V 160 mW
M-729V 260 mW
Duração das pilhas (gravação)
Veja a secção “Utilização das Fontes de Alimentação”.
Requisitos de energia
3V CC
Duas pilhas R6 (tamanho AA)
Dimensões (l/a/p)
Aprox. 65,1 × 121,4 × 25,2 mm, incluindo controlos e peças salientes
Peso
Aprox. 130 g, incluindo as pilhas
Acessórios fornecidos
Microcassete MC-30 (1) (só nos modelos M-629V/729V, modelo
earopeu)
Pilhas R6 (tamanho AA) (2) (só nos modelos M-629V/729V, modelo
earopeu)
Adaptador CA (1) (para os modelo M-679V)
Carregador (1) (para os modelo M-679V)
Pilhas recarregáveis NC-AA, 1,2 V, 600 mAh, Ni-Cd (1) (para os
modelo M-679V)
A concepção e as especificações estão sujeitas a alteração sem aviso
prévio.
Acessórios opcionais
Microcassete MC-60, MC-30
Auriculares ME-81, ME-L82
Cabo de ligação RK-G64HG (minificha a minificha com atenuador)
Microfone condensador Electret (polarização permanente) ECMT110
Adaptador CA AC-E30HG
 Loading...