

Page 1

Trwubleshooting
SONY
Should a problem occur, first check the following basic points. If the problem persists
after you have made these checks, consult your nearest Sony dealer.
The unit does not operate.
No sound from the built-in speaker.
The tape speed is too fast or too slow.
The tape stops in the rewind or fast
forward mode and the alarm sounds.
Sound drop-outs, loss of high
frequency sounds, or excessive noise.
► Connect the AC power adaptor to a wall
outlet.
• Turn up the volume.
• An earphone is plugged in.
» Set the SPEED selector correctly.
* Adjust the SPEED CONTROL.
» The entire tape has been wound onto the
right or left reel.
* The heads are dirty. See “Maintenance”.
Specification
Tape
Track system 2-track 1-channel
Tape speed
Tape speed control -10% to +50% Weight Approx. 0.8 kg (1 lb 12 oz)
Auto back space
Frequency response
Speaker
Power output
Input
Output
Power requirements
(MICROCASS€TTC ) '
(normal position type)
monaural
2.4 cm/sec. (15/16 ips).
1.2cm/sec. (15/32 ips) and controls
Approx. 0/1/3 sec.
250—4.000 Hz Fool control unit (1)
(at 2.4 cm position) AC power adaptor (1)
5 cm (2 inches) dia. Design and specifications sut^ect to change
300 mW without notice.
MIC (PLUG IN POWER):
minijack, sensitivity 0.3mV Optional Accessories
forSkilohmor lower
impedance Micro cassette MC-30, MC-60,3MC-60
EARPHONE: minijack, for Telephone pickup TP-15
an 8-300 ohm earphone Cassette eraser BE-9H
DC IN 9 V jack accepts the
supplied AC power adaptor.
Power consumption 600 mA
Dimensions Approx. 133 >r 61.5 x 230
mm (w/h/d)
(5V4 2V2 X 9V8 inches)
not incl. projecting parts
Supplied accessories Earphone (1)
Microphone ECM-F01, ECM-K7
Microcassette^'^ Transcriber
M-2000
Operating Instructions
Before operating the unit, please read this manual thoroughly, and
retain it for future reference.
Owner’s Record
The model and serial numbers are located at the bottom. Record
the serial number in the space provided below, Refer to these
numbers whenever you call upon your Sony dealer regarding this
product.
Model No. M-2000 Serial No.________________________________
t989 by Sony Corporation Printed in Japan
Page 2
Precautions
To prevent fire or shock hazard, do not expose the unit to rain or moisture.
To avoid electrical shock, do not open the cabinet. Refer servicing to qualified personnel
only.
INFORMATION
This equipment generates and uses radio frequency energy and if not installed and used properly,
that is. in strict accordance with the manufacturer's instructions, may cause interference to radio
and television reception. It has been type tested and found to comply with the limits for a Class B
computing device in accordance with the specifications in Subpart J of Part 15 of FCC Rules,
which are designed to provide reasonable protection against such interference in a residential
installation. However, there is no guarantee that interference will not occur in a parlicutar installa
tion. If this equipment does cause interference to radio or television reception, which can be
determined by turning the equipment off and on, the user is encouraged to try to correct the
interference by one or more of the following measures:
Reorient the receiving antenna
Relocate the equipment with respect to the receiver
Move the equipment away from the receiver
Plug the equipment into a different outlet so that equipment and receiver are on different branch
circuitsIf necessary, the user should consult the dealer or an experienced radio/television technician for
additional suggestions. The user may find the following booklet prepared by the Federal Commu
nications Commission helpful:
"How to Identify and Resolve Radio-TV Interference Problems”. This booklet is available from the
U.S. Government Printing Office, Washington. DC 20402, Stock No. 004-000-00345-4.
Overview
• Auto backspace function makes transcribing easy by reviewing the last few recorded vwrds
each time listening is resumed.
• Adjustable tape speed and tone control.
• Two alarms (End-of-tape, No-casseUe) alert you.
• Use the supplied AC power adaptor. Do not useany other AC power adaptor as it may cause malfunction.
• The nameplate indicating operating voltage, power consumption, and the caution labels are located at the
bottom.
• Unplug the unit from the wall outlet when it is not to be used for an extended period of time. To disconnect
the cord, pull it out by grasping the plug. Never pull it by the cord.
• Use only the (MicRocAssiffe)'“ with this unit.
• Two tape speeds can be selected for recording with the TAPE SPEED selector: 2.4cm/sec. or 1 2cm/sec.
Match the playback speed to the recording speed.
• Do not install the unit in a location near heal sources such as radiators or airducts, or in a place subject to
direct sunlight, excessive dust, mechanical vibration, or shock.
• Allow adequate air circulation to prevent internal heat build-up. Do not place the unit near materials (cur
tains. draperies) that may block the ventilation holes.
• Should any solid object or liquid fall into the unit, unplug the unit and have it checked by qualified person
nel before operating it any further.
Slack in the tape
Before inserting, take up any slack in the tape
by using a pencil.
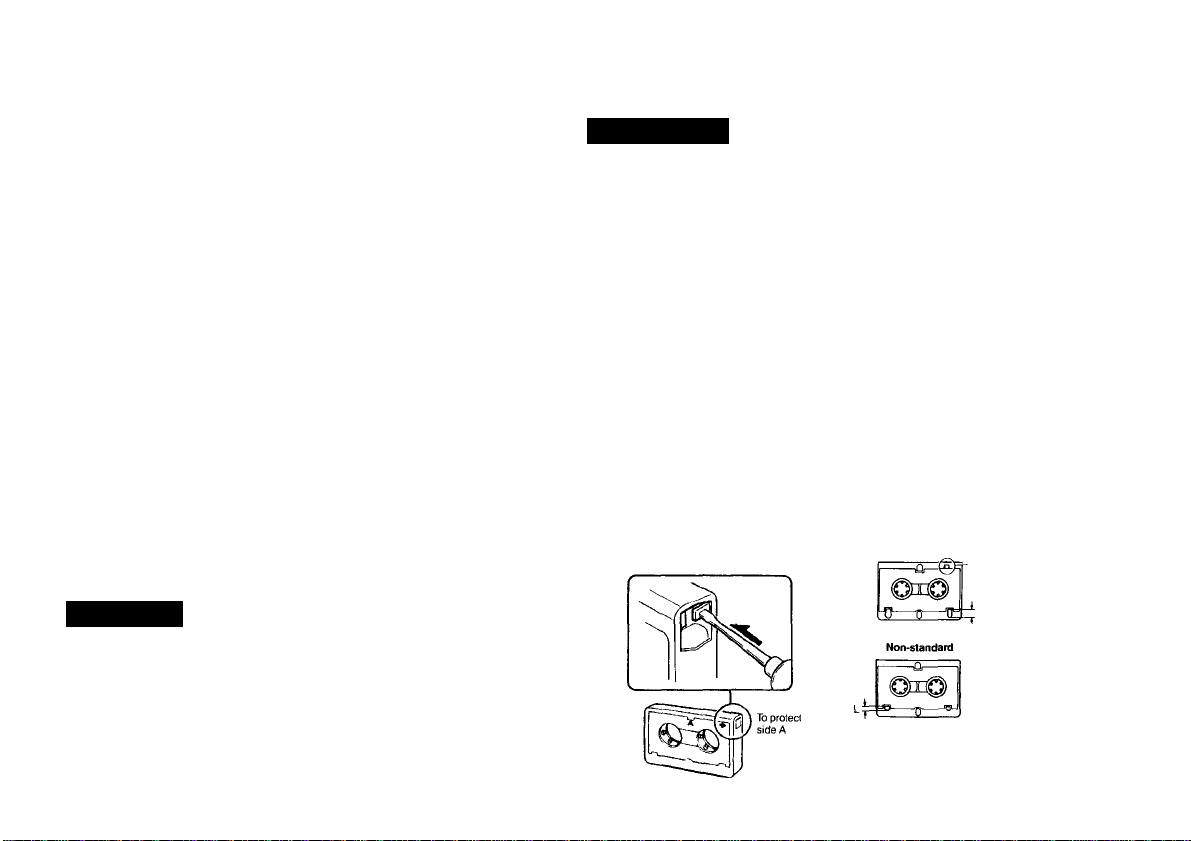
To prevent accidental erasure
When a recording is made, the previous
recording is automatically erased. To prevent
erasure, break the cassette tabs.
To record on a cassette with removed tabs
Cover each slot with a piece of plastic tape.
Note on the Microcassette
This unit uses only modern standard
Microcassettes. The non-standard Microcas
settes cannot be used because their "L”
dimension shown in the illustration below is
different.
Only the standard
Microcassette has a
small indentation
here.
Approx. 5 mm
Approx. 2,5 mm
Page 3

íj.ocation and Function of Controls
Foot control unit (supplied)
|23|
Em BBEE
Transcribing
Q OC IN 9 V lack (external power input) jack
[^OPR (operation) indicator
The indicator illuminates during tape operation.
(Tl REC (record) indicator
The indicator illuminates during recording.
Q ± EJECT (cassette eject) lever
[U CONTROL UNIT connector
fT| MIC (external microphone) (PLUG IN POWER)
Q EARPHONE jack (minijack)
|T| MIC (builMn microphone)
fs] SPEED selector
2.4 cm: A 60-minute recording can be made using
both sides of the MC-60 Microcassetle. This
setting produces optimum sound and is
recommended for normal use.
1.2 cm: A 120-minute recording can be made using
both sides of the MC-60.
REVERSE TIME (0/1/3)
(autobackspace time) control
Before operating the unit, connect the AC power adaptor to
a wall outlet.
1 Slide EJECT and insert a cassette.
2 Set SPEED to the same tape speed as that
used for recording.
3 Keep the right side of the pedal depressed
to listen to the tape.
4 Adjust VOUJME and TONE.
To Stop the tape, release the pedal.
You can control the unit with the buttons on itself as well.
[lT| TONE control
Slide toward H (high) to reinforce treble, and L (low) to
weaken it.
fig) -44REW (rewind) button
SPEED CONTROL (tape speed control)
[^VOLUME control
[is] FF (fast forward) button
► PLAY button
fi^ Recording (STOP/REC) switch
[iijHSTOP button
RESET button
Press to reset the counters to zero.
@ Tape counter
Cassette compartment
(H] BuilMn speaker
Rewind pedal
|g4| Playback pedal
Use of foot control unit
The foot control unit leaves your hands free, enabling
you to control this transcriber with your focrt.
Auto backspace
The tape rewinds a little each time it is stopped and the
last few recorded words can be reviewed when you
resume listening. Adjust REVERSE TIME to the desired
length (1 position: 1 second, 3 position: 3 seconds) At
the 0 position, the tape stops without rewinding at all.
This functions only when the foot control unit is used.
Speed control
The tape speed is adjustable with SPEED CONTROL.
The tape runs at normal speed with the control set to the
center click position.
Page 4

Fiecording
1 Slide EJECT and insert a cassette.
2 Select the tape speed with the SPEED
selector.
3 Slide the recording switch to REC and start
recording.
The REC indicator and OPR indicator illuminate during
recording.
To stop the tape, slide the recording switch to STOP
No recording level adjustment Is recessary.
When monitoring the recording
The recording can be monitored through an earphone (supplied).
Adjust VOLUME, if necessary.
What to be recorded
Conference or interview
Telephone conversation
Indexing the contents
Before recording, press RESET on the unit to reset the
counters to zero. Note the tape counter reading at a
desired point to locate the point later.
Use the built-in
microhpne or Sony
optional microphone
Use Sony telephone
pickup TP-15.
Maintenace
Cleanir>g the heads
To produce optimum sound, keep the tape heads
clean.
Moisten a cotton swab or a soft cloth with alcohol, and
wipe the parts shown on the left.
Cleanir>g the cabinet
Clean the cabinet with a soft cloth slightly moistened
with a mild detergent solution. Never use strong
solvents, such as thinner or bezine, since they may
damage the finish.
Alarm System
A continuous alarm sounds in the following situations.
Function Situation and indicator
Unit
Main REW
unit
Foot
control
LICTEN
FF
REC
PLAY
REW
No cassette,
or the
cassette tabs
have been
removed.
•
The end/
beginning of
the tape.
•
•
•
•
•
When the tape reaches its end or beginning, the
unit automatically shuts off.
To stop the alarm sound
When you use the main unit, the alarm stops auio
matically at the end or beginning of the tape
However, when using the foot control, release ii to
stop the alarm.
 Loading...