


Sony VAIO Desktop
User Guide
PCV-RZ series / PCV-1116
N

Read this first
Sony VAIO Desktop User Guide
nN
1
Read this first
Notice
© 2003 Sony Corporation. All rights reserved.
This manual and the software described herein, in whole or in part, may not be reproduced, translated, or reduced to any machinereadable form without prior written approval.
Sony Corporation provides no warranty with regard to this manual, the software, or other information contained herein and hereby
expressly disclaims any implied warranties or merchantability or fitness for any particular purpose with regard to this manual, the
software or such other information. In no event shall Sony Corporation be liable for any incidental, consequential, or special damages,
whether based on tort, contract, or otherwise, arising out of or in connection with this manual, the software, or other information
contained herein or the use thereof.
Macrovision: This product incorporates copyright protection technology that is protected by method claims of certain U.S. patents and
other intellectual property rights owned by Macrovision Corporation and other rights owners. Use of this copyright protection
technology must be authorised by Macrovision Corporation, and is intended for home and other limited viewing uses only unless
otherwise authorised by Macrovision Corporation. Reverse engineering or disassembly is prohibited.
Sony Corporation reserves the right to make any modification to this manual or the information contained herein at any time without
notice. The software described herein is governed by the terms of a separate user licence agreement.

Read this first
Sony VAIO Desktop User Guide
nN
2
Trademarks
Sony, DVgate, Giga Pocket, i.LINK and the i.LINK logo, MovieShaker, PictureGear Studio, PicoPlayer, Network Smart Capture, SonicStage,
Sony Style Imaging, UI Design Selector, VAIO Action Setup, VAIO Edit Components, VAIO System Information, Memory Stick and the
Memory Stick logo, VAIO and the VAIO logo are trademarks of Sony Corporation.
i.LINK is a trademark of Sony used only to designate that a product contains an IEEE1394 connection.
Microsoft, Windows and the Windows logo are trademarks or registered trademarks of U.S. Microsoft Corporation in the U.S. and other
countries.
StarOffice is a trademark or registered trademark of Sun Microsystems, Inc. in the United States and in other countries.
Adobe, Adobe Acrobat Reader, Adobe Premiere
QuickTime and the QuickTime logo are trademarks used under licence. QuickTime is registered in the U.S. and other countries.
RealOne Player is a trademark or registered trademark of RealNetworks, Inc. in the U.S. and other countries.
Symantec Norton Antivirus is a trademark of Symantec.
Click to DVD is a trademark of Sony Electronics.
EverQuest is a registered trademark of Sony Computer Entertainment America Inc.
RecordNow is a trademark or registered trademark of VERITAS.
All other names of systems, products and services are trademarks of their respective owners. In the manual, the ™ or
specified.
Specifications are subject to change without notice.
and Adobe Photoshop Elements are trademarks of Adobe Systems Incorporated.
®
marks are not
Read this first
nN
3
Sony VAIO Desktop User Guide
ENERGY STAR
As an ENERGY STAR® Partner, Sony has determined that this product meets the ENERGY STAR® guidelines for energy efficiency. The
International Energy Star
computers and their office equipment. The program backs the development and dissemination of products with functions that
effectively reduce energy consumption. It is an open system in which business proprietors can participate voluntarily. The targeted
products are office equipment such as computers, displays, printers, facsimiles and copiers. Their standards and logos are uniform
among participating nations.
E
NERGY STAR is a U.S. registered mark.
®
®
Office Equipment Program is an international program that promotes energy saving through the use of
Environmental information
Halogenated flame retardant is not used in cabinets.
Cushions formed by corrugated board are used in packaging.

Read this first
Sony VAIO Desktop User Guide
nN
4
Safety information
Warnings
General
❑ Risk of explosion if battery is replaced by an incorrect type. Dispose of used batteries according to the
instructions.
❑ Opening the unit, for whatever reason, could lead to damages that are not covered by the guarantee.
❑ To avoid electrical shock, do not open the cabinet. Refer servicing to qualified personnel only.
❑ To prevent fire or shock hazard, do not expose your VAIO desktop to rain or moisture.
❑ If reporting a gas leak, do not use the modem or a telephone in the vicinity of the leak.
❑ Avoid using the modem during a severe electrical storm.
❑ The power socket outlet you are using must be installed near the equipment and must be easily
accessible.
❑ Do not move your computer while the system is in Standby mode.
❑ The magnetic properties of some objects can have serious consequences for your hard disk drive. They
can erase the data on the hard disk drive and cause the computer to malfunction. Do not place your
computer near or on any objects, which emit magnetic fields, mainly:
❑ TV sets
❑ Speakers
❑ Magnets
❑ Magnetic bracelets.
Audio/video
❑ Audio and picture distortion may occur if this equipment is positioned in close proximity to any
equipment emitting electromagnetic radiation.
Read this first
Sony VAIO Desktop User Guide
nN
5
Connectivity
❑ Never install modem or telephone wiring during a severe lightning storm.
❑ Never install telephone jacks in wet locations unless the jack is specifically designed for wet locations.
❑ Be cautious when installing or modifying telephone lines.
❑ To disconnect your VAIO desktop completely from the mains voltage, unplug the power cable.
❑ Make sure that the socket outlet is easily accessible.
Optical disc drive
The use of optical instruments can cause eye hazard. As the laser beam used in this product is harmful to the
eyes, do not attempt any disassembling process. For servicing, refer to qualified personnel only.
There is visible and invisible radiation when the optical disc drive is open: avoid direct exposure to the laser beam. The disc drives are
classified as CLASS 1 LASER PRODUCTS and comply with the Laser Product Safety Standard EN 60825-1. Repair and maintenance only
by authorised Sony technicians. Improper repairs and use can create safety hazards.
CLASS 1
LASER PRODUCT
TO EN 60825-1
Read this first
Sony VAIO Desktop User Guide
nN
6
Regulatory information
Sony hereby declares that this product is in compliance with the essential requirements and other relevant provisions of European
Directive 1999/5/EC (radio equipment and telecommunications terminal equipment Directive).
Declaration of Conformity
The European Union is targeting the free movement of goods for the internal market and to prevent technical barriers to trade. This
effort has resulted in several EU Directives asking that manufacturers make their products comply with essential standards.
Manufacturers are required to affix the "CE" mark on the products they sell and to draw up a "Declaration of Conformity" (DoC).
Primarily, the Declarations of Conformity are intended for the market surveillance authorities as proof that products satisfy the required
standards. Additionally, Sony provides these EU DoC's on the website http://www.compliance.sony.de
You can search for all Declarations of Conformity available for a specific product by typing in the model name in the search box. A list
of matching documents will be displayed and can be downloaded. Please note that the availability of declarations depends on the scope
of the EU Directives and the individual product specifications.
This product complies with EN 55022 Class B and EN 55024 for use in the following areas: residential, commercial, and light industrial.
This product has been tested and found compliant with the limits set out in the EMC Directive for using connection cables not longer
than 3 metres (9.8 feet).
Before activating the built-in modem, please read the Modem Regulations leaflet.
as a service to our customers.

Read this first
Sony VAIO Desktop User Guide
nN
7
Disposing of the internal memory backup battery
Your Sony VAIO desktop is equipped with an internal back-up memory battery that should not have to be
replaced during the lifetime of the product. If you want to replace the battery, please contact VAIO-Link:
http://www.vaio-link.com
❑ Keep away from children.
❑ Dispose of the battery properly at its end-of-life.
❑ In some areas the disposal of non-hazardous batteries in household or business waste may be prohibited.
Please use the public waste collection system.

Welcome
Sony VAIO Desktop User Guide
nN
8
Welcome
Congratulations on purchasing a Sony VAIO desktop. Sony has combined leading-edge technology in audio,
video, computing and communications to provide you with state-of-the-art personal computing.
Here are the main features you will be able to enjoy:
❑ Exceptional performance - Your PC includes a fast processor, an internal modem, and a fast Ethernet
interface.
❑ Dual drives – Enjoy the freedom of two drives; your desktop model has both a DVD±RW and a
DVD-ROM drive.
❑ Sony audio and video quality – The advanced graphics card and high-quality external stereo speakers
enable you to take advantage of today’s advanced multimedia applications, games, and entertainment
software.
❑ Multimedia features – Enjoy audio and video CDs and DVDs.
❑ Giga Pocket - Take advantage of the new Giga Pocket technology, allowing you to watch TV and record
your favourite programs digitally and by remote control.
❑ Sony Memory Stick™ slot – The next generation in digital storage allows you to easily transfer images,
sounds, data and text between cameras, computers, and more.
❑ VAIO keyboard - Featuring power-on capabilities and shortcut keys to launch your favourite
applications within seconds.
❑ Interconnectivity – Your computer has Memory Stick™, USB 2.0, and i.LINK™ functionalities.
❑ Windows
system from Microsoft.
®
XP Home Edition Service Pack 1 - Your system includes the latest consumer operating
Welcome
Sony VAIO Desktop User Guide
nN
9
❑ Excellent customer support - If you are experiencing any problems with your computer, please check
the VAIO-Link website for a possible solution:
http://www.vaio-link.com
Before contacting VAIO-Link, please try to solve the problem by reading this guide, especially the section
Troubleshooting (page 75) or the manuals and help files for the peripherals or software.
Documentation pack
Your documentation pack contains printed user guides, as well as user guides delivered on a
documentation CD-ROM.
Printed documentation
The printed part of your documentation pack includes the following:
❑ A Getting Started brochure, where you will find a brief description of the items in your box and how
to set up your computer;
❑ A Specifications sheet, containing a table of specifications, a list of software, illustrations showing the
connectors, and a guide to setting up your computer.
❑ A Troubleshooting Guide, where you will find all the basic information to start using your VAIO
desktop, as well as troubleshooting and VAIO-Link information;
❑ An Application CD Guide, which explains the purpose and use of the final system recovery CD. Use this
when (re)installing bundled software.
❑ You r Sony Guarantee conditions;
❑ A Safety Regulations Guide for your information;
❑ A Modem Regulations leaflet applying to the modem.

Welcome
Sony VAIO Desktop User Guide
nN
10
Online documentation
The online documentation includes the following guides:
1 The Sony VAIO Desktop User Guide:
❑ Using your VAIO desktop shows you how to use the standard components of your system. In this
part of the manual you can also find out what you can do with a Memory Stick™.
❑ Connecting peripheral devices explains how you can add functionality by connecting various
peripherals.
❑ Getting help explains the support options available to you, and offers basic troubleshooting tips.
❑ Precautions provides facts and advice about using your VAIO desktop.
❑ Glossary refers to terms used in this manual.
2 The Software Guide:
❑ About the Software is a short description of the features of the software delivered with your
system.
❑ Using Video software explains how to use Sony video software: DVgate, MovieShaker and
Network Smart Capture.
❑ Managing audio files with SonicStage describes how to convert your existing MP3, WMA and
WAV format audio files into ATRAC3 format.
❑ Using PictureGear Studio explains how to get the most enjoyment out of your photo and movies
taken with a digital camera.
❑ Using Click to DVD explains the procedures for creating your own DVDs.
❑ Customising your VAIO computer explains how to set up your system's display and so on.
❑ Installing and updating applications details how to install, run or uninstall a software
application.
❑ Managing drivers describes how to install, update or uninstall a driver.

Welcome
Sony VAIO Desktop User Guide
nN
11
❑ Using the Product Recovery CD-ROMs explains how to perform a system and application recovery.
3 The Giga Pocket manual explains how to watch and record TV and video on your PC.
4 In the Customer Service Guide, you will find all the information you need relating to VAIO-Link,
including contact numbers for each country.
5 Consult the Online Help files of the software you are using for detailed information on features and
troubleshooting.
6 Refer to the Microsoft
®
Quick Start manual for more information on Windows®.
Welcome
Sony VAIO Desktop User Guide
nN
12
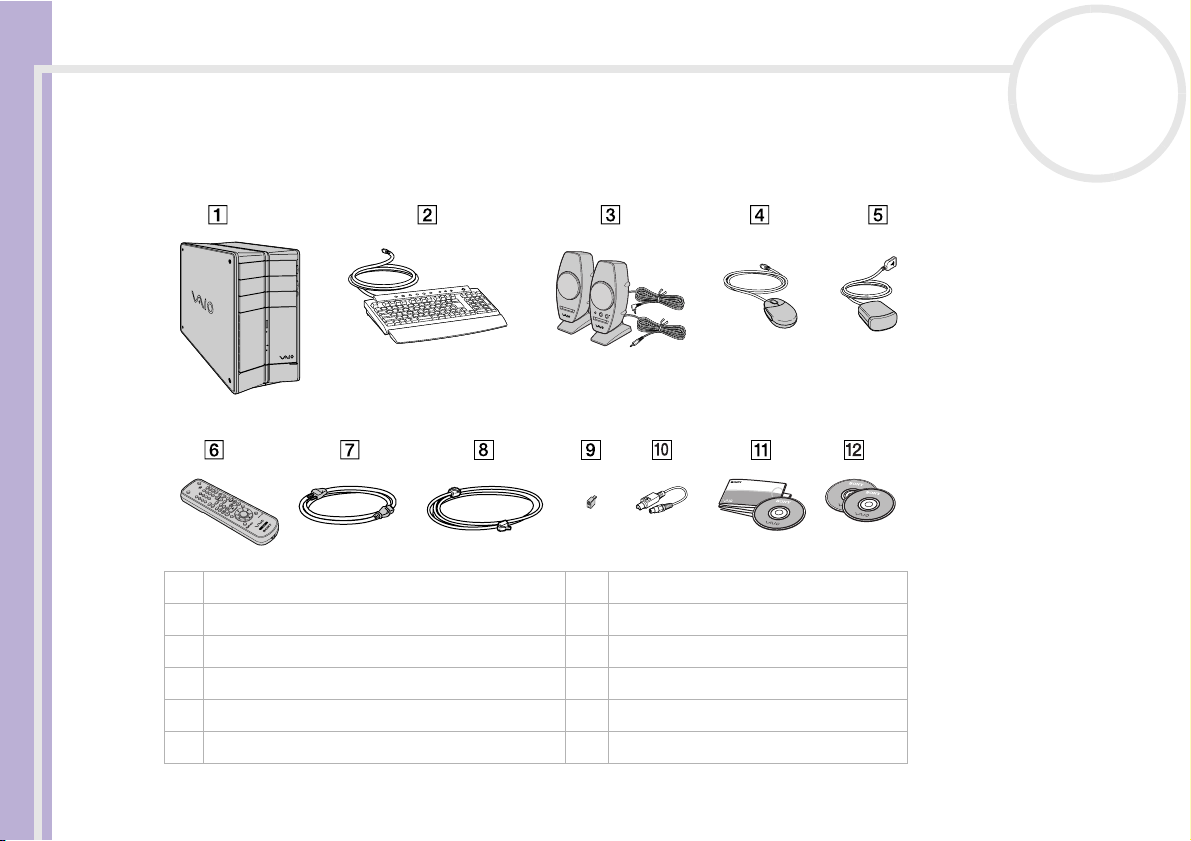
Your Sony VAIO desktop and its accessories
The following hardware items are in the box:
1 Main unit 7 Power cable
2 VAIO keyboard with palmrest 8 Phone cable
3 Stereo speakers 9 Phone plug adapter (country-specific)
4 VAIO optical wheel mouse 10 TV-Out cable
5 Infrared receiver (for remote control) 11 Documentation pack with CD-ROM
6 Remote control 12 Product recovery CD-ROMs
✍ The phone cable and plug adapter are used to connect the internal modem.
Welcome
Sony VAIO Desktop User Guide
nN
13
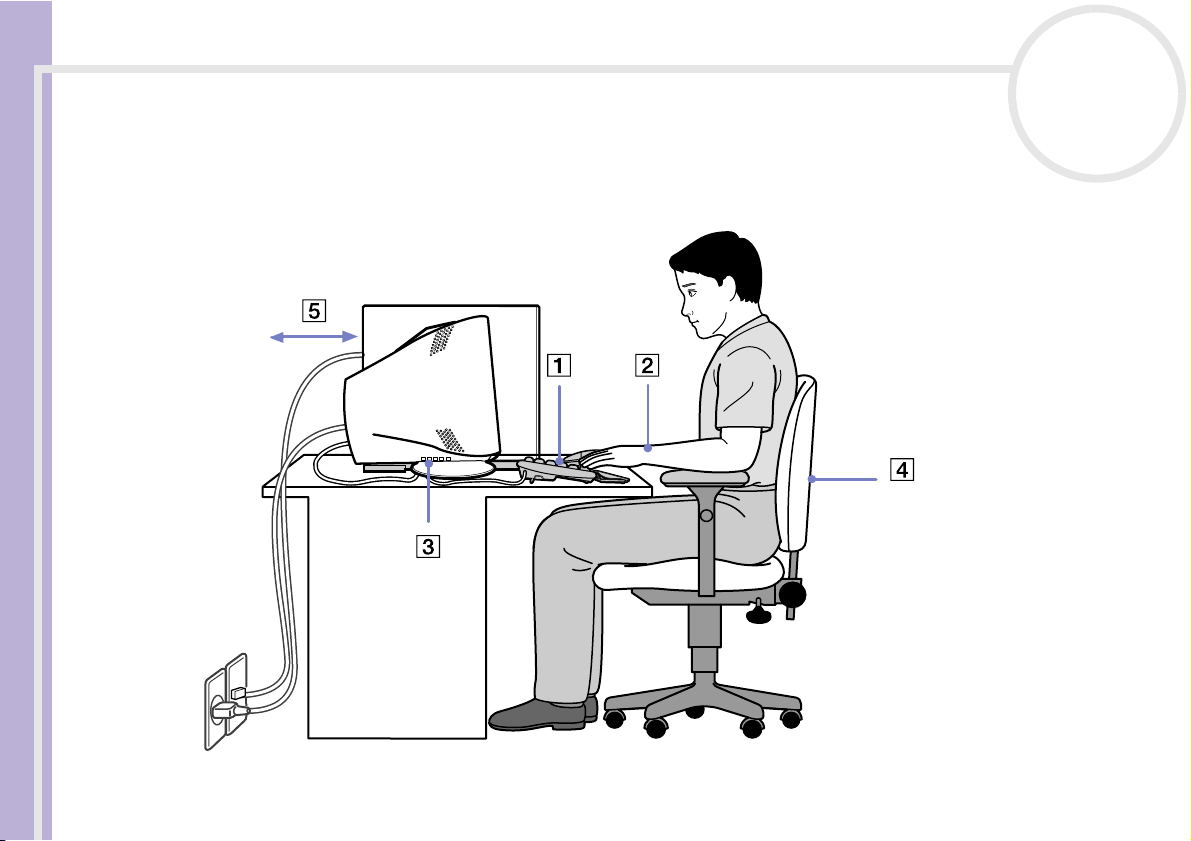
Ergonomic considerations
Whenever possible, try and take into account the following ergonomic considerations when using your new
computer, whether at home or in the office:

Welcome
Sony VAIO Desktop User Guide
nN
14
❑ Position of the keyboard and mouse – Place the keyboard directly in front of you (1). Keep your
forearms horizontal, with your wrists in a neutral, comfortable position (2) while using the keyboard or
mouse – not at an angle. Let your upper arms hang naturally at your sides. Use the palm rest only briefly,
to relax your wrists when you are not typing. Place the mouse at the same level as the keyboard and use
your whole arm to move it.
❑ Position and viewing angle of the monitor – Set the display at a comfortable viewing distance (3).
Make sure the display screen is at eye level or slightly lower. Use the display’s tilting feature, if available,
to find the best position. You can reduce eye-strain and muscle-fatigue by adjusting the tilt of the display
to the proper position. Remember to adjust the brightness setting of the display. If you are using a CRT
monitor, make sure that the refresh rate is at an optimal level, that is, at least 75Hz.
❑ Furniture and posture – Sit in a chair with good back support (4). Adjust the level of the chair so your
feet are flat on the floor. A footrest may make you more comfortable. Sit in a relaxed, upright posture
and avoid slouching forward or leaning too far backwards.
❑ Lighting – Choose a location where windows and lights do not create glare or reflection on the display.
Use indirect lighting to avoid bright spots reflecting on the display. You can also purchase accessories for
your display that help reduce glare. Proper lighting adds to your comfort and work effectiveness.
❑ Ventilation – Make sure you leave at least 25 cm of space behind and on the left of the main unit (5).
❑ And finally – Remember to have breaks during sessions with your computer. Excessive use of the
computer may strain muscles or tendons.

Using your VAIO desktop
Using your VAIO desktop
This section describes how to start using your computer and how to use your computer’s internal and
external devices.
❑ Locating connectors (page 15)
❑ Starting your computer (page 16)
❑ Shutting down your computer (page 17)
❑ Using the keyboard (page 18)
Sony VAIO Desktop User Guide
❑ Using the shortcut keys (page 23)
❑ Setting up the monitor (page 24)
❑ Using the TV function (page 25)
❑ Using the remote control (page 28)
❑ Using the optical mouse (page 33)
❑ Using the DVD drives (page 34)
❑ Using the floppy disk drive (page 38)
❑ Using the modem (page 40)
❑ Expansion capabilities (page 41)
❑ Using the Memory Stick™ (page 42)
❑ Using PC Cards (page 52)
❑ Using power saving modes (page 55)
nN
15
Locating connectors
Please see the printed Specifications sheet to identify connectors on your model.

Using your VAIO desktop
Starting your computer
Once you have all the components set up as described in the Getting Started guide, you can begin to use
your computer.
To start up your computer, proceed as follows:
1 Press the power button on your monitor to turn the display on (1).
2 Press the power button on the system unit until the blue power indicator light turns on (2).
3 Push the power button on the speakers to turn the sound on (3).
Sony VAIO Desktop User Guide
nN
16
✍ If you press the power button for more than four seconds, the computer will switch itself off.

Using your VAIO desktop
Shutting down your computer
It is important that you shut down your computer properly so you do not lose unsaved data.
To shut down your computer, proceed as follows:
1 Click the Start button.
2 Click Turn Off Computer.
The Turn off computer screen appears.
3 Click Tur n Off.
Sony VAIO Desktop User Guide
Wait for your computer to turn off automatically.
The power indicator turns off.
4 Turn off any peripherals connected to your computer.
✍ Respond to any prompts warning you to save documents or to consider other users.
If you are unable to shut down your computer;
- Close all software in use.
- Disconnect any USB devices.
- Press <Ctrl>+<Alt>+<Delete> at the same time. If you have not changed the default setting, you will enter the Task Manager. Select Turn
Off from the Shut Down menu to turn the computer off.
Alternatively, press <Alt>+<F4> and select Tur n Off from the screen that appears.
If this does not work, you can press the power button for more than four seconds. This will shut down the computer. This operation may result in loss
of data.
If you want to shut down the computer for a short period only, you can save power by using the Standby mode. Go to Start, Turn Off Computer,
and select Stand By (see Using power saving modes (page 55) for details).
nN
17
Using your VAIO desktop
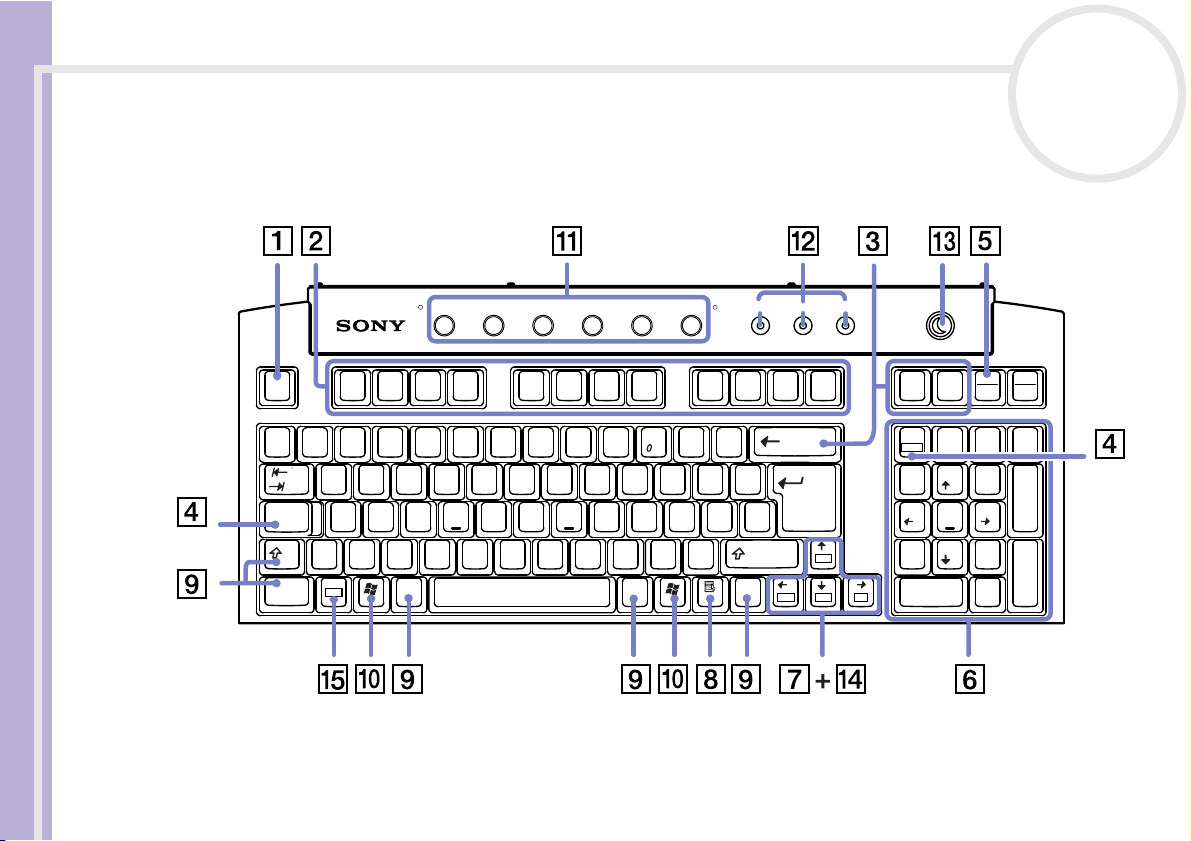
Using the keyboard
This section describes the features of the VAIO keyboard.
★
Tip: Your keyboard has an ergonomic design. You can put it in an upward position on its backside to save space on your desk.
nN
18
Sony VAIO Desktop User Guide
INTERNET MUSIC PICTURE VIDEO HELP
MAIL
S1 S2 S3 S4 S5 S6
Esc F1 F2 F3 F4 F11F10F6 F9F8F7F5 F12
!
¬
`
Caps
Lock
Ctrl
¦
1
|
\
£
"
2
Q
$
3
!
4
EW
A
XCVBNM
Z
Fn
Alt
^
%
5
&
6
7
R
HGFDS
8
I
UYT
(*)
9
O
P
:
L
KJ
;
>
<
,
.
Alt Gr
_
+
=
-
{
[
@
´
?
/
Num Lock Caps Lock Scroll Lock
}
]
~
#
Ctrl
Home
Prt Sc
Sys Rq
*
3
PgDn
.
Del
Pause
Break
Enter
-
+
Insert
Delete
/
NumLk
CapsLk
789
Home PgUp
456
End
12
End
0
Ins
PgUp
PgDn
Using your VAIO desktop
Keys Descriptions
Escape key (1) The <Esc> (Escape) key is used to cancel commands.
Function keys (2) The twelve function keys along the top of the keyboard are used to perform designated tasks.
Correction keys (3) The <Insert>, <Back Space> and <Delete> keys enable you to make corrections when typing.
Lock keys (4) Press <Caps Lock> once to activate the uppercase characters. Use the <Num Lock> key to
Sony VAIO Desktop User Guide
Print Screen key (5) The <Prt Sc> key takes an electronic snapshot of the screen and moves it to the Windows
Numeric keypad area (6) This contains the keys found on a typical calculator. Use the numeric keypad area to type
Navigation keys (7) These keys enable you to move the cursor on the screen.
Application key (8)
Operator keys (9) Several keys are used in combination with at least one other key: <Ctrl>, <Alt> and <Shift>.
Windows
Shortcut keys (S Keys) (11) You can use these buttons, numbered 1 to 6, to launch straight into assigned applications.
®
key (10)
nN
19
For example, in many applications, <F1> is the Help key. The task associated with each function
key may vary from one application to another.
activate the numerical keypad.
®
Clipboard. You can then paste the screenshot into a document and print it.
numbers or to perform mathematical calculations such as addition and subtraction. Note that
you must press the <Num Lock> key to activate the keypad.
The <Application> key displays a shortcut menu; pressing this key is equivalent to clicking the
right mouse button.
When held down at the same time as another key, the <Ctrl> (Control) and <Alt> (Alternate)
keys offer another way to execute commands. For example, in many applications, instead of
choosing the Save command from a menu, you can hold down <Ctrl> and press <S> (referred
to as <Ctrl>+<S>). The <Shift> key is used to type capital letters or special symbols such as @
and $.
The key with the Windows
clicking the Start button on the taskbar.
®
logo displays the Windows® Start menu; it is equivalent to
Using your VAIO desktop
Keys Descriptions
Indicator LEDs (12) A green light indicates whether the Caps Lock, Num Lock, and Scroll Lock functions are
Standby button (13) Press this button either to start up your computer, or to enter Standby mode, or to resume from
<Fn> combination keys (14) These keys are used in combination with the <Fn> key to execute the commands depicted
<Fn> key (15) The <Fn> key is used in combination with 5 other keys to execute certain commands.
Sony VAIO Desktop User Guide
nN
20
active.
a power saving mode.
within the box on the key.

Using your VAIO desktop
Combinations and functions with the Windows® key
Combinations Function
+ <F1> Displays Windows® Help and Support Center.
+ <Tab> Switches the selected button on the taskbar.
+ <D> Refreshes the screen if a window is not closing as it should.
+ <E> Displays My Computer.
Sony VAIO Desktop User Guide
+ <F> Displays the Search Results window to find a file or folder.
+ <Ctrl> + <F> Displays the Search Results - Computers window where
+ <L> Locks your computer.
+ <M> Minimises all displayed windows.
<Shift> + + <M> Returns all minimised windows to their previous size.
+ <R> Displays the Run window. This is equivalent to selecting Run
+ <U> Launches the Windows
This is equivalent to selecting Search from the Start menu.
you can locate other computers.
from the Start menu.
®
Utility Manager.
nN
21
Using your VAIO desktop
Combinations and functions with the <Fn> key
Combinations/ Feature Functions
<Fn> +
<Fn> +
nN
22
Moves the view to the next page down.
PgDn
Moves the view to the previous page up.
PgUp
Sony VAIO Desktop User Guide
Moves the cursor to the beginning of the line.
<Fn> +
<Fn> +
<Fn> +
Home
Moves the cursor to the end of the line.
End
Changes the way in which you can scroll the screen, depending on the application.
ScrLk
Using your VAIO desktop
Indicators
Light On Off
Num Lock Turns on when the number keys in the numeric keypad
Caps Lock Turns on when the letters appear in uppercase as you
Scroll Lock Turns on when the screen scrolls differently (not all
Sony VAIO Desktop User Guide
Using the shortcut keys
Press a shortcut key (<S> Key) to start your favourite software without having to click the shortcut icon on
the desktop.
Use an <S> Key simply by pressing it.
If you want to, you can use VAIO Action Setup to change the functions of the <S> Keys. All six buttons are
reprogrammable.
The programmable <S> Keys come with the following applications as their default settings (this may vary):
S1 — Outlook Express
S2 — Internet Explorer
S3 — SonicStage
S4 — PictureGear Studio
S5 — Giga Pocket
S6 — Help and Support Center
are active.
type. The <Shift> key lowers the case of typed letters
when Caps Lock is on.
applications support this function).
nN
23
Turns off when the alphanumeric character keys in the
keypad area are active.
Turns off when the letters appear in lowercase as you
type (unless you hold down the <Shift> key).
Turns off when the information moves across the
display normally.
Using your VAIO desktop
Setting up the monitor
If your VAIO desktop is delivered with a monitor, it may be delivered with a digital 15" or 17'' LCD (XGA TFT)
monitor or with a common analogue CRT monitor, depending on your model and vendor.
For more information on how to use your delivered monitor, refer to the user manual that came with it.
You can also refer to the section Connecting an external display (page 60).
Connecting the monitor
To connect your monitor, proceed as follows:
Sony VAIO Desktop User Guide
1 Plug one end of the monitor cable into the back panel of
your computer.
2 Plug the other end of the monitor cable into the back of
your monitor.
The monitor is now ready for use.
✍ There are two ports: one for DVI screens and one for common VGA and CRT
screens. Make sure you are using the appropriate connector.
nN
24

Using your VAIO desktop
Using the TV function
For details on using Sony’s Giga Pocket software, please see the dedicated online guide.
Your computer has been equipped with a TV-tuner board. In combination with Sony's Giga Pocket software,
it allows you to:
❑ Watch, record and play back analogue broadcasted cable and terrestrial TV-programs, all by remote
control;
❑ Digitise analogue video and audio using the S-Video or composite and audio inputs;
❑ Manage your video units (capsules), preview them and create multiple folders;
Sony VAIO Desktop User Guide
❑ Set up a timer to record channels at a repeated time;
❑ Suspend viewing TV (time-shifting);
❑ Stream your recorded TV contents via Ethernet (or WLAN) to connected PCs;
❑ Export your video capsules to MPEG2, MPEG1 and DVI-AVI-files;
❑ View recorded clips on client PCs located in other rooms using PicoPlayer.
Copyright protection
People who create artistic works such as music are entitled to a "copyright", meaning that they have
exclusive rights to dictate how their work is used. When they are created, artistic works are automatically
protected by a copyright without having to submit notification or registration, and may not be used without
the permission of the person who created the work.
This product incorporates copyright protection technology that is protected under Macrovision Corporation
and other rights owners, meaning you cannot record materials protected by copyright. Music and films etc.
that you record at home are for personal use only.
nN
25
Using your VAIO desktop
Starting to use Giga Pocket
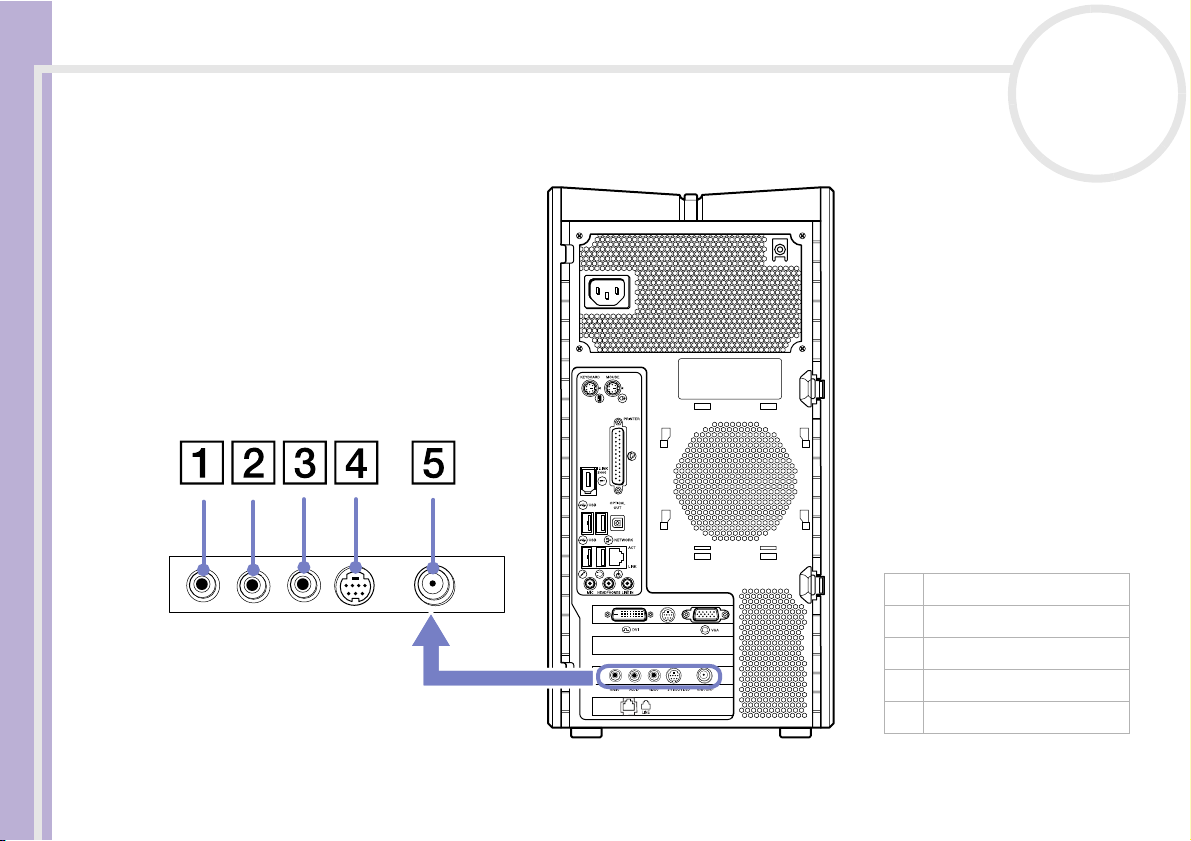
The following ports are located on the back of your desktop:
Sony VAIO Desktop User Guide
nN
26
1 Right audio-in channel
2 Left audio-in channel
3Video-in
4 S-Video-In port
5 Antenna-in port

Using your VAIO desktop
To connect terrestrial or cable TV to your computer, proceed as follows:
1 Plug one end of your antenna cable / cable-TV cable (not supplied) into the Antenna port (5) on the back
of the computer.
2 Plug the other end in the TV wall socket.
To connect an external video/audio source (such as a video camera, VCR or DVD player), proceed as follows:
1 Connect your video/audio device’s video cable to the S-Video (4) or Video-in port (3), depending on the
type of cable supplied with the external device.
If the video source has both a composite and an S-Video output, you are recommended to use the
Sony VAIO Desktop User Guide
S-Video output as this will result in higher quality video.
2 Connect the left and right audio cables into the right (1) and left (2) audio channel ports.
✍ Please note relevant directions with regards to TV licensing regulations in your own country.
nN
27
Using your VAIO desktop
Using the remote control
Your VAIO comes with a remote control with which you can control Giga Pocket, SonicStage and PowerDVD
for VAIO. Before you can use the remote control, you must insert two AA alkaline batteries and connect the
infrared receiver.
Inserting the batteries and connecting the infrared receiver
To insert the batteries, proceed as follows:
1 Slide the battery cover in the direction of the arrow.
Sony VAIO Desktop User Guide
2 Insert two AA alkaline batteries into the battery bay, matching the polarities (+ to +, - to -).
3 Close the battery cover and slide it securely back into place.
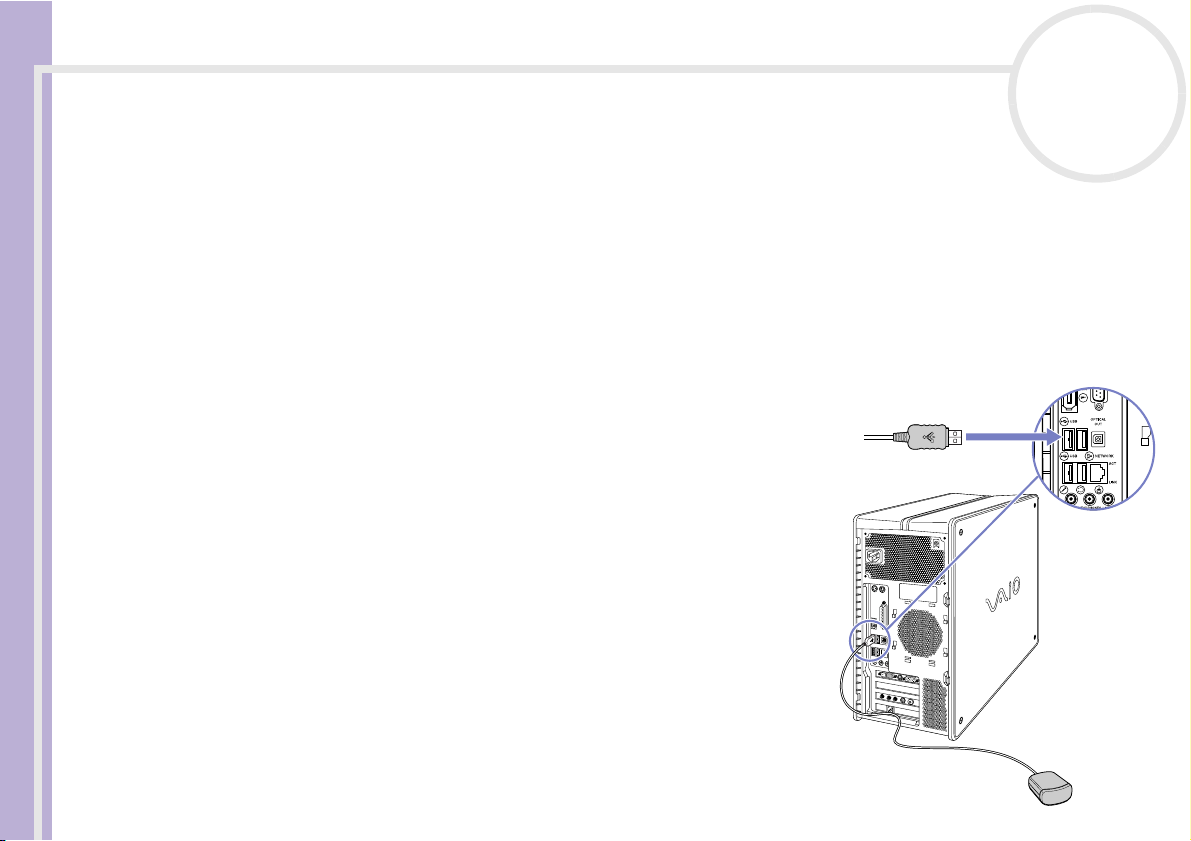
To connect the supplied USB infrared receiver, simply plug the end of
its USB cable into one of the computer’s USB ports, as shown:
✍ When using the remote control, always point it directly at the receiver.
nN
28
Using your VAIO desktop
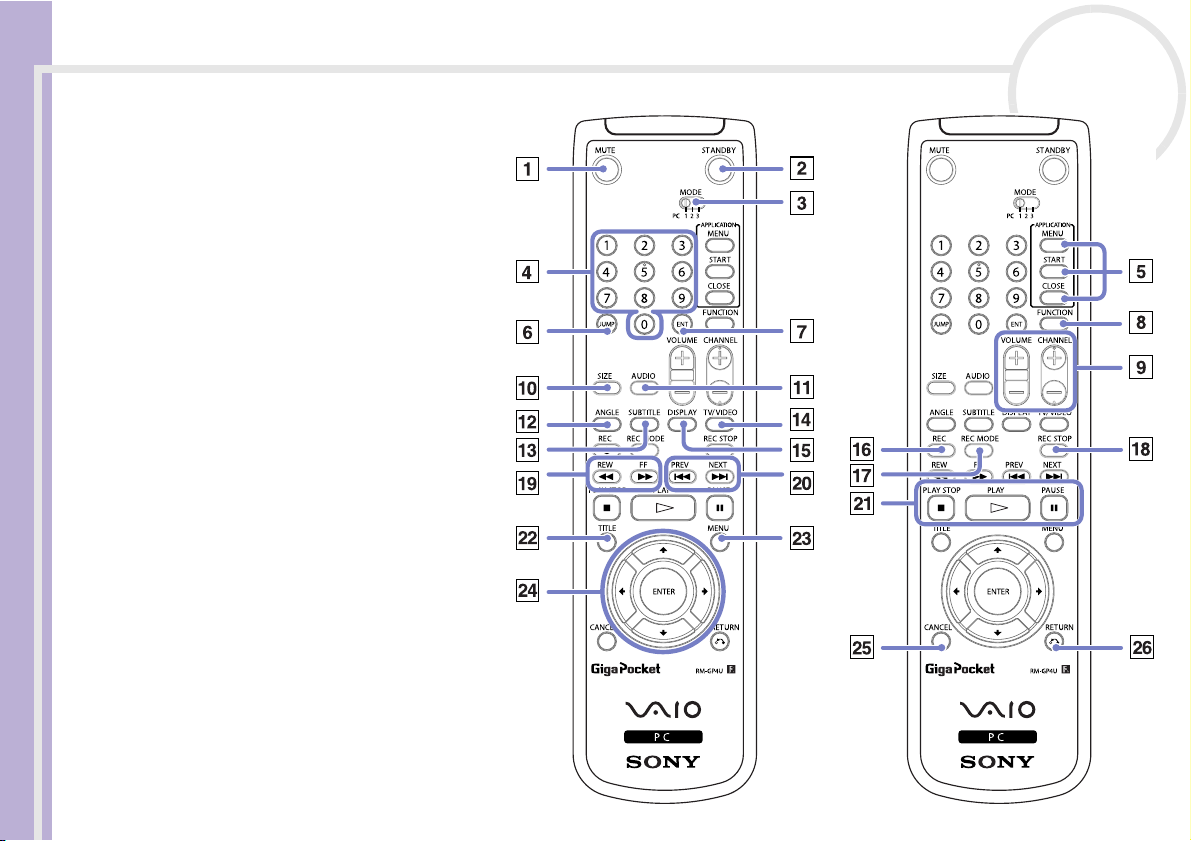
The following illustration and
table describe the remote control’s
features. Please see Giga Pocket’s
online Help files, within the
software itself, for more details.
Sony VAIO Desktop User Guide
nN
29

Using your VAIO desktop
Button Function
1 MUTE Temporarily mutes the sound. Pressing it again restores the sound.
2 STANDBY Puts your computer into Standby mode. See Using power saving modes (page 55). You cannot put your
3 MODE switch If you are using more than one desktop with the remote control, this switches control between the
Sony VAIO Desktop User Guide
4 Numbered buttons
1 - 0
5 Application
buttons
6 JUMP Goes back to the previous channel you selected. Press it again to return to the current channel.
7 ENT Selects the channel. Press it after pressing the channel number buttons.
8 FUNCTION Press this button while Giga Pocket is selected through the MENU button to switch from the TV/recording
9 VOLUME and
CHANNEL
10 SIZE Displays Giga Pocket in full-screen size. Pressing the button again displays Giga Pocket in its original size.
11 AUDIO Selects the sound mode. Each time you press this button, the sound mode changes as follows: Mono >
12 ANGLE This is a universal DVD playback function and is not used for Giga Pocket. This button changes the camera
nN
30
computer into Standby mode while Giga Pocket or Giga Pocket Server is running; approximately 5 minutes
before timer recording starts; or just after the expiration date of a Video Capsule.
computers. Set the switch from 1 to 3. whichever value is set in the target computer’s Remote Commander
Setting software. 1 is the default if you are just using one desktop.
Used to select channels. Press the ENT button after you press these number buttons. You can select up to
3-digit numbers. You cannot change channels while recording.
These buttons are used when operating Giga Pocket.
Pressing MENU displays a menu on the computer screen. Press this button again to select software from
the menu.
START launches the software that was selected with the MENU button.
CLOSE exits the software that was selected with the MENU button.
deck to the playback deck.
Used to adjust the volume and select a channel. You cannot change channels while recording.
Stereo > Channel A > Channel B > Mono.
angle while playing back DVDs, as long as this function is supported by the DVD movie.

Using your VAIO desktop
Button Function
13 SUBTITLE This is a universal DVD playback function and is not used for Giga Pocket. Use it to turn on/off the subtitles
14 TV/VIDEO Each time you press this button, the TV/Recording deck images change to the television feed, or to those
15 DISPLAY Displays the TV/Recording deck and playback deck screens when Giga Pocket is in full-screen mode.
Sony VAIO Desktop User Guide
16 REC Starts recording the TV programs you are watching on the TV/Recording deck.
17 REC MODE Selects the recording mode. Each time you press this button, the recording mode changes from SP
18 REC STOP Stops recording.
19 REW and FF Used to rewind or fastforward the video tape while playing back Video Capsules.
20 PREV and NEXT These are DVD playback functions and are not used for Giga Pocket. Use these buttons to skip to the next
21 PLAY STOP, PLAY
and PAUS E
22 TITLE This is a universal DVD playback function and is not used for Giga Pocket. The function of this button can
23 MENU Displays the Select Video Capsules window. Pressing it again hides the window. For details, refer to the
24 Up/Down/Left/
Right and ENTER
nN
31
or change the language of the subtitles while playing back DVDs, as long as this function is supported by
the DVD movie.
from a device connected to the external input port such as a digital device or VCR. You cannot change input
sources while recording.
Pressing the button again hides both the TV/Recording deck and playback deck.
(Standard Play) to HQ (High Quality). For details on the recording mode, refer to the Giga Pocket Help files.
or go back to the previous chapter, as long as the DVD supports this function.
Used to stop playback, play, and pause playback of Video Capsules appearing on the playback deck.
vary depending on the DVD you are watching.
Giga Pocket Help files and the online Giga Pocket manual.
Used to select a Cabinet or Video Capsule in the Select Video Capsules window. For details, refer to the
Giga Pocket Help files and the online Giga Pocket manual.
Also used to operate the film roll when playing back Video Capsules on the playback deck. For details, refer
to the Giga Pocket Help files and the online Giga Pocket manual.

Using your VAIO desktop
Button Function
25 CANCEL Closes the error message dialog box. The window returns to its original size when displayed in full-screen
26 RETURN This is a universal DVD playback function and is not used for Giga Pocket. Use it to go back to a specified
Sony VAIO Desktop User Guide
nN
32
mode.
moment on the DVD, as long as the DVD supports this function.

Using your VAIO desktop
Using the optical mouse
Your computer is delivered with a VAIO PS/2 optical mouse, which uses a light-emitting diode (LED) instead
of a ball. Avoid using the mouse on a piece of glass or other transparent material, as this can interfere with
smooth cursor movement on the screen.
Sony VAIO Desktop User Guide
nN
33
Function Action
point Move the entire mouse across a flat surface to
place the pointer on an item or object.
click Press the left button (1) once.
double-click Press the left button twice.
right-click Press the right button (2) once. In many
applications, this action displays a contextsensitive shortcut menu.
drag and drop Hold the left button down while sliding the
mouse. Then release the button to drop the
object.
scroll Turn the central wheel (3) to scroll up or down a
page. Or press the wheel once to lock the scroll
action and control the movement by moving the
entire mouse (the scroll function is available
only with applications that support a scroll
feature).
You can adjust the mouse pointer speed and other functions under Mouse Properties. To display Mouse
Properties, go to the Control Panel, select Printers and Other Hardware, then select Mouse.
✍ You can set the mouse up for left-hand use. See the Troubleshooting (page 75) section for details.

Using your VAIO desktop
Using the DVD drives
Your computer is equipped with both a DVD±RW and a DVD-ROM drive.
❑ The DVD±RW drive (top) reads data from and writes data onto DVD and CD.
❑ The DVD-ROM drive (bottom) reads data from DVDs and CDs.
To insert a disc, proceed as follows:
1 Turn on the computer.
2 Press the appropriate eject button to open the drive.
Sony VAIO Desktop User Guide
The cover flap opens and the tray slides out.
3 Place a disc in the tray with the label side facing upwards. Make sure the disc is secure in the centre of
the tray.
4 Close the tray by pushing it gently or by pressing the eject button.
nN
34

Using your VAIO desktop
✍ When the computer is in Standby or Hibernate mode, you cannot insert or remove a disc.
Make sure you seat the disc firmly in the tray. Otherwise, you could damage your disc drive and you may not be able to open the tray.
When you have finished using a disc, wait until the LED indicator turns off before pressing the eject button to remove the disc.
If the disc does not come out when you press the eject button, go to Windows Explorer or My Computer. Select the drive, click the right button
of your mouse and select Eject.
What (re)writable DVD formats can I use?
Recordable and rewritable DVD formats include: DVD-R, DVD-RW, DVD+R and DVD+RW.
DVD-RW and DVD+RW discs can be written to up to 1,000 times, whereas DVD-R/+R can only be written to
Sony VAIO Desktop User Guide
once. DVD+RW provides the most storage (4.7 GB), is the easiest to use and is the only one to provide full
compatibility. This means that a DVD+RW disc recorded in your DVD±RW drive can be played in virtually all
DVD players and DVD-ROM equipped PCs.
For more information on DVD+RW you can go to the website of the DVD+RW Alliance:
http://www.dvdrw.com
What (re)writable CD formats can I use?
Recordable and rewritable CD formats include CD-R, CD-RW (high-speed supported). CD-R (recordable)
allows one-time recording on a disc whereas CD-RWs can be rewritten as many as 1,000 times.
nN
35
Writing CDs and DVDs
To achieve optimum performance when writing data on to disc (also called ’burning’), follow these
recommendations:
❑ Only use circular discs. Do not use discs with any other shape (star, heart, card, etc.), as this may damage
the disc drive.
❑ Do not strike or shake the computer while writing data to a disc.
❑ For optimum writing speed, deactivate the screensaver before writing data to a disc.

Using your VAIO desktop
❑ Memory-resident disc utilities may cause unstable operation or data loss. Deactivate these utilities before
writing data to a disc.
❑ When using a software application to burn discs, make sure you exit and close all other applications.
❑ Never touch the surface of the disc. Fingerprints and dust on the surface of a disc may cause writing
errors.
❑ Never put stickers on discs. This will affect the use of the disc irreparably.
Playing DVDs
Sony VAIO Desktop User Guide
To achieve optimum performance when playing DVD-ROMs, you should follow these recommendations:
❑ Close all open applications before playing a DVD-ROM movie.
❑ You can play DVDs in both drives with the software PowerDVD for VAIO.
❑ If you want to play a DVD and use Giga Pocket at the same time, please launch Giga Pocket before
PowerDVD for VAIO.
❑ Do not switch power saving modes while playing a DVD-ROM.
❑ Do not use resident disc utilities or other resident utilities to speed up the access of discs, because they
may cause the system to become unstable.
❑ Make sure that the screensaver is deactivated.
❑ Region codes indicators are labelled on the DVDs to indicate in which region and on what type of player
you can play the disc. Unless a 2 or ALL is labelled on your DVD or on the packaging, you cannot play
the disc on this player.
❑ Do not try to change the region code settings of the DVD drive. Any difficulties caused by changing the
region code settings of the DVD drive are out of warranty.
nN
36

Using your VAIO desktop
Using two screens while watching a DVD film
By connecting a TV to your computer, you can watch a DVD film while still working on your desktop as
normal.
To use the two screens and change the DVD playback settings, proceed as follows:
1 Connect the TV to your computer as described in Connecting a TV (page 63).
2 Go to Control Panel.
3 Click Appearance and Themes and then Display.
The Display Properties dialog box appears.
Sony VAIO Desktop User Guide
4 Click the Settings tab.
5 Click Advanced.
The ...NVIDIA GeForce4 Ti 4600 dialog box appears.
6 Click the GeForce4 Ti 4600 tab.
7 Click nView Display Mode on the left.
8 Select the Clone mode check box.
9 Click Apply.
The image appears on both the computer and the TV display.
10 Click Overlay Controls on the left.
11 Under Full screen device, make sure Secondary Display is selected.
PowerDVD for VAIO will not play back the DVD on the TV if the Disable option is selected.
12 Make any other settings you require on the GeForce4 Ti 4600 tab and click OK.
IMPORTANT: While making your settings under Full Screen Device, DO NOT
will deactivate the Giga Pocket main screen on the TV display.
nN
37
select Disable, as you will
Using your VAIO desktop
Using the floppy disk drive
Your VAIO desktop is equipped with a floppy disk drive.
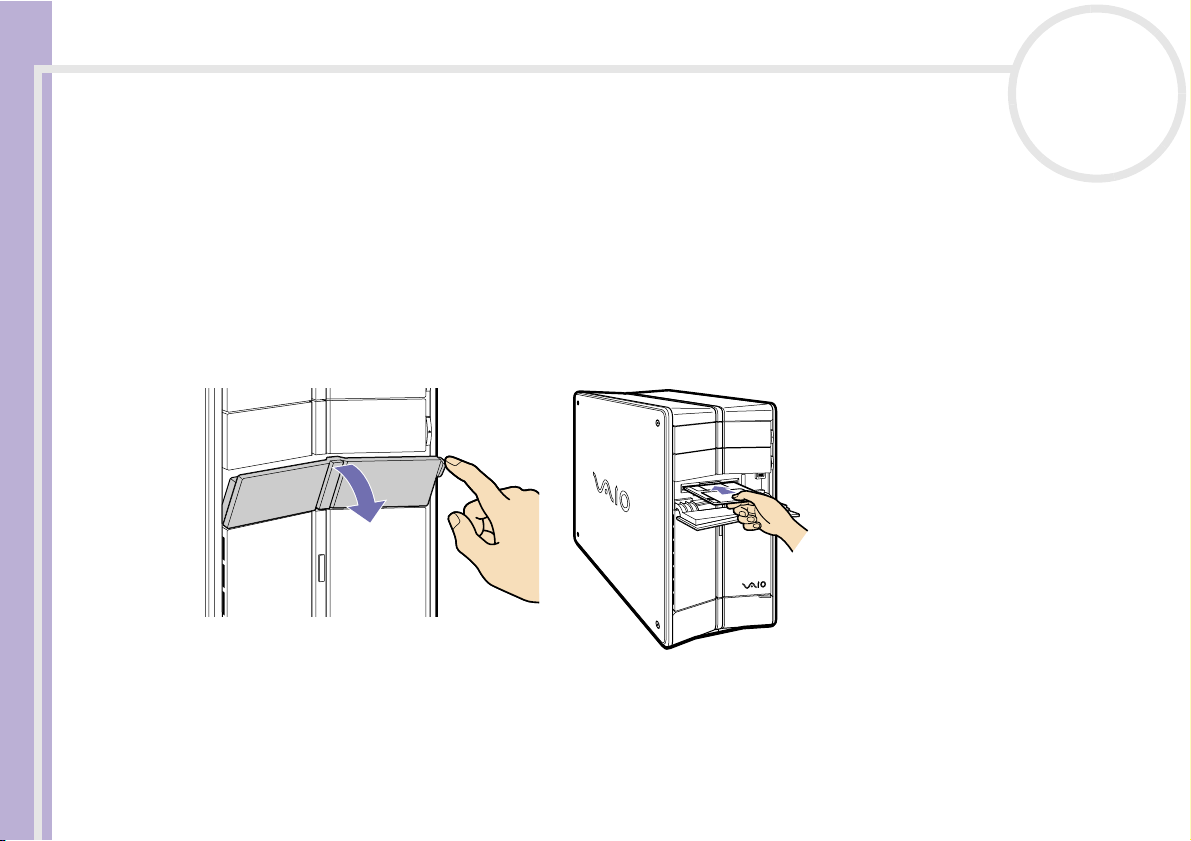
Inserting a floppy disk
To insert a floppy disk, proceed as follows:
1 Open the cover showing the Memory Stick™ icon on the front.
2 Hold the floppy disk with the label side facing up.
Sony VAIO Desktop User Guide
3 Gently push the disk into the floppy disk drive until it clicks into place.
nN
38
4 Close the cover flap.

Using your VAIO desktop
Removing a floppy disk
To remove a floppy disk, proceed as follows:
1 Wait until the LED indicator turns off.
2 Press the eject button and pull the disk out gently.
Sony VAIO Desktop User Guide
3 Close the cover flap.
✍ Do not press the eject button when the LED indicator is turned on. Otherwise, data may be lost.
nN
39

Using your VAIO desktop
Using the modem
Your VAIO desktop is equipped with an internal modem. You need to connect a phone line to take
advantage of online services and the Internet, to register your computer and software online, and to contact
VAIO-Link.
To connect a phone line, proceed as follows:
1 Plug one end of the supplied
phone cable into the LINE port on
the back of the computer.
Sony VAIO Desktop User Guide
2 Plug the other end into the wall
jack.
✍ A country-specific phone plug is supplied with
your VAIO desktop, allowing you to plug the
phone line into the wall jack. We recommend you
to use the supplied plug, because the usage of any
other phone plug can decrease the connection
quality.
Your computer cannot be connected to a coinoperated telephone, and may not work with
multiple phone lines or a private branch exchange
(PBX). If you connect the modem to a parallel
connected phone line, the modem or the other
connected device may not function properly. Some
of these connections may result in excess electrical
current and could cause a malfunction in the
internal modem.
Only DTMF (Dual Tone Multi Frequency) signalling (tone dialling) is supported.
nN
40

Using your VAIO desktop
Expansion capabilities
There are four expansion slots at the rear of your VAIO computer, as follows:
❑ CNR/PCI slot containing the modem card and PCI PCMCIA card (bottom).
❑ PCI slot containing the Giga Pocket ports.
❑ Empty PCI slot.
❑ AGP slot containing the graphics card (top).
The empty PCI slot allows you the choice of adding to the expansion capabilities of your computer. See
Sony VAIO Desktop User Guide
Upgrading your VAIO computer (page 93) for more details.
You are strongly advised not to add hardware yourself. Please contact your local Sony dealer for advice on
changing the internal hardware components.
nN
41

Using your VAIO desktop
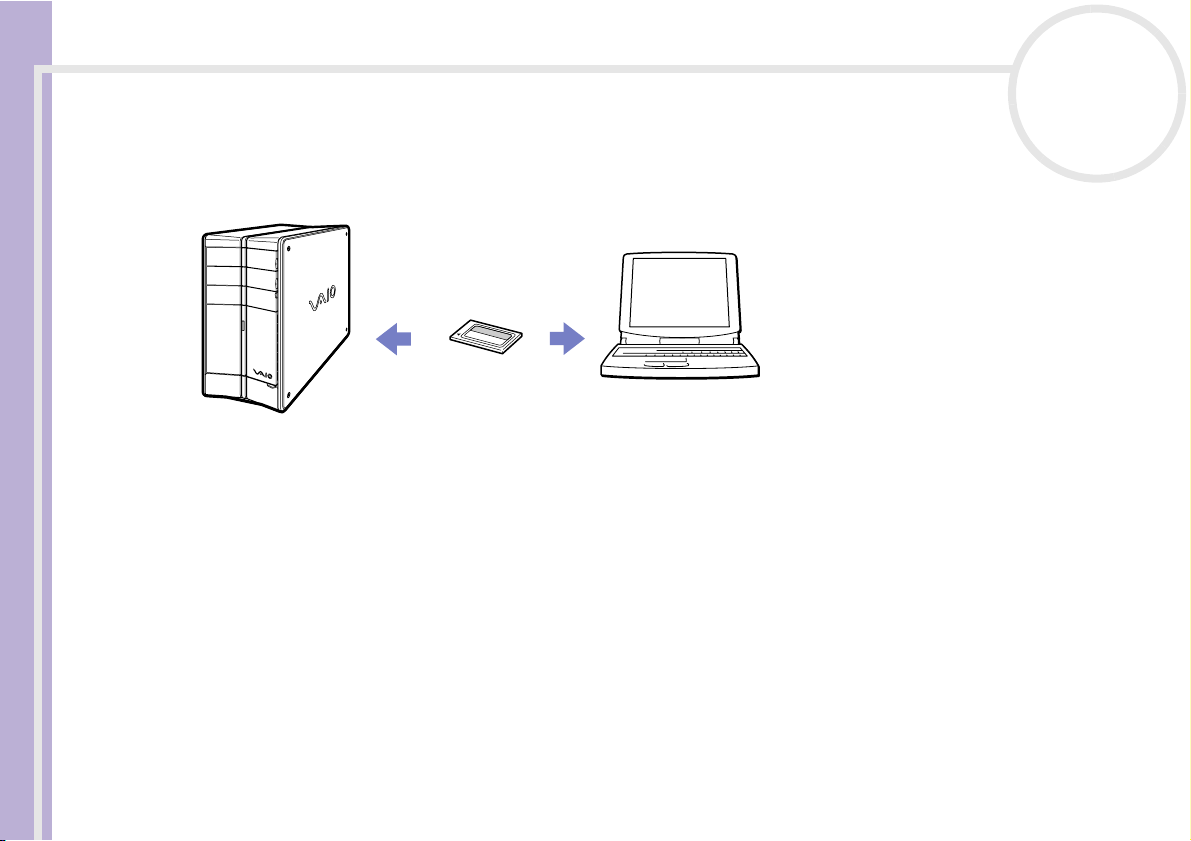
Using the Memory Stick™
Your VAIO computer is designed to support the Memory Stick™. The Memory Stick™ is a compact, portable,
and versatile device especially designed for exchanging and sharing digital data with compatible products.
Because it is removable, it can be used for external data storage.
Use the flash memory technology to download anything that can be converted into digital data, such as
pictures, music, words, sounds, movies and photographs.
Foreseen as the universal data storage device of the future, the Memory Stick™ can already be used with an
ever-increasing range of compatible products, including:
Sony VAIO Desktop User Guide
❑ Audio systems
❑ Visual devices
❑ VAIO products
❑ CLIE handhelds
❑ Mobile phones.
There are currently two different types of Memory Stick™:
❑ The generic Memory Stick™, coloured blue.
❑ The MagicGate Memory Stick™, coloured white.
✍ You can purchase Memory Sticks™ from the Sony Style website (http://www.sonystyle-europe.com), or from your local Sony dealer.
nN
42

Using your VAIO desktop
Why Memory Stick™?
Sony's vision is to expand the world of communication, promoting the portability of digital data. The
Memory Stick™ is the resulting medium, through which digital devices can be instantly connected. With it,
you can download data from any compatible device, then transfer it to another in a single and instant
transfer.
The main advantages of the Memory Stick™ are its:
❑ Compactness: with dimensions of just 21.5 mm (W) x 2.8 mm (H) x 50 mm (D), compatible products can
also be small, lightweight and attractive in their design.
Sony VAIO Desktop User Guide
❑ Capacity: Its data capacity far exceeds that of a floppy disk.
❑ Security: its lock option means you can protect your data from accidental erasure.
❑ Versatility: memory capacity ranges from 4MB up to 128MB (the equivalent capacity of 88 floppy disks).
❑ Reliability: by way of protecting the hardware and its contents, the number of terminals is reduced to
only 10 pins. This, and the overall robust structure of the stick, gives it a longer lifespan than other
storage devices.
❑ Durability: the same Memory Stick™ can be used tens of thousands of times.
nN
43

Using your VAIO desktop
Generic Memory Stick™
The original Memory Stick™, blue in colour, can be used to record image data taken with digital still
cameras, etc. or data from the PC. With it, you can record, play back and transfer various kinds of data at
any given time.
Sony VAIO Desktop User Guide
Because it is easy to remove and transport safely, you can use Memory Stick™ anywhere by inserting it into
any compatible device to transfer and share the information you have saved.
For you, this means you can expand the capabilities of your VAIO computer in the following scenarios:
❑ With your still digital camera, share your holiday pictures instantly by e-mail.
❑ From your handycam to your VAIO, make the most of your captured moments with the VAIO's movie
editing tools.
❑ Carry pictures on you by copying image files from the Internet to your VAIO to your CLIE handheld.
❑ With your voice recorder, add your voice to e-mails so your tone is never misunderstood.
The blue Memory Stick™ is currently available with a with a 4, 8, 16, 32, 64 or a 128 MB memory (the
equivalent capacity of 88 floppy disks).
✍ Generic Memory Sticks™ cannot be used with the Memory Stick™ Walkman, or with data that is protected by copyright.
nN
44

Using your VAIO desktop
MagicGate Memory Stick™
As the MagicGate Memory Stick™ is not supported on your RZ model, the following is for your
information only.
If you want to be able to use the MagicGate Memory Stick™ technology, you can buy our external accessory
MSGC-US10.
The MagicGate Memory Stick™, white in colour, records PC and image data just like its blue counterpart;
the difference is it uses the MagicGate copyright protection technology.
Sony VAIO Desktop User Guide
With this type of Memory Stick™, also called the MG Memory Stick™, you can enjoy the following features:
❑ 32, 64 and 128 MB capacity versions.
❑ Storage of up to 120 minutes of audio data.
❑ Download and save:
❑ digital music
❑ pictures
❑ movies, and more.
❑ Combine data files to add music to your home movies, for example.
❑ Transfer and share data between several digital products.
❑ MagicGate Copyright Protection Technology.
❑ SDMI (Secure Digital Music Initiative) Compliance.
❑ SonicStage software.
nN
45

Using your VAIO desktop
So that you further distinguish a MagicGate Memory Stick™ from a generic one, look for:
❑ the logo printed on it
❑ and a protruding dot located on the back.
✍ MagicGate is a copyright protection technology that complies with the standards set by SDMI (Secure Digital Music Initiative, an organisation working
to draw up industry standard specifications in order to protect copyrights of digital music).
The logo indicates the copyright protection system devised by Sony. It is not meant to guarantee compatibility
with other media.
Sony VAIO Desktop User Guide
MagicGate
MagicGate refers to the copyright protection technology used by the MagicGate Memory Stick™ and other
MagicGate Memory Stick™ compatible devices.
The Memory Stick™ Walkman and MagicGate Memory Stick™ work together to check the data and ensure
it complies with copyright protection.
If no problems are detected, the data is exchanged in encrypted form; if authentication is not passed, data
cannot be exchanged or played back.
OpenMG
This is a copyright protection technology that is used to manage the digital music content downloaded to
the PC from CDs, the Internet and/or other sources.
Software installed on the PC records music content in encrypted form onto the hard disk. As well as allowing
you to enjoy music on the PC, this technology protects against unauthorised distribution on the Internet.
Since it is compatible with MagicGate, you can use OpenMG / Sonicstage to transfer music that you have
downloaded onto your PC to your MG Memory Stick™, and playback on other MagicGate-equipped devices
and media.
nN
46

Using your VAIO desktop
Copyright protection
People who create artistic works such as music are entitled to a "copyright", meaning that they have
exclusive rights to dictate how their work is used. When they are created, artistic works are automatically
protected by a copyright without having to submit notification or registration, and may not be used without
the permission of the person who created the work.
In the music world, however, illegal acts of distributing music without the permission of the artist,
particularly on the Internet, have recently been on the increase. That is why the Recording Industry
Association of America (RIAA) took the initiative to organise a forum called Secure Music Digital Initiative
(SDMI) to study technology for protecting copyrights during the electronic distribution of music.
Sony VAIO Desktop User Guide
Sony offers the MagicGate Memory Stick™ and Memory Stick™ Walkman with a copyright protection
function that complies with SDMI standards, thereby providing an environment where individuals can
record and enjoy third-party music data without worrying about copyright infringement.
✍ Literary works that are recorded by individuals are permitted for private usage only.
nN
47

Using your VAIO desktop
Compatible devices
There are nearly 80 Memory Stick™-enabled products on the market or announced for introduction worldwide, ranging from camcorders and portable music players to voice recorders and many other electronic
devices.
You can currently use Memory Sticks™ with the following Sony products:
Visual:
❑ Cybershot digital camera
❑ Mavica digital camera
Sony VAIO Desktop User Guide
❑ PC, TRV and VX series digital video cameras
❑ LC data projector
Audio:
❑ MS Walkman
❑ MS Hi-fi system
❑ Network Walkmans
❑ Voice recorders
Other:
❑ VAIO notebooks
❑ VAIO desktops
❑ CLIE Handheld Entertainment Organiser
❑ Sony mobile phones
❑ Digital printers
❑ AIBO the Sony Entertainment Robot
To find out more about the products available in your country, go to:
http://www.sonystyle-europe.com
nN
48

Using your VAIO desktop
LOCK
LOCK LOCK
Write-protecting a Memory Stick™
Memory Sticks™ are designed with an erasure prevention switch to protect valuable data from accidental
erasure or overwriting.
Move the tab to the right or left* to set or release write-protection. When the erasure prevention switch is
off, data can be saved on the Memory Stick™. When the erasure prevention switch is on, data can be read
from but not saved on the Memory Stick™.
Sony VAIO Desktop User Guide
* The 128 MB Memory Stick™ has a vertical lock.
nN
49

Using your VAIO desktop
Inserting a Memory Stick™
To insert a Memory Stick™, proceed as follows:
1 Open the cover showing the Memory Stick™ icon on the front.
2 Insert the Memory Stick™ into the Memory Stick™ slot with the connectors pointing to the right.
The Memory Stick™ is automatically detected by your system and appears in the My Computer window
with its own drive.
Sony VAIO Desktop User Guide
nN
50
3 Close the cover flap.
✍ Always hold the Memory Stick™ with the arrow pointing in the correct direction when you insert it into the slot. To avoid damaging the computer or
the Memory Stick™, do not force the Memory Stick™ into the slot if it does not insert smoothly.

Using your VAIO desktop
Removing a Memory Stick™
To remove a Memory Stick™, proceed as follows:
1 Make sure the indicator light is not on.
2 Push the Memory Stick™ in to release it, and then pull it out.
Sony VAIO Desktop User Guide
nN
51
3 Close the cover flap.
✍ Always remove the Memory Stick™ gently, or it may pop out unexpectedly.
You are recommended to remove the Memory Stick™ before shutting down the computer.
Using your VAIO desktop
Using PC Cards
Your VAIO desktop has a PC Card slot on the front panel that supports Type I or Type II PC Cards. PC Cards
allow you to interconnect with portable external devices.
Sony VAIO Desktop User Guide
nN
52

Using your VAIO desktop
Inserting a PC Card
To insert a PC Card proceed as follows:
1 Open the bottom panel on the front
of your VAIO.
2 Insert the PC Card gently into the PC
Card slot with the label facing
upwards.
The PC Card is automatically detected
Sony VAIO Desktop User Guide
by your system and the Safely
Remove Hardware icon appears
in the taskbar.
3 Close the cover flap (unless the
PC Card peripheral prevents it).
✍ You do not need to shut down your computer when
inserting a PC Card.
Some PC Cards may require you to disable idle devices when using the PC Card.
You may not be able to use some PC Cards or some functions of the PC Card with this computer.
Make sure you use the most recent software driver provided by the PC Card manufacturer.
If the PC Card is operating abnormally, go to Control Panel, Performance and Maintenance, System, click the Hardware tab, and then Device
Manager. If an “!” mark appears next to the PC Card device, remove the software driver and then reinstall it from the installation CD that
accompanies the PC Card.
Do not force a PC Card into the slot. It may damage the connector pins. If you have difficulty inserting a PC Card, check that you are inserting the PC
Card in the correct direction. See the manual supplied with your PC Card for more information on use.
For some PC Cards, if you alternate between Normal power operation and Standby or Hibernate power management modes while the card is
inserted, you may find that a device connected to your system is not recognised. Reboot your system to correct the problem.
nN
53

Using your VAIO desktop
Removing a PC Card
Follow the steps below to remove the PC Card while your computer is on. If it is not removed properly, your
system may crash and unsaved data may be lost. If you want to remove a PC Card when your computer is off,
skip steps 1 to 7.
To remove a PC Card, proceed as follows:
1 Close any applications that are using the PC Card.
2 Double-click the Safely Remove Hardware icon in the taskbar.
Sony VAIO Desktop User Guide
The Safely Remove Hardware dialog box appears.
3 Select the hardware you want to unplug.
4 Click Stop.
5 In the Stop a Hardware Device dialog box, select the device and confirm that it can be safely removed
from the system.
6 Click OK.
You get the message that it is safe to remove the device.
7 Click Close.
8 Open the panel cover and press the
PC Card release button once so it is
extended and ready for use.
9 Push the PC Card release button to
eject the card.
10 Gently grasp the card and pull it out.
11 If the PC Card release button is still
out, push it back in so you can close
the front panel cover.
nN
54

Using your VAIO desktop
Using power saving modes
The colour of the power indicator light on the main unit tells you which mode the computer is in.
Colour Mode
Blue Computer is in Normal mode
Umber Computer is in Standby mode
No colour Computer is turned off or in Hibernate mode
nN
55
Sony VAIO Desktop User Guide
Using Standby mode
If you plan to stop using your computer for a short period of time (not overnight), you can put it into
Standby mode instead of turning it off completely. Putting the computer into Standby mode saves energy
and allows a quick return to normal computer use.
To set the timer for your computer to automatically enter Standby mode after a certain amount of time,
go to Control Panel, click Performance and Maintenance and open Power Options.
To activate Standby mode manually, use one of these two methods:
Use the Standby button:
1 Save your work, close all applications and close your Internet connection, if applicable.
2 Press the Standby button at the top of the keyboard.
The computer goes into Standby mode, indicated by the umber light behind the System icon.
Use the Windows
1 Save your work, close all applications and close your Internet connection, if applicable.
2 From the Start menu on the Windows
Alternatively, press <Alt>+<F4> to get to the same dialog box.
®
taskbar:
®
taskbar, select Turn Off Computer.

Using your VAIO desktop
3 Select Stand By.
The computer goes into Standby mode, indicated by the umber light behind the System icon.
To return to Normal mode, choose from the following:
❑ Press any key on the keyboard.
❑ Press the Standby button again.
❑ Press one of the <S> Keys on the keyboard.
❑ Quickly press the power button on your computer.
✍ You can leave Windows
Sony VAIO Desktop User Guide
If you press the power button for more than four seconds, the computer will switch off completely.
When the computer is in Standby mode, you cannot insert a disc.
Standby requires less time than Hibernate.
Standby uses more power than Hibernate.
Using Hibernate mode
If you are interrupted and need to leave your computer suddenly, you can put it into Hibernate mode. This
power saving mode saves you the time of shutting down in the normal way.
When you put your computer into Hibernate mode:
❑ Everything in the memory is saved to the hard disk.
❑ The monitor and hard disk are turned off.
❑ The computer is turned off.
❑ The power indicator light turns off.
To set the timer for your computer to automatically enter Hibernate mode after a certain amount of time,
go to Control Panel click Performance and Maintenance and open Power Options.
®
running when using Standby.
nN
56

Using your VAIO desktop
To activate Hibernate mode manually, use one of these two methods:
Use the Windows
1 Save your work.
2 From the Start menu on the Windows
Alternatively, press <Alt>+<F4> until the Turn Off Computer screen is displayed.
3 In the Turn Off Computer screen, hold down the <Shift> key to reveal the Hibernate button.
4 Click Hibernate.
The computer goes into Hibernate mode, the computer turns off.
Sony VAIO Desktop User Guide
Use the power button:
❑ Quickly press the power button on the front of the main unit.
The computer goes into Hibernate mode, the computer turns off.
To return to Normal mode, quickly press the power button on your computer.
Operation returns to the same state as before.
✍ You can leave Windows
If you press the power button for more than four seconds, the computer will switch off completely.
When the computer is in Hibernate mode, you cannot insert a disc.
Hibernate uses less power than Standby.
Hibernate requires more time than Standby.
®
taskbar:
®
running when using Hibernate.
®
taskbar, select Turn Off Computer.
nN
57

Connecting peripheral devices
Connecting peripheral devices
You can add functionality to your computer by connecting any of the following peripherals, and more.
Before you connect a peripheral, turn off both the computer and the peripheral.
Connect the power cord only after connecting all cables.
Turn on the computer only after turning on all peripherals.
❑ Notes on connecting Universal Serial Bus (USB) devices (page 59)
❑ Connecting an external display (page 60)
❑ Connecting a projector (page 62)
Sony VAIO Desktop User Guide
❑ Connecting a TV (page 63)
❑ Connecting an external microphone (page 66)
❑ Connecting a printer (page 67)
❑ Connecting a USB printer (page 68)
❑ Connecting an i.LINK™ device (page 69)
❑ Connecting a digital video camera recorder (page 70)
❑ Connecting two VAIO computers (page 71)
❑ Connecting to a network (page 72)
✍ Hot plug and play devices (such as USB devices) should be plugged in when the computer is switched on.
nN
58

Connecting peripheral devices
Notes on connecting Universal Serial Bus (USB) devices
You can connect a USB device, for example, a scanner or a printer, to your VAIO desktop. Your computer
features the latest USB technology, having been upgraded to USB Specification version 2.0. USB Specification
version 2.0 increases device data throughput up to 480 Mbps, 40 times faster than USB 1.1 devices.
With the increased speed, you have the benefit of an additional range of high performance peripherals.
Even with multiple high-speed peripherals connected to a USB 2 bus, you do not have to worry about hitting
the bandwidth bottleneck. The new specification also inherits the current USB’s Plug and Play and hotswapping capability as well as providing backward compatibility for USB 1.1 hardware.
Sony VAIO Desktop User Guide
There are USB ports on the front and back of your VAIO desktop. To connect a USB device, simply plug in
the USB cable of the device into one of the ports on your computer.
✍ USB devices are hot plug and play devices. You do not need to shut down your computer prior to connecting these devices unless the manual supplied
with the device states otherwise.
For some USB devices you need to install the software before you connect the device. Not following this procedure might cause the device not to work
properly. For more information, check the manual provided with the USB device.
You do not need to shut down the computer before connecting or disconnecting a USB peripheral.
nN
59

Connecting peripheral devices
Connecting an external display
You can connect multiple displays to your desktop, each using a different port on the back of your computer:
❑ an LCD screen using the DVI connector,
❑ a CRT or LCD screen using the VGA connector,
❑ a TV using the TV-Out connector.
See also Setting up the monitor (page 24) and Using two screens while watching a DVD film
(page 37).
nN
60
Sony VAIO Desktop User Guide
Please make note of the following viewing possibilities:
❑ If you have a VGA and a DVI display connected at the same time, you can switch from one display to the
other (the default is VGA), but you cannot display the image on both at the same time.
❑ If you have a VGA and a TV connected, the image is shown on both screens by default.
❑ If you have a DVI and a TV connected, the image is shown on both screens by default.
❑ If you have a VGA, a DVI and a TV connected, the image will be shown either on both the VGA and the
TV, or both the DVI and the TV.
To change your display from VGA to DVI or vice versa, proceed as follows:
1 Connect the display(s), as described in Setting up the monitor (page 24) or in the instructions
delivered with the display, if applicable.
2 Go to Control Panel.
3 Click Appearance and Themes then Display.
The Display Properties dialog box appears.
4 Click the Settings tab.
5 Click Advanced.
The ...NVIDIA GeForce4 Ti 4600 dialog box appears.

Connecting peripheral devices
6 Click the GeForce4 Ti 4600 tab.
7 Click nView Display Mode on the left.
8 Select the Device Settings button.
9 Click Select Output Device... and select the required display.
10 Click OK.
If you reboot after changing the settings as above, the default setting returns and the image is shown on
the VGA screen again. If you want the image to be shown on both the DVI and the TV after rebooting, please
disconnect the VGA.
Sony VAIO Desktop User Guide
Similarly, if you have all three displays connected and want the computer to select DVI and TV when you
start your computer, simply make your settings again.
nN
61
Connecting peripheral devices
Connecting a projector
You can connect a projector (such as the Sony LCD projector) directly to your computer.
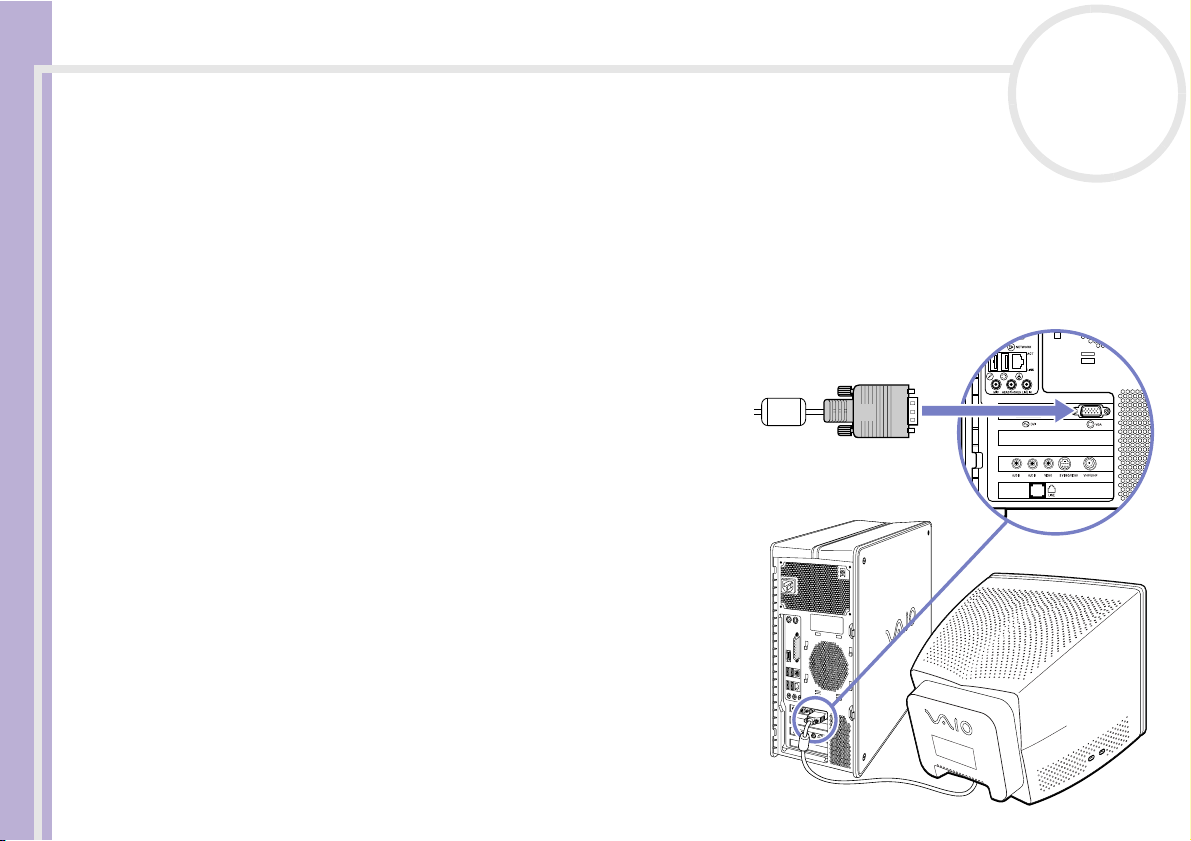
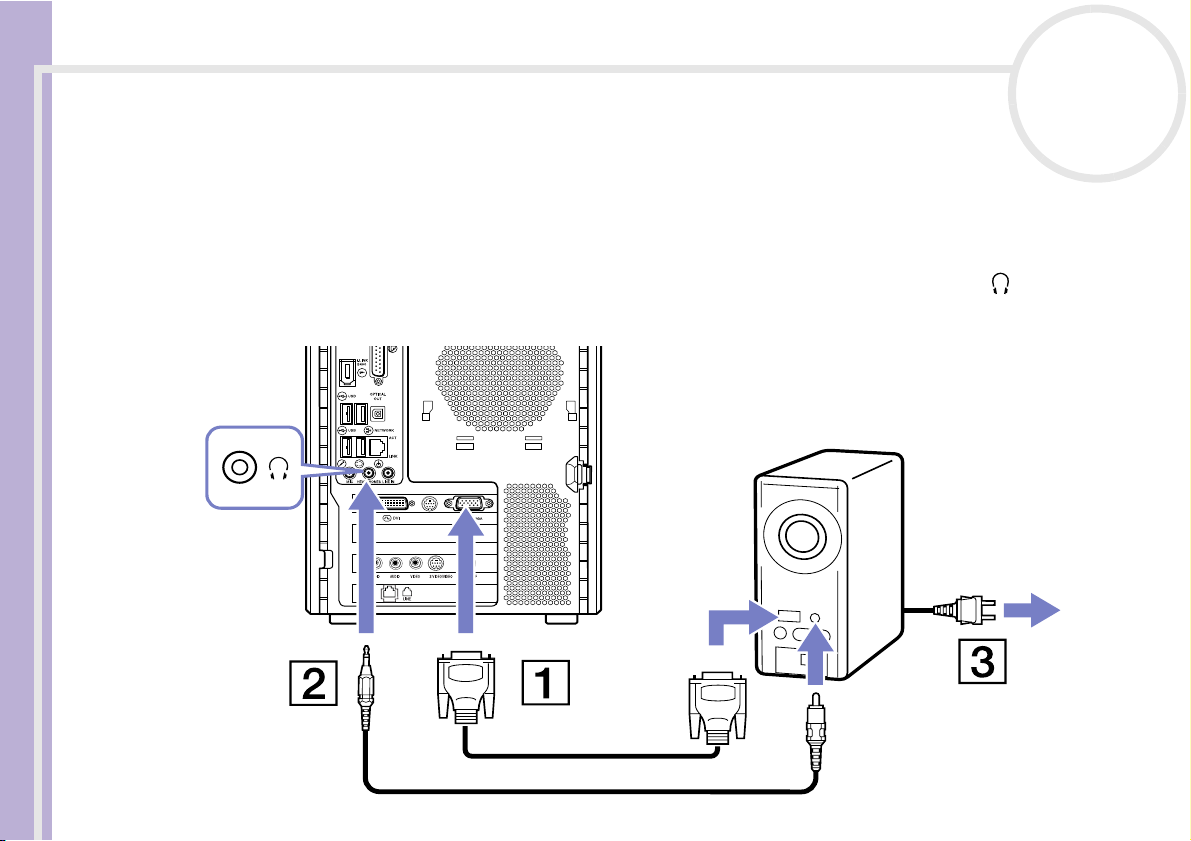
To connect a projector to your VAIO desktop, proceed as follows:
1 Plug one end of the VGA cable (not supplied) into the VGA connector on the back of your computer, and
the other end into the projector you want to use (1).
2 Plug the audio cable (not supplied) into the headphones connector identified by the symbol (2).
3 Connect the power cord of the projector into an AC outlet (3).
Sony VAIO Desktop User Guide
nN
62

Connecting peripheral devices
Connecting a TV
You can connect a TV directly to your computer. See also Using the TV function (page 25) and Using two
screens while watching a DVD film (page 37).
In order to be able to use a TV screen, you also have to enable the TV-Out function.
Your VAIO desktop is delivered with a TV-Out cable (or ’converter cable’), which is for use with TV sets
without an S-Video port.
Connecting a TV that has no Video-S port
nN
63
Sony VAIO Desktop User Guide
To connect a TV to your VAIO desktop with the supplied TV-Out cable, proceed as follows:
1 Plug one end of the TV-Out cable into the
TV-Out port on the back of your computer.
2 Take your composite cable (not supplied) and
connect one end to the inserted TV-Out cable.
3 Connect the other end to the yellow-coloured
port (Video-In) on your TV set.
The video output is now in place.
4 Connect the single end of your audio cable
(not supplied) to the headphones port, either
on the back of your computer or on the
connected speaker.
5 Connect the double end of the audio cable to
the red and white ports respectively on your
TV set.
The audio output is now in place and your TV
is ready for use with your computer.

Connecting peripheral devices
Connecting a TV that has a Video-S port
To connect a TV to your VAIO desktop with an S-Video cable (not supplied), proceed as follows:
1 Plug one end of the S-Video cable into the TV Out port on the back of your computer.
2 Plug the other end of the S-Video cable into your TV’s S-Video port.
Sony VAIO Desktop User Guide
nN
64
To enable TV-Out, proceed as follows:
1 Go to Control Panel.
2 Click Appearance and Themes.
3 Click Display.
The Display Properties dialog box appears.
4 Click the Settings tab.

Connecting peripheral devices
5 Click Advanced.
The ...NVIDIA GeForce4 Ti 4600 dialog box appears.
6 Click the GeForce4 Ti 4600 tab.
7 Click nView Display Mode on the left.
8 Select Clone and click Apply.
To watch a DVD with Giga Pocket, showing it in full-screen on TV, proceed as follows;
1 Click Overlay Controls on the left.
2 Select Secondary Display under Full Screen Device.
Sony VAIO Desktop User Guide
3 Click OK.
nN
65

Connecting peripheral devices
Connecting an external microphone
Your VAIO desktop does not contain an internal microphone. If you need to use a sound input device, for
example to chat on the Internet, you need to plug in an external microphone.
To connect an external microphone, plug the microphone cable (1) into the microphone port (2) identified
by the symbol .
Sony VAIO Desktop User Guide
nN
66
✍ Make sure your microphone is designed for computer use.

Connecting peripheral devices
Connecting a printer
To connect a printer, proceed as follows:
1 Plug the printer cable into the printer connector on your computer.
2 Plug the printer power cord into an AC outlet.
Sony VAIO Desktop User Guide
nN
67

Connecting peripheral devices
Connecting a USB printer
To connect a USB printer, simply plug the printer's USB cable into one of the USB ports on your VAIO
desktop. There are USB ports at the front and at the back of your computer.
Sony VAIO Desktop User Guide
nN
68
✍ Do not turn on the computer or the printer until all the connections are made.
These procedures do not apply to all printers. If you do not have a printer compatible to these procedures, please refer to the manufacturer’s
instructions on connecting and installing it.

Connecting peripheral devices
Connecting an i.LINK™ device
Your VAIO computer includes a 4-pin i.LINK™ port on the front of the system and a 6-pin i.LINK™ port on
the back of the system. Use these ports to connect an i.LINK™ device such as a digital video camera recorder
or to link up two VAIO computers so you can copy, delete or edit files.
❑ The 6-pin i.LINK™ port can supply power from the computer to the connected device.
❑ The 4-pin i.LINK™ port cannot supply power to a connected device.
The i.LINK™ ports supports transfer rates up to 400 Mbps; however, the actual transfer rate depends on the
transfer rate of the external device.
Sony VAIO Desktop User Guide
The i.LINK™ features available may vary depending on the software applications you use. Refer to the
documentation that came with your software for more information.
The i.LINK™ cables that are compatible with your VAIO desktop include cables with the following part
numbers: VMC-IL4415, VMC-IL4435, VMC-IL4615, VMC-IL4635, VMC-IL6615, and VMC-IL6635. Sony computer
supplies, accessories and peripherals can be purchased from your local retailer or from the Sony website:
http://www.sonystyle-europe.com
❑ Connecting a digital video camera recorder (page 70)
❑ Connecting two VAIO computers (page 71)
✍ An i.LINK™ connection with other compatible devices is not fully guaranteed.
You are strongly advised to use only Sony i.LINK™ cables, as using other brands may cause problems with the i.LINK™ devices.
The i.LINK™ connection varies depending on the software applications, operating system and i.LINK™ compatible devices you use. Refer to the
documentation that came with your software for more information.
Check the working conditions and OS compatibility of i.LINK™-compatible PC peripherals (HDD, CD-RW drive etc.) before you connect them to your
VAIO desktop.
nN
69

Connecting peripheral devices
Connecting a digital video camera recorder
To connect a digital video camera recorder, proceed as follows:
1 Plug one end of the i.LINK™ cable (not supplied) into the i.LINK™ port of the computer and the other
end into the DV-Out port on your digital video camera recorder.
Sony VAIO Desktop User Guide
nN
70
2 Launch the DVgate application (see your Software Guide for more information).
✍ On Sony digital video cameras, ports labelled DV Out, DV In/Out or i.LINK™ are i.LINK™-compatible.
The Sony digital video camera recorder is an example; your digital video camera recorder may need to be connected differently.
If your digital video camera recorder includes a Memory Stick™ slot, you canuse it to copy images from the camera to your computer. To do so, simply
copy images on the Memory Stick™, and then insert it into the Memory Stick™ slot of your computer; just like using a floppy disk, for example.

Connecting peripheral devices
Connecting two VAIO computers
If you have adminstrator rights on your computer, you can connect your VAIO desktop to another VAIO
computer using an i.LINK™ cable (not supplied). With the software delivered with your VAIO desktop, you
can copy, edit or delete files on another VAIO computer that also has Windows
You can also print a document on a printer connected to another VAIO computer.
To connect your VAIO desktop to another VAIO computer, proceed as follows:
1 Insert one end of the i.LINK™ cable into one of the i.LINK™ ports on the main unit of the VAIO desktop.
Sony VAIO Desktop User Guide
2 Connect the other end to the other VAIO computer.
®
XP installed.
nN
71

Connecting peripheral devices
Connecting to a network
Your computer comes with a built-in Ethernet interface.
To connect to a network, proceed as follows:
1 Connect your 10BASE-T/100BASE-TX Ethernet cable (not supplied) to the Ethernet port on the back of
the computer.
If there is a sticker covering the Ethernet port, this is to remind customers in Germany not to insert an
ISDN cable (see caution below).
Sony VAIO Desktop User Guide
nN
72
2 Go to Start, right-click My Computer and select Properties.
3 Click the Hardware tab and select Device Manager.
The Device Manager screen appears with the list of devices.
4 Under Network Adapters, right-click Realtek RTL8100B/810x Family PCI Fast Ethernet NIC.
Connecting peripheral devices
5 Click Properties.
6 Under Device Usage, select Use this device (enable).
7 Click OK to close the Properties window.
The Ethernet connection is now enabled.
!
Connect only 10BASE-T/100BASE-TX cables to the Ethernet port. Using other cables or a telephone cable may cause a malfunction, excessive heat
or even fire in the port. If using this computer in Germany, please make sure you do not use an ISDN cable. It is physically very similar, but its higher
voltage of 12V may destroy the motherboard inside the computer.
✍ For more information about connecting your VAIO desktop to the network, please consult the Hardware troubleshooting section of the VAIO-Link
website (http://www.vaio-link.com
Sony VAIO Desktop User Guide
How to troubleshoot network problems.
For help on connecting to a network, see your network administrator.
nN
73
):

Getting help
nN
74
Getting help
This section describes how to get help and support from Sony, as well as troubleshooting tips for your
computer.
Sony provides several support options for your computer.
Sony's support options
Sony offers you many support options for your computer.
Sony VAIO Desktop User Guide
Sony documentation
Please see the section Documentation pack (page 9) for details on the printed and online documentation
delivered with your computer.
Other sources of information
❑ Online Help files: Before contacting VAIO-Link, try to solve the problem by reading the user guides and
help files supplied with the peripherals or software.
❑ VAIO-Link website, which you can access if you have any problems with your computer:
http://www.vaio-link.com
✍ You will need to set up and configure your VAIO's internal modem before you can make use of these communication features.

Getting help
Sony VAIO Desktop User Guide
nN
75
Troubleshooting
This section describes how to solve common problems you might encounter when using your VAIO desktop.
Many problems have simple solutions. Please try these suggestions before contacting VAIO-Link or your local
Sony dealer.
You are recommended to print out this section and keep it for future reference.
❑ About the computer and software (page 76)
❑ About Giga Pocket (page 80)
❑ About the display (page 81)
❑ About discs and floppy disks (page 83)
❑ About sound (page 86)
❑ About the modem (page 87)
❑ About peripherals (page 88)
❑ About digital video captures and DVgate (page 92)
❑ About i.LINK™ devices (page 92)

Getting help
Sony VAIO Desktop User Guide
nN
76
About the computer and software
My computer does not start
❑ Check that the computer is plugged into a power source and that it is turned on.
❑ Check that the power indicator on the front panel of the computer indicates that the power is on.
❑ Confirm that the power cord and all cables are connected firmly.
❑ If you have plugged the computer into an Uninterrupted Power Supply (UPS), make sure the UPS is
turned on and works.
❑ Check that the monitor is properly connected to the main unit. Check that the brightness and contrast
controls are adjusted correctly.
❑ Moisture condensation may have occurred. Wait at least an hour after trying before turning the
computer on.
The message 'Press <F1> to continue, <F2> to enter setup' appears at startup
If the message Press <F1> to continue, <F2> to enter setup appears at the bottom of the display, you
need to initialise the BIOS.
To initialise the BIOS, proceed as follows:
1 Turn off the computer.
2 Remove any peripheral devices connected to the computer.
3 Turn on the computer and press <F2> when the Sony logo appears.
The BIOS setup menu screen appears.
4 Use the keyboard’s arrow keys to select the Exit menu.
5 Press <F5> or use the arrow keys to select Setup Defaults. The message Load default configuration
now? appears.
6 Make sure that Yes is selected and then press <Enter>.

Getting help
nN
77
7 Press <F10> to exit, or use the arrow keys to select Save and Exit..
The message Save configuration changes and exit now? appears.
8 Make sure that Yes is selected and then press <Enter>.
My computer does not shut down
Sony VAIO Desktop User Guide
It is recommended that you shut down your computer using the Turn Off Computer command on the
Windows
®
Start menu. Using other methods, including those listed here, may result in loss of unsaved data.
If the Turn Off Computer command does not work properly, proceed as follows:
1 Shut down the computer by pressing <Alt>+<F4>. The Turn off computer box appears. Select Turn Off.
2 If this does not work, press <Ctrl>+<Alt>+<Delete>. The Task Manager dialog box appears. Click Shut
Down, then Turn Off.
3 If this does not work, press the power button and hold it for at least four seconds.
This turns off the power.
4 If you really have tried everything, unplug the computer from the mains.
My system is running slowly
❑ The system response time varies, depending on the number of applications that are open and running.
Close any application that you are not currently using.
❑ Increasing the system memory may also help. The computer has two memory slots. For memory
upgrades, use only PC2700 (DDR333) DDR-SDRAM DIMM modules. For information on installing memory,
please see the section Upgrading memory (page 97).
❑ Another option is to defragment the hard drive. See the Windows
®
Help files for details or contact your
system administrator if you have one.

Getting help
Sony VAIO Desktop User Guide
nN
78
My computer locks up
❑ If you suspect an application is locking your system, you can try to stop it. To do this, press
<Ctrl>+<Alt>+<Delete> once. If you have not changed the default settings, you will enter the Task
Manager. On the Applications tab, select the application that is locking your system, and then click
End Task.
❑ If the above method does not work or you do not know which application is locking your system, restart
the computer. On the Windows
®
taskbar, click the Start button, click Turn Off Computer, and then
select Restart.
Alternatively, press <Alt>+<F4> to get to the Tur n o ff c o m puter screen.
❑ If the above method does not work, press the power button and hold it for at least four seconds. This
turns off the power.
❑ If your computer locks up while playing a CD or DVD, stop the disc, and shut down the computer by
pressing <Alt>+<F4>, and then click Tur n O ff.
My computer or software program is not responding
To end the application that has stopped responding, proceed as follows:
1 Press <Ctrl>+<Alt>+<Delete>.
If you have not changed the default settings, you will enter the Task Manager.
2 On the Applications tab, scroll down until you see the comment Not responding next to an
application.
3 Select this application from the list and click End Task.
Windows
®
will try to close the application. If it fails to do so, a second dialog box appears.
4 Select End Task again.
✍ If you are unable to unlock the application, repeat the above procedure, but select Shut Down > Turn Off when the Windows Task Manager
appears.

Getting help
Sony VAIO Desktop User Guide
nN
79
If this still fails, proceed as follows:
1 If possible, save any unsaved work.
2 Press <Alt>+<F4>.
The Turn off computer box appears.
3 Select Restart.
Make sure the software you are using is compatible with your equipment and operating system. If these
options fail, try re-installing the software. For bundled Sony software, see the printed Application CD
Guide for installation details.
✍ If none of the above solves the problem, you can turn off the computer by pressing the power button for longer than 4 seconds. All unsaved data will
be lost.
If the same application locks up regularly, contact the software publisher or the advertised technical support.
Windows® locks up during shutdown
There are many reasons why the Windows
incompatible or conflicting drivers, damaged files, or non-responsive hardware.
To search Windows
®
Help for troubleshooting information, proceed as follows:
1 From the Start menu, select Help and support.
2 Click Fixing a problem.
3 Use the browse and search functions to find a solution.
®
operating system may not shut down properly, including

Getting help
Sony VAIO Desktop User Guide
nN
80
About Giga Pocket
The "Hardware Overlay Error" message appears
❑ If another application is using the hardware overlay, this means it is temporarily overriding your desktop
settings and preventing Giga Pocket from launching. Close the relevant application and relaunch Giga
Pocket.
❑ If you want to use Giga Pocket at the same time as another application, make sure you launch Giga
Pocket first, as it needs prioritised access to the hardware overlay.
❑ In Giga Pocket Explorer, before clicking Make DVD or Send to > Click to DVD, close the main Giga
Pocket window. You can then proceed as normal.

Getting help
Sony VAIO Desktop User Guide
nN
81
About the display
My monitor does not display anything
❑ Check that the computer is plugged into a power source and that it is turned on.
❑ Check that the monitor is plugged into the computer and to a power source, and turned on.
❑ Check that the power indicators on the main unit and on the screen are on.
❑ Adjust the brightness of the monitor.
❑ The computer display may be in Standby mode. Press any key to activate the display.
❑ If you want to use a digital display (DVI), you cannot use it at the same time as a VGA. Either disconnect
the VGA display and reboot your computer, or change the settings as described under Connecting an
external display (page 60).
The window I have just closed is still on the screen
Press the Windows
®
key and <D> key twice to refresh the screen.
I cannot find the Windows
❑ Check that the taskbar is not hidden or minimised.
❑ Move the cursor to each edge of the screen to retrieve the taskbar.
®
taskbar
To change the default view of the taskbar and the Start menu, proceed as follows:
1 Click Start, and select Control Panel.
2 Click Appearance and Themes, then Taskbar and Start Menu.
The Taskbar and Start Menu Properties dialog box appears, where you can make the required
settings.

Getting help
Sony VAIO Desktop User Guide
nN
82
I want to change the resolution of my display
To change the resolution of your display, proceed as follows:
1 From the Start menu, select Control Panel.
2 Click Appearance and Themes, then Display.
The Display Properties dialog box appears.
3 Select the Settings tab.
4 Move the Screen resolution slider to change the resolution.
5 Click OK.

Getting help
Sony VAIO Desktop User Guide
nN
83
About discs and floppy disks
My disc drive tray does not open
To open the disc drive, proceed as follows:
With the eject button:
1 Make sure the power is turned on.
2 Press the eject button on the appropriate disc drive.
Using My Computer:
1 Click Start, and then My Computer.
2 Right-click the disc drive icon.
3 Select the Eject option.
The disc drive opens and you can retrieve the disc.
If the disc tray still does not eject, the CD/DVD-writing application software may be stopping it. Make sure
the application is closed before you proceed.
I cannot play a CD
❑ After inserting the CD, wait for a few seconds for the system to detect it before you try to access it.
❑ Make sure the label of the disc is facing upwards.
❑ If the disc requires software, make sure the software is installed according to the instructions of the
program.
❑ Check the volume of your speakers.
❑ Clean the disc with an appropriate cleaner.
❑ Moisture condensation may have occurred. Leave the computer for at least 1 hour before turning it on.

Getting help
Sony VAIO Desktop User Guide
nN
84
I cannot play a DVD
❑ If a region code warning appears when you are using the DVD player, it could be that the DVD you are
trying to play is incompatible with the DVD drive on your VAIO desktop. The region code is listed on the
packaging of the disc.
❑ If you hear sound but cannot see a picture, your computer's video resolution may be set too high. For
best results, change the resolution in the Control Panel - Display to a lower resolution.
❑ If you see the video but cannot hear sound, check all of the following:
❑ Make sure the mute setting is off in your DVD player software.
❑ Check the volume settings under Control Panel - Sounds, Speech and Audio Devices. If you have
connected external speakers, check the volume settings for your computer speakers and check the
connections between your speakers and the computer.
❑ In the Device Manager, check that the correct drivers are installed properly. To display the Device
Manager, Go to the Control Panel. Click Performance and Maintenance, and then the System
icon. In the System Properties dialog box, click the Hardware tab.
❑ A dirty or damaged disc may cause the computer to 'hang' while it tries to read the disc. If necessary,
reboot the computer, remove the disc and then check that it is not dirty or damaged.
✍ On your computer, the default DVD region code is 2, which is the region code for European DVDs. Do not change this setting using the Region Code
Change function in Windows
beyond the scope of your warranty and will result in service charges for repair.
®
, or any other software application. System malfunctions originating from the user changing the DVD region code are
My floppy disk drive cannot write to a disk
❑ The floppy disk may be write-protected. Disable the write-protect feature or use a disk that is not write-
protected.
❑ Check that the disk is properly inserted into the floppy disk drive.

Getting help
Sony VAIO Desktop User Guide
nN
85
When I double-click an application icon, a message such as 'You must insert the application CD into your
drive' appears and the software does not start
❑ Some titles require specific files that are located on the application CD-ROM. Insert the disc and try
starting the program again.
❑ Make sure you place the disc in the tray with the label side facing upwards.
The recording and reading speed of DVD+/-RWs is slow
Generally, the speed of a DVD+/-RW is slower than that of a CD/DVD-ROM, CD-R or DVD+/-R. The speed can
also vary depending on the type of format.

Getting help
nN
86
About sound
My speakers are not producing any sound
❑ If you are using an application that has its own volume control, check that the volume is turned up.
❑ Check the volume controls in Windows
❑ Check that the speakers are connected correctly and turned on, and that the power cable is plugged into
the mains (see the printed Getting Started brochure or the back of the Specifications sheet for
connection details).
®
and in Windows® Media Player.
Sony VAIO Desktop User Guide
My microphone is too sensitive to background noise
If you find there is too much background noise when you record sound, you can adjust the microphone gain.
To adjust the microphone settings, proceed as follows:
1 In the Control Panel, choose Sounds, Speech and Audio Devices.
2 Click Sounds and Audio Devices.
The Sounds and Audio Devices Properties box appears.
3 Click the Voice tab.
4 Under Voice recording, click Volume.
The Recording Control dialog box appears.
5 In the Options menu, select Properties.
The Properties dialog box appears.
6 Change the setting in the Adjust volume for dialog box from Playback to Recording, and then click
OK.
7 Reduce the microphone level by moving the slider control.

Getting help
nN
87
8 In the Options menu, select Advanced Controls, and then click the Advanced button under
Microphone - Balance.
The Advanced Controls for Microphone dialog box appears.
9 Deselect the Microphone Boost check box, and then click Close.
10 Close the Recording Control dialog box.
The unwanted noise should now be cleared.
About the modem
Sony VAIO Desktop User Guide
My internal modem does not work
❑ Check that the phone line is plugged into your computer.
❑ Check that the phone line is working. You can check the line by plugging in an ordinary phone and
listening for a dial tone.
❑ Check that the phone number the program is dialling, is correct (refer to the information you recieved
from your Internet Service Provider).
❑ In the Phone and Modem Options dialog box (Control Panel / Printers and other Hardware /
Phone and Modem Options), check that your modem is listed on the Modems tab, and that the
location information is correct on the Dialing Rules tab.
❑ Whenever you use your modem while travelling, make sure that the country of the active location
defined in the Phone and Modem Options dialog box matches the country you are dialling from.
My modem cannot establish a connection
❑ The modem dialling mode may be incompatible with your telephone line.
❑ The modem may not work properly if you are behind a Private Automatic Branch exchange (PABX).
❑ Make sure that the modem is the only device connected to your telephone line.

Getting help
Sony VAIO Desktop User Guide
nN
88
My modem connection is slow
Many factors influence modem connection speed, including telephone line noise or compatibility with
telephone equipment (such as fax machines or other modems). If you think your modem is not connecting
properly to other PC-based modems, fax machines, or your Internet Service Provider, check the following:
❑ Have your phone company check that your phone line is free from any line noise.
❑ If your problem is fax-related, check that there are no problems with the fax machine you are calling and
that it is compatible with fax modems.
❑ If you are having a problem connecting with your Internet Service Provider, check that the ISP is not
experiencing technical problems.
❑ If you have a second phone line available, try connecting the modem to that line.
About peripherals
My mouse does not work properly
❑ If using the mouse delivered with your computer, check that it is plugged into the PS/2 mouse port on
the back of the unit.
❑ PS/2 connections are not ’Plug and Play’ devices, which means that if you connect the PS/2 mouse after
the system has started, it does not work. Shut down the computer and connect the mouse before
restarting the system.
❑ Note that the scrolling features work only with programs that use scroll bars. Some programs do not
support features usually available with the central wheel.
❑ Do not use the mouse on a reflective surface (such as a mirror) or transparent surface (such as glass).
Some surfaces do not allow the sensor and DSP to function properly because the irregularities are too
small to be detected. The best surfaces reflect but scatter light; an example is a blank sheet of white
drawing paper. Otherwise, use a standard mouse pad.

Getting help
Sony VAIO Desktop User Guide
nN
89
My mouse needs to be set up for left-hand use
To set your mouse up for left-handed users, proceed as follows:
1 Go to Start, select Control Panel, then click the Printers and Other Hardware option.
2 Click the Mouse icon.
The Mouse Properties dialog box appears.
3 In the Buttons tab, select the option button next to Switch primary and secondary buttons.
4 Click OK.
The new mouse settings are now in place.
My keyboard does not work properly
❑ If using the keyboard delivered with your computer, check that it is plugged into the PS/2 keyboard port
on the back of the unit.
❑ PS/2 connections are not ’plug and play’, which means that if you connect the PS/2 keyboard after
starting your computer, it does not work. Shut down the computer and connect the keyboard before
restarting the system.
I cannot use digital (DV) devices. The message 'DV equipment seems to be disconnected or turned off'
appears.
❑ Check that the DV device is turned on and that the cables are properly connected.
❑ If you are using multiple i.LINK™ devices, the combination of the connected devices may cause unstable
operation. If this is the case, turn off all connected devices and disconnect unused devices. Check the
connection and then turn on the power again.
❑ You are strongly advised to use only Sony i.LINK™ cables, as using other brands may cause problems with
the i.LINK™ devices.

Getting help
Sony VAIO Desktop User Guide
nN
90
How do I install a printer?
Always check the printer manufacturer’s website for the latest drivers for Windows
®
XP Home Edition
Service Pack 1 before proceeding. Some printers do not function properly without updated drivers.
If the printer has a USB connection, the printer should be automatically installed.
To install a local printer, proceed as follows:
1 From the Control Panel, select Printers and Other Hardware, then Printers and Faxes.
2 Under Printer Tasks, click Add a printer.
3 Let the Add Printer Wizard guide you through the installation process.
4 Click Finish.
The printer is now installed.
✍ This procedure applies for most, but not for all printers.
I cannot print
❑ Check that all the cables of the printer are properly connected.
❑ Check the cable to see if the pins are bent or missing completely.
❑ Try a printer self test (if available) to see if the printer itself is still working properly. For more
information, please consult the manual supplied with your printer.
❑ Some printers have a specific installation procedure. Please check the manual supplied with your printer.
❑ Check that your printer is correctly configured and that you have up-to-date drivers. If necessary, contact
your dealer.
❑ Try resetting the printer connection, as follows:
1 From the Control Panel, select Printers and Other Hardware, then Printers and Faxes.
2 Click the icon of the printer installed on your computer.
3 In the Printer Tasks menu, which has now expanded, click Set printer properties.

Getting help
Sony VAIO Desktop User Guide
nN
91
4 Have a look through the different tabs and check for abnormalities.
5 Restart your computer.
❑ The default setting for the printer port mode is correct for most printers, but you can try to change the
printer port mode, as follows:
1 Turn on the computer and press <F2> when the Sony logo appears.
The BIOS setup menu screen appears.
2 Use the keyboard’s arrow keys to select the Advanced menu.
3 Select I/O Device Configuration, then press the <Enter> key.
4 Select Parallel Port Mode, then press the <Enter> key.
5 Select a printer port option using the arrow keys, then press <Enter>.
The documentation delivered with your printer should give you the relevant port option.
6 Press <F10> to exit, or use the arrow keys to select Save and Exit..
The message Save configuration changes and exit now? appears.
7 Make sure that Yes is selected and then press <Enter>.
8 Your computer restarts.
When I remove a Memory Stick™, an error message appears
Insert the Memory Stick™ into the slot again and press <Enter>. Wait until the active application finishes,
then remove the Memory Stick™. If the message confirms the ejection of the Memory Stick™, click OK.

Getting help
Sony VAIO Desktop User Guide
nN
92
About digital video captures and DVgate
When I record images to a digital video device using DVgate, my system displays the message 'Recording to
DV device failed. Check the power and cable connections to the devices and try again'
Close all open applications and restart your computer. Frequently recording images to a digital video device
while using DVgate sometimes causes this error.
About i.LINK™ devices
My i.LINK™ device does not appear on the desktop
To see the i.LINK™ device icon on the desktop, proceed as follows:
1 Turn off and disconnect your i.LINK™ device.
2 Reconnect your device.
3 Turn on the power on the device again.
The icon should now appear on the desktop.
The connected i.LINK™ device is not recognised
Disconnect the i.LINK™ device, then connect it again.
You are strongly advised to use only Sony i.LINK™ cables, as using other brands may cause problems with
the i.LINK™ devices.
I cannot establish an i.LINK™ connection between two VAIO computers
❑ You must have administrator rights on your computer to be able to link the two.
❑ Disconnect then reconnect the i.LINK™ cable.
❑ If you still have no connection after waiting for a while, restart both computers.
❑ If either computer has just returned from a power saving mode, the connection may be affected. In this
case, make sure you perform a full restart before connecting them.
❑ Check that both units are in the same workgroup, and that the Sharing option is enabled.

Upgrading your VAIO computer
Upgrading your VAIO computer
The following procedures assume familiarity with the general terminology associated with PCs and with the
regulatory compliance required for modifying electronic equipment.
Observe proper safety precautions at all times.
Your VAIO desktop and memory modules use high precision components and electronic connector
technology. To avoid the invalidation of your guarantee by mishandling, it is recommended that:
You contact your local Sony dealer to install any new internal hardware components.
Sony VAIO Desktop User Guide
You do not install memory modules yourself, if you are not familiar with upgrading memory on a computer.
Please contact VAIO-Link if you need assistance.
!
Always switch the power off before you open the system. Otherwise, damage may occur to the integrated circuits in your computer.
! Electrostatic discharge (ESD) can damage disk drives, add-on cards, and other components. Follow the procedures here only at an ESD workstation.
Otherwise, do not work on a carpeted area and do not handle materials that produce or hold static electricity, such as cellophane wrappers. Ground
yourself by keeping constant contact with an unpainted metal part of the unit while carrying out any of these procedures.
nN
93
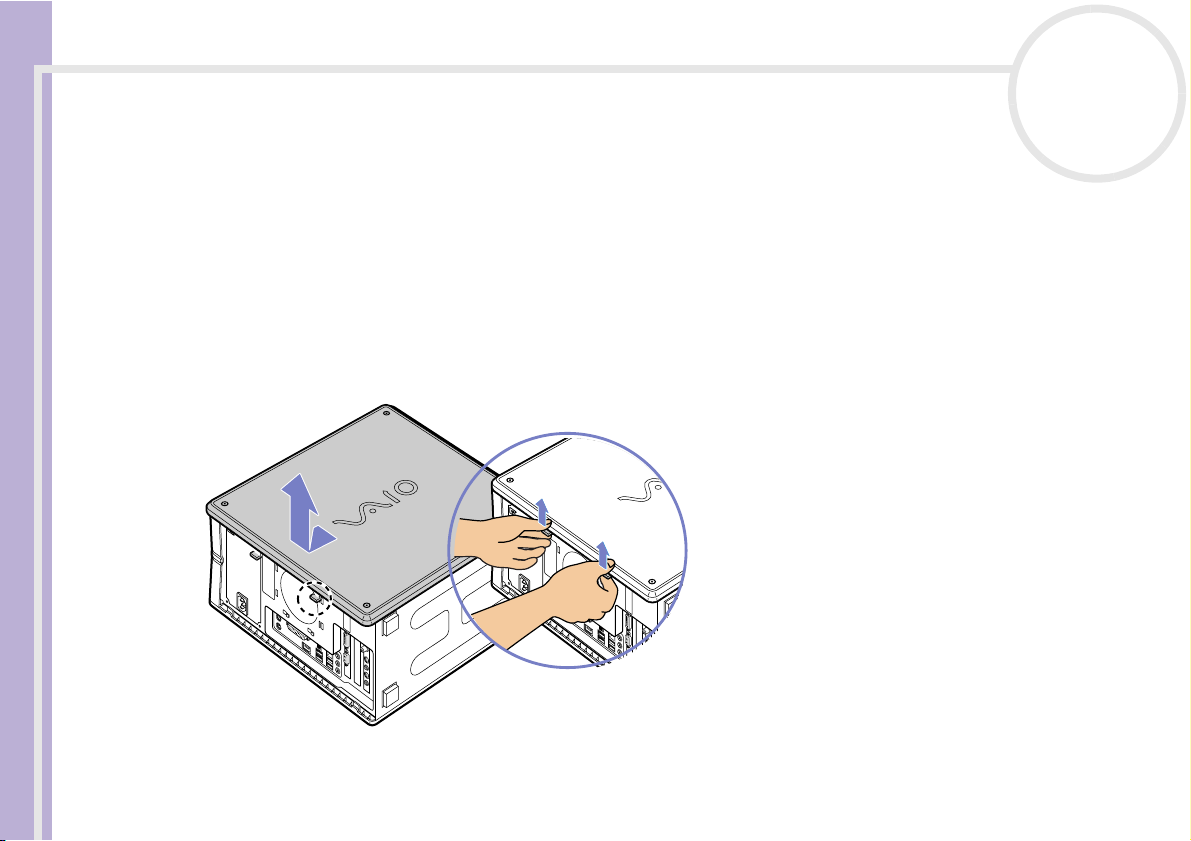
Upgrading your VAIO computer
Opening the side cover
To remove the side panel from the main unit, proceed as follows:
1 Shut down your computer and disconnect all peripheral devices.
2 Unplug the computer from the mains.
3 Wait until the computer cools down.
The inside of the main unit becomes very hot during operation. Wait for about one hour for the
computer to cool down before opening the unit.
Sony VAIO Desktop User Guide
4 With the main unit’s back panel facing you, position the main unit on its left side.
5 Locate the tabs on the side cover, and pull them up until the cover releases.
nN
94
6 Slide the cover away from the unit and set it aside.

Upgrading your VAIO computer
Inserting a PCI add-on board
Your computer has an open PCI expansion slot. This slot enables you to install an add-on board to expand
the functionality of your system.
Add-on board configuration can vary.
To insert an add-on board, proceed as follows:
1 Shut down your computer and turn off all peripheral devices,
such as your printer.
Sony VAIO Desktop User Guide
2 Unplug your computer and any peripheral devices.
3 Remove the side cover as described in Opening the side
cover (page 94).
4 Locate the available expansion slot.
5 Remove the screw, and then remove the slot cover, as shown:
nN
95

Upgrading your VAIO computer
6 Install the add-on board by plugging it into the expansion slot and secure it with the screw from the
expansion slot, as shown:
Sony VAIO Desktop User Guide
nN
96
7 Attach any internal cables that the board requires (see the manual that came with the add-on board).
8 Replace the side cover as described in Closing the side cover (page 101).
9 Reconnect all peripheral devices and the power cord, and then turn on the computer.
✍ Make sure you observe the proper safety precautions when you add boards to your VAIO computer.

Upgrading your VAIO computer
Upgrading memory
In the future, you may want to upgrade the memory installed on your VAIO by replacing / adding memory
modules. However, we recommend that you do not install them yourself unless you are familiar with
upgrading memory on a computer.
For memory upgrades, use only PC2700 (DDR333) DDR-SDRAM DIMM modules.
Be careful when adding memory yourself. Mistakes on installation or removal of the memory module may
cause a malfunction.
Electrostatic discharge can damage electronic components. Before touching a memory expansion board,
Sony VAIO Desktop User Guide
remember the following:
❑ Handle the memory module gently.
❑ The procedures described in this document assume familiarity with the general terminology associated
with personal computers and with the safety practices and regulatory compliance required for using and
modifying electronic equipment.
❑ Disconnect the system from its power source and from any telecommunication links, networks, or
modems before you open the system. Failure to do so may result in personal injury or equipment
damage.
❑ Electrostatic Discharge (ESD) can damage memory modules and other components. Install the memory
module only at an ESD workstation. If such a station is not available, do not work in a carpeted area, and
do not handle materials that produce or hold static electricity (cellophane wrappers, for example).
Ground yourself by maintaining contact with an unpainted metal portion of the chassis while
performing the procedure.
❑ Do not open the memory module package until you are ready to install the module. The package
protects the module from ESD.
❑ Use the special bag delivered with the memory module, or wrap the module in aluminium foil to protect
it from electrostatic discharge.
nN
97

Upgrading your VAIO computer
✍ Do not place the memory module in places subject to:
- Heat sources such as radiators or air ducts,
- Direct sunlight,
- Excessive dust,
- Mechanical vibration or shock,
- Strong magnets or speakers that are not magnetically shielded,
- Ambient temperature of more than +35°C or less than +5°C,
- High humidity.
! Introducing any liquids or any foreign substances or objects into the memory slots, or other internal components of the computer, will result in damage
to the computer and any repairs will be out of warranty.
Sony VAIO Desktop User Guide
nN
98

Upgrading your VAIO computer
Adding / replacing a memory module
If you are not familiar with upgrading memory on a computer, we highly recommend that you contact your
dealer.
To add or change a memory module, proceed as follows:
1 Shut down the computer, unplug it, and remove any peripheral devices. Wait for the computer to cool
down.
2 Open the unit (see Opening the side cover (page 94)).
3 To remove an existing memory module, release the end latches and gently lift out the module, as shown:
Sony VAIO Desktop User Guide
nN
99
4 To insert a new memory module, remove it from its anti-static package, handling it only by the edges.
 Loading...