

Sony RMT-V293A, LX40 User Manual
LX40/LX50/LX60S/LX70S
SERVICE MANUAL
123
456
789
0
g
RMT-V293A/V294A
Chilean Model
SLV-LX50CL/LX50CS/LX70SCL/
LX70SCS
Mexican Model
SLV-LX40MX/LX50MX/LX60SMX/
LX70SMX
Panama Model
Venezuelan Model
SLV-LX50PA/LX50PC/LX50VZ/
LX70SPA/LX70SPC/LX70SVZ
SLV-LX70S
Refer to the SERVICE MANUAL of VHS MECHANICAL
ADJUSTMENT
for MECHANICAL ADJUSTMENTS.
(9-921-748-11)
SPECIFICATIONS
System
Format
VHS NTSC standard
Video recording system
Rotary head helical scanning FM system
Video heads
Double azimuth four heads
Video signal
NTSC color, EIA standards
Tape speed
SP: 33.35 mm/s
EP: 11.11 mm/s
LP: 16.67 mm/s,
playback only
Maximum recording/playback time
9 hrs. in EP mode (with T-180 tape)
Fast-forward and rewind time
Approx. 3 min. (with T-120 tape)
Tuner section
Channel coverage
VHF 2 to 13
UHF 14 to 69
CATV A-8 to A-1, A to W, W+1 to W+84
Antenna
75-ohm antenna terminal for VHF/UHF
Input and outputs
LINE-1 IN and -2 IN
VIDEO IN, phono jack (1 each)
Input signal: 1 Vp-p, 75 ohms, unbalanced, sync
negative
AUDIO IN, phono jacks (1 each) (SLV-LX50
and LX40), (2 each) (SLV-LX70S and LX60S)
Input level: 327 mVrms
Input impedance: more than 47 kilohms
LINE OUT
VIDEO OUT, phono jack (1)
Output signal: 1 Vp-p, 75 ohms, unbalanced,
sync negative
AUDIO OUT, phono jacks (1 each) (SLV-LX50
and LX40), (2 each) (SLV-LX70S and LX60S)
Standard output: 327 mVrms
Load impedance: 47 kilohms
Output impedance: less than 10 kilohms
Timer section
Clock
Quartz locked
Timer indication
12-hour cycle
Timer setting
8 programs (max.)
Power back-up
Built-in self-charging capacitor
Back-up duration: up to 8 hours at a time
General
Power requirements
110 V AC to 240 V AC, 50/60 Hz
(SLV-LX70S (CL/CS) and LX50 (CL/CS))
120 V AC, 60 Hz
(SLV-LX70S (MX/PA/PC/VZ), LX60S (MX),
LX50 (MX/PA/PC/VZ), and LX40 (MX))
Power consumption
17 W
(SLV-LX70S (CL/CS/MX/PA/PC/VZ) and
SLV-LX60S (MX))
S MECHANISM
HiFi model : SLV-LX60S/LX70S
Mono model: SLV-LX40/LX50
16 W
(SLV-LX50 (CL/CS/MX/PA/PC/VZ) and
SLV-LX40 (MX))
Operating temperature
5°C to 40°C (41°F to 104°F)
Storage temperature
–20°C to 60°C (–4°F to 140°F)
Dimensions
Approx. 355 x
including projecting parts and controls
Mass
Approx. 3.6 kg
96 x 288.8 mm (w/h/d)
Supplied accessories
Remote commander (1)
Size AA (R6) batteries (2)
75-ohm coaxial cable with F-type connectors (1)
Audio/video cable (1) (3-phono to 3-phono)
(SLV-LX70S and LX60S only)
Plug adaptor (1)
(SLV-LX70S (CL/CS) and LX50 (CL/CS) only)
Design and specifications are subject to change
without notice
®
ENERGY STAR
As an ENERGY STAR
has determined that this product meets the
ENERGY STAR
is a U.S. registered mark.
®
Partner, Sony Corporation
®
VIDEO CASSETTE RECORDER
— 1 —

SAFETY CHECK-OUT
After correcting the original service problem, perform the following
safety checks before releasing the set to the customer.
1. Check the area of your repair for unsoldered or poorly-soldered
connections. Check the entire board surface for solder splashes
and bridges.
2. Check the interboard wiring to ensure that no wires are
"pinched" or contact high-wattage resistors.
3. Look for unauthorized replacement parts, particularly
transistors, that were installed during a previous repair. Point
them out to the customer and recommend their replacement.
4. Look for parts which, though functioning, show obvious signs
of deterioration. Point them out to the customer and recommend
their replacement.
5. Check the B+ voltage to see it is at the values specified.
SAFETY-RELATED COMPONENT WARNING!!
COMPONENTS IDENTIFIED BY MARK ! OR DOTTED LINE WITH
MARK ! ON THE SCHEMATIC DIAGRAMS AND IN THE PARTS
LIST ARE CRITICAL TO SAFE OPERATION. REPLACE THESE
COMPONENTS WITH SONY PARTS WHOSE PART NUMBERS
APPEAR AS SHOWN IN THIS MANUAL OR IN SUPPLEMENTS
PUBLISHED BY SONY.
— 2 —

TABLE OF CONTENTS
Section Title Page Section Title Page
SERVICE NOTE
1. ERROR CODE INDICATION ........................................... 5
1 GENERAL
Getting Started ...........................................................................1-1
Step 2 : Setting up the remote commander .............................1-1
Step 3 : Hookups .....................................................................1-1
Selecting a language ...............................................................1-4
Setting the clock ...................................................................... 1-4
Presetting channels.................................................................. 1-6
Basic Operations........................................................................ 1-8
Playing a tape ..........................................................................1-8
Recording TV programs.......................................................... 1-8
Recording TV programs using the Dial Timer........................ 1-9
Recording TV programs using the Timer ............................. 1-10
Additional Operations .............................................................1-11
Locking the VCR (Child Lock)............................................. 1-11
Playing/searching at various speeds...................................... 1-11
Setting the recording duration time....................................... 1-12
Checking/changing/canceling timer settings ........................1-12
Recording stereo and bilingual programs ............................. 1-13
Searching using for the begining of a timer recorded
program .........................................................................1-13
Searching using the index function .......................................1-13
Searching using the time search function ............................. 1-14
Skip-searching automatically (Quick view).......................... 1-14
Searching for a selected point on the tape ............................1-14
Adjusting the picture .............................................................1-15
Changing menu options ........................................................ 1-15
Editing with another VCR.....................................................1-16
Additional Information ............................................................1-16
General setup information..................................................... 1-16
Index to parts and controls ....................................................1-18
• MA-405 (4/79)(AUDIO PROCESS)
SCHEMATIC DIAGRAM ............................4-13
• MA-405 (5/7)(TUNER)
SCHEMATIC DIAGRAM ............................4-15
• MA-405 (6/7)(DISPLAY CONTROL)
SCHEMATIC DIAGRAM ............................4-17
• MA-405 (7/7)(POWER SUPPLY)
SCHEMATIC DIAGRAM ............................4-19
• FJ-32 (LINE-2 IN)
PRINTED WIRING BOARD AND
SCHEMATIC DIAGRAM ............................4-23
• DI-80 (DIAL TIMER)
PRINTED WIRING BOARD AND
SCHEMATIC DIAGRAM ............................4-24
5 INTERFACE, IC PIN FUNCTION
DESCRIPTION
5-1. SYSTEM CONTROL — MECHANISM BLOCK
INTERFACE (MA-405 BOARD IC160) ....................... 5-1
5-2. SYSTEM CONTROL — SERVO PERIPHERAL
CIRCUIT INTERFACE (MA-405 BOARD IC160) ...... 5-1
5-3. SYSTEM CONTROL — SYSTEM CONTROL
PERIPHERAL CIRCUIT INTERFACE
(MA-405 BOARD IC160).............................................. 5-2
5-4. SYSTEM CONTROL AND RF MODULATOR
— INPUT SELECTION BLOCK INTERFACE
(MA-405 BOARD IC160).............................................. 5-2
5-5. SYSTEM CONTROL — VIDEO/RP BLOCK
INTERFACE (MA-405 BOARD IC160) ....................... 5-2
5-6. SYSTEM CONTROL — AUDIO BLOCK INTERFACE
(MA-405 BOARD IC160).............................................. 5-2
5-7. SERVO/SYSTEM CONTROL MICROPROCESSOR
PIN FUNCTIONS (MA-405 BOARD IC160)............... 5-3
2 DISASSEMBLY
2-1. CASE, FRONT PANEL BLOCK ASSEMBLY ..............2-1
2-2. DI-80 BOARD, FJ-32BOARD........................................ 2-1
2-3. REAR PANEL .................................................................2-2
2-4. MA-405 BOARD ............................................................ 2-2
2-5. MECHANISM DECK ..................................................... 2-3
2-6. INTERNAL VIEWS........................................................ 2-4
2-7. CIRCUIT BOARDS LOCATION ...................................2-5
3 BLOCK DIAGRAMS
3-1. OVERALL BLOCK DIAGRAM ....................................3-1
3-2. VIDEO BLOCK DIAGRAM ..........................................3-3
3-3. SERVO/SYSTEM CONTROL BLOCK DIAGRAM ..... 3-5
3-4. TUNER BLOCK DIAGRAM .........................................3-7
3-5. AUDIO BLOCK DIAGRAM ..........................................3-9
3-6. POWER BLOCK DIAGRAM....................................... 3-11
4 PRINTED WIRING BOARDS AND
SCHEMATIC DIAGRAMS
4-1. FRAME SCHEMATIC DIAGRAM................................4-3
4-2. PRINTED WIRING BOARDS AND SCHEMATIC
DIAGRAMS .................................................................... 4-5
• MA-405 (VIDEO, AUDIO, SERVO/SYSTEM
CONTROL, TUNER, POWER)
PRINTED WIRING BOARD .........................4-5
• MA-405 (1/7)(REC/PB HEAD AMP)
SCHEMATIC DIAGRAM ..............................4-7
• MA-405 (2/7)(Y/C, AUDIO PROCESS)
SCHEMATIC DIAGRAM ..............................4-9
• MA-405 (3/7)(SERVO/SYSTEM CONTROL)
SCHEMATIC DIAGRAM ............................4-11
6 ADJUSTMENTS
6-1 MECHANICAL ADJUSTMENTS .................................6-1
6-2. ELECTRICAL ADJUSTMENTS ................................... 6-1
2-1. PREPARATION BEFORE ADJUSTMENT ...................6-1
2-1-1.Equipment Required ..................................................... 6-1
2-1-2.Equipment Connection ................................................. 6-1
2-1-3.Set-up of Adjustment ....................................................6-1
2-1-4.Alignment Tape............................................................. 6-1
2-1-5.Input/Output Levels and Impedance .............................6-2
2-1-6.Adjustment Sequence ................................................... 6-2
2-2. POWER SUPPLY CHECK .............................................6-2
2-2-1.Output Voltage Check (MA-405 Board) ......................6-2
2-3. SERVO SYSTEM CHECK .............................................6-3
2-3-1.RF Switching Position Adjustment (MA-405 Board)...6-3
2-4. AUDIO SYSTEM ADJUSTMENT.................................6-3
2-4-1.Hi-Fi Audio System Adjustment (Hi-Fi model only) ...6-3
2-4-2.HiFi Switching Position Adjustment (MA-405 Board) 6-4
2-4-3. Normal Audio System Adjustment ............................... 6-4
2-4-4.Audio Level and Distortion Check ............................... 6-4
2-4-5.Audio Noise Check .......................................................6-4
2-4-6.ACE Head Adjustment..................................................6-4
2-4-7.E-E Output Level Check ...............................................6-4
2-4-8.Frequency Response Check ..........................................6-4
2-5. ADJUSTING PARTS LOCATION DIAGRAM ............. 6-6
7 REPAIR PARTS LIST
7-1. EXPLODED VIEWS ......................................................7-1
7-1-1.FRONT PANEL AND UPPER CASE SECTION ........7-1
7-1-2.CHASSIS SECTION .................................................... 7-2
7-1-3.MECHANISM DECK SECTION-1 .............................7-3
7-1-4.MECHANISM DECK SECTION-2 .............................7-4
7-1-5.MECHANISM DECK SECTION-3 .............................7-5
7-2. ELECTRICAL PARTS LIST ..........................................7-6
— 3 —
SERVICE NOTE
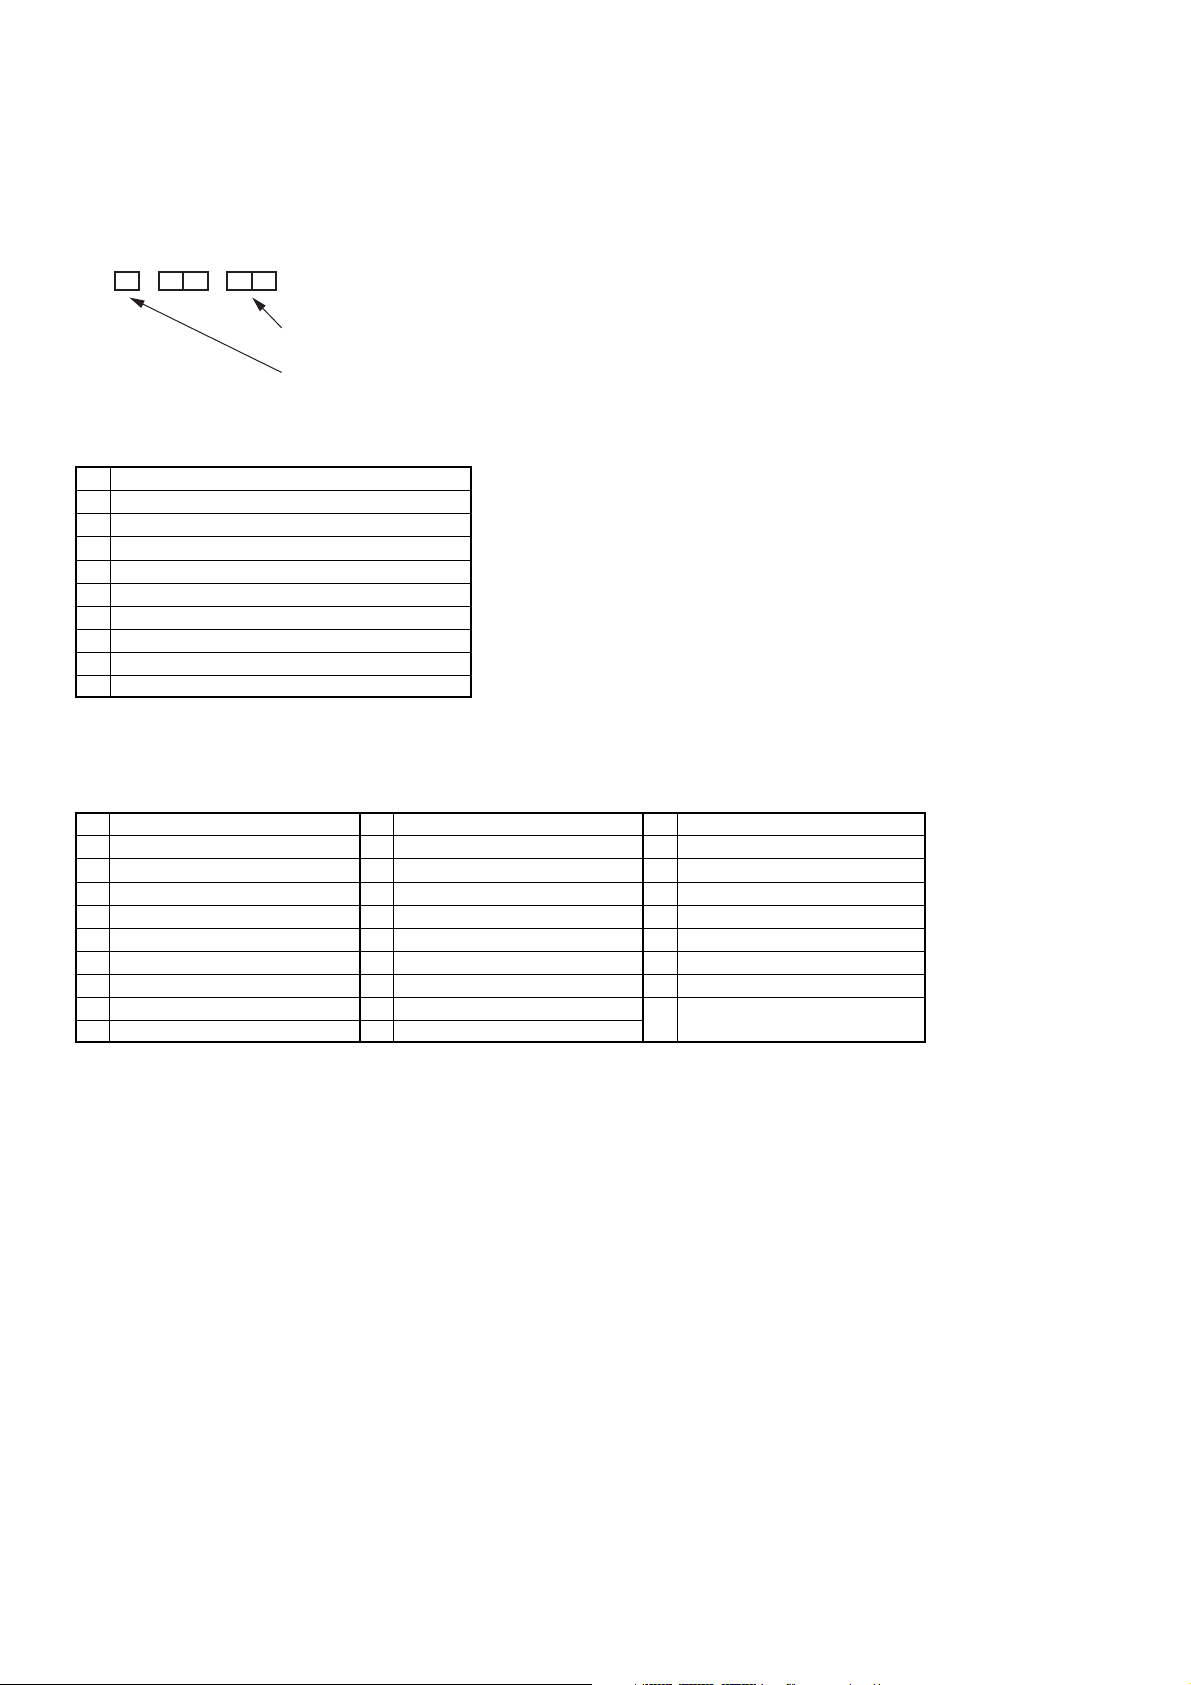
1. ERROR CODE INDICATION
• Error codes are indicated using the lower 5 digits in the fluorescent display tube.
“At this time, Colon “:” between character is not indicated.”
Mode code indication when the error has occurred.
Error code
ERROR CODE
0 No error
1 Cam encoder error Loading direction
2 Cam encoder error Unloading direction
3 T reel error
4 S reel error
5 Capstan error
6 Drum error
7 Error on initializing
8 Cassette loading error
9 Reserve
MODE CODE
0 Power-on eject 10 FWD x1 20 REW play
1 Power-on initial 11 FWD x2 21 Cas. loading
2 Power-off eject 12 CUE 22 Tape loading
3 Power-off stop 13 PB-pause 23 Power-off loading
4 FF 14 RVS-pause 24 Mecha. error (Power on)
5 REW 15 RVS x1 25 Power-on eject initial
6 REC 16 RVS x2 26 Power-off eject initial
7 REC- pause 17 REV 27 APC REC
8 Power-on stop 18 Power-off initial 28 Cas. loading
9 PB 19 Mecha. error (Power off) (No auto PB check)
— 4 —
SLV-LX40/LX50/LX60S/LX70S
6
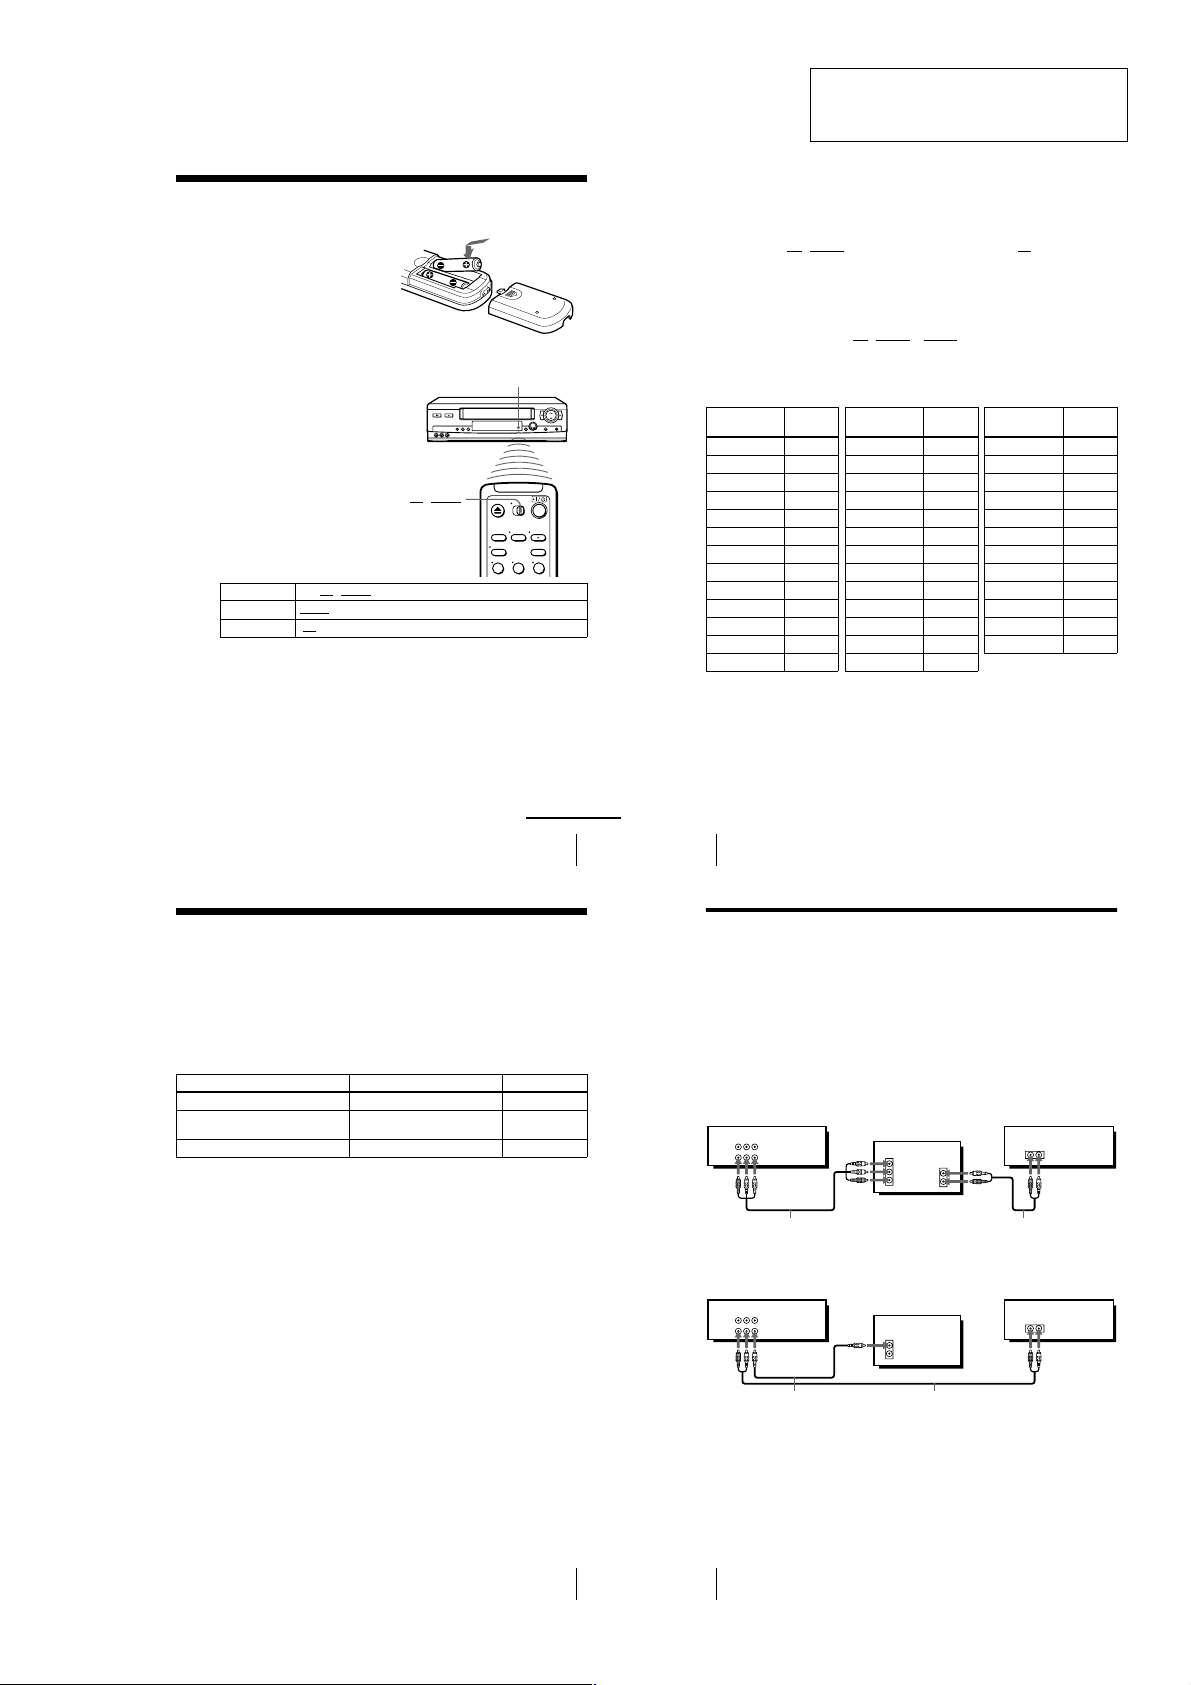
Setting up the remote commander
Controlling other TVs with the remote commander
(SLV-LX70S and LX60S only)
The remote commander is preprogrammed to control non-Sony TVs . If your TV is
listed in the following table, set the appropriate manufacturer’s code number.
Now you can use the ?/1, VOL +/–, CH +/–, and TV/VIDEO buttons to control your
TV. You can also use the buttons marked with a dot (•) to control a Sony TV. To
control the VCR, reset •TV
/ VIDEO to VIDEO.
Code numbers of controllable TVs
If more than one code number is listed, try entering them one at a time until you find
the one that works with your TV.
Notes
• If you enter a new code nu mber, the code number previously entered will be erased.
• If the TV uses a different remote control system from the one programmed to w ork with the
VCR, you cannot control your TV with the remote commander.
• When you replace the batter ies of the remote commander, the code number may change. Set
the appropriate code number every tim e you replace the batteries.
• When you press the AUDIO MONITOR button, your TV’s menu may appear on the TV
screen. To exit the TV menu, press the MENU button on the TV remote commander or wait
until the menu disappears auto matically.
1
Set •TV / VIDEO at the top of the remote commander to •TV.
2
Hold down ?/1, and enter your TV’s code number using the number buttons.
Then release ?/1.
TV brand
Code
number
Sony 01
Akai 04
AOC 04
Centurion 12
Coronado 03
Curtis-Mathes 12
Daytron 12
Emerson 03, 04, 14
Fisher 11
General Electric 06, 10
Gold Star 03, 04, 17
Hitachi 02, 03
J.C.Penney 04, 12
JVC 09
KMC 03
Magnavox 03, 08, 12
Marantz 04, 13
MGA/Mitsubishi
04, 12, 13, 17
NEC 04, 12
Panasonic 06, 19
Philco 03, 04
Philips 08
Pioneer 16
Portland 03
Quasar 06, 18
Radio Shack 05, 14
TV brand
Code
number
RCA 04, 10
Sampo 12
Sanyo 11
Scott 12
Sears 07, 10, 11
Sharp 03, 05, 18
Sylvania 08, 12
Teknika 03, 08, 14
Tosh ib a 07
Wards 03, 04, 12
Yor x 12
Zenith 15
TV brand
Code
number
8
Hookups
Audio/video (A/V) hookup
If your TV has audio/video (A/V) input jacks, you will get a better picture and sound
if you hook up your VCR using these connections. If your TV doesn’t have A/V
inputs, see the following pages for antenna or cable hookups.
If you’re not planning to use your VCR to record programs, you’re finished setting up
the VCR after you’ve made the connections shown on pages 8 and 9. If you want to
record regular or cable TV programs, complete these connections first, and then go to
the following pages for antenna or cable hookups.
For SLV-LX70S and LX60S
For a true “home theater” experience, you should connect the audio outputs of your
VCR or TV to your stereo system.
A Use this hookup if your TV has stereo jacks
B Use this hookup if your TV doesn’t have stereo jacks
Notes
• If you don’t have a stereo receiver, connect the white LINE OUT/AUDIO L jack to the
AUDIO IN jack on your TV.
• To play a tape in stereo, you must use th e A/V connection.
• If you use the Trinitron TV Synchro Play function (see page 34), the A/V connection is
necessary. (If your TV has two or more inputs, connect the audio/video cable to the VIDEO
IN 1 jacks.)
IN
VIDEO
AUDIO
AUDIO OUT
AUX IN
LINE-1 IN
LINE OUT
AUDIO VIDEO
Audio/video cable (supplied)
TV
Audio cable (not supplied)
Stereo receiverVCR
VIDEO
AUDIO
IN
AUX IN
LINE-1 IN
LINE OUT
AUDIO VIDEO
Video cable (not supplied)TVAudio cable (not supplied)
Stereo receiverVCR
Step 2 : Setting up the remote commander
Inserting the batteries
Insert two size AA (R6) batteries
by matching the + and – on the
batteries to the diagram inside the
battery compartment.
Insert the negative (–) end first,
then push in and down until the
positive (+) end clicks into
position.
Using the remote
commander
You can use this remote
commander to operate this VCR
and a Sony TV. Buttons on the
remote commander marked with a
dot (•) can be used to operate your
Sony TV.
•TV / VIDEO
To operate Set •TV / VIDEO to
the VCR VIDEO
a Sony TV •TV
Notes
• With normal use, the batteries should last about three to six months.
• If you do not u se the remote commander for an extended period of time, remove the batteries
to avoid possible damage from battery leakage.
• Do not use a new batt ery with an old one.
• Do not use different type s of batteries.
and point at the remote sensor at the VCR
and point at the remote sensor at the TV
Remote sensor
123
SECTION 1
GENERAL
This section is a translated version of
Instruction Manual SLV-LX70S model
Part number: 3-065-284-12
Step 3 : Hookups
Selecting the best hookup option
There are many ways in which your VCR can be hooked up. To hook up your VCR
so that it works best for you, first scan through the table below. Then use the
accompanying diagrams and procedur es on the following pages to set up your VCR.
If your TV has audio/video inputs, refer to pages 8 and 9 for audio/video (A/V)
hookup. Then foll ow one of the hookups below. If your TV doesn’t have A/V inputs,
go directly to one of the hoo kups below.
If you have Use Refer to
Antenna only, no cable TV Hookup 1 Pages 10 to 11
No cable box or cable box with only a few
scrambled channels
Cable box with many scrambled channels Hookup 3 Pages 15 to 17
After you’ve completed the connections, follow the instructions for setup. During
setup, if you need more details o n the procedure described, page numbers are
provided where you can find comple te, step-by-step instructions.
After you’ve completed the setup, you’re ready to use your VCR. Procedures differ
depending on the hookup you used. For an overview, refer to “Qu ick reference to
using the VCR” on the back cover.
Before you get started
• Turn off the power to all equipment.
• Do not connect the AC power cords until all of the connections are completed.
• Be sure to make connections firmly. Loose connection s may cause picture
distortion.
• If your TV doesn’t match any of the examples provided, see your nearest Sony
dealer or qualified technician.
continued
Setting up the remote commander
Hookup 2 Pages 12 to 14
Hookups
5
7
1-1
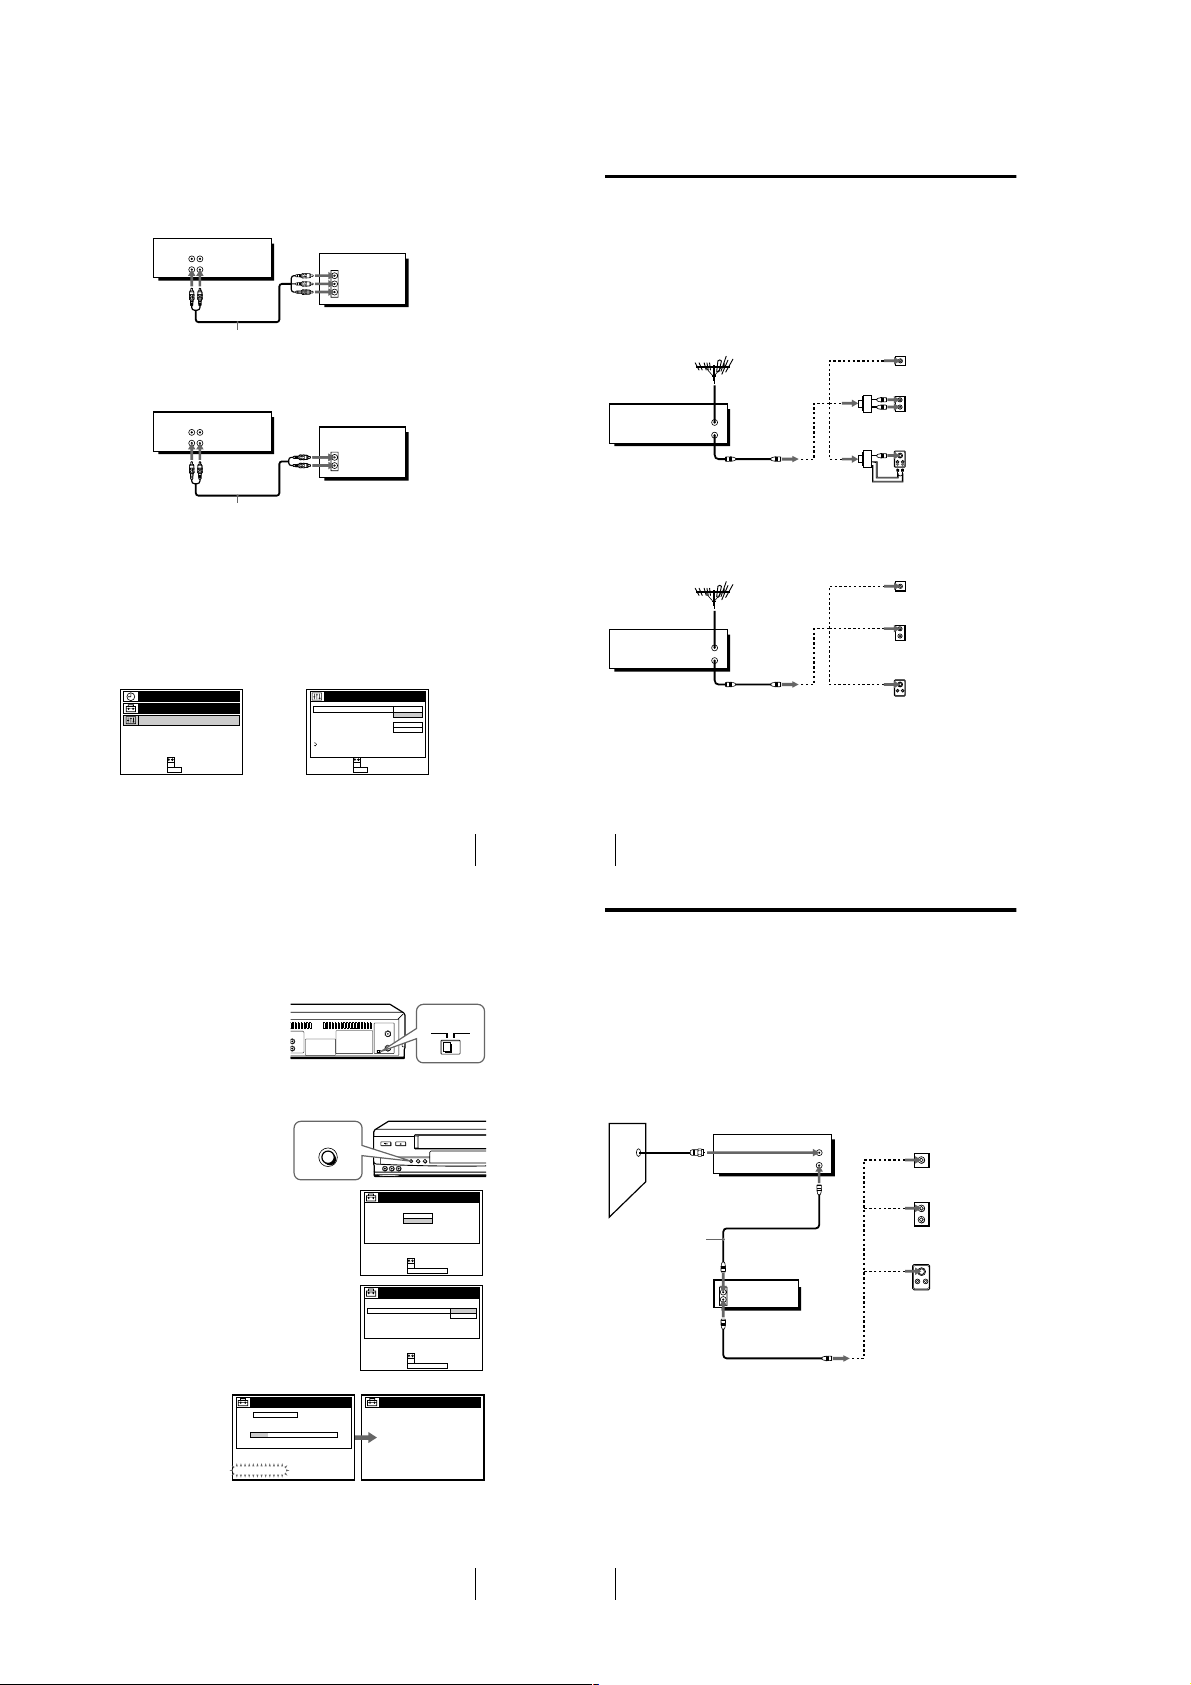
For SLV-LX50 and LX40
s
A Use this hookup if your TV has stereo jacks
VCR
LINE-1 IN
LINE OUT
AUDIO VIDEO
TV
IN
VIDEO
AUDIO
Audio/video cable (not supplied)
B Use this hookup if your TV doesn’t have stereo jacks
VCR
LINE-1 IN
LINE OUT
AUDIO VIDEO
TV
IN
VIDEO
AUDIO
Audio/video cable (not supplied)
Note
• If you use the Trinitron TV Synchro Play function (see page 34), the A/V connec tion is
necessary. (If your TV has two or more i nputs, connect the audio/video cable to t he VIDEO
IN 1 jacks.)
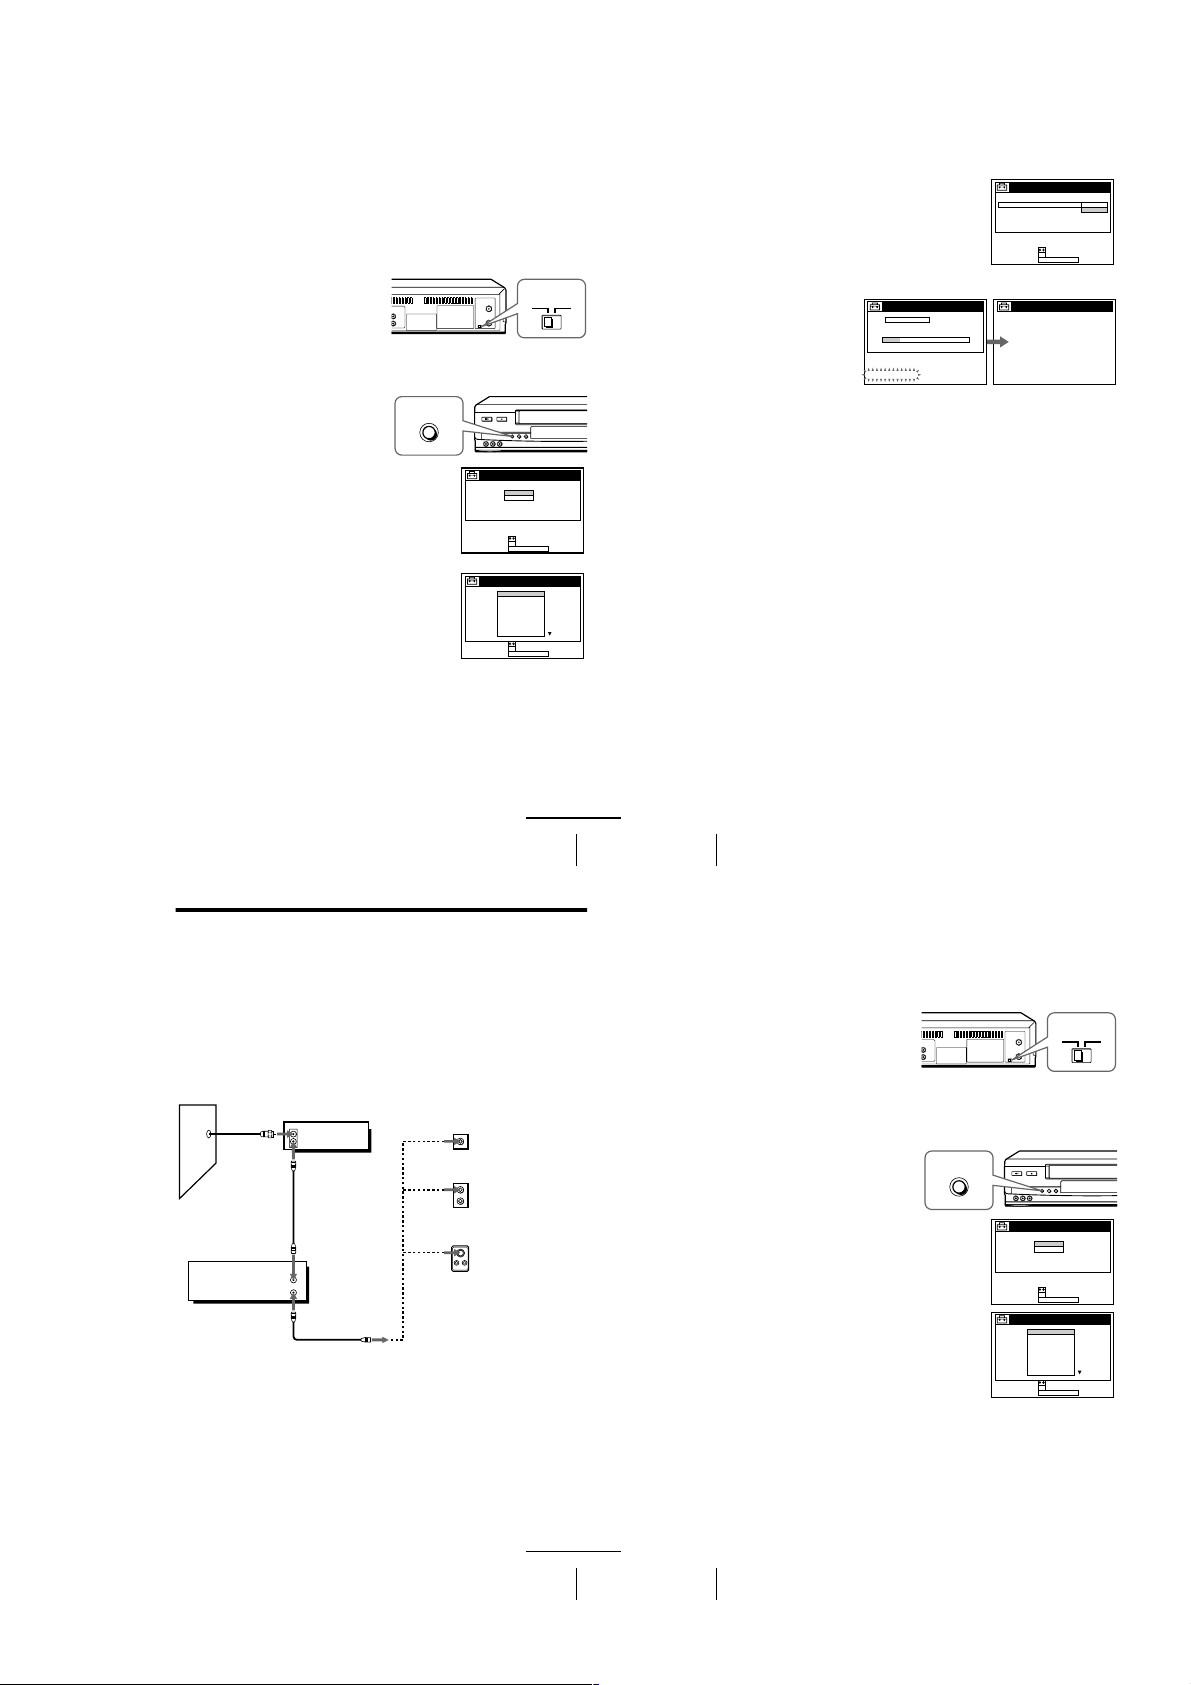
Completing A/V hookup
After you’ve connected your TV and completed antenna or cable hookup, return to
this procedure to complete VCR set up. This will prevent unwanted noise in the RF
channel.
Press MENU and select
OPCIONES.
PROG. / VERIF.
AJUSTES
OPCIONES
SELECCIONAR :
AJUSTAR :
OK
MENUPARA SALIR :
Set SELEC. AUTO. ANT.
to NO and press OK.
SELEC. AUTO. ANT.
ESTEREO AUTO.
SINTONIZ. AUDIO
SELC. DE CINTA
VEL. AUTO. CINTA
,
PRÓXIMA
VOLVER
SELECCIONAR :
AJUSTAR :
For details, see page 62.
OPCIONES
OK
MENUPARA SALIR :
Hookup 1
Antenna hookup
Make the following connections if you’re using an antenna (if you don’t have cable
TV).
A Use this hookup if you’re using:
• VHF/UHF antenna (you get channels 2–13 and channels 14 and higher)
• UHF-only antenna (you get channels 14 and higher)
• Separate VHF and UHF antennas
Rear of TV
VHF/UHF
Match the type of
A
VHF
B
UHF
VHF
C
UHF
Rear of TV
VHF/UHF
A
VHF
B
UHF
VHF
C
UHF
connector on your
TV: A, B, or C.
Match the type of
connector on your
TV: A, B, or C.
For connector type
B and C, no UHF
connection is
required.
VCR
VHF/UHF
IN
OUT
B Use this hookup if you’re using a VHF-only antenna (you get
channels 2–13 only)
VCR
VHF/UHF
IN
OUT
1PÁGINA
SI
NO
AUTO
SI
If you cannot connect your antenna cable to the VCR directly
If your antenna cable is a flat cable (300-ohm twin lead cable), attach an external
antenna connector (not suppl ied) so you can connect the cable to the VHF/UHF IN
connector. If you have separate cables for VHF and UHF antennas, you should use a
U/V band mixer (not supplied). For details, see page 68 .
or
or
or
or
Hookup 1 : VCR setup
Before you start…
• Turn on the VCR and the TV.
• Press TV/VIDEO to display the VIDEO indicator in the VCR’s display window.
Set the RF UNIT switch to CH3
1
or CH4, whichever channel is not
used in your area. If bot h are
used, set the switch to either
channel. For details, see page 67.
If you made A/V connections
(from page 8), you do not need to
adjust the RF UNIT switch.
Change the on-screen display language t o English, if desired. For details, see
2
page 18.
Press EASY SET UP on the VCR.
3
1 The RELOJ menu appears. Select MANUAL
and press OK. Then set the clock. For details,
see page 24.
2 The SINTONIZADOR menu appears. Set
ANTENA/CABLE to ANT and press OK.
For details, see page 26.
3 The AJUSTE AUTO. starts.
AJUSTE
SINTONIZADOR
AJUSTE AUTO.
EJECUTANDO
EASY SET UP
CH 2 4
SELECCIONAR :
SIGUIENTE :
ANTENA / CABLE
SELECCIONAR :
SIGUIENTE :
AJUSTE
RELOJ
AUTO
MANUAL
OK
EASY SET UPCANCELAR :
AJUSTE
SINTONIZADOR
OK
EASY SET UPCANCELAR :
AJUSTE
AJUSTE CONCLUIDO
Hookups
RF UNIT
CH3
CH4
ANT
CABLE
9
10
Hookups
Hookup 2
You have no cable box, or a cable box with only a few
scrambled channels
Recommended use
Use this hookup if you do n ot have a cable box. Also use this hookup if your c able
system scrambles only a few channels.
What you can do with this hookup
• Record any unscrambled channel by selecting the channel on the VCR
What you can’t do
• Record scrambled channels that require a cable box
Cable box
IN
OUT
VCR
VHF/UHF
OUT
Rear of TV
IN
VHF/UHF
Match the
A
type of
VHF
UHF
VHF
connector on
your TV: A,
B, or C.
B
For
connector
types B and
C, no UHF
connection
C
is required.
or
or
UHF
Wall
Connect this cable
directly to your TV
if you don’t have a
cable box.
POR FAVOR ESPERE
You have now completed hookup.
11
Hookups
12
Hookups
1-2
Hookup 2 : VCR setup
14
Hookups
You have now completed hookup.
Automatic clock setting
Once you’ve set up the VCR, it automatically sets the clock the first time you turn off
the VCR. “ACS” (Auto Clock Set) wi ll flash in the display window and search for a
time signal provided by Sony Entertainment Television (SETV). After that,
whenever you turn off the VCR, it checks the time and adjusts the clock, even for
Daylight Saving Time.
If you want to use the timer to record right away, or if the cable TV station in your
area does not broadcast SETV, or if SETV in your area does not carry time signals,
set the clock manually. For details, see page 23.
Notes
• If the clock is not set, “ACS ” will flash in the display window whenever the VCR is turned
off. During this time, the VCR will search for a time signal.
• The Daylight Saving Time start and end days may differ depending on the year. To ensure
correct switch ing, select SI or NO for the HORARIO VERANO setting (page 22).
3 The SINTONIZADOR menu appears. Set
ANTENA/CABLE to CABLE and press OK.
For details, see page 26.
4 The AJUSTE AUTO. starts.
AJUSTE
SINTONIZADOR
ANTENA / CABLE
CABLE
ANT
SIGUIENTE :
SELECCIONAR :
OK
EASY SET UPCANCELAR :
AJUSTE
AJUSTE CONCLUIDO
POR FAVOR ESPERE
AJUSTE
SINTONIZADOR
AJUSTE AUTO.
EJECUTANDO
CH 2 4
16
Hookups
Hookup 3 : VCR setup
Before you start…
• Turn on the VCR and the TV.
• Press TV/VIDEO to display the VIDEO indicator in the VCR’s display window.
1
Set the RF UNIT switch to CH3
or CH4, whichever channel is not
used in your area. If both are
used, set the switch to either
channel. For details, see page 67.
If you made A/V connections
(from page 8), you do not need to
adjust the RF UNIT switch.
2
Turn on your cable box.
3
Change the on-screen display language to English, if desired. For details, see
page 18.
4
Press EASY SET UP on the VCR.
1 The RELOJ menu appears. Se lect AUTO and
press OK. For details, see page 20.
2 The PAIS/ZONA DE HORARIO menu
appears. Select the country you want to set
and press OK. You can select the following
countries:
BELIZE y BOLIVIA y CHILE y
COLOMBIA y COSTA RICA y CUBA
y REP. DOMIN. y ECUADOR y
EL SALVADR y GUATEMALA y
GUYANA y HONDURAS y JAM AICA
y MEX-CENTRO y MEX-MONT. y
ME X- PAC IF. y MEX-S. ESTE y
NICARAGUA y PANAM A y PERU y
SURINAM y TRIN. & TOB. y
VENEZUELA
CH3
RF UNIT
CH4
EASY SET UP
SIGUIENTE :
SELECCIONAR :
OK
AUTO
MANUAL
AJUSTE
RELOJ
EASY SET UPCANCELAR :
SIGUIENTE :
SELECCIONAR :
OK
BELIZE
BOLIVIA
CHILE
COLOMBIA
COSTA RICA
CUBA
REP. DOMIN.
ECUADOR
EL SALVADR
AJUSTE
PAIS / ZONA DE HORARIO
EASY SET UPCANCELAR :
Before you start…
• Turn on the VCR and the TV.
• Press TV/VIDEO to display the VIDEO indicator in the VCR’s display window.
Set the RF UNIT switch to CH3
1
or CH4, whichever channel is not
used in your area. If bot h are
used, set the switch to either
channel. For details, see page 67.
If you made A/V connections
(from page 8), you do not need to
adjust the RF UNIT switch.
Change the on-screen display language t o English, if desired. For details, see
2
page 18.
Press EASY SET UP on the VCR.
3
EASY SET UP
RF UNIT
CH3
CH4
1 The RELOJ menu app ears. Select AUTO and
press OK. For details, see page 20.
2 The PAIS/ZONA DE HORARIO menu
appears. Select the country you want to set
and press OK. You can select the following
countries:
BELIZE y BOLIVIA y CHILE y
COLOMBIA y COSTA RICA y CUBA
y REP. DOMIN. y ECUADOR y
EL SALVADR y GUATEMALA y
GUYANA y HONDURAS y JAM AICA
y MEX-CENTRO y MEX-MONT. y
ME X- PAC IF. y MEX-S. ESTE y
NICARAGUA y PANA MA y PERU y
SURINAM y TRIN. & TOB. y
VENEZUELA
Hookup 3
Connecting a cable box with many scrambled channels
Recommended use
Use this hookup if your cable system scrambles all or most channels.
What you can do with this hookup
• Record any channel by selecting the channe l on the cable box
What you can’t do
• Record with the cable box turned off
• Record one channel while wat ching another channel
Wall
VCR
VHF/UHF
IN
OUT
Cable box
IN
OUT
or
or
SELECCIONAR :
SIGUIENTE :
SELECCIONAR :
SIGUIENTE :
Rear of TV
VHF/UHF
VHF
UHF
VHF
UHF
AJUSTE
RELOJ
AUTO
MANUAL
OK
EASY SET UPCANCELAR :
AJUSTE
PAIS / ZONA DE HORARIO
BELIZE
BOLIVIA
CHILE
COLOMBIA
COSTA RICA
CUBA
REP. DOMIN.
ECUADOR
EL SALVADR
OK
EASY SET UPCANCELAR :
Match the type of
A
connector on your
TV: A, B, or C.
For connector
B
types B and C, no
UHF connection
is required.
C
continued
Hookups
continued
Hookups
13
15
1-3

3 The SINTONIZADOR menu appears. Set
ANTENA/CABLE to ANT and press OK.
For details, see page 26.
4 The AJUSTE AUTO. starts.
AJUSTE
SINTONIZADOR
AJUSTE AUTO.
EJECUTANDO
POR FAVOR ESPERE
Automatic clock setting
Once you’ve set up the VCR, it automatically sets the clock the first time you turn off
the VCR. “ACS” (Auto Clock Set) will fl ash in the display window and search for a
time signal provided by Sony Entertainment Television (SETV). After that,
whenever you turn off the VCR, it checks the time and adjusts the clock, even for
Daylight Saving Time.
To use the Auto Clock Set feature with this hookup, you need to manually select
SETV:
Tune the cable box to SETV.
1
Select AUTO in the RELOJ menu to turn on the Auto Clock Set feature.
2
Turn off the VCR. It automatically sets the clock and adjusts for Daylight Saving
3
Time by picking up the time signal.
CH 2 4
AJUSTE
SINTONIZADOR
ANTENA / CABLE
SELECCIONAR :
SIGUIENTE :
AJUSTE
AJUSTE CONCLUIDO
ANT
CABLE
OK
EASY SET UPCANCELAR :
You have now completed hookup
If you want to use the timer to record right away, or if the cable TV station in your
area does not broadcast SETV, or if SETV in your area does not carry time signals,
set the clock manually. For details, see page 23.
Notes
• To use the Auto Clock Set feature, leave the cable box on.
• If the clock is not set, “ACS” will flash in the display window whenever the VCR is turned
off. During this time, the VCR will search for a time signal.
• The Daylight Saving Time start an d end days may differ depending on the year. To ensure
correct switching, select SI or NO for the HORARIO VERANO s etting (page 22).
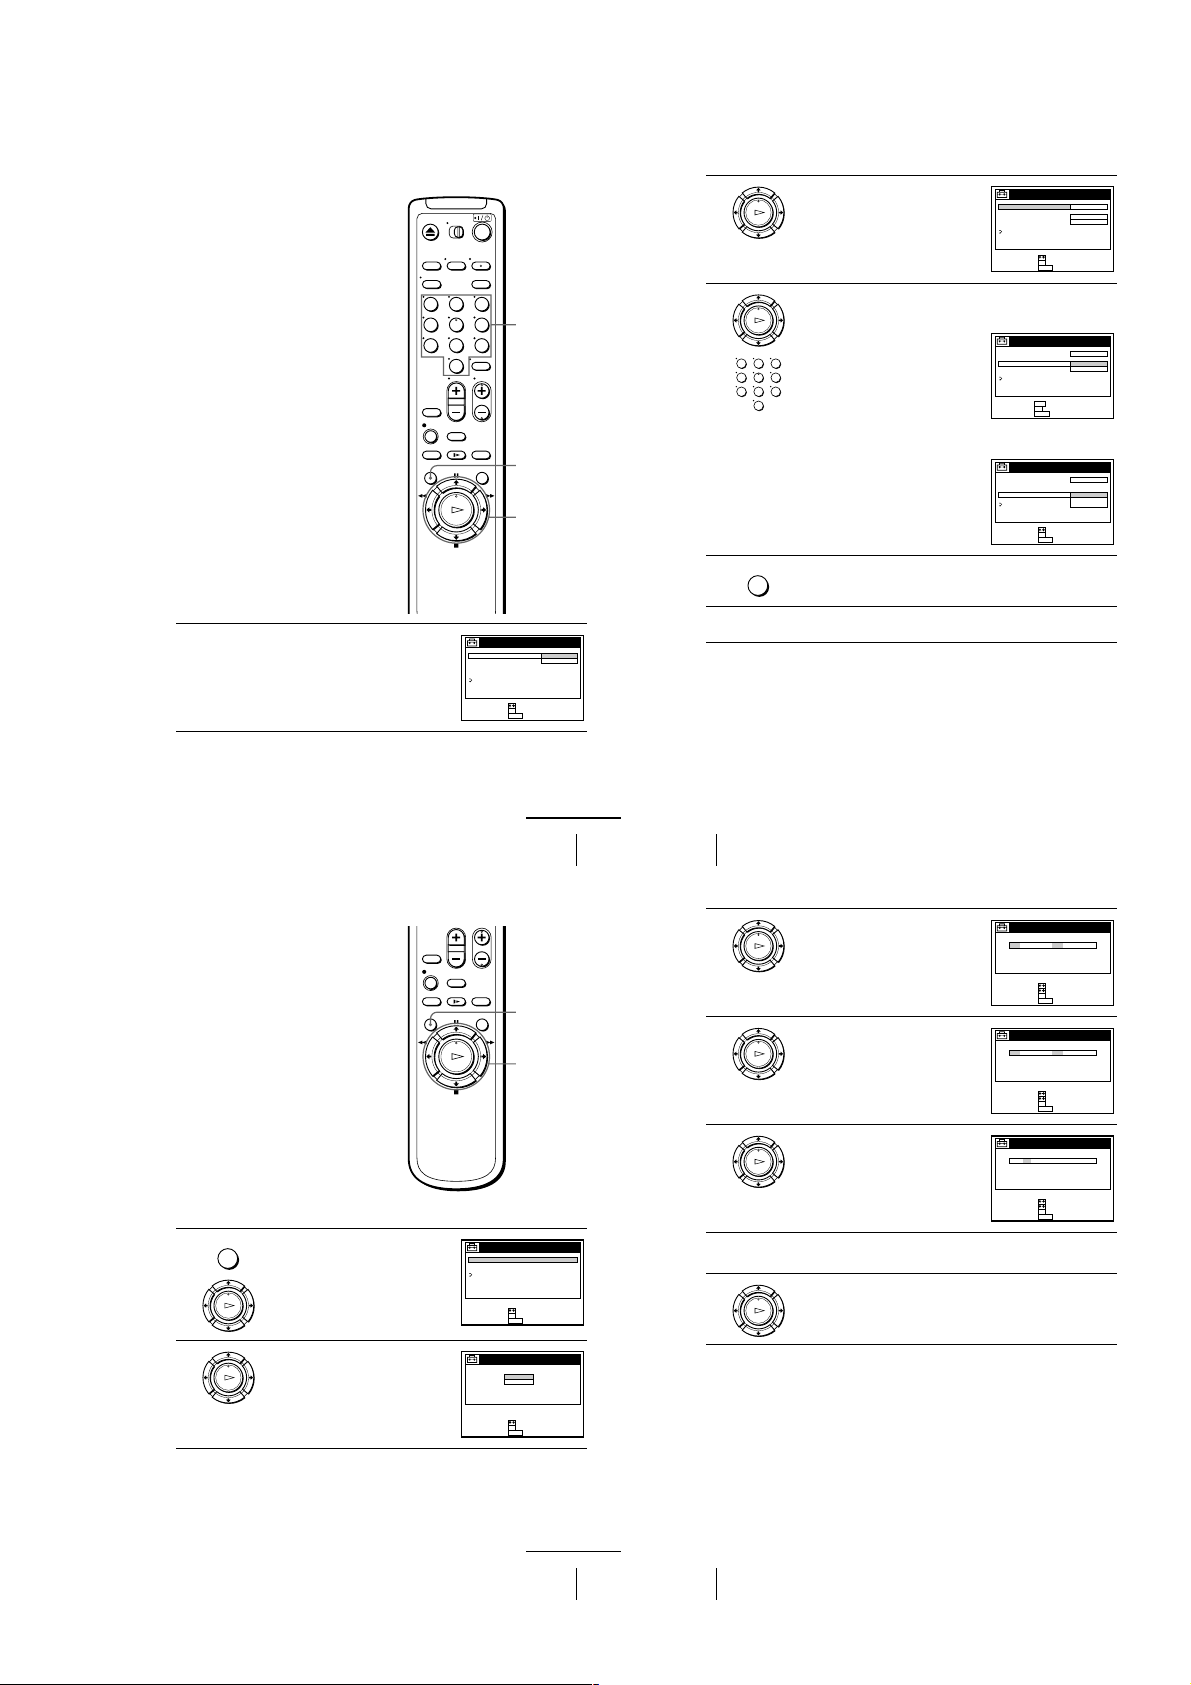
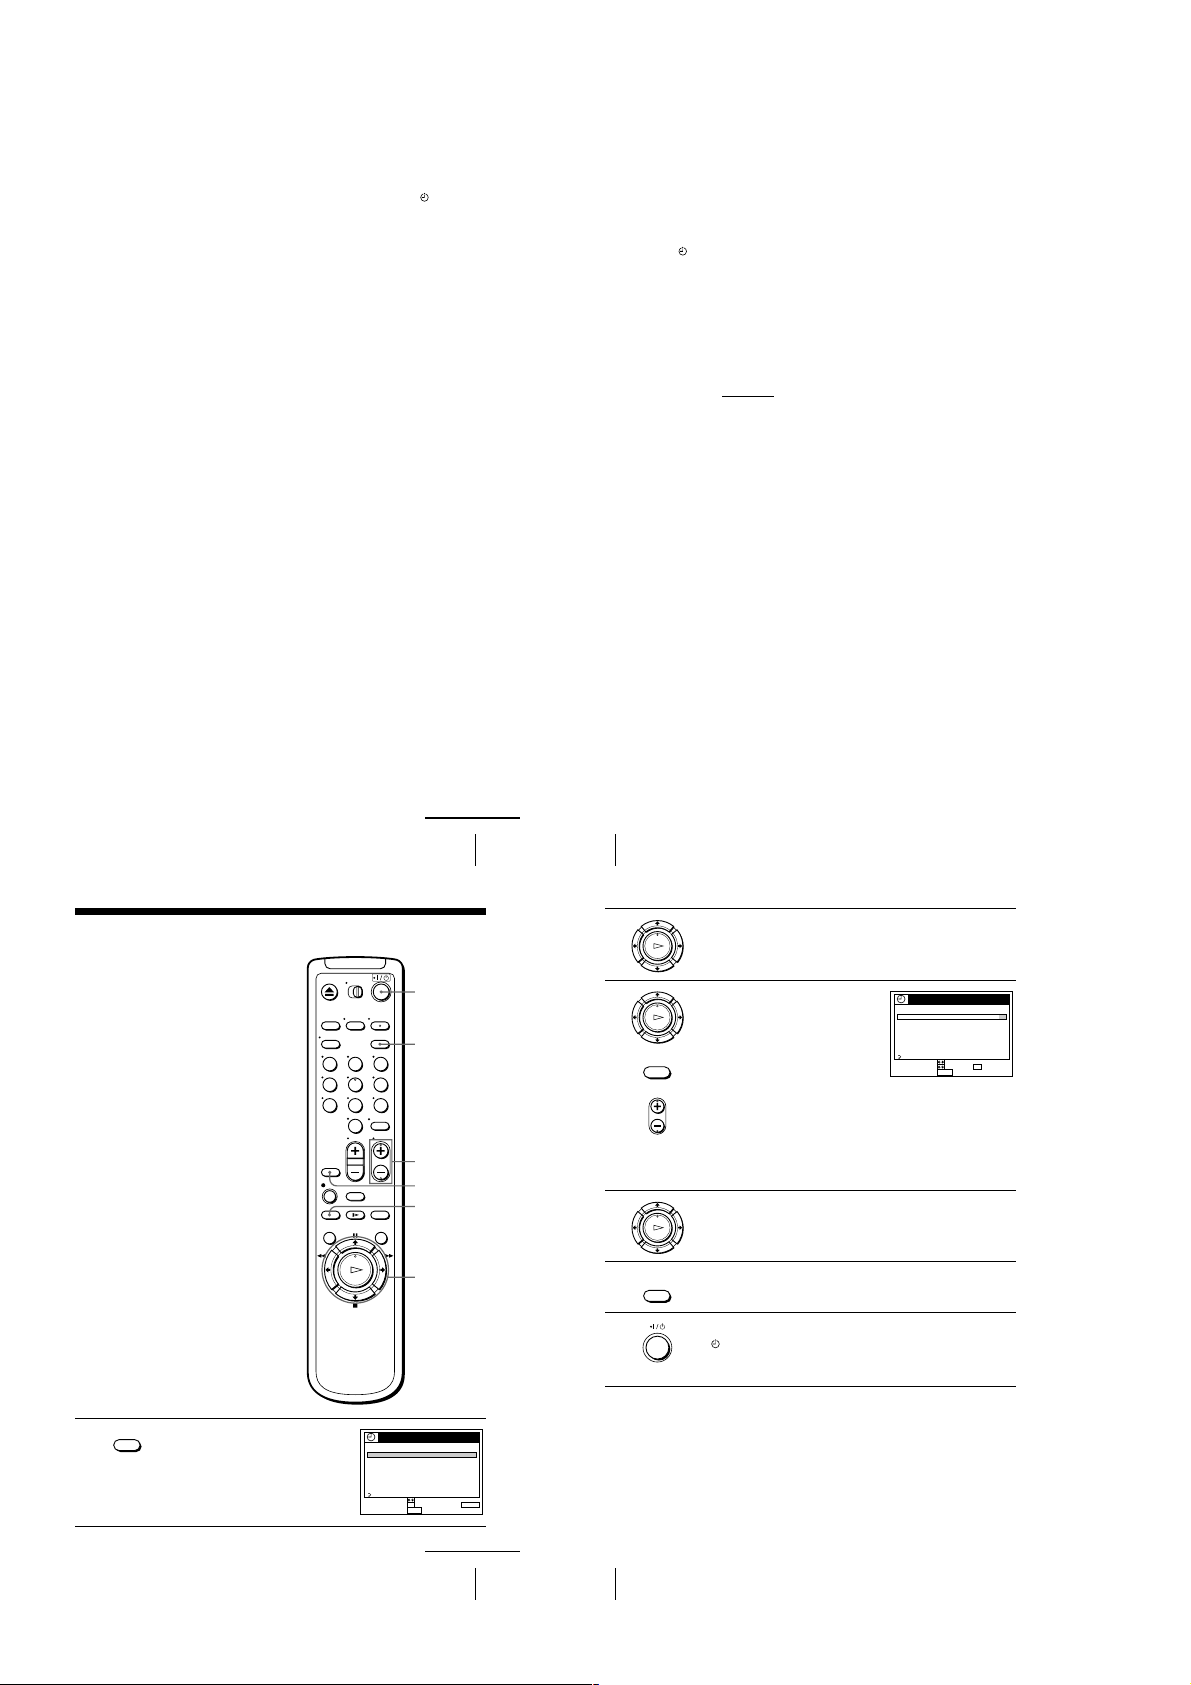
Selecting a language
You can change the on-screen display
language.
Before you start…
• Turn on the VCR and the TV.
• Set the TV to the VCR channel (channel 3
or 4). If your TV is connected to the VCR
using A/V connections, set the TV to video
input.
• Press TV/VIDEO to display the VIDEO
indicator in the VCR’s display window.
Press MENU, then press M/m to highlight
MENU
1
2
3
AJUSTES and press OK.
PLAY
OK
Press M/m to highlight SELECCION DEL
IDIOMA, then press OK.
PLAY
OK
Press M/m to highlight ENGLISH or ESPAÑOL, then press OK.
PLAY
OK
Tip
• If you want to return to the previous menu , highlight VOLVER and press OK.
MENU
M/m
OK
AJUSTES
PREAJUSTE DEL SINTONIZADOR
AJUSTE DEL RELOJ
SELECCION DEL IDIOMA
VOLVER
SELECCIONAR :
AJUSTAR :
OK
MENUPARA SALIR :
SELECCION DEL IDIOMA
ENGLISH
ESPAÑOL
SELECCIONAR :
OK
AJUSTAR :
MENUPARA SALIR :
Setting the clock
Using the Auto Clock Set
feature
Sony Entertainment Television (SETV)
transmits time signals with its broadcasts. If
the cable TV station in your area broadcasts
SETV and transmits these time signals, your
VCR can pick up these time signals to
automatically set the clock.
The Auto Clock Set feature works only if
SETV in your area broadcasts time signals. I f
SETV in your area does not broadcast ti me
signals or if you select Hookup 1 on page 10
set the time manually (page 23).
Before you start…
• Turn on the VCR and the TV.
• Set the TV to the VCR channel (channel 3
or 4). If your TV is connected to the VCR
using A/V connections, set the TV to video
input.
• Press TV/VIDEO to display the VIDEO
indicator in the VCR’s display window.
Press MENU, then press M/m to highlight
MENU
1
2
AJUSTES and press OK.
When using the EASY SET UP procedure,
skip steps 1 and 2.
PLAY
OK
Press M/m to highlight AJUSTE DEL
RELOJ, then press OK.
PLAY
OK
MENU
M/m
OK
AJUSTES
PREAJUSTE DEL SINTONIZADOR
AJUSTE DEL RELOJ
SELECCION DEL IDIOMA
VOLVER
SELECCIONAR :
AJUSTAR :
OK
MENUPARA SALIR :
AJUSTE DEL RELOJ
AUTO
MANUAL
SELECCIONAR :
OK
AJUSTAR :
MENUPARA SALIR :
Hookups
17
18
Selecting a language
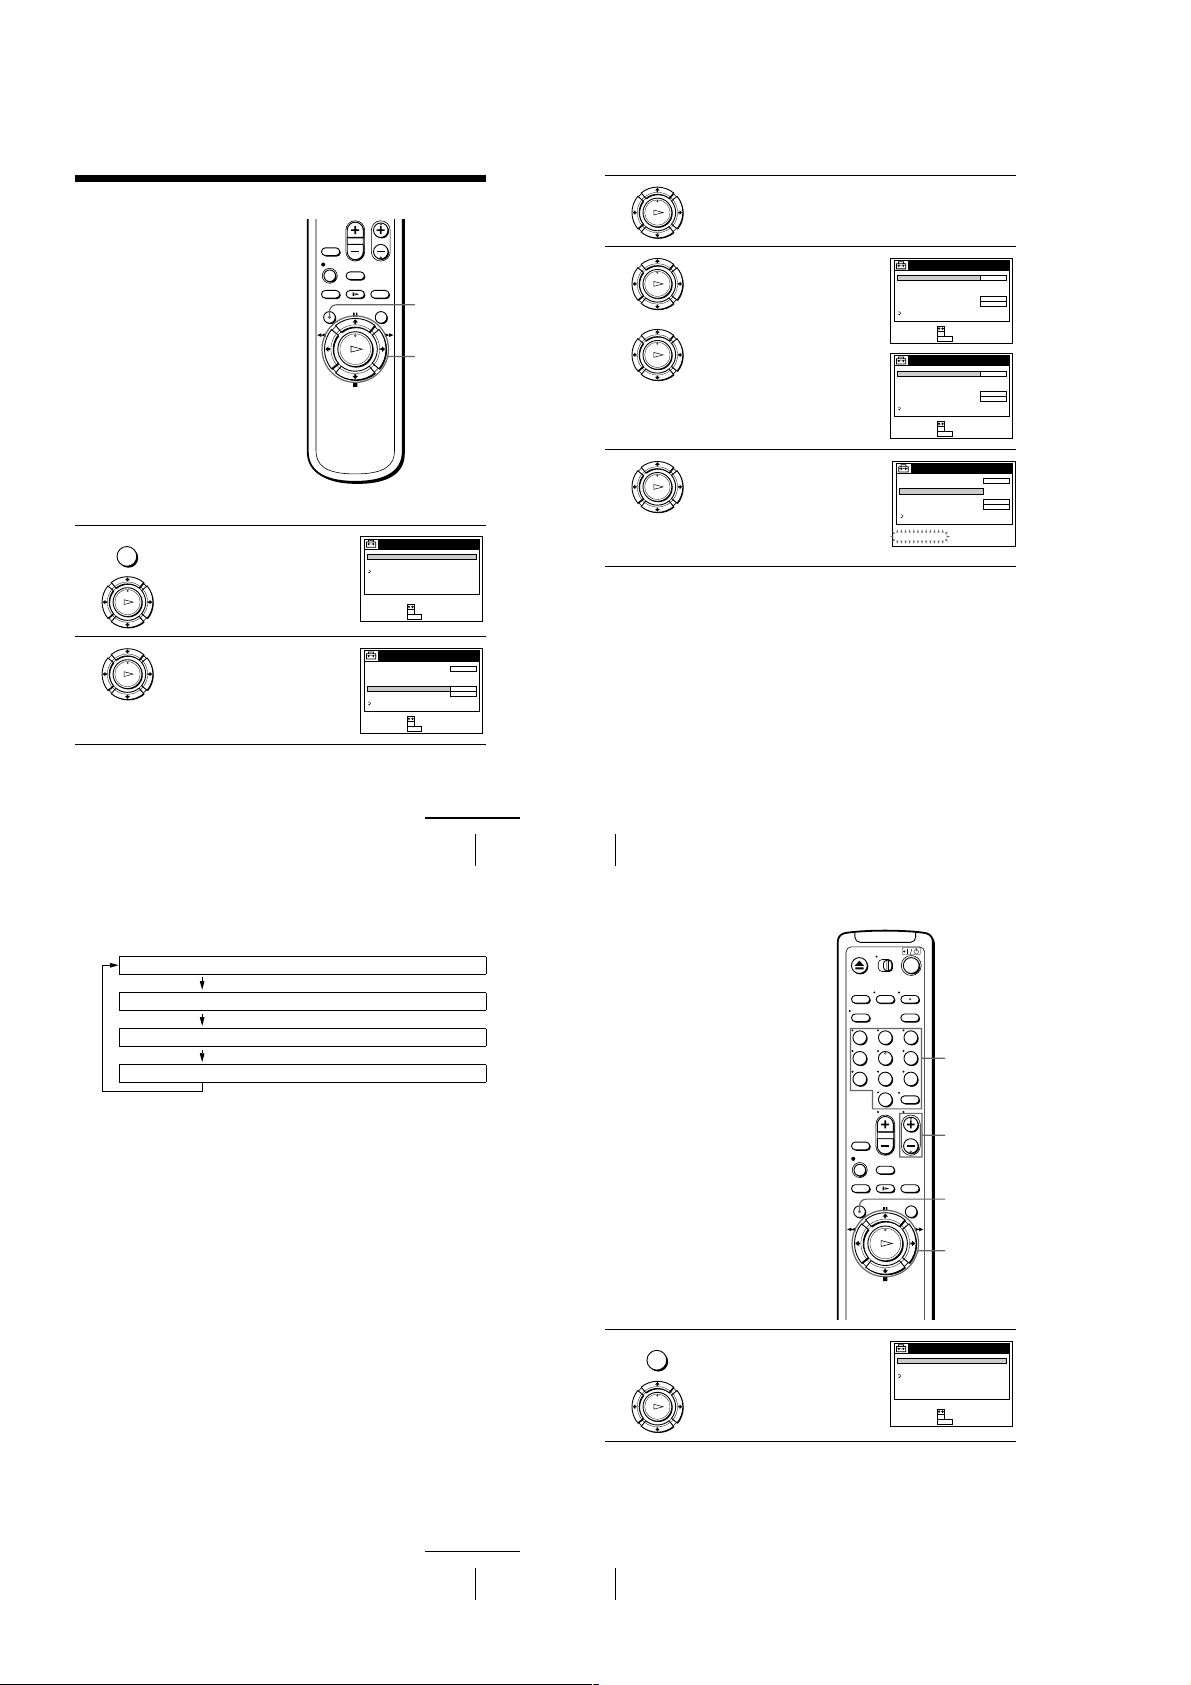
3
4
5
6
7
Press M/m to highlight AUTO, then press
OK.
PLAY
OK
SELECCIONAR :
AJUSTAR :
Press M/m to highlight TOTAL. AUTO.,
then press OK.
PLAY
OK
SELECCIONAR :
AJUSTAR :
Press M/m to highlight SI, then press OK.
PLAY
OK
Press MENU to exi t the menu.
MENU
To activate the Auto Clock Set function, turn off the VCR. “ACS” will flash
in the display window.
The VCR automatically se ts the clock by searching for the SETV broadcast
that carries time signals and sets Daylight Saving Time (if applicable).
If your clock is incorrectly set to Daylight Saving Time, you can adjust
these settings without turning off the Auto Clock Set feature ( page 21).
Tip
• If you want to return to the previous menu , highlight VOLVER and press OK.
Notes
• The clock can not be set automatically if you don’t receive SETV broadcast that carries time
signals in your area. If so, set the clock manually (page 23).
• Depending on the channels allotted to SETV in your area, setting the clock automatica lly
may take up to about 30 minutes. If nothing happens even after you wait about 30 minutes
after turning off the VCR, turn the VCR on and then off again. If the clock is not set even
after about another 30 mi nutes, set the clock manually (page 23).
• If the clock is not set, “ACS ” will flash in the display window whenever the VCR is turned
off. During this time, the VCR will search for a time signal.
AJUSTE AUTOMATICO RELOJ
TOTAL. AUTO.
CH AJUSTE RELOJ
HORARIO VERANO
VOLVER
OK
MENUPARA SALIR :
AJUSTE AUTOMATICO RELOJ
TOTAL. AUTO.
CH AJUSTE RELOJ
HORARIO VERANO
VOLVER
OK
MENUPARA SALIR :
SI
SI
NO
continued
Setting the clock
19
20
Setting the clock
1-4
If the clock does not activate
24
Setting the clock
Tip
• If you want to return to the previous menu , highlight VOLVER and press OK.
3
Press M/m to highlight MANUAL, then
press OK.
4
Press M/m to set the day.
5
Press , to highlig ht the month and press
M/m to set the month.
6
Set the year, hour, and minutes in the same way as the month.
The day of the week is set automatically.
7
Press OK to start the clock.
OK
PLAY
FIN :
AJUSTAR :
OK
MENU
SELECCIONAR :
LUN 1 AM00:211002/1/
AJUSTE DEL RELOJ
PARA SALIR :
OK
PLAY
DOM 1 AM00:2182002/1/
AJUSTE DEL RELOJ
FIN :
AJUSTAR :
OK
MENU
SELECCIONAR :
PARA SALIR :
OK
PLAY
VIE 1 AM00:2182002/9/
AJUSTE DEL RELOJ
FIN :
AJUSTAR :
OK
MENU
SELECCIONAR :
PARA SALIR :
OK
PLAY
22
Setting the clock
Tip
• If you want to return to the previous menu , highlight VOLVER and press OK.
Notes
• The Daylight Saving Time start and end days may differ depending on the year. To ensure
correct switch ing, select SI or NO for the HORARIO VERANO setting .
• If nothing happen s even after you wait about 30 minutes after turning off th e VCR, turn the
VCR on and then off again. If the clock is not set even after about another 30 minutes, set the
clock manually (page 23).
• Some cable TV stations broa dcasting SETV do not transmit time signals. If so, set the clock
manually (page 23).
2
Press M/m to highlight NO for TOTAL.
AUTO. and press OK.
3
Press M/m to highlight the item you want to
set and press OK. Then press M/m to make
the setting and press OK.
• For CH AJUSTE RELOJ
Leave the setting to “– – –” to have the
VCR automatically search for the SETV
broadcast.
Or, press the number buttons to select the
SETV channel if you know it.
• For HORARIO VERANO
Select SI or NO (standard time), o r
AUTO to have the VCR automatically set
the daylight saving time.
4
Press MENU to exi t the menu.
5
To activate the Auto Clock Set function, turn off the VCR. “ACS” will flash
in the display window.
OK
PLAY
AJUSTE AUTOMATICO RELOJ
TOTAL. AUTO.
CH AJUSTE RELOJ
HORARIO VERANO
VOLVER
NO
–––
AUTO
AJUSTAR :
SELECCIONAR :
OK
MENUPARA SALIR :
OK
PLAY
123
456
789
0
AJUSTE AUTOMATICO RELOJ
TOTAL. AUTO.
CH AJUSTE RELOJ
HORARIO VERANO
VOLVER
AJUSTAR :
USE :
OK
MENUPARA SALIR :
NO
123
AUTO
0–9
AJUSTE AUTOMATICO RELOJ
TOTAL. AUTO.
CH AJUSTE RELOJ
HORARIO VERANO
VOLVER
NO
AUTO
SI
NO
AJUSTAR :
SELECCIONAR :
OK
MENUPARA SALIR :
MENU
123
456
789
0
Number
buttons
MENU
M/m
OK
1
Follow steps 1 to 4 in “Using the Auto
Clock Set feature.”
The TOTAL. AUTO. menu is displ ayed.
Using Manual Clock Set
Before you start…
• Turn on the VCR and the TV.
• Set the TV to the VCR channel (channel 3
or 4). If your TV is connected to the VCR
using A/V connections, set the TV to video
input.
• Press TV/VIDEO to display the VIDEO
indicator in the VCR’s display window.
Press MENU, then press M/m to highlight
MENU
1
2
AJUSTES and press OK.
When using the EASY SET UP procedure,
skip steps 1 and 2.
PLAY
OK
Press M/m to highlight AJUSTE DEL
RELOJ, then press OK.
PLAY
OK
AJUSTE AUTOMATICO RELOJ
TOTAL. AUTO.
CH AJUSTE RELOJ
HORARIO VERANO
VOLVER
SELECCIONAR :
AJUSTAR :
SI
NO
OK
MENUPARA SALIR :
continued
Setting the clock
MENU
M/m/</,
OK
AJUSTES
PREAJUSTE DEL SINTONIZADOR
AJUSTE DEL RELOJ
SELECCION DEL IDIOMA
VOLVER
SELECCIONAR :
AJUSTAR :
OK
MENUPARA SALIR :
AJUSTE DEL RELOJ
AUTO
MANUAL
SELECCIONAR :
OK
AJUSTAR :
MENUPARA SALIR :
21
continued
Setting the clock
23
1-5
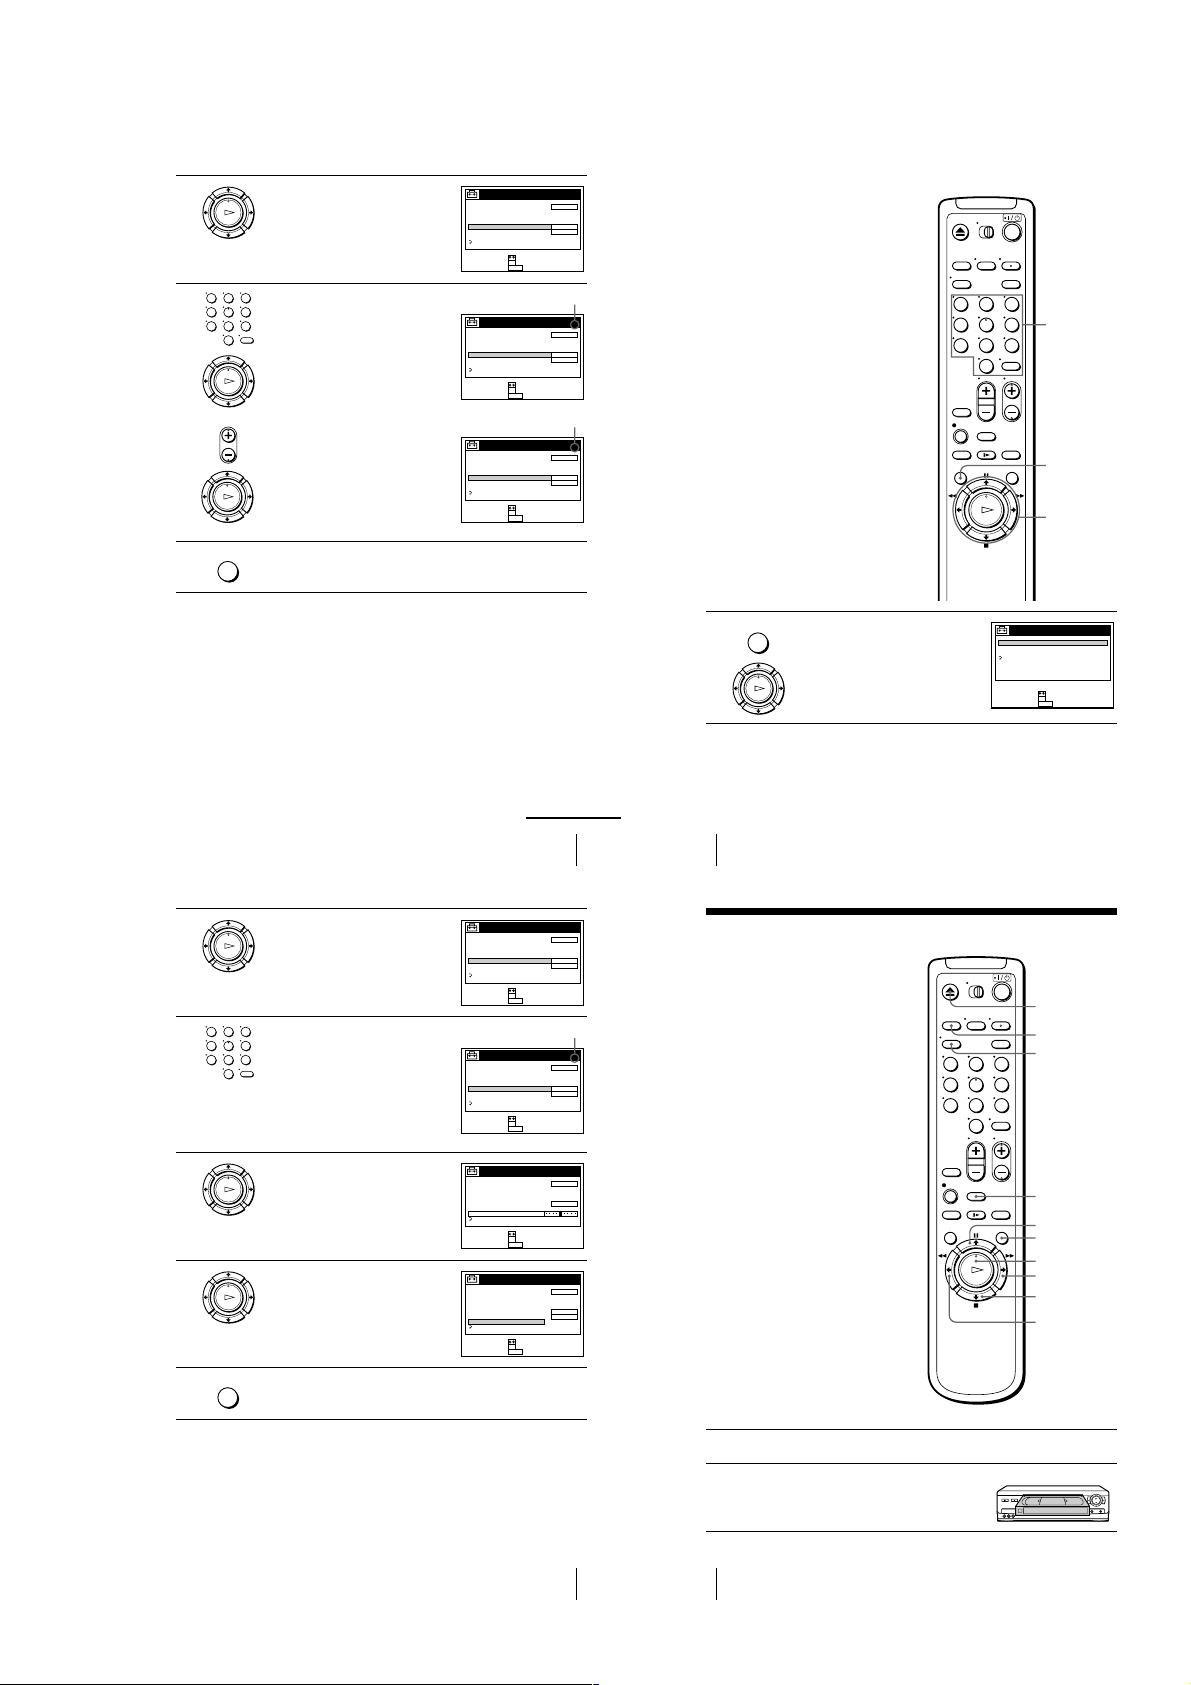
Presetting channels
This VC R is capable of receiving VHF
channels 2 to 13, UHF channels 14 to 69 an d
unscrambled CATV channels 1 to 125. First,
we recommend that you preset the receivable
channels in your area using automatic
presetting methods. Then, if there are any
unwanted channels, disable them manually.
If you have already decided which channels
you wish to preset, set them d irectly using
manual presetting methods.
Before you start…
• Turn on the VCR and the TV.
• Set the TV to the VCR channel (channel 3
or 4). If your TV is connected to the VCR
using A/V connections, set the TV to video
input.
• Press TV/VIDEO to display the VIDEO
indicator in the VCR’s display window.
Presetting all receivable channels automatically
Press MENU, then press M/m to highlight
MENU
1
2
AJUSTES and press OK.
When using the EASY SET UP procedure,
skip steps 1 and 2.
PLAY
OK
Press M/m to highlight PREAJUSTE DEL
SINTONIZADOR, then press OK.
PLAY
OK
MENU
M/m
OK
AJUSTES
PREAJUSTE DEL SINTONIZADOR
AJUSTE DEL RELOJ
SELECCION DEL IDIOMA
VOLVER
SELECCIONAR :
AJUSTAR :
OK
MENUPARA SALIR :
PREAJUSTE DEL SINTONIZADOR
ANTENA / CABLE
AJUSTE AUTO.
MANUAL
AFT
SINTONIA FINA
VOLVER
SELECCIONAR :
AJUSTAR :
OK
MENUPARA SALIR :
3
4
5
CH 1
CABLE
+
SI
Press M/m to highlight ANTENA/CABLE, then press OK.
PLAY
OK
• To preset cable TV channels:
Press M/m to set ANTENA/CABLE to
PLAY
CABLE, then press OK.
OK
PLAY
• To preset VHF and UHF channels:
OK
Press M/m to set ANTENA/CABLE to
ANT, then press OK.
Press M/m to highlight AJUSTE AUTO.,
then press OK.
PLAY
All receivable channels are preset in
OK
numerical sequence. When no more
receivable channels can be found, presetting
stops and the picture from t he lowest
numbered channel is displayed on the TV
screen.
PREAJUSTE DEL SINTONIZADOR
ANTENA / CABLE
AJUSTE AUTO.
MANUAL
AFT
SINTONIA FINA
VOLVER
SELECCIONAR :
AJUSTAR :
OK
MENUPARA SALIR :
PREAJUSTE DEL SINTONIZADOR
ANTENA / CABLE
AJUSTE AUTO.
MANUAL
AFT
SINTONIA FINA
VOLVER
SELECCIONAR :
AJUSTAR :
OK
MENUPARA SALIR :
PREAJUSTE DEL SINTONIZADOR
ANTENA / CABLE
AJUSTE AUTO.
MANUAL
AFT
SINTONIA FINA
VOLVER
POR FAVOR ESPERE
CH 1
CABLE
+
SI
CH 2
ANT
+
SI
CH 1
CABLE
+
SI
continued
Presetting channels
Tips
• When receiving a VHF, UHF, or CATV channel, the display changes as follows each time
you press DISPLAY.
Channel number
Remaining tape le ngth, and time counter
The bar indicator and pointer for searching for a specific place on a tape
No display
• If you want to return to the previou s menu, highlight VOLVER and press OK.
25
26
Presetting channels
Presetting/disabling channels manually
123
456
789
0
Press MENU, then press M/m to highlight
MENU
1
AJUSTES and press OK.
PLAY
OK
Number
buttons,
ENTER
CH +/–
MENU
M/m
OK
AJUSTES
PREAJUSTE DEL SINTONIZADOR
AJUSTE DEL RELOJ
SELECCION DEL IDIOMA
VOLVER
SELECCIONAR :
AJUSTAR :
OK
MENUPARA SALIR :
continued
Presetting channels
27
28
Presetting channels
1-6
2
30
Presetting channels
If the picture is not clear
Normally, the Auto Fine Tuning (AFT)
function automatically tunes in channels
clearly. If, however, the picture of a channel
is not clear, you can also use the manual
tuning function.
1
Press MENU, then press M/m to highlight
AJUSTES and press OK.
123
456
789
0
MENU
M/m/</,
OK
Number
buttons,
ENTER
OK
PLAY
MENU
AJUSTES
PREAJUSTE DEL SINTONIZADOR
AJUSTE DEL RELOJ
SELECCION DEL IDIOMA
VOLVER
AJUSTAR :
SELECCIONAR :
OK
MENUPARA SALIR :
32
Playing a tape
Basic Operations
Playing a tape
1
Turn on your TV and set it to the video channel.
2
Insert a tape.
The VCR turns on and starts pl aying
automatically if you insert a tape with its
safety tab removed.
123
456
789
0
Z
EJECT
DISPLAY
CLEAR
H
PLAY
REPLAY
X
PAU SE
M
FF
x
STOP
m
REW
TRINITRON TV
SYNCHRO PLAY
3
4
Press M/m to highlight PREAJUSTE DEL
SINTONIZADOR, then press OK.
PLAY
OK
• To preset a channel:
123
1
456
789
Press the number buttons to enter the
channel number, then press ENTER.
2
Press OK.
0
3
Press M/m to set MANUAL to +, then
press OK.
PLAY
OK
• To disable a channel:
• CH
1
Press CH +/– to select the channel
number.
2
Press OK.
3
Press M/m to set MANUAL to –, then
press OK.
PLAY
OK
Repeat step 3 to preset or disable channels as require d, then press MENU.
MENU
Tip
• If you want to return to the previou s menu, highlight VOLVER and press OK.
PREAJUSTE DEL SINTONIZADOR
ANTENA / CABLE
AJUSTE AUTO.
MANUAL
AFT
SINTONIA FINA
VOLVER
SELECCIONAR :
AJUSTAR :
OK
MENUPARA SALIR :
Channel to be preset
PREAJUSTE DEL SINTONIZADOR
ANTENA / CABLE
AJUSTE AUTO.
MANUAL
AFT
SINTONIA FINA
VOLVER
SELECCIONAR :
AJUSTAR :
OK
MENUPARA SALIR :
Channel to be disabled
PREAJUSTE DEL SINTONIZADOR
ANTENA / CABLE
AJUSTE AUTO.
MANUAL
AFT
SINTONIA FINA
VOLVER
SELECCIONAR :
AJUSTAR :
OK
MENUPARA SALIR :
CH 1
CABLE
+
SI
CH 5
CABLE
+
SI
CH 5
CABLE
–
SI
2
3
123
456
789
4
5
6
continued
Presetting channels
Press M/m to highlight PREAJUSTE DEL
SINTONIZADOR, then press OK.
PLAY
OK
Press the number buttons to select the
channel you want to fine-tune, then press
ENTER.
0
Press M/m to highlight SINTONIA FINA,
then press OK.
PLAY
The fine tuning meter appears.
OK
PLAY
OK
MENU
Tips
• To select the channel in step 3 above , you can also use the CH +/– buttons. In this case, you
don’t need to press ENTER.
• If you want to return to the previou s menu, highlight VOLVER and press OK.
Note
• When adjusting SINTONIA FINA, the menu may become difficult to read due to interference
from the picture being received.
Press </, to adjust to a clearer picture,
then press OK.
Note that the AFT setting switches to NO.
Press MENU to exit the menu .
PREAJUSTE DEL SINTONIZADOR
ANTENA / CABLE
AJUSTE AUTO.
MANUAL
AFT
SINTONIA FINA
VOLVER
SELECCIONAR :
AJUSTAR :
Selected channel
PREAJUSTE DEL SINTONIZADOR
ANTENA / CABLE
AJUSTE AUTO.
MANUAL
AFT
SINTONIA FINA
VOLVER
SELECCIONAR :
AJUSTAR :
PREAJUSTE DEL SINTONIZADOR
ANTENA / CABLE
AJUSTE AUTO.
MANUAL
AFT
SINTONIA FINA
VOLVER
SELECCIONAR :
AJUSTAR :
PREAJUSTE DEL SINTONIZADOR
ANTENA / CABLE
AJUSTE AUTO.
MANUAL
AFT
SINTONIA FINA
VOLVER
SELECCIONAR :
AJUSTAR :
CH 1
CABLE
+
SI
OK
MENUPARA SALIR :
CH 5
CABLE
+
SI
OK
MENUPARA SALIR :
CH 5
CABLE
+
OK
MENUPARA SALIR :
CH 5
CABLE
+
NO
OK
MENUPARA SALIR :
Presetting channels
29
31
1-7
3
Press H PLAY.
When the tape reaches the end, it will rewind automatically.
PLAY
OK
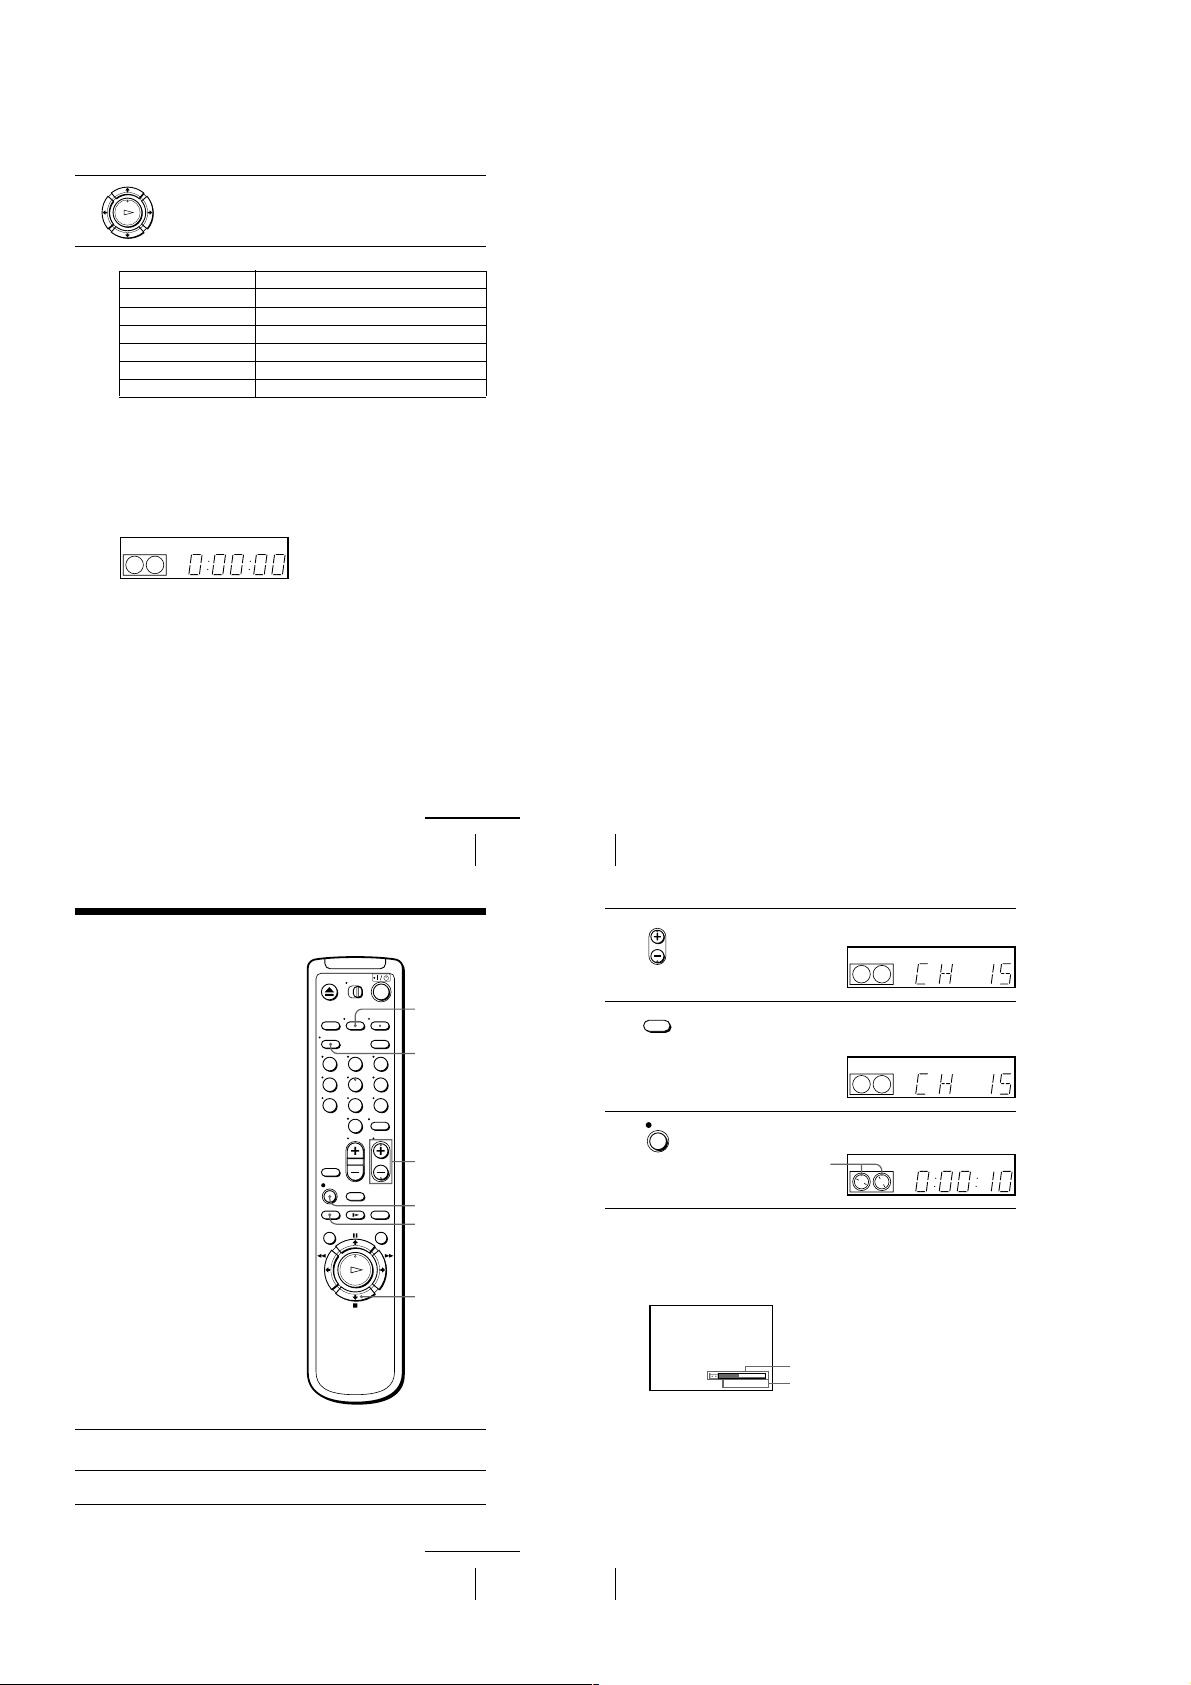
Additional tasks
To Press
Stop play
Pause play
Resume play after pause
Fast-forward the tape
Rewind the tape
Eject the tape
To play a recently watched scene
You can immediately rewind and playback the scene you want to watch again.
During playback, press REPLAY up to four times. The VCR rewinds the tape about
ten seconds on the counter for each press of the button, and restarts playback.
To use the time counter
Press CLEAR at the point on the tape that you want to find later. The counter in the
display window resets to “0:00 :00.” Search for the point afterwards by referring to
the counter.
VIDEO
SP
APC
x
STOP
X
PAUS E
X
PAUSE or HPLAY
M
FF during stop
m
REW during stop
Z
EJECT
To display the counter on the TV screen, press DISPLAY.
Notes
• Tapes recorded in the LP mode on other VCRs can be played back on this VCR but the
picture quality cannot be guarante ed.
• While displaying a menu on the TV screen, you cannot use
M
FF, m REW, or xSTOP buttons.
• The counter res ets to “0:00:00” whenever a tape is reinserted.
• The counter stops counting wh en it comes to a portion with no recording.
H
PLAY, XPAUS E ,
Turning on the VCR and TV, and starting playback
automatically (Trinitron TV Synchro Play)
You can only use this function if your TV is made by Sony (Trinitron TV).
How to connect to use this function
Connect the VCR and TV with the audio/video cable (see “Audio/video (A/V)
hookup” on pages 8 and 9). Be sure to connect the audio/video cable to the VIDEO
IN 1 jacks on the TV if the TV has two inputs or more. The TV mu st be placed
where it will respond to the remote commander while you are pointing it at the VCR.
Operation
Make sure that the TV’s power is in standby mode.
Press TRINITRON TV SYNCHRO PLAY and hold the remote comman der in place
for about two seconds.
The VCR and TV turn on, and the TV is set to the video channel. If there is a tape in
the VCR, playback starts automatically.
Notes
• If the Trinitron TV Synchro Play function does not work properly:
– Wait a few moments, and press the button again.
– Replace both of the batteries with new ones, and press the button again.
Note that this function may not ope rate some Sony TVs because of the remote commander’s
signal limitations.
• Do not press TRINITRON TV SYNCHRO PLAY during playback. If you do so, the TV’s
input source will mo mentarily switch to the TV’s tuner.
Recording TV programs
1
2
Turn on your TV and set it to the video channel.
To record from a cable box, turn it on.
Insert a tape with its safety tab in place.
123
456
789
0
continued
Playing a tape
TV/VIDEO
DISPLAY
CH +/–
z
REC
SP/EP
x
STOP
33
34
Playing a tape
Press CH +/– to select the channel or line input video source you want to
• CH
3
4
5
record.
EP
Press SP/EP to select the tape speed, SP or EP.
SP / EP
EP (Extended Play) provides recording time three times as long as SP
(Standard Play). However, SP produces better picture and audio quality.
SP
Press z REC to start recording.
REC
The recording indicator lights up red in the display window.
Recording indicator
To stop recording
Press x STOP.
To check the remaining tape length
Press DISPLAY repeatedly until the remaining tape length and the time counter
appear on the TV screen.
SP 20:00:2
To check the remaining tape length of a T-140 or T-180 tape, set SELC. DE CINTA in
the OPCIONES menu to 180. (For det ails, see page 62.)
Remaining tape length
Time counter
SP
VIDEO
VIDEO
VIDEO
APC
APC
APC
continued
Recording TV programs
35
36
Recording TV programs
1-8
To watch another TV program while recording
38
Recording TV programs using the Dial Timer
Recording TV programs using the Dial
Timer
The Dial Timer function allows you to make
timer recordings of programs without turning
on your TV. Set the recording timer to record
up to eight programs that will be broa dcast
within a month using the DIAL TIMER. The
recording start time and recording s top time
can be set at one minute intervals.
Before you start...
• When using a cable box, turn it on.
• Insert a tape with its safety tab in place.
Make sure the tape is longer than the total
recording time.
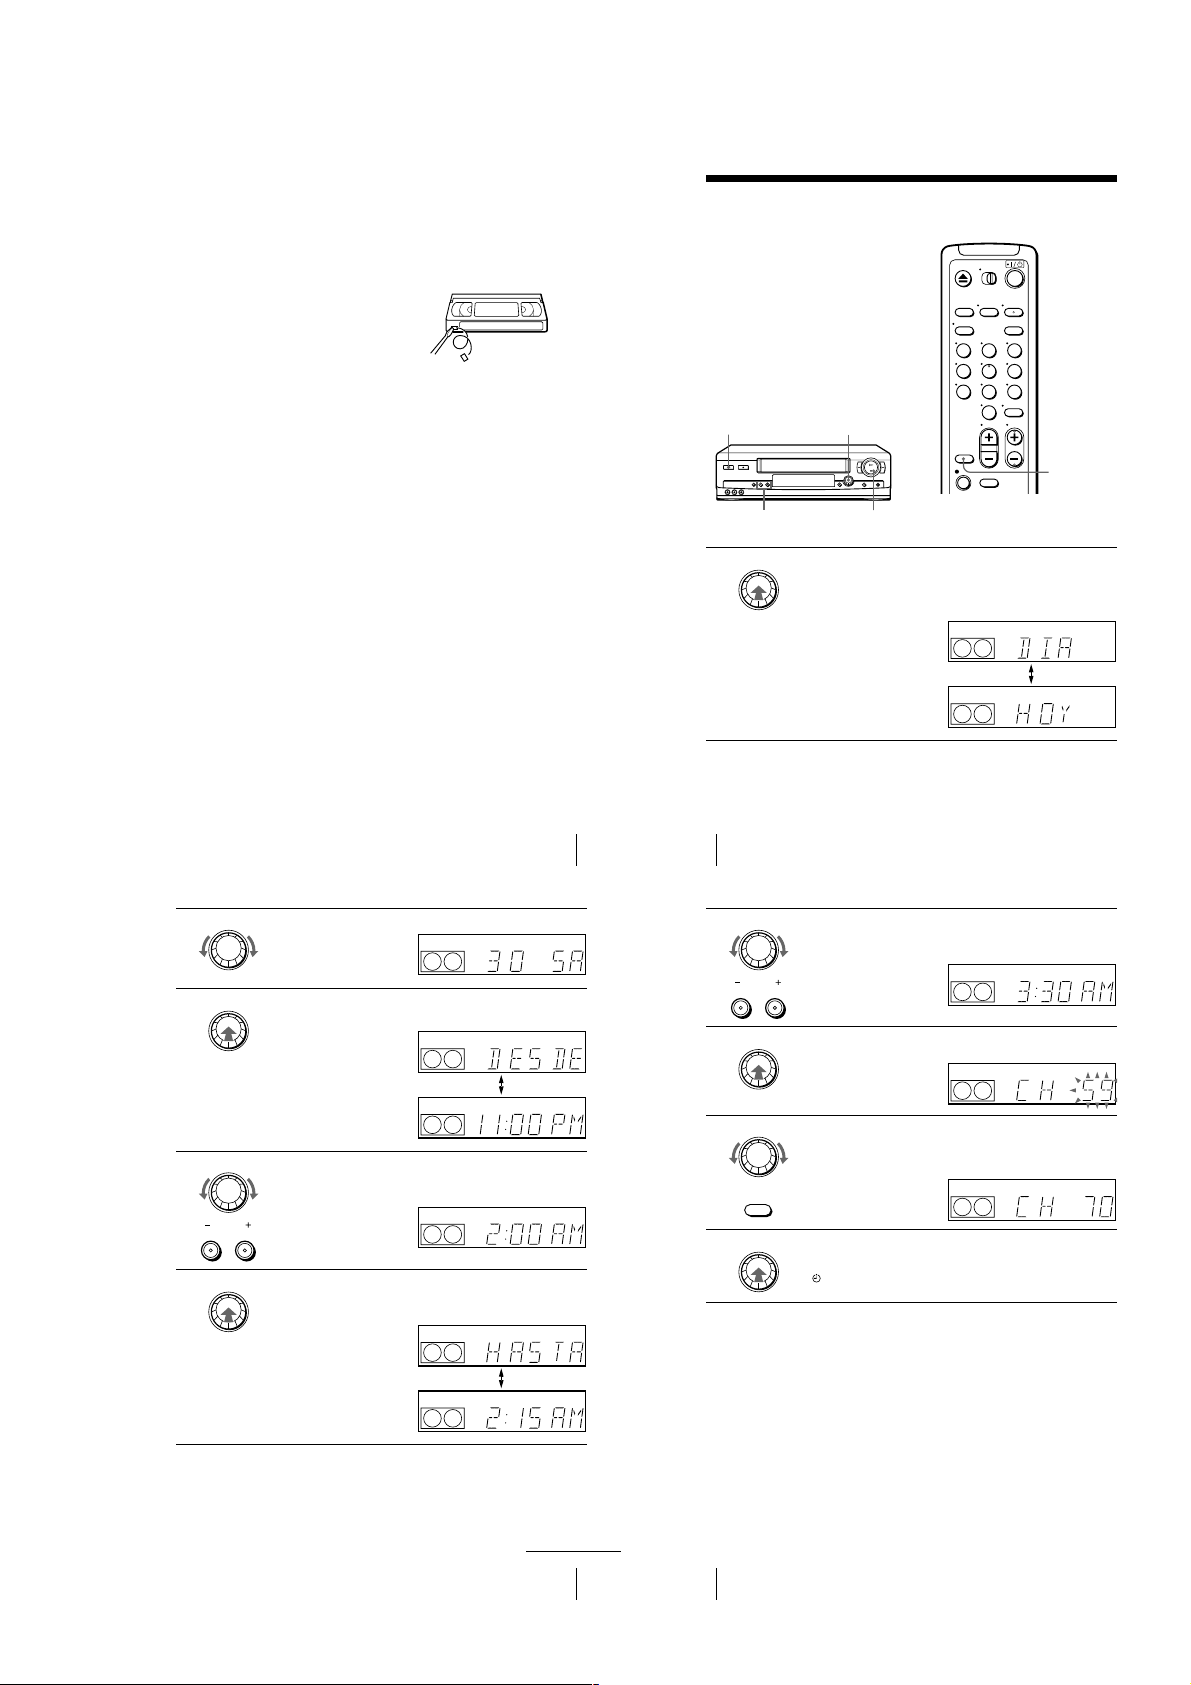
1
Press DIAL TIMER.
“DIA” and “HOY” appear alternately in the display window.
If the date and time are not set, “DIA” flashes. See step 2 in the following
section “To set the clock” to set the date and time.
x
STOP
DIAL TIMER
?/1
POWER
CHANNEL +/–
123
456
789
0
INPUT
SELECT
DIAL TIMER
EP
VIDEO
APC
EP
VIDEO
APC
40
Recording TV programs using the Dial Timer
To return to the previous step
To return to the previous step, press the CHANNEL + and – buttons on the VCR at
the same time during any of the Dial Timer settings.
To stop recording
To stop the VCR while recording, press x STOP.
6
Turn DIAL TIMER to set the recording stop time.
You can set the recording stop time in 15 minute intervals or adjust the time
in one minute intervals by pressing the CHANNEL +/– buttons.
7
Press DIAL TIMER.
The channel number appears in the display window.
8
Turn DIAL TIMER to set the channel number.
To record from a source connected to the LINE-1 IN or LINE-2 IN jacks,
turn DIAL TIMER or press INPUT SELECT on the remote commander to
display “L1” or “L2”.
9
Press DIAL TIMER to complete the setting.
“OK” appears in the display window for about five seconds.
The indicator appears in the display window and the VCR stands by for
recording. When using a cable box, leave it on.
DIAL TIMER
CHANNEL
EP
VIDEO
APC
DIAL TIMER
EP
VIDEO
APC
DIAL TIMER
INPUT
SELECT
EP
VIDEO
APC
DIAL TIMER
Press TV/VIDEO to turn off the VIDEO indicator in the display window.
1
If the TV is connected to the VCR’s LINE OUT jacks, set the TV to the TV’s
2
antenna input; if not, ski p this step.
Select another channel on the TV.
3
To save a recording
To prevent accidental erasure, break
off the safety tab as illustrated. To
record on the tape again, cover the tab
hole with adhesive tape.
Tips
• To select a channel, you can use the number buttons on the remote commander. Enter the
channel number, then press ENTER.
• You can select a video source from the LINE-1 IN or LINE-2 IN jacks using th e INPUT
SELECT button.
• The display appea rs on the TV screen indicating informatio n about the tape, but the
information won’t be recorded on the tape.
• If you don’t want to watch TV whil e recording, you can turn off the TV. When using a cable
box, make sure to leave it on.
Notes
• The remaining tape lengt h may not be indicated accurately for short tapes such as T-20 or T30, or tapes recorded in the LP mode.
• The display does no t appear during still (pause) mode or slow-motion playback.
• It may take up to one minute for the VCR to calculate and display the remaining tape length
after you press DISPLAY.
Safety tab
Turn DIAL TIMER to set the recording date.
DIAL TIMER
2
Press DIAL TIMER.
3
4
5
DIAL TIMER
“DESDE” and the current time appear alternately in the display window.
Turn DIAL TIMER to set the recording start time.
DIAL TIMER
CHANNEL
DIAL TIMER
You can set the recording start time in 15 minute intervals or adjust the time
in one minute intervals by pressing the CHANNEL +/– buttons.
Press DIAL TIMER.
“HASTA” and the recording stop time appear alternately in the display
window.
Recording TV programs
VIDEO
APC
EP
VIDEO
APC
EP
VIDEO
APC
EP
VIDEO
APC
EP
VIDEO
APC
EP
VIDEO
APC
EP
37
Recording TV programs using the Dial Timer
continued
39
1-9
To use the VCR after setting the timer
To use the VCR before a timer recording begins, just press ?/1. The indicator
disappears from the display window and the VCR switches on. Remember to press
?/1 to reset the VCR to the timer recording standby mode after using the VCR.
You can also do the following tasks while the VCR is recording:
• Reset the counter (page 33).
• Display tape information on the TV screen (page 36).
• Check the timer settings (page 50).
• Watch another TV program (page 37).
To set the cloc k
Turn DIAL TIMER so that “RELOJ” appears in the display window.
1
Press DIAL TIMER.
2
“DIA” appears in the display window.
Turn DIAL TIMER to set the day.
3
Press DIAL TIMER.
4
“MES” appears in the display window.
Turn and press DIAL TIMER to set the month and then the year.
5
After you set the year, “RELOJ” appears in the display window again.
Turn and press DIAL TIMER to set the hour and min ute.
6
When you have finished setting the time, press DIAL TIMER to start the clock.
7
Tips
• To cancel a Dial Timer setting, press
• The program is recorded in the current tape speed. To change the tape speed, press SP/EP
before you complete the se tting in step 9 (page 40).
• When you are recording a program in the SP mode and the remaining tape becomes shorter
than the recording time, the tape speed is automatically changed to the EP mode. Note that
some noise will appear on the picture when the tape speed is changed. I f you want to keep
the tape speed, set VEL. AUTO. CINTA to NO in the OPCIONES menu (page 62).
• To check, change, o r cancel the program setting , see “Checking/changing/cancel ing timer
settings” (page 50).
x
STOP on the VCR while you are making the setting.
Notes
• If eight programs have already bee n set using the PROG./VERIF. menu, “LLENO” appears in
the display window for about five seconds.
• If you set the clo ck using the Auto Clock Set function, t he clock will adjust itself to the
incoming time signal regardless of adjustments made with the Dial Timer. Be sure you have
set ACS correctly.
indicator flashes in the display window whe n you complete the setting in step 9
• The
(page 40) with no tape inserted.
About the Demonstration Mode
The Dial Timer function has a Demonstration Mode that allows the user, such as a
salesperson, to enter more than eight examples of timer settings when demonstrating
the use of the Dial Timer. It cancels the LLENO notice which appears if eight
programs have already been set. Do not use the Demonstration Mode for making
timer recordings. Doing so may cause the settings to be inaccurate.
To activate the Demonstration Mode
Press X PAUSE on the VCR
the display window for a few seconds.
To cancel the Demonstration Mode
Turn the power off and unplug the AC power cord. Although the Demonstration
Mode is canceled, the timer settings entered while using the Demonstration Mode
will remain. Be sure to manually cancel the timer settings before you use the Dial
Timer or any other timer meth od after reconnecting the AC power cord (see page 50).
while turning the DIAL TIMER. “DEMO” appears in
continued
Recording TV programs using the Dial Timer
Recording TV programs using the timer
You can preset up to eight programs together
with the Dial Timer settings at a time.
Before you start…
• Check that the VCR clock is set to the
correct time.
• Turn on your TV and set it to the video
channel. When using a cable box, turn it
on.
• Insert a tape with its safety tab in place.
Make sure the tape is longer than the total
recording time.
Press TIMER to display PROG./VERIF.
TIMER
1
123
456
789
0
PROG. / VERIF.
FECHA TER.COM.
–– –––: –––––––:– /
––– /
––– /
––– /
––– /
––– /
––– /
––– /
VOLVER
SELECCIONAR :
AJUSTAR :
?/1
TIMER
CH +/–
INPUT
SELECT
SP/EP
M/m/</,
OK
x
STOP
–––: –––––––:
–––: –––––––:
–––: –––––––:
–––: –––––––:
–––: –––––––:
–––: –––––––
:
–––: ––––––:
OK
CANCELAR :
MENUPARA SALIR :
41
42
Recording TV programs using the Dial Timer
2
3
4
5
6
Press M/m to highlight the line that is to be set, then press OK.
PLAY
OK
Set the date, start and stop time, channel
number, and tape speed:
PLAY
1 P ress M/m to set each item.
OK
2 P ress , to highlight and set each item
INPUT
SELECT
in turn.
To correct a setting, press < to return to
• CH
that setting and reset.
To record the same program every day or the same day every week, press m
while the date is highlighted. For details, see “Daily/weekly recording”
below.
To record from a source connected to the LINE-1 IN or LINE-2 IN jacks,
press INPUT SELECT or CH+/– to display “L1” or “L2” in the “CH”
position.
Press OK to confirm the setting.
To enter another setting, press M/m to highlight the next line and repeat step
PLAY
3.
OK
Press TIMER.
TIMER
Press ?/1 to turn off the VCR.
The indicator appears in the display window and the VCR stands by for
recording.
PROG. / VERIF.
FECHA TER.COM.
390/
DOM 8 0
––– /
––– /
––– /
––– /
––– /
––– /
––– /
VOLVER
SELECCIONAR :
AJUSTAR :
PARA SALIR :
PM PM
0:90053SP:
–––: –––––––:
–––: –––––––:
–––: –––––––:
–––: –––––––:
–––: –––––––:
–––: –––––––:
–––: –––––––:
MENU
FIN : OK
9/28
VIE
CH
When using a cable box, leave it on.
To stop recording
To stop the VCR while recording, press x STOP.
9/28
VIE
CH
–
CLEAR
Daily/weekly recording
In step 3 above, press m to select the recording pattern. Each time you press m, the
indication changes as shown below. Press M to change the indication in reverse order.
the current date t DOM-SAB t LUN-SAB t LUN-VIE t CADA SAB t ..... t
CADA LUN
date
CADA DOM t 1 month later t (dates count down) t the current
t
continued
Recording TV programs using the timer
43
44
Recording TV programs using the timer
1-10
To use the VCR after setting the timer
46
Locking the VCR (Child Lock)
Locking the VCR (Child Lock)
To lock the VCR
When the VCR is turned on, hold down ?/1 POWER on the VCR
until the indicator appears in the display window. The VCR turns off and the - indicator
remains lit. The VCR will not work except for timer recordings.
To unlock the VCR
Hold down ?/1 POWER on the VCR
until the - indicator disappears from the
display window. The VCR is unlocked and turns on.
To stop timer recording while the VCR is locked, press x STOP. The recording
stops and the VCR is unlocked.
Note
• The VCR will b e unlocked when:
– You stop timer recording by pressing
x
STOP.
– You insert a tape.
– The AC power cord is disconnected or power supply stops.
After you have set the timer, you can lock all
of the buttons on the VCR so that the settings
are not canceled by mistake.
?/1
POWER
x
STOP
48
Playing/searching at various speeds
Tip
• Adjust the picture using the TRACKING +/– buttons if:
– Streaks appear while playing in slow motion.
– The picture shakes during pause.
To set tracking to the center position, press both buttons (+/–) at the same time.
Notes
• The sound is muted during these operations.
• Tapes recorded in the LP mode on other VCRs can be played back on this VCR but the
picture quality canno t be guaranteed.
• The picture may show noise when playing at high speed in reverse.
To use the VCR before timer recording begins, just press ?/1. The indicator
disappears from the display window and the VCR switches on. Remember to press
?/1 to reset the VCR to the timer recording standby mode after using the VCR.
You can also do the following tasks while the VCR is recording:
• Reset the counter (page 33).
• Display tape information on the TV screen (page 36).
• Check the timer settings (page 50).
• Watch another TV program (page 37).
Tips
• To set the channel, you can also use the CH+/– or number buttons.
• To show the PROG./VERIF. menu, you can also use the MENU button. Press MENU, then
to highlight PROG./VERIF. and press OK.
press
M/m
• To set the tape speed, you can also use the SP/EP button.
• When you are recording a program in the SP mode and the remaining tape becomes shorter
than the recording time, the tape speed is automatically changed to the EP mode. Note that
some noise will appear on the picture when the tape speed is changed. I f you want to keep
the tape speed, set VEL. AUTO. CINTA to NO in the OPCIONES menu (page 62).
• To check, change or cancel the program setting, see “Checking/changing/canceling ti mer
settings” (page 50).
• If you want to retu rn to the previous menu and continue with other o perations after setting the
to highlight VOLVER, then press OK.
m
timer, press
The display returns to the MENU screen.
If you are finished using the VCR, turn off the power before ti mer recording starts.
Additional Operations
Playing/searching at various speeds
TRACKING +/–
Playback options Operation
View the picture during fastforward or rewind
Play at high speed • During playback, briefly p ress
Play at twice the norm al speed During p layback, press ×2.
Play in slow motion During playback or pause, press
Play frame by frame During pause, press
Rewind and start play While the tape is stopped, hold down
H PLAY
m REW
During fast-forward, hold down
m REW.
commander. The tape continues to play at high speed.
To resume normal playback
Press H PLAY.
• During playback , hold down
release the button, normal playback resumes.
Hold down the button to play one frame each second.
H PLAY on the VCR.
Recording TV programs using the timer
0
M FF
M FF. During rewind, hold down
M FF or m REW on the remote
M FF or m REW. When you
y SLOW.
M FF or m REW on the remote comma nder.
m REW on the VCR and press
x2
y SLOW
M
FF
m REW
45
continued
Playing/searching at various speeds
47
1-11
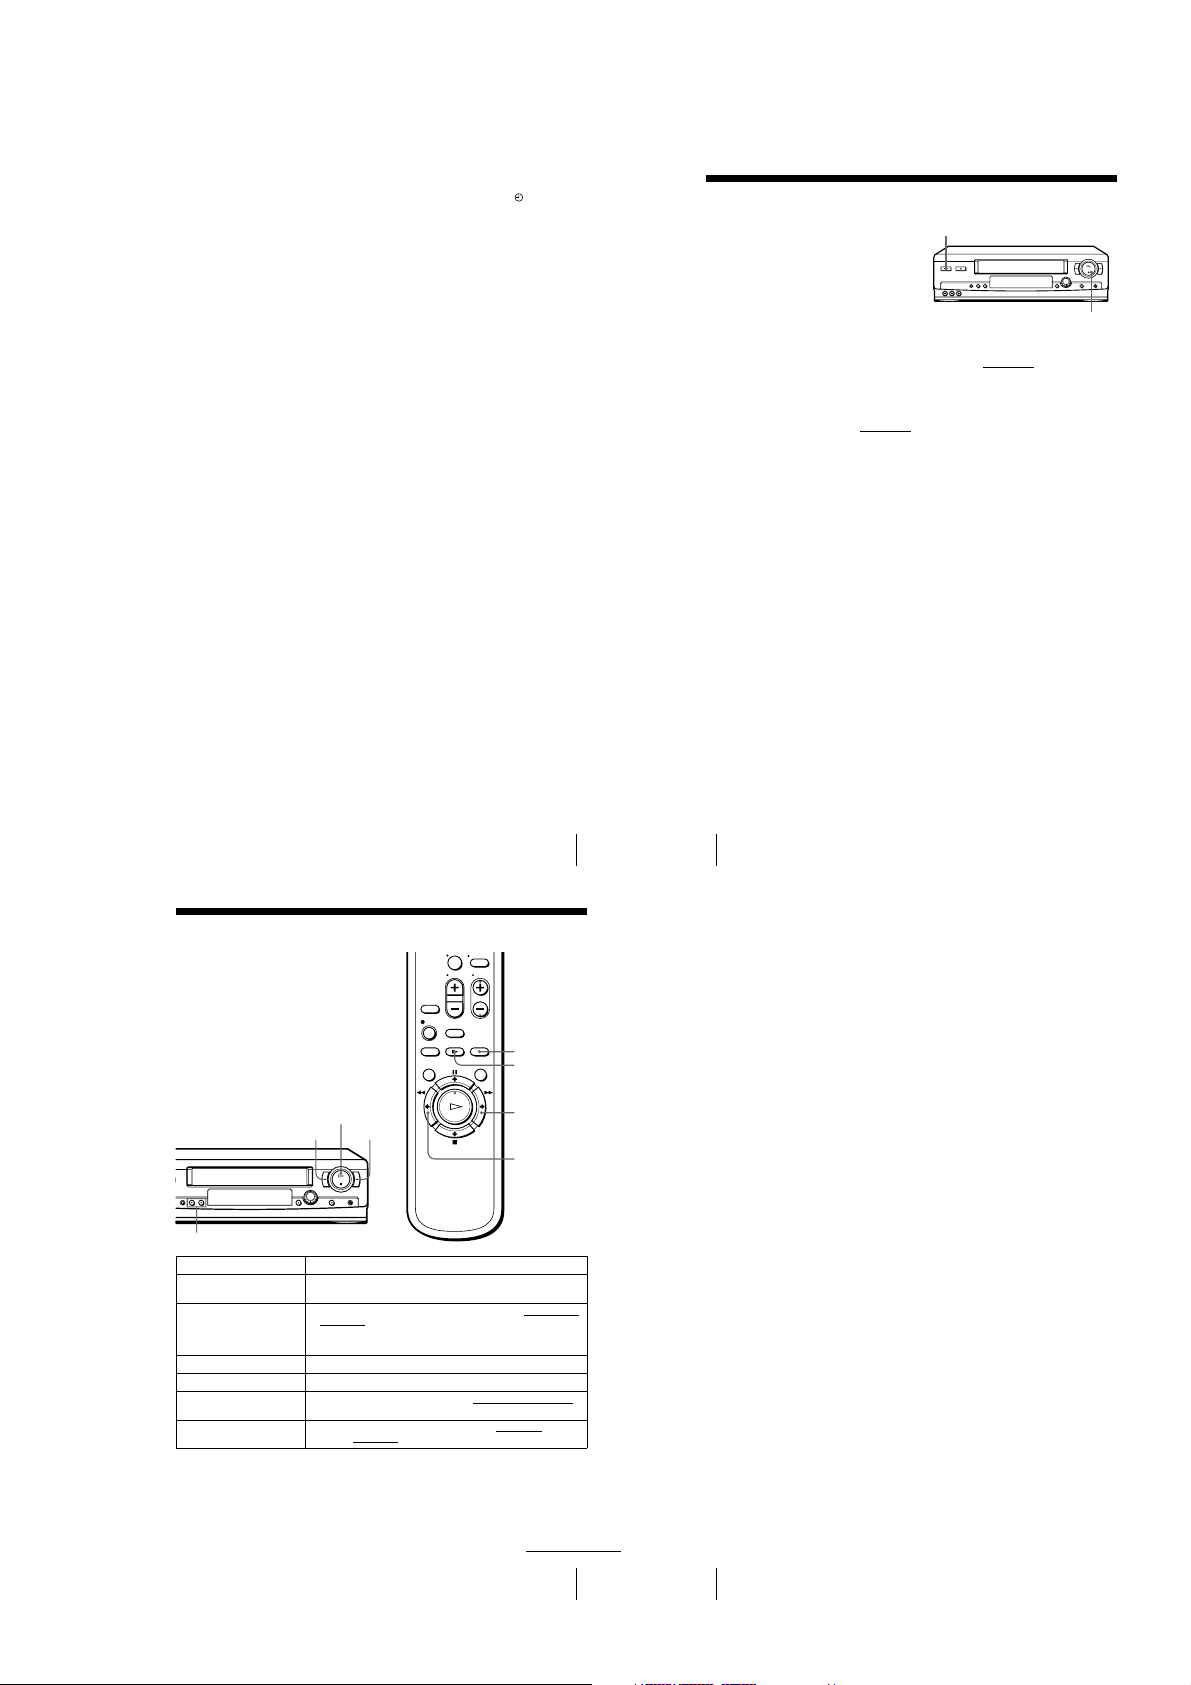
Setting the recording duration time
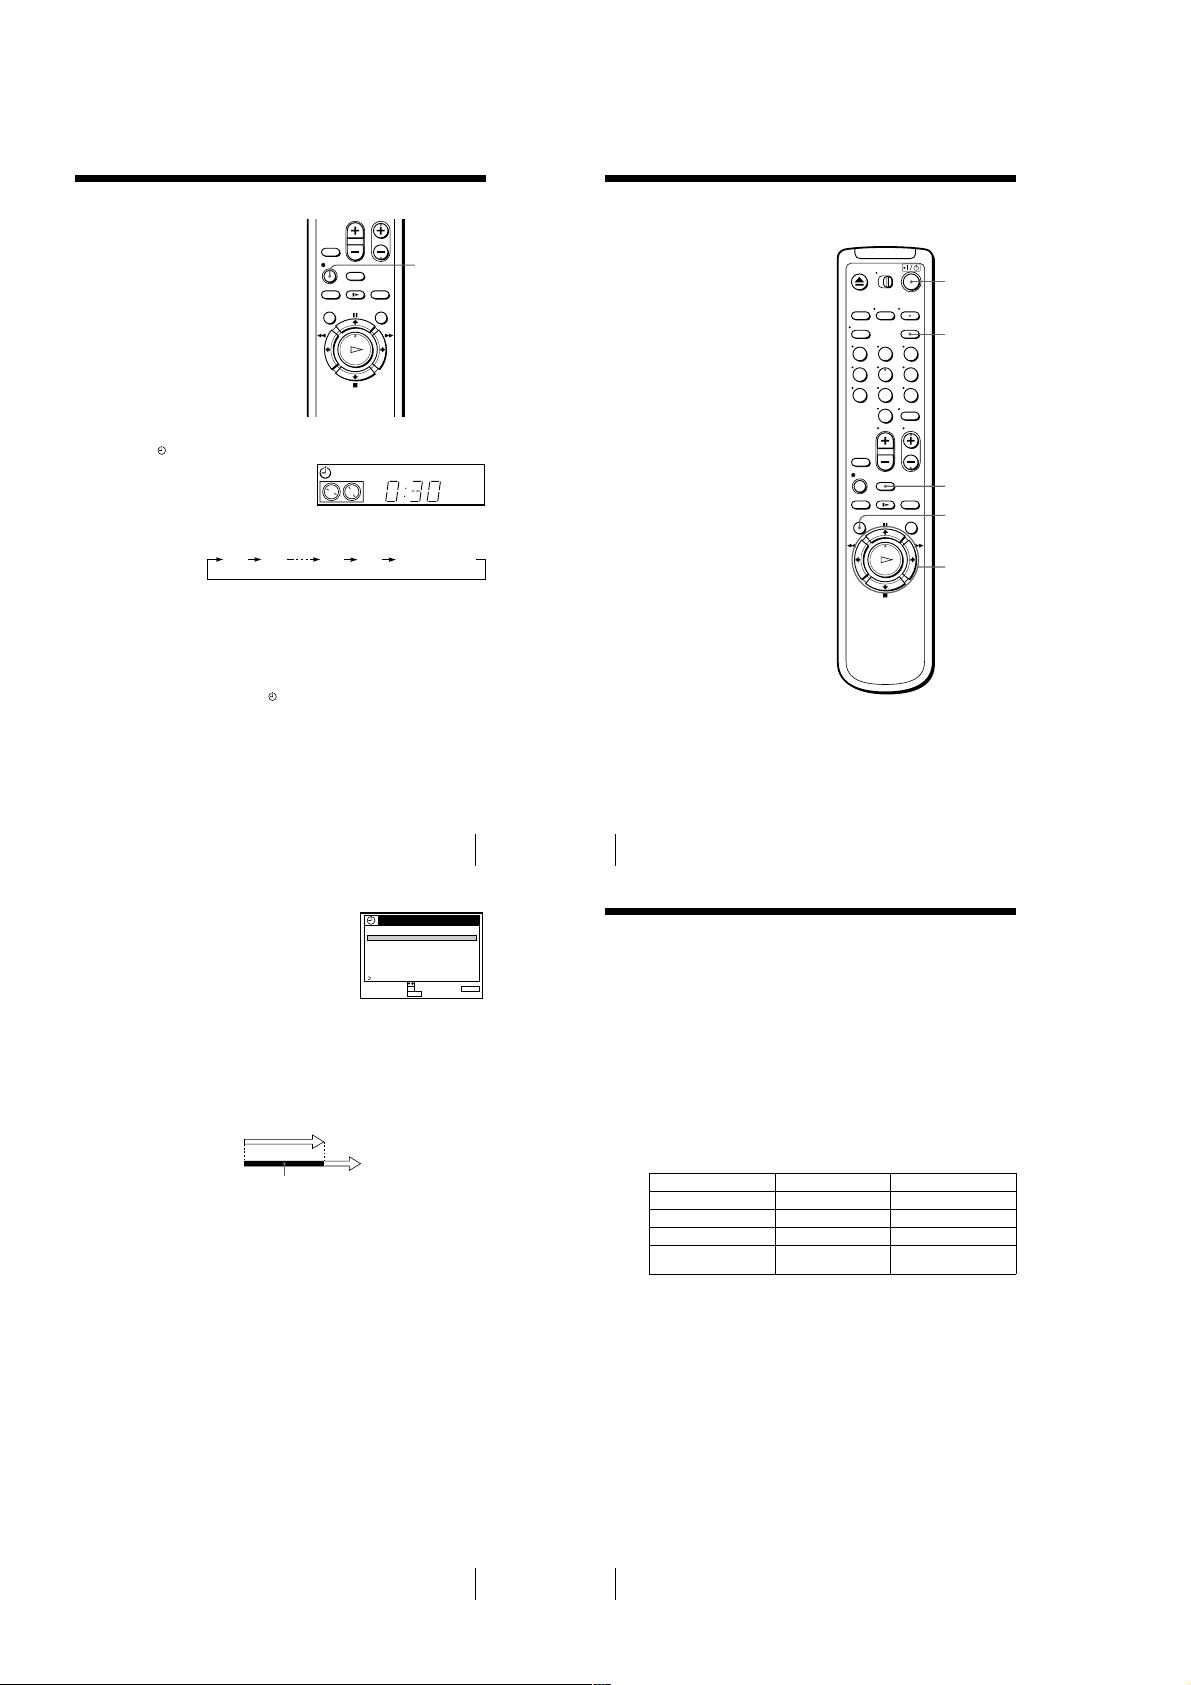
After you have started recording, you can
have the VCR stop recording automatically
after a specified duration.
Checking/changing/canceling timer
settings
Before you start…
z
REC
• Turn on your TV and set it to the video
channel.
?/1
While recording, press z REC.
1
The indicator appears in the dis play window.
Press z REC repeatedly to set the duratio n time.
2
Each press advances the time in increments of 30 minutes.
0:30 1:00
The tape counter decreases minute by minute to 0:00, then the VCR stops
recording and turns off automatically.
To extend the duration
Press z REC repeatedly to set a new duration time.
5:30 6:00
VIDEO
SP
APC
Normal recording
To cancel the duration
Press z REC repeatedly until the indicator disappears and the VCR returns to
normal recording mode.
To stop while recording
Press x STOP.
Note
• You cannot display the current tape time in the display window whe n setting the recording
duration time.
Setting the recording duration time
Press M/m to highlight the setting you want to
3
change or cancel.
• To change the setting, press OK and press </
, to highlight the item you want to change,
then press M/m to reset it.
• To cancel the setting, press CLEAR.
Press OK.
4
Press MENU to exit the menu.
5
If any timer settings remain, turn off the VCR to return to recording standby.
When the timer settings overlap
The program that starts first has priority and the second program starts recording only
after the first program has finished. If the programs start at the same time, the
program listed first in the menu has priority.
Program 1
Program 2
Will be cut off
Tip
• To show the PROG./VERIF. menu, you can also use the MENU button. Press MENU, then
to highlight PROG./VERIF. and press OK.
press
M/m
PROG. / VERIF.
FECHA TER.COM.
039
0:90053SP:/
DOM 8 0
20101
0:10302EP:10MAR/
LUN –
VIE 2 00:30006EP:
CADA 6 03:70024EP:
MER
–––––: –––––––:–/
–––––: –––––––:–/
–––––: –––––––:–/
–––––: –––––––:–/
VOLVER
SELECCIONAR :
OK CANCELAR : CLEAR
AJUSTAR :
MENUPARA SALIR :
PM PM
AM
PM
AM
9/28 VIE
CH
AM
PM
AM
123
456
789
0
Press ?/1 to turn on the VCR.
1
Press TIMER to display PROG./VERIF.
2
• If you want to change a setting, go on to the next step.
• If you do not need to change the settings, p ress MENU, then turn off the VCR
to return to recording standby.
49
50
Checking/changing/canceling timer settings
TIMER
CLEAR
MENU
M/m/</,
OK
Recording stereo and bilingual programs
(SLV-LX70S and LX60S only)
Recording stereo programs
This VCR automatically receives and records stereo programs. When a ste reo
program is received, the STEREO indicator lights up. If there is noise in the stereo
program, set ESTEREO AUTO. in the OPCIONES menu to NO. The sound will be
recorded in monaural (on b oth hi-fi and normal audio tracks) but with le ss noise. For
details, see page 62.
Recording bilingual programs
Normally, this VCR records only the main sound. When a S AP (Second Audio
Program) is received, the SAP indicator lights up. To record only SAP sound, set
SINTONIZ. AUDIO in the OPCIONES menu to SAP. For details, see page 62.
Selecting the sound during playback
Press AUDIO MONITOR to select the sound you want.
To listen to On-screen display Display window
Stereo ESTEREO STEREO
Left channel L STEREO
Right channel R STEREO
Monaural sound on the
normal audio track
No indicator No indicator
Checking/changing/canceling timer settings
51
52
Recording stereo and bilingual programs (SLV-LX70S and LX60S only)
1-12

How sound is recorded on a video tape
54
Searching for the beginning of a timer recorded program
Searching for the beginning of a timer
recorded program
Press DIAL TIMER.
The VCR turns on, rewinds to the beginning of the most recently recorded program
and starts playback automatically. The SEARCH MODE button turns off.
Tip
• To turn off the SEARCH MODE button, first turn the VCR on, then press the
SEARCH MODE button. (Do not press any other button at this point, otherwise
this SEARCH MODE function will be canceled.) To start the SEARCH MODE
function, press the SEARCH MODE button once. If you press the SEARCH
MODE button repeatedly, you can enter the index search or Time Search mode (for
details, see page 55 an d 56).
Notes
• This SEARCH MODE function will be canceled (the SE ARCH MODE button
turns off) if:
– The VCR starts recording other programs.
– You press
H
PLAY, M FF, m REW, or AEJECT button while the VCR is on.
– If there is a power failure.
If you record a program using the timer
function, you can easily find the beginning of
the recording with this SEARCH MODE
function. The SEARCH MODE button lights
up when the VCR finishes a timer recording
and the display window shows the
following:
SEARCH MODE
DIAL TIMER
56
Searching using the Time Search function
Searching using the Time Search function
To stop searching
Press x STOP.
Tip
• The VCR can search up to six hours ahead of or behind the current position of a
tape.
You can easily find a specific point on a tape
by using the Time Search function.
For example, you can find a recorded portion
15 minutes ahead of or behind the current
position of a tape by using the Time Search
function.
1
Press SEARCH MODE repeatedly until “TIME” appears in the display window
(the SEARCH MODE button lights up).
2
Turn DIAL TIMER clockwise or counterclockwise to set the length of the time
portion you want the VCR to fast-forward or rewind the tape. Each turn on the
control increases or decreases the duration by 15 minutes.
For example, if you want to watch a recorded portion 15 minutes ahead of the
current position, turn DIAL TIMER once clockwise.
To change the time by one minute,
press CHANNEL +/–.
3
Press DIAL TIMER.
The VCR starts searching and the tape counter starts counting until it reaches the
specified point.
The VCR starts playback automatically when the tape counter reaches the
specified point (the SEARCH MODE button turns off).
SEARCH MODE
DIAL TIMER
SP
APC
SP
APC
SP
APC
The VCR records sound onto two separate tracks. Hi-fi audio is recorded onto the
main track along with t he picture. Monaural sound is recorde d onto the normal audio
track along the edge of th e tape.
Normal audio track
Hi-fi audio track
(main track)
Notes
• To play a tape in stereo, you must u se the A/V connections.
• When you play a tape recorded in monaural, the sound is heard in monaural regardless of the
AUDIO MONITOR setting.
Monaural sound
Stereo sound
(left/right channels)
Recording stereo and bilingual programs (SLV-LX70S and LX60S only)
Searching using the index function
The VCR marks the tape with an index signal
at the point where each recording begins.
Use these signals as references to find a
specific recording. The VCR can search up
to 9 index signals ahead of or behind the
current position.
Press SEARCH MODE on the VCR repeatedly until “INDEX” appears in the
1
display window (the SEARCH MODE button lights up).
Turn DIAL TIMER to specify how many index signals ahead or behind you want
2
to search:
• To search ahead, turn DIAL TIMER clockwise.
• To search backwards, turn DIAL TIMER counterclockwise.
Press DIAL TIMER.
3
The VCR starts searching. The playback starts (the SEARCH MODE button
turns off) from the point about five seconds ahead of the specified index mark.
To stop searching
Press x STOP.
Note
• No index signal will be added when recording st arts from recording pause.
However, an index signal will be marked if you change the channel during
recording pause.
SP
SP
53
DIAL TIMER
SEARCH MODE
APC
APC
Searching using the index function
55
1-13
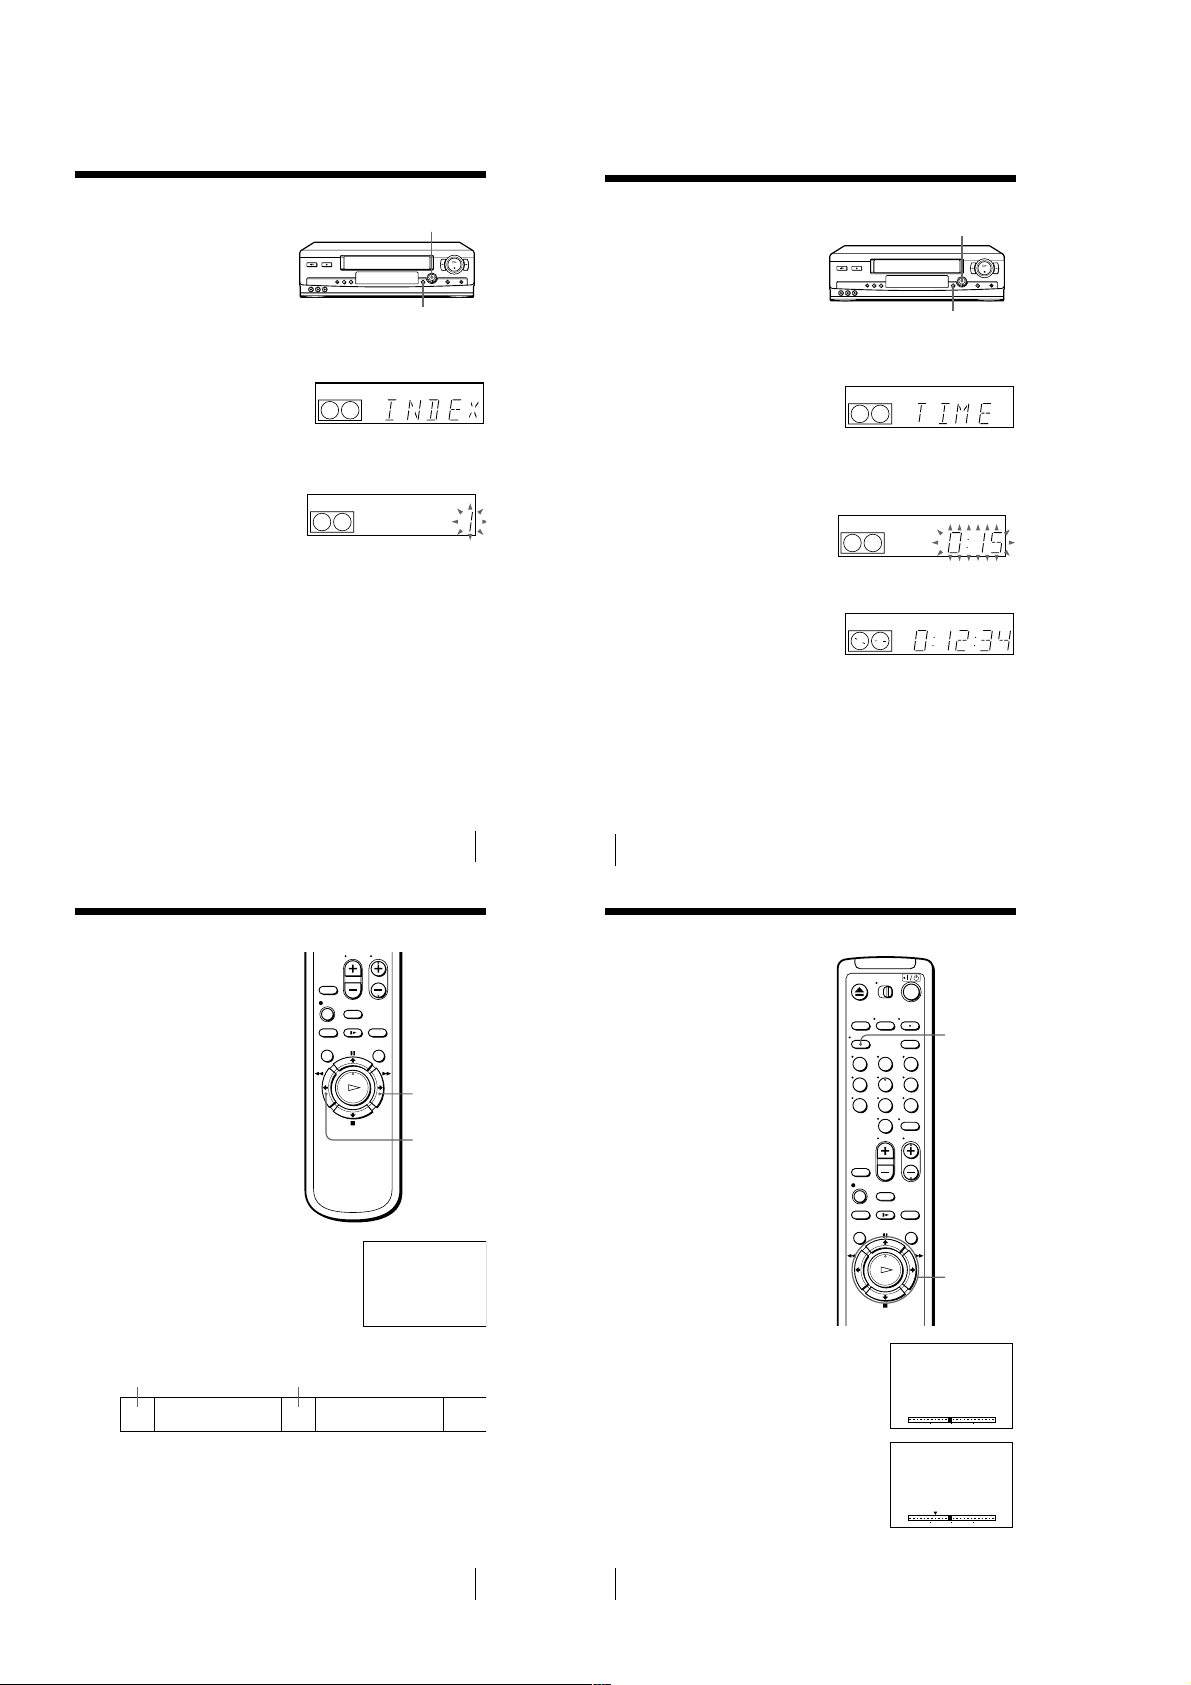
Searching using the index function
The VCR marks the tape with an index signal
at the point where each recording begins.
Use these signals as references to find a
specific recording. The VCR can search up
to 9 index signals ahead of or behind the
current position.
SEARCH MODE
DIAL TIMER
Searching using the Time Search function
You can easily find a specific point on a tape
by using the Time Search function.
For example, you can find a recorded portion
15 minutes ahead of or behind the current
position of a tape by using the Time Search
function.
DIAL TIMER
SEARCH MODE
Press SEARCH MODE on the VCR repeatedly until “INDEX” appears in the
1
display window (the SEARCH MODE button lights up).
Turn DIAL TIMER to specify how many index signals ahead or behind you want
2
to search:
• To search ahead, turn DIAL TIMER clockwise.
• To search backwards, turn DIAL TIMER counterclockwise.
Press DIAL TIMER.
3
The VCR starts searching. The playback starts (the SEARCH MODE button
turns off) from the point about five seconds ahead of the specified index mark.
To stop searching
Press x STOP.
Note
• No index signal will be added when recording st arts from recording pause.
However, an index signal will be marked if you change the channel during
recording pause.
Searching using the index function
APC
SP
APC
SP
Skip-searching automatically (Quick View)
You can spot check an entire tape quickly
using the Quick View function. At intervals,
the VCR skips playback while searching
forward or backward.
M
FF
m
REW
Press SEARCH MODE repeatedly until “TIME” appears in the display window
1
(the SEARCH MODE button lights up).
Turn DIAL TIMER clockwise or counterclockwise to set the length of the time
2
portion you want the VCR to fast-forward or rewind the tape. Each turn on the
control increases or decreases the duration by 15 minutes.
For example, if you want to watch a recorded portion 15 minutes ahead of the
current position, turn DIAL TIMER once clockwise.
To change the time by one minute,
press CHANNEL +/–.
Press DIAL TIMER.
3
The VCR starts searching and the tape counter starts counting until it reaches the
specified point.
The VCR starts playback automatically when the tape counter reaches the
specified point (the SEARCH MODE button turns off).
To stop searching
Press x STOP.
Tip
• The VCR can search up to six hours ahead of or behind the current position of a
tape.
55
56
Searching using the Time Search function
APC
SP
APC
SP
APC
SP
Searching for a selected point on the tape
You can easily find a specific point by
moving the pointer on t he TV screen.
The VCR fast-forwards or rewinds to the
point you indicate and starts playback
automatically.
DISPLAY
123
456
789
0
Hold down M FF (or m REW) more than two
seconds during stop. “SKIP” indicator appears on the
TV screen.
The VCR searches forward (or backward) for about
two minutes on the counter while showing the
contents of the tape. Then it fast-forwards (or rewinds)
for about ten minutes on the counter. The VCR
repeats this operation until it stops at the end (or
beginning) of the tape.
search forward while
showing the tape contents
M
fast-forward
To cancel skip-search
Press H PLAY or x STOP.
Note
• The VCR automatically fast -forwards (or rewinds) any portion with no recording.
search forward while
showing the tape contents
Skip-searching automatically (Quick View)
M
fast-forward
SKIP
</,
Press DISPLAY repeatedly until the bar
1
indication appears on the TV screen.
A cursor (x) indicating the cu rrent position of
the tape appears on the bar indication. If the
cursor does not appear, play the tape a few
moments (by pressing H PLAY, M FF, or
m REW) until the cursor appears.
Press </, to move the pointer (V) to the point
2
where you want to start playback.
The VCR starts searching and the cursor (x)
moves toward the pointer. When the VCR locates
the marked point, playback starts.
57
58
Searching for a selected point on the tape
0 120
0 120
1-14

To cancel searching
60
Adjusting the picture
Adjusting the picture
Adjusting the tracking
Although the VCR automatically adjusts the tracking
when playing a tape (the indicator flashes in the
display window, then turns off), distortion may occur
if the recording is in poor condition. In this case,
manually adjust the tracking.
Press TRACKING +/– to display the tracking meter.
The distortion should disappear as you press one of
the two tracking buttons (the indicator lights up).
To resume automatic tracking adjustment, eject the
tape and reinsert it.
About the Reality Regenerator function
The Reality Regenerator function automatically restores the picture to its original
quality during playback.
To use the Reality Regenerator function
To turn it off, select NO in step 4. The RR indicator turns off in the display window.
1
Press MENU, then select OPCIONES and press OK.
2
Press M/m to highlight PRÓXIMA, then press OK.
3
Press M/m to highlight REALITY REGENERATOR on PÁGINA2 of the
OPCIONES menu, then press OK.
4
Press M/m to set REALITY REGENERATOR to SI, then press OK.
The RR indicator lights up in the display window.
5
Press MENU to return to the original screen.
SEGUIMIENTO NORMAL
Tracking meter
OPCIONES
REALITY REGENERATOR
APC
SENSR CONDCIÓN CABEZA
NITIDEZ
NO
SI
ANTERIOR
VOLVER
AJUSTAR :
SELECCIONAR :
OK
MENUPARA SALIR :
2PÁGINA
62
Changing menu options
Changing menu options
Menu choices
Initial settings are indicated in bold print.
PÁGINA1
1
Press MENU, then select OPCIONES and press OK.
2
Press M/m to highlight the option to change, then press OK.
To g o to PÁGINA2, highlight PRÓXIMA and press OK. To return to PÁGINA1,
highlight ANTERIOR and press OK.
3
Press M/m to change the setting, then press OK.
To adjust the sharpness, press </, and press OK.
4
Press MENU to return to the original screen.
Menu option Set this option to
SELEC. AUTO. ANT. • SI i f your TV is connected only to VHF/UHF OUT on the
VCR. To play a tape, set the TV to the VCR channel (channel
3 or 4).
• NO if your TV is connected to both VHF/UHF OUT and LINE
OUT on the VCR. To play a tape, se t the TV to the VCR input.
ESTEREO AUTO.
(SLV-LX70S and
LX60S only)
• SI to receive stereo programs.
• NO to reduce noise. T he sound changes to monaural.
SINTONIZ. AUDIO
(SLV-LX70S and
LX60S only)
• MAIN to record the main sound on both hi-fi and norma l audio
tracks.
• SAP to record the SAP (Second Audio Program) sound on both
hi-fi and normal audio tracks.
SELC. DE CINTA • AU TO when using a T-160 length tap e or any tape shorter than
a T-140 length tape.
• 180 when using a T-140 or T-180 length tape.
For details, see page 36.
VEL. AUTO. CINTA • SI to change the tim er recording tape speed automatically to
the EP mode when the remainin g tape length becomes shorter
than the recording time. To operate VEL. AUTO. CINTA, set
SELC. DE CINTA correctly.
• NO to keep the same tape speed.
OPCIONES
ESTEREO AUTO.
SELEC. AUTO. ANT.
SINTONIZ. AUDIO
SELC. DE CINTA
SI
MAIN
SI
AUTO
VEL. AUTO. CINTA
SI
PRÓXIMA
VOLVER
AJUSTAR :
SELECCIONAR :
OK
MENUPARA SALIR :
1PÁGINA
OPCIONES
REALITY REGENERATOR
APC
SENSR CONDCIÓN CABEZA
NITIDEZ
SI
SI
SI
ANTERIOR
VOLVER
AJUSTAR :
SELECCIONAR :
OK
MENUPARA SALIR :
2PÁGINA
BA
Press H PLAY or x STOP.
To turn off the bar indication
Press DISPLAY again.
Notes
• The figure on the bar i ndication represents the total time length of the inserted tape as shown
below.
The total time length may n ot be displayed correctly for:
– Tapes other than T-60, T-120, or T-160.
– Tapes recorded in more than one tape speed mode.
Tape type
Total time length
SP LP EP
T-60 or shorter 60 120 180
from T-80 to T-140 120 240 360
T-160 or longer 160 320 480
V
• If you move the pointe r (
new reset point.
• With the bar indication on, the
commander work only for moving th e pointer (V) and are not used for normal tape oper ation.
M
FF and m REW buttons on the VCR are used for norm al tape operation. Note,
The
however, if you press these buttons on the VCR
) on the bar indication while searching, the VCR searches for the
M
FF/ , and m REW/ < buttons on the remote
, searching is canceled.
About the Adaptive Picture Control (APC) function
The Adaptive Picture Control (APC) function automatically improves recording and
playback quality by adjusting the VCR to the condition of the video heads and tape.
To maintain better picture quality, we recommend that you set APC to SI on
PÁGINA2 of the OPCIONES menu (The APC indicator lights up in the display
window). For details, see page 63.
APC playback
The APC function automatically works on all types of tapes, including rental tapes
and tapes that were not recorded with APC.
APC recording
Whenever you insert a tape and first start recording, the VCR adjusts to the tape using
the APC function (the APC indicator flashes rapidly). This adjustment is retained
until the tape is ejected.
Notes
• The auto tracking adj ustment cannot be guaranteed to work with tapes record ed in the LP
mode on other VCRs.
• The APC fu nction does not work if the tape speed is automatically changed from the SP to
EP mode during a timer recording when VEL. AUTO. CINTA is set to SI in the OPCIONES
menu, unless the tape has be en recorded in the EP mode with the APC function.
• There is a delay of about ten seconds before the VCR actually starts recording while the VCR
analyzes the tape. To avoid the delay, first set the VCR to recording pause (the APC indicator
flashes slowly) and press
flashes rapidly) and return to recording pause. After the APC indicator stops flashing, press
X PAUSE to start recording immediately.
If you want to start recording quickly without using the APC function, first set the VCR to
recording pause (the APC indicato r flashes slowly) and press
recording.
z REC to have the VCR analyze the tape (the APC indicator
Searching for a selected point on the tape
X PAUSE again to start
Adjusting the picture
59
61
1-15
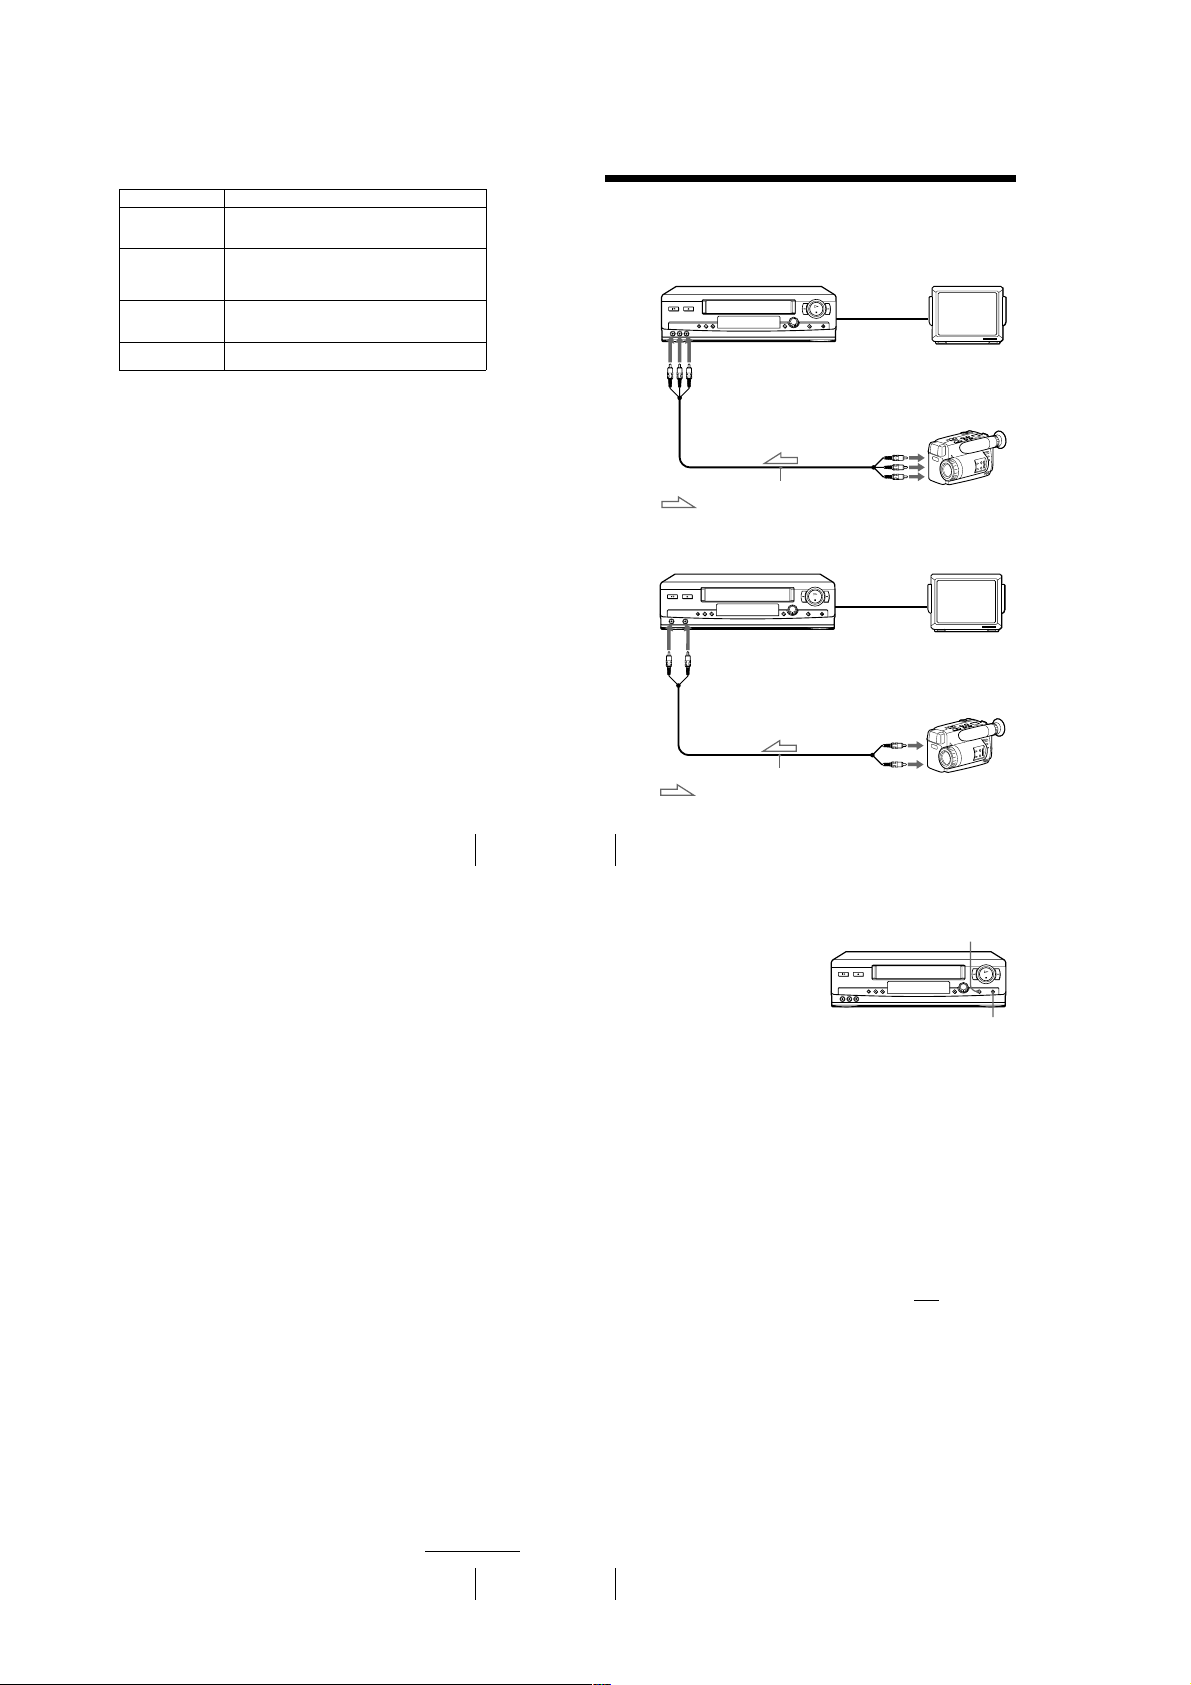
PÁGINA2
Menu option Set this option to
APC • SI to switch on the APC (Ada ptive Picture Control) function
REALITY
REGENERATOR
SENSR CONDCIÓN
CABEZA
NITIDEZ • B (Low) through A (High) to adjust the shar pness of the
and improve picture quality.
• NO to switch off APC.
• SI to switch on the Real ity Regenerator (Reality Regenerator)
function and restore the pictur e to its original quality during
playback.
• NO to switch off Reality Regenerator.
• SI to allow the VCR to automatically check the condition of
the video heads and inf orm you when they are dirty.
• NO to turn off the sensor.
picture. Select B to turn off the sharpness control.
Editing with another VCR
How to connect to record on this VCR
SLV-LX70S and LX60S
This VCR (Recorder)
LINE-2 IN
Audio/video cable (not supplied)
: Signal flow
SLV-LX50 and LX40
This VCR (Recorder)
LINE-2 IN
TV
Other VCR (P layer)
LINE OUT
TV
Other VCR (P layer)
LINE OUT
Changing menu options
Notes
• Make sure you connect the plugs to jacks of the same color.
• If you connected this VCR to both the LINE IN and LINE OUT jacks of the other VCR,
select the input correctly to prevent a humming noise.
• You can use the LINE-1 IN jacks for editing.
• If the other VCR is a mo naural type and connected to this VCR’s LINE-2 IN jacks , connect
the audio plug to the AUDIO L (white) jack. The sound is recorded on both right and left
channels. If you connect to t he AUDIO R (red) jack , the sound is recorded only on the right
channel. (SLV-LX70S and LX60S only)
• If the other VCR i s a monaural type and connected to this VC R’s LINE-1 IN jacks, the sound
is recorded only on t he channel whose jack is connected t o the audio plug. To record on both
right and left channels, connect the audio plugs to the AUDIO R/L jacks using a VMC910HG audio/video cable (not suppl ied). (SLV-LX70S and LX60S only)
Audio/video cable (not supplied)
: Signal flow
63
64
Editing with another VCR
Operation (when recording on this VCR)
Before you start editing
• Turn on your TV and set it to the
video channel.
• Press INPUT SELECT or
CHANNEL +/– to display “L2” (or
“L1”) in the display window.
• Press SP/EP to select the tape speed,
SP or EP.
Insert a source tape with its safety tab removed into the other (playback) VCR.
1
Search for the point to start playback and set it to pl ayback pause.
Insert a tape into this (recording) VCR. Search for the poin t to start recording
2
and press X PAU SE .
Press z REC on this VCR to set it to recording pause.
3
To start editing, press the X PAUSE buttons on both VCRs at the same time.
4
X PA US E
z REC
To stop editing
Press the x STOP buttons on both VCRs.
Tip
• To cut out unwanted scenes while editing, press
scene begins. When it ends, press
Note
• If you start recordi ng following the procedure above, the VCR won’t start recording with the
APC function. To record a tape with the APC function, press
pause in step 3 so that the VCR analyzes the tape. Then, pr ess
indicator stops flashing to start recording. If you press
stops flashing, the APC function is canceled.
X PAUSE on this VCR when an unwanted
X PAUSE again to resume recording.
z REC again during recording
X PAUSE after the APC
X PA USE be for e the APC indicator
continued
Editing with another VCR
65
66
Editing with another VCR
1-16

Additional Information
68
General setup information
Attaching the external antenna connector
Attaching a UHF/VHF band mixer
When using a 300-ohm twin lead cable for a
VHF/UHF antenna, use the EAC-32 antenna
connector (not supplied) to connect the
antenna to the VCR.
1
Loosen the screws on the antenna connector.
2
Wind the twin leads around the screws on the antenna connector.
3
Retighten the screws.
When using both a 75-ohm coaxial c able and
a 300-ohm twin lead cable for a VHF/UHF
antenna, use the EAC-66 UHF/VHF band
separator/mixer (not supplied) to connect the
antenna to the VCR.
1
Loosen the screws on the mixer.
2
Wind the twin leads around the screws on the mixer.
3
Retighten the screws.
4
Connect the 75-ohm coaxial cable to the mixer.
300-ohm twin
lead cable
EAC-32 antenna
connector (not
supplied)
300-ohm twin
lead cable
EAC-66
UHF/VHF
band
separator/
mixer (not
supplied)
75-ohm coaxial
cable
73
Index to parts and controls
Index to parts and controls
Refer to the pages indicated in parentheses ( ) for details.
Front panel
SLV-LX70S and LX60S
A ?/1 POWER switch (44)
B Z EJECT button (33)
C Tape compartment
D Remote sensor (5)
E m REW (rewind) button (33) (47)
F H PLAY button (33) (47)
G M FF (fast-forward) button (33) (47)
H z REC (record ) button (36) (49) (66)
I x STOP button (33) (66)
J X PAUSE button (33) (66)
K DIAL TIMER (38) (54) (55) (56)
L SEARCH MODE button (54) (55) (56)
M CHANNEL/TRACKING +/– buttons
(36) (60)
N EASY SET UP button (11) (13) (16)
O LINE-2 IN VIDEO/AUDIO L/R jacks
(64)
continued
General setup information
Setting the RF unit
When connecting the VCR to the TV using
only the antenna cable, you must set the RF
UNIT switch on the rear of the VCR so that
the TV can receive the correct signal from
the VCR.
TV
RF UNIT
CH3
CH4
CHANNEL +/–
?/1
POWER
Set the RF UNIT switch on the rear of the VCR to CH3 or CH4, whichever
1
channel is not used in your area . If both are used, set the switch to either channel.
Press ?/1 POWER to turn on the VCR.
2
Press TV/VIDEO to turn on the VIDEO indicator in the VCR’s display window.
3
Press CHANNEL +/– to display a channel number in the display window.
4
Select an active channel number in your area.
Turn on your TV and set it to the ch annel you selected in step 1 (channel 3 or 4) .
5
The channel you selected in step 4 appears on the TV screen. If the channels
change when you pres s CHANNEL +/–, you have made the correct setting.
Whenever you use the VCR, set the TV to the channel selected in step 1.
TV/VIDEO
123
456
789
0
Symptoms caused by contaminated video heads
• Normal picture • Unclear picture• Rough picture
Head Condition Sensor
The Head Condition Sensor checks the video heads ’ condition. If the heads are dirty, a message
will instruct you to insert a vi deo head cleaning cassette.
Be sure to use the Sony T-25CLD or T-25CLDR video head cleaning cassette. If these cleaning
cassettes are not available in your area, have the heads cleaned at your nearest Sony service
facility (a standard service charge will be required).
Note
• SENSR CONDCIÓN CABEZA in OPCIONES must be set to SI for the Head Condition
Sensor to operate.
• To turn off the head condition sensor message, set SENSR CONDCIÓN CABEZA to NO.
initial
contamination
continued
General setup information
• No picture (or
black & white
screen appears)
terminal
67
Troubleshooting
71
1-17
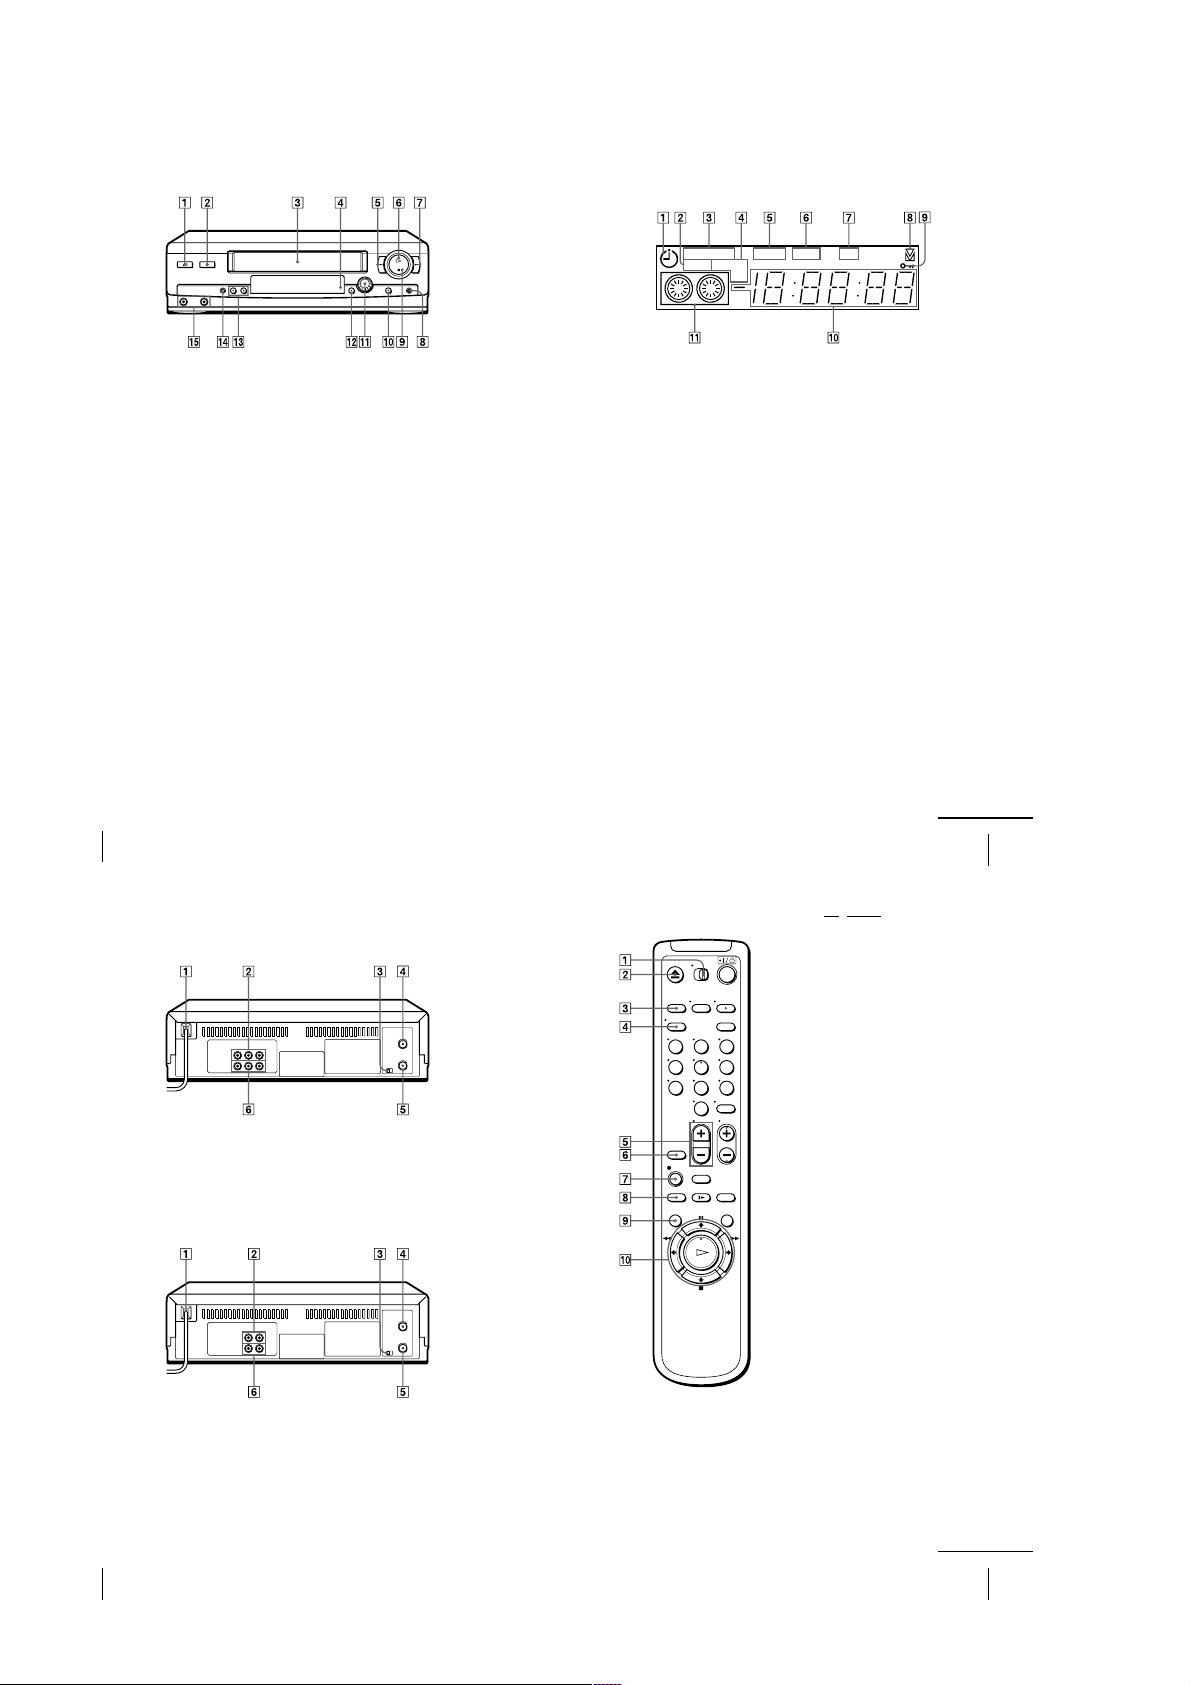
SLV-LX50 and LX40
Display window
A ?/1 POWER switch (44)
B Z EJECT button (33)
C Tape compartment
D Remote sensor (5)
E m REW (rewind) button (33) (47)
F H PLAY button (33) (47)
G M FF (fast-forward) button (33) (47)
H z REC (record) button (36) (49) (66)
74
Index to parts and controls
I x STOP button (33) (66)
J X PAUSE button (33) (66)
K DIAL TIMER (38) (54) (55) (56)
L SEARCH MODE button (54) (55) (56)
M CHANNEL/TRACKING +/– buttons
(36) (60)
N EASY SET UP button (11) (13) (16)
O LINE-2 IN VIDEO/AUDIO jacks (64)
STEREO
SAP LP SP
A Timer indicator (40) (44)
B SAP (Second Audi o Program) ind icator
(52) (SLV-LX70S and LX60S only)
C STEREO indicator (52) (SLV-LX70S
and LX60S only)
D Tape speed indicator (36)
E VIDEO indicator (37) (67)
F APC (Adaptive Picture Control)
indicator (61)
VIDEO
EP
RR
APC
G RR (Reality Regenerator) indicator (60)
H Tracking indicator (60)
I Child lock indicator (46)
J Time counter/clock/line/channel
indicator (33) (36) (66)
K Tape/recording indicator (36)
continued
Index to parts and controls
75
Rear panel
SLV-LX70S and LX60S
A AC power cord (7)
B LINE-1 IN AUDIO R/L/VIDEO jacks
(65)
C RF (Radio Frequ ency) UNIT switch (67)
SLV-LX50 and LX40
A AC power cord (7)
B LINE-1 IN AUDIO/VIDEO jacks (65)
C RF (Radio Frequ ency) UNIT switch (67)
D VHF/UHF IN connector (10) (12) (15)
E VHF/UHF OUT connector (10) (12) (15)
F LINE OUT AUDIO R/L/VIDEO jacks
(8)
D VHF/UHF IN connector (10) (12) (15)
E VHF/UHF OUT connector (10) (12) (15)
F LINE OUT AUDIO/VIDEO jacks (9)
Remote commander
123
456
789
0
/ VIDEO switch (5)
A •TV
B Z EJECT button (33)
C TRINITRON TV SYNCHRO PLAY
button (34)
D DISPLAY button (36) (58)
E VOL (volume) +/– buttons (6)
F INPUT SELECT button (37) (66)
G z REC (record) button (36) (49)
H SP (Stand ard Play)/EP (Extended Play)
button (36)
I MENU button (18) (62)
J X PAU SE /M button (18) (33)
x STOP /m button (18) (33)
m REW (rewind)/ < button (33) (47)
M FF (fast-forward)/ , button (33)
(47)
H PL AY/OK button (1 8) (33)
76
Index to parts and controls
1-18
continued
Index to parts and controls
77
 Loading...