

Sony KZ-32TS1E, KZ-42TS1E Quick start guide
Screw a hook (not supplied) to the wall or
pillar securely.
Side view Rear view
KZ-32TS1E
Checking the
Connecting the AC
Preventing the TV
KZ-42TS1E
Thank you for purchasing this Sony
product.
After following this step by step guide
you will be able to:
Insert Batteries into the Remote
Control.
Connect the AC Cable, Aerial and VCR
to your TV.
Select the language of the menu
screens.
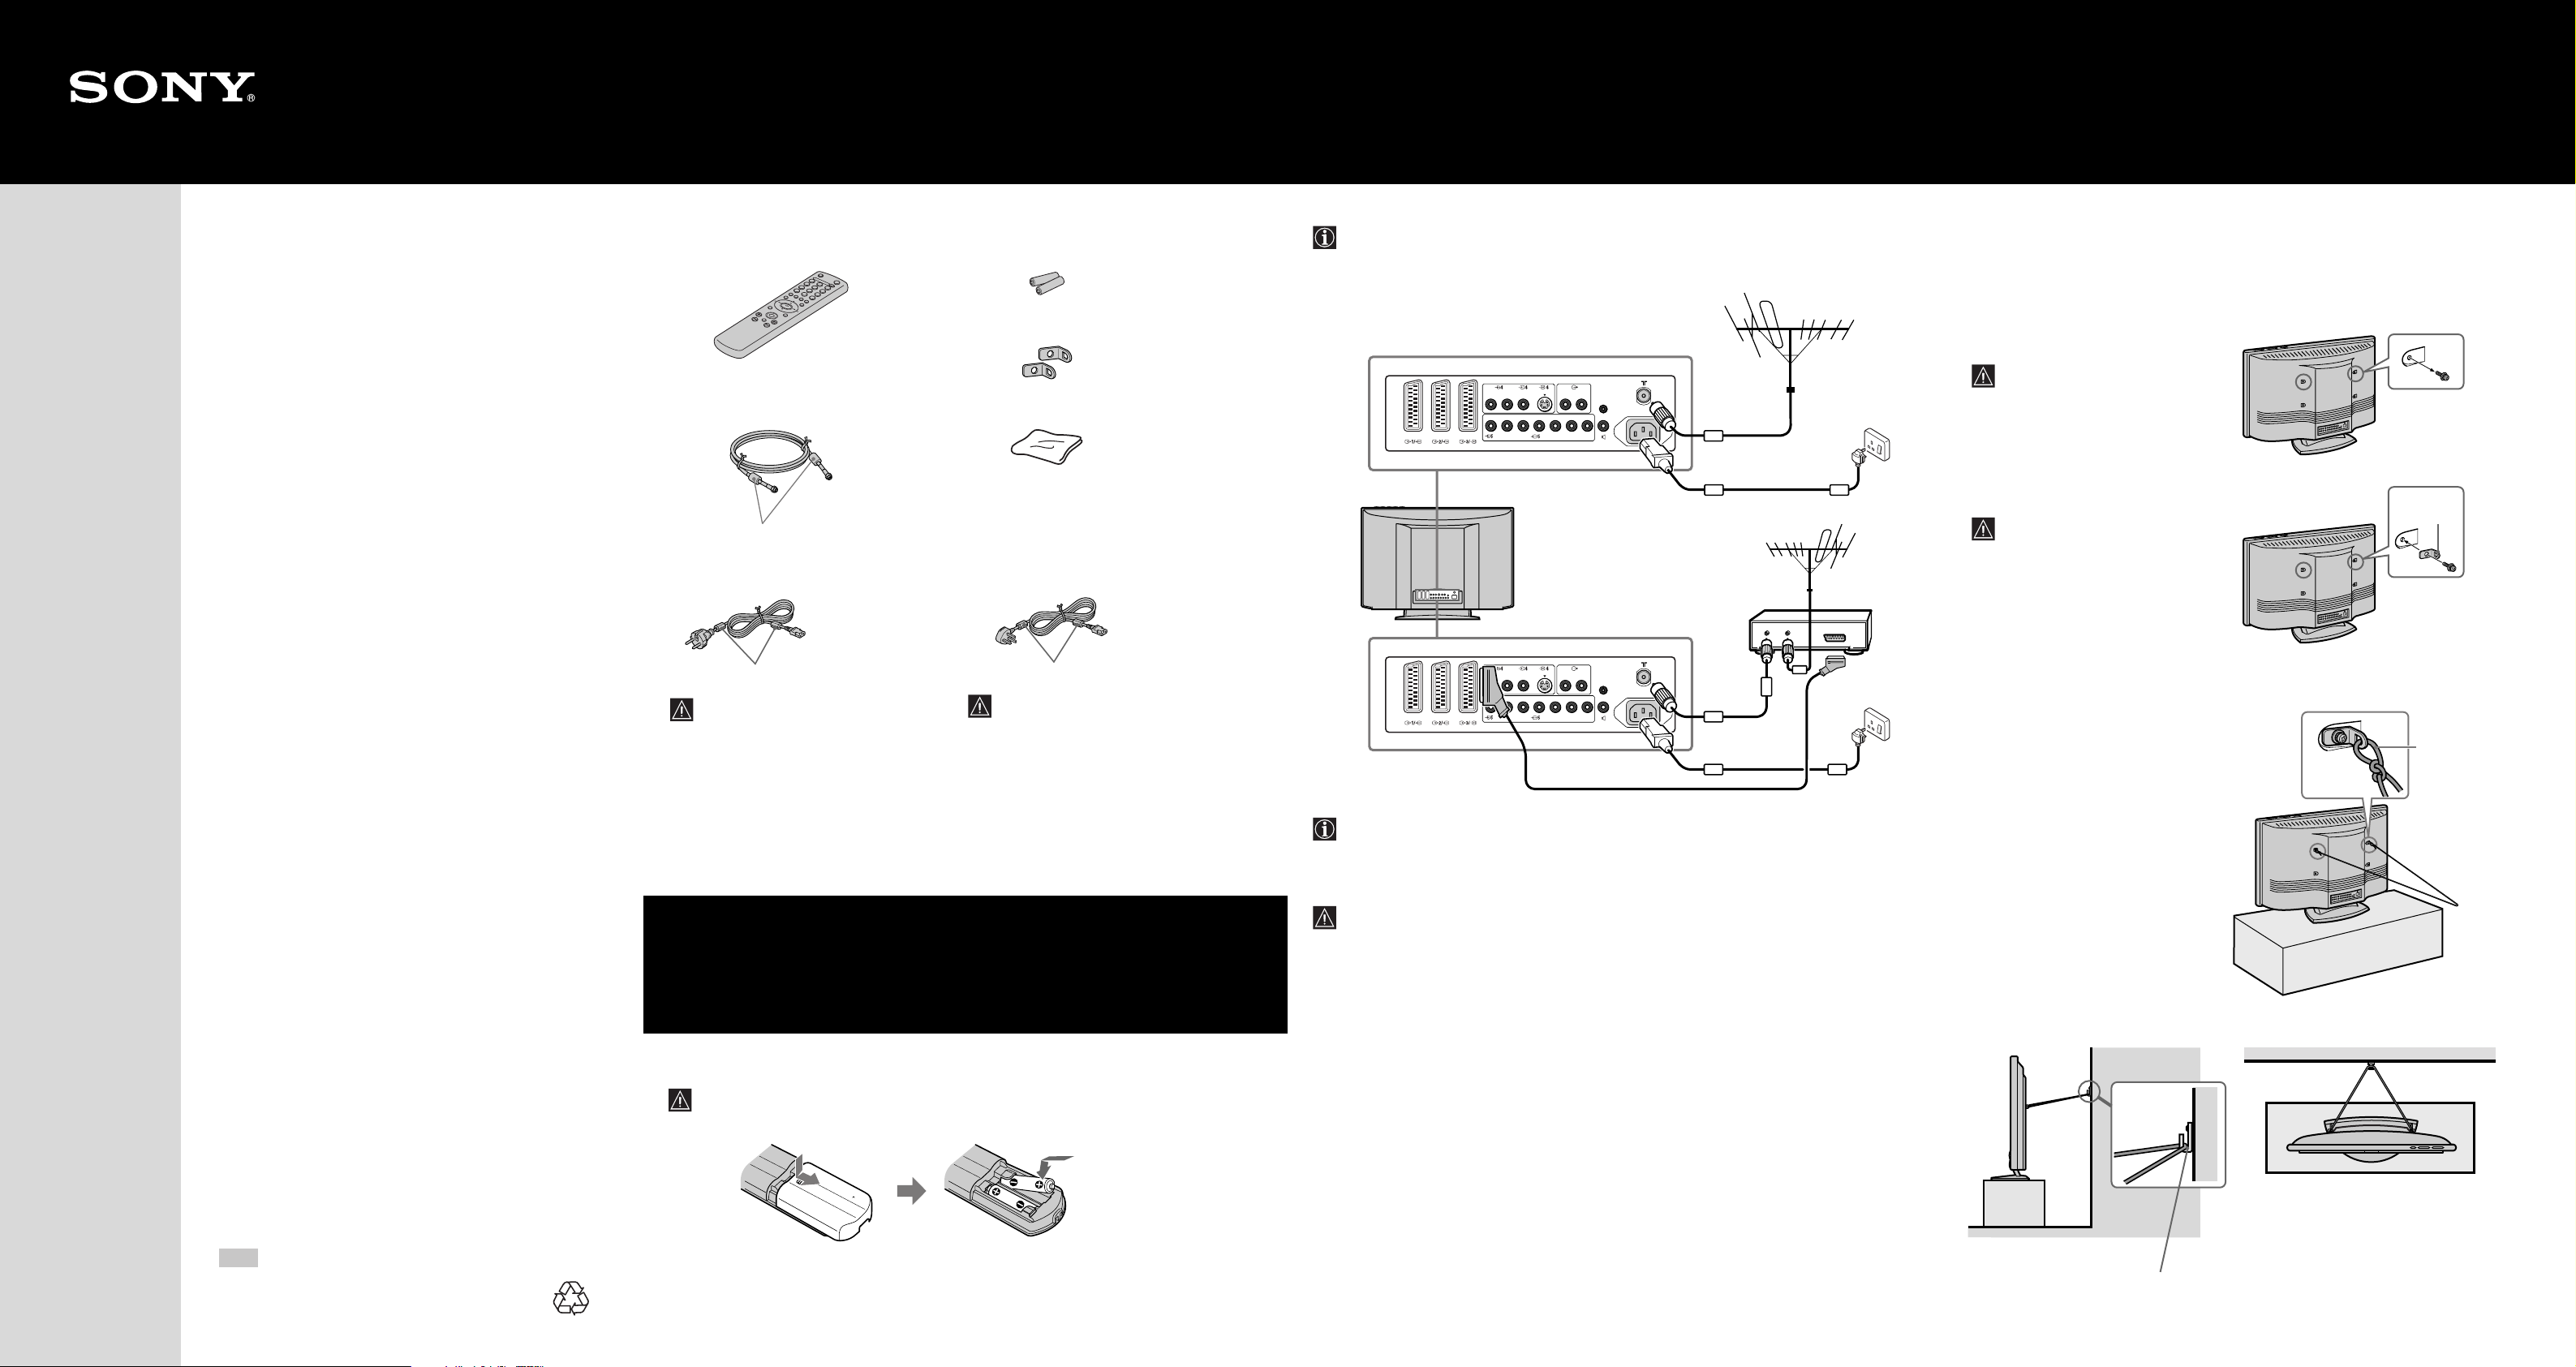
Accessories Supplied
One Remote Control (RM-932): Two batteries (R6 Type):
Two Brackets:
One coaxial cable: One Cleaning cloth:
Do not remove ferrite cores.
One AC Cable (Type C):
One AC Cable (Type BF):
1
Cable, Aerial and VCR
• Use the supplied AC cable (type BF, with safety earth).
• Use the supplied coaxial cable for aerial connection.
• Other connecting cables are not supplied.
L/G/S/IR/D/D/D
L/G/S/I
R/D/D/D Y/G PB/CB/BPR/CR/RHD VD
(SMARTLINK)
R/D/D/D
L/G/S/I
or
CTRL S
(W/G/W/G)
AC IN
Connect the supplied
cosxial cable.
Connect the supplied AC
cable (Type BF, with
safety earth).
from Falling Down
34
Attach the supplied bracket to the rear of the TV, and pass a sturdy cord or chain through
it to attach it to a wall or pillar. Consult your dealer when attaching the bracket, since the
screws for the bracket also hold the rear cabinet in a place.
Remove one of the screws attached at
1
the rear of the TV.
Do not remove both screws at the
same time as these screws secure
the rear cabinet. Never use the TV
with the screws removed.
2
Attach the supplied bracket with the screw.
Be sure to use the screw that
attaches the rear cabinet. A different
screw may damage the TV and
result in electric shock.
VCR
OUT IN
Bracket
(supplied)
Select the country in which you wish to
operate the set.
Tune your TV.
Change the broadcast channels into a
different order.
View TV Programmes.
Do not remove ferrite cores.
Use this AC cable (with safety earth) if
you use the set outside the United
Kingdom.
Do not remove ferrite cores.
• Use this AC cable (with safety earth) if
you use the set in the United
Kingdom.
• See “NOTICE FOR CUSTOMERS IN
THE UNITED KINGDOM” on page 2
of the instruction manual when using
the cable.
• This cable may not be supplied
depending on the country.
Inserting Batteries into the Remote Control
2
Make sure you insert the supplied batteries using the correct polarity.
Always remember to dispose of used batteries in an environmentally friendly way.
L/G/S/IR/D/D/D
R/D/D/D Y/G PB/CB/BPR/CR/RHD VD
L/G/S/I
(SMARTLINK)
• The Scart lead is optional, however if you use a Scart lead to connect your VCR it can
improve picture and sound quality when using it.
• For more details of VCR connection, please refer to the section “Connecting Optional
Equipment” on page 28 of the instruction manual.
If you do not have a Scart lead, after automatically tuning the TV, tune in the VCR test
signal to the TV programme number “0” by using the “Manual Programme Preset”
option. (for details of how to manually programme these presets, see page 22, step A of
the instruction manual).
Refer to your VCR instruction manual to find out how to find the output channel of your
VCR.
R/D/D/D
L/G/S/I
CTRL S
(W/G/W/G)
AC IN
3
Repeat steps 1 and 2 to attach the other bracket.
Attach a sturdy cord or chain securely to
4
each bracket on the rear of the TV.
Fix the cord or chain to a wall or pillar.
5
Attach the
sturdy cord
or chain
(not supplied)
securely.
Quick Start Guide
GB
©2002 by Sony Corporation
4-088-928-01 (1)
Printed in Spain
Ecological Paper - Totally Chlorine Free
/
TVVIDEO
DVDVCR
123
456
789
0
OK
PROG
TV
MENU REC
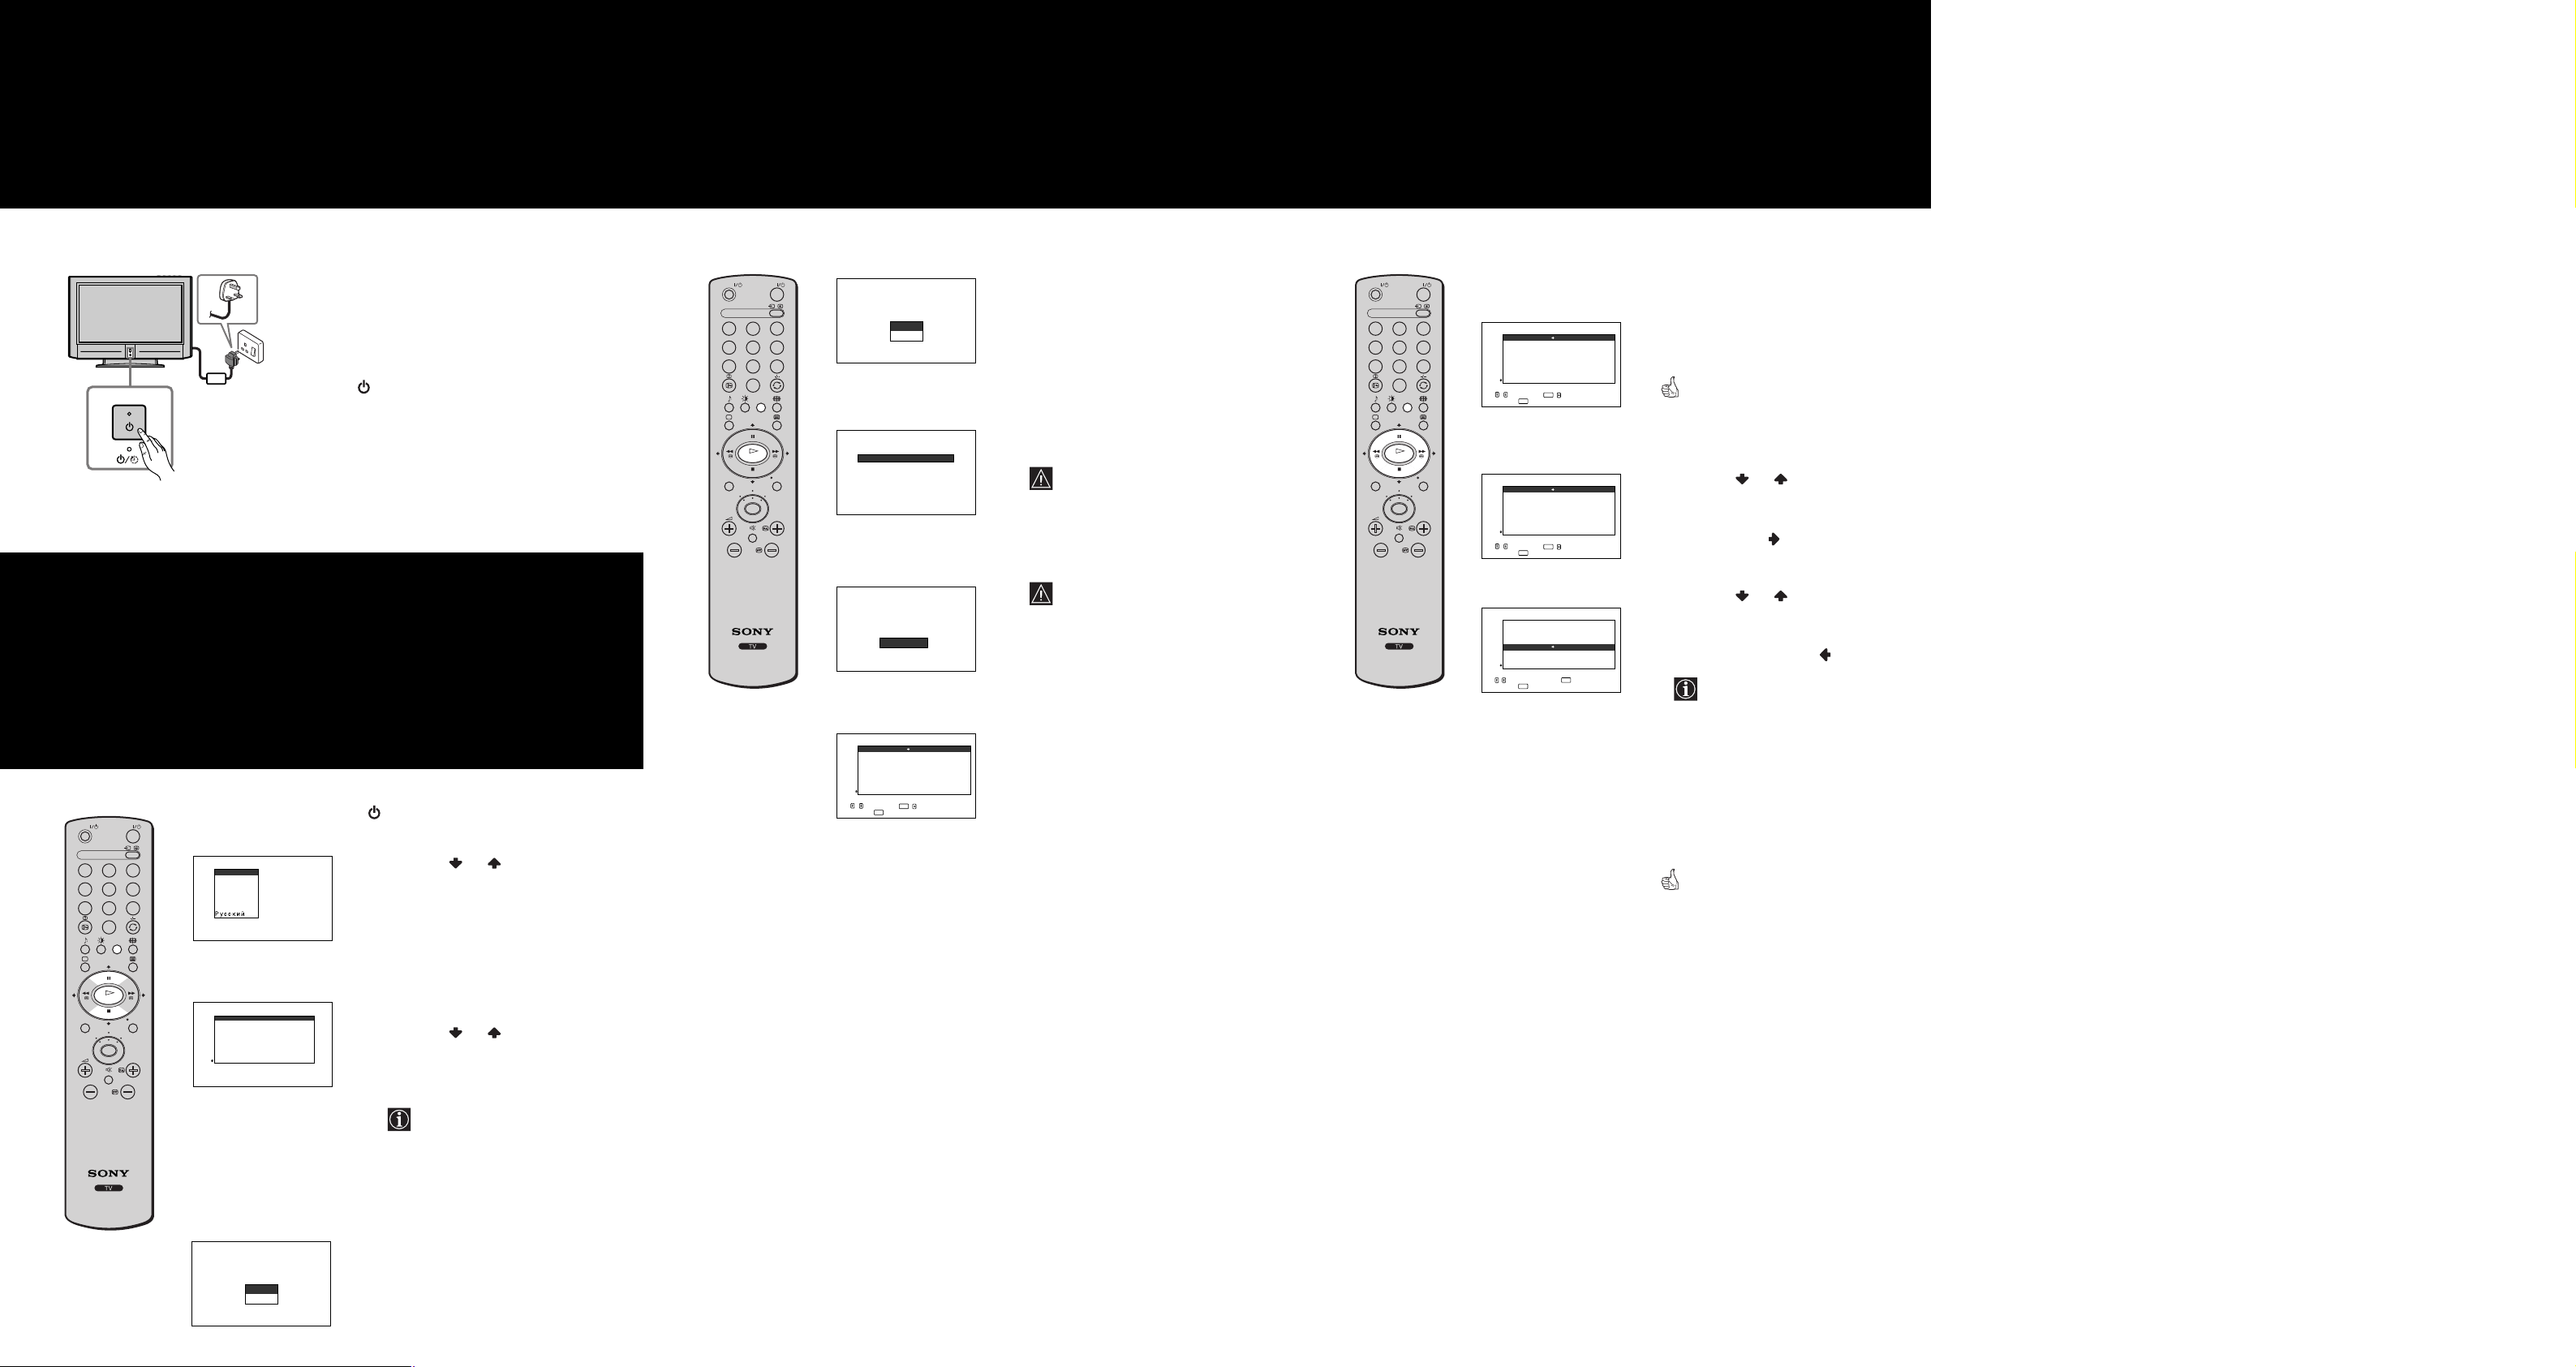
Switching on the set
Automatically Tune the TV
Changing the Programme Order
Connect the plug to the mains socket (220-240V AC,
1
50Hz).
2
Press the
Power
switch on the TV set to turn on
the TV.
Selecting the language of the menu screens and the country
This TV set works with menu screens. By following the
instructions below, you can select the desired language
of the menu screens and the country in which you
wish to operate the TV set.
6
123
456
789
MENU REC
TVVIDEO
/
0
The first time you press the
displays automatically on the TV screen.
Language
Engl
ish
Español
Français
Italiano
Port uguês
Deutsch
Neder l ands
Select language
m
OK
TV
DVDVCR
PROG
Count ry
—
United Kingdom
España
France
Italia
Portugal
Deutschland
Nederland
Select country
m
Do y o u
want to start
automatic tuning?
Ye s
No
Power
switch, a
1
Press the or button on the
Language
menu
remote control to select the language,
then press the OK button to confirm
your selection.
From now on all the menus will appear
in the selected language.
The
2
Country
menu appears
automatically on the TV screen.
Press the or button to select the
country in which you will operate the
TV set, then press the OK button to
confirm your selection.
• If the country in which you want
to use the TV set does not appear
in the list, select “-” instead of a
country.
• In case of changing the country
selection (including “-”), the
next procedure of Auto Tuning
always should be done after that.
The
Auto Tuning
menu appears on the TV
screen.
You need to tune the TV to receive channels
(TV Broadcast).
By following the instructions below, this set automatically
searches and stores all available channels for you.
75
Press the OK button on the remote
1
Do y o u
want to start
automatic tuning?
Ye s
No
m
Auto Tuning
Programme
Channel :
System :
No channel found.
Please connect aer i
Conf
Searching. . .
Conf i r m
01
:
C21
I
m
Programme Sorting
01
TVE
02
TVE2
03
TV3
04
C33
05
C27
06
C58
07
S02
08
S06
Select
channel
OK
, to select,
:
Exit
MENU
,to set
control to select
The TV starts to automatically search
2
and store all available broadcast
channels for you.
This procedure could take some
minutes.
Please be patient and do not press
any buttons while the auto tuning
is in progress, otherwise the auto
tuning will not be completed.
If no channels were found during
the auto tuning process then a
al
new menu appears automatically
on the screen asking you to
connect the aerial. Please connect
the aerial (refer to the step 3) and
press OK. The auto tuning
process will start again.
When the auto tuning is finished, the
Programme Sorting
the screen.
Yes
.
menu appears on
of the broadcast channels
By following the instrutions below, you can rearrange the
order in which the broadcast channels appear on the screen
8
TVVIDEO
/
123
456
789
0
OK
MENU REC
TV
DVDVCR
PROG
a) If you wish to keep the broadcast channels
in the tuned order:
Programme Sorting
01
TVE
02
TVE2
03
TV3
04
C33
05
C27
06
C58
07
S02
08
S06
Select
channel
OK
, to select,
:
MENU
Exit
Press the
control to exit and return to the normal
TV screen.
,to set
MENU
button on the remote
Your set is now ready for use.
b) If you wish to store the broadcast
channels in a different order:
1
Programme Sorting
01
TVE
02
TVE2
03
TV3
04
C33
05
C27
06
C58
07
S02
08
S06
Select
channel
OK
, to select,
:
Exit
MENU
,to set
m
Programme Sorting
01
TVE
02
TVE2
03
TV3
04
C33
C27
C58
S02
S06
new position
MENU
01 TVE
OK
05
06
07
08
Select
, to select, press to return
Exit :
Press the or button to select the
programme number with the channel
(TV Broadcast) you wish to rearrange,
then
press the button.
Press the or button to select the
2
new programme number position for
your selected channel (TV
Broadcast), then press .
The selected broadcast channel
now moves to its new programme
position and the other broadcast
channels move
accordingly.
3
Repeat steps 1) and 2) if you wish to change the order of the other channels.
Press the
4
MENU
button on the remote
control to exit and return to the normal
TV screen.
The TV set is now ready for use.
Your television stations are now stored in your television’s memory.
 Loading...