

SONY.
3-864-605-21
© 1998 by Sony Corporation
KW-34HD1
WARNING
To reduce the risk of fire or shock hazard, do not expose the TV to rain or moisture.
CAUTION
RISK OF ELECTRIC SHOCK
DO NOT OPEN
A
ATTENTION
RISQUE DE CHOC ELECTRIQUE,
NE PAS OUVRIR
PRECAUCION
RIESGO DE CHOQUE ELECTRICO
NO ABRIR
CAUTION: TO REDUCE THE RISK OF ELECTRIC SHOCK,
DO NOT REMOVE COVER (OR BACK).
NO USER-SERVICEABLE PARTS INSIDE.
REFER SERVICING TO QUALIFIED SERVICE PERSONNEL.
This symbol is intended to alert the user to the presence of uninsulated
"dangerous voltage" within the product's enclosure that may be of
sufficient magnitude to constitute a risk of electric shock to persons.
This symbol is intended to alert the user to the presence of important
operating and maintenance (servicing) instructions in the literature
accompanying the appliance.
CAUTION
TO PREVENT ELECTRIC SHOCK, DO NOT USE THIS POLARIZED AC PLUG WITH
AN EXTENSION CORD, RECEPTACLE, OR OTHER OUTLET UNLESS THE BLADES
CAN BE FULLY INSERTED TO PREVENT BLADE EXPOSURE.
CAUTION
When using TV games, computers, and similar products with your TV, keep the
brightness and contrast functions at low settings. If a fixed (non-moving) pattern is left
on the screen for long periods of time at a high brightness or contrast setting, the image
can be permanently imprinted onto the screen. Continuously watching the same
program can cause the imprint of station logos onto the TV screen. These types of
imprints are not covered by your warranty because they are the result of misuse.
Note on Caption Vision
This television receiver provides display of felevision closed captioning in accordance
with §15.119 of the FCC rules.
Note on Cleaning the TV
Clean the TV with a soft dry cloth. Never use strong solvents such as thinner or
benzine, which might damage the finish of the cabinet.
Note to CATV System Installer
This reminder is provided to call the CATV system installer's attention to Article 820-40
of the NEC that provides guidelines for proper grounding and, in particular, specifies
that the cable ground shall be connected to the grounding system of the building, as
close to the point of cable entry as practical.

Use of this television receiver for other than private viewing of programs broadcast on
UHF or VHF or transmitted by cable companies for the use of the general public may
require authorization from the broadcaster/cable company and/or program owner.
NOTIFICATION
This equipment has been tested and found to comply with the limits for a Class B
digital device pursuant to Part 15 of the FCC Rules. These limits are designed to
provide reasonable protection against harmful interference in a residential installation.
This equipment generates, uses, and can radiate radio frequency energy and, if not
installed and used in accordance with the instructions, may cause harmful interference
with radio communications. However, there is no guarantee that interference will not
occur in a particular installation. If this equipment does cause harmful interference to
radio or television reception, which can be determined by turning the equipment off
and on, the user is encouraged to try to correct the interference by one or more of the
following measures:
Reorient or relocate the receiving antennas.
U
Increase the separation between the equipment and receiver.
□
Cormect the equipment into an outlet on a circuit different from that to which the
□
receiver is cormected.
Consult the dealer or an experienced radio/TV technician for help.
□
You are cautioned that any changes or modifications not expressly approved in
this manual could void your authority to operate this equipment.
Safety
Installing
]□ I DOLBY I
DIGITAL
TruSurround
.№SrsC#T
□ Operate the TV only on 120 V AC.
□ The plug is designed, for safety purposes, to fit into the wall outlet only one way. If
you are unable to insert the plug fully into the outlet, contact your dealer.
If any liquid or solid object should fall inside the cabinet, unplug the TV
□
immediately and have it checked by qualified service personnel before operating it
further.
If you will not be using the TV for several days, disconnect the power by pulling
□
the plug itself. Never pull on the cord.
For details concerning safety precautions, see the supplied leaflet "IMPORTANT
SAFEGUARDS".
□ To prevent internal heat buildup, do not block the ventilation openings.
□ Do not install the TV in a hot or humid place, or in a place subject to excessive dust
or mechanical vibration.
Manufactured under license from Dolby Laboratories Licensing Corporation. Dolby
and the double-D symbol are trademarks of Dolby Laboratories Licensing Corporation.
TruSurround is a trademark of SRS Labs, Inc. SRS and the SRS symbol are registered
trademarks of SRS Labs, Inc. in the United States and selected foreign countries. SRS
and TruSurround are incorporated under license from SRS Labs, Inc. and is protected
under United States Patent Nos. 4,748,669 and 4, 841, 572 with numerous additional
issued and pending foreign patents. Purchase of this product does not convey the right
to sell recordings made with the TruSurround technology.

Contents
Introducing the DTV
System
Installing the DTV
System
Overview..........................................................................................................................10
Unpacking Your System...............................................................................................10
Setting Up Overview....................................................................................................11
Remote Control Overview...........................................................................................12
Frequently Asked Questions.......................................................................................13
Overview..........................................................................................................................16
Setting Up the TV, DTV Receiver, and Stand...........................................................17
Connecting a VHF/UHF Antenna...............................................................................24
Connecting a VCR and Cable......................................................................................25
Connecting a VCR and Cable Box..............................................................................26
Connecting a DBS (Satellite) Receiver......................................................................27
Connecting a DBS (Satellite) Receiver with a VCR
Connecting an A/V Receiver with Digital Audio IN
Connecting an Audio Receiver without Digital Audio In
Cormecting a DVD Player with A/V Connectors
Connecting a DVD Player with Component Video Output Cormectors 32
Cormecting a Camcorder..............................................................................................33
Using the CONTROL S Feature..................................................................................34
...............................................
.............................................
....................................
...................................................
28
29
30
31
Using DTV Features
Using the DTV Menus
Overview..........................................................................................................................36
Using the Program Guide to Select Subchannels
Using Wide Screen Mode.............................................................................................38
Using Picture and Picture (Twin Picture) Mode
Using the Freeze Function............................................................................................40
Overview..........................................................................................................................42
Using the Video Menu.................................................................................................43
Using the Audio Menu................................................................................................45
Using the Wide Screen Menu.....................................................................................46
Using the Channel Setup Menu................................................................................47
Using the System Setup Menu...................................................................................48
...................................................
.....................................................
37
39
VII

Contents
Other Information
Overview..................................................................................................................50
TV Controls and Connectors
Receiver Controls and Connectors.......................................................................53
Using the Remote Control.....................................................................................54
Troubleshooting......................................................................................................62
Specifications...........................................................................................................64
................................................................................
51

Introducing the DTV System
Overview
This chapter defines the contents of your DTV system, and provides an
overview of how to set up and use basic features of your digital TV.
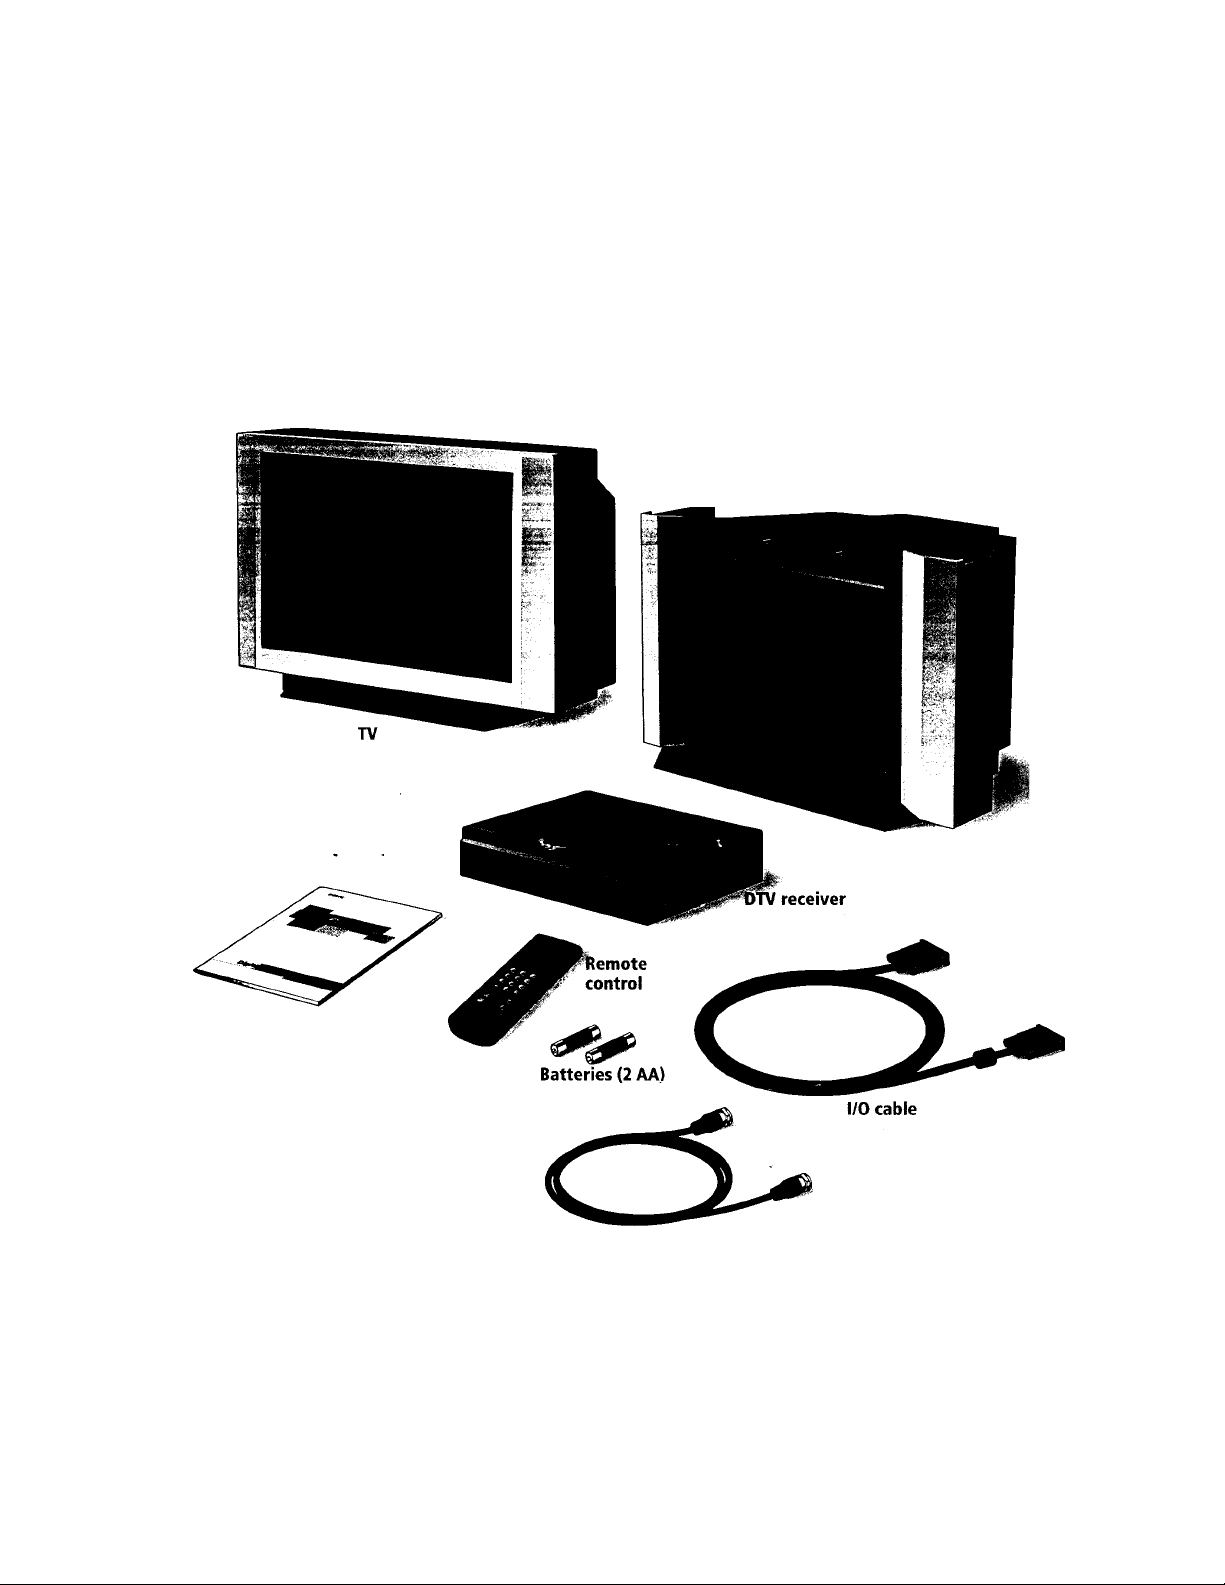
Unpacking Your System
Your system includes the following:
User Manual
Stand (packaged separately)
Coaxial cable

Setting Up Overview
Introducing the DTV System
Here is an overview of the steps required to set up your DTV system. Detailed
illustrations are included on the pages shown below.
To
1 Place the TV and DTV receiver on the stand.
2 Connect an antenna to the DTV receiver's FROM
ANTENNA jack. Connect the I/O cable to the DTV
receiver's I/O jack. Then route the cable through the stand
and connect it to the TV's I/O jack.
See Page(s)
17
19 to 21
3 Connect the TV's AC cord to the DTV receiver's AC outlet. 19
4 Connect other audio and video equipment you have, such 24 to 34
as cable boxes, VCRs, etc. Then connect the DTV receiver's
AC power cord to a wall outlet.
5 Turn on the TV to display the Auto Setup screen, which 47
enables you to run Auto Program. Auto Program sets up the
TV to receive channels for each iirput source, including
cable, VHF/UHF, and digital.

Introducing the DTV System
Remote Control Overview
Here is an overview of the buttons on the remote control you will most likely
use.
---------------
POWER
MUTING
I SLEEP
FUNCTION
“ ' —
WIDE ZOOM V CENTER
NORMAL ZOOM
FULL CAPTION
1
------------- --------------------
VOL
®
fV ~
JUMP
-------
1 PICTURE '
TV'VIDEO ANT
(2'5
-
(s'l (e )
® (9)
(0)
___
MENU
VTR CABLE
VTR CAB.E TV
ALTERNAIt — DISriAY
(3 )
c
-------------------TV
CH
0
TV POWER Button
Turns the TV and DTV receiver on and off.
Picture-and-Picture (P&P) Buttons
Use these buttons to display two programs at a time (page 39).
Wide Screen Mode Buttons
Use these four buttons to change the display of 4:3 aspect ratio pictures to Wide
Screen (16:9) mode (page 38).
ANT Button
Toggles through the available input sources: VHF/UHF (digital), and cable.
0-9, r~a, and ENTER Buttons
Pressing the 0-9 buttons and then the ENTER button selects a channel number
directly. Use the button to select a subchannel. For example, to select
channel 2.1, press
(D + + (D + ENTER. (See page 37 for details about
subchannels.)
MENU Button
Brings up the DTV menus (page 41).
CH+/- Buttons
Changes the charmel.
GUIDE
SONY
CEia 1
RM-yi58
Joystick/-^- Button
Move the joystick up, down, left and right to select programs in the Guide
(page 37), Menu options (page 41), and to zoom in Twin View mode (page 40).
Pressing the button selects the highlighted or displayed option.
GUIDE Button
Brings up an on-screen Guide for selecting subchannels (page 37).

Frequently Asked Questions
Introducing the DTV System
What is digital TV
(DTV)?
What are the benefits
of DTV?
Digital television (or "DTV") refers to the new over-the-air television broadcast
standards adopted by the Federal Communications Commission in 1996.
Developed by the Advanced Television Systems Committee (ATSC), a group
of manufacturing companies, these standards define the specifications for 18
digital broadcast formats.
There are six formats in the ATSC DTV standard that are described as "High
Definition Television." The remaining 12 video formats are described as
"Standard Definition Television."
Although the technical aspects of these standards are transparent to television
viewers, the benefits are as dramatic as those experienced when digital music
on compact disk was introduced — probably even more so.
Your Sony DTV is capable of receiving all 18 formats of digital TV formats,
including high-definition.
For the television viewer, digital TV represents one of the most significant
advances in television since color television replaced black and white. Here are
just a few of the benefits:
□ Dramatically superior picture quality, with up to six times the picture
detail of today's analog television.
□ Multichannel digital sound, including Dolby® Digital sound.
□ Widescreen. DTV can provide the same t3q)e of widescreen presentation as
you see in movie theaters. The new screen size has a 16:9 width-to-height
(or "aspect") ratio, compared with a 4:3 aspect ratio of today's
conventior.al television. This means that digital broadcasts of movies no
longer need to be "reformatted" for television.
Do / need a special
antenna to receive
digital television?
No. Initially, digital television will arrive through a standard, over-the-air
VHF/UHF antenna, which means you can receive digital broadcasts using the
same terrestrial ("rooftop") antenna you currently use to receive conventional
programming. However, if you currently receive your VHF/UHF
programming via cable, you will need to install a VHF/UHF antenna in order
to receive digital programming. Your Sony TV, however, is also equipped with
coimectors that will allow you to connect DTV-compatible cable boxes when
they become available.

Introducing the DTV System
Can this TV receive
conventional analog
broadcasts that are
available today?
When is digital
broadcasting being
introduced?
How can I select digital
channels?
Yes. This TV is designed to receive conventional analog broadcasts, cable TV,
as well as all formats of digital broadcasts. Of course, you can also connect
VCRs, DVD players, digital broadcast (satellite) receivers, and other
audio/video components.
The transition from today's analog broadcasting system to digital television
will take time to complete. In the fall of 1998, some networks will begin
broadcasting digital programs.
Digital channels are indicated by the use of a decimal or "dot" in the
subchannel number (for example, "2.1"). This number appears when you
press the CH +/- buttons or press the DISPLAY button. To select a subchannel
directly, use the 0-9 buttons, button, and the ENTER button.
For example, to select subchannel 2.1, press:
(D + a + © + ENTER
You can also select digital channels using an on-screen Guide. See page 37 for
details.


Overview
Installing the DTV System
This chapter includes illustrated instructions for setting up the DTV receiver,
TV, and stand (pages 17 to 23).
It aWincludes information on the following:
Topic
Connecting a VHF/UHF Antenna
Connecting a VCR and Cable
Connecting a VCR and Cable Box
Connecting a DBS (Satellite) Receiver
Connecting a DBS (Satellite) Receiver with a VCR
Connecting an A/V Receiver with Digital Audio IN
Connecting an Audio Receiver without Digital Audio In
Connecting a DVD Player with A/V Connectors
Connecting a DVD Player with Component Video Output
Connectors
Connecting a Camcorder
Using the CONTROL S Feature
Page
24
25
26
27
28
29
30
31
32
33
34

Setting Up the TV, DTV Receiver, and Stand
The DTV stand is shipped fully assembled. Follow these instructions to set up
the TV and DTV receiver.
The use of the Sony stand supplied with this DTV system is recommended
to enstue the safety, easy placement, proper operation, and optimal
performance of this product. In the event you decide not to use the stand,
Sony recommends the following guidelines:
□ The DTV receiver must be placed underneath the TV while
maintaining a distance of 12 inches between the top of the DTV
receiver and the bottom of the TV.
□ The cable must be properly routed as to avoid any damage.
□ Staples or hold-down devices, which could pierce the cable, should
not be used.
□ Proper ventilation of the TV and receiver must be provided.
□ Other electronic components should be placed at a minimiun of 12
inches to avoid any interference.
Installing the DTV System
Place the TV on the
Stand
1 Carefully filt fhe TV forward imtil fhe botfom ledge of the TV slides under
the foot cover. The TV should be flush against the foot cover on the stand.
2 Place the TV on the guides on the top of the stand. Make sure that the feet
on the TV fit into the guides on the stand.
Guides
Foot cover

Installing the DTV System
3 To secure the TV to the stand, insert the buckle into the slot in the rear of
the TV.
4 Pull the strap down to tighten it.

Installing the DTV System
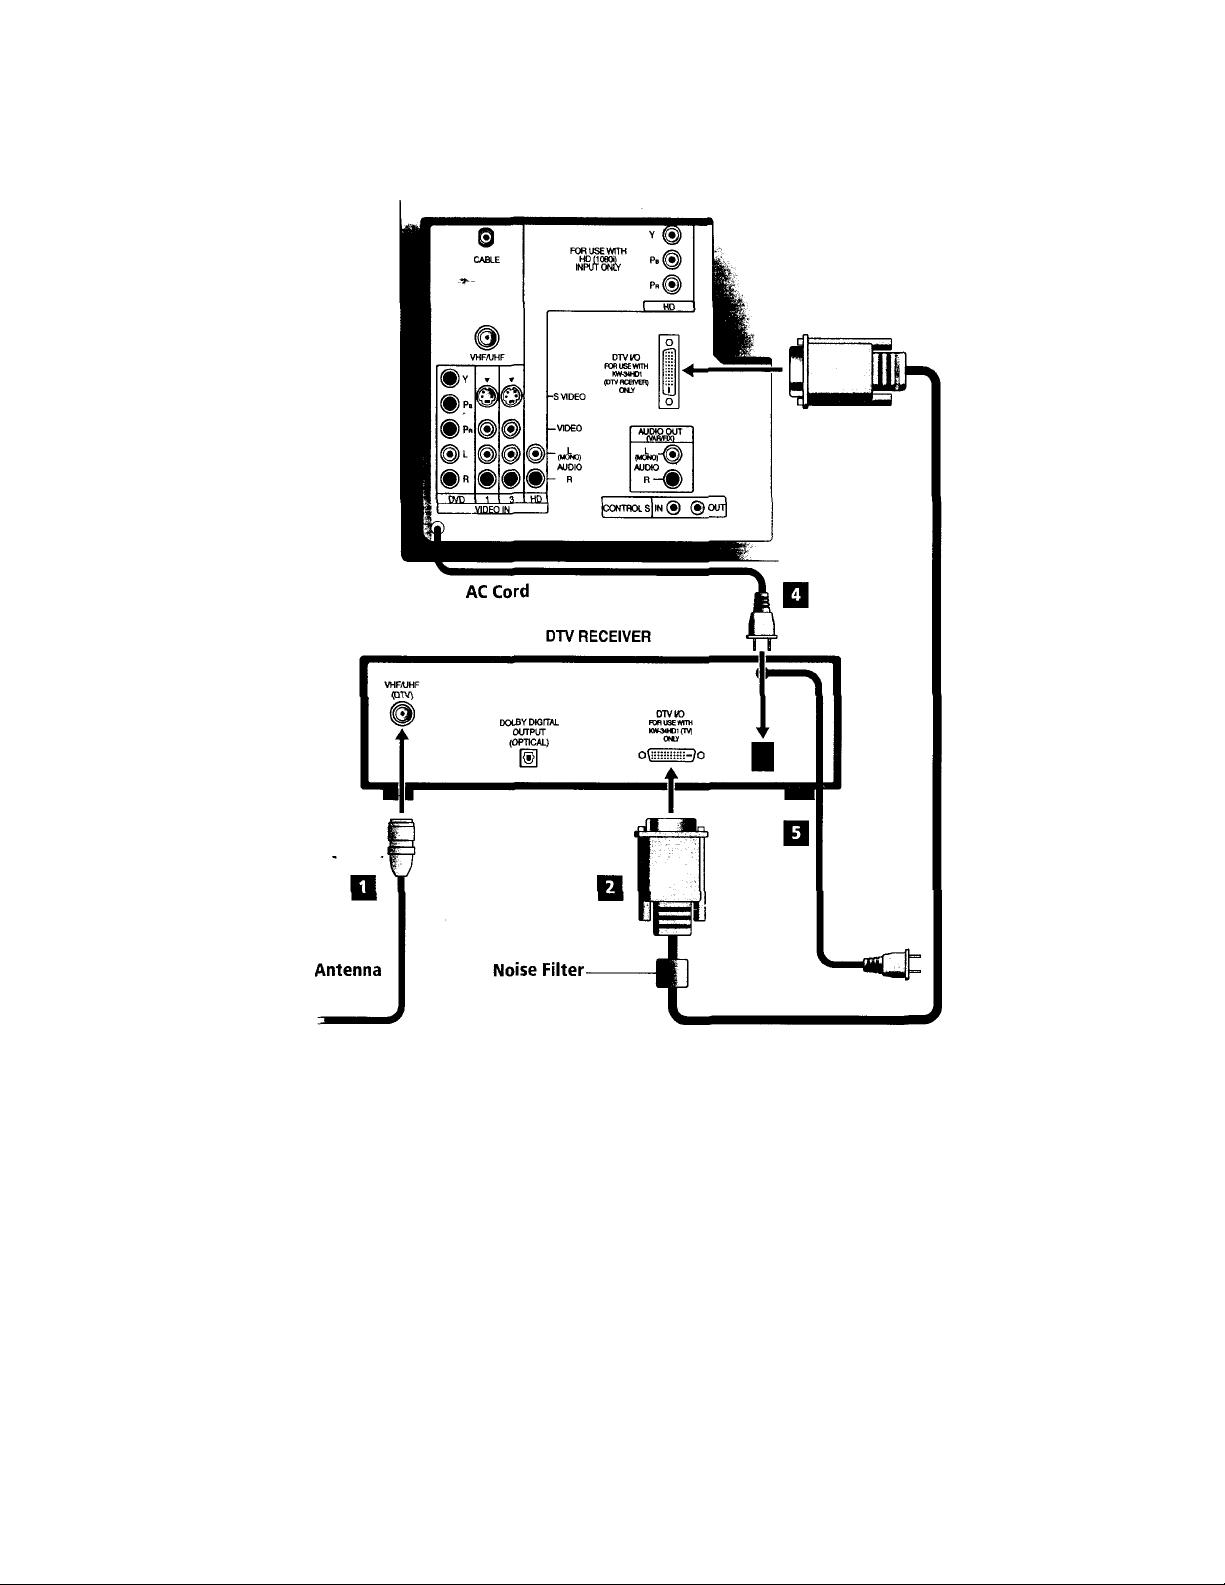
Connect the TV
and DTV Receiver
For details on routing the cables through the stand, see page 21.
1 Route the coaxial cable from the antenna through the stand to the lower
shelf and connect it to the DTV receiver's FROM ANTENNA jack.
O You cannot receive digital channels unless you connect a terrestrial antenna. This
applies even if you normally receive your programming through cable or satellite.
2 Connect the digital I/O cable to the DTV receiver's I/O jack.
^ To ensure best picture quality, use an outdoor antenna. The use of indoor rabbit ears is not
recommended.
^ Before conneding the I/O cable, check that it is oriented as shown — with the noise filter
closer to the DTV receiver.
3 Route the other end of the digital I/O cable through the stand and connect
it to the TV's DTV I/O jack.
4 Route the TV's AC power cord through the stand and connect it to the
receiver's AC outlet.
5 Route the receiver's AC power cord through the stand. Connect this to an
AC wall outlet only after you have finished connecting all components.
Installing the DTV System
I/O Cable
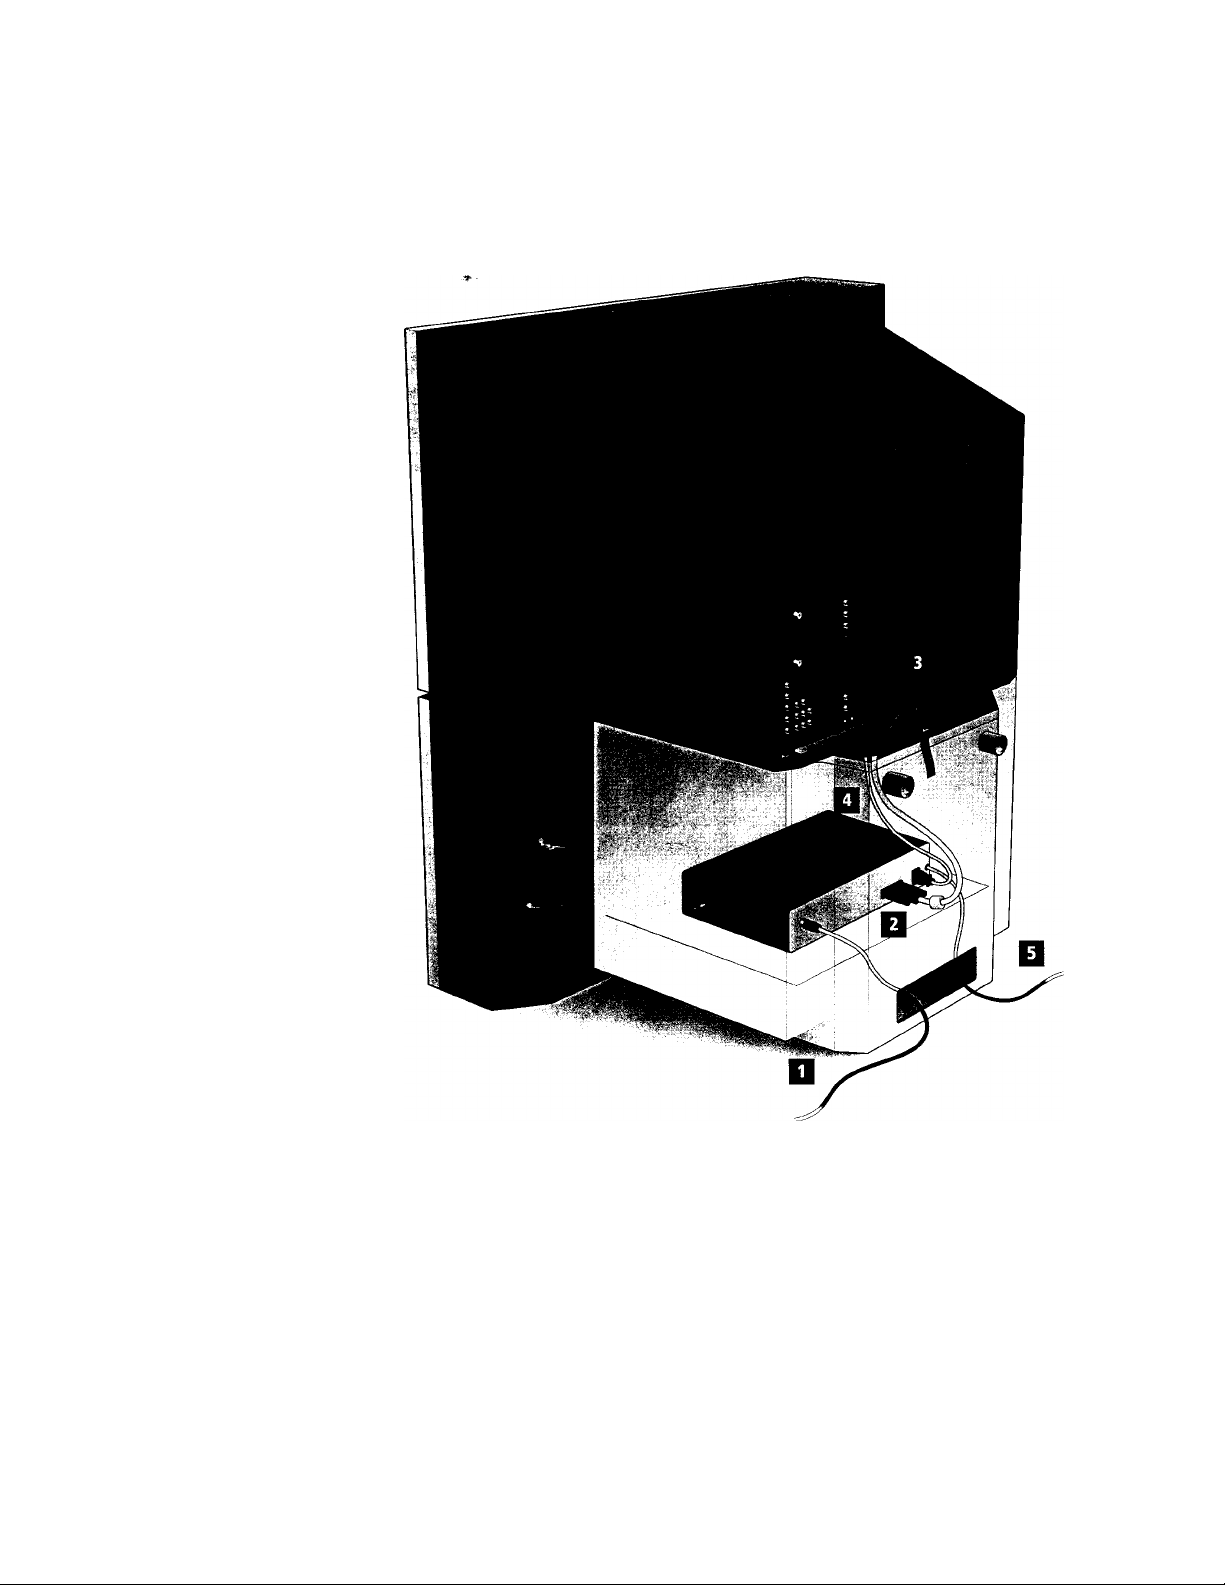
Installing the DTV System
Route the Cables
through the Stand
The numbers on the following illustration correspond with the steps described
in "Connect the TV and DTV Receiver" on page 19.

Installing the DTV System
Install the Stand
Side Panels
After connecting the cables, attach the two side panels onto the stand.
To install the stand side panels
1 Insert the guide on the side panel with the slot on the stand.
2 Lock the panels into place by pushing the side panel in the direction of the
arrow.
Stand
Slot
Guide
3 Repeat steps 1 and 2 for the other side panel.
Arrows
Side Panel
 Loading...