

Page 1

3-858-251-12 (1)
Trinitr on Color
Video CD TV
Operating Instructions
####
####
####
EN
C##
RF
A
f
KVD-C21MF1
1996 by Sony Corporation
Page 2

WARNING
To prevent fire or shock hazard, do not
expose the unit to rain or moisture.
To avoid electrical shock, do not open the
cabinet. Refer servicing to qualified
personnel only.
The following caution label is located inside of the unit.
This unit can play following discs:
Disc logo
Audio CDs
CD-G
(CD graphics)
VIDEO CDs
f
Contents
Disc size
Play time
Note on VIDEO CDs
This TV conforms to Ver. 1.1 and Ver. 2.0 of VIDEO CD standards.
You can enjoy two kinds of playback according to the discs.
Disc type
VIDEO CDs without PBC*
functions (Ver. 1.1 discs)
VIDEO CDs with PBC*
functions (Ver. 2.0 discs)
* PBC: Playback control
Audio
12cm/8cm
(CD single)
74 min./20
min.
Audio + Video
(still pictures)
12cm/8cm
74 min./20 min.
You can
Enjoy video playback (moving
pictures) as well as music.
Play interactive software using
menu screens displayed on the
TV screen, in addition to the
video playback function of Ver
1.1 discs.
Audio + Video
(moving pictures)
12cm/8cm
74 min./20 min.
-EN
2
Getting Started
Page 3

123
456
789
0
10
POWER
TV
MENU
ENTER
ENTER
ENTER
MENU
VISUAL MODE
PROGRAM PRESET
LANGUAGE /
DISC COLOR SYSTEM
Select and press ENTER
PROGRAM PRESET
AUTO PROGRAM
MANUAL PROGRAM
ENTER
and pressSelect
AUTO PROGRAM
SYSTEM
PROG CH
B / G
–– –––
I
–– –––
–– –––
D / K
–– –––
M
and press ENTER
Select
EN
Getting Started
-EN
3
Page 4

ill005 9
-EN
4
Getting Started
Page 5

Precautions
Table of Contents
• Operate the TV only at 110-240 V AC.
• Do not operate the TV if any liquid or solid object
falls into it. Have it checked immediately by
qualified personnel only.
• Do not block the ventilation openings.
• Do not install the TV in a confined space, such as a
bookcase or built-in cabinet.
• Do not install the TV in an inclined position.
• Do not install the TV in locations where it is;
-Extremely hot or cold
-Dusty or dirty
-Very humid
-Vibrating
-Subject to direct sunlight
• Do not keep the TV plugged in if you are not going to
use it for several days.
• Do not pull the power cord to disconnect the TV. Pull
it out by the plug.
Getting Started
6 Connections
8 Presetting channels
TV Operations
11 Watching the TV
CD Operations
13 Playing CDs
Karaoke Operations
17 Karaoke sing-along
EN
Additional Operations
19 Using the Sleep Timer
19 Using the Wake Up timer
20 Adjusting the picture mode
21 Muting the sound
21 Listening with headphones
Additional Information
22 Troubleshooting
23 Notes on CDs
24 Receivable channels and channel display
24 Specifications
25 Index to parts and controls
Getting Started
-EN
5
Page 6

Getting Started
Connections
Connecting a VHF antenna or a combination VHF/UHF antenna
— 75-ohm coaxial cable (round)
Attach an optional IEC antenna connector to the 75-ohm coaxial cable.
Plug the connector into the ˘ (antenna) socket at the rear of the TV.
Rear of TV
Rear of TV
On a wall
or
Connecting optional equipment
You can connect optional audio/video equipment to your TV such as a VCR, multi disc player, camcorder, video
game or stereo system.
Connecting video equipment using video input jacks
Rear of TV
AUDIO VIDEO
R L(MONO)
VIDEO 1 IN
VIDEO OUT
to antenna socket
to antenna
output
: Signal flow
VCR
VIDEO 1 IN
When connecting a monaural VCR
Connect the yellow plug to VIDEO and the black plug to
AUDIO-L (MONO).
-EN
6
Getting Started
to video
and audio
outputs
Page 7

VIDEO 2 IN
VIDEO L
(MONO)
-AUDIO-R
CamcorderFront of TV
Connecting audio/video equipment using VIDEO OUT jacks
to antenna
socket
Rear of TV
AUDIO VIDEO
R L(MONO)
VIDEO 1 IN
VIDEO OUT
to antenna
output
to video and
audio outputs
VCR
to video and
audio inputsVIDEO OUT
: Signal flow
When recording through the VIDEO OUT jacks
If you change the channel or video input while recording with a
VCR, the channel or video input you are recording also will be
changed.
To prevent the TV from falling
Stabilize the TV in either of the following ways.
•
With the supplied screws, attach the band to the TV
stand and to the rear of the TV using the hole provided
on the TV.
• Put the cord or chain through the clamps to stabilize
the TV against a wall or pillar.
: Signal flow
EN
Getting Started
-EN
7
Page 8

PROGRAM PRESET
AUTO PROGRAM
MANUAL PROGRAM
and press ENTER
Select
Presetting channels
TUNER PRESET
SYSTEM
B / G
PROG CH
I
D / K
M
–– –––
–– –––
–– –––
–– –––
P
–
/
+
V
sser
UNEMDC
n,oitcelesmetsysrof
t.ratsotNRUTER
AUTO PROGRAM
SYSTEM
B / G
PROG CH
I
D / K
M
–– –––
–– –––
–– –––
–– –––
and press ENTER
Select
4 Press › or ¢ to select “PROGRAM PRESET”
and press ENTER.
The PROGRAM PRESET menu appears.
Presetting channels automatically
You can preset 80 TV channels in numerical sequence
from program position 1.
Front of TV
RETURN
VCD MENU+/–
TUNER PRESET
1
123
456
789
0
10
2
3
4, 5, 6
5 Press › or ¢ to select “AUTO PROGRAM”
and press ENTER.
The AUTO PROGRAM menu appears.
6 Press › or ¢ to select the TV system (B/G, I,
D/K or M) of the channels which you want
to preset, and press ENTER.
Presetting starts from program position 1. The
preset program and channel numbers are displayed
on the screen in sequence.
When presetting is finished, the program position
from which presetting starts appears. All available
channels are now stored on successive number
buttons.
1 Press POWER.
2 Press TV.
3 Press MENU.
-EN
8
POWER
When the TV is in standby mode after pressing
POWER, press POWER on the remote commander.
TV
The main menu appears.
MENU
VISUAL MODE
PROGRAM PRESET
LANGUAGE /
DISC COLOR SYSTEM
and press ENTER
Select
Getting Started
To preset channels automatically using
the TUNER PRESET button on the TV.
1 Press POWER to switch it on.
2 Press TUNER PRESET with a pointed object.
The following display appears.
3 Using VCD MENU +/–, move the cursor (”) to
the TV system (B/G, I, D/K or M) of the
channels which you want to preset.
4 Press RETURN.
Presetting starts from program position 1.
When presetting is finished, the program position
from which presetting starts appears.
Page 9

MANUAL PROGRAM
1
and press ENTER
PRG SYS CH LABEL AFT
B / G C04 ––––– ON
2 B / G C05 ––––– ON
3 B / G C09 ––––– ON
4 B / G C12 ––––– ON
5 B / G C21 ––––– ON
6 B / G C25 ––––– ON
Select
Presetting channels manually
MANUAL PROGRAM
1
and press ENTER
PRG SYS CH LABEL AFT
B / G C04 ––––– ON
2 B / G C05 ––––– ON
3
–
C09 ––––– ON
4
B / G
C12 ––––– ON
5 B / G C21 ––––– ON
6 B / G C25 ––––– ON
––
Select
To change the channel for a particular program
position or to receive a channel with a weak signal,
preset the channel manually.
7 Repeat steps 4 to 6 to preset other
channels.
8 After you finish presetting, press MENU to
go back to the original screen.
1 Press MENU.
The main menu appears.
2 Press › or ¢ to select “PROGRAM PRESET”
and press ENTER.
The PROGRAM PRESET menu appears.
PROGRAM PRESET
AUTO PROGRAM
MANUAL PROGRAM
3 Press › or ¢ to select “MANUAL PROGRAM”
and press ENTER.
The MANUAL PROGRAM menu appears.
MANUAL PROGRAM
PRG SYS CH LABEL AFT
B / G C04 ––––– ON
1
2 B / G C05 ––––– ON
3 B / G C09 ––––– ON
4 B / G C12 ––––– ON
5 B / G C21 ––––– ON
6 B / G C25 ––––– ON
and press ENTER
Select
4 Press › or ¢ to select the program position
(number button) to which you want to
preset a channel, and press ENTER.
The “SYS” position turns red.
MANUAL PROGRAM
PRG SYS CH LABEL AFT
1
B / G C04 ––––– ON
2 B / G C05 ––––– ON
3 B / G C09 ––––– ON
4 B / G C12 ––––– ON
5 B / G C21 ––––– ON
6 B / G C25 ––––– ON
and press ENTER
Select
For program positions
beyond 6
This display scrolls by
pressing › repeatedly.
If you have made a mistake
Press ? to go back to the previous position.
Skipping program positions
You can skip unused program positions when
selecting program with the PROGR +/– buttons.
However, the skipped programs may still be called up
when you select them with the number buttons.
1 Press MENU.
The main menu appears.
2 Press › or ¢ to select “PROGRAM PRESET”
and press ENTER.
The PROGRAM PRESET menu appears.
3 Press › or ¢ to select “MANUAL PROGRAM”
and press ENTER.
The MANUAL PROGRAM menu appears.
4 Press › or ¢ to select the program position
which you want to skip and press ENTER.
The “SYS” position turns red.
EN
5 Select the TV broadcast system (B/G, I, D/K
or M) with › or ¢, and press ENTER.
The CH number turns red.
6
Search for the channel with › (down) or ¢ (up).
The channel number starts counting up or down.
When a channel is found, it stops.
If you want to preset this channel, press ENTER. If
not, press with › or ¢ to search for another channel.
You can also select the channel number directly
with the number buttons. Press C (once for regular
channels, twice for cable channels), number buttons
(e.g. For 06 press 0 and 6), then ENTER.
1 2 3
4 5 6
7 8 9
– /– – C
0
10
5 Press › or ¢ until “---” appears in the “SYS”
position and press ENTER.
When you select programs using the PROGR +/–
buttons, the program position is skipped.
6 Repeat steps 4 and 5 to skip other program
positions.
7 Press MENU to go back to the original
screen.
Getting Started
-EN
9
Page 10
MANUAL PROGRAM
1
and press ENTER
PRG SYS CH LABEL AFT
B / G C04 ––––– ON
2 B / G C05 ––––– ON
3 B / G C09 MTV– – ON
4 B / G C12 ––––– ON
5 B / G C21 ––––– ON
6 B / G C25 ––––– ON
Select
MANUAL PROGRAM
1
and press ENTER
PRG SYS CH LABEL AFT
B / G C04 ––––– ON
2 B / G C05 ––––– ON
3 B / G C09 ––––– ON
4 B / G C12 ––––– ON
5 B / G C21 ––––– ON
6 B / G C25 ––––– ON
Select
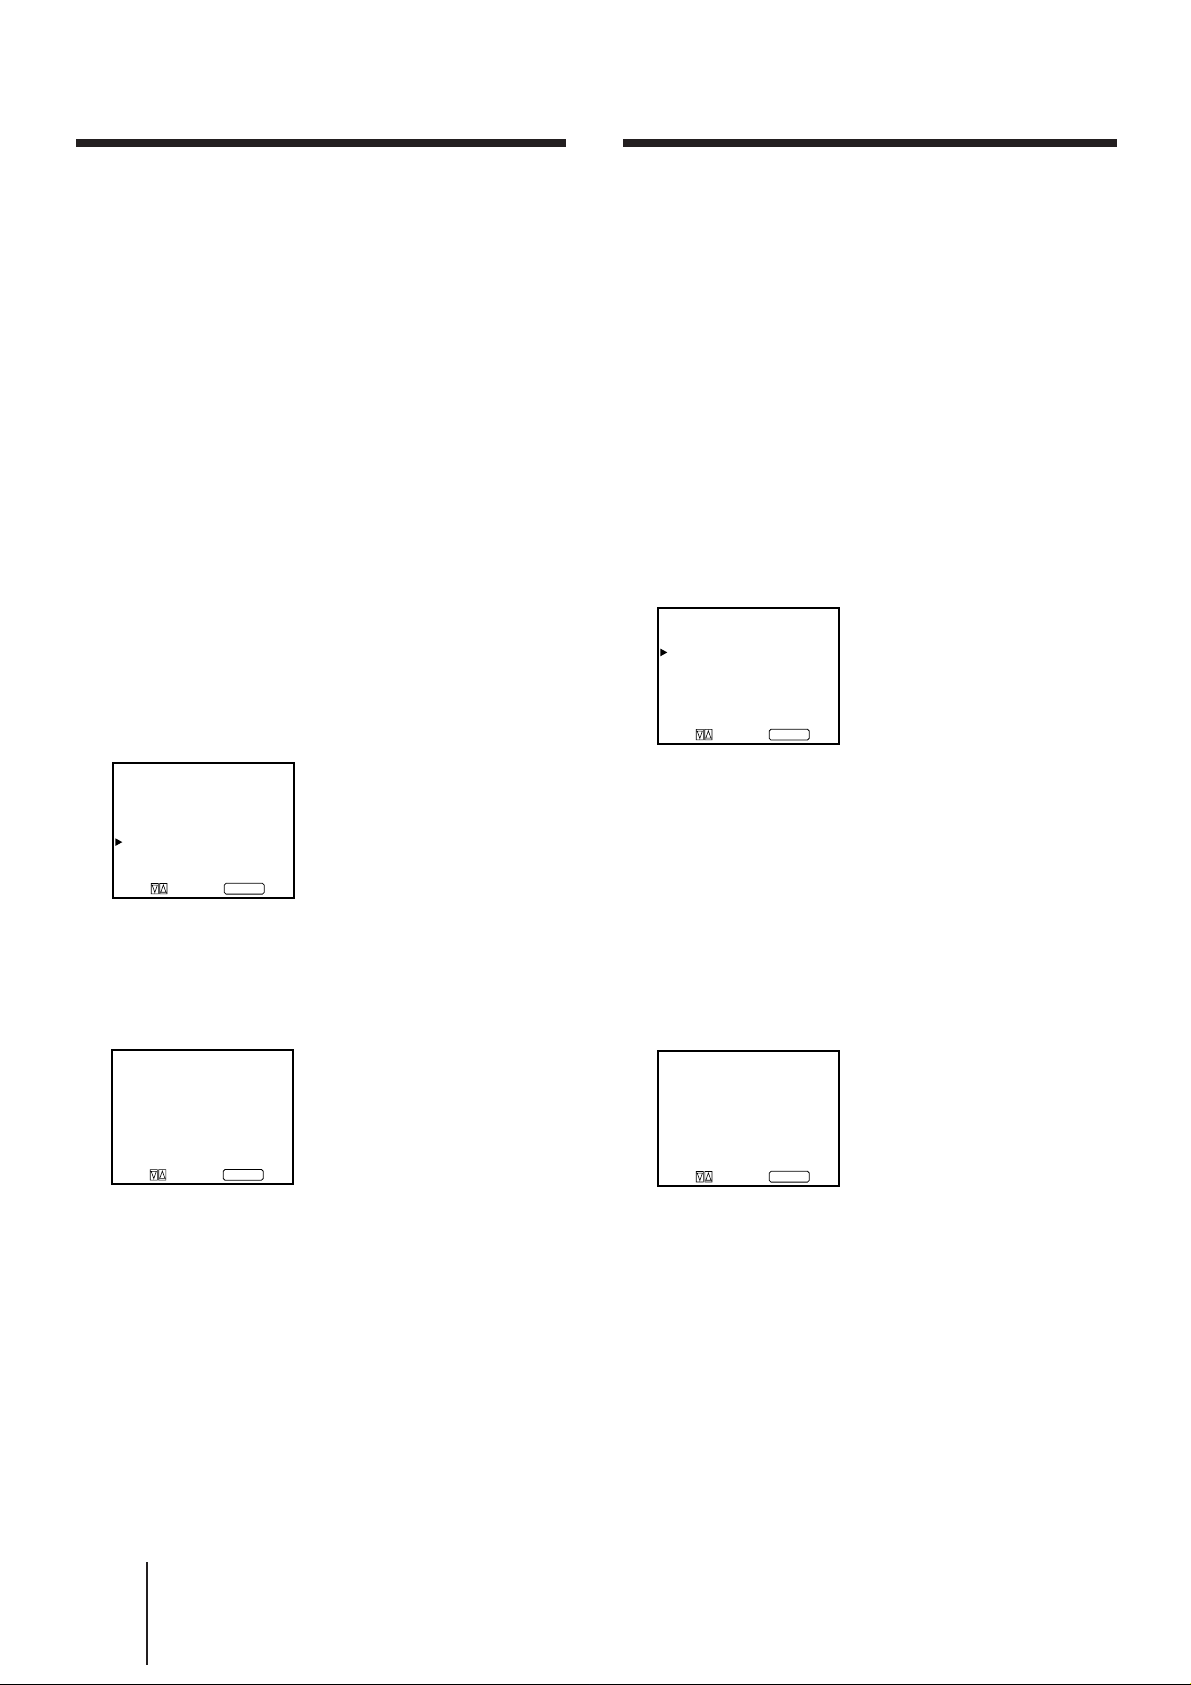
Manual fine-tuning
Captioning a station name
Normally, the automatic fine-tuning (AFT) is already
working. However, if the picture of a program is
distorted, you can use the manual fine-tuning function
to obtain better picture reception.
1 Press MENU.
The main menu appears.
2 Press › or ¢ to select “PROGRAM PRESET”
and press ENTER.
The PROGRAM PRESET menu appears.
3 Press › or ¢ to select “MANUAL PROGRAM”
and press ENTER.
The MANUAL PROGRAM menu appears.
4 Press › or ¢ to select the program position
corresponding to the channel which you
want to manually fine-tune, and press
ENTER repeatedly until the AFT position
turns red.
MANUAL PROGRAM
PRG SYS CH LABEL AFT
B / G C04 ––––– ON
1
2 B / G C05 ––––– ON
3 B / G C09 ––––– ON
4 B / G C12 ––––– ON
5 B / G C21 ––––– ON
6 B / G C25 ––––– ON
and press ENTER
Select
You can name a channel using up to five characters
(letters or numbers) to be displayed on the TV screen
(e.g. MTV). Using this function, you can easily identify
which channel you are watching.
1 Press MENU.
The main menu appears.
2 Press › or ¢ to select “PROGRAM PRESET”
and press ENTER.
The PROGRAM PRESET menu appears.
3 Press › or ¢ to select “MANUAL PROGRAM”
and press ENTER.
The MANUAL PROGRAM menu appears.
4 Press › or ¢ to select the program position
you want to caption and press ENTER
repeatedly until the first element of the
“LABEL” position turns red.
5 Fine-tune the channel with › or ¢ so that
you get the best TV reception. As you press
these buttons, the frequency changes from
-15 to +15.
MANUAL PROGRAM
PRG SYS CH LABEL AFT
1
B / G C04 ––––– ON
2 B / G C05 ––––– ON
3 B / G C09 ––––– ON
4 B / G C12 ––––– –
5 B / G C21 ––––– ON
6 B / G C25 ––––– ON
and press
Select
3
ENTER
6 After fine-tuning, press ENTER.
The cursor appears beside the program position.
Now the fine-tuned level is stored.
7 Repeat steps 4 to 6 to fine-tune other
channels.
8 Press MENU to go back to the original
screen.
5 Select a letter or number with › or ¢ and
press ENTER.
The next element turns red. Select other characters
in the same way. For the element you want to leave
blank, select “-” and press ENTER.
6 After selecting all the characters, press
ENTER repeatedly until the cursor appears
again. Now the caption you chose is stored.
7 Repeat steps 4 to 6 to caption other
channels.
8 Press MENU to go back to the original
screen.
-EN
10
Getting Started
Page 11
TV Operations
PROGR
VOL
Watching the TV
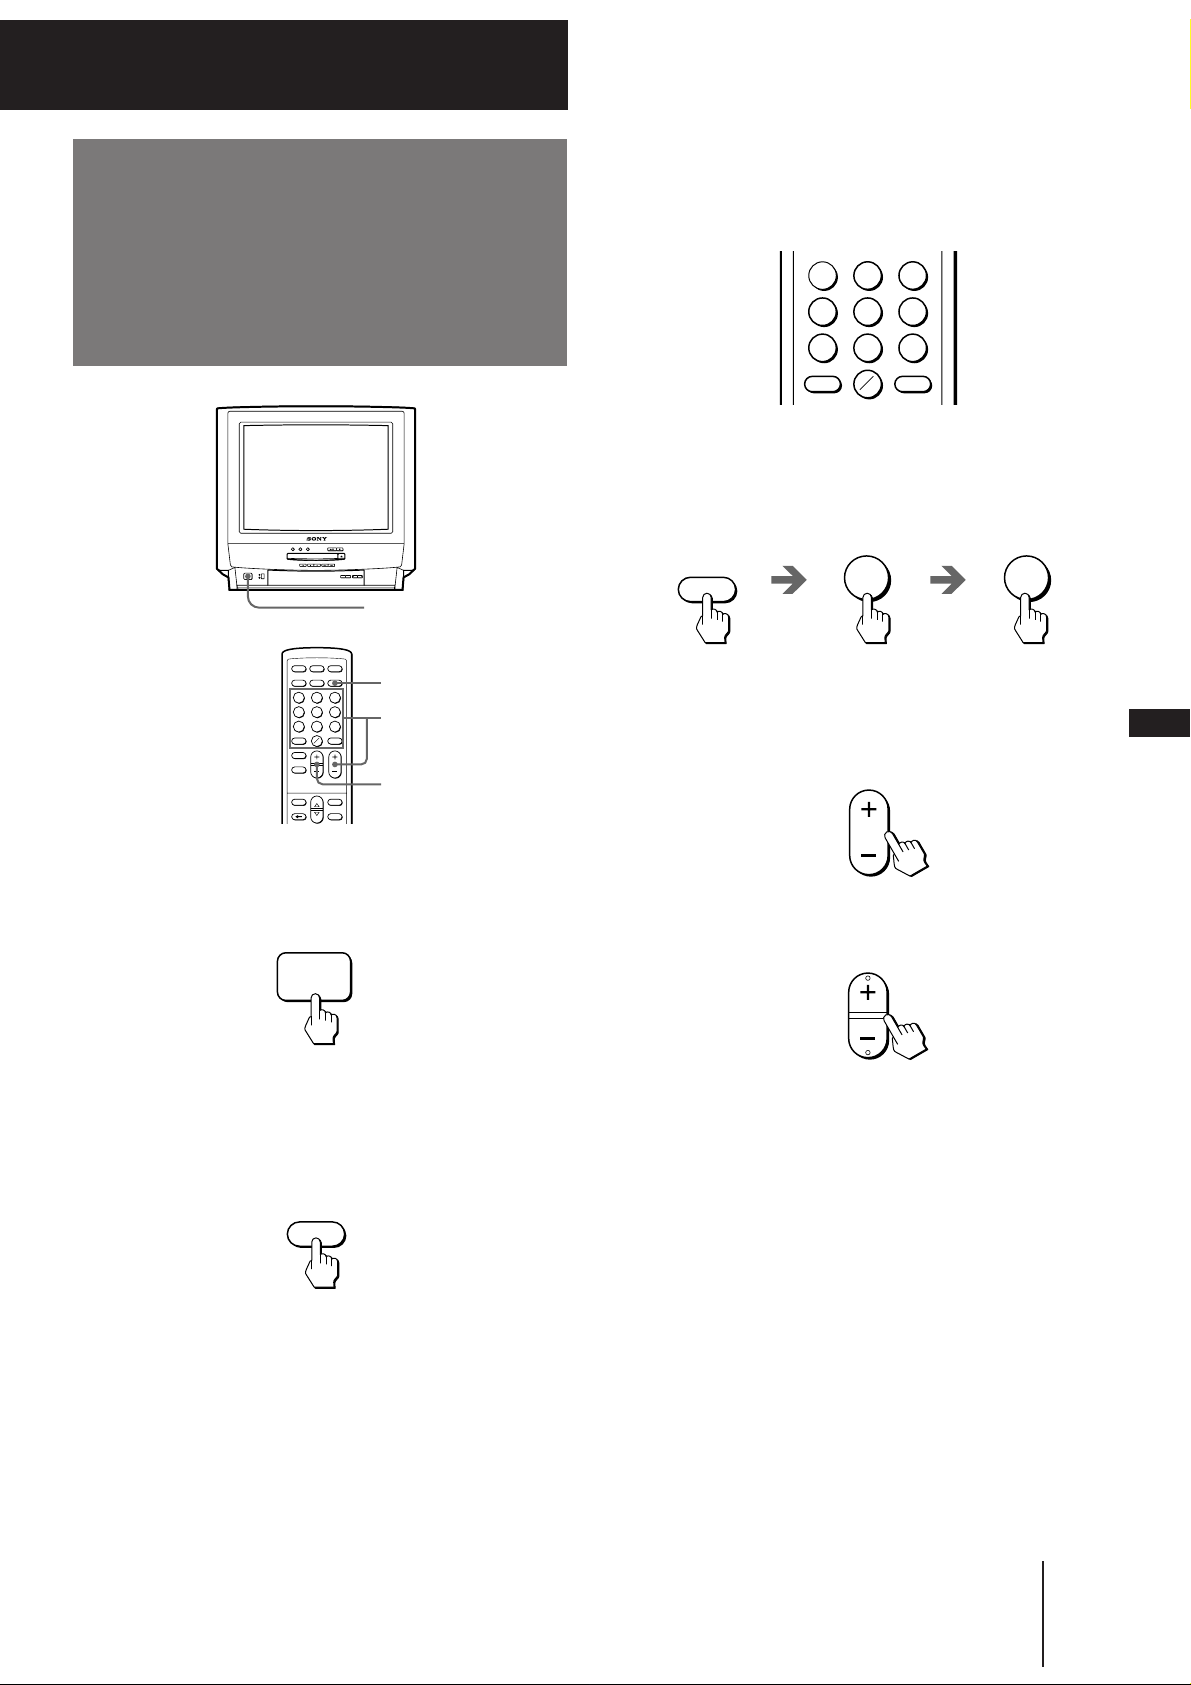
3 Select the TV channel you want to watch.
To select a channel directly
Press a number button.
1 2 3
4 5 6
7 8 9
– /– – C
0
10
To select a two-digit channel, press “ -/- -, ” before
the number buttons.
For example: to select channel 25, press “ -/- -, ”
and then “2” and “5.”
1
123
456
789
0
10
2
3
4
1 Press POWER to turn the TV on.
POWER
When the TV is in standby mode after pressing
POWER, press POWER on the remote commander.
– / – –
2 5
To scan through channels
Press PROGR +/– until the channel you want
appears.
4 Press VOL +/– to adjust the volume.
EN
2 Press TV.
TV
TV Operations
11
-EN
Page 12
Switching off the TV
123
456
789
10
0
DISPLAY
MENU
VISUAL MODE
PROGRAM PRESET
LANGUAGE /
DISC COLOR SYSTEM
and press ENTER
Select
Using the on-screen display (TV mode)
To switch off the main power, press POWER on the
remote commander.
The TV enters standby mode and the STANDBY lamp
on the front of the TV lights in red.
POWER
123
456
789
10
0
To switch off the TV completely, press POWER on the
TV.
The STANDBY lamp lights in amber.
POWER
Watching the video input
Press VIDEO.
VIDEO
Press DISPLAY.
The station name, program position, and CH number
are displayed on the screen.
ABCDE
1
C02
Changing the on-screen display
language
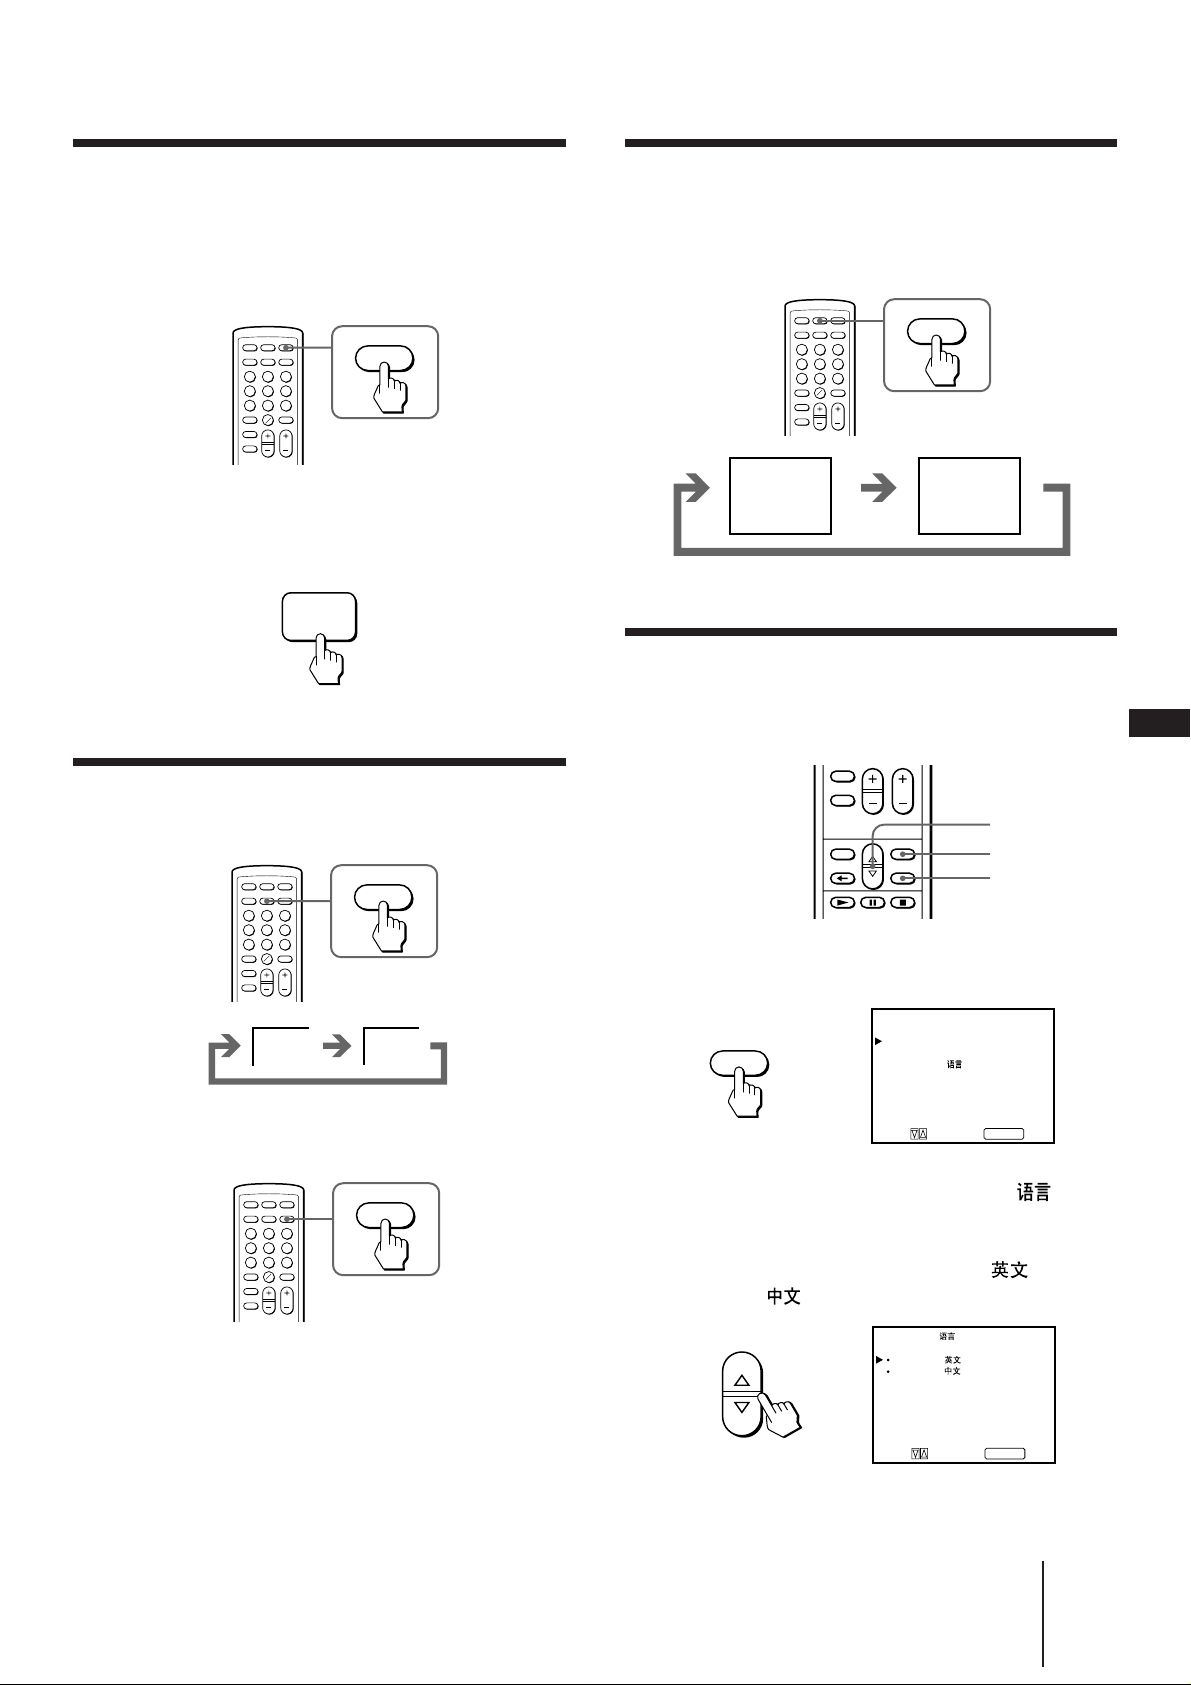
You can change the on-screen display language.
› or ¢
MENU
ENTER
EN
123
456
789
0
10
VIDEO 1 VIDEO 2
To watch TV, press TV.
123
456
789
0
10
TV
1 Press MENU.
The main menu appears.
MENU
2 Press › or ¢ to select “LANGUAGE/ ” and
press ENTER.
3 Press › or ¢ to select “ENGLISH/ ” or
“CHINESE/ ” and press ENTER.
LANGUAGE /
ENGLISH /
CHINESE /
and press ENTER
Select
TV Operations
12
-EN
Page 13
CD Operations
SELECT
Playing CDs
Playing a VIDEO CD without PBC
SELECT ^
STOP p
DISC
POWER
DISC
Number
buttons
-/--
SELECT z
PREV =
0
123
456
789
0
10
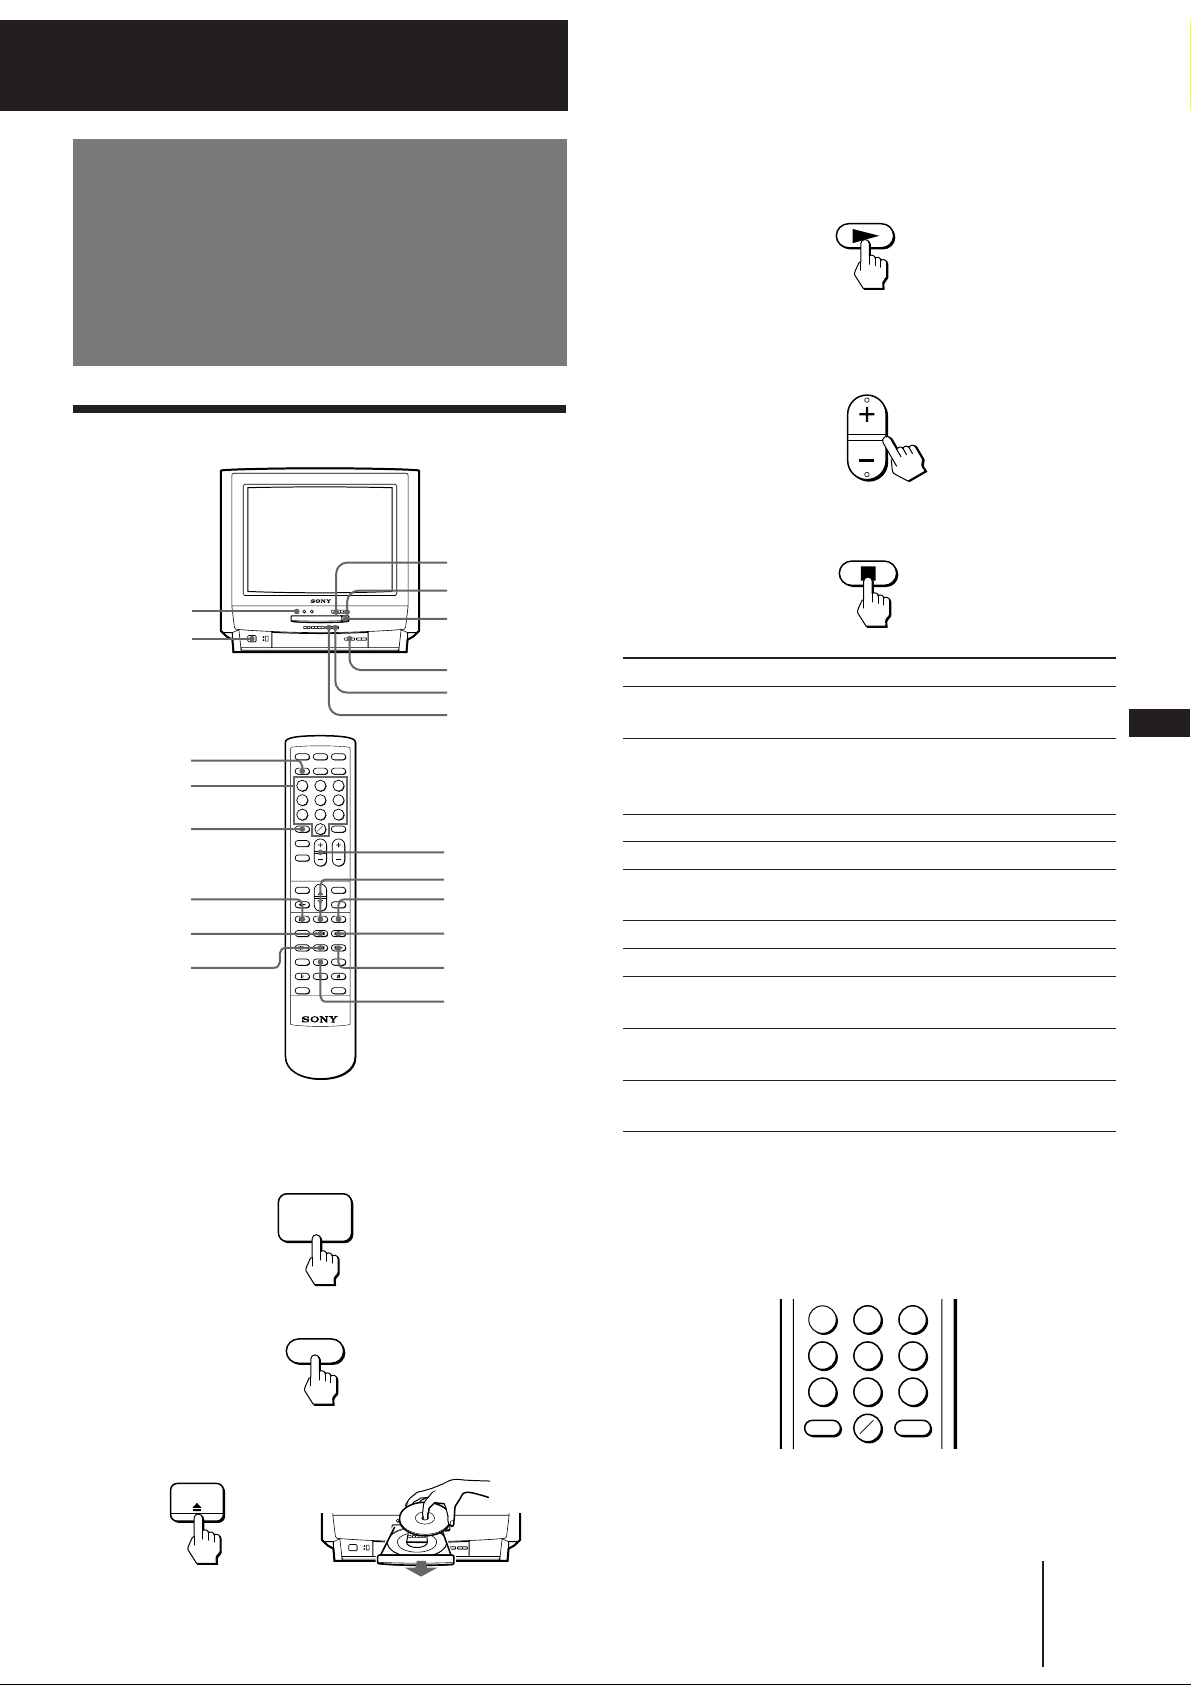
1 Press POWER.
When the TV is in standby mode after pressing
POWER, press POWER on the remote commander.
POWER
OPEN/CLOSE 6
VOLUME +/–
NEXT +
PREV =
VOL +/–
P
p
NEXT +
)
RESUME
4 Press SELECT z on the remote commander
or SELECT ^ on the TV.
5 Press VOL +/– on the remote commander or
VOLUME +/– on the TV to adjust the volume.
VOL
To stop playback
Press p.
When you want to
Pause
Resume play after pause
See the next frame
Go to the next track
Go back to the preceding
track
Stop play
Resume play after stop
Scan forward
Scan back
Select a track number
*1For operation on the TV, press the NEXT+/PREV=
button once.
2
*
For operation on the TV, keep pressing the NEXT+/
PREV= button.
3
To select a track with a number over 10, press -/-- before the
*
number buttons.
Press
P
(on the remote commander)
SELECT ^
(on the TV)
SELECT z, P(on the remote
commander)
SELECT ^
(on the TV)
7(on the remote commander)
NEXT +*
PREV =*
1
1
p
RESUME
(on the remote commander)
)(on the remote commander)
NEXT +*
2
(on the TV)
0(on the remote commander)
PREV =*
Number bottons*
2
(on the TV)
3
(on the remote
commander)
EN
2 Press DISC.
DISC
3 Press OPEN/CLOSE 6, and place the disc on
the disc tray.
OPEN /
CLOSE
1 2 3
4 5 6
7 8 9
– /– – C
0
10
Note
• It may take a few seconds after the OPEN/CLOSE 6 button is
pressed to open the disc tray.
CD Operations
13
-EN
Page 14
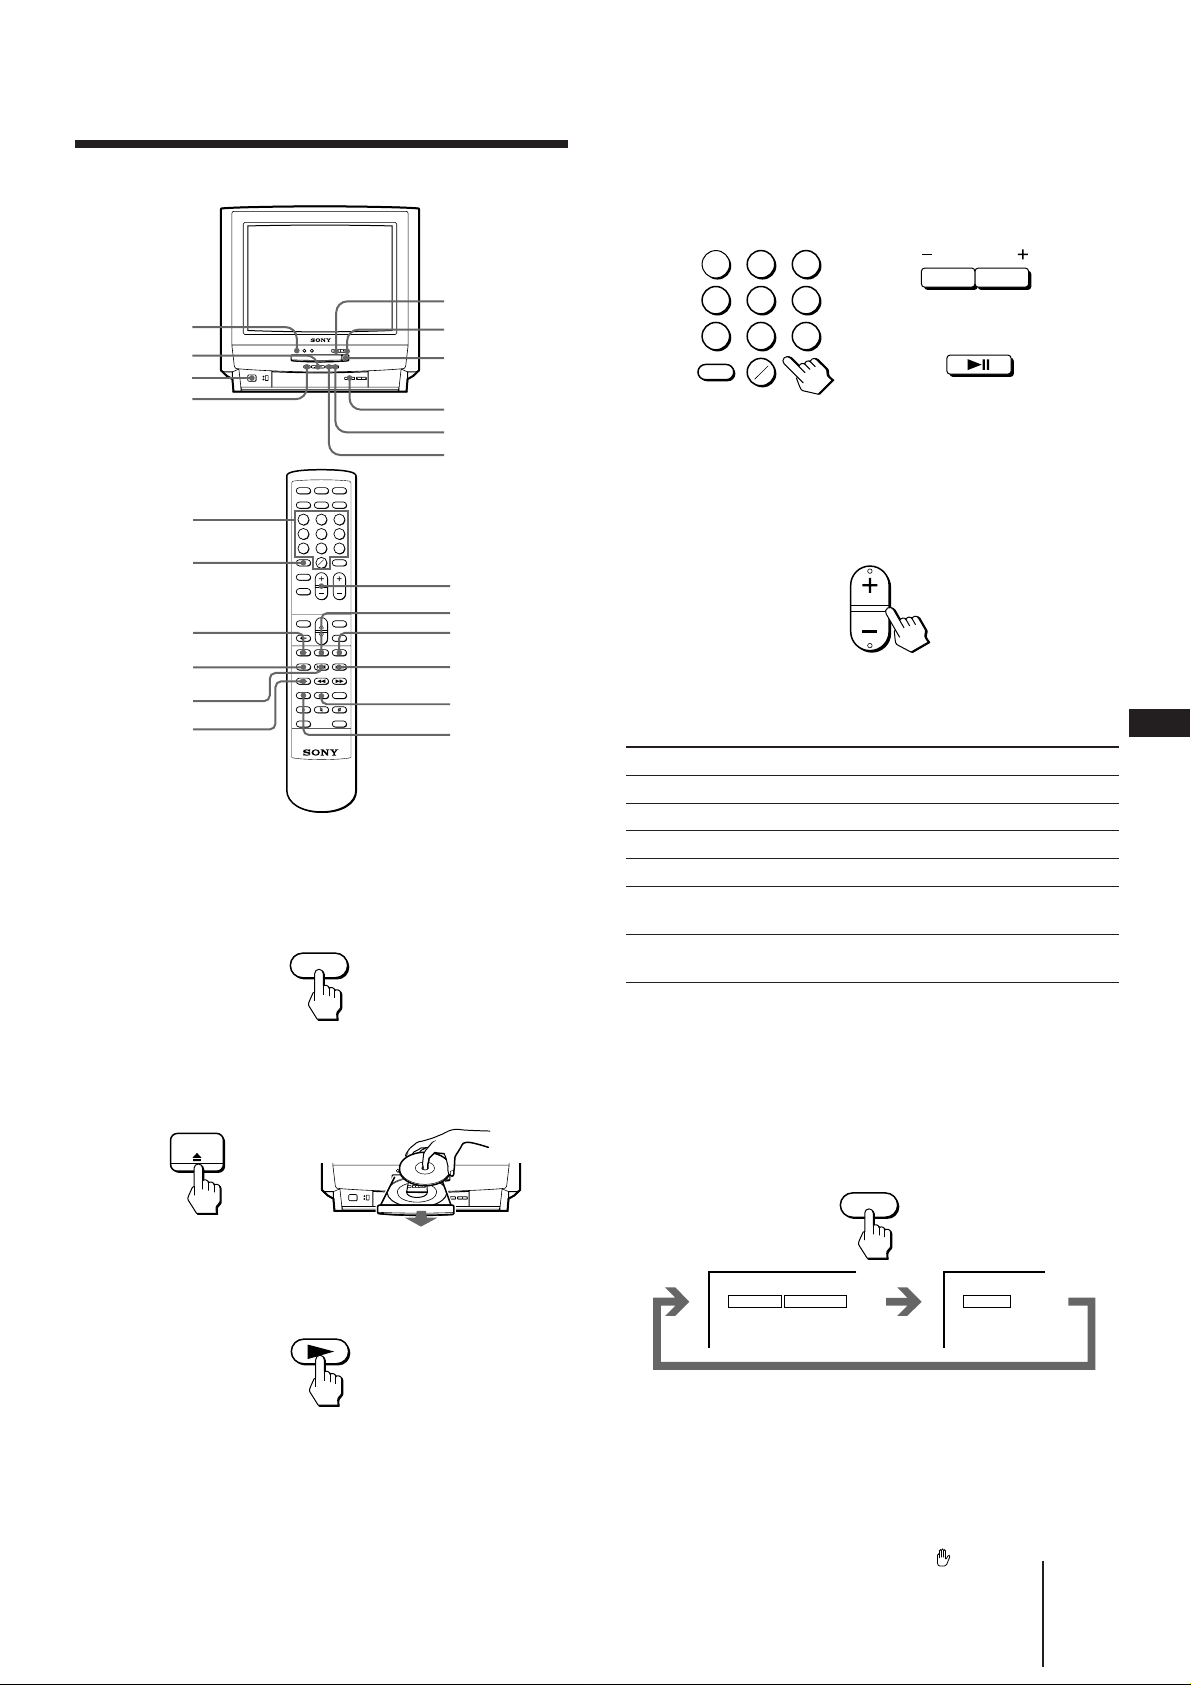
Playing a Video CD with PBC
PBC
5 Select the desired item in the menu screen
with the number buttons.
SELECT ^
DISC
VCD MENU +/–
POWER
RETURN
Number buttons
-/--
SELECT z
RETURN
PREV =
7
123
456
789
0
10
STOP p
OPEN/CLOSE 6
VOLUME +/–
NEXT +
PREV =
VOL +/–
P
p
NEXT +
RESUME
PBC
1 Press POWER.
When the TV is in standby mode after pressing
POWER, press POWER on the remote commander.
2 Press DISC.
DISC
3 Press OPEN/CLOSE 6, and place the disc on
the disc tray.
on the remote commander
1 2 3
4 5 6
7 8 9
– / – –
0
10
or
on the TV
VCD MENU
and
SELECT
Repeat this procedure, following the instructions
displayed in the menu screen.
6 Press VOL +/– on the remote commander or
VOLUME +/– on the TV to adjust the volume.
VOL
To stop playback
Press p.
When you want to
See the next page of the menu
See the preceding page of the menu
Stop play
Go back to the preceding menu
Resume play after pause
Resume play after stop
* For operation on the TV, press NEXT+/PREV= button
once.
Note
• It may take a few seconds after the OPEN/CLOSE 6 button is
pressed to open the disc tray.
Press
NEXT +*
PREV =*
p
RETURN
SELECT z, P
(on the remote commander)
RESUME
(on the remote commander)
EN
OPEN /
CLOSE
4 Press SELECT zon the remote commander
or SELECT ^ on the TV.
SELECT
CD Operations
To switch the PBC functions
Press PBC.
PBC OFF PBC ONCONTINUE
Notes
• You cannot switch on or off the PBC function during the
playing of the disc.
• The 0/), P, and 7 button may not work temporarily at
some portions while playing the disc with the PBC function set
to ON.
• When the unoperable button is pressed while playing the disc
with the PBC function set to ON, the “
” mark appears.
14
-EN
Page 15
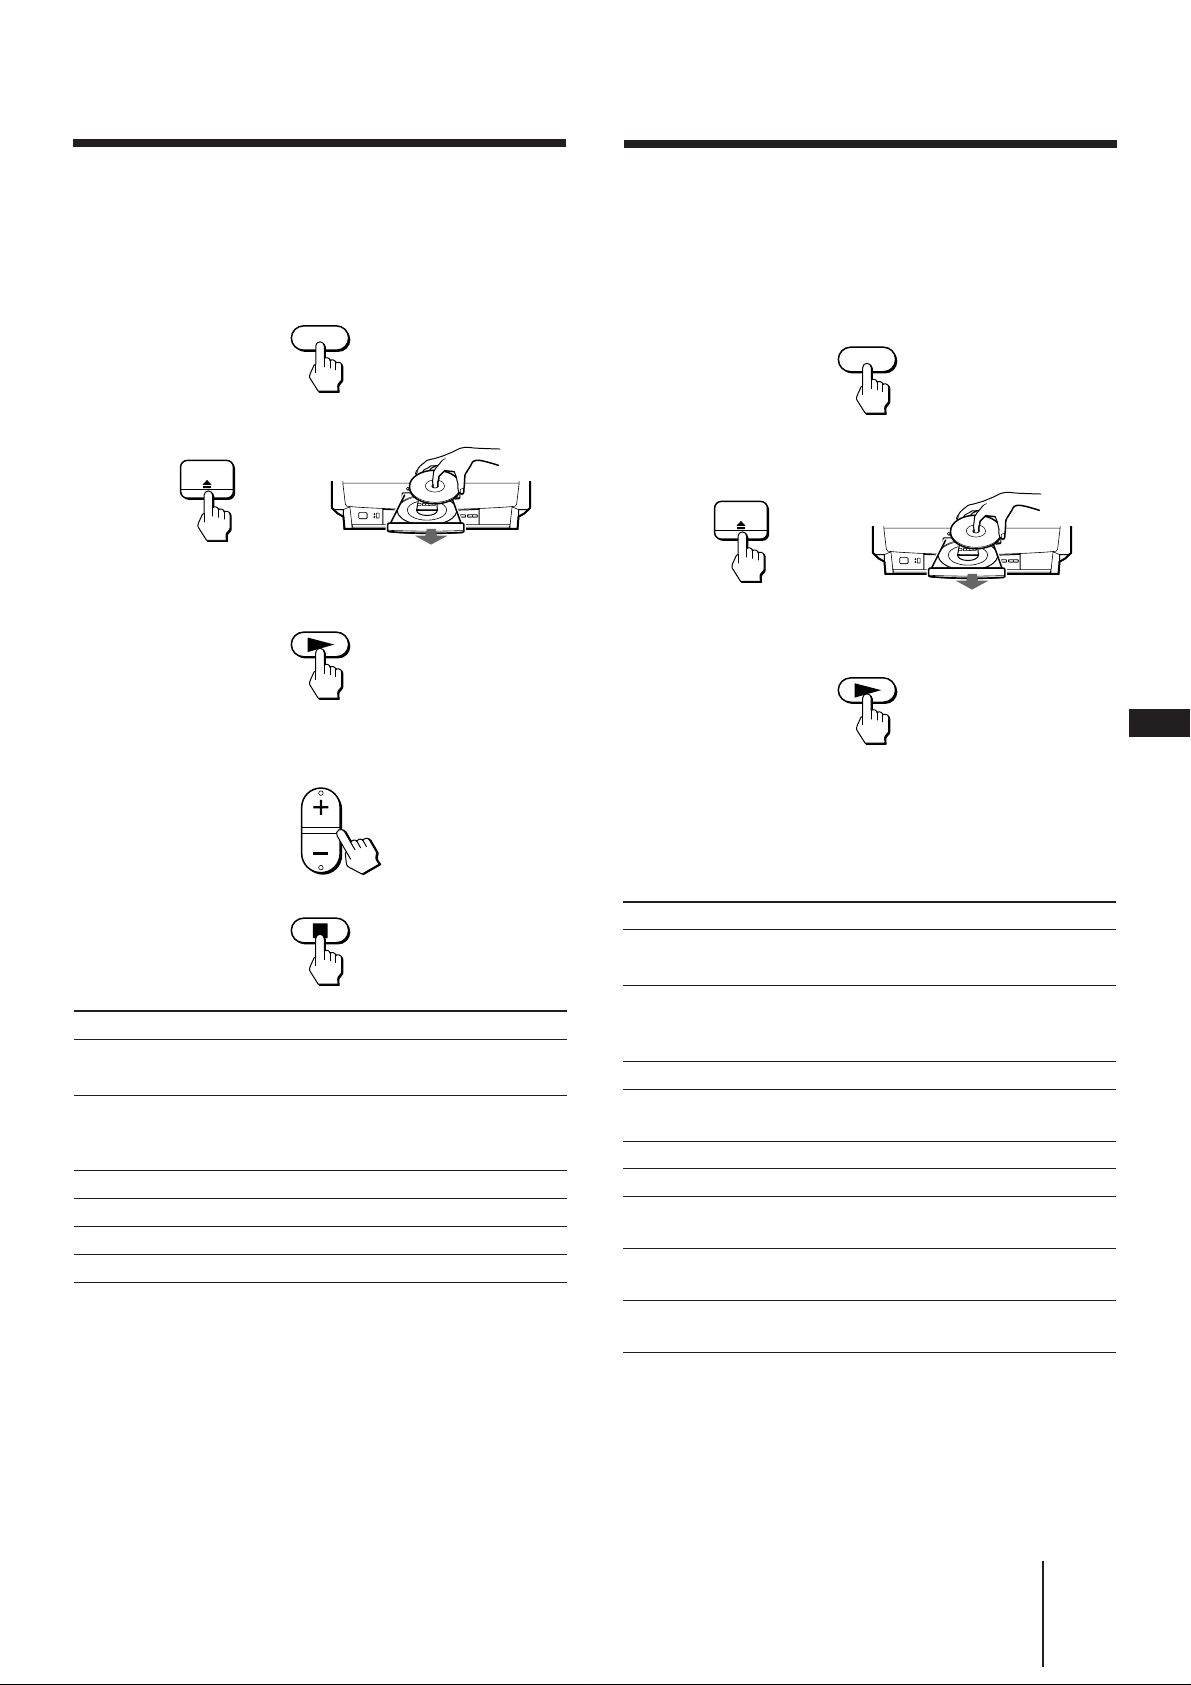
Playing a CD-G
OPEN /
CLOSE
SELECT
Playing an audio CD
1 Press POWER.
When the TV is in standby mode after pressing
POWER, press POWER on the remote commander.
2 Press DISC.
DISC
3 Press OPEN/CLOSE 6, and place the disc on
the disc tray.
OPEN /
CLOSE
4 Press SELECT z on the remote commander
or SELECT ^ on the TV.
SELECT
5 Press VOL +/– on the remote commander or
VOLUME +/– on the TV to adjust the volume.
VOL
1 Press POWER.
When the TV is in standby mode after pressing
POWER, press POWER on the remote commander.
2 Press DISC.
DISC
3 Press OPEN/CLOSE 6, and place the disc on
the disc tray.
4 Press SELECT z on the remote commander
or SELECT ^ on the TV.
EN
5 Press VOL +/– on the remote commander or
VOLUME +/– on the TV to adjust the volume.
To stop playback
Press p.
When you want to
Pause
Resume play after pause
Go to the next track
Go back to the preceding track
Stop play
Select a track number
*1For operation on the TV, press the NEXT+/PREV=
button once.
2
*
To select a track with a number over 10, press -/-- before the
number buttons.
Notes
• It may take a few seconds after the OPEN/CLOSE 6 button is
pressed to open the disc tray.
• The picture may be disturbed when:
- RESUME is pressed after stop.
- ) or 0 is pressed during playing back.
- NEXT+ or PREV= on the TV is pressed continuously
during playing back.
Press
P
(on the remote commander)
SELECT ^
SELECT z, P(on the remote
commander)
SELECT ^
NEXT +*
PREV =*
p
Number buttons*
(on the TV)
(on the TV)
1
1
To stop playback
Press p.
When you want to
Pause
Resume play after pause
Go to the next track
Go back to the preceding
track
Stop play
Resume play after stop
Scan forward
2
Scan back
Select a track number
*1For operation on the TV, press the NEXT+/PREV=
button once.
2
For operation on the TV, keep pressing the NEXT+/
*
PREV= button.
3
To select a track with a number over 10, press -/-- before the
*
number buttons.
Note
• It may take a few seconds after the OPEN/CLOSE 6 button is
pressed to open the disc tray.
Press
P
(on the remote commander)
SELECT ^
SELECT z, P(on the remote
commander)
SELECT ^
NEXT + *
PREV =*
p
RESUME
) (on the remote commander)
NEXT +*
0(on the remote commander)
PREV =*
Number buttons*
commander)
(on the TV)
(on the TV)
1
1
(on the remote commander)
2
(on the TV)
2
(on the TV)
3
(on the remote
CD Operations
15
-EN
Page 16
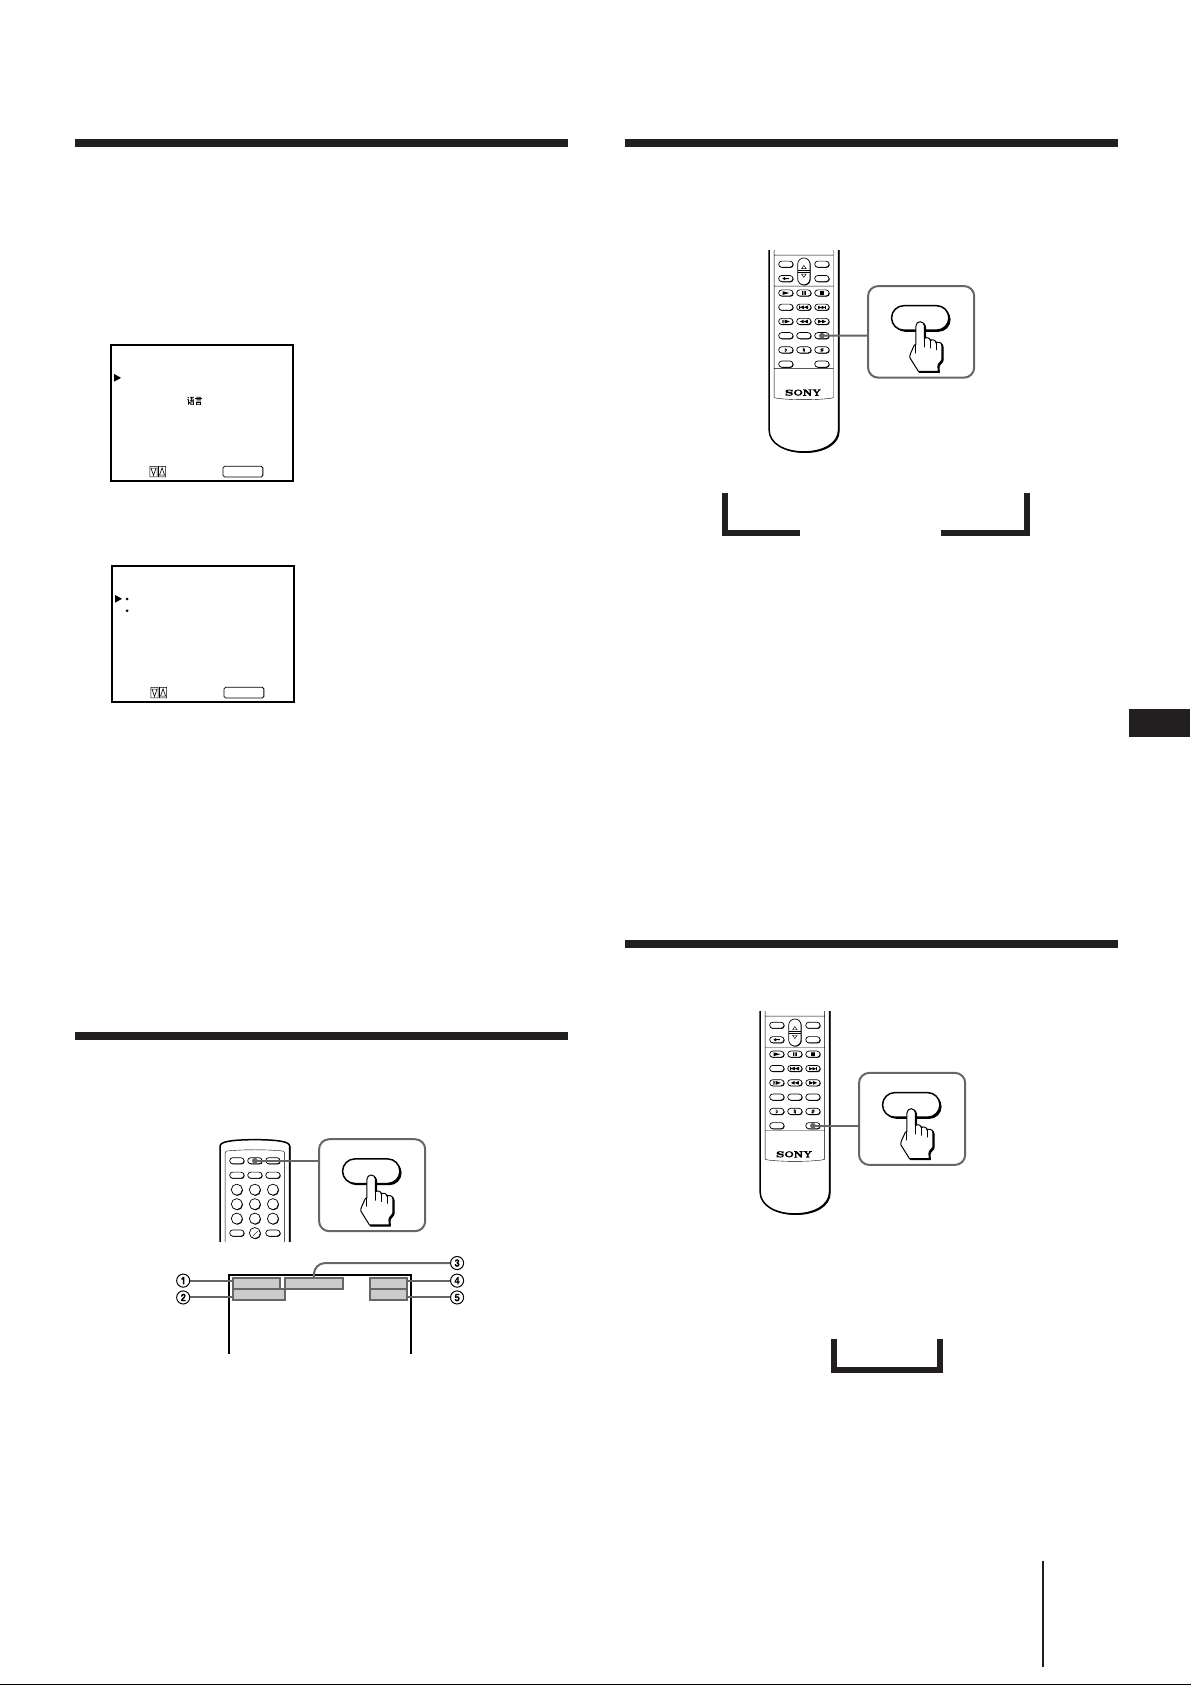
L/R/ST
REPEAT
Selecting the disc color system
Playing repeatedly
You can select the color system for the disc you want to
play back.
1 Press MENU.
The main menu appears.
MENU
VISUAL MODE
PROGRAM PRESET
LANGUAGE /
DISC COLOR SYSTEM
and press ENTER
Select
2 Press › or ¢ to select “DISC COLOR
SYSTEM” and press ENTER.
DISC COLOR SYSTEM
PAL
NTSC
and press ENTER
Select
3 Press › or ¢ to select the DISC COLOR
SYSTEM PAL or NTSC.
The color system and the picture size are changed.
You can play tracks repeatedly in any play mode.
CONTINUE b REPEAT 1 b REPEAT ALL
V
AUTO PAUSE
Press REPEAT in stop or playback mode until
“REPEAT 1” or “REPEAT ALL” or “AUTO PAUSE”
appears in the TV screen.
REPEAT 1: The unit repeats the selected 1 track.
REPEAT ALL: The unit repeats all tracks.
AUTO PAUSE:
To cancel repeat play
Press REPEAT repeatedly until “CONTINUE” appears.
The unit pauses at the start of every track.
EN
4 Press MENU to go back to the original
screen.
Note
• You cannot change the color system during the playing of the
disc.
Using the on-screen display (DISC) mode
You can check the operating status and the information
on the TV screen.
123
456
789
10
0
Press DISPLAY.
1 Track number/Scene number
2
REPEAT mode, PBC ON/OFF, SELECT and number
3 Time number
4 Playing status, Disc type
5 STEREO L or R, Karaoke PON
CD Operations
DISPLAY
Note
• You cannot change the repeat operation mode with the PBC
function set to ON.
Selecting the disc sound
Press L/R/ST.
Each time you press L/R/ST, the screen changes as
follows.
STEREO b L b R
V
Note
• When you select L (or R), the sound of the left (or right)
channel is output from both speakers.
16
-EN
Page 17
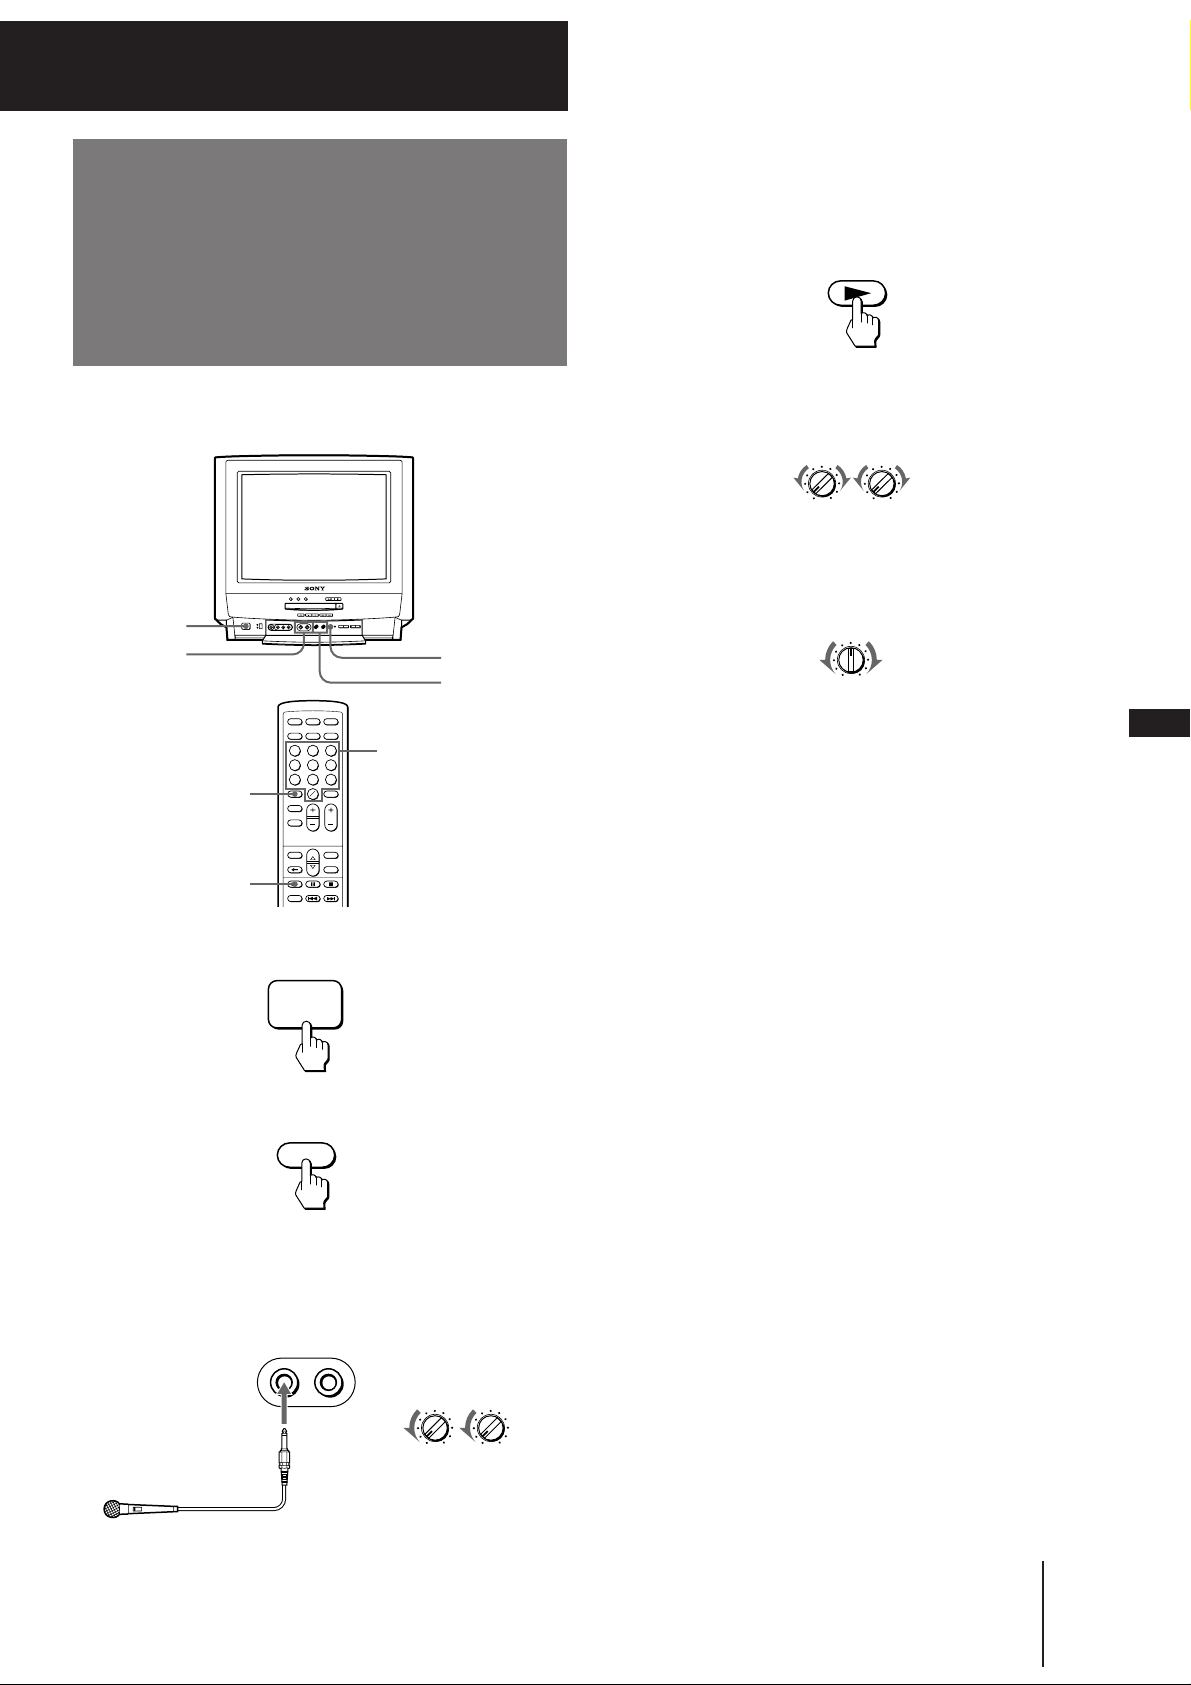
Karaoke Operations
SELECT
MIC VOL
MIN MAX MIN MAX
21
Karaoke sing-along
You can play karaoke (sing along) with CDs.
POWER
MIC IN 1/2
–/--
123
456
789
0
10
Number buttons
MIC ECHO
MIC VOL 1/2
4 Press OPEN/CLOSE 6, and place the disc on
the disc tray.
5 Press SELECT ”.
6 Turn the MIC VOL 1/2 control to adjust the
microphone volume.
7 Turn the ECHO VOL control to adjust the
strength of echo.
010
MIC ECHO
To reduce the vocal
Press the L/R/ST button to reduce a vocal while
playing a multiplex disc.
EN
SELECT ”
1 Press POWER.
POWER
2 Press DISC.
DISC
3 Set the MIC VOL 1 and 2 control on the unit
to MIN, then plug the microphone into the
MIC IN 1 or 2 jack.
12MIC IN
Note
• It may take a few seconds after the OPEN/CLOSE 6 button is
pressed to open the disc tray.
MIN MAX MIN MAX
MIC VOL
21
Karaoke Operations
17
-EN
Page 18
PON
KARAOKE
Changing the pitch (Key Control)
PON
While you are singing, you can change the pitch of the
song in half tone pitch.
Singing along with non-karaoke discs
(Karaoke Pon)
You can enjoy karaoke with a stereo recorded disc,
even if it is a non-karaoke disc, by reducing the singer’s
voice.
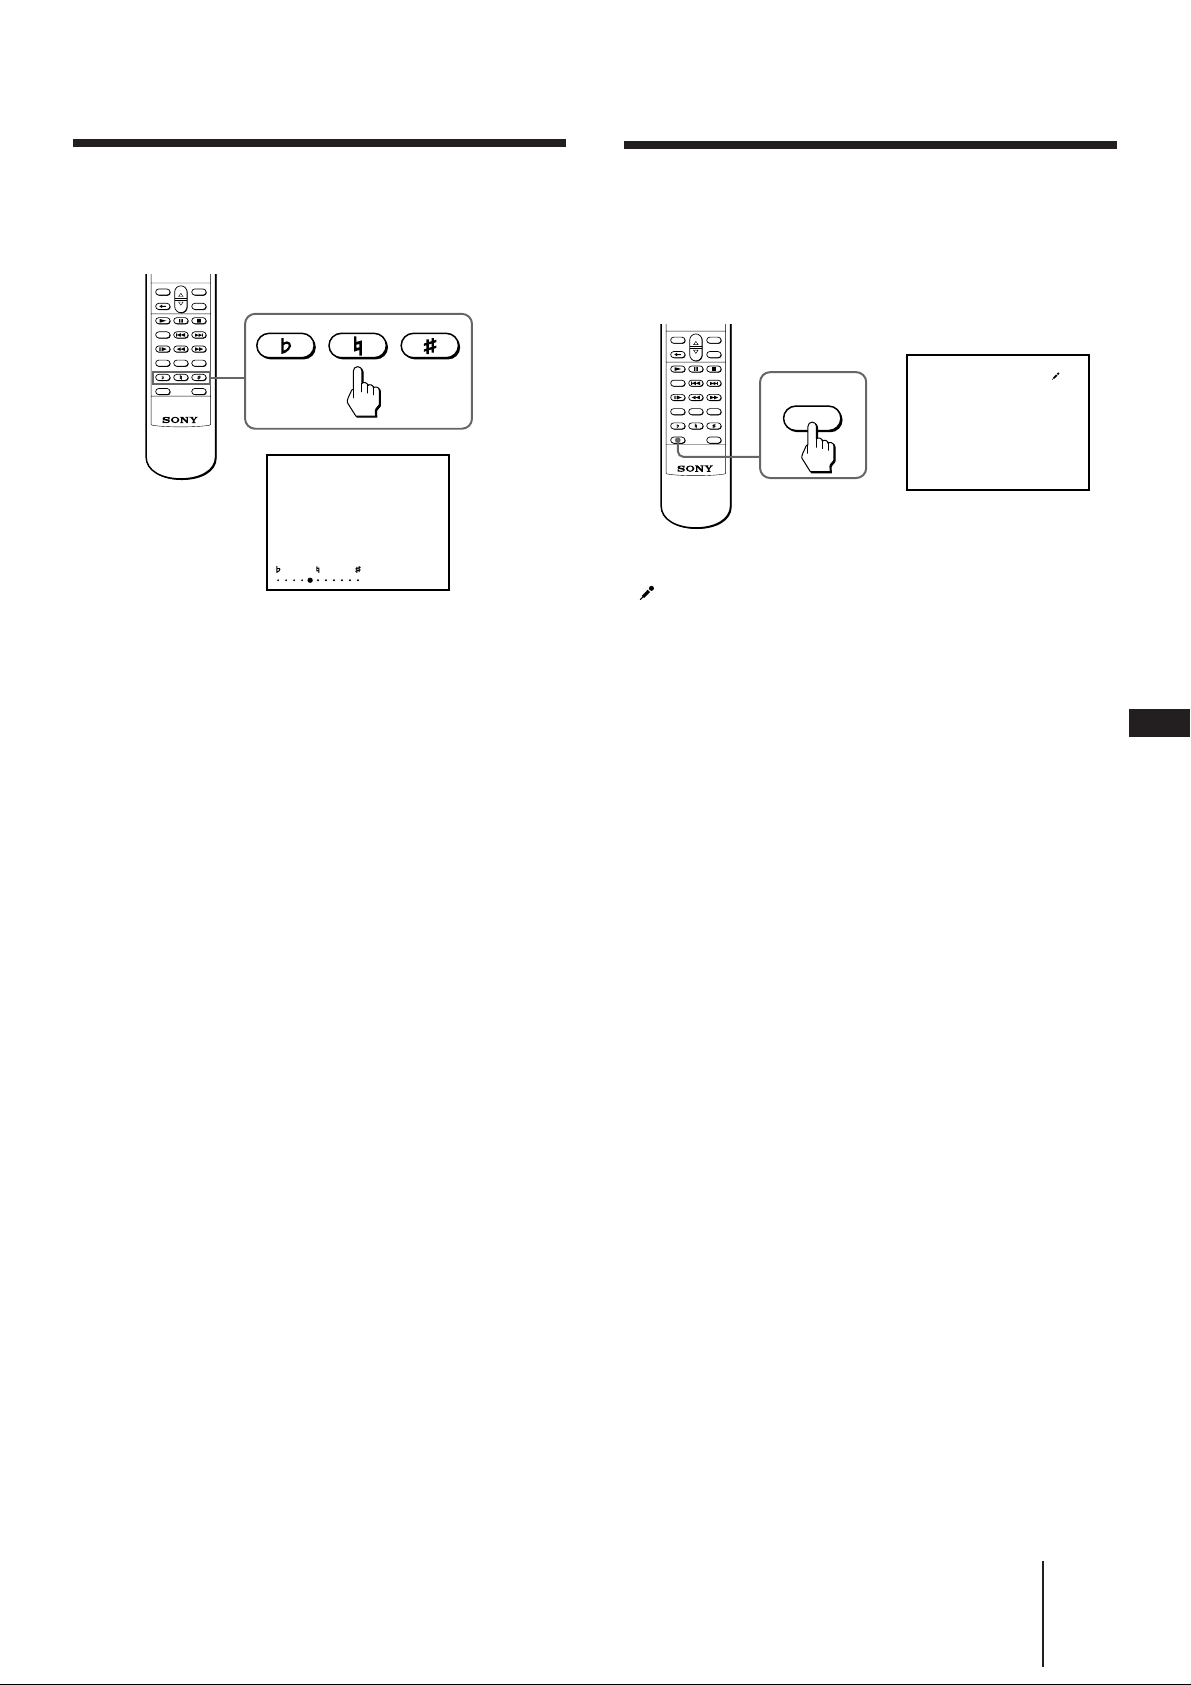
Press KARAOKE PON.
“ PON” appears on the TV screen.
Press n or ˜ on the remote repeatedly to set the pitch
you want.
The pitch you set appears on the TV screen.
To return the original key
Press N.
Note
• Stereo effect is reduced when the pitch is changed.
The singer’s voice is reduced so that you can enjoy
karaoke. However, the stereo effect is also reduced.
To cancel Karaoke Pon
Press KARAOKE PON again.
Notes
• The singer’s voice and instruments are reduced for monaural
recorded source.
• The singer’s voice may not be reduced completely even in the
stereo recorded source for the following reasons;
- Only a few instruments are playing
- A duet is being played
- The source has strong echoes or chorus
- The singer's voice on the source deviates from the center
EN
Karaoke Operations
18
-EN
Page 19
Additional Operations
123
456
789
10
0
WAKE UP
Using the Sleep
Timer
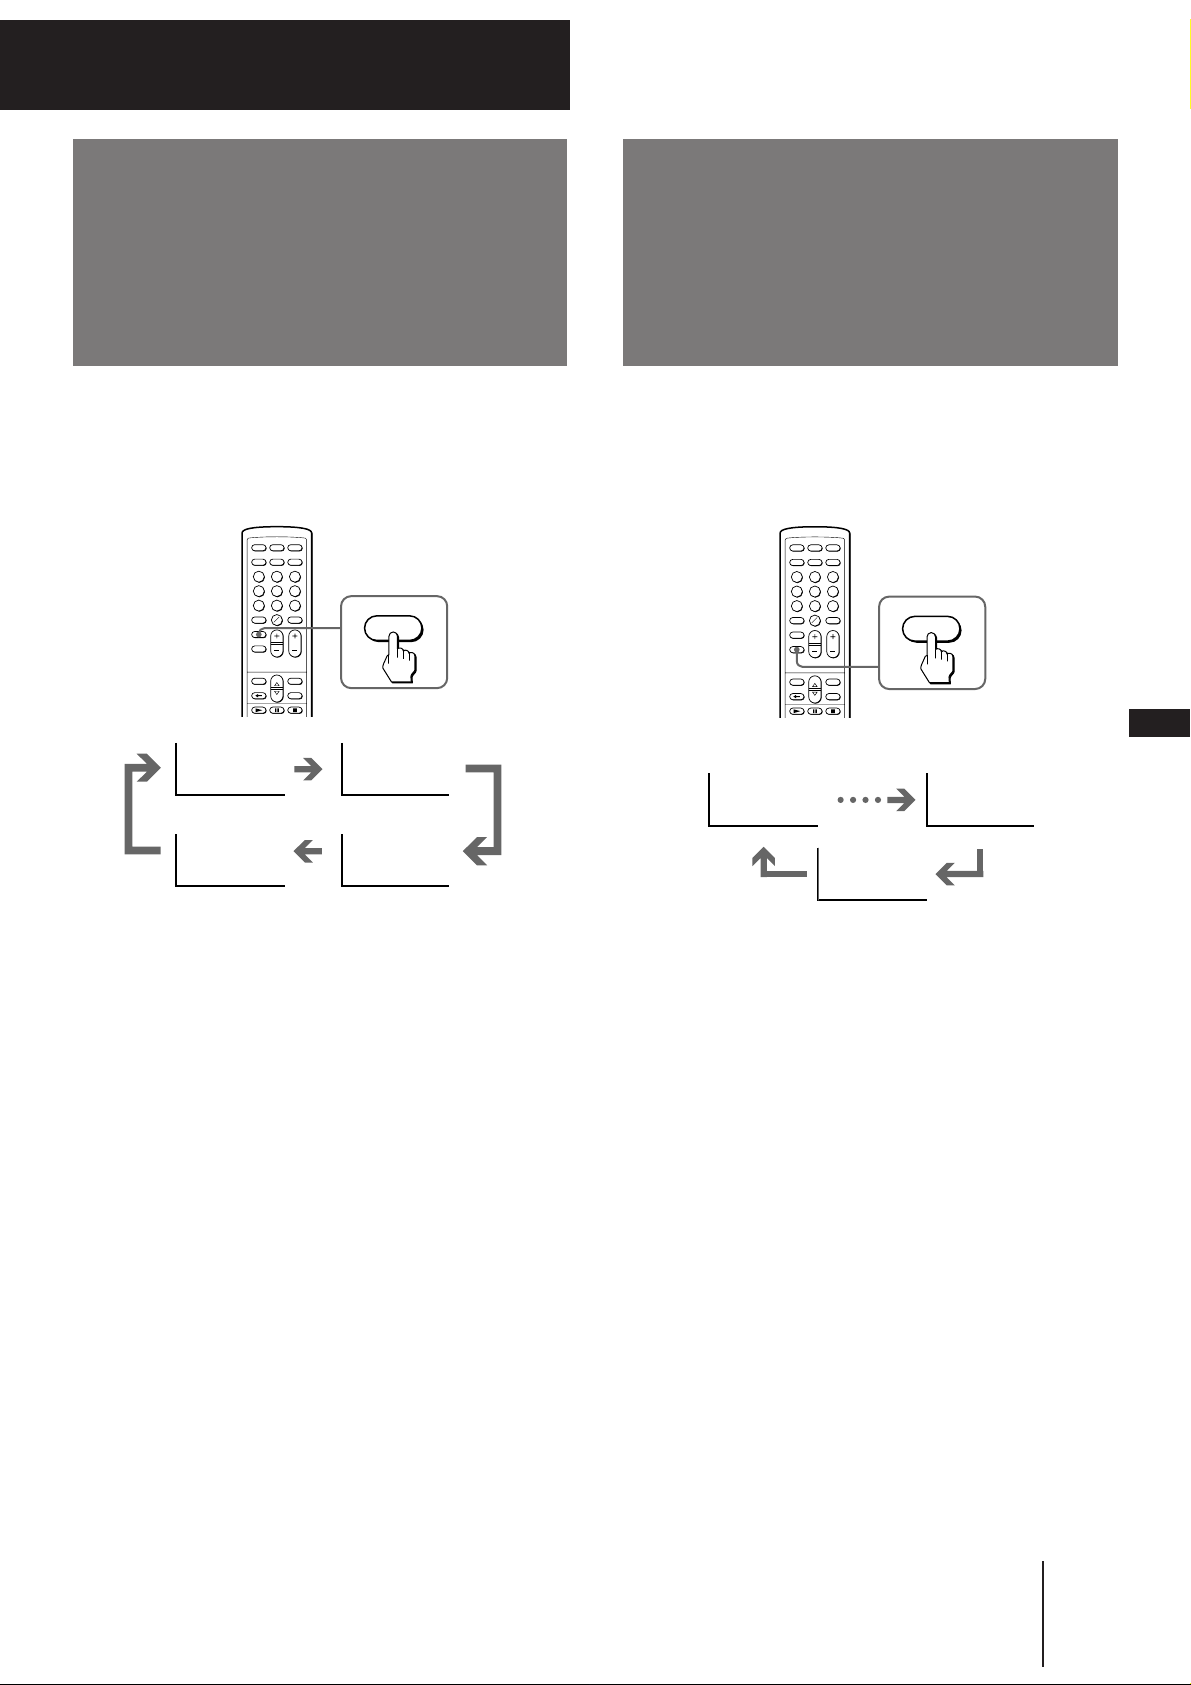
You can set the TV to turn off automatically after the
period of time you want.
Press SLEEP.
123
456
789
0
10
SLEEP 30 M SLEEP 60 M
After 30 minutes
SLEEP
After 60 minutes
Using the Wake Up
Timer
You can set the TV to turn on automatically after the
period of time you want.
1 Press WAKE UP.
between 10 minutes
and 12 hours in 10minute steps
WAKE UP 10M WAKE UP 12H00M
After 10 minutes After 12 hours
EN
SLEEP OFF SLEEP 90 M
No sleep timer
After 90 minutes
One minute before the TV switches into standby mode
a message “Good night” is displayed on the screen.
To cancel the Sleep Timer, press SLEEP repeatedly
until “SLEEP OFF” appears, or turn the TV off.
WAKE UP OFF
No WAKE UP timer
2 Press POWER on the remote commander.
After the selected period of time, the TV is turned
on and a message “Hello” is displayed on the
screen.
When no operation is done for 2 hours after the TV
is turned on, the TV is set in standby mode.
To erase the message
Press any button on the TV or the remote commander.
To cancel the wake up timer
Press WAKE UP repeatedly until “WAKE UP OFF”
appears.
Additional Operations
19
-EN
Page 20
MENU
VISUAL MODE
PROGRAM PRESET
LANGUAGE /
DISC COLOR SYSTEM
and press ENTER
Select
Adjusting the
PICTURE CONTROL
Select and press ENTER
PICTURE
COLOR
BRIGHTNESS
HUE
RESET
80
50
50
00
VISUAL MODE
and press ENTER
DYNAMIC
MIDDLE
SOFT
PERSONAL
PICTURE CONTROL
Select
Adjusting the picture mode settings
picture mode
› or ¢
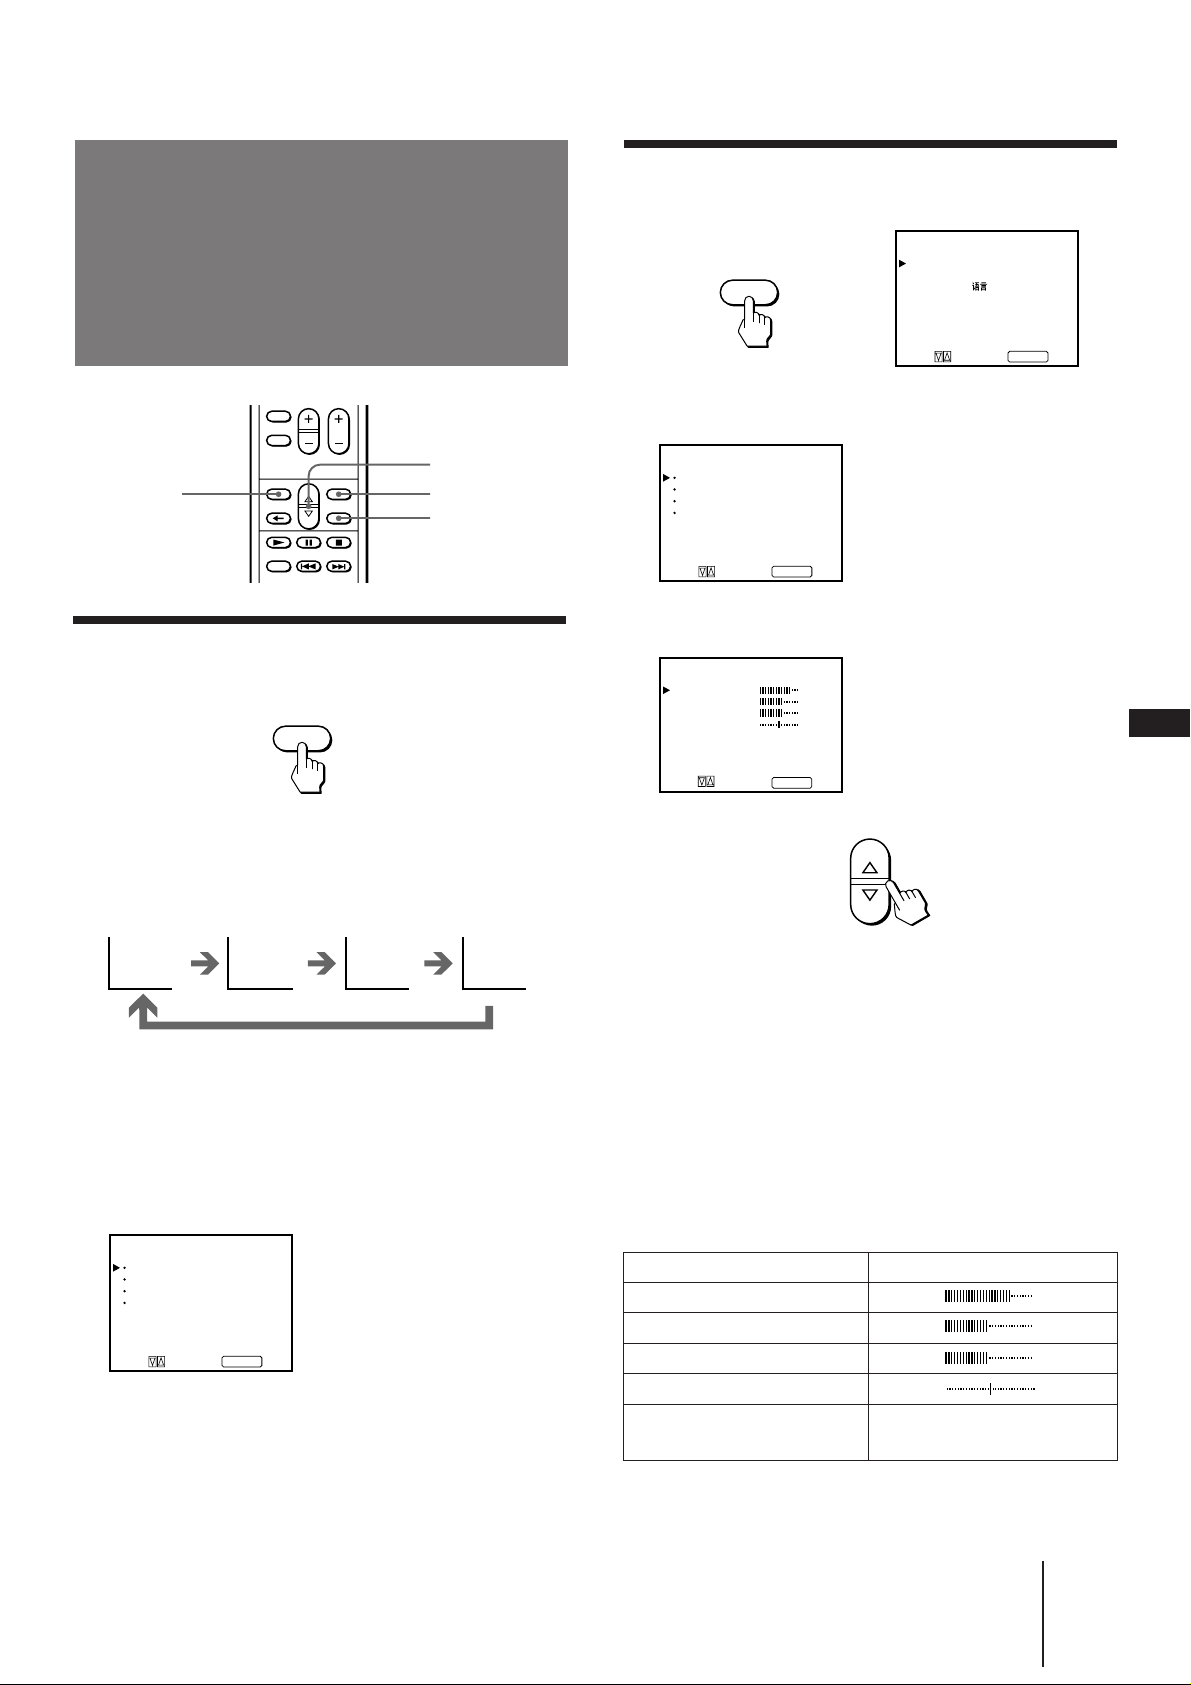
PIC MODE
Selecting the picture mode
Press PIC MODE until the mode you want
appears.
PIC MODE
MENU
ENTER
1 Press MENU.
The main menu appears.
MENU
2 Press › or ¢ to select “VISUAL MODE” and
press ENTER.
3 Press › or ¢ to select “PICTURE CONTROL”
and press ENTER.
EN
Each time you press PIC MODE, the screen changes as
follows:
The adjusted
picture control
levels are stored.
You can also select the mode from the menu.
1 Press MENU.
2 Press › or ¢ to select “VISUAL MODE” and
3 Press › or ¢ to select the desired VISUAL
Note
• If you change the picture mode after the following
adjustments, the adjustment changes in accordance with the
picture mode.
High contrast
picture
DYNAMIC MIDDLE SOFTPERSONAL
The main menu appears.
press ENTER.
VISUAL MODE
DYNAMIC
MIDDLE
SOFT
PERSONAL
PICTURE CONTROL
and press ENTER
Select
mode and press ENTER.
Additional Operations
Less contrast
picture
Soft picture
(good for video
games)
4 Press › or ¢ to adjust the item and press
ENTER.
5 Adjust the picture with › or ¢ and press
ENTER. With each press the vertical bars
increase or decrease and the figure at the
right margin changes to show the control
level.
6 To adjust other items, repeat steps 4 and 5.
7 Press MENU to go back to the original
screen.
Effect of each control
PERSONAL ADJUSTMENT
PICTURE
COLOR
BRIGHTNESS
HUE*
RESET
* The HUE adjustment is available only for the NTSC color
system.
The adjusted control levels are stored in “PERSONAL.”
Effect
Less More
Less
Darker
Reddish
More
Brighter
Greenish
Resets all the items to the
factory preset levels.
20
-EN
Page 21
Muting the sound
Listening with
headphones
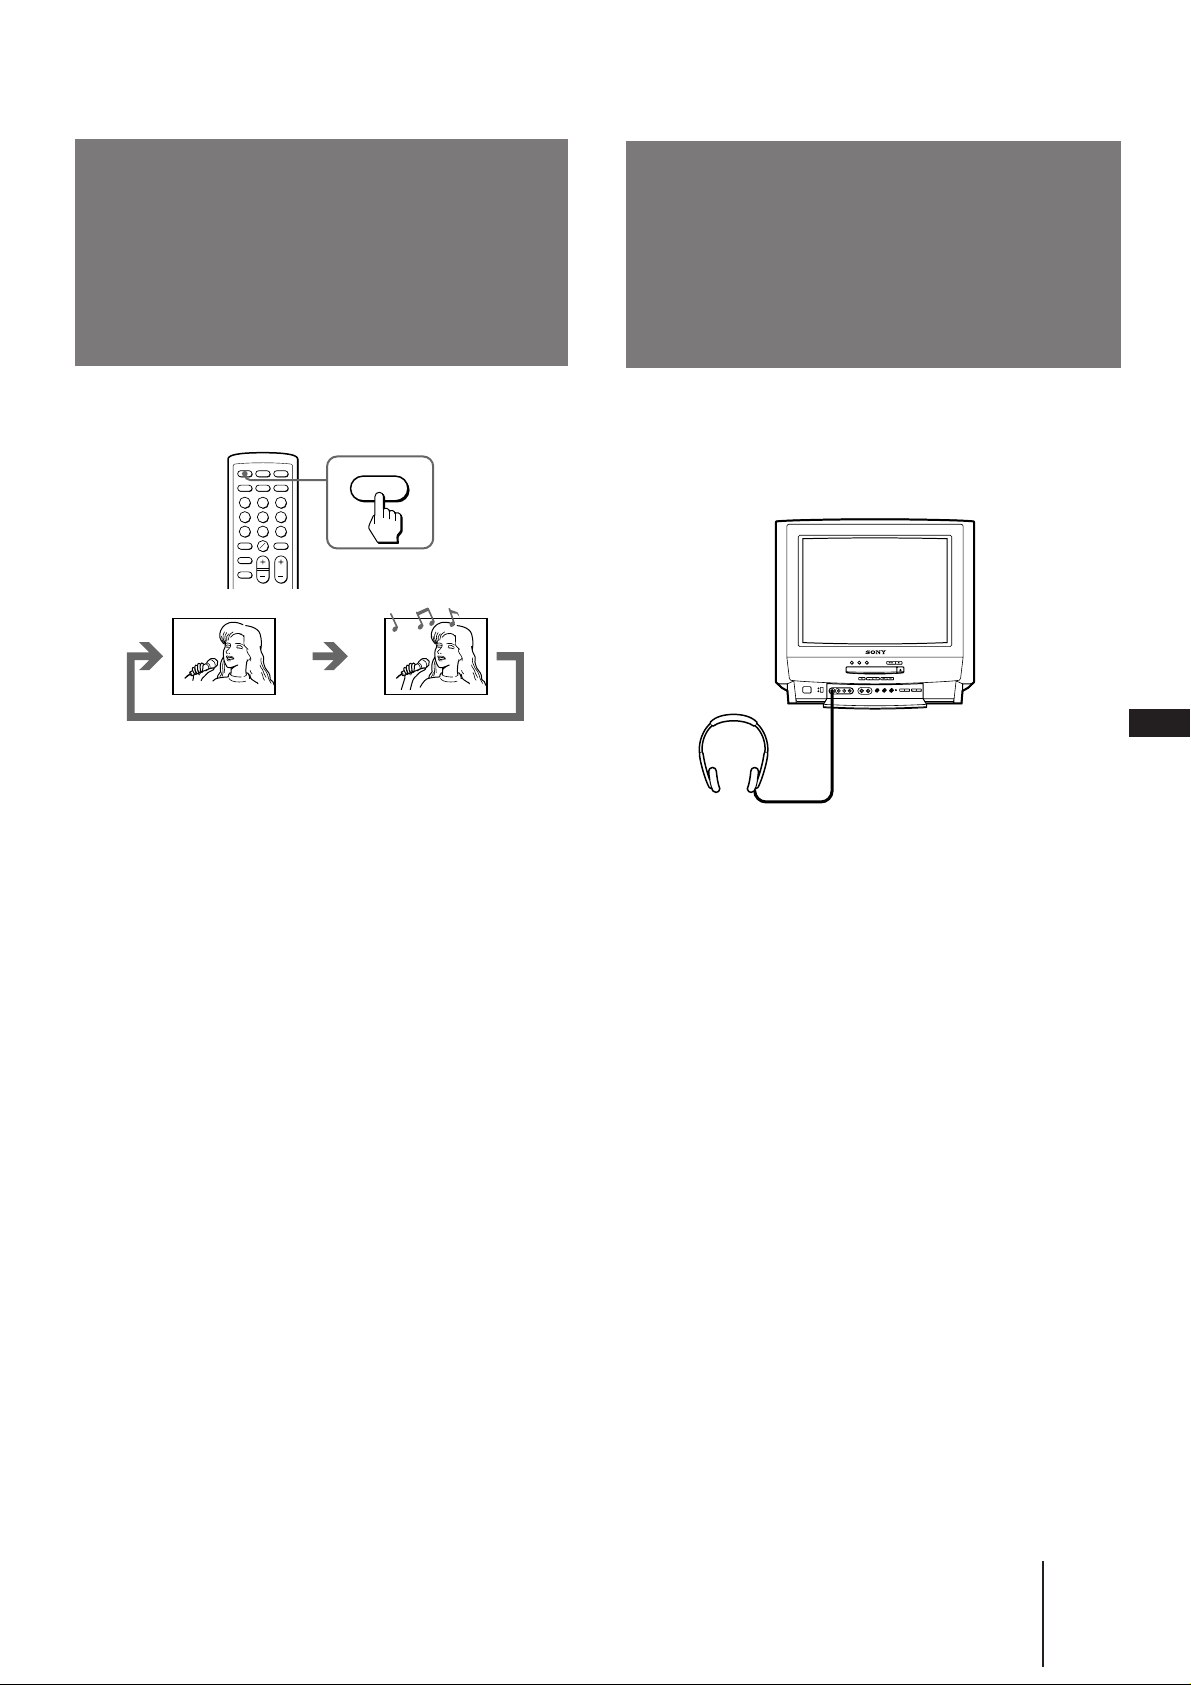
Press MUTING.
MUTING
123
456
789
0
10
MUTING
Plug the headphones (not supplied) to the 2
(headphones) jack inside the front panel on the TV.
The sound from the speaker is shut off.
EN
Additional Operations
21
-EN
Page 22
Additional Information
Troubleshooting
If you have any problems, read this manual again and
check the countermeasure for each of the symptoms
listed below.
If the problem persists, contact your nearest authorized
service center or dealer.
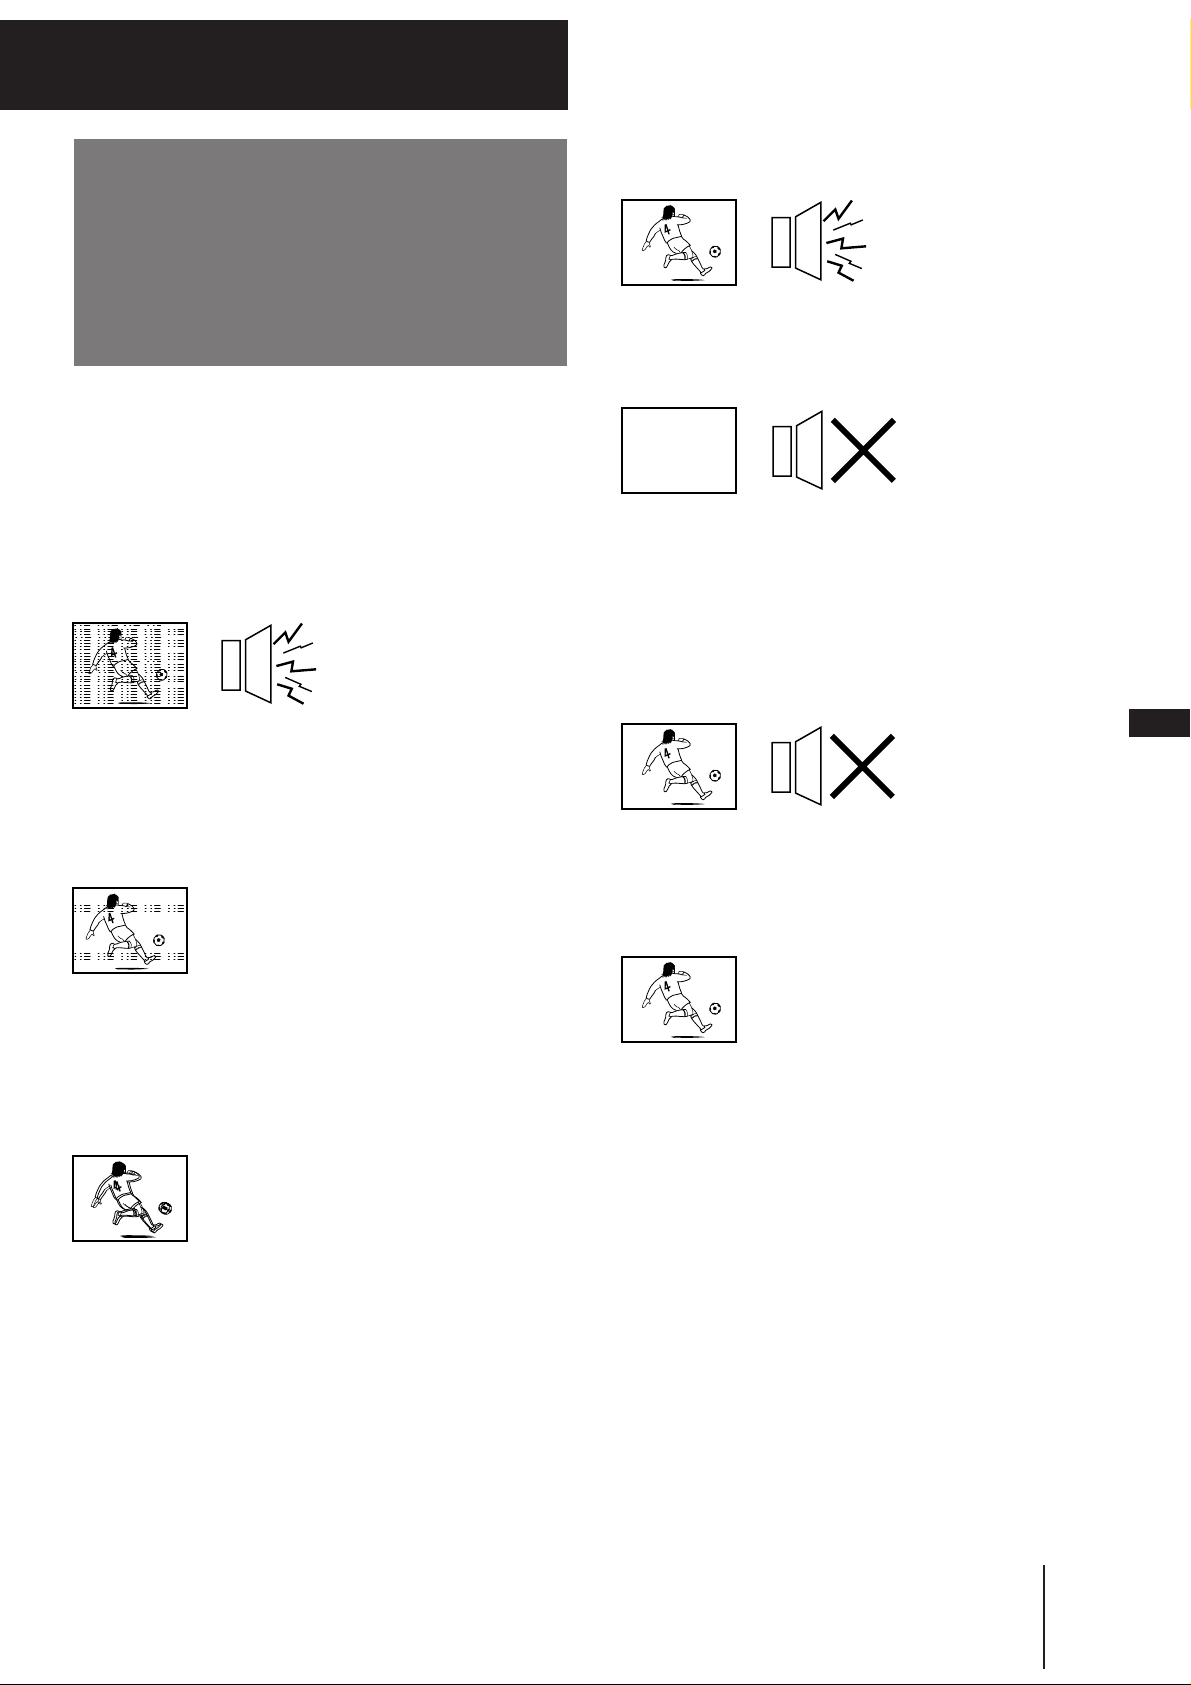
Snowy picture
Noisy sound
Good picture
Noisy sound
/ Check the TV SYSTEM setting.
No picture
No sound
/ Press POWER.
/ Check the antenna connection.
/ Check the VCR connections.
/ Check the power cord connection.
/ Check the standby mode.
/ Check the antenna.
/ Check the antenna connection on the TV
and on the wall.
/ Check the TV SYSTEM setting.
Dotted lines or stripes
/ This may be caused by local interference
(e.g. cars, neon signs, hair dryers, etc.).
Adjust the antenna for minimum
interference.
Double images or “ghosts”
/ This may be caused by reflections from
nearby mountains or buildings. A highly
directional antenna may improve the
picture.
Good picture
No sound
EN
/ Press VOLUME +.
/ Press MUTING.
/ Check the 2 (headphones) jack.
No color
/ Adjust the COLOR level in the on-screen
display.
TV cabinet creaks
/ Even if the picture or the sound is normal,
changes in the room temperature
sometimes make the TV cabinet expand
or contract, making a noise. This does not
indicate a malfunction.
Additional Information
22
-EN
Page 23
The CD doesn’t play
/ There’s no disc inside (“Please load a
disc” appears).
/ Insert the disc with the label side up on
the disc tray correctly.
/ Clean the disc.
/ Be sure that the disc can be played with
this unit.
/ Moisture has condensed inside the unit.
Leave the unit for more than one hour
with the disc tray open.
No sound from the microphone
/ Switch the microphone on.
/ Turn the MIC VOL 1 or 2 control
clockwise.
Howling
/ Move the microphone away from the
speakers.
/ Lower the volume.
/ Lower the microphone volume or echo
level.
The remote control doesn’t function.
/ Remove the obstacles in the path of the
remote and the TV.
/ Point the remote at the remote sensor on
the TV.
/ Replace the battery in the remote control
with a new one if it is weak.
Notes on CDs
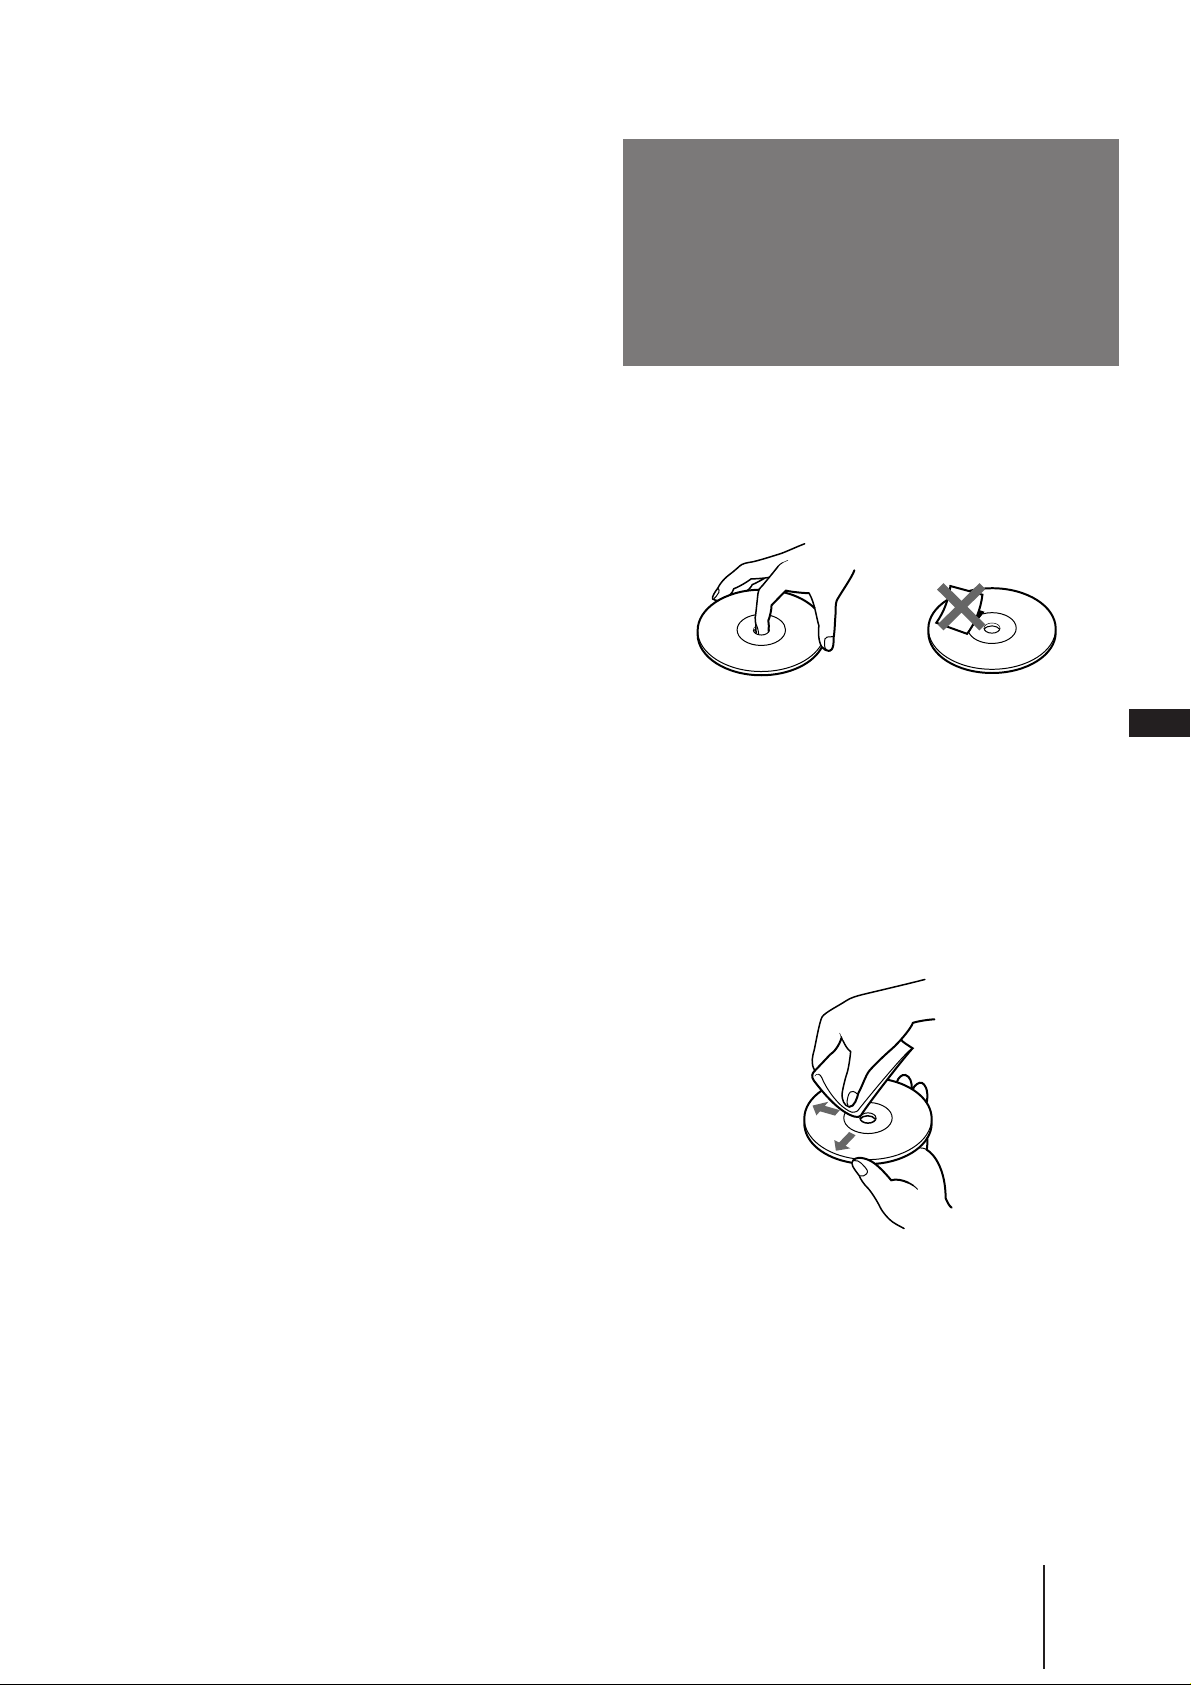
On handling CDs
• To keep the disc clean, handle the disc by its edge.
Do not touch the surface.
• Do not stick paper or tape on the disc.
Not this way
• Do not expose the disc to direct sunlight or heat
sources such as hot air ducts, nor leave it in a car
parked in direct sunlight as there can be considerable
rise in temperature inside the car.
• After playing, store the disc in its case.
On cleaning
• Before playing, clean the disc with a cleaning cloth.
Wipe the disc from the center out.
EN
The Video CD picture size is wrong.
/ Check the DISC COLOR SYSTEM.
• Do not use solvents such as benzine, thinner,
commercially available cleaners or anti-static spray
intended for vinyl LPs.
Additional Information
23
-EN
Page 24
Receivable channels
and channel display
Specifications
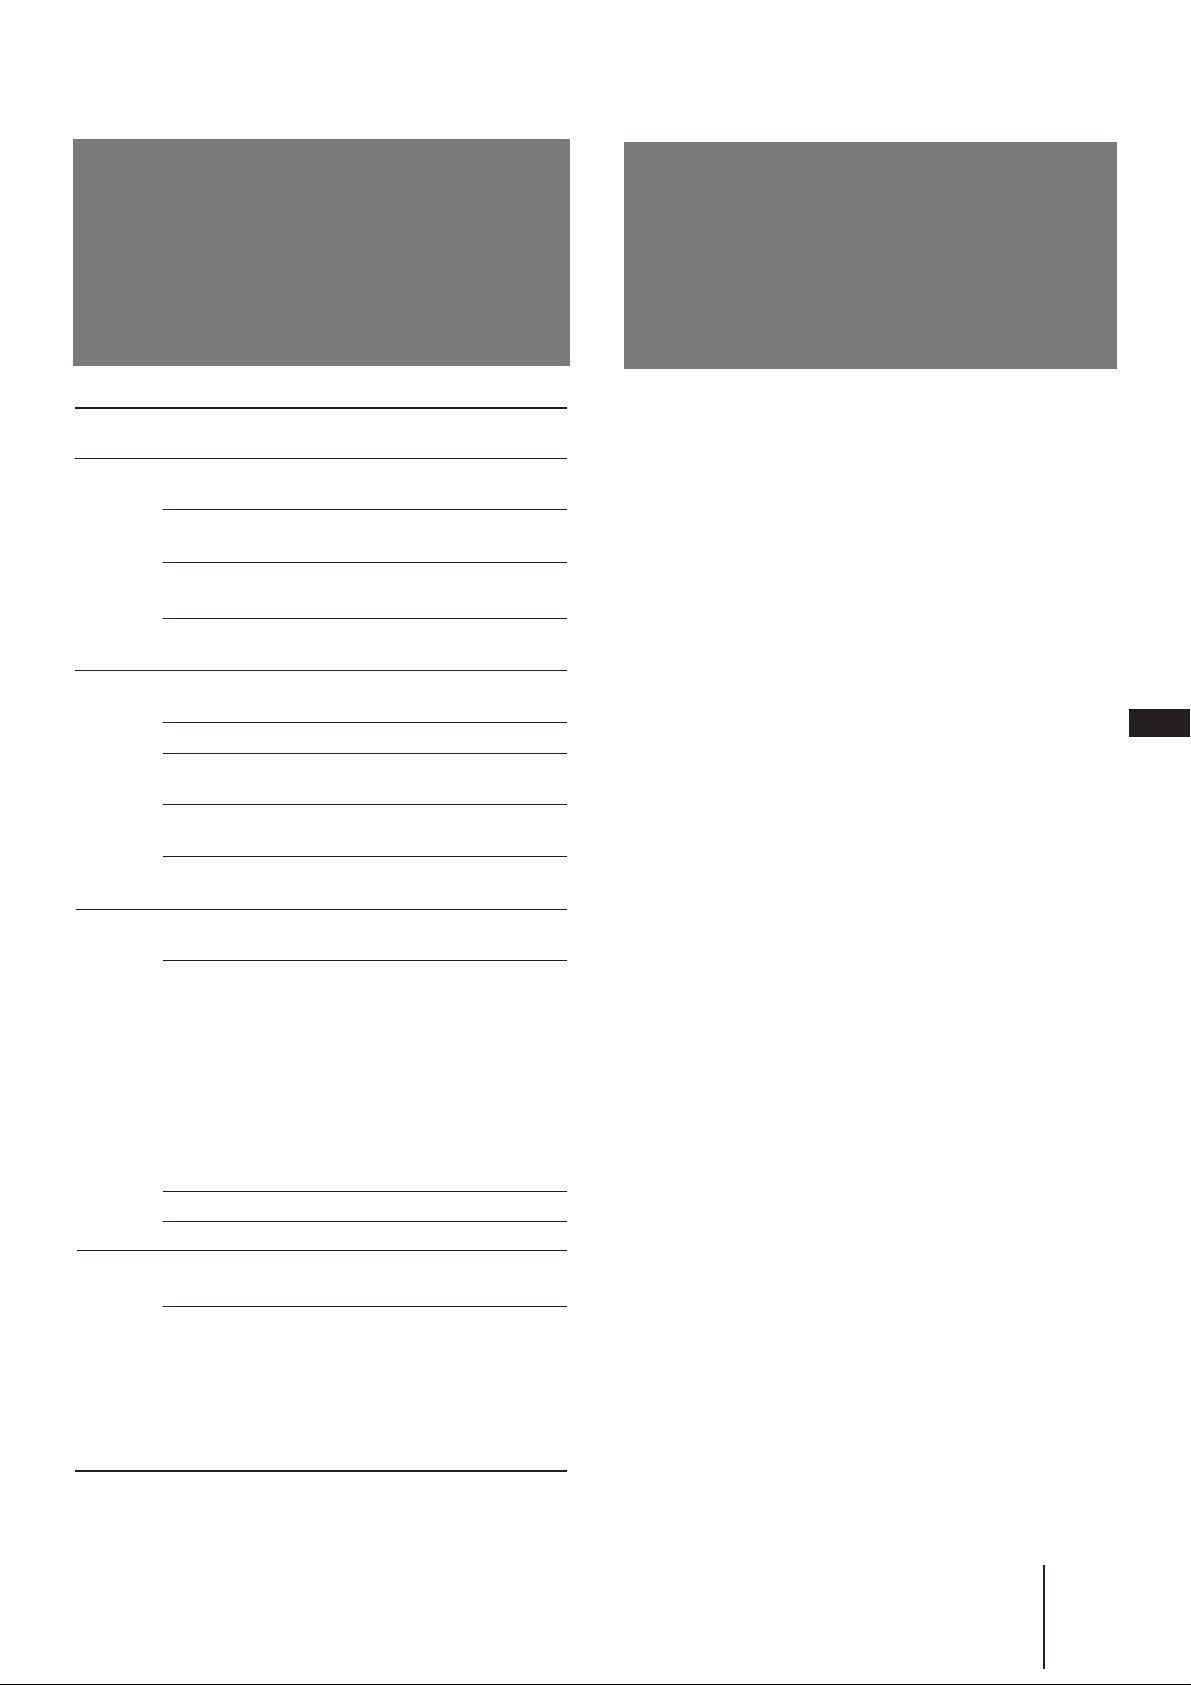
System
B/G, H
I
D/K,K1
M
Area
Middle East
/Asia
Indonesia
Morocco
CATV
Hong Kong/
United Kingdom
Ireland
South Africa
Angola
CATV
East European
countries
China
Ivory Coast
CATV
America
CATV
Channel
coverage
E-2 to E-12
E-21 to E-69
1A
2 to 11
M-4 to M-7
M-8 to M-10
S-01 to S-05
S-1 to S-41
B-21 to B-69
A, B, C,.....J
4 to 13
21 to 68
1
2 to 3
S-01 to S-05
S-1 to S-41
R-1 to R-2
R-21 to R-60
C-1
C-2
C-3
C-4
C-5
C-6
C-7 to C-12
C-13 to C-24
C-25 to C-47
C-48 to C-57
1 to 3
S-1 to S-39
A-2 to A-13
A-14 to A-83
A-8
A-7
A-6
A-5 to A-1
A to E
F to W+28
W+29 to W+58
Channel
display
C02 to C12
C21 to C69
C01
C03 to C12
C70 to C73
C08 to C10
S42 to S46
S01 to S41
C21 to C69
C01 to C09
C04 to C13
C21 to C68
C00
C02 to C03
S42 to S46
S01 to S41
C01 to C12
C21 to C60
C01
C02
C13
C03
C04
C14
C06 to C11
C21 to C32
C38 to C60
C61 to C70
C71 to C73
S01 to S39
C02 to C13
C14 to C83
S01
S05
S06
S95 to S99
S14 to S18
S19 to S64
S65 to S94
TV section
Television system B/G, I, D/K, M
Color system PAL/SECAM/NTSC3.58/
NTSC4.43
Channel coverage See “Receivable channels and
channel display”
Picture tube Trinitron
21 inches (approx. 54.5 cm
measured diagonally)
Antenna in 75-ohm antenna socket for VHF/
UHF
Speaker 3.5W × 2
Disc section
Laser Semiconductor laser
Wavelength 760 - 800 nm
Disc format Audio CD/CD-G/Video CD
(PAL, NTSC)
Input and outputs
AUDIO OUT Phono jacks, load impedance
over 47 kilohms
VIDEO OUT Phono jack, 1 Vp-p, load
impedance 75 ohms, unbalanced,
sync negative
Headphones Stereo minijack
VIDEO 1/2 IN Phono jacks, 1 Vp-p, input
impedance 75 ohms, unbalanced,
sync negative
AUDIO IN Phono jacks, input impedance
over 47 kilohms
MIC IN 1/2 Standard jacks
General
Power requirements 110-240 V, 50/60 Hz
Power consumption 115 W
Operating temperature
–10°C to 40°C (14°F to 104°F)
Storage temperature –20°C to 60°C (–4°F to 140°F)
Dimensions Approx. 550 × 525 × 480 mm
(w/h/d) incl. projecting parts
Mass Approx. 24 kg
Supplied accessories Remote commander (1)
Battery R6 (size AA) (1)
Band (1)
Clamps (2)
Wood screws (2)
Design and specifications are subject to change without
notice.
EN
Additional Information
24
-EN
Page 25
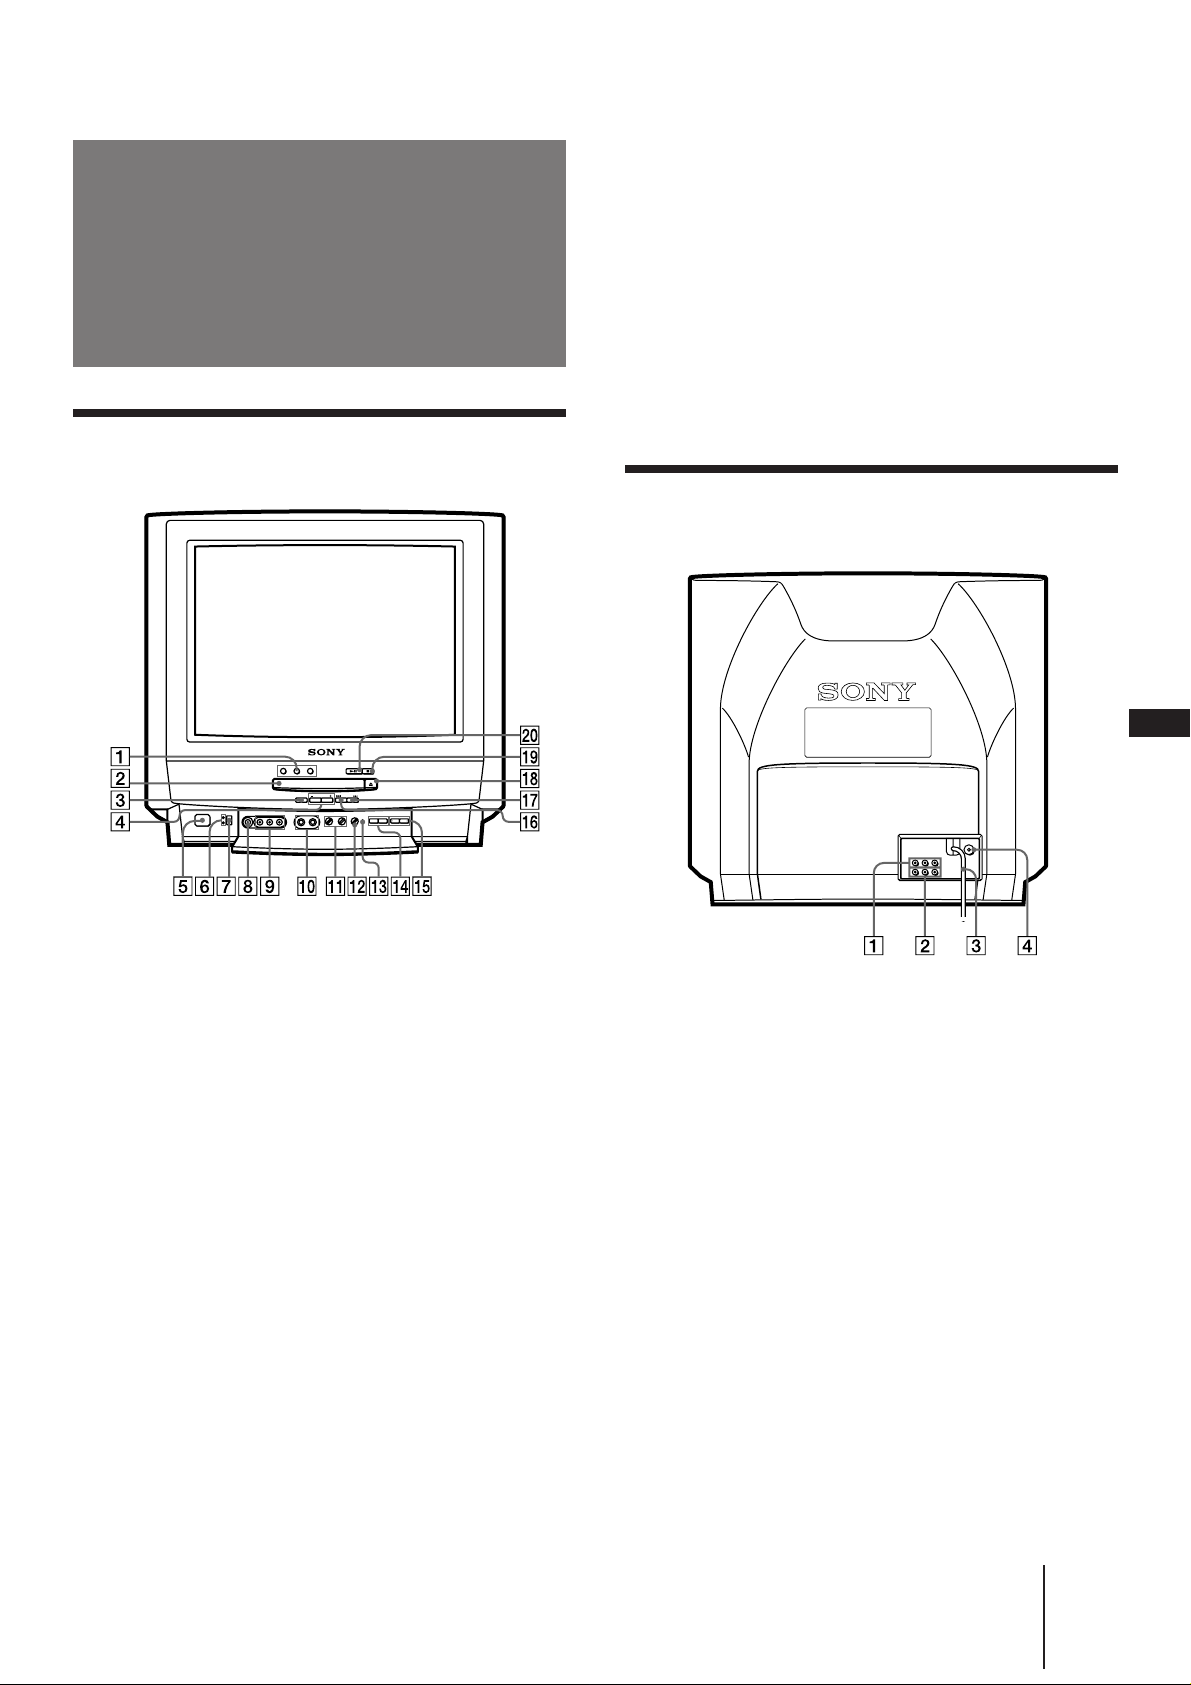
Index to parts and
!¢VOLUME +/– buttons
! PROGR (program) +/– buttons
controls
Front panel
!§PREV (previous) = button
!¶NEXT + button
!•OPEN/CLOSE 6 button
!ªSTOP p button
@º SELECT ^ button
Rear panel
EN
1 Function buttons
2 Disc tray
3 RETURN button
4 VCD (Video CD) MENU +/– buttons
5 POWER switch
6 Lamps
7 Remote sensor
82 (headphones) jack
9 VIDEO 2 IN (VIDEO/AUDIO) jacks
0 MIC IN 1/2 jacks
!¡MIC VOL 1/2 controls
!™ MIC ECHO control
!£TUNER PRESET button
1 VIDEO 1 IN (VIDEO/AUDIO) jacks
2 VIDEO OUT (VIDEO/AUDIO) jacks
3 Power cord
4 VHF/UHF antenna terminal
Additional Information
25
-EN
Page 26
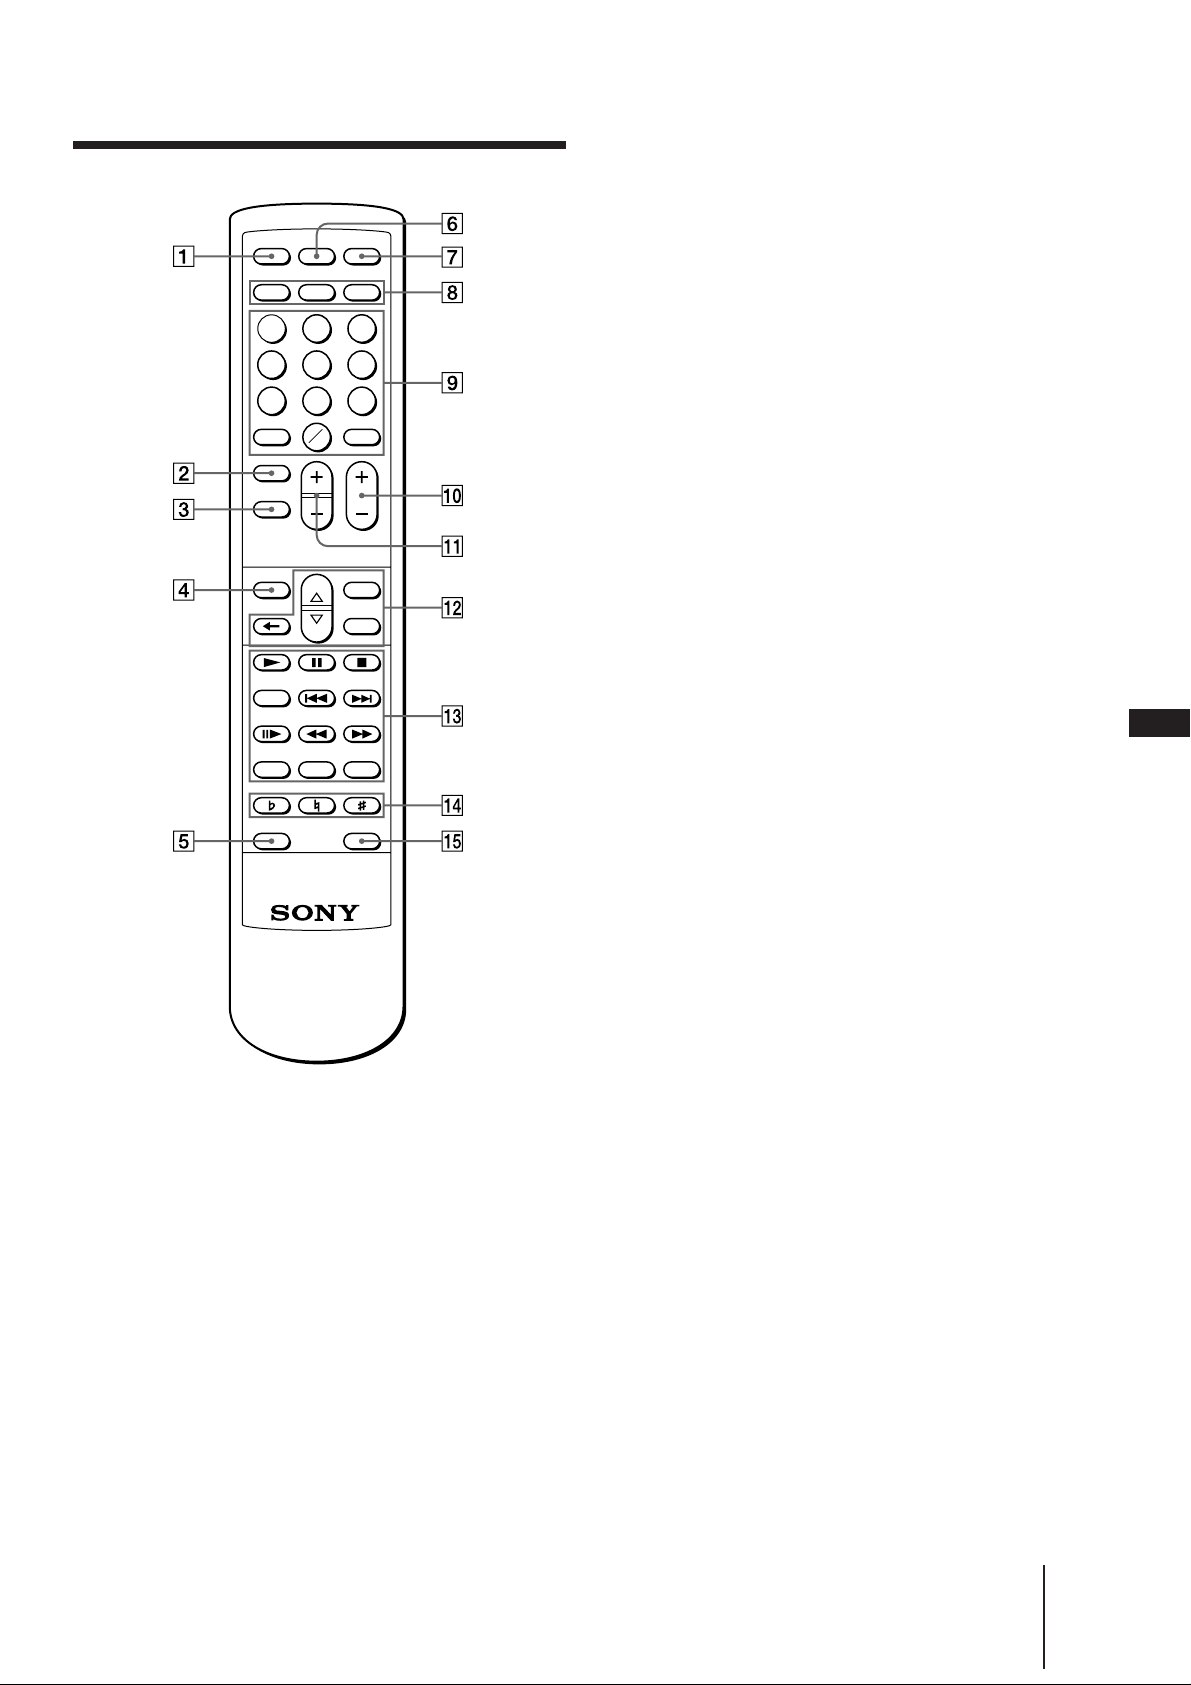
Remote Commander
1 2 3
4 5 6
7 8 9
– /– – C
0
1 MUTING button
2 SLEEP button
3 WAKE UP button
4 PIC (picture) MODE button
5 KARAOKE PON button
10
6 DISPLAY button
7 POWER switch
8 Function buttons
9 Number buttons
0 PROGR (program) +/– buttons
!¡VOL (volume) +/– buttons
!™ Menu operation buttons
!£CD operation buttons
EN
!¢KEY CONTROL buttons
! L/R/ST button
Additional Information
26
-EN
Page 27

Sony Corporation Printed in Malaysia
 Loading...