

Page 1
3-858-501-11 (1)
Trinitron Color TV
Operating Instructions
####
####
EN
C1
C2
KV-J25
KV-J29
1996 by Sony Corporation
MF, MH,MN
Page 2
20 mm
3.8 mm
2
Page 3
VIDEO 3 INPUT
S VIDEO
VIDEO
(MONO)
L–AUDIO–R
ENTER
MENU
AUTO
PROGR
AUTO
PROGR
AUT O P ROGRAM
PR: 01
TV SYS: B / G
VHF LO W
1
p KV-J25MH2/J29MH2/J25MN21/J29MN21
1
2
3
Page 4
4
Page 5

WARNING Table of contents
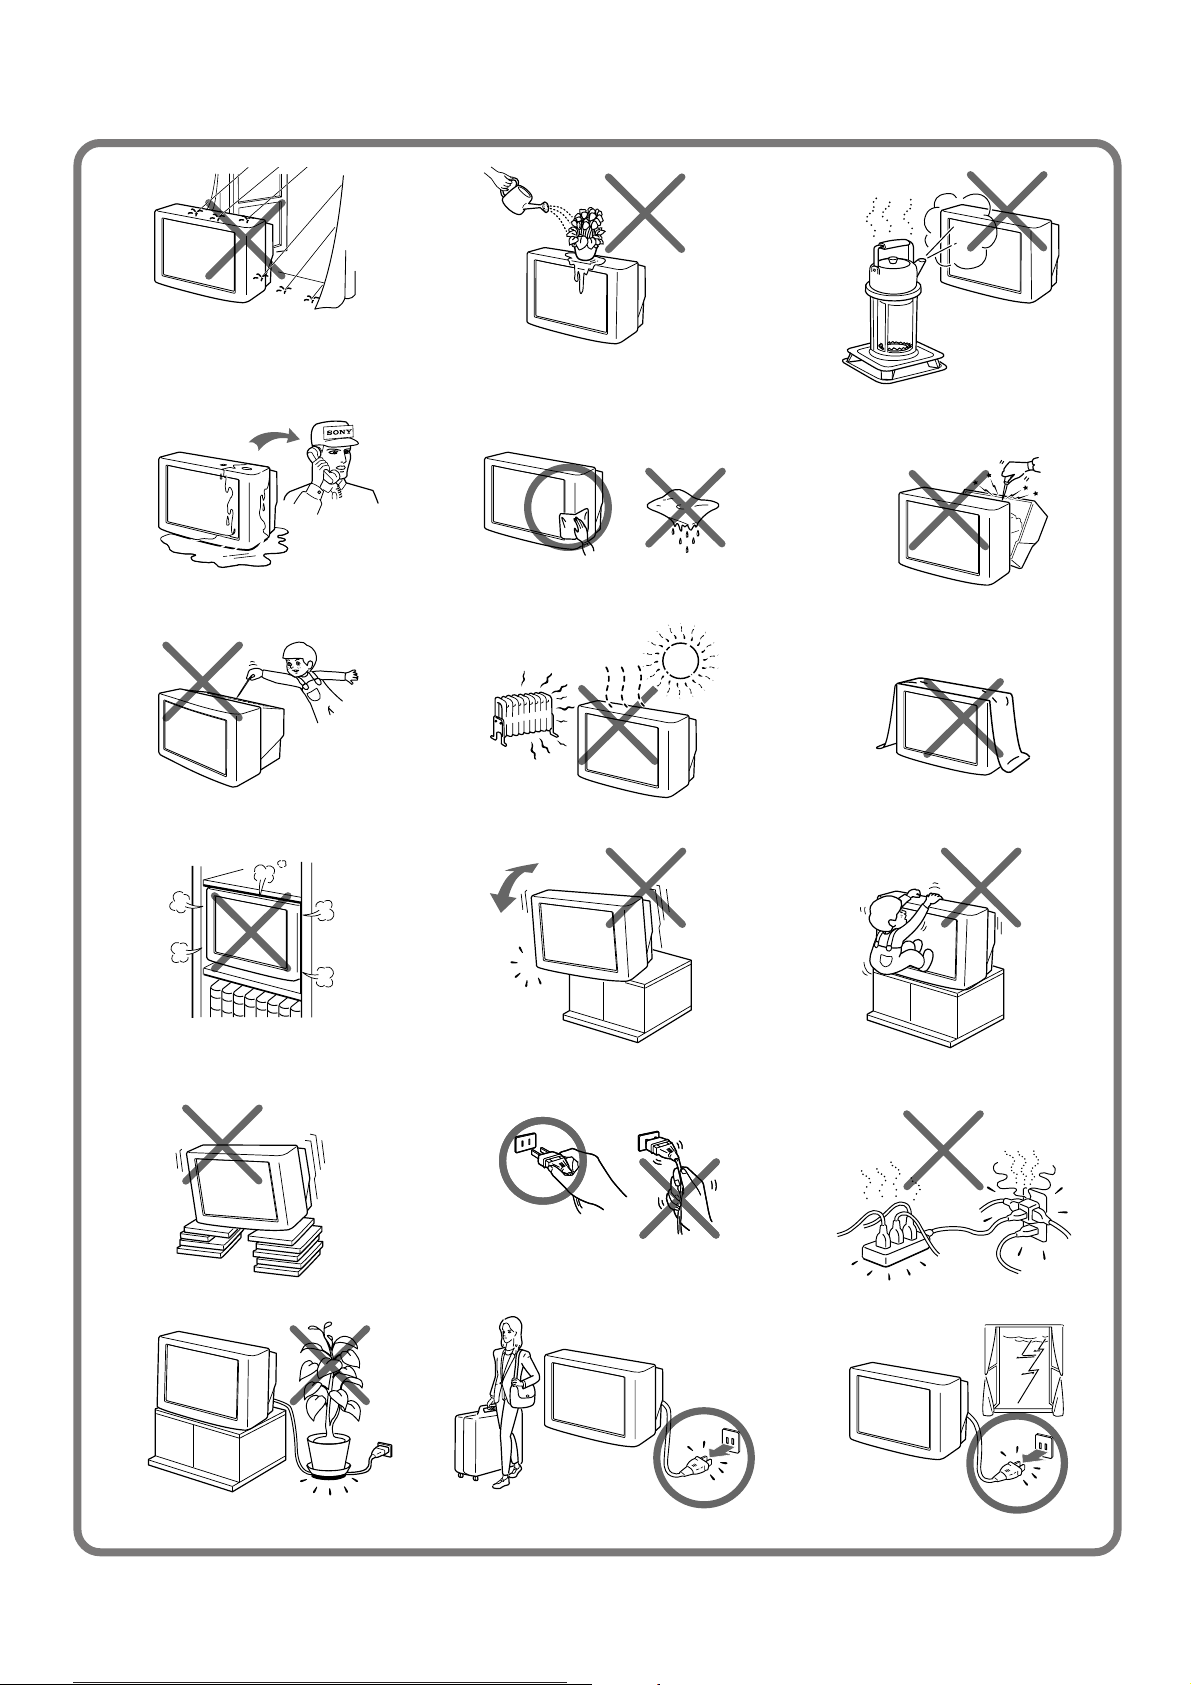
• Dangerously high voltages are present inside the TV.
• Operate the TV only at 110-240 V AC.
• Do not open the cabinet and the rear cover of the TV.
Refer servicing to qualified personnel.
• To prevent fire or shock hazard, do not expose the TV
to rain or moisture.
• Do not operate the TV if any liquid or solid object
falls into it. Have it checked immediately by qualified
personnel only.
• Do not block the ventilation openings.
• Do not install the appliance in a confined space, such
as a bookcase or built-in cabinet.
• Do not install the TV in hot, humid or excessively
dusty places.
• Do not install the TV where it may be exposed to
mechanical vibrations.
• Do not keep the TV plugged in if you are not going to
use it for several days.
• Do not pull the power cord to disconnect the TV. Pull
it out by the plug.
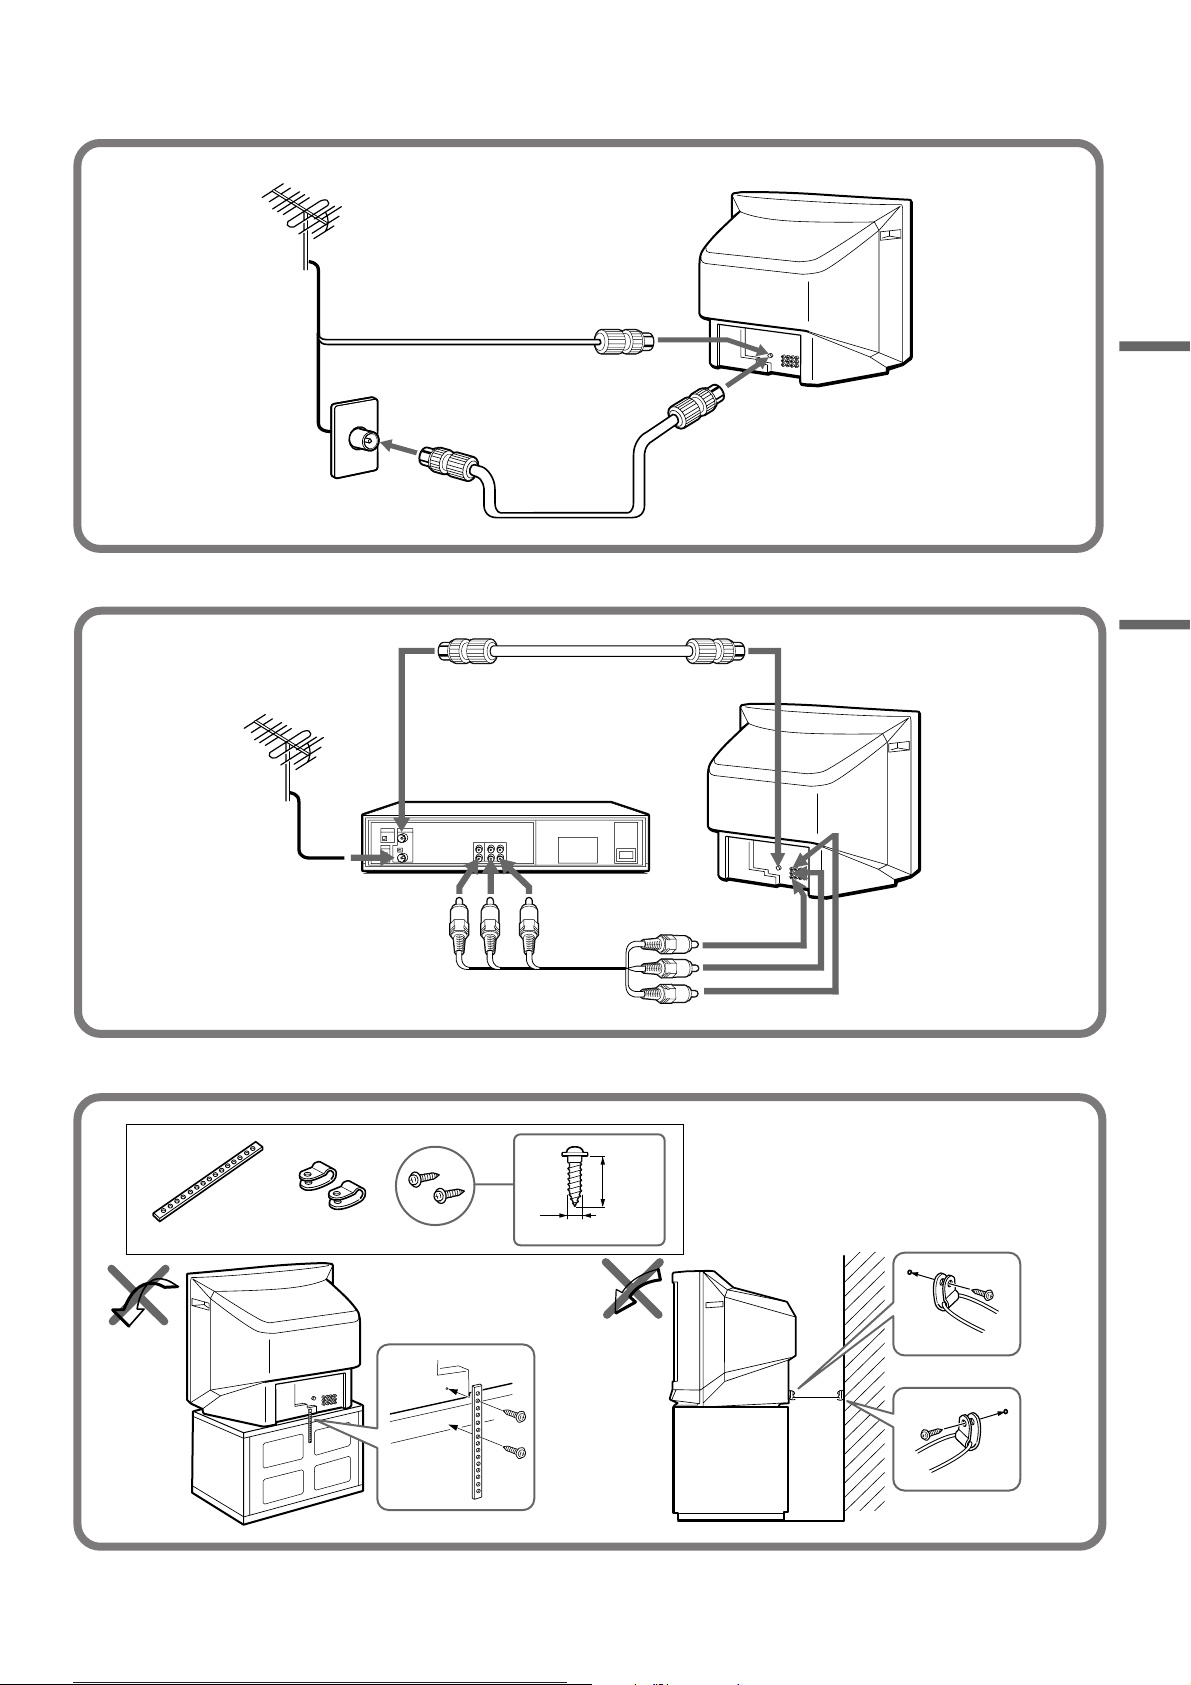
• Use only the supplied screws (as shown on page 2) to
fasten the TV to the TV stand or to stabilize the TV
against a wall or a pillar. Use of other screws may
damage the TV.
Note on the TV Illustrations
• The TV illustrations of the KV-J25MF1/J29MF1 models have
been used for the illustration purposes in this manual. Any
difference in operations between models is clearly indicated in
the text for example, “KV-J25MH2/J29MH2/J25MN21/
J29MN21 only.”
Getting Started
6 Connections
8 Introducing the menus
9 Changing the menu language
10 Presetting channels
Operations
12 Watching the TV
15 Adjusting the picture and sound
17 Listening to the woofer sound (3D WOOFER)
18 Listening to the surround sound (SURROUND)
19 Selecting a stereo or bilingual program
20 Viewing Teletext
22 Customizing the TV
Additional Information
23 Troubleshooting
Back Specifications
cover
All contents are subject to change without notice.
Design and specificafions are subject to change without
notice.
EN
Note on the remote commander
• The supplied remote commander is used on several models of
the TV. If you do not find instructions for some controls that
are on the remote commander, that means your TV does not
employ the features of those controls, e.g. TEXT.
Notes
• When you turn on the TV, you may hear the “boon” sound
that is caused by the demagnetization of the TV. This does not
indicate a malfunction.
• The picture color may become abnormal if you change the
direction of your TV. To obtain the normal picture color, press
POWER on the TV to turn off the TV for five minutes and then
turn it on again.
Getting Started
-EN
5
Page 6
Getting Started
Connections
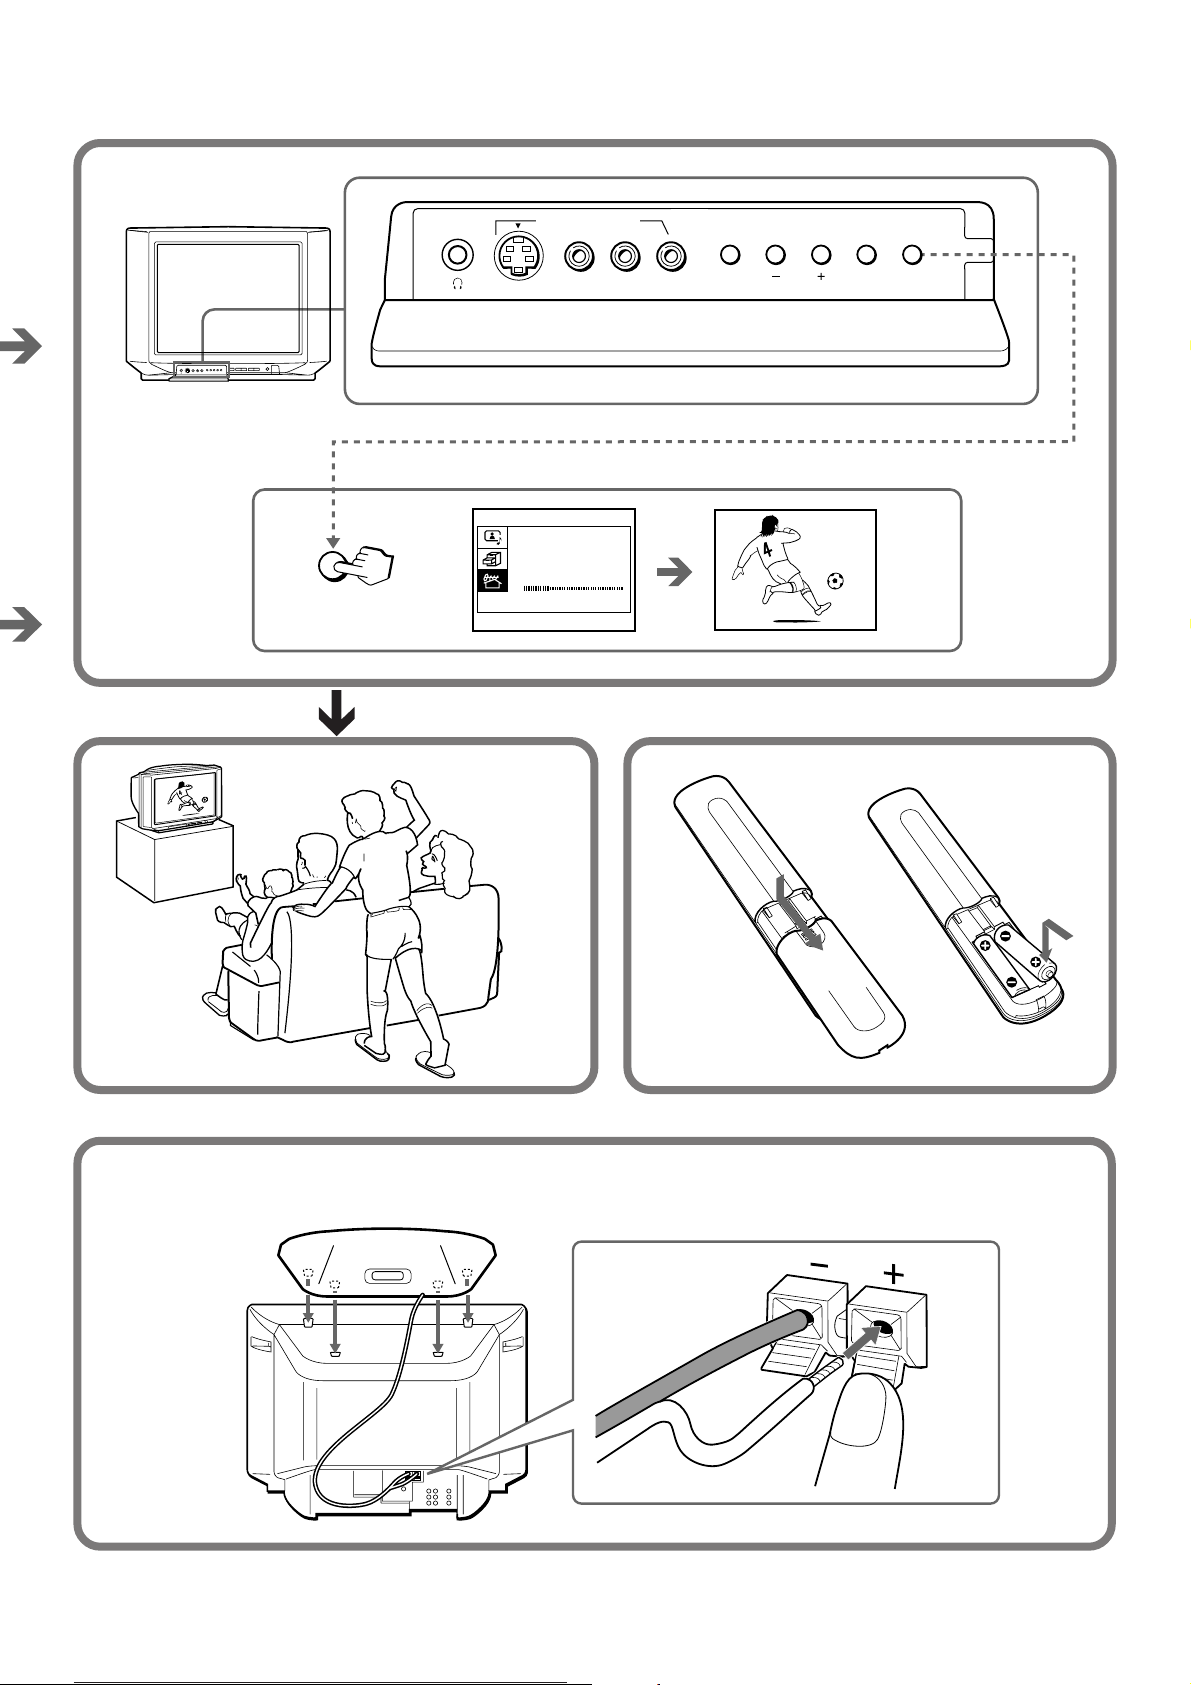
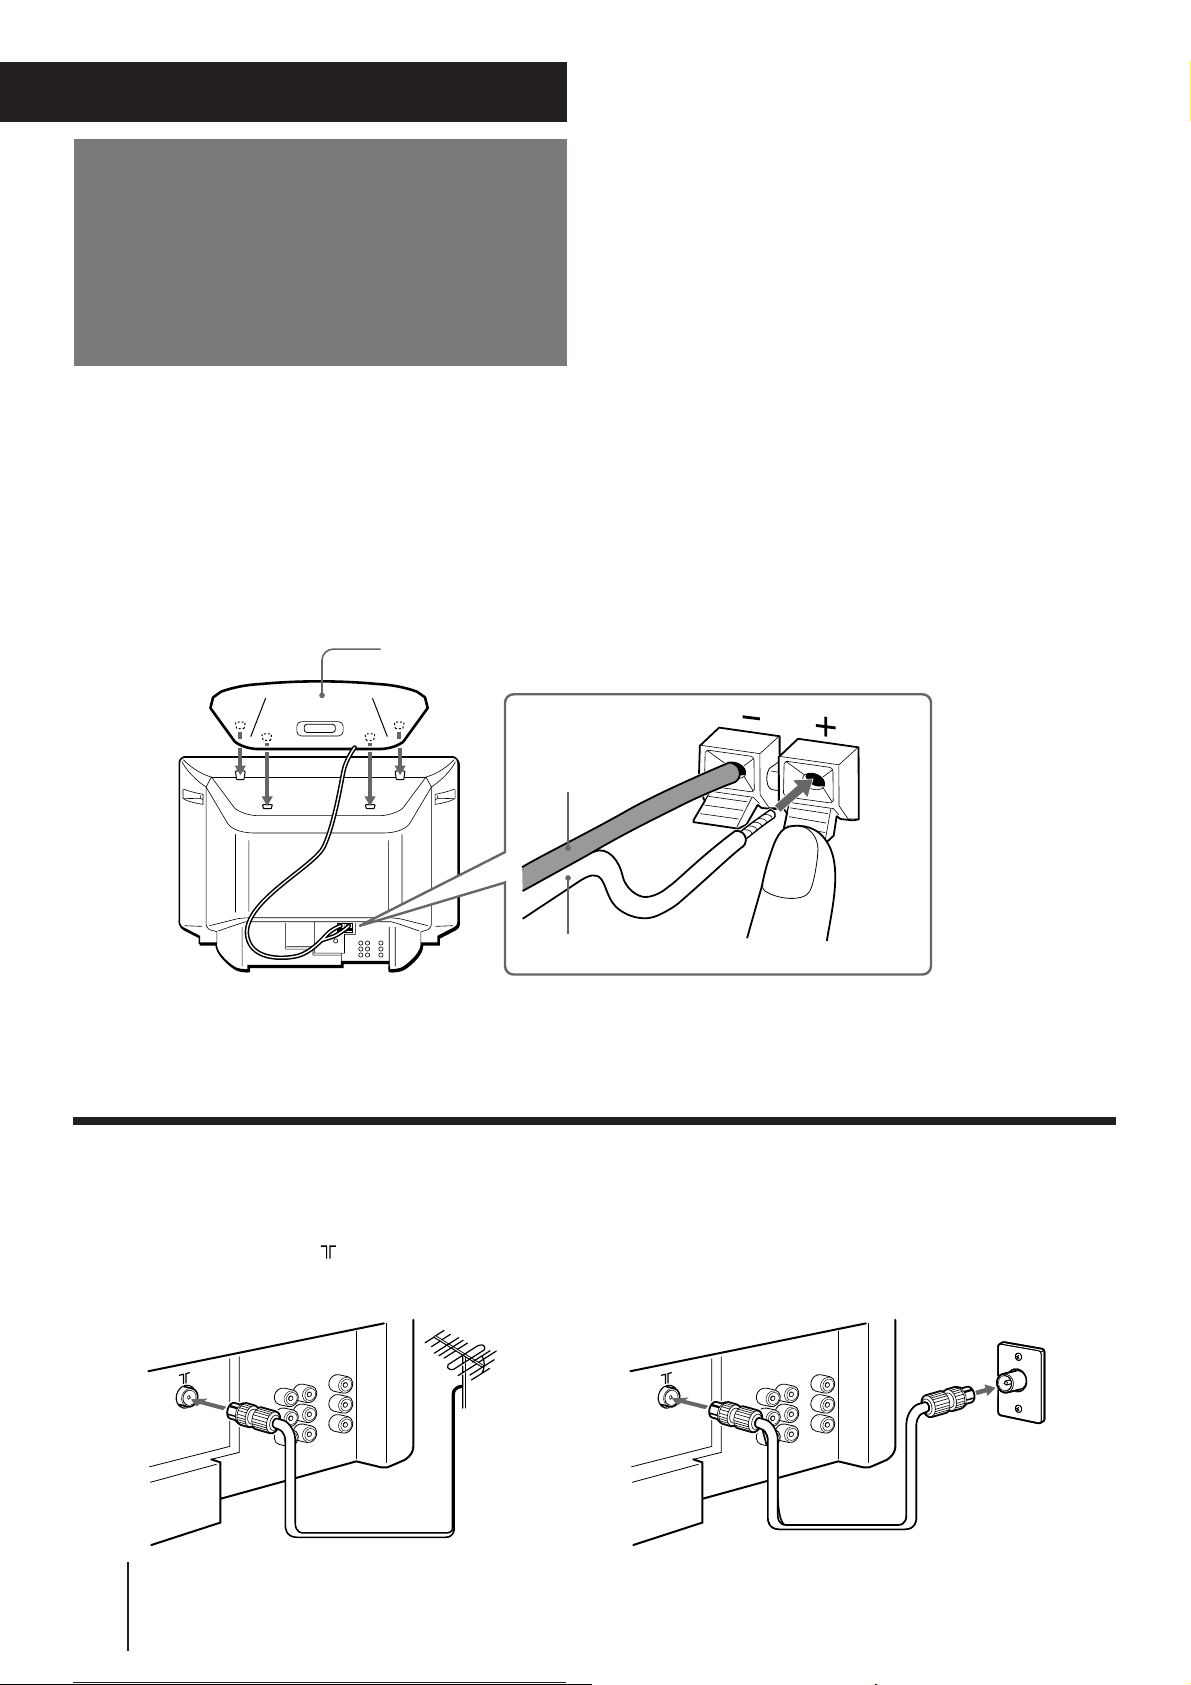
Connecting the 3D WOOFER
p KV-J25MH2/J29MH2/J25MN21/J29MN21 only
1 Attach the 3D WOOFER into the footholds on the top of the TV.
2 Connect the wires to the 3D WOOFER (8Ω) terminals at the rear of the TV.
The red wire should be connected to the ‘ red terminal and the black wire to the ’ black terminal.
3D WOOFER
1
Notes
• Connect only the supplied 3D WOOFER; otherwise the TV may malfunction.
• Unplug the TV from the wall outlet when connecting the 3D WOOFER.
• Make sure that none of the 3D WOOFER wire strands stick out, making contact with the neighbouring speaker terminal, to prevent a
malfunction caused by a short circuit of the terminals.
2
Black wire
Red wire
Connecting a VHF antenna or a combination VHF/UHF antenna
— 75-ohm coaxial cable (round)
Attach an optional IEC antenna connector to the 75-ohm coaxial cable.
Plug the connector into the (antenna) socket at the rear of the TV.
Rear of TVRear of TV
or
Getting Started
-EN
6
On a wall
Page 7
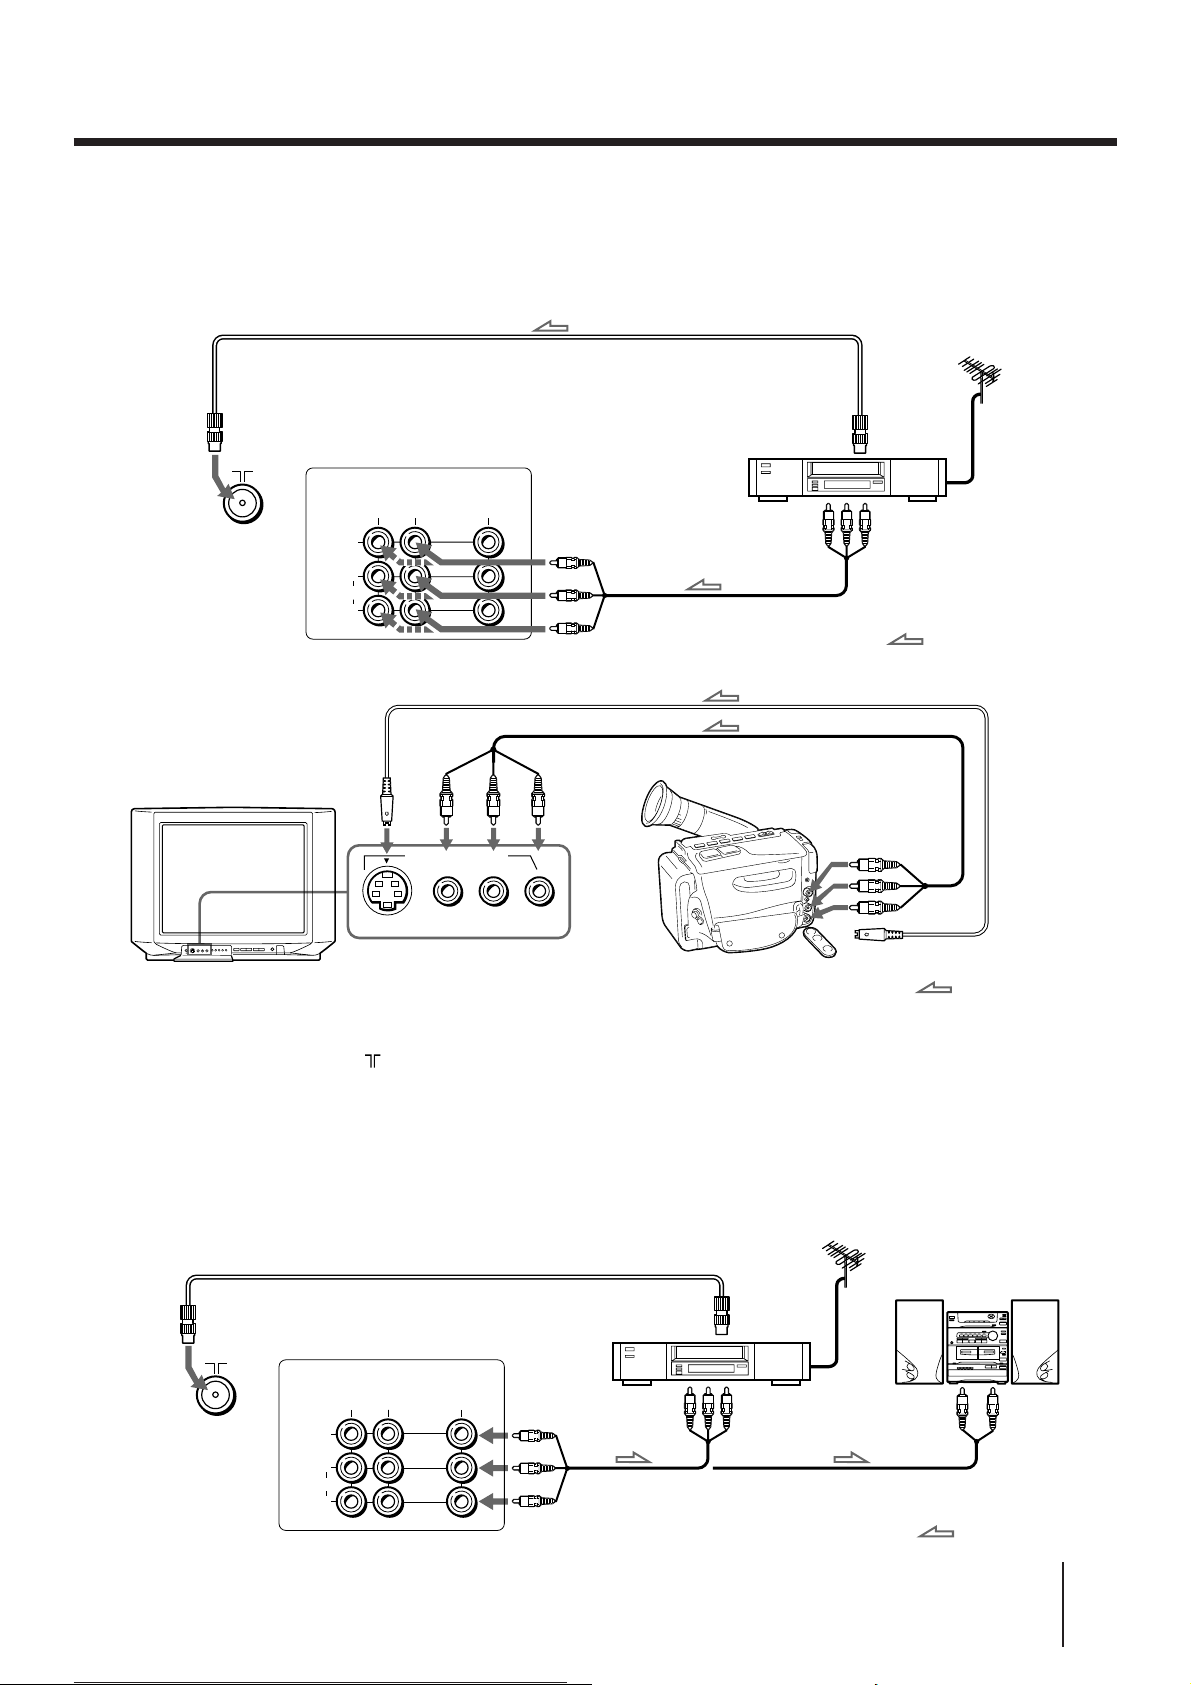
Connecting optional equipment
You can connect optional audio/video equipment to your TV such as a VCR, multi disc player, camcorder, video
game, or stereo system.
Connecting video equipment using video input jacks
Rear of TV
Front of TV
to
antenna
socket
VIDEO
(MONO)
AUDIO
VIDEO IN
1
L
R
S VIDEO
MON/TV
VIDEO
OUT
(MONO)
2
VIDEO 3 INPUT
L–AUDIO–R
VCR
VIDEO (yellow)
AUDIO-L (white)
AUDIO-R (red)
Camcorder
to
antenna
output
to video and
audio outputs
to video and
audio outputs
to S video output
: Signal flow
When connecting a monaural VCR
Connect the yellow plug to VIDEO and the black plug to AUDIO-L (MONO).
When connecting a VCR to the (antenna) terminal
Preset the signal output from the VCR to the program position 0.
If both S Video and video signals are input simultaneously
The S Video input signal is selected. To view a video input signal, disconnect the S Video connection.
Note on the video input
When no signal is input, the screen becomes blue.
Connecting audio/video equipment using MON/TV OUT jacks
Rear of TV
to
antenna
socket
VIDEO
(MONO)
AUDIO
VIDEO IN
1
L
R
VCR
MON/TV
2
OUT
VIDEO (yellow)
AUDIO-L (white)
AUDIO-R (red)
to
antenna
output
to video and
audio inputs
: Signal flow
Audio system
or
to audio
inputs
: Signal flow
Getting Started
-EN
7
Page 8
Introducing the
TV SYS: B / G
AUT O PROGRAM
VHF LO W
PR: 01
TV SYS: B / G
VHF LO W
PR: 01
MANUA L P ROGRAM
PRESET
SKIP:
PR02 OFF
TV SYS: B / G
COL
SYS :AUTO
ENGL I SH
AUT O PROGRAM
MANUA L P ROGRAM
L ANGUA GE /
:
menus
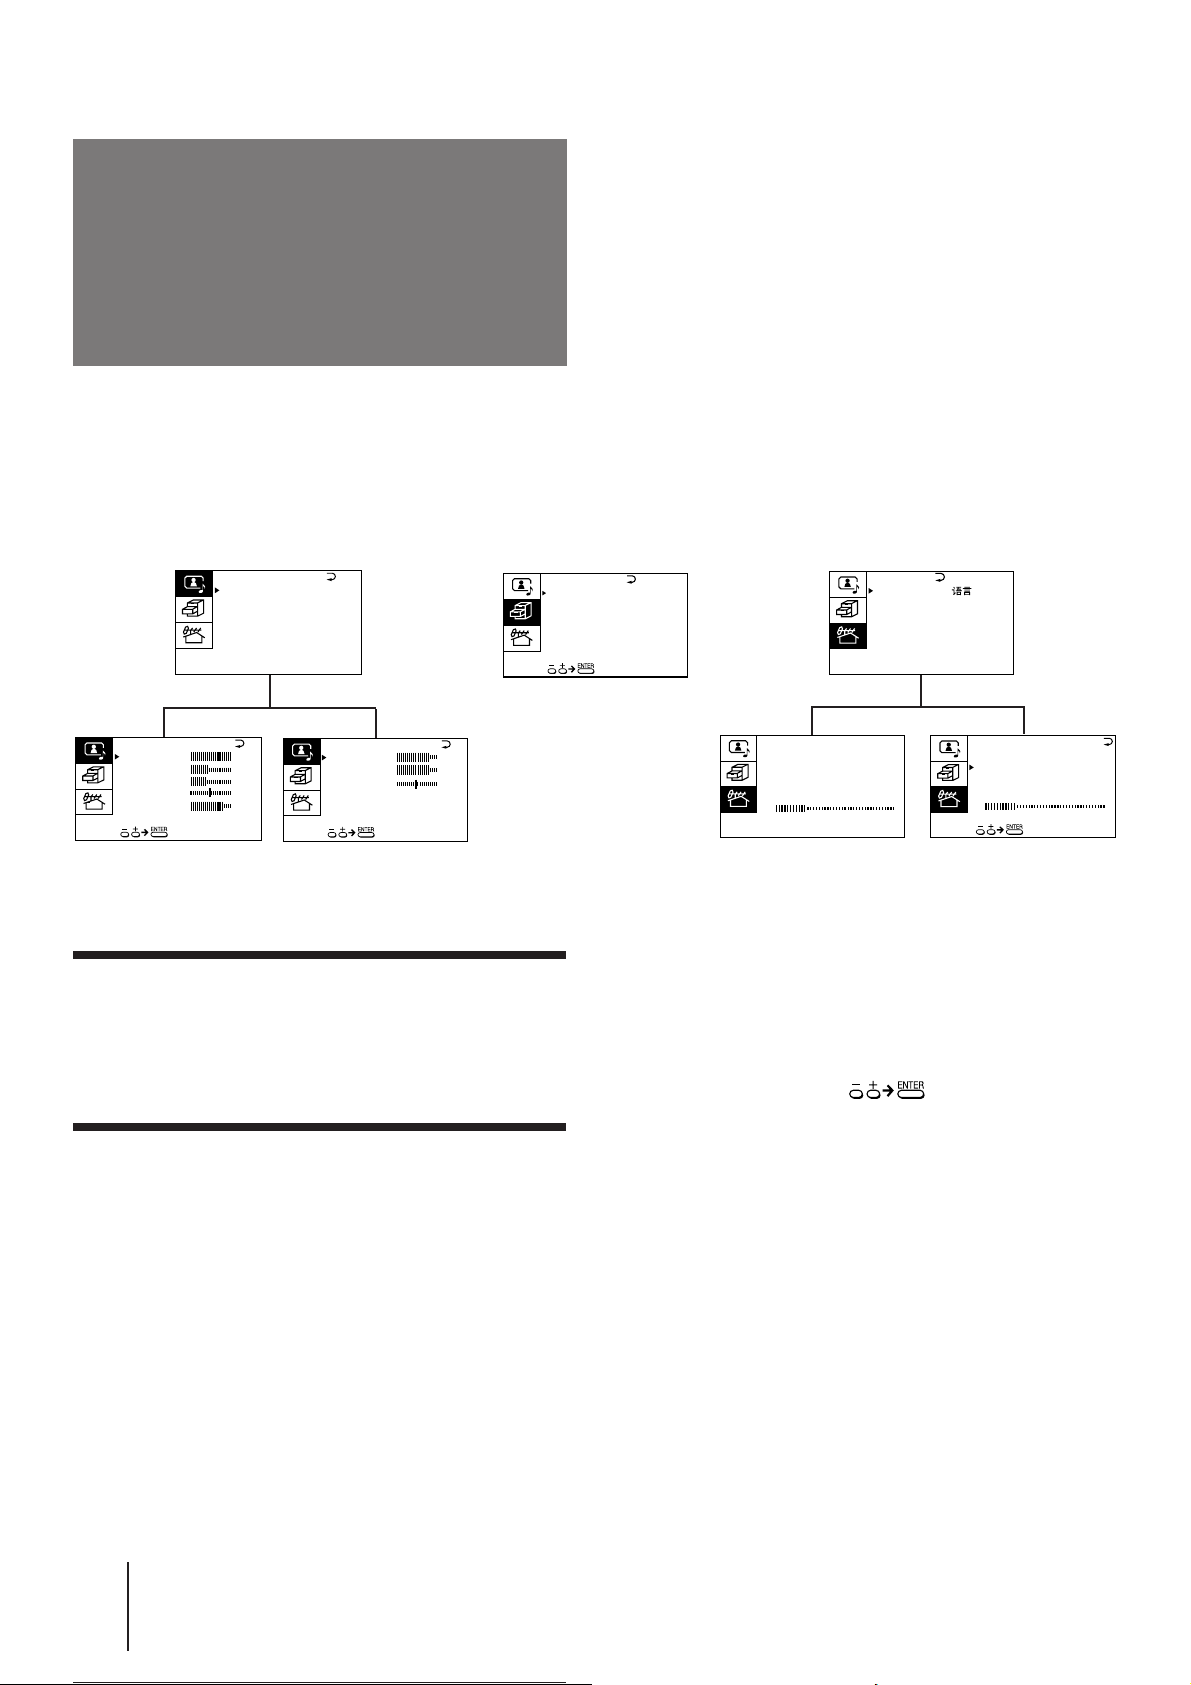
You can preset TV channels, adjust the picture and sound qualities, and select some settings using the on-screen
menus. You can use the buttons on both the remote commander and the TV to operate the menus.
A/V CONTROL
A / V CONTROL
DYNAMIC
STA NDARD
SOFT
PERSONAL
V IDEO ADJUST
V IDEO ADJUST
P ICTURE
COLOR
BR I GHT
HUE
SHARP
VM: HIGH
AUDI O ADJUST
T I LT CORRECT:
100
45
40
0
0
80
∗
0
∗
AUDIO ADJUST
BASS
TREBLE
BALANCE
3D WOOFER : ON
80
80
00
∗∗
(∗KV-J29MF1/J29MF1S/J29MH2/J29MN21 only)
(∗∗KV-J25MH2/J29MH2/J25MN21/J29MN21 only)
Getting back to the previous menu
(except for AUTO PROGRAM)
Press + or – to move the cursor (z) to the first
line (N) of each menu, and press ENTER.
Cancelling the menu screen
Press MENU.
FEATURES
FEATURES
SURROUND :
OFF
AV OUT :
MONITOR
PRESET
Notes (except for AUTO PROGRAM)
• When a menu is selected after pressing ENTER, the color of
both the menu and the menu symbol change and the cursor
(z) appears beside the first item of the menu.
• When an item on the menu is selected after pressing ENTER,
the color of the item changes.
• You can refer to the guide (
) at the bottom of the
menus (except for the A/V CONTROL and PRESET menus)
for the basic operations of the menu.
• If more than approximately 60 seconds elapse after you press a
button, the menu screen disappears automatically.
Getting Started
-EN
8
Page 9
Changing the menu
MENU
ENTER
+
–
PRESET
SKIP: PR02 OFF
TV SYS: B / G
COL SYS : AUTO
CH NESE
AUT O P ROGRAM
MANUA L P ROGRAM
L ANGUAG E /
:
I
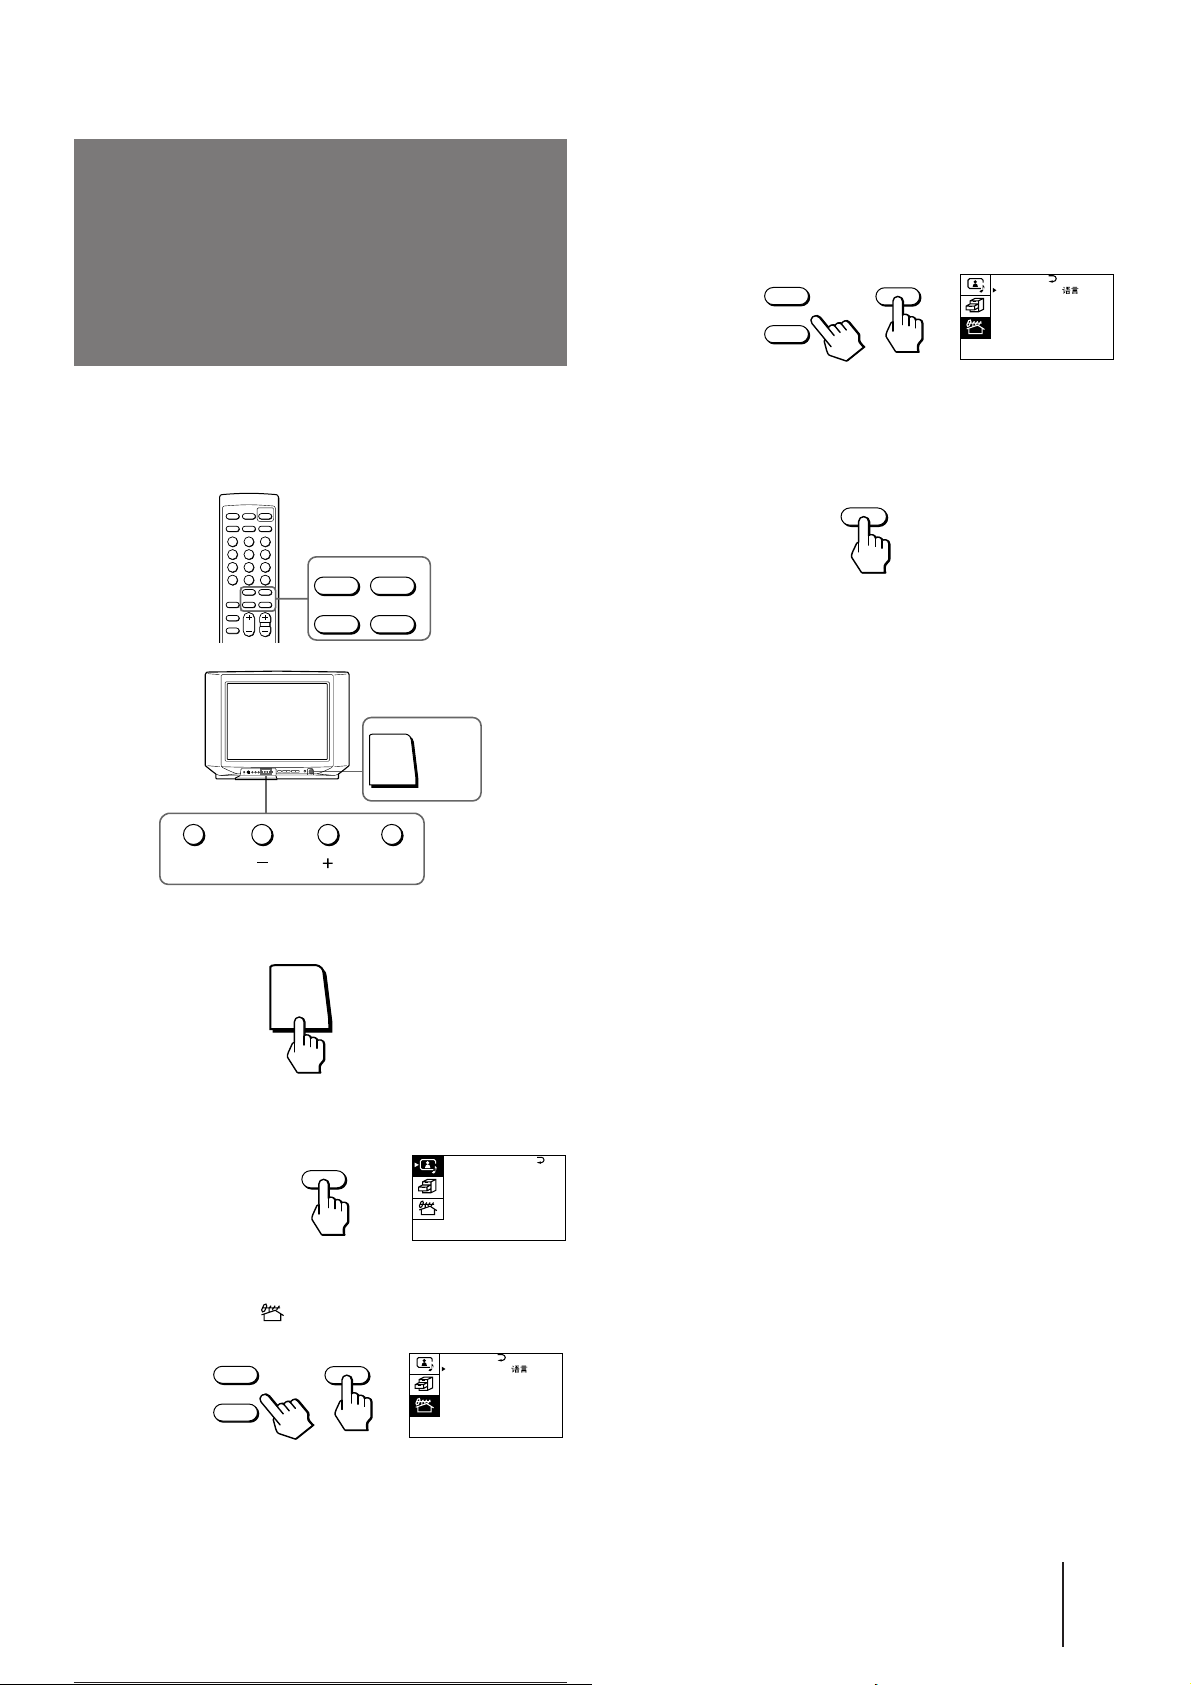
4 Make sure the cursor (z) appears beside
LANGUAGE/ ###, and press ENTER.
language
If you prefer Chinese to English, you can change the
menu language. You can use buttons on the remote
commander or the TV.
+
MENU
–
ENTER
POWER
5 Press + or – to select ###, and press ENTER.
All of the menus change to Chinese.
6 Press MENU to return to the normal screen.
ENTER MENU
1 Press POWER to turn on the TV.
POWER
2 Press MENU.
MENU
A / V CONTROL
DYNAMIC
STANDARD
SOFT
PERSONAL
V I DEO ADJUST
AUDI O ADJUST
3 Press + or – to move the cursor (z) to the
PRESET menu ( ), and press ENTER.
+
ENTER
–
PRESET
L ANGUAG E /
ENGL I S H
AUT O P ROGRAM
MANUA L P ROGRAM
TV SYS: B/ G
COL SYS : AUTO
SKIP: PR02 OFF
:
Getting Started
-EN
9
Page 10
Presetting channels
MENU
ENTER
+
–
A / V CONTROL
DYNAMIC
SOFT
STANDARD
PERSONAL
V I DEO ADJUST
AUDI O ADJUST
MENU
ENTER
+
–
PRESET
SKIP: PR02 OFF
TV SYS: B / G
COL SYS : AUTO
ENGL I S H
AUT O P ROGRAM
MANUA L P ROGRAM
L ANGUAG E /
:
TV SYS:B/G
VHF LOW
PR: 01
MANUA L P ROGRAM
ENTER
+
–
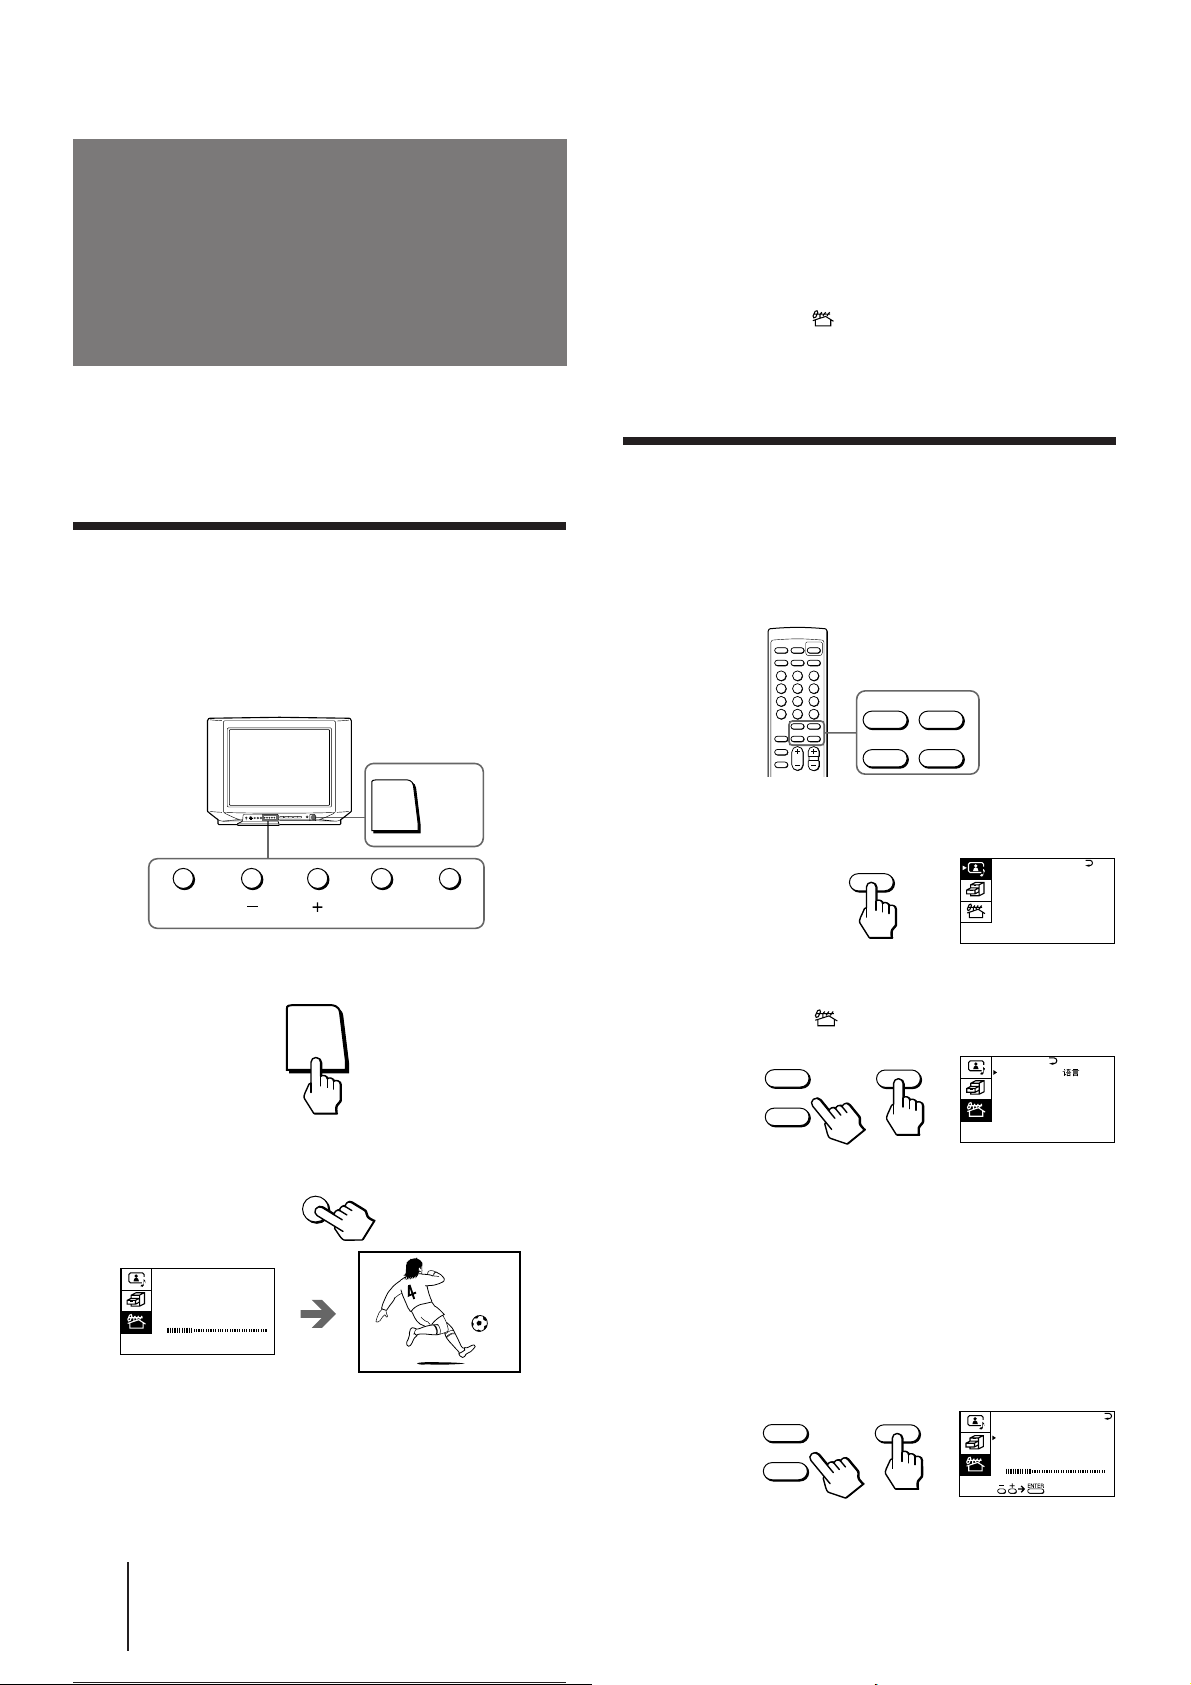
You can preset TV channels easily by storing all the
receivable channels automatically. You can also preset
channels manually or disable program positions (see
page 11 ).
Presetting channels automatically
You can preset up to 100 TV channels in numerical
sequence from the program position 1. You can preset
channels automatically using the button on the TV or
the menu.
To preset channels automatically using
the menu
1 Press MENU.
2 Press + or – to move the cursor (z) to the
PRESET menu ( ), and press ENTER.
3 Press + or – to move the cursor (z) to AUTO
PROGRAM, and press ENTER.
Presetting channels manually
To change the program position for a channel or to
receive a channel with a weak signal which you cannot
receive by automatic presetting, preset the channel
manually.
ENTER MENU
1 Press POWER to turn on the TV.
POWER
2 Press AUTO PROGR.
AUTO
PROGR
AUT O P ROGRAM
PR: 01
TV SYS:B/G
VHF LO W
POWER
AUTO
PROGR
1 Press MENU.
2 Press + or – to move the cursor (z) to the
PRESET menu ( ), and press ENTER.
3 Select your local TV system.
(1) Press + or – to move the cursor (z) to TV SYS, and
press ENTER.
1
(2) Press + or – until your local TV system appears on
the menu, and press ENTER.
4 Press + or – to move the cursor (z) to
MANUAL PROGRAM, and press ENTER.
The TV starts scanning and presetting channels
automatically. When all of the receivable channels
are stored, the first preset TV program appears on
the screen.
Getting Started
-EN
10
Page 11

5 Select the program position to which you
want to preset a channel.
(1) Make sure the cursor (z) appears beside PR, and
press ENTER.
(2) Press + or – until the program position you want
appears on the menu, and press ENTER.
6 Select the desired channel.
(1) Press + or – to move the cursor (z) to VHF LOW,
and press ENTER.
(2) Press + or – until the desired channel picture
appears on the TV screen, and press ENTER.
7 Press MENU to return to the normal screen.
If the TV system is not properly selected
The picture color may be poor and/or the sound may
be noisy. In this case, select the appropriate TV system.
Disabling program positions
By disabling unused or unwanted program positions,
you can skip those positions when you press PROGR
+/–.
1 Press MENU.
2 Press + or – to move the cursor (z) to the
PRESET menu ( ), and press ENTER.
3 Press + or – to move the cursor (z) to SKIP,
and press ENTER.
4 Press + or – until the unused or unwanted
program position appears on the menu,
and press ENTER.
5 Press + or – to select ON, and press ENTER.
1 Press PROGR +/– or the number buttons to select
the program position.
2 Display the PRESET menu.
3 Press + or – to move the cursor (z) to TV SYS, and
press ENTER.
4 Press + or – until the appropriate TV system
appears, and press ENTER.
Notes
• The TV system setting is memorized for each program
position.
• If you do not know your local TV system, consult your nearest
Sony dealer or authorized service center.
6 To disable other program positions, repeat
steps 4 and 5.
7 Press MENU to return to the normal screen.
To cancel the skip setting
1 Display the PRESET menu.
2 Press + or – to move the cursor (z) to SKIP, and
press ENTER.
3 Press + or – until the program position you want to
cancel the skip setting appears, and press ENTER.
4 Press + or – to select OFF, and press ENTER.
Getting Started
11
-EN
Page 12
POWER
VIDEO
HOLD
VIDEO 1 VIDEO 2 VIDEO 3 1
Operations
Watching the TV
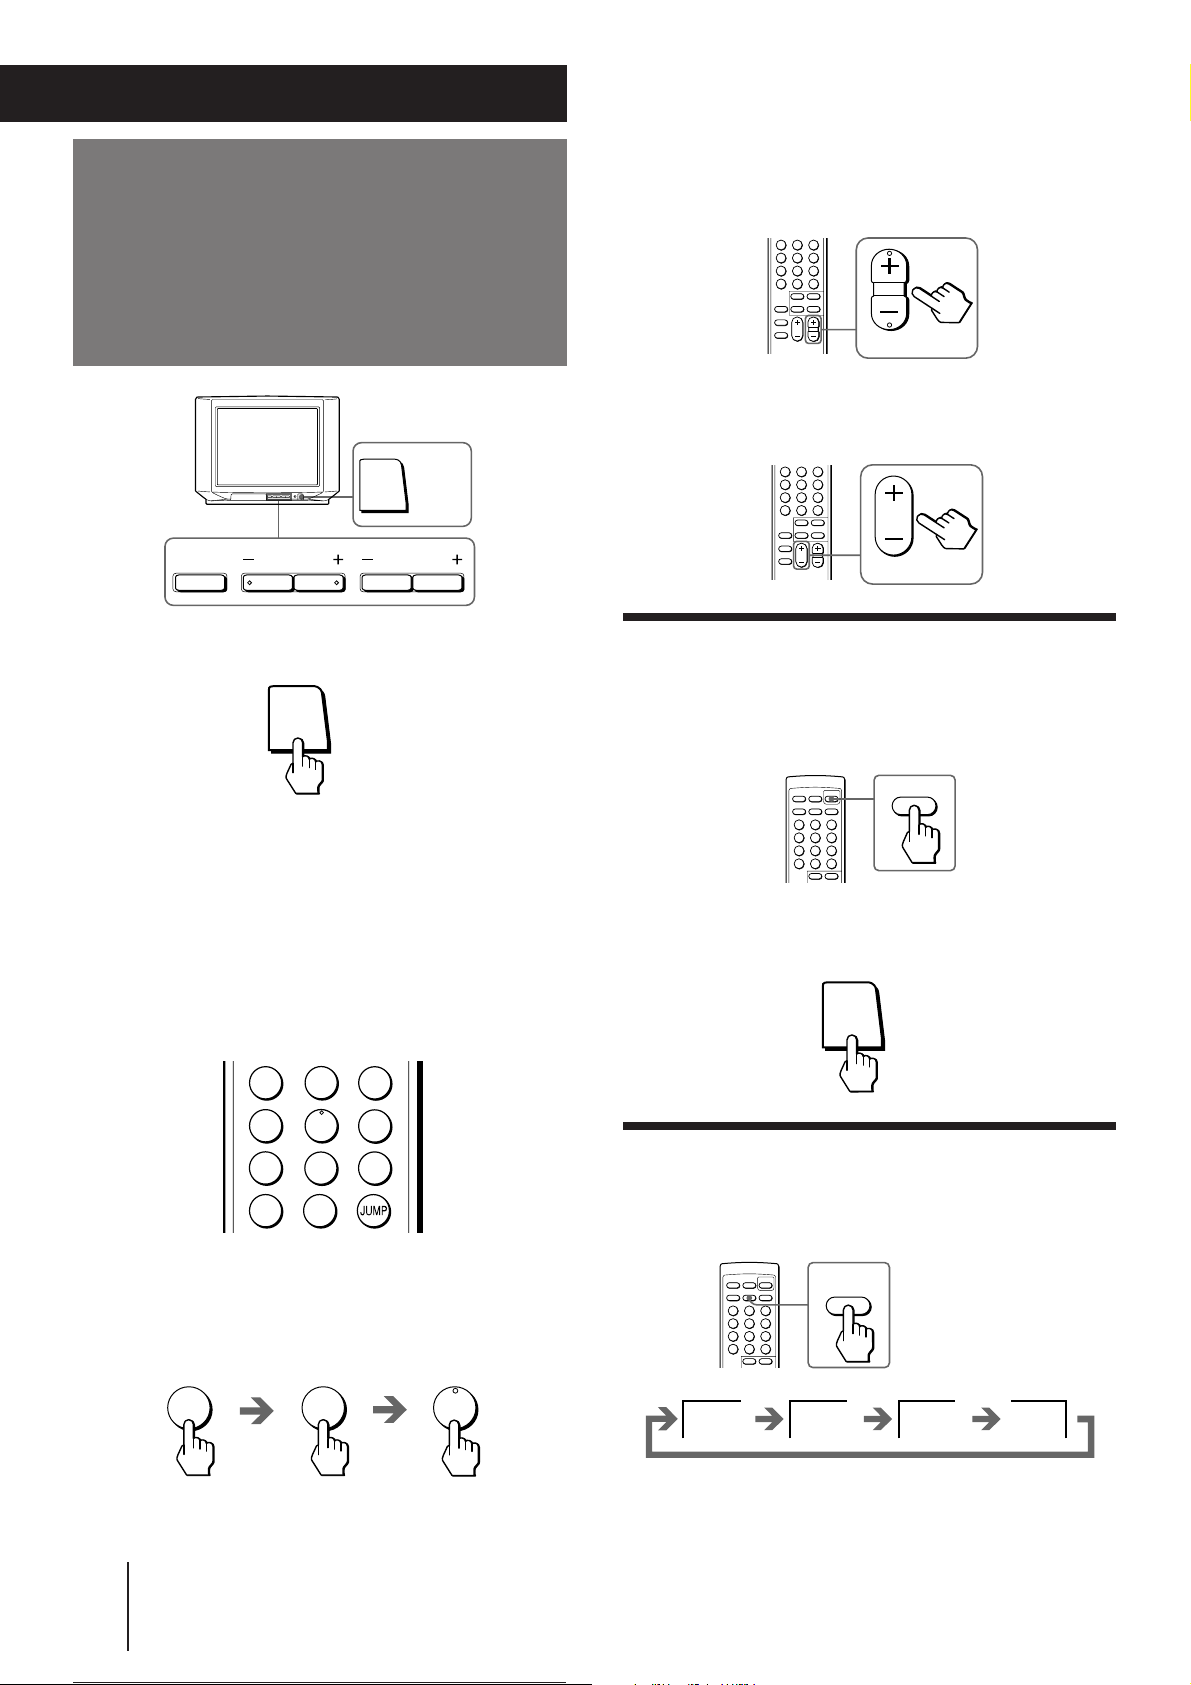
POWER
To scan through program positions
Press PROGR +/– on the remote commander or the
TV until the program position you want appears.
PROGR
3 Press VOL +/– on the remote commander or
VOLUME +/– on the TV to adjust the volume.
TV/VIDEO VOLUME PROGR
1 Press POWER to turn on the TV.
POWER
When the TV is turned on in the standby mode
after pressing POWER on the TV, press POWER on
the remote commander.
2 Select the TV program you want to watch.
To select a program position directly
Press the number button.
2
1
4
7
-/--
3
5
6
9
8
0
VOL
Turning off the TV
To turn off the TV temporarily
Press POWER on the remote commander. The standby
indicator lights up.
POWER
To turn off the TV completely
Press POWER on the TV.
Watching the video input
Press VIDEO/HOLD on the remote commander
or TV/VIDEO on the TV.
To select a two-digit program position, press “÷”
before the number buttons.
For example: to select program position 25, press
“÷,” then “2” and “5.”
-/--
Operations
-EN
12
25
Page 13
To watch TV
WAKE UP
INDEX
WAKE UP TIMER:10M
WAKE UP TIMER:OFF
WAKE UP TIMER:12H00M
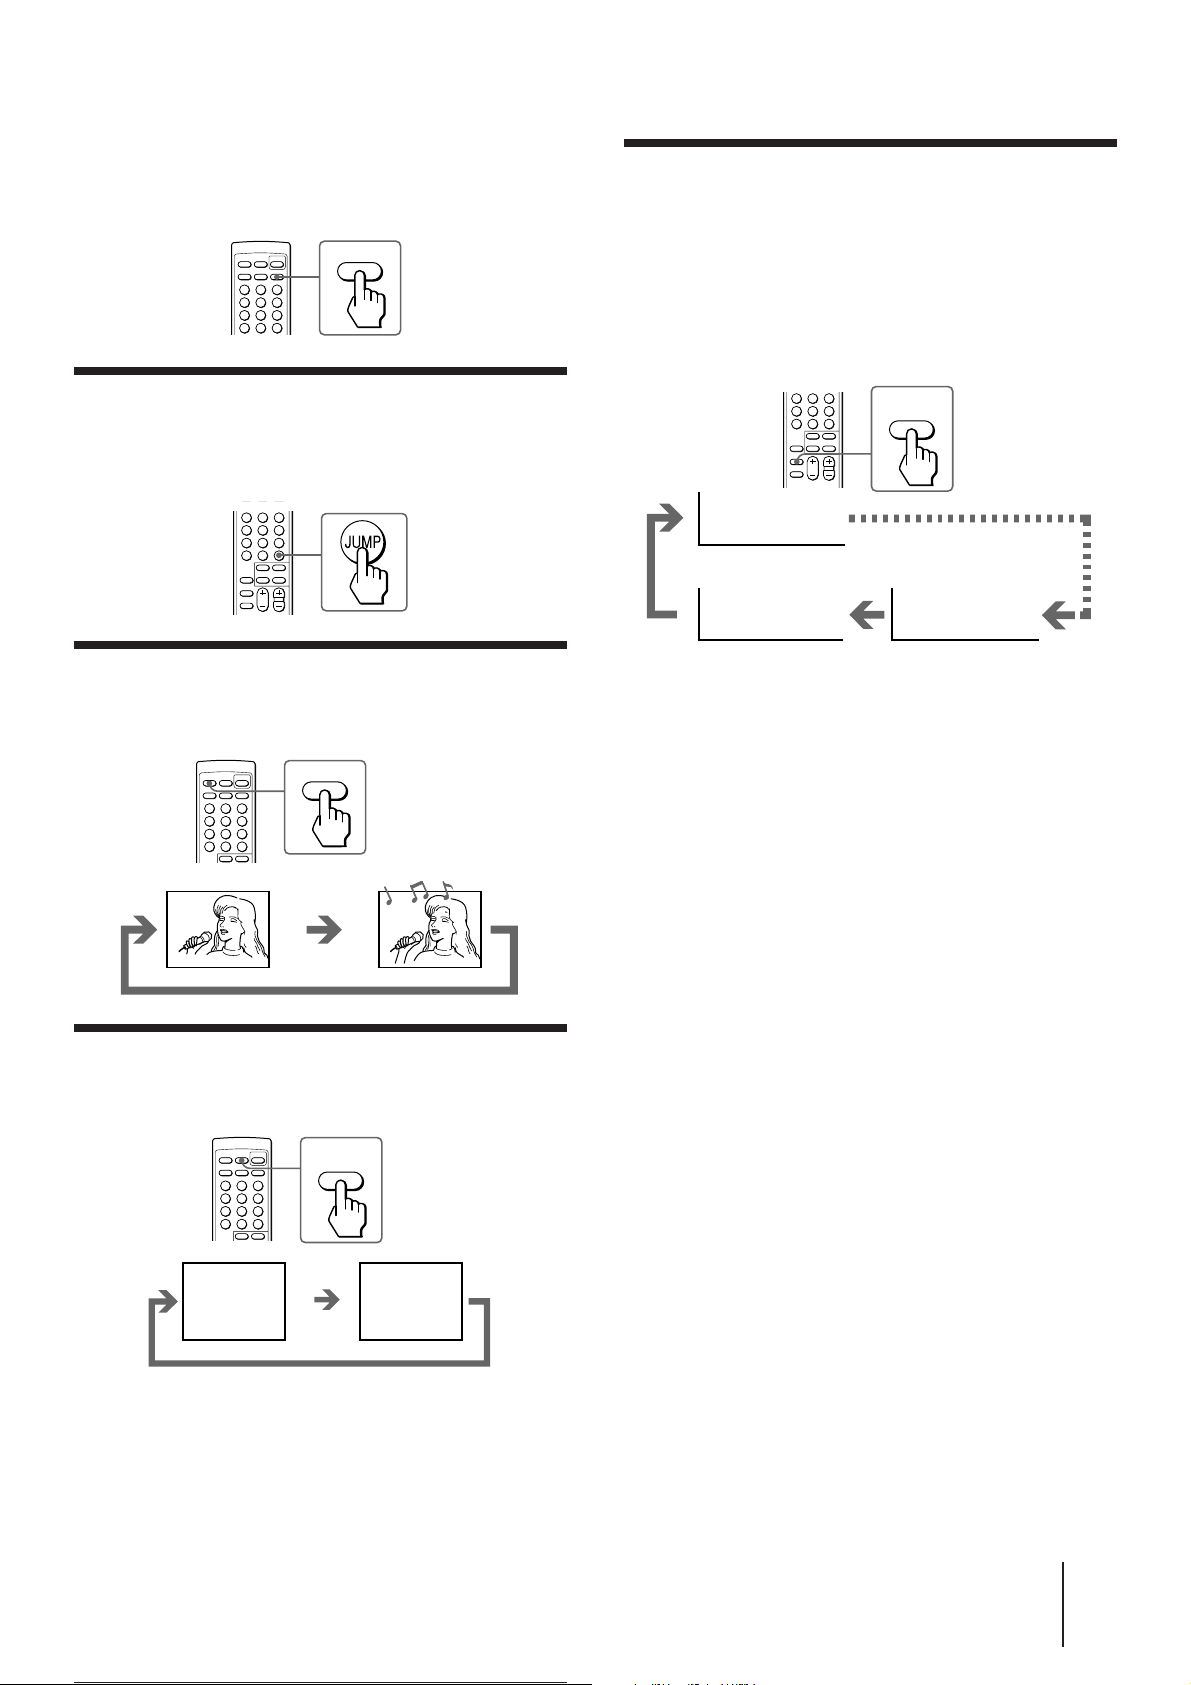
Press TV on the remote commander or TV/VIDEO on
the TV.
TV
Switching back quickly to the previous
channel
Press JUMP.
Setting the Wake Up Timer
You can set the TV to turn on automatically after the
period of time you want.
1 Press WAKE UP/INDEX repeatedly to set the
timer.
The on-screen display appears.
After 10 minutes
Muting the sound
Press MUTING.
MUTING
MUTING
Displaying the on-screen information
Press DISPLAY/REVEAL.
DISPLAY
REVEAL
8
No Wake Up Timer
After 12 hours
2 If you want a particular TV program or
video mode to be displayed using the Wake
Up Timer, select the TV program or video
mode.
3 Press POWER on the remote commander or
set the Sleep Timer to turn off the TV in the
standby mode.
The WAKE UP indicator lights up in amber color.
To cancel the Wake Up Timer, press WAKE UP/
INDEX repeatedly until “WAKE UP TIMER: OFF”
appears, or turn off the main power of the TV.
Notes
• The Wake Up Timer starts immediately after the on-screen
display disappears.
• The last TV program position or video mode just before the TV
turns into the standby mode will appear when the TV is turned
on using the Wake Up Timer.
• If no buttons or controls are pressed for more than two hours
after the TV is turned on using the Wake Up Timer, the TV
automatically turns into the standby mode. If you want to
continue watching the TV, press any button or control on the
TV or remote commander.
DYNAMIC
Note
• The on-screen display shows the program position or the video
mode and the picture and sound information. The on-screen
display for the picture and sound information disappear after
being displayed for approximately three seconds.
Operations
13
-EN
Page 14
Setting the Sleep Timer
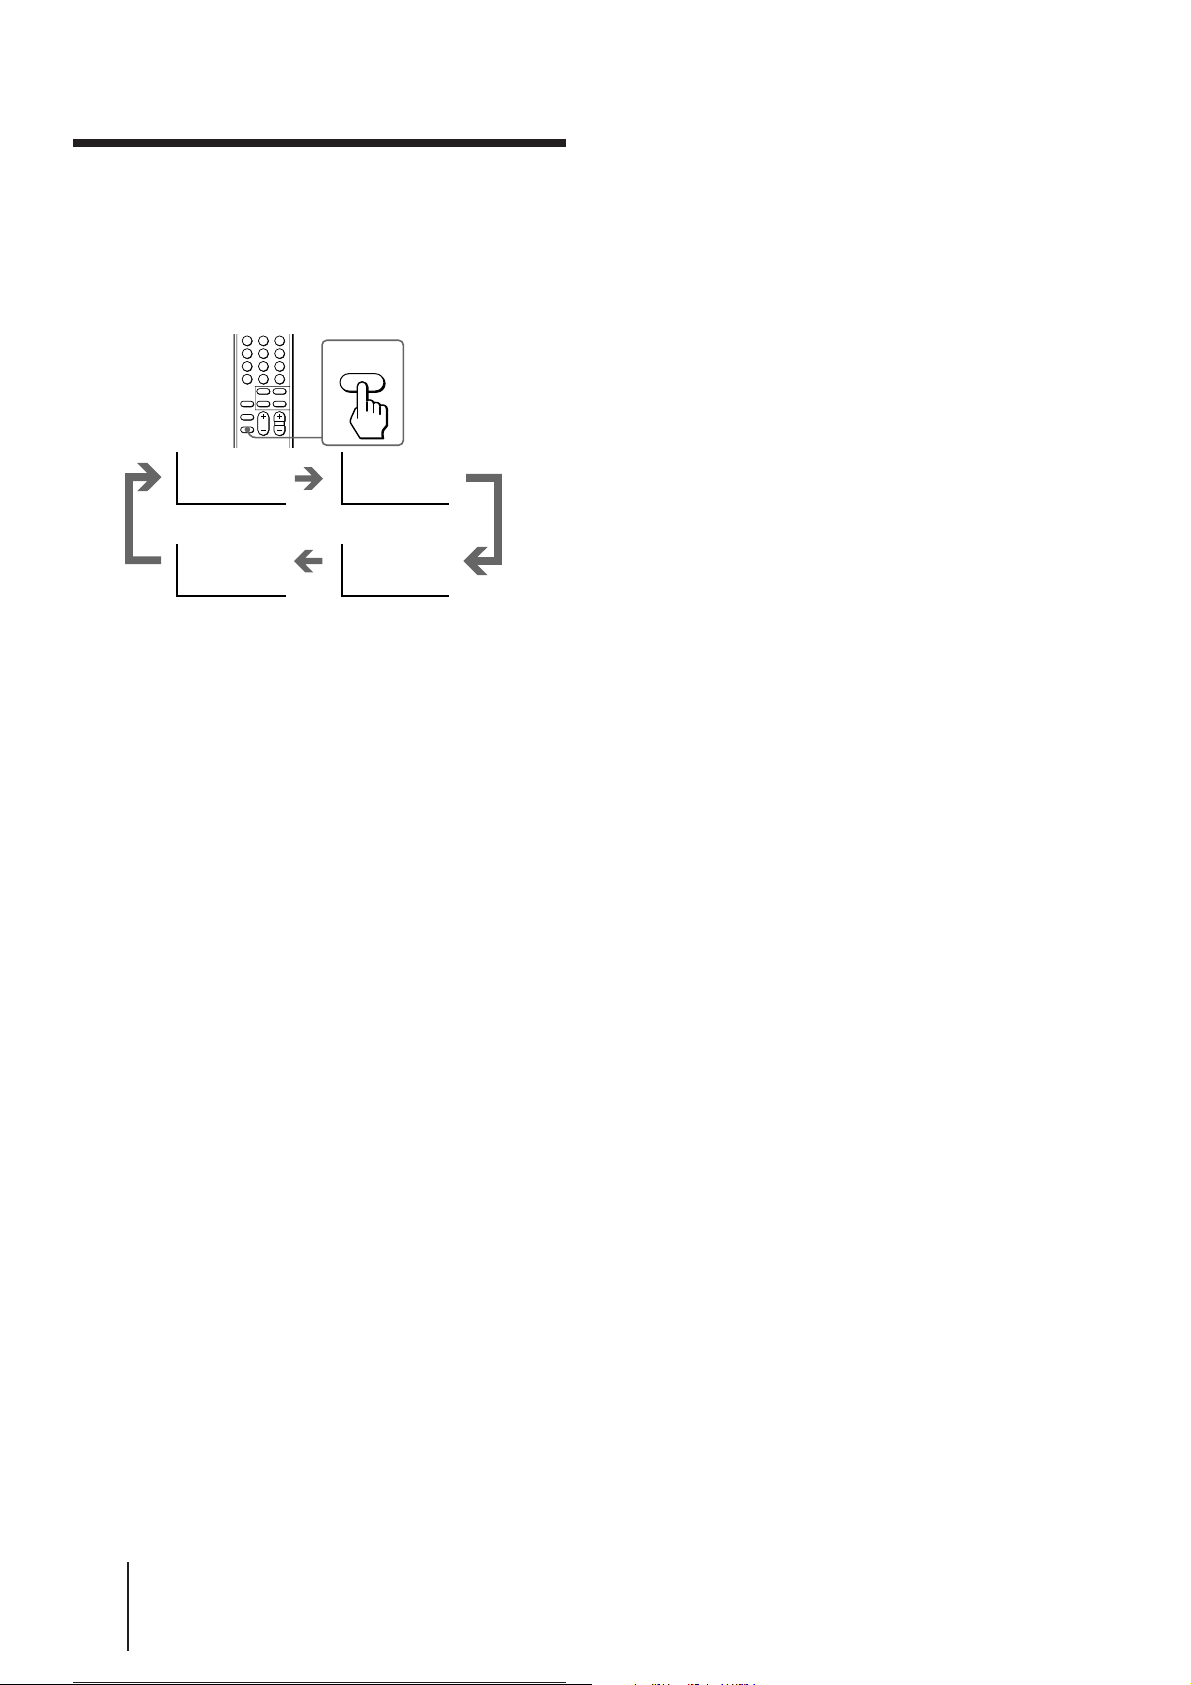
You can set the TV to turn off automatically after the
period of time you want.
Press SLEEP.
SLEEP
TEXT CLR
SLEEP TIMER:30M SLEEP TIMER:60M
After 30 minutes After 60 minutes
SLEEP TIMER:OFF SLEEP TIMER:90M
No Sleep Timer
To cancel the Sleep Timer, press SLEEP repeatedly
until “SLEEP TIMER: OFF” appears, or turn the TV off.
After 90 minutes
14
-EN
Operations
Page 15
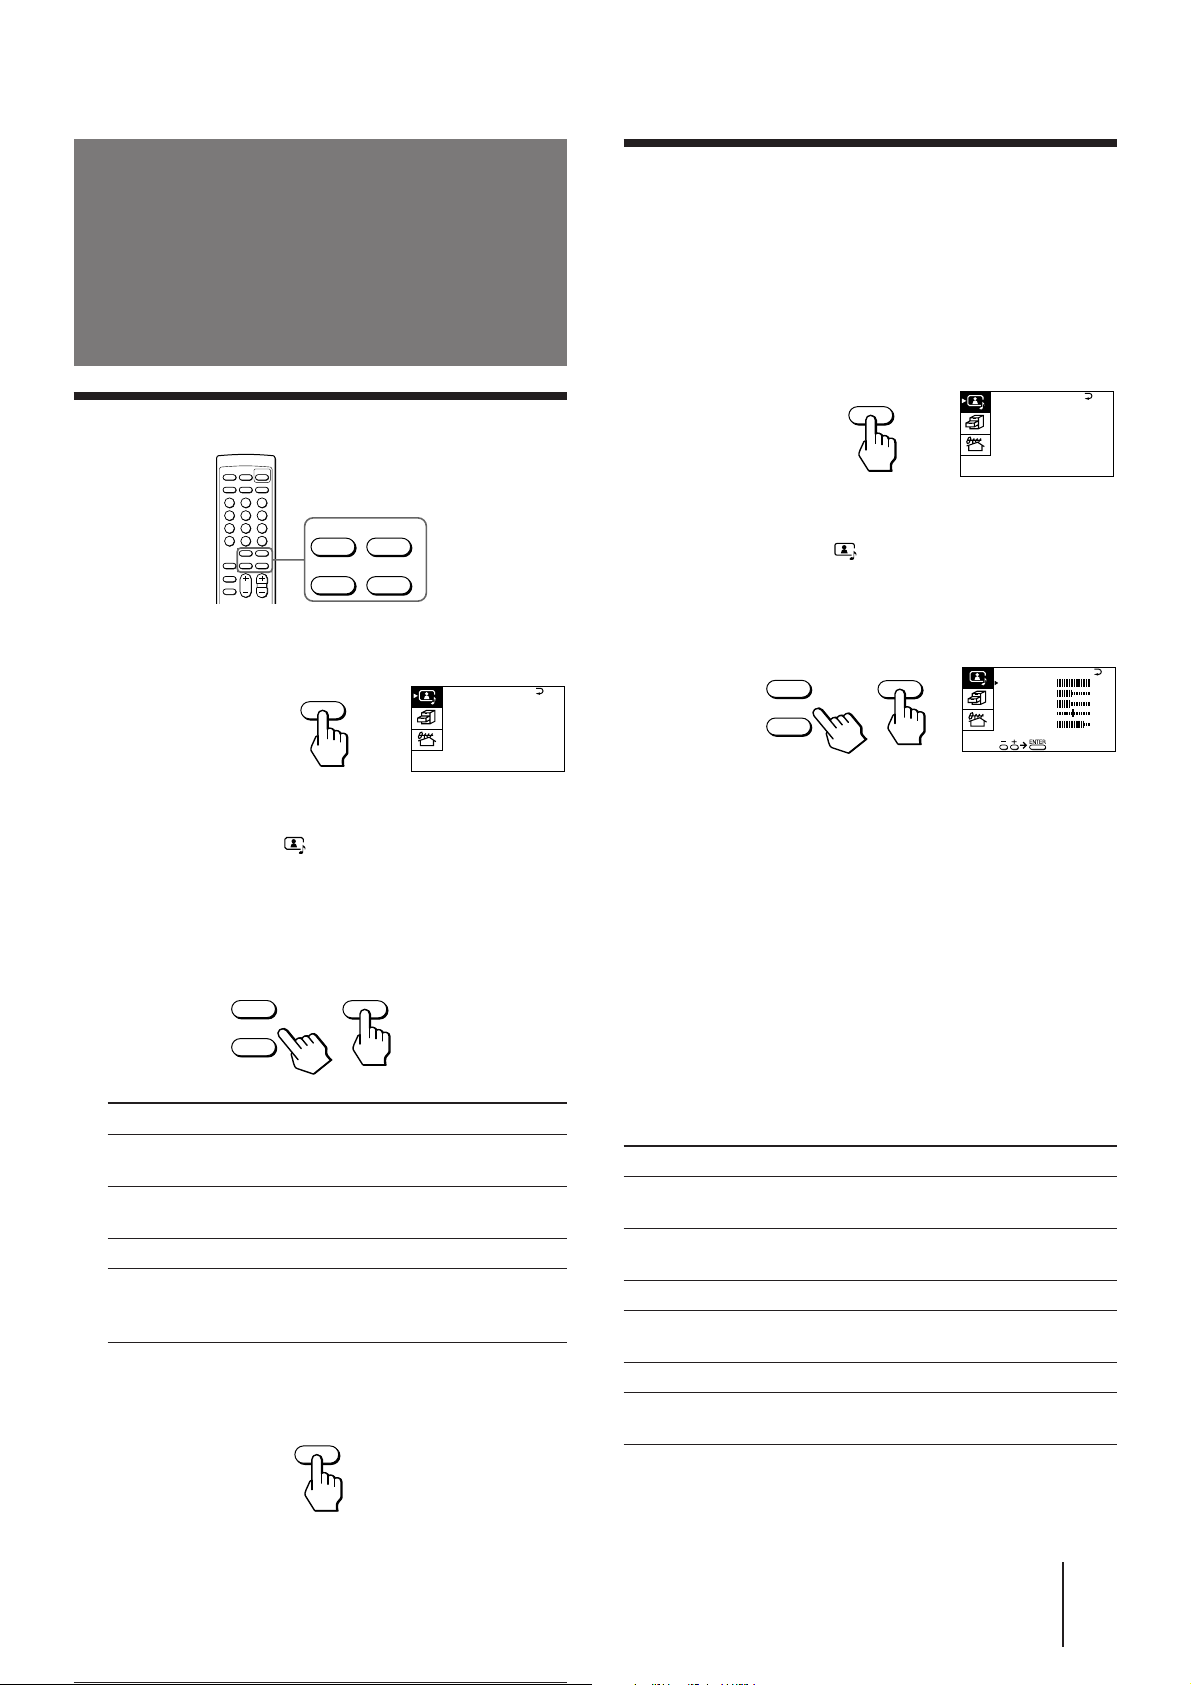
Adjusting the
A / V CONTROL
DYNAMIC
SOFT
STANDARD
PERSONAL
V I DEO ADJUST
AUDI O ADJUST
MENU
ENTER
+
–
P I CTURE
40
100
0
80
V I DEO ADJUST
COLOR
BR IGHT
HUE
SHARP
VM: HIGH
45
0
Adjusting the picture settings
(VIDEO ADJUST)
picture and sound
Selecting the picture and sound modes
+
MENU
–
ENTER
1 Press MENU.
MENU
2 Make sure the cursor (”) appears in the A/V
CONTROL menu ( ), and press ENTER.
3 Press + or – to move the cursor (”) to
DYNAMIC, STANDARD, SOFT, or PERSONAL,
and press ENTER.
+
ENTER
A / V CONTROL
DYNAMIC
STANDARD
SOFT
PERSONAL
V I DEO ADJUST
AUDI O ADJUST
You can adjust the picture settings to suit your taste
with the VIDEO ADJUST option. The adjusted settings
are stored in the PERSONAL option.
1 Press MENU.
2 Make sure the cursor (”) appears in the A/V
CONTROL menu ( ), and press ENTER.
3 Press + or – to move the cursor (”) to VIDEO
ADJUST, and press ENTER.
4 Press + or – to move the cursor (”) to the
item you want to adjust, and press ENTER.
5 Press + or – to adjust the selected item, and
press ENTER.
For details on each item, see “Description of adjustable
items” below.
–
Select To
DYNAMIC Receive high contrast picture with
powerful sound.
STANDARD Receive normal contrast picture with
medium listening sound.
SOFT Receive mild picture with soft sound.
PERSONAL Receive the last picture and sound
settings that are adjusted using VIDEO
ADJUST and AUDIO ADJUST.
4 Press MENU to return to the normal screen.
MENU
6 To adjust other items, repeat steps 4 and 5.
7 Press MENU to return to the normal screen.
Description of adjustable items
Item Press –
PICTURE Decrease picture
contrast.
COLOR Decrease color
intensity.
BRIGHT Darken the picture.
HUE Make picture tones
become reddish.
SHARP Soften the picture.
VM Decrease emphasis
on picture edges.
Notes
• You can adjust VM for the KV-J29MF1, KV-J29MF1S,
KV-J29MH2, and KV-J29MN21 models only.
• You can adjust HUE for the NTSC color system only.
Press +
Increase picture
contrast.
Increase color
intensity.
Brighten the picture.
Make picture tones
become greenish.
Sharpen the picture.
Increase emphasis on
picture edges.
Operations
15
-EN
Page 16
If the picture is slightly snowy
(for KV-J29MF1/J29MF1S/J29MH2/J29MN21
only)
You may try to improve the picture by changing the
VM setting as described below:
1 Display the VIDEO ADJUST menu.
2 Press + or – to move the cursor (”) to VM, and
press ENTER.
3 Press + or – to select LOW, and press ENTER.
5 Press + or – to adjust the selected item, and
press ENTER.
For details on each item, see “Description of adjustable
items” below.
6 To adjust other items, repeat steps 4 and 5.
7 Press MENU to return to the normal screen.
If the picture color is abnormal when receiving
programs through the (antenna) terminal
Change the color system or the TV system from the
PRESET menu as described below until the color
becomes normal.
1 Display the PRESET menu.
2 Press + or – to move the cursor (”) to
COL SYS or TV SYS, and press ENTER.
3 Press + or – to change the color system or the TV
system until the color becomes normal, and press
ENTER.
Note
• Normally set the color system (COL SYS) to AUTO.
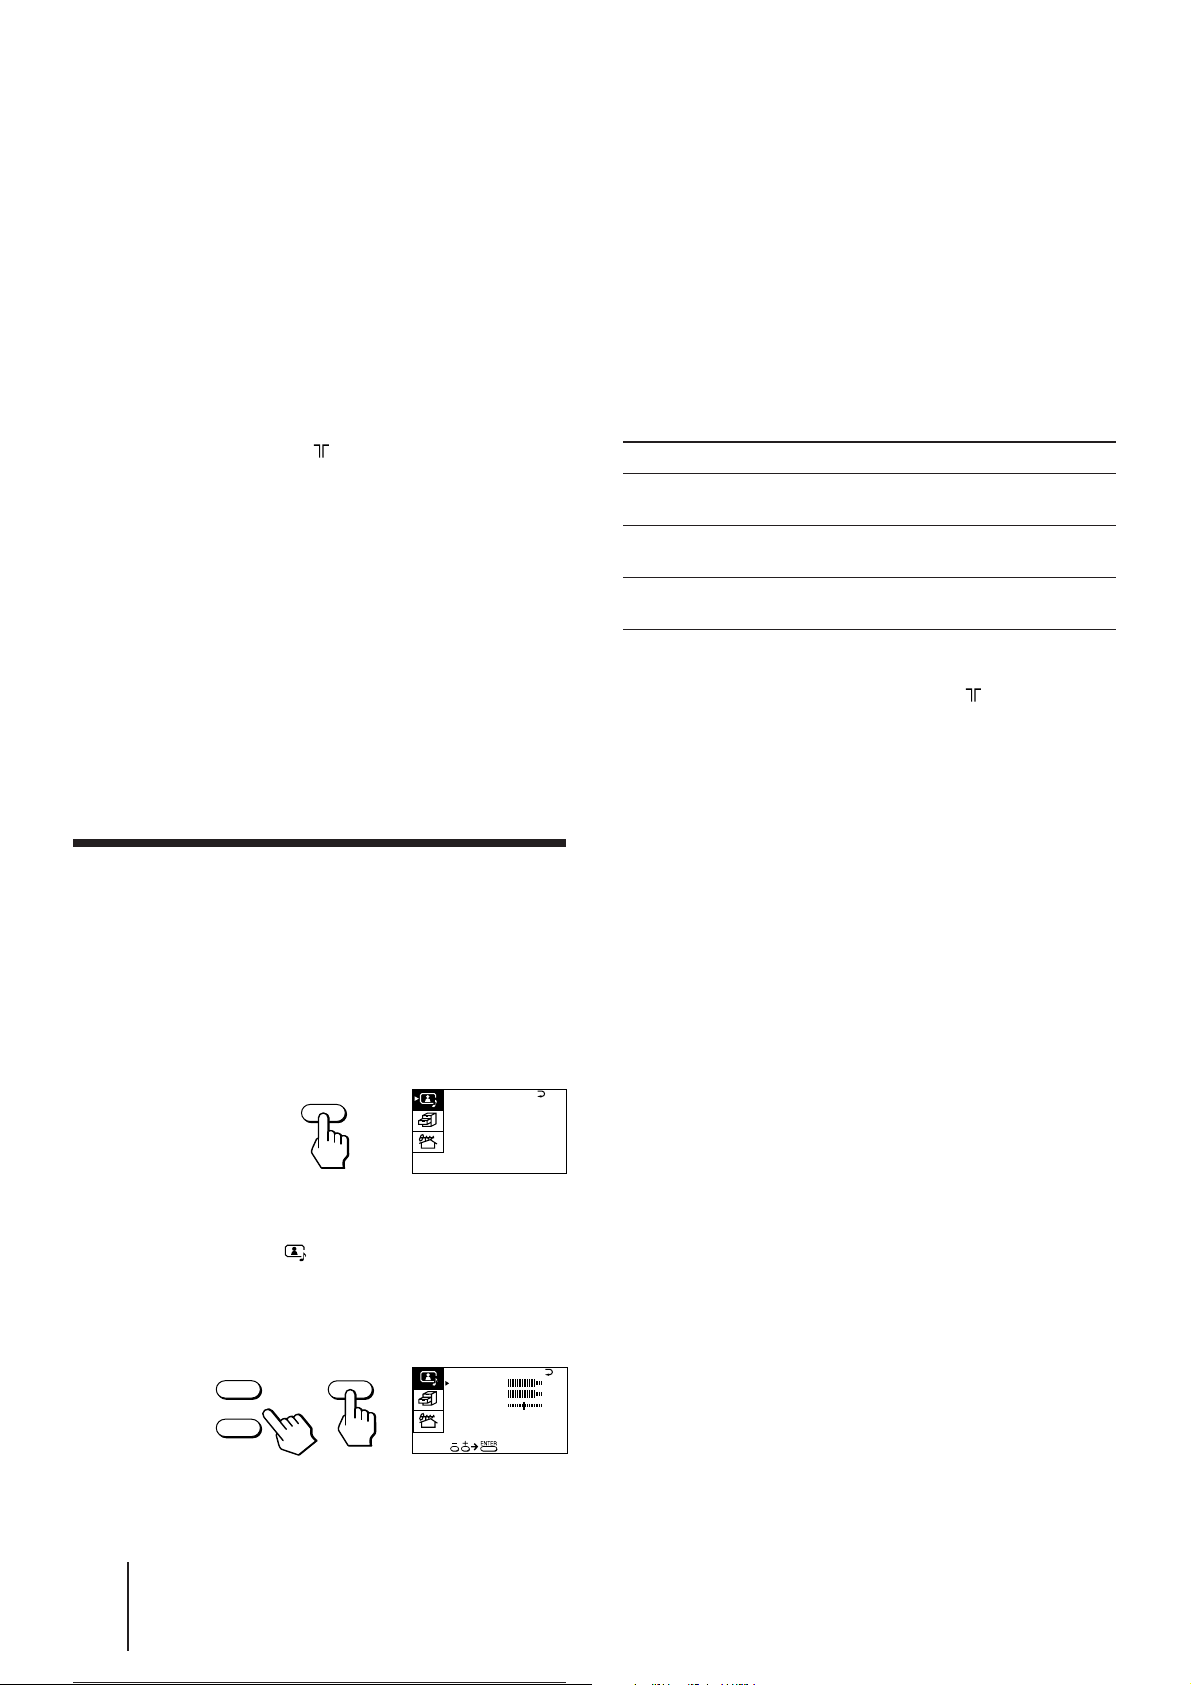
Adjusting the sound settings
(AUDIO ADJUST)
You can adjust the sound settings to suit your taste
with the AUDIO ADJUST option. The adjusted settings
are stored in the PERSONAL option.
Description of adjustable items
Item Press –
BASS Decrease the bass
sound.
TREBLE Decrease the treble
sound.
BALANCE Increase the left
speaker's volume
Press +
Increase the bass
sound.
Increase the treble
sound.
Increase the right
speaker's volume.
If the sound is distorted or noisy when
receiving programs through the (antenna)
terminal
Change the TV system from the PRESET menu as
described below until the sound becomes normal.
1 Display the PRESET menu.
2 Press + or – to move the cursor (”) to TV SYS, and
press ENTER.
3 Press + or – to change the TV system until the
sound becomes normal, and press ENTER.
1 Press MENU.
MENU
A / V CONTROL
DYNAMIC
STANDARD
SOFT
PERSONAL
V I DEO ADJUST
AUDI O ADJUST
2 Make sure the cursor (”) appears in the A/V
CONTROL menu ( ), and press ENTER.
3 Press + or – to move the cursor (”) to AUDIO
ADJUST, and press ENTER.
+
–
ENTER
AUDI O ADJUST
BASS
TREBLE
BALANCE
4 Press + or – to move the cursor (”) to the
item you want to adjust, and press ENTER.
Operations
-EN
16
80
80
00
Page 17
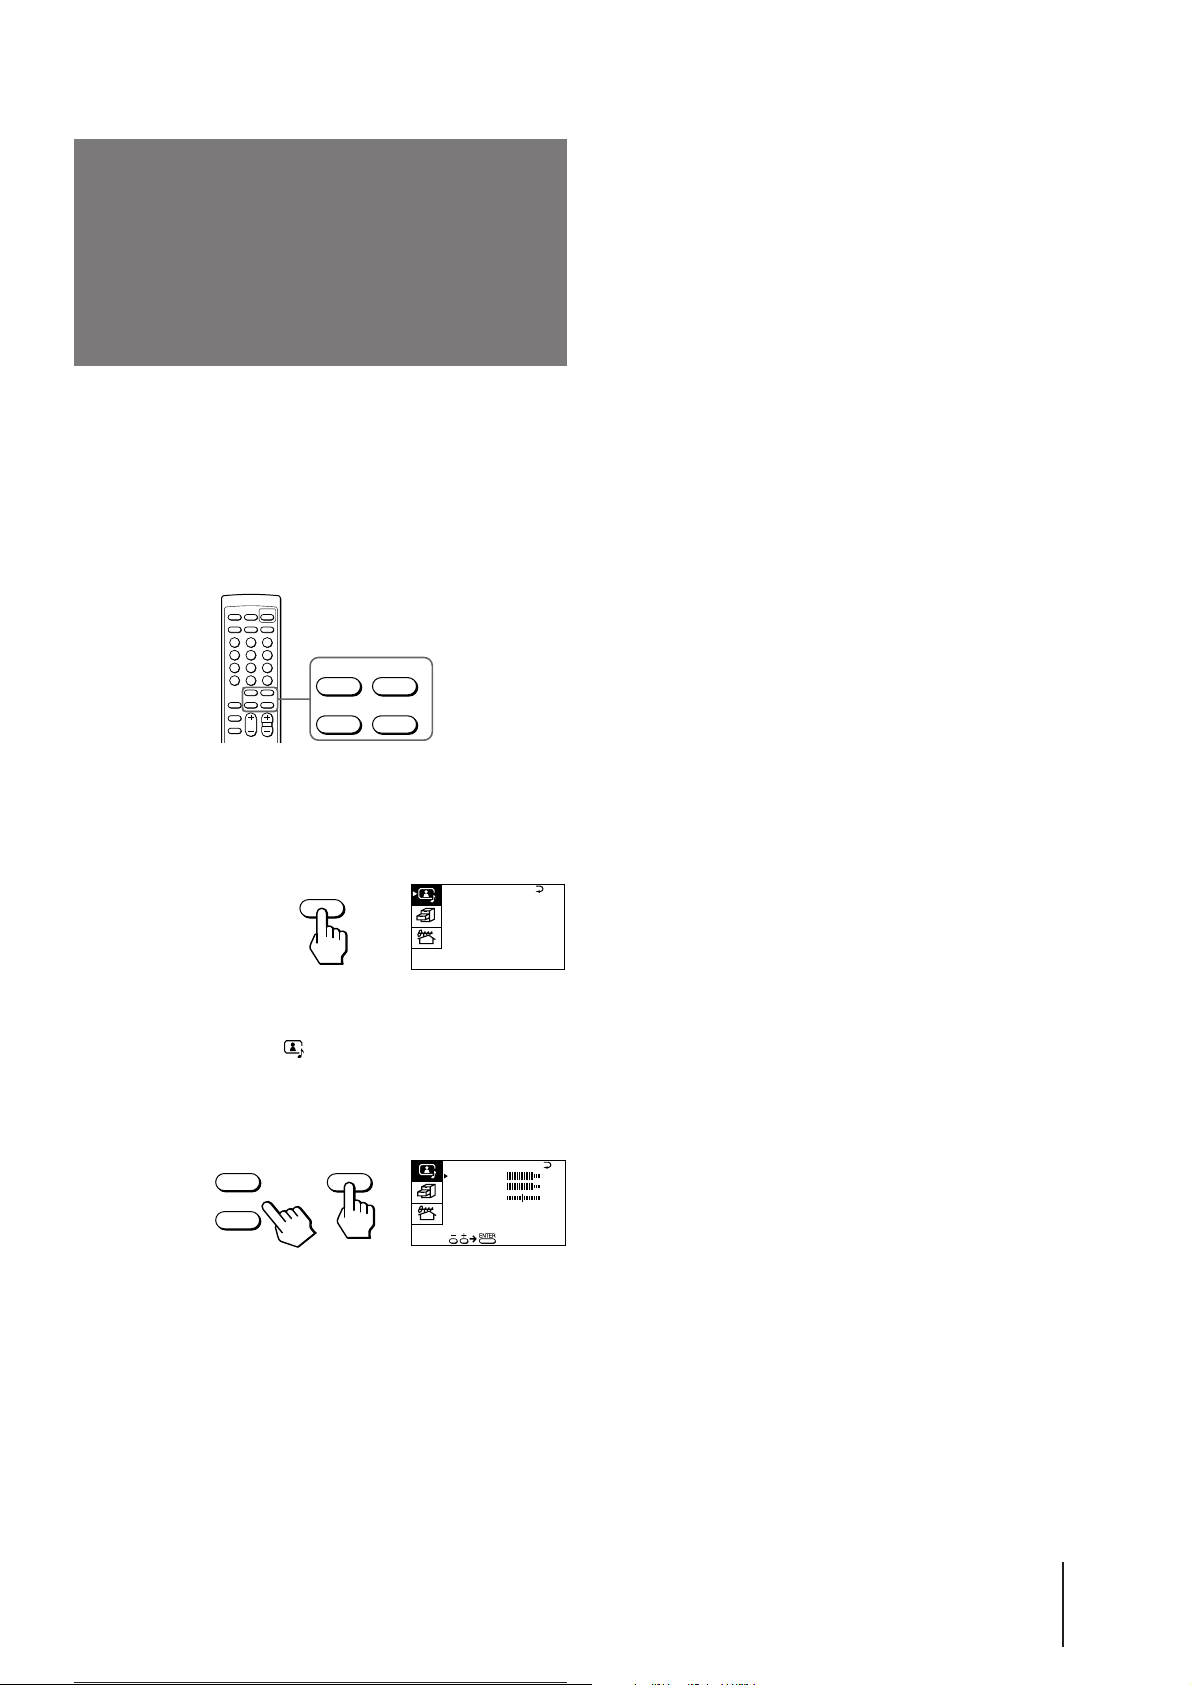
Listening to the
woofer sound
(3D WOOFER)
p KV-J25MH2/J29MH2/J25MN21/J29MN21 only
The 3D WOOFER enhances bold, dynamic and clear
sounds that spread over a large area and lets you enjoy
the thrills, horrors, and suspense of movies or music.
The initial setting of the 3D WOOFER is ON, and it is
ready for your listening when you turn on the TV.
+
MENU
–
ENTER
Notes
• To listen to the woofer sound, make sure that the 3D WOOFER
is properly connected to the TV (see page 6).
• You can also disconnect the 3D WOOFER from the TV to turn
off the woofer sound.
To turn off the woofer sound
1 Press MENU.
MENU
A / V CONTROL
DYNAMIC
STANDARD
SOFT
PERSONAL
V I DEO ADJUST
AUDI O ADJUST
2 Make sure the cursor (z) appears in the A/V
CONTROL menu ( ), and press ENTER.
3 Press + or – to move the cursor (z) to AUDIO
ADJUST, and press ENTER.
+
–
ENTER
AUDI O ADJUST
BASS
TREBLE
BALANCE
3D WOOFER : ON
80
80
00
4 Press + or – to move the cursor (z) to
3D WOOFER, and press ENTER.
5 Press + or – to select OFF, and press ENTER.
6 Press MENU to return to the normal screen.
Operations
17
-EN
Page 18
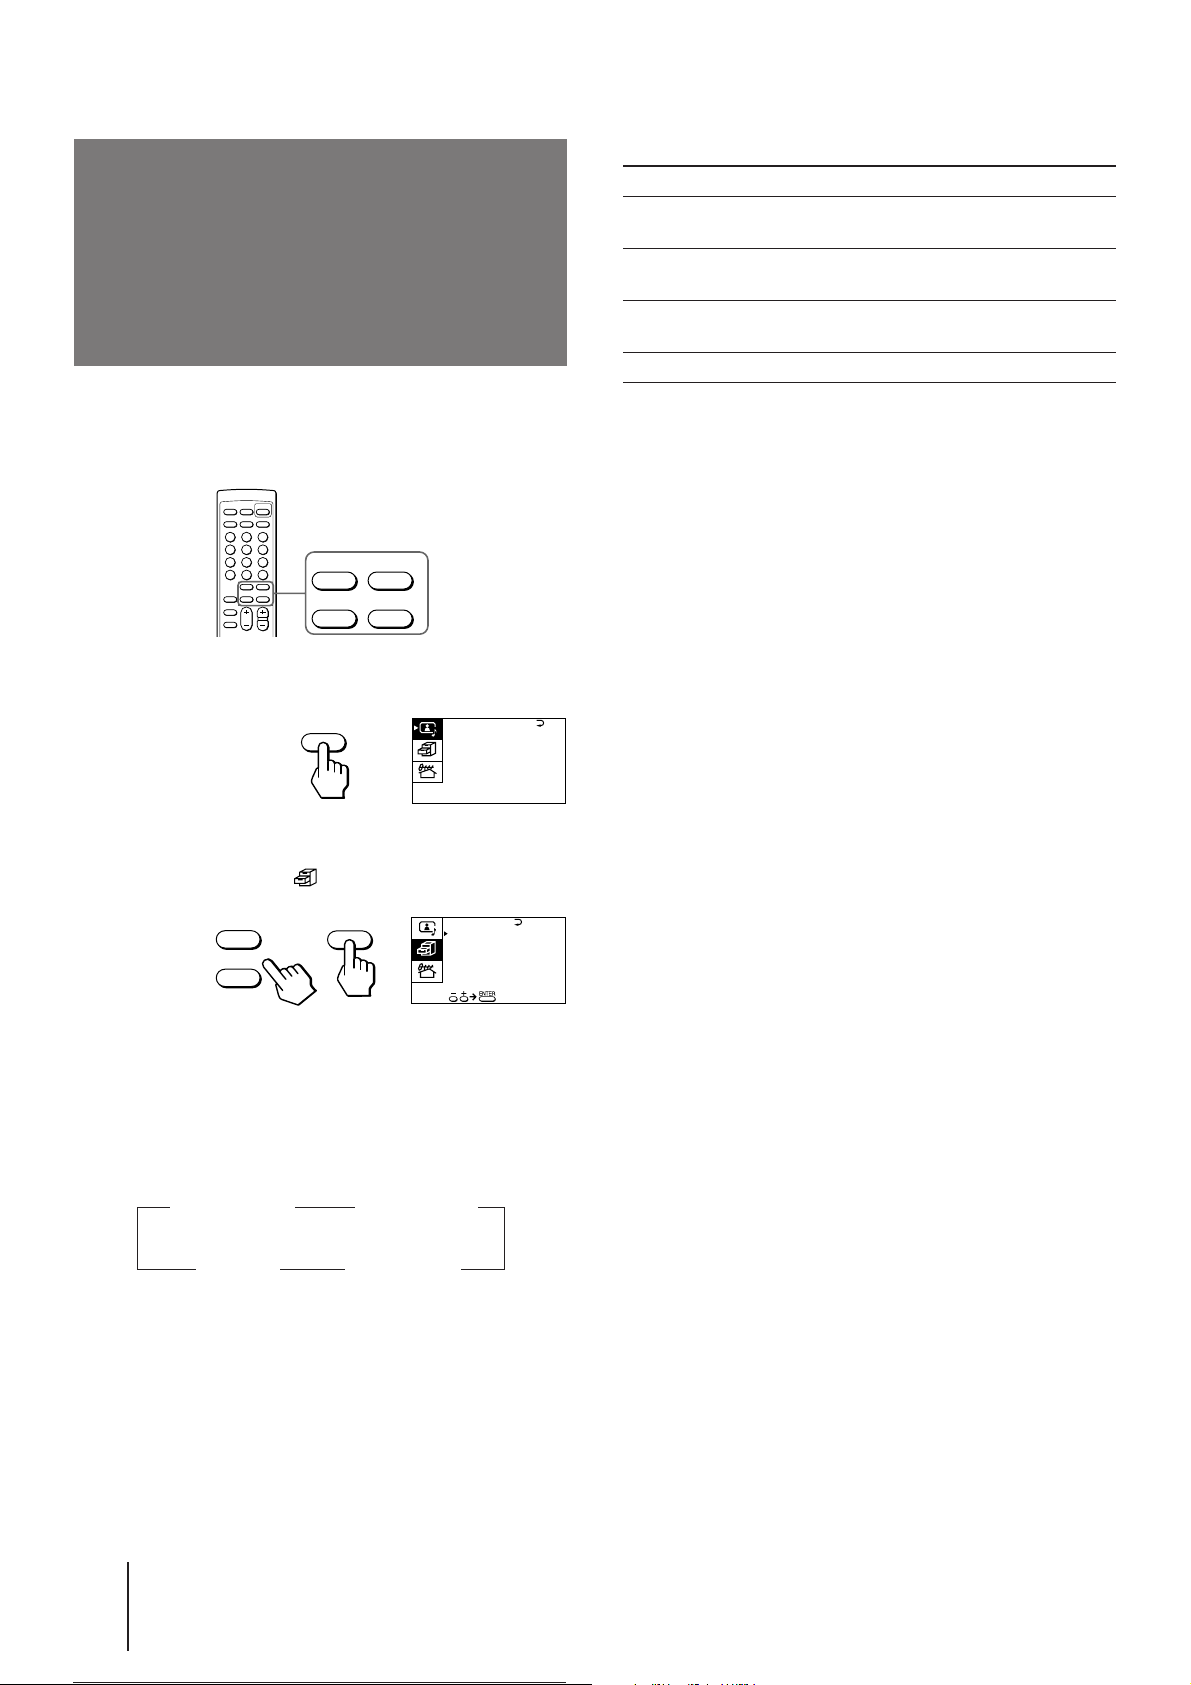
Listening to the
surround sound
(SURROUND)
Description of adjustable items
Select To
HALL〈SRS〉 Listen to a sound that spreads out over a
large area.
LIVE〈SRS〉 Listen to the sound that gives the feeling
of being at a live concert.
SPACE Listen to a monaural sound that gives a
stereo-like effect.
OFF Turn off the surround sound.
The SURROUND feature enables you to enjoy a
surround sound effect that is like being in a large hall
or live concert when receiving stereo signals.
+
MENU
–
ENTER
1 Press MENU.
MENU
A / V CONTROL
DYNAMIC
STANDARD
SOFT
PERSONAL
V I DEO ADJUST
AUDI O ADJUST
2 Press + or – to move the cursor (z) to the
FEATURES menu ( ) , and press ENTER.
+
ENTER
–
FE AT URES
SURROUND :
OFF
AV OUT :
MONITOR
Note
• The µ ® SRS (SOUND RETRIEVAL SYSTEM) is
manufactured by Sony Corporation under license from SRS
Labs, Inc. It is covered by U.S. Patent No. 4,748,669.
The word “SRS” and the SRS symbol µ are registered
trademarks of SRS Labs, Inc.
3 Make sure the cursor (z) appears beside
SURROUND, and press ENTER.
4 Press + or – to select HALL〈SRS〉, LIVE〈SRS〉,
or SPACE, and press ENTER.
z
HALL〈SRS〉 LIVE〈SRS〉
OFF
z
z
SPACE
z
For details on each item, see “Description of adjustable
items“ below.
5 Press MENU to return to the normal screen.
Operations
-EN
18
Page 19
Selecting a stereo or
bilingual program
p KV-J25MH2/J29MH2/J25MN21/J29MN21 only
You can enjoy stereo sound or bilingual programs of
NICAM and A2 (German) stereo systems.
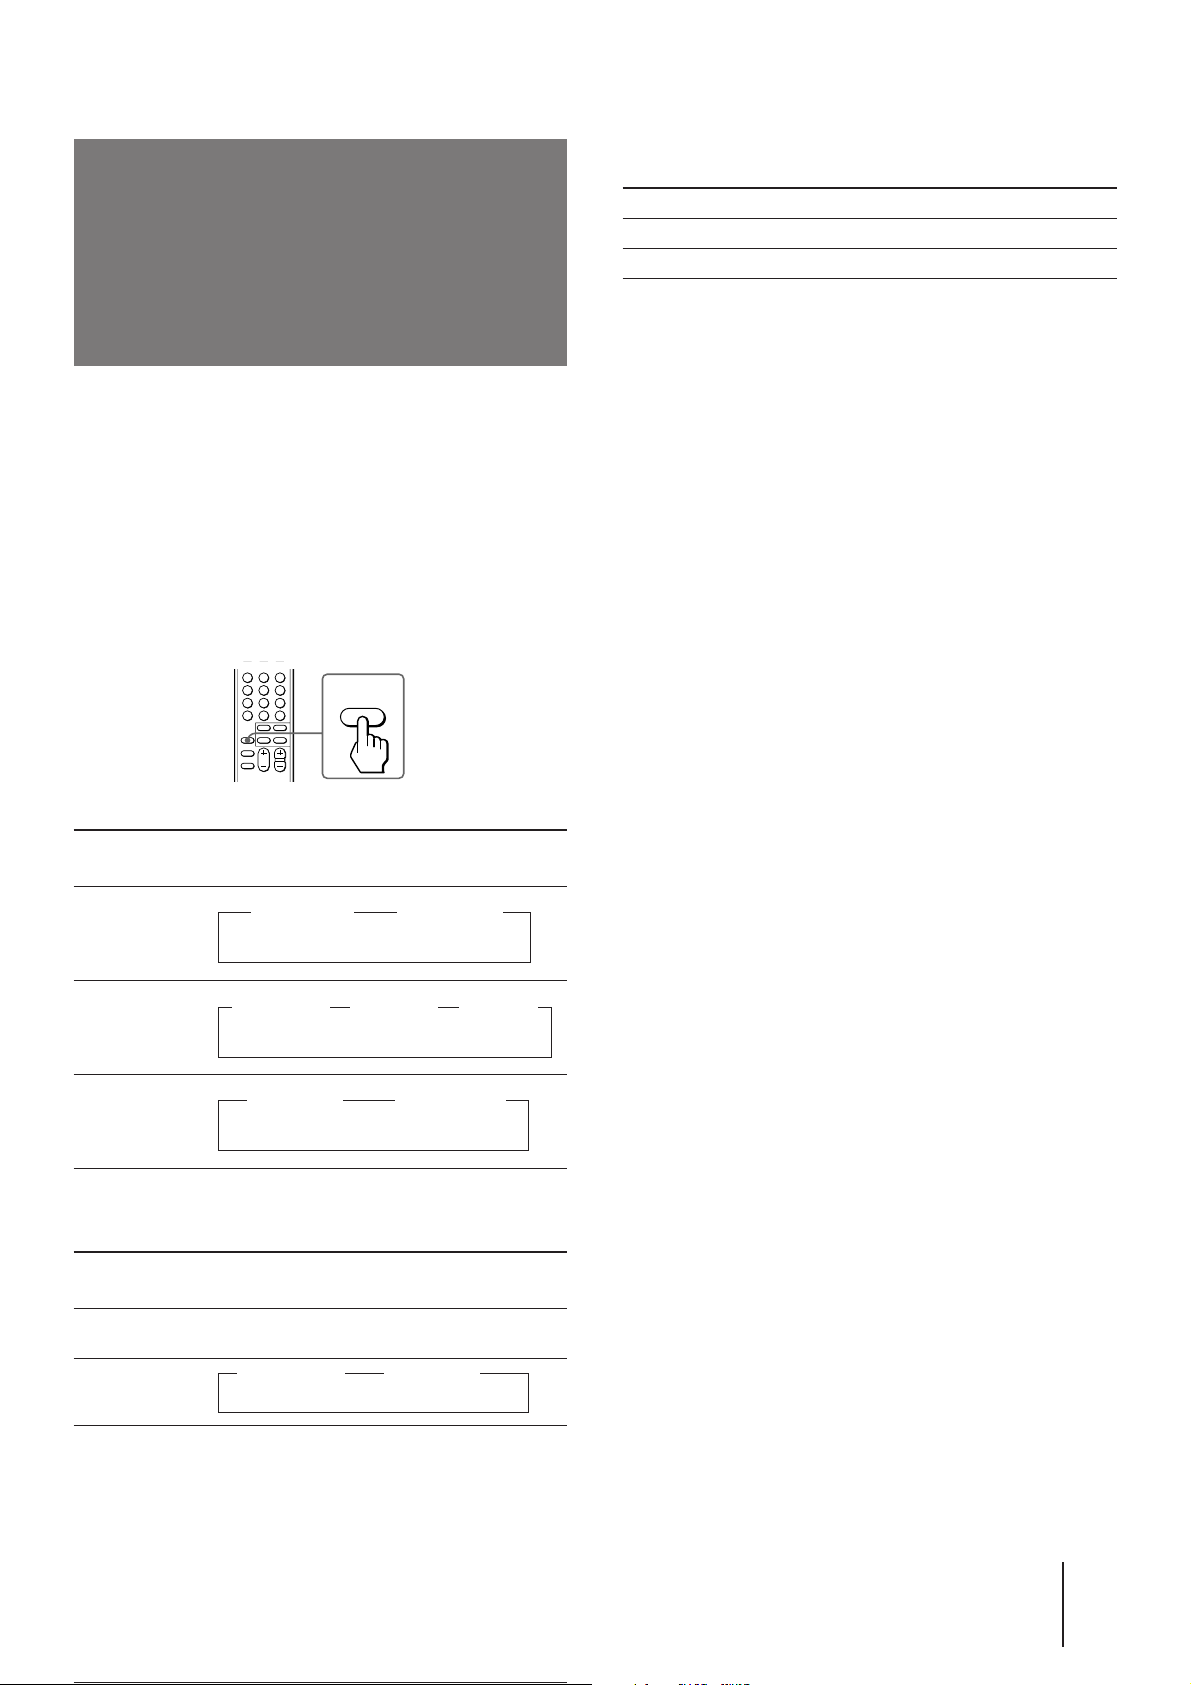
Press A/B/ENLARGE repeatedly until you
receive the sound you want.
The on-screen display changes corresponding to the
selected sound, and the STANDBY/STEREO/WAKE
UP indicator also lights up.
A/B
ENLARGE
Receiving area for NICAM and A2 (German)
programs
System Receiving area
NICAM Hong Kong, Singapore, New Zealand, etc.
A2 (German) Australia, Malaysia, Thailand, etc.
Notes
• If the signal is very weak, the sound becomes monaural
automatically.
• If the stereo sound is noisy when receiving a NICAM program,
select “MONO.” The sound becomes monaural, however, the
noise will be reduced.
When receiving a NICAM program
Broadcasting
NICAM stereo
NICAM bilingual
NICAM monaural
z NICAM
z MAIN
(Main sound)
z MAIN
On-screen display
(Selected sound)
(Stereo sound)
NICAM
NICAM
(Main sound)
z SUB
z MONO
(Regular sound)
NICAM
(Sub sound)
z MONO
(Regular sound)
z MONO
(Regular
sound)
When receiving an A2 (German) program
Broadcasting
A2 (German)
stereo
A2 (German)
bilingual
z MAIN
On-screen display
(Selected sound)
(Main sound)
STEREO
(Stereo sound)
z SUB
(Sub sound)
Operations
19
-EN
Page 20
Viewing Teletext
Checking the contents of a Teletext
service (INDEX)
Press WAKE UP/INDEX to display an overview
of the Teletext contents and page numbers.
Using FASTEXT
p KV-J25MN21/J29MN21 only
TV stations broadcast an information service called
Teletext via a TV channel.
Teletext service allows you to receive various
information such as market shares, weather forecasts or
news at any time.
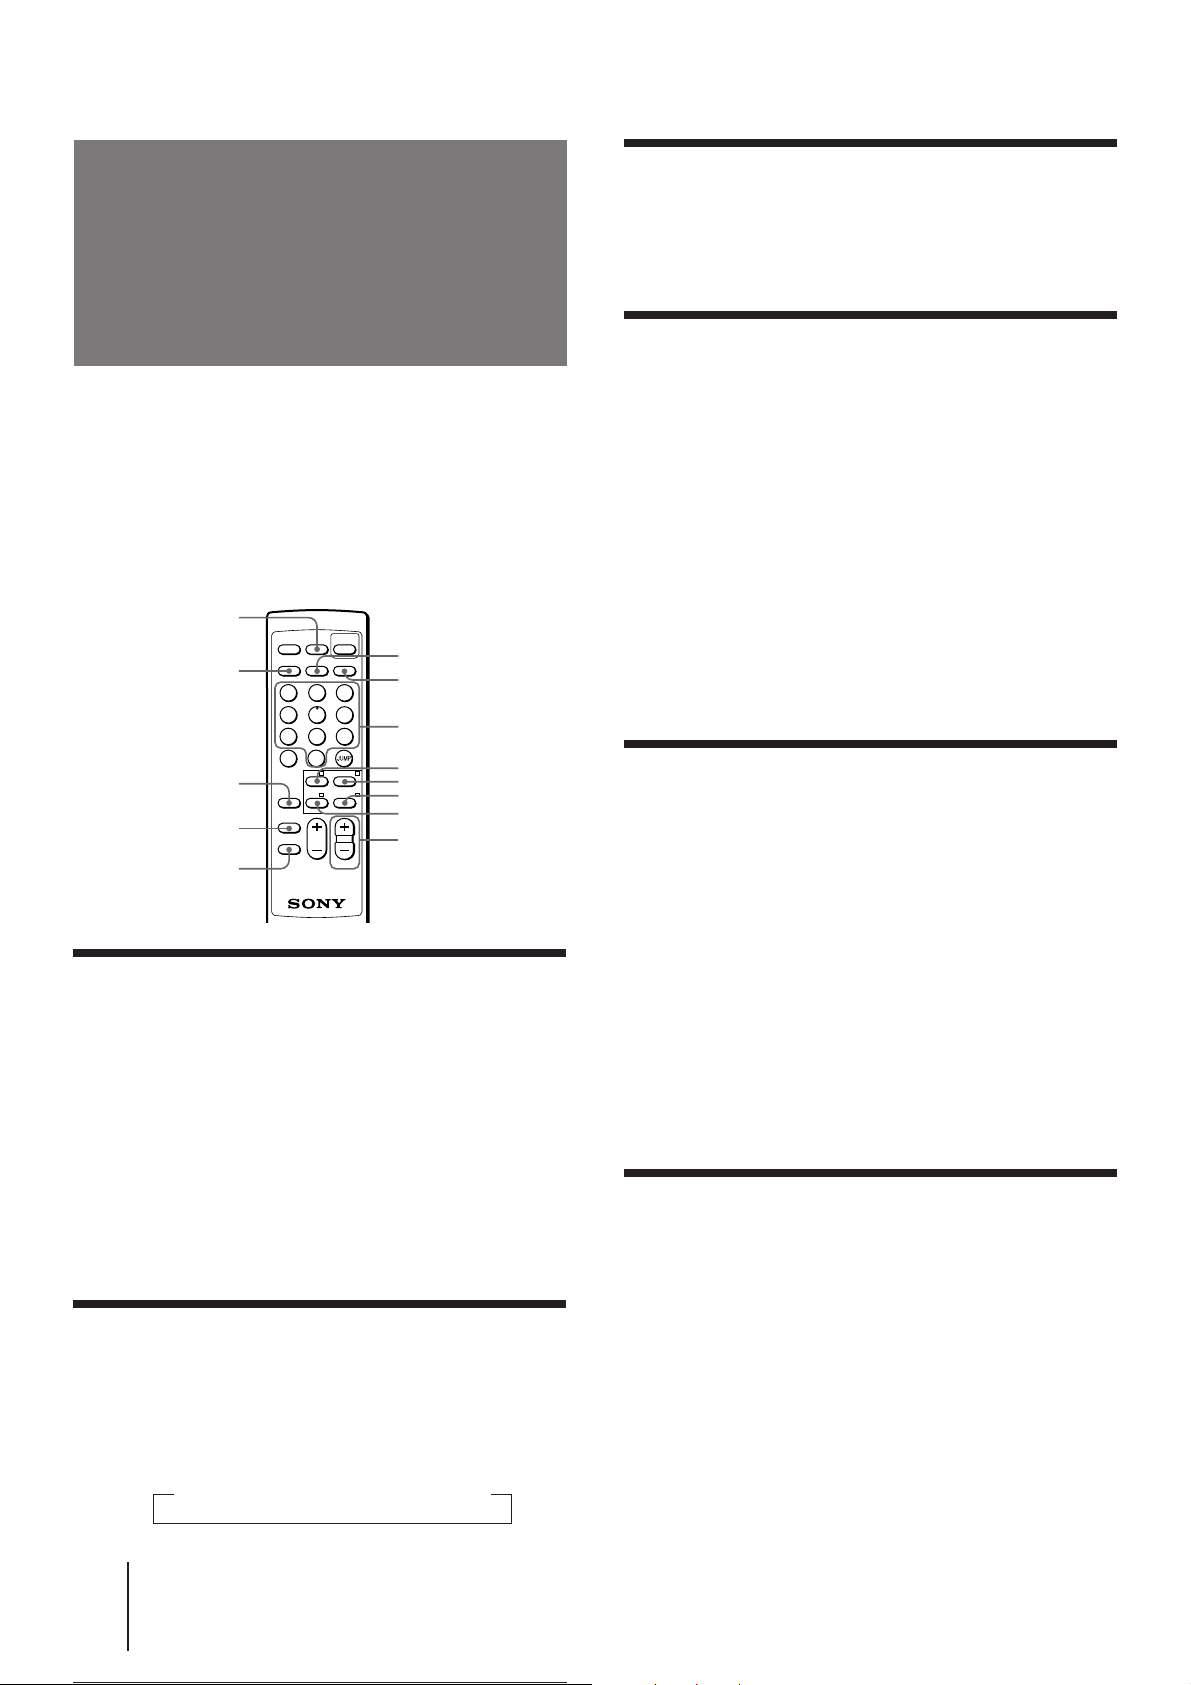
DISPLAY/REVEAL
TEXT
A/B/ENLARGE
WAKE UP/INDEX
SLEEP/TEXT CLR
MUTING
TEXT
1
4
7
-/--
A/B
ENLARGE
WAKE
INDEX
SLEEP
TEXT CLR
DISPLAY
REVEAL
VIDEO
HOLD TV
2
5
8
0
+ MENU
–
VOL PROGR
POWER
ENTER
VIDEO/HOLD
3
6
9
TV
Number
Red
Green
Blue
Yellow
PROGR +/–
This feature allows you to quickly access a Teletext
page that uses FASTEXT. When a FASTEXT program is
broadcasted, the colored menus appear at the bottom of
the screen. The colors of the menus correspond to the
red (+), green (MENU), yellow (–), and blue (ENTER)
color-coded buttons on the remote commander.
To access a FASTEXT menu
Press the color-coded button on the remote commander
that corresponds to the colored menu which appears at
the bottom of the screen.
The menu page appears on the screen after several
seconds.
Selecting a Teletext page
Press the number buttons to enter the threedigit page number of the Teletext page you
want.
If you make a mistake, re-enter the correct page
number.
Displaying Teletext
1 Select a TV channel that carries the Teletext
broadcast you want to watch.
2 Press TEXT to display the Teletext.
A Teletext page (normally the index page) is
displayed. If there is no Teletext broadcast, “100” is
displayed at the top left corner of the screen.
To turn off Teletext
Press TV.
Superimposing a Teletext page on the
TV picture
Press TEXT.
Each time you press TEXT, the screen changes as
follows:
n Teletext n Teletext and TV n TV
To access the next or previous page
Press PROGR +/–.
You can also access a Teletext page of any page
numbers that appear in the colored column at the
bottom of the screen using the corresponding colorcoded button on the remote commander.
Holding a Teletext page (HOLD)
A Teletext page may consist of several subpages. You
can stop the page scrolling in order to read the text at
your own pace.
Press VIDEO/HOLD.
The HOLD symbol “H” appears at the top left corner
of the screen.
To resume normal Teletext operation
Press VIDEO/HOLD again or TEXT.
20
-EN
Operations
Page 21

Revealing concealed information
(REVEAL)
The REVEAL option lets you disclose concealed
information, such as an answer to a quiz that you find
on some of the Teletext pages.
Press DISPLAY/REVEAL.
To conceal the information
Press DISPLAY/REVEAL again.
Enlarging the Teletext display
(ENLARGE)
Press A/B/ENLARGE.
Each time you press A/B/ENLARGE, the Teletext
display changes as follows:
n Enlarge upper half n Enlarge lower half
Normal size N
Waiting for a Teletext page while
watching a TV program (TEXT CLEAR)
1 Key in the page number of the Teletext that
you want to watch, then press SLEEP/
TEXT CLR.
2 When the page number is displayed on the
screen, press TEXT to turn on the Teletext.
Operations
21
-EN
Page 22
Customizing the TV
A / V CONTROL
DYNAMIC
SOFT
STANDARD
PERSONAL
V I DEO ADJUST
AUDI O ADJUST
MENU
Using the AV OUT (advanced rec-out)
terminal
You can select the output signal from the MON/TV
OUT jacks at the rear of the TV. However, the signal of
the Teletext broadcast cannot be output even though
MONITOR is selected (for KV-J25MN21/J29MN21
only).
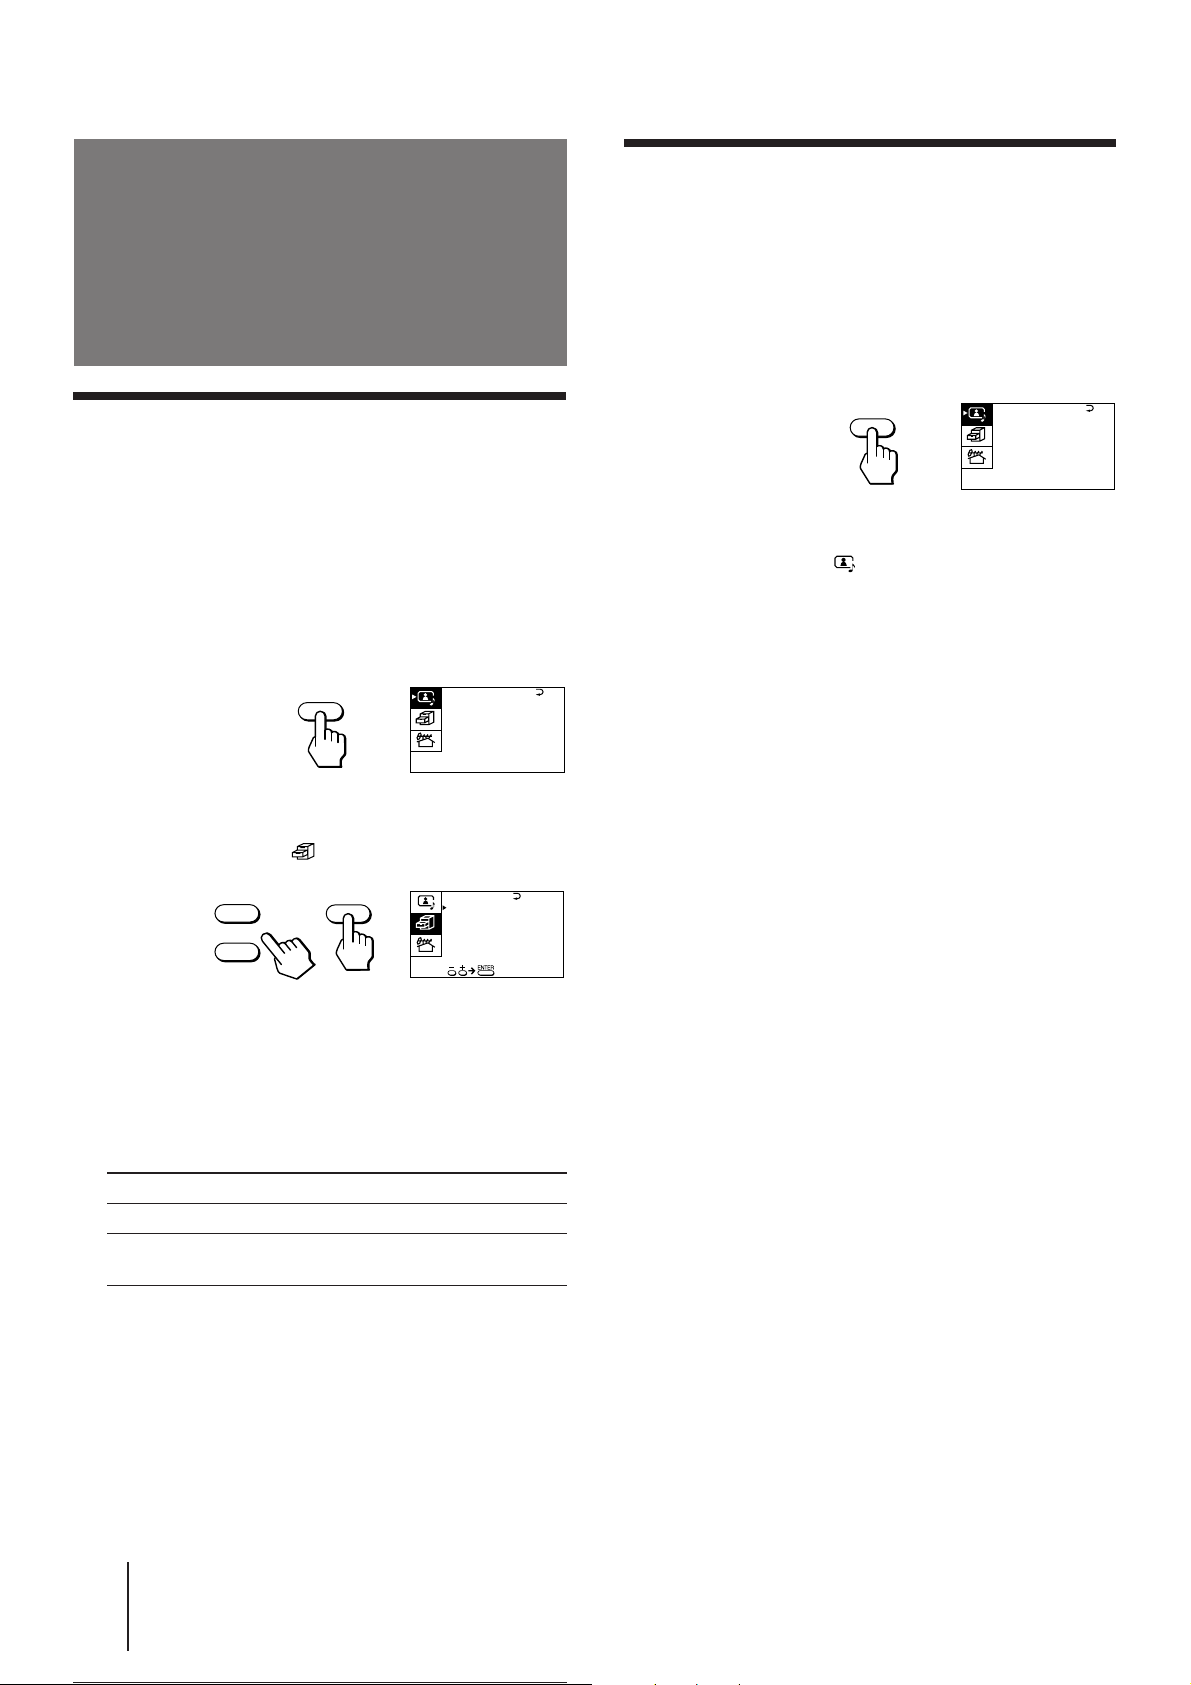
1 Press MENU.
Adjusting the picture tilt
p KV-J29MF1/J29MF1S/J29MH2/J29MN21 only
You can adjust the picture tilt if it is not aligned to the
TV screen. This may happen due to the direction of the
earth’s magnetic fields in relation to the TV position.
1 Press MENU.
2 Make sure the cursor (z) appears in the A/V
CONTROL menu ( ), and press ENTER.
3 Press + or – to move the cursor (z) to TILT
CORRECT, and press ENTER.
MENU
A / V CONTROL
DYNAMIC
STANDARD
SOFT
PERSONAL
V I DEO ADJUST
AUDI O ADJUST
2 Press + or – to move the cursor (z) to the
FEATURES menu ( ), and press ENTER.
+
ENTER
–
FE AT URES
SURROUND :
OFF
AV OUT :
MONITOR
3 Press + or – to move the cursor (z) to AV
OUT, and press ENTER.
4 Press + or – to select the output signal, and
press ENTER.
Select To
TV Output the signal of the TV broadcast.
MONITOR Output the signal of the picture you are
watching as a main picture.
4 Press + or – to select the most suitable
value to adjust the picture tilt, and press
ENTER.
TILT CORRECT:
–5 N –4 N –3 N –2 N –1 N 0 n +1 n +2 n +3 n +4 n +5
Press – Press +
Note
• Do not change the channel while recording with a VCR
through the MON/TV OUT jacks. If you change the channel, it
also changes the channel you are recording.
Operations
-EN
22
Page 23
Additional Information
Troubleshooting
If you have any problems, read this manual again and
check the countermeasure for each of the symptoms
listed below.
If the problem persists after trying the methods below,
contact your nearest Sony dealer or authorized service
center.
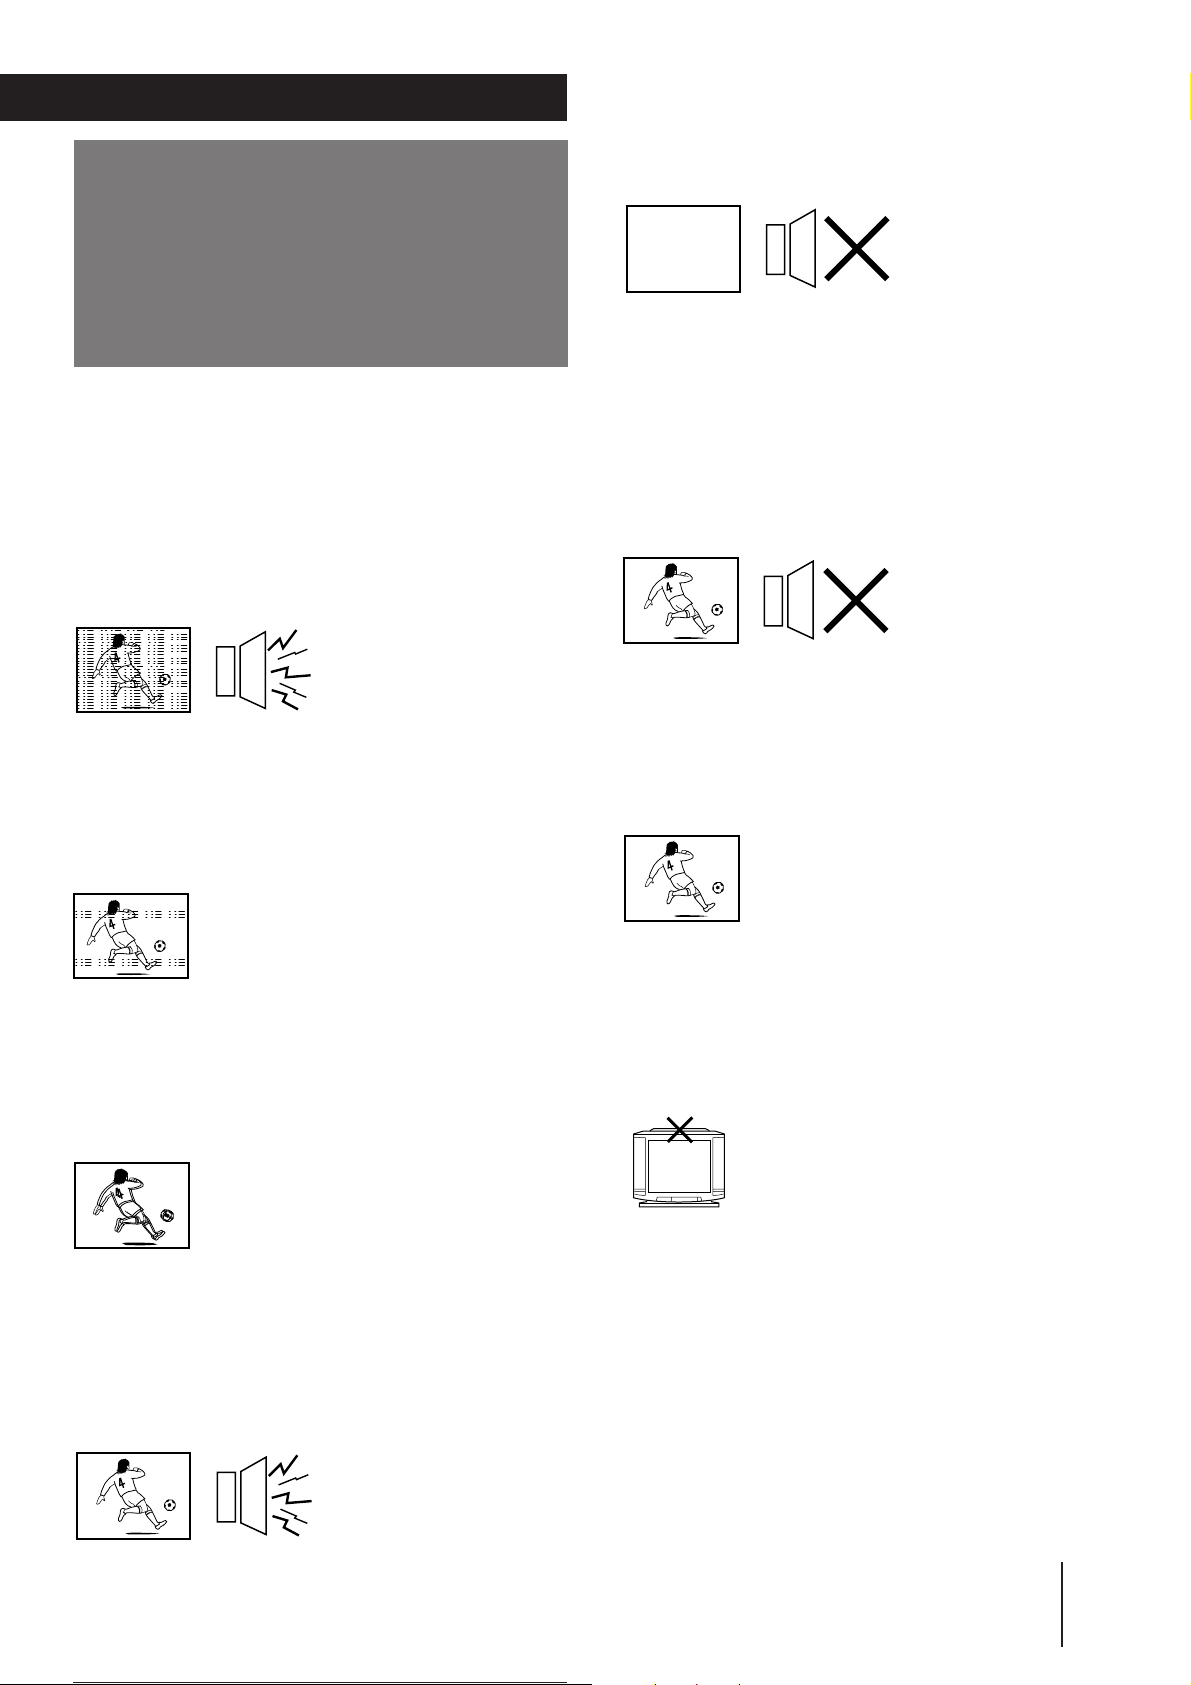
Snowy picture
Noisy sound
/ Check the antenna.
/ Check the antenna connection on the TV
and on the wall.
/ Check the TV system (TV SYS) setting.
No picture
No sound
/ Press POWER.
/ Press POWER to turn off the TV for about
five seconds and then turn it on again.
/ Check the power cord connection.
/ Check the antenna connection.
/ Check the VCR connections.
Good picture
No sound
/ Press VOL +.
/ Press MUTING.
/ Press A/B/ENLARGE (KV-J25MH2/
J29MH2/J25MN21/J29MN21).
No color
Dotted lines or stripes
/ This may be caused by local interference
(e.g. cars, neon signs, hair dryers, etc.).
Adjust the antenna for minimum
interference.
Double images or “ghosts”
/ This may be caused by reflections from
nearby mountains or buildings. A highly
directional antenna may improve the
picture.
Good picture
Noisy sound
/ Adjust the COLOR level in the VIDEO
ADJUST menu of the PERSONAL option.
/ Check the color system (COL SYS) setting.
No sound from 3D WOOFER
(KV-J25MH2/J29MH2/J25MN21/J29MN21 only)
/ Check the connection of the 3D WOOFER .
TV cabinet creaks
/ Even if the picture or the sound is normal,
changes in the room temperature
sometimes make the TV cabinet expand or
contract, making a noise. This does not
indicate a malfunction.
/ Check the TV system (TV SYS) setting.
Additional Information
Operations
23
-EN
Page 24
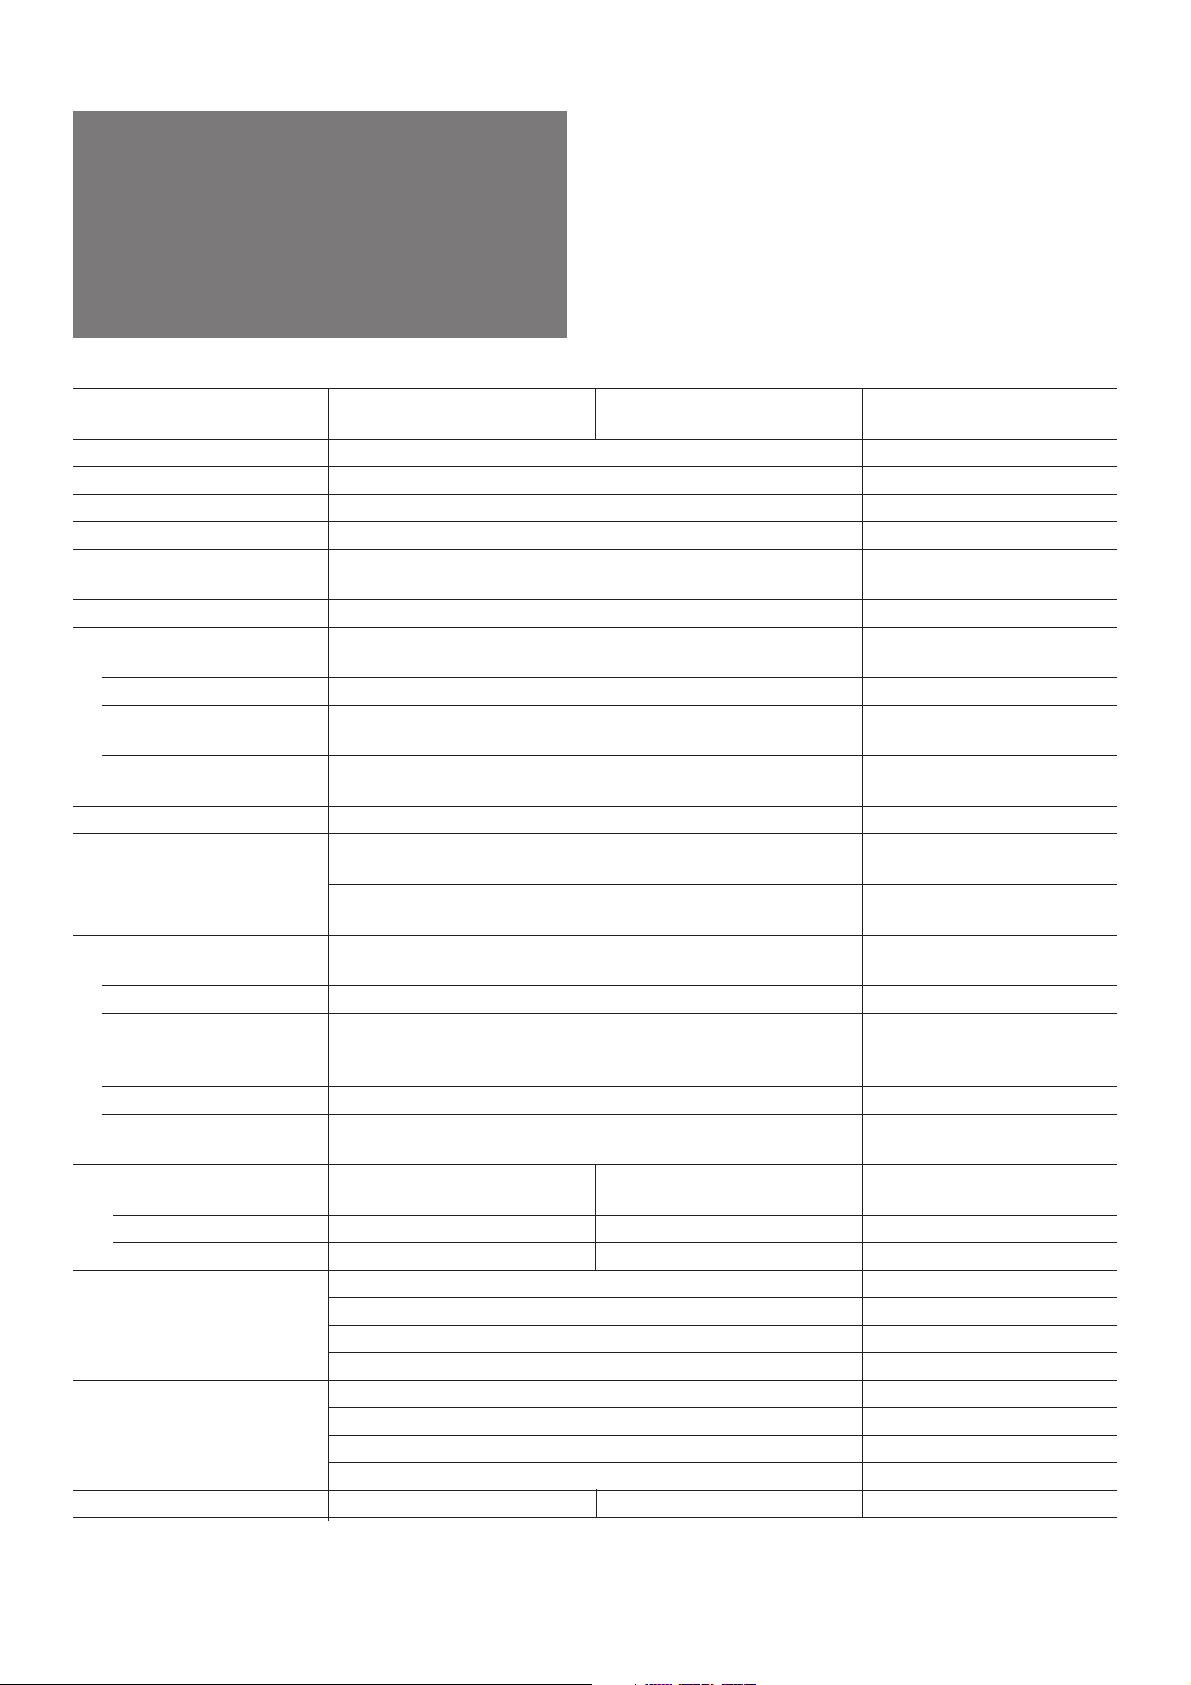
Specifications
Power requirements
Power consumption (W)
Television system
Color system
Stereo system
Teletext language
Channel coverage
B/G
I
D/K
M
Antenna
Audio output (speaker)
Number of terminal
Video
Audio
S Video
Headphone
3D WOOFER
Picture tube
Tube size (cm)
Screen size (cm)
Dimensions (w/h/d, mm)
Mass (kg)
Accessory (optional)
KV-J25MF1, KV-J25MF1S,
KV-J25MH2, KV-J25MN21
110-240 V AC, 50/60 Hz
Indicated on the rear of the TV
B/G, I, D/K, M
PAL, PAL 60, SECAM, NTSC4.43, NTSC3.58
NICAM Stereo B/G, I ; A2 Stereo (German) B/G KV-J25MH2/J29MH2/
English, German, Swedish, Italian, French, Spanish KV-J25MN21/J29MN21
VHF : E2 to E12 / UHF : E21 to E69 / CATV : S01 to S03, S1 to S41
UHF : B21 to B68 / CATV : S01 to S03, S1 to S41
VHF : C1 to C12, R1 to R12 / UHF : C13 to C57, R21 to R60 /
CATV: Z1 to Z39, S01 to S03, S1 to S41
VHF : A2 to A13 / UHF : A14 to A79/
CATV: A-8 to A-2, A to W+4, W+6 to W+84
75-ohm external terminal for VHF/UHF
5 W + 5 W + 15 W (3D WOOFER) KV-J25MH2/J29MH2/
6 W + 6 W KV-J25MF1/J29MF1/
Input : 3 Output : 1 Phono jacks; 1 Vp-p, 75ohms
Input : 3 Output : 1 Phono jacks; 500 mVrms
Input : 1 Y: 1 Vp-p, 75 ohms,
Output : 1 Minijack
Output : 1 KV-J25MH2/J29MH2/
Super Trinitron Super Trinitron Plus
(25 in.) (29 in.)
64 72 Measured diagonally
60 68 Measured diagonally
712 x 521 x 520 KV-J25MF1/J25MF1S
712 x 550 x 520 KV-J25MH2/J25MN21
780 x 577 x 542 KV-J29MF1/J29MF1S
780 x 601 x 542 KV-J29MH2/J29MN21
33 KV-J25MF1/J25MF1S
36 KV-J25MH2/J25MN21
43 KV-J29MF1/J29MF1S
46 KV-J29MH2/J29MN21
TV stand (SU-25H) TV stand (SU-29H)
KV-J29MF1, KV-J29MF1S,
KV-J29MH2, KV-J29MN21
Note
J25MN21/J29MN21
J25MN21/J29MN21
J25MF1S/J29MF1S
unbalanced, sync negative
C: 0.286 Vp-p, 75 ohms
J25MN21/J29MN21
Sony Corporation Tokyo, Japan
Design and specifications are subject to change without notice.
 Loading...