

Sony KV-HR32, KV-HR36 User Manual
SONY:
4-096-724-13 (1)
TrinitronColor TV
Operating Instructions
• Before operating the unit, please read this manual thoroughly
it for future reference.
and
retain
FD
Trlnltmn
EGA
KV-HR36
KV-HR32
© 2003 Sony Corporation
-I'W"-
MeMORY
STICKTM
I M31 I
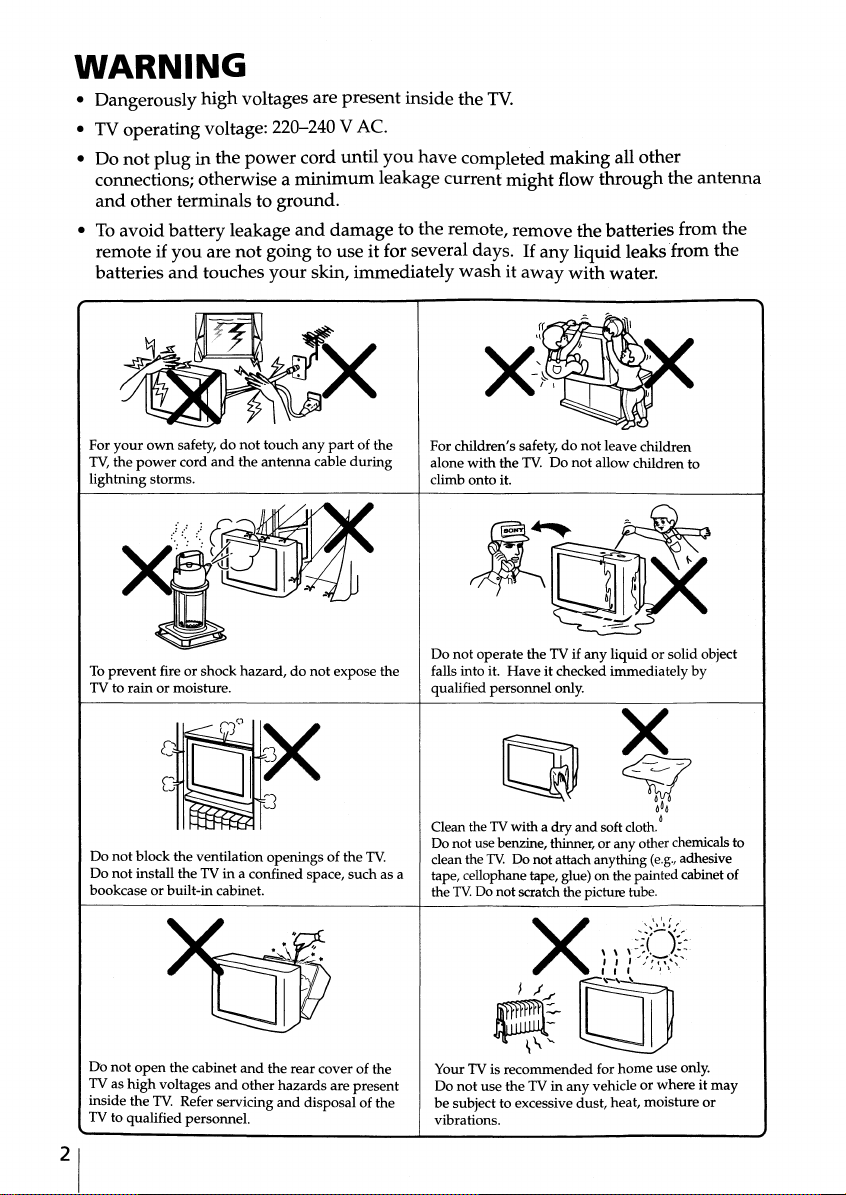
WARNING
• Dangerously
• TV operatingvoltage: 220-240 VAC.
• Do
not
connections; otherwise a
and
other terminals to ground.
• To avoid battery leakage
remote if you are
batteries
For
your
TV,the
power
lightning storms.
high
voltages are presentinsidethe
pluginthe
power
cord until
minimum
and
not
going to use it for several days. If any liquid leaks 'from the
and
touches your skin, immediately
own
safety, do not touch any
cord
and
the antenna cable
damage to the remote, remove the batteries from the
part
of the
during
TV.
you
have completed making all other
leakage current might flow throughthe antenna
washitaway
For children's safety, do not leave children
with
alone
climb onto it.
the TV. Do not allow children to
with
water.
To
prevent
fire or shock hazard, do not expose the
rain
TV to
Do not block the ventilation openings of the TV.
Do not install the TV in a confined space, such as a
bookcase or built-in cabinet.
Do not
TV as
inside the TV. Refer servicing and disposal of the
TV to qualified personnel.
or moisture.
open
the cabinet
high
voltages and other hazards are present
and
the rear cover of the
if
Do not operate the TV
falls into it.
qualified personnel only.
Have
any liquid or solid object
it checked immediately by
x
~
~
~Do
home
0
(e.g.,
adhesive
use only.
Clean the TVwith a dry and soft cloth.
Do not use benzine, thinner, or any other chemicals to
TV: Do not attach anything
clean the
tape, cellophane tape, glue) on the painted cabinet of
the
TV:Donot scratch the picture tube.
Your TV is recommended for
Do not use the TV in any vehicle or where it may
be subject to excessive dust, heat, moisture or
vibrations.

Install the TV on a stable TV
can
support
stand surface is flat
bottom area of the TV.
the TV set weight. Ensure
and
its area is larger
Do not place any
objects on the TV.The
apparatus
exposed to dripping or
splashing
objects filled
liquids, such as vases,
shall be placed on the
apparatus.
stand
and
and
floor which
that
shall not be
that
no
with
the TV
than
the
plug
in too
many
Do not
power
socket. Do not
Pull the
power
the
power
off, it is still connected to the AC
(mains) as long as the
Unplug
going to use it for several days.
cord itself. Even if
the TV before moving it or if you are not
appliances to the same
damage
cord
out
by the plug. Do not
power
the
your
power
cord is
power
TVis
plugged
cord.
pull
turned
source
in.
About
and
The top
Tokeep
• Avoid hitting
not
• Do
with
water, on the TV top. If any liquid fall into the cabinet, it
shock hazard.
the
side panels
and
side panels of
them
from discoloring, deterioration or scratching:
yourTVwith
putahot
glazed finish on
of
your
your
TV are glaze finished.
an object.
object such as a cup of coffee, or
x
the
top
TV
heavy
object such as a flower vase
may
cause fire or
The features you
will
enjoy include:
• "DRC-MF" for viewing higher quality
pictures (page 21)
• "TWIN" for viewing two programs
(page 28)
• "PROGRAM INDEX" for displaying
multiple programs (page 31)
• "Picture Mode"
"Surround"
(pages 20
/"Sound
for customizing
and
33)
• "Wide Screen" to enjoy
Mode"/
wide
your
mode
TV
pictures (page 24)
• "MEMORY STICK"
button
on the
remote control for viewing still pictures
and
movies stored in a "Memory
Stick"{page 42)
Your TV also offers the following features:
• Initial Setup function for on-screen language
selection, picture position adjustment
and
automatic channel presetting. (page 9)
•
Menu
language options
English/Chinese/
-
• "Program Block" for locking
Arabic (page 84)
out
specific
channels (page 93)
• "Intelligent Volume" for automatic
volume
adjustment (page 78)
tuning
• "Fine"
• ButtonJoystick
feature (page 89)
~
on the remote control for
easier operation (page 73)
• "Eco Mode" to save energy (page 85)
• "Game Mode" for video games (page 85)
Table
WARNING
of
Contents
Using Your
Getting Started 6
Step 1 Secure the TV 6
Step 2 Connect the
Step 3 Insert the batteries into the remote 8
Step 4 Set
Connecting optional components
Watching the TV 17
Advanced Operations
Selecting the picture
modes
Viewing higher quality pictures
Customizing
Clarity levels 22
Using
wide
Watching
time 28
Displaying multiple
Listening
Enjoying stereo or bilingual
programs
Viewing Teletext 36
Operating optional components 38
Using the TV's center speaker 41
Using the
New
up
your
the
picture Reality
screen
two
programs
with
surround
"Memory
TV
antenna
TV automatically 9
Adjusting Your Setup (MENU)
and
sound
and
mode
at the same
programs
sound
Stick" viewer ..42
20
21
24
31
33
34
Introducing the
Changing
Changing
Entering the
menu
Changing
setting
Operating
using
the
Changing
Additional
Troubleshooting 96
Self-diagnosis function...................
Identifying
Specifications
menu
the "Picture" setting 74
the
"Sound"
"Memory
the "Wide Screen"
the "Multi Picture"
menu
the "Setup" setting 84
Information
parts
and
11
system 70
setting 77
Stick"
controls ...... 103
7
Back
80
81
83
102
cover
TableofContents 1
5
Using
Your
New
TV
Getting
Step
Secure
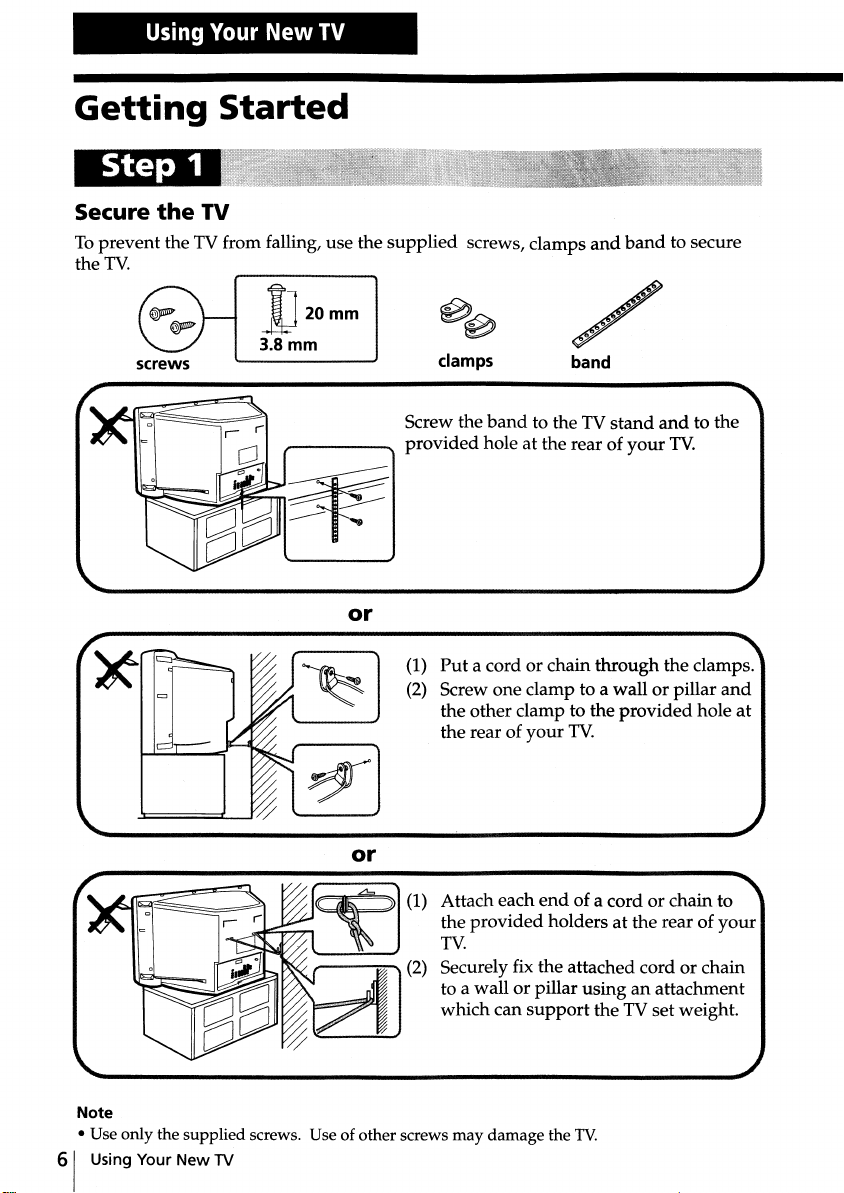
Toprevent the TV from falling, use the
the
the
TV.
screws
Started
1
TV
-lJ
3.8mm
20mm
,-----_
or
supplied
screws, clamps
and
band
/
clamps
Screw the
provided
(1)
(2) Screw one clamp to a wall or pillar
band
hole at the rear of
Put
a cord or chain through the clamps.
the other clamp to the provided hole at
the rear of
band
to the TV
your
TV.
stand
your
and
to secure
to the
TV.
and
or
(1) Attach each
.,,---~
Note
• Use only the supplied screws. Use of other screws may
61
Using Your New TV
......
(2) Securely fix the attached cord or chain
end
of a cord or chain
the provided holders at the rear of
TV.
to a wall or pillar using an attachment
which can
damage
support
the TV set weight.
the
TV.
to
your

Step
2
Connect
If
you
the
antenna
wish to connect a VCR, see the "Connect a VCR" diagram on page 8.
Antenna cable
(supplied)
with
filter
or
with
Performance
one
end
with
filter
of the cable has a male
plug
a female socket. Connect the male
TV.
Antenna cable
(supplied)
~
: Signal
flow
For
optimum
Toconnect the TV to the antenna or the VCR, use the supplied
antenna cable with filter.
Note
that
end
is fitted
(antenna) terminal of the
Rear of TV
fitted while the other
plug
to the
lr
CAUTION
Do not connect the power cord until all other connections are complete;
otherwise, a minimal current leakage through the antenna
terminals to the ground could occur.
and/
or other
continued
Using Your New TV
17

Getting
Started
Connect a VCR
To
playa
video tape, press -EJ (see page 18).
e========~
Toantenna
output VCR
Tovideo and
audio outputs
~
~
1'~_~_~
: Signal
flow
Notes
• If you connect a monaural VCR, connect the yellow
• If you connect a VCR to the
• When you connect a VCR to the Svideo input, display the "Setup"
(continued)
~
Antenna cable
(supplied)
Audio/Video cable
(not supplied)
and
jack)
the black
with
To lr (antenna)
filter
Rear
plug
to JLL (MONO) (the white jack).
--------
of TV
To
~_:.......v
@ (yellow)
.P-L(MONO) (white)
.P-R
lr (antenna) terminal, preset the signal
output
from the VCR to the program
and
select 11Auto" for "5
both-8(5 video input)
automatically selected. Toview the video signal
select "Off" for "S Input".
Input"
and@
number
(see page 86). If the signals are
(video input), the 5 video signal is
-8
1, 2 or 3 (video input)
(red)
plug
to @ (the yellow
0 on the TV.
input
to @ (video input),
input
....
menu
to
Insert
the
81
Step
the
remote
Using Your
3
batteries
Note
• Do not use old batteries or different types of batteries together.
New
TV
into
Step
4
Set up
When
menus
the inclination of picture, shift of the picture vertical position,
caused by the earth's magnetic field. (These
problem.) Adjust "Picture Rotation"
Tip
•
When
and
1
your
TV
automatically
you first
will
you
"Picture V-Position" using the
PressCDto turn on
The "Initial Setup"
appears,
the on-screen language.
turned
on the TV,the "Picture Rotation"
appear
install the TV to another location, make sure to adjust "Picture Rotation"
in the process of "Initial Setup". These
phenomenadonot
and
"Picture V-Position" appropriately.
menu
(see
page
the
TV.
menu
and
you
can select
87).
and
menus
~
"Picture V-Position"
allow you to adjust
and
color patches
indicate the TV's
_
MENU
2
Move~up or
select
the
language, then press
"Start auto
appears.
3
Move~up or
select "Yes", then press
~
to preset the
channels automatically.
The screen will indicate automatic presetting is in
progress. After channel presetting is complete, the
"Picture Rotation"
down
desired
program
down
now?"
menu
to
(@).
to
appears.
+
•
Program:
TV
VHF Low: u "' " • ..
•
First
pIease
auto
09
connect
program
continued
cable/antenna
Start
System:Auto
Using Your New 1V
now?
19
Getting
Started
(continued)
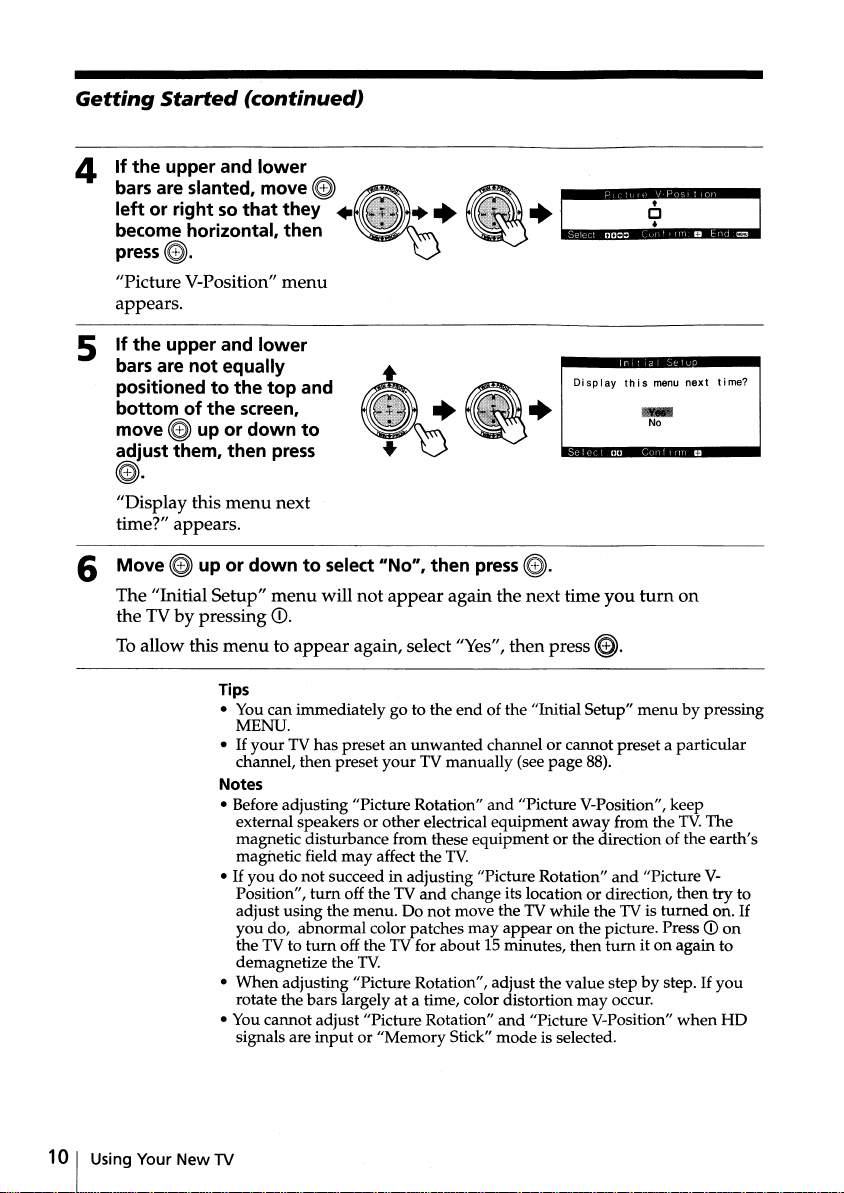
4 If the upper and lower
E~:~=i~~~:!~E~~:f
.~.
~.
t..::J::-_J
press@). V
"Picture V-Position"
appears.
If the upper and lower
5
bars are not equally
positioned to the top and
bottom of the screen,
~
move
adjust them, then
up or down to
menu
press
•
Display
this
menu
..
No
next
time?
~.
"Display this
time?" appears.
6 Move
The "Initial Setup"
the TV by pressing
To allow this
menu
next
~
up or down to select "No", then
menu
will
not
appear
CD.
menutoappear
Tips
• You can immediately go to the
MENU.
•
If
your
TV has preset an
channel,
Notes
• Before adjusting "Picture Rotation"
external speakers or other electrical
magnetic disturbance from these
magnetic field
•
If
you
do not succeed in adjusting "Picture Rotation"
Position",
adjust using the menu. Do
you
do, abnormal color patches may
the TV to
demagnetize the
•
When
adjusting "Picture Rotation", adjust the value step by step.Ifyou
rotate the bars largely at a time, color distortion
• You cannot adjust "Picture Rotation"
signals are
again, select "Yes", then
then
preset
your
may
affect the TV.
turn
off the TV
turn
off the TV for about 15 minutes,
TV.
inputor"Memory
press~.
again the next time
press~.
end
of the "Initial Setup"
unwanted
TV manually (see
and
channel or cannot preset a particular
and
equipment
change its location or direction,
not
move the TV while the TV is
Stick"
page
"Picture V-Position", keep
equipment
appear
and
mode
away
or the direction of the
on the picture. PressCDon
then
"Picture V-Position"
is selected.
you
menu
88).
from the TV.The
and
turn
may
occur.
turn
on
by pressing
earth's
"Picture V-
then
try to
turned
on.
it on again to
when
If
HD
10 I Using Your
New
TV
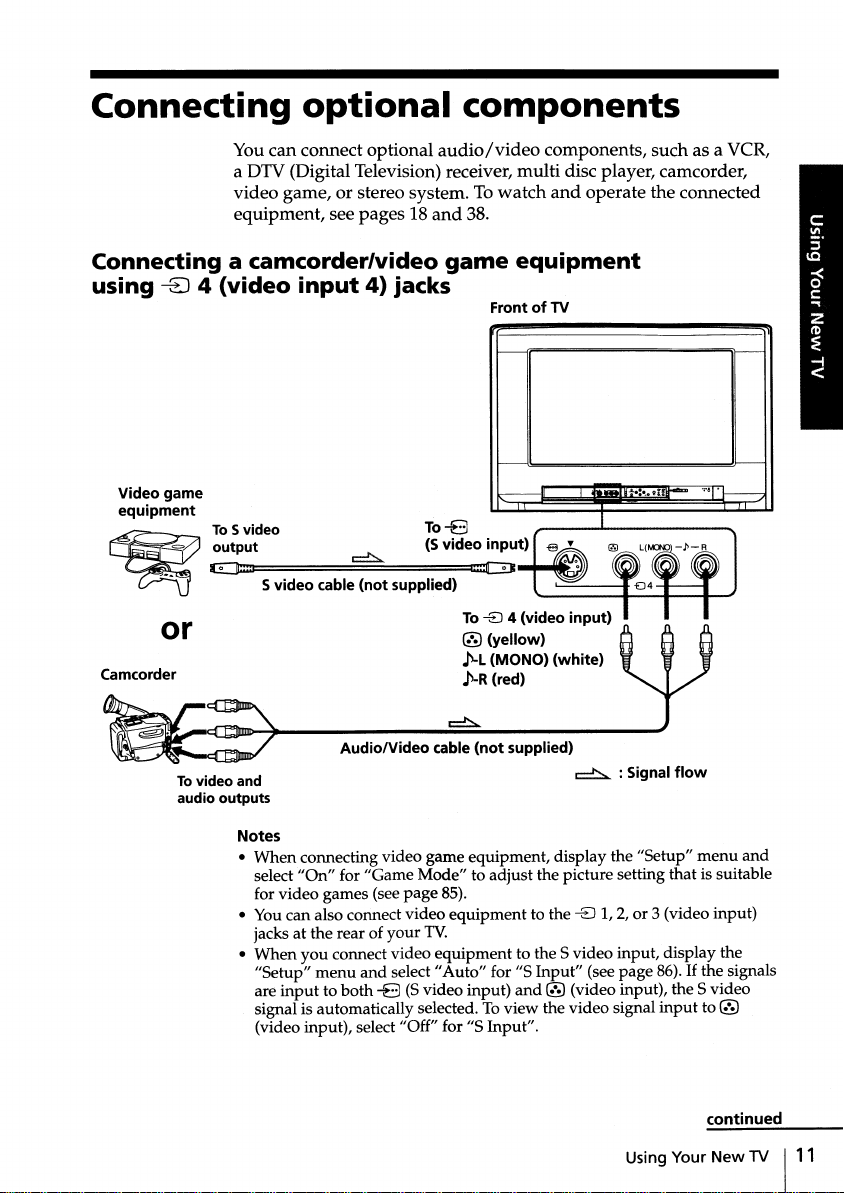
Connecting
optional
components
Youcan connect optional
a DTV (Digital Television) receiver, multi disc player, camcorder,
video game, or stereo system. To
equipment, see pages 18
Connecting a camcorder/video
using
-8
Video game
equipment
;>_~
~
4
(video
To
S video To
output
E]:::L
input4)jacks
~
Svideo cable (not supplied)
or
Camcorder
audio/video
watch
and
38.
game
Front of TV
-8
(5 video input)
t::CDt
To
-8
4 (video input)
® (yellow)
~L
(MONO)(white)
~-R
(red)
components, such as a VCR,
and
operate the connected
equipment
----.---nIII"'"~
.III
"'-
....._ ......_
....
.,.,
Tovideoand
audio outputs
Notes
•
When
select
for video games (see
• You can also connect video
jacks at the rear of
•
When
"Setup"
are
signal is automatically selected. To view the video signal
(video input), select "Off" for "5 Input".
Audio/Video cable (not supplied)
~
: Signal
connecting video game equipment, display the "Setup"
"On"
for "Game Mode" to adjust the picture setting that is suitable
you
connect video
menu
inputtoboth-8(Svideo input)
and
page
your
select"
85).
equipment
TV.
equipment
Auto"
to the -EJ 1, 2, or 3 (video input)
to the 5 video input, display the
for "5
Input"
(see
and
® (video input), the 5 video
page
Using Your
flow
menu
and
86).Ifthe signals
input
to ®
continued
New
TV
1"

Connecting
optional
components (continued)
Connecting audio/video
(monitor
Rear of TV
ToG
(monitor
output)
output)
jacks
® (yellow)
~l
(MONO)
(white)
~R
(red)
Audio/Video cable (not supplied)
Note
• If
you
select
sound
"HD
will be heard
18),
output). This does not indicate a malfunction.
equipment
lr Antenna cable (supplied)
using
a-~~
Toantenna
output
IDVD
1" or
"HD
but
IDVD
no picture will be
the
Audio cable
(not supplied)
~
2" on
your
output
G
or
Audio system
To
~
audio
inputs
: Signal
TVscreen (see
from G (monitor
.
flow
page
12
1 Using Your
New
TV
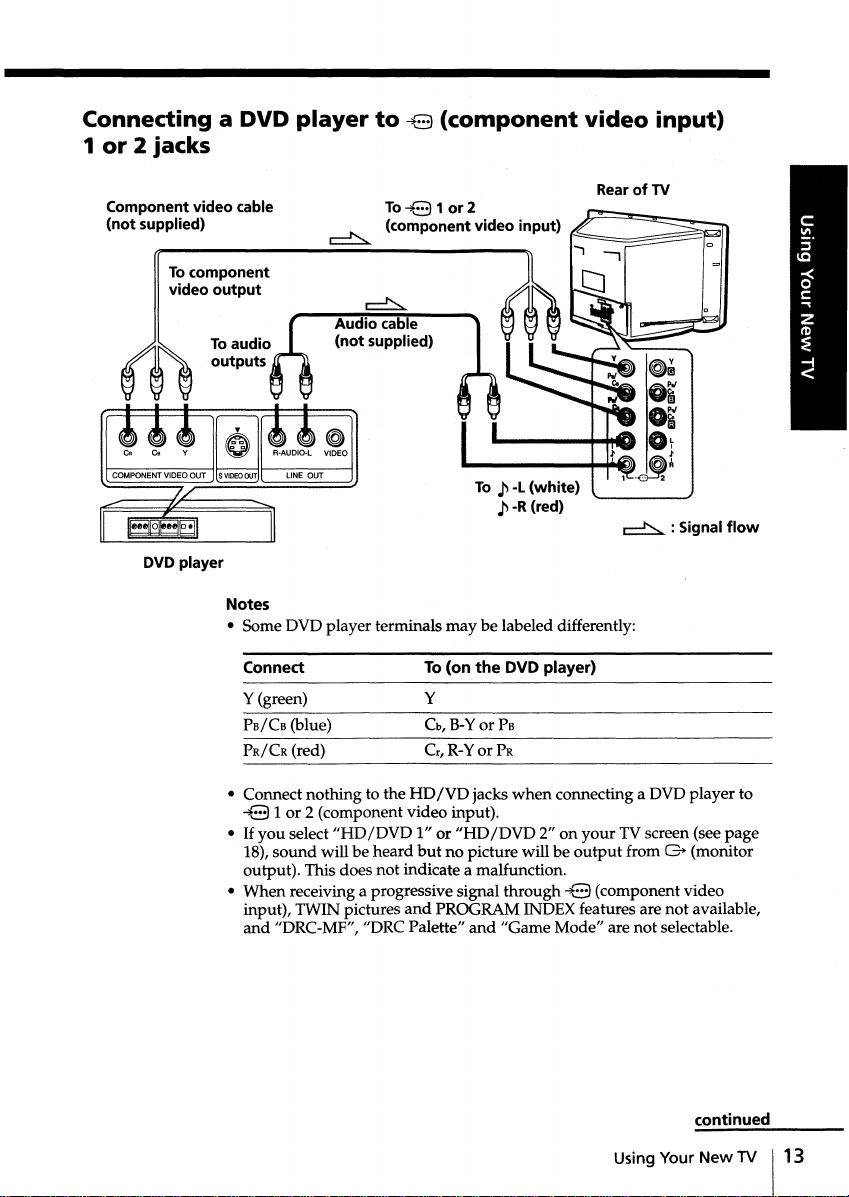
Connecting a DVD
1or2 jacks
Component video cable
(not supplied)
To component
output
video
DVD player
Notes
• Some DVD player terminals may be labeled differently:
player
~
Audio cable
(not supplied)
to
~8
(component
To~81
(component video input)
or2
To
.p
-l
.p
-R (red)
(white)
video
Rear
~
input)
of
TV
: Signal
flow
Connect
Y(green)
PB/CB
(blue)
PR/CR
(red)
• Connect nothing to the HD
~8 1 or 2 (component video input).
•
If
you select
18),
sound
output). This does not indicate a malfunction.
• When receiving a progressive signal through
input), TWIN pictures
and
"HD
will be heard
"DRC-MF", "DRC Palette"
To (on the DVD player)
Y
o,
B-Yor
c.R-Yor PR
IVD
IDVD
1" or
"HD
but
no picture will be
and
PROGRAM INDEX features are not available,
PB
jacks
when
IDVD
2" on
and
"Game Mode" are not selectable.
connecting a DVD player to
your
TV screen (see page
output
from G (monitor
~8
(component video
continued
Using Your
New
TV
113
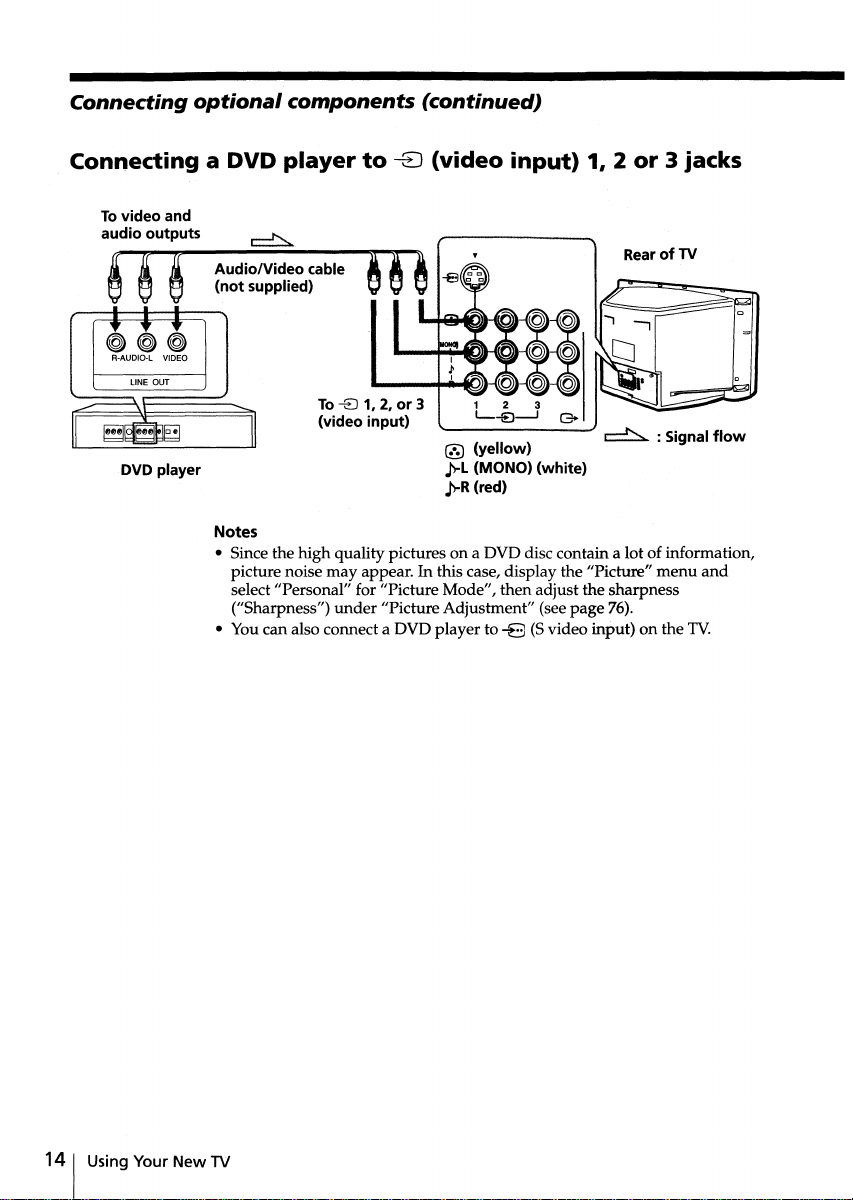
Connecting
optional
components (continued)
Connecting a
Tovideo and
audio outputs
~~~
R-AUDIO-L VIDEO
DVD player
DVD
player
Audio/Video cable
(not supplied)
Notes
• Since the high quality pictures on a DVD disc contain a lot of information,
picture noise may appear. In this case, display the "Picture"
select "Personal" for "Picture Mode", then adjust the sharpness
("Sharpness")
• You can also connect a DVD player to
to
To
-EJ 1, 2, or 3
(video input)
under
"PictureAdjustment" (see page 76).
-EJ
(video
@ (yellow)
p-L
(MONO)
p-R (red)
input)
-B
1, 2or3 jacks
~
(white)
(Svideo input) on the
Rear of TV
: Signal
menu
flow
and
TV.
14
1 Using Your New TV
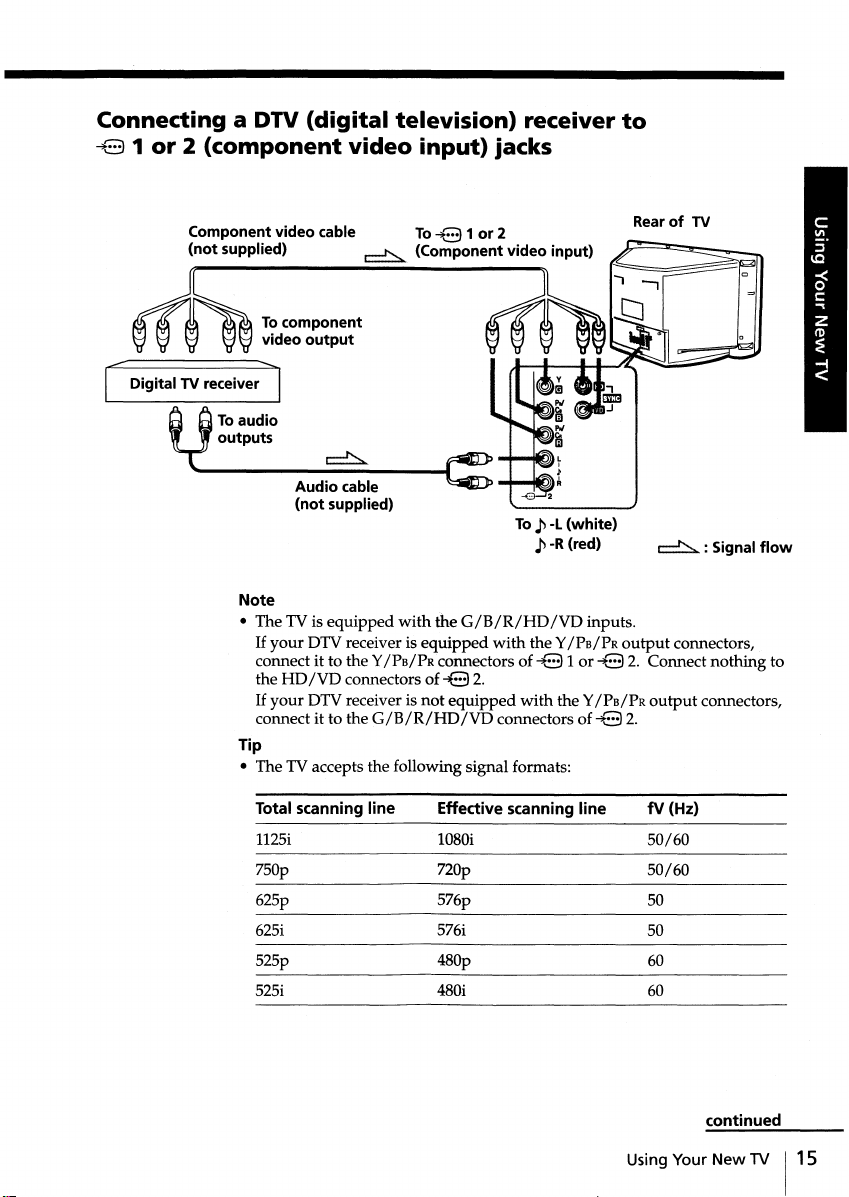
Connecting a DTV
~8
1
or2(component
(digital
video
television) receiver
input)
jacks
to
Component video cable To~81 or 2
(not supplied)
1""'-
Digital TV receiver
t)ToaUdiO
~
(Component video input)
Tocomponent
video output
........
1
outputs
Audio cable
(not supplied)
Note
• The TV is equipped
If
your DTV receiver is equipped
connect it to the Y
the
HD
/VD
If
your
DrV
connect it to the G
Tip
• The TV accepts the following signal formats:
with
the
G/B/R/HD/VD
/Pa/Psconnectors of
connectors of-e2.
receiver is not
/B
/R/HD
equipped
/VD
with
connectors of~82.
To
~
-l
(white)
~
-R(red)
the Y/PB/PR
~81or~8
with
the Y/PB/PR
Rear of TV
~
inputs.
output
connectors,
2. Connect nothing to
output
: Signal
flow
connectors,
Total scanning line
1125i
Effective scanning line
1080i
tv (Hz)
50/60
750p 720p 50/60
625p
625i
525p 480p
525i
576p
576i
480i
50
50
60
60
Using Your
continued
New
1V
115
Connecting
optional
components (continued)
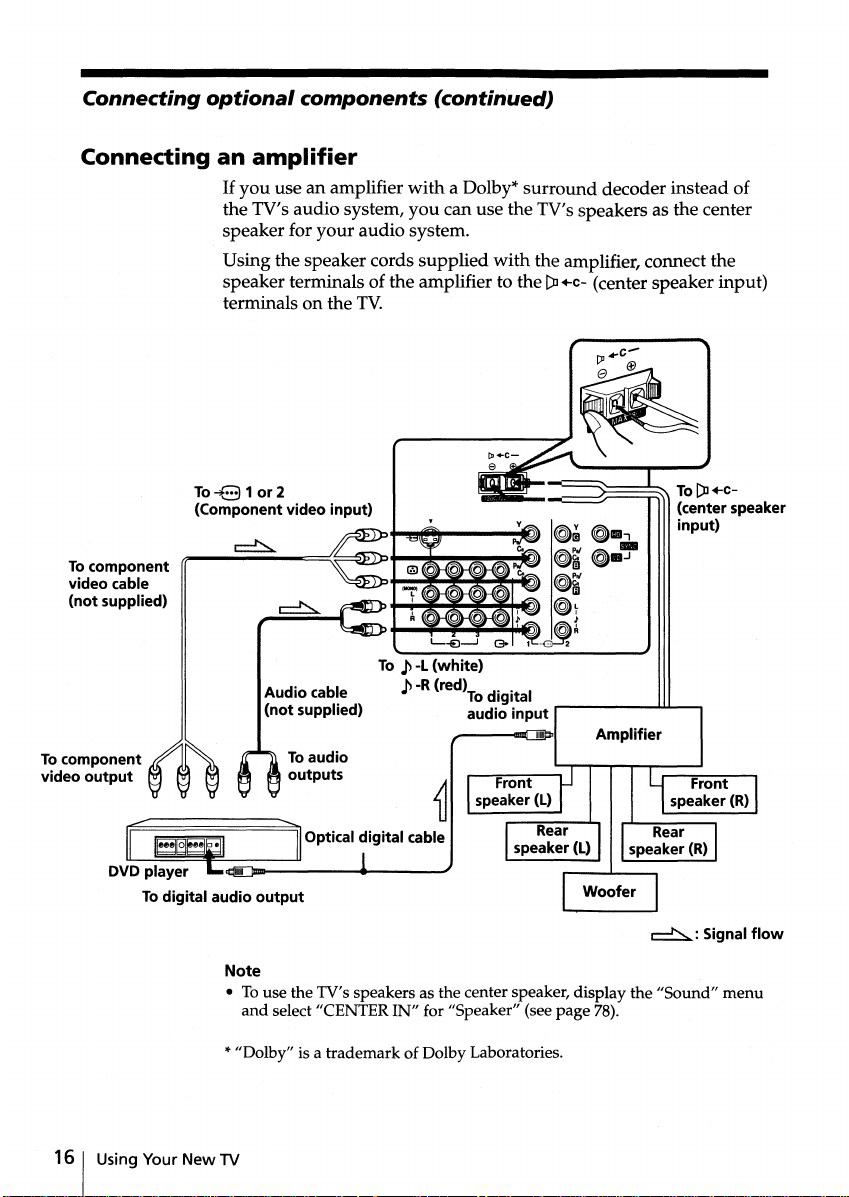
Connecting an
Tocomponent
video cable
(not supplied)
To component
video output
amplifier
If
you
use an amplifier
the TV's audio system,
speaker for
your
Using the speaker cords supplied
speaker terminals of the amplifier to the
terminals on the
To~81
(Component video input)
or2
Audio cable
(not supplied)
Toaudio
outputs
with
you
can use the TV's speakers as the center
audio system.
TV.
.p
-L (white)
To
.p
-R(red)
a Dolby*
Todigital
audio input
surround
with
the amplifier, connect the
-iIJIiII;~-=====!r===r,,\
..
decoder instead of
[):J+c- (center speaker input)
To
[):J
+c-
(center speaker
input)
Amplifier
16
1 Using Your
DVD player
Todigital audio output
New
TV
~:
Note
• To use the TV's speakers as the center speaker, display the "Sound"
and
select "CENTER IN" for "Speaker" (see page 78).
*"Dolby" is a trademark of Dolby Laboratories.
Signal
menu
flow
Watching
the
TV
,,--------D*
_L-...,t::.===::---@
G)
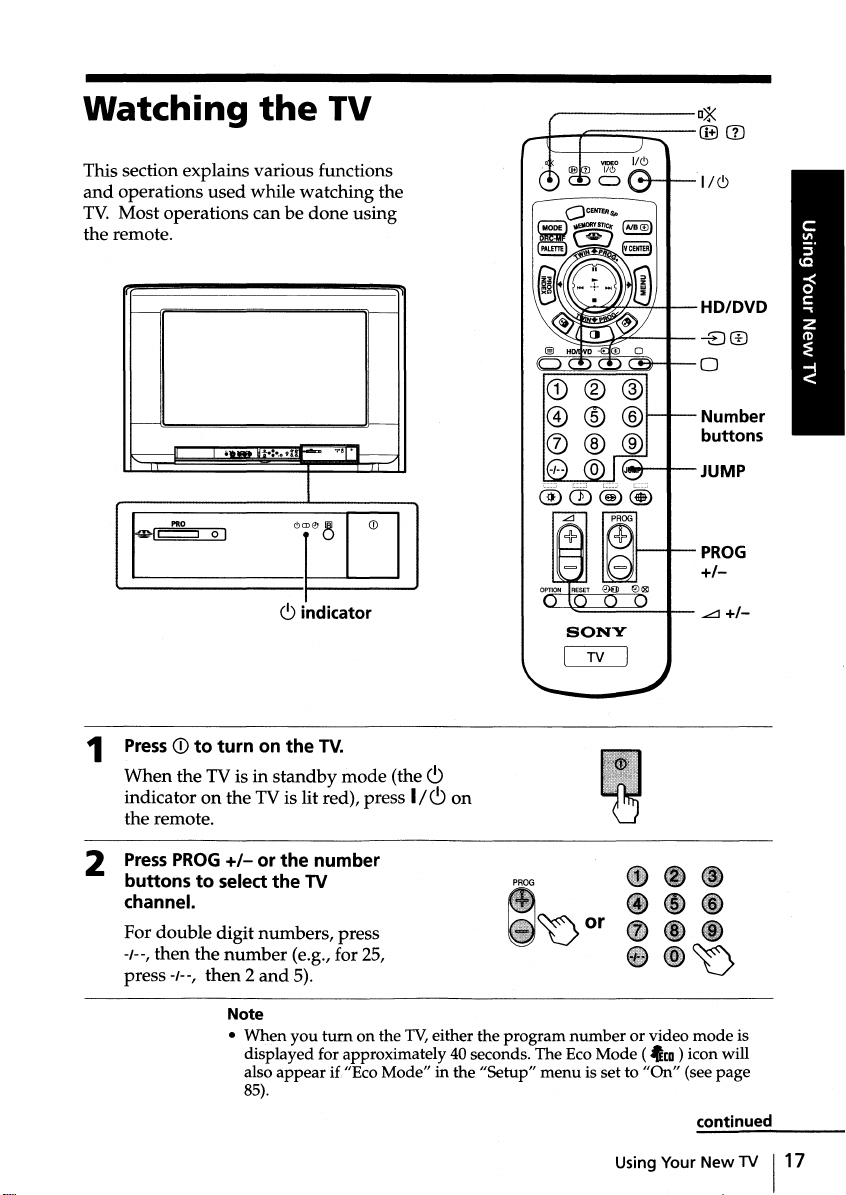
This section explains various functions
and
TV.
operations
Most
used
while
operations can be
watching
done
using
the remote.
"'8
Ur-m
GCDe
~
indicator
TV.
.~
CD
mode
1
PressCDto
When
indicator on
,.-----II
___
I
c:::::::J
PRO
the
na
....
~
~.:.,o
9
01
c9
turnonthe
TV is in
standby
the
TV is lit red), press
the remote.
the
(the
<9
1/<9
on
"-
~~"+-=+-----
~~-+---
""""-+-JUMP
1..--_._-
SONY
LiU
1/<9
HD/DVD
-EJ®
o
Number
buttons
PROG
+1-
Press
2
buttonstoselect
channel.
For
double
-1--,
then
-1--,
press
PROG
the
then2and
+/-
or
the
digit
number
number
the
TV
numbers,
(e.g., for 25,
press
PROG
'\J0r
5).
Note
• When
you
tum
displayed for approximately 40 seconds. The Eco Mode (
also
appear
85).
on the TV,eitherthe
if "Eco Mode" in the "Setup"
program
menu
number
or video
tco ) icon will
is set to
"On"
Using Your New TV
mode
(see page
continued
is
117
Watching
select
To
the
TV (continued)
a TV program quickly
1 Press
2 Release PROG +/-
Note
•
and
When
you
This does
hold PROG +
select a TV
not
indicate a malfunction.
/-.
when
the desired program
program
quickly, the picture
number
may
be disrupted.
appears.
Additional
tasks
To
Tum
off temporarily
Tum
off completely
Adjust the volume
Mute the
Watch the video
(VCR,camcorder, etc.)
Watch the component
input
(DVD, DTV receiver)
Jump
previous channel
Display the on-screen
information*
* Some
sound
back to the
picture/sound
mode
are displayed. The on-screen display for the
disappears after
input
about
Press
1/c9.
Thec9indicator on the TV lights up red.
CD
on the TV.
~+/-.
-EJ(or -EJon the TV) to select "VIDEO 1",
"VIDEO 2", "VIDEO 3", "VIDEO 4",
1" or
To
the TV).
HD/DVD
2".
To
the TV).
JUMP.
eEl.
settings,
3 seconds.
"HD/DVD
return
return
and
either the
2".
to the TV screen, press 0 (or -EJon
to select
"HD/DVD
to the TV screen, press 0 (or -EJon
program
number
picture/sound
1" or
"HD/DVD
"HD/DVD
or video
settings
18
1 Using Your New TV
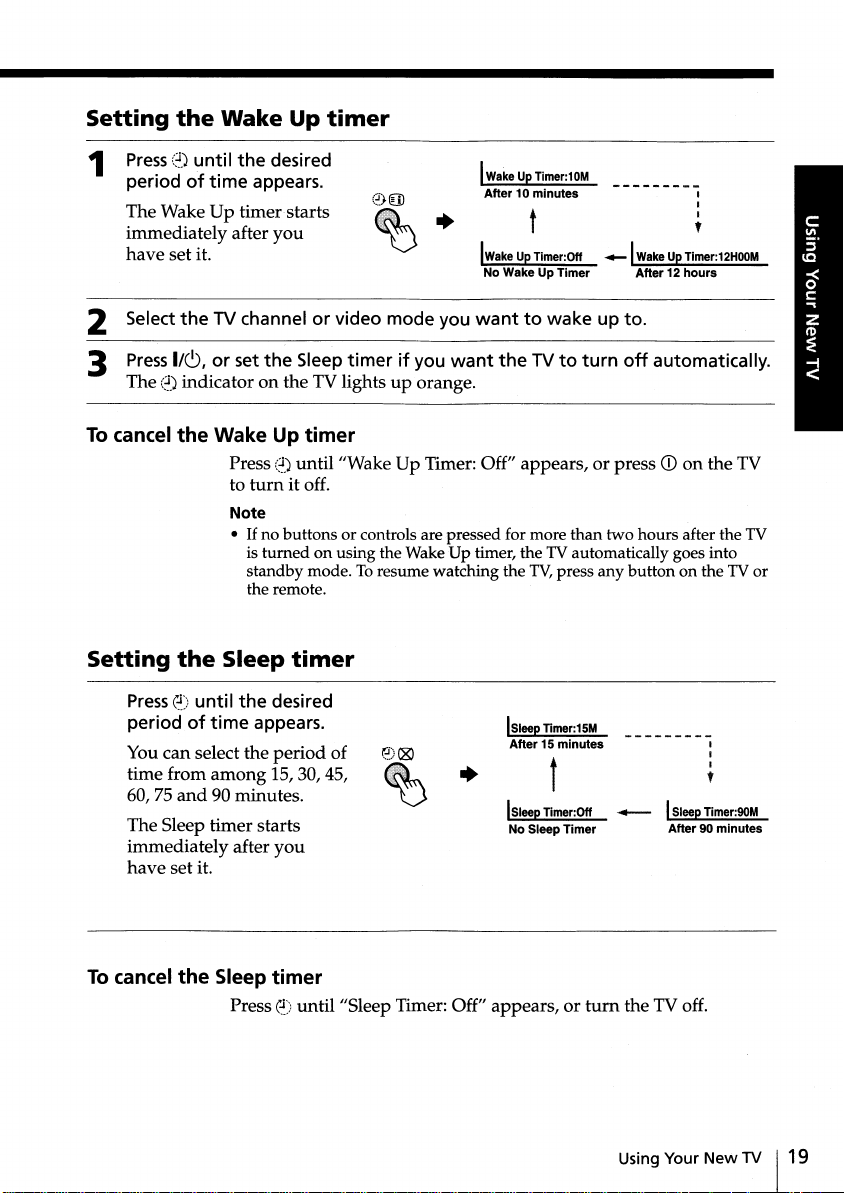
Setting
1
the
Wake
Press
::~)
until
of
period
The Wake Up timer starts
immediately after you
have set it.
time
the
desired
appears.
Up
timer
~
WakeUpTimer:10M
After10minutes
t
IwakeUpTimer:Off
No Wake Up
Timer
....-1
WakeUpTimer:12HOOM
After12hours
I
I
I
,
2 Select
3
To cancel
Setting
the
TV channel or video mode you
Press
1/(9, or set
The
::~)
indicator on the TV lights up orange.
the
Wake Up
Press
to
Note
•
If
is
standby mode. To resume watching the TV,press any
the remote.
the
Sleep
Presse)until
period
You can select the period of
time from
60, 75
and
The Sleep timer starts
immediately after
have
set it.
the
of
time
among
90 minutes.
wanttowake up to.
the
Sleep
timerifyou
want
theTVto
timer
::~)
until"Wake
turn
it off.
no buttons or controls are pressed for more
turned
on using the
Up Timer: Off" appears, or press Q) on the TV
WakeUp
timer, the TV automatically goes into
timer
desired
appears.
IS, 30, 45,
+
ISleep Timer:15M
After15minutes
ISleep Timer:Off
you
No Sleep
turn
off
than
two hours after the TV
button
t
........-
Timer
automatically.
on the TV or
I
I
I
,
ISleepTimer:90M
After90minutes
To cancel
the
Sleep
Presse)until"Sleep
timer
Timer: Off" appears, or
turn
the TV off.
Using Your
New
TV
119
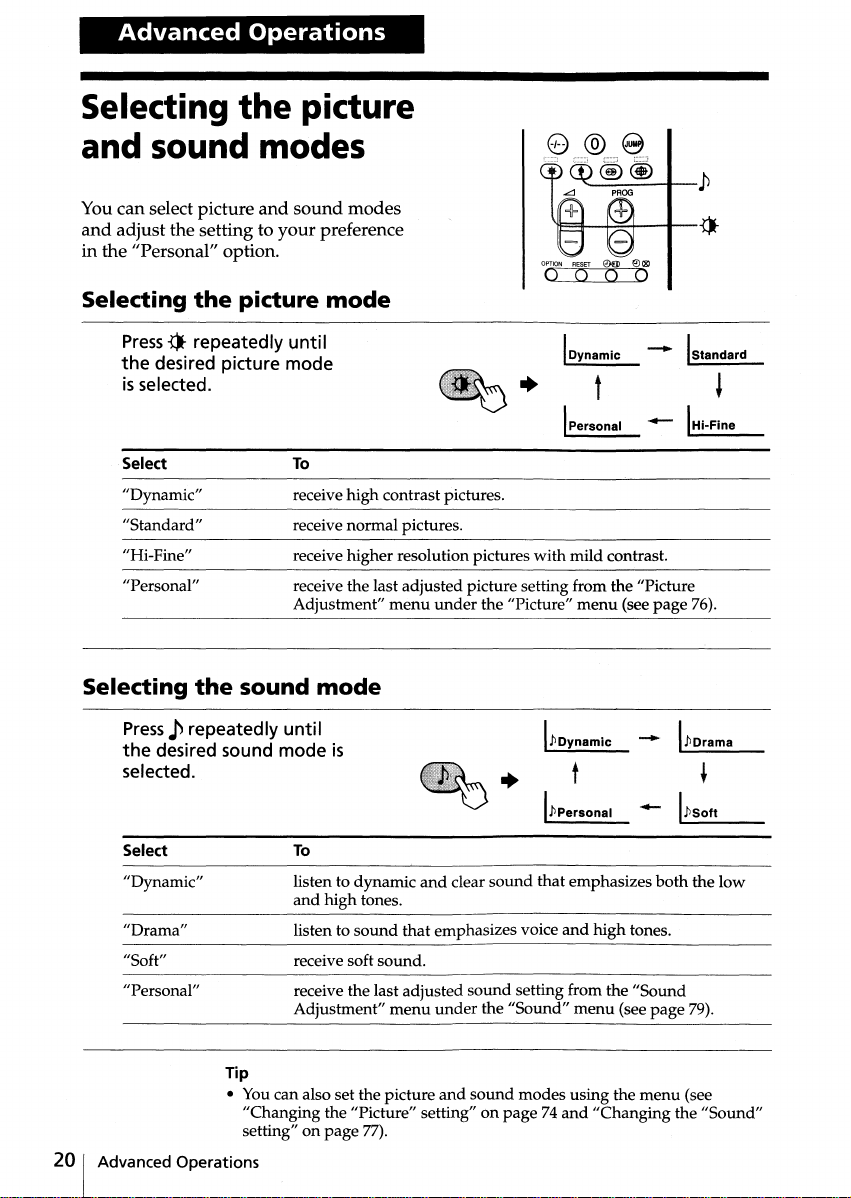
Advanced
Operations
Selecting
the
picture
and sound modes
You can select picture
and
adjust the setting to
in the "Personal" option.
Selecting
Press
the
isselected.
Select
"Dynamic"
"Standard"
"Hi-Fine"
"Personal"
Selecting
the
1)-repeated Iy
desired picture mode
the
and
sound
modes
your
preference
picture
mode
until
To
receive
high
receive normal pictures.
receive higher resolution pictures
receive the last adjusted picture setting from the "Picture
Adjustment"
sound
mode
contrast pictures.
menu
under
the "Picture"
"-------.P
l'F=fI--~+---.....--{J-
I
Dynamic
with
mild contrast.
menu
--.....
IStandard
t
.-.
(see
page
~
IHi-Fine
76).
Press,p repeatedly
the
desired sound mode is
selected.
Select
"Dynamic"
"Drama"
"Soft"
"Personal"
Tip
• Youcan also set the picture
"Changing the "Picture" setting" on
setting" on
Advanced Operations
until
To
listen to dynamic
and
high
listen to
receive soft sound.
receive the last adjusted
Adjustment"
sound
page
and
tones.
that
menu
77).
~
clear
sound
that
emphasizes voice
sound
under
and
setting from the
the
"Sound"
sound
modes using the
page74and
I./JDynamlC
t
I./Jpersonal -
emphasizes
and
high
menu
(see
"Changing the
-
both
tones.
"Sound
page
menu
I./JDrama
~
1_.P_SO_f_t
__
the low
79).
(see
"Sound"
Viewing
higher
quality
-
IIDRC-MF
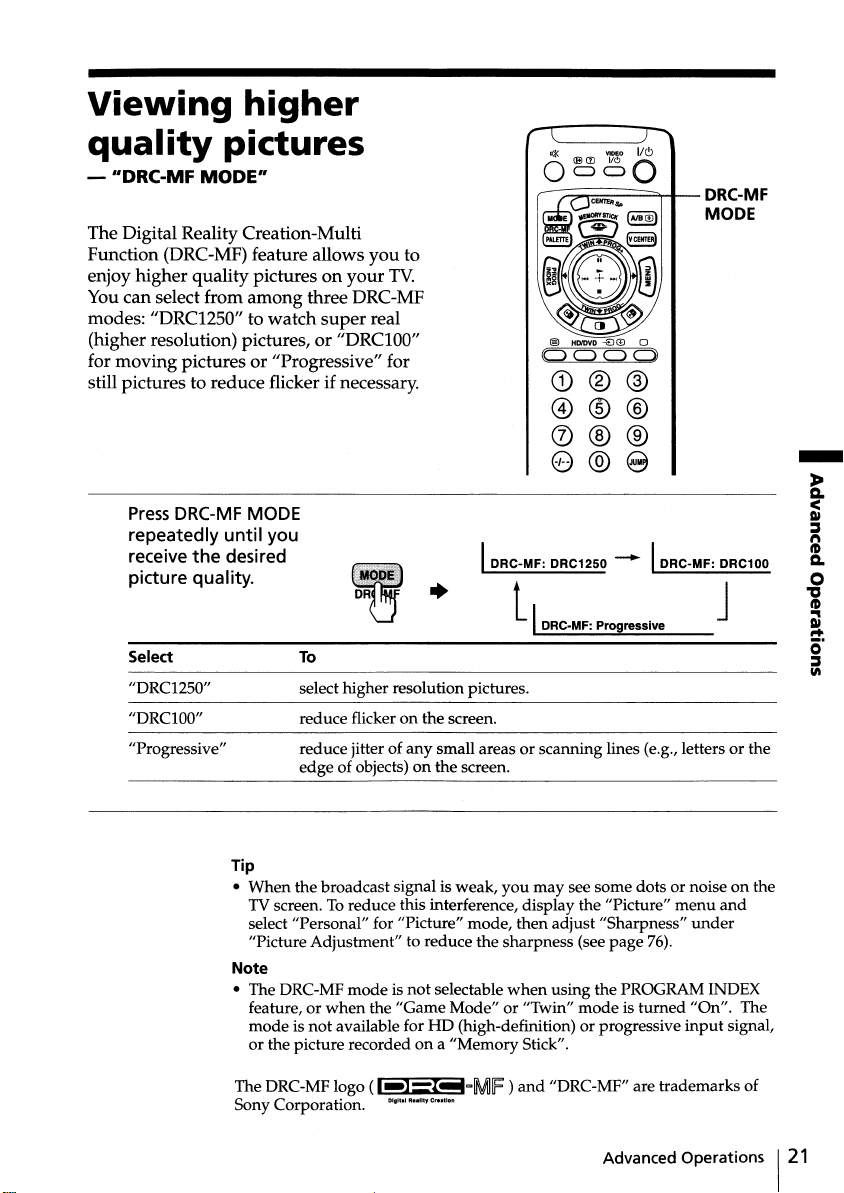
The Digital Reality Creation-Multi
Function (DRC-MF) feature allows you to
enjoy higher quality pictures on
You can select from among three DRC-MF
modes: "DRC1250" to watch
(higher resolution) pictures, or
for moving pictures or "Progressive" for
still pictures to reduce flicker if necessary.
pictures
MODE"
your
super
"DRCIOO"
real
TV.
......,~--~-
®
.HDlDVD
-€)
ill
C)
<::) <::)
0
C)
(D@@
@®®
(J)@@
e@e
Press
DRC-MF MODE
repeatedly until you
the
receive
picture quality.
Select
"DRC1250"
"DRCIOO"
"Progressive" reduce jitter of any small areas or scanning lines (e.g., letters or the
desired
I
DRC-MF:
DR~
•
To
select higher resolution pictures.
reduce flicker on the screen.
edge
of objects) on the screen.
+
DRC1250
t . J
IDRC-MF: ProgressIve
- I
DRC-MF:
DRC-MF
MODE
DRC100
Tip
• When the broadcast signal is weak,
TVscreen. To reduce this interference, display the "Picture"
select "Personal" for "Picture" mode, then adjust "Sharpness"
"Picture Adjustment" to reduce the sharpness (see page 76).
Note
• The DRC-MF mode is not selectable
feature, or
mode is not available for HD (high-definition) or progressive
or the picture recorded on a "Memory Stick".
The DRC-MF logo
Sony Corporation.
when
the "Game Mode" or "Twin"
(1-);l!!IiIcoMf)
01
••
llty
Crutlon
11" .1 A
you
may see some dots or noise on the
when
using the PROGRAM INDEX
mode
is turned "On". The
and
"DRC-MF" are trademarks of
Advanced Operations
menu
under
input
and
signal,
121
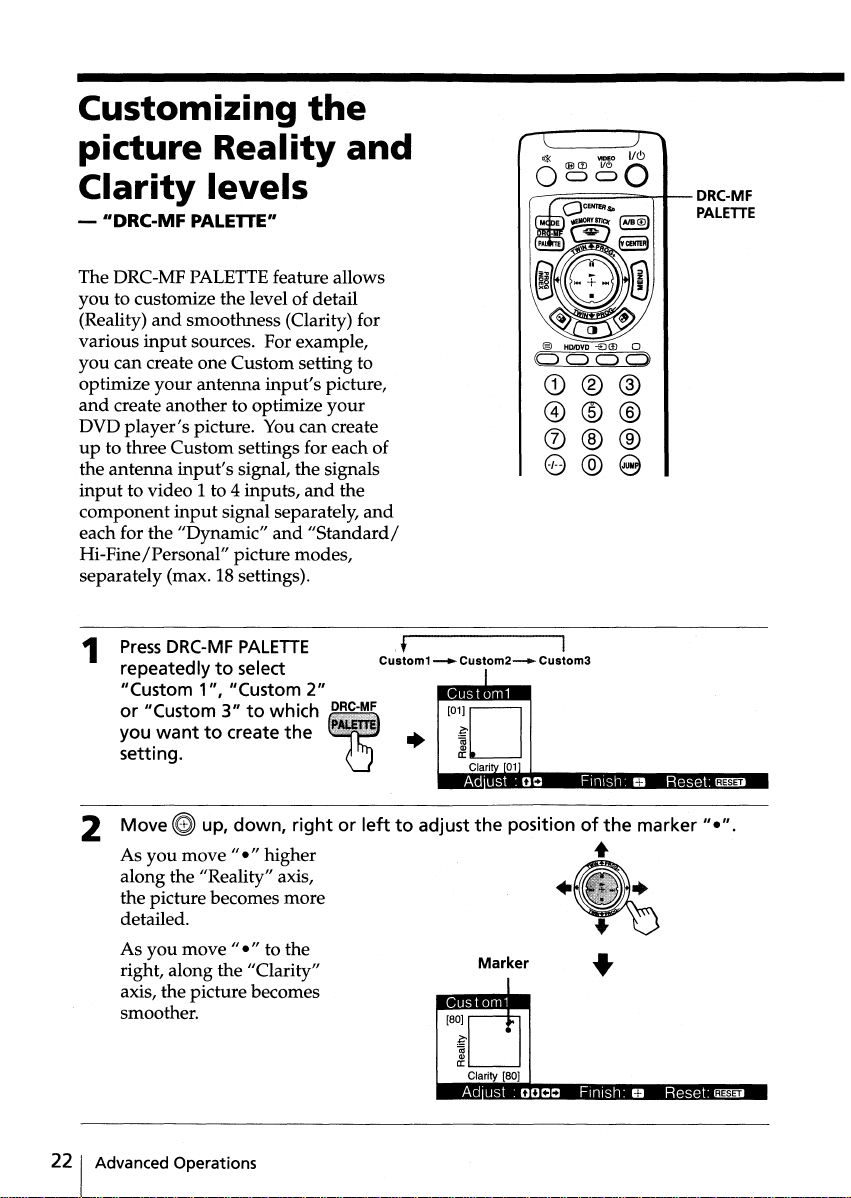
Customizing
the
picture Reality
Clarity
-
"DRC-MF
The DRC-MF PALETTEfeature allows
you
to customize the level of detail
(Reality)
various
you
optimize
and
DVD
up
the antenna
input
component
each for the "Dynamic"
Hi-Pine/Personal" picture modes,
separately (max. 18 settings).
1
input
can create one Custom setting to
create another to optimize
player's
to three Custom settings for each of
to video 1 to 4 inputs,
Press
repeatedlytoselect
"Custom 1", "Custom 2"
or "Custom 3"
you
setting.
levels
PALETTE"
and
smoothness (Clarity) for
sources. For example,
your
antenna
picture. You can create
input's
input
DRC-MF
wanttocreate
input's
signal, the signals
signal separately,
and
PALETTE
to
which
the
and
picture,
your
and
the
and
"Standard/
,t I
Custom1--...
Custom2--+-
+
[OiD
Clari 01
I • t +
-----::;;;=:::::::::=;;;;;;;;;;,.,~-
Custom3
-t-
••
DRC-MF
PALETTE
• RESET
2 Move
As
you
along the "Reality" axis,
the picture becomes more
detailed.
As you
right, along the "Clarity"
axis, the picture becomes
smoother.
221
Advanced Operations
~
up,
down,
move"."higher
move"."to the
rightorlefttoadjust
the
positionofthe
Marker
•
..
•
marker"·"
+
•••
.
RESET
3
Press~to
normal screen.
returntothe
To switch to
Display the picture
the
last adjusted Custom setting
and
press DRC-MF
Custom setting.
To reset to the factory preset values
Press RESETon the remote.
Note
• The DRC-MF PALETTEis not selectable
INDEX feature, or
"On". The
input
mode
signal, or the picture recorded on a "Memory Stick".
is not available for HD (high-definition) or progressive
PALETTE
when
the "Game Mode" or "Twin" mode is
repeatedly to select
when
using the PROGRAM
your
desired
turned
Advanced Operations
123
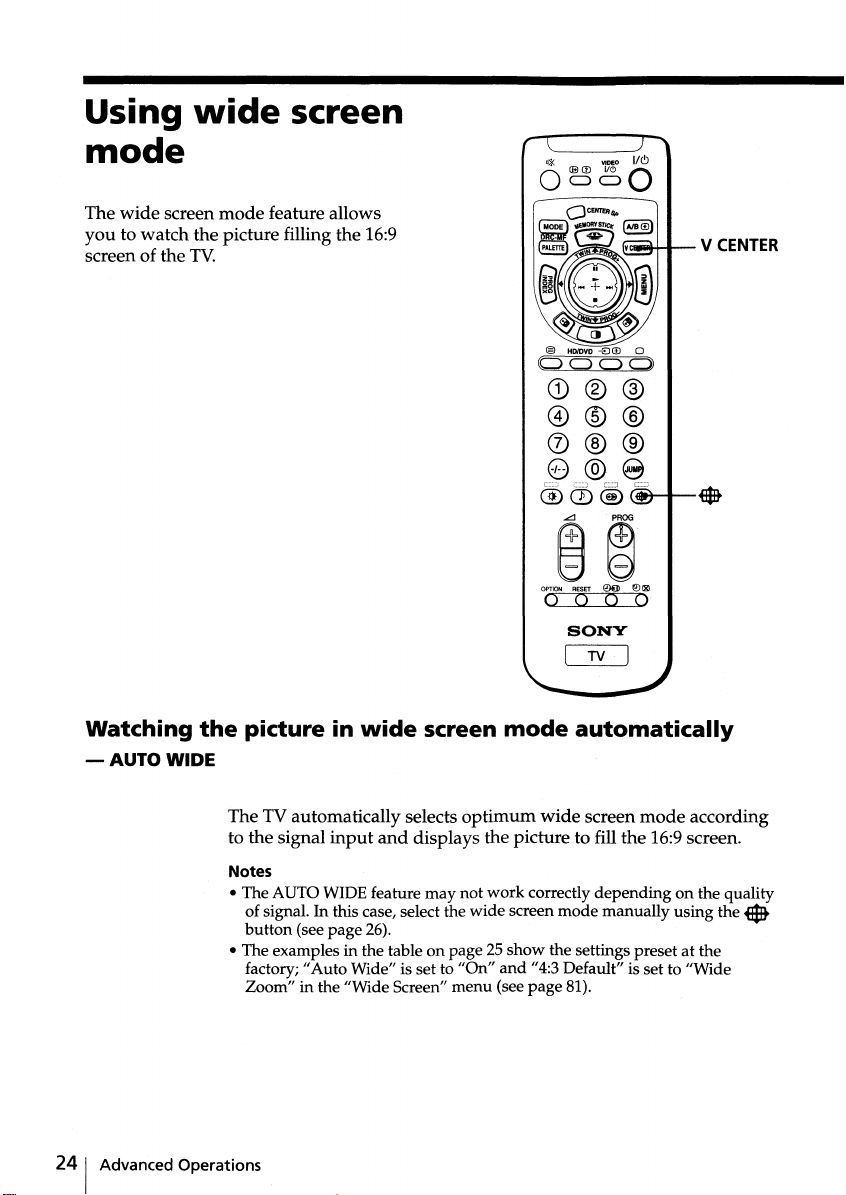
Using
wide
screen
mode
The
wide
screen
mode
feature allows
you
to watch the picture filling the 16:9
screen of the
TV.
~@
OPTION RESET
000
00
SONY
~
0 (g)
0
Watching
-AUTO
24
1 Advanced Operations
WIDE
the
picture in
The TV automatically selects
to the signal
Notes
• The AUTO WIDE feature may not
of signal. In this case, select the
button
(see page 26).
• The examples in the table on page 25
factory;
Zoom" in the "Wide Screen"
wide
input
and
"Auto
Wide" is set to "On"
screen
displays the picture to fill the 16:9screen.
optimum
work
wide
menu
(see
mode
screen
show
and
automatically
wide
screen
mode
according
correctly depending on the quality
mode
manually using the
the settings preset at the
"4:3 Default" is set to "Wide
page
81).
..

When
normal 4:3
aspect ratio
picture
with
ID-1 or 51
signal or a
without
signal
ID-1.
receiving ...
an
AUTO WIDE
functionstoselect ...
Wide
Zoom*
-+
The picture changes
enlarge the 4:3
picture,
the
lower
condensed to fit
the 16:9 screen.
to
upper
parts
...
with
and
4:3letter box
movie or a
orDVD
video
with
an 10-1
signal.
4:3squeezed
video camera
with
picture
10-1 or Sl
signal.
HDTV 16:9
picture
enlarge the
picture
(see
horizontally
and
in an equal
aspect ratio
fills the 16:9
screen**.
enlarge the
picture
horizontally
only, to fill the
16:9screen.
AnHDTV16:9
picture is
always
displayed in
"Full" mode.
mode
is
set"
page
81).
vertically
that
that
4:3
Zoom
-+
an
Full
-+
Full
-+
When
*
a normal 4:3 picture is received, "Wide
automatically selected
picture as it is
Default" in the "Wide Screen"
with
without
enlarging it ("Normal" mode)ifyou
the factory setting. You can display
menuto"Normal"
Zoom"
..
**
Black
bands
may
appear
on the top
Note
• The 720p/1080i format signal is always displayed in "Full"
has no 10-1 signal.
and
bottom of the screen.
Advanced Operations
mode
evenifit
continued
125
Using
wide
screen
mode
(continued)
Watching
You can select the desired
Press.
the mode indication you
want
screen.
For details on each mode,
see "Watching the picture
in
automatically".
the
picture in
repeatedly until
isdisplayed on the
wide
screen
mode
Notes
• Youcan also select the
page 81).
• When the
remote or using the menu, the AUTO WIDE feature does not
temporarily.
The AUTO WIDE feature functions again when:
- you change a TVchannel with PROG
- you change the video
- the TV is
• The 720p/1080i format signal (HDTV 16:9picture) is always displayed in
"Full" mode.
• Youcan adjust the vertical position of the picture
is set to "Wide Zoom" or "Zoom" (see page 27).
wide
wide
screen
screen
turned
wide
mode
off
screen
mode
manually.
IWideZoom
IZoom
-8.
t
+
/-.
•
wide
screen mode manually using the
mode
is selected by pressing the •
input
with
and
on again.
manually
---..
I
IFull
.....-
when
wide
Normal
!
menu
(see
button
on the
work
screen mode
261
Advanced Operations

Adjusting
1
PressVCENTER.
the
positionofthe
Youcan adjust the vertical position of the picture
- the
upper
or lower
Zoom" mode.
you
want
for "Zoom" mode.
This feature is available only for "Wide Zoom"
modes.
to adjust the vertical position of the picture in the screen
picture
part
of the picture cannot be seen in "Wide
•
when
and
"Zoom"
Move@)up or
2
move
down.
3
Press~.
down
to
the
picture up or
..
•
Notes
• The adjusted V Center value remains stored even after the TV is
• You can also adjust the position of the picture in "Wide Zoom"
"Zoom"
modes
using the
menu
(see
page
81).
turned
and
off.
Advanced Operations I27

Watching
two
programs
same
time
at
the
- ··TWIN··
With the TWIN pictures feature, you can
display a different TV
the
main
picture.
program
beside
Displaying TWIN pictures
Press
CI.
D~
VIDEO
I/~
6~oO
+--~~""'--l~
\~~~~I--'BI
~~---=,--I~CI
~~~~~-I--~
PROG
~
10 12
To return to
28
1 Advanced Operations
the
normal screen
CI.
Press
The left picture is displayed in full screen.
Tip
• You can also display the Twin pictures using the
"Multi Picture" using the
menu"
on page 83).
menu
(see "Operating the

Additional
tasks
To
change a TV
picture
swap
swap
right pictures.
change the screen size of the TWIN
pictures
the left
sound
between the left
program
and
right pictures
in the right
and
Press/Move
Move~up or
Press
ED.
[~-~J
Press~.
The
I/!""
symbol will
you are hearing.
~
Move
Move
•
left to increase the left screen size.
~
right to increase the right screen size.
down
(TWIN PROG + or -).
appear
to indicate which screen
IA~I
I~~I
~I
~~II
~;g:
II
Notes
• Swapping the pictures is not available for HD or DVD
• The TWIN pictures featureis not available for HD (high-definition)
progressive signals.Ifyou
progressive signal, a message appears
cancelled. The selected HD or progressive picture will be displayed in full
screen.
• The TWIN pictures feature is
speaker
mode
(J
(page 41)
button
mode while viewing the TWIN pictures.
• You cannot enjoy stereo
• You cannot change the picture to a video
can only display a video input, except for HD and progressive signals, in
the right picture by
displayed in the left picture.
• When the
about one second before the TWIN pictures appear. This does not indicate
a malfunction of the
change the left main picture to an HD or
not
and
you cannot set the TV to the center speaker
sound
swapping
is pressed, the TV screen flickers or goes blank for
TV.
and
the TWIN pictures feature is
available
in the right picture.
the pictures
when
input
when
input
signal.
the TV is in the center
in the
right
picture. You
a video
input
is
continued
Advanced Operations I29
and
Watching
two
programsatthe
same
time
- IITWIN"
(continued)
Selecting a TV
Picture)
You can select
(TWIN PROG
Move~up or
1
(TWIN
The two pictures of the
same channel
screen (PAP).
2 Move
(TWIN
desired program appears
on
3
Press~to
right
the
your
+/-).
PROG
~
up or
PROG
right
picture
+/-).
+/-)
screen.
display
program
desired TV
down
appear
on the
down
until
the
infult
screen.
using PAP(Picture
program
directly from the right picture by using
..
the
And
~
•
•
8
To change
To return to
30 I Advanced Operations
the
left
Press PROG
the
normal screen from
Press
The left picture is displayed in full screen.
Notes
• You cannot change the picture size or
• The PAP feature is not available for HD (high-definition)
•
picture channel
+/ - or the
CI.
mode. (Youcan
signals. If you change the left
a message appears
progressive picture will be displayed in full screen.
number
swap
the sounds of the two pictures.)
and
the PAP feature is cancelled. The selected HD or
the
buttons.
PAP
mode
swap
the two pictures in the PAP
main
picture to an HD or progressive signal,
and
progressive
 Loading...