

Page 1
2-698-614-12 (1)
Tr initron Color TV
Operating Instructions
• Before operating the unit, please read this manual thoroughly and retain
it for future reference.
GB
KV-AW21
© 2006 Sony Corporation
M83
M80
Page 2
A Specifications
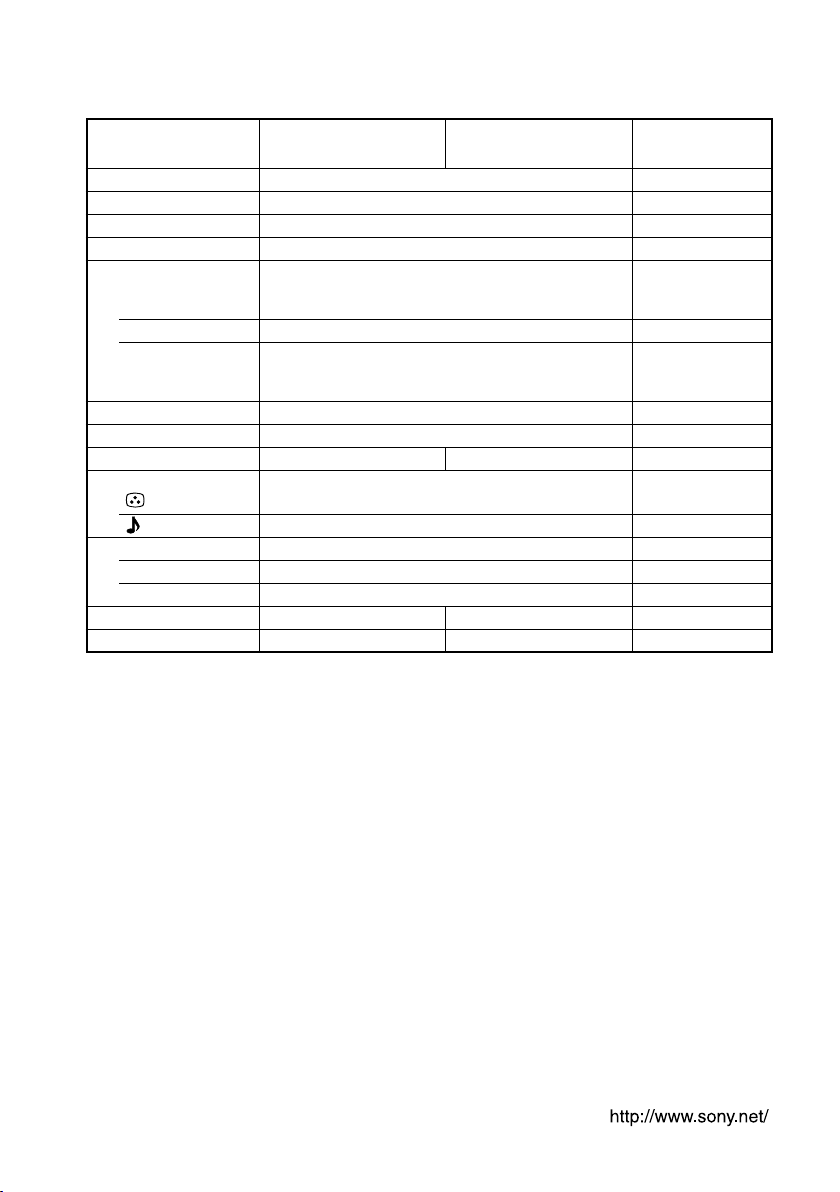
KV-AW21M83
Power requirements
Power consumption (W)
Television system
Color system
Channel coverage
B/G
I
D/K
8 (Antenna)
Audio output (Speaker)
3D Woofer
Number of terminal
(Video)
(Audio)
Picture tube
Tube size (cm)
Screen size (cm)
Dimensions (w/h/d, mm)
Mass (kg)
Design and specifications are subject to change without notice.
110-240 V AC, 50/60 Hz
Indicated on the rear of the TV
B/G, I, D/K
PAL, PAL 60, SECAM, NTSC3.58 (AV IN), NTSC4.43
VHF : E2 to E12 /UHF : E21 to E69 /
CATV : S01 to S03, S1 to S41
UHF : B21 to B68 /CATV : S01 to S03, S1 to S41
VHF : C1 to C12, R1 to R12 /
UHF : C13 to C57, R21 to R60 /
CATV : S01 to S03, S1 to S41, Z1 to Z39
75-ohm external terminal
3 W + 3 W
12 W ––
Input: 2 Phono jacks; 1 Vp-p, 75 ohms
Input: 2 Phono jacks; 500 mVrms
21 in.
54
51
600 × 584 × 481 600 × 465 × 481
28 25
KV-AW21M80
Note
Measured diagonally
Measured diagonally
Page 3
B WARNING
• Dangerously high voltages are present inside the TV.
• TV operating voltage: 110 – 240 V AC.
• Do not plug in the power cord until you have completed making all other
connections; otherwise a minimum leakage current might flow through the antenna
and other terminals to ground.
•To avoid battery leakage and damage to the remote, remove the batteries from the
remote if you are not going to use it for several days. If any liquid leaks from the
batteries and touches your skin, immediately wash it away with water.
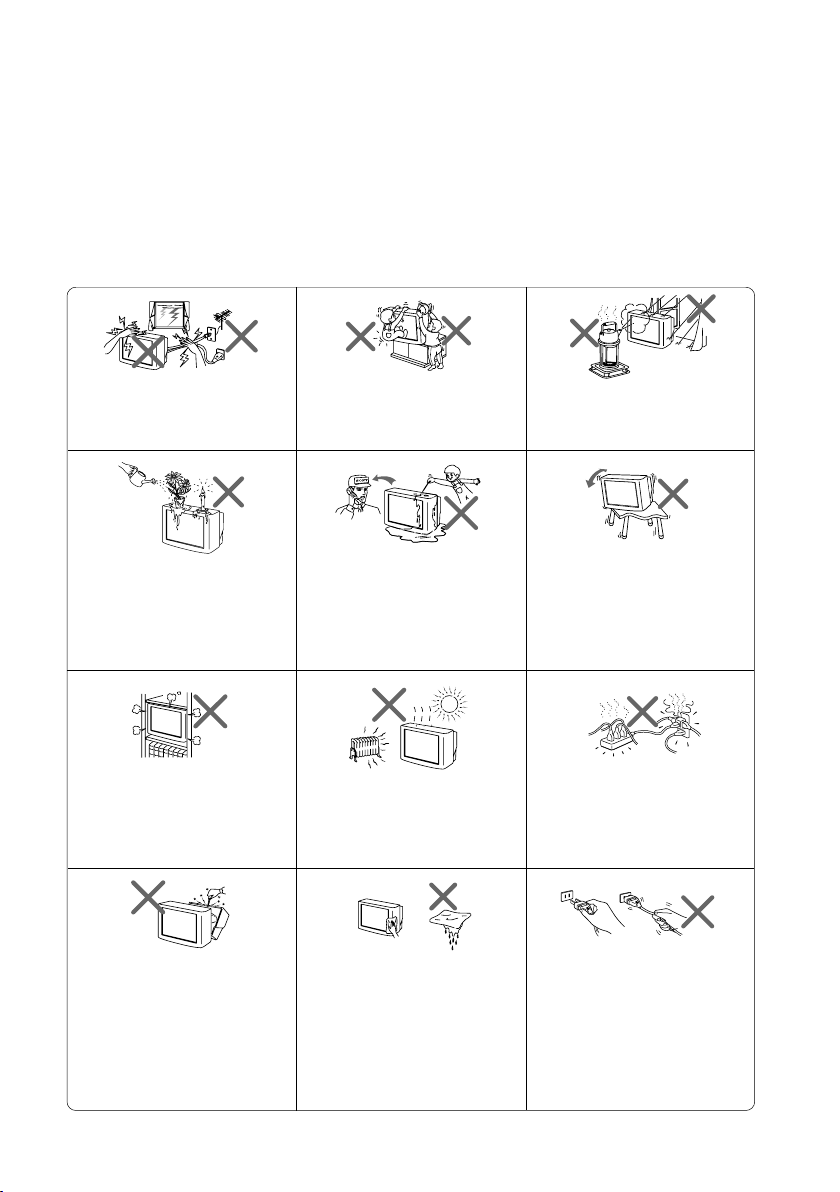
For your own safety, do not touch
any part of the TV, the power cord
and the antenna cable during
lightning storms.
Do not place any objects on the TV.
The apparatus shall not be
exposed to dripping or splashing
and that no objects filled with
liquids, such as vases, shall be
placed on the apparatus.
Do not block the ventilation
openings of the TV. Do not install
the TV in a confined space, such
as a bookcase or built-in cabinet.
Do not open the cabinet and the
rear cover of the TV as high
voltages and other hazards are
present inside the TV. Refer
servicing and disposal of the TV
to qualified personnel.
For children’s safety, do not leave
children alone with the TV. Do not
allow children to climb onto it.
Do not operate the TV if any liquid
or solid object falls into it. Have it
checked immediately by qualified
personnel only.
Your TV is recommended for
home use only. Do not use the TV
in any vehicle or where it may be
subject to excessive dust, heat,
moisture or vibrations.
Clean the TV with a dry and soft
cloth. Do not use benzine, thinner,
or any other chemicals to clean the
TV. Do not attach anything (e.g.,
adhesive tape, cellophane tape,
glue) on the painted cabinet of the
TV. Do not scratch the picture
tube.
To prevent fire or shock hazard, do
not expose the TV to rain or
moisture.
Install the TV on a stable TV stand
and floor which can support the
TV set weight. Ensure that the TV
stand surface is flat and its area is
larger than the bottom area of the
TV.
Do not plug in too many
appliances to the same power
socket. Do not damage the power
cord.
Pull the power cord out by the
plug. Do not pull the power cord
itself. Even if your TV is turned
off, it is still connected to the AC
power source (mains) as long as
the power cord is plugged in.
Unplug the TV before moving it
or if you are not going to use it for
several days.
Page 4
C Getting Started
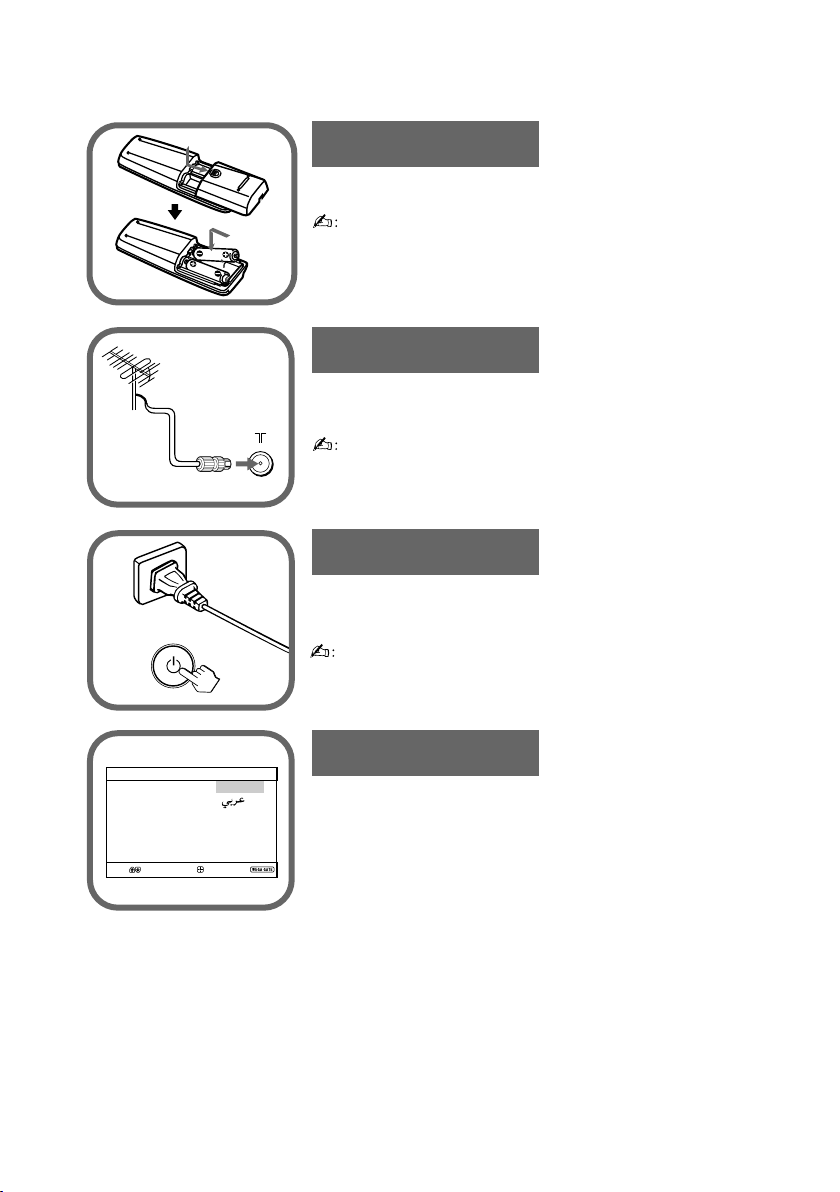
Step 1
Insert the batteries (supplied) into the remote.
• Do not use old or different types of batteries together.
Step 2
Connect the antenna cable (not supplied) to 8
(antenna input) at the rear of the TV.
• You can also connect your TV to other optional
components (see F).
Step 3
Initial Setup
Language:
Select
b
Confirm
Plug in the power cord, then press 1 on the TV to turn
it on.
• The 1 (standby) indicator flashes green for a few seconds
when turning on the TV. This does not indicate a
malfunction.
Step 4
English
Set up the TV by following the instructions of the
“Initial Setup” menu (see D).
End
Page 5
Program Sorting/Edit
01
02
03
04
Off
Off
Off
Off
Sorting:
Edit:
PROG
SkipLabel
Exit
Select
Confirm
End
Select
Confirm
Initial Setup
Language:
English
Start Auto Program now?
Yes
No
First please connect
cable/ antenna
Initial Setup
End
Select
Confirm
D
Select
Confirm
Initial Setup
Display this menu next time?
Yes
No
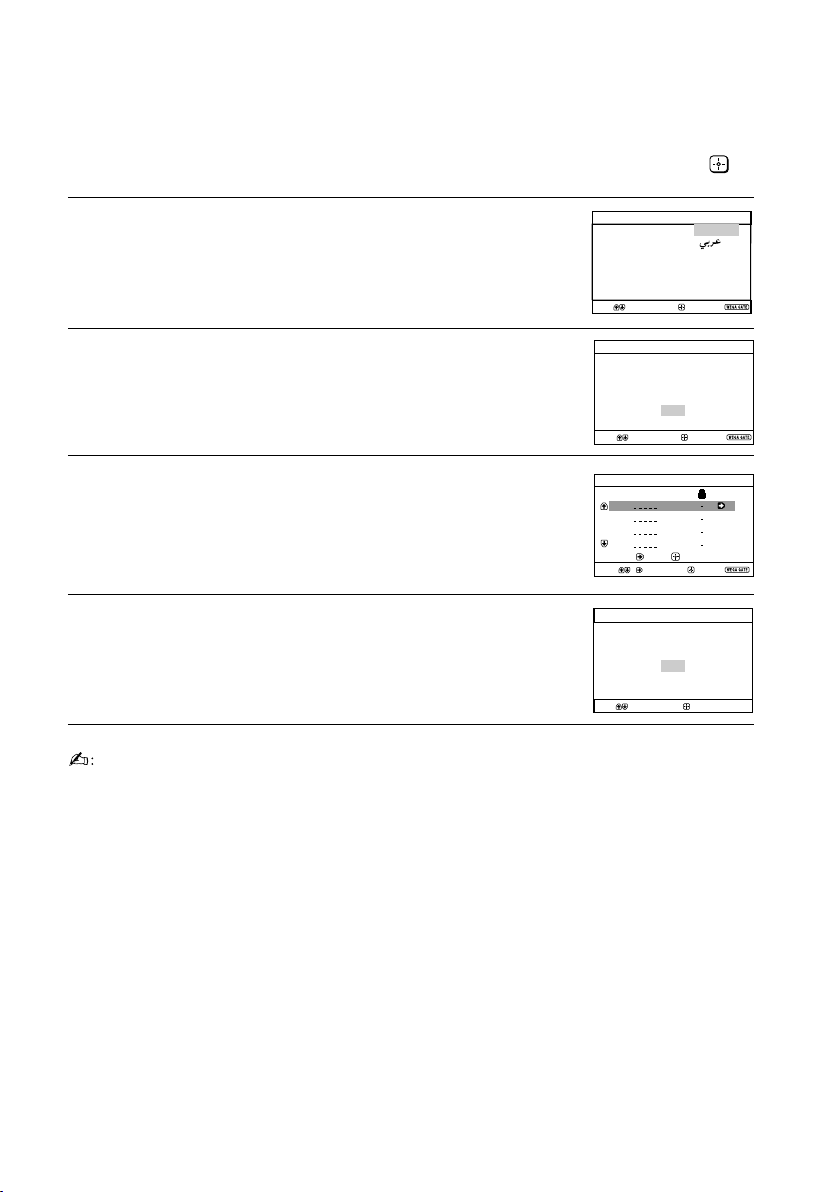
Setting up your TV (“Initial Setup”)
When you turn on your TV for the first time, the “Initial Setup” menu will
appear. You can adjust settings below using the buttons on the remote control
or TV front panel. Press V , v , B or b to select or adjust items, then press
Select the desired menu language.
1
Select “Yes” to preset the channels automatically.
2
To skip automatic channel presetting, select “No”.
The “Program Sorting/Edit” menu enables
3
you to sort and edit the channels (see L).
To prevent this “Initial Setup” menu from appearing
4
again when you turn on the TV by pressing 1,
select “No”.
To allow this menu to appear again, select “Yes”.
.
•You can immediately go to the end of the “Initial Setup” menu by pressing WEGA
GATE.
Page 6
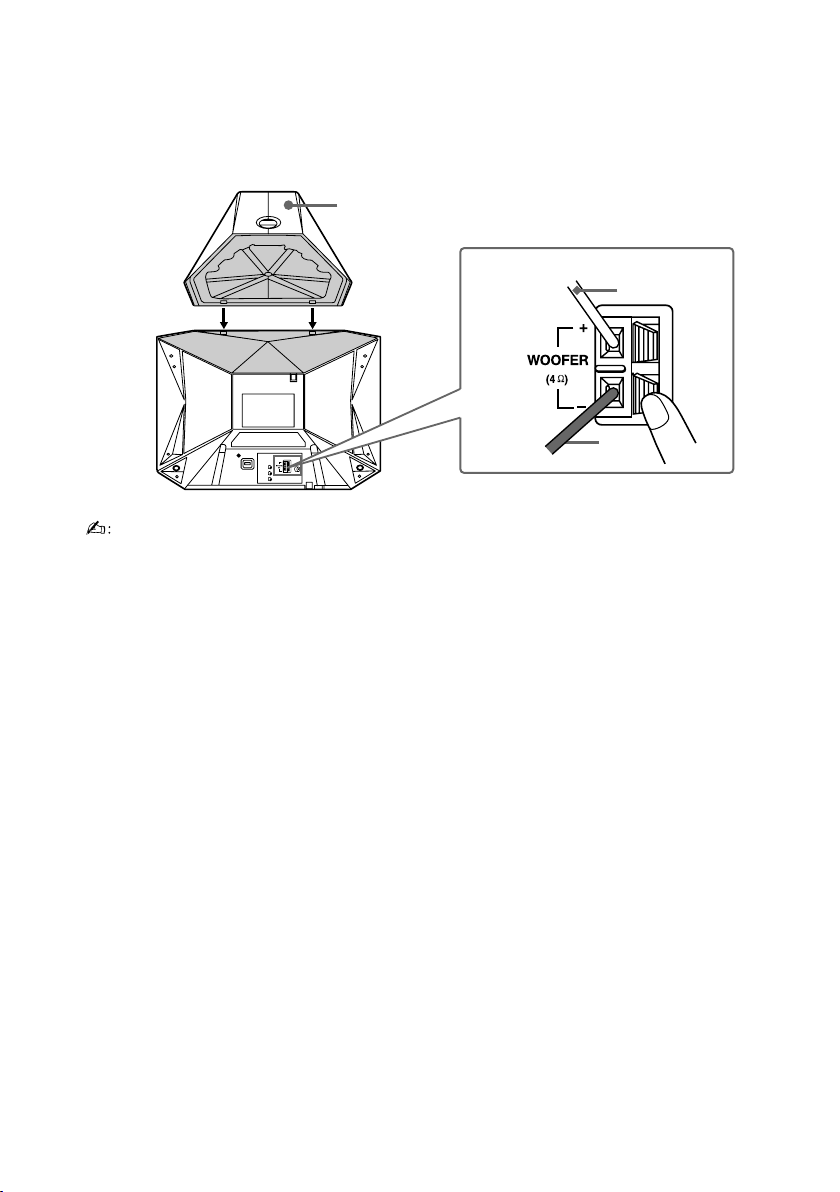
E 3D WOOFER
B KV-AW21M83 only
You can enjoy high quality sound by connecting the 3D WOOFER as follows:
Step 1
3D WOOFER
Step 2
Red wire
Black
wire
• Connect only the supplied 3D WOOFER; otherwise your TV may malfunction.
• Unplug your TV from the wall outlet when connecting the 3D WOOFER.
•To prevent a malfunction caused by a short circuit of the terminals, make sure that none
of the 3D WOOFER wire strands stick out, making contact with the neighbouring 3D
WOOFER terminal.
Page 7
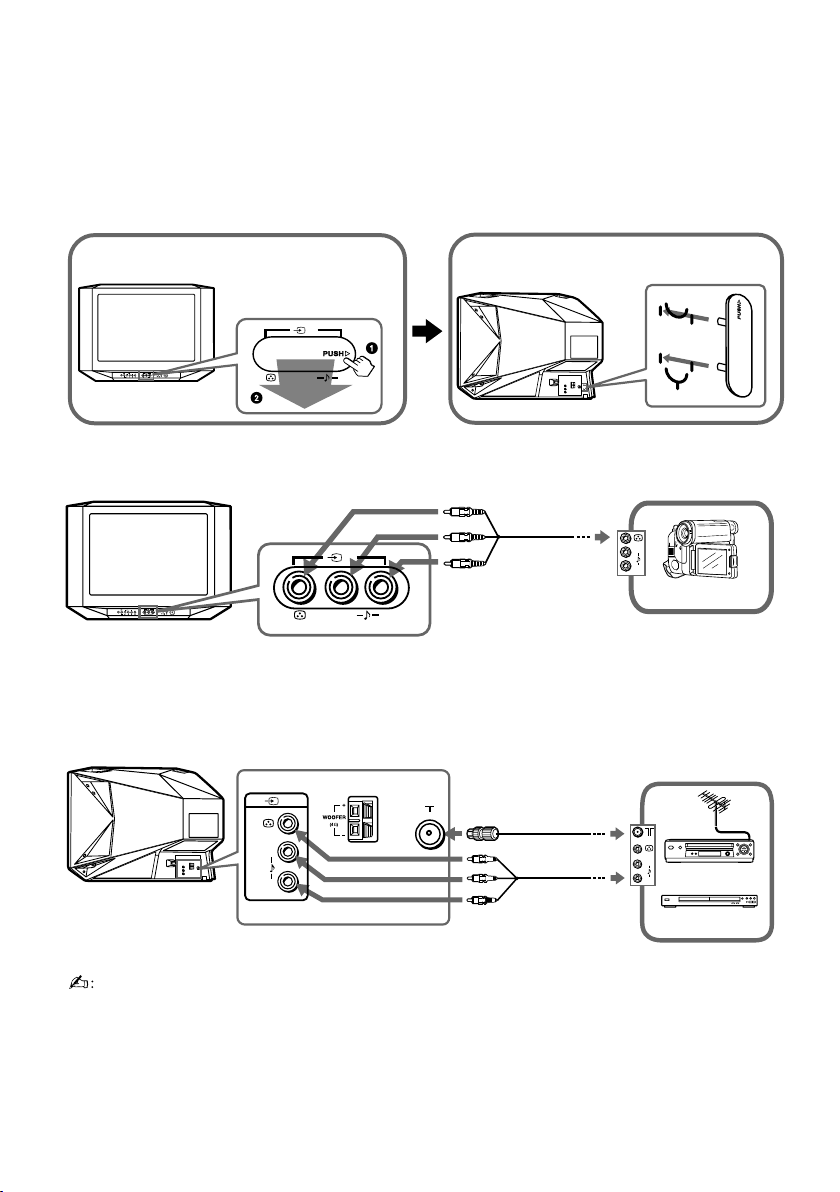
F Connecting optional components
You can connect a wide range of optional components to your TV. Connecting
cables are not supplied.
Connecting to the TV (front)
Step 1
2
2
PROG
WEGA
(MONO)
L
R
GATE
(MONO)
L
R
2
2
PROG
WEGA
(MONO)
L
R
GATE
(MONO)
L
Connecting to the TV (rear)
1
(MONO)
L
R
Step 2
Audio/Video
cable
R
Antenna
cable
Audio/Video
cable
L
R
Camcorder
L
R
VCR
DVD Player
• If you connect a VCR to 8 (antenna input), preset the signal output from the VCR to the
program number 0 on the TV (see L).
Page 8

G Troubleshooting
If you find any problem while viewing your TV, you can either use the
“Factory Settings” function (see M) or check the Troubleshooting guide below.
If the problem persists, contact your Sony dealer.
Snowy picture, noisy sound
• Check the antenna setup and other connections.
•Preset the channel manually again (see L).
• Set the “Signal Booster” to “Auto” (see L) or try using an external booster.
Distorted picture, noisy sound
• Set the “Signal Booster” to “Off” (see L), or turn off or disconnect any external booster in
use.
Good picture, noisy sound
• Select the appropriate “TV System” (see L).
No picture, no sound
• Check the power cord, antenna setup and other connections.
•Press 4/1 (power) to turn on the TV.
•Press 1 (main power) on the TV to turn off the TV for about five seconds, then turn it on
again.
Good picture, no sound
•Press 2 + to increase the volume level or press to cancel the muting.
Dotted lines or stripes
• Do not use a hair dryer or other equipment near the TV.
• Check the antenna setup.
Double images or “ghosts”
• Use the fine tuning (“Fine”) function (see L).
• Check the antenna setup or use a highly directional antenna.
•Turn off or disconnect any external booster in use.
No color
• Adjust the “Color” level from “Picture Adjustment” (see J).
• Select the appropriate “Color System” (see M).
• Check the antenna setup.
Picture slant
• Keep external speakers or other electrical equipment away from the TV.
Abnormal color patches
• Keep external speakers or other equipment away from the TV. Do not move the TV while
the TV is turned on. Press 1 (main power) on the TV to turn off the TV for about 15
minutes, then turn it on again to demagnetize the TV.
The 1 (standby) indicator on your TV flashes red several times after every three seconds.
• Count the number of times the 1 (standby) indicator flashes. Press 1 (main power) to
turn off your TV. Contact your nearest Sony service center.
The TV screen sometimes goes blank for slightly longer than usual during channel change.
• The “Signal Booster” is functioning to detect a weak signal. This does not indicate a
malfunction.
TV cabinet creaks.
• Changes in room temperature sometimes make the TV cabinet expand or contract, causing
a noise. This does not indicate a malfunction.
A small “boom” sound is heard when the TV is turned on.
• The TV’s demagnetizing function is working. This does not indicate a malfunction.
Page 9
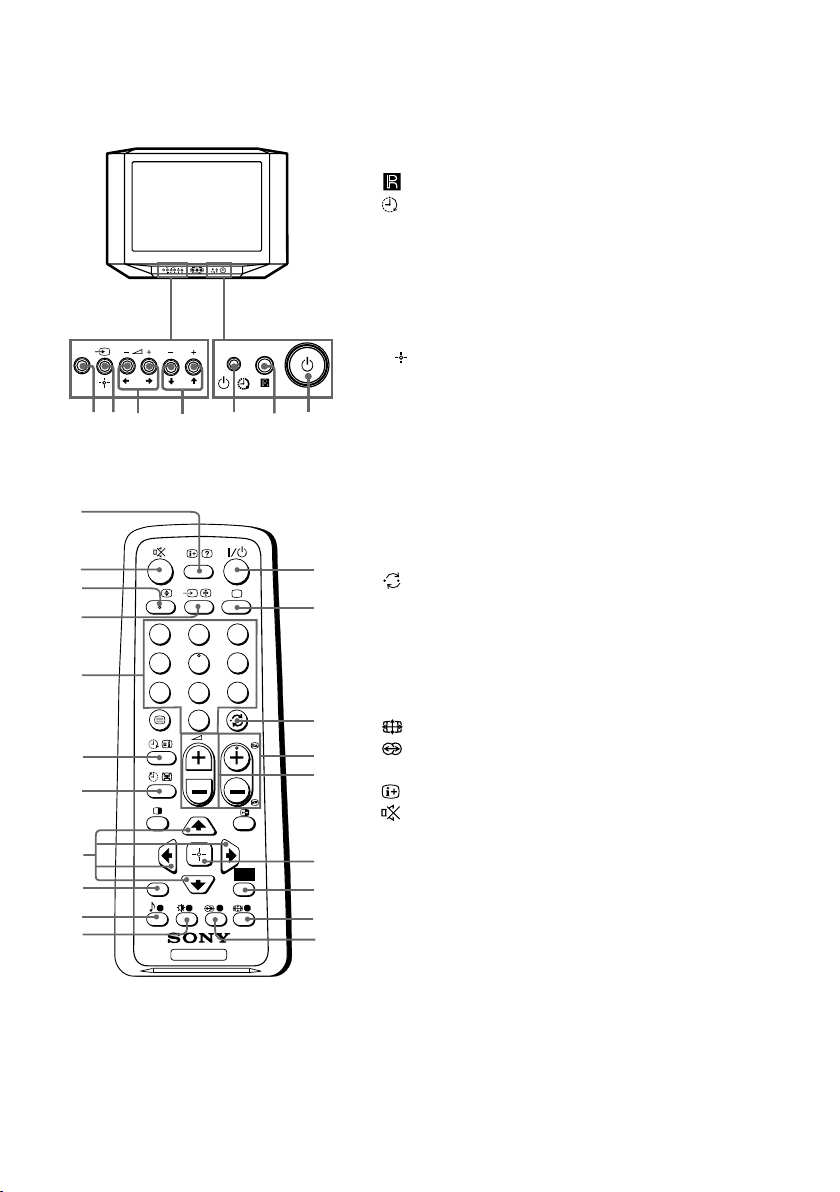
H TV buttons and remote control
1 1 Turn off or turn on the TV.
2 Remote control sensor.
3 Wake Up indicator.
3 1 Standby indicator.
4 PROG +/– Select program number.
5 2 +/– Adjust volume.
6 t Select TV or video input.
WEGA GATE menu operations (see I)
4,5 V,v,B,b Select or adjust items.
6
Confirm selected items.
7 WEGA GATE Display or cancel WEGA GATE menu.
WEGA
GATE
2
PROG
WEGA
(MONO)
L
R
GATE
PROG
0
qa
qs
qd
qf
qg
qh
qj
qk
ql
w;
432
567
A/B
1
2
4
5
8
7
0
RETURN
TV
3
6
9
PROG
WEGA
GATE
1
1 ?/1 Turn off temporarily or turn on the
TV.
2 a Display the TV program.
1
3 Jump to last program number that
2
4 PROG +/– Select program number. To select
5 2 +/– Adjust volume.
3
8 Not function for your TV.
9 Select surround mode options
4
(KV-AW21M83 only) (see K).
5
Display on-screen information.
0
qa Mute the sound.
qs A/B Not function for your TV.
qd t Select TV or video input.
6
qf 0-9 Input numbers. For program
7
8
9
has been watched for at least five
seconds.
quickly, press and hold until the
desired program number appears.
numbers 10 and above, enter the
second digit within two seconds.
Page 10
TV buttons and remote control (continued)
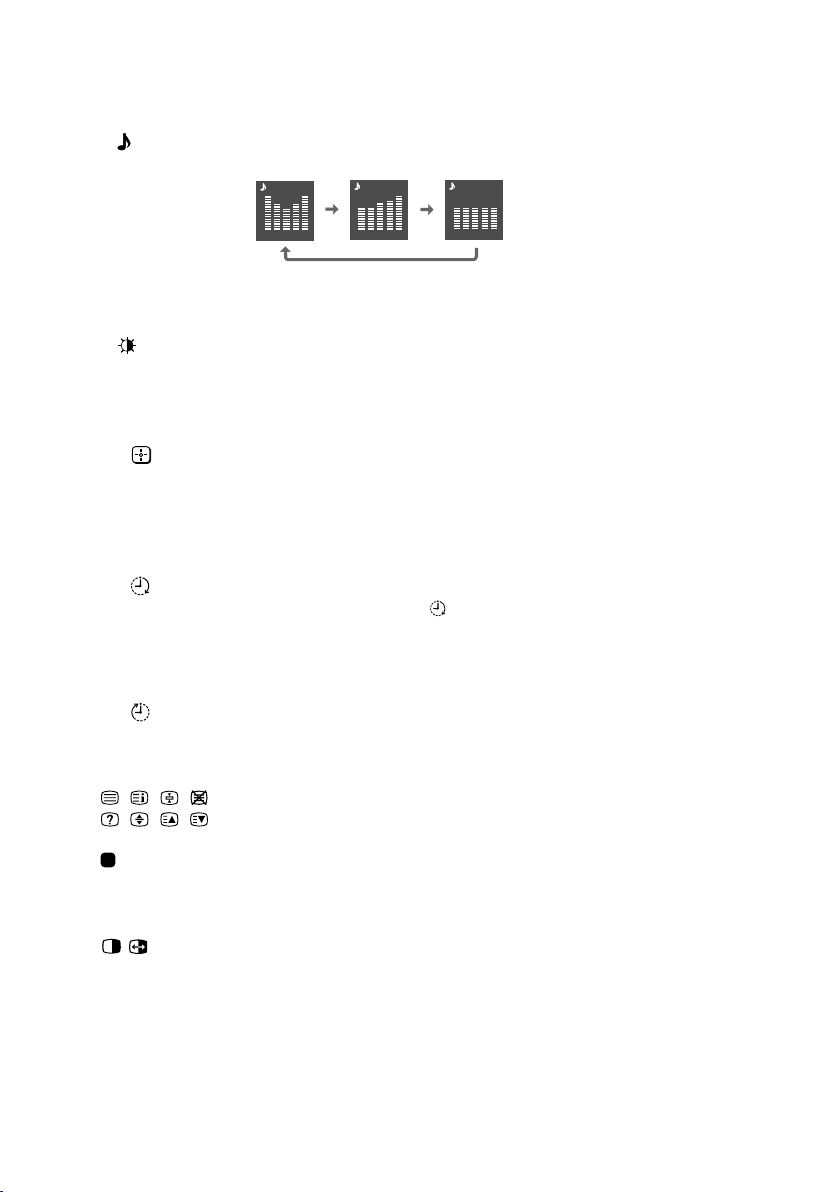
ql Select sound mode options with a 5-Band Graphic Equalizer display:
(KV-AW21M83 only) “Dynamic”, “Standard”, “Custom”* (see K).
Dynamic
Standard
Custom
100 300 1k 3k 8k
100 300 1k 3k 8k
100 300 1k 3k 8k
* When the “Custom” mode is selected, you can receive the last adjusted
sound settings from the “Sound Adjustment” option in the menu.
w; Select picture mode options: “Vivid”, “Standard”, “Custom”* (see J).
* When the “Custom” mode is selected, you can receive the last adjusted
picture settings from the “Picture Adjustment” option in the menu.
WEGA GATE menu operations (see I)
6 Confirm selected items.
7 WEGA GATE Display or cancel WEGA GATE menu.
qj V, v, B , b Select or adjust items.
qk RETURN Return to the previous level.
Timer operations
qg Set TV to turn on automatically according to the desired period of time
(Wake Up Timer) (max. of 12 hours). The indicator on TV lights up amber once you set
the wake up timer. If no buttons or controls are pressed for more than
one hour after the TV is turned on using the wake up timer, the TV
automatically goes into standby mode.
qh Set TV to turn off automatically according to the desired period of time
(Sleep Timer) (max. of one hour and 30 min.).
Teletext operations (green icon)
, , , ,
Not function for your TV.
, , , ,
(red, green,
yellow, blue)
PIP operations
, , V, v, B, b Not function for your TV.
Page 11
Confirm
Select
WEGA GATE
Settings
External Inputs
TV
I WEGA GATE navigator
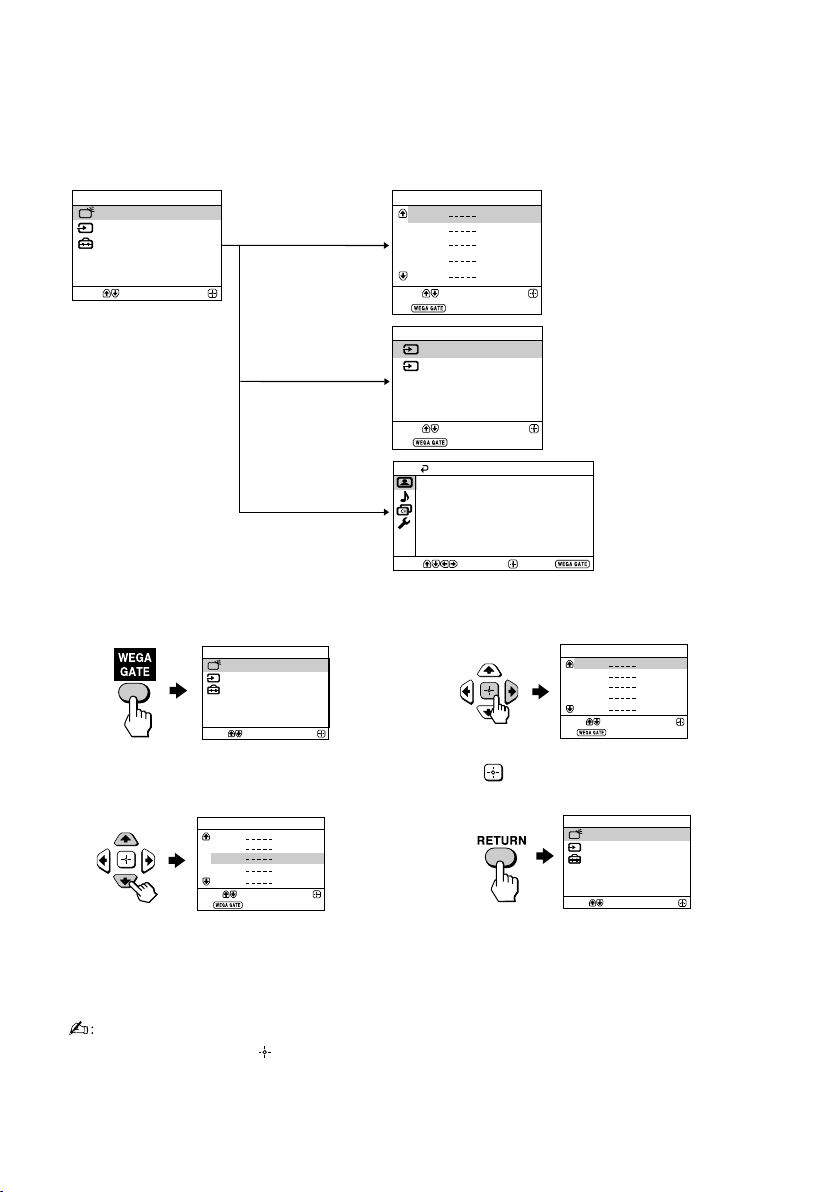
WEGA GATE is a gateway that allows you access to preset TV channels,
connected external inputs and “Settings” menu.
WEGA GATE
TV
Select
External Inputs
Settings
Confirm
“TV”
“External Inputs”
“Settings”
How to use WEGA GATE
WEGA GATE
TV
External Inputs
Settings
Select
(1) Press WEGA GATE to display or cancel
the WEGA GATE menu.
TV
01
02
03
04
05
Select
End
Confirm
Confirm
TV
01
02
03
04
05
Select
End
External Inputs
1
Video 1
Video 2
2
Confirm
watch the preset TV
channels (see D)
select the inputs for the
connected equipment
(see F)
Select
End
Picture Mode: Vivid
Picture Adjustment
Color Temperature: Cool
Intelligent Picture: On
Signal Level Indicator: On
Select
Picture
Confirm
Confirm
End
change the settings
of your TV
(see J,K,L,M)
TV
01
02
03
04
05
Select
End
Confirm
(2) Press (or b) to confirm your selection
or go to the next level.
(3) Press V or v to select the desired item.
(4) Press RETURN to move to the previous
level.
• When a feature is dimmed in the menu, it is not selectable.
• The WEGA GATE, and V,v,B,b buttons on the front panel can also be used for
the operations above.
Page 12
J “Picture” setting
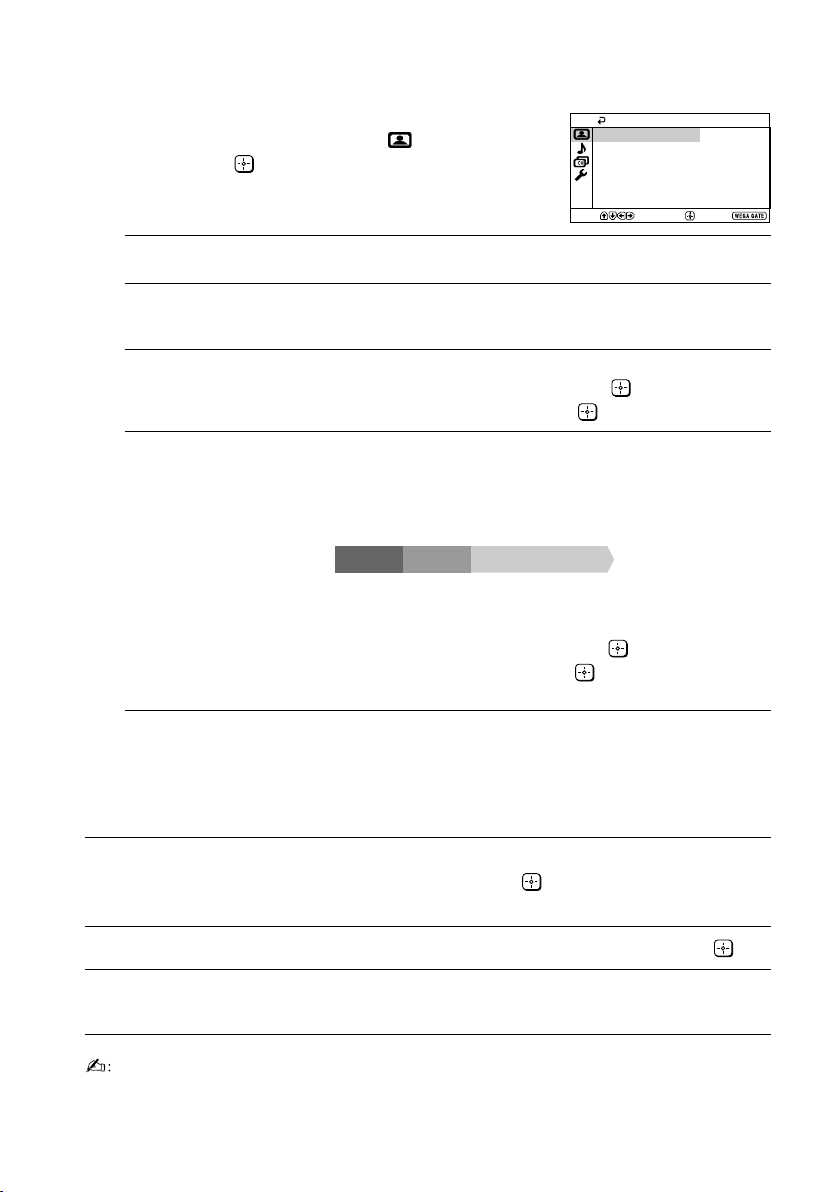
Press WEGA GATE and select “Settings”.
Make sure the “Picture” icon (
then press
.
) is selected,
Picture
Picture Mode: Vivid
Picture Adjustment
Color Temperature: Cool
Intelligent Picture: On
Signal Level Indicator: On
Select
Confirm
End
“Picture Mode” Choose either “Vivid” (bright, contrast and sharp),
“Color Temperature” Adjust white color tint.
“Intelligent Picture” Optimize picture quality.
“Signal Level Indicator” Display the signal level when the “Intelligent Picture” is
*You can adjust the setting to your personal preference in the “Picture Adjustment” and
“Color Temperature” options only when the “Custom” mode is selected.
“Standard” (normal) or “Custom”*.
Choose either “Cool” (blue tint), “Neutral” (neutral tint) or
“Warm” (red tint).
Press V or v to select “On”, then press .
To cancel, select “Off”, then press .
functioning.
“Intelligent Picture Signal Level” indicator will be displayed,
followed by picture improvement when you change the
program number or the input mode.
red amber green
(weak) (average) (good)
Press V or v to select “On”, then press .
To cancel, select “Off”, then press . “Intelligent Picture” is
still functioning.
Adjusting the “Picture Adjustment” items under “Custom”
mode
Press V or v to select either “Picture” (contrast), “Brightness”, “Color”,
1
“Hue” (color tones) or “Sharpness”, then press
.
Selecting “Reset” will set your TV to the factory settings.
Press V,v,B or b to adjust the setting of your selected item, then press .
2
Repeat the above steps to adjust other items.
3
The adjusted settings will be received when you select “Custom”.
• “Hue” can be adjusted for the NTSC color system only.
• Reducing “Sharpness” can also reduce picture noise.
Page 13
K “Sound” setting
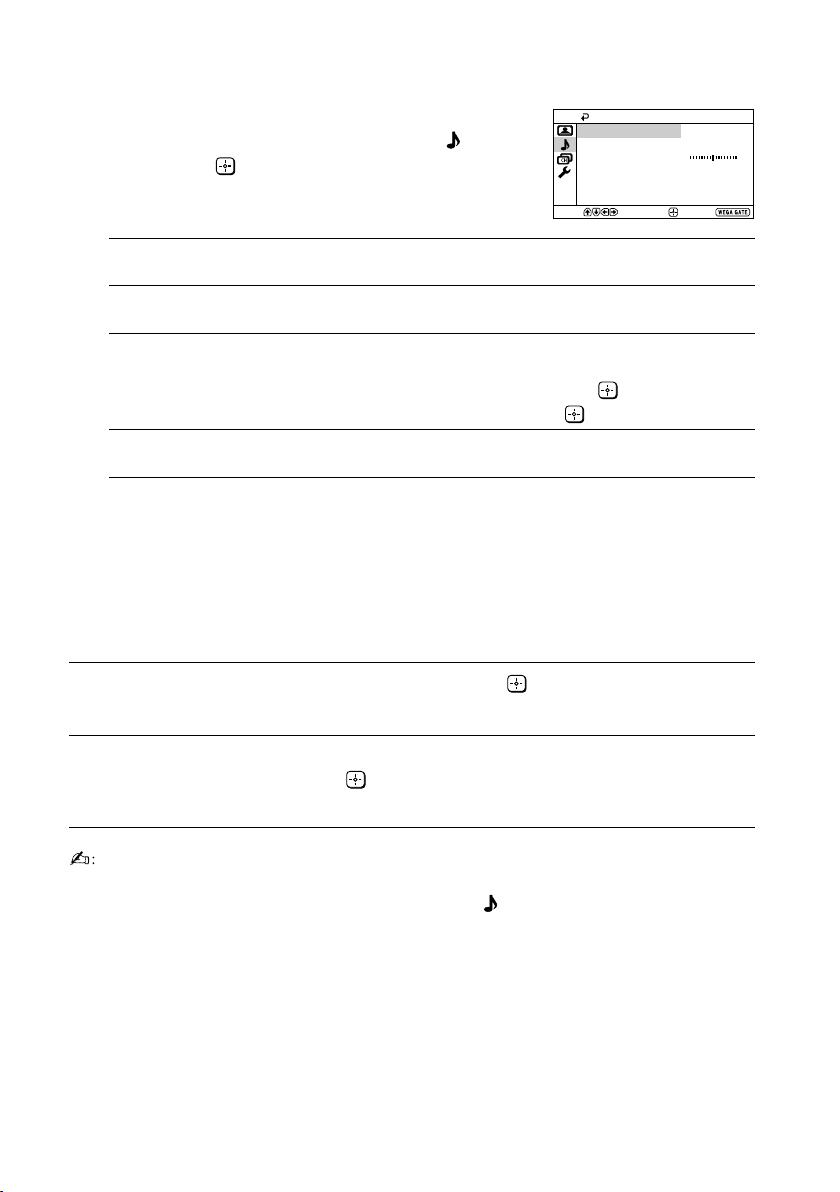
Press WEGA GATE and select “Settings”.
Press V or v to select the “Sound” icon (
then press
“Sound Mode” Choose either “Dynamic” (low and high tones), “Standard”
(KV-AW21M83 only) (voice and high tones) or “Custom”*.
“Balance” Press v or B to emphasize the left speaker.
“Intelligent Volume” Adjust the volume of all program numbers and video inputs
(KV-AW21M83 only) automatically.
“Surround” Choose either “On” (surround), “Simulated” (stereo-like
(KV-AW21M83 only) monaural sound) or “Off”.
*You can adjust the setting to your personal preference in the “Sound Adjustment”
option only when the “Custom” mode is selected.
.
Press V or b to emphasize the right speaker.
Press V or v to select “On”, then press .
To cancel, select “Off”, then press .
),
Adjusting the “Sound Adjustment” items under “Custom”
mode (KV-AW21M83 only)
The 5-Band Graphic Equalizer feature allows you to adjust sound frequency settings
of “Custom” mode in the menu.
Sound
Sound Mode: Dynamic
Sound Adjustment
Balance
Intelligent Volume: Off
Surround: Off
Select
Confirm
End
Make sure that “Adjust” is selected, then press .
1
Selecting “Reset” will set your TV to the factory settings.
Press B or b to select the desired sound frequency, then press V or v to
2
adjust the setting and press .
The adjusted settings will be received when you select “Custom”.
• Adjusting higher frequency will affect higher pitched sound and adjusting lower
frequency will affect lower pitched sound.
•You may display the settings directly by using the button on the remote control
(see H).
Page 14
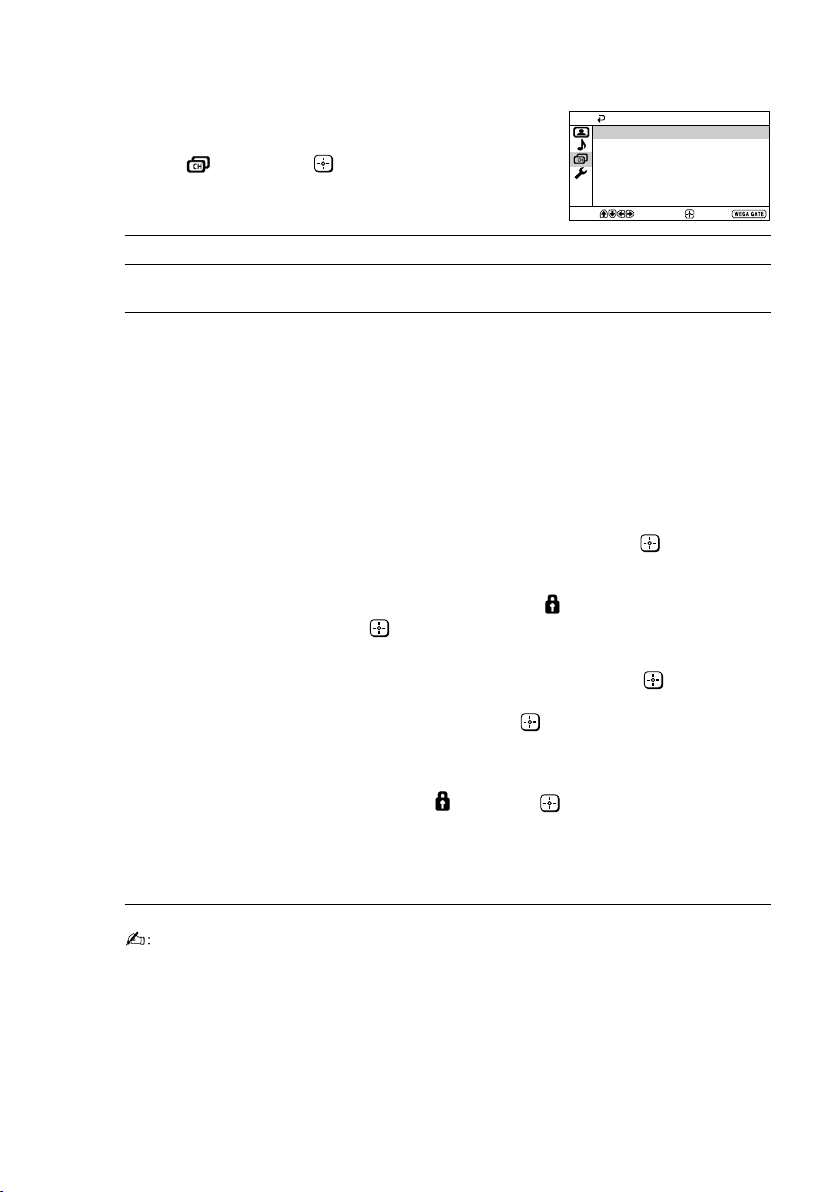
L
“Channel Setup” setting
Press WEGA GATE and select “Settings”.
Press V or v to select the “Channel Setup”
icon (
), then press .
Channel Setup
Auto Program
Manual Program
Program Sorting/Edit
Select
“Auto Program” Preset channels automatically.
“Manual Program” Manually preset desired channels and channels that cannot
“Program Sorting/Edit”
be preset automatically (see Presetting channels manually).
Sort and edit the channels.
(a) If you wish to keep the channels in the current condition,
press WEGA GATE to exit.
(b) Press
(c) If you wish to store the channels in a different order:
(d) If you wish to edit the channels, press to change to
characters for the label. Then press .
(e) Repeat step (b) to (d) if you wish to change other
V or v to select the program number with the
channel you wish to change. The selected channel will
appear on the screen.
(1) Press b to enter sorting mode.
(2) Press V or v to select the new program number
position for your selected channel, then press B.
edit mode.
Press b until the mode that you wish to edit is
highlighted: Label, Skip, (block symbol). Then press
.
(1) To label, press V or v to select the alphanumeric
(2) To skip the program number, press V or v to select
“On”. Then press .
You can skip this program number when using
PROG +/–.
(3) To block unwanted program number, press V or v to
select . Then press .
channels.
Confirm
End
Press WEGA GATE to exit.
• If you preset a blocked program number, that program number will be unblocked
automatically.
• If you sort a blocked program, that program will remain blocked.
Page 15
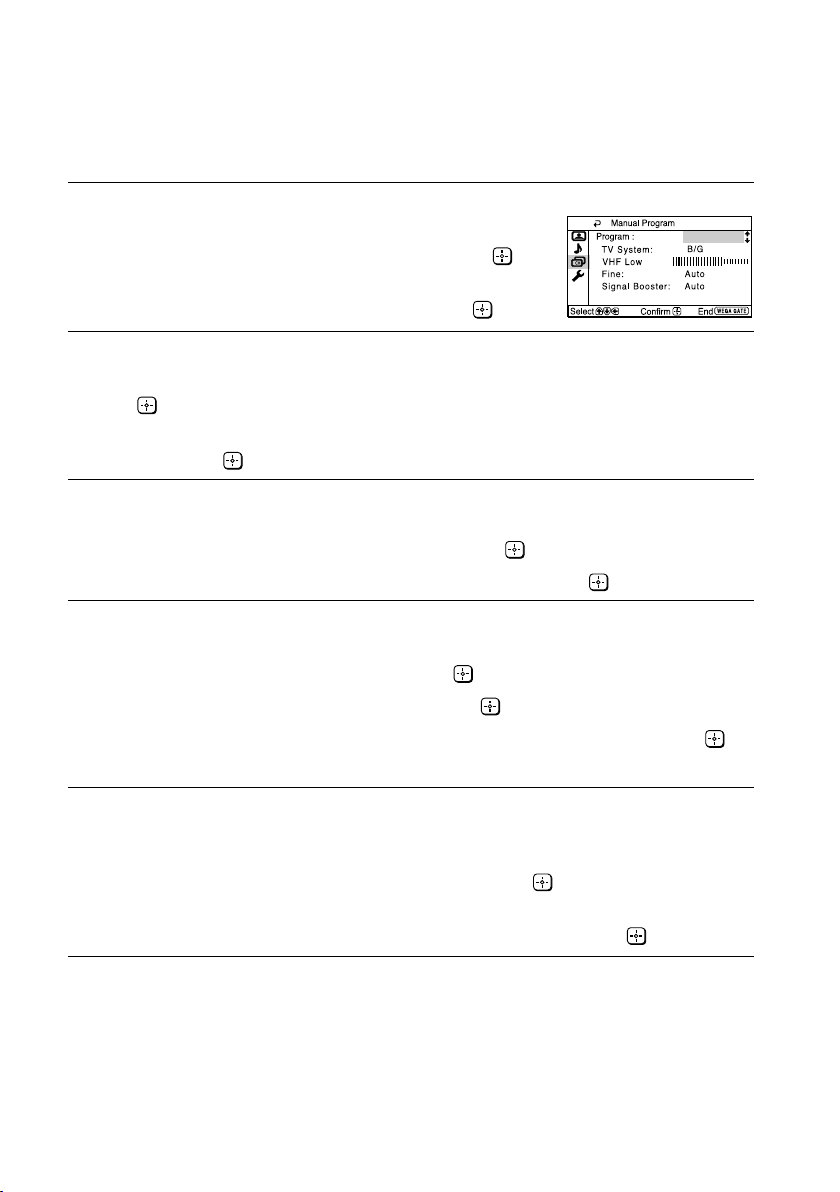
“Channel Setup” setting (continued)
Presetting channels manually
After selecting “Manual Program”, select the program
1
number to which you want to preset a channel.
(1) Make sure “Program” is selected, then press
(2) Press V or v
to preset appears on the menu, then press
Select the desired channel.
2
(1) Make sure either “VHF Low”, “VHF High” or “UHF” is selected, then press
.
(2) Press V or v until the desired channel’s broadcast appears on the TV screen,
then press .
If the sound of the desired channel is abnormal, select the appropriate TV
3
system.
(1) Press V or v
(2) Press V or v until the sound becomes normal, then press .
If you are not satisfied with the picture and sound quality, you may be able
4
to improve them by using the “Fine” tuning feature.
(1) Press V or v to select “Fine”, then press .
(2) Press V or v
Press V,v,B or b until the picture and sound quality are optimal, then press .
(3)
The + or – icon on the menu flashes while tuning.
until the program number you want
to select “TV System”, then press .
to select “Manual”, then press .
.
.
01
If the TV signal is too strong (picture distorted; picture with lines; signal
5
interference) or weak (snowy picture), you may be able to improve the
picture quality by setting the “Signal Booster” feature.
(1) Press V or v to select “Signal Booster”, then press .
(2) Press V or v
signal interference) or “Auto” (for snowy picture), then press
to select either “Off” (for picture distorted; picture with lines;
.
Page 16
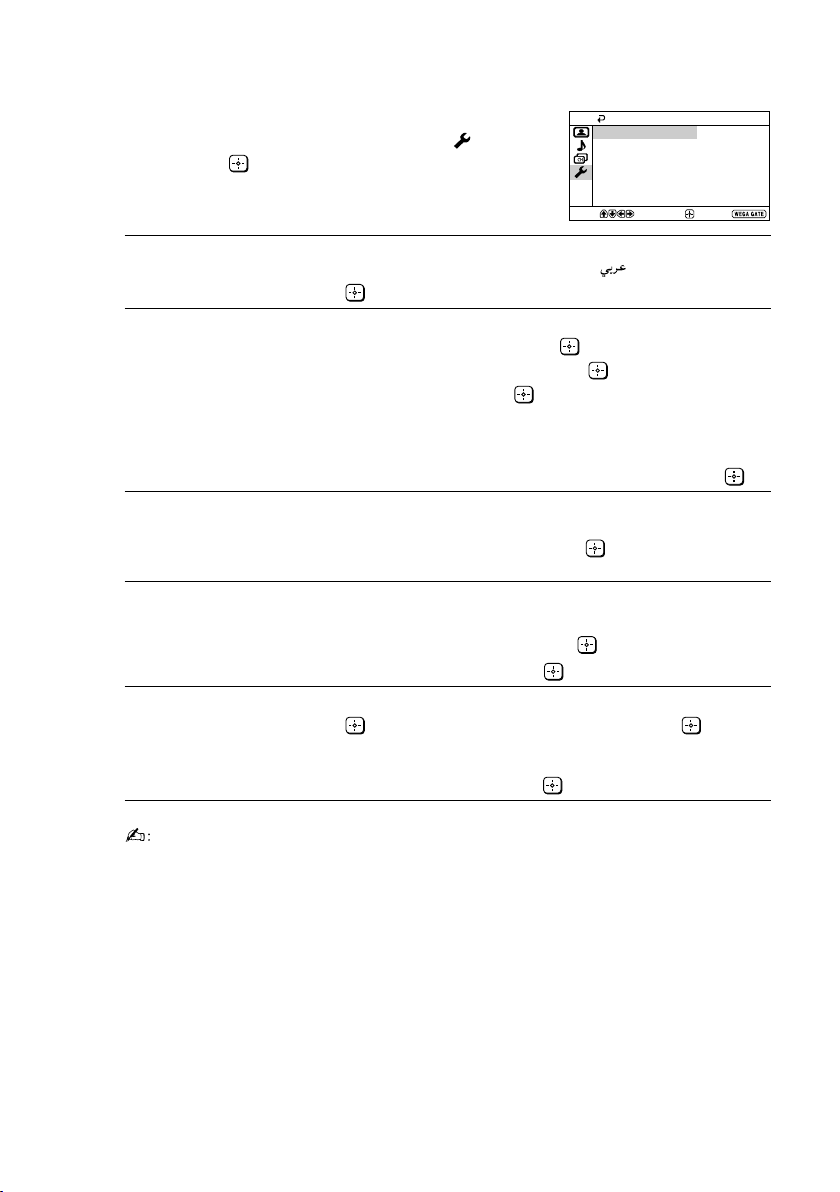
M
“Setup” setting
Press WEGA GATE and select “Settings”.
Press V or v to select the “Setup” icon (
then press .
Setup
),
Language:
Video Label
Color System:
Wake Up Timer Beep:
Factory Settings
Select
Confirm
English
Auto
On
End
“Language” Change the menu language.
Press V or v to select either “English” or “ ” (Arabic), then
press .
“Video Label” Label the connected equipment.
(1) Select “Video Input” and press . Press V or v to select the
input you want to label, then press .
(2) Select “Label” and press , then press V or v to select
the label options: “Video 1”/“Video 2”, “VCR”, “SAT”,
“Game” or “Edit”*.
* You may edit the video label to your favorite name. Press V or v
to select alphanumeric characters for the label, then press .
“Color System” Select the color system.
Press V or v to select either “Auto”, “PAL”, “SECAM”,
“NTSC3.58” or “NTSC4.43”, then press . Normally, set this to
“Auto”.
“Wake Up Timer
Beep
” automatically using wake up timer.
(KV-AW21M83 only)
Allow your TV to emit beeping sound when TV switches on
Press V or v to select “On”, then press .
To cancel, select “Off”, then press .
“Factory Settings”
Reset your TV to factory settings.
Press and press V or v to select “Yes”. Then press .
Your TV will go blank for a few seconds, then the “Initial Setup”
menu will appear.
To cancel, select “No”, then press .
•To ensure the beeping sound can be heard, you must set an appropriate volume
level on your TV and make sure the TV is not in mute condition.
•To stop the beeping sound, press any buttons on the remote control or front
panel.
• If no button is pressed for three minutes, the beeping sound will automatically
go off.
 Loading...