

Page 1

3-810-578-11 (1)
Trinitron Coior TV
Operating Instructions
Manual de instrucciones
KV-9PT50
KV-9PT60
©1995 by Sony Corporation
Page 2
Warning
To prevent fire or shock
hazard, do not expose
the television to rain or
moisture.
CAUTION
t
CAUTION TO REDUCE THE RISK OF ELECTRIC SHOCK,
DO NOT REMOVE COVER (OR BACK)
NO USER-SERVICEABLE PARTS INSIDE
REFER SERVICING TO QUALIFIED SERVICE PERSONNEL
This symbol is intended to
alert the user to the
presence of uninsulated
"dangerous voltage"
u ithin the product's
enclosure that mav be of
sufficient magnitude to
constitute a risk of electric
shock to persons.
This symbol is intended to
alert the user to the
presence of important
operating and
maintenance (servicing)
instructions in the
literature accompanying
the appliance.
Safety precautions
• For KV-9PT50, operate on 120 V AC, 60
Hz, For KV-OPT60, operate on 120 V
AC or on 12 DC.
• To operate from a car battery, use only
the supplied car battery cord.
• Unpluy the TV from the wall outlet if
you are not going to use it for several
days or more.
• Unplug the car battery cord if you are
not using the T\'.
• To prer ent electric shock, do not use
this polarized AC plug r\ ith an
extension cord, receptacle or other
outlet unless the blades can be fully
inserted to prex ent blade exposure,
2EN
For details concerning safety precautions,
see the attaching leaflet "IMPORTANT
SAFEGUARDS."
CAUTION
• To reduce the risk of fire, do not place
any heating or cooking appliance
beneath the TV.
• When using TV games, computers, and
similar products with your TV, keep the
brightness and contrast functions at low
settings. If a fixed (non-moving) pattern
is left on the screen for long periods of
time at a high brightness or contrast
setting, the image can be permanentK'
imprinted onto the screen. These types
of imprints are not covered by your
warranty because they are the result of
misuse.
• When using the shelf installation
bracket, follow the instruction (p. 5-9) in
the exact order given. If you do not, the
TV may fail from the bracket. (KV-
9PT50 only)
Installation
• To prevent internal heat build-up, do
not block the ventilation openings.
• Do not place the TV in direct sunlight,
near a heater, or where the humiditx is
high.
Note to CATV system installer
This reminder is provided to call the
CATV system installer's attention to
Article 820 - 40 of the NEC that provides
guidelines for proper grounding and, in
particular specifies that the cable ground
shall be connected to the grounding
system of the building, as close to the
point of cable entry as p>ractical.
Owner's Record
The model and serial numbers are located
at the rear of the TV^ Record these
numbers in the spaces provided below.
Refer to them whenever you call upon
\ pur Sonv dealer regarding this product.
Model No
Serial No.
Page 3

Table of contents
Welcome! 4
Setting Up
Setting up the KV-9PT50 5
Attaching the TV 5
Removing the TV 9
Using house current 10
Conriecting the supplied telescopic antenna 10
Setting up the KV-9PT60 11
Using house current 11
Using a car battery 11
Connecting the supplied telescopic antenna 12
Cormections 13
Connecting to outdoor antenna 13
Connecting to cable TV system 14
Connecting video equipment 14
Watching a VCR picture 14
Setting up the remote commander 15
Setting cable TV on or off 16
Presetting channels 18
Erasing or adding channels -19 -
Available Features
Functions 20
Adjusting the picture 22
Customizing the channel number buttons 24
Blocking out a channel (CHANNEL BLOCK) 26
Additional Information
Troubleshooting 27
Specifications 28
3EN
Page 4

Welcome!
Thank you for purchasing the Sony Trinitron Color TV, Before
operating the TV, please read this manual thoroughly and retain it for
future reference.
The instructions in this manual are for the models listed on the front
cover. Before you start reading, check your model number by looking at
the rear of your TV.
Here are some of the features you will enjoy with your TV;
• A 181-channel frequency synthesis tuner.
• On-screen menus that let you set the picture quality and other
settings.
• A sleep timer that automatically turns off the TV after the time you
selected.
• An Audio/Video input jack to connect your VCR to the TV.
• Dual mode swivel bracket to attach the TV to a kitchen shelf or
cabinet and to use the TV with the stand (KV-9PT50 only).
• Coiled power cord (KV-9PT50 only).
• Two-way AC/DC power supply (KV-9PT60 only).
4EN
Page 5
(^Setting Up
Setting up the KV-9PT50
Attaching the TV
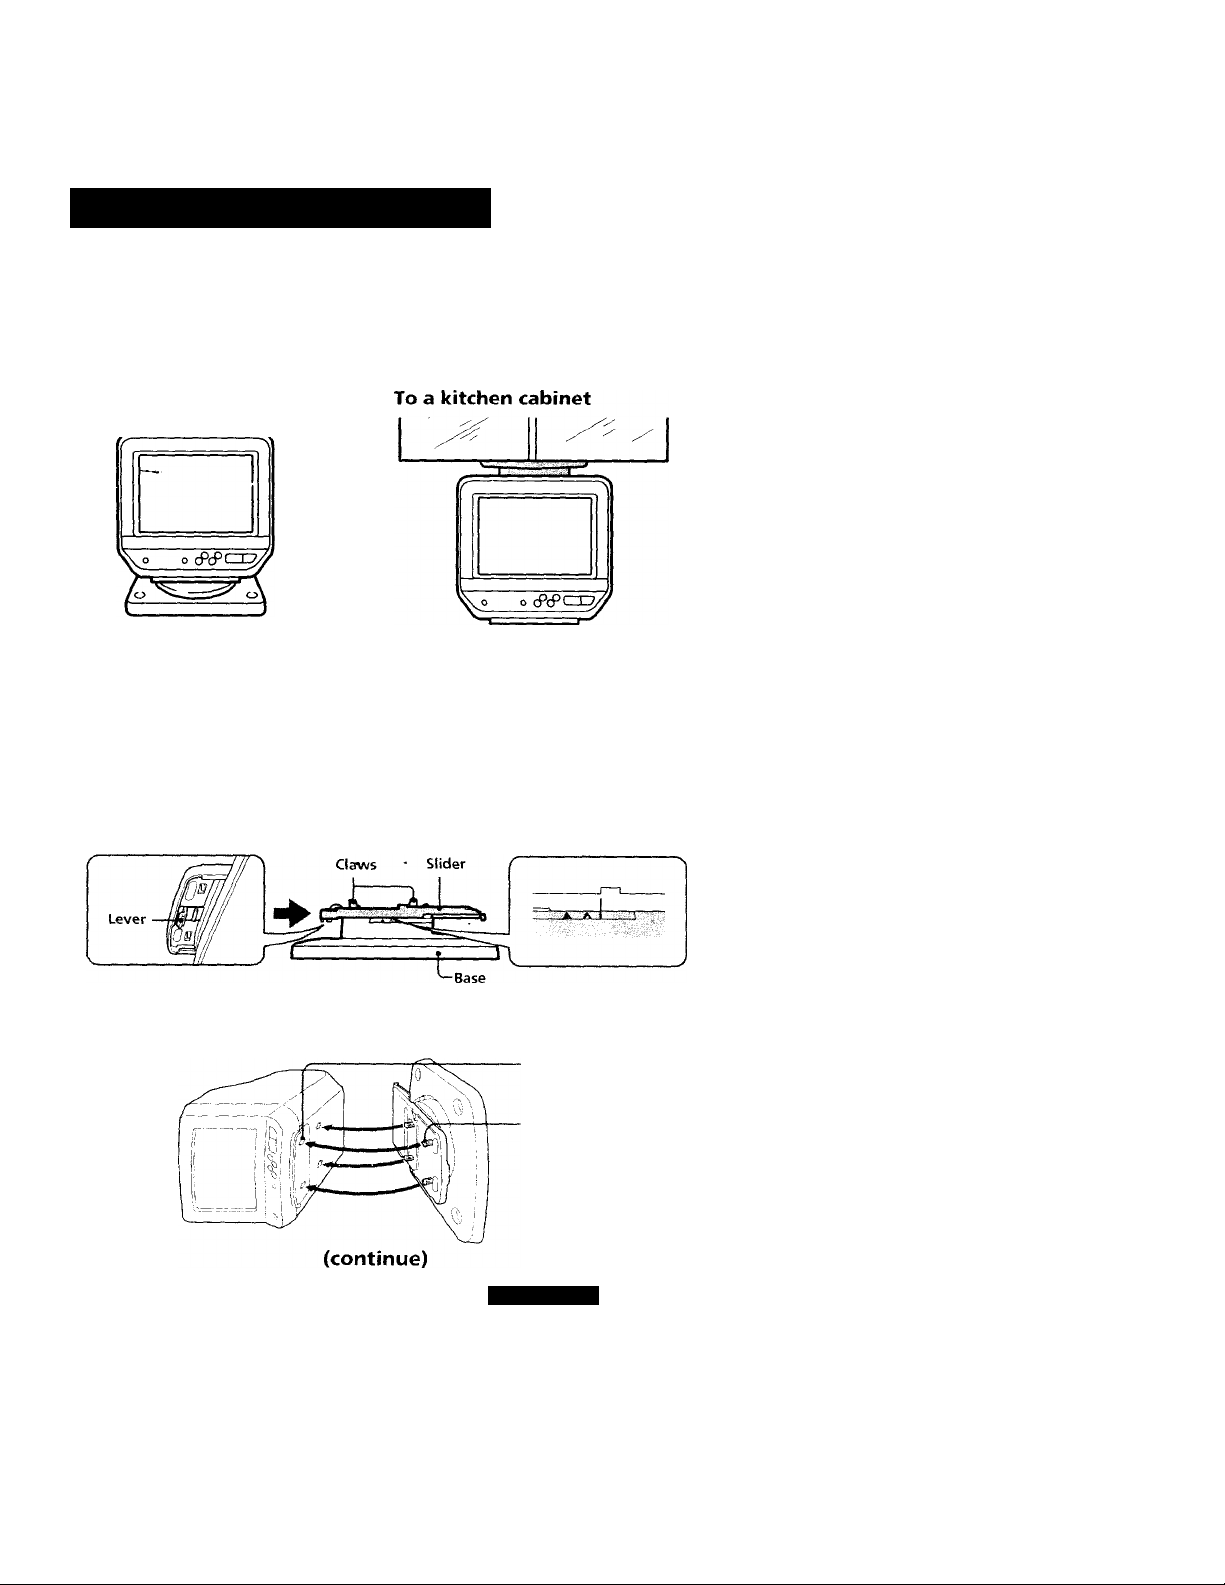
You can install the TV to the stand (bracket) in two ways with the
supplied dual mode swiv^el bracket.
To the stand
Caution
Do not install the TV with wet hands, or touch the TV and bracket with wet hands.
H To attach the TV to the stand
1 While holding up the lever, push the slider in the direction of the
arrow.
2 Turn the TV sideways, attach the stand to the TV so that the four
claws of the slider fit in the square-holes on the bottom of the TV.
Square-holes (4)
Claws (4)
Setting up
5EN
Page 6
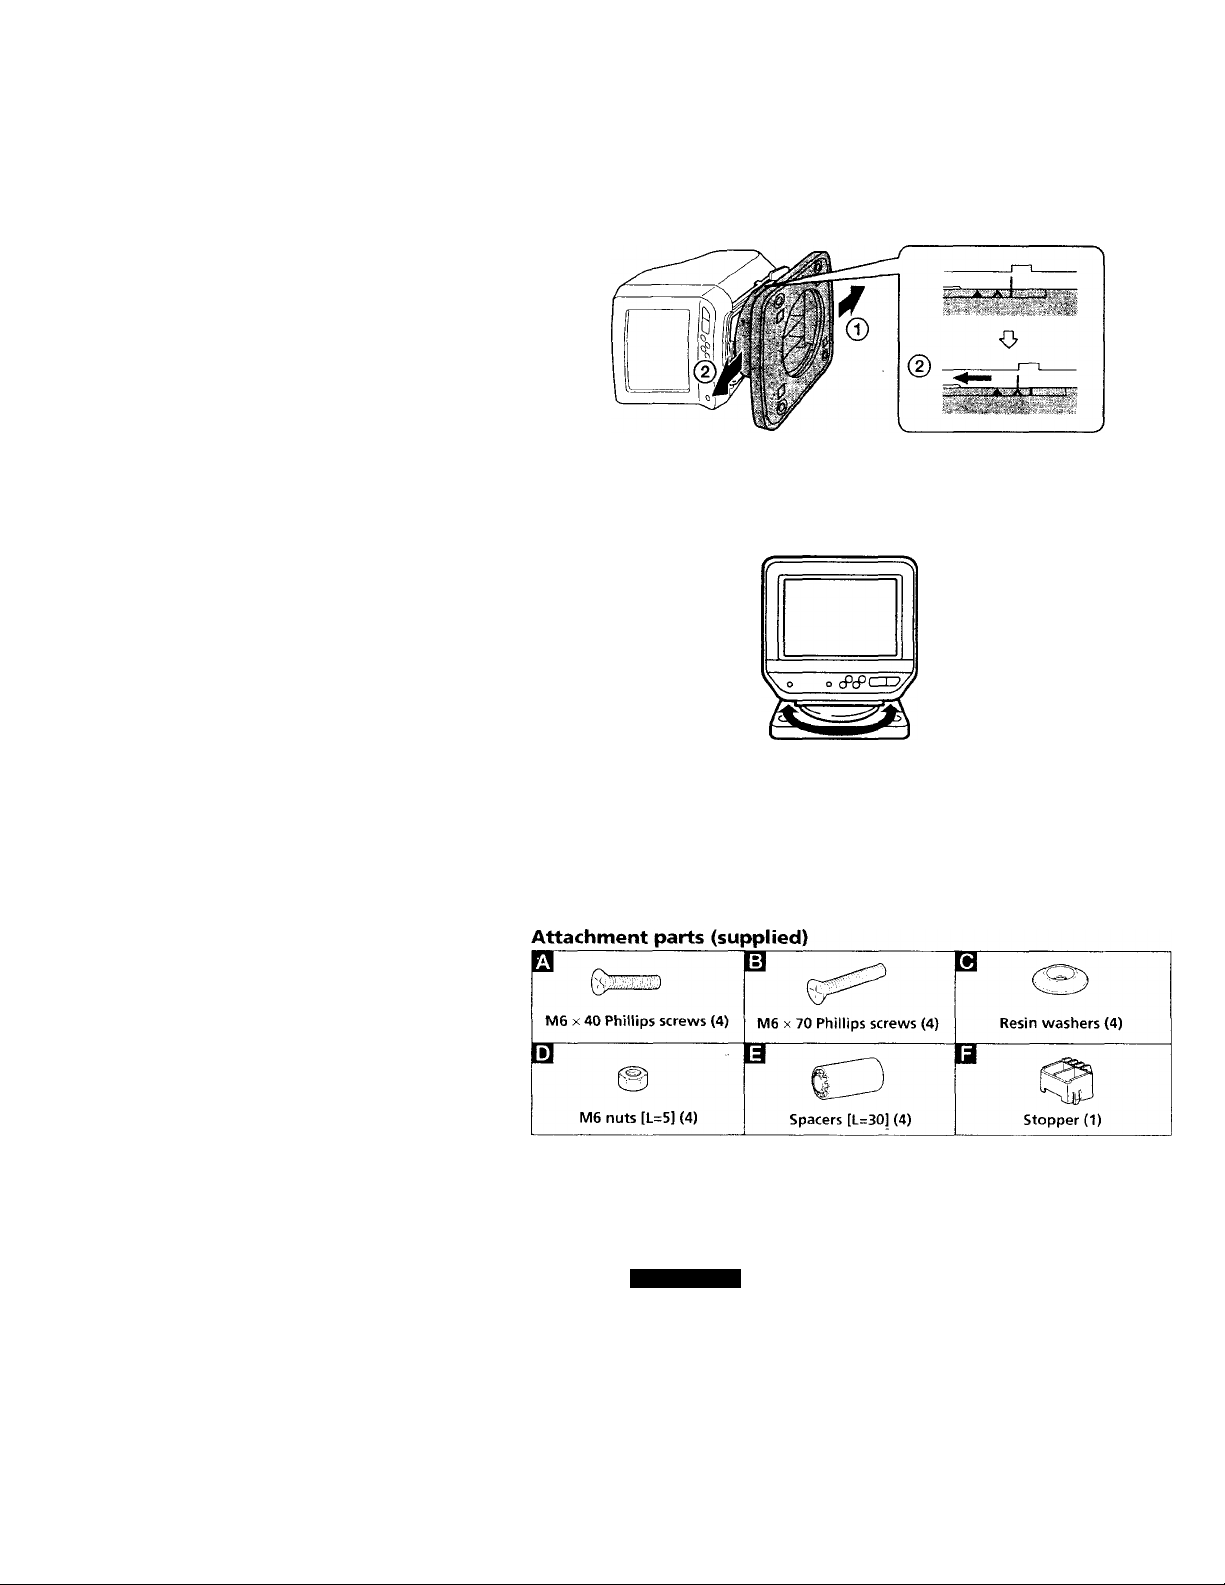
3 ® Push the base in the direction of the arrow © until the two rear
claws on the slider touch the back of the square-holes on the
bottom of the TV.
@ To lock the bracket and the TV, pull the slider in the direction of
the arrow @ while holding up the lever without moving the
base.
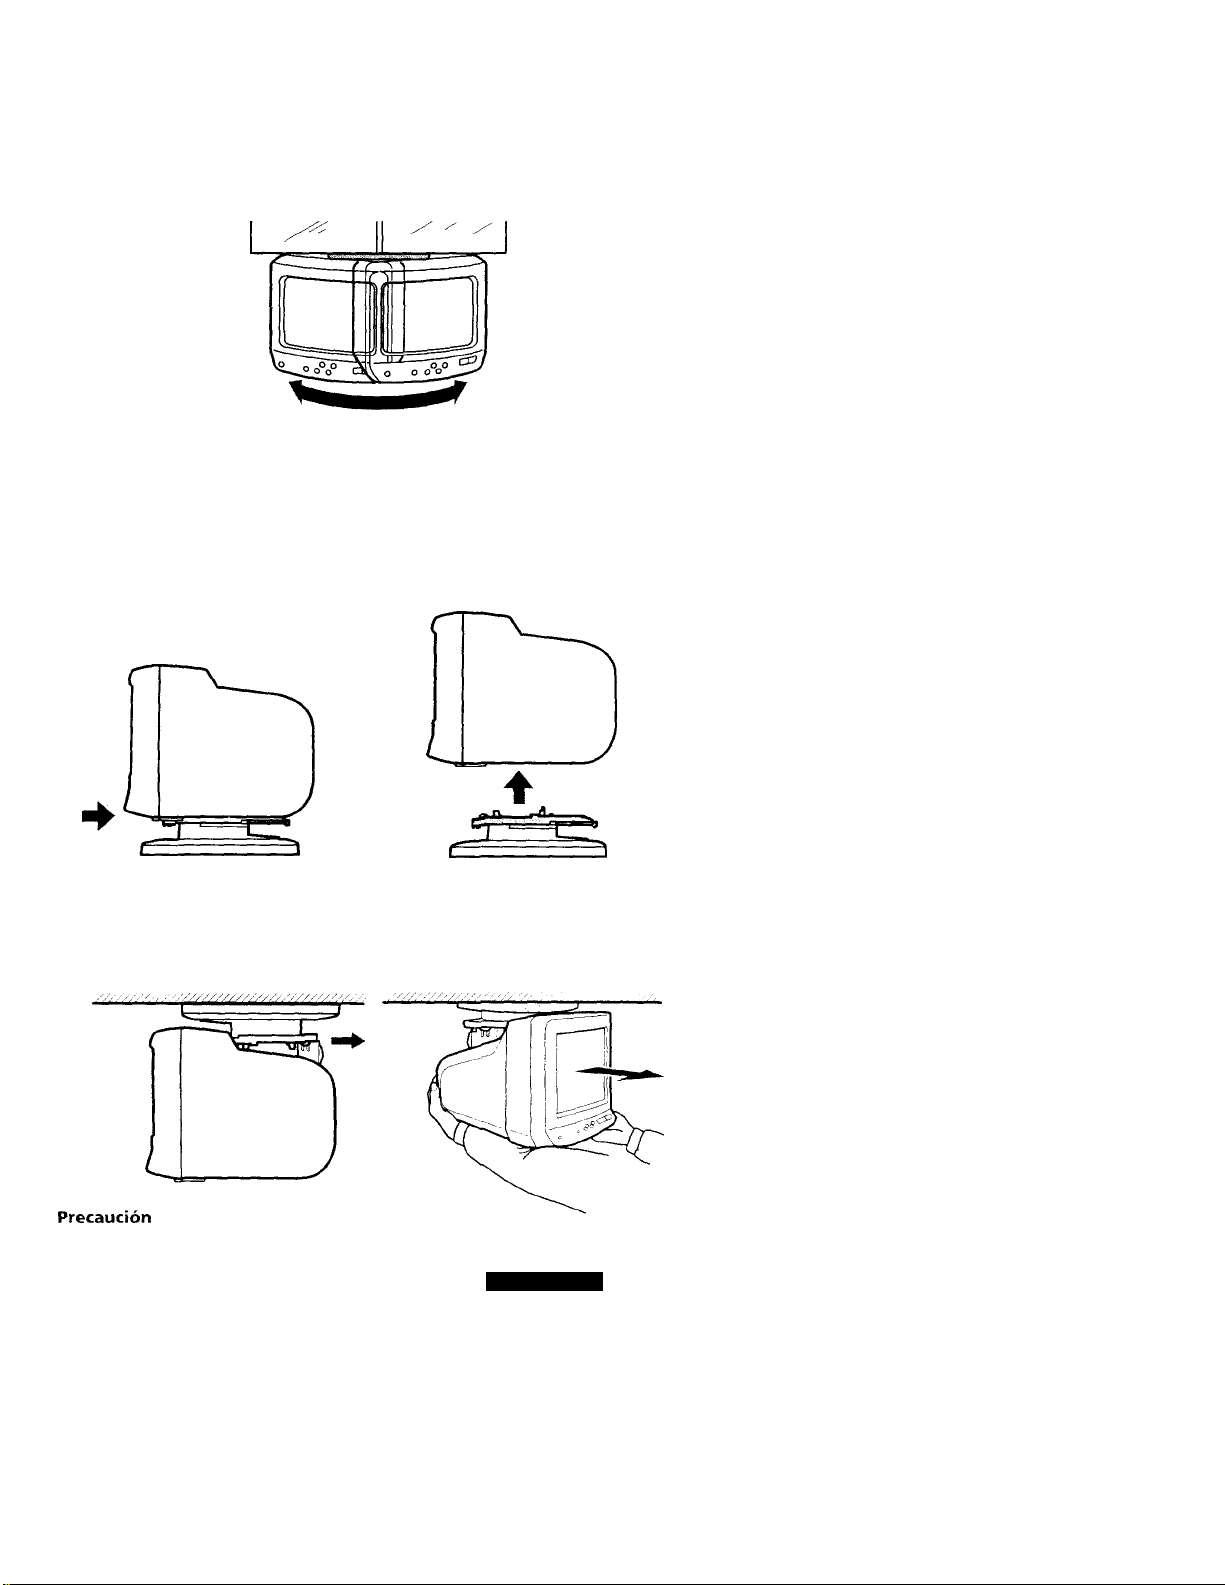
4 You can rotate the TV about 60° in either direction.
m To attach the TV to a kitchen cabinet
To install the TV to a kitchen cabinet, attach the supplied shelf
installation bracket using the attachment parts shown below. The
bracket attachment instructions differ depending on the cabinet type
(flush or overhanging). Follow the instructions that match your cabinet
type.
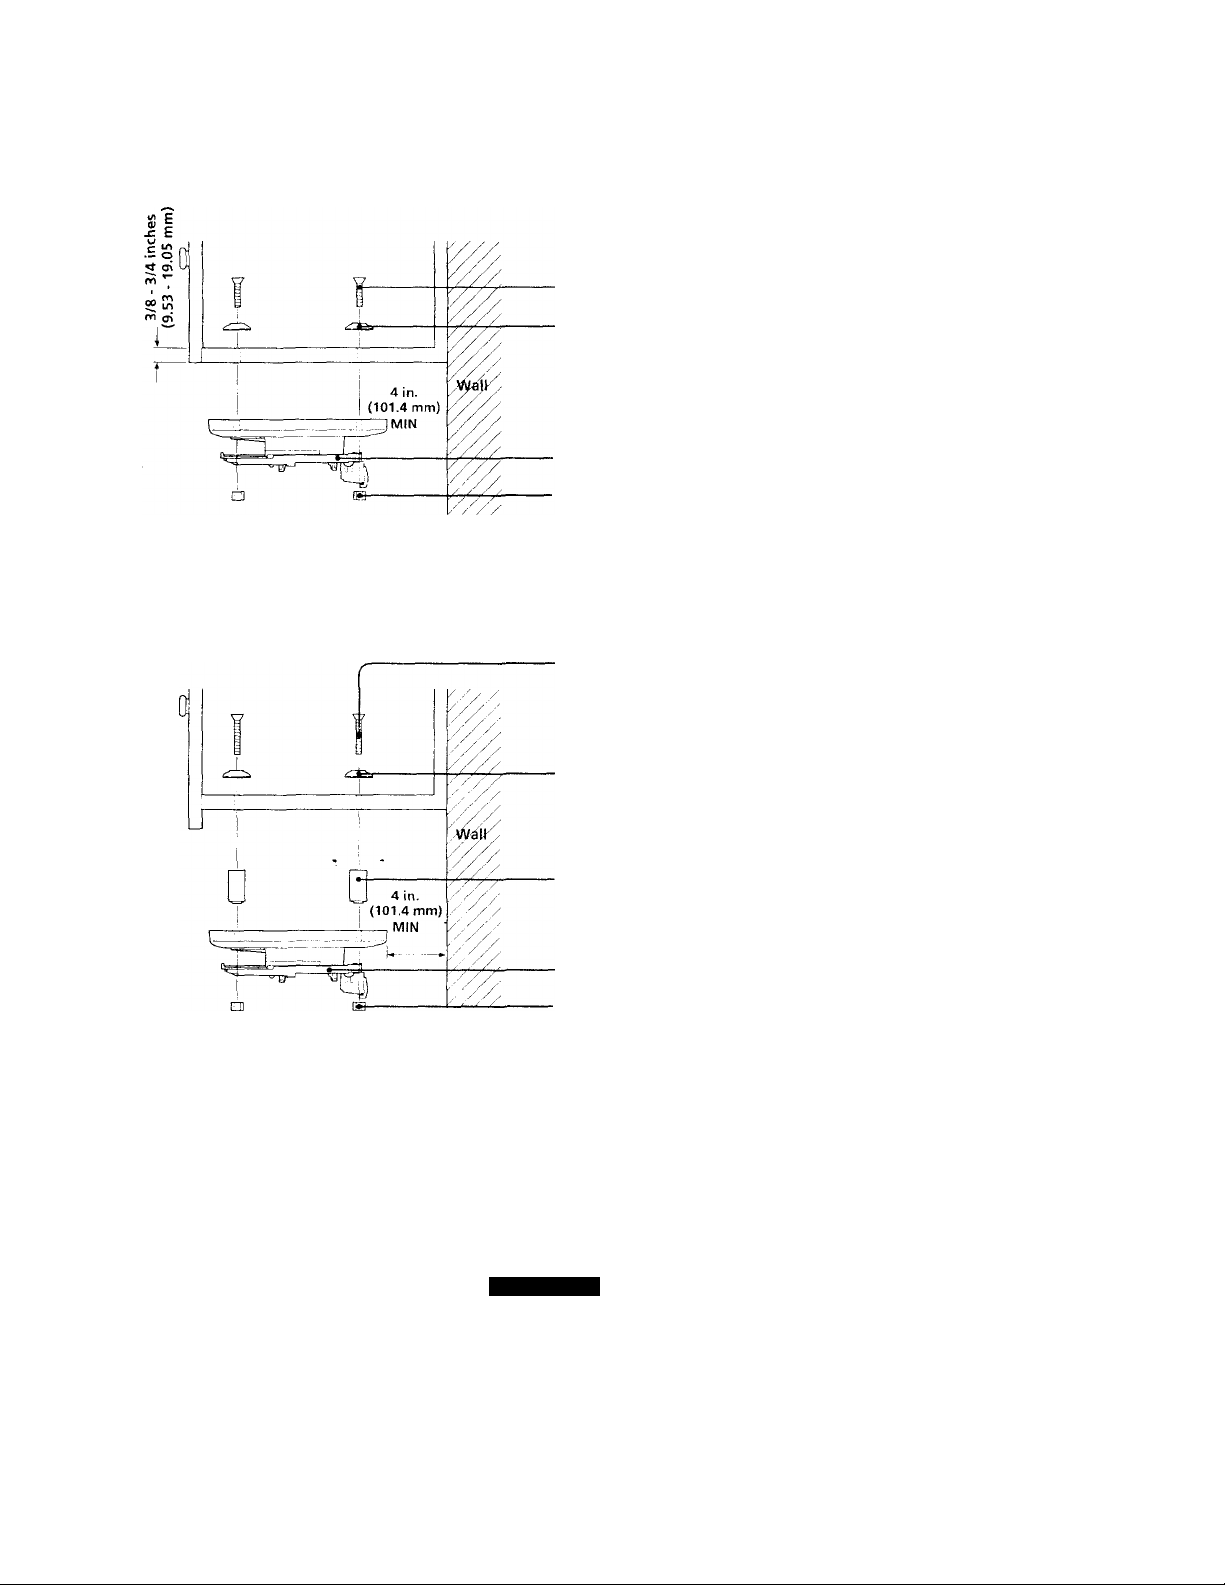
Lay the supplied paper pattern on the base of the cabinet (inside or
outside), to ensure the proper 4 inches (101.4 mm) distance between the
wall and the bracket. Drill 4 holes (diameter: 9/32 inches, 7 mm) where
indicated on the pattern. Attach the shelf installation bracket as shown
on the following pages.
6EN
Setting up
Page 7
Attaching to a flush type cabinet
- 0 M6 X 40
Phillips screws
B Resin washers
• Shelf installation
bracket
■ H M6 nuts [L=5]
Notes
• You cannot attach the shelf installation bracket to a cabinet with a base thickness of
less than 3/8 inches (9.53 mm).
• If the cabinet base thickness is over 3/4 inches (19.05 mm), purchase longer screws
(#10-32) and nuts at a hardware supply store.
Attaching to an overhanging type cabinet
0 M6 X 70
Phillips screws
B Resin washers
0 Spacers [L=30]
Shelf installation
bracket
■ B M6 nuts [L=5]
Notes
• The spacer is not needed for the cabinet with an overhang of 0 - 1 inch (0 - 25.4
mm).
• The spacer is needed for the cabinet with an overliang of 1 - 2 inches (25.4 - 51
mm).
• You cannot attach the shelf installation bracket to cabinet with an overhang of over
2 1/8 inches (51 mm).
Cautions
• When using the shelf installation bracket to attach the TV to a kitchen shelf or
cabinet, be sure that the bracket is attached level to the .shelf or cabinet base. If the
TV is installed to a bracket that is not level, it may fall from the bracket.
• To reduce the risk of fire, do not place anv heating or cooking appliance beneath
TV.
Setting up
JSN
Page 8
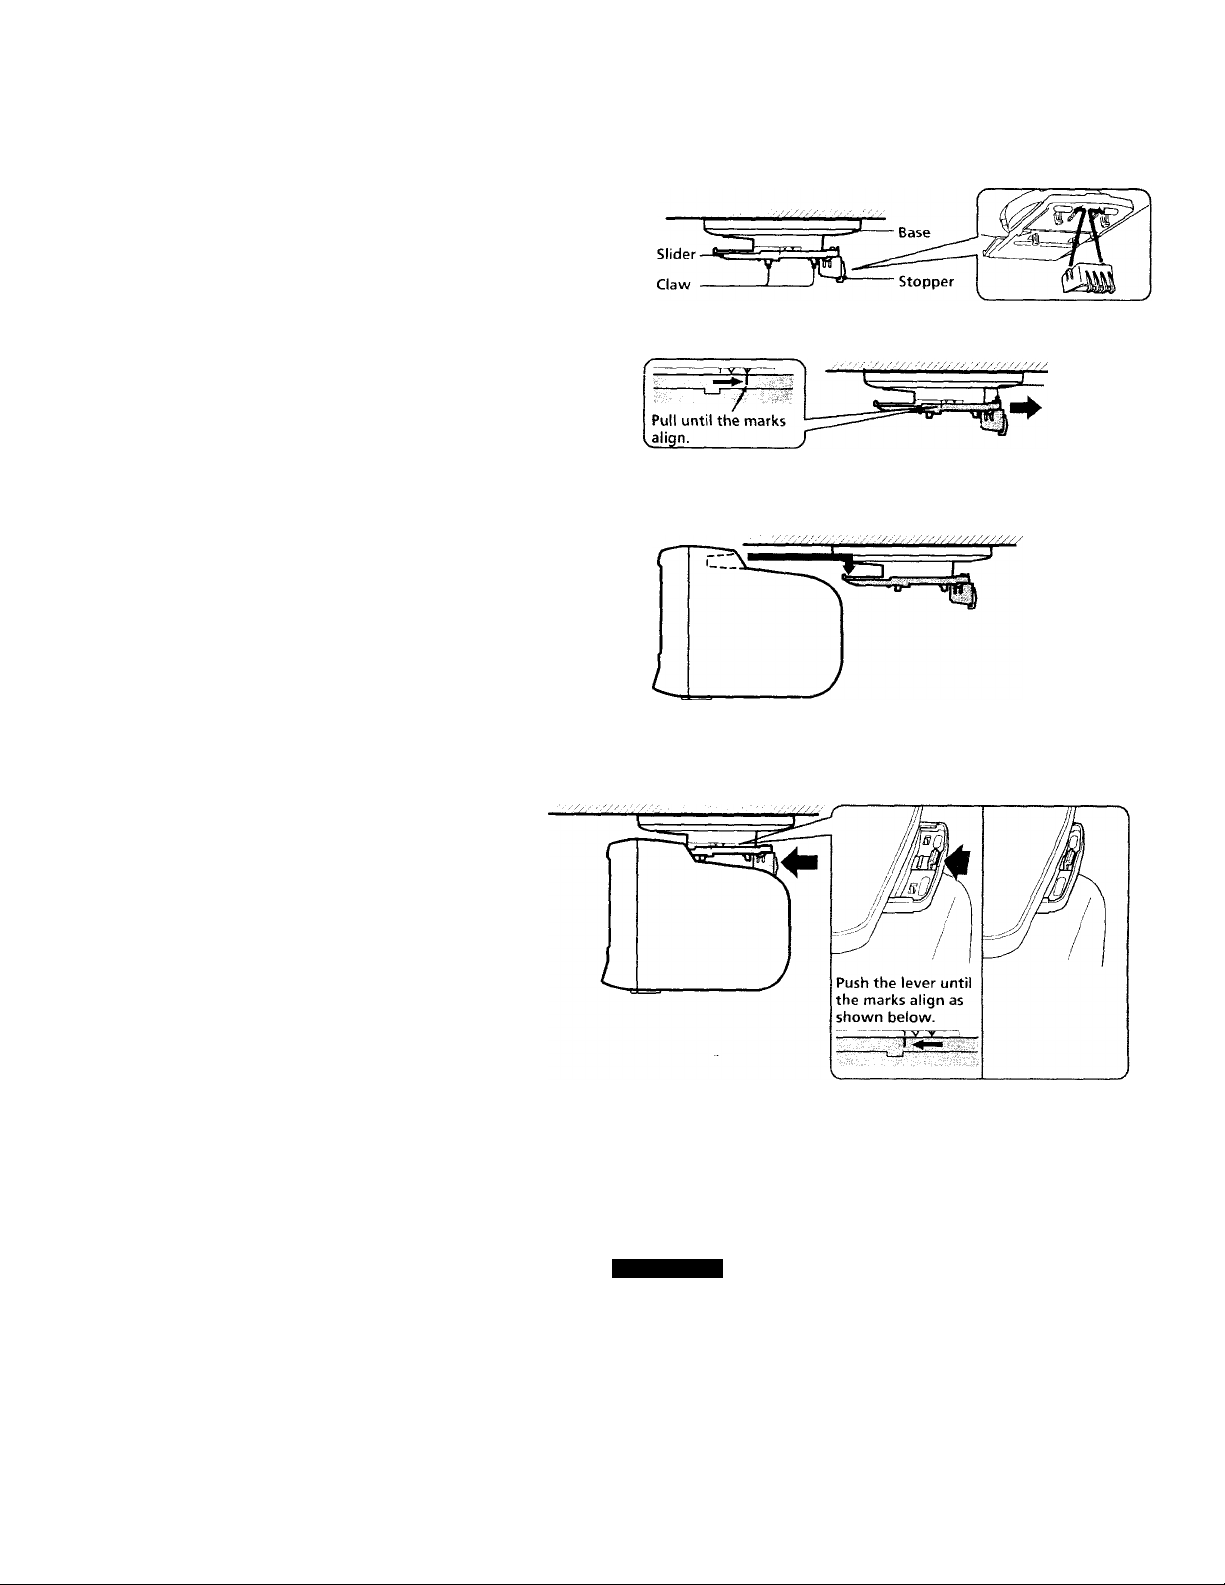
1 Attach the stopper to the slider.
2 While holding down the lever, pull the slider in the direction of the
arrow.
3 Attach the TV temporarily to the slider so that two claws of the
bracket base fit in the square-holes located inside of the TV's knob.
4 While holding down the lever, push the slider in the direction of the
arrow so that the claws of the stopper fit in the ventilation hole of
the TV' cabinet.
Make sure that the bracket and the TV are locked completely.
SEN
Setting up
Page 9

5 You can rotate the TV about 60° in either direction. Be sure to rotate
the TV slowly and gently.
Caution
• Take care that a child doe.s not hang on the TV or pull it forcibly.
Removing the TV
H To remove the TV from the stand
1 While holding up the lever, push the slider in the direction of the
arrow to unlock the bracket and the TV.
2 Remove the TV from the stand.
♦
1i Hi r~^ ~
£
m To remove the TV from the bracket
*1 While holding down the lever, pull the slider in the direction of the
arrow to unlock the bracket and the TV.
2 Pull the TV toward you to remove the TV from the bracket.
Caution
• If you do not support the TV as illustrated, the TV mav fail when it separates from
the bracket.
Setting up
9EN
Page 10
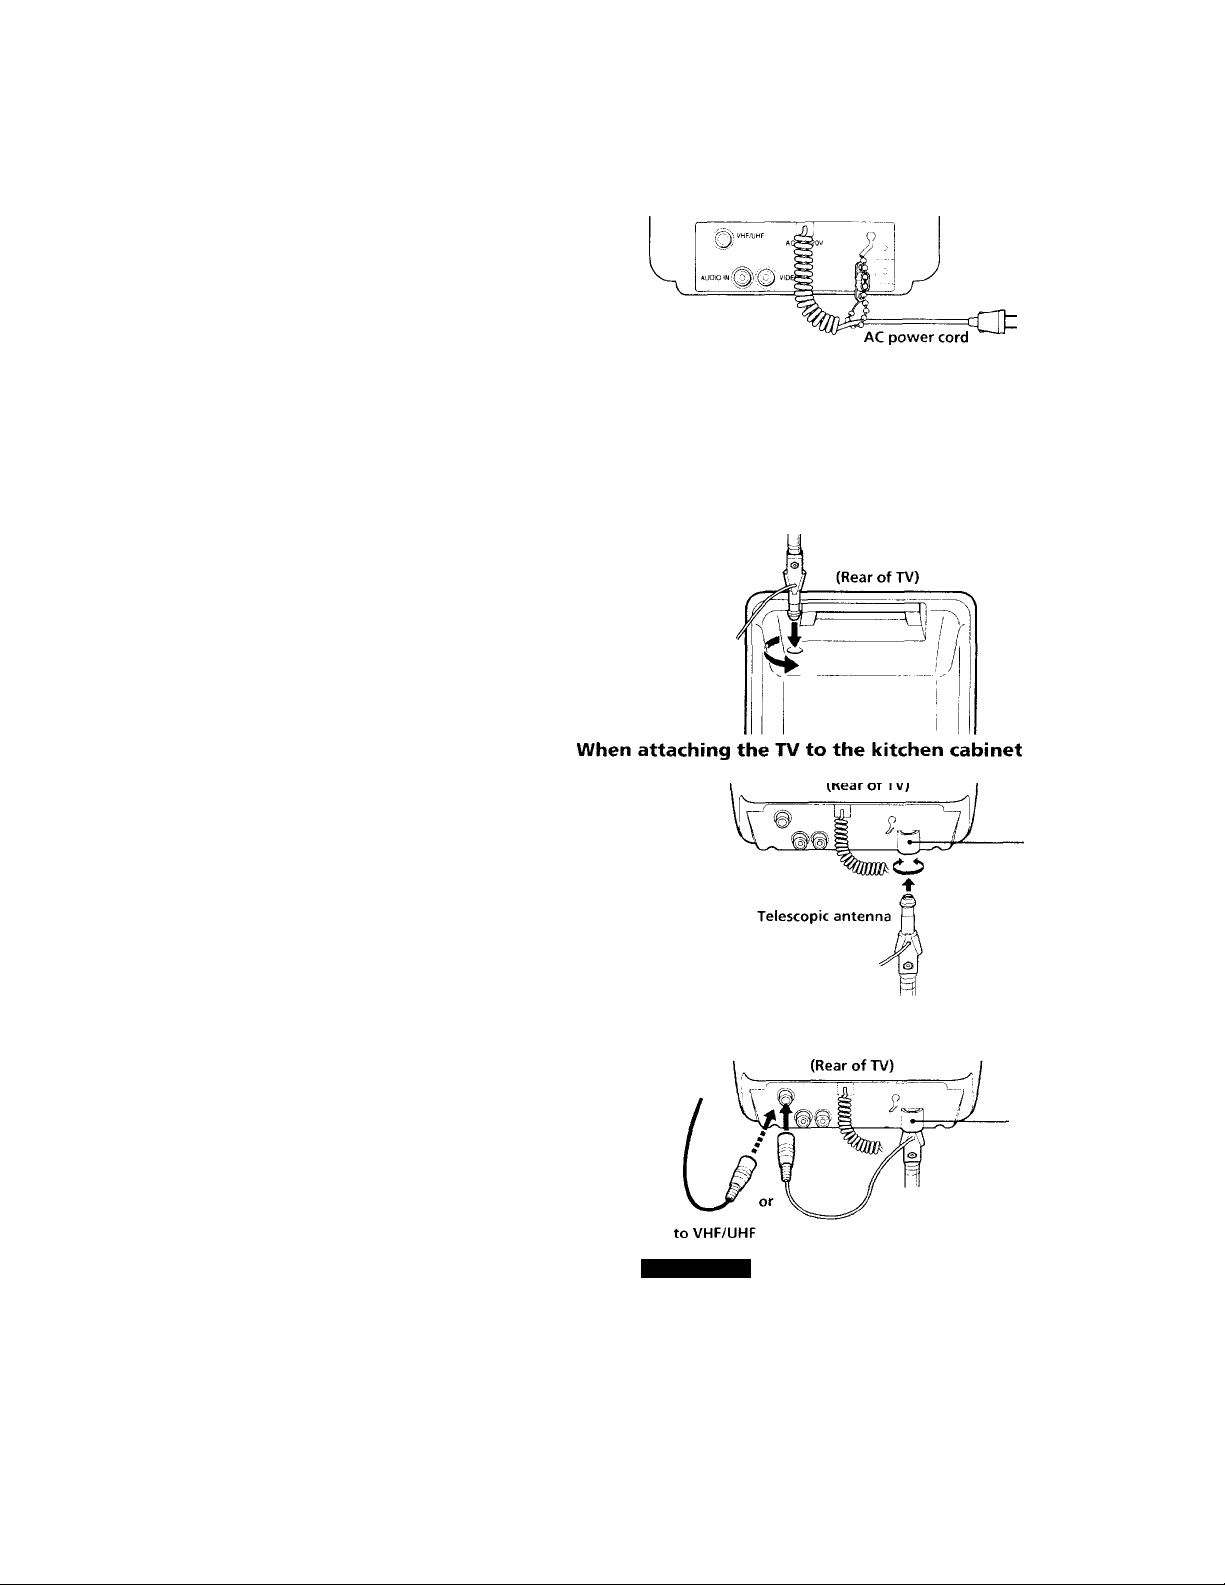
Using house current
(Rear of TV)
to a wall outlet
(120 VAC)
Connecting the supplied telescopic antenna
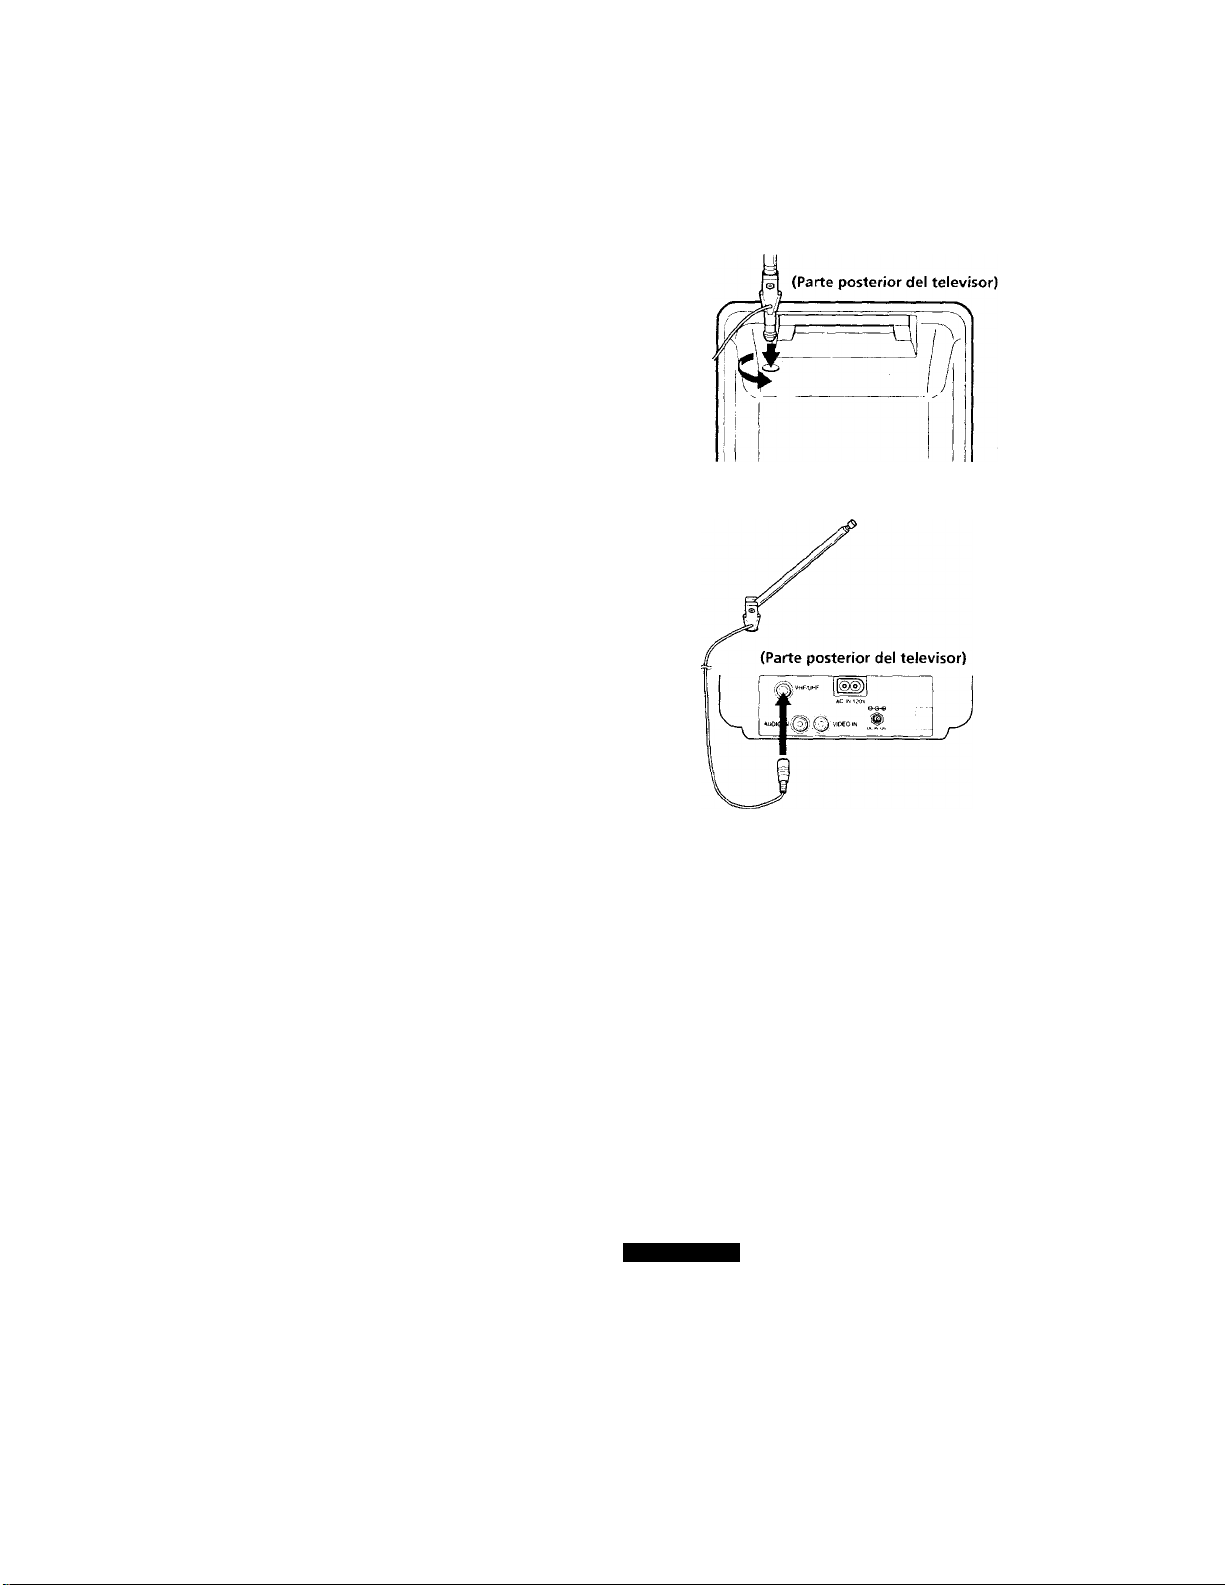
1 Insert the antenna into the receptacle on the TV, and twist to ensure
a secure fit.
When attaching the TV to the stand (table use)
Antenna
receptacle
2 Attach the antenna connector to the VHF/UHF terminal.
1QEN
Setting up
Page 11
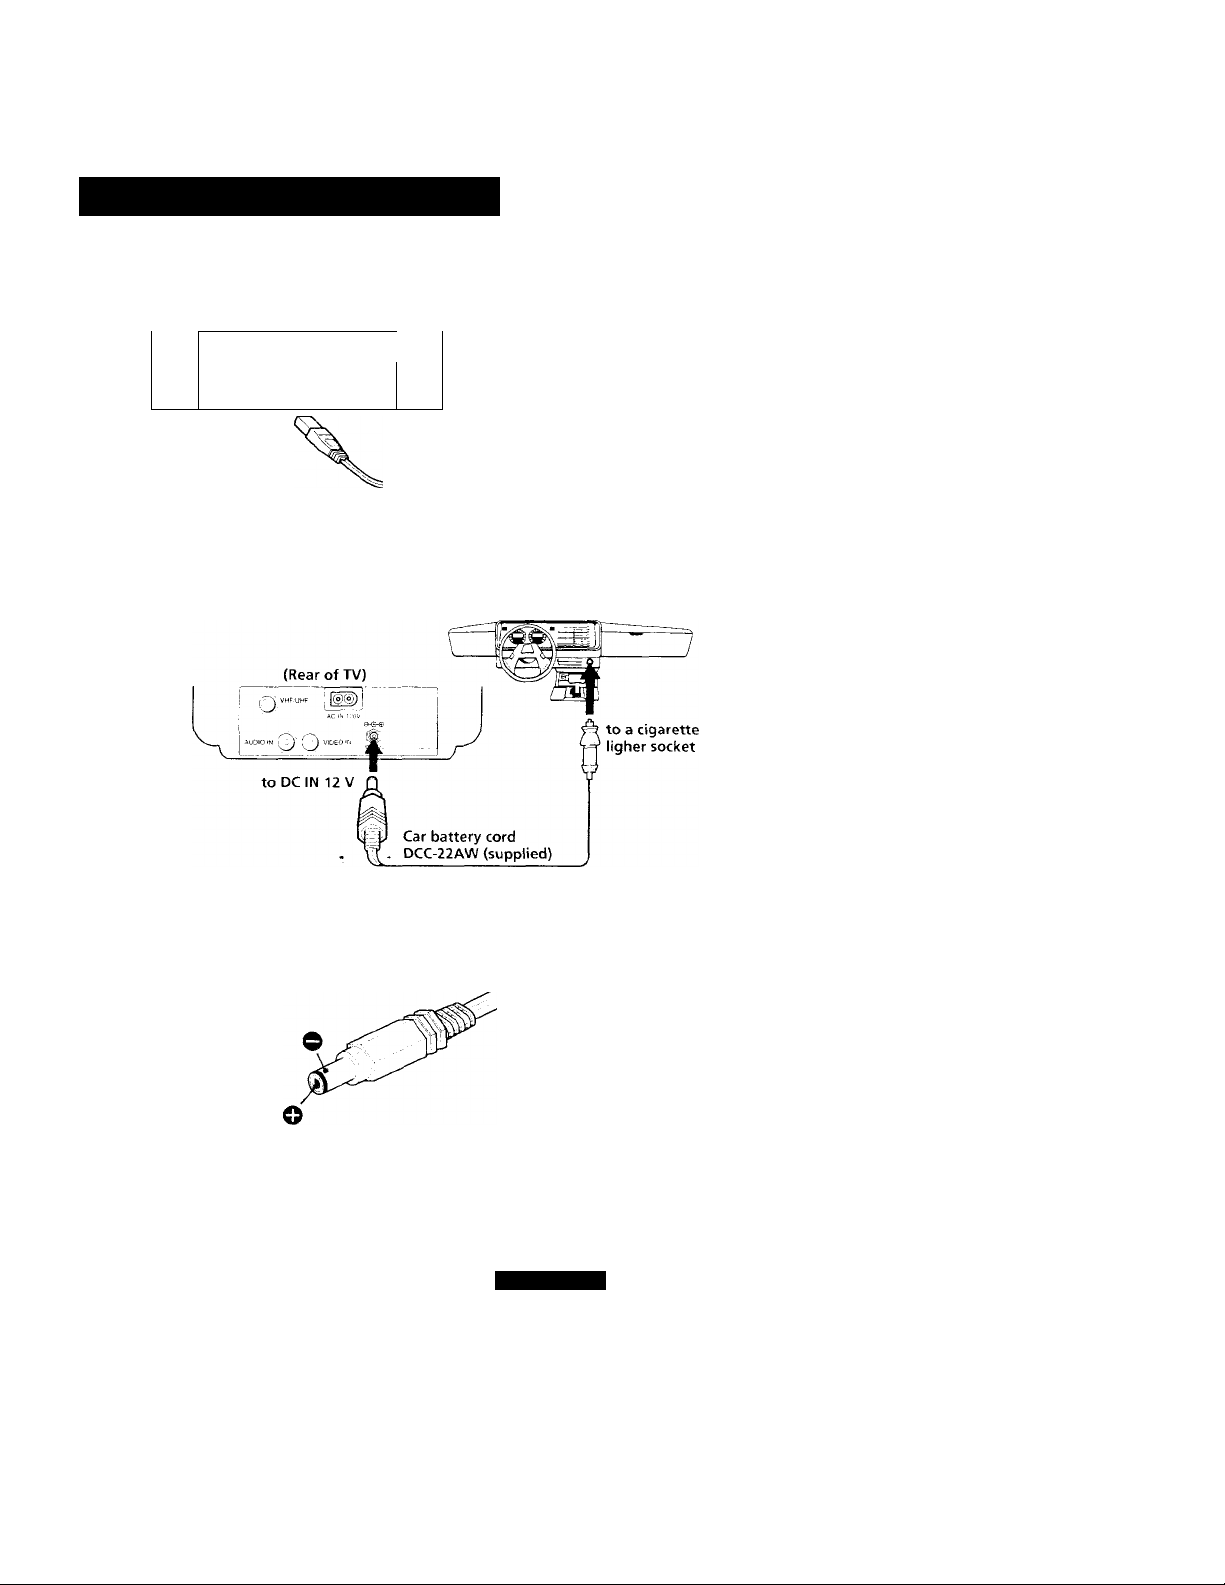
Setting up the KV-9PT60
Using house current
(Rear of TV)
■ VHF-UHE j |®(°j)
ACi|^2av
s
to AC IN 120 V
Using a car battery
VIDEW
AC power cord (supplied)
to a wall outlet
(120 VAC)
Notes
• For car use, the TV is designed for negative grouixi 12 V DC operation only.
• Use only the supplied car batter\' cord manufactured bv Sony. Polarity of the
plugs of other manufactures mav be different.
> When you aren't using the TV, remox'e the car batter\- cord from the cigarette
lighter socket.
Setting up
-JEN
Page 12
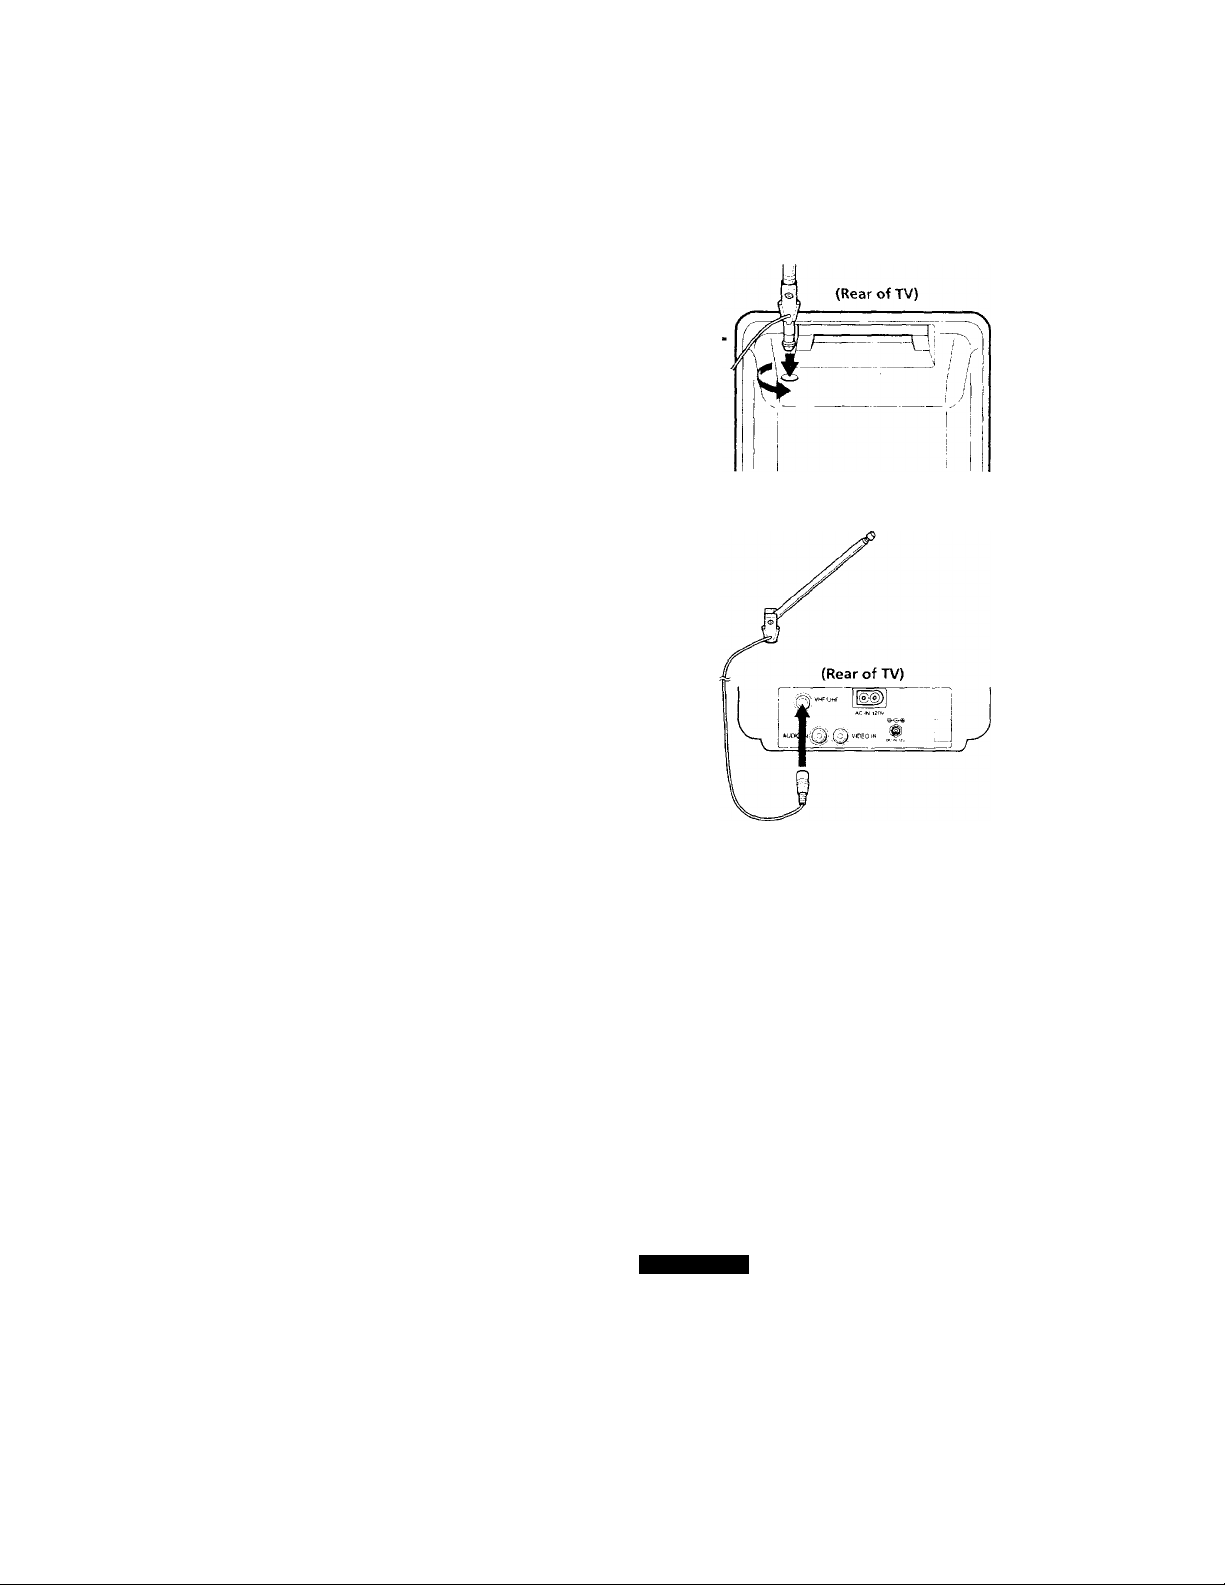
Connecting the supplied telescopic antenna
1 Insert the antenna into the receptacle on the TV, and twist to ensure
a secure fit.
2 Attach the antenna connector to the VHF/UHF terminal.
12EN Setting up
Page 13
Connections
Select one of the two ways to connect the TV to the antenna and/or
cable system. It is recommended to connect an outdoor antenna or a
cable TV system for better picture quality.
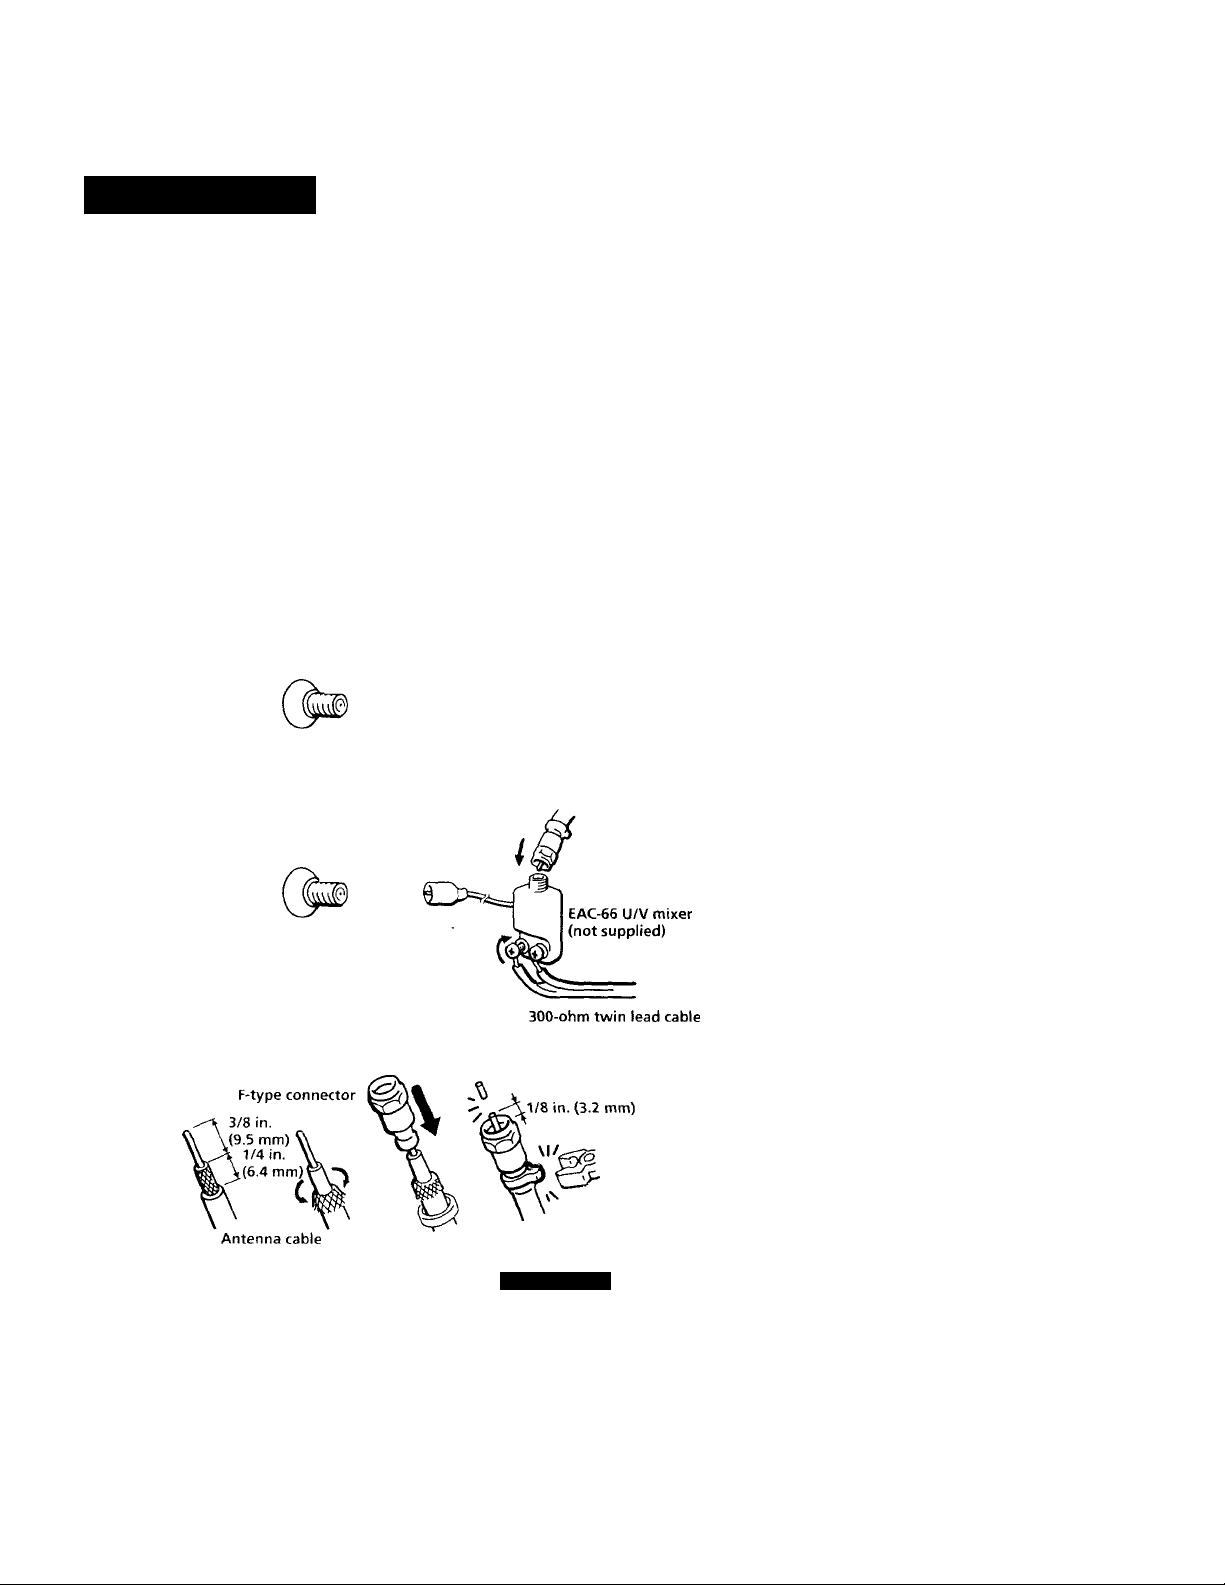
Connecting to outdoor antenna
Connect the antenna cable to the VHF-UHF antenna terminal. If the
antenna cable cannot be connected directly to the jack, follow one of the
diagrams below, depending on the type of cable you have.
Notes
• Do not use tools to attach the cable to the VHF/UHF terminal. Doing so may
damage the terminal.
• Most VHF/UHF combination antennas have a signal splitter. Remove the splitter
before attaching the appropriate connector.
• If the U/V mixer is used, snow and noise ma\' appear in the picture when viewing
cable TV channels over 37.
E!
> VHF only
or
. VHF/UHF
m
-VHF
and
. UHF
(Rear of TV)
VHF/UHF
(Rear of TV)
75-ohm coaxial cable
To attach an F-type connector, see "Attaching
an F-type connector to the antenna cable."
VHF/UHF -
Attaching an F-type connector to the antenna cable
75-ohm coaxial cable
Setting up
13EN
Page 14
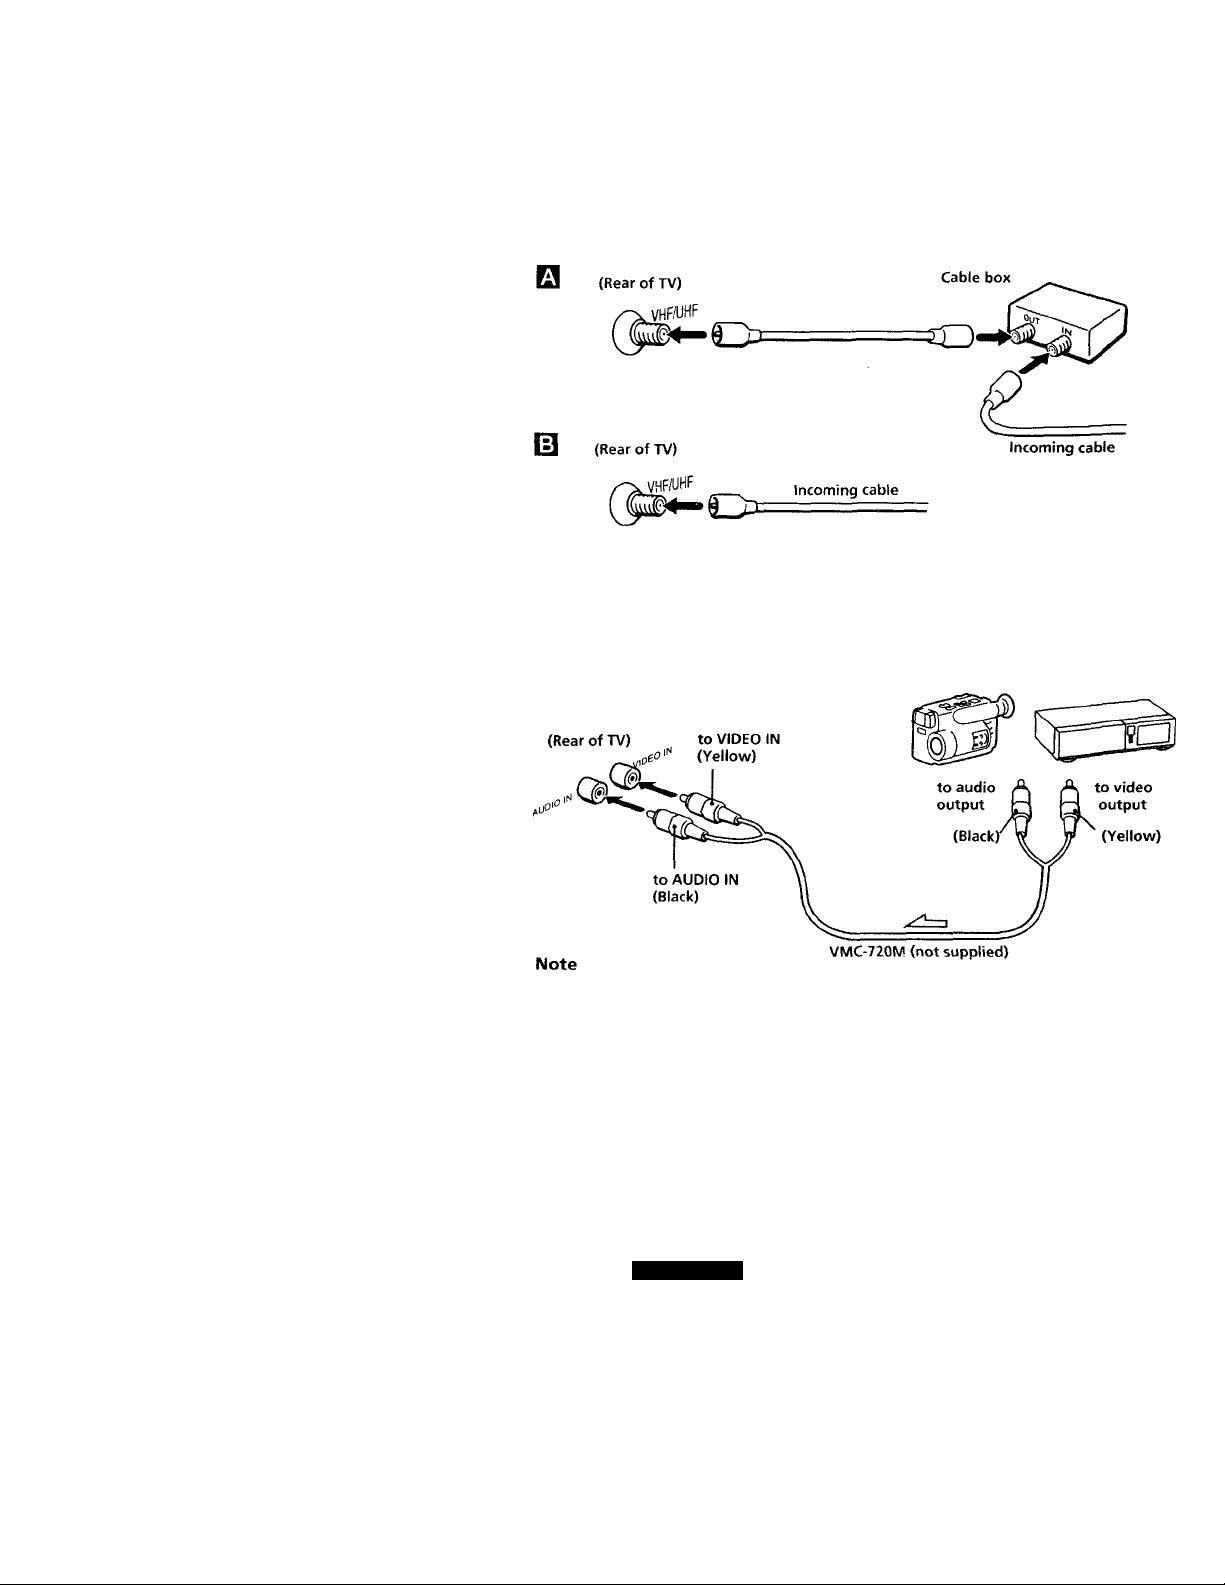
Connecting to cable TV system
If your cable company requires you to connect a cable box, follow
example
0
. If not, follow example
0
.
Connecting video equipment
Before connecting, turn off the power on all equipment.
Connecting a VCR or 8mm video camera
When connecting stereo equipment, use the VMC-920MS (not supplied) connecting
cable (stereo <—► monaural).
Watching a VCR picture
1 Turn on the TV.
2 Press TV/VIDEO so that "VIDEO" appears on the screen.
To return to TV mode
Press TV /VIDEO so that a channel number appears on the screen.
■J4EN
Setting up
Page 15
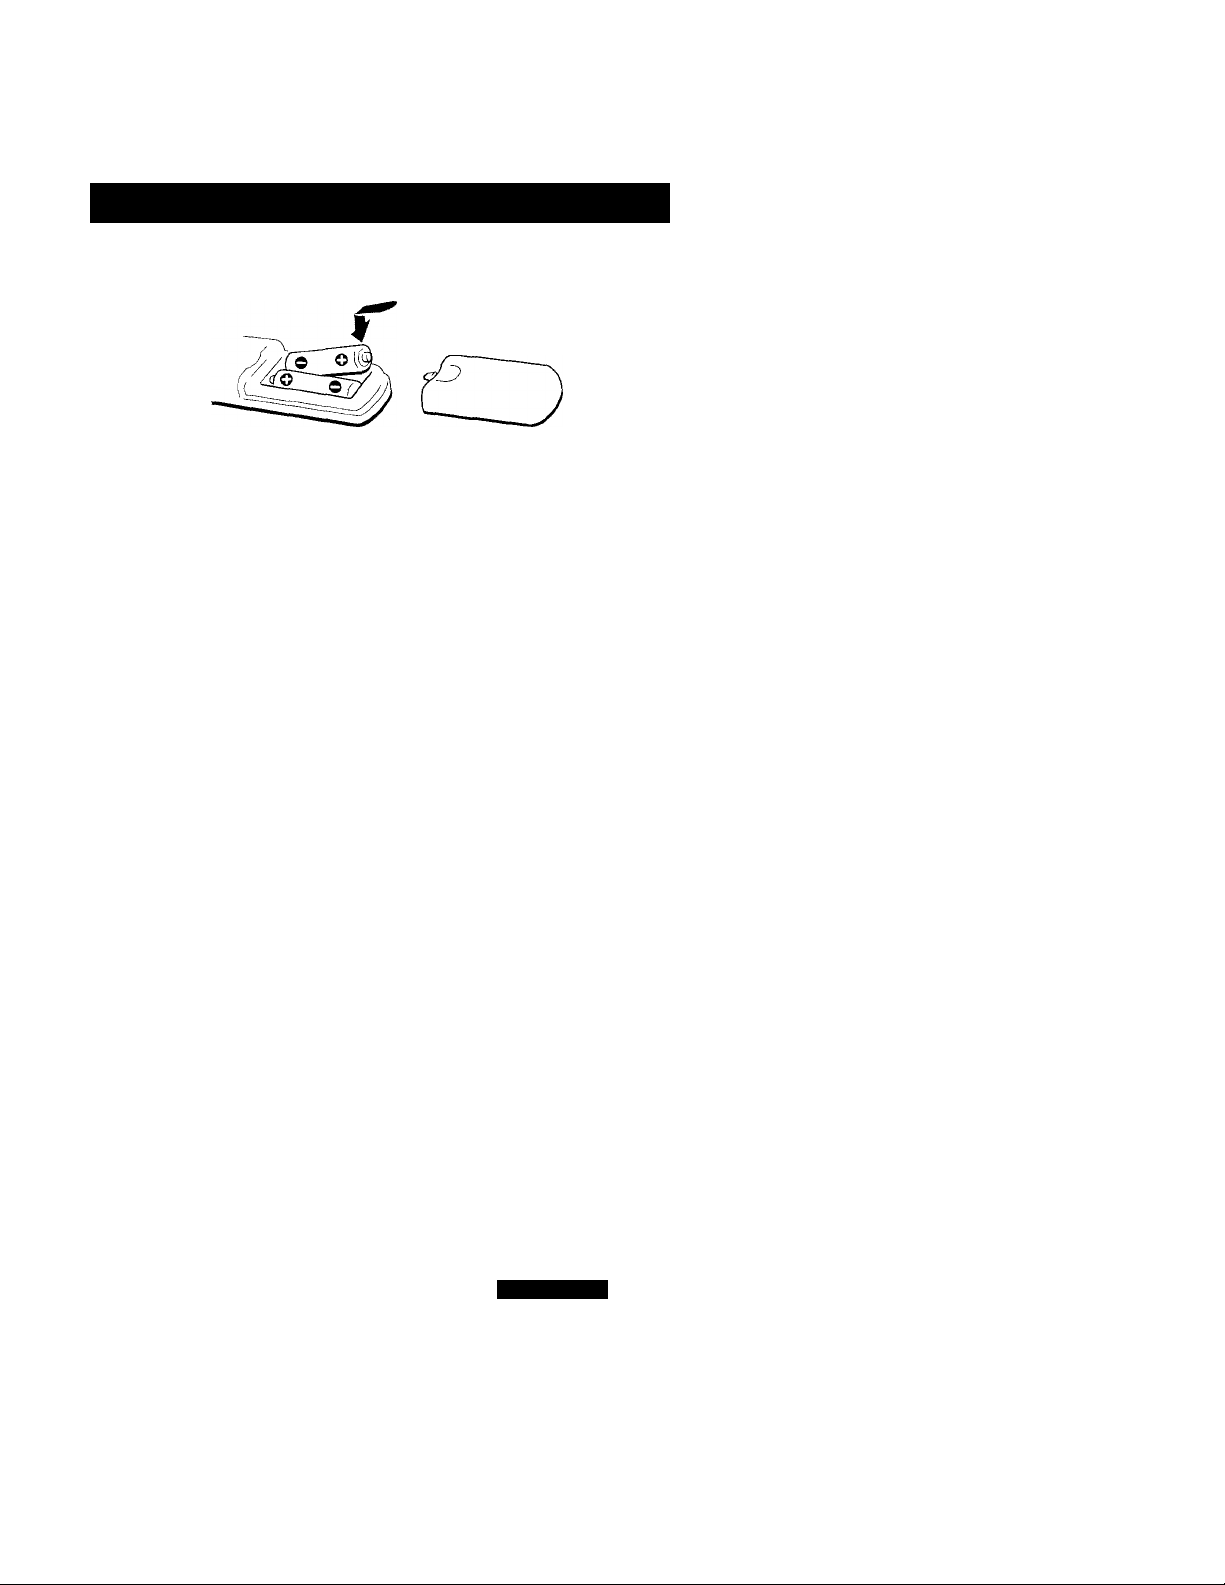
Setting up the remote commander
Install two size AA batteries (supplied) as shown.
Notes
• MatcKThe + and - on the batteries to the diagram inside the battery compartment.
• If you do not use the remote commander for an extended period of time, remove
the batteries to avoid possible damage from battery leakage.
• Do not handle the remote commander roughly. Do not drop it, step on it or let it
get wet.
• Do not place the remote commander in direct sunlight, near a heater, or where the
humidity is high.
Instructions in this manual are based on the remote commander. You
can also use the controls on the TV if they have the same name as those
on the remote commander.
Setting up
15EN
Page 16
Setting cable TV on or off
If the TV is connected to a cable TV system, then the factory setting
CABLE ON is correct. If the TV is not connected, set CABLE to OFF.
Note
If more than 90 seconds elapse after you press a button, the menu disappears
automatically.
1 Press MENU.
The main menu appears.
MENU
►VIDEO
SET UP
Use
Exits
2 Press A+ or V- on the remote commander to move the cursor (► ) on
the screen to SET UP. To select that function, press RETURN.
The SET UP menu appears.
SET UP
r+\(R)
V
(U
Note
If CABLE appears in black, the TV is set to video input and CABLE cannot
be selected. Press TV/VIDEO so that a channel number appears.
RETURN
►CABLE: ON
AUTO program
CH ERASE/ADD
CH CAPTI ON/GUI DE
CH BLOCK
UMENU
Use ^[RETWil ExitHOl
3 Set CABLE to ON or OFF.
(1) If the cursor is not beside CABLE, press A+ or V- to move the
cursor and press RETURN.
RETURN
16EN
Setting up
Page 17
(2) Press A+ or V- to select ON or OFF.
(3) Press RETURN.
RETURN
4 Press MENU to return to the original screen.
MENU
SET UP
►CABLE: OFF
AUTO PROGRAM
CH ERASE/ADD
CH CAPTION/GUIDE
CH BLOCK
3MENU
Use iHS Exi tlS®
Setting up
17EN
Page 18

Presetting channels
TV channels can be preset easily; first, store all the receivable channels
automatically by following the procedure below. Next, erase unwanted
channels or add additional channels. Preset channels during the day
rather than late at night, when some channels may not be broadcasting.
1 Press MENU.
2 Press A+ or V- on the remote commander to move the cursor (► ) on
the screen to SET UP and press RETURN.
The SET UP menu appears.
SET UP
RETURN
Note
If AUTO PROGRAM appears in black, the TV is set to video input and AUTO
PROGRAM cannot be selected. Press TV/VIDEO so that a channel number
appears.
3 Select AUTO PROGRAM.
(1) Press A+ or V- to move the cursor
/G^(r)
A
►CABLE; ON
AUTO PROGRAM
CH ERASE/ADD
CH CAPTI ON/GUI DE
CH BLOCK
^MENU
Use
Ex i tu
► ) to AUTO PROGRAM.
SET UP
CABLE: ON
►AUTO PROGRAM
CH ERASE/ADD
CH CAPTION/GUIDE
CH BLOCK
3MENU
Use iHjl] Exi tllSj]
(2) Press RETURN.
RETURN
AUTO PROGRAM
"AUTO PROGITAM" appears on the screen and the TV starts scanning
and presetting channels automatically. When all the receivable channels
are stored, "AUTO PROGRAM" disappears and the lowest numbered
channel is displayed.
18EN
Setting up
Page 19

Erasing or adding channels
1 Press MENU.
2 Press A+ or V- to select SET UP and press RETURN.
3 Press A+ or V- to select CH ERASE/ADD and press RETURN.
4 To erase an unwanted channel:
(1) Press CH +/- to select the channel you want to erase.
(2) Make sure the cursor (► ) is beside ERASE.
Channel to be erased
CH ERASE/ADD i
►ERASE
ADD
:^MENU
Select the channel
Use Ex 1 tH
(3) Press RETURN.
The indication appears beside the channel number, showing
that the channel is erased from the preset memory.
Note
You can select the erased channel using the 0-9 buttons.
no
To add a channel that you want:
(1) Press 0-9 buttons to select the channel you want to add and press
ENTER.
(2) Press A+ or V- to select ADD.
Channel to be added
CH ERASE/ADD i
ERASE
►ADD
DMENU
Select the channe1
Use Ex i til
(3) Press RETURN.
The indication "+" appears beside the channel number, showing
that the channel is added to the preset memory.
5 To erase and/or add other channels, repeat step 4.
6 When finished, press MENU.
Note
If YOU erase or add a VHP or UHF channel, the cable TV channel with the same
number is also erased or added, and v'ice v'ersa.
Setting up
'igcN
Page 20

(^Available Features
Functions
Note
If "VIDEO" appears on the screen, press TV/VIDEO so that a channel number
appears.
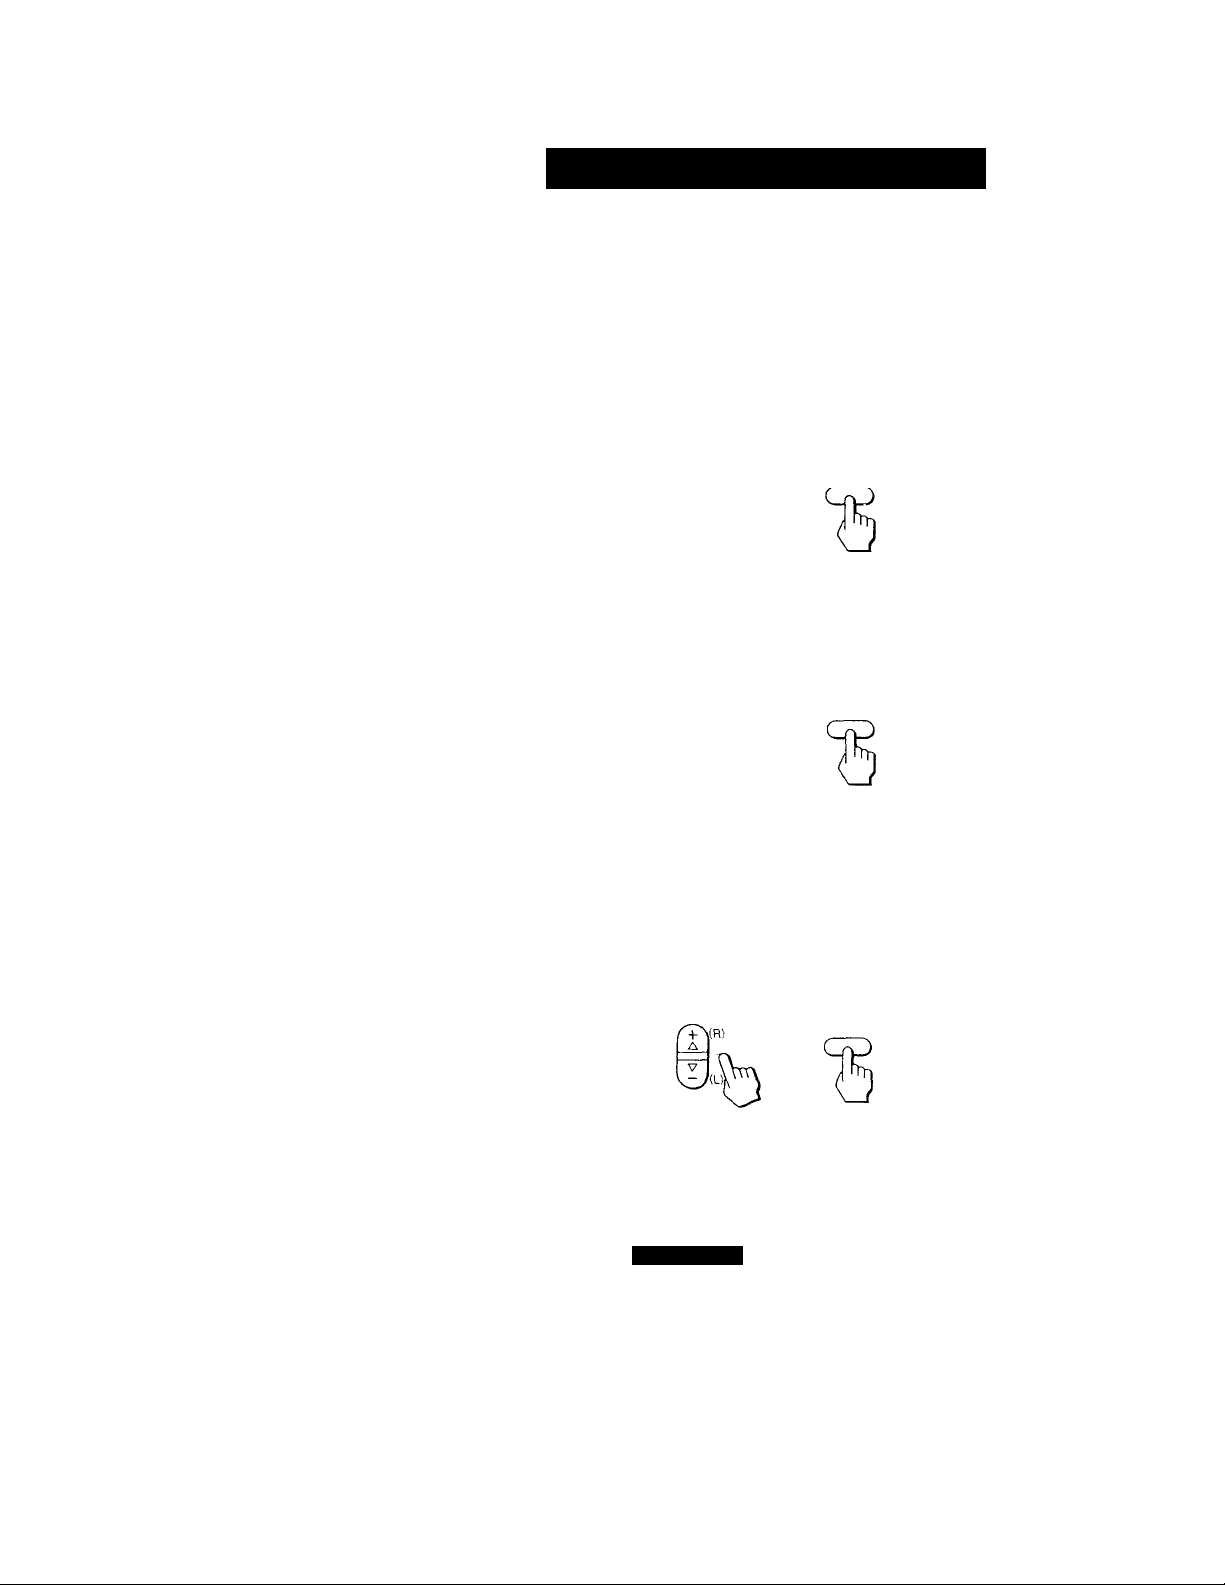
Selecting a channel directly
Press the 0-9 buttons to select a channel. Or press ENTER after entering
the channel for immediate selection.
© ® @
© © ©
© ® ©
© o
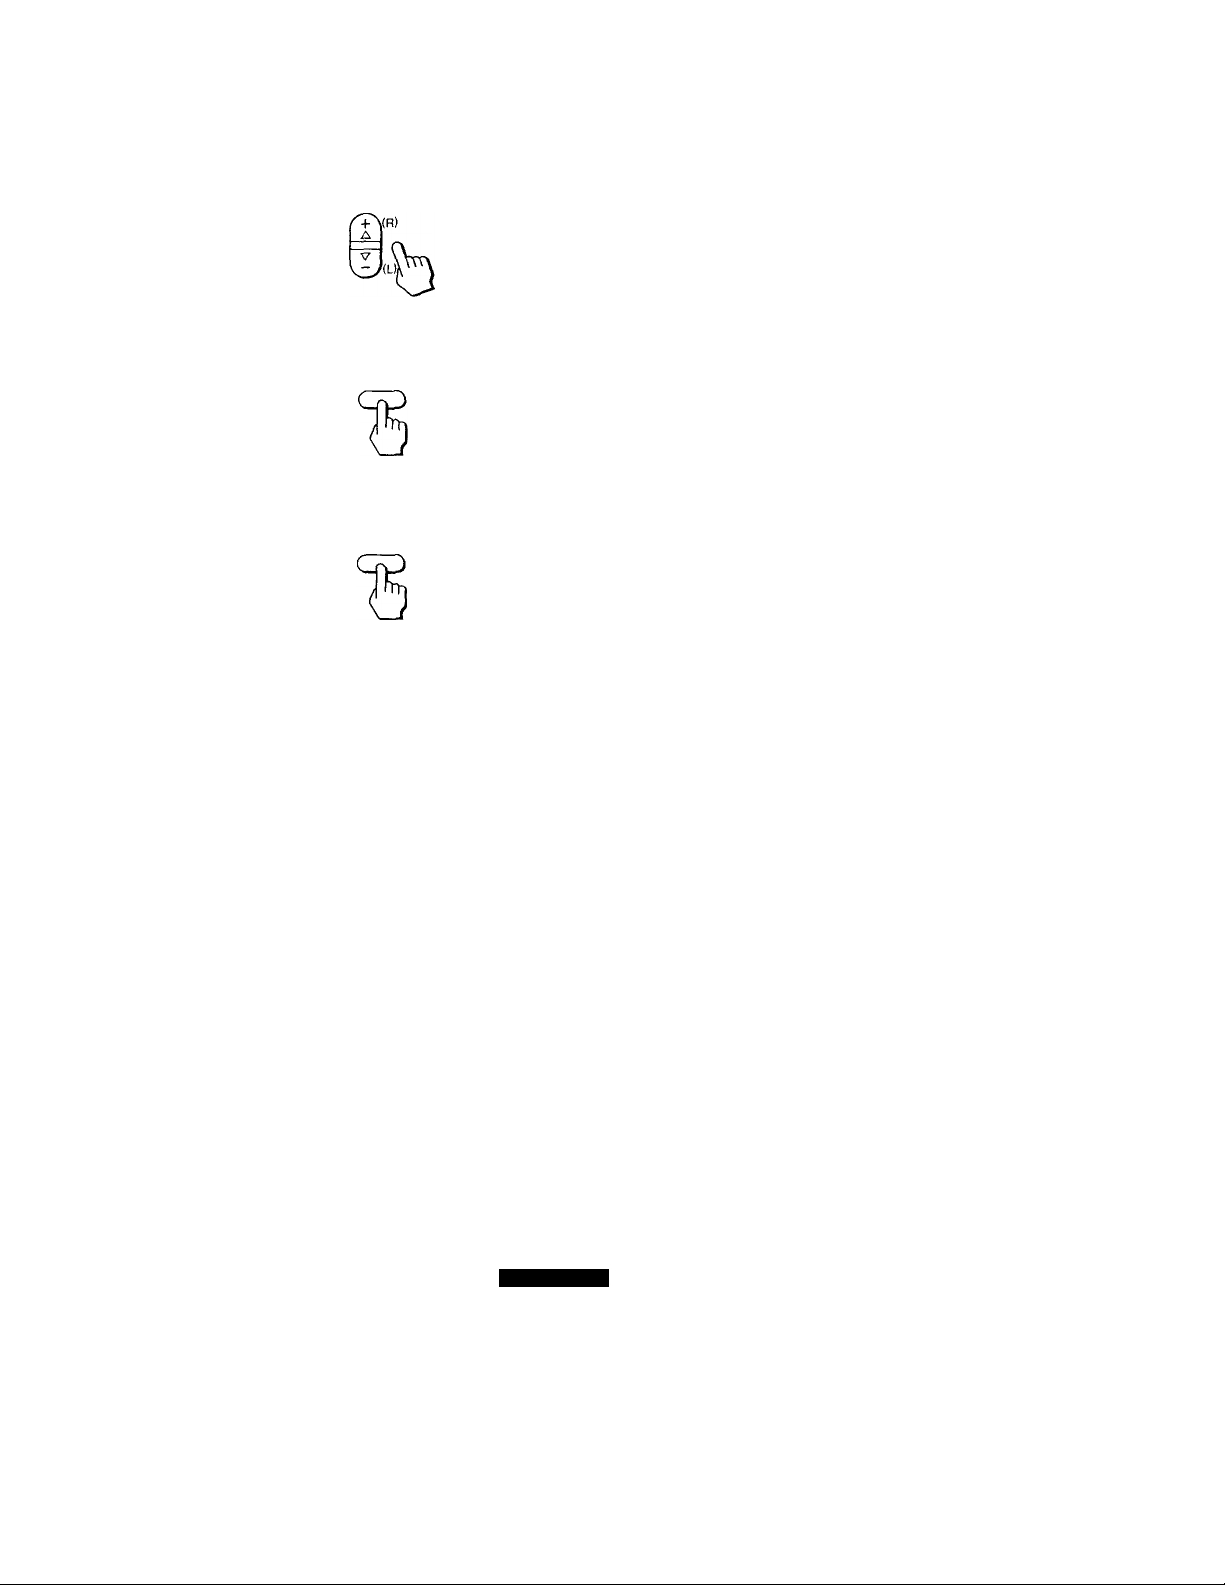
To scan through channels
Press CH +/- until the channel you want appears.
CH
o’
Switching quickly between two channels
Press JUMP.
The channel you watched previously appears. Pressing JUMP again
switches back to the original channel.
JUMP
Adjusting the volume
Press VOL +/- to adjust the volume.
VOL
VOLUME
2QEN
W
Available Features
Page 21

Muting the sound
Press MUTING.
"MUTING" appears on the screen.
MUTING
To restore the sound, press MUTING again, or press VOL +.
Displaying on-screen information
Use this feature to check your channels.
Press DISPLAY.
To cancel the display, press DISPLAY again.
DISPLAY
Setting the Sleep Timer
The TV stays on for the length of time specified and then shuts off
automatically.
Press SLEEP repeatedly until the time (minutes) wanted appears. Each
time you press SLEEP, the time changes as follows: 30 ♦ 60 ♦ 90 ♦ OFF.
"SLEEP" appears on the screen one minute before the TV power is shut
off.
SLEEP
To cancel the Sleep Timer, press SLEEP repeatedly until "SLEEP OFF"
appears, or turn the TV off.
Listening with headphones
Plug the headphones into the headphone jack.
The sound from the speaker is shut off and the monaural sound will be
heard from the headphones. To adjust the headphones volume, press
VOL+/-.
Page 22
Adjusting the picture
When watching TV programs, the quality of the picture can be adjusted
to suit your taste.
1 Press MENU.
2 Make sure the cursor (► ) is beside VIDEO and press RETURN.
VIDEO
►PICTURE llillilillllllllllilllllll-
HUE ................I
COLOR llilllillllll)
:^MENU
Use
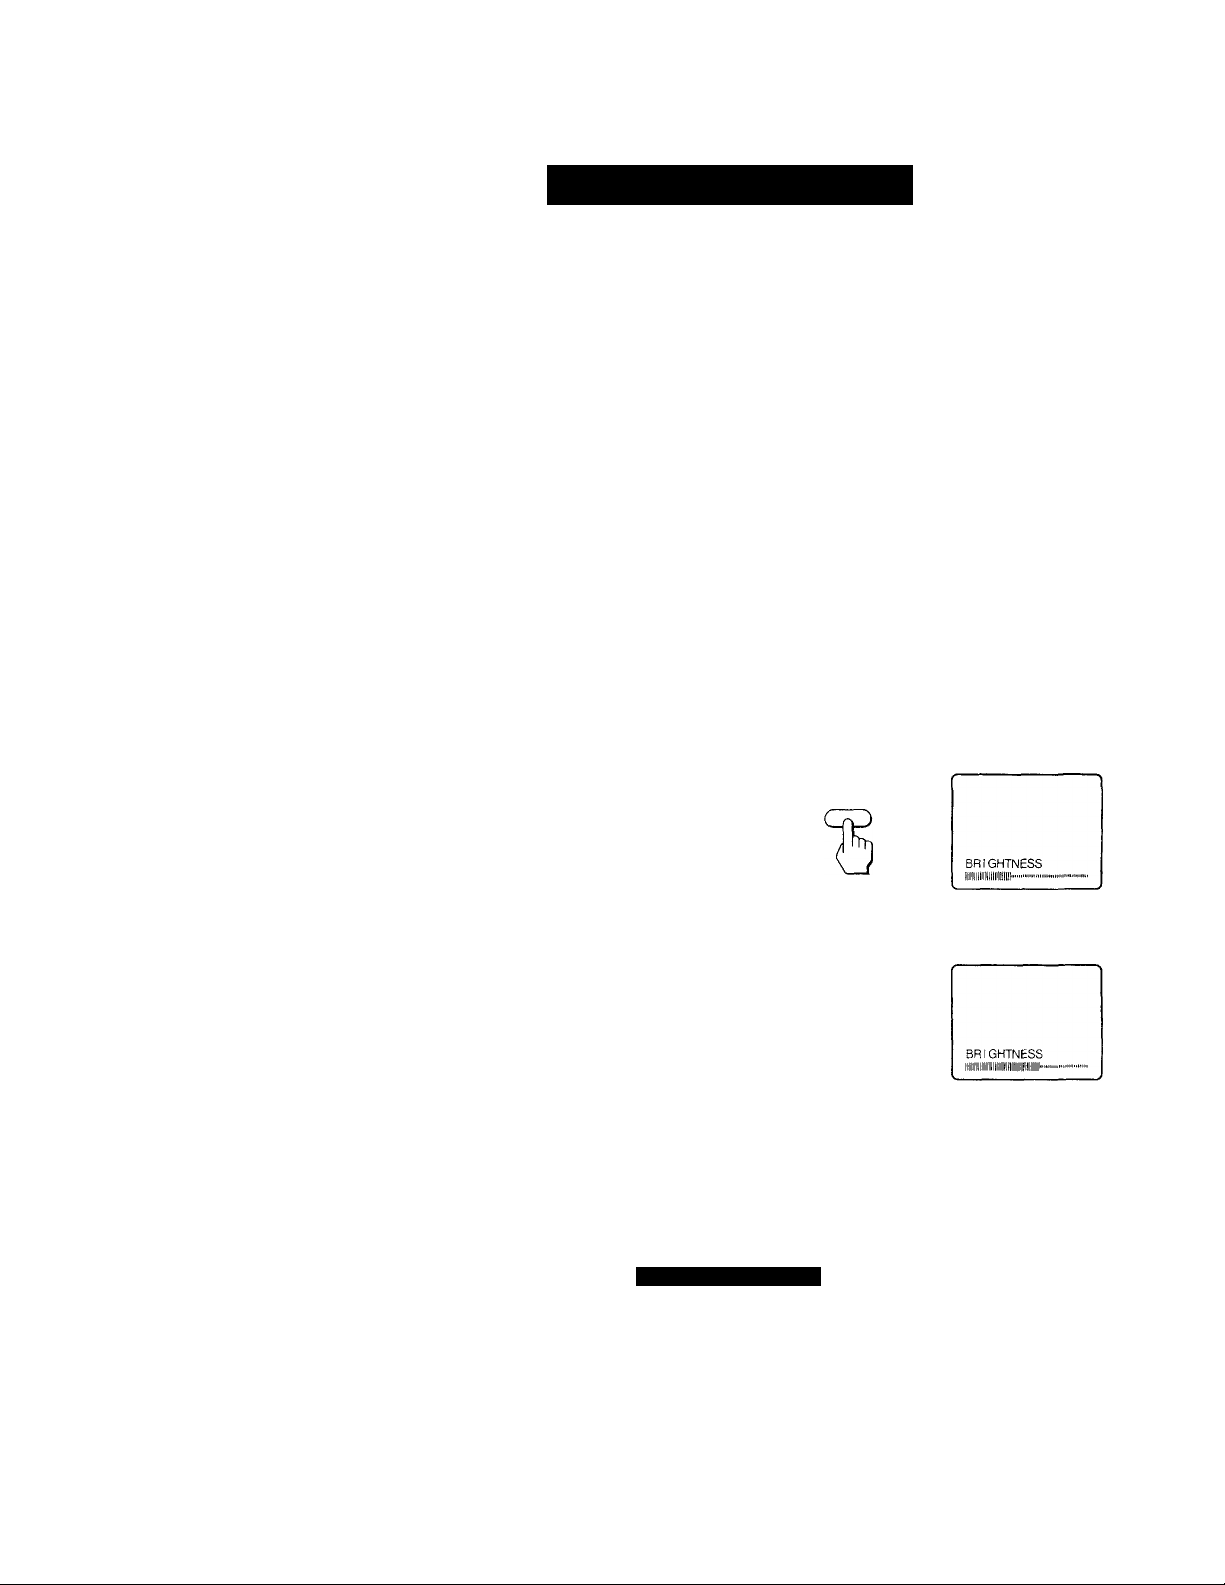
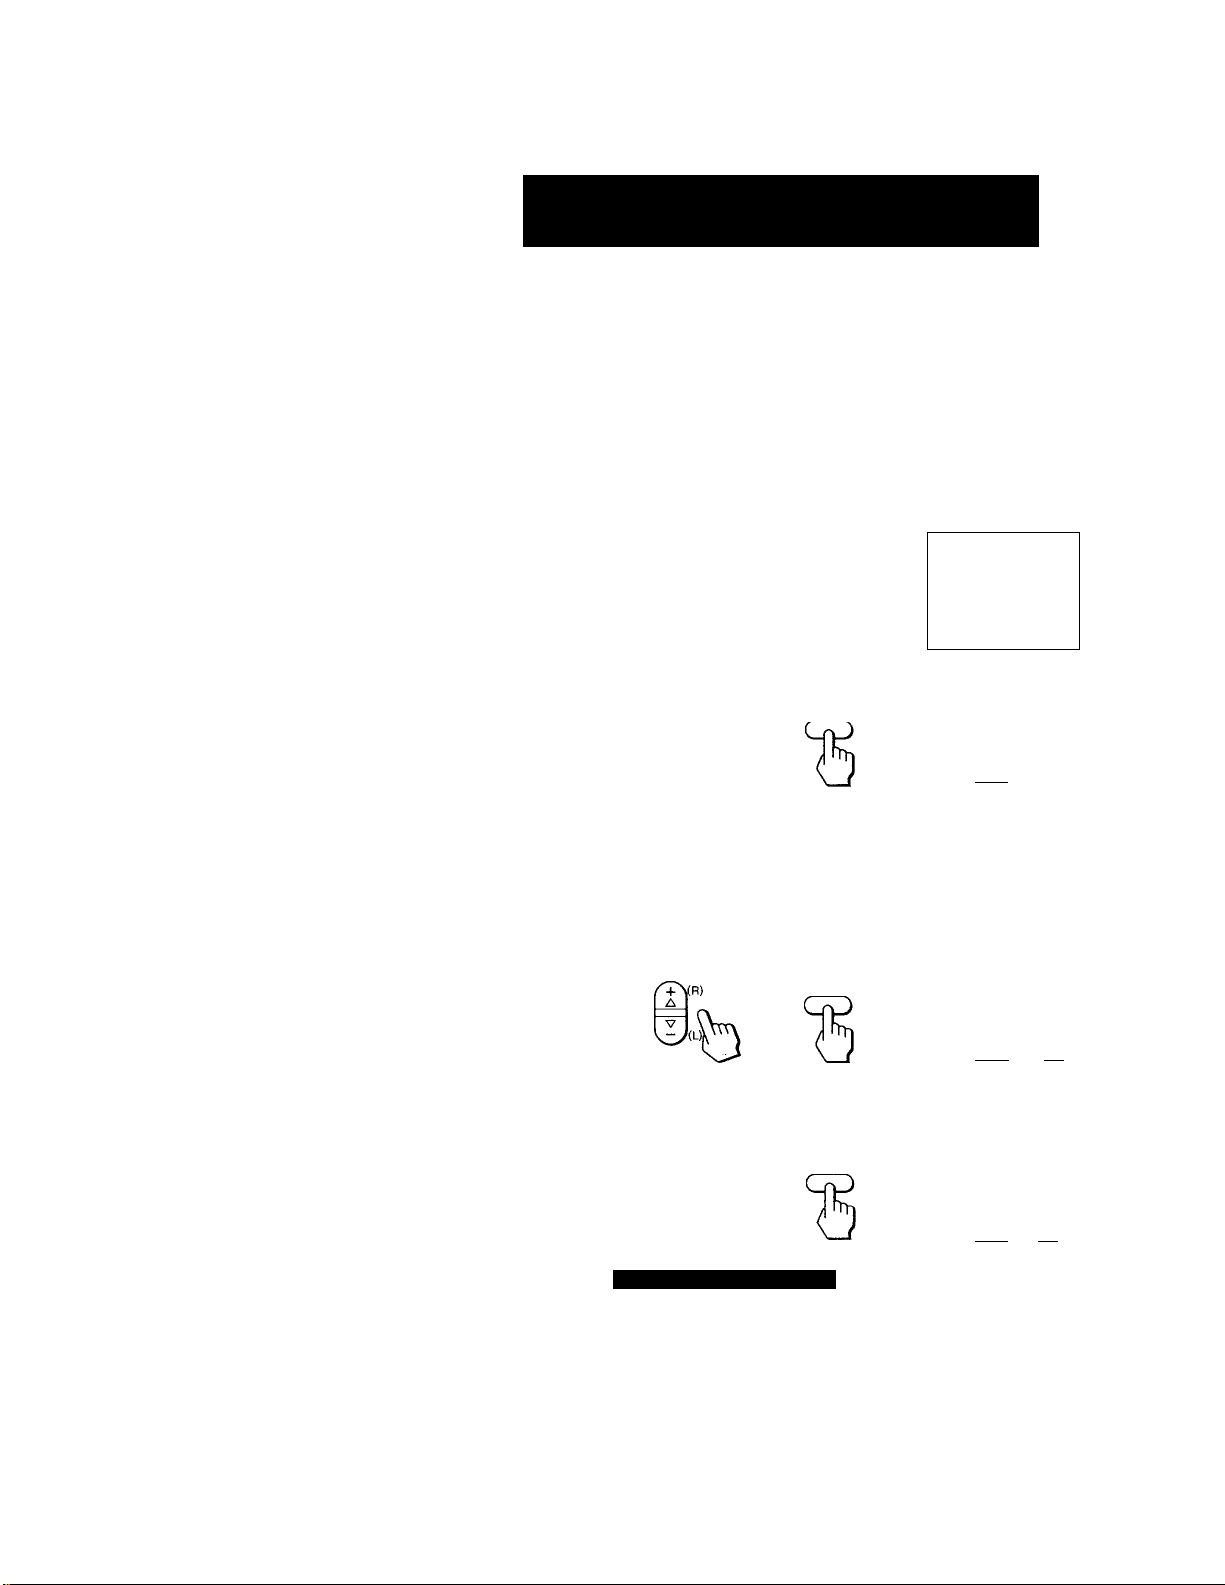
3 Select the item to adjust. See chart on following page for details on
results of adjustments. For example:
To adjust brightness, press A+ or V- to select BRIGHT and press
RETURN.
VIDEO
/AD\(R
V
(L
PICTURE llllllllllllllilll
HUE
COLOR IIIIIIIIIIIIIIHI'
►BRIGHT lilllllllillll-'«
DMENU
Use
.......
............
..........
ExitH
I"»
Exi
RETURN
4 Adjust the level;
(1) Press A+ or V- to adjust the level.
r+\{P')
A
V
(2) Press RETURN.
The new setting appears in the VIDEO menu.
5 To adjust other items, repeat steps 3 and 4 abo\ e.
22EN
Available Features
Page 23

Description of adjustable items
Item
PICTURE
HUE
COLOR
BRIGHT
Press A+ to Press V- to
Increase picture contrast
for vivid color
Make skin tones become
greenish
Increase color intensity
Brighten the picture
Adjustment
Decrease picture contrast
for soft color
Make skin tones become
purplish
Decrease color intensity
Darken the picture
To restore the factory settings
Press RESET while the VIDEO menu is displayed. All the settings
except PICTURE are restored to factory settings.
Adjusting the picture when watching video tapes
You can adjust the picture of the video input as well. These settings are
stored separately from those for the TV picture.
To adjust the video picture, first press TV /VIDEO to set to video input,
then follow the procedure on the previous page.
Available Features
23EN
Page 24

Customizing the channel number buttons
Up to 12 channels can be captioned and assigned to a specific channel
number button for each channel. This feature allows the easy selection
of your favorite channels by name. For example, select channel 17
"ESPN," and assign the channel number 2 button to it.
Setting captions to a favorite channel
1 Press MENU.
2 Press A+ or V- to select SET UP and press RETURN.
3 Press A+ or V- to select CH CAPTION/GUTDE and press RETURN.
CH CAPTION/GUIDE
►
—
D
------
4 Press RETURN again.
® 0 ®
® (5) (E)
® ® ®
ii ® 1®
Use ^iTW] ExitHii
RETURN
CH CAPTION/GUIDE
® 0 ®
® ® ®
------------
® ® ® :>
ii ® i|]
Se I ec t a pos i t i on.
Use »[Bil ExitWl
Press A+ or V- to select a channel guide number (chosen number will
appear in red) and press RETURN.
Eor example, select 2 as the channel guide number.
Numbers 0-9, DISPLAY and ENTER buttons are available for use as
a channel guide number. The channel number button you select will
be the one you press to call up your favorite channel.
A
V
(L
RETURN
CH CAPTION/GUIDE
® ©
Select the channel
Use »IMH ExitPHil
6 Press A+ or V- to select the channel that you want to caption and
press RETURN. For example, select channel 17.
A
V
(L
RETURN
CH CAPTION/GUIDE
® 0
® ®
HI ® H
Select the letter.
Use »reiml ExitHi]
Channel
guide
number
• Selected
channel
24EN
Available Features
Page 25

7 Enter the letters (up to four) to caption the channel:
(1) Press A+ or V- to select the first letter.
Each time you press A+ or V-, the letter changes as shown
below.
0^1-.
t
_____
• _ (blank space)
__________
Vr)
Is
(2) Press RETURN.
RETURN
CH CAPTiON/GUIDE
® @ ®
® ® ®
^ ® ®
®| ® HD
Select the
Use
»IBETWI
letter.
Ex i tlMJ]
E
3
(3) Repeat steps (1) and (2) to select the remaining letters and press
RETURN.
RETURN
CH CAPTION/GUIDE
® ® ®
® ® ®
® ® ®
ll ® B
Use ^[eiill
ExitBul
► —
3
8 Repeat step 4 to 7 to caption other charmels.
-----
t
17
—
To cancel a setting
Select the channel you want to cancel in step 5, then press RESET.
Selecting a captioned channel
1 Press CH GUIDE.
The CHANNEL GUIDE menu appears showing channel captions
and the corresponding channel number buttons.
2 Press a channel number button, the DISPLAY or ENTER button to
select the channel you want.
To cancel the CHANNEL GUIDE menu
Press CH GUIDE again.
Available Features
25EN
Page 26

Blocking out a channel (channel block)
This feature allows you to prevent children from watching unsuitable
programs.
1
Press MENU.
2
Press A+ or V- to select SET UP and press RETURN.
3
Press A+ or V- to select CH BLOCK and press RETURN.
A
V
(L)
RETURN
CHANNEL BLOCK
►1. CH
2. CH
:)MENU
Selecta p
Use
rogram
ExitC
4 Select the channel you want to block.
(1) Press A+ or V- to select program 1 or 2 and press RETURN.
The selected channel indication turns red.
RETURN
CHANNEL BLOCK
1, CH
___
2. CH,__
:)MENU
Select the channel
Use tWm Exit»
(2) Press A+ or V- to select the channel you want to block and press
RETURN.
CHANNEL BLOCK
►1. CH 7
2. CH
___
:>MENU
Selecta program
Use ExitH
5 Repeat step 4 to block other channels.
If you select the blocked channel when watching the TV,
"BLOCKED" appears and the picture is blocked and the sound is
muted.
To cancel a channel block
Press RESET in step 3.
26EN
Available Features
Page 27

(^Additional Information
1 Troubleshooting
If trying the remedies below, the problem is not corrected, contact your
nearest Sony dealer.
Problem
Poor or no picture
(screen lit), good
sound
No picture (screen not
lit), no sound
No color
Only snow and noise
appear on the screen
Dotted lines or stripes
Double images or
ghosts
The picture is distorted
(DC operation)
Cannot operate menu
The remote
commander does not
operate
The TV needs to be
cleaned.
Adjustment
• Adjust PICTURE in the VIDEO menu.
• Adjust BRIGHT in the VIDEO menu.
• Check antenna/cable connections.
• Make sure the power cord is connected securely.
• Check to see if the TV/VIDEO setting is correct. When
watching TV, set to TV, and when watching video tapes,
set to VIDEO or the channel you use for watching \ ideo.
• Try another channel. It could be station trouble.
• Adjust COLOR in the VIDEO menu.
• Black and white programs cannot be seen in color.
• Check the CABLE setting in the SET UP menu.
• Check the antenna/cable connection.
• Make sure the channel is broadcasting programs.
• Adjust the antenna.
• Move the TV away from noise sources such as cars, neon
signs, and hair-dryers.
• Use a highly directional outdoor antenna or a cable T\'
cable (when the problem is caused by reflections from
nearby mountains or tall buildings).
• When the car battery voltage drops too low, the picture
may be distorted. Use the TV with the engine running.
> The mertti disappears automatically when 90 seconds
elapse after you press a button.
• If the menu items appear in black, the TV is set to video
input and you cannot operate the menu. Press TV/
VIDEO until a channel number appears.
I Insert the batteries in the remote commander ivith the
correct polarity.
I Replace the batteries with new ones if they are weak.
• If there is a fluorescent light close to the TV, mo\ e it at
least 3-4 feet away fnrm the TV.
' Clean the TV with a soft dry cloth. Ne\’er use strong
solvents such as thinner or benzine, which might
damage the finish of the cabinet.
Additional Information
27EN
Page 28

Specifications
Television system
American TV standard, NTSC color
Channel coverage
VHP: 2-13/UHF: 14-69/CATV: 1-125
Screen size
9-inch picture measured diagonally
Antenna
VHF/UHF telescopic antenna
Speaker
77 mm round (3 '/«inches), 1 W
Inputs
VIDEO: RCA phono-type 1 Vp-p,
75 ohms
AUDIO: RCA phono-type monaural
VHF/UHF (Combined CATV/VHF/
UHF 75-ohm, F-type)
Output
Headphone jack (monaural)
Dimensions
10 Vi in. (258 mm)
Power requirements
KV-9PT50: 120 V AC, 60 Hz
KV-9PT60: 120 V AC, 60 Hz, 12 V DC
Power consumption
KV-9PT50: AC IN 53 W max.
KV-9PT60: AC IN 53 W max.,
DC IN 53 W max.
Mass
KV-9PT50: 5.5 kg (12 lb 2 oz)
KV-9PT60: 5.7 kg (12 lb 9 oz)
Supplied accessories
Remote commander RM-Y116
Size AA batteries (2)
Telescopic antenna (1)
KV-9PT50 only: Dual mode swivel
bracket (1), Attachment parts (1), Paper
pattern (1)
KV-9PT60 only: AC power cord (1), Car
battery cord DCC-22AW (1)
Design and specifications are subject to
change without notice.
When the bracket is attached to
the upper part of the TV
28EN
Additional Information
When the bracket is attached
to the lower part of the TV
Page 29

Page 30

ADVERTENCIA
Para evitar incendios o el
riesgo de electrocución,
no exponga el televisor a
la lluvia ni a la humedad.
CAUTION
CAUTION TO REDUCE THE RISK OF ELECTRIC SHOCK,
DO NOT REMOVE COVER {OR BACK)
NO USER-SERVICEABLE PARTS INSIDE.
REFER SERVICING TO QUALIFIED SERVICE PERSONNEL.
Este símbolo sirve para
indicar al usuario la
presencia de "alto voltage"
sin aislar dentro de la caja
de este producto, que
pueden ser de suficiente
magnitud como para
constituir un riesgo de
electrocución.
Este símbolo sirve para
indicar al usuario la
presencia de instrucciones
de operación y
mantenimiento en la
literatura que acompaña al
producto.
Precauciones
• Para el modelo KV-9PT50, alimente el
televisor con 120 V CA, 60 Hz. Para el
modelo KV-9PT60, utilice 120 V CA o 12
VCC.
• Para emplear la batería del automóvil
como fuente de alimentación, utilice sólo
el cable de batería de automóvil
suministrado.
• Desenchufe el televisor de la toma mural
si no va a utilizarlo durante varios días o
más.
• Desenchufe el cable de batería de
automóvil si no utiliza el televisor.
• Para ex'itar descargas eléctricas, no
emplee esta clavija de alimentación de
CA polarizada con un cable prolongador,
receptáculo u otro tomacorriente a
menos que las cuchillas puedan insertarse
completamente a fin de que no queden al
descubierto.
2ES
Para más información acerca de las
precauciones de seguridad, consulte el
folleto que se adjunta "PRECAUCIONES
IMPORTANTES".
PRECAUCION
• Para reducir el riesgo de incendio, no
sitúe aparatos calefactores ni de cocina
debajo del televisor.
• Cuando emplee los juegos de video,
computadoras, u otros productos
similares con su televisor, mantenga las
funciones del brillo y del contraste a
niveles bajos. Si un patrón fijo (sin
mover) queda en la pantalla durante
mucho tiempo con niveles de brillo y
contraste altos, la imagen podria
imprimirse permanentemente en la
pantalla. Las impresiones de este tipo
no están cubiertas por la garantía,
puesto que son el resultado del uso
equivocado.
• Si utiliza el soporte para la instalación
en una estantería, siga las instruccionc
(pág. 5 a 9) respetando el orden exactc
ya que en caso contrario el televisor
puede caerse del soporte. (KV-9PT50
solamente)
instalación
• Para evitar el sobrecalentamiento
interno, no bloquee los orificios de
ventilación.
• No coloque el televisor en un lugar
expuesto a la luz directa del sol o mu
húmedos, ni cerca de fuentes de calor
Nota para el instalador del sistema de cable
Este recordatorio es para llamar la
atención del instalador del sistema de
cable sobre el Artículo 820 - 40 de NEC
que ofrece las guías para la puesta a tie
apropiada y, en particular, especifica qi
el conductor de puesta a tierra deberá
conectarse al sistema de puesta a tierra
del edificio en el punto más cercano
posible al de entrada del cable.
Registro dei usuario
Los números de modelo y serie se
encuentran en la parte posterior de]
televisor. Anote estos números en los
espacios siguientes. Refiérase a ellos
cuando tenga que llamar a su proveedor
Sony en relación con este producto.
No de modelo _
No de serie
____
Page 31

Indice
¡Bienvenido! 4
Instalación
Instalación del televisor KV-9PT50 5
Instalación del televisor 5
Desinstalación del televisor 9
Uso de corriente doméstica 10
Conexión de la antena telescópica suministrada 10
Instalación del televisor KV-9PT60 11
Uso de corriente doméstica 11
Uso de batería de automóvil 11
Conexión de la antena telescópica suministrada 12
Conexiones 13
Conexión de antena exterior 13
Conexión del sistema de cable 14
Conexión de un equipo de video 14
Visualización de las imágenes de la videograbadora 14
Control remoto 15
Activación y desactivación del modo de cable 16
Programación de los canales de televisor 18
Borrado o adición de canales 19
Funciones disponibles
Funciones 20
Ajuste de la imagen 22
Personalización de botones de número de canal
Bloqueo de canales (CHANNEL BLOCK) 26
Información adicional
Solución de problemas 27
Especificaciones contraportada
24
3ES
Page 32

Bienvenido!
I
Felicitaciones por la adquisición del TV a color Trinitron Sony.
Recomendamos mucho que lea este manual antes de emplear su
televisor. Guarde el manual a su alcance para referencias futuras.
Las instrucciones de este manual se aplican para los modelos listados en
la portada. Antes de empezar a leer este manual, consulte el número de
modelo que está situado en la parte trasera del TV.
A continuación se indican algunas de las funciones que proporciona
este TV:
Sintonizador de frecuencias de 181 canales.
Menús en pantalla que permiten ajustar la calidad de la imagen y
otras funciones.
Apagado automático para que el televisor se desactive
automáticamente después de un periodo de tiempo seleccionado.
Una toma de entrada de audio/video para conectar la
videograbadora al TV.
Soporte giratorio de modo dual que permite la instalación del
televisor en un mueble o estantería de cocina y utilizarlo con el
soporte (KV-9PT50 solamente).
Cable de alimentación enrollado (KV-9PT50 solamente).
Suministro de alimentación de CA/CC de dos vías (KV-9PT60
solamente).
4ES
Page 33
(^Instalación
Instalación del televisor KV-9PT50
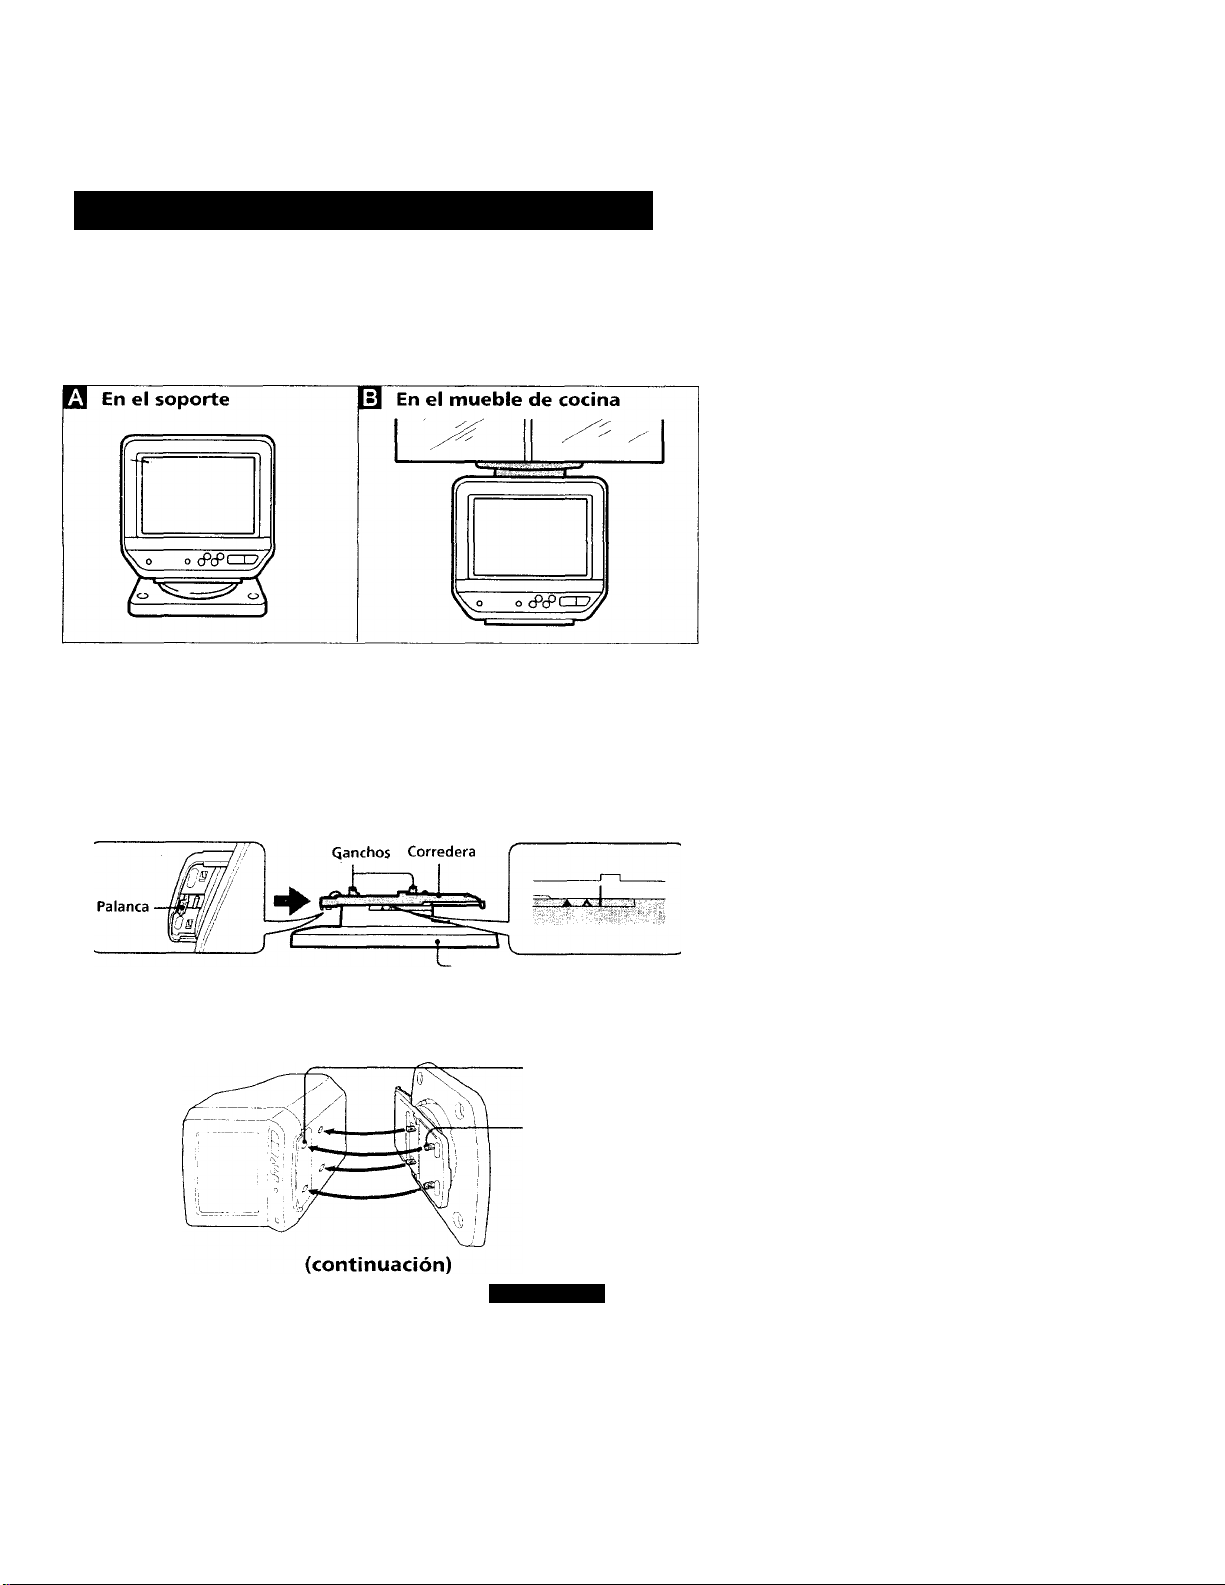
Instalación del televisor
Es posible instalar el televisor en el soporte de dos formas con el soporte
giratorio de modo dual suministrado.
Precaución
No instale ni toque el televisor y el soporte con las manos mojadas.
Q Instalación del televisor en el soporte
1 Mientras mantiene la palanca levantada, empuje la corredera en la
dirección de la flecha.
Base
2 Gire el televisor lateralmente, fije el soporte al televisor de forma
que los cuatro ganchos de la corredera encajen en los orificios
cuadrados de la base del televisor.
Orificios cuadrados (4)
Ganchos (4)
Instalación
5ES
Page 34
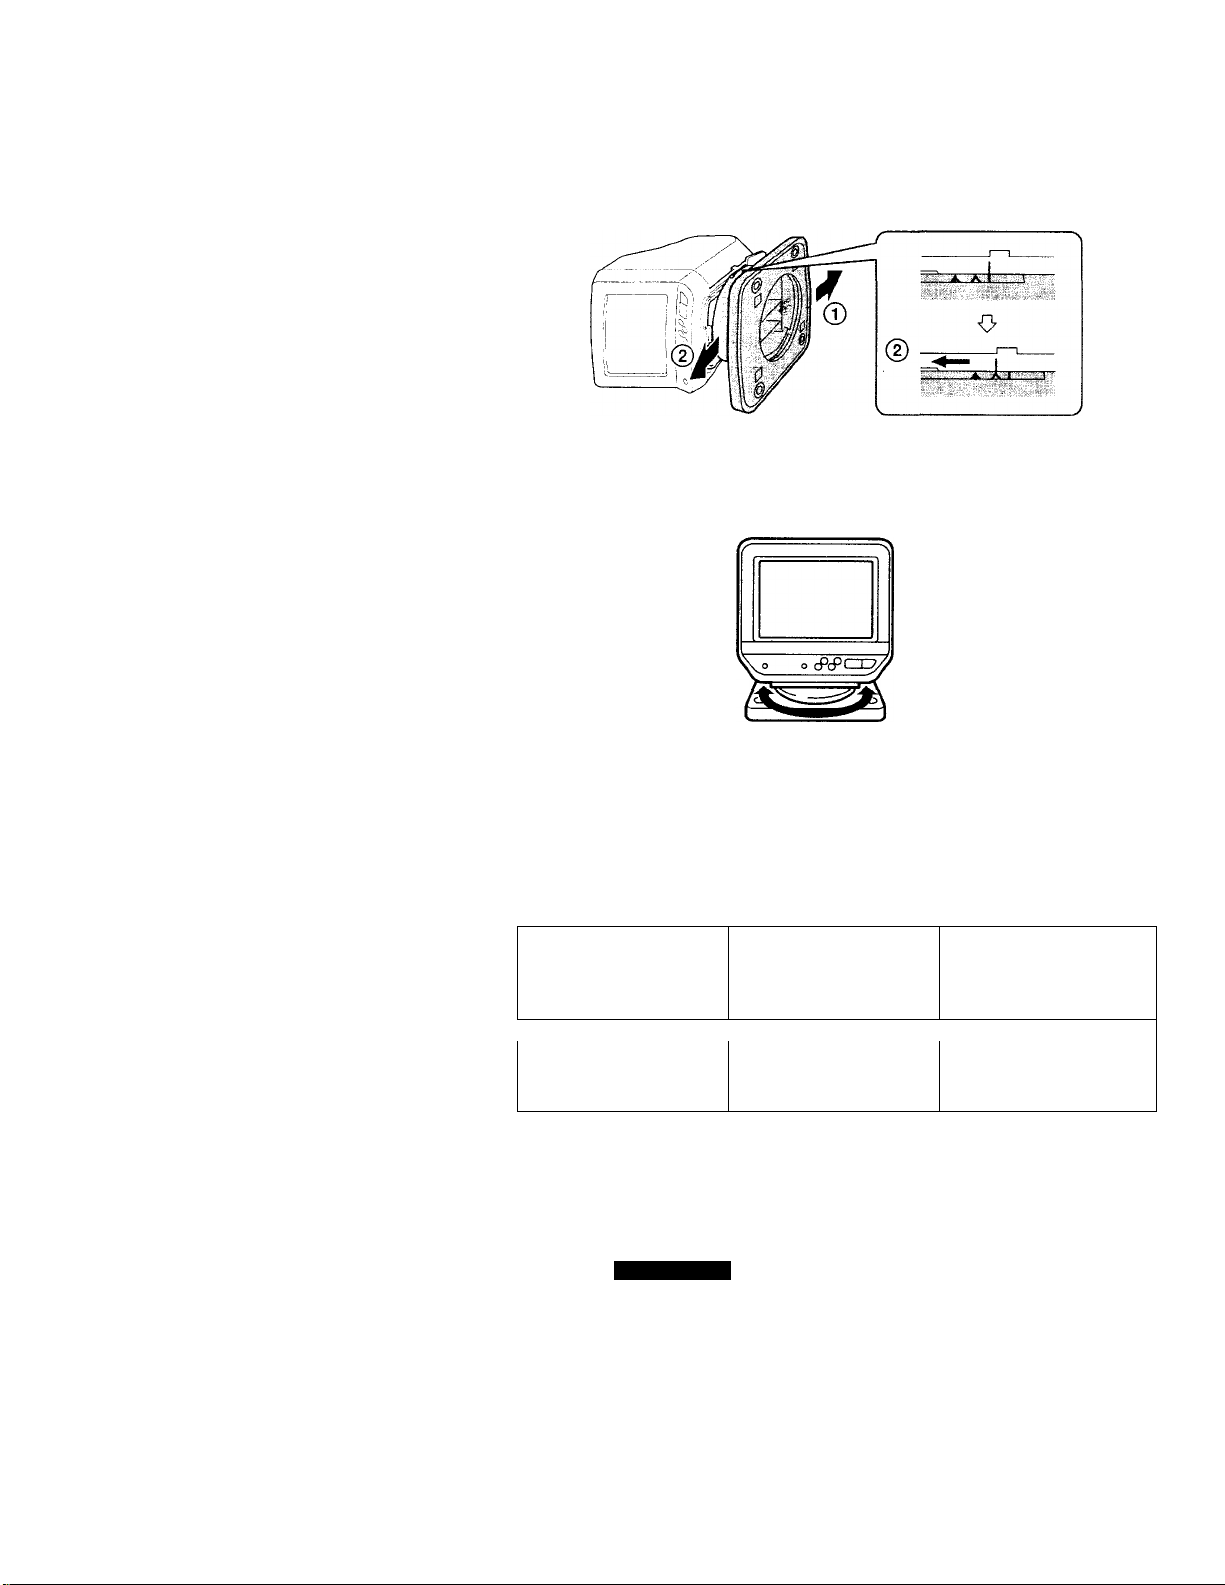
® Empuje la base en la dirección de la flecha ® hasta que los dos
ganchos posteriores de la corredera entren en contacto con la
parte trasera de los orificios cuadrados de la base del televisor.
® Mientras mantiene la palanca levantada sin mover la base, tire de
la corredera en la dirección de la flecha ® para bloquear el
soporte y el televisor.
Es posible girar el televisor aproximadamente 60° en cualquier
dirección.
m Instalación del televisor en un mueble de cocina
Para instalar el televisor en un mueble de cocina, fije el soporte para la
instalación en una estantería suministrado utilizando los componentes
de instalación que aparecen a continuación. Las instrucciones de
instalación de soportes difieren en función del tipo de mueble
(empotrado o saliente). Siga las instrucciones que se adecúen a su tipo
de mueble.
Componentes de instalación (suministrados)
0 0—
Tornillos tipo "Phillips"
M6x40 (4)
Tornillos tipo "Phillips"
M6x70 (4)
“ c2)
Arandelas de resina (4)
[>]
0
Tuercas M6 [L=5] (4)
Espaciadores [L=301 (4)
___
J
Tope (1)
Extienda el patrón de papel suministrado sobre la base del mueble (en
el interior o en el exterior) para asegurar que quede la distancia
adecuada de 4 pulgadas (101,4 mm) entre la pared y el soporte. Taladre
4 orificios de 9/32 pulgadas (7 mm) de diámetro donde se indica en el
patrón. Fije el soporte para instalación en estantería como se muestra en
las páginas siguientes.
6ES
Instalación
Page 35

Instalación en un mueble empotrado
Notas
• No es posible fijar el soporte para instalación en estantería a un mueble con una
base cuyo grosor sea inferior a 9,53 mm.
• Si el grosor de la base del mueble es superior a 19,05 mm, adquiera en una
ferretería tornillos (#10-32) y tuercas de mayor longitud.
Instalación en un mueble saliente
Notas
• No es necesario el uso del espadador si la parte saliente del mueble está
comprendida entre 0 y 25,4 mm.
• Es necesario el uso del espaciador si ¡a parte saliente del mueble está comprendida
entre 25,4 v 51 mm.
• No es posible fijar el soporte para instalación en estantería a un mueble cuva parte
saliente sea superior a 51 mm.
Precauciones
• Al utilizar el soporte para instalación en estantería para instalar el televisor en una
estantería o mueble de cocina, asegúrese de que fija el soporte al nivel de la base de
la estantería o del mueble. El televisor puede caerse si lo instala en un soporte
desnivelado.
• Para reducir el riesgo de incendio, no sitúe aparatos calefactores ni de cocina debajo
del tele\’isor.
Instalación
7“
Page 36

2 Mientras mantiene la palanca bajada, tire de la corredera en la
dirección de la flecha.
3 Instale cuidadosamente el televisor en la corredera de forma que
dos ganchos de dicha base encajen en los orificios cuadrados
situados en el interior del saliente del televisor.
4 Mientras mantiene la palanca bajada,, empuje la corredera en la
dirección de la flecha de forma que los ganchos del tope encajen en
el orificio de ventilación del televisor.
Asegúrese de que el soporte y el televisor queden totalmente
bloqueados.
8ES
Instalación
Page 37
5 Es posible girar el televisor aproximadamente 60° en cualquier
dirección. Asegúrese de girarlo lentamente y con cuidado.
Nota
• Tenga cuidado de que los niños no se cuelguen del televisor o tiren de él a la
fuerza.
Desinstalación del televisor
□ Para retirar el televisor del soporte inferior
1
Mientras mantiene la palanca levantada, empuje la corredera en la
dirección de la flecha para desbloquear el soporte y el televisor.
2
Retire el televisor del soporte.
m Para retirar el televisor del soporte superior
1
Mientras mantiene la palanca bajada, tire la base del soporte en la
dirección de la flecha para desbloquear el mismo y el televisor.
2
Tire del televisor hacia sí mismo para retirarlo del soporte.
' Si no sostiene el televisor como muestra la ilustración, éste puede caerse al
separarlo del soporte.
Instalación
9ES
Page 38

Uso de corriente doméstica
(Parte posterior del televisor)
a una toma murai
(120 VCA)
Conexión de la antena telescópica suministrada
1 Inserte la antena en el receptáculo del televisor y gírela para que
encaje por completo.
Al instalar el televisor en el soporte (uso de mesa)
Al instalar el televisor en un mueble de cocina
Antena telescópica
2 Fije el conector de antena al terminal VHF/UHF.
Receptáculo para
antena
Receptáculo para
antena
Page 39

Instalación del televisor KV-9PT60
Uso de corriente doméstica
(Parte posterior del televisor)
;Q .'KrUHF j I®®) j
e-<r-€>
AUDIO VIDEW
a ACIN 120 V
Uso de batería de automóvil
(Parte posterior del televisor)
I
JV
a una toma mural
(120 VCA)
Cable de alimentación de CA
(suministrado)
s
AUOiO IN VIDEO PN . 3r
©-^ - -
a DC IN12V
Cable de batería de
automóvil DCC-22AW
(suministrado)
a clavija del
encendedor
Notas
• Para el uso en el automóvil, el televisor está diseñado para alimentarse únicamente
con 12 V CC de toma a tierra negativa.
• Utilice sólo el cable de batería de automóvil suministrado fabricado por Sony, ya
que la polaridad de los enchufes de otros fabricantes puede ser diferente.
' Si no va a utilizar el televisor, desenchufe el cable de la cla\ ija del encendedor.
Instalación
11ES
Page 40
Conexión de la antena telescópica suministrada
1 Inserte la antena en el receptáculo del televisor y gírela para que
encaje por completo.
2 Fije el conector de antena al terminal VHF/UHF.
12ES
Instalación
Page 41

Conexiones
Seleccione una de las dos formas de conectar el TV a la antena y/o
al sistema de cable. Se recomienda conectar una antena exterior o un
sistema de cable para obtener una mejor calidad de imagen.
Conexión de antena exterior
Conecte el cable de la antena al terminal VHF-UHF. Si el cable de antena
no puede conectarse directamente a la toma, siga una de los diagramas
siguientes, dependiendo del tipo de cable de que disponga.
Notas
• No utilice herramientas para conectar el cable a la terminal de VHF/UHF, ya que
podría dañarla.
• La mayoría de las antenas combinadas VHF/UHF disponen de un separador de
señales. Extraiga este separador antes de instalar el conectar adecuado.
• Al utilizar el mezclador U/V, puede que aparezcan ruidos y nieve al recibir los
canales de cable que sigan al 37.
□
■ sólo VHP
o
■ VHF/UHF
(Parte posterior del televisor)
VHF/UHF
Para conectar un conector tipo F, consulte
"Conexión de un conector tipo F al cable de
antena".
Cable coaxial de 7S ohmios
m
■ VHF
y
-UHF
Conexión de un conector tipo F al cable de antena
Conector tipo F
3/8
pulgadas
(9,5 mm)
1/4
pulgadas
(6,4 mm)^ ' V *
^^^1/8 pulgadas (3,2 mm)
Cable de antena
Instalación
13ES
Page 42

Conexión del sistema de cable
Si la compañía de cable exige la conexión de un decodificador, siga el
ejemplo 0. En caso contrario, siga el ejemplo 0.
Conexión de un equipo de video
Antes de realizar la conexión, desactive la alimentación de todo el
equipo.
Conexión de una videograbadora o de una videocámara de 8mm
Cuando conecte un equipo estéreo, utilice el cable de conexión VMC-920MS (no
suministrado) (estéreo ■ <—► monoaural).
Visualización de las imágenes de la videograbadora
1 Encienda el televisor.
2 Oprima TV /VIDEO de forma que aparezca "VIDEO" en la pantalla.
Para volver al modo de televisión
Oprima TV/VIDEO de forma que aparezca el canal seleccionado antes
de haber entrado el modo de video.
14ES
Instalación
Page 43

Control remoto
Inserte dos pilas de tamaño AA (suministradas) con la polaridad
correda.
Notas __
• Inserte las pilas con la polaridad correda + y - corno se indica en la figura dentro
del compartimiento de las pilas.
• Para evitar el daño que podría causar el electrólito de las pilas, extráigalas si no
tiene intención de utilizar el control remoto durante un largo tiempo.
• No exponga el control remoto a golpes. No lo deje caer, pise, ni lo deje que se moje.
• No exponga el control remoto a la luz directa del sol, cerca de fuentes de calor ni en
lugares con un alto grado de humedad.
Las instrucciones de este manual están basadas en el control remoto.
También es posible utilizar los controles del TV si tienen el mismo
nombre que los del control remoto.
Instalación
15ES
Page 44

Activación y desactivación del modo
de cable
Si ha conectado un sistema de cable a su televisor, entonces el ajuste de
fábrica CABLE ON es el correcto. Si el televisor no está conectado, sitúe
CABLE en la posición OFF.
Nota
Si transcurren más de 90 segundos después de oprimir un botón, el menú
desaparecerá automáticamente.
1 Oprima MENU.
Aparece el menú principal.
MENU
►VIDEO
SET UP
Use »IBTÍÑI Exitg
2 Oprima los botones A+ o V- en el control remoto para situar el
cursor (► ) de la pantalla en SET UP. Para seleccionar dicha función,
oprima RETURN.
Aparece el menú de SET UP.
SET UP
(^+A(r)
A
V^(L)¡
RETURN
►CABLE: ON
AUTO PROGRAM
CH ERASE/ADD
CH CAPTI ON/GUI DE
CH BLOCK
2MENU
Use »llTWl ExItlììH)]
Nota
Si la indicación CABLE aparece en negro, significa que la televisión se encuentra
en el modo de video y que no puede seleccionarse CABLE. Oprima TV/VIDEO,
de forma que aparezca un número de canal.
3 Sitúe CABLE en la posición ON u OFF.
(1) Si el cursor no se encuentra junto a CABLE, oprima los botones
A+ o V- para desplazar el cursor y, a continuación, oprima
RETURN.
16ES
A
Instalación
RETURN
Page 45

(2) Oprima los botones A+ o V- para seleccionar ON u OFF.
(3) Oprima RETURN.
SET UP
RETURN
►CABLE: OFF
AUTO PROGRAM
CH ERASE/ADD
CH CAPTION/GUIDE
CH BLOCK
3MENU
Use ExitH
4 Oprima MENU para regresar a la pantalla normal.
MENU
Instalación
17ES
Page 46

Programación de los canales de
televisor
Los canales de TV pueden preprogramarse con facilidad; en primer
lugar, almacene todos los canales que se reciben automáticamente
siguiendo el procedimiento siguiente. A continuación, borre los canales
que no desee, o añada canales adicionales. Programe los canales durante
el día, en lugar de por la noche, cuando algunos canales podrían no
estar transmitiendo.
1 Oprima MENU.
i2 Oprima A+ o V- en el control remoto para situar el cursor {► ) de la
pantalla en SET UP y, a continuación, oprima RETURN.
Aparece el menú de SET UP.
SET UP
I^(R)
A
RETURN
\Zjío)
Nota
Si la indicación AUTO PROGRAM aparece en negro, significa que la televisión
se encuentra en el modo de video y que no puede seleccionarse AUTO
PROGRAM. Oprima TV/VIDEO, de forma que aparezca un número de canal.
►CABLE: ON
AUTO PROGRAM
CH ERASE/ADO
CH CAPTION/GUlOE
CH BLOCK
3MENU
Use ExilBl
3 Seleccione AUTO PROGRAM:
(1) Oprima A+ o V- para situar el cursor (► ) en AUTO PROGRAM.
SET UP
T+Nr)
A
(2) Oprima RETURN.
RETURN
Aparece "AUTO PROGRAM" en la pantalla y el TV comienza a
explorar y a programar los canales automáticamente. Una vez
almacenados todos los canales que se reciben, "AUTO PROGRAM"
desaparece y se muestra el número de canal mas bajo.
18ES
Instalación
CABLE; ON
►AUTO PROGRAM
CH ERASE/ADO
CH CAPTION/GUIDE
CH BLOCK
2MENU
Use ^iMWl ExitliBgl
AUTO PROGRAM
Page 47

Borrado o adición de canales
1 oprima MENU.
2 Oprima A+ o V- para seleccionar SET UP y, a continuación, oprima
RETURN.
3 Oprima A+ o V- para seleccionar CH ERASE/ADD y, a
continuación, oprima RETURN.
4 Para borrar un canal no deseado:
(1) Oprima CH +/- para seleccionar el canal que desea borrar.
(2) Compruebe que el cursor (► ) se encuentra en ERASE.
Canal que va a borrarse
CH ERASE/ADD JL
►ERASE
ADD
^lENU
Select the channel
Use »ИМ Exitlttl
(3) Oprima RETURN
El indicador aparece junto al número de canal, indicando que
el canal se ha borrado de la memoria de canales programados.
Nota
Es posible seleccionar el canal borrado con los botones 0-9.
Para añadir el canal que desee:
(1) Oprima los botones 0-9 para seleccionar el canal que desea
añadir y, a continuación, oprima ENTER.
(2) Oprima A+ o V- para seleccionar ADD.
' Canal que va a añadirse
CH ERASE/ADD 1
ERASE ^
►ADD
PMENU
Select the channel
Use ExitM
(3) oprima RETURN.
El indicador “+" aparece junto al número de canal para indicar
que el canal se ha añadido a la memoria de canales programados.
5 Para borrar y/o añadir otros canales, repita el paso
4
.
6 Cuando termine, oprima MENU.
Nota
Si borra o añade un canal de VHP o UHF, el canal de cable con el naismo número
también se borrará o añadirá, y viceversa.
Instalación
19ES
Page 48

(^Funciones disponibles
Funciones
Nota
Si aparece la indicación "VIDEO" en la pantalla, oprima TV/VIDEO para que
aparezca el canal sintonizado.
Para seleccionar directamente un canal
Oprima los botones 0-9 para seleccionar un canal, u oprima ENTER
después de introducir el canal para seleccionarlo directamente.
© © ®
® ©
© © ©'^
ewTEB
C=)
©
Exploración de canales
Oprima CH +/- hasta que aparezca el canal que desee.
CH
b
Cambio rápido entre dos canales
Oprima JUMP.
Aparece el canal que estaba viendo con anterioridad y vuelva a
oprimirlo para volver al canal original.
JUMP
Ajuste del volumen
Oprima VOL +/- para ajustar el volumen.
VOL
éÍV
20ES
Funciones disponibles
Page 49

Eliminación del sonido
Oprima MUTING.
Aparece la indicación "MUTING" en la pantalla.
MUTING
Para restablecer el sonido, vuelva a oprimir MUTING, o VOL+.
Visualización de indicaciones en pantalla
Utilice esta función para comprobar los canales.
Oprima-DISPLAY.
DISPLAY
Para cancelar las indicaciones, vuelva a oprimir DISPLAY.
Empleo del apagado automático
Esta función permite apagar el televisor de forma automática después
de un periodo de tiempo seleccionado.
Oprima SLEEP varias veces hasta que aparezca el tiempo (minutos) que
desee. Cada vez que oprima SLEEP, aparece de forma secuencial los
incrementos de tiempo que pueden seleccionarse; 30 ♦ 60 90 ♦ OFF.
"SLEEP" aparece en la pantalla un minuto antes de que la
alimentación del televisor se desactive.
SLEEP
Para cancelar el apagado automático, oprima SLEEP varias veces hasta
que aparezca la indicación "SLEEP OFF", o apague el televisor.
Empleo de los audífonos
Conecte los audífonos en su respectiva entrada.
El sonido de la bocina se desactiva y el sonido monoaural se escuchará a
través de los audífonos. Para ajustar el volumen de los audífonos,
21ES
Page 50

Ajuste de la imagen
Mientras se visualizan programas de TV, es posible ajustar la imagen
según sus preferencias.
1 Oprima MENU.
2 Compruebe que el cursor (► ) se encuentra en VIDEO y oprima
RETURN.
VIDEO
►PICTURE UHilH
HUE -."-I'
COLOR illlill»
BRIGHT illii3MENU
Use »[MSI Exitlí
Seleccione la función que desea ajustar. Consulte la figura localizada
en la siguiente página para obtener información detallada sobre los
resultados del ajuste. Por ejemplo:
Para ajustar el brillo, oprima A+ o V- para seleccionar BRIGHT y, a
continuación, oprima RETURN.
VIDEO
(^+^(R)
A
0^1
■b
PICTURE illiilW
HUE
COLOR
►BRIGHT
:>MENU
Use ^ffiTÜil Exiti
RETURN
4 Ajuste el nivel:
(1) Oprima A+ o V- para ajustar el nivel.
(^+^(R)
A
b
(2) Oprima RETURN.
El nuevo ajuste aparece en el menú VIDEO.
5 Para ajustar otras funciones, repita los pasos 3 y 4.
22ES Funciones disponibles
BRIGHTNESS
llllllillllllllllllllllllllllll
.
Page 51

Descripción de las funciones ajustables
Función
PICTURE
HUE
COLOR
BRIGHT
Oprima A+ para Oprima V- para
Aumentar el contraste de
la imagen
Aumentar el verde en los
tonos de piel
Aumentar la intensidad de
los colores
Aumentar el brillo a la
imagen
Ajuste
Disminuir el contraste de
la imagen
Aumentar el púrpura en
los tonos de piel
Disminuir la intensidad de
los colores
Disminuir el brillo de la
imagen
Para restablecer los ajustes de fábrica
Oprima RESET mientras se muestra el menú VIDEO. Todos los ajustes,
excepto PICTURE recuperarán los ajustes de fábrica.
Ajuste de la imagen ai visualizar cintas de video
Es posible ajustar también la imagen de la entrada de video. Estos
ajustes se almacenan de forma independiente con respecto a aquellos
correspondientes a la imagen del televisor.
Para ajustar la imagen de video, oprima en primer lugar TV/VIDEO
para ajustar la entrada de video y, a continuación, siga los
procedimientos descritos en la página anterior.
Funciones disponibles
23ES
Page 52
Personalización de botones de número de canal
Es posible titular y asignar hasta 12 canales a un botón de número de
canal específico por cada canal. Esta función permite seleccionar con
facilidad los canales preferidos mediante su nombre. Por ejemplo,
seleccione el canal 17 "ESPN" y asígnelo al botón de número 2 de canal.
Titulación de ios canales preferidos
1 oprima MENU.
2 Oprima A+ o V- para seleccionar SET UP y, a continuación, oprima
RETURN.
3 Oprima A+ o V- para seleccionar CH CAPTION/GUIDE y, a
continuación, oprima RETURN.
CH CAPTION/GUIDE
►
® ® ®
(3) (S) ©
® ® ®
IH ® H
Use ^IStDM
------
ExitH
—
4 Vuelva a oprimir RETURN.
RETURN
Oprima A+ o V- para seleccionar un número guía de canal (el
número elegido aparecerá en rojo) y, a continuación, oprima
RETURN. Por ejemplo, seleccione 2 como número guía de canal.
Los números 0-9 y los botones DISPLAY y ENTER están
disponibles para emplearlos como número guía de canal. El botón
de número de canal seleccionado será el que oprima para que
aparezca el canal que desee.
RETURN
6 Oprima A+ o V- para seleccionar el canal que desee titular y, a
continuación, oprima RETURN. Por ejemplo, seleccione el canal 17.
RETURN
24ES
/+V(R)
A
V
(U
Funciones disponibles
CH CAPTION/GUIDE
® ® @
® ® ®
-------------
® ® ® 5
Ü ® ffl
Select a posit ion.
Use ^[Mj ExitM
_____________
CH CAPTION/GUIDE
® ® ®
® ® ©
Select Tïïe
Use
CH CAPTION/GUIDE
® @ ®
® ® ®
iü ® ii]
Select the letter.
Use ^iRttÜ^Ñl Ex i tiMENül
channe-l
ExitM
©-
Número
guía de
canal
Canal
seleccionado
Page 53

7 Introduzca las letras (máximo de cuatro) para titular el canal:
(1) Oprima A+ o V- para seleccionar la primera letra.
Cada vez que oprima A+ o V-, la letra cambia como se muestra a
continuación.
. _ (espacio en blanco)
t
__
+ YR)
A
(2) Opfima RETURN.
RETURN
(3) Repita los pasos (1) y (2) para seleccionar las letras restantes y
oprima RETURN.
RETURN
CH CAPTION/GUIDE
Ül C) E]
Select the letter.
Use »IflETWMl ExitiM
CH CAPTION/GUIDE
® ® ®
® ® ®
® ® ®
|0 ® H
Use ^IM
® ® ®
® ®
® ® ®
__________
E
-----
D
►
------
—
z>
ExitllW
Î
17
8
Repita los pasos
4
a 7 para titular otros canales.
Para cancelar un ajuste
Seleccione el canal que desee cancelar en el paso
5
y, a continuación,
oprima RESET.
Selección de canales titulados
1 Oprima CH GUIDE.
Aparece el menú CHANNEL GUIDE en el que se muestran los
títulos de canal y los botones de número de canal correspondientes.
2 Oprima un botón de número de canal, el botón DISPLAY o ENTER
para seleccionar el canal que desee.
Para cancelar el menú CHANNEL GUIDE
Vuelva a oprimir CH GUIDE.
Funciones disponibles
25ES
Page 54

Bloqueo de canales (channel block)
Esta función permite evitar que los niños vean programas inadecuados.
1 Oprima MENU.
2 Oprima A+ o V- para seleccionar SET UP y, a continuación, oprima
RETURN.
3 Oprima A+ o V- para seleccionar CH BLOCK y, a continuación,
oprima RETURN.
CHANNEL BLOCK
►1. CH
__
2. CH
___
OMENU
Selecta prooram
Use ^fMÎ ExitlÜ
+Nr)
RETURN
4 Seleccione el canal que desee bloquear.
(1) Oprima A+ o V- para seleccionar el programa 1 o 2 y, a
continuación, oprima RETURN.
La indicación del canal seleccionado adopta el color rojo.
CHANNEL BLOCK
1. CH
___
2. CH
___
3MENU
Select the channel
Use 4BÜ ExitH
ó+Nr)
A
W
'Cy'
RETURN
(2) Oprima A+ o V- para seleccionar el canal que desee bloquear y,
a continuación, oprima RETURN.
CHANNEL BLOCK
►1. CH 7
2. CH
___
:«ENU
Selecta program
Use Exit®
5 Repita paso 4 para bloquear otros canales.
Si seleccionado el canal bloqueado mientras ve la televisión, aparece
"BLOCKED", la imagen se bloquea y el sonido desaparece.
Para cancelar el bloqueo de canales
Oprima RESET en el paso 3.
26ES
Funciones disponibles
Page 55

(^Información adicional
1 Solución de problemas
Si el problema persiste, póngase en contacto con el centro de
reparaciones Sony más cercano.
Síntoma
Imagen defectuosa o
ausencia de imagen
(pantalla apagada),
pero sonido adecuado.
Ausencia de imagen
(pantalla.apagada) y
de sonido.
Posibles causas y soluciones
• Ajuste PICTURE en el menú de VIDEO.
• Ajuste BRIGHT en el menú de VIDEO.
• Compruebe las conexiones de la antena /sistema de
cablevisión.
• Compruebe que el cable de alimentación está bien
conectado.
• Compruebe que el botón TV/VIDEO está en la posición
correcta. Para ver el TV, seleccione TV y, para ver cintas
de video, seleccione VIDEO o el canal que emplee para
ver el video.
• Pruebe otro canal. Es posible que el problema se deba a
la emisora.
Ausencia de color. • Ajuste COLOR en el menú VIDEO.
• Los programas en blanco y negro no pueden verse en
color.
Nieve y ruido
solamente.
Líneas discontinuas o
rayas
La imagen se
distorsiona
(alimentación con CC)
Imágenes dobles o
fantasmas.
No puede operarse el
menú.
El control remoto no
funciona
Es preciso limpiar el
TV.
• Compruebe el ajuste de CABLE en el menú de SET UP.
• Compruebe las conexiones de la antena/cable del
sistema de cablevisión.
• Compruebe que el canal está emitiendo programas.
• Ajuste la antena.
• Aleje el TV de fuentes de ruido, como automóviles,
lámparas fluorescentes y secadoras de pelo.
• Si la tensión de la batería del automóvil disminuye
demasiado, la imagen puede distorsionarse. Utilice el
televisor con el motor en marcha.
• Utilice una antena exterior direccional o un cable de
cablevisión (cuando el problema se deba a reflexiones de
montañas o edificios altos cercanos).
• El menú desaparece automáticamente transcurridos 90
segundos después de.oprimir un botón.
• Si los valores de menú aparecen en negro, significa que el
TV está en el modo de video y no puede utilizar los
menus. Oprima TV/VIDEO hasta que aparezca un
número de canal.
• Inserte las pilas en el control remoto con la polaridad
correcta.
• Sustituya las pilas con unas nuevas si se han agotado.
• Si hay una lámpara fluorescente cerca del TV, aléjela a
una distancia de un metro.
• Limpie el TV con un paño seco y suave. No utilice nunca
disolventes como diluyente o bencina, ya que pueden
dañar el acabado.
Información adicional
27ES
Page 56

Especificaciones
Sistema de televisor
TV estándar americana, color NTSC
Cobertura de canales
VHP: 2-13/UHF: 14-69/CATV: 1-125
Tamaño de pantalla
Imagen de 9 pulgadas, medida diagonal
Antena
Telescópica de VHF/UHF
Bocina
Redonda de 77 mm, 1 W
Entradas
VIDEO: Tipo de entrada de línea RCA
1 Vp-p, 75 ohmios
AUDIO: Monoaural tipo de entrada de
línea RCA
VHF/UHF (Combinación de CATV/
VHF/UHF de 75 ohmios, tipo F)
Salida
Entrada de audífono (monoaural)
Dimensione
10 'Apulgadas (258 mm)
Requisitos de alimentación
KV-9PT50:120 V CA, 60 Hz
KV-9PT60:120 V CA, 60 Hz, 12 V CC
Consumo de energía
KV-9PT50: CA IN 53 W máx.
KV-9PT60: CA IN 53 W máx.,
CC IN 53 W máx.
Masa
KV-9PT50: 5,5kg(121b2oz)
KV-9PT60: 5,7 kg (12 Ib 9 oz)
Accesorios sumirüstrados
Control remoto RM-Y116
Pilas tamaño AA (2)
Antena telescópica (1)
KV-9PT50 solamente: Soporte giratorio
de modo dual (1), Componentes de
instalación (1), Patrón de papel (1)
KV-9PT60 solamente: Cable de
alimentación de CA (1), Cable de
batería de automóvil DCC-22AW (1)
Diseño y especificaciones sujetos a cambio
sin previo aviso.
Quando está instalado el soporte
en la parte superior del televisor
Sony Corporation Printed in U.S.A.
Quando está instalado el soporte
en la parte inferior del televisor
 Loading...