

Page 1
R
Trinitron Colour
Television
4-204-994-94
420499494
Instruction Manual
Instrukcja obsługi
Návod k obsluze
Kezelési útmutató
Инструкции за употреба
Инструкция по зксплуатации
KV-36FS70K
© 1999 by Sony Corporation Printed in UK
Page 2
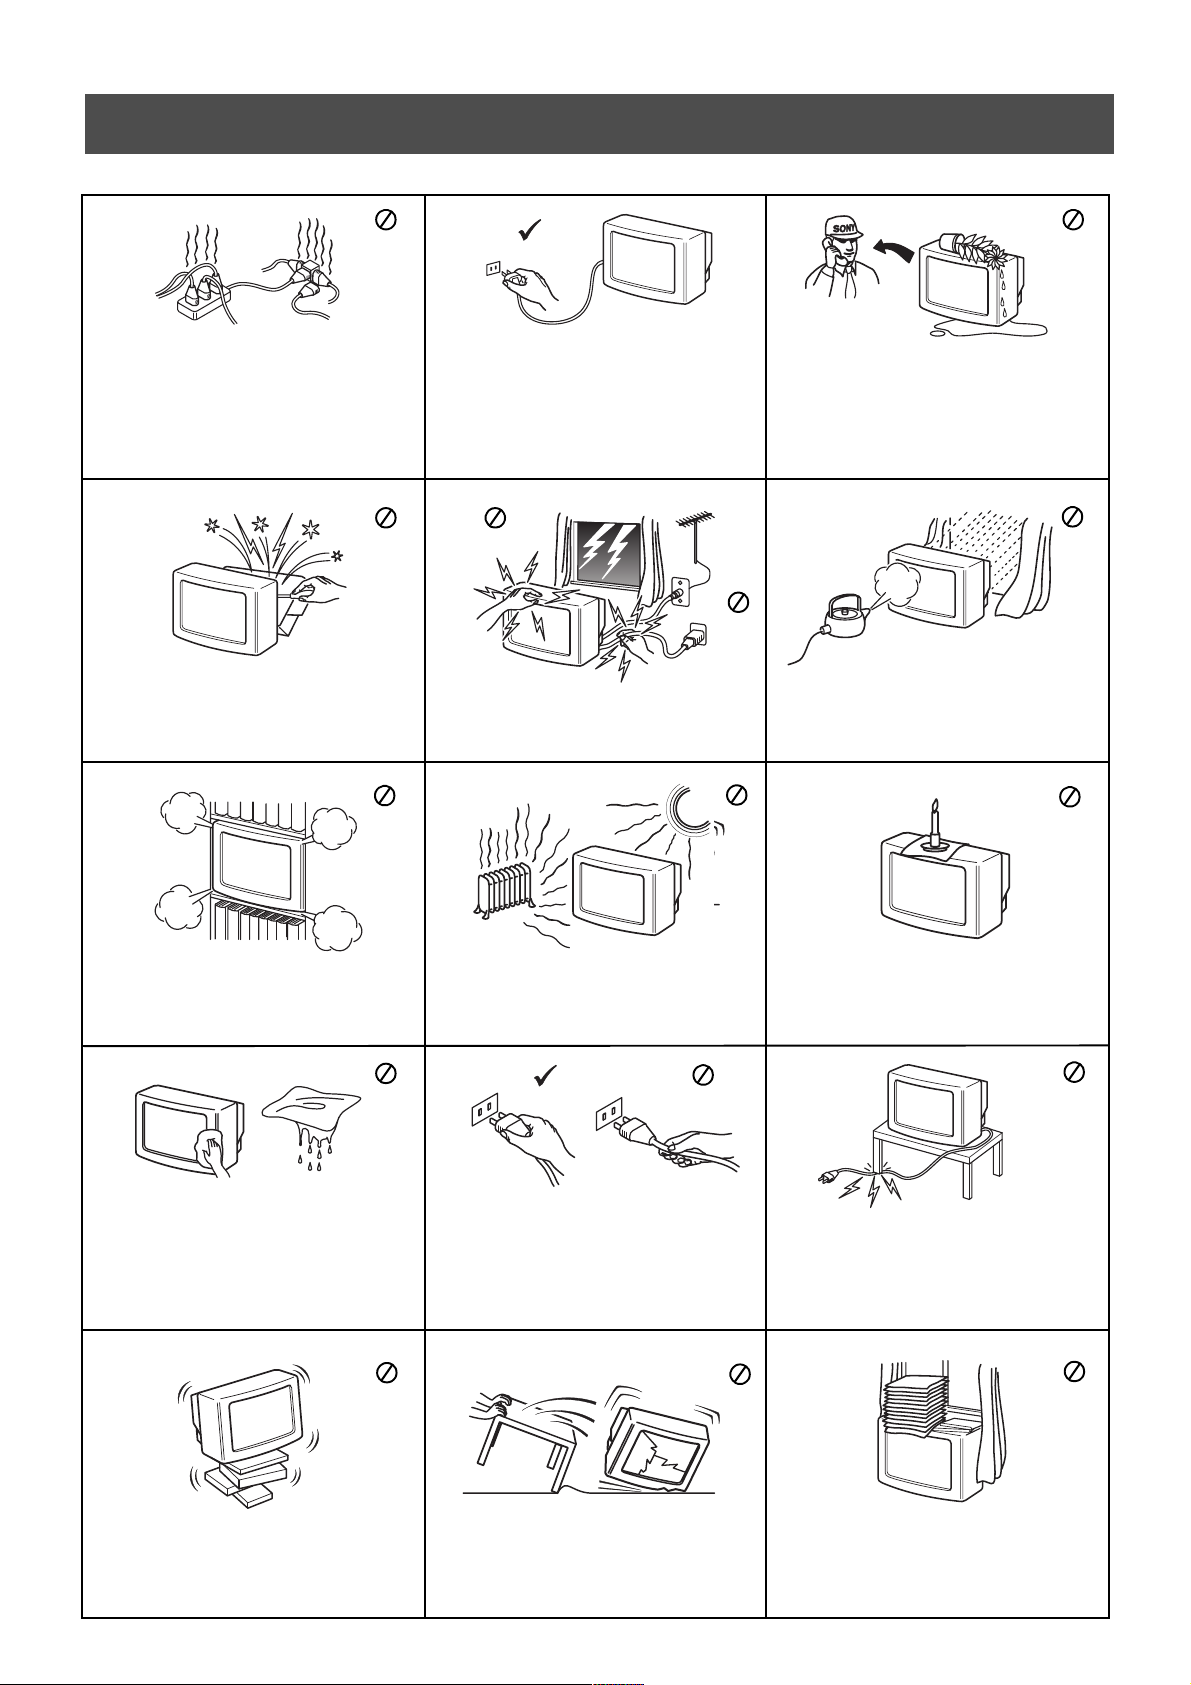
Safety Information
For your safety
This set is to operate on a 220-240V AC supply
only. Take care not to connect too many
appliances to the same power socket as this could
result in fire or electric shock.
Do not open the cabinet and the rear cover of the
TV. Refer to qualified service personnel only.
For environmental and safety reasons, it is
recommended that the TV set is not left in
standby mode when not in use. Disconnect
from the mains.
For your own safety, do not touch any part of the
TV, power lead or aerial lead during lightning
storms.
Never push objects of any kind into the set as
this could result in a fire or electric shock. Never
spill liquid of any kind on the set. If any liquid or
solid object does fall through, do not operate the
TV. Have it checked immediately by qualified
personnel.
To prevent fire or shock hazard, do not expose
the TV to rain or moisture.
Do not cover the ventilation openings of the TV
For ventilation, leave a space of at least 10cm all
around the set.
Clean the TV with a soft, lightly dampened cloth.
Do not use benzine, thinner or any other
chemicals to clean the TV. Do not scratch the TV
screen. As a safety precaution, unplug the TV
before cleaning it.
Place the TV on a secure stable stand. Do not
allow children to climb on to it. Do not place the
TV on its side or face up.
Never place the TV in hot, humid or excessively
dusty places. Do not install the TV where it may
be exposed to mechanical vibrations.
Pull out the power lead by the plug. Do not pull
on the power lead itself.
Unplug the power lead before moving the TV.
Avoid uneven surfaces, quick steps or excessive
force. If the set has been dropped or damaged,
have it checked immediately by qualified
service personnel.
To prevent fire, keep inflammable objects or
naked lights (eg candles) away from the TV.
Take care not to place heavy objects on the power
lead as this could result in damage.
We recommend you wind any excess lead around
the holders provided on the rear of the TV.
Do not cover the ventilation openings of the TV
with items such as curtains or newspapers etc.
Page 3
Table of Contents
Table of Contents
Installation
1. Checking the accessories supplied
2. Inserting batteries into the remote control
3. Connecting the TV
4. Switching on the TV
5. Using the joystick
6. Tuning your TV
7. Finding your video channel
Operation
Overview of the TV set buttons
Overview of the remote control buttons
NexTView
Teletext
Using the TV menu system
Adjusting the picture settings
Adjusting the sound settings
Setting up ‘Dolby Surround’
Using the Features menu
Changing the screen size
Using Multi PIP
Operating PAP (Picture and Picture)
Re-arranging the TV channels
Manually tuning the TV
Naming a channel
Skipping programme positions
Using the ‘Further Programme Preset’ feature
Selecting the ‘Demo’ feature
Adjusting the picture rotation
Adjusting the picture geometry for an RGB source
Inputting your personal ID
Presetting and labelling of input sources
2
2
3
5
5
6
6
7
8
9
11
13
13
14
15
16
16
17
17
18
18
19
19
20
20
21
21
22
22
Additional Equipment
Connecting additional equipment to the TV
Additional information when connecting equipment
Smartlink
Remote control of other Sony equipment
Additional Information
Specifications
Channel Display Table
Troubleshooting
23
24
24
24
25
25
26
1
Page 4
Installation
Follow steps 1-7 to install the TV and
view TV programmes.
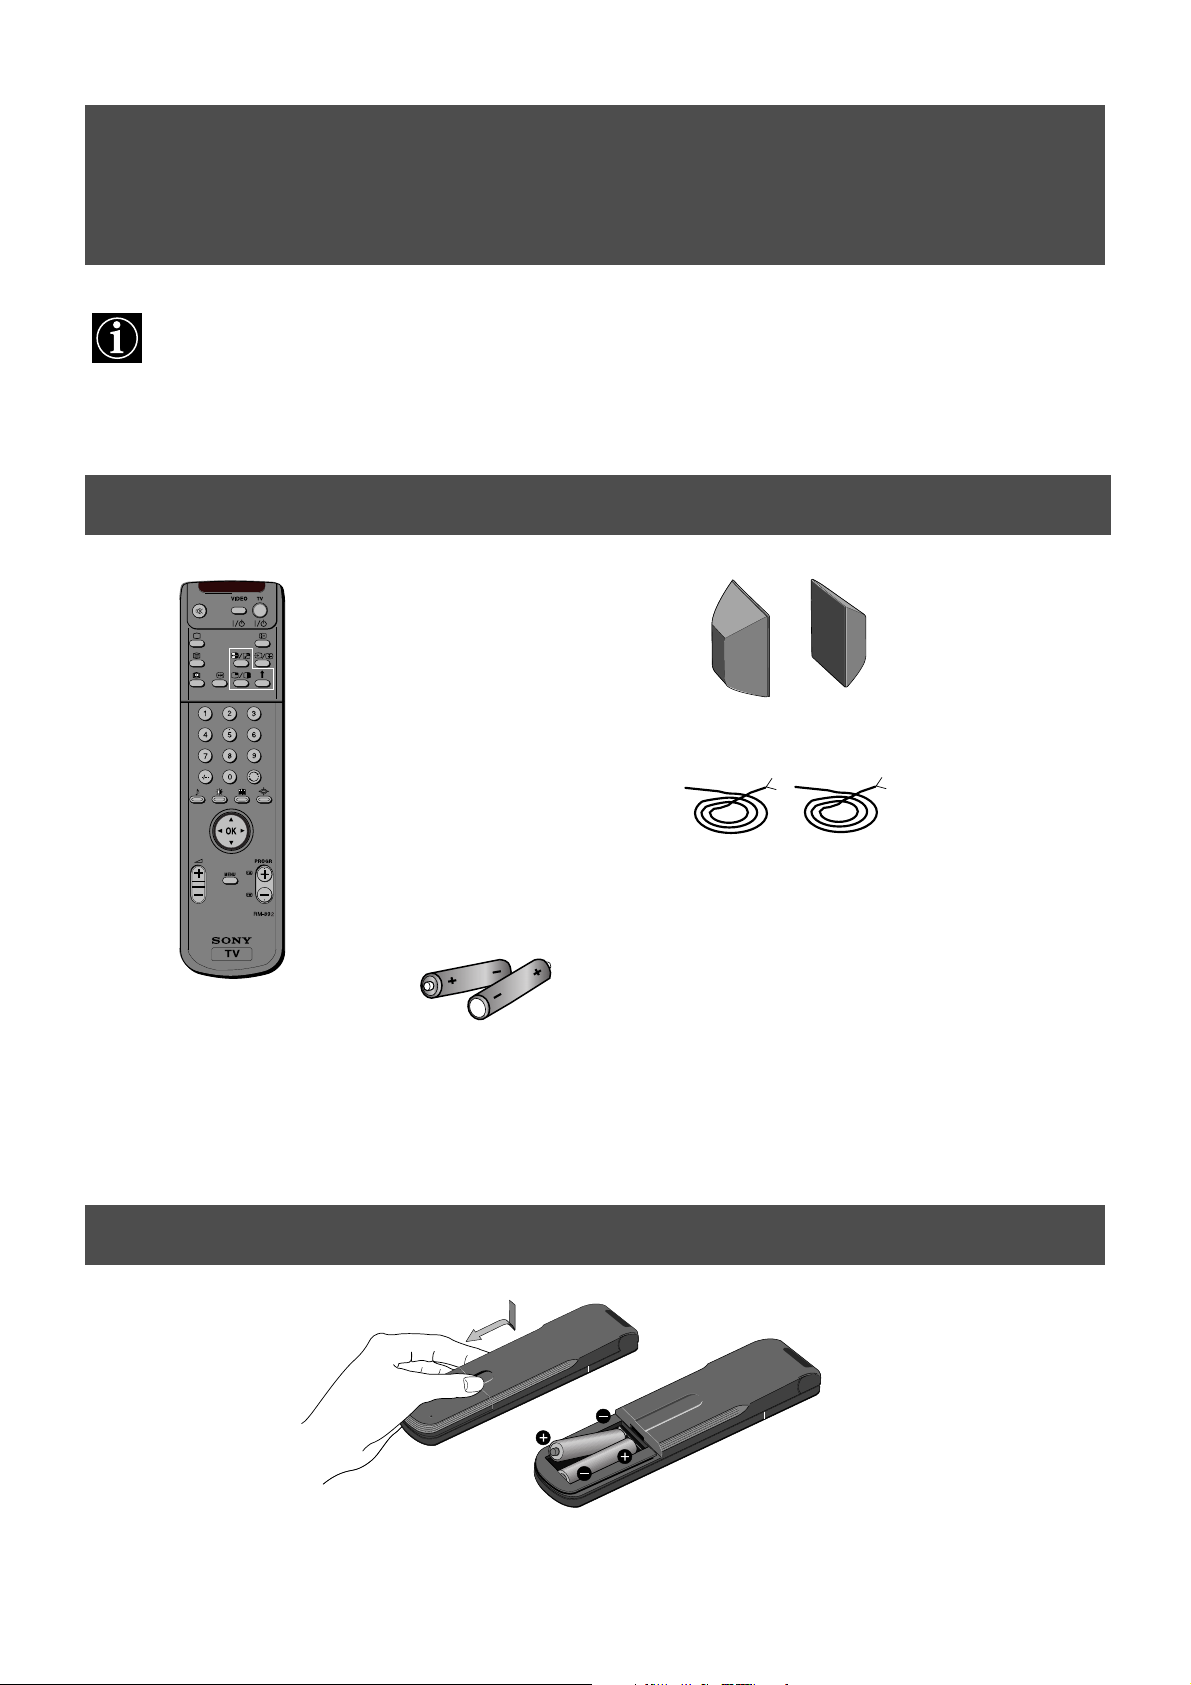
1. Checking the accessories supplied
surround speakers
surround speaker leads
remote control
batteries
2. Inserting batteries into the remote control
Always remember to dispose of used batteries in an environmentally friendly way.
2
Page 5

Installation
3. Connecting the TV
Connecting the speakers
Dolby* Pro Logic Surround normally requires 5 speakers.
Centre speaker (incorporated in the TV set) to anchor the stable sound image such as dialogues to the TV screen.
Left and right front speakers (incorporated in the TV set) for the normal two channels or stereo broadcasts.
Surround speakers (supplied) for the special effects created by the surround channel.
Connecting the supplied speakers
black
lead
C
S
S
black/
white
lead
surround speakers
Connecting your own speakers
(Make sure the speakers have at least 8 ohms impedance and are magnetically shielded. Otherwise you may get picture
distortions).
L/G/S/I
R/D/D/D
right speaker
left speaker
C
S
S
surround speakers
*Manufactured under licence from Dolby Laboratories Licensing Corporation. Dolby, ProLogic and the double-D symbol are
trademarks of Dolby Laboratories Licensing Corporation.
3
Page 6

Installation
3. Connecting the TV
Connecting an aerial to your TV
C
3
S
1
S
1
3
2
2
L/G/S/I
R/D/D/D
-
s
-
s
-
L/G
S/I
R/D
D/D
If you are not connecting
your TV to a VCR,
please connect the aerial
lead (as shown left) and
proceed to section
‘4.Switching on the TV’.
If you are connecting
your TV to a VCR please
refer to the section
below.
1. Connect your existing aerial lead to the socket marked on the rear of the TV set.
Connecting an aerial and VCR to your TV
C
-
s
-
s
-
L/G
S/I
R/D
D/D
(existing aerial lead)
IN
OUT
(scart lead - not supplied)
AC IN
3
S
1
S
1
3
2
2
L/G/S/I
R/D/D/D
The scart lead is
optional. If it can be
used however, this
additional
connection can
improve picture and
sound quality when
in play mode.
1. Connect your existing aerial lead to your VCR as shown.
2. Connect the VCR aerial lead from the RF OUT socket on the back of the VCR to the aerial
socket on the back of the TV as shown.
3. Connect the VCR set to the mains and switch on.
4. Insert a pre-recorded tape into the VCR and press the ‘PLAY’ button.
4
Page 7

Installation
4. Switching on the TV
1. Connect the TV plug to the mains socket (220-240V AC, 50Hz) and switch on.
2. Push in the on/off button on the front of the TV.
If the standby mode indicator on the front of the TV is lit, press the TV button on the
remote control to switch on the TV set. Please be patient as the picture may take a few
moments to appear on the TV screen.
/
5. Using the joystick
Moving the joystick Pressing the joystick
To move around the menus press
the relevant arrow button.
To select an item in a menu press
the OK button down in the middle.
5
Page 8
Installation
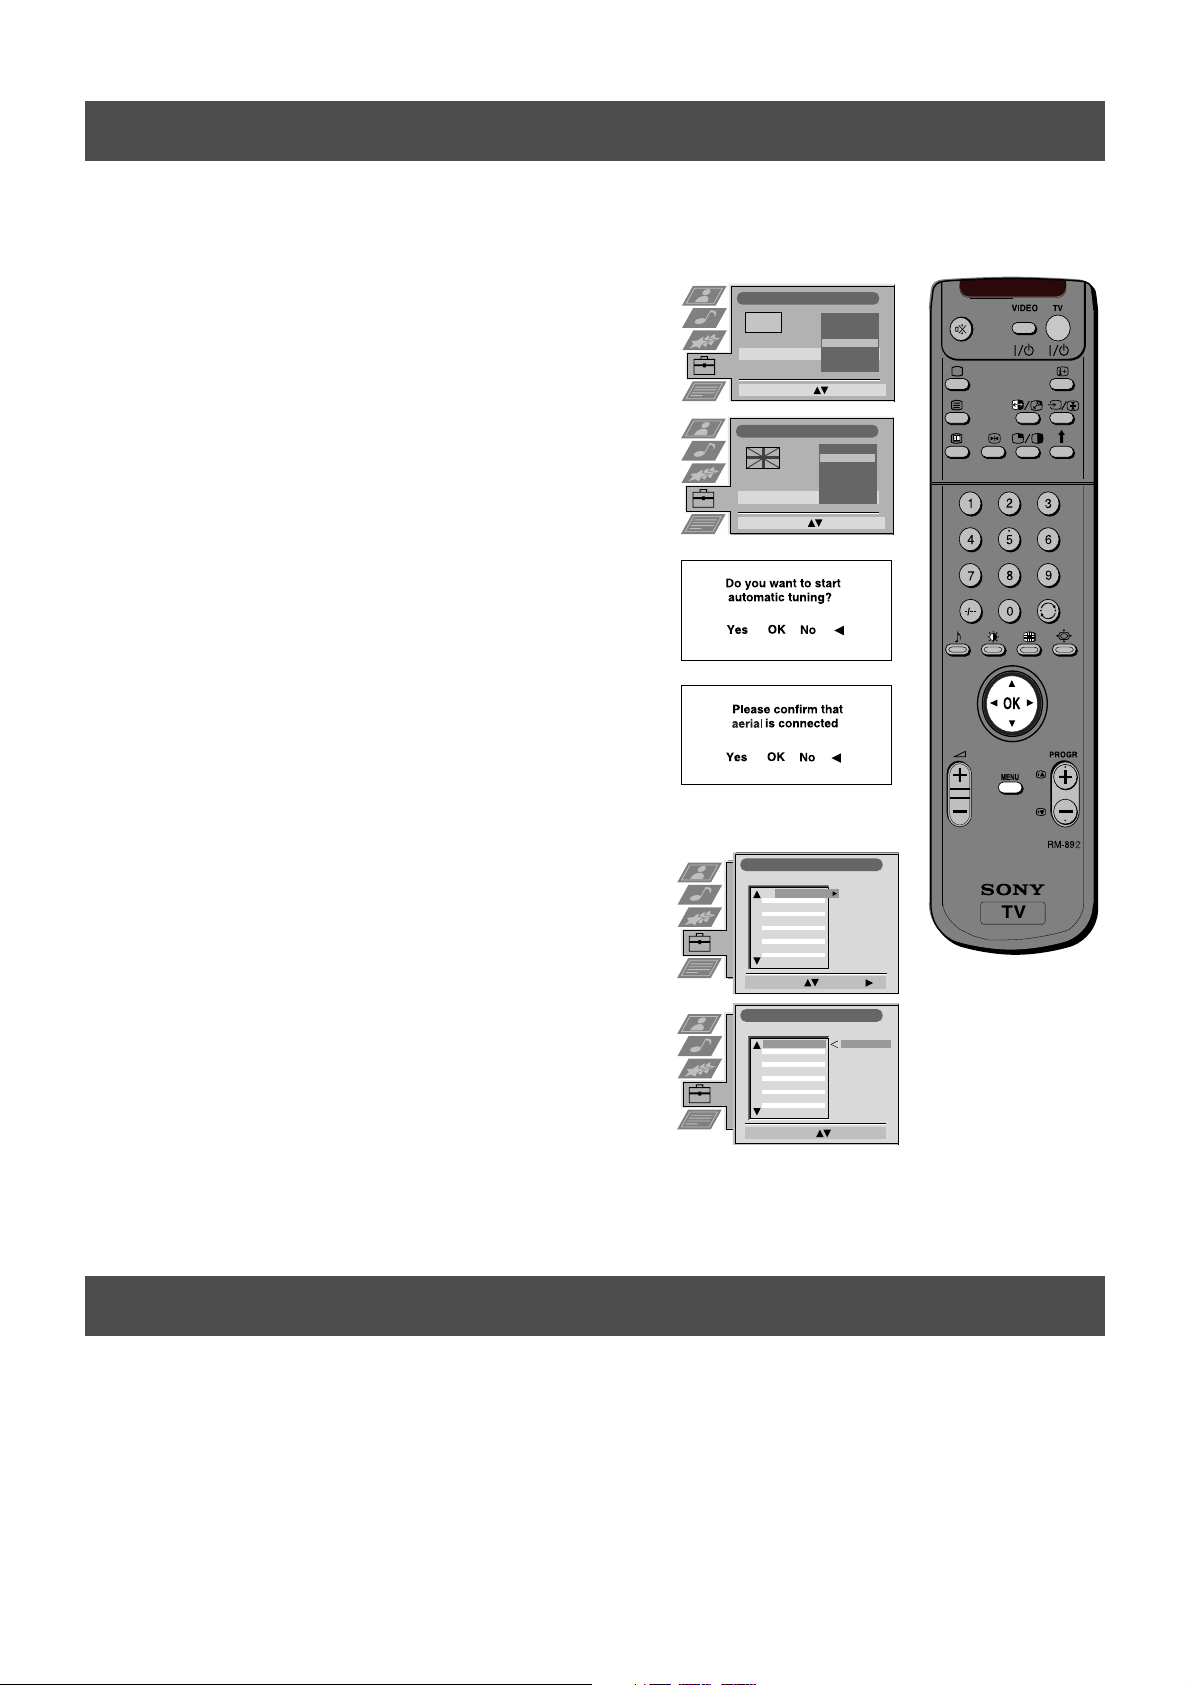
6. Tuning your TV
Before you tune your TV, you will be asked to set your language and country.
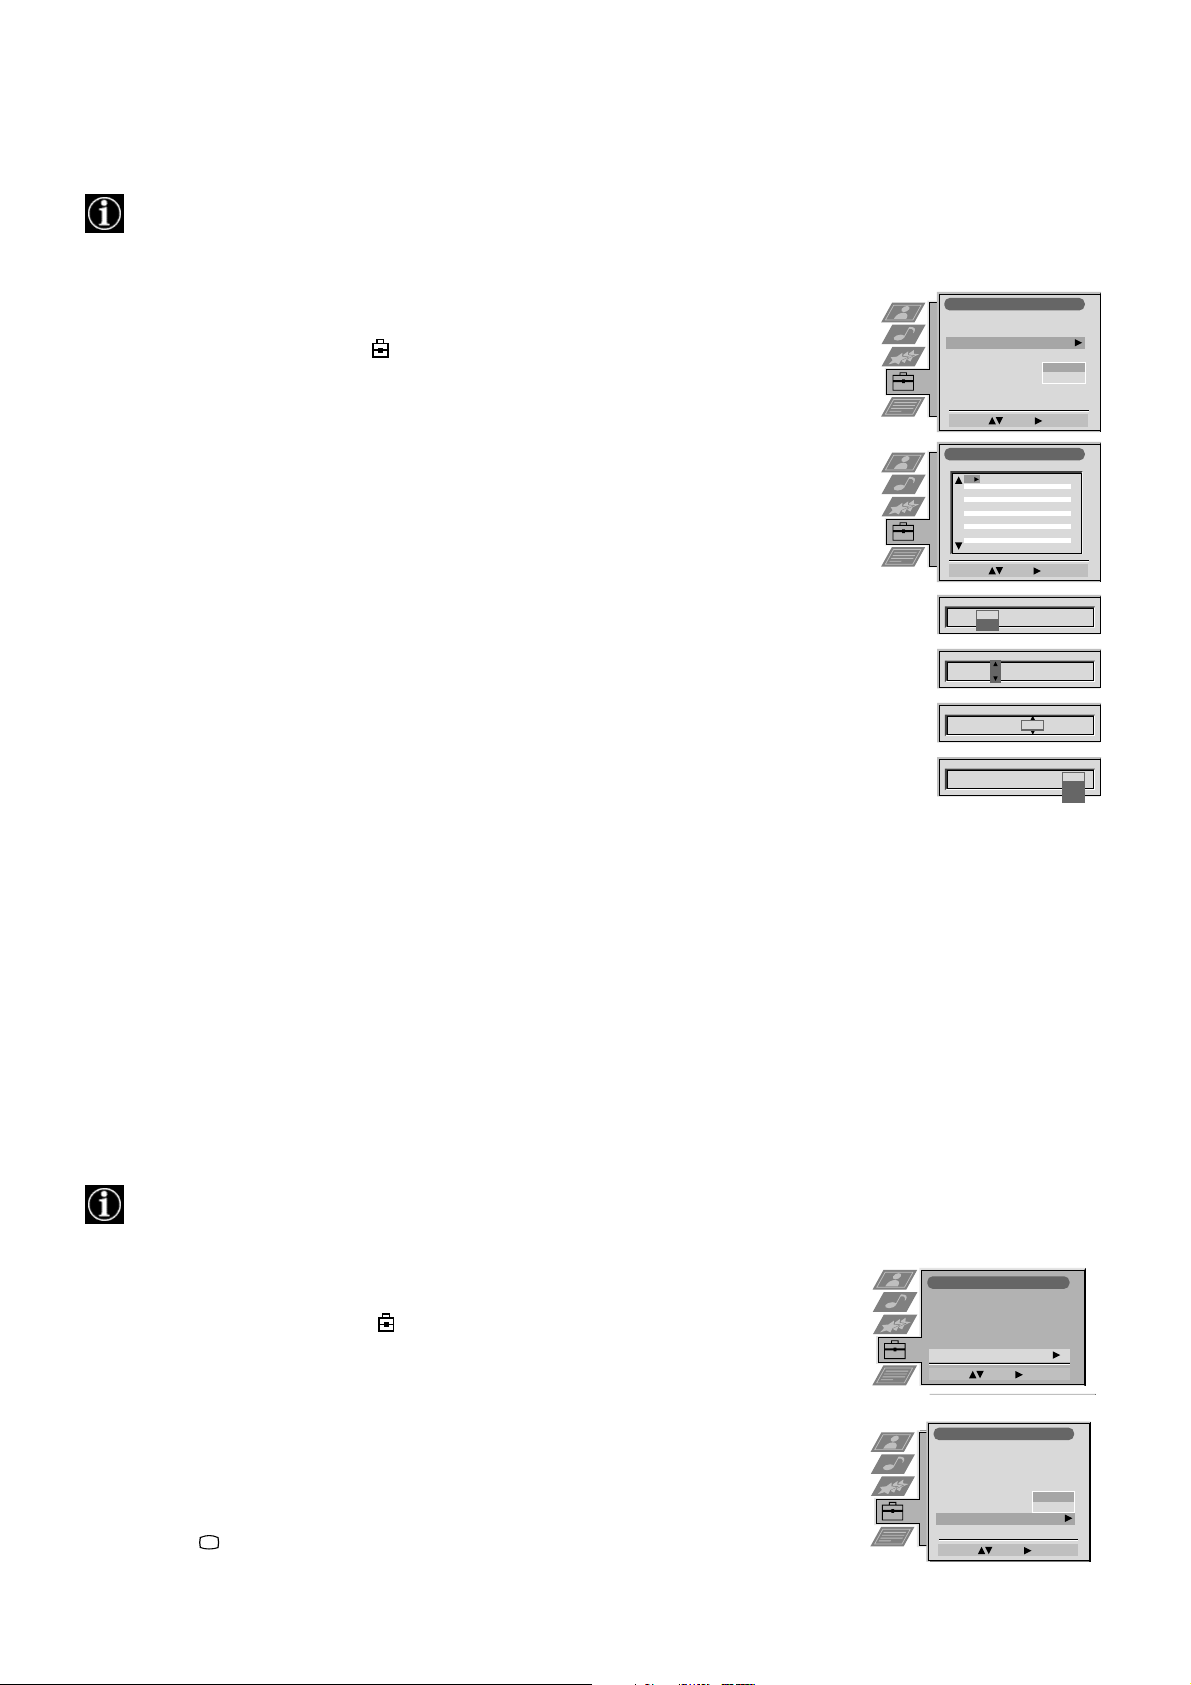
1. The Language/Country menu appears on the TV screen with the
word ‘English’ highlighted.
2. Press the v or V buttons on the remote control to select your
chosen language then press the OK button to confirm. The
country menu appears on screen with the word ‘OFF’ highlighted.
Select ‘OFF’ if you do not want your channels stored in a given
channel sequence starting from programme position 1.
3. Press v or V to select the country in which you wish to operate
the TV then press the OK button to confirm your choice.
4. The ‘autotune’ menu appears on the TV screen in your selected
language. Press the OK button to confirm.
5. Ensure the aerial is connected as instructed, then press the OK
button to confirm. The TV starts to auomatically search and store
all available channels for you. This may take a few minutes please be patient and do not press any buttons.
6. Once the TV has tuned all available channels the ‘Programme
Sorting’ menu appears on the TV screen enabling you to change
the order of the channels on your TV. If you wish to change the
channel order, press the v or V buttons to select the channel you
want to move then press B. Press the v or V buttons to select the
new programme number position for your selected channel then
press the OK button to confirm. The selected channel now moves
to its new programme position and the other channels move
accordingly. Repeat this procedure if you wish to sort the order of
other channels on your TV.
7. Press the MENU button to remove the menu from the TV screen.
8. Press the PROGR+/- or the numbered buttons to view the TV
channels.
Language/Country
Français
TV 5
PRO 7
EU-SP
SWF
RTL
SAT
MDR
DDI
DSF
RTL 2
KAB 1
TV 5
PRO 7
EU-SP
SWF
RTL
SAT
MDR
DDI
DSF
RTL 2
KAB 1
Deutsch
Confirm: OK
Great Britain
Germany
Denmark
Czech Rep.
Confirm: OK
:
:
C03 TV 5
Language
Country
Select Language:
Language/Country
Language
Country
Select Country:
:
:
Programme Sorting
PROG CH LABEL
C03
1
C05
2
C07
3
C08
4
C09
5
C11
6
C12
7
C13
8
C14
9
C15
10
C16
11
Select Prog: Confirm:
Programme Sorting
PROG CH LABEL
1
C03
2
C05
3
C07
4
C08
5
C09
6
C11
7
C12
8
C13
9
C14
10
C15
11
C16
Select Position: Move: OK
Italiano
Español
English
Dansk
Čeština
Greece
France
Finland
Note: If you would like to stop the autotune process at any stage,
press the OK button.
7. Finding your video channel
If you have connected a VCR to your TV, you now need to find your video channel.
1. Press the PROGR+/- buttons on your remote control until your video picture appears on the TV screen.
Note: If you wish to move your video channel to a different programme position, refer to the ‘Re-arranging the TV channels’
section of this instruction manual.
6
Page 9

Operation
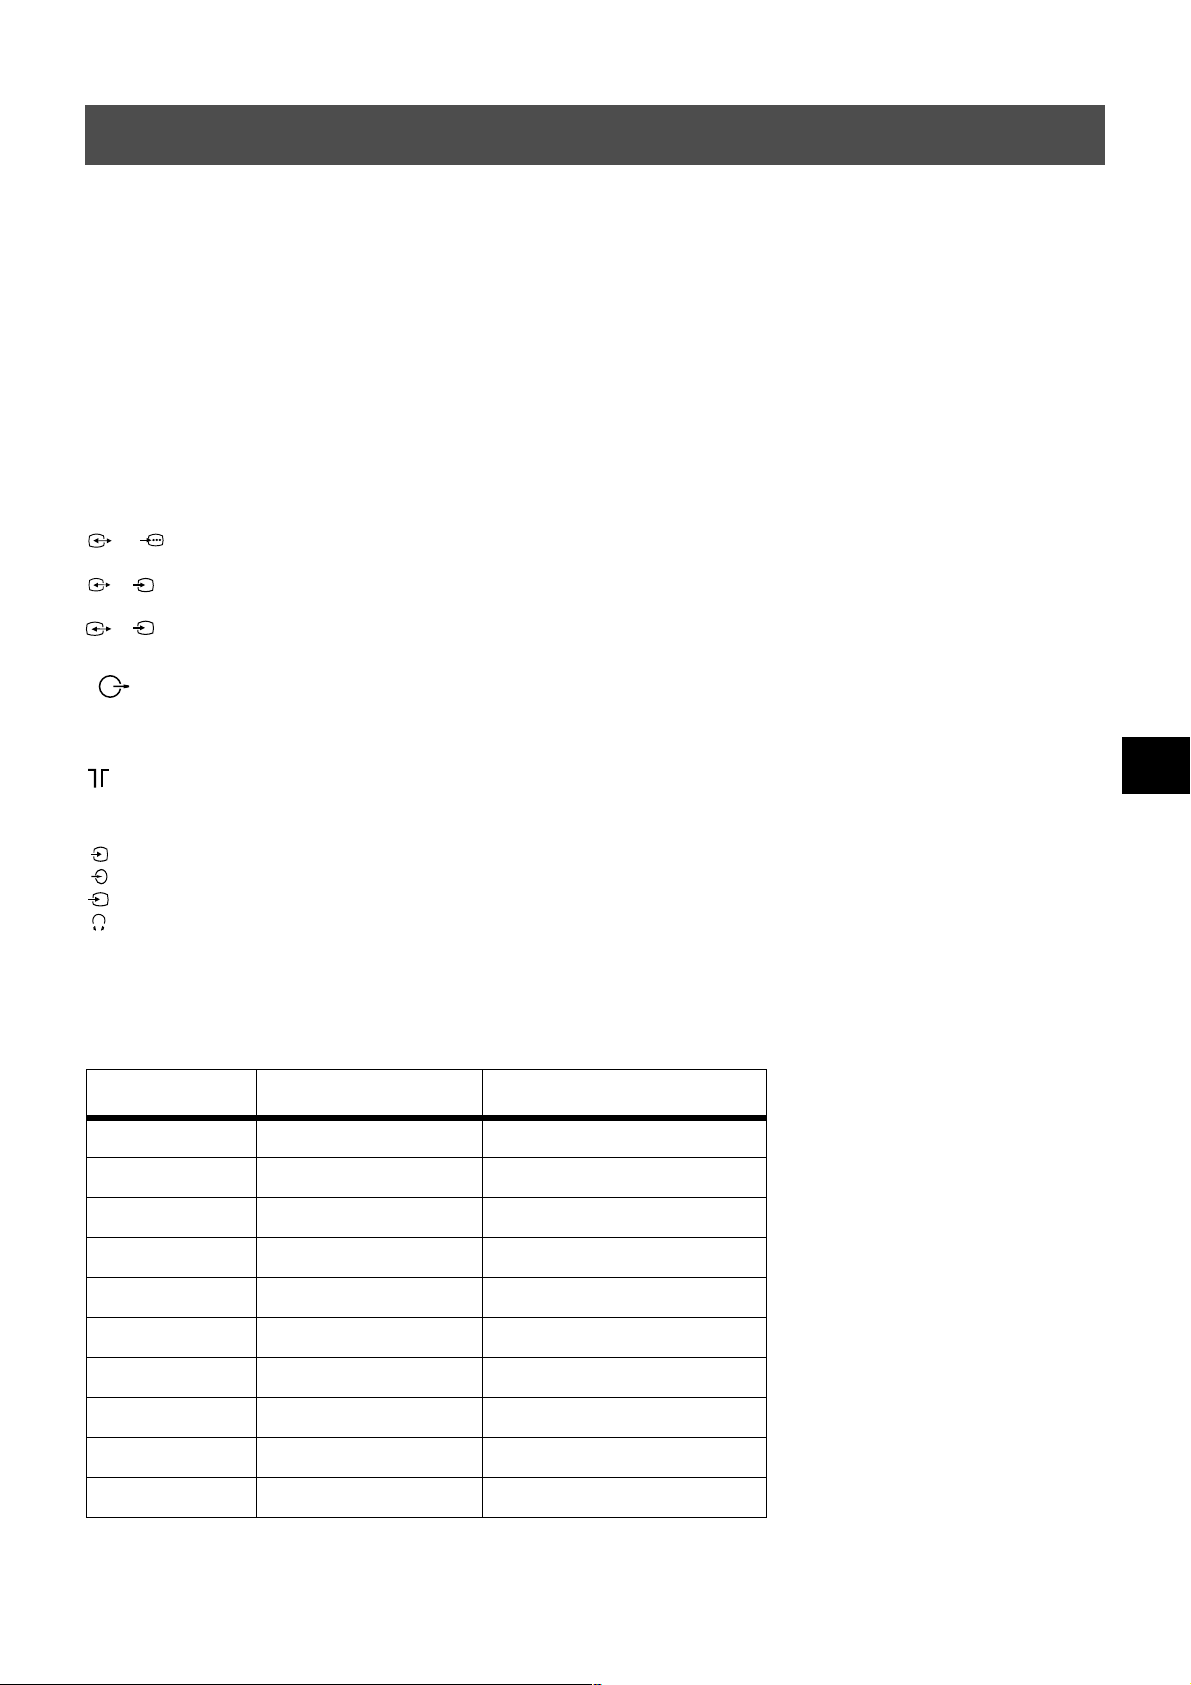
Overview of the TV set buttons
Volume control buttons.
Press to increase (+) /
decrease (-) volume.
Video input button.
Press to select the input
signals from VCR etc.
+
–
Programme Up (+) or
Down (-) buttons.
Press to select TV
channels.
PROGR
+
–
CONTROL
CONTROL button
Press to activate and
illuminate the control panel.
On/Off switch.
Press to switch TV on and off.
7
Page 10
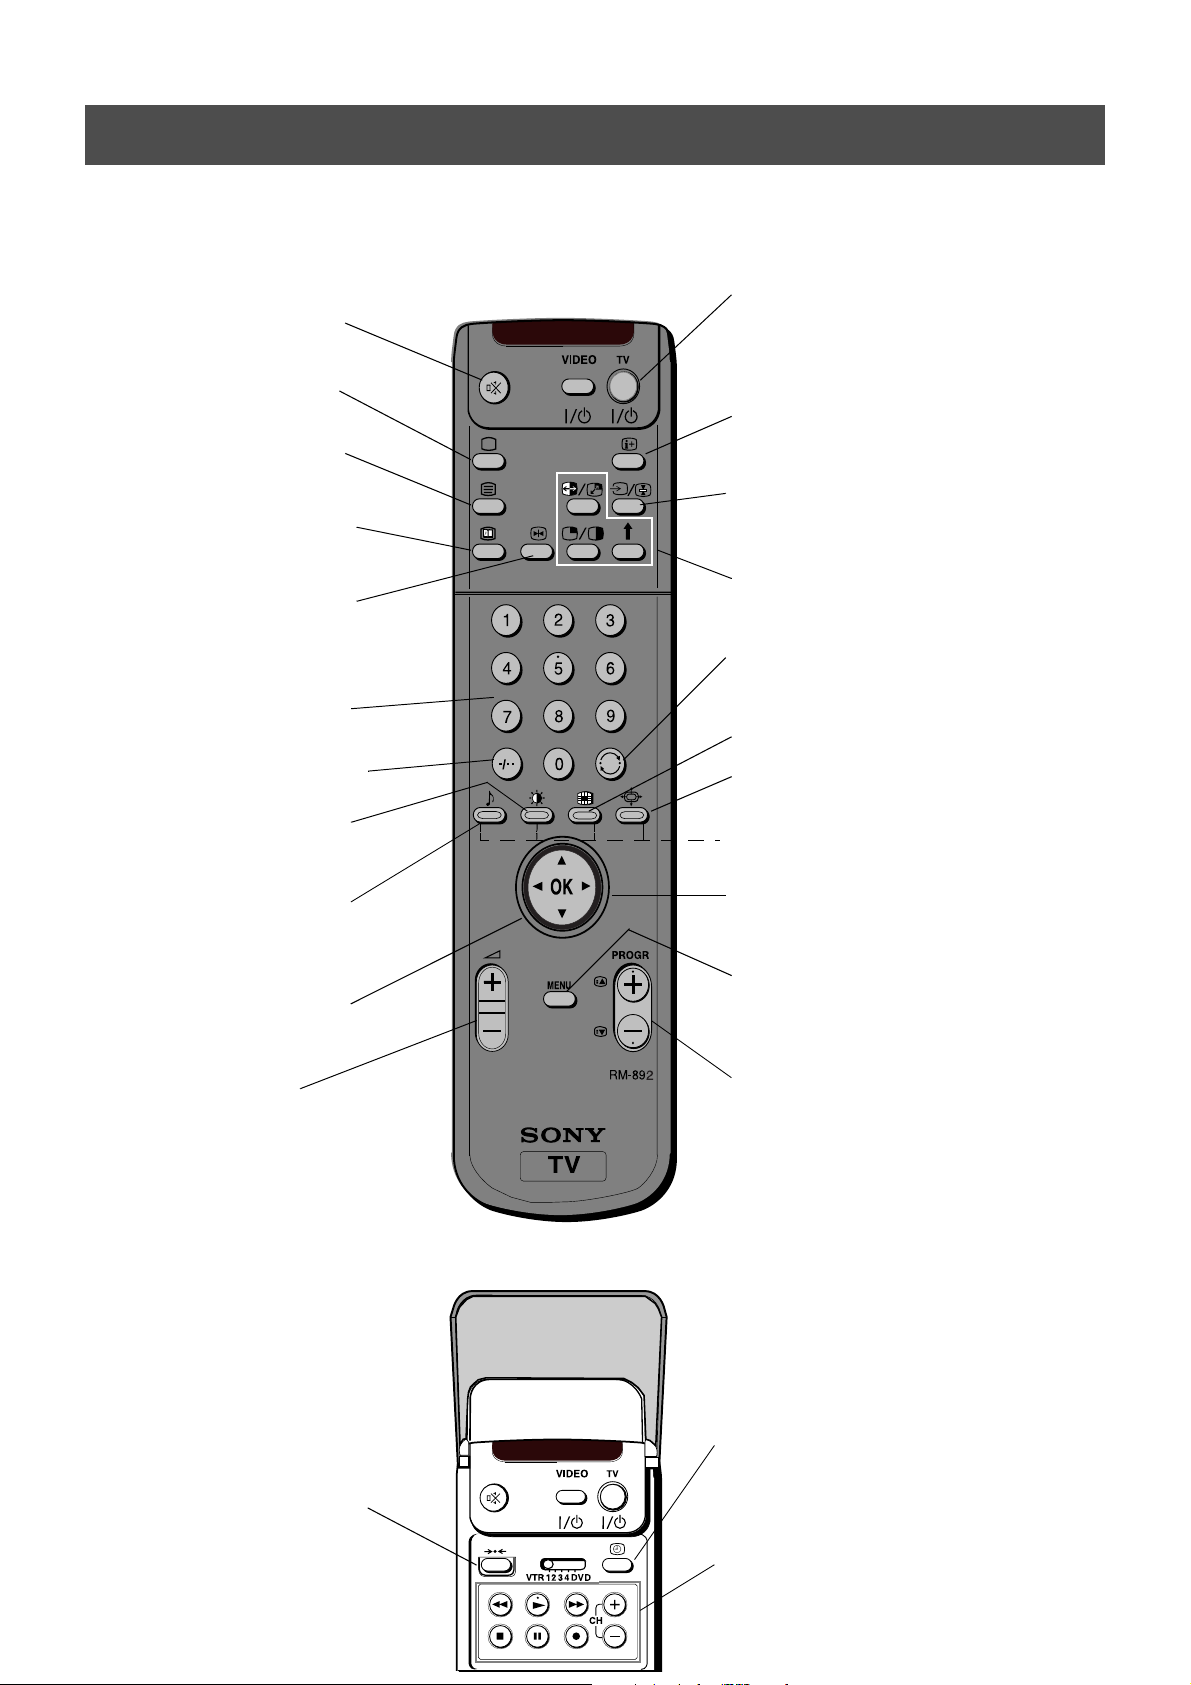
Operation
Overview of the remote control buttons
To mute sound
Press to mute TV sound. Press again to restore the
sound.
To return to TV mode
Press to return to the normal operation from teletext
mode or standby mode.
To select Teletext
Press to switch Teletext on and off.
To select Electronic Programme Guide
(EPG)
Press to switch EPG on and off.
To freeze the picture
Press if you wish to make a note of some
information on the TV screen eg a telephone
number. Press again to return to normal TV mode.
To select channels
Press the numbered buttons to select channels.
For double digit programme numbers, e.g.23, press
-/-- first, then the buttons 2 and 3.
To display picture menu
Press to change the picture settings. Press the OK
button to remove the display.
To display sound menu
Press to change the sound settings. Press the OK
button to remove the display.
To display the Channel Table
Press the OK button. Press v or V to select the
desired channel then press B to confirm.
To temporarily switch off TV
Press to temporarily switch off TV. Press again to switch on
from standby mode. To save energy, we recommend
switching off completely when TV is not in use. NOTE:
After 15-30 minutes without a TV signal and without any
button being pressed, the TV switches automatically into
standby mode.
To reveal on screen information
Press to reveal all on-screen indications. Press again to
cancel. In Teletext mode, press to reveal the index page
(normally page 100).
To select input signal or freeze teletext
Press to select inputs from the TV sockets (see Using
Optional Equipment section). In Teletext mode, press to
freeze the displayed page. Press once again to cancel.
Please refer to the ‘Operating PAP’ section of this
instruction manual for details.
To return to previous channel
Press to return to the previous channel you were watching.
Note: This can be done only after watching the present
channel for 5 seconds.
Press to switch Multi PIP mode on and off.
To change screen format
Press to change the size of the screen.
Fastext keys
See Teletext section of manual for details.
To select menu items
Use the OK button and arrow keys to select the options
available in the menu system of this TV.
To display the menu
Press if you wish to use the TV menu system. Press again to
remove the menu from the TV screen.
To adjust TV volume
Press to adjust the volume of the TV.
To reset to factory set levels.
Open the remote control lid and press to return
picture and sound settings to factory-set levels.
After the ‘Installation; menu has appeared on
the TV screen, refer to the ‘Selecting Language
and Country’ section of the instruction manual
to change your choice of language and country
if desired.
8
To select channels
Press to select channels.
To display the time.
Open the remote control lid and press to display the
time on screen. Press again to cancel.
To operate video equipment
Open the remote control lid and press these buttons to
operate your video equipment (please refer to your
VCR manual).
Page 11
Operation
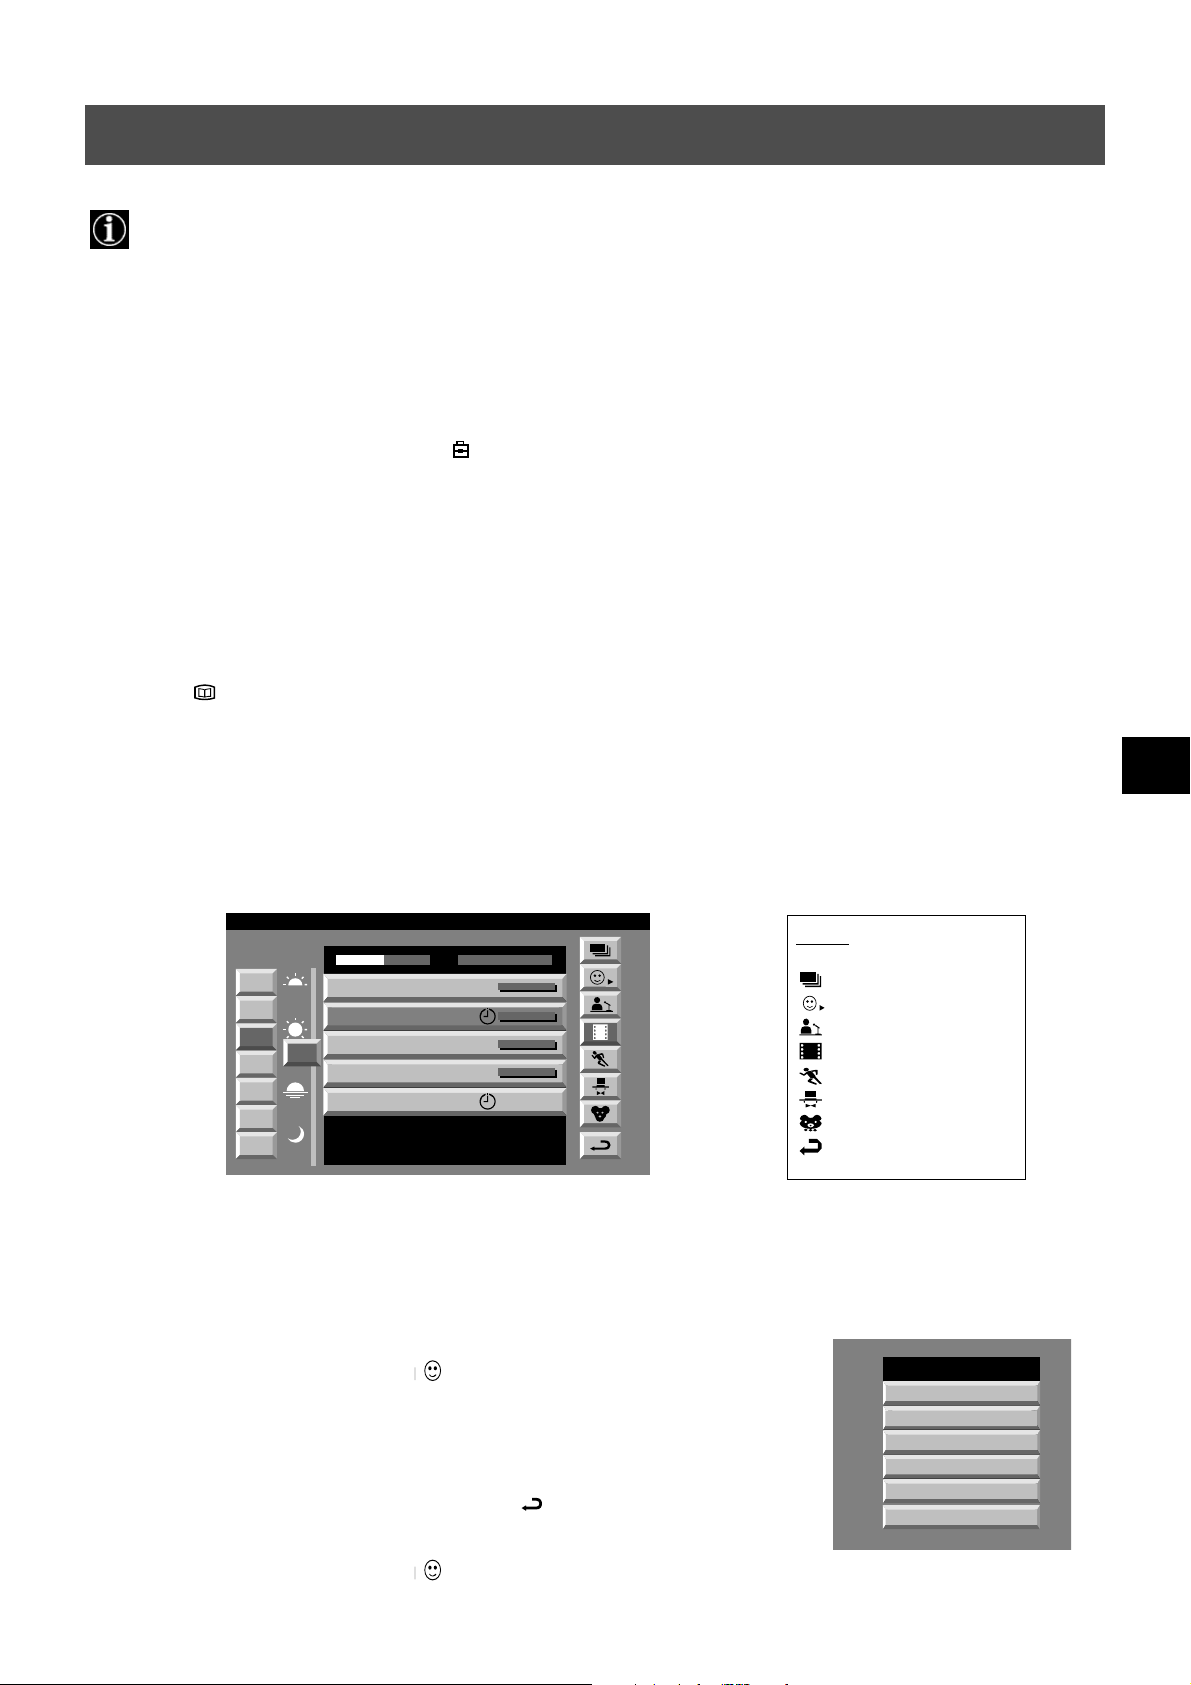
NexTView*
* depending on availability of service
NexTView is an on-screen electronic programme guide, providing you with programme information for different
broadcasters.
Selecting your NexTView provider
Your TV set automatically selects the best NexTView provider for you. This provider is available about 30 minutes after the
channel tuning. You can however change this selection of provider if you wish.
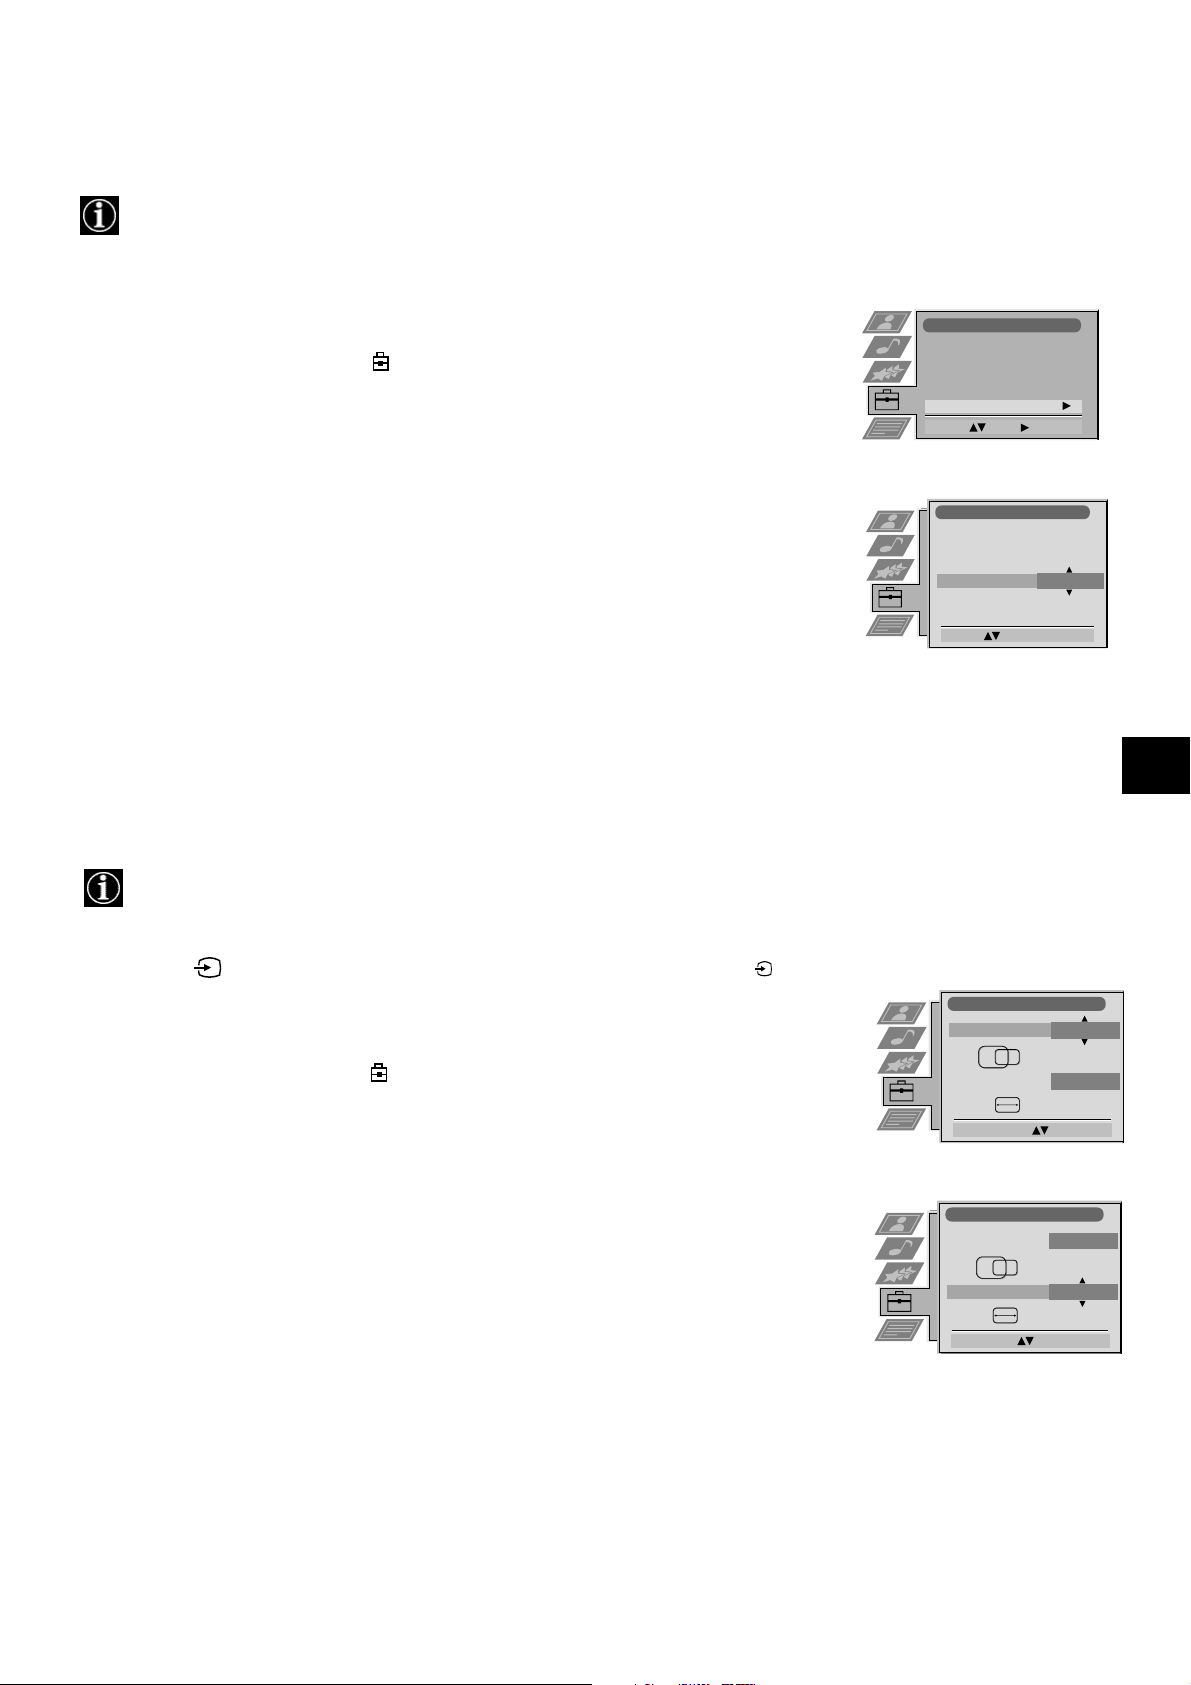
1. Press the MENU button on the remote control to display the menu on the TV screen.
2. Press the v or V buttons to select the the symbol on the menu screen then press B to enter the ‘Set Up’ menu.
3. Press v or V to highlight ‘Select NexTView’ then press B to confirm. A list is displayed containing all available
NexTView providers.
4. Press v or V to select the desired NexTView provider then press the OK button to store.
5. Press the MENU button to remove the menu from the TV screen.
Displaying NexTView
1. Press the button repeatedly on the remote control to switch NexTView on and off.
* In some cases, you may also need to press the b button to display the Sony electronic programme guide.
2. Press the v, V, b or B buttons to move the cursor around the screen.
3. Press the OK button to confirm a selection.
a. If you press the OK button in the date, time or icon (themes) columns, you change the programme list according to the
selection.
b. If you press the OK button in the programme list, you directly display the channel if the broadcast is currently running,
or, you display the ‘Long Info’ menu if the broadcast is running at some future time.
07 Tue
12:38
Wed
Mon
SWISS
7
Tue
8
9
Thu
10
Fri
11
Sat
12
Sun
13
Star Wars
Super RTL
Werner - Beinhart
Pro 7
Flui grüsst den Rest der Welt
Kabel 1
12
Once upon a time in the West
Euronews
International News
RTL Plus
Fantasy film, USA, 1996
TXT TPS / RINGIER
10:35 - 12:45
10:20 - 12:00
10:45 - 10:50
11:00 - 11:20
11:45 - 12:50
Tue 07. 04 .98
Index
full selection list
personal selection
news broadcasts
movies
sports
entertainment
children
return to last menu
Using the ‘Individual Setting’ menu
You can make a personal list of the types of programmes you wish to view on the
programme guide.
1. Press the v or V buttons to select the icon then press B to display the
‘Individual Setting’ menu.
2. Press v or V to select your chosen item on the screen then press the OK button to
confirm your choice.
3. Repeat step 2 for all the items you wish to have in your list.
4. When you have finished the list, press
B to select on the menu screen.
5. Press the OK button to return to the previous menu.
6. Press the v or V buttons to select the icon then press the OK button again to
activate your ‘Individual Setting’ filter.
Individual Setting
Movie
Comedy
Adult
News
Interview
Entertainment
9
Page 12
Operation
NexTView
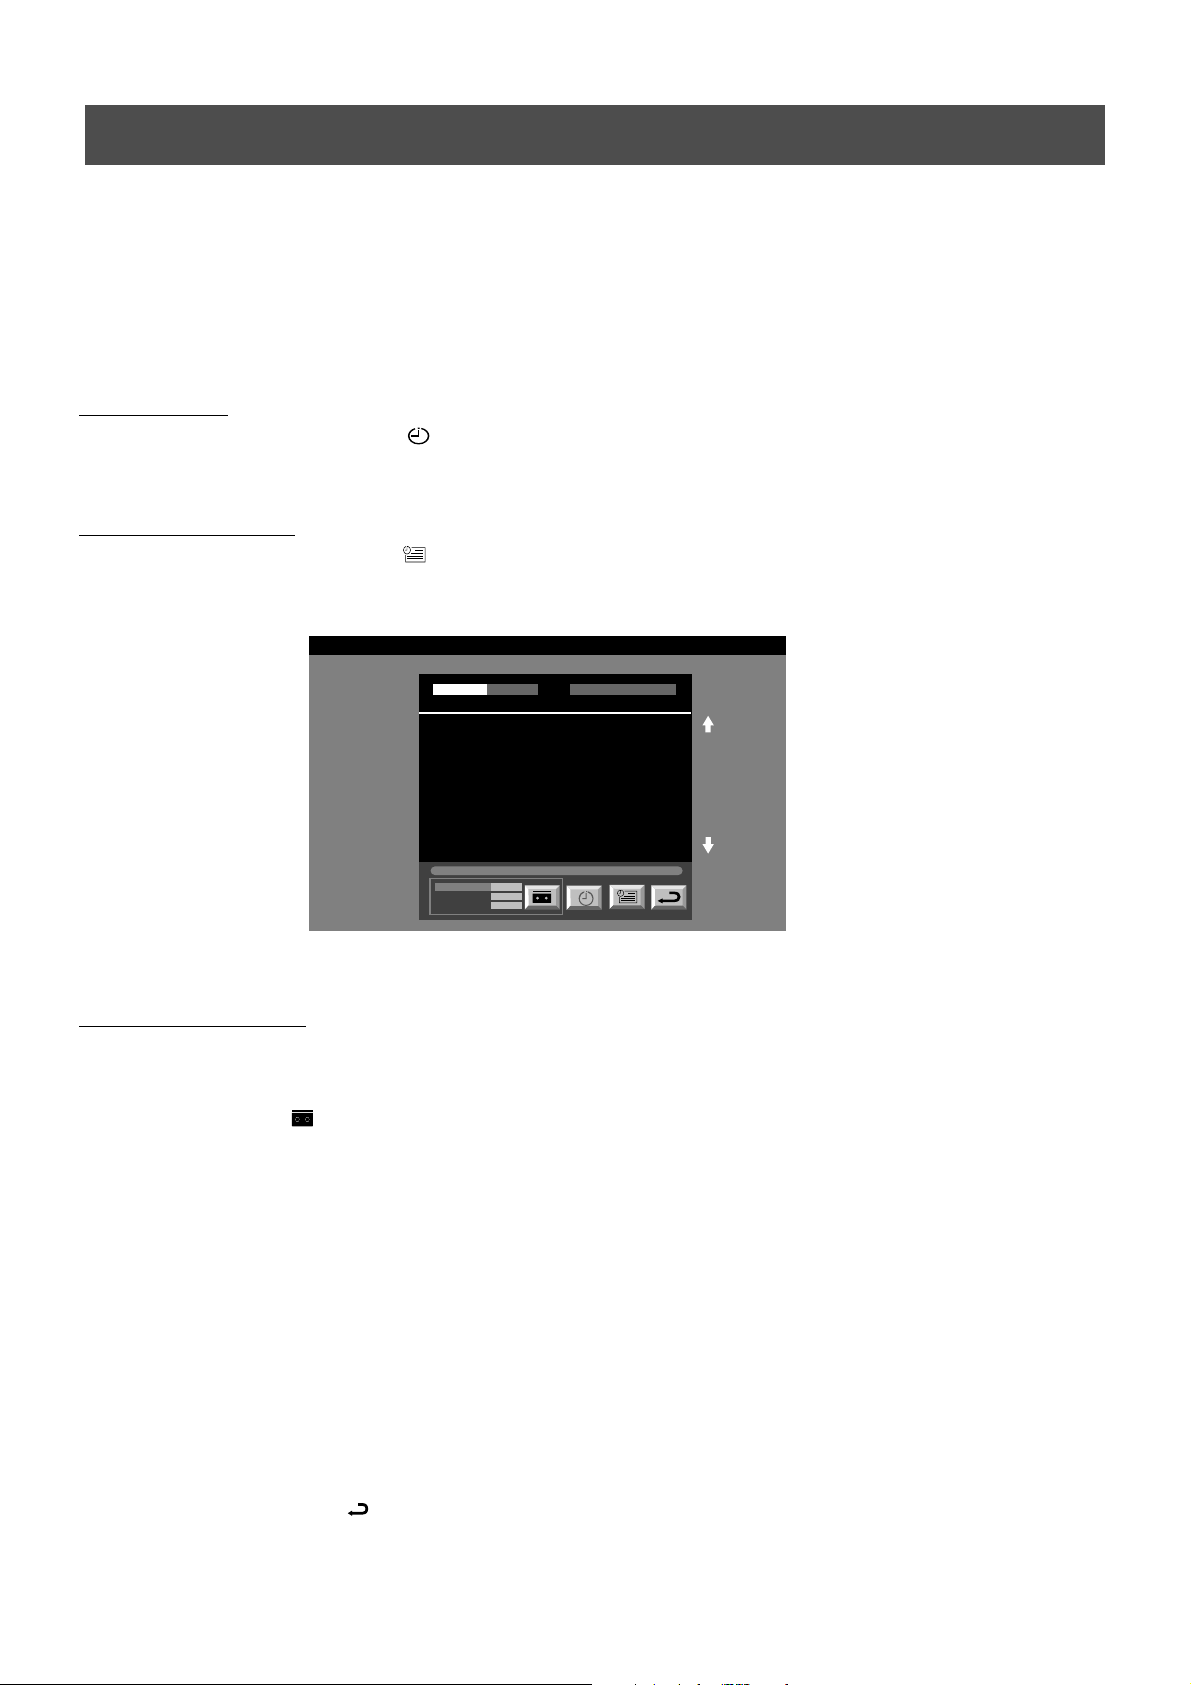
Using the ‘Long Info’ menu
With this ‘Long Info’ menu screen, you can set timers or record selected programmes.
1. Press v or V to select a future programme in the programme list column.
2. Press the OK button to display the ‘Long Info’ menu on the TV screen.
To set the timer
Press the b or B buttons to highlight the icon then press the OK button repeatedly to ‘set the timer’ or ‘cancel the timer’. If
you choose to set the timer, the programme is marked with a clock symbol and a message appears on the screen shortly before
the programme is due to start asking whether you wish to still view this programme.
To view the timer table
Press the b or B buttons to highlight the icon then press the OK button repeatedly to switch on/off the timer table. This table
shows the programmes on which you have already set a timer. (You can set a timer on up to 5 programmes).
07 Tue
12:38
First nextTView/EPG-Providers in Europe
SWISS TXT TPS / RINGIER nexTView
Address Mapping
The position of the addresses in the
OSDA is shown in the following diagram.
The position values of the DPW are set
to '0'.
If other values are set, the complete
combination will be scrolled.
Example:
if the DPWC is set to '63', the char-
This channel has been set for a timer
VPS/PDC
Speed
Timer Prog
VCR1
On
SP
Tue 07. 04 .98
To record programmes*
* (only with Smartlink VCRs)
1. Connect your Smartlink VCR.
2. Press b or B to select then press the OK button to download the information to your VCR.
3. To set up the VCR:
VPS/PDC
Press b to select VPS/PDC then press the OK button repeatedly to select ‘On’ or ‘Off’. With this setting on you have the
guaranteed recording of the whole broadcast should there be a change in the TV programme. This only works if the selected
channel broadcasts a VPS/PDC signal
Speed
Press V to select ‘Speed’ then press the OK button repeatedly to select between ‘SP’ for standardplay or ‘LP’ for
longplay. With longplay you can record twice as much on a videotape. The picture quality however may suffer.
VCR Setup
Press V to select ‘VCR Setup’ then press the OK button repeatedly to select which VCR you wish to programme, namely
‘VCR1’ or ‘VCR2’.
4. Finally, press B to select the icon then press the OK button to remove the menu from the TV screen.
10
Page 13

Operation
TELETEXT
Teletext
Most TV channels broadcast information via Teletext. The index page of the teletext service (usually page 100) gives you
information on how to use the service. Please use a TV channel with a strong signal, otherwise there may be Teletext errors.
Switching Teletext on and off
1. Select the TV channel which carries the teletext service you want to view.
2. Press the button once for Picture and Teletext (P&T). The screen is divided in two,
with the TV channel in the right corner and the Teletext display on the left.
P&T mode: Press then press PROGR+/- to change the channel of the TV
screen. Press b or B to change the size of the TV screen then press again
to resume normal teletext reception.
3. Press twice to get Teletext only.
4. Press three times for Mix mode.
5. Press a fourth time to switch off Teletext.
Selecting a Teletext page
Input three digits for the page number using the numbered buttons on the control. If you make
a mistake, type in any three digits then re-enter the correct page number.
Using Other Teletext Functions
Selecting the next or preceding page
Press the or buttons on the remote control to select the previous or next page.
TELETEXT
Index
Programme
News
Sport
Weather
TELETEXT
Index
Programme
News
Sport
Weather
TELETEXT
Index
Programme
News
Sport
Weather
216-02
m
m
25
153
101
98
25
153
101
98
25
153
101
98
Selecting a sub page
A teletext page may consist of several sub pages. In this case an information line is displayed,
showing the number of subpages. Select the sub page by pressing v or V.
To freeze a Teletext page
Press the button to freeze the page. Press again to cancel the freeze.
Revealing the index page
Press the button to reveal the index page (normally page 100).
Using colour buttons to access pages (Fastext)
(only available if the TV station broadcasts Fastext signals)
When the colour coded menu appears at the bottom of a page, press a coloured button on the
remote control (green, red, yellow or blue) to access the corresponding page.
Using the feature ‘Page Catching’
1. Press the numbered buttons on the remote control to select a teletext page which has
several page numbers on it (eg the index page).
2. Press the OK button.
3. Press v or V to select the desired page number then press the OK button. The requested
page is displayed after some seconds.
01 03 04 05 06 07 0802
11
Page 14

Operation
Teletext
Teletext is an information service transmitted by most TV stations.
Using the Teletext menu
1. With Teletext switched on, press the MENU button on the remote control to display the
menu on the TV screen.
2. Press v or V to select your chosen item on the screen then press B to display the relevant
sub menu.
3. To remove the Teletext menu from the screen, press the MENU button.
Top/Bottom/Full
The Top/Bottom/Full sub menu allows you to enlarge different sections of the Teletext page.
Press v to enlarge the upper half of the screen, press V to enlarge the lower half. Press the
OK button to restore the page to normal size. Press b to return to the Teletext menu screen.
Text Clear
*available in Teletext only and Mix modes (see ‘Switching Teletext on and off’).
Text Clear is a function that displays a TV channel whilst looking for a Teletext page.
1. Press the button twice on the remote control to select full screen text.
2. Press the MENU button to display the ‘Teletext’ menu.
3. Press v or V to highlight ‘Text Clear’ and press B to select.
4. The current TV channel is displayed. Once the text page has been found a blue
symbol appears in the top left corner of the screen.
5. Press the button on the remote control to view the page.
Teletext
Top / Bottom / Full
Text Clear
Reveal
Time Page
Page Overview
Select: Enter Menu:
Top: Bottom: Full: OK
Reveal
Some teletext pages contain hidden information (eg for a quiz), which you can reveal. After
having selected the function, the hidden information appears on screen. After having selected
the function, press B. The hidden information appears on screen.
Time Page*
*depending on availability of service
You can call up a time-coded page such as an alarm page at a time specified by you. After
you have displayed the Time Page sub menu:
Press the numbered buttons on the remote control to enter the three digits of the desired page.
Press the numbered buttons again to enter the four digits of the desired time.
Press the OK button to store the desired time. The time is displayed in the top left corner of
the screen. At the requested time the page is displayed.
Page Overview
*only available if TOP-Text is transmitted by the TV station
In this menu the TOP-Text pages are divided into two columns, the first column showing
‘blocks’ of pages and the second showing ‘groups’ of pages.
1. Press b or B to select the first or second column.
2. Press v or V to select the relevant ‘group’ or ‘block’ of pages.
3. Press the OK button to display the chosen pages.
Time Page
PAGE TIME
– – – - - : - -
Select: Enter:
12
Page 15
Operation
Using the TV menu system
The TV consists of a menu system which is based on a series of user friendly on-screen displays and menus. These displays will
help you get the most from your TV, helping you to change picture and sound settings, to alter the size of the TV picture and to
rearrange the TV channels etc.
Adjusting the picture and sound
The picture and sound are preset at the factory. You can however adjust them to suit your own taste.
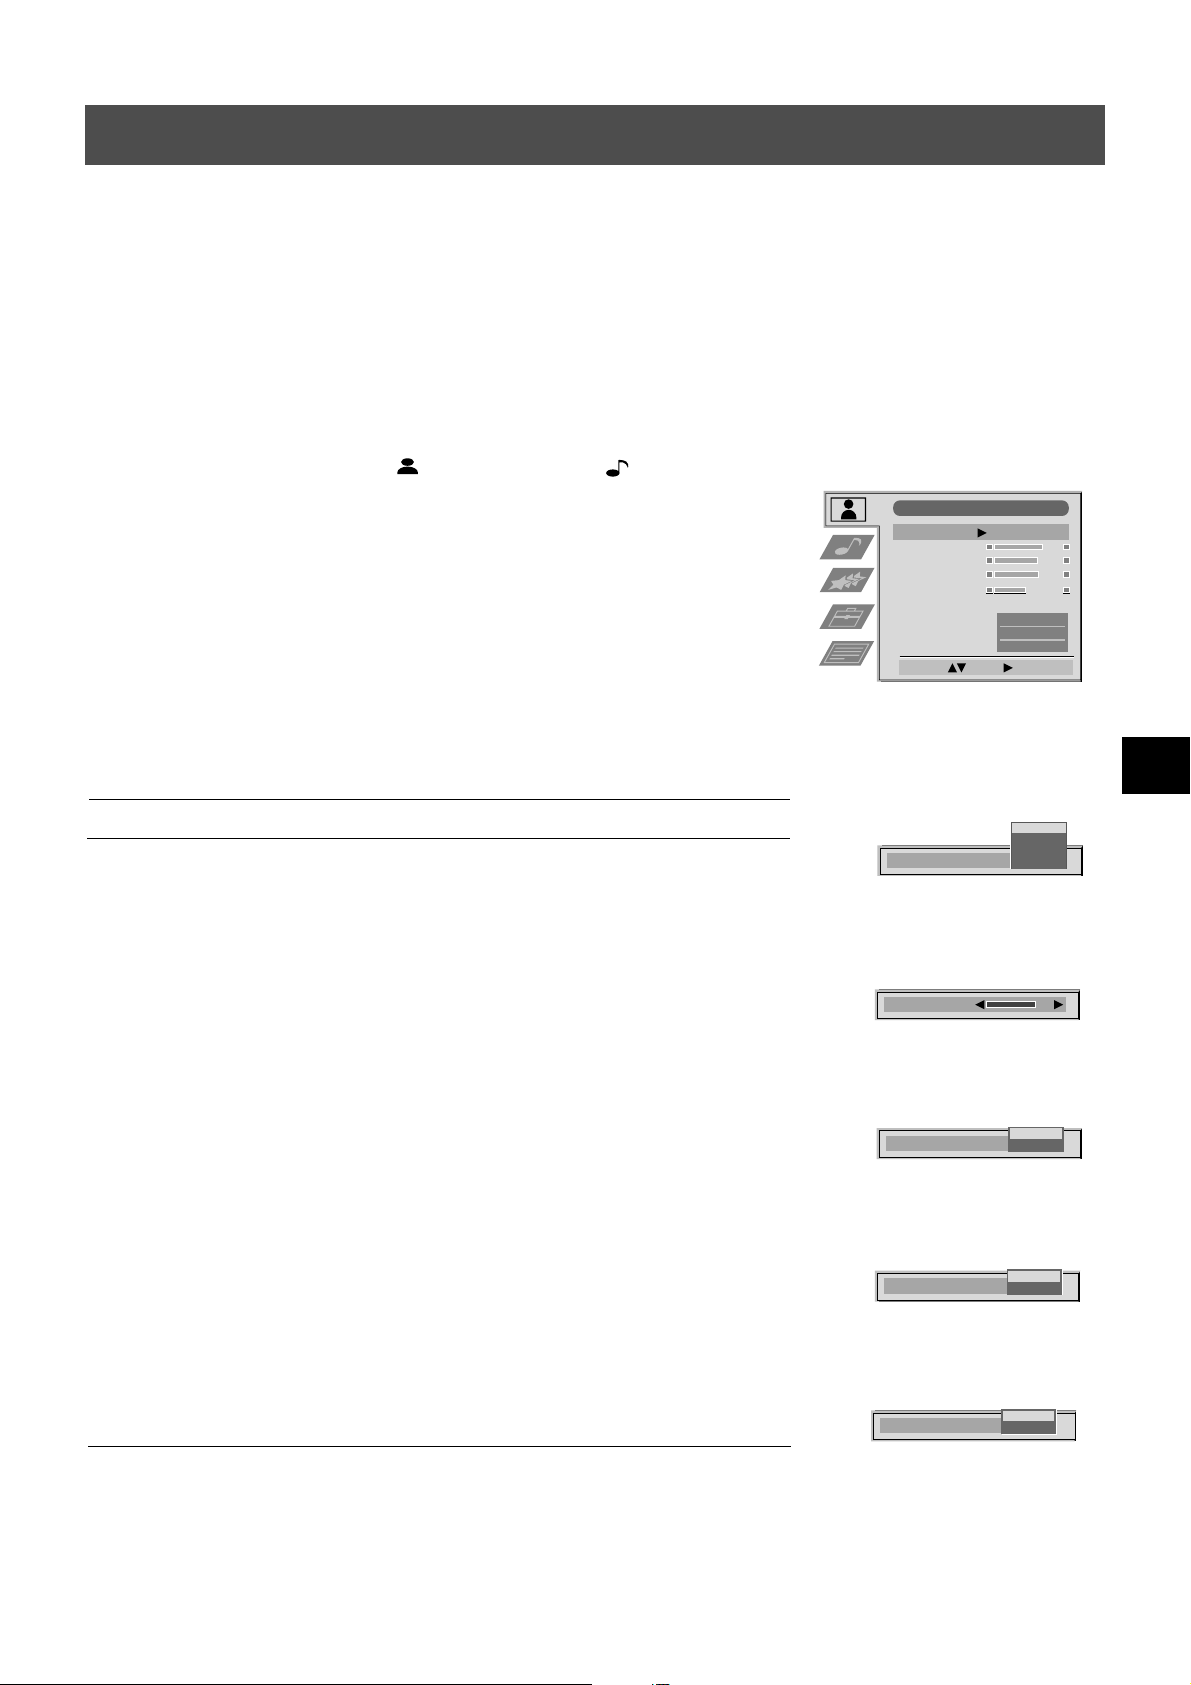
1. Press the MENU button on the remote control to display the menu on the TV screen.
2. Press the v or V buttons to select for picture settings or for sound settings
then press B to enter either the ‘Picture Adjustment’ menu or the ‘Audio
Adjustment’ menu.
3. Press the v or V buttons to select the item on the screen you wish to adjust then
press B to confirm. For a description of the menu items and their effects, see the
table below.
4. Press the v, V, B or b buttons to adjust your selected item.
5. As soon as you have adjusted the item, press the OK button to store the new setting.
6. Repeat steps 3-5 if you wish to adjust any of the other items.
7. Press the MENU button to remove the menu from the TV screen.
Picture Adjustment
Picture Mode
Contrast
Brightness
Colour
Sharpness
Reset
AI
Noise Detection
Digital Mode
Select : Enter:
Personal
Normal
On
On
Picture Control
Item Effect/Operation
Picture Mode V Live (for live broadcasts)
Personal (for individual settings)
Movie (for movie broadcasts)
v Game (for computer games)
Contrast Less bB More
Brightness* Darker bB Brighter
Colour* Less bB More
Hue** Reddish bB Greenish
Sharpness* Softer bB Sharper
Reset Resets picture to the factory preset levels
AI (Artificial Intelligence) V Off : Normal
v On : Automatic optimisation of contrast level
according to the TV signal.
Noise Detection V Off : Normal
v On : Reduces picture noise in case of a weak
broadcasting signal
Picture Mode
Contrast
AI
Noise Detection
Live
Personal
Movie
Game
On
Off
On
Off
Digital Mode V DRC 50 : improves picture resolution and is optimal
for viewing scrolling characters
v DRC 100 :improves picture resolution creating
flicker-free pictures
*Only if ‘Personal’ is selected in Picture Mode.
** Only available for NTSC colour signal (eg US video tapes)
Digital Mode
DRC 50
DRC 100
13
Page 16

Using the TV menu system:
Sound Control
Item Effect/Operation
Equaliser Mode V Personal
Vocal
Jazz
Rock
Pop
v Flat (fixed setting, cannot be adjusted)
Equaliser adjustment You can adjust the mode selected in Equaliser mode by
cutting and boosting the 5 selected frequency bands.
Press b or B to select the frequency band then V or v to
adjust the frequency. Finally, press the OK button to store
the new adjustment.
If you want to store the new setting, you need to set
the Equaliser mode to ‘Personal’. Personal mode
permanently stores the setting, all other modes
(Vocal, Jazz, Rock, Pop) store only until the next
mode change.
Surround Mode V Off
Dolby Sur
SRS
Hall
Church
Disco
v Stadium
SRS Mode* V SRS 1
(*only if ‘Surround Mode’ SRS 2
is set to ‘SRS’) v SRS 3
Auto Vol. Control V On : volume level of the channels will stay the same
independent of the broadcast signal (eg in the case of
advertisements)
v Off : volume level changes according to the broadcast
signal.
Audio Adjustment
Equaliser Mode
Equaliser
Adjustment
Surround Mode
SRS Mode
Auto Vol. Control
Dual Sound 00
Volume
Dual Sound 00
Select Mode :
Equaliser Adjustment
Personal
+
0
–
120 150 1,5K 5 K 10 K
Sel: Adjust: Confir m:OK
Surround Mode
SRS Mode
Auto Vol. Control
Dual Sound
Confirm: OK
Volume
Personal
Vocal
Rock
SRS
SRS 1
Stereo
Stereo
SRS
Church
Disco
Stadium
Jazz
Pop
Off
Hall
SRS 1
SRS 2
SRS 3
Stereo
Off
Mono
Off
On
Dual Sound For a bilingual broadcast:
V A for channel 1
v B for channel 2
For a stereo broadcast:
V Mono
v Stereo
When NICAM stereo is being broadcast, the
indication NiCAM appears briefly on the screen.
Headphones
i Volume Less bBMore
i Dual Sound For a bilingual broadcast:
V A for channel 1
v B for channel 2
14
Dual Sound
A
B
Page 17

Using the TV menu system:
Setting up Dolby Surround
Before listening to Dolby Surround encoded programmes you need to adapt the Dolby settings to suit your individual
requirements. This setting up is normally only necessary when installing your TV set or when changing the speaker positions.
1. Press the MENU button on the remote control to display the menu on the TV screen.
2. Press the V button to select the symbol on the menu screen then press B to enter the
‘Set Up’ menu.
3. Press the V button to select ‘Dolby Surround Set Up’ then press B to enter the ‘Dolby
Surround Set Up’ menu.
4. Press the v or V buttons to select ‘Surround Mode’ then press B to enter the ‘Surround
Mode’ sub menu. Press the v or V buttons to select’Pro Logic’ if you are using the
surround speakers or ‘TruSurround’ if you are not using surround speakers. Press the OK
button to confirm.
5. Press the v or V buttons to select ‘Level Setting’ then press B to hear a test tone which will
sequentially switch through all speakers. From your sitting position all volume levels
should be the same. If this is the case, press the OK button to store the settings. If this is not
the case:
(a)Press the v or V buttons to select ‘Front L.’, ‘Centre’, ’Front R.’ or ‘Surround’ speakers.
(b) Press b or B to adjust the volume level then press the OK button to store.
(c) Press V to select another speaker.
(d) Repeat steps (a) and (b) for all the speakers you wish to adjust.
(e) Press the OK button to store the new settings.
6. To select ‘Speaker Mode’ ensure ‘Surround Mode’ is set to ‘Pro Logic’ then press the v or
V buttons to select ‘Speaker Mode’. Press B to enter the ‘Speaker Mode’ sub menu. Press
the v or V buttons to select one of the following speaker modes then press the OK button
to store:
‘Normal’ all speakers are activated
‘Phantom’ centre speaker is switched off
‘Wide’ wider bandwidth from centre speaker
‘3CH Normal’ surround speakers are switched off
‘3CH Wide’ surround speakers are switched off, centre speaker carries full
frequency response.
7. To select ‘Delay Time’ ensure ‘Surround Mode’ is set to ‘Pro Logic’ then press the v or V
buttons to select ‘Delay Time’. Press B to enter the ‘Delay Time’ sub menu. Press the v
or V buttons to select the desired delay time for the surround speakers. You have the choice
between 15ms for big rooms, 20ms or 25ms for standard rooms and 30ms for small rooms.
Once you have set the time, press the OK button to store.
.
.
Normal
8. Press the v or V buttons to select ‘Auto Surround’ then press B to enter the ‘Auto
Surround’ sub menu. Press the v or V buttons to select ‘On’ or ‘Off’ then press the OK
button to store.
9. Press the MENU button to remove the menu from the TV screen.
15
Page 18

Using the TV menu system:
Using the Features menu
1. Press the MENU button on the remote control to display the menu on the TV screen.
2. Press the v or V buttons to select for the ‘Features’ menu then press B to enter the ‘Features’
menu.
3. Press the v or V buttons to select the desired menu item then press B to confirm. For a description
of the menu items and their effects, see the table below.
4. Press the v, V, B or b buttons to select the desired setting.
5. Press the OK button to confirm your choice of setting.
6. Repeat steps 3-5 if you wish to select any of the other items.
7. Press the MENU button to remove the menu from the TV screen.
Item Effect/Operation
Features
Auto Format
Format Correction
Sleep Timer
Parental Lock
AV 2 Output
Select: Enter:
Off
On
Off
Off
TV
Auto Format* V Off: Size of picture does not automatically adjust.
*only for aerial signal Normal: Size of picture automatically adjusts according to
information from the broadcaster.
v Full: The TV can automatically adjust the picture size to eliminate any
dark areas on the TV picture (as shown below):
Format Correction* V Off : 4:3/14:9 is selected
(*only if Auto Format is v On : Smart mode is selected automatically for 4:3/14:9 broadcasts
set to ‘Normal’ or ‘Full’)
Sleep Timer You can select a time after which the TV switches itself into
standby mode.
V Off
.
v 90 min
Parental Lock V Off : Normal
v On : Press the buttons on the remote control to switch the TV out of
standby mode. The buttons on the TV do not work.
AV2 Output V TV audio/video signal from the aerial
AV1 audio/video signal from scart 1
AV2 audio/video signal from scart 2
AV3 audio/video signal from scart 3
v AV4 audio/video signal from connectors on front of TV
Auto Format
Format Correction
Sleep Timer
Parental Look
AV 2 Output
Normal
AV 1
AV 2
AV 3
AV 4
Off
Full
Off
On
10 min
Off
On
TV
Changing the screen size
This feature allows you to change the size of the TV picture.
Press the button on the remote control repeatedly or use the v or V buttons to select one of the
following formats then press the OK button to confirm your selection:
Smart imitation of wide screen effect for 4:3 broadcasts.
4:3 conventional 4:3 picture size, full picture information.
14:9 compromise between 4:3 and 16:9 picture size.
Zoom widescreen format for letterbox movies
Wide for 16:9 broadcasts.
In Smart, Zoom and 14:9 modes parts of the top and bottom of the screen are cut off. Press v or V to
adjust the position of the image on screen (eg to read subtitles) then press the OK button to confirm.
16
Page 19
Using the TV menu system:
Using Multi PIP
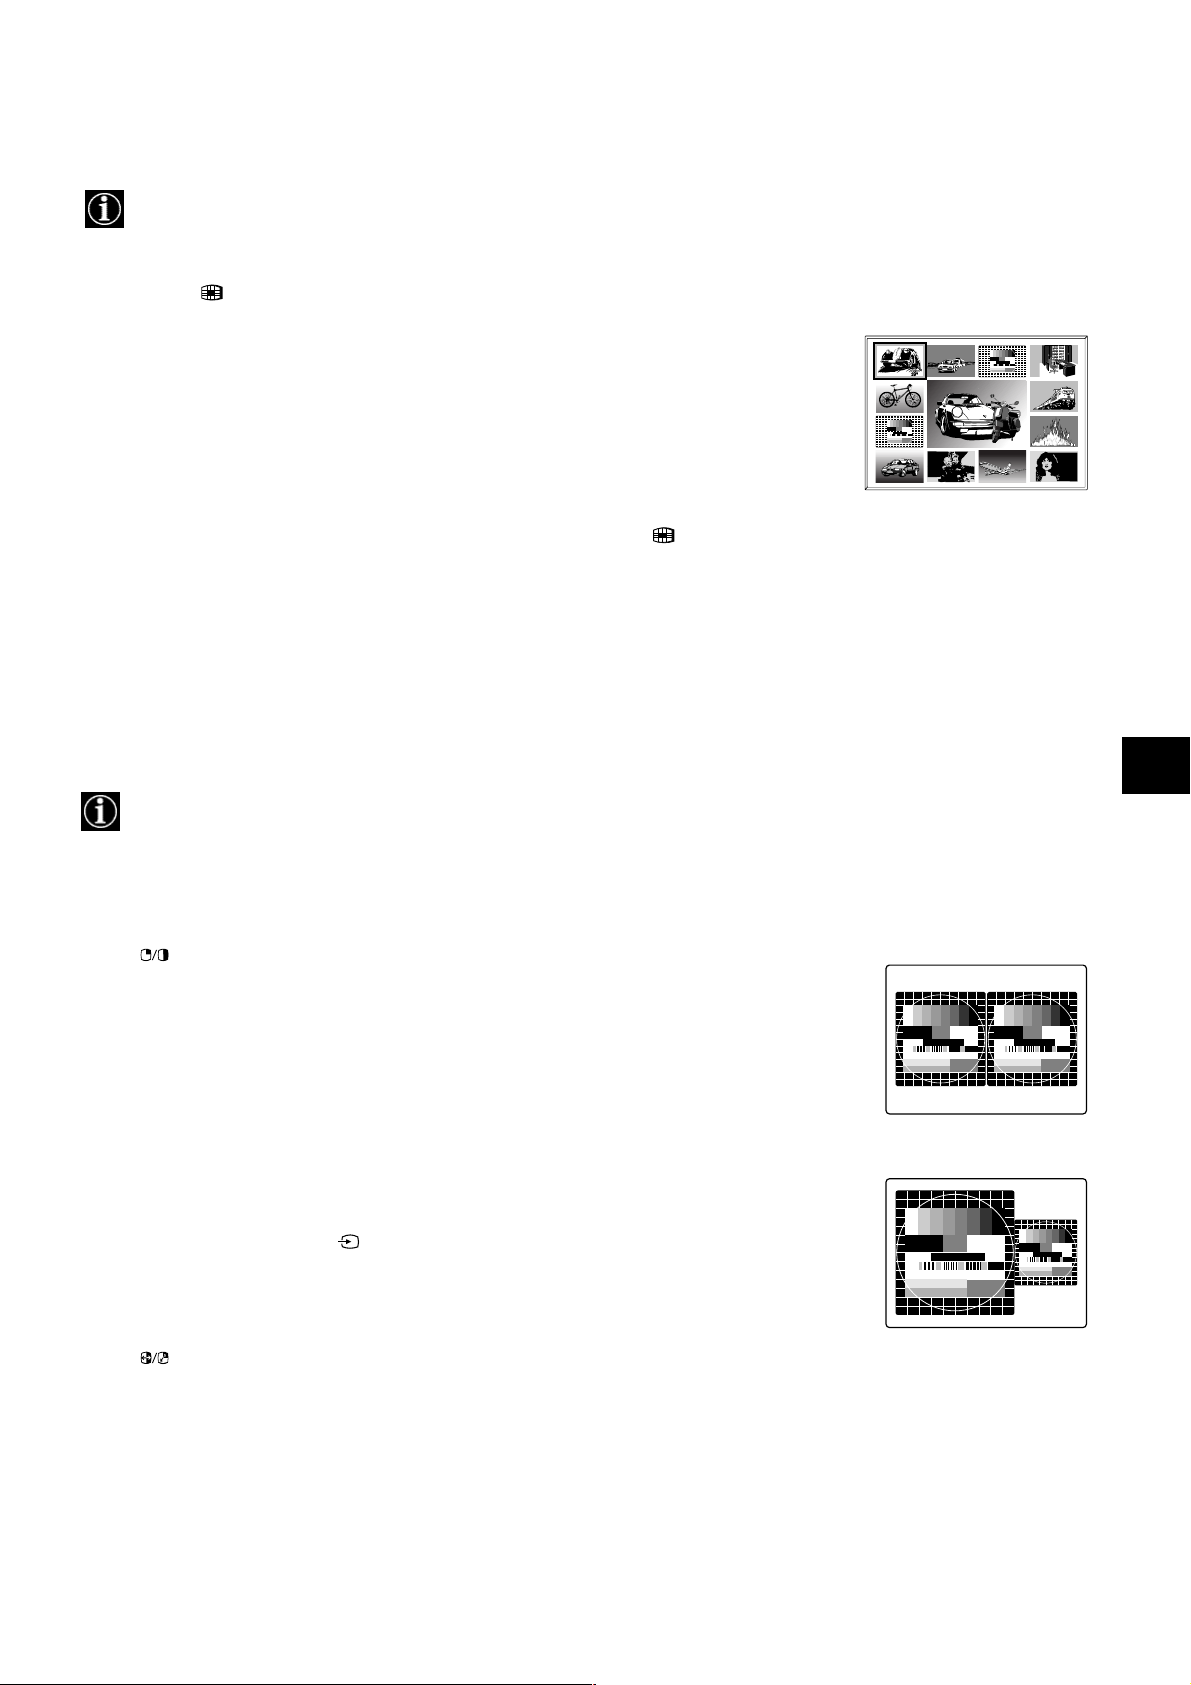
Multi PIP (picture in picture) mode displays a succession of 12 still pictures and a 13th that is live. You can manually
select which channel you wish to watch, either full-screen or in the PIP mode.
1. Press the button on the remote control to select Multi PIP mode. 13 programme
positons appear on the screen with the current channel in the centre.
03 05
2. Press the PROGR+/- buttons repeatedly to select the next or preceding 12 programme
positions.
3. Press the v, V, b or B buttons to move within the 13 displayed channels.
4. Press the OK button to select the framed channel. This channel now moves to the centre.
5. Press the OK button again to display the selected channel or press to remove Multi PIP
mode from the TV screen.
02
01 06
13
12
11 09 08
10
04
07
Operating PAP (Picture and Picture)
This PAP feature divides the screen into two for watching two channels simultaneously (with a video source on one if you
want). The sound of the left screen comes through the TV loudspeakers, the sound of the right screen is selectable via
headphones.
Switching PAP on and off
Press once to display the screens and twice to switch PAP off.
Selecting sound for the headphones
With PAP switched on, refer to the ‘Adjusting the picture and sound’ section of this manual and
set ‘i Dual Sound‘ to ‘PAP’.
Selecting a PAP source
Press M. The symbol M appears in the right screen. Select the desired source using the numbered
buttons (for a TV channel) or (for a video source).
Swapping screens
Press to swap the two screens.
Zooming the screens
Press the b or B buttons to change the size of the two screens.
17
Page 20
Using the TV menu system:
Re-arranging the TV channels
After tuning the TV, you can use this feature to change the order of the channels on the TV.
1. Press the MENU button on the remote control to display the menu on the TV screen.
2. Press the V button to select the symbol on the menu screen then press B to enter the ‘Set Up’
menu.
3. Press the V button to select ‘Programme Sorting’ then press B to enter the ‘Programme Sorting’
menu.
4. Press the v or V buttons to select the channel you want to move then press B to confirm.
5. Press the v or V buttons to select the new programme position (eg PROG 4) for your selected
channel then press the OK button to confirm. The selected channel now moves to its new
programme position and the other channels move accordingly.
6. Repeat steps 4 and 5 if you wish to sort the other channels.
7. Press the MENU button to remove the menu from the TV screen.
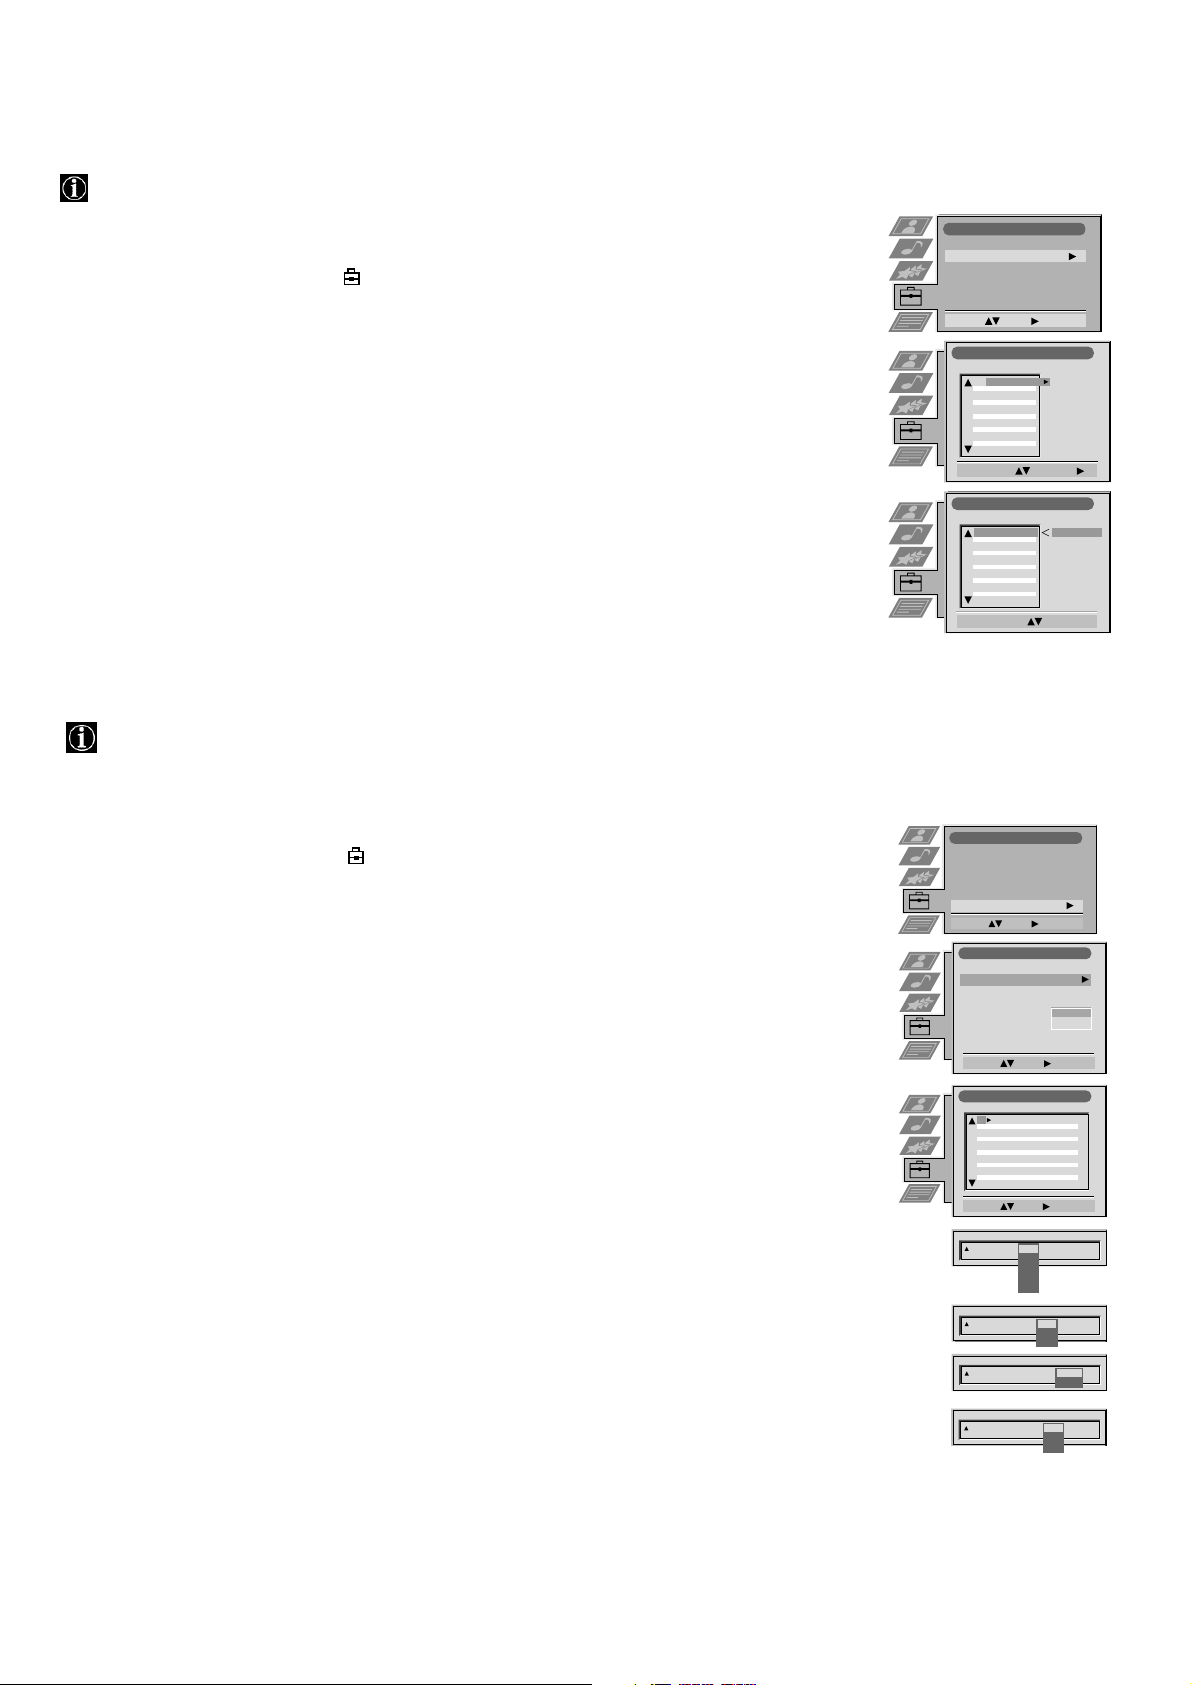
Manually tuning the TV
You have already tuned the TV automatically using the instructions at the start of this manual. You can however carry
out this operation manually, adding channels to the TV one at a time.
1. Press the MENU button on the remote control to display the menu on the TV screen.
2. Press the V button to select the symbol on the menu screen then press B to enter the ‘Set Up’
menu.
3. Press the V button to select ‘Manual Set Up’ on the menu screen then press B to enter the ‘Manual
Set Up’ menu.
4. Press the V button to select ‘Manual Programme Preset’ on the menu screen then press B to enter
the ‘Manual Programme Preset’ menu.
5. Press the v or V buttons to select a programme number for your channel (eg PROGR 1 for BBC1)
then press B to highlight the ‘SKIP’ column.
6. Press v to select ‘OFF’ then press B to highlight the ‘SYS’ column.
7. Press the v or V buttons to select the TV broadcast system (B/G for western european countries, I
for Great Britain, D/K for eastern european countries or L for France) or ‘EXT’ for a video input
source (AV1, AV2, ...) then press B to confirm.
8. Press the v or V buttons to select ‘C’ for terrestrial channels, ‘S’ for cable channels, or ‘F’ for
direct frequency inputs then press B to confirm.
9. Select the first number digit of ‘CH’ (channel) then the second number digit of ‘CH’ with the
number buttons on the remote control or
Press the V button to search for the next available channel.
10. If you do not wish to store this channel on the programme number you selected, press the v or V
buttons to continue searching for the desired channel.
Set Up
Auto Tuning
Programme Sorting
Select NexTView
Dolby Surround Set Up
AV Preset
Manual Set Up
Select: Enter :
Programme Sorting
PROG CH LABEL
TV 5
C03
1
PRO 7
C05
2
EU-SP
C07
3
SWF
C08
4
RTL
C09
5
SAT
C11
6
MDR
C12
7
DDI
C13
8
DSF
C14
9
RTL 2
C15
10
KAB 1
C16
11
Select Prog: Confirm:
Programme Sorting
PROG CH LABEL
1
TV 5
C03
2
C05
3
C07
4
C08
5
C09
6
C11
7
C12
8
C13
9
C14
10
C15
11
C16
Select Position: Move: OK
Set Up
Auto Tuning
Programme Sorting
Select Next View
Dolby Surround Set Up
AV Preset
Manual Set Up
Select: Enter:
Manual Set Up
Language/Country
Manual Programme Preset
Further Programme Preset
RGB Set Up
Picture Rotation
Personal ID
Demo
Select: Enter:
Manual Programme Preset
PROG CHSYSSKIP LABEL
1
2
3
4
5
6
7
8
9
10
11
Select: Enter:
PROG CHSYS
SKIP LABEL
Off
1
PROG SYS
SKIP LABEL
Off
1 I
PROG SYS
SKIP LABEL
Off
1 I
PROG CHSYS
SKIP LABEL
Off
0 EXT
C03 TV 5
PRO 7
EU-SP
SWF
RTL
SAT
MDR
DDI
DSF
RTL 2
KAB 1
- - - - - - -
C09
B/G
Off
C10
B/G
Off
B/G
Off
C03
B/G
Off
C05
B/G
Off
C07
B/G
Off
C08
Off
B/G
C09
Off
B/G
C11
Off
B/G
C12
Off
B/G
C13
Off
B/G
C14
B/G
L
I
D/K
EXT
CH
C
S
F
CH
AV1
AV2
AV3
ARD
BBC
TV 5
PRO 7
EU-SP
SWF
RTL
SAT
MDR
DDI
DSF
03
SEARCH
O
AV1
11. If this is the channel you wish to store, press the OK button.
12. Repeat steps 5-11 if you wish to store more channels then press the MENU button to remove the
menu from the TV screen.
18
Page 21
Using the TV menu system:
Naming a channel
Names for channels are usually taken automatically from Teletext if available. You can however name a channel or an
input video source using up to five characters (letters or numbers).
1. Press the MENU button on the remote control to display the menu on the TV screen.
Manual Set Up
Manual Set Up
Language/Country
2. Press the V button to select the symbol on the menu screen then press B to enter the ‘Set
Up’ menu.
3. Press the V button to select ‘Manual Set Up’ then press B to enter the ‘Manual Set Up’
menu.
4. Press the V button to select ‘Manual Programme Preset’ then press B to enter the ‘Manual
Programme Preset’ menu.
5. Press the v or V buttons to select the channel you wish to name.
6. Press the B button repeatedly until the first element of the ‘LABEL’ column is highlighted.
7. Press the v or V buttons to select a letter or number (select ‘-’ for a blank) then press B to
confirm. Select the other four characters in the same way.
8. After selecting all the characters, press the OK button.
Language/Country
Manual Programme Preset
Manual Programme Preset
Further Programme Preset
Further Programme Preset
RGB Set Up
RGB Set Up
Picture Rotation
Picture Rotation
Personal ID
Personal ID
Demo
Demo
Select: Enter :
Select: Enter :
Manual Programme Preset
PROG CHSYSSKIP LABEL
Select: Enter:
PROG CHSYS
6 I
1
Off
2
Off
3
Off
4
Off
5
Off
6
Off
7
Off
8
Off
9
Off
10
Off
11
SKIP LABEL
Off
B/G
C07 TE
C10
C09
B/G
Off
- - - - - - -
- - - - - - -
ARD
BBC
O
O
9. Repeat steps 5 to 8 if you wish to label other channels.
10. Press the MENU button to remove the menu from the TV screen.
Skipping programme positions
This function enables you to skip unused programme positions when selecting them with the PROGR+/- buttons.
However, by using the number buttons you can still select the skipped programme position.
1. Press the MENU button on the remote control to display the menu on the TV screen.
2. Press the V button to select the symbol on the menu screen then press B to enter the
‘Set Up’ menu.
3. Press the V button to select ‘Manual Set Up’ then press B to enter the ‘Manual Set Up’
menu.
4. Press the V button to select ‘Manual Programme Preset’ then press B to enter the ‘Manual
Programme Preset’ menu.
5. Press the v or V buttons to select the programme position then press B to highlight the
‘SKIP’ column.
6. Press the v or V buttons to select ‘Off’ or ‘On’ (if you wish to skip this programme
position) then press the OK button to store.
7. Repeat steps 5 and 6 if you wish to skip or unskip further programme positions.
8. Press the MENU button to remove the menu from the TV screen.
Manual Set Up
Language/Country
Manual Programme Preset
Further Programme Preset
RGB Set Up
Picture Rotation
Personal ID
Demo
Select: Enter :
Manual Programme Preset
PROG CHSYSSKIP LABEL
51
Off
52
Off
53
Off
54
Off
55
Off
56
Off
57
Off
58
Off
59
Off
60
Off
61
Off
Select: Enter:
PROG CHSYSSKIP LABEL
53 I
On
- - - - - - -
C09
BBC1
I
C10
BBC
I
F189 - - - Off
O
19
Page 22
Using the TV menu system:
Using the Further Programme Preset feature
With this feature you can a) adjust the attenuation of each channel, b) individually adjust the volume level of each channel,
c) manually fine-tune the TV to obtain a better picture reception if the picture is distorted or d) preset the AV output for
the programme positions of channels with scrambled signals (eg from a pay TV decoder). In this way a connected VCR
records the unscrambled signal.
1. Press the MENU button on the remote control to display the menu on the TV screen.
2. Press the V button to select the symbol on the menu screen then press B to enter the ‘Set
Up’ menu
3. Press the V button to select ‘Manual Set Up’ then press B to enter the ‘Manual Set Up’ menu.
4. Press the V button to select ‘Further Programme Preset’ then press B to enter the ‘Further
Programme Preset’ menu.
5. Press the v or V buttons to select the relevant programme number then press the B button
repeatedly to select a) ATT b) VOL c) AFT or d) DECODER. The selected item changes
colour.
6. a) ATT - RF Attenuator
Press the v or V buttons to switch attenuator ‘on’ or ‘off’. Press the OK button to confirm the
selection. Repeat steps 5 and 6a if you wish to adjust the attenuation of the other channels.
b) VOL - Volume Offset
Press the v or V buttons to adjust the volume level (range -7 to +7) of the channel. Store by
pressing the OK button. Repeat steps 5 and 6b if you wish to adjust the volume level of the
other channels.
Manual Set Up
Language/Country
Manual Programme Preset
Further Programme Preset
RGB Set Up
Picture Rotation
Personal ID
Demo
Select: Enter:
Further Programme Preset
PROG AFTVOL DECODER
1
2
3
4
5
6
7
8
9
10
11
Select: Enter:
PROG AFTVOLATT DECODER
1
PROG AFTVOL DECODER
1
PROG AFTVOL DECODER
1 -5
PROG AFTVOL DECODER
1 -5 On
O
- - - - - - -
ATT
Off
Off
Off
Off
Off
Off
Off
Off
Off
Off
Off
Off
On
Off
0
On
Off
0
On
Off
0
On
On
0
Off
On
0
Off
On
0
Off
0
On
Off
0
On
Off
0
On
Off
On
0
Off
On
0
Off
0
On
Off
AV1
AV2
c) AFT - Automatic Fine Tuning
Press the v or V buttons to fine tune the channel frequency over a range of -15 to +15. Press
the OK button to confirm. Repeat steps 5 and 6c if you wish to fine tune other channels.
d) DECODER
Press the v or V buttons to select AV1 or AV2 for the programme position then press the OK
button to confirm. You can now attach a decoder to the AV1 or the AV2 socket on the back
of the TV and the picture from that decoder will appear on this programme number. Repeat
steps 5 and 6d to preset the AV output for other programme positions.
7. Press the MENU button to remove the menu from the TV screen.
Selecting the ‘Demo’ feature
This function provides an overview of some of the features available on the TV.
1. Press the MENU button on the remote control to display the menu on the TV screen.
2. Press the V button to select the symbol on the menu screen then press B to enter the
‘Set Up’ menu
3. Press the V button to select ‘Manual Set Up’ then press B to enter the ‘Manual Set Up’
menu.
4. Press the V button to select ‘Demo’ then press B to start the demonstration (which lasts for
approximately 5 minutes).
5. Press the button to remove the demonstration from the TV screen.
Set Up
Auto Tuning
Programme Sorting
Select Next View
Dolby Surround Set Up
AV Preset
Manual Set Up
Select: Enter :
Manual Set Up
Language/Country
Manual Programme Preset
Further Programme Preset
RGB Set Up
Picture Rotation
Personal ID
Demo
Select: Enter:
- - - - - - -
O
20
Page 23
Using the TV menu system:
Adjusting the picture rotation
Because of the earth’s magnetism the picture might slant. In this case you can readjust the picture.
1. Press the MENU button on the remote control to display the menu on the TV screen.
2. Press the V button to select the symbol on the menu screen then press B to enter the
‘Set Up’ menu
3. Press the V button to select ‘Manual Set Up’ then press B to enter the ‘Manual Set Up’
Set Up
Auto Tuning
Programme Sorting
Select Next View
Dolby Surround Set Up
AV Preset
Manual Set Up
Select: Enter:
menu.
4. Press the V button to select ‘Picture Rotation’ then press B to enter the ‘Picture Rotation’
sub menu.
5. Press the v or V buttons to rotate the picture over a range of -5 to +5 then press the OK
button to store.
6. Press the MENU button to remove the menu from the TV screen.
Adjusting the picture geometry for an RGB source
When connecting an RGB source such as a Sony playstation you may need to readjust the geometry of the picture.
Manual Set Up
Language/Country
Manual Programme Preset
Further Programme Preset
RGB Set Up
Picture Rotation
Personal ID
Demo
Rotate: Confirm: OK
O
1. Press the button on the remote control to select the connected RGB source .
1
2. Press the MENU button to display the menu on the TV screen.
3. Press the V button to select the symbol on the menu screen then press B to enter the ‘Set
Up’ menu
4. Press the V button to select ‘Manual Set Up’ on the menu screen then press B to enter the
‘Manual Set Up’ menu
5. Press the V button to select ‘RGB Set Up’ on the menu screen then press B to enter the
‘RGB Set Up’ sub menu.
6. Press B to select H Centre then press v or V to adjust the centre of the picture over a range
of -10 to +10. Store the new range by pressing the OK button.
7. Press B to select H Size then press v or V to adjust the horizontal coordinates over a range
of -10 to +10. Store the new range by pressing the OK button.
8. Press the MENU button to remove the menu from the TV screen.
RGB Set Up
H Centre
H Size
Adjust Position: Confirm: OK
RGB Set Up
H Centre
H Size
Adjust Size: Confirm: OK
O
O
O
O
21
Page 24
Using the TV menu system:
Inputting your personal ID
With this feature, you can allocate a safety code to your TV which will enable you to be traced if the TV is stolen and
recovered. The safety code however can only be input once - please make a note of it!
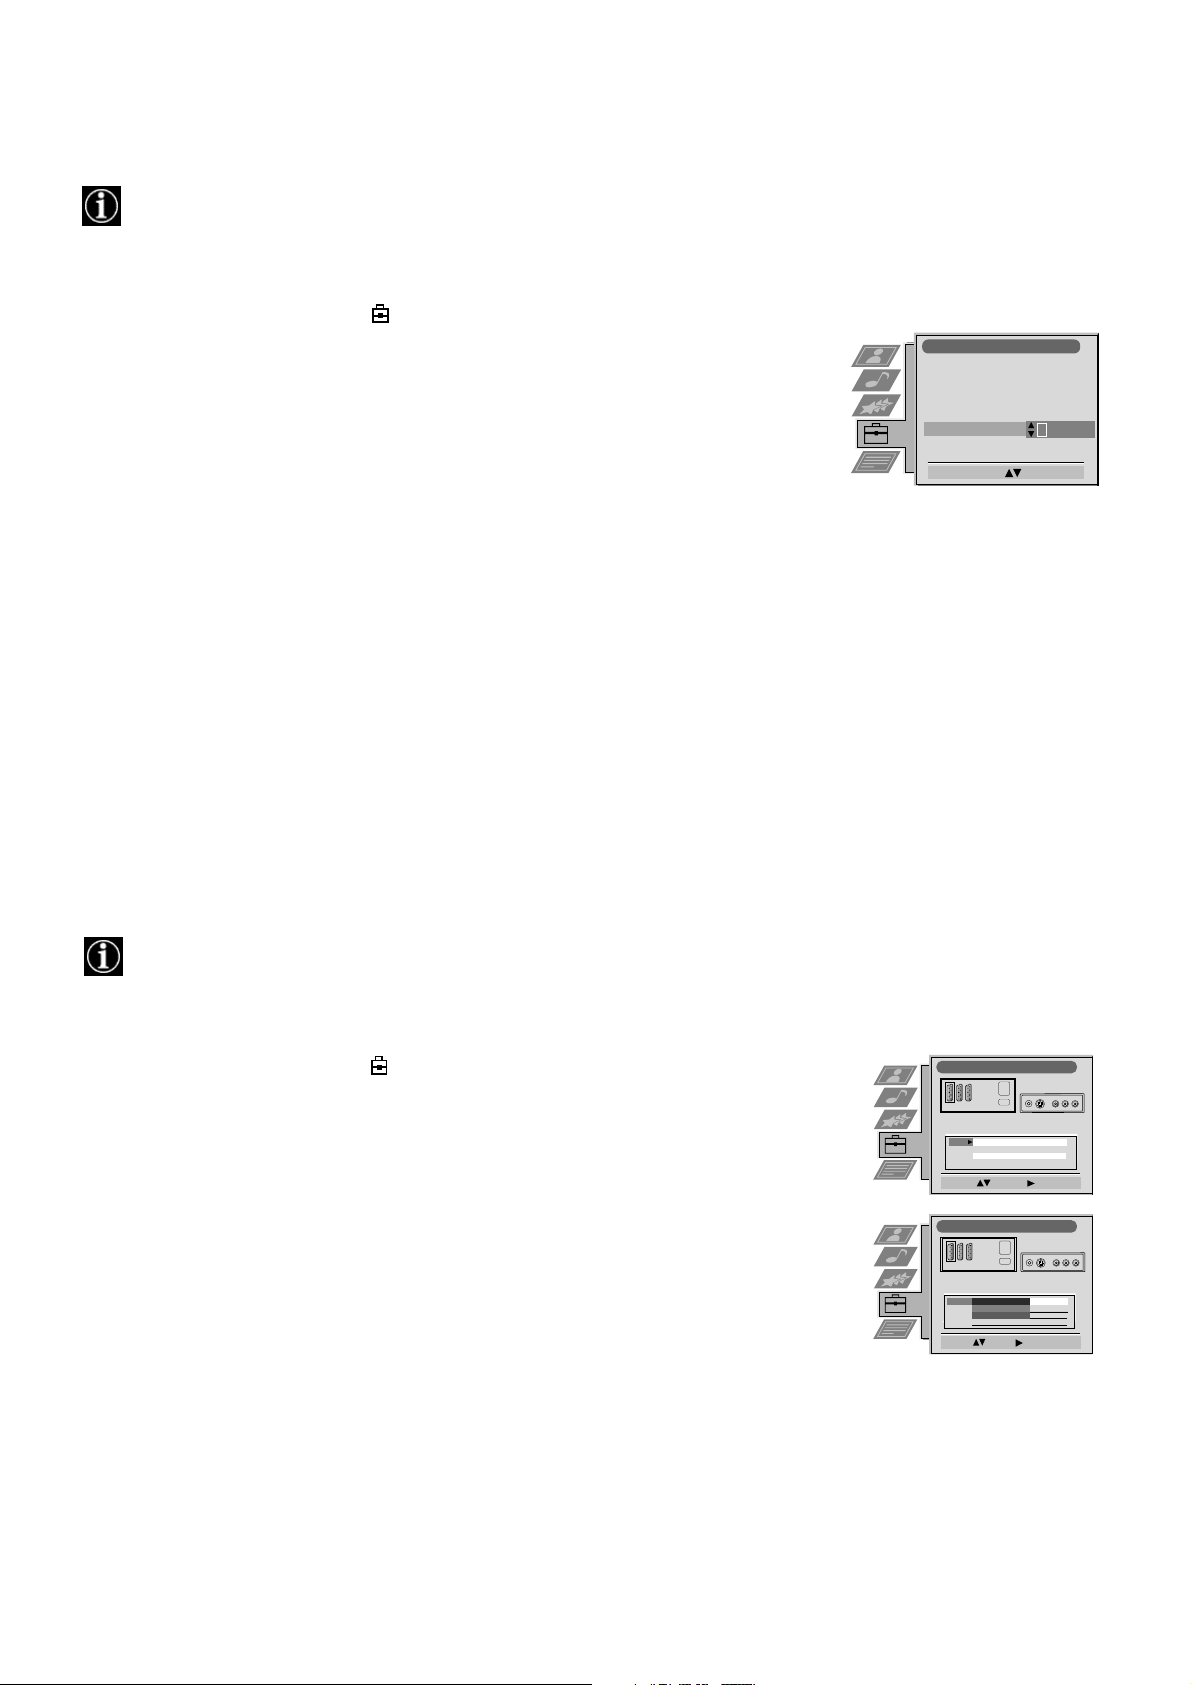
1. Press the MENU button on the remote control to display the menu on the TV screen.
2. Press the V button to select the symbol on the menu screen then press B to enter the
‘Set Up’ menu
3. Press the V button to select ‘Manual Set Up’ on the menu screen then press B to enter the
‘Manual Set Up’ menu.
4. Press the V button to select ‘Personal ID’ on the menu screen then press B to enter the
‘Personal ID’ sub menu.
5. Press the v or V buttons to select the first of a total of 11 characters (letter, number, + or
a blank) then press B to go to the next character.
6. Repeat step 5 to input all the characters for the code.
7. Press the OK button to store. A status box appears on screen requesting you to re-enter
your code.
Manual Set Up
Language/Country
Manual Programme Preset
Further Programme Preset
RGB Set Up
Picture Rotation
Personal ID
Demo
Select A-Z, 0-9: Confirm: OK
- - - - - -
8. Press the OK button to store the code or press b to cancel.
9. Press the MENU button to remove the menu from the TV screen.
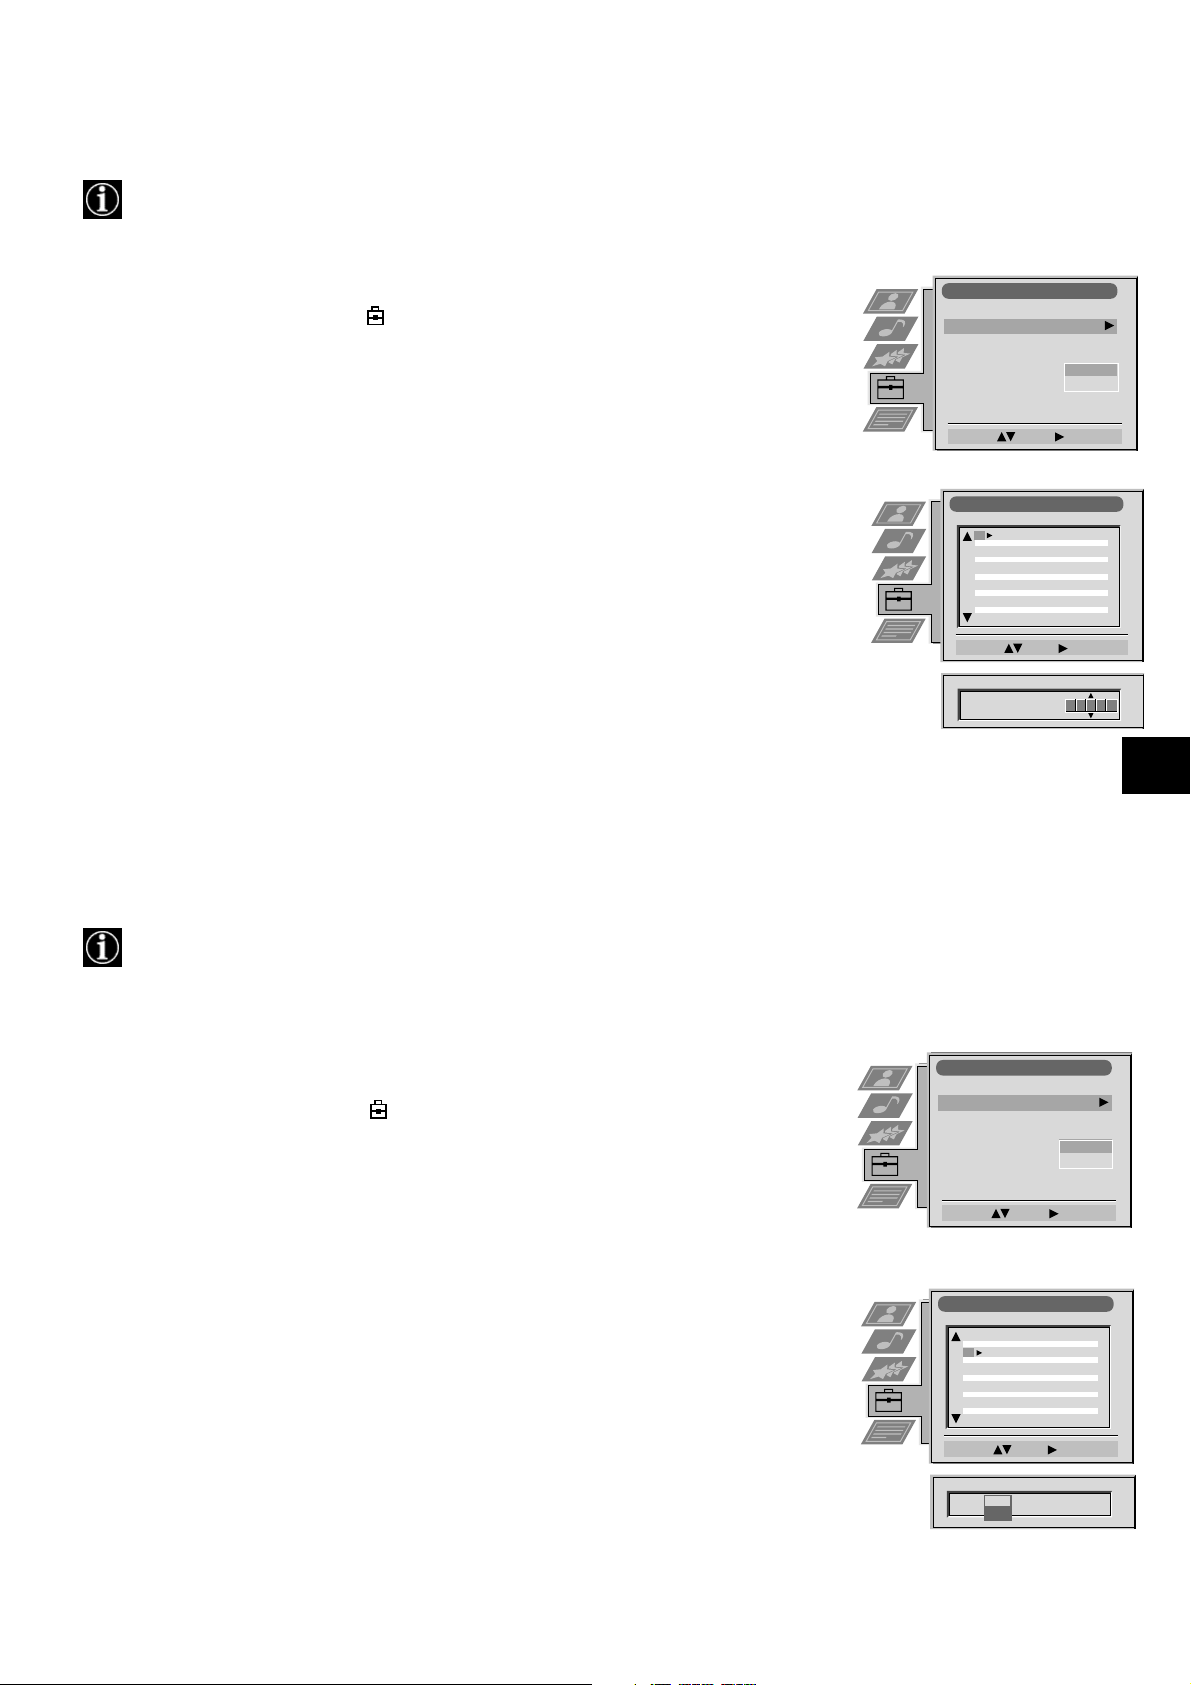
Presetting and naming input signals
Using this feature, you can automatically format and label input sources.
1. Press the MENU button on the remote control to display the menu on the TV screen.
2. Press the V button to select the symbol on the menu screen then press B to enter the ‘Set
Up’ menu
3. Press the V button to select ‘AV Preset’ on the menu screen then press B to enter the ‘AV
Preset’ menu.
4. Press the v or V buttons to select the desired AV input (AV1, 2, 3 or 4)..
5. Press the B button to select ‘Auto Format’ then press the v or V buttons to select ‘Off’,
‘Normal’ or ‘Full’.
6. Press the B button to select ‘Label’.
AV Preset
Input Auto Format Label
Select :
AV Preset
Input Auto Format Label
Select :
Full
Next :
Off
Normal
Normal
Enter:
Off
Normal
Full
Full
AV 1
AV 2
AV 3
AV 4
AV 1
AV 2
AV 3
AV 4
Confirm: OK
AV 1
AV 2
AV 3
AV 4
AV 1
AV 2
AV 3
AV 4
7. Press the v or V buttons to select the first character of the name then press the B button to
move to the next character.
8. Repeat step 7 to select the other 4 characters then store by pressing the OK button.
9. Repeat steps 4-8 for the other AV input sources then press the MENU button to remove the
menu from the TV screen.
22
Page 25
Additional Equipment
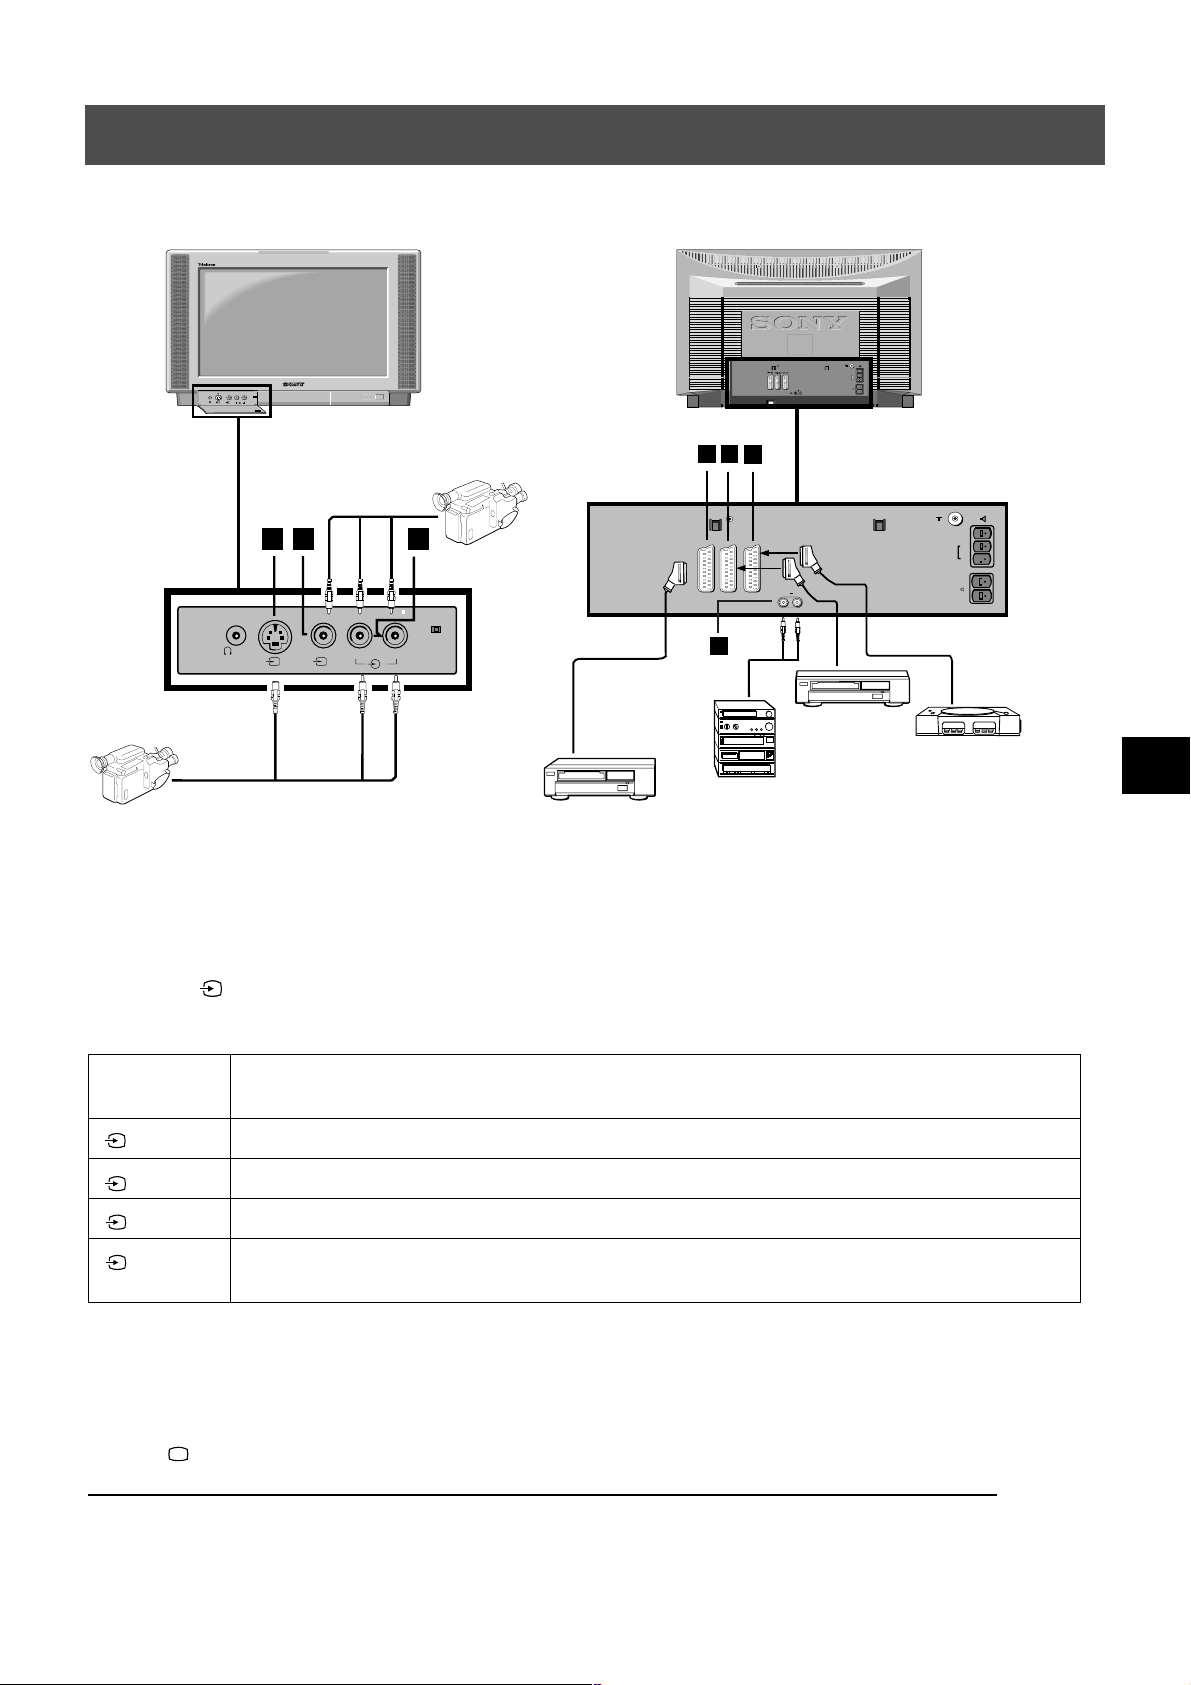
Connecting additional equipment to the TV
Using the illustrations below, you can connect a wide range of audio and video equipment to your TV.
C
-
s
-
s
-
L/G
S/I
L/G/S/I
R/D
D/D
MONO
L/G/S/I R/D/D/D
s
4
4
4
A B C
3
S
1
S
1
3
2
2
R/D/D/D
E
D
F
L/G/S/I
R/D/D/D
C
-
s
-
s
-
L/G
S/I
R/D
D/D
S
4
L/G/S/I R/D/D/D
4
4
DVD
G
VHS
2
1
In order to get the input signal of a connected equipment on to the TV screen, you need to select the symbol of the connector, to
which you have connected the device.
1. Using the illustrations above, connect your equipment to the appropriate TV socket.
2. Press the button repeatedly on the remote control until the correct input symbol for your equipment appears on the TV
screen (see table below):
Symbol on
Input signals from connector
the TV screen
1
2
3
• Audio/video input signal through scart connector D or* RGB through scart connector D
• Audio/video input signal through scart connector E or* S-video through scart connector E
• Audio/video input signal through scart connector F or* S-video through scart connector F
4
• S-video input signal through the 4-pin DIN connector A or* video input signal through phono jack
B and audio input signal through phono jacks C
* automatic detection of the signal according to the connected equipment
3. Switch on the connected equipment.
4. Press to return to the normal TV screen.
Note: To avoid picture distortion, do not connect equipment to the A and B sockets at the same time.
23
Page 26

Optional Equipment
Additional information when connecting equipment
* If the picture or sound is distorted, move the VCR away from the TV set.
* When connecting a monaural VCR, connect only the white jack to both the TV set and the VCR.
s
2
* For information on how to select the output signal of the scart 2 / , see page 16.
* When connecting external hi-fi equipment, you can adjust the volume level by adjusting the headphones setting in the
sound menu - please refer to the ‘Adjusting picture and sound’ section of this manual.
2
Smartlink
Smartlink is a direct link between your TV and VCR.
For Smartlink you need:
* A VCR which supports Smartlink, NexTView Link, Easy Link or Megalogic.
* A fully-wired 21-pin scart cable to connect your VCR to scart 2 / connector.
The features of Smartlink are:
* Tuning information such as the channel overview are downloaded from the TV set to the VCR.
* With NexTView you can programme your VCR easily.
* Direct TV recording : while watching TV you need to press just one button on the VCR to record this programme.
For more information on Smartlink please refer to your VCR instruction manual.
s
2
2
Remote control of other Sony equipment
Using the buttons underneath the cover of the remote control you can control other Sony equipment.
1. Open the cover of the remote control.
2. Set the selector VTR 1234 DVD according to the equipment you want to control:
VTR1 Beta VCR
VTR2 8mm VCR
VTR3 VHS VCR
VTR4 Digital Video (DCR-VX 1000/9000E,VHR-1000)
DVD Digital Video Disk
3. Use the buttons on the remote control to operate the equipment.
* If your equipment has a COMMAND MODE selector, set this selector to the same position as the VTR 1234 DVD
selector on the TV remote control.
* If the equipment does not have a certain function, the corresponding button on the remote control does not work.
24
Page 27
Additional Information
1
Specifications
TV system
B/G/H, D/K, I, L
Colour system
PAL, SECAM
NTSC 3.58, 4.43 (only Video In)
Channel coverage
See the ‘Channel Display Table’ below.
Picture tube
FD Trinitron WIDE
Approx 91cm (36 inches), 102° deflection
Rear Terminals
/ 21-pin Euro connector (CENELEC standard) including audio/
1
video input, RGB input, TV audio/video output.
s
/ 21-pin Euro connector (CENELEC standard) including audio/
2
2
video input, S-video input, Monitor audio/video output.
s
/ 21-pin Euro connector (CENELEC standard) including audio/
3
3
External speaker terminals : 2-pin DIN (5)
video input, S-video input, Monitor audio/video output.
L/G/S/I RCA connectors, variable output for audio signals
R/D/D/D
RF In
Front Terminals
4
4
s
4
Video input -phono jacks
Audio inputs - phono jacks
S video input - 4 pin DIN
Headphones jack - minijack stereo
Sound output
Left and Right speaker: 2x30W (music power)
2x15W (RMS)
Centre speaker: 1x20W (music power)
1x10W (RMS)
Surround speakers: 2x10W (music power)
2x5W (RMS)
Power consumption
170W
Dimensions (wxhxd)
Approx. 972 x 613.5 x 591 mm
Weight
Approx. 90.0kg
Accessories supplied
RM-892 remote control (1)
IEC designated size AA batteries (2)
Surround speaker (2)
Surround speaker lead (2)
Other features
Flat display Trinitron tube, noise detection, DRC 50Hz
picture, DRC 100Hz picture, PAP, PAT, graphic equaliser,
personal ID, sleep timer, NexTView, Dolby Surround, Digital
Comb Filter, second tuner.
Design and specifications are subject to change
without notice.
Channel Display Table
Receivable Channels Channel Displays
B/G/H E2..12, 21..69 C02..C12, C21..69
CABLE TV (1) S1..S41 S01..S41
CABLE TV (2) S01..S05 S42..S46
M1..M10 S01..S10
U1..U10 S11..S20
ITALIA A..H, H1, H2 C13..C20
D/K R01..R12, R21..R69 C01..C12, C21..C69
S01..S05 S42..S46
L F2..F10, F21..F69 C01..C12, C21..C69
I B21..B69 C21..C69
25
Page 28
Additional Information
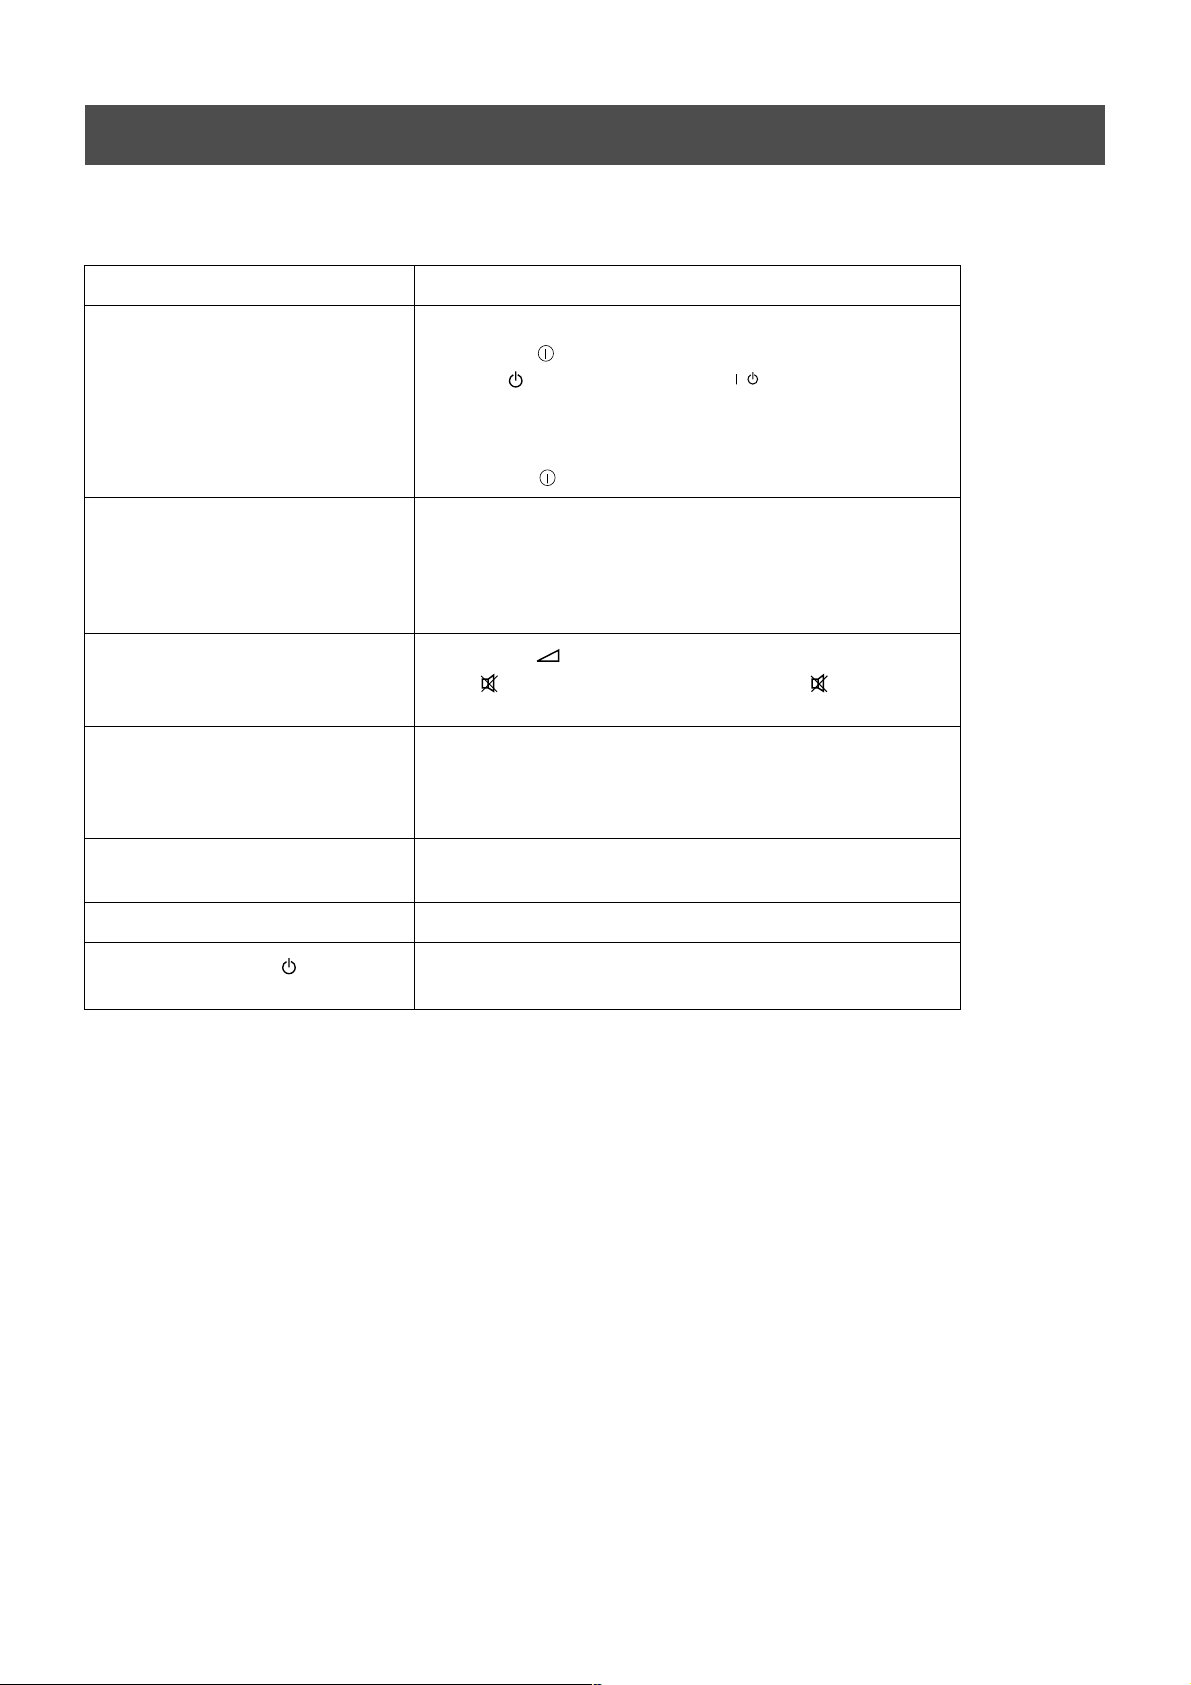
Troubleshooting
Here are some simple solutions to problems which may affect the picture and sound.
Problem Suggested remedy
No picture (screen is dark), no sound • Plug the TV in.
• Press the button on the front of the TV.
• If the indicator is on press the button or a numbered
button on the remote control.
• Check the aerial connection.
• Turn the TV off for 3 or 4 seconds and then turn it on again
using the button on the front of the TV.
/
Poor or no picture (screen is dark), but
good sound.
Good picture, no sound
No colour on colour programmes • Using the MENU system, select the Picture Adjustment
distorted picture when changing
programmes or selecting Teletext
Remote control does not function • Replace the batteries.
The standby indicator on the TV
flashes
• If you continue to have problems, have your TV serviced by qualified personnel.
• NEVER open the casing yourself.
• Using the MENU system, select the Picture
Adjustment display. Adjust the brightness, picture and colour
balance levels.
• From the Picture Adjustment display select RESET to return
to the factory settings.
• Press the button on the remote control.
• If is displayed on the screen, press the button on the
remote control.
display and adjust the colour setting.
• From the Picture Adjustment display select RESET to return
to the factory settings.
• Turn off any equipment connected to the scart connectors on
the rear of the TV.
• Contact your nearest Sony service centre.
26
Page 29

27
Page 30

Informacje dotyczące bezpieczeństwa
Bezpieczeństwo
Telewizor jest przystosowany do zasilania tylko
napięciem przemiennym 220 – 240 V. Nie włączać
zbyt dużej liczby urządzeń do jednego gniazdka
sieciowego grozi to pożarem lub porażeniem
prądem.
Nie otwierać obudowy ani nie zdejmować pokrywy
z tyłu telewizora. Naprawy powierzać tylko
wykwalifikowanym osobom.
Ze względu na bezpieczeństwo i ochronę
środowiska naturalnego zaleca się, aby telewizor,
który nie jest używany, nie pozostawał w trybie
czuwania, lecz był wyłączany z sieci.
Dla własnego bezpieczeństwa, w czasie burzy nie
dotykać żadnych elementów telewizora, jego
przewodu zasilającego ani przewodu antenowego.
Nigdy nie wpychać do telewizora żadnych
przedmiotów. Grozi to pożarem lub porażeniem
prądem. Nigdy nie wylewać na telewizor żadnych
płynów. Jeśli do wnętrza telewizora dostanie się
jakiś płyn lub przedmiot, nie używać urządzenia,
zanim zostanie ono skontrolowane przez
odpowiednio wykwalifikowaną osobę.
Aby uniknąć ryzyka pożaru lub porażenia prądem,
nie wystawiać telewizora na deszcz i chronić go
przed wilgocią.
Nie zakrywać otworów wentylacyjnych na
telewizorze. Dla zapewnienia właściwej wentylacji,
pozostawić wokół telewizora przynajmniej 10 cm
wolnego miejsca.
Do czyszczenia telewizora używać miękkiej, lekko
zwilżonej ściereczki. Nie czyścić telewizora
benzyną, rozcieńczalnikiem ani innymi środkami
chemicznymi. Nie rysować ekranu telewizora. Dla
bezpieczeństwa, przed czyszczeniem telewizora
wyłączyć go z sieci.
Ustawić telewizor na bezpiecznej, stabilnej
podstawie. Nie pozwalać, aby wspinały się na niego
dzieci. Nie kłaść telewizora na boku ani ekranem
do góry.
Nigdy nie stawiać telewizora w miejscach
gorących, wilgotnych lub nadmiernie zapylonych.
Nie instalować telewizora w miejscach, w których
będzie on narażony na wibracje mechaniczne.
Przy wyłączaniu przewodu zasilającego z gniazdka
sieciowego chwytać wtyczkę. Nie ciągnąć samego
przewodu.
Przed przenoszeniem telewizora wyłączyć go z
sieci. Unikać nierównych powierzchni, szybkiego
marszu i używania nadmiernej siły. Jeśli telewizor
został upuszczony lub uszkodzony, natychmiast
zlecić jego kontrolę odpowiednio
wykwalifikowanej osobie z serwisu.
Aby uniknąć pożaru, przechowywać łatwopalne
przedmioty z dala od telewizora i nie zbliżać się do
niego z otwartym ogniem (na przykład świecą).
Dbać, aby nie stawiać na przewodzie zasilającym
ciężkich przedmiotów, ponieważ mogą one
uszkodzić przewód.
Zalecamy nawinięcie nadmiaru przewodu na
zaczepy znajdujące się z tyłu telewizora.
Nie zakrywać otworów wentylacyjnych na
telewizorze takimi przedmiotami jak zasłony czy
gazety.
Page 31

Spis Treści
Spis Treści
Instalowanie
1. Sprawdzanie załączonych akcesoriów
2. Wkładanie baterii do pilota
3. Podłączanie telewizora
4. Włączanie telewizora
5. Używanie przycisku sterującego
6. Programowanie telewizora
7. Znajdywanie kanału wideo
Obsługa
Przegląd przycisków telewizora
Przegląd przycisków pilota
NexTView
Telegazeta
Posługiwanie się systemem menu telewizora
Regulacja obrazu
Regulacja dźwięku
Ustawienie 'Dolby Surround'
Używanie menu Funkcje
Zmienianie wielkości obrazu
Posługiwanie się trybem Multi PIP
Działanie trybu PAP (Obraz i obraz)
Zamiana pozycji programów
Ręczne programowanie telewizora
Nadawanie nazw programom
Pomijanie pozycji programów
Posługiwanie się menu "Dalsze nastawianie"
Włączanie trybu "Demo"
Regulacja obrotu obrazu
Regulacja geometrii obrazu dla sygnałów RGB
Wprowadzanie identyfikatora osobistego
Ustawianie i nadawanie nazw urządzeniom zewnętrznym
2
2
3
5
5
6
6
7
8
9
11
13
13
14
15
16
16
17
17
18
18
19
19
20
20
21
21
22
22
Dodatkowy osprzęt
Podłączanie urządzeń dodatkowych
Informacje dodatkowe dotyczące podłączania urządzeń
Smartlink
Zdalne sterowanie innym sprzętem Sony
Informacje dodatkowe
Dane techniczne
Tabela programów
Problemy i ich usuwanie
23
24
24
24
25
25
26
1
Page 32

Instalowanie
Wykonaj czynności 1-7, aby dokonać
instalacji telewizora i zacząć oglądać
programy.
1. Sprawdzanie załączonych akcesoriów
Baterie
Pilot
2. Wkładanie baterii do pilota
Pamiętaj, aby pozbywać się niepotrzebnych baterii w sposób przyjazny dla środowiska.
2
Page 33

Instalowanie
3. Podłączanie telewizora
Podłączanie głośników
System Dolby* Pro Logic Surround wymaga użycia 5 głośników:
- głośnika centralnego (zainstalowanego w telewizorze), dzięki któremu dialogi itp. zdają się dobiegać z ekranu
telewizora,
- lewego i prawego przedniego głośnika (zainstalowanych w telewizorze), służących do normalnej reprodukcji
audycji stereofonicznych,
- głośników surround, używanych do wytworzenia specjalnych efektów, jakie zapewnia kanał surround.
Podłączanie dostarczonych głośników
C
S
S
głośniki surround
Podłączanie własnych głośników
(Upewnij się, że głośniki mają co najmniej 8 omów impedancji i są magnetycznie ekranowane. W przeciwnym wypadku
mogą wystąpić zakłócenia obrazu).
L/G/S/I
R/D/D/D
prawy głośnik
lewy głośnik
C
S
S
głośniki surround
*Wyprodukowano na licencji Dolby Laboratories Licensing Corporation. Dolby, ProLogic oraz podwójne D są
znakami handlowymi Dolby Laboratories Licensing Corporation.
3
Page 34

Instalowanie
3. Podłączanie telewizora
Podłączanie anteny do telewizora
L/G
L/G/S/I
R/D/D/D
S/I
R/D
D/D
Jeżeli nie podłączasz
telewizora do
magnetowidu, wówczas
należy podłączyć antenę,
tak jak to pokazano na
ilustracji, po lewej i
przejść do sekcji
"4. Włączanie
telewizora".
Jeżeli natomiast
podłączasz telewizor do
magnetowidu, wówczas
należy przejść do sekcji
znajdującej się poniżej.
1. Podłącz antenę do gniazda oznaczonego , znajdującego się z tyłu odbiornika.
Podłączanie anteny i magnetowidu do telewizora
L/G
S/I
R/D
D/D
(istniejąca antena)
IN
OUT
(łączówka Euro nie ma w wyposażeniu)
AC IN
L/G/S/I
R/D/D/D
Kabel Euro nie jest
wymagany. Jeżeli
jednak zostanie
użyty, to dodatkowe
połączenie może
polepszyć obraz i
dźwięk podczas
odtwarzania.
1. Podłącz antenę do magnetowidu, tak jak to pokazano.
2. Połącz gniazdo magnetowidu RF OUT, znajdujące się z tyłu magnetowidu, z
gniazdkiem antenowym telewizora, tak jak to pokazano na rysunku.
3. Podłącz magnetowid do gniazdka sieciowego i włącz go.
4. Włóż nagraną kasetę do magnetowidu i przyciśnij 'PLAY'.
4
Page 35

Instalowanie
4. Włączanie telewizora
1. Podłącz wtyczkę kabla telewizora do gniazdka zasilania (220-240V AC, 50Hz).
2. Wciśnij wyłącznik zasilania znajdujący się z przodu telewizora.
Jeżeli świeci się kontrolka trybu czuwania, znajdująca się z przodu telewizora, należy nacisnąć przycisk TV
znajdujący się na pilocie, aby włączyć odbiornik TV. Należy zachować cierpliwość; obraz może pojawić się na
ekranie dopiero po kilku chwilach.
5. Używanie przycisku sterującego
Przemieszczanie wskaźnika Przyciskanie
przyciskiem sterującym przycisku sterującego
/
Aby poruszać się po menu,
wciśnij odpowiedni przycisk
kierunku.
Aby wybrać wariant z menu,
przyciśnij środek przycisku
sterującego.
5
Page 36

Instalowanie
6. Programowanie telewizora
Przed przystąpieniem do strojenia telewizora należy wybrać język i kraj.
1. Na ekranie pojawia się menu Język/Kraj z podświetlonym
słowem "English".
2. Przyciskami v oraz V pilota wybierz język, a następnie
przyciśnij OK, aby zatwierdzić. Pojawia się menu Kraj z
podświetlonym słowem "Wyłączony". Wybierz "Wyłączony",
jeżeli nie chcesz, aby kanały zostały kolejno zaprogramowane, począwszy od pozycji 1.
3. Wciśnij v lub V, aby wybrać kraj, w którym będzie używany
telewizor i przyciśnij OK, aby potwierdzić swój wybór.
4. Pojawia się menu "Automatyczne Strojenie" w wybranym
języku. Przyciśnij OK, aby potwierdzić.
5. Sprawdź, czy antena jest podłączona zgodnie z instrukcjami i
przyciśnij OK, aby zatwierdzić. Telewizor zacznie
automatycznie wyszukiwać i programować dostępne kanały.
Operacja ta może potrwać kilka minut - należy zachować
cierpliwość i nie przyciskać żadnych przycisków.
6. Po zakończeniu strojenia wszystkich dostępnych kanałów, na
ekranie pojawia się menu "Sortowanie programów", które
pozwala zmienić porządek zaprogramowanych kanałów.
Jeżeli chcesz zmienić kolejność programów, przyciśnij
v lub V, aby wybrać kanał, który chcesz przesunąć, następnie
przyciśnij B. Przy pomocy przycisków v lub V wybierz nową
pozycję dla danego programu i przyciśnij OK, aby
potwierdzić. Wybrany program zostanie przeniesiony w
nowe miejsce, a inne programy zostaną odpowiednio
przesunięte. Powtarzaj tę procedurę, jeżeli chcesz zmienić
kolejność pozostałych programów.
Language country
Language
Country
Select language: Confirm:
Türkçe
Svenska
Português
Nederlands
Great Britain
Suomi
Polski
Norsk
7. Naciśnij przycisk MENU, aby usunąć menu z ekranu
telewizora.
8. Naciskaj PROGR+/- lub numerowane przyciski, aby oglądać
programy telewizyjne.
Uwaga: Aby w dowolnym momencie zatrzymać proces
automatycznego strojenia, naciśnij przycisk OK.
7. Znajdywanie kanału wideo
Podłączywszy już magnetowid do telewizora, musisz znaleźć kanał wideo.
1. Naciskaj przyciski PROGR+/-, aż kanał wideo pokaże się na ekranie telewizora.
Uwaga: Jeżeli chcesz zmienić pozycję kanału wideo wśród programów, przejdź do sekcji "Zapamiętywanie
kanałów TV".
6
Page 37

Obsługa
Przegląd przycisków telewizora
Przyciski regulacji głośności.
Przyciśnij, aby zwiększyć (+) /
zmniejszyć ( ) głośność.
Przycisk wejścia Video.
Przyciśnij, aby wybrać
sygnał wejściowy z
magnetowidu lub innych
Przyciski zmiany
programu (+) i (-).
Przyciśnij, aby
zmienić program.
Przycisk CONTROL
Wciśnij, aby włączyć i
podświetlić panel
sterowania.
+
–
PROGR
–
+
CONTROL
Wyłącznik zasilania.
Przyciśnij, aby włączyć lub
wyłączyć telewizor.
7
Page 38

Obsługa
Przegląd przycisków pilota
Aby wyłączyć dźwięk
Wcisnąć w celu wyłączenia dźwięku telewizora.
Wcisnąć ponownie, aby przywrócić dźwięk.
Aby powrócić do normalnego trybu TV
Przyciśnij w celu powrotu do normalnego
działania z telegazety lub z trybu czuwania.
Aby włączyć telegazetę
Wciśnij w celu włączenia i wyłączenia
telegazety.
Aby wybrać Elektroniczny program TV
(EPG)
Wciśnij w celu włączenia i wyłączenia EPG.
Aby zatrzymać obraz
Przyciśnij, jeżeli chcesz zanotować jakąś
informację z ekranu telewizora, np. numer
telefonu. Przyciśnij ponownie, aby powrócić do
normalnego obrazu telewizyjnego.
Aby wybrać program
Przyciśnij jeden z numerowanych przycisków.
Dla programów dwucyfrowych, np. 23, najpierw
należy przycisnąć -/--, a następnie 2 oraz 3.
Aby wyświetlić menu obrazu
Przyciśnij, aby zmienić ustawienia obrazu.
Przyciśnij przycisk OK, aby usunąć menu.
Aby wyświetlić menu dźwięku
Przyciśnij, aby zmienić ustawienia dźwięku.
Przyciśnij przycisk OK, aby usunąć menu.
W celu wyświetlenia tabeli programów
Wciśnij przycisk OK. Wciśnij v lub V w celu
wyboru żądanego programu, a następnie B, aby
potwierdzić.
Aby chwilowo wyłączyć telewizor
Przyciśnij w celu chwilowego wyłączenia telewizora.
Aby włączyć telewizor, należy ponownie nacisnąć ten
przycisk. Aby oszczędzać energię, znależy wyłączać nie
używany telewizor z sieci. UWAGA: Jeśli przez 15-30
minut nie jest odbierany sygnał TV i nie zostanie
naciśnięty żaden przycisk, telewizor automatycznie
przełączy się w tryb oczekiwania.
Aby pokazać informacje
Naciśnij w celu pokazania wszystkich ekranowych
wskaźników. Naciśnij ponownie, aby je ukryć. Naciśnij w
trybie telegazety, aby przejść do spisu treści (przeważnie
strona 100), naciśnij ponownie, aby skasować.
Aby wybrać sygnał wejściowy lub zatrzymać
telegazetę
Wciśnij w celu wyboru sygnału wejściowego z gniazd
(patrz sekcja "Używanie dodatkowego sprzętu").
Naciśnij w trybie telegazety, aby zatrzymać wyświetlaną
stronę. Naciśnij ponownie, aby skasować.
Więcej szczegółów znajduje się w sekcji "Posługiwanie się
trybem PAP".
Aby powrócić do poprzedniego kanału
Wciśnij w celu przejścia do ostatnio oglądanego
programu. Uwaga: Operacja ta może zostać wykonana
tylko wtedy, gdy obecny kanał był oglądany przez 5
sekund.
Naciśnij, aby włączyć i wyłączyć tryb Multi PIP.
Aby zmienić format obrazu
Wciśnij w celu zmiany wielkości obrazu.
Przyciski Fastext
Aby zapoznać się ze szczegółami: patrz sekcja
Telegazeta.
Aby wybrać podpunkty menu
Użyj przycisku OK oraz przycisków kierunkowych, aby
wybrać opcje dostępne w systemie menu telewizora.
Aby wyświetlić menu
Naciśnij, jeżeli chcesz dokonać ustawień w menu
telewizora. Naciśnij ponownie, aby menu zniknęło z
ekranu.
Aby ustawić głośność
Przycisnąć w celu ustawienia głośności
telewizora.
Aby przywrócić ustawienia fabryczne.
Otwórz pokrywkę pilota i naciśnij, aby
przywrócić fabryczne ustawienia obrazu i
dźwięku. Po pojawieniu się menu
"Instalacja", przejdź do sekcji "Wybieranie
języka i kraju", aby zmienić, jeżeli to
potrzebne, język i kraj.
8
Aby wybrać kanał
Wcisnąć w celu wybrania kanału.
Aby wyświetlić godzinę.
Otwórz pokrywkę pilota i naciśnij w celu
wyświetlenia na ekranie aktualnej godziny.
Aby obsługiwać wyposażenie wideo
Otwórz pokrywkę pilota i użyj tych przycisków w
celu obsługi sprzętu wideo (proszę zapoznać się ze
szczegółami w instrukcji magnetowidu).
Page 39

Obsługa
NexTView
NexTView jest elektronicznym przewodnikiem po programach telewizyjnych, który dostarcza informacji o programach
nadawanych przez różne stacje.
Wybieranie usługodawcy NexTView
Telewizor automatycznie wybiera najlepszego usługodawcę NexTView. Wybór usługodawcy zostaje dokonany po
mniej więcej 30 minutach od zaprogramowania kanałów. Można jednak samodzielnie wybrać innego usługodawcę.
1. Naciśnij przycisk MENU na pilocie, aby wyświetlić menu na ekranie telewizora.
2. Naciskaj v lub V, aby wskazać na ekranie menu symbol , po czym naciśnij B, aby wyświetlić menu
Ustawienia .
3. Naciskaj v lub V, aby wskazać wariant Select NexTView , i potwierdź, naciskając B. Pojawi się lista wszystkich
usługodawców NexTView.
4. Naciskaj v lub V, aby wybrać żądanego usługodawcę NexTView, po czym naciśnij przycisk OK, aby zachować
ustawienie.
5. Naciśnij przycisk MENU, aby usunąć menu z ekranu.
Uruchamianie NexTView
1. Przyciskiem na pilocie można włączyć lub wyłączyć NexTView.
2. Naciskaj przyciski v, V, b lub B, aby przesuwać kursor po ekranie.
3. Naciśnij OK, aby potwierdzić wybór.
a. Jeżeli przyciśniesz OK w kolumnie daty, godziny lub ikony (tematu), lista programów będzie zmieniać się, w
zależności od wyboru.
b. Jeżeli natomiast naciśniesz OK na liście programów, to dany kanał zostanie włączony, jeżeli program ten jest
aktualnie wyświetlany, lub wyświetlone zostanie menu dalszych informacji "Long Info", jeżeli program
nadawany będzie w przyszłości.
Legenda
pełna lista
osobisty wybór
programy informacyjne
filmy
sport
programy rozrywkowe
programy dla dzieci
powrót do poprzedniego menu
07 Tue
12:38
Tu e
Wed
Thu
Sat
Sun
Mon
SWISS
7
8
9
12
10
Fri
11
12
13
Star Wars
Super RTL
Werner - Beinhart
Pro 7
Flui grüsst den Rest der Welt
Kabel 1
Once upon a time in the West
Euronews
International News
RTL Plus
Hat der alte Hexenmeister sich doch
einmal fortbegeben, und nun sollen
seine Geister auch nach meinem Willen
leben.
TXT TPS / RINGIER
10:35 - 12:45
10:20 - 12:00
10:45 - 10:50
11:00 - 11:20
11:45 - 12:50
Tue 07. 04 .98
9
Page 40

Obsługa
NexTView
Używanie menu "Ustawienia indywidualne"
Możesz dokonać osobistego wyboru tematów, wśród których dokonywane będzie wyszukiwanie.
1. Naciśnij v lub V, aby wybrać ikonę , a następnie B, aby wyświetlić menu "Ustawienia indywidualne".
2. Naciśnij v lub V, aby wybrać punkt na ekranie, a następnie naciśnij OK, aby potwierdzić swój wybór.
3. Powtarzaj czynność z kroku 2 dla wszystkich tematów, które chcesz mieć w swojej liście.
4. Kiedy skończysz swoją listę, naciśnij
5. Wciśnij przycisk OK, aby powrócić do poprzedniego menu.
6. Naciskaj v lub V, aby wybrać ikonę , po czym ponownie naciśnij przycisk OK, aby włączyć filtr Ustawienia
indywidualne .
Używanie menu "Long Info"
Menu Long Info umożliwia programowanie układów czasowych oraz nagrywanie wybranych programów.
1. Naciśnij v lub V, aby wybrać z listy programów pozycję, która będzie nadawana w przyszłości.
2. Naciśnij OK, aby wyświetlić menu "Long Info".
First nextTView/EPG-Providers in Europe
07 Tue
12:38
SWISS TXT TPS / RINGIER nexTView
Address Mapping
The position of the addresses in the
OSDA is shown in the following diagram.
The position values of the DPW are set
to '0'.
If other values are set, the complete
combination will be scrolled.
Example:
if the DPWC is set to '63', the char-
This channel has been set for a timer
VPS/PDC
Speed
Timer Prog
VCR1
On
SP
B, aby wybrać z menu.
Tue 07. 04 .98
Aby zaprogramować układ czasowy
Naciskaj przycisk b lub B, aby wskazać ikonę
, po czym naciskaj przycisk OK, aby
zaprogramować lub wyłączyć układ czasowy.
Jeśli zaprogramujesz układ czasowy, program
zostanie oznaczony ikoną zegara. Na krótko
przed rozpoczęciem programu pojawi się
pytanie, czy rzeczywiście chcesz go obejrzeć.
Aby wyświetlić tabelę układów czasowych
Naciskaj przycisk b lub B, aby wskazać ikonę
, po czym naciskaj przycisk OK, aby
wyświetlać lub ukrywać tabelę układów
czasowych. Tabela ta zawiera programy, dla
których został zaprogramowany układ
czasowy. (Za pomocą układów czasowych
można zaprogramować do 5 programów.)
Aby nagrywać programy*
(dotyczy tylko magnetowidów z systemem Smartlink)
1 Podłącz magnetowid Smartlink.
2. Naciskaj b lub B, aby wybrać . Następnie naciśnij przycisk OK, aby wczytać informacje do magnetowidu.
3. Aby wybrać ustawienia dla magnetowidu:
VPS/PDC
Naciskaj b, aby wybrać VPS/PDC, następnie naciśnij OK, aby wybrać "Wł." lub "Wył.". Jeżeli zostanie wybrana
ta opcja, wówczas wybrany program na pewno zostanie nagrany, nawet wówczas, gdy nastąpi zmiana w programie
telewizyjnym. Funkcja ta działa jednak tylko wtedy, gdy dany kanał jest nadawany z sygnałem VPS/PDC
Szybkość
Wciśńij V, aby wybrać "szybkość", a następnie naciśnij OK, aby wybrać "SP" dla normalnej szybkości lub "LP" dla
obniżonej szybkości nagrywania. Przy obniżonej szybkości (LP) można nagrać na kasecie dwa razy więcej.
Wówczas jakość obrazu może być obniżona.
Wybór magnetowidu
Naciskaj V, aby wybrać "VCR Setup", następnie naciśnij OK, aby wybrać magnetowid który chcesz
zaprogramować, to znaczy magnetowid 1 (VCR1) lub ' magnetowid 2 (VCR2).
4. Na koniec naciśnij B, aby wybrać ikonę , a następnie OK, aby usunąć menu z ekranu telewizora.
10
Page 41

Obsługa
TELETEXT
Tel e gaz eta
Większość programów telewizyjnych jest nadawana wraz z telegazetą. Strona spisu treści telegazety (zazwyczaj strona
100) podaje informacje dotyczące jej obsługi. Należy jednak korzystać z telegazety nadawanej z programem o silnym
sygnale, w przeciwnym wypadku mogą wystąpić błędy w odbiorze telegazety.
Włączanie i wyłączanie telegazety
1. Za pomocą numerowanych przycisków pilota wybierz program, razem z którym
nadawana jest telegazeta, którą chcesz obejrzeć.
2. Naciśnij raz , aby przejść do trybu Obraz i telegazeta (P&T).
Ekran zostanie podzielony na dwie części; program telewizyjny będzie po prawej
stronie, a telegazeta po lewej.
Tryb Obraz i telegazeta (P&T): naciśnij , a następnie naciskaj przycisk
PROGR +/- , aby zmienić odbierany program telewizyjny. Naciśnij b lub B, aby
zmienić wielkość obrazu telewizyjnego.
Naciśnij ponownie , aby powrócic do normalnego odbioru telegazety.
3. Naciśnij dwa razy , aby odbierać tylko telegazetę.
4. Naciśnij trzykrotnie , aby przejść do trybu Mix.
Obraz telewizyjny i telegazeta nakładają się na siebie.
5. Naciśnij cztery razy, aby wyłączyć telegazetę.
Wybieranie strony telegazety
Wprowadź trzy cyfry numeru strony, używając do tego numerowanych przycisków
pilota. Jeżeli popełnisz błąd, wprowadź jakiekolwiek trzy cyfry, a następnie wprowadź
jeszcze raz poprawny numer.
Używanie innych funkcji telegazety
Wybieranie następnej lub poprzedniej strony
Naciśnij przyciski lub , znajdujące się na pilocie, w celu wybrania poprzedniej
lub następnej strony.
TELETEXT
Index
Programme
News
Sport
Weather
TELETEXT
Index
Programme
News
Sport
Weather
TELETEXT
Index
Programme
News
Sport
Weather
216-02
m
m
25
153
101
98
25
153
101
98
25
153
101
98
Wybieranie podstron
Strona Telegazety może zawierać kilka podstron. W takim przypadku zostanie
wyświetlony pasek informacyjny, pokazujący liczbę podstron. Wybierz podstronę
przyciskając v lub V.
Aby zatrzymać stronę telegazety
Przyciśnij, w celu zatrzymania strony. Przyciśnij ponownie, aby przerwać
zatrzymanie.
Odkrywanie ukrytych informacji (np. odpowiedzi do quizu).
Naciśnij przycisk , aby pokazać ukrytą informację. Naciśnij ponownie, aby ją ukryć.
Używanie kolorowych przycisków w celu przejścia na strony (Fastext)
(dostępne tylko dla stacji telewizyjnych nadających sygnał Fastext)
Kiedy zakodowane kolorami menu pojawi się na dole strony, naciśnij kolorowy
przycisk pilota (zielony, czerwony, żółty lub niebieski), aby wyświetlić odpowiednią
stronę.
Używanie funkcji "Łapanie stron"
1. Za pomocą numerowanych przycisków pilota wybierz stronę, która zawiera kilka
stron (np. strona spisu treści).
2. Wciśnij przycisk OK.
3. Wciśnij v lub V, aby wybrać numer żądanej strony, a następnie przycisk OK.
Żądana strona zostanie wyświetlona po kilku sekundach.
01 03 04 05 06 07 0802
11
Page 42

Obsługa
Tel e gaz eta
Telegazeta jest to serwis informacyjny nadawany przez większość stacji telewizyjnych.
Posługiwanie się menu telegazety
1. Kiedy telegazeta jest włączona, naciśnij przycisk MENU na pilocie, aby wyświetlić
menu na ekranie telewizora.
2. Wciśnij v lub V w celu wybrania podpunktu, a następnie naciśnij
do odpowiedniego menu niższego poziomu.
3. Aby usunąć z ekranu menu telegazety, naciśnij przycisk MENU.
Góra/Dół/Cała
Menu Góra/Dół/Cała pozwala powiększyć różne części strony telegazety. Naciśnij v, w
celu powiększenia górnej części obrazu, V, aby powiększyć dolną część. Naciśnięcie
przycisku OK spowoduje przywrócenie normalnej wielkości strony. Naciśnij b, aby
powrócić do menu telegazety.
Usunięcie tekstu*
*funkcja dostępna tylko w trybie telegazety i trybie Mix (patrz Włączanie i wyłączanie
telegazety)
B, aby dostać się
Funkcja usunięcia tekstu służy do wyświetlania obrazu telewizyjnego podczas
wyszukiwania strony telegazety.
1. Dwukrotnie naciśnij przycisk na pilocic, aby wyświetlić telegazetę na pełnym
ekranie.
2. Naciśnij przycisk MENU, aby wyświetlić menu telegazety.
3. Naciskając v lub V wskaż wariant Usunięcie tekstu. Potwierdź wybór,
naciskając B.
4. Pojawi się obraz odbieranej obecnie stacji telewizyjnej. Po odszukaniu strony
telegazety, w lewym górnym rogu ekranu pojawi się niebieski symbol .
5. W celu wyświetlenia strony naciśnij przycisk na pilocie.
Odsłanianie
Niektóre strony telegazety zawierają ukryte informacje (np. na temat quizów), które
można odsłonić. Po wybraniu tej funkcji ukryte informacje pojawią się na ekranie.
Po wybraniu tej funkcji, naciśnij B. Ukryte informacje pojawią się na ekranie.
Strona na czas*
*zależnie od dostępności usługi
Można wyświetlić zakodowaną czasowo stronę, na przykład stronę alarmową, o
zadanej godzinie. Po wyświetleniu menu Strona na czas (Time Page):
Przyciskami v lub V wybierz "Tak" i naciśnij OK, aby potwierdzić.
Za pomocą numerowanych przycisków pilota wprowadź trzycyfrowy numer strony.
Następnie wprowadź cztery cyfry określające żądaną godzinę.
Naciśnij przycisk OK, aby wprowadzić ustawienia. Godzina zostanie wyświetlona w
górnym lewym rogu ekranu. Żądana strona pojawi się na ekranie o zadanej godzinie.
Przegląd stron*
*funkcji można użyć, gdy stacja telewizyjna nadaje dane TOP-text.
W tym menu strony TOP-text sa podzielone na dwje kolumny, z których pierwsza
zawiera bloki stron, a druga- grupy stron.
1.Naciskając b lub B, wybierz pierwszą albo drugą kolumnę.
2.Naciskając v lub V, aby wybierz żądaną grupę albo blok stron.
3.W celu wyswietlenia żądanych stron naciśnij przycisk OK.
12
Page 43

Obsługa
Posługiwanie się systemem menu telewizora
Telewizor zawiera przyjazny dla użytkownika system sterowania, który składa się z serii menu ekranowych. System ten
pomoże Ci oglądać z satysfakcją telewizję, a także zmienić ustawienia obrazu i dźwięku, wielkość obrazu, kolejność
programów oraz wiele innych funkcji.
Regulacja obrazu i dźwięku
Obraz i dźwięk zostały wyregulowane fabrycznie. Można jednak zmienić ustawienia w zależności od upodobań.
1. Przyciśnij przycisk MENU na pilocie, aby wyświetlić menu na ekranie
telewizora.
2. Naciskaj przycisk v lub V, aby wybrać (regulacja obrazu) lub
(ustawienia dźwięku), następnie należy nacisnąć B w celu wejścia do menu
"Ustawienia dźwięku" lub "Regulacja obrazu".
3. Przyciskami v lub V można wybrać parametr, którego wartość ma być
zmieniona, następnie należy przycisnąć B, aby zatwierdzić. Opis parametrów
w menu i ich działania - patrz tabela poniżej.
4. Przyciskami v, V, B oraz b dokonuje się regulacji wybranego parametru.
5. Po wprowadzeniu zmian przyciśnij przycisk OK, aby zachować nowe
ustawienia.
6. Powtórz czynności 3-5, jeżeli chcesz dokonać regulacji innych parametrów.
7. Przyciśnij przycisk MENU, aby menu zniknęło z ekranu telewizora.
Regulacja obrazu
Parametr Efekt/Działanie
Tryb Obrazu V Na żywo (dla programów nadawanych "na żywo")
Własny (ustawienia indywidualne)
Film (dla filmów)
v Gra (dla gier komputerowych)
Kontrast Mniej bBWięcej
Jasność* Ciemniej bBJaś niej
Kolor* Mniej bBWięcej
Odcień** Czerwonawy bBZielonkawy
Ostrość* Mniejsza bBWiększa
Zerowanie Zostaną przywrócone fabryczne ustawienia obrazu
Sztuczna intel. V Wyłączona : Normalne działanie
v Włączone : Automatyczna optymalizacja
kontrastu, w zależności od sygnału
TV.
Redukcja zakłóceń V Wyłączona : Normalne działanie
v Włączona : Redukcja zakłóceń przy słabym
sygnale
Tryb cyfrowy V DRC 50 : poprawia rozdzielczość obrazu i idealnie
nadaje się do oglądania przesuwających się po
ekranie znaków.
v DRC 100 : poprawia rozdzielczość obrazu poprzez
eliminację migotania
* Tylko jeśli dla Tryb obrazu jest wybrane ustawienie Własny
** Dotyczy tylko sygnału koloru NTSC (np. amerykańskich kaset video)
13
Page 44

Posługiwanie się systemem menu telewizora:
Regulacja dźwięku
Parametr Efekt/Działanie
Tryby korektora V Osobisty
Wokal
Jazz
Rock
Pop
v Płaski (ustawienie stałe, nie może być regulowane)
Ustawienia korektora Można dokonywać zmiany ustawienia wybranych
trybów korektora, poprzez zwiększanie lub zmniejszanie
częstotliwości w jednym z 5 zakresów. Przyciśnij b lub
B, aby wybrać zakres częstotliwości, a następnie V lub v
w celu dokonania regulacji częstotliwości. Na koniec
należy przycisnąć OK, aby zachować nowe ustawienia.
Jeżeli zamierzasz zachować nowe ustawienia, to
musisz wybrać tryb 'Osobisty'.
W trybie Osobistym ustawienia zostają zachowane
na stałe, we wszystkich innych trybach (Wokal,
Jazz, Rock, Pop) ustawienia zostają zachowane do
następnej zmiany trybu.
Tryb Surround V Wył.
Dolby Sur
SRS
Hala
Kościół
Disco
v Stadion
Tryb SRS* V SRS 1
(*tylko jeżeli 'Tryb SRS 2
Surround' jest ustawiony v SRS 3
na 'SRS')
Autom. reg. głośn. V Włączona : Poziom głośności programów będzie
cały czas taki sam niezależnie od nadawanego
sygnału (np. podczas reklam)
v Wyłączona: poziom głośności będzie zmieniał się,
w zależności od nadawanego sygnału.
Podw. dźwięk Dla programów nadawanych w dwóch językach:
V A kanał 1
v B kanał 2
Dla programów nadawanych w stereo:
V Mono
v Stereo
SRS 1
SRS 2
SRS 3
Kiedy zostanie odebrany sygnał NICAM stereo,
symbol NiCAM pojawi się na chwilę na ekranie.
Słuchawki
i Głośność głośniej bBciszej
i Podw. dźwięk Dla programów nadawanych w dwóch językach:
V A kanał 1
v B kanał 2
14
Page 45

Posługiwanie się systemem menu telewizora:
Ustawienia Dolby Surround
Przed słuchaniem programów zakodowanych w systemie Dolby Surround trzeba dopasować ustawienia systemu
Dolby do indywidualnych potrzeb. Zmiana opisanych tu ustawień jest normalnie konieczna tylko w czasie
instalacji telewizora lub przy zmienianiu miejsca instalacji głośników.
1. Przyciśnij przycisk MENU na pilocie, aby wyświetlić menu na ekranie telewizora.
2. Naciskaj przycisk V , aby wybrać symbol z menu i przyciśnij B, aby wejść do
menu "Ustawienia".
3. Naciśnij przycisk V, aby wybrać "Ustawienia Dolby Surround" i naciśnij B, aby wejść
do menu "Ustawienia Dolby Surround".
4. Naciskaj v lub V, aby wybrać "Tryb Surr." i naciśnij B, aby wejść do podmenu "Tryb
Surr.". Jeżeli używasz głośników typu surround lub TruSurround, to naciśnij v lub V,
aby wybrać "Pro Logic". Jeżeli nie używasz głośników typu surround, wówczas dla
parametrów Tryb głośników oraz Opóźnienie zostaną wybrane fabrycznie
zdefiniowane wartości. Przyciśnij OK, aby potwierdzić.
5. Naciskaj przycisk v lub V, aby wybrać "Regulacja poziomu" i naciśnij B, aby
usłyszeć dźwięk testowy, który będzie rozlegał się kolejno ze wszystkich głośników.
W miejscu słuchania głośność wszystkich głośników powinna być taka sama. Jeżeli
wszystko jest w porządku, naciśnij OK, aby zachować ustawienia. Jeżeli nie:
(a)Naciskaj przycisk v lub V, aby wybrać głośnik "L. przód", "Centr.", "P. przód"
lub "Surround".
(b) Naciśnij b lub B, aby wyregulować poziom głośności, po czym naciśnij przycisk
OK, aby wprowadzić ustawienie.
(c) Naciśnij V, aby wybrać kolejny głośnik.
(d) Powtarzaj kroki (a) oraz (b) dla głośników, dla których chcesz dokonać regulacji.
(e) Naciśnij OK, aby zachować nowe ustawienia.
6. Jeżeli chcesz wybrać "Tryb głośników" , sprawdź, czy"Tryb Surr." ustawiony jest na
"Pro Logic" i naciskaj przycisk v lub V, aby wybrać "Tryb głośników". Naciśnij B,
aby wejść do podmenu "Tryb głośników". Naciskaj przycisk v lub V, aby wybrać
jeden z następujących trybów i naciśnij OK, aby potwierdzić:
"Normalny" wszystkie głośniki są aktywne
"Fantom" centralny głośnik jest wyłączony
"Wide" szersze pasmo ze środkowego głośnika
"3CH Normal" głośniki surround (efektu otoczenia dźwiękiem) są wyłączone
"3CH Wide" głośniki surround są wyłączone, głośnik centralny przejmuje całą
charakterystykę częstotliwościową.
7. Naciskaj przycisk v lub V, aby wybrać Opóźnienie, następnie B , aby przejść do
podmenu Opóźnienie.
Przy pomocy przycisków v lub V, wybierz opóźnienie dla głośników surround.
Możesz wybrać wartość 15 ms dla dużych pomieszczeń, 20 ms lub 25 ms dla średnich
pomieszczeń oraz 30 ms dla małych pokojów. Kiedy ustawisz czas opóźnienia,
naciśnij przycisk OK aby wprowadzić ustawienie.
8. Naciskaj v lub V, aby wybrać "Auto Surround", następnie B, aby przejść do
podmenu "Auto Surround". Przyciskami v lub V wybierz "Tak" lub "Nie" i naciśnij
przycisk OK, aby zachować zmiany.
9. Nacisnij przycisk MENU, aby usunąć menu z ekranu telewizora.
15
Page 46

Posługiwanie się systemem menu telewizora:
Używanie menu Funkcje
1. Przyciśnij przycisk MENU na pilocie, aby wyświetlić menu na ekranie telewizora.
2. Naciskaj przycisk v lub V, aby wybrać (menu "Funkcje"), następnie B, aby je wyświetlić.
3. Naciskaj przycisk v lub V, aby wybrać żądany parametr z menu, a następnie naciśnij B, aby
potwierdzić. Opis parametrów w menu i efektów ich działania znajduje się w tabeli poniżej.
4. Naciskaj przycisk v, V, B lub b, aby dokonać żądanej regulacji.
5. Naciśnij OK, aby potwierdzić swój wybór.
6. Powtarzaj czynności 3-5, jeżeli zamierzasz dokonać dalszych regulacji.
7. Naciśnij przycisk MENU, aby usunąć menu ekranu telewizora.
Parametr Efekt/Działanie
Auto Format* V Wył.: Wielkość obrazu nie jest automatycznie regulowana.
*tylko dla sygnału Normalny:Wielkość obrazu jest automatycznie zmieniana,
z anteny w zależności od nadawanego programu.
v Cały: Telewizor może automatycznie dopasowywać wielkość
obrazu tak, aby zlikwidować wszystkie ciemne obszary z
ekranu (tak jak to pokazano poniżej):
Korekcta fomatu* V Nie: Wybrany jest 4:3/14:9
(*tylko jeżeli Auto v Tak: Tryb Smart jest wybierany automatycznie dla programów
Format jest ustawiony nadawanych w formacie 4:3/14:9
na "Normalny" lub "Cały')
Sleep Timer Możesz wybrać czas, po którym telewizor automatycznie przełączy się
w tryb czuwania.
V Nie
.
v 90 min
Blokada V Nie : Bez zmian
zabezpieczająca v Tak : Naciśnij przyciski pilota, aby wyłączyć telewizor ze
stanu czuwania. Przyciski na telewizorze nie będą działać.
Wyjście AV2 V TV sygnał audio/video z anteny
AV1 sygnał audio/video z gniazda 1
AV2 sygnał audio/video z gniazda 2
AV3 sygnał audio/video z gniazda 3
v AV4 sygnał audio/video z gniazd znajdujących się z przodu
telewizora
Zmienianie wielkości obrazu
Funkcja ta pozwala zmieniać wielkość obrazu telewizora.
Naciśnij kilkukrotnie przycisk na pilocie lub użyj v lub V, aby wybrać jeden z następujących
formatów, a następnie naciśnij OK, aby potwierdzić swój wybór:
Smart imitacja szerokiego ekranu dla programów nadawanych w formacie 4:3.
4:3 zwyczajny obraz w formacie 4:3, informacja o pełnym obrazie.
14:9 wariant pośredni pomiędzy formatami 4:3 i 16:9.
Zoom format szerokoekranowy dla filmów panoramicznych.
Szeroki dla programów nadawanych w formacie 16:9.
Smart
Szeroki
Zoom
(skalowanie obrazu)
W trybach Smart oraz 14:9, górna i dolna część obrazu zostają odcięte. Naciśnij v lub V, aby
ustawić pozycję obrazu na ekranie (np. aby przeczytać napisy), następnie naciśnij OK, aby
potwierdzić.
16
14:9
4:3
Page 47

Posługiwanie się systemem menu telewizora:
Posługiwanie się trybem Multi PIP
W trybie Multi PIP (obraz w obrazie) można wyświetlić 12 nieruchomych obrazów i 13, który jest ruchomy.
Możesz ręcznie wybrać program, który chcesz oglądać, w trybie pełnoekranowym lub w trybie PIP.
1. Naciśnij przycisk znajdujący się na pilocie, aby włączyć tryb Multi PIP. Na
ekranie pojawia się 13 pozycji programów, z bieżącym pośrodku.
2. Przyciskami PROGR+/- można wybrać następne lub poprzednie 12 programów.
02
13
03 05
01 06
04
3. Przyciskami v, V, b oraz B można poruszać się pomiędzy 13 wyświetlonymi
programami.
12
11 09 08
10
4. Naciśnij przycisk OK, aby wybrać zaznaczony program. Program ten będzie teraz
wyświetlany w środkowym oknie.
5. Naciśnij ponownie OK, aby wyświetlić wybrany kanał lub naciśnij , aby wyłączyć
tryb Multi PIP.
Działanie trybu PAP (Obraz i obraz)
Funkcja PAP dzieli obraz na dwie części i daje możliwość oglądania dwóch programów jednocześnie (może być
to także obraz z magnetowidu). Dźwięk programu z lewej części ekranu jest nadawany przez głośniki, natomiast
dźwięku z prawej części można słuchać przez słuchawki.
Włączanie i wyłączanie trybu PAP
Naciśnij raz , aby podzielić ekran na dwie części, drugi raz, aby powrócić do
normalnego obrazu.
07
Wybieranie dźwięku dla słuchawek
Włączywszy funkcję PAP, przejdź do sekcji Regulacja obrazu i dźwięku i wybierz dla
parametru Podwójny dźwięk ustawienie PAP .
Wybieranie źródła sygnału dla trybu PAP
Naciśnij M. SymbolM pojawi się w prawej części ekranu. Teraz można wybrać źródło
sygnału przy pomocy klawiszy oznaczonych numerami (dla programów telewizyjnych)
lub (dla magnetowidu).
Zamiana pozycji obrazów
Naciśnij , aby zamienić ekrany miejscami.
Zmienianie wielkości ekranów
Naciskaj przycisk b lub B, aby zmienić wielkość obydwu obrazów.
17
Page 48

Posługiwanie się systemem menu telewizora:
Zamiana pozycji programów
Po dokonaniu strojenia telewizora, dzięki tej funkcji można zmienić kolejność
zapamiętanych kanałów.
1. Przyciśnij przycisk MENU na pilocie, aby wyświetlić menu na ekranie telewizora.
2. Naciskaj przycisk V, aby wybrać z menu symbol i przyciśnij B, aby wejść do menu
"Ustawienia".
3. Naciśnij V, aby wybrać "Sortowanie programów", następnie B, aby wejść do menu
"Sortowanie programów".
4. Naciskaj przycisk v lub V, aby wybrać kanał, który chcesz przenieść pod inny numer i
naciśnij B, aby potwierdzić.
5. Naciśnij v lub V, aby wybrać nową pozycję (np. PROG 4) dla wybranego programu i
naciśnij OK, aby zatwierdzić. Wybrany program zostanie przemieszczony do nowej
pozycji, a pozycje pozostałych programów odpowiednio się zmienią.
6. Powtarzaj czynności 4 oraz 5, jeżeli zamierzasz posortować dalsze kanały.
7. Naciśnij przycisk MENU, aby usunąć menu z ekranu telewizora.
Ręczne programowanie telewizora
Po wykonaniu czynności opisanych na początku instrukcji telewizor jest już automatycznie zaprogramowany.
Można jednak wykonać tę operację ręcznie, aby dodać kanał.
1. Przyciśnij przycisk MENU na pilocie, aby wyświetlić menu na ekranie telewizora.
2. Naciśnij przycisk V , aby wybrać z menu symbol i przyciśnij B, aby wejść do menu
"Ustawienia".
3. Naciśnij V, aby wybrać "Ręczne ustawianie", a następnie naciśnij B, aby wejść do
menu"Ręczne ustawianie".
4. Naciśnij V, aby wybrać "Programowanie ręczne", a następnie naciśnij B, aby wejść do
menu "Programowanie ręczne".
5. Naciśnij przyciski v lub V, aby wybrać numer programu dla kanału (np. PROGR 1 dla
TVP1), a następnie naciśnij B, aby podświetlić kolumnę "POMIŃ".
6. Naciśnij v, aby wybrać "Nie", a następnie B, aby podświetlić kolumnę "SYS".
7. Naciśnij v lub V, aby wybrać system nadawczy (B/G dla Europy Zachodniej i dla Wielkiej
Brytanii, D/K dla Europy Wschodniej lub L dla Francji) lub "ZEW" (EXT) dla wejścia
wideo (AV1, AV2, ...), a następnie naciśńij B, aby zatwierdzić.
8. Naciskaj przycisk v lub V, aby wybrać "C" dla kanałów nadawanych normalnie, "S" dla
kanałów nadawanych w sieci kablowej, lub "F" dla wejść bezpośredniej częstotliwości,
następnie naciśnij B, aby potwierdzić.
9. Wybierz pierwszą cyfrę z numeru kanału ("KAN"), następnie drugą cyfrę numeru kanału,
korzystając z przycisków numerycznych pilota
lub naciśnij v lub V, aby rozpocząć przeszukiwanie do następnego dostępnego kanału.
B/G
L
I
D/K
EXT
10. Jeżeli nie zamierzasz przypisać tego kanału do pamięci o wybranym numerze, naciśnij v lub
V, aby kontynuować przeszukiwanie, aż do żądanego kanału.
11. Jeżeli znajdziesz kanał, którzy chcesz zapisać, naciśnij przycisk OK.
12. Powtarzaj czynności 5-9, jeżeli chcesz zaprogramować więcej programów, następnie naciśnij
przycisk MENU, aby usunąć menu z ekranu telewizora.
18
Page 49

Posługiwanie się systemem menu telewizora:
Nadawanie nazw programom
Nazwy programów są automatycznie pobierane z telegazety, jeżeli jest ona dostępna. Możesz jednak nadać nazwę
programowi lub urządzeniu wideo złożoną z pięciu znaków (liter i cyfr).
1. Przyciśnij przycisk MENU na pilocie, aby wyświetlić menu na ekranie telewizora.
2. Naciśnij przycisk V, aby wybrać z menu symbol i przyciśnij B, aby wejść do menu
"Ustawienia".
3. Naciśnij V, aby wybrać "Ręczne ustawianie", a następnie naciśnij B, aby wejść do
menu "Ręczne ustawianie".
Manual Set Up
Language/Country
Manual Programme Preset
Further Programme Preset
RGB Set Up
Picture Rotation
Personal ID
Demo
- - - - - - -
O
4. Naciśnij V, aby wybrać "Programowanie ręczne", a następnie B, aby wejść do menu
Select: Enter :
"Programowanie ręczne".
5. Naciśnij przyciski v lub V, aby wybrać kanał, który chcesz nazwać.
6. Naciskaj B, aż podświetlony zostanie pierwszy element z kolumny "NAZWA".
7. Naciśnij v lub V, aby wybrać literę lub cyfrę (wybierz "-" dla pustych miejsc),
następnie naciśnij B, aby zatwierdzić. Wybierz pozostałe cztery znaki w ten sam
sposób.
8. Po wybraniu wszystkich znaków naciśnij OK, aby zatwierdzić.
9. Powtórz czynności od 5 do 8, jeżeli zamierzasz nadać nazwy innym programom.
10. Naciśnij przycisk MENU, aby usunąć menu z ekranu telewizora.
Pomijanie pozycji programów
Można zaprogramować telewizor tak, aby podczas wybierania programów przyciskami PROGR+/-, pomijane
były niechciane numery programów. Jednakże przy pomocy przycisków numerycznych wciąż można wybrać
pominięty program.
1. Przyciśnij przycisk MENU na pilocie, aby wyświetlić menu na ekranie telewizora.
2. Naciśnij przycisk V, aby wybrać z menu symbol i przyciśnij B, aby wejść do menu
"Ustawienia".
3. Naciśnij V, aby wybrać "Ręczne ustawianie", a następnie naciśnij B, aby wejść do
menu "Ręczne ustawianie".
4. Naciśnij V, aby wybrać "Programowanie ręczne", a następnie B, aby wejść do menu
"Programowanie ręczne".
5. Naciśnij v lub V, aby wybrać pozycję programu, a następnie B, aby podświetlić
kolumnę "POMIŃ".
6. Naciśnij v lub V, aby wybrać "Nie" lub "Tak" (jeżeli chcesz, aby dana pozycja była
pomijana) i naciśnij OK, aby zachować.
7. Powtarzaj czynności 5 oraz 6, jeżeli zamierzasz włączyć lub wyłączyć pomijanie
innych programów.
8. Naciśnij przycisk MENU, aby usunąć menu z ekranu telewizora.
19
Page 50

Posługiwanie się systemem menu telewizora:
Posługiwanie się menu "Dalsze nastawianie"
Przy pomocy tej funkcji można: a) wyregulować tłumienie dla każdego kanału, b) wyregulować poziom głośności
dla każdego kanału, c) ręcznie dostroić kanał tak, aby uzyskać lepszy odbiór, jeżeli obraz jest zamazany lub d)
ustawić wyjście AV dla kodowanych kanałów (np. dekodera płatnej telewizji). W ten sposób podłączony
magnetowid nagra nie zamazany obraz.
1. Przyciśnij przycisk MENU na pilocie, aby wyświetlić menu na ekranie telewizora.
2. Naciśnij przycisk V i wybierz symbol znajdujący się na ekranie, następnie
naciśnij B, aby wejść do menu "Ustawienia".
3. Naciśnij V, aby wybrać "Ręczne ustawianie", następnie naciśnij B, aby wejść do menu
"Ręczne ustawianie".
4. Naciśnij przycisk V, aby wybrać "Dalsze ustawianie", następnie B, aby wejść do menu
"Dalsze ustawianie".
5. Naciśnij v lub V, aby wybrać odpowiedni program, następnie naciśnij B, aby wybrać
a) ATT b) GŁOS c) ARC lub d) DEKODER. Wybrany wariant zmieni kolor.
6. a) ATT - RF tłumienie
Naciskaj v lub V, aby włączyć ("Tak") lub wyłączyć ("Nie") tłumienie. Naciśnij OK,
aby potwierdzić swój wybór. Powtarzaj czynności 5 oraz 6a, jeżeli zamierzasz dokonać
regulacji dla innych kanałów.
b) GŁOS - poziom głośności
Naciskaj v lub V, aby wyregulować dla kanału poziom głośności (od -7 do +7). Przycisk
OK spowoduje zapisanie zmian. Powtarzaj czynności 5 oraz 6b, jeżeli zamierzasz
dokonać regulacji dla innych kanałów.
c) ARC - automatyczne dostrajanie
Naciśnij przyciski v lub V, aby dostroić kanał w zakresie od -15 do +15. Przyciśnij OK,
aby potwierdzić. Powtarzaj czynności 5 oraz 6c, jeżeli zamierzasz dokonać regulacji dla
innych kanałów.
d) DEKODER
Naciśnij przyciski v lub V, aby wybrać AV1 lub AV2 dla pozycji programu i naciśnij
OK, aby zatwierdzić. Teraz możesz podłączyć dekoder do gniazda AV1 lub AV2
znajdującego się z tyłu odbiornika, a pochodzący z niego obraz będzie się pojawiał na
ekranie po wybraniu tego numeru. Powtarzaj czynności 5 oraz 6d, jeżeli zamierzasz
dokonać regulacji dla innych kanałów.
7. Naciśnij przycisk MENU, aby usunąć menu z ekranu telewizora.
Włączanie trybu "Demo"
Tryb ten jest przewodnikiem po niektórych funkcjach dostępnych w telewizorze.
1. Przyciśnij przycisk MENU na pilocie, aby wyświetlić menu na ekranie telewizora.
2. Naciśnij przycisk V i wybierz symbol znajdujący się na ekranie, następnie
naciśnij B, aby wejść do menu "Ustawienia".
3. Naciśnij V, aby wybrać "Ręczne ustawianie" a następnie naciśnij B, aby wejść do
menu "Ręczne ustawianie".
4. Naciśnij przycisk V, aby wybrać "Demo" a następnie B, aby rozpocząć pokaz, który
trwa około 5 minut.
5. Naciśnij , aby przerwać pokaz.
20
Page 51

Posługiwanie się systemem menu telewizora:
Regulacja obrotu obrazu
Z powodu pola magnetycznego Ziemi obraz może okazać się przechylony. W takim przypadku można na nowo
wyregulować obraz.
1. Przyciśnij przycisk MENU na pilocie, aby wyświetlić menu na ekranie telewizora.
2. Naciśnij przycisk V i wybierz symbol , znajdujący się na ekranie, następnie
naciśnij B, aby wejść do menu "Ustawienia".
3. Naciśnij V, aby wybrać "Ręczne ustawianie", a następnie naciśnij B, aby wejść do
menu "Ręczne ustawianie".
4. Naciśnij V, aby wybrać "Obrót obrazu", następnie B, aby wejść do menu "Obrót
obrazu".
5. Naciśnij przyciski v lub V, aby obrócić obraz w zakresie od -5 do +5 i przyciśnij
przycisk OK, aby zachować.
6. Naciśnij przycisk MENU, aby usunąć menu z ekranu telewizora.
Regulacja geometrii obrazu dla sygnału RGB
Podczas podłączania źródła obrazu typu RGB, np. Sony Playstation, może okazać się, że konieczna jest regulacja
geometrii obrazu.
1. Naciśnij przycisk , aby wybrać źródło sygnału RGB .
2. Przyciśnij przycisk MENU, aby wyświetlić menu na ekranie telewizora.
3. Naciśnij przycisk V i wybierz symbol znajdujący się na ekranie, następnie
naciśnij B, aby wejść do menu "Ustawienia"
4. Naciśnij V, aby wybrać z menu "Ręczne ustawianie", następnie B, aby wejść do menu
"Ręczne ustawianie"
1
- - - - -
- - - - -
5. Naciśnij przycisk V, aby wybrać z menu "Ustawienia RGB", następnie naciśnij B, aby
wejść do podmenu "Ustawienia RGB".
6. Naciśnij B, aby wybrać Centrow. poziomie, następnie v lub V, aby wyregulować
położenie środka obrazu w zakresie od -10 do +10. Zapisz nowe ustawienia,
przyciskając OK.
7. Naciśnij B, aby wybrać "Wielkość poziomie", następnie v lub V, aby wyregulować
wielkość obrazu w poziomie, w zakresie od -10 do +10. Zapisz nowe ustawienia
przyciskając OK.
8. Naciśnij przycisk MENU, aby zniknęło ono z ekranu telewizora.
21
Page 52

Posługiwanie się systemem menu telewizora:
Wprowadzanie identyfikatora osobistego
Dzięki tej funkcji można wprowadzić do telewizora identyfikator osobisty, który pozwoli odszukać właściciela,
jeżeli telewizor zostanie ukradziony i odzyskany. Ten kod bezpieczeństwa można jednak wprowadzić tylko raz należy go zanotować!
1. Przyciśnij przycisk MENU na pilocie, aby wyświetlić menu na ekranie telewizora.
2. Naciśnij przycisk V i wybierz symbol , znajdujący się na ekranie, następnie
naciśnij B, aby wejść do menu "Ustawienia".
3. Naciśnij V, aby wybrać "Ręczne ustawianie", następnie naciśnij B, aby wejść do
menu "Ręczne ustawianie".
4. Naciśnij przycisk V, aby wybrać z menu "Ident. osobisty", następnie naciśnij B, aby
wejść do podmenu "Ident. osobisty".
5. Naciskaj przycisk v lub V, aby wybrać pierwszy z 11 znaków (litera, cyfra albo
odstęp), następnie naciśnij B, aby przejść do następnego znaku.
6. Powtarzaj czynności 5 dla wszystkich znaków z kodu.
7. Naciśnij OK, aby zachować. Na ekranie pojawi się okienko z żądaniem ponownego
wprowadzenia kodu.
8. Przyciśnij ponownie przycisk OK, aby ostatecznie zachować kod, lub naciśnij b, aby
skasować.
9. Naciśnij przycisk MENU, aby usunąć menu z ekranu telewizora.
Regulacja i nadawanie nazw sygnałom wejściowym
Dzięki tej funkcji można automatycznie formatować wejściowe sygnały źródłowe i nadawać im nazwy.
1. Przyciśnij przycisk MENU na pilocie, aby wyświetlić menu na ekranie telewizora.
2. Naciśnij przycisk V i wybierz symbol znajdujący się na ekranie, następnie
naciśnij B, aby wejść do menu "Ustawienia".
3. Naciśnij przycisk V, aby wybrać z menu "Nastawianie AV", następnie B, aby wejść do
menu "Nastawianie AV".
4. Naciskaj przycisk v lub V, aby wybrać żądane wejście AV (AV1, 2, 3 lub 4).
AV 1
AV 2
AV 3
AV 4
AV 1
AV 2
AV 3
AV 4
5. Naciśnij B, aby wybrać "AUTO FORMAT", następnie naciśnij v lub V, aby wybrać
"Wył.", "Normal." lub "Cały".
6. Przyciskiem B wybierz "NAZWA".
7. Naciskaj v lub V, aby wybrać pierwszy znak nazwy i naciśnij B, aby przejść do
następnego znaku.
8. Powtórz czynność 7, aby wybrać pozostałe 4 znaki, a następnie naciśnij OK, aby
zachować.
9. Powtórz czynności 4-8 dla pozostałych źródeł sygnału AV, następnie naciśnij przycisk
MENU, aby usunąć menu z ekranu telewizora.
22
AV 1
AV 2
AV 3
AV 4
AV 1
AV 2
AV 3
AV 4
Page 53

Dodatkowy osprzęt
Podłączanie urządzeń dodatkowych
Wzorując się na poniższych rysunkach, do telewizora można podłączyć różnorodny sprzęt audio i video.
C
-
3
S
1
S
1
3
2
MONO
L/G/S/I R/D/D/D
s
4
4
4
A B C
2
E
D
F
R/D/D/D
s
-
s
-
L/G
S/I
L/G/S/I
R/D/D/D
R/D
D/D
L/G/S/I
C
-
s
-
s
-
L/G
S/I
R/D
D/D
S
L/G/S/I R/D/D/D
4
4
4
DVD
G
VHS
2
1
Aby odebrać sygnał wejściowy z podłączonego sprzętu, należy wybrać to gniazdo, do którego podłączone jest dane
urządzenie.
1. Na podstawie powyższych rysunków, podłącz sprzęt do odpowiedniego gniazda telewizora.
2. Naciskaj przycisk pilota, aż odpowiedni symbol wejścia pokaże się na ekranie telewizora (patrz tabela poniżej):
Symbol na
Sygnał wejściowy z gniazda
ekranie
1
2
3
• Wejściowy sygnał audio/video z wejścia D lub sygnał* RGB z wejścia D
• Wejściowy sygnał audio/video z wejścia E lub sygnał* S-video z wejścia E
• Wejściowy sygnał audio/video z wejścia F lub sygnał* S-video z wejścia F
4
• Sygnał wejściowy S-video z 4-szpilkowego gniazda DIN A lub sygnał* video z gniazda cinch
B lub sygnał audio z gniazd cinch C
* automatyczne rozpoznanie sygnału w zależności od podłączonego sprzętu
3. Włącz podłączony sprzęt.
4. Naciśnij , aby powrócić do normalnego obrazu.
Uwaga: Aby uniknąć zniekształceń obrazu, nie wolno podłączać sprzętu jednocześnie do gniazd A oraz B.
23
Page 54

Wyposażenie dodatkowe
* Jeżeli występują zakłócenia obrazu lub dźwięku, wówczas należy odsunąć magnetowid od telewizora.
* Kiedy podłączasz monofoniczny magnetowid, podłącz przewód tylko do białych gniazd telewizora i
magnetowidu.
s
2
* Więcej informacji o wybieraniu sygnału wejściowego z gniazda Scart 2 / podano na stronie 16.
* Jeśli podłączasz zewnętrzny sprzęt hi-fi, regulację głośności możesz wykonać przez zmianę w menu dźwięku
ustawienia dla słuchawek - zapoznaj się z sekcją "Regulacja obrazu i dźwięku".
2
Smartlink
Smartlink jest to bezpośrednie łącze pomiędzy telewizorem i magnetowidem.
Do użycia systemu Smartlink potrzebny jest:
* Magnetowid obsługujący Smartlink, NexTView Link, Easy Link lub Megalogic.
s
2
* Pełny, 21-stykowy kabel Euro, umożliwiający podłączenie magnetowidu do gniazda Scart 2 / .
Zalety Smartlink to:
* Informacje na temat zaprogramowanych kanałów przekazywane są z telewizora do magnetowidu.
* Przy pomocy NexTView można łatwo programować magnetowid.
* Bezpośrednie nagrywanie: podczas oglądania telewizji wystarczy nacisnąć jeden przycisk magnetowidu, aby
nagrać dany program.
Aby uzyskać więcej informacji na temat Smartlink, należy zapoznać się z instrukcją magnetowidu.
2
Zdalne sterowanie innym sprzętem Sony
Przy pomocy przycisków znajdujących się pod pokrywką pilota, można sterować także innymi urządzeniami firmy
Sony.
1. Otwórz pokrywkę pilota.
2. Przestaw przełącznik VTR 1234 DVD w położenie odpowiadające urządzeniu, którym chcesz sterować:
VTR1 magnetowid Beta
VTR2 magnetowid 8 mm
VTR3 magnetowid VHS
VTR4 Digital Video (DCR-VX 1000/9000E,VHR-1000)
DVD Digital Video Disk
3. Użyj przycisków pilota do zdalnego sterowania dodatkowymi urządzeniami.
* Jeżeli sprzęt ten ma przełącznik trybu sterowania (COMMAND MODE), należy go przestawić w to samo
położenie, co przełącznik VTR 1234 DVD pilota.
* Jeżeli sprzęt ten nie ma danej funkcji, odpowiedni przycisk pilota nie będzie działał.
24
Page 55

Informacje dodatkowe
Dane techniczne
System TV
B/G/H, D/K, I, L
System koloru
PAL, SECAM
NTSC 3.58, 4.43 (tylko Video In)
Zakresy kanałów
Patrz "Tabela kanałów" na tej stronie.
Kineskop
FD Trinitron WIDE
Około 91cm (36 cale), kąt odchylania 102˚
Gniazda z tyłu
s
/ 21-stykowa łączówka Euro (norma CENELEC)
1
1
zawierająca wejście audio/video, RGB oraz
wyjście telewizyjne audio/video.
s
/ 21-stykowa łączówka Euro (norma CENELEC)
2
2
zawierająca wejście audio/ video, S-video oraz
wyjście audio/video monitora.
s
/ 21-stykowa łączówka Euro (norma CENELEC)
3
3
Wyjścia dla zewnętrznych głośników: 2-stykowe DIN (5)
zawierająca wejście audio/video, S-video oraz
wyjście audio/video monitora.
RF In
Gniazda z przodu
4
4
s
4
Wejście sygnału video - gniazdo cinch
Wejście sygnału audio - gniazdo cinch
Wejście sygnału S-video - gniazdo 4-stykowe DIN
Gniazdo słuchawkowe stereo mini
Moc wyjściowa dźwięku
Prawy i lewy głośnik: 2x25W (moc muzyczna)
2x15W (skuteczna)
Głośnik centralny: 1 x 20 W (moc muzyczna)
1 x 10 W (moc skuteczna)
Głośniki surround: 2 x 10 W (moc muzyczna)
2 x 5 W (moc skuteczna)
Pobór mocy
170W
Wymiary (szer. x wys. x gł.)
Około 972 x 613,5 x 591 mm
Ciężar
Około 90,0kg
Akcesoria w wyposażeniu
Pilot RM-892 (1 szt.)
Baterie do pilota (zgodne z normą IEC) (2 szt.)
Głośniki surround (2 szt.)
Inne funkcje
Płaski kineskop Trinitron, cyfrowa redukcja zakłóceń,
obraz 100 Hz, korektor graficzny identyfikator osobisty,
funkcja sleep, NexTView, Dolby Surround, cyfrowy filtr
grzebieniowy, drugi tuner.
Dane techniczne oraz konstrukcja mogą ulec
zmianie.
Tabela kanałów
Odbierane kanały Oznaczenia kanałów
B/G/H E2..12, 21..69 C02..C12, C21..69
CABLE TV (1) S1..S41 S01..S41
CABLE TV (2) S01..S05 S42..S46
M1..M10 S01..S10
U1..U10 S11.S20
ITALIA A, B..H, H1, H2 C13, C14..C20, C11, C12
CABLE TV S1..S41 S01..S41
S01..S05 S42..S46
25
Page 56

Informacje dodatkowe
Problemy i ich usuwanie
Oto kilka prostych rozwiązań problemów, które mogą niekorzystnie wpływać na obraz i dźwięk.
Problem Rozwiązanie
Brak obrazu (ekran jest ciemny),
brak dźwięku
Słaba jakość obrazu lub jego brak
(ekran jest ciemny), ale dobra
jakość dźwięku.
Słaba jakość obrazu podczas
oglądania sygnału wideo RGB.
Dobry obraz, brak dźwięku
Brak koloru w programach
kolorowych
• Włącz wtyczkę telewizora do sieci.
• Wciśnij przycisk znajdujący się z przodu telewizora.
• Jeżeli świeci się wskaźnik , wciśnij na pilocie
przycisk lub przycisk numeru programu.
• Sprawdź podłączenie anteny.
• Wyłącz telewizor na 3 lub 4 sekundy, następnie włącz go
ponownie, używając przycisku , znajdującego się z
przodu telewizora.
• W systemie menu wybierz "Regulacja
obrazu". Wyreguluj jasność, obraz oraz balans kolorów.
• Z menu regulacji obrazu wybierz "Zerowanie", aby
przywrócić ustawienia fabryczne.
• Wciskaj przycisk pilota, aż na ekranie zostanie
wyświetlony symbol RGB .
• Naciskaj na pilocie przycisk .
• Jeśli na ekranie wyświetlony jest symbol , wciśnij
przycisk pilota.
• Używając systemu MENU, wybierz menu regulacji
koloru i dokonaj regulacji.
• Z menu regulacji obrazu wybierz "Zerowanie", by
przywrócić ustawienia fabryczne.
/
Zniekształcony obraz przy
zmianach programu lub czytaniu
telegazety
Nie działa pilot • Wymień baterie.
Miga wskaźnik stanu czuwania
na telewizorze
• Jeżeli w dalszym ciągu występują problemy, oddaj swój telewizor do naprawy wykwalifikowanemu
personelowi.
• NIGDY nie zdejmować obudowy.
• Wyłącz urządzenia podłączone do gniazd znajdujących
się z tyłu telewizora.
• Skontaktuj się z najbliższym centrum serwisowym Sony.
26
Page 57

27
Page 58

Bezpečnostní informace
Bezpečnostní informace
Tento televizor pracuje pouze s napětím 220240V. V případě zapojení příli mnoha
spotřebičů do jedné el. zásuvky může dojít k
úrazu el. proudem či požáru.
Neotevírejte zadní kryt televizoru. Toto
přenechte pouze kvalifikovaným
odborníkům z autorizovaných servisů SONY.
Z bezpečnostních důvodů a z důvodů
ochrany životního prostředí doporučujeme
neponechávat televizor v pohotovostním
stavu pokud není del í dobu používán. V
tomto případě odpojte televizor z el. sítě.
Nedotýkejte se během bouřky jakékoliv
části el. přívodního kabelu ani anténního
kabelu.
Nevkládejte žádné předměty do televizoru,
rovněž do televizoru nelijte jakoukoliv
tekutinu. V případě, že se tak stane a již
úmyslně či neúmyslně televizor nezapínejte
a sdělte tuto skutečnost nejbliž ímu
autorizovanému servisu SONY, který
odborně televizor prověří.
Nevystavujte televizor de ti a vlhku,
předejdete tak případnému úrazu el.
proudem.
Nezakrývejte ventilační otvory televizoru.
Nechte kolem televizoru alespoň 10 cm
prostoru pro ventilaci vzduchu.
Televizor můžete čistit pouze jemnou, lehce
navlhčenou látkou. Nepoužívejte benzín,
ředidlo ani jiné chemikálie, rovněž
nepoužívejte čistící prostředky s brusnými
účinky. Ne krábejte povrch obrazovky. Pro va
i bezpečnost doporučujeme televizor před či
těním vždy odpojit od el. sítě.
Televizor postavte vždy na stabilní a bezpečný
stolek. Nedovolte dětem aby na televizor
lezli, sedali si na něj, či si na něm hráli. Při
manipulaci nepokládejte televizor na boční
ani na čelní stranu.
Neumis ujte televizor na horká, mokrá či
extrémně pra ná místa. Televizor by neměl
být vystaven mechanickým vibracím.
Při vytahování el. přívodního kabelu tahejte
pouze za zástrčku, netahejte za kabel.
Před manipulací vypojte televizor z el. sítě.
Při manipulaci postupujte opatrně abyste
televizor nepo kodili. Pokud vám televizor
upadl, či byl jiným způsobem po kozen
nechte ho prověřit odborným pracovníkem
autorizovaného servisu SONY.
Hořlavé látky, či otevřený oheň (svíčka)
neumis ujte v těsné blízkosti televizoru.
Abyste nepo kodili el. přívodní kabel
nepokládejte na něj žádné těžké předměty.
Doporučujeme přebytečnou část el.
přívodního kabelu navinout kolem háčků na
zadní straně televizoru.
Nezakrývejte ventilační otvory televizoru
novinami, časopisy ani záclonami a závěsy.
Page 59

Obsah
Obsah
Instalace
1. Kontrola dodaného příslušenství
2. Vložení baterií do dálkového ovladače
3. Připojení televizoru
4. Zapnutí televizoru
5. Použití ovládacího knoflíku
6. Vyladění televizoru
7. Vyhledání video kanálu
Obsluha
Přehled tlačítek televizoru
Přehled tlačítek dálkového ovladače
NexTView
Teletext
Použití systému nabídek televizoru
Úprava nastavení obrazu
Úprava nastavení zvuku
Nastavení Dolby Surround
Použití nabídky Spec. funkce
Změna rozměrů obrazovky
Použití režimu Multi PIP (vícenásobný obraz v obraze)
Ovládání funkce PAP (obraz a obraz)
Změna uspořádání televizních kanálů
Manuální vyladění televizoru
Pojmenování kanálu
Vynechání nevyužitých programů
Použití funkce Rozšířené předvolby
Výběr funkce Ukázka
Nastavení natočení obrazu
Nastavení geometrie obrazu pro zdroj RGB signálu
Zadání osobního ID čísla
Předvolení a popis zdrojů vstupního signálu
2
2
3
5
5
6
6
7
8
9
11
13
13
14
15
16
16
17
17
18
18
19
19
20
20
21
21
22
22
Další zařízení
Připojení dalšího zařízení k televizoru
Další informace týkající se připojování zařízení
Smartlink
Dálkové ovládání dalších zařízení firmy Sony
Další informace
Technické údaje
Tabulka zobrazení kanálů
Odstraňování chyb
23
24
24
24
25
25
26
1
Page 60

Instalace
Při instalaci televizoru a zobrazení televizních
programů postupujte podle kroků 1-7.
1. Kontrola dodaného příslušenství
Baterie
Dálkový ovladač
2. Vložení baterií do dálkového ovladače
Prostorové reproduktory
Propojovací kabely k prostorovým
reproduktorům
Použité baterie vždy likvidujte s ohledem na životní prostředí.
2
Page 61

Instalace
3. Připojení televizoru
Připojení reproduktorů
Dolby* Pro Logic Surround obyčejně vyžaduje 5 reproduktorů.
Středový reproduktor (zabudovaný v televizoru) pro zajištění stabilního ozvučeného obrazu, jako
jsou např. dialogy na televizní obrazovce.
Levý a pravý přední reproduktor (zabudované v televizoru) pro běžné dvoukanálové nebo stereo vysílání.
Prostorové reproduktory (součást dodávky) pro zvláštní efekty vytvářené prostorovým kanálem.
Připojení dodaných reproduktorů
C
S
S
Černý
propojovací
kabel
Černý/bílý
propojovací
kabel
prostorové reproduktory
Připojení vlastních reproduktorů
(Ujistěte se, že reproduktory mají impedanci nejméně 8 ohmů a jsou magneticky odstíněny. Jinak může dojít k pokroucení
obrazu).
L/G/S/I
R/D/D/D
pravý
levý reproduktor
C
S
S
reproduktor
prostorové reproduktory
*Vyrobeno podle licence od společnosti Dolby Laboratories Licensing Corporation. Dolby, ProLogic a symbol dvojité D jsou
ochranné známky společnosti Dolby Laboratories Licensing Corporation.
3
Page 62

Instalace
3. Připojení televizoru
Připojení antény k televizoru
L/G/S/I
R/D/D/D
Jestliže nebudete
televizor připojovat k
videorekordéru, připojte
prosím anténní svod
(podle vyobrazení vlevo)
a přejděte k oddílu
4.Zapnutí televizoru .
Pokud budete televizor
připojovat k
L/G
S/I
R/D
D/D
videorekordéru, přečtěte
si prosím níže uvedený
oddíl.
1. Připojte stávající anténní svod do zásuvky na zadní straně televizoru označené .
Připojení antény a videorekordéru k televizoru
L/G
S/I
R/D
D/D
(stávající anténní svod)
IN
OUT
(kabel SCART - není
součástí dodávky)
AC IN
L/G/S/I
R/D/D/D
Kabel typu SCART je
volitelný. Jestliže je
ho však možné použít,
toto doplňkové
propojení může
zlepšit kvalitu obrazu
a zvuku v režimu
přehrávání.
1. Podle vyobrazení připojte stávající anténní svod k videorekordéru.
2. Podle vyobrazení připojte anténní vedení ze zásuvky RF OUT na zadní straně
videorekordéru do anténní zásuvky na zadní straně televizoru.
3. Připojte videorekordér k elektrické síti a zapněte ho.
4. Do videorekordéru vložte předem nahranou pásku a stiskněte tlačítko PLAY
(přehrávat).
4
Page 63

Instalace
4. Zapnutí televizoru
1. Zapojte zástrčku televizoru do sít'ové zásuvky (220-240V ~, 50Hz) a zapněte ho.
2. Stiskněte vypínač na přední straně televizoru.
Jestliže svítí indikátor úsporného režimu umístěný na přední straně televizoru,
zapněte televizor stisknutím tlačítka TV na dálkovém ovladači. Bute
prosím trpěliví, nebot' obraz se může objevit na televizní obrazovce až po chvíli.
/
5. Použití ovládacího knoflíku
Pohyb ovládacím knoflíkem Stisknutí ovládacího knoflíku
V nabídkách se můžete pohybovat
stisknutím příslušných šipek.
Položku v nabídce zvolíte stisknutím
střední části ovládacího knoflíku.
5
Page 64

Instalace
6. Vyladění televizoru
Před vyladěním televizoru budete požádáni, abyste nastavili svůj jazyk a zemi.
1. Na obrazovce televizoru se objeví nabídka Language/Country se
zvýrazněným slovem English.
2. Stisknutím tlačítka v nebo V na dálkovém ovladači zvolte jazyk
dle vlastního výběru a potom pro potvrzení stiskněte tlačítko OK.
Na obrazovce se objeví nabídka zemí se zvýrazněným slovem
OFF (vypnuto). Pokud nechcete, aby byly kanály uloženy v
daném pořadí kanálů, počínaje pozicí programu 1, zvolte 'OFF'.
3. Stisknutím v nebo V zvolte zemi, v níž chcete televizor
provozovat a svou volbu potvrte stisknutím tlačítka OK.
4. Na obrazovce televizoru se objeví nabídka automatické ladění
ve vámi zvoleném jazyce. Pro potvrzení stiskněte tlačítko OK.
5. Ujistěte se, že je anténa připojena podle pokynů a pro potvrzení
stiskněte tlačítko OK. Televizor pro vás začne automaticky
vyhledávat a ukládat všechny dostupné kanály. To může trvat
několik minut - bute prosím trpěliví a nemačkejte žádná
tlačítka.
6. Když televizor naladí všechny dostupné kanály, na obrazovce se
objeví nabídka Třídění programů, která vám umožňuje změnit
pořadí kanálů v televizoru. Pokud chcete změnit pořadí kanálů,
zvolte stisknutím tlačítka v nebo V kanál, který chcete přemístit
a potom stiskněte B. Stisknutím tlačítka v nebo V zvolte pozici
nového čísla programu pro vámi zvolený kanál a potom pro
potvrzení stiskněte tlačítko OK. Zvolený kanál se nyní přesune
na svou novou pozici programu a také ostatní kanály se podle
toho přemístí. Pokud chcete setřídit pořadí dalších kanálů
televize, tento postup opakujte.
7. Stisknutím tlačítka MENU odstraňte nabídku z televizní
obrazovky.
8. Stisknutím tlačítek PROGR+/- nebo tlačítek s čísly zobrazíte
požadované televizní kanály.
Poznámka: Jestliže budete chtít automatické vylaování v
kterémkoliv okamžiku zastavit, stiskněte tlačítko OK.
7. Vyhledání video kanálu
Pokud jste připojili k televizoru videorekordér, budete muset nyní vyhledat kanál s videem.
1. Opakovaně tiskněte tlačítka PROGR+/- na dálkovém ovladači, dokud se na obrazovce televizoru neobjeví obraz z videa.
Poznámka: Jestliže chcete přesunout kanál s videem na pozici jiného programu, přečtěte si v této příručce oddíl
Řazení televizních kanálů .
6
Page 65

Obsluha
Přehled tlačítek televizoru
Tlačítka pro ovládání hlasitosti.
Jejich stisknutím můžete zvýšit (+)
nebo snížit (-) hlasitost.
Tlačítko pro video vstup.
Jeho stisknutím můžete zvolit vstupní
signál z videorekordéru atd.
Tlačítka pro přepnutí na
vyšší (+) nebo nižší (-)
program.
Jejich stisknutím lze
navolit požadovaný
televizní kanál.
OVLÁDACÍ tlačítko
Jeho stisknutím se aktivuje a
osvětlí ovládací panel.
+
–
PROGR
–
+
CONTROL
Sít'ový vypínač.
Jeho stisknutím televizor
zapnete nebo vypnete.
7
Page 66

Obsluha
Přehled tlačítek dálkového ovladače
Vypnutí zvuku
Jeho stisknutím vypnete zvuk televizoru.
Opětovným stisknutím zvuk obnovíte.
Návrat do režimu televizoru
Jeho stisknutím se vrátíte z teletextového nebo
pohotovostního režimu do normálního provozního
režimu.
Výběr teletextu
Jeho stisknutím zapnete nebo vypnete teletext.
Výběr Elektronického průvodce programy (EPG)
Jeho stisknutím zapnete nebo vypnete EPG.
Zmrazení obrazu
Pokud si chcete poznamenat nějaké informace z
televizní obrazovky, např. telefonní číslo, stiskněte
toto tlačítko. Jeho opětovným stisknutím se vrátíte
do normálního režimu televizoru.
Výbìr kanálù
Stisknutím těchto tlačítek s čísly můžete provádět
výběr kanálů.
U dvoumístných čísel programů, např. 23, stiskněte
nejprve -/-- a potom tlačítka 2 a 3.
Zobrazení nabídky pro nastavení obrazu
Po jeho stisknutí můžete provést změny v
nastavení obrazu. Zobrazení této nabídky zrušíte
stisknutím tlačítka OK.
Zobrazení nabídky pro nastavení zvuku
Po jeho stisknutí můžete provést změny v
nastavení zvuku. Zobrazení této nabídky zrušíte
stisknutím tlačítka OK.
Zobrazení tabulky kanálù
Stiskněte tlačítko OK. Stisknutím v nebo V zvolte
požadovaný kanál a potom stiskněte B pro
potvrzení.
Dočasné vypnutí televizoru
Jeho stisknutím televizor dočasně vypnete. Po jeho
opětovném stisknutí televizor opustí úsporný režim a zapne
se. Kvůli úspoře energie doporučujeme, abyste televizor
zcela vypínali, když jej nepoužíváte. POZNÁMKA: Jestliže
televizor nepřijímá po dobu 15 - 30 minut žádný televizní
signál a není stisknuto žádné tlačítko, automaticky se přepne
do úsporného režimu.
Vyvolání informací na obrazovce
Jeho stisknutím vyvoláte všechny údaje na obrazovce. Jeho
opětovným stisknutím jejich zobrazení zrušíte. V režimu
Teletext jeho stisknutím vyvoláte stránku s rejstříkem
(obvykle stránka 100) a jeho opětovným stisknutím její
zobrazení zrušíte.
Výběr vstupního signálu nebo zmrazení teletextu
Jeho stisknutím můžete zvolit vstup z některého z
konektorů televizoru (viz oddíl Použití přídavných zařízení).
V režimu Teletext jeho stisknutím zmrazíte zobrazenou
stránku. Jeho opětovným stisknutím toto zmrazení zrušíte.
Podrobnosti najdete v oddílu Ovládání funkce PAP v této
příručce.
Návrat na předchozí kanál
Jeho stisknutím se vrátíte na předchozí kanál, který jste
sledovali. Poznámka: Toto lze provést pouze po sledování
stávajícího kanálu po dobu 5 sekund.
Jeho stisknutím zapnete nebo vypnete režim Multi PIPf.
Změna formátu obrazovky
Jeho stisknutím změníte velikost obrazovky.
Klávesy pro Fastext
Podrobnosti najdete v příručce v oddílu Teletext.
Výběr položek nabídky
Pomocí tlačítka OK a kláves se šipkami můžete volit
možnosti, které jsou k dispozici v systému nabídek tohoto
televizoru.
Zobrazení nabídky
Toto tlačítko stiskněte, jestliže chcete použít systém nabídek
televizoru. Jeho opětovným stisknutím nabídku z televizní
obrazovky odstraníte.
Nastavení hlasitosti televizoru
Jeho stisknutím nastavíte hlasitost televizoru.
Obnovení hodnot nastavených ve výrobě.
Otevřete víčko dálkového ovladače a
stisknutím tohoto tlačítka obnovte výrobní
nastavení obrazu a zvuku. Když se na
obrazovce televizoru objeví nabídka
Instalace', podívejte se do příručky do oddílu
Výběr jazyka a země, abyste případně mohli
změnit svou volbu jazyka a země.
8
Výběr kanálů
Jeho stisknutím můžete zvolit požadovaný kanál.
Zobrazení času.
Po otevření víčka dálkového ovladače můžete
stisknutím tohoto tlačítka zobrazit na obrazovce čas.
Obsluha video přístroje
Po otevření víčka dálkového ovladače můžete
stisknutím těchto tlačítek ovládat svůj video přístroj
(prostudujte si prosím příručku ke svému
videorekordéru).
Page 67

Obsluha
NexTView*
*v závislosti na dostupnosti služby.
NexTView je elektronický průvodce programy, jenž poskytuje informace o programech až na 1 týden*, pro všechny kanály,
které podporují EPG.
*Jestliže objem dat překročí velikost paměti NexTView, obdržíte informace pro méně než 7 dní.
Zobrazení NexTView
Nejprve musíte zvolit kanál, který poskytuje službu NexTView. V tomto případě se zobrazí indikace NexTView,
jakmile budou k dispozici všechna data.
1. Opakovaným stisknutím tlačítka na dálkovém ovladači můžete NexTView zapnout a vypnout.
2. Stisknutím tlačítka v, V, b nebo B můžete přemíst'ovat kurzor na obrazovce.
3. Stisknutím tlačítka OK potvrdíte výběr.
a. Jestliže stisknete tlačítko OK ve sloupcích s datumem, časem nebo ikonami (témata), změníte tím seznam
programů podle daného výběru.
b. Jestliže stisknete tlačítko OK v seznamu programů, potom přímo zobrazíte daný kanál, pokud právě probíhá
vysílání, nebo zobrazíte nabídku Long Info, pokud vysílání proběhne až v budoucnu.
Rejstřík
úplný seznam pro výběr
osobní výběr
vysílání zpráv
filmy
sport
zábava
děti
návrat do poslední nabídky
07 Tue
12:38
Tu e
Wed
Thu
Sat
Sun
Mon
SWISS
7
8
9
10
Fri
11
12
13
Star Wars
Super RTL
Werner - Beinhart
Pro 7
Flui grüsst den Rest der Welt
Kabel 1
12
Once upon a time in the West
Euronews
International News
RTL Plus
Fantasy film, USA, 1996
TXT TPS / RINGIER
10:35 - 12:45
10:20 - 12:00
10:45 - 10:50
11:00 - 11:20
11:45 - 12:50
Tue 07. 04 .98
9
Page 68

Obsluha
NexTView
Použití nabídky Individual Setting
Když zvolíte ikonu , můžete provést svůj vlastní individuální výběr témat a omezit tak vyhledávání na označená témata.
1. Stisknutím v nebo V zvolte ikonu a potom stisknutím B zobrazte nabídku Individual Setting .
2. Stisknutím v nebo V vyberte zvolenou položku na obrazovce a potom svou volbu potvrte stisknutím tlačítka OK.
3. Opakujte krok 2 pro všechny položky, které chcete mít ve svém seznamu.
4. Když seznam dokončíte, stisknutím
5. Stiskněte tlačítko OK.
Použití nabídky Long Info
1. Stisknutím v nebo V zvolte ve sloupci se seznamem programů budoucí program.
2. Stisknutím tlačítka OK zobrazte nabídku Long Info.
B vyberte na obrazovce s nabídkou .
First nextTView/EPG-Providers in Europe
07 Tue
12:38
SWISS TXT TPS / RINGIER nexTView
Address Mapping
The position of the addresses in the
OSDA is shown in the following diagram.
The position values of the DPW are set
to '0'.
If other values are set, the complete
combination will be scrolled.
Example:
if the DPWC is set to '63', the char-
This channel has been set for a timer
VPS/PDC
Speed
Timer Prog
VCR1
On
SP
Tue 07. 04 .98
3. Jestliže máte videorekordér s funkcí Smartlink a chcete na něm nahrát zvolený program, nejprve stisknutím b zvolte a
potom stisknutím tlačítka OK nahrajte tyto informace do videorekordéru.
4. Nastavení videorekordéru:
VPS/PDC
Opakovaným stisknutím b zvolte VPS/PDC a potom stisknutím tlačítka OK zvolte Zap nebo Vyp. Když je toto
nastavení zapnuto, zaručuje vám zaznamenání celého pořadu i kdyby došlo ke změně v televizním programu.
Funguje však pouze v případě, že zvolený kanál vysílá signál VPS/PDC.
Rychlost
Stisknutím V zvolte Rychlost a potom stisknutím tlačítka OK zvolte SP pro standardní dobu přehrávání nebo LP pro
dlouhou dobu přehrávání. S nastavenou dlouhou dobou přehrávání můžete nahrát na videokazetu dvojnásobek
standardního záznamu. Může se však zhoršit kvalita obrazu.
VCR Setup
Stisknutím V zvolte VCR Setup a potom stisknutím tlačítka OK zvolte, který videorekordér chcete naprogramovat, tj.
VCR1 nebo VCR2 .
5. Nakonec zvolte stisknutím B ikonu a potom odstraňte nabídku z obrazovky televizoru stisknutím tlačítka OK.
10
Page 69

Obsluha
TELETEXT
Tele tex t
Většina televizních kanálů vysílá informace prostřednictvím teletextu. Stránka s rejstříkem teletextové služby (obvykle stránka
100) vám poskytuje informace o jejím využití. Použijte prosím televizní kanál se silným signálem, jinak se mohou v teletextu
vyskytnout chyby.
Zapnutí a vypnutí teletextu
1. Zvolte televizní kanál, na nemz je vysílána teletextová sluzba, kterou chcete
zobrazit.
2. Jedním stisknutím zvolte Obraz a teletext (P&T).
Obrazovka se rozdelí na
dve cásti, pricemz televizní kanál je v pravém rohu a zobrazení teletextu je vlevo
Rezim P&T: Stisknutím PROGR+/- prepnete kanál televizní obrazovky.
Stlacením b nebo B zmeníte velikost televizní obrazovky. Opetovným
stisknutím obnovíte normální príjem teletextu.
3. Dvojím stisknutím zobrazíte pouze teletext.
4. Trojím stisknutím prejdete do rezimu Mix.
5. Stisknutím nebo ctvrtým stisknutím teletext vypnete.
Vyvolání stránky s rejstríkem.
Tuto stránku (obvykle stránku 100) vyvoláte stisknutím tlacítka *. Jeho opetovným
stisknutím její zobrazení zrušíte.
Použití dalších funkcí teletextu
Výběr následující nebo předchozí stránky
Stisknutím tlačítka nebo na dálkovém ovladači zvolíte předchozí nebo následující
stránku.
TELETEXT
Index
Programme
News
Sport
.
Weather
25
153
101
98
m
TELETEXT
Index
Programme
News
Sport
Weather
m
25
153
101
98
TELETEXT
Index
Programme
News
Sport
Weather
216-02
25
153
101
98
Výběr podstránky
Teletextová stránka se může skládat z několika podstránek. V takovém případě je zobrazen
informační řádek, který ukazuje počet podstránek. Podstránku zvolíte stisknutím v nebo V.
Zmrazení teletextové stránky
Stránku zmrazíte stisknutím tlačítka . Jeho opětovným stisknutím toto zmrazení zrušíte.
Vyvolání skrytých informací (např. odpovědí na kvíz).
Informace vyvoláte stisknutím tlačítka .
Přístup ke stránkám pomocí barevných tlačítek (Fastext)
(k dispozici pouze v případě, že daná televizní stanice vysílá signály Fastext)
Když se ve spodní části stránky objeví barevně rozlišená nabídka, můžete stisknutím
barevného tlačítka na dálkovém ovladači (zeleného, červeného, žlutého nebo modrého)
přejít na příslušnou stránku.
Použití funkce Zachytávání stránek
1. Stisknutím očíslovaných tlačítek na dálkovém ovladači zvolte teletextovou
stránku, na které je několik čísel stránek (např. stránku s rejstříkem).
2. Stiskněte tlačítko OK.
3. Stisknutím v nebo V zvolte požadované číslo stránky a potom stiskněte tlačítko
OK. Požadovaná stránka se za několik sekund zobrazí.
01 03 04 05 06 07 0802
11
Page 70

Obsluha
Tele tex t
Teletext je informační služba, kterou vysílá většina televizních stanic.
Použití nabídky Teletext
1. Stisknutím tlačítka MENU na dálkovém ovladači zobrazte nabídku na obrazovce
televizoru.
2. Stisknutím v nebo V zvolte na obrazovce položku dle vlastního výběru a potom
zobrazte stisknutím
3. Nabídku Teletext odstraníte z obrazovky stisknutím tlačítka MENU.
Horní/Dolní/Plný
Dílčí nabídka Horní/Dolní/Plný vám umožňuje zvětšit různé části teletextové stránky.
Stisknutím v zvětšíte horní polovinu obrazovky, stisknutím V zvětšíte její dolní polovinu.
Stisknutím tlačítka OK obnovíte normální velikost stránky. Stisknutím b se vrátíte na
obrazovku s nabídkou Teletext.
Vymazaní textu*
*funkce přistupná pouze v režimech TELETEXT a Obraz a TELETEXT (viz Zapnutí
a vypnutí teletextu)
B příslušnou dílčí nabídku.
Po zvolení této funkce můžete při čekání na požadovanou teletextovou stránku sledovat
příslušný televizní kanál.
1. Na dálkovém ovladači stiskněte dvakrát tlačitko a teletext se zobrazí na celé
obrazovce.
2. Stisknéte tlačitko MENU - zobrazíte menu režimu teletext.
3. Stisknéte v nebo V, zvolte Skryti textu a potvrdte stisknutím B.
4. Zobrazí se příslušný televizní kanál, který sledujete. Jakmile bude stránka k dispozici,
modrý symbol se zobrazí v levérn horním rohu obrazovky.
5. Stiskněte tlačitko zobrazí se požadovaná stránka teletextu.
Odkrýt text
Některé teletextové stránky obsahují skryté informace (např. pro kvíz), které můžete
vyvolat. Po zvolení této funkce se budou skryté informace objevovat na obrazovce. Po
výběru této funkce stiskněte B. Na obrazovce se objeví skryté informace.
Casovací stránka
Ve vámi zadaném čase můžete vyvolat stránku s časovým kódem, např. stránku s alarmem.
Po zobrazení dílčí nabídky Casovací stránka:
Stisknutím v nebo V zvolte Zap a potom pro potvrzení stiskněte tlačítko OK.
Stisknutím očíslovaných tlačítek na dálkovém ovladači zadejte trojmístné číslo požadované
stránky. Dalším stisknutím očíslovaných tlačítek zadejte požadovaný čas ve čtyřmístném
formátu. Stisknutím tlačítka OK požadovaný čas uložte. Tento čas se zobrazí v levém
horním rohu obrazovky. V požadovaný čas se daná stránka zobrazí.
Přehled stránek*
*funkce přistupná pouze v připadě, že sledovaná stanice vysílá v režimu TOP-Text
V nabídce Přehled stránek jsou stránky bloků a skupin hlavního textu seřazeny do dvou
sloupců, aby si zákazník mohl snadno vybrat svou stránku. Pro každou stránku bloku v
prvním sloupci jsou ve druhém sloupci uvedeny odpovídající stránky skupin.
1. Na dálkovém ovladači stisknutím b nebo B zvolte první, nebo druhý sloupec.
2. Stisknutím v nebo V zvolte požadovanou skupinu či blok stránek.
3. Stisknutím tlačítka OK zobrazíte požadovanou stránku.
12
Page 71

Obsluha
Použití systému nabídek televizoru
Tento televizor obsahuje systém nabídek, který tvoří soustava snadno použitelných oken a nabídek na obrazovce. Tato okna
vám pomohou dosáhnout maximálního výkonu tohoto televizoru. Jejich pomocí můžete změnit nastavení obrazu a zvuku,
upravit rozměry televizního obrazu, změnit uspořádání televizních kanálů atd.
Nastavení obrazu a zvuku
Obraz a zvuk jsou předem nastaveny ve výrobě. Jejich nastavení však můžete upravit, aby vyhovovalo vašim vlastním
představám.
1. Stisknutím tlačítka MENU na dálkovém ovladači zobrazte nabídku na
obrazovce televizoru.
2. Stisknutím tlačítka v nebo V zvolte pro nastavení obrazu nebo pro
nastavení zvuku. Potom stisknutím B přejděte buto do nabídky Nastavení
obrazu nebo Nastavení zvuku .
3. Stisknutím tlačítka v nebo V zvolte na obrazovce parametr, jehož nastavení
chcete upravit a potom stiskněte B pro potvrzení. Popis jednotlivých položek
nabídky a jejich funkcí najdete v níže uvedené tabulce.
4. Stisknutím tlačítka v, V, B nebo b nastavte zvolený parametr.
5. Po nastavení parametru uložte nové nastavení stisknutím tlačítka OK.
6. Pokud chcete nastavit některý z dalších parametrů, zopakujte kroky 3 - 5.
7. Stisknutím tlačítka MENU odstraňte nabídku z televizní obrazovky.
Ovládání obrazu
Položka Účinek/ovládání
Režim obrazu V Live (pro živá vysílání)
Personal (pro individuální nastavení)
Movie (pro vysílání filmů)
v Game (pro pocítacové hry)
Kontrast nižší bBvyšší
Jas* tmavší bBjasnější
Barevná sytost* nižší bBvyšší
Odstín** načervenalý bBnazelenalý
Ostrost* mdlejší bBostřejší
Reset Obnoví původní nastavení obrazu z výroby
Umělá inteligence V Vyp : Normální
v Zap : Automatická optimalizace úrovně kontrastu
podle televizního signálu.
Redukce dig. šumu V Vyp : Normální
v Zap : Snižuje šum v obraze v případě slabého
televizního signálu
Digitální režim V DRC 50
v DRC 100
* Jen v případě, že je položka Režim obrazu nastavena na Personal
** Pouze u systému NTSC.
13
Page 72

Použití systému nabídek televizoru:
Ovládání zvuku
Položka Účinek/ovládání
Režim ekvalizéru V Personal
Vocal
Jazz
Rock
Pop
v Flat (pevné nastavení, které nelze upravovat)
Nastavení ekvalizéru Zvolený režim v Režimu ekvalizéru můžete upravit
potlačením nebo zesílením 5 zvolených kmitočtových
pásem. Stisknutím b nebo B zvolte kmitočtové pásmo a
potom stisknutím V nebo v nastavte daný kmitočet.
Nakonec stisknutím tlačítka OK nové nastavení uložte.
Jestliže chcete uložit nové nastavení, musíte nastavit
Režim ekvalizéru na Personal . V režimu Personal se
nastavení uloží trvale, zatímco ve všech ostatních
režimech (Vocal, Jazz, Rock, Pop) se uloží pouze do
příští změny režimu.
Režim Surround V Vyp
Dolby Sur
SRS
Hall
Church
Disco
v Stadium
Režim SRS* V SRS 1
(*pouze pokud je Režim SurroundSRS 2
nastaven na SRS ) v SRS 3
Auto nast. hlas. V Zap : úroveň hlasitosti kanálů zůstane stejná,
nezávisle na vysílaném signálu (např. v případě
reklam)
v Vyp : úroveň hlasitosti se bude měnit v závislosti na
vysílaném signálu.
Dvojí zvuk Pro dvojjazyčné vysílání:
V A pro kanál 1
v B pro kanál 2
Pro stereo vysílání:
V Mono
v Stereo
Při vysílání NICAM stereo se na obrazovce krátce
objeví indikace NiCAM.
Sluchátka
i Hlasitost nižší bB vyšší
i Dvojí zvuk Pro dvojjazyčné vysílání:
V A pro kanál 1
v B pro kanál 2
14
Page 73

Použití systému nabídek televizoru:
Nastavení Dolby Surround
Po vyladění televizoru můžete pomocí této funkce změnit pořadí jeho kanálů.
1. Stisknutím tlačítka MENU na dálkovém ovladači zobrazte nabídku na obrazovce
televizoru.
2. Stisknutím tlačítka V zvolte na obrazovce s nabídkou symbol a potom stisknutím
B přejděte do nabídky Nastavení .
3. Stisknutím tlačítka V zvolte Nastavení Dolby Surround a potom stisknutím B
přejděte do nabídky Nastavení Dolby Surround .
4. Stisknutím tlačítka v nebo V zvolte Surround Mode a potom stisknutím B přejděte
do dílčí nabídky Surround Mode . Stisknutím tlačítka v nebo V zvolte Pro Logic,
pokud používáte prostorové reproduktory, nebo TruSurround, pokud je
nepoužíváte nebo pokud jsou Režimy repro a Zpoždění nastaveny na pevné
hodnoty. Pro potvrzení stiskněte tlačítko OK.
5. Stisknutím tlačítka v nebo V zvolte Nastavení úrovní a potom stiskněte B, aby se ozval
zkušební tón, který postupně zazní ze všech reproduktorů. V místě, kde sedíte, mají být
úrovně všech hlasitostí stejné. Je-li tomu tak, uložte nastavení stisknutím tlačítka OK.
Jestliže tomu tak není:
(a)Stisknutím tlačítka v nebo V zvolte reproduktor Přední L, Střed, Přední P nebo
Zadní .
(b) Stisknutím b nebo B nastavte hlasitost.
(c) Stisknutím V zvolte další reproduktor.
(d) Opakujte krok (a) a (b) pro všechny reproduktory, které chcete nastavit.
(e) Stisknutím tlačítka OK uložte nové nastavení.
6. Chcete-li zvolit Režimy repro, nejprve se přesvědčte, že je Surround Mode
nastaven na Pro Logic a potom jej zvolte stisknutím tlačítka v nebo V. Stisknutím
B přejděte do dílčí nabídky Režimy repro . Stisknutím tlačítka v nebo V zvolte
jeden z následujících režimů reproduktorů a potom jej uložte stisknutím tlačítka OK:
Normal všechny reproduktory jsou aktivovány
Phantom středový reproduktor je vypnut
Wide větší šířka pásma ze středového reproduktoru
3CH Normal prostorové reproduktory jsou vypnuty
3CH Wide prostorové reproduktory jsou vypnuty, středový reproduktor
přenáší plnou kmitočtovou odezvu.
7. Stisknutím tlacítka v nebo V zvolte 'Zpozdení'a potom stisknutím B prejdete do
dílcí nabídky 'Zpozdení'. Stisknutím tlacítka v nebo V zvolte pozadované zpozdení
pro prostorové reproduktory. Máte moznost výberu mezi 15 ms pro velké místnosti,
20 ms nebo 25 ms pro bezné místnosti a 30 ms pro malé místnosti. Kdyz zpozdení
nastavíte, ulozte ho stisknutím tlacítka OK.
8. Stisknutím tlacítka nebo zvolte 'Auto Surround' a potom stisknutím prejdete do
dílcí nabídky 'Auto Surround'. Stisknutím tlacítka nebo zvolte 'Zap' nebo 'Vyp' a
potom pro ulození stisknete tlacítko OK.
9. Stisknutím tlacítka MENU odstrante nabídku z televizní obrazovky.
15
Page 74

Použití systému nabídek televizoru:
Použití nabídky Spec. funkce
1. Stisknutím tlačítka MENU na dálkovém ovladači zobrazte nabídku na obrazovce televizoru.
2. Stisknutím tlačítka v nebo V zvolte pro nabídku Spec. funkce a potom do této nabídky
přejděte stisknutím B.
3. Stisknutím tlačítka v nebo V zvolte požadovanou položku nabídky a potom pro potvrzení stiskněte
B. Popis jednotlivých položek nabídky a jejich funkcí najdete v níže uvedené tabulce.
4. Stisknutím tlačítka v, V, B nebo b zvolte požadované nastavení.
5. Stisknutím tlačítka OK svou volbu nastavení potvrte.
6. Pokud chcete vybrat některou z ostatních položek, opakujte kroky 3 - 5.
7. Stisknutím tlačítka MENU odstraňte nabídku z televizní obrazovky.
Položka Účinek/ovládání
Auto formát* V Vyp: Velikost obrazu se automaticky nenastavuje.
*pouze pro signál z antény Normal: Velikost obrazu se automaticky nastavuje podle
informací z vysílacího studia.
v Full: Televizor může automaticky nastavit velikost
obrazu, aby tak eliminoval veškerá tmavá
místa v televizním obrazu (jak je vyobrazeno níže):
Úprava formátu* V Vyp : je vybrán poměr 4:3/14:9
(*pouze je-li Auto formát v Zap : Pro vysílání v poměru 4:3/14:9 je automaticky
zvolen režim Smart
nastaven na Normal nebo Full )
Čas do vypnutí Můžete zvolit čas, po jehož uplynutí se televizor přepne do
úsporného režimu.
V Vyp
.
v 90 min
Rodičovský zámek V Vyp : Normal
v Zap : Stisknutím tlačítek na dálkovém ovladači můžete
televizor přepnout z úsporného režimu. Tlačítka
na televizoru nefungují.
Výstup AV2 V Televizní zvukový/obrazový signál z antény
Zvukový/obrazový signál AV1 ze SCART 1
Zvukový/obrazový signál AV2 ze SCART 2
Zvukový/obrazový signál AV3 ze SCART 3
v Zvukový/obrazový signál AV4 z konektorů na přední straně
televizoru
Změna rozměrů obrazovky
Tato funkce vám umožňuje změnit rozměry obrazu televizoru.
Opakovaným stisknutím tlačítka na dálkovém ovladači nebo pomocí tlačítka v nebo V zvolte jeden
z následujících formátů a potom svůj výběr potvrte stisknutím tlačítka OK:
Smart
Wide
Smart imitace efektu široké obrazovky pro vysílání s poměrem stran 4:3.
4:3 konvenční velikost obrazu 4:3, úplné informace o obrazu.
14:9 kompromis mezi velikostí obrazu 4:3 a 16:9.
Zoom formát široké obrazovky pro filmy ve formátu poštovní prihrádky.
Wide pro vysílání s poměrem stran 16:9.
V režimech Smart a 14:9 je odříznuta horní a spodní část obrazovky. Stisknutím v nebo V můžete
nastavit umístění obrazu na obrazovce (např. proto, abyste mohli číst titulky) a potom pro potvrzení
stiskněte tlačítko OK.
16
Zoom
14:9
4:3
Page 75

Použití systému nabídek televizoru:
Použití režimu Multi PIP (vícenásobný obraz v obraze)
Režim Multi PIP (obraz v obraze) zobrazuje posloupnost dvanácti statických obrazů a třináctý obraz, který je živý.
Můžete manuálně zvolit, který kanál chcete sledovat, buto na celé obrazovce nebo v režimu PIP.
1. Stisknutím tlačítka na dálkovém ovladači zvolte režim Multi PIP. Na obrazovce
se objeví 13 programů, přičemž aktuální kanál bude uprostřed.
03 05
2. Opakovaným stisknutím tlačítek PROGR+/- můžete zvolit 12 následujících nebo
předchozích programů.
3. Stisknutím tlačítka v, V, b nebo B se můžete pohybovat mezi 13 zobrazenými kanály.
4. Stisknutím tlačítka OK můžete zvolit kanál, který je právě v rámečku. Tento kanál
se nyní přemístí doprostřed.
5. Opětovným stisknutím tlačítka OK můžete zobrazit zvolený kanál, nebo můžete
stisknutím ukončit režim Multi PIP na obrazovce televizoru.
02
01 06
13
12
11 09 08
10
04
07
Ovládání funkce PAP (obraz a obraz)
Tato funkce PAP rozdělí obrazovku na dvě části, abyste mohli současně sledovat dva kanály (pokud budete chtít, v jedné
může být přehráváno video). Zvuk pro levou obrazovku vychází z reproduktorů televizoru a zvuk pro pravou obrazovku
lze navolit do sluchátek.
Zapnutí a vypnutí funkce PAP
Jedním stisknutím zobrazíte dvě obrazovky a druhým stisknutím funkci PAP vypnete.
Výběr zdroje signálu pro PAP
Stiskněte M. Na pravé obrazovce se objeví symbol M. Zvolte požadovaný zdroj signálu pomocí
očíslovaných tlačítek (pro televizní kanál) nebo (pro zdroj video signálu).
Záměna obrazovek
Stisknutím tyto dvě obrazovky navzájem zaměníte.
Zvětšení obrazovek
Stisknutím tlačítka b nebo B můžete změnit velikost těchto dvou obrazovek.
17
Page 76

Použití systému nabídek televizoru:
Změna uspořádání televizních kanálů
Po vyladění televizoru můžete pomocí této funkce změnit pořadí jeho kanálů.
1. Stisknutím tlačítka MENU na dálkovém ovladači zobrazte nabídku na obrazovce televizoru.
2. Stisknutím tlačítka V zvolte na obrazovce s nabídkou symbol a potom stisknutím B přejděte
do nabídky Nastavení.
3. Stisknutím tlačítka V zvolte Třídění programů a potom stisknutím B přejděte do nabídky
Třídění programů.
4. Stisknutím tlačítka v nebo V zvolte kanál, který chcete přemístit a potom pro potvrzení
stiskněte B.
5. Stisknutím tlačítka v nebo V zvolte novou pozici programu (např. PROG 4) pro zvolený kanál a
potom pro potvrzení stiskněte tlačítko OK. Zvolený kanál se nyní přesune na svou novou pozici
programu a ostatní kanály se podle toho také přemístí.
6. Pokud chcete setřídit další kanály, opakujte kroky 4 a 5.
7. Stisknutím tlačítka MENU odstraňte nabídku z televizní obrazovky.
Manuální vyladění televizoru
Televizor jste již automaticky vyladili podle pokynů na začátku této příručky. Tuto operaci však můžete provést
manuálně a přidávat kanály do televizoru jednotlivě.
1. Stisknutím tlačítka MENU na dálkovém ovladači zobrazte nabídku na obrazovce televizoru.
2. Stisknutím tlačítka V zvolte na obrazovce s nabídkou symbol a potom stisknutím B přejděte
do nabídky Nastavení.
3. Stisknutím tlačítka V zvolte na obrazovce s nabídkou Manuální nastavení a potom stisknutím B
přejděte do nabídky Manuální nastavení.
4. Stisknutím tlačítka V zvolte na obrazovce s nabídkou Ruční ladění a potom stisknutím B
přejděte do nabídky Ruční ladění.
5. Stisknutím tlačítka v nebo V zvolte pro daný kanál číslo programu (např. PROGR 1 pro BBC1) a
potom stisknutím B zvýrazněte sloupec SKOČ.
6. Stisknutím v zvolte Vyp a potom stisknutím B zvýrazněte sloupec SYS.
7. Stisknutím tlačítka v nebo V zvolte systém televizního vysílání (B/G pro západoevropské země
nebo D/K pro východoevropské země) nebo EXT pro zdroj vstupního video signálu (AV1,
AV2,...) a potom stiskněte B pro potvrzení.
8. Stisknutím tlačítka v nebo V zvolte C pro pozemní kanály, S pro kabelové kanály nebo F pro
přímé frekvenční vstupy a potom stiskněte B pro potvrzení.
9. Pomocí očíslovaných tlačítek na dálkovém ovladači zvolte nejprve první a potom druhou číslici
čísla K. (kanál) nebo Stisknutím tlačítka v nebo V vyhledejte další dostupný kanál.
10. Pokud nechcete uložit na zvoleném čísle programu tento kanál, pokračujte stisknutím tlačítka v
nebo V ve vyhledávání požadovaného kanálu.
11. Jestliže je to kanál, který chcete uložit, stiskněte tlačítko OK.
12. Pokud chcete uložit další kanály, opakujte kroky 5 - 11 a potom stisknutím tlačítka MENU
odstraňte tuto nabídku z obrazovky televizoru.
18
Page 77

Použití systému nabídek televizoru:
Pojmenování kanálu
Jména kanálů se obvykle přebírají automaticky z teletextu, pokud jsou k dispozici. Kanál nebo zdroj vstupního
video signálu však můžete pojmenovat s použitím až pěti znaků (písmen nebo čísel).
1. Stisknutím tlačítka MENU na dálkovém ovladači zobrazte nabídku na obrazovce
televizoru.
2. Stisknutím tlačítka V zvolte na obrazovce s nabídkou symbol a potom stisknutím
B přejděte do nabídky Nastavení.
3. Stisknutím tlačítka V zvolte Manuální nastavení a potom stisknutím B přejděte do
nabídky Manuální nastavení.
4. Stisknutím tlačítka V zvolte Ruční ladění a potom stisknutím B přejděte do nabídky
Ruční ladění.
5. Stisknutím tlačítka v nebo V zvolte kanál, který chcete pojmenovat.
6. Opakovaně mačkejte tlačítko B dokud nebude zvýrazněn první element sloupce
NÁZEV.
7. Stisknutím tlačítka v nebo V zvolte písmeno nebo číslici (pro mezeru zvolte - ) a
potom stiskněte B pro potvrzení. Další čtyři znaky vyberte stejným způsobem.
8. Po výběru všech znaků stiskněte tlačítko OK.
9. Pokud chcete pojmenovat další kanály, opakujte kroky 5 až 8.
10. Stisknutím tlačítka MENU odstraňte nabídku z televizní obrazovky.
Přeskočení pozic programů
Tato funkce vám umožňuje přeskočit nevyužité pozice programů při jejich výběru pomocí tlačítek PROGR+/-.
Pomocí tlačítek s čísly však přesto můžete tyto vynechané pozice programů zvolit.
1. Stisknutím tlačítka MENU na dálkovém ovladači zobrazte nabídku na obrazovce
televizoru.
2. Stisknutím tlačítka V zvolte na obrazovce s nabídkou symbol a potom stisknutím
B přejděte do nabídky Nastavení.
3. Stisknutím tlačítka V zvolte Manuální nastavení a potom stisknutím B přejděte do
nabídky Manuální nastavení.
4. Stisknutím tlačítka V zvolte Ruční ladění a potom stisknutím B přejděte do
nabídky Ruční ladění.
5. Stisknutím tlačítka v nebo V zvolte pozici programu a potom stisknutím B
zvýrazněte sloupec SKOČ.
6. Stisknutím tlačítka v nebo V zvolte Vyp nebo Zap (pokud chcete tuto pozici
programu přeskočit) a potom pro uložení stiskněte tlačítko OK.
7. Pokud chcete přeskočit nebo naopak nepřeskočit další pozice programů, opakujte
kroky 5 a 6.
8. Stisknutím tlačítka MENU odstraňte nabídku z televizní obrazovky.
19
Page 78

Použití systému nabídek televizoru:
Použití funkce Rozšířené předvolby
Pomocí této funkce muzete a) nastavit zeslabení jednotlivých kanálu, b) individuálne nastavit hlasitost jednotlivých
kanálu, c) manuálne jemne doladit televizor, abyste dosáhli lepšího príjmu obrazu, pokud je obraz pokroucený, nebo d)
predvolit výstup AV pro programové pozice kanálu s pomíchanými signály (napr. z placeného televizního dekodéru).
Pripojený videorekordér takto nahraje nepomíchaný signál.
1. Stisknutím tlačítka MENU na dálkovém ovladači zobrazte nabídku na obrazovce televizoru.
2. Stisknutím tlačítka V zvolte na obrazovce s nabídkou symbol a potom stisknutím B
přejděte do nabídky Nastavení.
3. Stisknutím tlačítka V zvolte Manuální nastavení a potom stisknutím B přejděte do nabídky
Manuální nastavení.
4. Stisknutím tlačítka V zvolte Rozšířené předvolby a potom stisknutím B přejděte do nabídky
Rozšířené předvolby.
5. Stisknutím tlačítka v nebo V zvolte příslušné číslo programu a potom opakovaným
stisknutím tlačítka B zvolte a) ZESL b) HLAS c) AFT nebo d) DEKODÉR. Vybraná
položka změní svou barvu.
6. a)ZESL - VF zeslabovač
Stisknutím tlačítka v nebo V zeslabovač zapnete nebo vypnete. Volbu potvrte stisknutím
tlačítka OK. Pokud chcete nastavit zeslabení dalších kanálů, opakujte kroky 5 a 6a.
b)HLAS - Kompenzace hlasitosti
Stisknutím tlačítka v nebo V nastavte úroveň hlasitosti (rozsah -7 až +7) daného kanálu. Pro
uložení stiskněte tlačítko OK. Pokud chcete nastavit úroveň hlasitosti dalších kanálů,
opakujte kroky 5 a 6b.
c) AFT - Automatické jemné doladění
Stisknutím tlačítka v nebo V můžete kmitočet daného kanálu jemně doladit v rozsahu -15 až
+15. Pro potvrzení stiskněte tlačítko OK. Pokud chcete jemně doladit další kanály, opakujte
kroky 5 a 6c.
d)DEKODÉR
Stisknutím tlačítka v nebo V zvolte AV1 nebo AV2 pro danou pozici programu a potom pro
potvrzení stiskněte tlačítko OK. Nyní můžete do zásuvky AV1 nebo AV2 na zadní straně
televizoru připojit dekodér. Obraz z tohoto dekodéru se objeví na tomto čísle programu.
Pokud chcete předvolit výstup AV pro další pozice programů, opakujte kroky 5 a 6d.
7. Stisknutím tlačítka MENU odstraňte nabídku z televizní obrazovky.
Výběr funkce Ukázka
Tato funkce poskytuje přehled některých funkcí, které jsou u tohoto televizoru k dispozici.
1. Stisknutím tlačítka MENU na dálkovém ovladači zobrazte nabídku na obrazovce
televizoru.
2. Stisknutím tlačítka V zvolte na obrazovce s nabídkou symbol a potom stisknutím
B přejděte do nabídky Nastavení.
3. Stisknutím tlačítka V zvolte Manuální nastavení a potom stisknutím B přejděte do
nabídky Manuální nastavení.
4. Stisknutím tlačítka V zvolte položku Ukázka a potom stisknutím B spust'te
předvedení ukázky (které trvá přibližně 5 minut).
5. Stisknutím tlačítka odstraňte ukázku z obrazovky televizoru.
20
Page 79

Použití systému nabídek televizoru:
Nastavení natočení obrazu
Zemský magnetismus může způsobovat naklonění obrazu. V takovém případě můžete upravit nastavení obrazu.
1. Stisknutím tlačítka MENU na dálkovém ovladači zobrazte nabídku na obrazovce
televizoru.
2. Stisknutím tlačítka V zvolte na obrazovce s nabídkou symbol a potom stisknutím
B přejděte do nabídky Nastavení.
3. Stisknutím tlačítka V zvolte Manuální nastavení a potom stisknutím B přejděte do
nabídky Manuální nastavení.
4. Stisknutím tlačítka V zvolte Pootočení obrazu a potom stisknutím B přejděte do
dílčí nabídky Pootočení obrazu.
5. Stisknutím tlačítka v nebo V pootočte obraz v rozmezí -5 až +5 a potom pro uložení
stiskněte tlačítko OK.
6. Stisknutím tlačítka MENU odstraňte nabídku z televizní obrazovky.
Nastavení geometrie obrazu pro zdroj signálu RGB
Při připojení zdroje signálu RGB, jako je např. Sony playstation, budete možná muset upravit nastavení
geometrie obrazu.
1. Stisknutím tlačítka na dálkovém ovladači zvolte připojený zdroj signálu RGB
1
.
2. Stisknutím tlačítka MENU zobrazte nabídku na obrazovce televizoru.
3. Stisknutím tlačítka V zvolte na obrazovce s nabídkou symbol a potom stisknutím
B přejděte do nabídky Nastavení.
4. Stisknutím tlačítka V zvolte na obrazovce s nabídkou Manuální nastavení a potom
stisknutím B přejděte do nabídky Manuální nastavení.
5. Stisknutím tlačítka V zvolte na obrazovce s nabídkou RGB Nastavení a potom
stisknutím B přejděte do dílčí nabídky RGB Nastavení.
6. Stisknutím B zvolte H Centre a potom stisknutím v nebo V nastavte střed obrazu v
rozsahu -10 až +10. Nový rozsah uložte stisknutím tlačítka OK.
7. Stisknutím B zvolte H Size a potom stisknutím v nebo V nastavte horizontální
souřadnice v rozsahu -10 až +10. Nový rozsah uložte stisknutím tlačítka OK.
8. Stisknutím tlačítka MENU odstraňte nabídku z televizní obrazovky.
21
Page 80

Použití systému nabídek televizoru:
Zadání osobního ID čísla
Pomocí této funkce můžete televizoru přiřadit bezpečnostní kód, který umožní vaše vyhledání, pokud bude televizor
ukraden a získán nazpátek. Tento bezpečnostní kód lze však zadat pouze jednou - poznamenejte si ho prosím
1. Stisknutím tlačítka MENU na dálkovém ovladači zobrazte nabídku na obrazovce
televizoru.
2. Stisknutím tlačítka V zvolte na obrazovce s nabídkou symbol a potom
stisknutím B přejděte do nabídky Nastavení.
3. Stisknutím tlačítka V zvolte na obrazovce s nabídkou Manuální nastavení a potom
stisknutím B přejděte do nabídky Manuální nastavení.
4. Stisknutím tlačítka V zvolte na obrazovce s nabídkou Osobní ID číslo a potom
stisknutím B přejděte do dílčí nabídky Osobní ID číslo.
5. Stisknutím tlačítka v nebo V zvolte první z celkem 11 znaků (písmeno, číslo + nebo
mezera) a potom stisknutím B přejděte na další znak.
6. Opakováním kroku 5 zadejte všechny znaky kódu.
7. Pro uložení stiskněte tlačítko OK. Na obrazovce se objeví stavové okénko se
žádostí, abyste znovu zadali svůj kód.
8. Dalším stisknutím tlačítka OK kód definitivně uložte, nebo jej zrušte stisknutím b.
9. Stisknutím tlačítka MENU odstraňte nabídku z televizní obrazovky.
Předvolení a pojmenování vstupních signálů
Pomocí této funkce můžete automaticky formátovat a označovat zdroje vstupních signálů.
1. Stisknutím tlačítka MENU na dálkovém ovladači zobrazte nabídku na obrazovce
televizoru.
2. Stisknutím tlačítka V zvolte na obrazovce s nabídkou symbol a potom stisknutím
B přejděte do nabídky Nastavení.
3. Stisknutím tlačítka V zvolte na obrazovce s nabídkou AV předvolby a potom
stisknutím B přejděte do nabídky AV předvolby.
4. Stisknutím tlačítka v nebo V zvolte požadovaný vstup AV (AV1, 2, 3 nebo 4).
5. Stisknutím tlačítka B zvolte AUTO FORMÁT a potom stisknutím tlačítka v nebo V
zvolte Vyp, Normal nebo Full.
6. Stisknutím tlačítka B zvolte POPIS.
7. Stisknutím tlačítka v nebo V zvolte první znak názvu a potom se stisknutím tlačítka B
přesuňte na další znak.
8. Opakováním kroku 7 zvolte další 4 znaky a potom pro uložení stiskněte tlačítko OK.
9. Opakujte kroky 4 - 8 pro ostatní zdroje vstupního signálu AV a potom stisknutím
tlačítka MENU odstraňte tuto nabídku z obrazovky televizoru.
22
Page 81

Další zařízení
Připojení dalšího zařízení k televizoru
Podle níže uvedených ilustrací můžete k televizoru připojit širokou řadu zvukových a obrazových zařízení.
C
-
3
S
1
S
1
3
2
MONO
L/G/S/I R/D/D/D
s
4
4
4
A B C
2
E
D
F
R/D/D/D
s
-
s
-
L/G
S/I
L/G/S/I
R/D/D/D
R/D
D/D
L/G/S/I
C
-
s
-
s
-
L/G
S/I
R/D
D/D
S
L/G/S/I R/D/D/D
4
4
4
DVD
G
VHS
2
1
Abyste dostali vstupní signál z připojeného zařízení na obrazovku televizoru, musíte zvolit symbol konektoru, k němuž
jste zařízení připojili.
1. Podle výše uvedených ilustrací zapojte zařízení do příslušné zásuvky televizoru.
2. Opakovaně mačkejte tlačítko na dálkovém ovladači, dokud se na obrazovce televizoru neobjeví správný
symbol vstupu pro vaše zařízení (viz níže uvedená tabulka):
Symbol na
Vstupní signály z konektoru
obrazovce
televizoru
1
Zvukový/obrazový vstupní signál přes konektor SCART D nebo* RGB přes konektor SCART
D
2
Zvukový/obrazový vstupní signál přes konektor SCART E nebo* S-video přes konektor SCART
E
3
Zvukový/obrazový vstupní signál přes konektor SCART F nebo* S-video přes konektor SCART
F
4
Vstupní signál S-video přes konektor A typu DIN se 4 kolíky nebo* obrazový vstupní signál přes
zdířku B a zvukový vstupní signál přes zdířky C
* automatická detekce signálu podle připojeného zařízení
3. Zapněte připojené zařízení.
4. Stisknutím se vrátíte na běžnou televizní obrazovku.
Poznámka: Abyste zamezili pokroucení obrazu, nepřipojujte zařízení současně do zásuvky A a B.
23
Page 82

Doplòková zaøízení
Další informace týkající se připojování zařízení
* Pokud je obraz nebo zvuk zkreslený, přemístěte videorekordér do větší vzdálenosti od televizoru.
* Při připojování monofonního videorekordéru zapojte do televizoru i videorekordéru pouze bílý kolík.
s
2
* Informace o tom, jak zvolit výstupní signál z konektoru SCART 2 / , najdete na straně 16.
2
Smartlink
Smartlink je přímé propojení mezi televizorem a videorekordérem.
Pro Smartlink potřebujete:
* Videorekordér, který podporuje Smartlink, NexTView Link, Easy Link nebo Megalogic.
* Kabel s konektory SCART s 21 kolíky a plným počtem vodičů pro připojení videorekordéru ke konektoru
SCART 2 / .
Smartlink má následující funkce:
* Informace o vyladění, např. přehled kanálů, jsou přenášeny z televizoru do videorekordéru.
* Pomocí NexTView můžete videorekordér snadno programovat.
* Přímé nahrávání z televizoru : při sledování televizoru můžete daný pořad nahrát stisknutím jediného tlačítka na
videorekordéru.
Více informací o propojení Smartlink najdete v příručce ke svému videorekordéru.
s
2
2
Dálkové ovládání dalších zařízení firmy Sony
Pomocí tlačítek umístěných pod krytem dálkového ovladače můžete ovládat další zařízení společnosti Sony.
1. Otevřete kryt dálkového ovladače.
2. Volič VTR 1234 DVD nastavte podle zařízení, které chcete ovládat:
VTR1 Videorekordér Beta
VTR2 Videorekordér 8mm
VTR3 Videorekordér VHS
VTR4 Digitální video (DCR-VX 1000/9000E,VHR-1000)
DVD Digitální video disk
3. K ovládání zařízení použijte tlačítka na dálkovém ovladači.
* Pokud je zařízení vybaveno voličem příkazového režimu (COMMAND MODE), nastavte tento volič do stejné
polohy jako volič VTR 1234 DVD na dálkovém ovladači televizoru.
* Jestliže zařízení není vybaveno některou funkcí, příslušné tlačítko na dálkovém ovladači nebude fungovat.
24
Page 83

Dal¹í informace
Technické údaje
Televizní systém
B/G/H, D/K, I, L
Barevný systém
PAL, SECAM
NTSC 3.58, 4.43 (pouze vstup video signálu)
Pokrytí kanálů
Viz Průvodce kanály na následující straně.
Obrazovka
FD Trinitron WIDE
Přibližně 91 cm (36 palců), vychýlení 102˚
Konektory na zadní straně
s
/ Konektor Euro s 21 kolíky (standard CENELEC) včetně
1
1
zvukového/obrazového vstupu, vstupu RGB a zvukového/
obrazového televizního výstupu.
s
/ Konektor Euro s 21 kolíky (standard CENELEC) včetně
2
2
zvukového/obrazového vstupu, vstupu S-video a zvukového/
obrazového výstupu pro monitor.
s
/ Konektor Euro s 21 kolíky (standard CENELEC) včetně
3
3
zvukového/obrazového vstupu, vstupu S-video a zvukového/
obrazového výstupu pro monitor.
Konektory pro externí reproduktory : DIN se 2 kolíky (5)
Vstup vysokofrekvenčního signálu
Výstup zvuku
Levý a pravý reproduktor: 2 x 30W (hudební výkon)
2 x 15W (RMS)
Příkon
170W
Rozměry (šxvxh)
Přibližně 972 x 613,5 x 591 mm
Hmotnost
Přibližně 90,0kg
Dodávané příslušenství
Dálkový ovladač RM-892 (1)
Baterie velikosti AA podle IEC (2)
prostorové reproduktory (2)
Propojovac
í kabel k prostorovým reprodukorům(2)
Další vlastnosti
Plochá obrazovka Trinitron, redukce šumu, obraz se
snímkovým kmitočtem 100 Hz, grafický ekvalizér, osobní
ID číslo, nastavení času do vypnutí, NexTView, Dolby
Surround, Digital Comb Filter.
Druhý tuner
Konstrukce a technické parametry mohou být
změněny bez předchozího upozornění.
Konektory na přední straně
Vstup obrazového signálu - zdířky
4
Vstupy zvukového signálu - zdířky
4
Vstup S video - DIN se 4 kolíky
s
4
Zdířka pro sluchátka - minizdířka, stereo
Tabulka zobrazení kanálů
Kanály,kterélze přijímat Zobrazení kanálů
B/G/H E2..12, 21..69 C02..C12, C21..69
KABEL. TEL. (1) S1..S41 S01..S41
KABEL. TEL. (2) S01..S05 S42..S46
M1..M10 S01..S10
U1..U10 S11.S20
ITALIA A, B..H, H1, H2 C13..C20
D/K R01..R12, R21..R69 C01..C12, C21..C69
S01..S05 S42..S46
L F2..F10, F21..F69 C01..C12, C21..C69
I B21..B69 C21..C69
25
Page 84

Další informace
Odstraňování chyb
Zde je několik jednoduchých řešení problémů, které mohou postihnout obraz a zvuk.
Problém Navrhované řešení
Žádný obraz (obrazovka je tmavá),
žádný zvuk.
Špatný nebo žádný obraz (obrazovka je tmavá), ale dobrý zvuk.
Dobrý obraz, žádný zvuk.
Žádné barvy v barevných programech.
Pokroucený obraz při přepnutí
programů nebo při výběru teletextu.
Zapojte televizor do zásuvky.
Stiskněte tlačítko na přední straně televizoru.
Jestliže svítí indikátor , stiskněte tlačítko nebo
některé z očíslovaných tlačítek na dálkovém ovladači.
Zkontrolujte připojení k anténě.
Pomocí tlačítka na přední straně televizoru televizor
na 3 až 4 sekundy vypněte a potom znovu zapněte.
V systému nabídek (MENU) zvolte okno Nastavení
obrazu. Nastavte jas, obraz a barevnou vyváženost.
V okně Nastavení obrazu zvolte RESET, abyste obnovili
původní výrobní nastavení.
Stiskněte tlačítko na dálkovém ovladači.
Pokud je na obrazovce zobrazen symbol , stiskněte
tlačítko na dálkovém ovladači.
V systému nabídek (MENU) zvolte okno Nastavení
obrazu a upravte nastavení barev.
V okně Nastavení obrazu zvolte RESET, abyste obnovili
původní výrobní nastavení.
Vypněte veškerá zařízení připojená ke konektorům
SCART na zadní straně televizoru.
/
Dálkové ovládání nefunguje. Vyměňte baterie.
Indikátor úsporného režimu na
televizoru bliká.
Pokud tyto problémy přetrvávají, nechte si televizor opravit kvalifikovaným opravářem.
NIKDY neotvírejte skříň televizoru sami.
Obrat'te se na nejbližší servisní středisko společnosti
Sony.
26
Page 85

27
Page 86

Biztonsági előírások
Az ön biztonsága érdekében
Kizárólag 220-240 V-os hálózati váltakozó
feszültséggel üzemeltesse a készüléket. Ne
csatlakoztasson túl sok készüléket
ugyanahhoz az aljzathoz, mert a túlterhelés
tüzet okozhat.
Soha ne nyissa ki a készülék hátsó burkolatát.
A javítást bízza szakemberre.
Energiatakarékossági és biztonsági okok
miatt ne hagyja a készüléket készenléti
üzemmódban, amikor nem használja.
Hosszabb távollét esetén húzza ki a hálózati
csatlakozó vezetéket a fali konnektorból.
Viharos időjárás, villámlás idején saját
biztonsága érdekében ne érintse meg a
készüléket, a hálózati csatlakozó vezetéket
és az antennakábelt.
Ne dugjon semmilyen tárgyat a készülékbe,
mert ezzel tüzet és áramütést okozhat. Ha a
szellőző nyílásokon keresztül bármilyen
szilárd test, vagy folyadék kerül a készülék
belsejébe, húzza ki a hálózati csatlakozó
vezetéket. Azonnal ellenőriztesse
szakemberrel!
Az áramütés és a tűz veszélyének elkerülése
érdekében óvja a TV készüléket esőtől és
nedvességtől.
A készülék szellőzőnyílásait hagyja
szabadon. A megfelelő szellőzés érdekében a
készülék minden oldalánál hagyjon legalább
10 cm-es szabad területet.
A képernyőt enyhén megnedvesített ruhával
tisztíthatja meg. Ne használjon a tisztításhoz
benzint, higítót, súrolószert. Tisztítás előtt
húzza ki a hálózati csatlakozót a
konnektorból.
A TV k ész üléke t stab il áll ványr a he lyezz e. Ne
engedje, hogy a gyerek felmásszon a TV-re.
Ne fordítsa a TV készüléket az oldalára, vagy
a képernyővel felfelé.
Ne állítsa a készüléket szélsőségesen meleg,
párás vagy poros helyre, vagy olyan helyre,
ahol mechanikai vibrációnak lehet kitéve.
A hálózati csatlakozó kihúzásánál a
csatlakozó dugót fogja meg, és ne a
vezetéket.
Mozgatás előtt húzza ki a hálózati
csatlakozót a konnektorból. A készüléket
óvatosan szállítsa, kerülje a zötykölődős
utcákat, óvja a készüléket ütéstől,
rázkódástól.
A tűz veszélyének elkerülése érdekében ne
tegyen a készülék közelébe gyúlékony
tárgyakat, ne gyújtson nyílt lángot (ne
égessen pl. gyertyát).
Ne tegyen nehéz tárgyat a hálózati vezetékre,
mert megsérülhet.
Javasoljuk, hogy a felesleges vezetéket
csévélje fel a tv készülék hátulján lévo
tartóra.
Ne takarja le a készülék szellőzőnyílásait pl.
függönnyel, újsággal, stb.
Page 87

Tartalomjegyzék
Tartalomjegyzék
Üzembe helyezés
1.A mellékelt tartozékok ellenőrzése
2.Az elemek behelyezése a távvezérlőbe
3.A TV csatlakoztatása
4.A TV bekapcsolása
5.A joystick használata
6.A TV hangolása
7.A videocsatorna megkeresése
Használat
A TV beállítógombjainak áttekintése
A távvezérlő gombjainak áttekintése
NexTView
Teletext
A TV menürendszerének használata
A képbeállítások módosítása
A hangbeállítások módosítása
A "Dolby Surround" beállítása
A Szolgáltatások menü használata
A kép méretének módosítása
A Multi PIP (kép a képben) funkció használata
A PAP (kép és kép) funkció használata
A programhelyek átrendezése
A TV manuális hangolása
Az állomások elnevezése
Programhelyek átugrása
A "További programok tárolása" szolgáltatás használata
A "Bemutató" szolgáltatás kiválasztása
A képelforgatás beállítása
A kép alakjának beállítása RGB forrás esetén
A személyi azonosító kód bevitele
Külső források tárolása és feliratozása
2
2
3
5
5
6
6
7
8
9
11
13
13
14
15
16
16
17
17
18
18
19
19
20
20
21
21
22
22
Külső berendezések
Külső berendezések csatlakoztatása a TV-hez
A berendezések csatlakoztatására vonatkozó további információk
Smartlink
Más Sony berendezések távvezérlése
További információk
Műszaki adatok
Csatornák és kijelzésük
Hibakeresés
23
24
24
24
25
25
26
1
Page 88

Üzembe helyezés
Kövesse az 1-7. lépéseket a TV-készülék
üzembe helyezéséhez és a TV-programok
megtekintéséhez.
1. A mellékelt tartozékok ellenőrzése
Elemek
surround hangszóró vezetékek
Távvezérlő
2. Az elemek behelyezése a távvezérlőbe
surround hangszórók
Mindig ügyeljen arra, hogy a használt elemek hulladékba helyezéséről környezetbarát módon gondoskodjon.
2
Page 89

Üzembe helyezés
3. A TV csatlakoztatása
A hangszórók csatlakoztatása
A Dolby* Pro Logic Surround rendszerint 5 hangszórót igényel.
A középső hangszóró (a TV-készülékbe beépítve) közvetíti a stabil hangképeket, mint például a TV-képernyőjén folyó
párbeszédek.
A bal első és jobb első hangszórók (a TV-készülékbe beépítve) szolgálják ki a normál kétcsatornás vagy
sztereoműsorokat.
A surround hangszórók (tartozékként mellékelve) a surround csatorna által létrehozott speciális effekteket szolgálják ki.
A tartozék hangszórók csatlakoztatása
fekete
vezeték
fekete/
C
S
S
fehér
vezeték
surround hangszórók
A saját hangszórók csatlakoztatása
(Győződjön meg arról, hogy a hangszórók legalább 8 ohmos impedanciával rendelkezzenek, és mágnesesen
árnyékoltak legyenek. Egyébként képtorzulás következhet be.)
L/G/S/I
R/D/D/D
jobb oldali
hangszóró
bal oldali
hangszóró
C
S
S
surround hangszórók
*Gyártva a Dolby Laboratories Licensing Corporation licence alapján. A Dolby, a ProLogic és a kettos D szimbólum
a Dolby Laboratories Licensing Corporation védjegyei.
3
Page 90

Üzembe helyezés
3. A TV csatlakoztatása
Antenna csatlakoztatása a TV-készülékhez
Ha a TV készüléket nem
csatlakoztatja
videomagnóhoz,
csatlakoztassa az
antennakábelt (a bal
oldali ábrán látható
módon), és folytassa a "4.
A TV bekapcsolása"
címszóval.
L/G
L/G/S/I
R/D/D/D
S/I
R/D
D/D
Ha a TV-készüléket
videomagnóhoz
csatlakoztatja, az alábbi
szakasz szerint járjon el.
1. Csatlakoztassa a meglévő antennakábelt a TV készülék hátlapján lévő aljzathoz.
Antenna és videomagnó csatlakoztatása a TV-készülékhez
L/G
L/G/S/I
R/D/D/D
S/I
R/D
D/D
A scart kábel külön
beszerezheto
kiegészíto.
Amennyiben
azonban használja, ez
a további kapcsolat
javíthatja a kép és a
hang minőségét
lejátszás közben.
(scart kábel - nem tartozék)
(meglévő antennakábel)
IN
AC IN
OUT
1. Csatlakoztassa a meglévő antennakábelt az ábrának megfelelően a videomagnóhoz.
2. Csatlakoztassa a videomagnó antennakábelét a videomagnó hátlapján lévő RF OUT
aljzatba és a TV hátlapján lévő antennaaljzatba az ábrának megfelelően.
3. Csatlakoztassa a videomagnót a hálózathoz, és kapcsolja be.
4. Helyezzen egy felvételt tartalmazó kazettát a videomagnóba, és nyomja meg a "PLAY"
gombot.
4
Page 91

Üzembe helyezés
4. A TV bekapcsolása
1. Csatlakoztassa a TV hálózati csatlakozóját a hálózati aljzathoz (220-240V AC, 50Hz),
és kapcsolja be a készüléket.
2. Nyomja be a hálózati kapcsolót a TV-készülék előlapján.
Ha a TV előlapján a készenléti üzemmód jelzőfénye világít, nyomja meg a TV gombot a
távvezérlőn a TV-készülék bekapcsolásához. Legyen türelemmel, mivel néhány pillanatig
eltarthat, amíg a kép megjelenik a TV képernyőjén.
/
5. A joystick használata
A joystick mozgatása A joystick megnyomása
A menükben való mozgáshoz
nyomja meg a megfelelő
nyílgombot.
Egy menüben az egyik tétel
kiválasztásához nyomja meg a
joystick közepét.
5
Page 92

Üzembe helyezés
6. A TV hangolása
Mielőtt elvégezné a TV hangolását, felszólítást kap a nyelv és az ország beállítására.
1. A Nyelv/Ország menü jelenik meg a TV képernyőjén az "English" szó
kiemelésével.
2. A távvezérlőn lévő v vagy V gombbal jelölje ki a választott nyelvet,
majd az OK gombot megnyomva erősítse meg a választást. Az ország
menü jelenik meg a TV képernyőjén a "Ki" szó kiemelésével. Válassza
a "Ki" beállítást, ha nem szeretné, hogy a csatornák egy megadott
csatornasorrend szerint kerüljenek tárolásra az 1. programhelytől
kezdődően.
3. A v vagy V gombbal válassza ki az országot, ahol a TV-készüléket
használni fogja, majd az OK gombot megnyomva erősítse meg a
választást.
4. Az "automatikus hangolás" menü jelenik meg a TV képernyőjén a
kiválasztott nyelven. Az OK gomb megnyomásával hagyja jóvá az
automatikus hangolást.
5. Győződjön meg arról, hogy az antenna az utasításoknak megfelelően
csatlakoztatva van, majd az OK gomb megnyomásával erősítse ezt meg.
A készülék megkezdi az összes rendelkezésre álló csatorna automatikus
keresését és tárolását. Ez néhány percig is tarthat - legyen türelemmel,
és ne nyomjon meg semmilyen gombot.
6. Amikor a TV elvégezte az összes rendelkezésre álló csatorna
hangolását, a "Programhelyek átrendezése" menü jelenik meg a TV
képernyőjén, ami lehetővé teszi a programok sorrendjének
megváltoztatását a TV-készüléken. Ha meg szeretné változtatni a
programok sorrendjét, a v vagy V gombbal válassza ki az áthelyezni
kívánt programot, majd nyomja meg a B gombot. A v vagy V gombbal
válassza ki az új programhely számát a kiválasztott csatorna számára,
majd az OK gombot megnyomva erősítse meg az áthelyezést. Ezzel a
kiválasztott csatorna az új programhelyre kerül, és a többi csatorna
ennek megfelelően kap új helyet. Ismételje meg ezt a műveletet, ha
más csatornák sorrendjét is meg kívánja változtatni a TV-készüléken.
Language country
Language
Country
Select language: Confirm:
Seretné elindítani az
automatikus hangolást ?
Igen : OK Nem :
Kérem igazolja, hogy az
antenna catlakoztatva van
Igen : OK Nem :
Suomi
Svenska
Português
Nederlands
Magyar
Great Britain
Lengyelország
Norvégia
Hollandia
Luxemburg
Olaszország
Irország
Magyarország
Polski
Norsk
7. Nyomja meg a MENU gombot, hogy eltávolítsa a menüt a TV
képernyőjéről.
8. A PROGR+/- vagy a számgombok segítségével tekintheti meg a TV-
programokat.
Megjegyzés:Ha bármelyik szakaszban le szeretné állítani az automatikus
hangolási folyamatot, nyomja meg az OK gombot.
7. A videocsatorna megkeresése
Ha a TV-készüléket videomagnóhoz csatlakoztatja, meg kell keresnie a videocsatornát.
1. Nyomogassa a távvezérlőn lévő PROGR+/- gombokat mindaddig, amíg a videokészülék képe meg nem jelenik a TV
képernyőjén.
Megjegyzés:Ha a videocsatornát egy másik programhelyre szeretné áthelyezni, lapozza fel a jelen kezelési útmutató "A
programhelyek átrendezése" c. szakaszát.
6
Page 93

Használat
A TV beállítógombjainak áttekintése
Hangerő-szabályozó gombok.
Nyomja meg, ha növelni(+)/
csökkenteni(-) kívánja a hangerőt.
Videobemenet gomb.
Megnyomásával kiválaszthatja a
videomagnóról stb. érkező bemenő jeleket.
Program fel (+) vagy le
(-) gombok.
Megnyomásával
kiválaszthatja a TVprogramokat.
CONTROL gomb
Megnyomásával
aktivizálhatja és
megvilágíthatja a
kezelőlapot.
+
–
PROGR
–
+
CONTROL
Hálózati kapcsoló.
Megnyomásával be- és kikapcsolhatja a TV-készüléket.
7
Page 94

Használat
A távvezérlő gombjainak áttekintése
A hang némítása
Megnyomásával elnémíthatja a TV hangját.
Ismételt megnyomásával visszaállíthatja a hangot.
TV üzemmódba való visszatérés
Megnyomásával visszatér normál üzemelésre
teletext vagy készenléti üzemmódból.
A teletext kiválasztása
Megnyomásával be- és kikapcsolhatja a teletextet.
Az Elektronikus musorfüzet (EPG)
kiválasztása
Megnyomásával be- és kikapcsolhatja az EPG-t.
A kép kimerevítése
Nyomja meg, ha fel kíván jegyezni valamilyen, a
TV képernyőjén látható információt (pl.
telefonszámot). Ismételt megnyomásával
visszatérhet a normál TV üzemmódba.
A programhelyek kiválasztása
A számgombokat megnyomva válassza ki a
programhelyeket.
Kétjegyű programhelyek, pl. 23, esetén, először
nyomja meg a -/-- gombot, majd pedig a 2 és a 3
gombot.
A képbeállítás menü megjelenítése
Megnyomásával módosíthatja a képbeállításokat.
Az OK gomb megnyomásával távolíthatja el a
menükijelzést.
Az Audio beállítás menü megjelenítése
Megnyomásával módosíthatja a hangbeállításokat.
Az OK gomb megnyomásával távolíthatja el a
menükijelzést.
A Programtáblázat megjelenítése
Ny omj a me g a z OK gom bot . A v vagy V gombbal
válassza ki a kívánt programot, majd a B gombot
megnyomva erősítse meg a választást.
A TV hangerejének beállítása
Megnyomásával beállíthatja a TV hangerejét.
A TV-készülék ideiglenes kikapcsolása
Megnyomásával ideiglenesen kikapcsolhatja a TVkészüléket. Nyomja meg ismét ezt a gombot a készenléti
üzemmódból történő bekapcsoláshoz.
Energiatakarékossági okokból javasoljuk, hogy teljesen
kapcsolja ki a TV-készüléket, amikor nincs használatban.
MEGJEGYZÉS: 15-30 perc elteltével, amely alatt sem TVjel nem érkezik, sem pedig semmilyen gombot nem
nyomnak meg, a készülék automatikusan készenléti
üzemmódba kapcsol.
A képernyő információk mutatása
Megnyomásával az összes képernyőjelzés láthatóvá válik. A
funkció elvetéséhez nyomja meg ismét a gombot. A teletext
üzemmódban megnyomására megjelenik az indexoldal
(rendszerint a 100. oldal), ismételt megnyomására pedig
eltűnik.
A bemenő jel kiválasztása vagy a teletext rögzítése
Megnyomásával kiválaszthatja a TV csatlakozóira érkező
bemenő jeleket (lásd az Opcionális berendezések használata
c. szakaszt). Teletext üzemmódban nyomja meg ezt a
gombot a kijelzett oldal rögzítéséhez. A funkció elvetéséhez
nyomja meg ismét a gombot.
Részletes ismertetésért lapozza fel a jelen kezelési útmutató
"A PAP funkció használata" c. szakaszát.
Visszatérés az előző csatornához
Megnyomásával visszatérhet az előzőleg nézett csatornához.
Megjegyzés: Csak akkor működik, miután a jelenlegi
csatornát 5 másodpercig nézte.
Megnyomásával be- és kikapcsolhatja a Multi PIP
üzemmódot.
A képernyőformátum megváltoztatása
Megnyomásával módosíthatja a képernyő méretbeállításait.
Gyorsteletext gombok
A részleteket lásd a kézikönyv Teletext c. szakaszában.
Menüpontok kiválasztása
Az OK gombot és a nyílbillentyűket használva
kiválaszthatja a TV menürendszerében rendelkezésre álló
opciókat.
A menü megjelenítése
Nyomja meg ezt a gombot, ha használni kívánja a TV
menürendszerét. Nyomja meg ismét, hogy eltávolítsa a
menüt a TV képernyőjéről.
Csatornák kiválasztása
Megnyomásával kiválaszthatja a csatornákat.
A gyári beállítások visszaállítása
Nyissa fel a távvezérlő fedelét, és nyomja meg
ezt a gombot, ha a kép- és hangbeállításokat
vissza kívánja állítani a gyárilag beállított
értékekre. Miután az "Üzembe helyezés"
menü megjelent a TV képernyőjén, lapozza fel
a kezelési útmutató "A nyelv és az ország
kiválasztása" c. szakaszát, ha módosítani
kívánja a nyelv- és az országválasztást.
8
A pontos idő megjelenítése
Nyissa fel a távvezérlő fedelét, és nyomja meg ezt
a gombot, ha meg kívánja jeleníteni a pontos időt
a képen.
Videokészülék használata
Nyissa fel a távvezérlő fedelét, és nyomja meg ezeket
a gombokat, ha a videokészüléket kívánja használni
(lapozza fel a videomagnó kézikönyvét).
Page 95

Használat
NexTView*
*a szolgáltatás rendelkezésre állásától függően.
A NexTView egy elektronikus műsorfüzet, amely az EPG-t támogató összes csatorna tekintetében legfeljebb 1 hét*
műsorinformációit tartalmazza.
*Ha az adatok meghaladják a NexTView memóriáját, 7 napnál kevesebbre vonatkozóan juthat információhoz.
A NexTView megjelenítése
Először ki kell választania egy olyan csatornát, amely NexTView szolgáltatást nyújt. Ilyen esetben megjelenik a
"NexTView" jelzés, amint az összes adat rendelkezésre áll.
1. A távvezérlőn lévő gombot ismételten megnyomva kapcsolhatja be és ki a NexTView-t.
2. A v, V, b vagy B gombokkal mozgassa a kurzort a képen.
3. Az OK gombot megnyomva erősítse meg a választást.
a. Ha az OK gombot a dátum, időpont vagy ikon (témakörök) oszlopokon nyomja meg, megváltoztatja a programlistát a
választással összhangban.
b Ha az OK gombot a programlistán nyomja meg, közvetlenül megjelenik a csatorna, ha a műsor aktuálisan fut,
vagy megjelenik a "Long Info" menü, ha a műsor sugárzására valamely későbbi időpontban kerül sor.
Tárgymutató
07 Tue
12:38
Tu e
Wed
Thu
Sat
Sun
Mon
SWISS
7
8
9
10
Fri
11
12
13
Star Wars
Super RTL
Werner - Beinhart
Pro 7
Flui grüsst den Rest der Welt
Kabel 1
12
Once upon a time in the West
Euronews
International News
RTL Plus
Fantasy film, USA, 1996
TXT TPS / RINGIER
10:35 - 12:45
10:20 - 12:00
10:45 - 10:50
11:00 - 11:20
11:45 - 12:50
Tue 07. 04 .98
teljes lista
egyéni választás
hírműsorok
filmek
sportközvetítések
szórakoztató műsorok
gyermekműsorok
visszatérés a legutóbbi menübe
9
Page 96

Használat
NexTView
Az "Individual Setting" menü használata
1. A v vagy V gombbal válassza ki a ikont, majd a B gombot megnyomva hívja be az "Individual Setting" menüt.
2. A v vagy V gombbal jelölje ki a képen a választani kívánt témát, majd az OK gombot megnyomva erősítse meg a
választást.
3. Ismételje meg a 2. lépést minden olyan tételnél, amelyet fel kíván venni a listára.
4. Amikor befejezte a lista összeállítását, a
5. Nyomja meg az OK gombot.
A "Long Info" menü használata
1. A v vagy V gombbal válasszon ki egy későbbi műsort a programlista oszlopában.
2. Az OK gomb megnyomásával hívja be a "Long Info" menüt.
B gombot megnyomva válassza a ikont a menü képen.
First nextTView/EPG-Providers in Europe
07 Tue
12:38
SWISS TXT TPS / RINGIER nexTView
Address Mapping
The position of the addresses in the
OSDA is shown in the following diagram.
The position values of the DPW are set
to '0'.
If other values are set, the complete
combination will be scrolled.
Example:
if the DPWC is set to '63', the char-
This channel has been set for a timer
VPS/PDC
On
Speed
SP
Timer Prog
VCR1
Tue 07. 04 .98
3. Ha Smartlink videomagnóval rendelkezik, és fel szeretné venni a kiválasztott műsort a videomagnóval, a b gombot
lenyomva válassza ki az ikont, majd az OK gombot lenyomva töltse le az információt a videomagnóra.
4. A videomagnó beállítása:
VPS/PDC
A b gombot ismételten megnyomva válassza ki a VPS/PDC opciót, majd az OK gombot megnyomva válassza ki a "Be"
vagy "Ki" beállítást. Ezzel a beállítással garantálható, hogy az egész műsor felvételre kerül akkor is, ha változás van a TVprogramban. Ez a funkció csak akkor működik, ha a kiválasztott csatorna sugároz VPS/PDC jelet.
Sebesség
A V gombbal válassza ki a "Speed" opciót, majd az OK gombot megnyomva válassza ki a "SP" (normál) vagy a
"LP"(hosszanjátszó) beállítást. Hosszanjátszó üzemmódban kétszer olyan hosszú felvételt tud készíteni a
videokazettára. Azonban a kép minősége romolhat.
A videomagnó beállítása
A V gombbal válassza ki a "VCR Setup" opciót, majd az OK gombot megnyomva válassza ki, melyik videomagnót szeretné
beprogramozni, ami lehet a "VCR1" vagy a "VCR2".
5. Végül a B gombot megnyomva válassza a ikont, majd nyomja meg az OK gombot, hogy eltávolítsa a menüt a TV
képernyőjéről.
10
Page 97

Használat
TELETEXT
Tele tex t
A legtöbb TV-állomás a teletexten keresztül sugároz információs szolgáltatást. A teletext indexoldala (rendszerint a
100. oldal) tájékoztatást nyújt a szolgáltatás használatának módjáról. Olyan TV-csatornát vegyen igénybe, amely
megfelelő térerővel fogható, mivel ellenkező esetben a teletext vételében hibák léphetnek fel.
A teletext be- és kikapcsolása
TELETEXT
1. Válassza ki azt a TV-csatornát, amelyen a nézni kívánt teletext adást sugározzák.
2. A P&T (kép és teletext) üzemmód bekapcsolásához nyomja meg egyszer a gombot. A
képernyő két részre oszlik, a jobb oldaliban a TV-csatorna, a bal oldaliban pedig a
teletext látható.
P&T üzemmód: A PROGR+/képernyőjén megjelenő csatornát. A
gomb megnyomásával válthatja a TV
b vagy B gomb megnyomásával
módosíthatja a TV képernyőjének méretét. A normál teletext vétel
visszaállításához nyomja meg a gombot ismét.
Index
Programme
News
Sport
Weather
TELETEXT
Index
Programme
News
Sport
Weather
m
25
153
101
98
25
153
101
98
3. Nyomja meg a gombot kétszer, hogy csak a teletext jelenjen meg.
4. A Mix üzemmódhoz nyomja meg a gombot háromszor.
5. A teletext kikapcsolásához nyomja meg a gombot, vagy nyomja meg a gombot
negyedszer is.
Egy teletext oldal kiválasztása
A távvezérlőn lévő számgombok használatával adja meg az oldalszám három számjegyét. Ha
eltéveszti, gépeljen be három tetszőleges számjegyet, majd adja meg ismét a helyes
oldalszámot.
További teletext funkciók használata
A következő vagy az előző oldal kiválasztása
A távvezérlőn lévő vagy gombot megnyomva választhatja ki az előző vagy a következő
oldalt.
Aloldal kiválasztása
Egy teletext oldal több aloldalt is tartalmazhat. Ilyen esetben megjelenik egy információs sor,
amely az aloldalak számát jelzi. A v vagy V gomb megnyomásával válassza ki az aloldalt.
Egy teletext oldal rögzítése
Nyomja meg a gombot az oldal rögzítéséhez. A rögzítés elvetéséhez nyomja meg
ismét a gombot.
TELETEXT
Index
Programme
News
Sport
Weather
216-02
01 03 04 05 06 07 0802
m
25
153
101
98
Az indexoldal felfedése.
Nyomja meg a gombot az gomb megnyomásával fedje fel az oldalt (rendszerint a 100.
oldal).
Színgombok használata az oldalak eléréséhez (gyorsteletext)
(csak akkor működik, ha a TV-állomás sugároz gyorsteletext jeleket).
Amikor egy oldal alján egy színkódos menü jelenik meg, a megfelelő oldal eléréséhez nyomja
meg a távvezérlőn lévő egyik színgombot (zöld, piros, sárga vagy kék).
Az "Oldalkapcsolás" szolgáltatás használata
1. A távvezérlőn lévő számgombokat megnyomva válasszon ki egy olyan teletext oldalt, amelyen több oldalszám szerepel (pl.
az indexoldal).
2. Nyomja meg az OK gombot.
3. A v vagy V gombbal válassza ki a kívánt oldalszámot, majd nyomja meg az OK gombot. A kért oldal néhány másodperc
múlva megjelenik.
11
Page 98

Használat
Tele tex t
A teletext a legtöbb TV-állomás által sugárzott információs szolgáltatás.
A Teletext menü használata
1. A távvezérlőn lévő MENU gombot megnyomva jelenítse meg a menüt a TV
képernyőjén.
2. A v vagy V gombbal jelölje ki a választani kívánt menüpontot, majd a
megnyomva hívja be a hozzá tartozó almenüt.
3. Nyomja meg a MENU gombot, hogy eltávolítsa a Teletext menüt a képernyőről.
Fel./Alul/Teljes
A Fel./Alul/Teljes almenü lehetővé teszi a Teletext oldal különböző részeinek felnagyítását. A
v gombot megnyomva a képernyő felső felét, a V gombot megnyomva pedig az alsó felét
nagyíthatja fel. Az OK gomb megnyomásával állíthatja vissza az oldalt a normál méretre. A
Teletext menühöz való visszatéréshez nyomja meg a b gombot.
Szövegtörlés*
*csak teletext és rávetítéses üzemmódban használható (lásd A teletext be- és
kikapcsolása)
B gombot
Oldaláttekintés
A szövegtörléssel a teletext oldal megtalálásáig nézhetó a tv állomás műsora.
1. A távvezérlő gombjának kétszeri megnyomásával kapcsoljon egész képernyős
szöveg üzemmódba.
2. A MENU gombbal hívja be a Teletext menüt.
3. A v vagy a V gombbal jelölje ki a Szövegtörlés sort, majd a B gombbal válassza ki azt.
4. Az aktuális tv csatorna megjelenik. A teletext oldal megtalálásakor a kék
szimbólum megjelenik a képernyő bal felső sarkában.
5. A teletext oldal behívásához nyomja meg a távvezérlő gombját.
Felfedés
Egyes teletext oldalakon rejtett információk találhatók (pl. rejtvényeknél), amelyek
felfedhetők. Miután kiválasztotta ezt a funkciót, a rejtett információ megjelenik a képen.
Miután kiválasztotta ezt a funkciót, nyomja meg a B gombot. A rejtett információ
megjelenik a képen.
Időkód oldal
Figyelmeztető oldalként beállíthat egy időkódolt oldalt, amely az Ön által megadott
időpontban fog megjelenni. Miután megjelenítette az Időkód oldal almenüt:
A v vagy V gombbal válassza ki a "Be" opciót, majd az OK gombot megnyomva erősítse
meg a választást. A távvezérlőn lévő számgombokkal adja meg a kívánt oldal három
számjegyét. Ismét a távvezérlőn lévő számgombokkal adja meg a kívánt időpont négy
számjegyét. Az OK gomb megnyomásával tárolja a kívánt időpontot. Az időpont
megjelenik a képernyő bal felső sarkában. A kért időpontban az oldal megjelenik.
Oldaláttekintés*
* csak ha a tv állomás TOP-Text adást sugároz
Ennél a menünél a TOP-Text oldalak két hasábban jelennek meg, az első tartalmazza az
oldal blokkokat, a második az oldal csoportokat.
1. A b vagy a B gombbal válassza ki az első vagy a második hasábot.
2. A v vagy a V gombbal válassza ki a megfelelő csoportot vagy blokkot.
3. Az OK gombbal hívja be a kiválasztott oldalt.
12
Page 99

Használat
A TV menürendszerének használata
A TV tartalmaz egy menürendszert, amely egy sor felhasználóbarát képernyőkijelzésen és menün alapul. Ezek a
kijelzések segítenek abban, hogy a legtöbbet hozza ki a TV-készülékből, segítséget nyújtanak a kép- és hangbeállítások
módosításában, a TV-kép méretének megváltoztatásában, a TV-programok átrendezésében stb.
A kép és a hang beállítása
A kép és a hang gyári előbeállítása megtörtént. Azonban módosíthatja ezeket a beállításokat, hogy megfeleljenek saját
ízlésének.
1. A távvezérlőn lévő MENU gombot megnyomva jelenítse meg a menüt a TV
képernyőjén.
2. A v vagy V gombbal válassza ki a menüpontot, ha a képbeállításokat,
vagy a menüpontot ha a hangbeállításokat kívánja módosítani, majd a B
gombot lenyomva lépjen be a "Képbeállítás", illetve az "Audio beállítás"
menübe.
3. A v vagy V gombbal válassza ki azt a tételt a képen, amelyet beállítani kíván,
majd a B gombot megnyomva erősítse meg a választást. A menüpontok és
hatásaik ismertetését az alábbi táblázat tartalmazza.
4. A v, V, B vagy b gombokkal állítsa be a kiválasztott tételt.
5. Amikor befejezte egy tétel beállítását, az OK gomb megnyomásával tárolja az
új beállítást.
6. Ismételje meg a 3-5. lépéseket, ha bármely más tételeket is be kíván állítani.
7. Nyomja meg a MENU gombot, hogy eltávolítsa a menüt a TV képernyőjéről.
A kép szabályozása
Tétel Hatás/Használat
Kép üzemmód V Live (élő adásokhoz)
Personal(egyéni beállításokhoz)
Mozi (filmekhez)
v Game (sportműsorokhoz)
Kontraszt KevesebbbB Több
Fényerő Sötétebb bB Világosabb
Színtelítettség KevesebbbB Több
Színárnyalat Reddish bB Greenish
Képélesség Lágyabb bB Élesebb
Törlés Visszaállítja a képjellemzőket a gyárilag beállított
értékekre.
AI (Mesterséges V Ki : Normál
intelligencia) v Be : A kontraszt szintjének automatikus
optimalizálása a TV-jelnek megfelelően.
Auto képzajszűrő V Ki : Normál
v Be : Csökkenti a képzajt gyenge
adásjel esetén
Játék
Digitális mód V DRC 50
v DRC 100
13
Page 100

A TV menürendszerének használata:
A hang szabályozása
Tétel Hatás/Használat
Ekvalizer üzemmód V Personal
Vocal
Jazz
Rock
Pop
v Flat (rögzített beállítás, nem módosítható)
Ekvalizer beállítás Módosíthatja az Ekvalizer üzemmód pontban kiválasztott
üzemmódot az 5 kiválasztott frekvenciasáv elnyomásával
és kiemelésével. A b vagy B gombot megnyomva válassza
ki a frekvenciasávot, majd a V vagy v gombot megnyomva
állítsa be a frekvenciát. Végül az OK gomb megnyomásával
tárolja az új beállítást.
Ha tárolni kívánja az új beállítást, az Ekvalizer
üzemmódot "Personal"-ra kell állítania. A Personal
üzemmód állandó jelleggel tárolja a beállítást, míg az
összes többi üzemmód (Vocal, Jazz, Rock, Pop) csak a
következő üzemmódváltásig tárolja azt.
Surround üzemmód V Ki
Dolby Sur
SRS
Hall
Church
Disco
v Stadium
SRS üzemmód* V SRS 1
(*csak ha a "Surround SRS 2
üzemmód" beállítása v SRS 3
"SRS")
Auto. hangerőszab. V Be : a csatornák hangereje ugyanaz marad
függetlenül a sugárzott jeltől (pl.
reklámok esetében)
v Ki : a hangerő a sugárzott jelnek megfelelően
változik.
Kettős hang Kétnyelvű adás esetén:
V A az 1. hangcsatornára
v B a 2. hangcsatornára
Sztereo adás esetén:
V Mono
v Sztereo
NICAM sztereo adás esetén a NiCAM jelzés rövid
időre megjelenik a képen.
Fejhallgatók
i Hangerő KevesebbbB Több
i Kettős hang Kétnyelvű adás esetén:
V A az 1. hangcsatornára
v B a 2. hangcsatornára
14
 Loading...