

Sony KV-27XBR35, KV-32XBR35 Service Manual
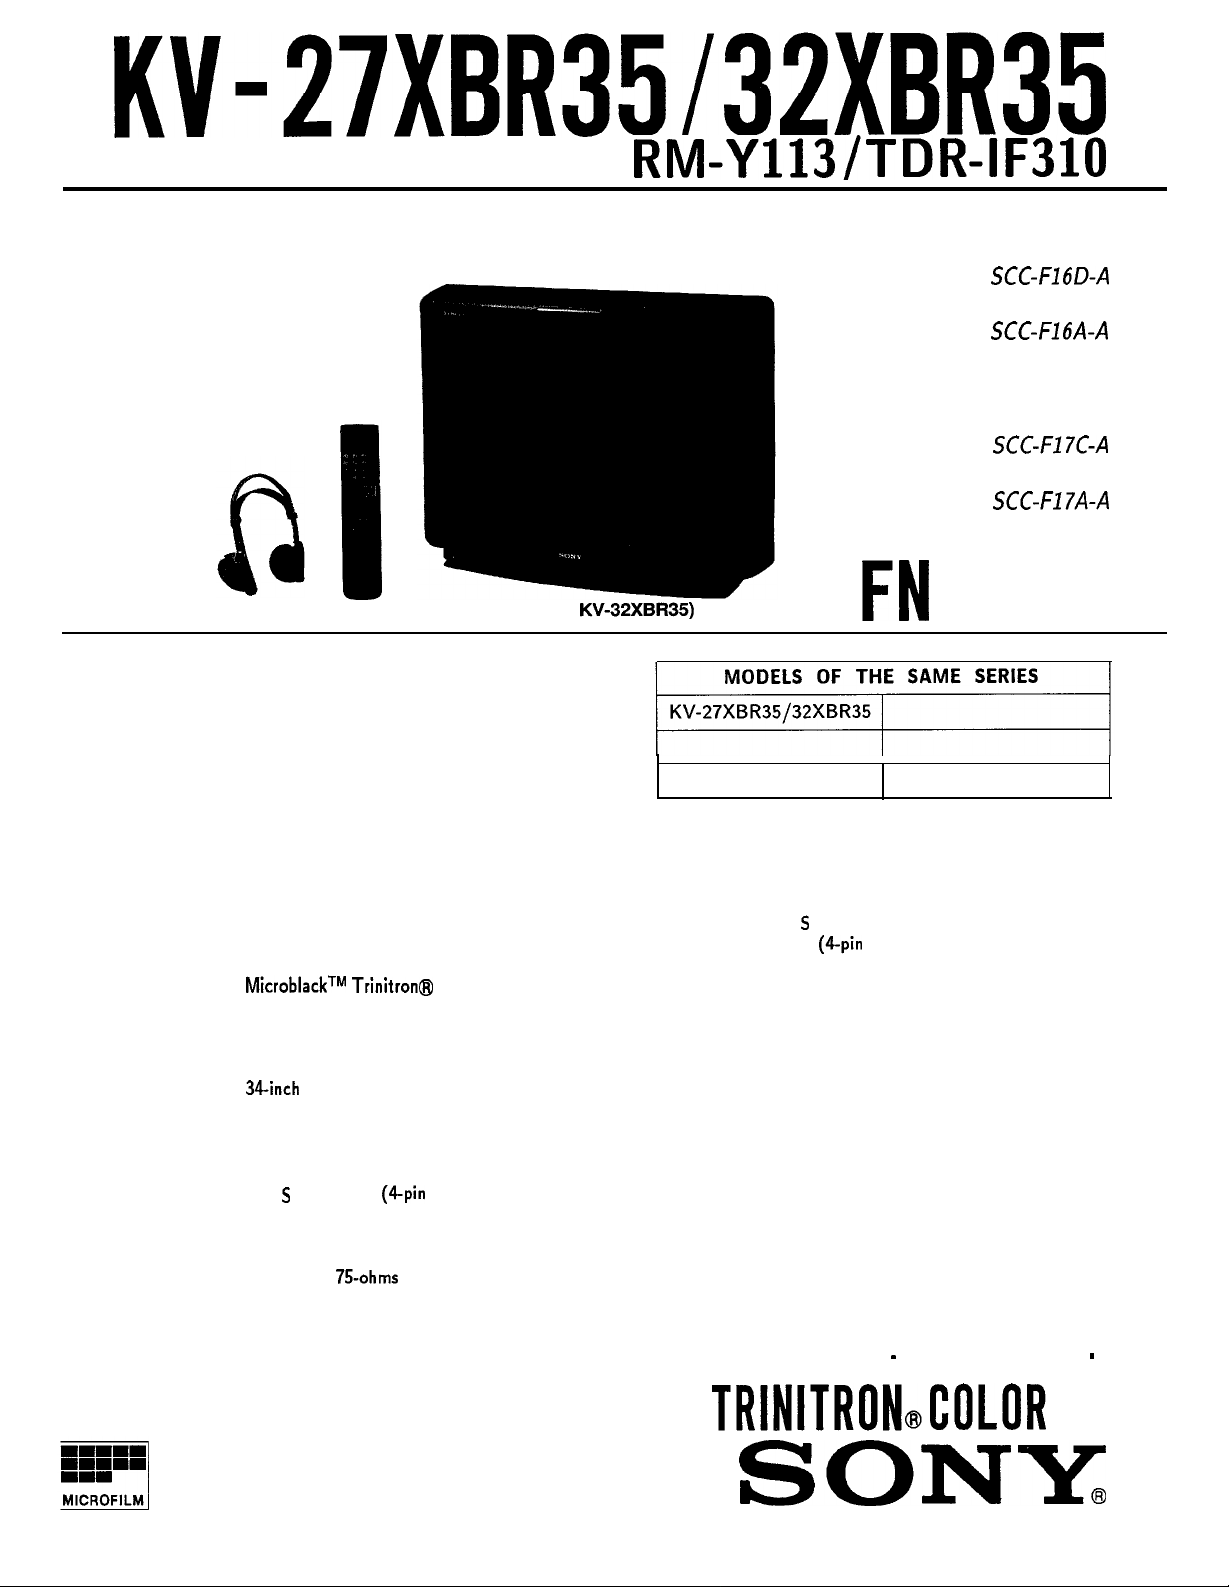
KV-27XBR35132XBR35
RM-Y113/TDR-IF310
SERVICEMANUAL
(Photo :
KW32XBR35)
US Model
KV-27XBR35
Chassis No. SCC-F16D-A
KV-32XBR35
Chassis No. SCC-F16A-A
Canadian Model
KV-27XBR35
.
Chassis No. SCC-Fl7C-A
KV-32XBR35
Chassis No.
FN
SCC-Fl7A-A
CHASSIS
Television system
Channel coverage
Picture tube
Antenna
Input jacks
SPECIFICATIONS
American TV standards
VHF: 2-13
UHF: 1669
CABLE TV: 1-125
MicroblackTM
27-inch picture measured diagonally
29-inch picture tube measured diagonally
(KV-27XBR35)
32-inch picture measured diagonally
34inch picture tube measured diagonally
(KV-32XBR35)
75 ohm external antenna
terminal for VHF/UHF
VIDEO IN 1, 2 and 3
S
Video (phono jacks) : 1 Vp-p, 75-ohms
Audio (phono jacks) :
Trinitron@ tube
VIDEO IN (4pin mini DIN)
Y : 1 Vp-p, 75-ohms unbalanced,
sync negative
C : 0.286 Vp-p (Burst signal)
75-ohms
unbalanced, sync negative
500 mVrms (100% modulation)
Impedance : 47 kilohms
Output jacks MONITOR OUT
S
VIDEO MONITOR OUT
(6pin mini DIN)
Y: 1 Vp-p, 75-ohms
Video (phono jacks) : 1 Vp-p, 75-ohms
unbalanced, sync negative
Audio (phono jacks) : 500 mVrms
(100% modulation)
Impedance : 10 kilohms
AUDIO OUTPUT (VARIABLE)
(phono jacks)
More than 900 mVrms (100%
modulation) at the maximum volume
setting (variable)
Impedance : 5 kilohms
. AUDIO LINE OUT
(phono jacks)
900 mVrms (100% modulation)
Impedance : 5 kilohms
TRINITRONdOLOR
unbalanced, sync negative
- Continued on next page
-
TV
SONY
KW27XBR35132XBR35
RM-Y113/TDR-IF310
Speaker output
Speaker size
Audio frequency response
Power requirements
Power consumption
Dimensions (w/h/d)
Weight
Supplied accessories
13W X2 (8 ohms)
Tweeter 25 mm (1 in.) X2 units
Woofer 100 mm (4
Tweeter 8 kHz-20 kHz
Woofer 50 Hz-8 kHz
120 V AC, 60 Hz
(KV-27XBR35)
250W
(KV-32XBR35)
225W
(KV-27XBR35)
Approx. 756~578x519 mm
(297/8 x 227/8 x 201/2 inches)
(KV-32XBR35)
Approx. 870 X 663 X 575.2 mm
(343/8 X261/8Xm/4
(KV-27XBR35)
Approx. 57.lkg (125 lb 15
(KV-32XBR35)
Approx.
Remote Commander RM-Y113 (1)
with 2 size AA (R6)
EVEREADY batteries
Wireless headphones
TDR-IF310 (1) with 2 size AA (R6)
EVEREADY batteries
77.3kg
in.)X2
units
inches)
(170 lb 7 oz)
oz)
Optional accessories
Design and specifications are subject to change without notice.
U/V mixer EAC-66
Connecting cable
RK-74A
VMC-810S/820S
YC-15v/3ov
TV stand SU-27XBR3
(KV-27XBR35)
TV stand SU-32XBR3
(KV-32XBR35)
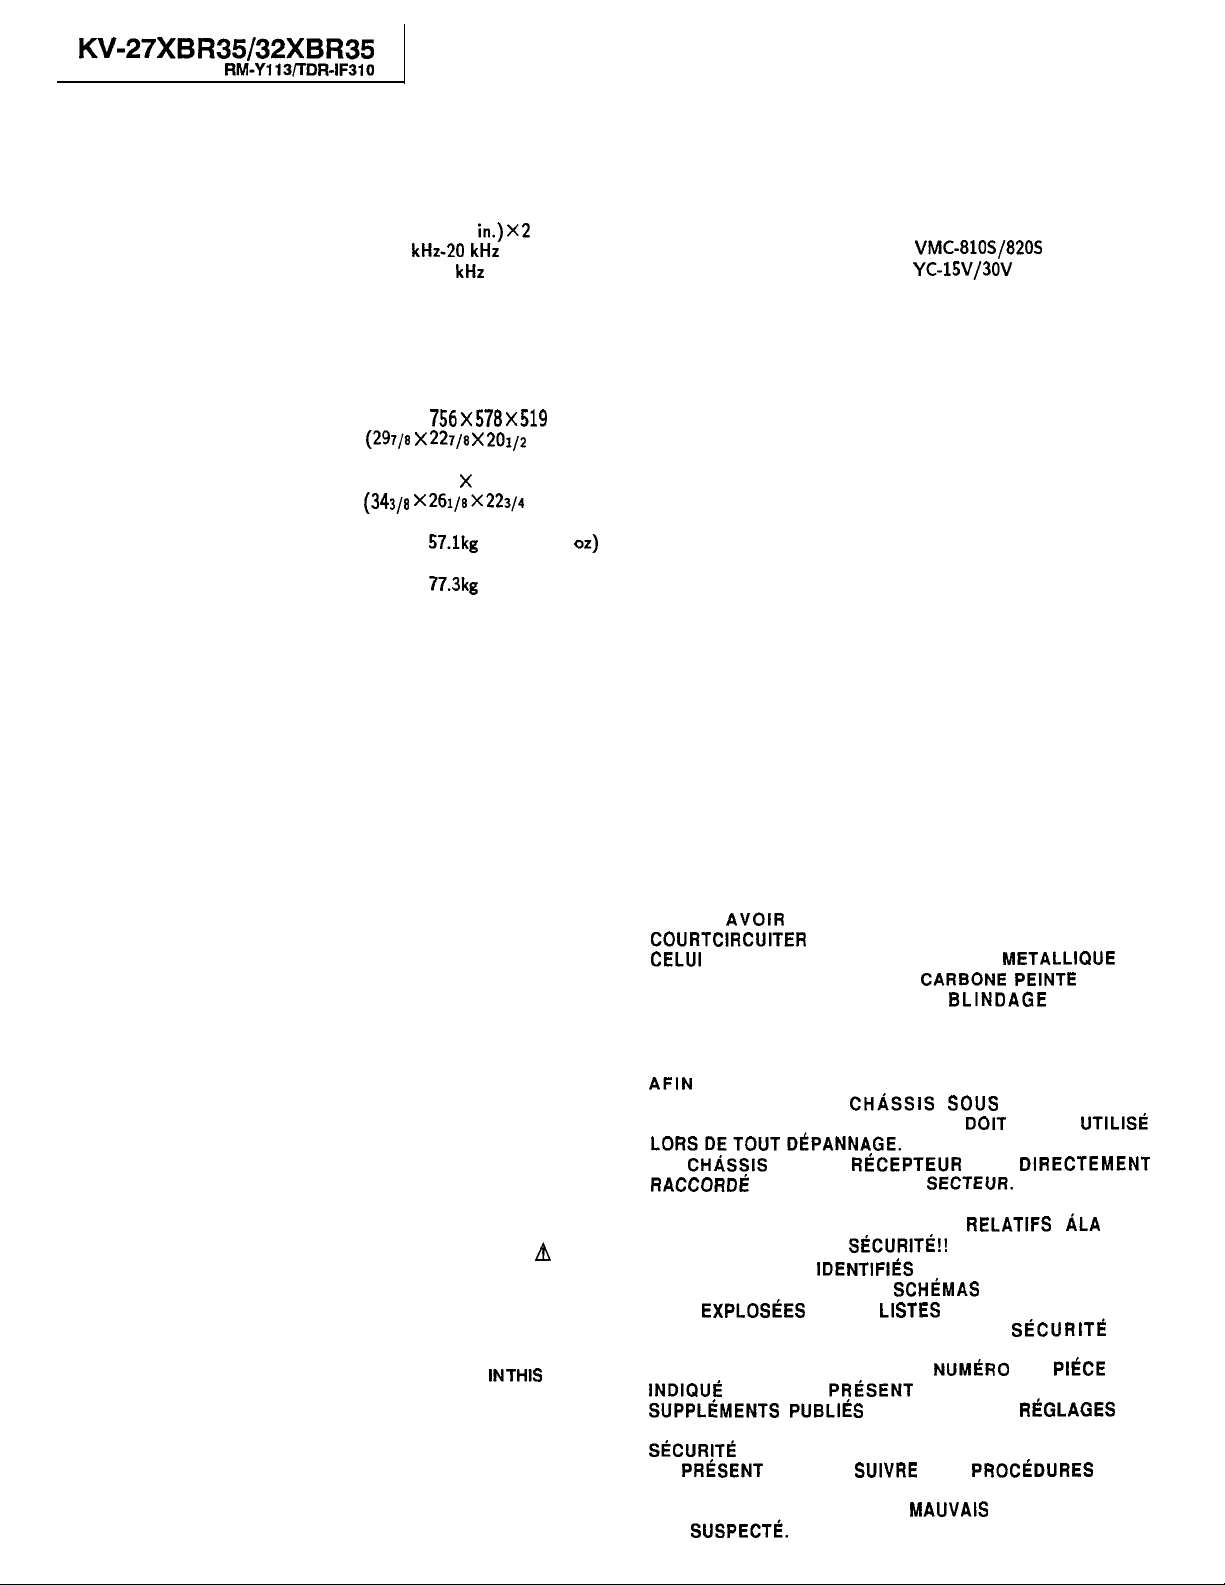
(CAUTION)
SHORT CIRCUIT THE ANODE OF THE PICTURE TUBE AND THE
ANODE CAP TO THE METAL CHASSIS, CRT SHIELD, OR CARBON
PAINTED ON THE CRT, AFTER REMOVING THE ANODE.
WARNING!!
AN ISOLATION TRANSFORMER SHOULD BE USED DURING ANY
SERVICE TO AVOID POSSIBLE SHOCK HAZARD, BECAUSE OF
LIVE CHASSIS.
THE CHASSIS OF THIS RECEIVER IS DIRECTLY CONNECTED TO
THE AC POWER LINE.
SAFETY-RELATED COMPONENT WARNING !!
COMPONENTS IDENTIFIED BY SHADING AND MARK A ON THE
SCHEMATIC DIAGRAMS, EXPLODED VIEWS AND IN THE PARTS
LIST ARE CRITICAL TO SAFE OPERATION. REPLACE THESE
COMPONENTS WITH SONY PARTS WHOSE PART NUMBERS
APPEAR AS SHOWN IN THIS MANUAL OR IN SUPPLEMENTS
PUBLISHED BY SONY. CIRCUIT ADJUSTMENTS THAT ARE
CRITICALTOSAFE OPERATION ARE IDENTIFIED INTHIS MANUAL.
FOLLOW THESE PROCEDURES WHENEVER CRITICAL
COMPONENTS ARE REPLACED OR IMPROPER OPERATION IS
SUSPECTED.
(ATTENTION)
APRES AVOIR DECONNECTE LE CAP DE L’ANODE,
COURTCIRCUITER L’ANODE DU TUBE CATHODIQUE ET
CELUI DE L’ANODE DU CAP AU CHASSIS METALLIQUE DE
L’APPAREIL, OU AU COUCHE DE CARBONE PEINTE SUR LE
TUBE CATHODIQUE OU AU
CATHODIQUE.
ATTENTION!!
AFIN
D’EVITER TOUT RISQUE D’ELECTROCUTION
PROVENANT D’UN
TRANSFORMATEUR D’ISOLEMENT DOIT ETRE UTlLlSCi
LORSDETOUTDtiPANNAGE.
LE CHliSSlS DE CE
RACCORDti A L’ALIMENTATION SECTEUR.
ATTENTION AUX COMPOSANTS RELATIFS ALA
LES COMPOSANTS
UNE MAPQUE A SUR LES SCHliMAS DE PRINCIPE, LES
VUES EXPLOSEES ET LES LISTES DE PIECES CONT D’UNE
IMPORTANCE CRITIQUE POUR LA
FONCTIONNEMENT. NE LES REMPLACER QUE PAR DES
COMPOSANTS SONY DONT LE NUMliRO DE PIliCE EST
INDIQUG DANS LE
SUPPLGMENTS
CIRCUIT DONT L’IMPORTANCE EST CRITIQUE POUR LA
SliCURITE DU FONCTIONNEMENT SONT IDENTIFIES DANS
LE PRl%ENT MANUEL. SUIVRE CES PROCliDURES LORS
DE CHAQUE REMPLACEMENT DE COMPOSANTS
CRITIQUES, OU LORSQU’UN MAUVAIS FONCTIONNEMENT
EST
SUSPECTk
IDENTIFIh
PUBLIh
CH/iSSlS
RliCEPTEUR
SiCURITli!!
PR&ENT
PAR SONY. LES RriGLAGES DE
BLINDAGE
SOUS TENSION, UN
EST DIRECTEMENT
PAR UNE TRAME ET PAR
MANUEL OU DANS DES
DU TUBE
SfiCURITk
2
DU
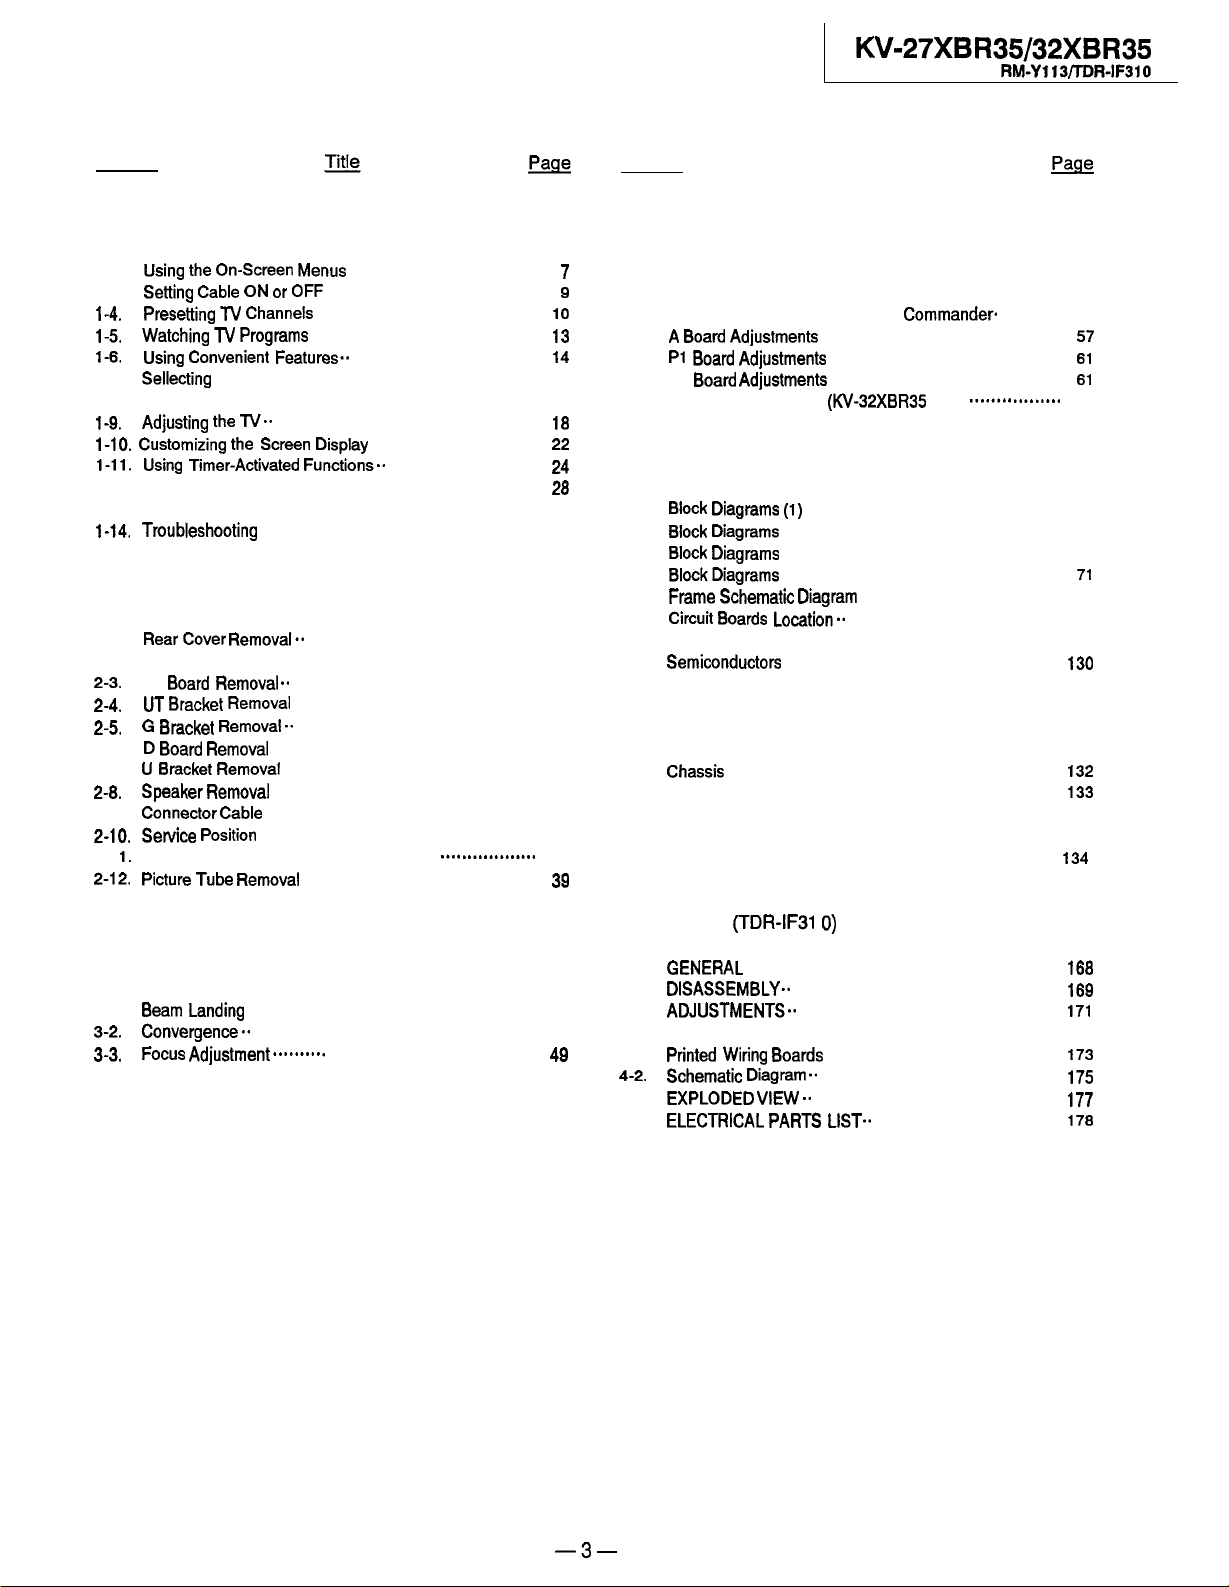
TABLE OF CONTENTS
Section
1.
GENERAL
l-l. Locating Controls and Connectors ............................
Using
the
l-2.
Setting
l-3.
l-4. presetting
l-5.
Watching
1-6.
Using
l-7.
Sellecting
1.8.
Watching Two Pictures at Once (PIP)........................
1-9.
Adjusting
l-10.
Customizing
l-11.
Using
On-Screen
Cable
JlJ Channels
Jl,
Convenient
a Picture and Sound Mode
the
TV.. .................................................
the Screen
Timer-Activated
l-12. Setting Favarite Channel
Menus
...................................
ON or OFF .......................................
.........................................
programs
..........................................
Features..
...................................
........................
Display
...............................
Functions..
............................
........................................
l-l 3. Using the Pre-Programmed Remote Commander
l-14.
Troubleshooting
2.
DISASSEMBLY
Rear
2-l.
2-2.
2-3. P3
2-4.
2-5, G
2-6.
2-7.
2-8.
2-9.
2-10.
Cover Removal..
Chassis Assy and H Bracket Removal .......................
Board Removal.. ..............................................
UT Bra&et
Bm,.ket Removal.. .............................................
D Board
,, Bracket
Speaker
connector
!&Nice
position
2-l 1. Degaussing Coil Removal (KV-27XBR35)
2-12.
picture Tube Removal
2-13. Repair of Chip Component Circuit Board
...................................................
...........................................
Removal
Removal
Remova,
Removal
Cable
.............................................
.................................................
...............................................
.................................................
..................................................
...................................................
...........................................
~*~*~~~~~~~~~~~~~~
....................
........
M
Section Title
SAFETY RELATED ADJUSTMENTS
4.
..................
M
51
5
7
5.
CIRCUIT ADJUSTMENTS
9
10
13
14
15
16
5-l.
Electrical Adjustment by Remote
A
Board
5-2.
PI
5-3.
P3 Board
5-4.
VC Board Adjustment (KV32XBR35 only)
5-5.
Adjustments
Board Adjustments
Adjustments
.............................................
...........................................
...........................................
Commander
~~~~***~~~~~~~~~~
............
55
57
61
61
62
18
22
24
6.
DIAGRAMS
28
Block
29
32
33
33
34
34
35
35
36
36
37
38
36
39
40
6-l.
6-2.
6-3.
6-4.
6-5.
6-6.
6-7.
6-8.
7.
7-l.
Diagrams
Block
Diagrams
Block
Diagrams
BlockDiagrams
Frame
Schematic
Circuit
Boar& Location..........................................
Printed Wiring Boards and Schematic Diagrams ..........
Semiconductor
EXPLODED VIEWS
Chassis ..............................................................
7-2. Picture Tube
6.
ELECTRICAL PARTS LIST
ACCESSORY
(1)
...............................................
(2) ...............................................
(3)
...............................................
(4)
...............................................
Diagram
.....................................
...................................................
........................................................
................................
(TDR-IF31 0)
63
65
67
71
75
78
78
130
132
133
,34
SET-UP ADJUSTMENTS
3.
&am
3-l.
3-2.
3-3.
3-4.
Landing
Convergence.. .....................................................
Focus Adj~stment~~~~~~~~~. .......................................
G2 (Screen) and White Balance Adjustments ..............
.....................................................
45
46
49
50
GENERAL ..........................................................
1.
DISASSEMBLY..
2.
ADJUSTMENTS..
3.
4.
DIAGRAMS
print4
4-l.
Wiring
4-2. Schematic
EXpLO,,E,, VIEW.. ..............................................
5.
,=L,=CT,Z,,CAL PARTS LIST..
6.
..................................................
.................................................
Boards ............................................
Diagram.. .............................................
...................................
168
169
17,
173
175
177
178
-3-

SAFETY CHECK-OUT
(US Model only)
After correcting the original service problem,
perform the following safety checks before releasing
the set to the customer:
1.
Check the area of your repair for unsoldered or
poorly-soldered connections. Check the entire
board surface for solder splashes and bridges.
2.
Check the interboard wiring to ensure that no
wires are “pinched” or contact high-wattage
resistors.
3. Check that all control knobs, shields, covers,
ground straps, and mounting hardware have
been replaced. Be absolutely certain that you
have replaced all the insulators.
4. Look for unauthorized replacement parts, par-
ticularly transistors, that were installed during a
previous repair. Point them out to the customer
and recommend their replacement.
5. Look for parts which, though functioning, show
obvious signs of deterioration. Point them out
to the customer and recommend their replacement .
6. Check the line cord for cracks and abrasion.
Recommend the replacement of any such line
cord to the customer.
Check the condition of the monopole antenna
7.
(if any).
Make sure the end is not broken off, and has
the plastic cap on it. Point out the danger of
impalement on a broken antenna to the
customer,
replacement.
8.
Check the B+ and HV to see they are at the
values specified. Make sure your instruments
are accurate; be suspicious of your HV meter
if sets always have low HV.
9.
Check the antenna terminals, metal trim,
“metallized” knobs, screws, and all other
exposed metal parts for AC leakage.
leakage as described below.
and recommend the antenna’s
Check
LEAKAGE TEST
The AC leakage from any exposed metal part to
earth ground and from all exposed metal parts to any
exposed metal part having a return to chassis, must
not exceed OSmA
(SO0
microampers).
Leakage
current can be measured by any one of three
methods.
1.
A commercial leakage tester, such as the
Simpson 229 or RCA WT-S40A. Follow the
manufacturers’ instructions to use these instruments.
2.
A battery-operated AC milliammeter. The Data
Precision 245 digital multimeter is suitable for
this job.
3.
Measuring the voltage drop across a resistor by
means of a VOM or battery-operated AC voltmeter.
analog meters must have an accurate
The “limit” indication is 0.75V, so
low-
voltage scale. The Simpson 250 and Sanwa
SH-63Trd are examples of a passive VOM that
is suitable. Nearly all battery operated digital
multimeters that have a 2V AC range are
suitable. (See Fig. A)
HOW TO
FlND
A GOOD EARTH GROUND
A cold-water pipe is guaranteed earth ground; the
cover-plate retaining screw on most AC outlet boxes is
also at earth ground. If the retaining screw is to be
used as your earth-ground, verify that it is at ground
by measuring the resistance between it and a
cold-
water pipe with an ohmmeter. The reading should be
zero ohms. If a cold-water pipe is not accessible,
connect a 60-100 watts trouble light (not a neon
lamp) between the hot side of the receptacle and the
retaining screw. Try both slots, if necessary, to locate
the hot side of the line, the lamp should light at
normal brilliance if the screw is at ground potential.
(See Fig. B)
:ig.
To Exposed Me tat
Parts on
A.
Using an AC voltmeter to check AC leakage.
Set
I
f
Earth Ground
AC
voltmeter
10.75 V}
-4-
rrouble
Light
F&.
B.
Checking for earth ground.
l-1.
LOCATING CONTROLS AND CONNECTORS
SECTION 1
GENERAL
For details, see the pages Indicated by the numbered black
Front
On-screen menu displays
0 Nr
> c
CtrCteS a
50
-vo
ILlJh
dE+
JC
VI’
VOLUME +I- buttons* @ @
+*W~reless
Channel number display
SLEEP, MUTING displays @
Channel caption display @
MTS (SAP) mode display @
-
CHANNEL+ POWER
CHANNEL
+I- buttons @ - @ 8
headphones Infrared
“MER
,I
I 7)
I
STEREO
Indicator lamp @
Tl
IMER
Indicator lamp @
POWER button*
Rear
VIDEO IN 1/2/3]acks
@-G@
STEREO
Remote
Control
detector
f!D 0
UDIO
ONITOR
LOOP OUT jacks @
AR. (vanable) AUDIO OUT jacks
LINE OUT jacks @
OUT jacks @
@I
AUX (auxiliary) terminal
(D
TO CONVERTER
termlnal @
VHF/UHF
antenna
tenmnat CD - (D
Q
(D
6
Chapter 1.
VIDEO IN 3 lacks (D
(ndeo. audio
I Buttons with the same function are also
located on the Remote Commander
smng
up
UR)
bEM0
a,
(dem::::“;=
@
m
(p.
8).
You can listen to the TVs sound and control the
headphones. within a distance of approx. 6 m
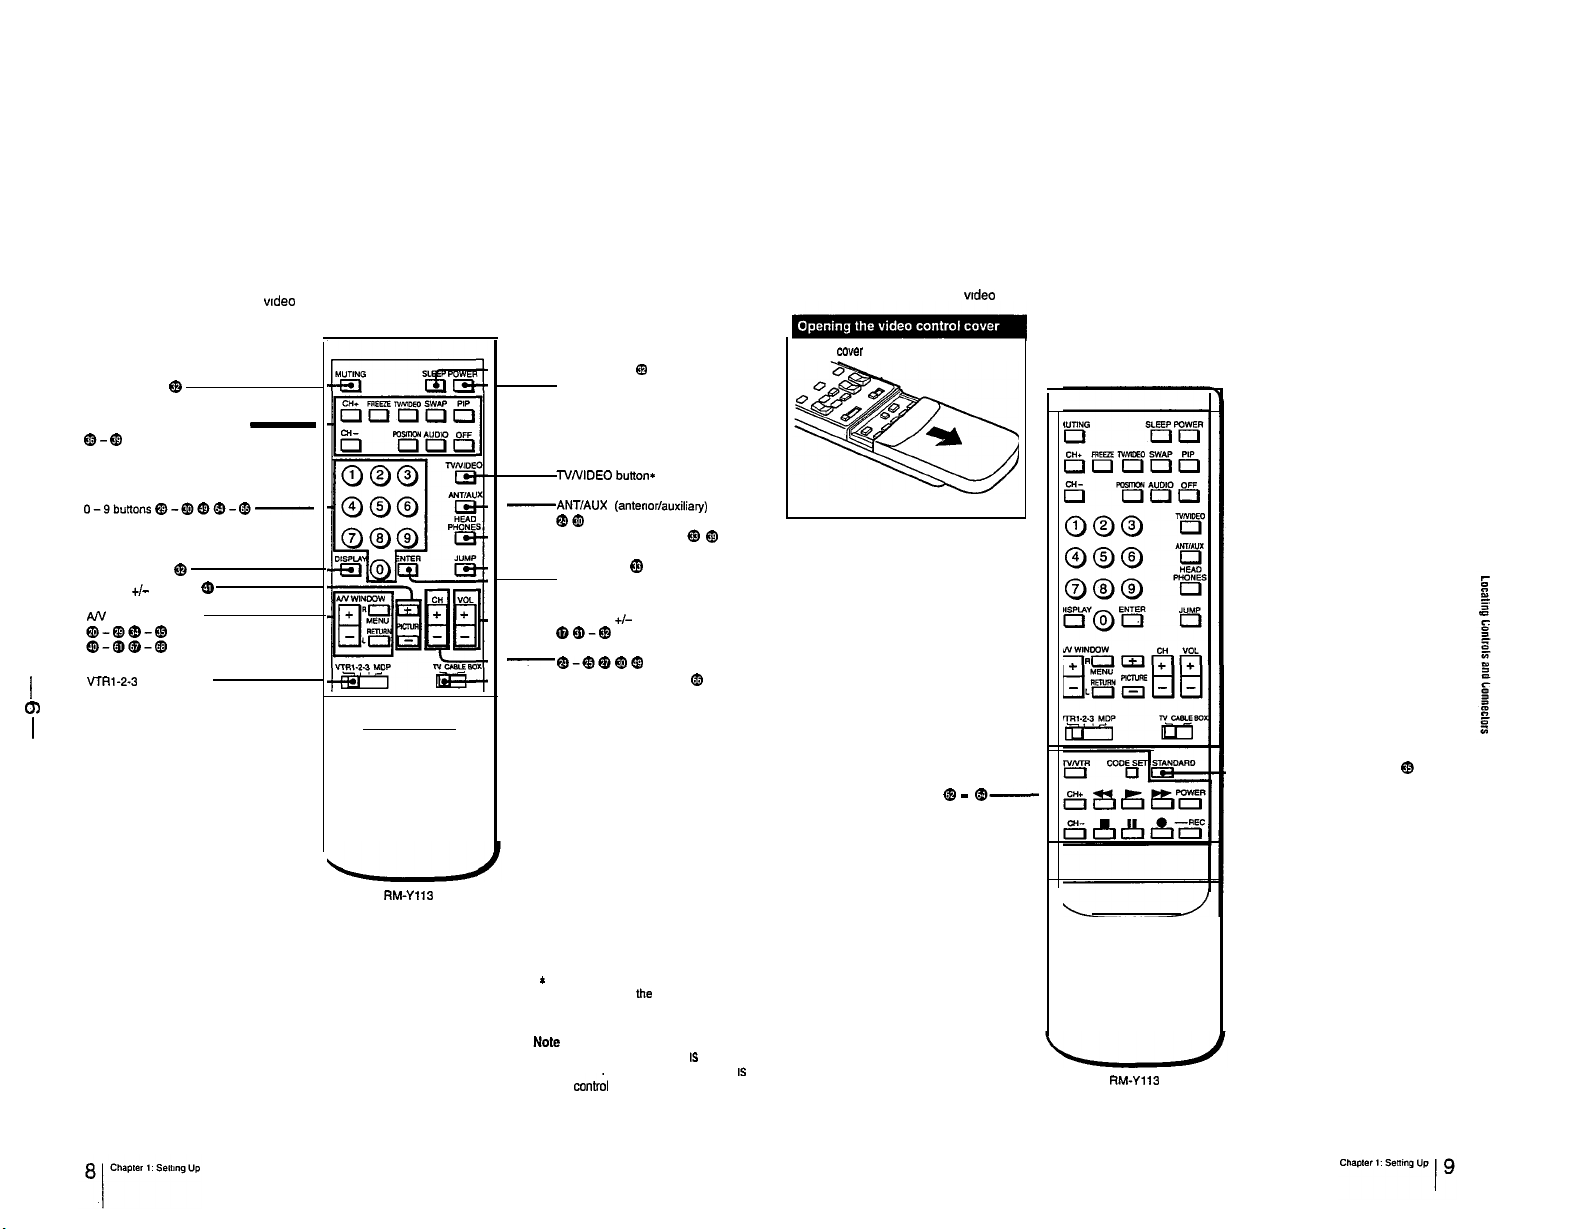
Remote Commander (with the wdeo control cover closed)
MUTING button
@
-SLEEP button
POWER button*
Remote Commander (with the wdeo control cover open)
Slide the
cwer
@
down.
PIP (Picture-n-Picture) buttons
Q-Q
0-9buttons@-@)eB@-@-
DISPLAY button
PICTURE
AN
VfRl-2-3
I
tn
Q-Q
@
+I-
buttons
0
WINDOW buttons
MDP selector
-
RM-Yll3
-ANT/AUX
-HEADPHONES button** @I
-JUMP button @
-VOL (volume) +I- button*
-Q-QQO@
-N/CABLE BOX selector
*
Buttons with the same function are
(anterior/auxiliary) button**
QO
ENTER button
QQ-Q
CH (channel) +/-buttons*
@
also located on
the
N (p. 6).
@I
-STANDARD button @
Video operating buttons @ -
@-
If the TV/CABLE BOX selector IS set to
CABLE BOX. the Remote Commander
able to co”tr;l a connected cable box. not
the TV (p. 66). Set the selector to TV to
control the N with the Remote
Commander.
IS
RM-Y113
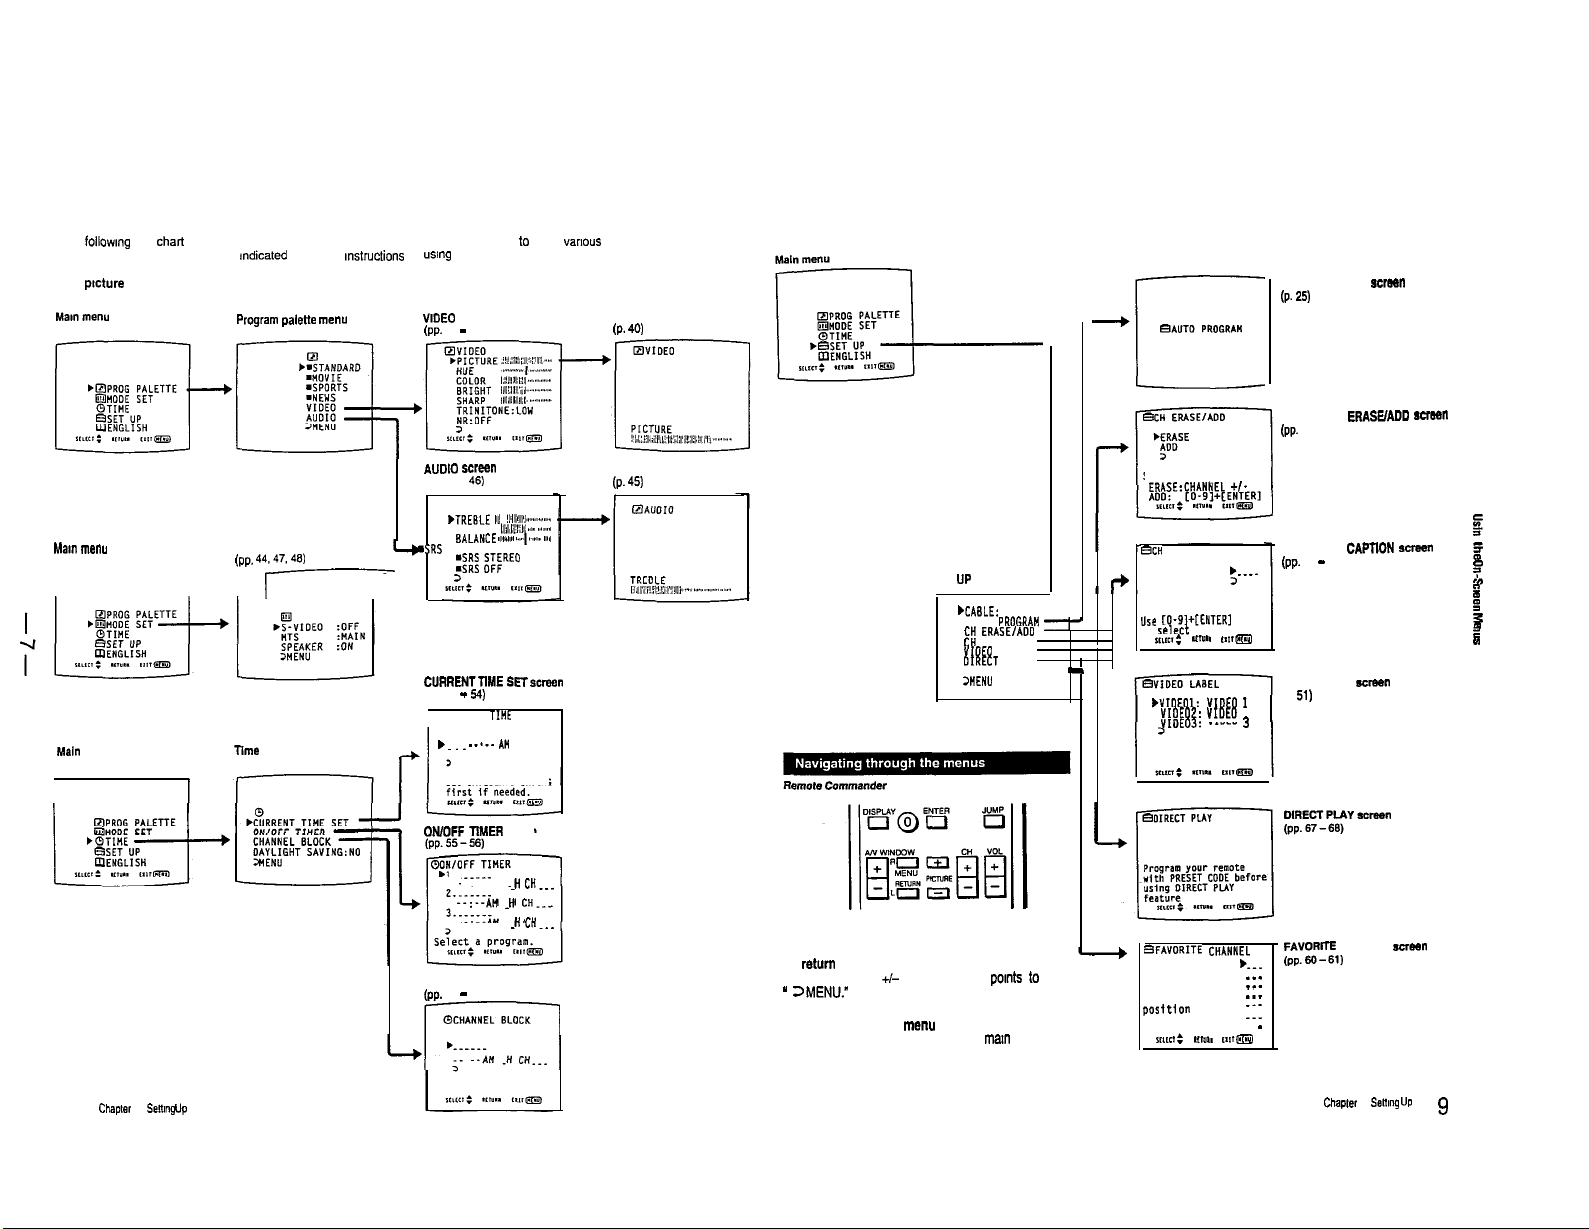
1-2. USING THE ON-SCREEN MENUS
The followmg flow
adjustments and settings. See the mdicated pages for mstructions on
For
picture
For mode adjustment
Ma,” menu
r----l
For time-related settings
MaIn menu
chart
shows the different levels of on-screen menus that you can use to make
and sound quality adjustment
Program palette menu
MODE SET screen
(PP. 44.47.46)
r------
rime
menu
using
each feature.
VIDEO screen
(pp.
40 - 43)
AUDtO ~2~8”
(pp. 45 -
46)
q AUOI0
*TREBLE ,,,,
!,‘,,/(,l’,,,,.,,,,,,,,,,.,
,,b,,,i,:;;,,,l
,,,,,
BASS
BALANCE ,<,,s,.,
.SRS
AUTO
6;:
>
CURRENTTME SETscreen
(PP. 53 - 54)
@CURRENT TlHE SET
. . . . --‘--
DAYLIGHT SAVING
Set DAYLIGHTS SAVING
,.,..,.,s,,,
;S:REO
AM
varm~s
Adjustment screen
(P.
Adjustment screen
(P.
I
,s,,,.,
,,,,,
For presetting and other functions
AUTO PROGRAM scraen
(P.
25)
40)
CH (channel) ERASOADD
(PP. 27.29)
45)
SET UP screen
I a
WAGLE: ON
AUTO
PROGRAH CH ERASE/ADO
CH CAPTION
YlOEO
LABEL
OlRECT
PLAY
FAVORITE CHANNEL
>WEHU
I ,
1
‘-
Select the channel.
ERASE:CHANNEL
BCH CAPTION
+
Ure CO-9I+tENTERI
to
select
*cm:
.YIOEOI:
1
YIOEOZ: VIDEO
VtOE03: VIDEO
Cl-
5.--
the channel.
.n”II t.,rm
VIDEO 1
2
CH (channel) CAPTlON screen
23
(pp.
49 - 50)
VIDEO LABEL screen
(P. 51)
3
s-”
f
z
P
L
G
f
3
cm
P
m
18
Chapter
1:
senmg up
CHANNEL BLOCK
ON,OFF TIMER screen
--:--A” H
--:--AH J CH...
--:--A” .” CM...
CHANNEL BLOCK screen
(pp.
58 - 59) .
OCHANNEL BLOCK
I--
CH.m.
To display the main menu
Press MENU.
To
return
to the previous me””
Press AN WINDOW
”
ZMENU.”
Then press RETURN.
To return to the main
Repeat the above, until you reach the
To return to the normal screen
Press MENU on the Remote Commander.
Note
The menus disappear automatically. if you do not press a
button within 90 seconds.
+I-
until the cursor pants to
menu
man
menu.
BFAVORITE
Set the
posttton to 1::
Input the
channel.
X,lCY :
CHANHEL
II,“,.
r.,rm
FAVORtTE CHANNEL
(PP.W-51)
b.-.
___
-__._
5 -
Chapler
-”
1:
Sent”9 UP, 9
Front of N
The menu language IS factory-set to
change the menu language to Sparush or French. or back to English.
Press POWER on the TV or on the Remote Commander to turn on the TV
ENGUSH.
Follow these instructions to
1
POWER
8
Press MENU.
me nwm men” appears.
2
1
RsELECCION
q
AJUSTE DE woo0
OHORA
.m"%%L
To return to the normal screen
Press MENU on the Remote Commander.
Notes concerning menus
*
During PIP (Picture-m-Picture) mode. the
on-screen menus may overlap
pmture.
*
Screen displays (VOLUME. MUTING,
A/Y
CHANNEL, etc.) may overlap
IlIe”“*.
*
The menus disappear aulomatically. if you do
not press a button within 90 seconds.
the
wndow
the
on-screen
Press AN WINDOW
Then press RETURN.
3
The language display tun,s red.
Press AN WINDOW
Each dine youpress
4
%NGUSH’men”s appear.
h
q
Note
Cerlam parts o,,he’ESPAfiOL’ and’FRANFAIS- menus remam m Englih.
+/-
until the Cursor pomts to ‘ENGLISH.
I
+I-
to select the language.
A4’
WINDOW%,
the
-ESPA~OL,TRAN~AlS’and
RPROG
lHOOE
PALETTE
SET
Chapter 1: SelNng
VP
2,
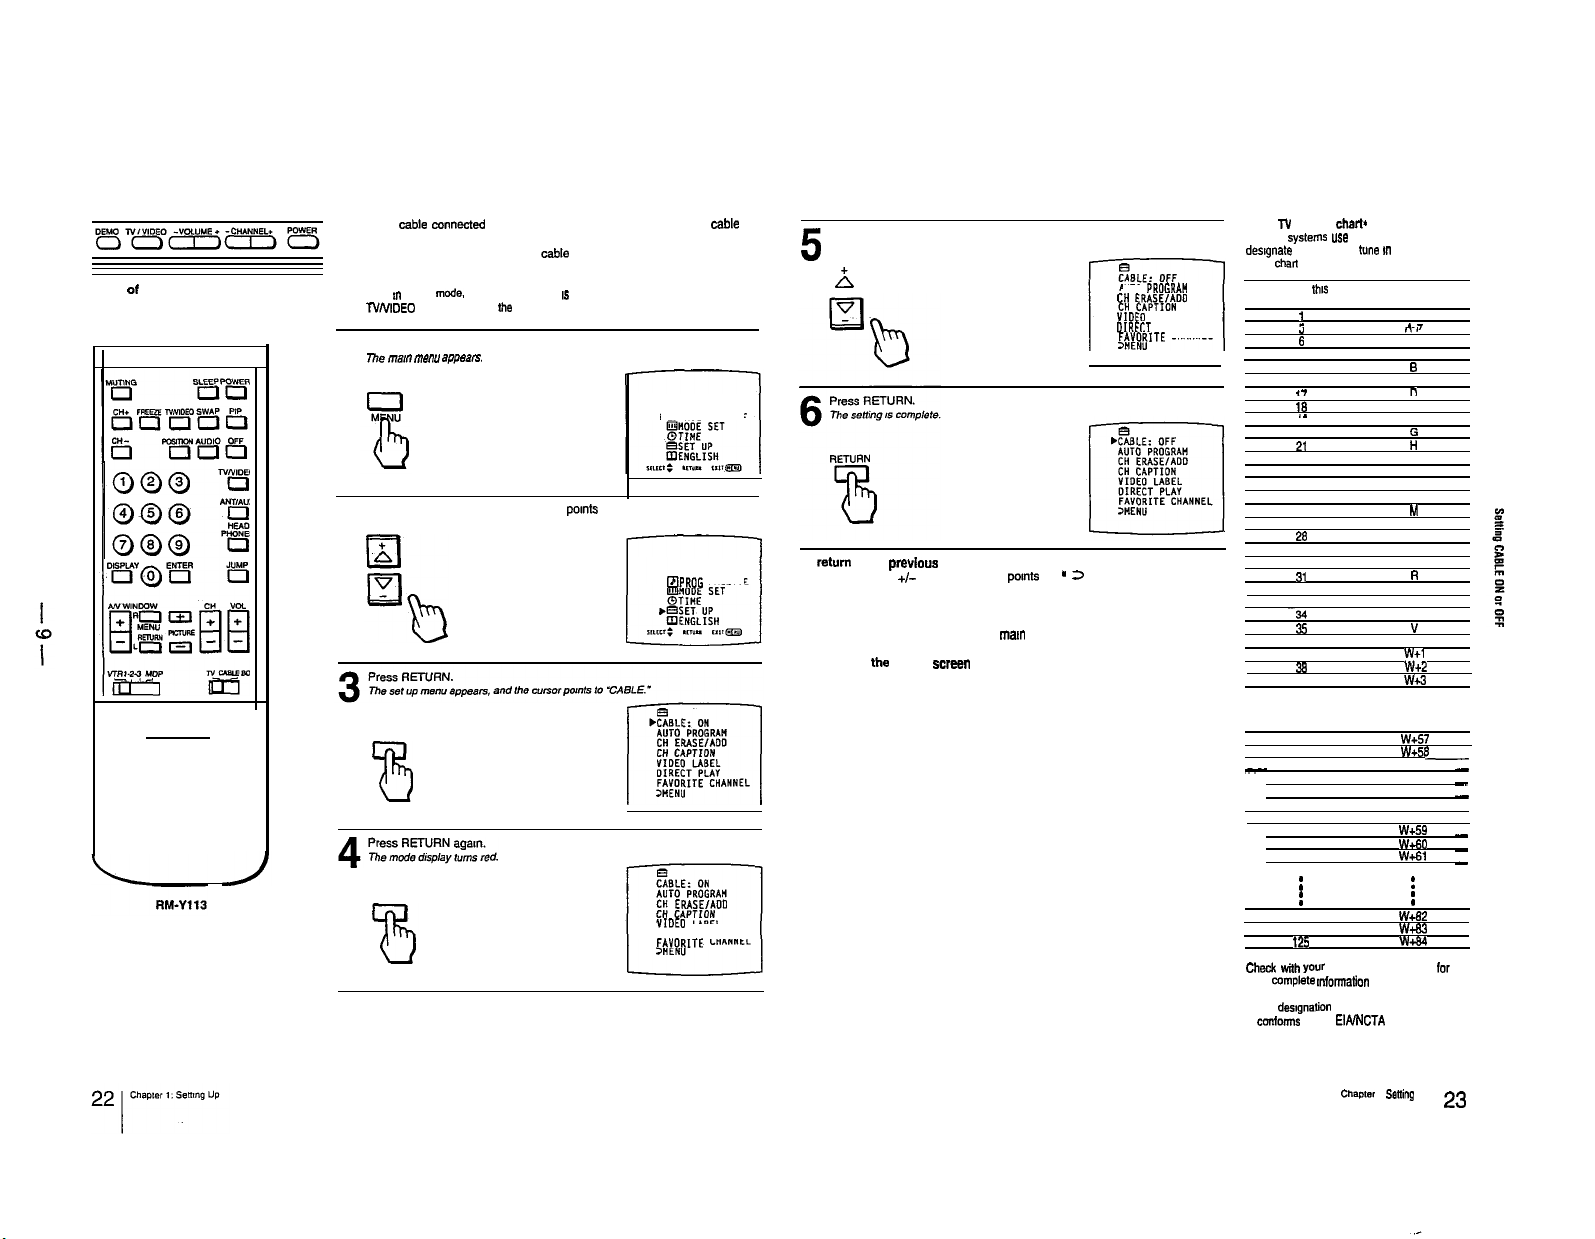
1-3. SETTING CABLE ON OR OFF
If you have cable connected to the TV, follow the steps below to set the oable
connection on or off. Set CABLE OFF to preset or watch VHF or UHF channels.
and set CABLE ON to preset or watch cable TV channels.
Front of TV
Note
If the TV is m video mode. the “CABLE display 1s shaded and cannot
Press
NNIDEO
an the N or on
Press MENU.
The
ma”
1
menu a!Jpaars.
Press AN WINDOW +/-until the cursor pomts to “SET UP.”
2
RETURN
B
RETURN
be
the
Remote Commander to change to
selected.
N
mode.
l
BPROG PALETTE
&%lPROG
CH ERASE/ADO
VIDEO LABEL
OIRECT PLAY
FAYORlTE CHANNEL
PALETTE
E
Press AN WINDOW +/-to select “ON” or “OFF”
J
A
q
To
return
to the
previous
Press AN WINDOW
Then press RETURN.
To return to the main menu
Repeat the above, until you reach the mam menu.
To return to
Press MENU on the Remote Commander.
the
menu
+/-
until the cursor pomts to ’ 2 MENU.’
normal screen
AUTO
PROGRAI!
CH ERASE/ADD
VIDEO LABEL
OIRECT
PLAY
FAYORlTE CHANNEL
Cable
l-V
channel chart*
Cable N ~y5tms use letters or numbers to
des,gna,e channels. To
to the
chat
below.
Number on
14
15
16
.7 n
18
20
21
22
23 J
24
25
26
27
28 0
29
30
31
32 S
33
~~34
35
36
37
38
39
93
94
95
-
96
97
99
100
101
102
123 W+82
124
125
Check wtth
more complete mformation on the available
channels.
. The des,gna,ia” of the cable N channels
conforms to the EIAMCTA recommendation
tune m
a channel. refer
this
TV Corresponding
CAN channel
1
r
.a
6 A-6
.-
. .
.
. .
. .
.
.
. .
yaw
local cable N company
A-II
d-7
-~.
W+l
w+2
W4.3
w+57
w+5r
A-5
A-4
A-3
A-l
w+59
w+60
W+61
W+@3
W+G4
A
s
C
E
0
Ii
I
K
L
M
N
P
a
R
T
U
”
W
.
L
-
-
-
-
-
-
.
.
for
Chapter 1: SB”i”0 UP
23
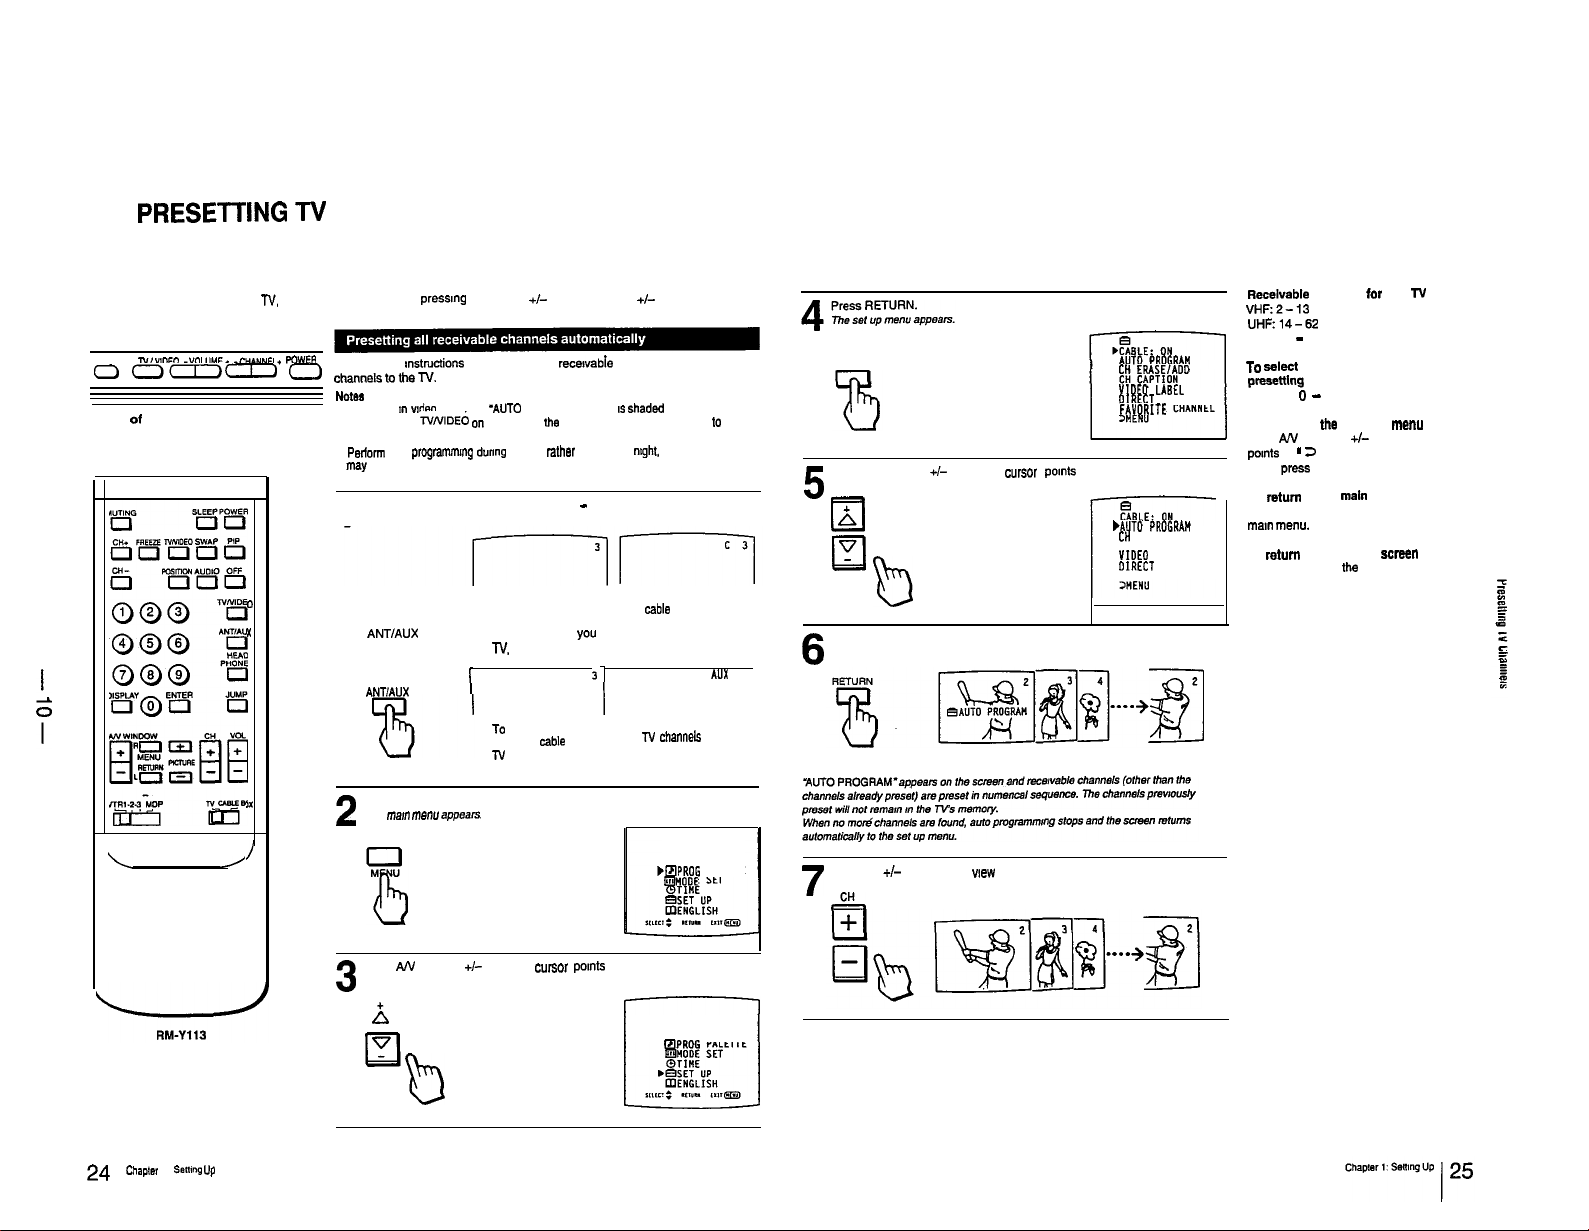
1-4.
PRESE-I-IING TV
CHANNELS
By presening N channels to the N. you can select channels by
Remote Commander.
DEMO
NlVlDEO -“OL”ME* -CHANNEL+ FOWER
0 ala=)-
Front of N
o
Follow these mstructions to preset all the
chmnelstotheN.
NO***
.
N the N is m wdeo mode. the -AUTO PROGRAM” display IS shaded and cannot be
selected. Press
N
mode.
.
Perlmr, auto prqamm,ng during the day rather than late at
may not be broadcasting.
7
Set the cable connection on or off (pp. 22
channel you want to preset, VHF/UHF or cable
1
0
x
s
Press ANT/AUX to select the type of channel you want to preset, VHF/UHF/
regular cable N or pay cable
ANTlAUX
I
Press MENU.
me
2
mam menu eppe.srs
\ /
lx
/
pressmg
CHANNEL +I- on the N or CH +I- on the
recawabie
NNlDE6 on
the
Nor
on Vie Remote Commander to change
-
23) to select the type of
To preset VHF
or UHF channels
N.
I
TO
preset VHF. UHF
or regular cable
N channels
VHF, UHF or cable
ntght.
when some channels
N.
TO preset
cable N channels
31
1
I
I
To preset pay cable
N channels
,BPNOG PALETTE
lMODE SET
to
AUX
N
3
RETURN
Press AN WINDOW
5
I
Inl
Q
Ll
AUTO PNOGNA”
CH ERASE/ADO
VIDEO LABEL
OlNECT PLAY
FAVORITE CHANNEL
+I-
until the cursor points to “AUTO PROGRAM.”
.A”Tg PNOGNAN
CH
ERASE/ADD
CH CAPTION
VIDEO LABEL
DlRECT PLAY
FAVORITE CHANNEL
Recalvable channels
VHF:2-13
UHF:14-62
Cable: 1 - 125
TO
salact TV channels without
plesetting
press the 0 - 9 buttons and ENTER.
To return to
Press AN WINDOW
pomts
to ’ 2 MENU.”
Then press RETURN.
To
raturn
to the
Repeat the above, until you reach the
maI” menu.
To return to the normal screen
Press MENU on tha Remote Commander.
for
the
previous
+I-
until the cursor
main
menu
this
menu
I-V
b
Press RETURN.
6
I
Press CH
+I-
7
to check or
CH
wew
the preset channels.
Press AN WINDOW
+I-
until the cursor pomts to “SET UP.”
3
A
q
b
24
Chapter
1:
senmg up
[IIPROG PALETTE
Front of N
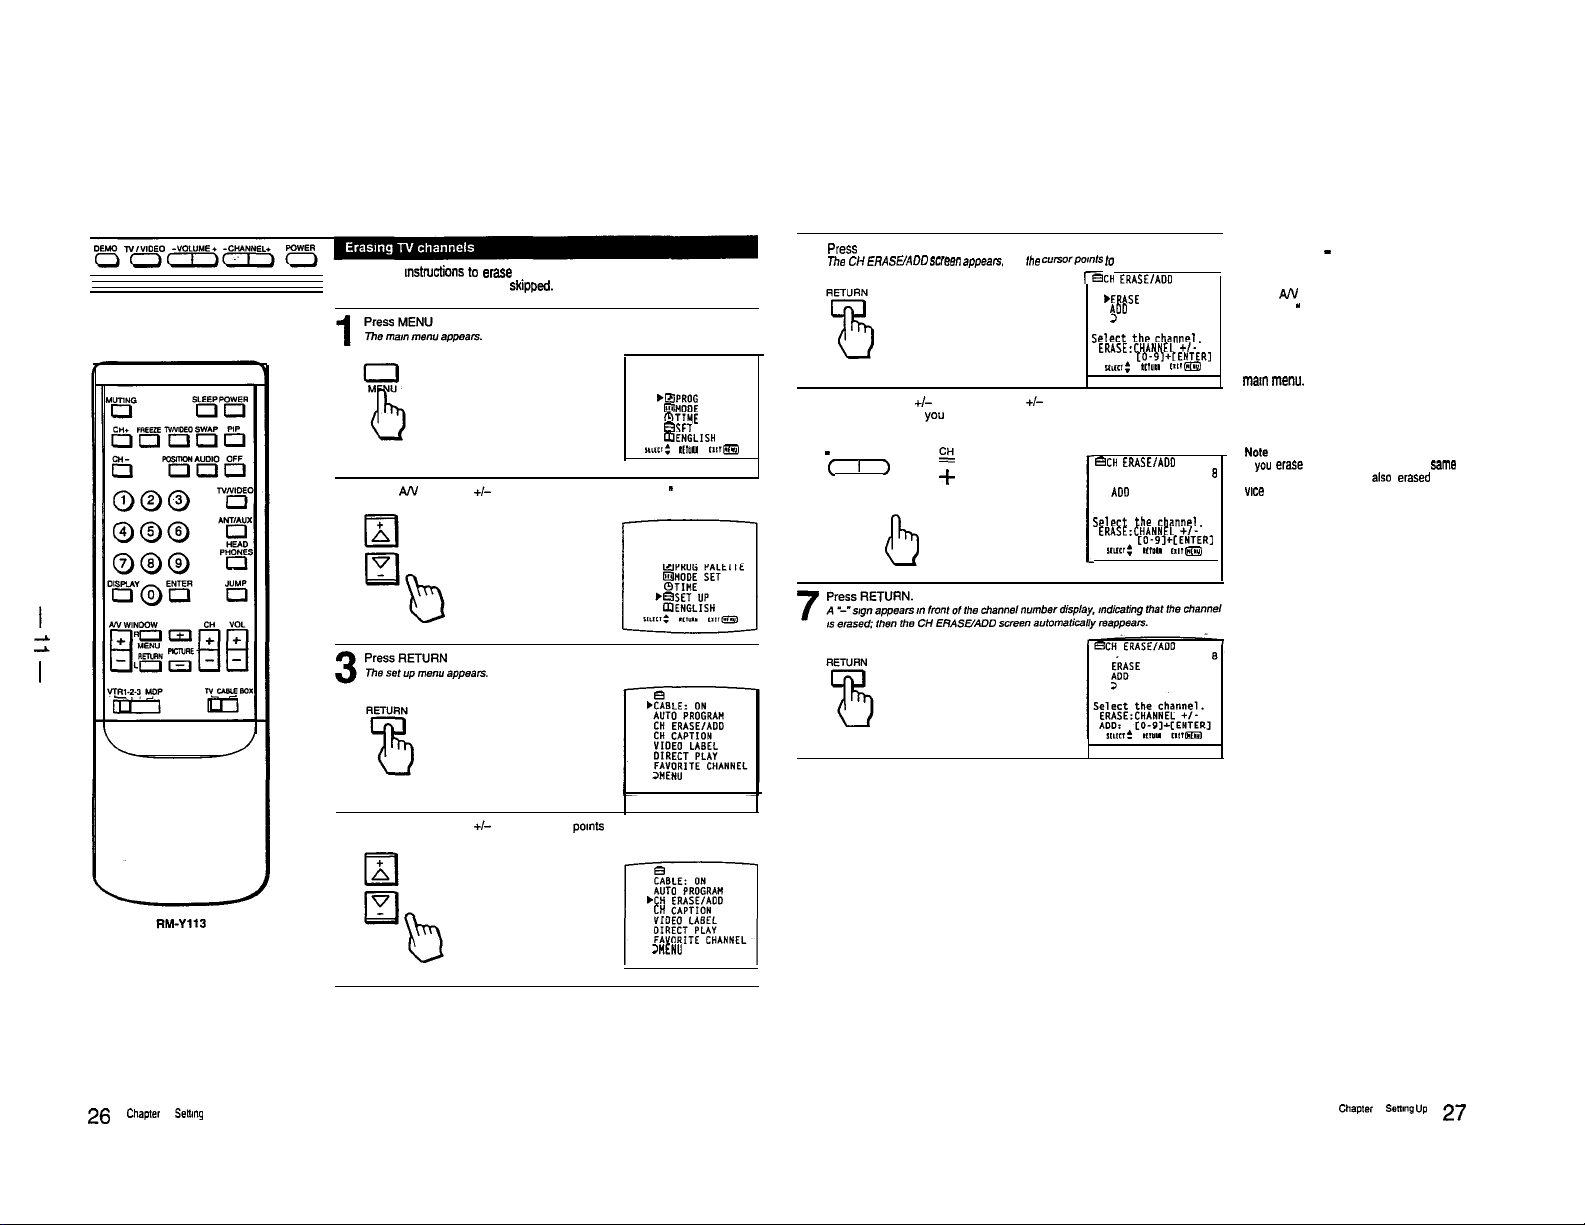
Follow these mstnxtions lo erase ““necessary N channels, so that when you
press CH +/-, the channel(s) are sldpped.
bEtPROG PALETTE
lHODE SET
QTIHE
BSET UP
aENGLISH
xmt:
.,I””
r.,r@m
Press AN WINDOW +I- until the cursor pomts to “SET UP
”
2
q PROG PALETTE
press
RETURN.
rnhe
CtI
ERASWADD
5
Press CHANNEL +I- on the N or CH +I- on the Remote Commander to
select the channel you want to erase.
6
me channel display appears.
-
CHANNEL +
c I 1
scrw appean. and
T
q
El
b
the cursorpwnls lo
r9CH ERASEIADD
Select
ADD: [O-O,+[ENTER,
BCH ERASElADD
Select the channel.
“ERASE.’
*ERASE
AIIO
>
ERASE:CHANNEL
mc<,: *mm
ERASE
ADO
3
ERASE:CHANNEL
ADD: [O-91+CENTERI
rw~: .LIO”
tile channel.
r.tr~
To erase another channel
Repeat steps 6 - 7.
1
To return to the previous me””
Press AN WINDOW +I- until the cursor
pomts to ” 3 MENU.”
Then press RETURN.
+I-
+I-
m,m
To return to the main menu
Repeat the above, until you reach the
mar”
menu.
To return to the normal screen
Press MENU on the Remote Commander.
Note
I, you erase a VHF or UHF channel. the fame
s
number cable TV channel is also erased (and
“Ice versa
26
Chaplel 1: senmg up
Press AN WINDOW +/- until the cursor pomts to ‘CH ERASE/ADD.”
4
r---l
%LE:
ON
AUTO PROGRAM
bCH ERASEIADD
CH
CAPTION
VIDEO LABEL
DIRECT PLAY
FAVORITE CHANNEL
WENU
Chapter 1: semng VP 27
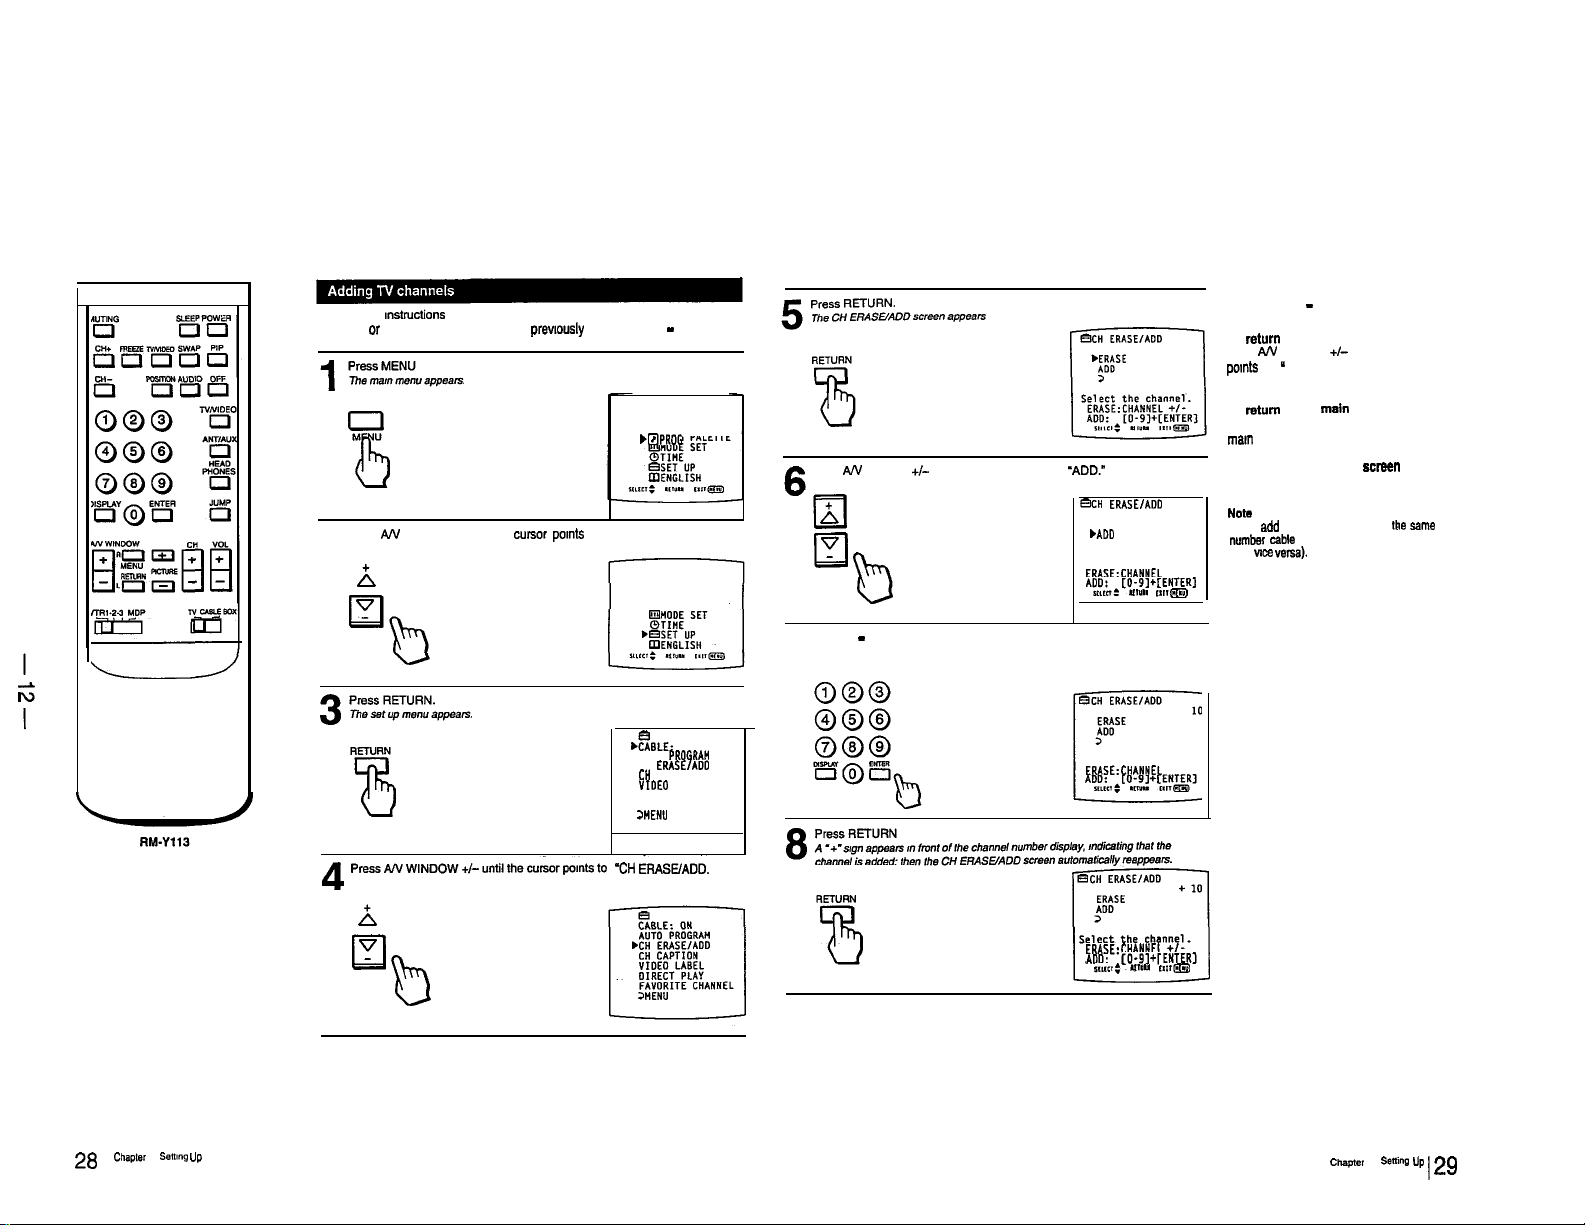
Follow these w.tructions to add TV channels one by one to the selection
memory. or to replace a N channel you
Press AN WINDOW +/-until the cursor pomts to “SET UP.”
previously
erased (pp. 26 - 27).
bFIPROG PALETTE
2
A
q
QPROG PALETTE
&LE:
ON
AUTO
PROGRAM
CH ERASE/ADD
CH
CAPTION
YIDEO LABEL
DIRECT PLAY
FAVORITE CHANNEL
JWEN”
Press AN WINDOW
b
-El
V
Ll
Press 0 - 9 and ENTER on the Remote Commander to select the channel
you want to add.
7
me channel display appears.
+/-
until the cursor points to -ADD.”
BCH
ERASE/A00
ERASE
.A00
3
Select the channel.
ERASE:CHANNEL +I-
A~~cDz~[O-91+IENTERl
.
b
UIYI. lIl,mg
Select the channel.
ERASE:CHANNEL +I-
To add another channel
Repeat steps 7 - 6.
TO return to the previous menu
Press AN WINDOW
points
to ” 3 MENU.’
Then press RETURN.
To return to the
Repeat the above, until you reach the
man
menu.
To return to the normal screen
Press MENU on the Remote Commander.
N&3
If you add a VHF or UHF channel.
number cable TV channel is also added
(and vies verss).
+/-
until the cursor
main
menu
the
ssms
28
Chapter
1:
smng UP
Pre~ANwi~~ow+l-~ntilmec~~rpo~ntsto
4
A
q
V
Ll
b
‘CH
&~EIADD.
BCH
ERASE/ADO
ERASE
A00
>
Select. the channel.
ERASE:CHANHEL +IADO: CO-SI+[ENTERl
WCT:
cl
#ml" mrm
+
10
chapter
1:
sonin UP 1
29
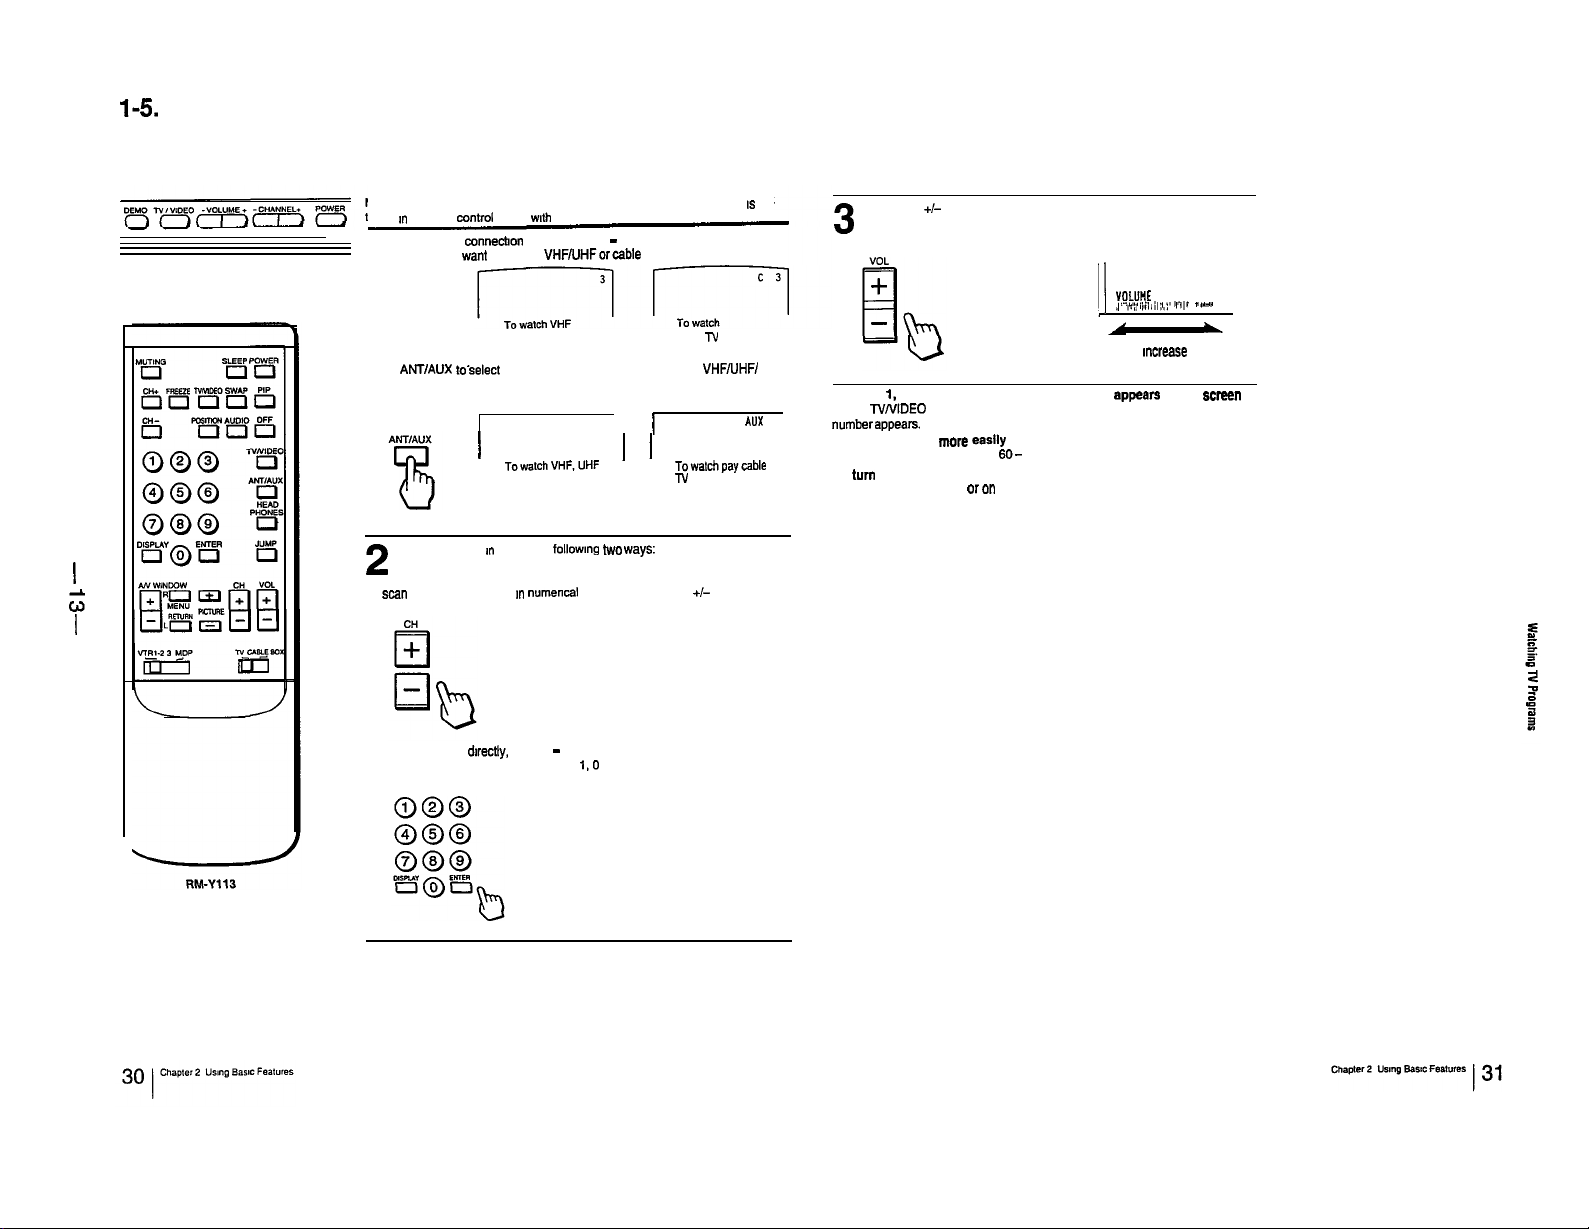
l-5. WATCHING TV PROGRAMS
I
w‘
Front of N
Make sure that the TV/CABLE BOX selector on the Remote Commander IS set
to TV.I” order to mntml the N with the Remote Commander.
Set the cable connecbon on or off (pp. 22 - 23) to select the type of
channel you want to watch, VHFAlHForcable N.
1
or UHF channels
Press
ANT/AUX
regular cable N or pay cable N.
toselect the type of channel you want to watch, VHFNHFI
’
TowtchVHF.UHF ’ ’
or regular cable
TV channels
Select a channel I” one of the following two ways:
3
cable -IV channels
I
Towatchpaycable
T” channels
AUY
3
Press VOL +/- to adjust the volume.
3
/ WILlME
]
,,‘~,r’~,‘ii,i,,i,;,,~‘r’r,r “a.-”
I
Press + to mcrease the volume.
Press-to decrease the volume.
ff VIDEO 1, VIDEO 2, VIDEO 3, S VIDEO, LD or VTR af~pean on the screen
Press NNIDEO on the N or on the Remote Commander until a N channel
numberappears.
To select channels more easily
Set FAVORITE CHANNEL (pp.
To
turn
off the N
Press POWER on the N or on the Remote Commander.
60-
61).
\
2
To scan the preset channels I” numerical sequence, press CH +I-
I
To select a channel dwsctly, press 0 - 9 and then ENTER.
For example, to select channel 10, press 1,O and ENTER
l-6. USING CONVENIENT FEATURES
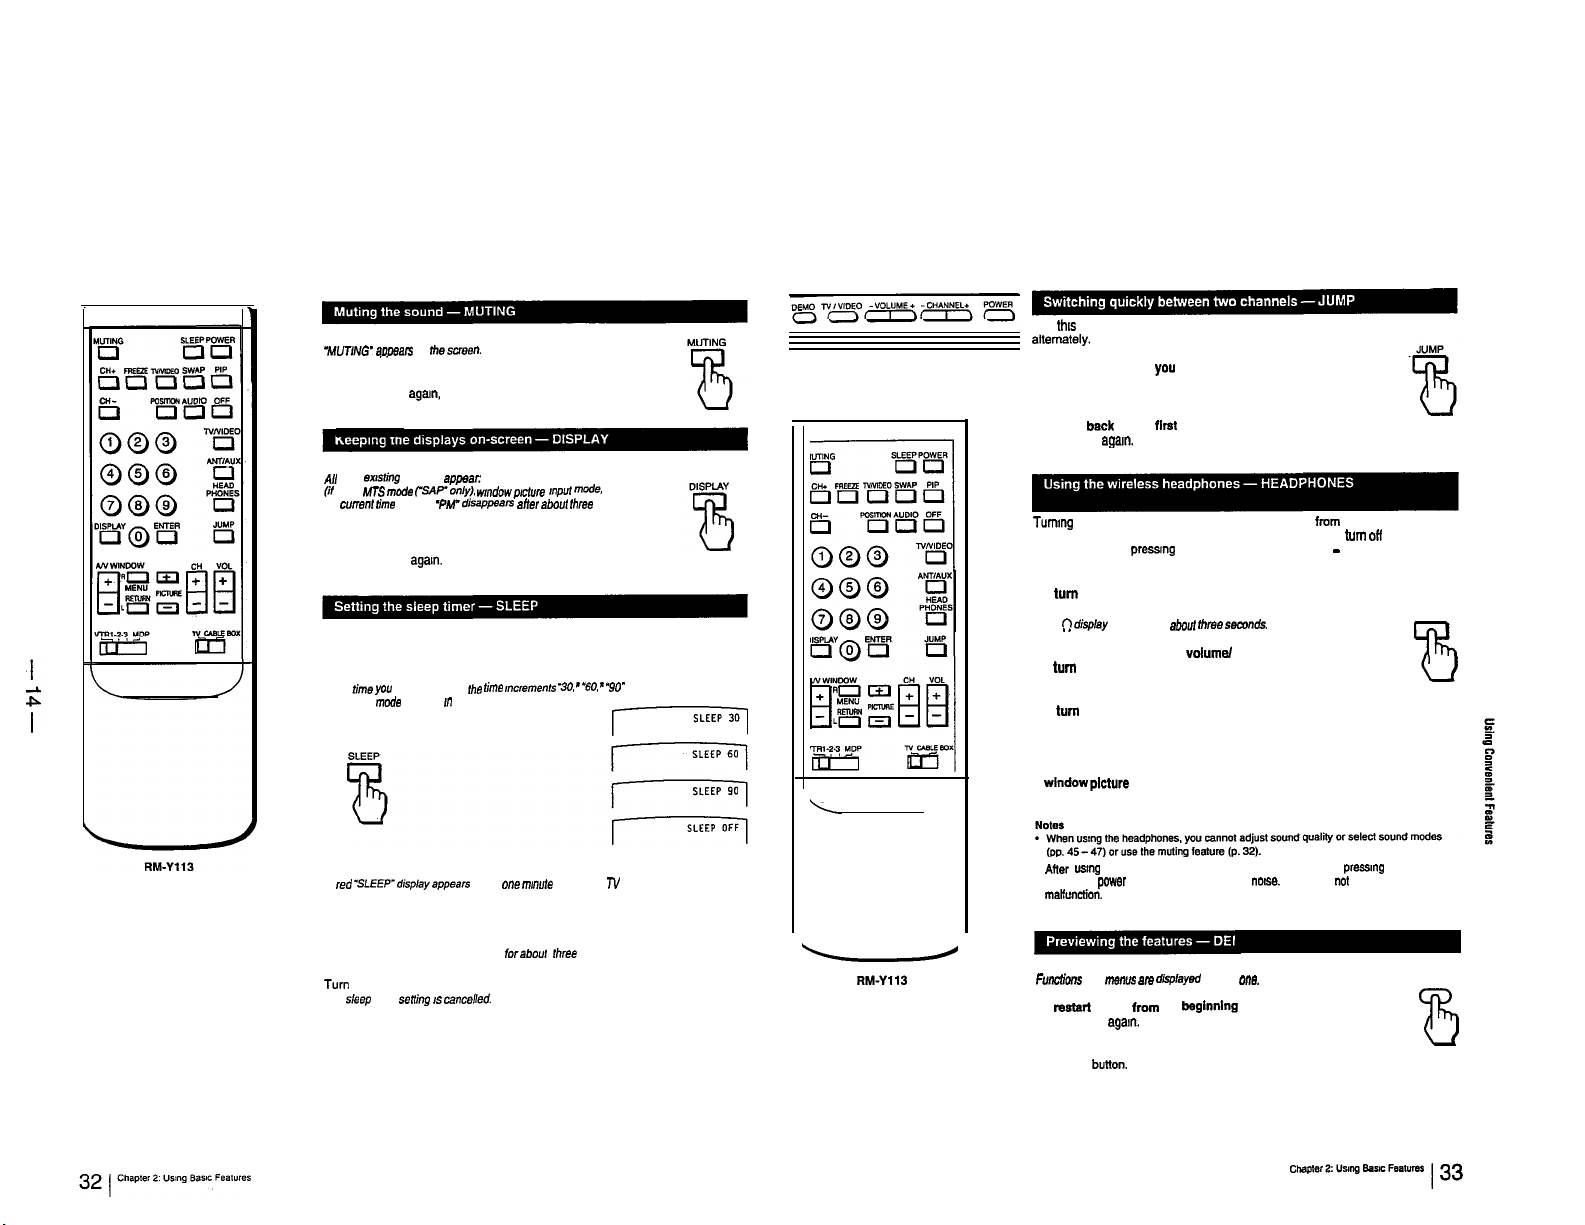
Press MUTING.
“MUTING’
ameals on
the s~reo”.
To restore the sound
Press MUTING
Press DISPLAY.
All the eustfng displays appear: channel “umber, channel caption
(if
set),
the current time (‘AM” or ‘PM-
seconds).
TO turn off the displays
Press DISPLAY
The sleep timer turns off the TV automatically after the amount of time
you select.
Press SLEEP
Each
and ‘OFF mode appear ~1 sequence.
MTS mode
time you
age,“,
or press VOL +.
(5AP’oniy).
agam.
press SLEEP,
wndowp~cfum mpuf mode.
disappsan affer
Ihe time ,“c,eme”,s -30, - “60, -
about three
and
90”
Use
thus
function to keep track of two programs
alternately.
Front of N
71
To recall the channel you were watching
previously
Press JUMP.
To switch bsck to the first channel
Press JUMP
Tummg on the headphones does not affect the sound from the N speakers.
If you want to listen to the sound from the headphones only,
speaker sound by pressmg VOLUME-on the N or VOL - on the Remote
Commander.
To turn on the headphones
Press HEADPHONES.
hefi
To control the headphones
To
Use the controls on the headphones.
To turn off the headphones
Press the headphones power button first,
then press HEADPHONES.
To use the headphonss to listen to sound from
s wlndow
See Selecting the headphones audio source” (p. 39).
age!“.
diSpay
appears for aboti
turn
the headphones power on or off
picture
volume/
(PIP function)
Mme semnds.
turn
ofi the N
HEAD
PHONES
A
red “SLEEP”display appear
goes on.
Tb cancel the setting.
Press SLEEP until OFF mode appears.
A green “SLEEP OFF display appears
OR
Turn
the N off.
The sleep timer seffing IS cancelfed.
about
one
““““fe before the T”
forabouf
three seconds
. A”er
usrng the headphones, K you press HEADPHONES without pressing the
headphones power button first, you may hear
maKunction.
Press DEMO.
Fwwffo”s
and
menus
am
dispayed
To restart DEMO
Press DEMO
To stop DEMO
Press any
age!“.
button.
from
the
beginnIng
one by
nose.
This does “Ot indicate a
one.
DEMO
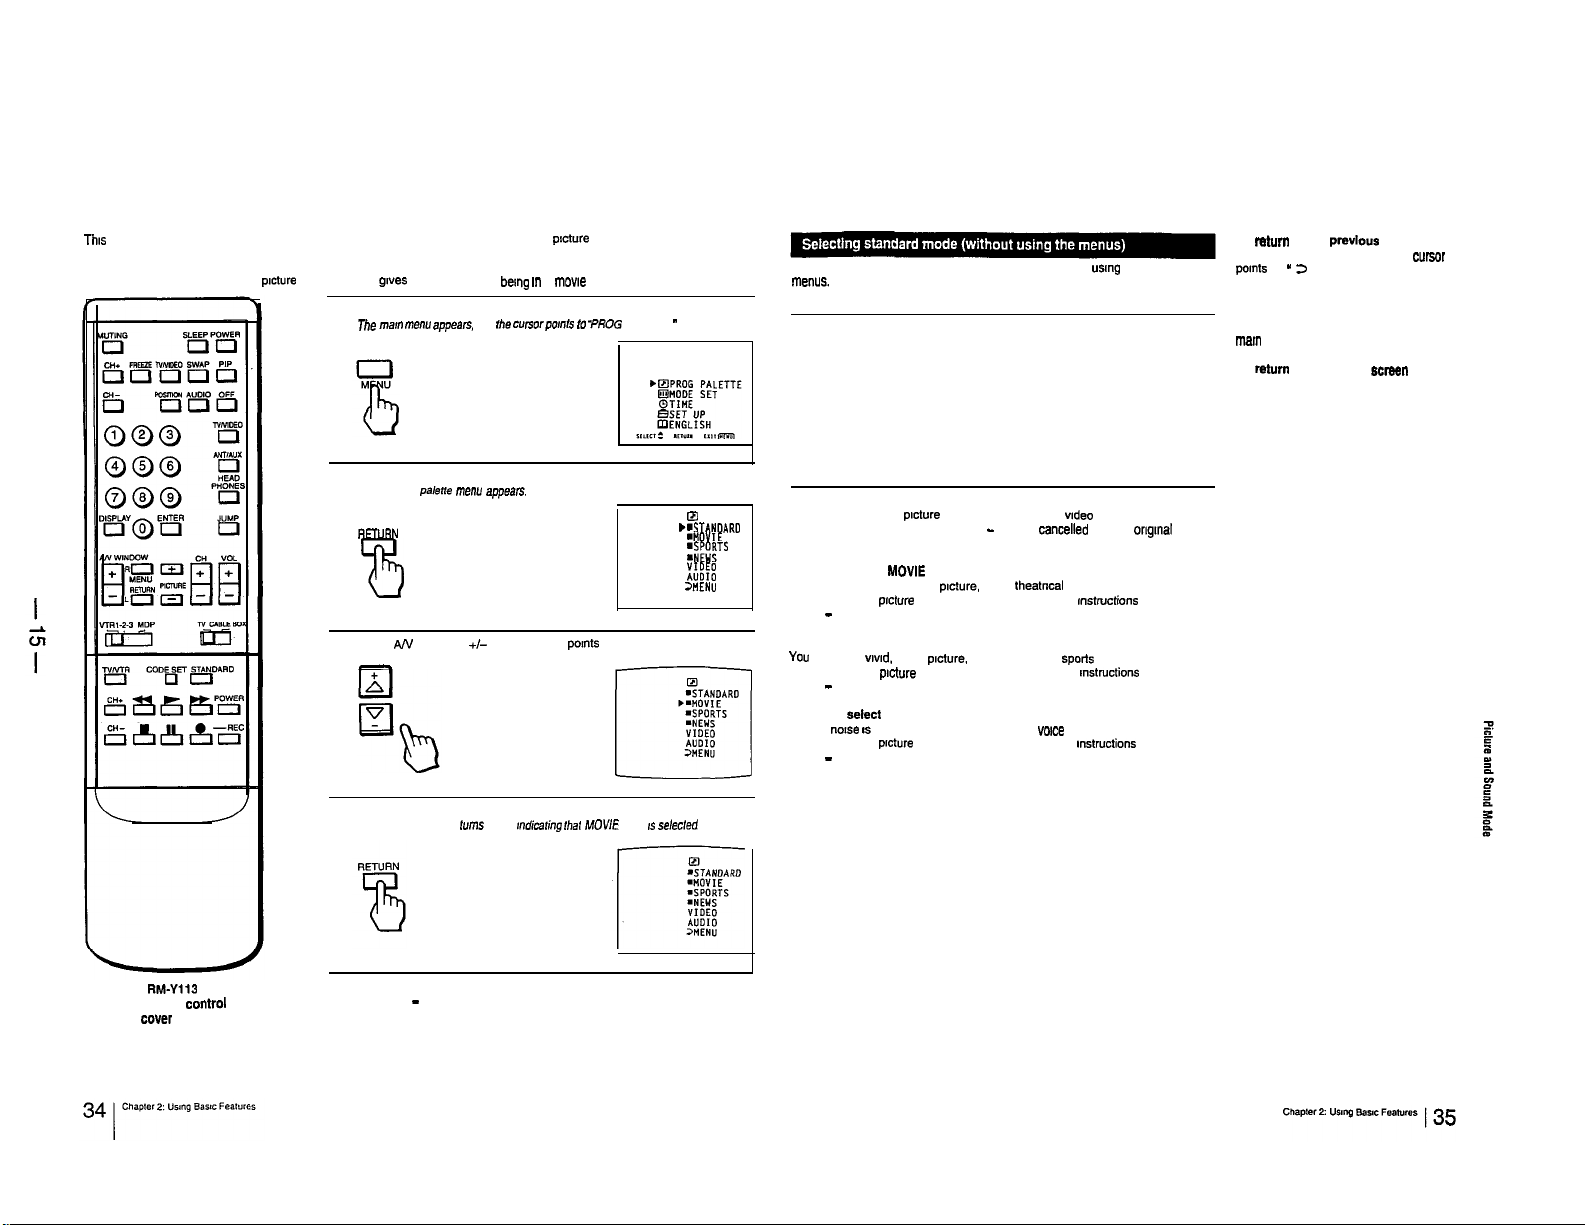
1-7. SELECTING A PICTURE AND SOUND MODE
This
TV features four modes (STANDARD, MOVIE. SPORTS, NEWS) that offer different
the one that best suits the type of program that you want to watch.
Example: Select MOVIE mode for
picture
and sound that gwes you the sense of bemg in a mowe theater.
Press MENU.
The man
1
ma”” appea,s, and
pkzture
and sound qualities. Choose
the
cunor~omb IO “PROG PALETTE.
r
Press RETURN.
The program pe,ene menu appeers.
2
RETURN
B
Press AN WINDOW +I- until the cursor points to “MOVIE.”
3
”
El
.mSTANOARO
.ttO”IE
:ETs
:L%:
=twu
Follow these Instructions to select standard mode without usmg the on-screen
llbZ”US.
Press STANDARD.
STANDARD
8
When you select STANDARD mode
You recewe standard
you made (‘Adjusting the TV,” pp. 40 - 48) are cancelled and the orlgmal factory
settings are restored.
When you select
You recewe a finely detailed picture, and a theatncel audio effect.
To further adjust
pp. 40 - 48.
When you select SPORTS mode
You recewe a wwd, bnght picture. and sound with a spotis stadium effect.
TO further adjust
pp. 40 - 48.
When you sefect NEWS mode
Picture
noxse IS
To further adjust
pp. 40 - 48.
picture
and sound quality. Any wdeo or audio adjustments
MOVfE
mode
picture
and sound qualities, follow the
picture
and sound qualities, follow the mstructions on
reduced, and you recewe clear
fxcture
and sound qualities, follow the instructions on
“once
mtnxticns
reproduction.
on
To return to the previous menu
Press AN WINDOW +/-until the curear
pomts to ” 13 MENU.’
Then press RETURN.
To return to the main menu
Repeat the above, until you reach the
mar” menu.
To return to the normal srxeen
Press MENU on the Remote Commander.
RM-Y113
(with video control
cover open)
Press RETURN.
The “MOVIE” display bns green. mdicafing lhal MOVIE mode 1s selecfed
4
To select a different mode
Repeat steps 3 - 4.

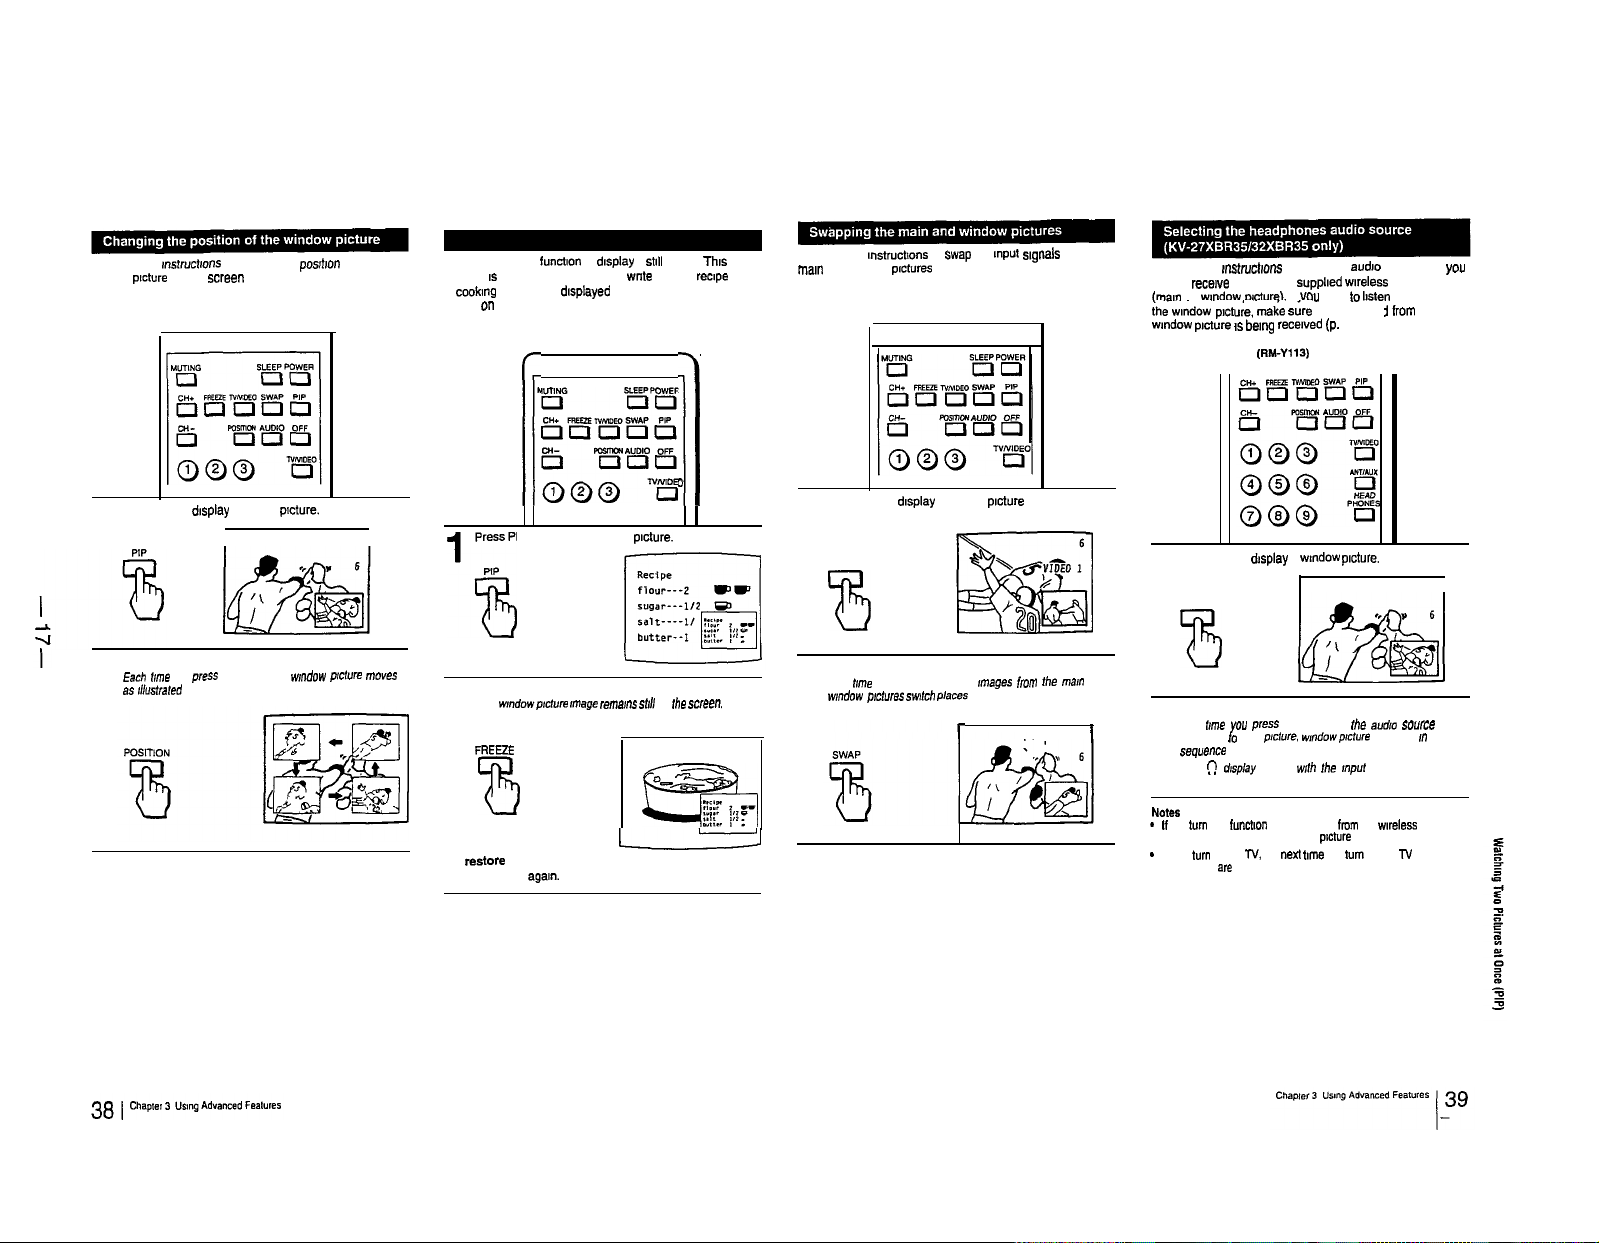
1-8. WATCHING TWO PICTURES AT ONCE (PIP)
You can watch both the me!”
slmulteneously. uemg the Picture-m-Picture (PIP) function.
Models KV-27XBR35/32XBR35 are equpped with two-tuner
PIP. ailowmg you to watch two N channels at once.
Picture-in-Picture special features
When watchmg the main
you can: -
. Swap the me,” and wmdow
*
Change the position of the wmdow
I
. Display a still pxture (FREEZE).
*
Choose the sound from the mam or wmdow
s
I
fAUDiOI.
*
ilsten td the wmdow
wweless
headphones (HEADPHONES).
(KV-27XBR35132XBR35 only)
Notes
*
The
wndow
picture sound is also output from the VAR. AUDIO
OUT lacks. The AUDIO LINE OUT and MONITOR OUT jacks
0”tp”t the
ma,”
-
The video label and channel caption will not appear with the
wmdow picture even if you have set them.
*
if you select a blocked channel in the
‘BLOCKED” aooears with the wmdow
CHANNEL
p,cture sound’only.
EL&K.”
picture
picture
and a wmdow picture.
plcturee
picture
sound through the supplied
pp. 58 - 59.)
and a window
wndow
(SWAP).
picture
(POSITION).
picture
picture. the display
wture.
(See “Setting
picture
Remote Commander
Press PIP to display a wmdow
picture
Inout source
mode or N channel
Input smce mode or N channel
to, the wmdow
p~dure
PIP
B
aimatefy:
To turn PIP function off
Press OFF
To receive the wmdow
PressAUDiO.
The P display appears for a few seconds. rndicafing thaf the
v,,,,dow
f~fure
To reetore the main picture sound
Press AUDIO age!“.
sound
picture
is
bemg recewed.
sound
Remote Commander
Press PIP to display a window
1
Press NNIDEO in the Picture-m-Picture control area
to select the Input mode.
2
Each
time you press TVNIDEO, -,-!I.”
and ‘WDEO 3”
To change N channels in the window
Press CH +/- I” the PIP control area.
appear
picture.
,n sequence.
‘VIDEO 1.
picture
,
.
“,“VIDEO
To use Picture-m-Picture with pay
connections to your cable converter box es shown below.
“cso*I
I[
yp$
. . . . . .
..s......
(Rear of l-V)
VHG810S/820S
(not supplied)
2
After making the above connections. turn the cable
connection on by foliowmg the Steps on pp. 22 - 23; then
continue with the
1-2
Put your VCR on an mactive channel (channel 3 or 4).
Steps
below.
Follow steps 1 - 2 I” ‘Changmg the wmdow
pfcture
mput mode” on
video Input mode for your connected VCR.
3
Change pay cable N channels with the decoder box.
4
To control your cable converter box with the supplied
Remote Commander
Seep. 66.
cable
N input. make the
(Front of TV)
~5 :Signai
thas
page to select the
flow
$
D
f
2
Follow these ,nsfnx,,o”s to change the
wmdow
p,cture
on the screen
Remote Commander
Press PIP to d,splay a wmdow ptcture.
1
I
posrhon
VIDEO 1
of the
Use the FREEZE
function IS useful when you want to wnfe down a ,ec,pe from
a
cookang
and so on
Remote Commander
fuxf,on
to d,splay a
program. a displayed address or phone number
still
picture Th,s
h
0
I
Press PIP to display a window picture.
‘8
1
m
Follow these ,nstruct,ons to Suap the mput s,g”als Of the
mar” and wmdow
Remote Commander
Press PIP to d,splay a wmdow p,cfu,e
p,ctores
1
PIP
B
Follow these ,nsfwct,ons to select the aud,o source that you
want to recewe through the supphed wireless headphones
imam or wndow
ihewndow p,ct”;e. m&e s&e that the so”“,
wndow
Remote Commander
Press PIP to display a wndow
1
p,cfure IS
PIP
o,cfure~.
If
You
bemg recewed
(RM-Yll3)
want lo
(p.
36).
picture.
bsten
to sound from
ram
VIDEO 1
the
Press POSITION
Each me you p,ess POSITION. the
2
ss d,us,ra,ed
wndow
~,c,“re moves
Press FREEZE.
The m”dowp,c,“re
2
rmege remans s,,l,
FREEZE
B
To restore the normal picture
Press FREEZE
age,“.
on ,he screen.
ES,
L
Press SWAP
Each hrne you press SWAP, the ,,nages ,,on, fhe
2
wndow
jxc,u,es swrtch ~,aces
ma”
, VIDEO 1
and
73
Press HEADPHONES.
Each ,,me you press HEADPHONES ,he a”d,o
1
2
changes ,o ma,”
*l?*Ue”Ce
Ther! drsp,ay appears m,h the mpo, mode
NOW6
-If you
turn
headphones changes to the ma,” p,cf”,e sound
-
If you twn off the
headphones are off
PIP
functvan
p,c,ure. w,“dowp,c,“re
off, the sound
TV,
the next
t,me
from
you
and “OFF” 1”
the weless
turn
on the
soone
T’,
the

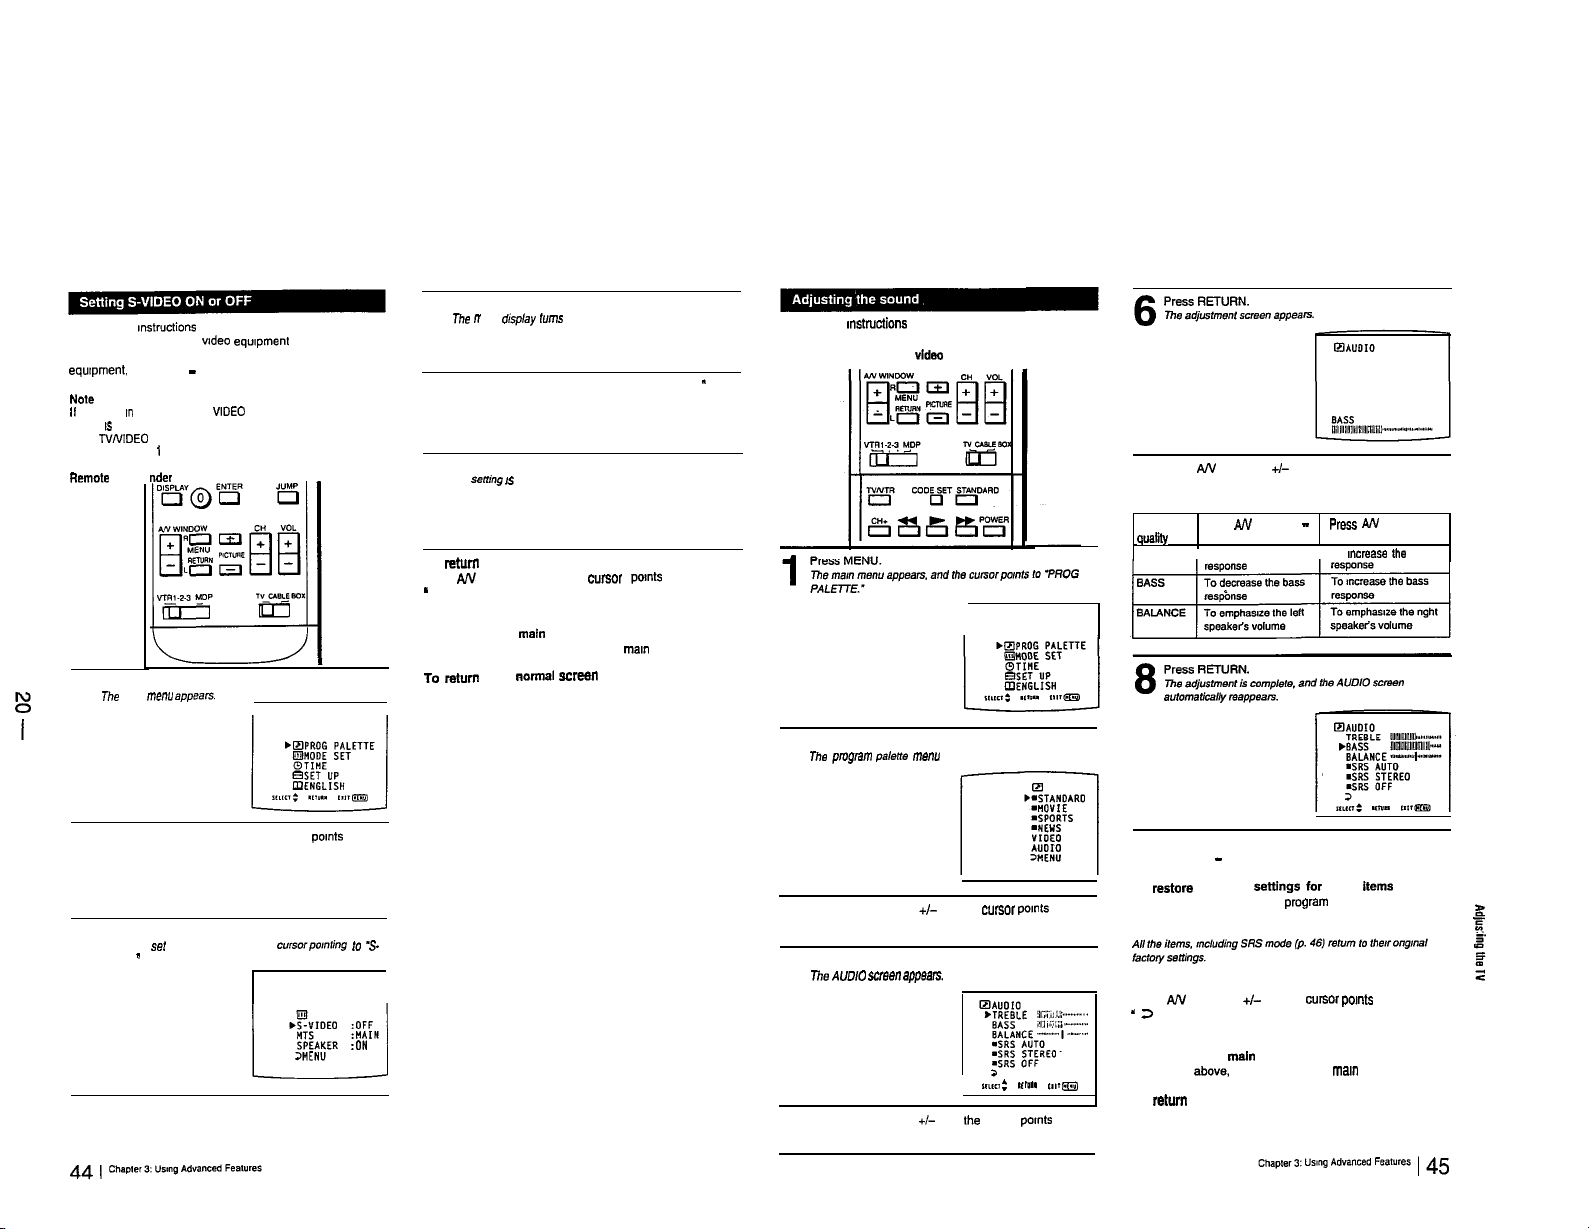
1-9. ADJUSTING THE TV
You
can
adjust the
picture
t-t-V,
VIDEO 1. VIDEO 2, VIDEO 3) by pressing TV/VIDEO
on the N or on the Remote Commander to select the mput
mode, before making the adjustments. These adjustments
are retalned in memory even when you turn off the N. but
are cancelled after you change the adjustments, or select a
prcture
and sound mode (pp. 24 - 35).
. ,
.-I..
Follow these Instructions to adjust PICTURE. HUE, COLOR,
BRIGHT (bnghtnees) and SHARP (sharpness).
Remote Commander (with video control cover open)
Press MENU.
me ma,”
p
1
2
menu app.ear.s,
PALDTE.’
Press RETURN.
me prqram pame
end sound for each input mode
,
-
and he c”mfpoms to
menu
‘PROG
Press RETURN.
The VIDEO screen appear+.
4
Press
AN WINDOW +/- until the cursor pomts to the
iterr
you want to adjust.
5
Press RETURN.
me adjtmment scmm app?*m
6
Press
AN WINDOW +I- to make the adjustment.
7
PI&n,
Press AN
1
q-w
PICTURE
HUE
COLOR
BRIGHT For less bnghbwss1 For more
SHARP For less shamness1 For
Press REIURN.
WINWW -
For decreased plchrre
mntra
with
soft
Skin tones become Skin tones
rnnobh omensh
For
less color Intensity1 For mom color
8
Press AN WINDOW +
For
color with
wreased
p,ct”ra
mid color
boome
mtenslty
brightness
more shamness
To adjust other items
Repeat steps 5 -
To restore the factory settings
Select “STANDARD” on the program palette menu, and
press RETURN;
of. press STANDARD on the Remote Commander.
AN Ae items, mcluting TRlNfTONE (p. 42) and NR (p. 43)
lhmr
ongml facmy
To adjust picture contrast
You can also adjust
buttons on the Remote Commander.
1 Press + to Increase picture contrast with
Press -to decrease picture contrast with sort col
me Plcl”re adjusfment ecrem appears.
2 Press RETURN
To return to the previous menu
Press
AN WINDOW +/- until the cwsof ports to
” 2
MENU.”
Then press RETURN.
To return to the
Repeat the above, until you reach the man menu.
TO return to the normal screen
Press MENU on the Remote Commander.
8.
for
sefffllgs.
picture
contrast with the PICTURE +/-
hwe.
main
menu
all the Items
vwd colx.
x.
r&m
to
Press AN WINDOW +I- until the cursor
1IIDEO.’
3
pot&
to
Color
picture
color temperature (tint) that
tint) or ‘coolness” (blue tint) of the
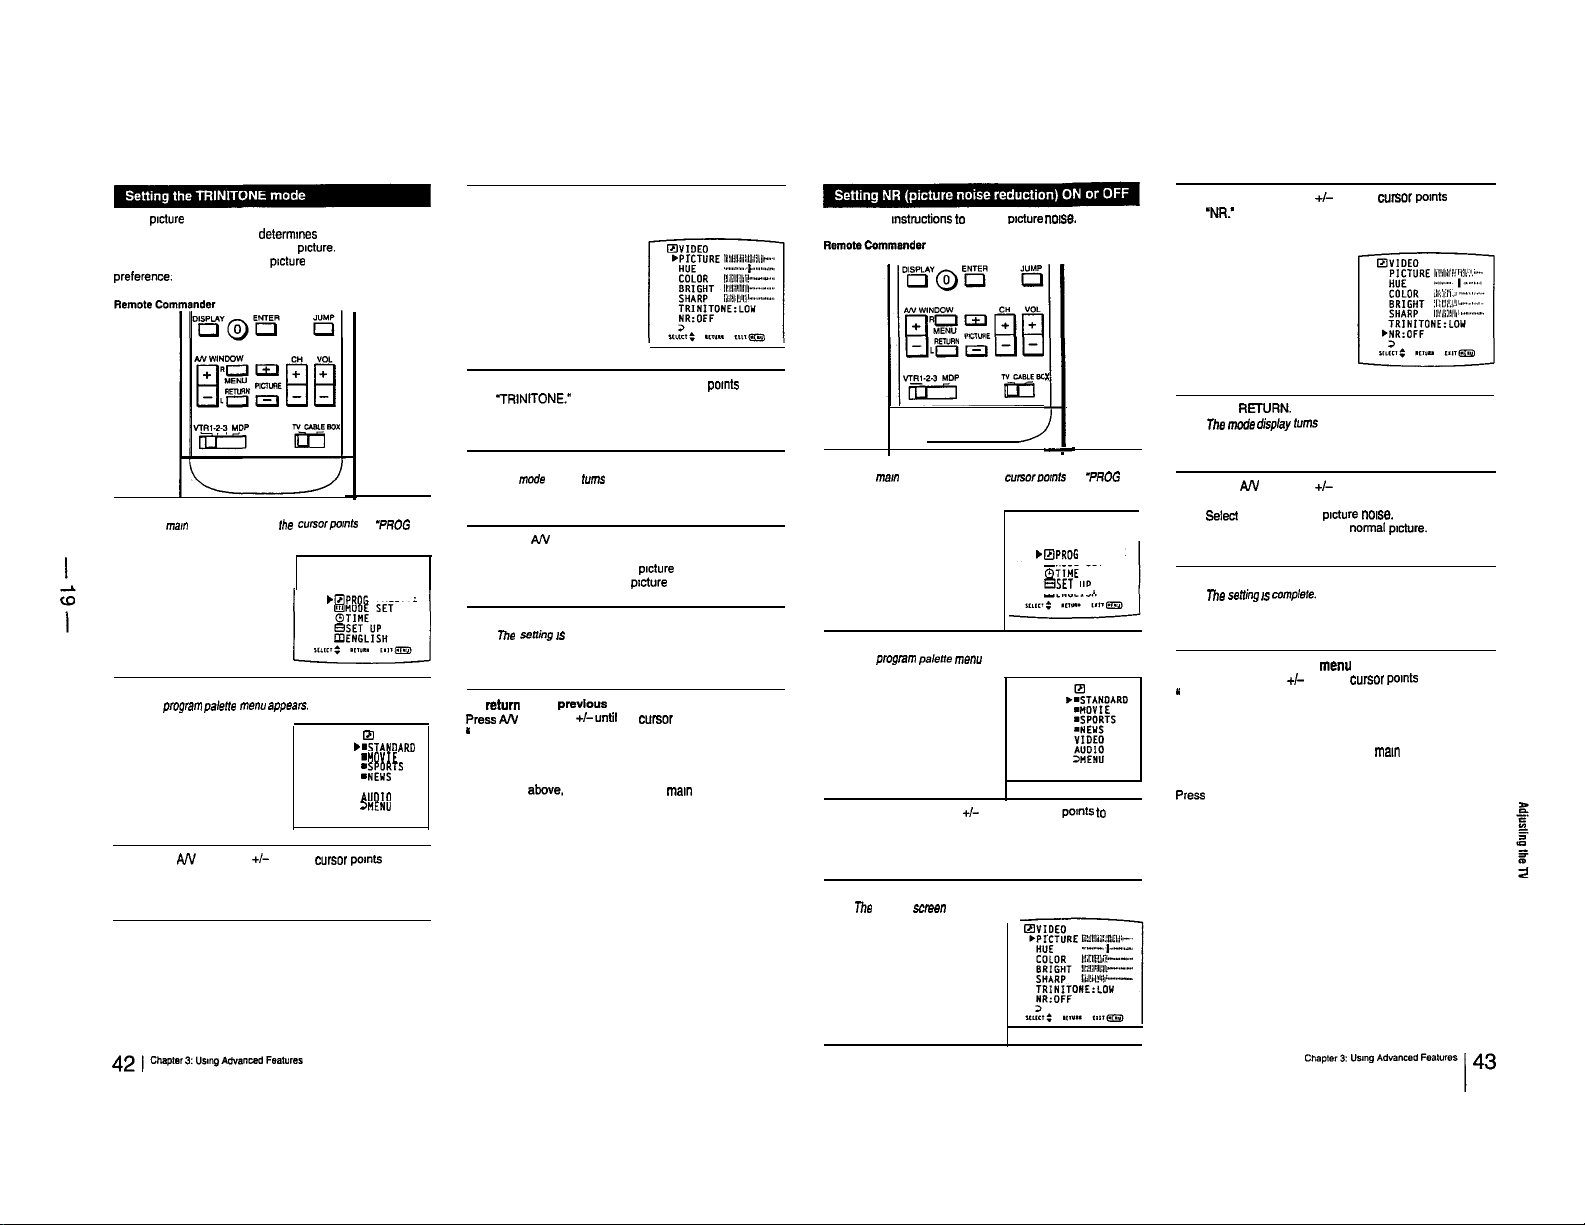
Trinitone feature to adjust the
preference.
tubes are usually manufactured with a fixed
determnnes
picture
the “warmth” (red
picture.
Use the Sony
color to your
Press RETURN.
The VIDEO screen appears.
4
Follow these mstructions to reduce ~xture
“01s~.
Press AN WINDOW +/- until the cureor points to
‘NIX’
5
Press MENU.
The man menu appears, and the cwsorpornh to “PROG
1
PALETTE.”
bBPROG PALETTE
Press RETURN.
The program pale,,e menu appears.
2
Press AN WINDOW +/- until the cursor pomts to
“VIDEO.”
3
III
bWTANOAR0
WOVIE
:%P”
VIDEO
AJo*
%ENU
Press AN WINDOW +/-until the cursor pomts to
‘TRINITONE.”
5
Press RETURN.
The mOde display turns red.
6
Press AN WINDOW+/- to select “HIGH” or “LOW.”
7
Select “HIGH” to make the
Select “LOW to make the
Press RETURN.
me senh7g IS
8
To
return
Press
PN WINDOW +I- untif the cwsor points to
*
3 MENU.”
Then press RETURN.
To return to the mafn menu
Repeat the above. until you reach the man menu.
To return to the normal screen
Press MENU on the Remote Commander.
to the
complete.
previous
menu
picture
picture
warm (reddish).
cool (blush).
Press MENU.
The
ma,”
1
2
3
4
menu appears and the ~~rsor~o,nt~ to -PFIOG
PALETTE.’
Press RETURN.
The program pa,e”e
Press AN WINDOW +/- until the cursor points to
“VIDEO.”
Press RETURN.
me
VIDEO
sowe”
me””
appears.
appears.
x
I)
-
.BPROG PALETTE
q
MOOE SET
-SET
UP
q
ENGLISH
Press RElURN.
me mGd’e
&play
turns
6
Press AN WINDOW +I- to select ‘ON’ or “OFF.”
7
Selecl “ON” to reduce
Select “OFF to restore the normal pdure.
Press RETURN.
me
seffing IS mmplsfe.
8
To return to the previous me””
Press AN WINDOW +I- until the cwsor points to
”
3 MENU.”
Then press RETURN.
To return to the main me””
Repeat the above, until you reach the
To return to the normal screen
Press MENU on the Remote Commander.
red.
picture “OlSe.
main
menu.
Follow these
depending on the kind of wdeo equpment you have
connected to the TV. For Instructions on connecting video
equipment. see pp. 13 - 16.
NOW
II the TV is rn TV, VIDEO 2 or VIDEO 3 mode. the ‘S-VIDEO’
display IS shaded and cannot be selected.
Press TVNIDEO on the TV or on the Remote Commander to
change to VIDEO 1 mode.
Remote con
I
I
1
8
mstructions
rider
Press MENU.
The
man
menu appears
to set S-VIDEO on or off,
Press RETURN.
T-he R
ode
dspiay
4
Press AJV WINDOW +/-to select ‘ON” or “OFF
turns red.
5
Press RETURN.
me
serrfhg
6
To return to the previous me””
Press AN W
-
3 MENU.”
Then press RETURN.
To return to the maln menu
Repeat the above, until you reach the man menu
To return to the r,Or”?al
Press MENU on the Remote Commander.
1
I* complete.
INDOW
+I- until the cursor
SE-”
pomts to
Follow these
BALANCE.
Remote Commander (with video control cover open)
”
mstructions
to adjust the TREBLE, SASS and
Press AN WINDOW
+/-
to make the adjustment
7
Press AN WINDOW +
-
To ,mcreese Ihe treble
Press RETURN.
The program palette
2
men”
appears
Sound Press AN WINDOW
quality
TREBLE
1 To decrease the treble 1
Press AN WINDOW +/-until the cursor pomts to
“MODE SET.”
2
Press RETURN.
The mode set menu appears, with the cursorpolnting to
3
VIDEO.
”
L-l
FJ
.S-VIDEO :OFF
HTS
:NAiIN
SPEAKER
:ON
>“ENU
To adjust other items
Repeat steps 5 - 9.
To
restore
the factory
Press AN WINDOW +/- until the cursor points to
“AUDIO.”
5
1
3
Press RETURN.
mhe AUDIO SW.W app&WS.
4
Press AN WINDOW +/- until the cursor pomts to the
item you want to adjust.
‘5
Lb :
1‘1U..
cm=
Select “STANDARD” on the
press RETURN; or. press STANDARD on the Remote
Commander.
To return to the previous me””
Press
AJV
WINDOW +I- until the cursor pomts to
- 2
MENU.’
Then press RETURN.
To return to the maln me””
Repeat the above, until you reach the man menu.
To return to the normal screen
Press MENU on the Remote Commander.
Mtlngs
for
program
all the
ItemS
palette me”“, and
For lifelike sound reproduction. follow the mstructions below
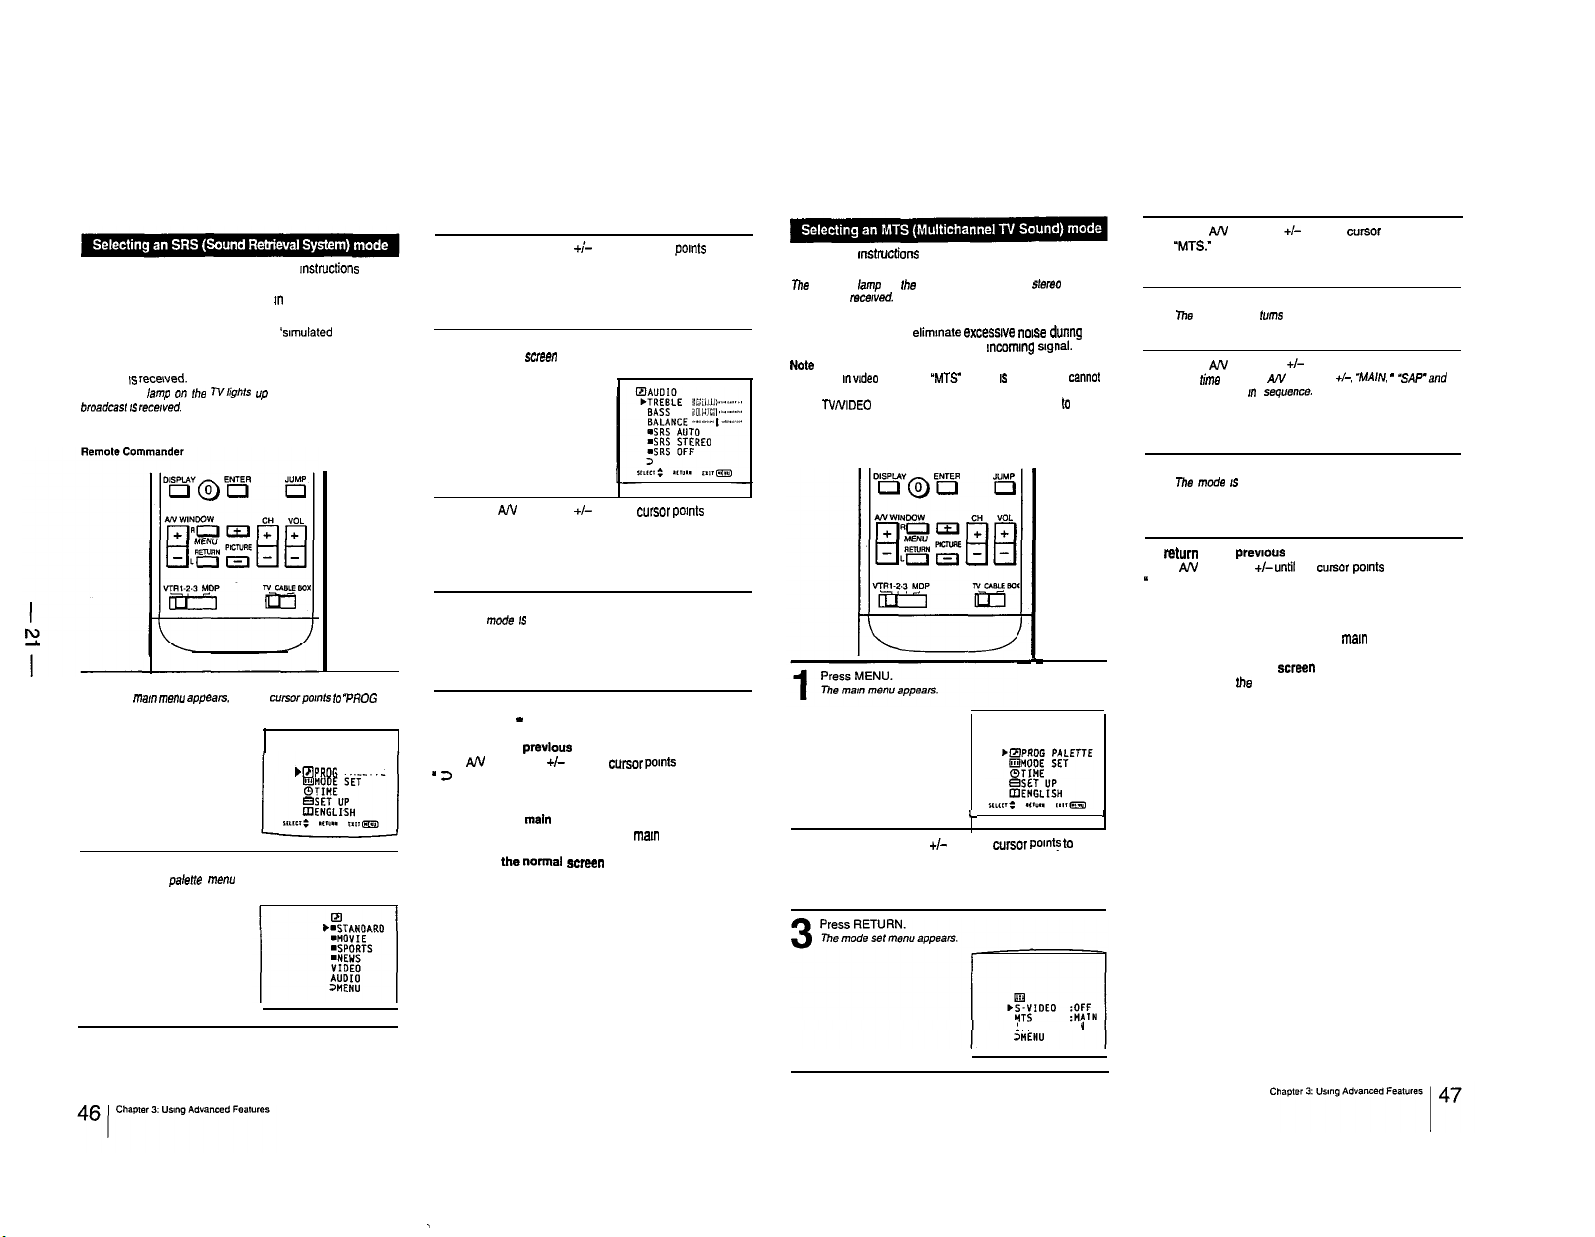
to select the SRS mode you prefer.
In SRS AUTO mode. SRS functions m both monaural and
stereo modes.
Monaural sound programs will have a
effect.
In SRS STEREO mode. SRS functions only when a stereo
program IS recewed.
The STEREO ,amp on Ihe TVlights up whenever a stereo
b,oadcaSr IS recewed.
Select SRS OFF mode to return to normal sound mode.
Press MENU.
The ma,”
I
2
menu appears.
PALETTE.”
Press RETURN.
me program palent? menu appears.
‘samulated
and the cwsorpo,“,s lo
bBPROG PALETTE
stereo’
“PROG
Press AN WINDOW +;- until the cursor pants to
“AUDIO.”
3
Press RETURN.
The AUDIO screen appears.
4
Press AN WINDOW +I- until the wrsor pants to the
SRS mode you want.
5
Press RETURN.
The mode IS selected.
6
To change the SRS mode
Repeat steps 5 - 6.
To return to the
Press AN WINDOW +I- until the cursor pomts to
- 2
MENU.”
Then press RETURN.
To return to the
Repeat the above, until you reach the
To return to the normal screen
Press MENU on the Remote Commander.
previous
main
menu
menu
man
menu.
Follow these mstrucffone to select an MTS mode.
Select MAIN mode to listen to stereo sound.
me STEREO lamp on fhe TV lights up whenever a 51ar.90
broadcast is mcewed.
Select SAP mode to listen to Second Audio Programs.
Select MONO mode to elimmate excesswe nolee during
stereo broadcasts, caused by a weak mcommg
Note
It the N is I”
be selected.
Press TVNIDEO on the N or on the Remote Commander
change to N mode.
Remote Commander
2
video
mods. the ‘MT9 display 1s shaded and
L
Press AN WINDOW +I- until the cwsor
“MODE SET.”
slgnal.
cannOt
b
I
-
pant!
to
Press AN WINDOW +/- until the cursor points to
‘MTS:
4
Press RETURN.
The mode display lums red.
5
Press AN WINDOW +I- to select the mode you want.
Each
t&o
6
7
To
Press AN WINDOW +I-
”
3 MENU.”
Then press RETURN.
To return to the main menu
Repeat the above. until you reach the mam menu.
To return to the normal screen
Press MENU on fhe Remote Commander
I
you press AN WINDOW 4, “MAIN, -
“MONO-appear ,,I sequencs.
Press RETURN.
mhe
mode IS selected.
ntturn
to the prewous menu
untff
the cweor points to
MP’and
SPEAKER :ON
.
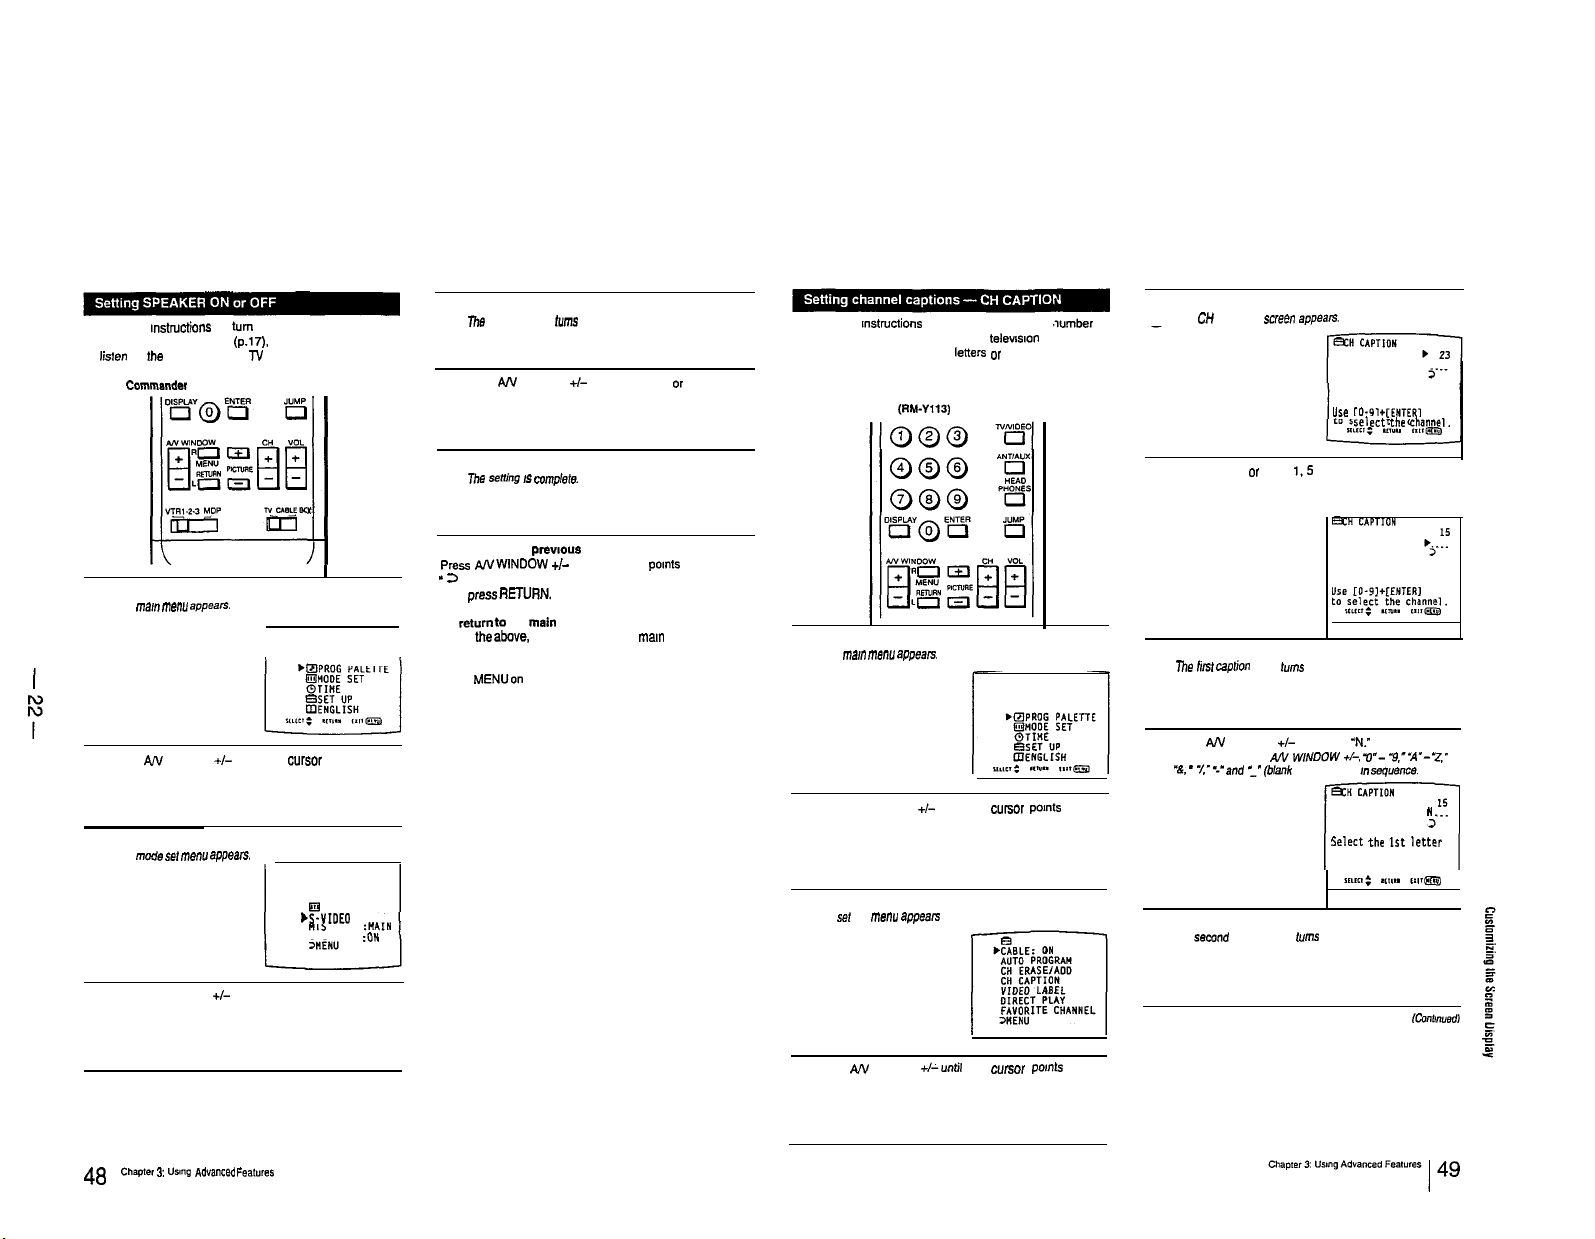
l-1 0. CUSTOMIZING THE SCREEN DISPLAY
Follow these mstructions to turn the TV speakers off when
you connect an audio system (p.17). and on when you want
to lislen to the sound from the TV speakers.
Remote Commandsr
x
I
Press MENU.
me
ma,” menu appean.
1
+QPROG PALETTE
Press AN WINDOW
“MODE SET.”
2
Press RETURN.
ma
mod.9 se, menu appears.
3
+I-
until the cursor pants to
Press RETURN.
7he mode display
5
Press AN WINDOW
turns
red
+/-
to select ‘ON” or “OFF”
6
Press RETURN.
The
senhg 19 complete
7
To return to the ~re~,o”s me””
Press
ANWINDOW +I-
* 13
MENU.”
Then pressRETURN.
To retumto the
Repeat theabove. until you reach the
To return to the normal screen
Press MENUon the Remote Commander.
until the cursor pants to
main
menu
man
menu.
Follow these wx&uctions to caption each channel
display with a name. for Instance, the televwon station call
letters. (You can set up to four leners or numbers)
Example: Caption channel 15 as ‘NBC.”
Remote Commander (RM-Y113)
Press MENU.
me man
1
2
men” appears
Press AN WINDOW
“SET UP.”
+/-
until the cursor potnts to
.wmber
Press RETURN.
The C” CAPTION screen apP*%S.
5
Use
[O-91+CENTERI
to select
Press CH +/-, or press
channel ‘15.”
6
Press RETURN.
The
lirst caplion space
7
Press AN WINDOW
Each time you press AN W/NDOW +I, ‘II”- “9,--A”- ‘2”
8
“&,
- *A- ‘-‘and :”
I,5
and ENTER to set
turns
red.
+I-
to select ‘N.”
(blank
space) appear KI squence.
&H
Select the 1st
r-l
CAPTION
the channel.
15
“j--
letter
Press AN WINDOW
“SPEAKER.”
4
Chapter 3: “sing AdYanCed Features
48 I
&S-VIDEO
:OFF
SPEAKER
:ON
+I-
until the cursor points to
Press RETURN.
me set up menu appean
3
Press AN WINDOW
to “CH CAPTION.”
4
+/-until
the cursor Points
Press RETURN.
The semnd caption space
9
(urns
red
Press AN WINDOW +/- to select a blank space.
14
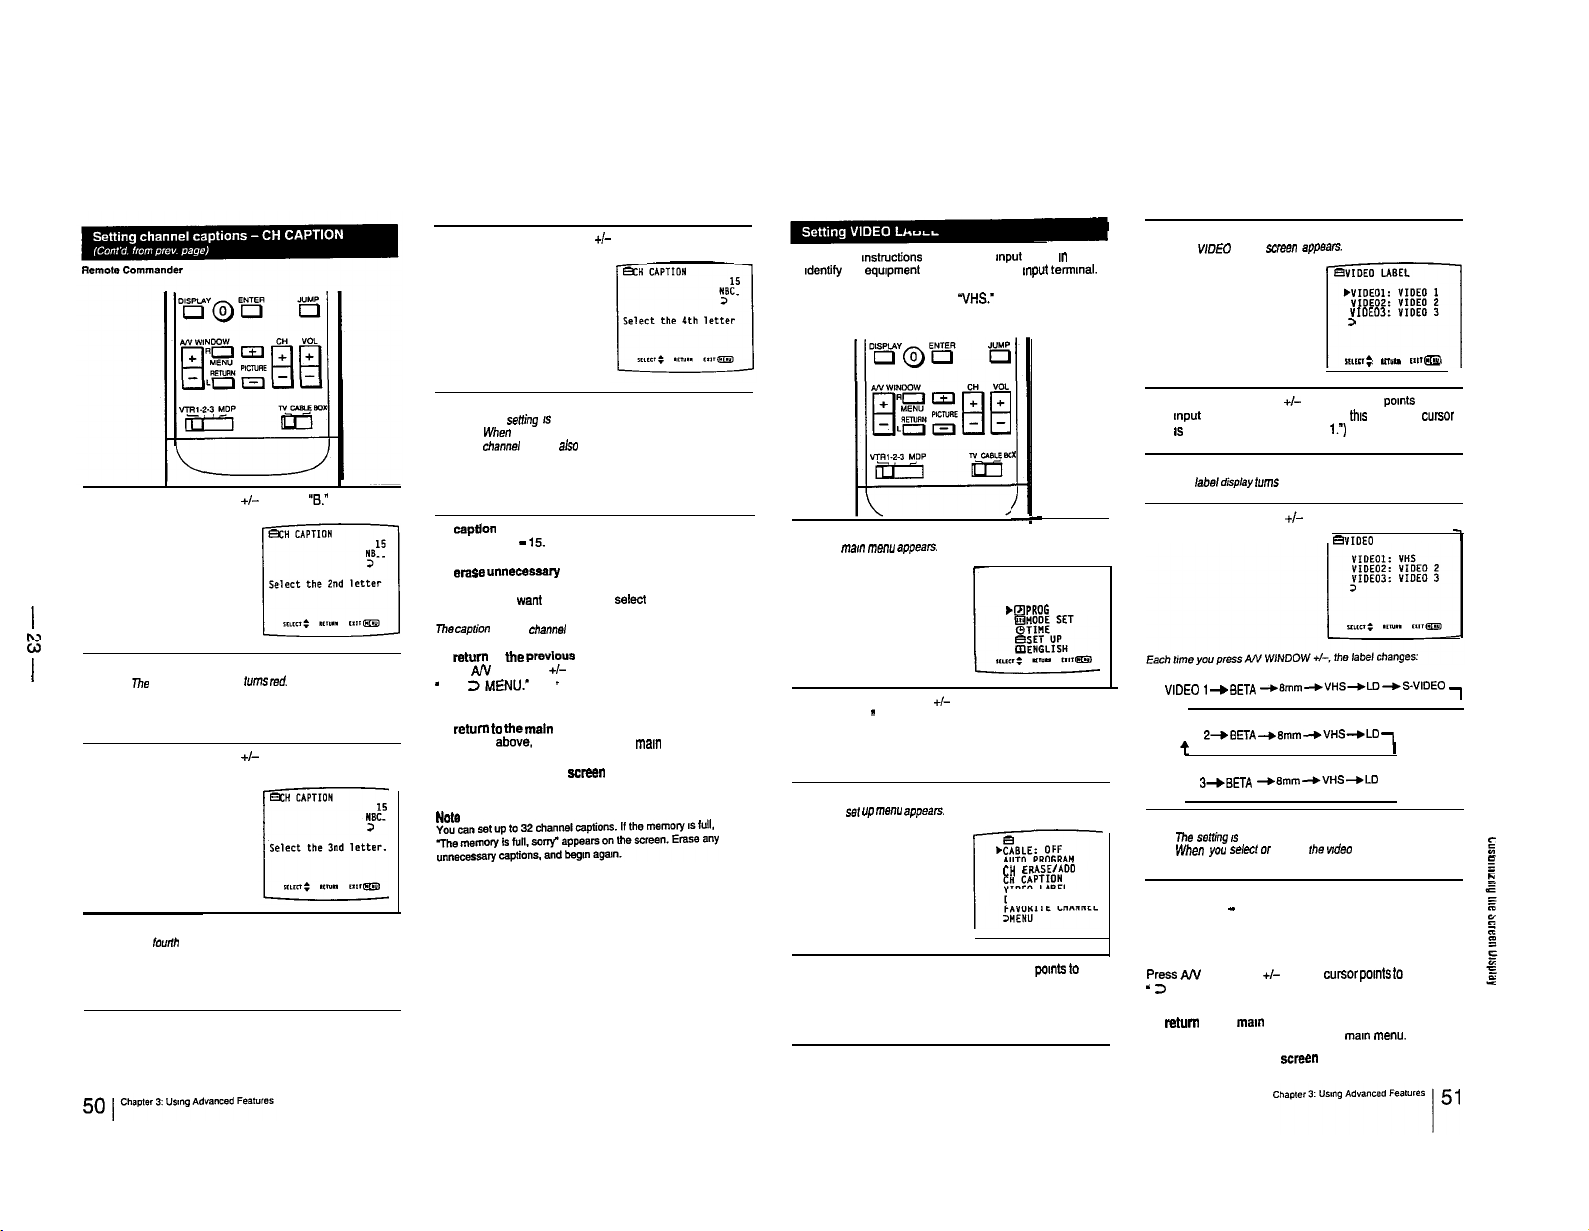
Follow these mstructtons to label each Input mode I” order
to ldentily the equpment connected to each Input termmal.
Example: Label VIDEO IN 1 as “VHS:
Remote Commander
Press RETURN.
The WOE0 LABEL
5
screen
apPs=tS.
BVIOEO LABEL
-1
,“IOEOl:
YIOEOI:
YIOE03:
>
I%,&
VIDEO 1
VIDEO 2
VIDEO 3
Ill””
rrosm
N
w
Press RETURN.
The senin9 IS complete.
15
When you select or display the channel number. the
cha”“e, caption
Press AN WINDOW +I- to select “8.”
10
I
I
Press RETURN.
The third caption space turns
11
Press AN WINDOW +I- to select ‘C.”
rod.
12
Press RETURN.
The lourth caption space turns red
13
To
caption
mom channels
Repeat steps 6 - 15.
To erase “““eceseary captions
Display the CH CAPTION screen. select the channel with
the caption you want to ease. and select blank spaces for
the channel caption; then press RETURN.
Ti,ecap,io” for that channel is erased.
TO return to
Press AN WINDOW +I- until the cursor pants to
- 2MENl.l.’ -
Then press RETURN.
To retumto
Repeat the above. until you reach the ma,” me”“.
To return to the normal ecreen
Press MENU on the Remote Commander.
NOM
also
the previous
the
maln menu
appears.
menu
Press MENU.
me “ml”
1
2
3
4
menu appears.
Press AN WINDOW +I- until the cursor pants to
“SET UP
”
Press RETURN.
me
se, up menu appsars.
AUTO PROGRAM
CH ERASE/ADO
VIDEO LABEL
DIRECT PLAY
FAVORITE CHANNEL
Press AN WINDOW +/-until the cursor pants to
“VIDEO LABEL.”
x
1
-
,@PROG PALETTE
Press AN WINDOW +I- until the cursor pants to the
mput mode you want to label. (In
6
IS
already panting to “VIDEO 1.7
Press RETURN.
me labs, Ceptay turns red.
7
Press AN WINDOW +I- to select ‘VHS.”
8
VIDEO 1
“,DEO
,-.BETA
+Bmm-.VHS+U)+S-VIDEO
VIDEO 2
VIDEO 2-v8ET~
t
VIDEO 3
VIDEO
t
Press RETURN.
me
s.9mng
9
When
appears.
To label other input modes
Repeat steps 6 - 9.
To change a label
Same as above.
To return to the previous menu
Press AJV
- 2
MENU.”
Then press RETURN.
To
return
Repeat the above, until you reach the mam menu.
To return to the normal ecreen
Press MENU on the Remote Commander.
+8mm+VHS+LD -l
3+BETA +Bmm+VHS+LD
IS
complete.
you
select o, display Ihs wdeo mode. the
WINDOW +I- until the curwr pants to
to the man menu
this
case. the
BVIOEO LABEL
cw.sOr
-l
I
video
label
g
;
”
l-1 1. USING TIMER-ACTIVATED FUNCTIONS
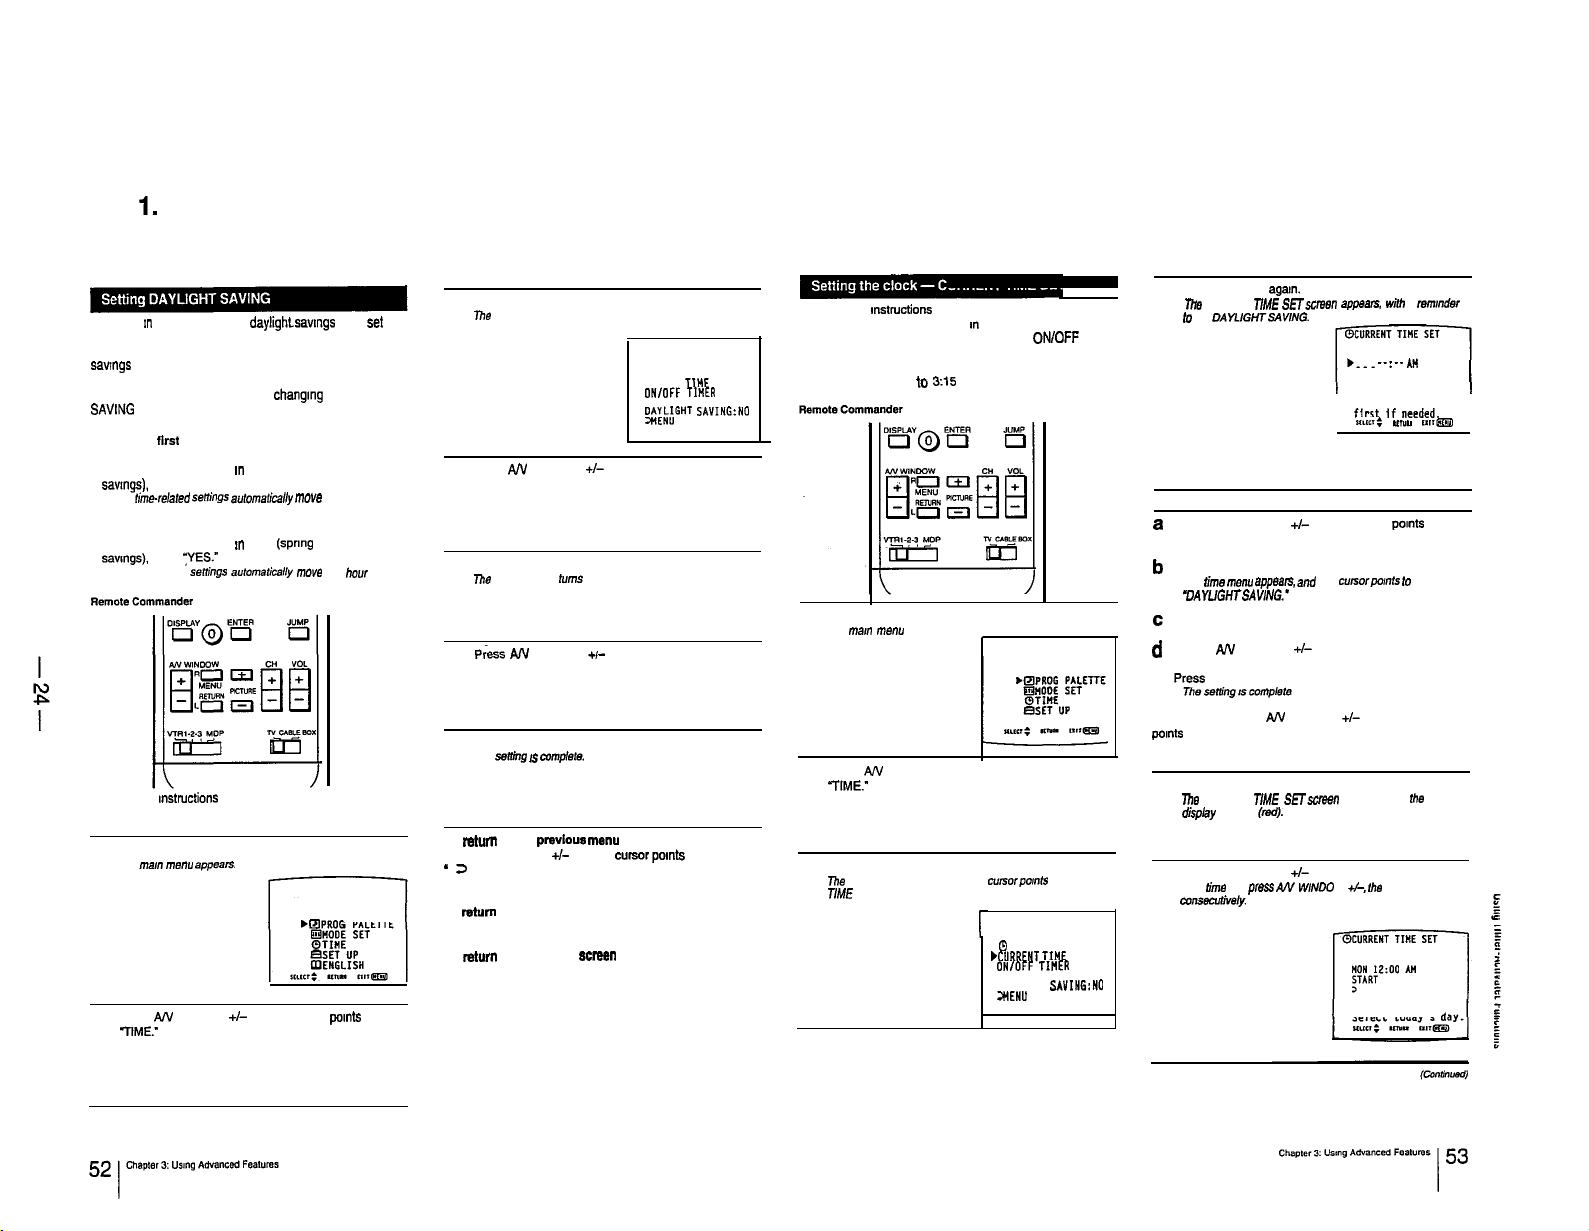
If you live !n an area that uses daylighLsawngs time, set
DAYLIGHT SAVING to “YES” or “NO” depending on the
season. before setting the current time. At the next daylight
savrngs
date, you will be able to automatically adjust all the
lime-related settings (CURRENT TIME, ON/OFF TIMER
and CHANNEL BLOCK) simply by changmg the DAYLIGHT
SAVtNG
setting.
When setting DAYLIGHT SAVING:
l After the ftrst Sunday in April (spring daylight savings)
Set to “YES” before setting the current time.
Then. on the last Sunday in October (fall daylight
savtngs).
set to “NO.”
AN the time-r&red
. After the last Sunday in October (fall daylight savings)
Set to “NO” before setting the current time.
Then. on the first Sunday rn April
savmgs).
AN the time-related settings automaticatty move one hour ahead.
Follow these instructions to set DAYLIGHT SAVING to
“YES” or “NO.”
Press MENU.
me Inan
1
Press AN WINDOW +i- until the cursor points to
IlME.”
2
set to
YYES.”
menu appears.
seth’ngs
automaticMy mwo one hour back.
(spring
daylight
bEPRO
PALETTE
Press RETURN.
lhhs time menu appears.
3
I
&RENT
TI”E
ONIOFF Tl”ER
CHANNEL BLOCK
$.W&GHT SAVING:NO
Press AN WINDOW +/- until the cursor pants to
“DAYLIGHT SAVING:
4
Press RETURN.
mo mode display
5
P&s
turns
red.
AN WINDOW +I- to select YES” or “NO.
6
Press RETURN.
The
samg IS
7
To mtum to the
Press AN WINDOW +I- until the cursor pants to
- 2
MENU:
Then press RETURN.
To rebtm to the main menu
Repeat the above, until you reach the mar” me”“.
To ratum to the normal scrssn
Press MENU on the Remote Commander.
mmplste.
~EA’IOUS
me””
SET
Follow these mstructfons to set the current time. The
correct current time must be set an order to use the other
time-related functions (DAYLIGHT SAVING, ON/OFF
TIMER, CHANNEL BLOCK).
Example: Set the time lo 3:15 PM, Monday.
Press MENU.
me rnml menu appears.
1
q
ENGLISH
Press AN WINDOW +I- until the cursor pants to
TIME.”
2
Press RETURN.
Thhe
time menu appears, and the cursorpomts to “CURRENT
3
TtME SET.’
0
.CURRENT TIHE
ON,OFF TItiER
CHANNEL BLOCK
DAYLIGHT SAVING:NO
3HENU
SET
Press RETURN agam.
llre
CURRENT TtME SETwzmsn appears.
4
lo
se,
DAYLIGHTSAVING.
If you do not need to set DAYLIGHT SAVING, press
RETURN and continue from step 5.
To set daylight saving
a
Press AN WINDOW +/- until the cursor pomte to
‘DAYLIGHT SAVING.”
b
Press RETURN.
me
time
“EW
ZXppeam, and
9AYUGHTSAVING.’
C Press RETURN.
d
Press AN WINDOW +I- to select YES’ or ‘NO.
the
wttb
a remmder
. . . .
--:-- At4
DAYLIGHT SAVING
3
Set DAYLIGHTS SAVING
ftrst If needed.
mm: et,"" rwm
CUrSOrpOmtS t0
e press RETURN.
To set the time, press AN WINDOW +/- until the cursor
points
to “CURRENT TIME SET”; press RETURN,
then continue from step 5.
Press RETURN.
The
CURRENT TIME SETscreen appears, and
5
disptay appears (red).
Press AN WINDOW +I- to select ‘MON.’
Each tinm you p,ess AN WIND0 W +/-,
6
EormecldN.¶ty
the
the
day changes
Select today’s day.
‘SUN’
Press RETURN.
The
c”rswpo,“f*
11
Check the actual time. and press RETURN to start
the clock.
12
to START..
Follow these instructions to make the program of your
choice appear on the screen at a specified time.
Example: Set the timer to turn on the TV every Monday
through
Frldav
channel 8. as.PROGRAM 1.
three programs.)
at 1:30 AM for 3 hours. on
(Ym
1
can set up to
Press RETURN.
The
ONKFF TIMER screen appears. and
5
lo
‘1.’
fhe
--:--AN .” CH...
--.--*n
--:--A” .”
-:-~A!4 .” CH-..
I
3.:---
3
c”rsor~o~~fs
H CH.--
CH-..
To reset the time
Display the CURRENT TIME SET screen and repeat steps
5-12.
Press RETURN.
he hour and am/pm displays
7
Press AA’ WINDOW +I- to set
Each fime you press A!‘/ WINDOW +,-,
8
I
sequence beg,““,“g wfh ‘12:OOAM.”
Press RETURN.
The rhinute
9
IO
display fums red.
Press AN WINDOW +/- to select ‘15”
Each time you press AN WINDOW +I-,
change ,n seqve”ce.
fum
red.
‘3:OOPM.”
the
NON
START
3
hour changes
(mmutes).
the
m,““fes
3:15 PN
To display the current time
Press DISPLAY.
To return to the previous menu
Press AN WINDOW +I- until the cursor pants to
- 2
MENU.’
Then press RETURN.
,n
To return to the main menu
Repeatthe above, until you reach the
To return to the normal screen
Press MENU on the Remote Commander.
I
main
menu.
Press MENU.
The ma,” menu appears.
1
Press AN WINDOW +/-until the cursor points to
TIME.”
2
Press RETURN.
The rime menu appears. r,
3
bCURRENT
ON,OFF TIUER
CHANNEL BLOCK
Press AN WtNDOW +/-until the cursor pants to
“ON/OFF TIMER.”
4
TINE
SET
To set program 1. press RETURN.
(To
set program 2 or 3, press AN WINDOW +I- until
6
the cwsor pants to that program; then press
RETURN.)
Press A/V WINDOW +/- to select “EVERY
then press RETURN.
7
Each the you press AN WINDOW +I-, the days of
change as show” m
Press AN WINDOW +I- to select ‘1
press RETURN.
8
Each time you press AN WfNOOW +I-, the hour changes
SH,“WKX.
Ftg. 1 (p.
57,.
QONfOFF TI”ER
1.E”EP.Y “ON-FRI
2. . _ _ .
3. . _ _ .
l-----l
--:--AN .H
--:--*I4 .H CH...
--:--AN .H
:OOAM”;
MON-FRI”;
fhe
week
CH...
CH..-
then
!n

Press AN WINDOW +I- to select “8” (channel);
then press RETURN.
11
The T/MER lamp lights, Indicating that the setting
complete.
Each time you press AN WINDOW +/-, the channel
number changes fmm I- I.25 in sequence.
Fig. 1
Selecting the day(s) of the week
IS
When you press AN WINDOW +, the days of th.3 week
appear I” the followmg order:
1 EVERY7
I I
(
--, ( EVERYT
1
(
Press AN WINDOW +I- to select “30”
then press RETURN.
9
Each lime you press AN WINDOW +A, the mtnutes change
1” sequence.
Press AN WINDOW +/- to select “3” (hour
duration); then press RETURN.
10
E&h rime
you p,ess AN WINDOW +I-, the duration
changes from
“I* -
“6” in sequence.
(mmutes):
To set program 2 or 3.
Press RETURN and repeat steps 6 -
To erase an ON/OFF TlMER setting
Display the ON/OFF TIMER screen. select the setting you
want to erase, and select a blank space for the day.
The ON/OFF TIMER setting IS erased.
To enter a new ON/OFF NMER setting
Display the ON/OFF TIMER screen and repeat steps 6 - 11.
To return to the previous menu
Press
AN WINDOW +I- until the cureor pants to
- 2
MENU.’
Then press RETURN.
To return to the main menu
Repeat the above. until you reach the man menu
To return to the normal screen
Press MENU on the Remote Commander.
Note
II you unplug the N or a
timer settings will be erased. Reset the current time; then set the
power
failure
11.
wcurs,
both the clock and
1
,E,;THU
t
I
1 1
------
NET
IJ
1
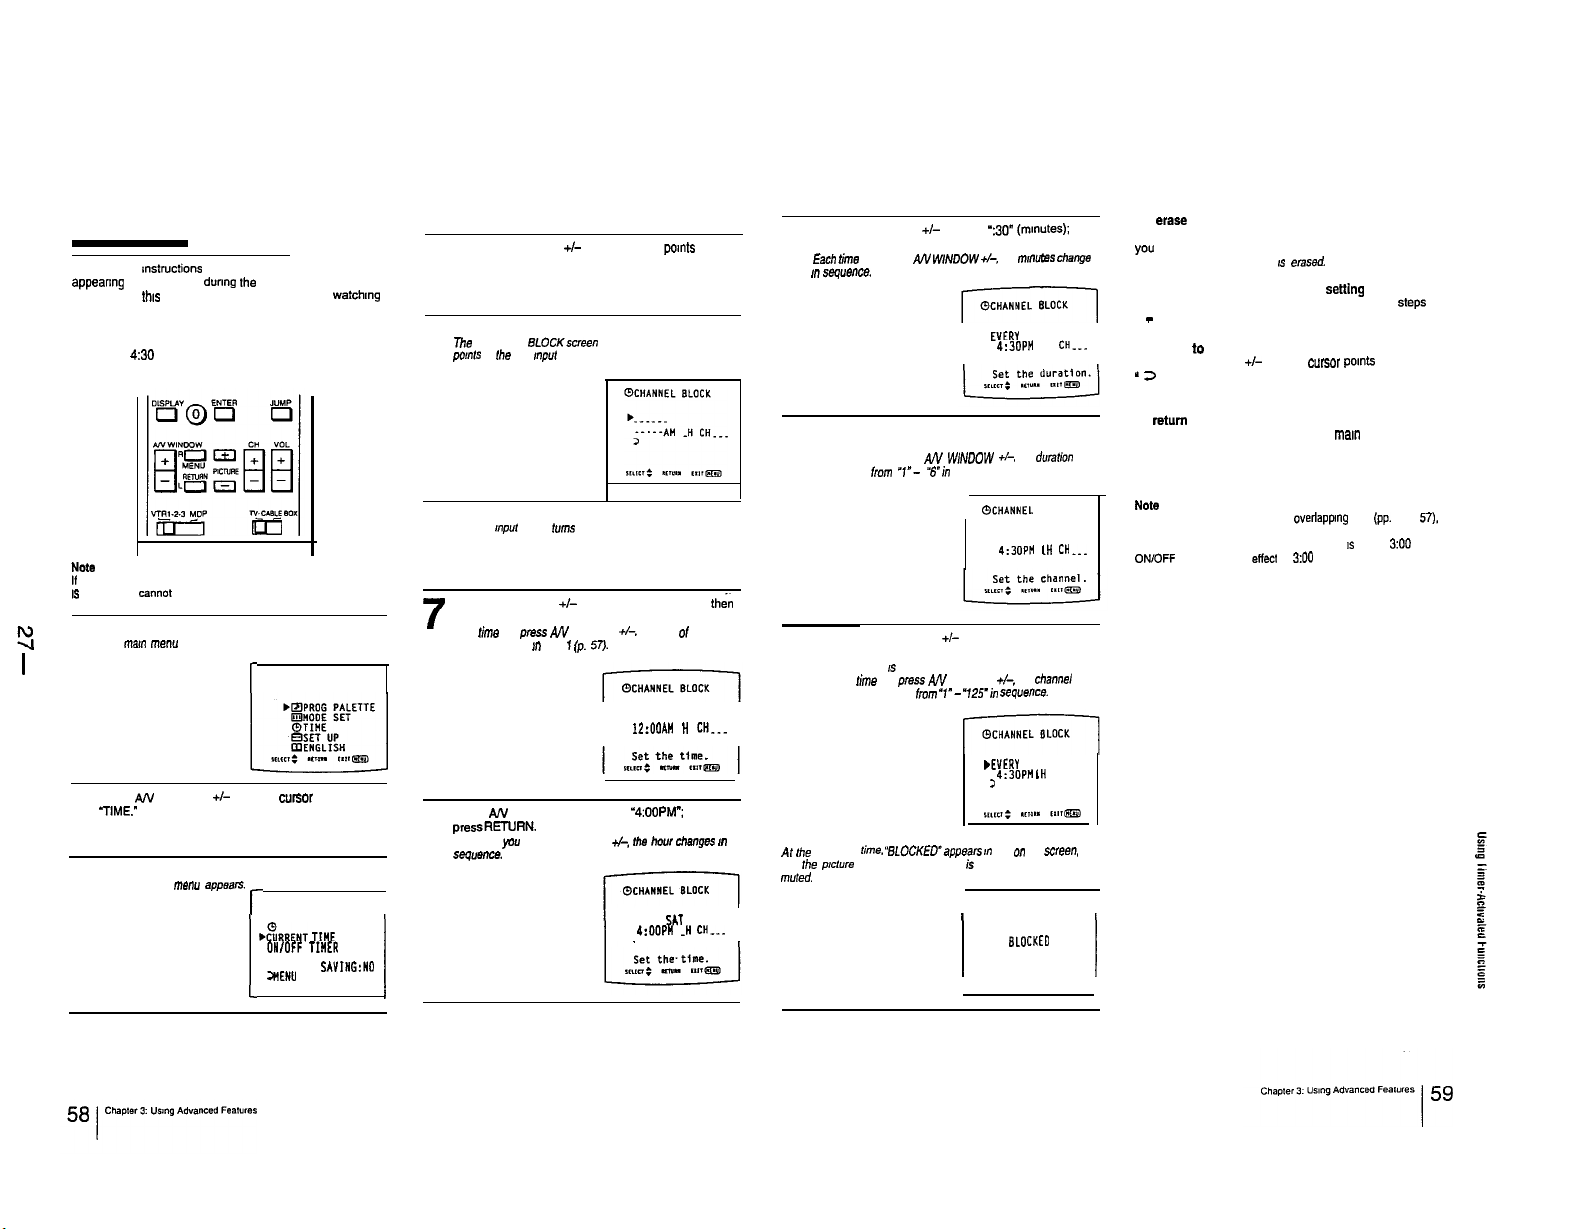
Follow these instructions to prevent a channel fmm
appearing on the screen during the time that you specify.
You can use
unsuitable programs.
Example: Set CHANNEL BLOCK every Saturday at
Remote Commander
If you have not set the current time, the “CHANNEL BLOCK” display
IS
shaded and cannot be selected.
I
1
thas
function to prevent children from watchtng
450
PM for 1 hour. on Channel 12.
Press MENU.
The mam menu appears.
I
c
Press
A!V
TIME.”
2
Press RETURN.
The rime
3
WINDOW +/- until the
menu appears. r
cwsc~r
pants to
,
&REHT
TIME
ON/OFF TIHER
CHANNEL BLOCK
DAYLIGHT SAVING:NO
;nEN”
I
c
SET
I
I
Press AN WINDOW +I- until the cursor pants to
“CHANNEL BLOCK.”
4
Press RETURN.
The CHANNEL BLOCKscreen appears, and the cursor
5
pants
lo the day mput space.
Press RETURN.
The day
,“p”t
6
II
Press AN WINDOW +I- to select “EVERY SAT”; then
/
press RETURN.
Each lime you press AN WINDOW +I-. the days of the week
change as shown m Fig. 1 (p. 57).
Press AN WINDOW +/-to select
pressREWRN.
8
Each time you press AN WINDOW +I-,
Seg”enCe.
space Urns red.
EYERY SAT
12:OOAW H
3
“4:OOPM”;
the
how changes
EVERY SIT
4:OOP” .H
3
CH...
then
CH...
To
eraSe
Press AN WINDOW +I- to select ‘:30”
press RETURN.
9
Each rime
you press AN
I” seq”ence.
Press AN WINDOW +/-to select ‘1” (hwr
duration); then press RETURN.
10
Each lime you press AN W/NDOW +I-, the
changes from
Press AN WINDOW +/- to select ‘12” (channel);
then press RETURN.
11
The setting IS complete.
Each rime you prsss AN WINDOW 4, the channel
number changes
m
At
,he
specified
and the p!cture of the specified channel is blocked and the sound is
IT”,&
I
lime.
WINDOW +I-,
‘I”- Tin
sequence.
from
‘1”- ‘12Si”
BLOCKEO”appean m red on he
(minutes);
then
the
muwtes change
EYERY
SAT
4:30PH
.H
dualion
BLOCK
4:3OPM LH
Seq”e”cS.
SAT
CHw-.
CH...
CH 12
screen.
1
I
3
@CHANNEL
r
EVERY SAT
3
WEVERY
4:SOP” I”
>
I
I sLoCKEo
a CHANNEL BLOCK setting
Display the CHANNEL BLOCK screen, select the setting
you want to erase. and select a blank space for the day.
The CHANNEL BLOCK setting IS
To enter a new CHANNEL BLOCK
Display the CHANNEL BLOCK screen and repeat
4 - lo. (You can only set one CHANNEL BLOCK at a time.)
To return to the previous me””
Press AN WINDOW +/- until the cursor points to
” 2
MENU.”
Then press RETURN.
To
return
to the main menu
Repeat the above, until you reach the man menu.
To return to the normal Screen
Press MENU on the Remote Commander
NOta
If the ON/OFF TIMER is set for an overlapPIng time (pp. 55 - 57).
the later time setting takes precedence. For example. if CHANNEL
BLOCK is set for 2:00 PM and ON/OFF TIMER
ONlOFF TIMER will take eflect at ZOO PM.
eased.
Setting
1s
set for ZOO PM.
Steps
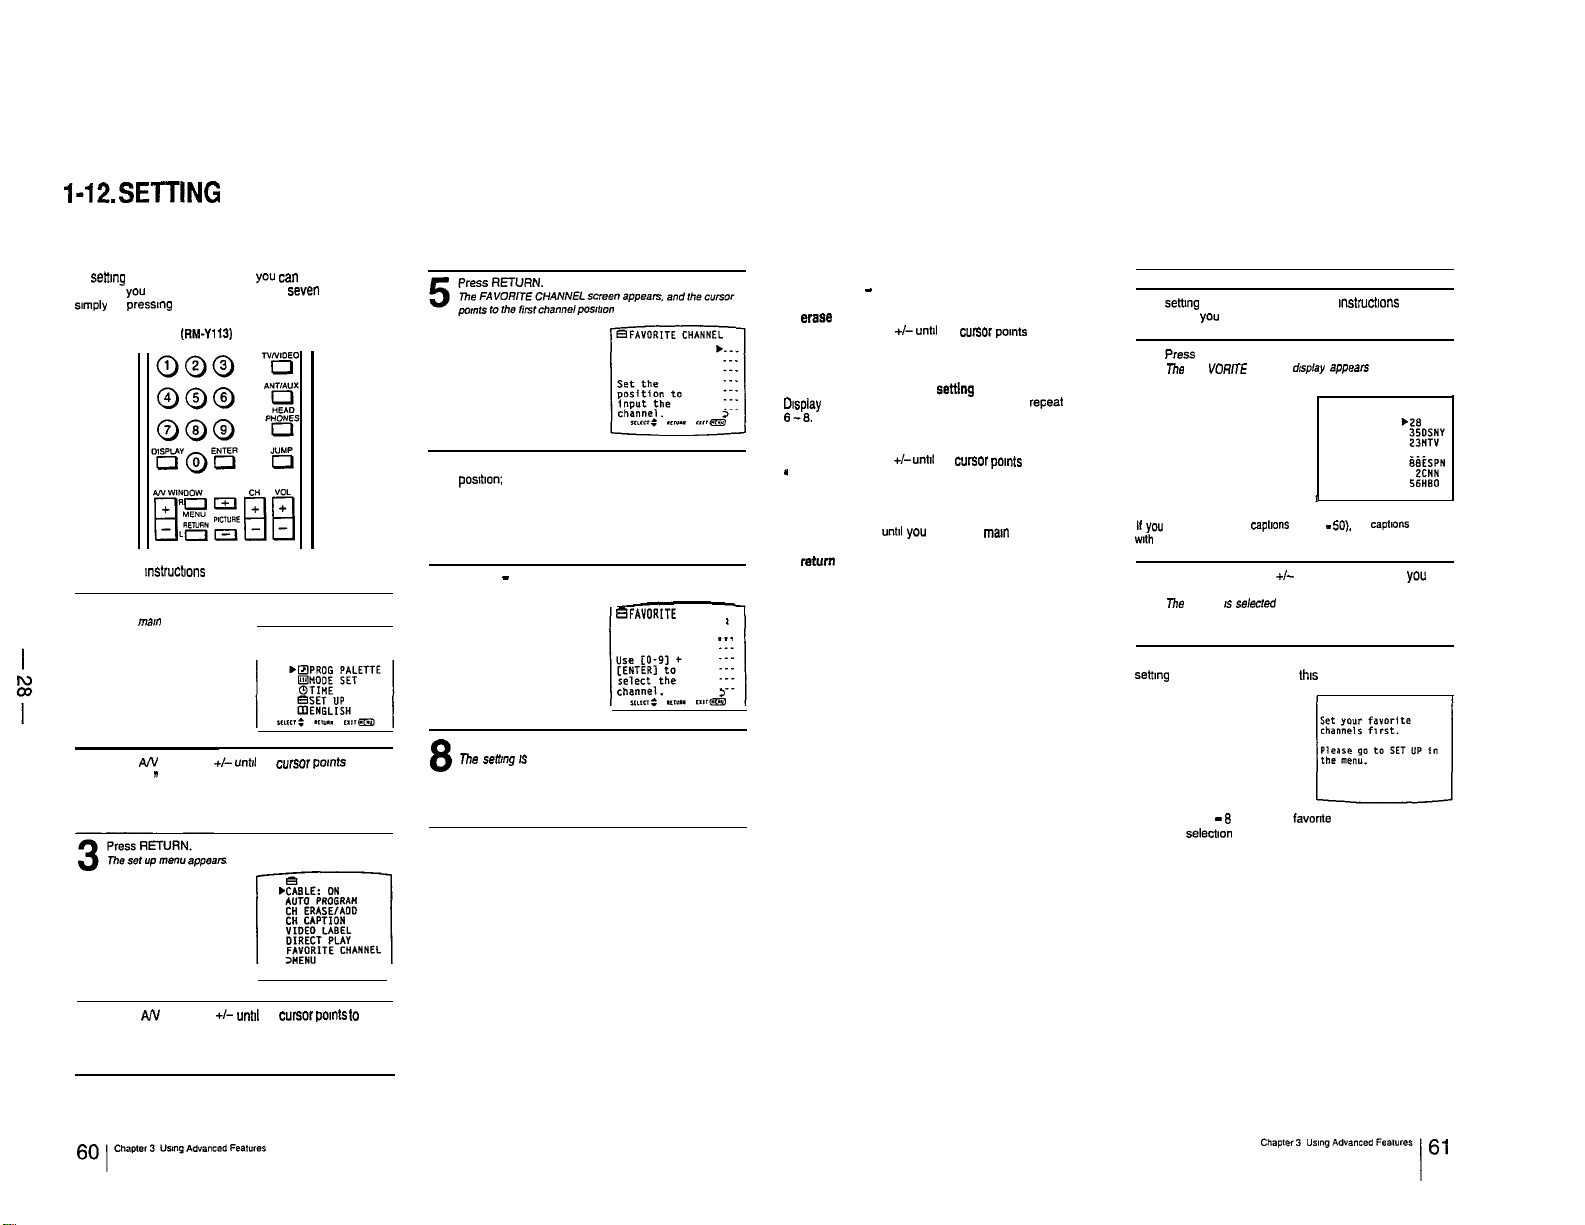
I-12.SETTlNG FAVORITE CHANNEL
By settmg FAVORITE CHANNEL, you can select the
channels you “se most frequently (up to seven channels)
simply
by pressmg RETURN on the Remote Commander
Remote Commander
Follow these mstructmns to set the channels.
Press MENU
The mm menu appears ,,
1
Press A/V WINDOW +I-
“SET UP
2
”
(RM-Y113)
unttl
the c”r.wr pants to
Press AN WINDOW +I- to select the channel
pos!bon;
6
7
8
then press RETURN.
Press 0 - 9 and ENTER to set the channel number.
BFAYORITE CHANNEL
Press RETURN.
me
semng IS complete.
To set other channels
Repeat steps 6 - 8.
To erase a favorite channel setting
Press AN WINDOW +I-
channel number you want to erase; then press 0 and
ENTER.
To reset a favorite channel
01splay
the FAVORITE CHANNEL screen and repeat steps
6-6.
To return to the previous men”
Press AN WINDOW +I-
”
3 MENU.”
Then press RETURN.
To return to the main menu
Repeat the above, unbl you reach the ma!” me””
To return to the normal screen
Press MENU on the Remote Commander.
28
_..
until
the c”r?m pomts to the
setting
unbt
the cur30r pomts to
Selecting a favorite channel
After settmg the channels. follow these lnstrucbons to select
the channel you want to watch.
Press RETURN.
m.3
FA VORlTE CHANNEL
1
Note
If
you have set channel
wth
the channel numbers
Press AN WINDOW +I- to select the channel
want to watch; then press RETURN.
2
me
channel
IS
selected
If you press RETURN on the Remote Commander before
setbng FAVORITE CHANNEL, this screen appears.
Follow step3 1 - 8 to set your favorite channels. and then
make the selecbon
~aptlons
d,Sp!=!J =pp.?XS
I ,
(pp 49 -
50).
the
captlO”S
appear
YOU
Press AN WINDOW +I- unbl the c”rsor points to
“FAVORITE CHANNEL.”
4
l-13. USING THE PRE-PROGRAMMED REMOTE
COMMANDER
You can operate other wdeo eqwpment (such as VCRs,
wdeo disc players and cable boxes) that have an mfrared
remote detector with
Follow these mstructions to operate Sony wdeo cassette
recorders (Bela. 6 mm and VHS) and wdeo disc players
(including multi-disc players).
Remote Commander (RM-Y113)
(with video control cover open)
thus
supplied Remote Commander.
Set the VTRl-2-3 MDP selector according to the wdeo
equrpment you want to operate.
2
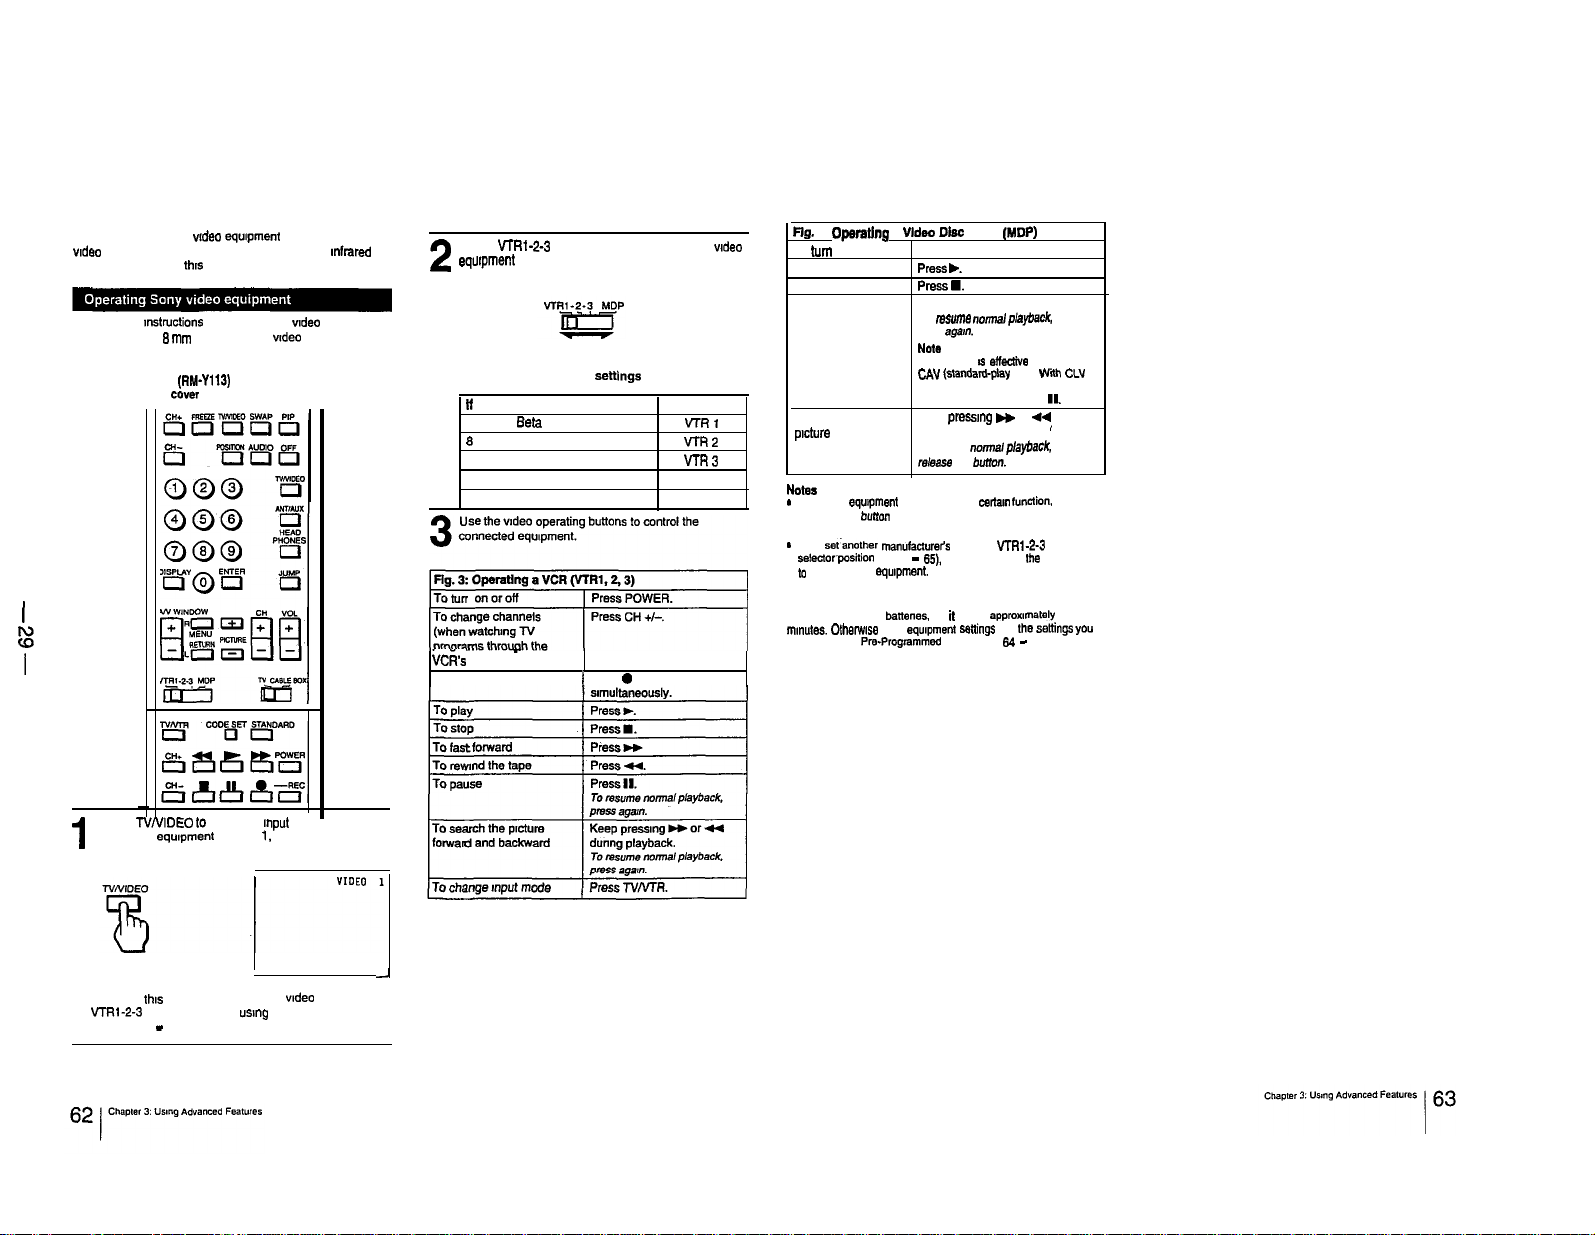
Pig. 2: Video equipment
it you want to operate a:
Beta. ED Beta VCR
6 mm VCR VTRP
VHS VCR
Video disc player
Use the wdeo operating buttons lo control the
~
I
M
I
VCR’s
tuner) -
To record
settings
(
Press 0 and REC
set to:
VTRl
VTR3
MDP
Pig.
4: Operating a Video Disc Player
To
turn
on or off ) Press POWER.
To play press
To stop
To pause
To search the
picture
forward
and backward
NOtSS
-
It the video
eqwpment
corresponding burton on this Remote Commander Will not
operate.
-
If you set~anolher
selectorposition (pp. 64 - 6% you must also set the Sony code
to
operate Sony
caution
When you replace the batteries. do it within approxlmalely 30
mwtes.
Olhemlse
made under the Pm-Programmed function (pp. 64 - 66) may be
‘erased.
PresSH.
Press II.
To msunm normal playback.
press agam.
NOW
This function 8s effective only for
CAV (slandard-play disc).
(extended-play disc), the TV goes off
(standby mode) if you press 11.
Keep pressmg H or
dunng playback.
To resume
release the button.
does not have a
manulactureh
equpment.
Sony
equprnent setiings
(MDP)
,.
wnh
44
playback.
and
the saltings
’
the
normal
certain functiO!I.
code to a VTRl-2-3 MDP
CLV
you
-
Press TVNIDEO to select the Input mode of your
connected equipment (VIDEO 1, VIDEO 2 or
1
VIDEO 3).
You can skip lhls step and go directly to wdeo mode with
the VTRl-2-3 MDP selector, by using the DIRECT PLAY
function (pp. 67 - 68).
J
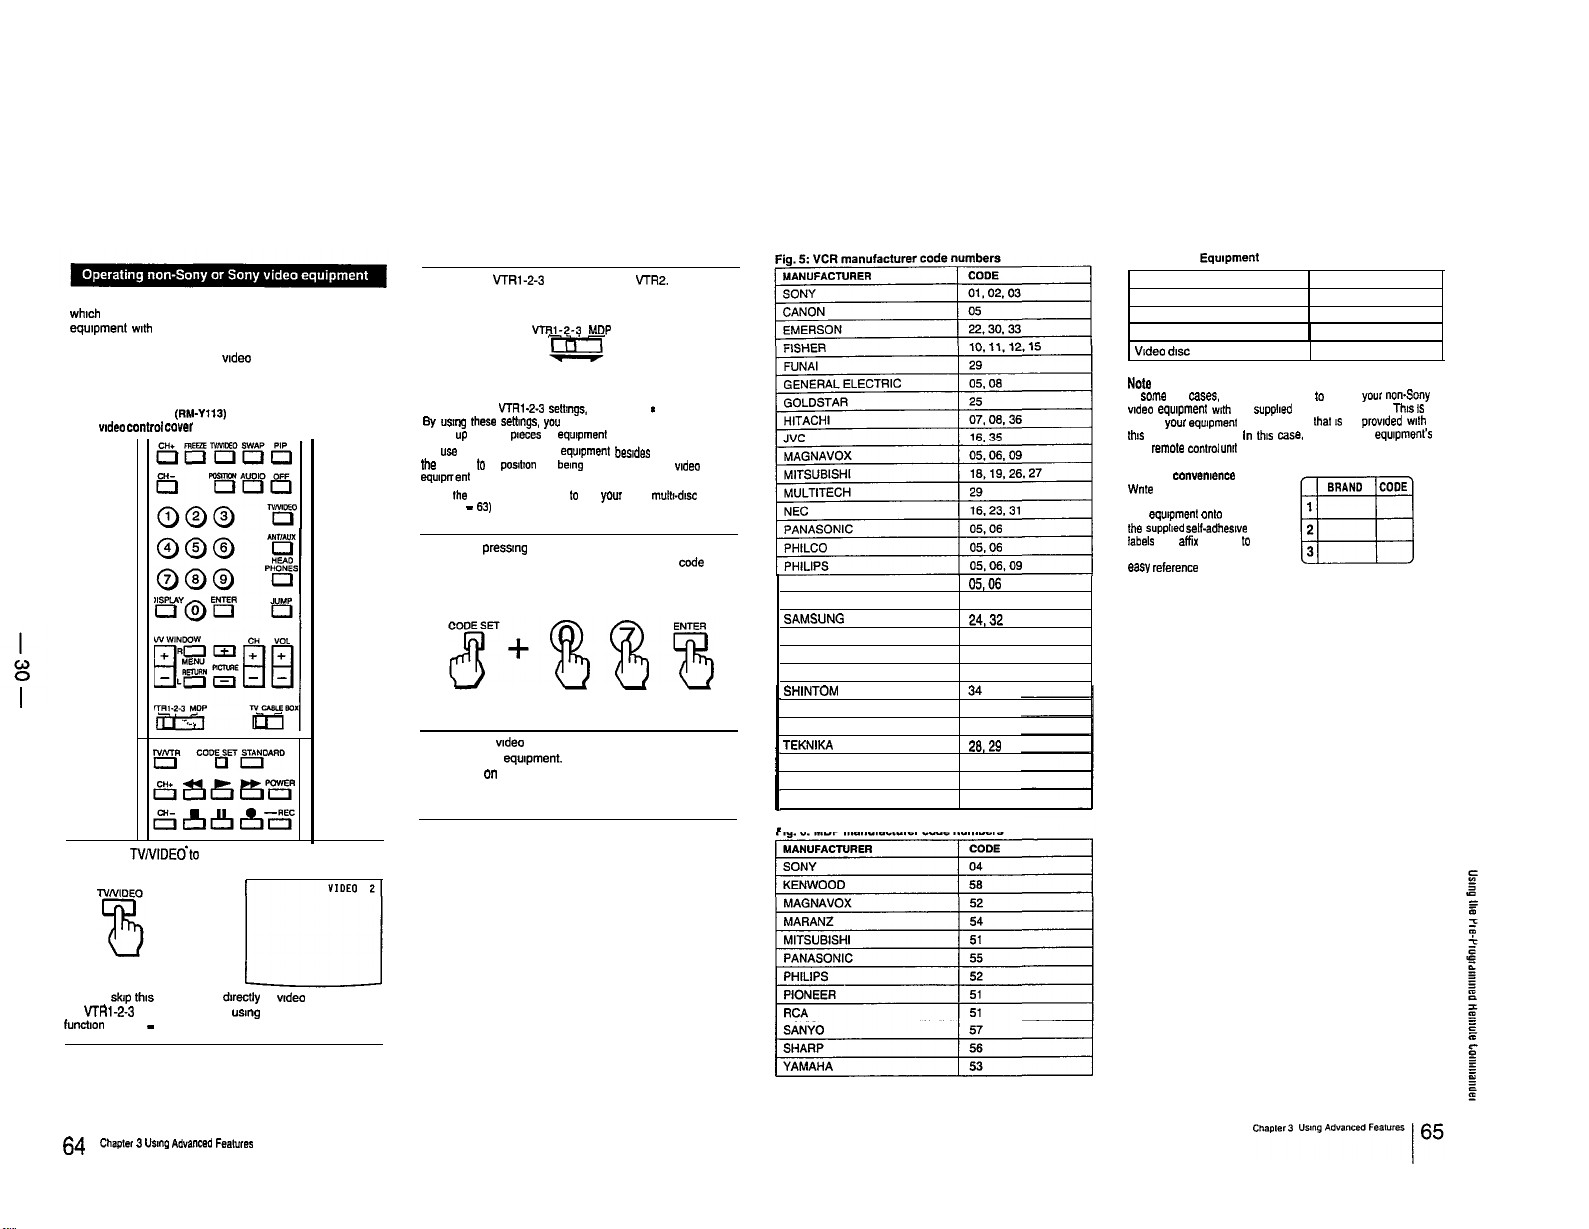
Follow these instructions to set the manufacturer’s code.
wh,ch will enable you to operate non-Sony and Sony video
equipment wth the pm-programmed Remote Commander.
Example: Operate an RCA video cassette recorder
connected to the VIDEO IN 2 jacks.
Remote Commander (RM-Y113)
(with wdeo comrof cover open)
Press
NNlDEdto
select VIDEO 2.
1
Set the VTRl-2-3 MDP selector to VrR2.
2
vnv-2-3
MDP
m
Note
You can use the VTRt-2-3 settmgs. but not MDP
6y
“smog these senmgs. you can “se the Remote Commander to
operate up to three p!eces of eq”,pment
To “se another manufacturer’s equipment besldes a Sony VCR. set
Ihe selector to a posltlon “a, being used for your Sony wdeo
equlpnent
l Set Ihe selector to MOP only
(PP 62 - 63)
While pressmg CODE SET, press 0.7 and ENTER to
set RCA’s code number. (For manufacturer cede
3
numbers. see Figs. 5.6 and 7 on p. 65.)
Use the wdeo operating buttons to operate the
connected equipment. (see Fig. 3 on p. 62 and
4
Fig. 4 on p. 63.)
lo
“se
*
your
Sony ,,,“I,,-dsc player
QUASAR
RCA
SAMSUNG
SANYO
scol-r
SHARP
SHINTOM
SYLVANIA
SYMPHONIC
TEKNIKA 26,29
TOSHIBA 20.21
TOTE VISION 25
ZENITH
Fig. 6: MDP manufacturer code numbers
OS,06
07.06
24,32
11.15
21
13.14
05, 06, 09
29
17
Fig. 7: Sony Equipment and Code Numbers
SONY EQUIPMENT CODE
Beta. ED Beta VCR
6 mm VCR
VHS VCR
Video dw player
Note
In some rare cases. you may not be able lo operate
wdeo equlpmen,
because
ths
Remote Commander In this case. please “se the
own
For your conwn,ence
Wnle the manufacturer
name and code number for
your equipment onto one Of
the SupplIed self-adheswe
labels and affix the label
the Remote Commander for
easy reference
wth
your
remote control
the supploed Remote Commander This IS
eq”,pmen, may use a code Lhat IS not provided with
““I,
10
01
02
1 03
04
your
equIpment’S
non-Sony
You can
skip thas
the VTRl-2-3 MDP selector. by usmg the DIRECT PLAY
lunchon (pp 67 - 66)
step and go
dwectly
to wdeo mode with
maple, 3 “Slnp Advancsd Fsat”res
64 I
 Loading...