

Page 1

SONY.
3-800-727-22 (1)
I
Trinitixyn^Color TV
Operating Instructions
KV-32XBR100
-1995 by Sony Corporation
Page 2

WARNING
To prevent fire or shock hazard, do not
expose the unit to rain or moisture.
CAUTION
RISK OF ELECTRIC SHOCK
DO NOT OPEN
NOTIFICATION
This equipment has been tested and found to comply with the
limits for a Class B digital device pursuant to Part 15 of the
FCC Rules. These limits are designed to provide reasonable
protection against harmful interference in a residential
installation. This equipment generates, uses, and can radiate
radio frequency energy and, if not installed and used in
accordance with the instructions, may cause harmful
interference with radio commcmications. However, there is
no guarantee that interference will not occur in a particular
installation. If this equipment does cause harmful
interference to radio or television reception, which can be
determined by turning the equipment off and on, the user is
encouraged to try to correct the interference by one or more of
the following measures;
- Reorient or relocate the receiving antennas.
- Increase the separation between the equipment and
receiver.
- Connect the equipment into an outlet on a circuit different
from that to which the receiver is connected.
- Consult the dealer or an experienced radio/TV technician
for help.
CAUTION: TO REDUCE THE RISK OF ELECTRIC SHOCK,
DO NOT REMOVE COVER (OR BACK).
NO USER-SERVICEABLE PARTS INSIDE.
REFER SERVICING TO QUALIFIED SERVICE PERSONNEL.
This symbol is intended to alert the user to the
presence of uninsulated "dangerous voltage"
within the product's enclosure that may be of
sufficient magnitude to constitute a risk of
electric shock to persons.
This symbol is intended to alert the user to the
presence of important operating and
maintenance (servicing) instructions in the
literature accompanying the appliance.
CAUTION
TO PREVENT ELECTRIC SHOCK, DO NOT USE THIS
POLARIZED AC PLUG WITH AN EXTENSION CORD,
RECEPTACLE OR OTHER OUTLET UNLESS THE BLADES
CAN BE FULLY INSERTED TO PREVENT BLADE
EXPOSURE.
CAUTION
When using TV games, computers, and similar products with
your TV, keep the brightness and contrast functions at low
settings. If a fixed (non-moving) pattern is left on the screen
for long periods of time at a high brightness or contrast
setting, the image can be permanently imprinted onto the
screen. These types of imprints are not covered by your
warranty because they are the result of misuse.
You are cautioned that any changes or modifications not
expressly approved in this manual could void your
authority to operate this equipment.
This document is for the remote commander RM-Y128.
MODEL: KV-32XBR100
Please keep this notice with the instruction manual.
Note on Closed Caption (Caption Vision)
This television receiver provides display of television closed
captioning in accordance with §15.119 of the FCC rules.
Note on CATV system installer
This reminder is provided to call the CATV system installer's
attention to Article 820-40 of the NEC that provides
guidelines for proper grotmding and, in particular, specifies
that the cable ground shall be connected to the groimding
system of the building, as close to the point of cable entry as
practical.
Use of this television receiver for other than private viewing
of programs broadcast on UHF or VHP or transmitted by
cable companies for the use of the general public may require
authorization from the broadcaster/cable company and/or
program owner.
Trademark
DSS* is a registered trademark of DIRECTV, Inc., a unit
of Hughes Electronics Corporation.
Owner's Record
The model and serial numbers are located at the rear of the
TV. Record these numbers in the spaces provided below.
Refer to them whenever you call upon your Sony dealer
regarding this product.
Model No. KV-32XBR100
Serial No. of Monitor unit
Serial No. of Feature box___________________
___________________
Page 3

Table of contents
4 Welcome!
4 Precautions
Getting Started
5 Step 1: Installing the TV
6 Step 2: Connections
6 Connecting an antenna
6 Connecting an antenna/cable TV system without a
VCR
7 Connecting an antenna/cable TV system with a VCR
9 Connecting a DSS® receiver
10 Connecting a camcorder
10 Connecting two VCRs for tape editing
11 Cormecting an audio system
12 Connecting an AV receiver
12 Connecting other Sony equipment with the
CONTROLS jacks
13 Step 3: Setting up the remote commander
13 Inserting batteries
13 Using the joystick remote commander for menu
operation
14 Step 4: Setting up the TV automatically (AUTO SET
UP)
15 Erasing or adding channels
16 Setting cable TV on or off
17 Presetting charmels
17 Changing the menu language
18 Selecting the cable box output channel (TV INPUT)
Operations
22 Changing the position of the window picture
22 Swapping the main/right and window/left pictures
22 Freezing the pictures
22 Watching eight TV channels at one time (CH INDEX)
23
Using the VIDEO menu
23 Adjusting the picture (VIDEO)
24 Adjusting the color temperature (TRINITONE)
24 Reducing picture noise (NR)
25 Enhancing the picture contrast (DYNAMIC
PICTURE)
25 Correcting the color (COLOR CORRECTION)
26
Using the AUDIO menu
26 Adjusting the sound (AUDIO)
27 Selecting stereo or bilingual programs (MTS)
27 Setting the speaker switch (SPEAKER)
28
Using the PROGRAM PALETTE menu
28 Selecting picture effect
29 Adjusting the picture in PROGRAM PALETTE
29
Using the INPUT/OUTPUT STATUS menu
29 Selecting an output signal (INPUT/OUTPUT
STATUS)
30 Setting video labels (VIDEO LABEL)
31
Using the TIMER menu
31 Setting the clock manually (CURRENT TIME—
MANUAL)
32 Setting the clock automatically (CURRENT TIME—
AUTO)
33 Setting your daylight saving time (DS TIME)
33 Setting your time zone (TIME ZONE)
34 Setting the timer to turn the TV on and off (ON/OFF
TIMER)
35 Blocking out a channel (CHANNEL BLOCK)
36 Using the SET UP menu
36 Customizing the channel names (CH CAPTION/
LOGO)
37 Setting your favorite channels (FAVORITE
CHANNEL)
38 Selecting a favorite channel
38 Adjusting the tilt of the picture (DIRECTION)
39 Selecting a VCR input directly (DIRECT PLAY)
39 Customizing the pointer (CUSTOMIZED POINTER)
40 Displaying Caption Vision/XDS (CAPTION VISION)
41 Operating video equipment
43 Operating a cable box or DSS receiver
44 Operating non-preprogrammed equipment—Learning
function
I
19
Watching the TV
19 Switching quickly between two channels
20
Muting the sound
20
Displaying on-screen information
20
Setting the Sleep Timer
20
Watching a video input picture
20
Changing the VHF/UHF input to the AUX input
21
Watching two programs at one time-PIP/P&P (Twin
View^”)
21
Displaying a window picture (PIP)
21
Displaying a left picture (P&P)
21
Changing the window/left picture input mode
21
Changing TV channels in the window/left picture
22
Listening to the sound of the window/left picture
Additional Information
45 Troubleshooting
46 Specifications
47 Index
The captions in parentheses indicate menu names.
Page 4

Welcome! Precautions
Thank you for purchasing the Sony Super Trinitron® TV.
Here are some of the features you will enjoy with your
TV:
• AUTO SET UP feature that allows you to set up your
TV easily by pressing the SET UP button.
• On-screen graphic menus that let you visually set
various settings.
• Two tuner Picture-in-Picture or Picture & Picture
(Twin View^'^) that allows you to watch another
channel, video or cable image as a window or left
picture.
• On/off timer that allows you to display the TV
program of your choice on the screen for a specified
duration.
• VA SPEAKER option of the AUDIO menu that lets
you take advantage of the Sony SA-VA series speaker
system's surround sound and super woofer mode
when you connect it to the TV.
• Dynamic Focus circuitry that automatically focuses
the scanning electron beam for enhanced sharpness,
especially at the corners.
• The supplied joystick remote commander that allows
you to operate Sony and other manufacturers' video
equipment, cable box and DSS receiver.
The Learning function of the commander allows
you to program the remote commander to operate the
equipment of manufacturers whose codes are not pre
programmed.
• 3-Dimensional Comb Filter for NTSC signals that
improve picture quality by reducing rainbow noise on
a striped image and flicker which may be caused by
color variation.
• XDS (Extended Data Service) display that allows you
to set the clock automatically and receive various
information which a broadcaster offers with a
program.
• Favorite channel feature that allows you to watch
eight channels as well as the currently selected
channel at the same time and lets you select your
favorite channel among them.
Safety
• Operate the TV only on 120 V AC.
• One blade of the plug is wider than the other for
safety purposes and will fit into the power outlet
only one way. If you are unable to insert the plug
fully into the outlet, contact your dealer.
• Should any liquid or solid object fall into the
cabinet, unplug the TV and have it checked by
qualified personnel before operating it further.
• Unplug the TV from the wall outlet if you are not
going to use it for several days or more. To
discormect the cord, pull it out by the plug. Never
pull the cord itself.
For details concerning safety precautions, see the
supplied leaflet "IMPORTANT SAFEGUARDS."
Installing
• To prevent internal heat build-up, do not block the
ventilation openings.
• Do not install the TV in a hot or humid place, or in a
place subject to excessive dust or mechanical
vibration.
About this manual
Instructions in this manual are based on use of the remote
commander. You can also use the controls on the TV if
they have the same name as those on the remote
commander.
Page 5

Getting Started
Step 1: Installing
the TV
Your TV is composed of two components, the Monitor
unit and the Feature box.
Before using your TV, connect the two components.
Connect the MULTI INPUT connector on the Monitor
unit to the MULTI OUTPUT connector on the Feature
box with the supplied 36-pin multi-cable. Then cover
the connectors with the supplied terminal cover.
(Rear of Monitor unit)
I
To disconnect the multi-cable
While pushing the projections on both sides of the
plug, pull the cord out by the plug.
Note
• Connect the monitor's AC cord to the AC outlet on the Feature
box.
Getting Started
Page 6

I
step 2:
Connections
Although you can use either an indoor antenna or
outdoor antenna with your TV, we recommend
connecting to an outdoor antenna or a cable TV system
for improved picture quality.
For the customers who connect a cable box, skip "Step
4; Setting up the TV automatically (AUTO SET UP)"
(page 14) and proceed to "Selecting the cable box
output channel (TV INPUT)" (page 18).
Connecting an antenna
Connect your antenna cable to the VHF/UHF antenna
terminal. If you cannot connect your antenna cable
directly to the terminal, follow one of the instructions
below depending on your cable type.
Connecting an antenna/cable TV
system without a VCR
To cable or antenna
Cable
To cable box
If your cable company requires you to connect a cable
box, make the connection as follows:
Cable
OUT
Cable box
To cable box and cable
(Rear of Feature box)
VHF/UHF AUX
(Rear of Feature box)
VHF/UHF
(Rear of Feature box)
VHF/UHF
(Rear of Feature box)
. VHF only
• VHF/UHF
• Cable
B
• VHF only
• UHFonly
• VHF/UHF
> VHF
and
■ UHF
or
or
or
or
300-ohm twin lead cable
75-ohm coaxial cable
300-ohm twin lead cable
75-ohm coaxial cable
Antenna connector
EAC-66 U/V mixer
(not supplied)
VHF/UHF
(Rear of Feature box)
VHF/UHF
(Rear of Feature box)
VHF/UHF
Notes
• Most VHF/UHF combination antennas have a signal splitter.
Remove the splitter before attaching the appropriate
connector.
• For better picture quality, connect an antenna by using a 75-ohm
coaxial cable.
Getting Started
75-ohm coaxial cable
(not supplied)
CATV cable
Pay cable TV systems use scrambled or encoded signals
requiring a cable box* in addition to the normal cable
connection.
* The cable box will be supplied by the cable company.
Note
You cannot watch the signal through AUX connector as a
window picture.
To cable and antenna
(Rear of Feature box)
VHF/UHF
AUX
CATV cable
Antenna cable
Page 7
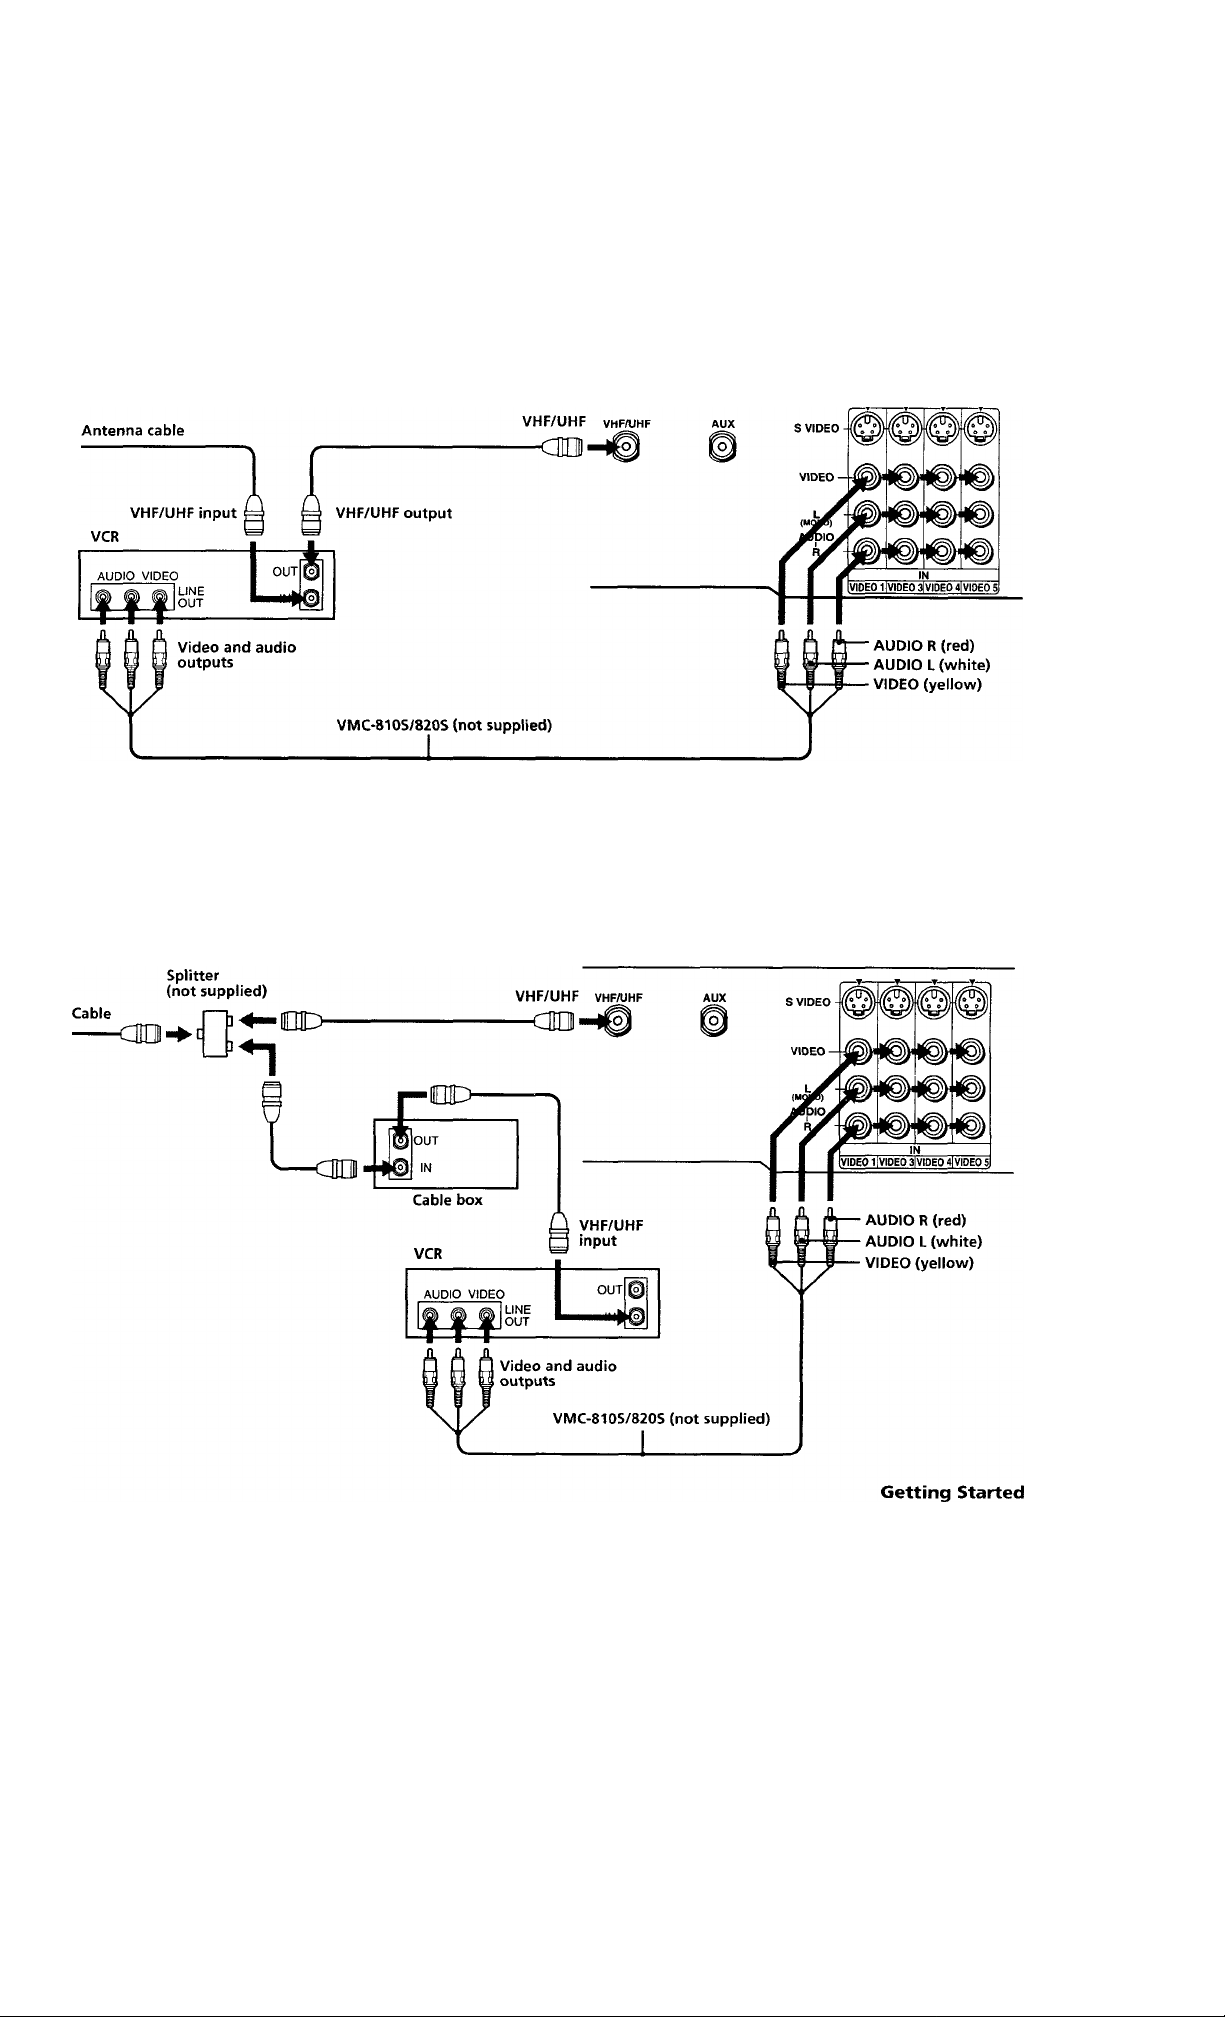
Connecting an antenna/cable TV system with a VCR
For connection details, see the instruction manual of
your VCR. Before connecting, disconnect the AC
power cords of the equipment to be connected.
To a conventional VCR
Without a cable box
After making these connections, you will be able to do
the following:
• View the playback of video tapes
• Record one TV program while viewing another
program
(Rear of Feature box)
Notes
• To connect a monaural VCR, connect the audio output of the
VCR to AUDIO L (MONO) of VIDEO 1/3/4/5 IN on the
feature box.
With a cable box
Do not connect the cable to the S VIDEO connector on the
feature box.
(Rear of Feature box)
Page 8
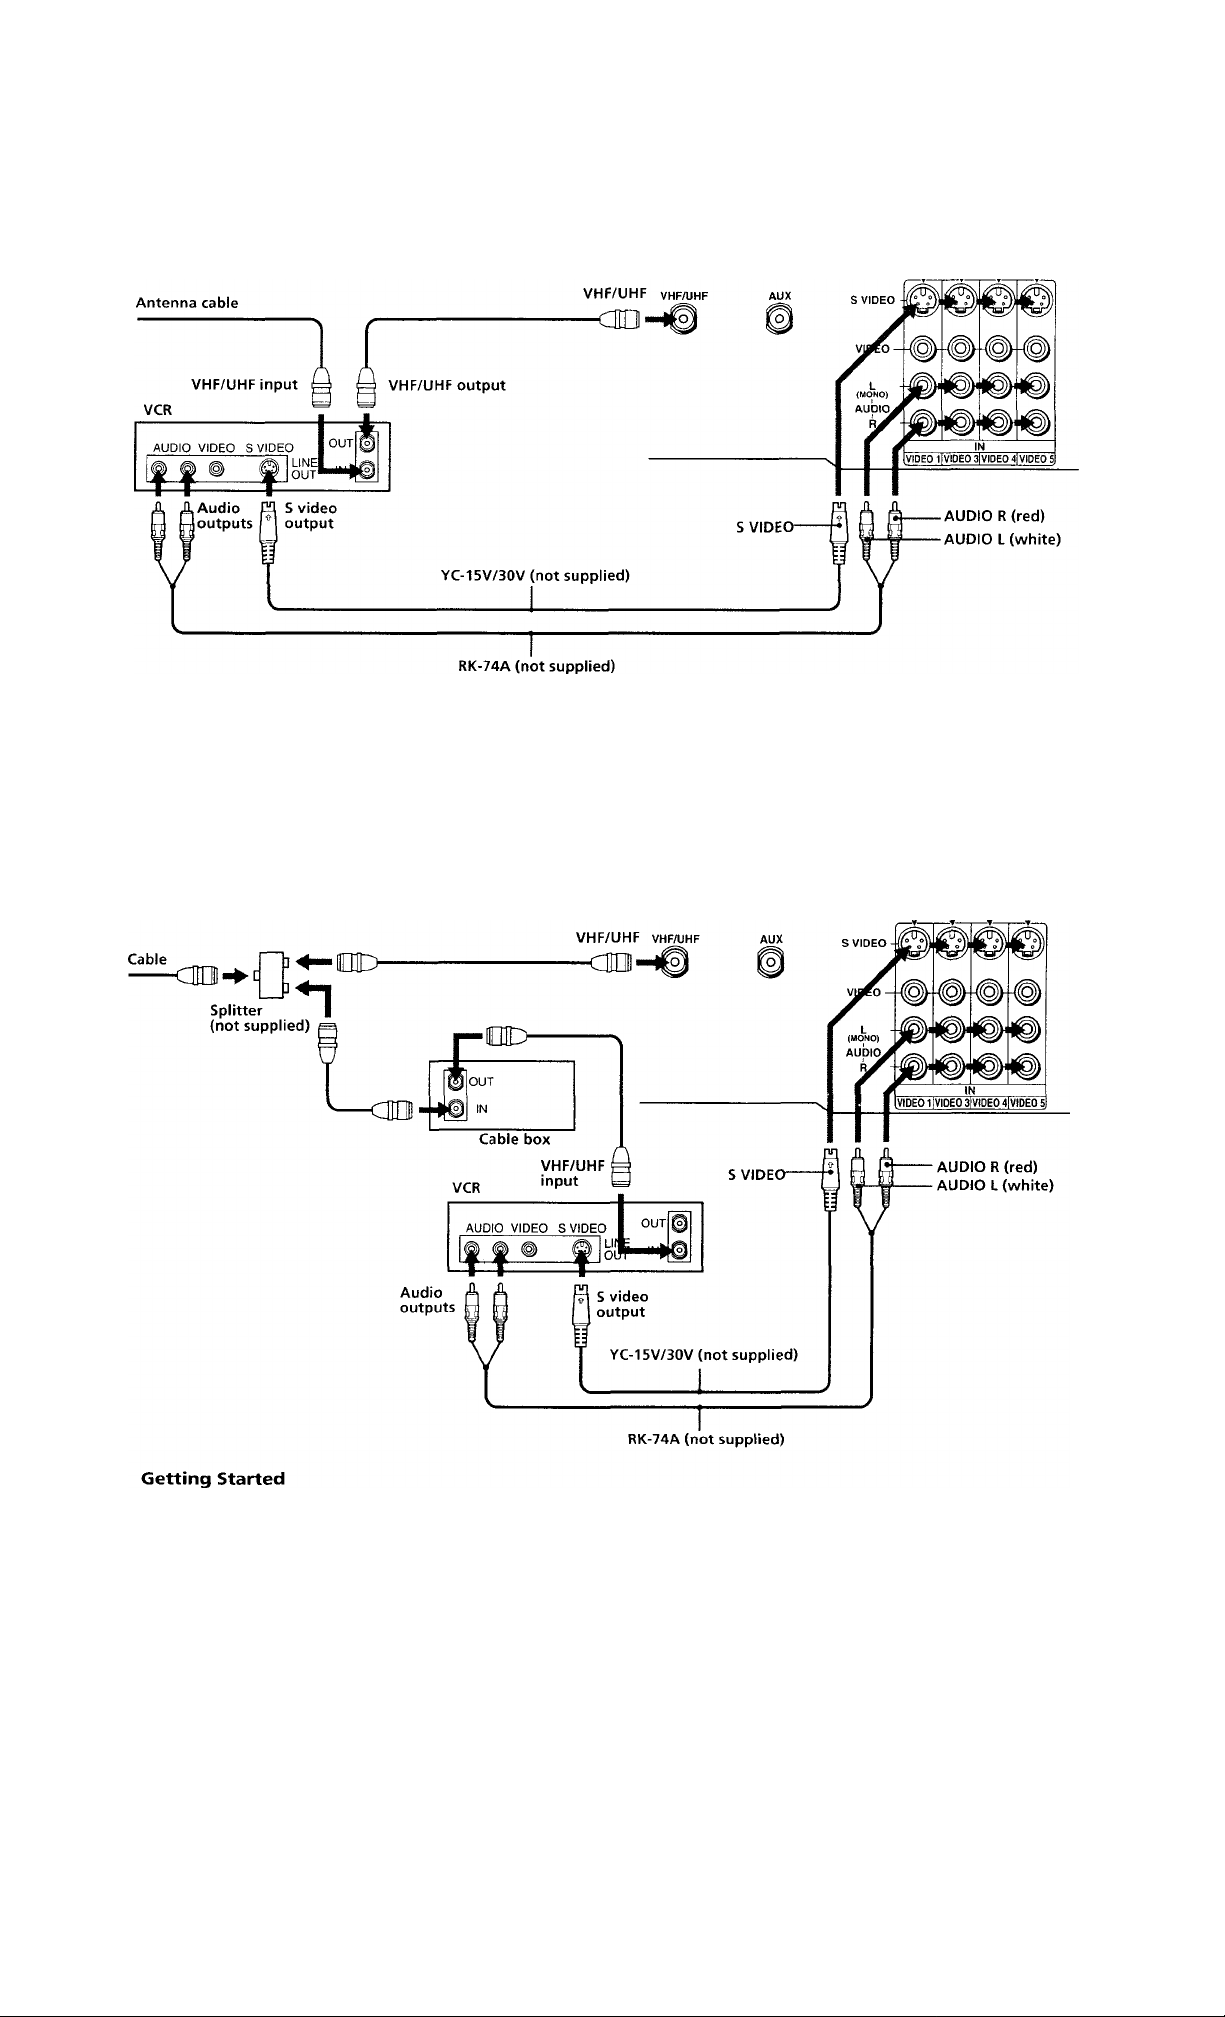
To an S video equipped VCR
If your VCR has an S video output jack, make the
connection as follows. Whenever you connect the cable
to the S VIDEO connector, the TV automatically
receives S video signals.
I
Without a cable box
Note
Video signals are composed of Y (luminance) and C (chroma)
signals. The S connection sends the two signals separately
preventing degradation, and gives better picture quality
compared to conventional connection.
(Rear of Feature box)
With a cable box
(Rear of Feature box)
8
Page 9
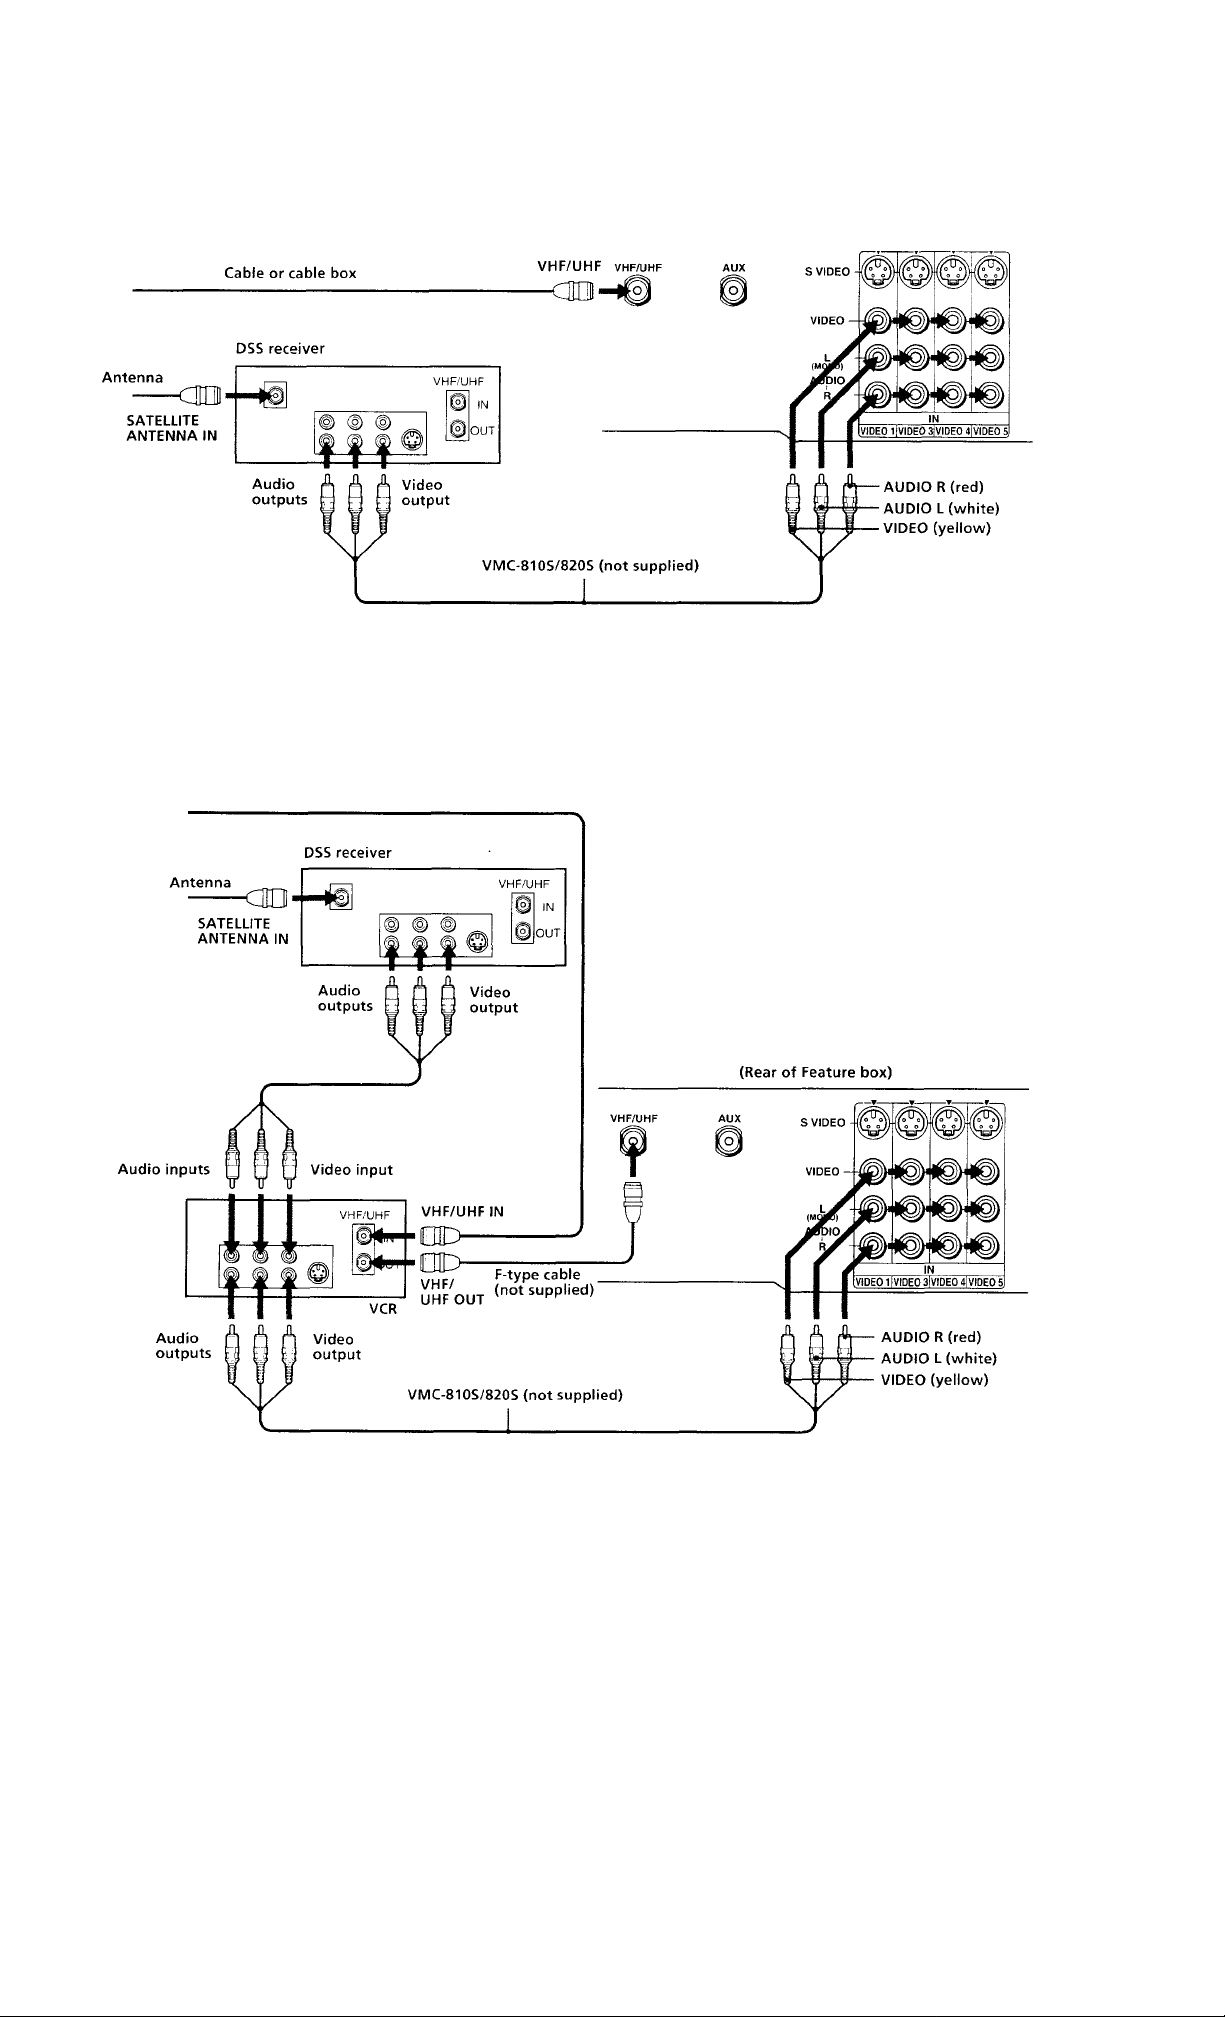
Connecting a DSS® receiver
For connection details, see the instruction manual of
the DSS receiver.
To a TV
Note
• You can use the S VIDEO jack or the composite video jack for
video connection.
To a TV and VCR
Cable or cable box
(Rear of Feature box)
Getting Started
Page 10
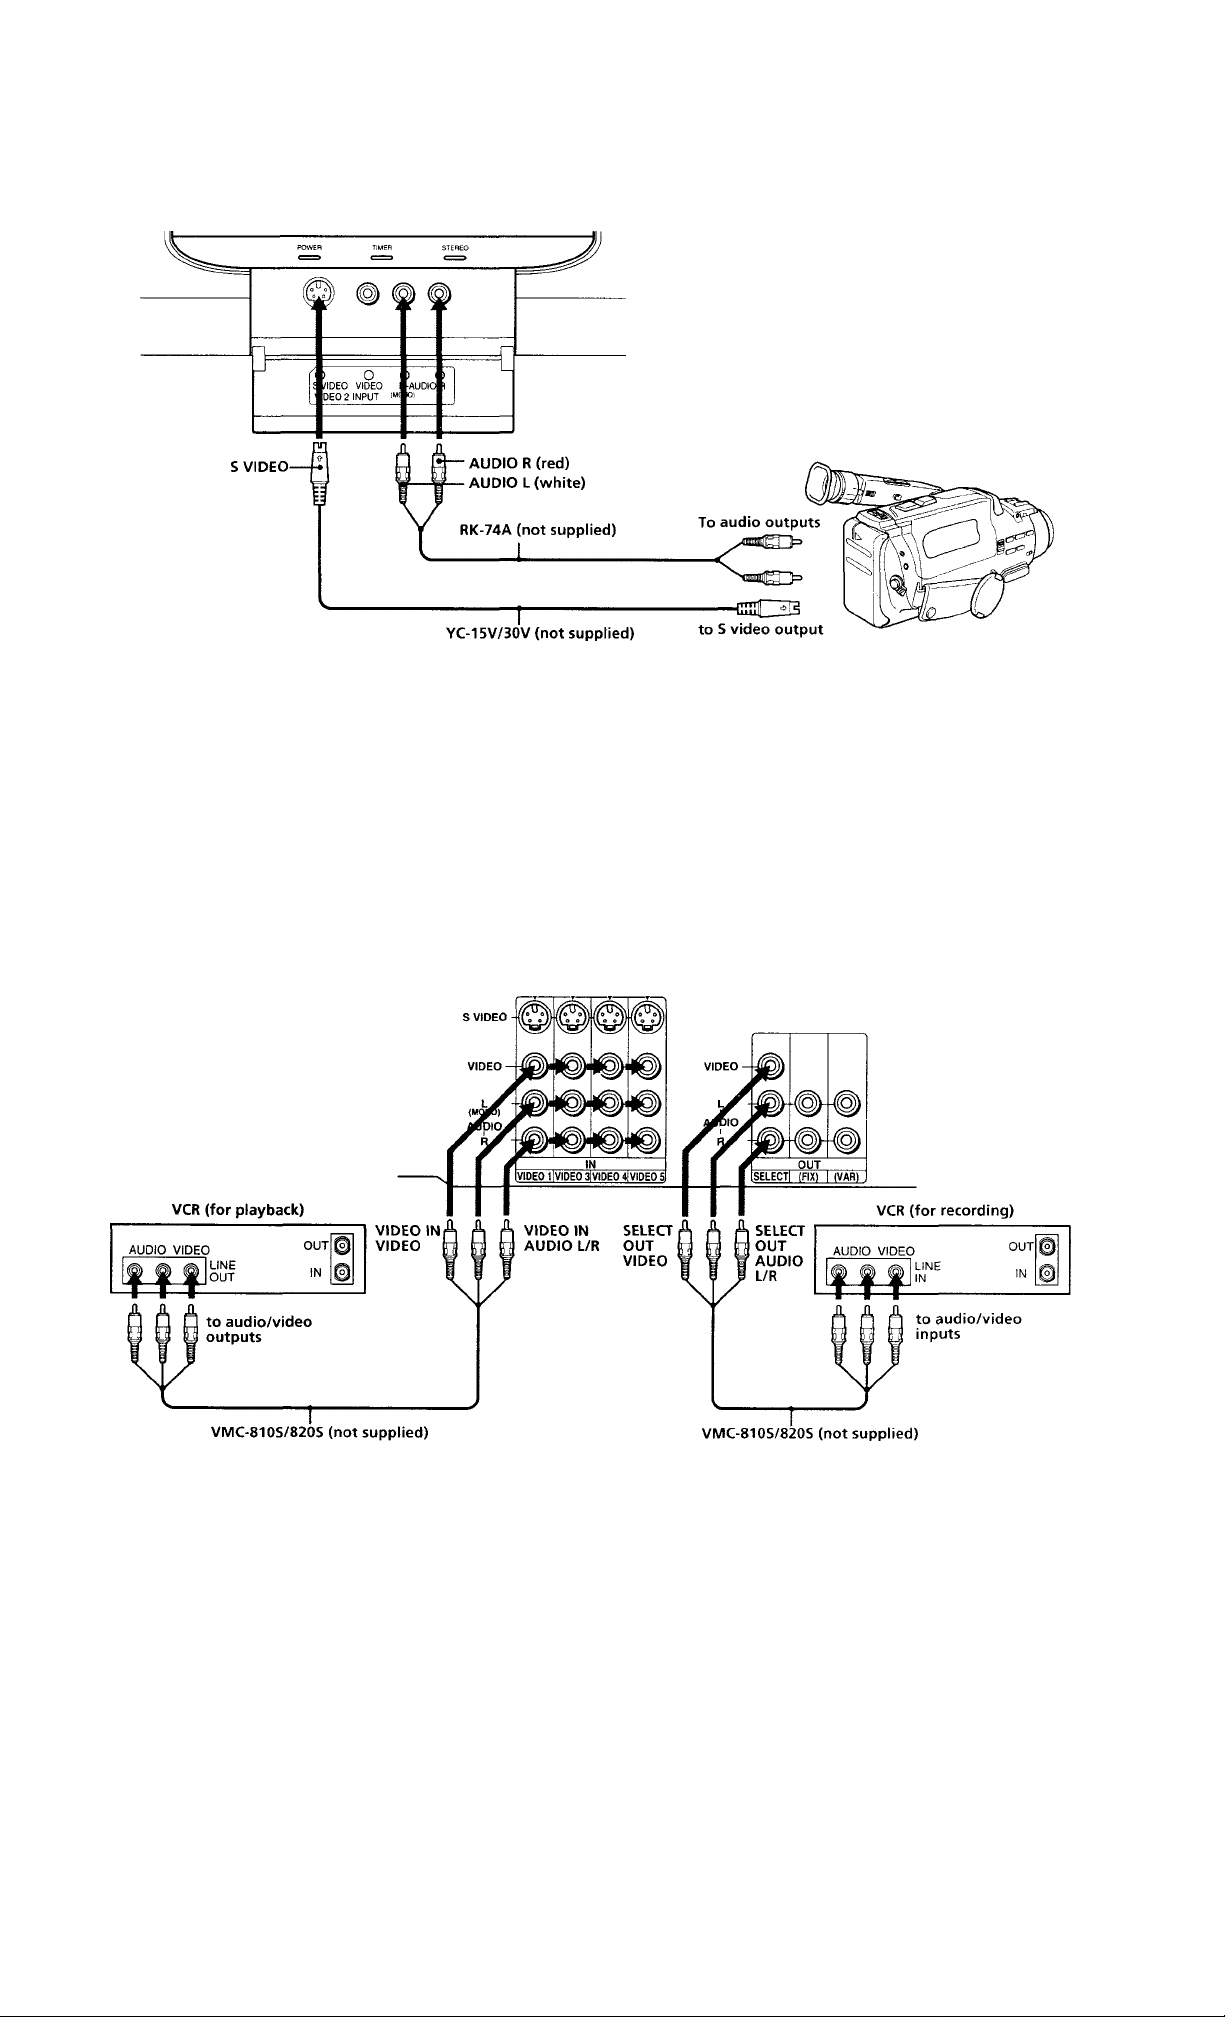
Connecting a camcorder
This connection is convenient for watching a picture
from a camcorder.
(Front of Feature box)
Notes
• To connect a monaural camcorder, connect the audio output of
the camcorder to AUDIO L (MONO) of VIDEO 2 INPUT on
the feature box.
• To connect a camcorder not equipped with the S video output,
connect the video output of the camcorder to VIDEO INPUT of
the feature box.
Connecting two VCRs for tape editing
You can select the output signal from the SELECT OUT
jacks. For detailed information, see page 29.
(Rear of Feature box)
10 Getting Started
Page 11

Connecting an audio system
When connecting audio equipment, see page 27 for
more information.
(Rear of Feature box)
I
S VIDEO -
VIDEO -
#
(MOÑO) #
AUDIO
R
# #
VIDEO 1IVIDE0 3l VIDEO 4I VIDEO 5
©
#
© ©
#
#
IN
VIDEO -
L
R
#
SELECT! (FIX)
Note
You can adjust the bass, treble and balance, or select an MTS
(Multichannel TV Sound) mode with the supplied remote
commander.
To connect a Sony SA-VA series
speaker system
If you have a Sony SA-VA series speaker system,
connect your speakers to the AUDIO (FIX) OUT jacks
on the feature box with the audio cable supplied with
the speakers. You can take advantage of the speakers'
Dolby Pro Logic* surround system and super woofer
mode, and control them with the supplied remote
commander.
OUT
AUDIO (VAR) OUT L (white)
RK-74A (not supplied)
AUDIO (VAR) OUT R (red)
(VAR)
Line input
“O
stereo amplifier
* Manufactured imder license from Etolby Laboratories
Licensing Corporation. Additionally licensed rmder one or
more of the following patents; U.S. numbers 2,632,886,
3,746,792 and 3,959,590. "Dolby" and the double-D symbol □□
are trademarks of Dolby Laboratories Licensing Corporation.
(Rear of Feature box)
Getting Started ^ ^
Page 12

Connecting an AV receiver
Connect an optional AV receiver to the VIDEO 1 IN
jacks at the rear of the feature box. For detailed
information, see page 29.
Connecting other Sony equipment with the CONTROL S jacks
This feature allows you to control your TV and other
Sony equipment with one remote commander.
Notes
• To control other Sony equipment with the TV's remote
commander, connect the input of the equipment to CONTROL S
OLFT jack on the feature box.
• To control the TV with the remote commander of other Sony
equipment, connect the output of the equipment to CONTROL S
IN jack on the feature box.
2 Getting Started
Page 13

step 3: Setting up
Using the joystick remote commander
for menu operation
the remote
commander
Inserting batteries
Insert two size AA (R6) batteries (supplied) by
matching the + and - on the batteries to the diagram
inside the battery compartment.
Notes
• With normal use, the batteries should last for approximately
six months.
• If you do not use the remote commander for an extended
period of time, remove the batteries to avoid possible damage
from battery leakage.
• Do not handle the remote commander roughly. Do not drop it,
step on it or let it get wet.
• Do not place the remote commander in direct sunlight, near a
heater, or where the humidity is high.
The supplied remote commander has a joystick with
motion in eight directions, as illustrated, to easily select
the items in the menu.
CD CD CD
© © ©
© ® ©
© © ©
O ® O
Press the MENU button to display the main menu.
MENU
MODE:STANDARD
HUE
BRIGHT
SHARP
TRlNfTONE; HIGH
NR : OFF
DYNAMIC PICTURE ; OFF
COLOR CORRECTION: OFF
:D □ RESET
Use (*) RETURN® Exil@^
La
2 Press the joystick up or down to move the
cursor (W ) to the desired item.
!□ CHANNEL ERASE/ADD
I □ CHANNEL CAPTION/LOGO
¡□FAVORITE CHANNEL
in DIRECTION :N HIGH
¡□DIRECT PLAY
¡□TV INPUT: OFF
I □ CABLE; ON
¡□AUTO PROGRAM
I □ CUSTOMIZED POINTER
iG LANGUAGE : ENGLISH
¡□G)
Use (i) RETURN® Exit
(continued)
Getting Started ^ 3
Page 14
3 Click the joystick to display the selected
menu.
¡¡CHANNEL ERASE/ADD
^CHANNEL CAPTIONfl.OGO
I FAVORITE CHANNEL
1 DIRECTION :N HIGH
a DIRECT PLAY
I TV INPUT: OFF
a CABLE : ON
a AUTO PROGRAM
I CUSTOMIZED POINTER
8 LANGUAGE: ENGLISH
IZ)
Use RETURN® Exit @
Step 4: Setting up the TV automatically
(AUTO SET UP)
Press the joystick up or down to select the item, then click the joystick to go to the next menu.
23
assrn □■test oeBT
niNBC
□ yk
□ S DO OHM □ e
□ #
ogvc □—«-DCS □ o
□ B
ODD □
a ON
Use 0 -9 to select
the channel. Then select
the LOGO or CAPTION.
Um*RETUFIN® Bdt HS
□ ^
□ ca
For further operatiorrs, you can select the item by
pressing the joystick in any of eight directions that vary
according to the selected menu. Then click the joystick
to store the setting.
To erase the main menu
Press MENU. The original screen is displayed.
To return to the previous menu
Press the joystick up, down, right or left to move the
cursor (W) to T3 of each menu, and click the joystick.
Note
• You can select one of various kinds of cursors (page 39).
For the customers who connect a cable box, skip this
step and proceed to "Selecting the cable box output
channel (TV INPUT)" (page 18).
You can set up your TV easily by using AUTO SET UP
feature. It changes the on-screen menu language and
presets all the receivable channels automatically. To set
up the TV manually, see "Changing the menu
language" (page 17) "Setting cable TV on or off" (page
16) and "Presetting channels" (page 17).
If the TV is set to a video input, you cannot execute
AUTO SET UP. Press TV/VIDEO so that a channel
number appears.
The touch keys on the Monitor unit illuminate if the
sensor of the Monitor rmit detects you. You caimot
control the keys which do not illuminate with the
exception of the POWER switch.
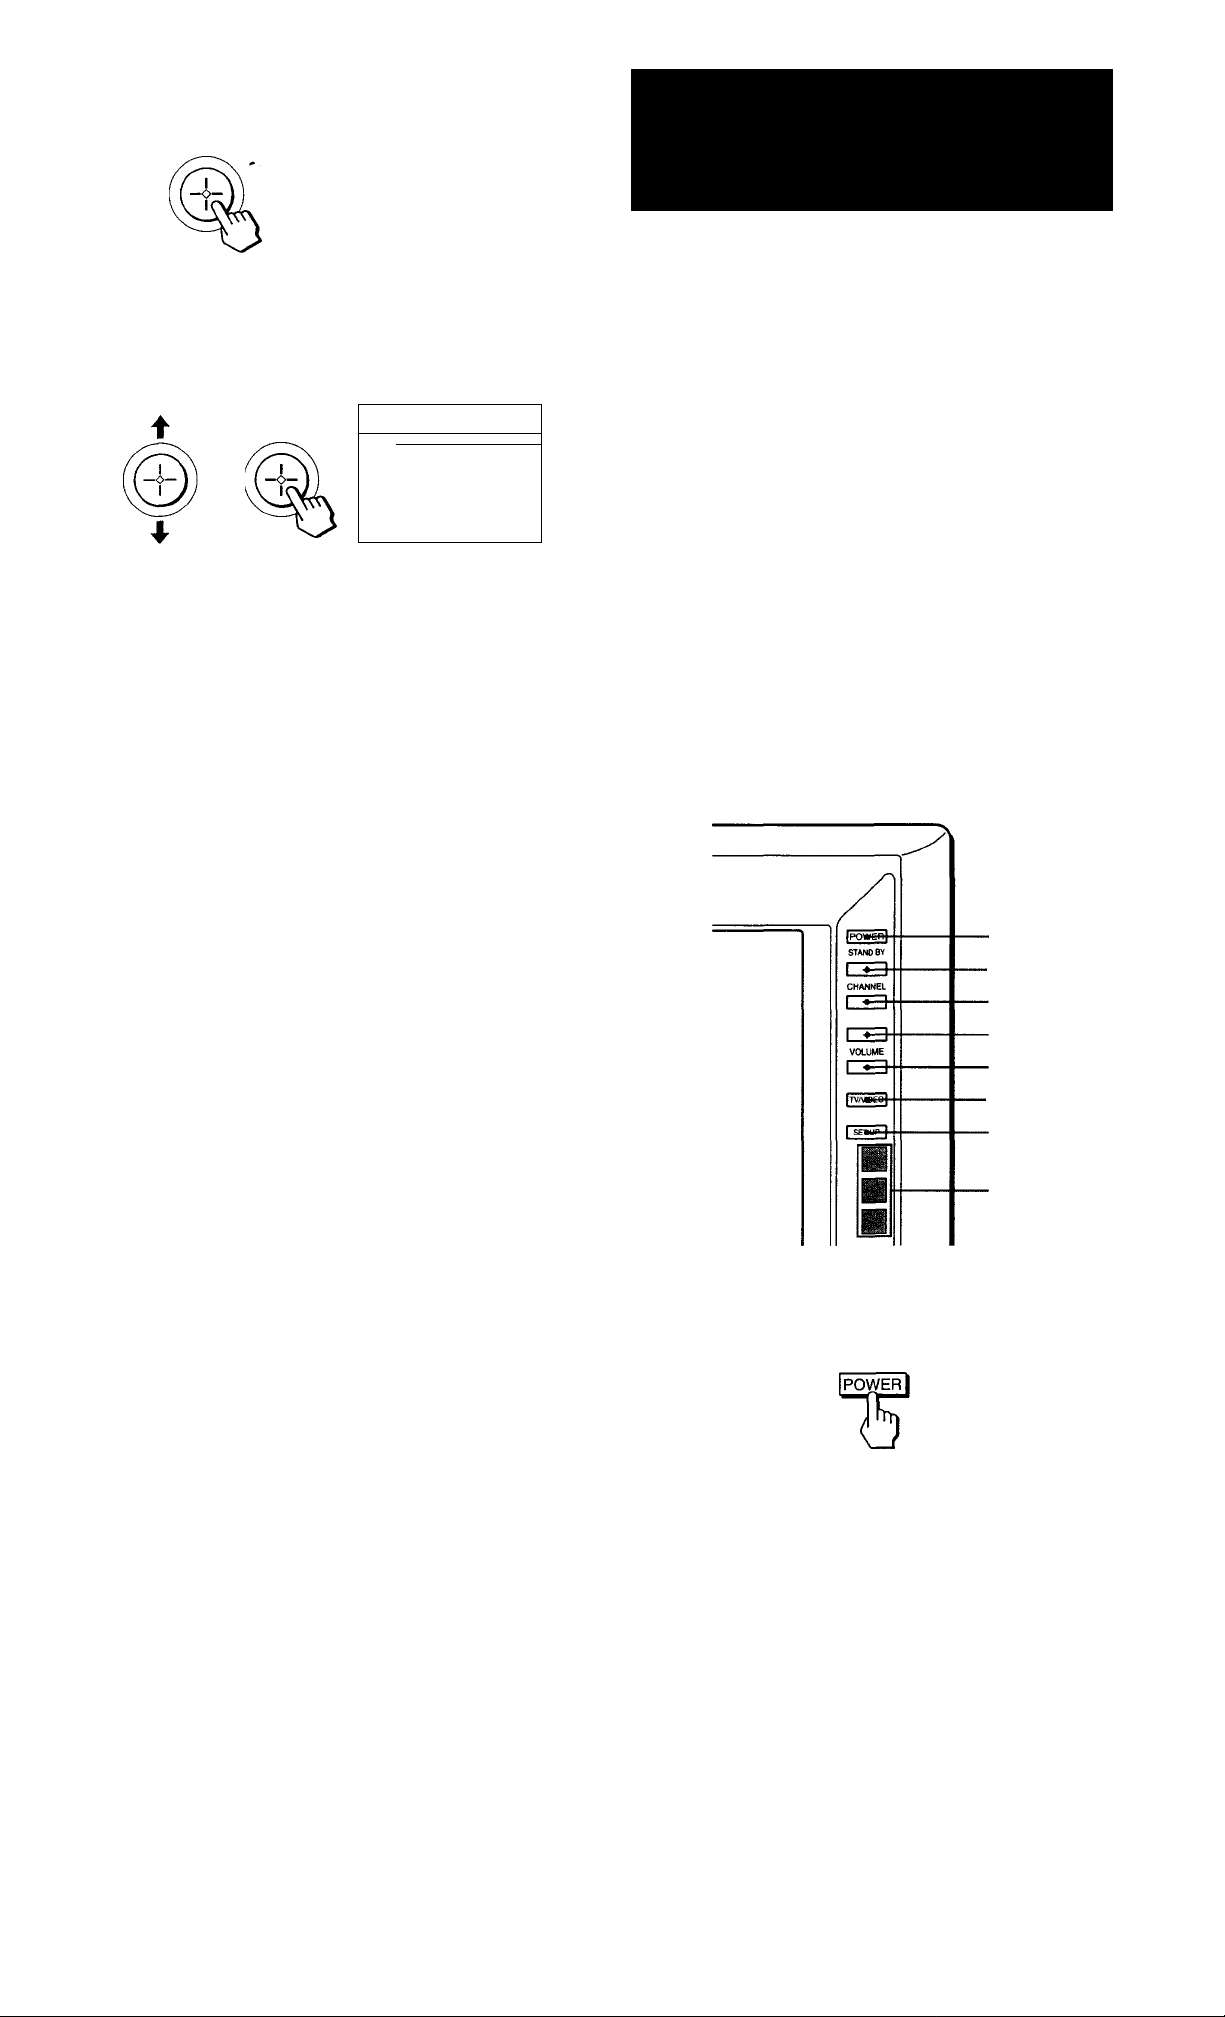
(Front of Monitor unit)
POWER
• CHANNEL+
14
CHANNELVOLUME+
VOLUME-
■ TV/VIDEO
SET UP
Sensor
1 Press POWER to turn the TV on.
Getting Started
Page 15
2 Press SET UP on the front of the TV.
Erasing or adding channels
AUTO SET UP : IciTVI
AUTO AJUSTES : ICH-[
X
RÉGLAGE AUTO:
DEMO;
Press 1 SETUP 1 lo Exit
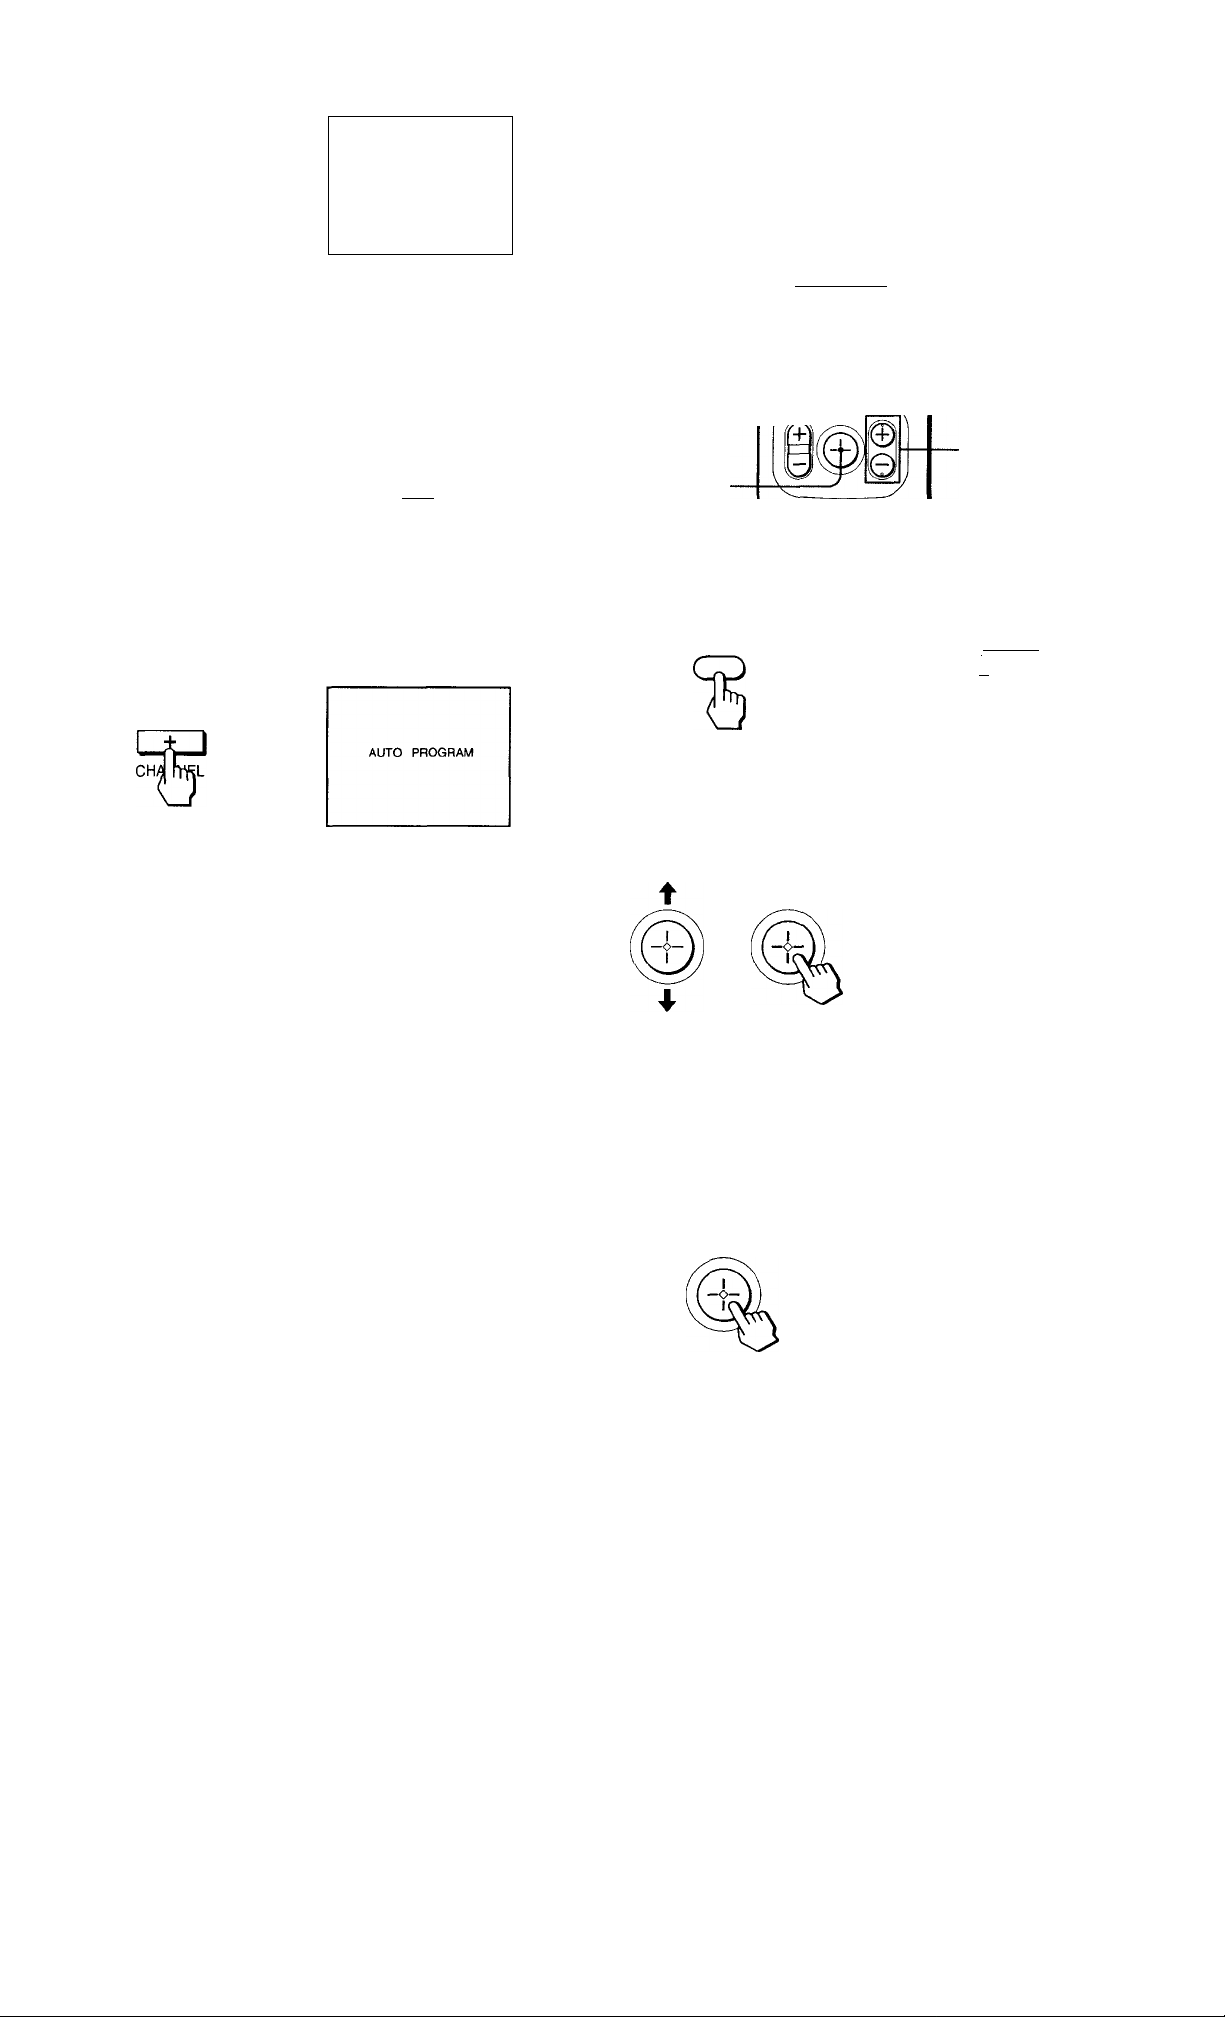
3 Press CHANNEL+.
If you prefer Spanish or French to English, you can
change the on-screen menu language. Press
CHANNEL- for Spanish or VOLUME-)- for French.
CONTINUE TO
AUTO PROGRAM-’
YES
CH^L
NO ;
MU
[cPrn
All of the menus will be set to the factory preset
condition in the selected language.
4 Press CHANNEL+.
ItolV]
After AUTO SET UP you can erase unnecessary
channels or add the channels you want. Preset
channels during the day rather than late at night, when
some channels may not be broadcasting.
CD Q CD
© © ©
® © ©
-0-9 buttons
© © ®
qMJo
MENU
CH+/-
Joystick
1 Press MENU.
The main menu appears.
■ □MODE: STANDARD
MENU
I □ PICTURE
IDHUE ................
I □ BRIGHT —»«■—««
Igtrinitoneihigh
Id NR: OFF
I □ DYNAMIC PICTURE : OFF
I □ COLOR CORRECTION: OFF
¡□Z) Q RESET
Use $ RETURNS) Exit S
"AUTO PROGRAM" appears on the screen and the
TV starts scanning and presetting channels
automatically. When all the receivable channels are
stored, "AUTO PROGRAM" disappears and the
lowest numbered channel is displayed. If the TV
receives cable TV channels, CABLE is set to ON
automatically.
Notes
• If more than 90 seconds elapse after you press a button, the
menu disappears automatically.
• In case of using the AUX connector, press the TV/VIDEO
button on the remote commander first so that "AUX" is
displayed beside the channel number on the screen. Then
follow steps 2 to 4 above to perform AUTO SET UP.
To preview the main functions (DEMO)
Press VOLUME- in step 2. The functions and menus
are displayed one by one.
Press the joystick up or down to move the
cursor (b) to SET UP and click the joystick.
The SET UP menu appears.
1 CHANNEL ERASE/ADD
^CHANNEL CAPTION/LOGO
I FAVORITE CHANNEL
I DIRECTION :N HIGH
I DIRECT PLAY
I TV INPUT; OFF
I CABLE: ON
a AUTO PROGRAM
i CUSTOMIZED POINTER
I LANGUAGE; ENGLISH
iZ)
Use (f) RETURN® Exilic
Make sure the cursor (W) is beside CHANNEL ERASE/ADD and click the joystick.
If the cursor is not beside CHANNEL ERASE /
ADD, press the joystick up or down to move the
cursor and click the joystick.
The CH ERASE/ADD menu appears.
n ERASE
:#^DD
□ Z)
Select the channel.
Use (j) RETURN® Exil S
(continued)
Getting Started I 15
Page 16

Erase or add the channel you want:
(1) Press the joystick up or down to select ERASE or
ADD.
(2) Press CH +/- or 0-9 buttons to select the
channel you want to erase or add.
Selected channel number
Setting cable TV on or off
If you have connected the TV to a cable TV system, set
CABLE to ON, the factory setting. If not, set CABLE to
OFF. You do not have to do this procedure if you
execute AUTO SET UP (page 14). Do this procedure
only when you want to set it manually.
© 0 ©
© 0 ©
© 0 d
^ ENTEr.
® O
(3) Click the joystick.
• If you select ERASE in step (1), appears
beside the channel number, showing that the
channel is erased from the preset memory.
• If you select ADD in step (1), "+" appears
beside the channel number, showing that the
channel is added to the preset memory.
5 To erase and/or add other channels, repeat
step 4.
6 When you finish, press MENU.
MENU
Notes
• If you erase or add a VHP or UHF channel, the cable TV
channel with the same number is also erased or added.
• If more than 90 seconds elapse after you press a button, the
menu disappears automatically.
• Erasing and adding channels is also available for the AUX
input.
1 Press MENU. 2 Press the joystick up or down to move the
cursor (W) to SET UP and click the joystick.
3 Press the joystick up or down to move the
cursor (W) to CABLE and click the joystick.
I CABLE BION
Use ({) RETURN® Exit ®
4 Press the joystick up or down to select ON
or OFF and click the joystick.
B CHANNEL ERASE/AOD
B CHANNEL CAPT10NA.0G0
B FAVORITE CHANNEL
B DIRECTION :N HIGH
I DIRECT PLAY
17V INPUT: OFF
CABLE: OFF
AUTO PROGRAM
t
I CUSTOMIZED POINTER
9 LANGUAGE : ENGLISH
iZ)
Use (♦) RETURN® Exit
5 Press MENU to return to the original screen.
Note
• If CABLE appears in grey, the TV is set to a video input and
you cannot select CABLE. Press TV/VIDEO on the remote
commander so that a channel number appears.
16
Getting Started
Page 17

I
Presetting channels
You can preset TV channels easily by AUTO
PROGRAM feature. You do not have to do this
procedure if you execute AUTO SET UP (page 14). Do
this procedure only when you want to set it manually.
Press MENU.
2 Press the joystick up or down to move the
cursor (W) to SET UP and click the Joystick.
Ira CHANNEL ERASE/ADD
il^HANNEL CAPTION/LOGO
1 FAVORITE CHANNEL
i DIRECTION : N HIGH
i DIRECT PLAY
I TV INPUT; OFF
I CABLE: ON
I AUTO PROGRAM
¡CUSTOMIZED POINTER
i LANGUAGE : ENGLISH
IZ3
Use (f) RETURN® Exit®)
3 Press the joystick up or down to move the
cursor (k) to AUTO PROGRAM and click the
joystick.
Changing the menu language
If you prefer Spanish or French to English, you can
change the menu language. You do not have to do this
procedure if you execute AUTO SET UP (page 14). Do
this procedure only when you want to set it manually.
1 Press MENU.
2 Press the joystick up or down to move the
cursor (b) to SET UP and click the joystick.
3 Press the joystick up or down to move the
cursor (W) to LANGUAGE and click the
joystick.
^ENGLISH
I LANGUAGE
Press the joystick up or down to select the
language and click the joystick.
The menu in the selected language appears.
l%:SPAÑOL
^FRANÇAIS
Use ($ RETURN® Exit (S
"AUTO PROGRAM" appears on the screen and the
TV starts scarming and presetting channels
automatically. When all the receivable channels are
stored, "AUTO PROGRAM" disappears and the
lowest numbered channel is displayed.
4 Press MENU to return to the original screen.
Notes
• If AUTO PROGRAM appears in grey in the SET UP menu, the
TV is set to a video input and you cannot select AUTO
PROGRAM. Press TV/VIDEO on the remote commander so
that a channel number appears.
• If more than 90 seconds elapse after you press a button, the
menu disappears automatically.
• Presetting charmels is also available for the AUX input.
I BORRAR/AÑADIR CANAL
§ NOMBRE DEL CANAL
i CANAL FAVORITO
i DIRECTION :N HIGH
i ENCENDIDO DIRECTO
B TV INPUT : NO
a CABLE : SI
8 AUTO PROGRAMACION
B INDICADOR ESPECIAL
I m LENGUAJE : ESPAÑOL
Usarli) RETURN® Salir®
^
5 Press MENU to return to the original screen.
Note
• Even when you select Spanish or French language, certain
parts of the menus remain in English.
Getting Started '] y
Page 18

Selecting the cable box output channel
(TV INPUT)
If you connect a cable box , you can select the cable box
output channel on your TV. It is recommended that
you set up your TV as follows when you connect a
cable box.
-MENU
-Joystick
I
Notes
• If you set TV INPUT to the option other than OFF, you cannot
use the favorite channel and CH INDEX features.
• If you set TV INPUT to VIDEO 1 INPUT mode, you cannot
select TV INPUT again. Press the TV/VIDEO button to select
and return to TV INPUT mode. If you are unable to return to
the TV INPUT mode by using the TV/VIDEO button, select TV
OUT in "Using the INPUT/OUTPUT STATUS menu" on page
29, and enter NO.
Press MENU.
2 Press the joystick up or down to select SET
UP and click the joystick.
Press the joystick up or down to select TV
INPUT and click the joystick.
The cable box output charmel options are
displayed.
6
VIDE01
AUX2
AUX3
AUX4
_ AUX5
0AUX6
Press the joystick up or down to select the
cable box output channel and click the
joystick.
a CHANNEL ERASE/ADD
O CHANNEL CAPTION/LOGO
□ FAVORITE CHANNEL
□ DIRECTION :N HIGH
□ DIRECT PLAY
R| TV INPUT : 2
CABLE: ON
□ AUTO PROGRAM
□ CUSTOMIZED POINTER
□ LANGUAGE : ENGLISH
□ ZD
Use (t) RETURN® Exit (u^D
__
You can select the cable output channel among 2-6
channels, VIDEO 1 and AUX 2-6 channels.
18
Getting Started
Page 19

Operations
Watching the TV
I
3 Select the channel you want to watch:
To select a channel directly
Press the 0-9 buttons.
Por example, to select channel 10, press 1 and 0.
© ® ©
0 © ©
MUTING ■
SLEEP .
TV/VIDEO .
CDOl
?
O (DO®
GDC3CDOCI3
CD <Z3
OCDC^
^ O CS-
0" ® (3)
© © ©
© © ©
• TV POWER
■ TV FUNCTION
•JUMP
■ 0-9 buttons
ô^fü
VOL +/- ■
te
ip
©
s
0
-----
CH +/-
/
Press TV FUNCTION on the remote commander.
The red indicator flashes once on the remote
commander, indicating that the buttons function
for the TV.
TV
© © d
ENTEr,
© o
To scan through channels
Press CH +/- until the channel you want to watch
appears.
4 Press VOL +/- to adjust the volume.
Switching quickly between two
channels
You can use the JUMP button to switch or "jump" back
and forth between two charmels.
2 Press TV POWER to turn on the TV.
The POWER indicator lights on the TV.
-POWER-
If any of "VIDEOl to VIDEOS" appears on the
screen, press the TV /VIDEO button until a channel
number appears.
Press JUMP.
JUMP
Pressing JUMP again switches back the channel.
Note
• You cannot jump to channels you scanned through using the
CH -(-/-buttons.
Operations I 19
Page 20

Muting the sound
Setting the Sleep Timer
Press MUTING.
"MUTING" appears on the screen.
MUTING
To restore the sound, press MUTING again, or press
VOL +.
Displaying on-screen information
1 Press DISPLAY.
Channel number, the current time (if set), charmel
caption or logo (if set), and MTS mode (if SAP is
selected) are displayed. SAP indication disappears
after 4 seconds.
Press DISPLAY again.
XDS (Extended Data Service) is turned on. If the
station provides this service, program information,
program type and program length are displayed.
DISPLAY
DISPLAY
The TV stays on for the length of time you specify and
then shuts off automatically.
Press SLEEP repeatedly until the time (in minutes) you want appears.
Each time you press SLEEP, the time changes as
follows: 30 —► 60 —90 —OFF.
SLEEP
"SLEEP" appears about one minute before the TV shuts
off.
To cancel the Sleep Timer, press SLEEP repeatedly
imtil "SLEEP OFF" appears, or turn off the TV.
Watching a video input picture
Press TVA/IDEO repeatedly until the desired video input appears.
Each time you press TV /VIDEO, the display changes
as follows: TV VIDEO 1 -> VIDEO 2 VIDEO 3
-► VIDEO 4 VIDEO 5.
Press DISPLAY again.
Caption Vision (if set) is displayed.
DISPLAY
To cancel the display, press DISPLAY again.
Freezing the picture
You can freeze the picture.
Press FREEZE. freeze
This feature is useful when you want to write down a
recipe from a cooking program, a displayed address or
phone number or the like.
To restore the normal screen, press PIP OFF.
Note
• This feature is also available for PIP/P&P mode. See page 22.
20 Operations
TVA/IDEO
To return to TV picture, press TV/VIDEO until a
channel number appears.
Changing the VHF/UHF input to the
AUX input
Press ANT/AUX.
"AUX" appears beside the channel number.
ANT/AUX
Pressing ANT/ AUX again switches back to the
previous input.
Page 21

Watching two
programs at one
time — PIP/P&P
(Twin ViewTM)
You can watch both the main/right picture and a
window/left picture simultaneously using the Picturein-Picture (PIP) or the Picture-and-Picture (Twin
■a
■3
■ PIP CH +/-
■ PIP TV/VIDEO
-POSITION
Displaying a left picture (P&P)
input-source mode
Press 3-
To restore the normal picture, press PIP OFF.
Notes
• If the main/right picture is not receiving an image, the
window/left picture may become a noisy picture.
• The window/left picture sound is also output from the
AUDIO (VAR/FIX) OUT jacks when you listen to it.
or TV channel for
the left picture
Changing the window/left picture
input mode
Displaying a window picture (PIP)
Press Q.
Press repeatedly to display a smaller window picture.
Each time you press Q, the size of the window picture
changes as follows; 1/4 size —►1/9 size —► 1 /16 size.
To remove the window picture, press PIP OFF.
Input-source mode or TV
channel for the main
Input-source mode or TV
channel for the window picture
Press PIP TV/VIDEO to select the input mode.
Each time you press PIP TV/VIDEO, "TV," "VIDEO
1," "VIDEO 2," "VIDEO 3," "VIDEO 4" and "VIDEO 5"
appear in sequence.
TVAIDEO
VIDEO 1
Changing TV channels in the window/
left picture
Press PIP CH +/-.
6 i'VIDEO 1
I»1
(S
CH CV_
7
i
j’VIDEO 1
Operations
4:^
21
Page 22

Listening to the sound of the window/
left picture
Press AUDIO.
appears for a few seconds on the window/left
picture, indicating that the window/left picture sound
is being received.
J'VIDEO 1
AUDIO
Freezing the pictures
When you display the normal picture or the right and
left pictures, you can freeze them. You can freeze both
the right and left pictures.
This feature is also available for the main picture.
This feature is useful when you want to write down a
recipe from a cooking program, a displayed address or
phone number or the like.
To restore the main/right picture sound, press AUDIO
again.
Changing the position of the window
picture
Press POSITION.
Each time you press POSITION, the window picture
will move as illustrated.
POSITION
Note
• POSITION is not a P&P feature.
Press FREEZE.
8 J'VIDEO 1
FREEZE
To restore the normal screen, press PIP OFF.
Watching eight TV channels at one
time (CH INDEX)
You can display all the preset channels in sequence.
Press H.
A main picture and seven window pictures are
displayed.
Each time you press ^ or PIP CH+/-, the next seven
sequential channels appear.
Swapping the main/right and window/
left pictures
Press SWAP.
Each time you press SWAP, the images and sound
from the main/right and window/left pictures switch
places.
VIDEO 1 J' 6
SWAP
1
6 J'VIDEO 1
'4-
22 Operations
To return to the normal picture, press PIP OFF.
Notes
• The channels being received through the AUX jack cannot be
displayed as a window/left picture.
• If you set TV INPUT to the option other than OFF, you cannot
use the CH INDEX feature.
Page 23

Using the VIDEO
menu
Adjusting the picture (VIDEO)
When watching TV programs, you can adjust picture,
hue, color, brightness and sharpness to suit your taste.
The adjusted level is stored in PROGRAM PALETTE.
CD CD CD
© (D ©
© ® ©
© ® ®
o ® O
I
(2) Click the joystick.
BRIGHTNESS
4 Adjust the selected item:
(1) Press the joystick up, down, right or left to
adjust the item.
(2) Click the joystick.
The new setting appears in the VIDEO menu,
and is stored in the displayed PROGRAM
PALETTE mode.
1
Press MENU.
2
Make sure the cursor is beside VIDEO and click the joystick.
If the cursor is not beside VIDEO, press the joystick
up or down to move the cursor.
The VIDEO adjustment menu appears.
3 MODE : STANDARD
I rp PICTURE
|l#,HUE
I ^ COLOR
3 BRIGHT
a TRINITONE : HIGH
i NR:OFF
10 DYNAMIC PICTURE ; OFF
3 COLOR CORRECTION: OFF
3ID PRESET
Use (r) RETURN® Exit ^
3 Select the item you want to adjust.
For example:
(1) To adjust brightness, press the joystick up or
down to select BRIGHT.
I MODE;STANDARD
10 PICTURE
3 HUE N»»««.1««.».-«
S COLOR ■■■«•.»«»».
I «BRIGHT ■■»••iN.nn..
¡[•SHARP
^•3 TRINITONE : HIGH
NR : OFF
i DYNAMIC PICTURE : ON
So COLOR CORRECTION: ON
ii]Z> PRESET
Use (♦) RETURN® Exit (SS)
I MODE:STANDARD
I PICTURE
3HUE
I^BRIGHT —
|bTRINITONE:HIGH
S NR:OFF
la DYNAMIC PICTURE : OFF
1 COLOR CORRECTION: OFF
B ID a RESET
Use (j) RETURN ©Exit®)
For details on each item, see "Description of
adjustable items" below.
5 To adjust other items, repeat steps 3 and 4.
Description of adjustable items
Item
PICTURE
HUE
COLOR
BRIGHT
SHARP
Press the joystick
down or left to
Decrease picture
contrast for soft color.
Make overall picture
purplish.
Decrease color
intensity.
Darken the picture.
Soften the picture.
To restore the factory setting
While the VIDEO menu is displayed, press the joystick
up, down, right or left to select RESET and click the
joystick.
The Trinitone, NR, dynamic picture and color
correction are also reset to the factory settings.
Press the joystick
up or right to
Increase picture
contrast for vivid
color.
Make overall picture
greenish.
Increase color
intensity.
Brighten the picture.
Sharpen the picture.
Operations 23
Page 24

Adjusting the color temperature
(TRINITONE)
The TRINITONE feature controls the color
temperature, permitting white balance preference
adjustment without affecting skin tones.
1 Press MENU.
Reducing picture noise (NR)
You can reduce picture noise when NR is set to ON.
1 Press MENU.
2 Press the joystick up or down to select
VIDEO and click the joystick.
2 Press the joystick up or down to select
VIDEO and click the joystick.
3 Press the joystick up or down to select
TRINITONE and click the joystick.
■ TRINITONE BHiGH
___________
[•MEDIUM
ONTSC STD
Use (j) RETURN® Exit ^
4 Press the joystick up or down to select
HIGH, MEDIUM or NTSC STD and click the
joystick.
I MODE; STANDARD
|S PfCTURE
■ HUE
a COLOR
I BRIGHT
I SHARP
IB TRINITONE : MEDIUM
|^R:OFF
IH DYNAMIC PICTURE : OFF
I a COLOR CORRECTION: OFF
ID a RESET
Use ^ RETURN® Exit
3 Press the joystick up or down to select NR
and click the joystick.
I NR aoN
^FF
Use (f) RETURN® Exil 5
4 Press the joystick up or down to select ON
and click the joystick.
I a MODE: STANDARD
a PICTURE
■ HUE
a COLOR
■ BRIGHT
a SHARP
3 TRINITONE; HIGH
|BNR:ON
I «DYNAMIC PICTURE : OFF
1 COLOR CORRECTION: OFF
a D a RESET
Use $ RETURN® Exit @9
Choose
HIGH
MEDIUM
NTSC STD
24 Operations
To
Make the white color bluish.
Make the white color whitish.
Make the white color reddish.
Page 25

Enhancing the picture contrast
(DYNAMIC PICTURE)
Correcting the color (COLOR
CORRECTION)
The DYNAMIC PICTURE feature enhances the
contrast of the picture, providing a dynamic image.
1 Press MENU.
2 Press the joystick up or down to select
VIDEO and click the joystick.
3 Press the joystick up or down to select
DYNAMIC PICTURE and click the joystick.
I DYNAMIC PICTURE SON
Use RETURN® Exit (Mei
aOFFI^F
4 Press the joystick up or down to select ON
and click the joystick.
I MODE: STANDARD
I PICTURE
i HUE
IB BRIGHT —H-w—
ITRINITONE : MEDIUM
I NR: OFF
B DYNAMIC PICTURE : ON
BCOLOR CORRECTION: OFF
ID m RESET
Use (f) RETURN® Exit @!)
The COLOR CORRECTION feature emphasizes red
and blue to make skin tones vivid.
1 Press MENU.
2 Press the joystick up or down to select
VIDEO and click the joystick.
3 Press the joystick up or down to select
COLOR CORRECTION and click the joystick.
I COLOR CORRECTIONgON
Use $ RETURN® Exit
Press the joystick up or down to select ON
and click the joystick.
I MODE:STANDARD
i PICTURE
is HUE
¡COLOR
¡BRIGHT
i SHARP
BTRINITONE: MEDIUM
i NR; OFF
B DYNAMIC PICTURE : OFF
iH COLOR CORRECTION: ON
B RESET
ImD
Use RETURN® Exit ^
rSOFF
Operations I 25
Page 26

Using the AUDIO
menu
4 Adjust the selected item:
(1) Press the joystick up, down, right or left to
adjust the item.
Adjusting the sound (AUDIO)
You can adjust the treble, bass and balance to suit your
taste. You can adjust the sound of video input(s) as
well.
CD o o
© ® @
© ® ©
© © ©
Q ® O
cs-
m
-MENU
. Joystick
1 Press MENU. 2 Press the joystick up or down to select
AUDIO and click the joystick.
I n TREBLE mm'»»
1%3Ass
BALANCE
B MTS : MAIN
mSPEAKER : ON
m- m-- ■ ■
ii 3 O RESET
Use $ RETURN® Exit IP
3 Select the item you want to adjust.
For example:
(1) To adjust bass, press the joystick up or down, to
select BASS.
(2) Click the joystick.
The new setting appears in the AUDIO menu.
n SPEAKER; ON
□
O
IJZ) PRESET
Use (f) RETURN® Exit S
For details on each item, see "Description of
adjustable items" below.
5 To adjust other items, repeat steps 3 and 4
above.
Description of adjustable items
Item
TREBLE
BASS
BALANCE
To restore the factory settings
While the AUDIO menu is displayed, press the joystick
up, down, right or left to select RESET and then click
the joystick. All the settings in the AUDIO menu are
reset to the factory settings.
Press the joystick
down or left to
Decrease the treble
response. response.
Decrease the bass Increase the bass
response.
Emphasize the left
speaker's volume.
Press the joystick
up or right to
Increase the treble
response.
Emphasize the right
speaker's volume.
(2) Click the joystick.
26 Operations
@ TREBLE wmm"»
n BASS mm«»
%3ALANCE I"'
m MTS ; MAIN
mSPEAKER: ON
a .. ■
m ■ ^ :
0 Z) m RESET
Use (:) RETURN® Exit 5
Page 27

Selecting stereo or bilingual programs
(MTS)
The Multichannel TV Sound (MTS) feature gives you
the choice to enjoy stereo sound or Second Audio
Programs (SAP) vs^hen available. The initial setting is
stereo sound (MAIN).
1 Press MENU.
2 Press the joystick up or down to select
AUDIO and click the joystick.
Setting the speaker switch (SPEAKER)
You may switch off the TV speakers when, for
example, you want to listen to the sound through a
stereo system.
If you connect the Sony SA-VA series speaker system
to the AUDIO (FIX) OUT jacks, you can take advantage
of the speakers' surround sound and super woofer
mode. After making the connections (page 11), set
SPEAKER to VA SPEAKER, then adjust SURROUND
MODE or SUPER WOOFER MODE.
3 Press the joystick up or down to select MTS
and click the joystick.
RIMAtN
[^AP
□MONO
Use<f) RETURN®Exits
4 Press the joystick up or down to select
MAIN, SAP or MONO and click the joystick.
Choose
MAIN
SAP
MONO
Note
• Stereo and SAP sounds are subject to program sources.
To
Listen to stereo sound.
The STEREO indicator on the feature box
lights up while a stereo broadcast is
received.
Listen to bilingual programs.
The sound of non-SAP programs wiU be
muted when SAP is selected.
Reduce noise during stereo broadcasts.
1 Press MENU.
2 Press the joystick up or down to select
AUDIO and click the joystick.
3 Press the joystick up or down to select
SPEAKER and click the joystick.
WBsm
B
B§B SPEAKER BION
IH use $ RETURN(SExia
«nm
i
W>FF
MV A SPEAKER
4 Press the joystick up or down to select ON,
OFF or VA SPEAKER and click the joystick.
TREBLE
^■mbass
BALANCE
BMraMT.q-MAiN
[^SPEAKER: OFF
ra|BZ) B RESET
Use (|) RETURN® Exit @)
Choose To
ON
OFF
VA SPEAKER
Listen to the sound from the TV.
Turn off the TV speaker sound and
listen to the TV's sound solely through
the audio system speakers.
Turn off the TV speaker sound and
listen to the TV's sound through the
Sony SA-VA series speaker system.
You can adjust volume, muting,
surround mode and super woofer mode
with the remote commander supplied
with the TV.
(continued)
Operations I 27
Page 28

To select surround sound or super
woofer mode (if you select VA
SPEAKER)
If you have the Sony SA-VA speaker system with an
operation capability for KV-32XBR100, you can adjust
the volume, muting and surround mode on your SA
VA speakers by using the remote commander supplied
with your TV.
After step 4, follow the procedure below.
1 Press the joystick up or down to select
SURROUND MODE or SUPER WOOFER MODE
and click the joystick.
t
I MTSMAIN
III SPEAKER ; VA SPEAKER
Ibi SURROUND mode
I ibSUPER WOOFER MODE
|ar> B RESET
Use 0 RETURN® Exit IS
Z Click the joystick repeatedly to select the
surround or super woofer mode option.
For details on each option, refer to the operating
instructions of the speaker system.
Using the PROGRAM
PALETTE menu
Selecting picture effect (PROGRAM
PALETTE)
You can select one of five settings for picture effect that
best suits the program. You can also adjust the picture
for each setting to suit your taste.
■MENU
- Joystick
Note
• This feature is only for Sony SA-VA speakers with an
operation system capability for KV-32XBR100.
1
2
Press the joystick up or down to select PROG PALETTE and click the joystick.
t
Select the item you want.
For example:
(1) To select MOVIE, press the joystick up or down
to move the cursor to MOVIE.
(2) Click the joystick.
STANDARD
lrasi
lOViE
|[%M<
Ibsf
SPORTS
NEWS
GAME
D
Use ({> RETURN® Exit IS
i STANDARD
!l MOVIE
bSPORTS
I NEWS
I GAME
Use $ RETURN® Exit ®
28 Operations
Page 29

For details on each item, see "Effect of picture
settings" below.
Using the INPUT/
Effect of picture settings
Item Picture effect
STANDARD
Standard
MOVIE Finely detailed picture
SPORTS
NEWS
Vivid, bright picture
Reduced noise in picture
GAME Softer picture
Adjusting the picture in PROGRAM
PALETTE
1 Press MENU.
2 Press the joystick up or down to select
VIDEO and click the joystick.
I MODE ; STANDARD
I m PICTURE
¡»HUE
H COLOR
1 BRIGHT ■■■»•"<»••«•
I @ SHARP
TBINITONE : HIGH
i NR ; OFF
I DYNAMIC PICTURE ; OFF
i COLOR CORRECTION: OFF
ID S3 RESET
Use (♦) RETURN® Exit
3 Press the joystick up or down to select
MODE and click the joystick.
ra STANDARD
[%MOVIE
O SPORTS
0NEWS
□ GAME
OUTPUT STATUS
menu
Selecting an output signal (INPUT/
OUTPUT STATUS)
You can select an output signal from the SELECT OUT
jacks at the rear of the Feature box.
TV/VIDEO
1 Press MENU.
2 Press the joystick up or down to select
INPUT/OUTPUT STATUS and click the joystick.
-S) CD CO
© © ©
© © ©
© ® ©
Q © o
MENU
Joystick
Use (*) RETURN® Exit 5
Press the joystick up or down to select the
item you want to adjust and click the
joystick.
I Bt MODE: MOVIE
1[%^ICTURE
□ HUE
dn COLOR aiM
]□ BRIGHT ...................
yn SHARP
HDTRINITONE : HIGH
an NR : OFF
]□ DYNAMIC PICTURE : OFF
SjO COLOR CORRECTION; OFF
iaZ) PRESET
....
......
......................
Use (j) RETURN® Exit I®
.
5 Adjust the picture according to the steps 3
to 5 in "Adjusting the picture" on page 23.
To restore the factory setting
While the VIDEO menu is displayed, press the joystick
up, down, right or left to select RESET and click the
joystick.
I ©VIDEO LABEL ©D
Use (|) RETURN® Exit ®
3 Select MONITOR OUT, EDIT OUT or TV OUT.
Select To
MONITOR OUT Output the signal of the picture
displayed on the TV screen.
Use this option to edit tapes while
monitoring.
EDIT OUT Output the signal input to the TV
regardless of the displayed picture on
the screen.
Use this option to edit tapes while
watching an input image different
from that being recorded.
TV OUT Output the TV signal.
Use this option when you connect an
AV receiver to the VIDEO 1 IN jacks.
(continued)
Operations I 29
Page 30

To select MONITOR OUT:
(1) Make sure the cursor is beside MONITOR OUT
and click the joystick.
(2) Press TV/VIDEO to select the input to the TV
and click the joystick.
Setting video labels (VIDEO LABEL)
This feature allows you to label each input mode so
that you can easily identify the connected equipment.
For example, you can label VIDEO 2 IN as VHS.
TV/VIDEO
To select EDIT OUT:
(1) Press the joystick up or down to select EDIT
OUT and click the joystick.
(2) Press the joystick up or down to select the input
to be edited and click the joystick.
S VIDEO LABEL 9 ZD
Use $ RETURN®Exit®
To select TV OUT:
(1) Press the joystick up or down to select TV OUT
and click the joystick.
"Set up using only VIDEOl input?" appears.
1 Press MENU.
2 Press the joystick up or down to select
INPUT/OUTPUT STATUS and click the Joystick.
3 Press the joystick up, down, right or left to
select VIDEO LABEL and click the joystick.
_
VIDEO VHS
VIDEO 3. ftmm
VIDEO 4 I BETA
VIDEO Sl
Use (f) RETURN® Exit ®
Press the joystick up or down to select the
input mode you want to label and click the
joystick.
V^O 1 1
LD
S VIDEO
Hi-8
AVRfCEIVFF
DSS
f“ ’sour
Set up using
only V1DE01
input?
RIYES
Hdv
l%NO
Use (♦) RETURN® Exit
(2) If you cormect only an AV receiver to your TV,
press the joystick up or down to select YES.
Then click the joystick. You can always select
the signal from the receiver by pressing TV/
VIDEO once.
If you connect your audio/video equipment to
the TV, select NO. You can select any of the
VIDEO 1 to VIDEO 5 inputs with the TV/
VIDEO button.
Note
• When you set INPUT/OUTPUT STATUS to TV OUT, you
cannot swap the main/right and window/left pictures.
I
5 Press the joystick up or down to select the
label and click the joystick.
Repeat steps 4 and 5 to label other input modes.
Note
• If more than 90 seconds elapse after you press a button, the
menu disappears automatically.
30 Operations
Page 31

Using the TIMER
menu
4 Make sure the cursor is beside MANUAL,
and click the joystick.
If the cursor is not beside MANUAL, press the
joystick right or left to move the cursor.
Setting the clock manually (CURRENT
TIME—MANUAL)
Setting the clock enables you to turn the TV on and off
with the timer, or to block a TV channel from being
watched at a certain time.
-MENU
-Joystick
2 Press the joystick up or down to select
TIMER and click the joystick.
t
5 Set the current time.
(1) Press the joystick up or down to select time
display and click the joystick. The item to be set
is highlighted.
(2) Press the joystick up or down to set the day and
click the joystick.
f
(3) Set the hour and nrinute in the same way as in
step (2). When you click the joystick after
setting the minute, the clock starts.
■ MANUAL DAUTO
□ PS TIME : YES
■ FmON №rioPilAI I
Set the time.
Use 4 RETURN® Exit®
D RESET
3 Make sure the cursor (b} is beside CURRENT
TIME, and click the joystick.
If the cursor is not beside CURRENT TIME, press
the joystick up or down to move the cursor.
^MANUAL il AUTO
□
□ SUN - • AM
az> a RESET
Use 4* return® Exit®
6 Press the joystick up or down to select OS
(Daylight Saving) TIME, and click the
joystick.
- CU R R EN T TI M E
■ MANUAL □ AUTO
■ DS TIME ; BYES
□ MON 1:2 RINO
□ □ 1%«I0NE
Use (jl RETURN® Exit ®
Operations I 31
(continued)
Page 32

I
7 Press the joystick up or down to select YES,
NO or NONE and click the joystick.
Choose To
YES
NO
NONE
To correct the time
While the CURRENT TIME menu is displayed, press
the joystick up, down, right or left to select RESET, and
then click the joystick.
To display the current time on the TV screen
Press DISPLAY.
Notes
• If you unplug the TV or a power interruption occurs, the clock
setting will be erased. Reset the current time.
• If you connect a VCR using an RF cable, the TV may not set up
the correct current time information.
Set for daylight saving start (set after the first
Sunday in April).
Current time automatically moves one hour
ahead.
Set for daylight saving end (set after the last
Sunday in October).
Set if your area does not use daylight saving
time.
Setting the clock automatically
(CURRENT TIME—AUTO)
Some broadcasters offer XDS service in which they
transmit time signals with their broadcasts. This TV
can pick up these time signals to automatically set the
clock.
1
Press MENU.
2
Press the joystick up or down to select
TIMER and click the joystick.
Make sure the cursor (k ) is beside CURRENT
TIME, and click the joystick.
¡^MANUAL E3 AUTO
□
□ SUN --:--AM
ü Z) 0 RESET
Us«-i* RETURN ©Exit 5
Press the joystick right or left to select
AUTO and click the joystick.
The message appears.
□ MANUAL BAUTO
I When clock data
service is avail*
able, leaving the TV
off overnigt will
set the clock
I
automatically.
IJYES m
Use €• RETURN® Exit®
5 Make sure the cursor is beside YES and click
the joystick.
32 Operations
To activate the AUTO clock setting, turn the
TV off.
The time signals automatically set the time for your
time zone and adjust your daylight saving time.
When you turn the TV on for the first time
after setting AUTO clock
• If your TV picked up the time signals, the clock
display with a message appears on the screen.
• If the dock sets, but your time zone or daylight
saving time is not set correctly, you can adjust these
settings. See "Setting your daylight saving time (DS
TIME)" or "Setting your time zone (TIME ZONE)"
on the next page.
• If your TV could not pick up the signals, a message
appears. Set the dock manually (page 31).
Note
• The message will disappear after 90 seconds. You can also
erase it by pressing VOL - on the TV or on the remote
commander.
Page 33

I
Setting your daylight saving time (DS
TIME)
Make sure to set the clock before setting daylight
saving time.
1 Press MENU.
2 Press the joystick up or down to select
TIMER and click the joystick.
3 Press the joystick up or down to select DS
TIME and click the joystick.
IDS TIME I OYGS
I R)NO
I ;%<IONE
SUN 12:00 AM
Use $ RETURN® Ext! 513
4 Press the joystick up or down to select YES,
NO or NONE and click the joystick.
Setting your time zone (TIME ZONE)
If your time zone is set incorrectly by "Setting the clock
automatically" on page 32, you can set your correct
time zone manually in the following steps.
1 Press MENU.
2 Press the joystick up or down to select
TIMER and click the joystick.
3 Press the joystick up or down to select TIME
ZONE and click the joystick.
t
B
hgMTIMF ZONE
mg SUN 12:00 AM
Use (j) RETURN ® Exit E3
0PACIFIC
SMOUNTAIN
□CENTRAL
IB EASTERN
[%\TLANTIC
□ALASKA
□ HAWAII
4 Press the joystick up or down to select your
time zone and click the joystick.
I CURRENT TIME
IB DS TIME : YES
[®TIME ZONE : EASTERN
0ON/OFF TIMER
mCHANNEL BLOCK
aiD
SUN 12:00 AM
Use (;) RETURN® Exit (M|3
Choose To
YES Set for daylight saving start (set after the first
Sunday in April).
Current time automatically moves one hour
ahead.
NO Set for daylight saving end (set after the last
Sunday in October).
NONE
Set if your area does not use daylight saving
time.
I CURRENT TIME
I DS TIME : NO
I1TIME ZONE ; ATLANTIC
|L#DN/OFF TIMER
¡CHANNEL BLOCK
113
SUN 12:00 AM
Use (♦) RETURN® Exit IM)
Operations 33
Page 34

I
Setting the timer to turn the TV on and
off (ON/OFF TIMER)
You can set the TV to turn on and off at the time you
specify. Make sure the clock is set correctly. If it is not,
set the clock first (page 31).
-MENU
-Joystick
2 Press the joystick up or down to select
TIMER and click the Joystick.
(3) Press the joystick up or down to set the time
(hour then minute) that you want to turn on the
TV and click the joystick.
The i indicator appears indicating the turn-on
time.
EVERY MONDAY
1:0SPM Iffl CHO
.. iPi‘*
(4) Press the joystick up or down to set the time
duration and click the joystick.
Each time you click the joystick, the time
duration increases by one hour up to a
maximum of six hours. The bar indicator shows
how long the TV is on.
3 Press the joystick up or down to select ON/
OFF TIMER and click the joystick.
Enter the ON/OFF TIMER setting.
(1) Press the joystick up or down to select program
1 or 2 and click the joystick.
(2) Press the joystick up or down to set the day(s)
and click the joystick. Each time you press the
joystick up or down, the days cycle as shown
below.
EVERY SUN-SAT->EVERY MON-FRl-^
SUNDAY-»...—SATURDAY—EVERY
SUNDAY—...—EVERY SATURDAY
Set the time.
Use (j) RETURN® Exit
Select the channel.
Use tt) RETURN® Exit li
(5) Press the joystick up or down to select the
charmel and click the joystick.
ni EVERY MONDAY SRESET
% 1:05 PM 4h CH 23
D2EVERY SUN-SAT GJRESET
12:00 AM Oh CH 0
JQID
......................
Select a program.
___________
Use4>RETURN® Exit ®
The TIMER indicator on the Feature box lights.
5 To set another program, click the joystick
and repeat step 4.
One minute before the TV turns off, a message "TV will
turn off." is displayed on the screen.
To cancel the timer
While the ON/OFF TIMER is displayed, press the
joystick right or left to select RESET besides the
program to be reset. Then click the joystick.
Note
• If you unplug the TV or a pow'er interruption occurs, ON/OFF
TIMER settings will be erased. Reset the current time, then set
the timer.
34 Operations
Page 35

I
Blocking out a channel (CHANNEL
BLOCK)
This feature allows you to prevent children from
watching unsuitable programs. Make sure the clock is
set correctly. If it is not, set the clock first (page 31).
-MENU
-Joystick
I Press MENU
2 Press the joystick up or down to select
TIMER and click the Joystick.
(3) Press the joystick up or down to set the time
(hour then minute) that you want to start
blocking the channel and click the joystick.
The i indicator appears indicating the time to
start blocking.
CHANNEL BLOCK
■ eVERY MONDAY
1O«tPME3CH0 ;
‘'JiSm- 6 !2fu I 12».''
- ........
□ 2 EVERY SUN-SAT GRE
_12 00 AM Oh CH 0
|G3.........................
Set the duration.
Use y RETURN© Exi:
(4) Press the joystick up or down to select the time
duration you want to block and click the
joystick.
Each time you click the joystick, the time
duration increases by one hour up to a
maximum of 12 hours. The bar indicator shows
how long the TV is blocked out.
3 Press the joystick up or down to select
CHANNEL BLOCK and click the joystick.
t
Enter a CHANNEL BLOCK setting.
(1) Press the joystick up or down to select program
1 or 2 and click the joystick.
(2) Press the joystick up or down to set the day(s)
and click the joystick. Each time you press the
joystick up or down, the days cycle as shown
below.
EVERY SUN-SAT-»EVERY MON-FRI->
SUNDA Y-».. .->SATURDA Y-*-E VERY
SUNDAY—...-»EVERY SATURDAY
CHANNEL BLOCK
mi EVERY SUN-SAT □RESET
• 12:00 AM Oh CH 0
□ 2 EVERY SUN-SAT GRESET
12:00 AM Oh CH 0
12am 6 ’2*^,...6,, ■'2av
ZC
....................
Select a program.
Use-rRETURN^ExitHv)
CHANNEL BLOCK
I EVERY MONDAY
— --Oh CftO
□ 2 EVERY SUN-SAT GRESET
12:00 AM Oh CH 0
12»« « ;2i«
□ 3........................
Set the time.
Use (♦) RETURN© Exit
□ 2EVERY SUN-SAT GRESET
1-.05PM 4h CHO
|G3
.........................
Select the channel.
Use (*) RETURN© Exit SE3
(5) Press the joystick up or down to select the
channel and click the joystick.
CHANNEL BLOCK
n 1 EVERY SUN-SAT GRESET
% 10:00 PM 2h CH23
□ 2EVERY SUN-SAT GRESET
12:00AM Oh CHO
I2w ^ 6 12fM 6 12»M
...................
Select a program.
Use 4' RETURN © Exit SaS
5 To set another program, click the joystick
and repeat step 4.
If you select the blocked channel during the time you
set, the message "BLOCKED" appears and the picture
is blocked and the sound is muted.
To cancel a CHANNEL BLOCK setting
While the CEIANNEL BLOCK menu is displayed, press
the joystick right or left to select RESET besides the
program to be reset. Then click the joystick.
Note
• If the CHANNEL BLOCK and ON/OFF TIMER settings are
overlapped, the later time setting has priority over the earlier
setting.
Operations 35
Page 36

Using the SET UP
menu
Customizing the channel names (CH
CAPTION/LOGO)
You can add a caption to up to 20 channels. This
feature allows you to easily identify which channel you
are watching. You can choose a broadcaster’s logo
(LOGO) or make your own caption (CAPTION).
-0-9 buttons
-MENU
- Joystick
Z Press the joystick up or down to select SET
UP and click the Joystick.
3 Press the joystick up or down to select CH
CAPTION/LOGO and click the joystick.
CH CAPTION./LOGO
ffltpGO OCWTION DD OfffiSer
□ y* Dgiiis apg
c f!> □ S no □ HB0 □ o
□ s cove DQ
Cl o«! □ □ G o
Use 0 - 9 to select
the channel. Then select
the LOGO or CAPTION.
Use -S- RETURN © Exit (S
4 Press 0-9 to select the channel that you
want to caption.
© ©
0
© © ©,
© © d
© О
CH CAPTION/LOGO
f LOGO О CAPTION ODD ВВЕГ
rnui.
□ ■w.'ra GeOT □ 'Лг
mr>
C ahi
□gn62 пЕЭ □—»'□ca
C Щ
GS GO □ нее G 03
□ OVC G>-="'
C: Ш
n
□ OM
Use 0
9 to select
the channel. Then select
the LOGO or CAPTION.
Use-i-RETURN©ExitHlS
□ вв'У □
□ DC3
□ o
G
5 Select LOGO or CAPTION.
To select LOGO:
(1) Make sure that the cursor is beside LOGO, and
click the joystick.
CH CAPTiON/LOGO
■ LOGO □ CAPTION □ Z) D RESET
о £5rn 0*07
0 6NBC Qggg
О «*
□
□ ом
Use 0 - 9 to select
the channel
Then select the LOGO.
□ □
□ S
О OVC 0 cs 0 Q
□ □ D □
Useir:-RETURN© Exit Mw)
(2) Press the joystick in any of eight directions to
select the broadcaster's logo and click the
joystick.
CH CAPTION/LOGO
RiiOGo осАРгюи o:z> ашЕг
rnu
■ ~ aeSAn D®BV □ ■!}!■
№
□ €NBC GE^
□ vis
U ^
□ & GO □ НВ0 □ 03
□ OVC □•-owT-.oca gq
□
□ □
□ (M
Use 0 - 9 to select
the channel Then select
the LOGO or CAPTION.
Use ^-RETURN® Exit®
To select CAPTION
(1) Press the joystick right or left to select
CAPTION and click the joystick.
CH CAPTION/LOGO
D LOGO ■ CAPTION □ □ RESET
QA QB SC QD OE SP SG
V OL ON @0 BP
□ O BR 0S BT QU av BWBX
OYaZQ&0 / S - 0001 02
03 04 05 D6 07 08 09 0_
Use 0-9 to select
the channel.
Select the 1st letter.
UseRETURN® Exit ffiil
(2) Press the joystick in any of eight directions to
select the first letter.
Q LOGO ■ CAPTION □ Z) □ RESET
QA OB 0C OD OE 0F OG OH
□ I OjeKQLQMONOOOP
□ Q0ROSBT %UQV OW QX
OY 0Z 0& 0 / 0 - eo 01 02
Q3 D4 05 06 07 08 09 B_
Use 0 - 9 to select
the channel.
Select the 1st letter,
Use ■tfi RETURN ©Exit®
(3) Click the joystick.
1
__
1 CH CAPTION/LOGC
□ LOGO ■ CAPTION I
SA
0B
QC 00 0E
О 1 О J
0K OL OM ON
□ RasOT
OQ
о Y
03 □ 4 □ 5 0 6 0 7080 9 0
Use 0the
19
1 Select the 2nd letter.
L_
0 / 0 .
BZ
o&
9 to select
channel.
Useti? RETURN ©Exit®
□ !Й
□ Q3
вквв
1
M-
IZ) ' □ RESET 1
о F
□ G Q H
00 0
QV 0W 0 X
0 1 0
□ 0
19
19
19
-
P
2
36 Operations
Page 37

I
(4) Repeat steps (2) and (3) to select the remaining
letters.
CH CAPTION-LOGO 23
::: logo ■ caption □ □ reset
□ A QB sc OD OE QF QG OH
SI OJSKOLSMSNOOQP
SQ0R QS QT SU WV SW 0 X
□ YOZQ&Q / 0 - %)01 02
□ 3 B4 35 36 B7 as B9 S_
Use 0 - 9 to select
the channel.
Select the 4th letter.
UseRETURN® Exit dH
MTV-
If you select fewer than three letters, move the
cursor (W) to after entering the letters, and
click the joystick.
6 Repeat steps 4 and 5 to caption other
channels.
To erase a caption
While the CH CAPTION/LOGO menu is displayed,
press the joystick in any of eight directions to select
RESET, then click the joystick.
Notes
• If the CH CAPTION/LOGO menu appears in gray, the TV is
set to a video input, and you cannot select CH CAPTION/
LOGO. Press TV/VIDEO so that a channel number appears.
• If more than 90 seconds elapse after you press a button, the
menu disappears automatically.
• The CH CAPTION/LOGO feature is available for the AUX
input.
• If you move the cursor to the blank spaces at the bottom of the
CH CAPTION/LOGO menu when you are selecting a logo,
you cannot select any logo.
Setting your favorite channels
(FAVORITE CHANNEL)
This feature allows you to select your favorite channels
(up to eight channels) easily while displaying them on
the screen at the same time.
-MENU
-Joystick
2 Press the joystick up or down to select SET
UP and click the joystick.
3 Press the joystick up or down to select
FAVORITE CHANNEL and click the joystick.
2
IM
i^r>
c* a powfor
Safa
h*
Press the joystick in any of eight directions
to select the position in the FAVORITE
CHANNEL screen, then click the joystick.
The current channel is displayed in the selected
position.
2
W
FAV
3fUTE tmt NEC
<4 tt» dtann
'U8
5 Press the joystick up or down to select the
desired channel and click the joystick.
The new channel is stored in the FAVORITE
CHANNEL screen in the selected position.
23
w
FAV
mm CHA»
Sale
ct a
Use
m.
OD
(continued)
Operations 37
Page 38

I
6 Repeat steps 4 and 5 to set other favorite
channels.
Note
• If you set TV INPUT to the option other than OFF, you cannot
use the FAVORITE CHANNEL feature.
Selecting a favorite channel
After you set your favorite channels, you can select a
channel you want while displaying all your favorite
channels on the TV screen at the same time.
1 Click the joystick.
Eight window pictures of your favorite channels
appear on the screen with the full-motion picture of
the currently selected channel in the center.
23
4-’
a '■*
I
m
r
’S'
2 Press the joystick in the direction of the
picture you want to select.
The joystick of the remote commander lets you
select any picture with a press.
23
J
r
a
3-
3 Click the joystick.
The picture of the selected channel is displayed on
the screen.
Adjusting the tilt of the picture
(DIRECTION)
You can adjust the tilt of the picture if it is not aligned
to the TV screen. Misalignment may be caused by the
direction of the earth’s magnetic fields in relation to the
position of the TV.
1 Press MENU. 2 Press the joystick up or down to select SET
UP, and click the joystick.
3 Press the joystick up or down to select
DIRECTION and click the joystick.
0EASTWEST
□ S HIGH
LOW
i
Use $ RETURN® Exil Ê
Adjust the tilt of the picture.
(1) Press the joystick up or down to select the
direction according to the location of your TV
and click the joystick.
I CHANNEL ERASE/ADD
I CHANNEL CAPTION/LOGO
I FAVORITE CHANNEL
1 DIRECTION : N LOW
_ DIRECT PLAY
ITV INPUT; OFF
I CABLE: ON
I AUTO PROGRAM
3 CUSTOMIZED POINTER
I LANGUAGE : ENGLISH
3r)
Use RETURN® Exil ®
If your TV faces
North
North East or North West NLOW
East or West
South East or Soutli West SLOW
South
Choose
NHIGH
EASTWEST
SHIGH
38 Operations
(2) While watching the screen, select the direction
which displays the smallest tilt.
Notes
• If your house is located near a high-voltage cable or is of
reinforced concrete, you may not be able to correct the tilt of
the picture properly. Consult your nearest Sony dealer.
• If there are large speakers near the TV, the tilt of the picture
cannot be corrected properly. Install the TV away from the
speakers.
Page 39

Selecting a VCR input directly (DIRECT
PLAY)
Customizing the pointer (CUSTOMIZED
POINTER)
The DIRECT PLAY feature allows you to switch from
TV input to VCR input mode by pressing the ►
(playback) button on the supplied remote commander.
For example, connect your VCR to the VIDEO 1 IN
jacks and set the VTRl 2 3 MDP selector to VTR2. After
completing the procedure below, the input mode is
switched to the VCR connected to the VIDEO 1 IN
jacks when you press the ► button.
1 Press MENU.
2 Press the joystick up or down to select SET
UP, and click the joystick.
3 Press the joystick up or down to select
DIRECT PLAY and click the joystick.
IBVIOEOI :OFF
11^IDE02 : OFF
I® VIDEOS-.OFF
|SVIDE04:0FF
3 VIDEOS : OFF
iI5
c ID
Use RETURN© Exit IS
You can select the desired cursor (pointer) from among
eight different designs and/or colors.
1 Press MENU.
2 Press the joystick up or down to select SET
UP and click the joystick.
3 Press the joystick up or down to select
CUSTOMIZED POINTER and click the joystick.
B CHANNEL ERASE/AOO
Q CHANNEL CAPTION/LOGO
□ FAVORITE CHANNEL
□ DIRECTION : N HIGH
3 DIRECT PLAY
@TV INPUT: OFF
B CABLE ; ON
I® AUTO PROGRAM
IH CUSTOMIZED POINTER
jl^NGUAGE : ENGLISH
Use (}) RETURN® Exit ®
Press the joystick in any of eight directions
to select the desired cursor and click the
joystick.
Press the joystick up or down to select the
input to which the video equipment is
connected and click the joystick.
BOFF
BVTR1
BIVTR2
:%ATR3
Use RETURN© Exit IS
Press the joystick up or down to select the
position of the VTR1 2 3 MDP selector and
click the joystick.
Operations 39
Page 40

Displaying Caption
Vision/XDS
(CAPTION VISION)
Some programs are broadcast with Caption Vision. To
display Caption Vision, select either CCl, CC2, CCS,
CC4, TEXTl, TEXT2, TEXTS or TEXT4 from the menu.
CCl, CCl, CCS or CC4 shows you a caption, that is a
printed version of the dialog or sound effects of a
program. (The mode should be set to CCl for most
programs.) TEXTl, TEXT2, TEXTS or TEXT4 shows you
text, that is information presented using either half or
the whole screen. It is not usually related to the
program.
3 Press the joystick up or down to select the
caption type and click the joystick.
The selected caption type is colored green.
Use (f) RETURN0Exits
To turn off the caption, text or XDS
Press DISPLAY on the remote commander until
"DISPLAY OFF" appears on the screen. Each time you
press DISPLAY, the display changes as follows:
on-screen information —*■ XDS —► Caption Vision or Text
^--------- DISPLAY OFF
"DISPLAY OFF" goes off after three seconds.
-------------------------
*
I
Some programs are broadcast with XDS (Extended
Data Service) which shows a network name, program
name, program length, call letters and time of the
show. When you select XDS with the DISPLAY button,
this information will be displayed on the screen if the
broadcaster offers this service.
-MENU
-Joystick
2 Press the joystick up or down to select
and click the Joystick.
t
Notes
• Poor reception of TV programs can cause errors in Caption
Vision and XDS.
Captions may appear with a white box or other errors instead
of a certain word.
• Caption Vision and the channel display cannot be used at the
same time.
40 Operations
Use (J) RETURN0Exit
Page 41

Operating video
equipment
You can program the supplied remote commander to
operate video equipment that have an infrared remote
sensor. For programming, set the manufacturer's code
number. You can set the manufacturer's code to each
of four positions of the slide switch inside the lid, so
that you can operate four different pieces of equipment.
Setting the manufacturer's code
The following Sony video equipment is assigned to
each position of the slide switch at its factory preset:
VTRl Beta, ED Beta VCRs
VTR2 8 mm VCR
VTR3 VHSVCR
MDP Multi-disc player
Slide switch
CODE SET
.0-9 buttons
■ENTER
Note
• To use another manufacturer's equipment besides a Sony VCR,
set the selector to a position not being used for your Sony VCR.
1 Turn off the equipment you want to set up.
2 Open the lid, then set the slide switch to
the position you want to set the code.
VTRl 2 3MDP
О О О О
3 Press CODE SET, then press 0 - 9 to enter
the manufacturer's code number (see the
chart below) and press ENTER. For
example, to operate a Sony 8 mm VCR,
press CODE SET, 3, 0, 2 and ENTER.
CODE SET
VCR manufacturer code numbers
Manufacturer
Sony
Aiwa
Audio Dynamic 314,337
Bell & Howell (M. Wards) 330,343
Brocsonic 319
Canon
Citizen 332
Craig
Curtis Mathis
Daewoo
DBX
Dimensia 304
Emerson
Fisher
Fimai
General Electric 329,304,309
Goldstar 332
Hitachi
Instant Replay
JC Peimy
JVC
Kenwood
LXI (Sears)
Magnavox
Marantz
Marta
Memorex 309,335
Minolta
Mitsubishi/MGA
Multitech
NEC
Olympic 309,308
Panasonic
Pentax
Philco 308, 309
Philips 310,308,309
Pioneer 308
Quasar
RCA/PROSCAN
Code number
301,302, 303
338
309,308
315, 302,332
304,338,309
341, 312, 309
314,336,337
319,320,316,317,318
330,334,335,333
338
306, 304,305
309,308
309,305,304,330, 314,
336, 337
314,336,337
314,336,332,337
332,305,333,334,330,
335
310, 308,309
314,336,337
332
305,304
323,324,325,326
325,338,321
314,336,337
308,309,306, 307
305,304
308,309
304, 305,308,309,310,
311,312,313
ENTER
(continued)
Operations
I
41
Page 42

VCR manufacturer code numbers
Manufacturer Code number
Realistic
309, 330, 328, 335, 324,
338
Sansui
Singer
Samsung
Sanyo
Scott
314
315
322, 313, 321
330,335
312,313,321,335,323,
324, 325, 326
Sharp
Shintom
Signature 2000 (M. Wards)
Sylvania
Symphonic
327, 328
315
338, 327
310,308,309, 338
338
Tashiro 332
Tatung
314,336,337
Teac 314, 336, 338, 337
Technics
Toshiba
309, 308
312,311
Wards 327, 328, 335,331, 332
Yamaha
Zenith
330, 314, 336, 337
331
Operating video equipment
T
d£D CDOCD
CD r5~> cw^ m
QO-o OO
CD O CD
(with the iid open)
Set the slide switch inside the lid to the position you set for the video equipment.
VTR1 2 3MDP
o o o o
Œ»
Use the video operating buttons on the
remote commander to operate the video
equipment.
Video operating
buttons
MDP manufacturer code numbers
Manufacturer
Sony
Kenwood
Magnavox
Maranz
Mitsubishi
Panasonic
Philips
Pioneer
RCA
Sanyo
Sharp
Yamaha
Notes
• If more than one code number is listed, try entering them one
by one, until you come to the correct code for your equipment.
• In some rare cases, you may not be able to operate your non-
Sony video equipment with this remote commander. This is
because your equipment may use a code that is not provided
with this remote commander. In this case, please use the
equipment's own remote control unit or use the learning
function (page 44).
• The code numbers for Sony equipment are assigned at the
factory as follows:
VHS VCR 301
8 mm VCR 302
Beta, ED Beta VCR 303
Multi-disc player 701
Caution
• Whenever you remove the batteries — to replace them, for
example — if too much time is taken, the code numbers revert
to the factory settings and must be reset.
42 Operations
Code number
701
707
703
702
702
704
703
702
702
706
705
703
Operating a VCR
To turn on or off
To change channels
To record
To play
To stop
To fast forward
To rewind the tape
To pause
To search the picture
forward or backward
To change input mode
To eject a cassette
Operating a multi
disc player
To tarn on or off
To play
To stop
To pause
To search the picture
forward or backward
To search the chapter
forward and backward
To eject a disc
Note
• If the video equipment does not have a certain function, the
corresponding button on this remote commander will not
operate.
Buttons on the remote
commander
Press POWER
Press CH +/Press # and REC simultaneously
Press ►-
Press ■
Press ►►
Press ◄◄
Press II
To resume normal playback, press again.
Press ►► or ◄◄ during playback
To resume normal playback, release the
button.
Press TV/VTR
Press ± (Used only with Sony brand
products)
Buttons on the remote
commander
Press POWER
Press ►
Press ■
Press II
To resume normal playback, press again.
Keep pressing ►► or ◄◄ during playback
To resume normal playback, release the
button.
Press CH +/-
Press A (Used only with Sony brand
products)
Page 43

Operating a cable box or DSS receiver
You can program the supplied remote commander to
operate a cable box or DSS receiver. Follow the
procedures below to set the manufacturer’s code
number to operate it.
CABLE POWER ■
CABLE FUNCTION
~^c£c^\
Œ) Cl'
CODE SET ■
rpT^ I
■SD CD-o O I
O CD O
© © ®
® © ©
© © ®
q1®[©
Turn off the equipment you want to set up
and press the FUNCTION button of the
equipment you want to set up (CABLE or
DSS).
-------
FUNCTION
CABLE DSS
--------
(ZD ( )
DSS POWER
■ DSS FUNCTION
-TV FUNCTION
- 0-9 buttons
-ENTER
- CH +/-
3 Press CABLE POWER to turn on a cable box
or DSS POWER to turn on a DSS receiver.
-------
POWER
CABLE DSS
-----------
CD CD
b
4
Use the TV control buttons to check if your
code number works.
For example, to operate a cable box, you can use the
CABLE POWER, JUMP, CH +/-, 0-9 and ENTER
buttons.
To operate a DSS receiver, you can use the DSS
POWER, JUMP, DISPLAY, MENU and 0-9 buttons,
and the joystick.
To operate the TV
Press TV FUNCTION. Then use the TV control buttons
to control the TV.
For more details on operating the cable box or
DSS receiver
Refer to the operating instructions that come with the
equipment.
If the remote commander doesn't work
• First, try repeating the setup procedures using the other codes
listed for your equipment.
• If — after trying all the codes listed for your equipment — you still
cannot get the remote commander to work properly, try the
learning function described on page 44.
Manufacturer code numbers (cable box)
Manufacturer
Hamlin/Regal 222, 223, 224, 225, 226
Jerrold/G. I.
Oak
Panasonic 219, 220, 221
Pioneer
Scientific Atlanta
Tocom 216, 217
Zenith 212, 213
Code number
201, 202, 203, 204, 205, 206, 207, 208,
218
227, 228, 229
214, 215
209,210,211
b
Press CODE SET. then press 0 - 9 to enter
the manufacturer's code number (see the
chart below) and press ENTER. For
example, to program your remote
commander to operate a Zenith cable box,
press CODE SET, 2, 1. 2 and ENTER.
CODE SET
+ 2)-f(1
ENTER
Manufacturer code numbers (DSS receiver)
Manufacturer
Sony
RCA
Notes
• If more than one code number is listed, try entering them one by
one until you come to the correct code for your equipment.
• If you enter a new code number, the code number you previously
entered at that setting is erased.
• In some rare cases, your equipment may use a code that is not
provided with this remote commander and you may not be able to
operate your equipment with the supplied remote commander. In
this case, use the equipment's own remote control unit or use the
learning function (page 44).
• Whenever you remove the batteries — to replace them, for
example — if too much time is taken, the code numbers revert to
the factory settings and niList be reset.
Code number
801
802
Operations
43
Page 44

Operating nonpreprogrammed
equipment —
4
Press and release the button on the
supplied remote commander that will learn
the function.
The LEARN indicator flashes off and then on again,
indicating that the remote commander is ready to
learn.
Learning function
You can program the supplied remote commander to
learn the functions of another remote commander. Use
this function to operate equipment whose
manufacturer's code is not preprogrammed, such as
Sony or other manufacturers' audio equipment or other
equipment whose manufacturer's code is not listed on
pages 41 - 43.
T
\ <^) C^\ C ^
■ LEARN indicator
- LEARN
Slide switch
"C
OC^CDCZ)^
-«3 CDCD O
ooDCBCBca
CZ)Cp-^ CZ)Œ3
O CD CZ)
(with the lid open)
1 Set the slide switch inside the lid to VTR3 or
MDP.
VTR1 2 3 MDP
o o o o
cm)
Place the supplied remote commander and
the other equipment's remote commander
directly facing each other, approximately
5 cm (2 inches) apart.
5 Hold down the corresponding button on
the other remote cornmander and release
the button when the LEARN indicator
flashes off then on again.
When the LEARN indicator flashes off and then on
again, this indicates that learning is complete. If
not, repeat steps 4 and 5.
6 Repeat steps 4 and 5 to learn other
functions.
7 Press LEARN.
The LEARN indicator goes off, indicating that
learning is complete.
Notes
• The LEARNING function does not work in VTRl or VTR2
setting.
• Do not move the remote commanders during learning.
• If you press a button of the supplied remote commander that
cannot be used for learning in learning mode, the LEARN
indicator flashes four times.
• If the other remote commander's signal cannot be learned, the
LEARN indicator flashes four times then keeps lighting up.
• To clear all learned signals from memory, set the slide switch
to MDP, press LEARN, then press TV POWER while holding
down VOL -. Then press LEARN again. The indicator flashes
3 times then keeps lighting up.
Caution
• Whenever you remove the batteries — to replace them, for
example — if too much time is taken, the code numbers revert
to the factory settings and must be reset.
3 Press and release the LEARN button.
The LEARN indicator lights up.
LEARN
44 Operations
Page 45

Additional Information
Troubleshooting
After trying the methods below, if the problem persists,
contact your nearest Sony dealer.
No picture (screen not lit), no sound
“►Make sure the power cord is connected
securely.
^Check to see if the TV/VIDEO setting is
correct: when watching TV, set to TV, and
when watching video tapes, set to VIDEO,
(page 20)
^Before you use the TV, cable box or DSS
receiver, make sure to press the
corresponding FUNCTION button on the
remote commander. The indicator above the
FUNCTION button that you selected
flashes, (pages 19, 43)
^Try another charmel. It could be station
trouble.
Poor or no picture (screen lit), good sound
^Adjust PICTURE in the VIDEO menu, (page
23)
^Adjust BRIGHTNESS in the VIDEO menu,
(page 23)
^ Check antenna/cable connections, (page 6)
Good picture, no sound
^ Press MUTING so that "MUTING"
disappears from the screen, (page 20)
^Check the MTS setting in the AUDIO menu,
(page 27)
“►Make sure SPEAKER is set to ON in the
AUDIO menu, (page 27)
No color
^ Adjust COLOR in the VIDEO menu, (page
23)
^Confirm that a black and white program is
not being broadcast.
I
Dotted lines or stripes
^Adjust the antenna.
“►Move the TV away from noise sources such
as cars, neon signs, and hair-dryers.
Double images or ghosts
^Use a highly directional outdoor anterma
or a cable (when the problem is caused by
reflections from nearby mountains or tall
buildings.)
Cannot operate menu
“►If the item you want to choose appears in
grey, you cannot select it. Press TV /VIDEO
correctly.
“►Check the CABLE setting in the SET UP
menu, (page 16)
Cannot receive upper channels (UHF) when
using an antenna
“►Check if CABLE is OFF in the SET UP
menu, (page 16)
^Use AUTO PROGRAM to add receivable
channels that are not presently in the
memory, (page 17)
Cannot receive any channels when using cable
TV
“►Check if CABLE is ON in the SET UP
menu, (page 16)
^Use AUTO PROGRAM to add receivable
channels that are not presently in the
memory, (pages 17)
Remote commander does not operate
^Battery could be weak. Replace the
battery, (page 13)
“►Make sure the TV's power cord is
connected securely to wall outlet.
“►Press TV FUNCTION when operating your
TV.
“►Are fluorescent lights too close to the TV?
Move lights at least 3-4 feet away from
the TV.
Only snow and noise appear on the screen
Check the CABLE setting in the SET UP
menu, (page 16)
Check the antenna/cable connections.
(page 6)
^Make sure the channel is broadcasting
programs.
(continued)
Additional Information I 45
Page 46

Some of the remote commander's buttons do
not function
Press the correct FUNCTION button
accordifig to the equipment you operate,
(pages 19, 43)
Cannot gain enough volume when using a
cable box
^Increase the volume at the cable box. Then
press TV FUNCTION and adjust the TV's
volume, (page 43)
The current time resets whenever the TV is
turned on
Connect the TV's and the cable box's AV
power cords to separate wall outlets.
The TV needs to be cleaned
■♦■Clean the TV with a soft dry cloth. Never
use strong solvents such as thinner or
benzine, which might damage the finish of
the cabinet.
No picture, incorrect menu display
^ Check the monitor unit/feature box
connection.
The touch keys on the front panel of the
monitor unit do not illuminate.
Check the monitor unit/feature box
cormection.
Cannot operate the 0-9 buttons, CH +/-, TV/
VIDEO and ANT/AUX buttons on the remote
commander.
-► Select TV OUT in the INPUT/OUTPUT
STATUS menu and enter NO. (page 29)
Specifications
Television system American TV standard
Channel coverage VHP: 2-13/UHF: 14 -69/CATV: 1 -125
Picture tube Super Trinitron® tube
Screen size 32-inch picture measured diagonally
Antenna 75 ohm external antenna terminal for VHP/
Input (Monitor unit) MULTI INPUT (36-pin)
Inputs/outputs (Feature box)
Speaker
Speaker output
Power requirement
Power consumption
Dimensions
Mass
Supplied accessories Remote commander RM-Y128 (1)
Optional accessories TV stand SU-32XBR4
UHP
MULTI OUTPUT (36-pin)
VIDEO 1/3/4/5 IN and VIDEO 2 INPUT
S VIDEO IN (4-pin mini DIN):
Y: 1 Vp-p, 75-ohms unbalanced, sync
negative
C: 0.286 Vp-p (Burst signal), 75 ohms
VIDEO (phono jack): 1 Vp-p, 75-ohms
unbalanced, sync negative
AUDIO (phono jacks): 500 mVrms (100%
modulation) Impedance ; 47 kilohms
SELECT OUT
VIDEO (phono jack): 1 Vp-p, 75 ohms
unbalanced, sync negative
AUDIO (phono jacks):
470 mVrms (100% modulation).
Impedance: 75 kilohms
AUDIO (VAR) OUT (phono jacks):
950 mVrms (100% modulation).
Impedance: 5 kilohms
AUDIO (FIX) OUT (phono jacks):
470 mVrms, Impedance: 5 kilohms
CONTROL SIN/OUT
mini jacks
Tweeter: 25 mm (1 inch) x 2
Woofer (M): 80 mm (3 ' /4 inches) x 2
Woofer (L): 80 mm (3 '/4 inches)
Mid-range: 50 mm (2 inches) x 2
Passive; 100 mm (4 inches)
Front: llWx2
Woofer: IIW x 2
120 V, 60 Hz
Monitor imit
Max. 225 W (2. 8A)
Standby mode: 1. 5 W
Feature box
Max. 26 W
Standby mode: 13W
Monitor unit;
828 X 632.6 X 586.1 mm (32 V8 x 24 V8 x
23 '/8 inches) (w/h/d)
Feature box: 430 x 82 x 275 mm (17 x 3 '/4 x
10 ^/s inches) (w/h/d)
Monitor unit: 75.5 kg (166 lbs 7 oz)
Feature box; 4.0 kg (8 lbs 13 oz)
Size AA (R6) battery (2)
36-pin multi-cable (1)
Terminal cover (1)
U/V mixer EAC-66
Connecting cables RK-74A, VMC-810S/
820S, YC-15V/30V, VMC-720M, RK-G34
I
46
Design and specifications are subject to change without notice.
Additional Information
Page 47

Index
Adjusting
the picture 23
the sound 25
Antenna 6
Auto program
Battery 13
Cable box 43
Cable TV 16
Caption Vision 40
Changing the menu language 17
Channel block 35
Channel Caption 36
Connection
with a DSS receiver 9
with a VCR 7, 8 ^
with an antenna 6
without a VCR 6
DEMO 15
DSS receiver 9, 43
Erase/add 15
Joystick 13
Jump 19
MTS (Multichannel TV Sound) 27
Muting 20
P&P (Picture-and-Picture) 21
PIP (Picture-in-picture) 21
Presetting channels 15,17
PROGRAM PALETTE 28
Remote commander 13
S video 8
SAP (Second Audio Program) 27
SA-VA speaker 11, 27
Setting
daylight saving time 31, 33
the clock 31
Time zone 33
Sleep timer 20
Speaker 27
STEREO indicator 27
Superwoofer 27
Surrormd 27
TIMER indicator 34
15,17
Twin View™ 21
Video label 30
Watching
TV 19
video tapes 20
XDS 40
Names of controls
H (channel index) button 22
3 (P&P) button 21
Q (PIP) button 21
ANT/AUX button 20
AUDIO button 22
AUDIO L(MONO)/R IN jacks 7-10,12
AUDIO (FIX) OUT jacks 11
AUDIO (VAR) OUT jacks 11
CH (channel)+/-buttons 16,19
CODE SET button 41
CONTROLS jacks 11,12
DISPLAY button 20,40
ENTER button 41
FREEZE button 22
FUNCTION (CABLE) button 43
FUNCTION (DSS) button 43
FUNCTION (TV) button 19
Joystick 13
JUMP button 19
MENU button 13
MULTI INPUT connector 5
MULTI OUTPUT connector 5
MUTING button 20
PIP CH (channel) +/ - buttons 21
PIP OFF button 21
PIP TV/VIDEO button 21
POSITION button 22
POWER (CABLE) button 43
POWER (DSS) button 43
POWER (TV) button 19
S VIDEO input jack 8
SELECT OUT jacks 10,12
SLEEP button 20
SWAP button 22
TV/VIDEO button 14,20
VTR (POWER, CH +/-,
REC, TV/VTR) buttons 42
VHF/UHF antenna terminal 6, 7
VIDEO 1/3/4/5 IN jack 7-10
VIDEO 2 INPUT jack 10
VOL (volume)+/-buttons 19
I
Additional Information
47
 Loading...