

Page 1

Contents
4-032-38844 (1)
Trinitron® Color TV
KV-27TS27
KV-27TS31
KV-27TS35
KV-32TS20
KV-32TS35
KV-27TW75
KV-27TW76
Preface
This section teiis you about special
features, safety information, and
preparatory information for using this pt»«
manual. .
Chapter 1: Set up
This section shows you the steps
necessary for installing and
presetting your TV.
Chapter 2: Basic Operation
This section gives you basic
information about operating and
adjusting your TV.
Chapter 3: Advanced Operation
This section shows you how to use ’ig.’u.
Picture-in-Picture, the On-Screen n
Menus and other useful features, as jgl/.i
well as the Remote Commander.
KV-32TW75
KV-32TW76
Operating Instruction
Before operating your TV, please read this manual
thoroughly and retain it for future reference.
Owner’s Record
The model and serial numbers are located at the rear of
the TV. Record these numbers in the spaces provided
beiow. Refer to them whenever you cali upon your Sony
deaier regarding this product.
Model No.. Serial No..
Chapter 4: Other Connections
This section shows you how to
connect optional video and audio
equipment.
Appendix
This section gives you specifications
and troubleshooting information.
• For a detailed table of contents,
see page 3.
-
© 1991 by Sony Corporation
Page 2
Preface
1
WARNING
IPrecautions
To prevent fire or shock hazard, do not
expose the unit to rain or moisture.
CAUTION
RISK OF ELECTRIC SHOCK
DO NOT OPEN
CAUTION ; TO REDUCE THE RISK OF ELECTRIC SHOCK.
DO NOT REMOVE COVER (OR BACK).
NO USER-SERVICEABLE PARTS INSIDE.
REFER SERViCINQ TO QUALIFIED SERVICE PERSONNEL
This symbol is intended to Edert the user to
the presence of uninsulated '‘dangerous
voltage” within the product’s enclosure that
may be of sufficient magnitude to constitute
a risk of electric shock to persons.
This symbol is intended to alert the user to
the presence of important operating and
maintenance (servicing) instructions in the
literature accompanying the appliance.
CAUTION:
TO PREVENT ELECTRIC SHOCK, DO NOT USE THIS
POLARIZED AC PLUG WITH AN EXTENSION CORD,
RECEPTACLE OR OTHER OUTLET UNLESS THE
BLADES CAN BE FULLY INSERTED TO PREVENT
BLADE EXPOSURE.
Safety
• Operate the TV only on 120 V AC.
• One blade of the plug is wider than the other for safety
purposes and will fit into the power outlet only one way.
If you are unable to insert the plug fully into the outlet,
contact your dealer.
• Should any liquid or solid object fall into the cabinet,
unplug the TV and have it checked by qualified
personnel before operating it any further.
• Unplug the TV from the wall outlet if you are not going
to use it for several days or more. To disconnect the
cord, pull it out by the plug. Never pull the cord itself.
I Installing
• To prevent internal heat build-up, do not block the
ventilation openings.
• Do not install the TV in a hot or humid place, or in a
place subject to excessive dust or mechanical vibration.
Cleaning
Clean the TV with a soft dry cloth. Never use strong
solvents such as thinner or benzine, which might damage
the finish of the cabinet.
Repacldng
Keep the original carton and packing materials to use for
safe transport of your TV in the future.
If you have any questions or problems concerning your
TV, please contact your nearest Sony dealer.
For details concerning safety precautions, see the
supplied leaflet “IMPORTANT SAFEGUARDS.”
Note to CATV system installer
This reminder is provided to call the CATV system
installer's attention to Article 820-40 of the NEC that
provides guidelines for proper grounding and, in particular,
specifies that the cable ground shall be connected to the
grounding system of the building, as ciose to the point of
cable entry as practical.
Use of this television receiver for other than private viewing
of programs broadcast on UHF or VHF or transmitted by
cable companies for the use of the general public may
require authorization from the broadcaster/cabie company
and/or program owner.
Preface
Page 3

1
Table of Contents
Preface
Waming/Precautions
Introducing the Sony TS/TW series
......................................................
.................................
Chapter 1: Set up
Connecting TV antenna/cabie........................................12
Turning the cabie mode on or off
...................................
14
Chapter 2: Basic Operation
Watching TV programs
..................................................
Chapter 3: Advanced Operation
Using Picture-in-Picture
(KV-27TS35, KV-32TS35, KV-27TW75,
KV-27TW76, KV-32TW75 and KV-327W76 only)
Using the Pre-Programmed
Remote Commander.............................................. 30
(KV-27TS31, KV-27TS35, KV-32TS35.
KV-27TW75, KV-27TW76, KV-32TW75
and KV-32TW76 only)
Setting the CURRENT TIME
................................................
...........................................
26
32
Chapter 4: Other Connections
19
2
4
Identifying your TV
Locating the controis........................................................ 6
Presetting TV channels....................................................15
Erasing unnecessary channels —
CHANNEL ERASE
Presetting oniy desired channeis —-
CHANNEL ADD....................................................18 "
Adjusting picture and sound quality
Adjusting the picture
Adjusting the sound
Receiving Multichannei : “
TV Sound programs — MTS
Turning the SPEAKER ON or OFF
Using the timer-activated functions — GUIDE ....34
Setting the ON/OFF TIMER...........................................34
Setting CHANNEL BLOCK
Setting the TIME DISPUY
Using CHANNEL CAPTION..............................................40
Captioning the channel
display — CHANNEL CAPTION
Viewing the captioned channels
— CHANNEL GUIDE
Enjoying other useful features..........................................43
------------------------------------------------------------------------------------------m
...........................................................
..................................................
.................................
...................................................
....................................................
.................................
...........................
............................................
.............................................
...............................
...............................................
4
16
20
20
22
24 '
25
36 '
38
40
42
Appendix
Connecting video equipment
Connecting an audio system............................................46
Specifications.................................................................. 47
Troubieshooting
...........................................
...........................................
back cover
Preface
13
44
Page 4
Introducing the Sony TS/TW Series
1
With the following features, you can:
• Receive up to 125 cable channels for a total of 181 possible
off-air and cable channels with the multi-band VHF/UHF/
CATV tuner.
• Receive the picture and sound of your VCR through the
VIDEO IN Jacks.
• Receive superior VCR playback pictures when you connect
a VCR equipped with an S video output jack to the S VIDEO
IN Jack (except for KV-27TS27).
• Watch your portable camera images (8mm, video, etc.) by
connecting to the CAMCORDER/VIDEO IN Jacks on the
front panel (except for KV-27TS27 and KV-32TS20).
• Receive stereo programs and Second Audio Program (SAP)
broadcasts with the built-in Multichannel TV Sound (MTS)
decoder.
• Receive TV or video sound through an audio system, by
connecting to the variable audio output Jacks.
• Simulate the sound quality of a concert hall or movie theater
with the SURROUND system.
• Watch another TV channel, video or cable image as a
window picture, using Picture-in-Picture (KV-27TS35,
KV-32TS35, KV-27TW75, KV-27TW76, KV-32TW75 and
KV-32TW76 only).
• Call up an on-screen menu for instructions on how to set the
On/Off Timer, Channel Block and Time Display, using the
GUIDE feature.
• Call up an on-screen menu for instructions on how to set
the time, caption the channel display, add or erase channels
from №e channel scan memory, and turn the cable mode on
or off, using the SET UP feature.
With the supplied Remote Commander, you can:
• Operate the TV, plus Sony and most other makers’ video
equipped or Sony multi disc player with the PreProgrammed feature (except for KV-27TS27 and
KV-32TS20).
• Automatically preset all receivable channels with AUTO
PROGRAM.
• Svritch quiddy between two channels, using JUMP.
• Set the TV to automatically shut off after approximately on
hour, using the SLEEP timer.
• Set the internal dock to display the CURRENT TIME
on-screen.
And enjoy other features giving you a high quality
picture...
• Colorpure niter'* produces fine picture detail without
color spill or color noise.
• The New Dynamic picture'* system adjusts picture
contrast automatically to produce nrare detail in both bright
and dark eireas of every scene.
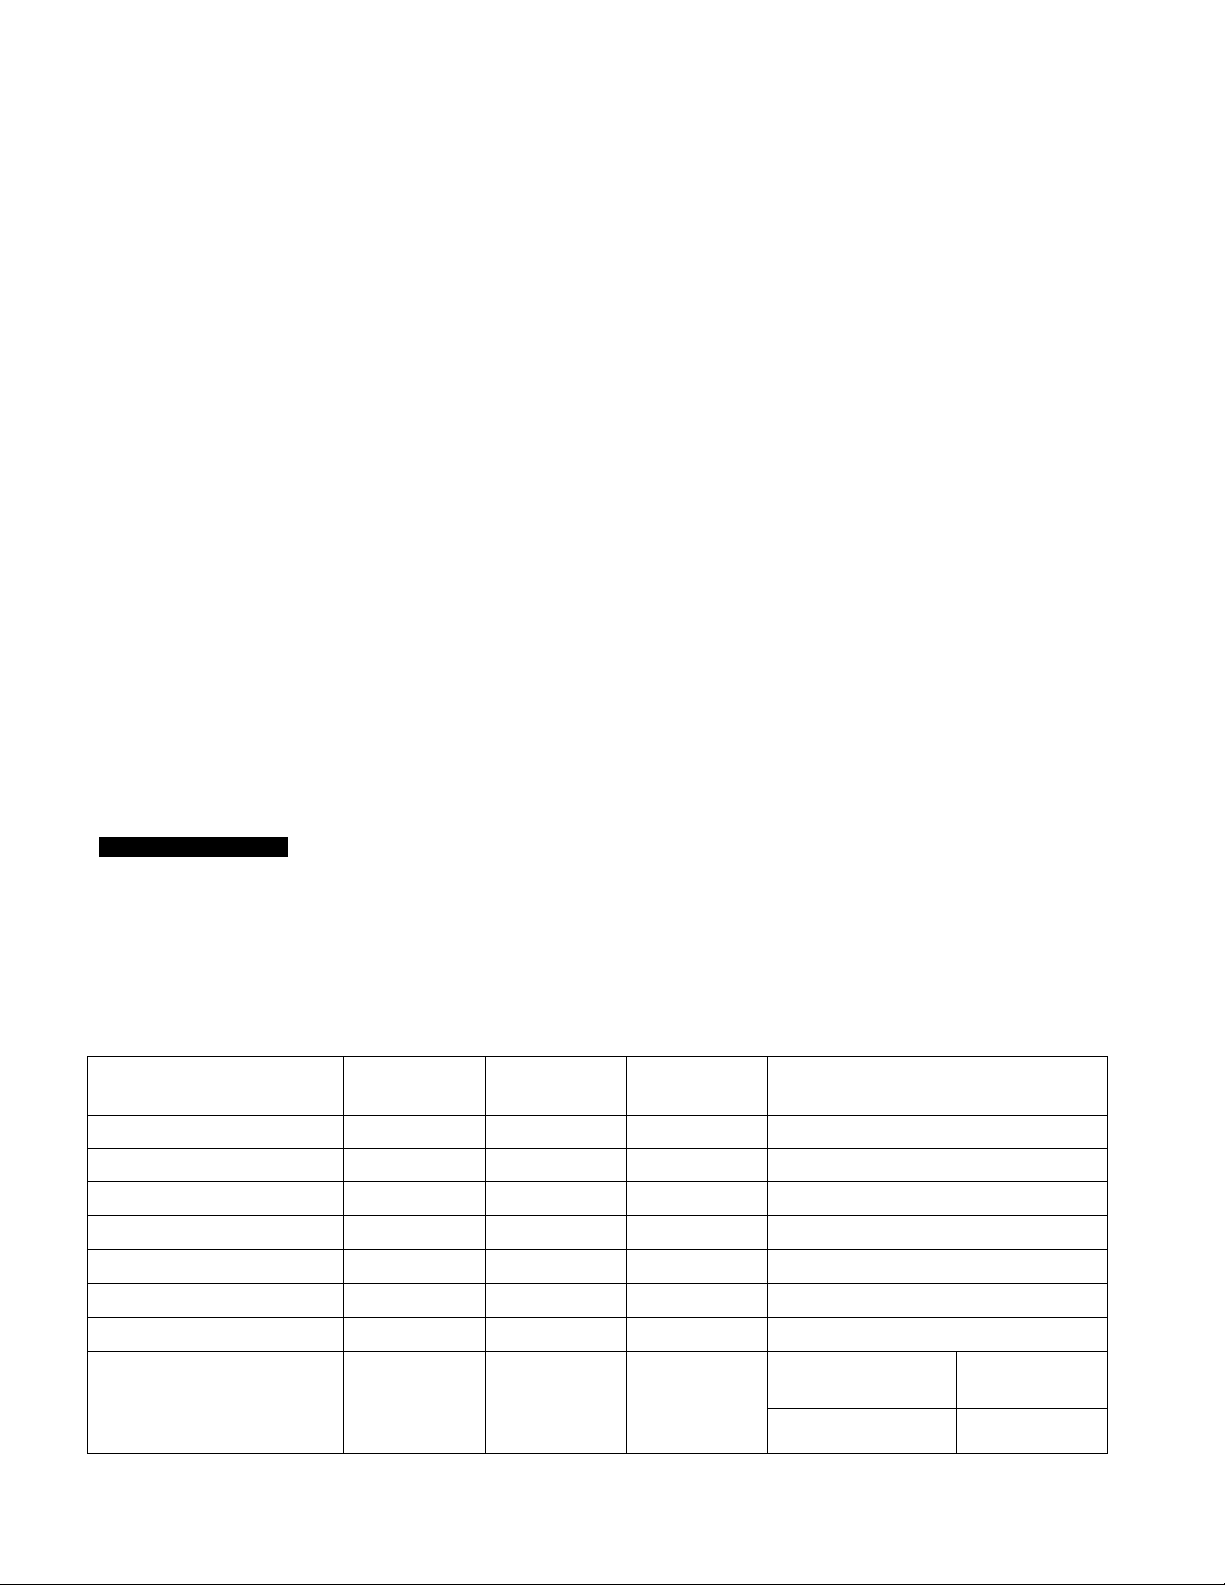
Identifying Your TV
Check the model number of your TV set
This manual covers nine models and there are slight
differences among them. Check the table below to see what is
equipped with your TV before you begin operating it.
Table of models
Rcture-in-Picture feature
Pre-Programmed feature
SURROUND system
Front panel A/V jacks
VARIABLE AUDIO OUT jacks YES YES
S-VIDEO IN jacks NO
Remote Commander
Model destination USA/CANADA USA
YES: equipped NO: not equipped
KV-27TS27
NO
NO
YES YES
NO
RM-791
KV-32TS20 KV-27TS31 KV-27TS35 KV-32TS35 KV-27TW75
RM-791
NO
NO
NO
YES
Instructions in this manual are based on model
KV-32TS35 (one of the models with maximum number of
features) and Remote Commander RM-Y102. if you have
a different model, please disregard any information that
does not apply to your TV.
KV-27TW76 KV-32TW75 KV-32TW76
NO
YES
YES YES
YES
YES YES
YES YES
RM-Y101
KV-27TS35 KV-27TW75
USAA^ANADA
KV^2TS35 KV-27TW76
USAADANADA
YES
YES
YES
RM-Y102
KV-32TW75
KV-32TW76
USA
^ I Preface
Page 5
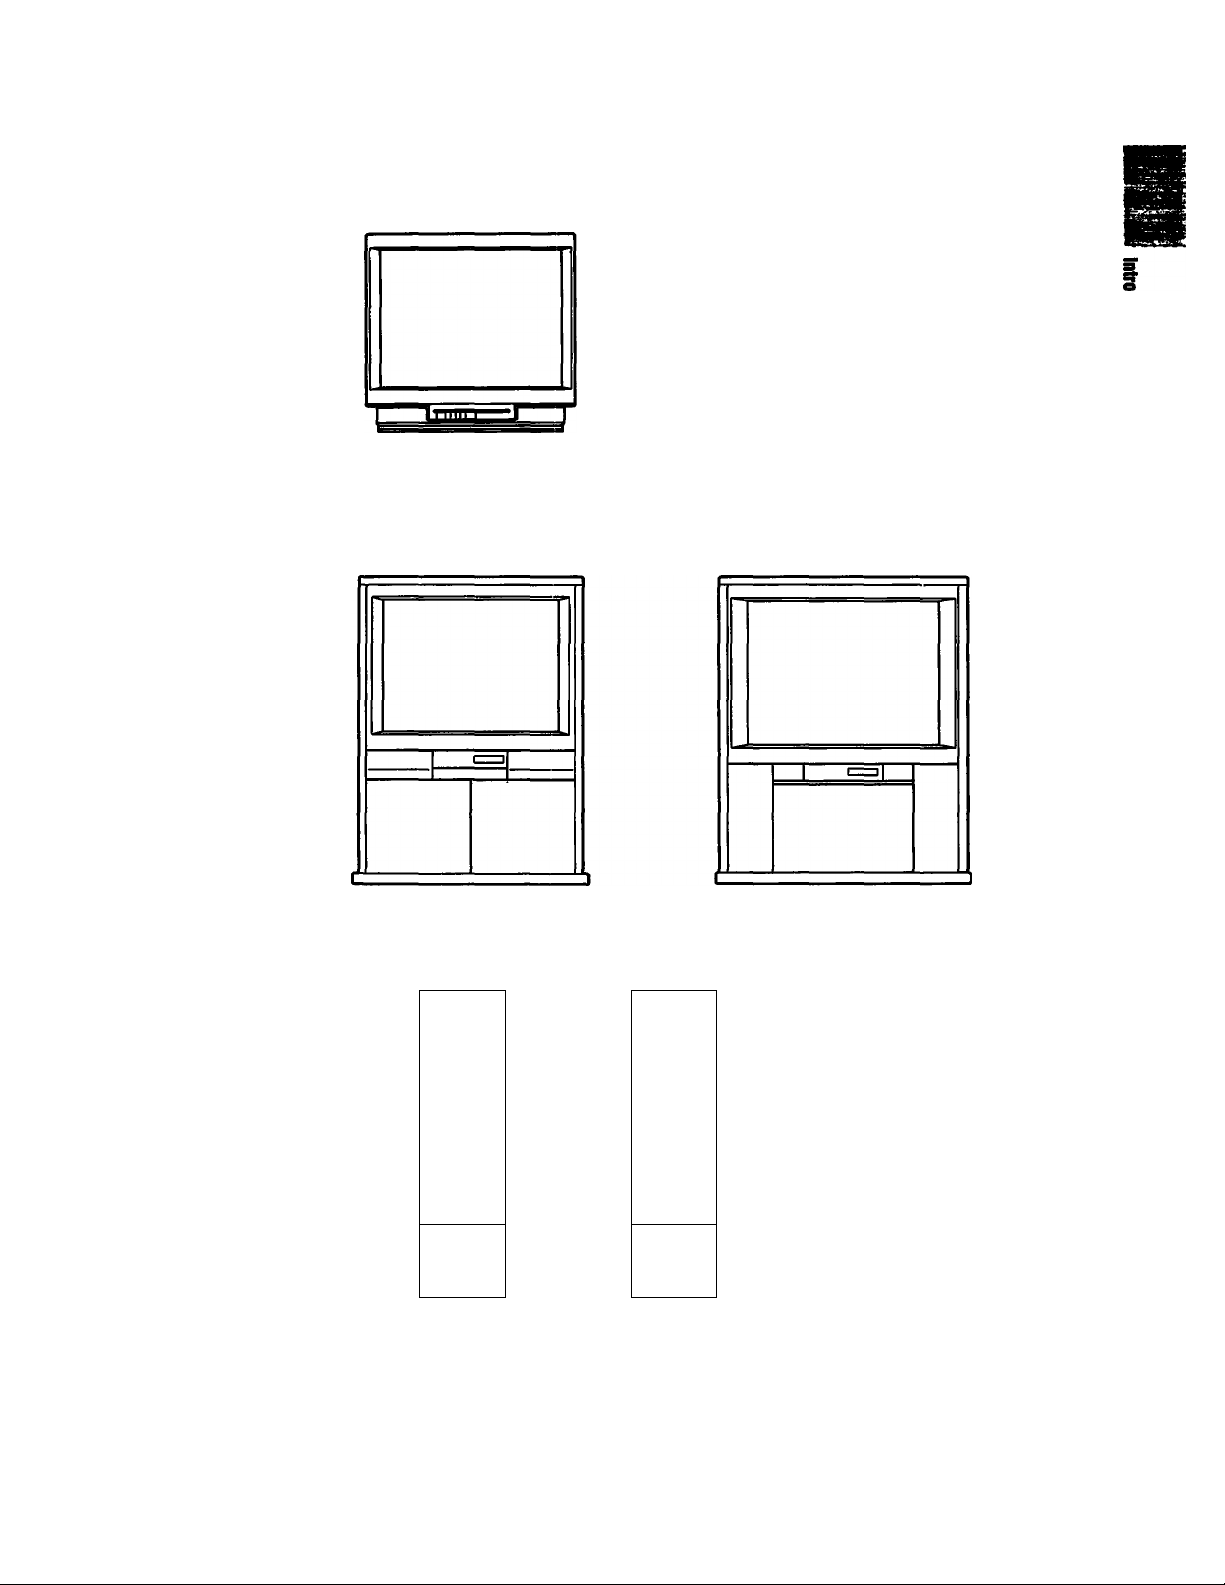
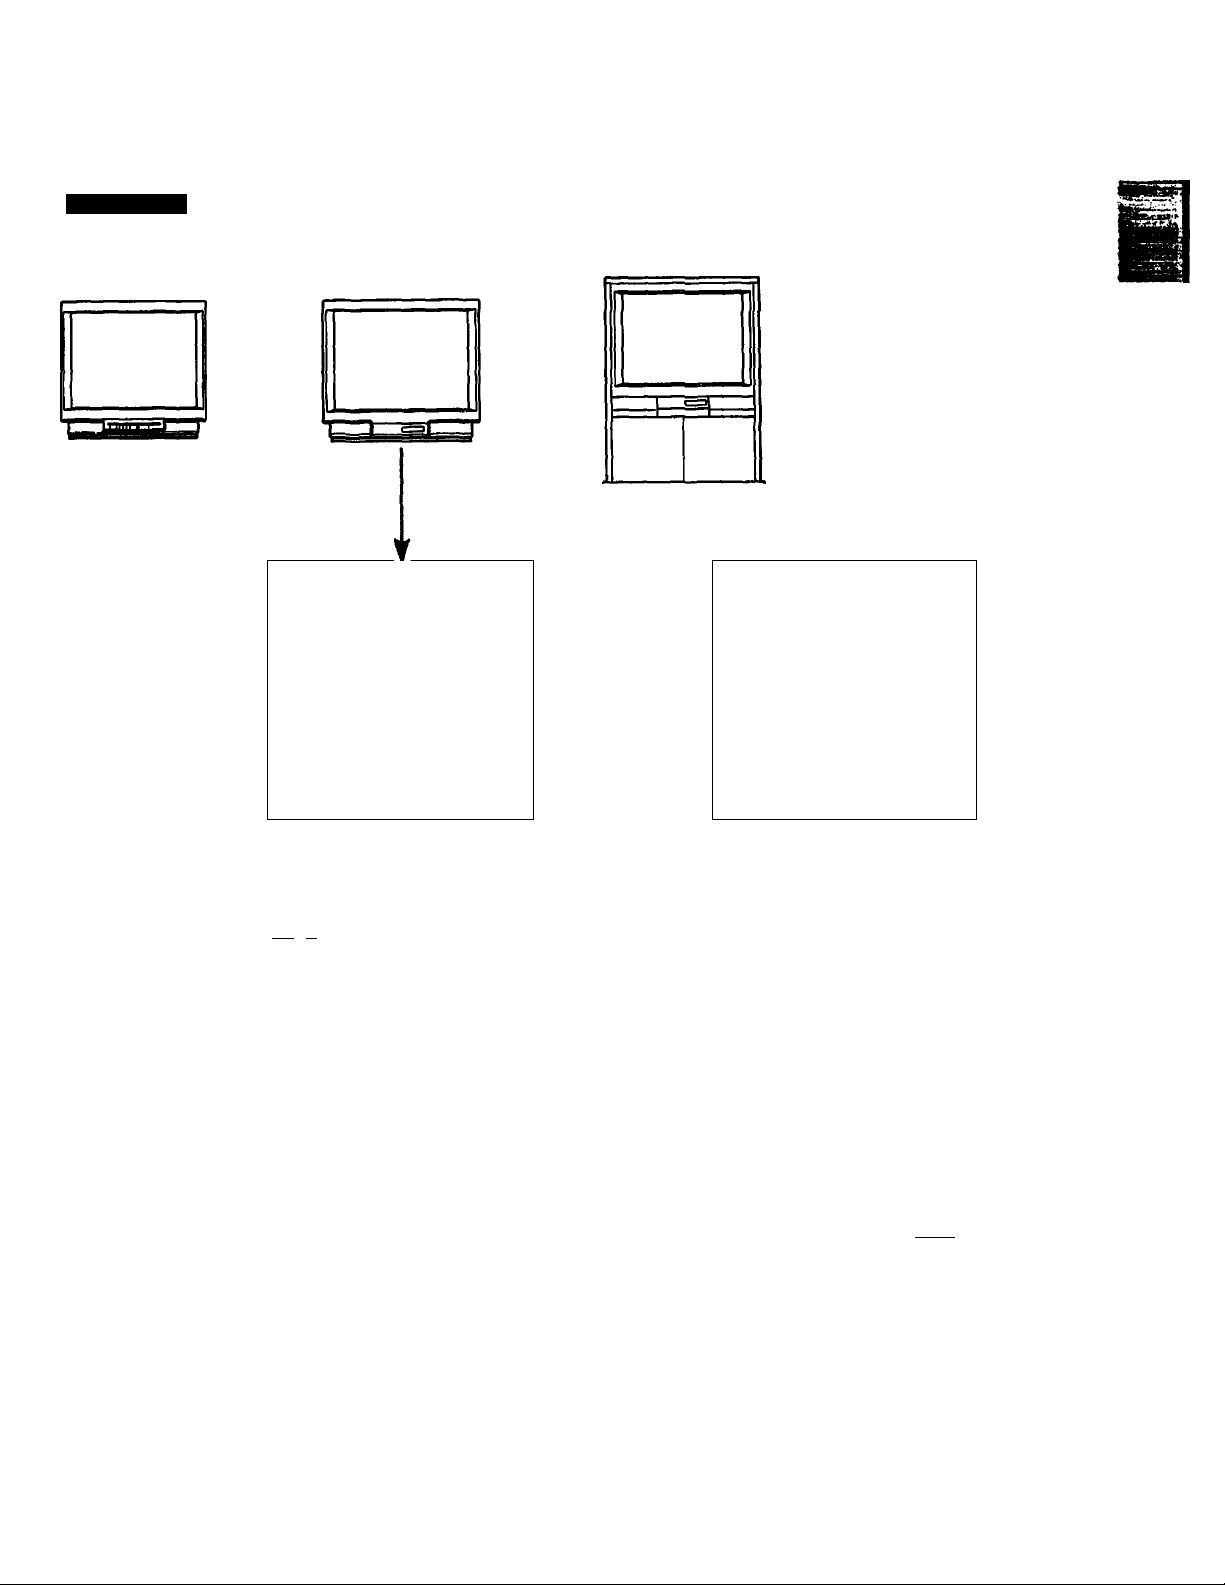
Design
KV-27TS27
KV-32TS20
KV-27TW75 (Natural wood finish)
KV-27TW76 (Black)
KV-27TS31 KV-32TS35
KV-27TS35
ÿ
s
B
i
I
8
KV-32TW75 (Natural wood finish)
KV-32TW76 (Black)
Supplied
Remote
Commander
RM-Y102
SBS
SB<=>
© ® ®
® ® ®
® ® ®
B® s
g|o
gs _»
BfSB
B&B
5oB
&&&
RM-Y101
BBS
■55ÎSB
© ® ®
® ® ®
© ® ®
B ® s
â B B
o-S-cs
RM-791
sœs
s-ass
© ® (D
® ® ®
© ® ®
B®
êm
sg
&
Preface
Page 6
Locating the Controls
Screen Displays
For details, refer to the pages indicated by the numbered black circles •.
A/V WINDOW displays
(VIDEO. AUDIO. GUIDE,
SET UP)
Bar display for volume,
pichjre or sound adjustment •
Channel number/cable *'C*’
displays
Main Picture input mode
> SLEEP. MUTING displays #
^CHANNEL CAPTION display
t
•MTS mode (MAIN. SAP or
MONO) •
CURRENT TIME display
SURROUND display#
I
I
I
I
I
KV-32TS35
(The screen displays, except for certain features
as noted above, are the same for all models.)
’ Picture-in-Picture input mode
(KV-27TS35, KV-32TS35, KV-27TW75,
KV-27TW76, KV-32TW75 and
KV-32TW76only)# — •
Preface
Page 7
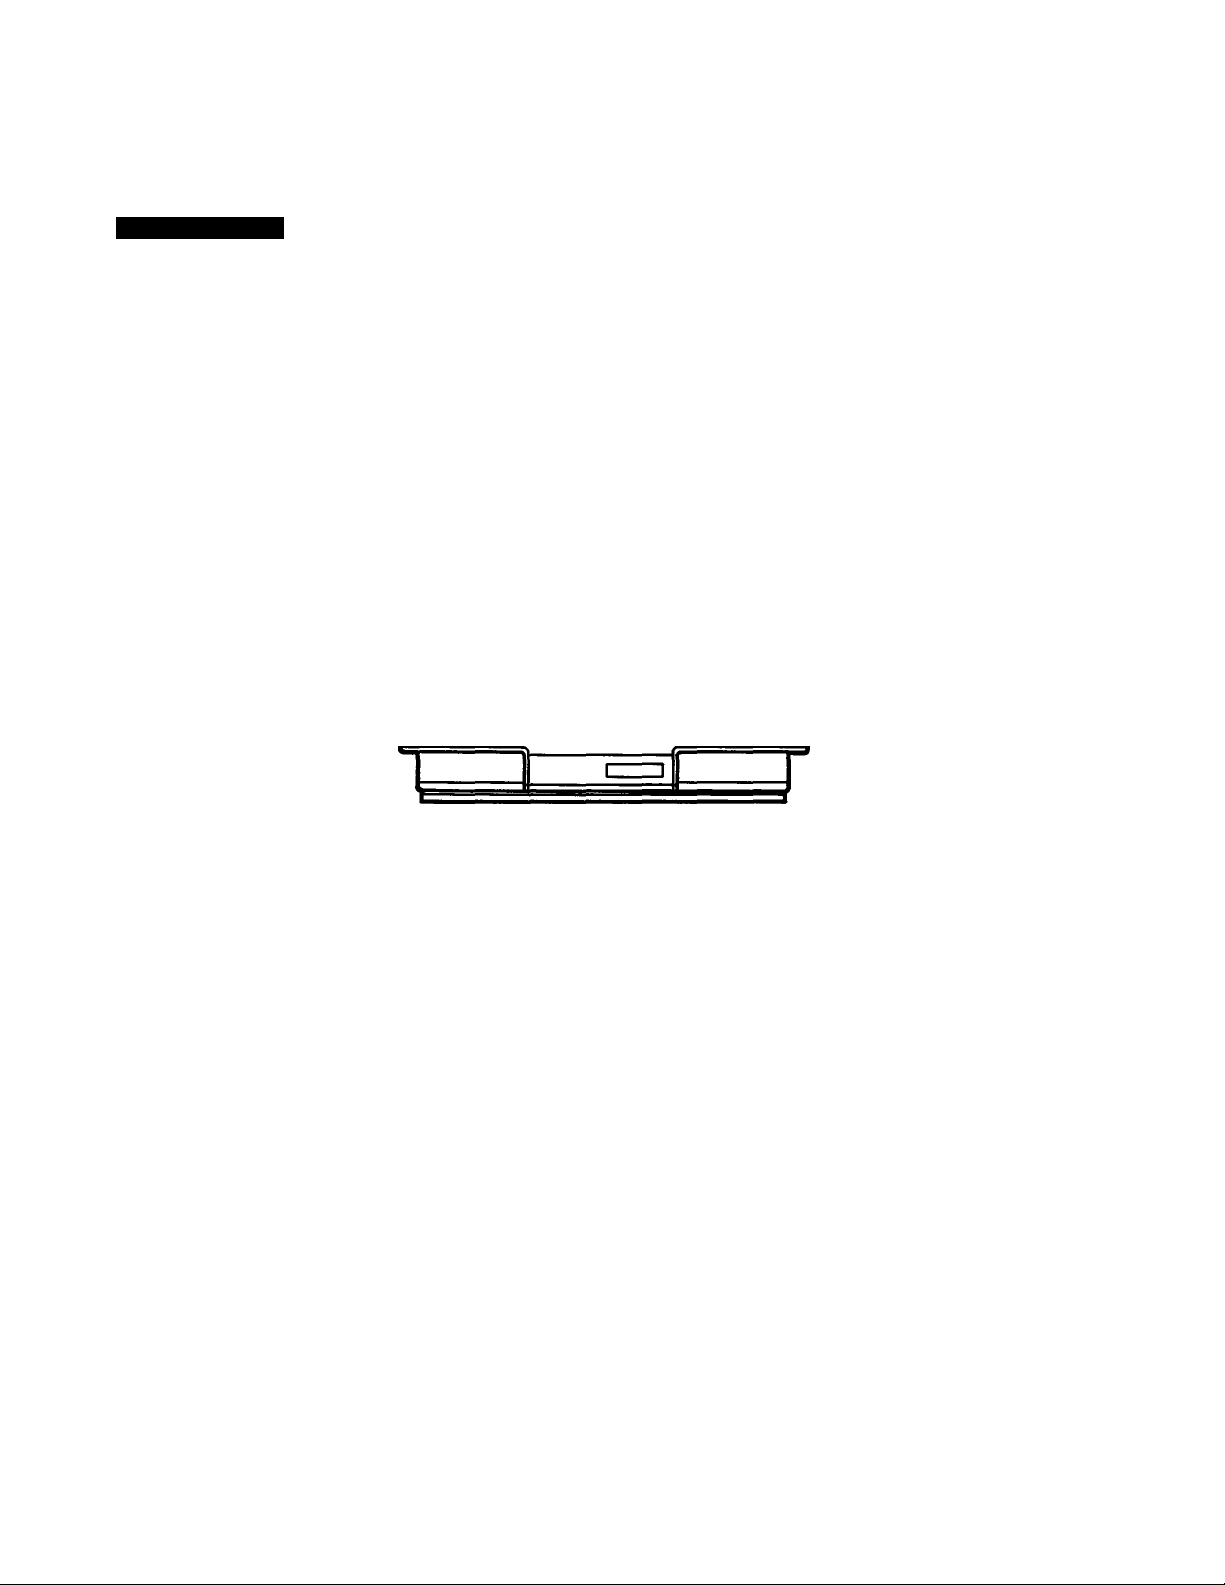
Front Panel
KV-27TSZ7
KV-32TS20
KV-27TS31
KV-27TS3S
KV-32TS35
Control Door Operation
KV-27TS31
KV-27TS35
KV-32TS35
Push Center To Open
KV-2TTW75
KV-27TW76
KV-32TW75
KV-32TW76
S
s
o
I
Control Door Operation
KV-27TW75 KV-32fW75
KV-27TW76 KV-32TW76
Comer To
V ^
vMmo -votUMt# -owAwwei»
CHANNEL•!■/--buttons»® ® ® ®
VOLUME +/- buttons*
TV/VIOEO button* ® ®
* Buttons with the same function are
also located on the Remote
Commander (pp. 10 -11).
pomm
TIMER Indicator lamp i
STEREO indicator lamp 9
POWER button* O ®
Remote detector
TV/V»£0 -VOlUME* -CHANN».« POWCH
© (£E)(B) ©
CHANNEL-1^-buttons*® ® ® ®
VOLUME +/- buttons*
T\WI0E0 button* ® ®
Remote detector
TIMER indicator lamp ®
STEREO indicErtor lamp ®
POWER button* ® ®
© @ ^
CAMCOROERfVIDEO IN
VIDEO, AUDIO input jacks i
l"
Page 8
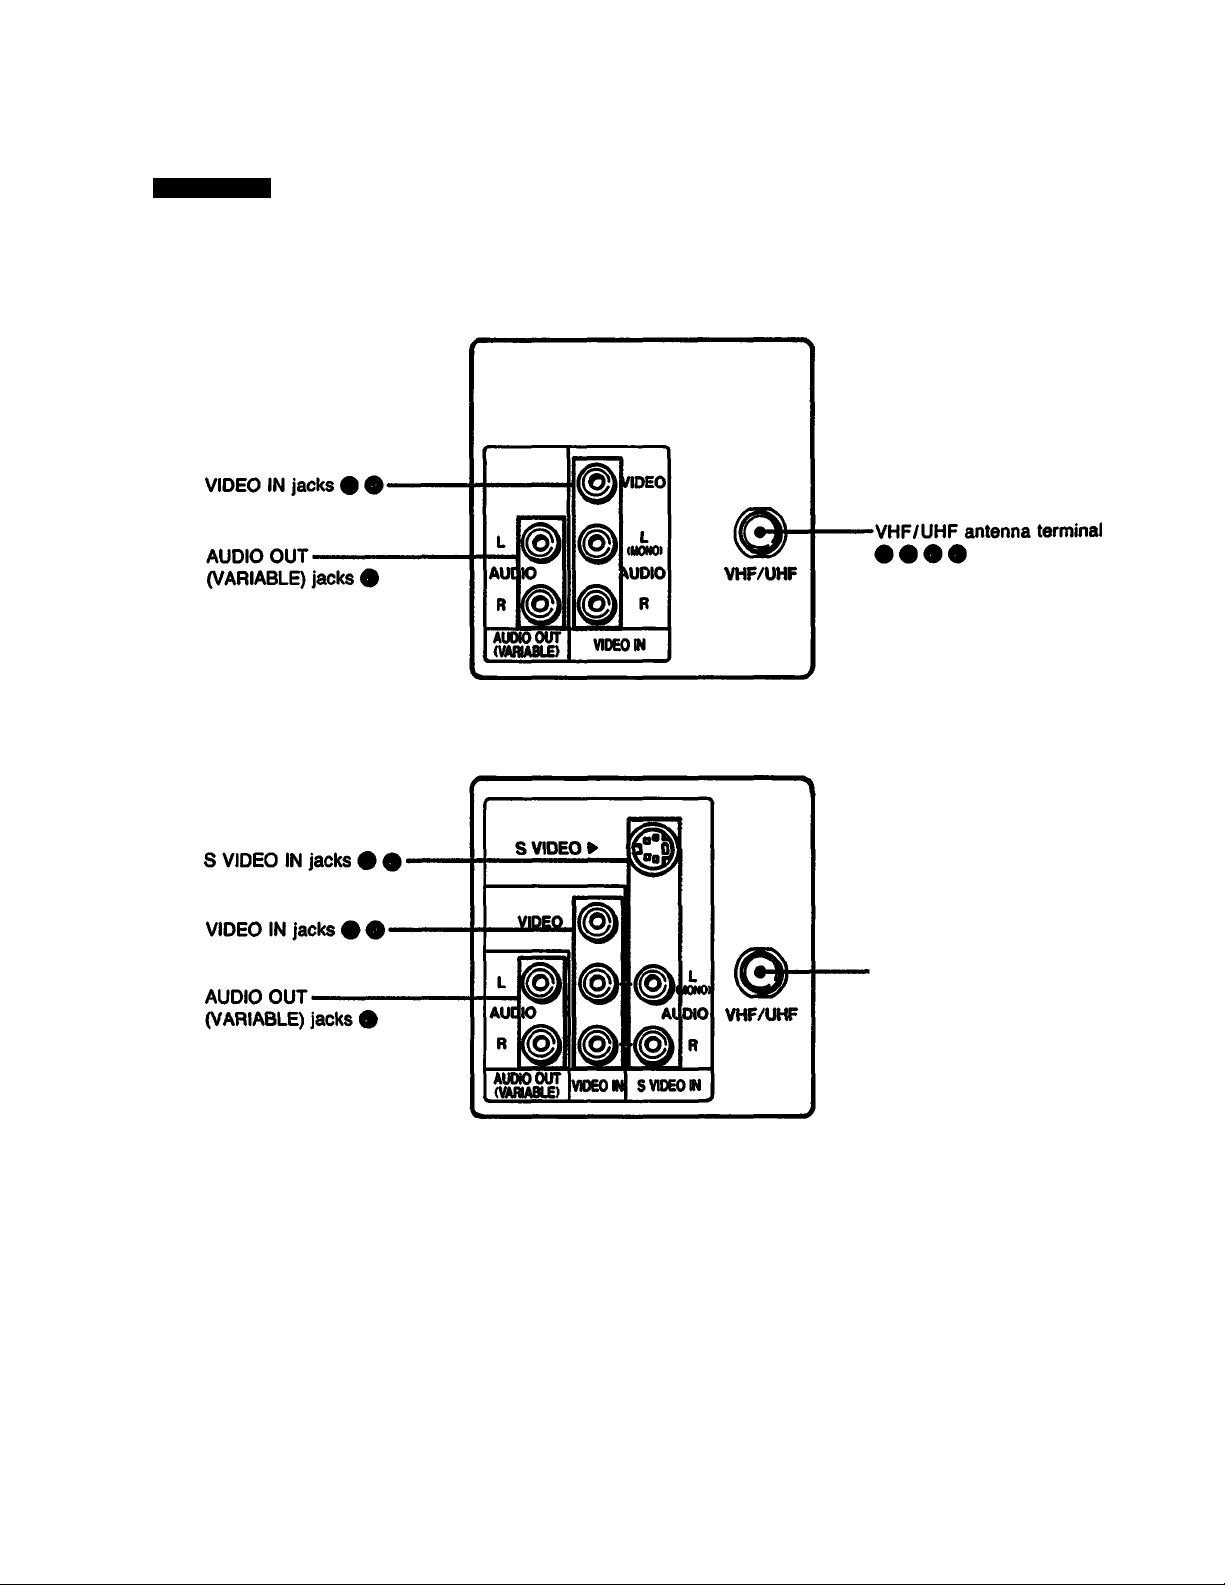
Locating the Controls
Rear Panel
For details, refer to the pages indicated by the numbered black circles •.
KV-27TS27
KV-27TS31 KV-32TS3S KV-3ZTW75
KV-27TS35 KV-27TW75 KV-32TW76
KV-32TS20 KV-27TW76
•VHF/UHF antenna terminal
8
Preface
Page 9
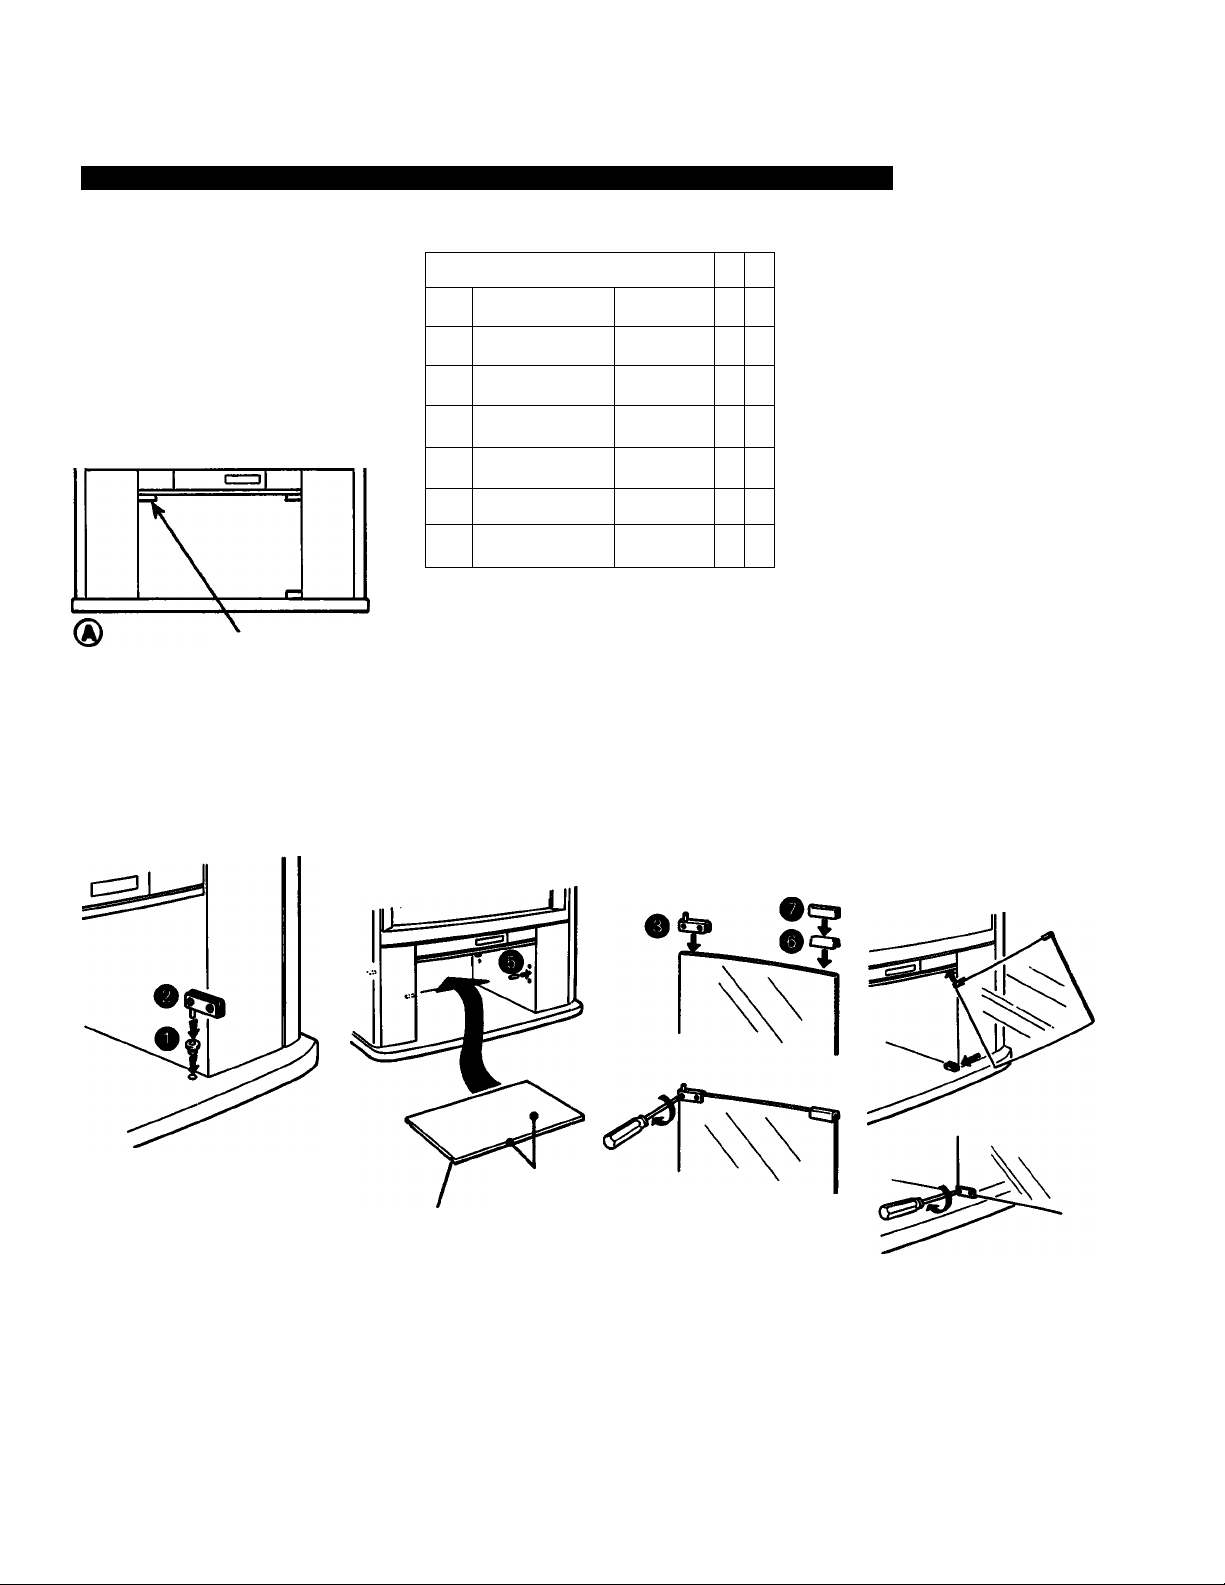
Installing the Glass Door and VCR Shelt (KV-27TW75 27TW76/32TW75/32TW76 only)
KV-32TW75
KV-32TW76
Push here to dose. To open, push again.
4 Insert bushing O into the cabinet
hole. Check that the projection of
the screw through the hinge allows for
proper installation of the hinge to the
glass, then insert the bottom hinge O
into the bushing.
Parts list
Bushing
o
Bottom Hinge
o
Top Hinge 1 2
o
Screw4x4 4 8
o
Metal tube
o
Plate pad
o
Push plate
o
O Insert the metal tube shelf
^ supports O and, aligning the
grooves with the supports, insert the
shelf.
(KV-32TW7WKV-32TW76 only)
®
®
1 2
i* » 1
a )
i j
1 1
3 Attach the top hinge® to one
end of the glass door and tighten
the screws. Attach plate pad® to the
other end, then push plate ® over the
plate pad.
1 2
4
1 2
1 2
-
KV-27TW75
KV-27TW76
(D
Push here to dose.
To open, push again.
^ Pushing the glass door hinge up
into the hole located on the cabinet
oeling, side the door Mo the bottom
hinge; then tighten the screws.
(Install the second door to the other side
in the same way as above, for models
KV-277W75 andKV-27IW76.)
a.
Check projection of this
area of screw O.
Coated side
Align the grooves with O.
Preface
Page 10
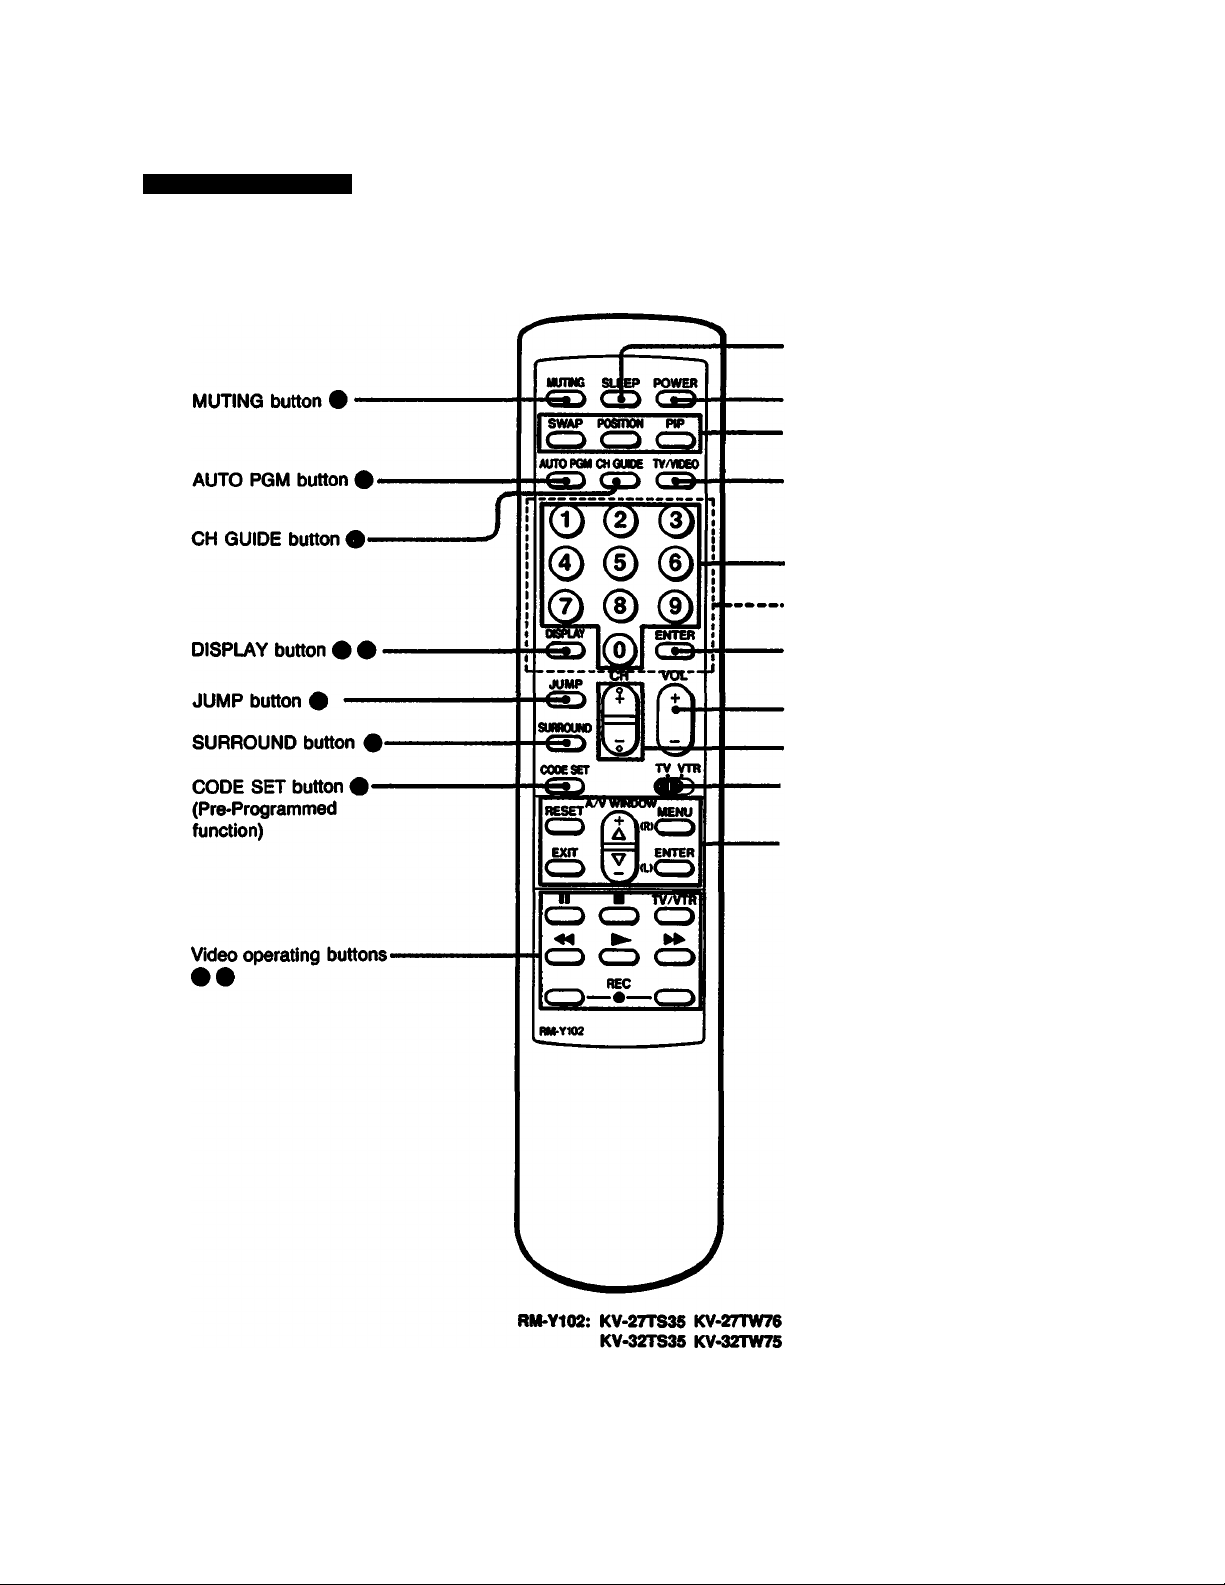
Locating the Controls
Remote Commander
For details, refer to the pages indicated by the numbered black circles •.
SLEEP button
POWER button* I
Picture-In-Picture buttons** (
TV/VIDEO button*
0-9 buttons
CHANNEL GUIDE directory keys i
ENTER button
VOL (volume) +/- button*
CH (channel) scan button*
• TV/VTR selector (
(Video equipment operation)
■A/V WINDOW buttons
* Buttons with the same function are
also located on the TV (p. 7).
** Buttons not included on
RM-Y101.
101
KV-27TW75 KV-3ZTW76
(RM-Y101: KV-27TS31)
Preface
Page 11
MUTING button •
AUTO PGM button
CH GUIDE button i
Min« SLflP POWER
M/rOPGtf CHGUOE TV/WeO
(D (2) (3)
0 0®
œ C9-
^ ^ CjS-
•SLEEP button E
• POWER button*
•TV/VIDEO button*
•0-9 buttons
•CHANNEL GUIDE directory keys (
<•
o
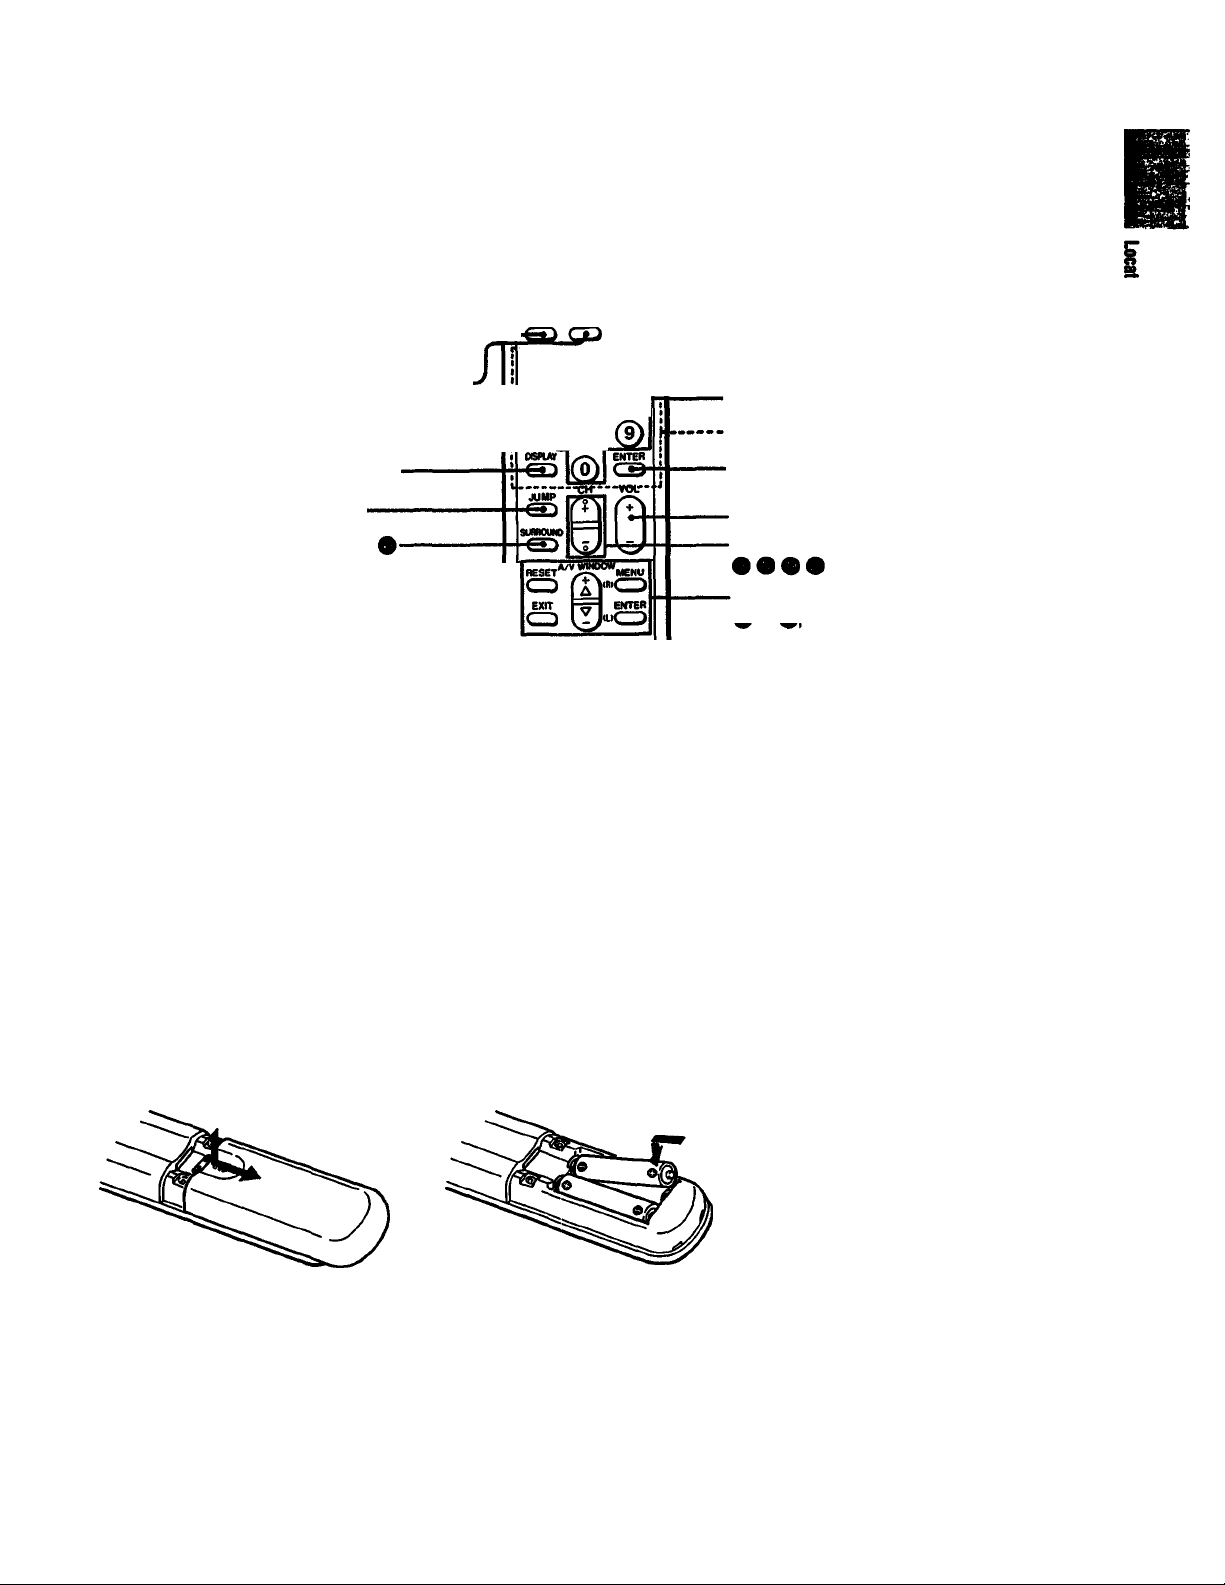
Installing Batteries
DISPLAY button •
JUMP button •
SURROUND button
TRMTRON
RM-791: KV-27TS27
KV-32TS20
•ENTER button
VOL (volume) +/- button*
CH (channel) +1- scan button*
A/V WINDOW buttons
* Buttons with the same function are
aiso located on the TV (p. 7).
WARNING
Batteries may explode if mistreated. Do
not recharge, disassemble or dispose of
in fire.
Remove the battery
compartment cover.
1
(Rear of commander)
Insert two size AA (R6
batteries in correct poiarity.
Battery life
With normal operation, batteries will last
up to half a year. If the Remote
(Commander does not operate properly,
the batteries might be exhausted. Replace
both with new ones.
To avoid damage from possible battery
leakage
Remove the batteries when you will not be
using the Remote Commander for a fairly
long time.
Preface
11
Page 12
Chapter 1: Set up
I
Connecting TV Antenna/Cable
You can use either an indoor or outdoor antenna with your TV. We recommend using an outdoor antenna for better
picture quality. You can receive cable TV by connecting a cable supplied by your local cable company.
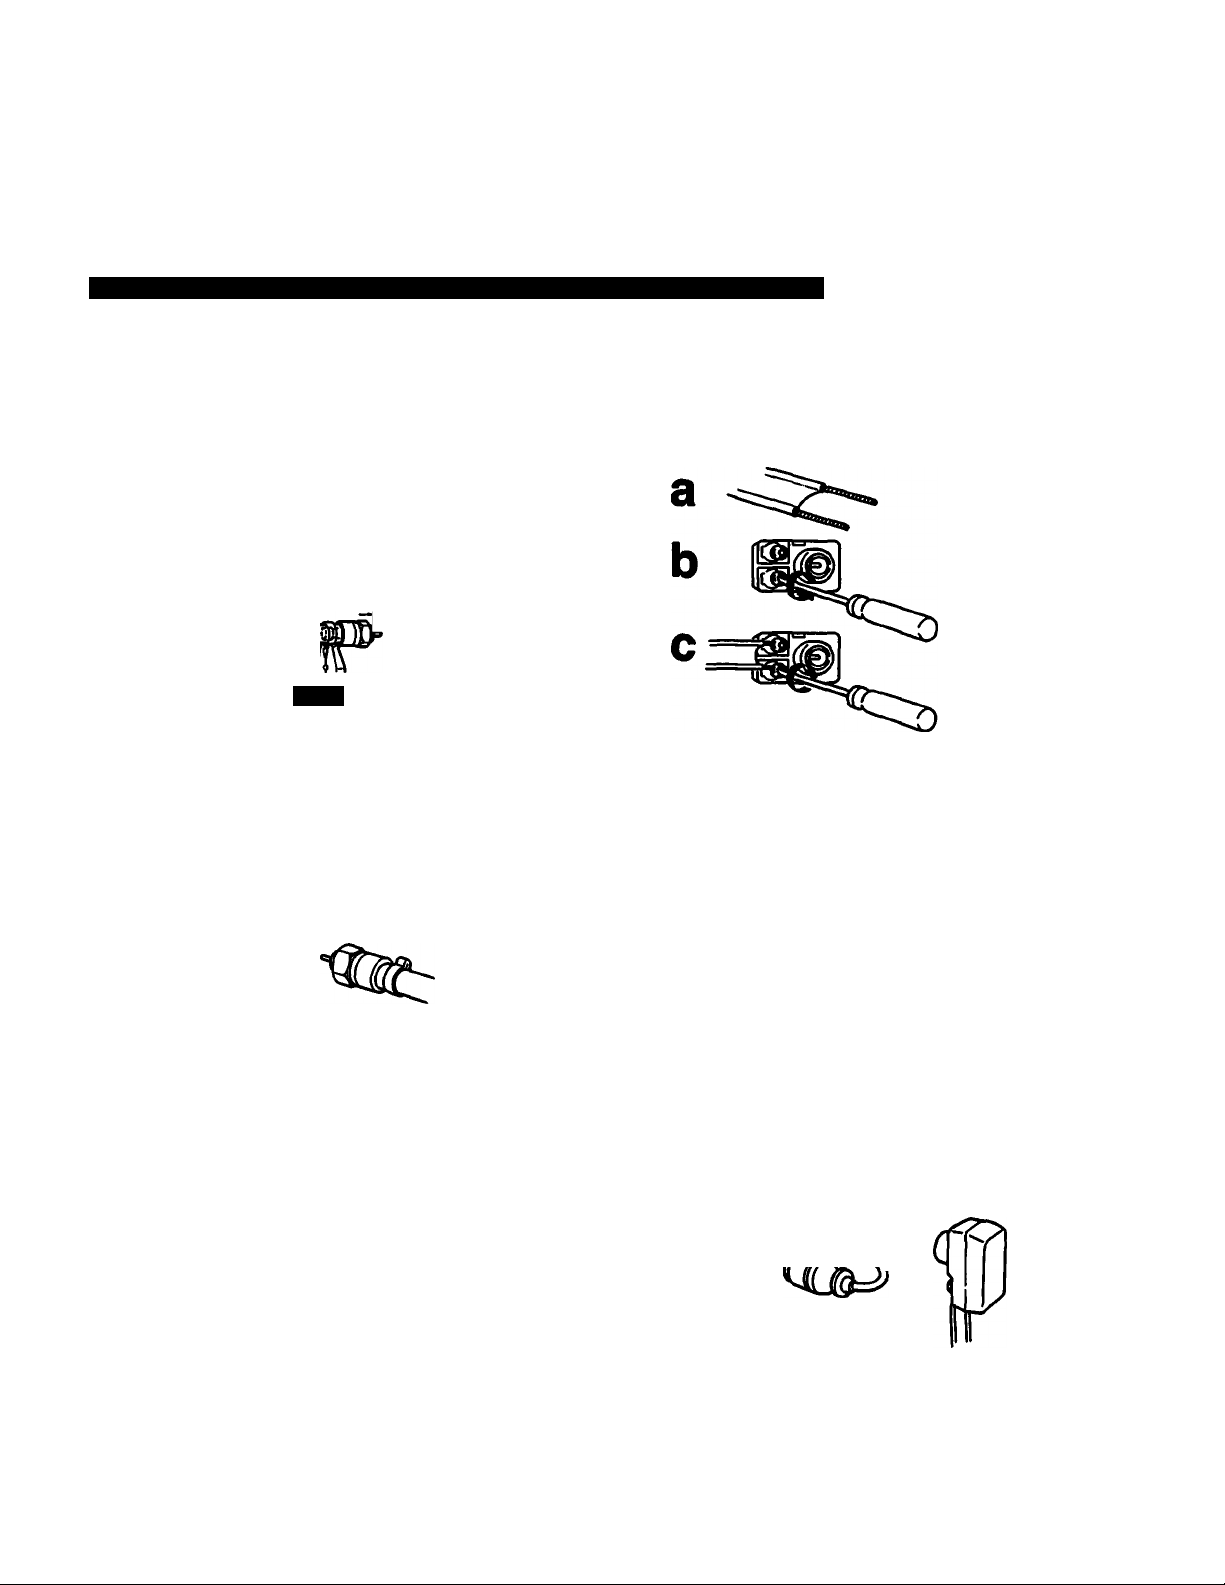
Connecting VHP. UHF or VHF/UHF Combination Antenna*, or CATV Cable
75-ohm coaxial cable (round)
Check your antenna cable type and prepare the
end of the cable using the F-type connector.
1
Attach an F-type connector (not supplied).
a
7 mm (t4 inch) 10 mm (% inch) F-type connector
b
3 mm (Vk inch)
It
c
d
Plug the connector into the VHF/UHF terminal at
the rear of the TV.
(Rear of TV)
300-ohm twin-lead cable (flat)
Check your antenna cable type and prepare the
end of the cable using the 300-ohm twin-lead cable.
1
Attach an antenna connector (not supplied).
Loosen both
screws on the
connector with a
screwdriver.
Attach the cable
and tighten both
screws with a
screwdriver.
Plug the connector into the VHF/UHF terminal at
the rear of the TV.
(Rear of TV)
VHF/UHF
* Most combination antennas are equipped with a signal splitter.
Remove the splitter and attach the appropriate connector.
VHF/UHF
(T^
r
For better picture quality, connect optional antenna cable
so that the 300-ohm twin-lead cable can be separated a
distance from the TV.
(Rear of TV)
VHF/UHF
•j 2 I Chapter 1: Set up
Page 13
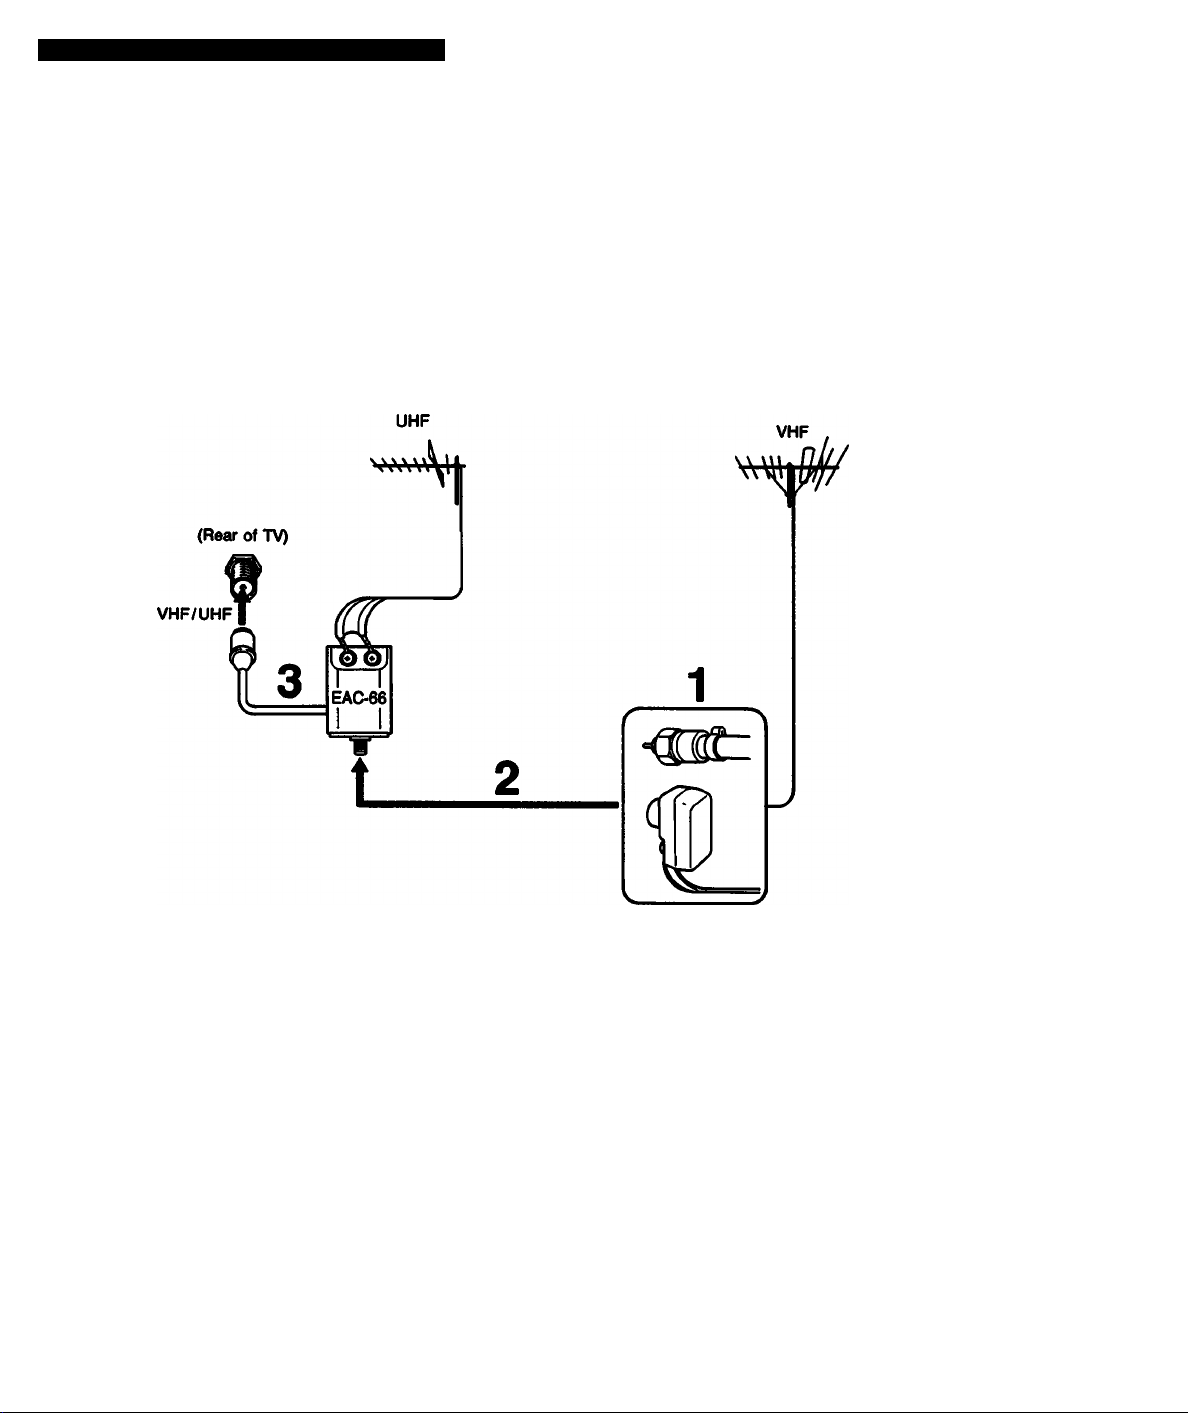
Connecting both VHF and UHF antennas
Use the EAC-66 U/V mixer (not supplied).
Prepare the VHF antenna end using the appropriate connector (p. 12).
1
Connect the cables to the mixer.
2
Attach the mixer to the VHF/UHF terminal.
3
«a
9
9
9
9
9
9
When the U/V mixer is used
Snow and noise may appear in the pictures of the cable TV channels over 37 (W+1).
Chapter 1: Set up
13
Page 14
1
Turning the Cable Mode On or Off
All of the controls are on the Remote
Commander.
If you have cable connected to your TV (p. 12), follow the steps below to turn
the cable connection on or off. Cable mode is preset to ON when you use
your TV for the first time; turn cable OFF to preset or watch VHF or UHF
channels (pp. 15 — 19).
Press MENU to display the
following screen.
1
MENU
USE UTI& (ENTER]
Press the +1- button to select SET UP.
USE UT] a (ENTER)
AAI UINDQU
►UIDEQ
AUDIO
GUIDE
SET UP
AAI MINDOU
UIDEO
AUDIO
GUIDE
►SET UP
• You cannot set (}ABLE ON/OFF while the
TV is in VIDEO mode. Before setting, select
TV mode by pressing TV/VIOEO.
• The menu will be cancelled automatically
after 10 seconds if you do not push any
buttons during that time.
Press ENTER.
ENTER
Press +1- button and
ENTER to select CABLE.
ENTER
Press the +/- button and ENTER to select ON or OFF alternately.
SET UP
CURRENT TIME SET
CHANNEL CAPTION CHAKNEL CAPTION
CHANNEL ERASE CHANNEL ERASE
CHANNEL ADD
CABLE: ON
USE (ITiaiENTERl USE (¿?] a (ENTER!
SET UP
►OJRRENT TIME SET
(>mEL (»PTIQN
OIANNEL ERASE
(MA№EL ADD
(>1BLE OFF
SET UP
(URRENT TIME SET
OiANCL CAPTION
CHANNEL ERASE
CHANNEL ADD
►CABLE OFF
SET UP
CURRENT TIME SET
CHANNEL ADD
CABLE OFF
14
Chapter 1: Set up
To return to TV mode.
Press EXIT.
Page 15

I
Presetting TV Channels
Presetting TV Channels Automatically
Press POWER on the TV or the Remote Commander to turn the TV on.
1
POWER
POWER
TV/VIDEO POWER
O
a
b
Turn the cable connection on or off, depending on if you want to preset
cable or VHF/UHF channels.
2
(FOLLOW THE STEPS ON P. 14)
If "VIDEO ” or "S VIDEO ” Is displayed on the screen, press the TV/VIDEO button on
the TV or the Remote Commander so that a channel number appears.
Press AUTO PGM.
AUTO PGM
14
4^
"AUTO PROGRAM " is displayed on the screen and receivable channels (other than the
channe/s eiready preset) will be preset in numerical sequence. The chamois /xrevioualy
preset remain In the TV's memory.
When no more channels can be found, the programming stops and the lowest numbered
channel is dl^rlayed.
16
15
tiS3SsS£
jMSSfSS.
’S
2
if
9
Press CH +1- to check or view preset channels.
3
Pl ^
4
a
Channels that can be received on this TV:
VHF: 2 — 13
UHF: 14 — 69
Cable: 1 —125
To erase unnecessary channels, or to add channels that could not be
preset automatically because their signal strength was too weak, follow the
steps in “Erasing Unnecessary Channels” (p. 16) and “Presetting Only
Desired Channels” (p. 18).
Chapter 1: Set up 115
Page 16

Presetting TV Channels
Erasing Unnecessary Channels — CHANNEL ERASE
Use this feature to erase non-receiving channeis from the channei scan
memory.
Note
You cannot use CHANNEL ERASE tMhile the TV is in VIDEO nrade. Before erasing
channels, select TV mode by pressing TV/VIOEO.
Press MENU to display the following screen.
1
MENU
Press the +1- button to select SET UP.
АЛ} UINDGU
ИЛ DEO
AUDIO
GUIDE
SET UP
USE (¿TI&IENTERI
Press ENTER.
ENTER
Press the button to select CHANNEL ERASE.
Press ENTER.
АЛ> UINDOU
UIDEQ
AUDIO
GUIDE
►SET UP
USE UT]& [ENTER]
SET UP
►CURRENT TIME SET
CHANNEL CAPTION
CHANNEL ERASE
CHANNEL ADD
CABLE ON
SET UP
CURRENT TIME SET
CHANNEL CAPTION
►CHANNEL ERASE
CHAMCL ADD
CABLE ON
16
Chapter 1: Set up
ENTER
ERASE
USE (CH*.-]
TO SELECT THE CH
THEN PRESS lENTERl
TO ERASE
Page 17

Press the CH h-/- button to select the channel you want to erase.
ERASE
USE tCH+.-]
TO SELECT THE CH.
THEN PRESS tENTER]
TO ERASE.
Press ENTER.
A appears before the channel number, showing that the channel has been erased
from the chant»! scan memory.
ENTER
The next tíme you press theCH +1- buttons, channel 8 witt be skipped.
Repeat step 4 to erase other channels.
ERASE
USE tCH*.-]
TO SELECT THE CH.
THEN PRESS tENTER]
TO ERASE.
To return to TV mode
Press EXIT.
When you erase a VHP or UHF channel, the
cable TV channel with the same number is
also erased, and vice versa.
Cable TV channel chart*
Cable TV systems use letters or numbers to
designate channels. To tune in a channel,
refer to the chart below.
Number on
this TV
1
S
6
14
15
16
17
18
19 F
20
21
22
23
24
25
26
27
28
29
30
31
32
33
34
35
36
37
38'
39
:
93
94
95
96
97
98
99
100
101
102
1
123
124
125
Corresponding cable
TV channel
A-8
A-7
A-6
A
B
C
0
E
G
H
1
J
K
L
M
N
0
P
Q
R
8
T
u
V
w
W+1
W+2
W+3
:
W+57
W+58
A-S
A-4
A-3
A-2
A-1
W+59
W-t-60
W+61
:
W-i-82
W+83
W+84
&
S
3
* This designation of cable TV channels
conforms to the EIA/NCTA
recommendation.
Check with your local cable TV company for
more complete information on the available
channels.
Chapter 1: Set up
17
Page 18

Presetting TV Channels
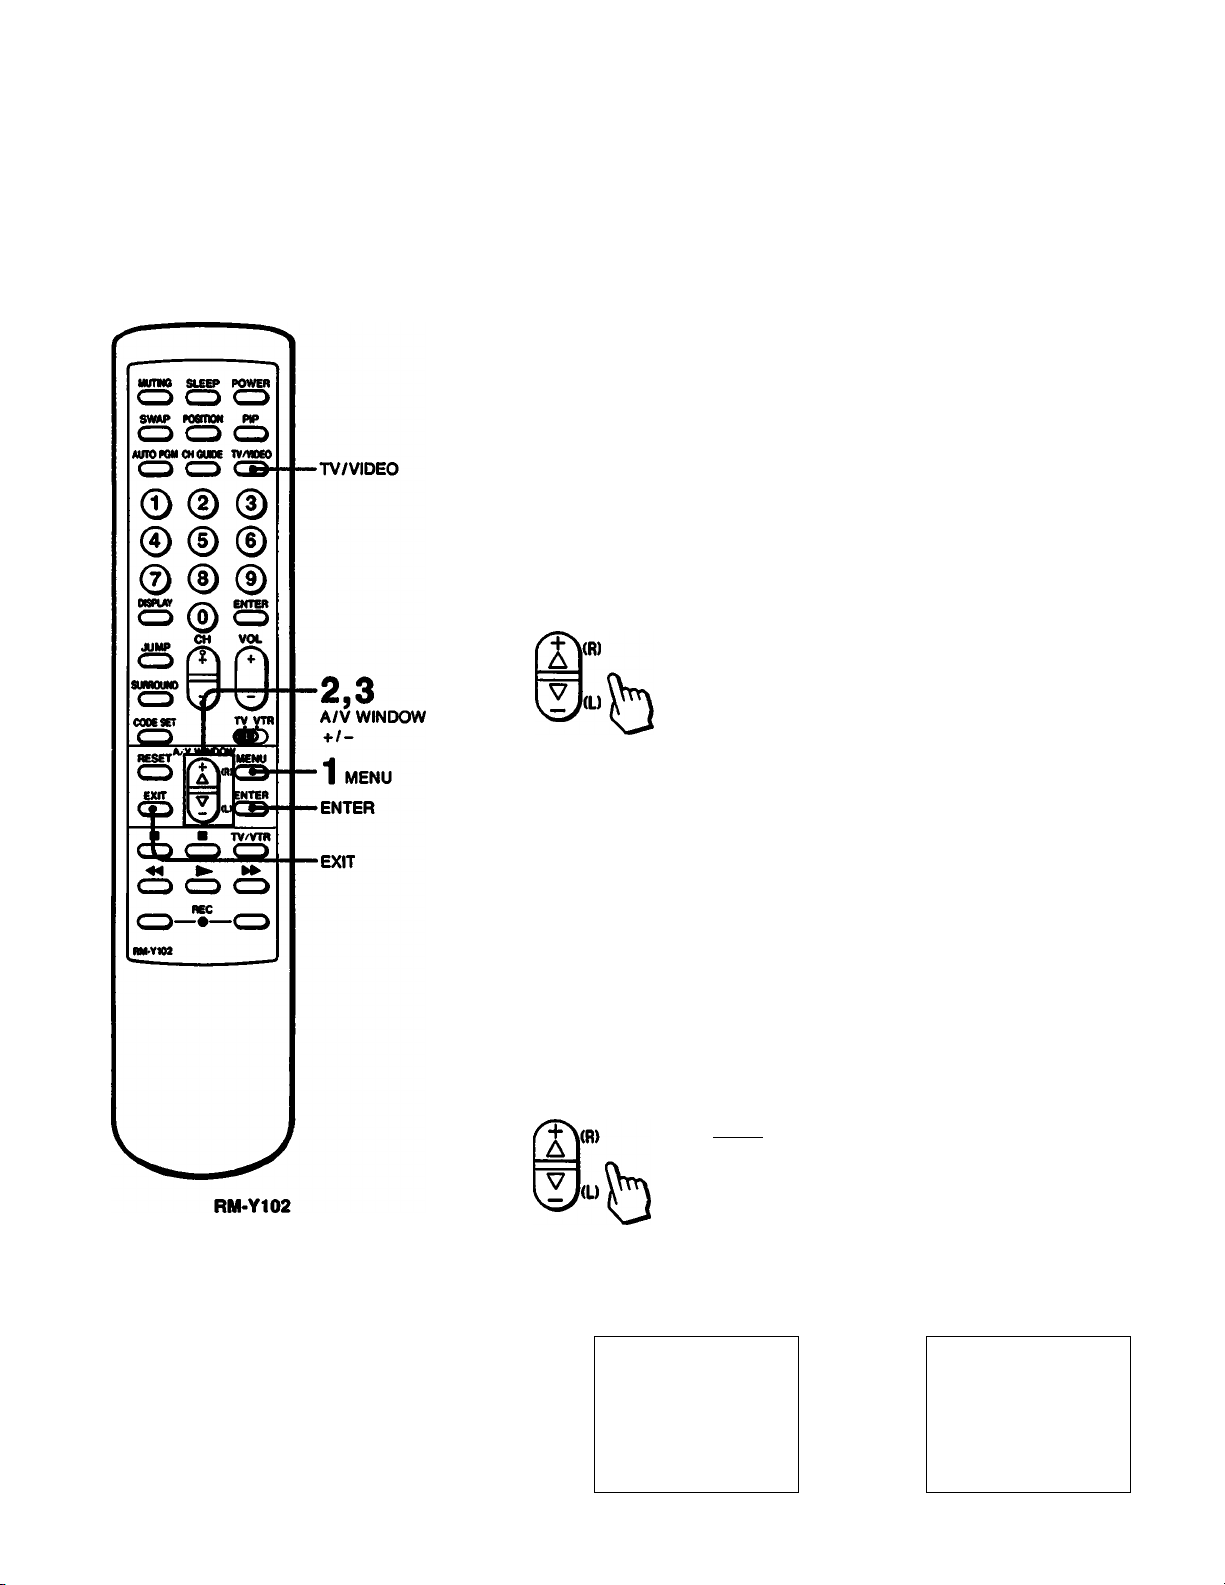
Presetting Only Desired Channels — CHANNEL ADD
Use this feature to add channels one by one to the channel scan memory.
You cannot use CHANNEL ADD while the TV is in VIDEO mode. Before adding
channels, select TV mode by pressing TV/VIDEO.
1-2
(FOLLOW STEPS 1 & 2 ON P. 16)
■TV/VIDEO
■4
0-9 buttons
.2,3
A/V WINDOW
+/-
'1 MENU
•ENTER
•EXIT
Press the +/- button to select CHANNEL ADD.
SET UP
CURRENT TIME SET
CHANNEL CAPTION
CHANNEL ERASE
►CHANNEL ADD
CABLE ON
Press ENTER.
ENTER
Press the 0 — 9 buttons to select the channel you want to add. For example, to add channel 25, press 2, 5 and ENTER.
ENTER
Press ENTER again.
A " + ” appears before the channel number, showing that the channel has
been added to the channel scan memory.
ADD
USE m-g]& CENTER]
TO SELECT THE CH
THEN PRESS CENTER)
TO ADD
ADD
USE CO-918. CENTER]
TO SELECT THE CH
THEN PRESS CENTER]
TO ADO
20
25
18
Chapter 1: Set up
ENTER
Repeat step 4 to add other channels.
To return to TV mode
Press EXIT.
ADO
USE CO-9] 8. CENTER]
TO SELECT THE CH
THEN PRESS CENTER]
TO ADD
t 25
Page 19

Cluster 2: Baste Operation
I
Watching TV Programs
■ □ i C^Gj
Press POWER on the TV or the Remote Commander to turn the TV on.
1
POWER
POWER
TV/VIDEO I
VOLUME X.
POWER
O
CD
h
Turn the cable mode on or off, depending on if you want to watch cable
or VHF/UHF channels.
(FOLLOW THE STEPS ON P. 14)
If “VIDEO" or “S VIDEO” Is displayed on the screen, press the TVAfIDEO button on the
TV or on the Remote Commander so that a channel number appears.
Select a channel in one of the following two ways:
To scan the preset channels* in numerical sequence
Press CH +/-.
• ••• S»
*For more on presetting channels, see pp. 15 - 18.
1
To select a channel directly
Press the 0 - 9 button(s) and then ENTER.
For example, to select channel 10, press 1, 0 and ENTER.
Press VOL -f/- to adjust the volume.
The display will disappear
automatically after 3 seconds.
To turn off the TV
Press POWER on the TV or the Remote Commander again.
To reduce To increase
the volume the volume
Chapter 2: Basic Operation
19
Page 20

Adjusting Picture and Sound Quaiity
Adjusting the Picture
Press MENU to display the following screen.
VIDEO Is already selected for you.
1
MENU
Press ENTER.
ENTER
ftA) MtNDGU
KJIIEO
AUDIO
GUIDE
SET UP
USE UT1& (ENTER]
Press the -f/- button to select the quality you want to adjust.
For example, to adjust the picture brightness, select BRIGHT.
Press ENTER.
ENTER
Chapter 2: Basic Operation
20
Page 21

Press the +!- button to make the adjustment.
A
To return to TV mode
Press EXIT.
To restore the factory (mid-level) setting
Go to the VIDEO menu and press RESET.
All the settings except for PICTURE will be
restored to the mid-level setting.
Brighter
Darker
Press ENTER.
The new settbig witt eppear In the VIDEO menu.
ENTER
To adjust another item
Repeat steps 3 and 4.
Press - to: Press to:
PICTURE
HUE make skin tones
COLOR decrease color intensity increase color intensity
BRIGHTNESS darken the picture brighten the picture
SHARPNESS soften the picture
The menus and adjustment bars will cBsappear automatically after 10 seconds If you do
not press any other buttons during that time.
decrease picture contrast with
soft color
become purplish
increase picture contrast with
vivid color
make skin tones
become greenish
sharpen the picture
m
£
e
S:
3
s
8
S
5
Chapter 2: Basic Operation
21
Page 22

Adjusting Picture and Sound Quaiity
Adjusting the Sound
Press MENU to display the following screen.
1
MENU
Press the +/- button to select AUDIO.
Press ENTER.
IVU UINDOU
KJIDEO
AUDIO
GUIDE
SET UP
USE IX?] & CENTER]
AAI UINDOU
UIDEO
^AUDIO
GUIDE
SET UP
USE CXr] a CENTER)
ENTER
Press the button to select the sound quality (TREBLE, BASS or
BALANCE) that you want to adjust. For example, to adjust the bass
response, select BASS.
Press ENTER.
ENTER
Chapter 2: Basic Operation
22
Page 23

Press the +!- button to make the adjustment.
VR)
Press ENTER.
The new setting will appear In the AUDIO menu.
ENTER
To adjust another item
Repeat steps 3 and 4.
To restore the factory (mid>level) settings
Go to the AUDIO menu and press RESET.
The setOigs (or MTS and SPEAKER will not
be affected (pp. 24 — 25).
To return to TV Mode
Press EXIT.
§.
§
at
a
8
Press - to:
TREBLE
BASS decrease the bass response increase the bass response
BALANCE emphasize the left
The menus and adjustment bars will disappear automatically attar 10 seconds If you do
not press any buttons during that time.
decrease the treble
response
speaker’s volume
increase the treble
response
emphasize the right
speaker’s volume
Press + to:
Chapter 2: Basic Operation
23
Page 24

Adjusting Picture and Sound Quaiity
Receiving Multichannel TV Sound programs — MTS
(FOLLOW STEPS 1 AND 2 ON P. 22)
1-2
Press the +!- button to select MAIN, SAP or MONO modes
alternately. (Display is red)
4
Select the MAIN mode to listen to STEREO sound.
The STEREO Mcator lamp on the TV will light up whenever a stereo broadcast Is
received.
MJDIO
TREBLE
BRSS
BALANCE
MTS MAIN
SPEAKER ON
USE U?l& (ENTER]
Select the SAP mode to listen to Second Audio Programs.
\(R)
During SAP mode, the sound of non-SAP
programs will be muted.
Select the MONO mode to eliminate excessive noise during stereo broadcasts, caused by a weak incoming signal.
Press ENTER.
The display witt turn green, indicatktg that the mode has been set.
ENTER
AUDIO
TREBLE
BASS
BALANCE
MTS SAP
SPEAKER ON
USE (Xri& [ENTER]
AUDIO
TREBLE
BASS
BALANCE
MTS: MONO
SPEAKER ON
USE (¿?]& (ENTER]
Chapter 2: Basic Operation
24
Page 25

Turning the SPEAKER ON or OFF
Use this feature to turn the TV speakers off when you connect an audio system (p. 46)
(FOLLOW STEPS 1 and 2 ON P. 22)
1-2
Press the ■(■/- button and ENTER to select SPEAKER.
To return to TV
Press EXIT.
'HPv«» enter
ENTER
M' CD
Press the +/- button to select ON or OFF modes alternately.
(Display Is red).
4
USE UTI&IENTERl.
USE a?l&[ENTER].
AUDIO
treble
BASS
BALANCE .........H...—
MTS: MAIN
SPEAKER: OFF
AUDIO
TREBLE
BALANCE —h—
MTS: MAIN
SPEAKER: ON
1
I
e
S:
9
3
fi)
s
Press ENTER.
Display will turn green, IncBcating that the mode has been set.
ENTER
Chapter 2: Basic Operation
25
Page 26

Chapter 3: Advanced Operation
I
Using PiCtUre-in-PiCtUre (KV-27TS35, KV-32TS35. KV-27TW7S,
With this feature, you can watch both the main picture and a video source,
simultгmeously, by means of a window picture.
For example, use Picture-in-Picture when you want to watch a TV program
and a video source from connected equipment (VCR, video disc player, etc.)
at the same time.
If you connect a VCR, you can watch two different TV programs at the same
time.
Displaying a window picture — PIP
Press PIP.
PIP
Input source mode or TV channel for the main picture
Input source mode or TV channel for the window
picture (display is white)
A window picture will appear In the same input mode as the last time you used PIP.
Scanning channels In the window picture
Press CH +/- or the 0 — 9 buttons and ENTER.
O©0
©0©
©0©
®b
ENTER
UIDEO
WSiv vT
UIDEO UIDEO
20 I Chapter 3: Advanced Operation
To make the window picture disappear
Press PIP again.
Page 27

KV-27TW76, KV-32TW75 and KV-32TW76 only)
Swapping the main and window pictures — SWAP
Pre^s PIP to display a window picture.
1
PIP
Press SWAP.
SWAP
Changing the position of the window picture — POSITION
Press PIP to display a window picture.
PIP
To change the input mode of the window
picture
1 Press TV/VIDEO to change the input mode
of the main picture.
(Selects TV. VIDEO, S VIDEO in sequence)
2 Press SWAP to swap the main picture with
the window picture.
• You cannot hear the sound of the window
picture channel.
• If the main picture is blocked, the display
“BLOCKED" will appear on the main
screen, and Picture-in-Picture will not
function (pp. 36 - 37 — Setting CHANNEL
BLOCK).
• If the main picture is not receiving an
image, the window picture will disappear. It
will reappear when you switch to a receiving
channel.
• When the main picture is black and white,
depending on the TV signal some window
picture images may also be black and
white.
• When you turn PIP on, or when you turn
the TV on with PIP mode on, the window
picture will appear at the bottom right of the
screen.
• Depending on the condition of the main
picture’s signal, the window picture may be
affected.
vsssa
Press POSITION.
Each time you pmss POSITION, the window picture wlH move counterclockwise
on the screen, as Illustrated below.
POSITION
Chapter 3: Advanced Operation
27
2
O
Page 28

Using Picture-in-Picture
Displaying a VIDEO input Image as a window picture
To watch VIDEO images (VCR playback or TV through a VCR tuner) using
Picture-in-Picture, first select a program mode (cable or VHF/UHF) by
following the steps on p. 14, “Turning the Cable Connection On or Off."
Then follow the steps below.
Press TV/VIDEO to select the appropriate video input mode.
(Selects TV, VIDEO and S VIDEO modes in sequence)
1
TV/VIDEO
The video image from the input mode you select wilt appear as the так) fkcture.
Press SWAP so that the video input picture becomes a window picture.
SWAP
_______________
Press SWAP again to change the video input picture back to the main
picture.
SWAP
ОТ
0
You can only change VIDEO input modes of the main picture.
To operate your VCR with the supplied Remote Commander, see pp. 30 - 31
— "Using the Remote Commander.”
UIDEO
Chapter 3: Advanced Operation
28
Page 29

Displaying pay cable TV as a window picture
In order to use Picture-in-Picture with pay cable TV images, make sure the
connections are made as illustrated below. Select cable mode by following
the steps on p. 14, “Turning the Cable Connection On or Off.” Then follow
the steps below.
Follow steps 1 — 3 in “To display a VIDEO input image as a
1-3
Put your VCR on an inactive channel (CH 3 or 4).
Change pay cable TV channels with the decoder box.
window picture” (p. 28).
KV-27TS27
KV-27TS31 KV-32TS35 KV-32TW75
KV-27TS35 KV-27TW75 KV-32TW76
KV-32TS20 KV-277W76
Decoder
box
VCR
a
c
3
CATV cable
.
Decoder
box
VCR
1 2
Chapter 3: Advanced Operation 129
VCR
,/
9
3
a
s
3
Page 30

Using the Pre-Programmed
1
Remote Commander (kv-zttssi, kv-zttsss,
You can operate other video equipment that has an infrared remote detector with this supplied Pre-Programmed Remote
Commander.
Operating Sony or non-Sony Video Equipment — Pre-Programmed Function
With the supplied Remote Commander, you can operate a Sony video
cassette recorder (Beta, 8mm, VHS) or multi disc player as well as most nonSony video equipment connected to your TV by following the steps below.
Set the TVA/TR selector to VTR.
1
m-mm, m-zmm
TV VTR
.
c*
When the selector is set to VTR, the POWER and CH -i-/- buttons on the Remote
Commander function as video operating buttons and cannot be used to operate the TV.
While pressing CODE SET, press the 0 — 9 buttons to enter the
manufacturer’s code number (see chart on p. 31). For example, to
2
operate a Sony 8 mm VCR, press 0, 2 and ENTER.
CODE SET
+
Use the video operating buttons on the Remote Commander to operate
the video equipment.
3
To turn on or off
To change channels
(when watching TV
programs through the
VCR’s tuner)
To record
To play
To stop
To fast forward
To rewind the tape
To pause
To search the picture
forward and backward
Operating a Video Disc Player
To play
To stop
To pause
To search the picture
fonward and backward
Operating a VCR
Press POWER
Press CH +/-
Press • (2 buttons simultaneously).
Press ■.
Press
Press II.
Press ►► or during playback.
Press
Press II.
To resume normal playback, press again.
•This function is effective only for CAV (standardplay disc). With CLV (extended-play disc), the
TV will go into the standby mode if II is
pressed.
Keep pressing ►► or during playback.
To resume normal playback, release the button.
ENTER
Chapter 3: Advanced Operation
30
Page 31

KV-27TW76, KV-32TW75 and KV-32TW76 only)
Manufacturers and Code Numbers (VCR)
Manufacturer
SONY
CANON
EMERSON 22, 30, 33
RSHER
FUNAI
GENERAL ELECTRIC
GOLDSTAR 25
HITACHI
JVC
MAGNAVOX
MITSUBISHI 18, 19, 26, 27
MULTITECH
NEC 16, 23, 31
PANASONIC
PHILCO
PHILIPS 05, 06, 09
QUASAR 05,06
RCA
SAMSUNG 24,32
SANYO
SCOTT 21
SHARP
SHINTOM 34
SYLVANIA 05, 06, 09
SYMPHONIC
TEKNIKA 28, 29
TOSHIBA 20, 21
TOTE VISION 25
ZENITH 17
Code number
01, 02, 03, 04
05
10, 11, 12, 15
29
05, 08
07, 08
16
05, 06, 09
29
05,06
05, 06
07, 08
11, 15
13, 14
29
• If more than one code number is listed for
manufacturers other than Sony, try entering
them one by one, until you come to the
correct code for your equipment.
• if the video equipment does not have a
certain function, the corresponding button
on this Remote Commander wiil not
operate.
In some rare cases, you may not be able to operate
your non-Sony video equipment with the supplied
Remote Commander. This is because your equipment
may use a code that is not provided with №is Remote
Commander. In this case, piease use the equipment’s
own remote controi unit.
CAUTION
When you remove the batteries from the
Remote Commander, ail the settings will
revert to the Sony Beta setting. Reset the
codes by following the steps on p. 30.
The code numbers for Sony equipment are assigned as foiiows:
01 _____Beta, ED Beta VCR
02 .... 8mm VCR
03 .... VHS VCR
04
__ _ _
Video disc player
For your convenience
Write the manufacturer name and code number
for your equipment onto one of the supplied
self-adhesive labels and affix to the Remote
Commander for easy reference.
BRAND CODE
1
2
3
■o
I ^
3
S
Chapter 3: Advanced Operation
31
Page 32

Setting the CURRENT TIME
Set the current time before using the Timer-activated functions from the GUIDE menu (pp. 34 - 39).
Press MENU to display the following screen.
1
MENU
Press the +/- button to select SET UP.
Press ENTER.
CURRENT TIME SET is already selected tor you.
RA) UINDGU
►UIDEO
AUDIO
GUIDE
SET UP
USE U?]& CENTER]
AAI UINDOU
UIOEO
AUDIO
GUIDE
►SET UP
USE Cl?} & CENTER)
ENTER
Press ENTER.
ENTER
SET UP
►CURRENT TIME SET
CHANNEL CAPTION
OmCL ERASE
CHAt>MEL ADD
Cm£ ON
Ca«RENT TIME SET
--------
AM
SET THE TIME
USE C0-91& CENTER]
Chapter 3: Advanced Operation
32
Page 33

Press the 0 — 9 buttons and ENTER to enter the current time. For
example, to set the time at 3:15, press 0, 3,1, 5. (You must press 4
digits.) ______
CURRENT TIME SET
Q3:15AM
SET THE TIME.
USE [0-91 & [ENTER].
To clear the time setting
Press RESET.
To reset the time
Press RESET while in the CURRENT TIME
screen, and repeat steps 4 and 5.
To display the time
Set TIME DISPLAY ON/OFF (pp. 38 - 39).
To return to TV mode
Press EXIT.
Press ENTER.
ENTER
Press the *!- button, to select AM or PM alternately.
CURRENT TIME SET
315AM
SET AM OR PM.
USE [¿T1&[ENTER].
5 ENTER.
ENTER
CURRENT TIME SET
3:15AM
SET AM OR PM.
USE an&IENTERl.
CURRENT TIME SET
315PM
SET AM OR PM.
USE [¿?]& [ENTER]
CURRENT TIME SET
• The internal clock of this TV operates on a
12-hour cycle. If a 24-hour cycle number
(for instance, 13:00) is entered, it will be
cleared when you press ENTER.
12:00 AM stands for midnight.
12:00 PM stands for noon.
> All the settings including TIME SET will be
erased if you unplug the TV, or if a power
failure occurs. Reset the current time by
following steps 1 - S.
3:15PM
CURRENT TIME
IS SET.
Chapter 3: Advanced Operation 133
Page 34

I
Using the Timer-activated Functions — GUiDE
Using the GUIDE feature, you can call up an on-screen menu giving
instructions on how to use the timer-activated functions: ON/OFF TIMER,
CHANNEL BLOCK, AND TIME DISPLAY ON/OFF.
Setting the ON/OFF TIMER
With this function you can set your favorite program to appear on the screen
at the time that you set.
EXAMPLE: Set the timer to turn on the TV to channel 21 at 3:15 PM, for 2
hours.
Press MENU to display the following screen.
1
MENU
Press the +1- button to select GUIDE.
f\A) UINDOU
K/IDEO
AUDIO
GUIDE
SET UP
USE UTI& [ENTER]
Press ENTER.
OWOFF TIMER Is already selected for you.
ENTER
Press ENTER.
ENTER
(\A) MINDOU
UIDEO
AUDIO
M3UIDE
SET UP
USE U?]& [ENTER]
GUIDE
►ON/OFF TIMER
OmEL BLOCK
TIME DISPLAV ON
GUIDE
CURRENT TIME IS
NOT SET
PRESS [ENTER] TO
SET THE TIME
If this screen appears, follow steps 3-5
on pp. 32 - 33. Then begin again from
step 1 on this page.
34 1 Chapter 3: Advanced Operation
ON/tFF TIMER
..:__AM -H CH
SET THE TIME
USE lO-giaiENTER]
If this screen appears, continue from step 4
on the next page.
______
Page 35

Set the time that you want the TIMER to start by pressing 0 — 9 (you
must press 4 digits) and ENTER.
_____________________
ONy'OFF TIMER
03:15AM -H CH_
To clear the ON/OFF TIMER setting
Press RESET.
To return to TV mode
Press EXIT.
SET THE TIME
USE m-SlK [ENTER]
Set the duration of time that you want the TV to remain on, by pressing
1 - 9 and ENTER.
ENTER
ON/OFF TIMER
3-15PM 2H CH
SET THE DURATION.
USE 10-9] 8. [ENTER]
_____
• While the TIMER is set, the TIMER
indicator lamp on the TV will be lit.
• One minute before the timer goes off, the
“TV WILL TURN OFF” display will appear
on the screen.
• If you have not set the clock correctly, the
ON/OFF TIMER will not operate. See p. 32,
"Setting the CURRENT TIME" to set the
dock.
• The TIMER setting will be erased if you
unplug the TV, or if a power failure occurs.
Repeat steps 1 - 7 to reset the TIMER.
Set the channel that you want the TV to turn on to, by pressing 0 — < and ENTER.
enter
The foliowing screen will appear, showing that the TIMER has been set.
ON/OFF TIMER
313=M 2H CH 21
SET THE CHANNEL.
USE [0-91&[ENTER].
ON/OFF TIMER
3:15PM 2H CH 21
ON/OFF TIMER
IS SET.
Chapter 3: Advanced Operation 135
ss
3
S'
a
S:
Page 36

Using the Timer-activated Functions — GUIDE
Setting CHANNEL BLOCK
Use this function to block a channel from appearing on the screen during the
preset time, for instance, to prevent children from watching undesirable
programs.
EXAMPLE: Set CHANNEL BLOCK at 8:45 PM, for one hour, on channel 38.
Press MENU to display the following screen.
1
MENU
Press the +!- button to select GUIDE.
AAJ UINDOU
HJIDEO
AUDIO
GUIDE
SET UP
USE UTl&IENTER]
AAJ UINDQU
UIDEO
AUDIO
M3UIDE
SET UP
USE (¿TI&IENTER)
! ENTER.
ENTER
Press the +/- buttons to select CHANNEL BLOCK.
Press ENTER.
ENTER
CURRENT TIME IS
NOT SET.
*=8
PRESS lENTERl TO
SET THE TIME.
GUIDE
►ON/IFF TIMER
CHANNEL BLOCK
TIME DISPLAV ON
GUIDE
ON/OFF TIMER
HXANNEL BLOCK
TIME DISPLAV ON
CHANNEL BLOCK
„ —AM -H CH
SET THE TIME
USE CO-SI & CENTER]
______
Chapter 3: Advanced Operation
36
If this screen appears, follow
steps 3 - S on pp. 32 — 33.
The begin again from step 1
on this page.
If this screen appears,
proceed to step 4 on
the next page.
Page 37

Set the time that you want CHANNEL BLOCK to start by pressing 0 — 9 (you must press 4 digit) and ENTER.
CHANNEL BLOCK
If you select a channel which has been
blocked, the BLOCKED screen will appear.
00:45AM -H CH
SET THE TIME.
USE [0-9] & [ENTER].
Select AM or PM by pressing the +I- button, and press ENTER.
ENTER
Set the duration of time that you want the TV to remain blocked (up to 9 hours), by pressing 1—9 and ENTER.
ENTER
CHANNEL BLOCK
8:45PM -H CH—
SET AM OR PM.
LISE UTl&tENTERl.
CHANNEL BLOCK
0:45PM 1H CH-
SET THE DURATION.
[0-9] & [ENTER].
---------
BLOCKED
To clear the BLOCK setting
Press RESET.
To return to TV mode
Press EXIT.
• If you set a new CHANNEL BLOCK by
following steps 1 - 7, the original setting
will be erased.
• If you have not set the clock correctly,
CHANNEL BLOCK will not operate. See
p. 32, “Setting the CURRENT TIME“ to set
the dock.
Set the channel that you want to block, by pressing 0 — 9 and ENTER.
ENTER
The following screen will appear, showhg that CHANNEL BLOCK has been set.
ENTER
CHANNEL BLOCK
8:45PM 1H CH 38
SET THE CHANNEL
USE [0-9] & [ENTER].
CHANNEL BLOCK
8:45PM 1H CH 38
CHANNEL BLOCK
IS SET.
Chapter 3: Advanced Operation |
Page 38

Using the Timer-activated Functions ~ GUIDE
Setting the TIME DISPLAY
Press MENU to display the following screen.
1
MENU
Press the +/- button to select GUIDE.
Press ENTER.
AAf MINDOU
HIIDEO
AUDIO
GUIDE
SET UP
USE UT1& CENTER]
A/U MINDGU
UIDEO
AUDIO
H3UIDE
SET UP
USE (XTI&IEKrERI
ENTER
Press the +/- button and ENTER to select TIME DISPLAY.
ENTER
GUIDE
►ON/OFF TIMER
OiANNEL BLOCK
TIME DISPLAS» ON
GUIDE
CmFF TIMER
CHANNEL BLOCK
►TIME DISPLAV ON
Chapter 3: Advanced Operation
38
Page 39

Press the +/- button to select ON or OFF alternately. (Display is red)
4
Press ENTER.
The di^ay will turn green, showing that the mode has been set.
ENTER GUIDE
GUIDE
QN/OFF TIMER
CHANNEL BLOCK
TIME DISPLAV: OFF
USE 11?] & [ENTER].
GUIDE
ON/DFF TIMER
CHANNEL BLOCK
TIME DISPLAV: ON
USE [1?]&[ENTER].
ON/OFF TIMER
CHANNEL BLOCK
►TIME DISPLAY: ON
To return to TV mode
Press EXIT.
• When TIME DISPLAY is set to ON, the time
will remain on the screen.
• The menu screens will be cancelled
automatically after 10 seconds if you do not
push any buttons during that time.
Chapter 3: Advanced Operation 139
Page 40

Using CHANNEL CAPTION
Captioning the channel display — CHANNEL CAPTION
Use this feature to caption up to 12 channel number displays with the matching channel call letters. For example, caption channel 20 with ESPN.
Press MENU to display the following screen.
_____________
1
MENU
USE IIT] a CENTER]
Press the +1- button to select SET UP.
USE CIT] a CENTER]
A/U UINDOU
KIIOEQ
AUDIO
GUIDE
SET UP
AA] UINDOU
UIDEO
AUDIO
GUIDE
►SET UP
Press ENTER.
ENTER
Press the +/- button to select CHANNEL CAPTION.
Press ENTER.
ENTER
SET UP
►CaJRRENT TIME SET
CHANNEL CAPTION
CHANNEL ERASE
CHANNEL ADD
CABLE ON
SET UP
CURRENT TIME SET
►CHANNEL CAPTION
CHANNEL ERASE
CHANNEL ADD
CABLE: gN
CHANNEL 16
CAPTION
SELECT A DESIRED
CH GUIDE KEV PROM
10-9]. CDISPLAV]
a CENTER]
_____
Chapter 3: Advanced Operation
40
Page 41

Enter a directory (CHANNEL GUIDE — see p. 42) number for the caption by pressing one of the directory keys. For example, to set caption number 4, press 4.
To erase unneeded captions
Call the caption setting screen by following
steps 1-4, and press RESET.
© © ©
CHANNEL 16
CAPTION 4
© © ©
Q ® (9)
oa>uf EMTEB
Select the channel you want to caption by pressing 0 — 9 and ENTER.
ENTER
Select the first letter by pressing the +1- button and ENTER. Press to advance alphabetically; press - to go back.
ENTER
USE [0-9] & [ENTER]
TO SELECT THE CH.
CHANNEL
CAPTION
SELECT THE LETTER.
USE I4T]&[ENTER].
CHANNEL
CAPTION
____
4
____
4E-
To return to TV mode
Press EXIT.
• You cannot use CHANNEL CAPTION while
the TV Is in VIDEO or S VIDEO mode.
Before setting captions, select TV mode by
pressing TV/VIDEO.
20
20
SELECT THE LETTER.
USE UT]&[ENTER].
Select each remaining letter by repeating step 6.
(For a 3-letter caption, leave a space by pressing ENTER only.)
ENTER
To set the next caption, press ENTER again, and repeat the steps from step 4.
8
ENTER
CHANNEL
CAPTION
PRESS [ENTER]
CONTINUE.
CHANNEL
CAPTION
SELECT A DESIRED
CH GUIDE KEY FROM
[0-9]. [DISPLAY]
&IENTER].
4ESPN
TO
4ESPN
o
>
20
s
3
20
Chapter 3: Advanced Operation
141
Page 42

Using CHANNEL CAPTION
Viewing the captioned channeis — CHANNEL GUiDE
Use this feature to display the captions you have set, and to seiect a channei
directly for viewing.
Press CH GUIDE.
A cKrectory appears, corresponding to the directory keys on the Remote
1
Commander.
CH GUIDE
To cancel the CHANNEL GUIDE screen
Press CH GUIDE again.
Press the directory key of the channel you want to watch.
© ® (3)
© ® ®
® © ® M
o ® o
CHANNEL GUIDE
1ABC 2DIS 3CNN
4ESPN 5
7
____8_____g---------
D
------6---------
___0_____E--------
42 1 Chapter 3: Advanced Operation
Page 43

I
Enjoying Other Useful Features
Muting the sound — MUTING
Press MUTING.
The display "MUTING " wttl appear on the screen.
To restore the sound
Press MUTING again, or press VOL-i-.
Keeping the channel displayed — DISPLAY
To display the channel
Press DISPLAY.
All the current displaya will appear tor 3 seconds,
then disappear. The channel display witt remain on
the screen.
To cancel the display
Press DISPLAY ageiin.
The channel display will disappear.
Listening to surround sound — SURROUND
Gives sound reproduction with the atmosphere of a movie theater or a
concert hall.
To set
Press SURROUND.
The display M <> |l•|ll•*l||■<l will appear on
the screen for a few seconds.
To cancel
Press SURROUND agsJn.
The display li-ili-iil-ii c=> ih will appear for a
few seconds.
MUTING
DI8PUY
SURROUND
Using the sleep timer — SLEEP
Turns TV off automatically atiout 1 hour after setting.
Press SLEEP.
A green "SLEEP ON " display appears tor a tow seconds.
(A red "SLEEP " dsplay will af^>ear 1 rrdnute More the TV shuts <^.)
To cancel the setting
Press SLEEP again.
A green "SLEEP OFF" display appears for a few seconds.
OR
Turn the TV off.
The sleep timer setting will be cancelled.
Switching quickly between 2 channels — JUMP
Press JUMP once to recall the channel
you were watching previously; press
JUMP again to switch back. Use this
feature to keep track of two programs
alternately.
Chapter 3: Advanced Operation
SLEEP 5
1
JUMP
43
Page 44

Chiner 4: OOter Connections
I
Connecting Video Equipment
After connecting, you will be able to ... — Play back video tapes
— Record TV programs
— Record one TV program while viewing another
— Watch 2 TV programs at once using a window picture
(Picture-in-Picture, p. 26)
Connecting a VCR with an S video output jack (except KV>27TS27)
Rear of TV
SVIOEO»
MnOOÜT
lnWMM>
to S VIDEO
to VHF/UHF
to VIDEO
AUDIO-L (white)
to VIDEO
AUDIO-R (red)
YC-15V/30V (not supplied)
RK-74A (not supplied)
to audio output
: Signal flow
VHF/
UHF
output
Ito s
video
' output
VCR
• If you connect a monaural VCR, connect the audio
output of the VCR to the L (MONO) jack of VIDEO IN
on the TV,
The monaural sound will be heard from both speakers.
• For operating instructions, refer to the instruction
manual furnished with the VCR.
• If the picture or sound is affected, move the VCR away
from the TV,
Chapter 4: Other Connections
44
About S video input
Video input and output signals can be separated into Y
(luminance or brightness) and C (chroma or color)
signals. Usually these two signals are combined in a VCR
and sent as one signal to a TV. Separation of the Y and
C signals prevents them from interfering with one
another, thereby improving picture (especially color)
quality.
This TV is equipped with an S video input jack through
which these separated signals can be Input directly. This
way you can connect your S video-equipped VCR
separately from a non-S video VCR.
Page 45

Connecting video equipment not equipped with an S video output jack
Rear of TV {KV-27TS27 also)
SVIOEO» ^
to VHF/UHF
to VIDEO (yellow)
MOO OUT
3SBÊÊË.
to AUDiaR (red)
to AUDIO-L (white)
Preparing for use
1 Turn on the TV.
2 Press the TVA/IDEO button on the TV or on the
Remote Commander so that “VIDEO” (for equipment
connected to VIDEO IN) or “S VIDEO” (for equipment
connected to S VIDEO IN) appears on the screen.
When you cannot obtain a clear picture and/or sound
Make sure that the TV/VTR mode select control on the
VCR is set to TV. Reselect the channel you want to view
with the controls on the TV or the Remote Commander.
VMC-820S (not supplied)
to audio output
to video output
Operating your equipment
(except for KV-27TS27 and KV-32TS20)
When using a Sony or other manufacturer’s infrared
remote control VCR or a Sony multi-disc player, you can
operate most of the equipment using the supplied pre
programmed Renrote Commander
(pp.30-31.)
To return to TV mode
Press the TV/VIDEO button on the TV or Remote
Commander so that a channel number appears on the
screen.
: Signal flow
VHF/
UHF
output
VCR
________________________
IwiMriVMâ-
Note
Connect one video equipment to the VIDEO IN jack on
either the front or rear panel. If you connect equipment to
both Jacks and turn them both on at once, the TV’s main
and window pictures will be distorted.
Chapter 4: Other Conrrections
S
S
45
Page 46

Connecting Vídeo Equipment
Connecting an
I
Audio System
Connecting Camcorders
Playing back recorded tapes
Front of TV (except for KV-27TS27 and KV-32TS20)
to VIDEO (MONO)
O QDCD O
to VIDEO
VMC-720M
(not supplied)
VMC-810/820S
(not supplied)
to AUOIO-L
to AUDIO-R
to AUOIO-L
(red)
(white)
Listening to TV or connected VCR sound through
an audio system
Rear of TV (KV-27TS27 also)
: Signal (low
to VIDEO
output
Monaural model
; Signal flow
If you connect two VCRs, be sure not to set both (front
and rear) VCRs in playback mode at the same time,
because combined TV programs from both VCRs will
appear on the screen.
Preparing for use
Same as p. 45.
Stereo model
to AUDIO
OUTPUT-L
(white)
to AUDIO
OUTPUT-R
(red)
to line input
a (D) CD 0 -O
Amplifier
Set the ampiifier’s function
to line input.
Preparing for operation
Turn the TV’s speakers off by calling up the A/V
WINDOW AUDIO menu, and setting SPEAKER to OFF.
(Follow the steps on p. 25.)
Adjusting the sound ievei
Leave the amplifier volume, bass and treble controls at
their mid position and adjust the level with the
VOLUME +/- buttons on the TV or the VOL +/button on the Remote Commander.
46 I Chapter 4: Other Connections
Page 47

Appendix
I
Specifications
Television system Channel coverage
Picture tube
American TV standards
VHP: 2-13
UHF: 14-69
Cable TV: 1 -125
Microblack™ Trinitron* tube
27- inch picture measured diagonally
28- inch picture tube measured
diagonally (KV-27TS27, KV-27TS31,
KV-27TS35, KV-27TW75, KV-27TW76)
32-inch picture measured diagonally
34-inch picture tube measured
diagonally (KV-32TS20, KV-32TS35,
KV-32TW75, KV-32TW76)
Antenna
Input
Output
Speaker output
Power requirements
75-ohm external antenna terminal for
VHF/UHF
VIDEO and S VIDEO
S VIDEO IN (S terminal)
Y: 1 Vp-p, 75-ohms
C: 0.286 Vp-p (Burst signal),
Video (phono jacks): 1 Vp-p,
75-ohms unbalemced,
sync negative
Audto (phono jacks): 500 mVrms
(100% modulation)
Impedance: 47 kilohms
AUDIO OUT (VARIABLE) (phono jacks)
More than 408 mVrms at the
maximum volume setting (variable)
Impedance: 5 kilohms
5Wx2
120 VAC, 60 Hz
Power consumption
KV-27TS27
KV-27TS31
KV-27TS35
KV-32TS20 185W
KV-32TS35
KV-27TW75 170W
KV-27TW76
KV-32TW75 195W
KV-32TW76
Standby mode
unbalanced, sync negative
75-ohms
160W
160W
170W
195W
170W
195W
5W
Dimensions/Weight
Weight
46 kg
(101 lbs7oz)
46 kg
(101 lbs7oz)
46 kg
(101 lbs7oz)
71 kg
(156 lbs 9 oz)
71 kg
(156ibs9oz)
88.6 kg
(195 lbs 6 oz)
88.6 kg
(195 lbs 6 oz)
117 kg
(257 lbs 15 oz)
117 kg
(257 lbs 15 oz)
KV-27TS27
KV-27TS31
KV-27TS35
KV-32TS20
KV-32TS35
KV-27TW75
KV-27TW76
KV-32TW75
KV-32TW76
Dimensions (w/h/d)
660.5 X 603.5 X 493 mm
(26'/8x23V»x19Viin.)
660.5 X 603.5 X 495.5 mm
(26V8x23Vex19»/»in.)
660.5 X 603.5 X 495.5 mm
(26V8x23V8Xl9*/8in.)
781 X 712 x 579 mm
(30V4X 2878x22^8 in.)
781 X 712 x 579 mm
(3074X2878X2278 in.)
758 X1000 X 635 mm
(2978x3978x25 in.)
758 X1000 X 635 mm
(2978x3978x25 in.)
905 X1089 X 689 mm
(3574 X 4278 x27>/4 in.)
905 X1089 X 689 mm
(3574x4278x2774 in.)
Supplied accessories
(KV-27TS27, KV-32TS20)
Remote commander RM-791 (1) with 2 size AA
(R6) EVEREADY batteries
(KV-27TS31)
Remote commander RM-Y101 (1 ) with 2 size AA
(R6) EVEREADY batteries
(KV-27TS35, KV-32TS35, KV-27TW75,
KV-27TW76, KV-32TW75, KV-32TW76)
Remote commander RM-Y102 (1) with 2 size AA
(R6) EVEREADY batteries
Recommended accessories
UA/ mixer EAC-66
Connecting cable
VMC-810/820S, YC-15 V/30 V, RK-74A
Design and specifications are subject to change without
notice.
Appendix 147
Page 48

Troubleshooting
Symptom
Poor or no picture (screen not lit), good sound
Good picture, no sound
No picture (screen not lit), no sound
No color
Possible causes and ramedles
•Adjust PICTURE.
•Adjust BRIGHTNESS.
•Check antenna/cable connections.
• Press VOLUME + on the TV or VOL -i- on the Remote
Commander.
• Press MUTING on the Remote Commander.
• Check that the MTS button is set correctly.
• Check that the TV/VIDEO button is set correctly.
• Check that “SPEAKER ON” is set.
• Is POWER switched on?
• Plug the unit into a wall outlet.
•Check that the TV/VIDEO button is set correctly.
• Is it a color program?
•Adjust COLOR.
Snow and noise only
Dotted lines or stripes
Double images or ghosts
Try another channel. It could be station trouble.
If the problem persists, contact your nearest service facility.
• Is it an active or the correct channel?
•Check the CABLE setting.
•Check antenna/cable connections.
TTiis is often caused by local interference, (e.g. cars, neon signs,
hairdryers etc.) Adjust the antenna for minimum interference.
Reflections from nearby mountains or buildings often cause this
problem. A highly directional outdoor antenna or a CATV cable
may improve the picture.
Sony Corporation Printed in U.S.A.
IT 4950 9310
 Loading...