

Page 1

3-810-687-23 (1)
Trinitron Color TV
Operating Instructions
KV-27S25
KV-27S35
KV-27V25
KV-27V35
KV-29R525
KV-29RS25C
KV-29V35C
KV-29V65M
KV-29V75M
KV-32525
KV-32S35
KV-32TW25
KV-32V25
KV-32V35
KV-34V35C
KV-35V35
KV-35V45
KV-35V75
¿ 1996 by Sony Corporation
Page 2
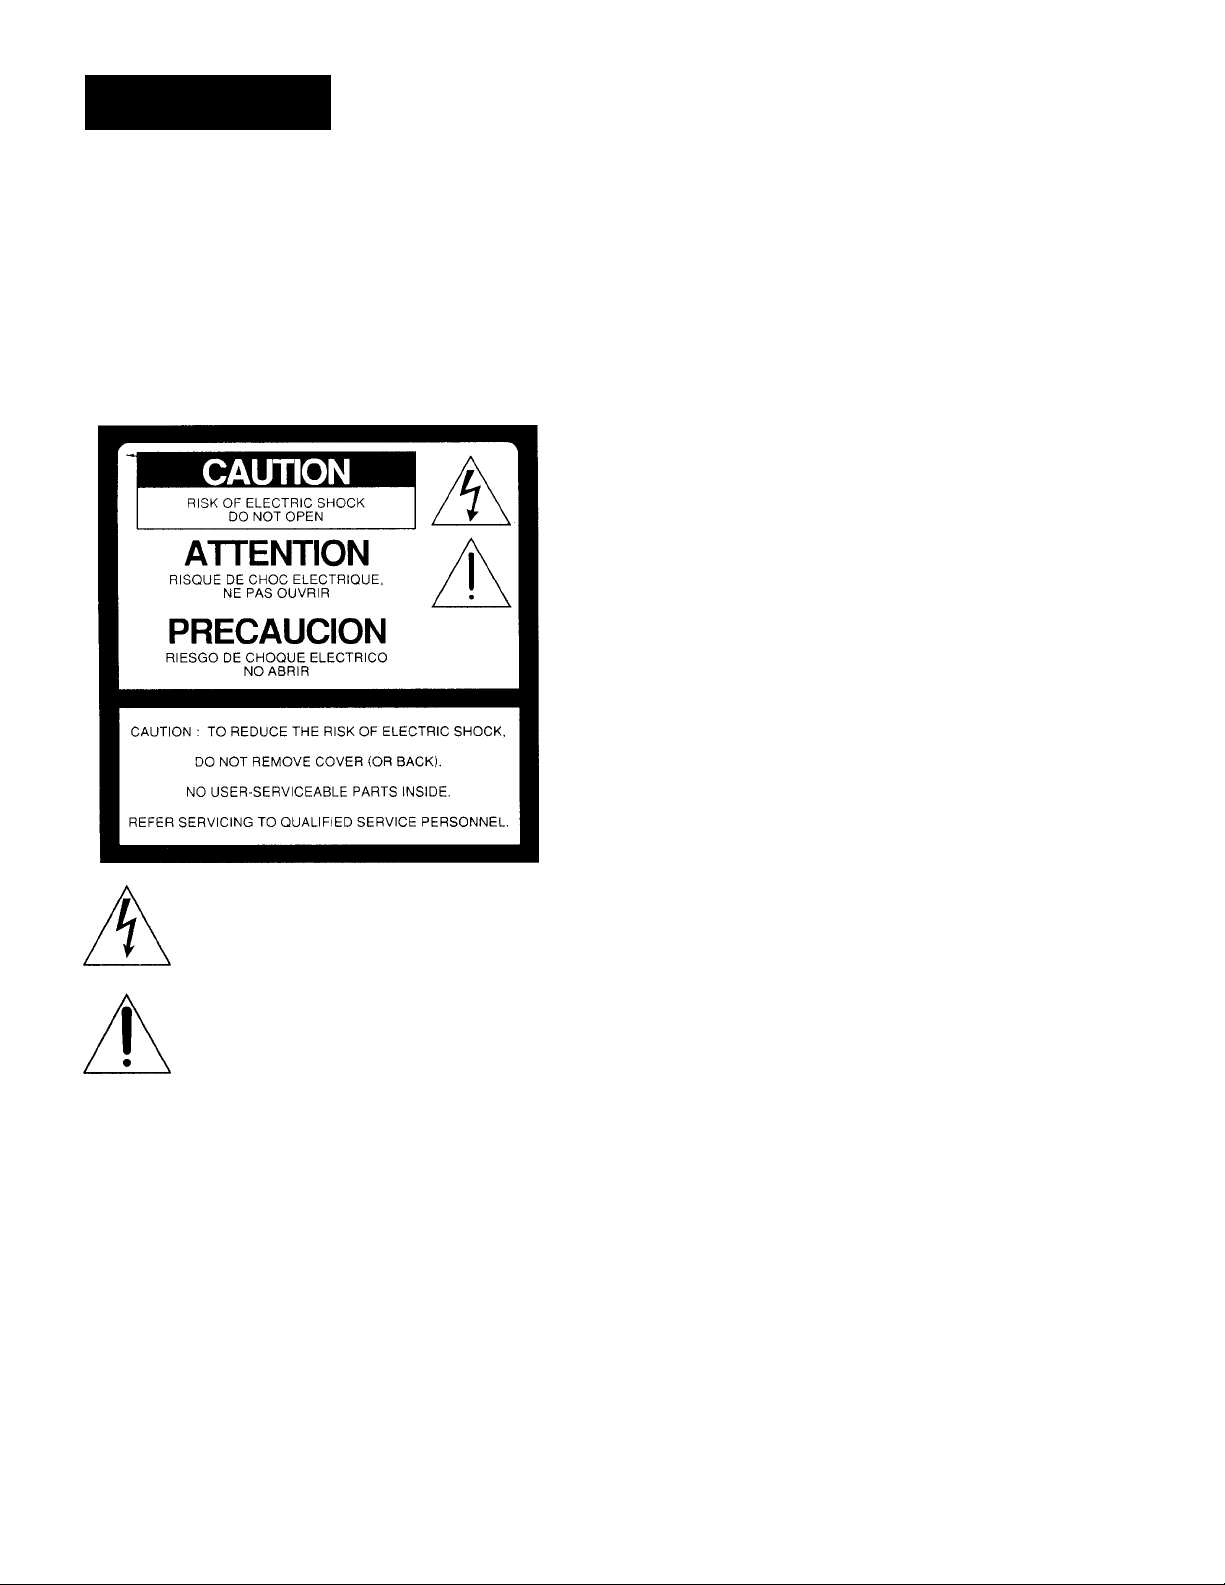
WARNING
To prevent fire or shock hazard, do not
expose the television to rain or
moisture.
This symbol is intended to alert the user to the
presence of uninsulated "dangerous voltage"
within the product's enclosure'that may be of
sufficient magnitude to constitute a risk of
electric shock to persons.
This symbol is intended to alert the user to the
presence of important operating and
maintenance (servicing) instructions in the
literature accompanying the appliance.
CAUTION
To prevent electric shock, do not use this polarized AC plug with
an extension cord, receptacle or other outlet unless the blades can
be fully inserted to prevent blade exposure.
Precautions
Safety
• Operate the TV only on 120 V AC {except KV-29RS25C/
29V35CI34V35C).
• Operate the TV only on 220 V AC (KV-29RS25CI29V35CI
34V35C only).
• One blade of the plug is wider than the other for safety
purposes and will fit into the power outlet only one way. If
you are unable to insert the plug fully into the outlet, contact
your dealer (except KV^29RS25CI29V35CI34V35C).
• Should any liquid or solid object fall into the cabinet, unplug
the TV and have it checked by qualified personnel before
operating it any further.
• Unplug the TV from the wall outlet if you are not going to
use it for several days or more. To disconnect the cord, pull it
out by the plug. Never pull the cord itself.
For details concerning safety precautions, see the supplied leaflet
"IMPORTANT SAFEGUARDS."
Installing
• To prevent internal heat build-up, do not block the
ventilation openings.
• Do not install the TV in a hot or humid place, or in a place
subject to excessive dust or mechanical vibration.
CAUTION
When using TV games, computers, and similar products with
your TV, keep the brightness and contrast functions at low
settings. If a fixed (non-moving) pattern is left on the screen for
long periods of time at a high brightness or contrast setting, the
image can be permanently imprinted onto the screen. These
types of imprints are not covered by your warranty because they
are the result of misuse.
NOTIFICATION
This equipment has been tested and found to comply with the
limits for a Class B digital device pursuant to Part 15 of the FCC
Rules. These limits are designed to provide reasonable protection
against harmful interference in a residential installation. This
equipment generates, uses, and can radiate radio frequency
energy and, if not installed and used in accordance with the
instructions, may cause harmful interference with radio
communications. Flowever, there is no guarantee that
interference will not occur in a particular installation. If this
equipment does cause harmful interference to radio or television
reception, which can be determined by turning the equipment off
and on, the user is encouraged to try to correct the interference
by one or more of the following measures:
- Reorient or relocate the receiving antennas.
- Increase the separation between the equipment and receiver.
- Connect the equipment into an outlet on a circuit different
from that to which the receiver is connected.
- Consult the dealer or an experienced radio/TV technician for
help.
You are cautioned that any changes or modifications not
expressly approved in this manual could void your
authority to operate this equipment.
This document is for the remote commander RM-Y136/Y137.
MODEL: KV-27S25/27S35/27V25/27V35/29RS25/29RS25C/
Please keep this notice with the instruction manual.
Note on Caption Vision
This television receiver provides display of television closed
captioning in accordance with § 15.119 of the FCC rules.
Note to CATV system installer
This reminder is provided to call the CATV system installer's
attention to Article 820-40 of the NEC that provides guidelines for
proper grounding and, in particular, specifies that the cable
ground shall be connected to the grounding system of the
building, as close to the point of cable entry as practical.
Use of this television receiver for other than private viewing of
programs broadcast on UHF or VHF or transmitted by cable
companies for the use of the general public may require
authorization from the broadcaster, cable company and/or
program owner.
29V35C/29V65M/29V75M / 32S25 / 32S35 / 32TW25 /
32V25/32V35/34V35C/35V35/35V45/35V75
Owner's Record
The model and serial numbers are located at the rear of the TV.
Record these numbers in the spaces provided below. Refer to
them whenever you call upon your Sony dealer regarding this
product.
Model No.
Serial No.
_________________
_________________
-
Page 3

Table of contents
4 Welcome!
4 Checking your model number
Getting Started
5 Step 1: Hookup
12 Step 2; Installing the glass door and adjusting the
shelf
14 Step 3: Setting up the remote commander
15 Step 4: Setting up the TV automatically
(auto SET UP)
18 Changing the menu language
18 Adjusting the tilt of the picture (tilt correction)
Operations
19 Watching the TV
21 Watching two programs at a time-
22 Adjusting the picture (video)
23 Selecting the video mode (video)
24 Adjusting picture brightness automatically
(lichtsensor)
24 Adjusting the sound (audio)
25 Using audio effect (effect)
26 Selecting stereo or bilingual programs (mts)
27 Setting the speaker switch (speaker)
27 Setting audio out (audio out)
28 Setting daylight saving time (daylight saving)
28 Setting the clock (current time set)
29 Setting the timer to turn the TV on and off (on/off
timer)
30 Customizing the channel names (channel caption)
31 Blocking out a channel (channel block)
31 Setting your favorite channels (favorite channel)
32 Setting video labels (video label)
33 Setting Caption Vision (caption vision)
34 Operating video equipment
36 Operating a cable box or DBS receiver
Additional Information
37 Troubleshooting
38 Specifications
Back cover Index
The captions in parentheses indicate menu names.
Page 4
Welcome!
Checking your model number
Thank you for purchasing the Sony Trinitron*^ Color
TV. Here are some of the features you will enjoy with
your TV:
• On-screen menus that let you set the picture quality,
strund, and other settings.
• Picture-in-Picture (PIP) that allows you to watch
another TV channel, video or cable image as a
window picture.
• Surround system that simulates the sound quality of
a concert hall or movie theater { K V- 27 S25 I2 7S 35 I
29R S2 5I 29 RS 25 CI 32 S2 5I3 2S 35 /3 2T W 25 on ly) .
• SRS (SOUND RETRIEVAL SYSTEM) that allows
you to receive realistic sound that recaptures audio
"clues" originally present but masked in the
recording process so that the action seems to
happen all around you (R V -27 V2 5I 27 V3 5I 29 V3 5C I
29V 65 M I29 V 75M I 32 V2 5I 32 V3 5I 34 V3 5C I3 5V 35 I
35V 45 I3 5V 75 on ly ).
• LightSensor''^’ that automatically adjusts the
brightness of the picture (KVT27V25/27V35/29V’35C/
29V 65 M I29 V 7.5 M I32 V2 5I 32 V3 5I 34 V3 5C I3 5V 35 I
35V 45 I3 5V 75 on ly ).
• S-Link'" that allows you to automatically change
the TV's input mode, turn on the VCR, and play a
tape by just pressing the VCR's play button
{KV ~2 7V 2 5l2 7V 35 l2 9V 35 CI 29 V6 5M t2 9V 75 M I3 2V 25 l
32V 35 i34 V 35 CI 35 V3 5l3 5V 4 5l3 5V 75 o nly ). This
feature is originally designed by Sony.
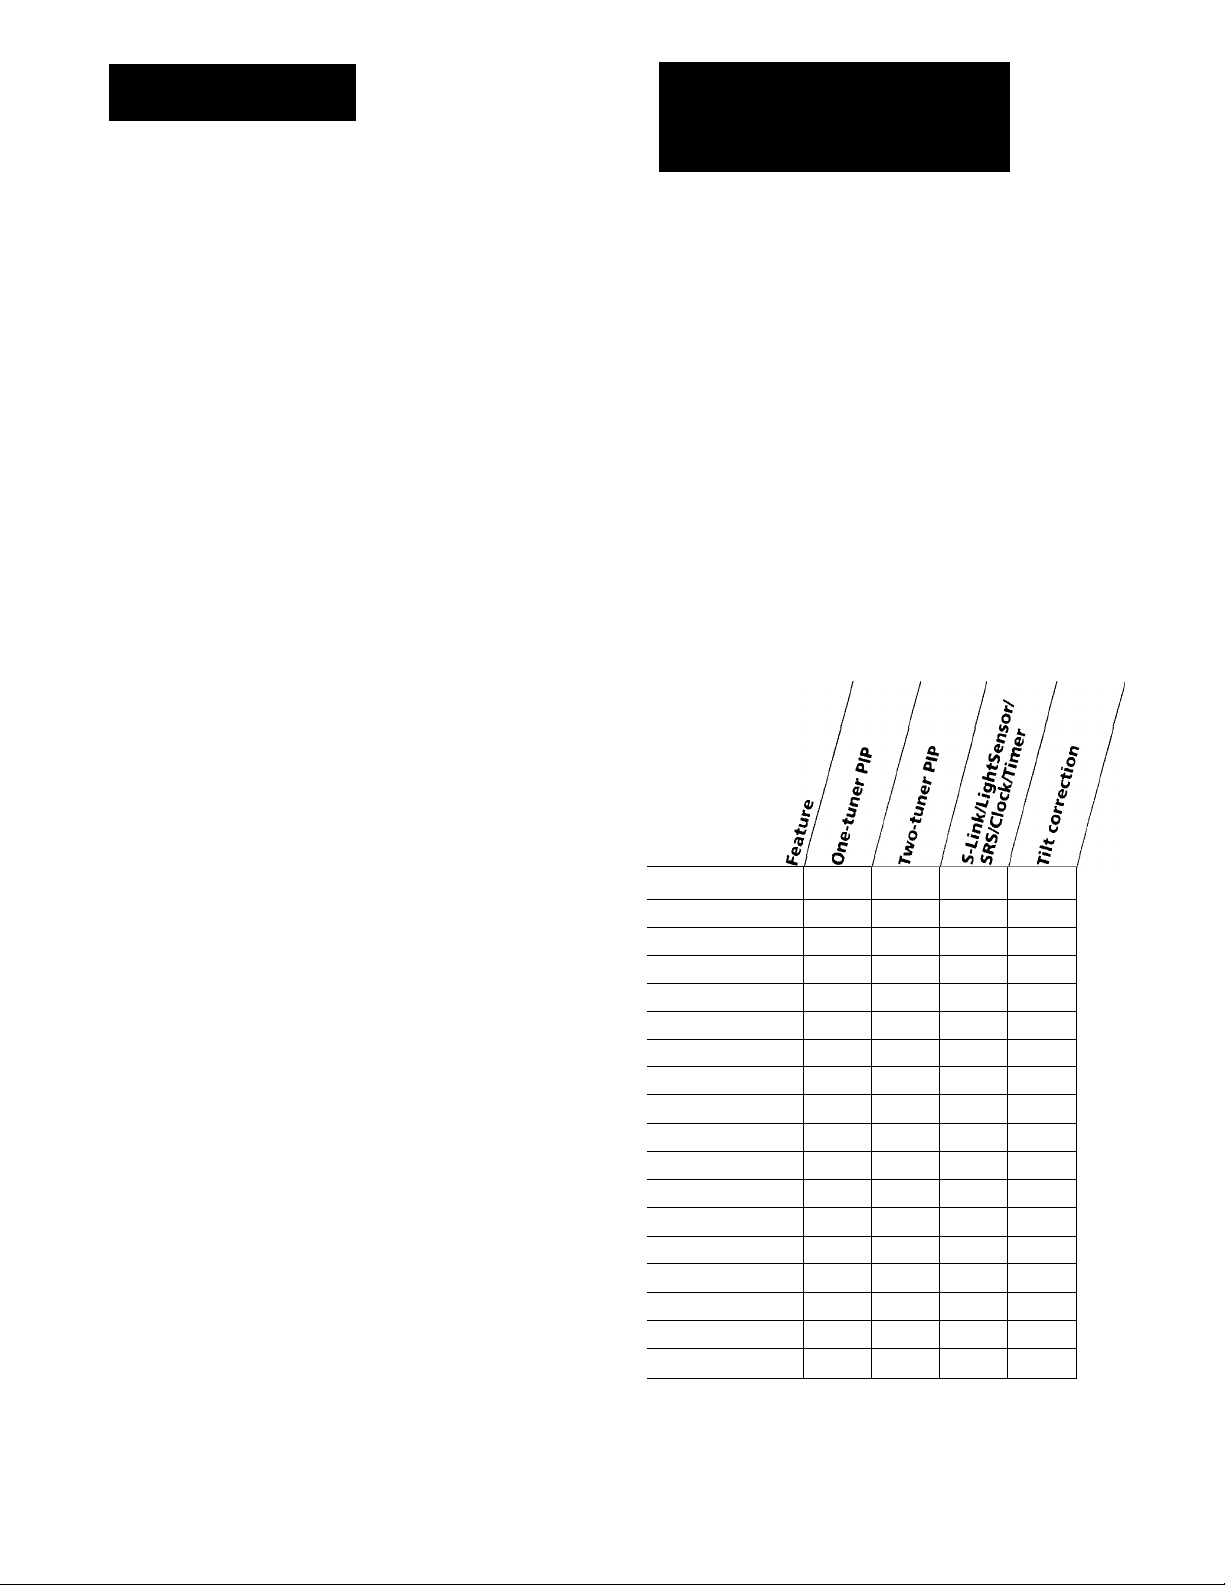
The instructions in this manual are for the eighteen
models listed below. Before you start reading, check
your model number by looking at the rear of your TV.
The KV-27S25 is the model used for illustration
purposes. Any differences in operation are clearly
indicated in the text, for example,
Instructions in this manual are based on the remote
commander. You can also use the controls on the TV if
they have the same name as those on the remote
commander.
"KV -2 7S 25 on ly .”
Feature packages
Model
number
KV-27S25
KV-27S35
KV-27V25
KV-27V35
KV-29RS25
KV-29RS25C
KV-29V35C
KV-29V65M
KV-29V75M
KV-32S25
KV-32S35
KV-32TW25
KV-32V25
KV-32V35
KV-34V35C
KV-35V35
KV-35V45
KV-35V75
•
•
•
• •
•
•
• •
•
« •
•
•
•
• •
•
• •
• •
• • O
• •
•
•
•
•
•
Page 5
Getting Started
Step 1: Hookup
Although you can use either an indoor or outdoor
antenna with your TV, we recommend that you
connect an outdoor antenna or a cable TV system to get
better-picture quality.
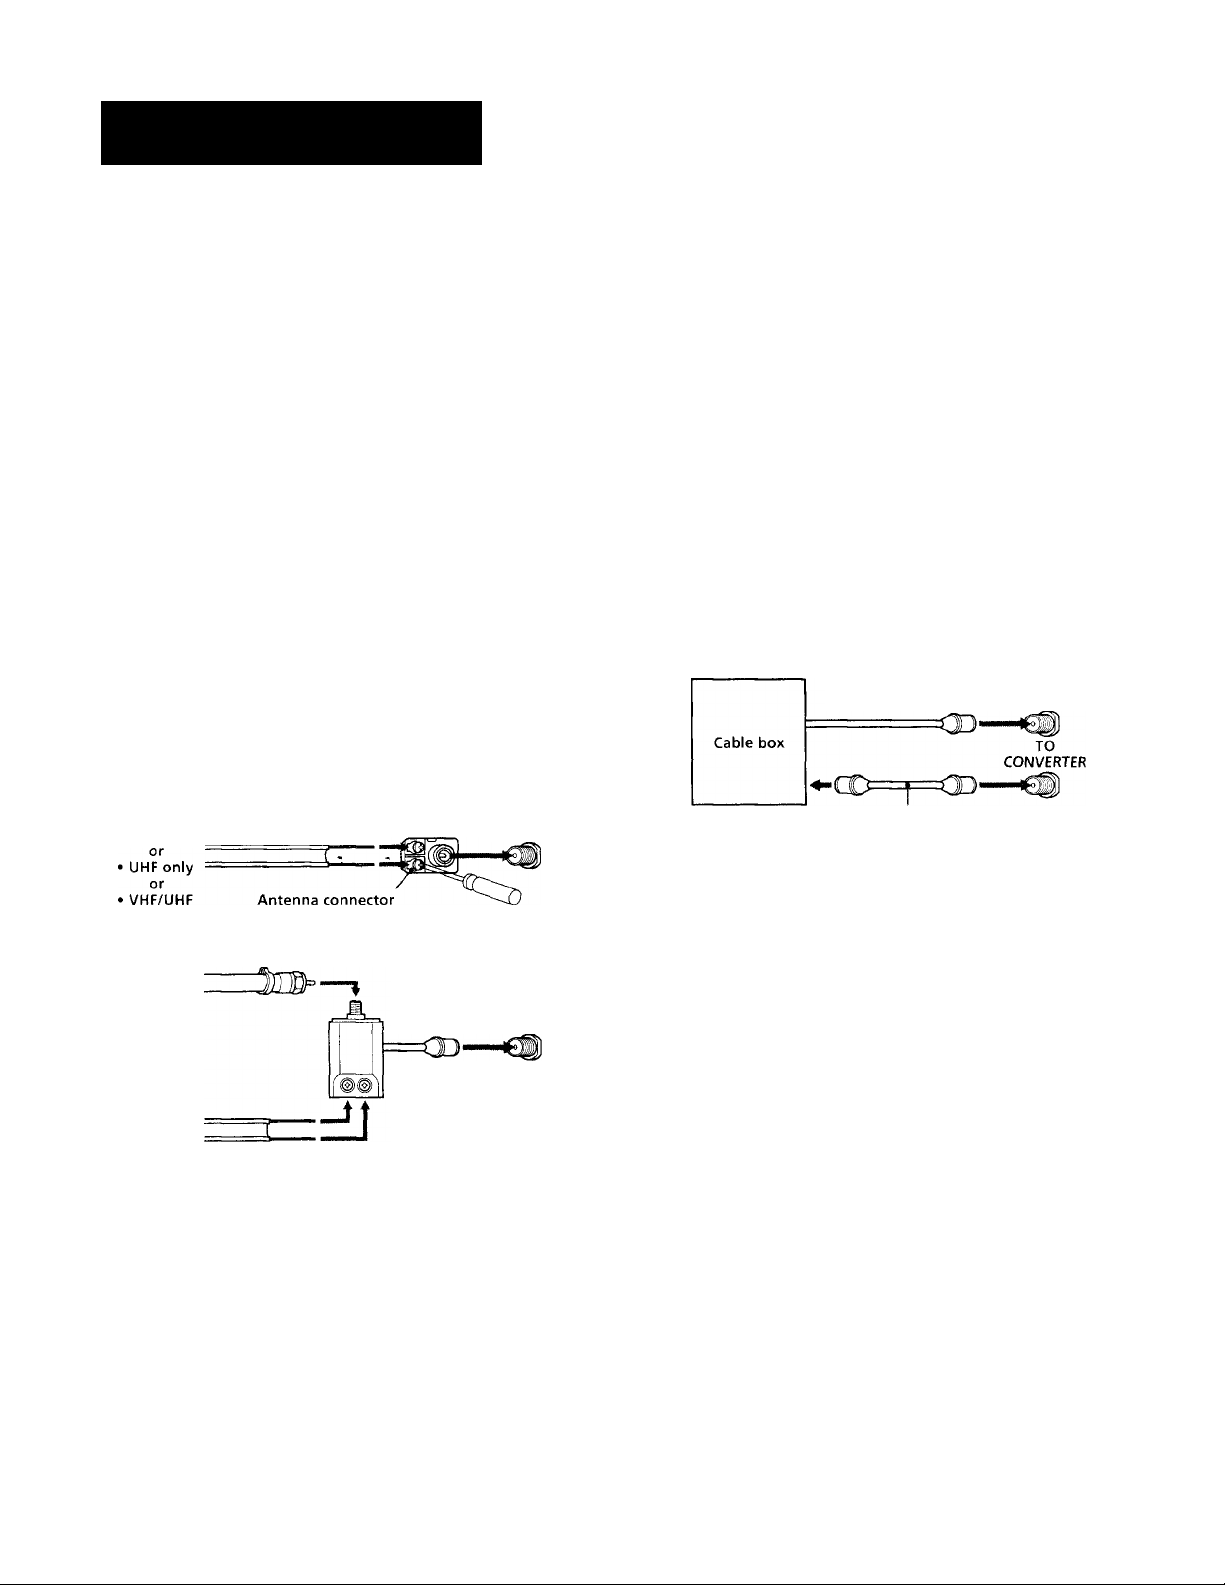
How to connect different types of cables
The illustrations below show examples of connecting
cables to the TV directly.
• VHP only
or
• VHF/UHF
or
• Cable
75-ohm coaxial cable
(Rear of TV)
VHF/UHF
Connecting an antenna/cable TV system without a VCR
If your cable company requires you to connect a cable
box, make the connection as follows:
Cable or antenna
(Rear of TV)
Cable
Cable box
Cable
IN OUT
Cable box
Cable box and cable
■ KV-27S35I27V3SI29V35CI29V75MI32S35I32V35/
34V35CI35V3SI3SV4SI35V7S only
VHF/UHF
(Rear of TV)
VHF/UHF
(Rear of TV)
AUX
(Rear of TV)
• VHF only 300-ohm twin lead cable
75-ohm coaxial cable
• VHF
and
UHF
300-ohm twin lead cable
EAC-66 U/V mixer
(not supplied)
VHF/UHF
(Rear of TV)
VHF/UHF
Notes
• Most VHF/UHF combination antennas have a signal splitter.
Remove the splitter before attaching the appropriate connector.
• If you use the U/V mixer, snow and noise may appear in the
picture when viewing cable TV channels ov’er37.
75-ohm coaxial
cable (not supplied)
CATV cable
Pay cable TV systems use scrambled or encoded signals
requiring a cable box"^ in addition to the norma! cable
connection.
VHF/UHF
* The cable box will be supplied by the cable company.
Note
• You cannot watch the signal through AUX connector ns a
window picture.
Cable and antenna
■ KV-27S35I27V3SI29V35CI29V75MI32S3SI32V35I
34V35CI3SV35I3SV45I35V75 only
(Rear of TV)
CATV cable
Antenna cable
AUX
m
TO
CONVERTER
VHF/UHF
Note
• Do not connect anything to the TO CONVERTER connector in
this case.
Getting Started 5
Page 6
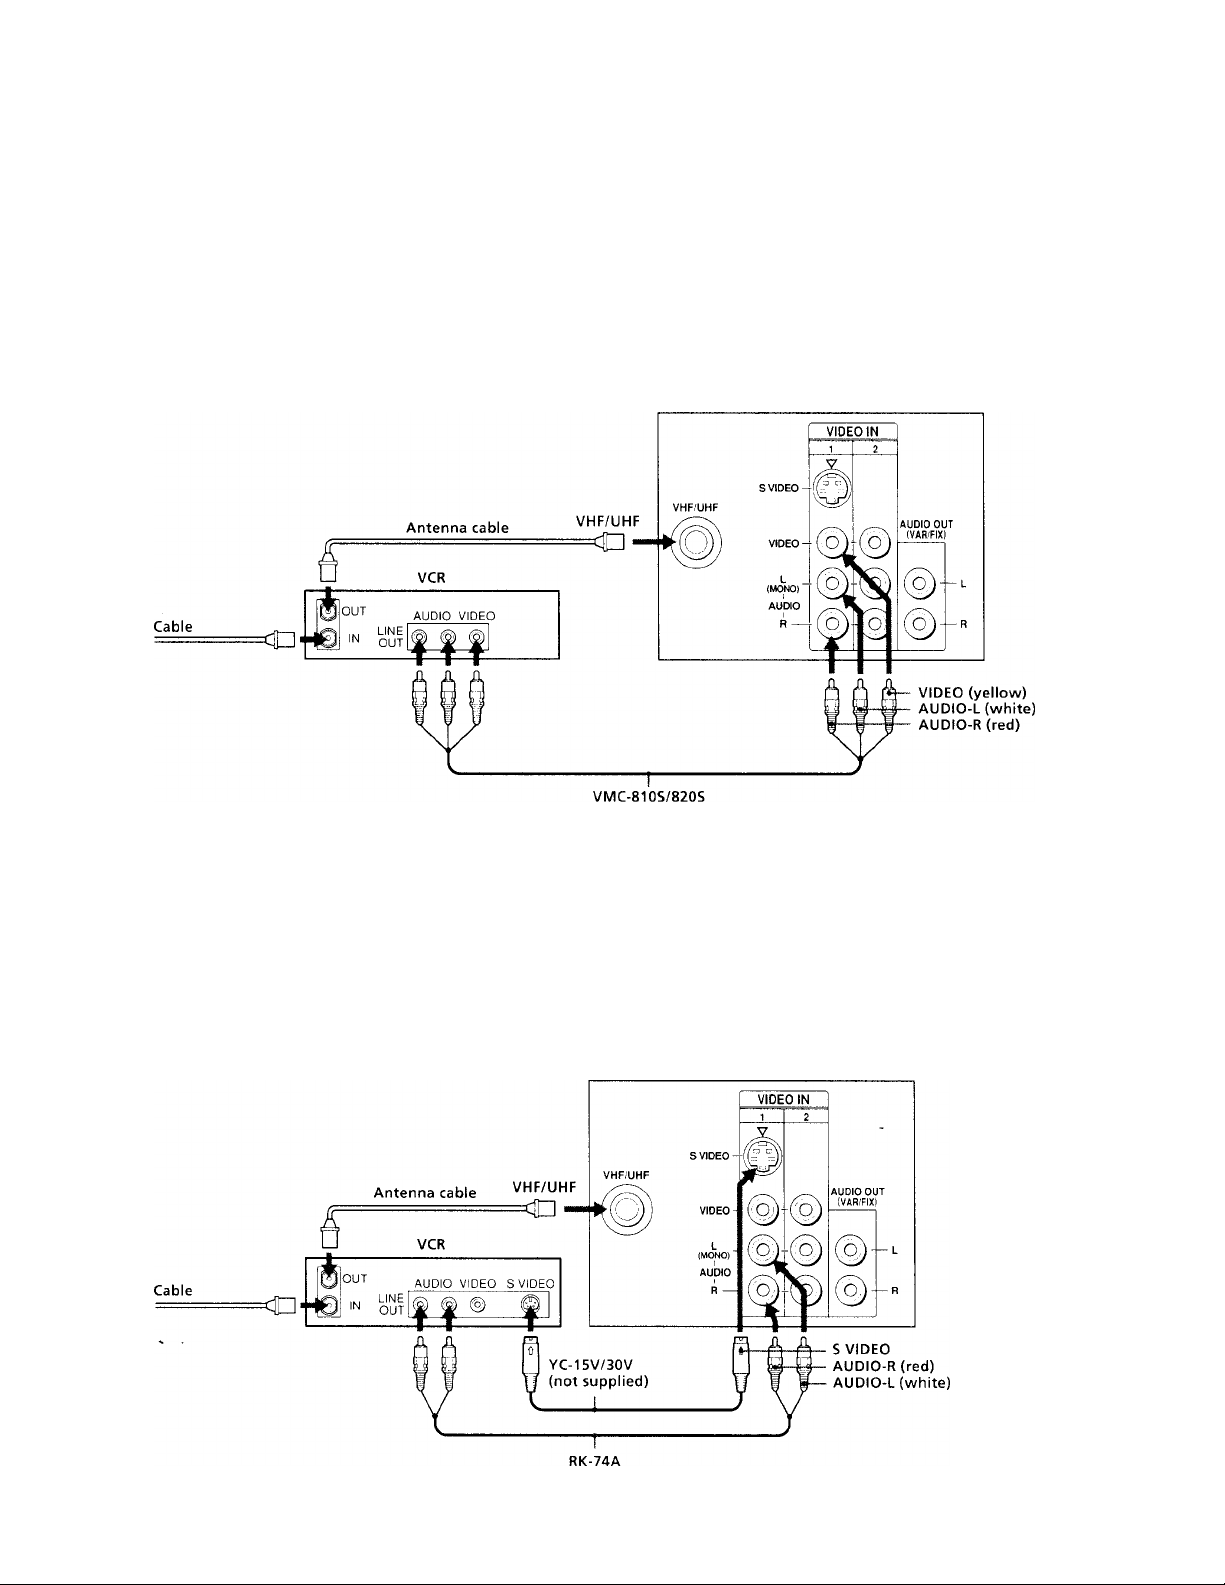
Connecting an antenna/cable TV system with a VCR
To connect your VCR to the TV, first check the model
number of your TV and select the corresponding
connection. For details on connection, see the
instruction manual of your VCR.
In order to operate PIP, a VCR must be connected to
your TV and turned on {KV-27S25/27V25/29RS25/
29RS25029V65M/32S25/32TW25/32V25 only).
Without a cable box
Before making the connection, disconnect the AC
power cords of the equipment to be connected.
After making these connections, you will be able to do
the following;
• View the playback of video tapes
• Record one TV program while viewing another
program
• Watch two TV programs at once using PIP
(Rear of TV)
Note r
• To connect a monaural VCR, connect the audio output of the
VCR to AUDIO-L (mono) of VIDEO 1 IN on the TV.
To an S video equipped VCR without a cable box
If your VCR has an S video output jack, make the
following connections.
(not supplied)
(Rear of TV)
Getting Started
(not supplied)
Page 7
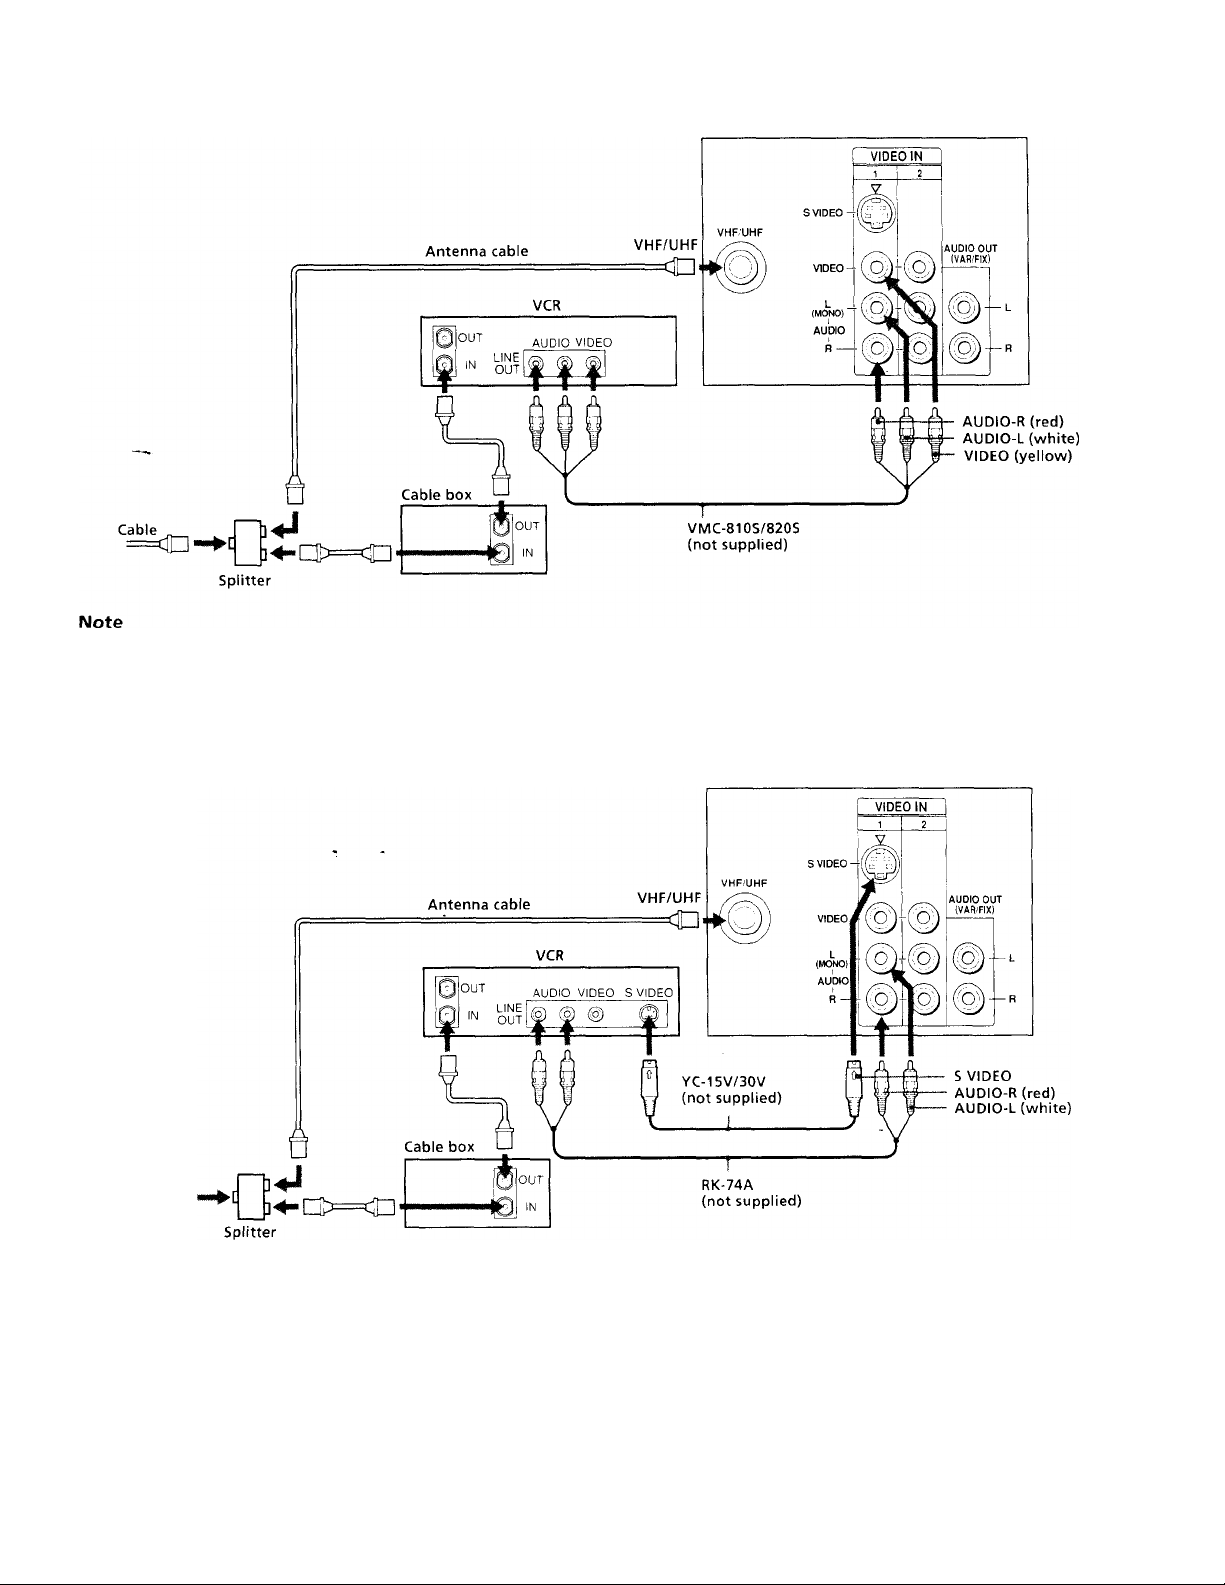
With a cable box
To connect a monaural VCR, connect the audio output of the
VCR to AUDIO-L (mono) of VIDEO 1 IN on the TV.
(Rear of TV)
To an S video equipped VCR with a cable box
Cable
___
==cD
Note
• Video signals are composed of Y (luminance) and C (chroma)
signals. The S connection sends the two signals separately
prea'enting degradation, and gives better picture quality
compared to conventional connections.
(Rear of TV)
Getting Started
Page 8
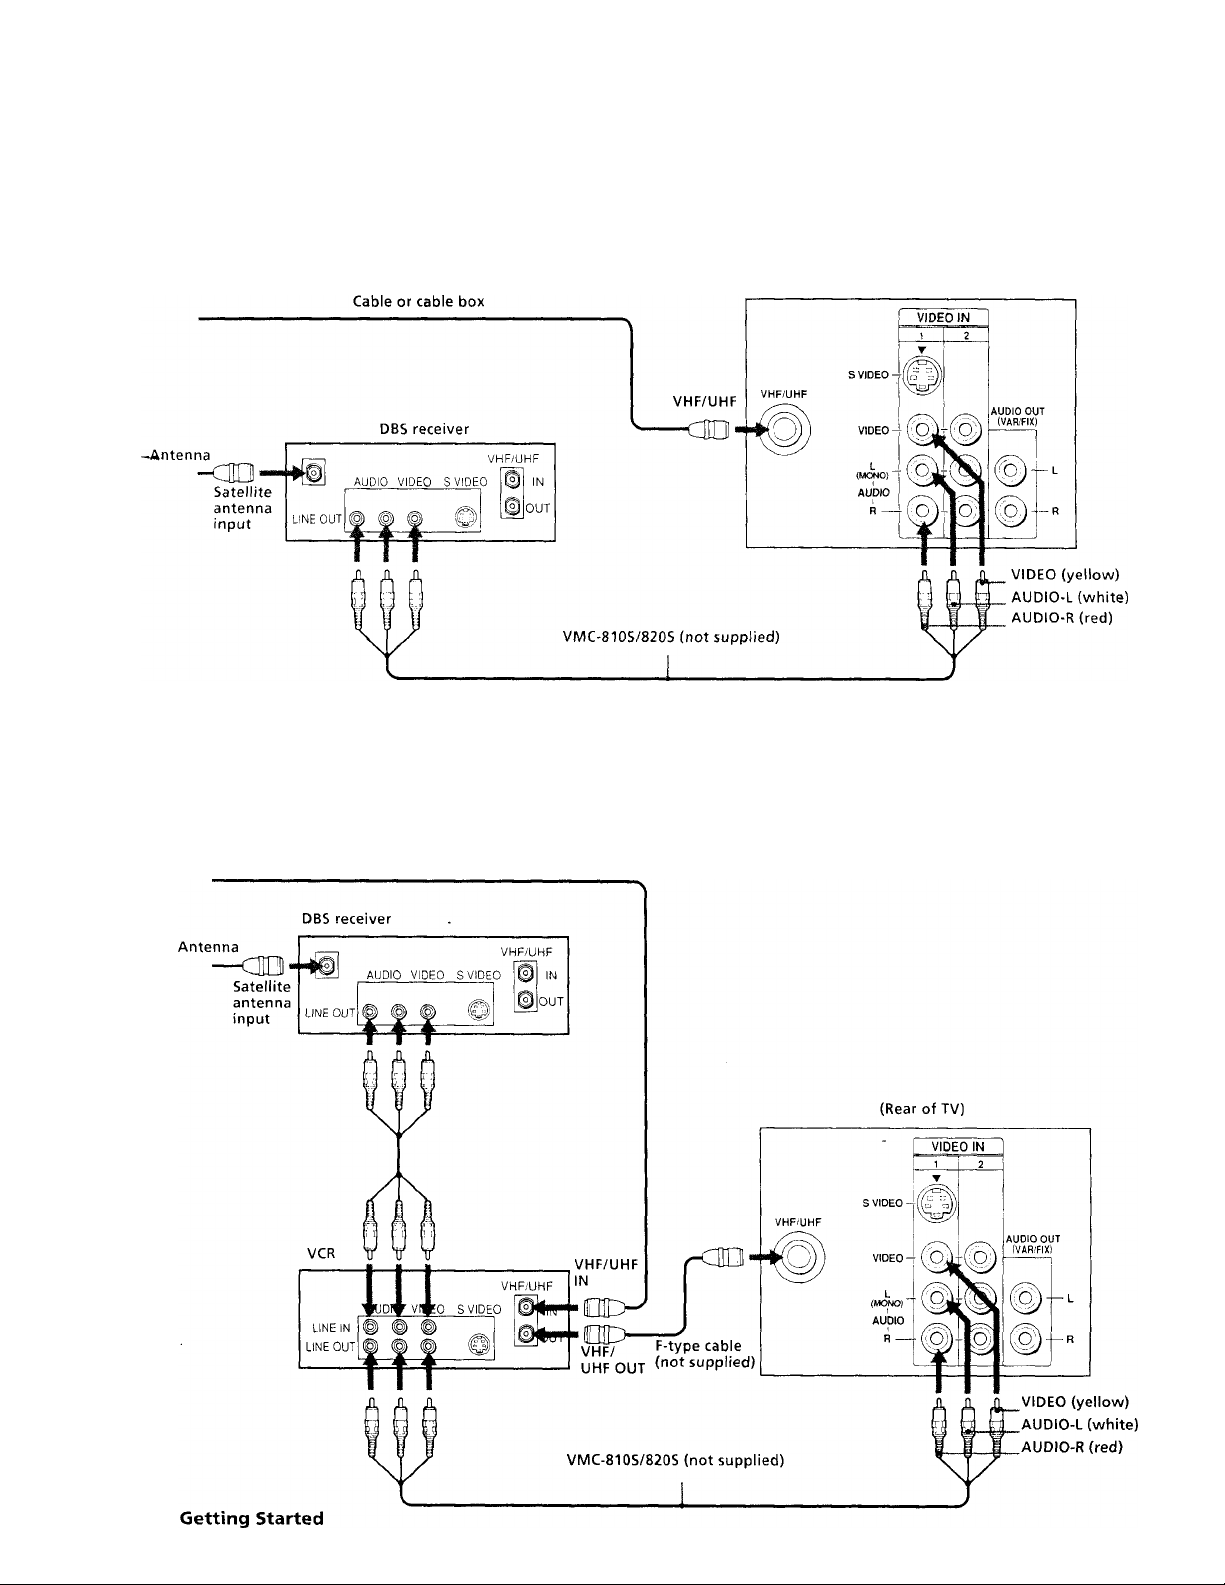
Connecting a DBS receiver
For connection details, see the instruction manual of
the DBS (Digital Broadcasting Satellites) receiver.
To a TV
(Rear of TV)
Note
• You can use the S VdDEO jack or the composite video jack for
the video connection.
To a TV and VCR
Cable or cable box
8
Page 9
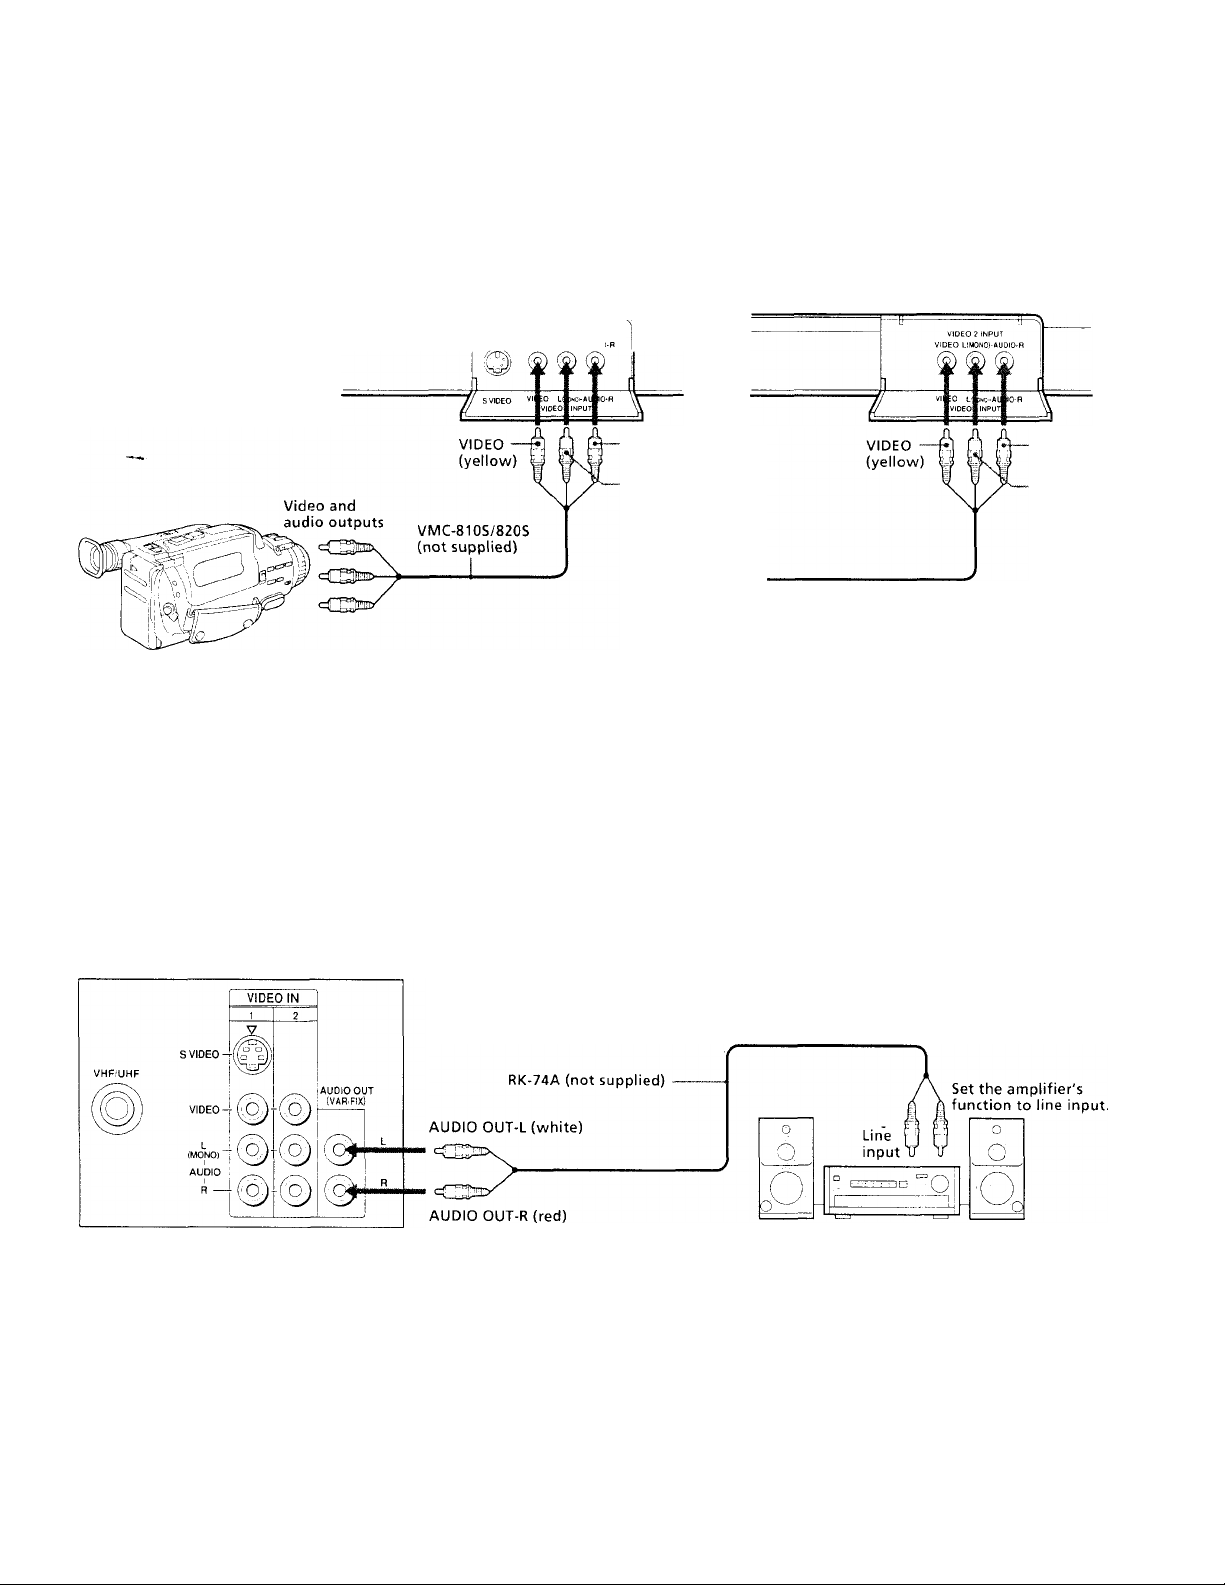
Connecting a camcorder
■ KV-27V25I27V35I29 V3SCI29 V65M/29 V7SMI32 V25I
32 V35134V35CI35V35I35V45I35V75 only
This connection is convenient for viewing a camcorder
picture.
(Front of KV-32V35/34V35C/35V45/35V75)
S VIDEO VIDEO 2 INPUT
Note
• To connect a monaural camcorder, connect the audio output of
the camcorder to AUDIO-L (mono) of VIDEO 2 INPUT on the
TV.
Connecting an audio system
VIDEO LIMONOI-AUDIC
AUDIO'R
(red)
AUDIO-L
(white)
(Front of KV-27V25/27V35/29V35C/
29V65M/29V75M/32V25/35V35)
AUDIO-R
(red)
AUDIO-L
(white)
When connecting audio ec]uipment, see page 27 for
more information.
(Rear of TV)
Getting Started
Page 10
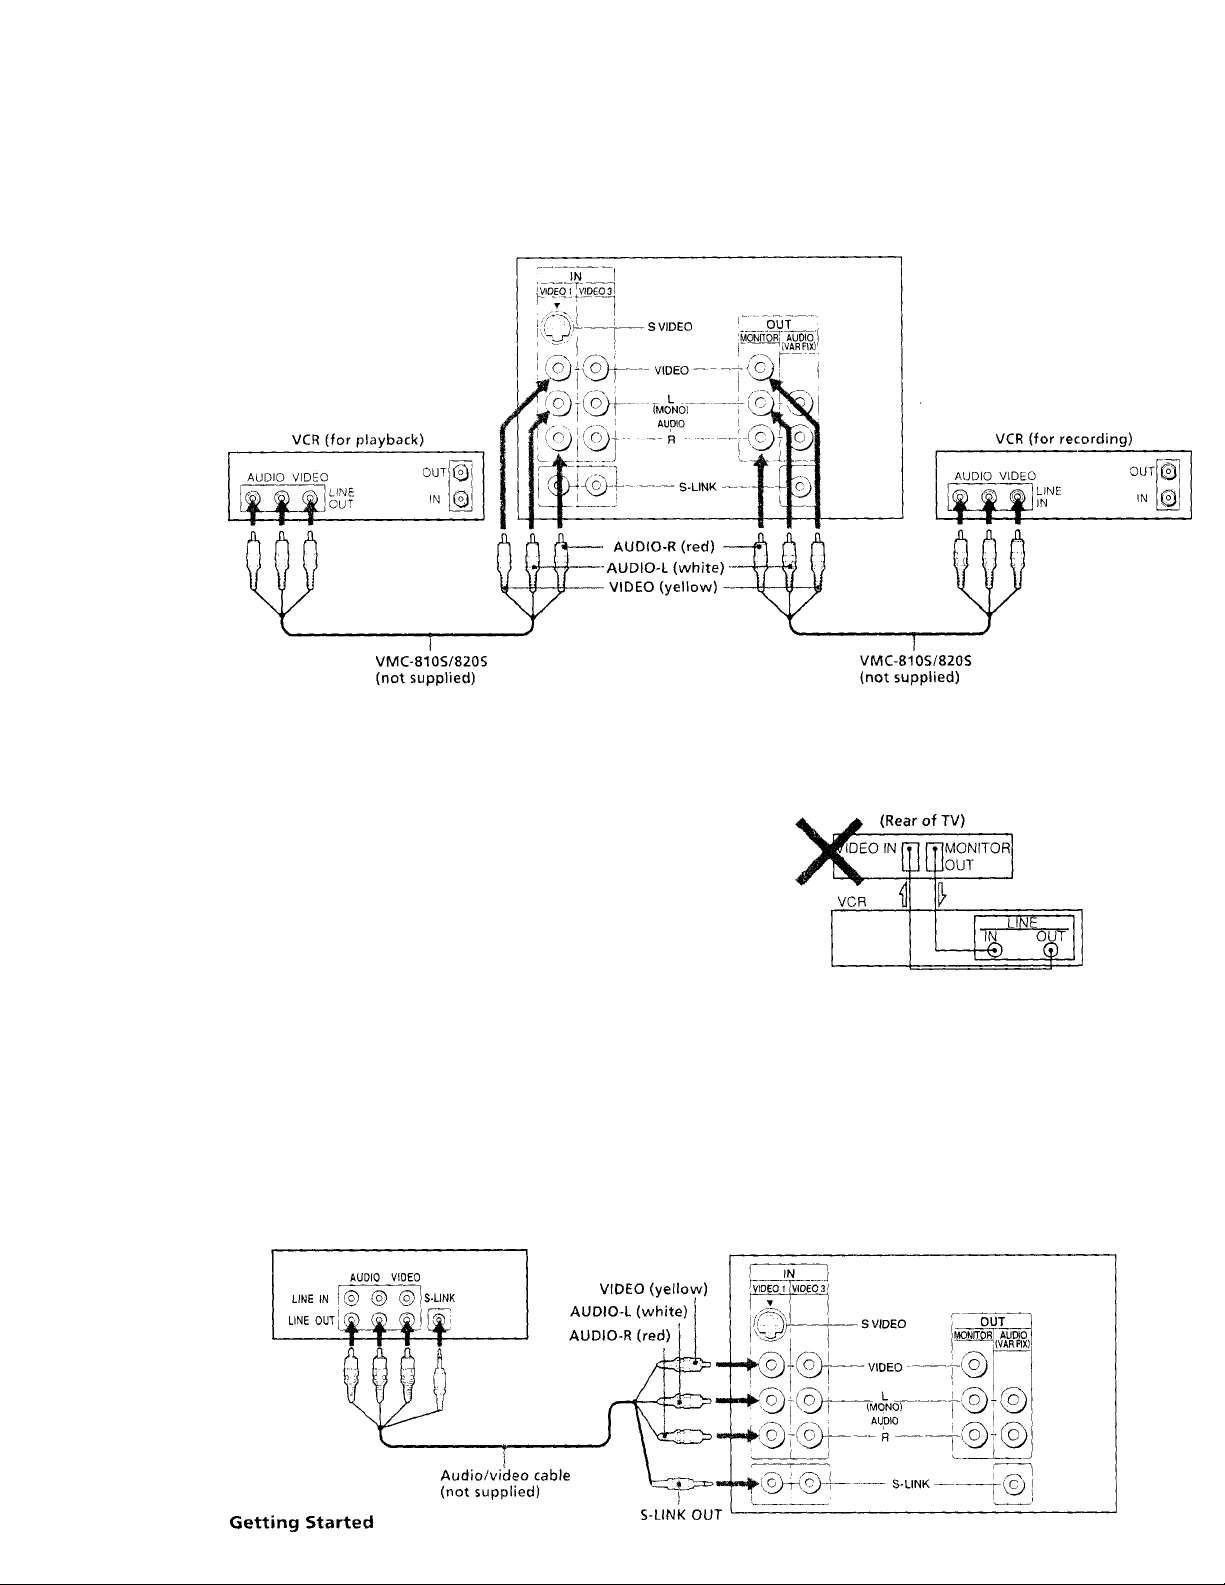
Connecting two VCRs for tape editing using MONITOR OUT
■ KV-27V25I27V35I29V3SCI29V65MI29V75MI32V25I
32V35I34V35CI35V35I35V45I35V75 only
MONITOR OUT allows you to record a program that is
on the screen.
(Rear of TV)
The above type of connection should only be used
when you connect from the line input of one VCR, and
from the line output of a second VCR.
Notes
• Do not cliange the input signal while editing tirrough .MONITOR
OUT, or the output signaj «’ill ajso ehange,
• h'dii can use the S video jack to connect a VCR for playback and the
composite video jack to connect a VCR for recording.
Using the S-Link function
■ KV-27V25I2 7 V35I29 V35C/29 V6SMI29 V75MI32 V25I
32V35I34V35CI35V35I35V45I35V75 only
The S-Link feature allcrvvs you to operate the TV and
VCR with the S-Link function in the following ways:
• When you press the VCR's play button, the TV's
input mode is automatically changed to vicleo, and
the VCR starts playing a tape.
VCR
When amnecting a single VCR to the TV, do not connect the
MONITOR OUT jacks at the rear of the TV to the VCR's line input,
while at the same time connecting from the TV's VIDRO IN jacks
to the \'CR's line output, as shown below.
• You can turn off the TV and VCR together using the
SYSTEM OFF button (see page 35 for details).
Notes
• The TV mav malfunction if you connect the S-Link cable to the TV
without connecting the other end of the cable to the VCR.
• When making the S-Link connection, be sure to insert all the
connectors firnilv.
• Connect the TV''s S-link terminal to the other equipment's S-Link
terminal only; otherwise, the S-link connection will not function.
(Rear of TV)
10
Page 11
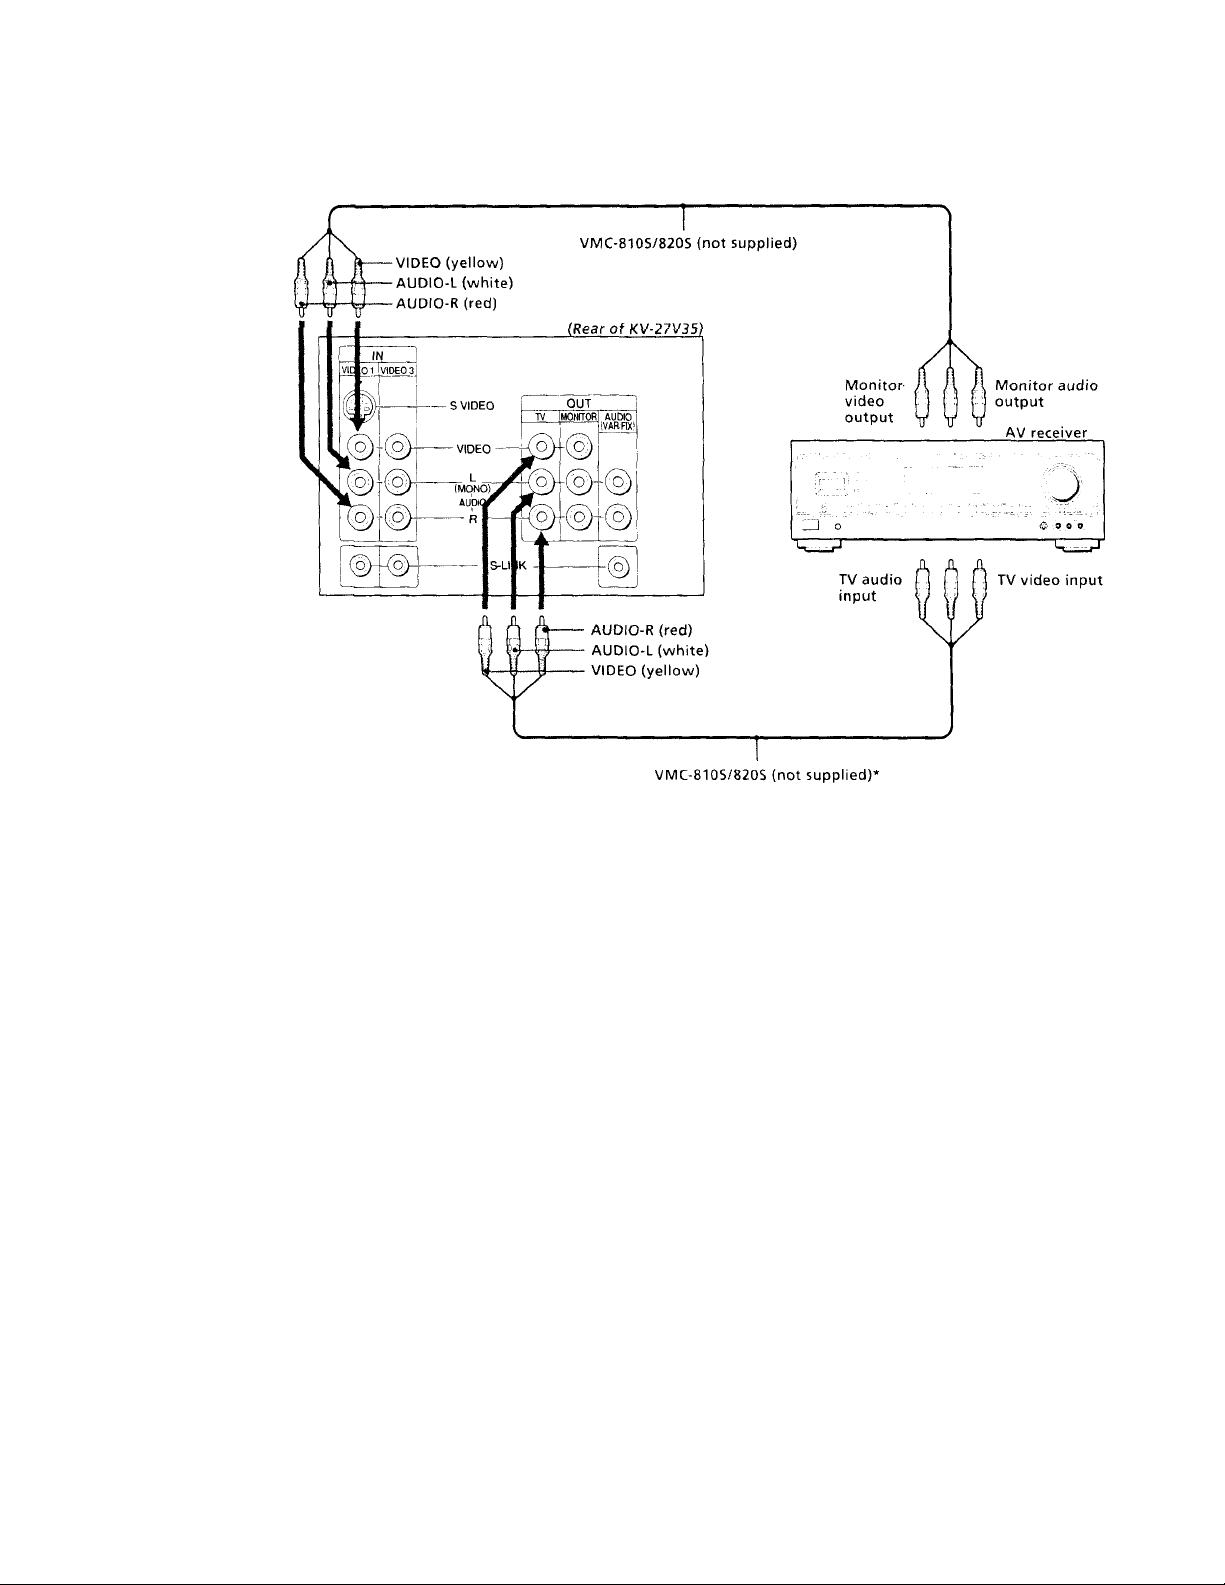
Connecting an AV receiver
Connect an optional AV receiver to the VIDEO 1 IN
jacks at the rear of the TV.
(K VO 7 V.35/2 9 V 35 CI 2 9 V 75 M /92 V 35 /.U V 35 CI 35 V 45 I
35V 75 on h/)
Make this connection if your TV has the TV OUT
jacks. When you connect an AV receiver to the TV
using the AV receiver's TV input jacks, it is
recommencied to set VIDEO 1 IN's video label to
"RECEIVER" (see page 32 for details).
Getting Started
11
Page 12
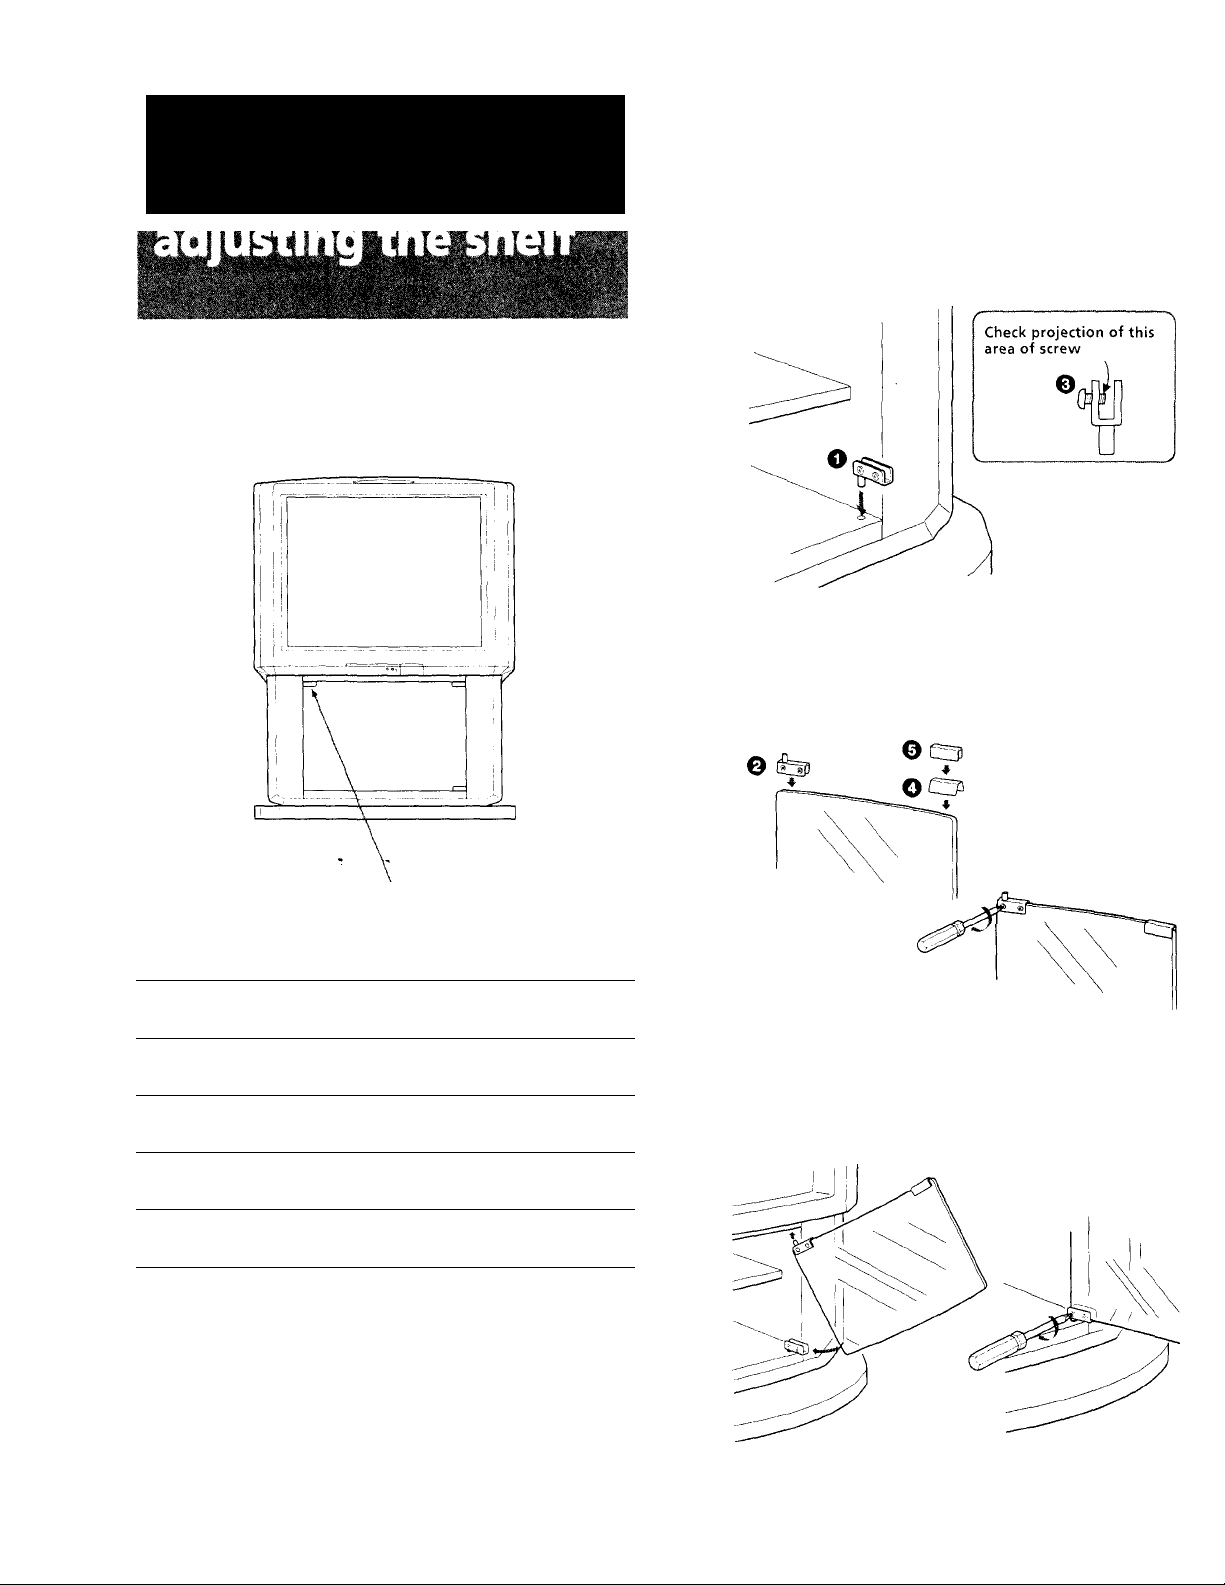
step 2: Installing the glass door and
■ KV-32TW25I35V75 only
Follow these instructions to install the glass door and
adjust the shelf.
Installing the glass door
1
Check that the projection of the screw
through the hinge allows for proper
installation of the hinge to the glass door,
and then insert the bottom hinge O into
the hole located at the bottom, right side
of cabinet.
Attach the top hinge 0 to the right side of
the glass door, tighten the screws snugly,
but do not overtighten. Attach the plate
pad O to the left side and push the plate 0
over the plate pad.
Parts List
Bottom hinge
o
Top hinge
0
Screw 4x4
O
Plate pad
O
Plate
0
■j 2 Getting Started
Push here to close.
To open, push again.
liHii
02D
q._ J
ezS
1
Push the top, glass door hinge into the top,
1
4
o
]
1
right bushing and gently slide the glass
door into the bottom hinge. Adjust the
glass door until level, and tighten the hinge
screws.
Note
• The glass door is made of tempered glass. Although it is more
shock-resistant than ordinary glass, tempered glass may
shatter if it is dropped or receives a sudden shock.
Page 13
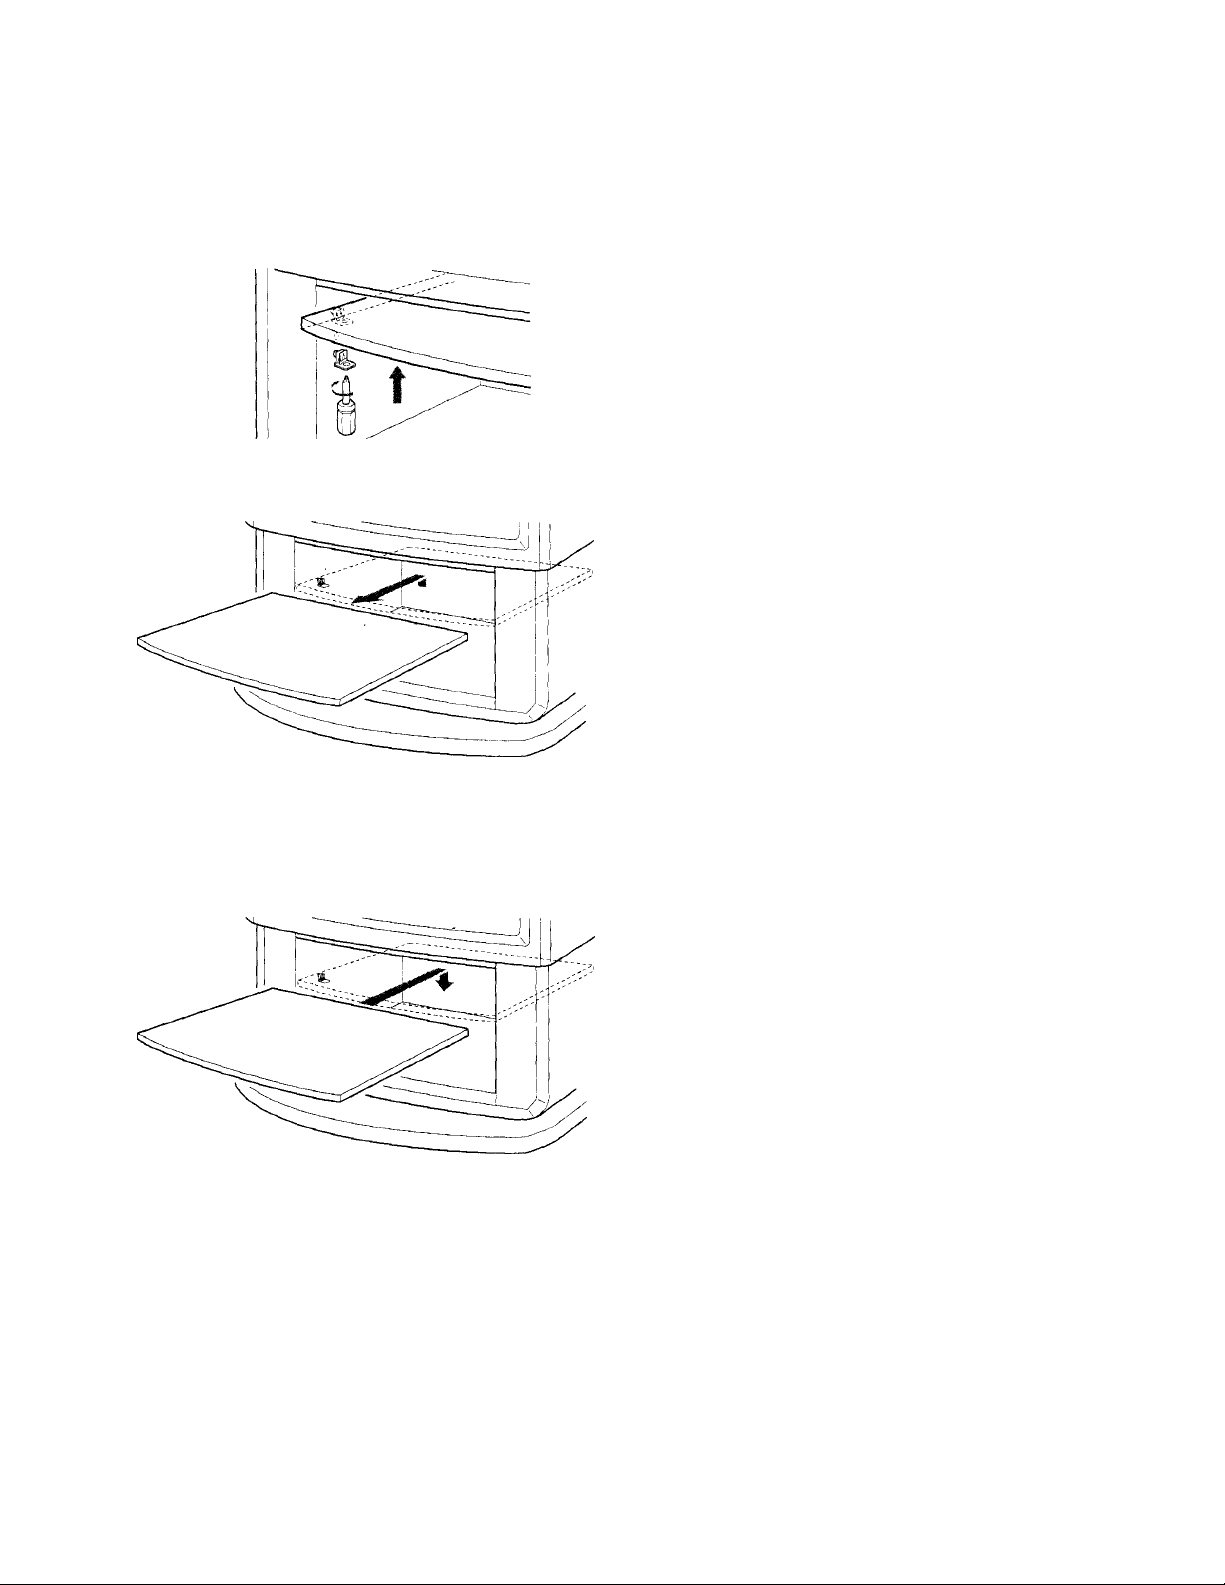
Adjusting the shelf
1 Unlock the four shelf supports with a
medium Philips head screwdriver. Turn the
screwdriver 90° to unlock the shelf
supports.
2 Gently slide the shelf up and out.
3 Insert shelf supports in the appropriate
holes. Slide shelf in, align the shelf grooves
with the shelf supports, and slide the shelf
down.
Getting Started
13
Page 14

step 3: Setting up
Getting to know buttons on the remote commander
the remote
commander
Inserting batteries
Insert two size AA (R6) batteries (supplied) by
matching the + and - on the battery to the diagram
inside the battery compartment.
Notes
• Under normal conditions, batteries will last up to six months.
If the remote commander does not operate properly or the
indicators of the buttons on the remote commander do not
light up, the batteries may be worn out. When replacing
batteries, replace both of them with new ones.
• Do not mix old batteries with new ones or mix different types
of batteries together. _
• If the electrolyte inside the battery should leak, wipe the
contaminated area of the battery compartment with a cloth and
replace the old batteries with new ones. To prevent the
electrolyte from leaking, remove the batteries when you don't
plan to use the remote commander for a long period of time.
• Do not handle the remote commander roughly. Do not drop it,
step on it or let it get wet.
• Do not place the remote commander in direct sunlight, near a
heater, or where the humidity is iiigh.
Names of buttons on the remote commander are
indicated in different colors to represent the available
functions.
Button color
Transparent
(light up) buttons. Press the appropriate
Green
Label color
White
Yellow
Blue
................
..........................
..........................
........................
............................
TV/VCR/DBS/Cable box function
function button first to change the
remote commander's function.
Buttons relevant to power operations.
TV/VCR/DBS/Cable box operation
buttons.
PIP operation buttons.
DBS operation buttons.
14 I Gett ng Started
Page 15

step 4: Setting up
the TV automatically
(AUTO SET UP)
You can set up your TV easily by using the AUTO SET
UP feature. It presets all the receivable channels.
To set up the TV manually, see "Setting cable TV on or
off" (page 17) and "Presetting channels"(page 17).
3 Press VOLUME
- VOLUME +
"AUTO PROGRAM" appears on the screen and
the TV starts scanning and presetting channels
automatically. When all the receivable channels are
stored, "AUTO PROGRAM" disappears and the
lowest numbered channel is displayed. If the TV
receives cable TV channels, CABLE is set to ON
automatically.
(Front of TV)
SET UP TV VIDBO - VOLUME -
og
For KV-27V35 / 29V35C / 29V75M / 32V35 / 34V35C /
35V45/35V75, the control buttons are located on the
top of the TV.
Before you start using AUTO SET UP, be sure to connect the antenna or cable to the TV (see page 5).
Q o
O STAND BY STEREO
PIP
1 Press POWER to turn on the TV.
The AUTO SET UP screen appears.
POWER
ENGLISH :
ESPAÑOL
AUTO SET UP [VOL-!
DEMO
F.rs! please connec!
the antenna
Press [SET UP) to exit.
Note
• The AUTO SET UP screen appears whenever you press
the POWER button if you do not execute AUTO
PROGRAM.
<2 (Exc ep t C a na dia n mo de ls)
Press CHANNEL + to select English screens or CHANNEL - to select Spanish screens.
- CHANNEL +
[CHH
ÍCH-)
(TV,VIDEO!
To perform AUTO SET UP again
1 Press SET UP on the TV.
2 (E xc ep t C a na dia n mo de ls)
Press CHANNEL + or CHANNEL - to select the
language.
3 Press VOLUME-.
The picture and sound settings will be set to the
factory preset conditions.
4 Press CHANNEL +.
"AUTO PROGRAM" appears on the screen and the
TV starts scanning and presetting channels.
5 Press CHANNEL - to exit the AUTO SET UP menu.
To exit AUTO PROGRAM
Press anv button.
Notes
• If the TV is set to a video input, you cannot execute AUTO SET
UP. Press TV (black button) so that a channel number appears,
• Using the AUX connector, press TV (black button) first and
make sure that "AUX" is displayed beside the channel number
on the screen. Then follow the procedure above to perform
AUTO SET UP. (RV-27S35/27V3S/29V35C/29V75M/32S,35/
32V35/34V35C/35V35/35V45/35V75oiih/)
To browse the main functions (DEMO)
Press TV/VIDEO on the TV in step 3. The functions
and menus are displayed one by one.
To exit DEMO
Press anv button.
Getting Started
15
Page 16

Erasing or adding channels
After AUTO SET UP, you can erase unnecessary
channels or add the channels you want. Preset channels
during the day rather than late at night, when some
channels may not be broadcasting.
4 Press 4 or 4 to select CHANNEL ERASE/ADD,
and press GD.
The CHANNEL ERASE/ADD menu appears.
CHANNEL ERASE/ADD
►ERASE
ADD
DMENU
Use[0-9lor(CH+/-]
to select the channel
Use (55) GB
Exit @
1 Press TV (FUNCTION).
— FUNCTION -
2 Press MENU.
The main menu appears.
MENU
3 Press 4 or ♦ to select and press GD.
The SET UP menu appears.
TV (FUNCTION)
0-9 buttons
ENTER
t
‘GD
MENU
CH +/-
VIDEO
MODE:STANDARD
PICTURE m m m
HUE
COLOR ■■N«
BRIGHTNESS
SHARPNESS
DMENU
Use 5K2 C3D Exit @
gig SET UP
„►CHANNEL ERASÈ/ADD
j. CHANNEL CAPTION
^ CHANNEL BLOCK
^ FAVORITE CHANNEL
M CABLE ; ON
^ AUTO PROGRAM
rii DMENU
Use IHfl GD Exit ®
...
..........
Erase and/or add channels:
To erase an unwanted channel
(1) Make sure the cursor (►) is beside ERASE.
(2) Press CH +/- or the 0-9 buttons to select the
channel you want to erase, and press ENTER.
Selected channel number
© @ ®
© ® ®
© ® ®
® o
CHANNEL ERASE/ADD
►ERASE
ADD
:dmenu
Use(0-9)or [CH+/-1
to select the channel
Use ®SI GD Exit ©
(3) Press GD.
The indication appears beside the channel
number, showing that the channel is erased
from the preset memory.
To add a channel that you want
(1) Press 4 or ♦ to move the cursor (►) to ADD.
(2) Press the 0-9 buttons to select the channel you
want to add, and press ENTER.
Selected channel number
© ® @
® ® ®
CHANNEL ERASE/ADD
ERASE
►ADD
DMENU
© ® ®
® O ^
(3) Press GD.
The "+" indication appears beside the channel
number, showing that the channel is added to
the preset memory.
Use 2)51 GD
Exit ©
16
6 To erase and/or add other channels, repeat
step 5.
Getting Started
Page 17

7 Press MENU to return to the original screen. Presetting channels
MENU
You can preset TV channels easily by using the AUTO
PROGRAM feature. You do not have to do this
procedure if you execute AUTO SET UP (page 15). Do
Notes
this procedure only when you want to set it manually.
• If you erase or add a VHF or UHF channel, the cable TV
channel with the same number is also erased or added, and
1 Press MENU.
vice versa.
• Erasing and adding channels is also available for the AUX
input. (KV-27S35/27V35/29V35C/29V73M/32S35/32'/35/
2 Press ♦ or ♦ to select Cb, and press CC .
34V35C!35V35I35V45/35V75 ouhj)
3 Press ♦ or ♦ to select AUTO PROGRAM, and
Setting cable TV on or off
If you have connected the TV to a cable TV system, set
CABLE to ON (the factory setting). If not, set CABLE to
OFF. You do not have to do this procedure if you
execute AUTO SET UP (page 15). Do this procedure
only when you want to set it manually.
1 Press MENU.
2 Press ♦ or ♦ to select and press .
press CG.
"AUTO PROGRAM" appears on the screen and the
TV starts scanning and presetting channels
automatically. When all the receivable channels are
stored, "AUTO PROGRAM" disappears and the
lowest numbered channel is displayed.
3 Set CABLE to ON or OFF;
(1) Press ♦ or ♦ to move the cursor (►) to CABLE,
and press (T;.
(2) Press ♦ or ♦ to select ON or OFF, and press CL. .
SET UP
CHANNEL ERASE.AOO
CHANNEL CAPTION
CHANNEL BLOCK
I •
FAVORITE CHANNEL
►CABLE OFF
AUTO PROGRAM
|a
DMENU
Use ®5] GE) Exit ®
4 Press MENU to return to the original screen.
Note
• If CABLE appears in gray, the TV is set to a video input and
you cannot select CABLE. Press TV (black button) so that a
channel number appears.
4 Press MENU to return to the original screen.
To exit AUTO PROGRAM
Press any button.
Notes
• If the AUTO PROGRAM menu appears in gray, the TV is set to
a video input and vou cannot select AUTO PROGRA.M. Press
TV (black) so that a channel number appears.
• Presetting channels is also available for the AUX input.
{KV-27S35I27V35I29V35CI29V75MI32S35I32V35I34V35CI
35V35/35V45I35V75 onh/)
Getting Started 17
Page 18

Changing the
Adjusting the tilt of
menu language
■ Except Canadian models
If you prefer Spanish to English, you can change the
menu language. You do not have to do this procedure
if you select the language during AUTO SET UP
(pageJS).
1 Press MENU.
2 Press ♦ or ♦ to select »*i, and press c
3 Press ♦ or to select LANGUAGE, and press
SET UP
_ _ _
I
language : ENGLISH
Use SE GD
4 Press ♦ or ♦ to select your favorite
language, "ENGLISH" or "ESPAÑOL," and press GY.
1AJUSTES
____
CABLE : SI
j>LENGUAJE : ESPAÑOL
UsarESfi] GD
CHANNEL ERASE'ADD
CHANNEL CAPTION
CHANNEL BLOCK
FAVORITE CHANNEL
CABLE : ON
AUTO PROGRAM
OMENU
BORRAR AÑADIR CANAL
NOMBRE DEL CANAL
BLOQUEAR CANAL
CANAL FAVORITO
AUTO PROGRAMACION
OMENU
Exit ÇÏ3
SalirflèT)
the picture
(TILT CORRECTION)
■ KV-3SV35I35V45I35V75 only
You can adjust the tilt of the picture if it is not aligned
with the TV screen. Misalignment may be caused by
the direction of the earth's magnetic fields in relation to
the position of the TV.
♦
CL ;
MENU
1 Press MENU.
2 Press 4 or ♦ to select is, and press GG.
3 Press ♦ or ♦ to select TILT CORRECTION, and
press
SET UP
CHANNEL ERASE/AOD
CHANNEL CAPTION
CHANNEL BLOCK
FAVORITE CHANNEL
CABLE : ON
AUTO PROGRAM
VIDEO LABEL
^ TILT CORRECTION . 0
!Z!J OMENU
Use HE GD Exit E3
4 Press ♦ or ♦ to adjust the tilt between +5
and -5.
5 Press MENU to return to the original screen. 5 Press MENU to return to the original screen.
Note
• Certain parts of the Spanish menus remain in English.
Notes
• If your house is located near a high-voltage cable or is of
reinforced concrete, you may ix)t be able to correct the tilt of
the picture properly. Consult your nearest Sony dealer.
• If there are large speakers near the TV, the tilt of the picture
cannot be corrected properly. Place the TV away from the
speakers.
Getting Started
18
Page 19

Operations
Watching the TV
3 Select the channel you want:
To select a channel directly
Press the 0-9 buttons, and press ENTER.
To scan through channels
Press CH + /- until the channel you want appears.
® © @
® © ®
® © ®
© O
CH
©
1 Press TV (POWER) to turn on the TV.
POWER
-TV (POWER)
-TV (FUNCTION)
-TV/VIDEO
-TV (black button)
-0-9 buttons
■ENTER
-CH +/-
The channel can also be selected without pressing
ENTER.
4 Press VOL +/- to adjust the volume.
VOL
Switching quickly between two channels
You can use the JUMP button to switch or "jump" back
and forth between two channels.
Press JUMP.
JUMP
If "VIDEO" appears on the screen, press TV (black
button) so that a channel number appears.
2 Press TV (FUNCTION).
— FUNCTION —
TV
Once you press TV (FUNCTION), the TV function
is set unless another function button is pressed.
Pressing JUMP again switches back the channel.
Note
♦ You cannot jump to channels you scanned through using the
CH +/- buttons.
Muting the sound
Press MUTING.
"MUTING" appears on the screen.
MUTING
To restore the sound, press MUTING again, or press
VOL -F.
Operations I 19
Page 20

Displaying on-screen information
Watching a video input picture
Press DISPLAY repeatedly until the desired display appears.
Each time you press DISPLAY, the display changes as
follows:
Status display'^
* Channel number, the current time (only for
iwailable models), channel caption (if set), and MTS
mode (if SAP is selected) are displayed. SAl’
indication disappears after three seconds.
** Some programs are broadcast with XDS (Extended
Data Service) which shows a network name,
program name, program type, program length, call
letters, and time of the show. When you select XDS
with the DISPLAY button, this information will be
displayed on the screen if the broadcaster offers this
service.
*** Some programs are broadcast with Caption Vision.
When you select Caption Vision with the DISPLAY
button. Caption Vision will be displayed on the
screen if the broadcaster offers this service. (See
page 33 for selecting Caption Vision.)
-♦ YDS*"^ —► Caption Vision*
DISPLAY OFF -<
DISPLAY
---------------
¡
Press TVA/IDEO repeatedly until the desired video input appears.
Each time you press TV/VIDEO, the display changes
as follows:
KV-27S25I27S35I29RS2SI29RS2SCI32S2SI32S35I
32TW25 only
TV -» VIDEO 1
t
__________
VIDEO 2
■ KV-27V25I27V35I29V35CI29V65MI29V75MI32V25I
32 V35I34 V35CI35V35I35V45I35V75 only
TV — VIDEO 1 VIDEO 2 -♦ VIDEO 3
1_________________________i
TV/VIDEO
To return to the TV picture, press TV (black button) so
that a channel number appears.
Changing the VHF/UHF input to the
AUX input
■ KV-27S35I27V35I29V35CI29V75MI32S35I32V35I
34V35CI35V35I35V45I35V75 only
To cancel the display, press DISPLAY repeatedly until
"DISPLAY OFF" appears. "DISPLAY OFF" goes off
after three seconds.
Setting the Sleep Timer
The TV stays on for the length of time you specify and
then shuts off automatically.
Press SLEEP repeatedly until the time (minutes) you want appears.
Each time you press SLEEP, the time changes as
follows:
30 60 90 SLEEP OFF
SLEEP
To cancel the Sleep Timer, press SLEEP repeatedly
until "SLEEP OFF" appears, or turn off the TV.
Press TV (black button).
Pressing TV (black button) again switches back to the
previous input.
20 Operations
Page 21

Watching two
Changing the window picture input mode
programs at a time
—PIP
The Picture-in-Picture (PIP) feature allows you to
watch both the main picture and a window picture
simultaneously.
For KV-27S25/27V25/29RS25/29RS25C/29V65M/
32S25/32TW25/32V25, your TV must be connected to
a VCR to enjoy this feature. See "Connecting an
antenna/cable TV system with a VCR" (page 6) for
connections. In order to operate PIP, your VCR must be
turned on.
o O coQ
FREEZE
CH +/- (yellow
labelled button) •
POSITION .
AUDIO
Use the yellow labelled buttons for PIP operations.
Displaying a window.picture
Press PIP.
PIP
Main picture
CD CD
^ i, (&-
(?)
SWAP
PIP
TV/VIDEO (yellow
labelled button)
Input-source mode or TV
channel for the main picture
Press TVAAIDEO (yellow labelled button) to select the input mode.
Each time you press TV/VIDEO (yellow labelled
button), "TV," "VIDEO 1," "VIDEO 2," and "VIDEO 3
(KV -2 7V 25 j27 V 35 l29 V3 5C I2 9V 65 M I2 9V 75 MJ 32 V 25 l
32V35/34V35C/35V35/35V45/35V7.5 only)" appear in
sec]uence.
TV/VIDEO
A window picture will appear in the same input mode
as the last time you used PIP.
Note
• If you use one of the connections from page 5, ycrur PIP input
source is a VCR. If you use one of the connections from page 7,
vour PIP input source is a VCR or cable box.
Listening to the sound of the window picture
Press AUDIO.
The display appears next to the PIP channel number
for a few seconds, indicating that the window picture
sound is being received.
AUDIO
Window picture
(1/9 size)
Input-source mode or TV
channel for the window picture
Press PIP again to display a smaller window picture.
PIP
To remove^ the window picture, press PIP again.
Note
• The window picture may be affected by the condition of the
main picture.
picture is received.
To restore the main picture sound, press AUDIO again.
The J' display moves to the main picture channel
number.
Changing TV channels in the window
picture
Press CH +1- (yellow labelled button).
TV/VTR
CHCH rv
Operations I 21
Page 22

Freezing the window picture
This feature is useful when you want to write down a
recipe from a cooking program, a displayed address, or
a phone number for example.
Press FREEZE.
You can adjust the picture of video input(s) as well.
o ® o
FREEZE
To restore the normal screen, press FREEZE again.
Swapping the main and window pictures
Press SWAP.
Each time you press SWAP, the images from the main
and window pictures switch places along with the
sound.
SWAP
1 Press MENU.
2 Press or to select GIC, and press
VIDEO
►MODE:STANDARD
PICTURE —Hlllll
HUE
COLOR HMH>
BRIGHTNESS
SHARPNESS
E3
DMENU
Use 03 GD
Exit §3
3 Select the item you want to adjust.
For example:
(1) To adjust the brightness, press ♦ or to move
the cursor (►) to BRIGHTNESS.
VIDEO
wl MODE : STANDARD
__I HUE
j COLOR ||iD(|||||jii«iMiiuwi
^ >B RIG H T N E S S ■“
PH SHARPNESS
^ I
DMENU
Use SO) GD Exit IHD
(2) Press I.
VIDEO STANDARD
i
BRIGHTNESS
Note
• The channels being received through the AUX jack cannot be
displayed as a window picture. (KV-27S35[27Vi5l29V35CI
29V75MI32S35I32V35134V35CI33V33I35V45I35V75 oiih/)
22 Operations
Page 23

4 Adjust the selected item:
(1) Press ♦ or ♦ to adjust the item.
(2) Press GD.
The new setting appears in the VIDEO menu.
VIDEO STANDARD
BRIGHTNESS
iVIDEO
1 MODE ; STANDARD
PICTURE innHi
HUE nrnmH^
COLOR mm«"
»BRIGHTNESS ■HU»"
SHARPNESS ■■■""
DMENU
Use ŒŒ GQ
Exit ©
Selecting the video mode (VIDEO)
The video mode feature allows you to choose three
different modes of picture settings. Choose the one that
best suits the type of program that you want to watch.
1 Press MENU.
For details on each item, see "Description of
adjustable items" below.
5 To adjust other items, repeat steps 3 and 4.
6 Press MENU to return to the original screen.
Description of adjustable items
Item
PICTURE
Press ♦ to
Decrease picture
contrast and give soft
color.
HUE
Make picture tones
become purplish.
COLOR
Decrease color intensity.
BRIGHTNESS Darken the picture.
SHARPNESS
Soften the picture.
To restore the factory settings
Press RESET while the VIDEO menu is displayed.
All the settings are restored to the factory settings.
Press ♦ to
Increase picture
contrast and give
vivid color.
Make picture tones
become greenish.
Increase color intensity.
Brighten the picture.
Sharpen the picture.
2 Press ♦ or ♦ to select GD, and press CD.
3 Press ♦ or ♦ to select MODE, and press CD.
4 Press ♦ or ♦ to select STANDARD, MOVIE, or
SPORTS mode, and press CD.
^VIDEO
^ MODE ; MOVIE
Tl PICTURE H
HUE COLOR HI
BRIGHTNESS IR
SHARPNESS Ml
DMENU
Exil ©
Choose
Use 15® GE)
To
STANDARD Receive a standard picture.
MOVIE Receive a finely detailed picture.
SPORTS
Receive a vivid, bright picture.
5 Press MENU to return to the original screen.
Note
• The settings for these modes can be adjusted in the VIDEO
menu.
Operations 23
Page 24

Adjusting picture
Adjusting the
brightness
automatically
(LIGHTSENSOR)
■ KV-27V25I27V35I29 V35CI29V65MI29V75MI32 V25I
32V3SI34V35CI35V35I3SV4SI35V75 only
The LightSensor feature adjusts the brightness of the
^picture automatically according to the ambient
brightness.
o ® o
o_
O cB-
Qi I®
1 Press MENU.
2 Press ♦ or ♦ to select [ull, and press CD.
3 Press or to select LIGHTSENSOR, and
press
4 Press ♦ or ♦ to select ON or OFF, and press
■MENU
TT
a
tCi
Us mCD Exiff-T]
cs
Use B® CS
VIDEO
MODE'STANDARD
PICTURE IHHIIIIIHIlUili
HUE
.................................
COLOR lii»!*
......................
BRIGHTNESS illU»«i—'
SHARPNESS Hlllllllll»'“"ii““'
LIGHTSENSOR . OFF
."MENU
VIDEO
MODE;STANDARD
PICTURE imilil
HUE
COLOR mi»—'
BRIGHTNESS miHKH—
SHARPNESS milllH«
►LIGHTSENSOR . ON
DM6NU
Exit ED
sound (AUDIO)
You can adjust the TV sound to suit your taste. You can
adjust the sound of the video input(s) as vcell.
o ® o
1 Press MENU.
2 Press 4 or ♦ to select J', and press
iM-REBLE imilll—•
BALANCE l!!!l!!ll|iiiiwi«
effect SURROUND
MTS : MAIN
SPEAKER; OFF
¡E)
AUDIO OUT . VARIABLE
0)MENU
Use OS GD
3 Select the item you want to adjust.
For example:
.
0) To adjust bass, press 4 or 4 to move the cursor
(►) to BASS.
Use B® GD Exit ED
(2) Press'
lAUDIO
EFFECT^ SUFWCUND
MTS : MAIN
SPEAKER :OFF
AUDIO OUT . VARIABLE
OMENU
Exit E3
5 Press MENU to return to the original screen.
Note
• The LightSensor function may malfunction if you stand or
place objects in front of the TV.
24 I Operations
Page 25

4 Adjust the selected item:
(1) Press ♦ or ♦ to adjust the item.
(2) Press GC.
The new setting appears in the AUDIO menu.
AUDIO
TREBLE
►BASS
BALANCE
EFFECT .
[e
MTS .
SPEAKER OFF
|e3
AUDIO OUT VARIABLE
DMENU
Use 3® G3
...........
itillllllKliniXilll
SURROUND
MAIN
Exit ED
..........
Using the 0 (audio effect) button
■ For KV-27S2SI27S3SI29RS25l29RS2Sa32S25l32S35l
32TW2S only
For details on each item, see "Description of
adjustable items" below.
5 To adjust other items, repeat steps 3 and 4.
6 Press MENU to return to the original screen.
Description of adjustable items
Item
TREBLE
Press ♦ to Press ♦ to
Decrease the treble Increase the treble
response. respoiTse.
BASS
Decrease the bass Increase the bass
response. 'respoTise.
BALANCE
Emphasize the left
speaker's volume.
Emphasize the right
speaker's volume.
To restore the factory settings
Press RESET while the AUDIO menu is displayed.
Note
• When SPEAKER (page 27) is OFF and AUDIO OUT (page 27)
is in the FIXED condition, the volume, TREBLE, BASS, and
BALANCE cannot be adjusted.
Press 0.
Each time you press the 0 button, the display changes
as follows:
SURROUND — SURROUND OFF
t______________i
Tv/Desv V
■ For KV-27V2SI27V35I29V35CI29V65MI29V7SMI
32V25I32V35I34V35CI35V35I35V45I3SV7S only
Press 0.
Each time you press the 0 button, the display changes
as follows:
SRS SIMULATED EFFECT OFF
t
_____________________
i
TV/DBSV y
Choose To
SURROUND Simulate sound reproduction with the
atmosphere of a movie theater or a concert
hall.
Surround sound is only effective for stereo
programs.
SRS When the program's audio signal is stereo
or encoded, SRS expands the material and
embraces you with dynamic three-
dimensional sound.
SIMULATED Receive monaural sound with a surround
like effect.
Note
• To use the 0 button function, press TV (FUNCTION).
Operations I 25
Page 26

Using the menu to set audio effect
Selecting stereo or
■ ♦
-GD
’ MENU
1 Press MENU.
2 Press ♦ or ♦ to select J", and press GE).
3 Press ♦ or ♦ to select EFFECT, and press
AUDIO
©
TREBLE
BASS
BALANCE I—
EFFECT SURROUND
MTS • MAIN
SPEAKER: OFF
AUDIO OUT : VARIABLE
OMENU
Use 50 GD Exit®
4 Press 4 or to select the audio effect mode,
and press GD.
Taudio
TREBLE WmU"
1 BASS wmt"
J BALANCE —W4»
I ►EFFECT: SURROUND OFP
' MTS : MAIN
SPEAKER; OFF
AUDIO OUT: VARIABLE
DMENU
Use 50 QD
5 Press MENU to return to the original screen.
Exit®
bilingual programs
(MTS)
The Multichannel TV Sound (MTS) feature allows you
to enjoy stereo sound or Second Audio Programs (SAP)
of your choice. The initial setting is stereo sound
(MAIN).
o ® o
I ®
o
1 Press MENU.
2 Press ♦ or ♦ to select u, and press GD.
3 Press ♦ or ♦ to select MTS, and press GD.
£l
OB-
- ♦
-GD
- MENU
Use SB ffl
AUDIO
TREBLE
BASS
MTS ; MAIN
SPEAKER : OFF
AUDIO OUT : VARIABLE
DMENU
BxU ©
4 Press ♦ or ♦ to select MAIN, SAP, or MONO,
and press GD.
®1\^R^EBLE ■
BALANCE
, EFFECT; SURROUND
____
^►MTS : SAP
SPEAKER ; OFF
' AUDIO OUT ; VARIABLE
DMENU
Use ilffi CS
Choose
MAIN
To
Listen to stereo sound.
The STEREO indicator on the TV lights up
when a stereo broadcast is received.
SAP Listen to bilingual programs.
There is no sound when the SAP signal is
not broadcasting.
MONO Listen to monaural sound.
Reduce noise during stereo broadcasts.
5 Press MENU to return to the original screen.
Note
• Stereo and SAP sounds are subject to program sources.
Exit ©
26 I Operations
Page 27

Setting the speaker
Setting audio out
switch (SPEAKER)
You may switch off the TV speakers when, for
example, you want to listen to the sound through a
stereo system.
o ® o
a
O' ^ CB'
Q'®
1 Press MENU.
2 Press ♦ or ♦ to select J', and press Ci:.
3 Press ♦ or ♦ to select SPEAKER, and press
: SlENU
(AUDIO OUT)
You can change AUDIO OUT to VARIABLE or FIXED
when SPEAKER is set to OFF.
AUDIO OUT is variable when SPEAKER is set to ON.
■ ♦
•QD
•Rienu
1 Press MENU.
2 Press ♦ or ♦ to select J', and press CD.
3 Press 4 or 4^ to select AUDIO OUT, and press
_
____, BAUNCE SSlm-im.
^¡EFFECT SURROUND
^ I MTS MAIN
m I SPEAKER;ON
___
I AUDIO OUT : VARIABLE
Use ©ffla Exil E3
4 Press 4 or ♦ to select ON or OFF; and press
►SPEAKER OFF
Use CD® GE Exit Q
5 Press MENU to return to the original screen.
DMENU
^^REBLE wmm
BALANCE !l!2IU««i
EFFECT SURROUND
MTS MAIN
AUDIO OUT . VARIABLE
DMENU
^T^R^EBLE miB»—•
BALANCE l!!!!!!iiii..iii.i
i'
EFFECT; SURROUND
MTS : MAIN
SPEAKER:OFF
ED
AUDIO OUT VARIABLE
DMENU
Use [Dil GD Exit ®
4
Press 4 or 4 to select VARIABLE or FIXED,
and press GD-
EFFECT: SURROUND
MTS : MAIN
SPEAKER;OFF
►AUDIO OUT FIXED
DMENU
Use OSl GD
VARIABLE; Sound output varied according to the
TV settings. You can adjust the
volume, bass, treble, and balance.
FIXED: Sound output is always fixed to a certain
level. The volume, bass, treble, and balance
are also fixed to the factory settings.
5 Press MENU to return to the original screen.
Note
• If AUDIO OUT appears in gray, set SPEAKER to OFF.
Exit ©
Operations 27
Page 28

Setting daylight
Setting the clock
saving time (daylight
SAVING)
■ KV-27V2SI27V35I29V3SCI29V65MI29V7SMI32V25I
32V3SI34V35a35V35l35V45l35V75 only
o ® o
Q Q
O)
a©
1 Press MENU.
2 Press ♦ or ♦ to select ©, and press GC .
3 Press 4 or ♦ to select DAYLIGHT SAVING,
and press gD-
4 Press ♦ or ♦ to select YES or NO, and press
MENU
TIMER
CURRENT TIME SET
ON/OFF TIMER
DAYLIGHT SAVING.YES
DMENU
H
___
)
Use (S® GD Exit @
TIMER
CURRENT TIME SET
ON/OFF TIMER
►DAYLIGHT SAVING:NO
DMENU
------
—- AM
(CURRENT TIME SET)
■ KV-27V25I27V3SI29V35CI29V6SMI29V75MI32V25I
32V35I34V35CI35V35I3SV45I3SV75 only
Setting the clock enables you to turn the TV on and off
with the timer. Make sure to set daylight saving time
first.
ffl
o
„0 ® O
JLu
■illENU
0, 0
1 Press MENU. 2 Press ♦ or ♦ to select ©, and press GD- 3 Press 4 or ♦ to select CURRENT TIME SET,
and press GD-
CURRENT TIME SET
►
___
Use iSE QD Exit ®
4 Make sure the cursor {>) is to the left of
- AM," and press GD.
CURRENT TIME SET
SUN 12; 00 AM
t)MENU
AM
Use ffl® GD
Choose
YES
To
Set for daylight saving start.
The current time automatically moves one
hour ahead.
NO
Set for daylight saving end.
5 Press MENU to return to the original screen.
28 I Operations
--AM
Exit ©
Set the day.
Use ®S1 O
5 Set the current time.
(1) Press 4 or 4 to set the day, and press GD-
CURRENT TIME SET
FRI 12:00 AM
DMENU
Set the time.
Use OP® QD Exit ®
(2) Set the hour and minutes in the same way as in
step (1). When you press GG> after setting the
minutes, the clock starts.
CURRENT TIME SET
FRI 12 04 AM
DMENU
Use ffifi) GD
6 Press MENU to return to the original screen.
Exit 63
Exit 63
Page 29

Setting the timer to
turn the TV on and
off (ON/OFF TIMER)
(2) Press ♦ or ♦ to set the time (hour then minutes)
that you want to turn on the TV, and press GE^'-
ON/OFF TIMER
EVERY SUN-SAT
12:02 AM _h CH
DMENU
Set the duration.
Use SE GD Exit @
(3) Press ♦ or ♦ to set the time duration, and press
_______
SUN 12:00 AM
■ KV-27V2SI27V3SI29V35CI29V6SMI29V7SMI32V25I
32V3SI34V3SCI3SV3SI35V4SI3SV75 only
You can set the TV to turn on and off at the times you
specify. Make sure the clock is set correctly. If it is not,
set the clock first (page 28) .
♦
•GD
♦
MENU
1 Press MENU.
2 Press ♦ or ♦ to select ©, and press GD-
3 Press ♦ or ♦ to select ON/OFF TIMER, and
press GD.
ON/OFF TIMER
►
____
DMENU
Use GD
4 Press GD and enter the ON/OFF TIMER
setting.
(1) Press ♦ or ♦ to set the day(s), and press CD.
Each time you press ♦ or ♦, the days cycle as
follows:
EVERY SUN-SAT-..EVERY MON-FRI->
SUNDAY—.. .—SATURDAY—EVERY
SUNDAY—...—EVERY SATURDAY
AM.h
SUN
CH
_____
12:00 AM
Exit ®
Each time you press 4, the time duration
increases by one hour up to a maximum of six
hours.
ON/OFF TIMER
EVERY SUN-SAT
12:02 AM ih CH_________
DMENU
Select the channel.
Use GD Exit E3
SUN 12 00 AM
(4) Press 4 or 4 to select the channel, and press :
ON/OFF TIMER
► EVERY SUN-SAT
12:02AM Ih CH 1
Use Blttl GD Exit ©
SUN 12:00 AM
The TIMER indicator on the TV lights up.
5 Press MENU to return to the original screen.
One minute before the TV turns off, the message "TV
will be off soon." is displayed on the screen.
To cancel the timer
In step 3 or 4, press RESET.
Note
• If you unplug the TV or a power interruption occurs, the ON/
OFF TIMER setting will be erased. Reset the current time, then
set the timer.
Operations 29
Page 30

Customizing the channel names
(CHANNEL CAPTION)
You can add a caption for up to 12 channels. This
feature allows you to easily identify which channel you
are watching. You can make your own caption.
-0-9 buttons
-ENTER
-♦
-o
-MENU
5 Enter the letters (up to four) to caption the
channel:
(1) Press 4 or 4 to select the first letter.
Each time you press 4 or 4, the letter changes as
follows:
0 * »I4 •4,,,4-->9* "~4B4—►..,4—►24—4&4—►/4—►_(bÌ3nk sodcs)
t_________________________:
(2) Press GD-
CHANNEL CAPTION
Select the letter.
Use Uffl QD Exit ®
(3) Repeat steps (1) and (2) to select the remaining
letters, and press GD-
____
1
DMENU
ESP-
125
2 Press 4 or ♦ to select and press GD-
____ CABLE : ON
^ AUTO PROGRAM
3 Press 4 or 4 to select CHANNEL CAPTION,
and press CD-
Press GD and press 4 or ♦ to select the
channel that you want to caption, and
press GD-
ISETUP
►CHANNEL ERASE/ADD
CHANNEL CAPTION
CHANNEL BLOCK
FAVORITE CHANNEL
^ I DMENU
Use ®5) GB Exit £¡3
CHANNEL CAPTION
►
__
riMENU
Use (SB CS
Exit ®
6 To caption other channels, repeat steps 4
and 5.
7 Press MENU to return to the original screen.
After you customize the channel, the channel caption
appears green.
To erase a caption
In step 5, press RESET.
Notes
• If the CHANNEL CAPTION menu appears in gray, the TV is
set to a video input, and you cannot select CHANNEL
CAPTION. Press TV (black button) so that a channel number
appears.
• If more than 90 seconds elapse after you press a button, the
menu disappears automatically.
• The channel caption feature is not available for the AUX input.
30 I Operations
CHANNEL CAPTION
125
DMENU
Select the letter.
Use 5IB CS Exit®
Page 31

Blocking out a
Setting your
channel (channel block)
The channel block feature allows you to prevent
children from watching unsuitable programs. You can
block out two channels.
♦
GD
MENU
1 Press MENU.
2 Press ♦ or ♦ to select S, and press GC .
3 Press 4 or to select CHANNEL BLOCK, and
press GD-
CHANNEL BLOCK
► 1. CH__,
2. CH
DMENU
Select a program
Use (Ddl GD Exit E3
____
favorite channels
(FAVORITE CHANNEL)
The favorite channel feature allows your TV to
memorize your favorite channels easily. If you set to
AUTO, the last five channels you selected with the 0-9
buttons are automatically set as your favorite channels.
If you want to input your own selection of channels, set
to MANUAL.
Setting your favorite channels
♦
■GD
♦
MENU
1 Press MENU. 2 Press 4 or ♦ to select S, and press GD. 3 Press 4 or 4 to select FAVORITE CHANNEL,
and press GD-
FAVORITE CHANNEL
► MODE: AUTO
5 Press ♦ or ♦ to select the channel which you
want to block out, and press GD-
6 Press MENU to return to the original screen.
When you select the blocked
channel "BLOCKED" appears
on the screen.
To cancel a CHANNEL BLOCK setting
In step 4 or 5, press RESET.
Note
• Once you use CHANNEL BLOCK, Caption Vision and XDS of
the blocked channel and the selected channel output from TV
OUT/MONITOR OUT are also blocked out.
DMENU
Use UGl GD Exit ®
4 Press GDi and press 4 or 4 to select AUTO or
MANUAL, and press GD.
FAVORITE CHANNEL
► MODE: MANUAL
Select a position
Use (EQ) GD Exit
If you select AUTO, skip steps 5 and 6.
The last five channels you selected with the 0-9
buttons are automatically set as your favorite
channels.
If you select MANUAL, the favorite channel
numbers become white, indicating that favorite
channels can be entered.
Operations 31
(continued)
Page 32

5 Press 4 or 'f to select a favorite channel
number, and press GD.
FAVORITE CHANNEL
MODE: MANUAL
1
__
2
__
3
____
4
____
^WNU
Select the channel
Use (ESI GD Exit ®
6 Press 4 or 4 to select the channel that you
want to set as your favorite channel, and
press GD.
FAVORITE CHANNEL
MODE: MANUAL
► 1. 5
2
__
3
____
4
____
fiWEfjU
Select a position
Use [DS GD Exit ®
7
Press MENU to return to the original screen.
Setting video labels
(VIDEO LABEL)
■ KV-27V25I27V35I29V3SCI29V6SMI29V75MI32V25I
32V35I34V3S035V35I35V4SI35V75 only
The video label feature allows you to label each input
mode so that you can easily identify the connected
equipment. Eor example, you can label VIDEO 1 IN as
VHS.
Notes
• If the FAVORITE CHANNEL menu appears in gray, the TV is
set to a video input and you cannot select FAVORITE
CHANNEL.
• If more than 90 seconds elapse after you press another button,
the menu disappears automatically.
• The favorite channel feature is not available for the AUX input.
Selecting your favorite channel
■ ♦
■CD)
' itiENU
1 Press GD-
The FAVORITE CHANNEL menu appears.
125 ESPN
14 ABC
48 CBS
► 1SHBO
5CBC
Exit
GD
MENU
1 Press MENU.
2 Press 4 or 4 to select S, and press GD-
3 Press 4 or 4 to select VIDEO LABEL, and
press GD-
VIDEO LABEL
► VIDEO 1:
Use BE C3i
4 Press 4 or 4 to select the input mode you
want to label, and press GD-
Use Effi CS Exit E3
VIDEO 2:
VIDEOS
DMENU
VIDEO 1
VIDEO 2
VIDEO 3
DMENU
VIDEO 1
VIDEO 2
VIDEOS
VIDEO 1
VIDEO 2
VIDEOS
Exit ®
2 Press 4 or 4 to select the favorite channel
you want to watch, and press GD .
The selected channel appears on the screen.
To cancel the FAVORITE CHANNEL menu
Press 4 or 4 to select "Exit," and press GD-
32 Operations
Page 33

5 Press 4 or to select the label, and press
GD.
VIDEO LABEL
► VIDEO 1
VIDEO 2
VIDEO 3
DMEMU
VHS
VIDEO 2
VIDEO 3
aetting caption
Vision (CAPTION VISION)
Use [5E GD
Each time you press 4 or 4, the label changes as
follows;
VIDEO 1
VIDEO 1 •
• VHS 8 mm BETA LD «-* S VIDEO
--------------------
► RECEIVER* <— DBS GAME
VIDEO 2
VIDEO 2
L
VHS 8 mm »— BETA ■>
RECEIVER*'^ DBS GAME •
■ S VIDEO**
VIDEO 3
VIDEO 3 ■
* KV-27V35I29V35CI29V75MI32V35I34V35CI35V45I35V75
• VHS8 mm
RECEIVER*
♦ BETA •—» LD
DBS .H-» GAME
only
** KV-32V35I34V35Q35V45I35V75 only
When you connect an AV receiver to the TV using the AV
receiver's TV input jacks, it is recommended to set the
label to RECEIVER. Wh^n RECEIVER is selected, TV
channels can be selected while the video input mode is
fixed. (See page 11 for the connection.)
6 Repeat steps 4 and 5 to label other input
modes.
LD
I
I
Exit ©
I
Some programs are broadcast with Caption Vision. To
display Caption Vision, select either CCl, CC2, CC3,
CC4, TEXTl, TEXT2, TEXTS, or TEXT4 from the menu.
CCl, CC2, CC3, or CC4 shows you a caption, that is a
printed version of the dialogue or sound effects of a
program. (The mode should be set to CCl for most
programs.) TEXTl, TEXT2, TEXTS, or TEXT4 shows
you text, that is information presented using either half
or the whole screen. It is not usually related to the
program.
-♦
■CD
■MENU
2 Press 4 or 4 to select E3, and press CD.
flCAPTION VISION
¡.►C31
”32
2 3
Exit ©
Note
• If more than 90 seconds elapse before you press another
button, the menu disappears automatically.
3 Press 4 or 4 to select the caption type, and
press CD.
(53 CAPTION VISION
® TÉXT1
TEXT 2
TEXTS
TEXT 4
a
DMENU
Use (HB GE
Exit ©
4 Press MENU to return to the original screen.
To display Caption Vision
Press DISPLAY. (See page 20 for details.)
Notes
• Poor reception of TV programs can cause errors in Caption
Vision and XDS.
Captions may appear with a white box or other errors instead
of a certain word.
• XDS, Caption Vision, and the status display cannot be used at
the same time.
• For details on XDS, see page 20.
Operations
33
Page 34

Operating video
equipment
You can use the supplied remote commander to
operate Sony or non-Sony video equipment that has an
infrared remote sensor. For this operation, set the
manufacturer's code number.
Setting the manufacturer's code
VTR (FUNCTION)
0-9 buttons
ENTER
Press the CODE SET. VTR (FUNCTION), and 0-9
buttons to enter the manufacturer's code
number (see the chart), then press ENTER. For
example, to operate a Sony 8 mm VCR, press
CODE SET, VTR (FUNCTION), 3, 0, 2, and ENTER.
- FUNCTION-
CODE SET
34 I Operations
VTR
+
VCR manufacturer code numbers
Manufacturer
Sony
Aiwa
Admiral (M. Wards)
Audio Dynamic
Bell & Howell (M. Wards) 330, 343
Broksonic
Canon 309, 308
Citizen 332
Craig 315, 302, 332
Curtis Mathis
Daewoo 341, 312, 309
DBX 314, 336, 337
Dimensia 304
Emerson
Fisher 330, 334, 335, 333
Funai 338
General Electric
Go Video 322
Goldstar 332
Hitachi
Instant Replay
JC Penney 309, 305, 304, 330, 314
JVC
Kenwood 314, 336, 332, 337
LXl (Sears) 332, 305, 333, 334, 330,
Magnavox 308, 309, 310
Marantz 314, 336, 337
Marta 332
Memorex 309, 335
Minolta 305, 304
Mitsubishi/MGA
Multitech 325, 338, 321
NEC 314, 336, 337
Olympic 309, 308
Optimus
Panasonic 308, 309, 306, 307
Pentax
Philco 308, 309
Philips 308, 309, 310
Pioneer 308
Quasar 308, 309, 306
RCA/PROSCAN
Realistic 309, 330, 328, 335, 324,
Sansui 314
Singer 315
Samsung 322, 313, 321
Sanyo
Scott 312, 313, 321,335, 323,
Sharp 327, 328
Shintom
Signature 2000 (M. Wards) 338, 327
Sylvania 308, 309, 338, 310
Symphonic 338
Tashiro 332
Tatung 314, 336, 337
Teac
Technics 309, 308
Toshiba 312,311
Wards 327, 328, 335, 331,332
XR-1000 315
Yamaha
Zenith
Code number
301,302, 303
338
327
314, 337
319,317
304, 338, 309
319, 320,316,317,318,
341
329, 304, 309
306, 304, 305
309, 308
336, 337
314, 336, 337
335, 338
323, 324, 325, 326
327
305, 304
304, 305, 308, 309,
311,312, 313,310
338
330, 335
324, 325, 326
315
314, 336, 338, 337
330, 314, 336, 337
331
Page 35

MDP Manufacturer Code Numbers
Manufacturer
Code number
MDP
Sony
Kenwood
Magnavox
Maranz
Mitsubishi
Panasonic
Philips
Pioneer
RCA
Sanyo
701
707
703
702
702
704
703
702
702
706
Sharp 705
Yamaha
703
Notes"
If more than one code number is listed, try entering them one
by one, until you come to the correct code for your equipment.
In some rare cases, you may not be able to operate your nonSony video equipment with the supplied remote commander.
This is because your equipment may use a code that is not
included with this remote commander. In this case, please use
the equipment's own remote control unit.
The code numbers for Sony equipment are assigned at the
factory as follows:
VHS VCR
301 (preset code for the supplied
remote commander)
8 mm VCR
Beta, ED Beta VCRs
302
303
Whenever you remove the batteries — to replace them, for
example — if too much time is taken, the code number may
revert to the factory setting and must be reset.
Operating video eqiripntent
VTR (POWER)
Operating a VCR
Buttons on the remote
commander
To turn on or off
To select a channel
Press VTR (POWER).
Press the 0-9 buttons.
directly
To change channels
To record
Press CH +/-.
Press ► while pressing •. First release
then release •.
To play
Press ►.
To stop Press ■.
To fast forward Press
To rewind the tape
Press -4^.
To pause Press II.
To resume normal playback, press again.
To search the picture
forward or backward
Press ►► or during playback.
To resume normal playback, release the
button.
To change input mode
Press TV/VTR.
Operating an MDP Buttons on the remote
commander
To turn on or off
To play
To stop
To pause
To search the picture
forward or backward
Press VTR (POWER).
Press the ►.
Press ■.
Press II.
To resume normal playback, press again.
Keep pressing ►► or ◄◄ during playback.
To resume normal playback, release the
button.
To search the chapter
Press CH +/-.
forward and backward
Note
• If the video equipment does not have a certain function, the
corresponding button on this remote commander will not
operate.
0-9 buttons
ENTER
CH +/-
Use the video operating buttons on the remote
commander to operate the video equipment.
Press VJR (FUNCTION) before operating the
video equipment.
Turning off the system
■ KV-27V25I27V3SI29V35CI29V65MI29V75MI32V25I
32V35I34V3SCI35V35I35V45I35V75 only
You can turn off the TV and Sony equipment with the
S-Link function, such as a VCR, together when you
make the S-Link connection (see page 10 for the
connection).
Press SYSTEM OFF.
SYSTEM OFF
Operations 35
Page 36

Operating a cable box or DBS receiver
You can program the supplied remote commander to
operate a cable box or DBS receiver. Follow the
procedures below to set the manufacturer's code
number in the remote commander.
. DBS/CABLE (POWER)
3 Press DBS/CABLE (POWER) to turn on the
cable box or DBS receiver.
POWER
DBS/CABLE
4 Use the cable box/DBS control buttons to
check if the code number works.
For example, to operate a cable box or DBS receiver,
you can use the DBS/CABLE (POWER), JUMP, CH
+ /-,0-9 and ENTER buttons.
Note
• If the cable box or DBS receiver does not have a certain
function, the corresponding button on this remote commander
will not operate.
. DBS/CABLE
(FUNCTION)
•0-9 buttons
ENTER
■ GUIDE*
. ■»/♦/♦/♦/gd *
■ MENU*
■ CH +!-
* The TV/DBS, GUIDE, DISPLAY, GD, and MENU
buttons can be used only with a DBS receiver.
1 Turn off the equipment you want to set up,
and press DBS/CABLE (FUNCTION).
To operate the TV
Press TV (FUNCTION). Then use the TV control
buttons to control the TV.
For more details on operating the cable box or
DBS receiver
Refer to the operating instructions that come with the
equipment.
If the remote commander doesn't work
• First, try repeating the setup procedures using the other codes
listed for your equipment.
Manufacturer code numbers (cable box)
Manufacturer
Hamlin/Regal
Jerrold/G. I.
Code number
222, 223,224, 225,226
201, 202, 203, 204, 205,206,207, 208,
218
Oak
Panasonic
Pioneer
Scientific Atlanta
Tocom
Zenith
227, 228,229
219, 220, 221
214,215
209, 210, 211
216,217
212, 213
Press the CODE SET, DBS/CABLE (FUNCTION),
and 0-9 buttons to enter the
manufacturer's code number (see the
chart), then press ENTER. For example, to
program your remote commander to
operate a Sony DBS receiver, press CODE
SET, DBS/CABLE (FUNCTION), 8, 0, 1, and
ENTER.
-------
CODE SET DBS/CABLE
FUNCTION----------
+ +
36 I Operations
Manufacturer code numbers (DBS receiver)
Manufacturer
Sony
Code number
801 (preset code for the supplied
remote commander)
RCA
802
Notes
• If more than one code number is listed, try entering them one
by one until you come to the correct code for your equipment.
• If you enter a new code number, the code number you
previously entered at that setting is erased.
• In some rare cases, your equipment may use a code that is not
provided with this remote commander and you may not be
able to operate your equipment with the supplied remote
commander. In this case, use the equipment's own remote
control unit.
• Whenever you remove the batteries — to replace them, for
example — if too much time is taken, the code numbers may
revert to the factory setting and must be reset.
Page 37

Additional Information
Troubleshooting
If the problem persists after trying the methods below,
contact your nearest Sony dealer.
No picture (screen not lit), no sound
^ Make sure the power cord is connected
securely.
^ Operate with the buttons on the TV.
^ Insert the batteries in the remote commander
with the correct polarity.
^ Replace the batteries with new ones if they are
weak.
^ Check to see if the TV/VIDEO setting is correct:
when watching TV, set to TV, and when
watching video tapes, set to VIDEOl, 2 or 3.
^ Try another channel. It could be station trouble.
^ Reform AUTO SET UP again using the SET UP
button to return to the factory preset condition,
(page 15)
Poor or no picture (screen lit), good sound
Adjust PICTURE in the VIDEO menu, (page 22)
Adjust BRIGHTNESS in the VIDEO menu.
(page 22)
^ Check antenna/cable connections.
^ Reform AUTO SET UP again using the SET UP
button to return to the factory preset condition,
(page 15)
Remove objects from the front-of TV.
Check the LIGHTSENSOR setting in the VIDEO
menu, (page 24)
Good picture, no sound
^ Press MUTING so that "MUTING" disappears
from the screen, (page 19)
^ Check the MTS setting in the AUDIO menu,
(page 25)
^ Make sure SPEAKER is set to ON in the AUDIO
menu, (page 27)
“► Reform AUTO SET UP again using the SET UP
button to return to the factory preset condition,
(page 15)
Only snow and noise appear on the screen
^ Check the CABLE setting in the SET UP menu,
(page 17)
^ Check the antenna/cable connections.
Make sure the channel is broadcasting
programs.
Press TV (black button) to change the input
mode, (page 20)
Dotted lines or stripes
^ Adjust the antenna.
Move the TV away from noise sources such as
cars, neon signs, and hair-dryers.
Double images or ghosts
^ Use a highly directional outdoor antenna or a
cable (when the problem is caused by
reflections from nearby mountains or tall
buildings).
Cannot operate menu
^ If the item you want to choose appears in gray,
you cannot select it. Press TV/VIDEO
correctly.
Cannot receive upper channels (UHF) when using an
antenna
Make sure CABLE is OFF in the SET UP menu,
(page 17)
LJse AUTO PROGRAM to add receivable
channels that are not presently in TV memory,
(pages 15, 17)
Cannot receive any channels when using
cable TV
Make sure CABLE is ON in the SET UP menu,
(page 17)
IJse AUTO PROGRAM to add receivable
channels that are not presently in TV memory,
(pages 15, 17)
Remote commander does not operate
Batteries could be weak. Replace the batteries.
Make sure the TV's power cord is connected
securely to the wall outlet.
Press TV (FUNCTION) when operating your
TV.
Are fluorescent lights too close to the TV? Move
them at least 3-4 feet away from the TV.
Check the S-Link connection, (page 10)
Cannot gain enough volume when using a cable box
Increase the volume at the cable box. Then press
TV (FUNCTION) and adjust the TV's volume.
No color
■ Adjust the COLOR in the VIDEO menu, (page
22)
• Black and white programs cannot be seen in
color.
• Reform AUTO SET UP again using the SET UP
button to return to the factory preset condition,
(page 15)
TV malfunctions when using the S-Link function
(KV-27VZ5I27V35I29V35CI29V65MI29V75MI32V25I32V35I
34V35CI35V35I35V45I35V75 only)
Make sure the TV's power cord is connected
securely to the wall outlet.
Check the S-Link connection, (page 10)
The TV needs to be cleaned
Clean the TV with a soft dry cloth. Never use
strong solvents such as thinner or benzine,
which might damage the finish of the cabinet.
Additional Information
37
Page 38

Specifications
Television system
Channel coverage
Antenna
Picture tube
American TV standard
VHP: 2-13 / UHF: 14-69 / CATV: 1-125
75-ohm external antenna terminal for VHF/UHF
Hi Black Trinitron® tube
Screen size (in.) 27-inch picture measured diagonally
Power requirements
120 V, 60 Hz 120 V, 60 Hz 120 V, 60 Hz 120 V, 60 Hz
120 V, 60 Hz
220V,50/60Hz 220V,50/6flHz
Number of inputs/
outputs
Video’*
S video^*
Audio^*
Audio out"
2 2
1 1
2 2
3 3
1 1
3 3
1 1 1 1
2 2
1
2 2
1
Monitor out" , - 1 1 - - 1
TV out’*
S-Link
Speaker output (W)
- - -
- -
5Wx2 5Wx2
•
5Wx2
1
•
10W x2 5Wx2
- -
- -
Power consumption (W)
When in use (Max.)
In standby
Dimensions (W/H/D)
(mm)
(in.)
Mass (kg)
(lbs)
165W
9W
660.4x602.5
X 521.2 trim
26x23V«x
20 Vsin.
40.6 kg
89 lbs 8 oz
180W
9W
660.4x602,5
X 521.2 mm
26 x 23*Ax
20 V* in.
42 kg
92 lbs 10 oz
180W
9W
690 X 575.4 X
503.4 mm
2774X2274
xl97s in.
43 kg
94 lbs 13 oz
195W
13W
690 X 575,4 X
503,4 mm
27 74 X 22 74
X19 O's in.
43 kg
94 lbs 13 oz
165W
9W
660,4x602,5
X 521.2 mm
26 x 23 74 X
20 7« in.
40.6 kg
89 lbs 8 oz
660.4x602.5
X 521.2 mm
26 x 23 74 X
20 7» in.
120 V, 60 Hz
3 3 3
1 1 1 1
3 3
1
1 1
1
1
- 1
• •
5Wx2 10W x2
165W
9W
40.6 kg
89 lbs 8 oz
195W
13W
690 X 575.4 X
503.4 mm
2774X2274
X1978 in.
43 kg
94 lbs 13 oz
5Wx2 10W x2
180W
9W
690 X 575.4 X
503.4 mm
2774X2274
X19 7s in.
43 kg
94 lbs 13 oz
120 V, 60 Hz
3
1
1
•
195W
13W
690 X 575.4 X
503.4 mm
2774X2274
X19 Vs in.
43 kg
94 lbs 13 oz
” 1 Vp-p, 75 ohms unbalanced, sync negative
Y; 1 Vp-p, 75 ohms unbalanced, sync negative
C; 0.286 Vp-p (Burst signal), 75 ohms
500 mVrms (100% modulation). Impedance; 47 kilohms
More than 408 mVrms at the maximum volume setting
(variable)
More than 408 mVrms (fix)
Impedance: 5 kilohms
38
Additional Information
Page 39

Television system American TV standard
Channel coverage VHP: 2-13 / UHF: 14-69 / CATV; 1-125
Antenna 75-ohm external antenna terminal for VHF/UHF
Picture tube
Hi Black Trinitron® tube
Screen size (in.) 32-inch picture measured diagonally
Power requirements
120 V, 60 Hz
120 V, 60 Hz 120 V, 60 Hz 120 V, 60 Hz 120 V, 60 Hz 220V,50/60Hz 120 V, 60 Hz 120 V, 60 Hz 120 V, 60 Hz
Number of inputs/
outputs
Video’*
S video^’
" Audio^’ 2 2
Audio out**
Monitor out** - - TV out”
S-Link -
Speaker output (W)
2 2
1
1 1 1
-
5Wx2
1
_ _
5Wx2 5Wx2 5W x2
2 3 3 3 3
1 1 2 2 1
2 3 3 3 3
1
1 1 1 1 1 1
- -
• • •
Power consumption (W)
When in use (Max.)
In standby
Dimensions (W/H/D)
(mm)
(in.)
Mass (kg)
(lbs)
185W
9W
781x712.1
X 582.5 mm
30 */4x28'A
X 23 in.
64.3 kg
141 lbs 12 oz
190W
9W
781x712.1
x 582.5 mm
30-’/4x28'/8
X 23 in.
66 kg
145 lbs 9 oz
185W
9W
942x1133.1
X 661.5 mm
37V«x44V8
x26 '/8 in.
108.9 kg
240 lbs
190W9W210W, 2.75 A
821 X 675.3
X 587 mm
33 72 x 27 78
X 24 in.
70 kg
154 lbs 6 oz
35-inch picture measured diagonally
1 1
1 1
10W x2 10Wx2 5W x2
215W,2.80A
13W
920 X 730.8
X 641.8 mm
37 78 X 29 78
X 26 74 in.
90 kg
198 lbs 7 oz
13W
821 x 675.3
X 587 mm
33 72X2778
X 24 in.
70 kg
154 lbs 6 oz
21OW
821 X 675.3
X 587 mm
33 72 X 27 78
X 24 in.
70 kg
154 lbs 6 oz
3 3
2 2
3 3
1 1 1
-
• • •
13W
1 1
10W x2 10Wx2
225W,2.90A
13W
920 X 730.8
X 641.8 mm
37 78 X 29 78
X 26 74 in.
90 kg
198 lbs 7 oz
X 713 mm
37-78 x 49’/8
X 28 7s in.
279 lbs 6 oz
225W
13W
920x1207
130 kg
” 1 Vp-p, 75 ohms unbalanced, sync negative
Y; 1 Vp-p, 75 ohms unbalanced, sync negative
C: 0.286 Vp-p (Burst signal), 75 ohms
500 mVrms (100% modulation). Impedance: 47 kilohms
More than 408 mVrms at the maximum volume setting
(variable)
More than 408 mVrms (fix)
Impedance: 5 kilohms
Supplied accessories
Remote commander RM-Y136 (1) (XV-27S25/27S35/29RS25/
29RS25CI32S25I32S35I32TW25
only)
RM-Y137 (1) {KV-27V25I27V35I29V35CI
29V65MI29V75MI32V25I32 V35j
34V35CI35V35I35V45I35V75
only)
Size AA (R6) battery (2)
Optional accessories
Connecting cables VMC-810S/820S, VMC-720M, YC-15V/30V,
RK-74A
TV Stand SU-27A (.KV-27S25/27S35/27V25/27V35/29RS25/
29RS25CI29V35CI29V65MI29V75Monly)
TV Stand SU-32A (KV-32S25I32S35I32V25/32V35I34V35C only)
TV Stand SU-35A {KV-35V35I35V45 only)
U/V mixer EAC-66
(•)» SRS (SOUND RETRIEVAL SYSTEM)
The (•) SRS (SOUND RETRIEVAL SYSTEM) is
manufactured by Sony Corporation under license from SRS
Labs, Inc. It is covered by U.S. Patent No. 4,748,669. Other
U.S. and foreign patents pending.
The word 'SRS' and the SRS symbol (•) are registered
trademarks of SRS Labs, Inc.
Design and specifications are subject to change without notice.
Additional Information
39
Page 40

Index
Adjusting the picture 22
Adjusting the sound 24
Antenna 5
Audio effect 25
Audio out 27
Auto program 17
Auto set up 15
AV receiver 11
Battery 14
Cable box 5
Cable TV 17
Caption Vision 33
Changing the menu language 18
Channel block 31
Channel caption 30
Current time set 28
Daylight savig time 28
DBS 8, 36
DEMO 15
Erase/Add 16 ■ Favorite channel 31
Hookup
with a VCR 6
without a VCR 5
Language 18
LightSensor 24
MTS (Multichannel TV Sound) 26
On/off timer 29
PIP (Picture-in-Picture) 21
Presetting channels 15,17
Remote commander 14
SAP (Second Audio Program) 26
Sleep timer 20
S-Link 10, 35
Speaker 27
SRS 25
Surround 25
TEXT 33
Tilt correction 18
Video label 33
Video mode 23
Watching
TV 19
video tapes 20
XDS 20
Names of controls
♦ /♦buttons 16
CD button 16
0-9 buttons 16
AUDIO OUT jacks 9
AUX antenna terminal 5
CH (channel) +/-buttons 16, 19
CONVERTER antenna terminal 5
CODE SET button 34
DISPLAY button 20
ENTER button 16, 19
FUNCTION (DBS/CABLE, TV, VTR) buttons 16
GUIDE button 14
JUMP button 19
MENU button 16
MONITOR OUT jacks 10
MUTING button 19
PIP operating buttons 21
POWER (DBS/CABLE, TV, VTR) buttons 15
RESET button 23
S-LINK jacks 10
S VIDEO input jack 6
SLEEP button 20
STAND BY/STEREO indicator 26
SYSTEM OFF button 35
TIMER indicator 29
TV (black) button 20
TV/ DBS @ button 25, 36
TV OUT jacks 11
TV/ VIDEO button 20
VHF/UHF antenna terminal 5
VIDEO 1 IN jacks 6
VIDEO 2 INPUT jacks 9
VIDEO 3 IN jacks 10
VOL (volume) +/- buttons 19
Sony Corporation Printed in U.S.A.
Page 41

English
Français
Español
Additional information for
code setting of the remote
commander
You can also use the following codes to set the
supplied remote commander and operate the
other manufacturer's equipment. To set a code,
see the Operating Instructions on pages 34 and
35. For an MDP ( Multi-disc player), set the
code the same way as the VCR.
Manufacturer Code number
VCR
Magnavox 310, 308,309
Philips 310, 308, 309
RCA/PROSCAN 304, 305, 308, 309, 310
Sylvania 310, 308, 309, 338
MDP
Sony 701
Kenwood
Magnavox 703
Maranz
Mitsubishi 702
Panasonic 704
Philips
Pioneer
RCA
Sanyo
Sharp
Yamaha
Cable box
Scientific Atlanta 209,210,211
DBS receivers
RCA
Operating an MDP
Use the video operating buttons on the remote
commander to operate the MDP. Press VTR
(FUNCTION) before operating the MDP.
Operating an MDP
To turn on or off
To play
To stop
To pause
To search the
picture forward or
backward
To search the
chapter forward
and backward
707
702
703
702
702
706
705
703
802
Buttons on the
remote commander
Press VTR (POWER).
Press ►.
Press ■.
Press II.
To resume normal
playback, press again.
Keep pressing ) or 0
during playback.
To resume normal
playback, release the
button.
Press CH +!-.
Informations
complémentaires pour le
réglage du code de la
télécommande
Vous pouvez également utiliser les codes
suivants pour le réglage de la télécommande
fournie et ainsi commander un équipement
d'un autre fabricant. Pour introduire un code,
reportez-vous aux instructions d'utilisation des
pages 34 et 35. Pour un lecteur multidisque
(MDP), réglez le code de la même façon que
pour le magnétoscope.
Fabricant Numéro de code
Magnétoscopes
Magnavox 310, 308,-309
Philips 310, 308, 309
RCA/PROSCAN 304, 305, 308, 309, 310
Sylvania 310, 308, 309, 338
MDP
Sony
Kenwood 707
Magnavox
Maranz 702
Mitsubishi 702
Panasonic 704
Philips 703
Pioneer 702
RCA 702
Sanyo 706
Sharp
Yamaha 703
Décodeurs
Scientific Atlanta 209,210,211
Récepteurs DBS
RCA 802
Utilisation d'un lecteur MDP
Utilisez les touches de commande vidéo de la
■télécommande pour
Appuyez sur VTR (FUNCTION) avant
d'utiliser le lecteur MDP.
Utiiisation d'un
MDP
Mise sous/hors
tension
Activer la lecture
Arrêter
Activer une pause
Recherche d'image
avant/arrière
Recherche du
passage
avant/arrière
701
703
705
contrôler le lecteur MDP.
Touches de la
télécommande
Appuyez sur VTR
(POWER).
Appuyez sur ►.
Appuyez sur ■.
Appuyez sur II.
Pour reprendre la lecture
normale, appuyez à
nouveau sur cette touche.
Maintenez ►► ou
enfoncé en mode de
lecture.
Pour reprendre la lecture
normale, relâchez la
touche.
Appuyez sur CH -(-/-.
Información adicional para
el ajuste de códigos del
control remoto
También es posible usar los siguientes códigos
para ajustar el control remoto suministrado y
controlar equipos de otoros fabricantes. Para
ajustar códigos, consulte las páginas 34 y 35 del
manual de instrucciones. Con respecto a una
MDP (reproductora de discos múltiples), ajuste
el código en la misma forma que la
videograbadora.
Fabricante
Videograbadora
Magnavox
Philips 310, 308, 309
RCA/PROSCAN 304,305,308,309,310
Sylvania 310, 308, 309, .338
MDP
Sony
Kenwood
Magnavox
Maranz 702
Mitsubishi
Panasonic
Philips 703
Pioneer 702
RCA 702
Sanvo 706
Sharp
Yamaha 703
Decodificador
Scientific Atlanta 209, 210, 211
Receptores DBS
RCA 802
Empleo de una MDP
Utilice las teclas de funcionamiento de video
del control remoto para emplear MDP Oprima
VTR (FUNCTION) antes de emplearla.
Empleo de una
MDP
Encendido/apagado Oprima VTR (POWER).
Reproducción Oprima
Detención Oprima ■.
Pausa
Búsqueda de Mantenga oprimida ►► o
imagen hacia
adelante, hacia
atrás
Búsqueda del
capítulo siguiente o
anterior
Córdigo
310,308,309
701
707
703
702
704
705
Teclas del control
remoto
Oprima II.
para restablecer la
reproducción normal,
oprima de nuevo la tecla.
durante la
reproducción.
Para restablecer la
reproducción normal
suelte la tecla.
Oprima CH +/-.
Note
• Connect the TV's S-Link terminal to the other
equipment's S-Link terminal only; otherwise,
the S-Link connection will not function.
Sony Corporation ©1996 Printed ¡n U.S.A.
Remarque
• Le connecteur S-Link du téléviseur doit être
raccordé au connecteur S-Link des autres
équipements, faute de quoi le connecteur
S-Link ne fonctionnera pas.
Nota
• Conecte la terminal de S-Link solamente a la
terminal de S-Link del otro equipo; si no, la
conexión de S-Link no funcionara.
3-856-482-02 (1)
Page 42

Custom Interchangeable Panels
KV-35V75
An optional custom panel can compliment your
decor and give your entertainment center a
dramatic focal point. The panels (see color
samples below) can be installed in minutes.
Installation is easy — simply follow the
instructions below.
Installation Instructions
1 Open your TV Operating Instructions to Step 3 of
"Installing the glass door and adjusting the shelf"
(page 12). Use this as your guide to remove the
glass door.
2 Remove the two screws from the holes located at
the top right and top left of the panel (see arrows
below).
3 Place one hand on each side of the panel and gently
remove the original panel by pulling it towards
you.
4 Unscrew the nut from the door magnet, located on
the back side, and install the magnet into the new
panel.
5 Align the four catchers inside the new panel with
the bushings on the stand and press into place.
6 Replace the top two screws to secure the panel and
reinstall the glass door.
cV
Note
The glass door is made of tempered glass. Although it is more
shock-resistant than ordinary glass, tempered glass may shatter
if it is dropped or receives a sudden shock.
How to Order Custom Interchangeable Panels
To order, check appropriate box and send Check or Money Order to address below.
□ Black Lacquer
X-4033-543-3
$39.95
□ Sienna Burl
X-4033-543-2
$39.95
Number of Custom Interchangeable Panels needed:
Payment method: □ check enclosed
□ Money order enclosed
(Payable to Sony Electronics Inc.)
□ Amber Oak
X-4033-543-1
$39.95
Ship order to:
Sony Corporation © 1996 Printed in USA
Mail order to: Sony Custom Panels
Hann & DePalmer
P.O. Box 9500
Cranbury, NJ 08512
(Allow 4 weeks for delivery)
4-053-420-01 (1)
 Loading...