

Sony KP-FS57 Operating Instructions Manual
4-090-365-F1 (1)
Projection TV
Operating Instructions
• Before operating the unit, please read this manual thoroughly and retain
it for future reference.
KP-FS57
© 2002 Sony Corporation
K90
2

Table of Contents
WARNING
Using Your New Projection TV
Getting Started ............................................................................................. 5
Step 1 Install the projection TV............................................................5
Step 2 Connect the antenna.................................................................. 6
Step 3 Insert the batteries into the remote.......................................... 7
Step 4 Setting up your projection TV automatically ........................ 8
Connecting optional components ........................................................... 10
Watching the TV ........................................................................................15
Advanced Operations
Selecting the picture and sound
modes...............................................18
Viewing higher quality pictures ......19
Using wide screen mode ..................20
Watching two programs
at the same time.............................. 24
Displaying multiple programs ........ 27
Listening with surround sound....... 29
Enjoying stereo or bilingual
programs ......................................... 30
Adjusting Your Setup (MENU)
Introducing the menu system ..........44
Changing the “PICTURE” setting ...48
Changing the “SOUND” setting ..... 51
Changing the “MEMORY STICK”
setting...............................................53
Changing the “WIDE SCREEN”
setting...............................................54
Changing the “MULTI PICTURE”
setting...............................................56
Changing the “SETUP” setting........ 57
Operating optional components...... 31
Using a “Memory Stick”...................34
Additional Information
Troubleshooting .................................63
Self-diagnosis function......................66
Identifying parts and controls ......... 67
Specifications...................... Back cover
Using Your New Projection TV
The features you will enjoy include:
• “DRC-MF” for viewing higher quality
pictures (page 19)
• “TWIN” for viewing two programs (page
24)
• “CHANNEL INDEX“ for displaying
multiple programs (page 27)
• “PICTURE MODE”/“SOUND MODE”/
“SURROUND” for customizing your
projection TV (pages 18 and 29)
• “WIDE SCREEN” to enjoy wide mode
pictures (page 20)
• “MEMORY STICK” button on the remote
control for viewing still pictures stored in
a “Memory Stick”(page 34)
Your projection TV also offers the following
features:
• Initial Setup function for on-screen language
selection, automatic channel presetting and
automatic convergence adjustment. (page 8)
• Menu language options
— English/korean (page 57)
• “CHILD LOCK” for locking out specific
channels (page 62)
• “INTELLIGENT VOL” for automatic volume
adjustment (page 51)
• Button Joystick on the remote control for
easier operation (page 47)
•
“ECO MODE” to save energy (page 58)
•
“GAME MODE” for video games (page 49)
3

WARNING
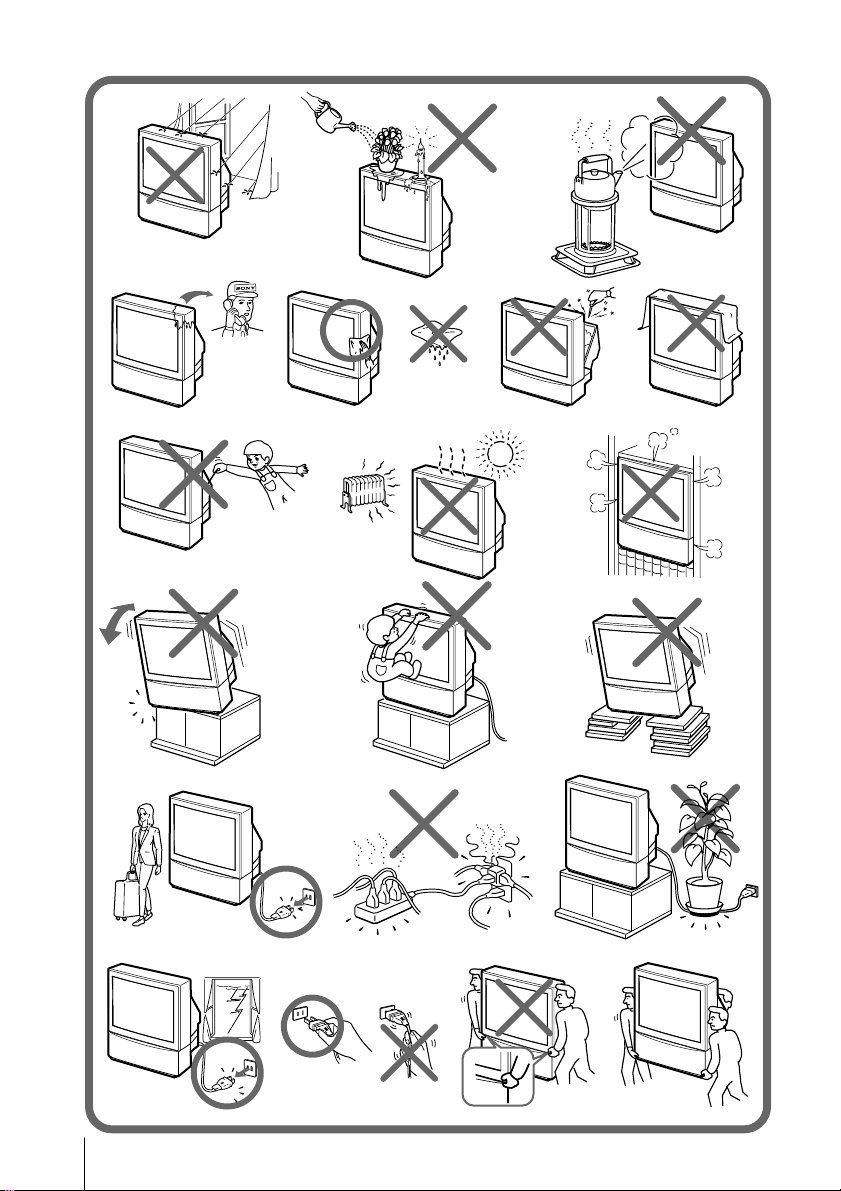
To prevent fire or shock hazard, do not expose the projection TV to rain or moisture.
Dangerously high voltages are present inside the projection TV. Do not open the
cabinet. Refer servicing to qualified personnel only.
For general safety:
• Do not expose the projection TV to rain or moisture.
• Do not open the rear cover.
For safe installation:
• Do not block the ventilation openings.
• Do not install the projection TV in hot, humid or excessively dusty places.
• Do not install the projection TV where it may be exposed to mechanical vibrations.
• Avoid operating the projection TV at temperatures below 5°C (41°F).
• If the projection TV is transported directly from a cold to a warm location, or if the room
temperature has changed suddenly, the picture may be blurred or show poor color. This
is because moisture has condensed on the mirror or lenses inside. If this happens, let the
moisture evaporate before using the projection TV.
• To obtain the best picture, do not expose the screen to direct illumination or direct
sunlight. It is recommended to use spot lighting directed down from the ceiling or to
cover the windows that face the screen with opaque drapery. It is desirable to install the
projection TV in a room where the floor and walls are not of reflecting material. If
necessary, cover them with dark carpeting or wall paper.
• Do not install the appliance in a confined space, such as a bookcase or built-in cabinet.
For safe operations:
• Do not operate the projection TV on anything but 220 V AC, 60 Hz.
• Do not operate the projection TV if any liquid or solid object falls in it—have it checked
immediately.
• Do not keep the projection TV plugged in if you are not going to use it for several days.
• Do not pull the power cord to disconnect the projection TV. Pull it out by the plug.
• Do not plug in too many appliances to the same power socket. Do not damage the
power cord.
• Do not place any object on the projection TV.
• Install the projection TV on a stable projection TV stand and floor which can support the
projection TV set weight. Ensure that the projection TV stand surface is flat and its area
is larger than the bottom area of the projection TV.
• Do not carry the projection TV holding the screen edges.
Caution
• When using TV games, computers, and similar products with your projection TV, keep
the brightness and contrast functions at low settings. If a fixed (non-moving) pattern is
left on the screen for long periods of time at a high brightness or contrast setting, the
image can be permanently imprinted onto the screen. These types of imprints are not
covered by your warranty.
Cleaning the Screen
• To clean the screen with a cloth, please use the supplied cleaning cloth lightly moistened
with water. Do not use any type of abrasive pad, alkaline cleaner, scouring powder or
solvent, such as alcohol or benzine. As a safety precaution, unplug the projection TV
before cleaning it.
• Do not rub, touch, or tap the surface of the screen with sharp or abrasive items, like a
ball point pen or a screw driver. Otherwise, this type or contact may result in a scratched
screen.
4
Using Your New Projection TV
Getting Started
Step 1
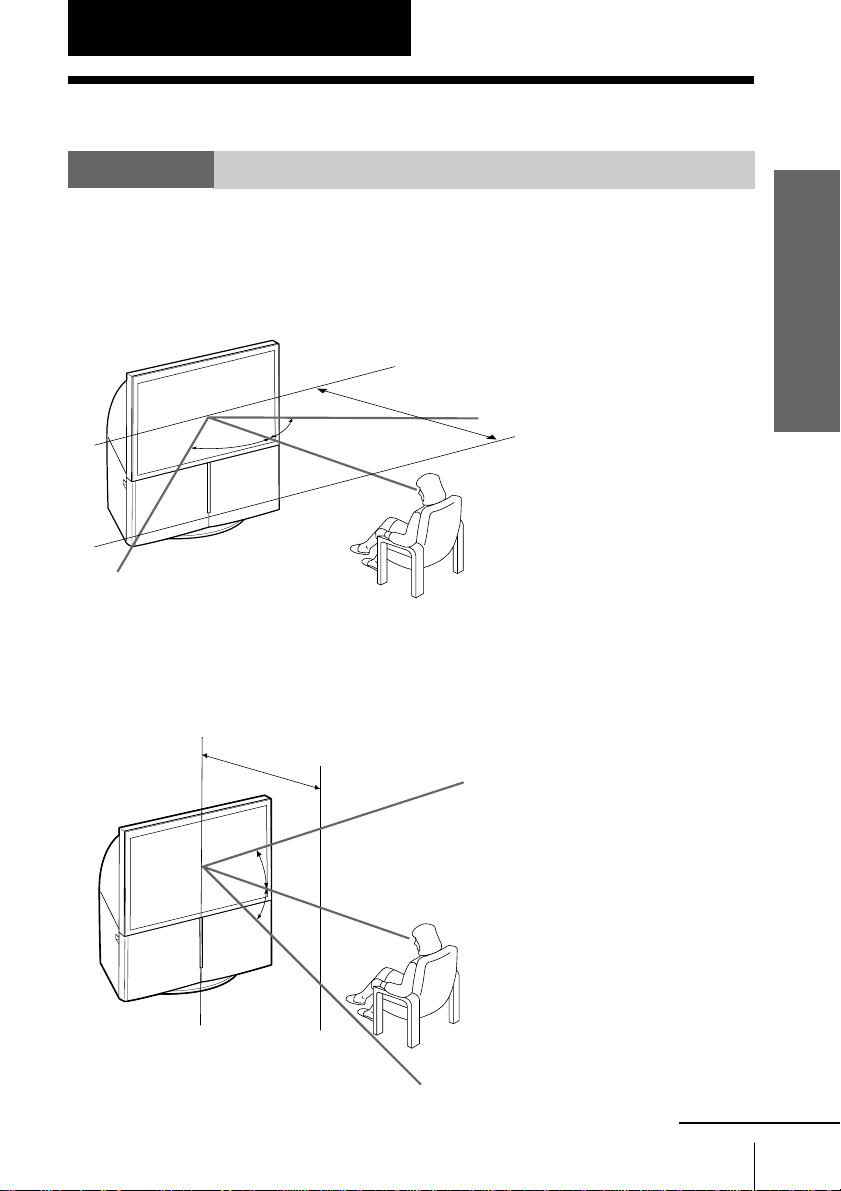
Install the projection TV
For the best picture quality, install the projection TV within the areas below.
Optimum viewing area (Horizontal)
min. 1.9 m
(6 ft.)
60°
60°
Optimum viewing area (Vertical)
min. 1.9 m
(6 ft.)
Using Your New Projection TV
30°
30°
continued
Using Your New Projection TV
5
Getting Started (continued)
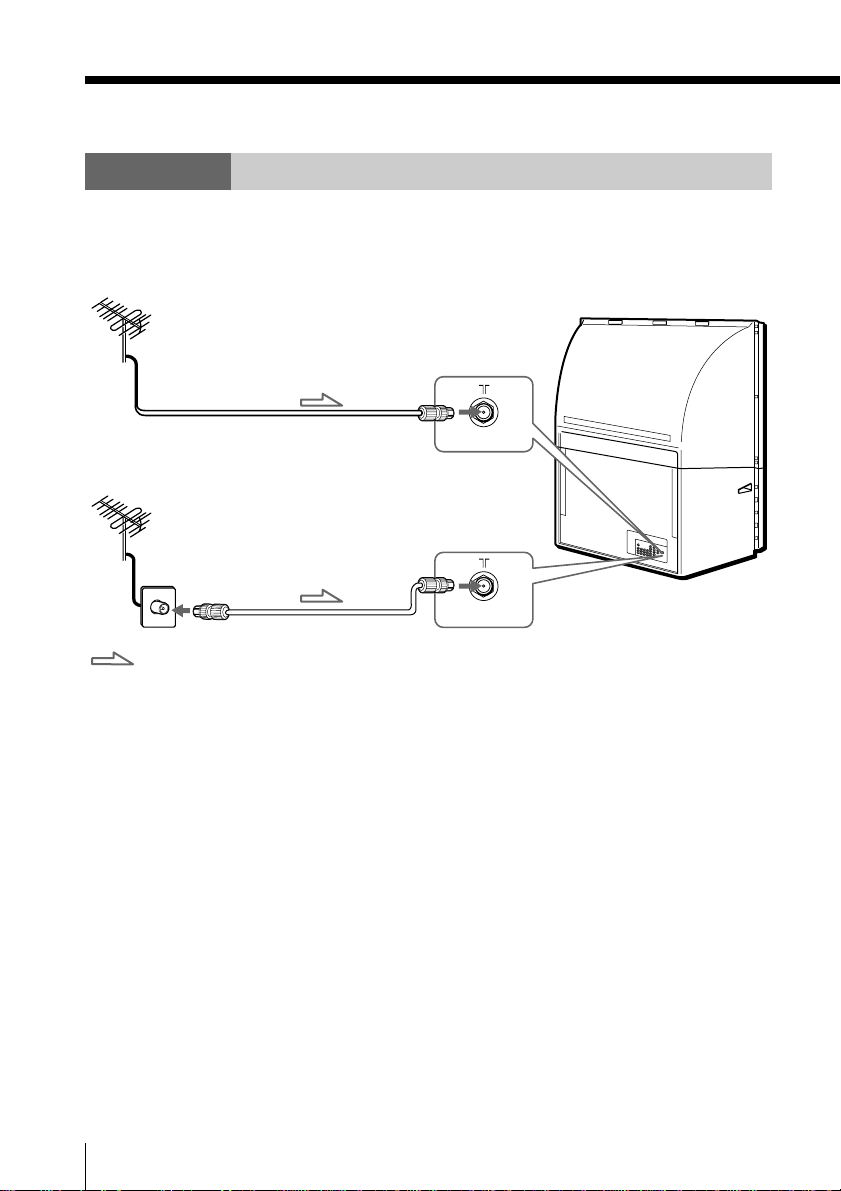
Step 2
Connect the antenna
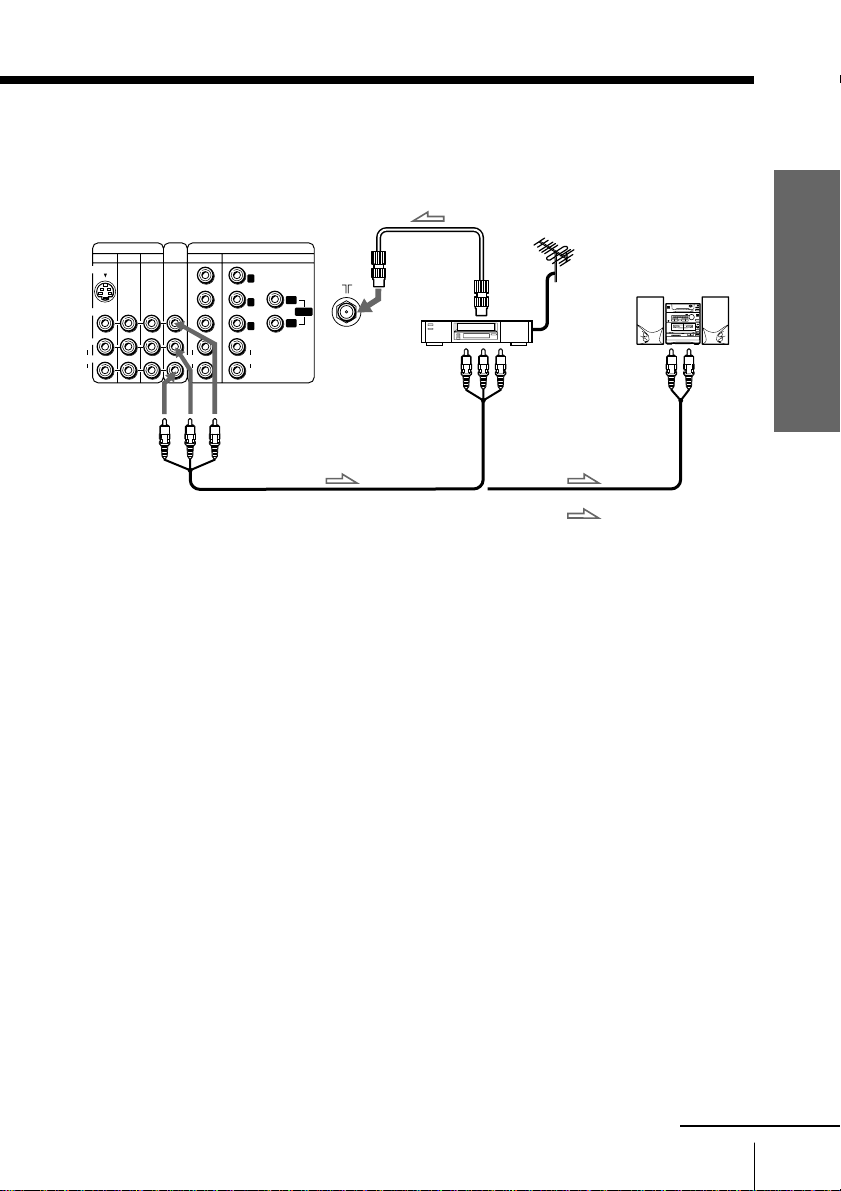
If you wish to connect a VCR, see the “Connecting a VCR” diagram on page 7.
Rear of
projection TV
Antenna cable (not supplied)
or
Antenna cable (not supplied)
: Signal flow
6
Using Your New Projection TV
CAUTION
Do not connect the power cord until all other connections are
complete, otherwise, a minimal current leakage through the antenna
and/or other terminals to the ground could occur.
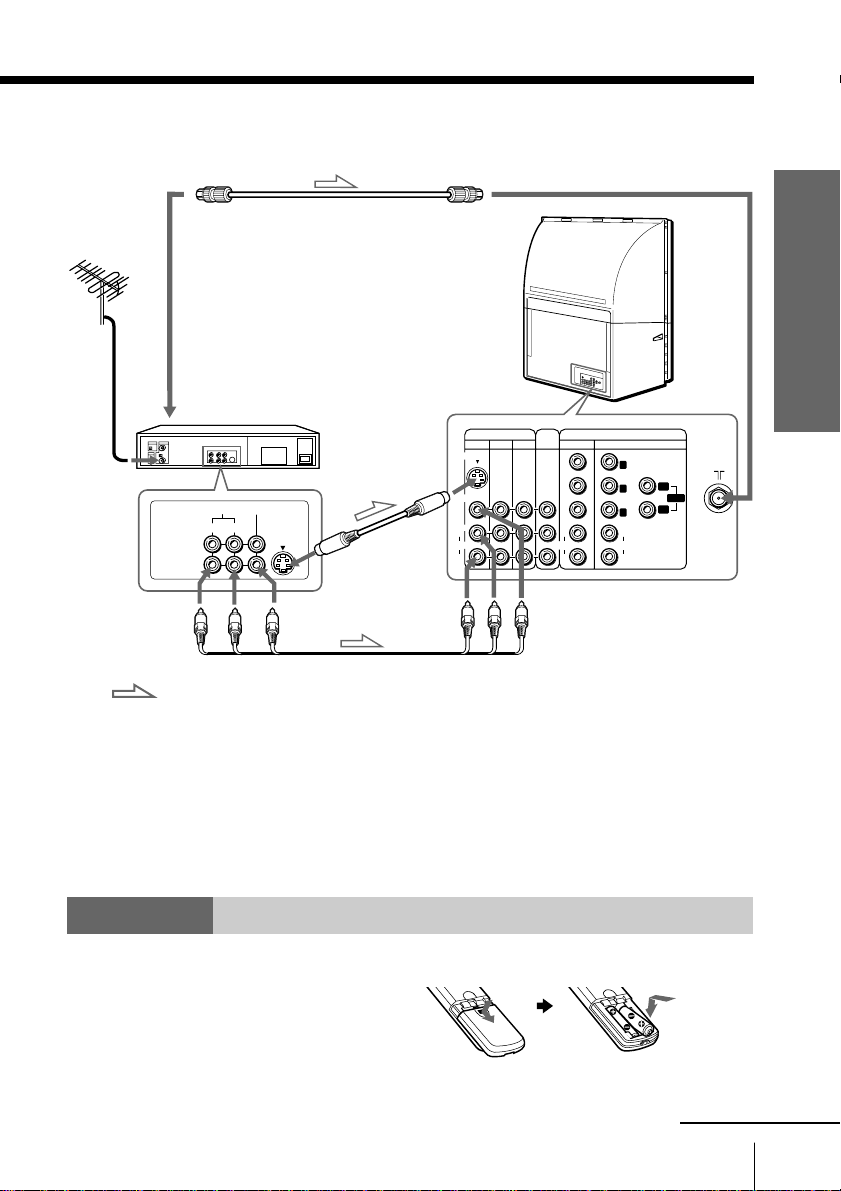
Connecting a VCR
To play a video tape, press INPUT SELECT (see page 16).
Antenna cable (not supplied)
Rear of
projection TV
To 8 (antenna)
Using Your New Projection TV
To antenna
output
VIDEO IN
VIDEO OUT
AUDIO
R L
VCR
VIDEO
To video and
audio outputs
Audio/Video cable
: Signal flow
(not supplied)
Notes
• If you connect a monaural VCR, connect the yellow plug to VIDEO (the
yellow jack) and the black plug to AUDIO-L (MONO) (the white jack).
• If you connect a VCR to the 8 (antenna) terminal, preset the signal
output from the VCR to the program number 0 on the projection TV.
• When both S VIDEO (S video input) and VIDEO 1 (video input) are
connected, S VIDEO is automatically selected. To view the video input to
VIDEO 1, disconnect the S video cable.
Step 3
Insert the batteries into
the remote
S video cable
(not supplied)
To S video
output
To
S VIDEO input
VIDEO IN
S VIDEO
VIDEO
(MONO)
L
AUDIO
R
COMPONENT VIDEO (HD/DVD) IN
MONITOR
OUT
Y
PB/
C
B
PR/
C
R
L
AUDIO AUDIO
R
21123
Y
G
PB/
C
B
HD
B
SYNC
PR/
C
R
VD
R
L
R
To VIDEO IN 1, 2 or 3
VIDEO (yellow)
AUDIO-L (MONO) (white)
AUDIO-R (red)
Note
• Do not use old batteries or different types of batteries together.
Using Your New Projection TV
continued
7
Getting Started (continued)
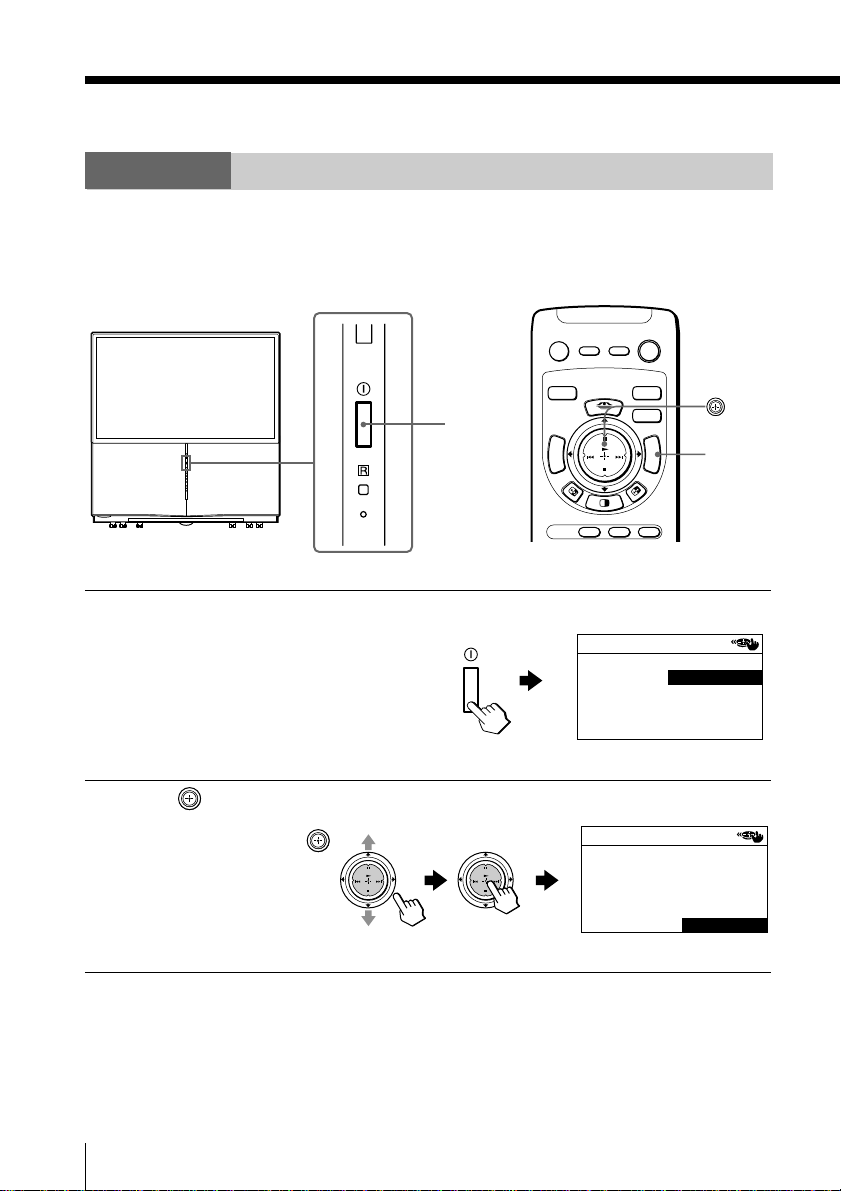
Step 4
Step 4
Setting up your projection TV automatically
Setting up your projection TV automatically
DISPLAY
VIDEO
POWER
POWERMUTING
Press ! to turn on the
1
projection TV.
The “INITIAL SETUP”
menu appears, and you can
select the on-screen
language.
Move up or down to
2
select the desired
language, then press
The automatic channel
presetting menu appears.
.
STAND BY
STEREO/
WAKE UP
N
I
W
T
T
W
I
N
MTS
Y
R
S
T
O
I
C
M
K
E
M
V CENTER
C
H
N
I
+
W
T
T
W
–
I
H
N
C
VIDEO TV
INITIAL SETUP
MENU
MENU
ENGLISH
!
DRC-MF
CHANNEL
INDEX
HD/DVD
LANGUAGE:
KOREAN
C
H
+
C
H
N
I
+
W
T
INITIAL SETUP
START AUTO PROGRAM
NOW?
T
–
H
C
W
–
I
H
N
C
YES
NO
8
Using Your New Projection TV
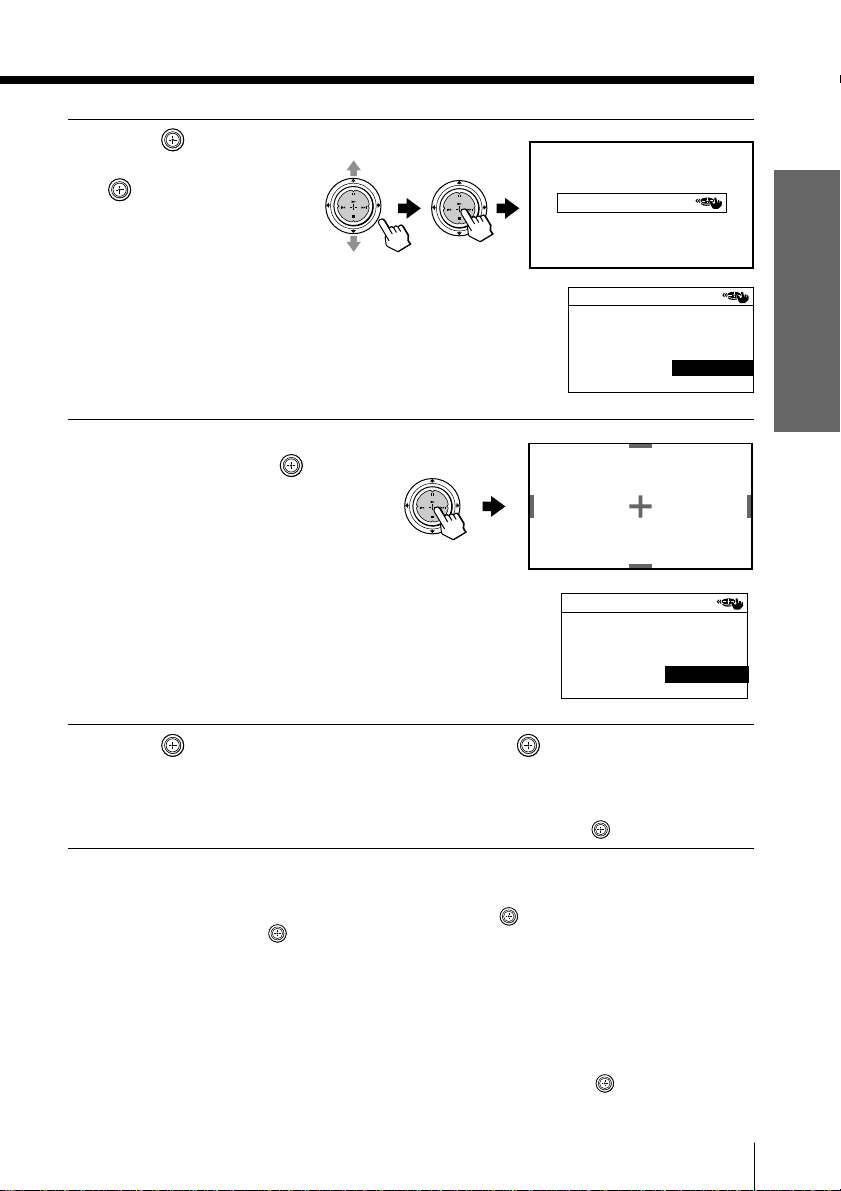
Move up or down to
3
select “YES”, then press
to preset the channel
automatically.
The screen will indicate
automatic channel
presetting is in progress.
After channel presetting is
complete, automatic
convergence adjustment
menu appears.
Make sure that “YES” is
4
selected, then press
The convergence
adjustment screen
appears, and the
convergence is
automatically adjusted.
The last “INITIAL
SETUP” menu appears.
12
C
H
N
I
+
W
T
C
H
N
I
+
W
T
Using Your New Projection TV
INITIAL SETUP
T
W
–
I
H
N
C
T
W
–
I
H
N
C
AUTO PROGRAM
INITIAL SETUP
START DIGITAL QUICK
FOCUS NOW?
YES
NO
.
C
H
N
I
+
W
T
T
W
–
I
H
N
C
INITIAL SETUP
DISPLAY THIS MENU
NEXT TIME?
YES
NO
Move up or down to select “NO”, then press .
5
The “INITIAL SETUP” menu will not appear again the next time you turn on the
projection TV by pressing !.
To allow this menu to appear again, select “YES”, then press
Notes
• If you want to cancel any setup, move up or down to select NO and
press , or press MENU.
• If your projection TV has preset an unwanted channel or cannot preset a
particular channel, then preset your projection TV manually (see page 61).
• Convergence is also adjusted manually using the menu (see page 59.)
• You can also perform the Digital Quick Focus feature using DIGITAL
QUICK FOCUS on the front panel.
• Sound will mute while the Digital Quick Focus feature is running.
• The MENU, VOLUME + or – and ENTER buttons on the projection TV
can be also used for the above operations instead of and MENU
buttons on the remote control.
Using Your New Projection TV
.
9
Connecting optional components
You can connect optional audio/video components, such as a VCR, a DTV (Digital
Television) Receiver, multi disc player, camcorder, video game, or stereo system. To
watch and operate the connected equipment, see pages 16 and 31.
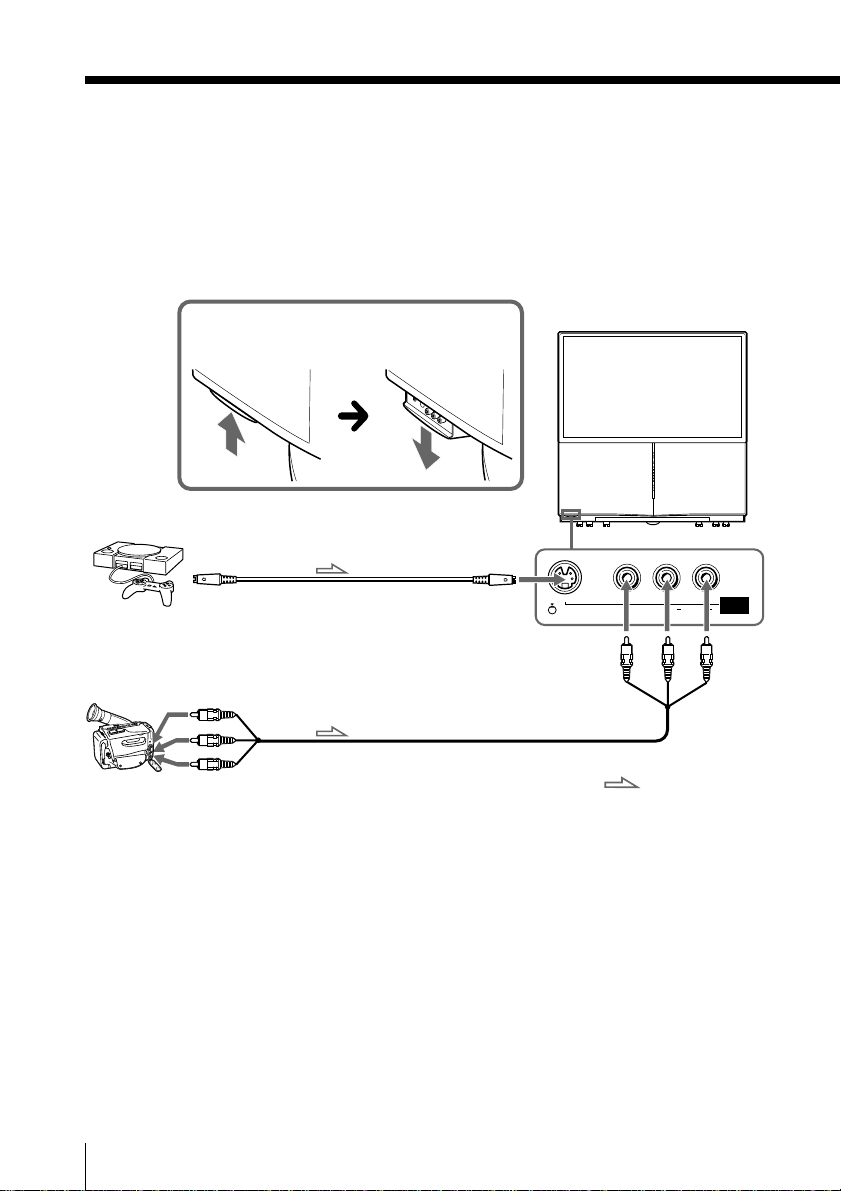
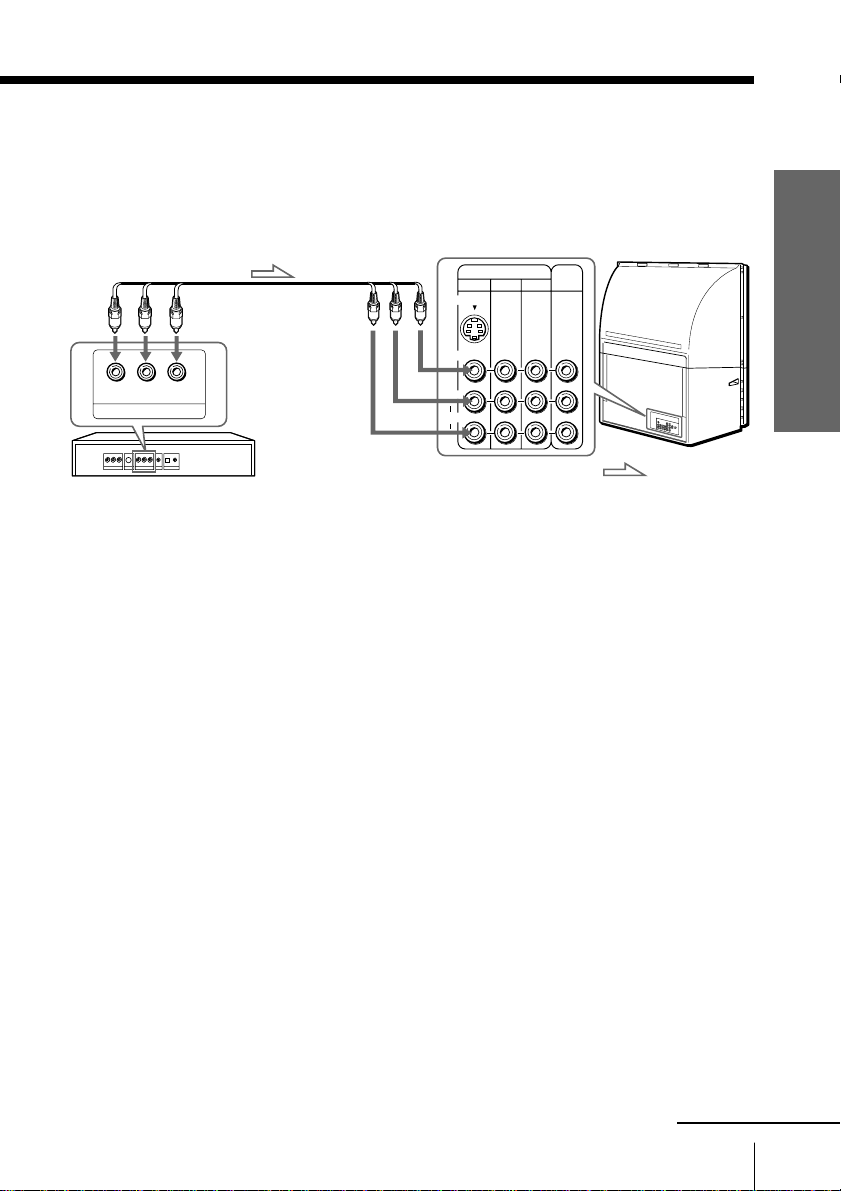
Connecting a camcorder/video game equipment
using the VIDEO 4 IN jacks
To open the drop-down panel of your
projection TV, push it up until you hear a
click, then it will slide down.
Video game
equipment
or
Camcorder
To S VIDEO
To S video
output
S video cable (not supplied)
Audio/Video cable (not supplied)
To video and
audio outputs
input
To VIDEO 4 IN
Notes
• When connecting video game equipment, display the “PICTURE” menu
and select “ON” for “GAME MODE” to adjust the picture setting that is
suitable for video games (see page 49).
• You can also connect video equipment to the VIDEO IN 1, 2, or 3 jacks at
the rear of your projection TV.
• When both the S VIDEO input and VIDEO 4 IN are connected, the S
VIDEO input is automatically selected. To view the video input to VIDEO
4 IN, disconnect the S video cable.
L
(MONO)
: Signal flow
RAUDIOS VIDEO VIDEO
VIDEO
4 IN
10
Using Your New Projection TV
Connecting audio/video equipment using the
MONITOR OUT jacks
Using Your New Projection TV
Rear of projection TV
VIDEO IN
MONITOR
S VIDEO
VIDEO
(MONO)
L
AUDIO
R
OUT
AUDIO AUDIO
VIDEO (yellow)
AUDIO-L (MONO)
(white)
AUDIO-R (red)
Antenna cable (not supplied)
COMPONENT VIDEO (HD/DVD) IN
Y
PB/
C
B
PR/
C
R
L
R
21123
Y
G
PB/
C
B
HD
B
SYNC
PR/
C
R
VD
R
L
R
To
antenna
output
To video
and audio
Audio system
VCR
or
inputs
To MONITOR OUT
Audio cable
(not supplied)
Audio/Video cable (not supplied)
: Signal flow
Note
• If you select “HD/DVD 1” or “HD/DVD 2” on your projection TV screen,
no sound and no picture will be output from MONITOR OUT (see page
16).
To
audio
inputs
continued
Using Your New Projection TV
11
Connecting optional components (continued)
Connecting a DVD player to COMPONENT VIDEO (HD/DVD) IN
1 Using an audio cable, connect R and L under COMPONENT VIDEO (HD/DVD) IN
1 or 2 on your projection TV to the LINE OUT, AUDIO R and L output connectors on
your DVD player.
2 Using a component video cable, connect Y, P
VIDEO (HD/DVD) IN 1 or 2 on your projection TV to the COMPONENT VIDEO
OUT Y, C
B, and CR output connectors on your DVD player.
3 Press VIDEO or HD/DVD on the remote or INPUT SELECT on the projection TV
until “HD/DVD 1” appears on the screen if you connect your DVD player to
COMPONENT VIDEO (HD/DVD) IN 1, or “HD/DVD 2” for connection to
COMPONENT VIDEO (HD/DVD) IN 2.
To COMPONENT VIDEO
Component video cable
(not supplied)
(HD/DVD) IN 1 or 2
(component video input)
B/CB, and PR/CR under COMPONENT
Rear of
projection TV
To component
video output
Y
CB CR
COMPONENT VIDEO OUT
Audio cable
To audio
output
S VIDEO OUT
R-AUDIO-L
LINE OUT
(not supplied)
VIDEO
COMPONENT VIDEO (HD/DVD) IN
Y
PB/
C
B
PR/
C
R
L
AUDIO AUDIO
R
21
Y
G
PB/
C
B
B
PR/
C
R
R
L
R
HD
SYNC
VD
To AUDIO -L (white)
DVD
player
AUDIO -R (red)
: Signal flow
Notes
• Some DVD player terminals may be labeled differently:
Connect To (on the DVD player)
Y (green) Y
PB/CB (blue) Cb, B-Y or PB
PR/CR (red) Cr, R-Y or PR
• Connect nothing to the HD/VD jacks when connecting a DVD player to
COMPONENT VIDEO (HD/DVD) IN 1 or 2.
• If you select “HD/DVD 1” or “HD/DVD 2” on your projection TV screen,
no sound and no picture will be output from MONITOR OUT. This does
not indicate a malfunction.
• When receiving a progressive signal through COMPONENT VIDEO
(HD/DVD) IN, TWIN pictures and CHANNEL INDEX features are not
available, and “DRC-MF” and “GAME MODE” are not selectable.
12
Using Your New Projection TV
Connecting a DVD player to VIDEO IN
Connect AUDIO/VIDEO jacks under VIDEO IN 1, 2, or 3 connectors on your
projection TV to LINE OUT on your DVD player.
Rear of
To audio/video
output
Audio/Video cable
(not supplied)
R-AUDIO-L
VIDEO
LINE OUT
To VIDEO IN
DVD
player
1, 2, or 3
S VIDEO
VIDEO
(MONO)
L
AUDIO
R
VIDEO IN
123
MONITOR
VIDEO(yellow)
AUDIO-L (MONO) (white)
AUDIO -R (red)
Notes
• Since the high quality pictures on a DVD disc contain a lot of information,
picture noise may appear. In this case, adjust the sharpness (“SHARP”)
under “ADJUST” in the “PICTURE MODE” menu (see page 50).
• You can also connect a DVD player to S VIDEO on the projection TV.
projection TV
OUT
: Signal flow
Using Your New Projection TV
continued
Using Your New Projection TV
13

Connecting optional components (continued)
Connecting a DTV (digital television) receiver to
COMPONENT VIDEO (HD/DVD) IN 1 or 2 jacks
Rear of
projection TV
Component video cable
(not supplied)
To COMPONENT VIDEO
(HD/DVD) IN 1 or 2
To component
video output
COMPONENT VIDEO (HD/DVD) IN
Y
PB/
C
B
PR/
C
R
L
AUDIO AUDIO
R
21
Y
G
PB/
C
B
B
PR/
C
R
R
L
R
HD
SYNC
VD
To audio
output
Audio cable
(not supplied)
Digital TV
receiver
To AUDIO -L (white)
AUDIO -R (red)
Notes
• The projection TV is equipped with the G/B/R/HD/VD inputs. If your
DTV receiver is not equipped with the Y/PB/PR output connectors, use the
G/B/R/HD/VD connectors.
• COMPONENT VIDEO (HD/DVD) IN 1 can be used as the Y/PB/PR
inputs.
• COMPONENT VIDEO (HD/DVD) IN 2 can be used as the Y/PB/PR or G/
B/R/HD/VD inputs. Connect nothing to the HD/VD connectors when
using the Y/PB/PR inputs.
Tip
• The projection TV accepts the following signal formats:
Total scanning Effective scanning fV (Hz)
line line
1125i 1080i 50/60
750p 720p 50/60
625p 576p 50
625i 576i 50
525p 480p 60
525i 480i 60
: Signal flow
14
Using Your New Projection TV
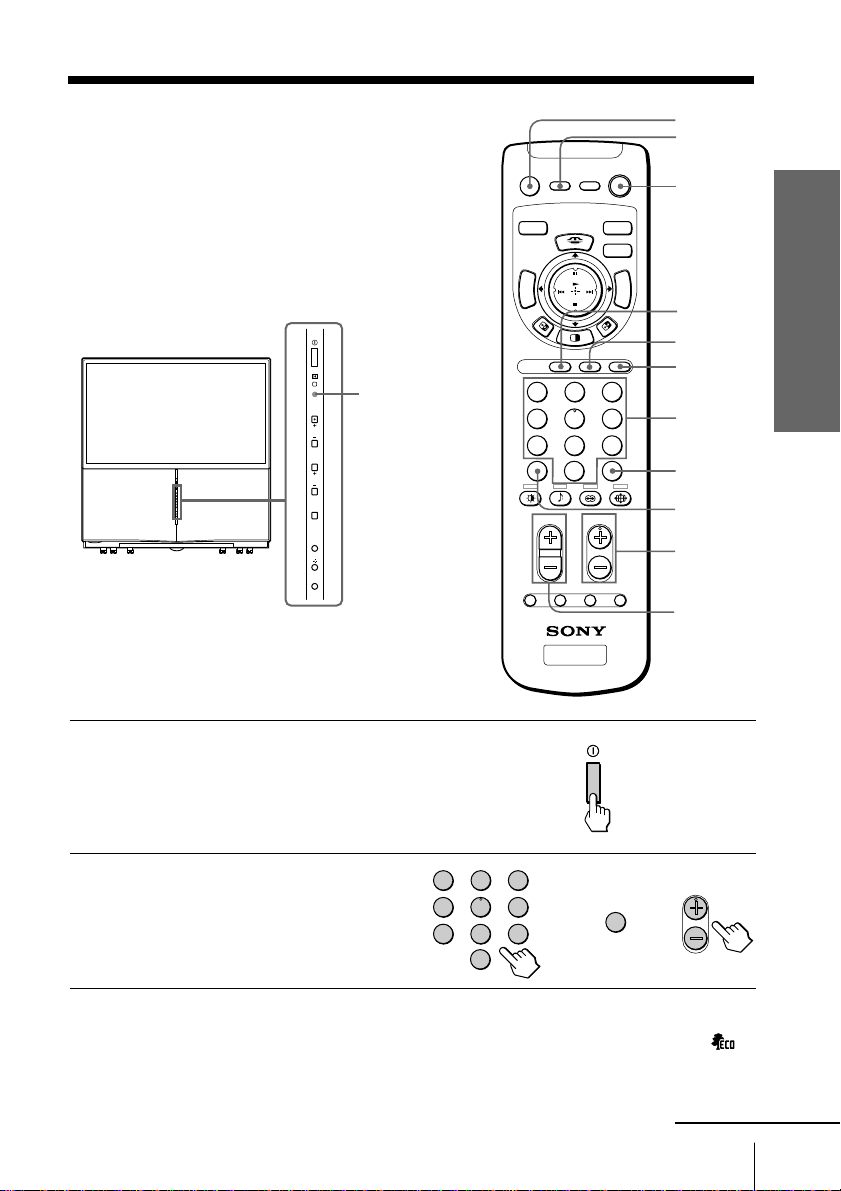
Watching the TV
This section explains various functions
and operations used while watching the
TV. Most operations can be done using
the remote.
STAND BY
STEREO/
STAND BY
WAKE UP
indicator
CHANNEL
VOLUME
INPUT
SELECT
MENU
ENTER
DIGITAL
QUICK
FOCUS
VIDEO
POWER
DISPLAY
DRC-MF
Y
R
S
T
O
I
C
M
K
E
M
V CENTER
C
H
N
I
+
W
T
CHANNEL
INDEX
T
W
–
I
H
N
C
VIDEO TV
HD/DVD
123
456
7809
JUMP
OPTION RESET
ENTER
CHVOL
WAKE UP
TV
POWERMUTING
MTS
SLEEP
MENU
MUTING
DISPLAY
POWER
HD/DVD
VIDEO
TV
Number
buttons
ENTER
JUMP
CH +/–
+/–
VOL
Using Your New Projection TV
Press ! to turn on the
1
projection TV.
When the projection TV is in standby mode
(the STAND BY indicator on the projection
TV is lit red), press POWER on the remote.
To select the TV program, press
2
the number buttons and then
press ENTER, or CH +/–.
Note
• When you turn on the projection TV, either the program number or video
mode is displayed for approximately 40 seconds. The ECO MODE ( )
icon will also appear if “ECO MODE “ in the “SETUP” menu is set “ON”
(see page 58).
123
456
7809
Using Your New Projection TV
,
ENTER
CH
or
continued
15

Watching the TV (continued)
To select a TV program quickly
(1) Press and hold CH +/–.
(2) Release CH +/– when the desired program number appears.
Note
• When you select a TV program quickly, the picture may be disrupted.
This does not indicate a malfunction.
Additional tasks
To
Turn off temporarily
Turn off completely
Adjust the volume
Mute the sound
Watch the video input
(VCR, camcorder, etc.)
Watch the component input
(DVD, DTV receiver)
Jump back to the previous channel
Display the on-screen information*
* Some picture/sound settings, and either the program number or video
mode are displayed. The on-screen display for the picture/sound settings
disappears after about 3 seconds.
Press
POWER.
The STAND BY indicator on the projection TV lights up
red.
! on the projection TV.
VOL +/–.
MUTING.
VIDEO (or INPUT SELECT on the projection TV) to
select “VIDEO 1”, “VIDEO 2”, “VIDEO 3”, “VIDEO 4”,
“HD/DVD 1” or “HD/DVD 2”.
To return to the TV screen, press TV (or INPUT SELECT
on the projection TV).
HD/DVD to select “HD/DVD 1” or “HD/DVD 2”.
To return to the TV screen, press TV (or INPUT SELECT
on the projection TV).
JUMP.
DISPLAY.
16
Using Your New Projection TV
Setting the Wake Up timer
Press WAKE UP until the
1
desired period of time
appears.
WAKE UP
WAKE UP TIMER:10M
After 10 minutes
The Wake Up timer starts
immediately after you
have set it.
Select the TV channel or video mode you want to wake up to.
2
Press POWER, or set the Sleep timer if you want the projection TV to turn off
3
automatically.
WAKE UP TIMER:OFF
No Wake Up Timer After 12 hours
WAKE UP TIMER:12H00M
The WAKE UP indicator on the projection TV lights up orange.
To cancel the Wake Up timer
Press WAKE UP until “WAKE UP TIMER: OFF” appears, or press !
on the projection TV to turn it off.
Note
• If no buttons or controls are pressed for more than two hours after the
projection TV is turned on using the Wake Up timer, the projection TV
automatically goes into standby mode. To resume watching the TV, press
any button on the projection TV or the remote.
Setting the Sleep timer
Press SLEEP until the
desired period of time
appears.
The Sleep timer starts
immediately after you
have set it.
SLEEP
SLEEP TIMER:30M SLEEP TIMER:60M
After 30 minutes
SLEEP TIMER:OFF SLEEP TIMER:90M
No Sleep Timer
After 60 minutes
After 90 minutes
Using Your New Projection TV
To cancel the Sleep timer
Press SLEEP until “SLEEP TIMER: OFF” appears, or turn the
projection TV off.
Using Your New Projection TV
17
0
ENTER
JUMP
CHVOL
OPTION RESET
WAKE UP
SLEEP
Advanced Operations
Selecting the picture and sound modes
You can select picture and sound modes
and adjust the setting to your preference
in the “PERSONAL” option.
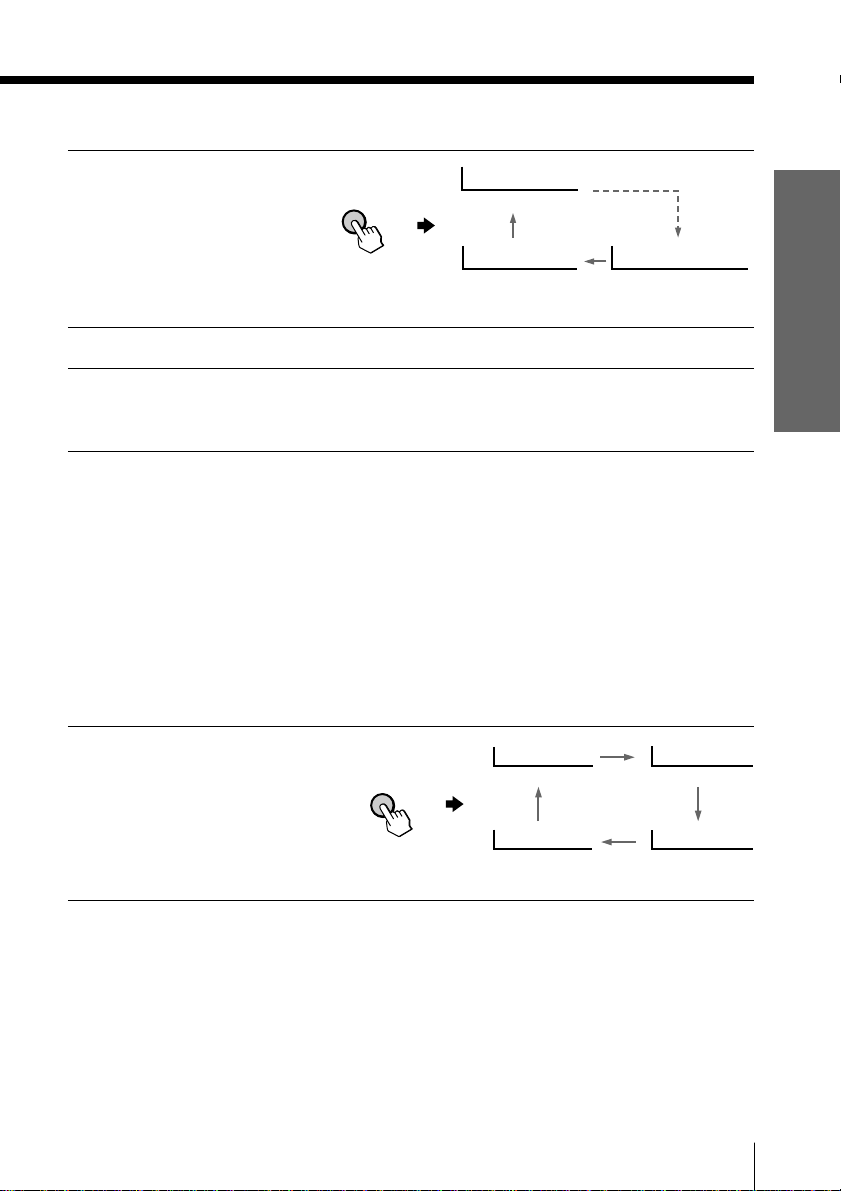
Selecting the picture mode
Press repeatedly until
the desired picture mode
is selected.
Select
“DYNAMIC”
“STANDARD”
“HI-FINE”
“PERSONAL”
To
receive high contrast pictures.
receive normal pictures.
receive higher density pictures with mild contrast.
receive the last adjusted picture setting from the “ADJUST” option in the
“PICTURE” menu (see page 50).
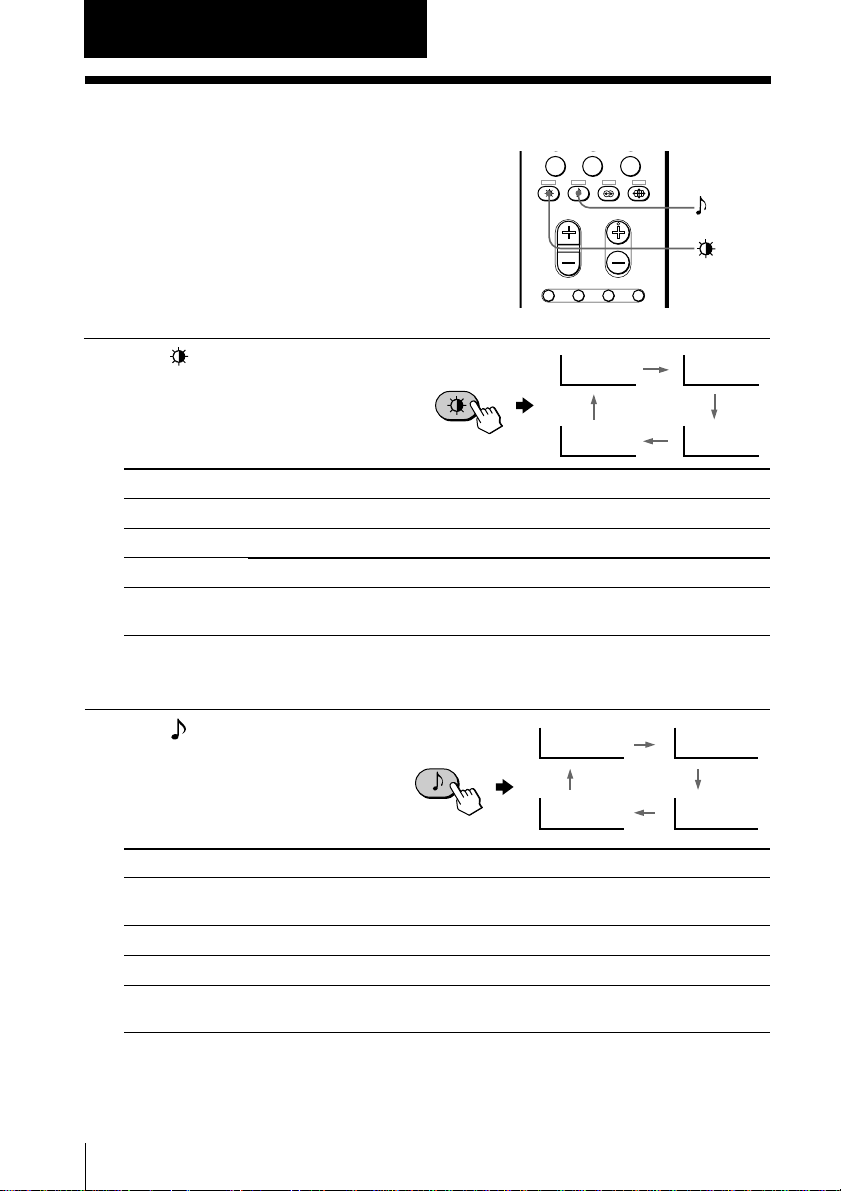
Selecting the sound mode
Press repeatedly until
the desired sound mode is
selected.
Select
“DYNAMIC”
“DRAMA”
“SOFT”
“PERSONAL”
18
Advanced Operations
To
listen to dynamic and clear sound that emphasizes both the low and high
tones.
listen to sound that emphasizes voice and high tones.
receive soft sound.
receive the last adjusted sound setting from the “ADJUST” option in the
“SOUND” menu (see page 52).
Tip
• You can also set the picture and sound modes using the menu (see
“Changing the “PICTURE” setting” on page 48 and “Changing the
“SOUND” setting” on page 51).
DYNAMIC
PERSONAL
9
DYNAMIC
9
PERSONAL
STANDARD
HI-FINE
9
DRAMA
9
SOFT
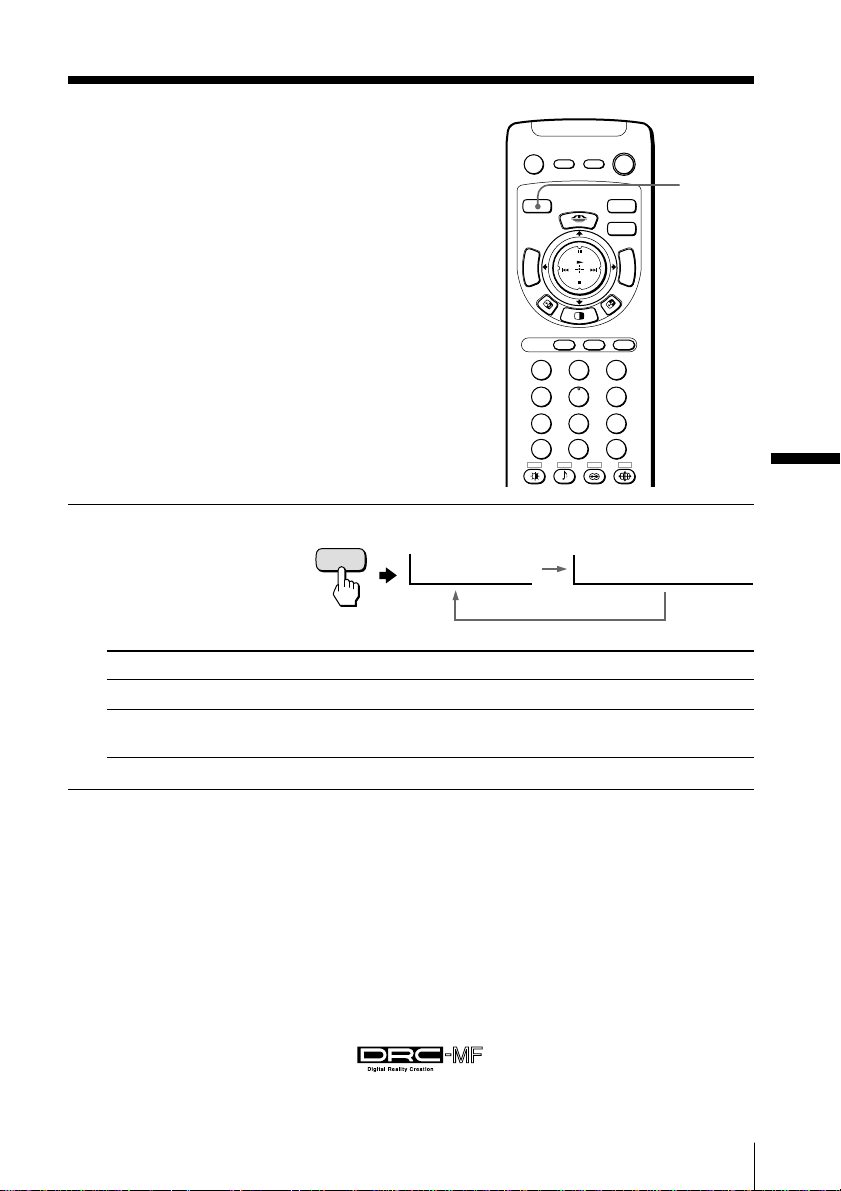
Viewing higher
quality pictures
— “DRC-MF”
The Digital Reality Creation-Multi
Function (DRC-MF) feature allows you to
enjoy higher quality pictures on your
projection TV. You can select “DRC1050” to
watch super real (higher resolution)
pictures, or “DRC PROGRESSIVE” to
reduce jittering on the screen if necessary.
Press DRC-MF repeatedly
until you receive the
desired picture quality.
DRC-MF
DRC-MF: DRC1050
POWERMUTING
VIDEO
POWER
DISPLAY
E
M
W
T
T
W
Y
R
O
M
N
I
I
N
S
T
I
C
K
V CENTER
C
H
+
–
H
C
VIDEO TV
MTS
DRC-MF
CHANNEL
INDEX
HD/DVD
123
456
7809
JUMP
ENTER
DRC-MF: DRC PROGRESSIVE
DRC-MF
MENU
Advanced Operations
Select
“DRC1050”
“DRC PROGRESSIVE”
Tip
• When the broadcast signal is weak, you may see some dots or noise on the
TV screen. To reduce this interference, display the “PICTURE” menu and
select “ADJUST” in “PICTURE MODE”, then adjust “SHARP” to reduce
the sharpness (see page 50).
Note
• The DRC-MF mode is not selectable when using the “CHANNEL INDEX”
feature, when the “GAME MODE” or “TWIN” mode is turned “ON”, or
when the “Memory Stick” menu is displayed. The mode is not also
selectable for HD (high-definition) or progressive signal.
The DRC-MF logo ( ) and “DRC-MF” are trademarks of
Sony Corporation.
To
select higher resolution pictures.
reduce jitter of any small areas or scanning lines (e.g., letters or
the edge of objects) on the screen.
Advanced Operations
19

Using wide screen
DISPLAY
VIDEO
POWER
POWERMUTING
mode
E
M
W
T
T
W
Y
R
O
M
N
I
I
N
TV
S
T
I
C
K
V CENTER
C
H
+
–
H
C
VIDEO TV
ENTER
CHVOL
WAKE UP
MTS
V CENTER
MENU
SLEEP
DRC-MF
The wide screen mode feature allows
you to watch the picture filling the 16:9
CHANNEL
INDEX
screen of the projection TV.
HD/DVD
123
456
7809
JUMP
OPTION RESET
Watching the picture in wide screen mode automatically
— AUTO WIDE
The projection TV automatically selects optimum wide screen mode according to the
signal input and displays the picture to fill the 16:9 screen.
Notes
• The AUTO WIDE feature may not work correctly depending on the quality
of signal. In this case, select wide screen mode manually using the
button (see page 22).
• The examples in the table on page 21 show the settings preset at the
factory; “AUTO WIDE” is set to “ON” and “4:3 DEFAULT” is set to
“WIDE ZOOM” in the “WIDE SCREEN” menu (see pages 54 and 55).
20
Advanced Operations
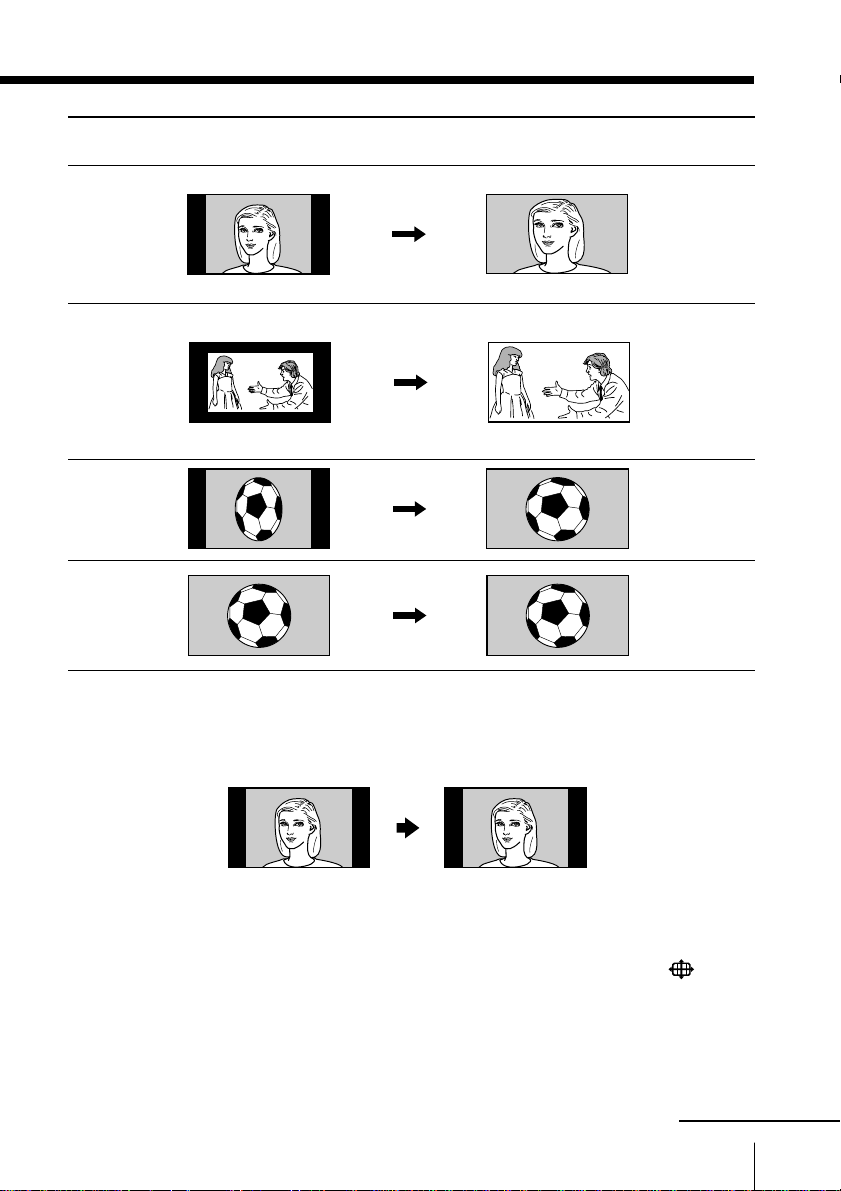
When receiving ...
normal 4:3
aspect ratio
picture with an
ID-1 signal or a
signal without
ID-1.
AUTO WIDE
functions to select ...
WIDE
ZOOM*
The picture changes to ...
enlarge the 4:3
picture, with
the upper and
lower parts
condensed to fit
the 16:9 screen.
4:3 letter box
movie of a
video or DVD
with an ID-1
signal.
4:3 squeezed
video camera
picture with an
ID-1 signal.
HDTV 16:9
picture
enlarge the
picture
ZOOM
horizontally
and vertically
in an equal
aspect ratio that
fills the 16:9
screen.
enlarge the
FULL
picture
horizontally
only, to fill the
16:9 screen.
An HDTV 16:9
FULL
picture is
always
displayed in
FULL mode.
* When a normal 4:3 picture is received, WIDE ZOOM mode is
automatically selected with the factory setting. You can display that
picture as it is without enlarging it (NORMAL mode) if you set “4:3
DEFAULT” in the “WIDE SCREEN” menu to “NORMAL” (see page 55).
Notes
• The 720p/1080i format signal is always displayed in FULL mode even if it
has no ID-1 signal.
• If the upper or lower part of the screen cannot be seen, adjust the V
CENTER value (see page 23) or select “FULL” by pressing the button
(see page 22).
continued
Advanced Operations
21

Using wide screen mode (continued)
Watching the picture in wide screen mode manually
You can select the desired wide screen mode manually.
Press repeatedly until
the mode indication you
want is displayed on the
screen.
For details on each mode,
see “Watching the picture
in wide screen mode
automatically”.
Notes
• You can also select wide screen mode manually using the menu (see page
54).
• When wide screen mode is selected by pressing the button on the
remote or using the menu, the AUTO WIDE feature does not work
temporarily.
The AUTO WIDE feature functions again when:
– you change a TV channel with CH +/–.
– you change the video input with VIDEO.
– the projection TV is turned off and on again.
• The 720p/1080i format signal (HDTV 16:9 picture) is always displayed in
FULL mode.
• You can adjust the vertical position of the picture when wide screen mode
is set to WIDE ZOOM or ZOOM (see page 23).
• If the upper or lower part of the screen cannot be seen, adjust the V
CENTER value (see page 23) or select “FULL” by pressing the button.
WIDE ZOOM NORMAL
ZOOM FULL
22
Advanced Operations
 Loading...