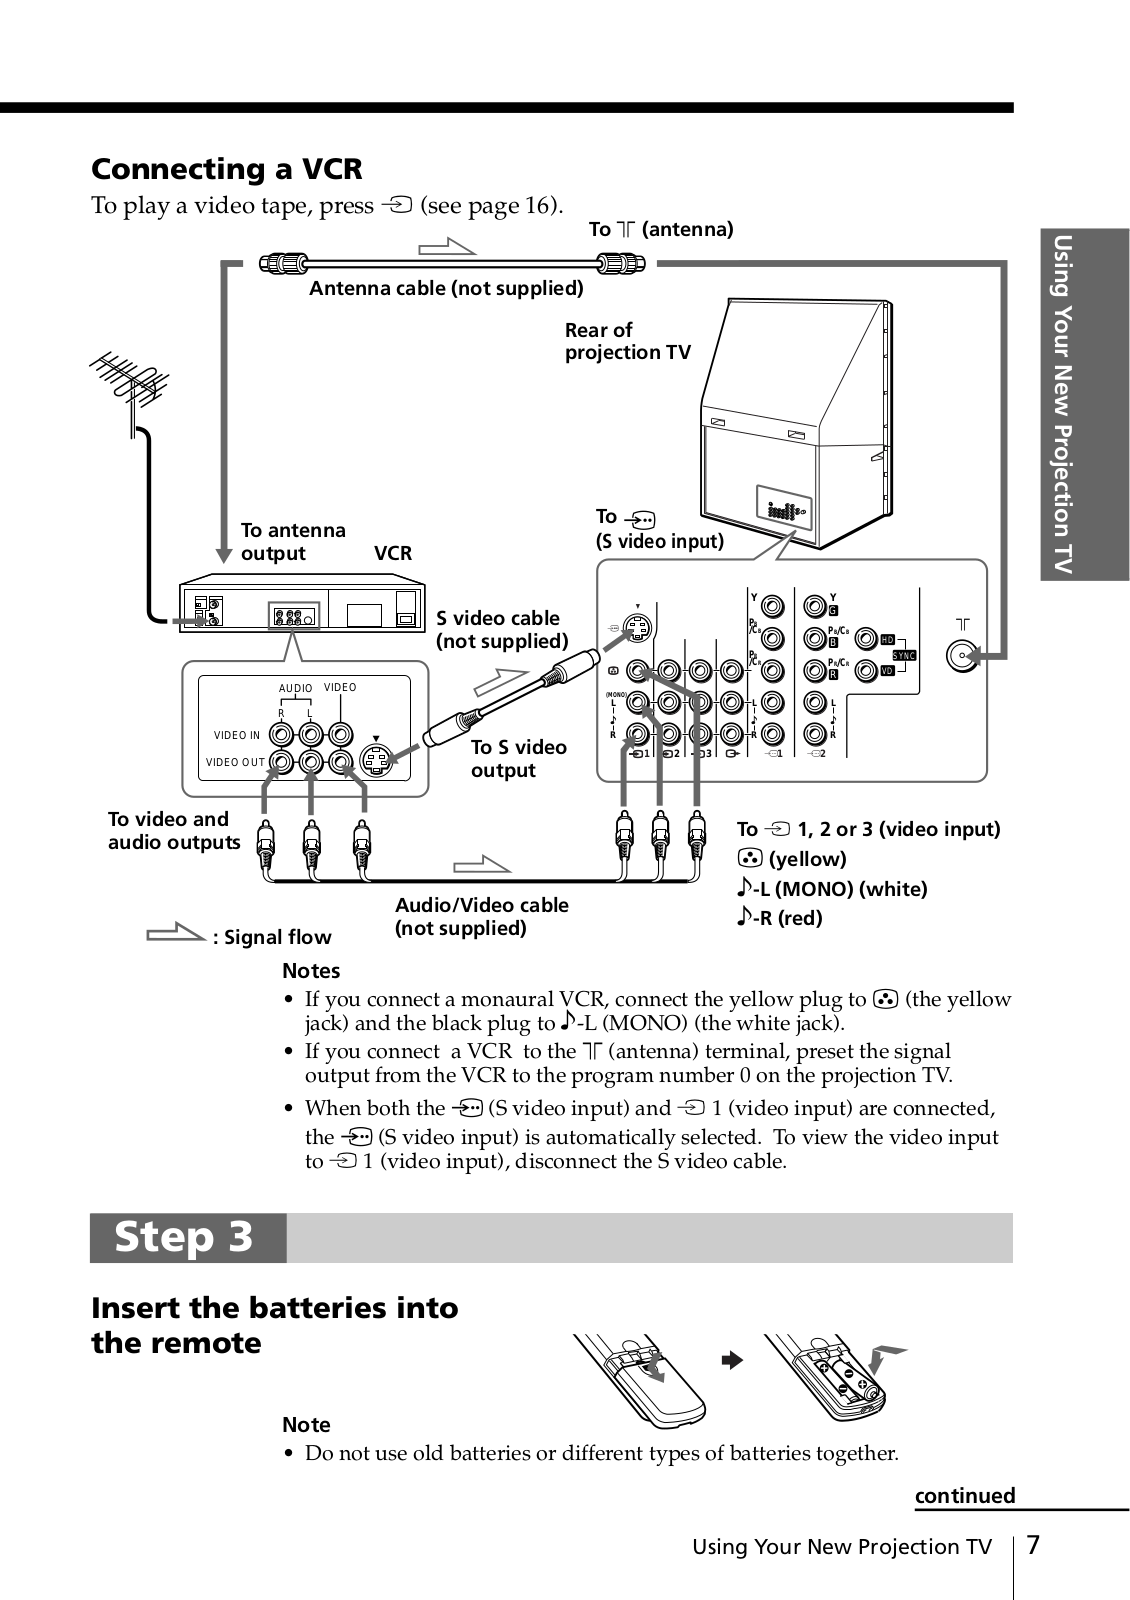
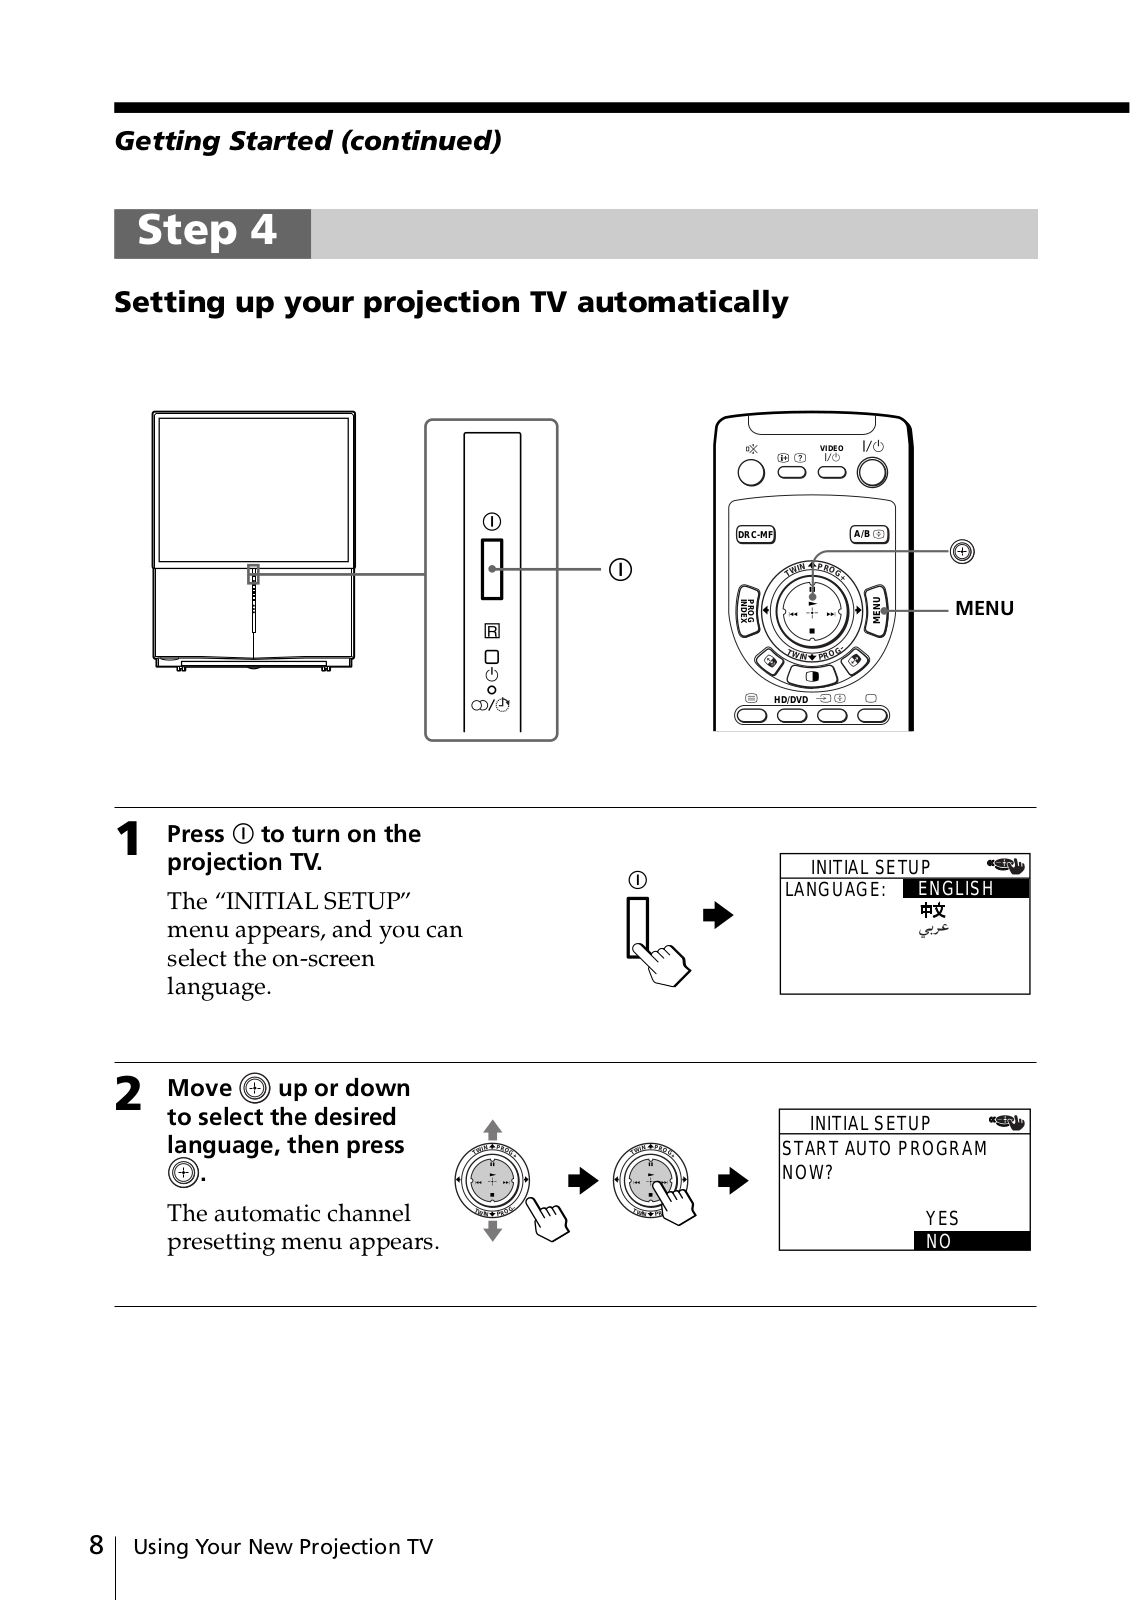
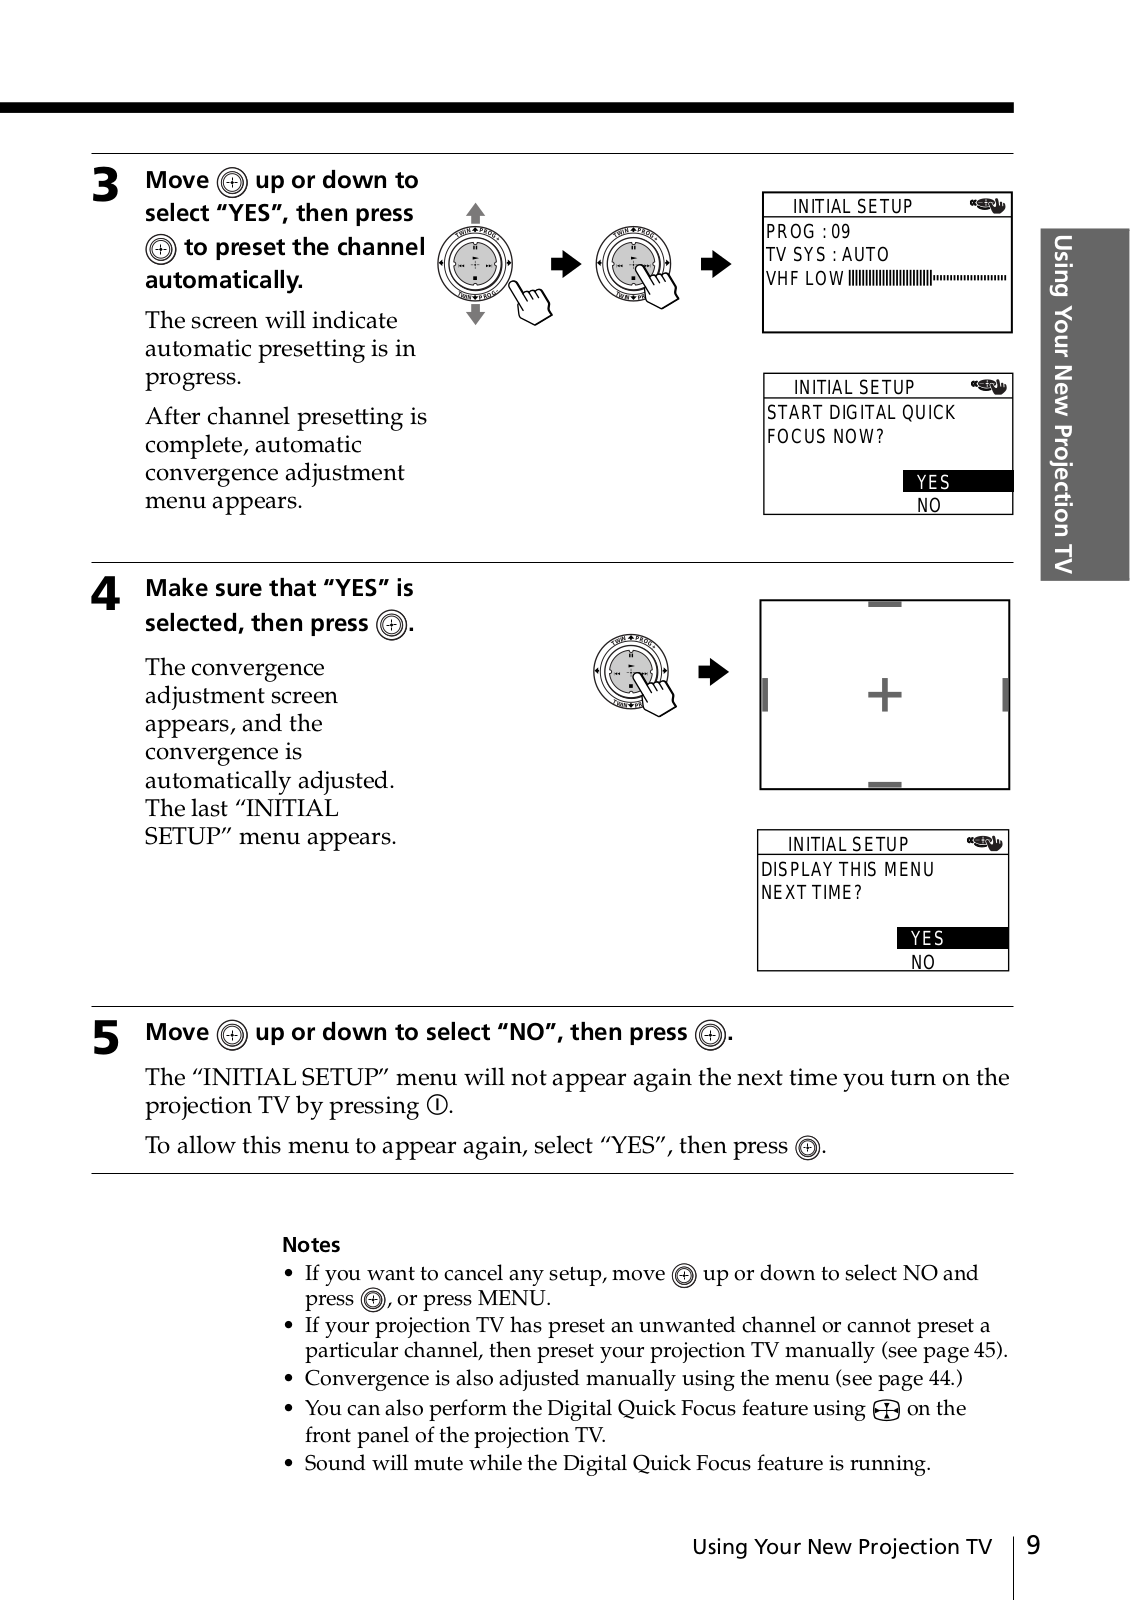
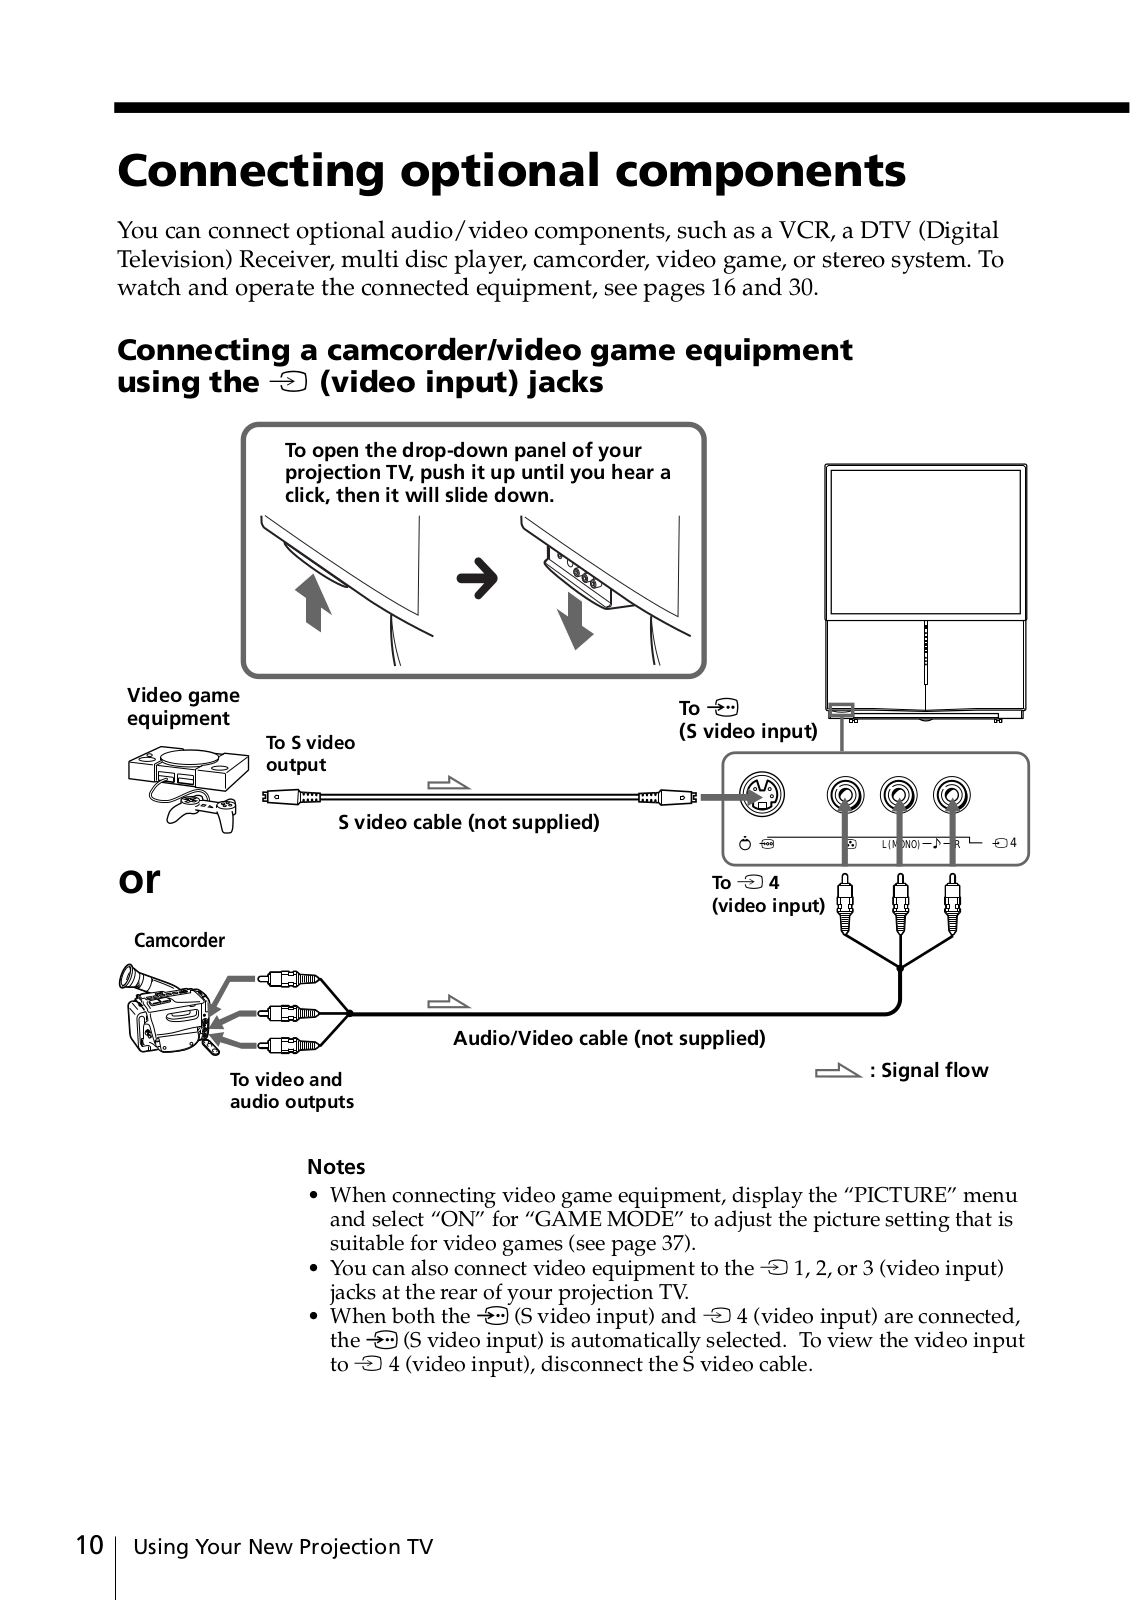
SONY KP-FS43M61 User Manual

Rear Color

TV Projection

FS53/FS43-KP

4-087-186-12 (1)

Projection TV

Operating Instructions

GB


Before operating the unit, please read this manual thoroughly and retain it for future reference.

Mode d’emploi


FR

Avant de faire fonctionner cet appareil, lisez attentivement le présent mode d’emploi et conservez-le pour toute référence ultérieure.

CT

CS

PR

• xxxxxxxx xxxxxxxxxxxxxxxx xxxxxxxxxxxx xxxxxxxxxxx xxxxxxxxxxx xxxxxxx.

AR

xxxxxxxx xxxxxxxxxxxxxxxx xxxxxxxxxxxx xxxxxxxxxxx xxxxxxxxxxx xxxxxxx.

KP-FS53

KP-FS43

M90, M91, M61, M31

© 2002 Sony Corporation

SONY KP-FS43M61 User Manual

2

Table of Contents


WARNING


Using Your New Projection TV


Getting Started .............................................................................................

5

Step 1

Install the projection TV ............................................................

5

Step 2

Connect the antenna ..................................................................

6

Step 3

Insert the batteries into the remote..........................................

7

Step 4

Setting up your projection TV automatically ........................

8

Connecting optional components ...........................................................

10

Watching the TV ........................................................................................

15

Your Using

Projection New

TV

Advanced Operations


Selecting the picture and sound


modes ...............................................

18

Viewing higher quality pictures ......

19

Watching two programs at the same

time ...................................................

20

Displaying multiple programs ........

23

Listening with surround sound .......

25

Enjoying stereo or bilingual


programs .........................................

26

Viewing Teletext .................................

28

Operating optional components ......

30

Adjusting Your Setup (MENU)

GB

..........Introducing the menu system

33


Changing the “PICTURE” setting ...

36


Changing the “SOUND” setting .....

39


Changing the “MULTI PICTURE”

41


setting ...............................................


Changing the “SETUP” setting ........

42


Additional Information


Troubleshooting .................................


49


Self-diagnosis function ......................


53


Identifying parts and controls .........

54


Specifications ......................

Back cover


The features you will enjoy include:

“DRC-MF” for viewing higher quality pictures (page 19)

“TWIN” for viewing two programs (page 20)

“PROGRAM INDEX“ for displaying multiple programs (page 23)

“PICTURE MODE”/“SOUND MODE”/ “SURROUND” for customizing your projection TV (pages 18 and 25)

“WIDE MODE” to view 16:9 pictures (page 37)

Your projection TV also offers the following features:

Initial Setup function for on-screen language selection, automatic channel presetting and automatic connvergence adjustment. (page 8)

Menu language options

— English/Chinese/Arabic (page 42)

“CHILD LOCK” for locking out specific channels (page 48)

“INTELLIGENT VOL” for automatic volume adjustment (page 39)

“FINE” tuning feature (page 46)

Button Joystick on the remote control for easier operation (page 35)

“ECO MODE” to save energy (page 43)

“GAME MODE” for video games (page 37)

3

WARNING

To prevent fire or shock hazard, do not expose the projection TV to rain or moisture. Dangerously high voltages are present inside the projection TV. Do not open the cabinet. Refer servicing to qualified personnel only.

For general safety:

Do not expose the projection TV to rain or moisture.

Do not open the rear cover.

For safe installation:

Do not block the ventilation openings.

Do not install the projection TV in hot, humid or excessively dusty places.

Do not install the projection TV where it may be exposed to mechanical vibrations.

Avoid operating the projection TV at temperatures below 5° C (41° F).

If the projection TV is transported directly from a cold to a warm location, or if the room temperature has changed suddenly, the picture may be blurred or show poor color. This is because moisture has condensed on the mirror or lenses inside. If this happens, let the moisture evaporate before using the projection TV.

To obtain the best picture, do not expose the screen to direct illumination or direct sunlight. It is recommended to use spot lighting directed down from the ceiling or to cover the windows that face the screen with opaque drapery. It is desirable to install the projection TV in a room where the floor and walls are not of reflecting material. If necessary, cover them with dark carpeting or wall paper.

Do not install the appliance in a confined space, such as a bookcase or built-in cabinet.

For safe operations:

Do not operate the projection TV on anything but 110 - 240 V AC, 50/60 Hz.

Do not operate the projection TV if any liquid or solid object falls in it—have it checked immediately.

Do not keep the projection TV plugged in if you are not going to use it for several days. Even if your TV is turned off, it is still connected to the AC power source (mains) as long as the power cord is plugged in.

Do not pull the power cord to disconnect the projection TV. Pull it out by the plug.

Do not plug in too many appliances to the same power socket. Do not damage the power cord.

Do not place any object on the projection TV.

Install the projection TV on a stable projection TV stand and floor which can support the projection TV set weight. Ensure that the projection TV stand surface is flat and its area is larger than the bottom area of the projection TV.

Do not carry the projection TV holding the screen edges.

Caution

When using TV games, computers, and similar products with your projection TV, keep the brightness and contrast functions at low settings. If a fixed (non-moving) pattern is left on the screen for long periods of time at a high brightness or contrast setting, the image can be permanently imprinted onto the screen. These types of imprints are not covered by your warranty.

Cleaning the Screen

To clean the screen with a cloth, please use the supplied cleaning cloth lightly moistened with water. Do not use any type of abrasive pad, alkaline cleaner, scouring powder or solvent, such as alcohol or benzine. As a safety precaution, unplug the TV before cleaning it.

Do not rub, touch, or tap the surface of the screen with sharp or abrasive items, like a ball point pen or a screw driver. Otherwise, this type or contact may result in a scratched screen.

4

Using Your New Projection TV

Getting Started

Step 1

Install the projection TV

For the best picture quality, install the projection TV within the areas below.

Optimum viewing


Optimum viewing area

area (Horizontal)


(Vertical)


KP-FS43


KP-FS43


min.


(6

1.9

m


ft.)


min.


(6

1.9

m


ft.)


60°


30°


60°


30°

KP-FS53


KP-FS53


min.


(8

2.4

m


ft.)


min.


(8

2.4

m


ft.)


30°


60°


60°


30°

Your Using

Projection New

TV

continued

Using Your New Projection TV 5

Getting Started (continued)

Step 2

Connect the antenna

If you wish to connect a VCR, see the “Connecting a VCR” diagram on page 7.

Rear of projection TV

Antenna cable (not supplied)

or

IEC connector (not supplied)

Antenna cable (not supplied)

: Signal flow

CAUTION

Do not connect the power cord until all other connections are complete, otherwise, a minimal current leakage through the antenna and/or other terminals to the ground could occur.

6 Using Your New Projection TV

Connecting a VCR

To play a video tape, press t (see page 16).

To 8 (antenna)

Antenna cable (not supplied)

Rear of projection TV

To antenna


To


(S video input)


output


VCR


Y


Y


S video cable


PB


G


PB/CB


(not supplied)


/CB


HD


B


PR


PR/CR

SYNC


/CR


VD


R


AUDIO

VIDEO


(MONO)


R L


L

L


L


VIDEO IN


To S video

R

R


R


VIDEO OUT


1 2

3

1

2


output


To video and


To t 1, 2 or 3 (video input)

audio outputs


(yellow)


Audio/Video cable


-L (MONO) (white)


-R (red)


: Signal flow

(not supplied)


Notes


• If you connect a monaural VCR, connect the yellow plug to

(the yellow

jack) and the black plug to

-L (MONO) (the white jack).


If you connect a VCR to the 8 (antenna) terminal, preset the signal output from the VCR to the program number 0 on the projection TV.

When both the (S video input) and t 1 (video input) are connected, the (S video input) is automatically selected. To view the video input to t 1 (video input), disconnect the S video cable.

Your Using

Projection New

TV

Step 3

Insert the batteries into the remote

Note

• Do not use old batteries or different types of batteries together.

continued

Using Your New Projection TV 7

Getting Started (continued)

Step 4

Setting up your projection TV automatically

1


Press ! to turn on the


projection TV.

The “INITIAL SETUP” menu appears, and you can select the on-screen language.

2

Move up or down


to select the desired

language, then press .

The automatic channel presetting menu appears.

WIN

PRO

T


G+

T

WIN

G


PRO


VIDEO


DRC-MF


A/B


!


N

+


P


WI

RO


T

G


PROG INDEX


MENU

MENU


T


OG


WIN PR


HD/DVD

INITIAL SETUP

LANGUAGE: ENGLISH


INITIAL SETUP

T

G+

START AUTO PROGRAM

WIN PRO


NOW?

T

YES

G


WIN PRO


NO

8 Using Your New Projection TV

3 Move up or down to select “YES”, then press to preset the channel automatically.

The screen will indicate automatic presetting is in progress.

After channel presetting is complete, automatic convergence adjustment menu appears.

WIN

PRO

T


G+

T

WIN

G


PRO

WIN

PRO

T


G+

T

WIN

G


PRO

INITIAL SETUP

PROG : 09

TV SYS : AUTO VHF LOW

INITIAL SETUP

START DIGITAL QUICK FOCUS NOW?

YES

NO

4 Make sure that “YES” is selected, then press .

The convergence adjustment screen appears, and the convergence is automatically adjusted. The last “INITIAL SETUP” menu appears.

WIN

PRO

T


G+

T

WIN

G


PRO

INITIAL SETUP

DISPLAY THIS MENU

NEXT TIME?

YES

NO

5 Move up or down to select “NO”, then press .

The “INITIAL SETUP” menu will not appear again the next time you turn on the projection TV by pressing !.

To allow this menu to appear again, select “YES”, then press .

Notes

If you want to cancel any setup, move up or down to select NO and press , or press MENU.

If your projection TV has preset an unwanted channel or cannot preset a particular channel, then preset your projection TV manually (see page 45).

Convergence is also adjusted manually using the menu (see page 44.)

You can also perform the Digital Quick Focus feature using on the front panel of the projection TV.

Sound will mute while the Digital Quick Focus feature is running.

Your Using

Projection New

TV

Using Your New Projection TV 9

Connecting optional components

You can connect optional audio/video components, such as a VCR, a DTV (Digital Television) Receiver, multi disc player, camcorder, video game, or stereo system. To watch and operate the connected equipment, see pages 16 and 30.

Connecting a camcorder/video game equipment using the t (video input) jacks

To open the drop-down panel of your projection TV, push it up until you hear a click, then it will slide down.

Video game


To

equipment


(S video input)


To S video


output


S video cable (not supplied)


L(MONO) R 4

or

To t 4


(video input)

Camcorder


Audio/Video cable (not supplied)

To video and

: Signal flow


audio outputs


Notes

When connecting video game equipment, display the “PICTURE” menu and select “ON” for “GAME MODE” to adjust the picture setting that is suitable for video games (see page 37).

You can also connect video equipment to the t 1, 2, or 3 (video input) jacks at the rear of your projection TV.

When both the (S video input) and t 4 (video input) are connected, the (S video input) is automatically selected. To view the video input to t 4 (video input), disconnect the S video cable.

10 Using Your New Projection TV

Connecting audio/video equipment using the T (monitor output) jacks

Rear of projection TV


Y


PB


/CB


PR


/CR

(MONO)


L

L


R


R

1

2

3

1

(yellow)

-L (MONO) (white)

-R (red)

Antenna cable (not supplied)

Y


To


G


Audio system

PB/CB


antenna

HD


B

output

VCR

PR/CR

SYNC

L

VD


or

R


R


To video

To

2


and audio

audio


inputs

inputs

To T

Audio cable

(monitor

(not supplied)

output)


Audio/Video cable (not supplied)

: Signal flow

Note

Your Using

Projection New

TV

If you select “HD/DVD 1” or “HD/DVD 2” on your projectio TV screen, no sound and no picture will be output from T(monitor output) (see page 16).

continued

Using Your New Projection TV 11

Connecting optional components (continued)

Connecting a DVD player to (component video input)

1Using an audio cable, connect R and L under 1 or 2 (component video input) on your projection TV to the LINE OUT, AUDIO R and L output connectors on your DVD player.

2Using a component video cable, connect Y, PB/CB, and PR/CR under 1 or 2 (component video input) on your projection TV to the COMPONENT VIDEO OUT Y, CB, and CR output connectors on your DVD player.

3Press tor HD/DVD on the remote or ton the projection TV until “HD/DVD 1”

appears on the screen if you connect your DVD player to 1, or “HD/DVD 2” for connection to 2.


Rear of


projection TV


Component video cable

To

1 or 2


(not supplied)


(component video input)


To component


video output


To audio

Audio cable


(not supplied)


output


Y

Y


PB

G


PB/CB


/CB


PR

B


PR/CR


/CR


R


L

L

CR CB Y

R-AUDIO-L VIDEO


R

R

COMPONENT VIDEO OUT

S VIDEO OUT

LINE OUT

To -L (white)

1

2


DVD

-R (red)


: Signal flow


player


Notes

• Some DVD player terminals may be labeled differently:

Connect

To (on the DVD player)

Y (green)

Y


PB/CB (blue)

Cb, B-Y or PB


PR/CR (red)

Cr, R-Y or PR


Connect nothing to the HD/VD jacks when connecting a DVD player to

1 or 2 (component video input).

If you select “HD/DVD 1” or “HD/DVD 2” on your projection TV screen, no sound and no picture will be output from T(monitor output). This does not indicate a malfunction.

When receiving a progressive signal through (component video input), TWIN pictures and PROGRAM INDEX features are not available, and “DRC-MF” and “GAME MODE” are not selectable.

12 Using Your New Projection TV

Connecting a DVD player to t (video input)

Connect t1, 2, or 3 (video input) / (audio/video) connectors on your projection TV to LINE OUT on your DVD player.

To audio/video

To t1, 2, or 3


output


(video input)


Audio/Video cable


(not supplied)


(MONO)


R-AUDIO-L VIDEO


L


LINE OUT

DVD


R


player


1

2

3


(yellow)


-L (MONO) (white) -R (red)

Rear of projection TV

: Signal flow

Notes

Your Using

Projection New

TV

Since the high quality pictures on a DVD disc contain a lot of information, picture noise may appear. In this case, adjust the sharpness (“SHARP”) under “ADJUST” in the “PICTURE MODE” menu (see page 38).

You can also connect a DVD player to (S video input) on the projection TV.

continued

Using Your New Projection TV 13

Connecting optional components (continued)

Connecting a DTV (digital television) receiver to 1 or 2 (component video input) jacks


Rear of


projection TV

Component video cable

To

1 or 2

(not supplied)

(Component video input)

To component video output

Audio cable (not supplied)

To audio output

Digital TV

To

-L (white)

receiver


-R (red)


Y

Y

PB

G

PB/CB

/CB

PR

B

PR/CR

/CR


R

L

L

R

R

1

2

: Signal flow

Notes

The projection TV is equipped with the G/B/R/HD/VD inputs. If your DTV receiver is not equipped with the Y/PB/PR output connectors, use the G/B/R/HD/VD connectors.

1 can be used as the Y/PB/PR inputs.

2 can be used as the Y/PB/PR or G/B/R/HD/VD inputs. Connect nothing to the HD/VD connectors when using the Y/PB/PR inputs.

Tip

• The projection TV accepts the following signal formats:

Total scanning

Effective scanning

fV (Hz)

line

line


1125i

1080i

50/60


750p

720p

50/60


625p

576p

50


625i

576i

50


525p

480p

60


525i

480i

60


14 Using Your New Projection TV

Watching the TV

This section explains various functions and operations used while watching the TV. Most operations can be done using the remote.

1 indicator

PROG

MENU

ENTER


VIDEO

DRC-MF


A/B


IN

PR

O

TW


G+

PROG INDEX


MENU

T

WIN


OG


PR

HD/DVD

1 2 3

4 5 6

7 8 9

0 JUMP

PROG

OPTION RESET

TV

HD/DVD

Number buttons

JUMP

PROG +/–

2 +/–

Your Using

Projection New

TV

1

Press ! to turn on the


projection TV.


When the projection TV is in standby mode


(the 1 indicator on the projection TV is lit


red), press !/1 on the remote.


2

Press PROG +/– or the number


buttons to select the TV

PROG

1

2

3


channel.

or

4

5

6


For double digit numbers, press


7

8

9


-, then the number (e.g., for 25,


0


press -, then 2 and 5).


Note

• When you turn on the projection TV, either the program number or video mode is displayed for approximately 40 seconds. The ECO MODE ( ) icon will also appear if “ECO MODE “ in the “SETUP” menu is set “ON”

(see page 43).

continued

Using Your New Projection TV 15

Watching the TV (continued)

To select a TV program quickly

(1)Press and hold PROG +/–.

(2)Release PROG +/– when the desired program number appears.

Note

When you select a TV program quickly, the picture may be disrupted. This does not indicate a malfunction.

Additional tasks

To

Press


Turn off temporarily

@/1.


The 1 indicator on the projection TV lights up red.


Turn off completely

! on the projection TV.


Adjust the volume

2 +/–.


Mute the sound

%.

Watch the video input (VCR, camcorder, etc.)

t (or t on the projection TV) to select “VIDEO 1”, “VIDEO 2”, “VIDEO 3”, “VIDEO 4”, “HD/DVD 1” or “HD/DVD 2”.

To return to the TV screen, press a (or t on the projection TV).

Watch the component input

HD/DVD to select “HD/DVD 1” or “HD/DVD 2”.

(DVD, DTV receiver)

To return to the TV screen, press a (or t on the


projection TV).


Jump back to the previous channel

JUMP.


Display the on-screen information*

.


*Some picture/sound settings, and either the program number or video mode are displayed. The on-screen display for the picture/sound settings disappears after about 3 seconds.

16 Using Your New Projection TV

Setting the Wake Up timer

1

Press until the desired


period of time appears.

The Wake Up timer starts immediately after you have set it.

WAKE UP TIMER:10M

After 10 minutes

WAKE UP TIMER:OFF


WAKE UP TIMER:12H00M


No Wake Up Timer


After 12 hours


2

Select the TV channel or video mode you want to wake up to.

3

Press !/1, or set the Sleep timer if you want the projection TV to turn off


automatically.

The indicator on the projection TV lights up orange.

To cancel the Wake Up timer

Press until “WAKE UP TIMER: OFF” appears, or press ! on the projection TV to turn it off.

Note

If no buttons or controls are pressed for more than two hours after the projection TV is turned on using the Wake Up timer, the projection TV automatically goes into standby mode. To resume watching the TV, press any button on the projection TV or the remote.

Setting the Sleep timer

Press until the desired period of time appears.

The Sleep timer starts immediately after you have set it.


SLEEP TIMER:30M


SLEEP TIMER:60M


After 30 minutes


After 60 minutes


SLEEP TIMER:OFF


SLEEP TIMER:90M


No Sleep Timer


After 90 minutes


To cancel the Sleep timer

Press until “SLEEP TIMER: OFF” appears, or turn the projection TV off.

Your Using

Projection New

TV

Using Your New Projection TV 17

Advanced Operations

Selecting the picture and sound modes

You can select picture and sound modes and adjust the setting to your preference in the “PERSONAL” option.

0 JUMP

PROG

OPTION RESET

Selecting the picture mode

Press repeatedly until the desired picture mode is selected.

DYNAMIC STANDARD

PERSONAL HI-FINE

Select

To

“DYNAMIC”

receive high contrast pictures.


“STANDARD”

receive normal pictures.


“HI-FINE”

receive higher density pictures with mild contrast.


“PERSONAL”

receive the last adjusted picture setting from the “ADJUST” option in the


“PICTURE” menu (see page 38).


Selecting the sound mode

Press repeatedly until


the desired sound mode is


9DYNAMIC


9DRAMA


selected.


9PERSONAL


9SOFT


Select

To


“DYNAMIC”

listen to dynamic and clear sound that emphasizes both the low and high


tones.


“DRAMA”

listen to sound that emphasizes voice and high tones.


“SOFT”

receive soft sound.


“PERSONAL”

receive the last adjusted sound setting from the “ADJUST” option in the


“SOUND” menu (see page 40).


Tip

You can also set the picture and sound modes using the menu (see “Changing the “PICTURE” setting” on page 36 and “Changing the “SOUND” setting” on page 39).

18 Advanced Operations

Viewing higher quality pictures

— “DRC-MF”

The Digital Reality Creation-Multi Function (DRC-MF) feature allows you to enjoy higher quality pictures on your projection TV. You can select “DRC1250” to watch super real (higher resolution) pictures, or “DRC100” for moving pictures or “DRC PROGRESSIVE” for still pictures to reduce flicker if necessary.


VIDEO


DRC-MF

DRC-MF


A/B


IN

PR

O

TW


G+

PROG INDEX


MENU

T

WIN


OG


PR

HD/DVD

1 2 3

4 5 6

7 8 9

0 JUMP


Press DRC-MF repeatedly

DRC-MF: DRC1250


DRC-MF: DRC100


until you receive the

DRC-MF


desired picture quality.


DRC-MF: DRC PROGRESSIVE


Select

To


“DRC1250”

select higher resolution pictures.


“DRC100”

reduce flicker on the screen.


“DRC PROGRESSIVE”

reduce jitter of any small areas or scanning lines (e.g., letters or


the edge of objects) on the screen.


Tip

When the broadcast signal is weak, you may see some dots or noise on the TV screen. To reduce this interference, display the “PICTURE” menu and select “ADJUST” in “PICTURE MODE”, then adjust “SHARP” to reduce the sharpness (see page 38).

Note

The DRC-MF mode is not selectable when using the “PROGRAM INDEX” feature, or when the “GAME MODE” or “TWIN” mode is turned “ON”. The mode is not also selectable for HD (high-definition) or progressive signal.

The DRC-MF logo (

) and “DRC-MF” are trademarks of

Sony Corporation.


Operations Advanced

Advanced Operations

19


Watching two programs at the same time

— “TWIN”

With the TWIN pictures feature, you can display a different TV program beside the main picture.


VIDEO

DRC-MF


A/B


IN

PR

O

TW


G+

PROG INDEX


MENU

T

WIN


OG


PR

HD/DVD

1 2 3

4 5 6

7 8 9

0 JUMP

Displaying TWIN pictures

Press .

10

12

To return to the normal screen

Press .

The left picture is displayed in full screen.

Tip

You can also display the TWIN pictures using the menu (see “Changing the MULTI PICTURE setting” on page 41).

Pressing displays the right picture in full screen (see “Selecting a TV program using TWIN” on page 22).

20 Advanced Operations

Additional tasks

To

Press/Move

change a TV program in the right

Move up or down (TWIN PROG + or –).

picture


swap the left and right pictures

Press .


swap sound between the left and right pictures.

Press .

The “” symbol will appear to indicate which screen you are hearing.

change the screen size of the TWIN pictures

Move left to increase the left screen size. Move right to increase the right screen size.

TWIN

PROG +

T

W

I

N

PROG

TWIN

PROG +

T

W

IN

PROG

Notes

Swapping the pictures is not available for HD or DVD input signals.

The TWIN pictures feature is not available for HD (high-definition) and progressive signals. If you change the left main picture to an HD or progressive signal, a message appears and the TWIN pictures feature is cancelled. The selected HD or progressive picture will be displayed in full screen.

You cannot enjoy stereo sound in the right picture.

You cannot change the picture to a video input in the right picture. You can only display a video input, except for HD and progressive signals, in the right picture by swapping the pictures when a video input is displayed in the left picture.

When the button is pressed, the TV screen flickers or goes blank for about one second before the TWIN pictures appear. This does not indicate a malfunction of the projection TV.

continued

Advanced Operations

21


Watching two programs at the same time (continued)

Selecting a TV program using TWIN

You can select your desired TV program directly from the right picture by using (TWIN PROG +/–).

1

Move up or down


(TWIN PROG +/–).

The TWIN pictures appear on the screen.

WIN

PRO

T


G+

T

WIN

G


PRO

10

6

2

Move up or down


(TWIN PROG +/–) until the

desired program appears on the right screen.

3

Press

to display the


right picture in full

screen.


10

8

WIN PRO


T

G+


T


G


WIN PRO


8

WIN

PRO

T

G+

T

W

IN

PROG

22 Advanced Operations

Displaying multiple programs

— “PROGRAM INDEX”

The PROGRAM INDEX feature displays all of the preset TV programs on twelve sub screens for direct selection.


VIDEO

DRC-MF


A/B


IN

PR

O

TW


G+

PROG INDEX


MENU

T

WIN


OG


PR

HD/DVD

1 2 3

4 5 6

7 8 9

0 JUMP

PROG

OPTION RESET

PROG

INDEX

PROG +/–

Press PROG INDEX.

The first twelve preset programs appear one by one, clockwise from the upper left corner.

Tip

PROG INDEX

Sub screens

1

2

3

4

b

Main

12


16

5


screen

11


6


10

9

8

7

When you press the PROG INDEX button in the TWIN pictures mode, the left picture appears as the main screen of the PROGRAM INDEX mode.

To view the next or the previous twelve preset programs

This works only when the number of the preset TV programs is more than twelve.

Press PROG +/– on the remote or on the projection TV.

1

2

3

4

13

14

15

16


PROG


16


16


12


5


17


11


6


18


10

9

8

7


continued


Advanced Operations

23

Displaying multiple programs (continued)

To select the desired program directly from the sub screens

1Move up, down, left or right to move the frame to the screen of the program you want to watch.

WIN

PRO

T


G+

T

WIN

G


PRO

2 Press

.

WIN PRO

T


G+

T


G


WIN PRO

1

2

3

4

12


16

5


11


6

10

9

8

7

1

2

3

4

12


8

5

11


6

10

9

8

7

3 Press again.

TWIN

8

PROG +

T

W

I

N

PROG

Tip

• Pressing the number buttons directly displays the program.

To return to the normal screen

Press PROG INDEX again, or:

1 Select “PROGRAM INDEX” from the “MULTI PICTURE” menu.

2 Press .

Tip

You can also display multiple programs using the menu (see “Changing the MULTI PICTURE setting” on page 41).

Notes

When displaying multiple programs, only the sound of the main screen is heard.

The PROGRAM INDEX feature is not available for HD (high-definition) and progressive signals. The selected HD or progressive picture will be displayed in full screen.

24 Advanced Operations

Listening with surround sound

1 2 3

4 5 6

7 8 9

The surround feature enables you to

0

JUMP

enjoy the sound effects of a concert hall


or movie theater.


PROG

OPTION

RESET


TV


Press repeatedly until you receive the desired surround sound.

SURROUND: TruSurround

SURROUND: OFF


SURROUND: SIMULATED


Select

To


“TruSurround”*

listen to the surround sound that spreads out to the rear of a room.


“SIMULATED”

listen to monaural sound with a stereo-like effect.


“OFF”

turn off the surround sound.


*TruSurround and the symbol are trademarks of SRS Labs, Inc. TruSurround technology is incorporated under license from SRS Labs, Inc.

Advanced Operations

25


Enjoying stereo or bilingual programs

You can enjoy stereo sound or bilingual programs of NICAM and A2 (German) stereo systems.

When you receive the channel with them, the indicator on the front panel of the projection TV lights up red.

VIDEO

DRC-MF


A/B

A/B


IN

PR

O


TW


G+


PROG INDEX


MENU

T

WIN


OG


PR


HD/DVD

1 2 3

4 5 6

Press A/B repeatedly until you receive the sound you

want.

NICAM

A/B

When receiving a NICAM program

Broadcasting

On-screen display (Selected sound)


NICAM stereo


NICAM


MONO


(Stereo sound)


(Regular sound)


NICAM bilingual


NICAM


NICAM


MONO


MAIN


SUB


(Regular sound)


(Main sound)


(Sub sound)


NICAM monaural


NICAM


MONO


MAIN


(Regular sound)


(Main sound)


26 Advanced Operations

When receiving an A2 (German) program

Broadcasting

On-screen display (Selected sound)


A2

(German) stereo


MONO


STEREO


(Regular sound)


(Stereo sound)


A2

(German) bilingual


MAIN


SUB


(Main sound)


(Sub sound)


Receiving area for NICAM and A2 (German) programs

System

Receiving area


NICAM

Hong Kong, Singapore, New Zealand, Malaysia,


Thailand, etc.


A2 (German)

Australia, Malaysia, Thailand, etc.

Notes

If the signal is very weak, the sound becomes monaural automatically.

If the stereo sound is noisy when receiving a NICAM program, select “MONO”. The sound becomes monaural, but the noise is reduced.

Before receiving a NICAM stereo program in China, please check the NICAM broadcast condition at your area. When receiving a NICAM stereo program, the receiving conditions might vary depending on area. In addition, different strength of the NICAM broadcast signal might affect the receiving quality.

If the sound is distorted or noisy when receiving a monaural program through the 8 (antenna) terminal

Press A/B repeatedly until “MONO” appears on the screen.

To cancel the monaural sound setting, press A/B again until “AUTO” appears on the screen.

MONO


AUTO


Notes

The “MONO” or “AUTO” setting is memorized for each program position.

You cannot receive a stereo broadcast signal when the projection TV is in the “MONO” setting. Normally, set the projection TV to “AUTO”.

Advanced Operations

27


Viewing Teletext

VIDEO

Some TV stations broadcast an information service called Teletext which allows you to receive various information, such as stock market reports and news.

DRC-MF


A/B

A/B


IN

PR

O


TW


G+


PROG INDEX


MENU


T

WIN


OG


PR


HD/DVD


1


2


3


4


5


6

Number

7


8


9

buttons


0


JUMP


PROG

OPTION RESET

(red, green, yellow, blue)

PROG +/–

TV

Displaying Teletext

1 Select a TV channel that carries the Teletext broadcast you want to watch.

2

Press

to display the


text.


A Teletext page (normally the index page) is displayed. If there is no Teletext broadcast, “100?” is displayed at the top left corner of the screen after approximately 10 seconds.


P166 SECTEXT

166 FR1 MAR 03:59:09


From Singapore


Day

Dep/Arr

Flight

Alrcraft


To PARIS

1.6


220/0588

SQ28

747


2


2130/1225

PA115

L15


3


2115/1330

SQ26

747


To OSAKA

2.5


1000/1715

SQ6

747


4.6


0930/2015

CX522

L10


To ROMA

2.7


2130/0745

SQ24

747


4


2300/0915

AZ487

747


To SYDNEY

1


2210/0610

SQ21A

747


2


2100/0835

SQ21A

747


To turn off Teletext

Press a.

28 Advanced Operations

Additional Teletext tasks

To

Do this


display a Teletext page on the TV

Press .


picture

Each time you press

, the screen changes as


follows: Teletext t Teletext and TV t TV.


check the contents of a Teletext service

Press .


An overview of the Teletext contents, including


page numbers, appears on the screen.


select a Teletext page

Press the number buttons to enter the three-digit


page number of the desired Teletext page.* If you


make a mistake, reenter the correct page number. To


access the next or previous page, press PROG +/–.

hold (pause) a Teletext page (stop the page from scrolling)

Press to display the symbol “z” at the top left corner of the screen. To resume normal Teletext viewing, press or .

reveal concealed information

Press .

(e.g., an answer to a quiz)

To conceal the information, press the button again.


enlarge the Teletext display

Press .


Each time you press , the Teletext display


changes as follows: Enlarge upper half tEnlarge


lower half tNormal size.


stand by for a Teletext page while watching

1 Enter the Teletext page number that you want to

a TV program

refer to, then press .

2When the page number is displayed, press to show the text.

* You can also select a Teletext page of any page number that appears in the colored column at the bottom of the screen using the corresponding colorcoded button on the remote.

Using FASTEXT

This feature allows you to quickly access a Teletext page that uses FASTEXT. When a FASTEXT program is broadcast, colored menus appear at the bottom of the screen. The color of each menu corresponds to the color-coded buttons on the remote (red , green , yellow , and blue ).

To access a FASTEXT menu

Press the color-coded button on the remote corresponding to the menu you want. The menu page appears on the screen after a few seconds.

Note

The FASTEXT feature can be used only when the FASTEXT broadcast is available.

Advanced Operations

29


Operating optional components

You can use the supplied remote to operate Sony video equipment such as Beta, 8 mm, VHS or DVD.


VIDEO


VIDEO I/1

DRC-MF


A/B


IN

PR

O

TW


G+

PROG INDEX


MENU

T

WIN


OG


PR

HD/DVD

1 2 3

4 5 6

7 8 9

0 JUMP

PROG

OPTION RESET

TV

Setting up the remote to work with other connected equipment

Number buttons 1-7

Number button 0

OPTION

While keeping VIDEO @/1 pressed, press the number button 0, then the corresponding number button for the desired equipment (see the table below).

For example, to operate a

Sony 8 mm VCR:

VIDEO

+ 0 2


To control

While holding

First press the

Next press the


down

number button

number button


DVD

VIDEO @/1

0

0


VTR1 (Beta)

VIDEO @/1

0

1


VTR2 (8 mm)

VIDEO @/1

0

2


VTR3 (VHS)

VIDEO @/1

0

3


MDP

VIDEO @/1

0

4


CD

VIDEO @/1

0

6


MD

VIDEO @/1

0

7


30 Advanced Operations

Loading...
+ 310 hidden pages