


Projection TV
‚ª√‡®§™íòπ∑’«’
2-652-549-11 (1)
Operating Instructions
• Before operating the unit, please read this manual thoroughly and retain it
for future reference.
§ŸË¡◊Õ°“√„™Èß“π
• °ËÕπ‡√‘Ë¡°“√„™Èß“π°√ÿ≥“ÕË“π§ŸË¡◊Õπ’È‚¥¬≈–‡Õ’¬¥∑—ÈßÀ¡¥·≈–‡°Á∫√—°…“§ŸË¡◊Õ‰«È
”À√—∫ÕÈ“ßÕ‘ß„π‚Õ°“µËÕʉª
KP-FR43
GB
‰∑¬
KP-FR53
© 2005 Sony Corporation
M94
M90
2

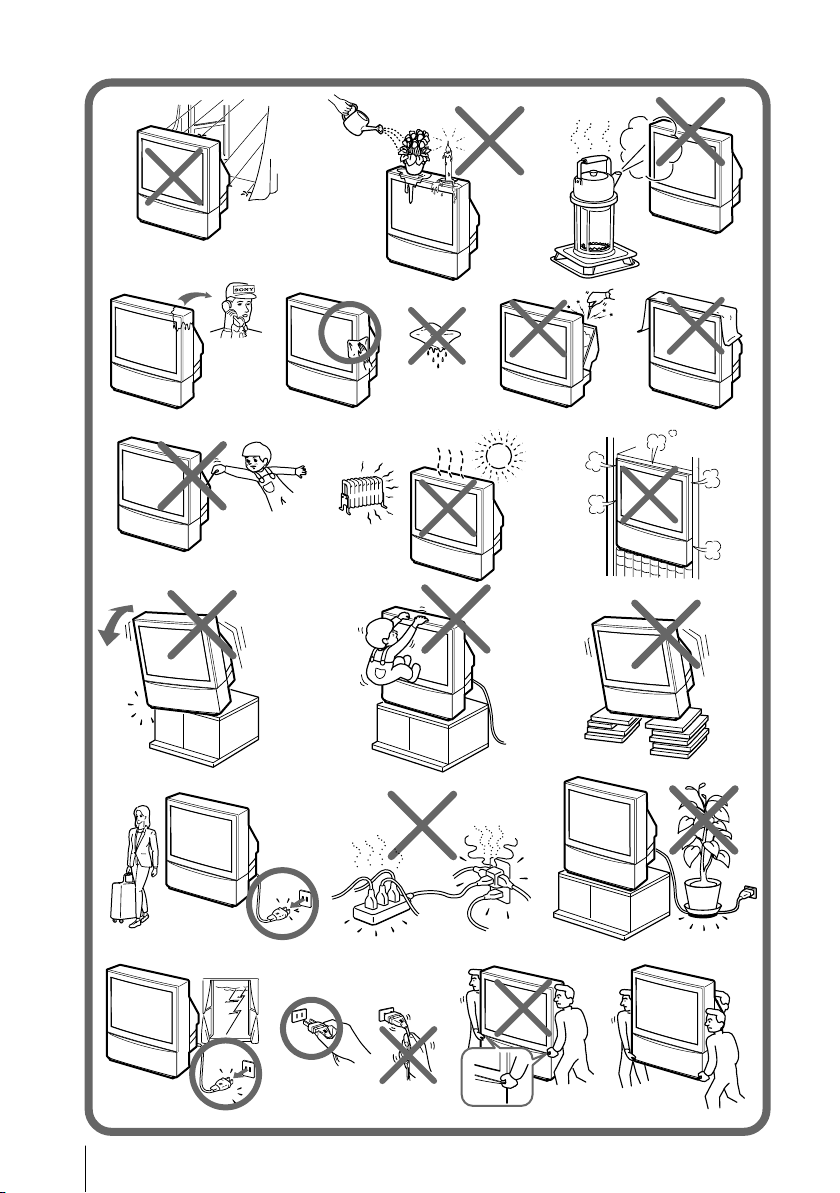
WARNING
To prevent fire or shock hazard, do not expose the projection TV to rain or moisture.
Dangerously high voltages are present inside the projection TV. Do not open the cabinet. Refer
servicing to qualified personnel only.
For general safety:
• Do not expose the projection TV to rain or moisture.
• Do not open the rear cover.
For safe installation:
• Do not block the ventilation openings.
• Do not install the projection TV in hot, humid or excessively dusty places.
• Do not install the projection TV where it may be exposed to mechanical vibrations.
• Avoid operating the projection TV at temperatures below 5°C (41°F).
• If the projection TV is transported directly from a cold to a warm location, or if the room
temperature has changed suddenly, the picture may be blurred or show poor color. This is
because moisture has condensed on the mirror or lenses inside. If this happens, let the
moisture evaporate before using the projection TV.
• To obtain the best picture, do not expose the screen to direct illumination or direct sunlight. It
is recommended to use spot lighting directed down from the ceiling or to cover the windows
that face the screen with opaque drapery. It is desirable to install the projection TV in a room
where the floor and walls are not of reflecting material. If necessary, cover them with dark
carpeting or wall paper.
• Do not install the appliance in a confined space, such as a bookcase or built-in cabinet.
For safe operations:
• Do not operate the projection TV on anything but 110-240 V AC, 50/60 Hz.
• Do not operate the projection TV if any liquid or solid object falls in it—have it checked
immediately.
• Do not keep the projection TV plugged in if you are not going to use it for several days. Even
if your projection TV is turned off, it is still connected to the AC power source (mains) as long
as the power cord is plugged in.
• Do not pull the power cord to disconnect the projection TV. Pull it out by the plug.
• Do not plug in too many appliances to the same power socket. Do not damage the power
cord.
• Do not place any objects on the projection TV. The apparatus shall not be exposed to dripping
or splashing and that no objects filled with liquids, such as vases, shall be placed on the
apparatus.
• Install the projection TV on a stable projection TV stand and floor which can support the
projection TV set weight. Ensure that the projection TV stand surface is flat and its area is
larger than the bottom area of the projection TV.
• Do not carry the projection TV holding the screen edges.
Caution
• When using TV games, computers, and similar products with your projection TV, keep the
brightness and contrast functions at low settings. If a fixed (non-moving) pattern is left on the
screen for long periods of time at a high brightness or contrast setting, the image can be
permanently imprinted onto the screen. These types of imprints are not covered by your
warranty.
Cleaning the Screen
• To clean the screen with a cloth, please use a cleaning cloth lightly moistened with water. Do
not use any type of abrasive pad, alkaline cleaner, scouring powder or solvent, such as alcohol
or benzine. As a safety precaution, unplug the projection TV before cleaning it.
• Do not rub, touch, or tap the surface of the screen with sharp or abrasive items, like a ball
point pen or a screw driver. Otherwise, this type of contact may result in a scratched screen.
GB
3
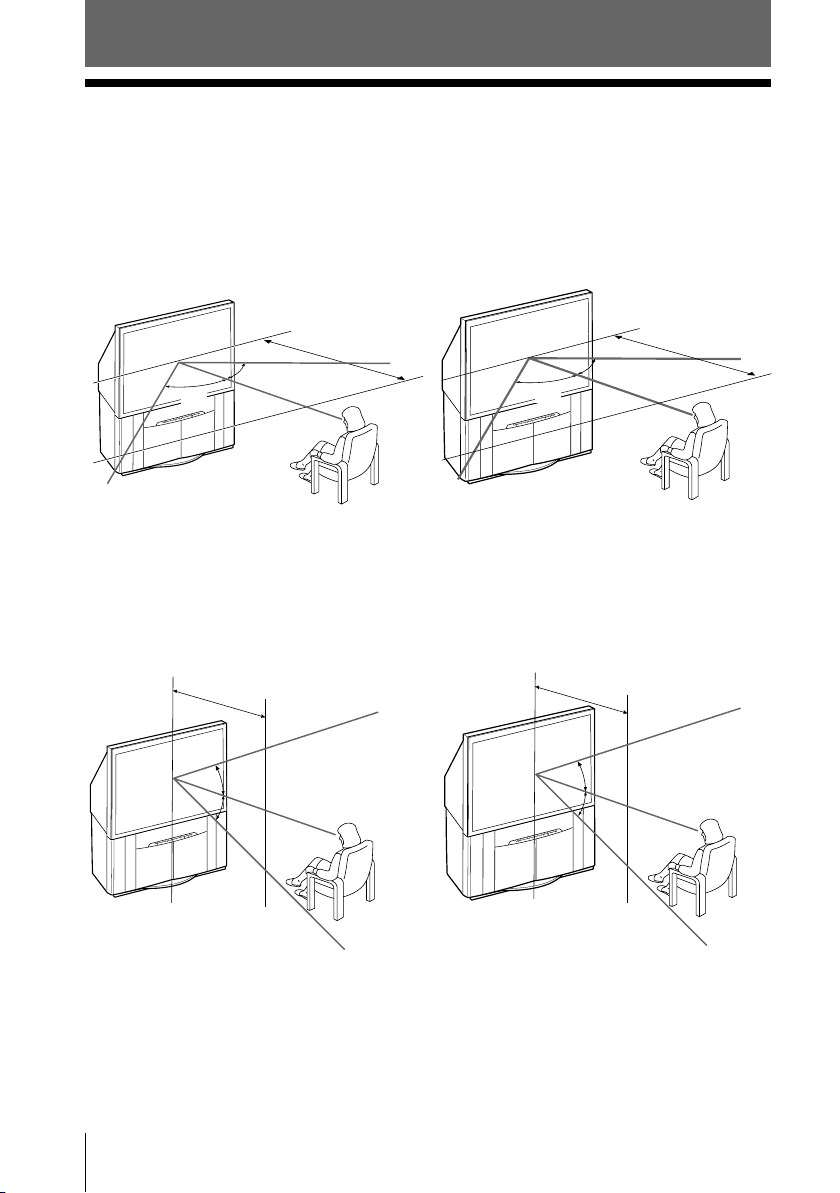
min. 1.7 m
Using Your New Projection TV
x Install the projection TV
For the best picture quality, install the projection TV within the areas below.
Optimum viewing area (Horizontal)
KP-FR43 KP-FR53
min. 1.9 m
min. 1.7 m
(6 ft.)
(5.6 ft.)
60°
60°
G
O
R
P
E
T
A
G
A
G
E
W
Optimum viewing area (Vertical)
KP-FR43 KP-FR53
min. 1.9 m
(6 ft.)
20°
G
O
R
P
E
T
A
G
A
G
E
W
20°
60°
G
O
R
P
TE
A
G
GA
WE
min. 2.4 m
G
O
R
P
WEGA GATE
min. 2.4 m
(8 ft.)
60°
(8 ft.)
20°
20°
4 Using Your New Projection TV

Table of Contents
Using Your New Projection
TV
Installation
Getting Started ..................................... 6
Setting up your projection TV
(“Initial Setup”) .................................... 7
Overview of Controls
Projection TV front, inside the drop-
down and rear panels.......................... 9
Using the remote control and
basic functions .................................... 10
Advanced Operations
Selecting the picture and
sound modes ...................................... 12
Enjoying the WEGA Theatre Mode
with center speaker ........................... 13
Viewing two programs at the same
time (KP-FR53M94 only) .................. 14
Displaying multiple programs
(KP-FR53M94 only) ........................... 15
Enjoying stereo or bilingual
programs ............................................. 16
Operating optional components ...... 17
Menu Adjustment
Introducing the WEGA GATE
navigator ............................................. 18
“Settings” Adjustment ...................... 19
Changing the “Picture” setting ........ 21
Changing the “Sound” setting ......... 22
Changing the “Wide Screen”
setting .................................................. 23
Changing the “Multi Picture”
setting (KP-FR53M94 only) .............. 24
Changing the “Channel Setup”
setting .................................................. 25
Changing the “Setup” setting .......... 27
Additional Information
Connecting optional components ... 29
Troubleshooting ................................. 32
Specifications ...................................... 34
GB
Using Your New projection TV
5
Installation
x
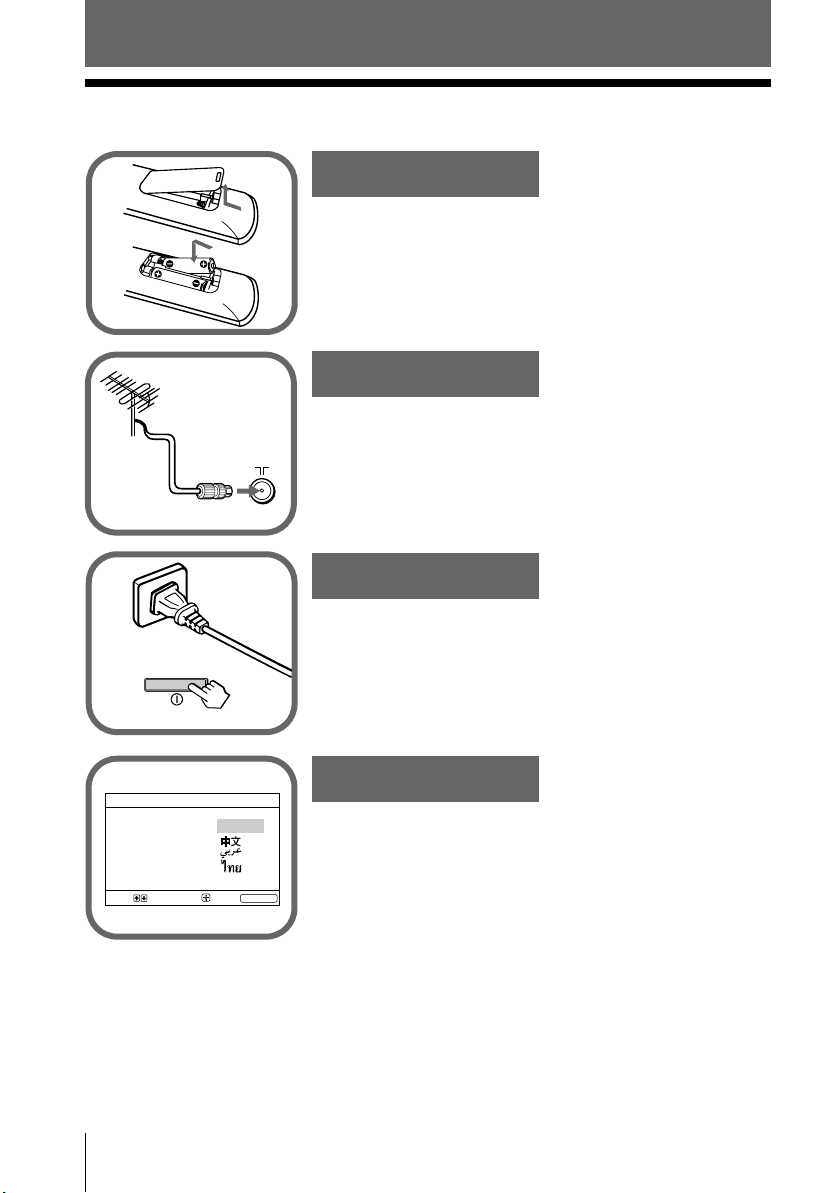
Getting Started
b
b
Step 1
1
Insert the batteries (supplied) into the remote.
Note
• Do not use old or different types of batteries together.
Step 2
Connect the antenna cable (not supplied) to 8
(antenna input) at the rear of the projection TV.
Tip
• You can also connect your projection TV to other optional
components (see page 29).
Step 3
Plug in the power cord, then press ! on the
projection TV to turn it on.
Note
• The 1 (standby) indicator flashes green for a few seconds
when turning on the projection TV. This does not indicate a
malfunction.
Initial Setup
Language:
Select:
6 Installation
Confirm:
English
End:
WEGA GATE
Step 4
Set up the projection TV by following the instructions
of the “Initial Setup” menu (see page 7).
x
Setting up your projection TV
(“Initial Setup”)
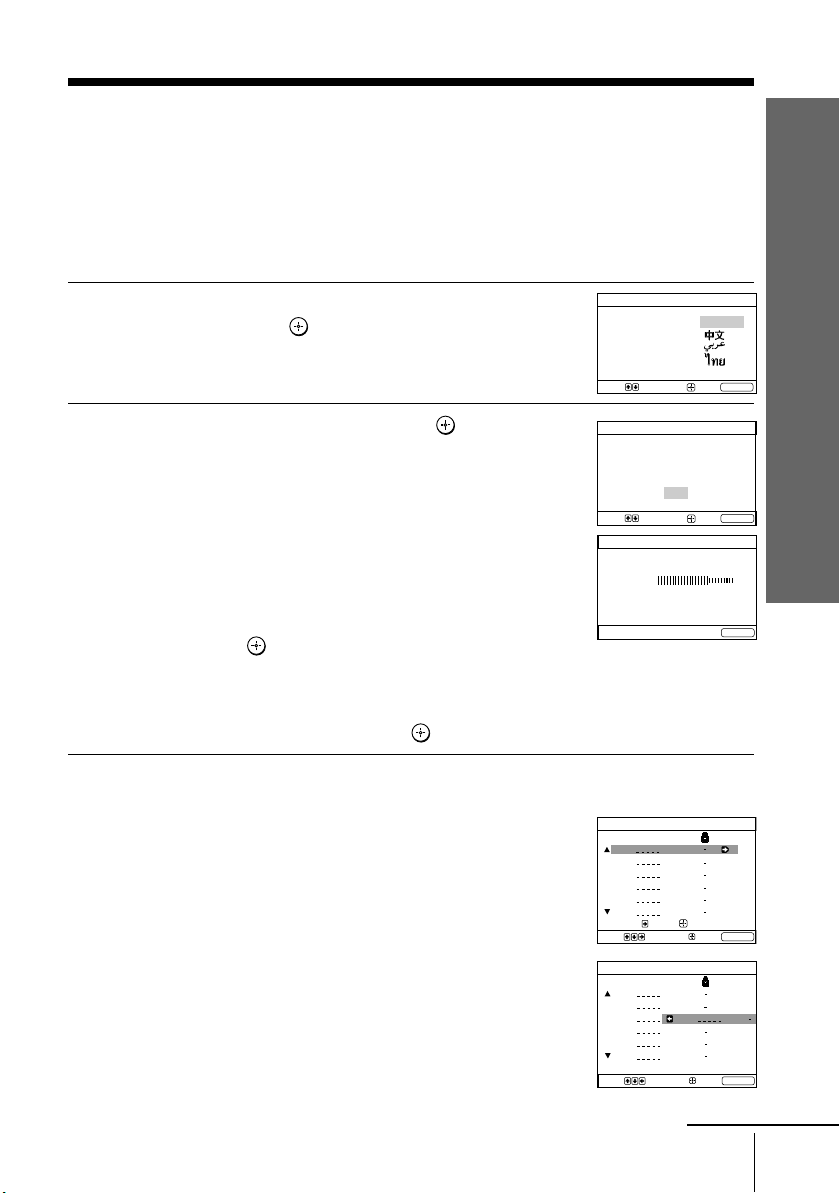
When you turn on your projection TV for the first time, the “Initial Setup” menu will
appear. You may change the menu language, preset the TV channels automatically,
sort or edit the channels and adjust the convergence using the buttons on the remote
control or projection TV front panel.
Press V or v to select the desired menu
1
language, then press
.
The selected menu language appears.
Language:
Select:
Initial Setup
Confirm:
English
End:
WEGA GATE
Installation
Press V or v to select “Yes”, then press
2
to preset the channels automatically.
The screen will indicate automatic
presetting is in progress.
After all available channels have been tuned
and stored, the “Program Sorting/Edit”
menu appears automatically on the screen.
To skip automatic channel presetting, select
“No”, then press
.
If the message “No channel found. Please
connect cable/antenna” appears, check your
projection TV connections, then press
The “Program Sorting/Edit” menu enables
3
you to sort and edit the channels.
a) If you wish to keep the channels in the
current condition, press WEGA GATE
to exit.
b) Press V or v to select the program
number with the channel you wish to
change. The selected channel will
appear on the screen.
c) If you wish to store the channels in a
different order:
1) Press b to enter sorting mode.
2) Press V or v to select the new
program number position for your
selected channel, then press B.
Initial Setup
First please connect
cable/antenna
Start Auto Program now?
Yes
No
End:
Select:
Auto Program
Program:
TV System: Auto
VHF Low
Confirm:
WEGA GATE
01
End:
WEGA GATE
.
Program Sorting/Edit
PROG
Label
01
02
03
04
05
06
Sorting:
Select:
Program Sorting/Edit
PROG
01
02
03
04
05
06
Sorting mode
Select:
Skip
Off
Off
Off
Off
Off
Off
Edit:
Confirm:
Label
Skip
Off
Off
Off
Off
Off
Confirm:
Installation
Exit:
WEGA GATE
Off01
Exit:
WEGA GATE
continue
7
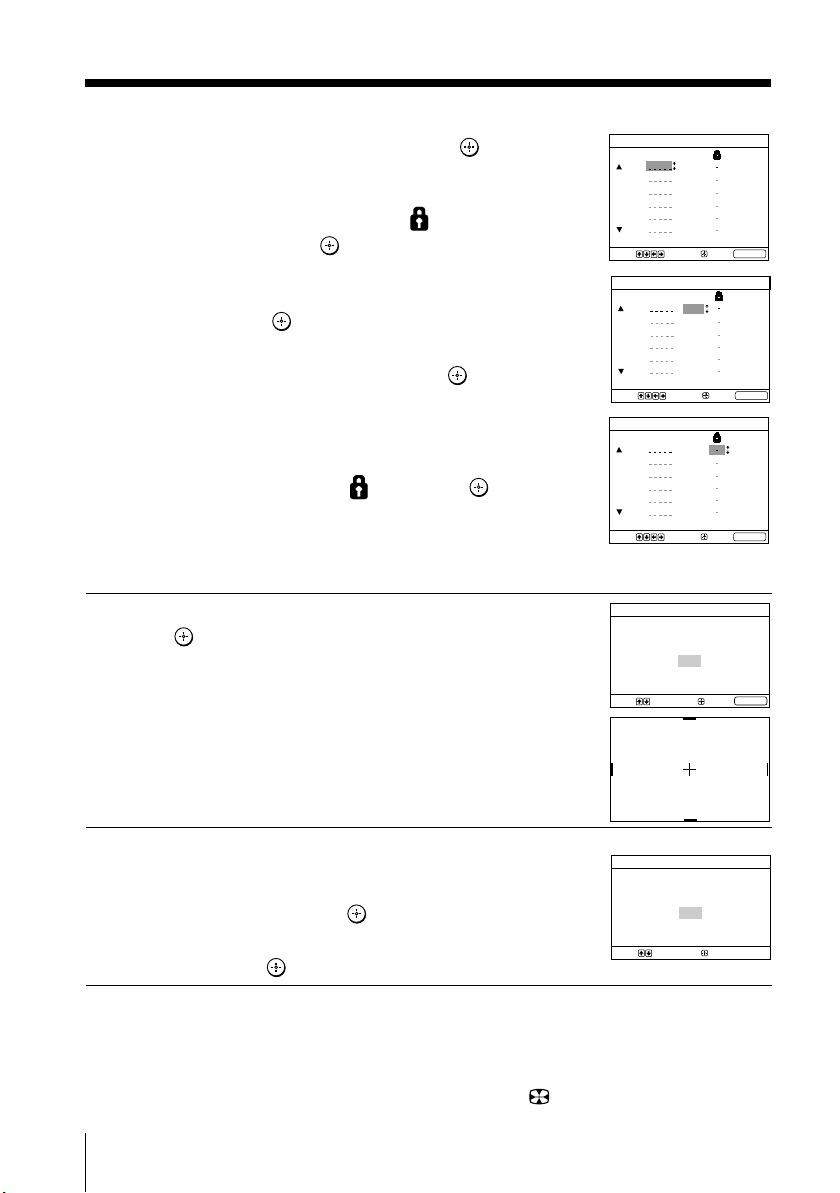
continued
Confirm:
Select:
Initial Setup
Display this menu next time?
Yes
No
d) If you wish to edit the channels, press
to change to edit mode.
Press b until the mode that you wish to
edit is highlighted: Label, Skip,
symbol). Then press
1) To label, press V or v to select the
alphanumeric characters for the label.
Then press
2) To skip the program number, press
V or v to select “On”. Then press
You can skip this program number
when using PROG +/–.
3) To block unwanted program number,
press V or v to select
e) Repeat step b) to d) if you wish to change
other channels.
Press WEGA GATE to go to the next menu.
.
.
. Then press .
(block
Program Sorting/Edit
PROG
Edit mode
Select:
.
Edit mode
Select:
Program Sorting/Edit
PROG
Edit mode
Select:
Skip
Label
01
02
03
04
05
06
Program Sorting/Edit
PROG
01
02
03
04
05
06
Off
Off
Off
Off
Off
Off
Confirm:
Skip
Label
01
Off
02
Off
03
Off
04
05
06
Label
Confirm:
Skip
Off
Off
Off
Off
Off
Off
Confirm:
Off
Off
Off
Exit:
Exit:
Exit:
WEGA GATE
WEGA GATE
WEGA GATE
4
5
Tip
• You can immediately go to the end of the ”Initial Setup” menu by pressing WEGA GATE.
Notes
• Convergence can also be adjusted manually using the menu (see page 27).
• You can also perform the Digital Quick Focus feature using on the front panel.
• Sound will be muted while the Digital Quick Focus feature is running.
8 Installation
Make sure that “Yes” is selected, then
press
to start digital quick focus.
The convergence adjustment screen appears,
and the convergence is automatically
adjusted.
After the adjustment, the last “Initial Setup”
menu appears automatically on the screen.
To prevent this “Initial Setup” menu from
appearing again when you turn on the
projection TV by pressing !, press V or v
to select “No”, then press
.
To allow this menu to appear again, select
“Yes”, then press
.
Initial Setup
Start digital quick focus now?
Yes
No
Confirm:
Exit:
Select:
WEGA GATE
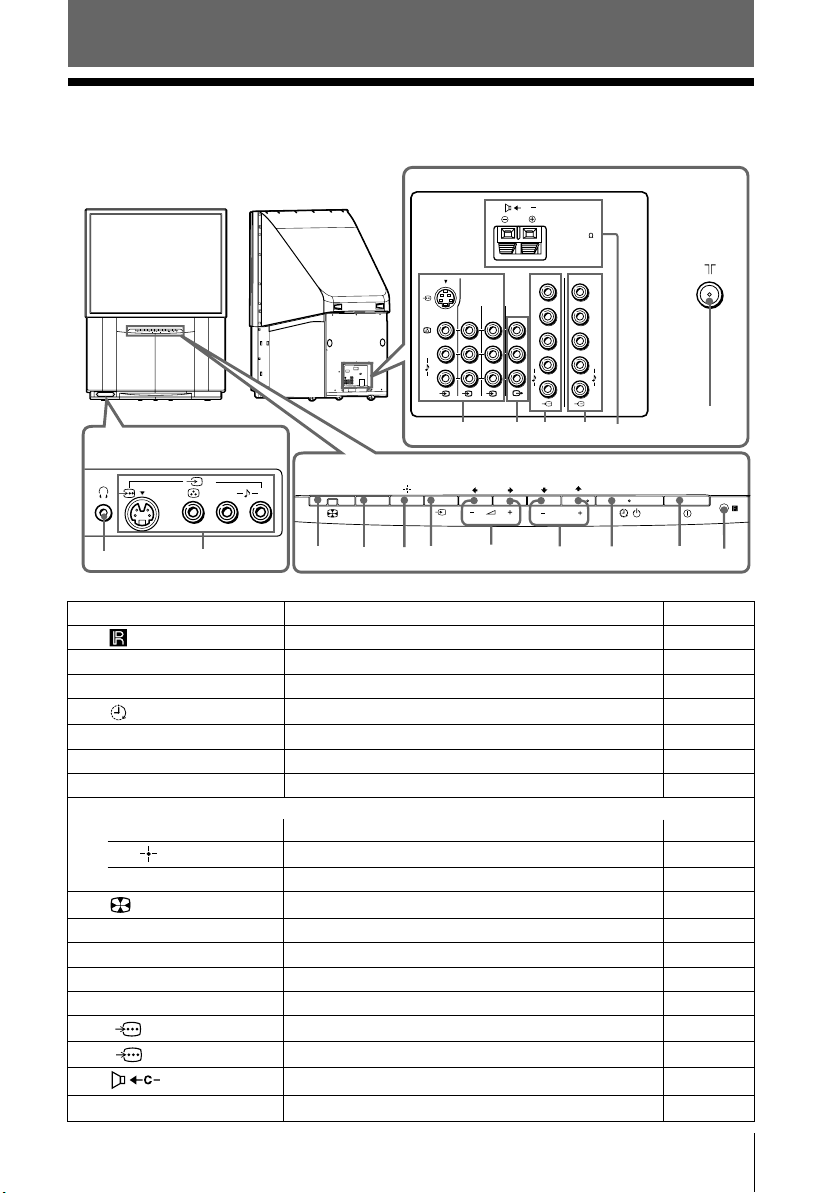
Overview of Controls
x Projection TV front, inside the drop-
down and rear panels
Projection TV rear panel
C
120W MAX 8
Overview of Controls
WEGA GATE
PROG
Inside the drop-down
panel
4
L(MONO)
qa
0
Projection TV front panel
9
WEGA GATE
78
R
(MONO)
L
R
1
2 3
qs qd qgqf
6
5
Y
PB/
C
PR/
C
L
R
B
R
1 2
PROG
4
Y
PB/
C
B
PR/
C
R
L
R
qj
qh
2
3
1
Button/Terminal Function Page
1 Remote control sensor. –
2 ! Turn off or turn on the projection TV. 6
3 1 Standby indicator. 6
3 Wake Up indicator. 10
4 PROG +/– Select program number. –
5 2 +/– Adjust volume. –
6 t Select TV or video input. 29
WEGA GATE menu operations
4, 5 V,v,B,b Select and adjust items. 18
7 Confirm selected items. 18
8 WEGA GATE Display or cancel WEGA GATE menu. 18
9 Adjust convergence automatically. 27
0 t4 Video input terminal 4. 29
qa i Headphone jack. –
qs t1, t2, t3 Video input terminal 1, 2, 3. 29
qd T Monitor output terminal. 29
qf 1 Component video input terminal 1. 30
qg 2 Component video input terminal 2. 30
qh Center speaker input terminal. 31
qj 8 Antenna input terminal. 29
Overview of Controls
9

x Using the remote control and basic
functions
Button Description Page
1
1 ?/1 Turn off temporarily or –
2
2 a Display the TV program. –
3
3 t Select TV or video input. 29
Stereo/bilingual operations
4
5
6
7
WEGA
GATE
8
9
3
6
9
0
qa
qs
qd
4 A/B Select stereo/bilingual mode. 16
5 PROG INDEX
(KP-FR53M94 only)
WEGA GATE menu operations
6 V, v, B, b Select and adjust items. 18
7 Confirm selected items. 18
8 WEGA GATE Display or cancel the WEGA 18
qj RETURN Return to the previous level. 18
9
0 Jump to last program number
qa PROG +/– Select program number. –
Timer operations
qs Set projection TV to turn off
(Sleep
Timer)
turn on the projection TV.
Display all preset TV programs.
GATE.
Change the picture size: –
“4:3”, “16:9”(16:9 wide-mode).
that has been watched for at –
least five seconds.
automatically according to the –
desired period of time (max.
of one hour and 30 min.).
qd Set projection TV to turn on
(Wake Up
Timer)
automatically according to the
desired period of time (max.
of 12 hours).
The indicator on projection
TV lights up amber once you
set the wake up timer.
If no buttons or controls are
pressed for more than two
hour after the projection TV is
turned on using the wake up
timer, the projection TV
automatically goes into
standby mode.
qf Mute the sound. –
qg
qh
WEGA THEATRE
Display on-screen information. –
Select WEGA Theatre Mode.
WEGA
THEATRE
VIDEO
qf
qg
qh
A/B
PROG INDEX
RETURN
qj
qk
ql
w;
wa
1
2
4
5
7
8
0
PROG
ws
OPTION
TV
10 Overview of Controls
15
–
13
Button Description Page
qk
ql
w;
wa 0 – 9
Select sound mode options. 12
Select picture mode options. 12
Select surround mode options. 22
Input numbers. For program numbers 10 and above,
enter the second digit within two seconds.
ws 2 +/– Adjust volume. –
TWIN picture operations (KP-FR53M94 only)
, , V, v, B, b All buttons are used for Twin picture operations. 14
Teletext operations (green label)
, , , , Not function for your TV. –
, , , ,
(red, green,
yellow, blue)
Optional components operations
VIDEO ?/1, OPTION, For details, see “Operating optional components”. 17
N, X, x, ., >,
, 2 +/–
TruSurround, SRS and symbol are trademarks of SRS Labs, Inc.
TruSurround technology is incorporated under license from SRS Labs, Inc.
–
Overview of Controls
Overview of Controls
11

Advanced Operations
x Selecting the picture and sound
modes
You can select picture and sound modes and adjust the setting to your
preference in the “Custom” option.
Selecting the picture mode
Press to select the desired picture mode.
WEGA
THEATRE
VIDEO
Select To view
A/B
PROG INDEX
“Vivid” contrast and sharp pictures.
“Standard” normal pictures.
RETURN
WEGA
GATE
from the “Picture Adjustment”
“Custom” the last adjusted picture setting
option in the menu (see page 21).
1
3
2
4
6
5
9
7
8
0
Selecting the sound mode
Press to select the desired sound mode.
Select To listen to
“Dynamic” dynamic and clear sound that emphasizes both the low
Dynamic
“Standard” sound that emphasizes voice and high tones.
and high tones.
Standard
“Custom” the last adjusted sound setting from the
“Sound Adjustment” option in the menu (see page 22).
Custom
12 Advanced Operations

x
Enjoying the WEGA Theatre Mode
with center speaker
The WEGA Theatre Mode enables you to enjoy the best picture, sound and
surround effect of a cinema from a DVD source. You can use your projection TV
speaker as the center speaker of your audio system for optimum vocal
enhancement and control its sound volume from the remote of the projection TV.
Setting up WEGA Theatre Mode
1.
Connect the center speaker terminals of the
amplifier to the center speaker input terminal on
the projection TV (see page 31).
2.
A/B
WEGA
GATE
Select the proper video input and center speaker
mode from “WEGA Theatre Setup” menu and turn on
(main power) the connected equipment (see page 27).
3.
See the table below. If the connected equipment is a
Sony audio/video equipment, you can set up the remote
to work with the connected equipment (see page 17).
WEGA
THEATRE
WEGA
THEATRE
RETURN
VIDEO
PROG INDEX
To Press
switch to WEGA WEGA THEATRE.
Theatre Mode Be sure to aim the remote control
at the projection TV set and
connected equipment for about
one second after the button is
pressed. The connected equipment
turns on automatically from
2 +/–
OPTION
1
3
2
4
6
5
9
7
8
0
PROG
standby mode and will start
playing (only for Sony audio/
TV
video equipment).
The “Picture Mode” and “Sound
Mode” will switch automatically
to “Custom” and you can adjust
the setting to your personal
preference (see pages 22 and 23).
adjust center 2 +/–.
speaker volume
Notes
• Be sure to place your projection TV and connected Sony equipment adjacent to each other so
that you can control both the projection TV and the connected equipment by using the
projection TV’s remote control at the same time (see page 17).
• The WEGA Theatre and center speaker modes are automatically cancelled when you change
the program number, video input or turn the projection TV off and on again.
• When the projection TV is in the center speaker mode, you cannot use the Twin pictures
feature, change the surround sound and the “Intelligent Volume” mode.
• Some Sony equipment might not respond properly when WEGA THEATRE button is
pressed. In this case, use the equipment’s own remote control.
• To use the projection TV’s speakers as the center speaker, you can also display “Center
Speaker” from “Sound” menu and select “On” (see page 22).
Advanced Operations
13

x Viewing two programs at the same
time
B KP-FR53M94 only
With the Twin pictures feature, you can display two
different TV program or video input at the same time.
10
8
V/v/B/b
WEGA
THEATRE
RETURN
OPTION
VIDEO
PROG INDEX
1
2
4
5
7
8
0
PROG
To
display Twin pictures
A/B
select a program number
in the right picture
swap the left and right pictures
WEGA
swap sound between the
GATE
left and right pictures
3
6
change the screen size
9
of the Twin pictures
Press
.
To cancel, press the button
again.
V or v.
.
B or b once.
A “ ” symbol will appear
to indicate which screen
you are hearing.
Hold B to increase the left
screen size.
Hold b to increase the
right screen size.
Sound will swap
automatically to the screen
which is increasing in size.
TV
Selecting TV program from “TV” in WEGA GATE menu (see page 18) using
PAP (Picture And Picture)
You can select your desired TV program directly from the right picture by using V or
v buttons.
1. Press V or v until the desired program appears on the right picture.
2. Press
Notes
• You cannot change the picture size or swap the two pictures in the PAP mode.
• Swapping the pictures is not available for HD (high-definition) and DVD input signals in
Twin mode.
• HD and DVD input signals are not available in the right picture.
• The Twin pictures feature is not available when the projection TV is in the center speaker
mode (see page 13) and you cannot set the projection TV to the center speaker mode while
viewing the Twin pictures.
• You can only enjoy stereo sound from the left picture.
• You cannot change the picture to a video input in the right picture. You can only display a
video input, except for HD and DVD input signals, in the right picture by swapping the
pictures when a video input is displayed in the left picture.
• The picture and sound from the T (monitor output) terminals will always be from the left
picture, even when you select the sound from the right picture by swapping the sound.
• Due to different video processors used, it is normal that the picture quality of the right picture
might be slightly different from the left picture.
(or b) to display the right picture in full screen.
14 Advanced Operations

x Displaying multiple programs
B KP-FR53M94 only
The Program Index feature displays all tuned TV programs scrolling on the
screen for direct selection.
WEGA
THEATRE
PROG INDEX
V/v/
RETURN
1
4
7
OPTION
1 432
10
,,8,
VIDEO
Press PROG INDEX.
1
The current program is displayed on the left.
The first tuned program is displayed on the
A/B
PROG INDEX
bottom right of the screen, then frozen.
It scrolls up and the next program appears on
the bottom-right until all tuned programs
appear one by one.
WEGA
GATE
3
2
6
5
9
8
0
PROG
Press V or v until the program you want to
2
view is displayed in the frame, then press
To return to scrolling, press V or v again.
Press again to enlarge the selected
3
program into the left frame.
Press PROG INDEX.
4
.
The selected program is displayed in full
10
screen.
8
TV
Note
• When displaying multiple programs, only the sound of the left picture is heard.
Advanced Operations
15

x
Enjoying stereo or bilingual programs
You can enjoy stereo sound or bilingual programs of NICAM and A2 stereo
systems by using the A/B button.
A/B
WEGA
THEATRE
RETURN
VIDEO
A/B
PROG INDEX
WEGA
GATE
1
3
2
4
6
5
9
7
8
0
PROG
When receiving a NICAM program
Broadcasting On-screen display (Selected sound)
NICAM
stereo
NICAM
bilingual
NICAM
monaural
NICAM
(Stereo sound)
t
NICAM Main
(Main sound)
t
NICAM Main
(Main sound)
t
t
NICAM Sub
tt
(Sub sound)
t
(Regular sound)
(Regular sound)
(Regular sound)
When receiving an A2 program
OPTION
TV
Note
• If the stereo sound is noisy when receiving a stereo program, select “Mono”. The sound
becomes monaural but the noise is reduced.
Broadcasting On-screen display (Selected sound)
A2
stereo
A2
bilingual
Stereo
(Stereo sound)
t
Main
(Main sound)
t
t
t
(Regular sound)
(Sub sound)
Mono
Mono
Mono
Mono
Sub
16 Advanced Operations

x Operating optional components
You can use the supplied remote to operate Sony audio/video equipment.
Setting up the remote to work with other connected equipment
While keeping VIDEO ?/1 For example, to operate a
pressed, press the corresponding Sony 8 mm VCR:
number button for the desired
equipment (see the chart
below).
To control Hold down VIDEO ?/1 and press
Audio System 1, 1x, 2 or 3 0, 1, 2 or 3
DVD 1, 2 or 3 4, 5 or 6
VTR1 (Beta), VTR2 (8 mm) or VTR3 (VHS) 7, 8 or 9
Operating audio/video equipment
Press VIDEO @/1 or while keeping OPTION pressed, press N, x, .,
>, X,
To Press
turn on/off VIDEO ?/1
play N while keeping OPTION pressed.
stop x while keeping OPTION pressed.
fast forward/ step forward or rewind/ > or . while keeping OPTION
step backward pressed.
pause X while keeping OPTION pressed.
mute the sound while keeping OPTION pressed.
(Audio System 1, 1x, 2 or 3 only)
adjust volume 2 +/– while keeping OPTION pressed.
(Audio System 1, 1x, 2 or 3 only)
or 2 +/– (see the chart below).
VIDEO
8
+
Press again to resume normal playback.
Notes
• If the equipment does not have a certain function, the corresponding button on the remote
will not operate.
• Some equipment might not respond properly to buttons on projection TV’s remote. In this
case, use the equipment’s own remote control.
Advanced Operations
17

Menu Adjustment
Confirm:
Select:
WEGA GATE
Settings
External Inputs
TV
TV
Confirm:
Select:
End:
01
02
03
04
05
06
07
x Introducing the WEGA GATE
navigator
WEGA GATE is a gateway that allows you access to preset TV channels,
connected external inputs and “Settings” menu.
TV
01
02
03
04
05
06
07
Select:
End:
External Inputs
1
Video
2
Video
3
Video
4
Video
1
HD/DVD 1
2
HD/DVD 2
Select:
End:
Picture
DRC-MF:
DRC-MF:
Picture Mode:
Picture Adjustment
3D-NR:
Select:
1
2
3
4
Confirm:
Confirm:
Confirm:
DRC1250
Vivid
Off
watch the preset TV
channels (see pages 7
and 14)
select the inputs for the
connected equipment
(see page 28)
WEGA GATE
End:
Select:
WEGA GATE
TV
External Inputs
Settings
“TV”
Confirm:
“External
Inputs”
“Settings”
change the settings
of your projection
TV (see page 19)
How to use WEGA GATE
WEGA GATE
TV
External Inputs
Settings
Select:
(1) Press WEGA GATE to display or cancel
the WEGA GATE menu.
TV
01
02
03
04
05
06
07
Select:
End:
(2) Press (or b) to confirm your selection
or go to the next level.
Tip
• The WEGA GATE, and V,v,B,b buttons on the front panel can also be used for the
operations above.
18 Menu Adjustment
Confirm:
(3) Press V or v to select the desired item.
Confirm:
(4) Press RETURN to move to the previous
level.

x “Settings” Adjustment
You are able to change the settings of your projection TV from “Settings” in WEGA
GATE menu.
Press WEGA GATE button to display WEGA GATE menu. Press V or v to select
“Settings” and press
The following is an overview of the items that can be adjusted.
.
Picture
DRC-MF:
DRC-MF:
Picture Mode:
Picture Adjustment
3D-NR:
Select:
Sound
Sound Mode:
Sound Adjustment
Balance
Intelligent Volume:
Surround:
Center Speaker:
Select:
Wide Screen
Wide Mode:
Auto Wide:
Select:
Multi Picture
Twin:
Swap
Program Index
Select:
Confirm:
Confirm:
Confirm:
Off
Confirm:
4:3
Off
Dynamic
DRC1250
Vivid
Off
End:
Off
Off
Off
End:
End:
End:
WEGA GATE
00
WEGA GATE
WEGA GATE
WEGA GATE
”Picture” (see page 21)
“DRC-MF”: “DRC1250” “DRC100” “Progressive”
“Picture Mode”: “Vivid” “Standard” “Custom”
“Picture Adjustment”: “Picture”, “Brightness”, “Color”, “Hue”,
“Sharpness”, “Color Temperature”,
“Reset”
“3D-NR”: “On” “Off”
”Sound” (see page 22)
“Sound Mode”: “Dynamic” “Standard” “Custom”
“Sound Adjustment”: “Treble”, “Bass”, “BBE”*, “Reset”
“Balance”
“Intelligent Volume”: “On” “Off”
“Surround”: “TruSurround” “Simulated” “Off”
“Center Speaker”: “On” “Off”
”Wide Screen” (see page 23)
“Wide Mode”: “16:9” “4:3”
“Auto Wide”: “On” “Off”
”Multi Picture” (KP-FR53M94 only) (see page 24)
“Twin”: “On” “Off”
“Swap”
“Program Index”
continue
Menu Adjustment
19

continued
Channel Setup
Auto Program
Manual Program
TV System: B/G
Program Sorting/Edit
Select:
Confirm:
End:
WEGA GATE
”Channel Setup” (see page 25)
“Auto Program”
“Manual Program”
“Program”: “00” - “99”
“TV System”: “B/G” “I” “D/K” “M”
“VHF Low”/“VHF High”/“UHF”
“Fine”: “Auto” “Manual”
“Signal Booster”: “Auto” “Off”
“ Sensitivity”: “High” “Low”
“TV System”: “B/G” “I” “D/K” “M”
“Program Sorting/Edit”
Setup
Language:
Convergence
WEGA Theatre Setup
Game Mode:
Video Label
Color System:
Eco Mode:
Select:
Confirm:
English
Off
Auto
Off
End:
WEGA GATE
”Setup” (see page 27)
“Language”: “English” “ ” (Chinese) “ ” (Arabic)
“ ” (Thai)
“Convergence”: “Digital Quick Focus”, “Manual Adjust”
“WEGA Theatre Setup”: “Direct Input”, “Speaker”
“Game Mode”: “On” “Off”
“Video Label”: “Video Input” , “Label”
“Color System”: “Auto” “PAL ” “SECAM”
“NTSC3.58” “NTSC4.43”
“Eco Mode”: “On” “Off”
“S input”: “Auto” “Off”
“Factory Settings”: “Ye s” “No”
Note
• When a feature is dimmed in the menu, it is not selectable.
* Licensed by BBE Sound, Inc. under USP4638258, 4482866.
“BBE” and BBE symbol are trademarks of BBE Sound, Inc.
20 Menu Adjustment

x Changing the “Picture” setting
The “Picture” menu allows you to adjust the picture settings.
Press WEGA GATE and select “Settings”.
1
Make sure the “Picture” icon ( ) is
2
selected, then press
Press V or v to select the desired item (e.g., “DRC-MF”), then press .
3
Select To
“DRC-MF” choose either “DRC1250” (for high density pictures), “DRC100”
“Picture Mode” choose either “Vivid”, “Standard” or “Custom”* (see page 12).
“3D-NR”
* You can adjust the setting to your personal preference in the “Picture Adjustment”
option only when the “Custom” mode is selected.
.
(reduce flicker on the screen) or “Progressive” (reduce jitter of
any small areas or scanning lines on the screen).
improve the picture quality of TV or video if a signal received is weak.
Press V or v to select “On”, then press .
To cancel, select “Off”, then press .
Adjusting the “Picture Adjustment” items under
“Custom” mode
Picture
DRC-MF:
DRC-MF:
Picture Mode:
Picture Adjustment
3D-NR:
Select:
Confirm:
DRC1250
Vivid
Off
End:
WEGA GATE
Press V or v to select either “Picture” (contrast), “Brightness”, “Color”,
1
“Hue” (color tones), “Sharpness” or “Color Temperature” (choose either
“Cool”, “Neutral” or “Warm”), then press
.
Selecting “Reset” will set your projection TV to the factory settings.
Press V,v,B or b to adjust the setting of your selected item, then press .
2
Repeat the above steps to adjust other items.
3
The adjusted settings will be received when you select “Custom”.
Notes
• The DRC-MF mode is not selectable when using the Program Index feature or when the
“Game Mode” or “Twin” mode is turned “On”. The mode is not available for HD (high-
definition) and progressive input signals.
•“Hue” can be adjusted for the NTSC color system only.
• Reducing “Sharpness” can also reduce picture noise.
The DRC-MF logo ( ) and “DRC-MF” are trademarks of Sony
Corporation.
Menu Adjustment
21

x Changing the “Sound” setting
The “Sound” menu allows you to adjust the sound settings.
Press WEGA GATE and select “Settings”.
1
Press V or v to select the “Sound”
2
icon (
Press V or v to select the desired item (e.g., “Sound Mode”), then press .
3
Select To
“Sound Mode” choose either “Dynamic”, “Standard” or “Custom”*
“Balance” Press v or B to emphasize the left speaker.
“Intelligent Volume” adjust the volume of all program numbers and video inputs
“Surround” choose either “TruSurround” (surround sound that spreads out
“Center Speaker” use your projection TV speaker to optimise vocal enhancement.
), then press .
(see page 12).
Press V or b to emphasize the right speaker.
automatically.
Press V or v to select “On”, then press .
To cancel, select “Off”, then press .
to the rear of a room), “Simulated” (stereo-like monaural sound)
or “Off”.
Press V or v to select “On”, then press .
To cancel, select “Off”, then press .
Sound
Sound Mode:
DRC-MF:
Sound Adjustment
Balance
Intelligent Volume:
Surround:
Center Speaker:
Select:
Confirm:
Dynamic
Off
Off
Off
End:
00
WEGA GATE
* You can adjust the setting to your personal preference in the “Sound Adjustment”
option only when the “Custom” mode is selected.
Adjusting the “Sound Adjustment” item under
“Custom” mode
Press V or v to select either “Treble”, “Bass” or “BBE” (choose either “High”,
1
“Low” or “Off”), then press
Selecting “Reset” will set your projection TV to the factory settings.
Press V, v, B or b to adjust the setting of your selected item, then press .
2
Repeat the above steps to adjust other items.
3
The adjusted settings will be received when you select “Custom”.
22 Menu Adjustment
.

x Changing the “Wide Screen” setting
Wide Screen
Select:
End:
Confirm:
WEGA GATE
Auto Wide:
Off
4:3
Wide Mode:
The “Wide Screen” menu allows you to view the picture with optimal effect
when receiving wide-mode (16:9) picture signal.
Press WEGA GATE and select “Settings”.
1
Press V or v to select the “Wide Screen”
2
icon (
Press V or v to select the desired item (e.g., “Wide Mode”), then press .
3
Select To
“Wide Mode” change the size of the picture when receiving wide-mode (16:9)
“Auto Wide” display the picture in optimum wide screen automatically
Tip
• You can also change to wide-mode picture size by pressing the button on the remote
control (see page 10).
), then press .
picture signal.
Choose “16:9”.
To restore the normal picture size, select “4:3”, then press .
when you choose “On”.
To cancel, select “Off”, then press .
Notes
•“Wide Mode” is not selectable for HD (1080i, 720p) input signals or in the right screen when
viewing twin pictures. For HD (1080i, 720p) input signals, your projection TV will always
display wide mode picture.
•“Auto Wide” is only available when receiving 576i, 480p and 480i input signals.
Menu Adjustment
23

x
Changing the “Multi Picture” setting
B KP-FR53M94 only
The “Multi Picture” menu allows you to view two pictures on the screen at the
same time, swap the picture of twin screen and display Program Index.
Press WEGA GATE and select “Settings”.
1
Press V or v to select the “Multi Picture”
2
icon (
), then press .
Multi Picture
Off
Twin:
Swap
Program Index
Select:
Press V or v to select the desired item (e.g., “Twin”), then press .
3
Select
“Twin”
“Swap”
“Program Index”
Tip
• You can also display or cancel the settings directly by pressing the , or PROG INDEX
buttons on the remote control (see pages 14 and 15).
To
display a different TV program beside the main picture.
Press V or v to select “On”, then press .
To cancel, select “Off”, then press .
swap the left and right pictures of the twin screen.
view multiple programs on the sub-screens.
To cancel, select “Program Index”, then press .
Confirm:
End:
WEGA GATE
24 Menu Adjustment

x C
hanging the “Channel Setup”
setting
The “Channel Setup” menu allows you to preset channels automatically,
manually preset channels, select the TV system and sort or edit the channels.
Press WEGA GATE and select “Settings”.
1
Press V or v to select the “Channel Setup”
2
icon (
Press V or v to select the desired item (e.g., “Auto Program”), then press .
3
Select To
“Auto Program” preset channels automatically.
“Manual Program” manually preset desired channels and channels that cannot
“TV System” select the TV system.
“Program Sorting/Edit” change the order in which the channels appear on the
), then press .
be preset automatically (see Presetting channels manually
in page 26).
Press V or v to select either “B/G”, “I”, “D/K” or “M”, then
press .
screen, label the program number, skip the program number
and block unwanted programs.
(see step 3 of the section “Initial Setup” in page 7).
Channel Setup
DRC-MF:
Auto Program
Manual Program
TV System:
Program Sorting/Edit
Select:
B/G
Confirm:
End:
WEGA GATE
Notes
• If you preset a blocked program number, that program number will be unblocked
automatically.
• If you sort a blocked program, that program will remain blocked.
Menu Adjustment
continue
25

continued
Presetting channels manually
After selecting “Manual Program”, select the program
1
number to which you want to preset a channel.
(1) Make sure “Program” is selected, then press
(2) Press V or v
until the program number you want
.
to preset appears on the menu, then press .
Select the desired channel.
2
(1) Make sure either “VHF Low”, “VHF High” or “UHF” is selected,
then press
.
(2) Press V or v until the desired channel’s broadcast appears on the projection
TV screen, then press
If the sound of the desired channel is abnormal, select the appropriate TV
3
system.
(1) Press V or v
(2) Press V or v
If you are not satisfied with the picture and sound quality, you may be able
4
to improve them by using the “Fine” tuning feature.
(1) Press V or v
(2) Press V or v
Press V,v,B or b until the picture and sound quality are optimal, then press .
(3)
to select “TV System”, then press .
until the sound becomes normal, then press .
to select “Fine”, then press .
to select “Manual”, then press .
.
The + or – icon on the menu flashes while tuning.
Manual Program
Program:
TV System:
VHF Low
Fine:
Signal Booster:
Sensitivity:
Select:
Confirm:
01
B/G
Auto
Auto
High
End:
WEGA GATE
If the TV signal is too weak (snowy picture), you may be able to improve the
5
picture quality by setting the “Signal Booster” feature.
(1) Press V or v
(2) Make sure “Auto” is selected, then press
(picture distorted; picture with lines; signal interference), select “Off”, press
and go to next step to adjust the “ Sensitivity”.
If the TV signal is too strong (picture distorted; picture with lines; signal
6
interference), you may be able to adjust the TV reception sensitivity by
setting the “ Sensitivity” feature.
(1) Press V or v
(2) Press V or v to select “Low”, then press
Note
•“ Sensitivity” is only selectable when “Signal Booster” is set to “Off”.
26 Menu Adjustment
to select “Signal Booster”, then press .
. If the TV signal is too strong
to select “ Sensitivity”, then press .
.

Setup
Select:
End:
Confirm:
WEGA GATE
Convergence
Language:
Wega Theatre Setup
Off
Game Mode:
Video Label
Auto
Color System:
Off
Eco Mode:
English
x C
hanging the “Setup” setting
The “Setup” menu allows you to change the menu language, adjust the
convergence, setup WEGA Theatre Mode, adjust suitable picture setting for
video games, label the connected equipment, select the color system, reduce
your projection TV power consumption, select the S video input mode and reset
your projection TV to factory settings.
Press WEGA GATE and select “Settings”.
1
Press V or v to select the “Setup” icon ( ),
2
then press
Press V or v to select the desired item (e.g., “Language”), then press .
3
Select To
“Language” change the menu language.
“Convergence” adjust the convergence.
“WEGA Theatre Setup” setup WEGA Theatre Mode for best picture, sound and
“Game Mode” adjust the picture setting that is suitable to view video games.
.
Press V or v to select either “English”, “ ” (Chinese),
“ ” (Arabic) or “ ” (Thai), then press .
Press V or v to select “Digital Quick Focus” or “Manual Adjust”,
then press .
When you select “Digital Quick Focus”, convergence is
automatically adjusted.
When you select “Manual Adjust”, the cross pattern appears on
the screen.
(1) Press V,v,B or b to adjust the red lines until they converge
with the green lines, then press .
(2) Press V,v,B or b to adjust the blue lines until they converge
with the center cross pattern, then press .
surround effect enjoyment of a cinema (see page 13).
Press V or v to select “Direct Input”, then press .
Select either “Video 1”, “Video 2”, “Video 3”, “Video 4”,
“HD/DVD 1” or “HD/DVD 2” for the connected equipment
that you want to view with WEGA Theatre, then press .
Select “Speaker” and press . Normally select “MAIN”.
When you want to use the projection TV’s speakers as the center
speaker, press V or v to select “CENTER IN”, then press .
Press V or v to select “On”, then press .
To cancel, select “Off”, then press .
Menu Adjustment
continue
27

continued
“Video Label” label the connected equipment.
(1)
Press V or v to select the input you want to label, then press .
(2) Press V or v to select the label options: “Video 1”/“Video
2”/“Video 3”/“Video 4”/“HD/DVD 1”/“HD/DVD 2”,
“VCR”, “SAT”, “Game” or “Edit”*, then press .
* You may edit the video label to your favorite name.
Press V or v to select alphanumeric characters for the label,
then press .
“Color System” select the color system.
“Eco Mode” reduce power consumption of your projection TV to save energy.
“S Input” select the S video input mode.
Press V or v to select either “Auto”, “PAL ”, “SECAM”,
“NTSC3.58” or “NTSC4.43”, then press . Normally, set this to
“Auto”.
Press V or v to select “On”, then press .
When you press or turn on the projection TV, Eco Mode
( ) symbol will appear on the screen for a while.
To cancel, select “Off”, then press .
Press V or v to select “Auto” to receive the S video signal
automatically when the signals are input through both the
(S video input) and (video input) jacks of the same video
input channel, then press .
To cancel, select “Off”, then press .
“Factory Settings” reset your projection TV to factory settings.
Press and press V or v to select “Yes ”, then press .
To cancel, select “No”, then press .
Tip
• When the Digital Quick Focus feature is performed, manual adjustment values are erased.
Notes
• Adjust convergence about 20 - 30 minutes after the projection TV is first turned on.
•“Game Mode” is available only when receiving signals through the t (video input),
(S video input) or (component video input) terminals.
• When HD (high-definition) or progressive signals are input, “Game Mode” does not function.
28 Menu Adjustment

Additional Information
x Connecting optional components
Connecting to the video input terminal ( t )
Projection TV drop-down panel
S Video cable
(not supplied)
4
L(MONO)
R
Audio/Video
Camcorder
cable
(not supplied)
Projection TV rear panel
C
120W MAX 8
Antenna cable
(not supplied)
Y
Y
/
PB
1 2
/
CB
PR
/
CR
L
R
S Video cable
(not supplied)
Audio/Video
cable
(not supplied)
VCR
DVD Player
CB
/
CR
L
R
(MONO)
R
PB
PR
L
1
2 3
Notes
• If you connect a VCR to 8 (antenna input), preset the signal output from the VCR to the
program number 0 on the projection TV (see page 26).
• When both (S video) and (video) for
t1
or
t4
are connected at the same time,
(S video) is automatically selected. To view (video), disconnect the S video cable.
Connecting to the monitor output terminal ( T )
Projection TV rear panel
C
120W MAX 8
(MONO)
L
R
Y
PB/
C
PR/
C
2 3
R
1
L
B
R
1 2
Y
PB/
C
B
PR/
C
R
L
R
Audio/Video
cable
(not supplied)
Additional Information
Audio system
VCR
continue
29

continued
Connecting to the component video input terminal ( )
Projection TV rear panel
C
120W MAX 8
Y
Y
PB/
PB/
C
B
C
(MONO)
PR/
2 3
C
L
R
L
R
1
R
1 2
B
PR/
C
R
L
R
Notes
• The component video terminals on your DVD player are sometimes labeled Y/CB/CR, Y/PB/
PR, Y/Cb/Cr or Y/B-Y/R-Y.
• If you select “HD/DVD 1” or “HD/DVD 2” on your projection TV screen, the signal from the
T (monitor output) terminals will not be output properly. This does not indicate a
malfunction.
Projection TV rear panel
C
120W MAX 8
Y
Y
PB/
PB/
C
B
C
(MONO)
PR/
2 3
C
L
R
L
R
1
R
1 2
B
PR/
C
R
L
R
Component
video cable
(not supplied)
Audio cable
(not supplied)
Component
video cable
(not supplied)
Audio cable
(not supplied)
DVD player
Digital TV receiver
Note
• If your DTV receiver is equipped with the Y/PB/PR output terminals, connect it to the
Y/PB/PR terminals of 1 (component video input 1) or 2 (component video input 2).
Tip
• The TV accepts the following signal formats:
Total scanning line Effective scanning line fV (Hz)
1125i 1080i 50/60
750p 720p 50/60
625p 576p 50
625i 576i 50
525p 480p 60
525i 480i 60
30 Additional Information

Connecting an amplifier to the center speaker input
terminal (
If you use an amplifier with a Dolby* surround decoder instead of the projection TV’s
audio system, you can use the projection TV’s speakers as the center speaker for your
audio system.
Using the speaker cords supplied with the amplifier, connect the center speaker
terminals of the amplifier to the
projection TV.
Projection TV
rear panel
(MONO)
C
L
R
120W
1
2 3
C
Y
PB/
C
B
PR/
C
R
L
R
)
120W MAX 8
1 2
(center speaker input) terminals on the
DVD player
Optical digital
cable
(not supplied)
Component
Y
PB/
C
B
PR/
C
R
L
R
video cable
(not supplied)
Audio cable
(not supplied)
Front
speaker (L)
Rear
speaker (L)
Amplifier
Front
speaker (R)
Rear
speaker (R)
Woofer
Note
• If you use the projection TV’s speaker as the center speaker and nothing is connected to the
center speaker input terminals on the rear of projection TV or the sound source emitted from
the amplifier does not contain the center speaker channel, no sound will be heard from the
projection TV’s speaker.
* “Dolby” is a trademark of Dolby Laboratories.
Additional Information
31

x Troubleshooting
If you find any problem while viewing your projection TV, you can either use the “Factory
Settings” function or check the Troubleshooting guide below. If the problem persists,
contact your Sony dealer.
“Factory Settings” function
Press the WEGA GATE button. Choose “Settings” and go to “Setup” ( ) menu.
From “Setup” menu, select “Factory Settings”. Then select “Yes” and press
Your projection TV will go blank for a few seconds, then the “Initial Setup” menu will
appear. Your projection TV will be set to factory settings, but certain problems may be solved.
Symptom Solutions
Snowy picture,
noisy sound
• Check the antenna cable and connection on the projection TV, VCR and at
the wall (see page 29).
• Check the antenna setup. Contact a Sony dealer for advice.
• Display the “Channel Setup” menu and select “Manual Program” to preset
the channel again (see page 26).
• Display the “Channel Setup” menu and set the “Signal Booster” to “Auto”
from “Manual Program” (see page 26).
• Try using an external booster.
Distorted picture,
noisy sound
• Turn off or disconnect the external booster if it is in use.
• Display the “Channel Setup” menu and set the “ Sensitivity” to “Low”
from “Manual Program”(see page 26).
Good picture,
noisy sound
• Display the “Channel Setup” menu and select the appropriate
“TV System” from “Manual Program” (see page 26).
• The sound of the right picture is selected when twin pictures are displayed.
Press or B, b once (KP-FR53M94 only) (see page 14).
No picture,
no sound
• Check the power cord, antenna and VCR connections (see page 29).
• Press ?/1 (power) to turn on the projection TV (see page 10).
• Press ! (main power) on the projection TV to turn off the projection TV for
about five seconds, then turn it on again (see page 9).
Good picture,
no sound
• Press 2 + to increase the volume level (see page 9).
• Press to cancel the muting (see page 10).
• The sound of the right picture is selected when twin pictures are displayed.
Press or B, b once (KP-FR53M94 only) (see page 14).
• Display the “Sound” menu and select the appropriate setting for “Center
Speaker” (see page 22).
Dotted lines or
stripes
Double images or
“ghosts”
• Do not use a hair dryer or other equipment near the projection TV.
• Check the antenna setup. Contact a Sony dealer for advice.
• Use the fine tuning (“Fine”) function (see page 26).
• Check the antenna setup. Contact a Sony dealer for advice.
• Turn off or disconnect the external booster if it is in use.
No color
•
Display the “Picture” menu and select “Custom” of “Picture Mode”, then
adjust the “Color” level in “Picture Adjustment” (see page 21).
• Display the “Setup” menu and check the “Color System” setting
(usually set this to “Auto”) (see page 28).
• Check the antenna setup. Contact a Sony dealer for advice.
.
32 Additional Information

Symptom Solutions
Abnormal color
patches
TV cannot receive
stereo broadcast
sound.
or
Stereo broadcast
sound switches on
and off or is
distorted.
The 1 (standby)
indicator on your
projection TV
flashes red several
times after every
three seconds.
The projection
TV screen
sometimes goes
blank for
slightly longer
than usual
during channel
change.
Cannot play
shooting games.
• Keep external speakers or other equipment away from the projection TV.
Do not move the projection TV while the projection TV is turned on.
• Check the antenna cable and connection on the projection TV, VCR and at
the wall (see page 29).
• Check the antenna setup. Contact a Sony dealer for advice.
• Count the number of times the 1 (standby) indicator flashes.
Press ! (main power) to turn off your projection TV. Contact your nearest
Sony service center.
• The “Signal Booster” is functioning to detect a weak signal. This does not
indicate a malfunction.
• Some shooting games which involve pointing a light beam at the
projection TV screen with an electronic gun or rifle cannot be used with
your projection TV. For details, see the instruction manual supplied with
the video game software.
Projection TV
cabinet creaks.
• Change in room temperature sometimes make the projection TV cabinet
expand or contract, causing a noise. This does not indicate a malfunction.
Static discharge is
felt when
touching the
projection TV
cabinet.
Lines moving
across the
projection TV
screen.
• This is the same static discharge that is felt when touching metal door
handles or car doors especially when the air is dry, for example in winter.
This does not indicate a malfunction.
• Use the fine tuning (”Fine”) function (see page 26).
Additional Information
33

x Specifications
KP-FR53M94 KP-FR43M90
Projection system
Picture tube
Projection lenses
Screen size
Television system
Color system
Stereo/Bilingual
system
Channel coverage
B/G
I
D/K
M
8 (Antenna)
Audio output (Speaker)
Number of terminal
(Video)
(Audio)
(S Video)
(Component
Video)
(Center
Speaker)
i (Headphone)
Power requirements
Power consumption (W)
Dimensions (w/h/d, mm)
Mass (kg)
3 picture tubes, 3 lenses, horizontal inline system.
7 inch high-brightness monochrome tubes (6.3 raster size),
with optical coupling and liquid cooling system
High performance, large-diameter hybrid lens F1.0
53 inches 43 inches
B/G, I, D/K, M
PAL, PAL 60, SECAM, NTSC3.58, NTSC4.43
NICAM Stereo/Bilingual B/G, I, D/K
A2 Stereo/Bilingual B/G
VHF : E2 to E12 /UHF : E21 to E69 /CATV : S01 to S03, S1 to S41
UHF : B21 to B68 /CATV : S01 to S03, S1 to S41
VHF : C1 to C12, R1 to R12 /UHF : C13 to C57, R21 to R60 /
CATV : S01 to S03, S1 to S41, Z1 to Z39
VHF : A2 to A13 /UHF : A14 to A79 /
CATV : A-8 to A-2, A to W+4, W+6 to W+84
75-ohm external terminal
15 W + 15 W
Input: 4 Output: 1 Phono jacks; 1 Vp-p, 75 ohms
Input: 6 Output: 1 Phono jacks; 500 mVrms
Input: 2 Y: 1 Vp-p, 75 ohms,
Input: 2 Phono jacks;
Input: 1 120 W max., 8 ohms
Output: 1 Stereo minijack
110-240 V AC, 50/60 Hz
250 W
1136 × 1435 × 666 926 × 1255 × 537
unbalanced, sync negative
C: 0.286 Vp-p, 75 ohms
Y: 1 Vp-p, 75 ohms, sync negative
P
B/CB: 0.7 Vp-p, 75 ohms
P
R/CR: 0.7 Vp-p, 75 ohms
73 56
Design and specifications are subject to change without notice.
 Loading...