

Sony KP-E41, KP-E53, KP-E61 Operating Instructions Manual

Projection TV
3-858-447-21 (1)
Operating Instructions
KP-E41
KP-E53
KP-E61
©1997 by Sony Corporation
MN
S VIDEO
VIDEO
L
(MONO)
AUDIO
R
-EN
2
Getting Started
MENU
ENTER
ENTER MENU
COLOR SYSTEM
ENTER
MENU
ENTER
ENTER
Getting Started
-EN
3
-EN
4
Getting Started

WARNING
To prevent fire or shock hazard, do not expose the
projection TV to rain or moisture.
Dangerously high voltages are present inside the
projection TV. Do not open the cabinet. Refer
servicing to qualified personnel only.
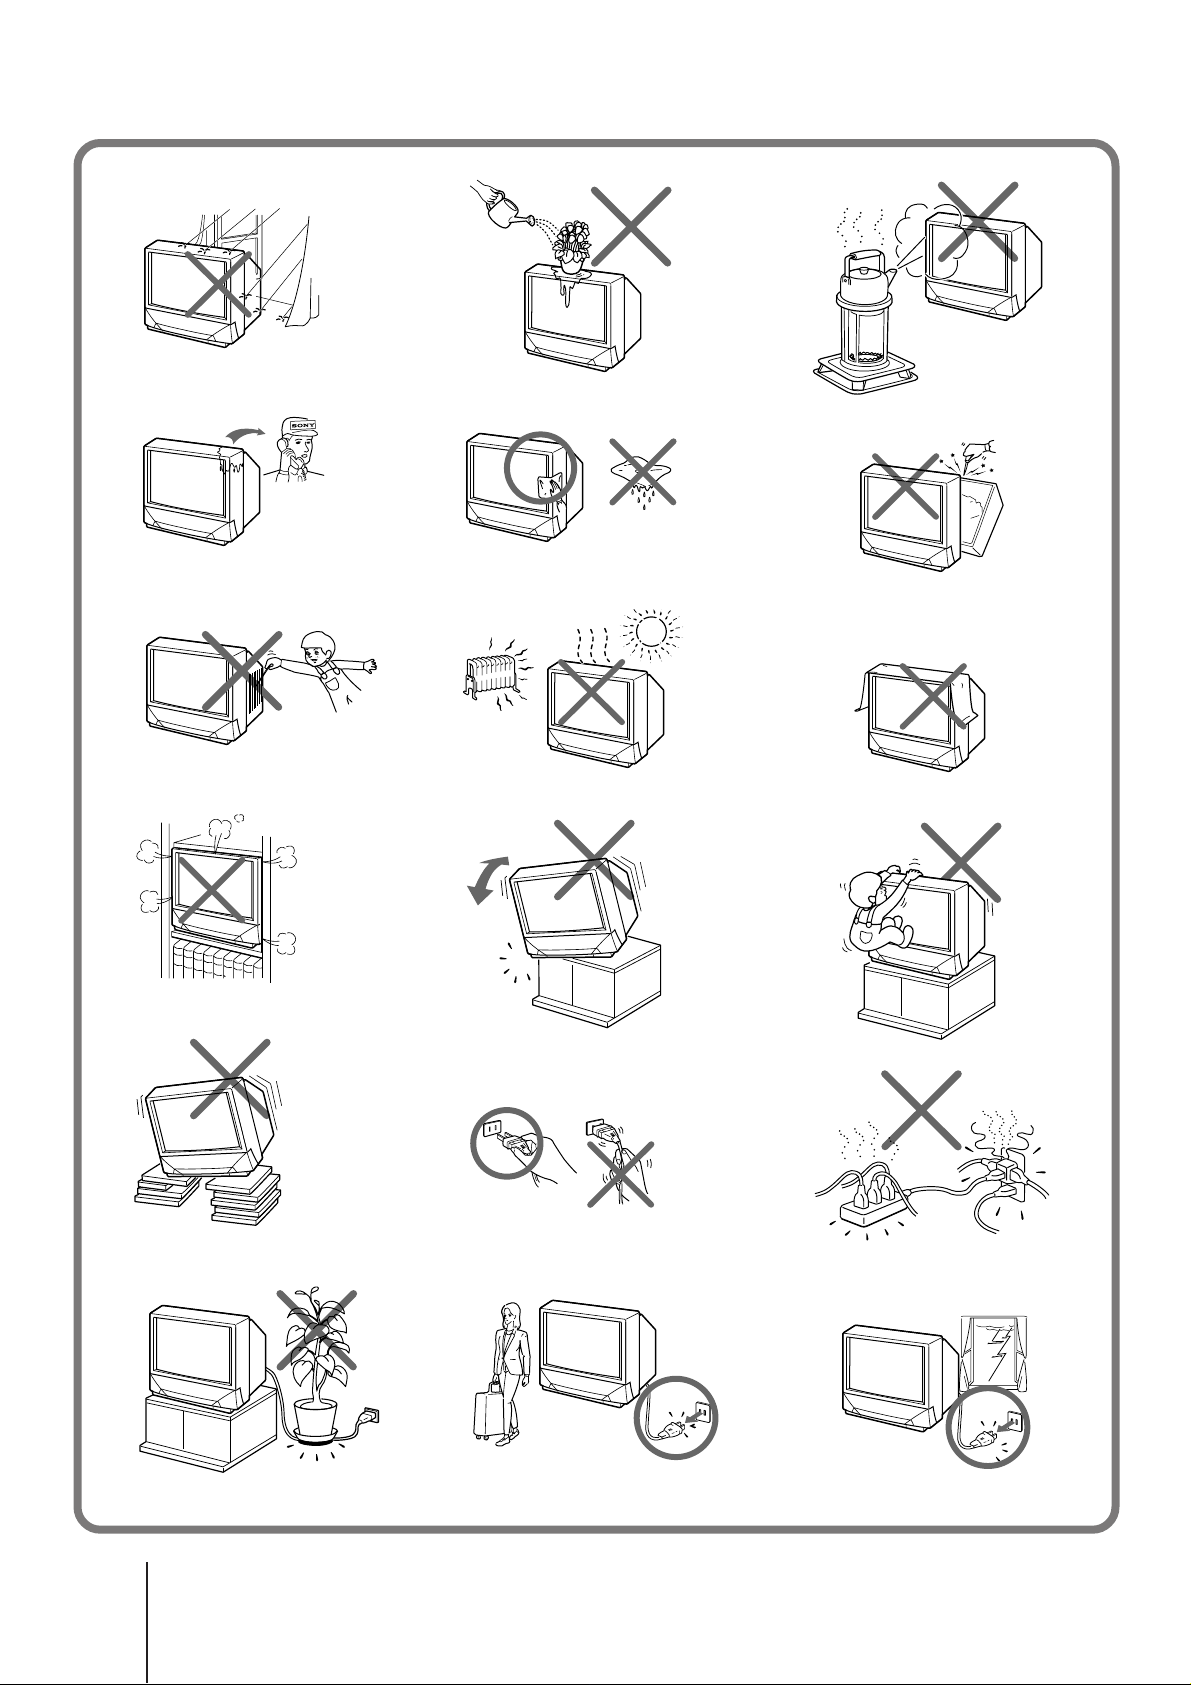
For general safety:
• Do not expose the projection TV to rain or moisture.
• Do not open the rear cover.
For safe installation:
• Do not block the ventilation openings.
• Do not install the projection TV in hot, humid or
excessively dusty places.
• Do not install the projection TV where it may be
exposed to mechanical vibrations.
• Avoid operating the projection TV at temperatures
below 5°C (41°F).
• If the projection TV is transported directly from a
cold to a warm location, or if the room temperature
has changed suddenly, the picture may be blurred or
show poor color. This is because moisture has
condensed on the mirror or lenses inside. If this
happens, let the moisture evaporate before using the
projection TV.
• To obtain the best picture, do not expose the screen to
direct illumination or directs sunlight. It is
recommended to use spot lighting directed down
from the ceiling or to cover the windows that face the
screen with opaque drapery. It is desirable to install
the projection TV in a room where the floor and walls
are not of reflecting material. If necessary, cover
them with dark carpeting or wall paper.
• Do not install the appliance in a confined space, such
as a bookcase or built-in cabinet.
Table of contents
Getting Started
6 Installing the projection TV
7 Changing the menu language
8 Adjusting the convergence (CONVERGENCE)
9 Presetting channels
10 Introducing the menu
Operations
EN
11 Watching the TV
13 Using the Picture-in-Picture features
14 Selecting the picture mode
15 Selecting the sound mode
17 Selecting a stereo or bilingual program
17 Setting the speaker switch
18 Viewing Teletext
20 Using headphones
20 Customizing the TV
23 Setting the remote command mode
For safe operations:
• Do not operate the projection TV on anything but
110–120/220-240 V AC, 50/60 Hz.
• Do not operate the projection TV if any liquid or solid
object falls in it—have it checked immediately.
• Do not keep the projection TV plugged in if you are
not going to use it for several days.
• Do not pull the power cord to disconnect the
projection TV. Pull it out by the plug.
Caution
• When using TV games, computers, and similar
products with your projection TV, keep the
brightness and contrast functions at low settings. If a
fixed (non-moving) pattern is left on the screen for
long periods of time at a high brightness or contrast
setting, the image can be permanently imprinted onto
the screen. These types of imprints are not covered
by your warranty because they are the result of
misuse.
• Avoid touching the screen surface and take care not
to scratch it with hard objects.
Additional Information
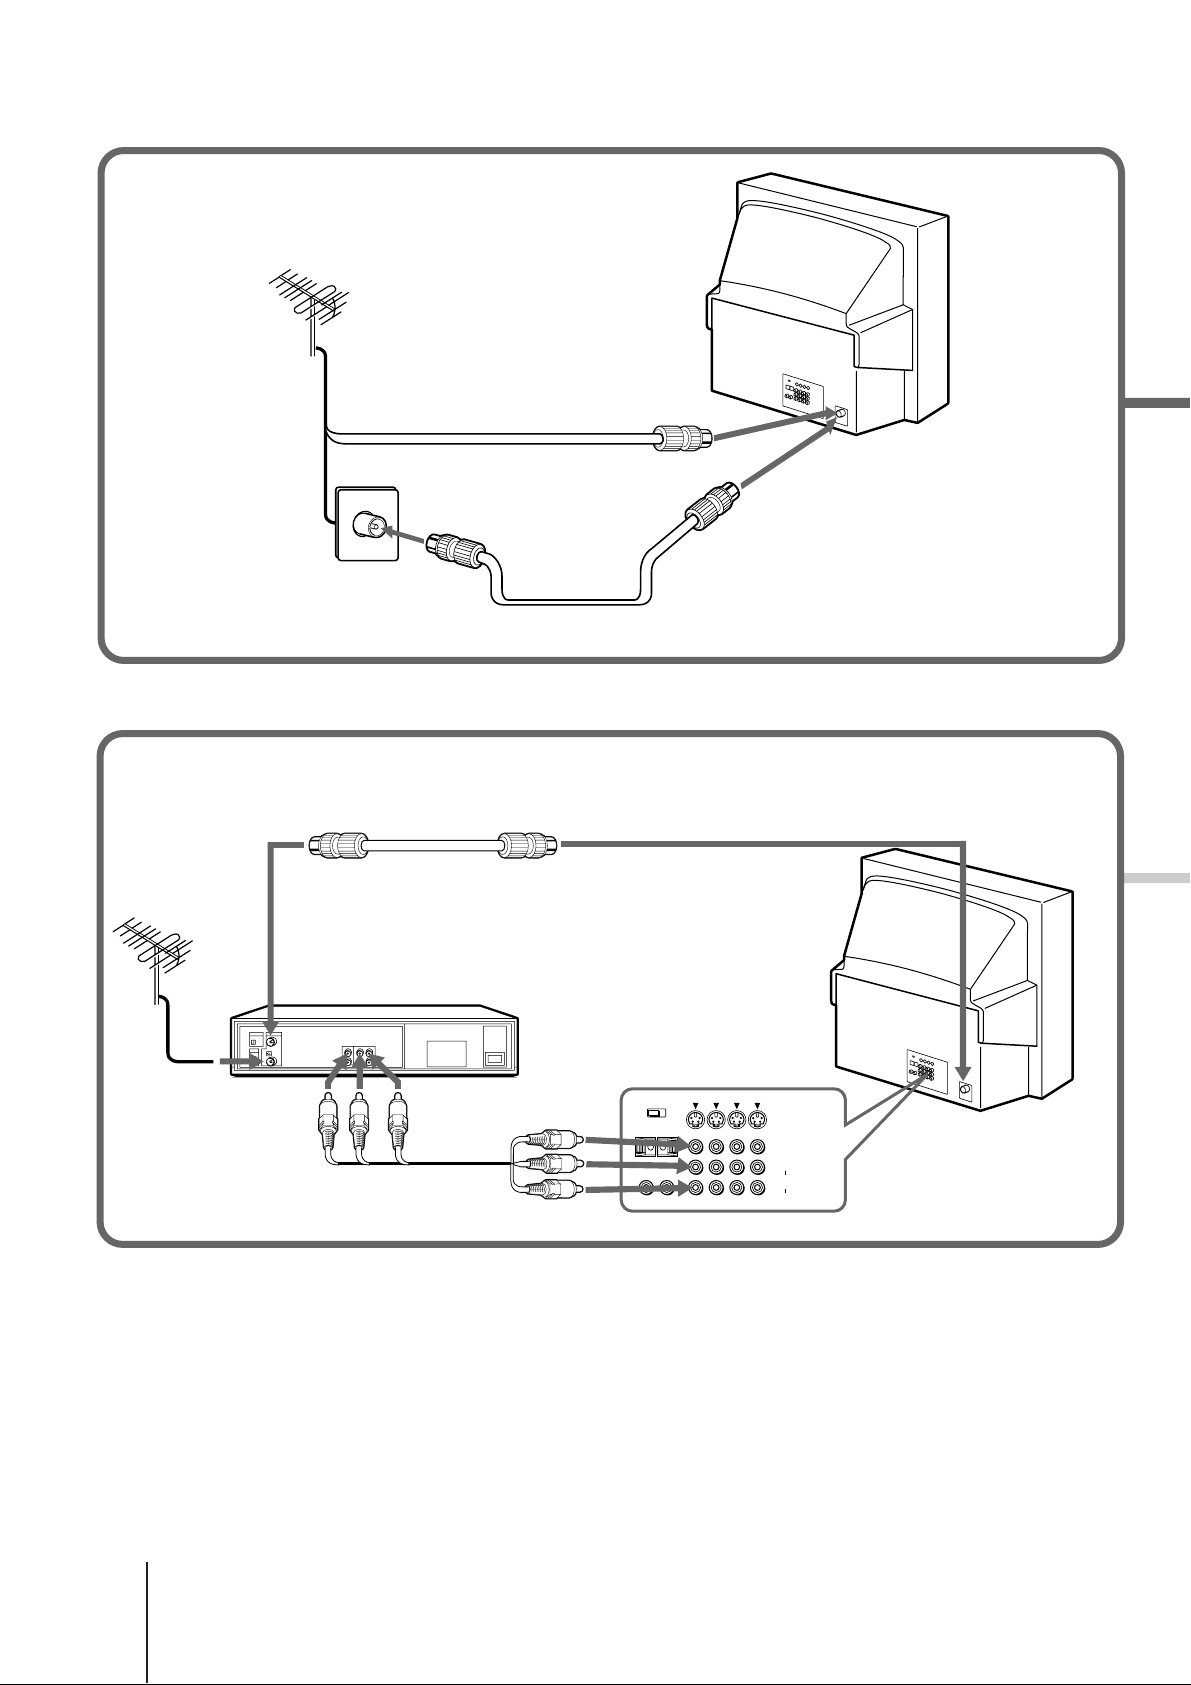
24 Connections
26 Troubleshooting
27 Channel allocation
Back Cover Specifications
About this manual
The instructions in this manual are for models KPE41, KP-E53 and KP-E61. Before you start reading
this manual, please check your model numbers,
located at the rear of the projection TV. Model KPE41 is used for illustration purposes in this manual.
There are no differences between these models in
operation. The differences in specifications are
indicated in the text.
Getting Started
-EN
5
Getting Started
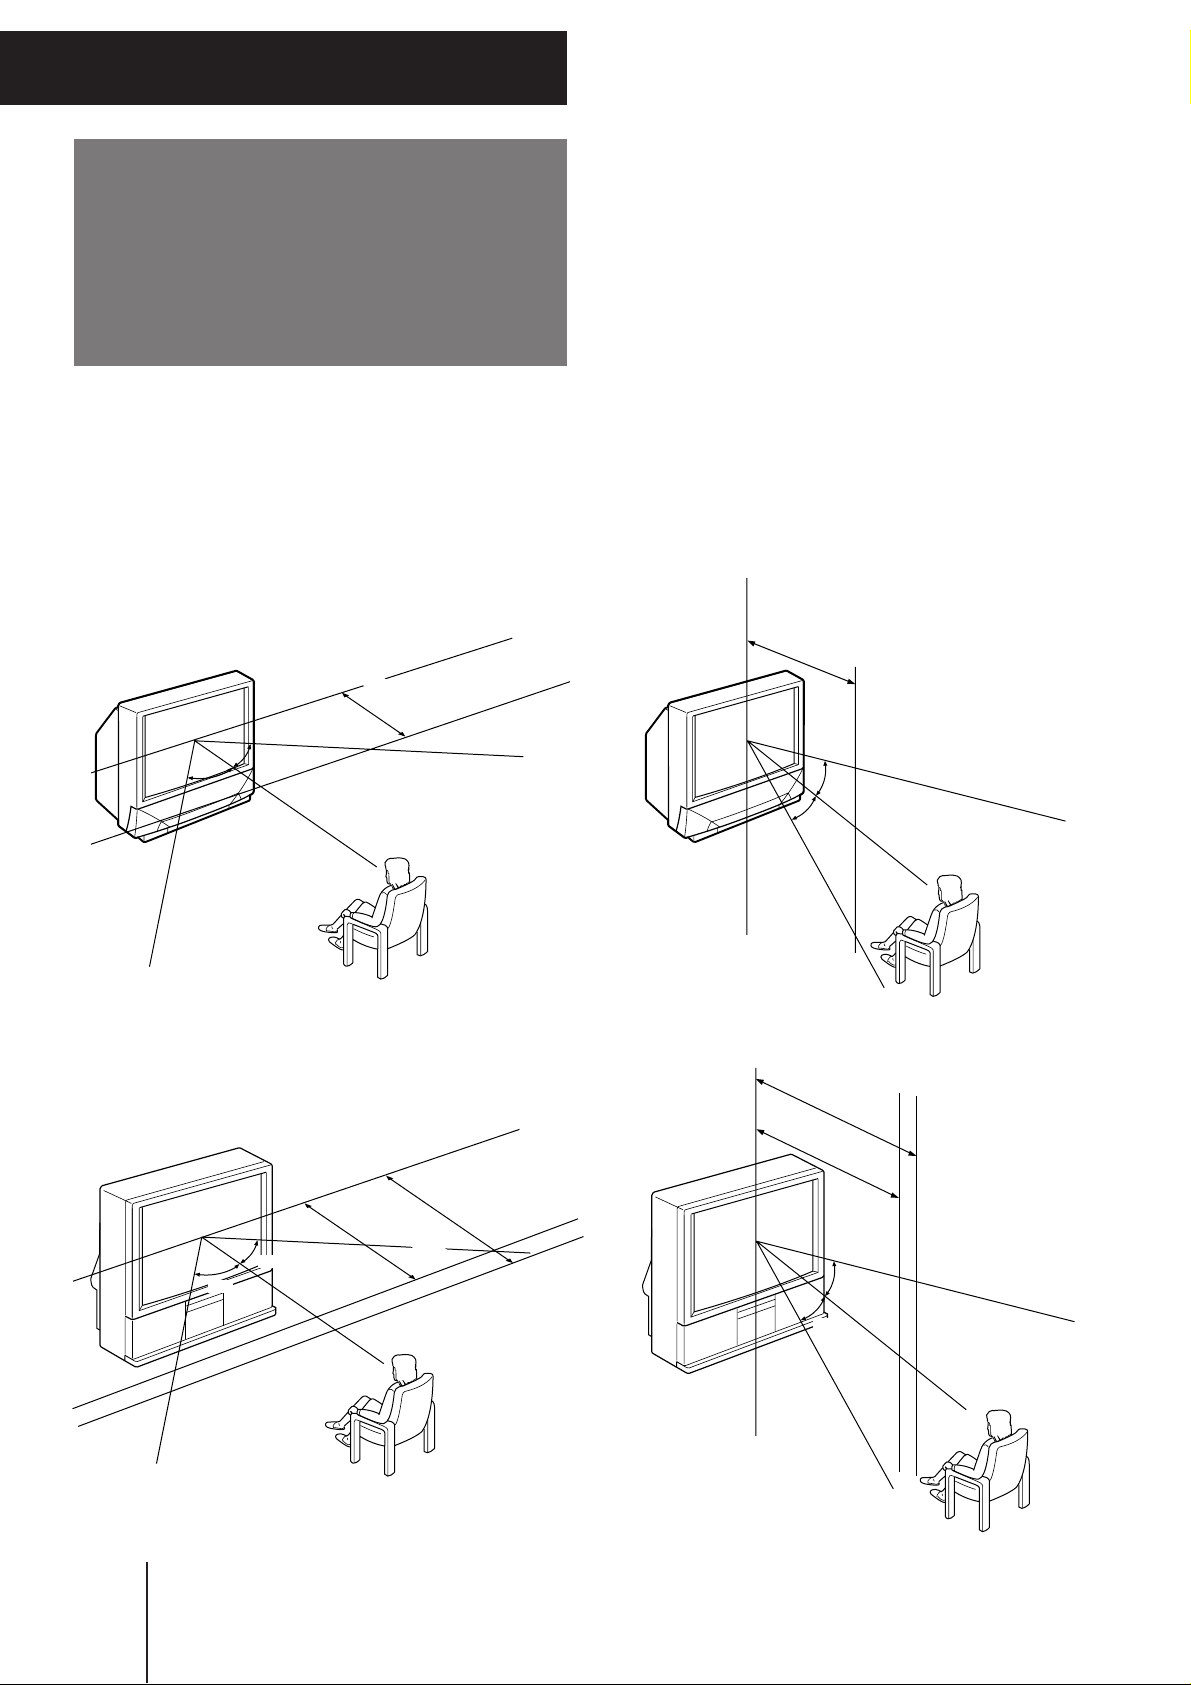
Installing the
projection TV
For the best picture quality, install the projection TV
within the areas shown below.
Optimum viewing area (Horizontal)
KP-E41
min. 1.5m (5 ft.)
41"
75°
75°75°
Optimum viewing area (Vertical)
KP-E41
KP-E53/E61 KP-E53/E61
min. 2.7m
min. 2.1m (7 ft.)
75°
75°
(approx. 9 ft.)
61"
53"
min. 1.5m (5 ft.)
41"
27.5°
27.5°
min. 2.7m
(approx. 9 ft.)
61"
min. 2.1m (7 ft.)
53"
27.5°
27.5°
-EN
6
Getting Started
Changing the menu
MENU
ENTER
ENTER
MENU
language
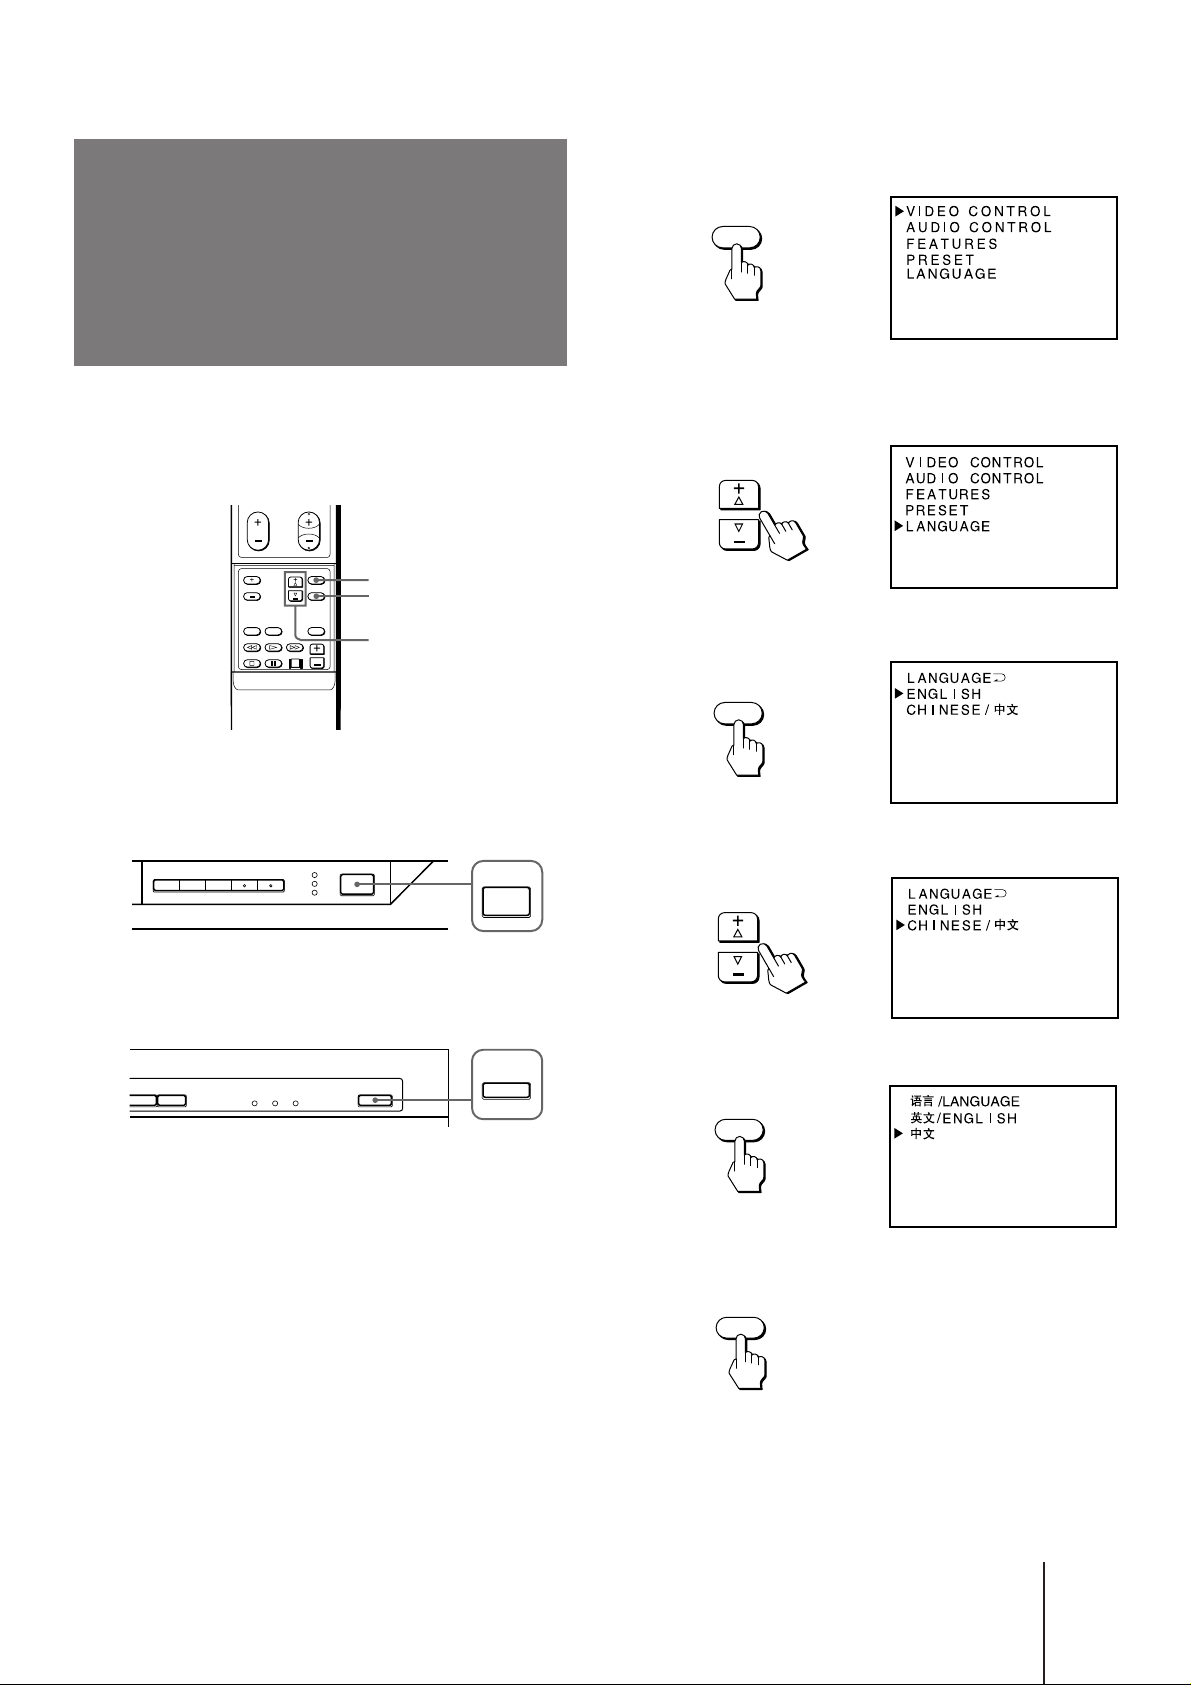
If you prefer Chinese to English, you can change the
menu language. You can use the buttons on both the
remote commander and the projection TV.
MENU
ENTER
2 Press MENU.
3 Press ¢ + or › – to move the cursor (z) to
LANGUAGE.
¢+ or ›–
1 Press POWER on the projection TV.
KP-E41
KP-E53/E61
POWER
POWER
4 Press ENTER.
5 Press ¢ + or › – to select CHINESE.
6 Press ENTER.
7 Press MENU to return to the normal screen.
Getting Started
-EN
7
Adjusting the
convergence
(CONVERGENCE)
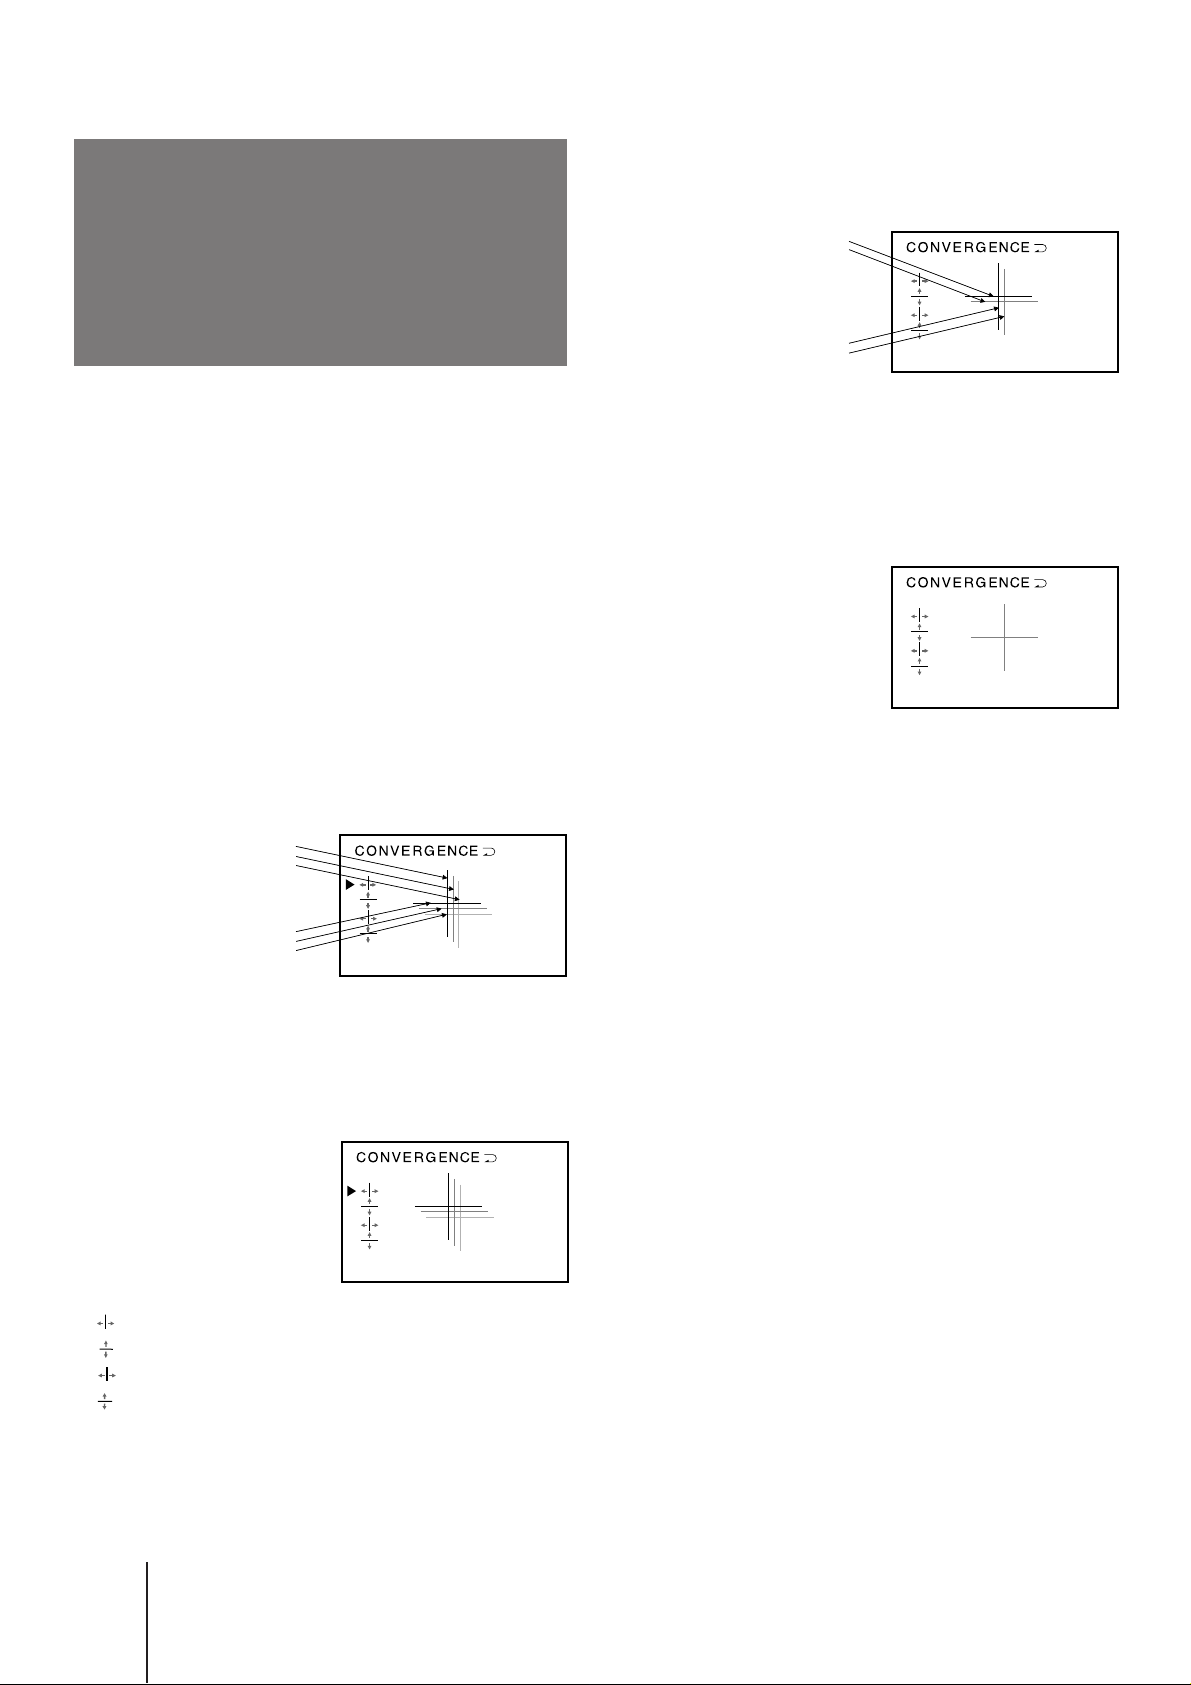
5 Press ¢ + or › – to move the line until it
converges with the center green line, and
press ENTER.
R
G+B
(Light blue)
R
G+B
(Light blue)
Before you use the projection TV, adjust convergence.
The projection tube image appears on the screen in
three layers (red, green and blue). If they do not
converge, the color is poor and the picture blurs. To
correct this, adjust convergence.
After 20-30 minutes of turning on the power, adjust
convergence.
1 Press MENU.
2 Press ¢ + or › – to move the cursor (z) to
FEATURES and press ENTER.
3 Press ¢ + or › – to move the cursor (z) to
CONVERGENCE and press ENTER.
The CONVERGENCE adjustment screen appears.
R
G
B
R
G
B
To move up/right, press ¢ +.
To move down/left, press › –.
6 Repeat step 4 and 5 to adjust the other
lines until all three lines converge and are
seen as a white cross.
7 Press MENU to return to the normal screen.
R=Red
G=Green
B=Blue
4 Press ¢ + or › – to move the cursor (z) to
the symbol showing the line you want to
adjust, and press ENTER.
: Red vertical line (left/right adjustment)
: Red horizontal line (up/down adjustment)
: Blue vertical line (left/right adjustment)
: Blue horizontal line (up/down adjustment)
-EN
8
Getting Started
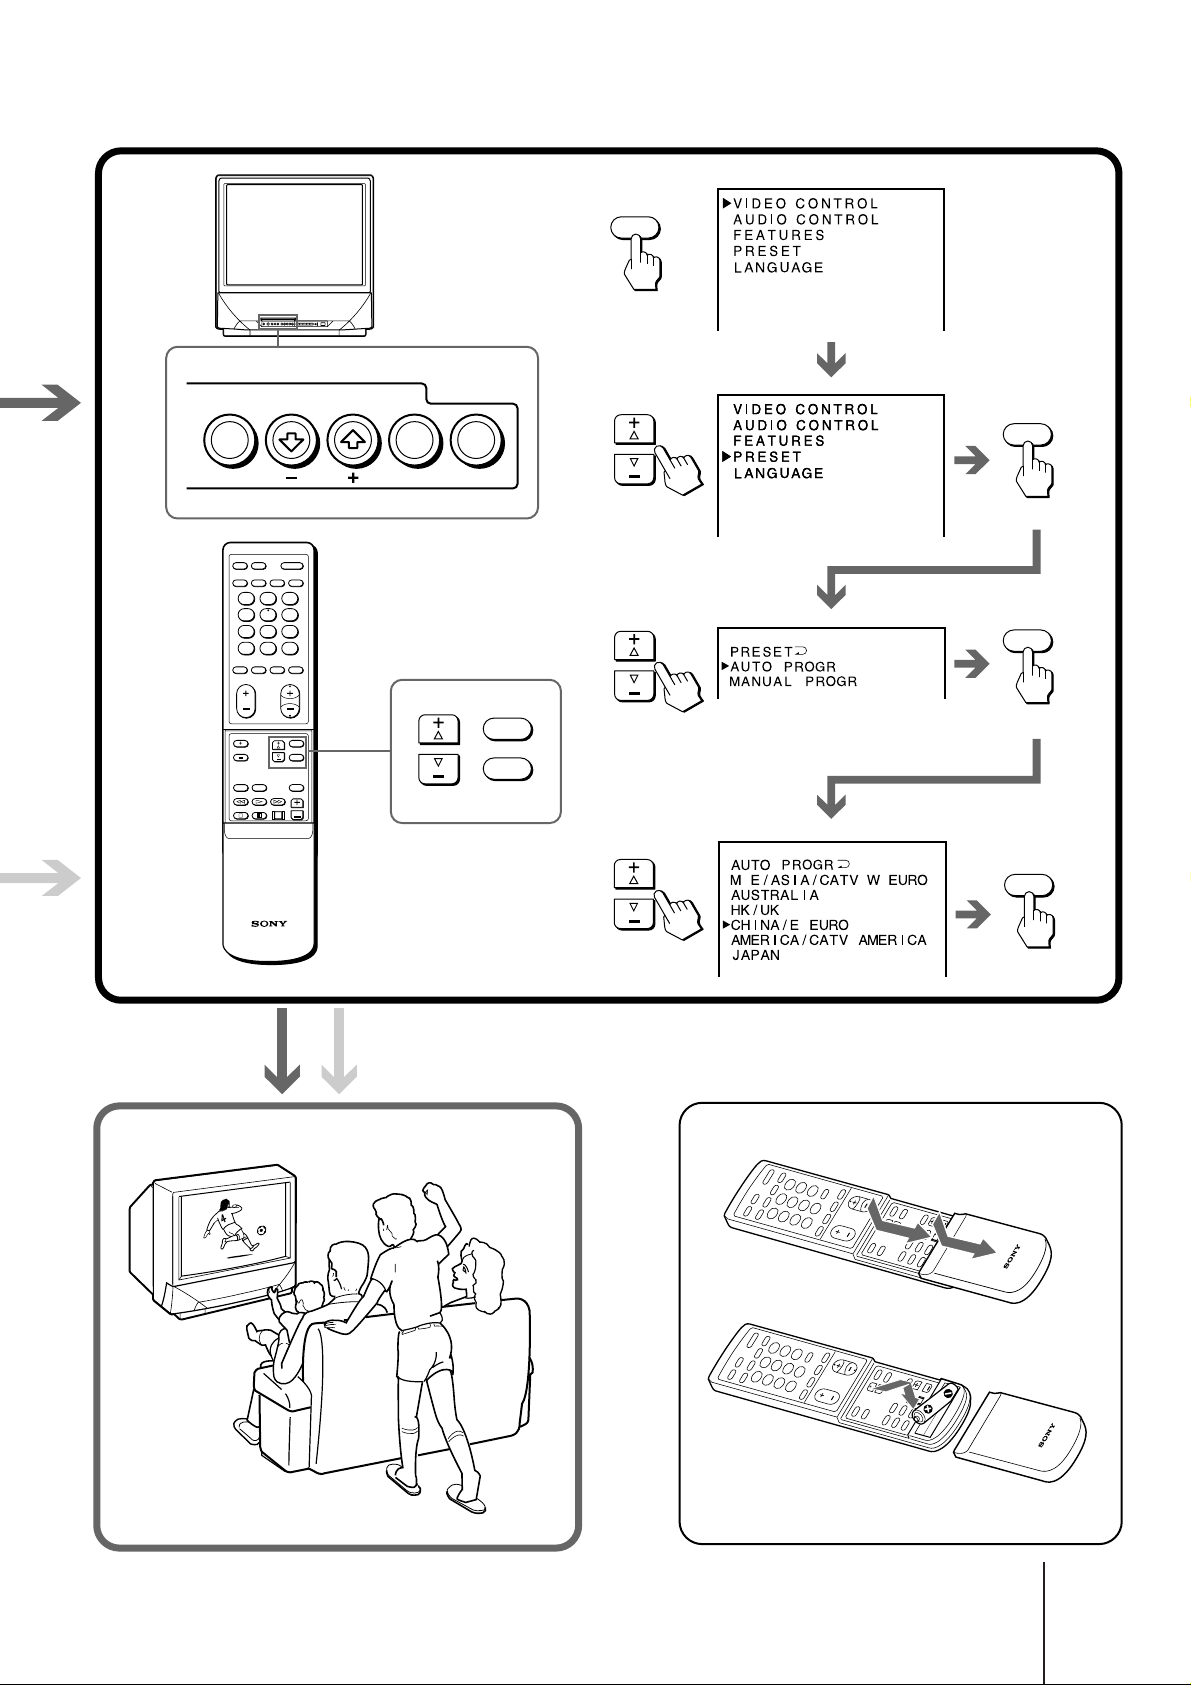
Presetting channels
ENTER
ENTER
You can preset TV channels easily by storing all the
receivable channels automatically. You can also preset
channels manually or skip program positions (page 23).
You can preset channels using the buttons on the
projection TV as well as those on the remote
commander.
Presetting channels automatically
You can preset up to 100 TV channels in numerical
sequence from program position 1.
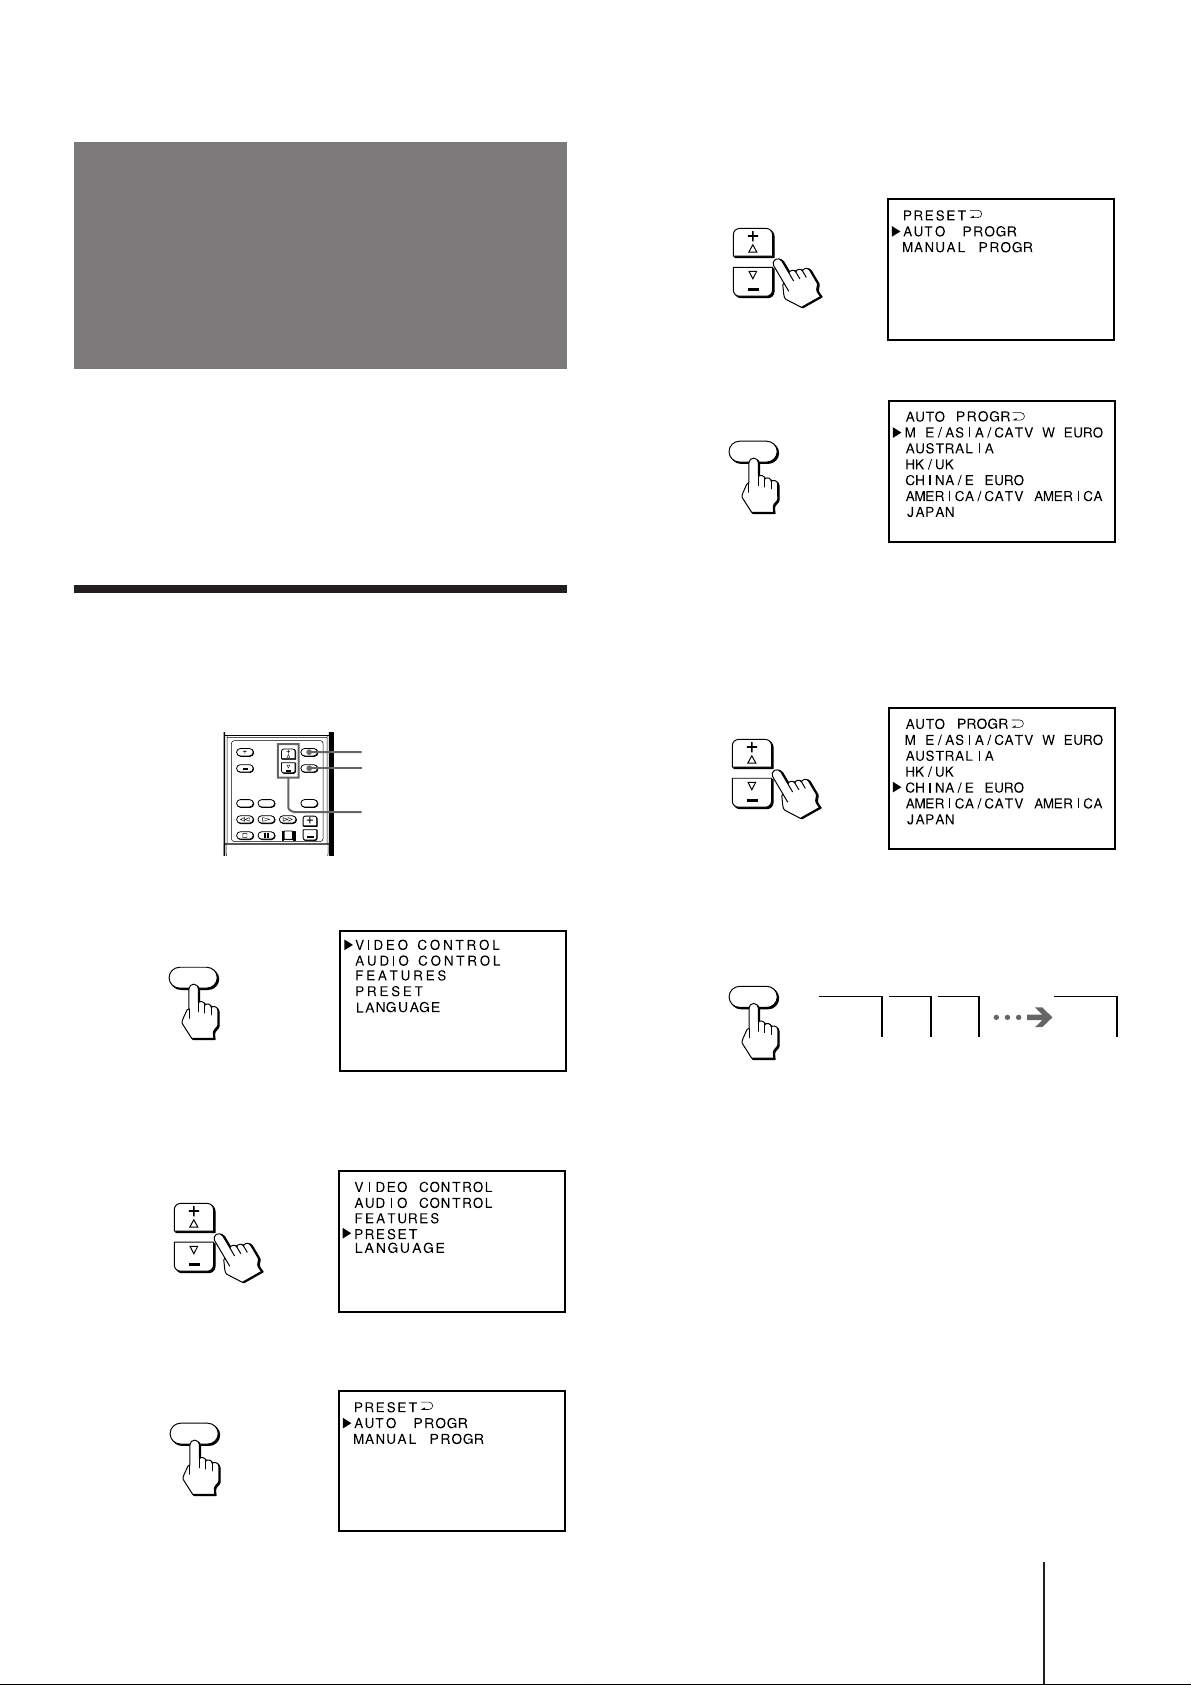
4 Press ¢ + or › – to select AUTO PROGR.
5 Press ENTER.
6 Press ¢ + or › – to select your area (channel
system).
For the areas allocated in each channel system, see
“Channel allocation” on page 27.
MENU
ENTER
¢+ or ›–
1 Press MENU.
MENU
2 Press ¢ + or › – to move the cursor (z) to
PRESET.
7 Press ENTER.
Presetting starts from program 1.
1 2 3 1
3 Press ENTER.
ENTER
Getting Started
-EN
9
 Loading...