

Page 1
LCD Monitor
Printed using VOC (Volatile Organic Compound)-free
vegetable oil based ink.
Moniteur ACL
Televisor en color de pantalla de cristal líquido
Printed in Japan
KLV-40ZX1M
© 2008 Sony Corporation
Operating Instructions
Mode d’emploi
Manual de instrucciones
Lea este manual antes de usar el producto
4-123-656-11(1)
US
FR
ES
Page 2
Owner’s Record
The model and serial numbers are located
at the inside of the terminal cover. Record
these numbers in the spaces provided
below. Refer to them whenever you call
upon your Sony dealer regarding this unit.
Model Name
Serial No.
CAUTION
To prevent electric shock and blade exposure,
do not use this polarized AC plug with an
extension cord, receptacle or other outlet
unless the blades can be fully inserted.
s Operate the unit only on 120-240 V AC.
Declaration of Conformity
Trade Name: SONY
Model: KLV-40ZX1M
Responsible Party: Sony Electronics Inc.
Address: 16530 Via Esprillo,
San Diego, CA 92127 U.S.A.
Telephone Number: 858-942-2230
This equipment complies with part 15 of t he
FCC rules. Operation is subject to the
following two conditions: (1) This
equipment may not cause harmful
interference, and (2) this equipment must
accept any interference received, including
interference that may cause undesired
operation.
NOTIFICATION
This equipment has been tested and found to
comply with the limits for a Class B digital
equipment, pursuant to Part 15 of the FCC
Rules. These limits are designed to provide
reasonable protection against harmful
interference in a residential installation. This
equipment generates, uses and can radiate
radio frequency energy and, if not installed and
used in accordance with the instructions, may
cause harmful interference to radio
communications.
However, there is no guarantee that
interference will not occur in a particular
installation. If this equipment does cause
harmful interference to radio or television
reception, which can be determined by turning
the equipment off and on, the user is
encouraged to try to correct the interference by
one or more of the following measures:
s Reorient or relocate the receiving antenna.
s Increase the separation between the
equipment and receiver.
s Connect the equipment into an outlet on a
circuit different from that to which the
receiver is connected.
s Consult the dealer or an experienced radio/
TV technician for help.
Pursuant to FCC regulations, you are
cautioned that any changes or modifications
not expressly approved in this manual could
void your authority to operate this
equipment.
For Customers in Canada
This Class B digital apparatus complies with
Canadian ICES-003.
CAUTION
Use the following Sony LCD Monitor only
with the following WALL-MOUNT
BRACKET or TV-stand.
Sony LCD Monitor Model
No.
Sony Wall- Mount
Bracket Model No.
Sony TV-stand
Model No.
Use with other WALL-MOUNT BRACKET
or TV-stand may cause instabilit y and possibly
result in injury.
To Customers
Sufficient expertise is required for installing
the specified unit. Be sure to subcontract the
installation to a Sony dealer or licensed
contractor and pay adequate attention to safety
during the installation.
Licensing Information
Macintosh is a trademark of Apple Inc.,
registered in the U.S. and other countries.
HDMI, the HDMI logo and High-Definition
Multimedia Interface are trademarks or
registered trademarks of HDMI Licensing,
LLC.
Fergason Patent Properties, LLC:
U.S. Patent No. 5,717,422
U.S. Patent No. 6,816,141
Blu-ray Disc is a trademark.
“BRAVIA” and , S-Force,
BRAVIA Sync, , DMe
and “x.v. Color” are trademarks or registered
marks of Sony Corporation.
“PLAYSTATION” is a registered trademark
and “PS3” is a trademark of Sony Computer
Entertainment Inc.
Adobe is a registered trademark or a trademark
of Adobe Systems Incorporated in United
States and/or other countries.
KLV-40ZX1M
SU-WL700
SU-FL71M
x
, MICRO VAULT,
US
2
Page 3
Contents
Overview
Welcome to the World BRAVIA® LCD Monitor ..........................................................................................4
Checking the Accessories...........................................................................................................................4
Getting Started
1. Installing the Unit.....................................................................................................................................5
Carrying the Unit......................................................................................................................................5
Preparation for Table-Top Stand.............................................................................................................5
Removing the Table-Top Stand...............................................................................................................6
Preparation for Wall-Mount Bracket ........................................................................................................7
When Installing the Unit Against a Wall or Enclosed Area......................................................................7
Securing the Unit.....................................................................................................................................8
2. Locating Inputs.......................................................................................................................................10
Connecting the AC Power Cord and HDMI Cable.................................................................................10
3. Connecting the Equipment....................................................................................................................11
4. Setting Up the Language.......................................................................................................................12
Using BRAVIA Sync with Control for HDMI.............................................................................................12
Operating the LCD Monitor
Inserting Batteries into the Remote Control............................................................................................13
When Using the Remote Control ..............................................................................................................13
LCD Monitor Control and Remote Control Button..................................................................................13
Indicators ....................................................................................................................................................15
Using LCD Monitor Settings
Picture Settings................................................................................................................................16
Sound Settings ................................................................................................................................18
Screen Settings ...............................................................................................................................19
HDMI Settings..................................................................................................................................20
Monitor Settings...............................................................................................................................20
PC Settings......................................................................................................................................21
Optional Accessories
Using with the Wall-Mount Bracket/Speaker System............................................................................22
Using with the Floor Stand/Speaker System.........................................................................................24
Other Information
Troubleshooting.........................................................................................................................................26
Specifications.............................................................................................................................................28
US
Customer Support
http://www.sony.com/tvsupport
On-line Registration
United States
http://productregistration.sony.com
Canada
http://www.sonystyle.ca/registration
US
3
Page 4

Overview
Welcome to the World BRAVIA® LCD Monitor
Thank you for purchasing this Sony BRAVIA® LCD Monitor. The quality of the image you see on your
BRAVIA LCD Monitor is only as good as the quality of the signal from the connected equipment.
Your BRAVIA LCD Monitor is Energy Star Compliant. It meets strict energy efficiency
guidelines set by the EPA and US Department of Energy. ENERGY STAR is a joint program
of these government agencies, designed to promote energy efficient products and practices.
Checking the Accessories
Remote control RM-VL610A (1)
Size AA batteries (2)
AC power cord (1)
HDMI cable (1)
Table-Top Stand (1) and Screws M5 × 8 (4)
Terminal cover (1)
Spacers (black) (4)
Spacers (silver) (4) and Screws M6 × 20 (4)
Stand Support adapter (1)
Operating Instructions (this manual) (1)
Warranty Card (1)
Safety and Regulatory Booklet (1)
Operating Instructions for the remote control (1)
Code List (1)
CAUTION
When the LCD Monitor is used for an extended period, the front and rear panel surrounds became warm.
You may feel hot when touching there by the hand. For details, see the flyer supplied.
US
4
Page 5
Getting Started
1. Installing the Unit
This Unit can be mounted on a wall using a WallMount Bracket or placed on a TV stand (each sold
separately). This section will explain:
• How to carry the Unit
• Preparation for a Table-Top stand
• Preparation for a Wall-Mount Bracket
• Installation against a wall or enclosed area
• Securing the Unit
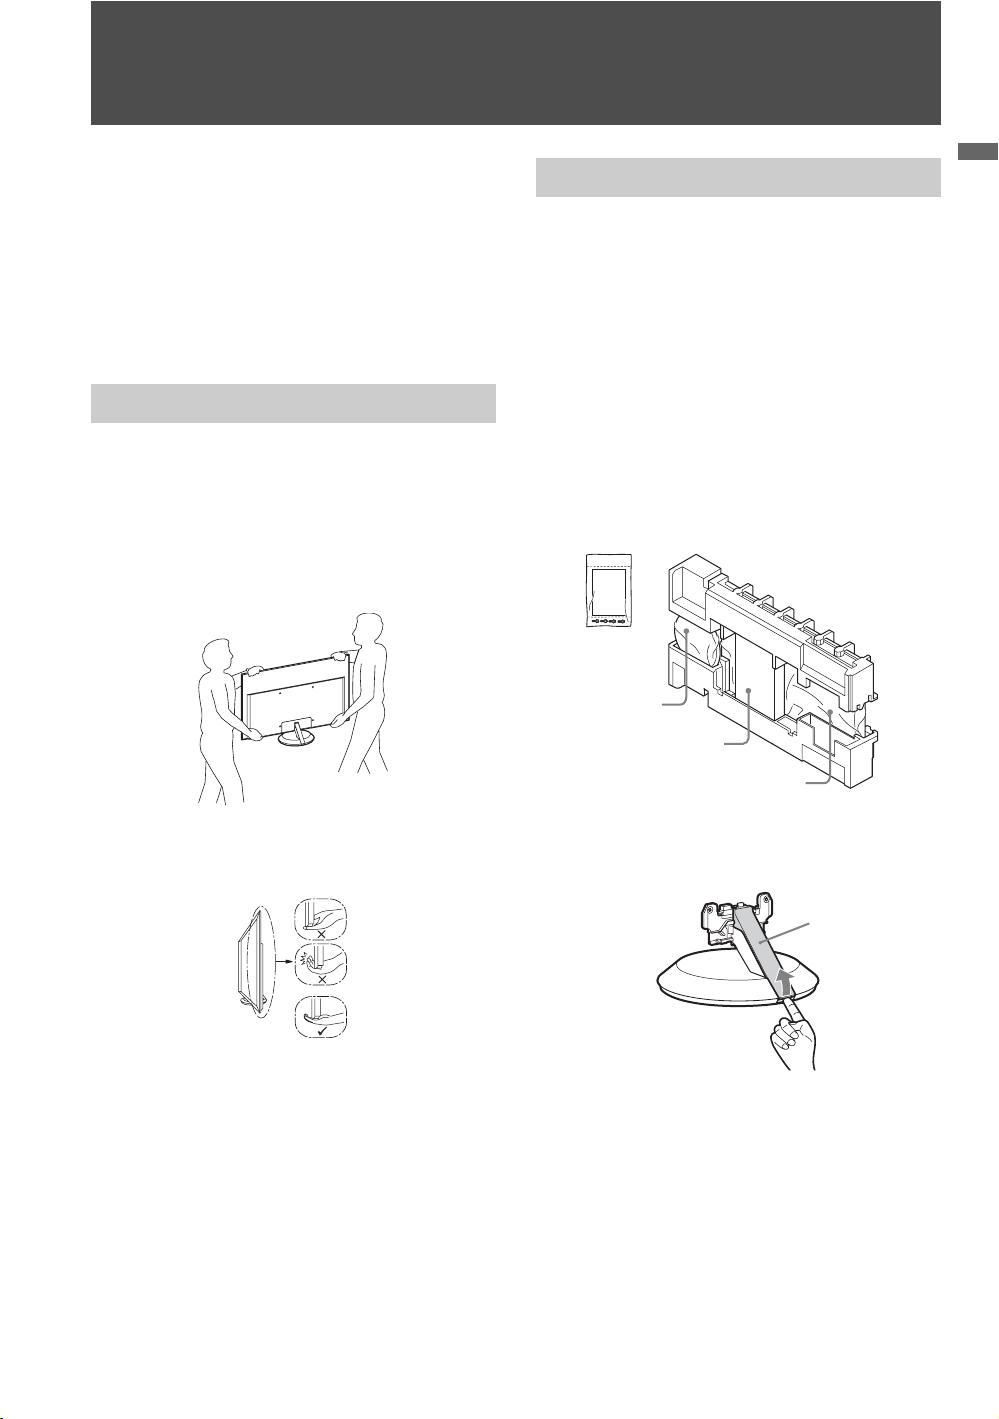
Carrying the Unit
Be sure to follow these guidelines to protect your
property and avoid causing serious injury.
• Before carrying the Unit, disconnect all cables.
• Carrying this Unit requires two or more people.
• When carrying the Unit, place your hand as
illustrated and hold it securely. Do not subject the
Unit to shocks, vibration, or excessive force.
Preparation for Table-Top Stand
Follow the assembling steps required to place on
the Table-Top Stand.
1 Remove the Table-Top Stand, accessory box
and accessory bag from the carton. The
screws and booklet can be found in the
accessory bag attached on the rear of the LCD
monitor.
For product protection and safety reasons,
Sony strongly recommends that you use the
screws provided with the display.
~
• Do not remove the blue tape that secures the plate on
the rear of the LCD monitor until you finish installing
the Table-Top Stand.
Accessory bag
Table-Top Stand
Accessory box
Getting Started
• Lift the Unit by placing your palm directly
underneath the panel but do not put stress on the
LCD panel.
Be sure to hold the bottom of the panel.
LCD monitor
2 Place the Table-Top Stand on a level and
stable surface, then remove the stand cover
from the Table-Top Stand.
Stand cover
(Continued)
US
5
Page 6
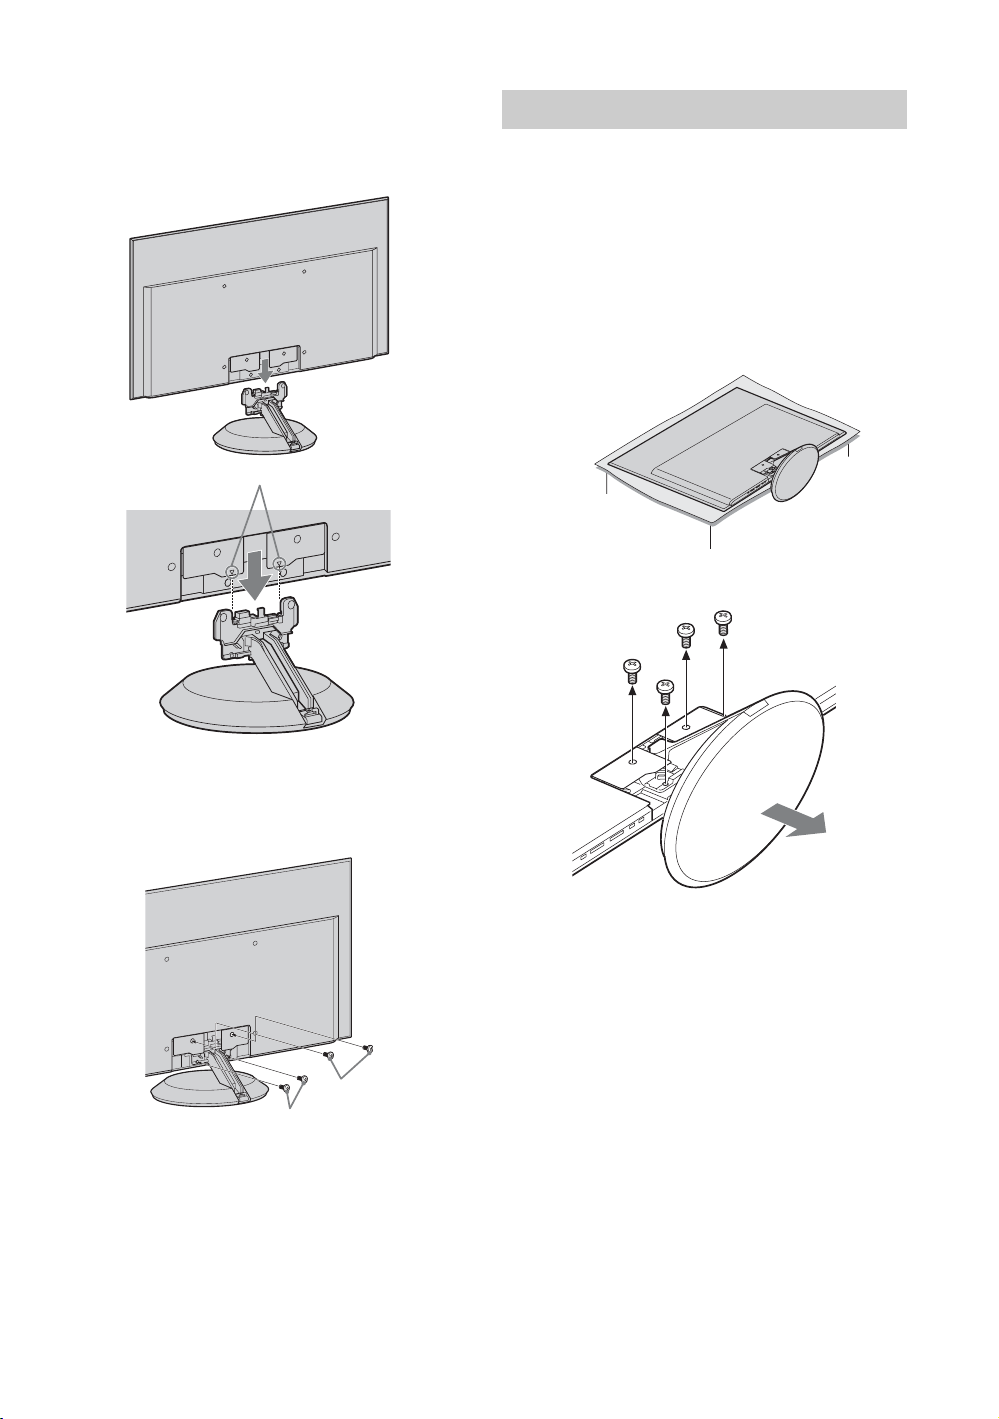
3 Align the F mark, then press the LCD
monitor against the neck of the Table-Top
Stand and gently slide the LCD monitor onto
the neck. Be sure to work with two or more
people.
F mark
Removing the Table-Top Stand
If the LCD monitor is to be wall-mounted of
installed on the Floor Stand (optional), remove the
Table-Top Stand.
1 Place the LCD monitor face down.
Lay a mat (packing sheet, etc.) on a table
wider than the LCD monitor, then place the
LCD monitor on the table with the stand
hanging over the edge of the table. Be sure to
work with two or more people.
Packing sheet, etc.
2 Remove the four screws from the Table-Top
Stand.
4 Attach the LCD monitor to the Table-Top
Stand using the supplied screws. Attach the
two bottom screws first, then the top two
screws.
2 Top screws
1 Bottom screws
~
• If an electric screwdriver is used, set the torque to
tighten at approximately 1.5 N·m {15 kgf·cm}.
• Do not put stress on the LCD panel or the frame
around the screen.
~
• Do not use the screws removed from the Table-Top
Stand for the Wall-Mount Bracket or Floor Stand.
• When you carry the LCD monitor, move the monitor
with a mat laid below.
• Hold the Table-Top Stand firmly with both hands.
US
6
Page 7
Preparation for Wall-Mount Bracket
This model is ready to be mounted on a wall. For
details, see page 22.
• For product protection and safety reasons,
Sony strongly recommends that you use the
Wall-Mount Bracket model designed for your
LCD monitor and the wall-mounting of LCD
monitor should be performed by a Sony
dealer or licensed contractor.
• Sufficient expertise is required in installing this
LCD monitor, especially to determine the
strength of the wall for withstanding the LCD
monitor’s weight.
• Be sure to use the screws supplied with the WallMount Bracket when attaching the mounting
hooks to the LCD monitor.
The supplied screws are designed so that they are
8 mm to 12 mm in length when measured from
the attaching surface of the spacer.
The diameter and length of the screws differ
depending on the Wall-Mount Bracket model.
Use of screws other than those supplied may
result in internal damage to the LCD monitor set
or cause it to fall, etc.
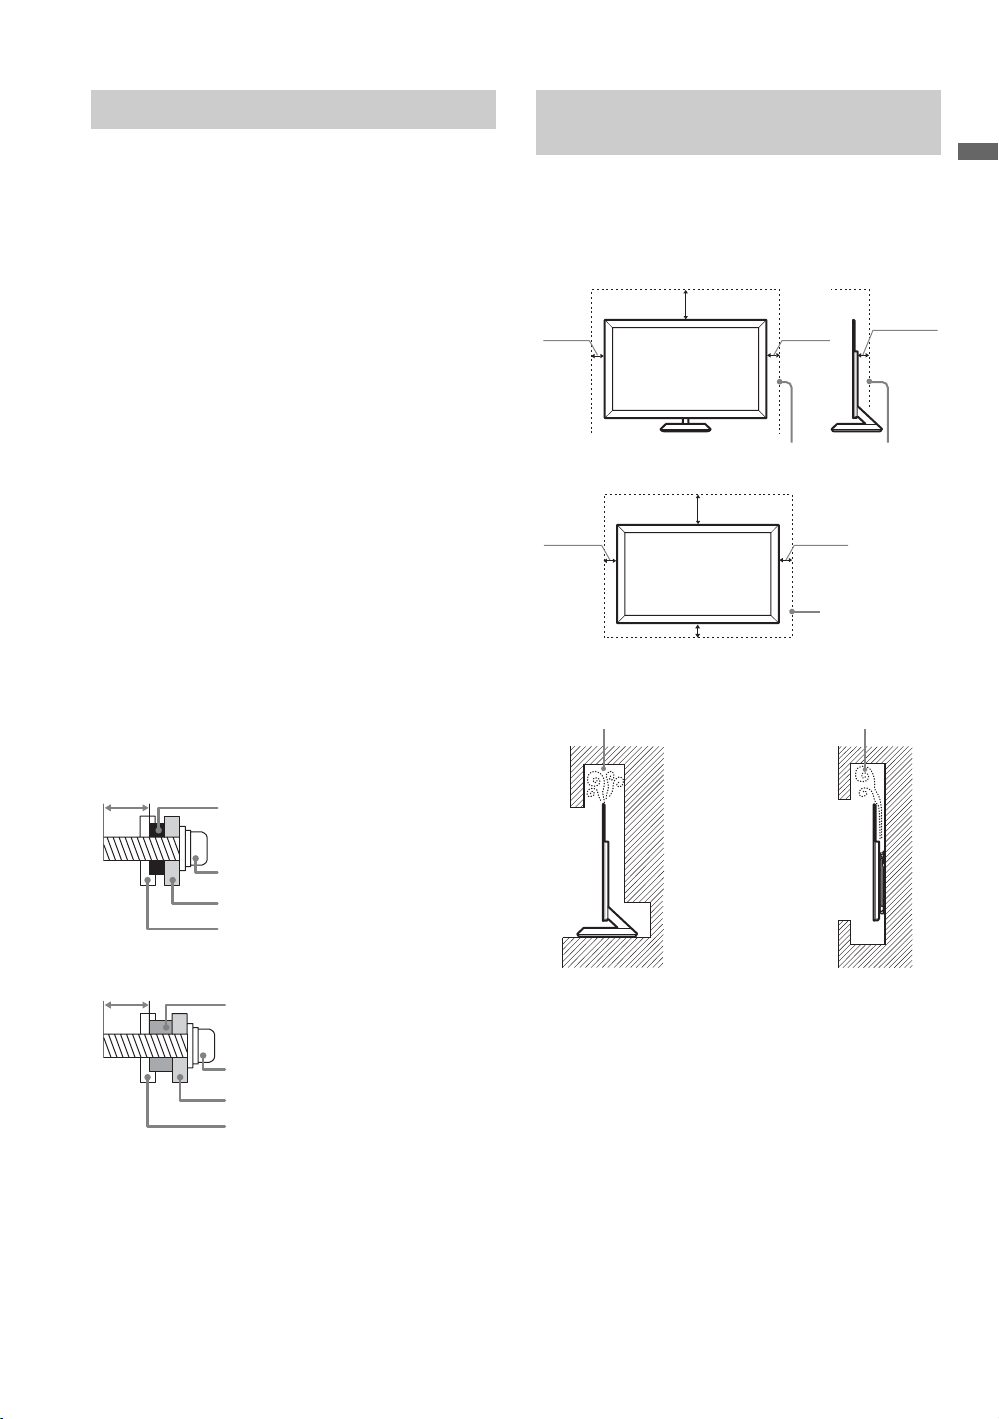
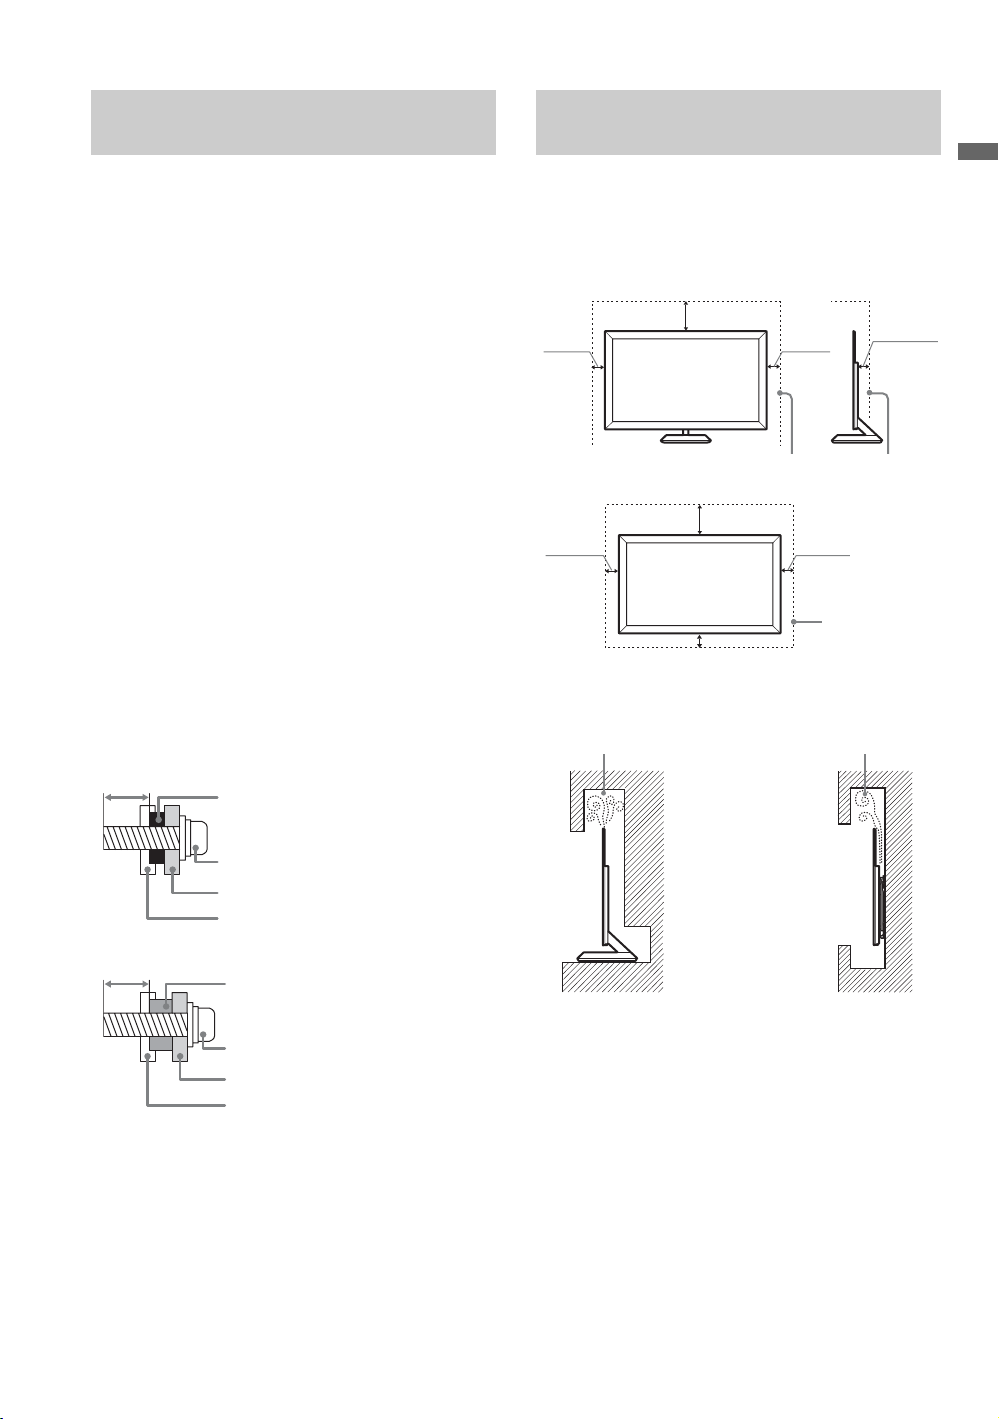
When Installing the Unit Against a
Wall or Enclosed Area
Make sure that your LCD Monitor has adequate
air circulation. Allow enough space around the
unit as shown below. Avoid operating the unit at
temperatures below 41 °F (5 °C).
Installed with stand
4 inches
(10 cm)
Leave at least this much space around the set.
Installed on the wall
4 inches
(10 cm)
Never install the unit set as follows:
Air circulation is blocked.
7
/
inches
11
8
(30 cm)
7
11
inches
/
8
(30 cm)
4 inches (10 cm)
3
inches2
/
4 inches
(10 cm)
4 inches
(10 cm)
Leave at least
this much space
around the set.
Air circulation is blocked.
8
(6 cm)
Getting Started
When attaching to the Wall-Mount Bracket
8-12 mm
Spacer (black)
Screw M6 × 16 (supplied with the
Wall-Mount Bracket)
Mounting Hook
Rear of the LCD monitor
When attaching to the Floor Stand
8-12 mm
Spacer (silver)
Screw M6 × 20 (supplied with the
LCD monitor)
Mounting Hook
Rear of the LCD monitor
• Be sure to store the unused screws and Table-Top
Stand in a safe place until you are ready to attach
the Table-Top Stand. Keep the screws away from
small children.
For details on how to use the Wall-Mount Bracket
compatible to your model, visit
www.sony.com/accessories
Or call 1-800-488-7669 (for United States)
1-877-899-7669 (for Canada)
Wall
Wall
~
• Inadequate air circulation can lead to overheating of
the unit and may cause damage to your unit or cause a
fire.
Consider the following for best picture
quality
• Do not expose the screen to direct illumination
or sunlight.
• Use spot lighting directed down from the
ceiling or cover the windows that face the
screen with opaque drapery.
• Install the unit in a room where the floor and
walls are not of a reflective material.
(Continued)
7
US
Page 8
• When moving the unit from a cold area to a
warm area, a sudden room temperature change
may cause the unit’s picture to blur or show
poor color due to moisture condensation.
Should this occur, please wait a few hours to
allow the moisture to evaporate before
powering on the unit.
Securing the Unit
Sony strongly recommends taking
measures to prevent the Unit from toppling
over. Unsecured Unit may topple and
result in property damage, serious bodily
injury or even death.
Prevent the Unit from Toppling Over
s Secure the Unit to a wall and/or stand.
s Do not allow children to play or climb on
furniture and Unit sets.
s Avoid placing or hanging items on the Unit.
s Never install the Unit on:
• slippery, unstable and/or uneven surfaces.
• furniture that can easily be used as steps,
such as a chest of drawers.
s Install the Unit where it cannot be pulled,
pushed, or knocked over.
s Route all AC power cords and connecting
cables so that they are not accessible to
curious children.
Use a Sony TV stand
Use a Sony specified TV stand (see page 2) and
follow the instruction manual provided with the
Sony TV stand.
If a Sony specified TV stand is not used, consider
the following recommended measures.
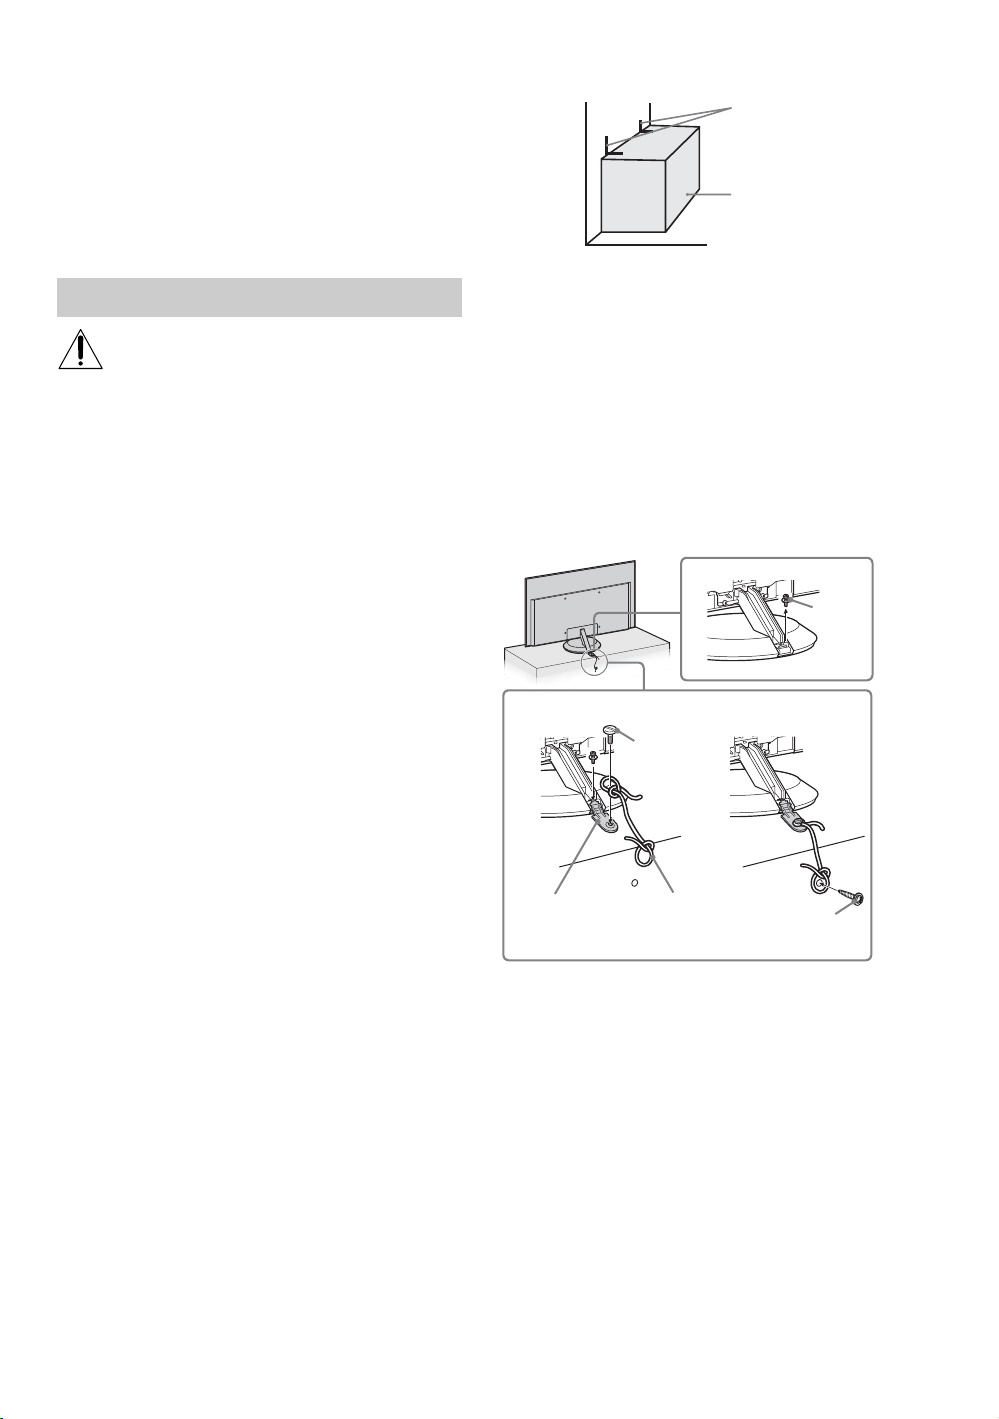
Recommended Measures to Secure the
Unit
Secure the Stand for the Unit
Make sure the TV stand can adequately support
the weight of the Unit. Use two angle braces (not
supplied) to secure the stand.
For each angle brace use the appropriate hardware
to:
• attach one side of the angle brace to the wall stud.
• attach the other side to the TV stand.
Angle brace
Stand
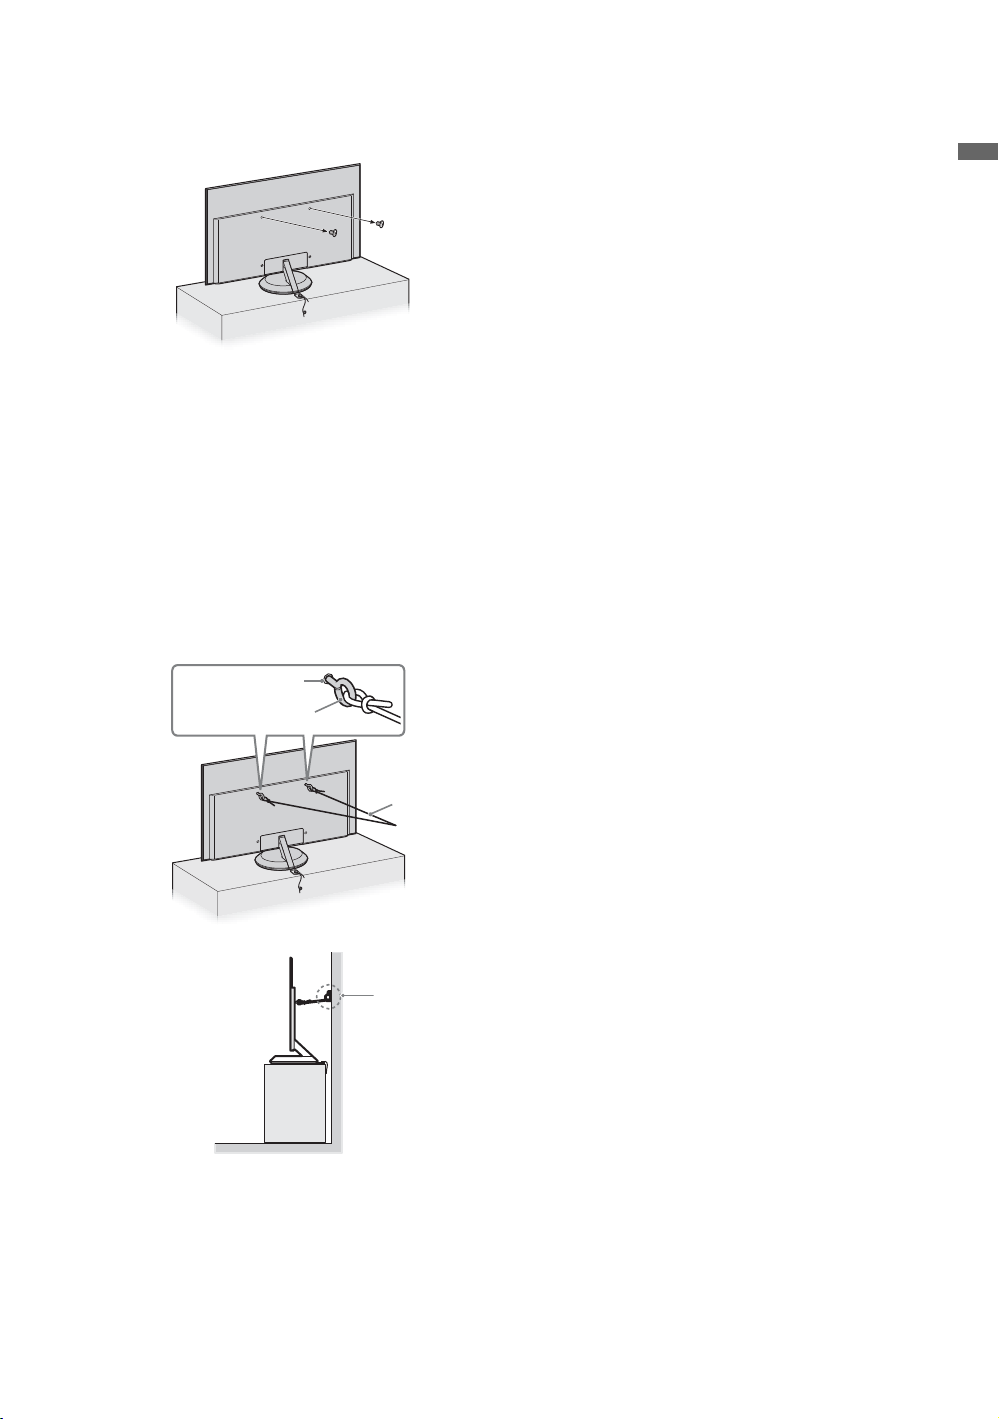
Secure the Unit to the Stand
Use the Stand Support adapter (supplied) and rope
or chain.
1 Remove the screw from the Table-Top Stand.
2 Secure the Stand Support adapter to the Table-
Top Stand, then attach the rope or chain to the
adapter.
3 Secure the rope or chain to the TV stand (not
supplied). Make sure that there is no excess
slack in the rope or chain.
1
Screw
23
Screw
Stand Support
adapter
Rope or chain
Screw
US
8
Page 9
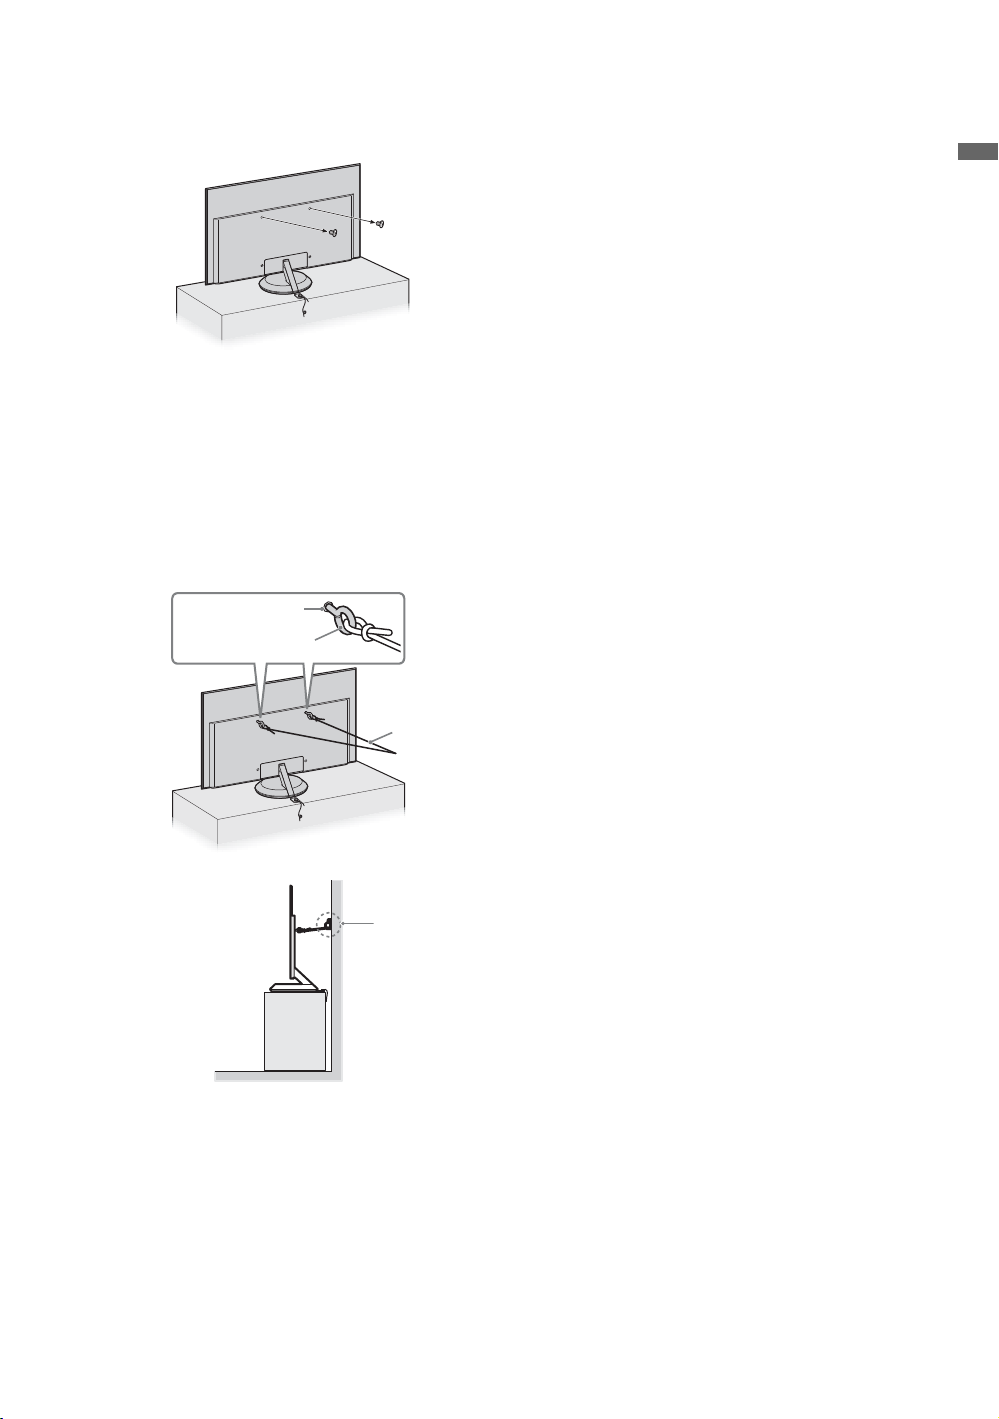
Anchor the Unit to the Wall
Remove the two screws from the top-most wallmount holes located on the rear of the Unit.
Use the hardware listed below (not supplied):
•Two M6 × 10-12 mm anchor bolts (screw into
the top-most wall-mount holes located on the
rear of the unit)
• Rope or chain (attach to one M6 anchor bolt)
• Wall-anchor (attach to the wall stud) strong
enough to support the weight of the unit (pass
the rope through the wall-anchor, then attach
to the other M6 anchor bolt)
Wall-mount holes
Anchor bolts
Getting Started
Rope or chain
Wallanchor
~
• Securing the unit to the stand without securing it and
the stand to the wall provides minimum protection
against the unit toppling over. For further protection,
follow all three measures recommended above.
US
9
Page 10
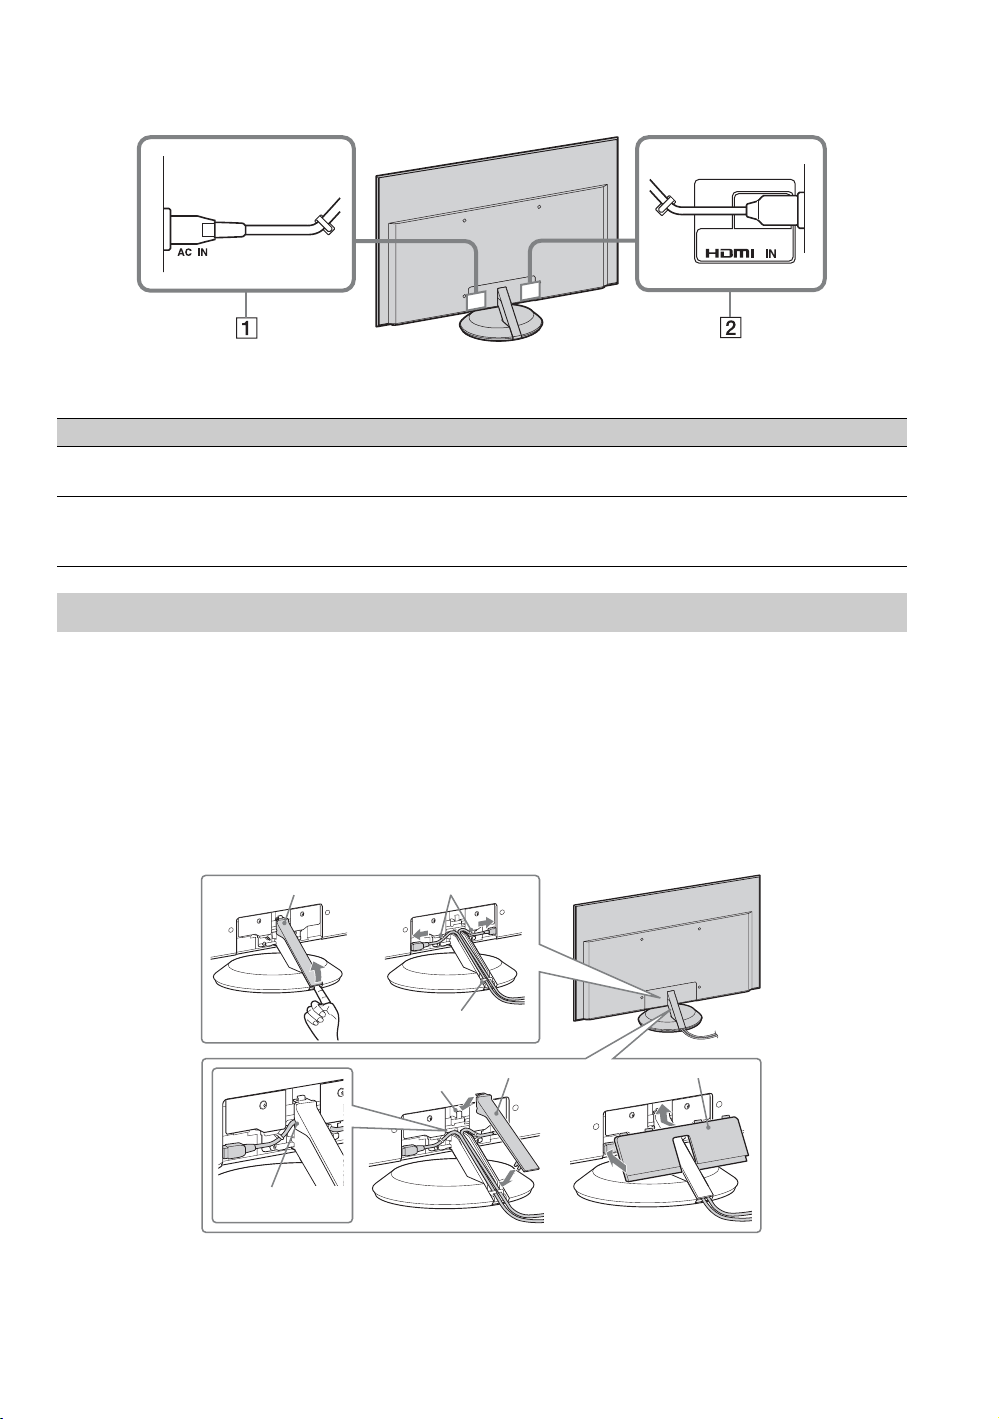
2. Locating Inputs
~
• This unit displays all video input signals in a resolution of 1,920 dots × 1,080 lines.
Item Description
1 AC IN Connects to your power source. Connect the supplied power cord to AC IN and the
nearest wall outlet.
2 HDMI IN HDMI (High-Definition Multimedia Interface) provides an uncompressed, all-digital
Connecting the AC Power Cord and HDMI Cable
1 Connect the AC power cord (supplied) to the AC IN jack and the HDMI cable (supplied) to the HDMI
IN jack on the rear of the unit, then use the hooks to store them in the back of the Table-Top Stand.
2 Hang the stand cover over the top of the Table-Top Stand’s center post, and then push down to close
until you hear a click.
audio/video interface between this LCD Monitor and any HDMI-equipped A/V
equipment. HDMI supports enhanced, or high-definition video, plus digital audio.
~
• To avoid pinching the AC power cord and the HDMI cable, ensure that these cables run under the notches on
either side of the stand cover.
3 Attach the terminal cover (supplied) to the unit.
Stand cover
Notch
Hooks
Hooks
Center post
Stand cover
Terminal cover
10
US
Page 11
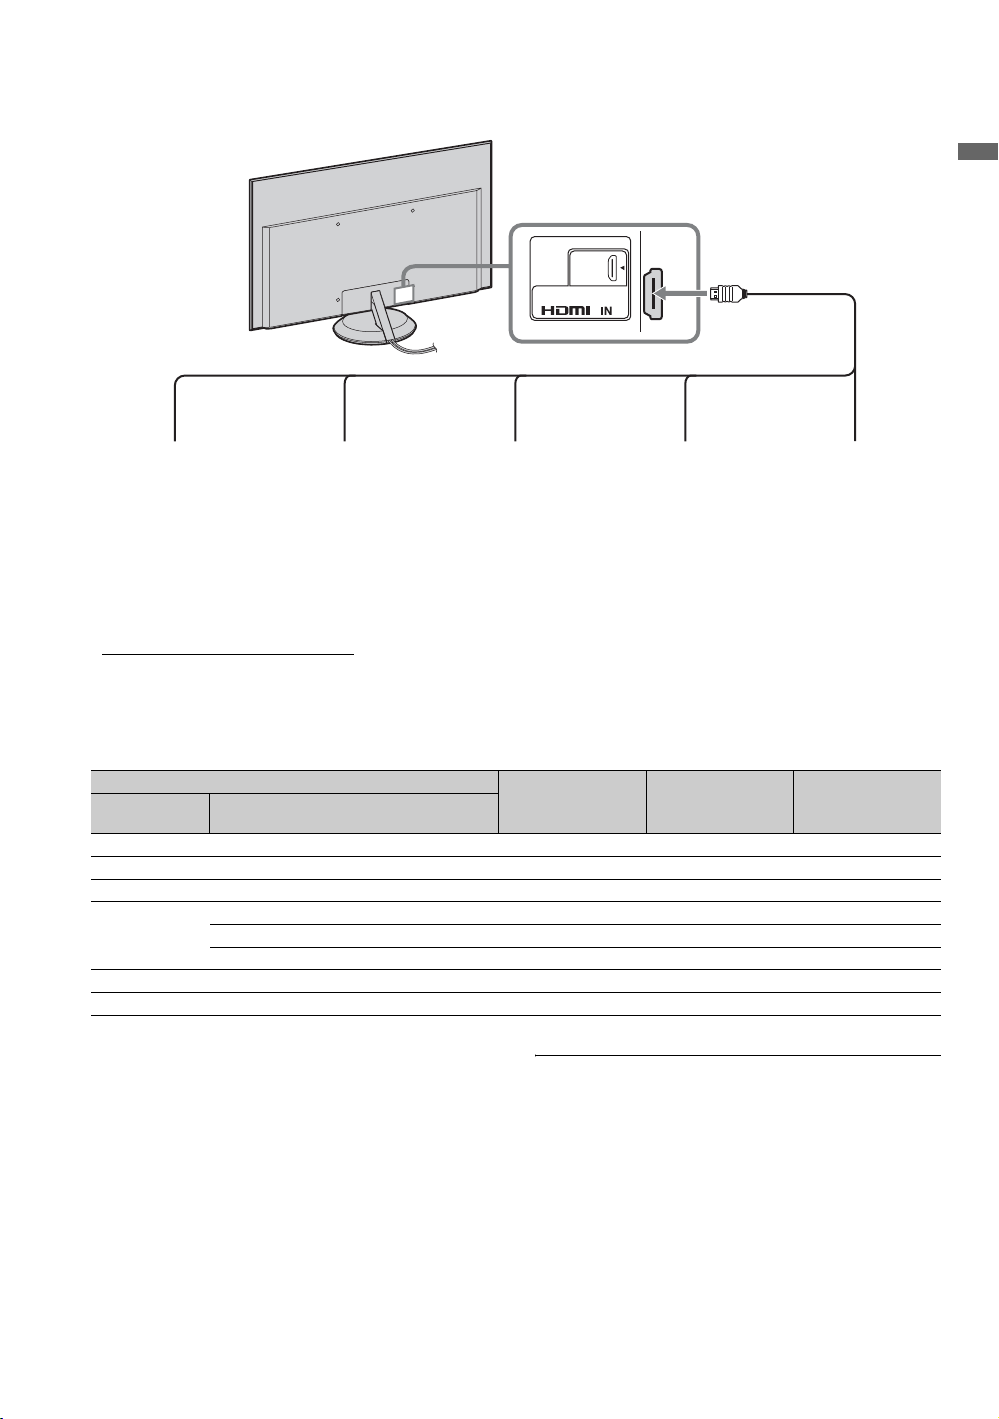
3. Connecting the Equipment
Getting Started
Blu-ray Disc player/
“PS3”
DVD player Personal computerDigital satellite receiver/
Digital cable box
BRAVIA Wireless Link
receiver unit
~
• You can enjoy high-definition programming by subscribing to a high-definition cable service or a high-definition
satellite service.
• For BRAVIA Wireless Link (DMX-WL1) users; if you want to attach the receiver unit on the rear of the monitor unit,
while attached to the Table-Top Stand, an optional bracket is necessary. For details, visit our website.
http://www.sonystyle.com/dmxwl1
PC Input Signal Reference Chart
After connecting the PC to the unit, set the output signal from the PC according to the supported
resolutions and timings indicated below.
Supported resolutions
Signal Horizontal
VGA 640
SVGA
XGA
WXGA
SXGA
HDTV
(Pixel)
800
1,024
1,280
1,280
1,360
1,280
1,920
× Vertical
×
×
×
×
×
×
×
×
(Line)
480 31.5 60 VGA
600 37.9 60 VESA Guidelines
768 48.4 60 VESA Guidelines
768 47.4 60 VESA
768 47.8 60 VESA
768 47.7 60 VESA
1,024 64.0 60 VESA
1,080 67.5 60 CEA-861*
Horizontal
frequency (kHz)
Vertical
frequency (Hz)
Standard
~
• Your PC must support one of the PC input signals
above to display on the television.
*The 1080p timing when applied to the HDMI input will
be treated as a video timing and not PC timing. This
Picture
affects
settings and
view PC content set
to
Full
Mode
, and
Picture Mode
Display Area
Wide Mode
to
Custom, Wide
to
Full Pixel
settings. To
.
11
US
Page 12
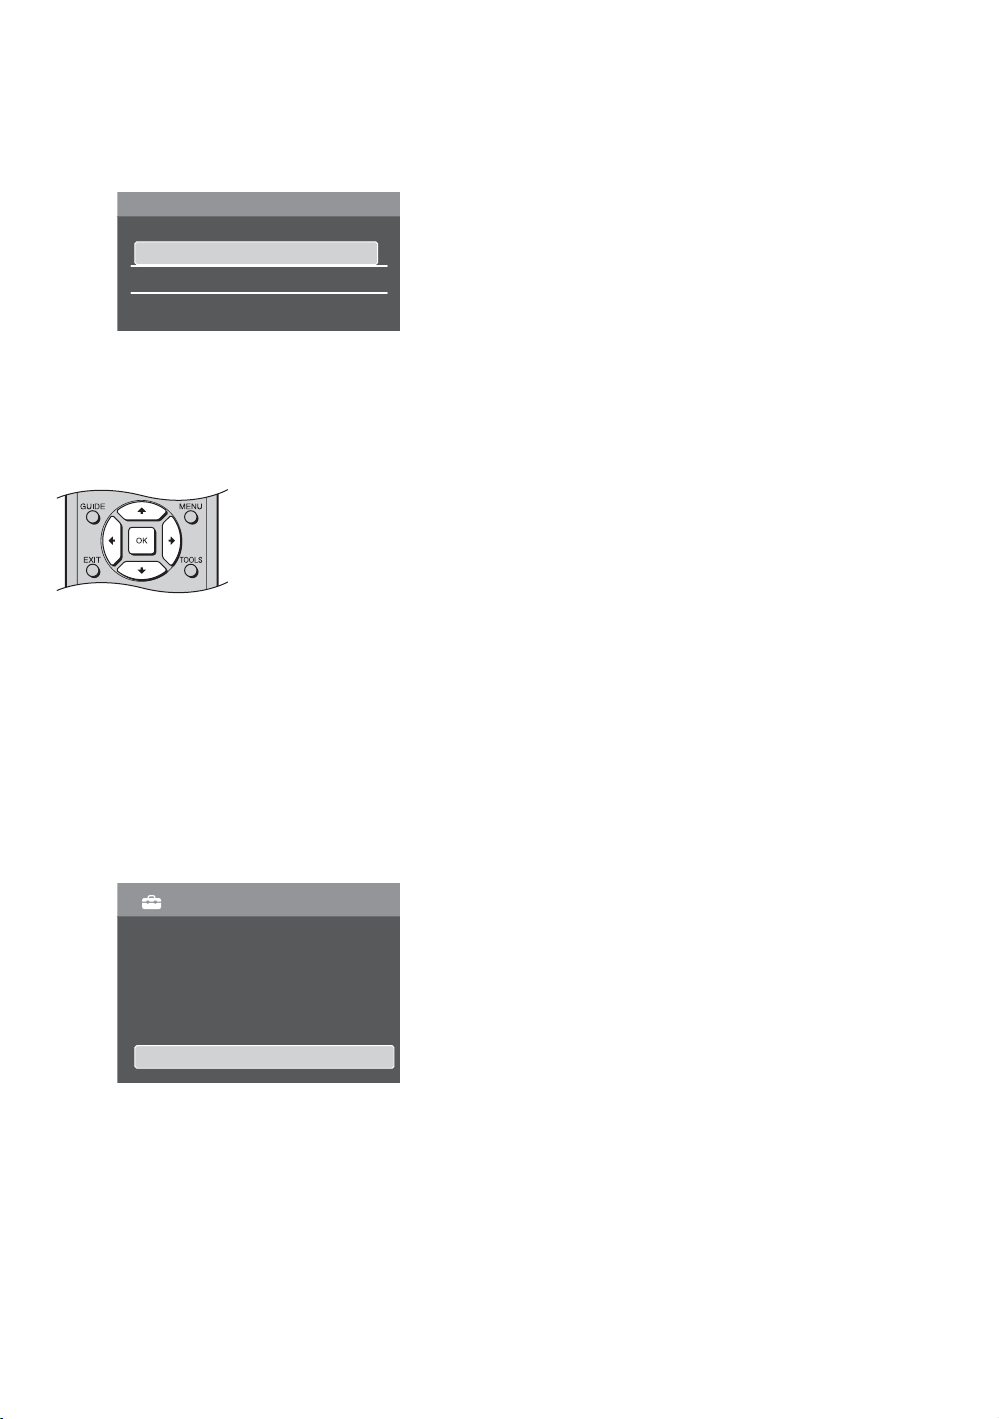
4. Setting Up the Language
The language set-up screen appears when you turn
on the unit for the first time.
Language
Using BRAVIA Sync with
Control for HDMI
The BRAVIA Sync function on this unit
communicates with other Sony equipment
supporting the Control for HDMI function.
English
Español
Français
1 Complete your cable connections (refer to the
preceding pages before proceeding with the
language set-up).
2 Use the remote control to navigate through the
language set-up:
V/v button:
Allows you to highlight options
where applicable.
OK button:
Allows you to select the
highlighted option and advance
to the next screen.
B button:
Allows you to move back to the
previous screen.
b button:
Allows you to move to the next
screen.
s To Reset the Language Settings
Select the Language from the Monitor
Settings (page 20).
Monitor Settings
Power Saving
Light Sensor
Product Information
Reset All
Language
Off
Off
English
To connect Sony equipment with Control
for HDMI
Use an HDMI cable that bears the HDMI logo for
connection. See pages 10 to 11 or see the HDMI
connection.
Setting the Control for HDMI
The Control for HDMI function must be set up in
order for the unit to communicate with other
Control for HDMI enabled equipment. See
page 20 for information on how to set up this
unit’s Control for HDMI function. For other
equipment, refer to its operating instructions.
Available options using Control for HDMI
The following operations are available after you
connect the supported Sony equipment with
Control for HDMI function to your LCD
monitor:
• Automatically turn off the connected equipment
when you turn off the LCD monitor.
• The LCD monitor will automatically turn on and
select the respective HDMI input through the
connected equipment by One-Touch-Play.
• Equipment listed under the Device List in the
HDMI Settings will turn on automatically when
selected, see page 20.
~
• If you accidentally turn off the unit during the
language set-up process, the language set-up will
restart from the beginning when the unit is turned back
on.
US
12
Page 13
Operating the LCD Monitor
Inserting Batteries into the Remote Control
Insert two size AA batteries (supplied) by matching e and E on the batteries to the diagram inside the
battery compartment of the remote control.
For details, see Operating Instructions for the remote control RM-VL610A (supplied).
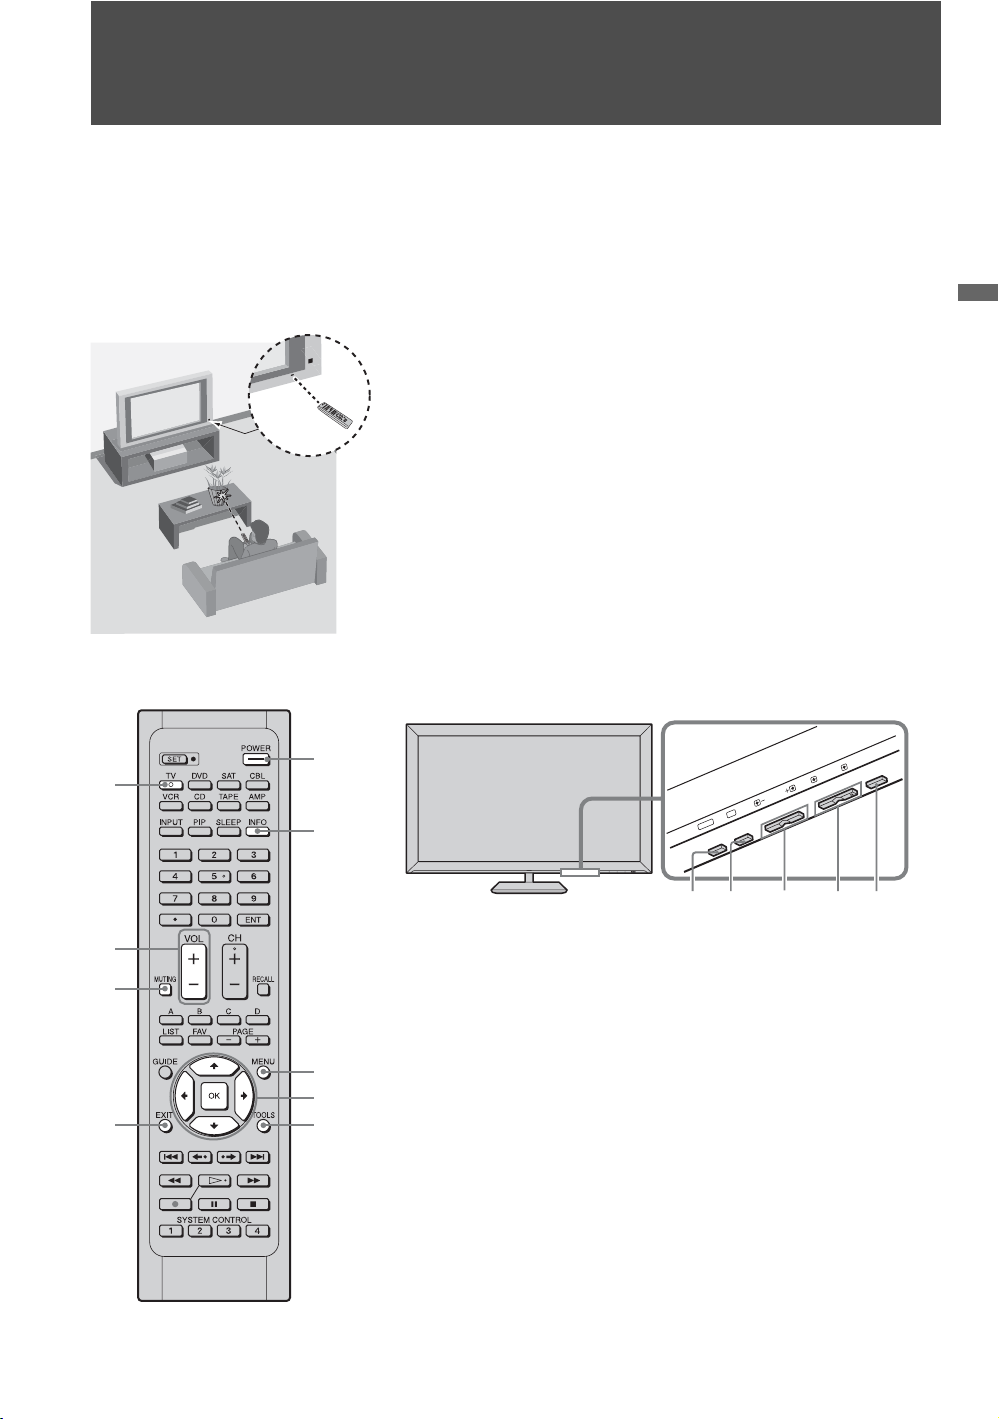
When Using the Remote Control
Follow the guidelines below
• Point your remote control directly at the IR sensor located on your
LCD monitor.
• Make sure that no objects are blocking the path between the
remote control and the IR sensor on your LCD monitor.
• Fluorescent lamps can interfere with your remote control; try
turning off the fluorescent lamps.
• If you are having problems with the remote control, reinsert or
replace your batteries and make sure that they are correctly
inserted.
LCD Monitor Control and Remote Control Button
1
6
2
MENU
Operating the LCD Monitor
POWER
VOL
OK
7
8
9
3
4
5
34 44,71
Buttons on the LCD monitor operate the same as the corresponding
buttons on the remote control. Refer to the remote control operating
instructions (supplied).
~
•The V button has a tactile dot. Use it as a reference when operating the LCD
monitor.
• When operating the LCD monitor, press a button (except POWER button)
on the unit once to light up all the indicators and press again to operate the
function. All indicators will fade out after a period of time.
(Continued)
13
US
Page 14
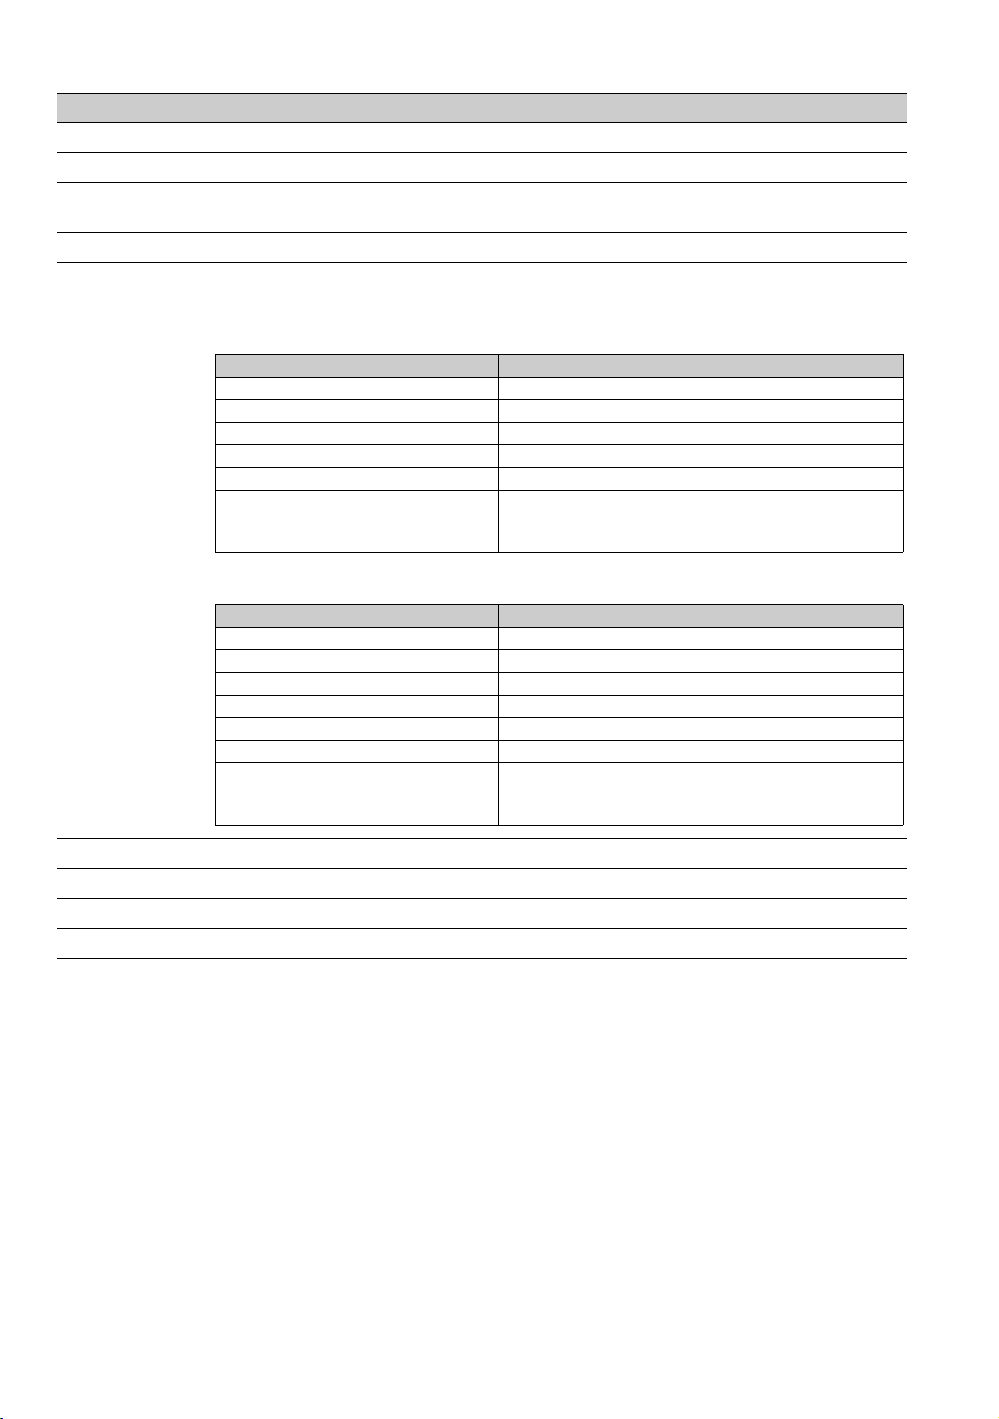
Item Description
1 POWER Press to turn on and off the Monitor.
2 INFO Press to display the current input information of selected external equipment.
3 MENU Press to display the MENU to access the MENU items such as the
Picture, Sound,
Screen, HDMI Settings, Monitor Settings and PC Settings.
4 V/v/B/b/OK Press V/v/B/b to move focus/highlight. Press OK to select/confirm an item.
5 TOOLS Press to display a list of convenient functions and menu shortcuts. The TOOLS menu items
vary based on current input and content.
Except HDMI-PC
Menu Item Reference Page/Details
Picture Adjustments See page 16
Sound See page 18
Power Saving See page 20
Motion Enhancer See page 17
Device Control See page 20
Sync’d HDMI Devices Displays a list of equipment with Control for HDMI
function connected to the unit. Select the HDMI
equipment you want to input and then press OK.
HDMI-PC
Menu Item Reference Page/Details
Picture Adjustments See page 16
Sound See page 18
Power Saving See page 20
H Center See page 21
V Center See page 21
Device Control See page 20
Sync’d HDMI Devices Displays a list of equipment with Control for HDMI
function connected to the unit. Select the HDMI
equipment you want to input and then press OK.
6 TV Lights up in red during the operations.
7 VOL +/– Press to adjust the volume.
8 MUTING Press to mute the sound. Press again or press VOL + to restore the sound.
9 EXIT Press to go back to the previous screen when displaying menu items and setting.
~
• The buttons on the remote other than those above cannot operate the unit.
US
14
Page 15
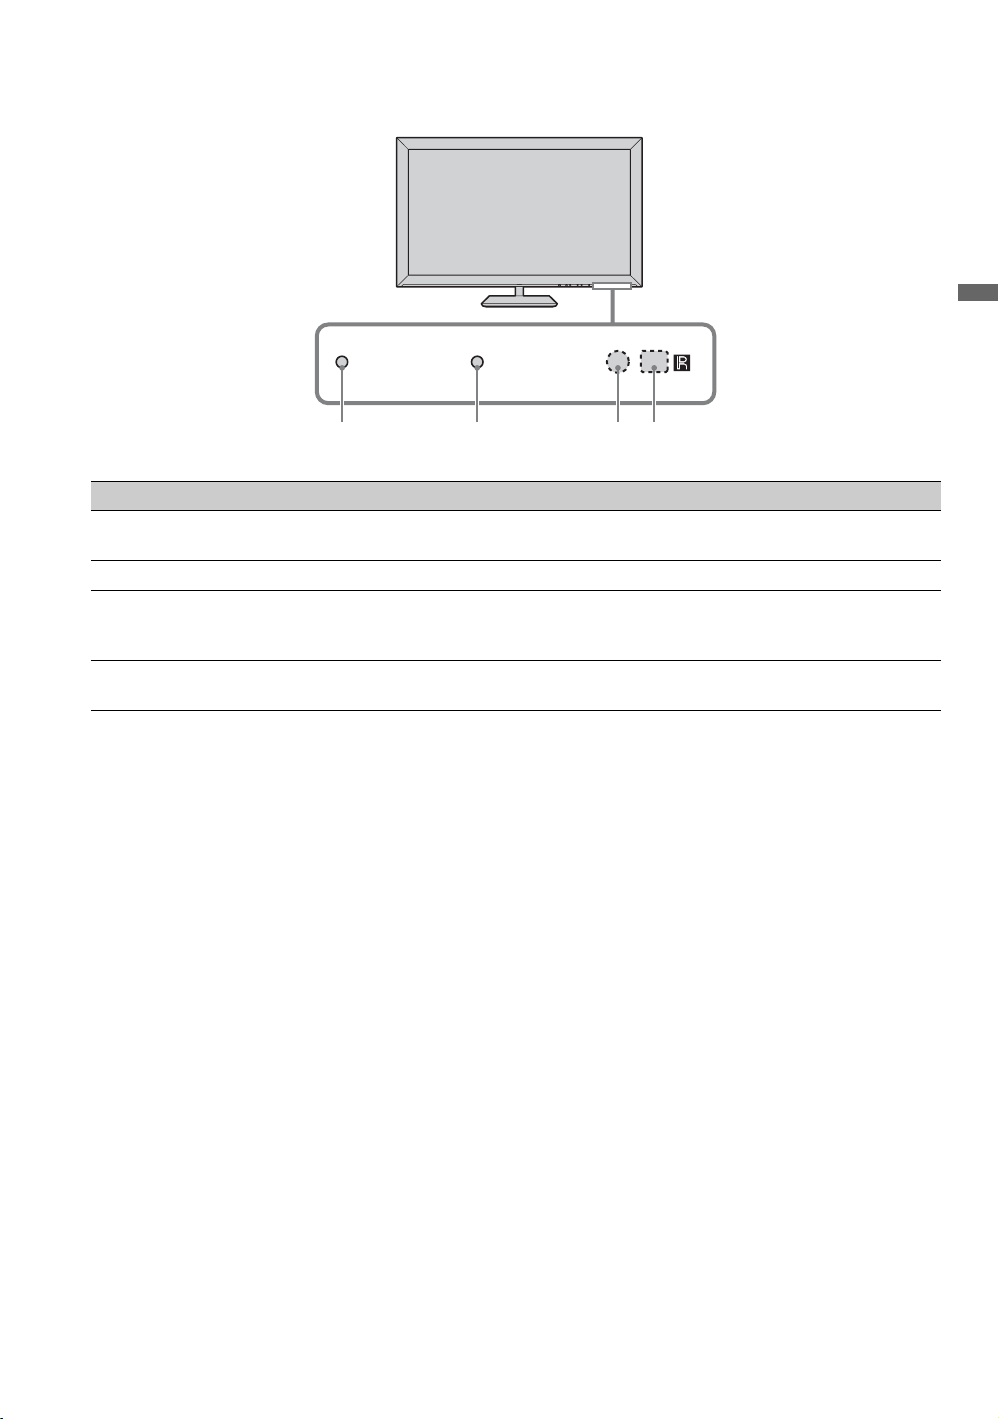
Indicators
12 34
PIC OFF POWER
Item Description
1 PIC OFF Lights up in green when the Picture Off feature is activated. For details, see page 20 (Picture
2 POWER LED Lights up in green when the unit is turned on.
3 Light Sensor Senses room light level and adjusts the screen brightness accordingly (see page 20 for details).
4 (IR) Infrared
Receiver
Off).
Do not put anything near the sensor or the nearby general area (as shown above), as its function
may be affected.
Receives IR signals from the remote control. Do not put anything near the sensor, as its function
may be affected.
Operating the LCD Monitor
15
US
Page 16
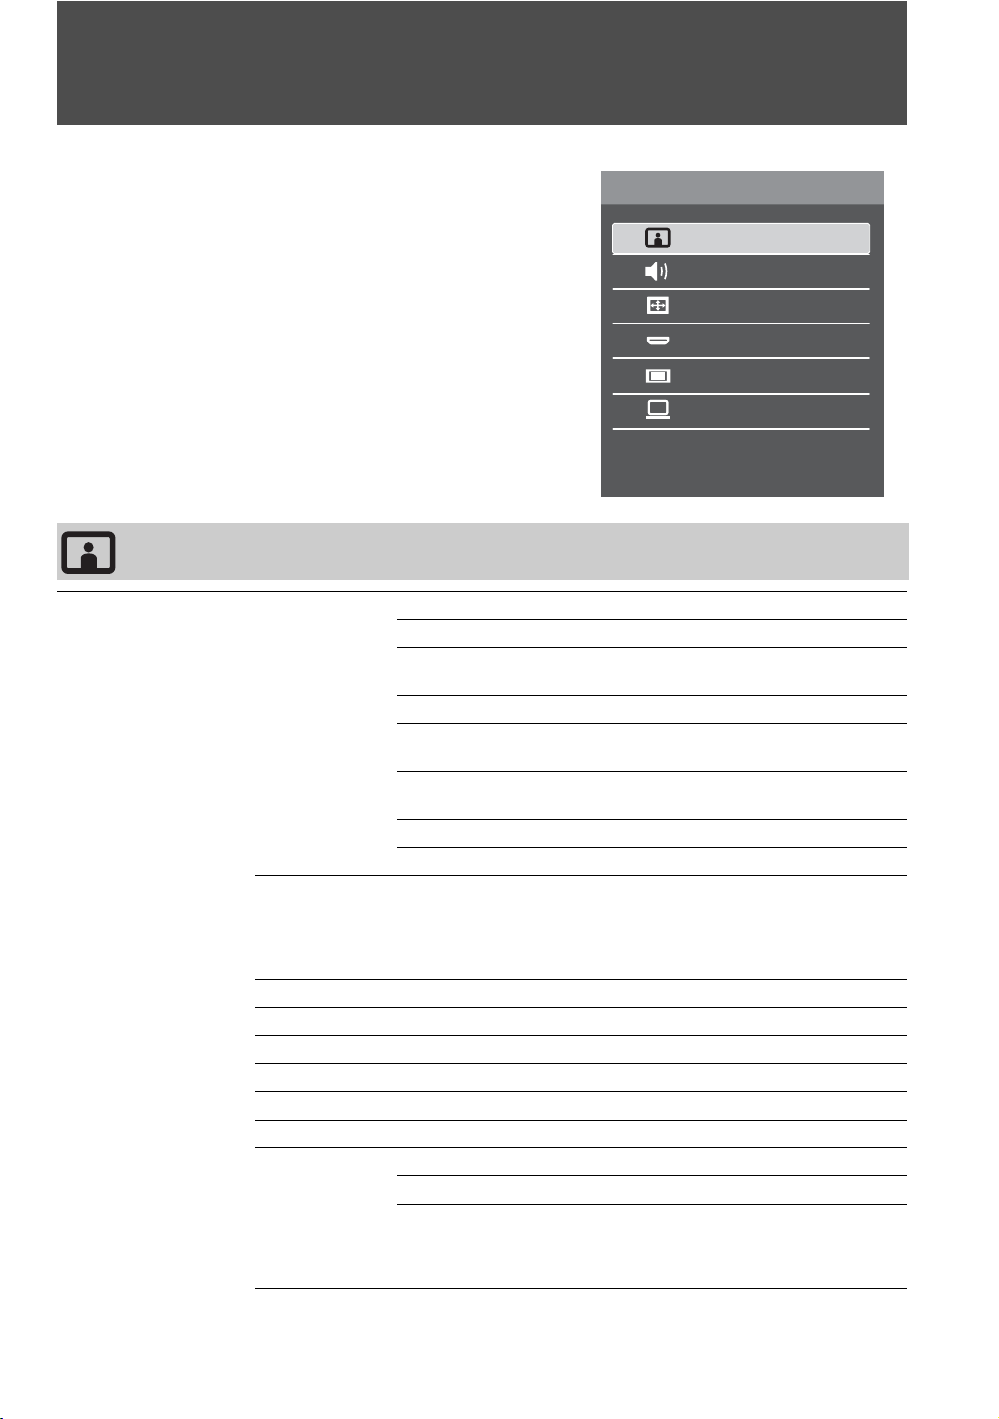
Using LCD Monitor Settings
1 Press MENU. The menu appears on the screen.
2 Press V/v to select the item, then press OK.
3 Follow the instructions on the screen.
4 Press MENU to exit.
Picture Settings
Picture Adjustments Picture Mode Vivid For enhanced picture contrast and sharpness.
Photo-Vivid* For enhancing contrast and sharpness.
Standard For standard picture settings. Recommended for
Photo-Standard*
Cinema For viewing film-based content. Most suitable for
Photo-Original* Images resemble the printed pictures from your
Custom Allows you to store your preferred settings.
Photo-Custom* Allows you to store your preferred settings.
* These options are not available when in PC timings.
home entertainment.
For standard viewing; select for home use.
viewing in a theater-like environment.
photo album.
MENU
Picture
Sound
Screen
HDMI Settings
Monitor Settings
PC Settings
16
US
~
• The options for Picture Mode may vary depending on the Video/Photo Optimizer
setting (see page 17).
Reset Resets the current settings to the default values.
Backlight Brightens or darkens the backlight.
Picture Increases or decreases picture contrast.
Brightness
Color Increases or decreases color intensity.
Hue Increases or decreases the green tones.
Color
Temperature
White adjustment
Brightens or darkens the picture.
Cool Gives the white colors a bluish tint.
Neutral Gives the white colors a neutral tint.
Warm 1, 2 Gives the white colors a reddish tint.
~
• The option Warm 1, 2 is not available for Vivid and Photo-Vivid.
Page 17
Sharpness Sharpens or softens the picture.
Noise Reduction
MPEG Noise
Reduction
Advanced
Settings
Reset Resets all the advanced settings to the default values.
Black Corrector Enhances black areas of the picture for stronger contrast.
Advanced C.E.
(Advanced Contrast
Enhancer)
Gamma Adjusts the balance between light and dark areas of the picture.
Clear White Emphasizes white and light colors.
Color Space Selects the range of color reproduction from Wide or Standard.
Live Color Makes colors more vivid and reproduces clear skin tones.
White Balance Adjusts the color temperature in detail.
Reduces the picture noise level.
Reduces the mosaic effect in MPEG-compressed video. Useful for
DVDs and Blu-ray.
Available in the following Picture Modes: Standard, Cinema,
Custom, Photo-Standard, Photo-Original, and Photo-Custom.
Automatically optimizes the backlight and contrast. This setting is
especially effective for dark picture scenes.
~
• Picture Adjustments settings can also be accessed by pressing TOOLS on the
remote control.
•Some Picture settings are not available with PC signal connected to HDMI input.
Motion Enhancer Activates Motion Enhancer to enhance the smoothness of picture movement and to reduce
blur.
High Provides smoother picture movement for film-based content.
Standard Provides smooth picture movement. Use this setting for standard use.
Off Use this setting when the High and Standard settings result in video
artifacts such as ghosting.
Using LCD Monitor Settings
~
• Depending on the video, you may not see the effect visually, even if you have changed
the setting.
• Motion Enhancer is not available when Game Mode is set to On.
CineMotion Automatically detects film-based content and applies an inverse 3-2 pull-down process
Game Mode Select On to optimize the enjoyment of fast paced video games where response time is
Video/Photo Optimizer Sets the picture settings to optimize the image quality of video (moving pictures) or photo
and a motion estimation engine to improve film content and de-interlacing performance.
Auto 1 Applies an inverse 3-2 pull-down process along with motion
estimation to obtain the smoothest picture quality and reduces artifacts
of moving images. Select for standard use.
Auto 2 Applies only the inverse 3-2 pull-down process. Picture movement
will be similar to the original film.
Off Turns off CineMotion. Use this setting when the Auto 1 or Auto 2
setting results in video artifacts such as ghosting.
important. Select Off to disable this feature.
(still image) content. Feature is only available for 1080i/p (excluding 1080/24p) content
connected to the HDMI input.
Video-A The unit will automatically set the picture settings for video or still
image content when Sony optional equipment that supports Video-A
mode is connected to the HDMI input.
Video Select to set the picture settings for video.
Photo Select to set the picture settings for photos.
~
• Game Mode and Video/Photo Optimizer features are not available when Theater Mode is set to On.
17
US
Page 18
Sound Settings
Sound Mode Dynamic Enhances treble and bass.
Standard Standard sound optimized for home use.
Clear Voice Suitable for spoken dialog.
Reset Resets the current settings to the default values.
Trebl e Increases or decreases higher-pitched sounds.
Bass Increases or decreases lower-pitched sounds.
Balance Emphasizes left or right speaker balance.
Surround S-FORCE
Front Surround
Off Select for normal stereo or mono reception.
Voice Zoom Adjusts the clarity of human voices. For example, if the voice of a news announcer is
indistinct, you can turn up this setting to make the voice clearer. Conversely, if you are
watching a sports program, you can turn down this setting to soften the voice of the
commentator.
Sound Booster The Sound Booster provides a fuller sound with a greater sense of depth and width, by
emphasizing the high and low frequency sounds. Select High, Low or Off for the amount
of boost you desire. Selecting Off will bypass the emphasis.
Provides a virtual surround sound experience made possible using just
two front speakers.
~
• Only available when Sound Mode is set to Standard.
Steady Sound Select On to stabilize the volume across all programs and commercials. Select Off to
Volume Offset Adjusts the volume level of the current input relative to other inputs.
disable this feature.
~
•
Sound
can also be accessed by pressing
TOOLS
on the remote control.
18
US
Page 19
Screen Settings
Wide Mode Wide Zoom Fills the screen with minimum distortion.
Normal Displays the 4:3 picture in its original aspect ratio when the original
Full Enlarges the picture horizontally to fill the screen when the original
Zoom Select to enlarge the picture horizontally and vertically to fill the
Auto Wide On Automatically changes Wide Mode setting based upon content. If
Off Turns off the Auto Wide option. Choose a Wide Mode from the
4:3 Default
Select the default screen
mode to use for 4:3
sources
Wide Zoom Enlarges the 4:3 picture to fill the 16:9 screen, displaying as much of
Normal Displays the 4:3 picture in its original aspect ratio.
Off Select to continue using the current Wide Mode setting when the
source is 4:3.
source is 4:3. When the original source is 16:9 (High-definition
source), select this mode to display the 16:9 picture in its original size.
screen while maintaining the aspect ratio.
frequent screen changes are disturbing to you, select Off.
Wide Mode option.
the original image as possible.
input is changed.
~
• 4:3 Default is not available if Auto Wide is set to Off.
• If 4:3 Default is set to anything but Off, the Wide Mode setting applies only to the
current input. When you change inputs, Wide Mode is automatically replaced with the
4:3 Default setting for 4:3 sources. To retain the current Wide Mode setting as inputs
are changed, set 4:3 Default to Off.
Display Area Full Pixel Displays the picture for 1080i, 1080p or 1080/24p sources in its
Normal Displays the picture in its original size.
-1/-2 Enlarges the picture to hide the edges of the picture.
Horizontal Center Allows you to move the position of the picture horizontally (left and right).
Vertical Center Allows you to move the position of the picture vertically (up and down).
Vertical Size Adjusts the vertical size of a standard-definition picture.
original size when Wide Mode is set to Full.
~
• Some options are not available with PC signal connected to HDMI input.
• Horizontal Center, Vertical Center and Vertical Size may not be available depending on the input signal.
Using LCD Monitor Settings
19
US
Page 20
HDMI Settings
HDMI inputs of this LCD monitor will recognize and communicate with other Sony equipment equipped
with Control for HDMI function. See page 12 for more information on Control for HDMI.
Control for HDMI On/Off feature allows your LCD monitor to communicate with other equipment that
supports Control for HDMI function.
Device Auto Power Off Select On to have your connected equipment with Control for HDMI function to power
off automatically when the LCD monitor is turned off. Select Off to disable this function.
This feature is available when Control for HDMI is On.
Monitor Auto Power OnSelect On to control your LCD monitor’s power on from your connected equipment with
Device List Update Creates or updates the HDMI Device List. Be sure to update the HDMI Device List when
Device List Displays a list of equipment with Control for HDMI function connected to the LCD
Control for HDMI function. Select Off to disable this function. This feature is available
when Control for HDMI is On.
you change the Control for HDMI compatible equipment connections or settings.
monitor.
~
• Press TOOLS while the equipment supporting Control for HDMI is connected to display the Device Control
options. The Device Control option provides access to the Menu, Options and Content List of your connected
equipment with your LCD monitor remote control.
• Some equipment with Control for HDMI does not support the Device Control feature.
Monitor Settings
Power Saving Reduces the power consumption by adjusting the backlight brightness. This also enhances
the black level. Select from Off, Low, High and Picture Off.
~
• While Picture Off is set, pressing VOL +/– or MUTING buttons will not disable this
function. Press other buttons to disable it.
Light Sensor Enables the automatic picture (screen) brightness control. The Light Sensor measures
the room brightness which allows the unit to automatically adjust the backlight brightness
based on the picture settings and the ambient room light conditions.
~
•
Be sure not to put anything around the sensor, as its function may be affected (see page 13).
• In low light the range of the backlight control is reduced when the Light Sensor is set
to On.
Product Information Displays your LCD monitor’s product information.
Reset All Restores all settings to factory defaults.
Language Select the language of your choice from English, Español and Français to be used for
displaying all the on-screen settings.
20
US
Page 21
PC Settings
Wide Mode Normal Select to display the picture in its original resolution and aspect ratio.
Full 1 Select to enlarge the picture to fill the screen, while maintaining its original
aspect ratio.
Full 2 Select to enlarge the picture to fill the screen.
Reset Resets the current settings to the default values.
H Center Allows you to move the position of the picture horizontally (left and right).
V Center Allows you to move the position of the picture vertically (up and down).
Using LCD Monitor Settings
21
US
Page 22

Optional Accessories
This unit is designed for use with the following optional accessories, such as the Wall-Mount Bracket (as
of October 2008).
Sufficient expertise is required for installing such optional accessories. Be sure to subcontract the
installation to licensed contractors. Read the instruction manual supplied with the accessories together
with this manual for secure installation.
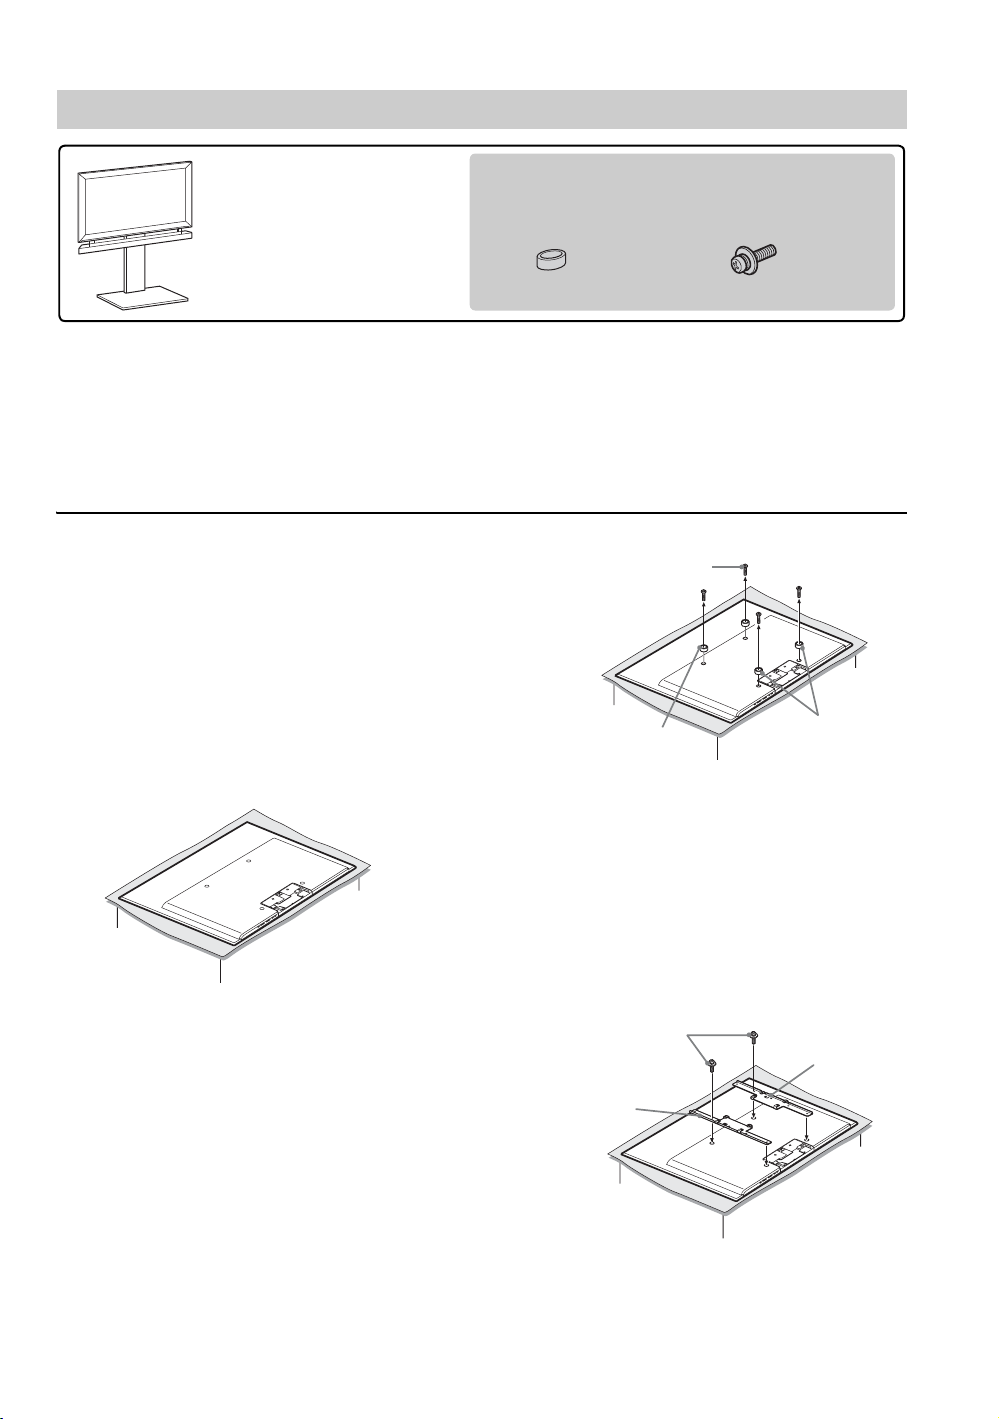
Using with the Wall-Mount Bracket/Speaker System
Wall-Mount Bracket:
SU-WL700
Speaker System:
Use the accessories supplied with this unit when
installing.
Spacers (black) (4)
SS-WAL700
Sound does not output from the LCD Monitor when the supplied Table-Top Stand is removed to use the LCD Monitor
with the Wall-Mount Bracket. In this case, use the LCD Monitor with the exclusive Speaker System (optional) to
output sound.
Installing With the Unit.
The following steps must be performed to correspond with the installation steps in the instruction manual
of the optional accessories. Follow the instructions in this manual referring to the instruction manual
supplied with the accessories. For explanations referred to in ( ) in the installation steps, see the same steps
in the instruction manual supplied with the accessories.
For Speaker System users, first see the instruction
2 Place spacers (4-2).
manual of Wall-Mount Bracket.
1 Remove four screws
1 Make sure that the Table-Top Stand is
from the rear of the
LCD Monitor.
removed (if necessary) (4-1).
• The stand is not attached to the LCD Monitor
when unpacking. Place the unit face down.
• If the Table-Top Stand has already been attached,
remove the stand (see page 6).
US
22
2 Place spacers
(black - supplied with
your LCD Monitor).
3 Follow steps 4-3 to 4-4 referring to the
instruction manual supplied with the WallMount Bracket.
When using only the Wall-Mount Bracket
Go to step 6 in this manual.
When using the Speaker System
Go to step 4 in this manual.
Page 23
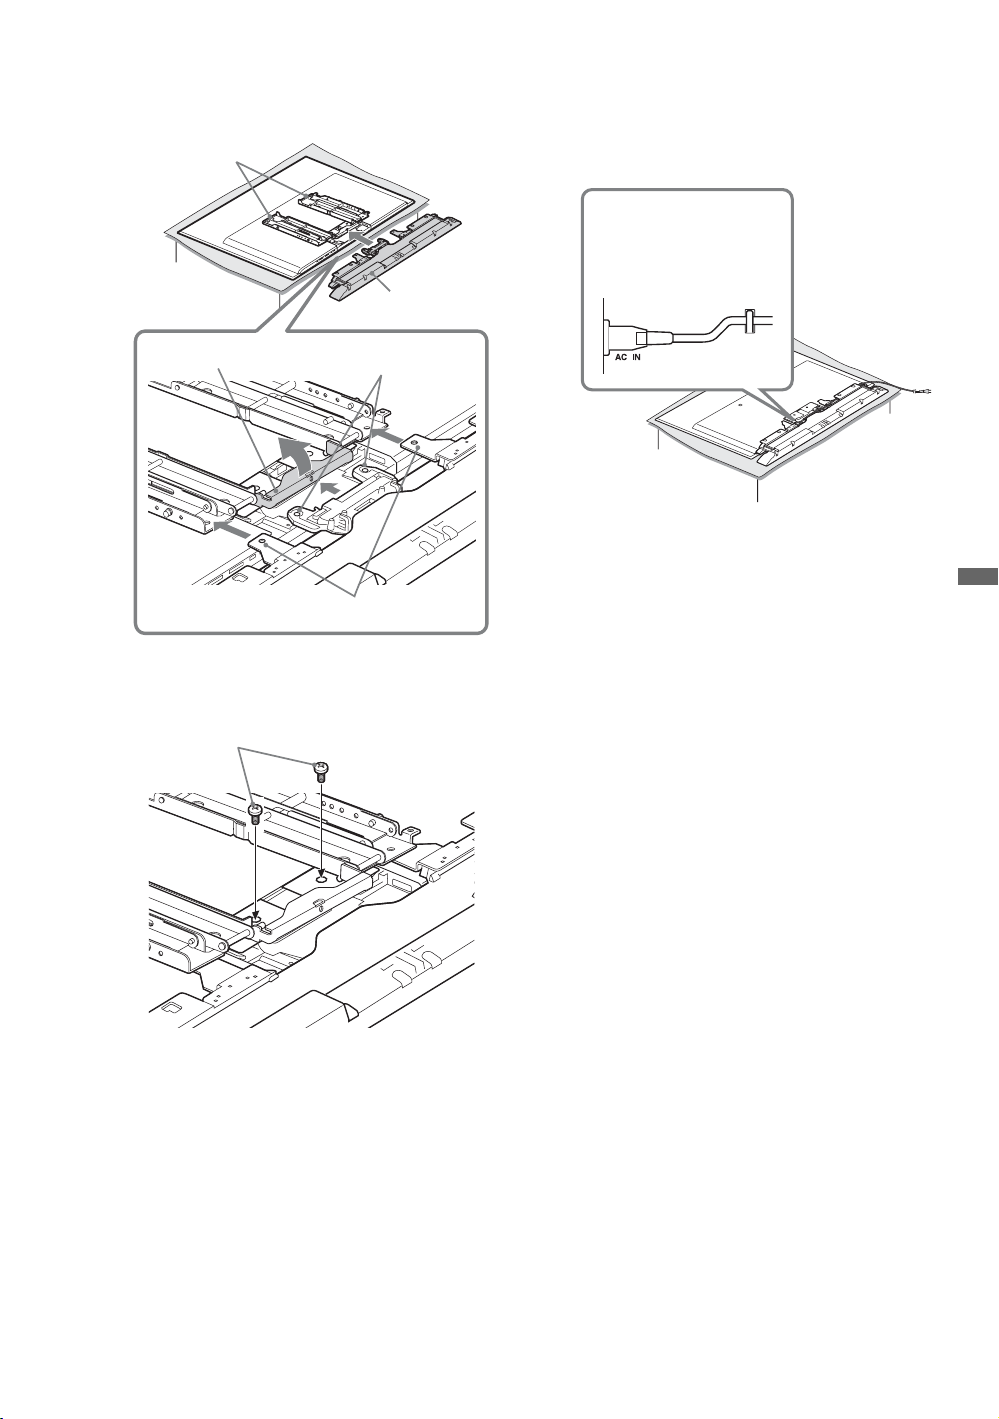
4 Lift the Lock Bracket to insert the Speaker
System (4-5).
Mounting Bracket
Speaker System
7 Connect the AC power cord (supplied with
your LCD Monitor) and the HDMI cable
(supplied with your LCD Monitor) (5-1).
1 Connect the power cord.
2 Fix to the hook.
Lock Bracket
This part will be above the Mounting Bracket.
Insert in the junction part for
the stand of the LCD Monitor.
5 Fix the Speaker System with two screws
(supplied with your Speaker System).
Screws (supplied with your Speaker System)
When installing the Speaker System
Fix the power cord with the two hooks, and
drop the cord down from the right edge of the
LCD Monitor.
Drop the HDMI cable from the left or right
edge of the LCD Monitor.
8 Follow the instruction manual supplied with
the Wall-Mount Bracket to continue installing
this unit on the wall.
~
• You cannot connect cables to the LCD Monitor after it
is wall-mounted or installed on the Floor Stand.
• When installing the LCD Monitor to a wall or the
Floor Stand, lift the unit together with the cloth under
the unit. Do not hold the speaker grill.
Optional Accessories
6 See the instruction manual supplied with the
Wall-Mount Bracket, and follow steps 4-6 to
4-7.
23
US
Page 24
Using with the Floor Stand/Speaker System
Floor Stand:
SU-FL71M
Speaker System:
SS-WAL700
Sound does not output from the LCD Monitor when the supplied Table-Top Stand is removed to use the LCD Monitor
with the Floor Stand. In this case, use the LCD Monitor with the exclusive Speaker System (optional) to output sound.
Use the accessories supplied with this unit when
installing.
Spacers (silver) (2)* Screws M6 × 20 (4)
* Use four spacers when the Speaker System is not installed.
Installing With the Unit.
The following steps must be performed to correspond with the installation step in the instructions manual
of the optional accessories. Follow the instructions in this manual referring to the instruction manual
supplied with the accessories.
For Speaker System users, first see the instruction
manual of the Floor Stand.
Follow steps below instead of “2 Preparing for
1 Remove four screws
from the rear of the
LCD Monitor.
the installation of the TV” (page 6) of the
instruction manual supplied with the Floor Stand.
1 Make sure that the Table-Top Stand is
removed (if necessary).
• The stand is not attached to the LCD Monitor
when unpacking. Place the unit face down.
2 Place spacers
(silver - supplied with
your LCD Monitor).
When the Speaker
System is installed,
place two spacers
(yellow - supplied with
your Speaker System)
on the lower part.
• If the Table-Top Stand has already been attached,
remove the stand (see page 6).
2 Place spacers.
When the Speaker System is not installed, use
all four spacers (silver - supplied with your
LCD Monitor).
US
24
3 Install the Bracket I J on the LCD Monitor.
1 Place the Bracket I J aligning with the screw
holes that became available in step 2.
2 Temporarily fix two Screws M6 × 20 (supplied
with your LCD Monitor) in the upper holes of
the Bracket. When the Speaker System is not
installed, tighten all four screws.
Screws M6 × 20
(supplied with your
LCD Monitor)
I
Go to step 5 when using only the Floor Stand.
J
Page 25

4 Insert the Speaker System.
Insert in the junction part for the
stand of the LCD Monitor.
Insert this part under the Bracket I J.
Speaker System
6 Connect the AC power cord (supplied with
your LCD Monitor) and the HDMI cable
(supplied with your LCD Monitor), then drop
them down from the center of the LCD
Monitor.
1 Connect the power cord.
2 Drop the cord down
from the center.
7 Follow the instruction manual supplied with
the Wall-Mount Bracket to continue the
installation.
Optional Accessories
5 Fix the Speaker System with screws, then
attach the hook M to the Bracket I J.
Tighten the upper two screws (temporarily
fixed in step 3).
Screws (supplied with
your Speaker System)
O
M
Screws M6 ×
20 (supplied
with your LCD
Monitor)
~
• You cannot connect cables to the LCD Monitor after it
is wall-mounted or installed on the Floor Stand.
• When installing the LCD Monitor to a wall or the
Floor Stand, lift the unit together with the cloth under
the unit. Do not hold the speaker grill.
25
US
Page 26
Other Information
Troubleshooting
If you have questions, service needs, or require
technical assistance related to the use of your
Sony LCD monitor, please visit our website or
call one of the following numbers:
http://www.sony.com/tvsupport
http://www.sony.ca/support
for US Support
for Canadian
Support
1-800-222-SONY(7669) for US Support
1-877-899-SONY(7669) for Canadian Support
Condition Explanation/Solution
No picture
No picture • Check the Power Saving settings (see page 20).
No picture from the video
source
• Check the connection between the optional video equipment and the LCD
monitor.
Poor picture
Picture quality not as good as
viewed at the store
No color / Dark picture / Color
is not correct / The picture is
too bright
Blurry picture / Poor color • Transporting the unit from a cold to a warm location or a sudden change in
• Picture quality depends on the signal content.
• Adjust the Picture Mode options in the Picture settings (see page 16).
• If you set the Power Saving mode to Low or High, it will enhance the black
level (see page 20).
room temperature may cause moisture condensation, resulting in a blurry
picture or poor color. Turn off the unit and wait a few hours before powering on
again.
No sound / Noisy sound
No sound / Good picture • Check the volume control.
• Press
14).
MUTING
or
VOL +
so that “Muting” disappears from the screen (
BRAVIA Sync
Cannot find connected
BRAVIA Sync HDMI
equipment
Second A/V receiver is not
listed on the Device List
• Make sure that the Control for HDMI is set up on both the LCD monitor and
the optional equipment compatible with BRAVIA Sync (see page 12).
• Only one A/V receiver may be used with the BRAVIA Sync and Control for
HDMI functions at one time (see page 20).
PC Input
No picture / No signal • Confirm the PC is correctly connected to the unit with the HDMI IN.
Poor Picture • Adjust the resolution (see page 11).
• Ensure the output signal from the PC is one of the formats listed on page 11.
General
Wide Mode changes
automatically
Black bands appear at the
edges of the screen
• The current Wide Mode setting is automatically replaced with the 4:3
Default setting, if 4:3 Default in the Screen settings is set to other than Off.
If you want to lock in Wide Mode selected with WIDE on the remote control,
set 4:3 Default to Off in the Screen settings (see page 19).
• Check the Auto Wide option in the Screen settings (see page 19).
• Some wide screen programs are filmed in aspect ratios that are greater than 16:9
(this is especially common with theatrical releases). Your LCD monitor will
show these programs with black bands at the top and bottom of the screen. For
more details, check the documentation that came with your DVD (or contact
your program provider).
• Programs in 4:3 aspect ratio will have bands on left and right sides of the screen.
see
page
26
US
Page 27
Condition Explanation/Solution
Certain programs on DVD or
other digital sources display a
loss of detail, especially during
fast-motion or dark scenes
• This is due to the digital compression of the source content used by certain
DVDs which may cause your LCD monitor screen to display less detail than
usual, or cause artifacts (small blocks or dots, pixelations) to appear on your
screen. These signal compressions are more visible and are dependent on the
clarity and resolution of the unit.
Remote control does not
operate
• To determine if the problem is with the remote control or not, press a button on
the unit.
• Press VOL +/- to adjust the volume.
• Press TV on the remote control when the button is not light up.
• Check the polarity of the batteries or replace the batteries.
• Point the remote control at the remote control sensor located at the front of the
unit.
• Keep the remote control sensor area clear from obstacles.
• Fluorescent lamps can interfere with your remote control operation; try turning
off the fluorescent lamps.
• Check the button that can operate this unit (see page 13).
Other Information
27
US
Page 28

Specifications
Model KLV-40ZX1M
System
Panel system
Speaker output
Input/Output jacks
HDMI IN
Power and others
Power requirement
Power consumption
in use
in standby
Screen size
(inches measured diagonally)
Display resolution
Speaker/Full range (4) (mm)
(inches)
Wo o f e r ( 1 ) ( m m )
(inches)
Dimensions
with stand (mm)
(inches)
without stand (mm)
(inches)
wall-mount hole pattern (mm)
wall-mount screw size (mm)
Mass
with stand (kg)
lb.)
(
without stand (kg)
lb.)
(
Supplied accessories
Optional accessories
LCD (Liquid Crystal Display) Panel
5 W + 5 W, 10 W (Woofer)
HDMI: Video: 480i, 480p, 720p, 1080i, 1080p, 1080/24p / Audio: Two channel linear PCM 32, 44.1 and 48 kHz, 16, 20
and 24bits
120-240 V AC, 50/60 Hz
188 W
0.3 W (120 V)
0.4 W (240 V)
40
1,920 dots (horizontal) × 1,080 lines (vertical)
ø30
3
/16
ø1
58 × 90
1
/4 × 3 9/16
2
986 × 682 × 307
7
/8 × 26 7/8 × 12 1/8
38
986 × 599 × 28
7
38
/8 × 23 5/8 × 1 1/8
300 × 300
M6 (length: refer to diagram on page 7)
15.0
33.1
12.2
26.9
See “Checking the Accessories” on page 4.
Wall-Mount Bracket / TV stand: see page 2
~
• Optional accessories availability depends on its stock.
• Design and specifications are subject to change without notice.
US
28
Page 29

For Your Convenience
Please contact Sony Customer Support directly if you:
• Have questions on the use of your LCD Monitor after reading your Operatin Instruction manual
• Experience difficulty operating your LCD Monitor
For United States
http://www.sony.com/tvsupport
or to speak with a support representative: 1-800-222-SONY(7669)
For Canada
http://www.sony.ca/support
or to speak with a support representative: 1-877-899-SONY (7669)
Sony will work to resolve your questions more quickly than your retailer or place of purchase.
Please Do Not Return the Product to the Store
On-line Registration Available:
Be sure to register your LCD Monitor
United States Canada
http://productregistration.sony.com http://www.SonyStyle.ca/registration
Other Information
29
US
Page 30

Fiche d’identification
Les numéros de modèle et de série sont
indiqués dans la partie intérieure du
couvercle des terminaux. Inscrivez ces
numéros dans les espaces ci-dessous.
Faites-y référence chaque fois que vous
consultez votre détaillant Sony au sujet de
cet appareil.
N° de modèle
N° de série
ATTENTION
Pour prévenir les chocs électriques et
l’exposition des broches, ne pas utiliser cette
fiche CA polarisée avec une rallonge, une prise
de courant ou une autre sortie de courant, sauf
si les broches peuvent être insérées jusqu’au
fond.
s Faites uniquement fonctionner l’appareil
sur un courant de 120 - 240 V CA.
Déclaration de conformité
Appellation commerciale : SONY
Modèle : KLV-40ZX1M
Partie responsable : Sony Electronics Inc.
Adresse : 16530 Via Esprillo,
San Diego, CA 92127 U.S.A.
Numéro de téléphone : 858-942-2230
Cet appareil est conforme à la section 15
des règlements de la FCC. Le
fonctionnement est soumis aux deux
conditions suivantes : (1) cet appareil ne
doit pas provoquer des interférences
gênantes; et (2) cet appareil doit pouvoir
accepter les interférences reçues, y compris
les interférences risquant de déclencher des
opérations non désirées.
AVIS
Cet appareil a été soumis à l’essai et s’est avéré
conforme aux limites pour un appareil
numérique de classe B, conformément à la
section 15 du règlement de la FCC. Ces normes
sont conçues pour assurer une protection
raisonnable contre les interférences nuisibles
dans un environnement résidentiel. Cet
appareil génère, utilise et peut émettre de
l’énergie radioélectrique et, s’il n’est pas
installé ou utilisé selon les directives, peut
causer des interférences nuisibles aux
communications radio.
Cependant, il n’existe aucune garantie que des
interférences ne se produiront pas dans une
installation particulière. Si ce matériel est
source d’interférences nuisibles pour la
réception radio ou télévisée, ce qui peut être
déterminé en mettant l’appareil hors tension,
puis sous tension, il est recommandé de tenter
d’éliminer ces interférences en appliquant
l’une ou plusieurs des mesures suivantes :
s Réorienter ou déplacer l’antenne
réceptrice.
s Éloigner l’appareil du récepteur.
s Brancher l’appareil dans une prise d’un
circuit différent de celui qui alimente le
récepteur.
s Consulter le détaillant ou un technicien
radio ou télévision qualifié pour obtenir de
l’aide.
Conformément aux règlements de la FCC,
vous êtes averti que tous les changements
ou modifications non expressément
approuvés dans ce manuel pourraient
annuler tous vos droits relatifs à l’ utilisation
de ce produit.
Pour les clients résidant au
Canada
Cet appareil numérique de la classe B est
conforme à la norme NMB-003 du Canada.
ATTENTION
N’utilisez le moniteur ACL Sony suivant
qu’avec le support de fixation murale ou la
base de téléviseur ci-dessous.
Numéro de modèle de
moniteur ACL Sony
KLV-40ZX1M
Numéro de modèle
du support de fixation
murale Sony
Numéro de modèle
de la base de
téléviseur Sony
L’utilisation avec toute autre support de
fixation murale ou la base de téléviseur peut
provoquer l’instabilité de l’appareil et causer
des blessures.
Note au consommateur
L’installation de cet appareil nécessite une
certaine compétence. Veillez à confier
l’installation à un détaillant Sony ou à un
entrepreneur autorisé et portez une attention
particulière à la sécurité pendant l’installation.
Information de licence
Macintosh est une marque de commerce
d’Apple Inc., déposée aux États-Unis et dans
d’autres pays ou régions.
HDMI, le logo HDMI et High-definition
Multimedia Interface sont des marques de
commerce ou des marques déposées de HDMI
Licensing, LLC.
Fergason Patent Properties, LLC:
U.S. Patent No. 5,717,422
U.S. Patent No. 6,816,141
Blu-ray Disc est une marque de commerce.
« BRAVIA » et , S-Force,
BRAVIA Sync, , DMe
et « x.v. Color » sont des marques de
commerce ou des marques déposées de Sony
Corporation.
« PLAYSTATION » est une marque déposée
et « PS3 » est une marque de commerce de
Sony Computer Entertainment Inc.
Adobe est une marque déposée ou une marque
de commerce d’Adobe Systems Incorporated
aux États-Unis et/ou dans d’autres pays/
régions.
SU-WL700
SU-FL71M
x
, MICRO VAULT
FR
2
Page 31
Table des matières
Aperçu
Bienvenue dans le monde du moniteur ACL BRAVIA®............................................................................4
Vérification des accessoires.......................................................................................................................4
Avant de commencer
1. Installer l’appareil.....................................................................................................................................5
Transporter l’appareil...............................................................................................................................5
Préparer l’installation à l’aide d’un support de table................................................................................5
Retirer le support de table.......................................................................................................................6
Préparer l’installation à l’aide d’un support de fixation murale ................................................................7
Installation de l’appareil contre un mur ou dans un endroit fermé...........................................................7
Fixer l’appareil.........................................................................................................................................8
2. Localiser les connecteurs d’entrée ......................................................................................................10
Raccordement du cordon d’alimentation CA et du câble HDMI ............................................................10
3. Raccordement d’autres appareils.........................................................................................................11
4. Réglage de la langue..............................................................................................................................12
Utiliser BRAVIA Sync avec la fonction Commande pour HDMI.............................................................12
Faire fonctionner le moniteur ACL
Insérer les piles dans la télécommande...................................................................................................13
Utiliser la télécommande...........................................................................................................................13
Commandes du moniteur ACL et touches de la télécommande...........................................................13
Indicateurs ..................................................................................................................................................15
Utiliser les réglages du moniteur ACL
Configuration Image ........................................................................................................................16
Configuration Son............................................................................................................................18
Configuration Écran.........................................................................................................................19
Configurations HDMI .......................................................................................................................20
Réglages du moniteur......................................................................................................................20
Configuration PC .............................................................................................................................21
Accessoires en option
Utilisation avec un support de fixation murale et des enceintes............................................................22
Utilisation avec un meuble et des enceintes .........................................................................................24
Information complémentaire
Dépannage..................................................................................................................................................26
Caractéristiques techniques.....................................................................................................................28
FR
Service à la clientèle
Canada http://fr.sony.ca/support
États-Unis http://www.sony.com/tvsupport
Enregistrement en ligne
Canada http://www.sonystyle.ca/fr/registration
FR
3
Page 32

Aperçu
Bienvenue dans le monde du moniteur ACL BRAVIA
Nous vous remercions d’avoir fait l’acquisition de ce moniteur ACL BRAVIA® de Sony. La qualité
d’image affichée par votre moniteur ACL BRAVIA sera aussi bonne que la qualité du signal provenant des
appareils raccordés.
Votre moniteur ACL BRAVIA est conforme à la norme Energy Star.
®
Vérification des accessoires
Télécommande RM-VL610A (1)
Piles AA (2)
Cordon d’alimentation CA (1)
Câble HDMI (1)
Support de table (1) et vis M5 × 8 (4)
Couvercle des terminaux (1)
Entretoises (noires) (4)
Entretoises (argent) (4) et vis M6 × 20 (4)
Adaptateur de soutien du support (1)
Mode d’emploi (le présent manuel) (1)
Carte de garantie (1)
Feuillet de consignes d’utilisation et de sécurité (1)
Mode d’emploi de la télécommande (1)
Liste de codes (1)
ATTENT ION
Lorsque le moniteur ACL est utilisé pendant une longue période, les parties avant et arrière du panneau se
réchauffent. Elles peuvent être très chaudes au toucher. Pour plus de détails à ce sujet, consultez l’encart
fourni.
FR
4
Page 33

Avant de commencer
1. Installer l’appareil
Cet appareil peut être installé sur un mur à l’aide
d’un support de fixation murale ou placé sur une
base de téléviseur (tous deux vendus séparément).
La présente section porte sur les sujets suivants :
• Comment transporter l’appareil
• Préparer l’installation à l’aide d’un support de
table
• Préparer l’installation à l’aide d’un support de
fixation murale
• Installation contre un mur ou dans un endroit
fermé
• Fixer l’appareil
Transporter l’appareil
Assurez-vous de suivre les consignes suivantes
pour protéger votre bien et éviter les blessures
graves.
• Avant de transporter l’appareil, débranchez tous
les câbles.
• Le transport de cet appareil doit être effectué par
au moins deux personnes.
• Lorsque vous transportez l’appareil, placez vos
mains tel qu’illustré et tenez solidement
l’appareil. Ne soumettez pas l’appareil à des
chocs ou à des vibrations, ni à une force
excessive.
Préparer l’installation à l’aide d’un
support de table
Suivez les étapes d’assemblage pour installer
l’appareil sur le support de table.
1 Retirez le support de table, la boîte
d’accessoires et le sac d’accessoires de la
boîte. Les vis et le feuillet se trouvent dans le
sac d’accessoires fixé à l’arrière du moniteur
ACL.
Pour des raisons de sécurité et de protection
de l’appareil, Sony vous recommande
fortement d’utiliser les vis fournies avec
l’appareil.
~
• N’enlevez pas le ruban bleu retenant la plaque arrière
du moniteur ACL jusqu’à ce que l’installation du
support de table soit terminée.
Sac d’accessoires
Support de table
Boîte d’accessoires
Avant de commencer
• Soulevez l’appareil en plaçant la paume de votre
main directement en dessous du panneau, mais
n’imposez pas de charge sur le panneau ACL.
Veillez à tenir le panneau par sa partie inférieure.
Moniteur ACL
2 Placez le support de table sur une surface
plane et solide, puis retirez le couvercle du
support du support de table.
Couvercle du
support
(Suite)
FR
5
Page 34

3 Alignez la marque F, puis appuyez le
moniteur ACL contre le manche du support de
table et faites glisser délicatement le moniteur
ACL sur le manche. Assurez-vous de
travailler avec au moins une autre personne.
Marque F
Retirer le support de table
Si vous comptez installer le moniteur ACL au mur
ou sur le meuble (en option), retirez le support de
table.
1 Placez le moniteur ACL face vers le bas.
Placez une surface matelassée (feuille
d’emballage ou autre) sur une table plus large
que le moniteur ACL, puis placez le moniteur
ACL sur la table en laissant dépasser le
support du bord de la table. Assurez-vous de
travailler avec au moins une autre personne.
Feuille d’emballage
ou autre
2 Retirez les quatre vis du support de table.
4 Fixez le moniteur ACL au support de table
avec les vis fournies. Fixez d’abord les deux
vis du bas, puis les deux vis du haut.
2 Vis du haut
1 Vis du bas
~
• Si vous utilisez un tournevis électrique, réglez le
couple de serrage à environ 1,5 N·m {15 kgf·cm}.
• N’appliquez pas de pression sur l’écran ACL ou sur le
cadre entourant l’écran.
FR
6
~
• N’utilisez pas les vis que vous avez retirées du support
de table avec le support de fixation murale ou le
meuble.
• Lorsque vous transportez le moniteur ACL, déplacezle en plaçant une surface matelassée dessous.
• Tenez le support de table fermement avec les deux
mains.
Page 35
Préparer l’installation à l’aide d’un
support de fixation murale
Ce modèle est prêt pour l’installation murale. Pour
plus de détails à ce sujet, consultez la page 22.
• Pour des raisons de sécurité et de protection de
l’appareil, Sony recommande fortement que
vous utilisiez le modèle de support de fixation
murale conçu pour votre moniteur ACL et que
l’installation murale soit effectuée par un
détaillant Sony ou un représentant agréé.
• Une certaine expertise est nécessaire pour
l’installation de ce moniteur ACL, en particulier
en ce qui concerne la solidité du mur en relation
avec le poids de l’appareil.
• Lorsque vous fixez les crochets de montage au
moniteur ACL, assurez-vous d’utiliser les vis
fournies avec le support de fixation murale.
Les vis fournies sont conçues de manière à
dépasser de 8 à 12 mm de la surface de fixation
de l’entretoise.
Le diamètre et la longueur des vis varient selon le
modèle de support de fixation murale.
L’utilisation d’autres vis que celles qui sont
fournies peut occasionner des dommages
internes au moniteur ACL ou provoquer sa chute
et d’autres dangers.
Lors de la fixation au support de fixation murale
8–12 mm
Entretoise (noire)
Installation de l’appareil contre un
mur ou dans un endroit fermé
Assurez-vous que l’air circule adéquatement
autour du moniteur ACL. Tel qu’illustré cidessous, laissez suffisamment d’espace autour de
l’appareil. Évitez d’utiliser l’appareil à des
températures inférieures à 5 °C (41 °F).
Installation sur support
10 cm
(4 pouces)
Laissez au moins cet espace autour de l’appareil.
Installation au mur
10 cm
(4 pouces)
N’installez jamais l’appareil de la manière suivante :
La circulation
d’air est bloquée.
30 cm
7
/
pouces)
(11
8
30 cm
7
(11
pouces)
/
8
10 cm (4 pouces)
10 cm
(4 pouces)
10 cm
(4 pouces)
Laissez au
moins cet
espace autour
de l’appareil.
La circulation
d’air est bloquée.
pouces)(2
3
6 cm
/
8
Avant de commencer
Vis M6 × 16 (fournies avec le support
de fixation murale)
Crochet de montage
Arrière du moniteur ACL
Lors de la fixation au meuble
8–12 mm
Entretoise (argent)
Vis M6 × 20 (fournies avec le
moniteur ACL)
Crochet de montage
Arrière du moniteur ACL
• Assurez-vous de ranger les vis non utilisées et le
support de table dans un endroit sûr jusqu’à ce que
vous soyez prêt à fixer le support de table. Gardez
les vis hors de la portée des jeunes enfants.
Pour plus de détails sur l’utilisation du support de
fixation murale compatible avec votre modèle,
visitez le site
www.sony.com/accessories
Ou encore, téléphonez au
1-800-488-7669 (aux États-Unis)
1-877-899-7669 (au Canada)
Mur
Mur
~
• Une circulation d’air inadéquate peut faire surchauffer
l’appareil et causer des dommages à l’appareil ou
déclencher un incendie.
Tenez compte de ce qui suit pour une
meilleure qualité d’image
• N’exposez pas l’écran à la lumière directe
d’une lampe ou du soleil.
• Utilisez un éclairage localisé provenant du
plafond ou placez un rideau opaque aux
fenêtres faisant face à l’écran.
• Installez l’appareil dans une pièce dont le sol
et les murs sont d’un matériau non
réfléchissant.
(Suite)
FR
7
Page 36

• Si l’appareil est déplacé d’un endroit froid à
un endroit chaud, dû au changement soudain
de température de la pièce, l’image peut
devenir floue ou les couleurs peuvent être de
mauvaise qualité à cause de la condensation
de l’humidité. Si cela se produit, laissez la
condensation s’évaporer pendant quelques
heures avant de mettre l’appareil sous tension.
Fixer l’appareil
Sony recommande fortement de prendre
les mesures nécessaires pour prévenir le
basculement de l’appareil. Un appareil qui
n’est pas fixé solidement peut basculer et
entraîner des dommages matériels, des
blessures corporelles graves ou même la mort.
Éviter le basculement de l’appareil
s Fixez l’appareil à un mur et/ou à un support.
s Ne laissez pas les enfants jouer ou monter sur
les meubles et les appareils.
s Évitez de placer ou d’accrocher des objets sur
l’appareil.
s N’installez jamais l’appareil sur :
• des surfaces glissantes, instables et/ou
inégales.
• un meuble qui peut facilement servir
d’escalier, comme une commode à tiroirs.
s Installez l’appareil à un endroit où il ne peut
pas être tiré, poussé ou renversé.
s Acheminez les cordons d’alimentation CA et
les cordons connecteurs afin qu’ils ne soient
pas accessibles aux enfants curieux.
Utilisez une base de téléviseur Sony
Utilisez une base de téléviseur indiquée par Sony
(consultez la page 2) et suivez le mode d’emploi
fourni avec la base de téléviseur Sony.
Attache angulaire
Base
Fixer l’appareil à la base
Utilisez l’adaptateur de support (fourni), ainsi
qu’une corde ou une chaîne.
1 Retirez la vis du support de table.
2 Fixez l’adaptateur de support au support de
table, puis fixez la corde ou la chaîne à
l’adaptateur.
3 Fixez la corde ou la chaîne à la base (non
fournie). Assurez-vous qu’il n’y a pas de mou
excessif dans la corde ou la chaîne.
1
Vis
23
Vis
Adaptateur de
support
Corde ou chaîne
Vis
Si une base de téléviseur autre que celles indiquées
par Sony est utilisée, tenez compte des consignes
recommandées ci-dessous.
Consignes recommandées pour fixer
l’appareil
Fixer la base de l’appareil
Assurez-vous que la base peut supporter
adéquatement le poids de l’appareil. Utilisez deux
attaches angulaires (non fournies) pour fixer la base.
Pour chaque attache angulaire, utilisez la
quincaillerie appropriée pour :
• fixer un côté de l’attache angulaire au poteau mural.
• fixer l’autre côté à la base du téléviseur.
FR
8
Page 37
Attacher l’appareil au mur
Retirer les deux vis des deux trous de montage
mural supérieurs situés à l’arrière de l’appareil.
Utilisez la quincaillerie énumérée ci-dessous
(non fournie) :
• Deux boulons d’ancrage M6 × 10-12 mm
(visser dans les trous de montage mural
supérieurs situés à l’arrière de l’appareil)
• Une corde ou une chaîne (fixer à l’un des
boulons d’ancrage M6)
• Dispositif d’ancrage au mur (fixer au poteau
mural) assez solide pour supporter le poids de
l’appareil (passer la corde à travers le
dispositif d’ancrage au mur, puis fixer à
l’autre boulon d’ancrage M6)
Avant de commencer
Trous de
montage mural
Boulons d’ancrage
Corde ou chaîne
Dispositif
d’ancrage
au mur
~
• La fixation de l’appareil à la base sans fixer l’appareil
et la base au mur offrira une protection minimale
contre le basculement de l’appareil. Pour une sécurité
accrue, suivez les trois mesures recommandées cidessus.
FR
9
Page 38

2. Localiser les connecteurs d’entrée
~
• Cet appareil affiche tous les signaux vidéo en entrée en résolution de 1 920 points × 1 080 lignes.
Élément Description
1 AC IN Permet de brancher votre source d’alimentation. Raccordez le cordon d’alimentation
fourni à AC IN et à la prise de courant la plus proche.
2 HDMI IN HDMI (High-Definition Multimedia Interface) fournit une interface audio et vidéo
entièrement numérique non compressée entre ce moniteur ACL et tout composant audio
et vidéo compatible HDMI. La connexion HDMI prend en charge les formats vidéo
améliorés ou haute définition, en plus du son numérique.
Raccordement du cordon d’alimentation CA et du câble HDMI
1 Branchez le cordon d’alimentation CA (fourni) à la prise AC IN et un câble HDMI (fourni) à la prise
HDMI IN à l’arrière de l’appareil, puis utilisez les crochets pour ranger les câbles à l’arrière du
support de table.
2 Accrochez le couvercle du support sur le dessus du poteau central du support de table, puis appuyez
vers le bas jusqu’au déclic.
~
• Pour éviter de pincer le cordon d’alimentation CA et le câble HDMI, assurez-vous que ces câbles sont
acheminés sous les encoches de chaque côté du couvercle du support.
3 Fixez le couvercle des terminaux (fourni) à l’appareil.
Couvercle du support
Crochets
10
FR
Encoche
Crochets
Couvercle du support Couvercle des terminaux
Poteau central
Page 39

3. Raccordement d’autres appareils
Avant de commencer
Lecteur Blu-ray
Disc/«PS3»
Lecteur
DVD
numérique/Décodeur
de câblodistribution
numérique
OrdinateurRécepteur satellite
Récepteur sans
fil BRAVIA
~
• Vous pouvez profiter de la programmation haute définition en vous abonnant aux services haute définition d’un
fournisseur de câblodistribution ou de diffusion par satellite.
• Pour les utilisateur du récepteur sans fil BRAVIA (DMX-WL1) : pour fixer le récepteur à l’arrière du moniteur alors
qu’il est installé sur le support de table, un support en option est requis. Pour plus de détails, visitez notre site Web.
http://www.sony.ca/support
Tableau de compatibilité du signal d’entrée d’ordinateur
Après avoir connecté un ordinateur à l’appareil, réglez le signal de sortie de l’ordinateur selon les
résolutions et les signaux pris en charge indiqués ci-dessous.
Résolutions prises en charge
Signaux Horizontal
VGA 640
SVGA
XGA
WXGA
SXGA
HDTV
(Pixel)
800
1 024
1 280
1 280
1 360
1 280
1 920
× Vertical
×
×
×
×
×
×
×
×
(Ligne)
480 31,5 60 VGA
600 37,9 60 Critères VESA
768 48,4 60 Critères VESA
768 47,4 60 VESA
768 47,8 60 VESA
768 47,7 60 VESA
1 024 64,0 60 VESA
1 080 67,5 60 CEA-861*
Fréquence
horizontale (kHz)
Fréquence
verticale (Hz)
Norme
~
• Votre ordinateur doit prendre en charge l’un des
signaux d’entrée d’ordinateur ci-dessus pour que son
image s’affiche à l’écran de l’appareil.
* Le signal 1080p, lorsqu’il est appliqué à l’entrée HDMI,
sera traité comme un signal vidéo et non d’ordinateur.
Image
à
et la
11
et
FR
Cela aura une incidence sur la configuration
les paramètres du
Mode cinéma
contenu de l’ordinateur, réglez le
Personnalisé
Zone d’affichage
, le
Mode cinéma
à
Tous pixels
. Pour afficher le
Mode image
à
Plein écran
.
Page 40

4. Réglage de la langue
L’écran de réglage de la langue s’affiche lorsque
vous allumez l’appareil pour la première fois.
Language
English
Español
Français
1 Terminez vos branchements de câbles
(consultez les pages précédentes avant
d’effectuer le réglage de la langue).
2 Servez-vous de la télécommande pour
naviguer dans les étapes de réglage de la
langue :
Touche V/v :
Vous permet de mettre en
surbrillance les options des
menus.
Touche OK :
Vous permet de sélectionner
l’option en surbrillance et de
passer à l’étape suivante.
Touche B :
Vous permet de retourner à
l’étape précédente.
Touche b :
Vous permet de passer à l’étape
suivante.
s Réinitialisation du réglage de la langue
Sélectionnez l’option Langue dans les
Réglages du moniteur (page 20).
Réglages du moniteur
Écono. d'énergie
Capteur de lumière
Info de produit
Réinitialiser tout
Langue
Non
Non
Français
Utiliser BRAVIA Sync avec la
fonction Commande pour
HDMI
La fonction BRAVIA Sync de cet appareil
communique avec d’autres appareils Sony prenant
en charge la fonction Commande pour HDMI.
Pour connecter des appareils Sony qui
prennent en charge la fonction Commande
pour HDMI
Reliez les appareils à l’aide d’un câble portant le
logo HDMI. Consultez les pages 10 à 11 ou
reportez-vous à la connexion HDMI.
Régler la fonction Commande pour HDMI
La fonction Commande pour HDMI doit être
configurée pour que cet appareil puisse
communiquer avec d’autres appareils prenant en
charge la Commande pour HDMI. Pour
configurer la fonction Commande pour HDMI
de cet appareil, consultez la page 20. Pour les
autres appareils, consultez leur documentation
respective.
Options disponibles lors de l’utilisation de
la Commande pour HDMI
Les commandes suivantes sont accessibles lorsque
vous raccordez un appareil Sony pris en charge
avec la fonction Commande pour HDMI à votre
moniteur ACL :
• Éteindre automatiquement un appareil raccordé
lorsque vous éteignez le moniteur ACL.
• Allumer automatiquement le moniteur ACL et
sélectionner automatiquement l’entrée HDMI
correspondante par l’appareil raccordé à l’aide de
la fonction One-Touch-Play.
• Allumer automatiquement les appareils
sélectionnés dans la Liste des périphériques
sous Configurations HDMI; consultez la
page 20.
~
• Si vous éteignez accidentellement l’appareil pendant le
réglage de la langue, l’appareil relancera le réglage de
la langue du début lorsque vous le rallumerez.
FR
12
Page 41
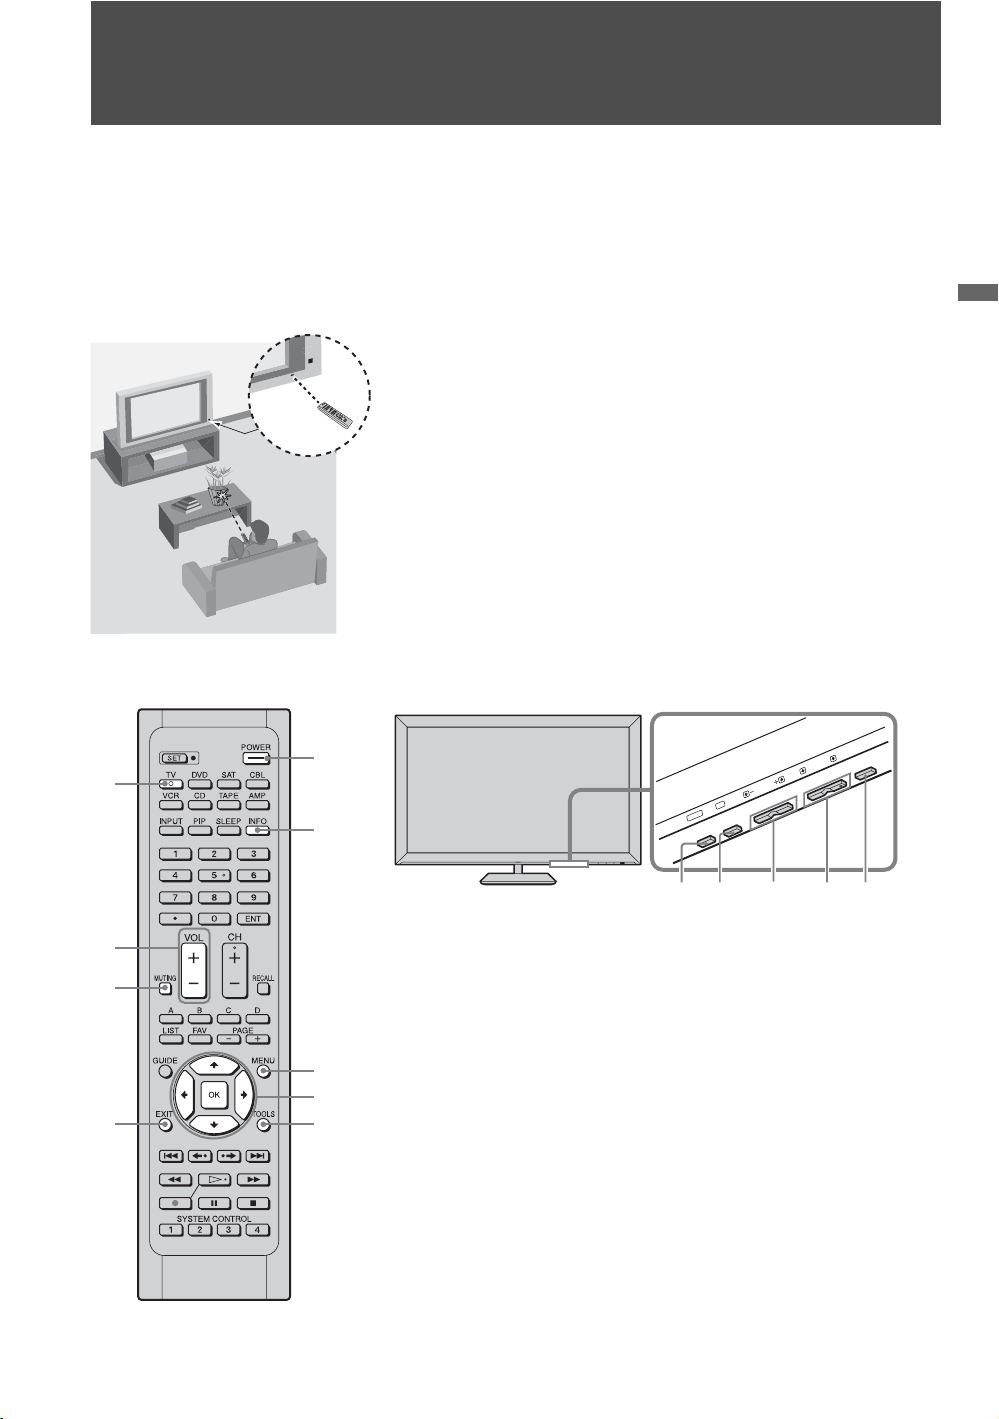
Faire fonctionner le moniteur ACL
Insérer les piles dans la télécommande
Insérez deux piles AA (fournies) en prenant soin d’aligner les indicateurs e et E des piles avec ceux qui
apparaissent dans le logement des piles de la télécommande.
Pour plus de détails, consultez le mode d’emploi de la télécommande RM-VL610A (fourni).
Utiliser la télécommande
Suivez les consignes ci-dessous
• Pointez la télécommande en direction du capteur infrarouge du
moniteur ACL.
• Assurez-vous qu’aucun objet ne se trouve entre la télécommande
et le capteur infrarouge du moniteur ACL.
• Les lampes fluorescentes peuvent perturber le fonctionnement de
votre télécommande; le cas échéant, éteignez les lampes
fluorescentes dans la pièce.
• Si vous éprouvez des difficultés avec la télécommande, réinsérez
ou remplacez les piles et assurez-vous qu’elles sont correctement
placées dans le compartiment.
Commandes du moniteur ACL et touches de la télécommande
POWER
6
1
2
VOL
OK
MENU
Faire fonctionner le moniteur ACL
7
8
9
3
4
5
34 44,71
Les touches du moniteur ACL actionnent les mêmes fonctions que les
touches correspondantes de la télécommande. Reportez-vous au mode
d’emploi de la télécommande (fourni).
~
•La touche V comporte un point tactile. Elle peut vous servir de référence
lorsque vous faites fonctionner le moniteur ACL.
• Lorsque vous utilisez le moniteur ACL, appuyez une fois sur une touche de
l’appareil (sauf la touche POWER) pour afficher tous les indicateurs, puis
appuyez de nouveau pour activer la fonction. Les indicateurs s’éteignent
après un certain temps.
(Suite)
13
FR
Page 42

Élément Description
1 POWER Appuyez sur cette touche pour allumer et éteindre le moniteur.
2 INFO Appuyez sur cette touche pour afficher des renseignements sur le signal d’entrée actuel de
l’appareil externe sélectionné.
3 MENU Appuyez sur cette touche pour afficher le MENU et pour accéder aux divers éléments du
MENU, tels que
Image, Son, Écran, Configurations HDMI, Réglages du
moniteur et Configuration PC.
4 V/v/B/b/OK Appuyez sur V/v/B/b pour changer la cible de saisie ou déplacer la surbrillance. Appuyez sur
OK pour sélectionner un élément ou confirmer un choix.
5 TOOLS Appuyez sur cette touche pour afficher une liste de fonctions et de raccourcis. Les éléments de
menu qui s’affichent avec TOOLS varient en fonction du signal d’entrée et du contenu du
signal actuels.
Sauf HDMI-PC
Élément de menu
Réglages d’image Consultez la page 16
Son Consultez la page 18
Écono. d’énergie
Optimiseur de mouvement Consultez la page 17
Contr. dispositif Consultez la page 20
Dispositifs HDMI synchronisés Affiche la liste des appareils dotés de la fonction
Page de référence/détails
Consultez la page 20
Commande pour HDMI connectés à l’appareil.
Sélectionnez l’appareil HDMI que vous souhaitez
utiliser en entrée, puis appuyez sur OK.
HDMI-PC
Élément de menu
Réglages d’image Consultez la page 16
Son Consultez la page 18
Écono. d’énergie
Centre H Consultez la page 21
Centre V Consultez la page 21
Contr. dispositif Consultez la page 20
Dispositifs HDMI synchronisés Affiche la liste des appareils dotés de la fonction
Page de référence/détails
Consultez la page 20
Commande pour HDMI connectés à l’appareil.
Sélectionnez l’appareil HDMI que vous souhaitez
utiliser en entrée, puis appuyez sur OK.
6 TV S’allume en rouge pendant l’opération.
7 VOL +/– Appuyez sur ces touches pour régler le volume.
8 MUTING Appuyez sur cette touche pour couper le son. Appuyez dessus de nouveau, ou appuyez sur
9 EXIT Appuyez sur cette touche pour revenir à l’écran précédent lorsque des éléments de menu ou des
VOL + pour rétablir le son.
réglages sont affichés.
~
• Les touches de la télécommande autres que celles décrites ci-dessus ne permettent pas de commander l’appareil.
FR
14
Page 43

Indicateurs
12 34
PIC OFF POWER
Élément Description
1 PIC OFF S’allume en vert lorsque la fonction Sans image est activée. Pour plus de détails à ce sujet,
2 Voyant à DEL
POWER
3 Capteur de
lumière
4 Port
infrarouge
(IR)
consultez la page 20 (Sans image).
Ce voyant s’allume en vert lorsque l’appareil est allumé.
Détecte le niveau de clarté de la pièce et règle la luminosité de l’écran en conséquence
(consultez la page 20 pour les détails). Ne placez aucun objet près du capteur ou dans la zone
qui l’entoure (tel qu’indiqué ci-dessus), car cela pourrait altérer son fonctionnement.
Reçoit les signaux infrarouges provenant de la télécommande. Ne placez aucun objet près du
capteur, cela pourrait altérer son fonctionnement.
Faire fonctionner le moniteur ACL
15
FR
Page 44

Utiliser les réglages du moniteur ACL
1 Appuyez sur MENU. Le menu s’affiche à l’écran.
2 Appuyez sur V/v pour sélectionner un élément, puis appuyez
sur OK.
3 Suivez les instructions qui s’affichent à l’écran.
4 Appuyez sur MENU pour quitter.
Configuration Image
Réglages d’image Mode image Éclatant Pour une image au contraste et à la netteté
rehaussés.
Photo-Éclatant* Pour améliorer le contraste et la netteté.
Standard Pour utiliser les paramètres d’image standard.
Conseillé pour le divertissement à domicile.
Photo-Standard*
Cinéma Idéal pour le visionnement de contenu vidéo
Photo-Original* Les images ressemblent aux photos imprimées
Personnalisé Permet de mémoriser vos paramètres préférés.
Photo-
Personnalisé*
* Ces fonctions ne sont pas accessibles avec le signal d’un ordinateur.
Affichage standard à sélectionner à la maison.
comme les films. Convient à un environnement de
type cinéma-maison.
d’un album de photos.
Permet de mémoriser vos paramètres préférés.
MENU
Image
Son
Écran
Configurations HDMI
Réglages du moniteur
Configuration PC
16
FR
~
• Les options du Mode image peuvent varier en fonction du paramètre Optimiseur de
vidéo/photo (consultez la page 18).
Réinitialiser Permet de réinitialiser les paramètres actuels à leurs valeurs par défaut.
Rétroéclairage Permet d’ajuster le rétroéclairage.
Image Permet d’ajuster le contraste de l’image.
Luminosité
Couleur Permet d’ajuster l’intensité des couleurs.
Nuance Permet d’ajuster l’intensité des verts dans l’image.
Temp. de la
couleur
Réglage des
blancs
Permet d’ajuster la luminosité de l’image.
Froide Permet de donner aux blancs une teinte bleue.
Neutre Permet de donner aux blancs une teinte neutre.
Chaude 1, 2 Permet de donner aux blancs une teinte rouge.
~
• L’option Chaude 1, 2 n’est pas disponible en mode Éclatant et
Photo-Éclatant.
Page 45

Netteté Permet d’ajuster la netteté de l’image.
Réduction du
bruit
Réduction du
bruit MPEG
Réglages
avancés
Réinitialiser Permet de réinitialiser les réglages avancés à leurs valeurs par défaut.
Correcteur de
noir
A. C. évolué
(Amplificateur de
contraste évolué)
Gamma
Blanc clair Permet d’accentuer le blanc et les couleurs claires.
Espace de
couleur
Couleur réelle Rend les couleurs plus éclatantes et les teints de peau plus naturels.
Équilibre des
blancs
Permet de réduire les parasites de l’image.
Cette option permet de réduire l’effet mosaïque des signaux vidéo
compressés en format MPEG. Elle est utile pour le visionnement des
DVD et des disques Blu-ray.
Accessibles pour les Mode image suivants : Standard, Cinéma,
Personnalisé, Photo-Standard, Photo-Original et PhotoPersonnalisé.
Permet d’améliorer les zones noires de l’image et procure un plus
grand contraste.
Permet d’optimiser le rétroéclairage et le contraste. Ce réglage est
particulièrement efficace pour améliorer l’image des scènes sombres.
Permet de régler l’équilibre entre les zones claires et sombres de l’image.
Permet de sélectionner l’intervalle de reproduction des couleurs
Large ou Standard.
Ajuste la température de la couleur en détail.
~
• Vous pouvez aussi accéder aux paramètres Réglages d’image en appuyant sur la
touche TOOLS de la télécommande.
• Certaines options de la configuration Image ne sont pas disponibles avec le signal d’un
ordinateur raccordé à l’entrée HDMI.
Optimiseur de
mouvement
Active Optimiseur de mouvement pour améliorer la netteté du mouvement de l’image et
pour réduire le flou.
Haut Reproduit un mouvement d’image plus fluide pour les films.
Standard Reproduit un mouvement d’image fluide. Utilisez cette option pour
une utilisation standard.
Non Utilisez ce réglage lorsque les réglages Haut et Standard génèrent
des artéfacts tels que des images fantômes.
~
• Selon le signal vidéo, il se peut que l’effet ne soit pas visible, même si vous avez changé
le réglage.
• Optimiseur de mouvement n’est pas disponible lorsque Mode jeu est réglé à Oui.
CineMotion Détecte automatiquement le contenu à base de film et applique un processus d’ajustement
Mode jeu Sélectionnez Oui pour optimiser le fonctionnement de l’appareil pour les jeux vidéo au
d’image (fonction de télécinéma inversé 3-2) et un moteur d’estimation du mouvement
pour améliorer le contenu à base de film et le désentrelacement.
Autom. 1 Applique un processus d’ajustement d’image inversé 3-2 et un moteur
d’estimation du mouvement pour réduire les artéfacts dans les images
vidéo et produire la meilleure qualité d’image possible. Sélectionnez
pour une utilisation standard.
Autom. 2 Applique uniquement le processus d’ajustement d’image (fonction de
télécinéma inversé 3-2). Le mouvement de l’image sera similaire à
celui du film d’origine.
Non Désactive l’option CineMotion. Utilisez ce réglage lorsque les
réglages Autom. 1 et Autom. 2 génèrent des artéfacts tels que des
images fantômes.
rythme rapide où le temps de réponse est crucial. Sélectionnez Non pour désactiver cette
fonction.
Utiliser les réglages du moniteur ACL
(Suite)
FR
17
Page 46

Optimiseur de vidéo/
photo
Règle les paramètres d’image pour optimiser la qualité d’image de la vidéo (images en
mouvement) ou de la photo (image fixe). Cette fonction est seulement disponible pour le
contenu au format 1080i/p (excluant 1080/24p) branché à l’entrée HDMI.
Vidéo-A L’appareil règle automatiquement les paramètres d’image pour le
contenu vidéo ou les images fixes lorsqu’un appareil Sony en option
qui prend en charge le mode Vidéo-A est branché à l’entrée HDMI.
Vidéo Sélectionner pour régler les paramètres d’image pour la vidéo.
Photo Sélectionner pour régler les paramètres d’image pour les photos.
~
• Les fonctions Mode jeu et Optimiseur de vidéo/photo ne sont pas disponibles lorsque le Mode théâtre est
réglé à Oui.
Configuration Son
Mode son Dynamique Permet d’accentuer les sons aigus et graves.
Standard Son standard optimisé pour l’utilisation à domicile.
Phonie en clair Ce réglage est particulièrement approprié pour les dialogues parlés.
Réinitialiser Permet de réinitialiser les paramètres actuels à leurs valeurs par défaut.
Aigu Permet d’ajuster les sons aigus.
Grave Permet d’ajuster les sons graves.
Équilibre Permet d’ajuster l’équilibre du haut-parleur de droite ou de gauche.
Ambiophonie S-FORCE
Front Surround
Non Sélectionnez cette option pour utiliser une réception stéréo ou mono
Zoom vocal Permet d’ajuster la clarté de la voix humaine. Par exemple, si la voix d’un lecteur de
nouvelles est inaudible, vous pouvez augmenter ce paramètre pour rendre la voix plus
claire. Inversement, si vous regardez une émission sportive, vous pouvez réduire ce
paramètre pour adoucir la voix du commentateur.
Surampli Le Surampli fournit un son plein avec un plus grand sens de profondeur et de largeur en
accentuant les fréquences hautes et basses. Sélectionnez Haut, Bas ou Non pour choisir
le niveau d’accentuation voulu. Sélectionnez Non pour désactiver l’accentuation.
Permet d’activer un mode ambiophonique virtuel avec deux hautparleurs frontaux.
normale.
~
• Accessible uniquement lorsque l’option Mode son est réglée à Standard.
Steady Sound Sélectionnez Oui pour stabiliser le volume entre les programmes et les messages
publicitaires. Sélectionnez Non pour désactiver cette fonction.
Décalage du volume Permet d’ajuster le volume de l’entrée courante par rapport aux autres entrées.
~
•
Son
est aussi accessible par la touche
FR
18
TOOLS
de la télécommande.
Page 47

Configuration Écran
Mode cinéma Grand zoom Permet de remplir l’écran avec un minimum de distorsion.
Normal Permet d’afficher une image 4:3 dans son format d’écran original
Plein écran Permet d’agrandir l’image à l’horizontale jusqu’à ce que l’écran soit
Zoom Permet d’agrandir l’image originale à l’horizontale et à la verticale sur
Cinéma autom. Oui Lorsque cette option est active, l’appareil ajuste automatiquement le
Non Permet de désactiver l’option Cinéma autom. Vous pouvez
4:3 par défaut
Permet de choisir le mode
d’écran par défaut pour
les sources 4:3
Grand zoom Permet d’agrandir l’image 4:3 de sorte qu’elle remplisse l’écran
Normal Sélectionnez cette option pour afficher l’image 4:3 dans son format
Non Sélectionnez cette option pour continuer à utiliser les paramètres de
lorsque la source originale est en 4:3.
rempli quand la source originale est en 4:3. Lorsque la source
originale est en 16:9 (source haute définition), sélectionnez ce mode
pour afficher une image 16:9 dans sa taille originale.
tout l’écran sans altérer le format d’écran.
Mode cinéma selon le contenu du signal. Si vous n’aimez pas les
fréquents changements de format d’image, sélectionnez Non.
sélectionner le Mode cinéma de votre choix dans le menu Mode
cinéma.
16:9 tout en conservant au maximum l’image initiale.
original.
Mode cinéma actuels lorsqu’il y a un changement d’entrée.
~
• L’option 4:3 par défaut n’est pas accessible si l’option Cinéma autom. est réglée à
Non.
• Si l’option 4:3 par défaut est réglée à autre chose que Non, le Mode cinéma
s’applique uniquement à l’entrée en cours. Lorsque vous changez d’entrée, le Mode
cinéma est automatiquement remplacé par le réglage 4:3 par défaut pour les sources
4:3. Pour garder les paramètres de Mode cinéma en cours lorsque vous changez
d’entrée, réglez le paramètre 4:3 par défaut à Non.
Zone d’affichage Tous pixels Permet d’afficher l’image provenant de sources 1080i, 1080p ou 1080/
Normal Permet d’afficher l’image dans sa taille originale.
-1/-2 Permet d’agrandir l’image pour masquer ses bordures.
Centrage horizontal Permet de déplacer l’image horizontalement, soit vers la gauche et vers la droite.
Centrage vertical Permet de déplacer l’image verticalement, soit vers le haut ou le bas.
Taille verticale Permet de régler la taille verticale de l’image pour une image de définition standard.
24p dans sa taille originale lorsque Mode cinéma est réglé à Plein
écran.
~
• Certaines options ne sont pas disponibles avec le signal d’un ordinateur raccordé à l’entrée HDMI.
• Selon le signal en entrée, les options Centrage horizontal, Centrage vertical et Taille verticale peuvent ne
pas être accessibles.
Utiliser les réglages du moniteur ACL
19
FR
Page 48

Configurations HDMI
Les entrées HDMI de ce moniteur ACL reconnaissent et prennent en charge les autres appareils Sony
comportant la fonction Commande pour HDMI. Consultez la page 12 pour plus de renseignements sur
la fonction Commande pour HDMI.
Commande pour
HDMI
Désact. autom. du
périphérique
Mise sous tension
automatique du
moniteur
Mise à jour liste
périphér.
Liste des
périphériques
En sélectionnant Oui ou Non, vous déterminez si le moniteur ACL pourra communiquer
avec les autres appareils qui prennent en charge la fonction Commande pour HDMI.
Sélectionnez Oui pour que les appareils raccordés qui prennent en charge la fonction
Commande pour HDMI s’éteignent automatiquement lorsque vous éteignez le
moniteur ACL. Sélectionnez Non pour désactiver cette fonction. Cette fonction est
disponible lorsque la fonction Commande pour HDMI est réglée à Oui.
Sélectionnez Oui pour allumer et éteindre le moniteur ACL par l’entremise d’un appareil
raccordé prenant en charge la fonction Commande pour HDMI. Sélectionnez Non
pour désactiver cette fonction. Cette fonction est disponible lorsque la fonction
Commande pour HDMI est réglée à Oui.
Permet de créer ou de mettre à jour la liste des périphériques HDMI. Assurez-vous de
mettre à jour la liste des périphériques HDMI lorsque vous modifiez les connexions ou les
réglages d’appareils raccordés prenant en charge la fonction Commande pour HDMI.
Affiche la liste des appareils dotés de la fonction Commande pour HDMI raccordés au
moniteur ACL.
~
• Pour afficher les options de Contr. dispositif, appuyez sur TOOLS alors que l’appareil prenant en charge la
fonction Commande pour HDMI est raccordé. L’option Contr. dispositif donne accès aux fonctions Menu,
Options et Liste de contenus de l’appareil raccordé avec la télécommande de votre moniteur ACL.
• Certains appareils dotés de la fonction Commande pour HDMI ne prennent pas en charge la fonction Contr.
dispositif.
Réglages du moniteur
Écono. d’énergie Permet de limiter la consommation d’énergie en ajustant l’intensité du rétroéclairage de
l’écran. Cette fonction améliore également le niveau du noir. Choisissez entre Non, Bas,
Haut et Sans image.
~
• Lorsque la fonction Sans image est réglée, appuyer sur les touches VOL +/– ou
MUTING ne la désactivera pas. Pour la désactiver, appuyez sur d’autres touches.
Capteur de lumière Permet l’ajustement automatique de la luminosité de l’écran. Le Capteur de lumière
perçoit la luminosité ambiante de la pièce et permet à l’appareil d’ajuster la luminosité du
rétroéclairage selon les réglages de l’image et les conditions d’éclairage.
~
• Veillez à ne placer aucun objet près du capteur, car cela pourrait nuire à son fonctionnement
(consultez la page 13).
• Lorsque la luminosité est faible, l’étendue de la commande de rétroéclairage est réduite
si le paramètre Capteur de lumière est réglé à Oui.
Info de produit Affiche des renseignements sur votre moniteur ACL.
Réinitialiser tout Permet de réinitialiser tous les réglages aux valeurs par défaut.
Langue Sélectionnez la langue de votre choix pour l’interface de l’appareil : English, Español
FR
20
ou Français.
Page 49

Configuration PC
Mode cinéma Normal Sélectionnez cette option pour afficher l’image dans sa résolution et son
format d’écran originaux.
Plein écran 1Permet d’agrandir l’image de façon à remplir l’écran tout en conservant les
proportions du format d’écran original.
Plein écran 2Permet d’agrandir l’image afin qu’elle remplisse tout l’écran.
Réinitialiser Permet de réinitialiser les paramètres actuels à leurs valeurs par défaut.
Centre H Permet de déplacer l’image horizontalement, soit vers la gauche et vers la droite.
Centre V Permet de déplacer l’image verticalement, soit vers le haut ou le bas.
Utiliser les réglages du moniteur ACL
21
FR
Page 50

Accessoires en option
Cet appareil est conçu pour être utilisé avec les accessoires en option ci-dessous, par exemple le support de
fixation murale (en date d’octobre 2008).
L’installation de ces accessoires en option nécessite une certaine compétence. Veillez à confier
l’installation à un entrepreneur autorisé. Pour une installation en toute sécurité, lisez le mode d’emploi
fourni avec les accessoires et reportez-vous au présent mode d’emploi.
Utilisation avec un support de fixation murale et des enceintes
Support de fixation murale :
SU-WL700
Enceintes :
Utilisez les accessoires fournis avec cet appareil
pour l’installation.
Entretoises (noires) (4)
SS-WAL700
Le son n’est pas émis pas le moniteur ACL lorsque le support de table fourni est retiré en vue d’utiliser le moniteur
ACL avec un support de fixation murale. Dans ce cas, utilisez les enceintes exclusives (en option) pour la sortie sonore
avec le moniteur ACL.
Installation avec l’appareil.
Suivez les étapes ci-dessous pour faire correspondre l’installation avec les étapes d’installation des modes
d’emploi des accessoires en option. Suivez les directives du présent mode d’emploi en vous reportant aux
modes d’emploi des accessoires. Pour les directives entre parenthèses ( ) des étapes d’installation,
reportez-vous aux mêmes étapes dans les modes d’emploi des accessoires en option.
Pour les utilisateurs d’enceintes, reportez-vous
2 Placez les entretoises (4-2).
d’abord au mode d’emploi du support de fixation
murale.
1 Retirez le support de table (si nécessaire)
1 Retirez les quatre vis
de l’arrière du
moniteur ACL.
(4-1).
• Le support de table n’est pas fixé au moniteur
ACL lorsque le produit sort de la boîte. Placez
l’appareil face vers le bas.
2 Placez les
entretoises
(noires - fournies
avec le moniteur ACL).
• Si le support de table est installé, retirez-le
(consultez la page 6).
FR
22
3 Suivez les étapes 4-3 à 4-4 en vous
reportant au mode d’emploi fourni avec le
support de fixation murale.
Lors de l’utilisation du support de fixation
murale seulement
Passez à l’étape 6 du présent mode d’emploi.
Lors de l’utilisation des enceintes
Passez à l’étape 4 du présent mode d’emploi.
Page 51

4 Soulevez la patte de verrouillage pour insérer
les enceintes (4-5).
Supports
de fixation
Enceintes
7 Branchez le cordon d’alimentation CA (fourni
avec le moniteur ACL) et le câble HDMI
(fourni avec le moniteur ACL) (5-1).
1 Branchez le cordon
d’alimentation.
2 Fixez-le au crochet.
Patte de
verrouillage
Insérez dans le joint du
support du moniteur ACL.
Cette partie se place au-dessus
des supports de fixation.
5 Fixez les enceintes avec deux vis (fournies
avec les enceintes).
Vis (fournies avec les enceintes)
Lors de l’installation d’enceintes
Fixez le cordon d’alimentation avec les deux
crochets, puis faites descendre le cordon du
côté droit du moniteur ACL.
Faites descendre le câble HDMI du côté
gauche ou droit du moniteur ACL.
8 Consultez le mode d’emploi fourni avec le
support de fixation murale pour la suite de
l’installation de l’appareil au mur.
~
• Il est impossible de brancher des câbles au moniteur
ACL après son installation au mur ou sur un meuble.
• Lors de l’installation du moniteur ACL au mur ou sur
un meuble, soulevez l’appareil avec un tissu placé sous
l’appareil. Ne le tenez pas par la grille des hautparleurs.
Accessoires en option
6 En vous reportant au mode d’emploi fourni
avec le support de fixation murale, suivez les
étapes 4-6 à 4-7.
23
FR
Page 52

Utilisation avec un meuble et des enceintes
Meuble :
SU-FL71M
Enceintes :
SS-WAL700
Le son n’est pas émis pas le moniteur ACL lorsque le support de table fourni est retiré en vue d’utiliser le moniteur
ACL avec un meuble. Dans ce cas, utilisez les enceintes exclusives (en option) pour la sortie sonore avec le moniteur
ACL.
Utilisez les accessoires fournis avec cet appareil
pour l’installation.
Entretoises (argent) (2)* Vis M6 × 20 (4)
* Utilisez quatre entretoises si vous n’installez pas les
enceintes.
Installation avec l’appareil.
Suivez les étapes ci-dessous pour faire correspondre l’installation avec l’étape d’installation des modes
d’emploi des accessoires en option. Suivez les directives du présent mode d’emploi en vous reportant aux
modes d’emploi des accessoires.
Pour les utilisateurs d’enceintes, reportez-vous
d’abord au mode d’emploi du meuble.
Suivez les étapes ci-dessous au lieu de l’étape
1 Retirez les quatre vis
de l’arrière du
moniteur ACL.
« 2 Préparation pour l’installation du téléviseur »
(page 6) du mode d’emploi fourni avec le meuble.
1 Retirez le support de table (si nécessaire).
• Le support de table n’est pas fixé au moniteur
ACL lorsque le produit sort de la boîte. Placez
l’appareil face vers le bas.
2 Placez les
entretoises
(argent - fournies avec
le moniteur ACL).
Si vous installez les
enceintes, placez
deux entretoises
(jaunes, fournies avec
les enceintes) dans le
bas.
• Si le support de table est installé, retirez-le
(consultez la page 6).
2 Placez les entretoises.
Si vous n’installez pas les enceintes, utilisez
les quatre entretoises (argent, fournies avec le
moniteur ACL).
FR
24
3 Installez le support I J sur le moniteur
ACL.
1 Placez le support I J en alignant les trous de
vis que vous avez libérés à l’étape 2.
2 Fixez temporairement deux vis M6 × 20
(fournies avec le moniteur ACL) dans les
orifices supérieurs du support. Si vous
n’installez pas les enceintes, fixez les quatre vis.
Vis M6 × 20
(fournies avec le
moniteur ACL)
I
Si vous utilisez seulement le meuble, passez à
l’étape 5.
J
Page 53
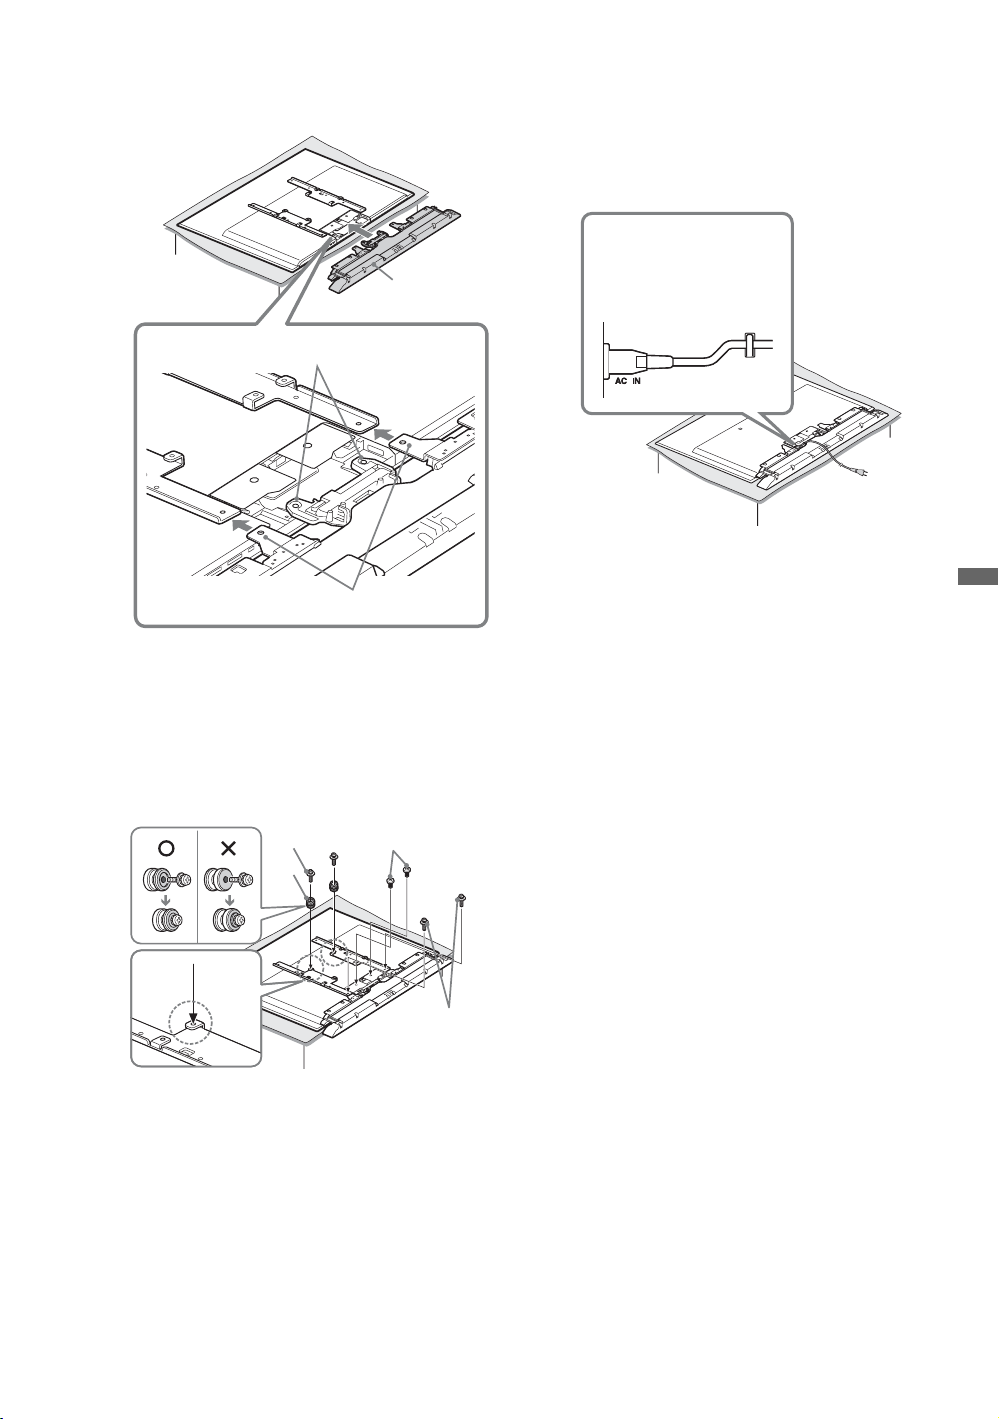
4 Insérez les enceintes.
Insérez dans le joint du
support du moniteur ACL.
6 Branchez le cordon d’alimentation (fourni
avec le moniteur ACL) et le câble HDMI
(fourni avec le moniteur ACL), puis faites-les
descendre au centre du moniteur ACL.
1 Branchez le cordon
d’alimentation.
Enceintes
2 Faites descendre le
cordon au centre.
Insérez cette partie sous le support I J.
5 Fixez les enceintes avec les vis, puis fixez le
crochet M au support I J.
Serrez le deux vis du haut (fixées
temporairement à l’étape 3).
Vis (fournies avec
O
M
les enceintes)
Vis M6 × 20
(fournies avec le
moniteur ACL)
7 Consultez le mode d’emploi fourni avec le
support de fixation murale pour la suite de
l’installation.
~
• Il est impossible de brancher des câbles au moniteur
ACL après son installation au mur ou sur un meuble.
• Lors de l’installation du moniteur ACL au mur ou sur
un meuble, soulevez l’appareil avec un tissu placé sous
l’appareil. Ne le tenez pas par la grille des hautparleurs.
Accessoires en option
25
FR
Page 54

Information complémentaire
Dépannage
Si vous avez des questions supplémentaires
concernant l’utilisation de votre moniteur ACL
Sony, si vous devez l’envoyer en réparation ou si
vous avez besoin d’assistance technique, visitez
notre site Web ou appelez l’un des numéros
suivants :
Symptôme Explication/solution
L’appareil n’affiche aucune image
L’appareil n’affiche aucune
image
Il n’y a aucune image en
provenance de la source vidéo
• Vérifiez les paramètres d’Écono. d’énergie (page 20).
• Vérifiez la connexion entre l’appareil vidéo en option et le moniteur ACL.
L’image est de mauvaise qualité
La qualité d’image n’est pas
aussi bonne qu’au magasin
L’écran n’affiche aucune
couleur, il affiche une image
sombre ou de mauvaises
couleurs ou encore l’image est
trop claire
Image floue/Couleurs de
mauvaise qualité
• La qualité de l’image dépend du signal.
• Réglez les options du Mode image dans la configuration Image (page 16).
• Si vous réglez le mode Écono. d’énergie à Bas ou à Haut, cela améliore le
niveau du noir (page 20).
• Si l’appareil est transporté d’un endroit froid à un endroit chaud ou si la
température de la pièce change brutalement, l’image peut devenir floue ou les
couleurs être de mauvaise qualité à cause de la condensation. Éteignez
l’appareil et patientez quelques heures avant de le rallumer.
L’appareil n’émet aucun son ou un son parasité
L’image s’affiche
correctement, mais il n’y a
aucun son
• Vérifiez le volume.
• Appuyez sur la touche
l’écran (page 14).
BRAVIA Sync
Impossible de trouver
l’appareil BRAVIA Sync
HDMI raccordé
Un deuxième récepteur audiovidéo ne s’affiche pas dans la
liste des périphériques
• Assurez-vous que la fonction Commande pour HDMI est configurée à la fois
sur le moniteur ACL et sur l’appareil externe compatible avec BRAVIA Sync
(page 12).
• Les fonctions BRAVIA Sync et Commande pour HDMI ne permettent
d’utiliser qu’un seul récepteur AV à la fois (page 20).
Entrée d’ordinateur
L’appareil n’affiche aucune
image ou ne reçoit aucun
signal
L’image est de mauvaise
qualité
• Assurez-vous que l’ordinateur est correctement branché à l’entrée HDMI IN de
l’appareil.
• Assurez-vous que le signal de sortie de l’ordinateur fait partie de ceux indiqués
à la page 11.
• Ajustez la résolution (page 11).
http://fr.sony.ca/support
http://www.sony.com/tvsupport
au Canada
aux États-Unis
1-877-899-SONY (7669) au Canada
1-800-222-SONY (7669) aux États-Unis
MUTING
ou
VOL +
de sorte que « Muting » disparaisse de
26
FR
Page 55

Symptôme Explication/solution
Généraux
Le Mode cinéma change
automatiquement
• Le réglage Mode cinéma en cours est automatiquement remplacé par le
réglage 4:3 par défaut si l’option 4:3 par défaut dans la configuration
Écran est réglée à une autre option que Non. Si vous voulez verrouiller le
Mode cinéma sélectionné avec la touche WIDE de la télécommande, réglez
l’option 4:3 par défaut à Non dans la configuration Écran (page 19).
• Vérifiez l’option Cinéma autom. dans la configuration Écran (page 19).
L’écran affiche des barres
noires
• Certaines émissions en format grand écran sont filmées dans un format d’écran
supérieur à 16:9 (cela est particulièrement fréquent dans le cas de films lancés
en salle). Votre moniteur ACL affiche ces émissions avec des barres noires au
haut et au bas de l’écran. Pour plus de détails, vérifiez la documentation fournie
avec votre DVD (ou communiquez avec votre fournisseur de service).
• Les émissions diffusées en format 4:3 s’afficheront avec des barres noires sur les
côtés de l’écran.
Certains programmes sur DVD
ou autres sources numériques
affichent une perte de détails,
particulièrement au cours de
scènes rapides ou obscures
La télécommande ne
fonctionne pas
• Cela vient de la méthode de compression utilisée par certains DVD, et peut faire
en sorte que l’écran de votre moniteur ACL affiche moins de détails qu’à
l’ordinaire ou que des artéfacts (petits blocs ou points, pixellisation)
apparaissent sur votre écran. L’intensité de ce phénomène de compression peut
varier en fonction de la clarté et de la résolution de l’appareil.
• Pour déterminer si le problème concerne la télécommande ou non, appuyez sur
une touche de l’appareil.
• Appuyez sur VOL +/– pour régler le volume.
• Appuyez sur la touche TV de la télécommande lorsque la touche n’est pas
allumée.
• Vérifiez le sens d’insertion des piles ou remplacez les piles.
• Pointez la télécommande vers le capteur, situé au devant de l’appareil.
• Assurez-vous que la zone du capteur de télécommande est libre de tout
obstacle.
• Les lampes fluorescentes peuvent perturber le fonctionnement de votre
télécommande; le cas échéant, éteignez les lampes fluorescentes dans la pièce.
• Vérifiez la description des touches qui servent à commander cet appareil
(page 13).
Information complémentaire
27
FR
Page 56

Caractéristiques techniques
Modèle KLV-40ZX1M
Système
Système de l’écran
Puissance des haut-parleurs
Connecteurs d’entrée et de sortie
HDMI IN
Alimentation, dimensions et accessoires
Alimentation
Consommation d’énergie
en cours d’utilisation
en veille
Taille de l’écran
(mesurée en diagonale)
(pouces)
Résolution de l’écran
Haut-parleur/
Pleine gamme (4) (mm)
(pouces)
Graves (1) (mm)
(pouces)
Dimensions
avec support (mm)
(pouces)
sans support (mm)
(pouces)
schéma des trous pour la
fixation murale (mm)
taille de la vis de fixation
murale (mm)
Poids
avec support (kg)
lb)
(
sans support (kg)
lb)
(
Accessoires compris
Accessoires en option
Écran ACL (affichage à cristaux liquides)
5 W + 5 W, 10 W (graves)
HDMI : Vidéo : 480i, 480p, 720p, 1080i, 1080p, 1080/24p / Audio : Deux canaux linéaires PCM 32, 44,1 et 48 kHz,
16, 20 et 24 bits
120-240 V CA, 50/60 Hz
188 W
0,3 W (120 V)
0,4 W (240 V)
40
1 920 points (horizontal) × 1 080 lignes (vertical)
Ø30
3
/16
Ø1
58 × 90
1
/4 × 3 9/16
2
986 × 682 × 307
7
/8 × 26 7/8 × 12 1/8
38
986 × 599 × 28
7
38
/8 × 23 5/8 × 1 1/8
300 × 300
M6 (longueur : consultez le schéma de la page 7)
15,0
33,1
12,2
26,9
Consultez la section « Vérification des accessoires » à la page 4.
Support de fixation murale / Base de téléviseur : consultez la page 2
~
• La disponibilité des accessoires en option dépend des stocks.
• La conception des produits et les caractéristiques techniques peuvent changer sans préavis.
FR
28
Page 57

Pour votre commodité
Veuillez communiquer directement avec le soutien à la clientèle de Sony si vous :
• Avez des questions sur l’utilisation de votre moniteur ACL après avoir lu le mode d’emploi
• Éprouvez des difficultés avec le fonctionnement de votre moniteur ACL
Pour le Canada
http://fr.sony.ca/support
ou contactez un de nos représentants : 1-877-899-SONY (7669)
Pour les États-Unis
http://www.sony.com/tvsupport
ou contactez un de nos représentants : 1-800-222-SONY (7669)
Sony visera à résoudre vos questions plus rapidement que votre détaillant ou emplacement d’achat.
Ne retournez pas le produit au magasin
Inscription en-ligne disponible :
Faire en sorte de compléter l’enregistrement de votre moniteur ACL.
Canada États-Unis
http://www.SonyStyle.ca/fr/registration http://productregistration.sony.com
Information complémentaire
29
FR
Page 58

Registro de propiedad
Los números de modelo y de serie están
ubicados en el interior de la cubierta del
terminal. Anote esos números en el
espacio que tiene a continuación.
Refiérase a ellos cuando contacte a su
distribuidor Sony acerca de esta unidad.
Nombre de modelo
N° de serie
PRECAUCIÓN
Para evitar las descargas eléctricas y la
exposición de los contactos, no utilice este
enchufe polarizado de corriente alterna con un
cable de extensión, receptáculo u otro
tomacorriente a menos que los contactos
puedan ser introducidos completamente.
s Opere la unidad únicamente con ca de
120 V a 240 V
Declaración de conformidad
Nombre de la marca: SONY
Modelo: KLV-40ZX1M
Parte responsable: Sony Electronics Inc.
Dirección: 16530 Via Esprillo,
San Diego, CA 92127 EE. UU.
Teléfono: 858-942-2230
Este dispositivo cumple con la Sección 15
del reglamento de la FCC. El
funcionamiento está sujeto a las dos
condiciones siguientes: (1) Este dispositivo
no debe provocar interferencias
perjudiciales y (2) este dispositivo debe
aceptar las interferencias recibidas,
incluidas las que puedan provocar un
funcionamiento no deseado.
NOTIFICACIÓN
Este aparato fue debidamente probado,
demostrándose que cumple con los límites
establecidos para los dispositivos digitales
Clase B de acuerdo con la Sección 15 de las
normas de la FCC. Estos límites se
establecieron para ofrecer protección
razonable contra interferencias perjudiciales en
las instalaciones residenciales. Este aparato
genera, usa y puede emitir energía de
frecuencia radioeléctrica, y si no se instala y
utiliza de acuerdo con las instrucciones
correspondientes, podría producir
interferencias perjudiciales en las
radiocomunicaciones.
No obstante, no puede garantizarse que no se
produzcan estas interferencias en una
instalación determinada. Si este aparato llega a
interferir en la recepción de radio o televisión,
lo que podrá comprobarse encendiendo y
apagando el aparato, se recomienda al usuario
intentar corregir la interferencia mediante una
o más de las siguientes medidas:
s Cambiar la orientación o la ubicación de la
antena de recepción.
s Aumentar la distancia entre el equipo y el
receptor.
s Conectar el equipo a un tomacorriente de
un circuito distinto al que está enchufado el
receptor.
s Ponerse en contacto con el distribuidor o
solicitar los servicios de un técnico
capacitado en radio y televisión.
De acuerdo con las regulaciones de la FCC,
se le advierte que cualquier cambio o
modificación que no se apruebe
expresamente en este manual podría anular
su autorización para operar este equipo.
PRECAUCIÓN
El siguiente televisor en color de pantalla de
cristal líquido Sony sólo se debe utilizar con el
SOPORTE DE MONTAJE MURAL o el
SOPORTE DE TELEVISOR que se
especifican a continuación.
Televisor en color de
pantalla de cristal líquido
Sony, N° de modelo
N° de modelo del
Soporte de montaje
mural Sony
N° de modelo del
Soporte de
televisor Sony
Si se utilizan con otros SOPORTES DE
MONTAJE MURAL o SOPORTES DE
TELEVISOR, podrían quedar inestables y
provocar daños personales.
Para los clientes
Para la instalación de la unidad especificada se
precisan conocimientos y experiencia
suficientes. Asegúrese de contratar la
instalación a un distribuidor o contratista
autorizado por Sony y de prestar especial
atención a la seguridad durante la instalación.
Información de licencias
Macintosh es una marca comercial de Apple
Inc., registrada en EE. UU. y otros países.
HDMI, el logotipo de HDMI y High-Definition
Multimedia Interface son marcas comerciales o
marcas comerciales registradas de HDMI
Licensing, LLC.
Fergason Patent Properties, LLC:
N° de patente de EE.UU. 5,717,422
N° de patente de EE.UU. 6.816.141
Blu-ray Disc es una marca comercial.
“BRAVIA” y , S-Force, BRAVIA
Sync, , DMe
Color” son marcas comerciales o marcas
registradas de Sony Corporation.
“PLAYSTATION” es una marca comercial
registrada y “PS3” es una marca comercial de
Sony Computer Entertainment Inc.
Adobe es una marca comercial registrada o una
marca comercial de Adobe Systems
Incorporated en los Estados Unidos y/o en
otros países.
x
KLV-40ZX1M
SU-WL700
SU-FL71M
, MICRO VAULT y “x.v.
ES
2
Page 59
Referencia de funciones y traducciones
En este manual se incluyen ciertos términos en inglés. A continuación encontrará su traducción y explicación.
Texto en el manual Español Explicación
AC IN Entrada de ca
A/V Audio/Video
BRAVIA Sync Marca comercial registrada
CineMotion Marca comercial registrada Esta opción permite que el televisor detecte en forma
x
DMe
DVD Disco digital de video
EXIT Salir
FCC Comisión Federal de Comunicaciones de Estados
HDMI Interfaz multimedia de alta definición
HDTV Televisión de alta definición
INFO Información
IN, INPUT Entrada
IR - Infrared Receiver Receptor infrarrojo
LED Iluminador
LCD Pantalla de cristal líquido
MENU Menú
MPEG Grupo de expertos en imágenes en movimiento
MUTING Silenciador
PC Computadora personal
PCM Modulación del pulso-código
PIC OFF Apagar la imagen
PICTURE Imagen
POWER Alimentación
S-Force Front Surround Marca comercial registrada
SOUND Sonido
Steady Sound Auto volumen Modula los niveles de volumen para uniformar el sonido
Surround Sonido envolvente
SVGA Súper adaptador de gráficos de video
SXGA Súper matriz de gráficos extendida
TOOLS Herramientas
TV Televisor o televisión
VESA Asociación de Estándares de Electrónica y Video
VGA Matriz de gráficos de video
VOLUME +/–, VOL +/– , – VOL + Volumen +/–, – Volumen +
WXGA Matriz panorámica de gráficos extendida
XGA Matriz de gráficos extendida
Marca comercial registrada
Unidos de America
automática el contenido de las películas y ofrezca una
imagen de máxima calidad.
de los programas y el de los comerciales.
Nota: Informaciones y traducciones referentes al uso del control remoto, consulte las páginas 15–16.
ES
3
Page 60

ES
4
Page 61

Contenido
Generalidades
Bienvenido al mundo del televisor en color de pantalla de cristal líquido BRAVIA®............................6
Verificación de los accesorios....................................................................................................................6
Procedimientos iniciales
1. Instalación de la unidad...........................................................................................................................7
Transporte de la unidad...........................................................................................................................7
Preparación para la colocación en el soporte de sobremesa..................................................................7
Remoción del soporte de sobremesa......................................................................................................8
Preparación para la colocación en el soporte de montaje mural.............................................................9
Instalación de la unidad en una pared o en un lugar cerrado .................................................................9
Fijación de la unidad..............................................................................................................................10
2. Ubicación de las entradas.....................................................................................................................12
Conexión del cable de alimentación de ca y el cable HDMI..................................................................12
3. Conexión de equipos.............................................................................................................................13
4. Ajuste del idioma....................................................................................................................................14
Cómo usar el Control para HDMI con BRAVIA Sync ..............................................................................14
Operación del televisor en color de pantalla de cristal líquido
Cómo introducir las pilas en el control remoto.......................................................................................15
Cuando utilice el control remoto..............................................................................................................15
Botones del televisor en color de pantalla de cristal líquido y del control remoto.............................15
Indicadores .................................................................................................................................................17
Uso de los ajustes del televisor en color de pantalla de cristal líquido
Configuración de Imagen.................................................................................................................18
Configuración de Sonido .................................................................................................................20
Configuración de Pantalla................................................................................................................21
Configuración de Ajustes HDMI.......................................................................................................22
Ajustes del monitor ..........................................................................................................................22
Configuración de PC........................................................................................................................23
Accesorios opcionales
Uso del soporte de montaje mural/sistema de altavoces......................................................................24
Uso con el soporte de suelo/sistema de altavoces ...............................................................................26
Información adicional
Solución de problemas..............................................................................................................................28
Especificaciones........................................................................................................................................30
ES
Soporte al cliente
http://esupport.sony.com/ES/LA/
Registro en línea
http://esupport.sony.com/LA/perl/registration.pl
ES
5
Page 62

Generalidades
Bienvenido al mundo del televisor en color de pantalla de cristal
líquido BRAVIA
Gracias por adquirir este televisor en color de pantalla de cristal líquido BRAVIA® de Sony. La calidad de
la imagen que verá en su televisor en color de pantalla de cristal líquido BRAVIA es equiparable a la
calidad de la señal que recibe del equipo conectado.
Su televisor en color de pantalla de cristal líquido BRAVIA adhiere al programa
Energy Star.
Verificación de los accesorios
Control remoto RM-VL610A (1)
Pilas tamaño AA (2)
Cable de alimentación de ca (1)
Cable HDMI (1)
Soporte de sobremesa (1) y tornillos M5 × 8 (4)
Cubierta del terminal (1)
Separadores (negros) (4)
Separadores (plateados) (4) y tornillos M6 × 20 (4)
Adaptador del Soporte (1)
Manual de instrucciones (este manual) (1)
Tarjeta de garantía (1)
Folleto de instrucciones de seguridad (1)
Manual de instrucciones de uso del control remoto (1)
Lista de códigos (1)
®
PRECAUCIÓN
Si el televisor en color de pantalla de cristal líquido se utiliza durante un período prolongado, se produce
un aumento en la temperatura de las áreas circundantes al panel frontal y al posterior. Si toca dichas áreas
es probable que note una temperatura elevada. Para obtener más información, consulte el encarte
suministrado.
ES
6
Page 63

Procedimientos iniciales
1. Instalación de la unidad
Esta unidad se puede instalar en la pared
utilizando un soporte de montaje mural o colocar
en una base de soporte para TV (ambos artículos
se venden por separado). Esta sección explica los
siguientes puntos:
• Cómo trasladar la unidad
• Preparación para el soporte de sobremesa del TV
• Preparación para el soporte de montaje mural
• Instalación en una pared o en un lugar cerrado
• Fijación de la unidad
Transporte de la unidad
Asegúrese de seguir estas instrucciones para
proteger su propiedad y evitar lesiones graves.
• Antes de transportar la unidad, desconecte todos
los cables.
• Para transportar esta unidad se necesitan dos o
más personas.
• Cuando traslade la unidad, coloque la mano
como muestra la ilustración y sujétela con
firmeza. No permita que la unidad se golpee o
quede expuesta a vibraciones excesivas.
Preparación para la colocación en el
soporte de sobremesa
Siga los pasos de montaje requeridos para la
colocación en el soporte de sobremesa.
1 Retire el soporte de sobremesa y la bolsa y la
caja de accesorios de la caja. Los tornillos y el
folleto se encuentran en la bolsa de accesorios
fijada a la parte posterior del televisor en color
de pantalla de cristal líquido.
Por motivos de protección y seguridad del
producto, Sony recomienda enfáticamente
utilizar los tornillos suministrados con la
pantalla.
~
• No retire la cinta azul que fija la placa a la parte
posterior del televisor en color de pantalla de cristal
líquido hasta tanto no haya terminado de instalar el
soporte de sobremesa.
Bolsa de
accesorios
Procedimientos iniciales
• Levante la unidad colocando la palma de la mano
directamente debajo del panel, pero asegúrese de
no presionar sobre el panel de la pantalla de
cristal líquido (LCD).
Asegúrese de sujetar el
panel por la parte inferior.
Soporte de
sobremesa
Caja de
accesorios
Televisor en color de pantalla
de cristal líquido
2 Coloque el soporte de sobremesa sobre una
superficie estable y nivelada, luego retire la
cubierta del soporte de sobremesa.
Cubierta del
soporte
(continúa)
7
ES
Page 64

3 Alinee la marca F, luego ejerza presión sobre
televisor en color de pantalla de cristal líquido
hacia el cuello del soporte de sobremesa y
deslice suavemente el monitor hacia el cuello.
Asegúrese de contar con la ayuda de una o
más personas.
Marca F
Remoción del soporte de sobremesa
En caso de que deba instalar el televisor en color
de pantalla de cristal líquido en la pared o sobre el
soporte de suelo (opcional), retire el soporte de
sobremesa.
1 Coloque el televisor en color de pantalla de
cristal líquido boca abajo.
Coloque un tapete (lámina de embalaje etc.)
sobre la mesa más amplia que el monitor.
Luego, coloque el monitor sobre la mesa de
modo que el soporte quede colgando del
borde de la mesa. Asegúrese de contar con la
ayuda de una o más personas.
Lámina de
embalaje etc.
2 Retire los cuatro tornillo del soporte de
sobremesa.
4 Fije el televisor en color de pantalla de cristal
líquido al soporte de sobremesa con los
tornillos suministrados. Fije primero los dos
tornillos inferiores, luego los dos superiores.
2 Tornillos superiors
1 Tornillos inferiors
~
• Si se utiliza un destornillador eléctrico, ajuste el par de
fijación aproximadamente a 1,5 N·m {15 kgf·cm}
• No presione el panel de cristal líquido ni el marco que
rodea la pantalla.
ES
8
~
• No utilice los tornillos que retiró del soporte de
sobremesa en el soporte de montaje mural ni en el
soporte de suelo.
• Cuando transporte el televisor en color de pantalla de
cristal líquido, llévelo con un tapete extendido por
debajo.
• Tome el soporte de sobremesa firmemente con ambas
manos.
Page 65

Preparación para la colocación en el
soporte de montaje mural
Este modelo está preparado para instalarse en la
pared. Para obtener más información, consulte
página 24.
• Para proteger el producto y por motivos de
seguridad, Sony le recomienda que utilice el
modelo de soporte de montaje mural diseñado
para el televisor en color de pantalla de cristal
líquido y que el montaje mural de éste sea
realizado por un distribuidor de Sony o por un
contratista con licencia.
• Se requiere bastante experiencia en la instalación
de este televisor en color de pantalla de cristal
líquido, especialmente para determinar la
fortaleza de la pared que soportará su peso.
• Asegúrese de utilizar los tornillos suministrados
con el soporte de montaje mural cuando fije los
ganchos de montaje al televisor en color de
pantalla de cristal líquido.
Los tornillos suministrados están diseñados para
que tengan entre 8 mm y 12 mm de longitud
cuando se miden desde la superficie del separador.
El diámetro y la longitud de los tornillos difieren
según el modelo de soporte de montaje mural. Si
se utilizan otros tornillos que no sean los
suministrados, es posible que el televisor en color
de pantalla de cristal líquido se dañe
internamente o no funcione correctamente, etc.
Fijación al soporte de montaje mural
8-12 mm
Separador (negro)
Instalación de la unidad en una pared
o en un lugar cerrado
Asegúrese de que el televisor en color de pantalla de
cristal líquido tenga la circulación de aire adecuada.
Deje suficiente espacio alrededor de la unidad,
como se muestra a continuación. Evite operar la
unidad con temperaturas inferiores a los 5 °C
Instalado con un soporte
30 cm
10 cm
Deje como mínimo este espacio alrededor del aparato.
Instalado en la pared
10 cm
10 cm
30 cm
10 cm10 cm
No instale nunca la unidad de este modo:
Se impide la
circulación del aire.
Se impide la
circulación del aire.
6 cm
Deje como
mínimo este
espacio
alrededor del
aparato.
Procedimientos iniciales
Tornillo M6 × 16 (suministrado con el
soporte de montaje mural)
Gancho de montaje
Parte posterior del televisor en
color de pantalla de cristal líquido
Fijación al soporte de suelo
8-12 mm
Separador (plateado)
Tornillo M6 × 20 (suministrado
con el televisor en color de
pantalla de cristal líquido)
Gancho de montaje
Parte posterior del televisor en color
de pantalla de cristal líquido
• Guarde los tornillos no utilizados y el soporte de
sobremesa en un lugar seguro hasta que esté listo
para fijarlo. Mantenga los tornillos fuera del
alcance de los niños pequeños.
Para obtener más información sobre soportes de
montaje mural aptos para su modelo, llame al
Centro de información al cliente al: 5002 9818 en
la ciudad de México o sin costo al: 01-800-7597669 (Estados Unidos)
Pared
Pared
~
• Una circulación de aire insuficiente puede provocar un
sobrecalentamiento de la unidad y dañarla o producir
un incendio.
Tenga en cuenta lo siguiente para obtener
la mejor calidad de imagen
• No exponga la pantalla a iluminación directa o
luz solar.
• Utilice focos de luz instalados en el techo o
cubra las ventanas situadas delante de la
pantalla con una tela oscura.
• Instale la unidad en una habitación donde el
piso y las paredes no sean de materiales
reflectantes.
(continúa)
ES
9
Page 66

• Cuando traslade la unidad de un área fría a una
cálida, el cambio de temperatura repentino en
la habitación podría causar que la imagen se
vea borrosa o que los colores no sean nítidos
debido a la condensación de la humedad. En
tal caso, espere unas horas antes de encender
la unidad para que la humedad se evapore.
Fijación de la unidad
Sony recomienda especialmente tomar
medidas para evitar que la unidad se caiga.
Las unidades que no están instaladas de
manera segura pueden caerse y provocar
daños a la propiedad, causar lesiones
corporales o incluso la muerte.
Medidas para evitar que se vuelque la
unidad
s Fíjela a la pared y/o a un soporte.
s No permita que los niños jueguen o se suban a
los muebles o a la unidad.
s Evite colocar o colgar elementos en la unidad.
s Nunca coloque la unidad en:
• Superficies resbaladizas, inestables o
irregulares.
• Muebles que pueden utilizarse fácilmente
como escalones. Por ejemplo, una cómoda.
s Instale la unidad donde no pueda ser
deslizada, empujada o tumbada.
s Coloque los cables de alimentación de ca y los
cables de conexión de manera tal que no se
encuentren al alcance de niños curiosos.
Use una base de soporte para TV Sony
Use el soporte para TV Sony que se indica (ver la
página 2) y siga el manual de instrucciones que se
proporciona con el soporte para TV Sony.
Soporte en ángulo
Soporte
Fije la unidad a la base de soporte
Use el adaptador del soporte (suministrado) y una
cuerda o cadena.
1 Retire el tornillo del soporte de sobremesa.
2 Fije el adaptador al soporte de sobremesa y
luego, la cuerda o la cadena al adaptador.
3 Asegure la cuerda o la cadena al soporte del
TV (no suministrada). Asegúrese de que la
cuerda o cadena no sea demasiado larga.
1
Tornillo
23
Tornillo
Adaptador del
soporte
Cuerda o cadena
Tornillo
Si no va a utilizar un soporte para TV Sony, se
aconseja tener en cuenta las siguientes medidas.
Medidas recomendadas para fijar la
unidad de manera segura
Fije el soporte para la unidad
Asegúrese de que pueda sostener adecuadamente
el peso de la unidad. Utilice dos soportes en
ángulo (no se suministran) para fijar la base.
Para cada soporte en ángulo use las herramientas
adecuadas para:
• fijar un lado del soporte en ángulo al tirante de la
pared.
• fijar el otro lado al soporte del TV.
ES
10
Page 67

Fije la unidad a la pared
Retire los dos tornillos de los orificios de montaje
mural superiores que se encuentran en la parte
posterior de la unidad.
Use los artículos que se enumeran a continuación
(no se suministran):
• Dos tornillos de anclaje M6 × 10-12 mm
(atornille en los orificios de montaje mural
superiores que se encuentran en la parte
posterior de la unidad)
• Cuerda o cadena (fije a cada uno de los
tornillos de anclaje M6)
• Anclaje (fíjelo al tornillo de la pared) lo
suficientemente fuerte como para soportar el
peso de la unidad (pase la cuerda a través del
anclaje, luego fíjela al otro tornillo de anclaje
M6)
Procedimientos iniciales
Orificios de
montaje mural
Tornillos de anclaje
Cuerda o
cadena
Anclaje
~
• Fijar la unidad al soporte sin sujetar correctamente la
unidad ni el soporte a la pared no es garantía suficiente
de que la unidad permanezca en su sitio. Para una
mayor protección, siga las tres medidas recomendadas
anteriormente.
11
ES
Page 68

2. Ubicación de las entradas
~
• Esta unidad muestra todas las señales de entrada de video en una resolución de 1 920 píxeles × 1 080 líneas.
Elemento Descripción
1 AC IN
(Entrada de ca)
2 HDMI IN
(Entrada de
HDMI)
Se conecta a la fuente de alimentación. Conecte el cable de alimentación suministrado a
la toma AC IN y al tomacorriente más cercano.
La HDMI (Interfaz multimedia de alta definición) ofrece una interfaz de audio/video
totalmente digital sin compresión entre este televisor en color de pantalla de cristal
líquido y cualquier equipo de audio/video equipado con HDMI. La HDMI es compatible
con video mejorado o de alta definición y con audio digital.
Conexión del cable de alimentación de ca y el cable HDMI
1
Conecte el cable de alimentación de ca (suministrado) a la toma AC IN y el cable HDMI (suministrado)
a la toma HDMI IN que se encuentra en la parte posterior de la unidad; luego use los ganchos para
ocultarlos en la parte posterior del soporte de sobremesa.
2 Cuelgue la cubierta del soporte sobre el poste central del soporte de sobremesa; luego, empuje hacia
abajo para cerrar la unidad hasta que escuche un clic.
~
• Para evitar apretar el cable de alimentación de ca y el de HDMI, asegúrese de que estos cables estén colocados
en las muescas a ambos lados de la cubierta del soporte.
3 Coloque la cubierta del terminal (suministrada) a la unidad.
12
ES
Cubierta del soporte
Muesca
Ganchos
Ganchos
Poste central
Cubierta del soporte Cubierta del terminal
Page 69

3. Conexión de equipos
Procedimientos iniciales
Reproductor de
Blu-ray Disc/“PS3”
Reproductor de DVD ComputadoraReceptor de satélite
digital/decodificador digital
~
• Puede disfrutar con la programación de alta definición subscribiéndose a un servicio de cable o de satélite de alta
definición.
Tabla de referencia de la señal de entrada de la computadora
Después de conectar la PC a la unidad, ajuste la señal de salida de la PC en función de las resoluciones y
temporizaciones compatibles como se indica a continuación.
Resoluciones compatibles
Señal Horizontal
VGA 640
SVGA (Súper
adaptador de
gráficos de video)
XGA (Matriz de
gráficos extendida)
WXGA (Matriz
panorámica de
gráficos extendida)
SXGA (Súper
matriz de gráficos
extendida)
HDTV (Televisión
de alta definición)
(Píxeles)
800
1 024
1 280
1 280
1 360
1 280
1 920
× Vertical
(Líneas)
×
×
×
×
×
×
×
×
480 31,5 60 VGA
600 37,9 60 Estándares VESA
768 48,4 60 Estándares VESA
768 47,4 60 VESA
768 47,8 60 VESA
768 47,7 60 VESA
1 024 64,0 60 VESA
1 080 67,5 60 CEA-861*
Frecuencia
horizontal (kHz)
Frecuencia
vertical (Hz)
Estándar
~
• Su PC debe ser compatible con una de las señales de
entrada de PC antes mencionadas para poder
visualizarse en el TV.
*La temporización para 1 080p aplicada a la entrada
HDMI será considerada como una temporización de
video, no como una temporización de PC. Esto afecta a
la configuración de
Imagen
visualizar el contenido de PC, ajuste el
en
Personalizar
Área de imagen
, el
en
y de
Modo ancho
Modo ancho
en
Satur. de píxeles
Modo imagen
. Para
Completa
.
13
y el
ES
Page 70

4. Ajuste del idioma
La pantalla de configuración de idioma aparece al
encender la unidad por primera vez.
Language
Cómo usar el Control para
HDMI con BRAVIA Sync
La función BRAVIA Sync en esta unidad
comunica a la unidad con ciertos equipos Sony
que admiten la función Control para HDMI.
English
Español
Français
1 Realice las conexiones de cables (consulte las
páginas precedentes antes de configurar el
idioma).
2 Utilice el control remoto para desplazarse por
la configuración de idioma:
Botón
V/v:
Le permite resaltar las opciones
donde corresponda.
Botón OK:
Le permite seleccionar la
opción resaltada y avanzar a la
siguiente pantalla.
Botón B:
Le permite retroceder a la
pantalla anterior.
Botón b:
Le permite pasar a la pantalla
siguiente.
s Para restablecer la configuración de
idioma
Seleccione el Idioma en Ajustes del monitor
(página 22).
Ajustes del monitor
Ahorro energía
Detector de luz
Info. del producto
Restablecer todos
Idioma
No
No
Español
Cómo conectar un equipo Sony con
Control para HDMI
Para la conexión, utilice un cable HDMI que tenga
el logotipo HDMI. Consulte las páginas 12 a 13 o
la sección de conexión HDMI.
Configuración de Control para HDMI
Se debe configurar la función de Control para
HDMI para que la unidad se pueda conectar con
otros equipos que cuenten con Control para
HDMI. Consulte la página 22 para obtener más
información acerca de cómo configurar la función
de Control para HDMI de esta unidad. Para otros
equipos, consulte los manuales de instrucciones
correspondientes.
Opciones disponibles al utilizar Control
para HDMI
Las siguientes funciones estarán disponibles una
vez que haya conectado el equipo compatible Sony
con Control para HDMI al televisor en color de
pantalla de cristal líquido:
• Apagado automático del equipo conectado
cuando se apaga el televisor en color de pantalla
de cristal líquido.
• El televisor en color de pantalla de cristal líquido
se encenderá automáticamente y seleccionará la
entrada de HDMI correspondiente mediante
One-Touch-Play (un simple toque de botón).
• Los equipos que se enumeran en la Lista de
dispositivos en la sección Ajustes HDMI se
encenderán automáticamente cuando sean
seleccionados, consulte la página 22.
~
• Si se apaga la unidad accidentalmente mientras se está
ejecutando el proceso de configuración de idioma, el
proceso se reiniciará desde el principio cuando se
vuelva a encender la unidad.
ES
14
Page 71

Operación del televisor en color de pantalla de cristal líquido
Cómo introducir las pilas en el control remoto
Inserte dos pilas tamaño AA (suministradas) haciendo coincidir las marcas e y E de las pilas con el
diagrama que se encuentra dentro del compartimiento para pilas del control remoto.
Para obtener más información, consulte el Manual de instrucciones del control remoto RM-VL610A
(suministrado).
Cuando utilice el control remoto
Siga las siguientes instrucciones
• Apunte el control remoto directamente hacia el sensor infrarrojo
que tiene el televisor en color de pantalla de cristal líquido.
• Asegúrese de que ningún objeto obstruya la comunicación entre el
control remoto y el sensor infrarrojo del televisor en color de
pantalla de cristal líquido.
• Las lámparas fluorescentes pueden interferir con el
funcionamiento del control remoto; apáguelas y compruebe si hay
menos interferencia.
• Si tiene problemas con el control remoto, vuelva a colocar las pilas
o reemplácelas y asegúrese de hacerlo correctamente.
Botones del televisor en color de pantalla de cristal líquido y del
control remoto
POWER
6
1
2
VOL
OK
MENU
Operación del televisor en color de pantalla de cristal líquido
7
8
9
3
4
5
34 44,71
Los botones del televisor en color de pantalla de cristal líquido operan
de la misma manera que los botones respectivos del control remoto.
Consulte el manual de instrucciones del control remoto
(suministrado).
~
• El botón V tiene un punto táctil. Úselo como referencia cuando opere el
televisor en color de pantalla de cristal líquido.
• Cuando opere el televisor en color de pantalla de cristal líquido, presione un
botón (a excepción del botón POWER) en la unidad una vez que se hayan
encendido todos los indicadores y vuelva a presionarlo para ejecutar la
función. Todos los indicadores se irán apagando gradualmente.
(continúa)
15
ES
Page 72
Elemento Descripción
1 POWER
(Alimentación)
2 INFO
(Información)
3 MENU
(Menú)
Presiónelo para encender y apagar el monitor.
Presiónelo para visualizar la información de entrada actual del equipo externo seleccionado.
Presiónelo para visualizar el MENU a fin de tener acceso a los elementos de MENU,
Imagen,
Sonido, Pantalla, Ajustes HDMI, Ajustes del monitor y Configuración de
PC.
4 V/v/B/b/OK Presione V/v/B/b para desplazar la selección u opción resaltada. Presione OK para seleccionar
5 TOOLS
(Herramientas)
o confirmar un elemento.
Presiónelo para visualizar una lista de funciones convenientes y accesos directos a los menús.
Los elementos del menú TOOLS varían en función de la entrada y del contenido actuales.
Excepto HDMI-PC
Elemento de menú Página de referencia/Detalles
Ajustes de imagen Consulte la página 18
Sonido Consulte la página 20
Ahorro energía Consulte la página 22
Mejorador de movimiento Consulte la página 19
Control disp. Consulte la página 22
Dispositivos HDMI sincronizados Muestra una lista de equipos compatibles con Control
para HDMI conectados a la unidad. Seleccione el
equipo HDMI que desea usar como entrada; luego,
presione OK.
HDMI-PC
Elemento de menú Página de referencia/Detalles
Ajustes de imagen Consulte la página 18
Sonido Consulte la página 20
Ahorro energía Consulte la página 22
Centrado H Consulte la página 23
Centrado V Consulte la página 23
Control disp. Consulte la página 22
Dispositivos HDMI sincronizados Muestra una lista de equipos compatibles con Control
para HDMI conectados a la unidad. Seleccione el
equipo HDMI que desea usar como entrada; luego,
presione OK.
6 TV
(Televisor o
televisión)
7 VOL
8 MUTING
9 EXIT
+/–
(Volumen +/–)
(Silenciador)
(Salir)
Se ilumina en rojo durante las operaciones.
Presiónelos para ajustar el volumen.
Presiónelo para silenciar el sonido. Presiónelo de nuevo o presione VOL + para recuperar el
sonido.
Presiónelo para volver a la pantalla anterior cuando visualiza elementos y ajustes de menú.
~
• Los botones del control remoto que no figuran en la enumeración anterior no pueden operar la unidad.
ES
16
Page 73

Indicadores
12 34
PIC OFF POWER
Elemento Descripción
1 PIC OFF
(Apagar la
imagen)
2 Luz POWER Se ilumina en verde cuando la unidad está encendida.
3 Detector de
luz
4 (IR) Receptor
de señal
infrarroja
Se ilumina en verde cuando la función Sin imagen está activada. Para obtener más
información, consulte la página 22 (Sin imagen).
Detecta el nivel de luz de la sala y ajusta el brillo de la pantalla en función de éste (consulte la
página 22 para obtener más información). No coloque ningún objeto cerca del detector ni en el
área circundante (como se muestra más arriba) ya que podría influir en su funcionamiento.
Recibe las señales infrarrojas del control remoto. No coloque ningún objeto cerca del detector
ya que podría influir en su funcionamiento.
Operación del televisor en color de pantalla de cristal líquido
17
ES
Page 74

Uso de los ajustes del televisor en color de pantalla de cristal líquido
1
Presione MENU. El menú aparece en pantalla.
2 Presione V/v para seleccionar el elemento y, a continuación,
OK.
3 Siga las instrucciones en pantalla.
4 Presione MENU para salir.
Configuración de Imagen
MENU
Imagen
Sonido
Pantalla
Ajustes HDMI
Ajustes del monitor
Configuración de PC
Ajustes de imagen Modo imagen Vívido Selecciónelo para mejorar el contraste y la nitidez
Foto-Vívido* Para mejorar el contraste y la nitidez.
Estándar Selecciónelo para que la configuración de imagen
Foto-Estándar*
Cine Para ver contenido cinematográfico. Indicado para
Foto-Original* Las imágenes se asemejan a las copias de fotos
Personalizar Le permite guardar la configuración preferida.
Foto-
Personalizar*
* Estas opciones no están disponibles en temporizaciones de PC.
de la imagen.
sea estándar. Se recomienda para los sistemas de
entretenimiento en el hogar.
Para visualización estándar; seleccione para uso
doméstico.
ver en un entorno similar a una sala de cine.
impresas de un álbum fotográfico.
Le permite guardar la configuración preferida.
~
• Las opciones de Modo imagen pueden diferir según la configuración del
Optimizador de video/foto (consulte la página 20).
Restablecer Restablece los ajustes actuales a los valores predeterminados.
Retroilumin Aclara u oscurece la iluminación de fondo.
Imagen Aumenta o disminuye el contraste de la imagen.
Brillo
Color Aumenta o disminuye la intensidad del color.
Tinte Aumenta o disminuye los tonos verdes.
Temperatura de
color
Ajuste de los
blancos
Aclara u oscurece la imagen.
Frío Da un tono azulado a los colores blancos.
Neutro Da un tono neutro a los colores blancos.
Cálido 1, 2 Da un tono rojizo a los colores blancos.
~
•
La opción
Cálido 1, 2
no está disponible en
Vívido y Foto-Vívido
.
18
ES
Page 75
Nitidez Aumenta la nitidez de la imagen o la suaviza.
Reducción de
ruido
Reducción de
ruido MPEG
Ajustes
avanzados
Restablecer Restablece todos los ajustes avanzados a los valores predeterminados.
Corrector negro Mejora las zonas de negro de la imagen para intensificar el contraste.
A.C. avanzada
(Amplificación de
contraste
avanzada)
Gamma Ajusta el balance entre las zonas claras y las zonas oscuras de la
Blanco claro Destaca los colores blancos y claros.
Espacio de
color
Color vivo Hace que los colores luzcan más vívidos y reproduce los tonos de piel
Equilibrio de
blancos
Reduce el nivel de ruido de la imagen.
Reduce el efecto de mosaico en los videos de MPEG comprimidos.
Útil para discos DVD y Blu-ray.
Disponible en los siguientes Modos de imagen: Estándar, Cine,
Personalizar, Foto-Estándar, Foto-Original y Foto-
Personalizar.
Optimiza la retroiluminación y el contraste automáticamente. Esta
configuración es especialmente eficaz para las escenas con imágenes
oscuras.
imagen.
Selecciona la gama de la reproducción de color desde Ancho o
Estándar.
claros.
Ajusta al detalle la temperatura de color.
~
• También se puede acceder a los Ajustes de imagen presionando el botón TOOLS en
el control remoto.
• Algunos ajustes de Imagen no están disponibles con la señal de PC conectada a la
entrada HDMI.
Mejorador de
movimiento
Permite activar Mejorador de movimiento para mejorar la nitidez de la imagen en
movimiento y reducir la borrosidad.
Alto Proporciona una imagen en movimiento más nítida para contenido
basado en cine.
Estándar Proporciona una imagen en movimiento nítida. Utilice este ajuste para
uso estándar.
No Utilice este ajuste cuando los ajustes Alto y Estándar muestren
artefactos de video, como por ejemplo, imágenes fantasma.
~
• Dependiendo del video, es posible que no perciba el efecto visualmente, aunque haya
cambiado el ajuste.
•El Mejorador de movimiento no se encuentra disponible si el Modo juego está
ajustado en Sí.
CineMotion Detecta automáticamente cuando el contenido es una película y aplica un proceso inverso
de exploración progresiva de señal (pulldown 3-2) y estimación de movimiento para
mejorar el rendimiento del contenido fílmico y del desentrelazado.
Auto 1 Aplica un proceso inverso de exploración progresiva de señal
(pulldown 3-2) junto con estimación de movimiento para lograr la más
refinada calidad de imagen y reduce artefactos en las imágenes en
movimiento. Seleccione esta opción para el uso estándar.
Auto 2 Aplica sólo el proceso inverso de exploración progresiva de señal
(pulldown 3-2). El movimiento de la imagen será similar al de la
película original.
No Apaga la función CineMotion. Utilice este ajuste cuando los ajustes
Auto 1 o Auto 2 muestren artefactos de video, como por ejemplo,
imágenes fantasma.
(continúa)
19
ES
Uso de los ajustes del televisor en color de pantalla de cristal líquido
Page 76

Modo juego Seleccione Sí para aumentar la diversión de los juegos de video rápidos, donde el tiempo
Optimizador de video/
foto
de respuesta es importante. Seleccione No para desactivar esta función.
Realiza los ajustes de imagen para optimizar la calidad de imagen del contenido en video
(imágenes en movimiento) o fotografía (imágenes fijas). La función solo está disponible
para el contenido 1 080i/p (excluyendo el 1 080/24p) conectado a la entrada HDMI.
Video-A La unidad establecerá de manera automática los ajustes de imagen del
contenido en video o imágenes fijas cuando el equipo opcional Sony
que admite el modo Video-A esté conectado a la entrada HDMI.
Video Seleccione para establecer los ajustes de imagen del contenido en
video.
Foto Seleccione para establecer los ajustes de imagen del contenido en
fotografías.
~
• Las funciones Modo juego y Optimizador de video/foto no están disponibles cuando el Modo sala de cine
está en Sí.
Configuración de Sonido
Modo sonido Dinámico Mejora los agudos y graves.
Estándar Sonido estándar optimizado para uso doméstico.
Voz clara Adecuado para diálogo hablado.
Restablecer Restablece los ajustes actuales a los valores predeterminados.
Agudos Aumenta o disminuye los tonos de alta frecuencia.
Graves Aumenta o disminuye los tonos de baja frecuencia.
Balance Enfatiza el sonido de la bocina izquierda o derecha.
Surround
(Sonido envolvente)
Acercar voz Ajusta la claridad de las voces humanas. Por ejemplo, si la voz de algún periodista de un
Amplific. sonido Amplific. sonido provee un sonido más completo con un mayor sentido de profundidad
S-FORCE Front
Surround
No Selecciónelo si desea una recepción normal estéreo o monoaural.
programa de noticias no es clara, puede activar esta configuración para obtener una voz
más clara. Por el contrario, si mira un programa deportivo, puede desactivar esta
configuración para suavizar la voz del comentarista.
y anchura, acentuando los sonidos de la frecuencia alta y baja. Seleccione Alto, Bajo o
No para determinar el nivel deseado de énfasis. Seleccione No para desactivar el
amplificador de sonido.
Proporciona una experiencia de sonido envolvente virtual, posible
utilizando sólo dos bocinas frontales.
~
• Sólo está disponible si el Modo sonido está definido en Estándar.
Steady Sound
(Auto volumen)
Nivelac. de volumen Ajusta el nivel del volumen de la entrada actual en relación con otras entradas.
Seleccione Sí para estabilizar el volumen para todos los programas y comerciales.
Seleccione No para desactivar esta función.
~
• También se puede acceder a los ajustes de
ES
20
Sonido
presionando el botón
TOOLS
en el control remoto.
Page 77

Configuración de Pantalla
Modo ancho Acerc.
panorám.
Normal Muestra una imagen 4:3 en su relación de aspecto original cuando el
Completa Amplía la imagen horizontalmente para llenar la pantalla cuando el
Acercamiento Selecciónelo para ampliar la imagen horizontal y verticalmente para
Ancho automático Sí Cambia automáticamente la configuración de Modo ancho en
No Desactiva la opción Ancho automático. Seleccione un Modo
4:3 Normal
Seleccione este modo de
pantalla como
predeterminado para
fuentes 4:3
Acerc.
panorám.
Normal Muestra la imagen 4:3 en su relación de aspecto original.
No Selecciónelo para seguir utilizando el ajuste del Modo ancho actual
Llena la pantalla con una distorsión mínima.
formato de la fuente original es 4:3.
formato de la fuente original es 4:3. Cuando la fuente original es
16:9 (fuente de alta definición), seleccione este modo para visualizar
la imagen 16:9 en su tamaño original.
llenar la pantalla mientras conserva la relación de aspecto.
función del contenido. Si los cambios frecuentes de pantalla le
molestan, seleccione No.
ancho en la opción Modo ancho.
Amplía la imagen 4:3 y la ajusta a la pantalla de 16:9, visualizando
una porción de la imagen original tan grande como sea posible.
cuando se cambia la entrada.
~
• 4:3 Normal no está disponible si Ancho automático se encuentra configurado en
No.
•Si 4:3 Normal no se establece en No, el ajuste de Modo ancho se aplica sólo a la
entrada actual. Cuando se cambian entradas, el Modo ancho es reemplazado
automáticamente por el valor 4:3 Normal para la fuentes con formato 4:3. Para
conservar el valor Modo ancho actual cuando se modifican las entradas, fije la opción
4:3 Normal en No.
Área de imagen
Centrado horizontal Permite mover la posición de la imagen horizontalmente (a la derecha y a la izquierda).
Centrado vertical Permite mover la posición de la imagen verticalmente (hacia arriba y hacia abajo en la
Dimensión vertical Ajusta la dimensión vertical de la imagen de una imagen de definición estándar.
Satur. de
píxeles
Normal Visualiza la imagen en su tamaño original.
-1/-2 Amplía la imagen para ocultar sus bordes.
ventana).
Visualiza la imagen de fuentes de 1 080i, 1 080p o 1 080/24p en su
tamaño original cuando el modo Modo ancho está definido en
Completa.
~
• Algunas opciones no están disponibles con la señal de PC conectada a la entrada HDMI.
• Es posible que las opciones Centrado horizontal, Centrado vertical y Dimensión vertical no estén
disponibles según la señal de entrada.
Uso de los ajustes del televisor en color de pantalla de cristal líquido
21
ES
Page 78

Configuración de Ajustes HDMI
Las entradas de HDMI de este televisor en color de pantalla de cristal líquido reconocerán y se
comunicarán con otros aparatos de Sony que estén equipados con Control para HDMI. Consulte la
página 14 para obtener información sobre Control para HDMI.
Control para HDMI La función Sí/No permite al televisor en color de pantalla de cristal líquido comunicarse
con otros equipos compatibles con el estándar Control para HDMI.
Desactivación auto.
del dispositivo
Encendido automático
del monitor
Actualizar lista
dispvos.
Lista de dispositivos Muestra una lista de equipos compatibles con Control para HDMI conectados al
Seleccione Sí para hacer que el equipo compatible conectado con Control para HDMI
se apague de forma automática cuando se apaga el televisor en color de pantalla de cristal
líquido. Seleccione No para desactivar esta función. Esta función está disponible cuando
el Control para HDMI está en Sí.
Seleccione Sí para controlar el encendido del televisor en color de pantalla de cristal
líquido desde el equipo compatible conectado con Control para HDMI. Seleccione No
para desactivar esta función. Esta función está disponible cuando el Control para HDMI
está en Sí.
Crea o actualiza la lista de dispositivos HDMI. Asegúrese de actualizar la Lista de
dispositivos HDMI cuando cambia las conexiones o ajustes del equipo compatible con el
Control para HDMI.
televisor en color de pantalla de cristal líquido.
~
•Presione TOOLS mientras el equipo compatible con Control para HDMI esté conectado para visualizar las
opciones de Control disp. La opción Control disp. permite acceder a Menú, Opciones y Lista de
contenido de su equipo conectado con el control remoto del televisor en color de pantalla de cristal líquido.
• Algunos equipos con Control para HDMI no son compatibles con la función de Control disp.
Ajustes del monitor
Ahorro energía Reduce el consumo de energía ajustando el brillo de retroiluminación. Esto también
mejora el nivel de negro. Elija entre No, Bajo, Alto y Sin imagen.
~
• Cuando esté programada la función Sin imagen, no podrá desactivarla al presionar los
botones VOL +/– o MUTING. Para desactivarla, presione cualquier otro botón.
Detector de luz Activa el control de brillo automático de la imagen (pantalla). El Detector de luz
calcula el brillo de la sala y permite que la unidad ajuste automáticamente el brillo de
retroiluminación en función de los ajustes de imagen y de las condiciones de iluminación
ambiental de la sala.
~
• Asegúrese de no colocar ningún objeto alrededor del detector, ya que podría influir en su
funcionamiento (consulte la página 15).
• En luz baja, la gama del control de luz de fondo se reduce cuando el Detector de luz se
ajusta en Sí.
Info. del producto Muestra la información de producto del televisor en color de pantalla de cristal líquido.
Restablecer todos Restaura todos los ajustes a los valores predeterminados de fábrica.
Idioma Seleccione el idioma que prefiera utilizar para mostrar todos los ajustes en pantalla:
English (Inglés), Español o Français (Francés).
ES
22
Page 79

Configuración de PC
Modo ancho Normal Selecciónelo para visualizar la imagen en su resolución y relación de
aspecto originales.
Completa 1 Selecciónelo para ampliar la imagen de modo que llene la pantalla,
conservando su relación de aspecto original.
Completa 2 Selecciónelo para ampliar la imagen de modo que llene la pantalla.
Restablecer Restablece los ajustes actuales a los valores predeterminados.
Centrado H Permite mover la posición de la imagen horizontalmente (a la derecha y a la izquierda).
Centrado V Permite mover la posición de la imagen verticalmente (hacia arriba y hacia abajo).
Uso de los ajustes del televisor en color de pantalla de cristal líquido
23
ES
Page 80

Accesorios opcionales
Esta unidad ha sido diseñada para ser usada con los siguientes accesorios opcionales, como el soporte de
montaje mural (a partir de octubre de 2008).
Para la instalación de los accesorios opcionales se precisan conocimientos y experiencia suficientes.
Asegúrese de contratar para la instalación a un contratista con licencia. Lea el manual de instrucciones que
se suministra con los accesorios junto con este manual para realizar una instalación segura.
Uso del soporte de montaje mural/sistema de altavoces
Soporte de montaje mural:
SU-WL700
Sistema de altavoces:
Use los accesorios suministrados con esta unidad
para realizar la instalación.
Separadores (negros) (4)
SS-WAL700
El televisor en color de pantalla de cristal líquido no emite sonido cuando se retira el soporte de sobremesa para usar el
televisor en color de pantalla de cristal líquido con el soporte de montaje mural. En este caso, use el televisor en color
de pantalla de cristal líquido con el exclusivo sistema de altavoces (opcional) para que emita el sonido.
Instalación con la unidad.
Los siguientes pasos se deben realizar de modo que se correspondan con los pasos de instalación del
manual de instrucciones de los accesorios opcionales. Siga las instrucciones de este manual y consulte el
manual de instrucciones suministrado con los accesorios. Si desea leer explicaciones relativas a ( ) en los
pasos de instalación, consulte los mismos pasos en el manual de instrucciones suministrado con los
accesorios.
Los usuarios del sistema de altavoces deben
consultar primero el manual de instrucciones del
soporte de montaje mural.
1 Asegúrese de haber retirado el soporte de
sobremesa (si fuera necesario) (4-1).
• El soporte no viene fijado al televisor en color de
pantalla de cristal líquido al desembalar. Coloque
la unidad boca abajo.
2 Coloque los separadores (4-2).
1 Retire los cuatro
tornillos de la parte
posterior del
televisor en color
de pantalla de
cristal
líquido.
2 Coloque los
separadores
(negros - suministrados
con el televisor en color de
pantalla de cristal líquido).
• Si el soporte de sobremesa ya ha sido instalado,
retírelo (consulte la página 8).
ES
24
3 Siga los pasos 4-3 a 4-4 del manual de
instrucciones suministrado con el soporte de
montaje manual.
Si sólo usa el soporte de montaje mural
Continúe con el paso 6 de este manual.
Si usa el sistema de altavoces
Continúe con el paso 4 de este manual.
Page 81

4 Levante el soporte de bloqueo para insertar el
sistema de altavoces (4-5).
Soporte de montaje
Sistema de
altavoces
Soporte de
bloqueo
Inserte en la pieza de unión del soporte del
televisor en color de pantalla de cristal líquido.
7 Conecte el cable de alimentación de ca
(suministrado con el televisor en color de
pantalla de cristal líquido) y el cable HDMI
(suministrado con el televisor en color de
pantalla de cristal líquido) (5-1).
1 Conecte el cable de
alimentación.
2 Fíjelo al gancho.
Esta pieza quedará sobre el soporte de montaje.
5 Fije el sistema de altavoces con dos tornillos
(suministrados con el sistema de altavoces).
Tornillos (suministrados con el sistema de altavoces)
6 Consulte el manual de instrucciones
suministrado con el soporte de montaje
manual y siga los pasos 4-6 a 4-7.
Si instala el sistema de altavoces
Fije el cable de alimentación a los ganchos y
deje que cuelgue del borde derecho del
televisor en color de pantalla de cristal
líquido.
Deje que el cable HDMI cuelgue del borde
izquierdo o derecho del televisor en color de
pantalla de cristal líquido.
8 Siga las instrucciones del manual
suministrado con el soporte de montaje mural
para continuar con la instalación de la unidad
en la pared.
~
• No se pueden conectar cables al televisor en color de
pantalla de cristal líquido una vez montado en la pared
o sobre el soporte de suelo.
• Si instala el televisor en color de pantalla de cristal
líquido en la pared o sobre el soporte de suelo, levante
la unidad junto con el paño que se encuentra debajo de
ella. No tome la unidad por la rejilla de la bocina.
Accesorios opcionales
25
ES
Page 82

Uso con el soporte de suelo/sistema de altavoces
Soporte de suelo:
SU-FL71M
Sistema de altavoces:
SS-WAL700
Use los accesorios suministrados con esta unidad
para realizar la instalación.
Separadores (plateados) (2)* Tornillos M6 × 20 (4)
* Use cuatros separadores si el sistema de altavoces no
está instalado.
El televisor en color de pantalla de cristal líquido no emite sonido cuando se retira el soporte de sobremesa para usar el
televisor en color de pantalla de cristal líquido con el soporte de suelo. En este caso, use el televisor en color de
pantalla de cristal líquido con el exclusivo sistema de altavoces (opcional) para que emita el sonido.
Instalación con la unidad
Los siguientes pasos se deben realizar de modo que se correspondan con el paso de instalación del manual
de instrucciones de los accesorios opcionales. Siga las instrucciones de este manual y consulte el manual
de instrucciones suministrado con los accesorios.
Los usuarios del sistema de altavoces, deben
consultar primero el manual de instrucciones del
soporte de suelo.
Siga los pasos siguientes en lugar de “2
Preparativos para la instalación del televisor”
(página 6) del manual de instrucciones
1 Retire los cuatro
tornillos de la parte
posterior del
televisor en color
de pantalla de
cristal
líquido.
suministrado con el soporte de suelo.
1 Asegúrese de haber retirado el soporte de
sobremesa (si fuera necesario).
• El soporte no viene fijado al televisor en color de
pantalla de cristal líquido al desembalar. Coloque
la unidad boca abajo.
2 Coloque los separa-
dores (plateados,
suministrados con el
televisor en color de
pantalla de cristal
líquido).
Si el sistema de
altavoces está
instalado, coloque dos
separadores (amarillos,
suministrados con el
sistema de altavoces)
en la parte inferior.
3 Instale del montaje del soporte I J en el
televisor en color de pantalla de cristal
líquido.
1 Coloque el montaje del soporte I J
alineándolo con los orificios para los tornillos
que quedan disponibles en el paso 2.
2 Fije temporalmente dos tornillos M6 × 20
(suministrado con el televisor en color de
pantalla de cristal líquido) en los orificios
• Si el soporte de sobremesa ya ha sido instalado,
retírelo (consulte la página 8).
2 Coloque los separadores.
Si el sistema de altavoces no está instalado,
use los cuatro separadores (plateados,
suministrados con el televisor en color de
pantalla de cristal líquido).
superiores del montaje del soporte. Si el sistema
de altavoces no está instalado, ajuste los cuatro
tornillos.
Tornillos M6 × 20
(suministrados con el
televisor en color de
pantalla de cristal
líquido)
I
J
26
ES
Continúe con el paso 5 si sólo usa el soporte
de suelo.
Page 83

4 Inserte el sistema de altavoces.
6 Conecte el cable de alimentación de ca
(suministrado con el televisor en color de
pantalla de cristal líquido) y el cable HDMI,
luego déjelos que cuelguen desde el centro del
televisor en color de pantalla de cristal
líquido.
Sistema de
altavoces
Inserte en la pieza de unión del soporte del
televisor en color de pantalla de cristal líquido.
Inserte esta pieza debajo del
montaje del soporte I J.
5 Fije el sistema de altavoces con los tornillos,
luego fije el gancho M al montaje del soporte
I J.
Ajuste los dos tornillos superiores (fijados
temporalmente en el paso 3).
Tornillos (suministrados
con el sistema de
altavoces)
O
M
1 Conecte el cable de
alimentación.
2 Déjelo que
cuelgue del centro.
Accesorios opcionales
7 Siga las instrucciones del manual
suministrado con el soporte de montaje mural
para continuar con la instalación.
~
• No se pueden conectar cables al televisor en color de
pantalla de cristal líquido una vez montado en la pared
o sobre el soporte de suelo.
• Si instala el televisor en color de pantalla de cristal
líquido en la pared o sobre el soporte de suelo, levante
la unidad junto con el paño que se encuentra debajo de
ella. No tome la unidad por la rejilla de la bocina.
Tornillos M6 × 20
(suministrados
con el televisor
en color de
pantalla de
cristal líquido)
27
ES
Page 84
Información adicional
Solución de problemas
Si tiene más preguntas, necesita servicio de
mantenimiento o requiere asistencia técnica en
relación con el uso del televisor en color de
http://esupport.sony.com/ES/LA/
o llame al número de teléfono que aparece en su
póliza de garantía.
pantalla de cristal líquido Sony, visite nuestra
página en Internet:
Síntoma Explicación/Solución
No hay imagen
No hay imagen • Compruebe la configuración de Ahorro energía (consulte la página 22).
No hay imagen de la fuente de
video
• Compruebe la conexión entre el equipo de video opcional y el televisor en color
de pantalla de cristal líquido.
Imagen de poca calidad
La calidad de las imágenes es
inferior a la calidad que tenían
en la tienda
Sin color, imagen oscura,
color incorrecto, imagen
demasiado brillante
Imagen borrosa, color de poca
calidad
• La calidad de la imagen depende del contenido de la señal.
• Ajuste las opciones de Modo imagen en la configuración de Imagen
(consulte la página 18).
• Si configura el modo Ahorro energía en Bajo o Alto, mejorará el nivel de
negro (consulte la página 22).
• Al trasladar la unidad de un lugar frío a uno caluroso o al producirse un cambio
de temperatura repentino en la habitación, es posible que la imagen se vea
borrosa o que sus colores no sean los adecuados debido a la condensación de
humedad. Apague la unidad y espere unas horas antes de volver a encenderla.
Sin sonido / ruido
Buena imagen / sin sonido • Compruebe el control de volumen.
•Presione
(
consulte la
MUTING
página 16).
o
VOL +
para que “Muting” desaparezca de la pantalla
BRAVIA Sync
No se detecta el dispositivo
HDMI BRAVIA Sync
El segundo receptor audio/
video no está en la Lista de
dispositivos
• Asegúrese de que el Control para HDMI esté configurado tanto en el televisor
en color de pantalla de cristal líquido como en el dispositivo opcional
compatible con BRAVIA Sync (consulte la página 14).
• Se puede utilizar un solo receptor audio/video por vez con las funciones
BRAVIA Sync y Control para HDMI (consulte la página 22).
Entrada de PC
No hay imagen / No hay señal • Confirme que la PC esté conectada correctamente a la unidad con la entrada
Imagen de poca calidad • Ajuste la resolución (consulte la página 13).
HDMI IN.
• Asegúrese de que la señal de salida desde la PC esté en uno de los formatos
enumerados en la página 13.
General
El Modo ancho cambia
automáticamente
• El ajuste de Modo ancho actual se sustituye automáticamente por el ajuste
4:3 Normal, si 4:3 Normal en la configuración de Pantalla está ajustado en
una opción distinta a No. Si desea bloquear el Modo ancho seleccionado con
el botón WIDE en el control remoto, ajuste 4:3 Normal en No en la
configuración de Pantalla (consulte la página 21).
• Compruebe la opción Ancho automático en la configuración de Pantalla
(consulte la página 21).
28
ES
Page 85

Síntoma Explicación/Solución
Aparecen bandas negras en los
bordes de la pantalla
• Algunos programas de pantalla ancha se filman en formatos superiores a
16:9 (esto es muy común en los lanzamientos cinematográficos). Su televisor en
color de pantalla de cristal líquido mostrará estos programas con bandas negras
en la parte superior y en la parte inferior de la pantalla. Para obtener
información más detallada, consulte la documentación que venía con el DVD (o
póngase en contacto con el proveedor de programas).
• Los programas en formato 4:3 tendrán bandas a la izquierda y a la derecha de la
pantalla.
Ciertos programas en DVD o
en otras fuentes digitales
muestran una pérdida de
detalle, especialmente durante
las escenas con mucha acción
• Esto se debe a que la compresión utilizada por algunas DVD puede hacer que la
pantalla del televisor en color de pantalla de cristal líquido muestre menos
detalles que lo habitual, o que aparezcan artefactos (pequeños bloques o puntos,
pixelizaciones) en la pantalla. Estas compresiones de señales son más visibles
en función de la claridad y la resolución de la unidad.
u oscuras
El control remoto no funciona • Para determinar si el problema es del control remoto o no, presione un botón de
la unidad.
•Presione VOL +/
–
para ajustar el volumen.
•Presione TV en el control remoto cuando el botón no esté iluminado.
• Compruebe la polaridad de las pilas o reemplácelas.
• Apunte el control remoto hacia el sensor del control remoto ubicado en la parte
frontal de la unidad.
• Mantenga la zona del detector del control remoto libre de obstáculos.
• Las lámparas fluorescentes pueden interferir con el funcionamiento del control
remoto; pruebe con apagarlas.
• Compruebe el botón que puede operar esta unidad (consulte la página 15).
Información adicional
29
ES
Page 86

Especificaciones
Modelo KLV-40ZX1M
Sistema
Sistema del panel
Salida de bocinas
Tomas de entrada/salida
HDMI IN
Alimentación y otras especificaciones
Requisitos de alimentación
Consumo energético
en uso
en espera
Tamaño de pantalla
(medido diagonalmente en
pulgadas)
Resolución del monitor
Bocina/
Gama completa (4) (mm)
Graves (1) (mm)
Dimensiones
con soporte (mm)
sin soporte (mm)
patrón de los orificios de
montaje mural (mm)
tamaño de tornillos de
montaje mural (mm)
Peso
con soporte (kg)
sin soporte (kg)
Accesorios suministrados
Accesorios opcionales
Panel LCD (pantalla de cristal líquido)
5 W + 5 W, 10 W (Graves)
HDMI: Video: 480i, 480p, 720p, 1 080i, 1 080p, 1 080/24p / Audio: PCM lineal de dos canales 32, 44,1 y 48 kHz; 16,
20 y 24 bits
120 V a 240 V ca, 50/60 Hz
188 W
0,3 W (120 V)
0,4 W (240 V)
40
1 920 puntos (horizontales) × 1 080 líneas (verticales)
Ø30
58 × 90
986 × 682 × 307
986 × 599 × 28
300 × 300
M6 (longitud: consulte el diagrama en la página 9)
15,0
12,2
Consulte la sección “Verificación de los accesorios” en la página 6.
Soporte de montaje mural/Soporte para TV: consulte la página 2
~
• La disponibilidad de los accesorios opcionales dependerá de las existencias.
• El diseño y las especificaciones están sujetos a cambios sin previo aviso.
ES
30
Page 87

Para su conveniencia
Por favor contacte directamente a Sony, si:
• Después de leer el Manual de instrucciones, tiene preguntas acerca del funcionamiento de su televisor
en color de pantalla de cristal líquido
• Tiene dificultad al operar su televisor en color de pantalla de cristal líquido
Si requiere asistencia con el producto: Visite la página de Internet
http://esupport.sony.com/ES/LA/
o llame al número de teléfono que aparece en su póliza de garantía.
Sony trabajará para resolver sus dudas más rápidamente que el establecimiento donde adquirió el
producto.
POR FAVOR NO DEVUELVA EL PRODUCTO A LA TIENDA
Información adicional
31
ES
 Loading...