

Page 1
LCD Monitor
Printed using VOC (Volatile Organic Compound)-free
vegetable oil based ink.
Moniteur ACL
Televisor en color de pantalla de cristal líquido
Printed in Japan
KLV-40ZX1M
© 2008 Sony Corporation
Operating Instructions
Mode d’emploi
Manual de instrucciones
Lea este manual antes de usar el producto
4-123-656-11(1)
US
FR
ES
Page 2

Owner’s Record
The model and serial numbers are located
at the inside of the terminal cover. Record
these numbers in the spaces provided
below. Refer to them whenever you call
upon your Sony dealer regarding this unit.
Model Name
Serial No.
CAUTION
To prevent electric shock and blade exposure,
do not use this polarized AC plug with an
extension cord, receptacle or other outlet
unless the blades can be fully inserted.
s Operate the unit only on 120-240 V AC.
Declaration of Conformity
Trade Name: SONY
Model: KLV-40ZX1M
Responsible Party: Sony Electronics Inc.
Address: 16530 Via Esprillo,
San Diego, CA 92127 U.S.A.
Telephone Number: 858-942-2230
This equipment complies with part 15 of t he
FCC rules. Operation is subject to the
following two conditions: (1) This
equipment may not cause harmful
interference, and (2) this equipment must
accept any interference received, including
interference that may cause undesired
operation.
NOTIFICATION
This equipment has been tested and found to
comply with the limits for a Class B digital
equipment, pursuant to Part 15 of the FCC
Rules. These limits are designed to provide
reasonable protection against harmful
interference in a residential installation. This
equipment generates, uses and can radiate
radio frequency energy and, if not installed and
used in accordance with the instructions, may
cause harmful interference to radio
communications.
However, there is no guarantee that
interference will not occur in a particular
installation. If this equipment does cause
harmful interference to radio or television
reception, which can be determined by turning
the equipment off and on, the user is
encouraged to try to correct the interference by
one or more of the following measures:
s Reorient or relocate the receiving antenna.
s Increase the separation between the
equipment and receiver.
s Connect the equipment into an outlet on a
circuit different from that to which the
receiver is connected.
s Consult the dealer or an experienced radio/
TV technician for help.
Pursuant to FCC regulations, you are
cautioned that any changes or modifications
not expressly approved in this manual could
void your authority to operate this
equipment.
For Customers in Canada
This Class B digital apparatus complies with
Canadian ICES-003.
CAUTION
Use the following Sony LCD Monitor only
with the following WALL-MOUNT
BRACKET or TV-stand.
Sony LCD Monitor Model
No.
Sony Wall- Mount
Bracket Model No.
Sony TV-stand
Model No.
Use with other WALL-MOUNT BRACKET
or TV-stand may cause instabilit y and possibly
result in injury.
To Customers
Sufficient expertise is required for installing
the specified unit. Be sure to subcontract the
installation to a Sony dealer or licensed
contractor and pay adequate attention to safety
during the installation.
Licensing Information
Macintosh is a trademark of Apple Inc.,
registered in the U.S. and other countries.
HDMI, the HDMI logo and High-Definition
Multimedia Interface are trademarks or
registered trademarks of HDMI Licensing,
LLC.
Fergason Patent Properties, LLC:
U.S. Patent No. 5,717,422
U.S. Patent No. 6,816,141
Blu-ray Disc is a trademark.
“BRAVIA” and , S-Force,
BRAVIA Sync, , DMe
and “x.v. Color” are trademarks or registered
marks of Sony Corporation.
“PLAYSTATION” is a registered trademark
and “PS3” is a trademark of Sony Computer
Entertainment Inc.
Adobe is a registered trademark or a trademark
of Adobe Systems Incorporated in United
States and/or other countries.
KLV-40ZX1M
SU-WL700
SU-FL71M
x
, MICRO VAULT,
US
2
Page 3
Contents
Overview
Welcome to the World BRAVIA® LCD Monitor ..........................................................................................4
Checking the Accessories...........................................................................................................................4
Getting Started
1. Installing the Unit.....................................................................................................................................5
Carrying the Unit......................................................................................................................................5
Preparation for Table-Top Stand.............................................................................................................5
Removing the Table-Top Stand...............................................................................................................6
Preparation for Wall-Mount Bracket ........................................................................................................7
When Installing the Unit Against a Wall or Enclosed Area......................................................................7
Securing the Unit.....................................................................................................................................8
2. Locating Inputs.......................................................................................................................................10
Connecting the AC Power Cord and HDMI Cable.................................................................................10
3. Connecting the Equipment....................................................................................................................11
4. Setting Up the Language.......................................................................................................................12
Using BRAVIA Sync with Control for HDMI.............................................................................................12
Operating the LCD Monitor
Inserting Batteries into the Remote Control............................................................................................13
When Using the Remote Control ..............................................................................................................13
LCD Monitor Control and Remote Control Button..................................................................................13
Indicators ....................................................................................................................................................15
Using LCD Monitor Settings
Picture Settings................................................................................................................................16
Sound Settings ................................................................................................................................18
Screen Settings ...............................................................................................................................19
HDMI Settings..................................................................................................................................20
Monitor Settings...............................................................................................................................20
PC Settings......................................................................................................................................21
Optional Accessories
Using with the Wall-Mount Bracket/Speaker System............................................................................22
Using with the Floor Stand/Speaker System.........................................................................................24
Other Information
Troubleshooting.........................................................................................................................................26
Specifications.............................................................................................................................................28
US
Customer Support
http://www.sony.com/tvsupport
On-line Registration
United States
http://productregistration.sony.com
Canada
http://www.sonystyle.ca/registration
US
3
Page 4

Overview
Welcome to the World BRAVIA® LCD Monitor
Thank you for purchasing this Sony BRAVIA® LCD Monitor. The quality of the image you see on your
BRAVIA LCD Monitor is only as good as the quality of the signal from the connected equipment.
Your BRAVIA LCD Monitor is Energy Star Compliant. It meets strict energy efficiency
guidelines set by the EPA and US Department of Energy. ENERGY STAR is a joint program
of these government agencies, designed to promote energy efficient products and practices.
Checking the Accessories
Remote control RM-VL610A (1)
Size AA batteries (2)
AC power cord (1)
HDMI cable (1)
Table-Top Stand (1) and Screws M5 × 8 (4)
Terminal cover (1)
Spacers (black) (4)
Spacers (silver) (4) and Screws M6 × 20 (4)
Stand Support adapter (1)
Operating Instructions (this manual) (1)
Warranty Card (1)
Safety and Regulatory Booklet (1)
Operating Instructions for the remote control (1)
Code List (1)
CAUTION
When the LCD Monitor is used for an extended period, the front and rear panel surrounds became warm.
You may feel hot when touching there by the hand. For details, see the flyer supplied.
US
4
Page 5
Getting Started
1. Installing the Unit
This Unit can be mounted on a wall using a WallMount Bracket or placed on a TV stand (each sold
separately). This section will explain:
• How to carry the Unit
• Preparation for a Table-Top stand
• Preparation for a Wall-Mount Bracket
• Installation against a wall or enclosed area
• Securing the Unit
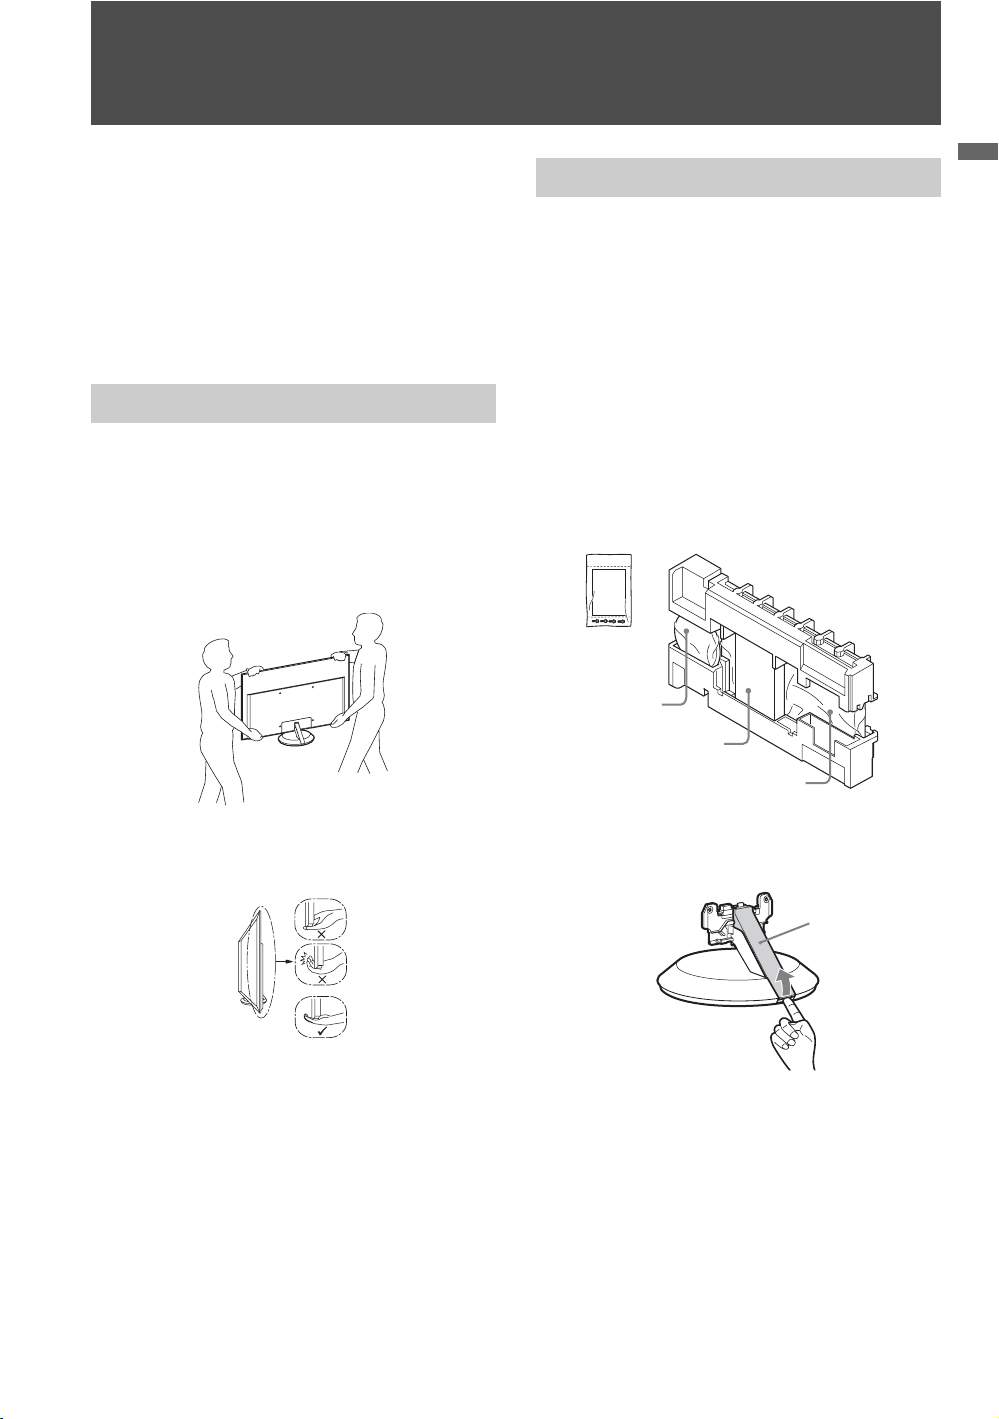
Carrying the Unit
Be sure to follow these guidelines to protect your
property and avoid causing serious injury.
• Before carrying the Unit, disconnect all cables.
• Carrying this Unit requires two or more people.
• When carrying the Unit, place your hand as
illustrated and hold it securely. Do not subject the
Unit to shocks, vibration, or excessive force.
Preparation for Table-Top Stand
Follow the assembling steps required to place on
the Table-Top Stand.
1 Remove the Table-Top Stand, accessory box
and accessory bag from the carton. The
screws and booklet can be found in the
accessory bag attached on the rear of the LCD
monitor.
For product protection and safety reasons,
Sony strongly recommends that you use the
screws provided with the display.
~
• Do not remove the blue tape that secures the plate on
the rear of the LCD monitor until you finish installing
the Table-Top Stand.
Accessory bag
Table-Top Stand
Accessory box
Getting Started
• Lift the Unit by placing your palm directly
underneath the panel but do not put stress on the
LCD panel.
Be sure to hold the bottom of the panel.
LCD monitor
2 Place the Table-Top Stand on a level and
stable surface, then remove the stand cover
from the Table-Top Stand.
Stand cover
(Continued)
US
5
Page 6
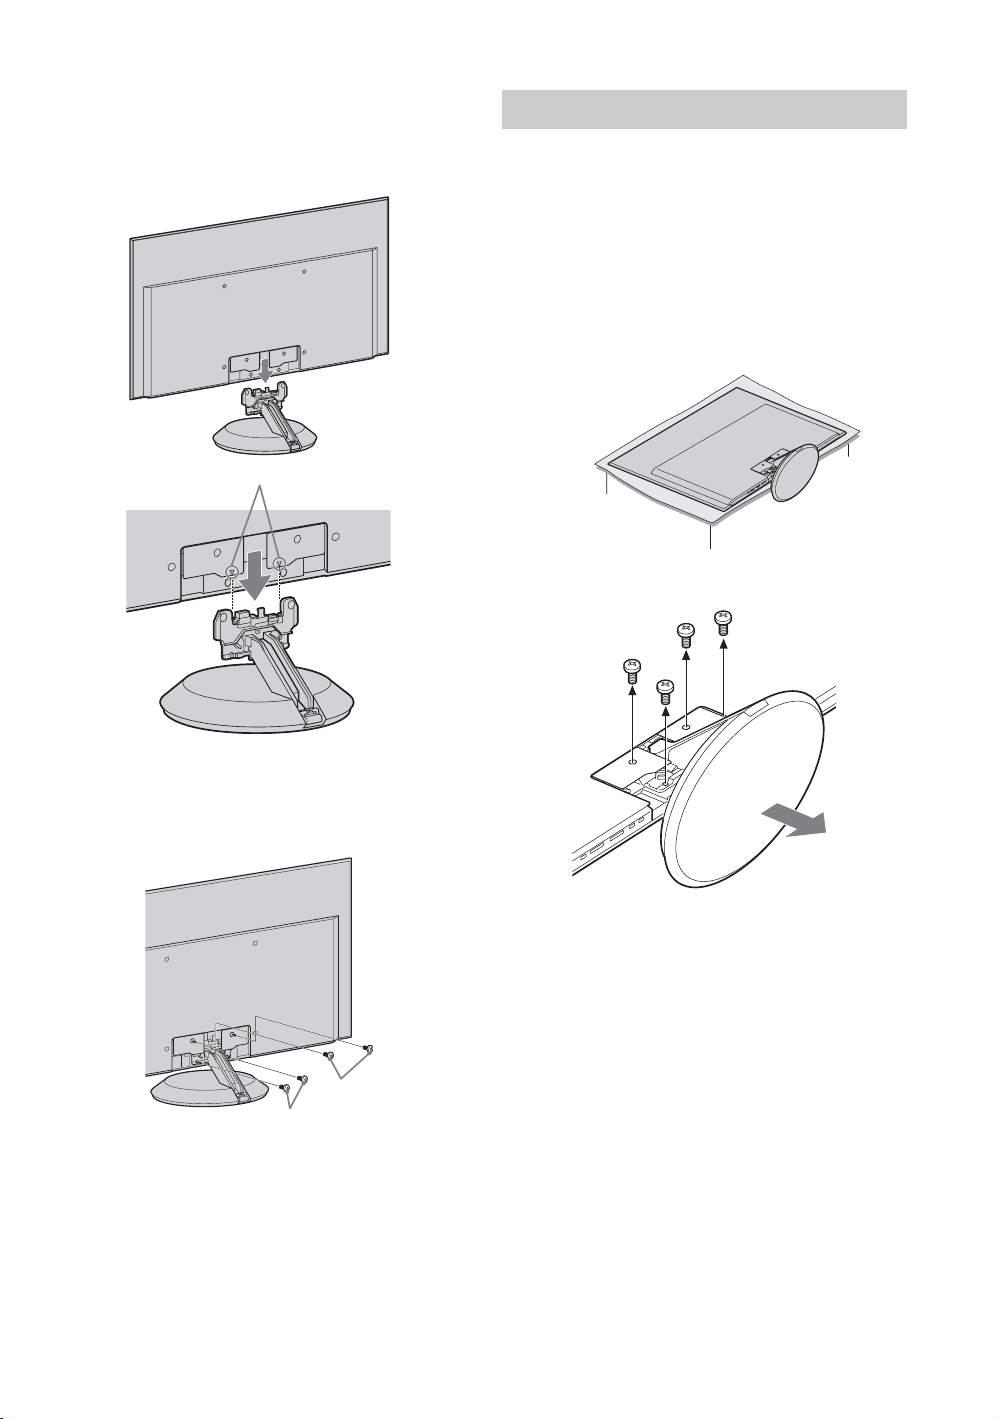
3 Align the F mark, then press the LCD
monitor against the neck of the Table-Top
Stand and gently slide the LCD monitor onto
the neck. Be sure to work with two or more
people.
F mark
Removing the Table-Top Stand
If the LCD monitor is to be wall-mounted of
installed on the Floor Stand (optional), remove the
Table-Top Stand.
1 Place the LCD monitor face down.
Lay a mat (packing sheet, etc.) on a table
wider than the LCD monitor, then place the
LCD monitor on the table with the stand
hanging over the edge of the table. Be sure to
work with two or more people.
Packing sheet, etc.
2 Remove the four screws from the Table-Top
Stand.
4 Attach the LCD monitor to the Table-Top
Stand using the supplied screws. Attach the
two bottom screws first, then the top two
screws.
2 Top screws
1 Bottom screws
~
• If an electric screwdriver is used, set the torque to
tighten at approximately 1.5 N·m {15 kgf·cm}.
• Do not put stress on the LCD panel or the frame
around the screen.
~
• Do not use the screws removed from the Table-Top
Stand for the Wall-Mount Bracket or Floor Stand.
• When you carry the LCD monitor, move the monitor
with a mat laid below.
• Hold the Table-Top Stand firmly with both hands.
US
6
Page 7
Preparation for Wall-Mount Bracket
This model is ready to be mounted on a wall. For
details, see page 22.
• For product protection and safety reasons,
Sony strongly recommends that you use the
Wall-Mount Bracket model designed for your
LCD monitor and the wall-mounting of LCD
monitor should be performed by a Sony
dealer or licensed contractor.
• Sufficient expertise is required in installing this
LCD monitor, especially to determine the
strength of the wall for withstanding the LCD
monitor’s weight.
• Be sure to use the screws supplied with the WallMount Bracket when attaching the mounting
hooks to the LCD monitor.
The supplied screws are designed so that they are
8 mm to 12 mm in length when measured from
the attaching surface of the spacer.
The diameter and length of the screws differ
depending on the Wall-Mount Bracket model.
Use of screws other than those supplied may
result in internal damage to the LCD monitor set
or cause it to fall, etc.
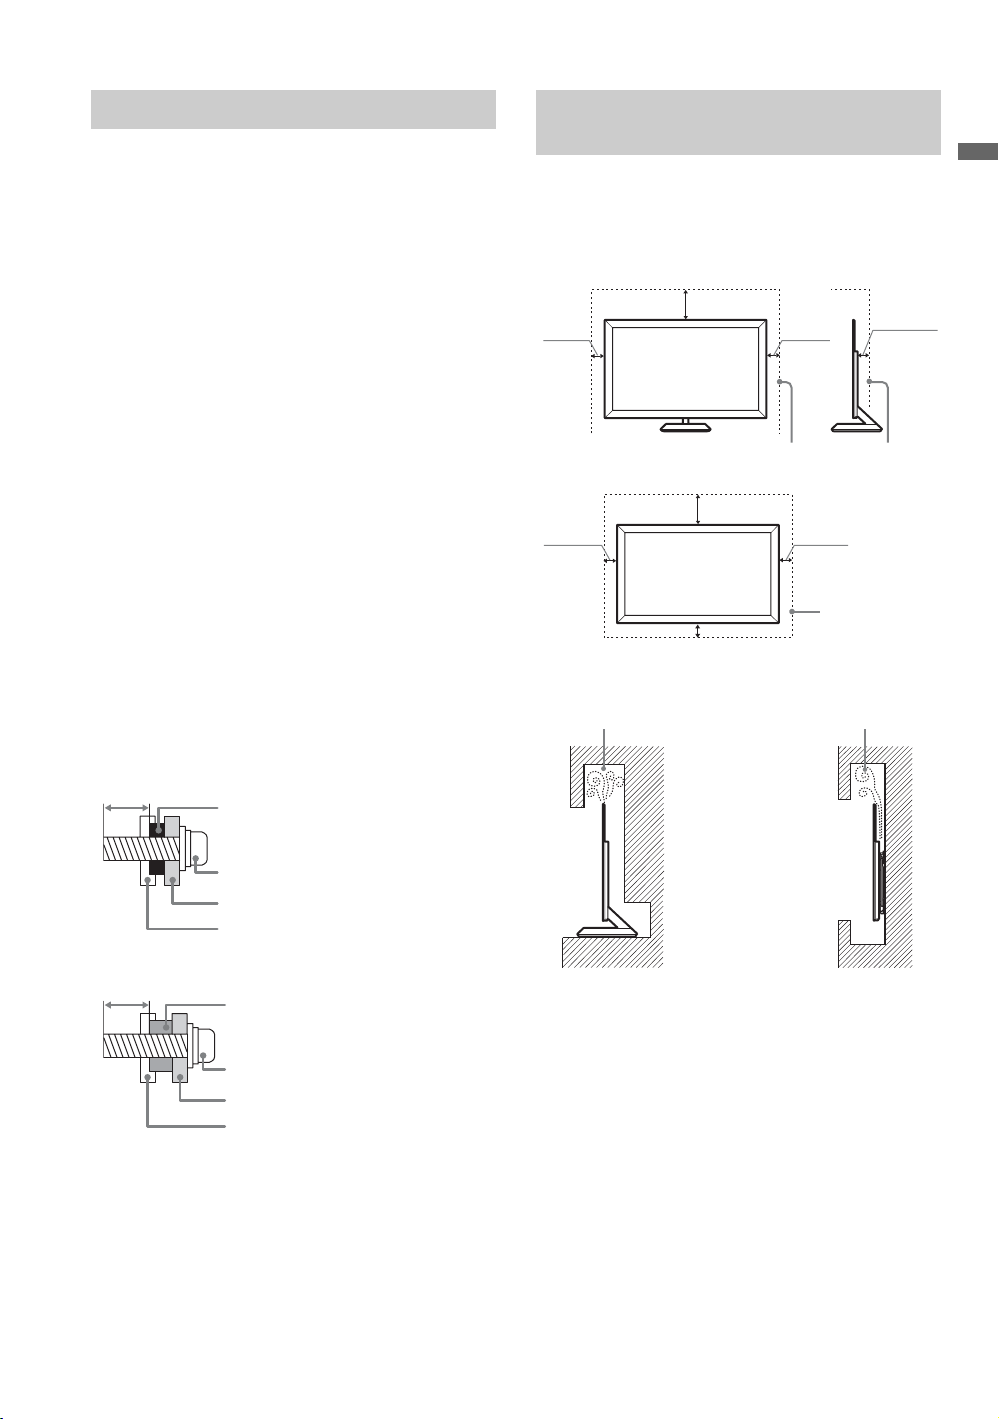
When Installing the Unit Against a
Wall or Enclosed Area
Make sure that your LCD Monitor has adequate
air circulation. Allow enough space around the
unit as shown below. Avoid operating the unit at
temperatures below 41 °F (5 °C).
Installed with stand
4 inches
(10 cm)
Leave at least this much space around the set.
Installed on the wall
4 inches
(10 cm)
Never install the unit set as follows:
Air circulation is blocked.
7
/
inches
11
8
(30 cm)
7
11
inches
/
8
(30 cm)
4 inches (10 cm)
3
inches2
/
4 inches
(10 cm)
4 inches
(10 cm)
Leave at least
this much space
around the set.
Air circulation is blocked.
8
(6 cm)
Getting Started
When attaching to the Wall-Mount Bracket
8-12 mm
Spacer (black)
Screw M6 × 16 (supplied with the
Wall-Mount Bracket)
Mounting Hook
Rear of the LCD monitor
When attaching to the Floor Stand
8-12 mm
Spacer (silver)
Screw M6 × 20 (supplied with the
LCD monitor)
Mounting Hook
Rear of the LCD monitor
• Be sure to store the unused screws and Table-Top
Stand in a safe place until you are ready to attach
the Table-Top Stand. Keep the screws away from
small children.
For details on how to use the Wall-Mount Bracket
compatible to your model, visit
www.sony.com/accessories
Or call 1-800-488-7669 (for United States)
1-877-899-7669 (for Canada)
Wall
Wall
~
• Inadequate air circulation can lead to overheating of
the unit and may cause damage to your unit or cause a
fire.
Consider the following for best picture
quality
• Do not expose the screen to direct illumination
or sunlight.
• Use spot lighting directed down from the
ceiling or cover the windows that face the
screen with opaque drapery.
• Install the unit in a room where the floor and
walls are not of a reflective material.
(Continued)
7
US
Page 8
• When moving the unit from a cold area to a
warm area, a sudden room temperature change
may cause the unit’s picture to blur or show
poor color due to moisture condensation.
Should this occur, please wait a few hours to
allow the moisture to evaporate before
powering on the unit.
Securing the Unit
Sony strongly recommends taking
measures to prevent the Unit from toppling
over. Unsecured Unit may topple and
result in property damage, serious bodily
injury or even death.
Prevent the Unit from Toppling Over
s Secure the Unit to a wall and/or stand.
s Do not allow children to play or climb on
furniture and Unit sets.
s Avoid placing or hanging items on the Unit.
s Never install the Unit on:
• slippery, unstable and/or uneven surfaces.
• furniture that can easily be used as steps,
such as a chest of drawers.
s Install the Unit where it cannot be pulled,
pushed, or knocked over.
s Route all AC power cords and connecting
cables so that they are not accessible to
curious children.
Use a Sony TV stand
Use a Sony specified TV stand (see page 2) and
follow the instruction manual provided with the
Sony TV stand.
If a Sony specified TV stand is not used, consider
the following recommended measures.
Recommended Measures to Secure the
Unit
Secure the Stand for the Unit
Make sure the TV stand can adequately support
the weight of the Unit. Use two angle braces (not
supplied) to secure the stand.
For each angle brace use the appropriate hardware
to:
• attach one side of the angle brace to the wall stud.
• attach the other side to the TV stand.
Angle brace
Stand
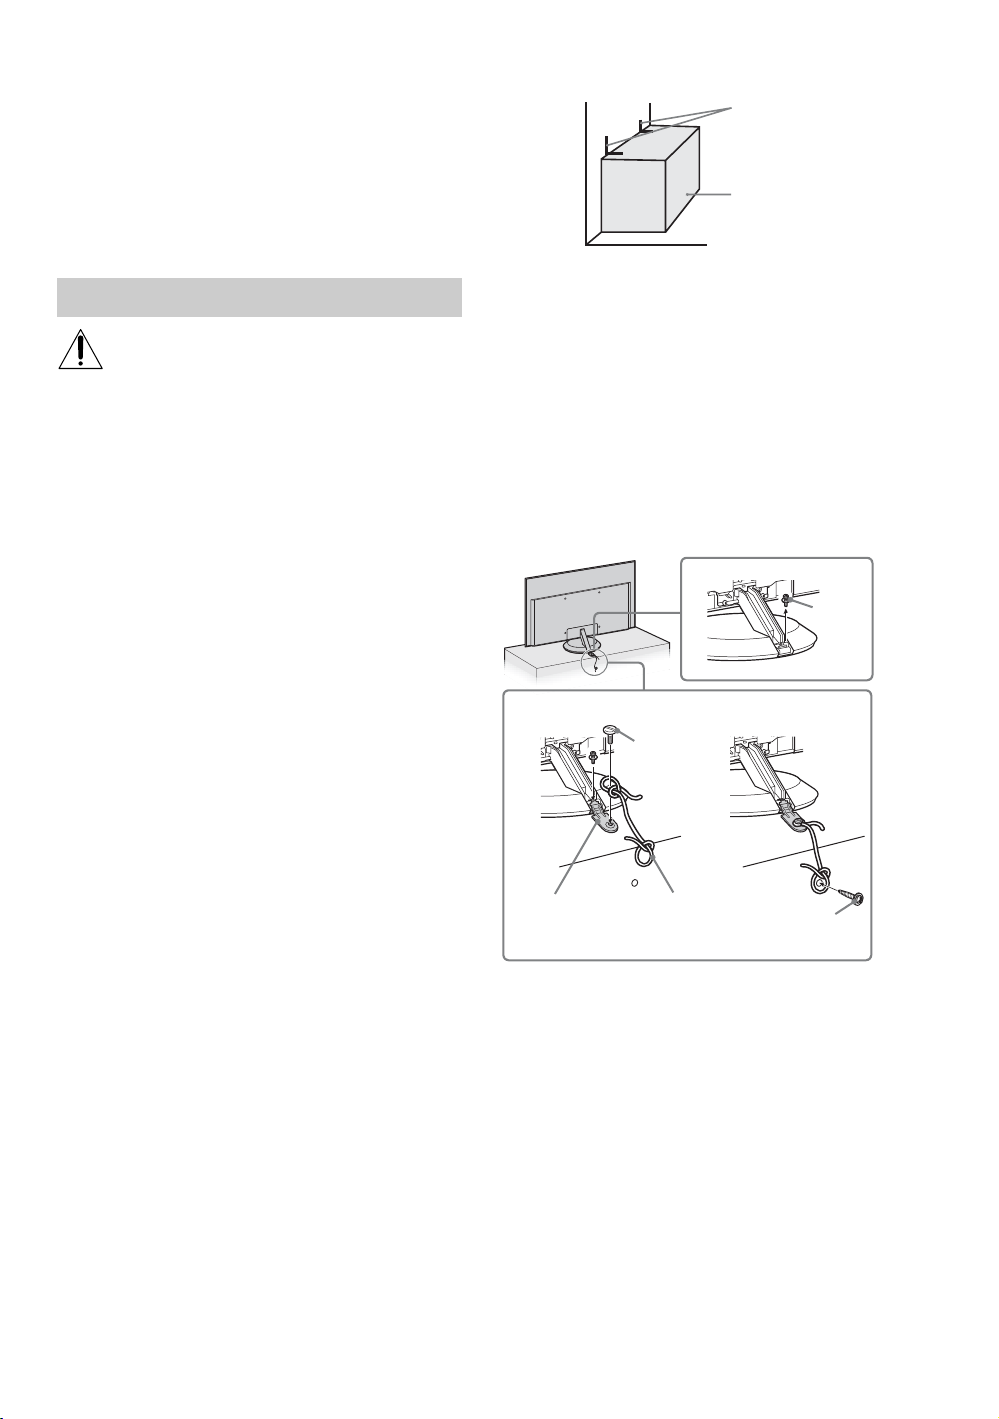
Secure the Unit to the Stand
Use the Stand Support adapter (supplied) and rope
or chain.
1 Remove the screw from the Table-Top Stand.
2 Secure the Stand Support adapter to the Table-
Top Stand, then attach the rope or chain to the
adapter.
3 Secure the rope or chain to the TV stand (not
supplied). Make sure that there is no excess
slack in the rope or chain.
1
Screw
23
Screw
Stand Support
adapter
Rope or chain
Screw
US
8
Page 9
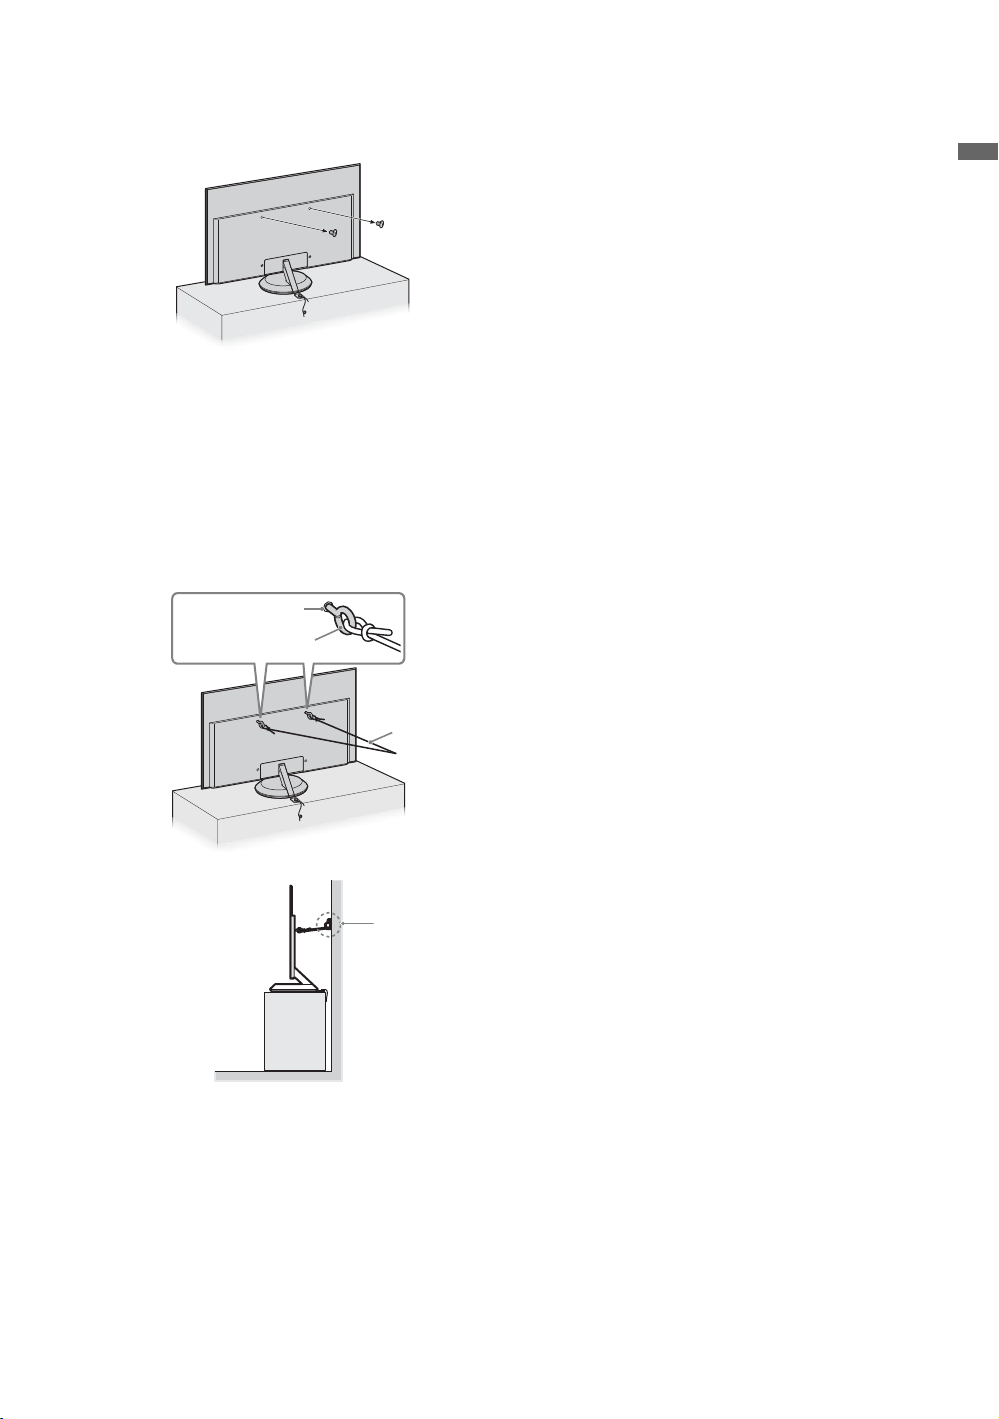
Anchor the Unit to the Wall
Remove the two screws from the top-most wallmount holes located on the rear of the Unit.
Use the hardware listed below (not supplied):
•Two M6 × 10-12 mm anchor bolts (screw into
the top-most wall-mount holes located on the
rear of the unit)
• Rope or chain (attach to one M6 anchor bolt)
• Wall-anchor (attach to the wall stud) strong
enough to support the weight of the unit (pass
the rope through the wall-anchor, then attach
to the other M6 anchor bolt)
Wall-mount holes
Anchor bolts
Getting Started
Rope or chain
Wallanchor
~
• Securing the unit to the stand without securing it and
the stand to the wall provides minimum protection
against the unit toppling over. For further protection,
follow all three measures recommended above.
US
9
Page 10

2. Locating Inputs
~
• This unit displays all video input signals in a resolution of 1,920 dots × 1,080 lines.
Item Description
1 AC IN Connects to your power source. Connect the supplied power cord to AC IN and the
nearest wall outlet.
2 HDMI IN HDMI (High-Definition Multimedia Interface) provides an uncompressed, all-digital
Connecting the AC Power Cord and HDMI Cable
1 Connect the AC power cord (supplied) to the AC IN jack and the HDMI cable (supplied) to the HDMI
IN jack on the rear of the unit, then use the hooks to store them in the back of the Table-Top Stand.
2 Hang the stand cover over the top of the Table-Top Stand’s center post, and then push down to close
until you hear a click.
audio/video interface between this LCD Monitor and any HDMI-equipped A/V
equipment. HDMI supports enhanced, or high-definition video, plus digital audio.
~
• To avoid pinching the AC power cord and the HDMI cable, ensure that these cables run under the notches on
either side of the stand cover.
3 Attach the terminal cover (supplied) to the unit.
Stand cover
Notch
Hooks
Hooks
Center post
Stand cover
Terminal cover
10
US
Page 11

3. Connecting the Equipment
Getting Started
Blu-ray Disc player/
“PS3”
DVD player Personal computerDigital satellite receiver/
Digital cable box
BRAVIA Wireless Link
receiver unit
~
• You can enjoy high-definition programming by subscribing to a high-definition cable service or a high-definition
satellite service.
• For BRAVIA Wireless Link (DMX-WL1) users; if you want to attach the receiver unit on the rear of the monitor unit,
while attached to the Table-Top Stand, an optional bracket is necessary. For details, visit our website.
http://www.sonystyle.com/dmxwl1
PC Input Signal Reference Chart
After connecting the PC to the unit, set the output signal from the PC according to the supported
resolutions and timings indicated below.
Supported resolutions
Signal Horizontal
VGA 640
SVGA
XGA
WXGA
SXGA
HDTV
(Pixel)
800
1,024
1,280
1,280
1,360
1,280
1,920
× Vertical
×
×
×
×
×
×
×
×
(Line)
480 31.5 60 VGA
600 37.9 60 VESA Guidelines
768 48.4 60 VESA Guidelines
768 47.4 60 VESA
768 47.8 60 VESA
768 47.7 60 VESA
1,024 64.0 60 VESA
1,080 67.5 60 CEA-861*
Horizontal
frequency (kHz)
Vertical
frequency (Hz)
Standard
~
• Your PC must support one of the PC input signals
above to display on the television.
*The 1080p timing when applied to the HDMI input will
be treated as a video timing and not PC timing. This
Picture
affects
settings and
view PC content set
to
Full
Mode
, and
Picture Mode
Display Area
Wide Mode
to
Custom, Wide
to
Full Pixel
settings. To
.
11
US
Page 12

4. Setting Up the Language
The language set-up screen appears when you turn
on the unit for the first time.
Language
Using BRAVIA Sync with
Control for HDMI
The BRAVIA Sync function on this unit
communicates with other Sony equipment
supporting the Control for HDMI function.
English
Español
Français
1 Complete your cable connections (refer to the
preceding pages before proceeding with the
language set-up).
2 Use the remote control to navigate through the
language set-up:
V/v button:
Allows you to highlight options
where applicable.
OK button:
Allows you to select the
highlighted option and advance
to the next screen.
B button:
Allows you to move back to the
previous screen.
b button:
Allows you to move to the next
screen.
s To Reset the Language Settings
Select the Language from the Monitor
Settings (page 20).
Monitor Settings
Power Saving
Light Sensor
Product Information
Reset All
Language
Off
Off
English
To connect Sony equipment with Control
for HDMI
Use an HDMI cable that bears the HDMI logo for
connection. See pages 10 to 11 or see the HDMI
connection.
Setting the Control for HDMI
The Control for HDMI function must be set up in
order for the unit to communicate with other
Control for HDMI enabled equipment. See
page 20 for information on how to set up this
unit’s Control for HDMI function. For other
equipment, refer to its operating instructions.
Available options using Control for HDMI
The following operations are available after you
connect the supported Sony equipment with
Control for HDMI function to your LCD
monitor:
• Automatically turn off the connected equipment
when you turn off the LCD monitor.
• The LCD monitor will automatically turn on and
select the respective HDMI input through the
connected equipment by One-Touch-Play.
• Equipment listed under the Device List in the
HDMI Settings will turn on automatically when
selected, see page 20.
~
• If you accidentally turn off the unit during the
language set-up process, the language set-up will
restart from the beginning when the unit is turned back
on.
US
12
Page 13

Operating the LCD Monitor
Inserting Batteries into the Remote Control
Insert two size AA batteries (supplied) by matching e and E on the batteries to the diagram inside the
battery compartment of the remote control.
For details, see Operating Instructions for the remote control RM-VL610A (supplied).
When Using the Remote Control
Follow the guidelines below
• Point your remote control directly at the IR sensor located on your
LCD monitor.
• Make sure that no objects are blocking the path between the
remote control and the IR sensor on your LCD monitor.
• Fluorescent lamps can interfere with your remote control; try
turning off the fluorescent lamps.
• If you are having problems with the remote control, reinsert or
replace your batteries and make sure that they are correctly
inserted.
LCD Monitor Control and Remote Control Button
1
6
2
MENU
Operating the LCD Monitor
POWER
VOL
OK
7
8
9
3
4
5
34 44,71
Buttons on the LCD monitor operate the same as the corresponding
buttons on the remote control. Refer to the remote control operating
instructions (supplied).
~
•The V button has a tactile dot. Use it as a reference when operating the LCD
monitor.
• When operating the LCD monitor, press a button (except POWER button)
on the unit once to light up all the indicators and press again to operate the
function. All indicators will fade out after a period of time.
(Continued)
13
US
Page 14

Item Description
1 POWER Press to turn on and off the Monitor.
2 INFO Press to display the current input information of selected external equipment.
3 MENU Press to display the MENU to access the MENU items such as the
Picture, Sound,
Screen, HDMI Settings, Monitor Settings and PC Settings.
4 V/v/B/b/OK Press V/v/B/b to move focus/highlight. Press OK to select/confirm an item.
5 TOOLS Press to display a list of convenient functions and menu shortcuts. The TOOLS menu items
vary based on current input and content.
Except HDMI-PC
Menu Item Reference Page/Details
Picture Adjustments See page 16
Sound See page 18
Power Saving See page 20
Motion Enhancer See page 17
Device Control See page 20
Sync’d HDMI Devices Displays a list of equipment with Control for HDMI
function connected to the unit. Select the HDMI
equipment you want to input and then press OK.
HDMI-PC
Menu Item Reference Page/Details
Picture Adjustments See page 16
Sound See page 18
Power Saving See page 20
H Center See page 21
V Center See page 21
Device Control See page 20
Sync’d HDMI Devices Displays a list of equipment with Control for HDMI
function connected to the unit. Select the HDMI
equipment you want to input and then press OK.
6 TV Lights up in red during the operations.
7 VOL +/– Press to adjust the volume.
8 MUTING Press to mute the sound. Press again or press VOL + to restore the sound.
9 EXIT Press to go back to the previous screen when displaying menu items and setting.
~
• The buttons on the remote other than those above cannot operate the unit.
US
14
Page 15

Indicators
12 34
PIC OFF POWER
Item Description
1 PIC OFF Lights up in green when the Picture Off feature is activated. For details, see page 20 (Picture
2 POWER LED Lights up in green when the unit is turned on.
3 Light Sensor Senses room light level and adjusts the screen brightness accordingly (see page 20 for details).
4 (IR) Infrared
Receiver
Off).
Do not put anything near the sensor or the nearby general area (as shown above), as its function
may be affected.
Receives IR signals from the remote control. Do not put anything near the sensor, as its function
may be affected.
Operating the LCD Monitor
15
US
Page 16

Using LCD Monitor Settings
1 Press MENU. The menu appears on the screen.
2 Press V/v to select the item, then press OK.
3 Follow the instructions on the screen.
4 Press MENU to exit.
Picture Settings
Picture Adjustments Picture Mode Vivid For enhanced picture contrast and sharpness.
Photo-Vivid* For enhancing contrast and sharpness.
Standard For standard picture settings. Recommended for
Photo-Standard*
Cinema For viewing film-based content. Most suitable for
Photo-Original* Images resemble the printed pictures from your
Custom Allows you to store your preferred settings.
Photo-Custom* Allows you to store your preferred settings.
* These options are not available when in PC timings.
home entertainment.
For standard viewing; select for home use.
viewing in a theater-like environment.
photo album.
MENU
Picture
Sound
Screen
HDMI Settings
Monitor Settings
PC Settings
16
US
~
• The options for Picture Mode may vary depending on the Video/Photo Optimizer
setting (see page 17).
Reset Resets the current settings to the default values.
Backlight Brightens or darkens the backlight.
Picture Increases or decreases picture contrast.
Brightness
Color Increases or decreases color intensity.
Hue Increases or decreases the green tones.
Color
Temperature
White adjustment
Brightens or darkens the picture.
Cool Gives the white colors a bluish tint.
Neutral Gives the white colors a neutral tint.
Warm 1, 2 Gives the white colors a reddish tint.
~
• The option Warm 1, 2 is not available for Vivid and Photo-Vivid.
Page 17

Sharpness Sharpens or softens the picture.
Noise Reduction
MPEG Noise
Reduction
Advanced
Settings
Reset Resets all the advanced settings to the default values.
Black Corrector Enhances black areas of the picture for stronger contrast.
Advanced C.E.
(Advanced Contrast
Enhancer)
Gamma Adjusts the balance between light and dark areas of the picture.
Clear White Emphasizes white and light colors.
Color Space Selects the range of color reproduction from Wide or Standard.
Live Color Makes colors more vivid and reproduces clear skin tones.
White Balance Adjusts the color temperature in detail.
Reduces the picture noise level.
Reduces the mosaic effect in MPEG-compressed video. Useful for
DVDs and Blu-ray.
Available in the following Picture Modes: Standard, Cinema,
Custom, Photo-Standard, Photo-Original, and Photo-Custom.
Automatically optimizes the backlight and contrast. This setting is
especially effective for dark picture scenes.
~
• Picture Adjustments settings can also be accessed by pressing TOOLS on the
remote control.
•Some Picture settings are not available with PC signal connected to HDMI input.
Motion Enhancer Activates Motion Enhancer to enhance the smoothness of picture movement and to reduce
blur.
High Provides smoother picture movement for film-based content.
Standard Provides smooth picture movement. Use this setting for standard use.
Off Use this setting when the High and Standard settings result in video
artifacts such as ghosting.
Using LCD Monitor Settings
~
• Depending on the video, you may not see the effect visually, even if you have changed
the setting.
• Motion Enhancer is not available when Game Mode is set to On.
CineMotion Automatically detects film-based content and applies an inverse 3-2 pull-down process
Game Mode Select On to optimize the enjoyment of fast paced video games where response time is
Video/Photo Optimizer Sets the picture settings to optimize the image quality of video (moving pictures) or photo
and a motion estimation engine to improve film content and de-interlacing performance.
Auto 1 Applies an inverse 3-2 pull-down process along with motion
estimation to obtain the smoothest picture quality and reduces artifacts
of moving images. Select for standard use.
Auto 2 Applies only the inverse 3-2 pull-down process. Picture movement
will be similar to the original film.
Off Turns off CineMotion. Use this setting when the Auto 1 or Auto 2
setting results in video artifacts such as ghosting.
important. Select Off to disable this feature.
(still image) content. Feature is only available for 1080i/p (excluding 1080/24p) content
connected to the HDMI input.
Video-A The unit will automatically set the picture settings for video or still
image content when Sony optional equipment that supports Video-A
mode is connected to the HDMI input.
Video Select to set the picture settings for video.
Photo Select to set the picture settings for photos.
~
• Game Mode and Video/Photo Optimizer features are not available when Theater Mode is set to On.
17
US
Page 18

Sound Settings
Sound Mode Dynamic Enhances treble and bass.
Standard Standard sound optimized for home use.
Clear Voice Suitable for spoken dialog.
Reset Resets the current settings to the default values.
Trebl e Increases or decreases higher-pitched sounds.
Bass Increases or decreases lower-pitched sounds.
Balance Emphasizes left or right speaker balance.
Surround S-FORCE
Front Surround
Off Select for normal stereo or mono reception.
Voice Zoom Adjusts the clarity of human voices. For example, if the voice of a news announcer is
indistinct, you can turn up this setting to make the voice clearer. Conversely, if you are
watching a sports program, you can turn down this setting to soften the voice of the
commentator.
Sound Booster The Sound Booster provides a fuller sound with a greater sense of depth and width, by
emphasizing the high and low frequency sounds. Select High, Low or Off for the amount
of boost you desire. Selecting Off will bypass the emphasis.
Provides a virtual surround sound experience made possible using just
two front speakers.
~
• Only available when Sound Mode is set to Standard.
Steady Sound Select On to stabilize the volume across all programs and commercials. Select Off to
Volume Offset Adjusts the volume level of the current input relative to other inputs.
disable this feature.
~
•
Sound
can also be accessed by pressing
TOOLS
on the remote control.
18
US
Page 19

Screen Settings
Wide Mode Wide Zoom Fills the screen with minimum distortion.
Normal Displays the 4:3 picture in its original aspect ratio when the original
Full Enlarges the picture horizontally to fill the screen when the original
Zoom Select to enlarge the picture horizontally and vertically to fill the
Auto Wide On Automatically changes Wide Mode setting based upon content. If
Off Turns off the Auto Wide option. Choose a Wide Mode from the
4:3 Default
Select the default screen
mode to use for 4:3
sources
Wide Zoom Enlarges the 4:3 picture to fill the 16:9 screen, displaying as much of
Normal Displays the 4:3 picture in its original aspect ratio.
Off Select to continue using the current Wide Mode setting when the
source is 4:3.
source is 4:3. When the original source is 16:9 (High-definition
source), select this mode to display the 16:9 picture in its original size.
screen while maintaining the aspect ratio.
frequent screen changes are disturbing to you, select Off.
Wide Mode option.
the original image as possible.
input is changed.
~
• 4:3 Default is not available if Auto Wide is set to Off.
• If 4:3 Default is set to anything but Off, the Wide Mode setting applies only to the
current input. When you change inputs, Wide Mode is automatically replaced with the
4:3 Default setting for 4:3 sources. To retain the current Wide Mode setting as inputs
are changed, set 4:3 Default to Off.
Display Area Full Pixel Displays the picture for 1080i, 1080p or 1080/24p sources in its
Normal Displays the picture in its original size.
-1/-2 Enlarges the picture to hide the edges of the picture.
Horizontal Center Allows you to move the position of the picture horizontally (left and right).
Vertical Center Allows you to move the position of the picture vertically (up and down).
Vertical Size Adjusts the vertical size of a standard-definition picture.
original size when Wide Mode is set to Full.
~
• Some options are not available with PC signal connected to HDMI input.
• Horizontal Center, Vertical Center and Vertical Size may not be available depending on the input signal.
Using LCD Monitor Settings
19
US
Page 20

HDMI Settings
HDMI inputs of this LCD monitor will recognize and communicate with other Sony equipment equipped
with Control for HDMI function. See page 12 for more information on Control for HDMI.
Control for HDMI On/Off feature allows your LCD monitor to communicate with other equipment that
supports Control for HDMI function.
Device Auto Power Off Select On to have your connected equipment with Control for HDMI function to power
off automatically when the LCD monitor is turned off. Select Off to disable this function.
This feature is available when Control for HDMI is On.
Monitor Auto Power OnSelect On to control your LCD monitor’s power on from your connected equipment with
Device List Update Creates or updates the HDMI Device List. Be sure to update the HDMI Device List when
Device List Displays a list of equipment with Control for HDMI function connected to the LCD
Control for HDMI function. Select Off to disable this function. This feature is available
when Control for HDMI is On.
you change the Control for HDMI compatible equipment connections or settings.
monitor.
~
• Press TOOLS while the equipment supporting Control for HDMI is connected to display the Device Control
options. The Device Control option provides access to the Menu, Options and Content List of your connected
equipment with your LCD monitor remote control.
• Some equipment with Control for HDMI does not support the Device Control feature.
Monitor Settings
Power Saving Reduces the power consumption by adjusting the backlight brightness. This also enhances
the black level. Select from Off, Low, High and Picture Off.
~
• While Picture Off is set, pressing VOL +/– or MUTING buttons will not disable this
function. Press other buttons to disable it.
Light Sensor Enables the automatic picture (screen) brightness control. The Light Sensor measures
the room brightness which allows the unit to automatically adjust the backlight brightness
based on the picture settings and the ambient room light conditions.
~
•
Be sure not to put anything around the sensor, as its function may be affected (see page 13).
• In low light the range of the backlight control is reduced when the Light Sensor is set
to On.
Product Information Displays your LCD monitor’s product information.
Reset All Restores all settings to factory defaults.
Language Select the language of your choice from English, Español and Français to be used for
displaying all the on-screen settings.
20
US
Page 21

PC Settings
Wide Mode Normal Select to display the picture in its original resolution and aspect ratio.
Full 1 Select to enlarge the picture to fill the screen, while maintaining its original
aspect ratio.
Full 2 Select to enlarge the picture to fill the screen.
Reset Resets the current settings to the default values.
H Center Allows you to move the position of the picture horizontally (left and right).
V Center Allows you to move the position of the picture vertically (up and down).
Using LCD Monitor Settings
21
US
Page 22

Optional Accessories
This unit is designed for use with the following optional accessories, such as the Wall-Mount Bracket (as
of October 2008).
Sufficient expertise is required for installing such optional accessories. Be sure to subcontract the
installation to licensed contractors. Read the instruction manual supplied with the accessories together
with this manual for secure installation.
Using with the Wall-Mount Bracket/Speaker System
Wall-Mount Bracket:
SU-WL700
Speaker System:
Use the accessories supplied with this unit when
installing.
Spacers (black) (4)
SS-WAL700
Sound does not output from the LCD Monitor when the supplied Table-Top Stand is removed to use the LCD Monitor
with the Wall-Mount Bracket. In this case, use the LCD Monitor with the exclusive Speaker System (optional) to
output sound.
Installing With the Unit.
The following steps must be performed to correspond with the installation steps in the instruction manual
of the optional accessories. Follow the instructions in this manual referring to the instruction manual
supplied with the accessories. For explanations referred to in ( ) in the installation steps, see the same steps
in the instruction manual supplied with the accessories.
For Speaker System users, first see the instruction
2 Place spacers (4-2).
manual of Wall-Mount Bracket.
1 Remove four screws
1 Make sure that the Table-Top Stand is
from the rear of the
LCD Monitor.
removed (if necessary) (4-1).
• The stand is not attached to the LCD Monitor
when unpacking. Place the unit face down.
• If the Table-Top Stand has already been attached,
remove the stand (see page 6).
US
22
2 Place spacers
(black - supplied with
your LCD Monitor).
3 Follow steps 4-3 to 4-4 referring to the
instruction manual supplied with the WallMount Bracket.
When using only the Wall-Mount Bracket
Go to step 6 in this manual.
When using the Speaker System
Go to step 4 in this manual.
Page 23

4 Lift the Lock Bracket to insert the Speaker
System (4-5).
Mounting Bracket
Speaker System
7 Connect the AC power cord (supplied with
your LCD Monitor) and the HDMI cable
(supplied with your LCD Monitor) (5-1).
1 Connect the power cord.
2 Fix to the hook.
Lock Bracket
This part will be above the Mounting Bracket.
Insert in the junction part for
the stand of the LCD Monitor.
5 Fix the Speaker System with two screws
(supplied with your Speaker System).
Screws (supplied with your Speaker System)
When installing the Speaker System
Fix the power cord with the two hooks, and
drop the cord down from the right edge of the
LCD Monitor.
Drop the HDMI cable from the left or right
edge of the LCD Monitor.
8 Follow the instruction manual supplied with
the Wall-Mount Bracket to continue installing
this unit on the wall.
~
• You cannot connect cables to the LCD Monitor after it
is wall-mounted or installed on the Floor Stand.
• When installing the LCD Monitor to a wall or the
Floor Stand, lift the unit together with the cloth under
the unit. Do not hold the speaker grill.
Optional Accessories
6 See the instruction manual supplied with the
Wall-Mount Bracket, and follow steps 4-6 to
4-7.
23
US
Page 24

Using with the Floor Stand/Speaker System
Floor Stand:
SU-FL71M
Speaker System:
SS-WAL700
Sound does not output from the LCD Monitor when the supplied Table-Top Stand is removed to use the LCD Monitor
with the Floor Stand. In this case, use the LCD Monitor with the exclusive Speaker System (optional) to output sound.
Use the accessories supplied with this unit when
installing.
Spacers (silver) (2)* Screws M6 × 20 (4)
* Use four spacers when the Speaker System is not installed.
Installing With the Unit.
The following steps must be performed to correspond with the installation step in the instructions manual
of the optional accessories. Follow the instructions in this manual referring to the instruction manual
supplied with the accessories.
For Speaker System users, first see the instruction
manual of the Floor Stand.
Follow steps below instead of “2 Preparing for
1 Remove four screws
from the rear of the
LCD Monitor.
the installation of the TV” (page 6) of the
instruction manual supplied with the Floor Stand.
1 Make sure that the Table-Top Stand is
removed (if necessary).
• The stand is not attached to the LCD Monitor
when unpacking. Place the unit face down.
2 Place spacers
(silver - supplied with
your LCD Monitor).
When the Speaker
System is installed,
place two spacers
(yellow - supplied with
your Speaker System)
on the lower part.
• If the Table-Top Stand has already been attached,
remove the stand (see page 6).
2 Place spacers.
When the Speaker System is not installed, use
all four spacers (silver - supplied with your
LCD Monitor).
US
24
3 Install the Bracket I J on the LCD Monitor.
1 Place the Bracket I J aligning with the screw
holes that became available in step 2.
2 Temporarily fix two Screws M6 × 20 (supplied
with your LCD Monitor) in the upper holes of
the Bracket. When the Speaker System is not
installed, tighten all four screws.
Screws M6 × 20
(supplied with your
LCD Monitor)
I
Go to step 5 when using only the Floor Stand.
J
Page 25

4 Insert the Speaker System.
Insert in the junction part for the
stand of the LCD Monitor.
Insert this part under the Bracket I J.
Speaker System
6 Connect the AC power cord (supplied with
your LCD Monitor) and the HDMI cable
(supplied with your LCD Monitor), then drop
them down from the center of the LCD
Monitor.
1 Connect the power cord.
2 Drop the cord down
from the center.
7 Follow the instruction manual supplied with
the Wall-Mount Bracket to continue the
installation.
Optional Accessories
5 Fix the Speaker System with screws, then
attach the hook M to the Bracket I J.
Tighten the upper two screws (temporarily
fixed in step 3).
Screws (supplied with
your Speaker System)
O
M
Screws M6 ×
20 (supplied
with your LCD
Monitor)
~
• You cannot connect cables to the LCD Monitor after it
is wall-mounted or installed on the Floor Stand.
• When installing the LCD Monitor to a wall or the
Floor Stand, lift the unit together with the cloth under
the unit. Do not hold the speaker grill.
25
US
Page 26

Other Information
Troubleshooting
If you have questions, service needs, or require
technical assistance related to the use of your
Sony LCD monitor, please visit our website or
call one of the following numbers:
http://www.sony.com/tvsupport
http://www.sony.ca/support
for US Support
for Canadian
Support
1-800-222-SONY(7669) for US Support
1-877-899-SONY(7669) for Canadian Support
Condition Explanation/Solution
No picture
No picture • Check the Power Saving settings (see page 20).
No picture from the video
source
• Check the connection between the optional video equipment and the LCD
monitor.
Poor picture
Picture quality not as good as
viewed at the store
No color / Dark picture / Color
is not correct / The picture is
too bright
Blurry picture / Poor color • Transporting the unit from a cold to a warm location or a sudden change in
• Picture quality depends on the signal content.
• Adjust the Picture Mode options in the Picture settings (see page 16).
• If you set the Power Saving mode to Low or High, it will enhance the black
level (see page 20).
room temperature may cause moisture condensation, resulting in a blurry
picture or poor color. Turn off the unit and wait a few hours before powering on
again.
No sound / Noisy sound
No sound / Good picture • Check the volume control.
• Press
14).
MUTING
or
VOL +
so that “Muting” disappears from the screen (
BRAVIA Sync
Cannot find connected
BRAVIA Sync HDMI
equipment
Second A/V receiver is not
listed on the Device List
• Make sure that the Control for HDMI is set up on both the LCD monitor and
the optional equipment compatible with BRAVIA Sync (see page 12).
• Only one A/V receiver may be used with the BRAVIA Sync and Control for
HDMI functions at one time (see page 20).
PC Input
No picture / No signal • Confirm the PC is correctly connected to the unit with the HDMI IN.
Poor Picture • Adjust the resolution (see page 11).
• Ensure the output signal from the PC is one of the formats listed on page 11.
General
Wide Mode changes
automatically
Black bands appear at the
edges of the screen
• The current Wide Mode setting is automatically replaced with the 4:3
Default setting, if 4:3 Default in the Screen settings is set to other than Off.
If you want to lock in Wide Mode selected with WIDE on the remote control,
set 4:3 Default to Off in the Screen settings (see page 19).
• Check the Auto Wide option in the Screen settings (see page 19).
• Some wide screen programs are filmed in aspect ratios that are greater than 16:9
(this is especially common with theatrical releases). Your LCD monitor will
show these programs with black bands at the top and bottom of the screen. For
more details, check the documentation that came with your DVD (or contact
your program provider).
• Programs in 4:3 aspect ratio will have bands on left and right sides of the screen.
see
page
26
US
Page 27

Condition Explanation/Solution
Certain programs on DVD or
other digital sources display a
loss of detail, especially during
fast-motion or dark scenes
• This is due to the digital compression of the source content used by certain
DVDs which may cause your LCD monitor screen to display less detail than
usual, or cause artifacts (small blocks or dots, pixelations) to appear on your
screen. These signal compressions are more visible and are dependent on the
clarity and resolution of the unit.
Remote control does not
operate
• To determine if the problem is with the remote control or not, press a button on
the unit.
• Press VOL +/- to adjust the volume.
• Press TV on the remote control when the button is not light up.
• Check the polarity of the batteries or replace the batteries.
• Point the remote control at the remote control sensor located at the front of the
unit.
• Keep the remote control sensor area clear from obstacles.
• Fluorescent lamps can interfere with your remote control operation; try turning
off the fluorescent lamps.
• Check the button that can operate this unit (see page 13).
Other Information
27
US
Page 28

Specifications
Model KLV-40ZX1M
System
Panel system
Speaker output
Input/Output jacks
HDMI IN
Power and others
Power requirement
Power consumption
in use
in standby
Screen size
(inches measured diagonally)
Display resolution
Speaker/Full range (4) (mm)
(inches)
Wo o f e r ( 1 ) ( m m )
(inches)
Dimensions
with stand (mm)
(inches)
without stand (mm)
(inches)
wall-mount hole pattern (mm)
wall-mount screw size (mm)
Mass
with stand (kg)
lb.)
(
without stand (kg)
lb.)
(
Supplied accessories
Optional accessories
LCD (Liquid Crystal Display) Panel
5 W + 5 W, 10 W (Woofer)
HDMI: Video: 480i, 480p, 720p, 1080i, 1080p, 1080/24p / Audio: Two channel linear PCM 32, 44.1 and 48 kHz, 16, 20
and 24bits
120-240 V AC, 50/60 Hz
188 W
0.3 W (120 V)
0.4 W (240 V)
40
1,920 dots (horizontal) × 1,080 lines (vertical)
ø30
3
/16
ø1
58 × 90
1
/4 × 3 9/16
2
986 × 682 × 307
7
/8 × 26 7/8 × 12 1/8
38
986 × 599 × 28
7
38
/8 × 23 5/8 × 1 1/8
300 × 300
M6 (length: refer to diagram on page 7)
15.0
33.1
12.2
26.9
See “Checking the Accessories” on page 4.
Wall-Mount Bracket / TV stand: see page 2
~
• Optional accessories availability depends on its stock.
• Design and specifications are subject to change without notice.
US
28
Page 29

For Your Convenience
Please contact Sony Customer Support directly if you:
• Have questions on the use of your LCD Monitor after reading your Operatin Instruction manual
• Experience difficulty operating your LCD Monitor
For United States
http://www.sony.com/tvsupport
or to speak with a support representative: 1-800-222-SONY(7669)
For Canada
http://www.sony.ca/support
or to speak with a support representative: 1-877-899-SONY (7669)
Sony will work to resolve your questions more quickly than your retailer or place of purchase.
Please Do Not Return the Product to the Store
On-line Registration Available:
Be sure to register your LCD Monitor
United States Canada
http://productregistration.sony.com http://www.SonyStyle.ca/registration
Other Information
29
US
 Loading...