

Page 1

4-748-134-11(1)
Television
Operating Instructions
Parts and Controls
Watching TV
Navigating through Home Menu
Viewing Pictures from Connected
Equipment
Additional Information
Customer Support and Contact:
KLV-40R352G / 32R302G
Page 2

To a t ta ch t h e Tab l e-Top
Stand, refer to the Setup
Guide.
Table of Contents
Safety Information . . . . . . . . . . . . . . . . . . . . .3
Parts and Controls
TV. . . . . . . . . . . . . . . . . . . . . . . . . . . . . . . . . 4
Remote Control . . . . . . . . . . . . . . . . . . . . . 5
Watching TV
Changing the Viewing Style . . . . . . . . . . . 7
Changing the Wide Mode . . . . . . . . . . . . . . . 7
Setting Scene Select. . . . . . . . . . . . . . . . . . . . 7
Navigating through Home
Menu
Favourites . . . . . . . . . . . . . . . . . . . . . . . . . . 8
Applications . . . . . . . . . . . . . . . . . . . . . . . . 8
Using the TV as a Photo Frame Mode. . . . . .8
Listening to FM Radio. . . . . . . . . . . . . . . . . . . 9
Media . . . . . . . . . . . . . . . . . . . . . . . . . . . . . 9
Playback Photo/Music/Video via USB . . . . .9
Settings. . . . . . . . . . . . . . . . . . . . . . . . . . . .11
System Settings . . . . . . . . . . . . . . . . . . . . . . 11
Customer Support . . . . . . . . . . . . . . . . . . . . 16
Additional Information
Installing the TV to the Wall . . . . . . . . . . .19
Troubleshooting . . . . . . . . . . . . . . . . . . . . 21
Picture . . . . . . . . . . . . . . . . . . . . . . . . . . . . . . 21
Sound. . . . . . . . . . . . . . . . . . . . . . . . . . . . . . . 21
Channels . . . . . . . . . . . . . . . . . . . . . . . . . . . . 22
General . . . . . . . . . . . . . . . . . . . . . . . . . . . . . 22
Specifications . . . . . . . . . . . . . . . . . . . . . .22
Viewing Pictures from
Connected Equipment
Connection Diagram . . . . . . . . . . . . . . . . 17
Using Audio and Video Equipment . . . . 18
GB
2
Page 3

Introduction
8 mm - 12 mm
Screw (not
supplied)
Cord (no t
supplied)
M4 Screw (not
supplied)
1.5 N·m/1,5 N·m
{15 kgf·cm}
Thank you for choosing t his Sony product.
Before operating the TV, please read this manual thoroughly and
retain i t for future referen ce.
Note
• Before operating the TV, please read the “Safety Information”
(page 3).
• Read the supp lied Safety Information for additio nal safety
information.
• Instructions about “Installing the TV to the Wall” are included
within this TV’s instructions manual.
• Images and illustrations used in the Setup Guide and this
manual are for reference only and may differ from actual
product.
Location of the identification label
Labels for the TV Model No. and Power Supply rating are located
on the rear of the TV.
Labels for AC adapter Model No. and Serial No. are located at the
bottom of AC adapter.
Safety Information
Installation/Set-up
Install and use the TV set in accordance with the instructions
below in order to avoid any risk of fire, electric shock or damage
and/or injuries.
Installation
• The TV set should be installed near an easily accessible AC
power outlet (mains socket).
• Place the TV set on a stable, level surface to prevent it from
falling over and causing personal injury or property damage.
• Install the TV so that the TV's Table-Top Stand does not
protrudes out from the TV stand (not supplied). If the Table-Top
Stand protrudes out from the TV stand, it may cause TV set to
topple over, fall down, and cause personal injury or damage to
the TV.
• When transporting the TV set, do not subject it to jolts or
excessive vibration.
• When transporting the TV set for repairs or when moving, pack
it using the original carton and packing material.
Topple prevention
GB
Tran spo rti ng
• Before transporting the TV set, disconnect all cables.
• Two or three people are needed to transport a large TV set.
• When transporting the TV set by hand, hold it as shown below.
Do not put stress on the LCD panel and the frame around the
screen.
GB
3
Page 4

Parts and Controls
4
1
2
3
TV
+ / – / / (Volume / Item select)
• Increases/decreases the volume, or
selects the next (+) or previous (–) channel
when the CH Up/Down notification is
displayed by pressing the CH/INPUT
button.
• Moves the selected input source up/down
when the input select menu is displayed
by pressing the CH/INPUT button.
(Sensors/LED indicator)
• Receives signals from the remote control.
Do not put anything over the sensor.
Doing so may affect its function.
• Lights up in amber when the [Sleep Timer]
or [On Timer] is set (page 14), or the TV is
in Photo Frame Mode (page 8).
• Lights up in green when [Power Saving] is
set to [Picture Off] (page 16).
• Lights up in green when the TV is turned
on.
• Does not light up when the TV is in
standby mode.
• Flashes while the remote control is being
operated.
Note
• Make sure that the TV is completely turned off before
unplugging the AC power cord (mains lead).
Hint
•The + button has a tactile dot. Use it as a reference
when operating the TV.
/ (Power)
Turns the TV on or switches to standby
mode.
Note
• To disconnect the TV from the AC power
completely, pull the plug from the mains socket.
CH/INPUT
Switches between the CH Up/Down screen
and the input select screen.
GB
4
Page 5

Remote Control
The remote control shape, location,
availability and function of remote control
button may vary depending on your
region/country/TV model.
/ (Input select / Text hold)
• Displays and selects the input source.
• In text mode, holds the current page.
SYNC MENU
Press to display the BRAVIA Sync Menu and
then select connected HDMI equipment
from [Device Selection].
The following options can be selected from
BRAVIA Sync Menu.
Device Control:
Use the [Device Control] to operate
equipment that is compatible with BRAVIA
Sync Control. Select options from [Home
(Menu)], [Options], [Content List] and [Power
Off] to operate the equipment.
Speakers:
Select [TV Speakers] or [Audio System] to
output the TV’s sound from the TV speakers
or connected audio equipment.
TV Control:
Use the [TV Control] menu to operate the TV
from the [Home (Menu)] or [Options] menu.
Return to TV:
Select this option to return to TV
programme.
Exit Text mode, or switches to a TV display
when displaying external input.
Number buttons
• Select channels. For channel numbers 10
and above, enter the next digit quickly.
• In text mode, enter the three digit page
number to select the page.
(Text)
In text mode, displays Text broadcast.
Each time you press , the display changes
cyclically as follows:
Tex t Text over the TV picture (mix mode)
No Text (exit the Text service)
Colour buttons
Displays operation guide (when colour
buttons are available).
SLEEP
Press repeatedly until the TV displays the
time in minutes ([Off]/[15 min]/[30 min]/
[45 min]/[60 min]/[90 min]/[120 min]) that
you want the TV to remain on before
shutting off. To cancel the sleep timer, press
SLEEP repeatedly until [Off] appears.
//// (Item select / Enter)
• Select or adjust items.
• Confirm selected items.
RETURN
• Returns to the previous screen of any
displayed menu.
• Stops playback when playing photo/
music/video file.
HOME
Displays or cancels the menu.
+/– (Volume)
Adjust the volume.
GB
Parts and Controls
GB
5
Page 6

(Mute)
Mutes the sound. Press again to restore the
sound.
//////
• Operate the connected BRAVIA Synccompatible equipment.
• These keys also can be used to operate
USB media playback.
/ (TV standby)
Turns the TV on or switches to standby
mode.
AUDIO
Select the sound of multilingual source or
dual sound for the programme current
being viewed (Depend on programme
source).
(Wide Mode)
Adjusts the screen display. Press repeatedly
to select the desired wide mode (page 7).
/ (Info / Text reveal)
• Displays information. Press once to
display information about the
programme/input you are viewing. Press
again to remove the display from the
screen.
• In text mode, reveals hidden information
(e.g. answers to a quiz).
OPTIONS
Displays a list that contains shortcuts to
some setting menus.
The listed options vary depending on the
current input and content.
(Jump)
Returns to the previous channel or input
viewed more than 15 seconds.
PROG +/–/ /
• Selects the next (+) or previous (–)
channel.
• In text mode, selects the next ( ) or
previous ( ) page.
Hint
• The number 5, , PROG + and AUDIO buttons have
tactile dots. Use the tactile dots as references when
operating the TV.
GB
6
Page 7

Watching TV
Changing the Viewing Style
1 Press / on the TV or remote control to
turn on the TV.
2 Press the number buttons or PROG +/–
to select a TV channel.
3 Press +/– to adjust the volume.
Changing the Wide Mode
1 Press repeatedly to select the wide
mode.
[Wide Zoom]* [Normal]
[Full] [Zoom]*
* Parts of the top and bottom of the picture may
be cut off.
For HDMI PC Input (PC timing)
[Normal] [Full 1]
[Full 2]
Setting Scene Select
1 Press OPTIONS.
2 Press / then to select [Scene
Select].
When you select the desired scene
option, the optimum picture and sound
quality for selected scene are
automatically set. The options you can
select may vary. Unavailable options are
greyed out.
GB
Watching TV
GB
7
Page 8

Navigating through Home Menu
Applications
The HOME button allows you to access a variety
of TV settings and features.
1 Press HOME.
2 Press / to select an option, then
press .
Favourites
The Favourite feature allows you to specify up 18
channels of your favourite programmes.
1 Press HOME.
2 Press / then to select [Favourites].
3 Press / then to select a
programme.
Using the TV as a Photo Frame Mode
Photo Frame Mode displays the clock and
calendar at the same time as displaying a
photo, and listening to music or FM radio.
HOME [Applications] [Photo Frame
Mode]
To launch Photo Frame Mode while
playback USB media
1 Press OPTIONS while playback a photo
or music file.
2 Press / then to select [Photo
Frame Mode] to launch Photo Frame.
To select Display mode
You can change the Photo Frame Mode display
by selecting [Display Mode] in the [Photo Frame
Settings] (page 14).
To select Clock Display mode
You can select among three clock display
modes by selecting [Clock Display] in the [Photo
Frame Settings] (page 14).
Note
• This TV does not have a battery powered backup for
the clock. If there is a power failure or if you
disconnect the power cord, the current date and time
will reset automatically.
GB
8
Page 9
Duration
To save power, the TV continually plays back in
Photo Frame Mode for up to 24 hours before
powering off automatically. After automatic
power off, do not use Photo Frame Mode for at
least one hour to avoid panel burn-in.
You can change the setting of the [Duration] in
the [Photo Frame Settings] (page 14).
To avoid panel burn-in, the position of the
photo, clock and calendar are switched
automatically every hour.
Listening to FM Radio
HOME [Applications] [FM Radio]
Note
• Press PROG +/– to select an FM radio station. Press
RETURN to exit FM Radio mode.
Presetting Radio Stations
When you use FM Radio function for the first
time, press HOME and select [Settings]
[System Settings] [Channel Set-Up] [FM
Radio Set-up] [Auto Tuning].
To change preset radio stations
1 Press OPTIONS in FM Radio mode.
2 Press / then to select [FM Radio
Presets].
3 Press / then to select the radio
station you want to change.
4 Press / then to change the FM
frequency then to edit FM Radio station
name.
Note
• If the station has a noisy sound, you may be able to
improve the sound quality by pressing
• When an FM stereo programme has static noise, press
AUDIO until [Mono] appears. There will be no stereo
effect, but the noise will be reduced.
/.
Media
Playback Photo/Music/Video via USB
You can enjoy photo/music/video files stored in
a Sony digital still camera/camcorder/
smartphone (depending on models)* through a
USB cable or USB storage device on your TV.
1 Connect a supported USB device to the
TV.
* Device needs to be in Media Transfer Mode (MTP).
2 Press HOME.
3 Press / then to select [Media].
4 Press / then to select [Photo],
[Music] or [Video].
5 Press /// then to select a file
or folder.
Playback Options
Press the red button in thumbnail/list view to
display the list of USB playback settings.
To adjust the picture and sound quality of
USB media
Press OPTIONS during media playback then
select [Picture] or [Sound].
Note
•Press /// then to select and adjust an item.
GB
Navigating through Home Menu
GB
9
Page 10

To play a photo as a slideshow (Photo)
1 Press the green button in thumbnail/list
view to start slideshow.
To set [Slideshow Effect] and [Slideshow
Speed], press OPTIONS
Options].
To stop a slideshow, press RETURN.
Note
• While the TV is accessing the data on a USB device,
observe the following:
Do not turn off the TV.
Do not disconnect the USB cable.
Do not remove the USB device.
The data on the USB device may be damaged.
• Sony will not be held liable for any damage to, or loss
of, data on the recording media due to a malfunction
of any connected devices or the TV.
• The file system on the USB device supports FAT16,
FAT32 and NTFS .
• The file name and folder name may not display
correctly in some cases.
• When you connect a Sony digital still camera, set the
camera’s USB connection mode to Auto or Mass
Storage. For more information about USB connection
mode, refer to the instructions supplied with your
digital camera.
• Use a USB storage device that is compliant with USB
mass storage device class standards.
• If a selected file has incorrect container information,
or is incomplete, it cannot be played back.
USB Video format
•AVI (.avi)
Video Codec: MPEG1, MPEG2, Xvid, MPEG4,
H.264, Motion JPEG
Audio Codec: PCM, MPEG1 Layer1/2, MPEG2
AAC, MPEG4 AAC, MPEG4 HEAAC, Dolby Digital, WMA v8,
MP3
•ASF (.wmv, .asf)
Video Codec: WMV v9, Xvid, VC-1
Audio Codec: MP3, WMA v8
• MP4 (.mp4, .mov, .3gp)
Video Codec: MPEG4, H.264, H.263, Motion
JPEG
Audio Codec: MPEG1 Layer1/2, MP3, MPEG2
AAC, MPEG4 AAC, MPEG4 HEAAC
[Playback
•MKV (.mkv)
Video Codec: WMV v9, MPEG4, H.264, VC-1,
VP8
Audio Codec: PCM, MPEG1 Layer1/2, MP3,
MPEG2 AAC, MPEG4 AAC,
MPEG4 HE-AAC, Dolby Digital,
WMA v8, DTS, VORBIS
•WebM (.webm)
Video Codec: VP8
Audio Codec: VORBIS
• PS (.mpg, .mpeg, .vro, .vob)
Video Codec: MPEG1, MPEG2
Audio Codec: MPEG1 Layer1/2, MP3, Dolby
Digital, DTS
•TS (.ts, .m2ts)
Video Codec: MPEG2, H.264, VC-1
Audio Codec: MPEG1 Layer1/2, MP3, MPEG2
AAC, MPEG4 AAC, MPEG4 HEAAC, Dolby Digital, DTS
USB Music format
•LPCM (.wav)
•MPEG1 audio layer3 (.mp3)
•WMA V8 (.wma)
USB Photo format
• JPEG (.jpg, .jpeg)
Note
• Playback of the above file formats is not guaranteed.
10
GB
Page 11
Settings
System Settings
Note
• The options you can adjust vary depending on the
situation. Unavailable options are greyed out or not
displayed.
Picture
Picture Mode
Sets a picture mode.
Reset
Resets all the [Picture] settings except
[Picture Mode] and [Intelligent Picture
Plus] to the default settings.
Backlight
Adjusts the brightness of the backlight.
Picture
Increases or decreases picture contrast.
Brightness
Brightens or darkens the picture.
Colour
Increases or decreases colour intensity.
Cinema Drive
Provides improved picture movement
when playing BD (Blu-ray Disc), DVD or
VCR images taken on film. Select [Auto] to
represent original film-based content as it
is.
Note
• If the image contains irregular signals or too
much noise, [Cinema Drive] is automatically
turned off even if [Auto] is selected.
Advanced Settings
Sets [Picture] settings in more detail.
Reset: Resets all the advanced settings
to the default settings.
Adv. Contrast Enhancer: Automatically
adjusts [Backlight] and [Picture] to
the most suitable settings for dark
images scenes.
Black Corrector: Enhances black areas
of the picture for stronger contrast.
Gamma: Adjusts the balance between
bright and dark areas of the picture.
Clear White: Emphasises white colours.
Live Colour: Makes colours more vivid.
LED Motion Mode: Reduces blur in
movies by controlling the LED
backlight source, but the brightness
decreases.
GB
Navigating through Home Menu
Hue
Increases or decreases the green tones
and red tones.
Sharpness
Sharpens or softens the picture.
Colour Temperature
Adjusts the whiteness of the picture.
Noise Reduction
Reduces the picture noise (snowy picture)
in a weak broadcast signal.
MPEG Noise Reduction
Reduces the picture noise in MPEGcompressed video.
Intelligent Picture Plus Set-up
Intelligent Picture Plus: Enhances
picture quality according to preferred
settings, channel or video input.
Signal Level Indicator: When [On] is
selected, the signal level bar will be
displayed when you select analogue
channel or video input.
Picture Optimisation: Allows you to
enhance the picture to your preferred
settings.
GB
11
Page 12
Sound
Sound Mode
Select according to content you want to
enjoy.
Reset
Reset [Equaliser], [Clear Voice], [Intelligent
Volume], [Balance] and [Volume Offset]
settings.
Equaliser
Adjusts sound frequency settings.
Advanced Settings
Dynamic Range: Compensates for
differences in the audio level
between different channels.
Note
• The effect may not function or may vary
depending on the programme regardless of
the [Dynamic Range] setting.
HE-AAC Audio Level: Adjust the HE-
AAC audio sound level.
MPEG Audio Level: Adjusts the MPEG
audio sound level.
Clear Voice
Makes voices sound clearer.
Intelligent Volume
Minimizes the difference in volume level
between all programmes and adverts.
Balance
Emphasises left or right speaker balance.
Volume Offset
Adjusts the volume level of the current
input relative to other inputs.
Dual Sound
Sets the sound from the speaker to
[Mono], [Stereo], [Main] or [Sub].
Note
• If the signal is very weak, the sound becomes
monaural automatically.
• If the stereo sound is noisy when receiving a
NICAM programme, select [Mono]. The sound
becomes monaural, but the noise is reduced.
• The [Dual Sound] setting is memorized for
each programme position.
• You cannot listen to stereo broadcast sound
when [Mono] is selected.
Hint
• If you select other equipment connected to the
TV, set [Dual Sound] to [Stereo], [Main] or [Sub].
Screen
Wide Mode
For details about wide mode, see page 7.
Auto Wide
Automatically changes the wide mode
according to the input signal from an
external equipment.
4:3 Default
Sets the default [Wide Mode] for a 4:3
input signal.
Auto Display Area
Select [On] to automatically adjusts the
display area based upon the content or
[Off] to choose from the [Display Area]
options.
Display Area
Adjusts the picture display area.
Horizontal Shift
Adjusts the horizontal position of the
picture.
Vertical Shift
Adjusts the vertical position of the picture.
PC Settings
Adjusts the picture size, see page 7.
GB
12
Page 13
Channel Set-up
1 Digit Direct
When [1 Digit Direct] is set to [On], you can
select a channel using one preset number
button (0 - 9) on the remote control.
Auto Tuning
Tunes in all the available channels
Programme Sorting
Changes the order in which the channels
are stored on the TV.
Programme Labels
Assign a channel name of your choice up
to seven letters or numbers.
Manual Programme Preset
Before selecting [Channel]/[AFT]/[Audio
Filter]/[Skip]/[Colour System], press
PROG +/– to select the programme
number with the channel. You cannot
select a programme number that is set to
[Skip:] (page 13).
Programme/TV System: Presets
programme channels manually.
Channel: Selects a channel number.
AFT: Allows you to fine-tune the
selected channel manually. When
[On] is selected, the fine tuning is
performed automatically.
Audio Filter: Improves the sound of
individual channels when distortion
occurs in mono broadcasts in TV
system [B/G], [I], [D/K] and [M].
Note
• You cannot receive stereo or dual sound
when [Low]/[High] is selected.
Skip: Skips unused channels.
Colour System: Select the colour
system according to the channel.
Signal Level: Displays the signal level
for programme currently being
watched.
FM Radio Set-up
Presets up to 30 FM radio stations that can
be received in your area.
Auto Tuning: Allows you to
automatically tune and store all the
available channels.
FM Radio Presets: Allows you to
manually tune and store each
available channel one at a time.
Note
• To enable this feature, access to FM Radio
mode by using Home (Menu) (page 9), then
preset your desired FM radio stations
according to the steps mentioned above.
Parental Lock
PIN Code
Sets a PIN code. Use 0-9 on the remote
control to enter a four-digit PIN code.
Change PIN Code
Select to change your PIN code.
Programme Block
Locks a channel from being watched. To
view a blocked channel, select
[Unblocked].
External Input Lock
Locks an external input from being
watched. To view a blocked external input,
select [Unblocked].
Note
• Entering the correct PIN code for blocked
channel or external input will temporarily
deactivates the [Parental Lock] feature. To
reactivate the [Parental Lock] settings, turn off
and on the TV.
Hint
• If you lost your PIN code, see page 22.
GB
Navigating through Home Menu
GB
13
Page 14
Set-up
Photo Frame Settings
Display Mode: Allows you to select the
display mode. See page 8.
Clock Display: Allows you to select the
clock display.
Note
• This option is available when [Display
Mode] is set to [Image and Clock] or [Full
Screen Clock].
Audio Application: Sets [FM Radio],
[Music] or [Off] as audio application.
Image Selection: Select image.
Music Selection: Select music.
Slideshow Setting: Select from
showing slideshow mode or single
view photo.
Music Playback Setting: Select from
listening to all tracks or a single
music track.
Duration: Select the time period after
which the TV automatically switches
to standby mode.
First day of the week: Sets [Sunday] or
[Monday] as the first day of the week
on the calendar.
USB Auto Start
When USB device is connected to the USB
port, select [On] to automatically view the
thumbnail of the last played Photo/
Music/Video.
Clock/Timers
Sets the timer and clock.
Sleep Timer: Sets the time in minutes
that you would like the TV to remain
on before shutting off automatically.
On Timer: Turns on the TV from
standby mode at a time you set, and
tuned to a channel or input of your
preference. Before setting this
function, make sure you set the
correct current time.
Clock Set: Sets the current time and
date.
Date
Set current date.
Time
Set Current Time.
Auto Start-up
Starts the initial set-up procedure. This
option allows you to retune the TV after
moving houses, or to search for new
channels that have been launched by
broadcasters.
Language
Select the language in which the menus
are displayed.
Start-up Logo
Select [On] to display the logo when the
TV is turned on. Select [Off] to disable it.
LED Indicator
Select [On] to light up the LED indicator.
Select [Off] to disable it.
AV Set-up
Video Labels: Assigns name to external
equipment input.
Enable: Select [Auto] to display names
only when the equipment is connected,
or [Always] to display regardless of
connection status.
Label Inputs: Uses one of the preset
labels to assign a name to connected
equipment. Select [Edit] to creates your
own label.
Colour System: Selects the colour
system according to the composite
video signal from the input source.
GB
14
Page 15
Video/Component Input: Select [Auto]
to have the TV detect and switch
between the component video jack
or the video jack when
component video jack or video
jack is connected.
Note
• You cannot use the component video jack
and the video jack at the same time.
Speakers: Select sound output from
the TV speakers or external audio
equipment.
Headphone/Audio Out: Sets the sound
output to headphone, external audio
systems or Active Subwoofer
connected to the TV. Disconnect
headphone from the TV when you
select [Audio Out] or [Subwoofer].
Headphone Speaker Link: Switches the
TV’s internal speakers on/off when
you connect headphone to the TV.
Headphone Volume: Adjusts the
volume of the headphone.
Note
• This option is not available, when
[Headphone/Audio Out] is set to [Audio
Out] or [Subwoofer].
Audio Out:
Variab le: When using an external
audio system, volume output from
audio out can be controlled using the
TV’s remote control.
Fixed: The audio output of the TV is
fixed. Use your audio receiver’s
volume control to adjust the volume
(and other audio settings) through
your audio system.
Hint
• This option is only available when
[Headphone/Audio Out] is set to [Audio
Out].
Digital Audio Out: Sets the audio signal
that is output by connecting using
HDMI cable. Set to [Auto], when
connecting equipment compatible
with Dolby Digital or DTS. Set to
[PCM], when connecting equipment
not compatible with Dolby Digital or
DTS.
TV Position: Improves the speaker
settings when set as [Table-Top
Stand] or [Wall Mount] according to
your TV’s position.
BRAVIA Sync Settings
Allows the TV to communicate with
equipment that is compatible with the
BRAVIA Sync Control function, and
connected to the HDMI ports of the TV.
Note that communication settings must
also be made on the connected
equipment.
BRAVIA Sync Control: Sets whether or
not to link the operations of the TV
and the connected equipment that is
compatible with BRAVIA Sync
Control. When set to [On], the
following functions are available. If
the specific Sony equipment that is
compatible with BRAVIA Sync Control
is connected, this setting is applied
to the connected equipment
automatically.
Auto Devices Off: When set to [On], the
connected equipment that is
compatible with BRAVIA Sync Control
turns off when your TV goes to
standby mode.
Auto TV On: When set to [On], the TV
turns on when you turn on the
connected equipment that is
compatible with BRAVIA Sync
Control.
BRAVIA Sync Device List: Displays a list
of connected equipment that is
compatible with BRAVIA Sync
Control. Select [Enable] to update the
[BRAVIA Sync Device List].
GB
Navigating through Home Menu
GB
15
Page 16
Device Control Keys: Select button
functions of the TV’s remote control
to operate the connected
equipment.
None
Deactivates the control by the TV’s
remote control.
Normal
For basic operations, such as navigation
buttons (up, down, left or right, etc).
Tuning Keys
For basic operations and operation of
channel-related buttons, such as
PROG +/– or (0-9), etc. Useful when
you control a tuner or set-top box, etc;
via the remote control.
Menu Keys
For basic operations and operation of
the HOME/OPTIONS buttons.
Useful when you select menus of a BD
player, etc; via the remote control.
Tuning and Menu Keys
For basic operations and operation of
channel-related buttons and HOME/
OPTIONS button.
Note
• Some equipment with [BRAVIA Sync
Control] does not support the [Device
Control Keys] feature.
Customer Support
Provides information of your TV’s model,
software, and others. For details, see
page 16.
Customer Support
Model Name
Displays model name of your TV.
Software Version
Displays current software version of your TV.
External Inputs
View Video Labels: Allows you to view or
manage the TV and external inputs.
Picture Check
View Test Picture: Allows you to check the
picture condition on the display.
Software Update
Select to perform system update.
Factory Settings
Resets all settings to factory settings. After
completing this process, the initial set-up
screen is displayed.
Note
• Be sure not to turn the TV off during this period (it
takes about 30 seconds) or press any buttons.
Product Information
Displays your TV’s product information.
Eco
Reset
Resets the current Eco settings to the
default values.
Power Saving
Reduces power consumption of the TV by
adjusting the backlight.
When you select [Picture Off], the picture
is switched off. The sound remains
unchanged.
Idle TV Standby
Turns the TV off after it has been kept idle
for the preset length of time.
GB
16
Page 17
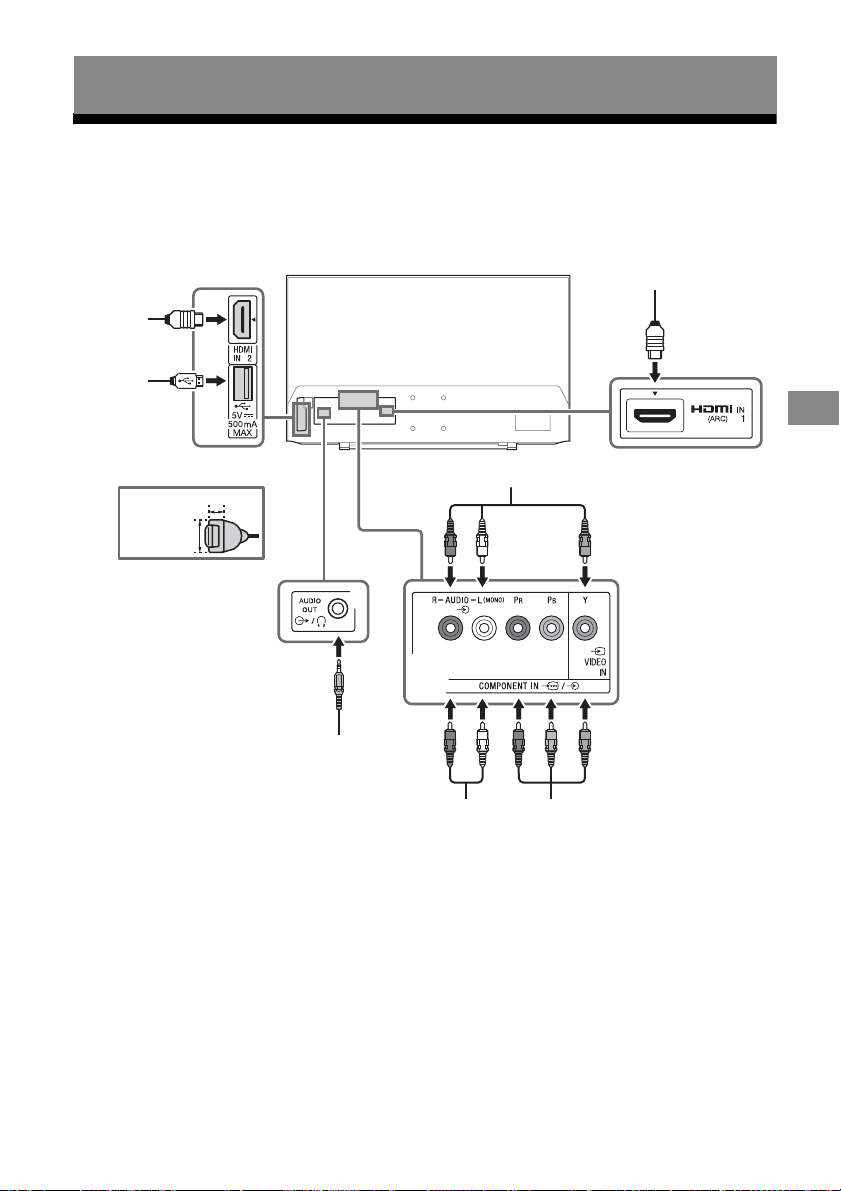
Viewing Pictures from Connected Equipment
DVD player with component output
VCR/Video game equipment/DVD player/
Camcorder
HDMI
Device
Home Audio System
with ARC/HDMI Device
Headphone/Home
Audio System/Subwoofer
*
< 12 mm
< 21 mm
*
Digital still
camera/
Camcorder/
USB storage
media
*
Connection Diagram
You can connect a wide range of optional equipment to your TV.
Note
• Depending on TV model, connecting a large USB device may interfere with other connected devices beside it.
GB
Viewing Pictures from Connected Equipment
GB
17
Page 18

Using Audio and Video Equipment
1 Turn on the connected equipment.
2 Press to display the input source.
3 Press / then to select the desired
input source.
The highlighted item is selected if 5 seconds
pass without any operation.
Note
• When connecting with an HDMI cable, be sure to use
HighSpeed HDMI Cable with Cable Type Logo
(Recommended SONY Cable).
• When connecting mono equipment, connect the
audio cable to the L (mono) jack.
To use BRAVIA Sync devices
When connecting the TV to BRAVIA Sync
compatible equipment, you can control them
together.
Be sure to perform the necessary settings in
advance. The BRAVIA Sync Control settings must
be set on both the TV and the connected
equipment. See [BRAVIA Sync Settings]
(page 15) for the settings on the TV side. Refer
to the connected equipment operating
instructions for the settings on the connected
equipment side.
18
GB
Page 19
Additional Information
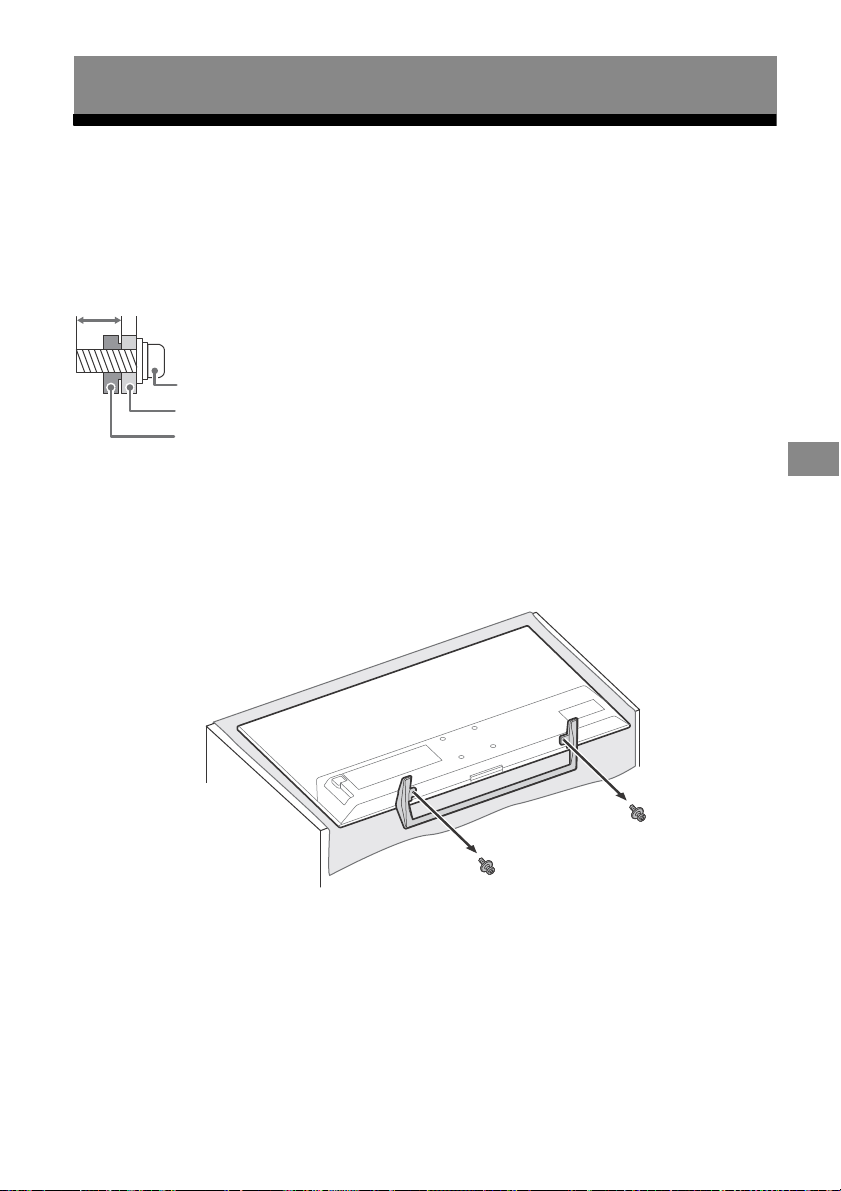
8 mm - 12 mm
Screw (M4)
Wall-Mount Bracket
TV’s rear cover
Installing the TV to the Wall
Use the Wall-Mount Bracket (not supplied) to install the TV to the wall.
Follow the instruction guide provided with the Wall-Mount Bracket for your model. Sufficient
expertise is required in installing this TV, especially to determine the strength of the wall for
withstanding the TV’s weight.
The length of the screw for Wall-Mount Bracket differs depending on the Wall-Mount Bracket
thickness. Please see below illustration.
Note
• Be sure to store the removed screws in a safe place, keeping them away from children.
• If the Table-Top Stand is attached to the TV, detach the Table-Top Stand beforehand. See the Setup Guide and follow
in reverse order the steps to detach the Table-Top Stand.
• Place the TV with its screen facing down on a level and stable surface covered with a thick and soft cloth when
removing the Table-Top Stand from the TV to prevent damaging the surface of the LCD display.
1 To detach the Table-Top Stand from the TV.
GB
Additional Information
GB
19
Page 20
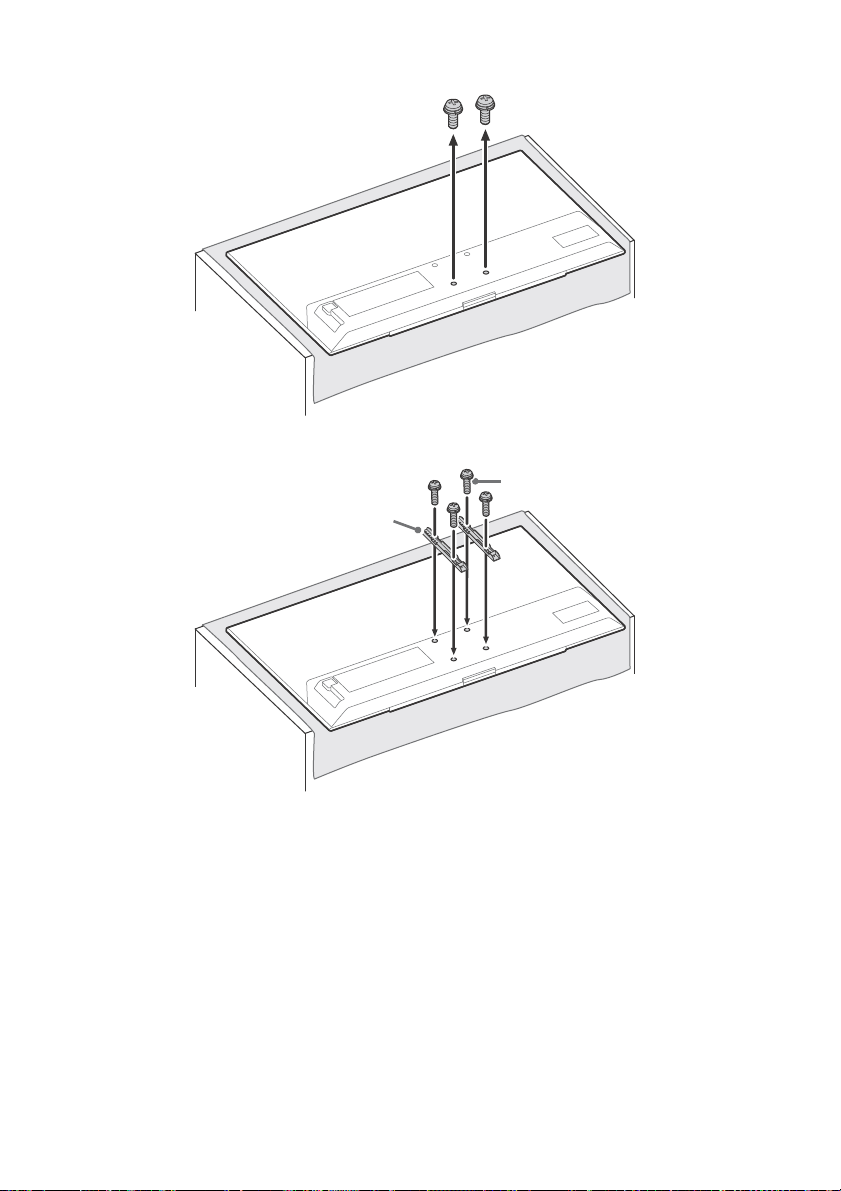
2 Removing the screws from the rear of the TV.
Screw (not supplied)
Wall-Mount Bracket (not supplied)
3 Attach the Wall-Mount Bracket (not supplied) using the screws (not supplied).
Note
• If using an electric screwdriver, set the torque at approximately 1.5 N·m {15 kgf·cm}.
GB
20
Page 21
Troubleshooting
When the LED indicator is flashing red, count
how many times it flashes (interval time is
three seconds).
If the LED indicator flashes red, reset the TV by
disconnecting the AC power cord (mains lead)
from the TV for two minutes, then turn on the
TV.
If the problem persists, contact your dealer or
Sony service centre with the number of times
the LED indicator flashes red (interval time is
three seconds). Press / on the TV to turn it off,
disconnect the AC power cord (mains lead), and
inform your dealer or Sony service centre.
When the LED indicator is not flashing, check
the items as follows.
If the problem persists, have your TV serviced by
qualified service personnel.
Picture
No picture (screen is dark) and no sound
Check the antenna (aerial)/cable connection.
Connect the TV to the AC power outlet (mains
socket), and press / on the TV or the remote
control.
No picture or no menu information from
equipment connected to the video input jack
appears on the screen
Press to display the connected equipment
list, then select the desired input.
Check the connection between the optional
equipment and the TV.
Double images or ghosting
Check the antenna (aerial)/cable connection,
location or direction.
Only snow and noise appear on the screen
Check if the antenna is broken or bent.
Check if the antenna has reached the end of its
serviceable life (three to five years in normal use,
one to two years at the seaside).
Distorted picture (dotted lines or stripes)
Keep the TV away from electrical noise sources
such as cars, motorcycles, hair-dryers or optional
equipment.
When installing optional equipment, leave some
space between the optional equipment and the
TV.
Check the antenna (aerial)/cable connection.
Keep the antenna cable away from other
connecting cables.
Picture or sound noise when viewing a TV
channel
Adjust [AFT] (Automatic Fine Tuning) to obtain
better picture reception. This function is for
analogue TV channels only.
Tiny black points and/or bright points appear
on the screen
The picture of a display unit is composed of
pixels. Tiny black points and/or bright points
(pixels) on the screen do not indicate a
malfunction.
Picture contours are distorted
Change the current setting of [Cinema Drive] to
other settings (page 11).
No colour on programmes
Select [Reset] (page 11).
No colour or irregular colour when viewing a
signal from the Y, PB, PR jacks of /
Check the connection of the Y, PB, PR jacks of
/ and check if each jacks are firmly seated
in their respective jacks.
No picture from the connected equipment
appears on the screen
Turn the connected equipment on.
Check the cable connection.
Press to display the connected equipment
list, then select the desired input.
Correctly insert the memory card or other storage
device in the digital still camera.
Use a digital still camera memory card or other
storage device that has been formatted according
to the instruction manual supplied with the digital
still camera.
Operations are not guaranteed for all USB
devices. Also, operations differ depending on the
features of the USB device and the video being
played.
Cannot select the connected equipment on
the menu or cannot switch the input
Check the cable connection.
Sound
No sound, but good picture
Press +/– or (Mute).
Check if [Speakers] in [AV Set-up] is set to [TV
Speakers] (page 15).
Check if the headphone plug is connected to the
TV.
No sound or noisy sound
Check if the TV system setting is appropriate
(page 12).
GB
Additional Information
GB
21
Page 22

Channels
Some channels are blank
Contact the broadcaster for transmission details.
General
The TV turns off automatically (the TV enters
standby mode)
Check if the [Sleep Timer] is activated (page 14).
Check if the [Duration] is activated by [On Timer]
(page 14) or [Photo Frame Settings] (page 14).
Check if the [Idle TV Standby] is activated
(page 16).
Some input sources cannot be selected
Select [Video Labels] and select [Always] of the
input source (page 14).
The remote control does not function
Replace the batteries.
HDMI equipment does not appear on [BRAVIA
Sync Device List]
Check that your equipment is compatible with
BRAVIA Sync Control.
Cannot select [Off] in [BRAVIA Sync Control]
If you have connected any audio system that is
compatible with BRAVIA Sync Control, you cannot
select [Off] in this menu. To change the audio
output to the TV speaker, select [TV Speakers] in
the [Speakers] menu (page 15).
The [Parental Lock] password has been
forgotten
Enter 9999 for the PIN code.
Update PIN code by pressing HOME and select
[Settings]
t [Change PIN Code].
Store Display Mode or Promoting Feature
Logo appears on the screen
On the remote control, press RETURN then press
HOME and select [Settings]
t [Set-up] t [Auto Start-up]. Be sure to select
[Home] in [Location].
t [System Settings] t [Parental Lock]
t [System Settings]
Specifications
System
Panel system
LCD (Liquid Crystal Display) Panel, LED backlight
TV system
Analogue: B/G, I, D/K, M
Depend on your country/area selection
Colour/video system
Analogue: PAL, SECAM, NTSC3.58, NTSC4.43
Channel coverage
Analogue: VHF/UHF/Cable, Depend on your
country/area selection
Sound output (Only for 19.5 V supply)
5 W + 5 W
Input/Output jacks
Antenna (aerial)/cable
75 ohm external terminal for VHF/UHF
COMPONENT IN/ VIDEO IN
COMPONENT IN
Supported formats: 1080p(50, 60 Hz), 1080i(50,
60 Hz), 720p(50, 60 Hz), 576p, 576i, 480p, 480i
Y: 1 Vp-p, 75 ohms, 0.3 V negative sync
P
B: 0.7 Vp-p, 75 ohms
P
R: 0.7 Vp-p, 75 ohms
Video input (phono jack)
COMPONENT IN/ AUDIO IN
Audio input (phono jacks)
HDMI IN 1 (ARC), HDMI IN 2
Video: 1080p(30, 50, 60 Hz), 1080/24p, 1080i
(50, 60 Hz), 720p(30, 50, 60 Hz), 720/24p, 576p,
576i, 480p, 480i
PC input: (Horizontal × Vertical, Horizontal
frequency, Vertical frequency)
For KLV-40R352G
640 × 480, 31.5 kHz, 60 Hz
800 × 600, 37.9 kHz, 60 Hz
1,024 × 768, 48.4 kHz, 60 Hz
1,280 × 768, 47.4 kHz, 60 Hz
1,280 × 768, 47.8 kHz, 60 Hz
1,360 × 768, 47.7 kHz, 60 Hz
1,280 × 1,024, 64 kHz, 60 Hz
*1,920 × 1,080, 67.5 kHz, 60 Hz
For KLV-32R302G
640 × 480, 31.5 kHz, 60 Hz
800 × 600, 37.9 kHz, 60 Hz
1,024 × 768, 48.4 kHz, 60 Hz
1,280 × 768, 47.4 kHz, 60 Hz
1,280 × 768, 47.8 kHz, 60 Hz
1,360 × 768, 47.7 kHz, 60 Hz
Audio:
Two channel linear PCM: 32, 44.1 and 48 kHz, 16,
20 and 24 bits, Dolby Digital
22
GB
Page 23
ARC (Audio Return Channel) (HDMI IN 1 only)
PCM, Dolby Digital, DTS
AUDIO OUT / (Stereo mini jack)
Headphone, Audio output, Subwoofer
USB port
DC IN 19.5 V
AC adapter input
Others
Operating temperature
0 ºC – 40 ºC
Power and others
Power requirements
19.5 V DC with AC adapter
Rating: Input 100 V - 240 V AC, 50/60 Hz
Screen size (measured diagonally) (approx.)
KLV-40R352G: 40 inches / 101.6 cm
KLV-32R302G: 32 inches / 80.0 cm
Display resolution
KLV-40R352G: 1,920 dots (horizontal) × 1,080 lines
(vertical)
KLV-32R302G: 1,366 dots (horizontal) × 768 lines
(vertical)
Power consumption
KLV-40R352G: 51 W
KLV-32R302G: 39 W
Output Rating
USB
5 V
, 500 mA MAX
Dimensions (Approx.) (w × h × d)
with Table-Top Stand
KLV-40R352G: 924 × 569 × 180 mm
KLV-32R302G: 735 × 461 × 168 mm
without Table-Top Stand
KLV-40R352G: 924 × 550 × 65 mm
KLV-32R302G: 735 × 443 × 63 mm
Trademark information
• The terms HDMI and HDMI High-Definition
Multimedia Interface, and the HDMI Logo
are trademarks or registered trademarks of
HDMI Licensing Administrator, Inc. in the
United States and other countries.
• Manufactured under license from Dolby
Laboratories. Dolby, Dolby Audio, and the
double-D symbol are trademarks of Dolby
Laboratories.
• “BRAVIA”, and BRAVIA Sync are
trademarks or registered marks of Sony
Corporation.
•“Blu-ray Disc”, “Blu-ray” and “Blu-ray Disc”
logo are trademarks of Blu-ray Disc
Association.
•For DTS patents, see
http://patents.dts.com. Manufactured
under license from DTS, Inc.
DTS, the Symbol, & DTS and the Symbol
together are registered trademarks, and
DTS 2.0+Digital Out is a trademark of DTS,
Inc. © DTS, Inc. All Rights Reserved.
• TUXERA is a registered trademark of Tuxera
Inc. in the US and other countries.
• All other trademarks are the property of
their respective owners.
GB
Additional Information
Mass (Approx.)
with Table-Top Stand
KLV-40R352G: 6.3 kg
KLV-32R302G: 4.4 kg
without Table-Top Stand
KLV-40R352G: 6.1 kg
KLV-32R302G: 4.3 kg
* The 1080p timing when applied to the HDMI input will
be treated as a video timing and not PC timing.
Note
• Optional accessories availability depends on
countries/region/TV model/stock.
• Design and specifications are subject to change
without notice.
23
GB
Page 24

© 2019 Sony Corporation
 Loading...