

Page 1

4-087-135-
R
12
(1)
Instruction Manual
Bedienungsanleitung
Mode d’emploi
Οδηγίες Χρήσης
Manuale d’Istruzioni
Gebruiksaanwijzing
Kullanwm Kwlavuzu
GB
DE
FR
GR
IT
NL
TR
KF-50SX200
KF-42SX200
©2003 by Sony Corporation
Page 2

Introduction
Thank you for choosing this Sony “Grand Wega” model.
Before operating the TV set, please read this manual thoroughly and retain it for future reference.
• Symbols used in the manual:
• Important information.
• Information on a feature.
1,2...
•
Sequence of instructions.
• Buttons shaded white on the remote control show the
buttons you have to press to follow the sequence
of instructions.
• Informs you of the result of the instructions.
Table of Contents
Introduction.......................................................................................................................................................................................................................3
Safety Information ............................................................................................................................................................................................................ 4
Overview
Checking the Accessories Supplied .................................................................................................................................................................. 5
Overview of TV Buttons.....................................................................................................................................................................................5
Overview of Remote Control Buttons .............................................................................................................................................................. 6
Installation
Inserting Batteries into the Remote Control .................................................................................................................................................... 7
Connecting the Aerial and VCR........................................................................................................................................................................8
Stabilizing the TV set ..........................................................................................................................................................................................8
First Time Operation
Switching on the TV set and Automatically Tuning......................................................................................................................................9
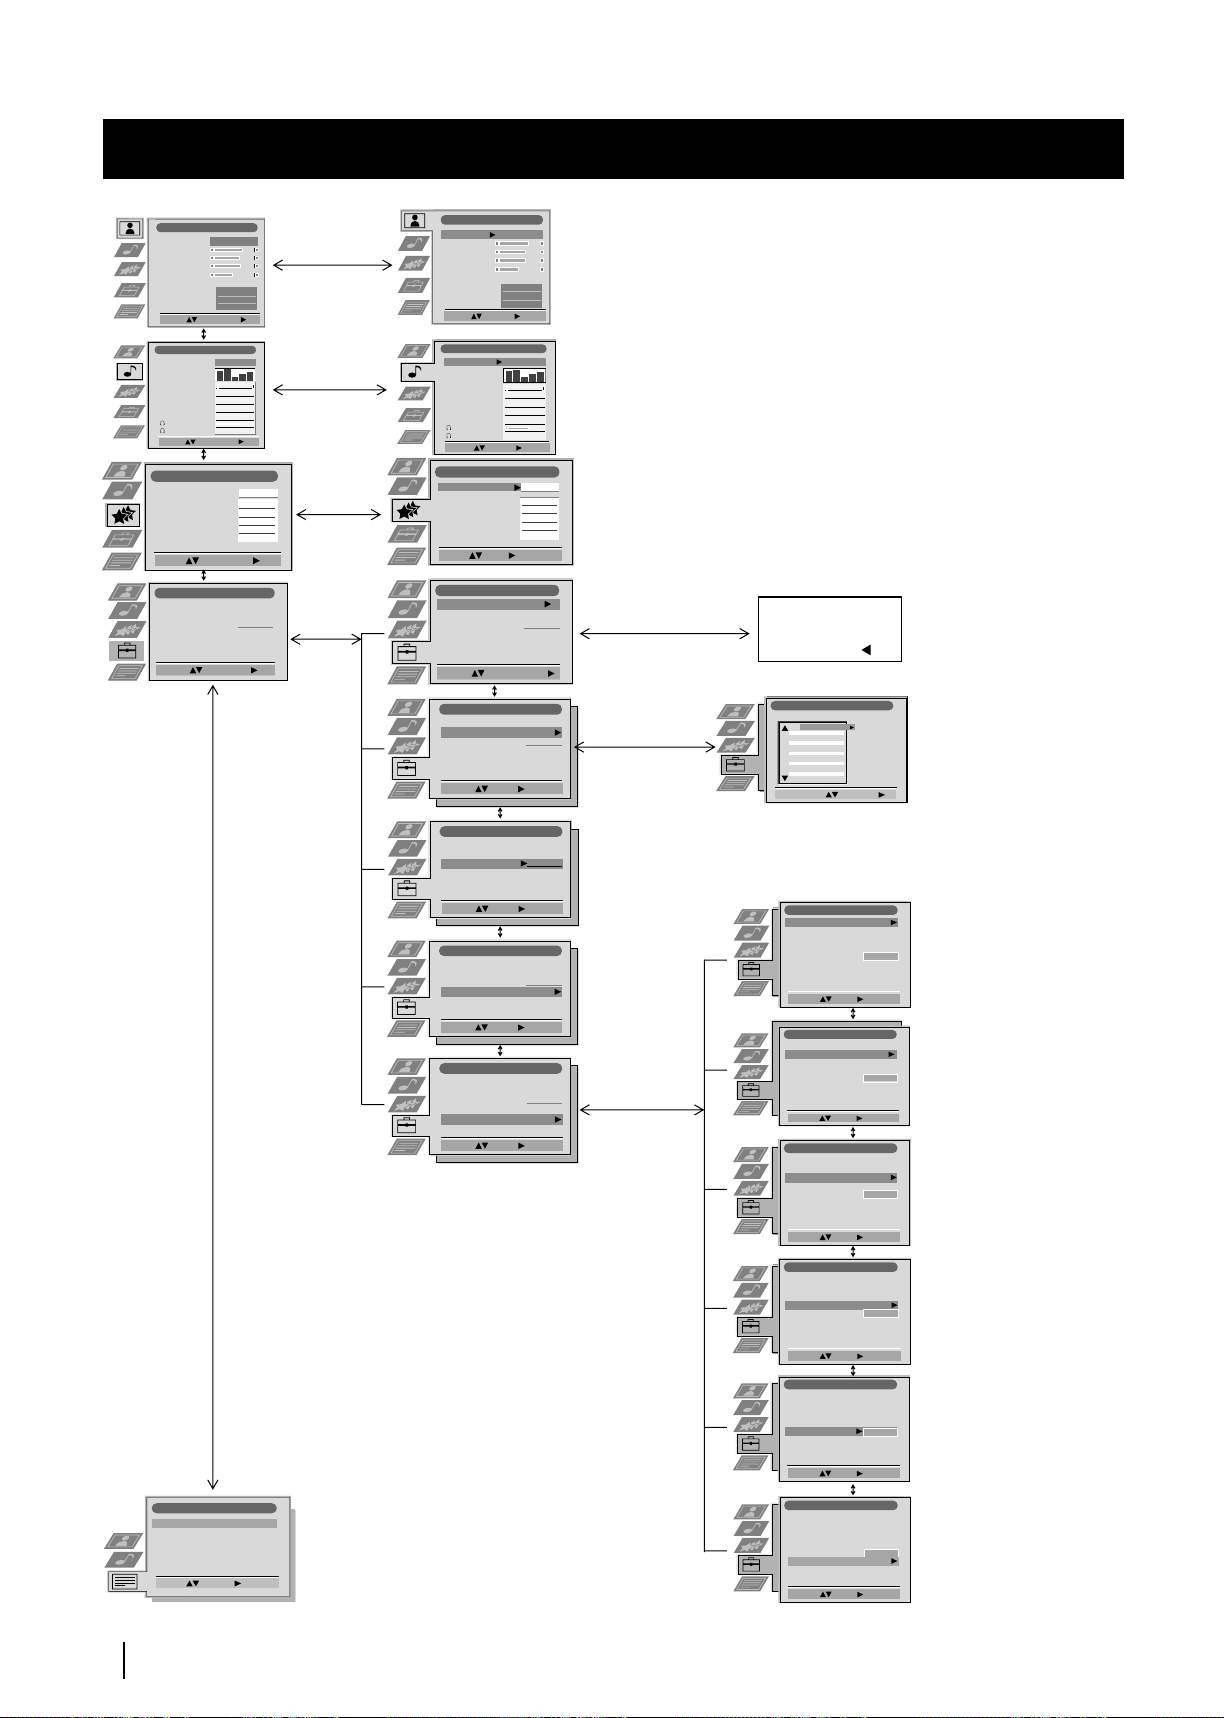
Menu System
Changing the Screen Format ...........................................................................................................................................................................11
Introducing and Using the Menu System...................................................................................................................................................... 11
On Screen display Menus Guide..................................................................................................................................................................... 12
Using the Menu System:
Adjusting the Picture......................................................................................................................................................................................13
Adjusting the Sound....................................................................................................................................................................................... 14
Using the Features menu...............................................................................................................................................................................16
Manually Tuning the TV ...............................................................................................................................................................................17
Labelling a channel......................................................................................................................................................................................... 18
Skipping programme positions ....................................................................................................................................................................19
Using the “Further Programme Preset” function ......................................................................................................................................20
Inputting your personal ID ...........................................................................................................................................................................21
Using the Demo Mode ................................................................................................................................................................................... 22
Adjusting the H Centre picture for an RGB source ...................................................................................................................................23
Labelling and Selecting the screen format of Input Sources ....................................................................................................................24
Using Multi PIP (Picture In Picture) ............................................................................................................................................................25
Using PAP (Picture And Picture) ................................................................................................................................................................. 25
Teletext
NexTView
......................................................................................................................................................................................................................26
.................................................................................................................................................................................................................28
Optional Connections
Connecting Optional Equipment .................................................................................................................................................................... 30
Using Optional Equipment..............................................................................................................................................................................31
Smartlink.............................................................................................................................................................................................................32
Remote Control of other Sony Equipment ....................................................................................................................................................32
GB
Additional Information
Remote Control Configuration for VCR/DVD.............................................................................................................................................33
Replacing the Lamp ..........................................................................................................................................................................................34
Optimum Viewing Area...................................................................................................................................................................................35
Specifications...................................................................................................................................................................................................... 36
Troubleshooting................................................................................................................................................................................................. 37
3
Page 3
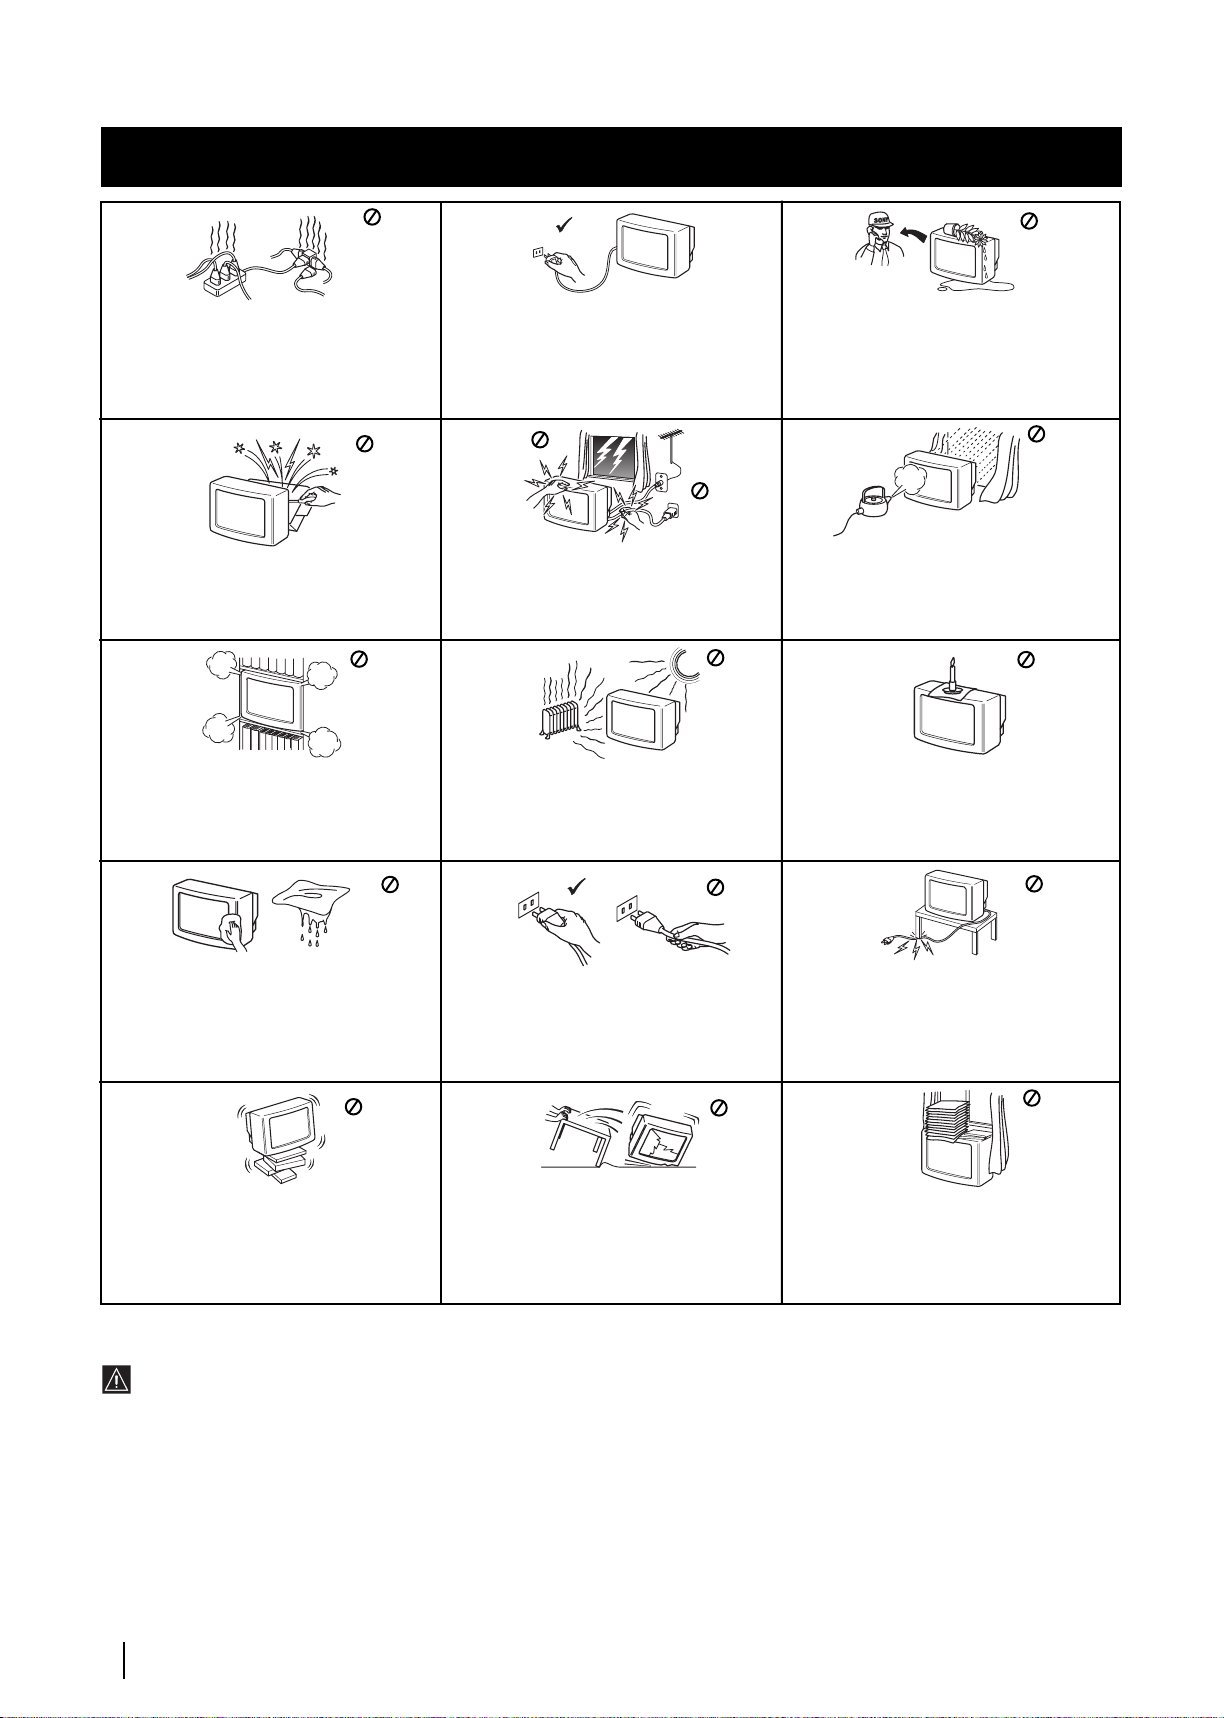
Safety Information
Safety Information
This set is to operate on a 220-240V AC supply
only. Take care not to connect too many
appliances to the same power socket as this
could result in fire or electric shock.
Do not open the cabinet and the rear cover of
the TV. Refer to qualified service personnel
only.
Do not cover the ventilation openings of the
TV For ventilation, leave a space of at least
10cm all around the set.
For environmental and safety reasons, it is
recommended that the TV set is not left in
standby mode when not in use. Disconnect
from the mains.
For your own safety, do not touch any part
of the TV, power lead or aerial lead during
lightning storms.
Never place the TV in hot, humid or
excessively dusty places. Do not install the
TV where it may be exposed to mechanical
vibrations.
Never push objects of any kind into the set as
this could result in a fire or electric shock.
Never spill liquid of any kind on the set. If
any liquid or solid object does fall into the
cabinet, do not operate the TV. Have it
checked immediately by qualified personnel.
To prevent fire or shock hazard, do not expose
the TV to rain or moisture.
To prevent fire, keep inflammable objects or
naked lights (eg candles) away from the TV.
Clean the screen and cabinet with a soft,
lightly dampened cloth. Do not use any type
of abrasive pad, alkaline cleaner, scouring
powder or solvent, such as alcohol or
benzine, or antistatic spray. As a safety
precaution, unplug the TV before cleaning it.
Place the TV on a secure stable stand. Do not
allow children to climb on to it. Do not place
the TV on its side or face up.
Pull out the power lead by the plug. Do not
pull on the power lead itself.
Unplug the power lead before moving the TV.
Avoid uneven surfaces, quick steps or
excessive force. If the set has been dropped or
damaged, have it checked immediately by
qualified service personnel.
Additional Safety Information
•When moving the TV set two persons are needed. To prevent
damage DO NOT push on the speaker grills on each side of the
screen. Do not grasp the front panels to prevent these parts from
breaking off. Support the bottom of the screen with one hand
while grasping the top part with the other hand.
•Do not block or cover the ventilation opening situated on the
bottom rear of the left hand side of the TV set. For ventilation,
leave a space of at least 10 cm from the wall.
•If after transporting the TV set, directly from a cold to a warm
location, or if the room temperature has changed suddenly,
pictures may be blurred or show poor colour over portions of the
picture. This is because condensation has formed on the mirrors
or lenses inside the TV set. Let the moisture evaporate before
using the TV set.
•To obtain a clear picture, do not expose the screen to direct
illumination or direct sunlight. If possible, use spot lighting
directed down from the ceiling.
Safety Information
4
Take care not to place heavy objects on the
power lead as this could result in damage.
We recommend you wind any excess lead
around the holders provided on the rear of the
TV.
Do not cover the ventilation openings of the
TV with items such as curtains or newspapers
etc.
• This TV set incorporates the latest high-precision LCD technology.
Even though the highest standards are applied in manufacture it is
still possible that a few black dots or bright points (red, green or
blue) may be visible on the screen under certain picture conditions.
It is not possible to remove them and this is not a fault condition.
• The screen of this TV set has an anti-reflection screen coating. To
avoid screen degradation, follow the advice given below:
• To remove dust from the surface of the screen, wipe with the
supplied cleaning cloth or a soft cloth.
• Clean the screen and cabinet with a soft, lightly dampened cloth.
Do not use any type of abrasive pad, alkaline cleaner, scouring
powder or solvent, such as alcohol or benzine, or antistatic spray.
As a safety precaution, unplug the TV before cleaning it.
• Avoid touching the screen, and take care not to scratch the
surface with hard objects.
Page 4
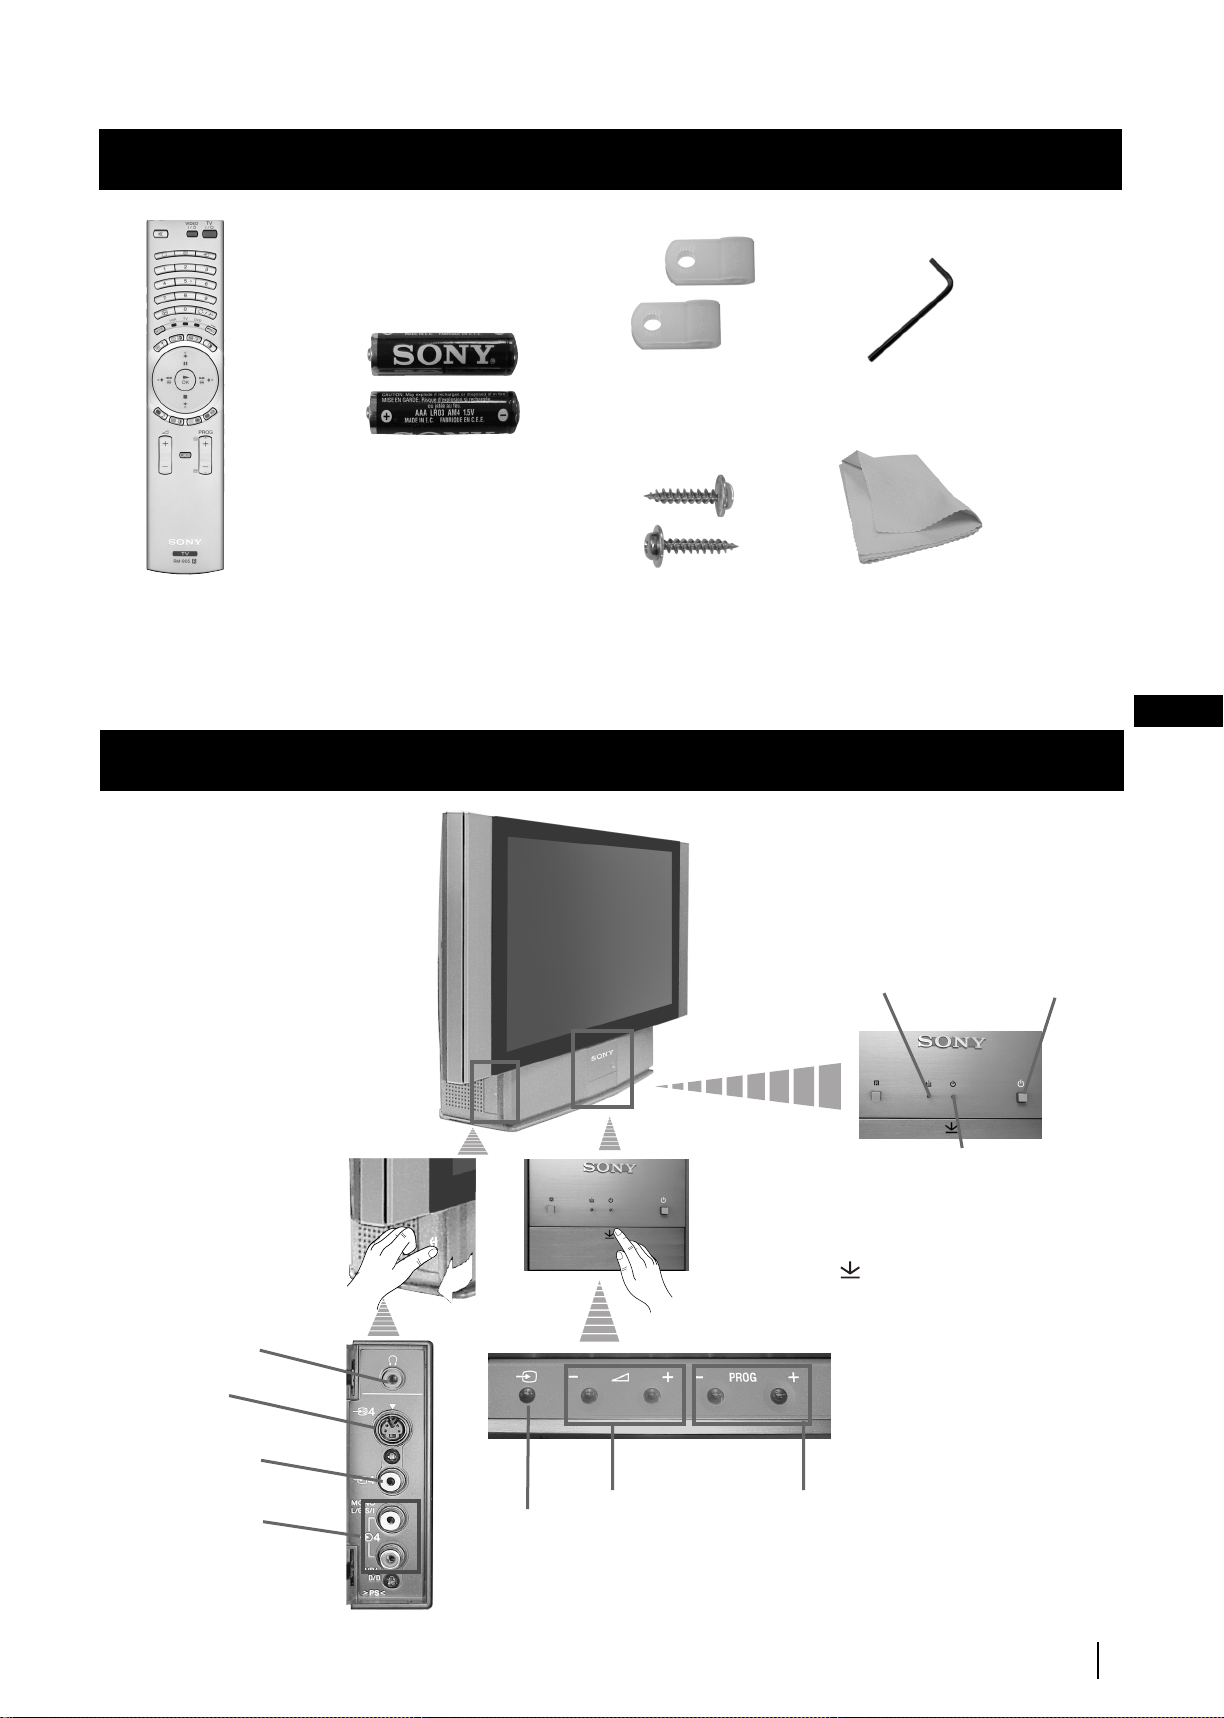
Overview
Press on the mark ,
on the front of the TV
set to reveal the front
connectors.
Checking the Accessories Supplied
s
Two batteries
(AAA size)
1 Hexagon key2 Brackets
One Remote Control
(RM-905)
Overview of TV Buttons
Headphone
jack
S Video
Input jack
2 Screws
1 Cleaning cloth
GB
Lamp
indicator (see
page 34)
On/Off
Switch
Standby indicator:
• By pressing the On/
Off button on the
Remote Control to
turn the TV off, the
standby indicator
light up in red.
• By pressing the On/
Off on the TV set to
turn the TV off, the
standby indicator
lights up in amber.
Video Input
jack
Audio Input
jacks
Input source
selection
button
Volume control
buttons
Programme up
or down buttons
(selects TV channels)
Overview
5
Page 5
Overview
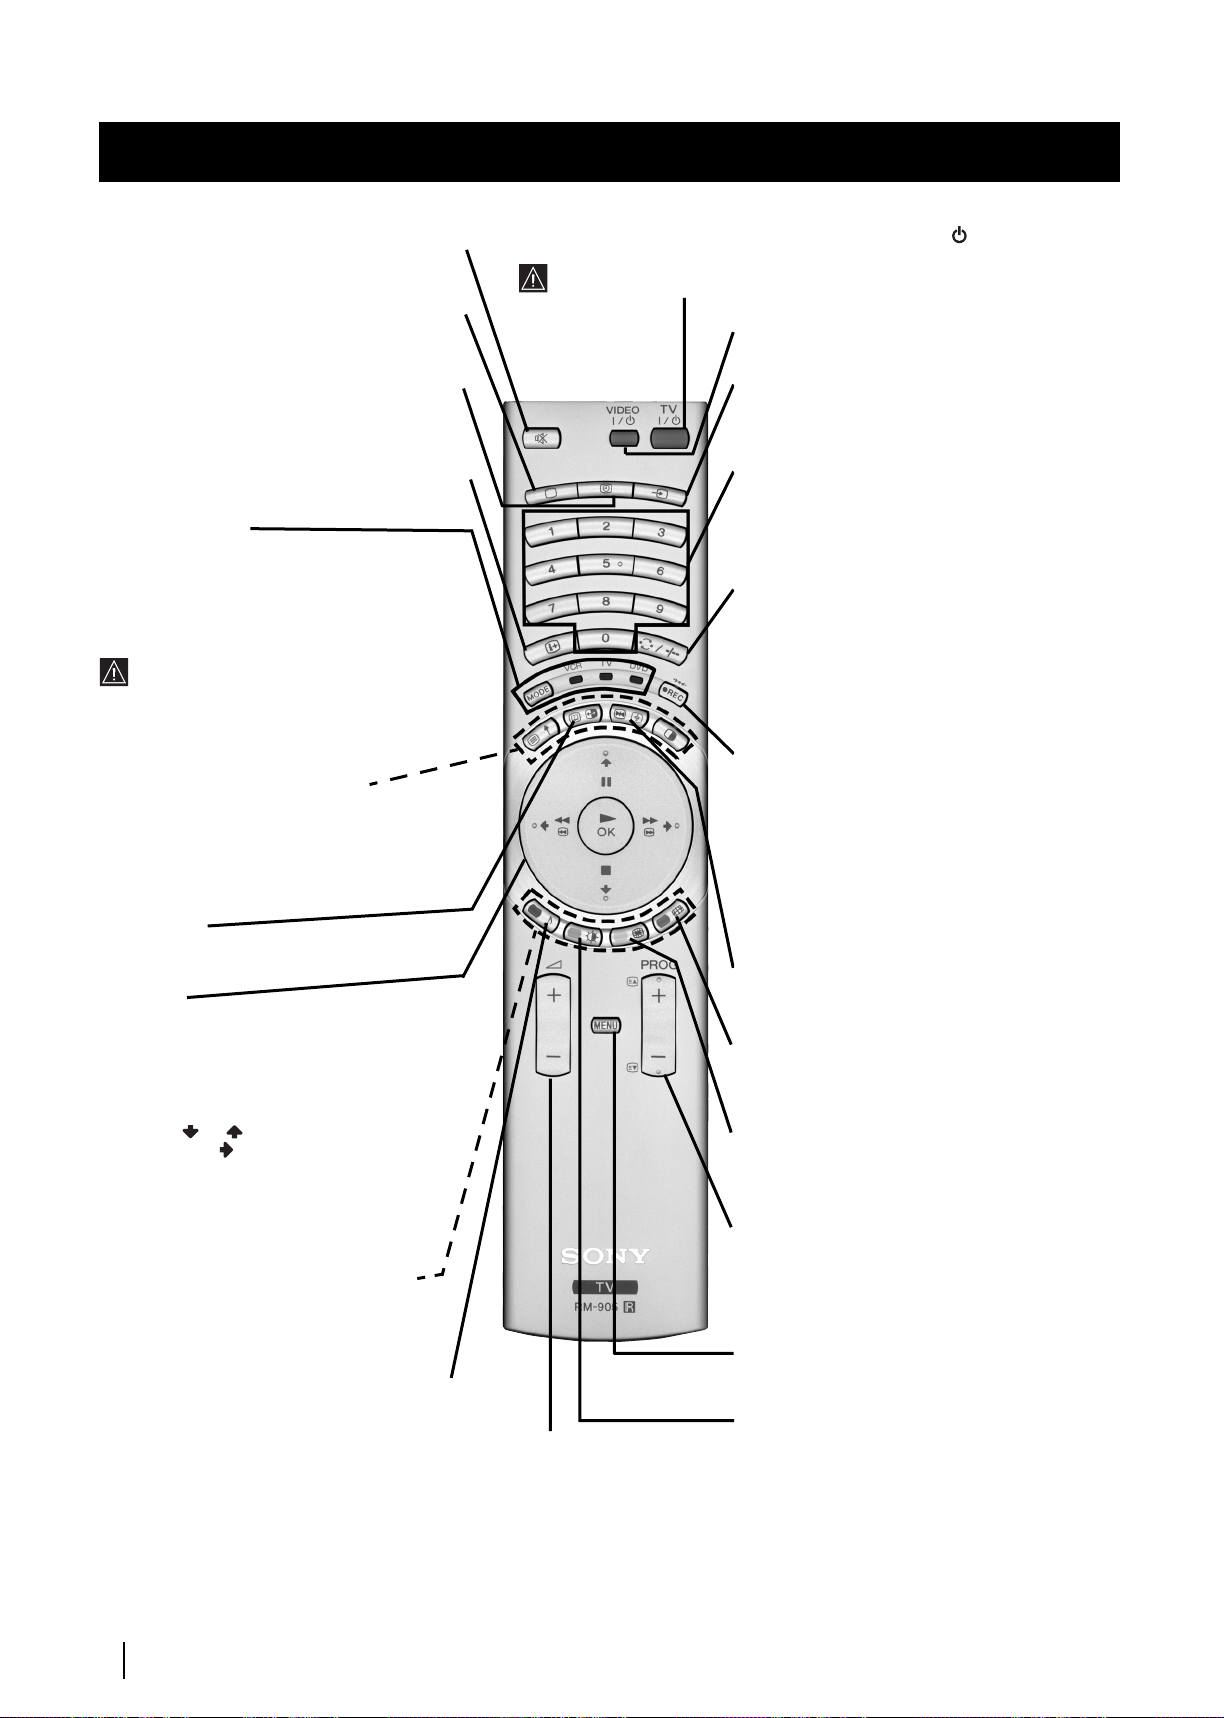
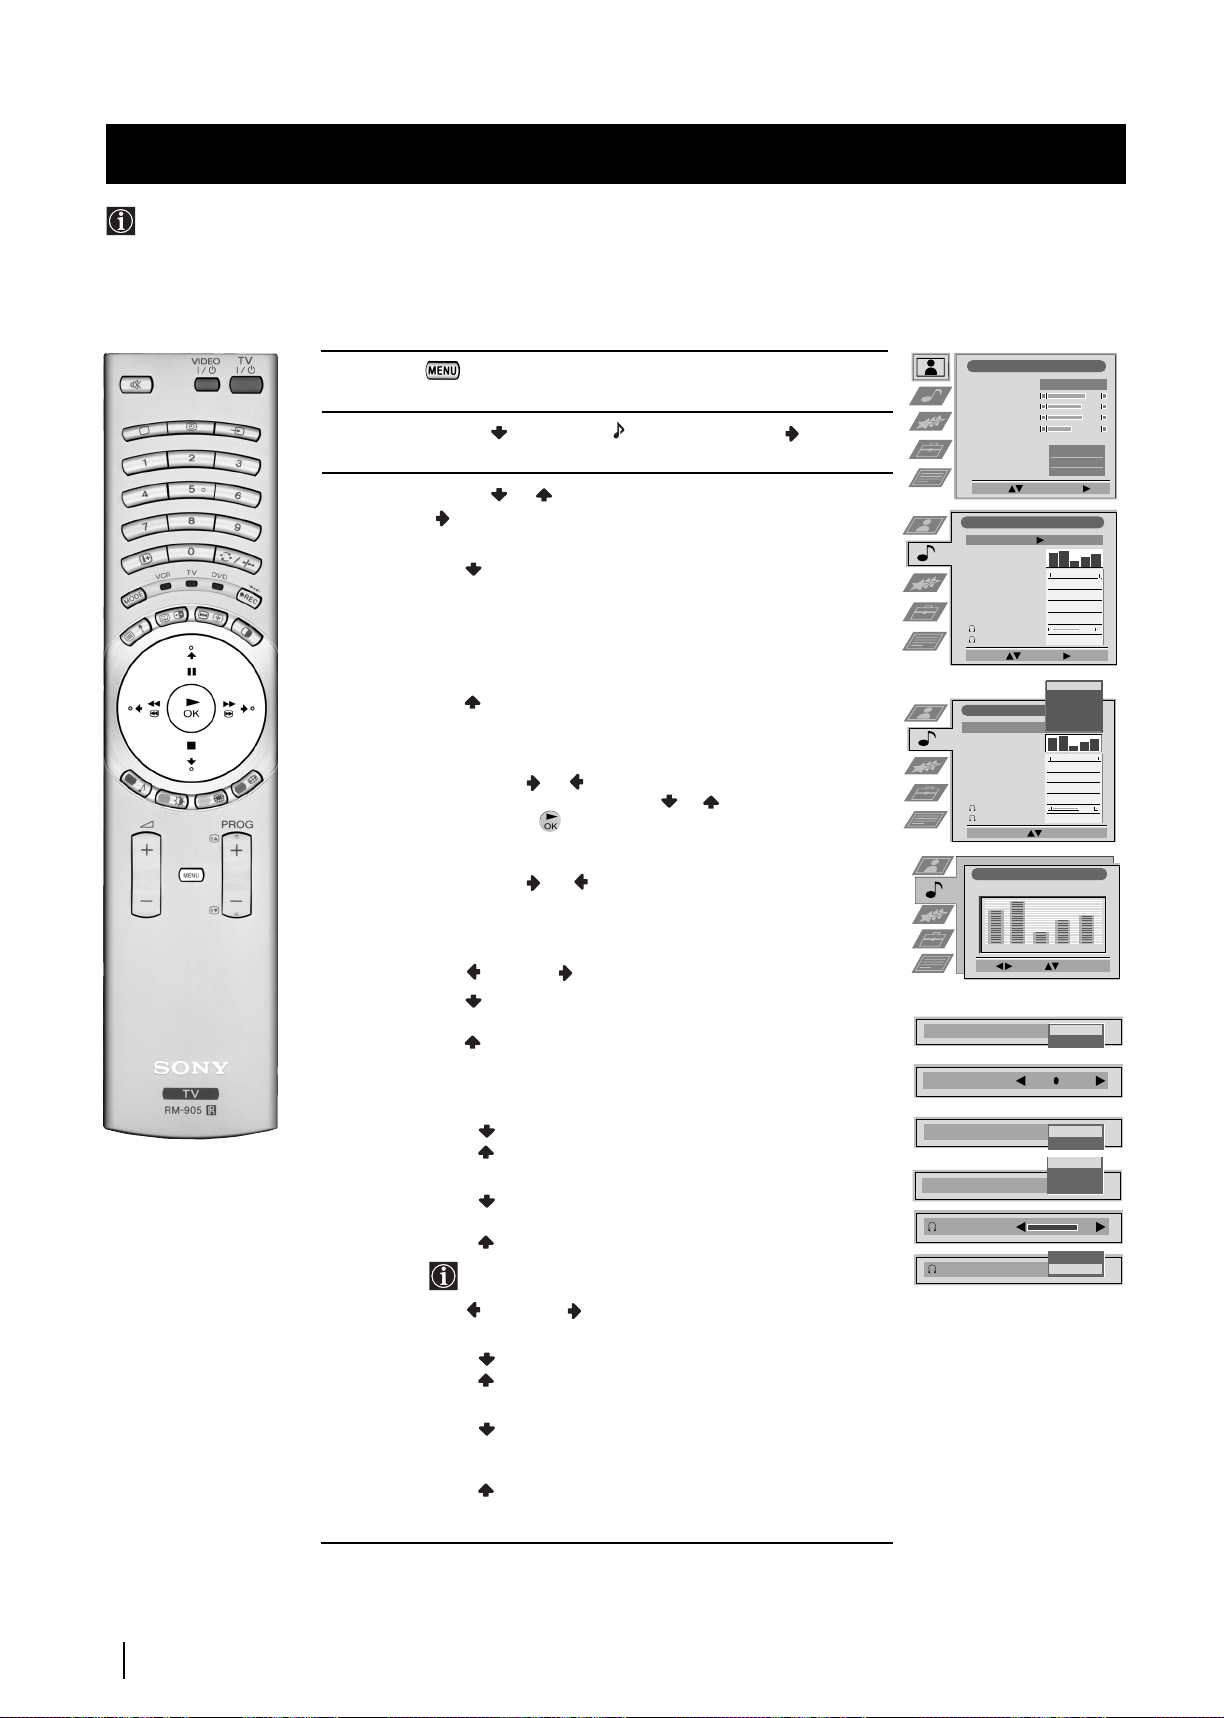
Overview of Remote Control Buttons
To Temporarily Switch Off:
Muting the Sound:
Press again to restore the sound.
Selecting TV mode:
Multi PIP, Teletext or video input.
Displaying the time:
display on or off (available only when teletext is
broadcast).
Displaying On Screen Information:
to display all on-screen indications. Press again to
cancel.
Press to mute TV sound.
Press to switch off PAP,
Press to switch the time
Press
Media Selector:
With this remote control you can operate not
only this TV but also the main functions of
your VCR or DVD.
Switch on the device you want to operate and next
press this button repeatedly to select the VCR, TV
or DVD. A green light will be momentarily lit to
indicate the chosen function.
Before the first time you want to control
a DVD or VCR by using this remote
control, you have to set it up depending on the
brand of the device to be used. For more details,
refer to chapter “Remote Control Configuration
for VCR or DVD” on page 33.
a) PAP (Picture And Picture):
For more details, please refer to the section
“Using PAP (Picture And Picture)”.
b) Teletext:
Buttons with green symbols are also used for
teletext operation. For more details, please
refer to the section “Teletext” of this manual.
NexTView:
For more details, please refer to the section
“NexTView” of this manual.
Joystick:
a) If Media Selector is switched to TV:
•When MENU is switched on, use these
buttons to operate the menu system. For
details refer to “Introducing and Using
the Menu System” on page 11.
• When MENU is switched off, press OK to
show an overview of all TV channels. Then
press or to select the channel and
then press button to watch the selected
channel.
b) If Media Selector is switched
to VCR or DVD:
Using these buttons you can control
the main functions of your VCR or DVD.
Fastext:
Fastext operation. For more details please refer
to the “Fastext” chapter in the “Teletext”
section of this manual.
Selecting Sound effect:
repeatedly to change the sound effect.
These buttons are also used for
Press this button
Press to temporarily switch off TV (the standby indicator
up in red). Press again to switch on TV from standby mode.
After 15-30 minutes without a signal and without any button being pressed,
the TV set switches automatically into standby mode.
VCR DVD on/off:
your VCR or DVD on or off.
Selecting Input source:
repeatedly until the input of the desired source
appears on the TV screen.
Selecting channels:
If Media Selector is switched to TV or VCR, press
this button to select channels.
For double-digit programme numbers, enter the
second digit within 2.5 seconds.
a) If Media Selector is switched to TV:
Press this button to watch the last channel
selected (the last channel watched for at least 5
seconds).
b) If Media Selector is switched to VCR:
To select a double-digit programme on a Sony
VCR, e.g. 23, press -/- - first and then the
buttons 2 and 3.
a) Recording button:
If Media Selector is switched to VCR, press this
button to record programmes.
b) Resetting to factory set levels:
Press, for a minimum of 3 seconds, to return the
picture and sound settings to the factory default
levels. This will also return the set to the install
condition and the “Auto Tuning” menu will
appear on the screen. If this is the case refer to the
section “Switching on the TV set and
automatically Tuning” (step 4) of this manual.
Freezing the picture:
freeze the picture. Press again to return to the
normal picture.
Selecting Screen format:
repeteadly to change the format of the screen (for
more details, please refer to the section “Changing
the Screen format”) of this manual.
Displaying Multi PIP (Picture In Picture):
Press to display Multi PIP mode. Press again to
cancel. For more details, please refer to the section
“UsingMulti PIP (Picture In Picture)”.
a) Selecting channels:
select the number of the next or previous
broadcast channel.
b) Teletext:
teletext operation. For more detail please refer to
the section “Teletext” of this manual.
Displaying the menu system:
button to display the menu on the screen. Press
again to remove the menu display from the screen.
Selecting Picture mode:
Adjusting TV Volume:
this button to adjust the volume
of the TV.
Press
repeatedly to change the picture mode.
on the TV set lights
Press this button to switch
Press this button
Press this button to
Press this button
Press this button to
These buttons are also used for
Press this
Press this button
6
Overview
Page 6
Installation
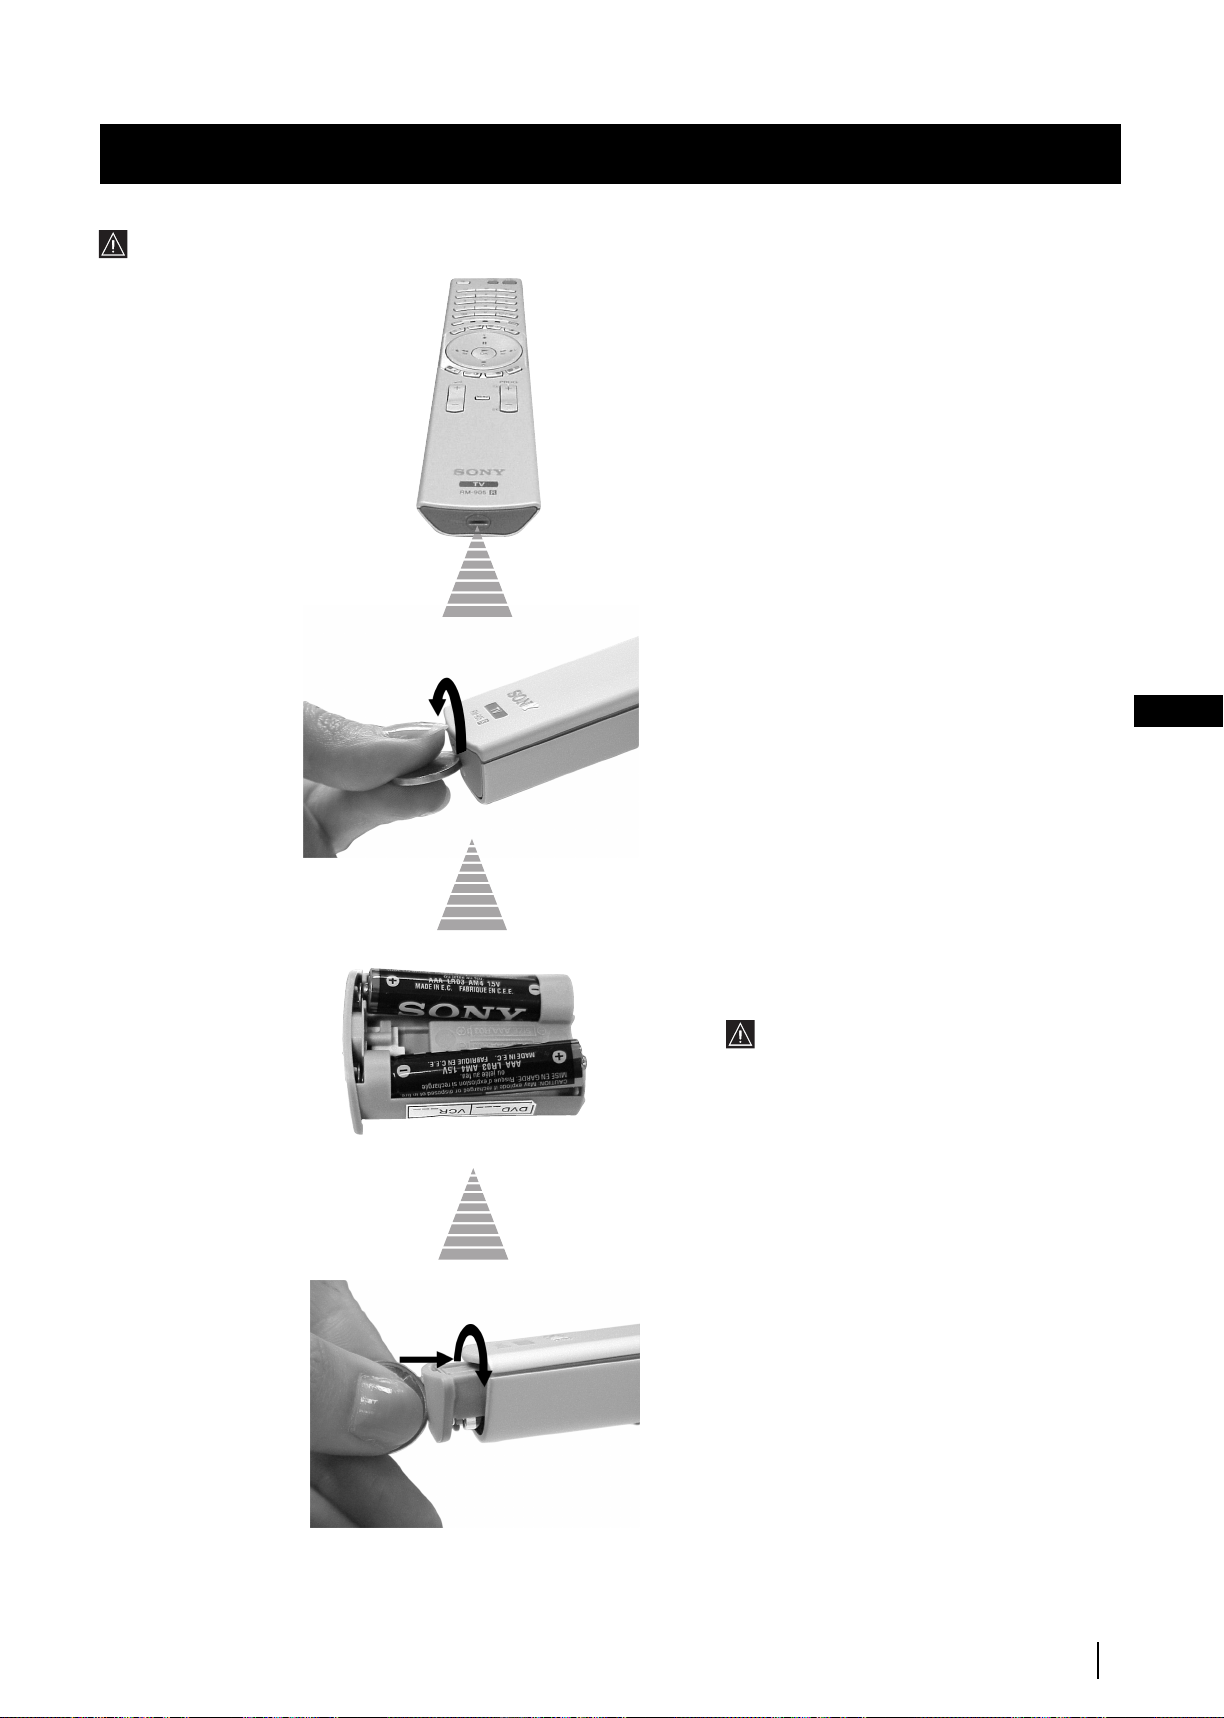
Inserting Batteries into the Remote Control
Always remember to dispose of used batteries in an environmental friendly way.
Make sure you insert the batteries using
the correct polarities.
GB
Installation
7
Page 7
Installation
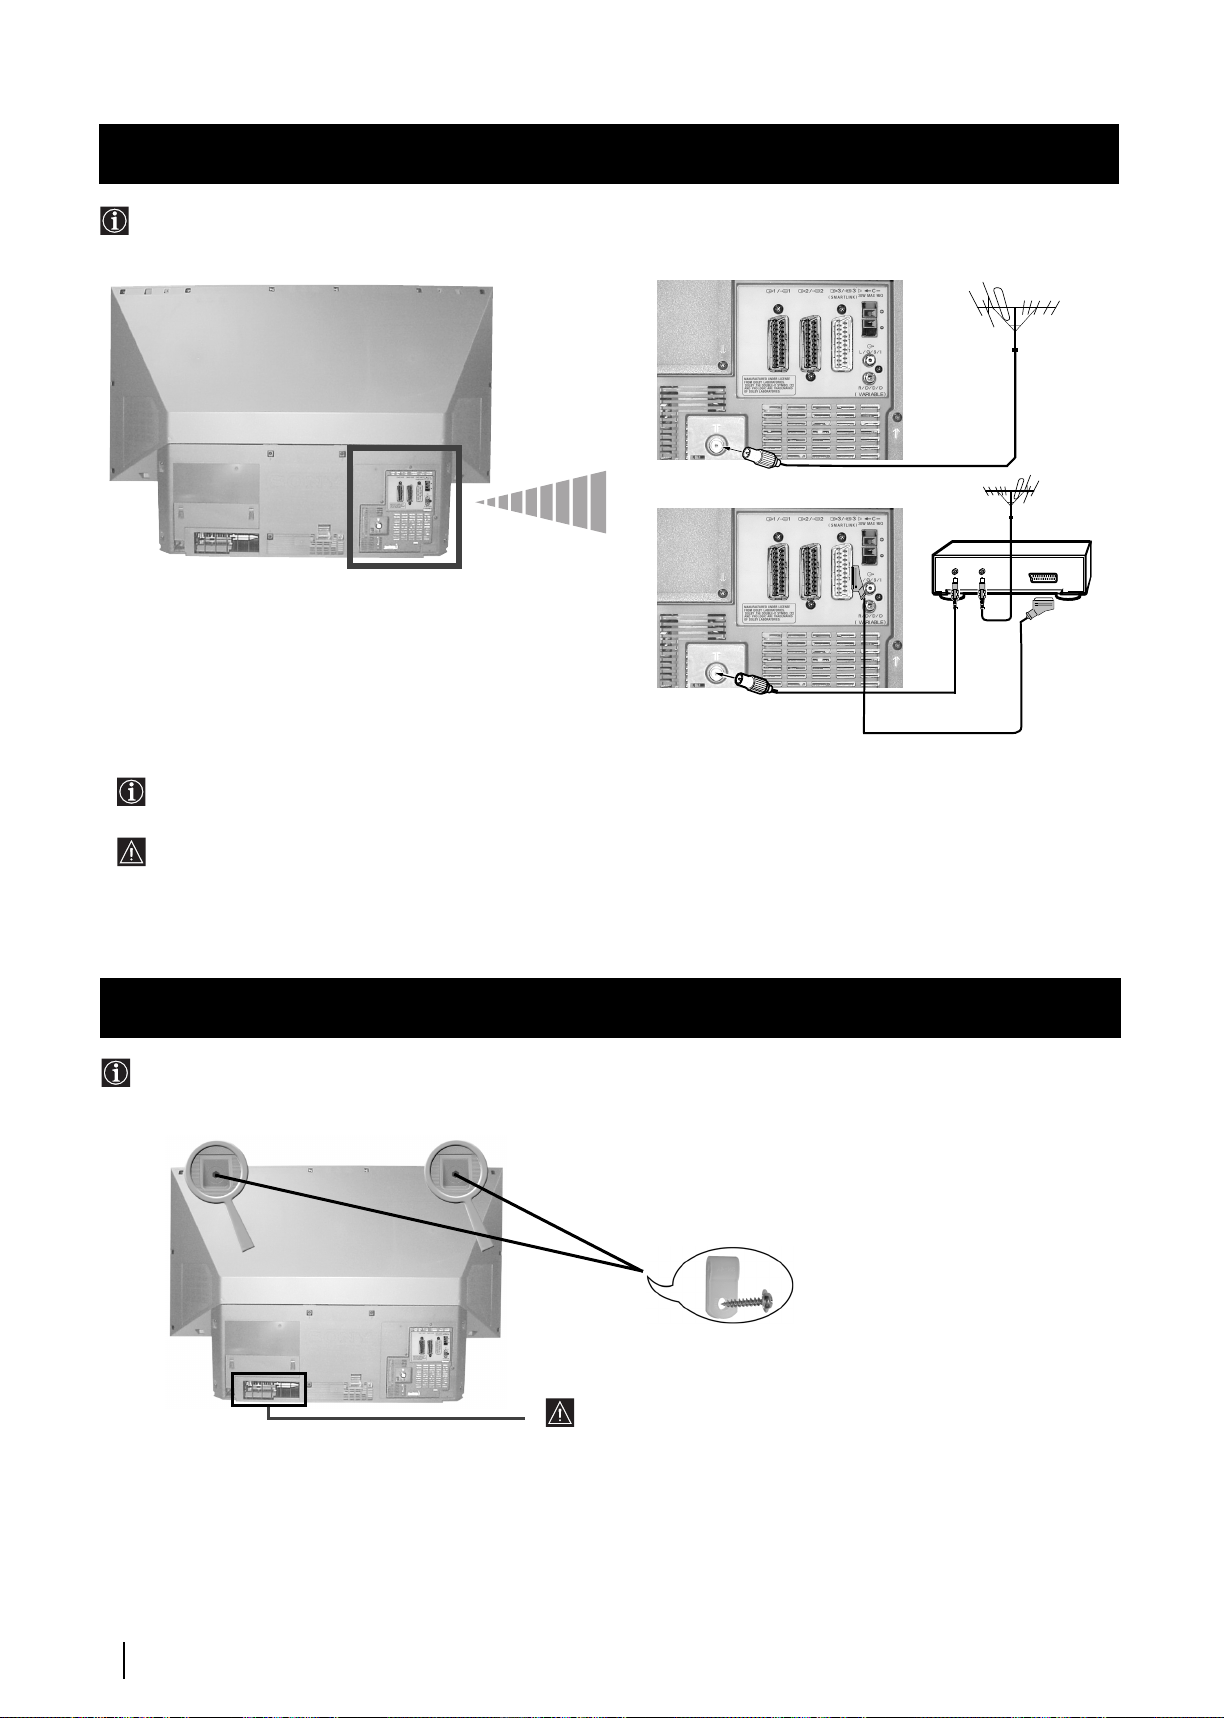
The Scart lead is optional, however if you use a Scart lead to connect your VCR it can improve picture and sound quality
when using it.
If you do not use a Scart lead, after automatically tuning the TV set, refer to the "Manually Tuning the TV" section of this
instruction manual, to tune in the set to the output of your VCR. Also, refer to your VCR instruction manual to find the
output channel of your VCR.
Connecting the Aerial and VCR
Connecting cables are not supplied.
or
OUT IN
VCR
Stabilizing the TV set the set
After setting up, secure the TV set to a wall, etc., using the supplied brackets and screws, for safety purposes.
1
Mount the two supplied brackets with the screws provided to the upper rear side of the TV set.
Do not block or cover this ventilation opening. For
ventilation, leave a space of at least 10 cm from the wall.
2
Pass a strong cord or a chain through each bracket, and then secure to a wall or a pillar, etc.
8
Installation
Page 8
First Time Operation
Language/Country
Language
Country
Select Language: Confirm: OK
4 Italiano
Français
Español
English
Deutsch
Dansk
Čeština
Language/Country
Language
Country
Select Language: Confirm: OK
4 Italiano
Français
Español
English
Deutsch
Dansk
Čeština
Language/Country
Language
Country
Select Language: Confirm: OK
4 Italiano
Français
Español
English
Deutsch
Dansk
Čeština
Language/Country
Language
Country
Select Country:
Confirm: OK
4
Finland
Denmark
Czech Rep.
Bulgaria
Belgium
Austria
Off
Do you want to start
automatic tuning?
Yes: OK No:
Please confirm that
aerial is connected!
Yes: OK No:
1
2
3
4
5
CO2
CO3
CO4
CO7
CO8
Searching...
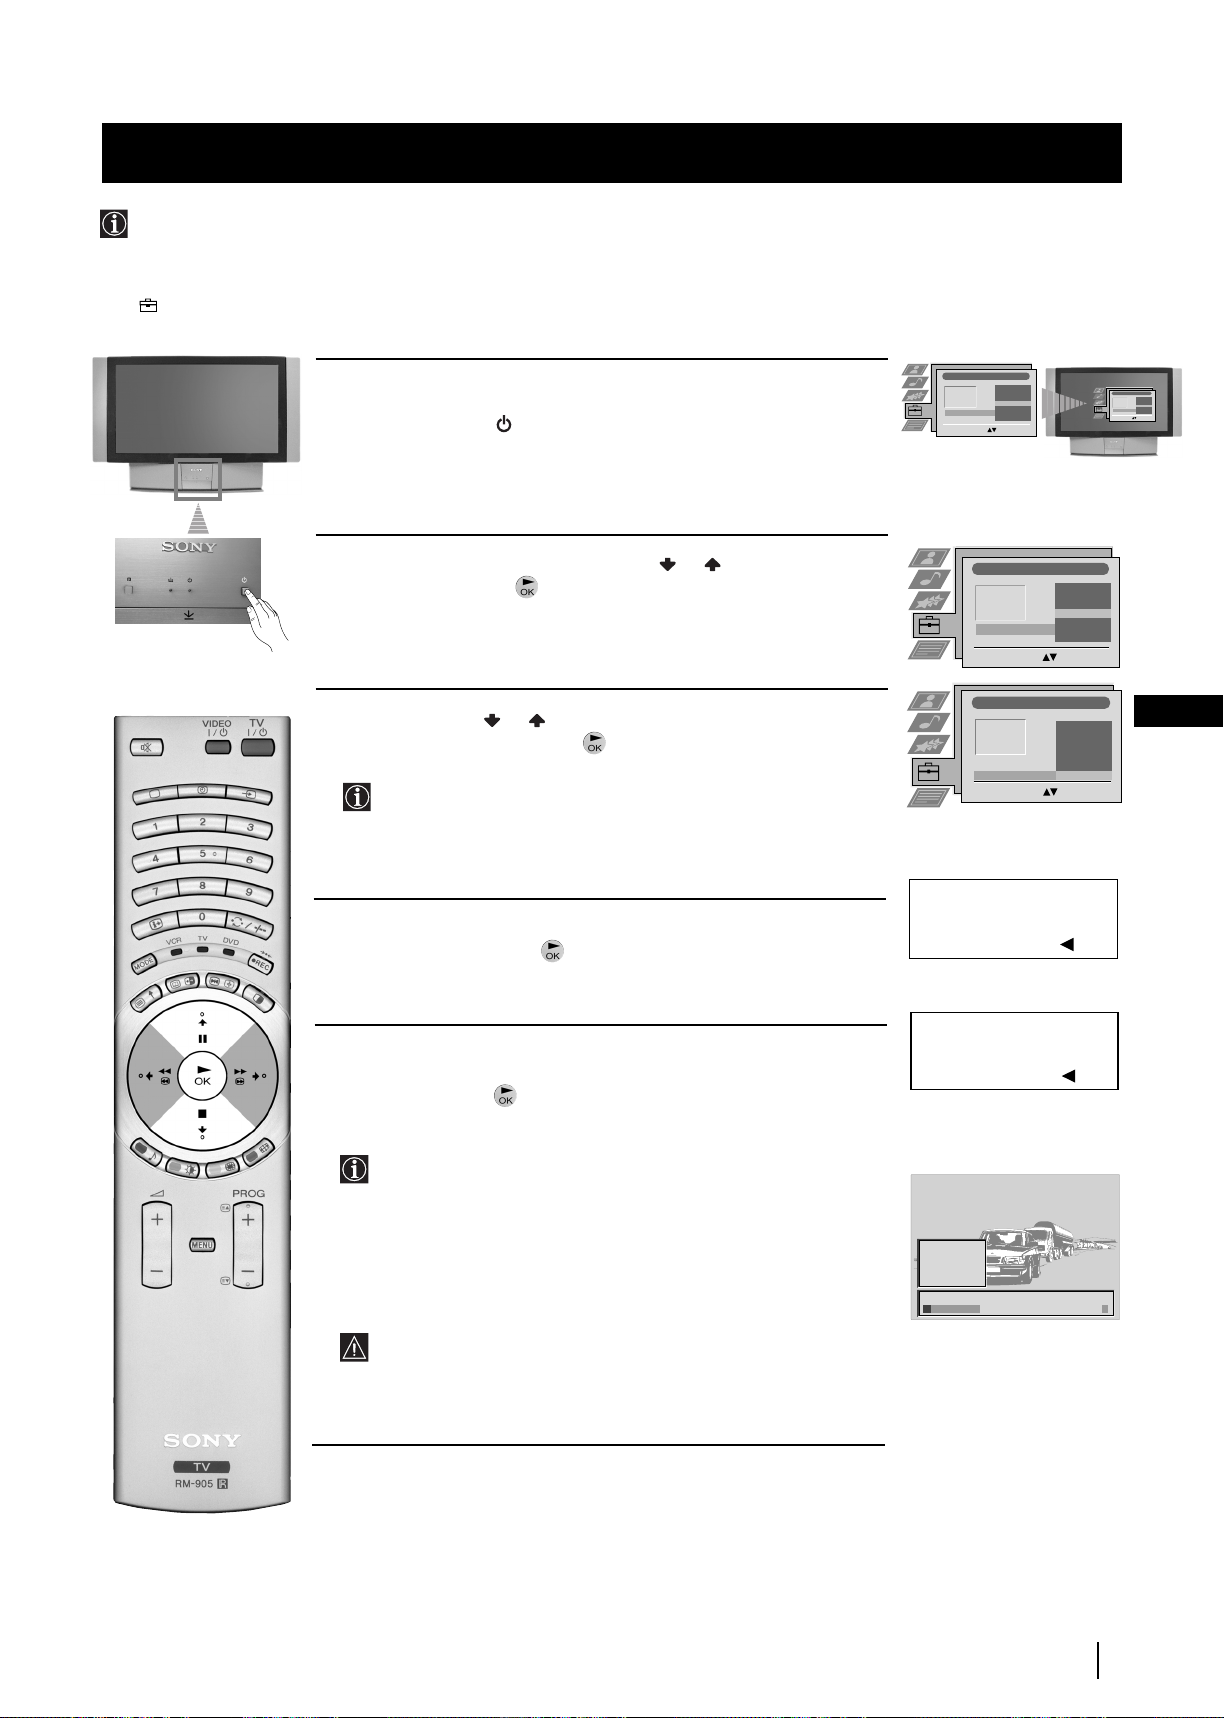
Switching on the TV set and Automatically Tuning
The first time you switch on your TV, a sequence of menu screens appear on the TV enabling you to 1) choose the language
of the menu screen, 2) choose the country in which you wish to operate the TV set, 3) search and store all available broadcast
channels and 4) change the order in which the broadcast channels appear on the screen.
However, if you need to change any of these settings at a later date, you can do that by selecting the appropriate option in the
(Set Up) menu
.
Connect the TV plug to the mains socket (220-240V AC, 50 Hz).
1
The first time that the TV set is connected, it is usually turned on. If the
TV is off, press the
The first time you switch on the TV, the
On/Off
button on your TV set to switch it on.
Language/Country
automatically displayed on the screen.
2
Push the joystick on the remote control or to select the
language, then press to confirm your selection. From now on all
the menus will appear in the selected language.
menu is
3
Push the joystick or to select the country in which you will
GB
operate the TV set, then press to confirm your selection.
Select "Off" instead of a country if you do not want the
broadcast channels stored in the normal channel sequence
starting from programme position 1 (i.e. BBC1= programme 1,
BBC2= programme 2...).
4
The Auto Tuning menu appears on the screen in the selected
language, then press the button on the remote control to select
Yes
.
5
A new menu appears automatically on the screen asking you to
check that the aerial is connected. Confirm that the aerial is connected
and then press the button to start the automatic tuning.
• The TV starts to automatically search and store all available
broadcast channels for you.
• If you have selected the “Off” option in the Country menu and
you activate autotuning, the broadcast channels will be stored
in the order in which they are received and no sorting will
take place.
This procedure could take some minutes. Please, be patient and
do not press any buttons while the automatic tuning is in
progress, otherwise the automatic tuning will
not be completed.
continued...
First Time Operation
9
Page 9
First Time Operation
6
After all available broadcast channels are captured and stored,
the Programme Sorting menu appears automatically on the
screen enabling you to change the order in which the channels
appear on the screen.
a)
If you wish to keep the broadcast channels in the tuned order, go to
step 7.
b)
If you wish to store the broadcast channels in a different order:
1
Push the joystick on the remote control
or to select the
programme number with the broadcast channel you wish to
rearrange, then push to enter.
2 Push the joystick or to select the new programme number
for your selected broadcast channel, then press .
The selected broadcast channel now moves to its new
programme position and the other broadcast channels move
accordingly.
3 Repeat steps b1) and b2) if you wish to change the order of the
other channels.
7 Press the button to exit and return to the normal TV screen.
Programme Sorting
PROG CH LABEL
TV 5
C03
1
PRO 7
C05
2
EU-SP
C07
3
SWF
C08
4
RTL
C09
5
SAT
C11
6
MDR
C12
7
DDI
C13
8
DSF
C14
9
RTL 2
C15
10
KAB 1
C16
11
Select Prog: Confirm:
Programme Sorting
PROG CH LABEL
1
TV 5
C03 TV 5
C03
2
PRO 7
C05
3
EU-SP
C07
4
SWF
C08
5
RTL
C09
6
SAT
C11
7
MDR
C12
8
DDI
C13
9
DSF
C14
10
RTL 2
C15
11
KAB 1
C16
Select Position: Move: OK
The TV set is now ready for use.
10
First Time Operation
Page 10
Menu System
Picture Adjustment
Select: Enter Menu:
Picture Mode
Contrast
Brightness
Colour
Sharpness
Reset
AI
Noise Reduction
Colour Tone
Personal
On
Off
Normal
Picture Adjustment
Select: Enter Menu:
Picture Mode
Contrast
Brightness
Colour
Sharpness
Reset
AI
Noise Reduction
Colour Tone
Personal
On
Off
Normal
Joystick:
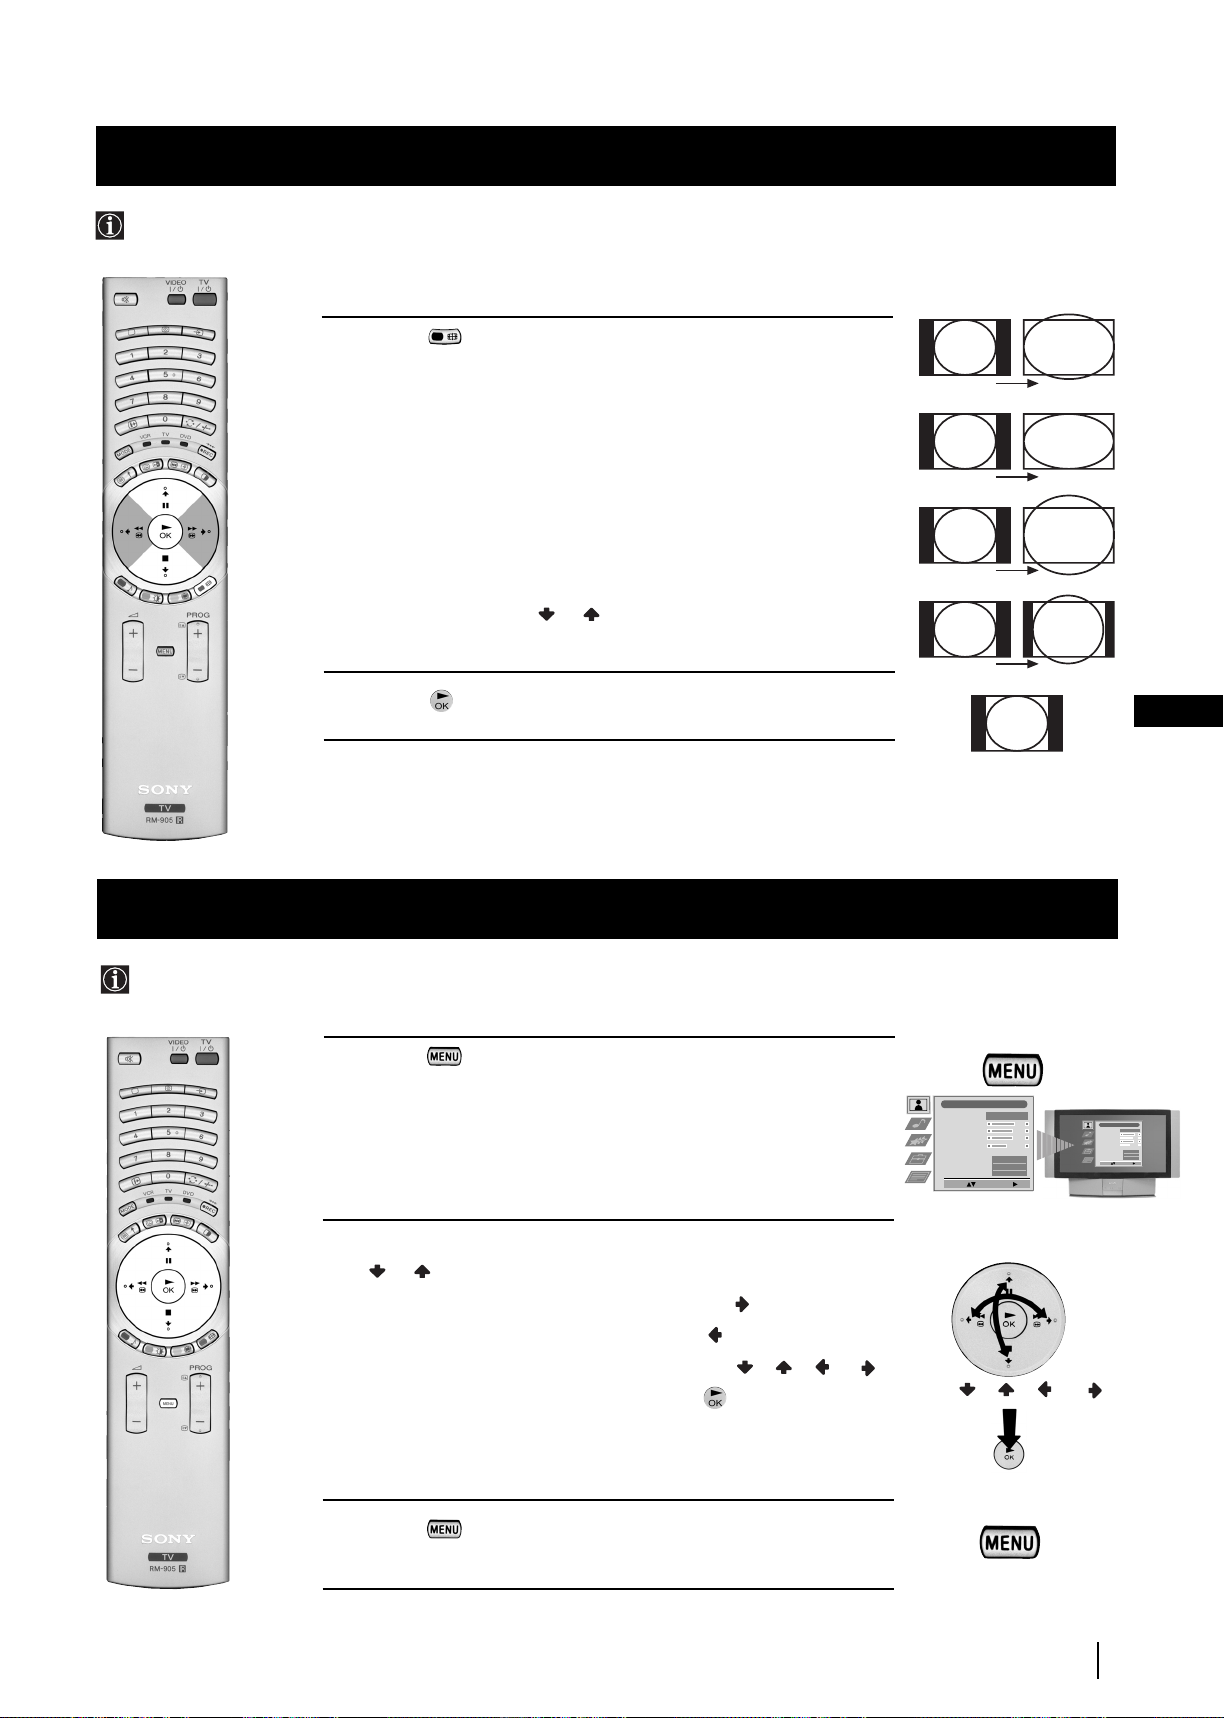
Changing the Screen Format
This feature allows you to change the size of the TV picture.
1 Press the button on the remote control repeatedly to select one
of the following formats.
Smart: imitation of wide screen effect for 4:3 broadcast.
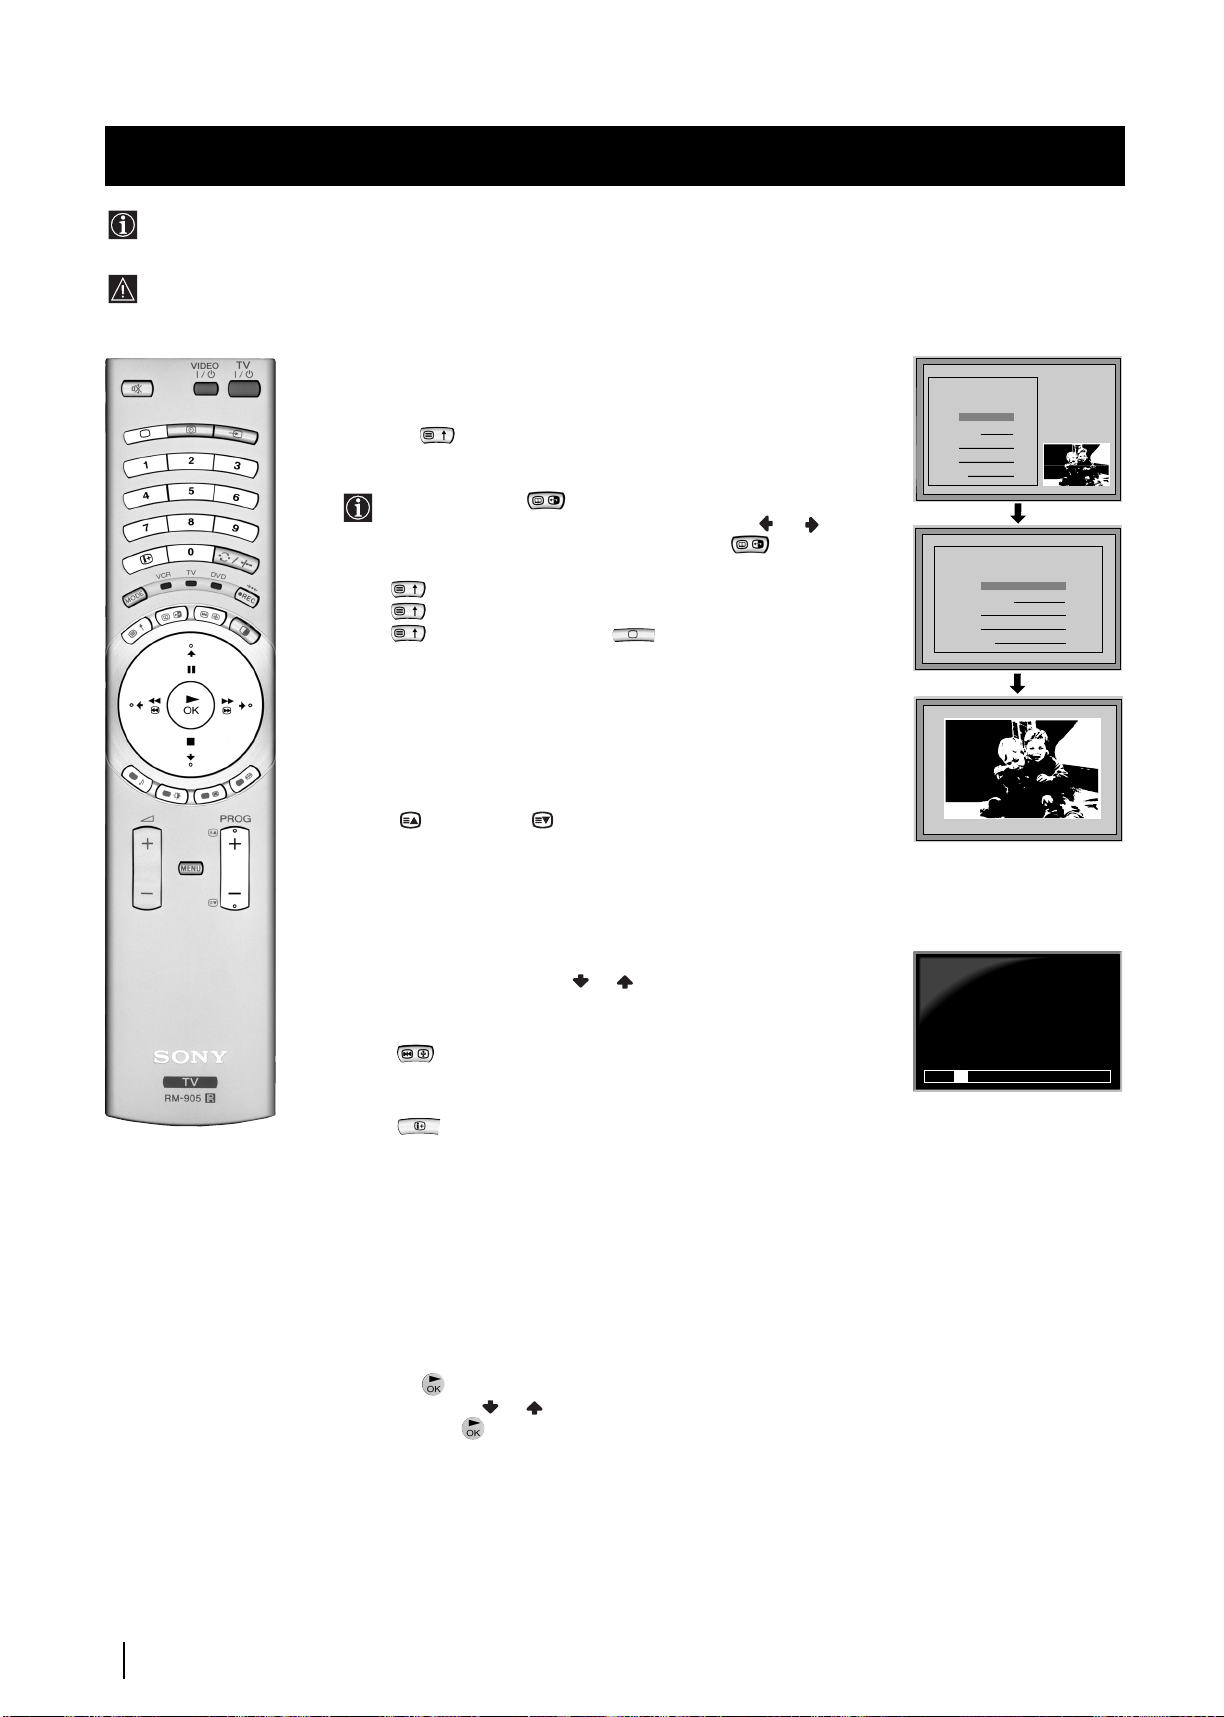
4:3: conventional 4:3 picture size, full picture information.
14:9: compromise between 4:3 and 16:9 picture size.
Zoom: widescreen format for letterbox movies.
Wide: for 16:9 broadcast, full picture information.
In Smart, Zoom and 14:9 modes parts of the top and bottom of the
screen are cut off. Press or to adjust the position of the image on
screen (eg to read subtitles).
2 Press the button to confirm your selection.
Introducing and Using the Menu System
Your TV set uses an on-screen menu system to guide you through the operations. Use the following buttons on the
Remote Control to operate the menu system:
Smart
Wide
Zoom
14:9
GB
4:3
1 Press the button to switch the main menu on.
2 •To higlight the desired menu or option, push the joystick
or .
•To enter to the selected menu or option, push
•To return to the last menu or option, push .
•To alter settings of your selected option, push / / or .
•To confirm and store your selection, press .
push / / or
press OK
3 Press the button to remove the menu from the screen.
Menu System
11
Page 11
Menu System
On Screen display Menus Guide
Picture Adjustment
Picture Mode
Contrast
Brightness
Colour
Sharpness
Reset
AI
Noise Reduction
Colour Tone
Select: Enter Menu:
Audio Adjustment
Equaliser Mode
Equaliser
Adjustment
Balance
Loudness
Space
Auto Vol. Control
Dual Sound
Volume
Dual Sound
Select: Enter Menu:
Features
Speaker
Auto Format
Format Correction
Sleep Timer
Parental Lock
AV2 Output
Select: Enter Menu:
Set Up
Set Up
Set Up
Auto Tuning
Auto Tuning
Auto Tuning
Programme Sorting
Programme Sorting
Programme Sorting
Select NexTView
Select NexTView
Select NexTView
AV Preset
AV Preset
AV Preset
Manual Set Up
Manual Set Up
Manual Set Up
Select:
Select:
Select:
Personal
Personal
.
0
0
0
Enter Menu:
Enter Menu:
Enter Menu:
On
Off
Normal
Off
Off
Off
Mono
Mono
Normal
- - - - - - -
Picture Adjustment
Picture Mode
Contrast
Brightness
Colour
Sharpness
Reset
AI
Noise Reduction
Colour Tone
Select: Enter:
Audio Adjustment
Equaliser Mode
Equaliser
Adjustment
Balance
Loudness
Space
Auto Vol. Control
Dual Sound
Volume
Dual Sound
Select: Enter:
Features
Main
On
Off
Off
TV
Speaker
Auto Format
Format Correction
Sleep Timer
Parental Lock
AV2 Output
Select: Enter:
Set Up
Auto Tuning
Programme Sorting
Select NexTView
AV Preset
Manual Set Up
Select:
Set Up
Auto Tuning
Programme Sorting
Select NexTView
AV Preset
Manual Set Up
Select:
Personal
Normal
Personal
.
0
0
Mono
Mono
0
Start
- - - - - - -
Start Auto Tuning
- - - - - - -
Enter:
Refer to the section
"Adjusting the Picture”
On
Off
Off
Refer to the section
Off
Off
"Adjusting the Sound”
Main
Refer to the section
Normal
On
"Using the features
Off
Off
menu”
TV
Do you want to start
automatic tuning?
Yes: OK No:
Programme Sorting
PROG CH LABEL
TV 5
C03
1
PRO 7
C05
2
EU-SP
C07
3
SWF
C08
4
RTL
C09
5
SAT
C11
6
MDR
C12
7
DDI
C13
8
DSF
C14
9
RTL 2
C15
10
KAB 1
C16
11
Select Prog: Confirm:
Refer to the section
"Switching on the TV
set and Automatically
Tuning"
Refer to the section
"Switching on the TV
set and Automatically
Tuning"
Teletext
Top / Bottom / Full
Text Clear
Reveal
Time Page
Page Overview
Select: Enter :
Refer to the
section "Teletext"
Set Up
Auto Tuning
Programme Sorting
Select NexTView
AV Preset
Manual Set Up
Enter:
Select:
Set Up
Auto Tuning
Programme Sorting
Select NexTView
AV Preset
Manual Set Up
Enter:
Select:
Set Up
Auto Tuning
Programme Sorting
Select NexTView
AV Preset
Manual Set Up
Enter:
Select:
- - - - - - -
- - - - - - -
- - - - - - -
Refer to the
section
“NexTView”
Refer to the
section
"Labelling and
selecting the
screen format
of Input
Sources”
Manual Set Up
Language/Country
Manual Programme Preset
Further Programme Preset
RGB Set Up
Personal ID
Demo
Select: Enter:
Manual Set Up
Language/Country
Manual Programme Preset
Further Programme Preset
RGB Set Up
Personal ID
Demo
Select: Enter:
Manual Set Up
Language/Country
Manual Programme Preset
Further Programme Preset
RGB Set Up
Personal ID
Demo
Select: Enter:
Manual Set Up
Language/Country
Manual Programme Preset
Further Programme Preset
RGB Set Up
Personal ID
Demo
Select: Enter:
Manual Set Up
Language/Country
Manual Programme Preset
Further Programme Preset
RGB Set Up
Personal ID
Demo
Select: Enter:
Manual Set Up
Language/Country
Manual Programme Preset
Further Programme Preset
RGB Set Up
Personal ID
Demo Start
Select: Enter:
- - - - - - -
- - - - - - -
- - - - - - -
- - - - - - -
- - - - - - -
- - - - - - -
Refer to the section
"Switching on the TV
set and Automatically
Tuning"
Refer to the sections
"Manually Tuning the
TV", "Labelling a
channel" and "Skipping
programme positions"
Refer to the section
"Using the Further
Programme Preset
function"
Refer to the section
"Adjusting the H centre
picture for an RGB
source"
Refer to the section
"Inputting your
personal ID"
Refer to the section
"Using the Demo
Mode"
12
Menu System
Page 12

Menu System
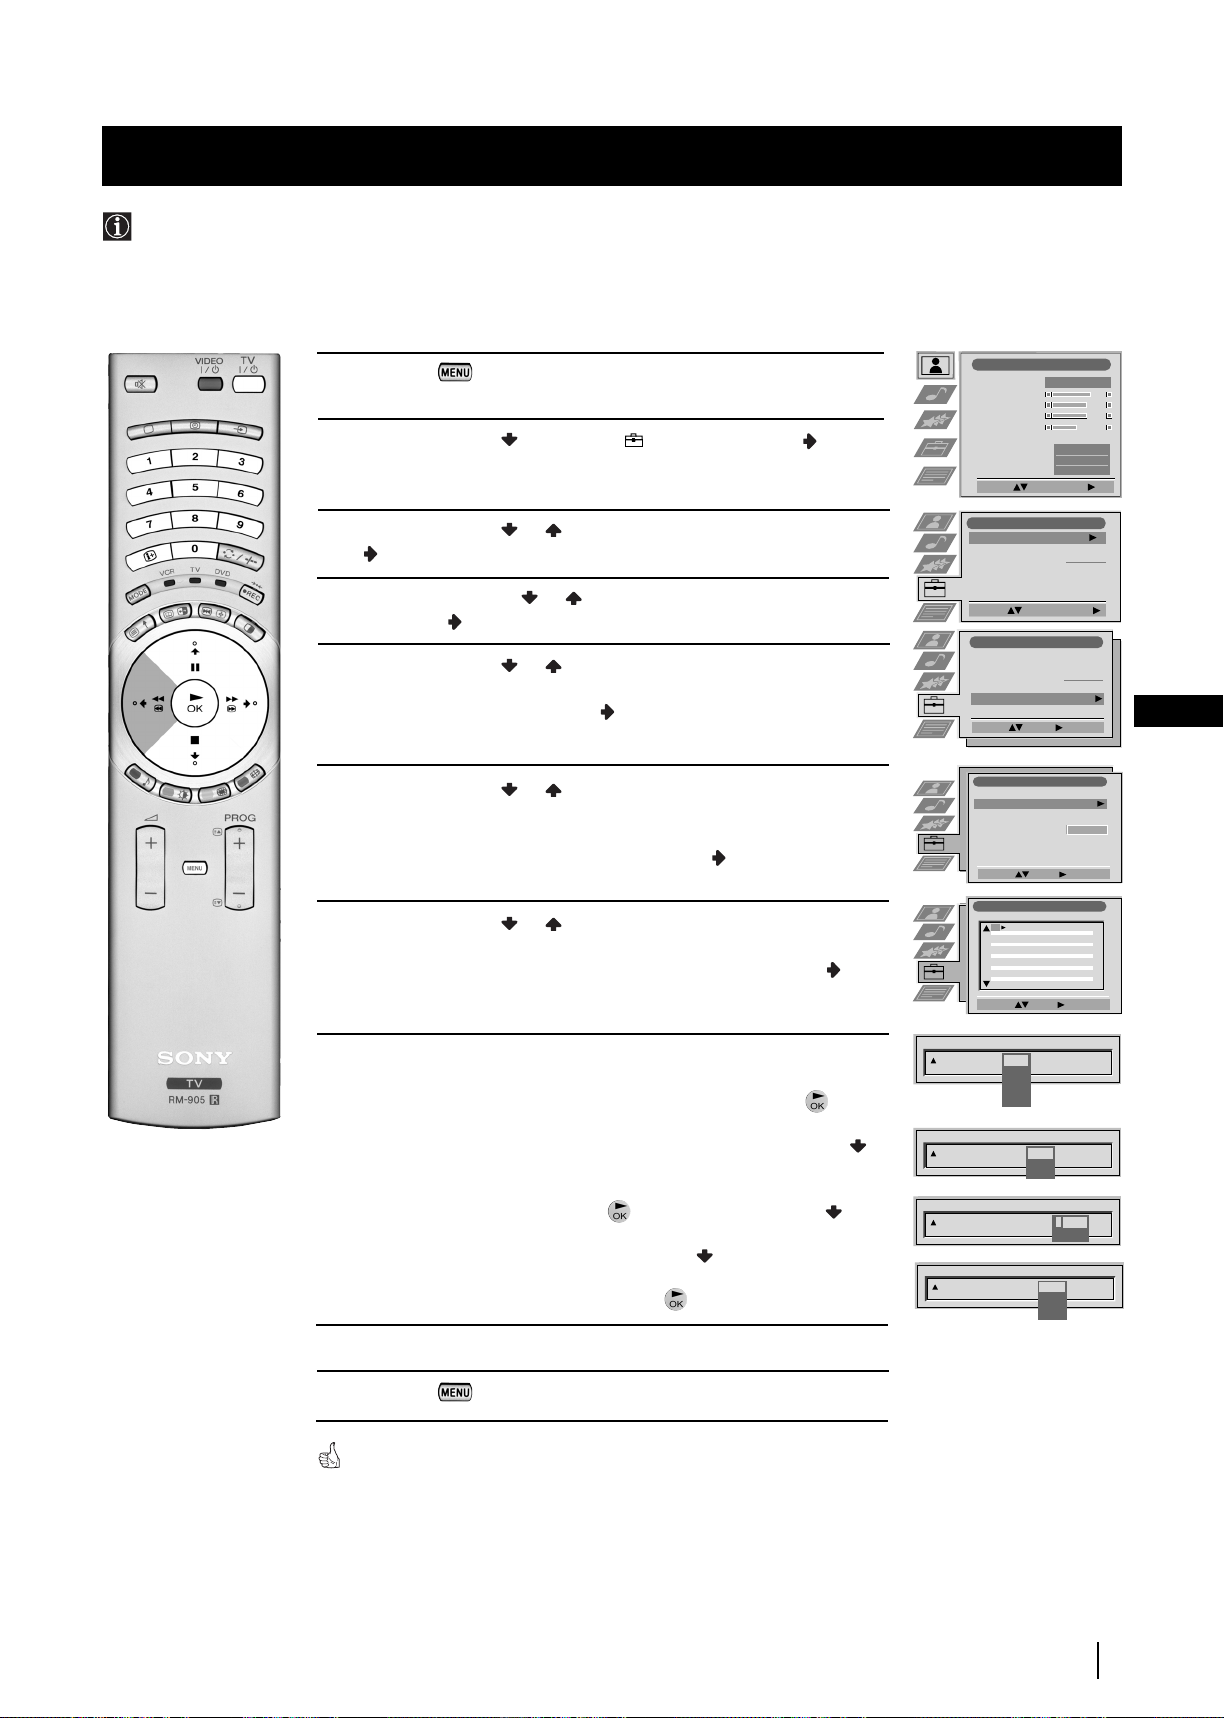
Adjusting the Picture
Although the picture is adjusted at the factory, you can modify it to suit your own taste.
1 Press the button on the remote control to display the menu
on the screen.
2 Push the joystick to enter the Picture Adjustment menu.
3 Push the joystick or to select the item you wish to change,
then push to enter.
See the table below for the effect of each menu item:
Picture Mode Live (for live broadcast programmes)
Personal (for individual settings)
Movie (for films)
Game (for computer games)
Contrast Less More
Brightness* Darker Brighter
Colour* Less More
Sharpness* Softer Sharper
Hue** Reddish Greenish
Reset Resets picture to the factory preset levels.
AI (Artificial Off: Normal
Intelligence) On: Automatic optimization of contrast level
according to the TV signal
Noise High: High noise reduction.
Reduction Mid: Medium noise reduction.
Low: Low noise reduction.
Auto: Optimum noise reduction automatically
selected. (This option is not available
when viewing an RGB source).
Off: No noise reduction.
Colour Tone Warm: Gives a warm tint to the picture.
---Normal: Normal.
Cool: Gives a cool tint to the picture.
Picture Adjustment
Picture Mode
Contrast
Brightness
Colour
Sharpness
Reset
AI
Noise Reduction
Colour Tone
Select: Enter Menu:
Picture Adjustment
Picture Mode
Contrast
Brightness
Colour
Sharpness
Reset
AI
Noise Reduction
Colour Tone
Select: Enter:
Picture Mode
Contrast
AI
Noise Reduction
Colour Tone
Personal
Personal
Live
Personal
Movie
Game
On
Off
High
Mid
Low
Auto
Off
Warm
Normal
Cool
Normal
Normal
On
Off
On
Off
GB
* Can only be altered if Personal Picture Mode is selected.
** Only avalaible for NTSC colour signal (e.g: USA video tapes).
4 Push the joystick , , or to alter the selected item, then
press the button to store the new adjustment.
5 Repeat steps 3 and 4 to alter the other items.
6 Press the button to exit and return to the normal TV screen.
Changing the Picture Mode Quickly
You can quickly change the Picture Mode without entering the
Picture Control menu screen.
1 Press the button on the remote control repeatedly to directly
access and select your desired picture mode (Live, Personal, Movie,
or Game).
2 Press the button to remove the display from the screen.
Picture Mode
Personal
Movie
Game
Menu System
Live
13
Page 13
Menu System
Adjusting the Sound
Although the sound is adjusted at the factory, you can modify it to suit your own taste.
1 Press the button on the remote control to display the menu
on the screen.
2 Push the joystick to select the symbol, then push to
enter to the Audio Adjustment menu.
3 Push the joystick or to select the item you wish to change,
then push to enter.
See the table below for the effect of each menu item:
Sound Effect Personal: No special acoustic effects.
Dolby
Dynamic: “BBE High Definition Sound system”**
Equaliser Push to or to select the frequency band you
Adjustment want to alter and push to or to adjust. Finally,
press the button to store the new adjustment.
(Only available if “Sound Effect” is set to “Personal”)
Virtual Effect Push to or to change the level of surround sound
effect when listening to a Dolby surround sound
broadcast. (Only available when “Sound Effect” is set to
“Dolby V”).
Balance Left Right
Auto Vol. Off: volume level changes according to the
Control broadcast signal
Dual Sound • For a stereo broadcast:
• For a bilingual broadcast:
Headphones:
When listening to the TV through the headphones, special sound
effects are disabled.
l Volume Less More
l Dual Sound • For a stereo broadcast:
• For a bilingual broadcast:
* V: Dolby Virtual, simulates the sound
effect of “Dolby Surround Pro Logic”.
intensifies clarity and presence of sound for better
intelligibility and musical realism.
Natural: Enhances clarity, detail and presence of
sound by using “BBE High Definition Sound
system”**.
On: volume level of the channels will stay the
same independent of the broadcast signal
(e.g. in case of advertisement)
Mono
Stereo
Mono (for mono channel if available)
A (for channel 1)
B (for channel 2)
Mono
Stereo
Mono (for mono channel if available)
A (for channel 1)
B (for channel 2)
PAP (only when PAP is switched on)
Loudness
Balance
Auto Vol. Control
Dual Sound
Volume
Dual Sound
Picture Adjustment
Picture Mode
Contrast
Brightness
Colour
Sharpness
Reset
AI
Noise Reduction
Colour Tone
Select: Enter Menu:
Audio Adjustment
Equaliser Mode
Equaliser
Adjustment
Balance
Loudness
Space
Auto Vol. Control
Dual Sound
Volume
Dual Sound
Select: Enter :
Audio Adjustment
Equaliser Mode
Equaliser
Adjustment
Balance
Loudness
Space
Auto Vol. Control
Dual Sound
Volume
Dual Sound
Select Mode: Confirm: OK
Equaliser Adjustment
(Personal)
+
0
–
120 500 1,5K 5 K 10 K
Sel: Adjust: Confirm:OK
0
0
0
0
Personal
Personal
.
0
Personal
Personal
.
0
Mono
Mono
.
Mono
Normal
Mono
Mono
Vocal
Jazz
Rock
Off
Off
Off
Pop
Flat
Off
Off
Off
Off
On
Off
On
On
Off
A
B
B
A
14
continued...
Menu System
Page 14
Menu System
4 Push the joystick//orto alter the selected item, then
press the button to store the new adjustment.
5 Repeat steps 3 and 4 to alter the other items.
6 Press the button to exit and return to the normal TV screen.
*This TV has been designed to create the “Dolby Surround” sound
effect by simulating the sound of four speakers with two speakers.
This sound effect will only operate when the broadcast audio
signal is Dolby Surround encoded.
* Manufactured under license from Dolby Laboratories. “Dolby”,
“Pro Logic” and the double-D symbol are trademarks of Dolby
Laboratories.
** The “BBE High Definition Sound system” is manufactured by
Sony Corporation under license from BBE Sound, Inc. It is
covered by U.S. Patent No. 4,638,258 and No. 4,482,866. The
word “BBE” and BBE Symbol are trademarks of BBE Sound, Inc.
Changing Sound Mode Quickly
You can quickly change Sound mode without entering the Sound
Control menu screen.
1 Press the button on the remote control repeatedly to directly
access and select your desired sound mode (Personal, Dolby V,
Dynamic or Natural).
2 Press the button to remove the display from the screen.
Equaliser Mode
Personal
Vocal
Jazz
Rock
Pop
Flat
GB
Menu System
15
Page 15
Menu System
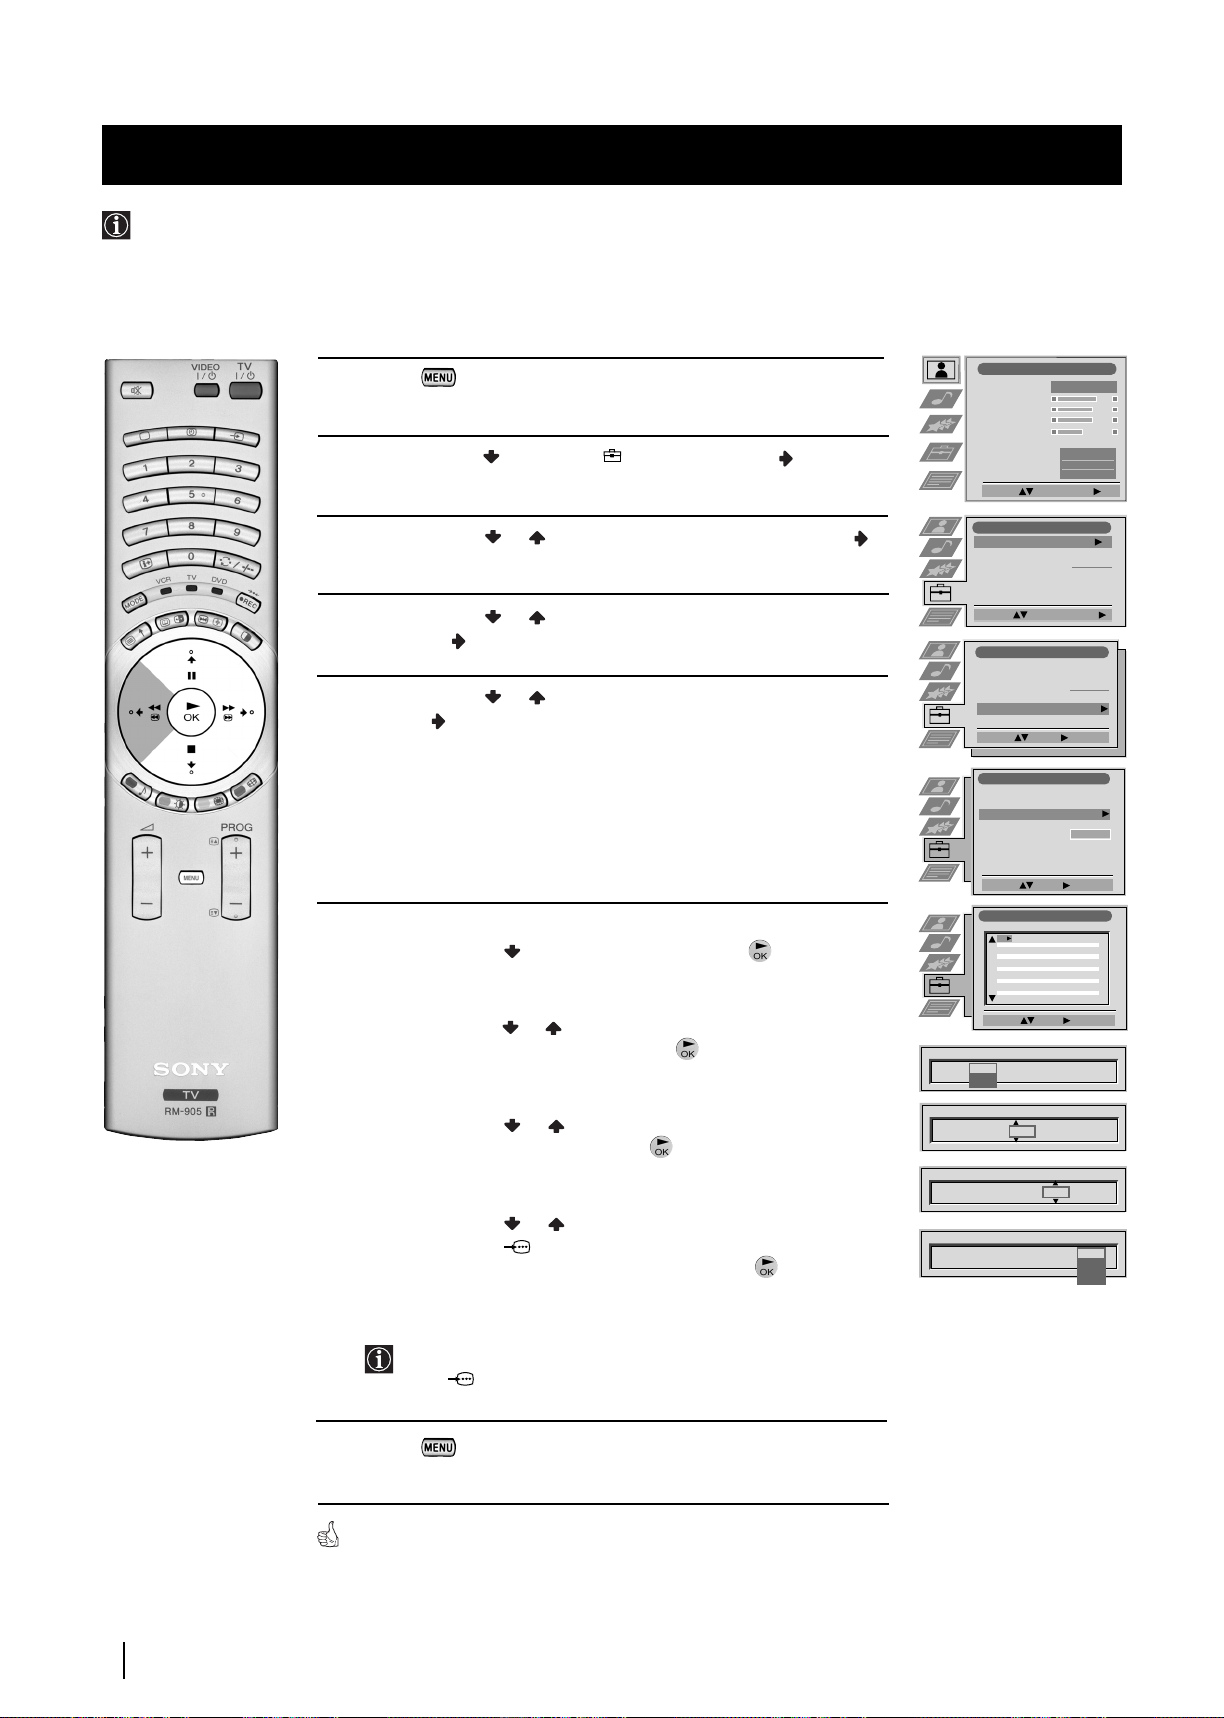
Using the Features Menu
Using the Features menu you can:
a) Select if you want to listen to the sound from the TV set directly or through an external amplifier.
b) Automatically adjust the size of picture.
c) Select a time period after which the TV set switches itself into standby mode.
d)
Lock the buttons on the TVset. In this way, the TV set only works by using the remote control buttons.
e) Select the source to be output from the Scart connector :3/q3 (SMARTLINK). In this way you can record from this scart
connector while watching another source. If your VCR supports Smartlink, this procedure is not necessary.
1 Press the button on the remote control to display the menu
on the screen.
2 Push the joystick to select the symbol, then push to
enter the Features menu.
3 Push the joystick or to select the desired menu item, then
push to enter (see the table below for the effect of each menu item).
4 Push or to select the desired setting and press the button
to store.
5 Press the button to exit and return to the normal TV screen.
Features Effect / Operation
Speaker Main (sound from the TV set)
Auto Format Off: Size of picture is not automatically adjusted.
(only for aerial Normal: Size of picture is automatically adjusted
signal) according to the broadcaster information.
size to eliminate any dark areas on the TV picture.
Format Correction
(only if Auto Format
is set to “Normal”
or “Full”)
Centre In (sound from external amplifier)
Full: The TV set automatically adjusts the picture
Off: 4:3/14:9 is selected.
On: Smart mode is selected automatically for
4:3/14:9 broadcast.
Picture Adjustment
Picture Mode
Contrast
Brightness
Colour
Sharpness
Reset
AI
Noise Reduction
Colour Tone
Select: Enter Menu:
Features
Speaker
Auto Format
Format Correction
Sleep Timer
Parental Lock
AV2 Output
Select: Enter:
Speaker
Auto Format
Format Correction
Personal
Normal
Main
Centre In
Normal
Normal
Main
Off
Full
Off
On
On
Off
On
Off
Off
TV
Sleep Timer
Off
10 min.
20 min.
.
.
.
90 min.
• One minute before the TV set switches into
standby mode, the time remaining is displayed
on the screen automatically.
•When watching the TV, press the button
on the remote control to display the time
remaining.
•To return to normal operation from standby
mode, press the TV button on the remote
control.
Parental Lock Off (Normal mode)
On (The TV set can only be switched on using the
remote control, the buttons on the TV do not
work)
AV3 Output TV (audio/video signal from the aerial)
AV1
(audio/video signal from the Scart
connector :1/ 1).
AV2 (audio/video signal from the Scart
:
connector
2/ 2).
AV3 (audio/video signal from the Scart
connector :3/q3 (SMARTLINK)).
AV4 (audio/video signal from the connector … 4
placed in the front of the TV set).
If you have connected a decoder, please
remember to change the AV3 Output back to
"TV" for correct unscrambling.
Sleep Timer
Parental Lock
AV2 Output
10 min
Off
On
TV
AV1
AV2
AV3
AV4
16
Menu System
Page 16
Menu System
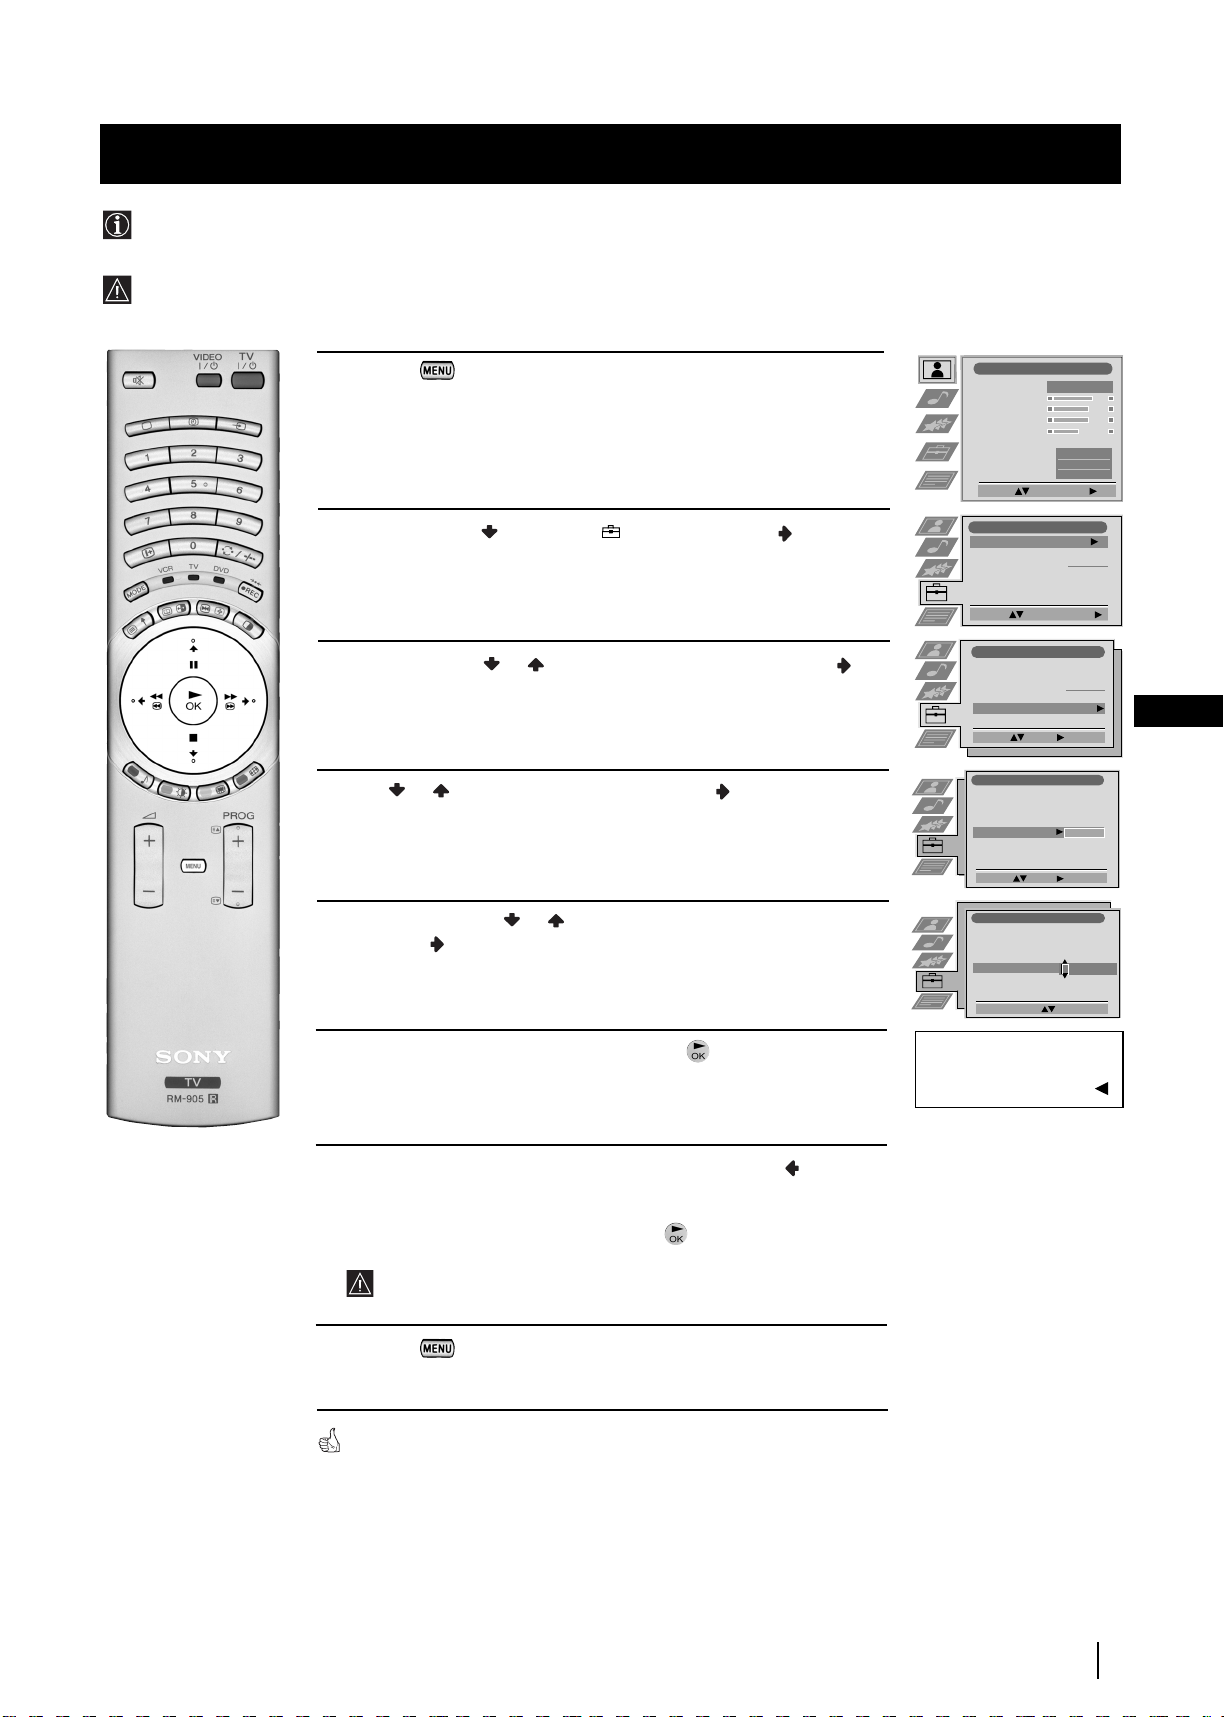
Manually Tuning the TV
Use this function to preset channels (TV Broadcast) or a video input source one by one to the programme order of your choice.
1 Press the button on the remote control to display the
menu on the screen.
2 Push the joystick to select the symbol, then push to
enter the Set Up menu.
3 Push the joystick or to select Manual Set Up, then push
to enter.
4 Push the joystick to or to select Manual Programme Preset,
then push to enter.
5 Push the joystick or to select which programme number
you want to preset a channel on (for VCR select programme
number "0"), then push twice . The column SYS is highlighted.
6 Push the joystick or to select the system for TV Broadcast
and VCR channel (B/G for western european countries, L for
France, I for Great Britain or D/K for eastern european countries)
or a external input source (EXT), then push . The column CH
is highlighted.
7 Push the joystick or to select the channel tuning, "C" for
terrestrial channels (for TV Broadcast or VCR channel), "S" for
cable channels or "F" for direct frequency input then push .
Picture Adjustment
Picture Mode
Contrast
Brightness
Colour
Sharpness
Reset
AI
Noise Reduction
Colour Tone
Select: Enter Menu:
Set Up
Auto Tuning
Programme Sorting
Select NexTView
AV Preset
Manual Set Up
Select:
Set Up
Auto Tuning
Programme Sorting
Select NexTView
AV Preset
Manual Set Up
Select:
Manual Set Up
Language/Country
Manual Programme Preset
Further Programme Preset
RGB Set Up
Personal ID
Demo
Select: Enter:
Manual Programme Preset
PROG CHSYSSKIP LABEL
1
2
3
4
5
6
7
8
9
10
11
Select: Enter:
Start Auto Tuning
Enter:
B/G
Off
B/G
Off
Off
Off
Off
Off
Off
Off
Off
Off
Off
Start
- - - - - - -
C09
C10
Personal
Normal
- - - - - - -
- - - - - - -
ARD
BBC
On
Off
GB
8 a) If you know the channel number of the TV Broadcast, the VCR
test signal channel or the frequency, press the number buttons
to enter the channel number directly. Then press the button
to store.
b) If you do not know the channel number, push the joystick
to select SEARCH and the TV set starts to search automatically
for the next available TV Broadcast channel or the channel of the
VCR signal. Then press the button to store or push to
continue searching for the desired channel.
c) For external input sources (EXT), push to select the input
source to which you have connected your equipment (AV1,
AV2, AV3 or AV4). Then press the button to store.
9 Repeat steps 4 to 8 a), b) or c) if you wish to store more channels.
10 Press the button to exit and return to the normal TV screen.
The TV set is now ready for use.
PROG CHSYS
SKIP LABEL
Off
1
PROG SYS
1 B/G
PROG SYS
1 B/G
PROG CHSYS
3 EXT
B/G
D/K
EXT
SKIP LABEL
Off
SKIP LABEL
Off
SKIP LABEL
Off
L
I
CH
C
- S
F
CH
03
C
SEARCH
AV1
AV2
AV3
AV4
Menu System
17
Page 17
Menu System
Labelling a channel
Names for channels (TV Broadcasts) are usually taken automatically from Teletext if available. You can however name a channel or
an input video source using up to five characters (letters or numbers). Using this function, you can easily identify which channel
(TV Broadcasts) or video source you are watching.
1 Press the button on the remote control to display the
menu on the screen.
2 Push the joystick to select the symbol, then push to
enter the Set Up menu.
3 Push the joystick or to select Manual Set Up, then push
to enter.
4 Push the joystick or to select Manual Programme Preset,
then push to enter.
5 Push the joystick or to select the programme number with
the channel you wish to name.
6 Push the joystick repeatedly until the first element of the
LABEL column is highlighted.
Picture Adjustment
Picture Mode
Contrast
Brightness
Colour
Sharpness
Reset
AI
Noise Reduction
Colour Tone
Select: Enter Menu:
Set Up
Auto Tuning
Programme Sorting
Select NexTView
AV Preset
Manual Set Up
Select:
Set Up
Auto Tuning
Programme Sorting
Select NexTView
AV Preset
Manual Set Up
Select:
Manual Set Up
Language/Country
Manual Programme Preset
Further Programme Preset
RGB Set Up
Personal ID
Demo
Select: Enter:
Manual Programme Preset
PROG CHSYSSKIP LABEL
1
2
3
4
5
6
7
8
9
10
11
Select: Enter:
PROG SYS
SKIP LABEL
Off
1 B/G
Start Auto Tuning
Enter:
B/G
Off
B/G
Off
Off
Off
Off
Off
Off
Off
Off
Off
Off
CH
C 03
Personal
Start
- - - - - - -
- - - - - - -
- - - - - - -
C09
C10
On
Off
Normal
ARD
BBC
A
18 Menu System
7 Push the joystick or to select a letter, number, "+" or a
blank, then push to confirm this character. Select the other
four characters in the same way.
8 After selecting all the characters, press the button.
9 Repeat steps 5 to 8 if you wish to label other channels.
10 Press the button to exit and return to the normal TV
screen.
When you select a named channel, the name will appear for a few seconds.
Page 18

Menu System
Skipping Programme positions
You can programme this TV set to skip any unused programme numbers when they are selected with the PROG +/- buttons.
To cancel this function afterwards, proceed in the same way as described below but by selecting Off instead of On in step 6.
1 Press the button on the remote control to display the menu
on the screen.
2 Push the joystick to select the symbol, then push to
enter the Set Up menu.
3 Push the joystick or to select Manual Set Up, then push to
enter.
4 Push the joystick or to select Manual Programme Preset,
then push to enter.
5 Push the joystick or to select the programme position you
want to skip, then push to enter the SKIP column.
6 Push the joystick to select On, then press the button to
store.
Picture Adjustment
Picture Mode
Contrast
Brightness
Colour
Sharpness
Reset
AI
Noise Reduction
Colour Tone
Select: Enter Menu:
Set Up
Auto Tuning
Programme Sorting
Select NexTView
AV Preset
Manual Set Up
Select:
Set Up
Auto Tuning
Programme Sorting
Select NexTView
AV Preset
Manual Set Up
Select:
Manual Set Up
Language/Country
Manual Programme Preset
Further Programme Preset
RGB Set Up
Personal ID
Demo
Select: Enter:
Manual Programme Preset
PROG CHSYSSKIP LABEL
1
2
3
4
5
6
7
8
9
10
11
Select: Enter :
PROG SYSSKIP LABEL
1 B/G
Off
On
Start Auto Tuning
Enter:
B/G
Off
B/G
Off
Off
Off
Off
Off
Off
Off
Off
Off
Off
CH
C 09
Personal
Start
- - - - - - -
- - - - - - -
- - - - - - -
C09
C10
ARD
BBC
ARD
Normal
On
Off
GB
7 Repeat steps 5 and 6 to skip other unused programme positions.
8 Press the button to exit and return to the normal TV screen.
When changing channels (TV Broadcasts) with the PROG +/- buttons,
the skipped programme positions do not appear. You can, however, still
select them using the number buttons.
Menu System
19
Page 19
Menu System
Using the "Further Programme Preset" function
With this feature you can:
a) Individually attenuate the strength of a channel signal in case there is a strong local aerial signal (characteristically a striped
picture).
b) Individually adjust the volume level of each channel.
c) Normally the automatic fine tuning (AFT) will operating, however you can manually fine-tune the TV to obtain better
reception if the picture is distorted.
d) Preset the AV output for the programme positions of channels with scrambled signals (eg from a pay TV decoder). In this way
a connected VCR records the unscrambled signal.
1 Press the button on the remote control to display the menu
on the screen.
2 Push the joystick to select the symbol, then push to enter the
Set Up menu.
Picture Adjustment
Picture Mode
Contrast
Brightness
Colour
Sharpness
Reset
AI
Noise Reduction
Colour Tone
Select: Enter Menu:
Personal
Normal
On
Off
3 Push the joystick or to select Manual Set Up then push to
to enter.
4 Push the joystick or to select Further Programme Preset,
then push to to enter.
5 Push the joystick or to select the relevant programme number,
then push repeatedly to select:
a) ATT (RF attenuator)
b) VOL (Volume Offset)
c) AFT (Automatic Fine Tuning) or
d) DECODER
6 a) ATT
Push the joystick to select On, then press the button.
Repeat steps 5 and 6 a) to attenuate other channels.
b)VOL
Push the joystick or to adjust the volume level of the channel
over a range of -7 to +7, then press the button. Repeat steps 5
and 6b) to adjust the volume level of the other channels.
c) AFT
Push the joystick or to fine tune the channel frequency over
a range of -15 to +15, then press the button. Repeat steps 5 and
6c) if you wish to fine tune other channels.
d)DECODER
Push the joystick or to select AV1 (for a decoder connected
to the Scart :1/ 1) or AV3 (for a decoder connected to the
Scart :3/q 3 (SMARTLINK)), then press the button.
Repeat steps 5 and 6d) to select the AV1 or AV3 output for other
programme positions.
Set Up
Auto Tuning
Programme Sorting
Select NexTView
AV Preset
Manual Set Up
Select:
Set Up
Auto Tuning
Programme Sorting
Select NexTView
AV Preset
Manual Set Up
Select:
Manual Set Up
Language/Country
Manual Programme Preset
Further Programme Preset
RGB Set Up
Personal ID
Demo
Select: Enter:
Further Programme Preset
PROG AFTVOLATT DECODER
1
2
3
4
5
6
7
8
9
10
11
Select: Enter:
PROG AFTVOLATT DECODER
1 Off
On
PROG AFTVOLATT DECODER
1On
PROG AFTVOLATT DECODER
1 On -5
PROG AFTVOLATT DECODER
1 On -5 2
Start Auto Tuning
Enter:
Off
0
Off
0
Off
0
- 5
2
On
On
On
Start
- - - - - - -
- - - - - - -
- - - - - - -
AV1
AV2
Off
Off
Off
Off
20
The picture from the decoder connected to the Scart connector
:1/ 1 or :3/q 3 (SMARTLINK) on the back of the
set will appear on the selected programme number.
7 Press the button to exit and return to the normal TV screen.
The TV set is now ready for use.
Menu System
Page 20
Menu System
Inputting Your Personal ID
You can programme this TV set with a personal code, using up to eleven characters (letters and numbers). By using
this function it will be possible to identify your TV set if it is ever stolen.
This code can only be input once!
Make sure you make a note of it in this instruction manual.
Press the button on the remote control to display the menu
1
on the screen.
Push the joystick to select the symbol, then push to enter the
2
Set Up
menu.
Push the joystick or to select
3
Manual Set Up
, then push to
enter.
Push or to select
4
5
Push the joystick to or to select a letter, number, + or a blank;
Personal ID
, then push to enter.
then push to confirm this character. Select the other ten
characters in the same way.
Picture Adjustment
Picture Mode
Contrast
Brightness
Colour
Sharpness
Reset
AI
Noise Reduction
Colour Tone
Select: Enter Menu:
Set Up
Auto Tuning
Programme Sorting
Select NexTView
AV Preset
Manual Set Up
Select:
Set Up
Auto Tuning
Programme Sorting
Select NexTView
AV Preset
Manual Set Up
Select:
Manual Set Up
Language/Country
Manual Programme Preset
Further Programme Preset
RGB Set Up
Personal ID
Demo
Select: Enter:
Manual Set Up
Language/Country
Manual Programme Preset
Further Programme Preset
RGB Set Up
Personal ID
Demo
Select A-Z, 0-9: Store: OK
Personal
Start
- - - - - - -
Start Auto Tuning
- - - - - - -
Enter:
- - - - - - -
A----------
Normal
On
Off
GB
After selecting all the characters, press the button. A new menu
6
automatically appears on the screen asking you to be sure that you
want to save this ID.
a) If you do not wish to store this ID, push the joystick and
7
repeat steps 4 to 6 to enter a new ID.
b) If you wish to store this ID, press the button.
Remember that this code can only be input once.
8
Press the button to return to the normal TV screen.
When you enter the Manual Set Up menu, in the "Personal ID" option the
code you entered above will be displayed. You will not be able to select and
change this option.
Are you sure?
Save: OK Cancel:
Menu System
21
Page 21
Menu System
Picture Adjustment
Select: Enter Menu:
Picture Mode
Contrast
Brightness
Colour
Sharpness
Reset
AI
Noise Reduction
Colour Tone
Personal
On
Off
Normal
Set Up
Auto Tuning
Programme Sorting
Select NexTView
AV Preset
Manual Set Up
Select:
Start Auto Tuning
Start
- - - - - - -
Enter:
Set Up
Auto Tuning
Programme Sorting
Select NexTView
AV Preset
Manual Set Up
Select:
- - - - - - -
Manual Set Up
Select: Enter:
Language/Country
Manual Programme Preset
Further Programme Preset
RGB Set Up
Personal ID
Demo Start
- - - - - - -
Using the Demo Mode
This function provides an overview of some of the features available on this TV set.
Press the button on the remote control to display the menu
1
on the screen.
Push the joystick to select the symbol, then push to
2
enter the
3
Push the joystick or to select
enter.
4
Push or to select
the demonstration.
The TV set starts the demonstration and shows most of the
available picture functions
Note:
Press the button on the remote control to stop the
demonstration and return to the normal TV screen.
Set Up
menu.
Manual Set Up
Demo
, then push to enter and start
.
, then push to
22
Menu System
Page 22
Menu System
Adjusting the H Centre picture for an RGB source
When connecting an RGB source, such as a DVD player, to Scart connector :1/ 1 or :2/ 2 you may need to readjust
the H Centre of the picture.
Press the button repeatedly on the remote control until the
1
symbol …1
or …2
appears on the screen.
• …1
symbol for devices connected to the
connector.
• …2
symbol for devices connected to the
connector.
:
1/ 1 Scart
:
2/ 2 Scart
… 1
2
Press the button to display the menu on the screen.
Push the joystick to select the symbol, then push to
3
enter the
Push or to select
4
Push the joystick or to select
5
6
Push the joystick to enter
Set Up
menu.
Manual Set Up
RGB Set Up
H Centre
then push to enter.
then push to enter.
, then push or to
adjust the centre of the picture over a range of -10 to +10. Press
the button to store.
Picture Adjustment
Picture Mode
Contrast
Brightness
Colour
Sharpness
Reset
AI
Noise Reduction
Colour Tone
Select: Enter Menu:
Set Up
Auto Tuning
Programme Sorting
Select NexTView
AV Preset
Manual Set Up
Select:
Set Up
Auto Tuning
Programme Sorting
Select NexTView
AV Preset
Manual Set Up
Select:
Manual Set Up
Language/Country
Manual Programme Preset
Further Programme Preset
RGB Set Up
Personal ID
Demo
Select: Enter :
RGB Set Up
H Centre
Start
Start Auto Tuning
- - - - - - -
Enter:
Personal
Normal
- - - - - - -
- - - - - - -
On
Off
GB
O
7
Press the button to exit and return to the normal TV screen.
Adjust Position: Confirm: OK
RGB Set Up
Menu System
23
Page 23
Menu System
Labelling and Selecting the screen format of Input Sources
This function enables you to select the size of the picture coming from the input source. It also allows you to assign a name to the
optional equipment you have connected to the sockets of this TV set. This name can contain up to 5 characters (letters or
numbers).
1
Press the button on the remote control to display the menu
on the screen.
Push the joystick to select the symbol, then push to enter the
2
Set Up
menu.
3
Push the joystick or to select
4
Push the joystick or to select the input source. Then push
AV Preset
, then push to enter.
to enter.
Push the joystick or to select:
5
Off
(The size of picture is not automatically adjusted).
Normal
(The size of picture is automatically adjusted according to
the broadcaster information).
Full
(The TV set automatically adjusts the picture size to
eliminate any dark areas on the TV picture (as shown in
the section “Changing the Screen Format”).
Picture Adjustment
Picture Mode
Contrast
Brightness
Colour
Sharpness
Reset
AI
Noise Reduction
Colour Tone
Select: Enter Menu:
Set Up
Auto Tuning
Programme Sorting
Select NexTView
AV Preset
Manual Set Up
Select:
Set Up
Auto Tuning
Programme Sorting
Select NexTView
AV Preset
Manual Set Up
Select:
AV Preset
INPUT LABEL
AV1
AV2
AV3
AV4
Select: Enter:
AV Preset
INPUT LABEL
AV1
AV2
AV3
AV4
Select: Next: Confirm: OK
AV Preset
Start Auto Tuning
Enter:
AUTO FORMAT
Off
Off
Normal
Full
AUTO FORMAT
Off
Off
Normal
Full
Personal
Normal
Start
- - - - - - -
- - - - - - -
VIDEO
VIDEO
VIDEO
VIDEO
VIDEO
VIDEO
On
Off
24
Menu System
Next push .
6
With the first element of the
LABEL
column highlighted, push the
joystick or to select a letter, number, "+" or blank;
then push to confirm this character. Select the other four
characters in the same way.
7
After selecting all the characters, press the button.
Repeat steps 4 to 7 if you wish to select the picture size or label other
8
input sources.
9
Press the button to exit and return to the normal TV screen.
Whenever the equipment with the labelled input is selected for use, the name
appears on the screen for a few seconds.
AUTO FORMAT
INPUT LABEL
Off
AV1
AV2
AV3
AV4
Select A-Z, 0-9: Confirm: OK
Off
Normal
Normal
IDEO
V
VIDEO
VIDEO
Page 24
Menu System
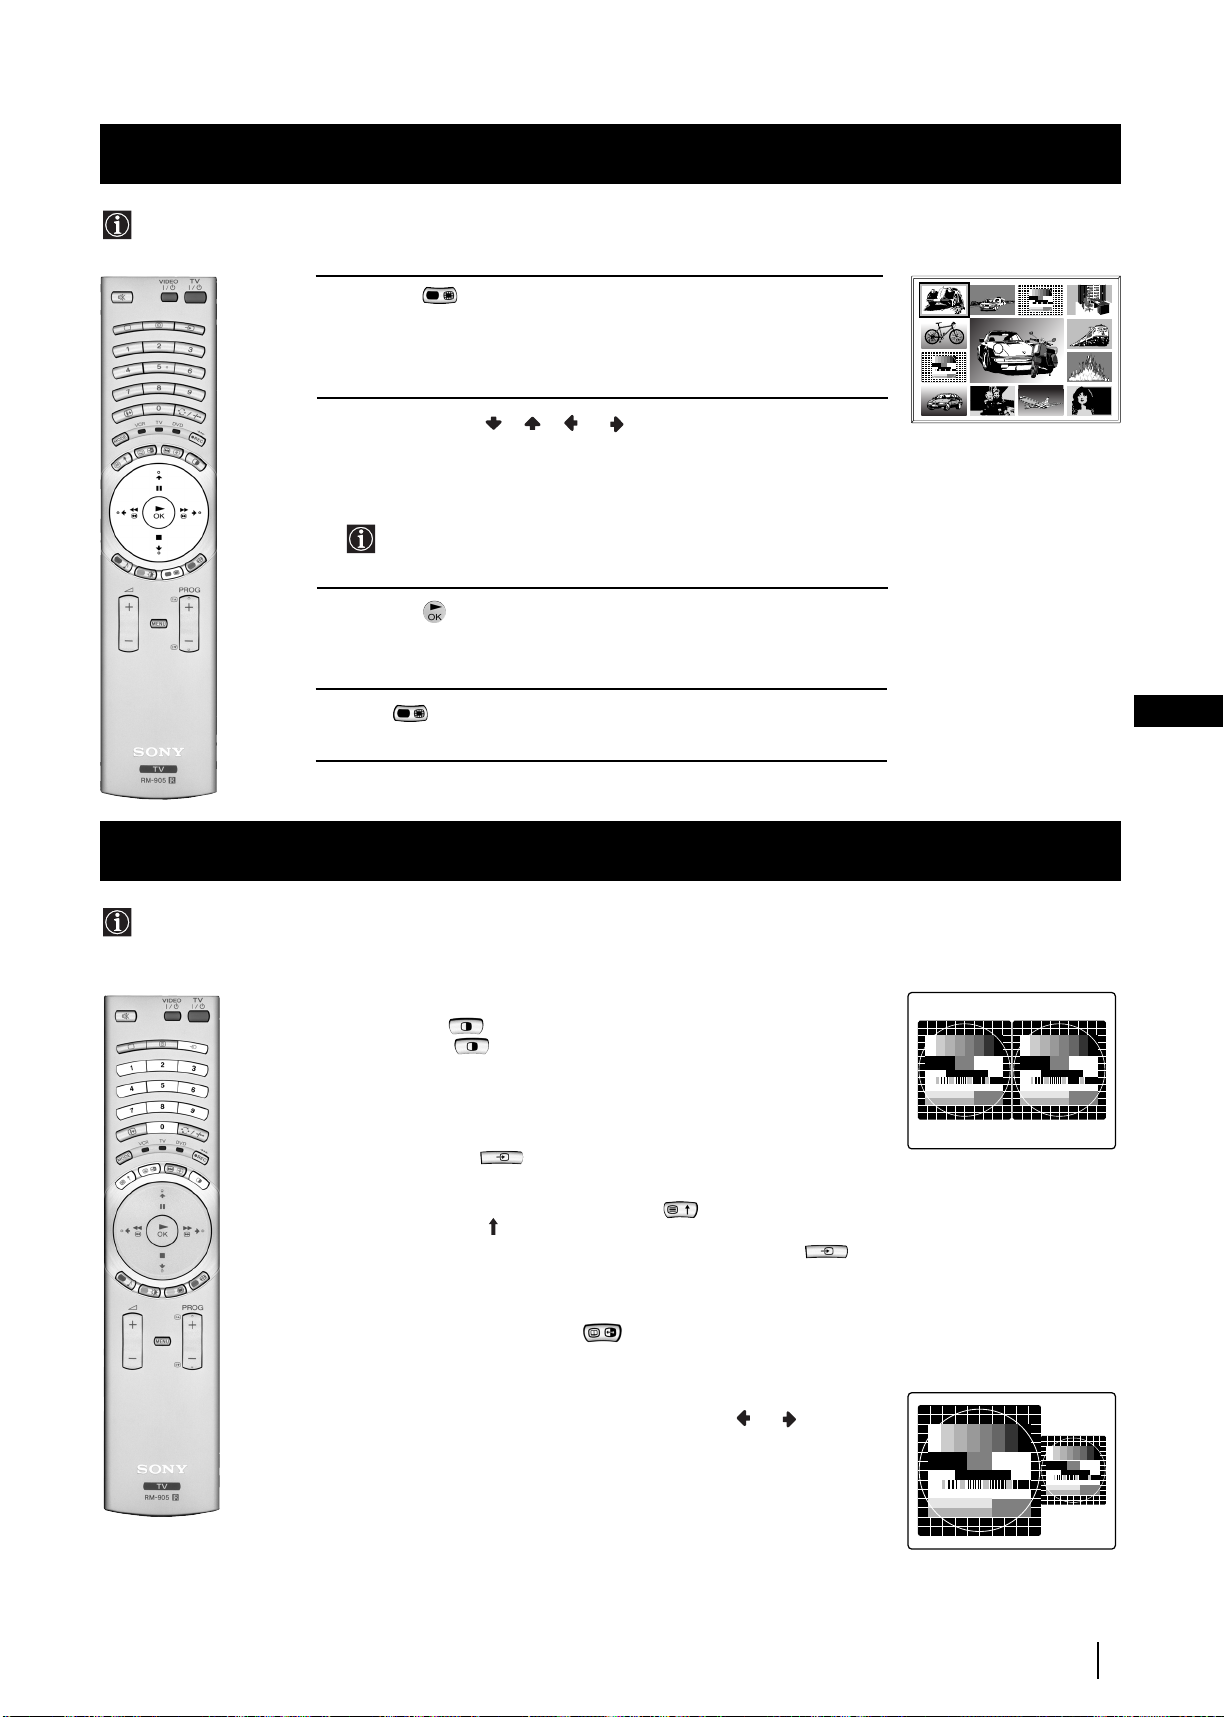
Using Multi PIP (Picture In Picture)
Multi PIP (Picture in Picture) mode displays a succession of 12 still pictures and a 13th that is live. You can manually select which
channel you wish to watch, either full-screen or in the PIP.
03 05
1 Press the button on the remote control to select the PIP mode.
Now 13 programme positions appear on the screen, with the current
channel in the centre. The programme displayed at the top left will be
highlighted by a frame around it.
2 Push the joystick//orto move within the 13 displayed
channels. You will notice that the framed channel moves to highlight
the current selection. Continue until the channel you wish to select is
framed.
By pressing PROG -/+, the next or previous 13 programme
numbers will appear on the screen.
3 Press the button to select the framed channel. The selected
channel moves to the centre.
02
01 06
13
12
11 09 08
10
04
07
4 Press to return to the normal TV mode.
Using PAP (Picture And Picture)
PAP divides the screen into two for watching two channels simultaneously. One of the pictures can be selected to come from a
video source.
The sound from the left screen comes through the TV set loudspeakers, the sound from the right screen can be heard via
headphones.
Switching PAP on and off
Press the button on the remote control to display the two screens in
format 4:3. Press again to switch PAP off.
Selecting PAP source
1 To change the source of the left screen:
With PAP switched on, press the number buttons (to select a TV
channel) or press (to select a video source).
2 To change the source of the right screen:
With PAP switched on, press the button on the remote control.
When the symbol appears at the bottom of the right screen,
press the number buttons (to select a TV channel) or press (to
select a video source).
GB
Swapping screens
With PAP switched on, press the button on the remote control to
swap the two screens.
Zooming the screens
With PAP switched on, push the joystick repeatedly or to
change the size of the two screens.
Selecting the sound of the right screen
You can hear the sound of the right screen via headphones. With
PAP switched on, refer to the "Adjusting the Sound" section of this
instruction manual and set the option "l Dual Sound" to "PAP".
Menu System
25
Page 25
Teletext
Teletext
Most TV channels broadcast information via Teletext. The index page of the teletext service (usually page 100) gives you
information on how to use the service.
! Please use a TV channel with a strong signal, otherwise there may be Teletext errors.
Switching Teletext on and off
1 Select the TV channel which carries the teletext service you want
to view.
2 Press the button once for Picture and Teletext (P&T). The screen
is divided in two, with the TV channel in the right corner and the
Teletext display on the left.
P&T mode: Press then press PROG +/- to change
the channel of the TV screen. Push the joystick or to
change the size of the TV screen then press again to
resume normal teletext reception.
3 Press twice to get Teletext only.
4 Press three times for Mix mode.
5 Press a fourth time or press to switch off Teletext.
Selecting a Teletext page
Input three digits for the page number using the numbered buttons on
the control. If you make a mistake, type in any three digits then re-enter
the correct page number.
Selecting the next or preceding page
Press the (PROG+) or (PROG-) buttons on the remote
control to select the previous or next page.
TELETEXT
Index
Programme
News
Sport
Weather
Index
Index
Index
Index
Index
Index
Index
Index
Programme
Programme
Programme
Programme
Programme
Programme
Programme
Programme
News
News
News
News
News
News
News
News
Sport
Sport
Sport
Sport
Sport
Sport
Sport
Sport
Weather
Weather
Weather
Weather
Weather
Weather
Weather
Weather
Index
Programme
News
Sport
Weather
TELETEXT
TELETEXT
TELETEXT
TELETEXT
TELETEXT
TELETEXT
TELETEXT
TELETEXT
TELETEXT
01
25
153
101
98
01
25
25
25
25
25
25
25
25
153
153
153
153
153
153
153
153
101
101
101
101
101
101
101
101
98
98
98
98
98
98
98
98
25
153
101
98
Selecting a sub page
A teletext page may consist of several sub pages. In this case, after a
few seconds, an information line is displayed showing the number of
subpages.
Select the sub page by pressing or .
To freeze a Teletext page
Press the button to freeze the page. Press again to cancel the freeze.
Revealing the index page
Press the button to reveal the index page (normally page 100).
Fastext
(only available if the TV station broadcasts Fastext signals)
When the colour coded menu appears at the bottom of a teletext page,
press a coloured button on the remote control (red, green, yellow or blue)
to access the corresponding page.
Using the feature "Page Catching"
1 This feature is used if the selected teletext page has several page
numbers on it (eg the index page).
2 Press the button.
3 Push the joystick or to select the desired page number
then press the buttons. The requested page is displayed after
a few seconds.
216-02
01 03 04 05 06 07 0802
26
continued...
Teletext
Page 26
Teletext
Using the Teletext menu
1 With Teletext switched on, press the button on the remote
control to display the teletext menu on the TV screen.
2 Push the joystick or to select your chosen item, then push to
to display the relevant sub menu.
3 To remove the teletext menu from the screen, press the
button.
Top / Bottom / Full
The Top/Bottom/Full sub menu allows you to enlarge different
sections of the Teletext page. Push the joystick to enlarge the
upper half of the screen, push to enlarge the lower half. Press
the button to restore the page to normal size.
Text Clear
After having selected this function, you can watch a TV channel while
waiting for a requested Teletext page. As soon as the page is available,
the symbol changes colour. To view the page, press .
Teletext
Top / Bottom / Full
Text Clear
Reveal
Time Page
Page Overview
Select: Enter:
Top: Bottom: Full: OK
GB
Reveal
Some teletext pages contain hidden information (e.g. for a quiz). By
pressing Reveal the hidden information appears on screen.
Time Page
(depending on availability of teletext service)
You can call up a time-coded page such as an alarm page at a time
specified by you. After you have displayed the Time Page sub menu:
1 Press the numbered buttons on the remote control to enter the
three digits of the desired page.
2 Press the numbered buttons again to enter the four digits of the
desired time.
3 Press the button to store the desired time. The time is displayed
in the top left corner of the screen. At the requested time the page is
displayed.
Page Overview
(depending on availability of teletext service)
In the Page Overview menu the block and group pages of TOP- Text
are sorted into two columns, so that the customer can easily select the
desired page. For each block page in the first column, the corresponding
group pages are shown in the second column. Push the joystick or
to select the desired block page, then push to enter to the group pages
column. Push or to select the desired group page .
Finally, press the button to display the page.
Time Page
PAGE TIME
- - : - -– – –
Select Page: 0-9 Next:
Teletext
27
Page 27
NexTView
NexTView *
* (depending on availability of service)
NexTView is an on-screen electronic programme guide (EPG), providing you with programme information for different
broadcasters.
Selecting your NexTView provider
The TV set automatically selects the best NexTView provider for
you.
This provider is available about 30 minutes after the channel tuning.
You can however change this selection of provider if you wish.
1 Press the button on the remote control to display the menu
on the screen.
2 Push the joystick or to select the symbol, then push
to enter the Set Up menu.
3 Push or to highlight Select NexTView then push to enter. A
list is displayed containing all available NexTView providers.
4 Push or to select the desired provider then press the
button to store.
5 Press the button to remove the menu from the screen.
Displaying NexTView
1 Press the button repeatedly on the remote control to switch
NexTView on and off.
* In some cases, you may also need to push the joystick to
display the Sony electronic programme guide.
2 Push the joystick//orto move the cursor
around the screen.
3 Press the button to confirm a selection.
a) If you press the button in the date, time or icon (themes)
columns, you change the programme list according to the
selection.
b) If you press the button in the programme list, you directly
display the channel if the broadcast is currently running, or,
you display the "Long Info" menu if the broadcast is running at
some future time.
Using the "Individual Setting" menu
07 Tue
12:38
7
Tue
8
Wed
9
Thu
12
10
Fri
11
Sat
12
Sun
13
Mon
Star Wars
Super RTL
Werner - Beinhart
Pro 7
Flui grüsst den Rest der Welt
Kabel 1
Once upon a time in the West
Euronews
International News
RTL Plus
Hat der alte Hexenmeister sich doch
einmal fortbegeben, und nun sollen
seine Geister auch nach meinem Willen
leben.
Index
Picture Adjustment
Picture Mode
Contrast
Brightness
Colour
Sharpness
Reset
AI
Noise Reduction
Colour Tone
Select: Enter Menu:
Set Up
Auto Tuning
Programme Sorting
Select NexTView
AV Preset
Manual Set Up
Start Auto Tuning
Select:
Set Up
Auto Tuning
Programme Sorting
Select NexTView
AV Preset
Manual Set Up
Select:
Enter:
SWISS
TXT TPS / RINGIER
Tue 07. 04 .98
10:35 - 12:45
10:20 - 12:00
10:45 - 10:50
11:00 - 11:20
11:45 - 12:50
full selection list
personal selection
news broadcasts
movies
sports
entertainment
children
return to last menu
Personal
Start
- - - - - - -
- - - - - - -
Normal
On
Off
28
You can make a personal list of the types of programmes you
wish to view on the programme guide.
1 Push the joystick or to select the icon then push to to
display the "Individual Setting" menu.
2 Push the joystick or to select your chosen item on the screen
then press the button to confirm your choice.
3 Repeat step 2 for all the items you wish to have in your list.
4 When you have finished the list, push to select the icon.
5 Press the button to return to the previous menu.
6 Push the joystick or to select the icon then press the
button again to activate your "Individual Setting" filter.
continued...
NexTView
Page 28
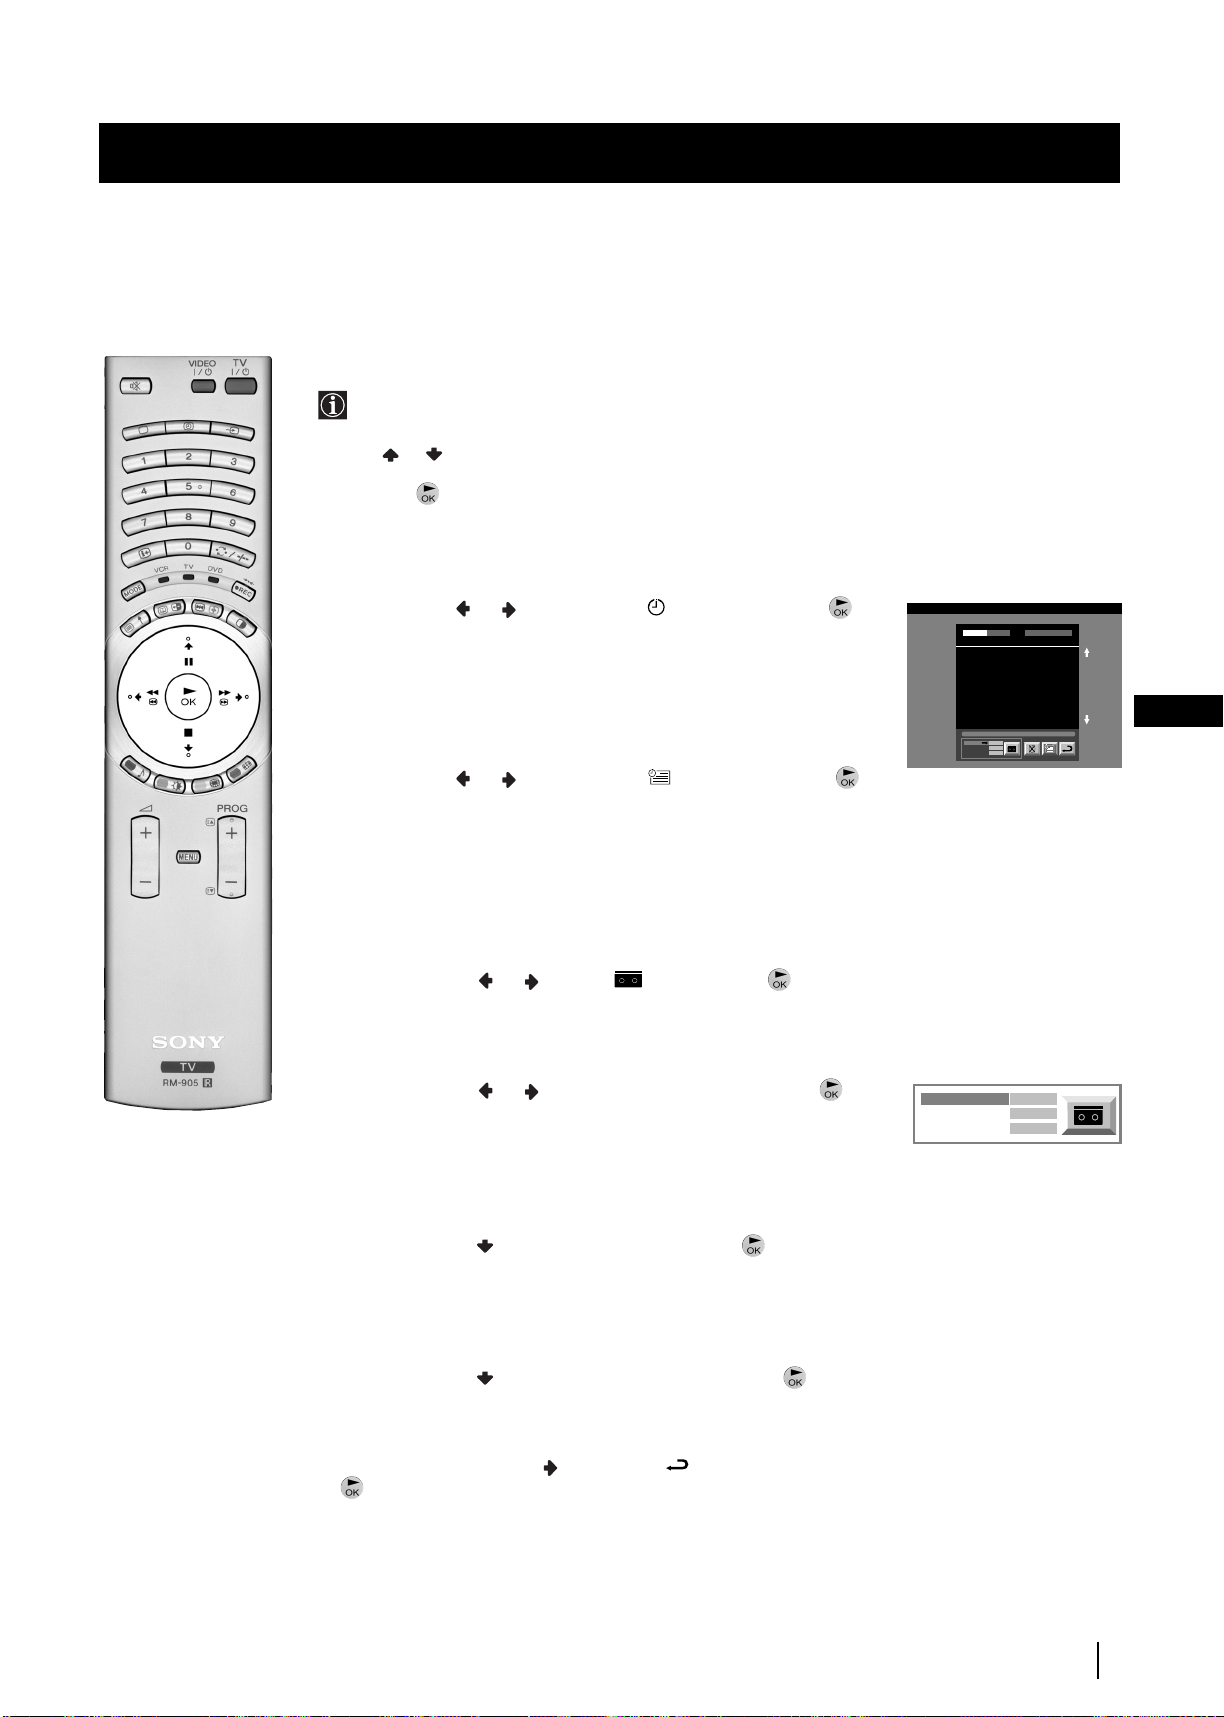
NexTView
Using the Long Info menu
With this menu screen, you can set timers or record selected
programmes.
1 Push or to select a future programme in the programme list
column.
2 Press the button to display the Long Info menu on the TV
screen.
To set the timer
Push the joystick or to highlight the icon then press the
button repeatedly to "set the timer" or "cancel the timer". If you choose
to set the timer, the programme is marked with a clock symbol and a
message appears on the screen shortly before the programme is due
to start asking whether you wish to still view this programme.
To view the timer table
Push the joystick or to highlight the icon then press the
button repeatedly to switch on/off the timer table. This table shows the
programmes on which you have already set a timer. (You can set a timer
on up to 5 programmes).
First nextTView/EPG-Providers in Europe
07 Tue
SWISS TXT TPS / RINGIER nexTView
12:38
Address Mapping
The position of the addresses in the
OSDA is shown in the following diagram.
The position values of the DPW are set
to '0'.
If other values are set, the complete
combination will be scrolled.
Example:
if the DPWC is set to '63', the char-
This channel has been set for a timer
VPS/PDC
On
Speed
SP
Timer Prog
VCR1
Tue 07. 04 .98
GB
To record programmes
(only with Smartlink VCRs)
1 Connect your Smartlink VCR.
2 Push the joystick or to select then press the button
to download the information to your VCR.
3 To set up the VCR:
VPS/PDC
Push the joystick or to select VPS/PDC then press the
button repeatedly to select On or Off. With this setting on you have
the guaranteed recording of the whole broadcast should there be a
change in the TV programme. This only works if the selected
channel broadcasts a VPS/PDC signal.
Speed
Push the joystick to select Speed then press the button
repeatedly to select between SP for standardplay or LP for longplay.
With longplay you can record twice as much on a videotape.
The picture quality however may suffer.
VCR Setup
Push the joystick to select VCR Setup then press the
button repeatedly to select which VCR you wish to programme,
namely VCR1 or VCR2.
4 Finally, push the joystick to select the icon then press the
button to remove the menu from the TV screen.
VPS/PDC
Speed
VCR Setup
On
SP
VCR1
NexTView
29
Page 29

Optional Connections
1
2
B
C
H
I
DVD
VCR
S.VHS/Hi8/DVC
camcorder
Dolby
Surround
Amplifier
F
G
8mm/Hi8/DVC
camcorder
D
E
1
2
DVD
A
Connecting Optional Equipment
Using the following instructions, you can connect a wide range of optional equipment to this TV set.
“PlayStation”*
To avoid
picture
distortion:
• Do not
connect
equipment to
F and G
connectors at
the same time.
* “PlayStation”
is a product of
Sony
Computer
Entertainment,
Inc.
* “PlayStation”
is a trademark
of Sony
Computer
Entertainment,
Inc.
Hi-Fi
“PlayStation”*
Decoder
Acceptable input signal
A Audio/video and RGB signal
B Audio/video and RGB signal
C Audio/video and S video signal
D Centre speaker input Set “Speaker”
Available output signal
Video/audio from TV tuner.
Video/audio displayed on TV screen (monitor out).
Video/audio from selected source.
No outputs.
on the Features menu to “Centre in”.
E No inputs
F S Video signal
G Video signal
H Audio signal
I No input
Audio signal.
No output.
No output.
No output.
Audio signal to headphones.
30
Optional Connections
Page 30
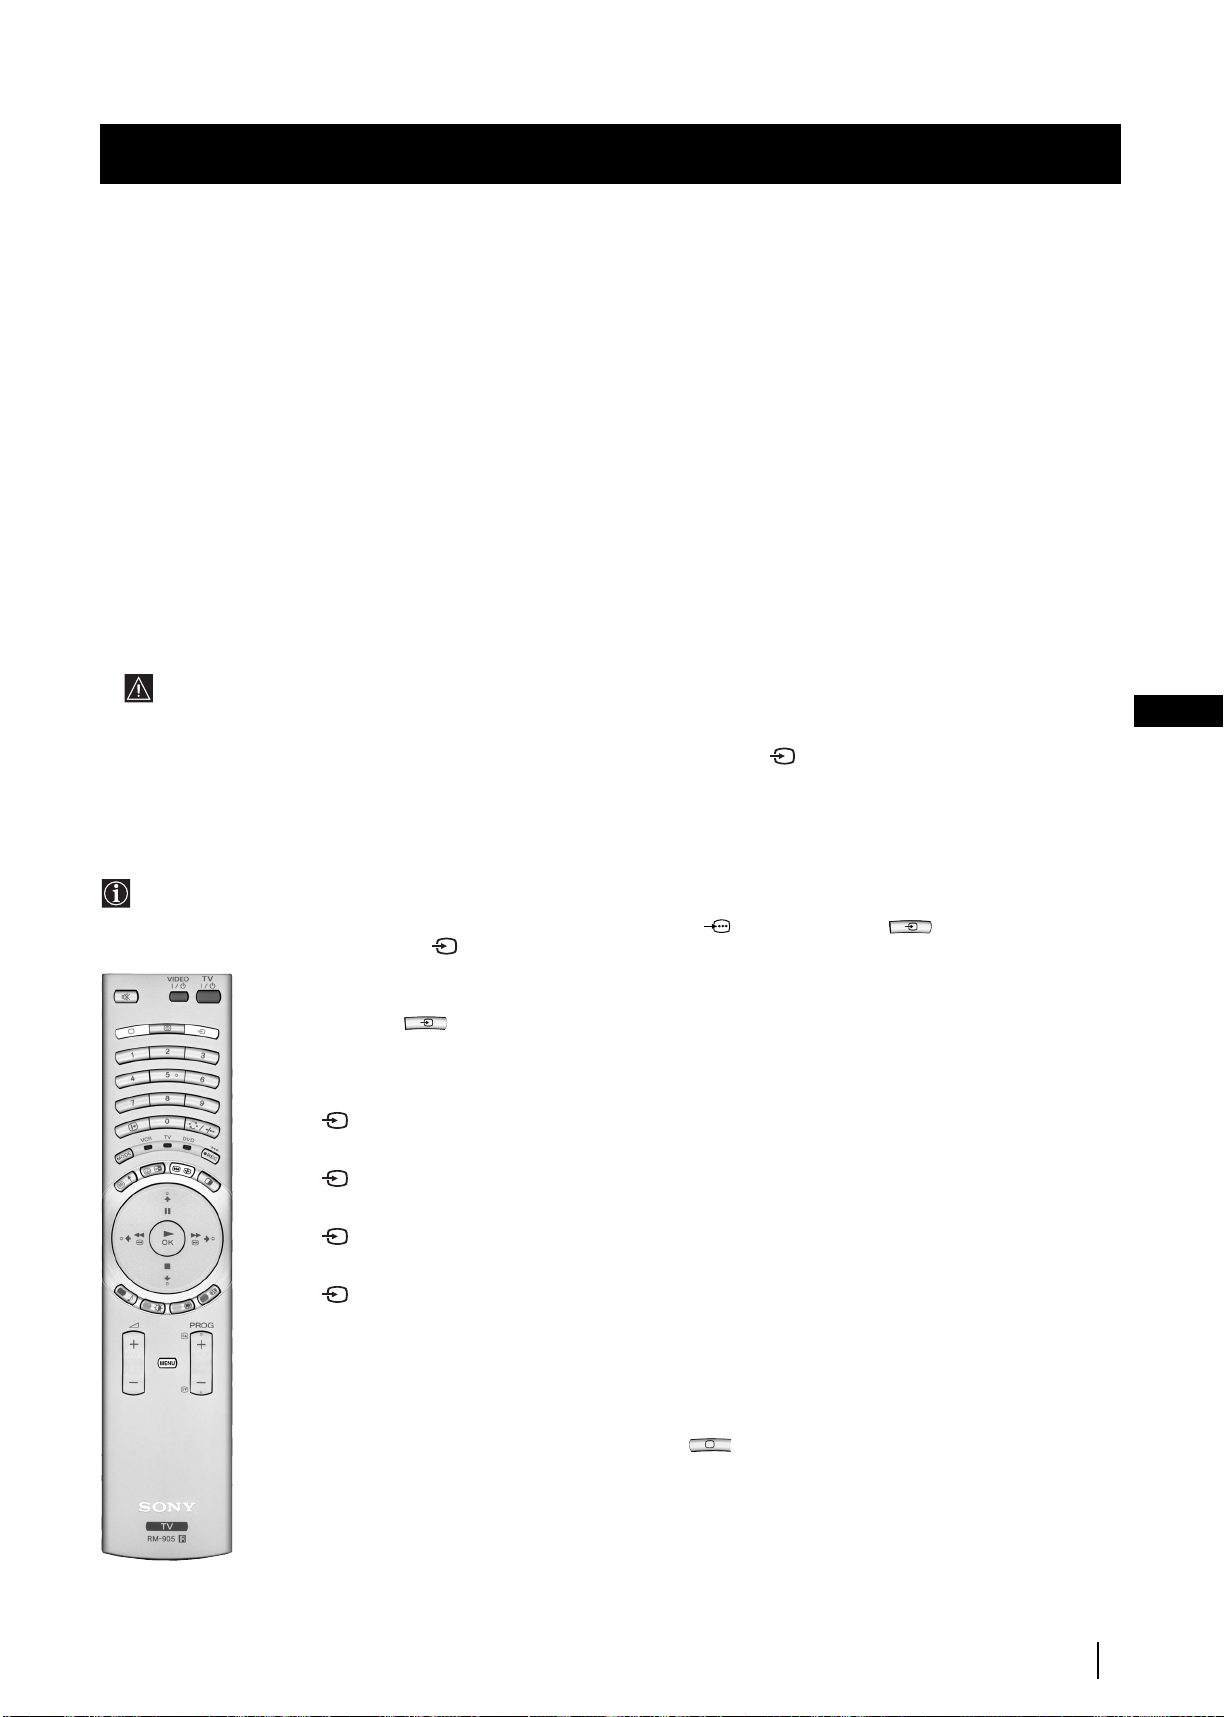
Optional Connections
Using Optional Equipment
Additional Information when connecting equipment
Connecting a VCR
We recommend you connect your VCR to the C socket using a scart lead. If you do not have a scart lead, use the “Manually
Tuning the TV” section of this instruction manual to tune in the channel of the VCR test signal to TV programme number “0”.
Also refer to your VCR instruction manual to get the VCR test signal.
If your video supports Smartlink, please refer to the “Smartlink” section of this instruction manual.
Connecting to External Audio Equipment
1 To listen to the sound from the TV set on Hi-Fi equipment:
Plug in your Hi-Fi equipment to the E sockets on the rear of the TV set if you wish to amplify the audio output
from the TV.
The output level from the E sockets can be varied by adjusting the volume of the headphones output. Refer to the “Adjusting
the sound” section of this instruction manual to adjust this.
2 To listen to Dolby Prologic system sound on the TV set speakers:
Plug in your Dolby Prologic system decoder amplifier to the D socket on the rear of the TV set if you wish to listen to the audio
output from your equipment on the TV speakers. If you have a Dolby amplifier, connect the centre output from your amplifier
to the D socket to use the TV set as a centre speaker. Refer to the “Using the Features menu” section of this instruction manual
and set the option “Speaker” to “Centre in”.
Remember that the maximum input level of this input is 30 W. Be careful never to exceed this.
For mono equipment
Connect the phono plug to the L/G/S/I socket on the front of the TV and select the 4 input signal using the instructions on
this page below.
GB
Select and View the Input Signal
In order to get the input signal of a connected equipment onto the TV screen, you need to select the symbol of the
connector to which you have connected the device.
e. g. : If your VCR is connected to the connector with the symbol
repeatedly until you see the symbol 1 on the screen.
Y1/ 1. Press the button on the remote control
1 Connect your equipment to the designated socket, as shown on the previous page.
2 Press the button on your remote control repeatedly until the correct input symbol
appears on the screen.
Symbol Input signals
1 • Audio/video input signal through the Scart connector A or * RGB
through Scart connector A.
2 • Audio/Video input signal through the Scart connector B or * RGB
through Scart connector B.
3 • Audio/Video input signal through the Scart connector C or * S Video
through Scart connector C.
4 • S Video input signal through the 4-pin DIN connector F or * video input
signal through phono jack G and audio input signal through phono jacks H.
* (automatic detection of the signal according to the connected equipment)
3 Switch on the connected equipment.
4 To return to the normal TV picture, press the button on the remote control.
Optional Connections
31
Page 31

Optional Connections
Smartlink
Smartlink is a direct link between the TV set and a VCR.
For Smartlink you need:
• A VCR which supports Smartlink, NextView Link, Easy Link or Megalogic.
Megalogic is a trademark of Grundig Corporation.
EasyLink is a trademark of Philips Corporation.
• A fully-wired 21 pin SCART cable to connect your VCR to the Scart connector :3/q3
(SMARTLINK) on the rear of the TV set.
The features of Smartlink are:
• Tuning information such as the channel overview are downloaded from the TV set to the VCR.
Rear
• Direct recording: while watching TV you only need to press just one button on the VCR to
record this programme.
• Automatically switching on: with the TV set in standby mode, pressing the “Play z” button on
your VCR automatically switches the TV on.
If you have connected a decoder to a VCR which supports the Smartlink feature, select
the menu “Further Programme Preset” in the (Manual Set Up) menu and select
DECODER AV3 for each coded channel. For more details, please refer to the section
"Using the Further Programme Preset function" of this instruction manual.
For more information on Smartlink, please refer to the Instruction Manual of your
VCR.
VCR
Decoder
32
Optional Connections
Page 32

Additional Information
Remote Control Configuration for VCR/DVD
In it’s default condition this remote control operate the basic functions of this Sony TV, Sony DVDs and most Sony VCRs. To
control VCRs and DVDs of other manufacturers and some Sony VCR models, please complete the following steps:
Before you start, look up the 3 digit code for your brand of DVD or VCR from the list below. On those brands that have more
than one code, enter the first code number.
1 Press the Media Selector button on the remote control repeatedly until the required green light
(VCR or DVD) is lit.
If Media Selector is on the TV position, code numbers will not be stored.
3
2 Before the green light goes out, press and hold the yellow button for approximately 6 seconds
1
2
until the green light starts flashing.
3 Whilst the green light is flashing, enter all three digits of the code for your brand of VCR or DVD using
the number buttons on the remote control.
If your selected code is entered correctly, all three green lights will be lit momentarily.
4 Turn on your VCR or DVD and check that the main functions work.
• If your device is not working or some of the functions do not work please check that you entered
the correct code or try the next code listed against the brand.
• Your brand codes may be lost if weak batteries are not replaced within a few minutes. To reset
your brand of DVD or VCR please repeat the above steps. A small label is added inside the
battery door to allow you to record your brand codes.
• Not all brands are covered and not all models of every brand may be covered.
GB
VCR Brand List DVD Brand List
Brand Code Brand Code
SONY (VHS) 301, 302, 303, 308, 309 SONY 001
SONY (BETA) 303, 307, 310 AIWA 021
SONY (DV) 304, 305, 306 DENON 018, 027, 020, 002
AIWA 325, 331, 351 GRUNDIG 009, 028, 023, 024, 016, 003
AKAI 326, 329, 330 HITACHI 025, 026, 015, 004
DAEWOO 342, 343 JVC 006, 017
GRUNDIG 358, 355, 360, 361, 320, 351 KENWOOD 008
HITACHI 327, 333, 334 LG 015, 014
JVC 314, 315, 322, 344, 352, 353, 354, 348, 349 LOEWE 009, 028, 023, 024, 016, 003
LG 332, 338 MATSUI 013, 016
LOEWE 358, 355, 360, 361, 320, 351 ONKYO 022
MATSUI 356, 357 PANASONIC 018, 027, 020, 002
ORION 328 PHILIPS 009, 028, 023, 024, 016, 003
PANASONIC 321, 323 PIONEER 004
PHILIPS 311, 312, 313, 316, 317, 318, 358, 359 SAMSUNG 011, 014
SAMSUNG 339, 340, 341, 345 SANYO 007
SANYO 335, 336 SHARP 019, 027
SHARP 324 THOMSON 012
THOMSON 319, 350 TOSHIBA 003
TOSHIBA 337 YAMAHA 018, 027, 020, 002
Additional Information
33
Page 33

Additional Information
Replacing the Lamp
When the lamp becomes dark or the picture colour is
not normal or the lamp indicator on the TV set
flashes, replace with a new lamp.
• Only use the lamp XL-2000E for replacement. If you
use another lamp, it may cause damage to the TV set.
• Do not remove the lamp except when replacing it.
• Before replacing the lamp, turn off the power and
disconnect the power cord.
• Replace the lamp only after it becomes cool. The front
glass of the lamp remains at least 100 °C (212 °F) even
after the power has been turned off for 30 minutes.
• Do not place the old lamp in proximity to children or
flammable material.
• Do not get the old lamp wet, or insert objects inside
the lamp. It may cause the lamp to explode.
• Do not place the old lamp near easily flammable
objects, as this may cause fire. Also, do not put your
hand inside the lamp compartment, as you may be
burned.
• Attach the new lamp securely. If it is not securely
attached, the picture may become dark.
1 Turn off the power and disconnect the power cord.
• If you start changing the lamp without disconnecting
the power cord, the standby indicator
flashes. Disconnect the power cord to continue
changing the lamp.
• Replace the lamp 30 minutes or more after the power
is turned off to allow it to cool.
• Prepare the new lamp.
on the TV set
3 Loosen the screw with an object such as a coin and
remove the lamp cover.
4 Loosen the two screws and pull out the lamp.
Loosen two screws with the hexagon key supplied.
Pull out the lamp by the handle.
2 Remove the front panel.
Remove the front panel without moving the TV set.
Grasp the right side of the front panel with your fingers
and pull it forward. Be careful not to catch your
fingernails.
The lamp is still extremely hot immediately after the
power is turned off. Be careful that you don’t touch
the front glass or surrounding area of the lamp or the
glass of the lamp compartment.
5 Attach the new lamp.
Replace the new lamp securely in the lamp receptacle and
fasten the screws tightly using the hexagon key supplied.
6 Attach the lamp cover.
Fasten the screw tightly with an object such as a coin.
7 Attach the front panel.
Attach the front panel locating the left hand edge of the
cover first and then pushing the right hand side back into
place.
Notes
• Do not touch or stain the front glass of the new lamp or the glass
of the lamp compartment. If the glass become dirty, the picture
quality may deteriorate or the lamp life may shorten.
• Attach the lamp cover firmly. If it is not firmly attached, the
power will not turn on.
• When the lamp burns out, a noise is audible. This does not
indicate damage to the TV set.
• Consult your nearest Sony service center to obtain a new lamp.
• Always remember to dispose of used lamps in an
evironmentally friendly way.
Additional Information
34
Page 34

Additional Information
Optimum Viewing Area
For the best picture quality, try to position the TV set so that you can view the screen from within the areas shown below.
Horizontal viewing area
2 m and more
65
65
Vertical viewing area
GB
(Optimum viewing position)
2 m and more
30
30
(Optimum viewing position)
Additional Information
35
Page 35

Additional Information
Specifications
TV system
B/G/H, D/K, I, L
Colour system
PAL, SECAM
NTSC 3.58, 4.43 (only Video In)
Channel coverage
VHF: E2-E12
UHF: E21-E69
CATV: S1-S20
HYPER: S21-S41
D/K: R1-R12, R21-R69
I: UHF B21-B69
L: F2-F10, B-Q, F21-F69
Projected picture size
• KF-50SX200: 50 inches (approx. 127 cm measured
diagonally).
• KF-42SX200: 42 inches (approx. 107 cm measured
diagonally).
Rear Terminals
• Centre speaker input terminals (2
• (L, R) audio outputs (phono jacks)
• :1/ 1 21-pin Euro connector (CENELEC
• :2/ 2 21-pin Euro connector (CENELEC
• :3/q 3 21-pin Euro connector (CENELEC
Front Terminals
•
•… 4 video input - phono jack
•≤ 4 audio inputs - phono jacks
•
C
terminals)
standard) including TV audio/video
input, RGB input, TV audio/video
output.
standard) including audio/video
input, RGB input, audio/video
output (monitor out).
(SMARTLINK)
q
4 S video input - 4 pin DIN
2
Headphones jack - minijack stereo
standard) including audio/video
input, S video input, selectable
audio/video output and Smartlink
interface.
Sound output
2 x 20 W (music power)
2 x 15 W (RMS)
Centre SP input
30 W (RMS) (using as the centre speaker)
Power consumption
210 W
Standby Power consumption
≤
1 W
Dimensions (w x h x d)
• KF-50SX200: Approx. 1376 x 898 x 384 mm
• KF-42SX200: Approx. 1200 x 790 x 343 mm
Weight
• KF-50SX200: Approx. 43 kg
• KF-42SX200: Approx. 37 kg
Accessories supplied
1 Remote Control (RM-905)
2 Batteries (IEC designated, AAA size)
1 Hexagon key
2 Brackets
2 Screws
1 Cleaning Cloth
Other features
• Digital Comb filter (High resolution)
• TELETEXT, Fastext, TOPtext (2000 page TEXT memory)
• NexTView
• NICAM
• Sleep Timer
• Smartlink
• Noise Reduction
• Graphic Equaliser
• Personal ID
• Dolby Virtual
• BBE
Design and specifications are subject to change without notice.
Ecological Paper - Totally Chlorine Free
Additional Information
36
Page 36

Additional Information
Troubleshooting
Here are some simple solutions to problems which may affect the picture and sound.
Problem
No picture (screen is dark), no sound.
Poor or no picture (screen is dark),
but good sound.
Poor picture quality when watching a
RGB video source.
Good picture, no sound
No colour on colour programmes
Distorted picture when changing
programmes or selecting teletext
Striped picture
Solution
• Plug the TV set in.
• Press the
• If the indicator is on in red colour, press TV button on the remote
control.
• Check the aerial connection.
• Check that the selected video source is on.
• Turn the TV set off for 3 or 4 seconds and then turn it on again using the
button on the front of the TV set.
• Using the MENU system, select the Picture Adjustment menu. Adjust the
brightness, contrast and colour balance levels.
• Press the button repeatedly on the remote control until the RGB
symbol 1 or 2 is displayed on the screen.
• Press the +/- button on the remote control.
• Check that "Main" speaker is selected in the "Features" menu.
• Using the MENU system, select the Picture Adjustment menu. Adjust the
colour balance.
• Turn off any equipment connected to the Scart connectors on the rear of
the TV set.
• Adjust the RF Attenuator (ATT). For details, please refer to the section
"Using the Further Programme Preset function".
button on the front of the TV set.
GB
Noisy picture when viewing TV channel
No unscrambling or unstable picture
whilst viewing a scrambled channel with
a decoder connected through the Scart
connector :3/q 3 (SMARTLINK)
Remote control does not function
The lamp indicator on the TVset
flashes.
The standby indicator on the TVset
flashes.
• Adjust Fine Tuning (AFT) to obtain better picture reception. For details,
please refer to the section "Using the Further Programme Preset function"
• Using the menu system, select the “Picture Adjustment” menu and set
“Noise Reduction” to “Auto”.
• Using the menu system, select the “Features” menu and set “AV3 Output”
to “TV”
• Check that the Media Selector on the remote control is set to the device you
are using (VCR, TV or DVD).
• If the remote control does not operate the VCR or DVD even when the
Media Selector has been set correctly. Enter the necessary code set as
explained on “Remote Controll Configuratio for VCR/DVD” chapter of
this instruction manual.
• Replace the batteries.
• Replace the lamp. For details please refer to the section “Replace the
Lamp”
• If you are changing the lamp without disconnecting the power cord, the
standby indicator flashes. To continue changing the lamp, disconnect the
power cord and wait for at least 30 minutes to allow the lamp to cool.
• Check that the lamp cover is tightly attached.
• If you are not changing the lamp but the standby indicator flashes, contact
your nearest Sony service centre.
• If you continue to have these problems, have your TV serviced by qualified personnel.
• NEVER open the casing yourself.
Additional Information
37
Page 37

Einleitung
Wir danken Ihnen, dass Sie das Modell Sony “Grand Wega” ausgewählt haben.
Bevor Sie dieses Gerät einschalten, lesen Sie bitte diese Bedienungsanleitungen aufmerksam durch und bewahren Sie sie als
künftige Referenz auf.
• Symbole, die in diesen Bedienungsanleitungen verwendet werden.
• Wichtige Information
• Information über die Funktion
1,2..
Reihenfolge der zu folgenden Anleitungen
•
• Die weiß hervorgehobenen Tasten der Fernbedienung
zeigen diejenigen, die zu betätigenden sind, um die
verschiedenen Anweisungen durchzuführen.
• Information über die Ergebnisse der Anleitungen.
Inhaltsverzeichnis
Einleitung .......................................................................................................................................................................................................................... 3
Sicherheitsmaßnahmen ................................................................................................................................................................................................... 4
Allgemeine Beschreibung
Überprüfen des mitgelieferten Zubehörs........................................................................................................................................................ 5
Allgemeine Beschreibung der Tasten am Gerät ............................................................................................................................................ 5
Allgemeine Beschreibung der Tasten auf der Fernbedienung..................................................................................................................... 6
Installation
Einlegen der Batterien in die Fernbedienung ................................................................................................................................................. 7
Anschluss der Antenne und des Videogerätes............................................................................................................................................... 8
Stabilisieren des Gerätes .................................................................................................................................................................................... 8
Erstmalige Inbetriebnahme
Einschalten des Geräts und automatische Feinabstimmung........................................................................................................................ 9
Das Menü- System
Einstellen des Bildschirmformats ................................................................................................................................................................... 11
Einführung in das Menü- System auf dem Bildschirm und seine Anwendung .....................................................................................11
Schnell- Führer, um sich innerhalb der Menüs zu bewegen ...................................................................................................................... 12
Anwendung des Menü- Systems:
Einstellen des Bildes....................................................................................................................................................................................... 13
Einstellen des Tons......................................................................................................................................................................................... 14
Verwenden des Menüs „Sonderfunktionen“............................................................................................................................................. 16
Manuelle Abstimmung des Fernsehgerätes............................................................................................................................................... 17
Eingeben eines Namens für einen Sender .................................................................................................................................................. 18
Überspringen von Programmpositionen.................................................................................................................................................... 19
Verwenden der Funktion „Zusatzfunktionen“ ......................................................................................................................................... 20
Eingabe Ihrer persönlichen Kennzeichnung.............................................................................................................................................. 21
Demonstration der verschiedenen Funktionen ......................................................................................................................................... 22
Einstellen der waagrechten Zentrierung des Bildes für eine RGB- Quelle............................................................................................ 23
Erkennen und Auswahl des Bildschirm- Formats der Eingangsquellen............................................................................................... 24
Mehrfach- Bilder (Multi PIP)........................................................................................................................................................................ 25
2 Bilder auf Bildschirm (PAP) ...................................................................................................................................................................... 25
Videotext
NexTView
.................................................................................................................................................................................................................. 26
................................................................................................................................................................................................................. 28
Frei wählbare Anschlüsse
Anschlüsse von frei wählbaren Zusatzgeräten ............................................................................................................................................ 30
Anwenden von frei wählbaren Zusatzgeräten............................................................................................................................................. 31
„Smartlink“ ........................................................................................................................................................................................................ 32
Fernbedienung weiterer Sony-Anlagen......................................................................................................................................................... 32
DE
Zusätzliche Information
Grundeinstellung der Fernbedienung für ein DVD oder einen Videorecorder...................................................................................... 33
Austauschen der Lampe .................................................................................................................................................................................. 34
Optimaler Sichtwinkel ..................................................................................................................................................................................... 35
Technische Daten .............................................................................................................................................................................................. 36
Störungsbehebung ............................................................................................................................................................................................ 37
3
Page 38

Sicherheitsmaßnahmen
Um Feuergefahr oder die Gefahr eines elektrischen
Schlages zu vermeiden, stecken Sie niemals
irgendwelche Gegenstände in das Gerät. Schütten
Sie niemals irgendeine Flüssigkeit in das Gerät
hinein. Benutzen Sie das Fernsehgerät nicht weiter,
wenn Flüssigkeiten oder Fremdkörper in das Gerät
gelangen. Lassen Sie das Gerät sofort von
qualifiziertem Fachpersonal überprüfen.
Sicherheitsmaßnahmen
Betreiben Sie das Fernsehgerät ausschließlich
an 220 - 240 V Wechselstrom. Um Feuergefahr
oder die Gefahr eines elektrischen Schlages
zu vermeiden, verwenden Sie nicht zu viele
Geräte an der gleichen Steckdose.
Öffnen Sie nicht das Gehäuse des Gerätes.
Überlassen Sie dies stets nur qualifiziertem
Fachpersonal.
Bedecken Sie nicht die Lüftungsöffnungen
des Fernsehgeräts. Lassen Sie um
das ganze Gerät für die Luftzufuhr
mindestens 10 cm Platz.
Aus Umweltschutz- und
Sicherheitsgründen empfiehlt es sich, das
Fernsehgerät nicht im Bereitschaftsmodus
zu lassen, wenn es nicht benutzt wird.
Schalten Sie es am Netzschalter aus.
Während eines Gewitters
fassen Sie nicht das Netzkabel oder das
Antennenkabel des Fernsehgerätes an.
Stellen Sie das Fernsehgerät nicht an Orten
auf, die Hitze, Feuchtigkeit oder übermäßig
viel Staub ausgesetzt sind. Stellen Sie das
Fernsehgerät nicht an einem Ort auf, an dem
es Erschütterungen ausgesetzt ist.
Um Feuergefahr oder die Gefahr eines
elektrischen Schlages zu vermeiden, setzen
Sie das Gerät nicht Regen oder sonstiger
Feutigkeit aus.
Um Feuergefahr zu vermeiden halten Sie
brennbaren Gegenstände oder offenes Licht
(z.B. Kerzen) fern vom Fernsehgerät.
Reinigen Sie den Bildschirm und das Gehäuse
mit einem weichen Tuch. Verwenden Sie in
keinem Fall Topfreiniger zum Scheuern,
alkalische Reiniger, Scheuerpulver oder
Lösemittel wie Alkohol, Benzin oder
Antistatik Spray. Als Sicherheitsmaßnahme
ziehen Sie das Netzkabel aus der Steckdose,
bevor Sie den Fernseher reinigen.
Stellen Sie das Fernsehgerät auf einen sicheren
stabilen Ständer. Verhindern Sie das Kinder
hinauf steigen können. Legen Sie das Gerät
nicht auf die Seite oder den Bildschirm.
Zusätzliche Sicherheitsmaßnahmen
• Zum Transport des Geräts werden zwei Personen benötigt. Tragen
Sie das Gerät, indem Sie es mit einer Hand oberhalb und mit der
anderen Hand unterhalb des Bildschirms anfassen. Um
Beschädignungen zu verweiden, drücken Sie nicht auf die
Lautsprecher-abdeckungen.
•Blockieren oder bedecken Sie die Entlüftungsöffnung nicht, die links
unten am hinteren Teil des Geräts angebracht ist. Zu einer
einwandfreien Entlüftung belassen Sie mindestens einen Abstand
von 10 cm zwischen der Wand und dem Gerät.
•Wenn Sie das Gerät direkt von einem kalten in einen warmen Raum
bringen, oder die Raumtemperatur sich plötzlich ändert, dann
können die Bilder verschwommen oder in einigen Bildschirmzonen
mit schlechter Farbqualität erscheinen. Das ist darauf
zurückzuführen, dass sich innerhalb des Gerätes die Feuchtigkeit auf
den Spiegeln oder Linsen kondensiert hat. Warten Sie bis die
4
Feuchtigkeit verdampft, bevor Sie das Gerät in Betrieb nehmen.
•Um scharfe Bilder zu sehen, lassen Sie keine direkte Beleuchtung auf
den Bildschirm einwirken.
Sicherheitsmaßnahmen
Ziehen das Netzkabel nur am Stecker heraus.
Ziehen Sie nicht am Kabel.
Bevor Sie das Gerät an einem anderen
Aufstellungsort platzieren, ziehen Sie den
Netzstecker. Vermeiden Sie beim Transport
den Gang über unebene Flächen, schnelle
hastige Schritte oder übermäßige Gewalt.
Falls das Fernsehgerät heruntergefallen oder
beschädigt wurde, lassen Sie es sofort durch
qualifiziertes Fachpersonal überprüfen.
Verwenden Sie nach Möglichkeit eine von der Decke ausgehende
Beleuchtung.
• Dieses Gerät wurde mit einer Hochpräzisionstechnologie hergestellt.
Dennoch können schwarze und/oder helle Lichtpunkte (rot, blau oder
grün) permanent auf dem Bildschirm zu sehen sein. Dies ist keine
Fehlfunktion des Geräts.
• Der Bildschirm dieses Geräts verfügt über eine antireflektierende
Schicht. Um zu vermeiden, dass der Bildschirm beschädigt wird,
befolgen Sie die nachfolgenden Anweisungen:
• Zum Entfernen des Staubs vom Bildschirm verwenden Sie das
Reinigungstuch, das mit dem Gerät geliefert wurde, oder ein weiches
Tuch.
• Reinigen Sie den Bildschirm und das Gehäuse mit einem weichen
Tuch. Verwenden Sie in keinem Fall Topfreiniger zum Scheuern,
alkalische Reiniger, Scheuerpulver oder Lösemittel wie Alkohol,
Benzin oder Antistatik Spray. Als Sicherheitsmaßnahme ziehen Sie das
Netzkabel aus der Steckdose, bevor Sie den Fernseher reinigen.
• Berühren Sie den Bildschirm nicht, um Kratzer auf der Oberfläche zu
vermeiden.
Achten Sie darauf das keine schweren
Gegenstände auf dem Netzkabel liegen und es
dadurch beschädigt wird. Darum empfehlen wir
Ihnen das Kabel zu straffen, wickeln sie es um
die auf der Rückseite des Fernsehgerätes
angebrachten Kabelhalter.
Bedecken Sie nicht die Lüftungsöffnungen
des Fernsehgerätes mit Gegenständen wie
Vorhängen, Zeitungen usw.
Page 39

Allgemeine Beschreibung
Überprüfen des mitgelieferten Zubehörs
1 Schraubenschlüssel2 Halterungen
Zwei Batterien
(Größe AAA).
Eine Fernbedienung
(RM-905)
2 Schrauben
1 Reinigungstuch
Allgemeine Beschreibung der Tasten am Gerät
Anzeige der
Lampe (siehe
Seite 34).
Drücken Sie auf die Taste
der Markierung an der
vorderen Seite des Geräts,
um die vorderen Buchsen
Buchse KopfhörerEingang
S-VideoEingangsbuchse
Cinch- Buchse
Videoeingang
Cinch- Buchse
Audioeingang
Taste zum
Auswählen der
EingangsQuelle
Tasten der
LautstärkenRegelung
zu zeigen.
Tasten zur schrittweisen
Programmwahl (mit ihnen
wählen Sie Fernsehsender aus)
DE
Schalter zum
Ein-/
Ausschalten
BereitschaftsbetriebsAnzeige (Standby):
• Wenn Sie das Gerät
ausschalten durch
Drücken der Taste der
vorübergehenden
Abschaltung der
Fernbedienung, leuchtet
die Anzeige in roter
Farbe.
• Wenn Sie es ausschalten
durch Drücken des
Schalters zum
Ausschalten des Geräts,
leuchtet die Anzeige in
bernsteinbrauner Farbe.
Allgemeine Beschreibung
5
Page 40

Allgemeine Beschreibung
Allgemeine Beschreibung der Tasten auf der Fernbedienung
Ausschalten des Tons:
Einmal drücken zum Ausschalten des Tons.
Nochmals drücken, um den Ton wieder
einzuschalten.
Auswählen des Fernseh- Modus:
Drücken Sie diese Taste, um den PAP, Multi
PIP, Videotext oder den Eingang des
Videogerätes zu deaktivieren.
Zeitanzeige:
Drücken Sie diese Taste, um die Zeitanzeige zu
aktivieren oder deaktivieren ( sie funktioniert
nur, bei Sendern, welche Videotext ambieten).
Informationsanzeige auf dem
Bildschirm:
Drücken Sie diese Taste, um alle Anzeigen auf
dem Bildschirm einzublenden. Drücken Sie sie
nochmals, um die Anzeige auszublenden.
Wähler des Geräts:
können Sie nicht nur den Fernseher, sondern
auch die hauptsächlichen Funktionen Ihres DVD
oder Videorecorders steuern. Schalten Sie das
Gerät ein, das Sie steuern wollen, und
anschließend drücken Sie diese Taste mehrere
Male, um DVD, TV oder VCR (für den
Videorecorder) auszuwählen. In der
ausgewählten Position leuchtet momentan ein
grünes Licht auf .
Bevor Sie die Fernbedienung erstmalig
benutzen, um das DVD oder den
Videorecorder zu steuern, muss in Abhängigkeit
von der Marke Ihres Geräts die Grundeinstellung
vorgenommen werden. Hierzu lesen Sie das
Kapitel Grundeinstellung der Fernbedienung für
ein „DVD oder einen Videorecorder“ auf der
Seite 33.
Mit dieser Fernbedienung
a) PAP (2 Bilder auf dem Bildschirm)
Für zusätzliche Einzelheiten, lesen Sie das
Kapitel „Funktion PAP (2 Bilder auf dem
Bildschirm).
b) Videotext:
Die Tasten mit Symbolen in grüner Farbe
werden auch für Videotext- Operationen
benutzt. Falls Sie weitere Information
wünschen, lesen Sie das Kapitel über
“Videotext” dieser Bedienungsanleitung.
NexTView:
Ausführliche Informationen finden Sie im kapitel
“NexTView”.
Joystick:
Wenn sich der Wähler des Geräts in der
a)
Position TV befindet:
• Wenn MENU eingeblendet ist, betätigen Sie
diese Tasten, um sich im System der Menüs
fortzubewegen. Für weitere Einzelheiten
lesen Sie das Kapitel „Einführung in das
Menü- System auf dem Bildschirms und
seine Anwendung“ auf der Seite 11.
• Wenn MENU nicht eingeblendet ist,
drücken Sie OK, um die allgemeine Liste der
eingestellten Kanäle zu sehen. Wählen Sie
den Kanal (Fernsehsender), indem Sie
auf oder drücken und anschließend
drücken Sie nochmals , um den
ausgewählten Kanal zu betrachten.
b)
Wenn sich der Wähler des Geräts in der
Position VCR (Videorecorder) oder DVD
befindet:
Wenn Sie diese Tasten benutzen, können Sie
die Hauptfunktionen an Ihrem VCR oder
DVD.
Fastext:
“Fastext”- Operationen benutzt. Falls Sie weitere
Information wünschen, lesen Sie den Abschnitt
über “Fastext” im Kapitel “Videotext” dieser
Bedienungsanleitung.
Auswahl des Toneffekts:
Taste mehrmals, um den Toneffekt zu ändern.
6
Diese Tasten werden auch für die
Drücken Sie diese
Allgemeine Beschreibung
Kurzzeitiges Ausschalten des Fernsehgerätes:
Drücken Sie diese Taste, um das Fernsehgerät vorübergehend auszuschalten (die
Standby- Anzeige
um das Fernsehgerät, ausgehend vom Bereitschaftsmodus (Standby), wieder
einzuschalten.
Wenn nach Ablauf von 15-30 Minuten weder ein Fernseh- Signal vorliegt noch
eine Taste betätigt wird, geht das Fernsehgerät automatisch in den
vorübergehenden Bereitschaftsmodus (Standby) über.
leuchtet in roter Farbe auf). Drücken Sie die Taste nochmals,
Einschalten / Ausschalten des
Videorecorders oder des DVD:
betätigen, um den am Fernseher angeschlossenen
Videorecorder oder das DVD.
Auswählen der Eingangsquelle:
Drücken Sie diese Taste mehrmals, bis das Symbol
der gewünschten Eingangsquelle auf dem Bildschirm erscheint.
Auswählen der Kanäle:
der Anlage in der Position TV oder VCR
(Videorecorder) befindet, drücken Sie diese Tasten
um Kanäle auszuwählen. Für zweistellige
Programm- Nummern drücken Sie die zweite Zahl
nicht länger als 2,5 Sekunden.
a)
Wenn sich der Wähler des Geräts in der
Position TV befindet:
Drücken Sie diese Taste, um zum zuletzt
ausgewählten Kanal zurückzukehren (der
vorausgegangezane Kanal muss zuvor
mindestens 5 Sekunden lang gesehen worden
sein).
Wenn sich der Wähler des Geräts in der
b)
Position VCR befindet:
Wenn Sie einen Sony-Videorecorder benützen,
für Programm- Nummern mit zwei Ziffern, z.B.
23, drücken Sie zuerst -/-- und anschließend die
Tasten 2 und 3.
a)
Aufnahmetaste:
Geräts in der Position VCR befindet, drücken Sie
diese Taste, um Programme aufzunehmen.
Wenn sich der Wähler
Wenn sich der Wähler des
b)Wiederherstellung der werkseitig
vorgenommen Einstellungen der
Normwerte:
Drücken Sie diese Taste, wärend mindestens 3
Sekunden, nicht nur, um die werkseitig
eingestellten Bild- und Ton- Einstellungen der
Normwerte wiederherzustellen, sondern auch,
um das Gerät wieder so, wie bei der erstmaligen
Inbetriebnahme einzustellen. Nach Erscheinen
das Menü der automatischen Feinabstimmung
auf dem Bildschirm gehen Sie so vor, wie im
Kapitel „Einschalten des Geräts und
automatische Feinabstimmung“ (Schritt 4) dieser
Bedienungsanleitungen angegeben.
Standbildfunktion:
Drücken Sie diese Taste, um das Fernsehbild
einzufrieren. Drücken Sie nochmals, um zum
normalen Fernsehbild zurückzukehren
Auswählen des Bildschirmsformates :
Drücken Sie diese Taste mehrmals, um das
Bildschirmsformat auszuwählen. Ausführliche
Informationen finden Sie im Kapitel “Einstellen des
Bildschirmformats”
Mehrfach- Bild (Multi PIP):
Drücken Sie diese Taste, um den Modus Multi PIP
zu aktivieren. Drücken Sie nochmals zum
Ausblenden. Ausfürliche Informationen finden Sie
im kapitel „Mehrfach-Bilder (Multi PIP)“.
Lautstärke- Regelung:
Drücken Sie diese Taste, um das
Lautstärkeformat des
Fernsehgerätes einzustellen.
Auswählen der Kanäle:
a)
Taste, um den nächsten oder vorausgegangenen
Kanal auszuwählen.
b) Videotext:
Videotext- Operationen benutzt. Falls Sie
weitere Information wünschen, lesen Sie das
Kapitel über “Videotext” dieser
Bedienungsanleitung.
Aktivieren des Menü- Systems:
Drücken Sie diese Taste, um das Menü auf dem
Bildschirm zu sehen. Nochmals drücken zum
Deaktivieren, und um den normalen
Fernsehbildschirm zu betrachten.
Diese Tasten werden auch für
Auswählen Bild- Modus:
Drücken Sie die Taste wiederholt, um den BildModus umzuschalten.
Drücken Sie diese
Die Taste
Page 41

Installation
Einlegen von Batterien in die Fernbedienung
Respektieren Sie die Umwelt und werfen Sie die gebrauchten Batterien in die speziell dafür
vorgesehenen Behälter.
Stellen Sie sicher, dass die Batterien
polaritätsrichtig eingelegt werden.
DE
Installation
7
Page 42

Die Euro-Buchse ist frei wählbar.
Wenn Sie die frei wählbare Buchse benutzen, kann sich die Bild- und Tonqualität bei Verwendung des Videogerätes
verbessern.
Wenn Sie die Euro- Buchse nicht benutzen, müssen Sie nach der automatischen Feinabstimmung des Geräts manuell
den Kanal des Videosignals feinabstimmen. Lesen Sie hierzu das Kapitel „Manuelle Abstimmung des Fernsehgerätes“.
Lesen Sie ebenfalls das Anleitungshandbuch Ihres Videogerätes, um zu erfahren, wie Sie den Kanal des Videosignals
empfangen können.
oder
Installation
Anschluss der Antenne und des Videogerätes
Die Anschlusskabel werden nicht mitgeliefert.
Videorecorder
OUT IN
Stabilisieren des Gerätes set
Je nach Aufstellungsort kann es erforderlich sein, das Gerät zusätzlich zu stabilisieren.
1
Bringen Sie dazu die beiden mitgelieferten Halterungen mit den Schrauben auf der Rückseite oben am Gerät a
Blockieren oder bedecken Sie die Entlüftungsöffnung nicht, die
links unten am hinteren Teil des Geräts angebracht ist. Zu einer
einwandfreien Entlüftung, belassen Sie mindestens einen
Abstand von 10 cm zwischen der Wand und dem Gerät.
Führen Sie ein Kabel oder eine Kette durch jede Halterung und befestigen Sie diese an einer Wand, einem
2
Pfeiler o.ä.
n.
8
Installation
Page 43

Erstmalige Inbetriebnahme
Language/Country
Language
Country
Select Language: Confir m: OK
4 Italiano
Français
Español
English
Deutsch
Dansk
Čeština
Language/Country
Language
Country
Select Language: Confirm: OK
4 Italiano
Français
Español
English
Deutsch
Dansk
Čeština
Einschalten des Geräts und automatische Feinabstimmung
Beim erstmaligen Einschalten des Geräts erscheinen einige Menüreihenfolgen auf dem Bildschirm, mit denen Sie folgende
Einstellungen vornehmen können: 1.) die Menüsprache auswählen, 2.) das Land auswählen, in dem Sie das Gerät einsetzen,
3.) alle vorhandenen Kanäle (Fernsehsender) suchen und automatisch speichern und 4.) die Reihenfolge des Erscheinens der
Kanäle (Fernsehsender) auf dem Bildschirm ändern.
Falls Sie jedoch nach einiger Zeit folgende Änderungen vornehmen müssen, können Sie dies tun, indem Sie das
entsprechende Menü auf auswählen (Grundeinstellungen).
Stecken Sie den Stecker des Geräts in die Steckdose (220-240 V
1
Wechselstrom, 50 Hz).
Beim erstmaligen Anschluss des Fernsehgerätes, schaltet sich dieser
automatisch ein. Falls dies nicht der Fall ist, drücken Sie die Taste
Einschalten/Ausschalten
einzuschalten.
Beim ersten Mal, wenn Sie das Fernsehgerät einschalten, erscheint
automatisch das Menü
Bildschirm.
2
Gehen Sie mit dem Joystick der Fernbedienung auf oder , um
die Sprache auszuwählen und anschließend drücken Sie die Taste
, um die Auswahl zu bestätigen. Ab diesem Moment erscheinen
alle Menüs in der ausgewählten Sprache.
3
Gehen Sie mit dem Joystick auf oder , um das Land
auszuwählen, in dem Sie das Geräts benutzen wollen und
anschließend drücken Sie die Taste , um die Auswahl zu
bestätigen.
an der vorderen Seite des Geräts, um ihn
Language/Country
(Sprache/Land) auf dem
Language/Country
Language
Country
Select Language: Confirm: OK
Sprache/Land
Sprache
Land
Land wählen: Speichern: OK
4 Italiano
Français
Español
English
Deutsch
Dansk
Čeština
4
Finnland
Dänemark
Tschech.Rep.
Bulgarien
Belgien
Österreich
DE
Aus
Wählen Sie „Aus“, anstatt eines Landes, wenn Sie nicht
wünschen, dass die Kanäle (Fernsehsender) in einer vorher
bestimmten Reihenfolge gespeichert werden, die mit der
Programm- Position Nummer 1 beginnt.
Das Menü der automatischen Feinabstimmung erscheint auf dem
4
Bildschirm in der ausgewählten Sprache. Drücken Sie die Taste ,
um „Ja“, auszuwählen.
Es erscheint automatisch ein neues Menü, das Sie darum bittet zu
5
überprüfen, ob die Antenne angeschlossen ist. Überprüfen Sie, ob die
Antenne angeschlossen ist und drücken Sie dann die Taste , um
die automatische Feinabstimmung zu beginnen.
• Das Gerät beginnt die Feinabstimmung und die automatische
Speicherung aller Kanäle (Fernsehsender), die zur Verfügung
stehen.
• Wenn Sie im Menü „Land“ „Aus“ ausgewählt haben und
nach der ersten. Inbetriebnahme nochmals eine automatische
Feinabstimmung machen, bleiben die Fernseh- Kanäle ab der
Programm- Nummer, in der Sie sich in diesem Moment
befinden, gespeichert.
Dieser Vorgang kann einige Minuten in Anspruch nehmen.
Haben Sie Geduld und drücken Sie keine Tasten während der
Feinabstimmung, da sie ansonsten nicht beendet wird.
Automatisches Abspeichern
jetzt starten?
Ja: OK Nein:
Bitte Antennenanschluss
überprüfen.
Ja: OK Nein:
1
CO2
2
CO3
3
CO4
4
CO7
5
CO8
Suche...
wird fortgesetzt...
Erstmalige Inbetriebnahme
9
Page 44

Erstmalige Inbetriebnahme
6
Nachdem das Gerät alle Kanäle (Fernsehsender) feinabgestimmt
und gespeichert hat, erscheint automatisch auf dem Bildschirm
das Menü „Programme Ordnen“, damit Sie die Reihenfolge wie
die Kanäle auf dem Bildschirm erscheinen ändern können.
a)
Wenn Sie die Reihenfolge der Kanäle nicht ändern wollen, gehen Sie
weiter zu Schritt 7.
b)
Wenn Sie die Reihenfolge der Kanäle ändern wollen:
1
Gehen Sie mit dem Joystick der Fernbedienung auf
oder , um
die Programm- Nummer mit dem Kanal (Fernsehsender), deren
Stellung Sie ändern wollen, auszuwählen und anschließend gehen
Sie auf .
2
Gehen Sie mit dem Joystick auf
oder , um die neue
Programm- Nummer auszuwählen, unter der Sie den
ausgewählten Kanal (Fernsehsender) speichern wollen, und
anschließend drücken Sie .
Der ausgewählte Kanal wechselt auf seine neue Programm-
Stellung und die übrigen Kanäle folgen dementsprechend.
3
Wiederholen Sie die Schritte b1) und b2), wenn Sie andere
Fernsehkanäle neu ordnen wollen.
7
Drücken Sie die Taste , um zum normalen Fernsehbild
zurückzukehren.
Programme Ordnen
PROG KA NAME
TV 5
C03
1
PRO 7
C05
2
EU-SP
C07
3
SWF
C08
4
RTL
C09
5
SAT
C11
6
MDR
C12
7
DDI
C13
8
DSF
C14
9
RTL 2
C15
10
KAB 1
C16
11
Progr. wählen: Markieren:
Programme Ordnen
PROG KA NAME
1
TV 5
C03 TV 5
C03
2
PRO 7
C05
3
EU-SP
C07
4
SWF
C08
5
RTL
C09
6
SAT
C11
7
MDR
C12
8
DDI
C13
9
DSF
C14
10
RTL 2
C15
11
KAB 1
C16
Pos. wählen: Speichern: OK
Das Gerät ist nun betriebsbereit.
Erstmalige Inbetriebnahme
10
Page 45

Menü- System
Bild-Einstellungen
Wählen
: Menü Bestätigen:
Bild-Modus
Kontrast
Helligkeit
Farbe
Bildschärfe
Normwerte
AI
dyn.NR
Farbton
Anwender
Ein
Aus
Normal
Bild-Einstellungen
Wählen
: Menü Bestätigen:
Bild-Modus
Kontrast
Helligkeit
Farbe
Bildschärfe
Normwerte
AI
dyn.NR
Farbton
Anwender
Ein
Aus
Normal
Joystick:
Einstellen des Bildschirmformats
Diese Funktion erlaubt die Art des Formats des Fernsehbildes zu wechseln.
1 Drücken Sie mehrmals die Tasten der Fernbedienung, um eines
der folgenden Formate auszuwählen:
Smart: Simulations eines Breitbildeffekts bei 4:3-Sendungen.
Smart
4:3: Normales 4:3-Bild, gesamtes Bild wird angezeigt.
14:9: Kompromiß zwischen 4:3- und 16:9-Format.
Zoom: Breitbildformat für Spielfilme im Letterbox-Format.
Wide
Wide: Format für 16:9-Sendungen, gesamtes Bil wird
angezeigt.
In den Modi Smart, Zoom und 14:9 wird am oberen und unteren
Bildrand ein Streifen abgeschnitten. Stellen Sie mit oder
die
Zoom
Position des Bildes am Bildschirm ein (z. B. für die Anzeige von
Untertiteln).
14:9
2 Drücken Sie die Taste , um Ihre Auswahl zu bestätigen.
4:3
Einführung in das Menü- System auf dem Bildschirm und seine Anwendung
DE
Dieses Gerät verwendet auf dem Bildschirm ein Menü- System, um Sie bei den verschiedenen Arbeitsvorgängen zu leiten.
Verwenden Sie die folgenden Tasten der Fernbedienung, um sich innerhalb der Menüs zu bewegen.
1 Drücken Sie die Taste , um das erste Menü- Niveau auf dem
Bildschirm zu zeigen.
2 •Gehen Sie mit dem Joystick auf oder , um das gewünschte
Menü oder die gewünschte Option hervorzuheben.
•Um das Menü oder die gewählte Option zu verwenden, gehen
Sie auf .
•Um zum vorangehenden Menü oder zur vorherigen Option
zurückzukehren, gehen Sie auf .
•Um die Einstellungen der gewählten Option zu ändern, gehen
Sie auf / / oder .
Gehen Sie auf
•Um Ihre Auswahl zu bestätigen und zu speichern, drücken Sie .
Drücken Sie OK
3 Drücken Sie die Taste , um zum normalen Fernsehbildschirm
zurückzukehren.
/ / oder
Menü-System
11
Page 46

Menü- System
“
Schnell- Führer, um sich innerhalb der Menüs zu bewegen
Bild-Einstellungen
Bild-Einstellungen
Bild-Modus
Kontrast
Helligkeit
Farbe
Bildschärfe
Normwerte
AI
dyn.NR
Farbton
Wählen
Ton-Einstellungen
Sound Effekt
Equalizer Einstellungen
Virtueller Effekt
Balance
Autom.Lautstärke
Zweiton
Lautstärke
Zweiton
Wählen: Menü Bestätigen:
Sonderfunktionen
Lautsprecher
Auto Format
Format-Korrektur
Timer
Kindersicherung
AV3 Ausgang
Wählen: Menü Bestätigen:
Set Up
Set Up
Grundeinstellungen
Auto Tuning
Auto Tuning
Autom. Abspeichern
Programme Sorting
Programme Sorting
Programme Ordnen
Select NexTView
Select NexTView
NexTView-Auswahl
AV Preset
AV Preset
AV-Abspeicherung
Manual Set Up
Manual Set Up
Manuelle Einstellungen
Select:
Select:
Wählen:
Anwender
: Menü Bestätigen:
Anwender
.
0
0
0
Enter Menu:
Enter Menu:
Menü Bestätigen:
Ein
Aus
Normal
Aus
Mono
Mono
Haupt-LS
- - - - - - -
Normal
Aus
Aus
Aus
TV
Bild-Einstellungen
Bild-Modus
Kontrast
Helligkeit
Farbe
Bildschärfe
Normwerte
AI
dyn.NR
Farbton
Wählen: Bestätigen:
Ton-Einstellungen
Sound Effekt
Equalizer Einstellungen
Virtueller Effekt
Balance
Autom.Lautstärke
0
Zweiton
Lautstärke
0
Zweiton
Wählen: Bestätigen:
Sonderfunktionen
Lautsprecher
Auto Format
Format-Korrektur
Timer
Kindersicherung
AV3 Ausgang
Wählen: Bestätigen:
Grundeinstellungen
Autom. Abspeichern
Programme Ordnen
NexTView-Auswahl
AV-Abspeicherung
Manuelle Einstellungen
Wählen:
Grundeinstellungen
Autom. Abspeichern
Programme Ordnen
NexTView-Auswahl
AV-Abspeicherung
Manuelle Einstellungen
Wählen: Bestätigen:
Anwender
Anwender
Haupt-LS
Start
- - - - - - -
Suchlauf:
- - - - - - -
Ausführliche
Informationen finden Sie
im Kapitel „Einstellen
Ein
des Bildes“
Aus
Normal
Ausführliche
.
0
Informationen finden Sie
Aus
Mono
im Kapitel „Einstellen
Mono
des Tons“
Ausführliche
Informationen finden
Normal
Sie im Kapitel
Aus
Aus
„Verwenden des Menüs
Aus
TV
„Sonderfunktionen““
Automatisches Abspeichern
jetzt starten?
Ja: OK Nein:
Programme Ordnen
PROG KA NAME
TV 5
C03
1
PRO 7
C05
2
EU-SP
C07
3
SWF
C08
4
RTL
C09
5
SAT
C11
6
MDR
C12
7
DDI
C13
8
DSF
C14
9
RTL 2
C15
10
KAB 1
C16
11
Progr. wählen: Markieren:
Ausführliche
Informationen finden Sie
im Kapitel „Einschalten
des Geräts und
automatische
Feinabstimmung“
Ausführliche
Informationen finden Sie
im Kapitel „Einschalten
des Geräts und
automatische
Feinabstimmung“
Videotext
Oben / Unten / Ganz
Aktuell
Aufdecken
Alarmseite
Seitenübersicht
Wählen: Menü Bestätigen:
Grundeinstellungen
Autom. Abspeichern
Programme Ordnen
NexTView-Auswahl
AV-Abspeicherung
Manuelle Einstellungen
Wählen: Bestätigen:
Grundeinstellungen
Autom. Abspeichern
Programme Ordnen
NexTView-Auswahl
AV-Abspeicherung
Manuelle Einstellungen
Wählen: Bestätigen:
Grundeinstellungen
Autom. Abspeichern
Programme Ordnen
NexTView-Auswahl
AV-Abspeicherung
Manuelle Einstellungen
Wählen: Bestätigen:
Ausführliche
Informationen finden
Sie im Kapitel
„Videotext“
- - - - - - -
- - - - - - -
- - - - - - -
Ausführliche
Informationen
finden Sie im
Kapitel
„NexTView“
Ausführliche
Informationen
finden Sie im
Kapitel
„Erkennen und
Auswahl des
BildschirmFormats der
Eingangsquellen
Manuelle Einstellungen
Sprache/Land
Manuell Abspeichern
Zusatzfunktionen
RGB-Einstellung
Sicherheitscode
Demo-Modus
Wählen: Bestätigen:
Manuelle Einstellungen
Sprache/Land
Manuell Abspeichern
Zusatzfunktionen
RGB-Einstellung
Sicherheitscode
Demo-Modus
Wählen: Best ätigen:
Manuelle Einstellungen
Sprache/Land
Manuell Abspeichern
Zusatzfunktionen
RGB-Einstellung
Sicherheitscode
Demo-Modus
Wählen: Bestätigen:
Manuelle Einstellungen
Sprache/Land
Manuell Abspeichern
Zusatzfunktionen
RGB-Einstellung
Sicherheitscode
Demo-Modus
Wählen: Bestätigen:
Manuelle Einstellungen
Sprache/Land
Manuell Abspeichern
Zusatzfunktionen
RGB-Einstellung
Sicherheitscode
Demo-Modus
Wählen: Bestätigen:
Manuelle Einstellungen
Sprache/Land
Manuell Abspeichern
Zusatzfunktionen
RGB-Einstellung
Sicherheitscode
Demo-Modus Start
Wählen: Bestätigen:
- - - - - - -
- - - - - - -
- - - - - - -
- - - - - - -
- - - - - - -
- - - - - - -
Ausführliche
Informationen finden Sie
im Kapitel „Einschalten
des Geräts und
automatische
Feinabstimmung“
Ausführliche
Informationen finden Sie
im Kapitel „Manuelle
Abstimmung des
Fernsehgerätes“,
„Eingeben eines Namens
für einen Sender“,
„Überspringen von
Programmpositionen“
Ausführliche
Informationen finden Sie
im Kapitel „Verwenden
der Funktion
Zusatzfunktionen“.
Ausführliche
Informationen finden Sie
im Kapitel „Einstellen der
waagrechten Zentrierung
des Bildes für eine RGBQuelle“
Ausführliche
Informationen finden Sie
im Kapitel „Eingabe Ihrer
persönlichen
Kennzeichnung”
Ausführliche
Informationen finden Sie
im Kapitel
„Demonstration der
verschiedenen
Funktionen“
12
Menü- System
Page 47

Menü- System
Einstellen des Bildes
Auch wenn das Bild werkseitig eingestellt ist, kann es individuell abgeändert werden.
1 Drücken Sie die Taste der Fernbedienung, um das Menü auf
dem Bildschirm einzublenden.
2 Gehen Sie mit dem Joystick auf , um das Menü Bild-
Einstellungen aufzurufen.
3 Gehen Sie mit dem Joystick auf oder , um das Element
auszusuchen, das Sie ändern wollen und gehen Sie danach auf .
Konsultieren Sie die folgende Tabelle zum Auswählen, und um die
Wirkung jedes Elementes sehen zu können:
Bild-Modus Live (für Live- Programme)
Anwender (für individuelle Einstellung)
Film (für Filme)
Kontrast Weniger Mehr
Helligkeit
* Dunkler Heller
Farbe* Weniger Mehr
Bildschärfe* Weicher Schärfer
Farbton** Grünlich Rötlich
Normwerte Setzt die werkseitig vorgenommenen
Bildeinstellungen wieder zurück
AI (künstliche Aus: Normal
Intelligenz) Ein: Automatische Optimierung des
Kontrastniveaus in Abhängigkeit vom
Fernsehsignal
dyn. NR Hoch: Hohe Rauschminderung.
Farbton Warm: Gibt dem Bild einen wärmeren Ton.
Spiel(für elektronische Spiele)
Mittel: Mittlere Rauschminderung.
Niedrig:Niedrige Rauschminderung.
Auto: Automatisch selektierte optimale
Rauschminderung (dieser Vorgang steht
nicht zur Verfügung, wenn Sie gerade
eine RGB – Signalquelle betrachten).
Aus: Keine aktivierte Rauschminderung.
---Normal: Normal.
Kühl: Gibt dem Bild einen kühlerem Ton.
Bild-Modus
Kontrast
AI
dyn. NR
Farbton
Bild-Einstellungen
Bild-Modus
Kontrast
Helligkeit
Farbe
Bildschärfe
Normwerte
AI
dyn.NR
Farbton
Wählen
: Menü Bestätigen:
Bild-Einstellungen
Bild-Einstellungen
Bild-Modus
Kontrast
Helligkeit
Farbe
Bildschärfe
Normwerte
AI
dyn.NR
Farbton
Wählen: Best ätigen:
Anwender
Anwender
Anwender
Live
Film
Spiel
Ein
Aus
Hoch
Mittel
Niedrig
Auto
Aus
Warm
Normal
Kühl
Normal
Normal
Ein
Aus
Ein
Aus
DE
*Dies kann nur abgeändert werden beim Auswählen von Anwender im
Bild-Modus
** Nur für das Farbsystem NTSC (z.B. amerikanische Videobänder)
verfügbar.
4 Gehen Sie mit dem Joystick auf , , / um die Einstellung des
ausgewählten Elements zu ändern, und anschließend drücken Sie
die Taste , um die neue Einstellung zu speichern.
5 Wiederholen Sie die Schritte 3 und 4, um andere Einstellungen
zu ändern.
6 Drücken Sie die Taste , um zum normalen Fernseh-
Bildschirm zurückzukehren.
Schneller Wechsel des Bild-Modus
Der Bild-Modus kann schnell geändert werden, ohne das Menü Bild Einstellungen einzublenden.
1 Drücken Sie wiederholt die Taste der Fernbedienung, zum
direkten Einblenden und Auswählen des gewünschten Bild-Modus
(Live, Anwender, Film oder Spiel.
2 Drücken Sie , um zum normalen Fernseh- Bildschirm
zurückzukehren.
Bild-Modus
Anwender
Spiel
Menü- System
Live
Film
13
Page 48

Menü- System
Einstellen des Tons
Auch wenn der Ton werkseitig eingestellt ist, kann er individuell abgeändert werden.
1 Drücken Sie die Taste der Fernbedienung, um das Menü auf
dem Bildschirm einzublenden.
2 Gehen Sie mit dem Joystick auf , um das Symbol auszuwählen,
und anschließend gehen Sie auf , um in das Menü Ton-
Einstellungen. aufzurufen.
3 Gehen Sie mit dem Joystick auf oder , um das Element
auszuwählen, das Sie umändern wollen, und anschließend gehen Sie
auf .
In der folgenden Tabelle finden Sie Informationen zum Auswählen,
und um die Wirkung jedes Elementes betrachten zu können.
Sound Effekt Anwender: Ohne besondere Toneffekte.
Dolby* V: Dolby Virtual, täuscht den Toneffekt
Dinamisch: „BBE High Definition Sound system”**
Equalizer- Gehen Sie mit dem Joystick auf oder um das
Einstellungen Frequenzband auszuwählen, das Sie ändern
wollen, und anschließend gehen Sie auf oder ,
um es einzustellen. Zuletzt drücken Sie die Taste ,
um die neue Einstellung zu speichern (diese Option steht
Virtueller Effekt Gehen Sie mit dem Joystick auf oder , um den Ton
Balance Links Rechts
Autom.Lautstärke
Sendesignal
vom Sendesignal aufrechterhalten(z.B. bei
Werbesendungen)
Zweiton • Bei Stereosendungen:
Kopfhörer:
Wenn Sie das Fernsehgerät über Kopfhörer hören, können die
l Lautstärke Weniger Mehr
l Zweiton • Bei Stereosendungen:
„Dolby Surround Pro Logic” vor.
verstärkt die Klarheit und die Klangpräsenz des Tons,
indem eine verständlichere Stimmqualität und eine
realere Musikqualität erzeugt wird.
Natürlich: Diese Taste erhöht die Klarheit, die
Einzelheiten und die Klangpräsenz des Tons mit Hilfe
des Systems „BBE High Definition Sound system”
nur zur Verfügung, wenn Sie „Anwender” innerhalb der
Option „Sound Effekt” ausgewählt haben).
des Surround- Effektes zu ändern, sofern Sie „Dolby V”
ausgewählt haben in der Option „Sound Effekt”, und das
Tonsignal des Senders „Dolby Surround” ist
Aus: Die Lautstärke variiert in Abhängigkeit vom
Ein: Die Lautstärke der Kanäle wird unabhängig
Mono
Stereo
• Für zweisprachige Sendungen
Mono (für Mono- Kanal, falls verfügbar)
A (für den Kanal 1)
B (für den Kanal 2)
speziellen Toneffekte nicht wahrgenommen werden
Mono
Stereo
• Für zweisprachige Sendungen
Mono (für Mono- Kanal, falls verfügbar)
A (für den Kanal 1)
B (für den Kanal 2)
PAP (nur wenn PAP aktiviert ist)
**.
Bild-Einstellungen
Bild-Modus
Kontrast
Helligkeit
Farbe
Bildschärfe
Normwerte
AI
dyn.NR
Farbton
Wählen
: Menü Bestätigen:
Ton-Einstellungen
Sound Effekt
Equalizer Einstellungen
Virtueller Effekt
Balance
Autom.Lautstärke
Zweiton
Lautstärke
Zweiton
Wählen: Bestätigen:
Ton-Einstellungen
Equalizer-Modus
Equalizer Einstellungen
Virtueller Effekt
Balance
Autom.Lautstärke
Zweiton
Lautstärke
Zweiton
Modus wählen: Speichern:
Equalizer-Einstellungen
(Anwender)
+
0
–
120 500 1,5K 5 K 10 K
Wahl: Einst: Speichern:OK
Virtueller Effekt
Balance
Autom. Lautstärke
Zweiton
Lautstärke
Zweiton
0
0
0
0
Anwender
Anwender
.
0
Anwender
Dolby V
Dinamisch
Natürlich
Personal
.
0
.
Mono
Normal
Aus
Mono
Mono
Aus
Mono
Mono
Aus
Ein
Ein
Aus
OK
A
B
B
A
14
wird fortgesetzt....
Menü- System
Page 49

Menü- System
4 Gehen Sie mit dem Joystick auf / / oder , um das
Einstellen des ausgewählten Elements zu ändern, und anschließend
drücken Sie , um die neue Einstellung zu speichern.
5 Wiederholen Sie die Schritte 3 und 4, um andere Einstellungen
zu ändern.
6 Drücken Sie die Taste , um zum normalen Fernsehbild
zurückzukehren.
* Dieser Fernseher wurde entworfen, um den Toneffekt „Dolby
Surround“ zu erzeugen, welcher nur mit den beiden
Lautsprechern des Fernsehers den Ton von 4 Lautsprechern
vortäuscht, solange das Tonsignal des Sender „Dolby Surround“
ist.
*In Lizenz von Dolby Laboratories hergestellt. „Dolby“, „Pro
Logic“ und das Doppel- D- Symbol sind Warenzeichen der
Dolby Laboratories.
DE
**„BBE High Definition Sound system” wird hergestellt von Sony
Corporation unter Lizenz von BBE Sound, Inc. BBE ist durch das
Patent Nr. 4,638,258 und No. 4,482,866 aus USA geschützt. Das
Wort “BBE” und das Symbol “BBE” sind Handelsmarken von
BBE Sound, Inc.
Schneller Wechsel des Ton- Modus
Der Ton- Modus kann schnell geändert werden, ohne dass Sie das
Menü Ton-Einstellungen aufrufen müssen.
1 Drücken Sie die Taste der Fernbedienung mehrmals, um
direkten Zugang zu haben zum Auswählen des gewünschten TonModus (Anwender, Dolby V, Dinamisch oder Natürlich).
2 Drücken Sie , um zum normalen Fernsehbildschirm
zurückzukehren.
Equalizer-Modus
Equalizer-Modus
Anwender
Dolby V
Dynamisch
Anwender
Natürlich
Dolby V
Dynamisch
Natürlich
Menü- System
15
Page 50

Bild-Einstellungen
Wählen
: Menü Bestätigen:
Bild-Modus
Kontrast
Helligkeit
Farbe
Bildschärfe
Normwerte
AI
dyn.NR
Farbton
Anwender
Ein
Aus
Normal
Sonderfunktionen
Auto Format
Format-Korrektur
Timer
Kindersicherung
AV3 Ausgang
Normal
Aus
Aus
Aus
TV
Wählen: Bestätigen:
Lautsprecher
Haupt-LS
Lautsprecher
Haupt-LS
Center LS
10 min.
Timer
Kindersicherung
Aus
Ein
AV3 Ausgang
TV
AV1
AV2
AV3
AV4
Auto Format
Aus
Normal
Plus
Format-Korrektur
Aus
Ein
16
Menü- System
Verwenden des Menüs „Sonderfunktionen“
Mit diesem Menü können Sie:
a) Auswählen, ob Sie den Ton direkt vom Gerät oder über einen externen Verstärker hören wollen.
b) Das Bildformat automatisch einstellen.
c) Eine Zeitspanne auswählen, nach der das Gerät automatisch auf den Modus des Bereitschaftsbetriebs (Standby) übergeht.
d) Die Tasten des Geräts sperren, so dass der Betrieb nur mit den Tasten der Fernbedienung möglich ist.
e) Die Ausgangsquelle für die Eurobuchse :3/q3 (SMARTLINK) auswählen. Auf diese Weise können Sie durch die Eurobuchse
eine Sendung aufnehmen, während Sie eine Sendung einer anderen Quelle betrachten (falls Ihr Video über Smartlink verfügt, ist
diese Vorgehensweise nicht notwendig).
1 Drücken Sie die Taste der Fernbedienung, damit das Menü
auf dem Bildschirm erscheint.
2 Gehen Sie mit dem Joystick der Fernbedienung auf , um das
Symbol auszuwählen, und anschließend gehen Sie auf , um
Zugang zu haben zum Menü Sonderfunktionen.
3 Gehen Sie mit dem Joystick auf oder , um das gewählte Menü
auszuwählen, und danach gehen Sie auf .
(Weitere Informationen finden Sie in der unten aufgeführten Tabelle,
um die Wirkung jeder Option zu sehen).
4 Gehen Sie mit dem Joystick auf oder , um die Einstellung der
ausgewählten Option umzuändern, und danach drücken Sie die
Taste zum Speichern.
5 Drücken Sie die Taste , um zum normalen Fernsehbildschirm
zurückzukehren.
Sonderfunktionen Wirkung/Vorgang
Lautsprecher Haupt-LS (Ton des Geräts)
Auto Format Aus: Bildformat wird nicht automatisch angepaßt.
(nur bei Normal: Bildformat wird nicht automatisch
Antennensignal) angepaßt, und zwar je nach den vomSender
so daß keine dunklen Ränder auf dem
Fernsehschirm erscheinen.
Format-Korrektur
(nur wenn AutoFormat aur
“Normal” oder
“Plus” gesetzt ist)
Timer Aus
automatisch auf dem Bildschirm.
Abschalten anzuzeigen.
Kindersicherung Aus (Normaler Modus)
AV3-Ausgang TV (Audio / Video- Signal der Antenne)
vorn am Gerät angebracht ist).
Center LS (Ton vom externen Verstärker )
ausgestrahlen Informationen.
Plus: Das Gerät paßt die Bildgröße automatisch an,
Aus: 4:3/14:9 ist immer ausgewählt.
Ein: Bei 4:3/14:9-Sendungen wird automatisch der
Modus Smart ausgewählt.
10 min.
20 min.
.
.
.
90 min.
• Eine Minute bevor das Gerät Fernseher zum
Bereitschaftsbetrieb (Standby) übergeht,
erscheint die verbleibende Restzeit
• Während Sie Fernsehen, drücken Sie die Taste
, um die verbleibende Restzeit bis zum
• Um das Gerät wieder vom Bereitschaftsbetrieb
(Standby) aus einzuschalten, drücken Sie die
Taste TV der Fernbedienung.
Ein (die Tasten des Geräts funktionieren nicht; es
funktioniert nur die Fernbedienung)
(Audio / Video- Signal der Eurobuchse
AV1
:1/ 1).
AV2 (Audio / Video- Signal der Eurobuchse
:
2/ 2).
AV3 (Audio / Video- Signal der Eurobuchse
:
3/q3 (SMARTLINK)).
AV4 (Audio / Video- Signal der Buchse … 4, die
Wenn Sie einen Dekoder angeschlossen haben,
vergessen Sie nicht, nochmals in „TV“ „AV3Ausgang“ auszuwáhlen zur korrekten
Dekodierung.
Menü- System
Page 51

Menü- System
Manuelle Abstimmung des Fernsehgerätes
Verwenden Sie diese Funktion, um einen nach dem anderen der Kanäle (Fernsehsender) oder einen
Videoeingang in der von Ihnen gewünschten Programm- Reihenfolge abzustimmen.
1 Drücken Sie die Taste der Fernbedienung, um das Menü auf
dem Bildschirm einzublenden.
2 Gehen Sie mit dem Joystick der Fernbedienung auf , um das
Symbol zu wählen, und danach, gehen Sie auf , um das Menü
Grundeinstellungen aufzurufen.
3Gehen Sie mit dem Joystick auf oder , um Manuelle
Einstellungen auszuwählen, und anschließend gehen Sie auf .
4 Gehen Sie mit dem Joystick auf oder , um Manuell
Abspeichern auszuwählen, und anschließend gehen Sie auf .
5 Gehen Sie mit dem Joystick auf oder , um die Programm-
Nummer (Position) auszuwählen, unter der Sie einen
Fernsehsender oder den Videokanal ablegen wollen; (für den
Videokanal empfehlen wir Ihnen, dass Sie die Programm- Nummer
„0“ auswählen). Gehen Sie zweimal mit dem Joystick auf , um die
Spalte NORM hervorzuheben.
6 Gehen Sie mit dem Joystick auf oder , um das Fernseh-
Empfangs-System auszuwählen und den Videokanal (B/G für
Westeuropa, L für Frankreich, I für Großbritannien oder D/K für
Osteuropa) oder eine externe Eingangsquelle EXT. Anschließend
gehen Sie mit dem Joystick auf , um die Spalte KA
hervorzuheben.
7 Gehen Sie mit dem Joystick auf oder , um den Kanaltyp „C“
für Standardkanäle (für Fernsehsender oder Videokanal), „S“ für
Kabelkanäle oder „F“ für direkte Frequenz- Eingänge
auszuwählen. Anschließend gehen Sie mit dem Joystick auf .
8 a) Wenn Sie die Kanalnummer des Fernsehsenders, des
Videokanal- Signals oder der Frequenz kennen, drücken Sie die
Zahlentasten, um diese Nummer direkt einzugeben.
Anschließend drücken Sie , zum Speichern.
b) Wenn Sie die Kanalnummer nicht kennen, gehen Sie mit dem
Joystick auf , um SUCHE auszuwählen, und das Gerät beginnt
automatisch den darauffolgenden Fernsehsender- Kanal oder
den Kanal des Videosignals suchen. Wenn Sie diesen nicht
speichern wollen, gehen Sie mit dem Joystick auf , um einen
anderen Kanal zu suchen. Wenn Sie den Kanal, den Sie speichern
wollen, gefunden haben, drücken Sie .
c) Für externe Eingangsquellen (EXT), gehen Sie mit dem Joystick
auf , um die Eingangsquelle auszuwählen an der Sie die
Anlage (AV1, AV2, AV3 oder AV4) angeschlossen haben.
Anschließend drücken Sie zum Speichern.
Bild-Einstellungen
Bild-Modus
Kontrast
Helligkeit
Farbe
Bildschärfe
Normwerte
AI
dyn.NR
Farbton
Wählen
: Menü Bestätigen:
Grundeinstellungen
Autom. Abspeichern
Programme Ordnen
NexTView-Auswahl
AV-Abspeicherung
Manuelle Einstellungen
Wählen:
Grundeinstellungen
Autom. Abspeichern
Programme Ordnen
NexTView-Auswahl
AV-Abspeicherung
Manuelle Einstellungen
Wählen: Best ätigen:
Manuelle Einstellungen
Sprache/Land
Manuell Abspeichern
Zusatzfunktionen
RGB-Einstellung
Sicherheitscode
Demo-Modus
Wählen: Bestätigen:
Manuell Abspeichern
PROG KANORMAUSL NAME
1
Aus
2
Aus
3
Aus
4
Aus
5
Aus
6
Aus
7
Aus
8
Aus
9
Aus
10
Aus
11
Aus
Wählen: Bestätigen:
PROG KANORM
AUSL NAM E
Aus
1
PROG NORM
1 B/G
PROG NOR M
1 B/G
PROG KANORM
3 EXT
B/G
L
I
D/K
EXT
AUSL NAME
Aus
AUSL NAME
Aus
AUSL NAME
Aus
B/G
B/G
C
S
F
KA
KA
C
AV1
AV2
AV3
AV4
Anwender
Start
- - - - - - -
Suchlauf:
- - - - - - -
- - - - - - -
C09
C10
- -
03
SUCHE
Ein
Aus
Normal
DE
ARD
BBC
9 Wiederholen Sie die Schritte 4 bis 8 a), b) oder c), zur
Feinabstimmung und Speichern von weiteren Kanälen.
10 Drücken Sie die Taste , um zum normalen
Fernsehbildschirm zurückzukehren.
Das Gerät ist jetzt betriebsbereit.
Menü- System
17
Page 52

Menü- System
Eingeben eines Namens für einen Sender
Normalerweise erhält man die Namen der Kanäle (Fernsehsender) automatisch durch den Videotext, falls er verfügbar ist. Sie
können jedoch einem Kanal oder einem Videoeingangs- Signal auch einen Namen mit höchstens 5 Zeichen (Buchstaben oder
Zahlen) zuweisen. Auf diese Weise können Sie den Kanal (Fernsehsender) oder die Videoquelle, die auf dem Bildschirm erscheint,
auf einfache Art identifizieren.
1 Drücken Sie die Taste der Fernbedienung zum Aufrufen
des Menüs auf dem Bildschirm.
2 Gehen Sie mit dem Joystick auf , um das Symbol
auszuwählen, und anschließend gehen Sie auf , um das Menü
Grundeinstellungen aufzurufen.
3 Gehen Sie mit dem Joystick auf oder , um Manuelle
Einstellungen auszuwählen, und anschließend gehen Sie auf .
4 Gehen Sie mit dem Joystick auf oder , um Manuell
Abspeichern auszuwählen, und anschließend gehen Sie auf .
5 Gehen Sie mit dem Joystick auf oder , um die Programm-
Nummer mit dem Kanal, den Sie benennen wollen, auszuwählen.
6 Gehen Sie mit dem Joystick mehrmals auf bis das erste Element
der Spalte NAME hervorgehoben wird.
Bild-Einstellungen
Bild-Modus
Kontrast
Helligkeit
Farbe
Bildschärfe
Normwerte
AI
dyn.NR
Farbton
Wählen
: Menü Bestätigen:
Grundeinstellungen
Autom. Abspeichern
Programme Ordnen
NexTView-Auswahl
AV-Abspeicherung
Manuelle Einstellungen
Wählen:
Grundeinstellungen
Autom. Abspeichern
Programme Ordnen
NexTView-Auswahl
AV-Abspeicherung
Manuelle Einstellungen
Wählen: Best ätigen:
Manuelle Einstellungen
Sprache/Land
Manuell Abspeichern
Zusatzfunktionen
RGB-Einstellung
Sicherheitscode
Demo-Modus
Wählen: Bestätigen:
Manuell Abspeichern
PROG KANORMAUSL NAME
1
Aus
2
Aus
3
Aus
4
Aus
5
Aus
6
Aus
7
Aus
8
Aus
9
Aus
10
Aus
11
Aus
Wählen: Bestätigen:
PROG NOR M
AUSL NAM E
Aus
1 B/G
B/G
B/G
KA
C 03
Anwender
Start
- - - - - - -
Suchlauf:
- - - - - - -
- - - - - - -
C09
C10
A
ARD
BBC
Normal
Ein
Aus
18
7 Gehen Sie mit dem Joystick auf oder , um einen Buchstaben,
eine Zahl, „+“ oder ein Leerzeichen auszuwählen und danach
gehen Sie auf , um dieses Zeichen zu bestätigen. Wählen Sie die
restlichen vier Zeichen auf die selbe Weise aus.
8 Nachdem Sie alle Zeichen ausgewählt haben, drücken Sie die Taste
.
9 Wiederholen Sie die Schritte 5 bis 8, wenn Sie andere Kanäle
benennen wollen.
10 Drücken Sie die Taste , um zum normalen
Fernsehbildschirm zurückzukehren.
Wenn Sie einen benannten Kanal auswählen, erscheint der Name einige
Sekunden lang auf dem Bildschirm.
Menü- System
Page 53

Menü- System
Bild-Einstellungen
Wählen
: Menü Bestätigen:
Bild-Modus
Kontrast
Helligkeit
Farbe
Bildschärfe
Normwerte
AI
dyn.NR
Farbton
Anwender
Ein
Aus
Normal
Grundeinstellungen
Autom. Abspeichern
Programme Ordnen
NexTView-Auswahl
AV-Abspeicherung
Manuelle Einstellungen
Wählen:
Suchlauf:
Start
- - - - - - -
Grundeinstellungen
Autom. Abspeichern
Programme Ordnen
NexTView-Auswahl
AV-Abspeicherung
Manuelle Einstellungen
- - - - - - -
Wählen: Best ätigen:
Manuelle Einstellungen
Sprache/Land
Manuell Abspeichern
Zusatzfunktionen
RGB-Einstellung
Sicherheitscode
Demo-Modus
- - - - - - -
Wählen: Bestätigen:
PROG NORMAUSL NAME
1 B/G
KA
C 09
ARD
Aus
Ein
Überspringen von Programm- Positionen
Es ist möglich dieses Gerät so zu programmieren, dass nicht gewünschte Programm- Nummern übersprungen werden, wenn das
Auswählen mit den Tasten PROG + / - erfolgt. Wenn Sie zu einem späteren Zeitpunkt die übersprungene
Programm- Nummer wiederbekommen wollen, gehen Sie wiederum so vor, wie anschließend angegeben wird, aber wählen Sie Aus,
anstatt Ein bei Schritt Nr. 6.
1 Drücken Sie die Taste der Fernbedienung zum Aufrufen des
Menüs auf dem Bildschirm.
2 Gehen Sie mit dem Joystick auf , um das Symbol auszuwählen,
und anschließend gehen Sie auf , um das Menü
Grundeinstellungen aufzurufen.
3 Gehen Sie mit dem Joystick auf oder , um Manuelle
Einstellungen auszuwählen, und anschließend gehen Sie auf .
DE
4 Gehen Sie mit dem Joystick auf oder , um Manuell Abspeichern
auszuwählen, und anschließend gehen Sie auf .
5 Gehen Sie mit dem Joystick auf oder , um die Programmposition
auszuwählen, die Sie überspringen wollen, und anschließend gehen
Sie auf , um die Spalte AUSL aufzurufen.
6 Gehen Sie mit dem Joystick auf , um Ein, und anschließend
drücken Sie zum Speichern.
7 Wiederholen Sie die Schritte 5 und 6, um andere Programm-
Positionen auszulassen.
8 Drücken Sie die Tastee , um zum normalen Fernsehbildschirm
zurückzukehren.
Wenn Sie einen Kanal (Fernsehsender) auswählen mit der Taste PROG
+ / -, erscheint dieser nicht.
Dieser Kanal kann jedoch ausgewählt werden, indem mit Hilfe der
Nummerntasten die entsprechende Programm- Nummer gedrückt wird.
Menü- System
19
Page 54

Menü- System
Verwenden der Funktion „Zusatzfunktionen“
Mit dieser Funktion können Sie:
a) Individuell die Intensität eines Sendesignals abschwächen, wenn das Signal der Ortsantenne sehr intensiv ist (Streifen im Bild).
b)Individuell die Lautstärke jedes Kanals einzustellen
c) Auch manuell die Feinabstimmung vornehmen, um einen besseren Bildempfang zu erhalten, wenn dieser Bildfehler aufweist,
auch wenn die automatische Feinabstimmung (AFT) immer aktiviert ist.
d) Den AV- Ausgang feinabstimmen für die Programm- Positionen mit verschlüsselten Signalen, wie z.B. den Dekoder eines
Gebühren- Fernsehprogramms. Auf diese Weise speichert ein an das Gerät angeschlossenes Videogerät das unverschlüsselte
Signal.
1 Drücken Sie die Taste der Fernbedienung, damit das Menü
auf dem Bildschirm erscheint.
2 Gehen Sie mit dem Joystick auf , um das Symbol
auszuwählen, und anschließend gehen Sie auf , um das Menü
Grundeinstellungen aufzurufen.
Bild-Einstellungen
Bild-Modus
Kontrast
Helligkeit
Farbe
Bildschärfe
Normwerte
AI
dyn.NR
Farbton
Wählen
: Menü Bestätigen:
Anwender
Normal
Ein
Aus
3 Gehen Sie mit dem Joystick auf oder , um Manuelle
Einstellungen auszuwählen, und anschließend gehen Sie auf .
4 Gehen Sie mit dem Joystick auf oder , um Zusatzfunktionen
auszuwählen, und anschließend gehen Sie auf .
5 Gehen Sie mit dem Joystick auf oder , um die entsprechende
Programm- Nummer auszuwählen, und anschließend gehen Sie
mehrmals mit ihm auf um folgende Auswahl vorzunehmen:
a) ANT (Dämpfer RF)
b) VOL (individuelle Lautstärke)
c) AFT (automatische Feinabstimmung)
d) DEKODER
6 a) ANT
Gehen Sie mit dem Joystick auf , um Ein und anschließend
drücken Sie . Wiederholen Sie die Schritte 5 und 6 a), um
weitere Kanäle abzuschwächen.
b) VOL
Gehen Sie mit dem Joystick auf oder , um die Lautstärke des
Kanals zwischen –7 und +7 einzustellen, und anschließend
drücken Sie die Taste . Wiederholen Sie die Schritte 5 und 6 b),
um die Lautstärke weitere Kanäle einzustellen.
c) AFT
Gehen Sie mit dem Joystick auf oder , um das Niveau der
Kanalfrequenz zwischen – 15 und + 15 einzustellen, und
anschließend drücken Sie die Taste . Wiederholen Sie die
Schritte 5 und 6 c), um die Feinabstimmung weiterer Kanäle
vorzunehmen.
d) DEKODER
Gehen sie mit dem Joystick auf oder , um AV1 auszuwählen
(für einen Dekoder, der an die Eurobuchse :1/ 1
angeschlossen ist oder an AV3 ( für einen Dekoder, der an die
Eurobuchse :3/q3 (SMARTLINK) angeschlossen)) ist, und
anschließend drücken Sie . Wiederholen Sie die Schritte 5 und
6 d), um den AV1- oder AV3- Ausgang auszuwählen bei weiteren
Programm- Positionen.
Wenn Sie einen Dekoder an ein Videogerät anschließen, das
hinten am Gerät an eine Eurobuchse :1/ 1 oder
:3/q3 (SMARTLINK) angeschlossen ist, erscheint das
Bild dieses Dekoders unter dieser Programm-Nummer.
Grundeinstellungen
Autom. Abspeichern
Programme Ordnen
NexTView-Auswahl
AV-Abspeicherung
Manuelle Einstellungen
Wählen:
Grundeinstellungen
Autom. Abspeichern
Programme Ordnen
NexTView-Auswahl
AV-Abspeicherung
Manuelle Einstellungen
Wählen: Best ätigen:
Manuelle Einstellungen
Sprache/Land
Manuell Abspeichern
Zusatzfunktionen
RGB-Einstellung
Sicherheitscode
Demo-Modus
Wählen: Bestätigen:
Zusatzfunktionen
PROG AFTVOLANT DEKODER
1
Aus
2
Aus
3
Aus
4
5
6
7
8
9
10
11
Wählen: Bestätigen:
PROG AFTVOLANT DEKODER
Aus
1
Ein
PROG AFTVO LANT DEKODER
1 Ein
PROG AFTVOL ANT D EKODER
1 Ein -5
PROG AFTVOLANT DE KODER
1 Ein -5 2
Start
- - - - - - -
Suchlauf:
- - - - - - -
- - - - - - -
0
Aus
Ein
0
Aus
Ein
0
Aus
Ein
- 5
2
Aus
AV1
AV3
20
7 Drücken Sie die Taste , um zum normalen Fernsehbildschirm
zurückzukehren.
Das Gerät ist jetzt betriebsbereit.
Menü- System
Page 55

Menü- System
Eingabe Ihrer persönlichen Kennzeichnung
Sie können dem Gerät einen Sicherheitscode mit höchstens 11 Zeichen (Buchstaben oder Nummern) zuordnen. Das hilft bei der
Wiedererlangung im Falle eines Diebstahls.
Dieser Code kann nur einmal eingegeben werden !
Stellen Sie sicher, dass Sie ihn aufschreiben, z.B. in diese Bedienungsanleitung, um ihn nicht zu vergessen !
1 Drücken Sie die Taste der Fernbedienung, damit das Menü
auf dem Bildschirm erscheint.
2 Gehen Sie mit dem Joystick auf , um das Symbol auszuwählen,
und anschließend gehen Sie auf , um das Menü
Grundeinstellungen aufzurufen.
3 Gehen Sie mit dem Joystick auf oder , um Manuelle
Einstellungen auszuwählen, und anschließend gehen Sie auf .
4 Gehen Sie mit dem Joystick auf oder , um Sicherheitscode
auszuwählen, und anschließend gehen auf .
5 Gehen Sie mit dem Joystick auf oder , um einen Buchstaben,
eine Nummer, „+“ oder eine Leerstelle auszuwählen, und
anschließend gehen Sie auf , um dieses Zeichen zu bestätigen.
Wählen Sie die restlichen 10 Zeichen auf die selbe Weise aus.
Bild-Einstellungen
Bild-Modus
Kontrast
Helligkeit
Farbe
Bildschärfe
Normwerte
AI
dyn.NR
Farbton
Wählen
Grundeinstellungen
Autom. Abspeichern
Programme Ordnen
NexTView-Auswahl
AV-Abspeicherung
Manuelle Einstellungen
Wählen:
Grundeinstellungen
Autom. Abspeichern
Programme Ordnen
NexTView-Auswahl
AV-Abspeicherung
Manuelle Einstellungen
Wählen: Best ätigen:
Manuelle Einstellungen
Sprache/Land
Manuell Abspeichern
Zusatzfunktionen
RGB-Einstellung
Sicherheitscode
Demo-Modus
Wählen: Bestätigen:
Manuelle Einstellungen
Sprache/Land
Manuell Abspeichern
Zusatzfunktionen
RGB-Einstellung
Sicherheitscode
Demo-Modus
Wahl A-Z, 0-9: Speichern: OK
Anwender
: Menü Bestätigen:
Start
- - - - - - -
Suchlauf:
- - - - - - -
- - - - - - -
A----------
Normal
Ein
Aus
DE
6 Wenn Sie alle Zeichen ausgewählt haben, drücken Sie . Auf dem
Bildschirm erscheint automatisch ein neues Menü, das fragt, ob Sie
sicher sind den eingegebenen Code speichern zu wollen.
7 a) Wenn Sie diesen Code nicht speichern wollen, gehen Sie mit dem
Joystick auf und wiederholen Sie die Schritte 4 bis 6, um einen
neuen Code einzugeben.
b) Wenn Sie diesen Code speichern wollen, drücken Sie die Taste
.
Erinnern Sie sich daran, dass Sie diesen Code nur einmal
eingeben können.
8 Drücken Sie die Taste , um zum normalen Fernsehbildschirm
zurückzukehren.
Wenn Sie das Menü Manuelle Einstellungen aufrufen bei der Option
Sicherheitscode , wird immer der Code erscheinen, den Sie eingegeben
haben und Sie können diese Option nie mehr einblenden.
Sind Sie sicher?
Speichern: OK Abbrechen:
Menü- System
21
Page 56

Menü- System
Demonstration der verschiedenen Funktionen
Diese Funktion bietet eine Gesamt- Perspektive einiger der Funktionen, die das Gerät aufweist.
.
1 Drücken Sie die Taste der Fernbedienung, damit das Menü
auf dem Bildschirm erscheint.
2 Gehen Sie mit dem Joystick auf , um das Symbol auszuwählen,
und anschließend gehen Sie auf , um das Menü
Grundeinstellungen aufzurufen.
3 Gehen Sie mit dem Joystick auf oder , um Manuelle
Einstellungen auszuwählen, und anschließend gehen Sie auf .
4 Gehen Sie mit dem Joystick auf oder , um Demo-Modus
auszuwählen, und anschließend gehen Sie auf , damit die
Demonstration beginnt.
Auf dem Bildschirm erscheint eine Reihenfolge mit der Mehrzahl
der Funktionen, die das Gerät besitzt.
Bild-Einstellungen
Bild-Modus
Kontrast
Helligkeit
Farbe
Bildschärfe
Normwerte
AI
dyn.NR
Farbton
Wählen
: Menü Bestätigen:
Grundeinstellungen
Autom. Abspeichern
Programme Ordnen
NexTView-Auswahl
AV-Abspeicherung
Manuelle Einstellungen
Wählen:
Grundeinstellungen
Autom. Abspeichern
Programme Ordnen
NexTView-Auswahl
AV-Abspeicherung
Manuelle Einstellungen
Wählen: Best ätigen:
Manuelle Einstellungen
Sprache/Land
Manuell Abspeichern
Zusatzfunktionen
RGB-Einstellung
Sicherheitscode
Demo-Modus Start
Wählen: Bestätigen:
Suchlauf:
Anwender
Normal
Start
- - - - - - -
- - - - - - -
- - - - - - -
Ein
Aus
Anmerkung:
Drücken Sie die Taste der Fernbedienung, um die
Demonstration zu stoppen, und um zum normalen
Fernsehbildschirm zurückzukehren.
22
Menü- System
Page 57

Menü- System
Einstellen der waagrechten Zentrierung des Bildes für eine RGB- Quelle
Wenn eine RGB- Quelle, wie ein DVD- Laufwerk (digitales Wiedergabegerät von Videoplatten) an die Eurobuchse :1/ 1 oder
:2/
2 angeschlossen wird, ist es u.U. notwendig, die waggrechte Zentrierung einzustellen.
1 Drücken Sie die Taste der Fernbedienung mehrmals bis das
Symbol …1 auf dem Bildschirm erscheint.
• Das Symbol …1 gilt für Anlagen, die an die Eurobuchse
:1/ 1 angeschlossen sind.
• Das Symbol …2 gilt für Anlagen, die an die Eurobuchse
:2/ 2 angeschlossen sind.
2 Drücken Sie die Taste der Fernbedienung, damit das Menü
auf dem Bildschirm eingeblendet wird.
3 Gehen Sie mit dem Joystick auf , um das Symbol auszuwählen,
und anschließend gehen Sie auf , um das Menü
Grundeinstellungen aufzurufen.
4 Gehen Sie mit dem Joystick auf oder , um Manuelle
Einstellungen auszuwählen, und anschließend gehen Sie auf .
… 1
Bild-Einstellungen
Bild-Modus
Kontrast
Helligkeit
Farbe
Bildschärfe
Normwerte
AI
dyn.NR
Farbton
Wählen
Grundeinstellungen
Autom. Abspeichern
Programme Ordnen
NexTView-Auswahl
AV-Abspeicherung
Manuelle Einstellungen
Wählen:
Grundeinstellungen
Autom. Abspeichern
Programme Ordnen
NexTView-Auswahl
AV-Abspeicherung
Manuelle Einstellungen
Wählen: Best ätigen:
Anwender
Normal
: Menü Bestätigen:
Start
- - - - - - -
Suchlauf:
- - - - - - -
Ein
Aus
DE
5 Gehen Sie mit dem Joystick auf oder , um RGB-Einstellung
auszuwählen, und anschließend gehen Sie auf .
6 Gehen Sie mit dem Joystick auf , um Position auszuwählen, und
anschließend gehen Sie auf oder , um die Bildmitte zwischen
–10 und +10 einzustellen. Drücken Sie die Taste zum Speichern.
7 Drücken Sie die Taste , um zum normalen Fernsehbildschirm
zurückzukehren.
Manuelle Einstellungen
Sprache/Land
Manuell Abspeichern
Zusatzfunktionen
RGB-Einstellung
Sicherheitscode
Demo-Modus
Wählen: Bestätigen:
RGB-Einstellung
Position
Pos. einst.: Speichern: OK
- - - - - - -
O
Menü- System
23
Page 58

Menü- System
Erkennen und Auswahl des Bildschirm- Formats der Eingangsquellen
Diese Funktion erlaubt Ihnen die Art des Formats des Bildes der frei wählbaren Anlage auszuwählen, die an dieses Gerät
angeschlossen ist, sowie dem besagten Eingang einen Namen mit höchstens fünf Zeichen (Buchstaben oder Nummern) zuzuweisen.
.
1 Drücken Sie die Taste der Fernbedienung, damit das Menü
auf dem Bildschirm erscheint.
2 Gehen Sie mit dem Joystick auf , um das Symbol auszuwählen,
und anschließend gehen Sie auf , um das Menü
Grundeinstellungen aufzurufen.
3 Gehen Sie mit dem Joystick auf oder , um AV-Abspeicherung
auszuwählen, und anschließend gehen Sie auf .
4 Gehen Sie mit dem Joystick auf oder , um das Eingangs- Signal
auszuwählen.
Anschließend gehen Sie mit ihm auf .
5 Gehen Sie zur Auswahl mit dem Joystick auf oder .
Aus: Bildformat wird nicht automatisch angepaßt.
Normal: Bildformat wird nicht automatisch angepaßt, und zwar
je nach den vomSender ausgestrahlen Informationen.
Plus: Das Gerät paßt die Bildgröße automatisch an, so daß
keine dunklen Ränder auf dem Fernsehschirm
erscheinen (wie im kapitel „Einstellen des
Bildschirmforats“).
Bild-Einstellungen
Bild-Modus
Kontrast
Helligkeit
Farbe
Bildschärfe
Normwerte
AI
dyn.NR
Farbton
Wählen
Grundeinstellungen
Autom. Abspeichern
Programme Ordnen
NexTView-Auswahl
AV-Abspeicherung
Manuelle Einstellungen
Wählen:
Grundeinstellungen
Autom. Abspeichern
Programme Ordnen
NexTView-Auswahl
AV-Abspeicherung
Manuelle Einstellungen
Wählen: Best ätigen:
AV-Abspeicherung
EINGANG
AV1
AV2
AV3
AV4
Wählen: Bestätigen:
AV-Abspeicherung
EINGANG NAM E
AV1
AV2
AV3
AV4
Wahl:
AV-Abspeicherung
Anwender
: Menü Bestätigen:
Suchlauf:
- - - - - - -
AUTO-FORMAT
NAME
Aus
VIDEO
Aus
Normal
VIDEO
Plus
VIDEO
AUTO-FORMAT
Aus
VIDEO
Aus
Normal
VIDEO
Plus
VIDEO
Weither: Speich.: OK
Ein
Aus
Normal
Start
- - - - - - -
24
Menü- System
Danach gehen Sie mit dem Joystick auf .
6 Mit dem ersten Element der hervorgehobenen Säule NAME, gehen
Sie mit dem Joystick auf oder , um einen Buchstaben, eine
Nummer, „+“ oder eine Leerstelle auszuwählen, und anschließend
gehen Sie mit ihm auf , um dieses Zeichen zu bestätigen. Wählen
Sie die übrigen vier Zeichen genau so aus.
7 Wenn Sie alle Zeichen ausgewählt haben, drücken Sie .
8 Wiederholen Sie die Schritte von 4 bis 7, wenn Sie das Bild- Format
auswählen oder andere Eingangs- Signale benennen wollen.
9 Drücken Sie die Taste , um zum normalen Fernsehbildschirm
zurückzukehren.
Immer wenn Sie das Zusatzgerät auswählen, dem Sie für das Eingangs Signal einen Namen zugeordnet haben, erscheint dieser Name einige
Sekunden lang auf dem Bildschirm
AUTO-FORMAT
EINGANG NAME
Aus
AV1
AV2
AV3
AV4
Wahl A-Z, 0-9: Speichern: OK
Aus
Normal
Plus
IDEO
V
VIDEO
VIDEO
Page 59

Menü- System
Mehrfach-Bilder (Multi PIP)
Diese Funktion (Multi PIP aus dem Englischen: Multi Picture in Picture) zeigt eine Folge von 12 statischen Bildern und ein
dreizehntes in Bewegung. Es kann der Kanal ausgewählt werden, den man sowohl im Modus Komplettbildschirm oder im Modus
Mehrfach-Bilder betrachten will.
03 05
1 Drücken Sie die Taste der Fernbedienung, um den Modus der
Mehrfach- Bilder auszuwählen. Auf dem Bildschirm erscheinen 13
Programm- Nummern, wobei in der Mitte das Programm gezeigt
wird, das Sie gerade betrachtet haben.
2 Gehen Sie mit dem Joystick auf / / oder , damit Sie sich
innerhalb der 13 Programme bewegen können.
Wenn Sie auf dem Bildschirm auf PROG -/+ drücken, werden
13 vorherige oder nachfolgende Programme erscheinen.
3 Drücken Sie , um den umrandeten Kanal auszuwählen. Dieser
Kanal verschiebt sich in die Mitte.
4 Drücken Sie die Taste , um zum normalen Fernsehbildschirm
zurückzukehren.
02
13
12
11 09 08
04
01 06
07
10
2 Bilder auf dem Bildschirm (PAP)
Diese Funktion (PAP, auf Englisch: Picture And Picture) unterteilt den Bildschirm in zwei Teile, um gleichzeitig zwei Kanäle sehen
zu können (falls gewünscht, einer davon ein Bild eines Videokanals).
Der Ton des linken Bildschirms kommt von den Lautsprechern des Geräts und der des rechten Bildschirms kann über die
Kopfhörer gehört werden.
PAP- Einschalten und – Ausschalten
Drücken Sie die Taste der Fernbedienung, um die zwei Bildschirme
in Format 4:3 zu betrachten; drücken Sie nochmals, um dem PAPModus auszublenden und zum normalen Bildschirm zurückzukehren.
Auswählen der PAP- Quelle
1 Zum Wechseln des linken Bildschirms:
Wenn Sie sich im PAP- Modus befinden, drücken Sie die
Nummerntasten der Fernbedienung (um einen Fernsehkanal
auszuwählen) oder wählen Sie die Taste …, (um einen Videoeingang
auszuwählen).
2 Zum Wechseln des rechten Bildschirms:
Wenn Sie sich im PAP- Modus befinden, drücken Sie die Taste
der Fernbedienung. Wenn das Symbol unten rechts auf dem
Bildschirm erscheint, drücken Sie die Nummerntasten (um einen
Fernsehkanal auszuwählen) oder drücken Sie die Taste , (um
einen Videoeingang auszuwählen).
Austausch von Bildschirmen
Wenn Sie sich im PAP- Modus befinden, drücken Sie die Taste der
Fernbedienung, um die zwei Bildschirme gegenseitig auszutauschen.
DE
Größenerweitern der Bildschirme
Wenn Sie sich im PAP- Modus befinden, gehen Sie mit dem Joystick
mehrmals auf o
ändern.
der , um die Größe der beiden Bildschirme zu
Ton- Auswahl des rechten Bildschirms
Wenn Sie sich im PAP- Modus befinden, konsultieren Sie das Kapitel
„Ton- Einstellungen“ dieser Bedienungsanleitungen und stellen Sie„l
Zweiton“ in „PAP“ ein.
Menü- System
25
Page 60

Videotext
Videotext
Der Videotext ist ein Informationsdienst, der von den meisten Fernsehsendern übertragen wird. Die Seite der Inhaltsangabe
des Videotextdienstes (im Allgemeinen die Seite 100) stellt Information zur Verfügung, wie dieser Dienst verwendet wird.
Stellen Sie sicher, dass ein Fernsehkanal mit einem starken Signal verwendet wird, da sich im gegenteiligen Fall Fehler im Videotext
ergeben könnten.
Ein- und Ausschalten des Videotextes
1 Wählen Sie den Fernsehkanal aus, der den Videotextdienst überträgt,
den Sie sehen wollen
2 Drücken Sie einmal die Taste der Fernbedienung, um
gleichzeitig das Fernsehbild und den Videotext zu sehen. Der
Bildschirm teilt sich auf in zwei Teile mit dem Fernsehprogramm
rechts und der Videotextseite links.
Wenn Sie sich gleichzeitig im Modus Fernsehbild und Videotext
befinden, drücken Sie die Taste , und anschließend
drücken Sie die Tasten PROG + / -, um den Kanal des
Fernsehbildschirms zu wechseln. Gehen Sie mit dem Joystick auf
oder , um die Größe des Fernsehbildschirms zu ändern.
Drücken Sie die Taste nochmals, um zum normalen
Videotext- Empfang zurückzukehren.
3 Drücken Sie zweimal, um nur den Videotext aufzurufen.
4 Drücken Sie dreimal, um den Videotext und das Fernsehbild zu
überlappen.
5 Drücken Sie ein viertes Mal oder , um den Videotextdienst
zu verlassen.
Auswählen einer Videotext- Seite
Geben Sie die drei Ziffern der Seitennummer, die sie sehen wollen, ein,
indem Sie die Nummerntasten der Fernbedienung verwenden. Wenn Sie
eine Fehleingabe machen, wählen Sie drei beliebige Ziffern aus, und
wiederholen Sie anschließend die Eingabe der richtigen Seitennummer.
TELETEXT
Index
Programme
News
Sport
Weather
TELETEXT
TELETEXT
TELETEXT
TELETEXT
TELETEXT
TELETEXT
TELETEXT
TELETEXT
Index
Index
Index
Index
Index
Index
Index
Index
Programme
Programme
Programme
Programme
Programme
Programme
Programme
Programme
News
News
News
News
News
News
News
News
Sport
Sport
Sport
Sport
Sport
Sport
Sport
Sport
Weather
Weather
Weather
Weather
Weather
Weather
Weather
Weather
TELETEXT
01
Index
Programme
News
Sport
Weather
25
153
101
98
01
25
25
25
25
25
25
25
25
153
153
153
153
153
153
153
153
101
101
101
101
101
101
101
101
98
98
98
98
98
98
98
98
25
153
101
98
26
Videotext
Auswählen der darauffolgenden oder
vorausgegangenen Seite
Drücken Sie die Tasten (PROG+) oder (PROG-) der
Fernbedienung, um die darauffolgende oder vorangehende Seite
auszuwählen.
Auswählen einer Seitenaufteilung
Eine Videotext- Seite kann ihrerseits wiederum aus mehreren
Aufteilungen bestehen. In diesen Fällen erscheint nach einigen
Sekunden eine Informationslinie am unteren Teil des Bildschirms mit
der Anzahl der Seitenaufteilungen, die diese Seite enthält. Gehen Sie mit
dem Joystick auf oder , um die Seitenaufteilung auszuwählen.
Anhalten einer Seite
Drücken Sie die Taste , um eine Seite zurückzuhalten und zu
vermeiden, dass Sie wechselt. Drücken Sie die Taste nochmals, um die
Sperre zu löschen.
Anzeige der Seite der Inhaltsangabe
Drücken Sie die Taste , um die Seite mit der Inhaltsangabe (im
Allgemeinen Seite 100) einzublenden.
Fastext
(Dieser ist nur verfügbar, wenn der Fernsehsender Fastext- Signale
sendet).
Wenn Fastext gesendet wird, erscheint unten auf der Videotextseite ein
Menü mit Farbcodes. Drücken Sie die farbige Taste (rot, grün, gelb oder
blau) der Fernbedienung, um die entsprechende Seite direkt
einzublenden.
Aufruf einer Seite
1 Drücken Sie die Nummerntasten der Fernbedienung, um eine Seite
des Videotextes, die mehrere Seiten- Nummern hat (z.B. die Seite der
Inhaltsangabe), auszuwählen.
2 Drücken Sie die Taste .
3 Gehen Sie mit dem Joystick auf oder , um die gewünschte
Seiten- Nummer auszuwählen, und anschließend drücken Sie .
Die aufgerufene Seite erscheint nach einigen Sekunden auf dem
Bildschirm.
wird fortgesetzt.....
216-02
01 03 04 05 06 07 0802
Page 61

Videotext
Verwenden des Videotext- Menüs
1 Wenn Sie sich im Videotextdienst befinden, drücken Sie die Taste
der Fernbedienung, um das Videotextmenü auf dem
Bildschirm zu sehen.
2 Gehen Sie mit dem Joystick auf oder , um die gewünschte Option
auszuwählen, und anschließend gehen Sie auf , um die besagte
Option aufzurufen.
3 Drücken Sie die Taste , um das Videotext- Menü vom
Bildschirm auszublenden.
Oben / Unten / Ganz
Diese Wahlmöglichkeit erlaubt Ihnen die verschiedenen Bildzonen des
Videotextes zu vergrößern. Gehen Sie mit dem Joystick auf , um die
obere Hälfte der Bildfläche zu vergrößern, oder gehen Sie auf , um die
untere Hälfte zu vergrößern. Drücken Sie , um zur normalen Größe
der Bildfläche zurückzukehren.
Aktuell
Wenn Sie diese Funktion auswählen, können Sie einen Fernsehkanal
sehen, während Sie auf die aufgerufene Videotext- Seite warten. Sobald
diese verfügbar ist, wechselt das Symbol seine Farbe. Um die
Seite zu sehen, drücken Sie .
Aufdecken
Einige Videotext- Seiten enthalten geheime Information, die aufgedeckt
werden kann, wie z.B. die Lösung eines Rätsels. Nach Auswählen dieser
Wahlmöglichkeit erscheint die geheime Information auf dem
Bildschirm.
Alarmseite
(diese hängt von der Verfügbarkeit des Videotext- Dienstes ab).
Sie können eine zeitweilig verschlüsselte Seite konsultieren, wie z.B. eine
Alarmseite zu einer gewissen Zeit, nach Auswählen dieser Option und
nach dem Erscheinen des Untermenüs der Alarmseite auf dem
Bildschirm.
1 Drücken Sie die Nummerntasten der Fernbedienung, um die drei
Ziffern der gewünschten Seite einzugeben.
2 Wiederholen Sie die Betätigung der Nummerntasten, um die vier
Ziffern der gewünschten Zeit einzugeben.
3 Drücken Sie die Taste , um die angegebene Zeitangabe zu
speichern. Die Zeitangabe erscheint oben links auf dem Bildschirm.
Die Seite wird zum angegebenen Zeitpunkt auf dem Bildschirm
erscheinen.
Videotext
Oben / Unten / Ganz
Aktuell
Aufdecken
Alarmseite
Seitenübersicht
Wählen: Menü Bestätigen:
Oben: Unten: Ganz: OK
Alarmseite
SEITE ZE IT
Seite wählen: 0-9 Weiter:
- - : - -– – –
DE
Seitenübersicht
(Diese hängt von der Verfügbarkeit des Videotextdienstes ab).
In diesem Untermenü organisieren sich die Blockseiten und die Seiten
des TOP- Textes in zwei Spalten, damit der Benutzer seine Seite
einfacher auswählen kann. Für jede Blockseite der ersten Spalte werden
in der zweiten die entsprechenden Gruppenseiten gezeigt. Gehen Sie mit
dem Joystick auf oder , um die gewünschte Blockseite
auszuwählen, und anschließen gehen Sie auf , um die Spalte der
Gruppenseiten aufzurufen. Gehen Sie mit dem Joystick auf oder ,
um die gewünschte Gruppenseite auszuwählen. Am Schluss drücken
Sie die Taste , um die besagte Seite zu betrachten.
Videotext
27
Page 62

NexTView
NexTView *
*(Dieser hängt von der Verfügbarkeit dieses Dienstes ab).
NexTView ist ein elektronischer Programm- Führer (EPG), der Informationen über die Programmierung verschiedener
Fernsehsender beinhaltet.
Auswählen des Anbieters von NexTView
Das Gerät wählt automatisch den besten Anbieter von NexTView
aus. Dieser Anbieter ist während 30 Minuten nach der Abstimmung
des Kanals verfügbar. Sie können auf jeden Fall den Anbieter
wechseln, wenn Sie es wünschen.
1 Drücken Sie die Taste der Fernbedienung, um das Menü auf
dem Bildschirm zu sehen.
2 Gehen Sie mit dem Joystick auf oder , um das Symbol
auszuwählen, und anschließend gehen Sie auf , um das Menü
Grundeinstellungen aufzurufen.
3 Gehen Sie mit dem Joystick auf oder , um NexTView- Auswahl
auszuwählen, und anschließend gehen Sie auf . Auf dem
Bildschirm erscheint die Liste sämtlicher verfügbarer NexTViewAnbieter.
4 Gehen Sie mit dem Joystick auf oder , um den Anbieter
auszuwählen, den Sie wünschen, und anschließend drücken Sie die
Taste .
5 Drücken Sie die Taste , um zum normalen Fernsehbildschirm
zurückzukehren.
Aktivieren von NexTView
1 Drücken Sie mehrmals die Taste der Fernbedienung, um
NexTView zu aktivieren oder zu deaktivieren.
*Bei einigen Fällen ist es auch notwendig mit dem Joystick auf zu
gehen, um den elektronischen Programmführer (EPG) von Sony zu
sehen.
2 Gehen Sie mit dem Joystick auf / / oder o, um den Cursor
(Schreibmarke) auf der Bildfläche zu bewegen.
3 Drücken Sie die Taste , um die Auswahl zu bestätigen.
a) Wenn Sie die Taste in den Spalten des Datums, des Zeitpunkts
oder der Ikonen (Themen) der Programmliste drücken, ändern
sich diese gemäß der vorgenommenen Auswahl.
b) Wenn Sie die Taste in der Programmliste drücken, sehen Sie
den Kanal direkt, wenn gerade eine Sendung stattfindet, oder es
wird das Menü Warteliste-Sendungen erscheinen, wenn die
Sendung später erfolgt.
Bild-Einstellungen
Bild-Modus
Kontrast
Helligkeit
Farbe
Bildschärfe
Normwerte
AI
dyn.NR
Farbton
Wählen
: Menü Bestätigen:
Grundeinstellungen
Autom. Abspeichern
Programme Ordnen
NexTView-Auswahl
AV-Abspeicherung
Manuelle Einstellungen
Wählen:
Grundeinstellungen
Autom. Abspeichern
Programme Ordnen
NexTView-Auswahl
AV-Abspeicherung
Manuelle Einstellungen
Wählen: Best ätigen:
07 Tue
12:38
SWISS
TXT TPS / RINGIER
7
Tue
8
Wed
9
Thu
12
10
Fri
11
Sat
12
Sun
13
Mon
Star Wars
Super RTL
Werner - Beinhart
Pro 7
Flui grüsst den Rest der Welt
Kabel 1
Once upon a time in the West
Euronews
International News
RTL Plus
Hat der alte Hexenmeister sich doch
einmal fortbegeben, und nun sollen
seine Geister auch nach meinem Willen
leben.
10:35 - 12:45
10:20 - 12:00
10:45 - 10:50
11:00 - 11:20
11:45 - 12:50
Tue 07. 04 .98
Index
volle Programmauswahl
Sportsendungen
individuelle Auswahl
Unterhaltung
Nachrichtensendungen
Kinderprogramm
Spielfilme
zurück zum vorigen Menü
Anwender
Start
- - - - - - -
Suchlauf:
- - - - - - -
Normal
Ein
Aus
28
Persönliche Programm- Auswahl
Sie können eine persönliche Liste mit allen Programmtypen
erstellen, die ihnen gefallen.
1 Gehen Sie mit dem Joystick auf oder , um das Symbol
auszuwählen, und anschließend gehen Sie auf , um das Menü
Individuelle Auswahl aufzurufen.
2 Gehen Sie mit dem Joystick auf oder , um Ihre Wahlmöglichkeit
auf dem Bildschirm auszuwählen, und anschließend drücken Sie die
Taste zur Bestätigung
3 Wiederholen Sie den Schritt 2, um alle Elemente, die Sie in Ihrer Liste
zu haben wünschen, auszuwählen.
4 Wenn Sie mit der Liste fertig sind, gehen Sie auf , um das Symbol
auszuwählen.
5 Drücken Sie die Taste , um zum vorausgegangenen Menü
zurückzukehren.
6 Gehen Sie mit dem Joystick auf oder , um das Symbol
auszuwählen, und anschließend drücken Sie die Taste , um Ihre
persönliche Programm- Auswahl zu aktivieren.
wird fortgesetzt.....
NexTView
Page 63

NexTView
Menü Warteliste-Sendungen
Mit diesem Menü können Sie die Grundeinstellung eines Timers
(Zeitschalter) vornehmen oder die ausgewählten Programme
speichern.
1 Gehen Sie mit dem Joystick auf oder , um in der Spalte der
Programmliste ein Programm auszuwählen, das zu einem späteren
Zeitpunkt gesendet wird.
2 Drücken Sie die Taste , um das Menü Warteliste-Sendungen
einzublenden.
Grundeinstellung des Timers (Zeitschalters)
Gehen Sie mit dem Joystick auf oder , um das Symbol
hervorzuheben, und anschließen drücken Sie mehrmals die Taste ,
um Timer Einstellen auszuwählen oder Timer Löschen. Wenn Sie
Timer Einstellen wählen, wird das Programm mit dem Symbol einer Uhr
markiert und bevor das Programm beginnt, erscheint auf dem
Bildschirm eine kurze Mitteilung, die Sie befragt, ob Sie es noch sehen
wollen.
Betrachten der programmierten Liste
Gehen Sie mit dem Joystick auf oder , um die Ikone
hervorzuheben, und anschließend drücken Sie mehrmals die Taste ,
um die programmierte Liste zu aktivieren oder deaktivieren. Diese Liste
zeigt die Programme, denen Sie einen Timer (Zeitschalter) zugeordnet
haben. (Sie können den Timer mit bis zu 5 Programmen einstellen).
Aufzeichnen von Programmen *
*(nur wenn Ihr Videogerät über Smartlink verfügt)
1 Schließen Sie das Videogerät an.
2 Gehen Sie mit dem Joystick auf oder , um auszuwählen,
und anschließend drücken Sie die Taste , damit die Information
auf das Videogerät übertragen wird.
3 Zur Konfiguration des Videogeräts gehen Sie wie folgt vor:
First nextTView/EPG-Providers in Europe
07 Tue
SWISS TXT TPS / RINGIER nexTView
12:38
Address Mapping
The position of the addresses in the
OSDA is shown in the following diagram.
The position values of the DPW are set
to '0'.
If other values are set, the complete
combination will be scrolled.
Example:
if the DPWC is set to '63', the char-
This channel has been set for a timer
VPS/PDC
On
Speed
SP
Timer Prog
VCR1
Tue 07. 04 .98
DE
VPS / PDC
Gehen Sie mit dem Joystick auf o
der , um VPS / PDC
auszuwählen, und anschließend drücken Sie mehrmals die Taste ,
um Ein oder Aus auszuwählen. Durch diese Einstellung wird die
Aufzeichnung der gesamten Sendung garantiert, auch wenn die
Programmierung geändert wird (dies funktioniert nur, wenn des
ausgewählte Kanal ein VPS/PDC- Signal sendet).
Geschwind.
Gehen Sie mit dem Joystick auf , um Geschwind. auszuwählen,
und anschließend drücken Sie Taste mehrmals, um „SP“
auszuwählen (Standard- Dauer oder „LP“ (lange Dauer). Mit dem
Modus der langen Dauer kann auf dem Videoband das doppelte an
Zeit aufgezeichnet werden, wobei sich aber die Bildqualität
verschlechtern kann.
Grundeinstellung des Videogerätes
Gehen Sie mit dem Joystick auf , um Videorec. auszuwählen, und
anschließend drücken Sie mehrmals die Taste , um das Video
auszuwählen, das Sie programmieren wollen, d.h. entweder VCR1
oder VCR2.
4 Zuletzt gehen Sie mit dem Joystick auf , um die das Symbol
auszuwählen, und anschließend drücken Sie die Taste , um zum
normalen Fernseh- Bildschirm zurückzukehren.
VPS/PDC
Geschwind.
Videorec.
Ein
SP
VCR1
NexTView
29
Page 64

Frei wählbare Anschlüsse
1
2
B
C
H
I
DVD
Videorecorder
S-VHS/Hi8
Camcorder
F
G
8mm/Hi8/DVC
Camcorder
D
E
1
2
DVD
A
Anschlüsse von frei wählbaren Zusatzgeräten
Es ist möglich eine weitreichende Palette von freiwählbaren Zusatzgeräten an das Gerät anzuschließen, wie in der Folge
gezeigt wird.
“PlayStation”*
* „PlayStation“
ist ein Produkt
von Sony
Computer
Entertainment,
Inc.
* „PlayStation“
ist ein
registriertes
Markenzeichen
von Sony
Entertainment,
Inc.
Um
Bildstörungen
zu vermeiden:
• Schließen Sie
an die
Buchsen F
und G nicht
gleichzeitig
Zusatzgeräte
an.
Dolby SurroundAnlage
“PlayStation”*
Dekoder
Zulässige Eingangs- Signale
A Audio- / Video und RGB- Signale
B Audio- / Video und RGB- Signale
C Audio- / Video und S- Video Signale
D Eingang des Hauptlautsprechers.
Stellen Sie die Option „Lautsprecher“
in „Center LS“ im Menü der
Grundeinstellungen ein.
E Ohne Eingänge
F S- Video- Signal
G Video- Signal
H Audio- Signal
I Ohne Eingang
Hi-Fi
Verfügbare Ausgangs- Signale
Video / Ton des Empfangssignals
Video / Ton sichtbar auf dem Bildschirm ( Monitor-Ausgang)
Video / Ton der ausgewählten Quelle
Ohne Ausgänge
Audio- Signal
Ohne Ausgang
Ohne Ausgang
Ohne Ausgang
Audio- Signal für die Kopfhörer
Frei wählbare Anschlüsse
30
Page 65

Frei wählbare Anschlüsse
Anwenden von frei wählbaren Zusatzgeräten
Weitere Information zum Anschluss eines Zusatzgerätes
Anschluss eines Videogerätes
Wir empfehlen, das Videogerät an die Eurobuchse C an der hinteren Seite des Geräts anzuschließen. Wenn Sie über kein
Eurobuchsen- Kabel verfügen, empfehlen wir, das Video- Signal einzustellen unter der Programm- Nummer „0“; hierzu finden
Sie weitere Informationen im Kapitel „Manuelle Feinabstimmung“ dieser Bedienungsanleitungen. Sie finden ebenfalls weitere
Informationen in den Bedienungsanleitungen Ihres Videogerätes, um zu sehen, wie Sie den Testkanal des Video- Signals
empfangen können.
Wenn Ihr Videogerät Smartlink annimmt, finden Sie ebenfalls hierzu weitere Informationen in diesen Bedienungsanleitungen.
Anschluss eines externen Tongerätes
1 Zum Hören des Tons des Geräts über die Hi-Fi- Anlage:
Wenn Sie den Ausgangston des Geräts verstärken wollen, schließen Sie die Hi-Fi- Anlage an die Buchsen E an der hinteren
Seite des Geräts an. Die Lautstärke der mit den Anschlüssen E verbundenen Anlage kann geändert werden durch Einstellen
der Lautstärke der Kopfhörer. Weitere Informationen hierzu finden Sie im Kapitel „Einstellen des Tons“ dieser
Bedienungsanleitungen.
2 Zum Hören des Tons der Dolby Prologic- Anlage durch das Gerät:
Wenn Sie den Ton Ihres Dekoders – Verstärkers Dolby Prologic durch die Lautsprecher Ihres Rückprojektions- Fernsehers
hören wollen, schließen Sie die Anlage an die Anschlüsse D an der Rückseite des Gerät an. Schließen Sie den Hauptausgang
des Verstärkers an die genannten Anschlüsse an, damit dieser die Funktion des mittleren Lautsprechers
übernimmt. Weitere Information hierzu finden Sie im Kapitel „Verwendung des Menüs“ „Sonderfunktionen“ und wählen Sie
„Center LS“ in der Option „Lautsprecher“.
Vergessen Sie nicht, dass die höchste Eingangsleistung dieser Buchse 30 Watt beträgt. Stellen Sie sicher, dass dieser
Grenzwert nicht überschritten wird.
Anschluss von Mono- Geräten
Schließen Sie das Audio- Kabel an die Buchse L/G/S/I an der Vorderseite des Geräts an und wählen Sie das Eingangs- Signal
4 aus; folgen Sie den anschließenden Anleitungen.
Auswählen und Display des Eingangs- Signals
Um auf dem Fernsehbildschirm das Eingangs- Signal des angeschlossenen Geräts zu erhalten, müssen Sie das Symbol der
Buchse, an die Sie das Gerät angeschlossen haben, auswählen.
z.B.: Ihr VCR ist an die Buchse mit dem Symbol
Fernbedienung solange, bis das Symbol 1 auf dem Bildschirm erscheint.
Y1/ 1 angeschlossen. Drücken Sie die Taste auf der
1 Schließen Sie das freiwählbare Zusatzgerät an die vorgesehene Buchse des Geräts an, wie auf der
vorausgegangenen Seite angegeben ist.
2 Drücken Sie mehrmals die Tast der Fernbedienung bis das richtige Eingangs- Symbol auf dem
Bildschirm erscheint.
Symbol Eingangs- Signale
1 • Eingangs- Signal Audio / Video über Eurobuchse A oder *RGB über Eurobuchse A
2 • Eingangs- Signal Audio / Video über Eurobuchse B oder *RGB über Eurobuchse
B
3 • Eingangs- Signal über Eurobuchse C oder * S- Video über Eurobuchse C
4 • S-Video- Eingangssignal von der 4-poligen DIN-Buchse F oder *Videoeingang über
RCA- Buchse G und Audio- Signal über RCA- Buchse H.
*(Automatische Signal- Feststellung gemäß des angeschlossenen Gerätes)
DE
3 Schalten Sie das Gerät ein, das Sie angeschlossen haben.
4 Drücken Sie die Taste der Fernbedienung, um zum normalen Fernsehbild zurückzukehren.
Frei wählbareAnschlüsse
31
Page 66

Frei wählbare Anschlüsse
Smartlink
Mit Smartlink kann Ihr Fernsehgerät mit einem angeschlossenen Videorecorder
„kommunizieren“.
Bedingungen dafür sind:
• Ein Videorecorder, der über Smartlink, NexTView Link, Easy Link oder Megalogic verfügt.
Megalogic ist ein Markenzeichen von Grundig, EasyLink ist ein Markenzeichen von
Philips.
• Der Anschluss eines vollständig verdrahteten 21-poligen Scartkabels, um den Videorecorder an
die Euro-AV-Buchse :3/q3 (SMARTLINK) an der hinteren Seite des Geräts
anzuschließen.
Die hauptsächlichen Merkmale von Smartlink sind:
• Es erlaubt Abspeicherinformation (z.B. die Programmliste) vom Fernseher auf den
Videorecorder weiterzugeben.
• Direkte Aufnahme vom Fernseher aus: wenn Sie fernsehen, reicht ein Tastendruck am
Videorecorder, um die laufende Sendung aufzunehmen.
• Automatisches Einschalten: mit dem Gerät im Modus Bereitschaftsbetrieb (Standby), drücken
Sie die Taste „Play z“ des Videorecorders und das Gerät wird automatisch eingeschaltet.
Wenn Sie einen Dekoder an einem Smartlink-fähigen Videorecorder angeschlossen
haben, wählen Sie das Menü Zusatzfunktionen in Manuell Abspeichern und wählen
Sie DEKODER. (Dekoder) in der Stellung AV3, für jeden verschlüsselten Kanal. Wenn
Sie weitere Information benötigen, konsultieren Sie das Kapitel „Verwenden der
Funktion „Zusatzfunktionen““.
Hinterer Teil
Videorecorder
Dekoder
Videorecorders.
Ausführliche Informationen über Smartlink finden Sie in der Bedienungsanleitung Ihres
32
Frei wählbare Anschlüsse
Page 67

Zusätzliche Information
Grundeinstellung der Fernbedienung für ein DVD oder einen Vídeorecorder
Diese Fernbedienung ist dazu vorbereitet nicht nur die Funktionen dieses Sony-Fernsehers, sondern ebenfalls die
Grundfunktionen Ihres DVD Marke Sony und der Mehrzahl der Sony- Videorecorder zu steuern, ohne dass es notwendig ist die
Grundeinstellung der Fernbedienung vorzunehmen. Zum Steuern anderer DVD- Marken und Videorecorder sowie einiger SonyVideogeräte, müssen Sie die Grundeinstellung dieser Fernbedienung vor ihrer erstmaligen Anwendung vornehmen. Hierzu ist
es nötig die folgenden Schritte durchzuführen:
Suchen Sie bevor Sie beginnen den dreistelligen Code, laut der Marke Ihres DVD oder Videogeräts (siehe die Tabelle weiter
unten). Bei den Marken, bei denen mehr als ein Code erscheint, geben Sie den ersten davon ein.
1 Drücken Sie mehrere Male die Taste der Geräteauswahl der Fernbedienung, bis in der
gewünschten Position DVD oder VCR (für den Videorecorder) das grüne Licht erscheint.
Wenn sich der Wähler der Anlage in der Position TV befindet, kann kein Code
gespeichert werden.
3
2 Während der Leuchtanzeiger in grüner Farbe in der gewünschten Position erleuchtet ist, drücken Sie
ca. 6 Sekunden lang die gelbe Taste der Fernbedienung, bis der Leuchtanzeiger in grüner Farbe
1
2
zu blinken beginnt.
3 Während der Leuchtanzeiger in grüner Farbe blinkt, geben Sie in Übereinstimmung mit dem Gerät,
das Sie benutzen werden und mit Hilfe der Nummerntastatur der Fernbedienung den Code mit 3
Ziffern ein.
Falls es den eingegebenen Code gibt, leuchten die drei Leuchtanzeiger in grüner Farbe momentan
auf. In gegenteiligem Fall wiederholen Sie vorausgegangenen Schritte.
4 Schalten Sie das Gerät, das Sie benutzen wollen, ein und prüfen Sie, dass Sie mit der Fernbedienung
des Fernsehers die hauptsächlichen Funktionen steuern können.
• Wenn das Gerät nicht funktioniert oder einige Funktionen versagen, wiederholen
Sie alle vorausgegangenen Schritte und vergewissern Sie sich, dass Sie den
richtigen Code eingeben und falls es mehr als einen Code gibt, versuchen Sie den
nächst folgenden und fahren Sie so fort, bis der richtige Code gefunden ist.
• Die gespeicherten Codes gehen verloren, wenn der Batteriewechsel der verbrauchten Batterien
nicht in weniger als einer Minute vollzogen wird. In diesem Fall wiederholen Sie sämtliche
vorausgegangenen Schritte. Auf der Innenseite des Batteriedeckels befindet sich ein Etikett auf
das Sie den Code schreiben können.
• Es sind nicht alle Marken und nicht alle Modelle in Betracht gezogen.
DE
Liste gemäß Marken der Videorecorder
Marke Code Marke Code
SONY (VHS) 301, 302, 303, 308, 309 SONY 001
SONY (BETA) 303, 307, 310 AIWA 021
SONY (DV) 304, 305, 306 DENON 018, 027, 020, 002
AIWA 325, 331, 351 GRUNDIG 009, 028, 023, 024, 016, 003
AKAI 326, 329, 330 HITACHI 025, 026, 015, 004
DAEWOO 342, 343 JVC 006, 017
GRUNDIG 358, 355, 360, 361, 320, 351 KENWOOD 008
HITACHI 327, 333, 334 LG 015, 014
JVC 314, 315, 322, 344, 352, 353, 354, 348, 349 LOEWE 009, 028, 023, 024, 016, 003
LG 332, 338 MATSUI 013, 016
LOEWE 358, 355, 360, 361, 320, 351 ONKYO 022
MATSUI 356, 357 PANASONIC 018, 027, 020, 002
ORION 328 PHILIPS 009, 028, 023, 024, 016, 003
PANASONIC 321, 323 PIONEER 004
PHILIPS 311, 312, 313, 316, 317, 318, 358, 359 SAMSUNG 011, 014
SAMSUNG 339, 340, 341, 345 SANYO 007
SANYO 335, 336 SHARP 019, 027
SHARP 324 THOMSON 012
THOMSON 319, 350 TOSHIBA 003
TOSHIBA 337 YAMAHA 018, 027, 020, 002
Liste gemäß DVD- Marken
Zusätzliche Information
33
Page 68

Zusätzliche Information
Austauschen der Lampe
Wenn die Lampe dunkel wird oder die Farbkraft des
Bildes nachlässt oder wenn die Anzeige der Lampe
des Geräts blinkt, die Lampe des Geräts austauschen.
• Als Ersatzteil ausschließlich die Lampe XL-2000E
verwenden. Wird eine andere Lampe eingesetzt,
kann dies zu Schäden am Gerät führen!
• Nehmen Sie die Lampe nur zum Austauschen
heraus.
• Schalten Sie das Gerät aus und lösen Sie das
Netzkabel von der Netzsteckdose, bevor Sie die
Lampe austauschen.
•
Tauschen Sie die Lampe aus, wenn sie abgekühlt ist. Das
Glas vorne an der Lampe kann sehr heiß sein (100 °C
und mehr), auch wenn das Gerät ausgeschaltet ist.
• Halten Sie die herausgenommene Lampe von
Kindern und brennbarem Material fern.
• Die herausgenommene Lampe darf nicht naß
werden, und es dürfen keine Fremdkörper
hineingelangen. Andernfalls besteht
Explosionsgefahr.
• Halten Sie die Lampe von Metall oder leicht
brennbaren Gegenständen fern. Andernfalls besteht
Feuergefahr. Greifen Sie mit Ihrer Hand nicht in das
Innere des Lampenfachs. Andernfalls könnten Sie
sich Verbrennungen zuziehen.
• Bringen Sie die neue Lampe fest an. Andernfalls wird
das Bild dunkel.
1 Schalten Sie das Gerät aus und lösen Sie das
Netzkabel von der Netzsteckdose.
•
Wenn Sie beginnen die Lampe auszutauschen ohne den
Netzstecker aus der Netzsteckdose zu ziehen, blinkt die
Anzeige des Bereitschaftsmodus (Standby) des
Geräts. Zur Fortsetzung des Austauschs, ziehen Sie den
Netzstecker aus der Netzsteckdose.
• Warten Sie mindestens 30 Minuten, nachdem Sie das
Gerät ausgeschaltet haben, bevor Sie die Lampe
austauschen.
• Halten Sie die neue Lampe bereit.
3 Lösen Sie die Schraube mit einer Münze o. ä. und
nehmen Sie die Lampenabdeckung ab.
4 Lösen Sie zwei Schrauben und ziehen Sie die Lampe
heraus.
Lösen Sie die beiden Schrauben mit dem mitgelieferten
Schraubenschlüssel.
Ziehen Sie die Lampe am Griff heraus.
2 Nehmen Sie die vordere Abdeckung ab
Nehmen Sie die vordere rechte Abdeckung ab, ohne das
Gerät zu verschieben.
Fassen Sie die vordere Abdeckung an der Seite an, und
ziehen Sie sie nach vorne.
Achten Sie dabei auf Ihre Fingernägel.
Zusätzliche Information
34
Die Lampe kann immer noch sehr heiß sein, auch
wenn das Gerät ausgeschaltet ist. Achten Sie darauf,
das Glas vorne, den Bereich um die Lampe und das
Glas im Lampenfach nicht zu berühren.
5 Bringen Sie die neue Lampe an.
Bringen Sie die neue Lampe an und ziehen Sie die beiden
Schrauben fest an.
6 Bringen Sie die Lampenabdeckung an.
Bringen Sie die Lampenabdeckung an, und ziehen Sie die
beiden Schrauben mit einer Münze o.ä. fest an.
7 Bringen Sie die vordere Abdeckung an.
Bringen Sie die vordere Abdeckung wieder so an, wie sie
ursprünglich angebracht war.
Hinweise
• Achten Sie darauf, das Glas vorne an der neuen Lampe nicht zu
berühren oder zu verschmutzen. Andernfalls kann die
Bildqualität oder die Lebensdauer der Lampe verringert
werden.
• Bringen Sie die Lampenabdeckung fest an. Andernfalls läßt
sich das Gerät nicht einschalten.
• Wenn die Lampe durchbrennt, ist ein Geräusch zu hören. Dies
ist normal.
• Wenden Sie sich an den nächsten Sony-Kundendienst, wenn
Sie eine neue Lampe benötigen.
• Respektieren Sie die Umwelt beim Entsorgen der gebrauchten
Lampe.
Page 69

Zusätzliche Information
Optimaler Sichtwinkel
Damit die Bildqualität optimal ist sorgen Sie dafür, dass das Gerät so aufgestellt wird, dass Sie den Bildschirm von den
anschließend aufgeführten Sichtwinkeln aus sehen können.
Waagerechter Sichtwinkel
Minimum - Abstand 2 m.
65
65
Senkrechter Sichtwinkel
DE
(empfohlene Position für den Benutzer)
Minimum - Abstand 2 m.
30
30
(empfohlene Position für
den Benutzer)
Zusätzliche Information
35
Page 70

Zusätzliche Information
Technische Daten
Fernseh- System
B/G/H, D/K, I, L
Farb- System
PAL, SECAM
NTSC, 3.58, 4.43 (nur Videoeingang)
Kanal- Bereich
VHF: E2-E12
UHF: E21-E69
CATV: S1-S20
HYPER: S21-S41
D/K: R1-R12, R21-R69
I: UHF B21-B69
L: F2-F10, B-Q, F21-F69
Größe des projezierten Bildes
• KF-50SX200: 50 Zoll (ca. 127 cm diagonal gemessen)
• KF-42SX200: 42 Zoll (ca. 107 cm diagonal gemessen)
Anschlüsse an der Rückseite
• Eingangs- Anschlüsse des Hauptlautsprechers
C
(2 Anschlüsse)
• Audio- Ausgang (links rechts) – RCA- Buchse
• :1/ 1 21- polige Eurobuchse (CENELEC- Standard),
einschließlich Eingang Ton / Video, Eingang
RGB, Fernsehaudio- / videoausgang
• :2/ 2 21- polige Eurobuche (CENELEC- Standard),
einschließlich Audio- / Videoeingang, Eingang
RGB, Monitor-Audio- / Videoausgang.
• :3/q 3 21- polige Eurobuchse (CENELEC- Standard),
(SMARTLINK)
Eingang, Audio- / Videoausgang wählbar und
Anschlüsse an der Vorderseite
• q 4 Video S - Eingang – 4-polig DIN
• … 4 Video- Eingang - RCA- Buchse
• ≤ 4 Audio- Eingang - RCA- Buchse
• 2 Kopfhörer Buchse - Stereo- Minibuchse
einschließlich Audio- / Videoeingang, S-Video-
Anschluss Smartlink.
Ton- Ausgabe
2 x 20 W (Musikleistung)
2 x 15 W (RMS)
Eingang Hauptlautsprecher
30 W (RMS) (wenn angewendet als Hauptlautsprecher)
Leistungsaufnahme
210 W
Leistungsaufnahme im Modus Bereitschaftsbetrieb
(Standby)
≤ 1 W
Abmessungen (breit x hoch x tief)
• KF-50SX200: ca. 1376 x 898 x 384 mm
• KF-42SX200: ca. 1200 x 790 x 343 mm
Gewicht
• KF-50SX200: ca. 43 kg.
• KF-42SX200: ca. 37 kg.
Mitgeliefertes Zubehör
1 Fernbedienung, Mod. RM-905.
2 Batterien mit IEC- Kennzeichnung (Größe AAA).
1 Schraubenschlüssel.
2 Halterungen.
2 Schrauben.
1 Reinigungstuch.
Weitere Merkmale:
• Digitaler Kammfilter (hohe Bildschärfe).
• Videotext, Fastext, TOPtext (2000 Seiten Videotextspeicher).
• NexTView.
• NICAM.
• Automatisches Abschalten.
• Smartlink.
• Rauschminderung.
• Graphischer Equalizer (Entzerrer).
• Persönliches Kennzeichnen.
• Dolby Virtual.
• BBE.
Design und technische Daten sind Änderungen ohne vorherigen Bescheid unterworfen.
Öko- Papier – Chlorfrei
36
Zusätzliche Information
Page 71

Zusätzliche Information
Störungsbehebung
Nachfolgend werden einige einfache Lösungen angeboten für Probleme in Verbindung mit Bild und Ton.
Problem
Kein Bild (Bildschirm ist dunkel), kein
Ton
Schlechtes oder kein Bild aber guter Ton
Schlechte Bild- Qualität wenn eine RGBVideoquelle gesehen wird
Gute Bild- Qualität aber kein Ton
Sendungen in Farbe werden
schwarzweiß angezeigt.
Das Bild erscheint verzerrt beim Wechsel
von Programmen oder Auswählen des
Videotextes.
Es erscheinen Striche auf dem Bild
Lösung
• Stecken Sie den Netzstecker des Fernsehgerätes in die Netzsteckdose.
• Drücken Sie die Taste an der Vorderseite des Fernsehgerätes.
• Bei roter Anzeige , drücken Sie die Taste TV der Fernbedienung.
• Überprüfen Sie den Anschluss der Antenne.
• Schalten Sie das Gerät während 3 oder 4 Sekunden aus und schalten Sie es
mit der Taste an der Vorderseite des Fernsehgerätes wieder ein.
• Mittels Menü- System „Bild-Einstellungen“ auswählen und Kontrast,
Farbe und Helligkeit neu einstellen
• Drücken Sie mehrmals die Taste der Fernbedienung bis das Symbol
1 oder 2 auf dem Bildschirm erscheint.
• Drücken Sie mehrmals die Taste +/- der Fernbedienung.
• Überprüfen Sie mittels des Menü- Systems, dass im Menü
„Sonderfunktionen“ „Lautsprecher“ in „Haupt-LS“ ausgewählt ist.
• Wählen Sie mittels des Menü- Systems „Bildeinstellungen“ aus und stellen
Sie das Farbniveau neu ein.
• Schalten Sie das an die 21- polige Eurobuchse an der Vorderseite des
Gerätes angeschlossene Zusatzgerät aus.
• Stellen Sie den Dämpfer RF (ANT) ein. Weitere Informationen
hierzu finden Sie im Kapitel „Verwenden der Funktion
„Zusatzfunktionen““.
DE
Bild mit Störungen
Das Bild wird nicht richtig dekodiert
oder es ist nicht stabil beim Sehen eines
kodierten Kanals durch einen an die
Eurobuchse 3/q3 (SMARTLINK)
angeschlossenen Dekoder.
Fernbedienung funktioniert nicht
Die Anzeige der Lampe des Geräts
blinkt.
Die Anzeige des Bereitschaftsbetriebs
(Standby) blinkt.
• Stellen Sie mittels des Menü- Systems die Feinabstimmung der Kanäle
(AFT) ein, um einen besseren Bildempfang zu erhalten. Weitere
Information finden Sie hierzu im Kapitel „Verwenden der Funktion
„Zusatzfunktionen““.
• Gehen Sie mit Hilfe des Menü-Systems in das Menü „Bild-Einstellungen“
und wählen Sie „dyn. NR“ in „Auto“.
• Gehen Sie mit Hilfe des Menü- Systems in das Menü „Sonderfunktionen”,
wählen Sie „AV3 Ausgang” in „TV”.
• Prüfen Sie, ob sich die Taste der Geräte- Auswahl der Fernbedienung in der
richtigen Position befindet gemäß dem Gerät, das Sie steuern wollen (DVD,
TV oder VCR (für den Videorecorder).
• Wenn Sie mit der Fernbedienung das DVD oder den Videorecorder nicht
steuern können, obwohl sich die Taste der Geräte- Auswahl auf der
richtigen Position befindet, geben Sie den notwendigen Kode nochmals so
ein, wie es im Kapitel „Grundeinstellungen der Fernbedienung für ein DVD
oder einen Videorecorder“ dieses Anleitungshandbuchs erklärt wird.
• Tauschen Sie die Batterien aus.
• Tauschen Sie die Lampe durch eine neue aus. Hierzu lesen Sie das Kapitel
„Austauschen der Lampe“.
• Wenn Sie während des Austauschens der Lampe den Netzstecker nicht aus
der Netzsteckdose ziehen, wird der Anzeiger des Bereitschaftsmodus
(Standby) blinken. Zum Fortsetzen des Austauschs der Lampe, ziehen Sie
den Netzstecker aus der Netzsteckdose und warten Sie ca. 30 Minuten.
• Überprüfen Sie, ob die Abdeckung der Lampe fest angebracht ist.
• Wenn Sie die Lampe nicht austauschen aber die Anzeige trotzdem blinkt,
wenden Sie sich an den nächsten Sony- Kundendienst.
• Bleiben die Probleme bestehen, lassen Sie das Fernsehgerät bitte von qualifiziertem Fachpersonal warten.
• Öffnen Sie das Gerät AUF KEINEN FALL selbst.
Zusätzliche Information
37
Page 72

Introduction
Merci d'avoir choisi ce modèle Sony “Grand Wega”.
Avant d'utiliser cet appareil, lisez attentivement ce manuel et conservez-le pour vous y référer ensuite.
• Symboles utilisés dans ce manuel :
• Remarques importantes.
• Information concernant la fonction.
1,2..
Etapes du mode d'emploi.
•
• Les touches de la télécommande qui apparaissent en blanc
indiquent les touches sur lesquelles appuyer pour
exécuter les diverses instructions.
• Résultat des instructions.
Table des matières
Introduction....................................................................................................................................................................................................................... 3
Consignes de sécurité ...................................................................................................................................................................................................... 4
Description générale
Vérification des accessoires fournis.................................................................................................................................................................. 5
Présentation générale des touches de l’appareil............................................................................................................................................. 5
Présentation générale des touches de la télécommande ...............................................................................................................................6
Installation
Insertion des piles dans la télécommande....................................................................................................................................................... 7
Branchement de l'antenne et du magnétoscope .............................................................................................................................................8
Fixation de l’appareil .......................................................................................................................................................................................... 8
Première mise en service
Mise sous tension de l’appareil et mémorisation automatique....................................................................................................................9
Système des Menus
Modification du format de l’écran.................................................................................................................................................................. 11
Introduction au Système des menus et son utilisation ................................................................................................................................ 11
Guide rapide de déplacement à travers les menus ......................................................................................................................................12
Utilisation du Système des Menus :
Contrôle de l'image ........................................................................................................................................................................................ 13
Contrôle du son............................................................................................................................................................................................... 14
Utilisation du menu "Caractéristiques” ...................................................................................................................................................... 16
Mémorisation manuelle des chaînes............................................................................................................................................................ 17
Donner un nom à une chaîne........................................................................................................................................................................ 18
Chaînes inutilisées.......................................................................................................................................................................................... 19
Utilisation de la fonction "Présélection (Suite)” ......................................................................................................................................... 20
Introduction de votre Code secret................................................................................................................................................................ 21
Démonstration des diverses fonctions ........................................................................................................................................................ 22
Réglage de centrage horizontal de l'image pour une source RVB ..........................................................................................................23
Identification et sélection du format d'écran des sources d'entrée ......................................................................................................... 24
Images Multiples (Multi PIP)........................................................................................................................................................................ 25
2 images sur écran (PAP)............................................................................................................................................................................... 25
Télétexte
NexTView
................................................................................................................................................................................................................... 26
................................................................................................................................................................................................................. 28
FR
Connexion des équipements en option
Connexion des équipements en option.......................................................................................................................................................... 30
Utilisation des équipements en option .......................................................................................................................................................... 31
“Smartlink” ........................................................................................................................................................................................................32
Télécommande d'autres appareils Sony ........................................................................................................................................................32
Informations complémentaires
Configuration de la télécommande pour un DVD ou un Magnétoscope................................................................................................. 33
Remplacement de la lampe.............................................................................................................................................................................. 34
Angle optimum de vision ................................................................................................................................................................................35
Spécifications ..................................................................................................................................................................................................... 36
Dépannage.......................................................................................................................................................................................................... 37
Les principaux émetteurs français.................................................................................................................................................................. 38
3
Page 73

Consignes de sécurité
N’introduisez jamais aucun objet dans le
téléviseur afin de ne pas risquer un choc
électrique. Assurez-vous de ne jamais renverser
de liquide dans l’appareil. Si un liquide ou un
objet pénétrait dans le téléviseur, débranchez-le
par la prise secteur et ne l’utilisez plus avant sa
vérification par le service après-vente.
Pour ne pas risquer un incendie, éloignez du
téléviseur tout objet inflammable ou lumière
incandescente (par exemple des bougies).
Consignes de sécurité
Ce modèle fonctionne uniquement sur
tension secteur de 220-240 volts. Ne
connectez pas trop d’appareils sur la même
prise afin de ne pas risquer un incendie ou un
choc électrique.
N’ouvrez pas le capot et le boîtier arrière du
téléviseur. Contactez toujours le service
après-vente en cas de problème.
N’obstruez jamais les orifices d’aération du
téléviseur. Pour une aération correcte, laissez
toujours un espace libre d’au moins 10 cm
autour de l’appareil (surtout si vous
l’encastrez dans un meuble).
Pour des raisons environnementales et de
sécurité, il est recommandé de ne pas laisser
le téléviseur en veille lorsque vous ne
l’utilisez pas. Pour des périodes prolongées
d’inutilisation, débranchez-le de la prise de
courant.
Pour votre sécurité, ne touchez aucune
partie du téléviseur, cordon secteur ou câble
d’antenne lors d’un orage.
Ne posez jamais le téléviseur dans un endroit
chaud, humide ou trop poussiéreux. Ne
l’installez pas dans un endroit où il pourrait
être soumis à des vibrations mécaniques.
Pour écarter tout risque d’incendie ou
d’électrocution, n’exposez pas le téléviseur à
l’humidité ou à la pluie.
Nettoyez l’écran et le coffret de votre téléviseur
avec un chiffon doux légèrement humide.
N’utilisez pas de tampon abrasif, d’appareil de
nettoyage alcalin, de poudre récurrente ou de
solvant comme de l’alcool, du benzine ou un
vaporisateur antistatique. Comme précaution de
sécurité, nous vous recommandons de toujours
débrancher le téléviseur avant le nettoyage.
Installez le téléviseur sur un meuble stable. Ne
permettez pas aux enfants de monter dessus.
Ne placez pas le téléviseur sur un côté ou sur
la façade.
Consignes de sécurité complémentaires
•Nous vous conseillons de transporter l'appareil à deux, en le
soutenant d'une main sous l'écran et de l'autre, par sa partie
supérieure. Ne le prenez JAMAIS en appuyant sur les hauts-parleurs
situés des deux côtés de l'écran ou par les panneaux frontaux, ce qui
leur évitera d'être déformés ou cassés.
•Ne bloquez pas ou ne recouvrez pas la rainure de ventilation située en
bas à gauche sur la partie arrière de l'appareil. Pour assurer une bonne
ventilation, laissez au moins une distance de 10 cm. entre le mur et
l'appareil.
•Si vous faites passer directement l’appareil d'un endroit froid à
un endroit chaud ou s'il se produit un brutal changement de
température dans la pièce où il se trouve, les images peuvent
apparaître floues ou les couleurs peuvent devenir de mauvaise
qualité dans certaines parties de l'écran. Ceci provient de l'humidité
qui s'est condensée sur les miroirs ou les lentilles. Avant d'utiliser
4
l’appareil, attendez que l'humidité se soit évaporée.
Consignes de sécurité
Débranchez le téléviseur par la fiche
d’alimentation. Ne tirez pas sur le cordon.
Débranchez le téléviseur du courant secteur
avant de le déplacer. D’une façon générale,
pendant son transport évitez les vibrations et
les déformations. Si le téléviseur tombait ou
était endommagé, faites le vérifier
immédiatement par le service après-vente.
• Pour voir des images nettes, n'exposez pas l'écran à l'éclairage direct.
Dans la mesure du possible, utilisez un éclairage venant
du plafond.
• Cet appareil utilise une technologie de haute précision. Malgré cela,
quelques points noirs ou colorés (bleu vert ou rouge) peuvent apparaître
de façon permanente sur l’image. Ce phénomène ne traduit pas un
dysfonctionnement de l’appareil.
• L'écran de cet appareil a reçu un traitement antireflet. Pour éviter que
l'écran ne s'abîme, procédez comme suit:
• Pour ôter la poussière de l'écran, utilisez le chiffon fourni avec cet
appareil ou un chiffon doux.
• Nettoyez l’écran et le coffret de votre téléviseur avec un chiffon doux
légèrement humide. N’utilisez pas de tampon abrasif, d’appareil de
nettoyage alcalin, de poudre récurrente ou de solvant comme de
l’alcool, du benzine ou un vaporisateur antistatique. Comme
précaution de sécurité, nous vous recommandons de toujours
débrancher le téléviseur avant le nettoyage.
• Evitez de toucher l'écran pour ne pas en rayer la superficie.
Prenez garde de ne pas placer des objets
lourds sur le cordon d’alimentation afin de ne
pas l’endommager.
Nous vous recommandons de ne pas
enrouler de cordon trop long autour des
supports à l'arrière du téléviseur.
Ne couvrez pas les zones d’aération du
téléviseur avec des éléments tels que des
rideaux, des journaux, etc…
Page 74

Description générale
Appuyez sur la
marque de la partie
frontale de l’appareil
pour voir les
connecteurs frontaux.
Vérification des accessoires fournis
Deux piles
(taille AAA).
1 Clé2 Supports
Une télécommande
(RM-905)
2 Vis 1 Chiffon nettoyant
Présentation générale des touches de l’appareil
Témoin (voir p. 34)
Indicateur de mise en
veille (standby):
• Si vous éteignez
l'appareil par la
touche d'arrêt
temporaire de la
télécommande, le
témoin s'éclairera en
rouge.
Prise
Casque
Prise
S-vidéo
• Si vous l'éteignez en
appuyant sur
l'interrupteur d'arrêt
de l'appareil, le
témoin deviendra
orange.
FR
Interrupteur
marche /
arrêt
Prise
vidéo
Prises
audio
Touche de
sélection de la
source d'entrée
Touches de
réglage du
volume
Touches de sélection
des chaînes
Description générale
5
Page 75

Description générale
Présentation générale des touches de la télécommande
Eteindre temporairement le rétroprojecteur :
Appuyez sur cette touche pour éteindre temporairement le rétroprojecteur (le
Coupure du son :
Appuyez sur cette touche pour couper le son.
Appuyez à nouveau pour le récupérer.
Sélection du mode TV :
Appuyez sur cette touche pour désactiver le
télétexte ou l'entrée vidéo.
Voir l'heure :
Appuyez sur cette touche pour activer ou
désactiver l'horloge (celle-ci ne fonctionne que
lorsqu'il y a transmission de télétexte).
Visualisation de l'information sur
l'écran :
Appuyez sur cette touche pour présenter toutes
les informations sur l'écran. Appuyez à nouveau
pour les faire disparaître.
Sélecteur Appareil :
permet de piloter le téléviseur ainsi que les
principales fonctions de votre DVD ou du
Magnétoscope. Allumez l'appareil que vous désirez
piloter et appuyez ensuite plusieurs fois de suite sur
cette touche pour sélectionner DVD, TV ou VCR
(pour le magnétoscope). Un voyant vert s'éclairera
momentanément sur la position sélectionnée.
Avant d'utiliser pour la première fois la
télécommande pour contrôler le DVD ou le
magnétoscope, il faudra la configurer suivant la
marque de votre appareil. Pour cela, reportez-vous
au chapitre “Configuration de la télécommande
pour un DVD ou un Magnétoscope", page 20.
Cette télécommande
a) PAP (2 images sur écran) :
Pour plus de détails, consultez le chapitre
“Fonction PAP (2 images sur écran)”.
b) Télétexte :
Les touches dont les symboles sont de couleur
verte sont aussi utilisées pour les opérations
de télétexte. Pour toute information
complémentaire, consultez le chapitre
“Télétexte” de ce mode d'emploi.
NexTView :
Pour de plus amples détails, consultez le chapitre
“NexTView”.
Sélecteur :
Si le Sélecteur Appareil est sur la
a)
position TV :
• Lorsque MENU est activé, utilisez ces
touches pour vous déplacer dans le système
des menus. Pour de plus amples détails,
reportez-vous au chapitre "Introduction au
système des menus et son utilisation" de la
page 9.
• Lorsque MENU est désactivé, appuyez sur
la touche OK pour voir la liste générale des
chaînes mémorisées. Sélectionnez la chaîne
(émetteur TV) en appuyant sur la
touche ou et ensuite, appuyez à nouveau
sur la touche pour voir la chaîne
sélectionnée.
b)Si le Sélecteur Appareil est sur la
position VCR (magnétoscope) ou DVD :
Utilisez ces touches pour contrôler les
principales fonctions du magnétoscope ou du
DVD.
Fastext :
les opérations de “Fastext”. Pour toute
information complémentaire, consultez la partie
“Fastext” du chapitre de “Télétexte” de ce mode
d'emploi.
Sélection d'effet de son :
plusieurs fois sur cette touche pour modifier
l'effet de son.
Ces touches sont aussi utilisées pour
Appuyez
voyant de mise en veille s'éclairera en rouge). Appuyez à nouveau pour allumer
rétroprojecteur à partir du mode veille (standby).
le
Si on n'appuie ni sur une touche du
télécommande, le
au bout de 15 à 30 minutes s’il ne détecte aucun signal d’antenne.
rétroprojecteur passera automatiquement en veille (standby)
rétroprojecteur, ni sur une touche de la
Marche/Arrêt du magnétoscope ou du DVD :
Appuyez sur cette touche pour allumer ou éteindre
le magnétoscope ou le DVD.
Sélection de la source d'entrée :
Appuyez plusieurs fois sur cette touche jusqu'à ce
que le symbole de la source d'entrée recherchée
apparaisse sur l'écran.
Sélection des chaînes :
est sur la position ”TV” ou “VCR” (magnétoscope),
appuyez sur ces touches pour sélectionner les
chaînes. Pour des numéros de chaîne à deux
chiffres, appuyez sur le deuxième chiffre
rapidement.
a)
Si le Sélecteur Appareil est sur la position
TV :
Appuyez plusieurs fois sur cette touche pour
revenir à la dernière chaîne sélectionnée (la
chaîne précédente doit avoir été visionnée
pendant 5 secondes au moins).
b) Si le Sélecteur Appareil est sur la position
VCR :
Si vous utilisez un magnétoscope Sony, pour les
numéros de chaîne à deux chiffres, par ex. 23,
appuyez d'abord sur -/-- et ensuite sur les
touches 2 et 3.
a) Touche d'enregistrement :
Appareil est sur la position VCR, appuyez sur
cette touche pour enregistrer des programmes.
Si le Sélecteur Appareil
Si le Sélecteur
b)Rétablissement des réglages d'origine :
N'appuyez sur cette touche, pendant 3 secondes
au moins, que pour rétablir les réglages de
l'image et du son tels qu'ils ont été effectués en
usine, mais aussi pour réinstaller l’appareil tel
qu'il était à sa première mise en service. Après
l'apparition sur l'écran du menu de
mémorisation automatique, procédez comme
indiqué au chapitre "Mise sous tension de
l’appareil et mémorisation automatique" (étape
4) de ce Mode d'emploi.
Arrêt sur image :
Appuyez sur cette touche pour geler l'image
télévisée. Appuyez à nouveau pour revenir à
l'image télévisée.
Sélection du format de l'écran :
Appuyez plusieurs fois sur cette touche pour
changer du format de l'écran. Pour de amples
détails, consultez le chapitre “Modification du
format de l’écran”.
Image Multiple (Multi PIP) :
Appuyez sur cette touche pour activer le mode
Multi PIP. Appuyez à nouveau pour le quitter. Pour
de amples détails, consultez le chapitre “Images
Multiples (Multi PIP)“.
Sélection des chaînes :
a)
touche pour sélectionner la chaîne suivante ou la
chaîne précédente.
b) Télétexte:
pour les opérations de télétexte. Pour toute
information complémentaire, consultez le
chapitre “Télétexte” de ce mode d'emploi.
Ces touches sont aussi utilisées
Appuyez sur cette
Activation du Système des Menus :
Appuyez sur cette touche pour que le menu
apparaisse sur l'écran. Appuyez à nouveau sur cette
touche pour le désactiver et voir l'écran de
télévision normal.
Réglage du volume :
Appuyez sur cette touche pour
régler le volume du téléviseur.
Sélection du mode d'image :
Appuyez de façon répétée sur cette touche pour
changer de mode d'image.
6
Description générale
Page 76

Installation
Insertion des piles dans la télécommande
Respectez l'environnement. Déposez les piles usagées dans les conteneurs prévus à cet effet.
Vérifiez que les piles sont correctement
placées!
FR
Installation
7
Page 77

Le connecteur Péritel est en option.
Si vous l'utilisez, cette connexion optionnelle peut améliorer la qualité de l'image et du son lorsque vous utilisez le magnétoscope.
Si vous n'utilisez pas le connecteur Péritel, après avoir mémorisé automatiquement l’appareil, vous devrez mémoriser
manuellement le canal du signal vidéo. Pour ce faire, consultez le chapitre "Mémorisation manuelle des chaînes". Consultez aussi
le mode d'emploi de votre magnétoscope pour voir comment obtenir le canal du signal vidéo.
Installation
Branchement de l'antenne et du magnétoscope
Les câbles de connexion ne sont pas fournis.
ou
OUT IN
magnétoscope
Fixation de l’appareilthe set
Par sécurité, une fois installé, nous vous conseillons de fixer en plus l’appareil à un mur, etc... à l’aide des supports fournis.
1
Montez les deux supports fournis avec les vis sur la partie supérieure arrière de l’appareil.
Ne bloquez pas ou ne recouvrez pas la rainure de
ventilation située en bas à gauche sur la partie arrière de
l'appareil. Pour assurer une bonne ventilation, laissez au
moins une distance de 10 cm. entre le mur et l'appareil.
Faites passer une corde résistance ou une chaîne dans chacun des supports montés à l’étape 1 que vous
2
fixez ensuite à un mur, à une colonne, etc.
8
Installation
Page 78

Première mise en service
Language/Country
Language
Country
Select Language: Confir m: OK
4 Italiano
Français
Español
English
Deutsch
Dansk
Čeština
Language/Country
Language
Country
Select Language: Confirm: OK
4 Italiano
Français
Español
English
Deutsch
Dansk
Čeština
Mise sous tension de l’appareil et mémorisation automatique
La première fois que vous allumerez l’appareil, des séquences de menus apparaîtront sur l'écran. Elles vous permettront de
1) sélectionner la langue des écrans de menu, 2) sélectionner le pays dans lequel vous désirez utiliser l'appareil, 3) chercher
et mémoriser automatiquement tous les canaux disponibles (émetteurs TV) et 4) changer l'ordre dans lequel les canaux
(émetteurs TV) apparaissent sur l'écran.
Cependant si, au bout d'un certain temps, vous devez à nouveau changer la langue des menus, le pays, reprendre la
mémorisation automatique (en cas de déménagement par ex.) ou modifier l'ordre des canaux, vous pouvez le faire en
sélectionnant le menu approprié de
Connectez l'interrupteur de l’appareil à la prise de courant (220-
1
240V AC, 50 Hz).
Lorsque vous connectez le téléviseur pour la première fois, celui-ci
s’allume automatiquement. Si ce n’était pas le cas, appuyez sur
l'interrupteur marche/arrêt
l'allumer.
La première fois que vous allumerez le téléviseur, le menu
/Country
2
Orientez le sélecteur de la télécommande vers ou pour
sélectionner la langue et appuyez ensuite sur la touche pour
confirmer votre choix. A partir de ce moment, tous les menus
apparaîtront dans la langue que vous avez choisie.
Orientez le sélecteur vers ou pour sélectionner le pays dans
3
lequel vous désirez utiliser l’appareil et appuyez ensuite sur la touche
pour confirmer votre choix.
Pendant la mémorisation automatique des chaînes, le menu
peut disparaître de l’écran momentanément. Ceci est normal et
n’entrave en rien la mémorisation automatique des chaînes.
(Réglage).
de la partie frontale de l’appareil pour
Language
(Langue/Pays) apparaîtra automatiquement sur l'écran.
Language/Country
Language
Country
Select Language: Confirm: OK
Langue/Pays
Langue
Pays
Sélect. le pays: Conf.: OK
4 Italiano
Français
Español
English
Deutsch
Dansk
Čeština
4
Finlande
Danemark
Rép. Tchèque
Bulgarie
Belgique
Autriche
Non
FR
Sélectionnez ”Non” au lieu d'un pays si vous ne désirez pas que
les canaux (émetteurs TV) soient mémorisés dans un ordre
déterminé en usine qui commence par le numéro de chaîne 1.
4
Le menu de mémorisation automatique apparaît sur l'écran dans la
langue que vous avez sélectionnée. Appuyez sur la touche pour
sélectionner
Un nouveau menu apparaît automatiquement sur l'écran et vous
5
Oui
.
demande de vérifier que l'antenne est connectée. Vérifiez que
l'antenne est bien connectée et appuyez ensuite sur la touche
pour que commence la mémorisation automatique.
• La mémorisation automatique de l’appareil commence et
mémorise automatiquement tous les canaux (émetteurs TV)
disponibles.
• Si vous avez sélectionné “Non” sur le menu “Pays” et que
vous procédez à nouveau à une mémorisation automatique
après la première mise en marche, les émetteurs TV seront
mémorisés à partir du numéro de chaîne de ce moment là.
Ce processus peut demander quelques minutes. Soyez patient
et n'appuyez sur aucune touche tant que durera le processus de
mémorisation. Sinon, le processus ne serait pas complet.
Réglage des chaînes en
automatique?
Oui: OK Non:
Vérifiez la connexion de
l'ántenne
Oui: OK Non:
1
CO2
2
CO3
3
CO4
4
CO7
5
CO8
recherche...
voir page suivante, SVP...
Première mise en service
9
Page 79

Première mise en service
6
Après avoir réglé l’appareil et mémorisé toutes les chaînes
(émetteurs TV), un nouveau menu Ordre des Chaînes apparaît
automatiquement sur l'écran : il permet de changer l'ordre
d'apparition des chaînes sur l'écran.
a)
Si vous ne désirez pas changer l'ordre des chaînes, passez à l'étape 7.
b)
Si vous désirez changer l'ordre des chaînes :
Le changement de l’emplacement d’une chaîne bouleversera
l’ordre des chaînes suivantes. Il faut donc commencer cette
réorganisation dans l’ordre croissant (ex : TF1 sur le numéro 1,
France 2 sur le numéro 2, France 3 sur le numéro 3, etc...)
1
Orientez le sélecteur de la télécommande vers
ou pour
sélectionner le numéro de la chaîne et le canal (émetteur TV) que
vous désirez changer de place et orientez-le ensuite vers .
2 Orientez le sélecteur vers
ou pour sélectionner le nouveau
numéro de chaîne sous lequel vous désirez mémoriser le canal
(émetteur TV) sélectionné et appuyez ensuite sur .
Le canal sélectionné passe à son nouveau numéro de chaîne et
les autres changent automatiquement.
3 Reprenez à b1) et b2) si vous désirez réorganiser d'autres chaînes de
télévision.
Ordre des chaînes
PROG CA NOM
TV 5
C03
1
PRO 7
C05
2
EU-SP
C07
3
SWF
C08
4
RTL
C09
5
SAT
C11
6
MDR
C12
7
DDI
C13
8
DSF
C14
9
RTL 2
C15
10
KAB 1
C16
11
Sélect. la chaîne: Conf.:
Ordre des chaînes
PROG CA NOM
1
TV 5
C03 TV 5
C03
2
PRO 7
C05
3
EU-SP
C07
4
SWF
C08
5
RTL
C09
6
SAT
C11
7
MDR
C12
8
DDI
C13
9
DSF
C14
10
RTL 2
C15
11
KAB 1
C16
Sélect. la pos.:
Déplacer: OK
7 Appuyez sur la touche pour revenir à l'image télévisée.
L’appareil est prêt à fonctionner.
Première mise en service
10
Page 80

Picture Adjustment
Select: Enter Menu:
Picture Mode
Contrast
Brightness
Colour
Sharpness
Reset
AI
Noise Reduction
Colour Tone
Personal
On
Off
Normal
Picture Adjustment
Select: Enter Menu:
Picture Mode
Contrast
Brightness
Colour
Sharpness
Reset
AI
Noise Reduction
Colour Tone
Personal
On
Off
Normal
Système des Menus
Sélecteur :
Modification du format de l’écran
Cette fonction permet de changer le type de format de l'image télévisée.
1 Appuyez plusieurs fois sur la touche de la télécommande pour
sélectionner l'un des formats suivants :
Large+ : imitation de l’effet grand écran pour les émissions
diffusées en 4 : 3.
4 : 3 : image conventionnelle 4 : 3, affichage complet des
informations.
14 : 9 : compromis entre le format 4 : 3 et 16 : 9.
Zoom : effet grand écran pour les émissions diffusées en
Cinémascope.
Plein : pour les émissions diffusées en 16 : 9.
En mode Large+, Zoom et 14 : 9, la partie supérieure et inférieure de
l’image sont tronquées. Appuyez sur ou pour régler la position
de l’image sur l’écran (pour lire les sous-titres, par exemple).
Large+
Plein
Zoom
14:9
2 Appuyez sur la touche pour confirmer votre sélection.
4:3
Introduction au système des menus et son utilisation
Cet appareil utilise un système de menus sur écran pour vous guider dans les diverses opérations que vous effectuez. Utilisez
les touches suivantes de la télécommande pour passer d'un menu à l'autre.
1 Appuyez sur la touche pour présenter le premier niveau de
menu sur écran.
2 •Pour obtenir le menu ou l'option désiré, orientez le sélecteur vers
ou .
•Pour entrer dans le menu ou l'option sélectionné, orientez-le vers
.
•Pour revenir au menu ou à l'option précédente, orientez-le vers .
•Pour modifier les réglages de l'option sélectionnée, orientez-le
vers / / ou .
•Pour confirmer et mémoriser votre sélection, appuyez sur .
Orientez-le vers //ou
FR
Appuyez sur OK.
3 Appuyez sur la touche pour revenir à l'image télévisée.
Système des Menus
11
Page 81

Système des Menus
Guide rapide de déplacement à travers les menus
Contrôle de l'image
Réglage de l'image
Contraste
Luminosité
Couleurs
Netteté
Raz
AI
Réducteur de bruit
Couleur
Sélection:
Entrer Menu:
Contrôle du son
Mode Egaliseur
Réglage
égaliseur
Balance
Loudness
Spacial
Contrôle Vol. auto.
Son stéréo
0
Volume
0
Son stéréo
Sélection: Entrer Menu:
Caractéristiques
Haut-parleur
Auto 16:9
Correct. de format
Temporisation
Verrouill.parental
Sortie sur AV2
Sélection:
Set Up
Set Up
Réglage
Auto Tuning
Auto Tuning
Mémorisation auto
Programme Sorting
Programme Sorting
Ordre des chaînes
Select NexTView
Select NexTView
Choix NexTView
AV Preset
AV Preset
Présélection audio/vidéo
Manual Set Up
Manual Set Up
Mise en service
Select:
Select:
Sélection:
Enter Menu:
Enter Menu:
Entrer Menu:
Personnel
Oui
Non
Normal
Personnel
.
0
Non
Non
Non
Mono
Mono
Principal
Entrer Menu:
- - - - - - -
Contrôle de l'image
Réglage de l'image
Contraste
Luminosité
Couleurs
Netteté
Raz
AI
Réducteur de bruit
Couleur
Choisir: Entrer:
Caractéristiques
Haut-parleur
Non
Oui
Non
Non
TV
Auto 16:9
Correct. de format
Temporisation
Verrouill. parental
Sortie sur AV2
Choisir: Entrer:
Réglage
Mémorisation auto
Ordre des chaînes
Choix NexTView
Présélection audio/vidéo
Mise en service
Sélect.:
Réglage
Mémorisation auto
Ordre des chaînes
Choix NexTView
Présélection audio/vidéo
Mise en service
Choisir:
Personnel
Contrôle du son
Mode Egaliseur
Réglage
égaliseur
Balance
Loudness
Spacial
Contrôle Vol.auto.
0
Son stéréo
Volume
0
Son stéréo
Choisir: Entrer:
Début pr. auto.:
Entrer:
Normal
Personnel
.
0
Principal
Début
- - - - - - -
- - - - - - -
Consultez le chapitre
“Contrôle de l'image”
Oui
Non
Non
Consultez le chapitre
Non
Non
Mono
“Contrôle du son”
Mono
Consultez le chapitre
Non
Oui
“Utilisation du menu
Non
Non
"Caractéristiques"
TV
Réglage des chaînes en
automatique?
Oui: OK Non:
Ordre des chaînes
PROG CA NOM
TV 5
C03
1
PRO 7
C05
2
EU-SP
C07
3
SWF
C08
4
RTL
C09
5
SAT
C11
6
MDR
C12
7
DDI
C13
8
DSF
C14
9
RTL 2
C15
10
KAB 1
C16
11
Sélect. la chaîne: Conf.:
Consultez le chapitre
“Mise sous tension de
l’appareil et
mémorisation
automatique”
Consultez le chapitre
“Mise sous tension de
l’appareil et
mémorisation
automatique”
Télétexte
Haut/Bas/Complet
Attente de l'affichage
Voir
Page Temps
Aperçu des pages
Sélection: Entrer Menu:
Consultez le
chapitre
“Télétexte”
Réglage
Mémorisation auto
Ordre des chaînes
Choix NexTView
Présélection audio/vidéo
Mise en service
Choisir:
Réglage
Mémorisation auto
Ordre des chaînes
Choix NexTView
Présélection audio/vidéo
Mise en service
Choisir:
Réglage
Mémorisation auto
Ordre des chaînes
Choix NexTView
Présélection audio/vidéo
Mise en service
Choisir:
Entrer:
Entrer:
Entrer:
- - - - - - -
- - - - - - -
- - - - - - -
Consultez le
chapitre
“NexTView”
Consultez le
chapitre
“Identification
et sélection du
format d'écran
des sources
d'entrée”
Mise en service
Langue/Pays
Mémorisation manuelle
Présélection (suite)
Réglage RVB
Code secret
Démonstration
Choisir: Entrer:
Mise en service
Langue/Pays
Mémorisation manuelle
Présélection (suite)
Réglage RVB
Code secret
Démonstration
Choisir: Entrer:
Mise en service
Langue/Pays
Mémorisation manuelle
Présélection (suite)
Réglage RVB
Code secret
Démonstration
Choisir: Entrer:
Mise en service
Langue/Pays
Mémorisation manuelle
Présélection (suite)
Réglage RVB
Code secret
Démonstration
Choisir: Entrer:
Mise en service
Langue/Pays
Mémorisation manuelle
Présélection (suite)
Réglage RVB
Code secret
Démonstration
Choisir: Entrer:
Mise en service
Langue/Pays
Mémorisation manuelle
Présélection (suite)
Réglage RVB
Code secret
Démonstration Début
Choisir: Entrer:
- - - - - - -
- - - - - - -
- - - - - - -
- - - - - - -
- - - - - - -
- - - - - - -
Consultez le chapitre
“Mise sous tension de
l’appareil et
mémorisation
automatique”
Consultez les chapitres
“Mémorisation
manuelle des chaînes”,
“Donner un nom à une
chaîne” et “Chaînes
inutilisées”
Consultez le chapitre
“Utilisation de la
fonction de
Présélection (Suite)”
Consultez le chapitre
“Réglage de centrage
horizontal de l'image
pour une source RVB”
Consultez le chapitre
“Introduction de votre
code secret”
Consultez le chapitre
“Démonstration des
diverses fonctions"
Système des Menus
12
Page 82

Système des Menus
Contrôle de l'image
Bien que l'image ait été réglée en usine, vous pouvez la modifier en fonction de vos préférences.
1 Appuyez sur la touche de la télécommande pour afficher le
menu sur l'écran.
2 Orientez le sélecteur vers pour entrer dans le menu Contrôle de
l'image.
3 Orientez le sélecteur vers ou pour sélectionner le paramètre
que vous désirez modifier et orientez-le ensuite vers .
Le tableau ci-dessous vous indiquera l'effet produit sur chaque
paramètre :
Réglage de l'image
Personnel (pour préférences individuelles)
Cinéma (pour les films)
Contraste Moins Plus
Luminosité
* Plus sombre Plus claire
Couleur* Moins Plus
Netteté* Plus douce Plus nette
Teinte** Dominante rouge Dominante verte
Raz Restaure les réglages d'image effectués en usine
AI (Intelligence Non (Normal)
artificielle) Oui (Optimisation automatique du niveau de
contraste en fonction du signal TV).
Réducteur Fort (Réduction importante du niveau de bruit).
de bruit Moyen (Réduction moyenne du niveau de bruit).
niveau de bruit). (Vous ne pouvez pas utiliser cette
Couleur Chaud (
l’image).
Studio (pour les programmes en direct)
Jeu (pour les jeux vidéo)
Faible (Réduction faible du niveau de bruit).
Auto (Réglage automatique de la réduction du
option en regardant une source de signaux RVB).
Non : (Pas de réduction de niveau de bruit).
Apporte une ambiance rougeâtre à
Normal (Normal).
Froid (Apporte une ambiance bleutée à l’image).
Contrôle de l'image
Réglage de l'image
Contraste
Luminosité
Couleurs
Netteté
Raz
AI
Réducteur de bruit
Couleur
Sélection:
Contrôle de l'image
Réglage de l'image
Contraste
Luminosité
Couleurs
Netteté
Raz
AI
Réducteur de bruit
Couleur
Choisir: Entrer:
Réglage de l'image
Contraste
AI
Réducteur de bruit
Couleur
Personnel
Entrer Menu:
Personnel
Studio
Personnel
Cinéma
Jeu
Oui
Non
Fort
Moyen
Faible
Auto
Non
Chaud
Normal
Froid
Normal
Normal
Oui
Non
Oui
Non
FR
*Ne peut être modifié qu'en sélectionnant Personnel dans Réglage de
l'image.
** Uniquement disponible sur le système couleur NTSC (par ex. Bandes
vidéo américaines).
4 Orientez le sélecteur vers , , / pour modifier le réglage
du paramètre sélectionné et appuyez ensuite sur la touche pour
entrer ce nouveau réglage en mémoire.
5 Reprenez à 3 et 4 pour modifier d'autres réglages.
6 Appuyez sur la touche pour revenir à l'image télévisée.
Changement rapide du réglage de
l'image
Le réglage de l'image peut être rapidement modifié sans avoir à
passer par le menu de Contrôle de l'image.
1 Appuyez à plusieurs reprises sur la touche de la télécommande
pour accéder directement à (Studio, Personnel, Cinéma ou Jeu) et
sélectionner le réglage de l'image que vous désirez.
2 Appuyez sur la touche pour revenir à l'image télévisée.
Réglage de l'image
Studio
Personnel
Cinéma
Jeu
Système des Menus
13
Page 83

Système des Menus
Contrôle du son
Bien que le son ait été réglé en usine, vous pouvez le modifier en fonction de vos préférences.
1 Appuyez sur la touche de la télécommande pour faire apparaître
le menu sur l'écran du téléviseur.
2 Orientez le sélecteur vers pour sélectionner le symbole et
orientez-le ensuite vers pour entrer dans le menu Contrôle du son.
3 Orientez le sélecteur vers ou pour sélectionner le paramètre
que vous désirez modifier et orientez-le ensuite vers .
Le tableau ci-dessous vous indiquera l'effet produit sur chaque
paramètre
Effet Sonore Personnel : Sans effets acoustiques particuliers.
Dolby* V : Dolby Virtual, lors de l’écoute d’une
Dynamique : Le système “BBE High Definition Sound
Réglage Orientez le sélecteur vers ou pour sélectionner
égaliseur la bande de fréquence que vous désirez modifier et
Réglage Effet Appuyez sur le sélecteur vers ou pour modifier le
Balance Gauche Droite
Contrôle Vol. auto.
émetteur
indépendamment du signal émetteur (par ex. lors
des annonces publicitaires)
Son stéréo • Emissions en stéréo :
Casque :
spéciaux resteront sans effet.
Si vous écoutez la télévision avec le casque, les effets sonores
l Volume Moins Plus
l Son stéréo •Emissions en stéréo :
source “Dolby Surround Pro Logic”, ce mode simule
l’effet “Dolby Surround Pro Logic” sans utiliser
d’enceintes arrières.
** dynamise la clarté, le détail et la présence
system”
du son en produisant une voix plus intelligible et une
musique plus présente.
Naturel: Le système “BBE High Definition Sound
system”** renforce la clarté, le détail et la présence
du son pour un rendu plus naturel.
orientez-le ensuite vers ou pour la régler.
Ensuite appuyez sur la touche pour entrer ce
nouveau réglage en mémoire (cette option n'est
possible que si vous avez sélectionné “Personnel” dans
l'option “Effet Sonore”).
niveau sonore de l'effet surround, chaque fois que, dans
l'option “Effet Sonore” vous aurez sélectionné “Dolby V”
et que le signal audio de l'émetteur sera en “Dolby
Surround”.
Non : le volume varie en fonction du signal
Oui : le volume des chaînes se maintient
Mono
Stéréo
• Emissions bilingues :
Mono (pour le canal mono, s'il est disponible)
A (pour le canal 1)
B (pour le canal 2)
Règle également le niveau de sortie
variable des prises E à l’arrière de l’appareil).
Mono
Stéréo
• Emissions bilingues :
Mono (pour le canal mono, s'il est disponible)
A (pour le canal 1)
B (pour le canal 2)
PAP (uniquement lorsque PAP est activé)
Contrôle de l'image
Réglage de l'image
Contraste
Luminosité
Couleurs
Netteté
Raz
AI
Réducteur de bruit
Couleur
Sélection:
Contrôle du son
Mode Egaliseur
Réglage
égaliseur
Balance
Loudness
Spacial
Contrôle Vol.auto.
Son stéréo
Volume
Son stéréo
Choisir: Entrer:
Contrôle du son
Mode Egaliseur
Réglage
égaliseur
Balance
Loudness
Spacial
Contrôle Vol. auto.
Son stéréo
Volume
Son stéréo
Choisir le mode: Conf.: OK
Réglage égaliseur
(Personnel)
+
0
–
120 500 1,5K 5 K 10 K
Sélect.: Régler: Conf.:OK
Loudness
Balance
Contrôle Vol. auto.
Son stéréo
Volume
Son stéréo
Personnel
Entrer Menu:
Personnel
0
0
Personnel
Sans eff.
Personal
0
0
.
0
.
0
Mono
.
Normal
Mono
Mono
Vocal
Rock
Non
Non
Non
Mono
Mono
Non
Oui
Non
Oui
Non
Non
Non
Non
Jazz
Pop
Oui
A
B
B
A
Système des Menus
14
voir page suivante, SVP...
Page 84

Système des Menus
4 Orientez les sélecteur vers//ou pour modifier le
5 Reprenez à 3 et 4 pour modifier d'autres réglages.
6 Appuyez sur la touche pour revenir à l'image télévisée.
réglage du paramètre sélectionné et appuyez ensuite sur la touche
pour entrer le nouveau réglage en mémoire.
* Ce téléviseur a été conçu pour créer un effet son “Dolby Virtual”
qui imite le son de quatre haut-parleurs avec uniquement les deux
seuls haut-parleurs avant du téléviseur, dans la mesure où le
signal audio de l'émetteur est “Dolby Surround Pro Logic”.
*Fabriqué sous licence Dolby Laboratories . “Dolby”, “Pro Logic”
et le symbole double D sont des marques de commerce de
Dolby Laboratories.
**“BBE High Definition Sound system” est fabriqué par Sony
Corporation sous licence BBE Sound, Inc. Il est protégé par le
brevet des E.-U. nº. 4,638,258 et 4,482,866. Le terme “BBE” et le
logo “BBE” sont des marques commerciales de BBE Sound, Inc.
Changement rapide du réglage du son
Le réglage du son peut être rapidement modifié sans devoir passer
par le menu de Contrôle du son.
1 Appuyez à plusieurs reprises sur la touche de la télécommande
pour accéder directement à (Personnel, Dolby V, Dynamique ou
Naturel.) et sélectionnez le réglage du son que vous désirez.
2 Appuyez sur la touche pour revenir à l'image télévisée.
Mode Egaliseur
Personnel
Sans eff.
Vocal
Rock
FR
Jazz
Pop
Système des Menus
15
Page 85

Contrôle de l'image
Sélection:
Entrer Menu:
Réglage de l'image
Contraste
Luminosité
Couleurs
Netteté
Raz
AI
Réducteur de bruit
Couleur
Personnel
Oui
Non
Normal
Caractéristiques
Auto 16:9
Correct. de format
Temporisation
Verrouill. parental
Sortie sur AV2
Non
Oui
Non
Non
TV
Choisir: Entrer:
Haut-parleur
Principal
Haut-parleur
Principal
Central
10 min.
Temporisation
Verrouill. parental
Non
Oui
Sortie sur AV2
TV
AV1
AV2
AV3
AV4
Auto 16:9
Non
Normal
Complet
Correct. de format
Non
Oui
16
Système des Menus
Utilisation du menu "Caractéristiques"
Ce menu permet de :
a) Sélectionner votre mode d'écoute : directement à partir de l’appareil ou par un amplificateur externe.
b) Régler automatiquement le format de l'image.
c) Sélectionner un laps de temps après lequel l’appareil passera automatiquement en mode veille (standby).
d) Bloquer les touches de l’appareil, de sorte qu'il ne soit possible de le faire fonctionner qu'en utilisant les touches de la
télécommande
e) Sélectionner la source de sortie du connecteur Péritel :3/q3 (SMARTLINK). Ainsi, vous pourrez enregistrer par cette prise
lorsque vous regardez une émission provenant d'une autre source (si votre magnétoscope dispose du Smartlink, ce procédé n'est
plus nécessaire).
1 Appuyez sur la touche de la télécommande pour que le menu
s'affiche sur l'écran.
2 Orientez le sélecteur de la télécommande vers pour sélectionner le
symbole et orientez-le ensuite vers pour entrer dans le menu
Système des Menus
Caractéristiques.
3 Orientez le sélecteur vers ou pour sélectionner l'option de menu
désirée et orientez-le ensuite vers .
(le tableau ci-dessous vous indiquera l'effet produit sur les
paramètres par chacune des options).
4 Orientez le sélecteur vers ou pour modifier le réglage de
l'option sélectionnée et appuyez ensuite sur la touche pour
l'entrer en mémoire.
5 Appuyez sur la touche pour revenir à l'image télévisée.
Caractéristiques Effet/Opération
Haut-parleur Principal (son de l’appareil)
Auto 16:9 Non : La taille des images ne sera pas ajustée
(uniquement pour automatiquement.
le signal d’antenne) Normal : La taille des images sera ajustée
automatiquement d’après les informations
transmises par les chaînes télévisées.
la taille de l’image pour éliminer des bandes noires
sur l’image télévisée.
des changements de taille au cours d’une même
émission.
Correc. de format
(úniquement si
Auto 16:9 est les programmes diffusés en 4:3/14:9.
sur Normal
ou Complet)
Temporisation. Non
en mode veille (standby), le temps restant sera
automatiquement affiché sur l'écran.
sur la touche
avant le passage en mode veille.
mode veille, appuyez sur la touche TV de la
télécommande.
Verrouill. parental
fonctionnent pas, l’appareil ne
fonctionnera que par la télécommande)
Sortie sur AV3 TV (signal audio/vidéo de l'antenne)
l'avant de l’appareil).
Central (son d'un amplificateur externe)
Complet : Le téléviseur ajuste automatiquement
Remarque: Le réglage “complet” peut entraîner
Non : 4:3/14:9 est sélectionné.
Oui : sélection automatique du mode Large+ pour
10 min.
20 min.
.
.
.
90 min.
• Une minute avant que l’appareil ne passe
• Pendant que vous regardez l’appareil, appuyez
pour voir le temps qui reste
• Pour allumer à nouveau l’appareil à partir du
Non (mode normal)
Oui (les touches de l’appareil ne
AV1 (signal audio/vidéo du connecteur
Péritel :1/ 1).
AV2 (signal audio/vidéo du connecteur Péritel
:
2/ 2).
AV3 (signal audio/vidéo du connecteur Péritel
:
3/q3 (SMARTLINK).).
AV4 (signal audio/vidéo du connecteur … 4 situé à
Au cas où un décodeur serait connecté,
rappelez-vous de sélectionner à nouveau la
Sortie sur AV3 sur “TV” pour un décodage
correct.
Page 86

Système des Menus
Mémorisation manuelle des chaînes
Utilisez cette fonction pour régler les canaux (émetteurs TV) les uns après les autres et dans l'ordre de chaîne que vous
désirez,
encore une entrée vidéo.
1 Appuyez sur la touche de la télécommande pour que le
menu s'inscrive sur l'écran.
2 Orientez le sélecteur de la télécommande vers pour sélectionner
le symbole et orientez-le ensuite vers pour entrer dans le
menu Réglage.
3Orientez le sélecteur vers ou pour sélectionner Mise en
service et orientez-le ensuite vers .
4Orientez le sélecteur vers ou pour sélectionner Mémorisation
manuelle et orientez-le ensuite vers .
5 Orientez le sélecteur vers ou pour sélectionner le nº de chaîne
sur lequel vous désirer mémoriser un émetteur de télévision ou le
canal vidéo (pour le canal vidéo, nous vous conseillons de
sélectionner la chaîne nº “0”). Orientez 2 fois le sélecteur vers
pour mettre en relief la colonne SYS.
6 Orientez le sélecteur vers ou pour sélectionner la norme
d'émission de télévision ou celle du canal vidéo (B/G
pour l'Europe Occidentale , L pour la France, I pour la Grande-
Bretagne ou D/K pour l'Europe de l'Est) ou une source d'entrée
externe (EXT). Ensuite, orientez le sélecteur vers pour mettre en
relief la colonne CA.
7 Orientez le sélecteur vers ou pour sélectionner le type de
canal, "C" pour les chaînes hertziennes (pour émetteurs TV ou le
canal vidéo), "S" pour les chaînes câblées ou “F” pour les entrées de
fréquence directe. Ensuite, orientez le sélecteur vers .
8 a) Si vous connaissez le numéro du canal de l'émetteur de
télévision, du signal du canal vidéo ou de la fréquence, appuyez
sur les touches numériques pour introduire directement le
numéro. Puis appuyez sur pour les entrer en mémoire.
b) Si vous ne connaissez pas le numéro du canal, orientez le
sélecteur vers pour sélectionner RECH. et l’appareil
commencera à effectuer une recherche automatique du canal
d'émetteur TV suivant ou le canal du signal vidéo.
Si ce n'est pas celui que vous désirez entrer en mémoire, orientez
le sélecteur vers pour chercher un autre canal. Lorsque vous
trouverez le canal que vous désirez entrer en mémoire, appuyez
sur .
Pendant la mémorisation manuelle des chaînes par la
fonction recherche “RECH.”, le menu peut disparaître de
l’écran momentanément. Ceci est normal et n’entrave en rien
la mémorisation manuelle des chaînes.
c) Pour des sources d'entrée externes (EXT), orientez le sélecteur
vers pour sélectionner la source d'entrée sur laquelle
l'équipement est connecté (AV1, AV2, AV3 ou AV4). Puis
appuyez sur la touche pour l'entrer en mémoire.
Contrôle de l'image
Réglage de l'image
Contraste
Luminosité
Couleurs
Netteté
Raz
AI
Réducteur de bruit
Couleur
Sélection:
Réglage
Mémorisation auto
Ordre des chaînes
Choix NexTView
Présélection audio/vidéo
Mise en service
Sélect.:
Réglage
Mémorisation auto
Ordre des chaînes
Choix NexTView
Présélection audio/vidéo
Mise en service
Choisir:
Mise en service
Langue/Pays
Mémorisation manuelle
Présélection (suite)
Réglage RVB
Code secret
Démonstration
Choisir: Entrer:
Mémorisation manuelle
PROG CASYSSAUT NOM
1
2
3
4
5
6
7
8
9
10
11
Choisir: Entrer:
PROG CASYS
SAUT N OM
Non
1
PROG SYS
SAUT NOM
Non
1 B/G
PROG SYS
SAUT NOM
Non
1 B/G
PROG CASYS
SAUT NOM
Non
3 EXT
Début pr. auto.:
B/G
Non
B/G
Non
Non
Non
Non
Non
Non
Non
Non
Non
Non
B/G
L
I
D/K
EXT
C
S
F
Personnel
Entrer Menu:
Début
- - - - - - -
- - - - - - -
Entrer:
- - - - - - -
C09
C10
CA
- -
CA
03
C
RECH.
AV1
AV2
AV3
AV4
Oui
Non
Normal
FR
ARD
BBC
9 Reprenez de 5 à 8 a), b) ou c) pour régler d'autres canaux et les
mémoriser.
10 Appuyez sur la touche pour revenir à l'image télévisée.
L’appareil est prêt à fonctionner.
Système des Menus
17
Page 87

Système des Menus
Donner un nom à une chaîne
Normalement, les noms des canaux (émetteurs TV) sont automatiquement obtenus par le télétexte s'il est disponible. Cependant, on
peut aussi assigner un nom à cinq caractères maximum (lettres ou chiffres) à une chaîne ou à un signal d'entrée vidéo. Il sera ainsi
plus facile d'identifier une chaîne (émetteur TV) ou un signal d'entrée vidéo qui s'inscrit sur l'écran.
1 Appuyez sur la touche de la télécommande pour que le
menu s'inscrive sur l'écran.
2 Orientez le sélecteur vers pour sélectionner le symbole et
orientez-le ensuite vers pour entrer dans le menu Réglage.
3 Orientez le sélecteur vers ou pour sélectionner Mise en
service et orientez-le ensuite vers .
4 Orientez le sélecteur vers ou pour sélectionner Mémorisation
manuelle et orientez-le ensuite vers .
5 Orientez le sélecteur vers ou pour sélectionner le numéro de
chaîne avec le canal auquel vous voulez donner un nom.
6 Orientez plusieurs fois le sélecteur vers jusqu'à ce que ressorte le
premier élément de la colonne NOM.
Contrôle de l'image
Réglage de l'image
Contraste
Luminosité
Couleurs
Netteté
Raz
AI
Réducteur de bruit
Couleur
Sélection:
Réglage
Mémorisation auto
Ordre des chaînes
Choix NexTView
Présélection audio/vidéo
Mise en service
Sélect.:
Réglage
Mémorisation auto
Ordre des chaînes
Choix NexTView
Présélection audio/vidéo
Mise en service
Choisir:
Mise en service
Langue/Pays
Mémorisation manuelle
Présélection (suite)
Réglage RVB
Code secret
Démonstration
Choisir: Entrer:
Mémorisation manuelle
PROG CASYSSAUT NOM
1
2
3
4
5
6
7
8
9
10
11
Choisir: Entrer:
PROG SYS
SAUT N OM
Non
1 B/G
Début pr. auto.:
B/G
Non
B/G
Non
Non
Non
Non
Non
Non
Non
Non
Non
Non
Personnel
Entrer Menu:
- - - - - - -
Entrer:
C09
C10
CA
C 03
Normal
Début
- - - - - - -
- - - - - - -
ARD
BBC
A
Oui
Non
18
Système des Menus
7 Orientez le sélecteur vers ou pour sélectionner une lettre, un
numéro, “+” ou un espace en blanc et orientez-le ensuite vers
pour confirmer ce caractère. Sélectionnez les quatre autres
caractères de la même façon.
8 Lorsque vous aurez sélectionné tous les caractères, appuyez sur la
touche .
9 Reprenez de 5 à 8 si vous désirez donner un nom à d’autres chaînes.
10 Appuyez sur la touche pour revenir à l'image télévisée.
Lorsque vous sélectionnerez un canal ayant un nom, il s'inscrit sur l'écran
pendant quelques secondes.
Page 88

Système des Menus
Contrôle de l'image
Sélection:
Entrer Menu:
Réglage de l'image
Contraste
Luminosité
Couleurs
Netteté
Raz
AI
Réducteur de bruit
Couleur
Personnel
Oui
Non
Normal
Réglage
Mémorisation auto
Ordre des chaînes
Choix NexTView
Présélection audio/vidéo
Mise en service
Sélect.:
Début pr. auto.:
Début
- - - - - - -
Entrer:
Réglage
Mémorisation auto
Ordre des chaînes
Choix NexTView
Présélection audio/vidéo
Mise en service
Choisir:
- - - - - - -
Mise en service
Choisir: Entrer:
Langue/Pays
Mémorisation manuelle
Présélection (suite)
Réglage RVB
Code secret
Démonstration
- - - - - - -
PROG SYSSAUT NOM
1 B/G
CA
C 09
ARD
Non
Oui
Chaînes inutilisées
Vous pouvez programmer cet appareil pour qu'il ignore les numéros de chaînes que vous ne désirez pas utiliser lorsque la
sélection sera effectuée au moyen des touches PROG +/-. Si vous désirez plus tard récupérer le nº des chaînes omises, procédez
comme indiqué ci-dessous, mais en choisissant Non au lieu de Oui à l'étape numéro 6.
1 Appuyez sur la touche de la télécommande pour que le menu
s'inscrive sur l'écran.
2 Orientez le sélecteur vers pour sélectionner le symbole et
orientez-le ensuite vers pour entrer dans le menu Réglage.
3 Orientez le sélecteur vers ou pour sélectionner Mise en service
et orientez-le ensuite vers
.
4 Orientez le sélecteur vers ou pour sélectionner Mémorisation
manuelle et orientez-le ensuite vers
5 Orientez le sélecteur vers ou pour sélectionner le numéro de
chaîne que vous désirez omettre et orientez-le ensuite vers
accéder à la colonne SAUT.
.
FR
pour
6 Orientez le sélecteur vers pour sélectionner Oui et appuyez
ensuite sur la touche pour le mémoriser.
7 Reprenez 5 et 6 pour mettre d'autres numéros de chaînes hors
service.
8 Appuyez sur la touche pour revenir à l'image télévisée.
En sélectionnant une chaîne (émetteur TV) au moyen de la touche PROG
+/-, celle-ci ne sera pas visible sur l'écran. Cependant cette chaîne peut être
sélectionnée en tapant son numéro sur les touches numériques.
Système des Menus
19
Page 89

Système des Menus
Utilisation de la fonction “Préselection (Suite)”
Cette fonction permet:
a)D'atténuer individuellement l'intensité d'un signal émetteur lorsque le signal de l'antenne locale est très intense (apparition de
rayures sur l'image).
b)De régler individuellement le volume de chaque canal.
c)Même lorsque la fonction de réglage fin automatique (AFT) est toujours activée, il est cependant possible, si vous observez une
distorsion de l'image, de procéder manuellement à un réglage fin pour améliorer la réception de l'image.
d)Régler la sortie AV pour les numéros de chaînes aux signaux codés comme par ex. celui d'un décodeur de télévision payante. De
cette façon, un magnétosocope connecté à l’appareil enregistrera le signal décodé.
1 Appuyez sur la touche de la télécommande pour que le menu
s'inscrive sur l'écran.
2 Orientez le sélecteur vers pour sélectionner le symbole et
orientez-le ensuite vers pour entrer dans le menu Réglage.
3 Orientez le sélecteur vers ou pour sélectionner Mise en service
et orientez-le ensuite vers .
4 Orientez le sélecteur vers ou pour sélectionner Présélection
(suite) et orientez-le ensuite vers .
Contrôle de l'image
Réglage de l'image
Contraste
Luminosité
Couleurs
Netteté
Raz
AI
Réducteur de bruit
Couleur
Sélection:
Réglage
Mémorisation auto
Ordre des chaînes
Choix NexTView
Présélection audio/vidéo
Mise en service
Sélect.:
Personnel
Entrer Menu:
Début
- - - - - - -
Début pr. auto.:
Normal
Oui
Non
5 Orientez le sélecteur vers ou pour sélectionner le numéro de
chaîne correspondant et orientez-le plusieurs fois vers pour
sélectionner:
a) ATT (Atténuateur RF)
b) VOL (contrôle volume individuel)
c) AFT (Réglage fin automatique)
d) DECODEUR
6 a) ATT
Orientez le sélecteur vers pour sélectionner Oui et appuyez
ensuite sur la touche . Reprenez les étapes 5 et 6 a) pour
atténuer d'autres chaînes.
b) VOL
Orientez le sélecteur vers ou pour régler l'intensité de
volume de la chaîne entre -7 et +7 et appuyez ensuite sur la touche
. Reprenez les étapes 5 et 6 b) pour régler l'intensité du volume
d'autres chaînes.
c) AFT
Orientez le sélecteur vers ou pour régler le niveau de la
fréquence de la chaîne entre -15 et +15 et appuyez ensuite sur la
touche . Reprenez les étapes 5 et 6 c) pour réaliser le réglage fin
d'autres chaînes.
d) DECODEUR
Orientez le sélecteur vers ou pour sélectionner AV1 (pour un
décodeur connecté au connecteur Péritel :1/ 1) ou AV3
(pour un décodeur connecté au connecteur Péritel :3/q3
(SMARTLINK)) et appuyez ensuite sur la touche . Reprenez
les étapes 5 et 6 d) pour sélectionner la sortie AV1 ou AV3 sur
d'autres numéros de chaînes.
Remarque: cette fonction ne s’applique que dans le cas de la
connexion d’un magnétoscope Smartlink sur la prise Péritel
AV3. Pour une meilleure commodité d’utilisation nous vous
conseillons de connecter votre décodeur sur la prise Péritel
prévue à cet effet sur le magnétoscope.
Réglage
Mémorisation auto
Ordre des chaînes
Choix NexTView
Présélection audio/vidéo
Mise en service
Choisir:
Mise en service
Langue/Pays
Mémorisation manuelle
Présélection (suite)
Réglage RVB
Code secret
Démonstration
Choisir: Entrer:
Présélection (suite)
PROG AFTVOLATT DECODEUR
1
2
3
4
5
6
7
8
9
10
11
Choisir: Entrer:
PROG AFTVO LATT DECODEUR
Non
1
Oui
PROG ATT
1 Oui
PROG
ATT AFTVOL DECODEUR
1 Oui -5
ATT AFTVOL DECODEUR
PROG
1 Oui -5 2
Non
0
Non
0
Non
0
AFTVOL DECODEUR
- 5
Entrer:
Oui
Oui
Oui
2
- - - - - - -
- - - - - - -
Non
Non
Non
Non
AV1
AV2
20
Système des Menus
7 Appuyez sur la touche pour revenir à l'image télévisée.
L’appareil est prêt à fonctionner.
Page 90

Système des Menus
Contrôle de l'image
Sélection:
Entrer Menu:
Réglage de l'image
Contraste
Luminosité
Couleurs
Netteté
Raz
AI
Réducteur de bruit
Couleur
Personnel
Oui
Non
Normal
Réglage
Mémorisation auto
Ordre des chaînes
Choix NexTView
Présélection audio/vidéo
Mise en service
Sélect.:
Début pr. auto.:
Début
- - - - - - -
Entrer:
Réglage
Mémorisation auto
Ordre des chaînes
Choix NexTView
Présélection audio/vidéo
Mise en service
Choisir:
- - - - - - -
Mise en service
Choisir: Entrer:
Langue/Pays
Mémorisation manuelle
Présélection (suite)
Réglage RVB
Code secret
Démonstration
- - - - - - -
Mise en service
Sélect. A-Z, 0-9: Enr.: OK
Langue/Pays
Mémorisation manuelle
Présélection (suite)
Réglage RVB
Code secret
Démonstration
A---------
Etes vous sûr?
Sauvegarder: OK Effacer:
Introduction de votre Code secret
Vous pouvez donner à l’appareil un code de sécurité de onze caractères maximum (lettres ou chiffres). Ceci en facilitera la
récupération en cas de vol.
Ce code ne peut être introduit qu'une seule fois!.
Assurez-vous que vous l'avez noté (par ex.sur ce mode d'emploi) pour ne pas l'oublier!
1 Appuyez sur la touche de la télécommande pour que le menu
s'inscrive sur l'écran.
2 Orientez le sélecteur vers pour sélectionner le symbole et
orientez-le ensuite vers pour entrer dans le menu Réglage.
3 Orientez le sélecteur vers ou pour sélectionner Mise en service
et orientez-le ensuite vers .
4 Orientez le sélecteur vers ou pour sélectionner Code secret et
orientez-le ensuite vers .
FR
5 Orientez le sélecteur vers ou pour sélectionner une lettre, un
chiffre, “+” ou un espace en blanc et orientez-le ensuite vers pour
confirmer ce caractère. Sélectionnez les autres dix caractères de la
même façon.
6 Lorsque vous aurez sélectionné tous les caractères, appuyez sur la
touche . Un nouveau menu s'inscrira automatiquement sur
l'écran et vous demandera si vous êtes certain de vouloir entrer en
mémoire le code introduit.
7 a) Si vous ne désirez pas entrer ce code en mémoire, orientez le
sélecteur vers et reprenez les étapes de 4 à 6 pour introduire un
nouveau code.
b) Si c'est bien le code que vous désirez conserver, appuyez sur la
touche .
Rappelez-vous que le code ne peut être introduit qu'une seule
fois.
8 Appuyez sur la touche pour revenir à l'image télévisée.
Lorsque vous entrerez dans le menu “Mise en service”, dans l'option Code
secret le code que vous aurez introduit apparaîtra toujours et vous ne
pourrez jamais plus entrer dans cette option.
Système des Menus
21
Page 91

Système des Menus
Démonstration des diverses fonctions
Cette fonction offre une perspective globale de certaines des fonctions de l’appareil.
1 Appuyez sur la touche de la télécommande pour que le menu
s'inscrive sur l'écran.
2 Orientez le sélecteur vers pour sélectionner le symbole et
orientez-le ensuite vers pour entrer dans le menu Réglage.
3 Orientez le sélecteur vers ou pour sélectionner Mise en service
et orientez-le ensuite vers .
4 Orientez le sélecteur vers ou pour sélectionner Démonstration
et orientez-le ensuite vers pour que la démonstration commence.
Sur l'écran commence à s'inscrire une séquence présentant la majorité des
fonctions dont dispose l’appareil.
Remarque :
Appuyez sur la touche de la télécommande pour arrêter la
démonstration et revenir à l'image télévisée.
Contrôle de l'image
Réglage de l'image
Contraste
Luminosité
Couleurs
Netteté
Raz
AI
Réducteur de bruit
Couleur
Sélection:
Réglage
Mémorisation auto
Ordre des chaînes
Choix NexTView
Présélection audio/vidéo
Mise en service
Début pr. auto.:
Sélect.:
Réglage
Mémorisation auto
Ordre des chaînes
Choix NexTView
Présélection audio/vidéo
Mise en service
Choisir:
Mise en service
Langue/Pays
Mémorisation manuelle
Présélection (suite)
Réglage RVB
Code secret
Démonstration Début
Entrer:
Choisir: Entrer:
Personnel
Normal
Entrer Menu:
Début
- - - - - - -
- - - - - - -
- - - - - - -
Oui
Non
Système des Menus
22
Page 92

Système des Menus
Réglage de centrage horizontal de l'image pour une source RVB
En connectant une source de signaux RVB, telle qu'un lecteur de DVD au connecteur Péritel :1/ 1 ou :2/ 2, il se peut
qu'il soit nécessaire de régler le centrage horizontal de l'image.
1 Appuyez plusieurs fois sur la touche de la télécommande
jusqu'à ce que le symbole …1 ou …2 s'inscrive sur l'écran.
• Le symbole …1 correspond aux appareils connectés au
connecteur Péritel
:1/ 1.
• Le symbole …2 correspond aux appareils connectés au
connecteur Péritel
:2/ 2.
2 Appuyez sur la touche de la télécommande pour que le menu
s'inscrive sur l'écran.
3 Orientez le sélecteur vers pour sélectionner le symbole et
orientez-le ensuite vers pour entrer dans le menu Réglage.
4 Orientez le sélecteur vers ou pour sélectionner Mise en service
et orientez-le ensuite vers .
… 1
Contrôle de l'image
Réglage de l'image
Contraste
Luminosité
Couleurs
Netteté
Raz
AI
Réducteur de bruit
Couleur
Sélection:
Réglage
Mémorisation auto
Ordre des chaînes
Choix NexTView
Présélection audio/vidéo
Mise en service
Sélect.:
Réglage
Mémorisation auto
Ordre des chaînes
Choix NexTView
Présélection audio/vidéo
Mise en service
Choisir:
Personnel
Entrer Menu:
Début
- - - - - - -
Début pr. auto.:
- - - - - - -
Entrer:
Normal
Oui
Non
FR
5 Orientez le sélecteur vers ou pour sélectionner Réglage RVB et
orientez-le ensuite vers .
6 Orientez le sélecteur vers pour sélectionner Centrage Horizontal
et orientez-le ensuite vers ou pour régler le centrage de l'image
entre –10 et +10. Appuyez sur la touche pour le rentrer en
mémoire.
7 Appuyez sur la touche pour revenir à l'image télévisée.
Mise en service
Langue/Pays
Mémorisation manuelle
Présélection (suite)
Réglage RVB
Code secret
Démonstration
Choisir: Entrer:
Réglage RVB
Centrage horizontal
Régler la pos.: Conf.: OK
- - - - - - -
O
Système des Menus
23
Page 93

Système des Menus
Identification et sélection du format d'écran des sources d'entrée
Cette fonction permet de sélectionner le type de format d'image de l'équipement optionnel connecté à cet appareil et de donner à
cette entrée un nom de cinq caractères maximum (lettres ou chiffres).
1 Appuyez sur la touche de la télécommande pour que le menu
s'inscrive sur l'écran.
2 Orientez le sélecteur vers pour sélectionner le symbole et
orientez-le ensuite vers pour entrer dans le menu Réglage.
3 Orientez le sélecteur vers ou pour sélectionner Présélection
audio/vidéo et orientez-le ensuite vers .
4 Orientez le curseur vers ou pour sélectionner le signal d'entrée,
puis orientez-le ensuite vers .
5 Orientez le curseur vers ou pour effectuer la sélection:
Non : La taille des images ne sera pas ajustée
automatiquement.
Normal : La taille des images sera ajustée automatiquement
d’après les informations transmises par les chaînes
télévisées.
Complet : La taille des images sera ajustée automatiquement
d’après les informations transmises par les chaînes. En
absence d’information, le téléviseur passera
automatiquement en mode zoom s’il détecte des bandes
moires dans l’image télévisée.
Remarque: Ce réglage peut entraîner des changements
de taille au cours d’une même émission.
Contrôle de l'image
Réglage de l'image
Contraste
Luminosité
Couleurs
Netteté
Raz
AI
Réducteur de bruit
Couleur
Sélection:
Réglage
Mémorisation auto
Ordre des chaînes
Choix NexTView
Présélection audio/vidéo
Mise en service
Sélect.:
Réglage
Mémorisation auto
Ordre des chaînes
Choix NexTView
Présélection audio/vidéo
Mise en service
Choisir:
Présélection audio/vidéo
ENTREE NOM
AV1
AV2
AV3
AV4
Choisir: Entrer:
Présélection audio/vidéo
ENTREE NOM
AV1
AV2
AV3
AV4
Select: Suite: Conf.: OK
Présélection audio/vidéo
ENTREE NOM
AV1
AV2
AV3
AV4
Sélect. A-Z, 0-9: Conf.: O K
Entrer Menu:
Début pr. auto.:
Entrer:
AUTO 16/9
Non
Non
Normal
Complet
AUTO 16/9
Non
Non
Normal
Complet
AUTO 16/9
Non
Non
Normal
Complet
Personnel
Normal
Début
- - - - - - -
- - - - - - -
VIDEO
VIDEO
VIDEO
VIDEO
VIDEO
VIDEO
IDEO
V
VIDEO
VIDEO
Oui
Non
24
Système des Menus
Puis orientez-le ensuite vers
.
6 Lorsque le premier élément de la colonne NOM ressort, orientez le
curseur vers ou pour sélectionner une lettre, un numéro, “+” ou
un espace en blanc et orientez-le ensuite ensuite vers pour
confirmer ce caractère. Sélectionnez les quatre autres caractères de la
même façon.
7 Lorsque vous avez sélectionné tous les caractères, appuyez sur la
touche .
8 Reprenez de 4 à 7 si vous désirez sélectionner le format de l'image ou
donner un nom à d'autres signaux d'entrée.
9 Appuyez sur la touche pour revenir à l'image télévisée
Chaque fois que vous sélectionnerez l'équipement du signal d'entrée auquel
vous avez donné un nom, ce nom s'inscrira sur l'écran pendant quelques
secondes.
Page 94

Système des Menus
Images Multiples (Multi PIP)
Cette fonction (Multi PIP, de l'anglais Multi Picture In Picture) présente une succession de 12 images statiques et une treizième en
mouvement. On peut sélectionner la chaîne que l'on désire voir, soit en passant en mode écran total ou en mode "images multiples".
03 05
1 Appuyez sur la touche de la télécommande pour sélectionner le
mode "images multiples". Sur l'écran apparaissent 13 numéros de
chaînes, dont celle que vous êtes en train de regarder, qui se trouve
au centre.
2 Orientez le sélecteur vers//ou pour vous déplacer
dans les 13 chaînes.
Si vous appuyez sur la touche PROG -/+, les 13 numéros de
chaînes antérieurs ou suivants apparaîtront sur l'écran.
3 Appuyez sur la touche pour sélectionner la chaîne choisie. Elle
se déplacera au centre.
4 Appuyez sur la touche pour revenir à l'image télévisée.
02
13
12
11 09 08
04
01 06
10
07
2 Images sur écran (PAP)
Cette fonction (PAP, de l'anglais Picture And Picture) divise l'écran en deux pour permettre de voir deux chaînes à la fois (avec une
image vidéo sur l'un d'eux, si on le désire).
Le son de l'écran gauche sort des haut-parleurs de l’appareil et celui de l'écran droit peut être entendu avec un casque.
Connexion et déconnexion du PAP
Appuyez sur la touche de la télécommande pour voir les deux
écrans en format 4:3, appuyez à nouveau pour quitter le mode PAP et
revenir à un écran normal.
Sélection de la source PAP
1 Pour modifier l'image de l'écran gauche :
Lorsque vous vous trouvez en mode PAP, appuyez sur les touches
numériques de la télécommande (pour sélectionner une chaîne de
télévision) ou appuyez sur la touche (pour sélectionner une
entrée vidéo).
2 Pour modifier l'image de l'écran droit :
Lorsque vous vous trouvez en mode PAP, appuyez sur la touche
de la télécommande. Lorsque le symbole apparaîtra en bas de
l'écran droit, appuyez sur les touches numériques (pour sélectionner
une chaîne de télévision) ou appuyez sur la touche (pour
sélectionner une entrée vidéo).
Changement d'écrans
Lorsque vous vous trouvez en mode PAP, il vous suffit d'appuyer sur la
touche de la télécommande pour intervertir les deux écrans.
FR
Agrandissement des écrans
Lorsque vous vous trouvez en mode PAP, orientez plusieurs fois le
sélecteur vers ou pour modifier la taille des deux écrans.
Sélection du son de l'écran droit
Lorsque vous vous trouvez en mode PAP, consultez le chapitre
“Contrôle du son” de ce mode d'emploi et réglez “l Son stéréo” en
“PAP”.
Système des Menus
25
Page 95

Télétexte
Télétexte
Le télétexte est un service d'information que diffuse la plupart des chaînes télévisées. La page du sommaire du service de télétexte
(en général, la page 100) explique comment utiliser ce service.
! Vérifiez que vous utilisez
télétexte.
Connexion et déconnexion du télétexte
1 Sélectionnez la chaîne TV qui diffuse le service de télétexte que vous
désirez consulter.
2 Appuyez une fois sur la touche de la télécommande pour voir à
appuyez sur la touche et appuyez ensuite sur les touches
PROGR +/- pour modifier la chaîne de l'écran de télévision.
Orientez le sélecteur vers o
de l'écran de TV. Appuyez à nouveau sur la touche pour
reprendre la réception normale de télétexte.
3 Appuyez deux fois sur la touche pour obtenir le télétexte seul.
4 Appuyez trois fois sur la touche pour superposer télétexte et
image télévisée.
5 Appuyez une quatrième fois sur la touche ou appuyez sur la
touche pour quitter le service de télétexte.
Sélectionner une page de télétexte
A l'aide des touches numériques de la télécommande, introduisez les
trois chiffres du numéro de page que vous désirez consulter. Si vous
vous trompez, choisissez trois chiffres quelconques et recommencez
ensuite à introduire le numéro de page correct.
une chaîne de télévision disposant d'un signal d'émission suffisamment fort pour éviter des erreurs de
TELETEXT
Index
la fois l'image télévisée et le télétexte. L'écran se divise en deux: à
droite le programme TV et à gauche la page de télétexte.
Vous trouvant alors à la fois en mode image TV et télétexte,
u pour modifier la dimension
Programme
News
Sport
Weather
TELETEXT
TELETEXT
TELETEXT
TELETEXT
TELETEXT
TELETEXT
TELETEXT
TELETEXT
Index
Index
Index
Index
Index
Index
Index
Index
Programme
Programme
Programme
Programme
Programme
Programme
Programme
Programme
News
News
News
News
News
News
News
News
Sport
Sport
Sport
Sport
Sport
Sport
Sport
Sport
Weather
Weather
Weather
Weather
Weather
Weather
Weather
Weather
TELETEXT
01
Index
Programme
News
Sport
Weather
153
101
25
01
98
25
25
25
25
25
25
25
25
153
153
153
153
153
153
153
153
101
101
101
101
101
101
101
101
98
98
98
98
98
98
98
98
153
101
25
98
Sélection de la page précédente ou de la page
suivante
Appuyez sur les touches (PROG+) ou (PROG-) de la
télécommande pour sélectionner la page suivante ou la page précédente.
Sélection des pages secondaires
Une page de télétexte peut comporter à son tour plusieurs pages
secondaires. En ce cas, au bout de quelques secondes une information
s'inscrit dans la partie inférieure de l'écran et précise le nombre de pages
secondaires que comporte cette page. Orientez le sélecteur vers ou
pour sélectionner la page secondaire qui vous intéresse.
Arrêt sur une page Télétexte
Appuyez sur la touche pour figer une page et éviter qu'elle ne
tourne. Appuyez à nouveau sur cette touche pour libérer le blocage.
Voir le sommaire
Appuyez sur la touche pour visualiser la page du sommaire (en
général, page 100).
Fastext
(disponible uniquement si l'émetteur TV émet des signaux Fastext)
En Fastext, un menu de codes couleur s'affiche au bas de la page de
télétexte. Appuyez sur la touche de couleur (rouge, verte, jaune ou bleue)
de la télécommande pour accéder directement à la page correspondante.
Capture d'une page
1 Appuyez sur les touches numériques de la télécommande pour
sélectionner une page de télétexte comportant plusieurs numéros de
page (par ex. la page du sommaire).
2 Appuyez sur la touche .
3 Orientez le sélecteur vers ou pour sélectionner le numéro de la
page que vous désirez consulter et appuyez ensuite sur la touche .
La page demandée apparaît sur l'écran au bout de quelques secondes.
voir page suivante, SVP...
216-02
01 03 04 05 06 07 0802
26
Télétexte
Page 96

Télétexte
Utilisation du menu du télétexte
1 Lorsque vous vous trouvez dans le service télétexte, appuyez sur
la touche de la télécommande pour voir le menu du télétexte
s'inscrire sur l'écran.
2 Orientez le sélecteur ver ou pour sélectionner l'option
recherchée et orientez-le ensuite vers pour entrer dans cette option.
3 Pour que le menu du télétexte disparaisse de l'écran, appuyez sur la
touche .
Haut / Bas / Complet
Cette option vous permet d'agrandir certaines parties de la page du
télétexte. Orientez le sélecteur vers pour agrandir la moitié supérieure
de l'écran ou appuyez sur pour agrandir la moitié inférieure. Appuyez
sur la touche pour revenir à la taille normale de la page.
Attente de l'affichage
Après avoir sélectionné cette fonction, vous pouvez voir une chaîne de
télévision pendant que vous attendez que s'affiche la page de télétexte
sollicitée. Lorsque la page est disponible, le symbole change de
couleur. Pour voir la page, appuyez sur la touche .
Voir
Certaines pages de télétexte contiennent une information cachée que l'on
peut faire apparaître, comme par ex. la solution d'une devinette. Après
avoir sélectionné cette option, l'information cachée s'inscrira sur l'écran.
Télétexte
Haut/Bas/Complet
Attente de l'affichage
Voir
Page Temps
Aperçu des pages
Sélection: Entrer Menu:
Haut: Bas: Complet: OK
FR
Page Temps
(suivant la disponibilité du service télétexte)
Vous pouvez consulter une page codée par temps, comme par ex. une
Page Temps à une heure précise. Après avoir sélectionné cette option et
que le menu secondaire "Page Temps" se soit inscrit sur l'écran:
1 Appuyez sur les touches numériques de la télécommande pour
introduire les trois chiffres de la page recherchée.
2 Appuyez à nouveau sur les touches numériques pour introduire les
quatre chiffres de l'heure recherchée.
3 Appuyez sur la touche pour entrer en mémoire l'heure établie.
L'heure s'inscrit en haut et à gauche de l'écran. La page s'affichera sur
l'écran à l'heure spécifiée.
Aperçu des pages
(suivant la disponibilité du service télétexte)
Dans ce menu secondaire, les pages de bloc et de groupe du TOP-Text
sont organisées en deux colonnes de façon à ce que l'utilisateur puisse
sélectionner sa page plus facilement. Pour chacune des pages de bloc de
la première colonne apparaissent sur la seconde les pages de groupe
correspondantes. Orientez le sélecteur vers ou pour sélectionner la
page de bloc recherchée et orientez-le ensuite vers pour entrer dans la
colonne de pages du groupe. Orientez le sélecteur vers ou pour
sélectionner la page de groupe recherché. Puis appuyez sur la touche
pour voir cette page.
Page Temps
PAGE TEMPS
Sélect. le page: 0-9 Suivant:
- - : - -– – –
Télétexte
27
Page 97

NexTView
NexTView *
* (suivant la disponibilité du service)
• NexTView est un guide électronique de programmes (EPG) qui contient une information concernant les programmes des divers
émetteurs de télévision.
• Le fournisseur NexTView est garant du contenu du guide. Le téléviseur gère la présentation, c’est à dire la structure des menus et la
navigation si cette fonction n’est pas prise en charge par le fournisseur. Les diffuseurs n’utilisant pas toujours le même nom pour
une chaîne, le nom de la chaîne qui apparaît dans le tableau NexTView peut être différent. Veillez à ce que le nom de la chaîne
s’affiche comme indiqué dans le tableau NexTView Voir le paragraphe “Donner un nom à une chaîne” en page 18 si des corrections
sont nécessaires. Si les deux noms (NexTView et Nom des chaînes) sont différents, les fonctions d’enregistrement programmé et autres
fonctions relatives au NexTView ne seront pas disponibles sur cette chaîne.
• Appuyez sur la touche OK pour obtenir le nom des chaînes.
Sélection du NexTView
L’appareil sélectionne automatiquement le fournisseur de
NexTView qui supporte le plus de chaînes correspondantes avec
votre mémorisation automatique des chaînes. Ce service est
disponible 30 minutes après que le canal ait été réglé. Il vous est tout
à fait possible de changer la chaîne supportant NexTView si vous le
désirez.
1 Appuyez sur la touche de la télécommande pour que le menu
s'inscrive sur l'écran.
2 Orientez le sélecteur vers ou pour sélectionner le symbole et
orientez-le ensuite vers pour entrer dans le menu Réglage.
3 Orientez le sélecteur vers ou pour sélectionner Choix
NexTView et orientez-le ensuite vers . Une liste de tous les
serveurs disponibles de NexTView s'affiche alors sur l'écran.
4 Orientez le sélecteur vers ou pour sélectionner le serveur que
vous désirez et appuyez ensuite sur la touche .
5 Appuyez sur la touche pour revenir à l'image télévisée.
Activation du NexTView
1 Appuyez plusieurs fois sur la touche de la télécommande pour
activer ou désactiver NexTView.
Dans le cas où la navigation du fournisseur est disponible, il est
aussi nécessaire d'orienter le sélecteur vers pour utiliser le
Guide Electronique de Programmes (EPG) de Sony.
2 Orientez le sélecteur vers//ou pour déplacer le curseur
sur l'écran.
3 Appuyez sur la touche pour confirmer la sélection.
a) Si vous appuyez sur dans les colonnes de la date, de l'heure ou
des icônes (sujets), la liste des programmes changera selon la
sélection faite.
b) Si vous appuyez sur dans la liste des programmes, vous verrez
directement le canal, si une émission est en cours ou sinon, vous
verrez apparaître le menu En attente d'émission si l'émission doit
avoir lieu plus tard.
Contrôle de l'image
Réglage de l'image
Contraste
Luminosité
Couleurs
Netteté
Raz
AI
Réducteur de bruit
Couleur
Sélection:
Réglage
Mémorisation auto
Ordre des chaînes
Choix NexTView
Présélection audio/vidéo
Mise en service
Début pr. auto.:
Sélect.:
Réglage
Mémorisation auto
Ordre des chaînes
Choix NexTView
Présélection audio/vidéo
Mise en service
Choisir:
07 Tue
12:38
SWISS
7
Tue
8
Wed
9
Thu
10
Fri
11
Sat
12
Sun
13
Mon
TXT TPS / RINGIER
Star Wars
Super RTL
Werner - Beinhart
Pro 7
Flui grüsst den Rest der Welt
Kabel 1
12
Once upon a time in the West
Euronews
International News
RTL Plus
Hat der alte Hexenmeister sich doch
einmal fortbegeben, und nun sollen
seine Geister auch nach meinem Willen
leben.
10:35 - 12:45
10:20 - 12:00
10:45 - 10:50
11:00 - 11:20
11:45 - 12:50
Légende des icônes
liste complète de la sélection
sélection personnelle
actualités
films
sports
divertissements
enfants
retour au dernier menu
Personnel
Entrer Menu:
- - - - - - -
Entrer:
Tue 07. 04 .98
Normal
Début
- - - - - - -
Oui
Non
28
Réglage individuel de Programmes
Vous pouvez établir votre liste personnelle de thèmes contenus
dans la liste proposée.
1 Orientez le sélecteur vers ou pour sélectionner le symbole et
orientez-le ensuite vers pour entrer dans le menu Réglage
individuel.
2 Orientez le sélecteur vers ou pour sélectionner votre option sur
l'écran et appuyez ensuite sur la touche pour confirmer.
3 Reprenez l'étape 2 pour sélectionner tous les éléments que vous
désirez voir portés sur votre liste.
4 Lorsque la liste est terminée, appuyez sur la touche pour
sélectionner le symbole .
5 Appuyez sur la touche pour revenir au menu précédent.
6 Orientez le sélecteur vers ou pour sélectionner le symbole et
appuyez ensuite sur la touche pour activer votre réglage
individuel des chaînes.
voir page suivante, SVP...
NexTView
Page 98

NexTView
Menu Emission en attente
Ce menu vous permet de configurer un aide-mémoire ou
d'enregistrer les programmes sélectionnés.
1 Orientez le sélecteur vers ou pour sélectionner, dans la colonne
de la liste des programmes, un programme qui doit être émis plus
tard.
2 Appuyez sur la touche pour entrer dans le menu Emission en
attente.
Configurer l'aide-mémoire
Orientez le sélecteur vers ou pour sélectionner le symbole et
appuyez ensuite plusieurs fois sur la touche pour sélectionner régler
l'aide-mémoire ou annuler l'aide-mémoire. Si vous choisissez régler
l'aide-mémoire, le programme affiche le symbole d'une horloge et, avant
que le programme ne commence, apparaîtra sur l'écran un court message
demandant si vous voulez toujours le voir.
First nextTView/EPG-Providers in Europe
07 Tue
SWISS TXT TPS / RINGIER nexTView
12:38
Address Mapping
The position of the addresses in the
OSDA is shown in the following diagram.
The position values of the DPW are set
to '0'.
If other values are set, the complete
combination will be scrolled.
Example:
if the DPWC is set to '63', the char-
This channel has been set for a timer
VPS/PDC
On
Speed
SP
Timer Prog
VCR1
Tue 07. 04 .98
Voir la liste programmée
Orientez le sélecteur vers ou pour sélectionner le symbole et
appuyez ensuite plusieurs fois sur la touche pour activer ou
désactiver la liste programmée, Cette liste montre les programmes
mémorisés par l'aide-mémoire (Le nombre total des programmes qui
peut entrer dans l'aide-mémoire est de 5).
Enregistrer des programmes*
*(uniquement si votre magnétoscope dispose du Smartlink)
1 Branchez le magnétoscope.
2 Orientez le sélecteur vers ou pour sélectionner le symbole
et appuyez ensuite sur la touche pour que l'information soit
transmise au magnétoscope.
3 Pour régler le magnétoscope:
VPS/PDC
Orientez le sélecteur vers ou , pour sélectionner VPS/PDC et
appuyez ensuite plusieurs fois sur la touche pour sélectionner
Oui ou Non. Ce réglage garantit que toute l'émission sera enregistrée,
même s'il y a des changements de programme (il ne fonctionne que si
le canal sélectionné émet un signal VPS/PDC).
Vitesse
Orientez le sélecteur vers pour sélectionner Vitesse et appuyez
ensuite plusieurs fois sur la touche pour sélectionner “SP” (durée
standard) ou “LP” (longue durée). En mode longue durée, on peut
enregistrer deux fois plus de temps sur la bande vidéo, bien que la
qualité de l'image puisse se dégrader.
VPS/PDC
Vitesse
Régl.magn.
FR
Oui
SP
VCR1
Réglage du magnétoscope
Orientez le sélecteur vers pour sélectionner Régl. magn. et
appuyez ensuite plusieurs fois sur la touche pour sélectionner le
magnétoscope que vous désirez programmer, soit VCR1 ou soit
VCR2.
4 Finalement, orientez le sélecteur vers pour sélectionner le symbole
et appuyez ensuite sur la touche pour revenir à l'image
télévisée.
NexTView
29
Page 99

Connexion des équipements en option
1
2
B
C
H
I
DVD
Magnétoscope
Camescope DV/D8/
S-VHS/Hi8/DVC
F
G
Camescope
8mm/Hi8/DVC
D
E
1
2
A
Connexion des équipements en option
Vous pouvez connecter à l’appareil une large gamme d'équipements optionnels, comme illustré ci-dessous.
“PlayStation”*
* “PlayStation”
est un produit
de Sony
Computer
Entertainment,
Inc.
* “PlayStation”
est une marque
commerciale
de Sony
Computer
Entertainment,
Inc.
Eviter des
distorsions de
l'image :
• Ne branchez
pas d'équipe-
ments aux
connecteurs
F et G
simultané-
ment.
Appareil Dolby
Surround
“PlayStation”*
Magnétoscope
Décodeur
Signaux d'entrée acceptés
A Signaux audio / vidéo et RVB
B Signaux audio / vidéo et RVB
C Signaux audio / vidéo et S-vidéo
D Entrée du haut-parleur central. Dans le
menu Caractéristiques, réglez l'option
“Haut-parleur” sur “Central”.
E Pas d'entrée
F Signal S-vidéo
G Signal vidéo
H Signal audio
I Pas d'entrée
Hi-Fi
Signaux de sortie disponibles
Vidéo/audio du tuner du TV
Vidéo/audio qui apparaissent sur l'écran (sortie de moniteur)
Vidéo/audio de la source sélectionnée
Pas de sortie
Signal audio
Pas de sortie
Pas de sortie
Pas de sortie
Signal audio pour le casque
Connexion des équipements en option
30
Page 100

Connexion des équipements en option
Utilisation des équipements en option
Informations complémentaires
Connexion d’un magnétoscope
Nous vous conseillons de connecter le magnétoscope au connecteur Péritel C sur la partie postérieure de l’appareil. Si vous
n'avez pas de câble Péritel, nous vous recommandons de régler le signal du magnétoscope sur le numéro de chaîne “0”; pour ce
faire, consultez le chapitre “Réglage manuel des chaînes” de ce Mode d'emploi. Consultez aussi le mode d'emploi de votre
magnétoscope pour voir comment obtenir le canal test du signal vidéo.
Si votre magnétoscope accepte "Smartlink", consultez le chapitre "Smartlink" de ce Mode d'emploi.
Connexion d'un équipement audio externe
1 Ecouter le son de l’appareil à travers votre chaîne Hi-Fi :
Si vous désirez amplifier la sortie audio de l’appareil, connectez votre chaîne hi-fi aux prises E qui se trouvent sur la
partie postérieure de l’appareil. Le volume de l'équipement branché aux prises E peut être modifié en variant le réglage
du volume du casque. Pour ce faire, consultez le chapitre “Contrôle du son” de ce mode d'emploi.
2 Ecouter le son d'un équipement Dolby Prologic à travers l’appareil :
Si vous désirez écouter le son du décodeur-ampli Dolby Prologic dans les haut-parleurs de l’appareil, connectez l'appareil
aux prises D de la partie postérieure de l’appareil. Branchez la sortie centrale de l'ampli à ces prises, pour que celui-ci
joue le rôle de haut-parleur central. Pour ce faire, consultez le chapitre “Utilisation du menu "Caractéristiques" et sélectionnez
“Central” dans l'option “Haut-parleur”.
Rappelez-vous que la puissance maximale à l'entrée de ce connecteur est de 30 W. Assurez-vous que cette limite n'est pas
dépassée.
Connexion d'équipements Mono
Connectez le câble audio au connecteur L/G/S/I situé sur la partie avant de l’appareil et sélectionnez le signal d'entrée
4 en suivant les instructions ci-dessous mentionnées.
Sélection et visualisation du signal d'entrée
Pour pouvoir obtenir, sur l'écran T.V. le signal d'entrée de l'appareil branché, sélectionnez le symbole du connecteur auquel
vous avez connecté l'équipement.
Par ex.: si vous avez branché un équipement au connecteur dont le symbole est
touche de la télécommande jusqu'à ce que le symbole 1 apparaisse sur l'écran.
Y1/ 1, appuyez plusieurs fois sur la
1 Connectez l'équipement optionnel au connecteur adéquat de l’appareil comme indiqué sur la
page précédente.
2 Appuyez plusieurs fois sur la touche de la télécommande jusqu'à ce que le symbole correct
d'entrée s'inscrive sur l'écran.
Symbole Signaux d'entrée
1 • Signal d'entrée audio / vidéo par le connecteur Péritel A ou *RVB par le connecteur
Péritel A.
2 • Signal d'entrée audio / vidéo par le connecteur Péritel B ou *RVB par le
connecteur Péritel B.
3 • Signal d'entrée par le connecteur Péritel C ou * S-vidéo par le connecteur Péritel C.
4 • Signal d'entrée S-vidéo par le connecteur à 4 broches F ou * entrée vidéo par le
connecteur RCA G et signal audio par les connecteurs RCA H.
FR
*(détection automatique du signal suivant l'équipement connecté)
3 Allumez l'équipement que vous avez connecté.
4 Pour revenir à l'image télévisée, appuyez sur la touche de la télécommande.
Connexion des équipements en option
31
 Loading...