

Page 1
R
PDP Colour TV
KE-P37XS1
KE-P42XS1
4-102-916-11 (1)
Operating Instructions
Before operating the TV, please read the “Safety Information”
section of this manual. Retain this manual fo r future reference.
Bedienungsanleitung
Bevor Sie das Fernsehgerät einschalten, lesen Sie bitte den
Abschnitt „Sicherheitshinweise“ dieses Handbuchs. Bewahren
Sie das Handbuch auf, um später bei Bedarf darin nachsc hla gen
zu können.
Manual de Instrucciones
Antes de utilizar este televisor, lea atentamente el capítulo
“Normas de seguridad” de este manual. Conserve el manual para
futuras referencias.
Mode d'emploi
Avant d'utiliser le téléviseur, nous vous prions de lir e avec
attention les “Consignes de sécurité illustrées à la section
correspondante de ce manuel. Conservez ce manuel pour vous y
référer ensuite.
GB
DE
ES
FR
©2004 by Sony Corporation
Page 2
NOTICE FOR CUSTOMERS IN THE UNITED
KINGDOM AND IRELAND
A moulded plug complying with BS1363 is fitted to this equipment for your safety and convenience.
Should the fuse in the plug supplied need to be replaced, a 5 AMP fuse approved by ASTA or BSI to BS
1362 (i.e. marked with or ) must be used.
When an alternative type of plug is used it should be fitted with a 5 AMP FUSE, otherwise the circuit
should be protected by a 5 AMP FUSE at the distribution board.
If the plug supplied with this equipment has a detachable fuse cover, be sure to attach the fuse cover after
you change the fuse. Never use the plug without the fuse cover. If you should lose the fuse cover, please
contact your nearest Sony service station.
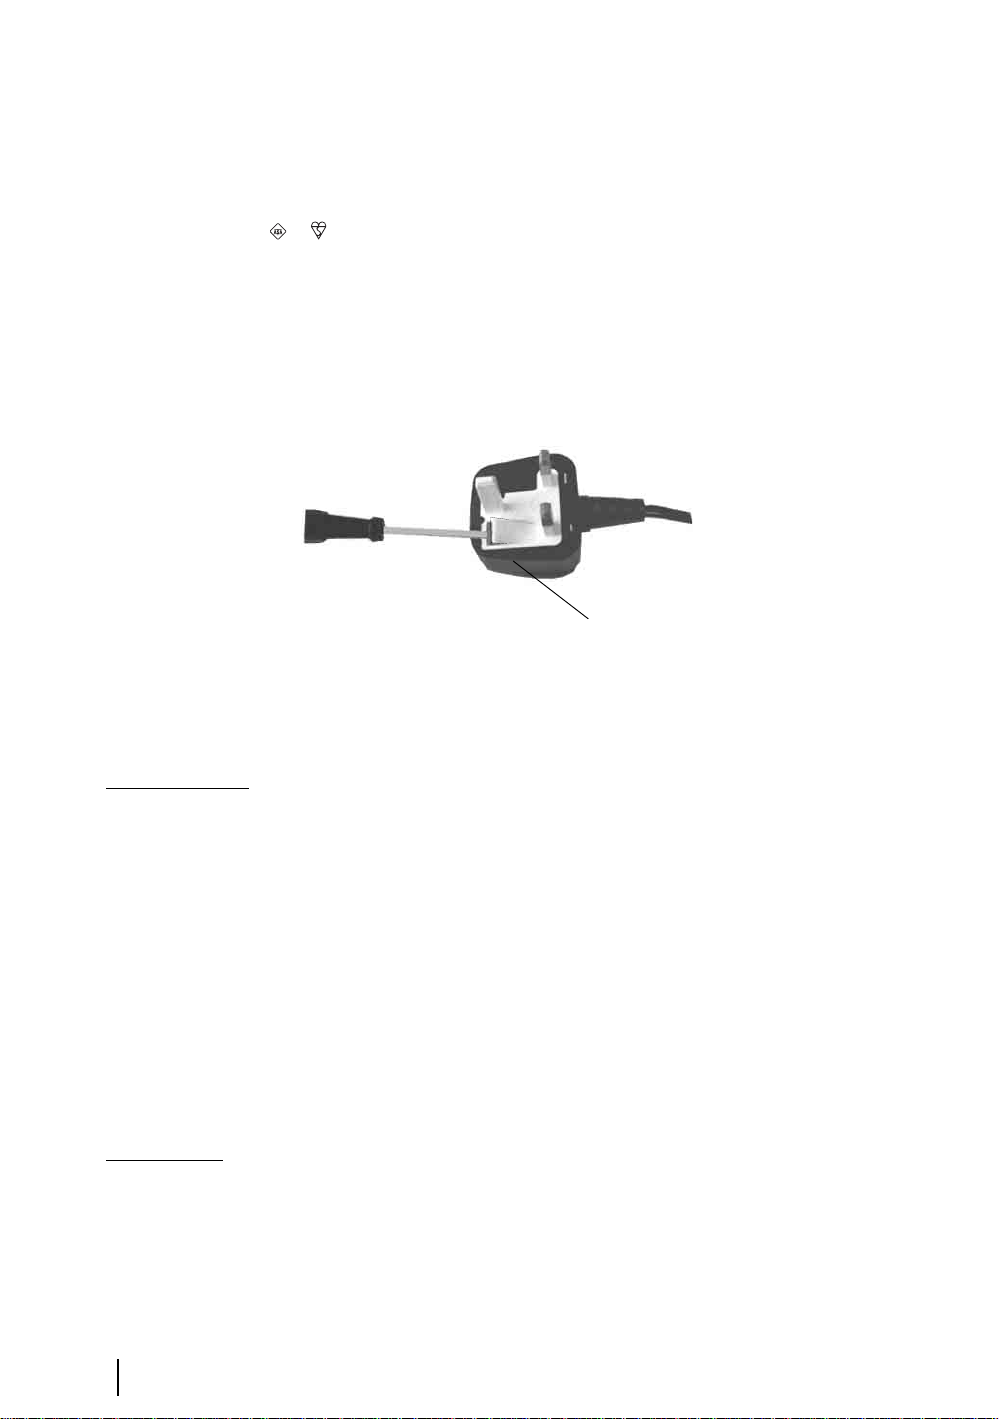
FUSE
How to replace the fuse
Open the fuse compartment with a blade screwdriver, and replace the fuse.
• IMPORTANT
If the plug supplied is not suitable for the socket outlets in your home, it should be cut off and
an appropriate plug fitted in accordance with the following instructions:
The wires in this mains lead are coloured in accordance with the following code:
Blue Neutral
Brown Live
As the colours of the wires in the mains lead of this apparatus may not correspond with the
coloured markings identifying the terminals in your plug, proceed as follows:
The wire which is coloured blue must be connected to the terminal which is marked with the
letter N or coloured black. The wire which is coloured brown must be connected to the
terminal which is marked with the letter L or coloured red. Do not connect either wire to the
earth terminal in the plug which is marked by the letter E or by the safety earth symbol I
or coloured green or green and yellow.
WARNING
• To prevent the risk of electric shock, do not insert the plug cut off from the mains lead into a
socket outlet. This plug cannot be used and should be destroyed.
• To prevent the risk of fire or electric shock, do not expose the unit to rain or moisture.
• Dangerously high voltages are present inside the set. Do not open the cabinet. Refer servicing
to qualified personnel only.
2
Page 3
Introduction
• Thank you for choosing this Sony product.
• Before operating the TV, please read this manual thoroughly and retain it for future reference.
• Symbols used in the manual:
• Important information.
• Information on a feature.
• 1,2... Sequence of instructions.
• Buttons shaded white on the remote control show you the
buttons you have to press to follow the sequence of the
instructions.
• Informs you of the result of the instructions.
Table of Contents
Notice for Customers in the United Kingdom and Ireland................................................................................... 2
Introduction .......................................................................................................................................................... 3
Safety Information................................................................................................................................................ 4
Precautions ...........................................................................................................................................................7
Overview & Installation
Checking the Accessories Supplied...................................................................................................................... 9
Overview of Remote Control Buttons...................................................... ..........................................................10
Overview of the TV Buttons and side Connectors................................. ............................................................ 12
Overview of the TV Indicators............ ....................................................... ........................................................ 13
Inserting Batteries into the Remote Control........................... ........................... ................................................. 13
Connecting the Aerial and VCR......................................................................................................................... 14
Stabilizing the TV set ....................................................................................................... .................................14
First Time Operation
Switching on the TV and Automatically Tuning ............................................................................................... 15
GB
TV Functions
Introducing and Using the Menu System ..........................................................................................................17
The Picture Adjustment menu ..................................................................................................................... 18
The Sound Adjustment menu....................................................................................................................... 20
The Features menu.............. .......................... ...................................................... .......................................... 22
The Timer menu ........................................................................................................................................... 25
The Set Up menu.................................... .. ........................... .. ........................... ............................................ 26
"Memory Stick"
About "Memory Stick"............. ....................................................... ................................................................... 30
Adjusting settings ............................................................................................................................................... 31
Viewing Photos and Playing movies..................................................................................................................33
Teletext..................................................................................................................................................................36
NexTView...............................................................................................................................................................37
Additional Information
Connecting Equipment to the TV........................................................................................................................38
Viewing pictures from equipment connected to the TV......................................................................................40
Remote Control Configuration for VCR or DVD ...............................................................................................41
Learning functions from other Remote controls..................................................................................................42
Technical Specifications........... ..................................................... ......................................................................44
Troubleshooting...................................................................................................................................................45
Television Channdel Number Guide...................................................................................................................49
Index....................................................................................................................................................................50
How to lift the TV ................................................................................................................................Back cover
Table of Contents
3
Page 4
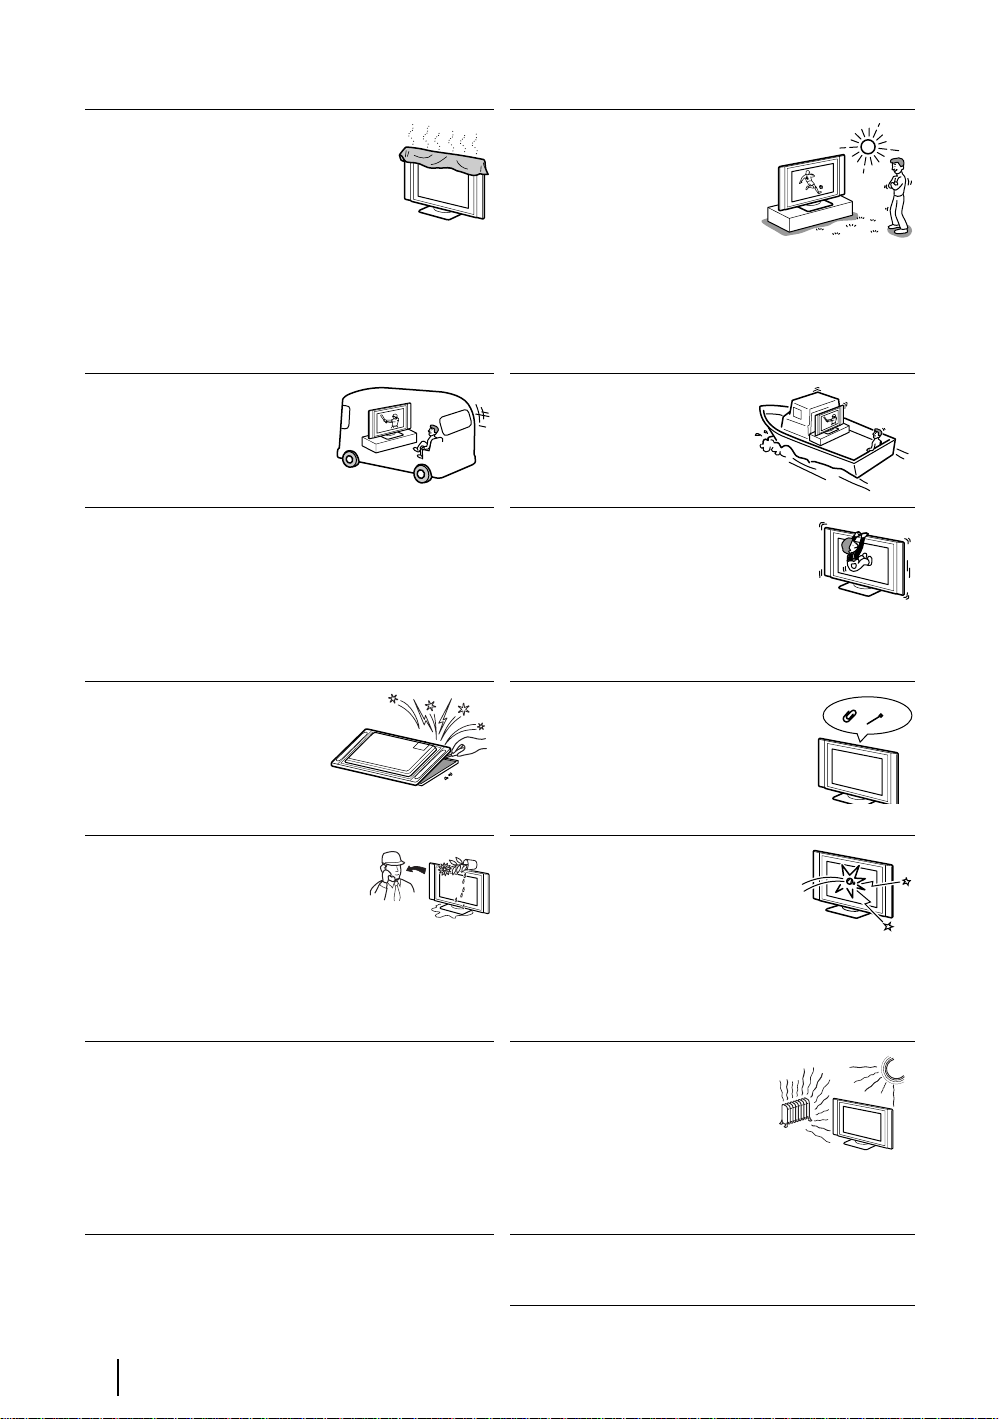
Safety Information
Table 1:
Mains lead
Unplug the mains lead when
moving the set. Do not move
the set with the mains lead
plugged in. It may damage the
mains lead and result in fire or
electric shock. If the set has been dropped or
damaged, have it checked immediately by qualified
service personal.
Damage requiring service
If the surface of the display cracks, do not touch it
until you have unplugged the mains lead. Otherwise
electric shock may result.
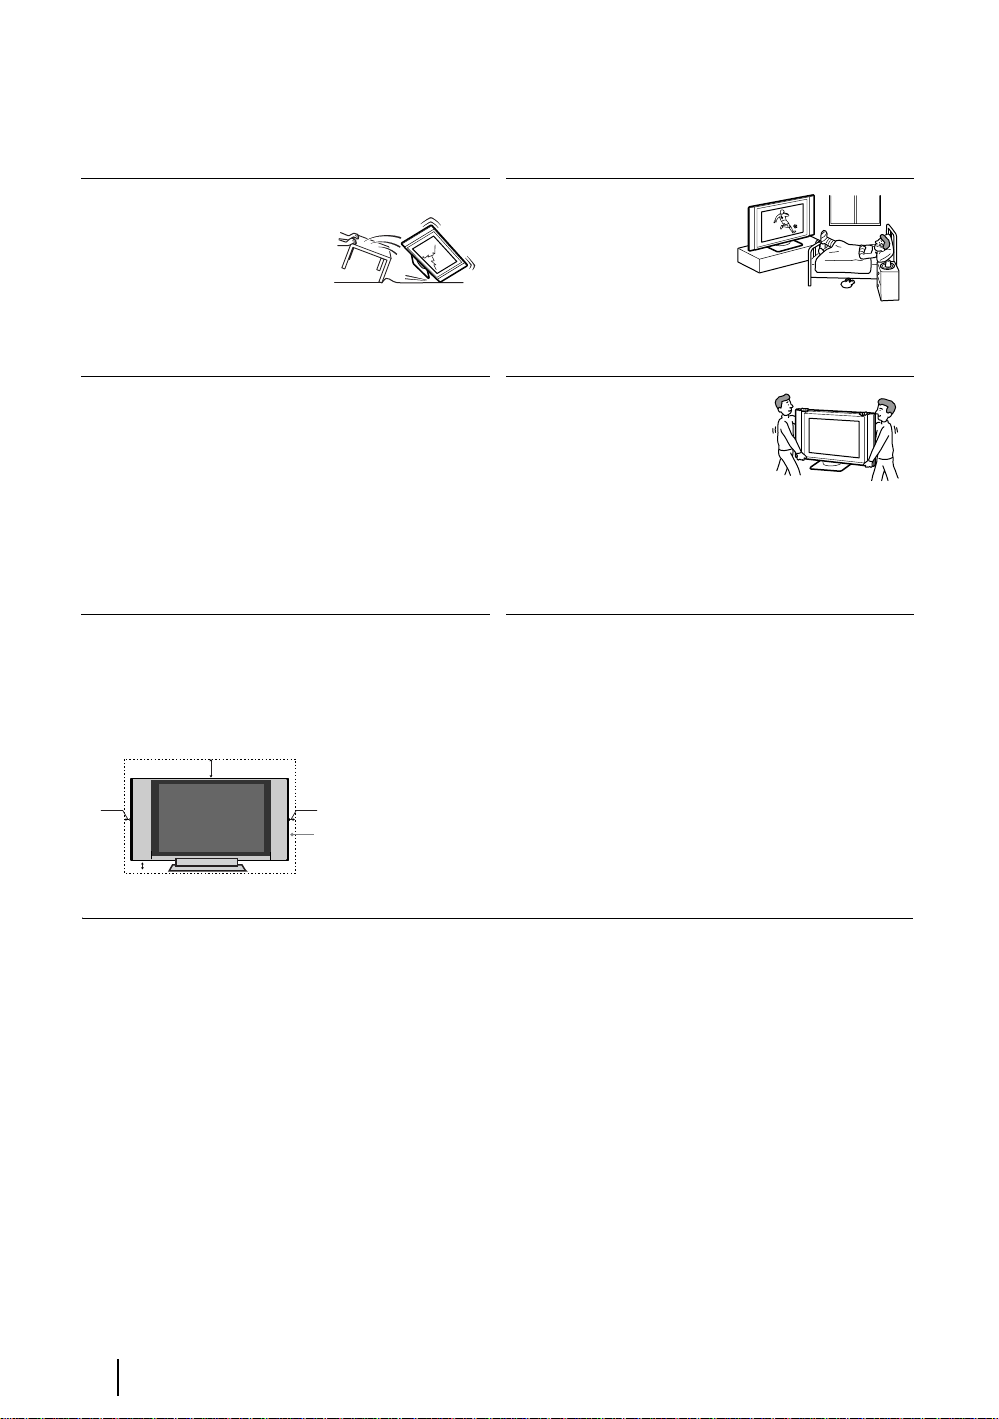
Ventilation
Leave space around the TV set. Otherwise, adequat e
air-circulation may be blocked causing overheating
which may cause fire or damage the TV set.
30cm
Leave at
10cm10cm
least
this
much
10cm
space.
Medical institution
Do not place this TV set in a
place where medical
equipment is in use. It may
cause malfunction of medical
instruments.
Carrying
Carrying the TV requires two or
more people. If you carry the TV
in a manner other than that
specified, it may drop and a
serious injury may be caused. Be
sure two or more people carry the TV. When
transporting, do not subject the TV set to shocks or
excessive vibration. The TV may fall and be damaged
or cause serious injury.
Safety Information
4
continued...
Page 5

Power Sources
Overloading
This set is designed to operate on
a 220-240V AC supply only.
Take care not to connect too
many appliances to the same
mains socket as this could result
in fire or electric shock.
Mains
Do not use a poor fitting mains socket. Insert
the plug fully into the mains. If it is loose, it
may cause arcing and result in fire. Contact
your electrician to have the mains socket
changed.
Moisture
Do not touch the mains lead with a wet
hand. If you plug/unplug the mains lead
with a wet hand, it may cause electric
shock.
Lightning storms
For your own safety, do not touch
any part of the set, mains lead or
aerial lead during lightning storms.
Mains lead
If you damage the mains lead, it
may result in fire or electric
shock.
• Do not pinch, bend, or twist the
cable excessively. The core
lines may be bared or cut,
causing a short - circuit which
may in fire or electric shock.
• Do not convert or damage the
mains lead.
• Do not put anything heavy on the mains lead. Do not
pull the mains lead.
• Keep the mains lead away from heat sources.
• Be sure to grasp the plug when disconnecting the
mains lead.
• If the mains lead is damaged, stop using it and ask your
dealer or Sony service centre to exchange it.
Mains lead protection
Pull out the mains lead by the
plug. Do not pull on the mains
lead itself.
Wiring
Unplug the mains lead when wiring cables. Be sure to
unplug the mains lead for your safety, when hooking up.
Cleaning
Clean the mains plug regularly. If the
plug is covered with dust and it picks up
moisture, its insulation may deteriorate
and result in fire. Unplug the mains plug
and clean it regularly.
When not in use
For environmental and safety
reasons, it is recommended that
the set is switched off when not
in use - not left in standby
mode. Disconnect from the
mains.
Cable wiring
Take care not to catch your feet on the cables. It may
damage the TV set.
Installation
• Do not install optional components too close to the
TV set. Keep optional components at least 30 cm
away from the TV set. If a VCR is installed in front or
at the right side of the TV set, the picture may distort.
Heat
Do not touch the surface of the TV. It remains hot, even
after the TV has been turned off for some time.
GB
Electric shock
Do not touch the TV set with wet hands. Doing so may
cause electric shock or damage the TV set.
Corrosion
If you use this set near the seashore, salt may corrode
metal parts of the TV set and cause internal damage or
fire. It may also shorten the life of the TV set. Steps
should be taken to reduce the humidity and temperature
of the area where the set is located.
Oils
Do not install TV set in restaurants that use oil. Dust
absorbing oil may enter into the TV set a nd damage TV
set.
continued...
Safety Information
5
Page 6
Installation and moving
Ventilation
Never cover the ventilation holes in the
cabinet. It may cause overheating and
result in fire. Unless proper ventilation is
provided, the TV set may gather dust and
get dirty. For proper ventilation, observe
the following:
• Do not install the TV set turned backward or sideways.
• Do not install the TV set turned over or upside down.
• Do not install the TV set on a shelf or in a closet.
• Do not place the TV set on a rug or bed.
• Do not cover the TV set with cloth, such as curtains, or
items such as news papers, etc.
Vehicle or ceiling
Do not install this TV set in a
vehicle. Bumping of the vehicle
may cause the set to fall down
and cause injury. Do not hang this
TV set from the ceiling.
Water and moisture
Do not use this TV set near water - for example, near a
bathtub or shower room. Also do not expose to rain. It
may result in fire or electric shock.
Outdoor use
Do not install this TV set
outdoors. If the TV set is exposed
to rain, it may result in fire or
electric shock. If the TV set is
exposed to direct sunlight, the TV
set may heat up and it may
damage the TV set.
Ships and other vessels
Do not install this TV set in a
ship or vessel. If the TV set is
exposed to seawater, it may
cause fire or damage the TV set.
To prevent the TV set from falling
Place the TV set on a secure, stable stand
and secure the TV set to a wall (see page
14 for details). Do not hang anything on
the TV set. The TV set may fall from the
stand or wall-hanging rack unit, causing damage or
serious injury.
Servicing
Do not open the cabinet or
remove the rear cover of the set.
Refer to qualified service
personnel only.
Moisture and flammable objects
• Do not let this set get wet. Never
spill liquid of any kind on the set. If
any liquid or solid object does fall
through, do not operate the set. It
may result in electric shock or damage to the set. Have
it checked immediately by qualified personnel.
• To prevent fire, keep inflammable objects or naked
lights (e.g. candles) away from the set.
Protruding location
Do not install the TV set in protruding locations. If you
install the TV set in the following locations, it m ay result
in injury.
• Do not install the TV set in a location where the TV
set protrudes, such as on or behind pillar.
• Do not install the TV set in a location where you
might bump your head on it.
Ventilation holes
Do not insert anything in the ventilation
holes. If metal or something flammable
enters, it may result in fire or electric
shock.
Broken glass
Do not throw anything at the TV set.
The screen glass may explode by the
impact and cause serious injury.
Placement
Never place the set in hot, humid or
excessively dusty places. Do not
install the set where it may be
exposed to mechanical vibrations.
Cleaning
Unplug the mains lead when cleaning this TV set. If not,
it may result in electric shock.
Safety Information
6
continued...
Page 7

Precautions
On viewing the TV comfortably
• To view the TV comfortably, the recommended viewing position is from four to seven times of the screen’s
vertical length away from the TV set.
• View the TV in a moderate light room, as viewing the TV in poor light taxes your eyes. Watching the screen
continuously for long periods of time can also tax your eyes.
On installing the TV set
• Do not install the TV in places subject to extreme temperature, for example in direct sunlight, or near a radiator,
or heating vent. If the TV set is exposed to extreme temperature, the TV set may heat up and it may cause
deformations of the casing or cause the TV set to malfunction.
• After transporting the TV directly from a cold to a warm location, or if the room temperature has changed
suddenly, pictures may be blurred or show poor colour over portions of the picture. This is because moisture has
condensed on the mirrors or lenses inside the TV set. In this case let the moisture evaporate before using the TV
set.
• To obtain a clear picture, do not expose the screen to direct illumination or direct sunlight. If possible, use spot
lighting directed down from the ceiling.
• The TV set is not disconnected from the mains when the switch is in Off position. To disconnect the set
completely, pull the plug from the mains.
On volume adjustment
• Adjust the volume so as not to trouble neighbours. Sound carries very easily at night time. Therefore, closing the
windows or using headphones is suggested.
• When using headphones, adjust the volume so as to avoid excessive levels, as hearing damage may result.
On handling the remote control
• Handle the remote control with care. Do not drop or step on it, or spill liquid of any kind onto it.
• Do not place the remote control in a location near a heat source, or in a place subject to direct sunlight, or in a
damp room.
On cleaning the cabinet
• Be sure to unplug the mains lead before cleaning.
• Clean the cabinet with the supplied cleaning cloth or a soft cloth lightly dampened. Do not use any type of abrasive
pad, alkaline cleaner, scouring powder or solvent, such as alcohol or benzine, or antistatic spray.
• Note that material deterioration or screen coating degradation may occur if the TV is exposed to a volatile solvent,
such as alcohol, thinner, benzine or insecticide, or if prolonged contact is maintained with rubber or vinyl
materials.
• The ventilation holes can accumulate dust over a period of time and the accumulated dust may make the cooling
function of the built-in fan less effective. To prevent this, we recommend removing the dust periodically (once a
month) using a vacuum cleaner.
On handling and cleaning the screen surface
The screen of this TV has an anti-reflection screen coating. To avoid screen degradation, follow the points mentioned
below. Do not push on or scratch with hard objects, or throw anything at the screen. The screen may be damaged.
• Be sure to unplug the mains lead before cleaning.
• Do not touch the TV after operating continuously for along period as the display panel becomes hot.
• The screen of this TV has an anti-reflection screen coating. We recommend that the screen surface is touched as
little as possible.
• Clean the screen with the supplied cleaning cloth or a soft cloth lightly moistened. Cleaning with dirty cleaning
cloth may result in damage to the TV set. Never use any type of abrasive pad, scouring powder, or solvent, such
as alcohol or benzine. This type of contact may result in damage to the screen surface.
GB
continued...
Safety Information
7
Page 8

On image
• Please note that the PDP (Plasma Display Panel) screen is made with high-precision technology. However, black
points or bright points of light (red, blue, or green) may appear constantly on the PDP screen, and irregular
coloured stripes or brightness may appear on the PDP screen. This is not a malfunction.
• With extensive use of this TV set in 4:3 mode, the 4:3 screen area might become darker within a 16:9 panel. To
avoid this problem, the “Smart” picture mode should be used (see page 22).
On image retention
• If the following images are displayed for an extended period time, image retention (afterimage) in areas of the
screen may result due to the characteristics of the Plasma Display Panel.
– Black bars at the top and bottom that appear with a wide video source (Letterbox picture).
– Black bars to the left and right that appear with a 4:3 video source (conventional TV broadcasts).
– Video game sources
–PC images
– DVD on-screen menu displays
– On-screen menus, channel numbers, etc., of connected equipment such as Set top box, Cable modem, VCR,
etc.
The risk of this is higher if the set is in “Live” mode or has a high contrast setting. This image cannot be
removed once burnt onto the screen. To avoid the risk of image retention do not leave the TV set operating
on such a picture, or programme for a long time, use the “Screen Saver” function (page 24) or lower the
contrast setting. Repeated extended daily usage of the same image, or programme can also result in this
occurrence. IMAGE RETENTION IS NOT COVERED BY THE SONY WARRANTY.
• To reduce image retention, this TV set has the “Screen Saver” function. The default setting of the “Orbit”
function in “Screen Saver” is “On” (page 24.)
• The “Screen Saver” function prevents and reduces image retention. For details see page 24.
On altitude
• When used at an altitude of greater than 2300m or 7546 feet (air pressure less than 760hPa), this Plasma TV may
generate a low buzzing sound as a result of the difference between the interior and exterior air pressure of the
panels. This is not considered a defect and is not covered under by the Sony Warranty. This buzzing sound is an
inherent characteristic of any Plasma Display Panel.
Safety Information
8
Page 9
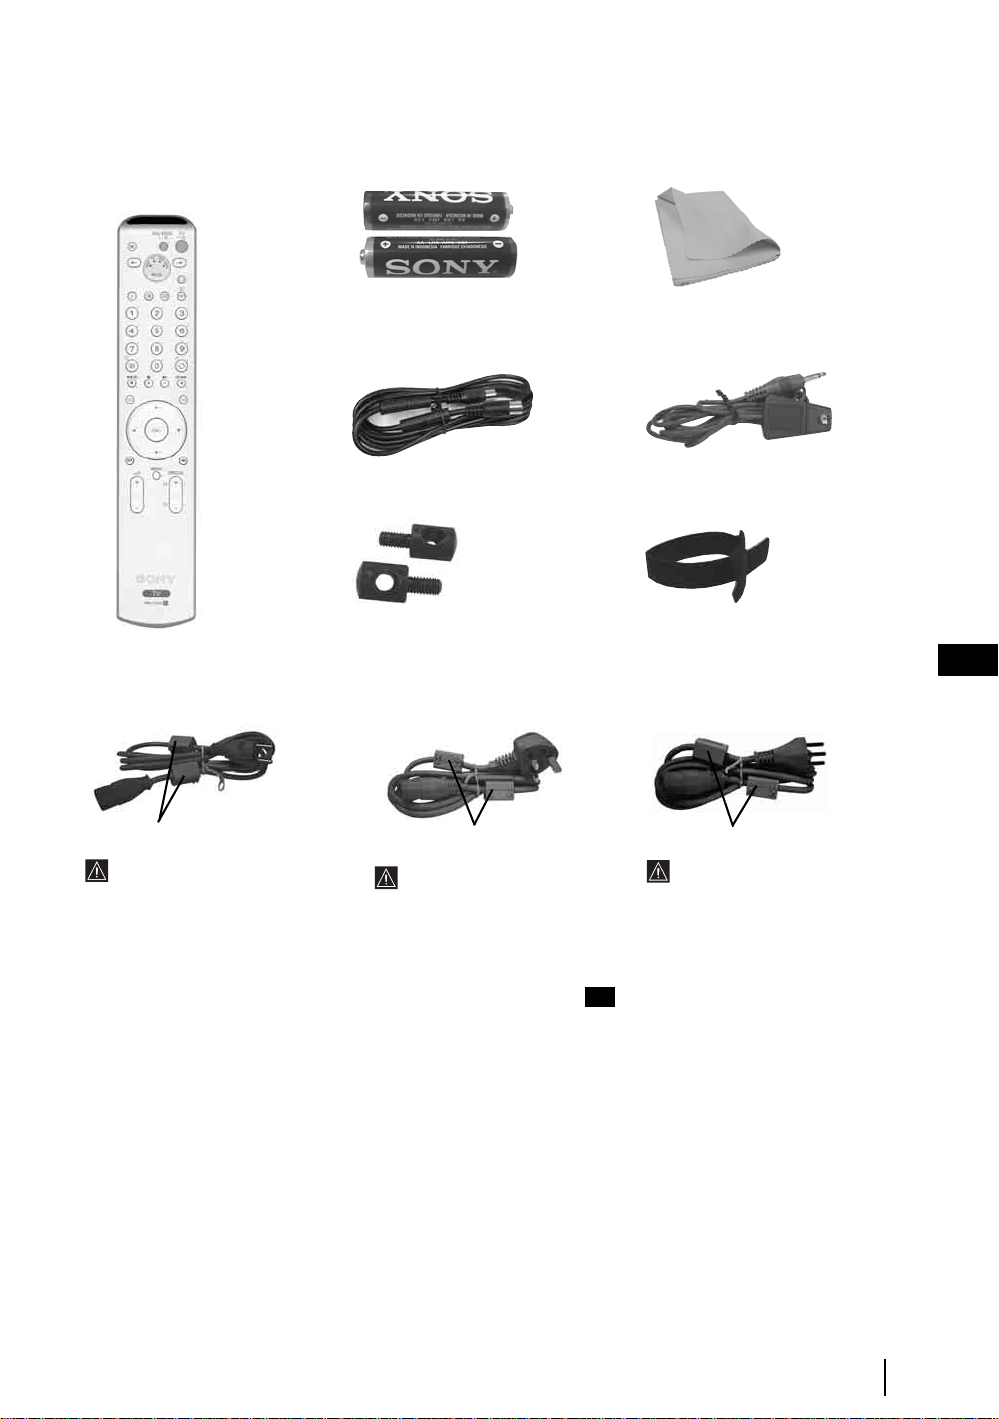
Checking the Accessories supplied
1 Remote control
(RM-Y1010):
1 Mains Leads (Type C-4):
2 Batteries (AA size):
1 Coaxial Cable:
2 Anchor attachments:
1 Mains Leads (Type BF):
1 Cleaning cloth:
1 AV Mouse:
1 Clump Belt:
GB
1 Mains Leads (Type C-5):
Do not remove ferrite cores.
Use this mains leads (with
safety earth) if you use the
set outside the United
Kingdom and Ireland.
1 “Notes on Plasma” book.
Do not remove ferrite cores.
• Use this mains leads (with
safety earth) if you use the set
in the United Kingdom.
•See “NOTICE FOR
CUSTOMERS IN THE
UNITED KINGDOM and
IRELAND” on page 2
when using these mains leads.
• This mains leads may not be
supplied depending on the
country.
GB
Do not remove ferrite cores.
• Use this mains leads (with
safety earth) if you use the set
in the Swiss Confederation.
• This mains leads may not be
supplied depending on the
country.
Overview & Installation
9
Page 10
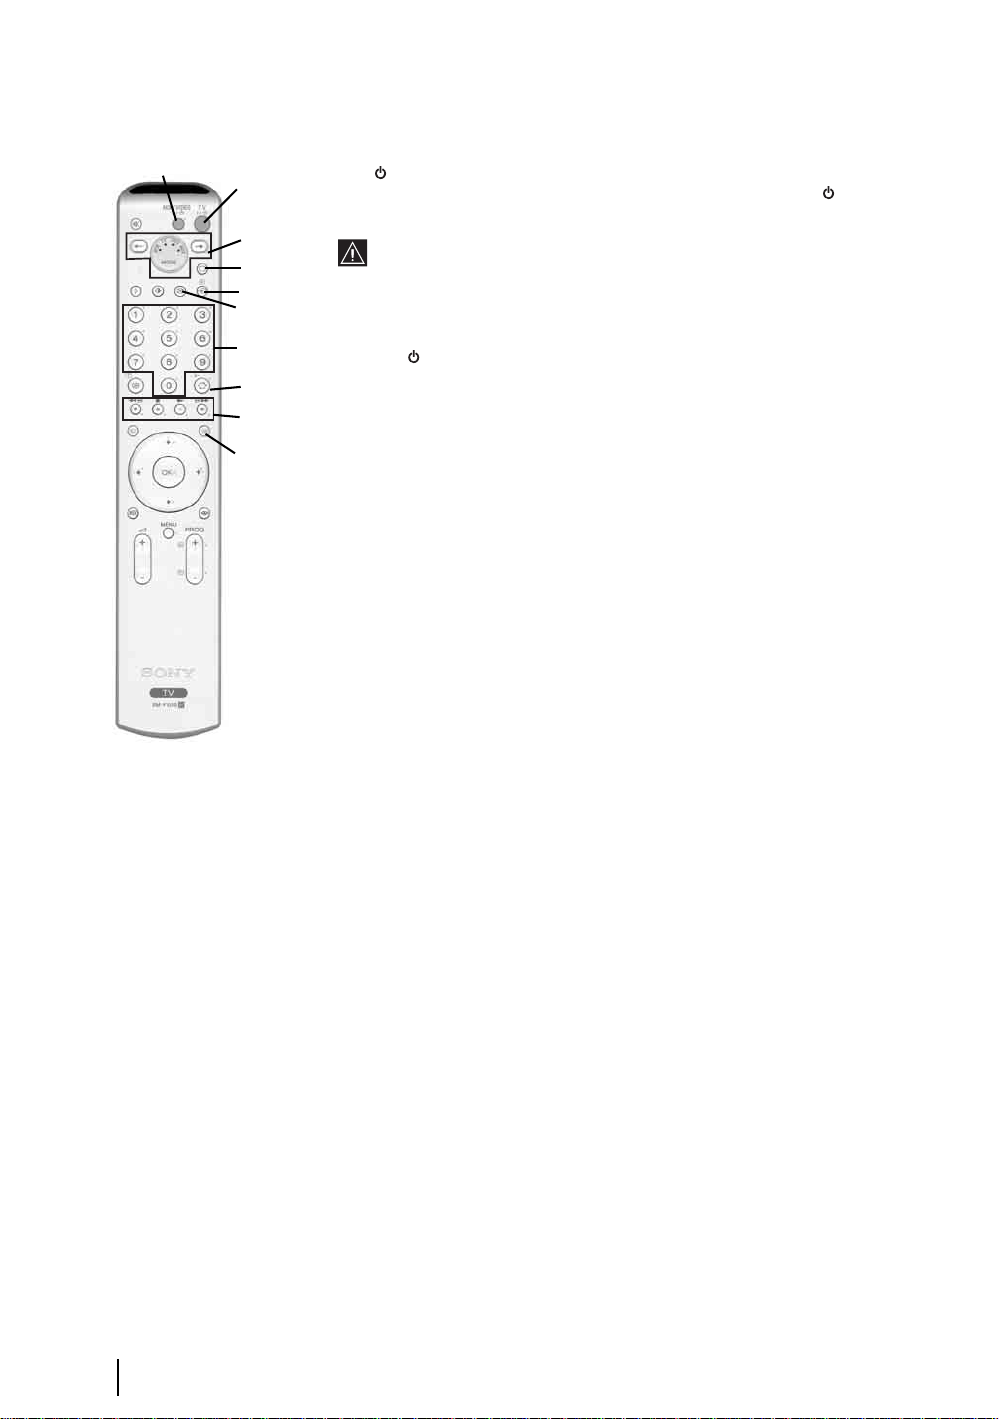
Overview of Remote Control Buttons
2
1
3
4
5
6
7
8
9
q;
1 TV I/ : To Temporarily Switch Off TV (stand by mode):
Press this button to temporarily switch off TV (the standby indicator on the TV
lights up). Press again to switch on TV from standby mode.
• To save energy we recommend switching off completely when TV is
not in use.
• If the “Auto Shutoff” option is set to “On” (see page 25) the TV
switches automatically into standby mode after 15 minutes without a
TV signal and without any button being pressed.
2 VIDEO I/ : press this button to switch your VCR or DVD on or off.
3 Media Selector: press these buttons to select which device you want to operate,
TV, VCR, DVD or AUX. A green light will be momentarily lit to show which one
you have selected. For details refer to pages 41-43.
4 Selecting TV mode: press this button to switch off Teletext or Video input
mode.
5 Selecting input source: press this button repeatedly until the desired input
symbol of the source appears on the TV screen. Refer to page 40.
6 Switching off the picture: press this button to switch off the picture. Only the
picture is switched off; the sound remains on. Press again to cancel.
7 Selecting broadcast channels: if Media Selector (3) is switched to TV,
press these buttons to select channels. For double-digit programme numbers, enter
the second digit within 2.5 seconds.
8 a) Watching last channel selected: if Media Selector (3) is switched to
TV, press this button to return to the previous channel you were watching
(provided you watched it for at least 5 seconds).
b) Selecting VCR double-digit: if Media Selector (3) is switched to VCR,
press this button to select double-digit channels for Sony's VCR e.g. 23, press
-/-- first and next the buttons 2 and 3.
Overview & Installation
10
9 a) Fastext: if Media Selector (3) is switched to TV and whilst you are in
Teletext mode, these buttons can be used as Fastext buttons. For details see
page 36.
b) Operating VCR or DVD: if Media Selector (3) is switched to VCR or
DVD, these buttons will operate the main functions of your VCR or DVD,
once the remote control has been programmed. Refer to page 41.
q; Teletext: press this button to switch on Teletext. For details see page 36.
continued...
Page 11
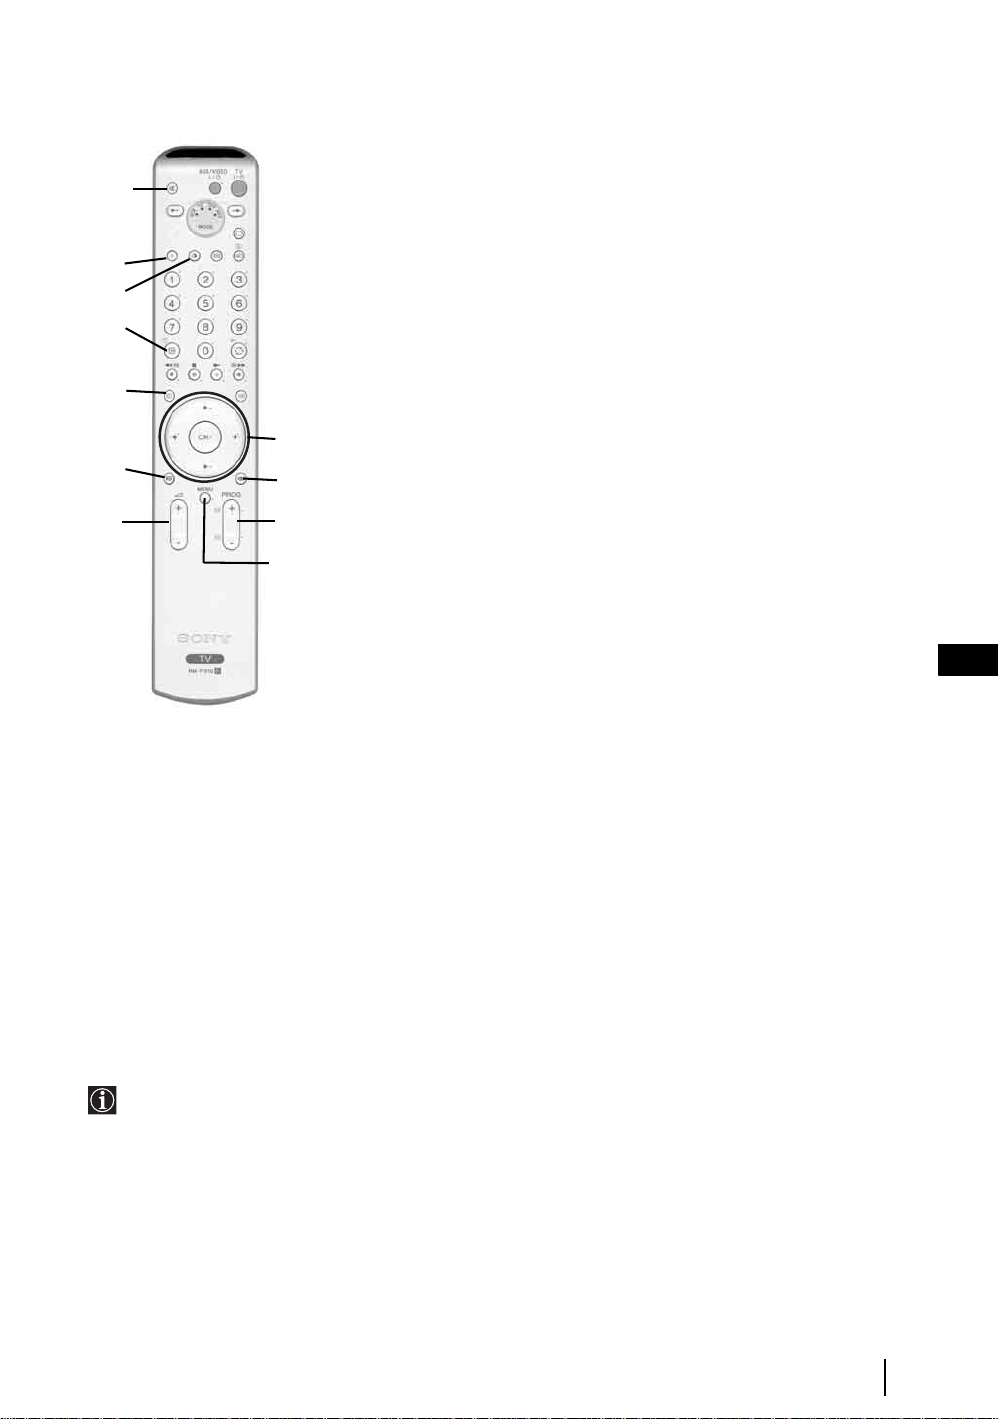
w;
ql
qk
qj
qh
qg
wa
qa a) Displaying a channel or an input signal index: If Media Selector
(3) is switched to TV and MENU is switched off, press OK to display a
channel or input signal index. Once you have pressed OK:
1 To select a channel: press v or V to select a channel and next press
again the OK button to w atch the selected channel.
2 To select an input signal: while watching the channel index, press b to
display the input signal (you can always switch from the channel inde x to
the input signal index and vice versa by pressing B or b). Next, press v
or
V to select an available input signal. Finally press again the OK button
to watch the selected input signal.
b) Navigator: if Media Selector (3) is switched to TV and MENU (qs) is
switched on, use these buttons to navigate through the menu system of the
qa
qs
qd
qf
TV. Refer to page 17.
qs Displaying "Memory Stick" menu: for details see pages 30-35.
qd Selecting broadcast channels: press these buttons to select the next or
previous broadcast channel.
qf Menu system: press this button to enter the TV menu system. Refer to page
17.
qg Adjusting volume: press these buttons to increase or decrease the volume.
qh Selecting the screen format: press this button repeatedly to change the
format of the screen. Refer to page 22.
qj NexTView: press this button to display NexTView. F or det ails, refer to page
37.
qk Displaying Info: press this button to display all on-screen indication such as
channel number, etc. Press again to cancel.
ql Selecting picture mode: press this button repeatedly to change the picture
mode. For details on the different picture modes, refer to page 18.
Selecting the sound effect: press this button repeatedly to change the
w;
sound effect. For details on different sound effects refer to page 20.
wa Muting the sound: press this button to mute the TV sound. Press again to
restore the sound.
The buttons labelled 5, qd and qk are also used for Teletext operation. For details see page 36.
.
GB
Overview & Installation
11
Page 12
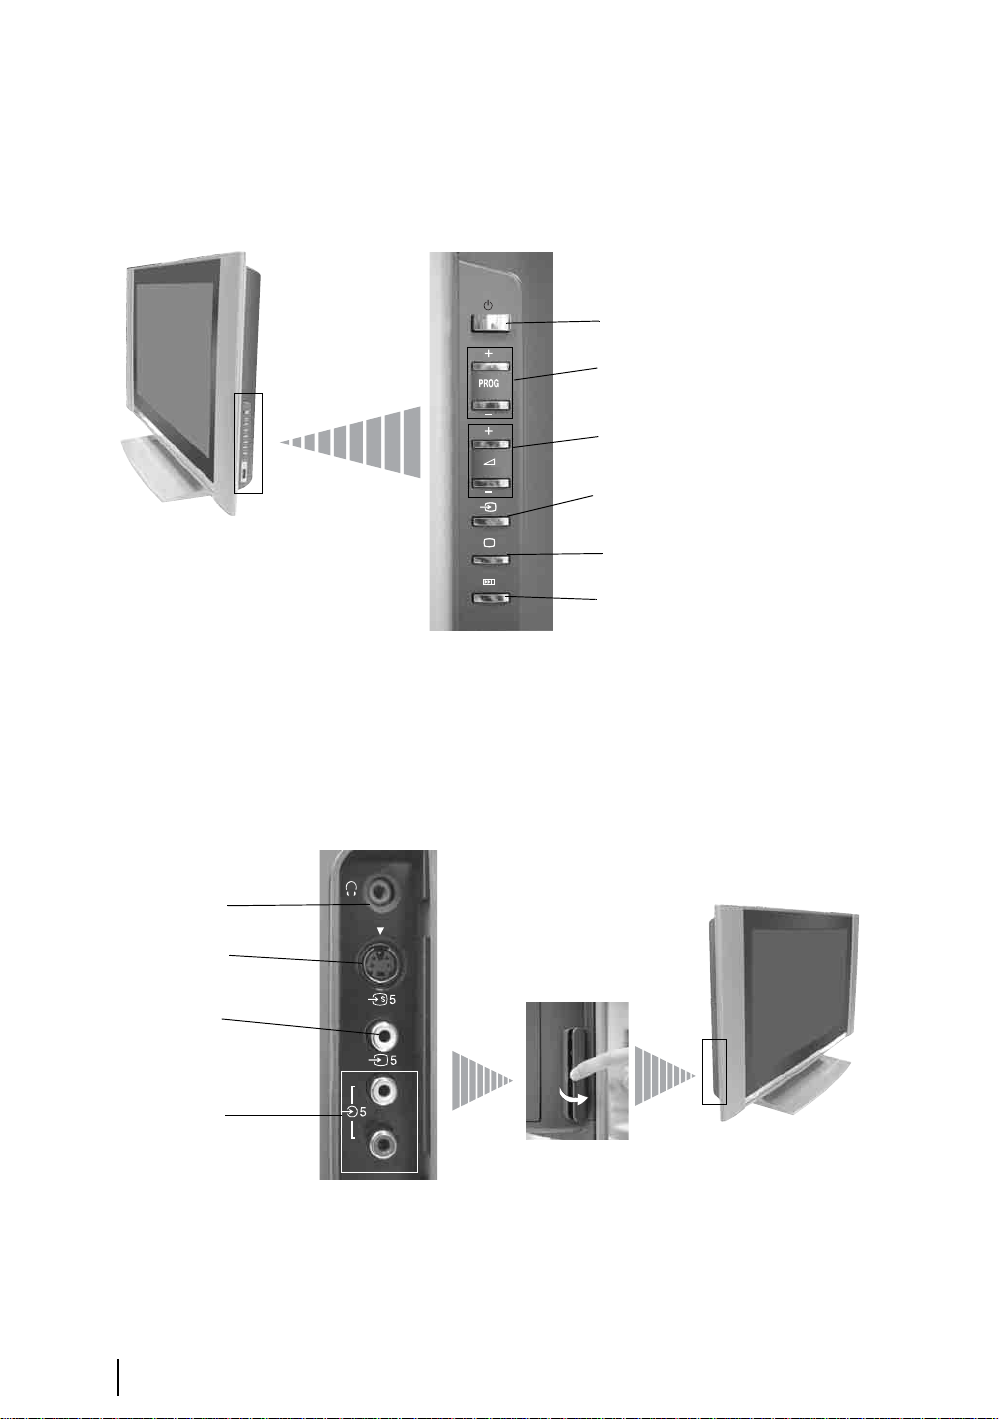
Overview of the TV Buttons and side Connectors
Overview of the TV Buttons
On/Off switch
Programme Up or Down buttons
(selects TV channels)
Volume control buttons (+/-)
Selecting Input Source button
(see page 40)
TV mode button
Auto Start Up button (starts
the auto start up sequence, see
page 15)
Overview of the side Connectors
Headphones
jack
S Video Input
jack
Video Input
jack
(MONO)
Audio Input
jacks
L/G/S/I
R/D/D/D
12
Overview & Installation
Page 13
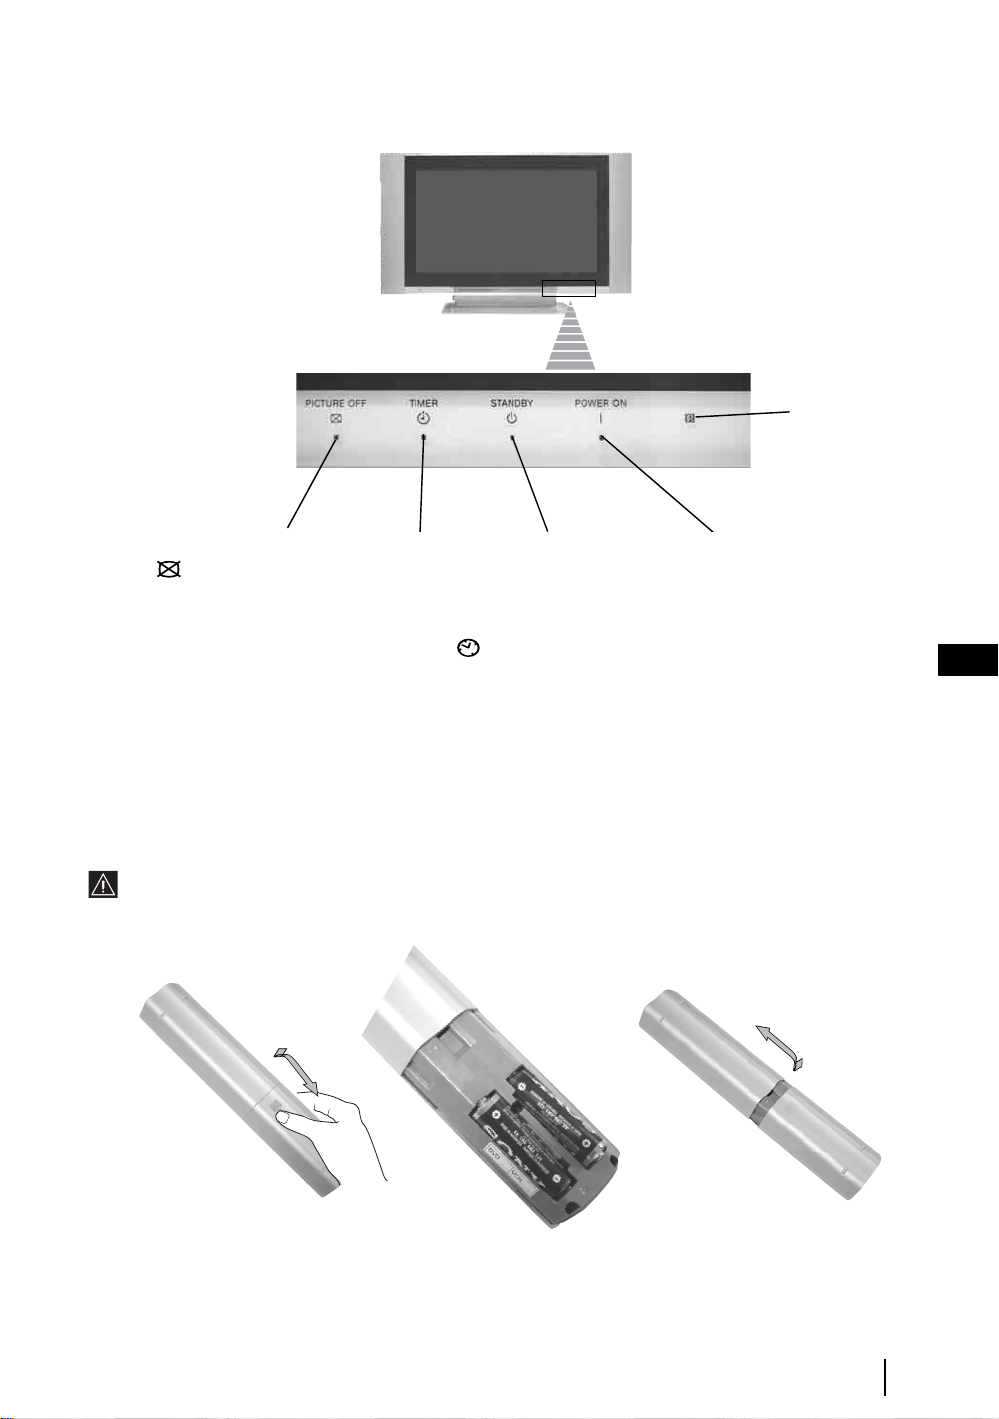
Overview of the TV indicators
To operate
the remote
control, point
it towards
this receiver.
Lights up in blue when you
press (picture off) on
the remote control to
switch off the picture. Only
the picture is switched off
(the sound remains
unchanged).
Lights up in red
when the sleep
timer is set. For
more details
regarding the sleep
timer, refer to “
Timer” on
page 25.
Lights up in red
when the TV is in
standby mode.
Lights up in
green when
the TV is
switched on.
Inserting Batteries into the Remote Control
Make sure you insert the supplied batteries using the correct polarities.
Always remember to dispose of used batteries in an environmental friendly way.
GB
Overview & Installation
13
Page 14
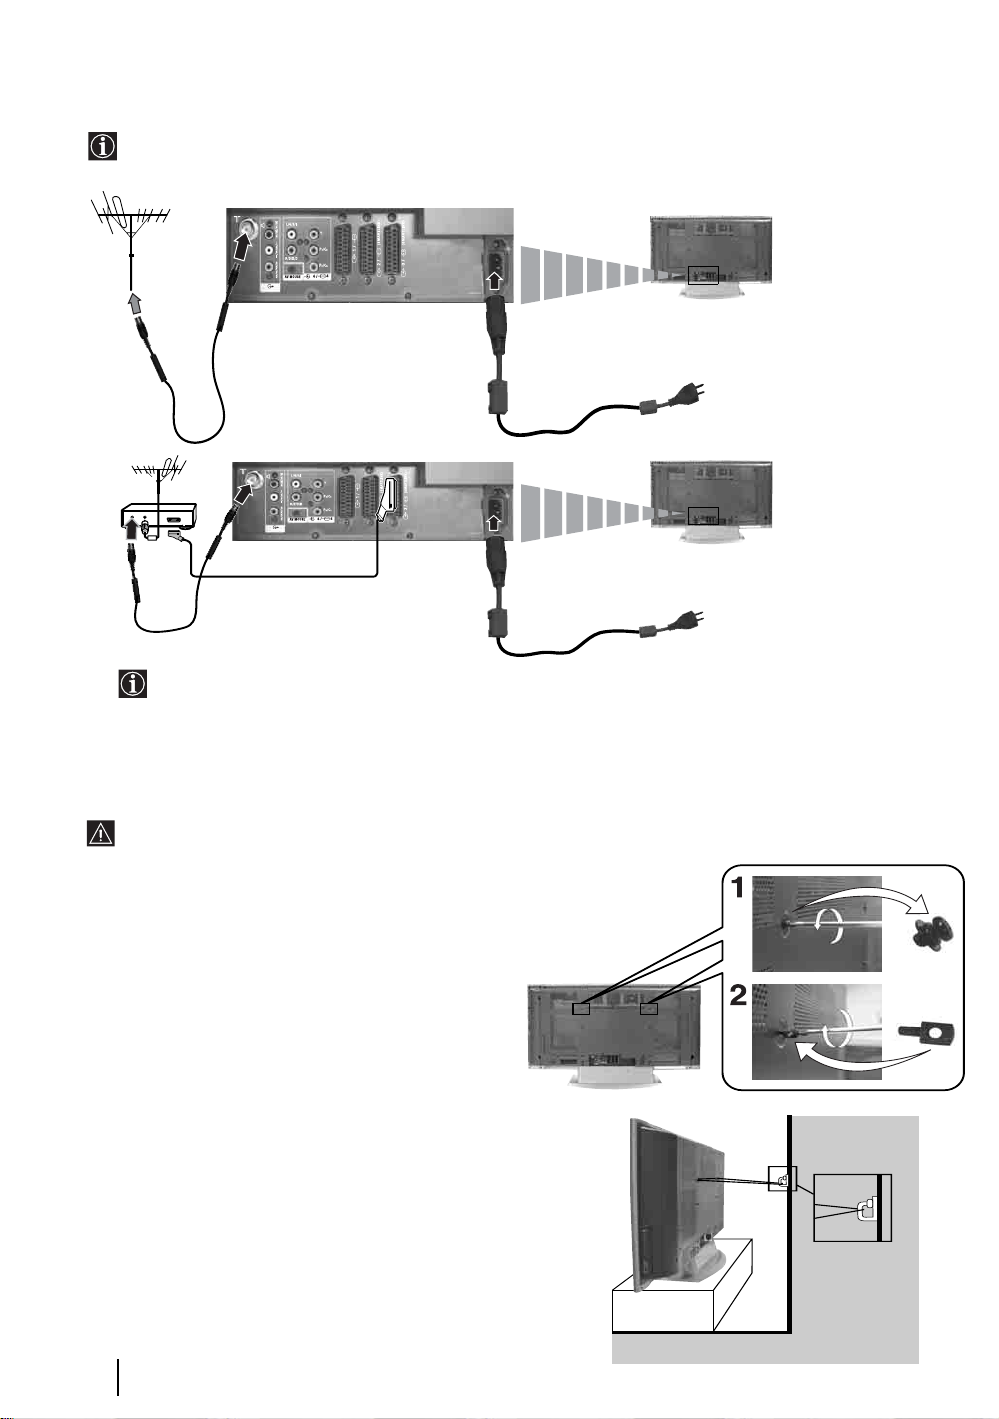
Connecting the Aerial and VCR
• Use the supplied mains lead (Type C-4, Type BF or Type C-5, see page 9).
• Use the supplied coaxial cable for aerial connection.
or
VCR
OUT IN
For more details regarding VCR connection, refer to
“Connecting Optional Equipment to the TV” on
page 38.
Stabilizing the TV set
After setting up, secure the TV set to a wall, pillar, etc, using the supplied anchor attachments, for safety
purposes.
1 Remove the two screws attached to the upper rear side
of the TV set.
2 Replace the two screws with the two supplied anchor
attachments.
3 Secure a wall anchor bracket (not supplied) to a solid wall or
pillar.
4 Pass a strong cord or chain through both holes of the anchor
attachments and then secure to a wall or pillar, etc.
14
Overview & Installation
Page 15
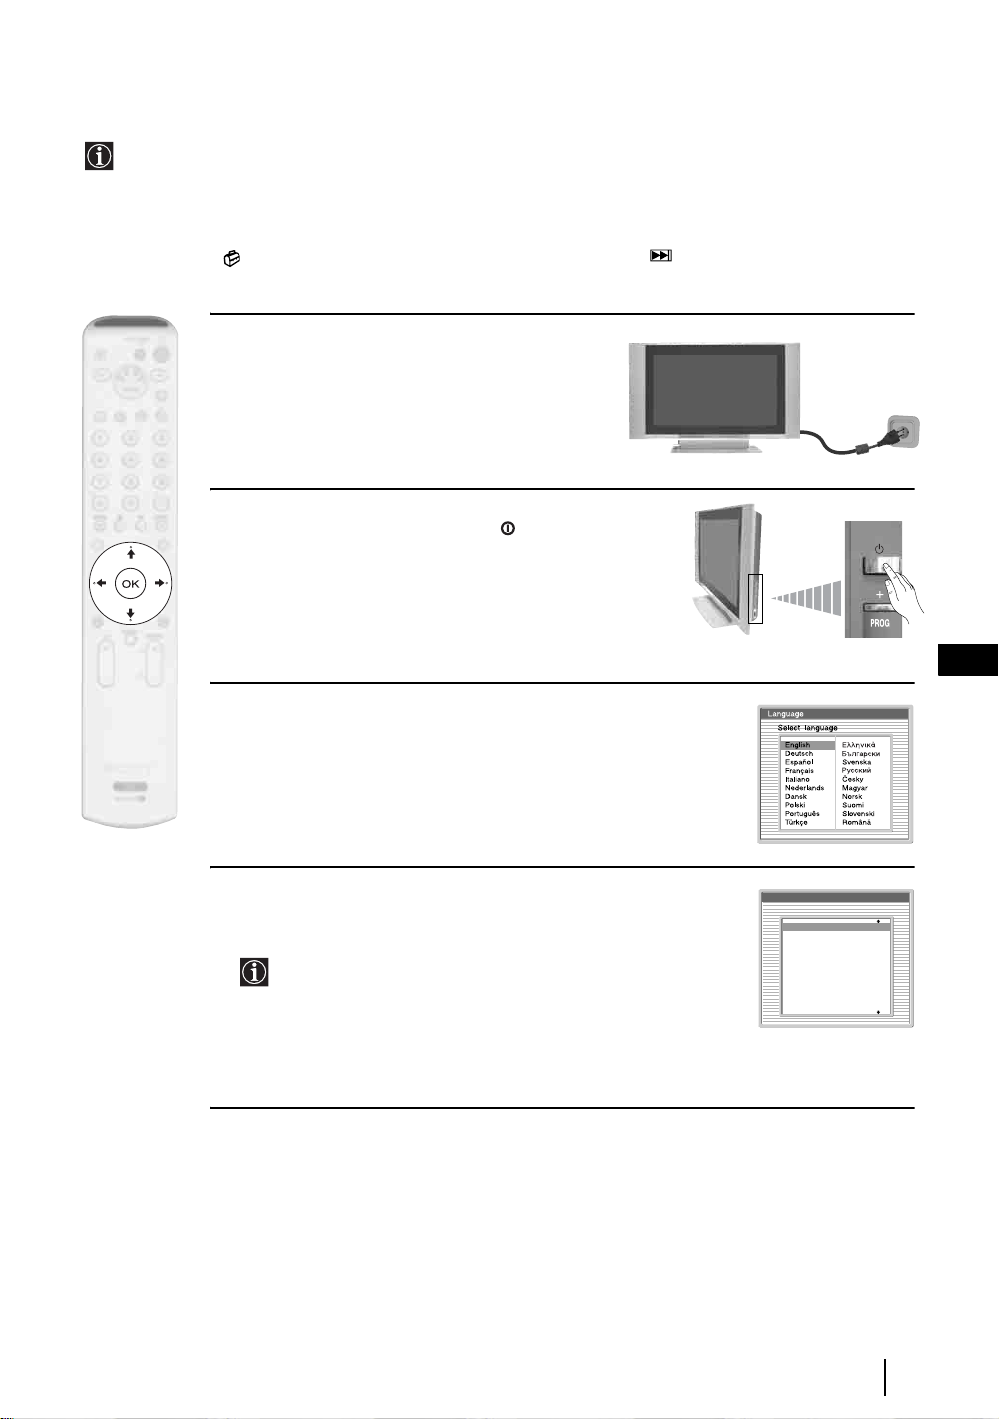
Switching On the TV and Automatically Tuning
The first time you switch on your TV, a sequence of menu screens appear on the TV enabling you to: 1) choose
the language of the menu screen 2) Choose the country in which you are going to operate the TV, 3) check how
to connect optional equipment to your TV, 4) search and store all available channels (TV Broadcast) and 5)
change the order in which the channels (TV Broadcast) appear on the screen.
However, if you need to change any of these settings at a later date, you can do that by selecting the appropriate
option in the (Set Up menu) or by pressing the Auto Start Up button on the right side of TV set.
1 Connect the TV plug to the mains socket (220-240V
AC, 50Hz).
2 The first time that the TV set is connected, it is usually
turned on. If the TV is off, press the on/off button on
the TV set to turn on the TV.
The first time you switch on the TV, a Language
menu appears automatically on the TV screen.
GB
3 Press the V, v, B or b buttons on the remote control to select your
language, then press the OK button to confirm your selection. From
now on all the menus will appear in your chosen language.
4 The Country menu appears automatically. Press the v or V button
to select the country in which you are using the TV. Press the OK
button to confirm your selection.
• If the country in which you want to use the TV set does not
appear in the list, select “Off” instead of a country.
• To avoid wrong teletext characters for cyrillic languages we
recommend selecting Russia if your own country does not
appear in the list.
Country
Select country
Off
Ireland
Nederland
België/Belgique
Luxembourg
France
Italia
Schweiz/Suisse/Svizzera
continued...
First Time Operation
15
Page 16
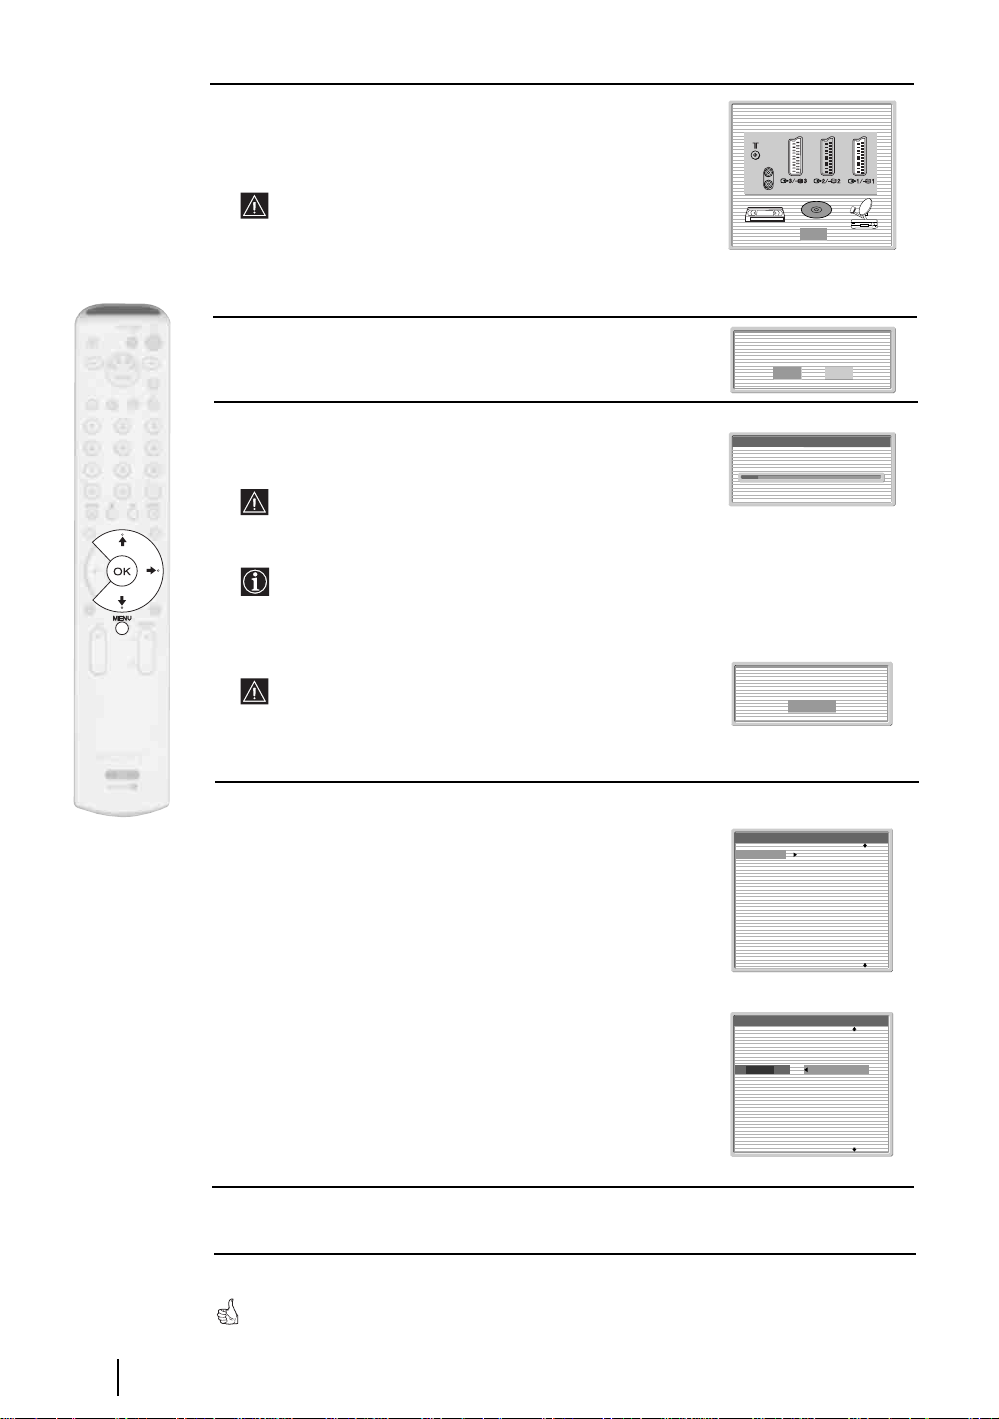
5 A diagram appears showing you how to connect a wide range of
equipment to your TV set. Follow the instructions and press the
OK button to remove the picture and continue the automatic
process.
The connection diagram should be used as a guide only as
most equipment can be connected to more than one type of
TV socket. Once the TV has completed the automatic
tuning process, refer to the ‘Connection Guide’ section on
page 23 for further information on getting the best set up for
your equipment.
Please connect your equipment
according to this chart
DVD
OK
6 The Auto Tuning menu appears on the screen. Press the OK
button to select Yes.
7 The TV starts to automatically search and store all
available broadcast channels for you.
This procedure could take some minutes. Please be patient
and do not press any buttons, otherwise automatic tuning
will not be completed.
In some countries the TV Broadcaster installs the channels
automatically (ACI system). In this case, the TV
Broadcaster sends a menu in which you can select your city
by pressing the
v or V button and OK to store the
channels.
If no channels were found during the auto tune process, a
message appears automatically on the screen asking you to
connect the aerial. Check the aerial connection (refer to
page 14). Press the OK button to restart the auto tuning
process.
8 After all available channels are captured and stored,
the Programme Sorting menu automatically appears
on the screen enabling you to change the order in
which the channels are stored.
a) If you wish to keep the broadcast channels in the tuned order,
go to step 9.
Do you want to start
automatic tuning?
Yes No
Auto Tuning
Programmes found: 4
No channel found.
Please connect aerial
Confirm
Programme Sorting
01
TVE
02
TVE2
03
TV3
04
C33
05
C27
06
C58
07
S02
08
S06
16
First Time Operation
b) If you wish to store the channels in a different order:
1 Press the v or V button to select the programme
number with the channel (TV Broadcast) you wish
to move. Press the b button.
2 Press the v or V button to select the new
programme number position for your selected
channel (TV Broadcast). Press the OK button to store.
3 Repeat steps b)1 and b)2 if you wish to change
the order of the other channels.
9 Press the MENU button to remove the menu from the screen
Your TV set is now ready for use
Programme Sorting
01
TVE
02
TVE2
03
TV3
04
C33
05
C27
06
C58
07
S02
08
S06
01 TVE
Page 17

Introducing and Using the Menu System
Your TV set uses an On-Screen menu system to guide you through the operations. Use the following buttons
on the Remote Control to operate the menu system:
1 To switch on the menu screens:
Press the MENU button to switch the first level menu on.
2 To navigate through the menus:
• To highlight and select the desired menu or option, press
• To enter the selected menu or option, press OK or
• To return to the last menu or option, press OK or
• To alter the settings of your selected option, press
• To confirm and store your selection, press OK.
3 To switch off the menu screens:
v or V.
b.
B.
v/V/B or b.
Picture Adjustment
Picture Mode: Live
Contrast:
Reset:
Noise Reduction: Auto
ColourTone: Cold
Select: Enter:OKExit:
PictureAdjustment
PictureMode: Live
Contrast:
Reset:
NoiseReduction: Auto
ColourTone: Cold
MENU
Select: Enter:OKExit:
MENU
GB
Press the MENU button to remove the menu from the screen.
TV Functions
17
Page 18
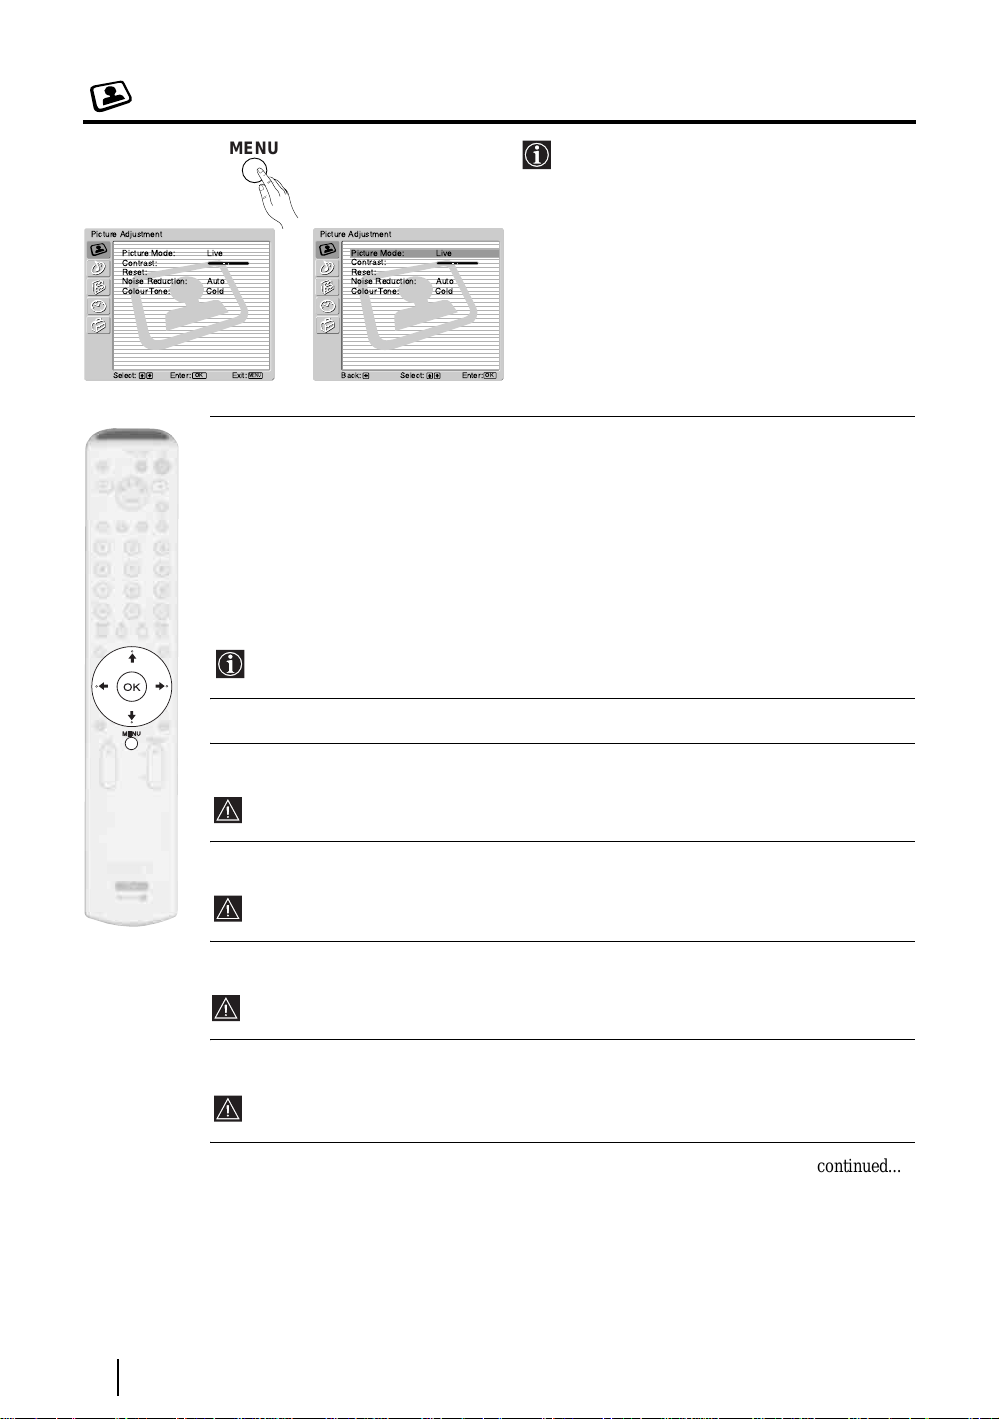
The Picture Adjustment Menu
Picture Adjustment
Picture Mode: Live
Contrast:
Reset:
Noise Reduction: Auto
Colour Tone: Cold
Select: Enter:OKExit:
MENU
The “Picture Adjustment” menu allows you to
alter the picture settings.
To do this:
MENU
,
Picture Adjustment
Picture Mode: Live
Contrast:
Reset:
Noise Reduction: Auto
Colour Tone: Cold
OK
Select:Back:
Enter:
Press the MENU button and then press OK to
enter this menu. Next, press
v or V to select the
desired option and press OK. Finally, read below
how to operate into each option.
Picture Mode This option allows you to customise the Picture Mode based on the programme
you are watching. After selecting this option press OK. Next, press repeatedly
V to select:
or
Live (for live broadcast programmes, DVD and Digital Set Top Box
receivers).
Movie (for films).
Personal (for individual settings).
Once you have selected your desired option, press OK to store.
"Brightness", "Colour" and "Sharpness" level of "Live" and "Movie" mode are fixed on the
factory to get the best picture quality.
Contrast Press B or b to reduce or enhance picture contrast. Next, press OK to store.
v
Brightness Press B or b to darken or brighten the picture. Next, press OK to store.
This option only appears and can only be adjusted if “Picture Mode” is set to “Personal”.
Colour Press B or b to decrease or to increase color intensity. Next press OK to store.
This option only appears and can only be adjusted if “Picture Mode” is set to “Personal”.
Hue Press B or b to decrease or to increase the green tones. Next press OK to store.
This option only appears for NTSC signal (e.g. USA video tapes).
Sharpness Press B or b to soften or to sharpen the picture. Next press OK to store.
This option only appears and can only be adjusted if “Picture Mode” is set to “Personal”.
continued...
18
TV Functions
Page 19
Reset Press OK to reset the picture to the factory preset levels.
Noise This option is set to Auto to automatically reduce the snowy picture visible in the weak broadcast
Reduction signal. However, it can be modified. After selecting this option press
select High, Mid, Low or Off. Finally, press OK to store.
Colour Tone This option allows you to alter the tint of the picture. After se lecting this option press b. Next, press
repeatedly
colours a neutral tint), Cold (gives the white colours a blue tint). Finally press OK to store.
DRC Mode This option allows you to select the high resolution picture with 4x density for high quality sources
(i.e. DVD player, satellite receiver). This option is set to High Density (recommended for moving
pictures). However it can be modified. After selecting this option, press
select Progressive (recommended for still images and text).
This option only appears and can only be adjusted if “Picture Mode” is set to “Personal”.
DRC Palette This option allows you to customise the level of detail (Reality) and smoothness (Clarity) for up to
three input sources. After selecting this option press
higher as the mark is along the Reality axis, the picture becomes more detailed) and press
v or V to select: Warm (gives the white colours a red tint), Normal (gives the white
b. Next, press v or V, to adjust Reality (as
b. Next, press v or V to
b. Next press v or V to
B or
b to adjust Clarity (as you move to the right, along the Clarity axis, the picture becomes
smoother). Finally, press OK to store.
This option only appears and can only be adjusted if “Picture Mode” is set to “Personal”.
GB
TV Functions
19
Page 20
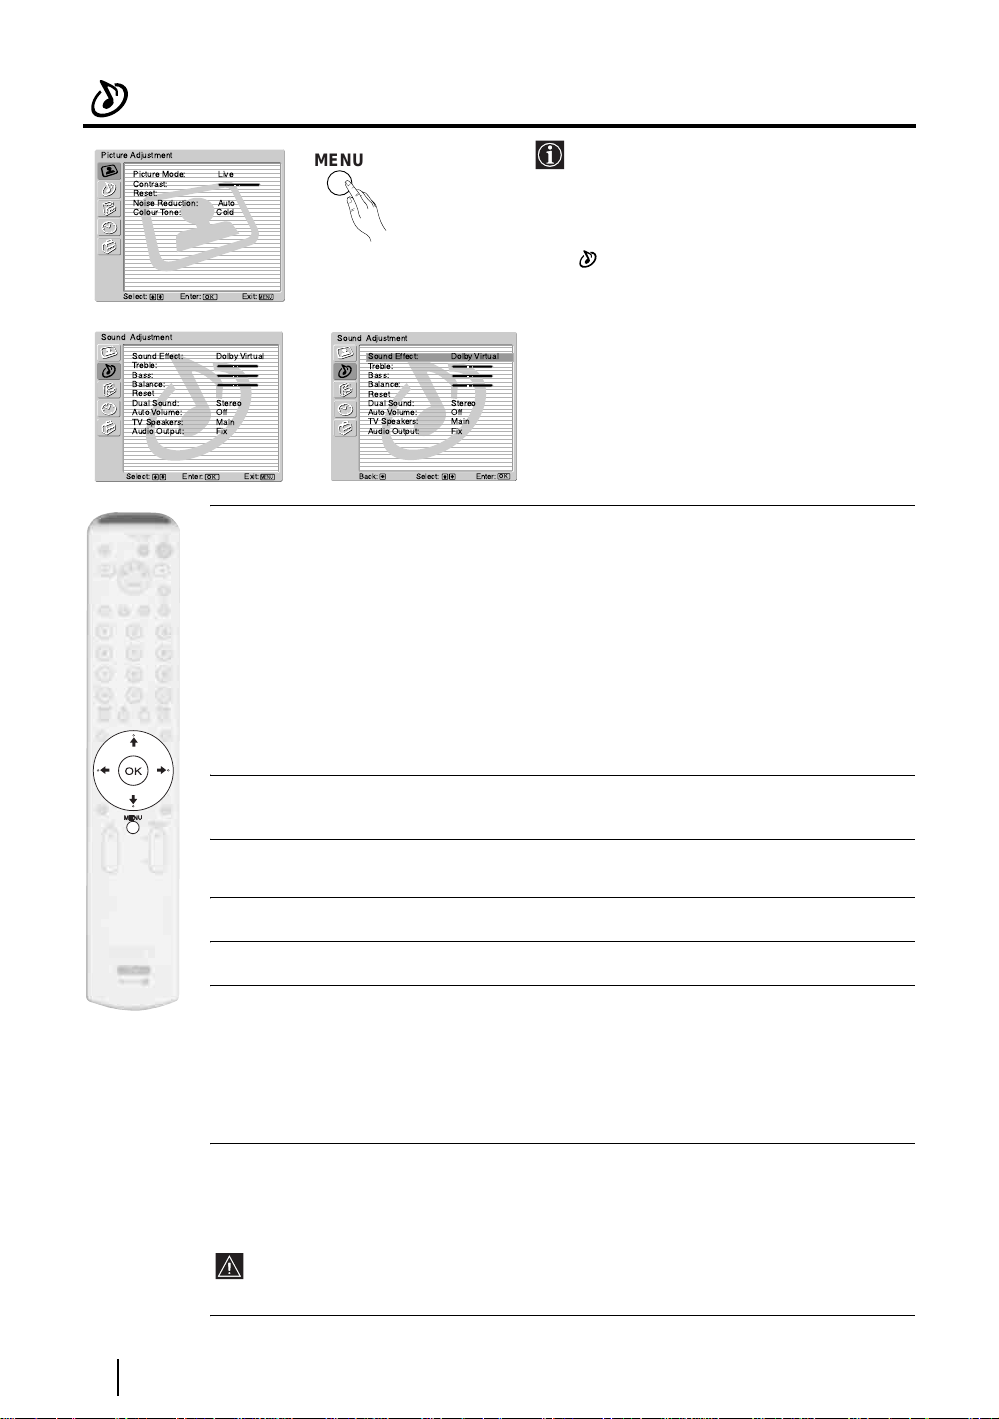
The Sound Adjustment Menu
Picture Adjustment
Picture Mode: Live
Contrast:
Reset:
Noise Reduction: Auto
Colour Tone: Cold
Select: Enter:
m
Sound Adjustment
Sound Effect: Dolby Virtual
Treble:
Bass:
Balance:
Reset
Dual Sound: Stereo
Auto Volume: Off
TV Speakers: Main
Audio Output: Fix
Select: Enter:
MENU
The “Sound Adjustment” menu allows you to
alter the sound settings.
To do this:
Press the MENU button and press
, then press OK to enter this menu. Next,
v or V to select the desired option and
OK
MENU
Exit:
Sound Adjustment
Sound Effect: DolbyVir tual
Treble:
Bass:
Balance:
,
OK
MENU
Exit:
Reset
Dual Sound: Stereo
Auto Volume: Off
TV Speakers: Main
Audio Output: Fix
Select:Back:
Enter:
OK
press
press OK. Finally, read below how to operate
into each option.
Sound This option allows you to customise the Sound Effect. After selecting this
Effect option press OK. Next, press repeatedly
v or V to select:
Dolby* (Dolby Virtual, simulates the sound effect of “Dolby Surround Pro
Virtual Logic”).
Natural (Enhances clarity, detail and presence of sound by using “BBE High
Definition Sound system”**).
Dynamic (“BBE High Definition Sound system”** intensifies clarity and presence
of sound for better intelligibility and musical realism).
Off (Flat response).
Once you have selected your desired option, press OK to store.
v to select
20
Treble Press B or b to decrease or to increase higher-frequency sounds. Next, press OK to
Bass Press B or b to decrease or to increase the lower-frequency sounds. Next, press OK
Balance Press B or b to emphasise the left or the right speaker. Next, press OK to store.
Reset Press OK to reset the sound to the factory preset levels.
Dual Press b. Next:
Sound • For a Stereo broadcast:
Auto Press b. Next press v or V to select On (the volume level of the channels will
Volume stay the same, independent of the broadcast signal, e.g. in the case of advertisements)
TV Functions
store.
to store.
Press
v or V to select Stereo or Mono. Next press OK to store.
• For a bilingual broadcast:
Press
v or V to se lect Mono (for mono channel if available), A (for channel 1) or B
(for channel 2). Next press OK to store.
or Off (the volume level changes according to the broadcast signal). Next press OK to
store.
If you select “Dolby Virtual” on the “Sound Effect” option, the “Auto Volume” option will
automatically be switched to “Off”.
continued...
Page 21
TV Speakers This option allows you to select if you want to listen the TV from the TV speakers or from an external
amplifier connected to the audio outputs on the rear of the TV.
After selecting this option, press b. Next press repeatedly
Main to listen the TV from the TV set speakers.
Off to listen to the TV from an external amplifier.
Once you have selected your desired option, press OK to store.
If you have selected "Off", the volume of the external equipment can also be altered by pressing the 2 +/-
buttons of the remote control. When the volume buttons are pressed, the symbol
the volume you are altering is not the volume of the TV set speakers, it is from the external equipment.
v or
V to select:
% will appear indicating that
Audio Output This option allows you to select how to control the volume of the TV’s sepakers when an external
* Manufactured under license fro m Dolby Labo ratories. “Dolby” and the double-D symbol are trademarks of
** This TV has been designed to create surround sound effect by simulating the sound of four speakers with two
** The “BBE High Definition Sound system” is manufactured by Sony Corporation under license from BBE
amplifier is connected to the TV’s audio output sockets. After selecting this option, press
press
v
or
V
to select Var i ab le (if you wish to use the TV’s remote control) or Fix (if you wish to
use the external amplifier’s remote control).
Dolby Laboratories.
speakers, when the broadcast audio signal is Dolby Surround encoded. The sound effect can also be improved
by connecting a suitable external amplifier (for details refer to page 39).
Sound, Inc. It is covered by U.S. Patent No. 4,638,258 and No. 4,482,866. The word “BBE” and BBE Symbol
are trademarks of BBE Sound, Inc.
b. Next
GB
TV Functions
21
Page 22
The Features Menu
Picture Adjustment
Picture Mode: Live
Contrast:
Reset:
Noise Reduction: Auto
Colour Tone: Cold
Select: Enter:OKExit:
m
Features
Power saving Reduce
Auto Format On
Film Mode Auto
AV2 Output TV
AV3 Output TV
SmartLink Output
Connection Guide
RGB Centering
Screen Saver
Logo Illumination Yes
Select: Enter:OKExit:
MENU
various settings of the TV.
To do this:
The “Features” menu allows you to alter
Press the MENU button and press
v twice to
select , then press OK to enter this menu.
MENU
MENU
,
Features
Power saving Reduce
Auto Format On
Film Mode Auto
AV2 Output TV
AV3 Output TV
SmartLink Output
Connection Guide
RGB Centering
Screen Saver
Logo Illumination Yes
Next, press
and press OK. Finally, read below how to
operate into each option.
OK
Select:Back:
Enter: :
v or V to select the desired option
POWER SAVING
This option allows you to reduce the power consumption of this TV.
To d o t h is :
After selecting the option, press OK. Then, press
v or V to select Reduce. Next, press OK to store.
AUTO FORMAT
This option allows you to automatically change the aspec t ratio of the screen.
To do this:
After selecting the option, press OK. Then, press
v or V to select On (if you wish the TV set to
automatically switch the screen format according to the broadcast signal) or Off (if you wish to
keep your preference). Finally, press OK to store.
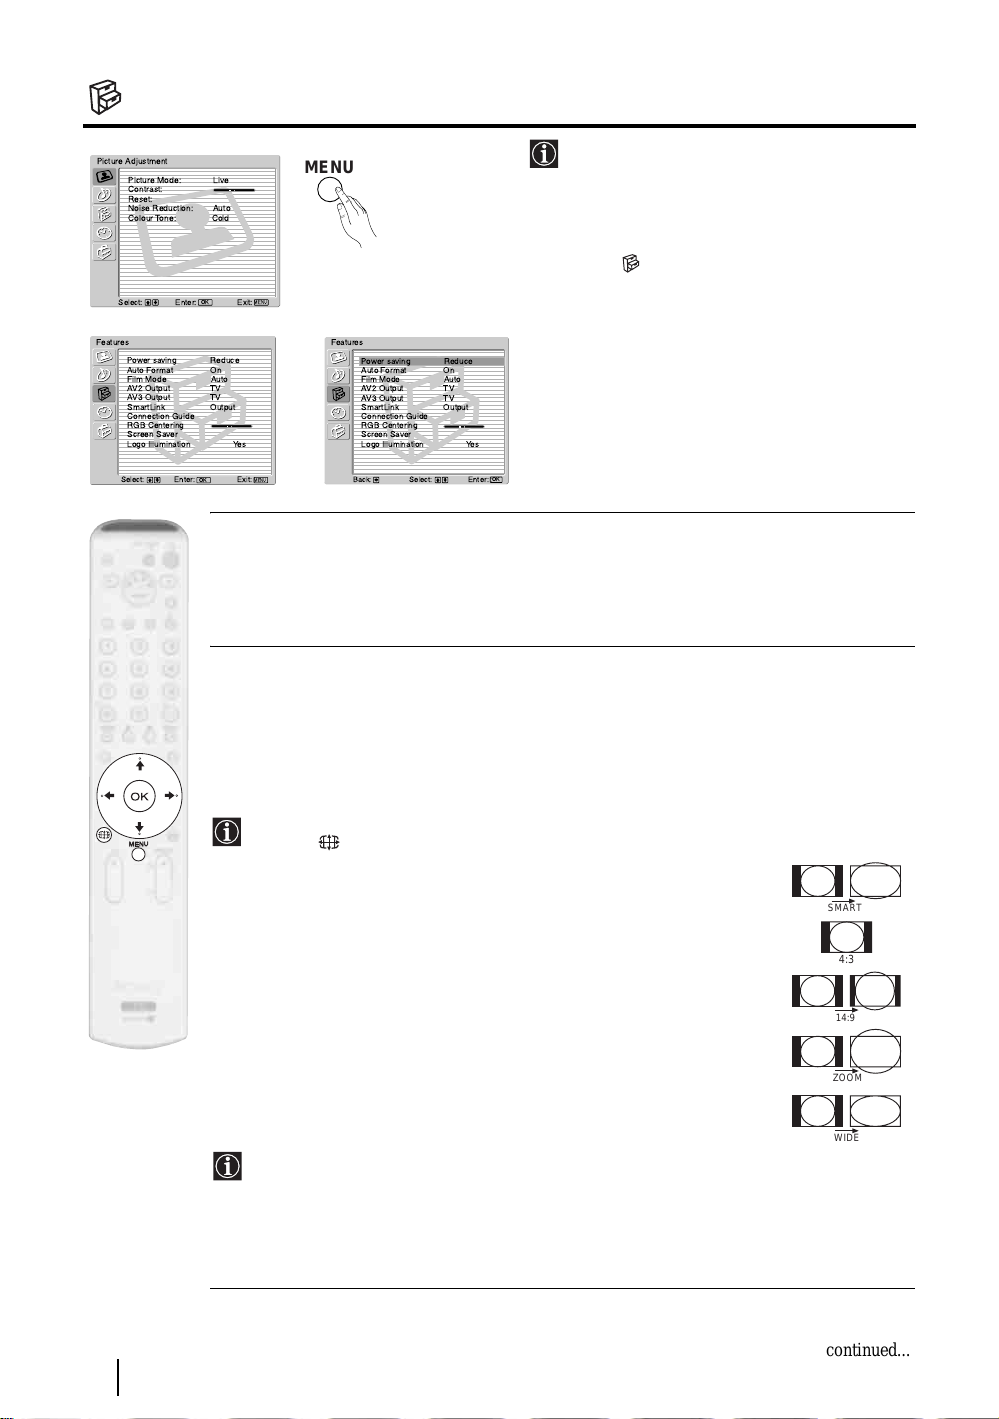
Even if you have selected “On” or “Off”, you can always modify the format of the screen by
pressing repeatedly on the remote control to select one of the following formats:
22
TV Functions
SMART: Imitation of wide screen effect for 4:3 broadcast.
SMART
4/3: Conventional 4:3 picture size, full picture
information.
14/9: Compromise between 4:3 and 16:9 picture size.
4:3
14:9
ZOOM: Widescreen format for letterbox movies.
ZOOM
WIDE: For 16:9 broadcast. Full picture information.
WIDE
• In “SMART”, “ZOOM” and “14/9” modes, parts of the top and bottom of the screen are
cut off. Press
v or V to adjust the position of the image on the screen (e.g. to read
subtitles).
• According to the format of diffussion, black bands can always appear whatever the
selected mode.
continued...
Page 23
FILM MODE
This option is set to Auto to improve the quality of the pictures in movement of the films. To cancel this function,
v or V to select Off. Finally, press OK to store.
press
AV2 OUTPUT / AV3 OUTPUT
The "AV2 Ouptut" and "AV3 Output" options allows you to select the source to be output from the Scart connectors
external equipment connected to the Scart connector 1/, 2/ and 3/ or side connectors 5
or 5 and 5.
To do this:
Once you have entered into the "Features" menu as it is explained in the previous page and after selecting the option,
press OK. Then press
S
3/ and 2/ 2 so that you can record from these Scart any signal coming from the TV or from an
If your VCR or DVD recorder supports SmartLink, this procedure is not necessary.
v or V to select the desired output signal:
TV to output the aerial source.
AV1 to output sources connected to 1/.
AV2 to output sources connected to 2/ (only for AV3 Output).
AV3 to output sources connected to 3/ (only for AV2 Output).
AV5 to output sources connected to 5 or 5 and 5.
AUTO to output the signal that is being viewed on the TV.
S
S
S S
• If you select “AUTO”, the output signal will always be the same one that is displayed on the screen.
• If you have connected a decoder to the Scart 2/ or 3/ 3 or to a VCR connected to one of these
Scarts, please remember to change back the "AV2 Output" or “AV3 Output” to “TV” for correct
unscrambling.
SMARTLINK
Both Scart connectors 2/ and 3/ support SmartLink, but they cannot support SmartLink at the
same time. This option allows you to select which of the Scart connectors you want to support SmartLink.
To do this:
Once you have entered the "Features" menu as it is explained in the previous page and after selecting the option, press
OK. Then press
CONNECTION GUIDE
Even you have already connected the external equipment to the TV set, it is important for you to follow the
instructions of this menu. If you proceed in this way, you will get the optimum picture settings related with the
optional equipment.
To do this:
v or V to select AV2 or AV3. Finally press OK to store.
S
S
1 Once you have entered the "Features" menu as it is explained in the previous page and after selecting the option,
press OK. Next press
Decoder, DVD, GAME, VIDEO or DVD rec. (DVD recorder). Next press
(equipment selected also can be deleted by pressing
press
v or V to select "Confirm" and press OK.
v or V to chose the equipment you want to connect among the available: SAT (satellite),
b to select the equipment chosen
B). Once you have selected all the equipment to be connected,
2 A new menu will appear showing you on which Scart connector of the rear of the TV should be connected each
equipment. Please connect each equipment ac cording to this inform ation to get the optimu m picture setting of t he
optional equipment.
W e strongly recommend you to follo w our connecti on proposals, but in case you do not agree press
to select "No" and next press the OK button. A new menu appears on the screen in which you can assign the
connections according to your preferences.
B or b
3 Once you have connected the optional equipment, press B or b to select "OK" and finally press the OK button
of the remote control.
GB
continued...
TV Functions
23
Page 24
RGB CENTRING
This option is only available if an RGB source has been connected to the Scart connectors 1/ or
2/ on the rear of TV.
When viewing an RGB signal, the picture may need some adjusting. This option allows you to adjust the horizontal
picture position so that the picture is in the middle of the screen.
To do this:
Once you have entered the "Features" menu as it is explained in on page 22 and while watching an RGB source select
the “RGB Centring” option and press OK. Then press
+15. Finally press OK to confirm and store.
SCREEN SAVER
This sub menu allows you to reduce the image retention.
If the following images are displayed for an extended period time, image retention (afterimage) in areas of the
screen may result due to the characteristics of this display panel:
• Black bars at the top and bottom that appear with a wide video source (letterbox picture).
• Black bars to the left and right that appear with a 4:3 video source (conventional TV broadcast).
• Video game sources.
• PC images.
• DVD on-screen menu displays.
• On-screen menus, channel numbers, etc..of connected equipment such as Set Top Box, cable modem,
VCR, etc...
To do this:
Once you have entered the “Features” menu as it is explained on page 22 and after selecting the option, press OK.
v
or
V
Next press
All White Select this option and press OK. Next press
to select:
•This function finishes automatically after 30 minutes. If image retention is still present,
repeat the above.
• To cancel this function halfway, press any buttons (except the sound related buttons) on
the remote control.
v or V to adjust the centre of the picture between –15 and
v
or
V
to select On to turn the screen to white.
Orbit Select this option and press OK. Next press
LOGO ILLUMINATION
This option allows you to illuminate the SONY logo located on the front of the TV.
To do t h is :
Once you have entered the “Features” menu as it is explained on page 22 and after selecting the option, press OK.
Next press
24
v
or
V
to select Ye s if you want to illuminate the Sony logo in blue. Finally press OK to store.
TV Functions
v
or
V
to select On to move the picture position.
continued...
Page 25
The Timer Menu
Picture Adjustment
Picture Mode: Live
Contrast:
Reset:
Noise Reduction: Auto
Colour Tone: Cold
Select: Enter:OKExit:
m
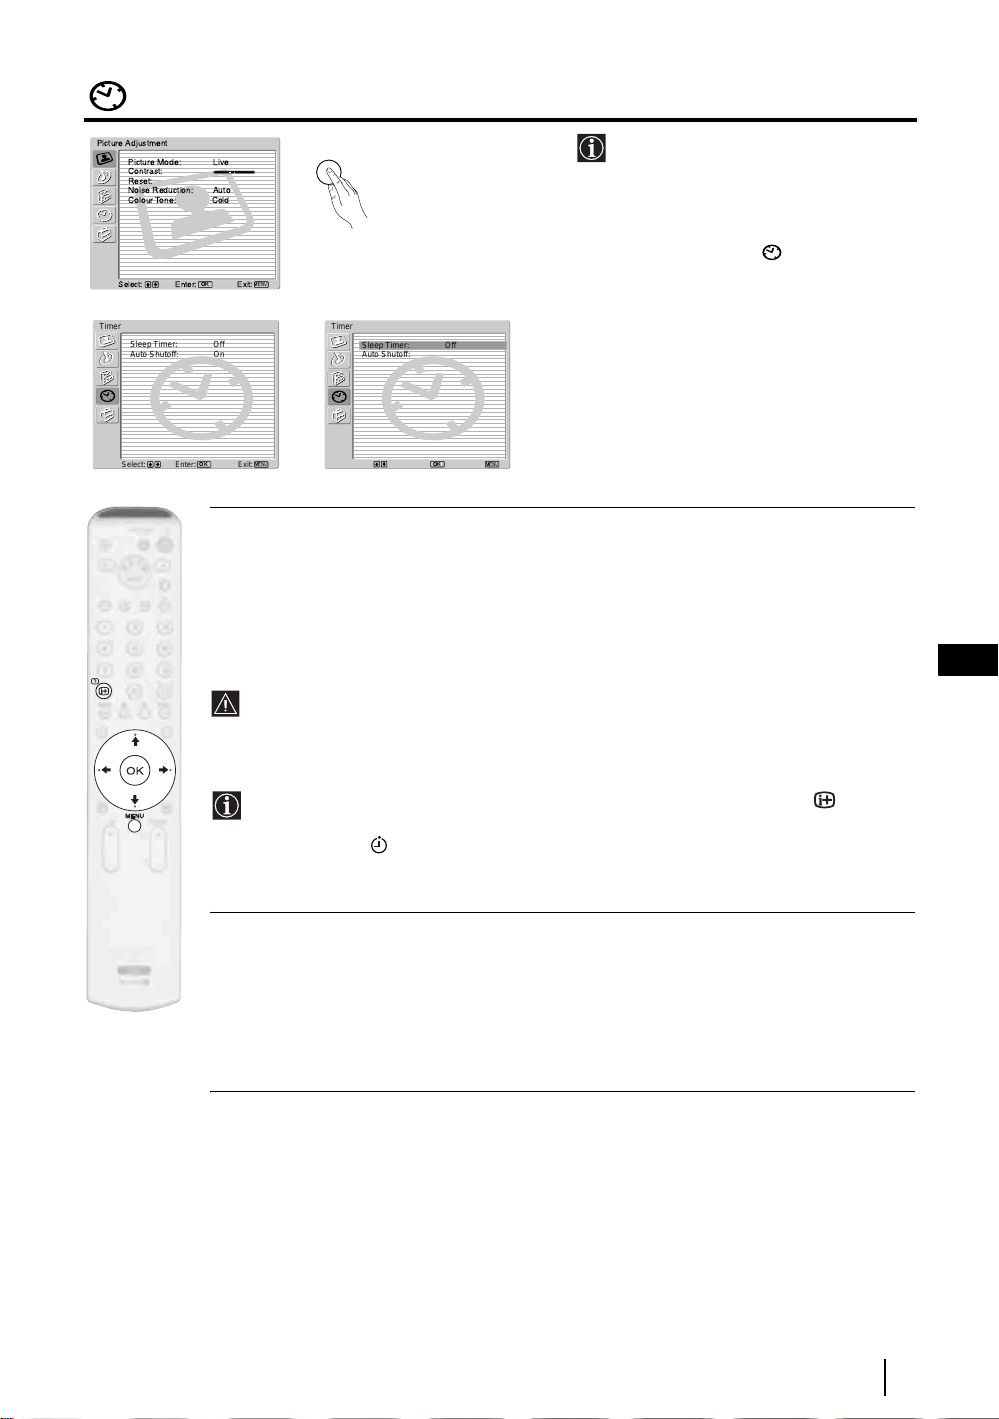
Timer
Sleep Timer: Off
Auto Shutoff: On
Select: Enter: OKExit:
MENU
The “Timer” menu allows you to alter the
timer adjustments.
To do this:
Press the MENU button and press v
three times to select then press OK to
v
or
V
MENU
enter this menu. Next, press
to
select the desired option and press OK.
Timer
Sleep Timer: Off
Auto Shutoff: On
Finally, read below how to operate into
each option.
,
MENU
Back: Select:OKEnter:
SLEEP TIMER
This option allows you to select a time period for the TV to switch itself automatically into the
standby mode.
To d o t h is :
After selecting the option, press OK. Next, press repeatedly
(max. of 2 hours). Finally press OK to store.
While the “All White” function in the “Screen Saver” option (page 24) is set to “On”, the
off timer functions are suspended and the TV does not switch into the standby mode
automatically at a specified time. After the “All White” function finishes, the off timer
functions are resumed and the TV automatically enters the standby mode.
MENU
v
or
V
to set the time period delay
GB
• While watching the TV, you can display the time remaining by pressing the button on
the remote control.
• The “TIMER ” indicator on front of the TV lights up to indicate that the sleep timer is
set.
AUTO SHUTOFF
This option allows you to set the TV to change to the standby mode automatically if there is no TV
signal.
To d o t h is :
v
or
V
After selecting the option press OK. Next, press
to select On. Finally, press OK to store.
continued...
TV Functions
25
Page 26
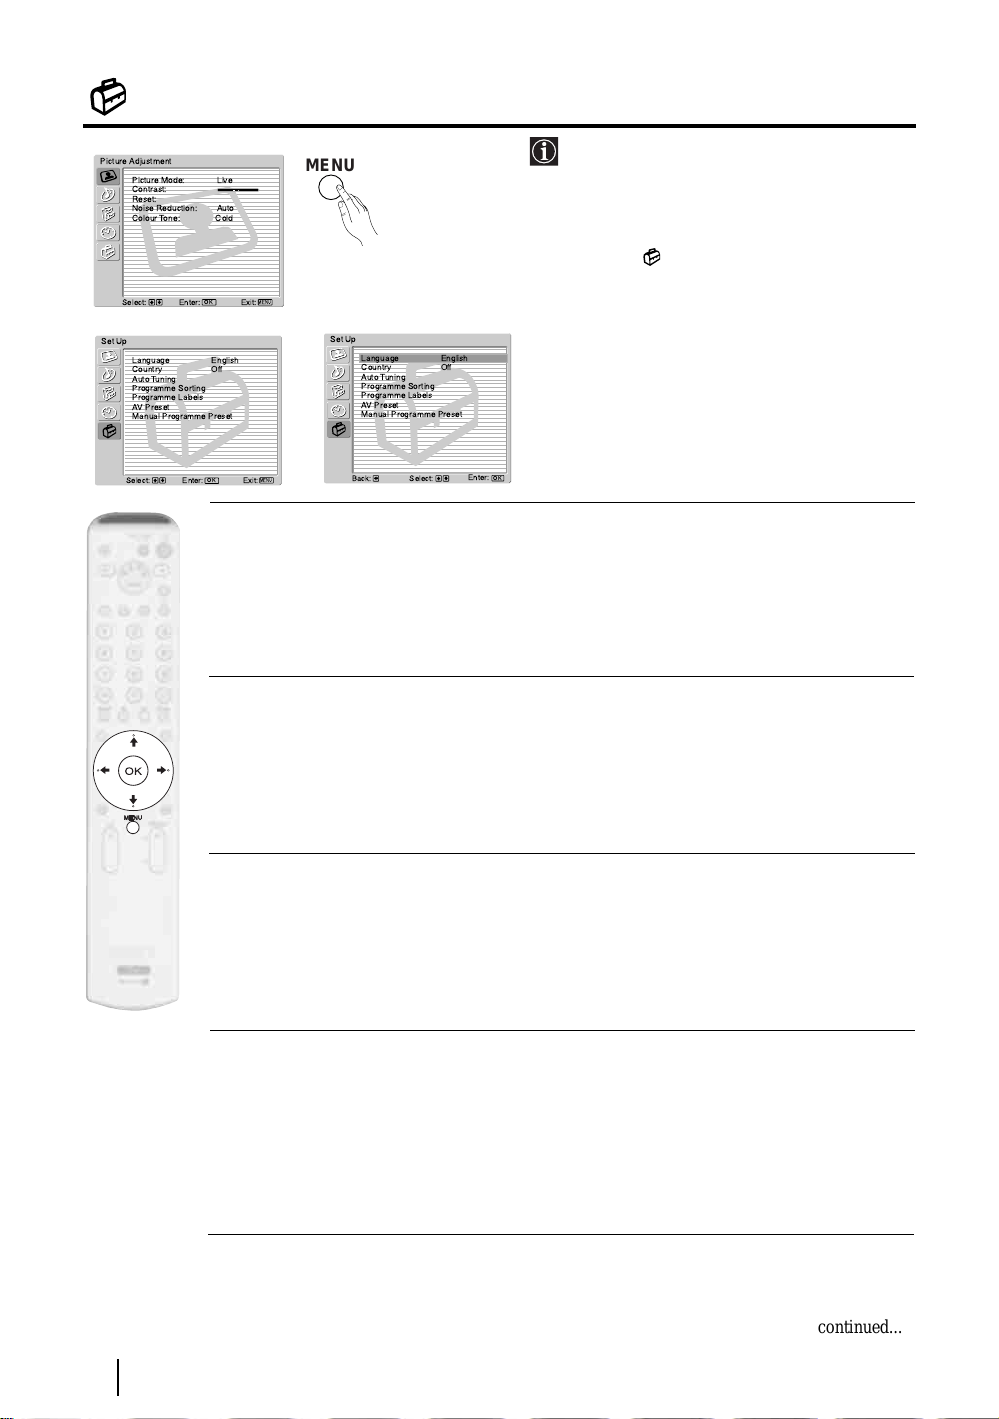
The Set Up Menu
Picture Adjustment
Picture Mode: Live
Contrast:
Reset:
Noise Reduction: Auto
Colour Tone: Cold
Select: Enter:
m
Set Up
Language English
Country Off
Auto Tuning
Programme Sorting
Programme Labels
AV Preset
Manual Programme Preset
Select: Exit:
Enter:
MENU
options on this TV.
To do this:
The “Set Up” menu allows you to alter various
v
Press the MENU button and press
four times
to select , then press OK to enter this menu.
v
Next, press
OK
MENU
Exit:
Set Up
Language English
Country Off
Auto Tuning
Programme Sorting
Programme Labels
,
MENU
OK
AV Preset
Manual Programme Preset
Select:Back:
Enter:
OK
and press OK. Finally, read below how to
operate into each option.
or V to select the desired option
LANGUAGE
This option allows you to select the language that menus are displayed in.
To do this:
After selecting the option, press OK and then proceed in the same way as in step 3 of the section
"Switching On the TV and Automatically Tuning" on page 15.
COUNTRY
This option allows you to select the country in which you wish to operate the TV set.
To do this:
After selecting the option, press OK and then proceed in the same way as in step 4 of the section
"Switching On the TV and Automatically Tuning" on page 15.
AUTO TUNING
This option allows you to automatically search for and store all available TV channels.
To do this:
After selecting the option, press OK and then proceed in the same way as in the steps 7 and 8 of
the section “Switching On the TV and Automatically Tuning” on page 16.
PROGRAMME SORTING
This option allows you to change the order in which the channels (TV Broadcast) appear on the
screen.
To do this:
After selecting the option, press OK and then proceed in the same way as in the st ep 9 of the section
“Switching On the TV and Automatically Tuning” on page 16.
continued...
26
TV Functions
Page 27
PROGRAMME LABELS
This option allows you to name a channel using up to five characters (letters or numbers).
To do this:
1 Once you have entered the "Set Up" menu as it is explained in the previous page and after selecting this option,
press OK, then press v or V to select the programme number with the channel yo u wish to name. Next press OK.
2 With the first element of the Label column highlighted, press OK and
press OK.
When you have finished, press
turn off the menu from the screen.
• To correct a letter, select "
• For a blank, select " " on the screen and press OK.
AV PRESET
This option allows you to:
a) Designate a name to the external equipment you have connected to the input sockets of the TV set.
To do this:
v, V
, B or b to select the word “End” on the screen and finally press OK to
%" on the screen to go back and press OK.
v, V
, B or b to select the letter, next
1 Once you have entered the "Set Up" menu as it is explained in the previous page and after selecting this option,
v
press OK, then press
rear Scarts and AV5 for side connectors. Next press OK twice.
or V to select the input source you wish to name: AV1, AV2, AV3 or AV4 for the
2 A label automatically appears in the label column:
a) If you want to use one of the predefined labels, press
The total predefined labels are: VIDEO, DVD, CABLE, GAME, CAM (camcorder) or SAT
(satellite).
b) If you want to set a different label, select Edit and press OK. Then, with the first element highlighted, press
v or V to select the desired label and finally press OK.
v, V, B or b to select the le tter, next p ress OK. When you have finished, press v, V, B or b to select
the word “End” on the screen and finally press OK to turn off the menu from the screen.
GB
• To correct the letter, select "
• For a blank, select " " on the screen and press OK.
%" on the screen to go back and press OK.
b) Change the input sound level of the optional equipment connected.
To do this:
Once you have entered the "Set Up" menu as it is explained in the previous page and after selecting this option
v
press OK, then press
or AV4 for the rear Scarts and AV5 for side connectors. Next press twice
column. Finally press OK and v or V to alter the input sound level between -9 and +9.
or V to select the input source you want to alter the input sound level: AV1, AV2, AV3
b to highlight the Sound Offset
continued...
TV Functions
27
Page 28

MANUAL PROGRAMME PRESET
This option allows you to:
a) Preset channels or the VCR channel one by one to the programme order of your choice.
To do this:
1 Once you have entered the “Set Up”menu as it is explained on page 26 and after selecting the "Manual
Programme Preset" option, press OK. Next with Programme option highlighted press OK.
Press
v or V to select which programme number you want to preset the channel on (for VCR, select
programme number “0”). Then press B.
2 The following option is only available depending on the country you have selected in the “Country”
menu.
After selecting the System option, press OK. Then press
for western European countries, D/K for eastern European countries, L for France or I for United Kingdom).
Then press
B.
3 After selecting the Channel Number option, press OK. Next press
for terrestrial channels or "S" for cable channels). Then press the number buttons to enter directly the channel
number of the TV Broadcast or the channel of the VC R signal. If you do not know the channel number, press
v or V to select the TV Broadcast system (B/G
v
or V to select the channel tuning ("C"
b and v or V to search for it. When you have tuned the desired channel, press OK twice to store.
Repeat all the above steps to tune and store more channels.
b) Label a channel using up to five characters.
To do this:
Once you have entered the “Set Up”menu as it is explained on page 26 and after selecting the "Manual
Programme Preset" option, press OK. Next with the Programme option, highlighted press the PROG +/- button
to select the programme number with the channel you wish to name. When the programme you want to name
appears on the screen, press
highlighted, press
v, V
v
or V to select the Label option and press OK. Then, with the first element
, B or b to select the letter, next press OK. When you have finished, press v, V, B or
b to select the word “End” on the screen and finally press OK to turn off the menu from the screen. Finally press
OK to store.
• To correct a letter, select "
• For a blank, select " " on the screen and press OK.
%" on the screen to go back and press OK.
c) Fine tune the broadcast reception. Normally the automatic fine tuning (AFT) will give the best possible picture,
however you can manually fine tune the TV to obtain a better picture reception in case the picture is distorted.
To do this:
While watching the channel (TV Broadcast) you wish to fine tune, and once you have entered the “Set Up” menu
as it is explained on page 26 and after selecting the "Manual Programme" option, press
to select the AFT option and press
press OK twice to store.
28
TV Functions
b. Next press v
or V
to adjust the fine tuning between -15 and +15. Finally
OK.
Then press v or V
continued...
Page 29

d) Skip any unwanted programme numbers when they are selected with the PROG +/- buttons.
To do this:
Once you have entered the "Set Up" menu as it is explained on page 26 and after selecting the "Manual
Programme Preset" option, press OK. Next with the Programme option highlighted, press the PROG +/- button
to select the programme number you want to skip. When the programme you want to skip appears on the screen,
press
v
or V to select the Skip option and press
confirm and store.
To cancel this function afterwards, select “Off” instead of “On” in the step above.
b. Next press v or V
to select On. Finally press OK twice to
e) View and record scrambled channels (e.g. from a pay TV decoder) when using a decoder connected to Scart
3/ directly or through a VCR.
This option is only available depending on the country you have selected in the “Country” menu.
To do this:
Once you have entered the "Set Up" menu as it is explained on page 26 and after selecting the "Manual
Programme Preset" option, press OK. Next press
S
v or V to select the Decoder option and press b. Next press
v or V to select On. Finally press OK twice to confirm and store.
To cancel this function afterwards, select "Off" instead of "On" in the step above.
GB
TV Functions
29
Page 30
About "Memory Stick"
A "Memory Stick"* is a new recording medium with a data capacity that exceeds a floppy disk. It is specially
designed for exchanging and sharing digital data among "Memory Stick" compatible products. With this TV
you can use the "Memory Stick" to display still images JPEG pictures, DCF version 1.0 format)** as well as
moving pictures (MPEG 1).
* "Memory Stick" and the logo are trademarks of Sony Corporation.
** DCF (Design rules for Ca mera File systems) is a standard file name format for digital still cameras, DV camcorders
etc. It is supported by Sony and other manufacturers.
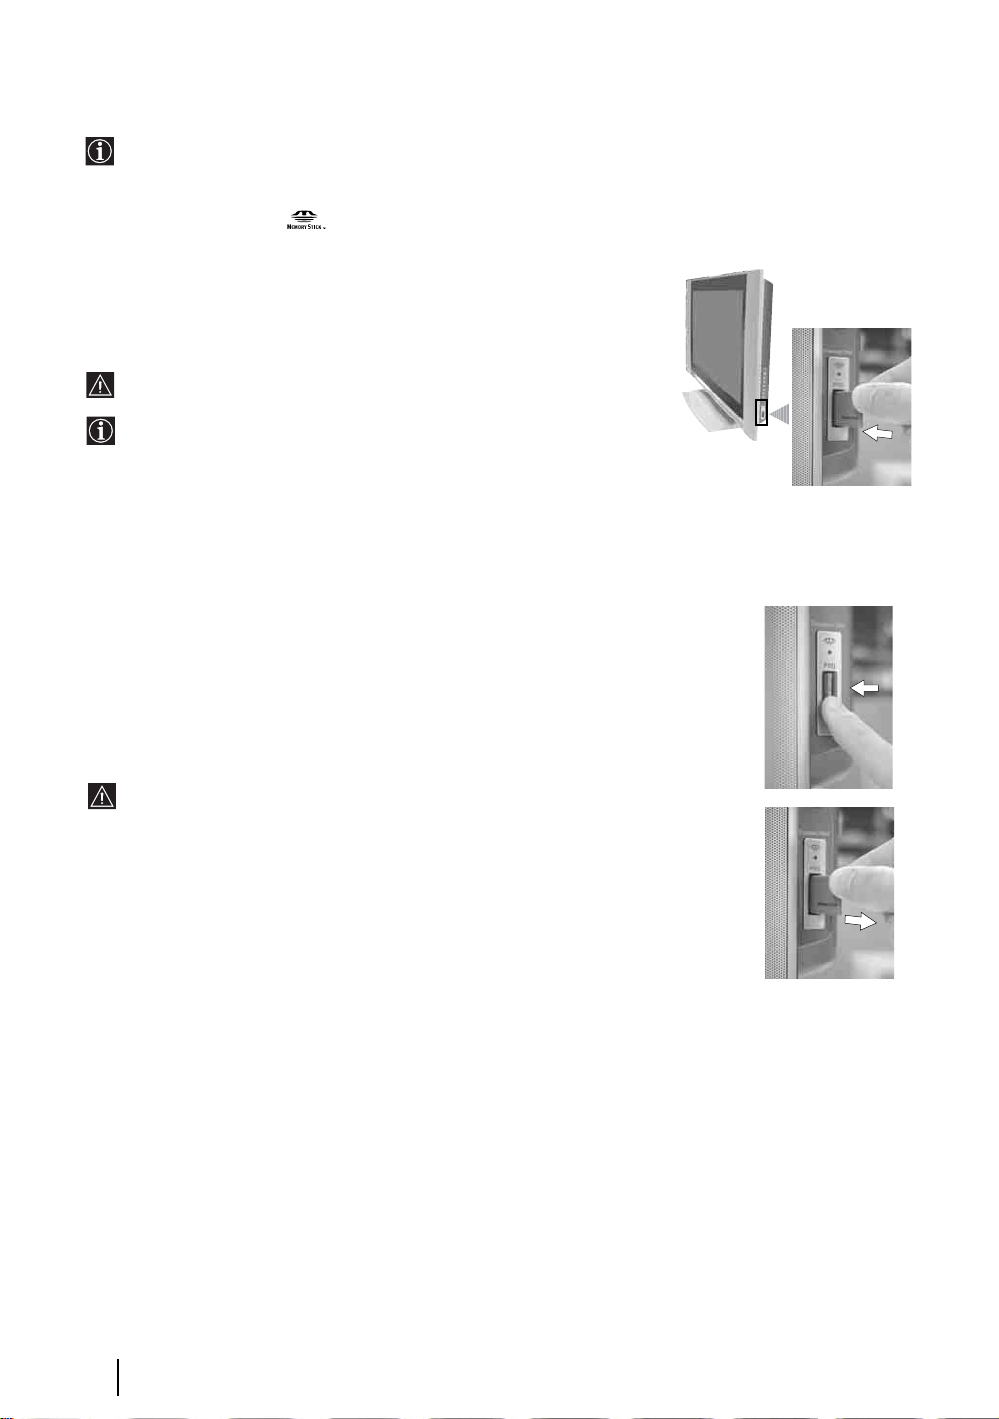
Inserting a "Memory Stick"
Insert a "Memory Stick", into the “MEMORY STICK” slot until it
clicks into the connector (see picture).
Insert the "Memory Stick" with the mark v f acing up and
pointing towards the "MEMORY STICK" slot.
The red light of the Memory Stick flashes indicating that the
"Memory Stick" contents are being read.
Inserting a "Memory Stick Duo"
You can also use a "Memory Stick Duo" with this TV by inserting the "Memory
Stick Duo directly into the "MEMORY STICK" slot.
Viewing pictures or movies from the "Memo ry Stick"
See pages 31-35.
Removing a "Memory Stick"
Push the "Memory Stick" and then release, the "Memory Stick" will spring out.
Remove the "Memory Stick".
"Memory Stick" precautions
• Do not remove the "Memory Stick" while it is
reading or writing data.
• We recommend that you make a backup copy of
important data that you record on the "Memory
Stick".
• When you set the "Memory Stick" erasure
prevention switch to "LOCK", data cannot be
recorded, edited, or erased.
• Data may become damaged if:
- you remove the Memory Stick or turn off the TV
while it is reading or writing data.
- you use the "Memory Stick" in a location subject
to the effects of static electricity or electric noise.
• "Memory Stick" supports JPEG DCF formatted files
only. Any files not recognised as DCF format will
be displayed as “--------” or in blank. JPEG DCF
formatted files that have been created or modified on
a PC may not appear correctly on the TV screen.
• Pictures ta ken by some
equipments may not be
displayed on this
television screen.
• In addition to these
precautions, we
recommend that you
carefully read the
instructions supplied
with the "Memory
Stick".
• Although you may be able to view images on certain
non-Sony brand "Memory Stick" media, it is
possible that some images cannot be displayed and
some features (rotate, etc.) may not be available. If
you attempt any of these operations an error message
will occur.
"Memory Stick"
30
continued...
Page 31

The Memory Stick Home Menu
Folder name for
the selected
folder
Memory Stick Home
Slide Show
Option
Select Folder
1 min. remain
Select: Set:
Remaining
recording
time
Indicates that the thumbnail
is Protected (for details see
page 33).
8903241
Highlighted
thumbnail
This screen gives an overview of the “Memory
Stick” content. From this menu you can view
photos and movies recorded on the “Memory
Stick” and change settings related to the viewing
operation.
8903241
To do this:
Once you have inserted a "Memory Stick", press the
button on the remote control (anytime you want
to remove the menu, press the button again).
No.: 3/16
Size: 510 x 480
OK
Information about
the selected image
or movie
File: ARIADNA.JPG
Date: 27.NOV.2002 11:97
Indicates the thumbnail
is a movie (MPEG 1)
instead of a photo
(JPEG)
Next, read below how to operate into each option.
ADJUSTING SETTINGS
SLIDE SHOW
This option allows you to display all the “Memory Stick” pictures as a slideshow presentation on
the TV screen.
To do this:
Whilst the “ Memory Stick Home” menu is displayed, press
Next press the OK button Finally press
v or V button to select:
v or V to select Slide Show.
GB
Start To start the slideshow presentation, select this option and press OK
Advan. To set the length of time a picture is displayed during a slideshow, select this
Slds. option and press OK. Next, press v or V to select:
Auto Select this option and press OK if you want the slideshow to run
automatically.
Manual Select this option and press OK if you want the slideshow to run
manually. In that case,
b or B buttons should be pressed to show the
next or previous picture.
Interval To select the in terv al between each picture (when “Advan. Slds.” is set to “Auto”),
select this option and press OK. Next press
v or V to select between 5 sec, 10 sec ,
30 sec, 1 min or 5 min.
Close Select this option and press OK to back to the previous menu.
continued...
"Memory Stick"
31
Page 32

OPTION
This option allows you to sort the pictures within a f older, to filter the images to be shown, to delete all the pictures
stored well as display information about the “Memory Stick” information.
To do this:
While the “ Memory Stick Home” menu is displayed, press
OK button Finally, press
File Select this option and press OK. Next, press
v or V button to select:
The “Sort” and “Filter” options are only available when the “ Digi-Camera Mode”
option is set to “Off” For details on “ Digi-Camera Mode”, see below.
v or V button to select Option. Next, press the
v or V to select:
Sort Select this option and press OK. Next press
Filter Select this option and press OK. Next press
Select this option and press OK to display information such as used space, available space and
total capacity for the “Memory Stick”.
Close Select this option and press OK to go back to the previous menu.
SELECT FOLDER
This option allows you to select a specific folder on the “Memory Stick”.
To do this:
While the “ Memory Stick Home” menu is displayed, press
the OK button Finally press
Digi. Camera Select this option and press OK. Press
Mode pictures taken by a digital camera or select Off to display all the folders contained on the
“Memory Stick”. Finally, press OK to confirm your selection.
/ Select this option and press
folder you want to view and press OK.
alphabetically or by date.
only the still images stored in the “Memory Stick”), Movie (to show only the
moving images stored in the “Memory Stick”) or Off (to show all the images
(still and moving) stored in the “Memory Stick”).
v or V button to select Select Folder. Next, press
v or V button to select:
v or V to select On to automatically show all the
b to display the list of folders. Next, press v or V to sele ct the
v or V to sort the image file
v or V to select Still (to show
O Select this option and press OK to go to the upper folder stage.
Close Select this option and press OK to go back to the previous menu.
"Memory Stick"
32
continued...
Page 33

VIEWING PHOTOS AND PLAYING MOVIES
To do this:
1 While the “ Memory Stick Home” menu is displayed, press b to enter to the thumbnail pictures. Then press
B, b, v or V to highlight the required thumbnail.
2 With the required thumbnail highlighted, press OK to display the sele cted thumbnail together with all a v ai lable
options. Press
Full Screen This option appears only if the selected thumbnail is a photo. Select this option and press
(for photos) OK to view the selected photo fully in the TV screen.
v or V to select:
• The TV automatically displays the approp ria te ima ge size for eac h im age on t he full
screen.
• The quality of the photo when viewed at full screen depends on the resolution of the
JPG file.
While viewing a photo fully on the TV screen you can:
1 Press b or B to display the next or previous file.
2 Press OK to access the following additional options:
Return Select this option and press OK to return to the “ Memory Stic k
Home” menu.
Information Select this option and press OK. Next, press
Protect Select this option and press OK. Next, press
Rotate This option is only available for unprotected still images (photos).
Delete This option is only available for unprotected files. Select this option
Close Select this option and press OK to go back to the previous menu.
display all information about the selected file or Off to remove the
information from the screen. Finally, press Close to store.
protect the selected thumbnail file from any changes or Off to
unprotect the file. Press Close to store.
All the protected files are indicated with the mark .
Select this option and press OK. Next, pre ss
rotate clockwise or select to rotate anticlockwise. Next, press
repeatedly OK to rotate the photo (whenever you press OK, the
image rotates 90 degrees). Finally, select Close to store.
and press OK if you want to delete the selected file. A message asks
you to confirm deletion. Press
confirm.
b or B to select Yes and press OK to
v or V to select On to
v or V to select On to
v or V to select to
GB
continued...
"Memory Stick"
33
Page 34

Movie Player This option appears only if the selected thumbnail is a movie (marked with the symbol).
(for movies) Select this option and press OK to operate the movie player. Next press
select:
B, b, v or V to
Return Select this option and press OK to return to the “ Memory Stick Home”
While the movie is in playback mode, press and hold the
Full Screen Select this option and press OK to automatically playback the movie at full
Menu Select this option and press OK. A new menu is displayed. Next press
menu.
Select this button and press OK to playback the movie. During playing,
select this button again and press OK to pause the movie.
While the movie is in playback mode, press and hold the
remote control to rewinds the movie. Normal playback continues when you
release the button.
B button on the
b button on the
remote control to fast forward the movie. Normal playback continues when
you release the button.
If you press B or b buttons before the movie is in playback
mode, the next or previous photo or movie will be displayed.
Select this button and press OK to stop the movie.
screen size.
• To display the movie player controls again, press
OK.
• The TV automatically displays the appropriate image size for eac h
movie on the full screen.
• The quality of the movie, when is viewed at full screen, depends on
the resolution of the MPEG 1 file.
B, b, v or V or
v or
V to select:
Information Select this option and press OK. Next press v or V to
select On (displays all information for the se lected f i le) or
Off (removes the information from the screen).
Protect Select this option and press OK. Next press
.
Delete This option is only available for unprotected files. Select
select On to protect the selected thumbnail file from any
changes or Off to unprotect the file. Press Close to store.
All the protected files are indicated with the mark
this option and press OK if you want to delete the selected
file. A message asks you to confirm deletion. Pr ess
b to select Yes and press OK to confirm.
Close Select this option and press OK to go back to the previous
Slide Show Select this option and press OK to automatically displays all the photos and movies from the
selected folder in a slideshow presentation mode.
34
"Memory Stick"
menu.
v or V to
B or
continued...
Page 35

Protect Select this option and press OK. Next press v or V to select On to protect the selected
thumbnail file from any changes or Off to unprotect the file. Next press
to store.
All the protected files are indicated with the symbol .
Rotate This option is only available for unprotected still images (photos). Select this option and press
OK. Next press
press repeatedly OK to rotate the photo (whenever you press OK, the image rotates 90
degrees). Finally select Close to store.
Delete This option is only available for unprotected thumbnails files. Select this option and press OK if
you want to delete the selected movie or photo. A message asks you to confirm deletion. Press
v or V to select to rotate clockwise or to rota te anticlockwise. Next,
v or V to select Close
B or b to select Yes and press OK to confirm.
Close Select this option and press OK to back to the previous menu.
GB
"Memory Stick"
35
Page 36

Teletext
Teletext is an information service transmitted by most TV stations. The index page of the teletext service
(usually page 100) gives you information on how to use the service. To operate teletext, use the remote control
buttons as indicated below.
Teletext errors may occur if you use a channel (TV Broadcast) with a weak signal.
To switch on Teletext :
1 Select the broadcast channel which carries the teletext
service you wish to view.
2 Press the button once to enter Picture And Text
13
46
7
9
(PAT) mode. The screen is divided into two with the
Text display on the left and the TV channel in the
botton right corner.
While viewing PAT, you can zoom the picture
screen by pressing
two screens are overlapped, they can be sw apped
by pressing the OK button.
v or V buttons. Once the
3 If you wish to view the Text in full screen mode, press
the button a second time.
To select a Teletext page:
Input 3 digits for the page number, using the numbered buttons.
• If you make a mistake, retype the correct page number.
• If the counter on the screen continues searching, it is because the page
is not available. If this is the case, input another page number.
To access the next or preceding page:
Press PROG + ( ) or PROG - ( ) .
To freeze a teletext page:
Press / . Press it again to cancel the freeze.
To select a sub page:
A teletext page may consist of several sub pages. In this case, one or more arrows appear next
to the page number. Press
showing the number of sub pages contained on this page. As soon as sub pages are available, they
start to automatically run. If you want to stop the show and select your desired sub page, press
repeatedly
To Switch Off Teletext:
Press .
B or b.
B or b to display an information line at the bottom of the screen
Fastext
Fastext service lets you access Teletext pages with one button push.
When you are in Teletext mode and Fastext is broadcast, a colour coded menu appears at
the bottom of the teletext page. Press the appropriate coloured button (red, green, yellow
or blue) to access the page corresponding to your menu choice.
36
Teletext
Page 37

NexTView*
*(depending on availability of service).
NexTView is an on-screen electronic programme guide, providing you with programme information for
different broadcasters.
When looking for information you can search by theme (sports, art, etc...) or date.
If wrong characters appear when viewing NexTView, use the menu system to enter the “Language” menu (see
page 26) and select the same language as the NexTView is broadcasted.
Displaying NexTView
1 Select a broadcast channel providing a NexTView service. In this case the indication
“NexTView” is displayed as soon as data is available.
2 To see NexTView service you have two different types of NexTView interface. These depend
on the % of available data:
a) “Programme List” interface:
Whilst you are watching TV, and after the indication “NexTView” (coloured orange) is
displayed on the screen, press the button on the remote control to watch the
“Programme List” interface (see fig. 1).
b) “Overview” interface:
Whilst you are watching TV, and after more than 50% of NexTView data is available
(100% data may not be available depending on the area) the indication “NexTView”
(coloured black) is displayed on the screen. Press the button on the remote control
to watch the “Overview” interface (see fig. 2).
3 To navigate through NexTView:
B or b to move left or right.
• Press
•Press
v or V to move downwards or upwards.
• Press OK to confirm a selection.
• If you have selected a programme, press OK to get more information on the
selected programme.
GB
4 To switch NexTView off, press the button on the remote control.
“Programme List” interface (fig. 1): “Overview” interface (fig. 2):
1 Programmme list 2 3
Icons’ key:
General:
All the programme information is listed by time
and broadcast channels order.
News
Movie
Sports
Praesentiert von
Ihrer Programmzeitschr
Thu 12
14:30
AttrText
AttrText
AttrText
1
AttrText
AttrText
AttrText
Perry Mason
RTL2
Krimiserie - DerFall mitdem mittelmass
2
www.tvmovie.de
15:00
Tue 17 Jun 14:55 - 16:30
Select:
15:30
AttrText16
AttrText16
AttrText16
AttrText16
AttrText16
AttrText16
Thu 12 Jun
14:36
16:00
General
CategoriesDate
3
Date:
Press the red button of the remote
control to display the date screen,
you can select the desired date by
pressing v or V. Next press OK to
confirm.
1
Show
Children
Arts
Music
Praesentiert von
Ihrer Programmzeitschr
Thu 12
AttrText
AttrText
AttrText
AttrText
AttrText
AttrText
Perry Mason
RTL2
Krimiserie - DerFall mitdem mittelmass
Date
www.tvmovie.de
15:00
14:30
Auf schlimmer undewig
Baywatch
Benny Hill
Perry Mason
The Osbournes
Segeln: Louis VuittonCup
Twilight Zone
Tue 17 Jun 14:55 - 16:30
Select:
2
Categories:
Press the blue button of the remote to
display the icons (see below the Icon’s key)
for different themes. Next press v or V to
select the desired icon and finally press the
OK button to confirm.
Thu 12 Jun
15:30 16:00
NexTView
General
categories
14:36
3
37
Page 38

Connecting Equipment to the TV
• Using the following instructions you can connect a wide range of optional equipment to your TV set.
• Connecting cables are not supplied.
Sub woofer
D
G
H
I
J
K
VCR
A
B
C
8mm/Hi8/
DVC
camcorder
To avoid snowy picture, do not
(MONO)
L/G/S/I
R/D/D/D
S VHS/Hi8/
DVC
camcorder
Hi-fi
E
F
2
PlayStation
DVD
“PlayStation”*
DVD recorder with
component signal format
Decoder
* “PlayStation” is
a product of Sony
Computer
Entertainment,
Inc.
* “PlayStation” is
a trademark of
Sony Computer
Entertainment,
Inc.
connect external equipment to
connectors A and B at the
same time.
Compact AV
System/Amplifier
Connecting a VCR
To connect a VCR, please refer to the section “Connecting the aerial and VCR” of this instruction manual on page 14.
Connecting a VCR or a DVD recorder that supports SmartLink
SmartLink is a direct link between the TV set and a SmartLink compatible VCR/DVD recorder. For more
information on SmartLink, please refer to the instruction manual of your SmartLink VCR/DVD recorder.
If you use a VCR or a DVD recorder that supports SmartLink, please connect the VCR or the DVD recorder to the
TV using a Scart lead to the Scart 2/ J or 3/ K.
S
Both Scart connectors 2/ J and 3/ K cannot support SmartLink at the same time. If you
S
connect a VCR or a DVD recorder to both Scart connectors, select which Scart supports SmartLink through
the “SmartLink” option in the “Features” menu. For details see page 23.
If you have connected a decoder or a Set Top Box to the Scart 3/ K or through a
S
VCR connected to this Scart
Select the “Manual Programme Preset” option in the “Set Up” menu and afte r entering in the “Decoder**” option,
select “On” (refer to page 29). Repeat this option for each scrambled signal.
**This option is only available depending on the country you have selected in the “Country” menu.
continued...
38
Additional Information
Page 39

Connecting a DVD or DVD recorder
Connect the DVD or the DVD recorder to the Scart connector 2/ J.
Connecting a DVD recorder with 576p signal format
Some DVD recorder may have 576p signal format. In this case, connect the DVD recorder to the Scart connector
2/ J, to the audio input jacks 4 G and to the video component jacks Y, P
Using this connection, the TV will record from the AV2 input ( Scart connector
T o watch the input signal, you can chose from AV2 (Scart connector
2/ J) or AV4 (audio input jacks
, PR/CR 4 H.
B/CB
2/ J).
4 G and video component jacks 4 H). To watch the best picture we recommend you select AV4.
Connecting Audio Equipment to the TV
To listen to the sound from TV on Hi-fi equipment.
Connect your audio equipment to the audio output sockets E if you wish to amplify the audio output from the TV.
Next, using the menu system, select the “Sound Adjustment” menu and set the “TV Speakers” to "Off" (see page 21).
• To control the external speakers using this remote control, set “Audio Output” option to “Variable” in
the “Sound Adjustment” menu (see page 21).
• The volume of the external speak ers can be altere d by pressing the volume buttons on the TV remote control.
The treble and bass setting can also be altered through the “Sound Adjustment” menu (see page 20).
For a sub woofer
Connect your sub woofer to the 5 W/G/W/G output jack D using a monaural audio cable.
To enjoy “Dolby Virtual” sound effect through your
audio equipment
Hi-Fi speakers
Place the speakers of your equipment in front of your listening position and
beside the TV set.
Then by using the menu system, select the menu “Sound Adjustment”. Next
set the option "Audio Output" to "Variable" and the option "Sound Effect" to
"Dolby Virtual" (see pages 20 and 21).
To control the volume level of an external amplifier
~50°
Your sitting position
When you connect the AV mouse and install it in an external amplifier, you can use the external amplifier’s remote
control toward the TV for controlling the volume level of the external amplifier. Connect the AV mouse to the AV
MOUSE IN jack F, and install it right above the external amplifier’s remote control sensor.
AV mouse
(supplied)
Amplifier
Remote control sensor
GB
continued...
Additional Information
39
Page 40

Viewing pictures from equipment connected to the TV
1 Connect your equipment to the designated TV socket, as indicated on page 38.
2 Switch on the connected equipment.
3 To watch the picture from the connected equipment, press the button repeatedly until the
correct input symbol appears on the screen.
Symbol Input Signals
1 • Audio / video input signal through the Scart connector I
1 • RGB input signal through the Scart connector I. This symbol appears only if
an RGB source has been connected.
2 • Audio / video input signal through the Scart connector J.
2 • RGB input signal through the Scart connector J. This symbol appears only if
an RGB source has been connected.
3 • Audio/video input signal through the Scart connector K.
S
3 • S Video Input signal through the Scart connector K. This symbol appears only
if an S Video source has been connected.
4 • Component input signal through the Y, P
signal through G.
5 • Video input signal through the phono socket B and Audio input signal through
C.
S
5 • S Video Input signal through the side S Video input jack A and Audio signal
through C. This symbol appears only if an S Video source has been connected.
, PR/CR jacks H and audio input
B/CB
Additional Information
40
4 Press the button on the remote control to return to the normal TV picture.
For Mono Equipment
Connect the phono plug to the L/G/S/I socket on the side of the TV and select 5 or 5
input signal using the instructions above. Next, refer to the “Sound Adjustment” section of this
manual and set “Dual Sound” option to “A” on the sound menu screen (see page 20).
S
Page 41

Remote Control Configuration for VCR or DVD
In it’s default condition this remote control will operate the basic functions of this Sony TV, Sony DVDs and
most Sony VCRs. To control VCRs and DVDs of other manufacturers (and some Sony VCR models), the
remote control needs to be configured.
fig. 2
13
46
9
7
To do this:
• Before you start, look up the 3 digit code for your brand of DVD or VCR from the list below.
On those brands that have more than one code, enter the first code number.
• Sony will endeavour to update the software according to market changes. Therefore, please
refer to the code table included with the remote control for latest code set.
• A small label is provided inside the battery door to allow you to record your brand codes.
1 Press and hold the T button on the remote control for approximately 6
seconds until the green DVD and VCR light of the Media Selector starts
flashing (see fig. 1).
2 While the VCR and DVD lights are flashing, enter all three digits of the
R
C
V
fig. 1
D
V
T
MODE
V
D
A
U
X
code for your brand of VCR or DVD (see the list below) using the
number buttons on the remote control (see fig. 2).
If your selected code is entered correctly, the green VCR or DVD
light (according to your selection) will be lit momentarily (see fig.
3), otherwise repeat all the above steps.
3 Turn on your VCR or DVD and check that the main functions (playback,
stop, rewind, fast forward and channel selection for both VCR and
6 sec.
R
C
V
fig. 3
D
V
T
MODE
V
D
A
U
X
DVDs as well as Menu and cursors buttons only for DVDs) work.
• If your device is not working or some of the functions do not work please check that you
entered the correct code or try the next code listed against the brand.
• Not all brands are covered and not all models of every brand may be covered.
4 Always remember to press the T or t button until the green light iluminates according to
the equipment you want to operate with this remote control: VCR, TV or DVD. Refer to pages
42 -43 on how to operate the AUX mode.
GB
VCR Brand List DVD Brand List
Brand Code Brand Code
SONY (VHS) 301, 302, 303, 308, 309,362
SONY (BETA) 303, 307, 310
SONY (DV) 304, 305, 306
AIWA 325, 331, 351
AKAI 326, 329, 330
DAEWOO 342, 343
GRUNDIG 358, 355, 360, 361, 320, 351, 366
HITACHI 327, 333, 334
JVC 314, 315, 322, 344, 352, 353, 354, 348, 349
LG 332, 338
LOEWE 358, 355, 360, 361, 320, 351
MATSUI 356, 357
ORION 328
PANASONIC 321, 323
PHILIPS 311, 312, 313, 316, 317, 318, 358, 359,
363, 364
SAMSUNG 339, 340, 341, 345
SANYO 335, 336
SHARP 324
THOMSON 319, 350, 365
TOSHIBA 337
SONY 001, 029, 030, 036, 037, 038, 039, 040,
041, 042, 043, 044, 053, 054, 055
AIWA 021
AKAI 032
DENON 018, 027, 020, 002
GRUNDIG 009, 028, 023, 024, 016, 003
HITACHI 025, 026, 015, 004, 035
JVC 006, 017
KENWOOD 008
LG 015, 014, 034
LOEWE 009, 028, 023, 024, 016, 003
MATSUI 013, 016
ONKYO 022, 033
PANASONIC 018, 027, 020, 002, 045, 046, 047
PHILIPS 009, 028, 023, 024, 016, 003, 031
PIONEER 004, 050, 051, 052
SAMSUNG 011, 014
SANYO 007
SHARP 019, 027
THOMSON 012
TOSHIBA 003, 048, 049
YAMAHA 018, 027, 020, 002
Additional Information
41
Page 42

Learning functions from other Remote Controls
To eliminate the amount of remote controls you need, this remote control has a learning feature. Once set up
as explained below, it can be used in place of your other remote controls.
It is recommended that you make a note of what each button has been taught (you can use the table provided
with the remote control).
Before you start and for accurate learning, please read below instructions:
• Choose the button (a-g) you want to learn. See fig. 3 to find out the possible buttons.
• Do not move the remote units during the learning procedure.
• Be sure to keep holding down the learning button until your commander reacts as described.
• Use fresh batteries in both remote units.
• Avoid learning in places subjects to direct sunlight or a strong fluorescent light.
• Noise may interfere during the learning procedure.
• The remote control detector area may differ depending on each remote unit. If learning does not work, try
changing the positions of the two remote controls.
• It is possible that some specific remote control signals may not be learned.
• If you do not perform the learning steps within 20 seconds at any point during the process, the learning mode
ends.
fig. 3
Buttons available to
store learned
functions.
a
13
46
b
7
c
d
e
f
AUX/VIDEO
1 Position both remote controls as shown (see fig. 1).
2 Press and hold the t button of this TV remote control for
approximately 6 seconds, until the green AUX light starts flashing
(see fig.2).
3 Press the button on this TV remote control that you wish to use to
store a learned function (see fig.3).
Once the selected button has been pressed, the VCR, TV, DVD and
AUX lights illuminate in order (see fig. 4).
9
4 Press the button on the other remote control that you wish to teach your TV
remote control.
g
• During the data transfer process, all the four lights illuminate at the
same time (see fig. 5).
• As soon as data transfer is finished, the AUX green light starts
flashing (see fig. 6).
5 If you wish to record other functions repeat steps 2-4 (read before the
warning below), otherwise go to step 6.
• In case you try to select one button which has been already
learned, all the four lights will momentarily flash very shortly and
the remote control automatically return to the same condition as
in the step 2 with the AUX light flashing
• In case you try to select a not-learnable button, the remote control
stay in to the same condition as in the step 2 with the AUX light
flashing.
6 Press the t button to finish the learning process.
7 Check that all the learning functions have been learned correctly.
This TV remote
control
fig. 1
2-3 cm.
fig. 2
V
T
R
C
V
MODE
fig. 4
R
C
V
fig. 5
T
R
C
V
MODE
fig. 6
T
R
C
V
MODE
Other remote
control
D
V
D
A
U
X
D
V
V
D
T
MODE
D
V
V
D
D
V
V
D
6 sec.
A
U
X
A
U
X
A
U
X
Additional Information
42
• To use a learned function later, press the T or t buttons to select AUX and next
press the relevant button.
• Always remember to press the
T or t button until the green light iluminates
according to the equipment you want to operate with this remote control: VCR, TV,
DVD or AUX.
continued...
Page 43

Erasing a learned function
1 Press and hold the t button for approximately six seconds until the AUX green light
flashes (see fig. 7).
2 While pressing the % button, press the button (a - g) with the learned function that you
want to erase (see fig. 8).
All the four lights illuminate at the same time (see fig. 9) and as soon as the learned
function is erased, the AUX green light starts flashing (see fig. 10).
3 If you wish to store a new function, repeat steps 3 and 4 from the previous page, otherwise
press the
t button to return to normal operation.
fig. 2
V
T
R
C
V
MODE
fig. 8
fig. 9
V
T
R
C
V
MODE
fig. 10
V
T
R
C
V
MODE
D
V
D
A
U
X
6 sec.
+ a-g
D
V
D
A
U
X
D
V
D
A
U
X
Erasing all the learned functions in one time
1 Press and hold the t button for approximately six seconds, until the AUX green light
flashes (see fig. 11).
2 While pressing the % button, press t to erase all the learned functions (see fig. 12).
All the four lights illuminate at the same time (see fig. 13) and as soon as all the
learned function are erased, the remote con trol aut omatical ly retu rns to the normal
operation.
fig. 11
V
T
R
C
V
MODE
fig. 12
fig. 13
V
T
R
C
V
MODE
GB
D
V
D
A
U
X
6 sec
D
V
D
A
U
X
Additional Information
43
Page 44

Technical Specifications
Panel System:
PDP (Plasma Display Panel)
TV system:
Depending on your country
selection:
B/G/H, D/K, L, I
Colour system:
PAL, SECAM
NTSC 3.58, 4.43 (only Video In)
Aerial:
75 ohm external terminal for
VHF/UHF
Channel Coverage:
VHF: E2-E12
UHF: E21-E69
CATV: S1-S20
HYPER: S21-S41
D/K: R1-R12, R21-R69
L: F2-F10, B-Q, F21-F69
I: UHF B21-B69
Screen Size:
• KE-P37XS1: 37 inches (approx. 94 cm
measured diagonally)
• KE-P42XS1: 42 inches (approx. 107 cm
measured diagonally)
Display Resolution:
1024 dots (horizontal) x 1024 lines
(vertical)
Power Requirement:
220-240V AC; 50/60 Hz
Power Consumption:
• KE-P37XS1: 312 W
• KE-P42XS1: 370 W
Standby Power Consumption:
1.9 W
Sound Output:
2 x 15 W (RMS)
Dimensions (w x h x d):
• KE-P37XS1:
Approx. 1135 x 692 x 286 mm
• KE-P42XS1:
Approx. 1229 x 753 x 286 mm
Weight:
• KE-P37XS1:
• KE-P42XS1:
44
Additional Information
Approx. 37.5 Kg.
Approx.
43 Kg.
Rear Terminals:
• AV1: 1/
21-pin Scart connector
(CENELEC standard) including
audio/video input, RGB input,
TV audio/video output.
• AV2: 2/ (SMARTLINK;
selectable)
21-pin Scart connector
(CENELEC standard) including
audio/video input, RGB input,
selectable audio/video output
and SmartLink interface.
• AV3: 3/ (SMARTLINK;
selectable)
21-pin Scart connector
(CENELEC standard) including
audio/video input, S video input,
selectable audio/video output
and Smartlink interface.
• AV4:
• 4: Y:1 Vp-p, 75 ohms,
• 4: audio input (phono
jacks)
modulation),
ohms
• AV MOUSE: minijack
• audio outputs (Left/Right) phono jacks
• Sub Woofer output (phono
jack)
• Aerial connector (RF In)
Left side:
• Memory Stick Slot
S
0.3V negative sync
PB:0.7 Vp-p, 75 ohms
PR:0.7 Vp-p, 75 ohms
500 m Vrms (100%
Impedance: 47 kilo
Right side Terminals:
• AV5:
negative
negative
Accessories supplied:
• One Remote Control (RM-Y1010)
• Two size AA batteries (R03 type)
• One Coaxial Cable
• One AV Mouse
• One Mains Leads (Type C-4)
• One Mains Leads (Type BF)
• One Mains Leads (Type C-5)
• One Cleaning cloth
• One Clump Belt.
• Two Anchor attachments.
Other features:
• Teletext, Fastext, TOPtext
•NexTView
• Sleep Timer
• SmartLink (direct link between
• TV system Autodetection
• Dolby Virtual
• BBE Digital
• ACI (Auto Channel Installation)
• Auto Format
•DRC
• Remote Control with learning
• Memory Stick (reader).
S
• 5: S video input (4-pin
• 5: video input (phono
• 5: audio input (phono
• headphones jack
your TV set and a compatible
VCR or DVD recorder. For more
information on Smartlink, please
refer to the Instruction Manual of
your VCR or DVD recorder).
functions.
mini DIN):
Y: 1 Vp-p, 75-ohms
unbalanced, sync
C: 0.286 Vp-p (Burst
signal), 75 ohms
jack):
1 Vp-p, 75-ohms
unbalanced, sync
jacks):
500 m Vrms,
Impedance: 47 kilo
ohms
Main leads Type BF and
Type C-5 may not be supplied
depending on the country.
®
(Digital Reality Creation)
Design and specifications are subject to change without notice.
This instruction manual has been printed on:
Ecological Paper - Totally Chlorine Free
continued...
Page 45

Troubleshooting
Here are some simple solutions to problems which may affect the picture and sound.
TV
Problem Possible solution
No picture
No picture (screen is dark) and no sound. • Check the aerial connection.
• Connect the TV to the mains, and press the power switch on the
right side of the TV set.
• If the (standby) indicator is on, press AUX/VIDEO on the
remote control.
The TV turns off automatically. (The TV
enters the standby mode.)
No picture or no menu information from
equipment connected to the Scart
connector.
Poor picture/Unstable picture.
Double images or ghosting. • Check aerial/cable connections.
Only snow and noise appears on
the screen.
Dotted lines or stripes. • Keep the TV away from electrical noise sources such as cars,
No colour on colour programmes. • Using the menu system, select the “Picture Adjustment” menu and
Some tiny black points and/or bright
points on the screen.
The picture is too bright.
• Check if the Sleep Timer is activated (page 25).
• Check if Auto Shutoff is activated (page 25).
• Check that the optional equipment is on and press the button
repeatedly on the remote control until the correct input symbol is
displayed on the screen (page 40).
• Check the connection between the optional equipment and the TV.
• Check the aerial location and direction.
• Check if the aerial is broken or bent.
• Check if the aerial has reached the end of its serviceable life. (3-5
years in normal use, 1-2 years at the seaside)
motorcycles, or hair-dryers.
select “Reset” to return to the factory settings (page 19).
• If you set the Power Saving function to “Reduce,” picture colours
may become dimmer (page 22).
• The picture of the display is composed of pixels. Tiny black points
and/or bright points (pixels) on the screen, do not indicate a
malfunction.
• Using the menu system, select the “Picture Adjustment” menu and
select “Picture Mode” Then select the desired picture mode (page
18).
• Make sure that the aerial is connected using the supplied coaxial
cable.
GB
Picture (stripe) noise.
Poor picture (white saturation) when
viewing a signal from Scart connector
S
3/ .
• Keep the aerial cable away from other connecting cords.
• Do not use 300-ohm twin lead cables as interference may occur.
• Make sure that the output signal of the equipment connected to the
Scart connector 3/ is not an RGB signal. If it is an RGB
signal, please connect the equipment to Scart 1/ or
2/ .
S
continued...
Additional Information
45
Page 46

Problem Possible solution
Stripe noise during playback/recording
of a VCR.
• Video head interference. Keep your VCR away from the TV.
• Leave a space of 30 cm between your VCR and the TV set to avoid
noise.
• Avoid installing your VCR in front or at the side of the TV set.
Poor or no picture (screen is dark), but
good sound.
Noisy picture when viewing a TV
channel.
Distorted picture when changing
programmes or selecting teletext.
In the screen appears an image retention
(afterimage)
The screen flickers when turning on the
TV.
Wrong characters appear when viewing
teletext.
Wrong characters appear when viewing
NexTView.
No sound/Noisy sound.
Good picture, no sound. • Press the 2 + on the remote control.
Audio noise. • Make sure that the aerial is connected using the supplied coaxial
• Using the menu system, select the “Picture Adjustment” menu and
select “Reset” to return to the factory settings (page 19).
• If the PICTURE OFF indicator lights up in blue, press
(picture off) on the remote control.
• Using the menu system, select the “Manual Programme Preset”
option in the “Set Up” menu and adjust Fine Tuning (AFT) to
obtain better picture reception (page 28).
• Using the menu system, set the "Noise Reduction" option in the
“Picture Adjustment” menu to reduce the noise in the picture (page
19).
• Turn off any equipment connected to the Scart connector on the rear
of the TV set.
• Using the menu system, select the “Features” menu, next select the
“Screen Saver” submenu and finally set the “All White” option to
“On” to reduce the image retention (see page 24).
• This is inherent in the Plasma Display Panel, and does not indicate
a malfunction.
• Using the menu system, enter the “Country” option in the “Set Up”
menu and select the country in which you operate the TV set (page
26). For Cyrillic languages, we recommend that you select Russia
if your own country does not appear in the list.
• Using the menu system, enter the “Language” option in the “Set
Up” menu and select the language as the NexTView is broadcasted
(page 37).
• Check that “TV Speakers” option is set to “Main” in the “Sound
Adjustment” menu (page 21).
cable.
• Keep the aerial cable away from other connecting cords.
• Do not use 300-ohm twin lead cables as interference may occur.
• Communication problems may occur if the infrared communication
equipment (e.g. infrared cordless headphones) is used near the TV.
Please use headphones other than infrared cordless headphones,
move the infrared transceiver away from the TV until the noise is
eliminated, or move the transmitter and receiver of the infrared
communication equipment closer together.
46
Additional Information
continued...
Page 47

Problem Possible solution
The TV fan noise gets louder.
• The ventilation holes can accumulate dust over a period of time.
The accumulated dust may make the cooling function of the builtin fan less effective. To prevent this, we recommend removing the
dust periodically (once a month) using a vacuum cleaner.
Cannot operate the menu.
Strange sound.
The TV cabinet creaks. • Changes in room temperature sometimes causes the TV cabinet to
The TV whirs. • The TV’s fan setting is working. This does not indicate a
The TV ticks. • An electrical circuit inside the TV is activated when the TV is
The TV buzzes. • There might be a surge sound when turning on the TV. This does
Remote Control
Remote control does not function.
• If the item you want to select appears in a pale colour, you cannot
select it.
expand or contract, which can make slight noises. This does not
indicate a malfunction.
malfunction.
turned on. This does not indicate a malfunction.
not indicate a malfunction.
• Check that the Media Selector on the remote control is set correctly
for the device you are using (VCR, TV, DVD or AUX).
• If the remote control does not operate th e VCR or DVD even when
the Media Selector has been set correctly, enter the necessary code
set as explained in “Remote Control Configuration for VCR or
DVD” on page 41.
• Replace the batteries.
GB
The (standby) or (power on)
indicators on the TV flashes
• Contact your nearest Sony service centre.
Additional Information
continued...
47
Page 48

"Memory Stick"
Problem Possible solution
Cannot insert the “Memory Stick” into the
“Memory Stick” slot.
• The “Memory Stick” is not facing in the correct direction. Insert
the “Memory Stick” with the b mark facing up into the “Memory
Stick” slot (page 30).
Images from the “Memory Stick” can not
be displayed or you can view the image but
some features are not available and an
error message appears on the TV screen.
Cannot delete a file or all materials. • The write-protect switch on the “Memory Stick” is set to LOCK.
The image is not displayed • The image file is not DCF-compatible or MPEG 1 - compatible.
• This is not a malfunction of the TV. This is because you are using a
non-Sony brand “Memory Stick” media.
Release the lock.
• The image file is protected. Release the protection (pages 33-35).
• If you continue to experience problems, have your TV serviced by qualified personnel.
• Never open the casing yourself.
48
Additional Information
Page 49

Television Channel Number Guide
Only the main transmitters are listed. Information regarding the regional sub-relay channel numbers can be
obtained by contacting The BBC Engineering Information Dept., Telephone Number 020 7852 5040.
MAIN TRANSMITTERS BBC1 BBC2 ITV CH4 CH5
London & South East
1 Bluebell Hill 40 46 43 65 -
2 Crystal Palace 26 33 23 30 -
3 Dover 50566653-
4 Heathfield 49 52 64 67 -
5 Oxford 57 63 60 53 49
South-West
6 Beacon Hill 57 63 60 53 -
7 Caradon Hill 22 28 25 32 -
8 Huntshaw Cross 55 62 59 65 67
9 Redruth 51 44 41 47 37
10 Stockland Hill 33 26 23 29 -
Channel Islands
11 Fremont Point 51 44 41 47 -
South
12 Hannington 39 45 42 66 -
13 Midhurst 61 55 58 68 -
14 Rowridge 31 24 27 21 -
West
15 Mendip 5864615437
East
16 Sandy Heath 31 27 24 21 39
17 Sudbury 51 44 41 47 -
18 Tacolneston 62 55 59 65 52
Midlands (West)
19 Ridge Hill 22 28 25 32 -
20 Sutton Coldfield 46 40 43 50 -
21 The Wrekin 26 33 23 29 -
Midlands (East)
22 Waltham 58646154-
Northern Ireland
23 Brougher Mountain 22 28 25 32 -
24 Divis 31272421-
25 Limavady 55 62 59 65 -
North
26 Belmont 22 28 25 32 56
27 Emley Moor 44 51 47 41 37
North-West
28 Winter Hill 55 62 59 65 48
North-East
29 Bilsdale West Moor 33 26 29 23 -
30 Caldbeck 30 34 28 32 56
31 Chatton 39454942-
32 Pontop Pike 58 64 61 54 -
Scotland
33 Angus 57 63 60 53 -
34 Black Hill 40 46 43 50 37
35 Sandale 22 67 - - -
36 Caldbeck --283256
37 Craigkelly 31 27 24 21 48
38 Darvel 33 26 23 29 -
39 Durris 22 28 25 32 67
40 Eitshal (Lewis) 33 26 23 29 -
41 Keelylang Hill 40 46 43 50 -
42 Knock More 33 26 23 29 -
43 Rosemarkie 39 45 49 42 -
44 Rumster Forest 31 27 24 21 -
45 Selkirk 55 62 59 65 52
Wales
46 Blaenplwyf 31 27 24 21 56
47 Carmel 57 63 60 53 -
48 Llanddona 57 63 60 53 -
49 Moel-y-Parc 52 45 49 42 -
50 Presely 46 40 43 50 37
51 Wenvoe 44 51 41 47 -
GB
Additional Information
49
Page 50

Index
A
Accessories, supplied 9
Aerial, connecting 14
AFT 28
Anchor attachments 14
Audio adjustment menu 20
Audio output 21
Auto format 22
Auto shutoff 25
Auto Start Up button 12
Auto volume 20
AV Mouse 9, 42
AV Preset 27
AV2 Output 23
AV3 Output 23
B, C
Balance, adjusting 20
Bass, adjusting 20
Batteries,
inserting into the remote control 13
BBE 20
Brightness, adjusting 18
Buttons,
overview of the remote control 10
overview of the TV Buttons 12
Camcorder, connecting 38
Channel Index 11
Channels, changing 11
Cleaning,
the cabinet 7
the screen 7
Colour 18
Colour Tone 19
Configuring, the remote control 41
Connecting,
an aerial 14
a Camcorder 38
a DVD 38
a Hi-Fi 38
a SmartLink VCR or DVD recorder
38
a VCR 14, 38
headphones 38
Connection guide menu 23
Contrast, adjusting 18
Controlling,
the volume level of an external
amplifier 39
Country, selecting 26
D, E, F, G, H, I
Dolby Virtual 20, 39
DRC 23
Dual Sound 20
DVD, connecting 38
Fastext 36
Features menu 22
Film mode 23
Fine tuning chanels 28
Headphones, connecting 38
Hi-Fi, connecting 38
Image retention 8
J, K, L, M
Labelling,
channels 27
external equipment 27
Language of the menus, selecting 26
Logo illumination 24
Manually tuning channels 28
Media Selector button 10
"Memory Stick",
general information 30
inserting 30
removing 30
precautions 30
adjustting settings 31
viewing photos 33
playing movies 33
Menu systems 17
Mode 14:9 22
Mode 4:3 22
Movie mode 18
N, O, P, Q
Naming a programme 27
NextView 37
Noise Reduction 19
On/Off ,
switch 12
indicator 13
Optional equipment,
connecting 38
using 40
changing the sound level input 27
Overview,
of the remote control 10
of the TV buttons 12
of the TV indicators 13
Picture Adjustment menu 18
Picture modes 18
Picture Off,
button 10
indicator 13
Power saving 22
Precautions 7
Programme Index table 11
Programme,
naming 27, 28
sorting 26
skipping 29
R, S
Remote control,
inserting batteries 13
overview 10
controlling other equipment 41, 42
Resetting,
picture settings 19
sound settings 20
RGB centring 24
Safety information,
general 4
power sources 5
installation and moving 6
ventilation 4
Screen saver 24
Set Up menu 26
Sharpness, adjusting 18
Skipping a programme 29
Sleep timer 25
Smart mode 22
SmartLink,
Selection 23
VCR/DVD recorder connecting 38
Sound Adjustment menu 20
Sound modes 20
Stabilizing the TV set 14
Supplied accessories 9
Switching on the TV 12
T, U, V, W, X, Y, Z
Table of contents 3
Technical specifications 44
Teletext 36
Timer indicator 13
Timer menu 25
Sleep timer 25
Treble, adjusting 20
Tuning,
automatically 26
manually 28
TV menu system 17
TV speakers 21
Using optional equipment 40
VCR, connecting 14, 38
Ventilation 4
Video,
input button 40
watching 40
Vie wing picture from equipment
connected to the TV 40
Volume, adjusting 11
Wide mode 22
Widescreen, watching 22
Zoom mode 22
Additional Information
50
Page 51

Einführung
• Vielen Dank, dass Sie sich für ein Produkt von Sony entschieden haben.
• Bitte lesen Sie dieses Handbuch aufmerksam durch, bevor Sie das Fernsehgerät verwenden, und bewahren
Sie es auf, um später bei Bedarf darin nachschlagen zu können.
• Symbole, die in diesem Handbuch verwendet werden:
• Wichtige Informationen
• Informationen zu einer Funktion
• 1,2... Anleitungsschritte
• Die Tasten der Fernbedienung, die weiß hinterlegt
dargestellt werden, sind diejenigen, die in einer
Anleitung nacheinander genannt werden und gedrückt
werden müssen.
• kennzeichnet das Ergebnis einer Anleitung.
Inhaltsverzeichnis
Einführung............................................................................................................................................................ 3
Sicherheitsinformationen...................................................................................................................................... 4
Sicherheitsmaßnahmen ................ ............................... ............................... .......................................................... 7
Übersicht und Aufstellen des Geräts
Überprüfen des mitgelieferten Zubehörs.............................................................................................................. 9
Die Fernbedienung ............................................................................................................................................. 10
Bedienelemente des Fernsehgeräts und seitlich e Anschl üsse ................................................. ........................... 12
Anzeigeelemente des Fernsehgeräts........ ............................. ........................................................ ...................... 13
Einsetzen von Batterien in die Fernbedienung...................................................................................................13
Anschluss der Antenne und eines Videorecorders ...................... .. ..................................................................... 14
Befestigen des Fernsehgeräts ............................................................................................................................. 14
Erste Inbetriebnahme
Einschalten des Fernsehgeräts und automatische Sendersuche..................... ..................................................... 15
TV-Funktionen
Das Menüsystem ............................................................................................................................................... 17
Das Menü Bild-Einstellungen ..................................................................................................................... 18
Das Menü Ton-Einstellungen ............................................. ............................. ............................................ 20
Das Menü Sonderfunktionen........................................................................................................................ 22
Das Menü Timer................. .......................................................................................................................... 25
Das Menü Grundeinstellungen..................................................................................................................... 26
DE
„Memory Stick“
Info zum „Memory Stick“........................................................................................ .......................................... 30
Einstellung Diaschau.......................................................................................................................................... 31
Wiedergabe von Photos und Filmen ................................................................................................................. 33
Videotext............................................................................................................................................................... 36
NexTView...............................................................................................................................................................37
Zusatzinformationen
Anschließen von Geräten an das Fernsehgerät....................................................................................................38
Anzeigen eines Bildes, das von einem angeschlossenen Gerät kommt .............................................................40
Konfiguration der Fernbedienung für Video und DVD ...................... ............................. .. ................................41
Übernahme von Funktionen anderer Fernbedienungen ......................................................................................42
Technische Daten ...............................................................................................................................................44
Störungsbehebung ...............................................................................................................................................45
Index....................................................................................................................................................................49
Wie Sie das Fernsehgerät am besten anheben ................................ ............................. ............Umschlagrückseite
Inhaltsverzeichnis
3
Page 52

Sicherheitshinweise
Table 1:
Netzkabel
Bevor Sie das Gerät an einen
anderen Aufstellungsort
transportieren, stecken Sie das
Netzkabel aus. Bewegen Sie
die Geräte nicht, solange
Netzkabel angeschlossen ist. Andernfalls kann
Netzkabel beschädigt wird. Dies kann zu Feuergefahr
führen. Falls die Geräte heruntergefallen sind oder
beschädigt wurden, lassen Sie sie sofort durch
qualifiziertes Fachpersonal überprüfen.
Schäden, die Service-Maßnah men erfordern
Wenn die Oberfläche des Displays bricht, darf sie
nicht berührt werden, bevor das Netzkabel gezogen
wurde. Andernfalls kann es zu einem Stromschlag
kommen.
Belüftung
Lassen Sie Abstand um das Fernsehgerät.
Andernfalls kann die Luftzirkulation beeinträchtigt
werden, was zur Überhitzung führen kann.
Feuergefahr und Schäden am Gerät können die
Folge sein.
Medizinische
Einrichtungen
Stellen Sie das Fernsehgerät
nicht an Orten auf, an denen
medizinische Geräte
eingesetzt werden. Es könnte
zu Störungen der
medizinischen Instrumente kommen.
Transportieren
Zum Tragen des Fernsehgeräts
sind mindestens zwei Personen
erforderlich. Wenn Sie das
Fernsehgerät auf eine andere als
die hier beschriebene Weise
tragen, kann es herunterfallen und schwere
Verletzungen verursachen. Das Fernsehgerät muss
von mindestens zwei Personen getragen werden.
Setzen Sie das Fernsehgerät bei einem Transport
weder Schlägen noch starken Erschütterungen aus.
Das Fernsehgerät kann herunterfallen und schwere
Verletzungen verursachen.
10cm
Sicherheitshinweise
4
30cm
10cm10cm
Lassen Sie
mindestens soviel
Abstand.
Fortsetzung...
Page 53

Stromquellen
Überspannung
Dieses Gerät darf nur an 220-240V
Wechselstrom betrieben werden. S ie
sollten niemals zu viele Geräte an
derselben Steckdose anschließen, da
dies zu Feuergefahr und Gefahr von
Stromschlägen führen kann.
Netzanschluss
Verwenden Sie nur fachgerecht installierte
Steckdosen. Stecken Sie den Netzstecke r
vollständig ein. Sollte die Steckverbindung lose
sein, kann dies zu Funkenbildung führen. F euer
könnte die Folge sein. Beauftragen Sie g gf. Ihren
Elektriker mit einer fachgerechten Installa tion der Steckdose.
Feuchtigkeit
Berühren Sie das Netzkabel nicht mit fe uchten
Händen. Das Ein-/Ausstecken des Ne tzkabels
mit feuchten Händen kann zu einem Stromschlag
führen.
Gewitter
Berühren Sie im Interesse Ihrer eigenen
Sicherheit während Gewittern w eder die
Geräte noch das Antennen- oder das
Netzkabel.
Schutz des Netzkabels
Ziehen Sie am Netzstecker. Ziehen
Sie nicht am Netzkabel.
Verkabelung
Stecken Sie das Netzkabel aus, wenn Sie an der Verkabelung
arbeiten. Achten Sie aus Sicherheitsgründen darauf, dass das
Netzkabel ausgesteckt ist, wenn Sie Geräte anschließen.
Reinigung
Reinigen Sie die Steckdose regelmäßig.
Wenn die Steckdose staubbedeckt ist und
feucht wird, kann die Isolation beeinträchtigt
werden. Dies kann zu Feuergefahr führen.
Stecken Sie den Netzstecker aus und reinigen
Sie ihn regelmäßig.
Bei Nicht-Gebrauch
Aus Umweltschutz- und
Sicherheitsgründen empfiehlt es
sich, die Geräte nicht im
Bereitschaftsmodus zu lassen, wen n
sie nicht benutzt werden. Schalten
Sie sie aus. Trennen Sie die Verbindung z um Stromnetz.
Netzkabel
Das Beschädigen des Netzkabels kann
zu Feuergefahr bzw. zu einem Strom schlag führen.
• Klemmen Sie das Kabel nic ht ein, und
knicken oder verdrehen Sie es nicht.
Die Adern können unterbrochen o der
abgeschert werden. Dies kann zu einem Kurzschluss führen. F euergefahr
bzw. ein Stromschlag können die Folge sein.
• Verwenden Sie keine A dapter und beschädigen Sie das Netzkabel nicht.
• Stellen Sie keine schweren Gegenstände auf das Netzk abel. Ziehen Sie nicht am Netzkabel.
• Bringen Sie das Netzkabel nicht in die Nähe von Wärmequellen.
• Achten Sie darauf, den Netz stecker zu ergreifen, um das Netzk abel auszustecken.
• Sollte das Netzkabel beschädigt se in, dürfen Sie es nicht weiter-
hin verwenden. Wenden Sie sich an Ihren Händler oder ein Sony
Service-Zentrum, um es zu ersetzen.
Stromschlag
Berühren Sie das Fernsehgerät nicht mit feuchten Händen.
Andernfalls kann es zu einem Stromschlag oder zur
Beschädigung des Geräts kommen.
Korrosion
Wenn Sie das Fernsehgerät in Meeresnähe verwenden, können
Metallteile durch Salz korrodieren. Das Gerät kann intern
beschädigt und es kann dadurch Feuergefahr verursacht
werden. Außerdem kann die Lebensdauer des Geräts verkürzt
werden. Luftfeuchtigkeit und Temperatur am Aufstellungsort
sollten verringert werden.
Verlegen der Kabel
Achten Sie darauf, dass sich Ihre Füße nicht in den Kabeln
verfangen. Das Gerät könnte beschädigt werden.
Aufstellen des Geräts
• Ordnen Sie optionale Zusatzkomponenten nicht zu nahe
am Fernsehgerät an. Lassen Sie zwischen optionalen
Zusatzkomponenten und dem Fernsehgerät mindestens
30 cm Abstand. Wenn vor oder rechts vom Fernseh gerät
ein Videorecorder angeordnet wird, kann dies zu
Bildstörungen führen.
Wärme
Berühren Sie die Oberfläche des Fernsehgeräts nicht. Sie
bleibt auch nachdem das Gerät für einige Zeit abgeschaltet
wurde noch heiß.
Öle
Bringen Sie das Fernsehgerät nicht in Restaurants an, in denen
Öl verwendet wird. Staub, der Öl absorbiert, kann in das
Fernsehgerät eindringen und es beschädigen.
Fortsetzung...
DE
Sicherheitshinweise
5
Page 54

Aufbau und Transport
Belüftung
Blockieren Sie nicht die Lüftungsöffnunge n des
Gehäuses. Andernfalls kann es zu Über hitzung
kommen. Feuergefahr kann die Folge s ein. Wenn
keine korrekte Belüftung gewährleiste t ist, kann
das Fernsehgerät durch Staub verschmutzen. Um
die korrekte Belüftung zu gewährleisten, ist fo lgendes zu beachten:
• Bringen Sie das Gerät nicht mit der Vorderseite zur Wand oder
seitlich an.
• Bringen Sie das Gerät nicht mit der Vorderseite nach unten an.
• Bringen Sie das Gerät nicht auf einem Regalbrett oder in einem
Schrank an.
• Stellen Sie das Gerät nicht auf einen Teppich oder ein Bett.
• Bedecken Sie das Gerät nicht mit Gegenständen wie Vorhängen,
Zeitungen usw.
Fahrzeug oder Decke
Bringen Sie das Gerät nicht in einem
Fahrzeug an. Die Bewegungen ein es
Fahrzeugs können dazu führen, dass es
herabfällt und Verletzungen verursacht.
Hängen Sie das Gerät nicht an einer
Decke auf.
Verwendung im Freien
Bringen Sie das Gerät nicht im Freien
an. Sollte das Gerät dem Regen
ausgesetzt werden, kann dies zu
Feuergefahr bzw. zu einem S tromschlag
führen. Wenn das Gerät direkter
Sonneneinstrahlung ausgesetzt wird ,
kann es sich aufheizen und beschädigt w erden.
Schiffe und Boote
Bringen Sie das Gerät nicht auf
Schiffen oder einem Boot an. Sollte das
Gerät Wassereinwirkung ausge setzt
werden, kann dies zu Feuergefahr bzw.
zu einem Stromschlag führen.
Wasser und Feuchtigkeit
Verwenden Sie das Gerät nicht neben W asser - beispielsweise neben
einer Badewanne oder einer Dusche. Setzen Sie es nich t dem Regen
aus. Dies kann zu Feuergefahr bzw. zu einem Stromschlag führen.
Wartung
Öffnen Sie nicht das Gehäuse und entfernen Sie nicht die hintere Abdeckung
des Geräts. Überlassen Sie dies stets
qualifiziertem Fachpersonal.
Feuchtigkeit und feuergefährliche Gegenstände
• Das Gerät darf nicht nass werden. Schütten
Sie niemals irgendeine Flüssigkeit in das
Gerät hinein. Benutzen Sie das Gerät nicht
weiter, wenn Flüssigkeiten oder Frem dkörper ins Innere gelangten. Andernfalls besteht die Gefahr eines Stromschlags oder der
Beschädigung des Geräts. Lassen Sie d as Gerät sofort von qualifiziertem Fachpersonal überprüfen.
• Um Feuergefahr zu vermeiden, halten Sie brennbaren G egenstände oder offenes Licht (z.B. Kerzen ) von dem Gerät fern.
Hervorstehende Objekte
Ordnen Sie das Gerät nicht an hervo rstehenden Stellen an. Wenn Sie
das Display an einem hervorstehenden O bjekt anbringen, kann dies
zu schwere Verletzungen führen.
• Bringen Sie das Gerät nicht an einem Ort an, wo es hervorsteht,
beispielsweise an einem Pfeiler.
• Bringen Sie das Gerät nicht an einem Ort an, wo die Gefahr
besteht, dass man mit dem Kopf dagegen stößt.
So schützen Sie das Gerät vor dem Herabfallen
Stellen Sie das Gerät auf einen sicheren un d
stabilen Ständer und befestigen Sie das
Fernsehgerät an einer Wand. (siehe Seite 14).
Hängen Sie nichts an den Bildschirm . Das Gerät
könnte von dem Ständer oder dem wandhängenden Regal fallen,
beschädigt werden und schwere V erletzungen verursache n.
Lüftungsöffnungen
Stecken Sie nichts in die Lüftungsöffnu ngen.
Sollten brennbare Gegenstände od er solche aus
Metall eindringen, kann dies zu F euergefahr bzw.
zu einem Stromschlag führen.
Glasbruch
Werfen Sie nichts gegen das Gerä t. Die
Glasscheibe könnte durch die Einwirku ng
brechen und schwere Verletzung en
verursachen.
Anordnung
Platzieren Sie das Gerät nicht an Orten, d ie
Hitze, Feuchtigkeit oder übermäßig v iel
Staub ausgesetzt sind. Stellen Sie das
Gerät nicht an einem Ort auf, an dem es
Erschütterungen ausgesetzt ist.
Reinigung
Stecken Sie das Netzkabel aus, wen n Sie das Gerät reinigen.
Andernfalls kann es zu einem Stromschlag kommen.
Sicherheitshinweise
6
Fortsetzung...
Page 55

Vorsichtsmaßnahmen
Anmerkungen zu komfortablem Fernsehen
• Um komfortabel fernsehen zu können, wird ein Betrachtungsabstand empfohlene, der ungefähr vier bis sieben Mal so groß
ist wie die Höhe des Bildschirms.
• Betrachten Sie das Bild in einem moderat beleuchteten Raum. Fernsehen in einem dunklen Raum ist anstrengend für die
Augen. Auch andauerndes Betrachten des Bildschirms ohne Unterbrechung, kann eine Belastung für die Augen darstellen.
Anmerkungen zum Aufbau des Fernsehgeräts
• Bringen Sie das Fernsehgerät nicht an Orten an, an denen es extremen Temperaturen ausgesetzt ist, wie z.B. unter direkter
Sonneneinstrahlung, neben einem Heizkörper oder einem Warmluftauslass. Wenn das Gerät starker Hitze ausgesetzt
wird, kann es sich aufheizen. Dadurch kann das Gehäuse deformiert werden und es können Betr iebsstörungen auftreten .
• Nach einem Transport des Fernsehgeräts von einem kalten an einen warmen Ort oder nach einer plötzlichen Änderung
der Raumtemperatur kann das Bild unscharf erscheinen und di e Farbqualit ät in einzelnen Bildbereichen kann
beeinträchtigt sein. Dieser Effekt wird durch Kondensation auf Spiegeln und Linsen im Gerät hervorgerufen. In diesem
Fall sollten Sie es der Feuchtigkeit im Gerät ermöglichen, zu verdunsten, bevor Sie das Gerät benutzen.
• Um ein brillantes Bild zu erzielen, sollte der Bildschirm nicht direk ter Beleucht ung oder S onnene instrahlung ausgesetzt
werden. Wenn möglich, sollte die Beleuchtung durch Spotlampen erfolgen, die von der Decke aus nach unten strahlen.
• Das Fernsehgerät wird durch Ausschalten des Ein/Aus-Schalters nicht vom Stromnetz getrennt. Um das Gerät vom
Stromnetz zu trennen, müssen Sie den Netzstecker aus der Steckdose ziehen.
Anmerkungen zur Lautstärkeregelung
• Stellen Sie die Lautstärke so ein, dass Nachbarn dadurch nicht gestört werden. Nachts sind Geräusche weit hörbar. Aus
diesem Grund wird empfohlen, die Fen ster zu schließen oder einen Kopfhörer zu verwenden.
• Stellen Sie, falls Sie einen Kopfhörer verwenden, diesen nicht übermäßig laut ein, da andernfalls Ihr Gehör geschädigt
werden kann.
Anmerkungen zum Umgang mit der Fernbedienun g
• Behandeln Sie die Fernbedienung sorgfältig. Lassen Sie sie nicht herunterfallen, treten Sie nicht darauf und schütten Sie
keine Flüssigkeiten darauf.
• Bewahren Sie die Fernbedienung nicht neben einer Wärmequelle, unter direkter Sonneneinstrahlung oder an einem
feuchten Ort auf.
Anmerkungen zur Reinigung des Gehäuses
• Achten Sie darauf, vor dem Reinigen das Netzkabel vom Stromnetz zu trennen.
• Reinigen Sie das Gehäuse mit dem mitgelieferten Reinigungstuch oder einem weichen, leicht feuchten Tuch. Verwenden
Sie keine Scheuerschwämme, alkalischen Reinig ungsmittel, Sch euermittel oder Lösu ngsmittel wie A lkohol oder Ben zin
oder antistatische Sprays.
• Beachten Sie, dass Materialschäden auftreten können oder die Beschichtung des Bildschirms beeinträchtigt w erden kann,
wenn das Fernsehgerät Lösungsmitteln, wie z.B. Alkohol, Verdünner, Benzin oder Insektiziden ausgesetzt wird oder wenn
lange Kontakt mit Gummi oder Vin yl-Material besteht.
• In den Lüftungsöffnungen kann sich mit der Zeit Staub ablagern, der dann die Kühlung durch den eingebauten Lüfter
beeinträchtigen kann. Um dies zu vermeid en wird em pfohlen, Staub regelmäßig (ein mal mon atlich) mit ein em
Staubsauger zu entfernen.
DE
Anmerkungen zum Umgang und zur Reinigung der Bildschirmoberfläche
Der Bildschirm dieses Fernsehgeräts besitzt eine Antirefl ex-Beschichtung. Um seine Leistungsfähigkeit zu erhalten, sollten
Sie folgende Punkte beachten: Drücken oder kratzen Sie nicht mit harten Gegenständen an der Oberfläche und werfen Sie
nichts gegen den Bildschirm. Der Bildschirm kann dadurch beschädigt werden.
• Achten Sie darauf, vor dem Reinigen das Netzkabel vom Stromnetz zu trennen.
• Berühren Sie das Fernsehgerät nach längerem Gebrauch nicht, da sich das Display stark aufheizt und zuerst abkühlen
muss.
• Der Bildschirm dieses Fernsehgeräts besitzt eine Antireflex-Beschichtung. Es wird empfohlen, die Bildschirmoberfläche
so wenig wie möglich zu berühren.
• Reinigen Sie den Bildschirm mit dem mitgelieferten Reinigungstuch oder einem weichen, leicht feuchten Tuch. Durch ein
schmutziges Reinigungstuch kann das Fernsehgerät beschädigt werden. Verwenden Sie niemals irgendwelche
Scheuerschwämme, Scheuermittel oder Lösungsmittel wie Alkohol od er Benzin. A ndernfalls kö nnte die
Bildschirmoberfläche zerkratzt werden.
Fortsetzung...
Sicherheitshinweise
7
Page 56

Anmerkungen zum Bild
• Beachten Sie, dass der Plasmabildschirm mit höchster Präzision gefertigt wurde. Auf dem Plasmabildschirm
können jedoch schwarze Stellen oder leuchtende Punkte (rot, grün oder blau) sichtbar sein, und es können
unregelmäßig gefärbte Streifen oder helle Zonen auftreten. Dabei handelt es sich nicht um eine Fehlfunktion.
• Wenn das Fernsehgerät außergewöhnlich lange im 4:3-Modus betrieben wird, kann der Bildschirmbereich des
4:3-Bildes innerhalb des 16:9-Displays dunkler werden. Um dies zu vermeiden, sollte der Bild-Modus „Smart“
verwendet werden (siehe Seite 22).
Anmerkungen zu langfristigem Nachleuchten
• Wenn Bilder der folgenden Art für sehr lange Zeit angezeigt werden, kann es auf Grund der Eigenschaften eines
Plasmabildschirms in Bereichen des Bildschirms zu langfristigem nachleuchten kommen.
– Schwarze Balken oben und unten, die bei Bildern im Breitwandformat angezeigt werden können.
– Schwarze Balken rechts und links, die bei Bildern im Format 4:3 (normales Fernsehformat) angezeigt werden.
– Videospiele
– PC-Bilder
– DVD-Bildschirmmenüs
– Bildschirmmenüs, Kanalnummern o.ä. von einer angeschlossenen Set-Top-Box, einem Kabelmodem,
Videorecorder o.ä.
Dieses Risiko ist höher, wenn das Gerät im Modus „Live“ betrieben wird oder eine starke Kontrasteinstellung
gewählt wurde. Dieses nachleuchten kann nicht mehr entfernt werden, wenn es im Bildschirm eingebrannt
ist. Um den Nachleuchteffekt zu vermeiden, sollte das Fernsehgerät solch ein Bild bzw. solch einen Sender
nicht längere Zeit anzeigen. Nutzen Sie die Funktion „Bildschirmschoner“ (Seite 24) oder verringern Sie die
Kontrasteinstellung. Wiederholte und langdauernde tägliche Wiedergabe gleicher Bilder oder Programme
kann zum Auftreten dieses Effektes führen. DER NACHLEUCHTEFFEKT IST DURCH DIE SONY
GARANTIE NICHT ABGEDECKT.
• Um den Nachleuchteffekt zu mindern, besitzt dieses Fernsehgerät die Funktion „Bildschirmschoner“. Die
Standardoption „Verschiebung“ der Funktion „Bildschirmschoner“ ist „Ein“ (Seite 24.)
• Die Funktion „Bildschirmschoner“ verhindert und reduziert das langfristigem nachleuchten. Näheres dazu
finden Sie auf Seite 24.
Anmerkungen zu Höhe
• Wenn dieses Fernsehgerät mit Plasmabildschirm in Höhen über 2300 m (bzw. bei geringerem Luftdruck als
760 hPa) betrieben wird, wird auf Grund der Druckdifferenz zwischen dem Inneren des Bildschirms und der
Umgebung u.U. ein summendes Geräusch erzeugt. Dies wird nicht als Funktionsstörung angesehen und ist durch
die Sony Garantie nicht abgedeckt. Das summende Geräusch ist eine Eigenschaft von Plasmabildschirmen.
Sicherheitshinweise
8
Page 57

Überprüfen des mitgelieferten Zubehörs
1 Fernbedienung
(RM-Y1010):
1 Netzkabel (Typ C-4):
2 Batterien (Größe AA):
1 Koaxialkabel:
2 Schraub-Ösen:
1 Netzkabel (Typ BF):
1 Reinigungstuch:
AV-Maus:
1 Verbindungskabelstrang:
1 Netzkabel (Typ C-5):
Entfernen Sie nicht die Ferritkerne.
Verwenden Sie bei Einsatz
des Geräts in Europa
(ausgenommen
Großbritannien, Irland und
die Schweiz) dieses
Netzkabel (mit
Schutzleiter).
1 Buch „Notes on Plasma“
Entfernen Sie nicht die Ferritkerne.
• Verwenden Sie bei Einsatz
des Geräts in Großbritannien
dieses Netzkabel (mit
Schutzleiter).
• Beachten Sie „NOTICE FOR
CUSTOMERS IN THE
UNITED KINGDOM and
IRELAND“ auf Seite 2
wenn Sie dieses Netzkabel
verwenden.
• Je nach Land wird dieses
Netzkabel u.U. nicht
mitgeliefert.
DE
Entfernen Sie nicht die Ferritkerne.
• Verwenden Sie bei Einsatz des
Geräts in der Schweiz dieses
Netzkabel (mit Schutzleiter).
• Je nach Land wird dieses
Netzkabel u.U. nicht
mitgeliefert.
GB
Übersicht und Aufstellen des Geräts
9
Page 58

Die Fernbedienung
2
1
5
6
7
9
q;
3
4
8
1 TV I/ : Schaltet das Fernsehgerät kurzzeitig aus (Standby-Betrieb):
Mit dieser Taste schalten Sie das Fernsehgerät kurzzeitig aus (die StandbyAnzeige am Fernsehgerät beginnt zu leuchten). Schalten Sie das Fernsehgerät
dann mit derselben Taste aus dem Standby-Betrieb wieder ein.
• Um Energie zu sparen, empfie hlt es sich, das Fernsehgerät ganz
auszuschalten, wenn es nicht benutzt wird.
• Wenn die Option „Auto.Ausschalt“ auf „Ein“ gesetzt ist (siehe Seite
25), schaltet das Fernsehgerät automatisch in den Standby-Betrieb,
wenn 15 Minuten lang kein Signal empfangen und keine Taste gedrückt
wird.
2 VIDEO I/ : Mit dieser Taste schalten Sie den Videorecorder oder DVD-Player
ein bzw. aus.
3 Medienauswahl: Mit diesen Tasten wählen Sie aus, welches Gerät bedient
werden soll, Fernsehgerät (TV), Videorecorder (VCR), DVD-Player oder
Zusatzgerät (AUX). Durch kurzes Aufleuchten einer grünen LED wird
signalisiert, welches Gerät ausgewählt wurde. Näheres dazu finden Sie auf den
Seiten 41 - 43.
4 Auswählen des Fernsehmodus: Mit dieser Taste schalten Sie den Videotext
oder den Videoeingangsmodus aus.
5 Auswählen der Signalquelle: Drücken Sie diese Taste so oft, bis auf dem
Bildschirm das Symbol für die gewünschte Signalquelle angezeigt wird. Näheres
dazu finden Sie auf Seite 40.
6 Bild aus: Mit dieser Taste schalten Sie das Bild aus. Dadurch wird nur das Bild
ausgeschaltet, der Ton bleibt eingeschaltet. Durch erneutes Drücken der Taste
wird diese Funktion wieder deaktiviert.
Übersicht und Aufstellen des Geräts
10
7 Kanalwahl: Wenn die Medienauswahl (3) auf TV geschaltet ist, wird mit
diesen Tasten der Kanal ausgewählt. Tippen Sie die zweite Ziffer zweistelliger
Programmnummern innerhalb von 2,5 Sekunden ein.
8 a) Anzeigen des zuletzt gesehenen Senders: Wenn die Medienauswahl
(3) auf TV geschaltet ist, können Sie mit dieser Taste wieder auf den Sender
schalten, den Sie zuletzt (mindestens 5 Sekunden lang) gesehen haben.
b) Auswählen zweistelliger Kanalnummern am Videorecorder: Wenn
die Medienauswahl (3) auf VCR geschaltet ist, wählen Sie mit dieser Taste
für Videorecorder von Sony zweistellige Kanalnummern. Hier ein Beispiel:
Um 23 einzustellen,
drücken Sie zuerst -/-- und anschließend die Tasten 2 und 3.
9 a) Fastext: Wenn die Medienauswahl (3) auf TV geschaltet und der
Videotextmodus aktiviert ist, können diese Tasten als Fastext-Tasten
eingesetzt werden. Näheres dazu finden Sie auf Seite 36.
b) Ansteuern eines Videorecorders oder DVD-Players: Wenn die
Medienauswahl (3) auf VCR oder DVD geschaltet ist, bedienen Sie mit
diesen Tasten die Hauptfunktionen des Videorecorders bzw. DVD-Players,
wenn die Fernbedienung dafür programmiert wurde. Näheres dazu finden Sie
auf Seite 41.
q; Videotext: Mit dieser Taste schalten Sie den Videotext ein. Näheres dazu finden
Sie auf Seite 36.
Fortsetzung...
Page 59

w;
ql
qk
qj
qh
qg
wa
qa a) Anzeigen der Senderliste bzw. der Liste der Eingangssignale:
W enn die Medienauswahl (3) auf TV geschaltet und das MENU
ausgeblendet ist, können Sie durch Drücken der Taste OK eine Senderliste
bzw. Liste der Eingangssignale anzeigen. Nachdem Sie auf OK gedrückt
haben:
1 Wählen Sie wie folgt einen Sender aus: Drücken Sie v oder V, um den
gewünschten Sender auszuwählen. Drücken Sie dann erneut auf die
Taste OK, um die Sendung des ausgewählten Senders anzuzeigen.
2 Wählen Sie wie f olgt ein Eingangssignal aus: Drück en Sie, während die
Senderliste angezeigt wird,
können jederzeit zwischen der Senderliste und der Liste der
Eingangssignale umschalten, indem Sie
dann auf
qa
qs
qd
qf
qs Anzeigen des „Memory Stick“ Menüs: Näheres dazu finden Sie auf
qd Senderwahl: Mit diesen Tasten wählen Sie den nächsten bzw. den davor
qf Die Taste MENU: Mit dieser Taste rufen Sie das Menüsystem des
auszuwählen. Drücken Sie dann erneut auf die Ta ste OK, um das
ausgewählte Eingangssignal anzuzeigen.
b) Navigator: Wenn die Medienauswahl (3) auf TV geschaltet und das
MENU (qs) eingeblendet ist, können Sie mit diesen Tasten durch das
Menüsystem des Fernsehgeräts navigieren. Näheres dazu finden Sie auf
Seite 17.
Seite 30 - 35.
liegenden Sender aus.
Fernsehgeräts auf. Näheres dazu finden Sie auf Seite 17.
v oder V, um eines der verfügbaren Eingangssignale
b, um das Eingangssignal anzuzeigen. (Sie
B oder b drücken). Drücken Sie
qg Lautstärkeeinstellung: Mit diesen Tasten erhöhen bzw. verringern Sie die
Lautstärke.
qh Auswählen des Bildformats: Drücken Sie wiederholt auf diese Taste, um
das Bildformat zu ändern. Näheres dazu finden Sie auf Seite 22.
qj NexTView: Mit dieser Taste rufen Sie NexTView auf. Näheres dazu finden
Sie auf Seite 37.
qk Info-Taste: Mit dieser Taste blenden Sie alle Bildschirminformationen ein,
beispielsweise die Kanalnummer usw. Durch erneutes Drücken der Taste wird
diese Funktion wieder deaktiviert.
ql Auswahl des Bild-Modus: Drücken Sie wiederholt auf diese Taste, um den
Bild-Modus zu ändern. Näheres zu den verschiedenen Bild-Modi finden Sie
auf Seite 18.
w;
Auswahl des Soundeffekts: Drücken Sie wiederholt auf diese Taste, um
den Soundeffekt zu ändern. Näheres zu den verschiedenen Soundeffekten
finden Sie auf Seite 20.
wa Ausschalten des Tons: Mit dieser Taste schalten Sie den Fernsehton ab.
Wenn Sie die Taste erneut drücken, ist der Ton wieder zu hören.
Die Tasten 5, qd und qk dienen auch zum Bedienen der Videotextfunktionen. Näheres dazu finden Sie auf
Seite 36.
DE
Übersicht und Aufstellen des Geräts
11
Page 60

Bedienelemente des Fernsehgeräts und seitliche
Anschlüsse
Beschreibung der Bedienelemente am Fernsehgerät
Ein/Aus-Schalter
Programmtasten Nach-oben und
Nach-unten (zur Senderwahl)
Lautstärketasten (+/-)
Taste für Signalquellenwahl
(siehe Seite 40)
TV-Modus-Taste
T aste Automatischer Neustart (startet
die automatische Programmierung,
siehe Seite 15)
Die seitlichen Anschlüsse
Kopfhöreranschluss
S-Video-Eingang
CINCHVideoeingang
Audioeingänge
12
Übersicht und Aufstellen des Geräts
(MONO)
L/G/S/I
R/D/D/D
Page 61

Anzeigeelemente des Fernsehgeräts
Leuchtet blau, wenn Sie an
der Fernbedienung
(Picture off - Bild aus)
drücken, um das Bild
auszuschalten. Dadurch
wird nur das Bild
ausgeschaltet (der Ton
bleibt unverändert).
Leuchtet rot, wenn
der Abschalttimer
eingestellt wurde.
Näheres zum
Abschalttimer
entnehmen Sie dem
Abschnitt “
Timer” auf Seite 25.
Leuchtet rot, wenn
sich das
Fernsehgerät im
Standby-Betrieb
befindet.
Leuchtet grün,
wenn das
Fernsehgerät
eingeschaltet
ist.
Beim Bedienen
der
Fernbedienung
diese in
Richtung
dieses
Empfängers
halten.
Einsetzen von Batterien in die Fernbedienung
Achten Sie beim Einsetzen der Batterien auf die richtige Polung.
Denken Sie daran, verbrauchte Batterien umweltfreundlich zu entsorgen.
DE
Übersicht und Aufstellen des Geräts
13
Page 62

Anschluss der Antenne und eines Videorecorders
• Verwenden Sie das mitgelieferte Netzkabel (Typ C-4, Typ BF oder Type C-5, siehe Seite 9).
• Verwenden Sie das mitgeliefert Koaxialkabel für die Verbindung zur Antenne.
oder
Video
recorder
OUT IN
Näheres zum Anschließen eines Videorecorders finden
Sie unter „Anschließen optionaler Zusatzgeräte an das
Fernsehgerät“ auf Seite 38.
Befestigen des Fernsehgeräts
Befestigen Sie das Fernsehgerät nach dem Anschließen an einer Wand o.ä. und verwenden Sie dazu aus
Sicherheitsgründen die mitgelieferten Schraub-Ösen.
1 Entfernen Sie die beiden Schrauben, die oben an der
Rückseite des Fernsehgeräts angebracht sind.
2 Bringe n Sie an Stel le der Schrauben die zwei mitgelieferten
Schraub-Ösen an.
3 Befestigen Sie an einer tragfähigen Wand oder einem Pfeiler
eine Halteplatte (nicht mitgeliefert).
4 Ziehen Sie durch die Schraub-Ösen eine starke Schnur oder
Kette und befestigen Sie diese anschließend an der Wand
bzw. dem Pfeiler o.ä.
14
Übersicht und Aufstellen des Geräts
Page 63

Einschalten des Fernsehgeräts und automatische
Sendersuche
Wenn Sie das Fernsehgerät zum ersten Mal einschalten, erscheinen einige Menüs, mit denen Sie folgende
Einstellungen vornehmen können: 1) die Menüsprache auswählen, 2) das Land auswählen, in dem Sie das Gerät
einsetzen, 3) sich informieren, wie Zusatzgeräte an das Fernsehgerät angeschlossen werden, 4) alle vorhandenen
Kanäle (Fernsehsender) suchen und speichern und 5) die Reihenfolge des Erscheinens der Kanäle (Fernsehsender)
auf dem Bildschirm ändern.
Wenn Sie später einige dieser Einstellungen ändern möchten, können Sie dies tun, indem Sie in (Menü
Grundeinstellungen) die betreffende Option wählen, oder an der rechten Seite des Fernsehgerätsgerät die Taste
Automatischer Neustart drücken.
1 Stecken Sie den Netzstecker des Fernsehgeräts in eine
Steckdose (220 - 240 V Wechselstrom, 50 Hz).
2 Wenn das Fernsehgerät das erste Mal an das Stromnetz
angeschlossen wird, ist es normalerweise eingeschaltet.
Falls das Fernsehgerät ausgeschaltet ist, drücken
Sie die Ein/Aus-Taste
einzuschalten.
Wenn Sie das Fernsehgerät zum ersten
Mal einschalten, erscheint auf dem
Fernsehschirm automatisch das Menü Language (Sprache).
am Fernsehgerät, um es
3 Wählen Sie mit den Tasten V, v, B oder b der Fernbedienung die
gewünschte Sprache aus und drücken Sie danach die Taste OK, um
die Auswahl zu bestätigen. Hiernach werden alle Menüs in der von
Ihnen gewählten Sprache angezeigt.
4 Das Menü Land erscheint automatisch. Wählen Sie mit der Taste v
oder
V das Land, in dem Sie das Fernsehgerät betreiben. Bestätigen
Sie die Auswahl mit der Taste OK.
• Wenn das Land, in dem Sie den Fernseher benützen wollen,
nicht auf der Liste erscheint, wählen Sie an Stelle eines
Landes die Einstellung „Aus“.
• Um zu vermeiden, dass an Stelle kyrillischer Zeichen im
Videotext falsche Zeichen angezeigt werden, wird
empfohlen, Russland auszuwählen, wenn Ihr Land in der
Liste nicht aufgeführt ist.
Land
Land wählen
Aus
Ireland
Nederland
België/Belgique
Luxembourg
France
Italia
Schweiz/Suisse/Svizzera
Fortsetzung...
DE
Erste Inbetriebnahme
15
Page 64

5
Eine schematische Darstellung wird eingebl endet, in der dargestellt wird,
wie Sie viele verschiedene Zusatzgeräte an das Fernsehgerät anschließen
können. Halten Sie sich an diese Anleitung und drücken Sie die Taste
OK
, um die Darstellung auszublenden und den Vorgang fortzusetzen.
Die schematische Darstellung der Anschlüsse stellt nur einen
Anhaltspunkt dar. Die meisten Geräte können an verschiedenen
Anschlüssen des Fernsehgeräts angeschlossen werden. Nach
Abschluss der automatischen Sendersuche sollten Sie den Abschnitt
'Anschlussanleitung' auf Seite 23 zu Rate ziehen, um näheres über die
optimale Wahl der Anschlüsse für Geräte zu erfahren.
Bitte schließen Sie ihre Apparatur an
gemäss der Tabelle
DVD
OK
6 Das Menü Autom. Abspeichern ersc heint auf dem Bildschirm.
Drücken Sie zur Wahl von Ja die Taste OK.
7
Das Fernsehgerät beginnt nun automatisch, alle verfügbaren Kanäle
zu suchen und zu speichern.
Dieser Prozess kann einige Minuten in Anspruch nehmen. Warten
Sie bitte, bis der Vorgang abgeschlossen ist, und drücken Sie in der
Zwischenzeit keine Taste, da der Prozess sonst nicht beendet wird.
In einigen Ländern ist es der Fernsehsender, der automatisch alle
Kanäle installiert (System ACI). In diesem Fall sendet der Sender ein
v
Menü, in dem Sie mit der Taste
anschließend
OK
drücken müssen, um die Kanäle zu speichern.
Wenn bei der automatischen Sendersuche kein Sender gefunden
wird, wird eine Meldung eingeblendet, in der Sie aufgefordert
werden, die Antenne anzuschließen. Überprüfen Sie die
Antennenverbindung (Näheres dazu finden Sie auf Seite 14).
Drücken Sie die Taste
OK
starten.
8
Nachdem das Fernsehgerät alle Kanäle (Fernsehsender) abgestimmt hat,
wird automatisch das Menü
Programme ordnen
damit Sie die Reihenfolge der gespeicherten Sender ändern können.
a)
Wenn Sie die Reihenfolge der Sender nicht ändern wollen, gehen Sie
weiter zu Sch ritt 9 .
b)
Wenn Sie die Reihenfolge der Sender ändern wollen:
1
Wählen Sie mit der Taste v oder V die Nummer des Senders aus,
dessen Platz in der Reihenfolge geändert werden soll. Drücken
b
Sie die Taste
2
Wählen Sie dann mit der Taste v oder V die neue
.
Position für den markierten Sender. Speichern Sie die neue
Einstellung anschließend mit der Taste OK.
3
Wiederholen Sie die Schritte b)1 und b) 2, wenn Sie die
Reihenfolge anderer Sender neu ordnen möchten.
oder V Ihre Stadt auswählen und
, um die automatische Sendersuche neu zu
eingeblendet,
Automatisches Abspeichern
jetzt starten?
Ja Nein
Autom. Abspeichern
Gefundene Programme: 4
Kein Sender gefunden.
Bitte Antenne anschliessen
Bestätigen
Programme ordnen
01
TVE
02
TVE2
03
TV3
04
C33
05
C27
06
C58
07
S02
08
S06
Programme ordnen
01
TVE
02
TVE2
03
TV3
04
05
06
07
08
01 TVE
C33
C27
C58
S02
S06
16
Erste Inbetriebnahme
9
Blenden Sie das Menü mit der Taste
Nun ist das Fernsehgerät betriebsbereit.
MENU
aus.
Page 65

Das Menüsystem
Dieses Fernsehgerät verwendet ein Menüsystem auf dem Bildschirm, um Sie bei den verschiedenen
Einstellungsvorgängen zu leiten. Verwenden Sie zur Bedienung des Menüsystems die folgenden Tasten der
Fernbedienung:
1 So rufen Sie Menüs auf:
Drücken Sie die Taste MENU, um die obere Menüebene
aufzurufen.
Bild-Einstellungen
Bild-Modus: Live
Kontrast:
Normwerte
Dyn. NR: Auto
Farbton: Kalt
Wählen: Eingeben:OKBeenden:
2 So navigieren Sie durch die Menüs:
• Um ein gewünschtes Menü oder eine Option zu markieren, drücken Sie
• Um ein ausgewähltes Menü aufzurufen, drücken Sie OK oder
b.
• Um zum vorherigen Menü bzw. zur vorherigen Option zurückzukehren, drücken Sie OK
oder
B.
• Um die Einstellungen der ausgewählten Option zu ändern, drücken Sie
• Mit der Taste OK bestätigen und speichern Sie Ihre Auswahl.
v oder V.
v/V/B oder b.
3 So blenden Sie die Menüs aus:
Bild-Einstellungen
Bild-Modus: Live
Kontrast:
Normwerte
Dyn. NR: Auto
Farbton: Kalt
MENU
Wählen: Eingeben:OKBeenden:
MENU
DE
Blenden Sie das Menü mit der Taste MENU aus.
TV-Funktionen
17
Page 66

Das Menü Bild-Einstellungen
Bild-Einstellungen
Bild-Modus: Live
Kontrast:
Normwerte
Dyn. NR: Auto
Farbton: Kalt
Wählen: Eingeben:OKBeenden:
MENU
Mit dem Menü „Bild-Einstellungen“ können Sie
die Bild-Einstellungen ändern.
Führen Sie dazu folgende Schritte aus:
,
Bild-Einstellungen
Bild-Modus: Live
Kontrast:
Normwerte
Dyn. NR: Auto
Farbton: Kalt
Drücken Sie die Taste MENU und drücken Sie
dann auf OK, um dieses Menü aufzurufen.
Drücken Sie dann
v oder V , um die
gewünschte Option auszuwählen, und
anschließend auf OK. Die einzelnen Optionen
und die zugehörigen Einstellungen werden
MENU
Zurück:
Wählen:
Eingeben:
OK
nachfolgend beschrieben.
Bild-Modus Mit diese Option können Sie den Bild-Modus ändern - je nach Sendung, die Sie
gerade betrachten. Drücken Sie nach der Auswahl der Option auf OK. Drücken
Sie dann wiederholt auf die Taste
v oder V um eine Einstellung auszuwählen:
Live (für Live-Sendungen, DVD und digitale Set-Top-Boxen).
Film (für Spielfilme).
Anwender (für individuelle Einstellungen).
Drücken Sie nach der Auswahl der gewünschten Option auf OK, um die
Einstellung zu speichern.
Die Einstellungen für „Helligkeit“, „Farbe“ und „Bildschärfe“ der Modi „Live“ und „Film“
sind Werkseinstellungen für eine optimale Bilddarstellung.
Kontrast Drücken Sie die Taste B oder b , um den Kontrast zu erhöhen oder zu verringern.
Speichern Sie die neue Einstellung anschließend mit der Taste OK.
Helligkeit Drücken Sie die Taste B oder b , um die Helligkeit zu erhöhen oder zu
verringern. Speichern Sie die neue Einstellung anschließend mit der Taste OK.
Diese Option wird nur angezeigt und kann nur geändert werden, wenn „Bild-Modus“ auf
„Anwender“ gesetzt ist.
Farbe Drücken Sie die Taste B oder b , um die Farbsättigung zu erhöhen oder zu
verringern. Speichern Sie die neue Einstellung anschließend mit der Taste OK.
Diese Option wird nur angezeigt und kann nur geändert werden, wenn „Bild-Modus“ auf
„Anwender“ gesetzt ist.
Farbton Drücken Sie die Taste B oder b , um die Grüntöne zu verstärken oder zu
verringern. Speichern Sie die neue Einstellung anschließend mit der Taste OK.
Diese Option ist nur für das Farbsystem NTSC verfügbar (z.B. Videobänder aus den USA).
Bildschärfe Drücken Sie die Taste B oder b , um das Bild schärfer oder weicher darzustellen.
Speichern Sie die neue Einstellung anschließend mit der Taste OK.
Diese Option wird nur angezeigt und kann nur geändert werden, wenn „Bild-Modus“ auf
„Anwender“ gesetzt ist.
Fortsetzung...
TV-Funktionen
18
Page 67

Normwerte Drücken Sie OK, um für das Bild die werkseitigen Standardeinstellungen zu aktivieren.
Dyn. NR Diese Option ist auf Auto eingestellt, um das Bildrauschen bei Sendern mit schwachem Signalpegel
automatisch zu dämpfen. Die Einstellung kann jedoch geändert werden. Drücken Sie nach der
Auswahl der Option auf
auszuwählen. Drücken Sie zum Abschluss die Taste OK, um die Einstellung zu speichern.
Farbton Mit dieser Funktion können Sie die Farbtemperatur des Bildes verändern. Drücken Sie nach der
Auswahl der Option auf
Einstellung auszuwählen: warm (Der Weißanteil der Farben erhält einen roten Farbton), normal
(Der Weißanteil der Farben erhält einen neutralen Farbton), kalt (Der Weißanteil der Farbe n erhält
einen blauen Farbton). Drücken Sie zum Abschluss die Taste OK, um die Einstellung zu speichern.
DRC Modus Mit dieser Option können Sie hochaufgelöste Bilder von hochauflösenden Signalquellen mit 4-
facher Informationsdichte auswählen (z.B. DVD-Player, Satelliten-Receiver). Die Option ist auf
Hohe Dichte eingestellt (empfohlene Einstellung für bewegte Bilder). Die Einstellung kann
jedoch geändert werden. Drücken Sie nach der Auswahl der Option auf
b. Drücken Sie dann auf v oder V, um hoch, mitten, niedrig, oder Aus
b. Drücken Sie dann wiederholt auf die Taste v oder V, um eine
b. Wählen Sie dann mit
v oder V Progressiv (empfohlene Einstellung für Standbilder und Text).
Diese Option wird nur angezeigt und kann nur geändert werden, wenn „Bild-Modus“ auf „Anwender“ gesetzt ist.
DRC Palette Mit dieser Option können Sie die Detailtreue (Naturtreue) und die Ausgeglichenheit (Klarheit) für
bis zu drei Signalquellen einstellen. Drücken Sie nach der Auswahl der Option auf
v oder V, um den Wert für Naturtreue einzustellen (je höher die Markierung auf der
dann
Achse Naturtreue steht, desto detaillierter wird das Bild wiedergegeben) und drücken Sie
b. Drücken Sie
B oder
b, um den Wert für Klarheit einzustellen (je weiter rechts die Markierung auf der Achse Klar-
heit steht, desto ausgeglichener wird das Bild wiedergegeben). Drücken Sie zum Abschluss die
Taste OK, um die Einstellung zu speichern.
Diese Option wird nur angezeigt und kann nur geändert werden, wenn „Bild-Modus“ auf „Anwender“ gesetzt ist.
DE
TV-Funktionen
19
Page 68

Das Menü Ton-Einstellungen
Bild-Einstellungen
Bild-Modus: Live
Kontrast:
Normwerte
Dyn. NR: Auto
Farbton: Kalt
Wählen: Eingeben:OKBeenden:
m
Ton-Einstellungen
Sound Effekt: Dolby Virtual
Höhen:
Tiefen:
Balance:
Normwerte
Zweiton: Stereo
Autom.Lautstärke: Aus
TV Lautsprecher: Ein
Audio Ausgang: Fest
Wählen: Eingeben:OKBeenden:
Sound
Effekt
MENU
Mit dem Menü „Ton-Einstellungen“ können
Sie die Ton-Einstellungen ändern.
Führen Sie dazu folgende Schritte aus:
Drücken Sie die Taste MENU und dann auf
um auszuwählen, und drücken Sie dann die
Taste OK, um das zugehörige Menü
aufzurufen. Drücken Sie dann auf
v oder V ,
um die gewünschte Option auszuwählen.
Drücken Sie dann auf OK. Die einzelnen
Optionen und die zugehörigen Einstellungen
werden nachfolgend beschrieben.
MENU
MENU
,
Ton-Einstellungen
Sound Effekt: Dolby Virtual
Höhen:
Tiefen:
Balance:
Normwerte
Zweiton: Stereo
Autom.Lautstärke: Aus
TV Lautsprecher: Ein
Audio Ausgang: Fest
Wählen: Eingeben:
Zurück:
OK
Mit dieser Funktion können Sie den Klangeffekt einstellen. Drücken Sie nach Auswahl der Option
OK. Drücken Sie dann wiederholt auf die Taste
Dolby*
Virtual
Natürlich
(Dolby Virtual, simuliert den Klangeffekt von „Dolby Surround Pro
Logic“).
(Verbessert die Klangschärfe, die Detailtreue und die Klangpräsenz mit
v oder V, um eine Einstellung auszuwählen:
Hilfe des „BBE High Definition Sound system“**).
Dynamisch
(„BBE High Definition Sound system“* verbessert die Klangschärfe und
die Klangpräsenz für eine klarere Wiedergabe und größere Authentizität der
Musikwiedergabe).
Aus
(Wiedergabe ohne Effekt).
Drücken Sie nach der Auswahl der gewünschten Option auf OK, um die Einstellung zu speichern.
v,
20
TV-Funktionen
Höhen
Drücken Sie die Taste
B oder b , um hohe Tonfrequenzen zu verstärken oder zu dämpfen.
Speichern Sie die neue Einstellung anschließend mit der Taste OK.
Tiefen
Drücken Sie die Taste
B oder b , um tiefe Tonfrequenzen zu dämpfen oder zu verstärken.
Speichern Sie die neue Einstellung anschließend mit der Taste OK.
Balance
Normwerte
Drücken Sie die Taste
Speichern Sie die neue Einstellung anschließend mit der Taste
B oder b, um den linken oder rechten Lautsprecher hervorzuheben.
OK
.
Drücken Sie die Taste OK, um für den Ton die werkseitig voreingestell ten Standardein stellungen zu aktivieren.
Zweiton
Drücken Sie
b.
• Für Sendungen mit Stereoton:
Wählen Sie mit
anschließend mit der Taste
v oder V
Stereo
OK
.
oder
Mono
aus. Speichern Sie die neue Einstellung
• Für zweisprachige Sendungen:
Wählen Sie mit der Taste
v oder V
Mono
(für Mono-Kanal, falls verfügbar), A (für Kanal
1) oder B (für Kanal 2). Speichern Sie die neue Einstellung anschließend mit der Taste OK.
Autom.
Lautstärke
Drücken Sie b. Drücken Sie dann v oder V , um
Ein
(Die Lautstärke wird unabhängig
vom Sendesignal aufrechterhalten z.B. bei Werbesendungen) oder
Aus
auszuwählen (Die
Lautstärke variiert in Abhängigkeit vom Sendesignal). Speichern Sie die neue Einstellung
anschließend mit der Taste
OK
.
Wenn Sie für die Option „Sound Effekt“ die Einstellung „Dolby Virtual“ auswählen, wird
„Autom.Lautstärke“ automatisch auf „Aus“.
Fortsetzung...
Page 69

TV Mit dieser Option können Sie auswählen, ob Sie den Ton der Fernsehsendung direkt durch die
Lautsprecher Lautsprecher des Fernsehers hören möchten oder über einen externen Verstärker, der an den
Audioausgängen des Fernsehgeräts angeschlossen wurde.
Drücken Sie nach der Auswahl der Option auf
V
, um eine Einstellung auszuwählen:
Haupt Bei dieser Einstellung wird der Ton über die Lautsprecher des Fernsehgeräts ausg ege-
ben.
Aus Mit dieser Einstellung wird der Fernsehton über einen externen Verstärker
wiedergegeben.
Drücken Sie nach der Auswahl der gewünschten Option auf OK, um die Einstellung zu speichern.
Wenn Sie „Aus“ ausgewählt haben, kann die Lautstärkeeinstellung der externen Geräte durch Drücken der
Tasten 2 +/- mit der Fernbedienung gesteuert werden. Wenn Lautstärketasten gedrückt werden, wird das
Symbol
sondern die Lautstärke der externen Geräte.
Audio Mit dieser Option können Sie auswählen, wie die Lautstärke der Lautsprecher des Fernsehgeräts
Ausgang reguliert werden soll, wenn an den Audio-Ausgängen des Fernsehgeräts ein externer Verstärker
% eingeblendet, um darauf hinzuweisen, dass nicht die Lautstärke des Fernsehgeräts geändert wird,
angeschlossen ist. Drücken Sie nach der Auswahl der Option auf
um Variabel auszuwählen (wenn Sie die Fernbedienung des Fernsehgeräts verwenden möchten)
oder wählen Sie Fest (wenn Sie die Fernbedienung des externen Verstärkers verwenden möchten).
b. Drücken Sie dann wiederholt auf die Taste v
b. Drücken Sie dann
v
oder
oder
V
,
* Herstellung in Lizenz der Dolby Laboratories. „Dolby“ und das Doppel-D Symbol sind Warenzeichen der
Dolby Laboratories.
** Dieses Fernsehgerät kann Raumklang erzeugen und den Klang von vier Lautsprechern mit zwei Lautsprechern
simulieren, wenn das empfangene Signal Dolby-Surround-kodiert ist. Der Klang kann außerdem durch das
Anschließen eines geeigneten externen Verstärkers verbessert werden. (Näheres dazu finden Sie auf Seite 39).
** Das „BBE High Definition Sound system“ wird von Sony Corporation in Lizenz von BBE Sound, Inc.
hergestellt. Es ist durch die US-Patente Nr. 4,638,258 und Nr. 4,482,866 geschützt. „BBE“ und das BBE-Symbol
sind Warenzeichen von BBE Sound, Inc.
DE
TV-Funktionen
21
Page 70

Das Menü Sonderfunktionen
Bild-Einstellungen
Bild-Modus: Live
Kontrast:
Normwerte
Dyn. NR: Auto
Farbton: Kalt
Wählen: Eingeben:OKBeenden:
m
Sonderfunktionen
Energie sparen Reduziert
Auto Format Ein
Kontrastanhebung Auto
AV2 Ausgang TV
AV3 Ausgang TV
SmartLink Ausgang
Anschlusshilfe
RGB Horiz.Position
Bildschirmschoner
Logo Beleuchtung Ja
Wählen: Eingeben: OKBeenden:
ENERGIE SPAREN
Mit dieser Funktion können Sie den Energieverbrauch dieses Fernsehgeräts reduzieren.
Führen Sie dazu folgende Schritte aus:
Wählen Sie die Option aus und drücken Sie dann auf OK. Drücken Sie dann
ziert auszuwählen. Speichern Sie die neue Einstellung anschließend mit der Taste OK.
AUTO FORMAT
Bei dieser Einstellung wird das Bildformat vom Fernsehgerät automatisch angepasst.
Führen Sie dazu folgende Schritte aus:
Wählen Sie die Option aus und drücken Sie dann auf OK. Drücken Sie die Taste
die Funktion Ein (wenn das Fernsehgerät das Bildformat automatisch an die ausgestrahlte Sendung
anpassen soll) oder Aus zu schalten (wenn Sie Ihre Vorzugseinstellung beibehalten möchten).
Drücken Sie zum Abschluss die Taste OK, um die Einstellung zu speichern.
MENU
verschiedene Einstellungen des Fernsehgeräts
ändern.
Führen Sie dazu folgende Schritte aus:
Drücken Sie die Taste MENU und dann
Mit dem Menü „Sonderfunktionen“ können Sie
MENU
zweimal auf
v, um auszuwählen, und
drücken Sie dann die Taste OK, um das
zugehörige Menü aufzurufen. Drücken Sie
dann auf
v oder V, um die gewünschte Option
auszuwählen. Drücken Sie dann auf OK. Die
einzelnen Optionen und die zugehörigen
Einstellungen werden nachfolgend
beschrieben.
MENU
,
Sonderfunktionen
Energie sparen Reduziert
Auto Format Ein
Kontrastanhebung Auto
AV2 Ausgang TV
AV3 Ausgang TV
SmartLink Ausgang
Anschlusshilfe
RGB Horiz.Position
Bildschirmschoner
Logo Beleuchtung Ja
Zurück:
Wählen:
Eingeben:
OK
v oder V, um Redu-
v oder V, um
Auch wenn Sie „Ein” oder „Aus” ausgewählt haben, können Sie das Format bei Bedarf ändern,
indem Sie auf der Fernbedienung wiederholt drücken, um eines der folgenden Formate
auszuwählen:
SMART: Nachahmung des Breitbildeffekts bei Sendungen im Format 4:3.
SMART
4:3: Herkömmliches Bildformat 4:3, gesamtes Bild wird angezeigt.
4:3
TV-Funktionen
22
14:9: Kompromiss zwischen den Bildformaten 4:3 und 16:9.
14:9
ZOOM: Breitwandformat für Filme, die im Cinemascope-Format
(oben und unten mit schwarzem Rand) übertragen werden.
ZOOM
WIDE: Für Übertragungen im 16:9 Format. Der gesamte
Bildinhalt ist sichtbar.
WIDE
• Bei den Anzeigemodi „SMART“, „ZOOM“ und „14:9“ werden Teile des oberen und
unteren Bildrands abgeschnitten. Drücken Sie die Taste
v oder V, um die Position des
Bildes auf dem Bildschirm anzupassen (z.B. um Untertitel sehen zu können).
• Schwarze Streifen bzw. Ränder können in jedem ausgewählten Modus auftreten - je nach
gesendetem Bildformat.
Fortsetzung...
Page 71

FILM MODUS
Diese Option ist auf Auto gesetzt, um die Bildqualität bei bewegten Bildern zu verbessern. Falls Sie die Einstellung
deaktivieren wollen, drücken Sie
die Einstellung zu speichern.
AV2 AUSGANG / AV3 AUSGANG
Mit den Funktionen „AV2 Ausgang“ und „AV3 Ausgang“ definieren Sie, welche Signalquelle über die Scartbuchsen
können, das vom Fernsehgerät stammt oder von einem externen Gerät, das über den Scart-Anschluss 1/,
Führen Sie dazu folgende Schritte aus:
Wenn Sie gemäß der Anleitung auf der vorhergehenden Seite das Menü „Sonderfunktionen“ und dann die
entsprechende Option aufgerufen haben, drücken Sie die Taste OK. Markieren Sie das gewünschte Ausgangssignal
mit der Taste
S
3/ und 2/ 2 ausgegeben wird. Das bedeutet, dass Sie an den Scartbuchsen jedes Signal aufzeichnen
2/ und 3/ oder die seitlichen Anschlüsse 5 oder 5 und 5 angeschlossenen ist.
Wenn Ihr Video- oder DVD-Recorder SmartLink unterstützt, ist dieses Verfahren nicht notwendig.
v
TV damit wird das Antennensignal ausgegeben.
AV1 damit wird das Signal ausgegeben, das über 1/ anliegt.
AV2 damit wird das Signal ausgegeben, das über 2/ (nur für AV3 Ausgang) anliegt.
AV3 damit wird das Signal ausgegeben, das über 3/ (nur für AV2 Ausgang) anliegt.
AV5 damit wird das Signal ausgegeben, das über 5 oder 5 und 5anliegt.
AUTO damit wird das Signal ausgegeben, das auf dem Bildschirm angezeigt wird.
• Wenn Sie „Auto“ auswählen, wird immer das Signal ausgegeben, das gerade auf dem Bildschirm verfolgt wird.
• Wenn Sie an den Scart-Anschluss
Scart-Anschlüsse einen Pay-TV-Dekoder angeschlossen haben, sollten Sie nicht vergessen, die Einstellung für
„AV2 Ausgang“ bzw. „AV3 Ausgang“ wieder auf „TV“ zu stellen, damit das Signal korrekt dekodiert wird.
S S
oder
V:
v oder V, um Aus auszuwählen. Drücken Sie zum Abschluss die Taste OK, um
S
S
2
/ oder 3/3 oder an einen Videorecorder an einem dieser
S
SMARTLINK
Beide Scart-Anschlüsse 2/ und 3/ unterstützen einzeln SmartLink, jedoch nicht beide gleichzeitig.
Mit dieser Funktion definieren Sie, welcher Scart-Anschluss SmartLink unterstützen soll.
Führen Sie dazu folgende Schritte aus:
Wenn Sie gemäß der Anleitung auf der vorhergehenden Seite das Menü „Sonderfunktionen“ und dann die
entsprechende Option aufgerufen haben, drücken Sie die Taste OK. Wählen Sie dann mit
aus. Drücken Sie zum Abschluss die Taste OK, um die Einstellung zu speichern.
ANSCHLUSSANLEITUNG
Auch wenn Sie Ihre externen Geräte bereits an das Fernsehgerät angeschlossen haben, sollten Sie die Anleitungen in
diesem Menü befolgen. Wenn Sie auf diese Weise verfahren, erzielen Sie für Ihre externen Geräte die besten
Bildeinstellungen.
Führen Sie dazu folgende Schritte aus:
S
v oder V AV2 oder AV3
1 Wenn Sie gemäß der Anleitung auf der vorhergehenden Seite das Menü „Sonderfunktionen“ und dann die
entsprechende Option aufgerufen haben, drücken Sie die Taste OK. Wählen Sie dann mit der Taste
der verfügbaren Liste die Geräte aus, die Sie anschließen möchten: SAT (Satellit), Dekoder, DVD, SPIELE,
VIDEO (Videorecorder) oder DVD rec. (DVD-Recorder). Drücken Sie dann auf
auszuwählen (Mit
angeschlossen werden sollen, ausgewählt haben, wählen Sie mit
B können ausgewählte Geräte aus der Auswahl entfernt werden). Wenn Sie alle Geräte, die
v oder V „Bestätigen“ aus und drücken auf OK.
b, um die ausgewählten Geräte
v oder V aus
2 Ein neues Menü wird eingeblendet. Darin ist angegeben, an welchen Scart-Anschluss an der Rückseite des
Fernsehgeräts die einzelnen Geräte angeschlossen werden sollten. Sie sollten die einzelnen Geräte gemäß diesen
Empfehlungen anschließen, um die optimale Bildqualität für jedes Gerät zu erzielen.
Es wird dringend empfohlen, sich an die Empfehlungen zum Anschluss der Geräte zu halten. Falls Sie sich
jedoch anders entscheiden, drücken Sie B oder b, um „Nein“ auszuwählen und drücken Sie anschließend
die Taste OK. Daraufhin wird ein neues Menü eingeblendet, in dem Sie die Anschlüsse gemäß Ihrer
Entscheidung zuordnen können.
3 Wenn Sie alle Zusatzgeräte angeschlossen haben, wählen Sie mit B oder b „OK“ aus. Drücken Sie zum
Abschluss die Taste OK der Fernbedienung.
DE
Fortsetzung...
TV-Funktionen
23
Page 72

RGB HORIZ.POSITION
Diese Option ist nur verfügbar, wenn an den Scart-Anschlüssen 1/ oder 2/ an der Rückseite
des Fernsehgeräts eine RGB-Bildquelle angeschlossen ist.
Wenn ein RGB-Signal angezeigt wird, muss möglicherweise das Bild eingestellt werden. Mit dieser Funktion können
Sie die horizontale Position des Bildes anpassen, so dass es in der Mitte des Bildschirms angezeigt wird.
Führen Sie dazu folgende Schritte aus:
Wenn Sie gemäß der Anleitung auf Seite 22 das Menü „Sonderfunktionen“ aufgerufen haben und ein Bildsignal von
einer RGB-Quelle angezeigt wird, wählen Sie die Option „RGB Horiz.Position“ und drücken dann OK. Stellen Sie
dann mit der Taste
speichern Sie die Einstellung.
BILDSCHIRMSCHONER
Mit diesem Untermenü können Sie das langfristige nachleuchten reduzieren.
Wenn Bilder der folgenden Art für sehr lange Zeit angezeigt werden, kann es auf Grund der technischen
Eigenschaften dieses Bildschirms in einzelnen Bildschirmbereichen zu einem langfristigem Nachleuchten kommen:
•
Schwarze Balken oben und unten, die möglicherweise bei Bildern im Breitwandformat angezeigt werden.
•
Schwarze Balken rechts und links, die bei Bildern im Format 4:3 (normales Fernsehformat) angezeigt werden.
•
Videospiele.
•
PC-Bilder.
•
DVD-Bildschirmmenüs.
•
Bildschirmmenüs, Kanalnummern o.ä. von einer angeschlossenen Set-Top-Box, einem Kabelmodem,
Videorecorder, o.ä.
Führen Sie dazu folgende Schritte aus:
Wenn Sie gemäß der Anleitung auf Seite 22 das Menü „Sonderfunktionen“ und dann die entsprechende Option aufgerufen haben, drücken Sie OK. Wählen Sie dann mit
Weissbild Wählen Sie diese Option und drücken Sie dann auf OK. Drücken Sie dann
v oder V die horizontale Position im Bereich –15 bis +15 ein. Mit der Taste OK bestätigen und
v
oder
V
folgende Einstellung:
v
oder
V
, um Ein aus-
zuwählen. Dadurch wird der Bildschirm weiß.
•Diese Funktion wird nach 30 Minuten automatisch deaktiviert. Sollte das langfristige
nachleuchten noch vorhanden sein, wiederholen Sie diesen Schritt.
•
Wenn Sie die Funktion zu einem beliebigen Zeitpunkt abbrechen möchten, drücken Sie eine
beliebige Taste (ausgenommen sind Tasten für Ton- bzw. Lautstärkefunktionen) der Fernbedienung.
Verschiebung
LOGO BELEUCHTUNG
Mit dieser Option können Sie die Beleuchtung des SONY Logos an der Vorderseite des Fernsehgeräts ein-/ausschalten.
Führen Sie dazu folgende Schritte aus:
Wenn Sie gemäß der Anleitung auf Seite 22 das Menü „Sonderfunktionen“ und dann die entsprechende Option
aufgerufen haben, drücken Sie OK. Wählen Sie dann mit der Taste
werden soll. Drücken Sie zum Abschluss die Taste OK, um die Einstellung zu speichern.
TV-Funktionen
24
Wählen Sie diese Option und drücken Sie dann auf OK. Wählen Sie dann mit der Taste
Ein, um die Bildlage zu verschieben.
v
oder
V
Ja, wenn das Sony Logo blau beleuchtet
Fortsetzung...
v
oder
V
Page 73

Das Menü Timer
Bild-Einstellungen
Bild-Modus: Live
Kontrast:
Normwerte
Dyn. NR: Auto
Farbton: Kalt
Wählen: Eingeben:OKBeenden:
m
Timer
Abschalttimer: Aus
Auto.Ausschalt: Ein
Wählen: Eingeben: OKUscita:
MENU
Mit dem Menü „Timer“ können Sie die
Timer-Einstellungen ändern.
Führen Sie dazu folgende Schritte aus:
Drücken Sie die Taste MENU und dann
v
, um auszuwählen, und
MENU
dreimal auf
drücken Sie dann die Taste OK, um das
zugehörige Menü aufzurufen. Wählen Sie
v
oder
V
die
,
Temporizador
Abschalttimer: Aus
Auto.Ausschalt: Ein
dann mit der Taste
gewünschte Option aus. Drücken Sie
dann auf OK. Die einzelnen Optionen
und die zugehörigen Einstellungen
werden nachfolgend beschrieben.
MENU
Zurück:
Eingeben:
Beenden:
OK
ABSCHALTTIMER
Mit dieser Option können Sie eine Zeitspanne auswählen, nach der das Fernsehgerät automatisch
in den Standby-Betrieb geschaltet wird.
Führen Sie dazu folgende Schritte aus:
Drücken Sie, nachdem Sie die Option ausgewählt haben, OK. Drücken Sie dann wiederholt
v
oder
V
, um die gewünschte Zeitspanne auszuwählen (max. 2 Stunden). Drücken Sie zum
Abschluss die Taste OK, um die Einstellung zu speichern.
Wenn die Funktion „Weissbild“ der Option „Bildschirmschoner“ (Seite 24) auf „Ein“
gesetzt ist, wird der Abschalttimer deaktiviert, und das Fernsehgerät schaltet sich nach der
eingestellten Zeitspanne nicht automatisch ab. Nachdem die Funktion „Weissbild“
durchlaufen wurde, wird der Abschalttimer reaktiviert und das Fernsehgerät wird
automatisch in den Standby-Betrieb geschaltet.
DE
• Während Sie fernsehen können Sie die verbleibende Zeitspanne anzeigen, indem Sie die
Taste der Fernbedienung drücken.
• Die Anzeige “TIMER ” an der Vorderseite des Fernsehgeräts leuchtet, um anzuzeigen,
dass der Abschalttimer aktiviert ist.
AUTO.AUSSCHALT
Diese Option ermöglicht, dass das Fernsehgerät automatisch in den Standby-Betrieb geschaltet
wird, wenn kein Fernsehsignal anliegt.
Führen Sie dazu folgende Schritte aus:
Drücken Sie, nachdem Sie die Option ausgewählt haben, OK. Wählen Sie dann mit der Taste
v
oder
V
Ein aus. Drücken Sie zum Abschluss die Taste OK, um die Einstellung zu speichern.
Fortsetzung...
TV-Funktionen
25
Page 74

Das Menü Grundeinstellungen
Bild-Einstellungen
Bild-Modus: Live
Kontrast:
Normwerte
Dyn. NR: Auto
Farbton: Kalt
Wählen: Eingeben:OKBeenden:
m
Grundeinstellungen
Sprache Deutsch
Land Aus
Autom. Abspeichern
Programme ordnen
Programmnamen
AV-Einstellungen
Manuell abspeichern
Wählen: Beenden:
OK
Eingeben:
SPRACHE
Mit dieser Option können Sie die Sprache auswählen, in der die Menüs angezeigt werden.
Führen Sie dazu folgende Schritte aus:
Drücken Sie, nachdem Sie die Option ausgewählt haben, die Taste OK und befolgen Sie dann die
Anweisung im Abschnitt „Einschalten des Fernsehgeräts und automatische Sendersuche“ auf Seite
15 ab Schritt 3.
LAND
Mit dieser Option können Sie das Land auswählen, in dem Sie das Fernsehgerät betreiben.
MENU
MENU
,
MENU
Grundeinstellungen
Sprache Deutsch
Land Aus
Autom. Abspeichern
Programme ordnen
Programmnamen
AV-Einstellungen
Manuell abspeichern
Zurück:
Wählen:
Eingeben:
Mit dem Menü „Grundeinstellungen“ können
Sie die Einstellungen verschiedener Optionen
des Fernsehgeräts ändern.
Führen Sie dazu folgende Schritte aus:
Drücken Sie die Taste MENU und dann
v
viermal auf
, um auszuwählen. Drücken
Sie dann auf OK, um das zugehörige Menü
aufzurufen. Drücken Sie dann auf
v
oder
V,
um die gewünschte Option auszuwählen.
Drücken Sie dann auf OK. Die einzelnen
Optionen und die zugehörigen Einstellungen
werden nachfolgend beschrieben.
OK
Führen Sie dazu folgende Schritte aus:
Drücken Sie, nachdem Sie die Option ausgewählt haben, die Taste OK und befolgen Sie dann die
Anweisung im Abschnitt „Einschalten des Fernsehgeräts und automatische Sendersuche“ auf Seite
15 ab Schritt 4.
AUTOM. ABSPEICHERN
Mit dieser Option können Sie alle vorhandenen Kanäle (Fernsehsender) suchen und speichern.
Führen Sie dazu folgende Schritte aus:
Drücken Sie, nachdem Sie die Option ausgewählt haben, die Taste OK und befolgen Sie dann die
Schritte 7 und 8 im Abschnitt „Einschalten des Fernsehgeräts und automatische Sendersuche“ auf
Seite 16.
PROGRAMME ORDNEN
Mit dieser Option können Sie die Reihenfolge des Erscheinens der Kanäle (Fernsehsender) auf dem
Bildschirm ändern.
Führen Sie dazu folgende Schritte aus:
Drücken Sie, nachdem Sie die Option ausgewählt haben, die Taste OK und befolgen Sie dann
Schritt 9 im Abschnitt „Einschalten des Fernsehgeräts und automatische Sendersuche“ auf Seite 16.
Fortsetzung...
TV-Funktionen
26
Page 75

PROGRAMMNAMEN
Mit dieser Funktion können Sie einem Kanal einen Sendernamen mit bis zu fünf Zeichen zuweisen (Buchstaben und Zahlen).
Führen Sie dazu folgende Schri tte aus:
1 Wenn Sie gemäß der Anleitung auf der vorhergehenden Seite das Menü „Grundeinstellungen“ und dann die
entsprechende Option aufgerufen haben, drücken Sie die Taste OK. Wählen Sie dann mit v oder V die
Programmnummer des Kanals aus, dem Sie einen Namen zuweisen möchten. Drücken Sie dann auf OK.
2 Drücken Sie, während das erste Element der Spalte Name hervorgehoben ist, auf die Taste OK und auf
v, V
B oder b, um den gewünschten Buchstaben auszuwählen. Drücken Sie dann auf OK.
Drücken Sie, wenn Sie fertig sind,
drücken Sie zum Abschluss die Taste OK, um das Menü auszublenden.
• Um den Buchstaben bei Bedarf zu korrigieren, wählen Sie auf dem Bildschirm „
zu gehen und drücken Sie die Taste OK.
• Um ein Leerzeichen einzugeben, wählen Sie auf dem Bildschirm „ “ aus und drücken Sie die Taste OK.
AV-EINSTELLUNGEN
Diese Option dient folgendem Zweck:
a) Zuweisen eines Namens an ein externes Geräte, das über einen der Eingänge an das Fernsehgerät angeschlos sen ist.
Führen Sie dazu folgende Schritte aus:
v, V
, B oder b , um auf dem Bildschirm das Wort „Aus“ auszuwählen und
%“ aus, um zurück
1 Wenn Sie gemäß der Anleitung auf der vorhergehenden Seite das Menü „Grundeinstellungen“ und dann die
entsprechende Option aufgerufen haben, drücken Sie die Taste OK. Wählen Sie dann mit
Signalquelle aus, der Sie einen Namen zuweisen möchten: AV1, AV2, AV3 oder AV4 für die ScartAnschlüsse auf der Rückseite bzw. AV5 für Anschlüsse an der Seite des Geräts. Drücken Sie dann zweimal
auf OK.
v
oder
V die
2 In der Spalte Name wird automatisch ein Name angezeigt:
a) Wenn Sie einen der vorgegebenen Namen verwenden wollen, drücken Sie
auszuwählen und drücken Sie zum Abschluss die Taste OK.
Hier sind die vordefinierten Namen aufgeführt: VIDEO, DVD, CABLE, GAME, CAM
(Camcorder) oder SAT (Satellit).
b) Wenn Sie einen anderen Namen eingeben möchten, wählen Sie Bearb. und drücken Sie OK. Drücken Sie
dann, während das erste Element hervorgehoben ist, v, V, B oder b, um den gewünschten Buchstaben
auszuwählen. Drücken Sie dann auf OK. Drücken Sie, wenn Sie fertig sind, v, V, B oder b, um auf dem
Bildschirm das Wort „Aus“ auszuwählen und drücken Sie zum Abschluss die Taste OK, um das Menü
auszublenden.
v oder V, um den gewünschten
,
DE
• Um den Buchstaben zu korrigieren, wählen Sie auf dem Bildschirm „%“ aus, um zurück zu gehen,
und drücken Sie die Taste OK.
• Um ein Leerzeichen einzugeben, wählen Sie auf dem Bildschirm „ “ aus und drücken Sie die Taste OK.
b) Ändern der Verstärkung des Toneingangssignals von angeschlossenem Zusatzgerät.
Führen Sie dazu folgende Schritte aus:
Wenn Sie gemäß der Anleitung auf der vorhergehenden Seite das Menü „Grundeinstellungen“ und dann die
v
entsprechende Option aufgerufen haben, drücken Sie die Taste OK. Wählen Sie dann mit
Signalquelle aus, für die Sie die Signalstärke des Toneingangssignals ändern möchten: AV1, AV2, AV3 oder
AV4 für die Scart-Anschlüsse auf der Rückseite bzw. AV5 für Anschlüsse an der Seite des Geräts. Drücken Sie
dann zweimal auf
OK und v oder V, um die Signalstärke des Toneingangssignals im Bereich -9 bis +9 einzustellen.
b, um die Spalte Klang-Einstellung hervorzuheben. Drücken Sie zum Abschluss die Taste
oder V die
Fortsetzung...
TV-Funktionen
27
Page 76

MANUELL ABSPEICHERN
Diese Option dient folgendem Zweck:
a) Speichern der einzelnen Sender und des Videokanals in der von Ihnen gewünschten Reihenfolge.
Führen Sie dazu folgende Schritte aus:
1 Wenn Sie gemäß der Anleitung auf Seite 26 das Menü „Grundeinstellungen“ und dann die Option „Manuell
Abspeichern“ aufgerufen haben, drücken Sie die Taste OK. Drücken Sie nach dem Markieren der Option
Programm die Taste OK.
Drücken Sie die Taste
speichern möchten. (Wählen Sie für den Videokanal die Sendernummer “0“). Drücken Sie dann die Taste
v oder V, um auszuwählen unter welcher Nummer Sie den betreffenden Sender
2 Die Verfügbarkeit der folgenden Option ist von der Einstellung abhängig, die für „Land“ ausgewählt
wurde.
B.
Drücken Sie nach Auswahl der System-Option auf die Taste OK. Wählen Sie dann mit der Taste
das Fernsehsystem (B/G für westeuropäische Länder, D/K für osteuropäische Länder, L für Frankreich und
I für Großbritannien). Drücken Sie dann die Taste
B.
v
3 Drücken Sie, nachdem Sie die Option Kanalnummer ausgewählt haben, die Taste OK. Drücken Sie dann
auf v
oder
Kabelkanäle). Drücken Sie dann die Zahlentasten, um die Kanalnu mmer für den Sender bzw. für das Signal
des Videorecorders direkt einzugeben. Wenn Sie die Kanalnummer nicht kennen, drücken Sie
V, um die Kanalabstimmung auszuwählen (“C“ für terrestrisch übertragene Kanäle oder „S“ für
b und v oder
V, um danach zu suchen. Drücken Sie zum Speichern zweimal auf OK, wenn die Abstimmung des
gewünschte Kanals erfolgt ist.
Wiederholen Sie alle aufgeführten Schritte, um weitere Kanäle abzustimmen und zu speichern.
b) Einem Kanal einen Namen mit bis zu fünf Zeichen zuweisen.
Führen Sie dazu folgende Schritte aus:
Führen Sie dazu folgende Schritte aus:
Wenn Sie gemäß der Anleitung auf Seite 26 das Menü „Grundeinstellungen“ und dann die Option „Manuell
Abspeichern“ aufgerufen haben, drücken Sie die Taste OK. Drücken Sie, während die Option Programm
markiert ist, die Taste PROG +/-, um die Sendernummer des Senders auszuwählen, dem Sie einen Namen
zuweisen möchten. Wählen Sie, wenn das betreffende Progra mm angezeigt wird, mit
aus und drücken Sie die Taste OK. Drücken Sie dann, während das erste Element hervorgehoben ist, v, V, B
oder
b, um den gewünschten Buchstaben auszuwählen. Drücken Sie dann auf OK. Drücken Sie, wenn Sie fertig
sind,
v, V
Taste OK, um das Menü auszublenden. Drücken Sie zum Abschluss die Taste OK, um die Einstellung zu
speichern.
, B oder b, um auf dem Bildschirm das Wort „Aus“ auszuwählen und drücken Sie anschließend die
• Um einen Buchstaben zu korrigieren, wählen Sie auf dem Bildschirm „
und drücken Sie die Taste OK.
• Um ein Leerzeichen einzugeben, wählen Sie auf dem Bildschirm „ “ aus und drücken Sie die Taste OK.
v
oder V die Option Name
%“ aus, um zurück zu gehen
oder
V
c) Feinabstimmung des Fernsehempfangs-Normalerweise wird durch AFT (vom Englischen „Automatic Fine
Tuning“ = Automatische Feinabstimmung) die optimale Bildqualität erzielt, Sie haben jedoch die Möglichkeit
den Empfang manuell feinabzustimmen, sollte das Bild verzerrt sein.
Führen Sie dazu folgende Schritte aus:
Schalten Sie auf den Sender, den Sie feinabstimmen möchten, rufen Sie gemäß der Anleitung auf Seite 26 das
Menü „Grundeinstellungen“ und dann die Option „Manuell Abspeichern“ auf, und drücken Sie dann die Taste
OK. Wählen Sie dann mit v oder V die Option AFT aus und drücken Sie anschließend b. Drücken Sie dann
auf
v
oder
V
zweimal die Taste OK, um die Einstellung zu speichern.
28
TV-Funktionen
, um die Feinabstimmung im Bereich -15 und +15 einzustellen. Drücken Sie zum Abschluss
Fortsetzung...
Page 77

d) Auslassen unerwünschter Sendernummern bei der Programmwahl mit den Tasten PROG +/-.
Führen Sie dazu folgende Schritte aus:
Wenn Sie gemäß der Anleitung auf Seite 26 das Menü „Grundeinstellungen“ aufgerufen und dann die Option
„Manuell abspeichern“ markiert haben, drücken Sie die Taste OK. Drücken Sie, während die Option Programm
markiert ist, die Taste PROG +/-, um die Sendernummer auszuwählen, die ausgelassen werden soll. Wählen Sie,
wenn der betreffende Sender angezeigt wird, mit
Sie dann auf
speichern Sie die Einstellung.
Falls Sie die Einstellung später rückgängig machen wollen, wählen Sie im oben aufgeführten Schritt „Aus“ an
Stelle von „Ein“.
v
oder
V,
um Ein auszuwählen. Durch zweimaliges Drücken der Taste OK bestätigen und
v
oder V die Option Auslassen und drücken Sie
b. Drücken
e) Anzeigen und Aufnehmen verschlüsselter Kanäle (z.B. von einem Pay-TV-Dekoder), wenn ein Dekoder
verwendet wird, der direkt über Scart 3/ oder einen Videorecorder angeschlossen ist.
Die Verfügbarkeit dieser Option ist von der Einstellung abhängig, die für „Land“ ausgewählt wurde.
Führen Sie dazu folgende Schritte aus:
Wenn Sie gemäß der Anleitung auf Seite 26 das Menü „Grundeinstellungen“ aufgerufen und dann die Option
„Manuell abspeichern“ markiert haben, drücken Sie die Taste OK. Wählen Sie dann mit
Dekoder und drücken Sie
Drücken der Taste OK bestätigen und speichern Sie die Einstellung.
Falls Sie die Einstellung später rückgängig machen wollen, wählen Sie im oben aufgeführten Schritt „Aus“ an
Stelle von „Ein“.
b. Drücken Sie dann auf v oder V, um Ein auszuwählen. Durch zweimaliges
S
v oder V die Option
DE
TV-Funktionen
29
Page 78

Info zum „Memory Stick“
Ein „Memory Stick“* ist ein neuartiges Speichermedium mit einer größeren Speicherkapazität als eine
herkömmliche Diskette. Der „Memory Stick“ wurde speziell entwickelt, um den Austausch digitaler Daten
zwischen „Memory Stick“-kompatiblen Geräten zu ermöglichen. Sie können zusammen mit diesem
Fernsehgerät einen „Memory Stick“ verwenden, um Standbilder im Format JPEG (gemäß DCF Version
1.0)** und Videosequenzen (MPEG 1) wiederzugeben.
* “Memory Stick“ und das Logo sind Warenzeichen der Sony Corporation.
** DCF (vom Englischen „Design rules for Camera File systems“ = Regeln für den Aufbau von Kameradateisystemen)
ist die Bezeichnung eines Dateistandards für digitale Fotoapparate, DV-Camcorder u.ä. Dieser Standard wird von
Sony und anderen Herstellern unterstützt.
Einschieben eines „Memory Stick“
Schieben Sie einen „Memory Stick“ in den „MEMORY STICK“
Slot, bis er einrastet (siehe Abbildung).
Schieben Sie den „Memory Stick“ so ein, dass die mit
Seite nach oben und zum „MEMORY STICK“ Slot zeigt.
Die rote Signal-LED des „Memory Stick“ blinkt und zeigt
dadurch an, dass der Inhalt des „Memory Stick“ gelesen wird.
v markierte
Einschieben eines „Memory Stick Duo“
Mit diesem Fernsehgerät können Sie auch einen „Memory Stick Duo“ verwenden.
Stecken Sie den „Memory Stick Duo“ dazu einfach direkt in den „MEMORY
STICK“ Slot.
Anzeigen von Bildern oder Videos von einem „Memory Stick“
Siehe Seiten 31 - 35.
Herausnehmen eines „Memory Stick“
Drücken Sie den „Memory Stick“ nach innen und lassen Sie dann los. Der
„Memory Stick“ wird ausgeworfen. Nehmen Sie den „Memory Stick“ heraus.
Vorsichtsmaßnahmen bei Verwendung eines
„Memory Stick“
• Entfernen Sie den „Memory Stick“ nicht, während
Daten darauf abgelegt oder davon gelesen werden.
• Es wird empfohlen, von wichtigen Daten, die auf
dem „Memory Stick“ gespeichert werden, eine
Sicherungskopie zu erstellen.
• Wenn Sie den Lösch-Sicherungsschalter des
„Memory Stick“ auf Schalterstellung „LOCK“
schalten, können weder Daten aufgezeichnet noch
bearbeitet oder gelöscht werden.
• Durch folgendes Verhalten können Daten beschädigt
werden:
- Entfernen des „Memory Stick“ oder Abschalten
des Fernsehgeräts, während Daten auf dem
„Memory Stick“ abgelegt oder davon gelesen
werden.
- Verwenden des „Memory Stick“ an einem Ort, an
dem er statischer Elektrizität oder elektrischem
Rauschen ausgesetzt ist.
• Der „Memory Stick“ unterstützt nur Dateien im
Format JPEG DCF. Alle Dateien, die ni cht als DCFFormat erkannt werden, werden als „--------“ oder
leer angezeigt. Dateien im Format JPEG DCF, die
“Memory Stick“
30
auf einem PC erstellt oder
geändert wurden, werden auf
dem Fernsehbildschirm evtl.
nicht korrekt angezeigt.
• Bilder, die mit bestimmten
Geräten aufgenommen wurden,
werden möglicherweise auf
diesem Fernsehgerät nicht
angezeigt.
• Sie sollten zusätzlich zu den genannten
Vorsichtsmaßnahmen die Anleitung, die einem
„Memory Stick“ beiliegt, sorgfältig lesen.
Eventuell können auch Bilder von „Memory Stick“
Medien angezeigt werden, die nicht das Sony
Markenzeichen tragen. Dabei ist es jedoch möglich,
dass manche Bilder nicht angezeigt werden können
und bestimmte Funktionen (Drehen o.ä.) nicht
verfügbar sind. Wenn Sie versuchen, einen solchen
Vorgang durchzuführen, wird eine Fehlermeldung
angezeigt.
Fortsetzung...
Page 79

Das Menü Memory Stick Home
Ordnername des
ausgewählten
Ordners
Memory Stick Home
Diaschau
Option
Verzeichnis wählen
1min Restzeit
Auswählen: Eingeben:
Verbleibende
Aufnahmedauer
Zeigt an, dass das
Mosaikbild geschützt ist
(siehe Seite 33).
8903241
Markiertes
Mosaikbild
Dieses Menü gibt eine Übersicht über den Inhalt
des „Memory Stick“. Mit diesem Menü können
Sie Bilder und Videos anzeigen, die auf dem
„Memory Stick“ aufgezeichnet wurden, und
Einstellungen der Darstellungseigenschaften
ändern.
8903241
Führen Sie dazu folgende Schritte aus:
Drücken Sie, nachdem ein „Memory Stick“
eingeschoben wurde, die Taste der
Nr.: 3/16
Grösse: 510 x 480
OK
Informationen zum
ausgewählten Bild
oder Video
Datei: ARIADNA.JPG
Datum:24.May.2002 13:08
Zeigt an, dass das
Mosaikbild ein Video
(MPEG 1) und kein
Einzelbild (JPEG) ist.
Fernbedienung (wenn Sie das Menü ausblenden
möchten, drücken Sie erneut auf die Taste ). Die
einzelnen Optionen und die zugehörigen Einstellungen
werden nachfolgend beschrieben.
EINSTELLUNG DIASCHAU
DIASCHAU
Mit dieser Option können Sie alle Bilder auf dem „Memory Stick“ als Diaschau auf dem
Fernsehschirm anzeigen lassen.
Führen Sie dazu folgende Schritte aus:
Wählen Sie, während das Menü „ Memory Stick Home“ angezeigt wird, mit
Option Diaschau aus. Drücken Sie dann die Taste OK und wählen Sie anschließend mit
oder
V eine der folgenden Einstellungen:
v oder V die
v
Ausführen Damit wird die Diaschau gestartet. Wählen Sie diese Option und drücken Sie
dann auf OK.
Nächstes Damit stellen Sie ein, wie lange ein Bild innerhalb der Diaschau angezeigt wird.
Wählen Sie diese Option und drücken Sie OK. Wählen Sie dann mit
v oder V:
Autom. Wählen Sie diese Option und drücken Sie auf OK, wenn Sie wollen,
dass die Diaschau automatisch abläuft.
Manuell Wählen Sie diese Option und drücken Sie auf OK, wenn Sie die
Diaschau manuell steuern möchten. In diesem Fall muss das nächste
oder vorherige Bild jeweils mit
b bzw. B aufgerufen werden.
Intervall Damit können Sie den Zeitraum pro Einzelbild einstellen (wenn „Nächstes“ auf
„Autom.“ gesetzt ist), wählen Sie diese Option und drücken Sie auf OK. Wählen
Sie dann mit v oder V zwischen den Einstellungen 5sek., 10sek., 30sek., 1min
oder 5min.
Beenden
Wählen Sie diese Option und drücken Sie dann auf OK, um zum vorherigen Menü
zurück zu gehen.
Fortsetzung..
DE
“Memory Stick“
31
Page 80

OPTION
Mit dieser Option können Sie die Bilder in einem Ordner sortieren, die Bilder, die angezeigt werden sollen, f iltern,
alle Bilder löschen sowie Informationen zum „Memory Stick“ abrufen.
Führen Sie dazu folgende Schritte aus:
Wählen Sie, während das Menü „ Memory Stick Home“ angezeigt wird, mit
Sie dann auf die Ta ste OK und wählen Sie anschließend mit
Datei Wählen Sie diese Option und drücken Sie auf OK. Wählen Sie dann mit
Die Optionen „Sortieren“ und „Filter“ sind nur verfügbar, wenn die Option „
DigiCam-Modus“ auf „Aus“ gesetzt ist. Näheres zum „ DigiCam-Modus“ finden Sie
weiter unten.
v oder V eine der folgenden Optionen:
v oder V Option aus. Drücken
v oder V:
Sortieren Wählen Sie diese Option und drücken Sie auf OK. Drücken Sie dann
V, um die Bilddateien alphabetisch oder nach Datum zu ordnen.
Filter Wählen Sie diese Option und drücken Sie dann auf OK. Wählen Sie dann mit
v oder V Standbild (dadurch werden nur die Standbilder auf dem „Memory
Stick“ angezeigt), Film (dadurch werden nur die V ideos auf dem „Memory
Stick“ angezeigt) oder Aus (dadurch werden al l e Bil d er auf dem „Memory
Stick“, d.h. Standbilder und Videos, angezeigt).
Wählen Sie diese Option und drücken Sie dann auf OK, um Informationen über den „Memory
Stick“ anzuzeigen; dazu gehören belegter Speicherplatz, verfügbarer Speicherplatz und
Gesamtkapazität.
Beenden Wählen Sie diese Option und drücken Sie auf OK, um zum vorherigen Menü zurückzukehren.
VERZEICHNIS WÄHLEN
Mit dieser Option können Sie den gewünschten Ordner auf dem „Memory Stick“ auswählen.
Führen Sie dazu folgende Schritte aus:
Wählen Sie, während das Menü „ Memory Stick Home“ angezeigt wird, mit
wählen aus. Drücken Sie dann auf die Taste OK und wählen Sie anschließend mit
Einstellungen:
DigiCam- Wählen Sie diese Option und drücken Sie dann auf OK. Drücken Sie
Modus auszuwählen, wenn alle Bilder angezeigt werden sollen, die mit einer Digitalkamera
aufgenommen wurden, oder wählen Sie Aus , um alle Ordner anzuzeigen, die der „Memory
Stick“ enthält. Bestätigen Sie die Auswahl mit der Taste OK .
v oder V die OptionVerzeichnis
v oder V eine der folgenden
v oder V, um Ein
v oder
/ Wählen Sie diese Option und drücken Sie dann auf
Wählen Sie mit
Taste OK.
v oder V den Ordner aus, den Sie anzeigen möchten, und drücken Sie die
b, um die Liste der Ordner anzuzeigen.
O Wählen Sie diese Option und drücken Sie dann auf OK, um eine Ordnerebene höher zu gehen.
Beenden Wählen Sie diese Option und drücken Sie dann auf OK, um zum vorherigen Men ü
zurückzukehren.
Fortsetzung...
“Memory Stick“
32
Page 81

WIEDERGABE VON PHOTOS UND VIDEOS
Führen Sie dazu folgende Schritte aus:
1 Drücken Sie, während das Menü „ Memory Stick Home“ angezeigt wird, b, um die Mosaikbilder
anzuzeigen. Wählen Sie dann mit
B, b, v oder V das gewünschte Mosaikbild aus.
2 Drücken Sie, während das gewünschte Mosaikbild markiert ist, OK, um es zusammen mit allen verfügbaren
Optionen anzuzeigen. Wählen Sie mit
Volle Größe Diese Option wird nur angezeigt, wenn das ausgewählte Mosaikbild ein Foto ist. Wählen
(bei Fotos) Sie diese Option und drücken Sie dann auf OK, um das ausgewählte F oto bildschirmfüllend
anzuzeigen.
• Das Fernsehgerät zeigt jedes Bild automatisch bildschirmfüllend an.
• Die Bildqualität hängt von der Auflösung der JPG-Datei ab.
Wenn Sie ein Foto bildschirmfüllend anzeigen, können Sie:
1 b oder B drücken, um die nächste oder vorherige Datei anzuzeigen.
2 OK drücken, um auf folgende zusätzliche Optionen zuzugreifen:
Zurück Wählen Sie diese Option und drücken Sie auf OK, um zum Menü
v oder V:
„ Memory Stick Home“ zurückzukehren.
Information Wählen Sie diese Option und drücken Sie auf OK. Drücken Sie dann
v oder V, um Ein auszuwählen, wenn Sie alle Informationen über
die ausgewählte Datei anzeigen möchten, oder Aus auszuwählen, um
diese Informationen auszublenden. Drücken Sie anschließend auf
Beenden, um zu speichern.
Schutz Wählen Sie diese Option und drücken Sie auf OK. Wählen Sie dann
Drehen Diese Option ist nur für ungeschützte Standbilder (Fotos) verfügbar.
Löschen Diese Option ist nur für ungeschützte Dateien verfügbar. Wählen Sie
Beenden Wählen Sie diese Option und drücken Sie auf OK, um zum
mit
v oder V Ein aus, wenn Sie das ausgewählte Mosaikbild vor
Änderungen schützen möchten, oder wählen Sie Aus aus, um den
Schutz der Datei zu entfernen. Drücken Sie Beenden, um zu
speichern.
Alle geschützten Dateien sind durch das Symbol
gekennzeichnet.
Wählen Sie diese Option und drücken Sie auf OK. Wählen Sie mit v
oder
V aus, wenn Sie das Bild im Uhrzeigersinn drehen
möchten, oder wählen Sie aus, wenn Sie es entgegen dem
Uhrzeigersinn drehen möchten. Drücken Sie dann wiederholt OK,
um das Foto zu drehen (bei jedem Tastedruck auf OK wird das Bild
um 90 Grad gedreht). Wählen Sie anschließend Beenden, um zu
speichern.
diese Option und drücken Sie auf OK, wenn Sie die ausgewählte
Datei löschen möchten. Eine Bestätigungsaufforderung für den
Löschvorgang wird eingeblendet. Drücken Sie
auszuwählen, und drücken Sie OK, um zu bestätigen.
vorherigen Menü zurückzukehren.
b oder B um Ja
DE
Fortsetzung...
“Memory Stick“
33
Page 82

Movie Player Diese Option wird nur angezeigt, wenn das ausgewählte Mosaikbild ein Video ist (bzw.
(fürVideos) durch das Symbol gekennzeichnet ist).
Wählen Sie diese Option und drücken Sie auf OK, um den Movie Player zu bedienen.
Drücken Sie dann
Z
urück
B, b, v oder V, um eine der folgenden Optionen auszuwählen:
Wählen Sie diese Option und drücken Sie auf OK, um zum Menü „ Memory
Stick Home“ zurückzukehren.
Wählen Sie diese Option und drück en Sie OK, um das Video abzuspielen. Sie
können diese Option während der Wiedergabe erneut auswählen und
um das Video anzuhalten.
OK
drücken,
Volle Größe
Menü
Drücken Sie, während der Wiedergabemodus aktiviert ist, auf
Fernbedienung, und halten Sie die Taste gedrückt, um den schnellen Rücklauf zu
aktivieren. Wenn Sie die Taste loslassen, wird die W iedergabe fortgesetzt.
Drücken Sie, während der Wiedergabemodus aktiviert ist, auf b der
Fernbedienung, und halten Sie die Taste gedrückt, um den schnellen V orlauf zu
aktivieren. Wenn Sie die Taste loslassen, wird die W iedergabe fortgesetzt.
B
W enn Sie
ist, wird das nächste bzw . vo rherige Foto oder Video angezeigt.
Wählen Sie diese Option und drück en Sie OK, um das Video zu stoppen.
Wählen Sie diese Option und drück en Sie dann auf OK, um das Video
bildschirmfüllend abzuspielen.
• Um die Bedienelemente des Movie Player wieder einzublenden, drücken
Sie
• Das Fernsehgerät zeigt jedes Video automatisch in angemessener Größe an.
• Die Bildqualität hängt von der Auflösung der betreffenden MPEG 1 Datei ab.
Wählen Sie diese Option und drücken Sie auf OK. Ein neues Menü wird
eingeblendet. Drücken Sie dann
Information
Schutz
oder b drücken, bev or das Video im Wiederga bemodus
B, b, v
oder
V oder
OK
.
v
oder
V , um eine Option auszuwählen:
Wählen Sie diese Option und drücken Sie auf OK. Drücken
Sie dann
Informationen über die ausgewählte Datei anzeigen möchten,
oder
Wählen Sie diese Option und drücken Sie auf OK. Wählen Sie
dann mit
Mosaikbild vor Änderungen schützen möchten, oder wählen
Sie
Sie
v
oder
V, um
Ein
auszuwählen, wenn Sie alle
Aus
auszuwählen, um diese Informationen auszublenden.
v
oder
V
Ein
aus, wenn Sie das ausgewählte
Aus
aus, um den Schutz der Datei zu entfernen. Drücken
Beenden
, um zu speichern.
Alle geschützten Dateien sind durch das Symbol .
B
der
Löschen
Beenden
Diaschau Wählen Sie diese Option und drücken Sie auf OK, wenn Sie wollen, dass alle Videos und
Fotos im ausgewählten Ordner als Diaschau angezeigt werden sollen.
34
“Memory Stick“
Diese Option ist nur für ungeschützte Dateien verfügbar.
Wählen Sie diese Option und drücken Sie auf
die ausgewählte Datei löschen möchten. Eine
Bestätigungsaufforderung für den Lö schv or gang wird
eingeblendet. Drücken Sie
und drücken Sie
Wählen Sie diese Option und drücken Sie auf OK, um
vorherigen Menü zurückzukehren
OK
B
oder b, um Ja auszuwählen,
, um zu bestätigen.
OK
, wenn Sie
zum
Fortsetzung...
Page 83

Schutz Wählen Sie diese Option und drücken Sie auf OK. Wählen Sie dann mit v oder V Ein aus,
wenn Sie die ausgewählte Mosaikbilddatei v or Änderungen schützen möchten, oder wählen Sie
Aus aus, um den Schutz der Datei zu entfernen. Wählen Sie dann mit v oder V Beenden aus,
um zu speichern.
Alle geschützten Dateien sind durch das Symbol gekennzeichnet.
Drehen Diese Option ist nur für ungeschützte Standbilder (Fotos) verfügbar. Wählen Sie diese Option
und drücken Sie dann auf OK. Wählen Sie mit
Uhrzeigersinn drehen möchten, oder wählen Sie aus, wenn Sie es entgegen dem
Uhrzeigersinn drehen möchten. Drücken Sie dann wiederholt OK, um das Foto zu drehen (bei
jedem Tastedruck auf OK wird das Bild um 90 Grad gedreht). Wählen Sie anschließend
Beenden, um zu speichern.
Löschen Diese Option ist nur für ungeschützte Mosaikbilddateien verfügbar. Wählen Sie diese Option
und drücken Sie auf OK, wenn Sie das ausgewählte Video oder Foto löschen möchten. Eine
Bestätigungsaufforderung für den Löschvor gang wird eingeblendet. Drücken Sie
Ja auszuwählen, und drücken Sie OK, um zu bestätigen.
Beenden Wählen Sie diese Option und drücken Sie auf OK, um zum vorherigen Menü zurückzukehren.
v oder V aus, wenn Sie das Bild im
B oder b, um
DE
“Memory Stick“
35
Page 84

Videotext
Videotext ist ein Informationsdienst, der von den meisten Fernsehsendern übertragen wird. Das Inh altsverzeichnis
des Videotextdienstes (im Allgemeinen Seite 100) enthält Informationen dazu, wie dieser Dienst verwendet wird.
Verwenden Sie zur Anwendung des Videotextes die Tasten der Fernbedienung, gemäß der folgenden Anleitungen.
Fehler im Videotext können auftreten, wenn die Signale des betreffenden Senders zu schwach sind.
So schalten Sie Videotext ein:
1 Wählen Sie den Fernsehkanal, auf dem der
gewünschte Videotext-Dienst übertragen wird.
2 Drücken Sie die Taste , um in den PAT- ( vom
13
46
7
9
Englischen „Picture And Text“ = Bild und Text)
Modus zu schalten. Der Bildschirm wird nun in zwei
Bilder geteilt: das linke Bild zeigt die Videotextseiten
und das Bild rechts unten das Fernsehprogramm.
Während der P A T -Modus akti viert ist, können Sie die Bildgröße mit der Zoom-Funktion
verändern. Drücken Sie dazu
Sie durch Drücken von OK ausgetauscht werden.
v oder V. Wenn sich beide Bilder überlappen, können
3 Wenn Sie die Vollbildanzeige für Videotext aufrufen möchten, drücken Sie erneut die Taste .
So wählen Sie eine Videotextseite aus:
Geben Sie mit den Zahlentasten drei Ziffern für die Seitenzahl ein.
• Wenn Sie einen Fehler gemacht haben, geben Sie einfach die korrekte Seitenzahl neu ein.
• Wenn der Seitenzähler auf dem Bildschirm nicht anhält, ist die gewünschte Seite nicht
verfügbar. In diesem Fall geben Sie eine andere Seitennummer ein.
So wählen Sie die nächste oder die davor liegende Seite aus:
Drücken Sie die Taste PROG + ( ) oder PROG - ( ).
So halten Sie eine Videotextseite an:
Drücken Sie die Taste / . Drücken Sie die Taste erneut, wenn Sie das Standbild beenden
möchten.
So wählen Sie eine Folgeseite aus:
Eine Videotextseite kann mehrere Folgeseiten umfassen. In diesem Fall werden neben der
Seitennummer ein oder mehrere Pfeile eingeblendet. Drücken Sie
Bildrand ein Informationsfeld einzublenden, das die Anzahl der verfügbaren Folgeseiten angibt.
Wenn Folgeseiten vorhanden sind, werden sie automatisch nacheinander angezeigt. Wenn Sie
den automatischen Ablauf stoppen möchten, wählen Sie die gewünschte Seite der Folge durch
wiederholtes Drücken der Taste
So schalten Sie den Videotext aus:
Drücken Sie die Taste .
B oder baus.
B oder b, um am unteren
TopText*/Fastext*
* (Hängt von der Verfügbarkeit dieses Dienstes ab). TopText/Fastext-Dienst erlaubt, die
Videotext-Seiten durch Betätigen einer einzigen Taste au fzurufen.
Wenn Sie Videotext betrachten und TopText/Fastext-Signale übertragen werden,
erscheint unten auf der Bildschirmseite ein farbiges Kode-Menü, das Ihnen den direkten
Zutritt zu einer Seite erlaubt. Drücken Sie hierzu die entsprechende Farbtaste (rot, grün,
gelb oder blau) der Fernbedienung.
36
Videotext
Page 85

NexTView*
*(Hängt von der Verfügbarkeit dieses Dienstes ab).
NexTView ist ein elektronischer Programmführer, der Information über die Programme verschiedener Fernsehsender beinhaltet.
Sie können damit ein Thema (Sport, Kunst, usw.) oder ein Datum angeben und Information über die zugehörigen Sendungen
suchen.
Falls beim Verwenden von NexTView falsche Schriftzeichen erscheinen, rufen Sie anhand des Menüsystems (siehe
Seite 26) das Menü „Sprache“ auf und wählen Sie dieselbe Sprache, in der NexTView gerade gesendet wird.
Anzeigen von NexTView
1
Wählen Sie einen Fernsehsender, der den Dienst NexTView überträgt. In diesem Fall erscheint die
Anzeige „NexTView“ auf dem Bildschirm, sobald die Information zur V erfügung steh t.
2
Zur Darstellung des NexTView-Dienstes gibt es zwei unterschiedliche B enutzeroberflächen, die in
Abhängigkeit der geladenen Datenmenge automatisch gewählt werden:
a)
“Programmliste“:
Während Sie fernsehen und nachdem in orange die Anzeige „NexTView“ auf dem
Bildschirm erschienen ist, betätigen Sie die Taste der Fernbedienung, um die
„Programmliste“ (siehe Abb. 1) zu sehen.
b)
“Übersicht“:
Während Sie fernsehen und nachdem mehr als 50% der Daten von NexTView zur Verfügung
stehen (die 100%-ige Menge der Daten ist möglicherweise je nach Empfangsbereich nicht
voll verfügbar), erscheint auf dem Bildschirm die Anzeige „NexTView“ in Schwarz. Drücken
Sie die Taste der Fernbedienung, um die „Übersicht“ (siehe Abb. 2) zu sehen.
3 So navigieren in NexTView:
• Drücken Sie die Taste
• Drücken Sie die Taste
• Drücken Sie zur Bestätigung der Auswahl die Taste OK.
• Drücken Sie nach der Auswahl des gewünschten Programms auf die Taste OK, um mehr
Informationen dazu aufzurufen.
4 Mit der Taste der Fernbedienung schalten Sie NexTView aus.
„Programmliste“ (Abb. 1): „Übersicht“ (Abb. 2):
1 Programmliste 2 3
Symbol:
Allgemein:
Alle Programminformationen werden in zeitlicher
Reihenfolge und nach Sendern geordnet aufgeführt.
Nachrichten
Film
Sport
1
Praesentiert von
Ihrer Programmzeitschr
Do 12
AttrText
AttrText
AttrText
AttrText
AttrText
AttrText
Perry Mason
RTL2
Krimiserie - Der Fall mit dem mittelmass
14:30
www.tvmovie.de
15:00
Di 17 Jun 14:55 - 16:30
Wählen:
2
Datum
Drücken Sie die rote Taste der
Fernbedienung, um das Menü für
Datumsauswahl anzuzeigen. Wählen Sie
mit der Taste v oder V das gewünschte
Datum aus. Bestätigen Sie die Einstellung
mit der Taste OK.
B oder b, um den Cursor nach recht bzw. links zu bewegen.
v oder V, um den Cursor nach oben bzw. unten zu bewegen.
15:30
AttrText16
AttrText16
AttrText16
AttrText16
AttrText16
AttrText16
Do 12 Jun
16:00
Allgemein
KategorieDatum
14:36
3
Unterhaltung
Kinder
Künste
Musik
1
Praesentiert von
Ihrer Programmzeitschr
Do 12
AttrText
AttrText
AttrText
AttrText
AttrText
AttrText
Perry Mason
RTL2
Krimiserie - Der Fall mit dem mittelmass
Datum
14:30
Auf schlimmer undewig
Baywatch
Benny Hill
The Osbournes
Segeln: Louis Vuitton Cup
Twilight Zone
www.tvmovie.de
15:00
Perry Mason
Di 17 Jun 14:55 - 16:30
Wählen:
15:30 16:00
2
Kategorien:
Drücken Sie die blaue Taste der Fernbedienung,
um die Symbole für die verschiedenen Kategorien
anzuzeigen (siehe unter dem Kategoriensymbol).
Drücken Sie dann auf v oder V, um das
gewünschte Symbol auszuwählen und bestätigen
Sie zum Abschluss mit der Taste OK.
Do 12 Jun
Allgemein
Kategorie
3
DE
14:36
NexTView
37
Page 86

“
g
Anschließen von Geräten an das Fernsehgerät
• Anhand der folgenden Anweisungen können Sie viele verschiedene Zusatzgeräte an das Fernsehgerät anschließen.
• Die Anschlusskabel werden nicht mitgeliefert.
Bass-Lautsprecher
(Woofer)
D
G
H
I
J
K
Videorecorder
A
B
C
8mm/Hi8/
DVC
Camcorder
Um Bildstörungen zu
vermeiden, sollten Sie Geräte
nicht gleichzeitig an die
Buchsen A und B
anschließen.
(MONO)
L/G/S/I
R/D/D/D
S VHS/Hi8/
DVC
Camcorder
HiFi-Anlage
E
F
AV-Kompaktsystem
bzw. Verstärker
2
PlayStation
DVD
„PlayStation“*
DVD-Recorder mit Signalformat „Component
Si
nal“
Pay-TVDekoder
* „PlayStation“
ist ein Produkt
von Sony
Computer
Entertainment,
Inc.
* „PlayStation“
ist ein
Warenzeichen
von Sony
Computer
Entertainment,
Inc.
Anschluss eines Videorecorders
Eine Anleitung zum Anschließen eines Videorecorders finden Sie im Abschnitt „Anschluss der Antenne und eines
Videorecorders“ auf Seite 14 dieses Handbuchs.
Anschluss eines Videorecorders oder DVD-Ge räts, das SmartLink unterstützt
Die SmartLink-Schnittstelle ermöglicht eine direkte Verbindung zwischen dem Fernsehgerät und einem
SmartLink-kompatiblen Video- oder DVD-Recorder. Weitergehende Hinweise zu SmartLink schlagen Sie
bitte in der Bedienungsanleitung Ihres SmartLink Video- oder DVD-Recorders nach.
Wenn Sie einen Video- oder DVD-Recorder benutzen, der SmartLink unterstützt, sollten Sie ihn mit einem
Scartkabel an den Scart-Anschluss 2/ J oder 3/ K des Fernsehgeräts anschließen.
Die beiden Scart-Anschlüsse 2/ J und 3/ K unterstützen einzeln SmartLink, jedoch nicht
S
S
beide gleichzeitig. Wenn Sie an beiden Scart-Anschlüssen einen Video- oder DVD-Recorder anschließen,
müssen Sie anhand der Option „SmartLink“ im Menü „Sonderfunktionen“ festlegen, welcher der Anschlüsse
SmartLink unterstützen soll. Näheres dazu finden Sie auf Seite 23.
Wenn bereits ein Dekoder oder eine Set-Top-Box an den Scart-Anschluss 3/ K
S
oder an einen Videorecorder angeschlossen ist, der mit diesem Scart-Anschluss
verbunden ist
Wählen Sie im Menü „Grundeinstellungen“ die Option „Manuell abspeichern“ aus und wählen Sie dort für die
Option „Dekoder**“ die Einstellung „Ein“ (Näheres dazu finden Sie auf Seite 29). Verfahren Sie so für jedes
verschlüsselte Signal.
**Die Verfügbarkeit dieser Option ist von der Einstellung abhängig, die für „Land“ ausgewählt wurde.
Fortsetzung...
38
Zusatzinformationen
Page 87

Anschluss eines DVD-Players oder -Recorders
Schließen Sie den DVD-Player oder -Recorder an Scart-Anschluss 2/ J an.
Anschluss eines DVD-Recorders mit 576p-Signal
Bestimmte DVD-Recorder arbeiten mit dem Signalformat 576p. Sollte dies bei Ihrem Gerät der Fall sein, schließen
Sie den DVD-Recorder an Scart-Anschluss
Videosignal-Eingänge Y, P
, PR/CR 4 H an.
B/CB
2/ J sowie an die Audioeingänge 4 G und die
Wenn diese Verbindung genutzt wird, zeichnet das Fernsehgerät vom AV2-Eingang (Scart-Anschluss
2/ J) auf.
Um das Eingangssignal anzuzeigen, können Sie zwischen AV2 (Scart-Anschluss
(Audioeingänge 4 G und Videosignal-Eingänge 4 H) wählen. Um die beste Bildqualität zu
erzielen, wird empfohlen AV4 auszuwählen.
2/ J) oder AV 4
Anschließen von Audiogeräten an das Fernsehgerät
So können Sie den Ton vom Fernsehgerät über eine HiFi-Anlage wiedergeben.
Schließen Sie Ihre Audioanlage an die Audioausgänge E an, wenn das vom Fernsehgerät kommende Tonsignal
verstärkt werden soll. Rufen Sie danach im Menüsystem das Menü „Ton-Einstellungen“ auf und setzen Sie die
Option „TV Lautsprecher“ auf „Aus“ (siehe Seite 21).
• Wenn Sie die Lautstärke der externen Lautsprecher mit der Fernbedienung steuern möchten, setzen Sie die
Option „Audio Ausgang“ im Menü „Ton-Einstellungen“ auf „Variabel“ (siehe Seite 21).
• Die Lautstärke der externen Lautsprecher kann durch die Lautstärketasten der Fernbedienung geändert werden.
Sie können auch die Höhen- und Tiefeneinstellung über das Menü „Ton-Einstellungen“ ändern (siehe Seite 20).
Wenn Sie einen Bass-Lautsprecher (Woofer) verwenden
HiFi-Lautsprecher
Schließen Sie Ihren Bass-Lautsprecher (Woofer) mit einem monauralen
Kabel an den Ausgängen 5 W/G/W/G D an.
So nutzen Sie die „Dolby Virtual“ Klangeffekte über
ihre HiFi-Anlage
Ordnen Sie die Lautsprecher Ihrer Anlage vor Ihrer Sitzposition und neben
~50°
dem Fernsehgerät an.
Rufen Sie danach im Menüsystem das Menü „Ton-Einstellungen“ auf. Setzen
Sie die Option „Audio Ausgang“ auf „Variabel“ und die Option „Sound
Effekt“ auf „Dolby Virtual“ (siehe Seite 20 und 21).
So regeln Sie die Lautstärke eines externen Verstärkers
Ihre Sitzposition
Wenn Sie die AV-Maus anschließen und an einem externen Verstärker anbringen, können Sie die Fernbedienung
des externen Verstärkers in Richtung des Fernsehgerät ausrichten und damit die Lautstärke des externen Verstärkers
regeln. Verbinden Sie die AV-Maus mit dem Anschluss AV-MOUSE IN F und bringen Sie sie direkt über dem
Infrarot-Sensor des externen Verstärkers an.
AV-Maus (wird
mitgeliefert)
Verstärker
Sensor für Signale der
Fernbedienung
DE
Fortsetzung...
Zusatzinformationen
39
Page 88

Anzeigen eines Bildes, das von einem
angeschlossenen Gerät kommt
1 Schließen Sie die Geräte wie auf Seite 38 angegeben an die Anschlüsse des Fernsehgeräts an.
2 Schalten Sie das angeschlossene Gerät ein.
3 Um das Bild von einem angeschlossenen Gerät anzuzeigen, drücken Sie wiederholt auf die
Taste , bis auf dem Bildschirm das Symbol für die betreffende Signalquelle eingeblendet
wird.
Symbol Eingangssignale
1 • Audio-/Videoeingangssignal über den Scart-Anschluss I.
1 • RGB-Eingangssignal über den Scart-Anschluss I. Dieses Symbol erscheint
nur, wenn am Fernsehgerät eine RGB-Signalquelle angeschlossen ist.
2 • Audio-/Videoeingangssignal über den Scart-Anschluss J.
2 • RGB-Eingangssignal über den Scart-Anschluss J. Dieses Symbol erscheint
nur, wenn am Fernsehgerät eine RGB-Signalquelle angeschlossen ist.
3 • Audio-/Videoeingangssignal über den Scart-Anschlussr K.
S
3 • S-Video-Eingangssignal über den Scart-Anschluss K. Dieses Symbol
erscheint nur, wenn am Fernsehgerät eine S-Video-Signalquelle angeschlossen
ist.
4 • Bildkomponenten-Eingangssignal über die Anschlüsse Y, P
Audioeingangssignal über G.
5 • Videoeingangssignal über die Cinch-Buchse B und Audioeingangssignal über
C.
S
5 • S-Video-Eingangssignal über den seitlichen S-Video-Eingang A und
Audiosignal über C. Dieses Symbol erscheint nur, wenn am Fernsehgerät eine
S-Video-Signalquelle angeschlossen ist.
, PR/CR, H und
B/CB
Zusatzinformationen
40
4 Drücken Sie die Taste der Fernbedienung, um zum normalen Fernsehbild zurückzukehren.
Anschließen von Mono-Geräten
Schließen Sie den Audio-Cinchstecker an die Buchse L/G/S/I an der Seite des Fernsehgeräts an,
und wählen Sie wie vorstehend beschrieben das Eingangssignal 5 oder 5. Schlagen Sie
dann im Abschnitt „Ton-Einstellungen“ in diesem Handbuch nach, und setzen Sie im Menü für
Ton-Einstellungen die Option „Zweiton“ auf die Einstellung „A“ (siehe Seite 20).
S
Page 89

Konfiguration der Fernbedienung für Video und DVD
In ihrer Standardkonfiguration steuert diese Fernbedienung die Grundfunktionen dieses Sony Fernsehgeräts, eines
Sony DVD-Players und der meisten Sony Videorecorder. Um Videorecorder und DVD-Player anderer Marken (und
bestimmte Videorecorder von Sony) ansteuern zu können, muss die Fernbedienung konfiguriert werden.
Abb. 2
13
46
7
Führen Sie dazu folgende Schritte aus:
1
9
2 Geben Sie mit den Zahlentasten der Fernbedienung (siehe Abb. 2), während
3 Schalten Sie den V ideorecorder oder DVD-Player ein und kontrollieren Sie, ob
4 Vergessen Sie nicht, so oft die Taste T oder t zu drücken, bis die grüne LED für das betreffende
• Suchen Sie als Erstes den dreistelligen Code des betreffenden Geräts in der nachstehenden Liste.
Wenn zu der betreffenden Marke mehrere Codes angegeben sind, geben Sie den ersten Code ein.
• Sony ist bemüht, die Software bei Bedarf auf den neuesten Stand zu bringen. Beachten Sie aus
diesem Grund bitte die Codetabelle, die Sie mit Ihrer Fernbedienung erhalten haben.
• Sie können die für Sie gültigen Gerätecodes auf einem an der Innenseite der
Batteriefachabdeckung angebrachten Aufkleber notieren.
Drücken Sie die Taste T
der Fernbedienung ca. 6 Sekunden lang, bis die grünen
Medienauswahl-LEDs DVD und VCR anfangen zu blinken (siehe Abb. 1).
die LEDs VCR und DVD blinken, den dreistelligen Code für die Marke Ihres
Videorecorders bzw. DVD-Players (siehe die folgende Liste) ein.
Wenn der ausgewählte Code korrekt eingegeben wurde, leuchten die
grünen LEDs VCR bzw. DVD kurz auf (je nach Ihrer Auswahl) (siehe
Abb. 3).
sich die Hauptfunktionen bedienen lassen (Wiedergabe, Stop, Zurückspulen,
Vorspulen und Kanalwahl für den V ideorecorder und die DVD-Geräte sowie
6 sek.
Abb. 1
V
T
R
C
V
MODE
Abb. 3
T
R
C
V
MODE
D
V
D
A
U
X
D
V
V
D
A
U
X
Menü- und Cursortasten bei DVD-Geräten).
• Falls Ihr Gerät oder einige Funktionen nicht funktionieren, prüfen Sie, ob Sie den richtigen
Code eingegeben haben bzw. versuchen Sie es mit dem nächsten Code, der zu der
betreffenden Marke aufgeführt ist.
• Die Liste deckt nicht alle Marken und möglicherweise nicht alle Typen einer Marke ab.
Gerät leuchtet, das mit der Fernbedienung bedient werden soll: VCR (für Videorecorder), TV oder
DVD. Näheres dazu finden Sie auf den Seiten 42 - 43 im Abschnitt über den AUX-Modus.
DE
Markenliste für Videorecorder Markenliste für DVD-Player
Marke Code Marke Code
SONY (VHS) 301, 302, 303, 308, 309,362
SONY (BETA) 303, 307, 310
SONY (DV) 304, 305, 306
AIWA 325, 331, 351
AKAI 326, 329, 330
DAEWOO 342, 343
GRUNDIG 358, 355, 360, 361, 320, 351, 366
HITACHI 327, 333, 334
JVC 314, 315, 322, 344, 352, 353, 354, 348, 349
LG 332, 338
LOEWE 358, 355, 360, 361, 320, 351
MATSUI 356, 357
ORION 328
PANASONIC 321, 323
PHILIPS 311, 312, 313, 316, 317, 318, 358, 359,
363, 364
SAMSUNG 339, 340, 341, 345
SANYO 335, 336
SHARP 324
THOMSON 319, 350, 365
TOSHIBA 337
SONY 001, 029, 030, 036, 037, 038, 039, 040,
041, 042, 043, 044, 053, 054, 055
AIWA 021
AKAI 032
DENON 018, 027, 020, 002
GRUNDIG 009, 028, 023, 024, 016, 003
HITACHI 025, 026, 015, 004, 035
JVC 006, 017
KENWOOD 008
LG 015, 014, 034
LOEWE 009, 028, 023, 024, 016, 003
MATSUI 013, 016
ONKYO 022, 033
PANASONIC 018, 027, 020, 002, 045, 046, 047
PHILIPS 009, 028, 023, 024, 016, 003, 031
PIONEER 004, 050, 051, 052
SAMSUNG 011, 014
SANYO 007
SHARP 019, 027
THOMSON 012
TOSHIBA 003, 048, 049
YAMAHA 018, 027, 020, 002
Zusatzinformationen
41
Page 90

Übernahme von Funktionen anderer Fernbedienungen
Um die Zahl der benötigten Fernbedienungen zu begrenzen, ist diese Fernbedienung in der Lage, zusätzliche
Funktionen zu übernehmen. Nachdem sie wie im Folgenden beschrieben eingestellt wurde, kann sie an Stelle anderer Fernbedienungen verwendet werden.
Es wird empfohlen, die übernommenen Funktionen für die einzelnen Tasten schriftlich festzuhalten (Sie können
dazu die Tabelle, die der Fernbedienung beiliegt, verwenden).
Bevor Sie beginnen, sollten Sie die folgende Anleitung aufmerksam lesen:
• Wählen Sie die Taste aus (a-g), die eine zusätzliche Funktion übernehmen soll. In Abb. 3 können Sie die betreffenden Tasten sehen.
• Bewegen Sie die Fernbedienungen während des Funktionsübernahme-Verfahrens nicht.
• Achten Sie darauf, die Taste, die eine zusätzliche Funktion übernehmen soll, so lange gedrückt zu halten, bis
die Fernbedienung wie angegeben reagiert.
• Verwenden Sie in beiden Fernbedienungen neue Batterien.
• Führen Sie das Funktionsübernahme-Verfahren an einer Stelle ohne direktes Sonnenlicht und ohne starkes
Licht von Leuchtstofflampen durch.
• Geräusche können das Funktionsübernahme-Verfahren beeinträchtigen.
• Der Detektorbereich von Fernbedienungen kann unterschiedlich sein. Wenn die Funktionsübernahme nicht
funktioniert, ordnen Sie die beiden Fernbedienungen an ders an.
• Bestimmte Fernbedienungssignale können u.U. nicht übernommen werden.
• Wenn innerhalb des Funktionsübernahme-Verfahrens zwischen den einzelnen Schritten Pausen auftreten, die
länger sind als 20 Sekunden, wird der Funktionsübernahme-Modus automatisch beendet.
Abb. 3
Tast en, die zusätzl iche
Funktionen
übernehmen können
a
b
AUX/VIDEO
13
46
7
c
d
e
f
1
Ordnen Sie die Fernbedienungen wie dargestellt an (sieh e Abb. 1).
2
Drücken Sie die Taste t der Fernbedienung des Fernsehgeräts ca. 6
Sekunden lang, bis die grüne LED
3
Drücken Sie auf der Fernbedien ung des Fernsehg eräts die Taste, die die
AUX
anfängt zu blinken (siehe Abb. 2).
Fernbedienung
dieses Fernseh-
zusätzliche Funktion übernehmen so ll (siehe Abb . 3).
Danach leuchten die LEDs VCR, TV, DVD und AUX nacheinander auf
(siehe Abb. 4).
4
9
Drücken Sie die Taste der anderen Fernbedienung, der en Funktion die Fernbedien ung
des Fernsehgeräts übernehmen soll.
• Während der Datenübertragung leuchten alle vier LE Ds gleichzeitig (sieh e Abb. 5).
g
• Nach Abschluss der Datenübertragun g beginnt die grün e LED AUX
zu blinken (siehe Abb. 6).
5
Wenn die Fernbedienung weitere Funktionen übernehmen soll, wiederholen Sie die
Schritte 2-4 (lesen Sie zuvor jedoch untenste henden Warnh inweis), gehen S ie
andernfalls zu Schritt 6.
• Wenn Sie eine Taste auswählen, d ie bereits eine zusätzliche F unktion
übernommen hat, blinken kurzze itig alle vier LED s und die
Fernbedienung wird in den Zustand von Schritt 2 versetzt, wobei d ie LED
AUX blinkt.
• Wenn Sie eine Taste auswählen, d ie keine zusätzliche Fun ktion
übernehmen kann, bleibt die Fernbedie nung im Zusta nd von Schritt 2,
wobei die LED AUX blinkt.
Abb. 1
2 - 3 cm
R
C
V
MODE
R
C
V
Abb. 5
R
C
V
Andere Fernbedienung
Abb. 2
D
V
V
D
T
Abb. 4
D
V
T
MODE
D
V
V
T
MODE
A
U
X
6 sek.
V
D
A
U
X
D
A
U
X
Zusatzinformationen
42
6
Drücken Sie die Taste t , um das Funktionsübernahme-Verfah ren zu beenden.
7
Prüfen Sie, ob die betreffenden Funktion en korrekt überno mmen wur den.
• Um anschließend eine übernommene Fun ktion einzusetzen, d rücken
Sie T oder t, um
• Vergessen Sie nicht, so oft d ie Taste
AUX
auszuwählen und drücken Sie dann d ie betreffende Taste .
T
oder t
zu drücken, bis die grüne LED
für das betreffende Gerät leuchtet, das mit de r Fernbedienung b edient werden soll:
Videorecorder
), TV
(Fernsehgerät),
DVD
( DVD-Player) oder
AUX
Abb. 6
D
V
T
R
C
V
MODE
VCR
(für
(ein weiteres Zusatzgerät).
Fortsetzung...
V
D
A
U
X
Page 91

Löschen einer übernommenen Funktion
1 Drücken Sie die Taste t und halten Sie sie ca. 6 Sekunden lang gedrückt, bis die grüne
LED AUX anfängt zu blinken (siehe Abb. 7).
2 Drücken Sie, während Sie die Taste % gedrückt halten, die Taste (a - g), deren
übernommene Funktion gelöscht werden soll (siehe Abb. 8).
Alle vier LEDs leuchten gleichzeitig (siehe Abb. 9) und nach dem Löschen der
übernommenen Funktion beginnt die grüne LED AUX zu blinken (siehe Abb. 10).
3 Wenn Sie eine neue Funktion speichern möchten, wiederholen Sie die Schritte 3 und 4 der
vorhergehenden Seite. Drücken Sie andernfalls die Taste
zurückzukehren.
t, um zum normalen Betrieb
Abb. 2
D
V
V
T
R
C
V
MODE
Abb. 8
Abb. 9
D
V
T
R
C
V
MODE
Abb. 10
D
V
T
R
C
V
MODE
D
A
U
X
6 sek.
+ a-g
V
D
A
U
X
V
D
A
U
X
Löschen aller übernommener Funktionen
1 Drücken Sie die Taste t und halten Sie sie ca. 6 Sekunden lang gedrückt, bis die grüne
LED AUX anfängt zu blinken (siehe Abb. 11).
2 Drücken Sie, während Sie die Taste % gedrückt halten, die Taste t , um alle
übernommenen Funktionen zu löschen (siehe Abb. 12).
Alle vier LEDs leuchten gleichzeitig (siehe Abb. 13) und nach dem Löschen der
übernommenen Funktionen kehrt die Fernbedienung automatisch in den normalen
Betriebszustand zurück.
Abb. 11
D
V
T
R
C
V
MODE
Abb. 12
Abb. 13
D
V
T
R
C
V
MODE
V
D
A
U
X
DE
6 sek.
V
D
A
U
X
Zusatzinformationen
43
Page 92

Technische Daten
Bildschirmsystem:
Plasmabildschirm
Fernsehnorm:
Abhängig von der Auswahl des
Landes:
B/G/H, D/K, L, I
Farbsystem:
PAL, SECAM
NTSC 3,58, 4,43 (nur Video In)
Antenne:
75 Ohm, externer Anschluss, für
VHF/UHF
Kanalbereich:
VHF: E2-E12
UHF: E21-E69
CATV: S1-S20
HYPER: S21-S41
D/K: R1-R12, R21-R69
L: F2-F10, B-Q, F21-F69
I: UHF B21-B69
Bildsch.-Größe:
• KE-P37XS1: (Diagonale) 37 Zoll
(ca. 94 cm)
• KE-P42XS1: (Diagonale) 42 Zoll
(ca. 107 cm)
Auflösung des Displays:
1024 Punkte (horizontal) x 1024
Zeilen (vertikal)
Stromversorgung:
220 - 240 V Wechselstrom;
50/60Hz
Leistungsaufnahme:
• KE-P37XS1: 312 W
• KE-P42XS1: 370 W
Leistungsaufnahme im Standby-
Betrieb:
1,9 W
Tonwiedergabe:
2 x 15 W (effektiv)
Abmessungen (Breite x Höhe x
Tiefe):
• KE-P37XS1:
ca. 1135 x 692 x 286 mm
• KE-P42XS1:
ca. 1229 x 753 x 286 mm
Gewicht:
• KE-P37XS1:
• KE-P42XS1:
44
Zusatzinformationen
ca. 37,5 kg
ca.
43 kg
Anschlüsse an der Rückseite:
• AV1: 1/
21-poliger Scart-Anschluss
(CENELEC-Norm) einschl.
Audio-/Videoeingang, RGBEingang, TV-Audio-/
Videoausgang
• AV2: 2/ (SMARTLINK;
wählbar)
21-poliger Scart-Anschluss
(CENELEC-Norm) einschl.
Audio-/Videoeingang, RGBEingang, wählbarer Audio-/
Videoausgang und SmartLinkSchnittstelle.
• AV3: 3/ (SMARTLINK;
wählbar)
21-poliger Scart-Anschluss
(CENELEC-Norm) einschl.
Audio-/Videoeingang, S-VideoEingang, wählbarer Audio-/
Videoausgang und SmartLinkSchnittstelle.
• AV4:
• 4: Y:1 Vp-p, 75 Ohm,
• 4: Audioeingang
CINCH)
Modulation),
• AV-MOUSE: Miniklinke
• Audioausgänge (links/rechts) CINCH
• Bass-Lautsprecher-Ausgang
(CINCH)
• Antennenanschluss (HF-
Eingang)
Linke Seite:
• Memory Stick Slot
S
0,3 V negative Sync
PB:0,7 Vp-p, 75 Ohm
PR:0,7 Vp-p, 75 Ohm
500 m Veff (100%
Impedanz: 47 Kiloohm
Änderungen, die dem technischen
Fortschritt dienen, bleiben
vorbehalten.
Dieses Handbuch wurde gedruckt auf:
Öko-Papier - Chlorfrei
Anschlüsse an der rechten Seite:
• AV5:
S
• 5: S-Video-Eingang (4-
negativ
• 5: Videoeingang (CINCH):
negativ
• 5: Audioeingang (CINCH):
• Kopfhöreranschluss
Mitgeliefertes Zubehör:
• 1 Fernbedienung (RM-Y1010)
• 2 Batterien (Größe AA, Typ R03)
• 1 Koaxialkabel
• 1 AV-Maus
• 1 Netzkabel (Typ C-4)
• 1 Netzkabel (Typ BF)
• 1 Netzkabel (Typ C-5)
• 1 Reinigungstuch
• 1 Verbindungskabelstrang
• 2 Schraub-Ösen
Weitere Funktionen:
• Videotext, Fastext, TOPtext
•NexTView
• Abschalttimer
• SmartLink (direkte Verbindung
zwischen Ihrem Fernsehgerät und
einem kompatiblen Video- oder
DVD-Recorder. Weitergehende
Hinweise zu SmartLink schlagen Sie
bitte in der Bedienungsanleitung
Ihres Video- oder DVD-Recorders
nach).
• Automatische Erkennung des TVSystems
• Dolby Virtual
•BBE Digital
• ACI (vom Englischen „Auto Channel
Installation“ = Automatische
Installation von Kanälen).
• AUTO FORMAT
•DRC
Reality Creation“ = Digitale
Realitätserzeugung)
• Fernbedienung mit der Möglichkeit,
zusätzliche Funktionen zu
übernehmen
• Memory Stick (Lesegerät)
polig, Mini-DIN):
Y: 1 Vp-p, 75 Ohm
asymmetrisch, Sync
C: 0,286 Vp-p
(Farberkennungssignal),
75 Ohm
1 Vp-p, 75 Ohm
asymmetrisch, Sync
500 m Veff
Impedanz: 47 Kiloohm
Je nach Land werden die
Netzkabel Typ BF bzw. Typ C-5
u.U. nicht mitgeliefert.
®
(vom Englischen „Digital
Fortsetzung...
Page 93

Störungsbehebung
Im Folgenden finden Sie einige einfache Lösungsvorschläge für Probleme, die möglicherweise Bild und Ton
beeinträchtigen.
TV
Problem Mögliche Lösung
Kein Bild
Kein Bild (Bildschirm ist dunkel)
und kein Ton
Das Fernsehgerät wird automatisch
ausgeschaltet. (Das Fernsehgerät wird in den
Standby-Betrieb geschaltet.)
Kein Bild oder kein Informationsmenü von
Geräten, die am Scart-Anschluss angeschlossen
sind.
Schlechte Bildqualität / Bild instabil
Doppelbild oder Geisterbild • Prüfen Sie die Antennen- und die Kabelverbindungen.
Auf dem Bildschirm ist nur Schnee und
Rauschen zu sehen.
Unterbrochene Linien oder Streifen • Halten Sie das Fernsehgerät fern von Quellen elektrischen
Sendungen in Farbe werden schwarzweiß
angezeigt.
Auf dem Bildschirm sind einige kleine
schwarze und/oder helle
Punkte sichtbar.
Das Bild ist zu hell.
• Überprüfen Sie die Antennenverbindung.
• Schließen Sie das Fernsehgerät an der Stromversorgung an,
und drücken Sie den Netzschalter an der rechten Seite des
Geräts.
• Falls die Anzeige (Standby) leuchtet, drücken Sie die Taste
AUX/VIDEO der Fernbedienung.
• Prüfen Sie, ob der Abschalttimer aktiviert ist (Seite 25).
• Prüfen Sie, ob Auto.Ausschalt aktiviert ist (Seite 25).
• Stellen Sie sicher, dass die Zusatzgeräte eingeschalten sind und
drücken Sie wiederholt die Taste der Fernbedienung, bis
auf dem Bildschirm das richtige Eingangssymbol erscheint
(Seite 40).
• Prüfen Sie die Verbindung zwischen dem Zusatzgerät und dem
Fernsehgerät.
• Prüfen Sie die Lage und die Ausrichtung der Antenne.
• Prüfen Sie, ob die Antenne gebrochen oder abgeknickt ist.
• Prüfen Sie, ob das Ende der Lebensdauer der Antenne erreicht
ist. (3 - 5 Jahre bei normalem Betrieb, 1 - 2 Jahre an der Küste)
Rauschens, wie beispielsweise von Fahrzeugen, Motorrädern
und Föns.
• Rufen Sie im Menüsystem das Menü „Bild-Einstellungen“ auf
und wählen Sie „Normwerte“, um wieder die werkseitigen
Einstellungen zu aktivieren (Seite 19).
• Wenn Sie die Funktion „Energie sparen“ auf „Reduziert“
setzen, werden die Farben des Bildes u.U. schwächer (Seite
22).
• Das Bild auf dem Display besteht aus Pixeln (Bildpunkten).
Kleine schwarze und/oder helle Punkte (Pixel) auf dem
Bildschirm sind nicht Zeichen einer Fehlfunktion.
• Rufen Sie im Menüsystem das Menü „Bild-Einstellungen“ auf
und wählen Sie „Bild-Modus“. Wählen Sie dann den
gewünschten Bild-Modus aus (Seite 18).
• Stellen Sie sicher, dass die Antenne mit dem mitgelieferten
Koaxialkabel angeschlossen wurde.
DE
Bildrauschen (Streifen)
• Verlegen Sie das Antennenkabel nicht neben anderen
Verbindungskabeln.
• Verwenden Sie keine 2-adrigen 300-Ohm-Kabel, da dies zu
Interferenzen führen kann.
Fortsetzung...
Zusatzinformationen
45
Page 94

Problem Mögliche Lösung
Schlechte Bildqualität (starke Weiß-Sättigung),
wenn das Bildsignal von Scart-Anschluss
3/ kommt.
S
• Stellen Sie sicher, dass das Signal von dem Gerät, das an ScartAnschluss 3/ angeschlossen ist, kein RGB-Signal ist.
Falls es sich um ein RGB-Signal handelt, schließen Sie das
Gerät über Scart 1/ oder 2/ an.
Streifenartiges Rauschen bei Wiedergabe/
Aufnahme von einem
Videorecorder.
• Interferenz am Videokopf. Lassen Sie zwischen Videorecorder
und Fernsehgerät Abstand.
• Lassen Sie mindestens 30 cm Abstand zwischen Ihrem
Videorecorder und dem Fernsehgerät, um Rauschen zu
verhindern.
• Vermeiden Sie es, Ihren Videorecorder vor dem Fernsehgerät
oder seitlich davon zu postieren.
Schlechtes oder kein Bild (Bildschirm ist
dunkel), aber guter Ton
• Rufen Sie im Menüsystem das Menü „Bild-Einstellungen“ auf
und wählen Sie „Normwerte“, um wieder die werkseitigen
Einstellungen zu aktivieren (Seite 19).
• Drücken Sie, wenn die blaue LED PICTURE OFF (Bild
aus) leuchtet, die Taste (Bild aus) der Fernbedienung.
Verrauschtes Bild, wenn ein Fernsehbild
empfangen wird.
• Rufen Sie im Menüsystem unter „Grundeinstellungen“ die
Option „Manuell abspeichern“ auf und stellen Sie die
Feinabstimmung (AFT) so ein, dass der Empfang optimal ist
(Seite 28).
• Rufen Sie im Menüsystem das Menü „Bild-Einstellungen“ auf
und stellen Sie die Option „Dyn. NR“ ein, um das Bildrauschen
zu unterdrücken (Seite 19).
Verzerrtes Bild beim Umschalten zwischen
Programmen oder Auswählen von Videotext.
• Schalten Sie alle Geräte aus, die an die Scart-Buchse an der
Rückseite des Fernsehgeräts angeschlossen sind.
S
Auf dem Bildschirm erscheint ein Geisterbild
(Nachleuchten)
• Rufen Sie im Menüsystem das Menü „Sonderfunktionen“ und
dann das Untermenü „Bildschirmschoner“ auf. Setzen Sie die
Option „Weissbild“ auf „Ein“, um das Nachleuchten zu
verringern (siehe Seite 24).
Der Bildschirm flackert beim Einschalten des
Fernsehgeräts.
Beim Verwenden von Videotext erscheinen
falsche Schriftzeichen.
• Dies ist bei einem Plasmabildschirm bauartbedingt und keine
Funktionsstörung.
• Rufen Sie im Menüsystem unter „Grundeinstellungen“ die
Option „Land“ auf und wählen Sie das Land aus, in dem Sie
das Fernsehgerät einsetzen (Seite 26). Für kyrillische Sprachen
wird empfohlen, für „Land“ Russland auszuwählen, wenn Ihr
Land in der Liste nicht aufgeführt ist.
Beim Verwenden von NexTView erscheinen
falsche Schriftzeichen.
• Rufen Sie im Menüsystem unter „Grundeinstellungen“ die
Option „Sprache bzw. Language“ auf und wählen Sie die
Sprache aus, in der NexTView ausgestrahlt wird (Seite 37).
Kein Ton oder stark verzerrter Ton
Gutes Bild, kein Ton • Drücken Sie auf der Fernbedienung 2 +.
• Überprüfen Sie, ob im Menü „Ton-Einstellungen“ „TV
Lautsprecher“ auf „Haupt“ gesetzt ist (Seite 21).
46
Zusatzinformationen
Fortsetzung...
Page 95

Problem Mögliche Lösung
Verrauschter Ton • Stellen Sie sicher, dass die Antenne mit dem mitgelieferten
Koaxialkabel angeschlossen wurde.
• Verlegen Sie das Antennenkabel nicht neben anderen
Verbindungskabeln.
• Verwenden Sie keine 2-adrigen 300-Ohm-Kabel, da dies zu
Interferenzen führen kann.
• Wenn in der Umgebung des Fernsehgeräts infrarot-gestützte
Kommunikationsgeräte verwendet werden (z.B. drahtlose,
infrarot-gestützte Kopfhörer), können
Kommunikationsstörungen auftreten. Verwenden Sie keine
drahtlose, infrarot-gestützte Kopfhörer, stellen Sie den InfrarotTransceiver mit so großem Abstand vom Fernsehgerät auf, dass
das Rauschen vermieden wird, oder postieren Sie Sender und
Empfänger der Infrarot-Kommunikationsanlage dichter
zusammen.
Die Geräusche des Lüfters des Fernsehgeräts
werden lauter.
• In den Lüftungsöffnungen kann sich mit der Zeit Staub
ablagern. Der abgelagerte Staub kann die Kühlung durch den
eingebauten Lüfter beeinträchtigen. Um dies zu vermeiden
wird empfohlen, Staub regelmäßig (einmal monatlich) mit
einem Staubsauger zu entfernen.
Das Menü kann nicht verwendet werden
Ungewöhnliche Geräusche
Vom Gehäuse des Fernsehgeräts gehen
Geräusche aus.
Das Fernsehgerät macht ein surrendes
Geräusch.
Das Fernsehgerät tickt. • Solange das Fernsehgerät eingeschaltet ist, ist in seinem Innern
Das Fernsehgerät summt. • Beim Einschalten des Fernsehgeräts kann ein summendes
Fernbedienung
Fernbedienung funktioniert nicht
• Wenn ein Menüelement mit unterdrückter Farbe dargestellt
wird, kann es nicht ausgewählt werden.
• Veränderungen der Raumtemperatur können u.U. dazu führen,
dass sich das Gehäuse ausdehnt oder zusammen zieht. Dies
kann geringfügige Geräusche verursachen. Dies ist kein
Anzeichen für eine Fehlfunktion.
• Der Lüfter des Fernsehgeräts läuft. Dies ist kein Anzeichen für
eine Fehlfunktion.
eine elektrische Schaltung aktiviert. Dies ist kein Anzeichen
für eine Fehlfunktion.
Geräusch auftreten. Dies ist kein Anzeichen für eine
Fehlfunktion.
• Überprüfen Sie, ob die Medienauswahl an der Fernbedienung
korrekt auf das verwendete Gerät eingestellt ist (VCR (für
Videorecorder), TV , DVD oder AUX (Zusatzgerät)).
• Wenn die Fernbedienung den Videorecorder bzw. das DVDGerät nicht steuert, obwohl die Medienauswahl korrekt
eingestellt ist, müssen Sie den richtigen Code eingeben. Dies
wird im Abschnitt „Konfiguration der Fernbedienung für
Videorecorder oder DVD-Gerät“ auf Seite 41 beschrieben.
• Tauschen Sie die Batterien aus.
DE
Die Anzeige (Standby) oder
(Stromversorgung) des Fernsehgeräts blinkt
• Wenden Sie sich an den nächsten Sony-Kundendienst.
Fortsetzung...
Zusatzinformationen
47
Page 96

"Memory Stick"
Problem Mögliche Lösung
Der "Memory Stick" lässt sich nicht in den
"Memory Stick" Slot einschieben.
• Der "Memory Stick" ist nicht richtig ausgerichtet, bzw. wird falsch
gehalten. Schieben Sie den "Memory Stick" so ein, dass die mit b
markierte Seite nach oben und zum "Memory Stick" Slot zeigt
(Seite
30).
Bilder vom "Memory Stick" können nicht
angezeigt werden oder können zwar
angezeigt werden, einige Funktionen sind
jedoch nicht verfügbar und auf dem
Bildschirm des Fernsehgeräts erscheint
eine Fehlermeldung.
Dateien bzw. Daten können nicht gelöscht
werden
Das Bild wird nicht angezeigt. • Das Bild ist weder DCF-kompatibel noch MPEG 1 - kompatibel.
• Es handelt sich nicht um eine Fehlfunktion des Fernsehgeräts. Dies
geschieht, weil Sie einen "Memory Stick" von einer anderen Marke
als Sony verwenden.
• Der Schreibschutzschalter des "Memory Stick" befindet sich in
Stellung LOCK. Entfernen Sie die Schreibsperre.
• Die Bilddatei ist geschützt. Entfernen Sie den Schutz (Seiten
33 - 35).
• Sollten fortlaufend Probleme auftreten, lassen Sie das Fernsehgerät bitte von qualifiziertem
Fachpersonal warten.
• Öffnen Sie das Gehäuse auf keinen Fall selbst.
48
Zusatzinformationen
Page 97

Index
A
Abschalttimer 25
Abstimmen,
automatisch 26
manuell 28
AFT 28
Anschließen,
eine Antenne 14
einen Camcorder 38
ein DVD-Gerät 38
eine HiFi-Anlage 38
einen SmartLink Video- oder
DVD-Recorder 38
einen Videorecorder 14, 38
Kopfhörer 38
Anschlussanleitung (das Menü) 23
Antenne, anschließen 14
Anzeigen eines Bildes, das von
einem angeschlossenen Gerät
kommt 40
Audioausgang 21
Auto Format 22
Auto.Ausschalt 25
Autom.Lautstärke 20
Automatischer Neustart
(die Taste) 12
AV2 Ausgang 23
AV3 Ausgang 23
AV-Einstellungen 27
AV-M au s 9, 42
B, C
Balance, einstellen 20
Bass, einstellen 20
Batterien,
einsetzen in die Fernbedienung 13
BBE 20
Befestigen des Fernsehgeräts 14
Belüftung 4
Bild-Einstellungen (das Menü) 18
Bild-Modi 18
Bildschirmschoner 24
Breitwandformat, anzeigen 22
Camcorder, anschließen 38
D, E, F, G, H, I
Dolby Virtual 20, 39
DRC, 23
DVD, anschließen 38
Dyn. NR 19
Ein/Aus,
Schalter 12
Anzeige 13
Einschalten des Fernsehgeräts 12
Energie sparen 22
Farbe 18
Farbton 19
Feinabstimmung von Sendern 28
Fernbedienung,
Einsetzen von Batterien 13
Übersicht 10
andere Geräte steuern 41,
Film Modus 23
Grundeinstellungen (das Menü) 26
Helligkeit, einstellen 18
HiFi-Anlage, anschließen 38
Höhen, einstellen 20
Inhaltsverzeichnis 3
J, K, L, M
Konfigurieren der Fernbedienung 41
Kontrast, einstellen 18
Kopfhörer, anschließen 38
Land, auswählen 26
Lautsprecher des Fernsehgeräts 21
Lautstärke, einstellen 11
Logo Beleuchtung 24
Medienauswahl (die Taste) 10
"Memory Stick",
Allgemeines 30
einschieben 30
herausnehmen 30
Sicherheitsmaßnahmen 30
Einstellung Diaschau 31
Fotos anzeigen 33
Videos abspielen 33
Menüsystem 17
Menüsystem des Fernsehgeräts 17
Mitgeliefertes Zubehör 9
Modus 14:9 22
Modus 4:3 22
Modus Film 18
N, O, P, Q
Nachleuchten 8
Namen festlegen,
für externe Geräte 27
für Programme 27
Namen für Sender 27
NextView 37
Picture off (Bild aus),
Taste 10
Anzeige 13
R, S
Regeln,
die Lautstärke eines
externen Verstärkers 39
Reinigen,
das Gehäuse 7
den Bildschirm 7
RGB Horiz.Position 24
Schärfe, einstellen 18
Schraub-Ösen 14
Sender manuell abstimmen 28
Sender,
Namen festlegen 27, 28
ordnen 26
übergehen 29
Sender, umschalten 11
Senderliste 11
Sicherheitshinweise,
Allgemein 4
Stromquellen 5
Aufbau und Transport 6
Belüftung 4
Sicherheitsmaßnahmen 7
SmartLink,
Auswahl 23
Video oder DVD-Recorder
anschließen 38
Smart-Modus 22
Sonderfunktionen (das Menü) 22
Sprache für Menüs, auswählen 26
T, U, V, W, X, Y, Z
Tasten,
Die Fernbedienung 10
Beschreibung der Bedienele-
mente am Fernsehgerät 12
Technische Daten 44
Timer (das Menü) 25
Timer-Anzeige 13
Ton-Einstellungen (das Menü) 20
Ton-Modi 20
TopText*/Fastext*36
Übergehen eines Senders 29
Übersicht,
über die Fernbedienung 10
über die Bedienelemente
des Fernsehgeräts 12
über die Anzeigeelemente des
Fernsehgeräts 13
Video,
Eingang 40
abspielen 40
Videorecorder, anschließen 14, 38
Videotext 36
Wide-Modus 22
Zoom-Modus 22
Zurücksetzen,
Bild-Einstellungen 19
Ton-Einstellungen 20
Zusatzgeräte verwenden 40
Zusatzgeräte,
anschließen 38
benutzen 40
Ändern der Verstärkung
des Toneingangssignals 27
Zweiton 20
DE
Zusatzinformationen
49
Page 98

Introducción
• Gracias por elegir este producto Sony.
• Antes de utilizar este televisor, lea este manual atentamente y consérvelo para futuras referencias.
• Símbolos utilizados en este manual:
• Información importante.
• Información sobre la función.
• 1,2... Secuencia de las instrucciones a seguir.
• Los botones resaltados en blanco del mando a distancia
muestran los botones que ha de pulsar para seguir la
secuencia de instrucciones.
• Información sobre el resultado de las instrucciones.
Índice
Introducción.......................................................................................................................................................... 3
Normas de seguridad ............................................................................................................................................ 4
Precauciones ................... .............................................. ............................................... ........................................ 7
Descripción general e instalació n
Comprobación de los accesorios suministrados ................................................................................................... 9
Descripción general de los botones del mando a distancia ............................................................................... 10
Descripción general de los botones del televisor y de los conectores laterales..................................................12
Descripción general de los indicadores del televisor.......................................................................................... 13
Instalación de las pilas en el mando a distancia ................................................................................................. 13
Conexión de la antena y del vídeo......................................................................................................................14
Sujeción del televisor ......................................................................................................................................... 14
Primera puesta en marcha
Encendido y sintonización automática del televisor .......................................................................................... 15
Funciones del televisor
Introducción y manejo del sistema de menús ....................................................................................................17
Menú de ajuste de la imagen ........................................................................................................................ 18
Menú de ajuste del sonido ............................................................................................................................ 20
Menú de Características................................................................................................................................ 22
Menú del temporizador................................................................................................................................. 25
Menú de Configuración................................................................................................................................ 26
"Memory Stick"
Acerca de "Memory Stick"................................................................................................................................. 30
Opciones del menú "Memory Stick"........................................................ ............................. .............................31
Cómo ver fotografías y películas........................................................................................................................ 33
Teletexto............................................................................................................................................................... 36
NexTView...............................................................................................................................................................37
Información complementaria
Conexión de otros equipos al televisor...................... ............................. ............................. ................................38
Cómo ver imágenes de los equipos conectados al televisor................................................................................40
Configuración del mando a distancia para un DVD o un vídeo..........................................................................41
Memorización de funciones de otros mandos a distancia ....................................................... ... .........................42
Especificaciones técnicas .................... ................................................................................................................44
Solución de problemas.........................................................................................................................................45
Índice...................................................................................................................................................................49
Cómo coger el televisor................................................................................................................... Contraportada
ES
Índice
3
Page 99

Información de seguridad
Table 1:
Cable de red eléctrica
Para mover el aparato,
desenchufe el cable de la
corriente. No mueva el aparato
con el cable de la corriente
enchufado ya que el cable
podría dañarse y provocar un incendio o una sacudida
eléctrica. Si el aparato se cae o sufre algún daño, avise
inmediatamente al servicio técnico.
Daños que requieren un servicio de mantenimiento
Si la pantalla se agrieta, no la toque hasta que haya
desenchufado el cable de la corriente. De lo contrario,
puede sufrir una sacudida eléctrica.
Ventilación
Deje espacio alrededor del televisor. De lo contrario,
impedirá que el aire circule libremente y se
producirá un sobrecalentamiento que puede
provocar un incendio o dañar el televisor.
Centro sanitario
No instale este televisor en
un lugar donde se utilicen
equipos médicos. Podría
provocar el funcionamiento
defectuoso de los
instrumentos médicos.
Transporte
Se necesitan dos o más personas
para transportar el televisor. Si no
lo hace así, podría caerse y
provocar lesiones graves.
Asegúrese de que el televisor es
transportado por dos o más personas. Cuando
transporte el televisor, evite los golpes o la excesiva
vibración. El televisor podría caerse y estropearse o
provocar lesiones graves.
10cm
30cm
10cm10cm
Deje
este
espacio,
como
mínimo.
continúa...
Información de seguridad
4
Page 100

Fuentes de alimentación
Sobrecarga
Este aparato sólo debe utilizarse
con fuentes de alimentación de
220-240 V CA. No enchufe
demasiados aparatos en el mismo
enchufe ya que podría causar
descargas eléctricas o un
incendio.
Corriente eléctrica
No utilice un enchufe que no encaje bien.
Inserte el enchufe completamente en la toma
de corriente. Si el enchufe queda flojo, puede
formar un arco eléctrico y provocar un
incendio. Póngase en contacto con su
electricista para que le cambie el enchufe.
Humedad
No toque el cable con las manos mojadas.
Si enchufa/desenchufa el cable con las
manos mojadas, puede sufrir una sacudida
eléctrica.
Tormentas
Por su seguridad, no toque ninguna
pieza del aparato, ni tampoco el
cable de corriente y el cable de la
antena cuando haya tormentas.
Protección del cable
Desenchufe el aparato tirando
del enchufe. Nunca tire del
cable.
Cableado
Para conectar los cables, desenchufe el cable de
corriente. Por razones de seguridad, desenchufe el cable
de corriente cuando realice conexiones.
Limpieza
Limpie el enchufe con regularidad. Si el
enchufe está cubierto de polvo o coge
humedad, su aislamiento puede
deteriorarse y provocar un incendio.
Retire el enchufe de la toma y límpielo
con regularidad.
Cuando no utilice el aparato
Por razones medioambientales
y de seguridad, se recomienda
apagar el aparato cuando no se
utiliza en lugar de dejarlo en
modo de espera. Desenchúfelo.
Cable de red eléctrica
Si daña el cable de la corriente, se
puede producir un incendio o
sacudida eléctrica.
• No apriete, doble ni tuerza el
cable en exceso. Los filamentos
internos podrían quedar al
descubierto o romperse,
provocando un cortocircuito
que podría dar lugar a un
incendio o sacudida eléctrica.
• No transforme ni dañe el cable de la corriente.
• No ponga objetos pesados sobre el cable de la
corriente. No tire del cable.
• Mantenga el cable de la corriente lejos de las fuentes
de calor.
• Agarre el enchufe cuando desconecte el cable.
• Si el cable de la corriente sufre daños, no lo utilice y
pida a su distribuidor o al servicio técnico de Sony que
se cambie.
Sacudida eléctrica
No toque el televisor con las manos mojadas. De lo
contrario, puede sufrir una sacudida eléctrica o dañar el
televisor.
Corrosión
Si utiliza este aparato cerca de la costa, la sal puede
corroer las piezas metálicas del televisor y provocar
daños internos o un incendio. También puede reducir la
vida útil del televisor. Debe tomar medidas para reducir
la humedad y la temperatura de la zona en la que está
colocado el aparato.
Cableado
Tenga cuidado de no enredar sus pies con los cables.
Podría dañarse el aparato.
Instalación
No instale los componentes opcionales demasiado cerca
del televisor. Mantenga dichos componentes a una
distancia mínima de 30 cm del televisor. Si el vídeo está
instalado enfrente o a la derecha del televisor, la imagen
puede aparecer distorsionada.
Calor
No toque la superficie del televisor. Permanece caliente
incluso después de que el televisor lleve apagado
durante un tiempo.
Aceites
No instale el televisor en restaurantes donde se utilice
aceite. El aceite que absorbe polvo puede introducirse
en el televisor y dañarlo.
continúa...
ES
Información de seguridad
5
 Loading...