

Page 1

2-658-162-11(4)
LCD Digital Colour TV
KDL-V32A11E
KDL-V40A11E
Operating Instructions
Before operating the TV, please read the “Safety
information” section of this manual.
Retain this manual for future reference.
Bedienungsanleitung
Lesen Sie vor der Inbetriebnahme des Fernsehgeräts bitte
den Abschnitt „Sicherheitsinformationen“ in dieser
Anleitung. Bewahren Sie die Anleitung zum späteren
Nachschlagen auf.
Mode d’emploi
Avant d’utiliser le téléviseur, lisez attentivement la section
« Consignes de sécurité » de ce manuel.
Conservez ce manuel pour toute référence ultérieure.
Manual de instrucciones
Antes de utilizar el televisor, lea la sección “Información de
seguridad” de este manual.
Conserve este manual para consultarlo en el futuro.
For useful information about Sony products
Fur hilfreiche Informationen zu Sony Produkten
Pour obtenir les informations utiles concernant les produits
Sony
Información de utilidad para productos Sony
GB
DE
FR
ES
© 2005 Sony Corporation
Page 2

WARNING Introduction
• To prevent the risk of electric shock, do not insert the plug
cut off from the mains lead into a socket outlet. This plug
cannot be used and should be destroyed.
• To prevent the risk of fire or electric shock, do not expose
the TV set to rain or moisture.
• Dangerously high voltages are present inside the TV set.
Do not open the cabinet. Refer servicing to qualified
personnel only.
Thank you for choosing this Sony product.
Before operating the TV, please read this manual
thoroughly and retain it for future reference.
Trademark information
• is a registered trademark of the DVB Project
• “PlayStation” is a trademark of Sony Computer
Entertainment, Inc.
• TruSurround technology is used as a virtualizer for Dolby
Virtual Surround.
• TruSurround, SRS and symbol are trademarks of
SRS Labs, Inc.
TruSurround technology is incorporated under license
from SRS Labs, Inc.
• This TV incorporates
Interface (HDMI™) technology. HDMI, the HDMI logo
and High-Definition Multimedia Interface are trademarks
or registered trademarks of HDMI Licensing LLC.
High-Definition Multimedia
GB
2
Page 3

Table of Contents
Safety information ....................................... 4
Precautions ................................................. 7
Disposal of the TV set........................................ 7
Overview of the remote ............................ 8
Overview of the TV buttons and
indicators.............................................. 9
Getting Started
1: Checking the accessories ..................... 10
2: Inserting batteries into the remote......... 10
3: Connecting an aerial/VCR..................... 11
4: Preventing the TV from toppling over.... 12
5: Switching on the TV .............................. 12
6: Selecting the language and
country/region ...................................... 13
7: Auto-tuning the TV ................................ 14
Watching TV
Watching TV.............................................. 15
Checking the Digital Electronic Programme
Guide (EPG) ............................... 18
Using the Favourite list .................... 20
Viewing pictures from connected
equipment ............................................ 21
: for digital channels
only
Dual Sound..................................................26
Reset ................................................................26
Screen Control menu.................................27
Auto Format......................................................27
Screen Format..................................................27
Screen Shift......................................................27
Features menu ..........................................28
Power Saving ...................................................28
Speaker............................................................28
AV2 Output.......................................................28
Picture Off ........................................................29
Timer menu ...............................................30
Sleep Timer ......................................................30
Auto Shutoff......................................................30
Set Up menu..............................................31
Auto Start Up....................................................31
Language.........................................................31
Country.............................................................31
Auto Tuning (Analogue mode only) .................32
Programme Sorting (Analogue mode only)......32
Programme Labels (Analogue mode only) ......32
AV Preset..........................................................33
Manual Programme Preset (Analogue mode
only)............................................................33
Digital Set Up .........................................36
Using Optional Equipment
Connecting optional equipment .................39
Programming the remote...........................41
GB
Using the Menu
Navigating through menus ........................ 21
Overview of the menus.................................... 22
Picture Adjustment menu .......................... 23
Mode ............................................................... 23
Contrast/Brightness/Colour/Hue/Sharpness/
Backlight.................................................... 23
Colour Tone..................................................... 23
Noise Reduction.............................................. 24
Dynamic Picture .............................................. 24
Gamma Correction.......................................... 24
Reset ............................................................... 24
Sound Adjustment menu........................... 25
Effect (sound effect)........................................ 25
Treble/Bass/Balance ....................................... 25
Auto Volume .................................................... 25
Dual Sound...................................................... 26
Volume (headphone volume)...................... 26
Additional Information
Specifications ............................................43
Troubleshooting .........................................44
Index..........................................................47
3
GB
Page 4
Safety information
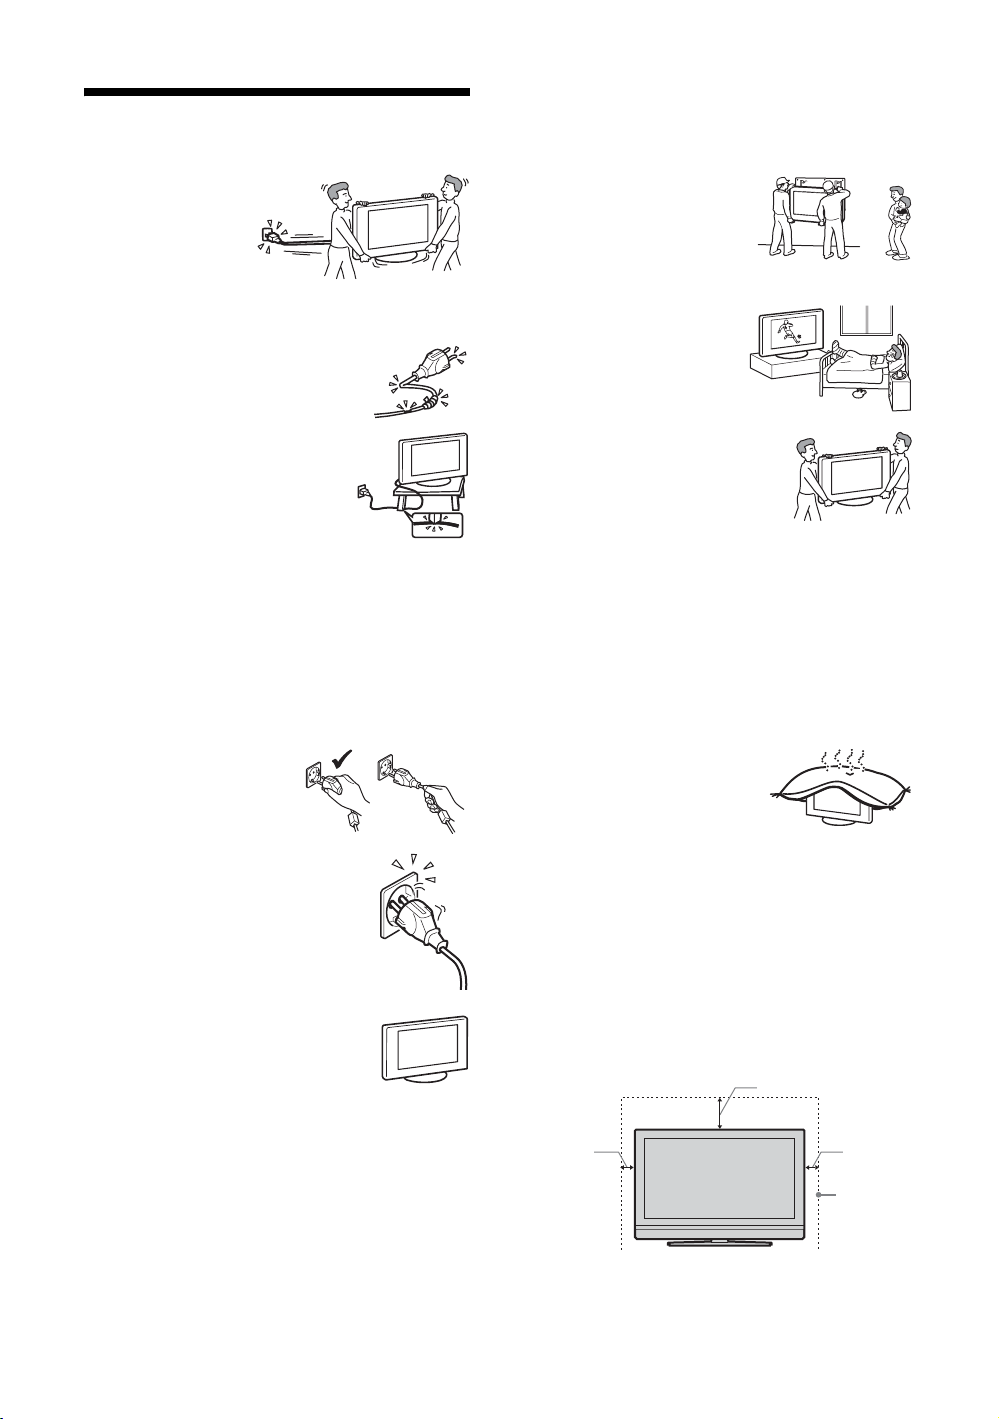
Mains lead
• Unplug the mains lead
when moving the TV
set. Do not move the
TV set with the mains
lead plugged in. It may
damage the mains lead
and result in fire or electric shock.
• If you damage the mains lead, it may
result in fire or electric shock.
– Do not pinch, bend, or twist the
mains lead excessively. The core
conductors may be exposed or
broken, causing a short-circuit,
which may cause fire or electric
shock.
– Do not modify or damage the mains
lead.
– Do not put anything heavy on the
mains lead. Do not pull the mains
lead.
– Keep the mains lead away from heat sources.
– Be sure to grasp the plug when disconnecting the mains
lead.
• If the mains lead is damaged, stop using it and ask your
dealer or Sony service centre to exchange it.
• Do not use the supplied mains lead on any other
equipment.
• Use only an original Sony mains lead, not other brands.
Mains lead/cable protection
Pull out the mains lead/cable by
the plug. Do not pull on the mains
lead/cable itself.
Mains
Do not use a poor fitting mains socket. Insert
the plug fully into the mains socket. A poor
fit may cause arcing and result in fire.
Contact your electrician to have the mains
socket changed.
Optional accessories
Observe the following when installing the
TV set using a stand or wall-mount bracket.
If you do not do so, the TV set may fall and
cause serious injury.
• It is strongly recommended that you use Sony accessories
for safety reasons:
– KDL-V40A11E:
Wall-mount bracket SU-PW2, TV stand SU-FF51.
– KDL-V32A11E:
Wall-mount bracket SU-WL31, TV stand SU-FF51.
• It is strongly recommended that you use the official Sony
wall-mount bracket to allow adequate air circulation and
to avoid dust build up around the TV, wall and ceiling.
• Secure the TV set properly, following the instructions
supplied with your stand or wall-mount bracket when
installing the TV set.
• Be sure to attach the brackets supplied with your stand.
Installation
If the TV set is to be installed on a
wall, have the installation carried
out by qualified service men.
Improper installation may render
the TV set unsafe.
Medical institutions
Do not place this TV set in a place
where medical equipment is in
use. It may cause malfunction of
medical instruments.
Carrying
• Before carrying t he TV set, disconnect
all the cables from the TV set.
• When you carry the TV set by hand,
hold the TV set as illustrated on the
right. If you do not do so, the TV set
may fall and be damaged or cause
serious injury. If the TV set has been
dropped or damaged, have it checked immediately by
qualified service personnel.
• When transporting it, do not subject the TV set to jolts or
excessive vibration. The TV set may fall and be damaged
or cause serious injury.
• When you carry the TV set in for repair or when you move
it, pack it using the original carton and packing material.
• Carrying the TV set requires two or more people.
Ventilation
• Never cover the ventilation
holes in the cabinet. It may
cause overheating and result in
fire.
• Unless proper ventilation is provided, the TV set may
gather dust and get dirty. For proper ventilation, observe
the following:
– Do not install the TV set turned backwards or sideways.
– Do not install the TV set turned over or upside down.
– Do not install the TV set on a shelf or in a closet.
– Do not place the TV set on a rug or bed.
– Do not cover the TV set with cloth, such as curtains, or
items such as newspapers, etc.
• Leave some space around the TV set. Otherwise, aircirculation may be inadequate and cause overheating,
which may cause fire or damage to the TV set.
30 cm
10 cm 10 cm
Leave
at least
this
much
space.
GB
4
Page 5
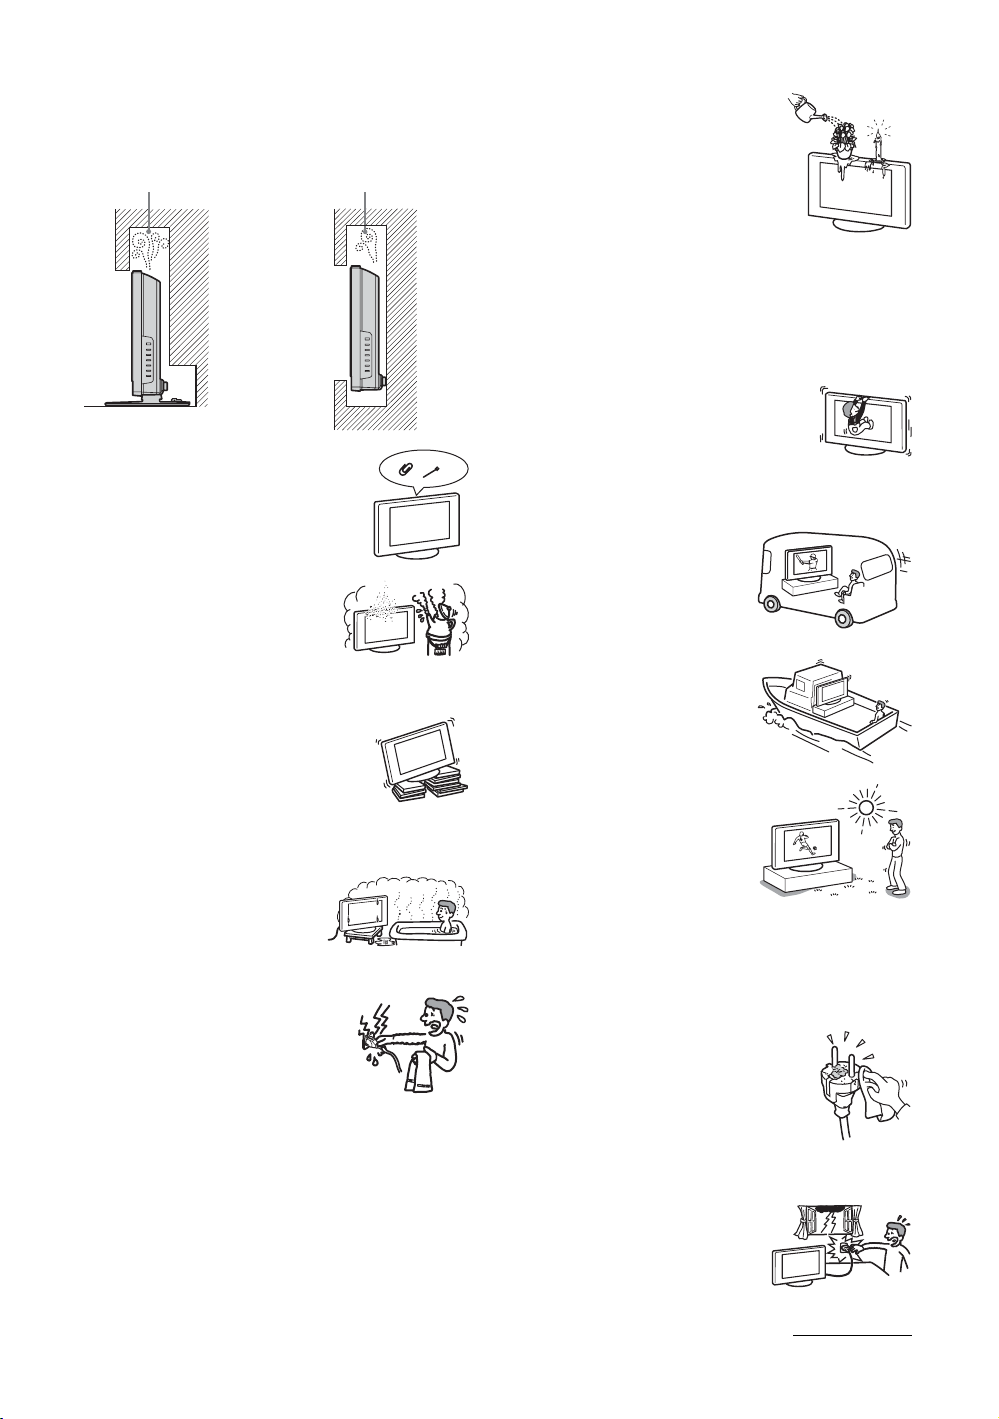
• When installing the TV set on the wall, leave at least 10
cm space from the bottom of the TV set.
• Never install the TV set as follows:
Air circulation
is blocked.
Air circulation
is blocked.
Wall Wall
Ventilation holes
Do not insert anything in the ventilation
holes. If metal or liquid is inserted in these
holes, it may result in fire or electric shock.
Placement
• Never place the TV set in hot, humid
or excessively dusty places.
• Do not install the TV set where
insects may enter.
• Do not install the TV set where it
may be exposed to mechanical vibration.
• Place the TV set on a stable, level surface.
Otherwise, the TV set may fall and cause
injury.
• Do not install the TV set in a location
where it may protrude, such as on or
behind a pillar, or where you might bump
your head on it. Otherwise, it may result
in injury.
Water and moisture
• Do not use this TV set near water
– for example, near a bathtub or
shower room. Also do not expose
to rain, moisture or smoke. This
may result in fire or electric shock.
• Do not touch the mains lead and the TV
set with wet hands. Doing so may cause
electric shock or damage to the TV set.
Moisture and flammable objects
• Do not let this TV set get wet. Never
spill liquid of any kind on the TV set.
If any liquid or solid object does fall
through openings in the cabinet, do
not operate the TV set. It may result in
electric shock or damage to the TV set.
Have it checked immediately by
qualified service personnel.
• To prevent fire, keep flammable objects (c andles, etc.) and
electric bulbs away from the TV set.
Oils
Do not install this TV set in restaurants that use oil. Dust
absorbing oil may enter and damage the TV set.
Fall
Place the TV set on a secure, stable stand. Do
not hang anything on the TV set. If you do,
the TV set may fall from the stand or wallmount bracket, causing damage or serious
injury.
Do not allow children to climb on the TV set.
Vehicle or ceiling
Do not install this TV set in a
vehicle. The motion of the vehicle
may cause the TV set to fall down
and cause injury. Do not hang this
TV set from the ceiling.
Ships and other vessels
Do not install this TV set on a ship
or other vessel. If the TV set is
exposed to seawater, it may cause
fire or damage the TV set.
Outdoor use
• Do not expose the TV set to
direct sunlight. The TV set may
heat up and this may result in
damage to the TV set.
• Do not install this TV set
outdoors.
Wiring
• Unplug the mains lead when wiring cables. When hooking
up, be sure to unplug the mains lead for your safety.
• Take care not to catch your feet on the cables. It may
damage the TV set.
Cleaning
• Unplug the mains lead when cleaning the
mains plug and this TV set. If you do not,
it may result in electric shock.
• Clean the mains plug regularly. If the
plug is covered with dust and it picks up
moisture, its insulation may deteriorate
and result in fire.
Lightning storms
For your own safety, d o not touch any
part of the TV set, mains lead, or
aerial lead during lightning storms.
Continued
GB
5
Page 6
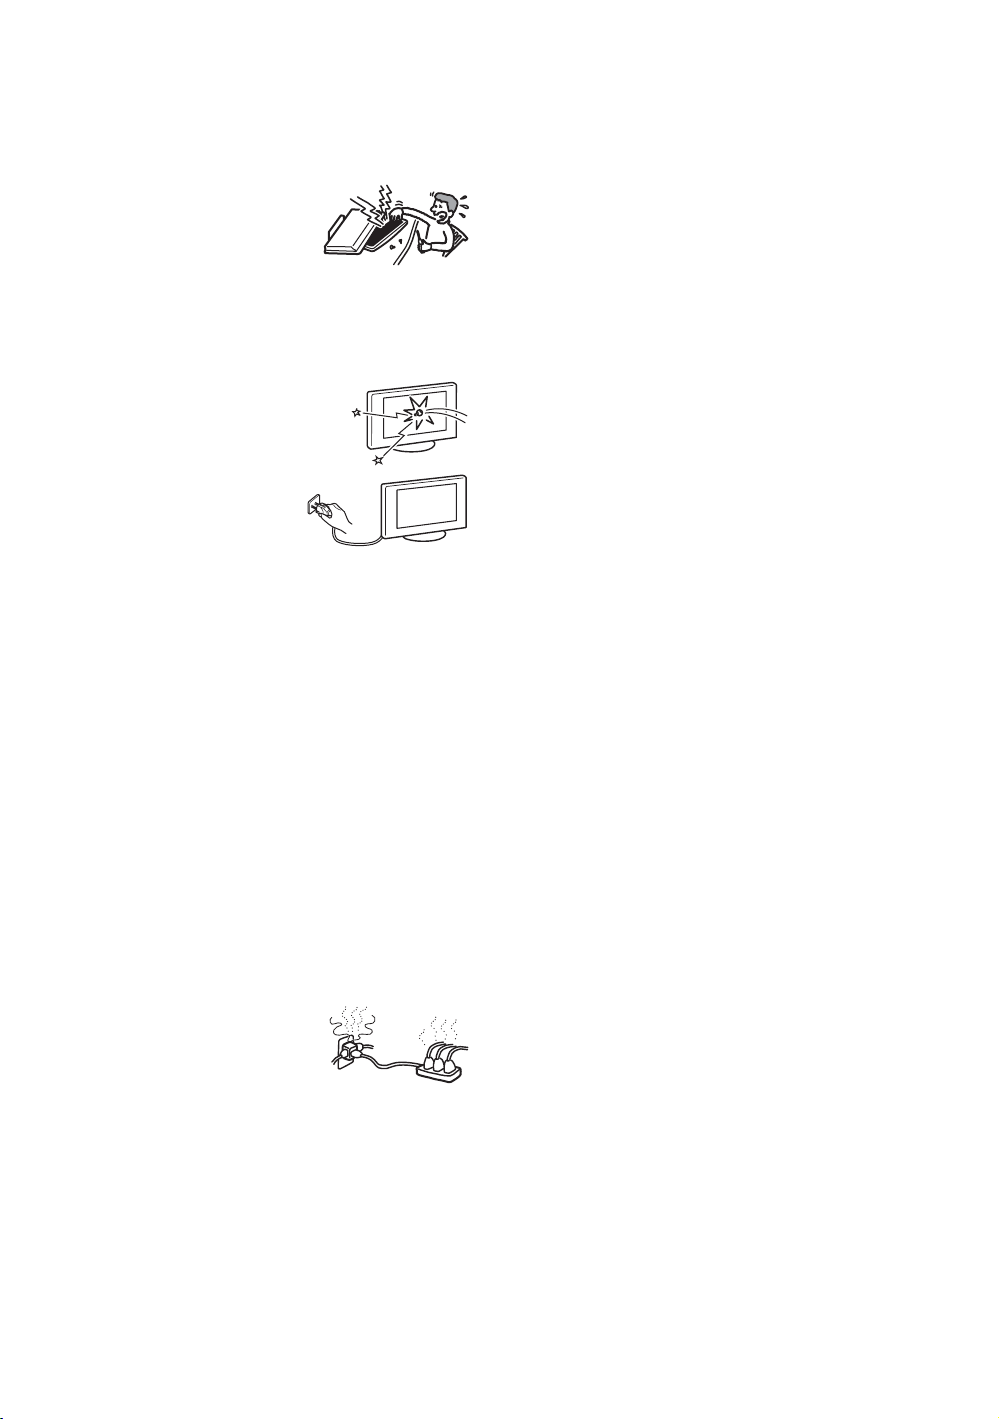
Damage requiring service
If the surface of the TV set cracks, do not touch it until you
have unplugged the mains lead. Otherwise electric shock
may result.
Servicing
Do not open the cabinet. Entrust the
TV set to qualified serv ice personnel
only.
Small accessories removal and
fittable
Keep accessories out of children’s reach. If they are
swallowed, choking or suffocation may occur. Call a doctor
immediately.
Broken glass
Do not th row an ythin g at th e TV set. T he
screen glass may explode by the impact
and cause serious injury.
When not in use
For environmental and safety
reasons, it is recommended that
the TV set is not left in standby
when unused. Disconnect from
the mains. However, some TV
sets may have features which need the TV set to be left in
standby to work correctly. The instructions in this manual
will inform you if this applies.
Viewing the TV
• To view the TV comfortably, the recommended viewing
position is from four to seven times the screen’s vertical
length away from the TV set.
• View the TV in moderate light, as viewing the TV in poor
light strains your eyes. Watching the screen continuously
for long periods of time can also strain your eyes.
• If the angle of the TV set is to be adjusted, steady the base
of the stand with your hand to prevent the TV set from
becoming separated from the stand. Be careful not to get
your fingers caught between the TV set and the stand.
Volume adjustment
• Adjust the volume so as not to trouble your neighbours.
Sound carries very easily at night time. Therefore, closing
the windows or using headphones is suggested.
• When using headphones, adjust the volume so as to avoid
excessive levels, as hearing damage may result.
Overloading
This TV set is designed to operate on
a 220–240 V AC supply only. Take
care not to connect too many
appliances to the same mains socket
as this could result in fire or electric
shock.
Heat
Do not touch the surface of the TV set. It remains hot, even
after the TV set has been turned off for some time.
Corrosion
If you use this TV set near the seashore, salt may corrode
metal parts of the TV set and cause internal damage or fire.
It may also shorten the life of the TV set. Steps should be
taken to reduce the humidity and moderate the temperature
of the area where the TV set is located.
GB
6
Page 7

Precautions
LCD Screen
• Although the LCD screen is made with high-precision
technology and 99.99% or more of the pixels are effective,
black dots may appear or bright points of light (red, blue,
or green) may appear constantly on the LCD screen. This
is a structural property of the LCD panel and is not a
malfunction.
• Do not expose the LCD screen surface to the sun. Doing
so may damage the screen surface.
• Do not push or scratch the front filter, or place objects on
top of this TV set. The image may be uneven or the LCD
panel may be damaged.
• If this TV set is used in a cold place, a smear may occur in
the picture or the picture may become dark.
This does not indicate a failure. These phenomena
disappear as the temperature rises.
• Ghosting may occur when still pictures are displayed
continuously. It may disappear after a few moments.
• The screen and cabinet get warm when this TV set is in
use. This is not a malfunction.
• The LCD contains a small amount of liquid crystal and
mercury. The fluorescent tube used in this TV set also
contains mercury. Follow your local ordinances and
regulations for disposal.
Fluorescent lamp
This TV set uses a special fluorescent lamp as its light
source. If the screen image becomes dark, flickers, or does
not appear, the fluorescent lamp has worn out and the LCD
screen should be replac ed. For replacement, consult qualified
service personnel.
Installing the TV set
• Do not install the TV set in places subject to extreme
temperature, for example in direct sunlight, or near a
radiator, or heating vent. If the TV set is exposed to
extreme temperature, the TV set may overheat and cause
deformation of the casing or cause the TV set to
malfunction.
• The TV set is not disconnected from the mains when the
TV set is switched off. To disconnect the TV set
completely, pull the plug from the mains.
• To obtain a clear picture, do not expose the screen to direct
illumination or direct sunlight. If possible, use spot
lighting directed down from the ceiling.
• Do not install optional components too close to the TV set.
Keep optional components at least 30 cm away from the
TV set. If a VCR is installed in front of the TV set or
beside the TV set, the picture may become distorted.
Handling and cleaning the screen surface/cabinet of
the TV set
The screen surface is finished with a special coating to
prevent strong light reflections.
To avoid material degradation or screen coating degradation,
observe the following precautions.
• Do not push on the screen, scratch it with a hard object, or
throw anything at it. The screen may be damaged.
• Do not touch the display panel after operating the TV set
continuously for a long period as the display panel
becomes hot.
• We recommend that the screen surface be touched as little
as possible.
• To remove dust from the screen surface/cabinet, wipe
gently with a soft cloth. If dust is persistent, wipe with a
soft cloth slightly moistened with a diluted mild detergent
solution. You can wash and repeatedly use the soft cloth.
• Never use any type of abrasive pad, alkaline/acid cleaner,
scouring powder, or volatile solvent, such as alcohol,
benzene, thinner or insecticide. Using such materials or
maintaining prolonged contact with rubber or vinyl
materials may result in damage to the screen surface and
cabinet material.
• The ventilation holes can accumulate dust over time. To
ensure proper ventilation, we recommend removing the
dust periodically (once a month) using a vacuum cleaner.
Disposal of the TV set
Disposal of Old Electrical &
Electronic Equipment
(Applicable in the European
Union and other European
countries with separate
collection systems)
This symbol on the product or on
its packaging indicates that this
product shall not be treated as
household waste. Instead it shall
be handed over to the applicable
collection point for the recycling
of electrical and electronic equipment. By ensuring this
product is disposed of correctly, you will help prevent
potential negative consequences for the environment and
human health, which could otherwise be caused by
inappropriate waste handling of this product. The recycling
of materials will help to conserve natural resources. For more
detailed information about recycling of this product, please
contact your local Civic Office, your household waste
disposal service or the shop where you purchased the
product.
GB
7
Page 8
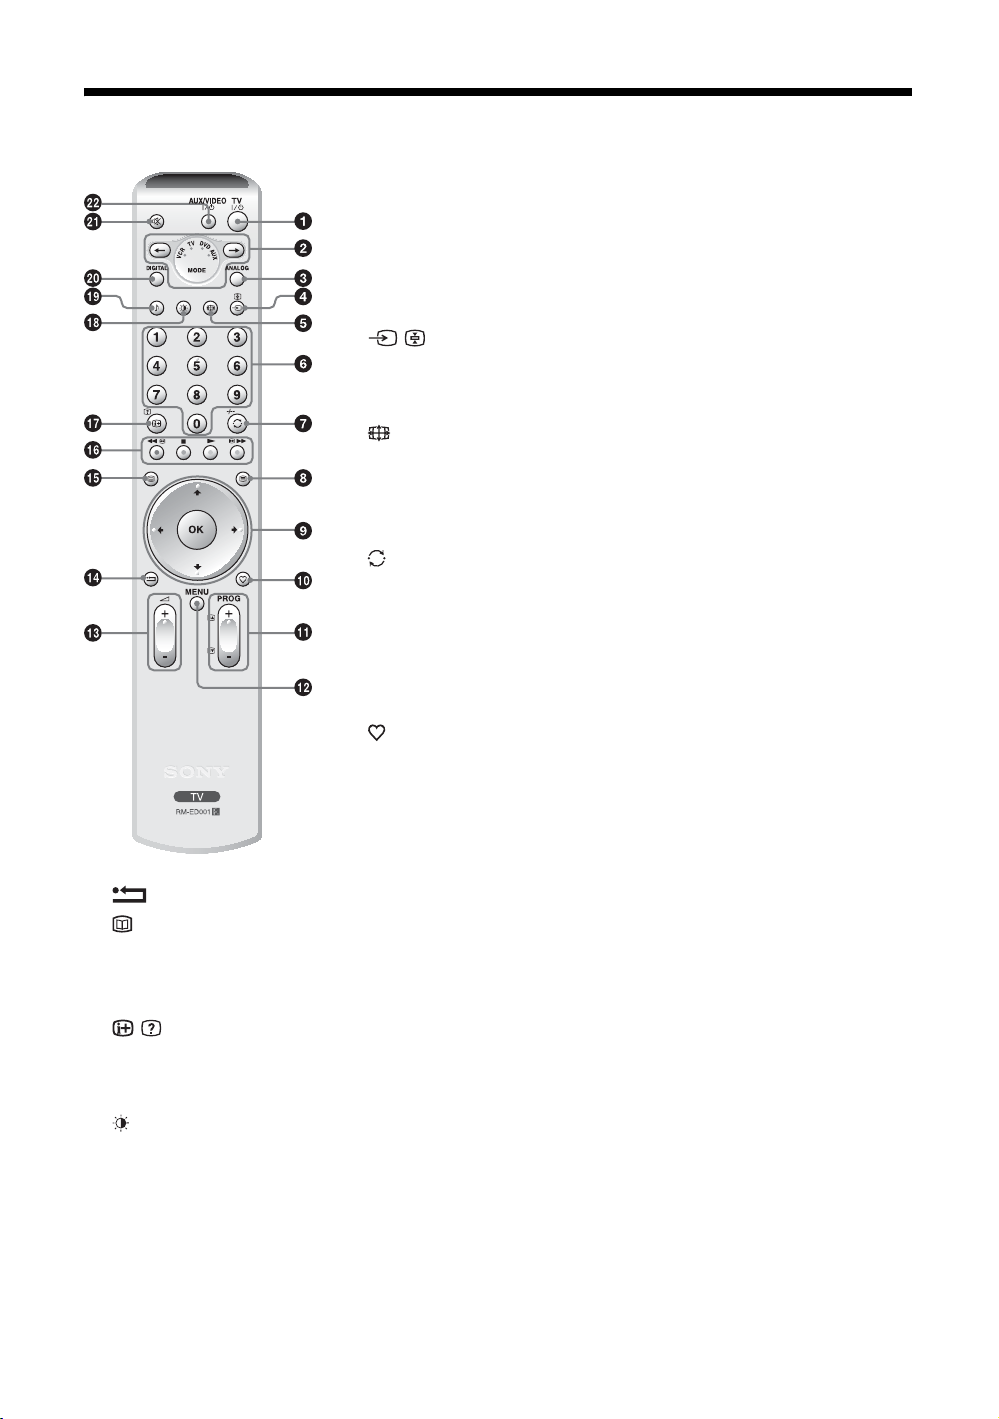
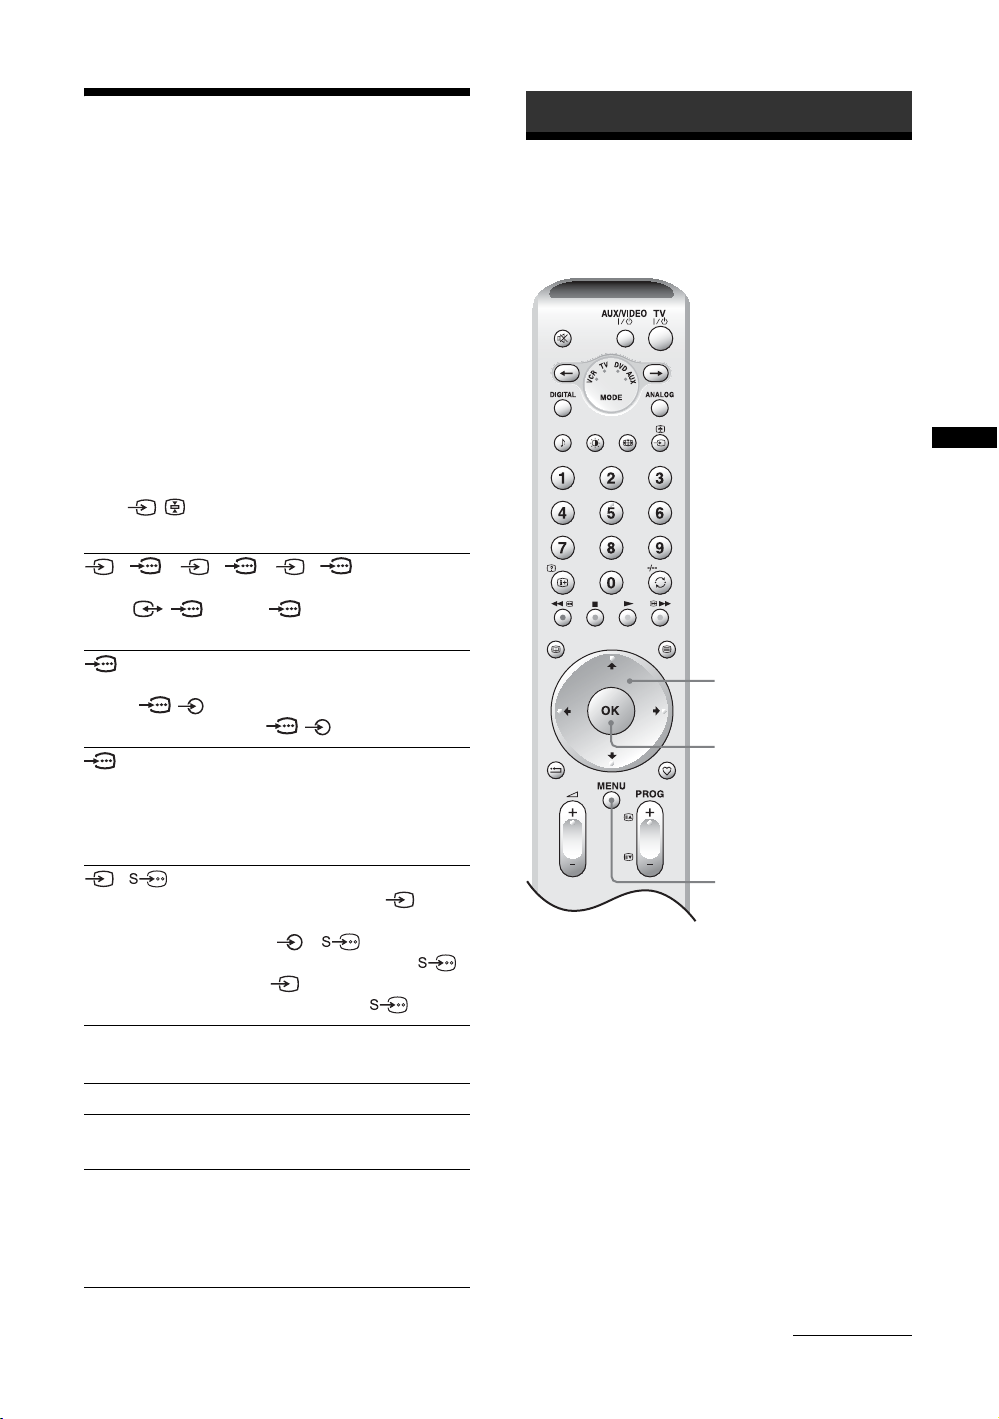
Overview of the remote
1 TV "/1 – TV standby
Switches off the TV temporarily and on from standby mode.
2 Media selector (page 41)
Selects which equipment you want to operate. A green light will be momentarily
lit to show which one you have selected.
3 ANALOG – Analogue mode (page 15)
4 / – Input select / Text hold
• In TV mode (page 21): Selects the input source from equipment connected to
the TV sockets.
• In Text mode (page 16): Holds the current page.
5 – Screen mode (page 17)
6 Number buttons
• In TV mode: Selects channels. For channel numbers 10 and above, enter the
second digit within two seconds.
• In Text mode: Enters the three digit page number to select the page.
7 / -/-- – Previous channel / VCR double digit
• In TV mode: Returns to the previous channel watched (for more than five
seconds).
• In VCR mode: Selects the double-digit channels for Sony’s VCR (e.g., for 23,
press -/-- and then the 2 and 3).
8 / – Text (page 16)
9 M/m/</,/OK (page 16, 21)
q; – Favourite (page 20)
qa PROG +/- (page 15)
• In TV mode: Selects the next (+) or previous (-) channel.
• In Text mode: Selects the next (+) or previous (-) page.
qs MENU (page 21)
qd 2 +/- – Volume
qf – This button has no function for this TV.
qg – EPG (Digital Electronic Programme Guide) (page 18) / NexTView (page 16)
qh Coloured buttons
• In digital mode (page 18, 20): Selects the options at the bottom of the Favourite and EPG digital menus.
• In VCR and DVD mode (page 41): Operates the main functions of your VCR or DVD.
qj / – Info / Text reveal
• In digital mode: Displays brief details of the programme currently being watched.
• In analogue mode: Displays information such as current channel number and screen mode.
• In Text mode (page 16): Reveals hidden information (e.g., answers to a quiz).
qk – Picture mode (page 23)
ql 9 – Sound effect (page 25)
w; DIGITAL – Digital mode (page 15)
wa % – Mute (page 15)
ws AUX/VIDEO "/1
Switches your equipment on/off, as programmed on the remote (page 41).
Tip
The M/m/</,, 2 +, PROG +, and number 5 buttons have tactile dots. Use the tactile dots as references when operating the TV.
GB
8
Page 9
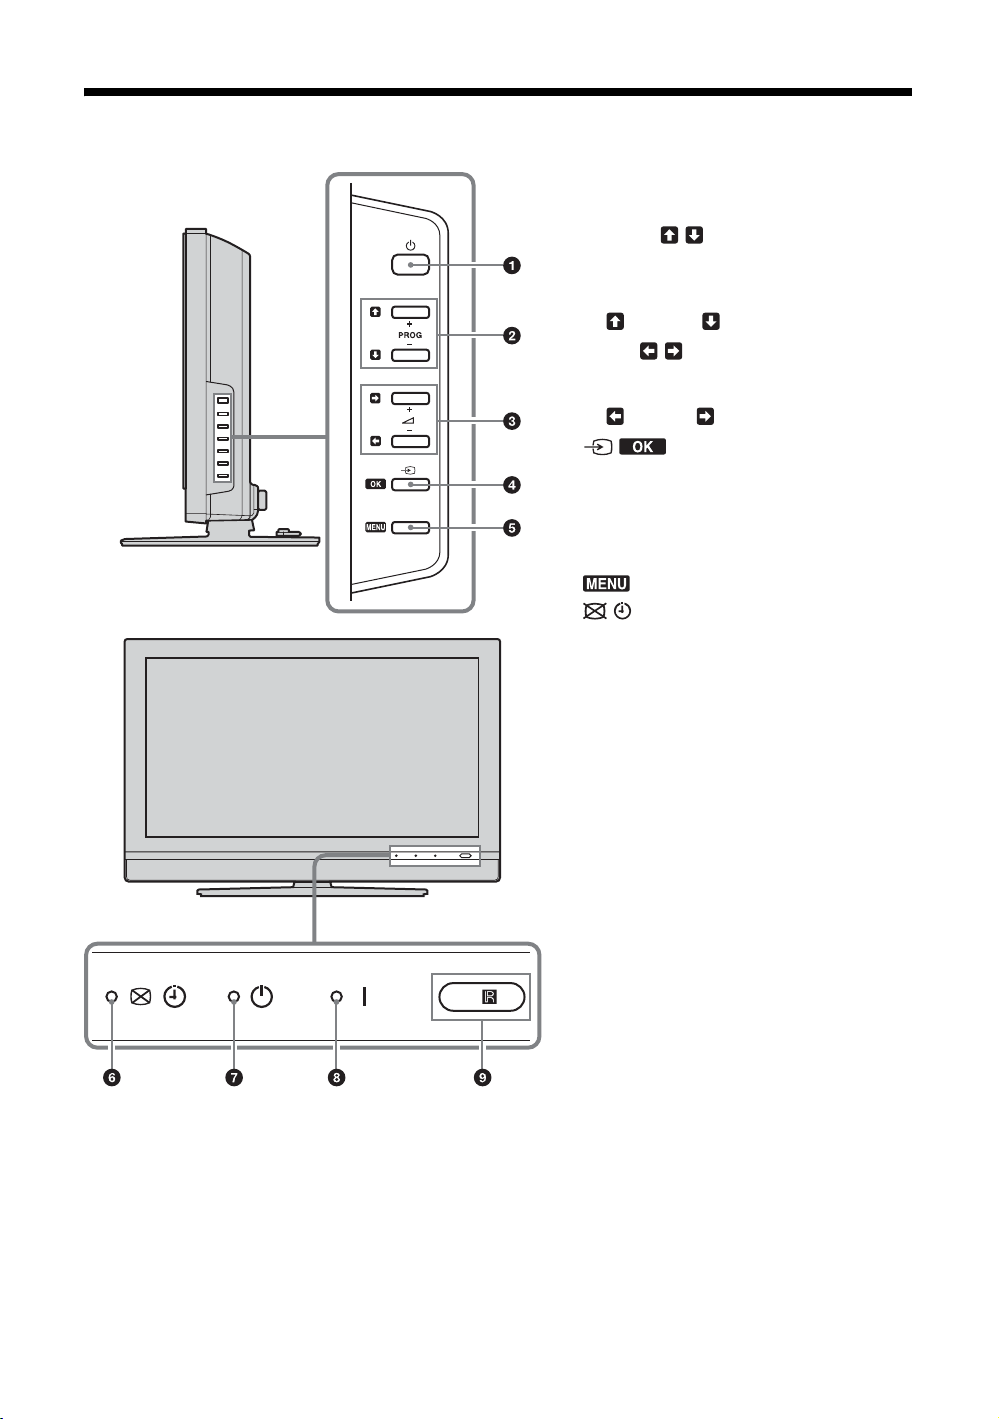
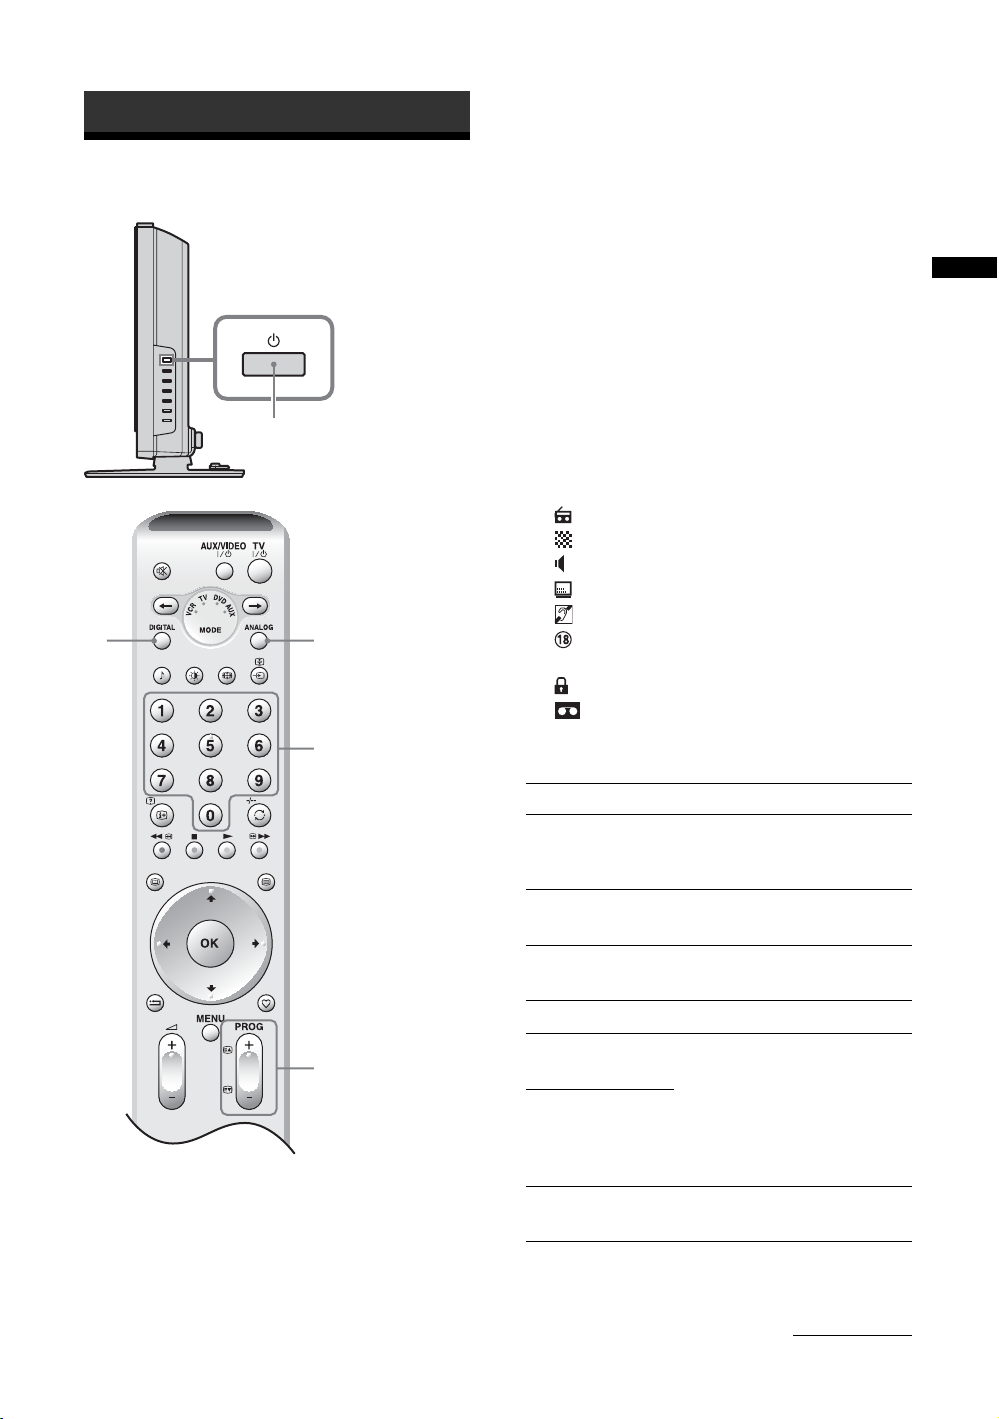
Overview of the TV buttons and indicators
1 1 – Power
Switches the TV on or off.
2 PROG +/-/ /
• In TV mode: Selects the next (+) or previous
(-) channel.
• In TV menu: Moves through the options up
() or down ().
3 2 +/-/ /
• Increases (+) or decreases (-) the volume.
• In TV menu: Moves through the options left
( ) or right ( ).
4 / – Input select/OK
• In TV mode (page 21): Selects the input
source from equipment connected to the TV
sockets.
• In TV menu: Selects the menu or option, and
confirm the setting.
5 (page 21)
6 – Picture Off/Timer indicator
• Lights up in green when the picture is
switched off (page 29). Only the picture is
switched off (the sound remains unchanged).
• Lights up in orange when the timer is set
(page 30).
7 1 – Standby indicator
Lights up in red when the TV is in standby mode.
8 " – Power indicator
Lights up in green when the TV is switched on.
9 Remote control sensor
GB
9
Page 10
Getting Started
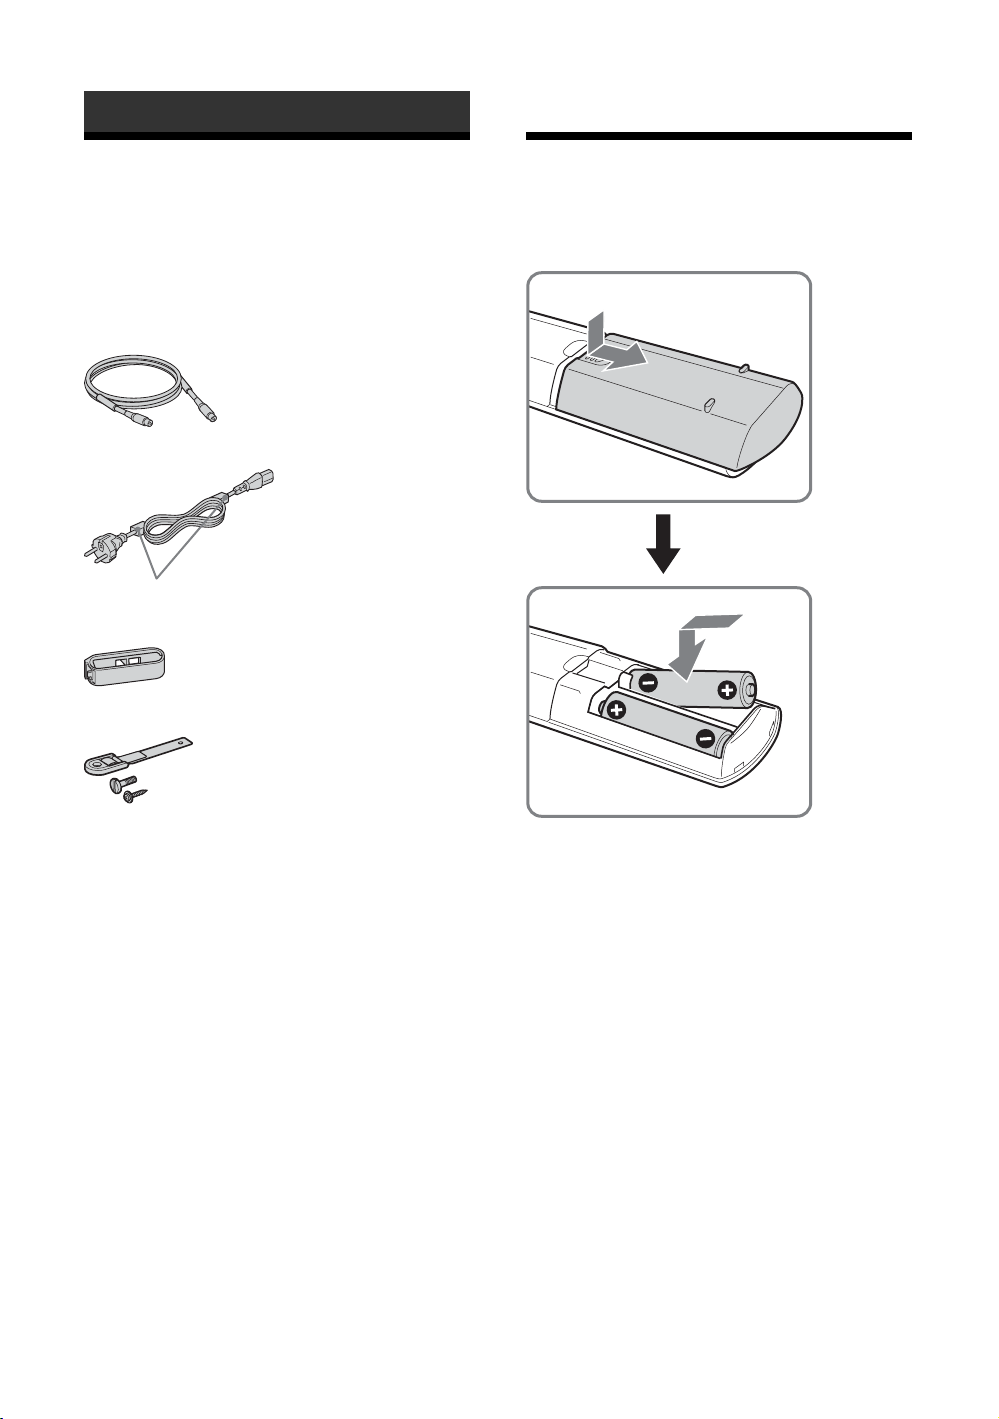
1: Checking the
accessories
Remote RM-ED001 (1)
Size AA batteries (R6 type) (2)
Coaxial cable (1)
Mains lead (Type C-6) (1)
Do not remove these ferrite cores.
Cable holder (1)
Support belt (1) and screws (2)
2: Inserting batteries
into the remote
10
Notes
• Observe the correct polarity when inserting batteries.
• Dispose of batteries in an environmentally friendly way.
Certain regions may regulate disposal of the battery.
Please consult your local authority.
• Do not use different types of batteries together or mix old
and new batteries.
• Handle the remote with care. Do not drop or step on it, or
spill liquid of any kind onto it.
• Do not place the remote in a location near a heat source, or
in a place subject to direct sunlight, or in a damp room.
GB
Page 11
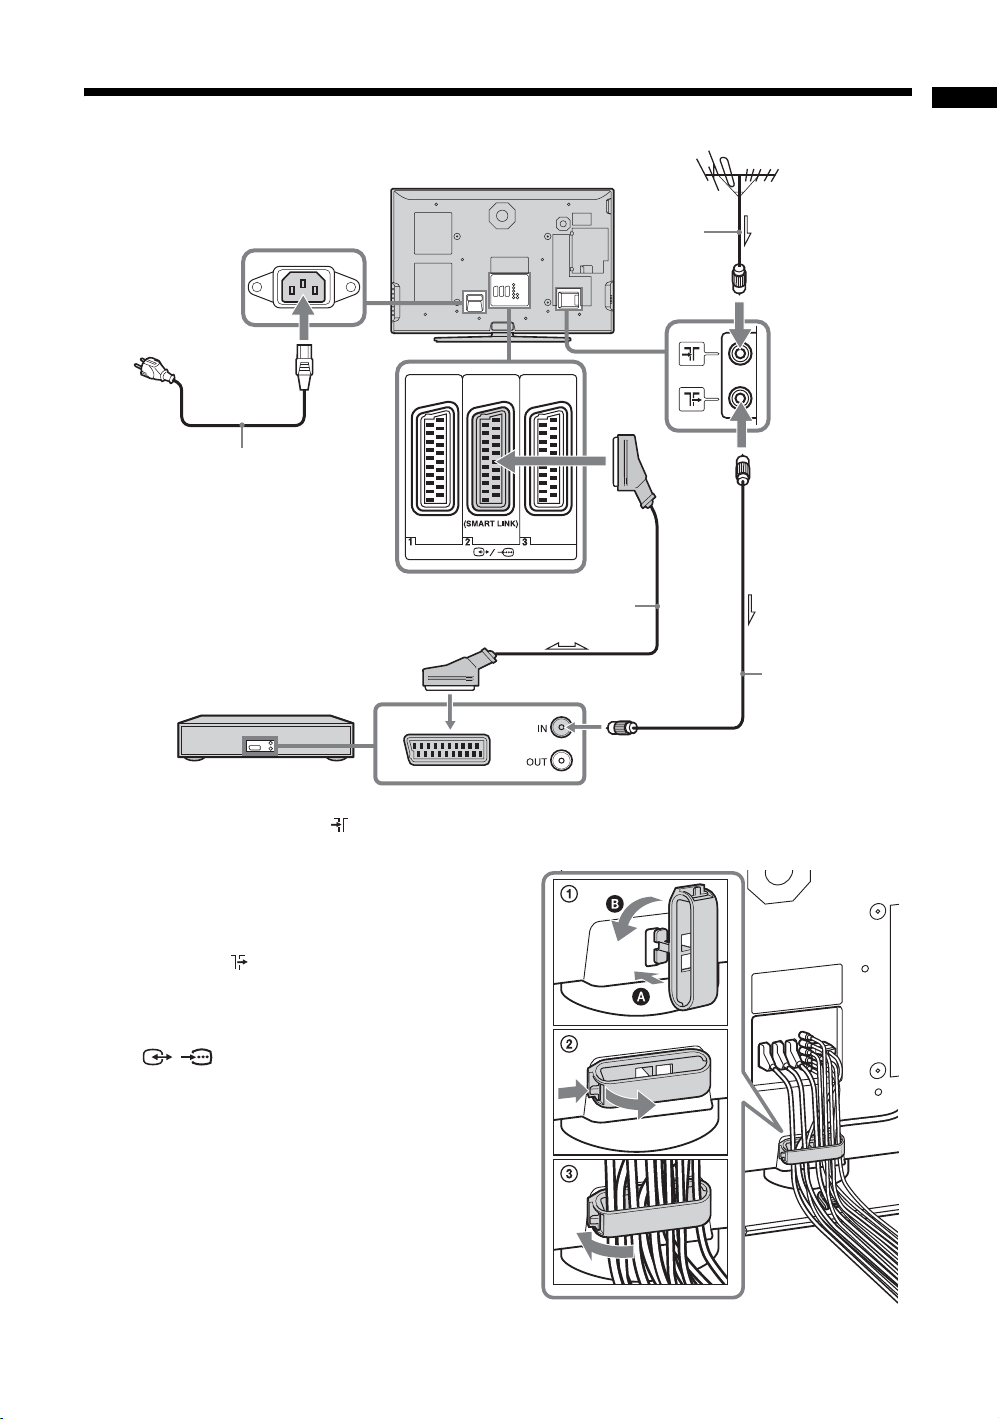
3: Connecting an aerial/VCR
Rear of the TV
Getting Started
3
Mains lead
(supplied)
VCR
Scart lead (not supplied)
2-2
Coaxial
cable
(supplied)
1
2-1
RF lead
(not supplied)
1 Connect your aerial to the socket on the
rear of the TV.
If connecting to an aerial only
Go to step 3.
2 Connect your VCR.
1 Connect the socket on the rear of the TV to
the input socket on your VCR with the RF
lead.
2 Connect the scart socket on your VCR to the
/ 2 scart socket on the rear of the TV
with a scart lead.
3 Connect the supplied mains lead to the AC
IN socket on the rear of the TV.
Note
Do not connect the mains lead to your mains socket until
all connections are complete.
4 Bundle the cable.
1 Attach the cable holder to the rear of the TV
(A), then turn the cable holder a quarter turn
to the left (B).
2 Push the clasp lever in to release the lock and
open the cover, and then insert the cables.
3 Close the cover until it clicks shut and locks.
11
GB
Page 12

4: Preventing the TV from toppling over
After all connections are completed, secure the TV.
2
3
1
1 Fasten the supplied support belt to the stand with the supplied screw.
2 Fit the supplied support belt to the TV stand, then firmly fasten with the supplied screw using a
screw driver or coin, etc.
3 While supporting the TV, tighten the supplied support belt to adjust the length.
5: Switching on the TV
1
2
1 Connect the TV to your mains socket (220-240V AC, 50Hz).
2 Press 1 on the TV (right side).
When you switch on the TV for the first time, the Language menu appears on the screen, then go to “6: Selecting
the language and country/region” on page 13.
When the TV is in standby mode (the
remote to switch on the TV.
1 (standby) indicator on the TV (front) is red), press TV "/1 on the
12
GB
Page 13
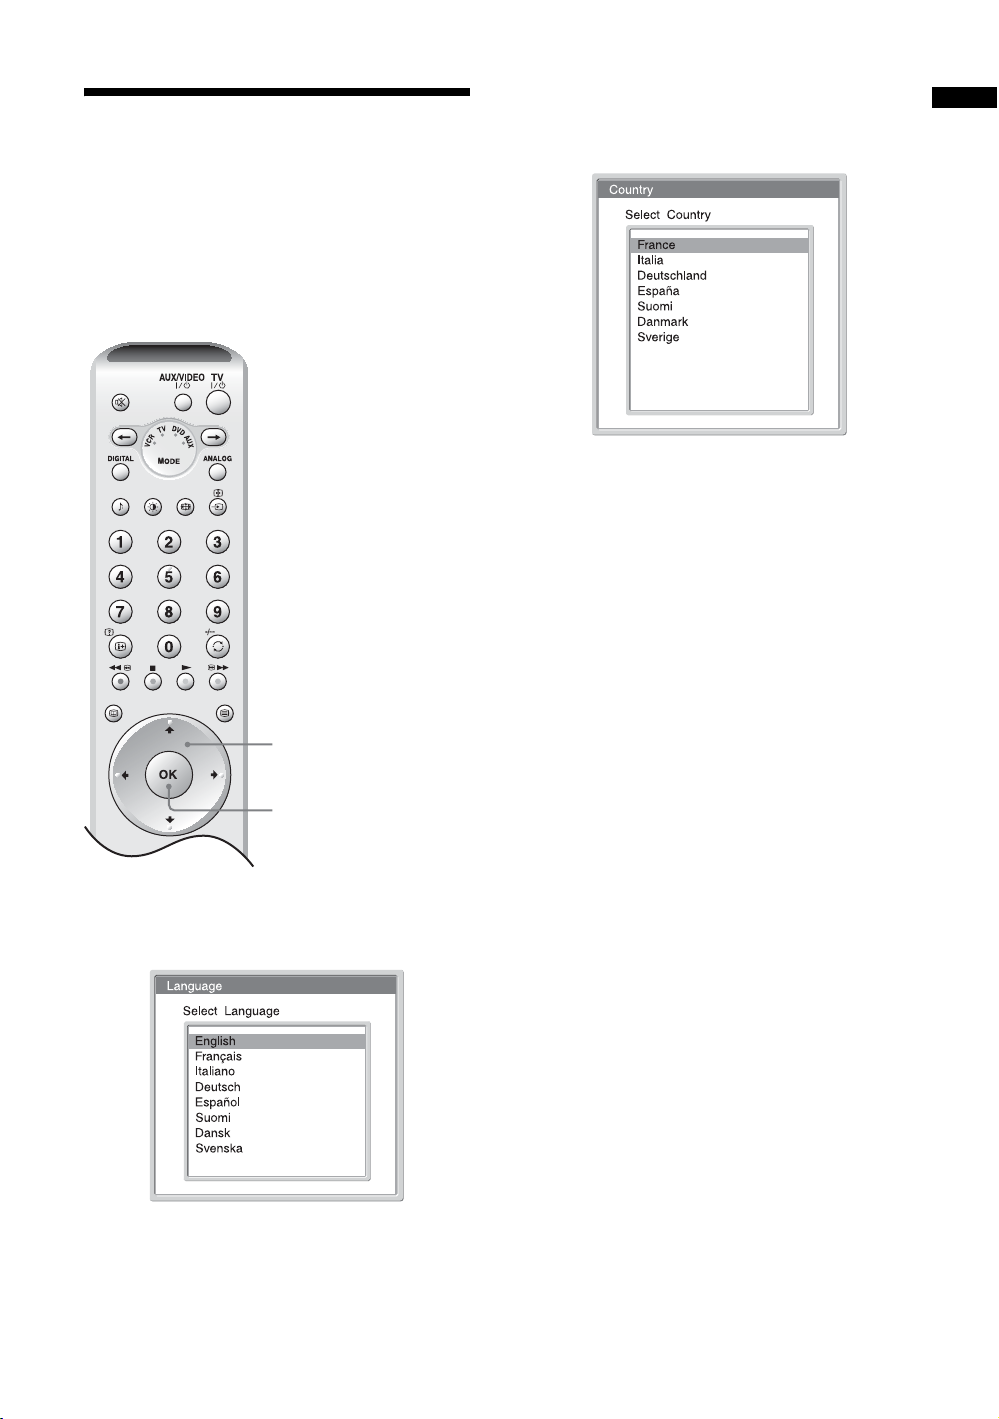
6: Selecting the
PROG
language and country/
region
When you switch on the TV for the first time, the
Language menu appears on the screen.
TV
AUX/VIDEO
D
V
V
D
T
A
R
U
C
X
V
DIGITAL ANALOG
MODE
123
456
7809
2 Press M/m to select the country/region in
which you will operate the TV, then press
OK.
If the country/region in which you want to use the
TV does not appear in the list, select “-” instead of
a country/region.
The message confirming the TV start auto-tuning
appears on the screen, then go to “7: Auto-tuning
the TV” on page 14.
Getting Started
1,2
OK
1,2
1 Press M/m to select the language
displayed on the menu screens, then press
OK.
13
GB
Page 14
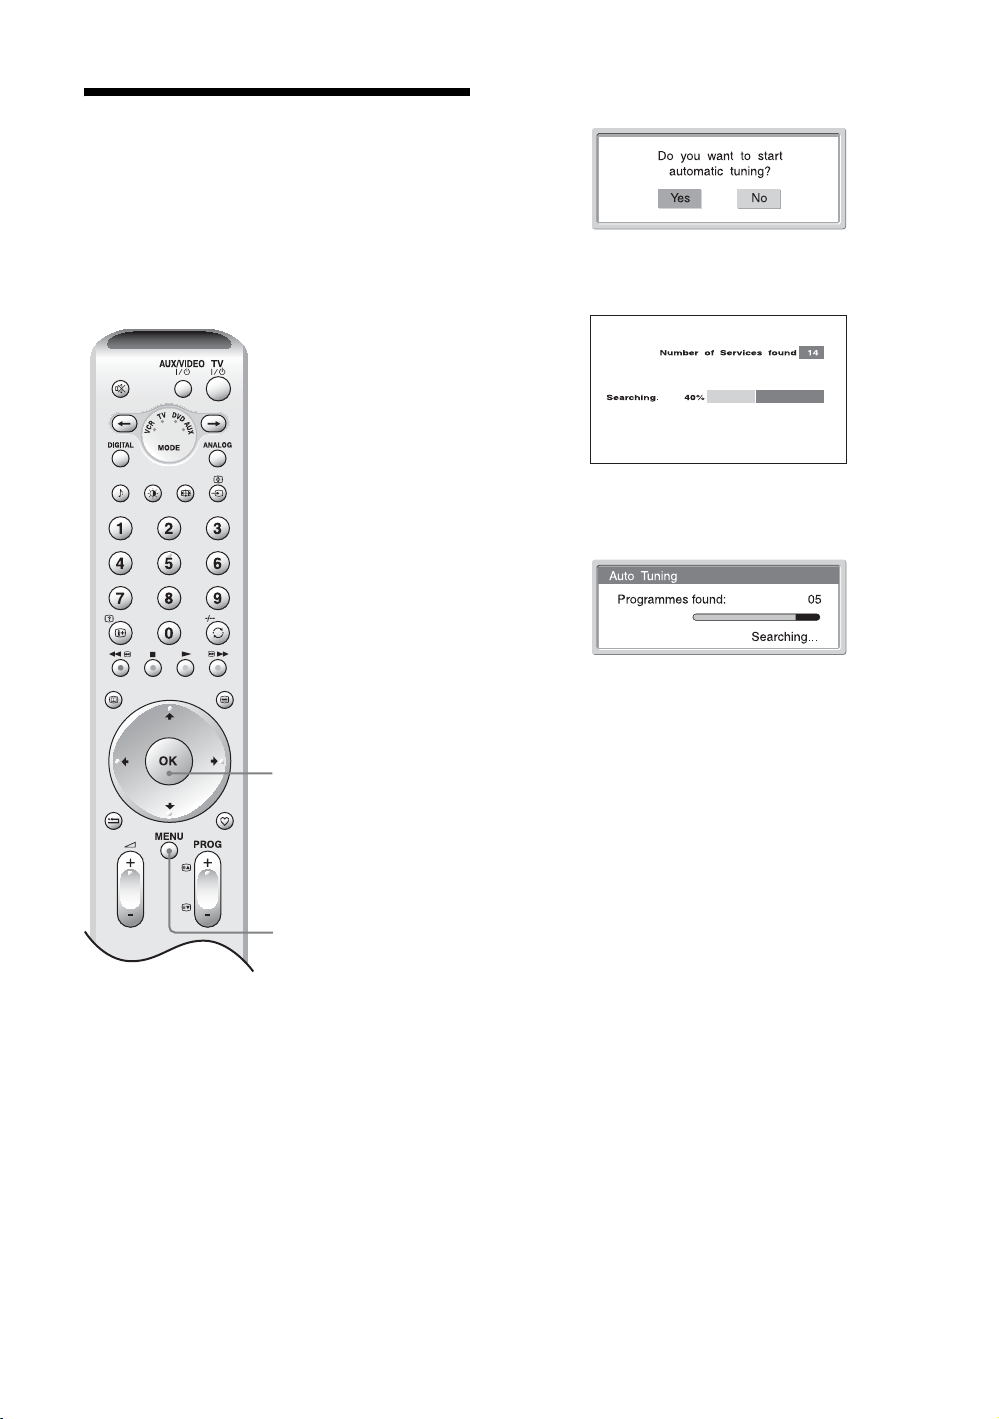
7: Auto-tuning the TV
After selecting the language and country/region, a
message confirming the TV start auto-tuning appears
on the screen.
You must tune the TV to receive channels (TV
broadcasts). Do the following to search and store all
available channels.
1 Press OK to select “Yes”.
m
Digital auto-tune display
m
Analogue auto-tune display
The TV starts searching for all available digital
channels, followed by all available analogue
channels. This may take some time, please be
patient and do not press any buttons on the TV or
1
3
remote.
Once all available digital and analogue channels
have been stored, the TV returns to normal
operation, displaying the digital channel stored on
channel number 1. If no digital channels are
found, the analogue channel stored on channel 1 is
displayed.
When a message appears for you to confirm the
aerial connections
No digital or analogue channels are found. Check
all the aerial connections and press OK to start
auto-tuning again.
2 When the Programme Sorting menu
appears on the screen, follow steps 2 to 3
of “Programme Sorting (Analogue mode
only)” (page 32).
If you do not change the order in which the
analogue channels are stored on the TV, go to step
3.
3 Press MENU to exit.
The TV has now tuned in all the available
channels.
14
GB
Page 15
Watching TV
Watching TV
1
2 Press DIGITAL to switch to digital mode or
ANALOG to switch to analogue mode.
The channels available vary depending on the
mode.
3 Press the number buttons or PROG +/- to
select a TV channel.
To select channel numbers 10 and above using the
number buttons, enter the second and third digits
within two seconds.
To select a digital channel using the Digital
Electronic Programme Guide (EPG), see page 18.
In digital mode
An information banner appears briefly. The
following icons may be indicated on the banner.
: Radio service
: Scrambled/Subscription service
: Multiple audio languages available
: Subtitles available
: Subtitles available for the hearing impaired
22
3
: Recommended minimum age for current
programme (from 4 to 18 years)
: Parental Lock
: Current programme is being recorded
Additional operations
Watching TV
3
1 Press 1 on the TV (right side) to switch on
the TV.
When the TV is in standby mode (the 1 (standby)
indicator on the TV (front) is red), press TV "/1
on the remote to switch on the TV.
To Do this
Turn off the TV
temporarily
(Standby mode)
Turn off the TV
completely
Adjust the volume Press 2 + (increase)/
Mute the sound Press %. Press again to restore.
Switch to digital
mode
Hide interactive
prompts from the
screen (in digital
mode only)
Switch to analogue
mode
Press TV "/1.
Press 1 on the TV (right side).
- (decrease).
Press DIGITAL.
Press ANALOG.
Continued
15
GB
Page 16
To Do this
Return to the
previous channel
watched (for more
than five seconds)
Access the
Programme index
table (in analogue
mode only)
Press .
Press OK. To select an analogue
channel, press M/m, then press
OK.
To access the Input signal index
table, see page 21.
To access Text
Press /. Each time you press /, the display changes
cyclically as follows:
Text t Text over the TV picture (mix mode) t No
Text (exit the Text service)
To select a page, press the number buttons or PROG
+/-.
To hold a page, press / .
To reveal hidden information, press / .
Tips
• Ensure that the TV is receiving a good signal, or some text
errors may occur.
• Most TV channels broadcast a Text service. For
information on the use of the service, select the index page
(usually page 100).
• When four coloured items appear at the bottom of the Text
page, Fastext is available. Fastext allows you to access
pages quickly and easily. Press the corresponding
coloured button to access the page.
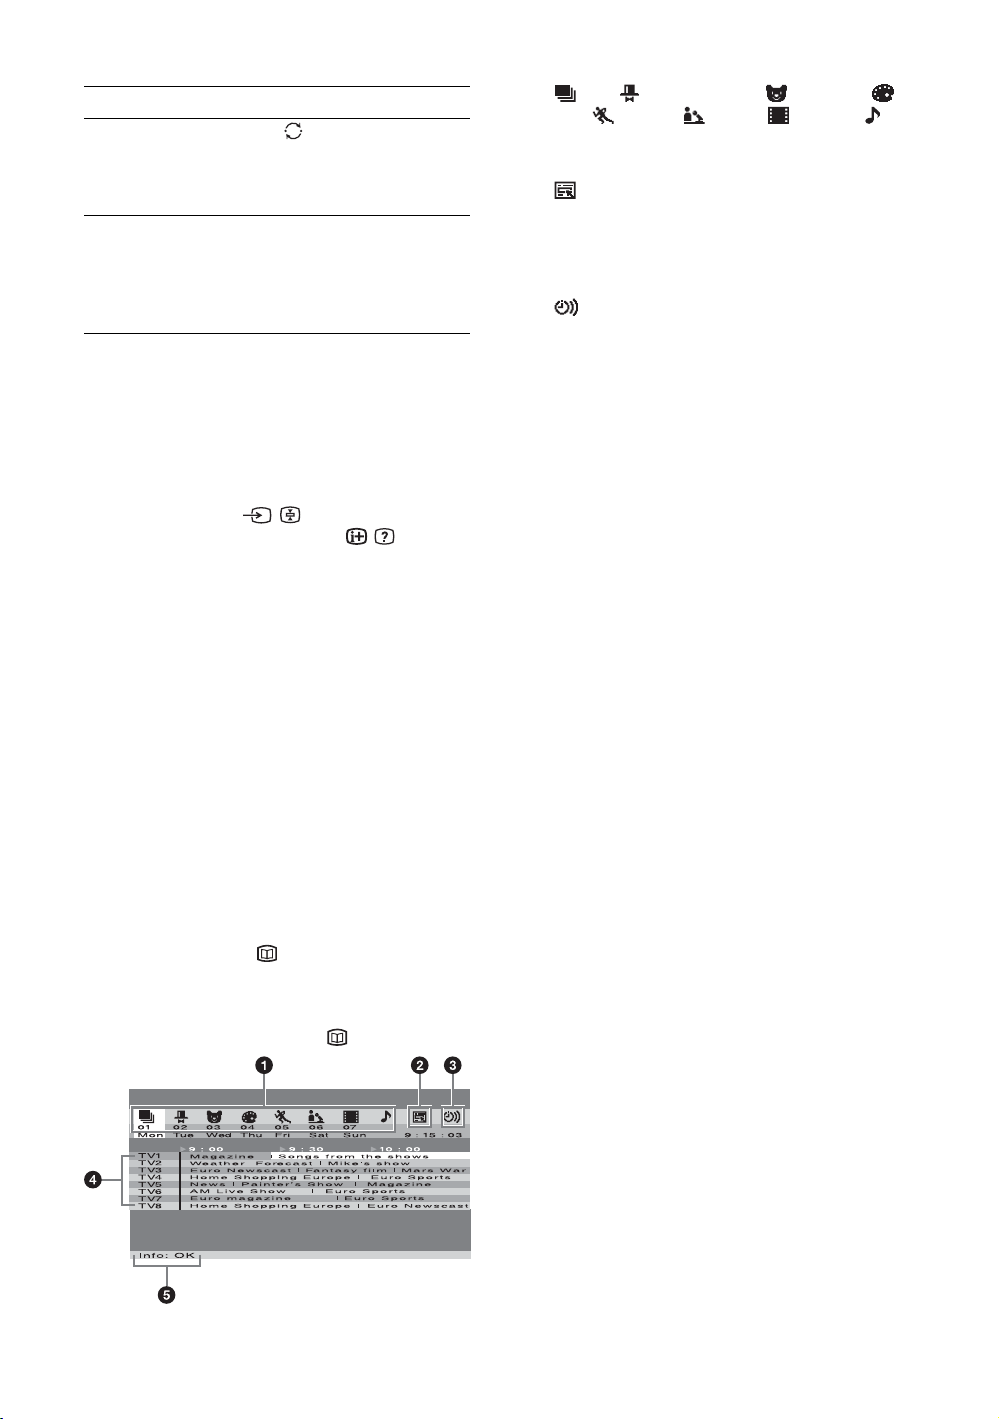
To access NexTView (depending on
availability of service)
NexTView is an electronic programme guide.
1 When a channel which provides a
NexTView service is selected (“NexTView”
is displayed as soon as the data is
available), press .
1 (All)/ (Entertainment)/ (Children)/
(Art)/ (Sports)/ (News)/ (Movies)/
(Music):
Lists programmes by category.
2 (Only when more than eight channels provide
NexTView):
Creates a channel list. You can store up to eight
channels. To restore the factory setting channels,
select “Auto B”.
3 :
Shows a reminder list (for details, see “5 Info:”).
4 Programmes:
Displays the programme list by time when the TV
receives 50% or less of the NexTView data
(“NexTView” is displayed in orange when a channel
is selected), and displays the programme list by time
and channel when the TV receives more than 50% of
the NexTView data (“NexTView” is displayed in
black when a channel is selected). The percentage
may differ depending on your area.
5 Info:
Displays programme description.
To record the programme (only VCRs which support
SmartLink and Timer Programming features), press
the red button.
To display a reminder message when the programme
is broadcast, press the green button. You can set up
to five programmes.
Notes
• Wrong characters appear on the screen if the language
used in the NexTView does not match the language set on
your TV. Set “Language” to the language used in the
NexTView (page 31). Also set “Country” to the country/
region from which the N exTView programme is broadcast
(page 31).
• “Record” and “Remind” are not available once the
programme has started.
2 Press M/m/</, to select the displayed
option, then press OK to confirm.
To turn off NexTView, press again.
GB
16
Page 17

To change the screen mode manually to
suit the broadcast
Press repeatedly to select Wide, Smart, 4:3, 14:9,
or Zoom.
Wide
Displays wide screen (16:9) broadcasts in the correct
proportions.
Smart*
Displays conventional 4:3 broadcasts with an
imitation wide screen effect. The 4:3 picture is
stretched to fill the screen.
4:3
Watching TV
Displays conventional 4:3 broadcasts (e.g., non-wide
screen TV) in the correct proportions.
14:9*
Displays 14:9 broadcasts in the correct proportions.
As a result, black border areas are visible on the
screen.
Zoom*
Displays cinemascopic (letter box format) broadcasts
in the correct proportions.
* Parts of the top and bottom of the picture may be cut off.
Tips
• Alternatively, you can set “Auto Format” to “On”. The TV
will automatically select the best mode to suit the
broadcast (page 27).
• You can adjust the portion of the picture when selecting
Smart, 14:9, or Zoom. Press M/m to move up or down
(e.g., to read subtitles).
17
GB
Page 18

Checking the Digital Electronic Programme Guide
(EPG)
1 In digital mode, press to display the
Digital Electronic Programme Guide
(EPG).
2 Perform the desired operation, as shown in
the following table.
Digital Electronic Programme
Guide (EPG)
To Do this
Turn off the EPG Press .
Move through the EPG Press M/m/</,.
Display the previous or next six channels Press the red (previous) or green (next) button.
Watch a current programme Press OK while the current programme is selected.
Note
Programme information will only be displayed if the TV
station is transmitting it.
Sort the programme information by
category – Category list
Set a programme to be recorded – Timer
REC
1 Press the blue button.
2 Press M/m/</, to select a category. The category name is
displayed on the side.
The categories available include:
Favourite
Contains all the channels that have been stored in the Favourite list
(page 20).
All Categories
Contains all available channels.
News
Contains all news channels.
3 Press OK.
The Digital Electronic Programme Guide (EPG) now only displays the
current programmes from the category selected.
1 Press M/m/</, to select the future programme you want to
record.
2 Press OK.
3 Press M/m to select “Timer REC”.
4 Press OK to set the TV and your VCR timers.
A symbol appears by that programme’s information. The
indicator on the TV (front) lights up in standby mode.
Notes
• You can set VCR timer recording on the TV only for Smartlink compatible
VCRs. If your VCR is not Smartlink compatible, a message will be displayed to
remind you to set your VCR timer.
• Once a recording has begun, you can switch the TV to standby mode, but do not
switch off the TV completely or the recording may be cancelled.
• If an age restriction for programmes has been selected, a message asking for pin
code will appear on the screen. For more details refer to Parental Lock on
page 37.
18
GB
Page 19

To Do this
Set a programme to be displayed
automatically on the screen when it starts
– Reminder
1 Press M/m/</, to select the future programme you want to
display.
2 Press OK.
3 Press M/m to select “Reminder”.
4 Press OK to automatically display the selected programme
when the programme starts.
A c symbol appears by that programme’s information. The indicator
on the TV (front) lights up in standby mode.
Note
If you switch the TV to standby mode, it will automatically turn itself on
when the programme is about to start.
Watching TV
Set the time and date of a programme you
want to record – Manual timer REC
Cancel a recording/reminder – Timer list
1 Press OK.
2 Press M/m to select “Manual timer REC”.
3 Press M/m to select the date, then press ,.
4 Set the start and stop time in the same way as in step 3.
5 Press M/m to select the channel, then press OK to set the TV
and your VCR timers.
A symbol appears by that programme’s information. The
indicator on the TV (front) lights up in standby mode.
Notes
• You can set VCR timer recording on the TV only for Smartlink compatible
VCRs. If your VCR is not Smartlink compatible, a message will be displayed to
remind you to set your VCR timer.
• Once a recording has begun, you can switch the TV to standby mode, but do not
switch off the TV completely or the recording may be cancelled.
• If an age restriction for programmes has been selected, a message asking for pin
code will appear on the screen. For more details refer to Parental Lock on
page 37.
1 Press OK.
2 Press M/m to select “Timer list”.
3 Press M/m to select the programme you want to cancel, then
press OK.
A display appears to confirm that you want to cancel the programme.
4 Press , to select “Yes”, then press OK to confirm.
19
GB
Page 20
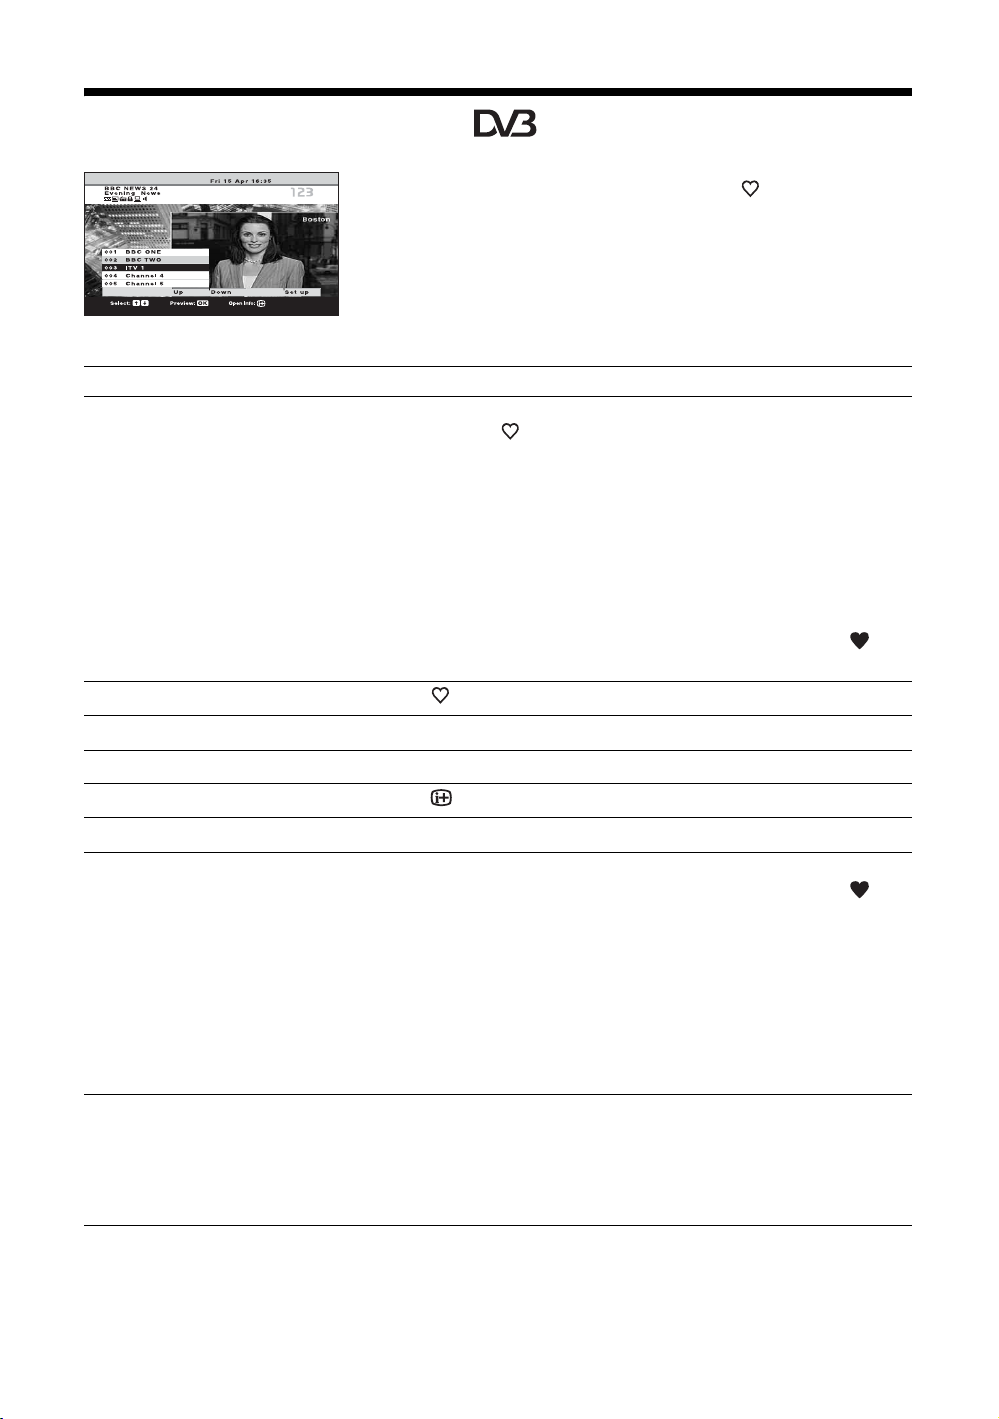
Using the Favourite list
1 In digital mode, press to display the
Favourite list.
A message appears asking if you want to add
channels to the Favourite list when the Favourite
list is blank.
Favourite list
To Do this
Create your Favourite list for the first time A message appears asking if you want to add channels to the Favourite list
when you press for the first time.
1 Press OK to select “Yes”.
2 Press M/m to select the channel you want to add, then press
OK.
If there are more than five channels in the list, press the green button for
the next five channels or press the red button for the previous five
channels. If you know the channel number, you can use the number
buttons to directly select a channel.
3 Press OK.
Channels that are stored in the Favourite list are indicated by a
symbol.
Turn off the Favourite list Press .
Move through in the Favourite list Press M/m.
Display the previous or next five channels Press the red (previous) or green (next) button.
See brief details on current programmes Press while selecting a channel. Press again to cancel.
Watch a channel Press OK while selecting a channel.
Add or remove channels in the Favourite
list
1 Press the blue button.
Channels that are stored in the Favourite list are indicated by a
symbol.
2 Press M/m to select the channel you want to add or remove.
If there are more than five channels in the list, press the green button for
the next five channels or press the red button for the previous five
channels. If you know the channel number, you can use the number
buttons to directly select a channel.
3 Press OK.
4 Press the blue button to return to the Favourite list.
the following table.
2 Perform the desired operation, as shown in
Remove all channels from the Favourite list
GB
20
1 Press the blue button.
2 Press the yellow button.
A display appears to confirm that you want to delete all channels from the
Favourite list.
3 Press < to select “Yes”, then press OK to confirm.
Page 21
Viewing pictures from
Using the Menu
connected equipment
Switch on the connected equipment, then
perform one of the following operation.
For equipment connected to the scart sockets using a
fully-wired 21-pin scart lead
Start playback on the connected equipment.
The picture from the connected equipment appears on
the screen.
For an auto-tuned VCR (page 11)
In analogue mode, press PROG +/-, or the number
buttons, to select the video channel.
For other connected equipment
Press / repeatedly until the correct input
symbol (see below) appears on the screen.
1/ 1, 2/ 2, 3/ 3:
Audio/video or RGB input signal through the scart
socket / 1, 2 or 3. appears only if an RGB
source has been connected.
4:
Component input signal through the Y, P
sockets / 4, and audio input signal through the
L/G/S/I, R/D/D/D sockets / 4.
5:
Digital audio/video signal is input through the HDMI IN
5 socket. Audio input signal is analogue only if the
equipment has been connected using the DVI and audio
out socket.
B/CB, PR/CR
Navigating through
menus
Using the Menu
2,3,4
4
6/ 6:
Video input signal through the video socket 6, and
audio input signal through the audio socket L/G/S/I
(MONO), R/D/D/D sockets 6. appears only if
the equipment is connected to the S video socket 6
instead of the video socket 6, and S video input
signal is input through the S video socket 6.
Additional operations
To Do this
Return to the normal
TV operation
Access the Input
signal index table
Press DIGITAL or ANALOG.
Press OK to access the Input signal
index table. (Then, only in
analogue mode, press ,.) To
select an input source, press M/m,
then press OK.
1
1 Press MENU to display the menu.
2 Press M/m to select a menu icon.
3 Press M/m/</, to select an option.
4 Press M/m/</, to change/set the
setting, then press OK.
To exit the menu, press MENU.
To return to the last display, press <.
Continued
21
GB
Page 22
Overview of the menus
The following options are available in each menu. For
details on navigating through menus, see page 21.
Also, see page in parentheses for details of each menu.
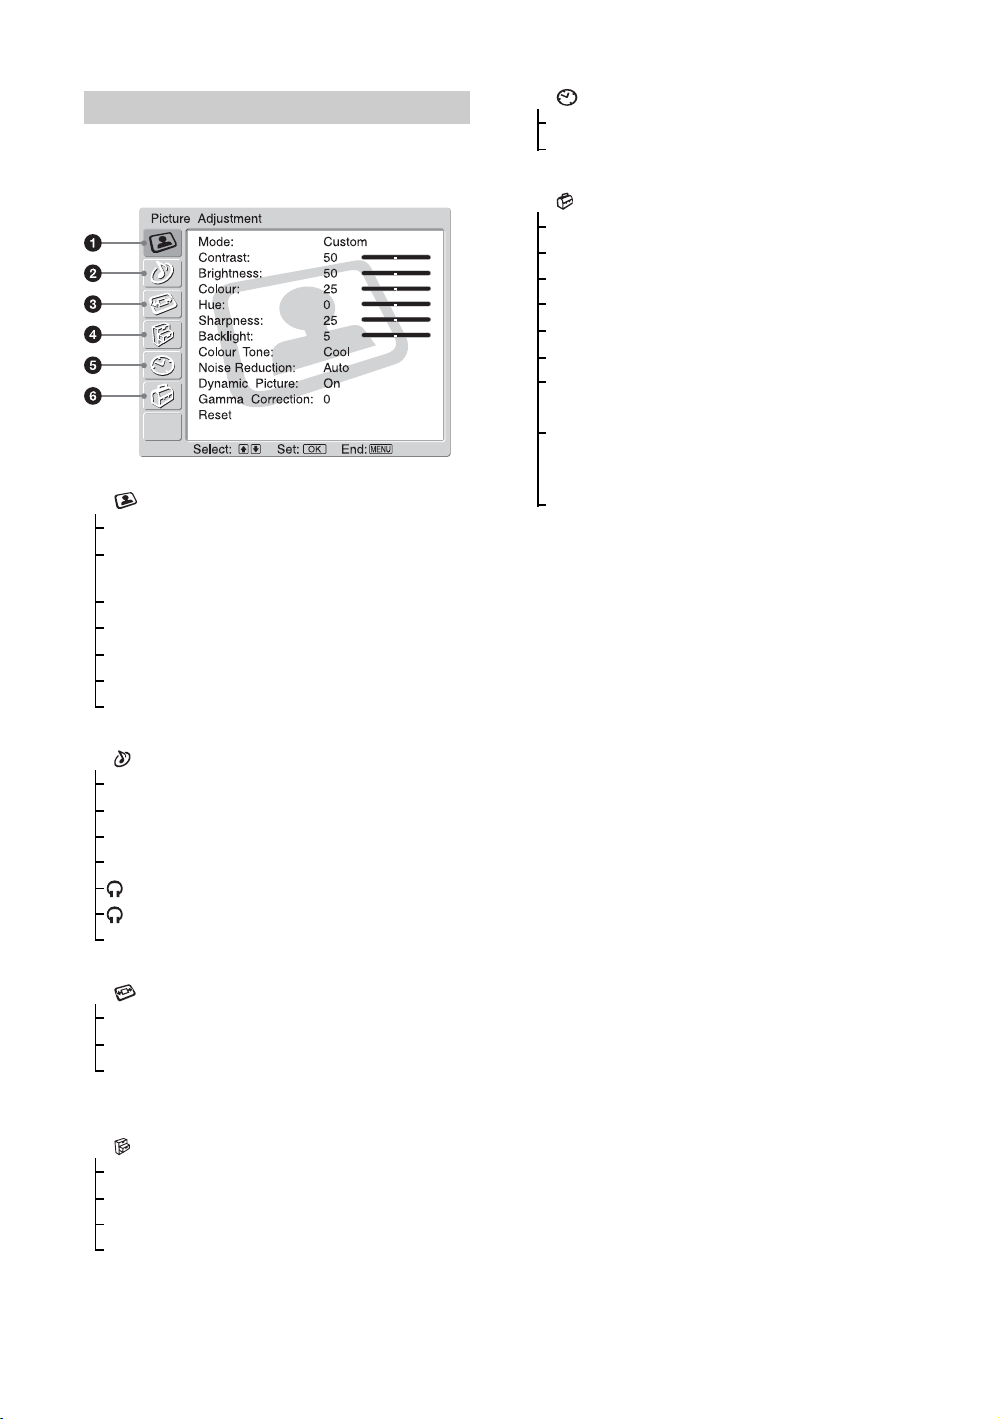
1 Picture Adjustment
Mode (23)
Contrast/Brightness/Colour/Hue/
Sharpness/Backlight (23)
Colour Tone (23)
Noise Reduction (24)
Dynamic Picture (24)
Gamma Correction (24)
Reset (24)
5 Timer
Sleep Timer (30)
Auto Shutoff (30)
6 Set Up
Auto Start Up (31)
Language (31)
Country (31)
Auto Tuning (32)
Programme Sorting (32)
Programme Labels (32)
AV Preset (33)
– Equipment labels/Edit/Skip
Manual Programme Preset (33)
– Programme/System/Channel/Label/AFT/
Audio Filter/Skip/Decoder/ATT/Confirm
Digital Set Up (36)
– Digital Tuning/Digital Set-up
Note
The options you can adjust vary depending on the situation.
Only the options that can be operated are displayed.
2 Sound Adjustment
Effect (25)
Treble/Bass/Balance (25)
Auto Volume (25)
Dual Sound (26)
Volume (26)
Dual Sound (26)
Reset (26)
3 Screen Control
Auto Format (27)
Screen Format (27)
Screen Shift (27)
– V Shift/H Shift/Reset
4 Features
Power Saving (28)
Speaker (28)
AV2 Output (28)
Picture Off (29)
22
GB
Page 23
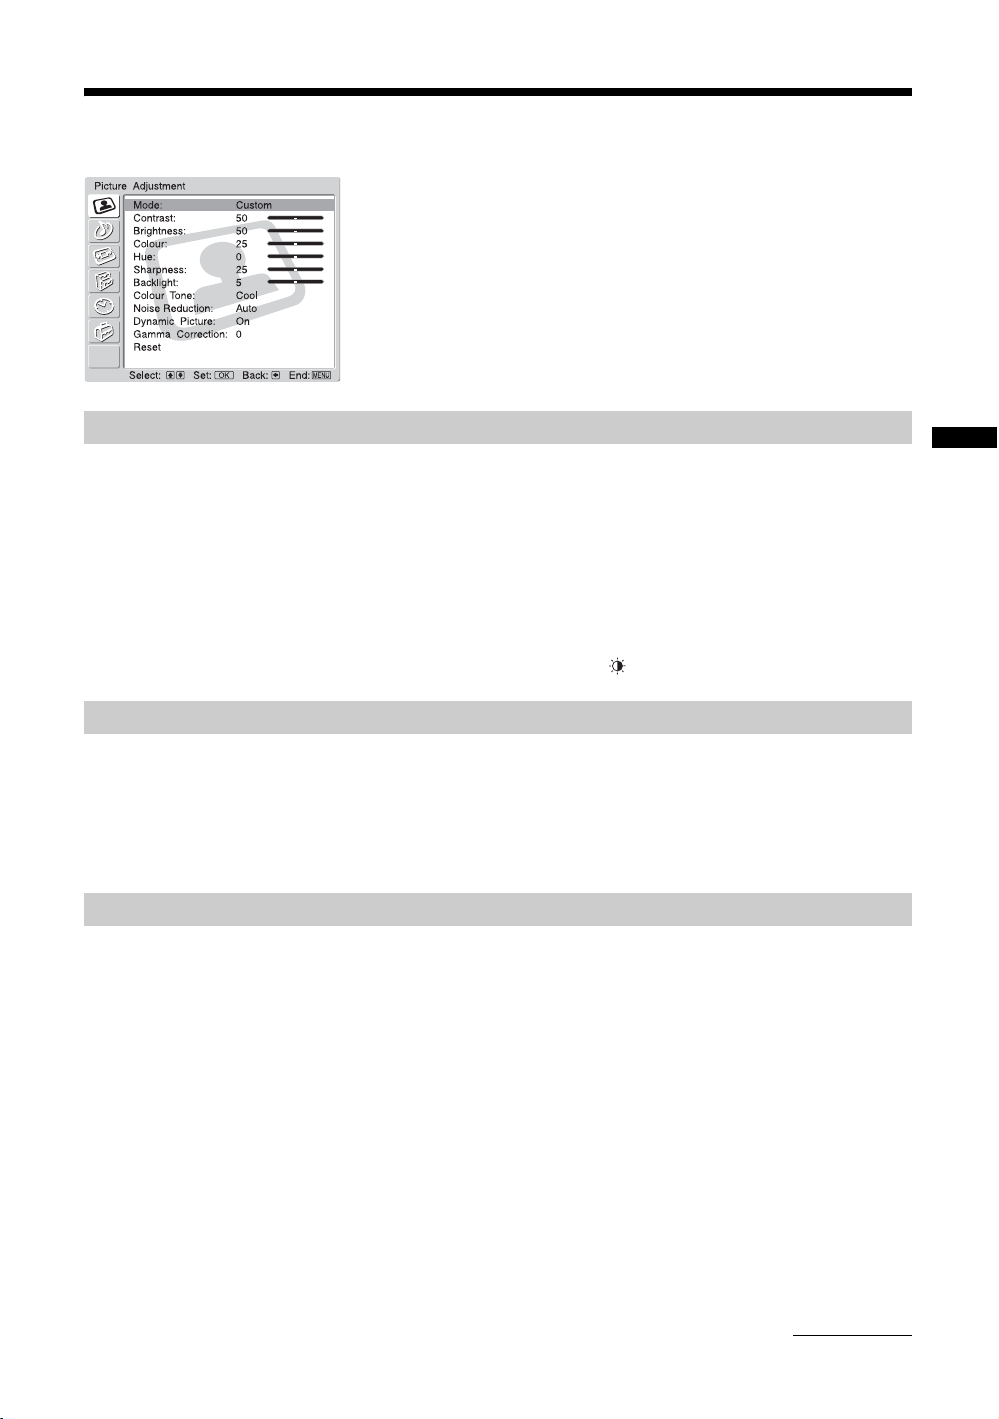
Picture Adjustment menu
Mode
Selects the picture mode.
1 Press OK to select “Mode”.
2 Press M/m to select one of the following picture modes, then press OK.
Vivid: For enhanced picture contrast and sharpness.
Standard: For standard picture. Recommended for home entertainment.
Custom: Allows you to store your preferred settings.
Tip
You can also change the picture mode by pressing repeatedly.
You can select the options listed below on the Picture
Adjustment menu. To select options, see “Navigating
through menus” (page 21).
Tip
When you set “Mode” to “Vivid” or “Standard”, you can
adjust only “Mode”, “Contrast”, “Colour Tone”, “Noise
Reduction”, and “Reset”.
Using the Menu
Contrast/Brightness/Colour/Hue/Sharpness/Backlight
1 Press OK to select the option.
2 Press </, to set the level, then press OK.
Tip
“Hue” can only be adjusted for an NTSC colour signal (e.g., U.S.A. video tapes).
Colour Tone
1 Press OK to select “Colour Tone”.
2 Press M/m to select one of the following, then press OK.
Cool: Gives the white colours a blue tint.
Neutral: Gives the white colours a neutral tint.
Warm: Gives the white colours a red tint.
Continued
23
GB
Page 24

Noise Reduction
Reduces the picture noise (snowy picture) in a weak broadcast signal.
1 Press OK to select “Noise Reduction”.
2 Press M/m to select one of the following, then press OK.
Dynamic Picture
Enhances the picture contrast.
1 Press OK to select “Dynamic Picture”.
2 Press M/m to select “On”, then press OK.
Gamma Correction
Adjusts the balance between bright and dark areas of the picture.
1 Press OK to select “Gamma Correction”.
2 Press M/m to set the level, then press OK.
Auto: Automatically reduces the picture noise.
High/Low/Off: Modifies the effect of the noise reduction.
CNR: Reduces the picture noise when the animation image is received.
BNR: Reduces the block picture noise. This is effective for digital channels, or a
connected DVD player/digital satellite receiver with MPEG playback.
Reset
Reset all the picture settings to the factory settings.
1 Press OK to select “Reset”.
2 Press M/m to select “OK”, then press OK.
24
GB
Page 25

Sound Adjustment menu
Effect (sound effect)
1 Press OK to select “Effect”.
2 Press M/m to select one of the following sound effects, then press OK.
Off: Flat response.
Natural: Enhances clarity, detail, and sound presence by using “BBE High Definition
Sound System
Dynamic: Intensifies clarity and sound presence for better intelligibility and musical
realism by using the “BBE High Definition Sound System”.
Dolby Virtual
multi channel system.
Tips
• You can also change sound effect by pressing 9 repeatedly.
• If you set “Auto Volume” to “On”, “Dolby Virtual” is automatically set to “Natural”.
*1
Manufactured under license from BBE Sound, Inc.
Licensed by BBE Sound, Inc. under USP4638258, 4482866. “BBE” and BBE symbol are
trademarks of BBE Sound, Inc.
*2
Manufactured under license from Dolby Laboratories. “Dolby” and the double-D symbol are
trademarks of Dolby Laboratories.
*1
”.
*2
: Uses the TV speakers to simulate the surround effect produced by a
You can select the options listed below on the Sound
Adjustment menu. To select options, see “Navigating
through menus” (page 21).
Using the Menu
Treble/Bass/Balance
Adjusts higher-pitched sounds (Treble), adjusts lower-pitched sounds (Bass), and
emphasizes left or right speaker balance (Balance).
1 Press OK to select the option.
2 Press </, to set the level, then press OK.
Auto Volume
Keeps a constant volume level even when volume level gaps occur (e.g., adverts tend to be
louder than programmes).
1 Press OK to select “Auto Volume”.
2 Press M/m to select “On”, then press OK.
Tip
If you set “Effect” to “Dolby Virtual”, “Auto Volume” will automatically be switched to “0ff”.
Continued
25
GB
Page 26

Dual Sound
Selects the sound from the speaker for a stereo or bilingual broadcast.
1 Press OK to select “Dual Sound”.
2 Press M/m to select one of the following, then press OK.
Stereo, Mono: For a stereo broadcast.
A/B/Mono: For a bilingual broadcast, select “A” for sound channel 1, “B” for sound
channel 2, or “Mono” for a mono channel, if available.
Tip
If you select other equipment connected to the TV, set “Dual Sound” to “Stereo”, “A” or “B”.
Volume (headphone volume)
Adjusts the volume of the headphones.
1 Press OK to select “ Volume”.
2 Press </, to set the level, then press OK.
Dual Sound
Selects the sound of the headphones for a stereo or bilingual broadcast.
1 Press OK to select “ Dual Sound”.
Reset
2 Press M/m to select one of the following, then press OK.
Stereo, Mono: For a stereo broadcast.
A/B/Mono: For a bilingual broadcast, select “A” for sound channel 1, “B” for sound
channel 2, or “Mono” for a mono channel, if available.
Tip
If you select other equipment connected to the TV, set “ Dual Sound” to “Stereo”, “A” or “B”.
Resets the “Treble”, “Bass” and “Balance” settings to the factory settings.
1 Press OK to select “Reset”.
2 Press M/m to select “OK”, then press OK.
26
GB
Page 27

Screen Control menu
Auto Format
Automatically changes the screen format according to the broadcast signal.
1 Press OK to select “Auto Format”.
2 Press M/m to select “On”, then press OK.
To keep your setting, select “Off”.
Tips
• Even if you have selected “On” or “Off” in “Auto Format”, you can always modify the format of
the screen by pressing repeatedly.
• “Auto Format” is available for PAL and SECAM signals only.
You can select the options listed below on the Screen
Control menu. To select options, see “Navigating
through menus” (page 21).
Using the Menu
Screen Format
Screen Shift
For details about the screen format, see page 17.
1 Press OK to select “Screen Format”.
2 Press M/m to select “Smart”, “4:3”, “14:9”, “Zoom” or “Wide” (see page
17 for details), then press OK.
Adjusts the position of the picture for each screen format.
1 Press OK to select “Screen Shift”.
2 Press M/m to select one of the following, then press OK.
V Shift: Adjusts the vertical picture position.
H Shift: Adjusts the horizontal picture position.
Reset: Resets to the factory settings. Instead of step 3, press M/m to select “OK”, then
press OK.
3 Press M/m (for vertical picture position) or </, (for horizontal picture
position), then press OK.
Tip
When “Screen Format” is set to “4:3” or “Wide”, “V Shift” cannot be adjusted.
27
GB
Page 28
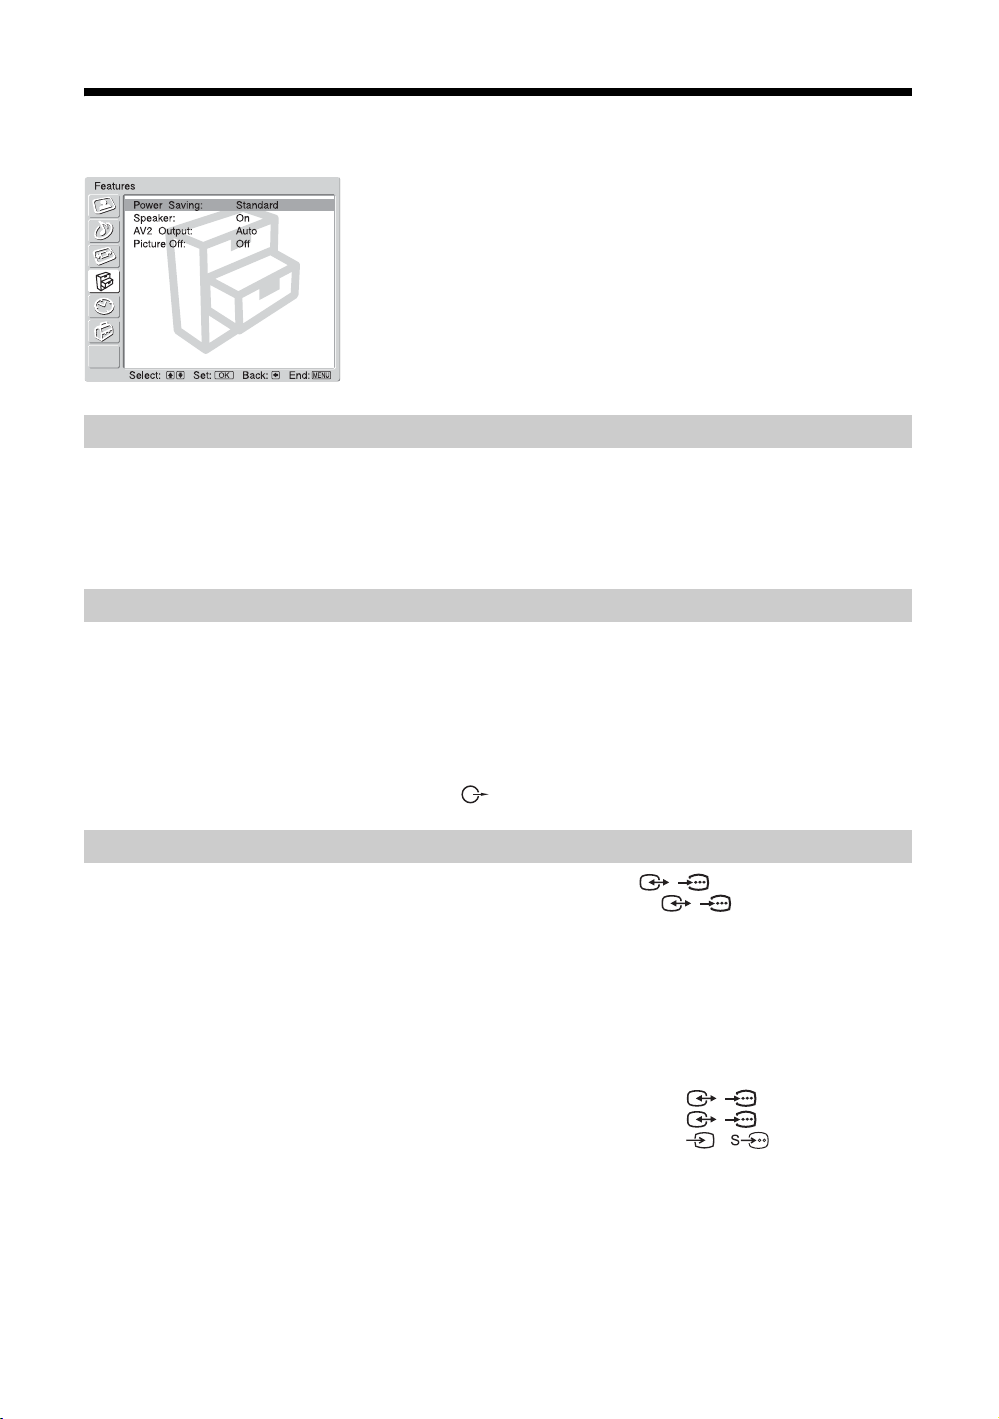
Features menu
Power Saving
Reduces the power consumption of the TV.
1 Press OK to select “Power Saving”.
2 Press M/m to select “Reduce”, then press OK.
Speaker
Switches on/off the TV’s internal speakers.
1 Press OK to select “Speaker”.
You can select the options listed below on the
Features menu. To select options, see “Navigating
through menus” (page 21).
AV2 Output
2 Press M/m to select “On” or “Off”, then press OK.
On: The sound of the TV is output through the TV’s speakers.
Off: The sound of the TV is output through the external audio equipment connected to
the audio output sockets .
Sets a signal to be output through the socket labelled / 2 on the rear of the TV. If
you connect a VCR or other recording equipment to the / 2 socket, you can then
record from the equipment connected to other sockets of the TV.
1 Press OK to select “AV2 Output”.
2 Press M/m to select one of the following, then press OK.
Auto: Outputs whatever is being viewed on the screen.
TV Analog: Outputs an analogue broadcast.
TV Digital: Outputs a digital broadcast.
AV1: Outputs signals from equipment connected to the / 1 socket.
AV3: Outputs signals from equipment connected to the / 3 socket.
AV6: Outputs signals from equipment connected to the 6/ 6 socket.
28
GB
Page 29

Picture Off
Switches off the picture. You can still listen to the sound with the picture off.
1 Press OK to select “Picture Off”.
2 Press M/m to select “On”, then press OK.
The (Picture Off) indicator on the TV (front) lights up in green. To restore the
picture, press any buttons (except 2 +/- and 9).
Using the Menu
29
GB
Page 30
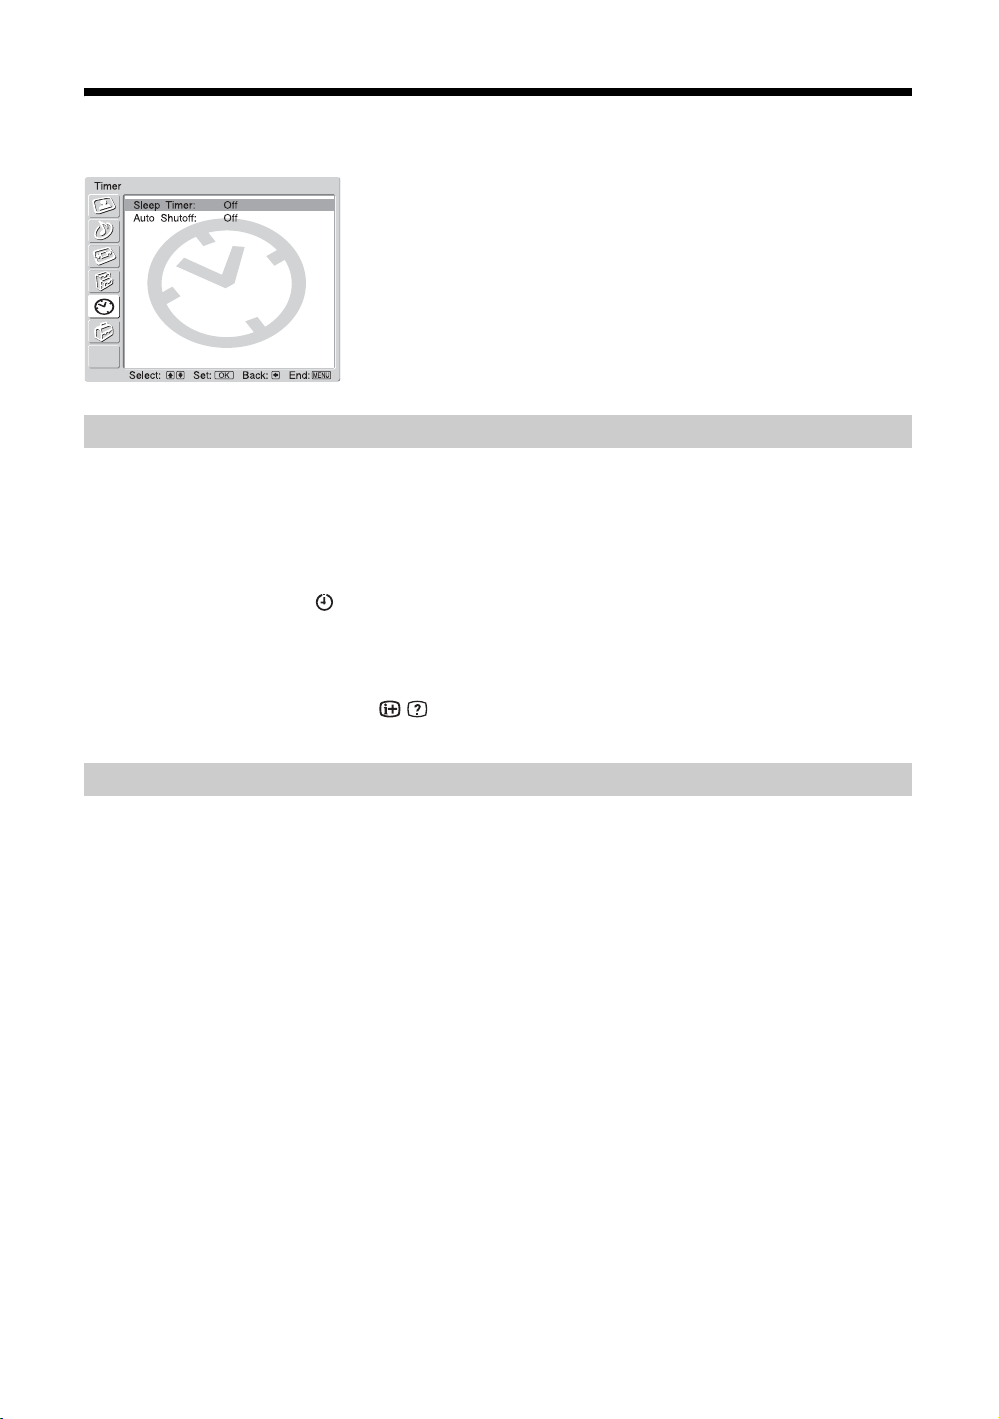
Timer menu
Sleep Timer
Sets a period of time after which the TV automatically switches itself into standby mode.
1 Press OK to select “Sleep Timer”.
2 Press M/m to select the desired time period (“30min”/“60min”/“90min”/
You can select the options listed below on the Timer
menu. To select options, see “Navigating through
menus” (page 21).
“120min”), then press OK.
The (Timer) indicator on the TV (front) lights up in orange.
Tips
• If you switch off the TV and switch it on again, “Sleep Timer” is reset to “Off”.
• “Sleep timer will end soon. Power will be turned off.” appears on the screen one minute before
the TV switches to standby mode.
• If you press / , the remaining time in minutes before the TV switches to standby mode is
displayed on the screen.
Auto Shutoff
Sets the TV to switch to standby mode automatically when you select the input source and
there is no input signal from connected equipment.
In TV mode, this Auto Shutoff function is always set to “On”.
1 Press OK to select “Auto Shutoff”.
2 Press M/m to select “On”, then press OK.
30
GB
Page 31

Set Up menu
Auto Start Up
Starts the “first time operation menu” to select the language and country/region, and tune in
all available digital and analogue channels. Usually, you do not need to do this operation
because the language and country/region will have been selected and channels already tuned
when the TV was first installed (page 13, 14). However, this option allows you to repeat the
process (e.g., to retune the TV after moving house, or to search for new channels that have
been launched by broadcasters).
1 Press OK to select “Auto Start Up”.
2 Press OK to select “Yes”.
You can select the options listed below on the Set Up
menu. To select options, see “Navigating through
menus” (page 21).
Using the Menu
The Language menu appears on the screen.
Language
Country
3 Follow steps of “6: Selecting the language and country/region” (page 13)
and “7: Auto-tuning the TV” (page 14).
Selects the language in which the menus are displayed.
1 Press OK to select “Language”.
2 Press M/m to select the language, then press OK.
All menus will appear in the selected language.
Selects the country/region where you operate the TV.
1 Press OK to select “Country”.
2 Press M/m to select the country/region in which you will operate the TV,
then press OK.
Continued
31
GB
Page 32

Auto Tuning (Analogue mode only)
Tunes in all the available analogue channels.
Usually you do not need to do this operation because the channels are already tuned when
the TV was first installed (page 14). However, this option allows you to repeat the process
(e.g., to retune the TV after moving house, or to search for new channels that have been
launched by broadcasters).
1 Press OK to select “Auto Tuning”.
2 Follow step 1 of “7: Auto-tuning the TV” (page 14).
When all available analogue channels have been tuned, the TV returns to normal
operation.
Programme Sorting (Analogue mode only)
Changes the order in which the analogue channels are stored on the TV.
1 Press OK to select “Programme Sorting”.
2 Press M/m to select the channel you want to move to a new position,
then press OK.
3 Press M/m to select the new position for your channel, then press OK.
Repeat the procedure in steps 2 and 3 to move other channels if required.
Programme Labels (Analogue mode only)
Assigns a channel name of your choice up to five letters or numbers. The name will be
displayed briefly on the screen when the channel is selected. (Names for channels are usually
taken automatically from Text (if available).)
1 Press OK to select “Programme Labels”.
2 Press M/m to select the channel you want to name, then press OK.
3 Press M/m/</, to select the desired letter or number (“s” for a blank
space), then press OK.
If you input a wrong character
Press M/m/</, to select %/5 and press OK repeatedly until the wrong character is
selected. Then, press M/m/</, to select the correct character and press OK.
4 Repeat the procedure in step 3 until the name is complete.
5 Press M/m/</, to select “End”, then press OK.
32
GB
Page 33

AV Preset
Assigns a name to any equipment connected to the side and rear sockets. The name will be
displayed briefly on the screen when the equipment is selected. You can skip an input source
that is not connected to any equipment.
1 Press OK to select “AV Preset”.
2 Press M/m to select the desired input source, then press OK.
3 Press M/m to select the desired option below, then press OK.
Option Description
Equipment
labels
Edit Creates your own label. Follow steps 3 to 5 of “Programme Labels”
Skip Skips an input source that is not connected to any equipment when
Manual Programme Preset (Analogue mode only)
Before selecting “Label”/“AFT”/“Audio Filter”/“Skip”/“Decoder”/“ATT”, press PROG +/to select the programme number with the channel. You cannot select a programme number
that is set to skip (page 35).
Uses one of the preset labels to assign a name to connected
equipment.
(page 32).
you press M/m to select the input source.
Using the Menu
1 Press OK to select “Manual Programme Preset”.
2 Press M/m to select one of the following options, then press OK.
Continued
33
GB
Page 34

Option Description
Programme Presets programme channels manually.
System
Channel
1 Press M/m to select “Programme”, then press OK.
2 Press M/m to select the programme number you want
to manually tune (if tuning a VCR, select channel 0),
then press <.
3 Press M/m to select “System”, then press OK.
Note
Depending on the country/region selected for “Country”
(page 31), this option may not be available.
4 Press M/m to select one of the following TV broadcast
systems, then press <.
B/G: For western European countries/regions
D/K: For eastern European countries/regions
I: For the United Kingdom
L: For France
5 Press M/m to select “Channel”, then press OK.
6 Press M/m to select “S” (for cable channels) or “C” (for
terrestrial channels), then press ,.
7 Tune the channels as follows:
If you do not know the channel number (frequency)
Press M/m to search for the next available channel. When a
channel has been found, the search will stop. To continue
searching, press M/m.
If you know the channel number (frequency)
Press the number buttons to enter the channel number of the
broadcast you want or your VCR channel number.
8 Press OK.
9 Press m to select “Confirm”, then press OK.
10 Press m to select “OK”, then press OK.
Repeat the procedure above to preset other channels manually.
Label Assigns a name of your choice, up to five letters or numbers, to the
selected channel. This name will be displayed briefly on the screen
when the channel is selected.
1 Follow steps 3 to 5 of “Programme Labels” (page 32).
2 Press m to select “Confirm”, then press OK.
3 Press m to select “OK”, then press OK.
34
AFT Fine-tunes the selected programme number manually if you feel
that a slight tuning adjustment will improve the picture quality.
(Normally, fine tuning is performed automatically.)
1 Press M/m to adjust the fine tuning over a range of -15
to +15, then press OK.
2 Press m to select “Confirm”, then press OK.
3 Press m to select “OK”, then press OK.
To restore automatic fine tuning, select “On” in step 1.
GB
Page 35

Option Description
Audio Filter Improves the sound for individual channels in the case of distortion
in mono broadcasts. Sometimes a non-standard broadcast signal
can cause sound distortion or intermittent sound muting when
watching mono programmes.
1 Press M/m to select “Low” or “High”, then press OK.
If you do not experience any sound distortion, we recommend
that you leave this option set to the factory setting “Off”.
2 Press m to select “Confirm”, then press OK.
3 Press m to select “OK”, then press OK.
Note
You cannot receive stereo or dual sound when “Low” or “High” is
selected.
Skip Skips unused analogue channels when you press PROG +/- to
select channels. (You can still select a skipped channel using the
number buttons.)
1 Press M/m to select “Yes”, then press OK.
2 Press m to select “Confirm”, then press OK.
3 Press m to select “OK”, then press OK.
To restore a skipped channel, select “No” in step 1.
Decoder Views and records the scrambled channel selected when using a
decoder connected to the scart connector / 2 either
directly or via a VCR.
Note
Depending on the country/region selected for “Country” (page 31), this
option may not be available.
1 Press M/m to select “On”, then press OK.
2 Press m to select “Confirm”, then press OK.
3 Press m to select “OK”, then press OK.
To cancel this function afterwards, select “Off” in step 1.
Using the Menu
ATT Attenuates the RF signal. In case of a strong RF signal, some video
interference may be displayed.
1 Press M/m to select “On”, then press OK.
2 Press m to select “Confirm”, then press OK.
3 Press m to select “OK”, then press OK.
Note
When “ATT” is set to “On”, picture noise may occur during VCR
recording when turning on/off the TV or selecting a TV channel.
In this case, connect your aerial to the input socket on your VCR, then
connect the output socket on your VCR to the socket on the rear of
the TV. Confirm that the VCR can record the digital channels.
Continued
35
GB
Page 36

Digital Set Up
Displays the “Digital Set Up” menu. You can change/set the digital settings using this menu.
1 Press OK to select “Digital Set Up”.
2 Press M/m to select the desired icon below, then press OK.
Digital Tuning menu
3 Press M/m to select one of the following options, then press OK.
Option Description
Digital Tuning Tunes in all the available digital channels.
Digital Auto
Tuning
Usually you do not need to do this operation because the channels
are already tuned when the TV was first installed (page 14).
However, this option allows you to repeat the process (e.g., to
retune the TV after moving house, or to search for new channels
that have been launched by broadcasters).
1 Press OK to start digital auto-tuning.
When all available digital channels have been tuned, a message
stating that the auto-tuning process is finished appears.
2 Press <.
36
GB
Programme
List Edit
Removes any unwanted digital channels stored on the TV, and
changes the order of the digital channels stored on the TV.
1 Press M/m to select the channel you want to remove
or move to a new position.
If you know the channel number (frequency)
Press the number buttons to enter the three-digit programme
number of the broadcast you want.
To display the previous or next five channels
Press the red button (previous) or the green button (next).
2 Remove or change the order of the digital channels as
follows:
To remove the digital channel
Press OK. A message that confirms whether the selected
digital channel is to be deleted appears. Press , to select
“Yes”, then press OK.
To change the order of the digital channels
Press ,, then press M/m to select the new position for the
channel and press OK. Repeat the procedure in steps 1 and
2 to move other channels if required.
3 Press <.
Page 37

Option Description
Digital Manual
Tuning
Tunes the digital channels manually.
1 Press the number button to select the channel number
you want to manually tune, then press M/m to tune the
channel.
2 When the available channels are found, press M/m to
select the channel you want to store, then press OK.
To display the previous or next five channels
Press the red button (previous) or the green button (next).
3 Press M/m to select the programme number where
you want to store the new channel, then press OK.
Repeat the procedure above to tune other channels manually.
Digital Set-up Displays digital subtitles on the screen.
Subtitle Setting
Subtitle
Language
Press M/m to select “Off”, “Basic”, or “For Hard Of Hearing”, then
press OK.
When “For Hard Of Hearing” is selected, some visual aids may
also be displayed with the subtitles (if TV channels broadcast such
information).
Selects which language subtitles are displayed in.
Press M/m to select the language, then press OK.
Using the Menu
Audio
Language
Audio Type
Parental Lock
Selects the language used for a programme. Some digital channels
may broadcast several audio languages for a programme.
Press M/m to select the audio language, then press OK.
Increases the sound level.
Press M/m to select “Basic” or “For Hard Of Hearing”, then press
OK.
Sets an age restriction for programmes. Any programme that
exceeds the age restriction can only be watched after a PIN Code is
entered correctly.
1 Press the number buttons to enter your existing PIN
code.
If you have not previously set a PIN, a message appears to
inform you. Press OK, then follow the instruction of “PIN
Code” below.
2 Press M/m to select the age restriction or “None” (for
unrestricted watching), then press OK.
3 Press <.
Continued
37
GB
Page 38

Option Description
PIN Code
Sets a PIN code for the first time, or to change your PIN code.
1 Enter a PIN as follows:
If you have previously set a PIN
Press the number buttons to enter your existing PIN.
If you have not set a PIN:
Press the number buttons to enter the factory setting PIN of
9999.
2 Press the number buttons to enter the new PIN code.
3 When requested, press the number buttons to enter
the new PIN again for confirmation.
A message appears to inform you that the new PIN has been
accepted.
4 Press <.
Tip
PIN code 9999 is always accepted.
Technical
Set-up
CA Module
Set-up
Displays the Technical Set-up menu. Do the following options.
1 Press M/m to select the desired option, then press
OK.
Auto Service Update: Enables the TV to detect and store new
digital services as they become available.
Software Download: Enables the TV to automatically receive
software updates, free through your existing aerial (when
issued). Sony recommends that this option is set to “On” at all
times. If you do not want your software to be updated, set this
option to “Off”.
System Information: Displays the current software version and
the signal level. Instead of step 2, press <.
2 Press M/m to select the “On”, then press OK.
This option will allow you to access a Pay Per View service once
you obtain a Conditional Access Module (CAM) and a view card.
See page 39 for the location of the MODEM and (PCMCIA)
sockets.
38
GB
Page 39

Using Optional Equipment
Connecting optional equipment
You can connect a wide range of optional equipment to your TV. Connecting cables are not supplied.
Connecting to the TV (side)
6
//
(MONO)
L/G/
S VHS/Hi8/DVC
camcorder
R/D/
S/I
D/D
Headphones
To connect Do this
S VHS/Hi8/DVC
camcorder A
Connect to the S video socket
6 or the video socket 6,
and the audio sockets 6. To
avoid picture noise, do not connect
the camcorder to the video socket
6 and the S video socket
6 at the same time. If you
connect mono equipment, connect
to the L/G/S/I socket 6, and set
“Dual Sound” to “A” (page 26).
Headphones B Connect to the i socket to listen to
sound from the TV on headphones.
MODEM
5V
500mA
CAM eject
button
To connect Do this
Modem connector CNot supported on this TV.
Conditional Access
Module (CAM) D
To use Pay Per View services.
For details, refer to the instruction
manual supplied with your CAM.
To use the CAM, press the eject
button and remove the “dummy”
card. Switch off the TV when
inserting your CAM into the CAM
slot. When you do not use the
CAM, we recommend that the
“dummy” card be inserted and
kept in the CAM slot.
Using Optional Equipment
Continued
39
GB
Page 40

Connecting to the TV (rear)
DVD player
with component output
DVD player
Digital satellite receiver
40
GB
PlayStation 2
DVD player
Decoder
DVD recorder
VCR
Decoder
VCR
Hi-Fi
DVD player
Page 41

To connect Do this
DVD player with
component output
E
Digital satellite
receiver or DVD
player F
Connect to the component sockets
and the audio sockets / 4.
The component signal containing
576p signal format and audio
signal are input from the DVD
player.
Connect to the HDMI IN 5 socket
if the equipment has a HDMI
socket. The digital video and audio
signals are input from the digital
satellite receiver. If the equipment
has a DVI socket but not an HDMI
socket, connect the DVI socket to
the HDMI IN 5 socket through a
DVI - HDMI adaptor interface (not
supplied), and connect the
equipment’s audio out sockets to
the audio in HDMI IN 5 sockets.
The digital video and analogue
audio signals are input from the
equipment.
Programming the
remote
This remote is preset to operate Sony TVs, most Sony
DVDs, VCRs and AUX systems (DAV, DTT
Receiver, Home Theatre, etc.).
To control VCRs and DVDs of other manufactures
(and some other Sony VCR, DVD and AUX models),
do the following procedure to programme the remote.
Note
Before you start, look up the three-digit code for your brand
of DVD, VCR or AUX system from the “Manufacturer’s
codes” on page 42.
1
“PlayStation 2”,
DVD player or
decoder G
DVD recorder or
VCR that supports
SmartLink H
VCR I For details, see page 11.
Hi-Fi audio
equipment J
Connect to the scart socket /
1. When you connect the
decoder, the scrambled signal from
the TV tuner is output to the
decoder, then the unscrambled
signal is output from the decoder.
In this case, it will be properly
unscrambled if you set “AV2
Output” to “TV Analog”
(page 28).
Connect to the scart socket /
2. SmartLink is a direct link
between the TV and a VCR/DVD
recorder. For more information on
SmartLink, refer to the instruction
manual supplied with your VCR or
DVD recorder.
Connect to the audio output
sockets to listen to the sound
from the TV on Hi-Fi audio
equipment. To turn off the sound
of the TV speakers, set “Speaker”
to “Off” (page 28).
Using Optional Equipment
2
1 To programme VCR or DVD:
Press and hold for about six seconds
until the green VCR and DVD lights flash.
To programme Sony AUX systems:
Press and hold for about six seconds
until the green AUX light flashes.
2 While the relevant lights are flashing, press
the number buttons to enter all three-digits
of the code for your brand of equipment
(page 42).
The green light is lit momentarily.
3 Turn on your equipment and check that the
following main functions work.
N (playback), x (stop), m (rewind), M (fast
forward), channel selection for both VCR and
DVDs, MENU and M/m/</, buttons only for
DVDs.
Continued
41
GB
Page 42

If your equipment is not working, or some of the
functions do not work
Enter the correct code or try the next code listed
for the brand. However, not all brands are covered
and not all models of every brand may be covered.
Tip
A small label is provided inside the battery door to allow you
to record your brand codes.
Manufacturer’s codes
Not all brands are covered and not all models of every
brand may be covered.
VCR brand list
Brand Code
SONY (VHS) 301, 302, 303, 308, 309, 362
SONY (BETA) 303, 307, 310
SONY (DV) 304, 305, 306
AIWA 325, 331, 351
AKAI 326, 329, 330
DAEWOO 342, 343
GRUNDIG 358, 355, 360, 361, 320, 351, 366
HITACHI 327, 333, 334
JVC 314, 315, 322, 344, 352, 353, 354, 348,
349
LG 332, 338
LOEWE 358, 355, 360, 361, 320, 351
MATSUI 356, 357
ORION 328
PANASONIC 321, 323
PHILIPS 311, 312, 313, 316, 317, 318, 358, 359,
363, 364
SAMSUNG 339, 340, 341, 345
SANYO 335, 336
SHARP 324
THOMSON 319, 350, 365
TOSHIBA 337
Brand Code
DENON 018, 027, 020, 002
GRUNDIG 009, 028, 023, 024, 016, 003
HITACHI 025, 026, 015, 004, 035
JVC 006, 017
KENWOOD 008
LG 015, 014, 034
LOEWE 009, 028, 023, 024, 016, 003
MATSUI 013, 016
ONKYO 022, 033
PANASONIC 018, 027, 020, 002, 045, 046, 047
PHILIPS 009, 028, 023, 024, 016, 003, 031
PIONEER 004, 050, 051, 052
SAMSUNG 011, 014
SANYO 007
SHARP 019, 027
THOMSON 012
TOSHIBA 003, 048, 049
YAMAHA 018, 027, 020, 002
AUX Sony systems brand list
DVD Home Theatre System
Brand Code
SONY (DAV) 500, 501, 502
Home Theatre System
Brand Code
SONY 504, 505
AV receiver
Brand Code
SONY 505, 506, 507, 508
DVD brand list
Brand Code
SONY 001, 029, 030, 036, 037, 038, 039, 040,
041, 042, 043, 044, 053, 054, 055
AIWA 021
AKAI 032
GB
42
Digital terrestrial receiver
Brand Code
SONY 503
Page 43

Additional Information
Specifications
Display Unit
(KDL-V32A11E)
Power Requirements:
220–240 V AC, 50 Hz
Screen Size:
32 inches
Approx. 80.0 cm measured diagonally
Display Resolution:
1,366 dots (horizontal) × 768 lines (vertical)
Power Consumption:
143 W
Standby Power Consumption:
0.5 W or less
Dimensions (w × h × d):
Approx. 808.0 × 587.8 × 308.2 mm (with stand)
Approx. 808.0 × 549.4 × 110.5 mm (without stand)
Mass:
Approx. 22.7 kg (with stand)
Approx. 18.7 kg (without stand)
(KDL-V40A11E)
Power Requirements:
220–240 V AC, 50 Hz
Screen Size:
40 inches
Approx. 101.5 cm measured diagonally
Display Resolution:
1,366 dots (horizontal) × 768 lines (vertical)
Power Consumption:
228 W
Standby Power Consumption:
0.5 W or less
Dimensions (w × h × d):
Approx. 1,014.4 × 722.7 × 370.3 mm (with stand)
Approx. 1,014.4 × 683.3 × 121.3 mm (without stand)
Mass:
Approx. 34.0 kg (with stand)
Approx. 27.5 kg (without stand)
Panel System
LCD (Liquid Crystal Display) Panel
TV System
Analogue: Depending on your country/region selection:
B/G/H, D/K, L, I
Digital: DVB-T
Colour/Video System
Analogue: PAL, SECAM
NTSC 3.58, 4.43 (only Video In)
Digital: MPEG-2 MP@ML
Aerial
75 ohm external terminal for VHF/UHF
Channel Coverage
Analogue: VHF: E2–E12
UHF: E21–E69
CATV: S1–S20
HYPER: S21–S41
D/K: R1–R12, R21–R69
L: F2–F10, B–Q, F21–F69
I: UHF B21–B69
Digital: VHF/UHF
Terminals
/1
21-pin Scart connector (CENELEC standard) including
audio/video input, RGB input, and TV audio/video
output.
/2 (SMARTLINK)
21-pin Scart connector (CENELEC standard) including
audio/video input, RGB input, selectable audio/video
output, and SmartLink interface.
/3
21-pin Scart connector (CENELEC standard) including
audio/video input, RGB input, and audio/video output
which currently appears on the screen.
4
Supported formats: 1080i, 720p, 576p, 576i, 480p, 480i
Y: 1 Vp-p, 75 ohms, 0.3V negative sync
B/CB: 0.7 Vp-p, 75 ohms
P
P
R/CR: 0.7 Vp-p, 75 ohms
4
Audio input (phono jacks)
500 mVrms
Impedance: 47 kilo ohms
HDMI IN 5
Video: 1080i, 720p, 576p, 576i, 480p, 480i
Audio: Two channel linear PCM
32, 44.1 and 48 kHz, 16, 20 and 24 bits,
or analogue audio input (phono jacks)
6 S video input (4-pin mini DIN)
6 Video input (phono jack)
6 Audio input (phono jacks)
Audio output (Left/Right) (phono jacks)
i Headphones jack
CAM (Conditional Access Module) slot
MODEM
Modem jack (not supported on this TV)
Sound Output
10 W + 10 W
Supplied Accessories
• Remote RM-ED001 (1)
• Size AA batteries (R6 type) (2)
• Coaxial cable (1)
• Mains lead (Type C-6) (1)
• Cable holder (1)
• Support belt (1) and screws (2)
Optional Accessories
• Wall-Mount Bracket SU-WL31 (for KDL-V32A11E)
SU-PW2 (for KDL-V40A11E)
• TV stand SU-FF51
Design and specifications are subject to change
without notice.
Additional Information
43
GB
Page 44

Troubleshooting
Check whether the 1 (standby) indicator is flashing in red.
When it is flashing
The self-diagnosis function is activated.
1 Count how many 1 (standby) indicator flashes between each two second break.
For example, the indicator flashes three times, then there is a two second break, followed by another three flashes, etc.
2 Press 1 on the TV (right side) to switch it off, disconnect the mains lead, and inform your dealer or
Sony service centre of how the indicator flashes (number of flashes).
When it is not flashing
1 Check the items in the tables below.
2 If the problem still persists, have your TV serviced by qualified service personnel.
Picture
Problem Cause/Remedy
No picture (screen is dark) and
no sound
• Check the aerial connection.
• Connect the TV to the mains, and press 1 on the TV (right side).
• If the 1 (standby) indicator lights up in red, press TV "/1.
No picture or no menu
information from equipment
connected to the scart
connector
Distorted picture
Double images or ghosting
Only snow and noise appear
on the screen
Picture (dotted lines or stripes)
noise
• Check that the optional equipment is on and press / repeatedly until
the correct input symbol is displayed on the screen.
• Check the connection between the optional equipment and the TV.
• Check if any connected optional equipment is installed in front of the TV or
beside the TV. When installing optional equipment, leave some space
between the optional equipment and the TV.
• When changing programmes or selecting Text, turn off any equipment
connected to the scart connector on the rear of the TV.
• Check aerial/cable connections.
• Check the aerial location and direction.
• Check if the aerial is broken or bent.
• Check if the aerial has reached the end of its serviceable life (three to five
years in normal use, one to two years at the seaside).
• Keep the TV away from electrical noise sources such as cars, motorcycles,
or hair-dryers.
• Make sure that the aerial is connected using the supplied coaxial cable.
• Keep the aerial cable away from other connecting cables.
• Do not use a 300-ohm twin lead cable as interference may occur.
44
GB
Page 45

Problem Cause/Remedy
Picture noise when viewing a
TV channel
• Select “Manual Programme Preset” in the “Set Up” menu and adjust “AFT”
(Automatic Fine Tuning) to obtain better picture reception (page 34).
• Select “Noise Reduction” in the “Picture Adjustment” menu to reduce the
noise in the picture (page 24).
Stripe noise during playback/
recording of a VCR
• Video head interference. Keep your VCR away from the TV.
• Leave a space of 30 cm between your VCR and the TV to avoid noise.
• Avoid installing your VCR in front of the TV or beside the TV.
Some tiny black points and/or
bright points on the screen
No colour on programmes
• The picture of a display unit is composed of pixels. Tiny black points and/or
bright points (pixels) on the screen do not indicate a malfunction.
• Select “Reset” in the “Picture Adjustment” menu to return to the factory
settings (page 24).
No colour or irregular colour
when viewing a signal from the
Y, P
B/CB, PR/CR jacks of 4
• Check the connection of the Y, PB/CB, PR/CR jacks of 4.
• Make sure that the Y, PB/CB, PR/CR jacks of 4 are firmly seated in their
respective sockets.
Sound
Problem Cause/Remedy
No sound, but good picture
• Press 2 +/- or % (Mute).
• Check that “Speaker” is set to “On” in the “Features” menu (page 28).
Noisy sound
Audio distortion
• See the “Picture (dotted lines or stripes) noise” causes/remedies on page 44.
• See “Audio Filter” on page 35.
Channels
Problem Cause/Remedy
The desired channel cannot be
selected
• Switch between digital and analogue mode and select the desired digital/
analogue channel.
Additional Information
Some channels are blank
Digital channel is not displayed
• Scrambled/Subscription only channel. Subscribe to the Pay Per View
service.
• Channel is used only for data (no picture or sound).
• Contact the broadcaster for transmission details.
• Check that the aerial is plugged directly into the TV (not through other
equipment).
• Contact a local installer to find out if digital transmissions are provided in
your area.
• Upgrade to a higher gain aerial.
Continued
45
GB
Page 46

General
Problem Cause/Remedy
The TV turns off automatically
(the TV enters standby mode)
• Check if the Sleep Timer function is activated (page 30).
• Check if the Auto Shutoff is activated (page 30).
• If no signal is received or no operation is performed in the TV mode for 10
minutes, the TV automatically switches to standby mode.
Some input sources cannot be
selected
The remote does not function
Wrong characters appear
when viewing the menu/Text/
NexTView
The 1 (standby) indicator
flashes
• Select “AV Preset” in the “Set Up” menu and cancel “Skip” of the input
source (page 33).
• Check that the remote is set correctly for the equipment you are using.
• If the remote does not operate the equipment even when the remote has been
set correctly to the equipment, enter the necessary code set as explained in
“Programming the remote” (page 41).
• Replace the batteries.
• Select “Language” and “Country” in the “Set Up” menu and set the
language and country/region in which Text/NexTView is provided
(page 31). For Cyrillic languages, we recommended that you select Russia
if your own country/region does not appear in the list.
• Digital programme is set for “Timer REC”. For details, see “Checking the
Digital Electronic Programme Guide (EPG)” on page 18.
46
GB
Page 47

Index
Numerics
0-9 buttons 8
14:9 17
4:3 17
A
Accessories supplied 10
Aerial, connecting 11
AFT 34
ANALOG button 8
ATT 35
Audio Filter 35
Audio Language 37
Audio Type 37
Auto Format 27
Auto Shutoff 30
Auto Start Up 31
Auto Tuning
analogue and digital channels 14
analogue channels only 32
digital channel only 36
Auto Volume 25
AUX/VIDEO "/1 button 8
AV Preset 33
AV2 Output 28
B
Backlight 23
Balance 25
Bass 25
Batteries, inserting into the remote 10
BBE 25
Brightness 23
C
CA Module Set-up 38
Category list 18
Channels
auto-tuning 14
selecting 15
Skip 35
Colour 23
Colour Tone 23
Coloured buttons 8
Connecting
an aerial/VCR 11
optional equipment 39
Contrast 23
Country 31
D
Decoder 35
Digital Auto Tuning 36
DIGITAL button 8
Digital Manual Tuning 37
Digital Set Up 36
Digital Set-up 37
Digital Tuning 36
Dolby Virtual 25
Dual Sound 26
Dynamic Picture 24
E
Edit 33
Effect (sound effect) 25
EPG (Digital Electronic Programme
Guide) 18
Equipment labels 33
F
Fastext 16
Favourite list 20
Features menu 28
G
Gamma Correction 24
H
Headphones
connecting 39
Dual Sound 26
Volume 26
Hue 23
I
Info ( ) button 8
Input select ( ) button 8
Input signal index table 21
, 9
L
Label 34
Language 31
M
Manual Programme Preset 33
Manual timer REC 19
Media selector 8
MENU button 8
Mode (Picture mode) 23
Mute (%) button 8
, 9
N
NexTView 16
Noise Reduction 24
Number buttons 8
O
OK button 8, 9
P
Parental Lock 37
Picture Adjustment menu 23
Picture mode ( ) button 8
Picture Off 29
Picture Off ( ) indicator 9
PIN Code 38
Power (\) indicator 9
Power (1) switch 9
Power Saving 28
Previous channel ( ) button 8
PROG +/- buttons 8
Programme index table 16
, 9
Programme Labels 32
Programme List Edit 36
Programme Sorting 32
R
Reminder 19
Remote control
inserting batteries 10
overview 8
programming 41
sensor 9
Reset
picture adjustment 24
sound adjustment 26
S
Screen Control menu 27
Screen Format 27
Screen mode 17
Screen mode ( ) button 8
Screen Shift 27
Set Up menu 31
Sharpness 23
Skip 33
, 35
Sleep Timer 30
Smart 17
Sound Adjustment menu 25
Sound effect (9) button 8
Speaker 28
Specifications 43
Standby (1) indicator 9
Subtitle Language 37
Subtitle Setting 37
T
Technical Set-up 38
Text 16
Text (/) button 8
Text hold ( ) button 8
Text reveal ( ) button 8
Timer ( ) indicator 9
Timer list 19
Timer menu 30
Timer REC 18
Treble 25
TV standby (TV "/1) button 8
V
VCR
connecting 11
programming 41
recording 18
VCR double digit (-/--) button 8
Volume (2) +/- buttons 8
, 9
W
Wide 17
Z
Zoom 17
Additional Information
47
GB
Page 48

ACHTUNG Einführung
• Um die Gefahr eines elektrischen Schlags zu vermeiden,
stecken Sie den vom Ne tzkabel abge trennten Stecker nicht
in eine Netzsteckdose. Ein solcher Stecker ist nicht mehr
verwendbar und muss entsorgt werden.
• Um Feuergefahr und die Gefahr eines elektrischen
Schlags zu vermeiden, setzen Sie das Fernsehgerät weder
Regen noch sonstiger Feuchtigkeit aus.
• Im Fernsehgerät liegen gefährlich hohe Spannungen an.
Öffnen Sie das Gehäuse nicht. Überlassen Sie
Wartungsarbeiten nur qualifiziertem Fachpersonal.
Danke, dass Sie sich für dieses Produkt von Sony
entschieden haben.
Lesen Sie diese Anleitung vor Inbetriebnahme des
Fernsehgeräts bitte genau durch und bewahren Sie sie
zum späteren Nachschlagen sorgfältig auf.
Informationen zu Markenzeichen
• ist eine eingetragene Marke der DVB Project
• „PlayStation“ ist ein Markenzeichen der Sony Computer
Entertainment, Inc.
• Die TruSurround-Technologie wird als
Virtualisierungstechnik für Dolby Virtual Surround
verwendet.
• TruSurround, SRS und das Symbol sind
Markenzeichen der SRS Labs, Inc.
Die TruSurround-Technologie wird unter Lizenz der SRS
Labs, Inc., verwendet.
• Diese Fernsehgerät arbeitet mit
(High-Definition Multimedia Interface). HDMI, das
HDMI-Logo und High-Definition Multimedia Interface
sind Markenzeichen oder eingetragene Markenzeichen
von HDMI Licensing LLC.
der HDMI™-Technologie
DE
2
Page 49

Inhaltsverzeichnis
Sicherheitsinformationen............................. 4
Sicherheitsmaßnahmen .............................. 7
Entsorgen des Fernsehgeräts........................... 7
Übersicht über die Fernbedienung.......... 8
Übersicht über die Bedienelemente und
Anzeigen am Fernsehgerät ................. 9
Vorbereitungen
1: Überprüfen des Zubehörs ..................... 10
2: Einlegen von Batterien in die
Fernbedienung..................................... 10
3: Anschließen einer Antenne/eines
Videorecorders..................................... 11
4: Anbringen einer Kippsicherung für das
Fernsehgerät........................................ 12
5: Einschalten des Fernsehgeräts............. 12
6: Auswählen von Sprache und Land/
Region.................................................. 13
7: Automatisches Speichern von Sendern im
Fernsehgerät........................................ 14
Fernsehen
: nur für digitale Kanäle
Fernsehen ................................................. 15
Benutzung des elektronischen
Programmführers (EPG) ............. 18
Benutzung der Favoritenliste ........... 20
Bildwiedergabe von angeschlossenen
Geräten ................................................ 21
Verwendung der Menüs
Menü „Ton-Einstellungen“ .........................25
Effekt (Klangeffekt)...........................................25
Höhen/Tiefen/Balance......................................25
Autom.Lautst. ...................................................25
Zweiton.............................................................26
Lautst. (Kopfhörerlautstärke).......................26
Zweiton ........................................................26
Normwerte........................................................26
Menü „Bildschirm einstellen“ .....................27
Auto Format......................................................27
Bildformat.........................................................27
Bildposition.......................................................27
Menü „Funktionen“ ....................................28
Energie sparen.................................................28
Lautsprecher....................................................28
AV2 Ausgang ...................................................28
Bild aus ............................................................29
Menü „Timer“ ............................................. 30
Abschalttimer ...................................................30
Auto.Ausschalt .................................................30
Menü „Grundeinstellungen“ .......................31
Neuinitialisierung..............................................31
Sprache............................................................31
Land .................................................................31
Autom. Progr. (nur Analogmodus) ...................32
Programme ordnen (nur Analogmodus) ..........32
Programmnamen (nur Analogmodus)..............32
AV-Einstellungen..............................................33
Manuell abspeichern (nur Analogmodus)........33
Digital Einstellung ..................................36
Verwendung von Zusatzgeräten
Anschließen von Zusatzgeräten ................ 39
Programmieren der Fernbedienung ..........41
DE
Navigieren in den Menüs .......................... 21
Übersicht über die Menüs............................... 22
Menü „Bild-Einstellungen“ ......................... 23
Modus.............................................................. 23
Kontrast/Helligkeit/Farbe/Farbton/Bildschärfe/
Ht.Grd.Licht............................................... 23
Farbtemperatur................................................ 23
Dyn. NR ........................................................... 24
Dyn. Bild.......................................................... 24
Gamma-Korrektur............................................ 24
Normwerte....................................................... 24
Zusatzinformationen
Technische Daten......................................43
Störungsbehebung ....................................44
Index..........................................................47
3
DE
Page 50

Sicherheitsinformationen
Netzkabel
• Ziehen Sie den
Netzstecker aus der
Steckdose, wenn Sie
das Fernsehgerät
umstellen. Stellen Sie
das Fernsehgerät nicht
um, wenn das Netzkabel eingesteckt ist. Andernfalls kann
das Netzkabel beschädigt werden und es besteht
Feuergefahr und die Gefahr eines elektrischen Schlags.
• Wenn das Netzkabel beschädigt wird,
besteht Feuergefahr und die Gefahr
eines elektrischen Schlags.
– Klemmen Sie das Netzkabel nicht
ein und biegen und verdrehen Sie das
Kabel nicht übermäßig. Die
Isolierung könnte beschädigt
werden, so dass die blanken Adern
im Inneren des Kabels freiliegen,
oder das Kabel selbst könnte
beschädigt werden. In diesem Fall
kann es zu einem Kurzschluss
kommen und es besteht Feuergefahr
bzw. die Gefahr eines elektrischen Schlags.
– Beschädigen Sie das Netzkabel nicht und nehmen Sie
keine Veränderungen daran vor.
– Stellen Sie keine schweren Gegenstände auf das
Netzkabel. Ziehen Sie nicht am Netzkabel.
– Halten Sie das Netzkabel von Wärmequellen fern.
– Ziehen Sie immer am Stecker, wenn Sie das Netzkabel
von der Steckdose trennen.
• Wenn das Netzkabel beschädigt ist, verwenden Sie es
nicht weiter. Lassen Sie es bei Ihrem Händler oder SonyKundendienst austauschen.
• Verwenden Sie das mitgelieferte Netzkabel nicht mit
anderen Geräten.
• Verwenden Sie ausschließlich ein Originalnetzkabel von
Sony und keinem anderen Hersteller.
Umgang mit dem Netzkabel
bzw. mit anderen Kabeln
Ziehen Sie immer am Stecker,
wenn Sie das Netzkabel oder ein
anderes Kabel lösen wollen.
Ziehen Sie nicht am Netzkabel
bzw. dem Kabel selbst.
Netzstrom
Verwenden Sie eine Netzsteckdose, in der
der Stecker fest sitzt. Stecken Sie den Stecker
ganz in die Netzsteckdose. Wenn der Stecker
lose in der Steckdose sitzt, kann es zu einem
Lichtbogenüberschlag kommen. In diesem
Fall besteht Feuergefahr. Wenden Sie sich
gegebenenfalls an einen qualifizierten
Elektriker und lassen Sie die Netzsteckdose auswechseln.
Sonderzubehör
Beachten Sie folgende Hinweise, wenn Sie
das Fernsehgerät auf einem Ständer
aufstellen oder mithilfe einer Wandhalterung
installieren. Andernfalls kann das
Fernsehgerät herunterfallen und schwere Verletzungen
verursachen.
• Aus Sicherheitsgründen wird unbedingt empfohlen,
orginal Sony Zubehör zu verwenden
– KDL-V40A11E:
Wandhalterung SU-PW2, TV Standfuss SU-FF51.
– KDL-V32A11E:
Wandhalterung SU-WL31, TV Standfuss SU-FF51.
• Es wird unbedingt die Verwendung der offiziellen Sony
Wandhalterung empfohlen, um für ausreichende
Luftzufuhr zu sorgen und Schmutzablagerung um das
Fernsehgerät an Wand und Decke zu vermeiden.
• Befolgen Sie bei der Installation des Fernsehgeräts
unbedingt die mit dem Ständer oder der Wandhalterung
gelieferten Anweisungen und befestigen Sie das
Fernsehgerät ordnungsgemäß.
• Verwenden Sie unbedingt die mit dem Ständer oder der
Wandhalterung gelieferten Halterungs- und
Befestigungsteile.
Installation
Wenn das Fernsehgerät an einer
Wand installiert werden soll, lassen
Sie die entsprechenden Arbeiten
unbedingt von qualifiziertem
Fachpersonal ausführen. Bei
unsachgemäßer Installation stellt
das Fernsehgerät eine potenzielle Gefahrenquelle dar.
Medizinische Einrichtungen
Stellen Sie dieses Fernsehgerät
nicht an Orten wie
Krankenhäusern auf, an denen
medizinische Geräte eingesetzt
werden. Dieses Gerät kann
Fehlfunktionen an medizinischen
Geräten verursachen.
Transport
• Wenn Sie das Fernsehgerät
transportieren müssen, lösen Sie
zunächst alle Kabel vom
Fernsehgerät.
• Wenn Sie das Fernsehgerät tragen,
halten Sie es wie in der Abbildung rechts dargestellt.
Andernfalls kann das Fernsehgerät herunterfallen und
beschädigt werden oder schwere Verletzungen
verursachen. Wenn das Fernsehgerät herunterfällt oder
anderweitig beschädigt wird, lassen Sie es unverzüglich
von qualifiziertem Fachpersonal überprüfen.
• Setzen Sie das Fernsehgerät beim Transport keinen
Stößen und keinen starken Erschütterungen aus.
Andernfalls kann das Fernsehgerät herunterfallen und
beschädigt werden oder schwere Verletzungen
verursachen.
• Wenn Sie das Fernsehgerät wegen einer Reparatur oder
bei einem Umzug transportieren müssen, verpacken Sie es
mithilfe der Originalverpackungsmaterialien im
Originalkarton.
• Zum Tragen des Fernsehgeräts sind mindestens zwei
Personen erforderlich.
Luftzufuhr
• Decken Sie auf keinen Fall die
Lüftungsöffnungen im Gehäuse
ab. Andernfalls besteht
Feuergefahr aufgrund einer
Überhitzung des Geräts.
DE
4
Page 51

• Ohne ausreichende Luftzufuhr kann sich auf und im
Fernsehgerät Staub und Schmutz ansammeln. Beachten
Sie Folgendes, um eine ausreichende Luftzufuhr zu
gewährleisten:
– Installieren Sie das Fernsehgerät nicht nach hinten oder
seitwärts geneigt.
– Installieren Sie das Fernsehgerät nicht auf dem Kopf
stehend oder falsch herum.
– Installieren Sie das Fernsehgerät nicht in einem Regal
oder einem Schrank.
– Stellen Sie das Fernsehgerät nicht auf einer Decke oder
einem Bett auf.
– Decken Sie das Fernsehgerät nicht mit Decken oder
Vorhängen ab und legen Sie keine Gegenstände wie
Zeitungen usw. darauf.
• Lassen Sie ausreichend Platz um das Fernsehgerät.
Andernfalls ist die Luftzufuhr unzureichend und das
Fernsehgerät kann sich überhitzen. In diesem Fall besteht
Feuergefahr und das Fernsehgerät kann beschädigt
werden.
30 cm
10 cm 10 cm
Lassen Sie
mindestens
so viel Platz
um das
Gerät.
• Wenn das Fernsehgerät an der Wand installiert werden
soll, lassen Sie an der Unterseite des Fernsehgeräts
mindestens 10 cm Platz.
• Installieren Sie das Fernsehgerät auf keinen Fall
folgendermaßen:
Die Luftzirkulation
wird unterbunden.
Die Luftzirkulation
wird unterbunden.
Wand Wand
Lüftungsöffnungen
Führen Sie nichts in die Lüftungsöffnungen
ein. Wenn Metallgegenstände oder
Flüssigkeiten in diese Öffnungen gelangen,
besteht Feuergefahr und die Gefahr eines
elektrischen Schlags.
Aufstellung
• Stellen Sie das Fernsehgerät nicht in
sehr warmer, feuchter oder stark
staubbelasteter Umgebung auf.
• Installieren Sie das Fernsehgerät
nicht an Orten, an denen die Gefahr
besteht, dass Insekten in das Gerät eindringen.
• Stellen Sie das Fernsehgerät nicht an Orten auf, an denen
es mechanischen Vibrationen ausgesetzt ist.
• Stellen Sie das Fernsehgerät auf eine
stabile, ebene Fläche. Andernfalls kann
das Fernsehgerät herunterfallen und
Verletzungen verursachen.
• Installieren Sie das Fernsehgerät nicht so,
dass es z. B. hinter einer Säule hervorragt
oder dass eine Person mit dem Kopf
dagegen stoßen könnte. Andernfalls kann es zu
Verletzungen kommen.
Wasser und Feuchtigkeit
• Installieren Sie das Fernsehgerät
nicht in der Nähe von Wasser, wie
z. B. neben einer Badewanne oder
einer Dusche. Schützen Sie das
Fernsehgerät außerdem vor
Regen, Feuchtigkeit und Rauch. Andernfalls besteht
Feuergefahr und die Gefahr eines elektrischen Schlags.
• Berühren Sie das Netzkabel und das
Fernsehgerät nicht mit nassen Händen.
Andernfalls kann es zu einem
elektrischen Schlag kommen und das
Fernsehgerät kann beschädigt werden.
Feuchtigkeit und brennbares
Material
• Schützen Sie das Fernsehgerät vor
Feuchtigkeit. Verschütten Sie
keinerlei Flüssigkeit auf dem
Fernsehgerät. Wenn durch die
Öffnungen Flüssigkeiten oder
Fremdkörper in das Fernsehgerät
gelangt sind, dürfen Sie es nicht mehr benutzen.
Andernfalls kann es zu einem elektrischen Schlag
kommen und das Fernsehgerät kann beschädigt werden.
Lassen Sie das Fernsehg erät umgehend von qualifiziertem
Kundendienstpersonal überprüfen.
• Um Feuergefahr zu vermeiden, halten Sie brennbare
Gegenstände (z. B. Kerzen) und Glühbirnen vom
Fernsehgerät fern.
Öl und Fett
Installieren Sie dieses Fernsehgerät nicht in Restaurants, in
denen viel Öl oder Fett verwendet wird. Andernfalls könnte
fettgetränkter Staub in das Fernsehgerät eindringen. In
diesem Fall besteht die Gefahr von Schäden am Gerät.
Stabile Installation des Fernsehgeräts
Stellen Sie das Fernsehgerät auf einen
tragfähigen, stabilen Ständer oder sonstigen
Unterbau. Hängen Sie nichts an das
Fernsehgerät. Andernfalls könnte das
Fernsehgerät vom Ständer oder von der Wandhalterung
herunterfallen und Sachschäden oder schwere Verletzungen
verursachen.
Sorgen Sie dafür, dass Kinder nicht auf das Fernsehgerät
klettern.
Fortsetzung
DE
5
Page 52

Installation in einem Fahrzeug
oder an der Decke
Installieren Sie das Fernsehgerät
nicht in einem Fahrzeug. Durch die
Bewegung beim Fahren kann das
Fernsehgerät herunterfallen und
Verletzungen verursachen. Installieren Sie das Fernsehgerät
auch nicht an der Decke.
Schiffe, Boote und andere
Wasserfahrzeuge
Installieren Sie das Fernsehgerät
nicht in einem Schiff, Boot oder
einem anderen Wasserfahrzeug.
Wenn das Fernsehgerät Wasser,
insbesondere Meerwasser, ausgesetzt wird, besteht
Feuergefahr und die Gefahr von Schäden am Gerät.
Nutzung im Freien
• Schützen Sie das Fernsehgerät
vor direktem Sonnenlicht.
Andernfalls kann sich das
Fernsehgerät erhitzen und
beschädigt werden.
• Installieren Sie das Fernsehgerät
nicht im Freien.
Verkabelung
• Ziehen Sie den Netzstecker aus der Steckdose, wenn Sie
Kabel an das Gerät anschließen. Trennen Sie das Gerät zu
Ihrer eigenen Sicherheit unbedingt vom Netzstrom, wenn
Sie Kabel daran anschließen.
• Stolpern Sie nicht über die Kabel. Andernfalls kann das
Fernsehgerät beschädigt werden.
Reinigung
• Ziehen Sie den Netzstecker aus der
Steckdose, wenn Sie den Netzstecker
und das Fernsehgerät reinigen.
Andernfalls besteht die Gefahr eines
elektrischen Schlags.
• Reinigen Sie den Netzstecker regelmäßig. Wenn der
Stecker verstaubt ist und sich Feuchtigkeit ablagert, kann
die Isolierung leiden und es besteht Feuergefahr.
Gewitter
Berühren Sie zu Ihrer eigenen
Sicherheit bei einem Gewitter nicht
das Fernsehgerät, das Netzkabel oder
das Antennenkabel.
Reparaturbedürftige Schäden
Wenn der Bildschirm des Fernsehgeräts gesprungen ist,
trennen Sie unbedingt sofort das Netzkabel vom Stromnetz.
Erst dann dürfen Sie das Gerät berühren. Andernfalls besteht
die Gefahr eines elektrischen Schlags.
Wartung
Öffnen Sie das Gehäuse nicht.
Überlassen Sie Wartungsarbeiten
stets nur qualifiziertem
Kundendienstpersonal.
Umgang mit Kleinteilen
Halten Sie kleine Zubehörteile außerhalb der Reichweite von
Kindern. Wenn sie verschluckt werden, besteht
Erstickungsgefahr. Rufen Sie in einem solchen Fall
umgehend einen Arzt.
Glassplitter
Werfen Sie nichts gegen das Fernsehgerät.
Das Glas des Bildschirms könnte
explodieren. In diesem Fall besteht die
Gefahr schwerer Verletzungen.
Wenn das Gerät nicht benutzt
wird
Zum Schutz der Umwelt und aus
Sicherheitsgründen empfiehlt es
sich, das Fernsehgerät nicht im
Bereitschaftsmodus zu lassen,
wenn es nicht benutzt wird. Trennen Sie es vom Stromnetz.
Bei einigen Fernsehgeräten gibt es jedoch möglicherweise
Funktionen, für die das Fernsehgerät in den
Bereitschaftsmodus geschaltet sein muss. Ist dies der Fall,
werden Sie in den Anweisungen in dieser Anleitung darauf
hingewiesen.
Augenschonendes Fernsehen
• Für ermüdungsfreies Fernsehen sollte die Entfernung zum
Fernsehgerät das Vier- bis Siebenfache der Bildhöhe betragen.
• Schauen Sie bei gemäßigter Beleuchtung fern. Bei einer
falschen Beleuchtung werden die Augen belastet. Auch
kontinuierliches Fernsehen über längere Zeit kann die
Augen stark beanspruchen.
• Wenn Sie den Winkel des Fernsehgeräts einstellen
wollen, halten Sie den Fuß des Ständers mit der Hand,
damit das Fernsehgerät nicht vom Ständer getrennt wird.
Achten Sie darauf, sich nicht die Finger zwischen dem
Fernsehgerät und dem Ständer einzuklemmen.
Einstellen der Lautstärke
• Stellen Sie die Lautstärke so ein, dass Ihre Nachbarn nicht
gestört werden. Bei Nacht ist der Ton weit zu hören. Es
empfiehlt sich daher, die Fenster zu schließen oder
Kopfhörer zu verwenden.
• Stellen Sie beim Verwenden von Kopfhörern die
Lautstärke moderat ein. Andernfalls kann es zu
Gehörschäden kommen.
Überlastung der Stromkreise
Dieses Fernsehgerät ist
ausschließlich auf den Betrieb an
220–240 V Wechselstrom ausgelegt.
Achten Sie darauf, nicht zu viele
andere Geräte an dieselbe
Netzsteckdose anzuschließen.
Andernfalls besteht Feuergefahr und
die Gefahr eines elektrischen Schlags.
Hohe Temperaturen
Berühren Sie nicht die Oberfläche des Fernsehgeräts. Es
bleibt sehr warm, auch wenn das Fernsehgerät bereits einige
Zeit ausgeschaltet ist.
Korrosion
Wenn Sie das Fernsehgerät in der Nähe von Meerwasser
aufstellen, kann die salzhaltige Luft Korrosion an den
Metallteilen des Fernsehgeräts verursachen. Interne Bauteile
können beschädigt werden und es besteht Feuergefahr. Die
Lebensdauer des Fernsehgeräts kann sich verringern.
Ergreifen Sie geeignete Maßnahmen zum Verringern der
Luftfeuchtigkeit und Mäßigen der Temperatur in dem Raum,
in dem das Fernsehgerät aufgestellt ist.
DE
6
Page 53

Sicherheitsmaßnahmen
LCD-Bildschirm
• Der LCD-Bildschirm wird in einer
Hochpräzisionstechnologie hergestellt und der Anteil der
effektiven Pixel beträgt mindestens 99,99 %. Trotzdem sind
möglicherweise schwarze Punkte oder helle Lichtpunkte
(rot, blau oder grün) permanent auf dem LCD-Bildschirm zu
sehen. Dies ist eine spezifische Eigenschaft von LCDBildschirmen. Es handelt sich dabei nicht um eine
Fehlfunktion.
• Setzen Sie den LCD-Bildschirm nicht der Sonne aus.
Andernfalls kann die Bildschirmoberfläche beschädigt
werden.
• Stoßen Sie nicht gegen den Filter an der Vorderseite,
zerkratzen Sie ihn nicht und stellen Sie nichts auf dieses
Fernsehgerät. Das Bild kann ungleichmäßig werden und
der LCD-Bildschirm kann beschädigt werden.
• Wenn dieses Fernsehgerät an einem kalten Ort verwendet
wird, kommt es möglicherweise zu Schmierstreifen im
Bild oder das Bild wird dunkel.
Dabei handelt es sich nicht um eine Fehlfunktion. Diese
Effekte verschwinden, wenn die Temperatur steigt.
• Wenn Standbilder längere Zeit angezeigt werden, kann es
zu Doppelbildern kommen. Dieser Effekt verschwindet in
der Regel nach einigen Augenblicken.
• Bildschirm und Gehäuse erwärmen sich, wenn das
Fernsehgerät in Betrieb ist. Dies ist keine Fehlfunktion.
• Der LCD-Bildschirm enthält kleine Mengen an
Flüssigkristall und Quecksilber. Die Leuchtstoffröhre in
diesem Fernsehgerät enthält ebenfalls Quecksilber.
Entsorgen Sie das Gerät gemäß den örtlichen Vorschriften.
Leuchtstoffröhre
Bei diesem Fernsehgerät wird eine spezielle Leuchtstoffröhre
als Lichtquelle eingesetzt. Wenn die Anzeige auf dem
Bildschirm dunkel wird, flimmert oder gar nicht mehr
erscheint, muss der LCD-Bildschirm gegen einen neuen
ausgetauscht werden. Wenden Sie sich bitte an qualifiziertes
Kundendienstpersonal, um die Leuchtstoffröhre austauschen
zu lassen.
Installieren des Fernsehgeräts
• Stellen Sie das Fernsehgerät nicht an Orten auf, an denen
es extremen Temperaturen ausgesetzt ist, z. B. in direktem
Sonnenlicht oder in der Nähe einer Heizung oder eines
Warmluftauslasses. Wenn das Fernsehgerät extremen
Temperaturen ausgesetzt wird, kann es sich überhitzen. In
diesem Fall kann sich das Gehäuse verformen oder es
kann zu Fehlfunktionen kommen.
• Das Fernsehgerät bleibt auch in ausgeschaltetem Zustand
mit dem Stromnetz verbunden. Wenn Sie das
Fernsehgerät ganz vom Netz trennen wollen, ziehen Sie
den Stecker aus der Steckdose.
• Für eine gute Bildqualität achten Sie darauf, dass kein
Lampen- oder Sonnenlicht direkt auf den Bildschirm fällt.
Falls möglich, bringen Sie eine von der Decke herab
gerichtete Punktbeleuchtung an.
• Stellen Sie andere Geräte nicht zu nahe beim Fernsehgerät
auf. Lassen Sie mindestens 30 cm Platz zwischen dem
Fernsehgerät und anderen Geräten. Wenn ein
Videorecorder vor oder neben dem Fernsehgerät
aufgestellt wird, kann es zu Bildstörungen kommen.
Pflegen und Reinigen der Bildschirmoberfläche bzw.
des Gehäuses
Die Bildschirmoberfläche ist mit einer speziellen Beschichtung
versehen, um starke Lichtreflexionen zu vermeiden.
Um Materialschäden oder Schäden an der
Bildschirmbeschichtung zu vermeiden, beachten Sie bitte
folgende Sicherheitsmaßnahmen.
• Stoßen Sie nicht gegen den Bildschirm, berühren Sie ihn
nicht mit einem harten Gegenstand und werfen Sie nichts
gegen den Bildschirm. Andernfalls kann der Bildschirm
zerkratzt oder beschädigt werden.
• Berühren Sie nicht die Mattscheibe, wenn Sie das
Fernsehgerät kontinuierlich längere Zeit in Betrieb haben.
Die Mattscheibe kann sich erhitzen.
• Es empfiehlt sich, die Bildschirmoberfläche so wenig wie
möglich zu berühren.
• Entfernen Sie Staub vorsichtig mit einem weichen Tuch
von der Bildschirmoberfläche bzw. dem Gehäuse. Bei
stärkerer Verschmutzung feuchten Sie ein weiches Tuch
leicht mit einer milden Reinigungslösung an und wischen
dann über den Bildschirm. Das Tuch kann gewaschen und
mehrmals verwendet werden.
• Verwenden Sie keine Scheuerschwämme, keine
alkalischen/säurehaltigen Reinigungsmittel, kein
Scheuerpulver und keine flüchtigen Lösungsmittel wie
Alkohol, Benzin, Verdünnung oder Insektizide. Wenn Sie
solche Mittel verwenden oder das Gerät längere Zeit mit
Gummi- oder Vinylmaterialien in Berührung kommt,
kann es zu Schäden an der Bildschirm- oder der
Gehäuseoberfläche kommen.
• In den Lüftungsöffnungen kann sich über einen längeren
Zeitraum hinweg Staub ansammeln. Um eine
ausreichende Belüftung sicherzustellen, empfiehlt es sich,
den Staub regelmäßig (einmal pro Monat) mit einem
Staubsauger abzusaugen.
Entsorgen des Fernsehgeräts
Entsorgung von gebrauchten
elektrischen und
elektronischen Geräten
(anzuwenden in den Ländern
der Europäischen Union und
anderen europäischen
Ländern mit einem separaten
Sammelsystem für diese
Geräte)
Das Symbol auf dem Produkt oder
seiner Verpackung weist darauf
hin, dass dieses Produkt nicht als
normaler Haushaltsabfall zu behandeln ist, sondern an einer
Annahmestelle für das Recycling von elektrischen und
elektronischen Geräten abgegeben werden muss. Durch
Ihren Beitrag zum korrekten Entsorgen dieses Produkts
schützen Sie die Umwelt und die Gesundheit Ihrer
Mitmenschen. Umwelt und Gesundheit werden durch
falsches Entsorgen gefährdet. Materialrecycling hilft, den
Verbrauch von Rohstoffen zu verringern. Weitere
Informationen über das Recycling dieses Produkts erhalten
Sie von Ihrer Gemeinde, den kommunalen
Entsorgungsbetrieben oder dem Geschäft, in dem Sie das
Produkt gekauft haben.
DE
7
Page 54

Übersicht über die Fernbedienung
1 TV "/1 – Fernsehbereitschaft
Zum vorübergehenden Ausschalten des Fernsehgeräts und zum Einschalten aus
dem Bereitschaftsmodus.
2 Medienwahltaste (Seite 41)
Zum Auswählen, welches Gerät bedient werden soll. Eine grüne Anzeige
leuchtet kurz auf und zeigt damit an, welches Gerät Sie ausgewählt haben.
3 ANALOG – Analogmodus (Seite 15)
4 / – Eingangswahl / Anhalten von Text
• Im Fernsehmodus (Seite 21): Zum Auswählen des Eingangssignals von
Geräten, die an die Fernsehbuchsen angeschlossen sind.
• Im Videotextmodus (Seite 16): Zum Anhalten der aktuellen Seite.
5 – Bildformat (Seite 17)
6 Zifferntasten
• Im Fernsehmodus: Zum Auswählen von Kanälen. Geben Sie für Kanalnummer
10 und höher die zweite Ziffer innerhalb von zwei Sekunden ein.
• Im Videotextmodus: Zum Eingeben der dreistelligen Nummer, mit der die
Seite ausgewählt wird.
7 / -/-- – Vorheriger Kanal / Videorecorder (zweistellige Nummer)
• Im Fernsehmodus: Zum Zurückschalten auf den vorher angezeigten Kanal
(mehr als fünf Sekunden).
• Im Videorecordermodus: Zum Auswählen zweistelliger Kanalnummern bei
Videorecordern von Sony (Beispiel: Drücken Sie bei 23 zuerst -/-- und dann 2 und 3).
8 / – Videotext (Seite 16)
9 M/m/</,/OK (Seite 16, 21)
q; – Favoriten (Seite 20)
qa PROG +/- (Seite 15)
• Im Fernsehmodus: Zum Auswählen des nächsten (+) oder vorherigen (-) Kanals.
• Im Videotextmodus: Zum Auswählen der nächsten (+) oder vorherigen (-) Seite.
qs MENU (Seite 21)
qd 2 +/- – Lautstärke
qf – Diese Taste besitzt keine Funktion für dieses Fernsehgerät.
qg – EPG (Elektronischer Programmführer) (Seite 18) / NexTView (Seite 16)
qh Farbige Tasten
• Im Digitalmodus (Seite 18, 20): Die Tasten dienen zur Wahl der Optionen am unteren Ende der Favoriten- und EPGDigitalmenüs.
• Im Videorecorder- und DVD-Modus (Seite 41): Zum Steuern der Hauptfunktionen am Videorecorder oder DVD-Player.
qj / – Info / Anzeigen von verborgenem Text
• Im Digitalmodus: Zeigt kurze Details des momentan wiedergegebenen Programms an.
• Im Analogmodus: Zum Anzeigen von Informationen, wie aktuelle Kanalnummer und Bildformat.
• Im Videotextmodus (Seite 16): Zum Anzeigen von verborgenen Informationen (z. B. Antworten für ein Quiz).
qk – Bildmodus (Seite 23)
ql 9 – Klangeffekt (Seite 25)
w; DIGITAL – Digitalmodus (Seite 15)
wa % – Stummschalten (Seite 15)
ws AUX/VIDEO "/1
Zum Ein-/Ausschalten des Geräts, wie auf der Fernbedienung programmiert (Seite 41).
Tipp
An den Tasten M/m/</,, 2 +, PROG +, und an der Zifferntaste 5 befindet sich ein Tastpunkt. Verwenden Sie die Tastpunkte
als Anhaltspunkt beim Bedienen des Fernsehgeräts.
DE
8
Page 55

Übersicht über die Bedienelemente und Anzeigen
am Fernsehgerät
1 1 – Netz
Zum Ein- und Ausschalten des Fernsehgeräts.
2 PROG +/-/ /
• Im Fernsehmodus: Zum Auswählen des
nächsten (+) oder vorherigen (-) Kanals.
• Im Fernsehmenü: Zum Anfahren der
Optionen nach oben ( ) bzw. unten ( ).
3 2 +/-/ /
• Zum Erhöhen (+) bzw. Verringern (-) der
Lautstärke.
• Im Fernsehmenü: Zum Anfahren der
Optionen nach links ( ) bzw. rechts ( ).
4 / – Eingangswahl/OK
• Im Fernsehmodus (Seite 21): Zum Auswählen
des Eingangssignals von Geräten, die an die
Fernsehbuchsen angeschlossen sind.
• Im Fernsehmenü: Zum Auswählen eines
Menüs oder einer Option und zum Bestätigen
der Einstellung.
5 (Seite 21)
6 – Bildabschaltungs-/Timeranzeige
• Leuchtet grün auf, wenn das Bild
ausgeblendet wird (Seite 29). Dabei wird nur
das Bild ausgeblendet. Der Ton ist nach wie
vor zu hören.
• Leuchtet in Orange auf, wenn der Timer
aktiviert ist (Seite 30).
7 1 – Bereitschaftsanzeige
Leuchtet rot auf, wenn sich das Fernsehgerät im
Bereitschaftsmodus befindet.
8 " – Netzanzeige
Leuchtet grün auf, wenn das Fernsehgerät
eingeschaltet wird.
9 Fernbedienungssensor
DE
9
Page 56

Vorbereitungen
1: Überprüfen des
Zubehörs
Fernbedienung RM-ED001 (1)
Batterien der Größe AA (Typ R6) (2)
Koaxialkabel (1)
Netzkabel (Typ C-6) (1)
Entfernen Sie diese Ferritkerne nicht.
Kabelhalter (1)
Halteriemen (1) und Schrauben (2)
2: Einlegen von
Batterien in die
Fernbedienung
10
Hinweise
• Achten Sie beim Einlegen der Batterien auf richtige
Polarität.
• Entsorgen Sie Batterien umweltfreundlich. In einigen
Regionen gelten unter Umständen spezielle Vorschriften
zur Entsorgung von Batterien. Nähere Informationen
erhalten Sie beispielsweise bei der Stadtverwaltung.
• Verwenden Sie nicht Batterien verschiedenen Typs oder
alte und neue Batterien zusammen.
• Gehen Sie sorgfältig mit der Fernbedienung um. Lassen
Sie sie nicht fallen und treten Sie nicht darauf.
Verschütten Sie auch keine Flüssigkeiten auf der
Fernbedienung.
• Legen Sie die Fernbedienung nicht in die Nähe von
Wärmequellen oder an Orte, an denen sie direktem
Sonnenlicht oder Feuchtigkeit ausgesetzt ist.
DE
Page 57

3: Anschließen einer Antenne/eines Videorecorders
Rückseite des Fernsehgeräts
Vorbereitungen
3
Netzkabel
(mitgeliefert)
Scart-Kabel (nicht mitgeliefert)
Videorecorder
1
Schließen Sie Ihre Antenne an die Buchse
an der Rückwand des Fernsehgeräts an.
Wenn Sie lediglich eine Antenne anschließen
Fahren Sie mit Schritt 3 fort.
2 Schließen Sie den Videorecorder an.
1
Verbinden Sie die Buchse an der Rückwand
des Fernsehgeräts über das HF-Kabel mit der
Eingangsbuchse Ihres Videorecorders.
2 Verbinden Sie die Scart-Buchse am
Videorecorder über ein Scart-Kabel mit der
Scart-Buchse / 2 an der Rückseite
des Fernsehgeräts.
3
Schließen Sie das mitgelieferte Netzkabel an
die Buchse AC IN an der Rückseite des
Fernsehgeräts an.
Hinweis
Schließen Sie das Netzkabel erst an die Netzsteckdose
an, wenn alle Anschlüsse vorgenommen wurden.
4 Bündeln Sie die Kabel.
1 Bringen Sie den Kabelhalter an der Rückseite
des Fernsehgeräts an (A) und drehen Sie den
Kabelhalter dann um eine Viertelumdrehung
nach links (B).
Koaxialkabel
(mitgeliefert)
1
2-1
2-2
2
Drücken Sie den Verschlusshebel nach innen,
um die Sperre zu entriegeln, und öffnen Sie die
Abdeckung. Setzen Sie dann die Kabel ein.
3 Schließen Sie die Abdeckung, bis sie
einwandfrei einrastet.
HF-Kabel
(nicht
mitgeliefert)
11
DE
Page 58

4: Anbringen einer Kippsicherung für das
Fernsehgerät
Wenn alle Anschlüsse vorgenommen wurden, sichern Sie das Fernsehgerät.
2
3
1
1 Befestigen Sie den mitgelieferten Halteriemen mit der mitgelieferten Schraube an dem
Möbelstück, auf dem das Fernsehgerät steht.
2 Bringen Sie die andere Seite des mitgelieferten Halteriemens am Fernsehständer an, und
befestigen Sie ihn mit einem Schraubenzieher, einer Münze o. Ä. sicher mithilfe der
mitgelieferten Schraube.
3 Halten Sie das Fernsehgerät fest, und ziehen Sie dabei den mitgelieferten Halteriemen an, um
die Länge einzustellen.
5: Einschalten des Fernsehgeräts
1
2
1 Verbinden Sie das Fernsehgerät mit der Netzsteckdose (220-240 V Wechselstrom, 50 Hz).
2 Drücken Sie 1 am Fernsehgerät (rechte Seite).
Wenn Sie das Fernsehgerät zum ersten Mal einschalten, erscheint das Sprachenmenü auf dem Bildschirm.
Fahren Sie dann mit „6: Auswählen von Sprache und Land/Region“ auf Seite 13 fort.
Wenn sich das Fernsehgerät im Bereitschaftsmodus befindet (die Anzeige
(vorne) leuchtet rot), schalten Sie das Fernsehgerät mit TV "/1 an der Fernbedienung ein.
1 (Bereitschaft) am Fernsehgerät
12
DE
Page 59

6: Auswählen von
PROG
Sprache und Land/
Region
Wenn Sie das Fernsehgerät zum ersten Mal
einschalten, erscheint das Menü „Language“
(Sprache) auf dem Bildschirm.
TV
AUX/VIDEO
D
V
V
D
T
A
R
U
C
X
V
DIGITAL ANALOG
MODE
123
456
7809
2 Wählen Sie mit M/m das Land bzw. die
Region aus, wo Sie das Fernsehgerät
betreiben, und drücken Sie anschließend
OK.
Wenn das Land bzw. die Region, wo Sie das
Fernsehgerät verwenden wollen, nicht in der Liste
enthalten ist, wählen Sie „-“ statt eines Landes
bzw. einer Region.
Auf dem Bildschirm erscheint eine Meldung mit
der Aufforderung, den Start des automatischen
Sendersuchlaufs zu bestätigen. Fahren Sie dann
mit „7: Automatisches Speichern von Sendern im
Fernsehgerät“ auf Seite 14 fort.
Vorbereitungen
1,2
OK
1,2
1 Wählen Sie mit M/m die Sprache für die
Menübildschirme aus und drücken Sie
anschließend OK.
13
DE
Page 60

7: Automatisches
Speichern von Sendern
im Fernsehgerät
1
Drücken Sie OK, um die Option „Ja“ zu wählen.
Wenn Sie die Sprache und das Land bzw. die Region
ausgewählt haben, erscheint eine Meldung auf dem
Bildschirm, in der Sie gefragt werden, ob die
automatische Senderspeicherung beginnen soll.
Das Fernsehgerät muss für den Empfang von Kanälen
(Fernsehprogrammen) eingestellt werden. Gehen Sie
zum Suchen und Speichern aller verfügbaren Kanäle
folgendermaßen vor.
1
3
m
Anzeige des digitalen Sendersuchlaufs
m
Anzeige des analogen Sendersuchlaufs
Das Fernsehgerät beginnt mit der Suche nach
allen verfügbaren digitalen Kanälen, gefolgt von
allen verfügbaren analogen Kanälen. Dies kann
einige Zeit dauern. Warten Sie bitte, und drücken
Sie keine Taste am Fernsehgerät oder an der
Fernbedienung.
Nachdem alle verfügbaren digitalen und analogen
Kanäle abgespeichert worden sind, schaltet das
Fernsehgerät auf den normalen Betrieb um und
zeigt den unter Kanalnummer 1 gespeicherten
digitalen Kanal an. Falls keine digitalen Kanäle
gefunden werden, wird der unter Kanalnummer 1
gespeicherte analoge Kanal angezeigt.
Wenn eine Meldung zum Überprüfen der
Antennenanschlüsse erscheint
Es wurden keine digitalen oder analogen Kanäle
gefunden. Überprüfen Sie alle Antennenanschlüsse,
und starten Sie mit OK erneut die automatische
Senderspeicherung.
2
Wenn das Menü „Programme ordnen“ auf
dem Bildschirm erscheint, gehen Sie wie in
Schritt 2 und 3 unter „Programme ordnen
(nur Analogmodus)“ erläutert vor (Seite 32).
Wenn Sie die Reihenfolge, in der die analogen
Kanäle im Fernsehgerät gespeichert wurden, nicht
ändern wollen, fahren Sie mit Schritt 3 fort.
3 Drücken Sie MENU, um den Vorgang zu
beenden.
Am Fernsehgerät sind nun alle verfügbaren
Kanäle eingestellt.
14
DE
Page 61

Fernsehen
Fernsehen
2 Drücken Sie DIGITAL oder ANALOG, um
auf den Digitalmodus bzw. den
Analogmodus umzuschalten.
Die verfügbaren Kanäle hängen vom gewählten
Modus ab.
3 Wählen Sie mit den Zifferntasten oder
PROG +/- einen Fernsehkanal aus.
Um die Kanalnummer 10 und höher mit den
Zifferntasten zu wählen, geben Sie die zweite und
dritte Ziffer innerhalb von zwei Sekunden ein.
Um einen digitalen Kanal mithilfe des
1
22
3
elektronischen Programmführers (EPG)
auszuwählen, siehe Seite 18.
Im Digitalmodus
Ein Informationsbanner erscheint kurz. Die
folgenden Symbole können auf dem Banner
angezeigt werden.
: Radiodienst
: Verschlüsselungs-/Abonnementdienst
: Mehrere Dialogsprachen verfügbar
: Untertitel verfügbar
: Untertitel für Hörgeschädigte verfügbar
: Empfohlenes Mindestalter für aktuelles
Programm (von 4 bis 18 Jahren)
: Kindersicherung
: Aktuelles Programm wird aufgenommen
Fernsehen
3
1
Drücken Sie zum Einschalten des
Fernsehgeräts
Seite).
Wenn sich das Fernsehgerät im Bereitschaftsmodus
befindet (die Anzeige
Fernsehgerät (vorne) leuchtet rot), schalten Sie das
Fernsehgerät mit TV
1
am Fernsehgerät (rechte
1
(Bereitschaft) am
"/1
an der Fernbedienung ein.
Weitere Funktionen
Funktion Vorgehen
Zeitweiliges
Ausschalten des
Fernsehgeräts
(Bereitschaftsmodus)
Vollständiges
Ausschalten des
Fernsehgeräts
Einstellen der
Lautstärke
Stummschalten des
To ns
Drücken Sie TV "/1.
Drücken Sie 1 am Fernsehgerät
(rechte Seite).
Drücken Sie 2 + (lauter)/
- (leiser).
Drücken Sie %. Drücken Sie die
Taste erneut, um den Ton
wiederherzustellen.
Fortsetzung
15
DE
Page 62

Funktion Vorgehen
Umschalten auf
Digitalmodus
Interaktive
Aufforderungsmeldungen ausblenden
(nur im
Digitalmodus)
Umschalten auf
Analogmodus
Zurückschalten zum
vorher (mehr als fünf
Sekunden)
angezeigten Kanal
Aufrufen der
Programmindextabelle (nur im
Analogmodus)
Drücken Sie DIGITAL.
Drücken Sie ANALOG.
Drücken Sie .
Drücken Sie OK. Um einen
analogen Kanal auszuwählen,
drücken Sie M/m, dann OK.
Informationen zum Aufrufen der
Indextabelle mit
Eingangssignalen finden Sie auf
Seite 21.
So rufen Sie Videotext auf
Drücken Sie /. Mit jedem Tastendruck auf /
wechselt die Anzeige zyklisch wie folgt:
Videotext t Videotext über dem Fernsehbild
eingeblendet (Mischmodus) t Kein Videotext
(Beenden der Videotextanzeige)
Zum Auswählen einer Seite drücken Sie die
Zifferntasten oder PROG +/-.
Zum Anhalten einer Seite drücken Sie / .
Zum Anzeigen von verborgenen Informationen
drücken Sie / .
Tipps
• Sorgen Sie dafür, dass das Fernsehgerät starke Signale
empfängt. Andernfalls können Textfehler auftreten.
• Die meisten Fernsehkanäle strahlen Videotext aus.
Weitere Informationen zu diesem Dienst finden Sie auf
der Indexseite (in der Regel Seite 100).
• Wenn vier farbige Optionen unten auf der Videotextseite
zu sehen sind, steht TOPtext/Fastext zur Verfügung. Mit
Fastext können Sie schnell und einfach auf Seiten
zugreifen. Drücken Sie die entsprechende farbige Taste,
um die Seite aufzurufen.
So rufen Sie NexTView auf (abhängig von
der Verfügbarkeit des Dienstes)
NexTView ist eine elektronische
Programmzeitschrift.
1 Wenn ein Kanal ausgewählt wird, der den
NexTView-Dienst zur Verfügung stellt
(„NexTView“ wird angezeigt, sobald Daten
verfügbar sind), drücken Sie .
2 Wählen Sie mit M/m/</, die angezeigte
Option aus, und drücken Sie zur
Bestätigung OK.
Zum Ausschalten von NexTView drücken Sie
erneut.
Mo Di Mi Do Fr Sa So
1 (Alle)/ (Unterhaltung)/ (Kinder)/
(Kultur)/ (Sport)/ (Nachrichten)/
(Filme)/ (Musik):
Die Programme werden nach Kategorie aufgelistet.
2 (nur, wenn NexTView auf mehr als 8 Kanälen
verfügbar ist):
Erstellt eine Kanalliste. Sie können bis zu 8 Kanäle
speichern. Wenn Sie die werkseitig eingestellten
Kanäle wiederh erstellen wollen, wählen Sie „Autom.
B“.
3 :
Zeigt eine Erinnerungsliste an (Einzelheiten finden
Sie unter „5 Info:“).
4 Programme:
Zeigt die Programmliste nach Zeit geordnet an, wenn
das Fernsehgerät maximal 50 % der NexTView-Daten
empfängt („NexTView“ wird orange angezeigt, wenn
ein Kanal ausgewählt wird), bzw. zeigt die
Programmliste nach Zeit und Kanal geordnet an, wenn
das Fernsehgerät mehr als 50 % der NexTView-Daten
empfängt („NexTView“ wird schwarz angezeigt, wenn
ein Kanal ausgewählt wird). Der Prozentsatz kann je
nach der Region variieren.
5 Info:
Zeigt eine Beschreibung der Sendung an.
Drücken Sie die rote Taste, wenn Sie die Sendung
aufnehmen wollen (nur bei einem Videorecorder, der
SmartLink und die Timerprogrammierung unterstützt).
Drücken Sie die grüne Taste, wenn eine
Erinnerungsmeldung angezeigt werden soll, sobald
die Sendung ausgestrahlt wird. Sie können bis zu
fünf Sendungen programmieren.
Hinweise
• Falsche Zeichen erscheinen auf dem Bildschirm, wenn die
in NexTView verwendete Sprache und die am
Fernsehgerät eingestellte Sprache nicht übereinstimmen.
Stellen Sie für „Sprache“ die in NexTView verwendete
Sprache ein (Seite 31). Stellen Sie für „Land“ außerdem
das Land bzw. die Region ein, von wo aus das NexTViewProgramm ausgestrahlt wird (Seite 31).
• „Aufnehmen“ un d „Erinnern“ stehen nicht zur Verfügung ,
sobald die Sendung begonnen hat.
16
DE
Page 63

Manuelles Wechseln des Bildformats je
nach Sendung
Drücken Sie mehrmals, um „Wide“, „Smart“,
„4:3“, „14:9“ oder „Zoom“ auszuwählen.
Wide
Breitbildsendungen (16:9) werden mit den richtigen
Proportionen angezeigt.
Smart*
Herkömmliche 4:3-Sendungen werden mit einem
Breitbildeffekt angezeigt. Das Bild im 4:3-Format
wird bildschirmfüllend gedehnt.
4:3
Tipps
• Alternativ dazu können Sie „Auto Format“ auch auf „Ein“
setzen. In diesem Fall wird automatisch das beste Format
für die Sendung ausgewählt (Seite 27).
• Sie können den Bildbereich einstellen, der bei „Smart“,
„14:9“ oder „Zoom“ angezeigt wird. Mit M/m
verschieben Sie das Bild nach oben oder unten (z. B. zum
Lesen von Untertiteln).
Fernsehen
Herkömmliche 4:3-Sendungen (also keine
Breitbildsendungen) werden mit den richtigen
Proportionen angezeigt.
14:9*
14:9-Sendungen werden mit den richtigen
Proportionen angezeigt. Als Resultat erscheinen
schwarze Balken auf dem Bildschirm.
Zoom*
Kinofilme (Letter-Box-Format) werden mit den
richtigen Proportionen angezeigt.
* Teile des Bildes werden oben und unten möglicherweise
abgeschnitten.
17
DE
Page 64

Benutzung des elektronischen Programmführers
(EPG)
1 Drücken Sie im Digitalmodus, um den elektronischen
Programmführer (EPG) anzuzeigen.
2 Führen Sie den gewünschten Bedienungsvorgang gemäß
der nachstehenden Tabelle durch.
Hinweis
Elektronischer
Programmführer (EPG)
Funktion Vorgehen
Ausschalten des EPG Drücken Sie .
Navigieren im EPG Drücken Sie M/m/</,.
Anzeigen der vorherigen oder nächsten
sechs Kanäle
Anschauen des aktuellen Programms Drücken Sie OK, während das aktuelle Programm ausgewählt ist.
Sortieren der Programminformationen
nach Kategorie – Kategorieliste
Einstellen des aufzunehmenden
Programms – Timer Aufnahme
Programminformationen werden nur angezeigt, wenn der Fernsehsender solche
überträgt.
Drücken Sie die rote (vorherige) oder grüne (nächste) Taste.
1 Drücken Sie die blaue Taste.
2 Drücken Sie M/m/</, um eine Kategorie auszuwählen. Der
Kategoriename wird auf der Seite angezeigt.
Die folgenden Kategorien sind verfügbar:
Favoriten
Enthält alle in der Favoritenliste gespeicherten Kanäle (Seite 20).
Alle Kategorien
Enthält alle verfügbaren Kanäle.
Nachrichten
Enthält alle Nachrichtenkanäle.
3 Drücken Sie OK.
Der elektronische Programmführer (EPG) zeigt nun nur die aktuellen
Programme der ausgewählten Kategorie an.
1 Drücken Sie M/m/</,, um das später aufzunehmende
Programm auszuwählen.
2 Drücken Sie OK.
3 Drücken Sie M/m, um die Option „Timer Aufnahme“
auszuwählen.
4 Drücken Sie OK, um den Timer des Fernsehgeräts und Ihres
Videorecorders zu aktivieren.
Das Symbol erscheint bei der Information des betreffenden
Programms. Die Anzeige auf der Gerätefront leuchtet im Standby
Modus.
Hinweise
• Am Fernsehgerät kann VCR-Timeraufnahme nur für Smartlink-kompatible
Videorecorder eingestellt werden. Wenn Ihr Videorecorder nicht Smartlinkkompatibel ist, erscheint eine Meldung, die Sie auffordert, den Timer Ihres
Videorecorders einzustellen.
• Nachdem die Aufnahme begonnen hat, können Sie Ihr Fernsehgerät in den
Bereitschaftsmodus schalten. Wenn Sie Ihr Fernsehgerät jedoch ganz
ausschalten, wird die Aufnahme möglicherweise abgebrochen.
• Ist für Sendungen eine Altersbegrenzung eingestellt, wird durch Einblendung
auf dem Bildschirm nach dem Pin Code gefragt. Weitere Details siehe
Kindersicherung auf Seite 38.
18
DE
Page 65

Funktion Vorgehen
Einstellen eines Programms auf
automatische Anzeige bei Programmstart
– Erinnerung
1 Drücken Sie M/m/</,, um das später anzuzeigende
Programm auszuwählen.
2 Drücken Sie OK.
3 Drücken Sie M/m, um die Option „Erinnerung“ auszuwählen.
4 Drücken Sie OK, um das ausgewählte Programm beim
Programmstart automatisch anzuzeigen.
Das Symbol c erscheint bei der Information des betreffenden
Programms. Die Anzeige auf der Gerätefront leuchtet im Standby
Modus.
Hinweis
Wenn Sie das Fernsehgerät in den Bereitschaftsmodus versetzen, schaltet es
sich kurz vor dem Programmstart automatisch ein.
Einstellen von Uhrzeit und Datum eines
aufzunehmenden Programms
– Manuelle Timer Aufnahme
1 Drücken Sie OK.
2 Drücken Sie M/m, um die Option „Manuelle Timer Aufnahme“
auszuwählen.
3 Wählen Sie das Datum mit M/m aus, und drücken Sie dann
,.
4 Stellen Sie die Start- und Stoppzeit auf die gleiche Weise wie
in Schritt 3 ein.
5 Wählen Sie den Kanal mit M/m aus, und drücken Sie dann
OK, um den Timer des Fernsehgeräts und Ihres
Videorecorders zu aktivieren.
Das Symbol erscheint bei der Information des betreffenden
Programms. Die Anzeige auf der Gerätefront leuchtet im Standby
Modus.
Hinweise
• Am Fernsehgerät kann VCR-Timeraufnahme nur für Smartlink-kompatible
Videorecorder eingestellt werden.Wenn Ihr Videorecorder nicht Smartlinkkompatibel ist, erscheint eine Meldung, die Sie auffordert, den Timer Ihres
Videorecorders einzustellen.
• Nachdem die Aufnahme begonnen hat, können Sie Ihr Fernsehgerät in den
Bereitschaftsmodus schalten. Wenn Sie Ihr Fernsehgerät jedoch ganz
ausschalten, wird die Aufnahme möglicherweise abgebrochen.
• Ist für Sendungen eine Altersbegrenzung eingestellt, wird durch Einblendung
auf dem Bildschirm nach dem Pin Code gefragt. Weitere Details siehe
Kindersicherung auf Seite 38.
Annullieren einer Aufnahme/Erinnerung
– Timer-Liste
1 Drücken Sie OK.
2 Drücken Sie M/m, um die Option „Timer-Liste“ auszuwählen.
3 Wählen Sie das zu annullierende Programm mit M/m aus, und
drücken Sie dann OK.
Es erscheint eine Anzeige zur Bestätigung, dass Sie das Programm
annullieren wollen.
4 Drücken Sie , zur Wahl von „Ja“, und drücken Sie dann OK
zur Bestätigung.
Fernsehen
19
DE
Page 66

Benutzung der Favoritenliste
1 Drücken Sie im Digitalmodus, um die Favoritenliste
anzuzeigen.
Es erscheint eine Meldung, in der Sie gefragt werden, ob Sie der
Favoritenliste Kanäle hinzufügen wollen, wenn die Favoritenliste
leer ist.
Favoritenliste
Funktion Vorgehen
Erstmaliges Erstellen Ihrer Favoritenliste
Ausschalten der Favoritenliste Drücken Sie .
Navigieren in der Favoritenliste Drücken Sie M/m.
Anzeigen der vorherigen oder nächsten
fünf Kanäle
Anzeigen kurzer Details zu aktuellen
Programmen
Wiedergeben eines Kanals Drücken Sie OK, während Sie einen Kanal auswählen.
der nachstehenden Tabelle durch.
Es erscheint eine Meldung, in der Sie gefragt werden, ob Sie der Favoritenliste
Kanäle hinzufügen wollen, wenn Sie zum ersten Mal drücken.
1 Drücken Sie OK, um die Option „Ja“ auszuwählen.
2 Wählen Sie den hinzuzufügenden Kanal mit M/m aus, und
drücken Sie dann OK.
Wenn die Liste mehr als fünf Kanäle enthält, drücken Sie die grüne Taste
für die nächsten fünf Kanäle oder die rote Taste für die vorherigen fünf
Kanäle. Wenn Sie die Kanalnummer kennen, können Sie einen Kanal
mithilfe der Zifferntasten direkt auswählen.
3 Drücken Sie OK.
Kanäle, die in der Favoritenliste gespeichert sind, werden durch das
Symbol gekennzeichnet.
Drücken Sie die rote (vorherige) oder grüne (nächste) Taste.
Drücken Sie , während Sie einen Kanal auswählen. Drücken Sie die Taste
erneut, um die Funktion auszuschalten.
2 Führen Sie den gewünschten Bedienungsvorgang gemäß
Hinzufügen oder Löschen von Kanälen in
der Favoritenliste
Löschen aller Kanäle in der Favoritenliste
DE
20
1 Drücken Sie die blaue Taste.
Kanäle, die in der Favoritenliste gespeichert sind, werden durch das
Symbol gekennzeichnet.
2 Wählen Sie den hinzuzufügenden oder zu löschenden Kanal
mit M/m aus.
Wenn die Liste mehr als fünf Kanäle enthält, drücken Sie die grüne Taste
für die nächsten fünf Kanäle oder die rote Taste für die vorherigen fünf
Kanäle. Wenn Sie die Kanalnummer kennen, können Sie einen Kanal
mithilfe der Zifferntasten direkt auswählen.
3 Drücken Sie OK.
4 Drücken Sie die blaue Taste, um zur Favoritenliste
zurückzukehren.
1 Drücken Sie die blaue Taste.
2 Drücken Sie die gelbe Taste.
Es erscheint eine Anzeige, um zu bestätigen, dass Sie alle Kanäle in der
Favoritenliste löschen wollen.
3 Drücken Sie < zur Wahl von „Ja“, und dann OK zur
Bestätigung.
Page 67

Bildwiedergabe von
Verwendung der Menüs
angeschlossenen Geräten
Schalten Sie das angeschlossene Gerät
ein, und führen Sie folgende Schritte aus.
Bei Geräten, die mit einem voll belegten 21-poligen
Scart-Kabel an die Scart-Buchsen angeschlossen sind
Starten Sie die Wiedergabe am angeschlossenen Gerät.
Das Bild vom angeschlossenen Gerät erscheint auf dem
Fernsehschirm.
Bei einem mit der automatischen Senderspeicherung
eingestellten Videorecorder (Seite 11)
Drücken Sie im Analogmodus PROG +/- oder die
Zifferntasten zur Wahl des Videokanals.
Bei anderen angeschlossenen Geräten
Drücken Sie / so oft, bis das richtige
Eingangssymbol (siehe unten) auf dem Fernsehschirm
angezeigt wird.
1/ 1, 2/ 2, 3/ 3:
Audio-/Video- oder RGB-Eingangssignal über die ScartBuchse / 1, 2 oder 3. erscheint nur, wenn
eine RGB-Signalquelle angeschlossen wurde.
4:
Komponenteneingangssignal von den Buchsen Y, P
P
R/CR ( / 4) und Audioeingangssignal von den
Buchsen L/G/S/I, R/D/D/D ( / 4).
5:
Ein digitales Audio-/Videosignal wird über die Buchse
HDMI IN 5 eingespeist. Das Audioeingangssignal ist
nur analog, wenn das Gerät über die DVI- und
Audioausgangsbuchse angeschlossen ist.
6/ 6:
Videoeingangssignal über die Videobuchse 6 und
Audioeingangssignal über die Audiobuchsen L/G/S/I
(MONO), R/D/D/D ( 6). erscheint nur, wenn das
Gerät an die S-Videobuchse 6 statt an die Videobuchse
6 angeschlossen ist und das S-Videoeingangssignal
über die S-Videobuchse 6 eingespeist wird.
Weitere Funktionen
Funktion Vorgehen
Zurückschalten zum
normalen
Fernsehbetrieb
Aufrufen der
Indextabelle mit
Eingangssignalen
Drücken Sie DIGITAL oder
ANALOG.
Drücken Sie OK, um die
Eingangssignal-Indextabelle
aufzurufen. (Drücken Sie dann,
nur im Analogmodus, ,.) Zum
Auswählen einer Eingangsquelle
drücken Sie M/m und dann OK.
B/CB,
Navigieren in den
Menüs
Verwendung der Menüs
2,3,4
4
1
1 Rufen Sie mit MENU das Menü auf.
2 Wählen Sie mit M/m ein Menüsymbol aus.
3 Wählen Sie mit M/m/</, eine Option
aus.
4 Nehmen Sie mit M/m/</, die
Einstellung vor, und drücken Sie
anschließend OK.
Zum Beenden des Menüs drücken Sie MENU.
Zum Zurückschalten zur letzten Anzeige drücken
Sie <.
Fortsetzung
21
DE
Page 68

Übersicht über die Menüs
Die folgenden Optionen stehen in den einzelnen
Menüs zur Verfügung. Einzelheiten zum Navigieren
in den Menüs finden Sie auf Seite 21.
Weitere Informationen zu den einzelnen Menüs
finden Sie außerdem auf der in Klammern
angegebenen Seite.
1 Bild-Einstellungen
Modus (23)
Kontrast/Helligkeit/Farbe/Farbton/
Bildschärfe/Ht.Grd.Licht (23)
Farbtemperatur (23)
Dyn. NR (24)
Dyn. Bild (24)
Gamma-Korrektur (24)
Normwerte (24)
2 Ton-Einstellungen
Effekt (25)
Höhen/Tiefen/Balance (25)
Autom.Lautst. (25)
Zweiton (26)
Lautst. (26)
Zweiton (26)
Normwerte (26)
4 Funktionen
Energie sparen (28)
Lautsprecher (28)
AV2 Ausgang (28)
Bild aus (29)
5 Timer
Abschalttimer (30)
Auto.Ausschalt (30)
6 Grundeinstellungen
Neuinitialisierung (31)
Sprache (31)
Land (31)
Autom. Progr. (32)
Programme ordnen (32)
Programmnamen (32)
AV-Einstellungen (33)
– Gerätenamen/Bearb./Auslassen
Manuell abspeichern (33)
– Programm/TV-System/Kanal/Name/AFT/
Audio Filter/Auslassen/Dekoder/
Dämpfung/Bestätigen
Digital Einstellung (36)
– Digitaler Suchlauf/Digital Einstellung
Hinweis
Welche Optionen Sie einstellen können, hängt von der
jeweiligen Situation ab. Nur die zur Verfügung stehenden
Optionen werden angezeigt.
3 Bildschirm einstellen
Auto Format (27)
Bildformat (27)
Bildposition (27)
– V. Position/H. Position/Normwerte
DE
22
Page 69

Menü „Bild-Einstellungen“
Modus
Zum Auswählen des Bildmodus.
1 Drücken Sie OK, um die Option „Modus“ auszuwählen.
2 Wählen Sie mit M/m einen der folgenden Bildmodi aus, und drücken Sie
anschließend OK.
Brillant: Für verbesserten Bildkontrast und Bildschärfe.
Standard: Für Standardbilder. Empfohlen für privaten Gebrauch.
Anwender: Zum Speichern bevorzugter Einstellungen.
Tipp
Sie können den Bildmodus auch wechseln, indem Sie wiederholt drücken.
Im Menü „Bild-Einstellungen“ können Sie die unten
aufgelisteten Optionen auswählen. Wie Sie Optionen
auswählen, erfahren Sie unter „Navigieren in den
Menüs“ (Seite 21).
Tipp
Wenn Sie „Modus“ auf „Brillant“ oder „Standard“ setzen,
können Sie nur „Modus“, „Kontrast“, „Farbtemperatur“,
„Dyn. NR“ und „Normwerte“ einstellen.
Verwendung der Menüs
Kontrast/Helligkeit/Farbe/Farbton/Bildschärfe/Ht.Grd.Licht
1 Drücken Sie OK, um die Option auszuwählen.
2 Stellen Sie mit </, den Pegel ein, und drücken Sie dann OK.
Tipp
„Farbton“ lässt sich nur bei NTSC-Farbsignalen einstellen (z. B. bei Videokassetten aus den USA).
Farbtemperatur
1 Drücken Sie OK, um die Option „Farbtemperatur“ auszuwählen.
2 Wählen Sie mit M/m eine der folgenden Einstellungen aus, und drücken
Sie anschließend OK.
Kalt: Bei Weißtönen wird der Blauanteil erhöht.
Neutral: Normale Weißtöne.
Warm: Bei Weißtönen wird der Rotanteil erhöht.
Fortsetzung
23
DE
Page 70

Dyn. NR
Zum Verringern von Bildstörungen (verrauschtes Bild) bei schwachen Sendesignalen.
1 Drücken Sie OK, um die Option „Dyn. NR“ auszuwählen.
2 Wählen Sie mit M/m eine der folgenden Einstellungen aus, und drücken
Dyn. Bild
Zum Verbessern des Bildkontrasts.
1 Drücken Sie OK, um die Option „Dyn. Bild“ auszuwählen.
2 Wählen Sie mit M/m die Option „Ein“ aus, und drücken Sie anschließend
Gamma-Korrektur
Zum Einstellen der Balance zwischen hellen und dunklen Bildbereichen.
Sie anschließend OK.
Autom.: Die Bildstörungen werden automatisch verringert.
hoch/niedrig/Aus: Die Rauschunterdrückung wird unterschiedlich stark eingestellt.
CNR: Die Bildstörungen beim Empfang von Animationsbildern werden verringert.
BNR: Die Blockbildung wird verringert. Diese Funktion ist effektiv für digitale Kanäle
oder einen angeschlossenen DVD-Player/digitalen Satellitenreceiver mit MPEGWiedergabe.
OK.
Normwerte
1 Drücken Sie OK, um die Option „Gamma-Korrektur“ auszuwählen.
2 Stellen Sie mit M/m den Pegel ein, und drücken Sie anschließend OK.
Zum Zurücksetzen aller Bildeinstellungen auf die Werkseinstellungen.
1 Drücken Sie OK, um die Option „Normwerte“ auszuwählen.
2 Wählen Sie mit M/m die Option „OK“ aus, und drücken Sie anschließend
OK.
24
DE
Page 71

Menü „Ton-Einstellungen“
Effekt (Klangeffekt)
Im Menü „Ton-Einstellungen“ können Sie die unten
aufgelisteten Optionen auswählen. Wie Sie Optionen
auswählen, erfahren Sie unter „Navigieren in den
Menüs“ (Seite 21).
1 Drücken Sie OK, um die Option „Effekt“ auszuwählen.
2 Wählen Sie mit M/m einen der folgenden Klangeffekte aus, und drücken
Sie anschließend OK.
Aus: Flat response.
Natürlich: Klarheit, Detailgenauigkeit und Klangwirkung des Tons werden mit dem
„BBE High Definition Sound System
Dynamisch: Für eine größere Klangpräzision und naturgetreuere Musikwiedergabe
werden Klarheit und Klangwirkung des Tons durch das „BBE High Definition Sound
System“ verstärkt.
Dolby Virtual
Fernsehlautsprecher simuliert.
Tipps
• Sie können den Klangeffekt auch wechseln, indem Sie wiederholt 9 drücken.
• Wenn Sie „Autom.Lautst.“ auf „Ein“ setzen, wird für „Dolby Virtual“ automatisch „Natürlich“
*1
*2
Höhen/Tiefen/Balance
Zum Einstellen hochfrequenter Töne (Höhen) und niederfrequenter Töne (Tiefen) und zum
Verschieben der Balance zwischen dem linken und rechten Lautsprecher (Balance).
1 Drücken Sie OK, um die Option auszuwählen.
*1
“ verstärkt.
*2
: Die Raumklangeffekte eines Mehrkanalsystems werden über die
eingestellt.
Hergestellt unter der Lizenz von BBE Sound, Inc.
Lizenziert von BBE Sound, Inc., unter US-Patent 4638258, 4482866. „BBE“ und das BBESymbol sind Markenzeichen von BBE Sound, Inc.
Hergestellt unter Lizenz von Dolby Laboratories. „Dolby“ und das Doppel-D-Symbol sind
Warenzeichen von Dolby Laboratories.
Verwendung der Menüs
Autom.Lautst.
2 Stellen Sie mit </, den Pegel ein, und drücken Sie dann OK.
Zum Beibehalten eines konstanten Lautstärkepegels, auch wenn Lautstärkesprünge auftreten
(beispielsweise sind Werbespots in der Regel lauter als Fernsehsendungen).
1 Drücken Sie OK, um die Option „Autom.Lautst.“ auszuwählen.
2
Wählen Sie mit M/m die Option „Ein“ aus, und drücken Sie anschließend OK.
Tipp
Wenn Sie „Effekt“ auf „Dolby Virtual“ setzen, wechselt „Autom.Lautst.“ automatisch zu „Aus“.
Fortsetzung
25
DE
Page 72

Zweiton
Zum Auswählen des Tons vom Lautsprecher bei einer Stereo- oder Zweikanaltonsendung.
1 Drücken Sie OK um die Option „Zweiton“ auszuwählen.
2 Wählen Sie mit M/m eine der folgenden Einstellungen aus, und drücken
Sie anschließend OK.
Stereo, Mono: Bei einer Stereosendung.
A/B/Mono: Bei Zweikanaltonsendungen wählen Sie „A“ für Tonkanal 1, „B“ für
Tonkanal 2 oder „Mono“ für einen Monokanal, falls verfügbar.
Tipp
Wenn Sie ein an das Fernsehgerät angeschlossenes Gerät auswählen, setzen Sie die Option
„Zweiton“ auf „Stereo“, „A“ oder „B“.
Lautst. (Kopfhörerlautstärke)
Zum Einstellen der Lautstärke von Kopfhörern.
1 Drücken Sie OK, um die Option „ Lautst.“ auszuwählen.
2 Stellen Sie mit </, den Pegel ein, und drücken Sie dann OK.
Zweiton
Zum Auswählen des Tons von den Kopfhörern bei einer Stereo- oder Zweikanaltonsendung.
Normwerte
1 Drücken Sie OK, um die Option „ Zweiton“ auszuwählen.
2 Wählen Sie mit M/m eine der folgenden Einstellungen aus, und drücken
Sie anschließend OK.
Stereo, Mono: Bei einer Stereosendung.
A/B/Mono: Bei Zweikanaltonsendungen wählen Sie „A“ für Tonkanal 1, „B“ für
Tonkanal 2 oder „Mono“ für einen Monokanal, falls verfügbar.
Tipp
Wenn Sie ein an das Fernsehgerät angeschlossenes Gerät auswählen, setzen Sie die Option „
Zweiton“ auf „Stereo“, „A“ oder „B“.
Zum Zurücksetzen der Einstellungen von „Höhen“, „Tiefen“ und „Balance“ auf die
werkseitigen Einstellungen.
1 Drücken Sie OK, um die Option „Normwerte“ auszuwählen.
2 Wählen Sie mit M/m die Option „OK“ aus, und drücken Sie anschließend
OK.
26
DE
Page 73

Menü „Bildschirm einstellen“
Im Menü „Bildschirm einstellen“ können Sie die
unten aufgelisteten Optionen auswählen. Wie Sie
Optionen auswählen, erfahren Sie unter „Navigieren
in den Menüs“ (Seite 21).
Auto Format
Zum automatischen Wechseln des Bildformats je nach Sendesignal.
1 Drücken Sie OK, um die Option „Auto Format“ auszuwählen.
2 Wählen Sie mit M/m die Option „Ein“ aus, und drücken Sie anschließend
OK.
Wenn Sie Ihre Einstellung beibehalten wollen, wählen Sie „Aus“.
Tipps
• Auch wenn Sie unter „Auto Format“ die Option „Ein“ oder „Aus“ gewählt haben, können Sie
das Bildformat jederzeit durch wiederholtes Drücken von ändern.
• „Auto Format“ steht nur bei PAL- und SECAM-Signalen zur Verfügung.
Verwendung der Menüs
Bildformat
Bildposition
Einzelheiten zum Bildformat finden Sie auf Seite 17.
1 Drücken Sie OK, um die Option „Bildformat“ auszuwählen.
2 Drücken Sie M/m zur Wahl von „Smart“, „4:3“, „14:9“, „Zoom“ oder
„Wide“ (Einzelheiten auf Seite 17), und drücken Sie dann OK.
Zum Einstellen der Bildposition bei den unterschiedlichen Bildformaten.
1 Drücken Sie OK, um die Option „Bildposition“ auszuwählen.
2 Wählen Sie mit M/m eine der folgenden Einstellungen aus, und drücken
Sie anschließend OK.
V. Position: Zum Einstellen der vertikalen Bildposition.
H. Position: Zum Einstellen der horizontalen Bildposition.
Normwerte: Zum Zurücksetzen auf die werkseitigen Einstellungen. Statt Schritt 3
auszuführen, wählen Sie mit M/m die Option „OK“ aus und drücken anschließend OK.
3 Drücken Sie M/m (für die vertikale Bildposition) oder </, (für die
horizontale Bildposition), und drücken Sie anschließend OK.
Tipp
Wenn „Bildformat“ auf „4:3“ oder „Wide“ gesetzt ist, kann „V. Position“ nicht eingestellt werden.
Fortsetzung
27
DE
Page 74

Menü „Funktionen“
Energie sparen
Zum Verringern der Leistungsaufnahme des Fernsehgeräts.
1 Drücken Sie OK, um die Option „Energie sparen“ auszuwählen.
2 Wählen Sie mit M/m die Option „Reduziert“ aus, und drücken Sie
anschließend OK.
Lautsprecher
Zum Ein-/Ausschalten der internen Lautsprecher des Fernsehgeräts.
1 Drücken Sie OK, um die Option „Lautsprecher“ auszuwählen.
Im Menü „Funktionen“ können Sie die unten
aufgelisteten Optionen auswählen. Wie Sie Optionen
auswählen, erfahren Sie unter „Navigieren in den
Menüs“ (Seite 21).
AV2 Ausgang
2 Wählen Sie mit M/m die Option „Ein“ oder „Aus“, und drücken Sie
anschließend OK.
Ein: Der Ton vom Fernsehgerät wird über die Fernsehlautsprecher ausgegeben.
Aus: Der Ton vom Fernsehgerät wird über ein externes Audiogerät, das an die
Audioausgangsbuchsen angeschlossen ist, ausgegeben.
Zum Ausgeben von Signalen über die Buchse / 2 an der Rückseite des
Fernsehgeräts. Wenn Sie einen Videorecorder oder ein anderes Aufnahmegerät an die
Buchse / 2 anschließen, können Sie die zugespielten Signale von angeschlossenen
Geräten an anderen Buchsen des Fernsehgeräts aufnehmen.
1 Drücken Sie OK, um die Option „AV2 Ausgang“ auszuwählen.
2 Wählen Sie mit M/m eine der folgenden Einstellungen aus, und drücken
Sie anschließend OK.
Autom.: Die auf dem Fernsehschirm angezeigten Bilder werden ausgegeben.
TV Analog: Eine analoge Sendung wird ausgegeben.
TV Digital: Eine digitale Sendung wird ausgegeben.
AV1: Signale vom an die Buchse / 1 angeschlossenen Gerät werden
ausgegeben.
AV3: Signale vom an die Buchse / 3 angeschlossenen Gerät werden
ausgegeben.
AV6: Signale vom an die Buchse 6/ 6 angeschlossenen Gerät werden
ausgegeben.
28
DE
Page 75

Bild aus
Zum Ausblenden des Bildes. Der Ton wird auch bei ausgeblendetem Bild wiedergegeben.
1 Drücken Sie OK, um die Option „Bild aus“ auszuwählen.
2 Wählen Sie mit M/m die Option „Ein“ aus, und drücken Sie anschließend
OK.
Die Anzeige (Bild aus) am Fernsehgerät (vorne) leuchtet grün auf. Wenn Sie das
Bild wieder einblenden wollen, drücken Sie eine beliebige Taste (mit Ausnahme von 2
+/- und 9).
Verwendung der Menüs
29
DE
Page 76

Menü „Timer“
Abschalttimer
Zum Festlegen einer Zeitspanne, nach der das Fernsehgerät automatisch in den
Bereitschaftsmodus schaltet.
1 Drücken Sie OK, um die Option „Abschalttimer“ auszuwählen.
2 Wählen Sie mit M/m die gewünschte Zeitspanne aus („30 Min.“/„60
Min.“/„90 Min.“/„120 Min.“), und drücken Sie dann OK.
Die Anzeige (Timer) am Fernsehgerät (Vorderseite) leuchtet in Orange auf.
Tipps
• Wenn Sie das Fernsehgerät aus- und wieder einschalten, wird „Abschalttimer“ auf „Aus“
zurückgesetzt.
• „Absch.-Timer läuft gleich ab. Gerät wird abgeschaltet.“ wird eine Minute, bevor das
Fernsehgerät in den Bereitschaftsmodus schaltet, auf dem Fernsehschirm angezeigt.
• Wenn Sie / drücken, wird die verbleibende Zeit, bevor das Fernsehgerät in den
Bereitschaftsmodus schaltet, in Minuten auf dem Fernsehschirm angezeigt.
Im Menü „Timer“ können Sie die unten aufgelisteten
Optionen auswählen. Wie Sie Optionen auswählen,
erfahren Sie unter „Navigieren in den Menüs“
(Seite 21).
Auto.Ausschalt
DE
30
Zum Einstellen des Fernsehgeräts, so dass es automatisch in den Bereitschaftsmodus
schaltet, wenn Sie die Eingangsquelle auswählen und kein Eingangssignal vom
angeschlossenen Gerät eingeht.
In Fernsehmodus ist das „Auto.Ausschalt“ immer auf „Ein“ gesetzt.
1 Drücken Sie OK, um die Option „Auto.Ausschalt“ auszuwählen.
2 Wählen Sie mit M/m die Option „Ein“ aus, und drücken Sie anschließend
OK.
Page 77

Menü „Grundeinstellungen“
Im Menü „Grundeinstellungen“ können Sie die unten
aufgelisteten Optionen auswählen. Wie Sie Optionen
auswählen, erfahren Sie unter „Navigieren in den
Menüs“ (Seite 21).
Neuinitialisierung
Dient zum Aufrufen des „Initialisierungsmenüs“, mit dem Sie Sprache und Land/Region
wählen und alle verfügbaren digitalen und analogen Kanäle abspeichern können. In der
Regel brauchen Sie diesen Vorgang nicht auszuführen, da die Sprache und das Land/die
Region sowie die Kanäle von der ersten Konfiguration des Fernsehgeräts bereits eingestellt
sind (Seite 13, 14). Mit dieser Option können Sie den Vorgang allerdings erneut ausführen
(z. B. um nach einem Umzug Sender neu einzustellen oder nach neu eingeführten
Sendekanälen zu suchen).
1 Drücken Sie OK, um die Option „Neuinitialisierung“ auszuwählen.
2 Drücken Sie OK, um die Option „Ja“ auszuwählen.
Das Sprachenmenü erscheint auf dem Bildschirm.
Verwendung der Menüs
Sprache
Land
3 Führen Sie die Schritte unter „6: Auswählen von Sprache und Land/
Region“ (Seite13) und „7: Automatisches Speichern von Sendern im
Fernsehgerät“ (Seite14) aus.
Zum Auswählen der Sprache, in der die Menüs angezeigt werden.
1 Drücken Sie OK, um die Option „Sprache“ auszuwählen.
2 Wählen Sie mit M/m die Sprache aus, und drücken Sie anschließend
OK.
Alle Menüs werden in der ausgewählten Sprache angezeigt.
Zum Auswählen des Landes bzw. der Region, wo Sie das Fernsehgerät betreiben.
1 Drücken Sie OK, um die Option „Land“ auszuwählen.
2 Wählen Sie mit M/m das Land bzw. die Region aus, wo Sie das
Fernsehgerät betreiben, und drücken Sie anschließend OK.
Fortsetzung
31
DE
Page 78

Autom. Progr. (nur Analogmodus)
Dient zum Abspeichern aller verfügbaren analogen Kanäle.
In der Regel brauchen Sie diesen Vorgang nicht auszuführen, da die Kanäle von der ersten
Konfiguration des Fernsehgeräts bereits eingestellt sind (Seite 14). Mit dieser Option
können Sie den Vorgang allerdings erneut ausführen (z. B. um nach einem Umzug Sender
neu einzustellen oder nach neu eingeführten Sendekanälen zu suchen).
1 Drücken Sie OK, um die Option „Autom. Progr.“ auszuwählen.
2 Gehen Sie wie in Schritt 1 unter „7: Automatisches Speichern von
Sendern im Fernsehgerät“ (Seite14) erläutert vor.
Wenn alle verfügbaren analogen Kanäle abgespeichert worden sind, schaltet das
Fernsehgerät auf den normalen Betrieb zurück.
Programme ordnen (nur Analogmodus)
Dient zum Ändern der Reihenfolge, in der die analogen Kanäle im Fernsehgerät gespeichert
sind.
1 Drücken Sie OK, um die Option „Programme ordnen“ auszuwählen.
2 Wählen Sie mit M/m den Kanal aus, den Sie zu einer anderen
Programmposition verschieben wollen, und drücken Sie dann OK.
3 Wählen Sie mit M/m die neue Position für den Kanal aus, und drücken
Sie anschließend OK.
Falls erforderlich, gehen Sie zum Verschieben weiterer Kanäle wie in Schritt 2 und 3
erläutert vor.
Programmnamen (nur Analogmodus)
Zum Zuordnen eines beliebigen Namens aus bis zu fünf Buchstaben oder Ziffern zu einem
Kanal. Der Name wird kurz auf dem Fernsehschirm angezeigt, wenn der Kanal ausgewählt
wird. (Die Namen der Kanäle werden in der Regel automatisch vom Videotext abgerufen,
falls verfügbar.)
1 Drücken Sie OK, um die Option „Programmnamen“ auszuwählen.
2 Wählen Sie mit M/m den zu benennenden Kanal aus, und drücken Sie
OK.
3 Wählen Sie mit M/m/</, den gewünschten Buchstaben bzw. die
Ziffer aus („s“ für ein Leerzeichen), und drücken Sie OK.
Wenn Sie ein falsches Zeichen eingegeben haben
Wählen Sie mit M/m/</, die Option %/5 aus, und drücken Sie OK so oft, bis das
falsche Zeichen ausgewählt ist. Wählen Sie dann mit M/m/</, das richtige Zeichen
aus, und drücken Sie OK.
4 Gehen Sie wie in Schritt 3 erläutert vor, bis Sie den ganzen Namen
eingegeben haben.
5 Wählen Sie mit M/m/</, die Option „Aus“, und drücken Sie OK.
32
DE
Page 79

AV-Einstellungen
Jedem Gerät, das an die Buchsen an der Seite und an der Rückseite angeschlossen ist, wird
ein Name zugewiesen. Der Name wird kurz auf dem Fernsehschirm angezeigt, wenn das
Gerät ausgewählt wird. Eingangssignalquellen, die nicht mit irgendwelchen Geräten
verbunden sind, können übersprungen werden.
1 Drücken Sie OK, um die Option „AV-Einstellungen“ auszuwählen.
2 Wählen Sie mit M/m die gewünschte Eingangsquelle aus, und drücken
Sie anschließend OK.
3 Wählen Sie mit M/m die gewünschte Option unten aus, und drücken Sie
anschließend OK.
Option Beschreibung
Gerätenamen Verwendet eines der Vorwahl-Etiketten, um dem angeschlossenen
Gerät einen Namen zuzuweisen.
Bearb. Erstellen Sie einen eigenen Namen. Gehen Sie wie in Schritt 3 bis 5
unter „Programmnamen” (Seite 32).
Auslassen Eine Eingangsquelle, an die kein Gerät angeschlossen ist, wird
übersprungen, wenn Sie mit M/m die Eingangsquelle auswählen.
Manuell abspeichern (nur Analogmodus)
Bevor Sie „Name“/„AFT“/„Audio Filter“/„Auslassen“/„Dekoder“/„Dämpfung“ auswählen,
wählen Sie mit PROG +/- die Programmnummer mit dem Kanal aus. Sie können keine
Programmnummer auswählen, für die das Auslassen eingestellt wurde (Seite 35).
Verwendung der Menüs
1 Drücken Sie OK, um die Option „Manuell abspeichern“ auszuwählen.
2 Wählen Sie mit M/m eine der folgenden Optionen aus, und drücken Sie
anschließend OK.
Fortsetzung
33
DE
Page 80

Option Beschreibung
Programm Sie können Programmkanäle manuell abspeichern.
TV-System
Kanal
1 Wählen Sie mit M/m die Option „Programm“ aus, und
drücken Sie anschließend OK.
2 Wählen Sie mit M/m die Programmnummer aus, für
die Sie manuell einen Kanal speichern wollen (zum
Einstellen des Videorecorders wählen Sie Kanal 0),
und drücken Sie dann <.
3 Wählen Sie mit M/m die Option „TV-System“ aus, und
drücken Sie anschließend OK.
Hinweis
Je nachdem, was Sie unter „Land“ als Land bzw. Region
ausgewählt haben (Seite 31), steht diese Option mög licherweise
nicht zur Verfügung.
4 Wählen Sie mit M/m eine der folgenden
Fernsehnormen aus, und drücken Sie anschließend
<.
B/G: Für westeuropäische Länder/Regionen
D/K: Für osteuropäische Länder/Regionen
I: Für Großbritannien
L: Für Frankreich
5 Wählen Sie mit M/m die Option „Kanal“ aus, und
drücken Sie anschließend OK.
6 Wählen Sie mit M/m die Option „S“ (für Kabelkanäle)
oder „C“ (für terrestrische Kanäle) aus, und drücken
Sie ,.
7 Speichern Sie die Kanäle wie im Folgenden erläutert:
Wenn Sie die Kanalnummer (Frequenz) nicht kennen
Suchen Sie mit M/m nach dem nächsten verfügbaren Kanal.
Wenn ein Kanal gefunden wird, stoppt die Suche. Drücken Sie
zum Weitersuchen M/m.
Wenn Sie die Kanalnummer (Frequenz) kennen
Geben Sie mit den Zahlentasten die Kanalnummer des
gewünschten Senders oder die Kanalnummer für den
Videorecorder ein.
8 Drücken Sie OK.
9 Wählen Sie mit m die Option „Bestätigen“ aus, und
drücken Sie anschließend OK.
10 Wählen Sie mit m die Option „OK“ aus, und drücken
Sie anschließend OK.
Gehen Sie wie oben erläutert vor, wenn Sie weitere Kanäle manuell
speichern wollen.
Name Zum Zuordnen eines beliebigen Namens aus bis zu fünf Buchstaben
oder Ziffern zum ausgewählten Kanal. Dieser Name wird kurz auf
dem Fernsehschirm angezeigt, wenn der Kanal ausgewählt wird.
1 Gehen Sie wie in Schritt 3 bis 5 unter
„Programmnamen“ (Seite 32) erläutert vor.
2 Wählen Sie mit m die Option „Bestätigen“ aus, und
drücken Sie anschließend OK.
3 Wählen Sie mit m die Option „OK“ aus, und drücken
Sie anschließend OK.
34
DE
Page 81

Option Beschreibung
AFT
Sie können ein ausgewähltes Programm manuell feineinstellen, wenn
Sie den Eindruck haben, dadurch die Bildqualität verbessern zu können.
(In der Regel wird die Feineinstellung automatisch ausgeführt.)
1 Nehmen Sie mit M/m eine Feineinstellung im Bereich
-15 bis +15 vor, und drücken Sie OK.
2 Wählen Sie mit m die Option „Bestätigen“ aus, und
drücken Sie anschließend OK.
3 Wählen Sie mit m die Option „OK“ aus, und drücken
Sie anschließend OK.
Wenn Sie die automatische Feineinstellung wieder aktivieren
wollen, wählen Sie in Schritt 1 die Option „Ein“.
Audio Filter Der Klang einzelner Kanäle wird bei Monosendungen mit
Tonstörungen verbessert. In einigen Fällen kann es beim
Wiedergeben von Monosendungen durch nicht standardmäßige
Sendesignale zu Tonverzerrungen oder Tonaussetzern kommen.
1 Wählen Sie mit M/m die Option „niedrig“ oder „hoch“
aus und drücken Sie anschließend OK.
Wenn keine Tonverzerrungen zu hören sind, empfiehlt es sich,
diese Option in der werkseitigen Einstellung „Aus“ zu lassen.
2 Wählen Sie mit m die Option „Bestätigen“ aus, und
drücken Sie anschließend OK.
3 Wählen Sie mit m die Option „OK“ aus, und drücken
Sie anschließend OK.
Hinweis
Sie können einen Sender nicht in Stereo oder mit Zweiton empfangen,
wenn „niedrig“ oder „hoch“ ausgewählt ist.
Auslassen Unbenutzte analoge Kanäle werden übersprungen, wenn Sie PROG
+/- zur Auswahl der Kanäle drücken. (Mit den Zahlentasten können
Sie einen übersprungenen Kanal weiterhin auswählen.)
1 Wählen Sie mit M/m die Option „Ja“ aus, und drücken
Sie anschließend OK.
2 Wählen Sie mit m die Option „Bestätigen“ aus, und
drücken Sie anschließend OK.
3 Wählen Sie mit m die Option „OK“ aus, und drücken
Sie anschließend OK.
Wenn Sie einen übersprungenen Kanal wieder aktivieren wollen,
wählen Sie in Schritt 1 „Nein“.
Verwendung der Menüs
Dekoder Verschlüsselte Kanäle werden mithilfe eines Dekoders, der direkt
oder über einen Videorecorder an den Scart-Anschluss / 2
angeschlossen ist, angezeigt und aufgezeichnet.
Hinweis
Je nachdem, was Sie unter „Land“ als Land bzw. Region ausgewählt haben
(Seite 31), steht diese Option möglicherweise nicht zur Verfügung.
1 Wählen Sie mit M/m die Option „Ein“ aus, und drücken
Sie anschließend OK.
2 Wählen Sie mit m die Option „Bestätigen“ aus, und
drücken Sie anschließend OK.
3 Wählen Sie mit m die Option „OK“ aus, und drücken
Sie anschließend OK.
Wenn Sie diese Funktion später deaktivieren wollen, wählen Sie in
Schritt 1 oben „Aus“.
Fortsetzung
35
DE
Page 82

Digital Einstellung
Dient zum Anzeigen des Menüs „Digital Einstellung“. Mithilfe dieses Menüs können Sie die
digitalen Einstellungen ändern/festlegen.
1 Drücken Sie OK, um die Option „Digital Einstellung“ auszuwählen.
2 Drücken Sie M/m, um das gewünschte Symbol unter den
Option Beschreibung
Dämpfung Das HF-Signal wird abgeschwächt. Im Falle eines starken HF-
Signals können Bildstörungen sichtbar sein.
1 Wählen Sie mit M/m die Option „Ein“ aus, und drücken
Sie anschließend OK.
2 Wählen Sie mit m die Option „Bestätigen“ aus, und
drücken Sie anschließend OK.
3 Wählen Sie mit m die Option „OK“ aus, und drücken
Sie anschließend OK.
Hinweis
Wenn „Dämpfung“ auf „Ein“ gesetzt wird, kann Bildrauschen während
der VCR-Aufnahme auftreten, wenn das Fernsehgerät ein-/
ausgeschaltet oder ein TV-Kanal gewählt wird.
Schließen Sie in diesem Fall Ihre Antenne an die Eingangsbuchse Ihres
Videorecorders an, und verbinden Sie dann die Ausgangsbuchse Ihres
Videorecorders mit der Buchse an der Rückwand des Fernsehgeräts.
Vergewissern Sie sich, dass der Videorecorder die digitalen Kanäle
aufnehmen kann.
nachstehenden auszuwählen, und drücken Sie dann OK.
36
DE
Digitalabstimmungsmenü
3 Wählen Sie mit M/m eine der folgenden Optionen aus, und drücken Sie
anschließend OK.
Option Beschreibung
Digitaler Suchlauf
Automatischer
DigitalSuchlauf
Dient zum Abspeichern aller verfügbaren digitalen Kanäle.
In der Regel brauchen Sie diesen Vorgang nicht auszuführen, da die
Kanäle von der ersten Konfiguration des Fernsehgeräts bereits
eingestellt sind (Seite 14). Mit dieser Option können Sie den Vorgang
allerdings erneut ausführen (z. B. um nach einem Umzug Sender neu
einzustellen oder nach neu eingeführten Sendekanälen zu suchen).
1 Drücken Sie OK, um den digitalen Sendersuchlauf zu
starten.
Wenn alle verfügbaren digitalen Kanäle abgespeichert worden
sind, erscheint die Meldung, dass der automatische
Sendersuchlauf beendet ist.
2 Drücken Sie <.
Page 83

Option Beschreibung
Programmliste
editieren
Dient zum Löschen unerwünschter, im Fernsehgerät gespeicherter
digitaler Kanäle und zum Ändern der Reihenfolge der im
Fernsehgerät gespeicherten digitalen Kanäle.
1 Wählen Sie mit M/m den Kanal aus, den Sie löschen
oder zu einer neuen Position verschieben wollen.
Wenn Sie die Kanalnummer (Frequenz) kennen
Geben Sie mithilfe der Zifferntasten die dreistellige
Programmnummer der gewünschten Sendung ein.
Zum Anzeigen der vorherigen oder nächsten fünf Kanäle
Drücken Sie die rote Taste (vorherige) oder die grüne Taste
(nächste).
2 Gehen Sie folgendermaßen vor, um digitale Kanäle zu
löschen oder ihre Reihenfolge zu ändern:
Zum Löschen eines digitalen Kanals
Drücken Sie OK. Es erscheint eine Meldung zur
Bestätigung, dass der ausgewählte digitale Kanal gelöscht
werden soll. Wählen Sie mit , die Option „Ja“ aus, und
drücken Sie anschließend OK.
Zum Ändern der Reihenfolge der digitalen Kanäle
Drücken Sie ,, dann M/m, um die neue Position für den
Kanal zu wählen, und drücken Sie dann OK. Falls
erforderlich, gehen Sie zum Verschieben weiterer Kanäle
wie in Schritt 1 und 2 erläutert vor.
3 Drücken Sie <.
Verwendung der Menüs
Manueller
DigitalSuchlauf
Digital
Einstellung
Untertitel
Einstellung
Sprache für
Untertitel
Audio-Sprache
Dient zum manuellen Abstimmen der digitalen Kanäle.
1 Geben Sie mit den Zifferntasten die Nummer des
Kanals ein, den Sie manuell abstimmen wollen, und
drücken Sie dann M/m, um den Kanal abzustimmen.
2 Wenn die verfügbaren Kanäle gefunden worden sind,
drücken Sie M/m, um den zu speichernden Kanal
auszuwählen, und drücken Sie dann OK.
Zum Anzeigen der vorherigen oder nächsten fünf Kanäle
Drücken Sie die rote Taste (vorherige) oder die grüne Taste
(nächste).
3 Wählen Sie mit M/m die Programmnummer aus, unter
der Sie den neuen Kanal speichern wollen, und
drücken Sie dann OK.
Wiederholen Sie den obigen Vorgang, um weitere Kanäle manuell
abzustimmen.
Dient zum Anzeigen digitaler Untertitel auf dem Bildschirm.
M/m
Wählen Sie mit
aus, und drücken Sie anschließend OK.
Wenn „Hörbehindert“ gewählt wird, können bestimmte Sichthilfen
ebenfalls zusammen mit den Untertiteln angezeigt werden (falls die
TV-Kanäle solche Informationen ausstrahlen).
Dient zur Wahl der Untertitelsprache.
Wählen Sie mit M/m die Sprache aus, und drücken Sie anschließend OK.
Dient zur Wahl der für ein Programm verwendeten Dialogsprache.
Manche digitalen Kanäle senden möglicherweise mehrere
Dialogsprachen für ein Programm.
Wählen Sie mit M/m die Dialogsprache aus, und drücken Sie dann OK.
die Option „Aus“, „Basic“ oder „Hörbehindert“
Fortsetzung
37
DE
Page 84

Option Beschreibung
Audio-Typ
Dient zum Erhöhen des Tonpegels.
Wählen Sie mit M/m die Option „Basic“
und drücken Sie anschließend OK.
oder „Hörbehindert“
aus,
Kindersicherung
PIN-Code
Dient zum Festlegen einer Altersgrenze für bestimmte Programme.
Ein Programm, das die Altersgrenze überschreitet, kann nur nach
korrekter Eingabe eines PIN-Codes angeschaut werden.
1 Geben Sie Ihren vorhandenen PIN-Code mit den
Zifferntasten ein.
Falls Sie zuvor noch keinen PIN-Code eingestellt haben, weist
eine Meldung Sie darauf hin. Drücken Sie OK, und folgen Sie
dann den Anweisungen unter „PIN-Code“ weiter unten.
2 Drücken Sie M/m zur Wahl der Altersgrenze oder
„Ohne“ (für uneingeschränkte Wiedergabe), und
drücken Sie dann OK.
3 Drücken Sie <.
Dient zum erstmaligen Einstellen des PIN-Codes oder zum Ändern
Ihres PIN-Codes.
1 Geben Sie den PIN-Code wie folgt ein:
Wenn Sie bereits einen PIN-Code eingestellt haben
Geben Sie Ihren vorhandenen PIN-Code mit den Zifferntasten ein.
Wenn Sie noch keinen PIN-Code eingestellt haben:
Geben Sie den werksseitig vorgegebenen PIN-Code „9999“ mit
den Zifferntasten ein.
2
Geben Sie den neuen PIN-Code mit den Zifferntasten ein.
3 Wenn Sie dazu aufgefordert werden, geben Sie den
neuen PIN-Code zur Bestätigung erneut mit den
Zifferntasten ein.
Es erscheint eine Meldung, dass der neue PIN-Code akzeptiert
worden ist.
4 Drücken Sie <.
Tipp
Der PIN-Code „9999“ wird immer akzeptiert.
38
DE
Technische
Einstellungen
CA-ModulEinstellung
Dient zum Anzeigen des Menüs für die technischen Einstellungen.
Sie haben folgende Möglichkeiten.
1 Drücken Sie M/m, um die gewünschte Option
auszuwählen, und drücken Sie dann OK.
Dienste auto. aktualisieren: Ermöglicht es dem Fernsehgerät,
neue digitale Dienste zu erkennen und zu speichern, sobald
diese verfügbar werden.
Software Download: Ermöglicht es dem Fernsehgerät, SoftwareUpdates über Ihre vorhandene Antenne automatisch zu empfangen
(wenn diese herausgegeben werden). Sony empfiehlt, diese Option
immer auf „Ein“ eingestellt zu lassen. Wenn Sie keine Aktualisierung
Ihrer Software wünschen, setzen Sie diese Option auf „Aus“.
Systeminfo: Zeigt die aktuelle Software-Version und den
<
Signalpegel an. Statt Schritt 2 auszuführen, dücken Sie
.
2 Wählen Sie mit M/m die Option „Ein“ aus, und drücken
Sie anschließend OK.
Diese Option gestattet es Ihnen, auf einen Pay Per View-Dienst
zuzugreifen, nachdem Sie ein Conditional Access Module (CAM)
und eine View Card erhalten haben. Informationen zur Lage der
Buchsen MODEM und (PCMCIA) finden Sie auf Seite 39.
Page 85

Verwendung von Zusatzgeräten
Anschließen von Zusatzgeräten
Sie können viele unterschiedliche Geräte zusätzlich an das Fernsehgerät anschließen. Die Verbindungskabel werden
nicht mitgeliefert.
Anschlüsse am Fernsehgerät (Seite)
6
//
S-VHS-/
Hi8-/DVCCamcorder
(MONO)
L/G/
S/I
R/D/
D/D
Kopfhörer
Anschließen Vorgehen
S-VHS-/Hi8-/
DVC-Camcorder
A
Anschließen an die S-Videobuchse
6 oder die Videobuchse
6 und die Audiobuchsen
6. Um Bildstörungen zu
vermeiden, schließen Sie den
Camcorder nicht gleichzeitig an
die Videobuchse 6 und an die
S-Videobuchse 6 an. Bei
einem Mono-Gerät schließen Sie
dieses an die Buchse L/G/S/I (
6) an, und setzen Sie
„Zweiton“ auf „A“ (Seite 26).
Kopfhörer B Anschließen an die Buchse i,
wenn Sie den Ton vom
Fernsehgerät über Kopfhörer
wiedergeben lassen wollen.
MODEM
5V
500mA
CAMAuswerftaste
Anschließen Vorgehen
Modemanschluss CWird von diesem Fernsehgerät
nicht unterstützt.
Conditional Access
Module (CAM) D
Zur Benutzung von Pay Per ViewDiensten.
Einzelheiten entnehmen Sie bitte
der Bedienungsanleitung Ihres
CAM. Um das CAM zu benutzen,
entnehmen Sie die Blindkarte durch
Drücken der Auswerftaste.
Schalten Sie das Fernsehgerät aus,
wenn Sie Ihr CAM in den CAMSchacht einführen. Wenn Sie das
CAM nicht benutzen, empfehlen
wir, die Blindkarte einzuführen und
im CAM-Schacht zu belassen.
Fortsetzung
Verwendung von Zusatzgeräten
39
DE
Page 86

Anschließen an das Fernsehgerät (Rückseite)
DVD-Player mit
Komponentenausgang
DVD-Player
Digitaler SatellitenReceiver
40
DE
PlayStation 2
DVD-Player
Dekoder
DVD-Recorder
Videorecorder
Dekoder
Videorecorder
HiFiAnlage
DVD-Player
Page 87

Anschließen
DVD-Player mit
Komponentenausgang
E
Digitaler SatellitenReceiver oder
DVD-Player F
„PlayStation 2“,
DVD-Player oder
Dekoder G
DVD-Recorder
oder Videorecorder
mit SmartLinkUnterstützung H
Videorecorder I
HiFi-Stereoanlage
J
Vor gehen
Anschließen an die
Komponentenbuchse und die
Audiobuchsen / 4. Das
Komponentensignal mit 576pSignalformat und das Audiosignal
werden vom DVD-Player
eingespeist.
Anschließen an die Buchse HDMI
IN 5, wenn das Gerät über eine
HDMI-Buchse verfügt. Digitale
Video- und Audiosignale werden
vom digitalen Satelliten-Receiver
eingespeist. Wenn das Gerät nicht
über eine HDMI-Buchse, sondern
über eine DVI-Buchse verfügt,
verbinden Sie die DVI-Buchse
über einen DVI-HDMI-Adapter
(nicht mitgeliefert) mit der Buchse
HDMI IN 5 und die
Audioausgänge des Geräts mit den
Audioeingängen HDMI IN 5.
Digitale Video- und analoge
Audiosignale werden vom Gerät
eingespeist.
Anschließen an die Scart-Buchse
/ 1. Wenn Sie einen
Dekoder anschließen, wird das
verschlüsselte Signal vom
Fernsehtuner in den Dekoder
eingespeist und vom Dekoder
unverschlüsselt ausgegeben.
In diesem Fall wird das Signal
korrekt decodiert, wenn Sie „AV2
Ausgang:“ auf „TV Analog“
setzen (Seite 28).
Anschließen an die Scart-Buchse
/ 2. SmartLink stellt eine
direkte Verbindung zwischen dem
Fernsehgerät und einem
Videorecorder bzw. DVDRecorder her. Weitere
Informationen zu SmartLink
finden Sie in der mit dem
Videorecorder bzw. DVDRecorder gelieferten
Bedienungsanleitung.
Einzelheiten dazu finden Sie auf
Seite 11.
Anschließen an die
Audioausgangsbuchsen , wenn
Sie den Ton vom Fernsehgerät
über eine HiFi-Stereoanlage
wiedergeben lassen wollen. Zum
Ausschalten des Tons von den
Fernsehlautsprechern setzen Sie
„Lautsprecher:“ auf „Aus“
(Seite 28).
Programmieren der
Fernbedienung
Diese Fernbedienung ist so voreingestellt, dass Sie damit
Fernsehgeräte von Sony sowie die meisten DVD-Geräte,
Videorecorder und AUX-Systeme von Sony (DAV,
DTT-Receiver, Heimkinoanlagen usw.) steuern können.
Wenn Sie Videorecorder und DVD-Geräte anderer
Hersteller sowie bestimmte Videorec order, DVD-Geräte
und AUX-Systeme von Sony steuern wollen,
programmieren Sie die Fernbedienung nach dem
folgenden Verfahren.
Hinweis
Suchen Sie zunächst den dreistelligen Herstellercode für Ihr
DVD-, VCR- oder AUX-System in der Liste der
„Herstellercodes“ auf Seite 42.
1
2
1
So programmieren Sie die Fernbedienung
für Videorecorder und DVD-Geräte:
Halten Sie etwa sechs Sekunden lang
gedrückt, bis die grünen Anzeigen VCR und
DVD blinken.
So programmieren Sie die Fernbedienung
für AUX-Systeme von Sony:
Halten Sie etwa sechs Sekunden lang
gedrückt, bis die grüne Anzeige AUX blinkt.
2 Während die entsprechenden Anzeigen
blinken, geben Sie mit den Zifferntasten
alle drei Ziffern des Codes für den
Hersteller des Geräts ein (Seite 42).
Die grüne Anzeige leuchtet kurz auf.
Fortsetzung
Verwendung von Zusatzgeräten
41
DE
Page 88

3 Schalten Sie das Gerät ein und überprüfen
Sie, ob die folgenden wichtigsten
Funktionen über die Fernbedienung
ausgeführt werden können.
N
(Wiedergabe), x (Stopp), m (Rückspulen),
M
(Vorspulen), Kanalwahl für VCR und DVDs
MENU sowie die Tasten
Wenn Sie das Gerät nicht steuern oder einzelne
Funktionen nicht ausführen können
Geben Sie den richtigen Code ein, oder versuchen
Sie es mit der nächsten Codenummer, die für den
Hersteller aufgeführt ist. Es werden jedoch nicht
alle Hersteller und auch nicht unbedingt alle
Modelle der einzelnen Hersteller unterstützt.
Tipp
Innen an der Batteriefachabdeckung befindet sich ein kleiner
Aufkleber, auf dem Sie die benötigten Codenummern
notieren können.
Herstellercodes
Es werden nicht alle Hersteller und auch nicht unbedingt
alle Modelle der einzelnen Hersteller unterstützt.
Herstellerliste für Videorecorder
Hersteller Code
SONY (VHS) 301, 302, 303, 308, 309, 362
SONY (BETA) 303, 307, 310
SONY (DV) 304, 305, 306
AIWA 325, 331, 351
AKAI 326, 329, 330
DAEWOO 342, 343
GRUNDIG 358, 355, 360, 361, 320, 351, 366
HITACHI 327, 333, 334
JVC 314, 315, 322, 344, 352, 353, 354, 348,
349
LG 332, 338
LOEWE 358, 355, 360, 361, 320, 351
MATSUI 356, 357
ORION 328
PANASONIC 321, 323
PHILIPS 311, 312, 313, 316, 317, 318, 358, 359,
363, 364
SAMSUNG 339, 340, 341, 345
SANYO 335, 336
SHARP 324
THOMSON 319, 350, 365
TOSHIBA 337
M/m/</,
nur für DVDs.
Herstellerliste für DVD-Geräte
Hersteller Code
SONY 001, 029, 030, 036, 037, 038, 039, 040,
041, 042, 043, 044, 053, 054, 055
AIWA 021
AKAI 032
DENON 018, 027, 020, 002
GRUNDIG 009, 028, 023, 024, 016, 003
HITACHI 025, 026, 015, 004, 035
JVC 006, 017
KENWOOD 008
LG 015, 014, 034
LOEWE 009, 028, 023, 024, 016, 003
MATSUI 013, 016
ONKYO 022, 033
PANASONIC 018, 027, 020, 002, 045, 046, 047
PHILIPS 009, 028, 023, 024, 016, 003, 031
PIONEER 004, 050, 051, 052
SAMSUNG 011, 014
SANYO 007
SHARP 019, 027
THOMSON 012
TOSHIBA 003, 048, 049
YAMAHA 018, 027, 020, 002
Herstellerliste für AUX-Systeme von Sony
DVD-Heimkinoanlagen
Hersteller Code
SONY (DAV) 500, 501, 502
Heimkinoanlagen
Hersteller Code
SONY 504, 505
AV-Empfänger
Hersteller Code
SONY 505, 506, 507, 508
Digitaler terrestrischer Empfänger
Hersteller Code
SONY 503
42
DE
Page 89

Zusatzinformationen
Technische Daten
Anzeigeeinheit
(KDL-V32A11E)
Betriebsspannung:
220–240 V Wechselstrom, 50 Hz
Bildschirmgröße:
32 Zoll
ca. 80,0 cm (diagonal gemessen)
Anzeigeauflösung:
1.366 Punkte (horizontal) × 768 Zeilen (vertikal)
Leistungsaufnahme:
143 W
Leistungsaufnahme im Bereitschaftsmodus:
max. 0,5 W
Abmessungen (B × H × T):
ca. 808,0 × 587,8 × 308,2 mm (mit Ständer)
ca. 808,0 × 549,4 × 110,5 mm (ohne Ständer)
Gewicht:
ca. 22,7 kg (mit Ständer)
ca. 18,7 kg (ohne Ständer)
(KDL-V40A11E)
Betriebsspannung:
220–240 V Wechselstrom, 50 Hz
Bildschirmgröße:
40 Zoll
ca. 101,5 cm (diagonal gemessen)
Anzeigeauflösung:
1.366 Punkte (horizontal) × 768 Zeilen (vertikal)
Leistungsaufnahme:
228 W
Leistungsaufnahme im Bereitschaftsmodus:
max. 0,5 W
Abmessungen (B × H × T):
ca. 1.014,4 × 722,7 × 370,3 mm (mit Ständer)
ca. 1.014,4 × 683,3 × 121,3 mm (ohne Ständer)
Gewicht:
ca. 34,0 kg (mit Ständer)
ca. 27,5 kg (ohne Ständer)
Bildschirmsystem
LCD-Bildschirm (Flüssigkristall-Display)
Fernsehsystem
Analog: Je nach ausgewähltem Land/Gebiet:
B/G/H, D/K, L, I
Digital: DVB-T
Farb-/Videosystem
Analog: PAL, SECAM
NTSC 3,58, 4,43 (nur Videoeingang)
Digital: MPEG-2 MP@ML
Antenne
75-Ohm-Außenantenne für VHF/UHF
Kanalbereich
Analog: VHF: E2–E12
UHF: E21–E69
CATV: S1–S20
HYPER: S21–S41
D/K: R1–R12, R21–R69
L: F2–F10, B–Q, F21–F69
Digital: VHF/UHF
I: UHF B21–B69
Anschlüsse
/1
21-poliger Scart-Anschluss (CENELEC-Standard) mit
Audio-/Videoeingang, RGB-Eingang und Audio-/
Videoausgang für Fernsehsignale.
/2 (SMARTLINK)
21-poliger Scart-Anschluss (CENELEC-Standard) mit
Audio-/Videoeingang, RGB-Eingang, wählbarem
Audio-/Videoausgang und SmartLink-Schnittstelle.
/3
21-poliger Scart-Anschluss (CENELEC-Standard) mit
Audio-/Videoeingang, RGB-Eingang und Audio-/
Videoausgang, der gerade auf dem Bildschirm erscheint.
4
Unterstützte Formate: 1080i, 720p, 576p, 576i, 480p, 480i
Y: 1 Vp-p, 75 Ohm, 0,3 V, sync-negativ
B/CB: 0,7 Vp-p, 75 Ohm
P
P
R/CR: 0,7 Vp-p, 75 Ohm
4
Audioeingang (Cinchbuchsen)
500 mV effektiver Mittelwert
Impedanz: 47 kOhm
HDMI IN 5
Video: 1080i, 720p, 576p, 576i, 480p, 480i
Audio: Zwei Kanäle, linear, PCM
32, 44,1 und 48 kHz, 16, 20 und 24 Bit oder
analoger Audioeingang (Cinchbuchsen)
6 S-Videoeingang (4-polig, Mini-DIN)
6 Videoeingang (Cinchbuchse)
6 Audioeingang (Cinchbuchsen)
Audioausgang (links/rechts) (Cinchbuchsen)
i Kopfhörerbuchse
CAM (Conditional Access Module)-Schacht
MODEM
Modembuchse
(wird von diesem Fernsehgerät nicht unterstützt)
Tonausgabe
10 W + 10 W
Mitgeliefertes Zubehör
• Fernbedienung RM-ED001 (1)
• Batterien der Größe AA (Typ R6) (2)
• Koaxialkabel (1)
• Netzkabel (Typ C-6) (1)
• Kabelhalter (1)
• Halteriemen (1) und Schrauben (2)
Sonderzubehör
• Wandhalter SU-WL31 (für KDL-V32A11E)
SU-PW2 (Für KDL-V40A11E)
• Fernsehständer SU-FF51
Änderungen, die dem technischen Fortschritt dienen,
bleiben vorbehalten.
Zusatzinformationen
43
DE
Page 90

Störungsbehebung
Überprüfen Sie, ob die Anzeige 1 (Bereitschaft) rot blinkt.
Wenn die Anzeige blinkt
Die Selbstdiagnosefunktion wurde aktiviert.
1 Überprüfen Sie, wie oft die Anzeige 1 (Bereitschaft) zwischen den 2-Sekunden-Intervallen blinkt.
Beispiel: Die Anzeige blinkt dreimal, dann zwei Sekunden lang nicht und erneut dreimal usw.
2 Schalten Sie das Fernsehgerät mit der Netztaste 1 (an der rechten Seite) aus, trennen Sie das
Netzkabel vom Gerät, und teilen Sie Ihrem Händler oder dem Sony-Kundendienst mit, wie oft die
Anzeige blinkt (Anzahl der Blinksignale).
Wenn die Anzeige nicht blinkt
1 Prüfen Sie die Posten in den nachstehenden Tabellen.
2 Wenn sich das Problem anhand dieser Maßnahmen nicht beheben lässt, lassen Sie das
Fernsehgerät von qualifiziertem Kundendienstpersonal überprüfen.
Bild
Problem Ursache/Abhilfemaßnahme
Kein Bild (Bildschirm ist
schwarz) und kein Ton
• Überprüfen Sie die Antennenverbindung.
• Schließen Sie das Fernsehgerät an eine Netzsteckdose an, und drücken Sie
1 am Fernsehgerät (rechte Seite).
• Wenn die Anzeige 1 (Bereitschaft) rot leuchtet, drücken Sie TV "/1.
Von dem an den ScartAnschluss angeschlossenen
Gerät werden kein Bild und
keine Menüs angezeigt
Das Bild ist verzerrt
Doppelbilder bzw. Nachbilder
treten auf
Auf dem Bildschirm ist nur
Störrauschen (Schnee) zu
sehen
Bildstörungen (gepunktete
Linien oder Streifen)
• Stellen Sie sicher, dass das angeschlossene Gerät eingeschaltet ist, und
drücken Sie / so oft, bis das richtige Eingangssymbol auf dem
Bildschirm erscheint.
• Überprüfen Sie die Verbindung zwischen dem angeschlossenen Gerät und
dem Fernsehgerät.
• Überprüfen Sie, ob angeschlossene Zusatzgeräte vor oder neben dem
Fernsehgerät aufgestellt sind. Lassen Sie beim Aufstellen von
Zusatzgeräten etwas Platz zwischen dem Zusatzgerät und dem
Fernsehgerät.
• Wenn Sie das Programm wechseln oder Videotext auswählen wollen,
schalten Sie die Geräte aus, die an die Scart-Buchsen an der Rückseite des
Fernsehgeräts angeschlossen sind.
• Überprüfen Sie die Antennen-/Kabelverbindungen.
• Überprüfen Sie Lage und Ausrichtung der Antenne.
• Überprüfen Sie, ob die Antenne beschädigt oder verbogen ist.
• Überprüfen Sie, ob die Lebensdauer der Antenne (drei bis fünf Jahre im
normalen Betrieb, ein bis zwei Jahre in Meeresnähe) abgelaufen ist.
• Halten Sie das Fernsehgerät von elektrischen Störquellen wie Autos,
Motorrädern und Haartrocknern fern.
• Stellen Sie sicher, dass die Antenne mit dem mitgelieferten Koaxialkabel
korrekt angeschlossen ist.
• Halten Sie das Antennenkabel von anderen Verbindungskabeln fern.
• Verwenden Sie kein zweiadriges 300-Ohm-Kabel, da es andernfalls zu
Interferenzen kommen kann.
44
DE
Page 91

Problem Ursache/Abhilfemaßnahme
Bildrauschen beim Betrachten
eines Fernsehkanals
• Wählen Sie „Manuell abspeichern“ im Menü „Grundeinstellungen“, und
stellen Sie „AFT“ (Automatic Fine Tuning) ein, um einen besseren
Bildempfang zu erhalten (Seite 35).
• Wählen Sie „Dyn. NR“ im Menü „Bild-Einstellungen“, um Bildrauschen zu
reduzieren (Seite 24).
Während der Wiedergabe/
Aufnahme mit einem
Videorecorder treten Streifen
auf
• Es kommt zu Interferenzen vom Videokopf. Halten Sie den Videorecorder
vom Fernsehgerät fern.
• Lassen Sie zwischen dem Videorecorder und dem Fernsehgerät 30 cm Platz,
um Störungen zu vermeiden.
• Stellen Sie den Videorecorder nicht direkt vor oder neben dem Fernsehgerät
auf.
Einige winzige schwarze
Punkte und/oder helle
Lichtpunkte sind auf dem
Bildschirm zu sehen
Bei Fernsehsendungen fehlen
die Farben im Bild
Bei Wiedergabe eines Signals
von den Buchsen Y, P
R des Eingangs 4 fehlen
C
die Farben oder werden
verfälscht angezeigt
B/CB, PR/
• Das Bild wird bei diesem Fernsehgerät aus Pixeln zusammengesetzt.
Winzige schwarze Punkte und/oder helle Lichtpunkte (Pixel) auf dem
Bildschirm stellen keine Fehlfunktion dar.
• Wählen Sie „Normwerte“ im Menü „Bild-Einstellungen“, um die
Werkseinstellungen wiederherzustellen (Seite 24).
• Überprüfen Sie die Verbindung zu den Buchsen Y, PB/CB, PR/CR am
Eingang 4.
• Stellen Sie sicher, dass die Stecker fest in den Buchsen Y, P
Eingangs 4 sitzen.
Ton
Problem Ursache/Abhilfemaßnahme
Kein Ton, aber gutes Bild
Der Ton ist verrauscht
• Drücken Sie 2 +/- oder % (Stummschalten).
• Vergewissern Sie sich, dass „Lautsprecher“ im Menü „Funktionen“ auf
„Ein“ gesetzt ist (Seite 28).
• Siehe Ursachen/Abhilfemaßnahmen für „Bildstörungen (gepunktete Linien
oder Streifen)“ auf Seite 44.
B/CB, PR/CR des
Zusatzinformationen
Der Ton ist verzerrt
• Siehe „Audio Filter“ auf Seite 35.
Kanäle
Problem Ursache/Abhilfemaßnahme
Der gewünschte Kanal kann
nicht gewählt werden
Einige Kanalpositionen sind
leer
Es werden keine digitalen
Kanäle angezeigt
• Schalten Sie zwischen Digital- und Analogmodus um, und wählen Sie den
gewünschten digitalen/analogen Kanal.
• Nur Verschlüsselungs-/Abonnementkanal. Abonnieren Sie den Pay Per
View-Die nst.
• Der Kanal wird nur für Daten verwendet (kein Bild oder Ton).
• Wenden Sie sich bezüglich der Übertragungsdetails an die Sendeanstalt.
• Prüfen Sie, ob die Antenne direkt an das Fernsehgerät (nicht über ein
anderes Gerät) angeschlossen ist.
• Fragen Sie einen örtlichen Installateur, um herauszufinden, ob digitale
Sendungen in Ihrem Gebiet verfügbar sind.
• Besorgen Sie sich eine Antenne mit höherem Gewinn.
Fortsetzung
45
DE
Page 92

Allgemeines
Problem Ursache/Abhilfemaßnahme
Das Fernsehgerät schaltet sich
automatisch aus (wechselt in
den Bereitschaftsmodus)
• Überprüfen Sie, ob der Abschalttimer aktiviert ist (Seite 30).
• Überprüfen Sie, ob das „Auto.Ausschalt“ aktiviert ist (Seite 30).
• Wenn im Fernsehmodus 10 Minuten lang kein Signal eingeht und keine
Taste gedrückt wird, schaltet das Fernsehgerät automatisch in den
Bereitschaftsmodus.
Einige Eingangsquellen lassen
sich nicht auswählen
Die Fernbedienung funktioniert
nicht
Beim Anzeigen von Menüs/
Videotext/NexTView
erscheinen falsche Zeichen
Die Anzeige 1 (Bereitschaft)
blinkt
• Wählen Sie „AV-Einstellungen“ im Menü „Grundeinstellungen“ und
deaktivieren Sie für die Eingangsquelle die Einstellung „Auslassen“
(Seite 33).
• Stellen Sie sicher, dass die Fernbedienung für das verwendete Gerät korrekt
eingestellt ist.
• Wenn sich das Gerät mit der Fernbedienung nicht bedienen lässt, obwohl
die Fernbedienung korrekt auf das Gerät eingestellt ist, geben Sie den
erforderlichen Code ein, wie unter „Programmieren der Fernbedienung“
(Seite 41) erläutert.
• Tauschen Sie die Batterien aus.
• Wählen Sie „Sprache“ und „Land“ im Menü „Grundeinstellungen“, und
stellen Sie die Sprache und das Land bzw. die Region ein, in denen der
Videotext/NexTView ausgestrahlt wird (Seite 31). Wählen Sie für
kyrillische Sprachen als Land „Russland“ aus, wenn Ihr Land bzw. Ihre
Region nicht in der Liste enthalten ist.
• Ein digitales Programm ist auf „Timer Aufnahme“ eingestellt. Einzelheiten
hierzu finden Sie unter „Benutzung des elektronischen Programmführers
(EPG)“ auf Seite 18.
46
DE
Page 93

Index
Numerische Einträge
0-9, Tasten 8
14:9 17
4:3 17
A
Abschalttimer 30
AFT 35
ANALOG, Taste 8
Anhalten von Text ( ), Taste 8
Anschließen
Antenne/Videorecorder 11
Zusatzgeräte 39
Antenne anschließen 11
Anzeigen von verborgenem Text
(), Taste8
Audio Filter 35
Audio-Sprache 37
Audio-Typ 38
Auslassen 33
Auto Format 27
Auto.Ausschalt 30
Autom. Progr.
Autom.Lautst. 25
Automatischer Digital-Suchlauf 36
AUX/VIDEO "/1 Taste 8
AV2 Ausgang 28
AV-Einstellungen 33
, 35
analoge und digitale Kanäle 14
nur analoge Kanäle 32
nur digitale Kanäle 36
B
Balance 25
Batterien, Einlegen in die
Fernbedienung 10
BBE 25
Bearb. 33
Bereitschaftsanzeige (1)9
Bild aus 29
Bildabschaltung ( ), Anzeige 9
Bild-Einstellungen, Menü 23
Bildformat 17
Bildformat ( ), Taste 8
Bildmodus ( ), Taste 8
Bildposition 27
Bildschärfe 23
Bildschirm einstellen, Menü 27
, 27
C
CA-Modul-Einstellung 38
D
Dämpfung 36
Dekoder 35
Digital Einstellung 36
DIGITAL, Taste 8
Digitaler Suchlauf 36
Dolby Virtual 25
Dyn. Bild 24
Dyn. NR 24
, 37
E
Effekt (Klangeffekt) 25
Eingangswahl ( ), Taste 8
Energie sparen 28
EPG (Elektronischer
Programmführer) 18
Erinnerung 19
F
Farbe 23
Farbige Tasten 8
Farbtemperatur 23
Farbton 23
Fastext 16
Favoritenliste 20
Fernbedienung
Einlegen von Batterien 10
Programmieren 41
Sensor 9
Übersicht 8
Fernsehbereitschaft (TV
Funktionen, Menü 28
"/1
), Taste 8
G
Gamma-Korrektur 24
Gerätenamen 33
Grundeinstellungen, Menü 31
H
Helligkeit 23
Höhen 25
Ht.Grd.Licht 23
I
Indextabelle mit
Eingangssignalen 21
Info ( ), Taste 8
K
Kanäle
Auslassen 35
auswählen 15
automatisches Speichern 14
Kategorieliste 18
Kindersicherung 38
Klangeffekt (9), Taste 8
Kontrast 23
Kopfhörer
anschließen 39
Zweiton 26
Lautst. 26
L
Land 31
Lautsprecher 28
Lautstärketasten (2) +/- 8
, 9
M
Manuell abspeichern 33
Manuelle Timer Aufnahme 19
Manueller Digital-Suchlauf 37
, 9
Medienwahltaste 8
MENU, Taste 8
Mitgeliefertes Zubehör 10
Modus (Bildmodus) 23
, 9
N
Name 34
Netzanzeige (\)9
Netzschalter (1)9
Neuinitialisierung 31
NexTView 16
Normwerte
Bild-Einstellungen 24
Ton-Einstellungen 26
O
OK, Taste 8, 9
P
PIN-Code 38
PROG +/-, Tasten 8
Programme ordnen 32
Programmindextabelle 16
Programmliste editieren 37
Programmnamen 32
, 9
S
Smart 17
Sprache 31
Sprache für Untertitel 37
Stummschalten (%), Taste 8
T
Technische Daten 43
Technische Einstellungen 38
Tiefen 25
Timer Aufnahme 18
Timer, Menü 30
Timeranzeige ( ) 9
Timer-Liste 19
Ton-Einstellungen, Menü 25
U
Untertitel Einstellung 37
V
Videorecorder
anschließen 11
Aufnahme 18
Programmieren 41
Videorecorder (zweistellige
Nummer) (-/--), Taste 8
Videotext 16
Videotext-Taste (/)8
Vorheriger Kanal ( ), Taste 8
W
Wide 17
Z
Zifferntasten 8
Zoom 17
Zweiton 26
Zusatzinformationen
47
DE
Page 94

AVERTISSEMENT Introduction
• Afin de prévenir les risques d’incendie ou d’électrocution,
ne pas insérer la fiche secteur dans une prise de courant si
elle est détachée du cordon d’alimentation. Cette fiche ne
doit pas être utilisée, mais détruite.
• Pour prévenir les risques d’incendie ou d’électrocution,
tenir ce téléviseur à l’abri de la pluie et de l’humidité.
• A l’intérieur de ce téléviseur, certains points présentent
une tension élevée pouvant être dangereuse. Ne pas ouvrir
le boîtier de l’appareil. Confier la réparation de l’appareil
à un personnel qualifié uniquement.
Nous vous remercions d’avoir porté votre choix sur ce
produit Sony.
Avant d’utiliser le téléviseur, lisez attentivement ce
manuel et conservez-le pour vous y référer
ultérieurement.
Informations sur les marques
commerciales
• est une marque déposée du DVB Project
• « PlayStation » est une marque commerciale de Sony
Computer Entertainment, Inc.
• La technologie TruSurround est utilisée pour virtualiser le
son Dolby Virtual Surround.
• TruSurround, SRS et le symbole sont des marques
de SRS Labs, Inc.
La technologie TruSurround est intégrée sous licence SRS
Labs, Inc.
• Ce téléviseur intègre la
Definition Multimedia Interf ace). HDMI, le logo HDMI et
High-Definition Multimedia Interface sont des marques
ou des marques déposées de HDMI Licensing LLC.
technologie HDMI™ (High-
FR
2
Page 95

Table des matières
Consignes de sécurité................................. 4
Précautions ................................................. 7
Mise au rebut du téléviseur............................... 7
Présentation de la télécommande ........... 8
Présentation des touches et témoins du
téléviseur .............................................. 9
Préparation
1 : Vérification des accessoires................. 10
2 : Insertion des piles dans la
télécommande...................................... 10
3 : Raccordement d’une antenne ou d’un
magnétoscope...................................... 11
4 : Protection du téléviseur contre les
chutes .................................................. 12
5 : Mise sous tension du téléviseur........... 12
6 : Sélection de la langue et du pays ou
de la région .......................................... 13
7 : Réglage automatique du téléviseur...... 14
Regarder
la télévision
: pour les chaînes
numériques uniquement
Regarder la télévision ............................... 15
Vérification du guide électronique numérique
de programmes (EPG) ................ 18
Utilisation de la liste de favoris ......... 20
Affichage d’images depuis un appareil
raccordé ............................................... 21
Utilisation du menu
Menu Contrôle du son ...............................25
Effet (effet sonore)............................................25
Aigus/Graves/Balance .....................................25
Volume auto. ....................................................25
Son stéréo ........................................................26
Volume (volume du casque)........................26
Son stéréo....................................................26
R à Z.................................................................26
Menu Commande écran ............................27
Auto 16:9..........................................................27
Format écran....................................................27
Centrage écran ................................................27
Menu Fonctions .........................................28
Eco. énergie.....................................................28
Haut parleur .....................................................28
Sortie AV2.........................................................28
Image OFF .......................................................29
Menu Temporisation ..................................30
Arrêt tempo. .....................................................30
Arrêt auto..........................................................30
Menu Réglage ...........................................31
Démarrage automatique ..................................31
Langue .............................................................31
Pays..................................................................31
Mém. auto. (mode analogique uniquement)....32
Ordre des chaînes
(mode analogique uniquement).................32
Noms des chaînes
(mode analogique uniquement).................32
Présél. audio/vidéo...........................................33
Mémorisation manuelle
(mode analogique uniquement).................33
Installation TNT ......................................36
Utilisation d’un appareil
optionnel
FR
Navigation au sein des menus .................. 21
Présentation des menus.................................. 22
Menu Contrôle de l’image ......................... 23
Mode ............................................................... 23
Contraste/Luminosité/Couleurs/Teinte/Netteté/
Rétro-éclairage.......................................... 23
Ton couleur...................................................... 23
Réduc.de bruit................................................. 24
Image dynamique ........................................... 24
Correction Gamma.......................................... 24
R à Z................................................................ 24
Raccordement d’un appareil optionnel ......40
Programmation de la télécommande.........42
Informations complémentaires
Spécifications ............................................44
Dépannage ................................................45
Index..........................................................48
3
FR
Page 96

Consignes de sécurité
Cordon d’alimentation
secteur
• Débranchez le cordon
d’alimentation secteur
avant de déplacer le
téléviseur. Ne déplacez
jamais le téléviseur lorsque le cordon d’alimentation
secteur est branché. Cela pourrait abîmer le cordon et
provoquer un incendie ou une décharge électrique.
• Si vous endommagez le cordon
d’alimentation secteur, cela peut
provoquer un incendie ou une décharge
électrique.
– Ne pliez pas et ne tordez pas
exagérément le cordon
d’alimentation secteur. Il se peut que
les conducteurs du noyau soient mis
à nu ou rompus et créent un courtcircuit entraînant un risque
d’incendie ou d’électrocution.
– Ne modifiez pas et n’endommagez
pas le cordon d’alimentation secteur.
– Ne posez jamais d’objet lourd sur le cordon
d’alimentation secteur. Ne tirez jamais sur le cordon
d’alimentation secteur.
– Eloignez le cordon d’alimentation secteur des sources
de chaleur.
– Saisissez toujours le cordon par sa fiche lorsque vous le
débranchez.
• Si le cordon d’alimentation secteur est endommagé,
cessez de l’utiliser et demandez à votre centre de service
après-vente Sony de le remplacer.
• N’utilisez pas le cordon d’alimentation fourni avec un
autre appareil.
• Utilisez uniquement un cordon d’alimentation d’origine
Sony et pas un cordon d’une autre marque.
Protection du câble/cordon
d’alimentation secteur
Débranchez le câble/cordon
d’alimentation secteur en tirant
directement sur la fiche. Ne tirez
jamais sur le câble/cordon
d’alimentation secteur proprement dit.
Prise de courant
Pour la prise de courant, n’utilisez pas une
prise de mauvaise qualité. Insérez la fiche à
fond dans la prise secteur. Si elle n’est pas
solidement insérée, des étincelles peuvent se
produire et provoquer un incendie. Prenez
contact avec votre électricien pour remplacer
cette prise par une prise plus adéquate.
Accessoires en option
Observez les indications suivantes lors de
l’installation du téléviseur sur un pied ou un
support mural. Sinon, le téléviseur risque de
tomber et de causer des blessures graves.
• Il vous est fortement recommandé d’utiliser
exclusivement les accessoires Sony pour des raisons de
sécurité:
– KDL-V40A11E:
Support mural SU-PW2, meuble SU-FF51.
– KDL-V32A11E:
Support mural SU-WL31, meuble SU-FF51.
• Il vous est aussi fortement recommandé d’utiliser le
support mural officiel Sony qui permettra une circulation
d’air suffisante pour éviter la surchauffe et l’apparition de
traces de poussières autour de l’écran, sur les murs et le
plafond.
• Lorsque vous installez le téléviseur, fixez-le correctement
en suivant le mode d’emploi fourni avec le pied ou le
support mural.
• Vérifiez que les supports du pied sont fixés correctement.
Installation
Si le téléviseur doit être accroché
au mur, confiez l’installation à un
technicien de service après-vente
qualifié. Une ins tallation incorrecte
peut être dangereuse pour le téléviseur.
Centres médicaux
Ce téléviseur ne doit pas être
installé dans un lieu où sont
utilisés des équipements
médicaux. Cela pourrait entraîner
un mauvais fonctionnement de
ceux-ci.
Transport
• Avant de transporter le téléviseur,
débranchez tous ses câbles.
• Pour transporter le téléviseur,
saisissez-le de la manière illustrée cicontre. Sinon, le téléviseur risque de
tomber et d’être endommagé ou de provoquer des
blessures graves. Si le téléviseur est tombé ou a été
endommagé, faites-le vérifier immédiatement par un
technicien de service après-vente qualifié.
• Lorsque vous transportez le téléviseur, ne le soumettez pas
à des secousses ou des vibrations excessives. Le téléviseur
peut tomber, être endommagé et provoquer des blessures
graves.
• Lorsque vous transportez le téléviseur pour le porter à
réparer ou lorsque vous déménagez, glissez-le dans son
emballage et son carton d’origine.
• Le transport du téléviseur exige plusieurs personnes.
Aération
• N’obstruez jamais les orifices
d’aération du téléviseur. Cela
pourrait entraîner une
surchauffe et provoquer un
incendie.
• Si le téléviseur ne dispose pas d’une bonne aération, il
peut accumuler poussière et saleté. Pour une bonne
aération, appliquez les conseils suivants :
– Ne placez pas le téléviseur vers l’arrière ou sur le côté.
– N’installez pas le téléviseur inversé ou à l’envers.
– N’installez pas le téléviseur sur une étagère ou dans un
meuble.
– Ne posez pas le téléviseur sur un tapis ou sur un lit.
– Ne couvrez pas le téléviseur avec des tissus tels que des
rideaux, pas plus qu’avec des journaux, etc.
FR
4
Page 97

• Laissez un espace libre autour du téléviseur, faute de quoi
la circulation d’air peut être inadéquate et entraîner une
surchauffe susceptible de provoquer un incendie ou des
dégâts internes.
30 cm
10 cm 10 cm
Laissez au
moins cet
espace.
Eau et humidité
• Ne jamais utiliser ce téléviseur
près d’un point d’eau – par
exemple près d’une baignoire ou
d’une douche. Ne pas non plus
exposer le téléviseur à la pluie, à
l’humidité ou à la fumée. Cela pourrait provoquer un
incendie ou l’électrocution.
• Ne pas toucher le cordon
d’alimentation secteur et le téléviseur
avec des mains humides. Cela
risquerait de provoquer l’électrocution
ou d’endommager le téléviseur.
• Lors de la fixation du téléviseur au mur, laissez un espace
de 10 cm minimum à partir du dessous du téléviseur.
• N’installez jamais le téléviseur de la façon suivante :
La circulation de
l’air est bloquée.
La circulation de
l’air est bloquée.
Mur Mur
Orifices d’aération
Ne jamais rien introduire dans les orifices
d’aération. Si un objet métallique ou du
liquide pénétrait dans ces derniers, cela
pourrait provoquer un incendie ou une
décharge électrique.
Disposition
• Ne jamais placer le téléviseur dans
un endroit excessivement chaud,
humide ou poussiéreux.
• Ne pas installer le téléviseur dans un
endroit accessible aux insectes.
• Ne pas installer le téléviseur dans un endroit où il pourrait
être exposé à des vibrations mécaniques.
• Placer le téléviseur sur une surface stable
et horizontale. Sinon, le téléviseur risque
de tomber et de provoquer des blessures.
• Ne pas installer le téléviseur dans un
endroit où il serait en saillie, notamment
sur ou derrière un pilier, ou encore dans
un emplacement où vous pourriez le
heurter avec la tête. En effet, vous risqueriez de vous
blesser.
Humidité et objets inflammables
• Ne pas mouiller le téléviseur. Ne
jamais renverser de liquide d’aucune
sorte sur le téléviseur. Si un objet
liquide ou solide tombe sur le
téléviseur, ne le mettez pas sous
tension. Cela risquerait de provoquer
l’électrocution ou d’endommager le
téléviseur.
Contacter un technicien qualifié pour une vérification
immédiate.
• Pour éviter les risques d’incendie, tenir le téléviseur à
l’écart d’objets inflammables (bougies, etc.) et de lampes
à incandescence.
Huiles
Ne pas installer ce téléviseur dans des restaurants qui
utilisent de l’huile. La poussière imprégnée d’huile peut
s’introduire dans le téléviseur et l’endommager.
Chute
Poser le téléviseur sur un support stable et
solide. Ne rien suspendre au téléviseur.
Sinon, le téléviseur pourrait tomber du pied
ou du support mural et provoquer des dégâts
ou des blessures graves.
Ne pas laisser les enfants grimper sur le
téléviseur.
Véhicules ou plafonds
Ne pas installer le téléviseur dans
un véhicule. Les mouvements du
véhicule risquent de provoquer la
chute du téléviseur ainsi que des
blessures. Ne pas suspendre le
téléviseur au plafond.
Bateau ou voilier
Ne jamais installer le téléviseur sur
un bateau ou un voilier. S’il est
exposé à l’eau de mer, un incendie
peut se déclarer ou le téléviseur
peut être endommagé.
Utilisation à l’extérieur
• Ne pas exposer le téléviseur aux
rayons directs du soleil. Le
téléviseur risque de chauffer et
d’être endommagé.
• Ne jamais installer le téléviseur à
l’extérieur.
Suite
FR
5
Page 98

Câblage
• Débrancher le cordon d’alimentation secteur pendant les
raccordements des câbles. Pour votre propre sécurité,
assurez-vous que le cordon d’alimentation secteur est
débranché lorsque vous réalisez des connexions.
• Veiller à ne pas trébucher dans les câbles. Cela pourrait
endommager le téléviseur.
Nettoyage
• Débrancher le cordon d’alimentation
secteur avant de nettoyer la fiche secteur
et le téléviseur. S’il est branché, vous
pouvez recevoir une décharge électrique.
• Nettoyer régulièrement la fiche du
cordon d’alimentation secteur. Si la fiche
accumule de la poussière et reçoit de l’humidité,
l’isolation peut se détériorer et un incendie se déclarer.
Orages
Pour votre sécurité ne touche z aucune
des parties du téléviseur, pas plus que
le cordon d’alimenta tion secteur o u le
câble de l’antenne pendant les orages.
Panne exigeant une intervention
Si la surface de l’écran se fendille, ne touchez pas le
téléviseur avant d’avoir débranché le cordon d’alimentation
secteur. Faute de quoi, vous pourriez recevoir une décharge
électrique.
Entretien
Ne pas ouvrir le boîtier de l’appareil.
Confier le téléviseur à un technicien
qualifié uniquement.
Petits accessoires amovibles et
enfichables
Conserver les accessoires hors de la portée des enfants. S’ils
les avalent, ils risquent de suffoquer ou d’étouffer. Appeler
immédiatement un médecin.
Verre cassé
Ne rien jeter sur le téléviseur. Le verre de
l’écran pourrait exploser lors de l’impact
et provoquer des blessures graves.
Au repos
Pour des raisons de sécurité et de
protection de l’environnement, il
est conseillé de ne pas laisser le
téléviseur en mode de veille
lorsqu’il n’est pas utilisé.
Débranchez-le du secteur. Toutefois, certains téléviseurs
possèdent des fonctionnalités dont le bon fonctionnement
exige que l’appareil demeure sous tension lorsqu’il est en
mode de veille. Si cela s’applique à votre appareil, vous
trouverez les instructions correspondantes dans le présent
manuel.
Regarder la télévision
• Pour regarder confortablement la télévision, nous vous
conseillons de vous trouver à une distance du téléviseur
égale à quatre à sept fois la diagonale de l’écran.
• Regarder la télévision dans une pièce modérément
éclairée ou peu éclairée soumet vos yeux à un effort. Par
ailleurs, fixer l’écran pendant de longs moments entraîne
aussi une fatigue pour les yeux.
• Si l’angle du téléviseur doit être réglé, maintenez le pied
avec la main pour éviter que le téléviseur s’en détache.
Veillez à ne pas coincer les doigts entre le téléviseur et le
pied.
Réglage du volume
• Maintenez le volume sonore à un niveau qui ne gêne pas
les voisins. Le son se transmet très facilement pendant la
nuit. Nous vous conseillons donc de fermer les fenêtres ou
d’utiliser un casque.
• Si vous utilisez un casque, réglez le volume de façon à
éviter un niveau sonore excessif qui pourrait altérer votre
capacité auditive.
Surcharge
Ce téléviseur est conçu pour
fonctionner sur une alimentation de
220 – 240 V CA uniquement. Prenez
soin de ne pas brancher un trop grand
nombre d’appareils sur la même prise
de courant, ce qui pourrait provoquer
un incendie ou une décharge électrique.
Chaleur
Ne touchez pas la surface du téléviseur. Elle reste chaude un
certain temps après la mise hors tension du téléviseur.
Corrosion
Si vous utilisez ce téléviseur au bord de la mer, la salinité
peut faire rouiller les parties métalliques et causer des dégâts
internes ou provoquer un incendie. Elle peut aussi raccourcir
la durée de vie du téléviseur. Si le téléviseur doit être soumis
à l’une de ces conditions, il convient de prendre des mesures
qui réduiront l’humidité et la température du lieu dans lequel
il est placé.
FR
6
Page 99

Précautions
Ecran LCD
• Bien que l’écran LCD soit le fruit d’une technologie de
pointe et que 99,99 % ou plus des pixels sont efficaces, des
points noirs ou des points lumineux (rouges, bleus ou
verts) peuvent apparaître en permanence sur l’écran LCD.
Ceci est une propriété structurelle du panneau LCD et ne
constitue pas un problème de fonctionnement.
• Ne pas exposer la surface de l’écran LCD à la lumière
directe du soleil. Cela pourrait endommager la surface de
l’écran.
• Ne pas appuyer sur le filtre avant, ne pas l’égratigner et ne
pas placer d’objets sur ce téléviseur. L’image pourrait être
instable ou le panneau LCD être endommagé.
• Si ce téléviseur est utilisé dans un environnement froid,
l’image peut apparaître sale ou sombre.
Ce n’est pas le signe d’une défaillance. Ce phénomène
disparaît au fur et à mesure que la température augmente.
• Une image rémanente peut apparaître lorsque des images
fixes sont affichées en continu. Elle peut disparaître au
bout d’un certain temps.
• L’écran et le boîtier se réchauffent lorsque le téléviseur est
en cours d’utilisation. Ceci n’a rien d’anormal.
• L’écran LCD contient une petite quantité de cristaux
liquides et de mercure. Le tube fluorescent utilisé dans ce
téléviseur contient également du mercure. Respectez les
réglementations locales en vigueur concernant
l’élimination de cet équipement.
Lampe fluorescente
Ce téléviseur utilise une lampe fluorescente spéciale comme
source lumineuse. Si l’image à l’écran devient sombre,
tremblote ou ne s’affiche pas, la lampe fluorescente est usée
et l’écran LCD doit être remplacée. Pour cela, consultez un
technicien qualifié.
Installation du téléviseur
• N’installez pas le téléviseur dans des lieux sujets à des
températures extrêmes, par exemple en plein soleil ou près
d’un radiateur ou d’une bouche d’air chaud. Si le
téléviseur est exposé à de fortes températures, il peut
chauffer excessivement et ceci peut entraîner la
déformation des pièces moulées ou un mauvais
fonctionnement.
• Le téléviseur n’est pas débranché du secteur lorsque son
alimentation du téléviseur est hors tension. Pour
déconnecter totalement le téléviseur, débranchez la fiche
de la prise secteur.
• Pour obtenir une image nette, n’exposez pas directement
l’appareil à une lumière intense ou aux rayons directs du
soleil. Si possible, utilisez une source de lumière dirigée
du plafond vers le sol.
• N’installez pas les appareils optionnels trop près du
téléviseur. Laissez un intervalle de 30 cm au moins. Si un
magnétoscope est installé devant ou à côté du téléviseur,
l’image risque d’être déformée.
Traitement et nettoyage du boîtier et de la surface de
l’écran du téléviseur
La surface de l’écran est recouverte d’un enduit spécial
destiné à prévenir l’éblouissement par des reflets lumineux.
Pour éviter toute dégradation du matériau ou du revêtement
de l’écran, respectez les précautions suivantes.
• N’exercez pas de pression et ne rayez pas l’écran avec des
objets durs. Ne jetez jamais rien sur l’écran. Cela pourrait
l’endommager.
• Ne touchez pas la surface de l’écran alors que le téléviseur
a fonctionné de manière continue pendant une période
prolongée, car l’écran est alors chaud.
• Nous vous conseillons d’éviter le plus possible de toucher
la surface de l’écran.
• Pour ôter la poussière du boîtier ou de la surface de
l’écran, frottez délicatement avec un linge doux. En cas de
saleté tenace, frottez avec un linge doux légèrement
imprégné d’une solution à base de détergent doux dilué.
Vous pouvez laver et réutiliser le linge doux.
• N’utilisez jamais aucune éponge abrasive, produit de
nettoyage alcalin/acide, poudre à récurer ou solvant
volatil, qu’il s’agisse d’alcool, d’essence, de diluant ou
d’insecticide. L’utilisation de ces produits ou tout contact
prolongé avec des matériaux en caoutchouc ou en vinyle
peut endommager la surface de l’écran et le matériau du
boîtier.
• Avec le temps, la poussière peut s’accumuler sur les
ouvertures d’aération. Pour une ventilation correcte, nous
vous conseillons d’aspirer régulièrement la poussière (une
fois par mois).
Mise au rebut du téléviseur
Traitement des appareils
électriques et électroniques
en fin de vie (Applicable dans
les pays de l’Union
Européenne et aux autres
pays européens disposant de
systèmes de collecte
sélective)
Ce symbole, apposé sur le produit
ou sur son emballage, indique que
ce produit ne doit pas être traité
avec les déchets ménagers. Il doit
être remis à un point de collecte approprié pour le recyclage
des équipements électriques et électroniques. En s’assurant
que ce produit est bien mis au rebut de manière appropriée,
vous aiderez à prévenir les conséquences négatives
potentielles pour l’environnement et la santé humaine. Le
recyclage des matériaux aidera à préserver les ressources
naturelles. Pour toute information supplémentaire au sujet du
recyclage de ce produit, vous pouvez contacter votre
municipalité, votre déchetterie ou le magasin où vous avez
acheté le produit.
FR
7
Page 100

Présentation de la télécommande
1 TV "/1 – Veille du téléviseur
Met temporairement le téléviseur hors et sous tension depuis le mode de veille.
2 Sélecteur de source (page 42)
Sélectionne l’appareil à utiliser. Un témoin vert s’allume momentanément pour
indiquer l’appareil sélectionné.
3 ANALOG – Mode analogique (page 15)
4 / – Sélecteur d’entrée / Maintien du texte
• En mode TV (page 21) : sélectionne la source d’entrée à partir de l’appareil
raccordé aux prises du téléviseur.
• En mode Télétexte (page 16) : maintient l’affichage de la page en cours.
5 – Mode d’écran (page 17)
6 Touches numériques
• En mode TV : sélectionne les chaînes. Pour les numéros de chaînes 10 et
supérieurs, entrez le deuxième chiffre dans les deux secondes qui suivent.
• En mode Télétexte : entre le numéro de la page à trois chiffres afin de la
sélectionner.
7 / -/-- – Chaîne précédente / Chaîne à deux chiffres du magnétoscope
• En mode TV : revient à la chaîne précédemment sélectionnée (pendant plus de
cinq secondes).
• En mode Magnétoscope : sélectionne les chaînes à deux chiffres du
magnétoscope Sony (par exemple, pour 23, appuyez sur -/--, puis sur 2 et sur 3).
8 / – Télétexte (page 16)
9 M/m/</,/OK (page 16, 21)
q; – Favoris (page 20)
qa PROG +/- (page 15)
• En mode TV : sélectionne la chaîne suivante (+) ou précédente (-).
• En mode Télétexte : sélectionne la page suivante (+) ou précédente (-).
qs MENU (page 21)
qd 2 +/- – Volume
qf – Cette touche n’a pas de fonction pour ce téléviseur.
qg – EPG (Digital Electronic Programme Guide – guide électronique numérique de programmes) (page 18) /
NexTView (page 16)
qh Touches de couleur
• En mode numérique (page 18, 20) : sélectionne les options en bas des menus Favoris et EPG numérique.
• En modes Magnétoscope et DVD (page 42) : utilis e les fonctions principales de votre magnétoscope ou lecteur de DVD.
qj / – Infos / Affichage du texte
• En mode numérique : affiche de brefs détails sur le programme actuellement regardé.
• En mode analogique : affiche des informations telles que le numéro de la chaîne en cours et le mode d’écran.
• En mode Télétexte (page 16) : affiche les informations masquées (par exemple, les réponses d’un questionnaire).
qk – Mode de l’image (page 23)
ql 9 – Effet sonore (page 25)
w; DIGITAL – Mode numérique (page 15)
wa % – Silencieux (page 15)
ws AUX/VIDEO "/1
Met votre équipement sous ou hors tension, comme programmé sur la télécommande (page 42).
Conseil
Les touches M/m/</,, 2 +, PROG + et le numéro 5 disposent de points tactiles. Ils vous serviront de références lors de
l’utilisation du téléviseur.
FR
8
 Loading...