

Page 1
KE-V42A10E
KLV-V40A10E
KLV-S40A10E
KDL-V40A11E
KDL-S40A11E
Installing the Wall-Mount Bracket
Installation du support de fixation mural
Instalación del soporte de montaje mural
Installieren der Wandhalterung
De wandmontagesteun installeren
Installazione della staffa di montaggio a parete
Instalar o Suporte de Montagem na Parede
Montering af beslaget til vægmontering
Installera väggfästet
Seinäasennuskiinnittimen asentaminen
Montere veggmonteringskonsollen
Τοποθέτηση του στηρίγµατος τοίχου
GB
FR
ES
DE
NL
IT
PT
DK
SE
FI
NO
GR
Instalacja uchwytu ściennego
Поpядок ycтaновки нacтeнного монтaжного кpонштeйнa
© 2005 Sony Corporation 2-635-540-12(2)
PL
RU
Page 2
English
Before installation
To Customers
For product protection and safety reasons, Sony
strongly recommends that wall-mounting of your
Display Unit be performed by a reliable licensed
contractor. Do not attempt to install it yourself.
Your KE-V42A10E/KLV-V40A10E/KLV-S40A10E/
KDL-V40A11E/KDL-S40A11E can be wallmounted using SU-PW2 Wall-Mount Bracket (sold
separately). Please provide your contractor with
this installation supplement as well as the
Instructions (supplied with SU-PW2 Wall-Mount
Bracket). Read these documents carefully for safety
and proper installation.
To Sony Dealers and Contractors
Provide full attention to safety during the
installation, periodic maintenance and
examination of this product.
Installing the Display Unit
on a wall
The Display Unit can be installed on a wall by
attaching a Wall-Mount Bracket (sold separately).
Verify your TV’s model number and be sure to use
the bracket specified for your model only. Refer to
the Steps on this leaflet along with the Instructions
supplied with SU-PW2 Wall-Mount Bracket, to
properly carry out the installation.
Sufficient expertise is required for installing
this product. Be sure to subcontract the
installation to Sony dealers or licensed
contractors and pay special attention to safety
during the installation.
Sony is not liable for any damages or injury
caused by mishandling or improper
installation. Your Statutory Rights (if any) are
not affected.
Step 1: Check the parts
required for the
installation
Open the Wall-Mount Bracket package and check
the contents for all required parts along with the
Instructions.
Step 2: Decide on the
installation location
Decide where you want to install your Display
Unit. Turn to the back cover or inside the back
cover for the display installation dimensions and
determine the location.
If you intend to route the cables in the wall, also
determine the position of the cable hole and bore a
hole in the wall.
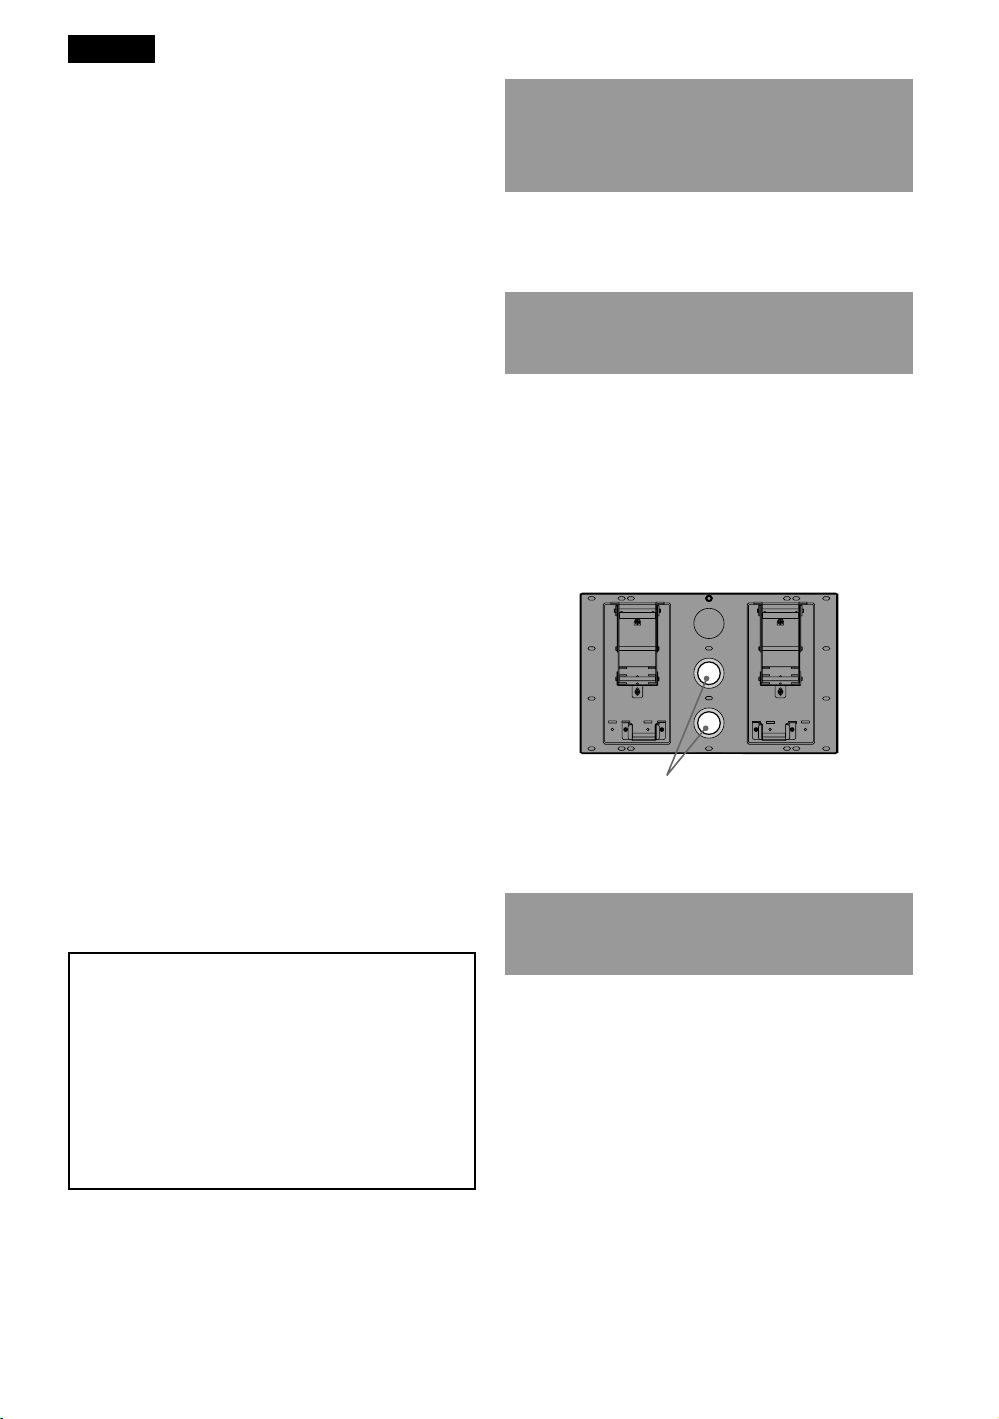
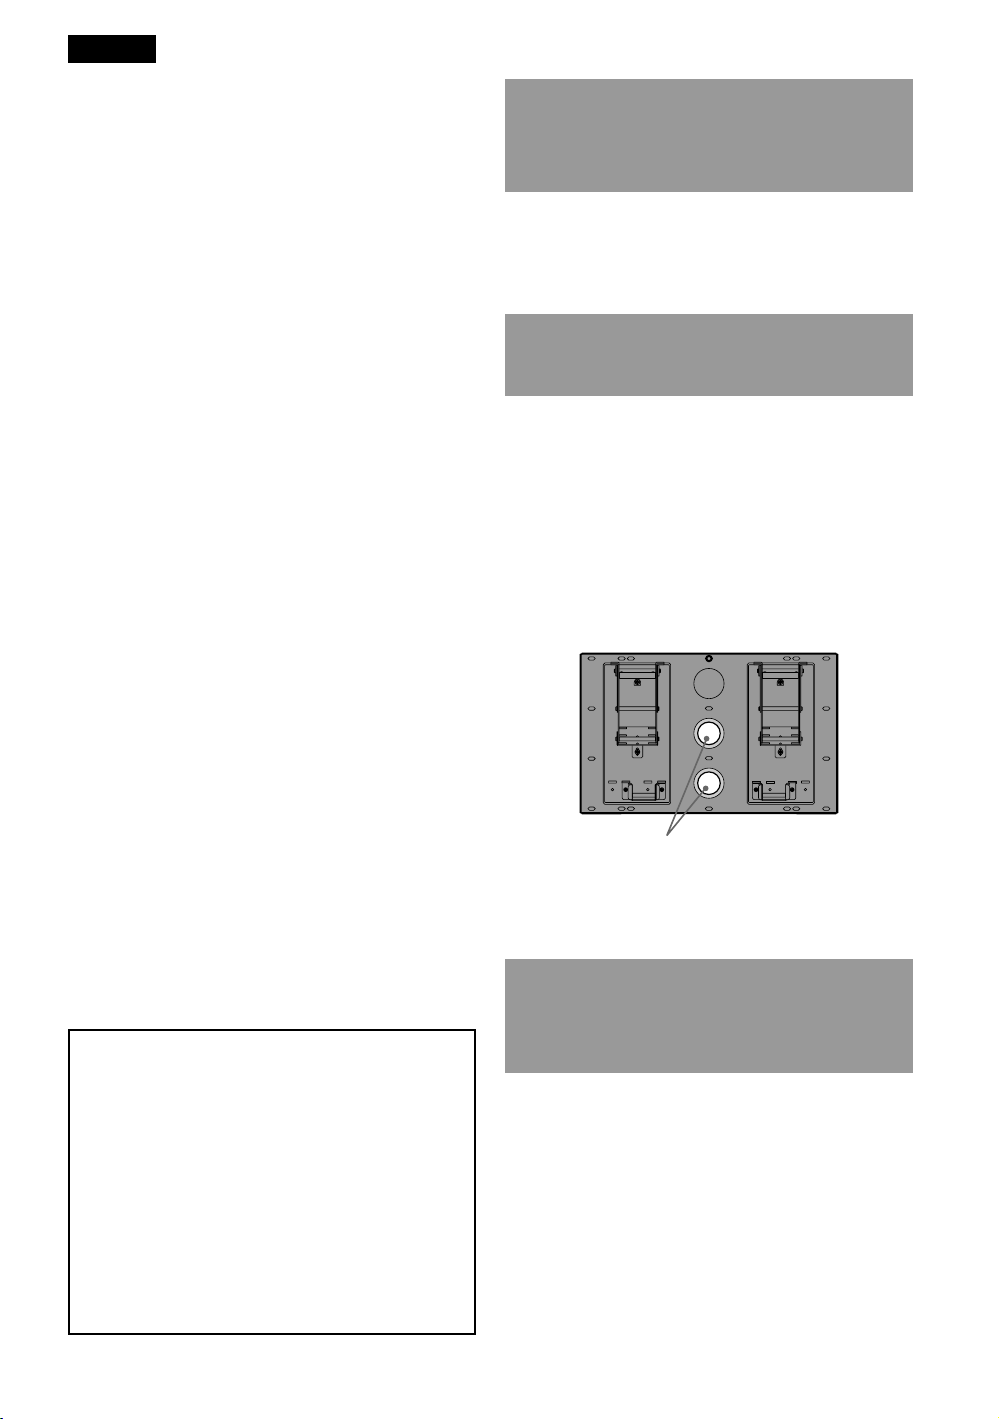
Hole for cable routing (One of two)
Refer to the Instructions for the SU-PW2.
Step 3: Install the Plate Unit on
the wall
Change the position of the Mounting Hook Unit
supported shafts.
Refer to the Instructions for the SU-PW2.
2 (GB)
Page 3
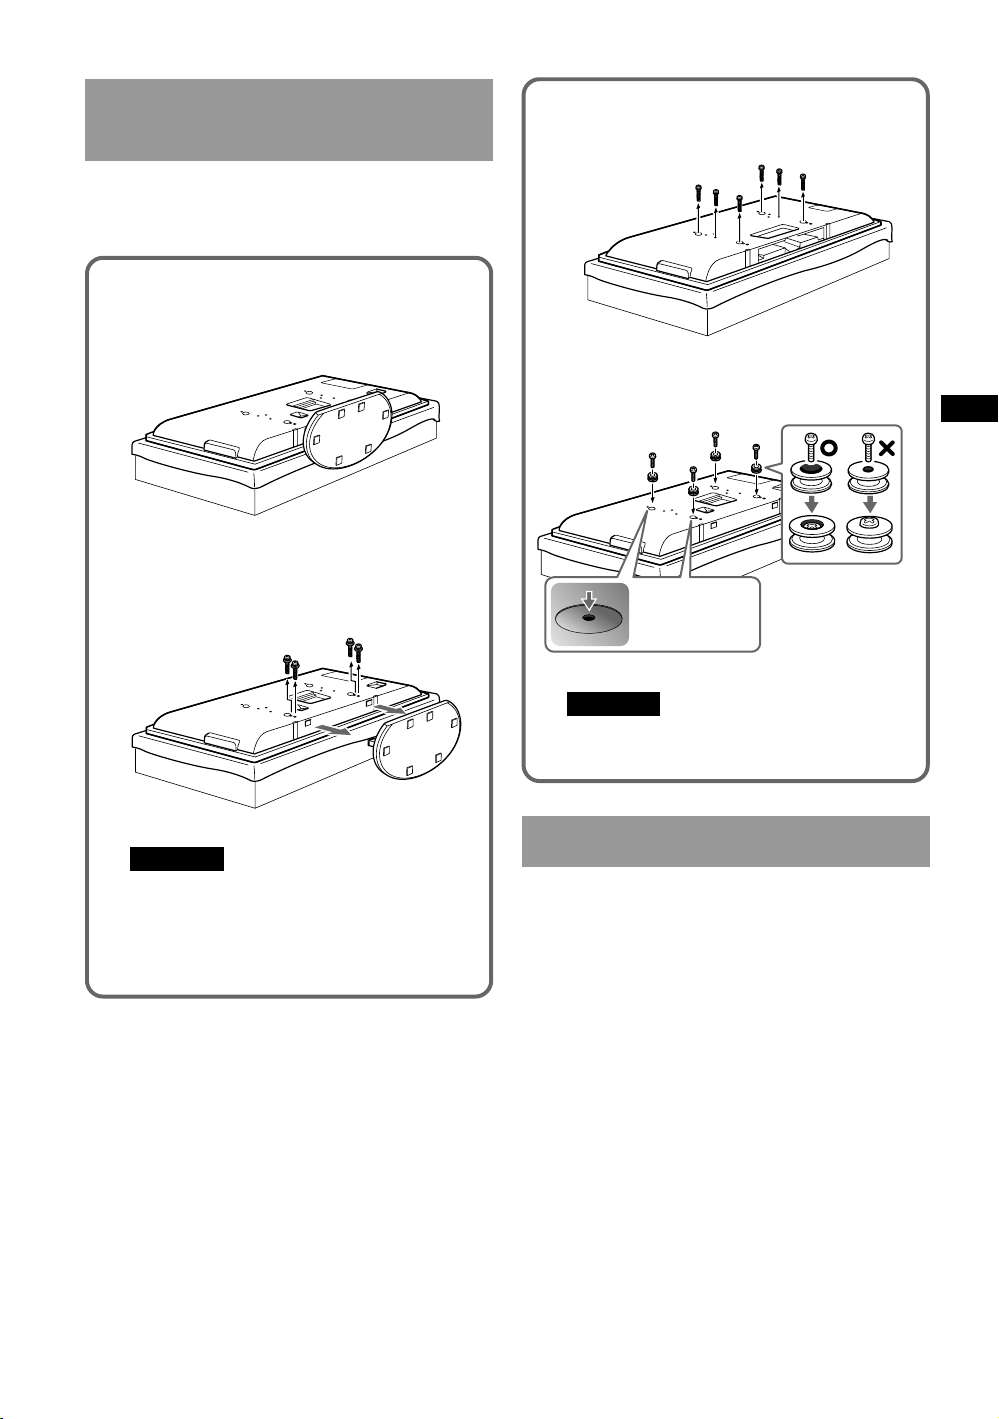
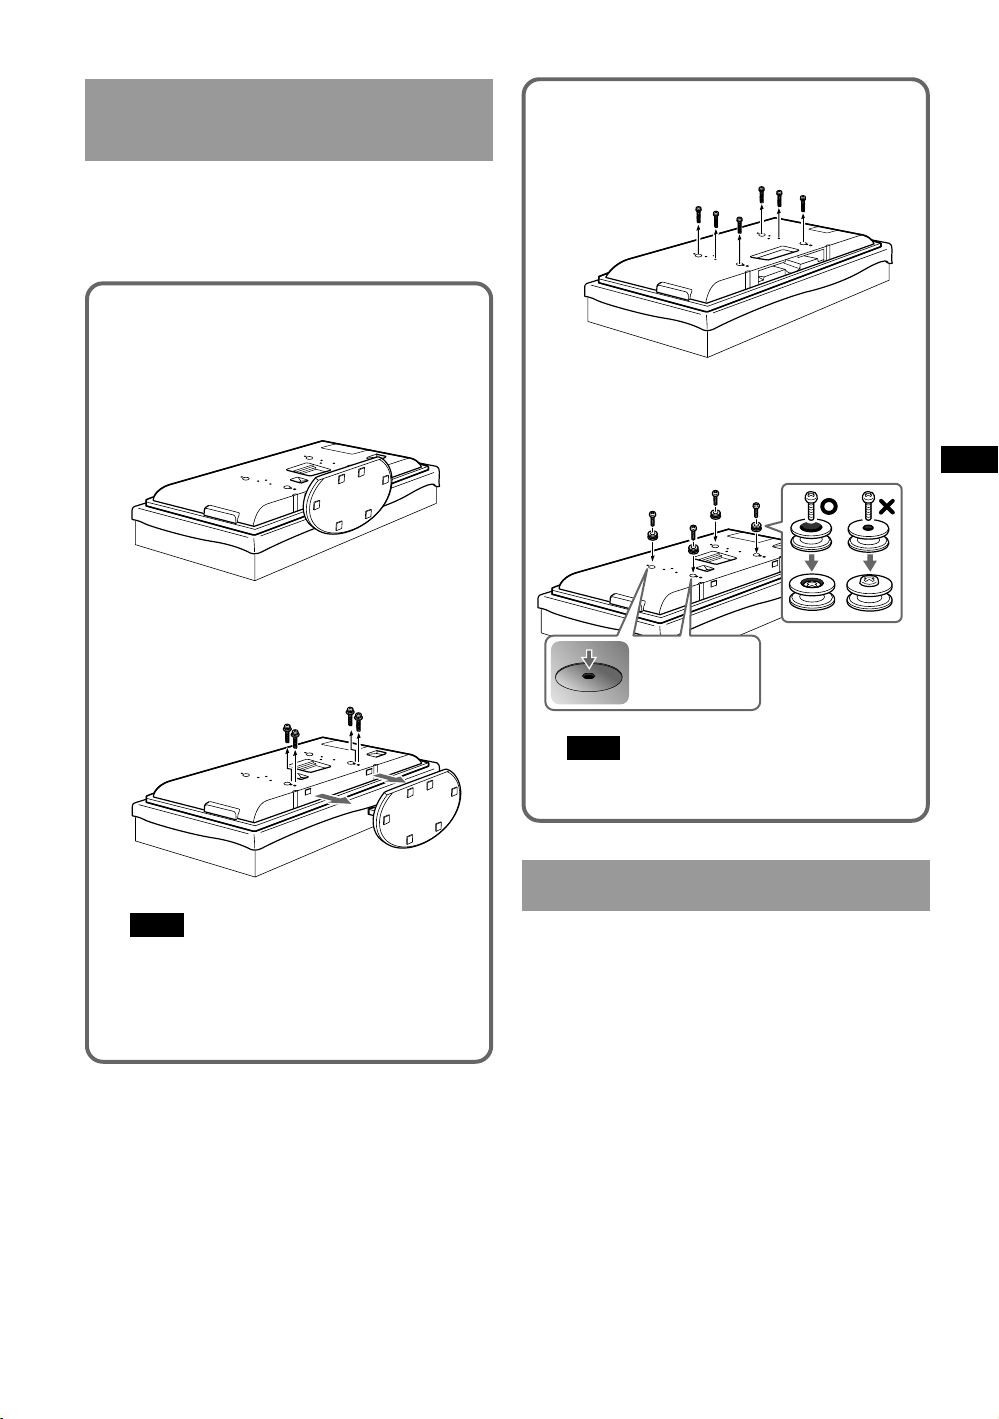
Prepare for the installation of
the Display Unit
Before removing the Table-Top Stand, disconnect
all the cables from the Display Unit.
Refer to the Instructions for the SU-PW2.
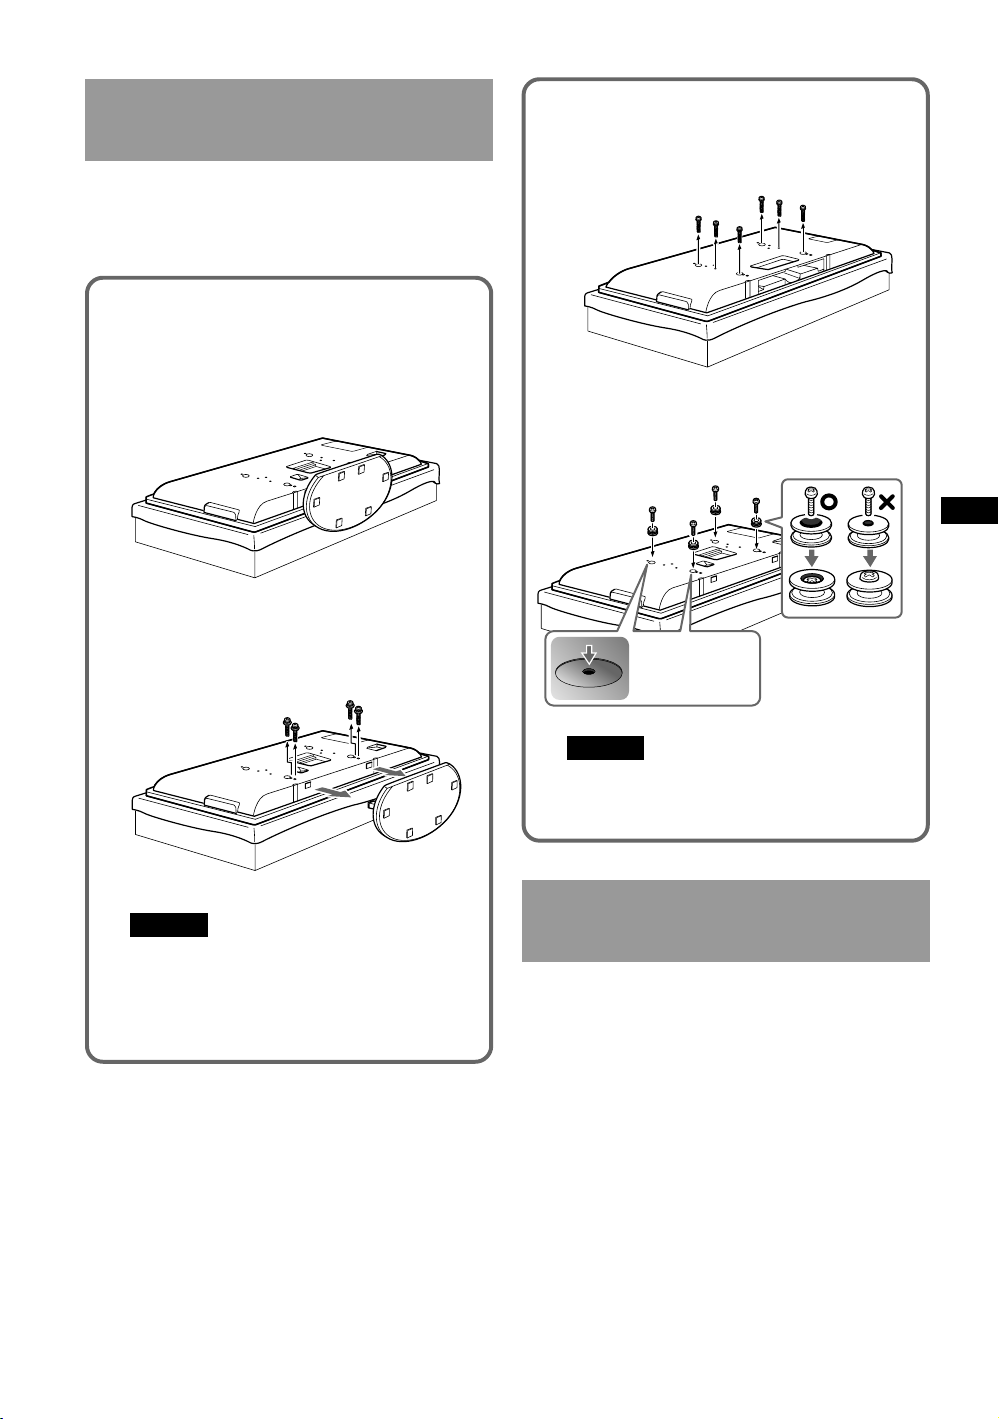
1 Place the Display Unit, with its screen
facing down, on a stable, cloth-covered
work surface, at least 20 cm off the floor.
2 Remove the screws that hold the Display
Unit to the Table-Top Stand and detach the
Table-Top Stand from the Display Unit.
3 Remove six screws on the rear side of the
Display Unit (for KE-V42A10E only).
4 Attach the supplied four hooks with the
supplied four screws (+PSW5 × L16).
Screw into the
recessed screw
holes.
GB
Note
Remove the cable holder beforehand when it is
attached to the Display Unit. For details on the
cable holder, refer to the instruction manual of
the Display Unit (for KE-V42A10E/KLVV40A10E/KDL-V40A11E only).
Note
When using an electric screwdriver, set the
torque setting to approximately 2 N·m.
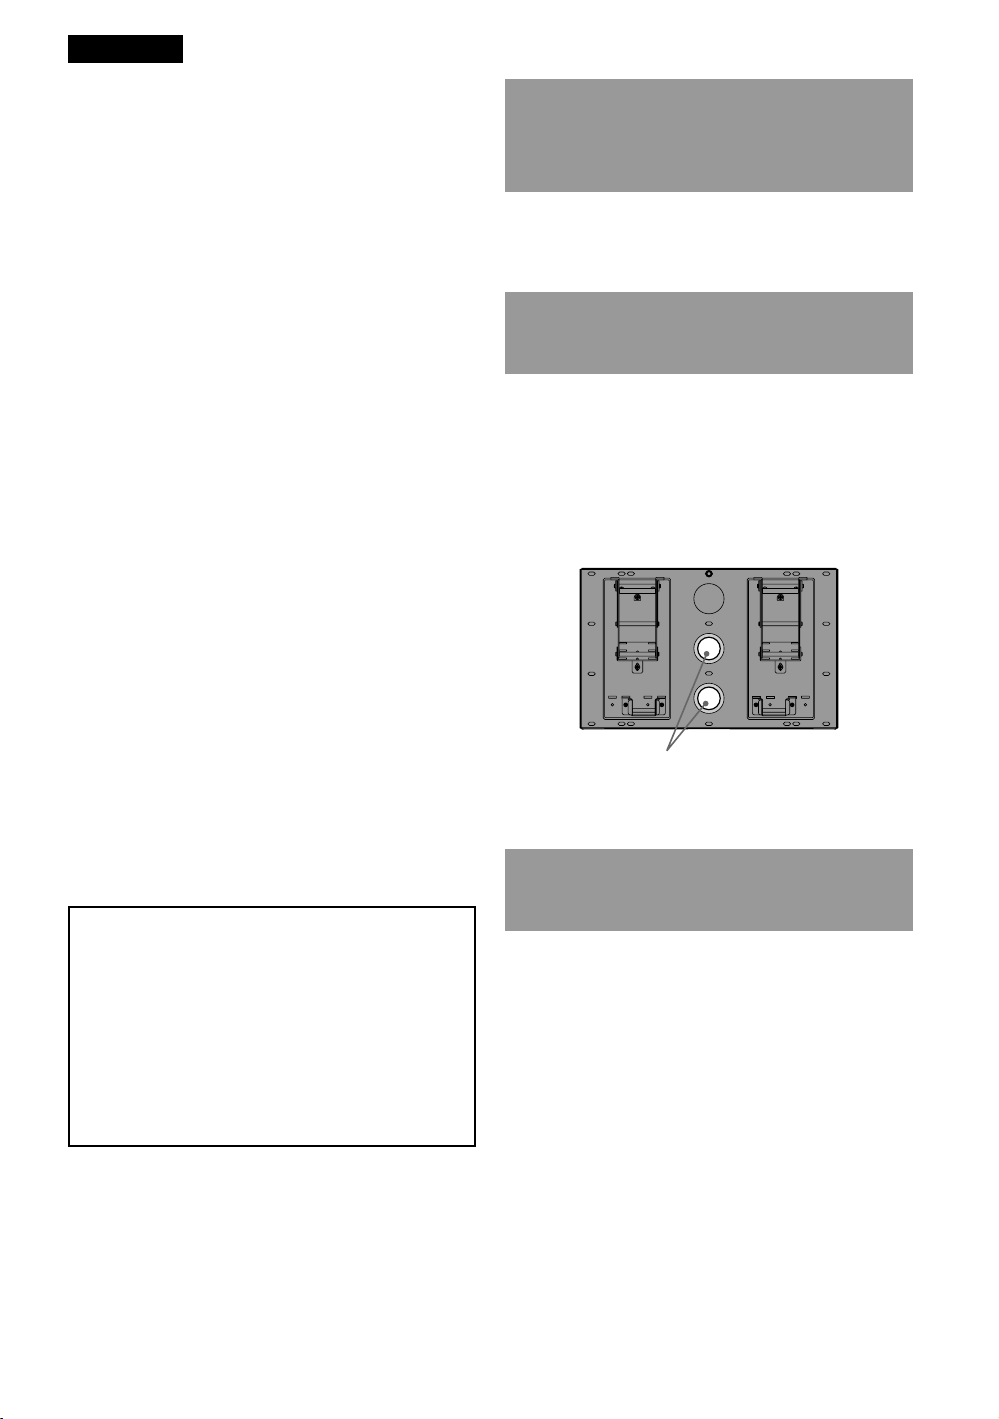
Step 4: Install the Display Unit
Refer to the Instructions for the SU-PW2.
(GB) 3
Page 4
Français
Avant l’installation
A l’attention des clients
Pour protéger le produit et pour des raisons de
sécurité, Sony conseille vivement de confier la
fixation de l’écran au mur à un installateur agréé
compétent. N’essayez pas de l’installer vousmême.
Votre KE-V42A10E/KLV-V40A10E/KLV-S40A10E/
KDL-V40A11E/KDL-S40A11E peut être fixé au
mur à l’aide du support de fixation mural SU-PW2
(vendu séparément). Remettez ces consignes
d’installation supplémentaires à votre installateur
ainsi que les Instructions (fournies avec le support
de fixation mural SU-PW2). Lisez soigneusement
ces documents pour une installation sûre et
correcte.
A l’attention des installateurs et revendeurs
Sony
Soyez particulièrement attentif à la sécurité
pendant l’installation, l’entretien périodique et
l’examen du produit.
Installation de l’écran au
Etape 1 : Vérification des
pièces nécessaires à
l’installation
Ouvrez l’emballage du support de fixation mural
et vérifiez s’il renferme bien toutes les pièces
requises ainsi que les Instructions.
Etape 2 : Choix de
l’emplacement
d’installation
Déterminez l’emplacement d’installation de votre
écran. A la dernière ou l’avant-dernière page de
cette brochure, vous trouverez les dimensions
d’installation de l’écran qui vous permettront de
choisir son emplacement.
Si vous envisagez d’acheminer les câbles à travers
la paroi murale, déterminez la position du trou et
percez-le.
mur
L’écran peut être accroché au mur en fixant un
support de fixation mural (vendu séparément).
Vérifiez le numéro de modèle du téléviseur pour
être certain d’utiliser le support qui lui est
exclusivement destiné. Reportez-vous à la
procédure de ce feuillet ainsi qu’aux Instructions
fournies avec le support de fixation mural SU-PW2
pour procéder correctement à l’installation.
Une certaine expérience est requise pour
installer ce produit. Veillez à confier
l’installation à des revendeurs Sony ou à des
installateurs agréés et portez une attention
particulière aux consignes de sécurité pendant
l'installation.
Sony ne saurait être tenue responsable de tout
dommage ou de toute blessure découlant
d’une mauvaise utilisation ou d’une
installation incorrecte. Vos droits légaux
(éventuels) ne sont pas affectés.
Trou pour le passage des câbles (un des deux)
Reportez-vous aux Instructions du SU-PW2.
Etape 3 : Installation de la
plaque sur le mur
Changez les emplacements des axes de l’équerre
de fixation.
Reportez-vous aux Instructions du SU-PW2.
4 (FR)
Page 5
Préparation pour l’installation
de l’écran
Avant de retirer le support table, débranchez tous
les câbles de l’écran.
Reportez-vous aux Instructions du SU-PW2.
1 Installez l’écran tourné vers le bas sur une
surface stable et recouverte d’un drap, à au
moins 20 cm du sol.
2 Retirez les vis qui maintiennent l’écran sur
le support table et détachez le support
table de l’écran.
3 Retirez les six vis à l’arrière de l’écran
(pour le KE-V42A10E uniquement).
4 Fixez les quatre crochets fournis avec les
quatre vis fournies (+PSW5 × L16).
Vissez dans les
trous pour vis
renfoncés.
FR
Remarque
Retirez préalablement le support de câble s’il est
fixé à l’écran. Pour plus d’informations sur le
support de câble, reportez-vous au mode
d’emploi de l’écran (pour le KE-V42A10E/KLVV40A10E/KDL-V40A11E uniquement).
Remarque
Si vous utilisez un tournevis électrique, réglez le
couple sur 2 N·m environ.
Etape 4 : Installation de l’écran
Reportez-vous aux Instructions du SU-PW2.
(FR) 5
Page 6
Español
Antes de la instalación
Información para los clientes
Por razones de protección del producto y de
seguridad, Sony recomienda que el montaje mural
del monitor sea realizado por un contratista
autorizado de confianza. No intente instalarlo
usted mismo.
El modelo KE-V42A10E/KLV-V40A10E/KLVS40A10E/KDL-V40A11E/KDL-S40A11E puede
instalarse en una pared mediante el soporte de
montaje mural SU-PW2 (se vende por separado).
Muestre al contratista este suplemento para la
instalación, así como el manual de instrucciones
(suministrado con el soporte de montaje mural SUPW2). Lea atentamente estos documentos para
realizar la instalación correctamente y de manera
segura.
Para distribuidores y contratistas de Sony
Preste especial atención a la seguridad durante la
instalación, mantenimiento periódico y
comprobación de este producto.
Instalación del monitor en
Paso 1: Comprobar las piezas
necesarias para la
instalación
Abra el embalaje del soporte de montaje mural y
compruebe que contiene todas las piezas
necesarias, así como el manual de instrucciones.
Paso 2: Decidir la ubicación de
instalación
Decida dónde desea instalar el monitor. Consulte
en la contraportada o en el interior de la
contraportada de este folleto las dimensiones de
instalación del monitor y determine la ubicación
de instalación.
Si desea pasar los cables por la pared, determine
también la posición del orificio para el cable y
taladre un orificio en la pared.
la pared
El monitor puede instalarse en una pared mediante
un soporte de montaje mural (se vende por
separado).
Compruebe el número de modelo del televisor y
asegúrese de utilizar solamente el soporte
especificado para dicho modelo. Consulte los
pasos especificados en este folleto junto con el
manual de instrucciones suministrado con el
soporte de montaje mural SU-PW2 para realizar la
instalación correctamente.
Para instalar este producto se requieren
suficientes conocimientos técnicos. Asegúrese
de contratar la instalación a un distribuidor o a
un contratista Sony autorizado y preste
especial atención a la seguridad durante la
instalación.
Sony no se responsabiliza de ningún daño o
lesión provocados por una manipulación o
instalación incorrectas. Esto no afecta a sus
derechos legales (en caso de haberlos).
Orificio para colocar el cable (uno de dos)
Consulte el manual de instrucciones del soporte
SU-PW2.
Paso 3: Instalar la placa en la
pared
Cambie las posiciones de los ejes de soporte de los
ganchos de montaje.
Consulte el manual de instrucciones del soporte
SU-PW2.
6 (ES)
Page 7
Preparación para la instalación
del monitor
Antes de extraer el soporte de sobremesa,
desconecte todos los cables del monitor.
Consulte el manual de instrucciones del soporte
SU-PW2.
1 Coloque el monitor con la pantalla
mirando hacia abajo encima de una
superficie de trabajo estable, cubierta con
un paño y situada, como mínimo, a 20 cm
del suelo.
2 Retire los tornillos que sujetan el monitor
al soporte de sobremesa y separe este
soporte del monitor.
3 Retire los seis tornillos de la parte
posterior del monitor (sólo para el modelo
KE-V42A10E).
4 Monte los cuatro ganchos suministrados
con los cuatro tornillos suministrados
(+PSW5 × L16).
Atorníllelos en los
orificios para
tornillos
ahuecados.
ES
Nota
Extraiga previamente el portacables si está fijado
al monitor. Para obtener más información acerca
del portacables, consulte el manual de
instrucciones del monitor (sólo para los modelos
KE-V42A10E/KLV-V40A10E/KDL-V40A11E).
Nota
Si utiliza un destornillador eléctrico, establezca
el ajuste de par en 2 N·m aproximadamente.
Paso 4: Instalar el monitor
Consulte el manual de instrucciones del soporte
SU-PW2.
(ES) 7
Page 8
Deutsch
Vorbereitungen für die
Installation
Für den Kunden
Zum Schutz des Produkts und aus
Sicherheitsgründen empfiehlt Sony dringend, die
Montage des Displays an der Wand von
zuverlässigen lizenzierten Fachleuten ausführen
zu lassen. Versuchen Sie nicht, das Display selbst
an der Wand zu installieren.
Das KE-V42A10E/KLV-V40A10E/KLV-S40A10E/
KDL-V40A11E/KDL-S40A11E kann mit der
Wandhalterung SU-PW2 (gesondert erhältlich) an
der Wand angebracht werden. Bitte geben Sie den
Montagefachleuten diese Installationsanleitung
sowie die Gebrauchsanweisung (mit der
Wandhalterung SU-PW2 mitgeliefert). Lesen Sie
diese Unterlagen aus Sicherheitsgründen und zum
Zweck einer ordnungsgemäßen Installation
sorgfältig durch.
Für Sony-Händler und Montagefachleute
Achten Sie bei der Installation, der regelmäßigen
Wartung und der Überprüfung des Produkts in
erster Linie auf Sicherheit.
Schritt 1: Überprüfen der für
die Installation
benötigten Teile
Öffnen Sie das Paket mit der Wandhalterung und
überprüfen Sie, ob alle erforderlichen Teile
zusammen mit der Gebrauchsanweisung geliefert
wurden.
Schritt 2: Festlegen der
Montageposition
Legen Sie fest, wo Sie das Display installieren
wollen. Auf der hinteren Umschlagseite bzw. der
Innenseite der hinteren Umschlagseite finden Sie
die Installationsabmessungen des Displays,
anhand derer Sie die Montageposition festlegen
können.
Wenn Sie die Kabel in der Wand verlegen möchten,
legen Sie auch die Position der Aussparung für die
Verkabelung fest und bohren Sie ein Loch in die
Wand.
Installieren des Displays an
der Wand
Das Display lässt sich an der Wand installieren,
wenn Sie eine Wandhalterung (gesondert
erhältlich) daran anbringen.
Sehen Sie nach, welche Modellnummer Ihr
Fernsehgerät hat, und verwenden Sie
ausschließlich die für Ihr Modell angegebene
Halterung. Halten Sie sich an die Anweisungen in
diesem Infoblatt und an die mit der
Wandhalterung SU-PW2 gelieferte
Gebrauchsanweisung, um die Installation
ordnungsgemäß auszuführen.
Zur Installation dieses Produkts sind
Fachkenntnisse erforderlich. Lassen Sie die
Installationsarbeiten unbedingt von Ihrem
Sony-Händler oder lizenzierten Fachleuten
ausführen und beachten Sie bei der
Installation die nötigen
Sicherheitsvorkehrungen.
Sony übernimmt keine Haftung für
Verletzungen bzw. Sachschäden, die durch
unsachgemäßen Umgang mit dem Produkt
oder eine fehlerhafte Montage entstehen. Ihre
gesetzlich vorgeschriebenen Rechte (sofern
vorhanden) bleiben davon unberührt.
Aussparung zum Verlegen der Kabel (eine von zweien)
Schlagen Sie in der Gebrauchsanweisung zur
SU-PW2 nach.
Schritt 3: Installieren der
Montageplatte an der
Wand
Versetzen Sie die Trageschäfte der
Befestigungsstreben.
Schlagen Sie in der Gebrauchsanweisung zur
SU-PW2 nach.
8 (DE)
Page 9
Vorbereitungen für die
Installation des Displays
Lösen Sie vor dem Abnehmen des Tischständers
alle Kabel vom Display.
Schlagen Sie in der Gebrauchsanweisung zur
SU-PW2 nach.
1 Legen Sie das Display mit dem Bildschirm
nach unten in einem Abstand von
mindestens 20 cm zum Fußboden auf eine
stabile, mit einem Tuch bedeckte
Arbeitsfläche.
2 Entfernen Sie die Schrauben, mit denen der
Ständer am Display befestigt ist, und
nehmen Sie den Ständer vom Display ab.
3 Entfernen Sie die sechs Schrauben an der
Rückseite des Displays (nur beim KEV42A10E).
4 Bringen Sie die vier mitgelieferten Haken
mit den vier mitgelieferten Schrauben
(+PSW5 × L16) an.
In die tiefer
liegenden
Bohrungen
schrauben.
DE
Hinweis
Nehmen Sie zuvor den Kabelhalter ab, wenn
einer am Display angebracht ist. Einzelheiten
zum Kabelhalter finden Sie in der
Bedienungsanleitung zum Display (nur beim
KE-V42A10E/KLV-V40A10E/KDL-V40A11E).
Hinweis
Wenn Sie einen elektrischen Schraubenzieher
verwenden, stellen Sie ein Drehmoment von
etwa 2 N·m ein.
Schritt 4: Installieren des
Displays
Schlagen Sie in der Gebrauchsanweisung zur
SU-PW2 nach.
(DE) 9
Page 10
Nederlands
Voor de installatie
Voor klanten
Om uw product te beschermen en uit
veiligheidsoverwegingen raadt Sony u ten
stelligste aan om uw beeldscherm enkel door een
erkende vakman tegen de wand te laten
bevestigen. Probeer dit niet zelf te doen.
Uw KE-V42A10E/KLV-V40A10E/KLV-S40A10E/
KDL-V40A11E/KDL-S40A11E kan tegen de wand
bevestigd worden met SU-PW2
wandmontagesteunen (niet meegeleverd). Bezorg
uw vakman deze bijlage en de handleiding
(meegeleverd met de SU-PW2
wandmontagesteun). Lees deze documenten
aandachtig om uw veiligheid en een correcte
installatie te waarborgen.
Aan een Sony-handelaar of installateur
Besteed steeds de nodige aandacht aan uw
veiligheid tijdens de installatie, onderhoud en
controle van dit product.
Het beeldscherm tegen
een muur bevestigen
Stap 1: De vereiste onderdelen
voor de installatie
controleren
Open de verpakking van de wandmontagesteun
en controleer of ze alle benodigde onderdelen en
een handleiding bevat.
Stap 2: De installatieplaats
bepalen
Kies waar u uw beeldscherm wilt installeren.
Raadpleeg de achterflap of de binnenkant van de
achterflap voor de afmetingen van de installatie en
bepaal de plaats.
Als u de kabels door de muur wilt leiden, bepaal
dan ook de plaats van de kabelopening en boor
een gat in de muur.
Het beeldscherm kan tegen een muur bevestigd
worden door middel van de wandmontagesteunen
(niet meegeleverd).
Controleer het modelnummer van uw televisie en
let erop dat u enkel een steun gebruikt die geschikt
is voor uw toestel. Volg de stappen in dit boekje en
respecteer ook de handleiding die met de SU-PW2
wandmontagesteun worden meegeleverd. Zo bent
u zeker dat de installatie correct verloopt.
Voldoende ervaring is vereist voor het
installeren van dit product. Besteed de
installatie uit aan uw Sony-handelaar of een
bevoegde installateur en houd voldoende
rekening met de veiligheid tijdens de
installatie.
Sony is niet aansprakelijk voor schade of letsel
als gevolg van onjuist handelen of een onjuiste
installatie. Uw wettelijke rechten (indien van
toepassing) worden niet aangetast.
Opening voor kabels (één of twee)
Raadpleeg de handleiding van de SU-PW2.
Stap 3: De plaat aan de muur
bevestigen
Verplaats de steunen voor de montagehaken.
Raadpleeg de handleiding van de SU-PW2.
10 (NL)
Page 11

De installatie van het
beeldscherm voorbereiden
Verwijder alle kabels uit het beeldscherm voordat
u het steunblad verwijdert.
Raadpleeg de handleiding van de SU-PW2.
1 Leg het beeldscherm met het glas naar
beneden op een stabiel, met zacht
materiaal bedekt werkoppervlak dat ten
minste 20 cm van de vloer is verwijderd.
3 Verwijder zes schroeven aan de achterkant
van het beeldscherm (enkel voor KEV42A10E).
4 Bevestig de vier bijgeleverde haken met de
vier bijgeleverde schroeven (+PSW5 × L16).
2 Verwijder de schroeven waarmee het
beeldscherm op de tafelstandaard is
bevestigd en haal de tafelstandaard van het
beeldscherm.
Opmerking
Verwijder vooraf de kabelhouder als die
bevestigd is aan het beeldscherm. Wilt u meer
informatie over de kabelhouder, raadleeg dan de
gebruiksaanwijzing van het beeldscherm (enkel
voor KE-V42A10E/KLV-V40A10E/KDLV40A11E).
Bevestig in de
aanwezige
schroefgaten.
Opmerking
Wanneer u een elektrische schroevendraaier
gebruikt, moet de draaikracht worden ingesteld
op ongeveer 2 N·m.
Stap 4: Het beeldscherm
installeren
Raadpleeg de handleiding van de SU-PW2.
NL
(NL) 11
Page 12

Italiano
Prima dell’installazione
Per i clienti
Per ragioni di protezione e sicurezza, Sony
consiglia di far eseguire il montaggio a parete del
display esclusivamente da personale autorizzato.
Evitare di eseguire autonomamente l’installazione.
L’apparecchio KE-V42A10E/KLV-V40A10E/KLVS40A10E/KDL-V40A11E/KDL-S40A11E può
essere montato a parete utilizzando la staffa di
montaggio a parete SU-PW2 (venduta
separatamente). È necessario fornire all’installatore
autorizzato questo dispositivo supplementare
insieme alle relative istruzioni (in dotazione con la
staffa di montaggio a parete SU-PW2). È
opportuno leggere attentamente questi documenti
per ragioni di sicurezza e per consentire
un’installazione appropriata.
Per i rivenditori e gli installatori Sony
Prestare molta attenzione alla sicurezza durante le
operazioni di installazione, manutenzione
periodica e controllo del prodotto.
Installazione del display su
Punto 1: Verifica dei
componenti necessari
all’installazione
Aprire l’imballaggio della staffa di montaggio a
parete e verificare che vi siano tutti i componenti
necessari e le istruzioni.
Punto 2: Individuazione del
luogo di installazione
Individuare il luogo di installazione del display.
Guardare sul coperchio posteriore o dentro al
coperchio posteriore per informazioni sulle
dimensioni relative all’installazione del display e
per determinare il luogo di installazione.
Se si desidera far passare i cavi nella parete,
determinare anche la posizione del foro per i cavi e
praticare un foro nella parete.
una parete
È possibile installare il display su una parete
mediante una staffa di montaggio a parete
(venduta separatamente).
Controllare il numero del modello del televisore e
accertarsi di utilizzare esclusivamente la staffa
specificata per il modello. Per effettuare una
corretta installazione, fare riferimento alla
procedura illustrata in questo opuscolo unitamente
alle istruzioni fornite in dotazione con la staffa di
montaggio a parete SU-PW2.
Per l’installazione del presente prodotto, è
necessario disporre di sufficiente competenza.
Assicurarsi che l’installazione venga eseguita
da un rivenditore Sony o da personale
autorizzato e di prestare particolare attenzione
durante l’installazione.
Sony non può essere ritenuta responsabile per
eventuali danni o ferite risultanti da un uso
errato o un’installazione non adeguata. I diritti
legali del cliente, se previsti, non vengono
violati.
Foro per il passaggio dei cavi (uno di due)
Fare riferimento alle istruzioni per la staffa SUPW2.
Punto 3: Installazione della
piastra alla parete
Cambiare le posizioni degli assi di supporto dei
ganci di montaggio.
Fare riferimento alle istruzioni per la staffa SUPW2.
12 (IT)
Page 13

Preparazione all’installazione
del display
Prima di rimuovere il supporto da tavolo,
scollegare tutti i cavi dal display.
Fare riferimento alle istruzioni per la staffa SUPW2.
1 Posizionare il display con lo schermo
rivolto verso il basso su una superficie di
lavoro stabile ricoperta da un panno, ad
almeno 20 cm dal pavimento.
3 Rimuovere sei viti sul lato posteriore del
display (solo per KE-V42A10E).
4 Fissare i quattro gancetti in dotazione con
le quattro viti in dotazione (+PSW5 × L16).
2 Rimuovere le viti che fissano il display al
supporto da tavolo e rimuovere
quest’ultimo dall’apparecchio.
Nota
Rimuovere innanzitutto il fermacavo quando
questo è collegato al display. Per maggiori
dettagli sul fermacavo, fare riferimento alle
istruzioni per l’uso del display (solo per KEV42A10E/KLV-V40A10E/KDL-V40A11E).
Avvitare nei fori
incassati delle viti.
Nota
Se si utilizza un cacciavite elettrico, la coppia
deve essere pari a circa 2 N·m.
Punto 4: Installazione del
display
Fare riferimento alle istruzioni per la staffa SUPW2.
IT
(IT) 13
Page 14

Português
Antes da instalação
Para os clientes
Por razões de protecção do produto e de
segurança, a Sony recomenda vivamente que a
instalação do ecrã na parede seja efectuada por um
técnico qualificado. Não seja o utilizador a instalar
o ecrã.
O ecrã KE-V42A10E/KLV-V40A10E/KLVS40A10E/KDL-V40A11E/KDL-S40A11E pode ser
instalado na parede com o suporte de montagem
na parede SU-PW2 (vendido em separado).
Forneça ao técnico este suplemento de instalação,
assim como o Manual de instruções (fornecido
com o suporte de montagem na parede SU-PW2).
Leia atentamente estes documentos para uma
instalação segura e adequada.
Para Agentes e Técnicos da Sony
Dê total atenção à segurança durante a instalação,
manutenção periódica e inspecção deste produto.
Instalar o ecrã numa
parede
Passo 1: Verifique se dispõe
das peças necessárias
para a instalação
Abra a embalagem do suporte de montagem na
parede e verifique se contém todas as peças
necessárias e o Manual de instruções.
Passo 2: Escolha o local de
instalação
Decida onde vai instalar o ecrã. Procure na
contracapa ou no interior da contracapa as
dimensões para instalação do ecrã e determine o
local.
Se pretender fazer passar os cabos pela parede,
determine também a posição do orifício para
passagem de cabos e abra um orifício na parede.
O ecrã pode ser instalado numa parede através da
fixação de um suporte de montagem na parede
(vendido em separado).
Verifique o número do modelo do televisor e
certifique-se de que utiliza o suporte especificado
para esse modelo. Consulte os Passos indicados
nesta brochura e o Manual de instruções fornecido
com o suporte de montagem na parede SU-PW2,
para proceder a uma instalação adequada.
É necessária uma formação técnica adequada
para instalar este produto. Certifique-se de
que a instalação é efectuada por agentes da
Sony ou agentes autorizados e tenha em
atenção a segurança durante a instalação.
A Sony não se responsabiliza por quaisquer
danos ou ferimentos causados pela utilização
indevida ou instalação incorrecta. Os seus
Direitos Estatutários (se existirem) não são
afectados.
Orifício para instalação de cabos (Um de dois)
Consulte o Manual de instruções do suporte SUPW2.
Passo 3: Fixar a placa à parede
Altere as posições dos veios de apoio do grampo
de montagem.
Consulte o Manual de instruções do suporte SUPW2.
14 (PT)
Page 15

Preparação da instalação do
ecrã
Antes de retirar a base para mesa, desligue todos
os cabos do ecrã.
Consulte o Manual de instruções do suporte SUPW2.
1 Coloque o ecrã voltado para baixo, numa
superfície de trabalho estável coberta com
um pano, a uma distância de, pelo menos,
20 cm do chão.
3 Retire os seis parafusos da parte posterior
do ecrã (apenas para o ecrã KE-V42A10E).
4 Fixe os quatro grampos fornecidos com os
quatro parafusos fornecidos (+PSW5 ×
L16).
2 Retire os parafusos que prendem o ecrã à
base para mesa e separe a base do ecrã.
Nota
Retire previamente o porta-cabos, quando este
estiver fixo ao ecrã. Para obter mais informações
sobre o porta-cabos, consulte o manual de
instruções do ecrã (apenas para o ecrã KEV42A10E/KLV-V40A10E/KDL-V40A11E).
Aparafuse nos
orifícios abertos.
Nota
Quando utilizar uma chave eléctrica, regule o
binário de aperto para aproximadamente 2 N·m.
Passo 4: Instalação do ecrã
Consulte o Manual de instruções do suporte SUPW2.
PT
(PT) 15
Page 16

Dansk
Før montering
Til kunder
Af hensyn til produktets og den generelle
sikkerhed, anbefaler Sony på det kraftigste, at
vægmontering af skærmen udføres af en pålidelig,
autoriseret installatør. Forsøg ikke at montere det
selv.
Model KE-V42A10E/KLV-V40A10E/KLVS40A10E/KDL-V40A11E/KDL-S40A11E kan
monteres på væggen ved hjælp af vægbeslag SUPW2 (ekstraudstyr). Giv installatøren dette
monteringstillæg og den monteringsvejledning,
der fulgte med vægbeslag SU-PW2. Af
sikkerhedshensyn skal I læse dokumentationen
omhyggeligt for at udføre monteringen korrekt.
Til Sony-forhandlere og installatører
Vær opmærksom på sikkerheden under
montering, vedligeholdelse og eftersyn af
produktet.
Montering af skærmen på
væggen
Trin 1: Kontroller de dele, der
skal bruges ved
monteringen
Kontroller, at pakken med vægbeslaget indeholder
en monteringsvejledning og alle nødvendige dele.
Trin 2: Find et monteringssted
Find den placering, hvor skærmen skal monteres.
Tabellen med skærmens monteringsmål, som du
skal bruge, når skærmen skal monteres, findes på
bagsiden eller inde i denne vejledning.
Hvis kablerne føres inde i væggen, skal du også
finde placeringen af kablernes udgangshul og bore
et hul i væggen.
Skærmen kan hænges op på en væg ved at
montere et vægbeslag (ekstraudstyr).
Kontroller tv’ets modelnummer, og brug kun det
beslag, der er angivet for den pågældende model.
Se trinnene i denne vejledning, og læs
anvisningerne i monteringsvejledningen til
vægbeslag SU-PW2 for at udføre monteringen
korrekt.
Der kræves tilstrækkelig ekspertise for at
installere dette produkt. Lad monteringen
udføre af en Sony-forhandler eller autoriseret
forhandler, og vær særlig opmærksom på
sikkerheden under monteringen.
Sony kan ikke holdes ansvarlig for
personskader eller materielle skader forårsaget
af ukorrekt behandling eller montering. Dine
lovsikrede rettigheder påvirkes ikke.
Hul til kabelføring (et af to)
Yderligere oplysninger findes i
monteringsvejledningen til SU-PW2.
Trin 3: Monter pladen på
væggen
Skift positionerne for monteringsenhedsholderne.
Yderligere oplysninger findes i
monteringsvejledningen til SU-PW2.
16 (DK)
Page 17

Forbered monteringen af
skærmen
Fjern alle kabler fra skærmen, før du fjerner tvfoden.
Yderligere oplysninger findes i
monteringsvejledningen til SU-PW2.
1 Placer skærmen med forsiden nedad på en
stabil arbejdsflade dækket med et klæde
mindst 20 cm fra gulvet.
2 Fjern de skruer, der holder skærmen fast
på tv-foden, og fjern tv-foden.
3 Fjern de seks skruer på bagsiden af
skærmen (kun KE-V42A10E).
4 Fastgør de fire leverede kroge med de fire
leverede skruer (+PSW5 × L16).
Skru dem ind i de
forsænkede
skruehuller.
Bemærk
Fjern kabelholderen, før den monteres på
skærmen. Yderligere oplysninger om
kabelholderen findes i skærmens
betjeningsvejledning (kun KE-V42A10E/KLVV40A10E/KDL-V40A11E).
Bemærk
Hvis der bruges en elektrisk skruemaskine,
indstilles momentet til cirka 2 N·m.
Trin 4: Montering af skærmen
Yderligere oplysninger findes i
monteringsvejledningen til SU-PW2.
DK
(DK) 17
Page 18

Svenska
Före installationen
För kunder
För att skydda produkten och av säkerhetsskäl,
rekommenderar Sony starkt att väggmonteringen
av din bildskärm utförs av en pålitlig licensierad
entreprenör. Försök inte att montera den själv.
Din KE-V42A10E/KLV-V40A10E/KLV-S40A10E/
KDL-V40A11E/KDL-S40A11E kan monteras på
väggen med hjälp av väggfästet SU-PW2 (säljes
separat). Visa din entreprenör denna
installationsbilaga, samt instruktionerna (levereras
med väggfäste SU-PW2). Läs dessa dokument
noga för säkert och korrekt montage.
För Sony-återförsäljare och entreprenörer
Var noga med säkerheten vid montaget, vid
regelbundet underhåll samt när produkten
undersöks.
Montera bildskärmen på
en vägg
Bildskärmen kan monteras på en vägg genom att
man monterar ett väggfäste (säljes separat).
Kontrollera din TV:s modellnummer, så att endast
det fäste som är avsett för din modell används.
Referera till stegen på detta blad tillsammans med
de instruktioner som medföljde väggfäste SU-PW2,
så att montaget utförs korrekt.
För att installera den här produkten krävs
vissa kunskaper. Överlåt installationen till en
Sony-återförsäljare eller behörig montör och se
till att säkerhetsföreskrifterna följs under
installationen.
Sony kan inte göras ansvarigt för eventuella
skador eller personskador som orsakats av
felaktig användning eller felaktig installation.
Dina eventuella lagenliga rättigheter påverkas
inte.
Steg 1: Kontrollera att du har
alla delar som krävs för
installationen
Öppna paketet med väggfästet och kontrollera så
att alla delar finns med, tillsammans med
instruktionerna.
Steg 2: Bestäm dig för var
bildskärmen ska
installeras
Bestäm dig för var du vill montera din bildskärm.
Bläddra till det bakre omslaget eller inuti det bakre
omslaget för att se skärmens monteringsmått och
för att kunna avgöra monteringsplatsen.
Om du avser att dra kablarna i väggen, ska även
kabelns position fastställas och ett hål borras i
väggen.
Hål för kabeldragning (ett av två)
Referera till instruktionerna för SU-PW2.
Steg 3: Fäst monteringsplattan
på väggen
Ändra placeringen av stödskaklarna för
monteringskrokarna.
Referera till instruktionerna för SU-PW2.
18 (SE)
Page 19

Förberedelser inför installation
av bildskärmen
Dra ut alla kablar ur bildskärmen innan
bordstativet demonteras.
Referera till instruktionerna för SU-PW2.
1 Placera bildskärmen med skärmen vänd
nedåt på en mjuk duk eller en filt, minst 20
cm från golvet.
2 Skruva bort skruvarna till bordsstället och
ta sedan bort bordsstället från
bildskärmen.
3 Lossa sex skruvar på bildskärmens baksida
(endast för KE-V42A10E).
4 Fäst de fyra medföljande hakarna med de
fyra medföljande skruvarna (+PSW5 ×
L16).
Skriva in i de
försänkta
skruvhålen.
Obs!
Ta bort kabelhållaren i förväg när den sitter
monterad på bildskärmen. Referera till
bildskärmens bruksanvisning för detaljerad
information om kabelhållaren (endast för KEV42A10E/KLV-V40A10E/KDL-V40A11E).
Obs!
Om du använder en elektrisk skruvdragare
ställer du vridmomentet på ungefär 2 N·m.
Steg 4: Montera bildskärmen
Referera till instruktionerna för SU-PW2.
SE
(SE) 19
Page 20

Suomi
Ennen asennusta
Asiakkaille
Tuotteen ja käyttäjien suojelemiseksi Sony
suosittelee, että näyttöyksikön seinäasennuksen
tekee valtuutettu huoltoliike. Älä yritä asentaa sitä
itse.
KE-V42A10E/KLV-V40A10E/KLV-S40A10E/KDLV40A11E/KDL-S40A11E voidaan asentaa seinälle
SU-PW2-seinäasennuskiinnittimen (lisävaruste)
avulla. Toimita huoltoliikkeelle tämä asennusliite
ja asennusohje (tulee SU-PW2seinäasennuskiinnittimen mukana). Lue nämä
asiakirjat huolellisesti, jotta asennus sujuu
turvallisesti ja oikein.
Sony-jälleenmyyjille ja huoltoliikkeille
Noudata turvallisuusohjeita tämän tuotteen
asennuksessa, määräaikaishuollossa ja
tarkastuksessa.
Näyttöyksikön
asentaminen seinälle
Näyttöyksikkö voidaan asentaa seinälle
seinäasennuskiinnittimen (lisävaruste) avulla.
Tarkista television mallinumero ja käytä vain
kyseiselle mallille määritettyä kiinnitintä. Tee
asennus tämän ohjeen ja SU-PW2seinäasennuskiinnittimen mukana tulleen
käyttöohjeen mukaisesti.
Vaihe 1: Tarkasta asennuksessa
tarvittavat osat
Avaa seinäasennuskiinnittimen pakkaus ja tarkista,
että siinä on kaikki tarvittavat osat ja käyttöohje.
Vaihe 2: Valitse asennuspaikka
Päätä, minne haluat asentaa näyttöyksikön. Tämän
käyttöohjeen takakannessa tai takakannen
sisäpuolella on näyttöyksikön asennusmitat, joiden
avulla voit päättää, minne televisio asennetaan.
Jos viet kaapelit seinän sisälle, määritä myös
kaapelireiän paikka ja poraa reikä seinään.
Aukko kaapeleita varten (toinen kahdesta)
Katso SU-PW2:n käyttöohjetta.
Vaihe 3: Kiinnitä asennuslevy
seinään
Tämän tuotteen asentaminen vaatii
erikoisasiantuntemusta. Asennus on jätettävä
Sony-jälleenmyyjän tai valtuutetun
huoltoliikkeen tehtäväksi. Asennuksen
turvallisuuteen on kiinnitettävä erityisen
suurta huomiota.
Sony ei ole vastuussa vahingoista tai
vammoista, jotka aiheutuvat tuotteen väärästä
käsittelystä tai asennuksesta. Tämä ei vaikuta
(mahdollisiin) asianomaisten lakien mukaisiin
oikeuksiin.
20 (FI)
Muuta asennuskoukkuyksikön tukivarsien
paikkaa.
Katso SU-PW2:n käyttöohjetta.
Page 21

Valmistele näyttöyksikön
asennus
Irrota kaikki kaapelit näyttöyksiköstä, ennen kuin
irrotat pöytäjalustan.
Katso SU-PW2:n käyttöohjetta.
1 Aseta näyttöyksikkö kuvaruutu alaspäin
vakaalle, kankaalla päällystetylle
työalustalle vähintään 20 cm:n korkeudelle
lattiasta.
2 Irrota ruuvit, joilla näyttöyksikkö on
kiinnitetty pöytäjalustaan. Irrota
pöytäjalusta sitten näyttöyksiköstä.
3 Irrota kuusi ruuvia näyttöyksikön
takaosasta (vain KE-V42A10E).
4 Kiinnitä vakiovarusteisiin sisältyvät neljä
koukkua neljällä vakiovarusteisiin
sisältyvällä ruuvilla (+PSW5 × L16).
Kiinnitä ruuvit
upotettuihin
ruuvinreikiin.
Huomautus
Irrota kaapelipidike etukäteen, jos se on liitetty
näyttöyksikköön. Lisätietoja kaapelipidikkeestä
on näyttöyksikön käyttöohjeessa (vain KEV42A10E/KLV-V40A10E/KDL-V40A11E).
Huomautus
Jos kiristät ruuvit sähkökäyttöisellä
ruuvinvääntimellä, valitse kiristysvoiman
asetukseksi noin 2 N·m.
FI
Vaihe 4: Asenna näyttöyksikkö
Katso SU-PW2:n käyttöohjetta.
(FI) 21
Page 22

Norsk
Før montering
Til kunder
Av hensyn til sikkerhet og beskyttelse av produktet
anbefaler Sony på det sterkeste at veggmontering
av skjermen utføres av pålitelige, lisensierte
fagfolk. Forsøk ikke å montere den selv.
Din KE-V42A10E/KLV-V40A10E/KLV-S40A10E/
KDL-V40A11E/KDL-S40A11E kan veggmonteres
med en brakett for veggmontasje av typen SU-PW2
(selges separat). Vennligst gi montøren dette
utstyret, sammen med instruksjonene (følger med
SU-PW2 brakett for veggmontasje). Les disse
dokumentene nøye for å sikre riktig installasjon og
maksimal sikkerhet.
Til Sony-forhandlere og underleverandører
Fokuser fullt på sikkerhet under montering,
periodisk vedlikehold og kontroller av dette
produktet.
Montere skjermen på en
vegg
Skjermen kan monteres på en vegg ved hjelp av en
brakett for veggmontasje (selges separat).
Sjekk TV-apparatets modellnummer, og pass på at
du kun bruker braketten som er spesifisert for din
modell. Se trinnene beskrevet i dette heftet
sammen med instruksjonene som følger med
braketten for veggmontasje av typen SU-PW2 for
informasjon om riktig montering.
Tilstrekkelig kompetanse er nødvendig for å
installere dette produktet. Sørg for at
installeringen blir utført av Sony-forhandler
eller annet kvalifisert personell. Sørg for at det
blir tatt spesielt hensyn til sikkerheten under
installeringen.
Sony skal ikke holdes ansvarlig for materielleller personskader som skyldes feil håndtering
eller installering. Eventuelle lovfestede
rettigheter påvirkes ikke.
Trinn 1: Kontroller delene som
trengs for monteringen
Åpne forpakningen med braketten for
veggmontasje og sjekk at alle nødvendige deler er
til stede, sammen med instruksjonene.
Trinn 2: Bestem hvor utstyret
skal monteres
Bestem hvor du vil montere skjermen. Se bak på
omslaget eller inni det bakre omslaget for
informasjon om dimensjoner for installasjonen, og
fastsett plasseringen.
Hvis du planlegger å trekke kablene til apparatet i
veggen, må du fastslå posisjonen til kabelhullet og
bore et hull i veggen.
Hull til kabler (ett av to)
Se instruksjonene for SU-PW2.
Trinn 3: Monter platen på
veggen
Endre plasseringene til støttestengene på
monteringskrokene.
Se instruksjonene for SU-PW2.
22 (NO)
Page 23

Gjør klar for montering av
skjermen
Før du fjerner bordstativet må du koble fra alle
kablene på skjermen.
Se instruksjonene for SU-PW2.
1 Legg skjermen, med forsiden ned, på et
stabilt tøydekket underlag, minst 20 cm
over gulvet.
2 Løsne skruene som holder skjermen fast til
bordstativet, og fjern så stativet fra
skjermen.
3 Fjern seks skruer fra baksiden av skjermen
(kun for KE-V42A10E).
4 Fest de medfølgende fire krokene med de
fire medfølgende skruene (+PSW5 × L16).
Skru inn i de
forsenkede
skruehullene.
Merknad
Fjern kabelholderen på forhånd hvis den er
festet til skjermen. For informasjon om
kabelholderen, se håndboken til skjermen (kun
for KE-V42A10E/KLV-V40A10E/KDLV40A11E).
Merknad
Hvis du bruker en elektrisk skrutrekker, må du
sette dreiemomentet til omtrent 2 N·m.
Trinn 4: Monter skjermen
NO
Se instruksjonene for SU-PW2.
(NO) 23
Page 24

Ελληνικά
Πριν απ την τοποθέτηση
Για τους πελάτες
Για λγους προστασίας και ασφαλείας του
προϊντος, η Sony συνιστά θερµώς η στήριξη
της οθνης σας στον τοίχο να
πραγµατοποιηθεί απ κάποιον αξιπιστο
τεχνικ µε τα κατάλληλα προσντα. Μην
επιχειρήσετε να την εγκαταστήσετε µνοι σας.
Η KE-V42A10E/KLV-V40A10E/KLV-S40A10E/
KDL-V40A11E/KDL-S40A11E µπορούν να
στηριχθούν στον τοίχο χρησιµοποιώντας το
επιτοίχιο στήριγµα SU-PW2 (πωλείται
ξεχωριστά). ∆ώστε στον τεχνικ το παρν
συµπλήρωµα εγκατάστασης καθώς και τις
Οδηγίες (που παρέχονται µε το επιτοίχιο
στήριγµα SU-PW2). ∆ιαβάστε τα έγγραφα αυτά
προσεκτικά για ασφαλή και κατάλληλη
εγκατάσταση.
Προς τους αντιπροσώπους της Sony και τους
τεχνικούς
∆ώστε µεγάλη προσοχή στην ασφάλεια κατά
την εγκατάσταση, την περιοδική συντήρηση
και την εξέταση αυτού του προϊντος.
Βήµα 1: Έλεγχος των
εξαρτηµάτων που
απαιτούνται για την
τοποθέτηση
Ανοίξτε τη συσκευασία του επιτοίχιου
στηρίγµατος και ελέγξτε για την παρουσία
λων των εξαρτηµάτων καθώς και των
Οδηγιών.
Βήµα 2: Καθορισµς της
θέσης τοποθέτησης
Αποφασίστε πού θα εγκαταστήσετε την οθνη
σας. Γυρίστε στo οπισθφυλλο ή στο µέσα
οπισθφυλλο για τις διαστάσεις εγκατάστασης
της οθνης σας και προσδιορίστε τη θέση.
Αν επιθυµείτε να περάσετε τα καλώδια απ
τον τοίχο, προσδιορίστε επίσης τη θέση της
τρύπας που θα περάσουν τα καλώδια και
ανοίξτε την τρύπα στον τοίχο.
Εγκατάσταση της οθνης
σε τοίχο
Η οθνη µπορεί να εγκατασταθεί σε τοίχο
προσαρτώντας το επιτοίχιο στήριγµα (πωλείται
ξεχωριστά).
Επαληθεύστε τον αριθµ του µοντέλου της
τηλερασής σας και βεβαιωθείτε τι
χρησιµοποιείτε το στήριγµα που καθορίζεται
για το µοντέλο σας µνον. Για να
πραγµατοποιήσετε επιτυχώς την εγκατάσταση,
ανατρέξτε στα βήµατα του παρντος
φυλλαδίου καθώς και στις Οδηγίες που
παρέχονται µε το επιτοίχιο στήριγµα SU-PW2.
Για την τοποθέτηση του συγκεκριµένου
προϊντος απαιτείται επαρκής τεχνική
εµπειρία και κατάρτιση. Αναθέστε την
τοποθέτηση του προϊντος σε
αντιπροσώπους ή εξουσιοδοτηµένους
τεχνικούς της Sony και προσέξτε ιδιαίτερα
τις προφυλάξεις ασφάλειας κατά τη
διάρκεια της τοποθέτησης.
Η Sony δεν αναλαµβάνει καµία ευθύνη για
τυχν ζηµιά ή τραυµατισµ που ενδέχεται
να προκληθεί απ λανθασµένους
χειρισµούς ή µη κατάλληλη τοποθέτηση.
∆εν επηρεάζονται τα νµιµα δικαιώµατά
σας (εάν υπάρχουν).
Οπή για καλώδιο (Μία απ τις δύο)
Ανατρέξτε στις Οδηγίες για το SU-PW2.
Βήµα 3: Τοποθέτηση της
βάσης στον τοίχο
Αλλάξτε τη θέση των αξνων στήριξης της
ράβδου µε τα άγκιστρα.
Ανατρέξτε στις Οδηγίες για το SU-PW2.
24 (GR)
Page 25

Προετοιµασία για την
τοποθέτηση της οθνης
Πριν αφαιρέσετε την επιτραπέζια βάση,
αποσυνδέστε λα τα καλώδια απ την οθνη.
Ανατρέξτε στις Οδηγίες για το SU-PW2.
1 Τοποθετήστε την οθνη µε την
µπροστινή πλευρά στραµµένη προς τα
κάτω σε µια σταθερή επιφάνεια
καλυµµένη µε κάποιο πανί, σε ύψος
τουλάχιστον 20 cm επάνω απ το
δάπεδο.
2 Αφαιρέστε τις βίδες που συγκρατούν
την οθνη στην επιτραπέζια βάση και
στη συνέχεια αφαιρέστε την
επιτραπέζια βάση απ την οθνη.
3 Αφαιρέστε έξι βίδες απ το πίσω µέρος
της οθνης (για την KE-V42A10E
µνον).
4 Πρoσαρτήστε τα τέσσερα άγκιστρα
που παρέχονται στη συσκευασία µε τις
τέσσερις βίδες που παρέχονται στη
συσκευασία (+PSW5 × L16).
Βιδώστε στις
φρεζαρισµένες
τρύπες.
Σηµείωση
Αφαιρέστε προηγουµένως τη συσκευή
συγκράτησης καλωδίων που είναι
προσαρτηµένη στην οθνη. Για
λεπτοµέρειες σχετικά µε τη συσκευή
συγκράτησης των καλωδίων, ανατρέξτε στο
εγχειρίδιο οδηγιών της οθνης (για την KEV42A10E/KLV-V40A10E/KDL-V40A11E
µνον).
Σηµείωση
Εάν χρησιµοποιήσετε ηλεκτρικ κατσαβίδι,
ρυθµίστε τη ροπή στρέψης στην τιµή 2 N·m.
Βήµα 4: Τοποθέτηση της
οθνης
Ανατρέξτε στις Οδηγίες για το SU-PW2.
GR
(GR) 25
Page 26

Język polski
Przed instalacją
Informacja dla klientów
Dla ochrony produktu oraz ze względów
bezpieczeństwa, firma Sony zaleca powierzenie
montażu monitora na ścianie wykwalifikowanym
instalatorom. Nie należy podejmować
samodzielnych prób montażu urządzenia.
Model KE-V42A10E/KLV-V40A10E/KLV-S40A10E/
KDL-V40A11E/KDL-S40A11E można zamocować
przy pomocy uchwytu SU-PW2 (sprzedawany
oddzielnie). Instalator powinien mieć wgląd do
Dodatku instalacyjnego oraz Instrukcji
(dostarczanej z uchwytem ściennym SU-PW2). W
celu zapewnienia bezpieczeństwa oraz
poprawności instalacji, zapoznaj się dokładne z
tymi dokumentami.
Do sprzedawców produktów firmy Sony i
instalatorów
Podczas instalacji, okresowej konserwacji oraz
przeglądu urządzenia zwróć szczególną uwagę na
kwestie bezpieczeństwa.
Instalacja monitora na
Krok 1: Sprawdź części
wymagane do
instalacji
Otwór opakowanie z uchwytem ściennym i
konsultując się z Instrukcją sprawdź, czy zawiera
one wszystkie części wymagane do instalacji.
Krok 2: Wybierz miejsce
instalacji
Wybierz miejsce zamontowania monitora na
ścianie. Przy wybieraniu miejsca zamontowania
monitora sprawdź wymiary instalacyjne
urządzenia, znajdujące się na tylnej okładce lub
wewnątrz okładki tego dokumentu.
Jeśli chcesz poprowadzić kable w ścianie, określ
miejsce otworu na kable i wywierć otwór w
ścianie.
ścianie
Do instalacji monitora na ścianie można użyć
ściennego wspornika (sprzedawanego oddzielnie).
Sprawdź numer modelu telewizora w celu
upewnienia się, że używany uchwyt ścienny jest
przeznaczony do wykorzystania jedynie z
posiadanym modelem odbiornika. W celu
poprawnego przeprowadzenia czynności
instalacyjnych, wykonuj czynności opisane w
Krokach tej broszury oraz z Instrukcją uchwytu
ściennego SU-PW2.
Instalacja niniejszego produktu wymaga
odpowiedniej wiedzy i doświadczenia. Należy
zlecić instalację dystrybutorowi firmy Sony lub
licencjonowanym wykonawcom i zwrócić
szczególną uwagę na bezpieczeństwo
podczas instalacji.
Firma Sony nie ponosi odpowiedzialności za
żadne szkody lub uszkodzenia ciała powstałe
w wyniku niewłaściwego użytkowania lub
niewłaściwej instalacji. Nie ma to wpływu na
żadne Państwa uprawnienia ustawowe (jeśli
dotyczy).
Otwór do przeprowadzenia kabli (Jeden z dwóch)
Patrz Instrukcja produktu SU-PW2.
Krok 3: Zainstaluj na ścianie
płytkę
Zmień położenie wałków wspierających się na
haku mocującym.
Patrz Instrukcja produktu SU-PW2.
26 (PL)
Page 27

Przygotuj się do instalacji
monitora
Przed zdjęciem podstawy odłącz wszystkie
przewody od monitora.
Patrz Instrukcja produktu SU-PW2.
1 Umieść monitor ekranem do dołu, na
stabilnej, pokrytej szmatką powierzchni, w
odległości co najmniej 20 cm od podłogi.
2 Usuń wkręty łączące podstawę do
monitora, a następnie odłącz podstawę od
urządzenia.
3 Usuń sześć wkrętów znajdujących się na
dole monitora (dotyczy tylko modelu KEV42A10E).
4 Przykręć cztery dostarczone haczyki przy
pomocy czterech wkrętów również
wchodzących w skład wyposażenia
(+PSW5 × L16).
Przymocuj wkręty
do wpuszczonych
otworów.
Uwaga
Wcześniej należy zdjąć uchwyt na kable, jeśli
taki został zamocowany na monitora. Aby
uzyskać szczegółowe informacje na temat
uchwytu na kable, patrz instrukcja obsługi
monitora (dotyczy tylko modeli KE-V42A10E/
KLV-V40A10E/KDL-V40A11E).
Uwaga
W przypadku korzystania z elektrycznego
śrubokręta, ustaw moment obrotowy na ok.
2 N·m.
Krok 4: Zainstaluj monitora
Patrz Instrukcja produktu SU-PW2.
PL
(PL) 27
Page 28

Русский
Пepeд ycтaновкой
Для покyпaтeлeй
Для обecпeчeния cоxpaнноcти издeлия и по
cообpaжeниям бeзопacноcти компaния Sony
нacтоятeльно peкомeндyeт пpивлeкaть для
ycтaновки диcплeя нa cтeнe только нaдeжныx
лицeнзиpовaнныx подpядчиков. He пытaйтecь
выполнить ycтaновкy caмоcтоятeльно.
KE-V42A10E/KLV-V40A10E/KLV-S40A10E/KDLV40A11E/KDL-S40A11E можно зaкpeпить нa
cтeнe c помощью нacтeнного монтaжного
кpонштeйнa SU-PW2 (пpиобpeтaeтcя
отдeльно). Пepeдaйтe подpядчикy дaннyю
инcтpyкцию по ycтaновкe, a тaкжe инcтpyкции,
пpилaгaeмыe к нacтeнномy монтaжномy
кpонштeйнy SU-PW2. Bнимaтeльно
ознaкомьтecь c дaнными докyмeнтaми.
Дилepaм и подpядчикaм Sony
Пpи выполнeнии ycтaновки обpaтитe оcобоe
внимaниe нa вопpоcы бeзопacноcти,
пepиодичecкого обcлyживaния и оcмотpa
дaнного издeлия.
Шaг 1: пpовepкa нaличия
дeтaлeй,
нeобxодимыx для
ycтaновки
Bcкpойтe yпaковкy c нacтeнным монтaжным
кpонштeйном и yбeдитecь, что в комплeкт
поcтaвки вxодят инcтpyкция и вce
нeобxодимыe элeмeнты.
Шaг 2: опpeдeлeниe
мecтоположeния для
ycтaновки
Oпpeдeлитe, гдe cлeдyeт ycтaновить диcплeй.
Ha поcлeднeй или пpeдпоcлeднeй cтpaницe
дaнного pyководcтвa пpивeдeнa тaблицa
paзмepов, c помощью котоpой можно
опpeдeлить мecто ycтaновки диcплeя.
Ecли пpeдполaгaeтcя пpодолжить кaбeли в
cтeнe, тaкжe опpeдeлитe отвepcтия для
кaбeля и пpоcвepлитe отвepcтиe в cтeнe.
Уcтaновкa диcплeя нa
cтeнy
Диcплeй можно зaкpeпить нa cтeнe c помощью
нacтeнного монтaжного кpонштeйнa
(пpиобpeтaeтcя отдeльно).
Уточнитe номep модeли вaшeго тeлeвизоpa и
иcпользyйтe кpонштeйн, пpeднaзнaчeнный
имeнно для этой модeли. Для пpaвильного
выполнeния ycтaновки cлeдyйтe инcтpyкциям в
дaнном pyководcтвe, a тaкжe инcтpyкции,
пpилaгaeмой к нacтeнномy монтaжномy
кpонштeйнy SU-PW2.
Для ycтaновки дaнного издeлия тpeбyeтcя
доcтaточный опыт. Oбязaтeльно
обpaтитecь к дилepy или
лицeнзиpовaнномy подpядчикy Sony, a
тaкжe cоблюдaйтe нeобxодимыe мepы
пpeдоcтоpожноcти во вpeмя ycтaновки
издeлия.
Sony нe нeceт отвeтcтвeнноcти в cлyчae
повpeждeния или полyчeния тpaвм в
peзyльтaтe нeпpaвильного обpaщeния или
нeнaдлeжaщeй ycтaновки. Это нe влияeт
нa вaши зaконныe пpaвa (ecли тaковыe
имeютcя).
Oтвepcтиe для подводa кaбeлeй (одно или двa)
Cм. инcтpyкции для SU-PW2.
Шaг 3: ycтaновкa монтaжной
пaнeли нa cтeнe
Измeнитe положeниe опоpныx cтepжнeй
монтaжного пpиcпоcоблeния c кpючкaми.
Cм. инcтpyкции для SU-PW2.
28 (RU)
Page 29

Подготовкa к ycтaновкe
диcплeя
Пepeд cнятиeм нacтольной подcтaвки
отcоeдинитe от диcплeя вce кaбeли.
Cм. инcтpyкции для SU-PW2.
1 Помecтитe диcплeй экpaном вниз нa
ycтойчивyю, pовнyю, покpытyю ткaнью
повepxноcть нa выcотe нe мeнee 20 cм
от полa.
2 Bывepнитe винты, котоpыe кpeпят
нacтольнyю подcтaвкy к диcплeю, и
отcоeдинитe этy подcтaвкy от диcплeя.
3 Bывepнитe шecть винтов нa зaднeй
пaнeли диcплeя (только для модeли KEV42A10E).
4 Иcпользyя чeтыpe пpилaгaeмыx винтa
(+PSW5 × L16), пpикpeпитe чeтыpe
пpилaгaeмыx кpючкa.
Bкpyтить в
yглyблeнныe
отвepcтия для
винтов.
Пpимeчaниe
Ecли нa диcплee ycтaновлeн дepжaтeль
кaбeля, cнимитe eго зapaнee. Подpобныe
cвeдeния о дepжaтeлe кaбeля cодepжaтcя в
Pyководcтвe по экcплyaтaции диcплeя
(только для модeли KE-V42A10E/KLVV40A10E/KDL-V40A11E).
Пpимeчaниe
Ecли иcпользyeтcя элeктpичecкий
шypyповepт, eго вpaщaющий момeнт должeн
cоcтaвлять пpиблизитeльно 2 Н·м.
Шaг 4: ycтaновкa диcплeя
Cм. инcтpyкции для SU-PW2.
RU
(RU) 29
Page 30

Page 31

English
Français
Español
Deutsch
Nederlands
Italiano
Português
Display installing dimensions table
Tableau dimensionnel pour l’installation
Tabla de dimensiones de instalación del monitor
Aufriss und Tabelle der Installationsabmessungen für das Display
Tabel met installatie-afmetingen van het beeldscherm
Tabella delle dimensioni relative all’installazione del display
Tabela com as dimensões para a instalação do ecrã
A
F
C
Screen centre line/
Axe de l’écran/
Línea central de la
pantalla/
Bildschirmmittellinie/
Middellijn van scherm/
Linea di centro schermo/
Linha central do ecrã
Display Model/ Display Dimensions/ Unit: mm/ Length for each mounting angle/ Unit: mm/ Weight/
Modèle d’écran/ Dimensions de l’écran/ Unité : mm/ Longueur de chaque angle de fixation/ Unité : mm/ Poids/
Modelo de monitor/ Dimensiones del monitor/ Unidad: mm/ Longitud de cada ángulo de montaje/ Unidad: mm/ Peso/
Displaymodell/ Abmessungen des Displays/ Einheit: mm/
Model beeldscherm/ Afmetingen beeldscherm/ Eenheid: mm/ Lengte voor elke plaatsingshoek/ Eenheid: mm/ Gewicht/
Modello di display/ Dimensioni del display/ Unità di misura: mm/
Modelo de ecrã Dimensões do ecrã Unidade: mm Extensão de cada ângulo de montagem Unidade: mm Peso
ABCDE Montagewinkel (α°)/ FGH
KE-V42A10E 1054 722 124 300 95 10° 279 205 113
KLV-V40A10E
KDL-V40A11E [286,5]
KLV-S40A10E
KDL-S40A11E [310,5]
1015 684 122
999 693 103
286.5
310.5
Abmessungen bei verschiedenen Montagewinkeln/ Einheit: mm/
Lunghezza per ciascun angolo di montaggio/ Unità di misura: mm/
Mounting angle (α°)/
Angle de fixation (α°)/ (× 4)*
Ángulo de montaje (α°)/
Plaatsingshoek (α°)/
Angolo di montaggio (α°)/
Ângulo de montagem (α°)
90 10° 272 174 111
86 10° 252 194 104
0° 180 234 95
5° 230 222 104
15° 326 187 117
20° 371 165 120
0° 179 201 90
5° 226 190 100
15° 316 155 121
20° 359 132 129
0° 160 214 86
5° 206 206 95
15° 297 177 112
20° 339 156 119
B
B
D
393 ± 0.5 [0,5]
E
Gewicht/
Peso/
38.5 [38,5] kg
(154 kg)
27.5 [27,5] kg
(110 kg)
26.5 [26,5] kg
(106 kg)
* The wall must be strong enough to support at least four times the weight of the display that you are installing./
* Le mur sur lequel l’écran est installé doit pouvoir supporter un poids équivalent à au moins quatre fois le poids de
l’écran./
* La pared en la que se va a instalar el monitor debe ser capaz de soportar un peso al menos cuatro veces superior al
peso del monitor./
* Die Wand, an der das Display installiert werden soll, muss eine Tragfähigkeit von mindestens dem Vierfachen des
Gewichts des Displays aufweisen./
* De muur waaraan u het beeldscherm wilt bevestigen, moet sterk genoeg zijn om ten minste vier keer het gewicht
van het beeldscherm te dragen./
*È necessario che la parete scelta per l’installazione sia in grado di sostenere un peso almeno quattro volte superiore a
quello del display./
*A parede em que o ecrã vai ser instalado deve ser suficientemente forte para suportar um peso de, pelo menos,
quatro vezes o do ecrã.
G
H
Page 32

Dansk
Svenska
Suomi
Norsk
Tabel med installationsmål for skærmen
Bildskärmarnas monteringsmått
Näytön asennusmitat
Tabell over målene til skjermen som skal installeres
Πίνακας διαστάσεων για την τοποθέτηση της οθνης
Tabela wymiarów instalacji monitora
Ta б лицa paзмepов для ycтaновки диcплeя
A
F
C
Skærmens midterlinje/
Installera väggfästet/
Kuvaruudun keskiviiva/
Skjermens senterlinje/
Κεντρική γραµµή οθνης/
Linia środkowa ekranu/
Cpeдняя линия экpaнa
Skærmmodel/ Mål på skærm/ Enhed: mm/ Længde for hver monteringsvinkel/ Enhed: mm/ Vægt/
Bildskärmsmodell/ Bildskärmsmått/ Enhet: mm/ Längd för de olika monteringsvinklarna/ Enhet: mm/ Vikt/
Näytön malli/ Näytön mitat/ Mittayksikkö: mm/ Eri asennuskulmien mitat/ Mittayksikkö: mm/ Paino/
Skjermmodell/ Skjermens mål/ Enhet: mm/ Lengde for hver monteringsvinkel/ Enhet: mm/ Vekt/
Μοντέλο οθνης/ ∆ιαστάσεις οθνης/ Μονάδα: mm/ Μήκος γωνιών τοποθέτησης/ Μονάδα: mm/ Βάρος/
Model odbiornika monitora
Mодeль диcплeя Paзмepы диcплeя Eдиницa: мм Beличинa монтaжныx yглов Eдиницa: мм Bec
KE-V42A10E 1054 722 124 300 95 10° 279 205 113
KLV-V40A10E
KDL-V40A11E
KLV-S40A10E
KDL-S40A11E
/Wymiary odbiornika/ Jednostki: mm/ Długość dla każdego kąta ustawienia/ Jednostki: mm/ Waga/
Monteringsvinkel (α°)/
Monteringsvinkel (α°)/ (× 4)*
ABCDEMonteringsvinkel (α°)/ FGH
1015 684 122 286,5 90 10° 272 174 111
999 693 103 310,5 86 10° 252 194 104
Asennuskulma (α°)/
Γωνία τοποθέτησης (α°)/
Kąt ustawienia (α°)/
Mонтaжный yгол (α°)
0° 180 234 95
5° 230 222 104
15° 326 187 117
20° 371 165 120
0° 179 201 90
5° 226 190 100
15° 316 155 121
20° 359 132 129
0° 160 214 86
5° 206 206 95
15° 297 177 112
20° 339 156 119
B
B
D
393 ± 0,5
E
38,5 kg
(154 kg)
27,5 kg
(110 kg)
26,5 kg
(106 kg)
* Væggen, som skærmen skal monteres på, skal kunne bære en vægt på mindst fire gange skærmens vægt./
* Väggen du tänker installera bildskärmen på bör vara stark nog att minst kunna bära en vikt på fyra gånger
bildskärmens vikt./
* Näyttöyksikön asennusseinän on kestettävä vähintään neljä kertaa näyttöyksikön paino./
*Veggen som skjermen skal monteres på bør ha bærekapasitet for minst fire ganger vekten til skjermen./
*Ο τοίχος στον οποίο θα στερεωθεί η οθνη θα πρέπει να έχει αντοχή βάρους τουλάχιστον τέσσερις φορές
το βάρος της οθνης./
* Ściana, na której ma być zainstalowany odbiornik monitora powinna mieć wytrzymałość umożliwiającą
przeniesienie obciążenia czterokrotnie większego niż ciężar odbiornika./
* Cтeнa, нa котоpой бyдeт ycтaновлeн диcплeй, должнa выдepживaть вec, по кpaйнeй мepe, в чeтыpe paзa
пpeвышaющий вec диcплeя.
G
H
Printed in Spain
 Loading...