

Page 1

Television
Reference Guide
KDL-50W950C / 43W950C
Page 2

Table of Contents
Safety Information . . . . . . . . . . . . . . . . . . . . . 2
Precautions . . . . . . . . . . . . . . . . . . . . . . . . . . .6
Parts and Controls . . . . . . . . . . . . . . . . . . . 8
Controls and Indicators . . . . . . . . . . . . . . . . . 8
Inputs and Outputs . . . . . . . . . . . . . . . . . . . .9
Using Remote Control . . . . . . . . . . . . . . . 10
Remote Control Parts Description. . . . . . . . 10
Connecting the TV . . . . . . . . . . . . . . . . . . 12
Installing the TV to the Wall . . . . . . . . . . 14
Detaching the Table-Top Stand from the
TV . . . . . . . . . . . . . . . . . . . . . . . . . . . . . . . . . . 14
Using the Wall-Mount Bracket
(Supplied) . . . . . . . . . . . . . . . . . . . . . . . . . . . 19
Using an optional Wall-Mount Bracket. . . . 25
Using the Wall-Mount Bracket
(Not Supplied / Not Optional) . . . . . . . . . . .28
Troubleshooting . . . . . . . . . . . . . . . . . . . . 29
Troubles and Solutions . . . . . . . . . . . . . . . .29
Specifications . . . . . . . . . . . . . . . . . . . . . . 30
Introduction
Thank you for choosi ng this Sony product.
Before operating the TV, please read this manual thoroughly and
retain it for fu ture ref erence.
Note
• Before operating the TV, please read “Safety Information”
(page 2).
• Instructio ns about “Installing the TV to the Wall” are included
within this TV’s instructions manual.
• Images an d illustrations used in Startup G uide and this manual
are for reference only and ma y differ from actual p roduct
appearance.
Location of the identification label
Labels for the TV Model No. and Power Supply rating are located
on the rear of the TV.
Labels for the AC ada pter Model No. and Serial No. are located on
the bottom of the AC adapter.
IMPORTANT INFORMATION
If a television is not positioned in a sufficiently stable location, it
can be potentia lly hazardous due to fallin g. Many injur ies,
particularly to children, can be avoided by taking simple
precautions such as:
• Using cabin ets or stands recommended by th e manufacturer of
the television.
• Only using furniture that can safely suppor t the television.
• Ensuring the television is not overhanging the edge of the
supporting furniture.
• Not placing the television on tall furniture (for exam ple,
cupboards or bookcases) without anchoring both the furniture
and the television to a suitable support.
• Not standin g the televisions on cloth or other materials placed
between the televisio n and supporting fur niture.
• Educating children about the dangers of climbing on furniture
to reach the television or its controls.
Safety Information
WARN ING
Batteries must not be expose d to excessive heat such as
sunshine, fire or the like.
Installation/Set-up
Install and use the TV s et in accordance with the instructio ns
below in order to avoid any risk of fire, electrical shock or damage
and/or in juries.
Installation
• The TV se t should be insta lled near an easily accessible AC
power outlet (mains socket).
• Place the TV set on a stable, level surface to avoid it from falling
down and cause pe rsonal injury or dam age to the TV.
• Install the TV where it cannot be pulled, pushed, or knocked
over.
• Install the TV s o that the TV's Table-Top Stand does not
protrudes out from the TV stand (not supplied).
GB
2
Page 3

If the Table-Top Stand protrudes out from the TV stand, it may
Screw (supplied with the
Wall-Mount Bracket)
Mounting Hook (Wall-Mount
Shaft)
5 mm
Screw (supplied with the
Wall-Mount Bracket)
Wall-Mount Bracket
10 mm - 12 mm
30 cm
10 cm
10 cm
10 cm
Leave at least this space around the set.
30 cm
10 cm
10 cm
Leave at least this space around the set.
6 cm
Air circulation is blocked.
Wall Wall
cause TV set to topple over, fall down, and cause personal injury
or damage to the TV.
• Install the TV where it cannot be pulled, pushed, or knocked
over.
• Only qualified service personnel should carry out wall
installations.
• For safety reasons, it is strongly recommended that yo u use
Sony accessories, includ ing:
Wall-Mount Bracket (supplied)
Wall-Mou nt Bracket SU-WL450
• Be sure to use the screws supplied with the Wall-Mount Bracket
when attaching the Mo unting Hooks (Wall-Mount Sh aft)/WallMount Bracket to the TV set. The su pplied screws are designed
as indicated by illustration whe n measured from the attachin g
surface of the Mounting Hooks (Wall-Mount Shaft)/Wall-Mo unt
Bracket.
The diameter and length of the screws differ depending on the
Wall-Mount Bracket model.
Use of screws other than t hose supplied may result in internal
damage to the TV se t or cause it to fall, etc.
Wall-Mount Bracket (supplied)
Wall-Mount Bracket SU-WL450
• When transpo rting the TV set, do not s ubject it to jolts or
excessive vibration.
• When transpo rting the TV set for repairs o r when moving, pa ck
it using the original carton and packing material.
Ventilation
• Never cover the ventilation holes or insert anything in the
cabin et.
• Leave space around the TV set as shown below.
• It is strongly recomme nded that you use a Sony Wall-Mo unt
Bracket in order to provide adequate air circulation.
Installed on the wall
Installed with stand
• To ensure proper ventilation and prevent the collection of dirt or
dust:
Do not la y the TV set flat, install up side down, backwards, or
sideways.
Do not pla ce the TV set on a shelf, rug, bed or in a closet.
Do not cover the TV set with a cloth , such as curtains, or items
such as newspapers, etc.
Do n ot install the T V set as shown below.
GB
Tran spo rti ng
• Before transporting the TV set, disconnect all cables.
• Two or three people are needed to transport a large TV set.
• When transpo rting the TV set by han d, hold it as shown below.
Do not put stress on the LCD pane l and the frame around th e
screen.
• Correct hand placem ent while carrying the TV i s very important
for safety and to avoid damage.
AC power cord (mains lead)
Handle the AC power cord (ma ins lead) and outlet (mai ns socket)
as follows in order to avo id any risk of fire, electrical sh ock or
damage and/or injuries:
The shape of AC power plug (mains plug), which is supplied
with the TV set, varies de pending on the regions. Be s ure to
connect the appropriate supp lied AC power cord (mai ns lead)
with the plug that fits into the AC power outlet (mai ns socket).
Us e only Sony supplied AC power cords (mai ns lead), not those
of other brands.
In sert the plug fully into th e AC power outlet (main s socket).
Operate the TV set on a 100–240 V AC supply only.
3
GB
Page 4

When wiring cables, be sure to unplug the AC power cord
(mains lead) for yo ur safety and take care not to catch your feet
on the cables.
Disconnect the AC power cord (mains lead) from the AC power
outlet (mains socket) before working on or moving the TV set.
Keep the AC po wer cord (mains lead) away from heat sources.
Unplug the AC power plug (mains plug) and clean it regularly. If
the plug is covered with dust and it picks up moisture, its
insulation may deterio rate, which could result in a fire.
Unplug the AC power plug (mains plug) from AC power outlet
(mains socket) when detachin g or re-attaching the connector of
External Speaker.
Notes
• Do not use the s upplied AC power cord (mai ns lead) on any
other equipment.
• Do not pinch, bend, or twist the AC power cord (m ains lead)
excessively. The core conductors may be exposed or broken.
• Do not modify the AC power cord (mains lead).
• Do not put anythi ng heavy on the AC power cord (mains lead).
• Do not pull on th e AC power cord (mains lead) itse lf when
disconnecting the AC power cord (mains lead).
• Do not connect to o many appliances to the sam e AC power
outlet (m ains so cket).
• Do not use a po or fitting AC power outlet (mains socket).
NOTE ON AC ADAPTER
Warning
To reduce the risk of fire or electric shock, do not expose this
apparat us to rain or m oistu re.
To prevent fire or shock hazard, do not place objects filled with
liquids, such as vas es, on the apparatus.
Do not install this equipm ent in a confined space, suc h as a
bookshelf or similar unit.
• Please ensu re that the AC power outlet (mai ns socket) is
installed near the equipment and shall be easily accessible.
• Be sure to use the supplied AC adapter and AC power cord
(mains lead). Other wise it may cause a mal function.
• Connect the AC ad apter to an easily accessible AC pow er outlet
(mains socket).
• Do not coil the AC power cord (m ains lead)
around the AC adapter. The core wire may
be cut and/or it ma y cause a malfunction
of the TV.
• Do not touch the AC adapter with wet hands.
• If you notice an ab normality in the AC adapte r, disconnect it
from the AC power outlet (m ains socket) immediately.
• The set is not dis connected from the AC source as long as it is
connected to the AC power outl et (mains so cket), even if the set
itself has been turned off.
• As the AC adapter w ill become warm when it is used for a long
time, you may feel hot when touching it by hand.
Prohibited Usage
Do not install/use the TV s et in locations, environments or
situations such as t hose listed below, or the TV set ma y
malfunction and cause a fire, electrical shock, damage an d/or
injuries.
Location:
• Outdoors (in d irect sunlight), at the seashore, on a sh ip or other
vessel, inside a vehicle, in medical institutions, unstable
locations, near water, rain, moisture or s moke.
• If the TV is placed in the changing room of
a public bath or hot spring, the TV may be
damaged by airborne sulphur, etc.
• For best picture quality, do not expose the screen to direct
illumination or sunlight.
• Avoid moving the TV from a cold area to a warm area. Sud den
room temperature changes m ay cause moisture condensati on.
This may cause the TV to show poor picture and/or poor colour.
Should this occur, allow moisture to evap orate completely
before powering the TV on.
Environment:
• Places that are hot, humid, or excessively dusty; where insects
may enter; where it migh t be exposed to mechanical vi bration,
near flammable objects (candles, etc.). The TV set shall not be
exposed to dripping or splashing and no objects filled with
liquids, such as vases, shall be placed on the TV.
• Do n ot place the TV in a humid o r dusty
space, or in a room with oily smoke or
steam (near cooking tables or
humidifiers). Fire, electric shock, or
warping may result.
• Do not install the T V in places subject to extreme temp erature,
such as in direct sunlight, near a radiator or a heating vent. T he
TV may overheat in such conditions which can cause
deformation of the en closure and/or TV malfun ction.
Situation:
• Do not use when your hands are wet, with the cabinet removed,
or with attachments not recommended by the manu facturer.
Disconnect the TV set from AC power outlet (mains socket) and
antenna (aerial) during lightning storms.
• Do not instal l the TV so that it sticks out
into an open space. Injury or damage
from a person or object bumping into
the TV may result.
Broken pieces:
• Do n ot throw anything at the TV set. T he screen glass may break
by the impact and cause serious injury.
• If the surface of th e TV set cracks, do not touch it until yo u have
unplugged the AC power cord (mains lead). Otherwise electric
shock may result.
When not in use
• If you will not be using the TV set for seve ral days, the TV set
should be disconnected from the AC power (mains) for
environmental and safety reasons.
• As the TV s et is not disconnected from the AC powe r (mains)
when the TV set is just turned off, pull the plug from the AC
power outlet (mains socket) to disconnect the TV set
completely.
• However, some T V sets may have features that requi re the TV
set to be left in standby to w ork correctly.
For children
• Do not allow children to climb on the T V set.
• Keep small accessorie s out of the reach of children, so that they
are not mistakenly swallowe d.
If the following problems occur...
Turn off the T V set and unplug the AC pow er cord (mains lead)
immediately if any of the following pro blems occur.
Ask your dealer or Sony service centre to have it checked by
qualified service personnel.
When:
AC powe r cord (mains lead) is damaged.
Poor fittin g of AC power outlet (mains socket).
TV set is damaged by being dropped, hit or having something
thrown at it.
Any liquid or solid object falls through openings in the cabinet.
About LCD Monitor Temperature
When the LCD Monitor is used for an extended period, the panel
surrounds become warm. You may feel hot wh en touching there
by the hand.
GB
4
Page 5

WALL-MOUNT BRACKET
Wall-M ount Shaft
Wall-Mount Shaft
Below information show s the correct handling of the Wall-Mount
Bracket. Be sure to read this information thoroughl y and use the
Wall-Mount Bracket correctly.
To C u sto mer s:
Be sure to observe the following precautions for safety to prevent
a serious injury through fire, electric shock, the product toppling
over, or the product dropping.
• Be sure to subcontract th e installation to licensed contractors
and keep small children aw ay during installation.
• Be sure to subcontract m oving or dismounting of the TV to
licensed contractors.
• Do not remove screw s, etc., after mounting the TV.
• Do not make alterations to the parts of the Wall-Mount Bracket.
• Do not mount any equipment other th an the specified product.
• Do not apply any load other than the TV on the Wall-Mount
Bracket.
• Do not lean on or hang from the TV.
• Do not hand le the TV with excessive force during cleaning or
maintenance.
• Do not hang hol ding External Speaker.
• Do not put an d hang anything on Extern al Speaker.
• Please do not put finger in the hole.
To Sony Dealers and Contractors:
The followin g instruction s are for Sony dealers and con tractors
only. Be sure to read safety precautions described below and pay
special attention to safety duri ng the installation, mainte nance
and checking of this product.
• When hand ling or mounting the TV set, hold it on the sides. Do
not lift the TV by Wall-Moun t Shaft/Bracket.
• Do not instal l the Wall-Mount Bracket on
wall surfaces where the corners or the
sides of the TV are protruding away from
the wall surface.
• Do not install th e TV over or under an ai r
conditioner.
• Be sure to install t he Wall-Mount Bracket
securely to the wa ll following the
instruction s in this instruction m anual. If any
of the screws are loose or fall out, the WallMount Bracket may fall and cause injur y or
property damage.
• Be sure to use the supplied screws and
attachment parts prope rly following the
instructions given in this instruction manual.
If you use substitute item s, the TV may fall
and cause bodily injury to someone or damage to the TV.
• Be sure to assemble the bracket properly following the
instructed procedure explain ed in this in struction m anual.
• Be sure to tighte n the screws securely in the desi gnated
position.
• Be careful not to s ubject the TV to shock du ring installation.
• Be su re to install the TV on a wall that is both perpendicular and
flat.
• After proper installation of the TV, secure the cables properly.
• Do not allow th e AC power cord (ma ins
lead) or the connecting cables to be
pinched as the internal conductors m ay
become exposed and cause a short
circuit or an electrical break.
GB
GB
5
Page 6

Precautions
Viewing the TV
• Some people may experience discomfort (such as eye strain,
fatigue, or nausea) while watching 3D video images or pla ying
stereoscopic 3D games. Sony recommends that all viewers take
regular breaks while watching 3D video images or playing
stereoscopic 3D games. The length and frequency of necessary
breaks will vary from person to person. You must decide what
works best. If you experience any discomfort, you should stop
watching the 3D video images or playing stereoscopic 3D
games until the discom fort ends; consult a doctor if you believ e
necessary. You should also review (i) the instruction manu al of
any other device or medi a used with this television a nd (ii) our
website (http://www.sony-a sia.com/support) for th e latest
information. The vision of young children (especially those
under six years old) is still under development. Consult your
doctor (such as a paediatrician or eye doctor) before allowing
young children to watch 3D video images or play stereoscopic
3D games. Adults should supervise young children to ensure
they follow the recommendations listed above.
• Do not use, store, or leav e the 3D Glasses or batter y near a fire,
or in places with a high tem perature, e.g., in direct sunlight, or
in sun-heated cars.
• View the TV in moderate li ght, as viewing th e TV in poor light or
during long period of time, strains your eyes.
• When using he adphones, adjust th e volume so as to avoid
excessive levels , as hea ring damag e may result.
LCD Screen
• Although the LCD screen is made with high-precision
technology and 99.99% or mo re of the pixels are effective, black
dots may appear or bright points of light (red, blue, or green)
may appear constantl y on the LCD screen. This is a struct ural
property of the LCD screen and is n ot a malfunction.
• Do not push or scratch the front filter, or place objects on top of
this TV set. The image may be uneven or the LCD screen may be
damaged.
• If this TV set is use d in a cold place, a smear may occur in the
picture or the picture may become dark. This does not indicate a
failure. These phenomena disappear as the temperature rises.
• Ghosting may occur when still pictures are displayed
continuously. It may disappear after a few moments.
• The screen and cabinet get warm when this TV set is in use. This
is not a malfunction.
• The LCD screen contains a small amount of liquid crystal. Follow
your local ordinances and regulations for disposal.
Handling and cleaning the screen surface/
cabinet of the TV set
Be sure to unplug the AC powe r cord (mains lead) connected to
the TV set from AC power ou tlet (mains socket) before clean ing.
To avoid material degradation or screen coatin g degradation,
observe the following precautions.
• To remove dust from the sc reen surface/cabinet, wipe gently
with a soft cloth. If dus t is persistent, wipe with a soft cloth
slightly moistened with a diluted mild detergent solution.
• Never spray water or de tergent directly on
the TV set. It may drip to th e bottom of the
screen or exterior parts and enter the TV set,
and may cause dama ge to the TV set.
• Never use any type of abrasive pad, alkaline/acid cleaner,
scouring powder, or volatile so lvent, such as alcohol , benzene,
thinner or insecticide. Using such materials or maintaining
prolonged contact with rub ber or vinyl materials may result in
damage to the screen sur face and cabinet material.
• Periodic vacuuming of the ventilation openings is
recommended to ensure to p roper ventilation.
• When adju sting the angle of the TV s et, move it slowly so as to
prevent the TV set from m oving or slipping off f rom its table
stand.
Optional Equipment
Keep optional components or any equipment emitting
electromagnetic radiation awa y from the TV set. Othe rwise
picture distortion and/or noisy sound may occur.
Wireless Function of the unit
• Do not operate this un it near medical equipmen t (pacemaker,
etc.), as malfunction of the medical equipment may result.
• Although th is unit transmits/receives scrambled signals, be
careful of unauthorise d interception. We cannot be responsi ble
for any trouble as a result.
Caution about handling the remote control
• Observe the correct polarity when inserting batteries.
• Do not use di fferent types of batteries together or mix old and
new batteries.
• Dispose o f batteries in an environmentall y friendly way. Certain
regions may regulate the d isposal of batteries. P lease consult
your local authority.
• Handle the remote control with care. Do not drop or step on it,
or spill liquid of any kind onto it.
• Do not place the remote cont rol in a location near a heat source,
a place subject to direct sunlight, or a damp room.
WALL-MOUNT BRACKET
• If you use the T V installed on the Wall-Mount Bracket for a long
time, the wall behind or above the TV may become discoloured
or the wallpaper may come unglued, depending on the material
of the wall.
• If the Wall-Mount Bracket is removed after installing it on the
wall, the screw holes remain .
• Do not use the Wall-Mount Bracket in a place where it is
subjected to mechanical vibration.
Disposal of the TV set
Disposal of Old Electrical &
Electronic Equipment (Applicable in
the European Union and other
European countries with sepa rate
collection systems)
This symbol is on the remote control.
Disposal of the TV set
Disposal of Old Electrical &
Electronic Equipment (Applicable
in Republic of India)
This symbol indicates that this product shall
not be treated as househol d waste and may
not be dropped in garbage bins. Product
owners are advised to de posit their product at
the nearest collectio n point for the recycling of
operation shall facilitate proper disposal & help prevent pote ntial
negative consequences/h azards to the environment and hu man
health, which could other wise be caused by inapprop riate waste
disposal including improp er handling, accidental breakage,
damage and/or improper recycling of e-waste. The recycling o f
materials will help to conse rve natural resources. For more
detailed information about recycling of this product, plea se
contact your local civic office, your household waste disposal
service provider or the store where you made the purchase. You
may contact our company’s toll free nu mber in India for
assistance.
electrical and electronic equipment. Your co-
GB
6
Page 7

This product complies with the “India E-waste Rule 2011”. The
E-waste Rules, 2011 is an Indian directive aimed at reducing
the harmful environmental impact of waste electrical
equipment by restricting the use of known hazardous
substances. As of 1st May 2012, new electrical and electronic
equipment introduced into the market may no longer contain
the followi ng chemicals o r its specified maxim um
concentration levels:
Lead, M ercury, Hexav alent C hromium, Pol ybrom inated
Biphenyls (PBB) or Polybrominated Diphenylethers (PBDE) - in
concentrations exceeding 0.1 weight % and Ca dmium - 0.01
weight %, except of exemptions set in Schedule 2 of the
aforesaid Rule.
GB
GB
7
Page 8

Parts and Controls
TV
Ȫ
ȫ
Ȭ
ȭ
Controls and Indicators
Remote Control sensor* / Light sensor*
/ Illumination LED / 3D Sync
Transmitter*
The Illumination LED lights up or blinks
according to the status of the TV.
•White
When turning on the TV/picture off
mode/software update, etc.
•Cyan
When connecting with a mobile device
wirelessly.
•Amber
Timer is set.
(Power)
CH +/- (Channel)
+/- (Volume)
TV
Switch to a TV channel or input from other
applications.
GB
8
(Input select)
Display and select the input source.
* Do not place anything near the sensor.
Page 9

Inputs and Outputs
Ȯ
Ȱ
ȱ
Ȫ ȫ
Ȭ
ȭ Ȯ
ȩ
ȯ
GB
VIDEO IN 2, / COMPONENT IN
• For a composite connection:
Use VIDEO IN 2, and (L/R) of /
COMPONENT IN*.
• For a component connection:
Use Y, P
B, PR, and (L/R).
HDMI 3 AUDIO IN
For HDMI 3 analogue audio connection.
DIGITAL AUDIO OUT (OPTICAL)
LAN
CABLE/ANTENNA
Connect to your cable or antenna (aerial).
/ VIDEO IN 1
For a composite connection, use the
supplied analogue extension cable*.
USB 1/2
•Connecting a large USB device may
interfere with other connected devices
beside it.
• When connecting a large USB device,
connect to the USB 1 socket.
HDMI IN 2/3/4
• If the device has a DVI jack, connect it to
HDMI IN 3 through a DVI - HDMI adaptor
interface (not supplied), and connect the
device's audio out jacks (sockets) to HDMI
3 AUDIO IN.
• If connecting a digital audio system that is
compatible with Audio Return Channel
(ARC) technology, use HDMI IN 4. If not, an
additional connection with DIGITAL AUDIO
OUT (OPTICAL) is necessary.
AUDIO OUT /
To listen to the TV's sound through the
connected equipment, press HOME. Select
[Settings] [Sound] [Headphone/Audio
out] and then select the desired item.
HDMI IN 1/MHL
You can connect your MHL (Mobile Highdefinition Link) device using an HD quality
MHL cable.
* When connecting mono equipment, connect to the L
(MONO) audio jack.
Note
• When connecting with an HDMI cable, be sure to use
HighSpeed HDMI Cable with Cable Type Logo
(Recommended SONY Cable).
GB
9
Page 10

Using Remote Control
Remote Control Parts Description
ȩ
Ȫ
ȫ
Ȭ
ȭ
Ȯ
ȯ
/ (Input select/Text hold)
In TV mode: Display and select the input
source.
In Text mode: Hold the current page.
(TV standby)
Turn on or turn off the TV (standby mode).
DIGITAL/ANALOG
Switch between digital and analogue mode.
EXIT
Return to the previous screen or exit from
the menu. When an Interactive Application
service is available, press to exit from the
service.
GB
10
Number buttons
(Twin picture/PIP)*
Display two pictures simultaneously.
(Text)
Display text information.
Colour buttons
Execute correspondent function at that time.
(Wide mode)
Change the screen format.
TV
Switch to a TV channel or input from other
applications.
HELP
Display Help Menu.
1*2
Page 11

ACTION MENU
Display a list of contextual functions.
/ (Info/Text reveal)
Display information.
GUIDE/ *
1
Display the digital programme guide.
BACK
Return to previous screen.
HOME
Display the TV Home Menu.
DISCOVER
Bring up the Content Bar to search for
content.
//// (Item select/Enter)
+/– (Volume)
Adjust the volume.
(Jump)
Jump back and forth between two channels
or inputs. The TV alternates between the
current channel or input and the last
channel or input that was selected.
(Muting)
Mute the sound. Press again to restore the
sound.
PROG +/–//
In TV mode: Select the channel.
In Text mode: Select the next (
previous (
) page.
) or
AUDIO
Change the language for the programme
currently being viewed.
(Subtitle setting)
Turn subtitles on or off (when the feature is
available).
//////
Operate media contents on TV and
connected BRAVIA Sync compatible device.
SYNC MENU
Display the BRAVIA Sync Menu.
FOOTBALL
Turn Live Football Mode on or off (when the
feature is available).
*1 The location, availability and function of remote
control button may vary depending on your country/
region/TV mode l.
*2 Twin Picture function will be available within 2015.
You will receive Twin Picture function automatically
as a network software upgrade. Make sure your TV is
connected to the Internet. If you do not have a
network connection, you will be able to download
the software from the Sony support website using
your PC. For details on how to upgrade, please visit
the Sony support website.
GB
GB
11
Page 12
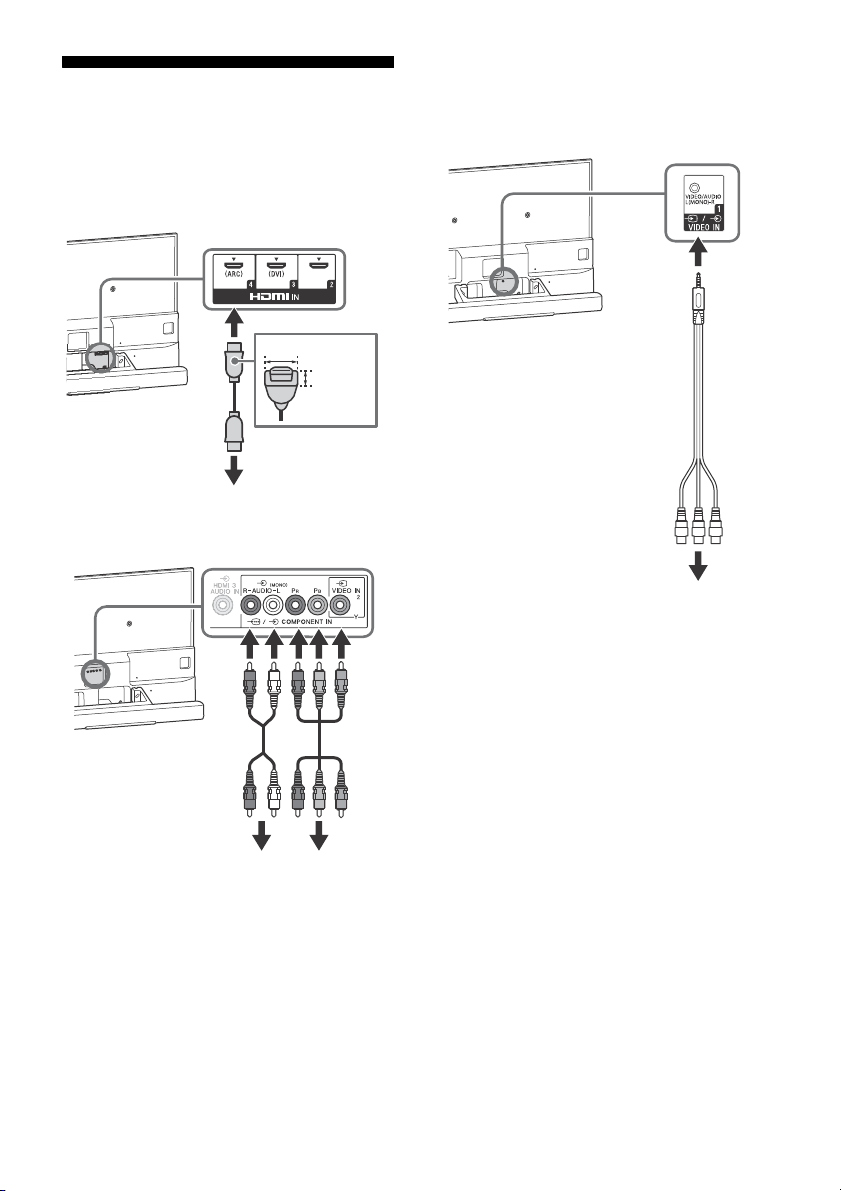
Connecting the TV
To H D MI O U T
< 21 mm
< 12 mm
To AUDIO OUT To COMPONENT
OUT (P
R/PB/Y)
To V IDE O OU T
Note
• When connecting the cable to the Cable/Antenna,
input finger tighten only, over-tightening the
connection can damage the TV.
To connect with an HDMI cable
To connect with component cables
To connect with Analogue Extension
Cable
Availability depends on countries/regions/TV
models.
GB
12
Page 13
GB
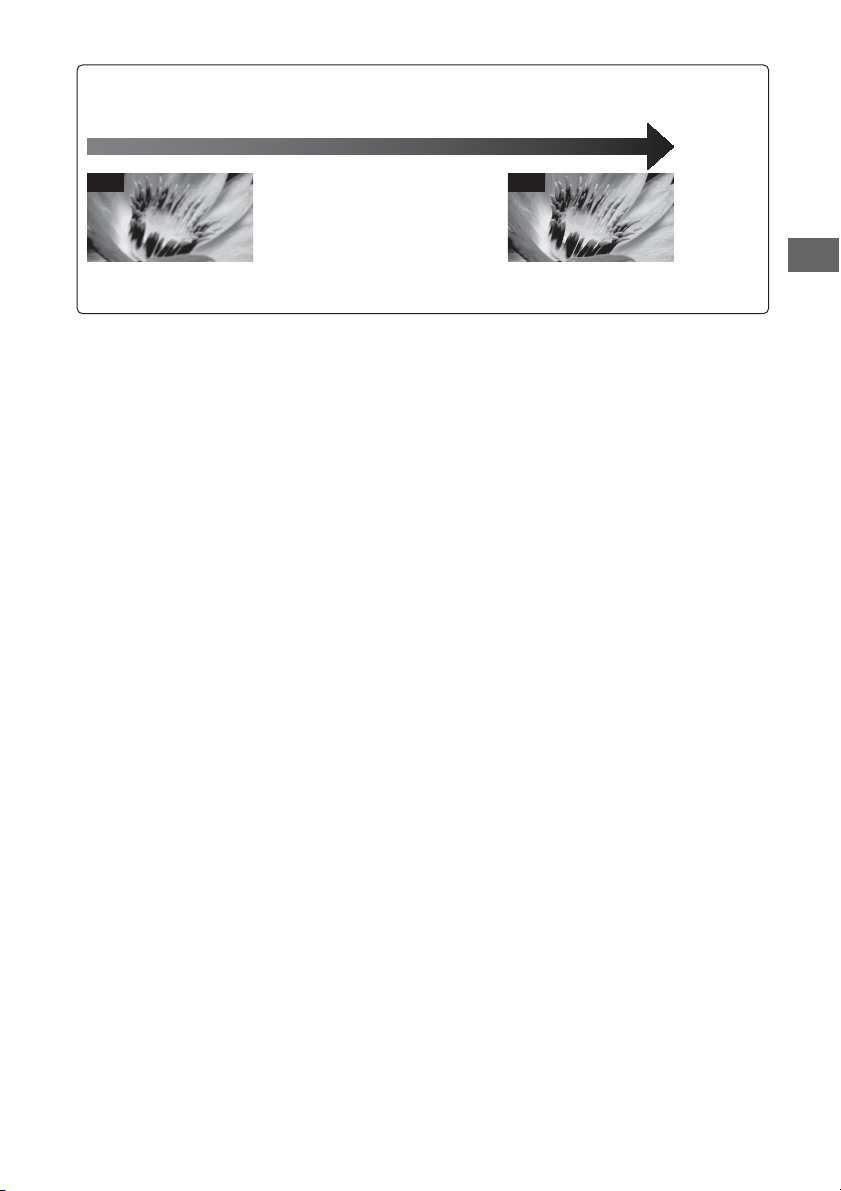
SD HD
Picture Quality
• AV composite cable
• Antenna (aerial) cable
• Component cable • HDMI cable
Standard definition (SD) videos have picture signal s with a
vertical resolution of 480 (NTSC) or 576 (PAL/SECAM) lines.
High definition (H D) videos have picture si gnals
with a vertical resolution of 720 or 1,080 lines.
GB
13
Page 14
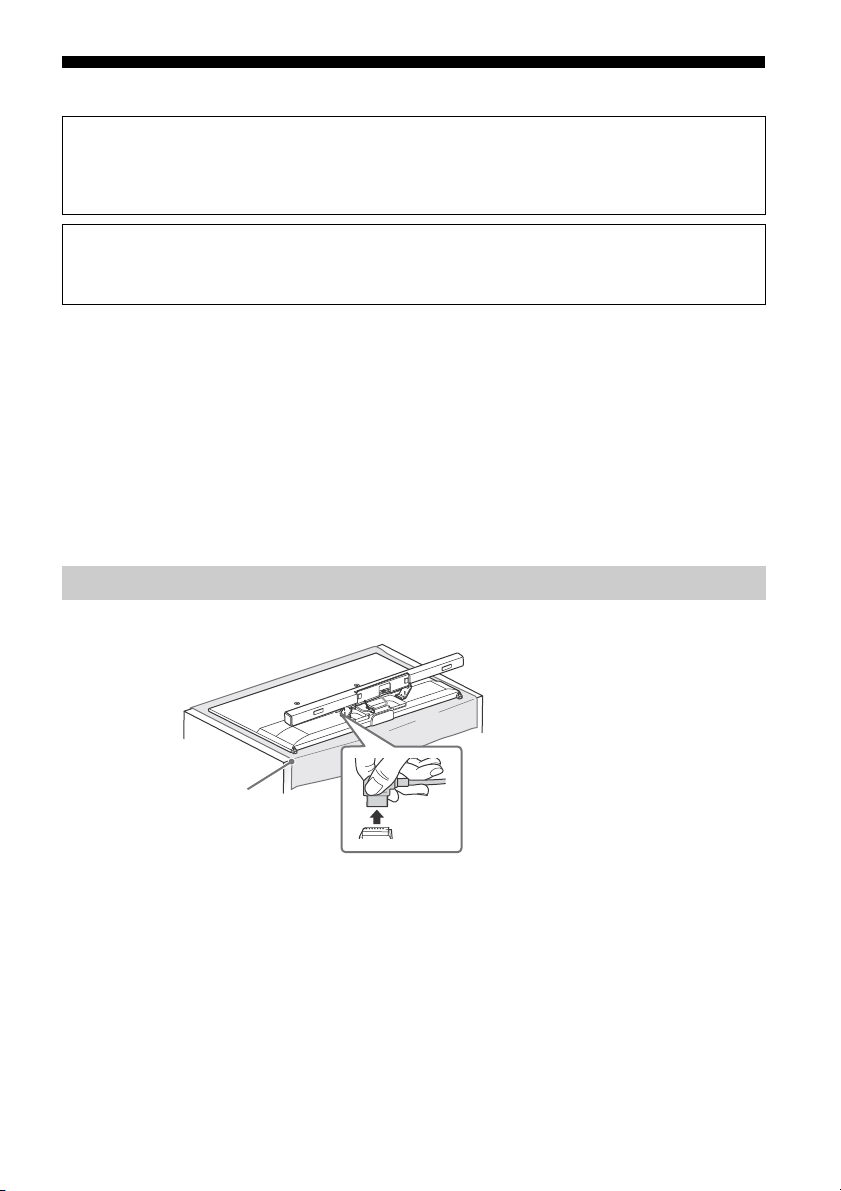
Installing the TV to the Wall
Soft cloth
To C usto mer s
Sufficient expertise is required for installing this product. Be sure to subcontract the installation to Sony
dealers or licensed contractors and pay special attention to safety during the installation. Sony is not liable
for any damages or injury caused by mishandling or improper installation, or installing any other than the
specified product. Your Statutory Rights (if any) are not affected.
To Sony Dealers and Contractors
Sufficient expertise is required for installing this product. Be sure to read this instruction manual
thoroughly to do the installation work safely. Sony is not liable for any damages or injury caused by
mishandling or improper installation.
Your TV’s External Speaker will be used as a part of the Wall-Mount Bracket.
Note
• See page 2 (Safety Information) and page 6 (Precautions) on WALL-MOUNT BRACKET before carrying out Wall-Mount
Bracket installation.
• If the External Speaker is attached to the TV, detach the Table-Top Stand and External Speaker from the TV
beforehand.
• Place the TV with its screen facing down on a flat and stable surface covered with a thick and soft cloth that is larger
than the TV, when securing the Stand or when removing the Table-Top Stand from the TV to prevent damaging the
surface of the LCD display.
• Once the Table-Top Stand are detached from External Speaker, be sure to keep the Table-Top stand and screws in a
safe place.
• When attaching the Table-Top Stand again, be sure to fasten the screws (pre viousl y removed) to th e original holes
on the rear of the TV.
Detaching the Table-Top Stand from the TV
1 Detach the cable from the TV.
GB
14
Page 15
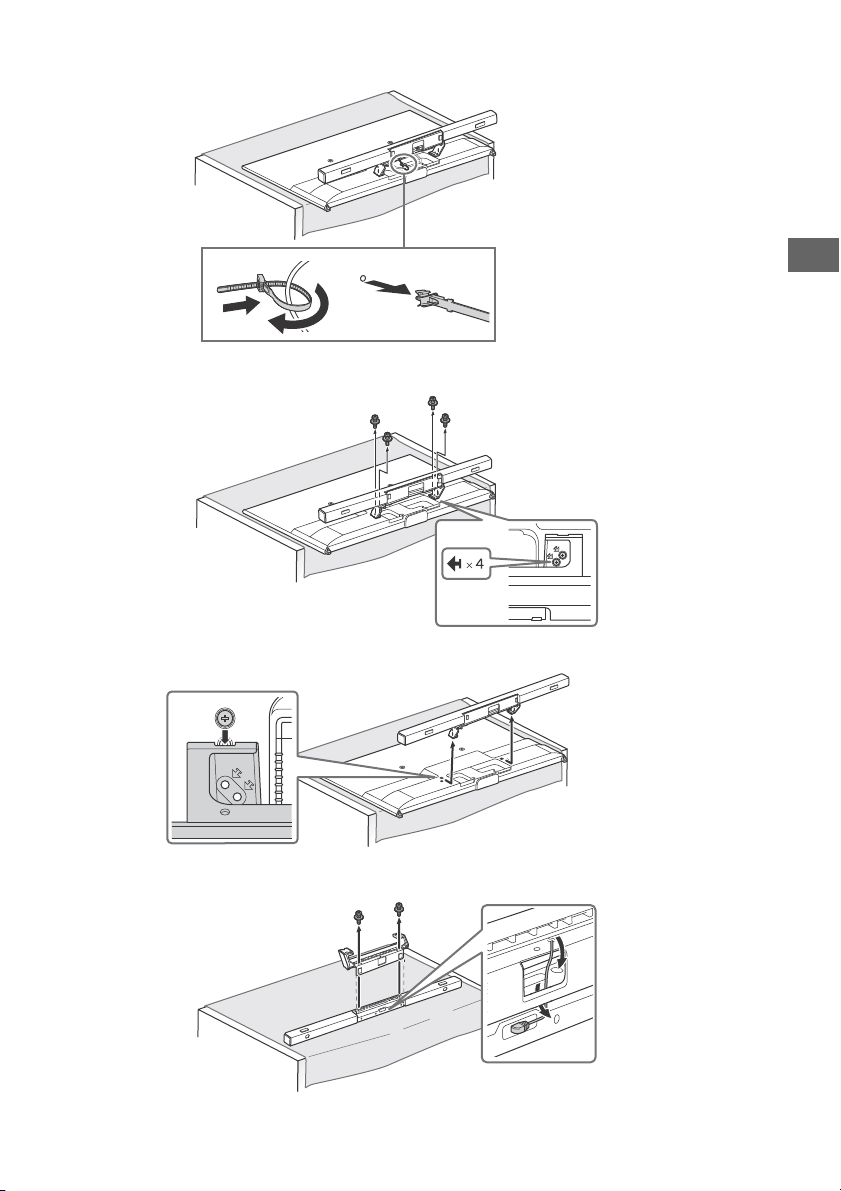
2 Detach the cable holder from the TV.
AB
3 Remove the screws from the TV.
GB
4 Detach the Table-Top Stand from the TV.
5 Detach the Table-Top Stand from External Speaker.
GB
15
Page 16
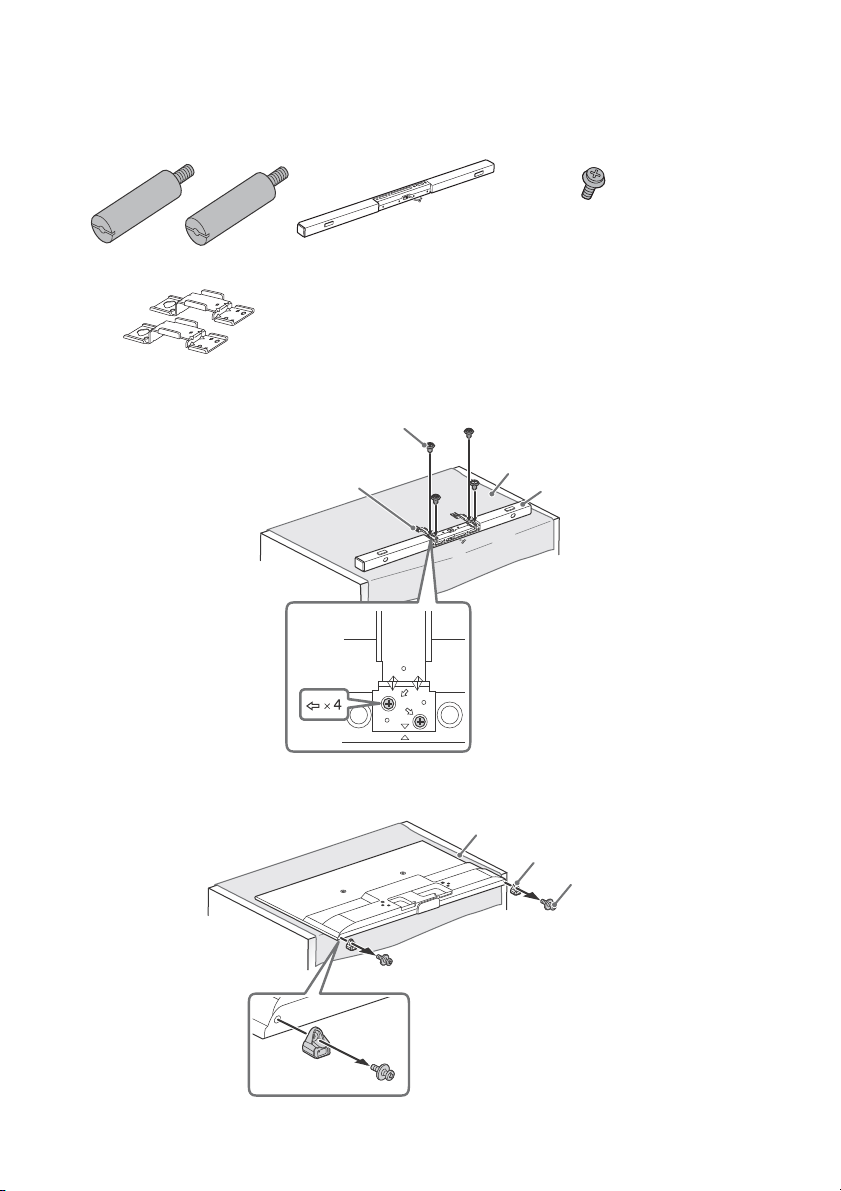
Preparing for the installation of the TV
D
M
Soft cloth
C
Soft cloth
Petit stand
Screw
1 Prepare necessary items (supplied).
Wall-Mount Attachment (2) H External Speaker (1) C Screw (+PSW 4 x 12) (8) D
Wall-Mount Arm (2) M
2 Attach Wall-Mount Arm M to the External Speaker C using the supplied screws D.
3 Remove the screws and petit stand from the bottom of the TV.
Be sure to store the removed parts in a safe place, keeping them away from children.
GB
16
Page 17
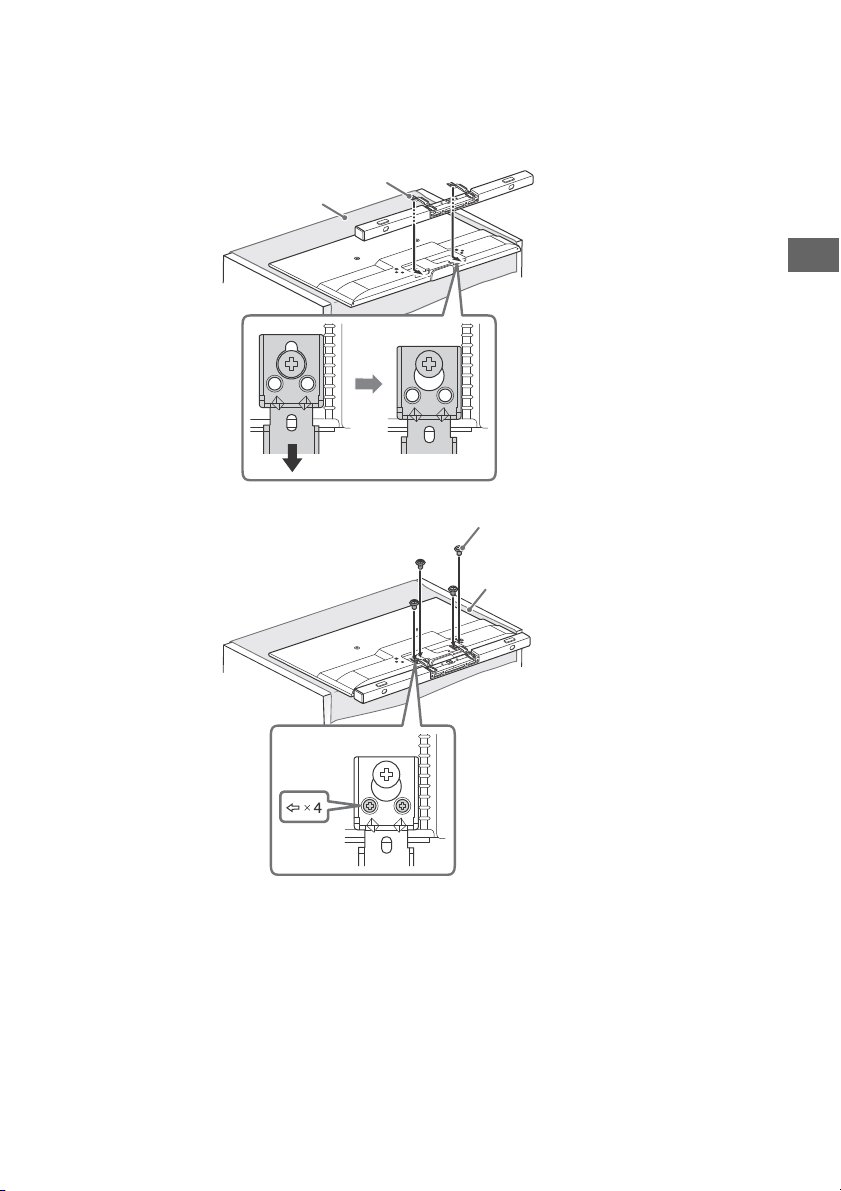
4 Attach the Wall-Mount Arm M with External Speaker to the TV using the supplied screws
Soft cloth
M
Soft cloth
D
D.
Note
• Keep away External Speaker from the flat surface for placing the TV, when attach the Wall-Mount Arm to the TV.
GB
GB
17
Page 18
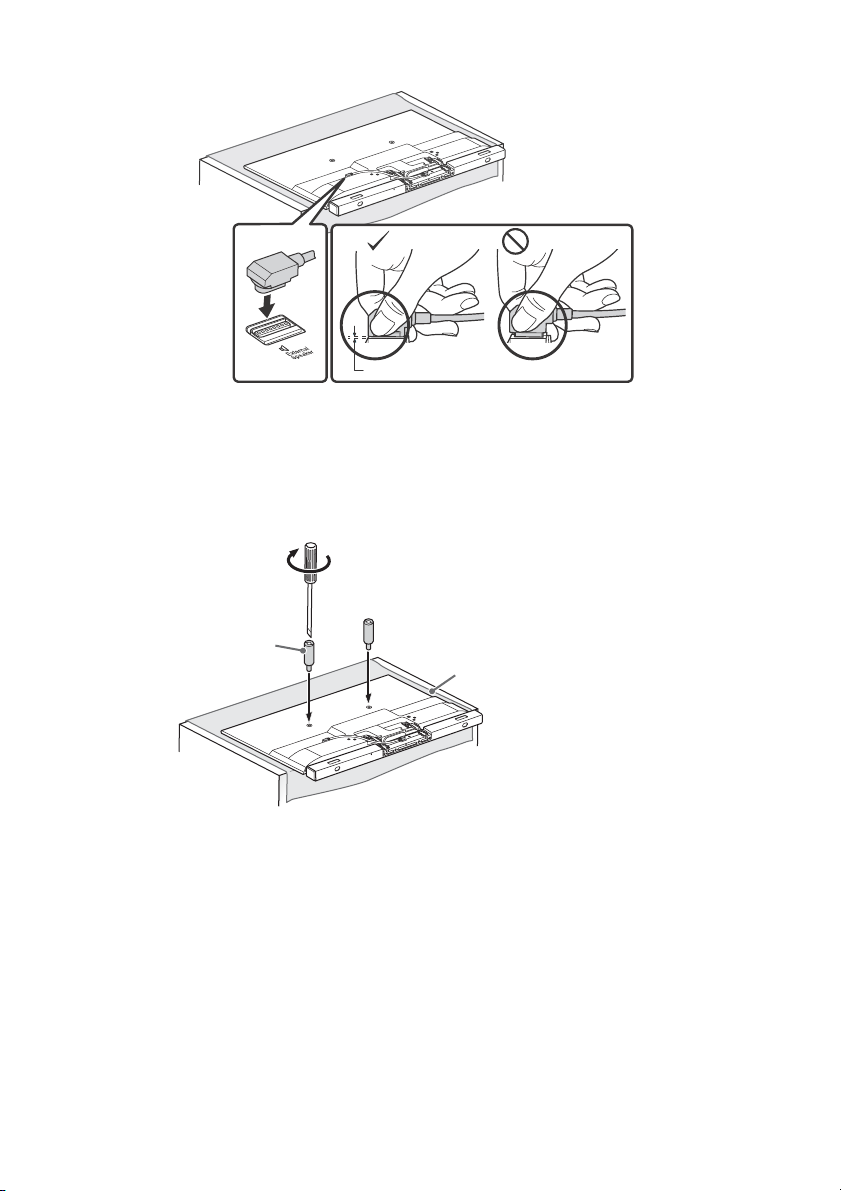
5 Connect the cable of External Speaker.
Approx. 2-3 mm
Soft cloth
H
1.5 N∙m/1,5 N∙m
{15 kgf∙cm}
6 Attach the Wall-Mount Attachment H (supplied with the TV) to the rear of the TV (to make
it parallel with the wall).
Note
• If using an electric screwdriver, set the torque at approximately 1.5 N·m {15 kgf·cm}.
• Be sure to fasten the Wall-Mount Attachment when attaching them to the TV.
• Use only a flat head screwdriver to install the Wall-Mount Attachment. Use of another tool might result in over
torqueing the Wall-Mount Attachment and damaging the TV.
GB
18
Page 19
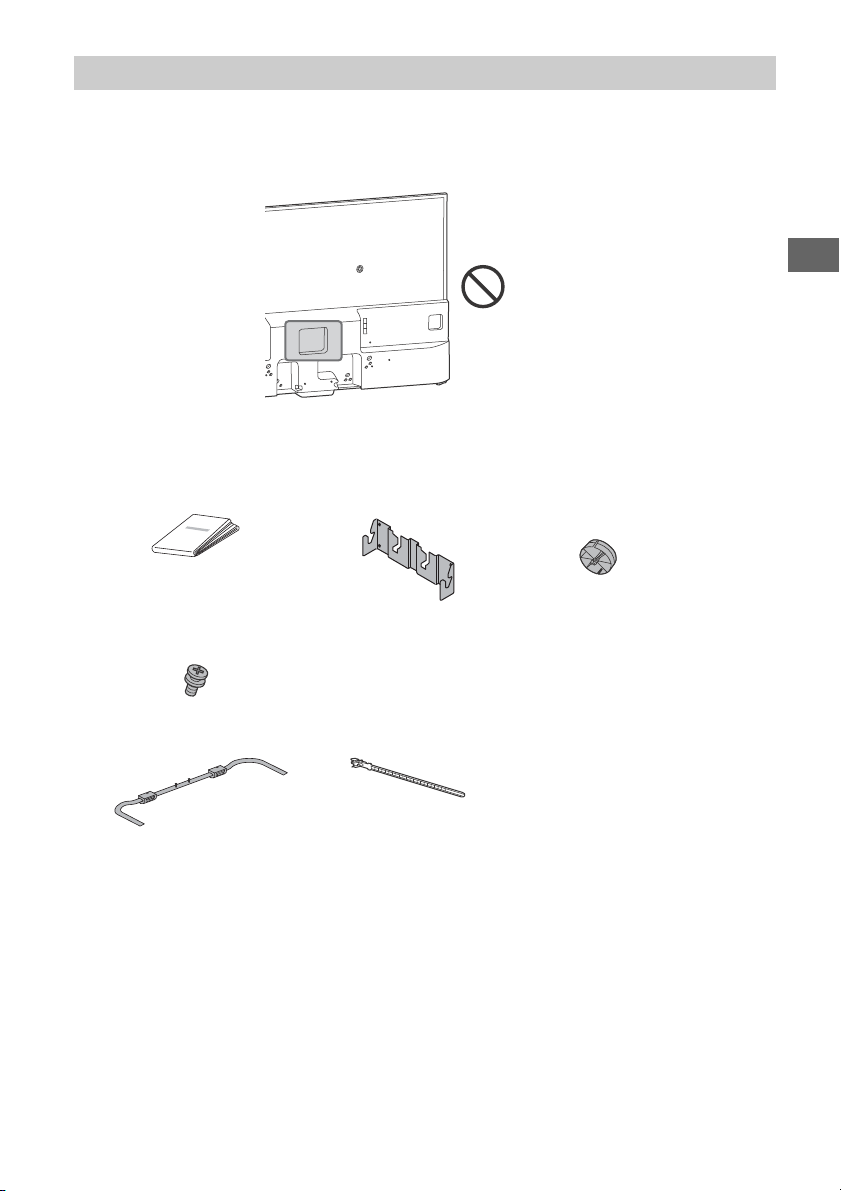
Using the Wall-Mount Bracket (Supplied)
Note
• See page 5 (WALL-MOUNT BRACKET) and page 6 (WALL-MOUNT BRACKET) on WALL-MOUNT BRACKET before
carrying out Wall-Mount Bracket installation.
• You cannot use some of the terminals on the rear of the TV when using this mounting style.
• Connect the Analog Extension Cable (supplied) if you need to use the / VIDEO IN 1 jack.
1 Prepare necessary items.
Wall-Mount Bracket accessories K (supplied)
A Paper Template B Wall-Mount Base (1) C Spacers (2)
D Screw (+PSW 6 × 12) (2)
GB
Wall-Mount Shaft L Cable holder I
Screws for Wall-Mount Base (8 mm in diameter, not supplied) (4)
GB
19
Page 20
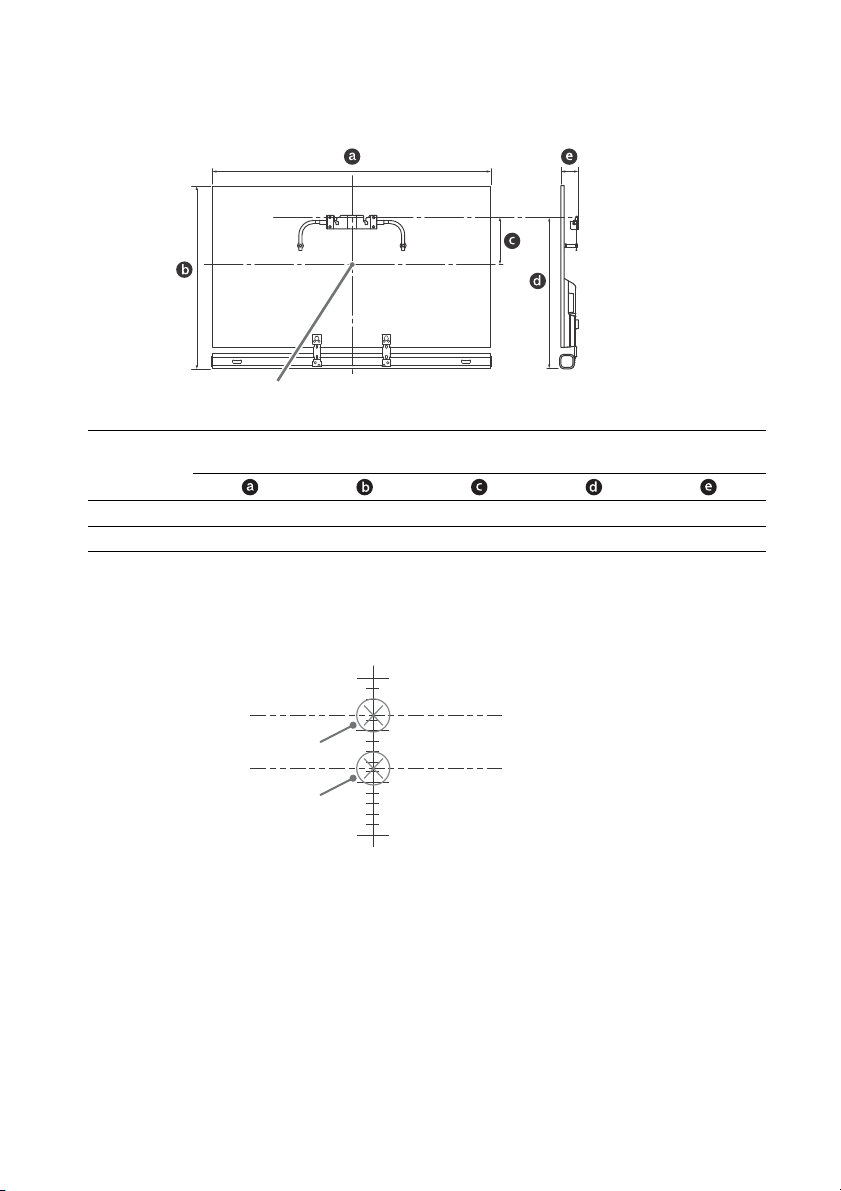
2 Make sure that the wall has enough space for the TV and is capable of supporting a
Screen center point
150
200
250
300
Scale on Paper Template A
Mark for KDL-50W950C
Mark for KDL-43W950C
weight of at least four times that of the TV.
Refer to the following table on installing the TV to the wall. See page 30-31
(Specifications)
for the TV’s weight.
Unit: mm
Model Name
KDL-
50W950C 1,116 733 187 603 69
43W950C 962 643 233 601 69
Note
• Figures in the table may differ slightly depending on the installation.
Display dimensions
Screen center
dimension
Length for mounting
3 Make a mark on the Paper Template A that indicates the center of the screen for your TV.
20
GB
Page 21
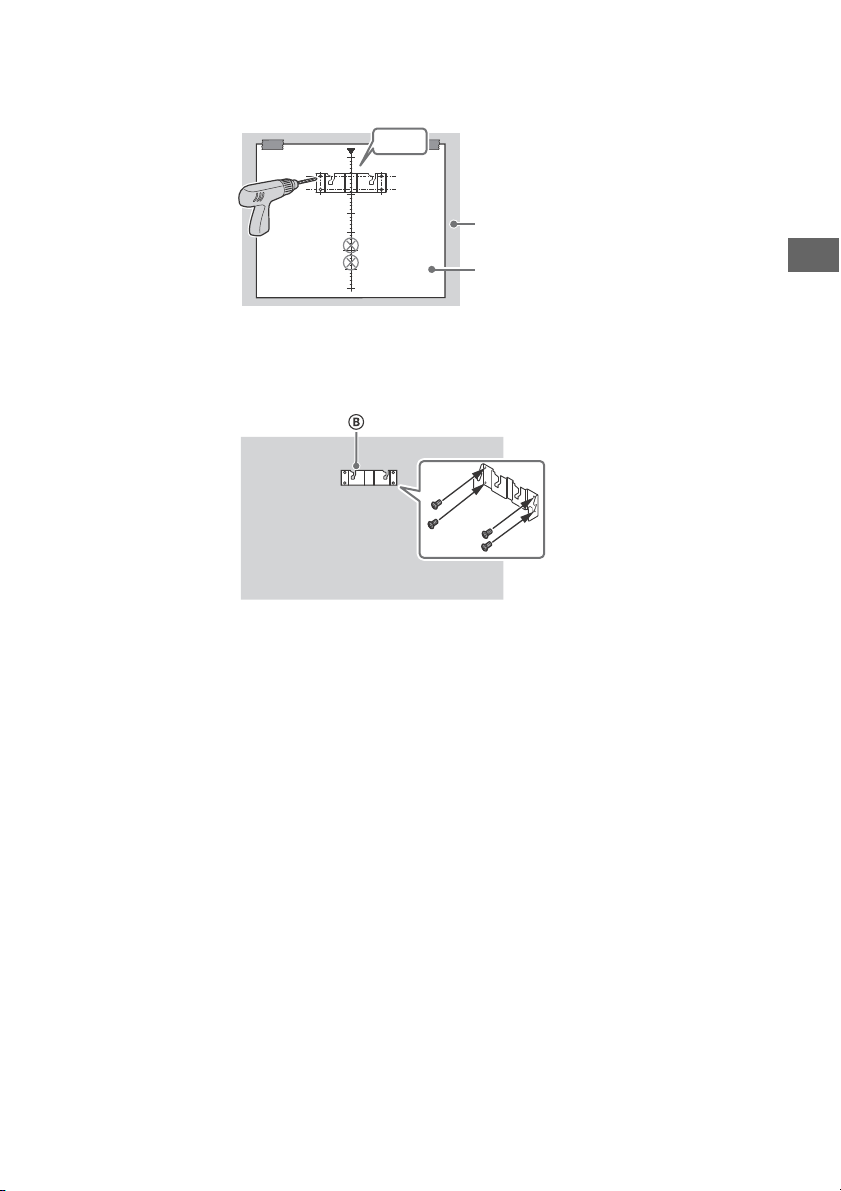
4 Tape the Paper Template A to the wall and drill holes according to the numbering on the
300
250
200
150
100
50
50
0
1
2
3
4
1, 2, 3, 4
Wall
A
Paper Temp late A using an electric drill.
5 Remove the Paper Template A from the wall.
6 Attach the Wall-Mount Base B to the wall correctly using the screws (8 mm in diameter,
not supplied).
GB
GB
21
Page 22
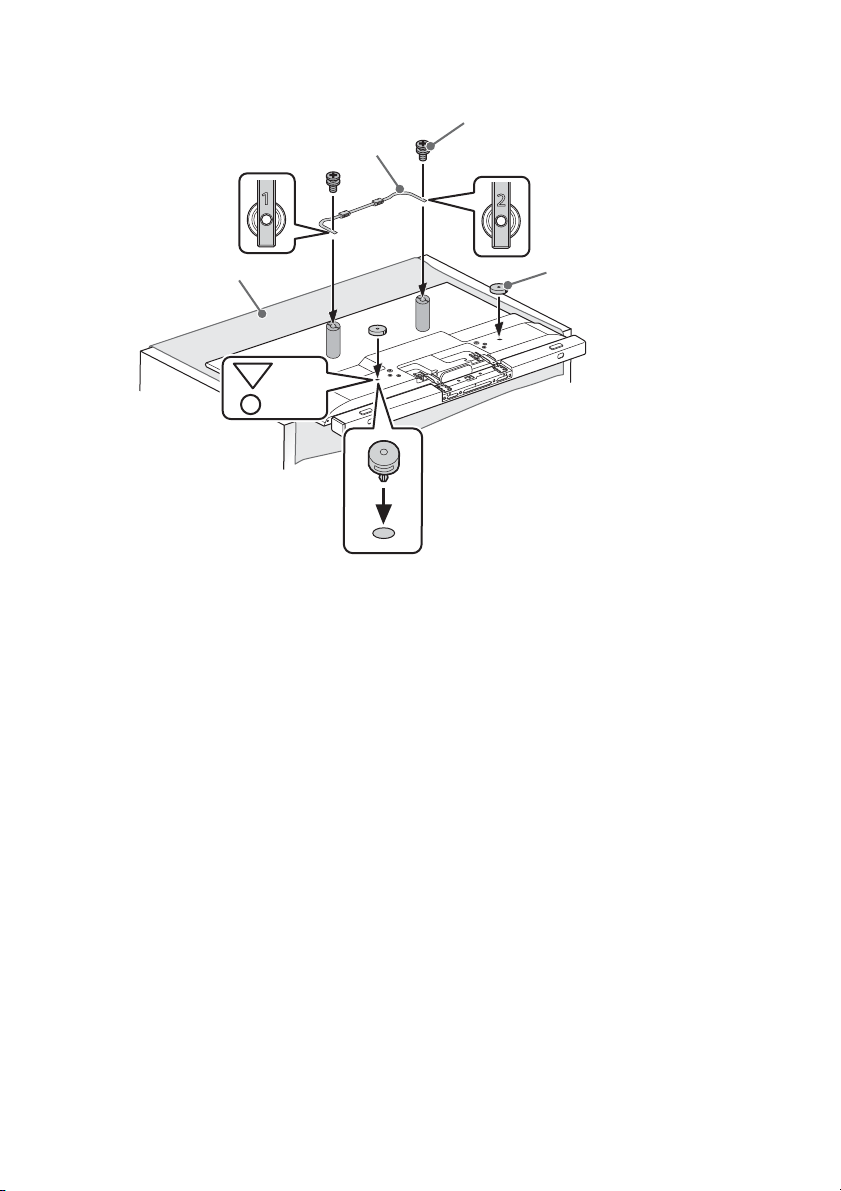
7 Attach the Wall-Mount Shaft L to the TV using the supplied screws D.
×
2
D
L
CSoft cloth
f
Attach the Spacers C to the holes indicated by the triangle marks
.
GB
22
Page 23
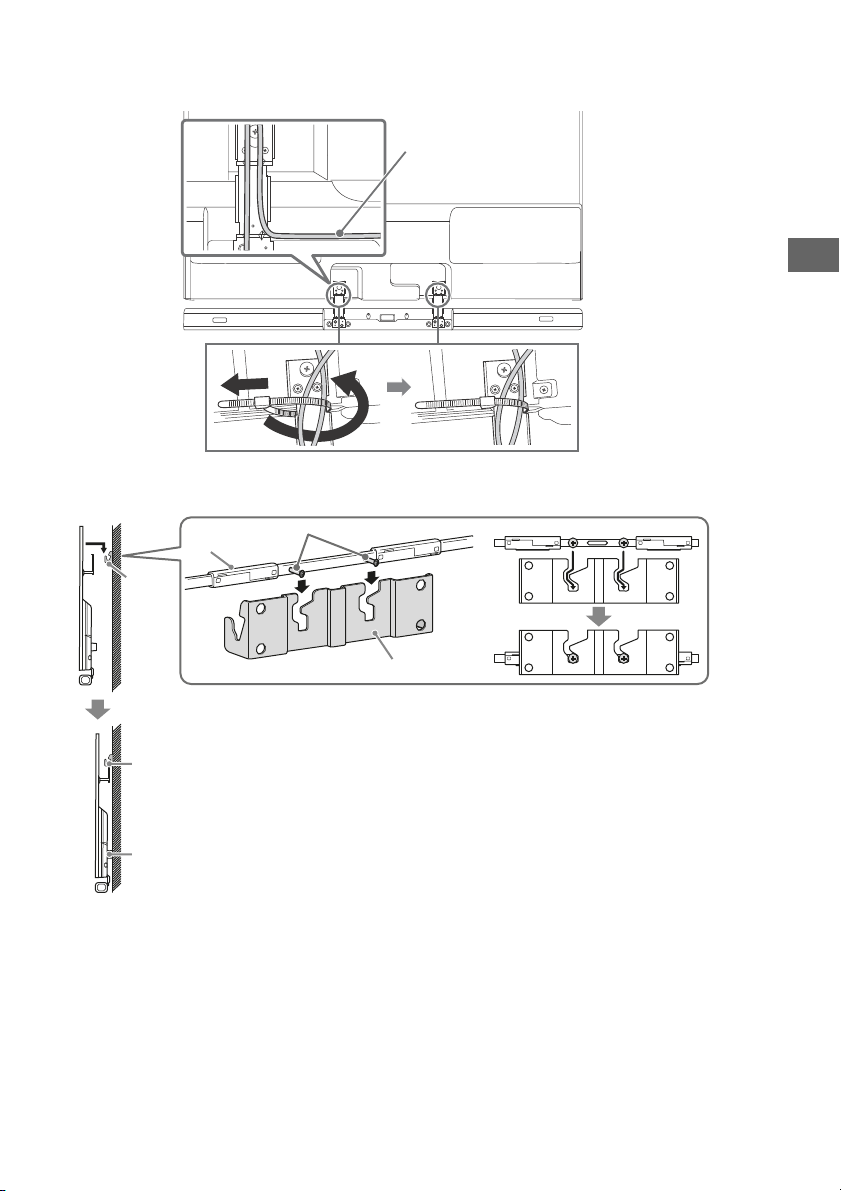
8 Make sure to connect and bundle the cables before installing the TV on the wall.
Cable of External
Speaker
B
L
B
B
C
Pulley
Wall
Wall
Fix cables to the Wall-Mount Arm using the cable holder I.
9 Install the TV on the wall. Then, confirm the Pulley (on the Wall-Mount Shaft L) is firmly
latched into the Wall-Mount Base B and the Spacers C touch the wall.
GB
23
GB
Page 24
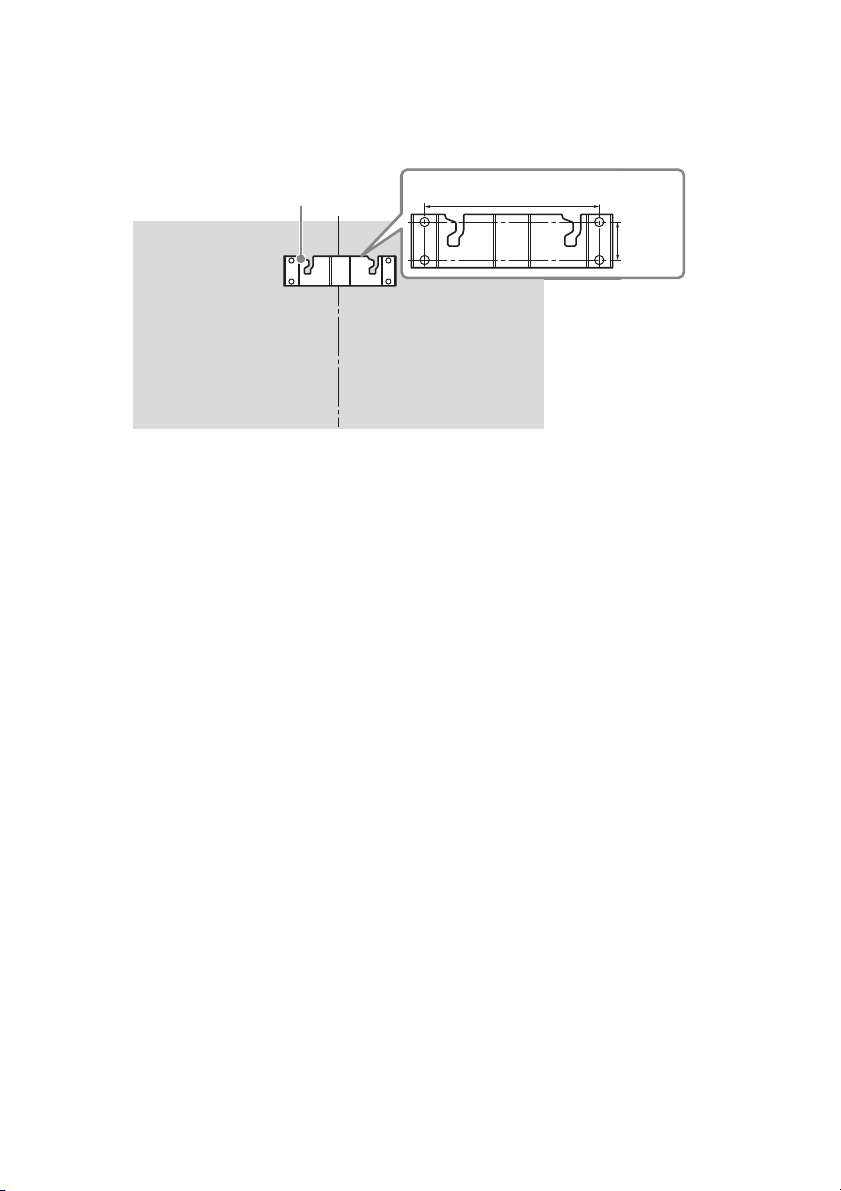
Dimensions of the hole positions on the wall
170 mm
37 mm
B
Provide the following information to the licensed contractors if necessary.
Use screws (8 mm in diameter, not supplied) to install the Wall-Mount Base B on the wall.
Be sure to use the supplied Paper Template A that shows the actual position of Wall-Mount Base B
for easy installation.
24
GB
Page 25
Using an optional Wall-Mount Bracket
Screen centre point
80
Standard mounting Slim mounting
This TV’s instruction manual only shows the steps on preparing the installation of the TV before
installing to the wall.
Use the Wall-Mount Bracket SU-WL450 (not supplied) to install the TV to the wall.
When installing the Wall-Mount Bracket, also refer to the Operating Instructions and Installation Guide
supplied with the Wall-Mount Bracket.
SU-WL450
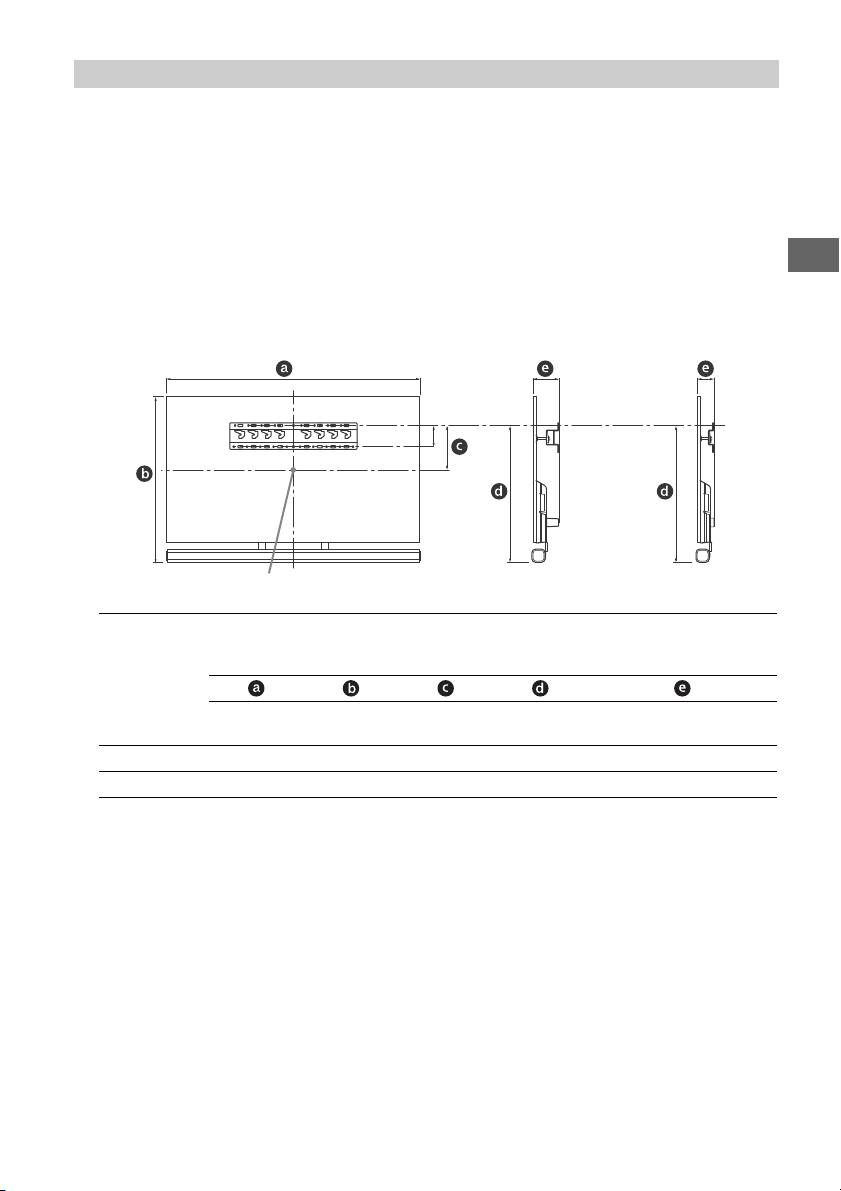
1 Make sure that the wall has enough space for the TV and is capable of supporting a
weight of at least four times that of the TV. Refer to the following table on installing the TV
to the wall. See page 30-31 (Specifications) for the TV’s weight.
Display dimensions
Model Name
KDL-
50W950C 1,116 733 127 543 122 80
43W950C 962 643 173 543 122 80
Note
• Figures in the table may differ slightly depending on the installation.
• When your TV is installed on the wall, the upper side of the TV slightly leans forward.
Screen
centre
dimension
Length for mounting
Standard
mounting
mounting
GB
Unit: mm
Slim
25
GB
Page 26
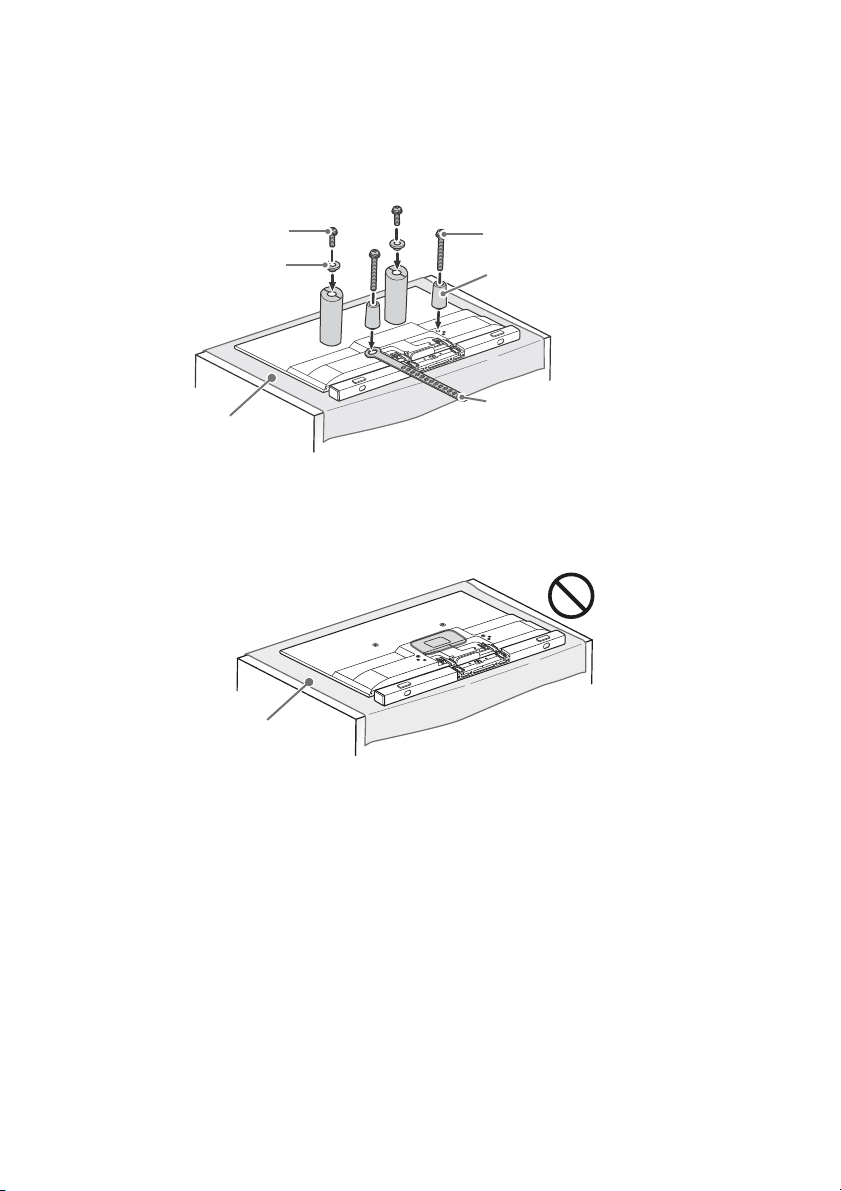
2 Attach the Attachment parts for Wall-Mount Bracket. Check the Attachment parts by
Pulley
Screw (+PSW 6 x 20)
Spacer (60 mm)
Screw (+PSW 6 x 50)
Belt
Soft cloth
Soft cloth
referring to “1” of the Wall-Mount Bracket Installation Guide.
Note
• If using an electric screwdriver, set the torque at approximately 1.5 N·m {15 kgf·cm}.
• Be sure to store the unused parts in a safe place for future use. Retain this manual for future reference.
Standard mounting
Slim mounting
Note
• You cannot use some of the terminals on the rear of the TV when using this mounting style.
• Connect the Analogue Extension Cable (supplied) if you need to use the
/ VIDEO IN 1 socket.
26
GB
Page 27
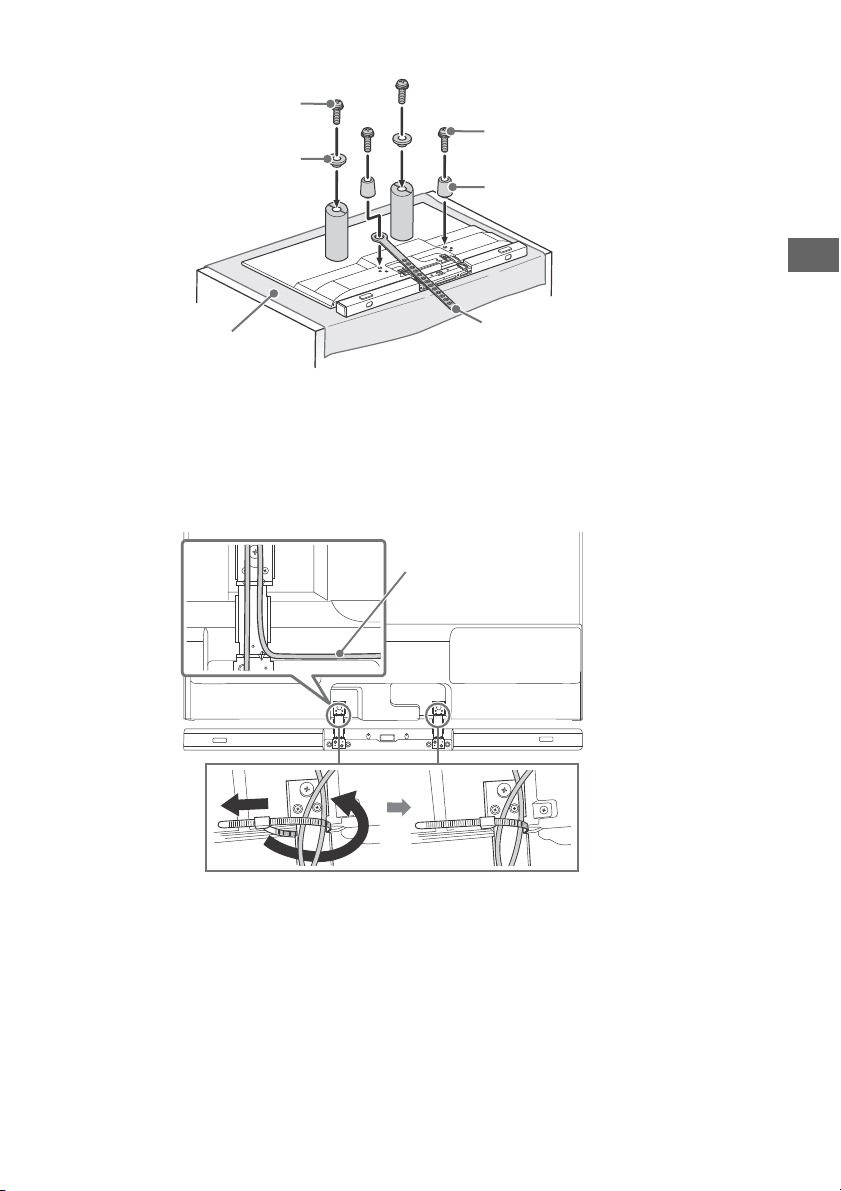
3 Connect necessary cables to the TV.
Pulley
Screw (+PSW 6 x 20)
Belt
Spacer (20 mm)
Soft cloth
Screw (+PSW 6 x 20)
Cable of External
Speaker
Note
• You cannot access to any terminal after installing the TV to the wall.
4 Make sure to connect and bundle the cables before installing the TV on the wall.
Fix cables to the Wall-Mount Arm using the cable holder I.
GB
GB
27
Page 28
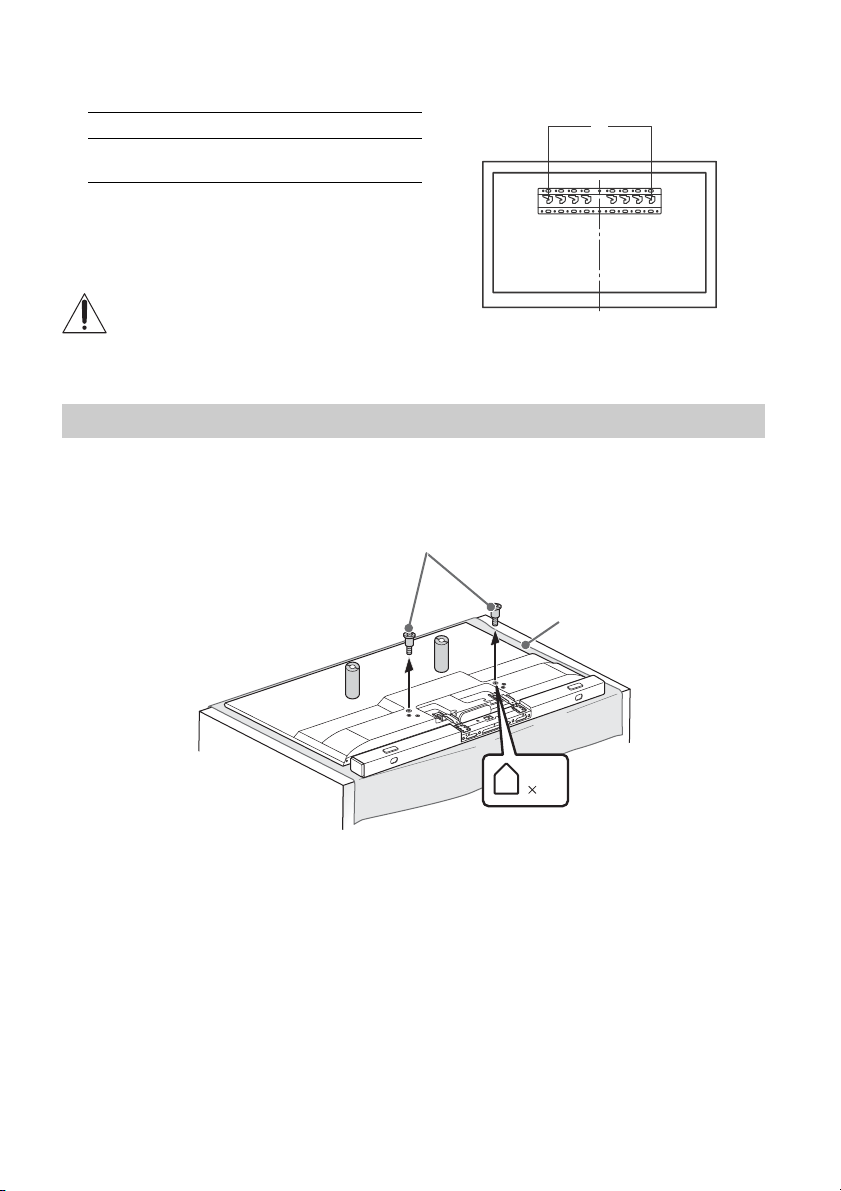
5 Install the TV to the Base. Refer to “5” of Installation Guide and “Installing the TV to the
a
2
1
Pulley
Soft cloth
Wall” of Operating Instructions supplied with the Wall-Mount Bracket.
Model Name KDL- Hook location
50W950C /
43W950C
Refer to the instructions supplied with the Wall-Mount Bracket for your model to install the TV on the wall.
a
Using the Wall-Mount Bracket (Not Supplied / Not Optional)
1 Remove Pulley from the rear of the TV to use Wall-Mount Bracket (not supplied or not
optional). Be sure to store the removed parts in a safe place, keeping them away from
children.
28
GB
Page 29
Troubleshooting
TV
Rear of TV
In order to keep your TV software up-to-date, it
is necessary to download the latest software
information via the digital broadcasting system
or internet and to update the software. Select
[Update Now] to start a software update. The
illumination LED flashes white while the
software is updating. Do not unplug the AC
power cord during the software update. If you
do, the software update may not finish
completely, and it may cause a software
malfunction. Software updates can take up to
30 minutes. If you do not wish to update the
software automatically, press HOME select
[Help] [System software update]
[Automatic software download] [Off].
When you unplug the TV and plug it in again,
the TV may not be able to turn on for a while
even if you press the power button on the
remote control or the TV because it takes time
to initialize the system. Wait for about 10 to 20
seconds, then operate it again.
When the illumination LED is flashing red,
count how many times it flashes (interval
time is three seconds).
If the illumination LED flashes red, reset the TV
by disconnecting the AC power cord (mains
lead) for two minutes, then turn on the TV.
If the problem persists, contact your dealer or
Sony service centre with the number of times
the illumination LED flashes red (interval time is
three seconds). Disconnect the AC power cord
(mains lead), and inform your dealer or Sony
service centre.
When the illumination LED is not flashing,
check the items as follows.
You can also refer to [Troubleshooting] in the
Help Guide or perform self-diagnosis by
selecting [Help] [Self diagnostics]. If the
problem persists, have your TV serviced by
qualified service personnel.
Troubles and Solutions
There is no picture (screen is dark) and no
sound.
Check the antenna (aerial)/cable connection.
Connect the TV to the AC power (mains), and
press on the TV or remote control.
Some programmes cannot be tuned.
Check the antenna (aerial)/cable connection.
The remote control does not function.
Replace the batteries.
The [Parental lock] password has been
forgotten.
Enter 9999 for the PIN code. (PIN code 9999 is
always accepted.)
The TV surrounds become warm.
When the TV is used for an extended period, the
TV surrounds become warm.
You may feel hot when touching there by the
hand.
Frozen audio or video, a blank screen, or the
TV does not respond to TV or remote co ntrol
buttons.
Perform a simple reset of the TV by unplugging
the AC power cord (mains lead) for two minutes,
then plug it in again.
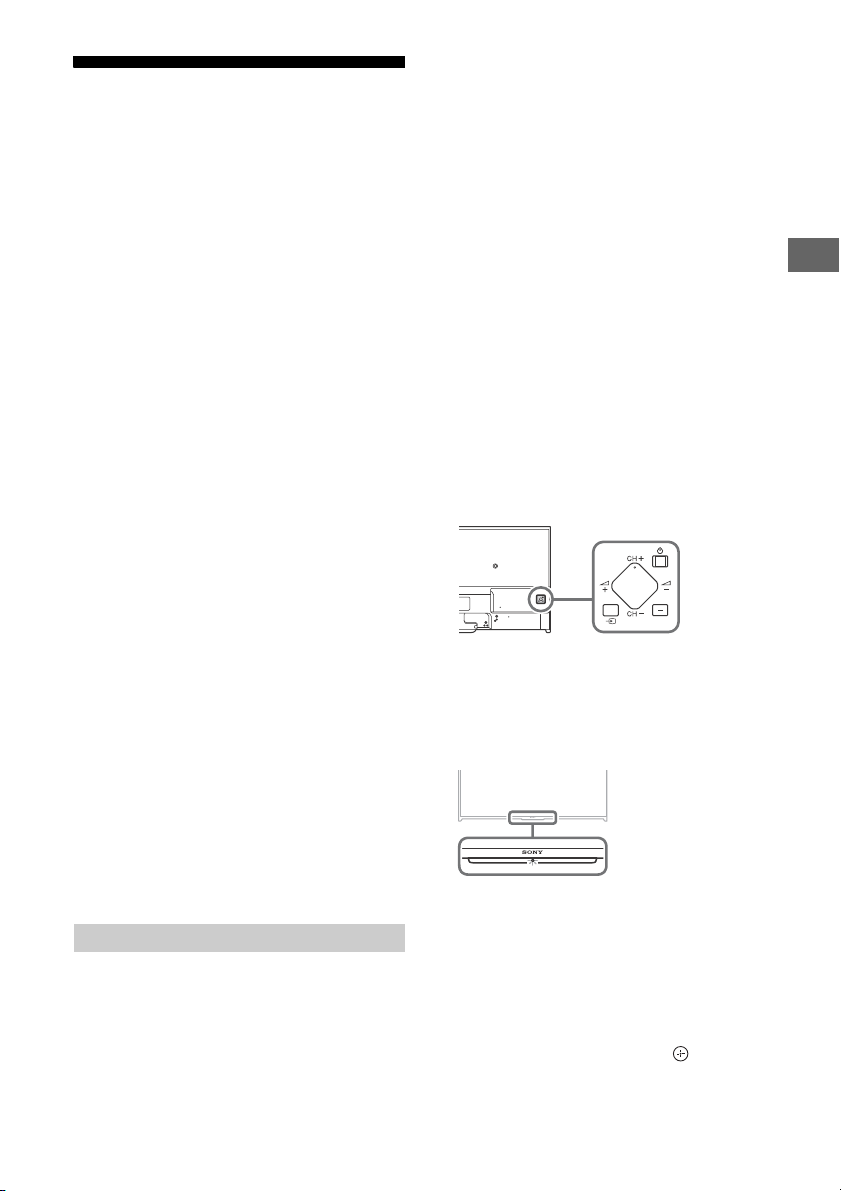
The , CH+/–, +/–, and TV buttons
cannot be located on the TV.
See below illustration for location of the buttons
on the TV.
The illumination LED is turned on.
If you do not wish to light up the illumination LED,
you can turn it off.
Press HOME, then select [Settings] t
[Illumination LED] t [Off].
Cannot connect to a wireless router by WPS
(Wi-Fi Protected Setup).
If you use WEP security, select [Easy] t [Wi-Fi] t
[Connect by scan list]. Then, select the network
name (SSID) you want to connect.
Cannot find the required network name in
network setup.
Select [[Manual entry]] and press to enter
network name.
GB
GB
29
Page 30
Specifications
System
Panel system
LCD (Liquid Crystal Display) Panel, LED Backlight
TV system
Analogue: B/G, I, D/K, M
Digital: DVB-T/DVB-T2
Colour/video system
Analogue: PAL, SECAM, NTSC3.58, NTSC4.43
Digital: Refer to the Help Guide
Channel coverage
Analogue: UHF/VHF/Cable, Depending on your
country/area selection.
Digital: UHF/VHF, Depending on your country/
area selection.
Sound output
10 W + 10 W + 10 W + 10 W
Wireless technology
Protocol IEEE802.11a/b/g/n
Bluetooth Version 4.1
Input/Output jacks
Antenna (aerial)/cable
75 ohm external terminal for VHF/UHF
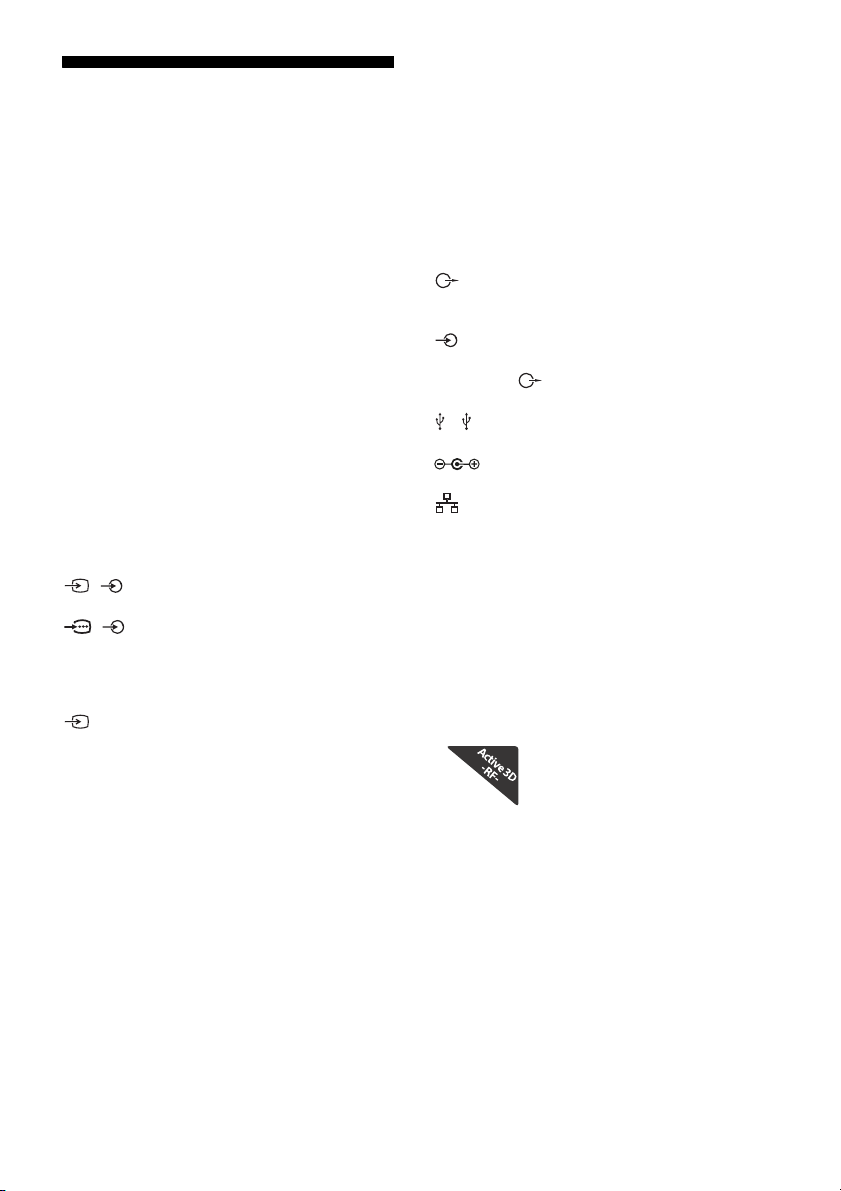
/ VIDEO IN 1
Video/Audio input (mini jack)
/ COMPONENT IN
YPBPR (Component Video): 1080p (50, 60 Hz),
1080i (50, 60 Hz), 720p (50, 60 Hz), 576p, 576i,
480p, 480i
Audio input (phono pin jack)
VIDEO IN 2
Video input (common phono pin with Y input)
HDMI IN 1, 2, 3, 4
Video (2D): 1080p (30, 50, 60 Hz), 1080/24p, 1080i
(50, 60 Hz), 720p (30, 50, 60 Hz), 720/24p, 576p,
576i, 480p, 480i, PC Formats
Video (3D):
Frame Packing: 1080p (30 Hz), 1080/24p,
1080i (50, 60 Hz), 720p (30, 50, 60 Hz), 720/24p
Side-by-Side: 1080p (50, 60 Hz), 1080/24p,
1080i (50, 60 Hz), 720p (50, 60 Hz)
Over-Under: 1080p (30, 50, 60 Hz), 1080/24p,
1080i (50, 60 Hz), 720p (50, 60 Hz)
Audio: 5.1 channel linear PCM: 32, 44.1, 48, 88.2,
96, 176.4 and 192 kHz, 16, 20 and 24 bits, Dolby
Digital and DTS
ARC (Audio Return Channel) (HDMI IN 4 only)
MHL (common with HDMI IN 1)
Video (2D): 1080p (30 Hz), 1080/24p,
1080i (50, 60 Hz), 720p (30, 50, 60 Hz),
720/24p, 576p, 576i, 480p, 480i
Video (3D):
Side-by-Side: 1080/24p, 1080i (50, 60 Hz),
720p (50, 60 Hz)
Over-Under: 1080p (30 Hz), 1080/24p,
1080i (50, 60 Hz), 720p (50, 60 Hz)
Audio: 5.1 channel linear PCM: 32, 44.1, 48, 88.2,
96, 176.4 and 192 kHz, 16, 20 and 24 bits, Dolby
Digital and DTS
DIGITAL AUDIO OUT (OPTICAL)
Digital optical jack (Two channel linear PCM,
Dolby Digital, DTS)
HDMI 3 AUDIO IN
Analogue audio input (Stereo mini jack)
AUDIO OUT / (Stereo mini jack)
Headphone, Audio Output, Subwoofer
1, 2
USB port
DC IN 19.5 V
AC adapter input
LAN
10BASE-T/100BASE-TX connector (Depending on
the operating environment of the network,
connection speed may differ. 10BASE-T/100BASETX communication rate and communication
quality are not guaranteed for this TV.)
Others
Optional accessories
Touchpad Remote Control: RMF-TX100E
Wall -Moun t Bracket: SU-W L45 0
MHL Cable: DLC-MC10/DLC-MC20
Active 3D Glasses: TDG-BT500A
Operating temperature
0 ºC – 40 ºC
Power and others
Power requirements
19.5 V DC with AC adapter
Rating: Input 100 V - 240 V AC, 50/60 Hz
Screen size (measured diagonally) (Approx.)
KDL-50W950C: 50 inches / 125.7 cm
KDL-43W950C: 43 inches / 108.0 cm
Display resolution
1,920 dots (horizontal) × 1,080 lines (vertical)
30
GB
Page 31
Power consumptio n
KDL-50W950C: 131 W
KDL-43W950C: 111 W
Dimensions (Approx.) (w × h × d)
with Table Top-Stand and External Speaker
(Table-top condition)
KDL-50W950C: 1,122 × 663 × 200 mm
KDL-43W950C: 968 × 574 × 200 mm
with External Speaker (Wall-Mount condition)
KDL-50W950C: 1,122 × 733 × 70 mm
KDL-43W950C: 968 × 643 × 70 mm
Mass (Approx.)
with Table Top-Stand and External Speaker
(Table-top condition)
KDL-50W950C: 19.8 Kg
KDL-43W950C: 15.4 Kg
with External Speaker (Wall-Mount condition)
KDL-50W950C: 17.3 Kg
KDL-43W950C: 13.9 Kg
Note
• Optional accessories availability depends on country/
region/TV model/stock.
• Design and specifications are subject to change
without notice.
• This TV set incorporates MHL 2.
Notes on Digital TV function
• Any functions related to Digital TV ()
will only work in countries or areas where
DVB-T/DVB-T2 (MPEG-2 and H.264/MPEG4 AVC) digital terrestrial signals are
broadcast. Please confirm with your local
dealer if you can receive a DVB-T/DVB-T2
signal where you live.
• This TV set complies with DVB-T/DVB-T2
specifications, but compatibility with future
DVB-T/DVB-T2 digital terrestrial broadcasts
are not guaranteed.
• Some Digital TV functions may not be
available in some countries/areas.
• Gracenote, Gracenote eyeQ, Gracenote
VideoID, Gracenote Video Explore, the
Gracenote logo and logotype, and the
“Powered by Gracenote” logo are either
registered trademarks or trademarks of
Gracenote in the United States and/or
other countries.
• Opera® Devices SDK from Opera Software
ASA. Copyright 1995-2014 Opera Software
ASA. All rights reserved.
• Wi-Fi, Wi-Fi Direct, Miracast and Wi-Fi
Protected Setup are trademarks or
registered trademarks of Wi-Fi Alliance.
• MHL, Mobile High-Definition Link and the
MHL Logo are trademarks or registered
trademarks of MHL Licensing, LLC.
• For DTS patents, see
http://patents.dts.com.
Manufactured under license from DTS, Inc.
DTS, the Symbol, & DTS and the Symbol
together are registered trademarks, and
DTS Digital Surround is a trademark of DTS,
Inc. © DTS, Inc. All Rights Reserved.
• Designed with UEI Technology
TM
Under License from Universal Electronics
Inc. Portions © UEI 2000 – 2014
• The Bluetooth® word mark and logos are
owned by the Bluetooth SIG, Inc. and any
use of such marks by Sony Corporation is
under license. Other trademarks and trade
names are those of their respective
owners.
• TUXERA is a registered trademark of Tuxera
Inc. in the US and other countries.
GB
Trademark information
• The terms HDMI and HDMI High-Definition
Multimedia Interface, and the HDMI Logo
are trademarks or registered trademarks of
HDMI Licensing LLC in the United States
and other countries.
• Manufactured under license from Dolby
Laboratories.
Dolby and the double-D symbol are
trademarks of Dolby Laboratories.
• “BRAVIA” and are trademarks of
Sony Corporation.
GB
31
Page 32
GB
32
Page 33

Page 34

Page 35

Page 36
Customer Support and Contact:
©2015 Sony Corporation 4-565-468-14(2)
 Loading...