

Sony KDL-46EX605, KDL-46EX707, KDL-40EX707, KDL-40EX705, KDL-40EX607 Setup Manual
...
4-180-191-E3(1)
LCD
Digital Color TV
Setup Guide (Operating Instructions)
Setting up your TV
To watch TV
Additional Information
Sony Customer Support
http://esupport.sony.com/ES/LA/
Call the number on the warranty card.
Please Do Not Return
the Product to the Store
KDL-52EX707 / 46EX707 / 46EX705 / 46EX607 / 46EX605 / 40EX707 / 40EX705
KDL-40EX607 / 40EX605 / 32EX707 / 32EX705 / 32EX607 / 32EX605

Registro de propiedad
El modelo y el número de serie están
situados en la parte lateral y en la
posterior del televisor. Anote esos
números en el espacio que tiene a
continuación. Refiérase a ellos cuando
contacte con su distribuidor Sony
acerca de este televisor.
Nombre de modelo
N° de serie
ADVERTENCIA
Para reducir el riesgo de incendio o descarga
eléctrica, no exponga este televisor a la
humedad ni la lluvia.
CAUTION
RISK OF ELECTRIC SHOCK
DO NOT OPEN
ATTENTION
RISQUE DE CHOC ELECTRIQUE,
NE PAS OUVRIR
PRECAUCION
RIESGO DE CHOQUE ELECTRICO
NO ABRIR
Este símbolo pone sobre aviso al
usuario de la presencia de “voltaje
peligroso” sin aislamiento en el
interior del televisor, el cual puede
ser de tal intensidad que podría
presenter riesgo de descarga
eléctrica.
Este símbolo tiene por objeto
advertir al usuario que la
documentación que acompaña a
este televisor contiene
instrucciones importantes de
operación y mantenimiento
(servicio).
El televisor no debe estar expuesto a goteos
ni salpicaduras, ni se deben colocar sobre él
objetos con líquidos como floreros.
PRECAUCIÓN
Para evitar las descargas eléctricas, no utilice
este enchufe polarizado de corriente alterna
con un cable de extensión, receptáculo u otro
tomacorriente a menos que, al conectarse, los
contactos queden completamente
introducidos y no queden expuestos.
Seguridad
Use el televisor únicamente con ca de
❑
110 - 240 V
❑ Evite operar con temperaturas inferiores
a 5°C
❑ Utilice el cable de alimentación de ca
especificado por Sony y que
corresponda al voltaje de la zona donde
vaya a utilizarlo.
❑ Por razones de seguridad, el enchufe
está diseñado de tal forma que sólo
puede conectarse en una dirección en
los tomacorrientes de pared. Si no
puede introducir completamente los
contactos del enchufe en el
tomacorriente, póngase en contacto con
su distribuidor.
❑ Si se introduce algún objeto sólido o cae
líquido en la unidad, desenchufe el
televisor inmediatamente y haga que sea
revisado por personal especializado
antes de volver a operarlo.
❑ Desconecte el televisor si no va a
utilizarlo durante algunos días. Para
ello, tire del enchufe, nunca del cable.
❑ Consulte la información sobre
seguridad en Folleto de instrucciones de
seguridad.
Audio
Evite el uso prolongado del aparato con
volumen superior a 85 decibeles, porque esto
podrá perjudicar su audición.
Nota sobre Closed Captions
El uso del televisor con finalidades distintas a
la visualización privada de emisiones de
programas en UHF o VHF o transmisiones
vía cable dirigidas al público en general
puede requerir la autorización de la compañía
de emisión por cable y/o del propietario del
programa.
~
• Las ilustraciones del control remoto
utilizadas en este manual pertenecen
al RM-YD047 a menos que se
indique lo contrario.
La clase 32 ofrec e un tamaño de imagen
de 31,5 pulgadas (80,01 cm) medidos
en sentido diagonal.
La experiencia BRAVIA® Full HDTV
¡Gracias por elegir a Sony! Su Nuevo TV BRAVIA® le abre
la puerta a la “Experiencia de TV HD completa”. Este
documento lo ayudará a aprovechar su TV al máximo.
Registre su TV en:
http://esupport.sony.com/LA/perl/
registration.pl
Los cuatro pasos para una experiencia de
alta definición completa
TV, fuente, sonido y configuración
1 TV
Ahora que ya hizo la mejor elección en tecnología LCD
de TV, retire todos los accesorios del empaque antes de
configurar su TV.
2 Fuente
Para disfrutar los increíbles detalles de su TV BRAVIA
debe tener acceso a programación HD.
• Mejore la señal o la fuente de contenido, solicite la
alta definición (HD) a su proveedor de servicios de
HD.
Este TV muestra todas las señales de video de entrada con una resolución de 1.920 puntos × 1.080 líneas.
• Reciba las emisiones de HD por aire a través de una
antena para TV de alta definición (HD) conectada
directamente a la parte posterior del TV.
Visite www.antennaweb.org para recibir más
información sobre la selección y configuración de
antena.
• Descubra la riqueza del entretenimiento disponible
en la actualidad a través de los reproductores Bluray Disc™ de súper alta resolución y demás
equipos HD de Sony.
3 Sonido
Complete la experiencia de alta definición con un
sistema de sonido envolvente BRAVIA Sync™ o un
receptor de audio/video de Sony.
4 Ajustes
Instale su TV y conecte sus fuentes. Consulte la
página 6 para ver diagramas de conexión de muestra.
Para obtener la más alta calidad de experiencia HD,
utilice los cables de HDMI (Interfaz multimedia de alta
definición) de Sony.
2
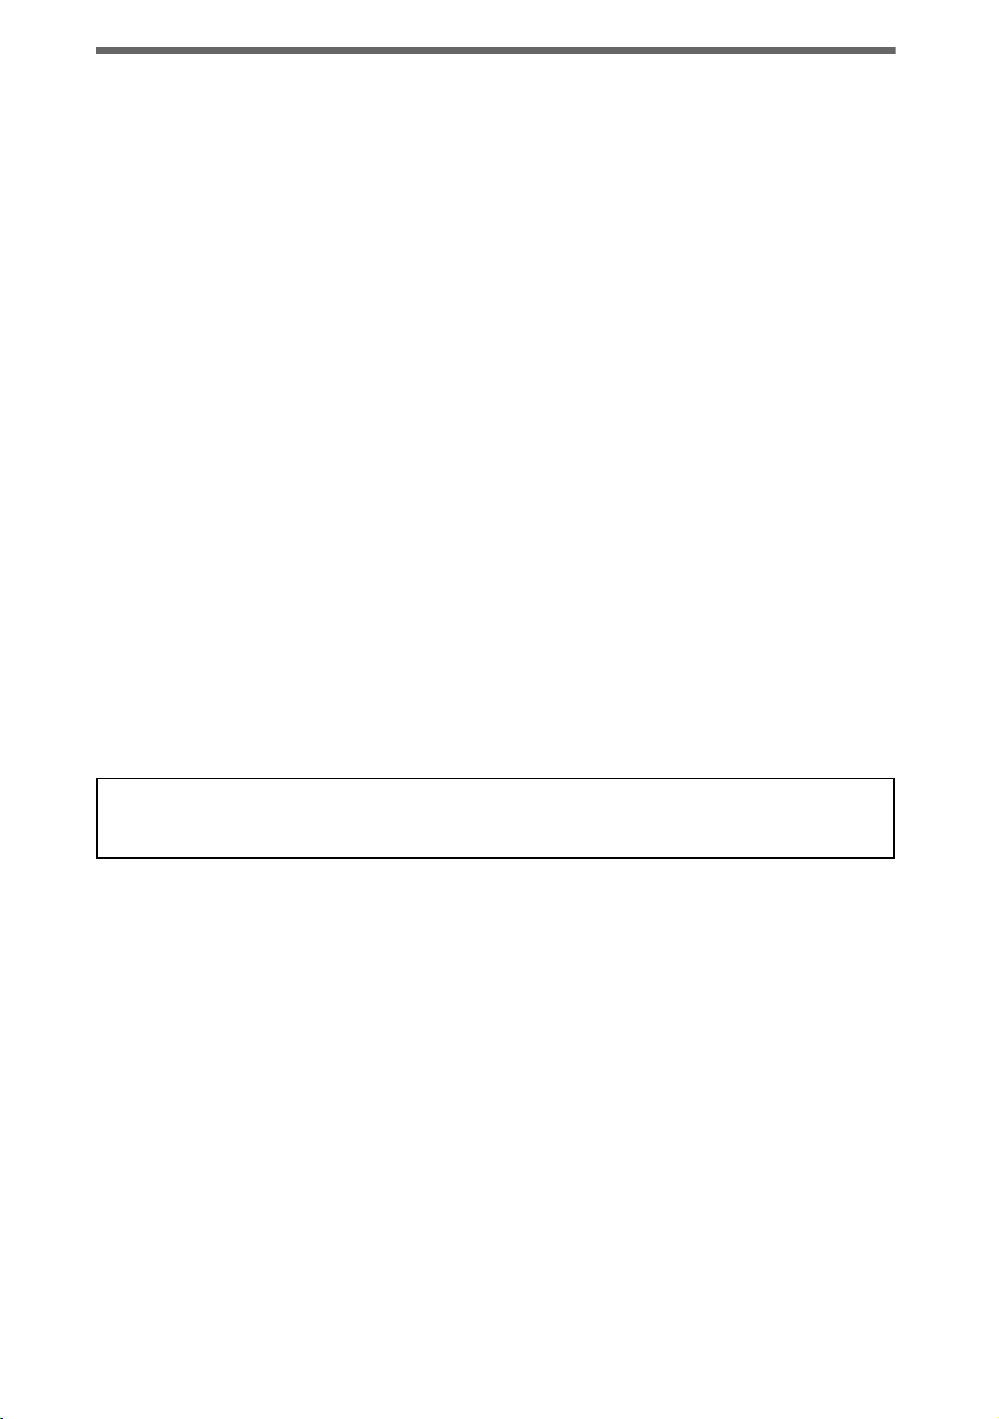
Table of Contents
Checking the accessories..............................................................................................................4
Inserting batteries into the remote control .....................................................................................4
Setting up your TV
Attaching the Table-Top Stand......................................................................................................5
Connecting the TV.........................................................................................................................6
Securing the TV...........................................................................................................................10
Organizing the AC power cord ....................................................................................................11
Running initial setup....................................................................................................................11
Detaching the Table-Top Stand from the TV...............................................................................12
Using a Wall-Mount Bracket........................................................................................................13
Installing the TV Against a Wall or Enclosed Area......................................................................13
To watch TV
To watch programs......................................................................................................................14
To use the TV features................................................................................................................14
To use i-Manual...........................................................................................................................15
Additional Information
Troubleshooting...........................................................................................................................16
Specifications ..............................................................................................................................18
• Operating instructions are built into your BRAVIA TV. Refer to “To use i-Manual” for operation
(page 15).
• Retain this manual for future reference.
3
Checking the accessories
AC power cord (1)
Table-Top Stand (1)*
Stand Rear Cover (1)*
Fixing screws for Table-Top Stand
(M5 × 16) (4)
Assembling Screws for Table-Top Stand
(M5 × 16) (4)
(for KDL-40/32EX707, KDL-40/32EX705,
KDL-40/32EX607 and KDL-40/32EX605
models)
Remote control (1)*
Size AAA batteries (2)
*1 The 32" and 40" models require assembling.
Refer to other leaflet to assemble the Table-Top
Stand.
*2 The Stand Rear Cover is attached to the Table-
Top Stand for 46" and 52" models.
*3 Please refer to the model name printed on the
remote control.
1
2
3
Inserting batteries into the remote control
Guidelines for Remote Control
• Point your remote control directly at the IR
sensor located on your TV.
• Make sure that no objects are blocking the
path between the remote control and the IR
sensor on your TV.
• Fluorescent lamps can interfere with your
remote control; try turning off the fluorescent
lamps.
• If you are having problems with the remote
control, reinsert or replace your batteries and
make sure that they are correctly inserted.
1 Remove the protection sheet.
2 Push and slide the cover upward.
4
Setting up your TV
Some TV models are packaged with a detached
Table-Top Stand so you can mount your TV to
a wall right away. If you are not mounting the
TV to a wall, you will need to attach the
Table-Top Stand. You will need a Phillips
screwdriver and the supplied screws to
complete the task. Look for the attachment
instructions provided with the TV.
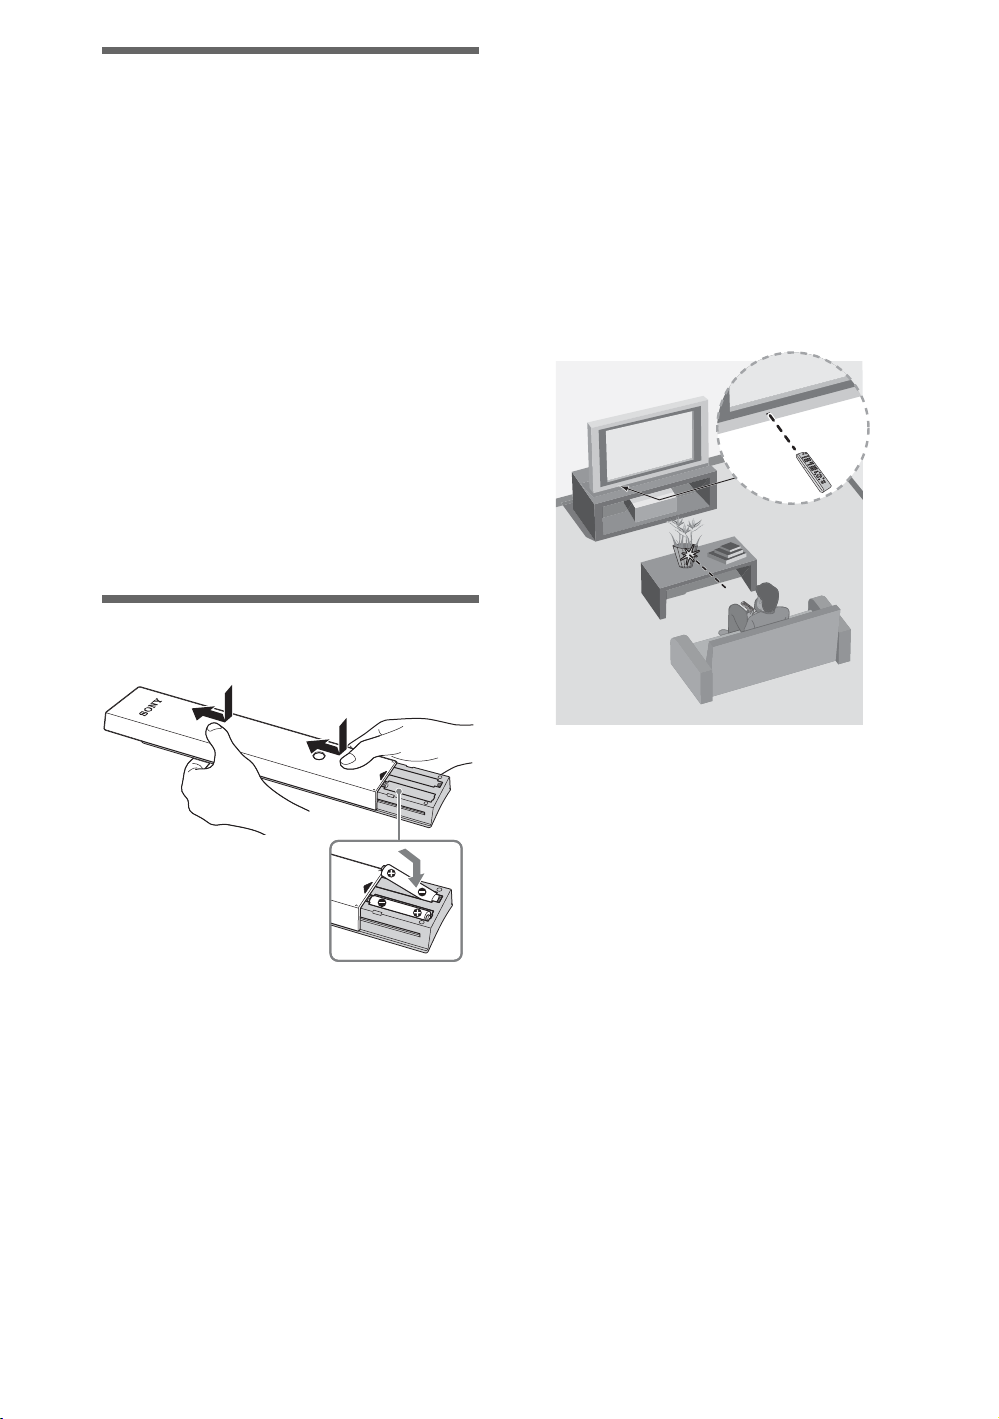
Be sure to consider the following while setting
up your TV:
• Disconnect all cables when carrying the
TV.
• Carry the TV with the adequate number of
people; larger size TVs require two or more
people.
• Correct hand placement while carrying the
TV is very important for safety and to avoid
damage.
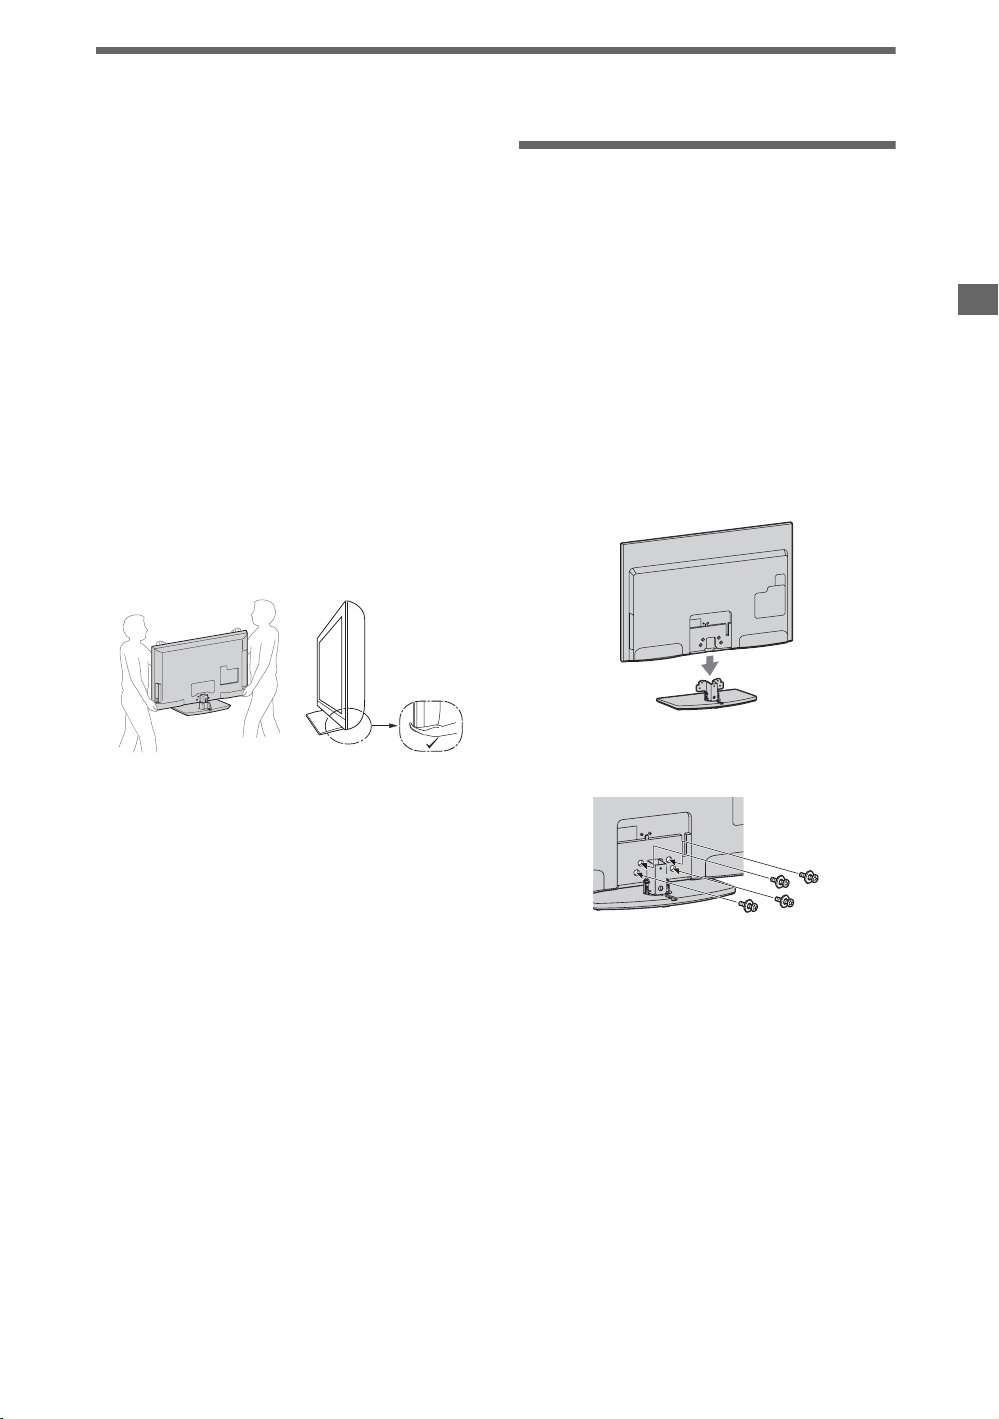
Attaching the Table-Top Stand
Refer to the supplied Table-Top Stand
instruction leaflet for proper attachment.
1 Gently slide the TV unit onto the
Table-Top Stand and align the screw
holes.
~
• Do not put stress on the LCD panel or the frame
around the screen.
• Be careful to not pinch your hands or the AC
power cord when you install the TV unit to the
Table-Top Stand.
Setting up your TV
• Ensure your TV has adequate ventilation,
see page 13.
• For best picture quality, do not expose the
screen to direct illumination or sunlight.
• Avoid installing the TV in a room with
reflective wall and floor materials.
• Avoid moving the TV from a cold area to a
warm area. Sudden room temperature
changes may cause moisture condensation.
This may cause the TV to show poor picture
and/or poor color. Should this occur, allow
moisture to evaporate completely before
powering the TV on.
2 Use the supplied screws to attach the
TV unit to the Table-Top Stand.
~
• If you use an electric screwdriver, set the
tightening torque at approximately 1.5 N·m
{15 kgf·cm}.
3 After all the screws are tighten cover
the Table-Top Stand with the supplied
Stand Rear Cover.
~
• You can attach the TV to the Table-Top Stand
with the Stand Rear Cover on with the
exception of the 32" and 40" models. The 32"
and 40" models must follow the above
instructions.
5
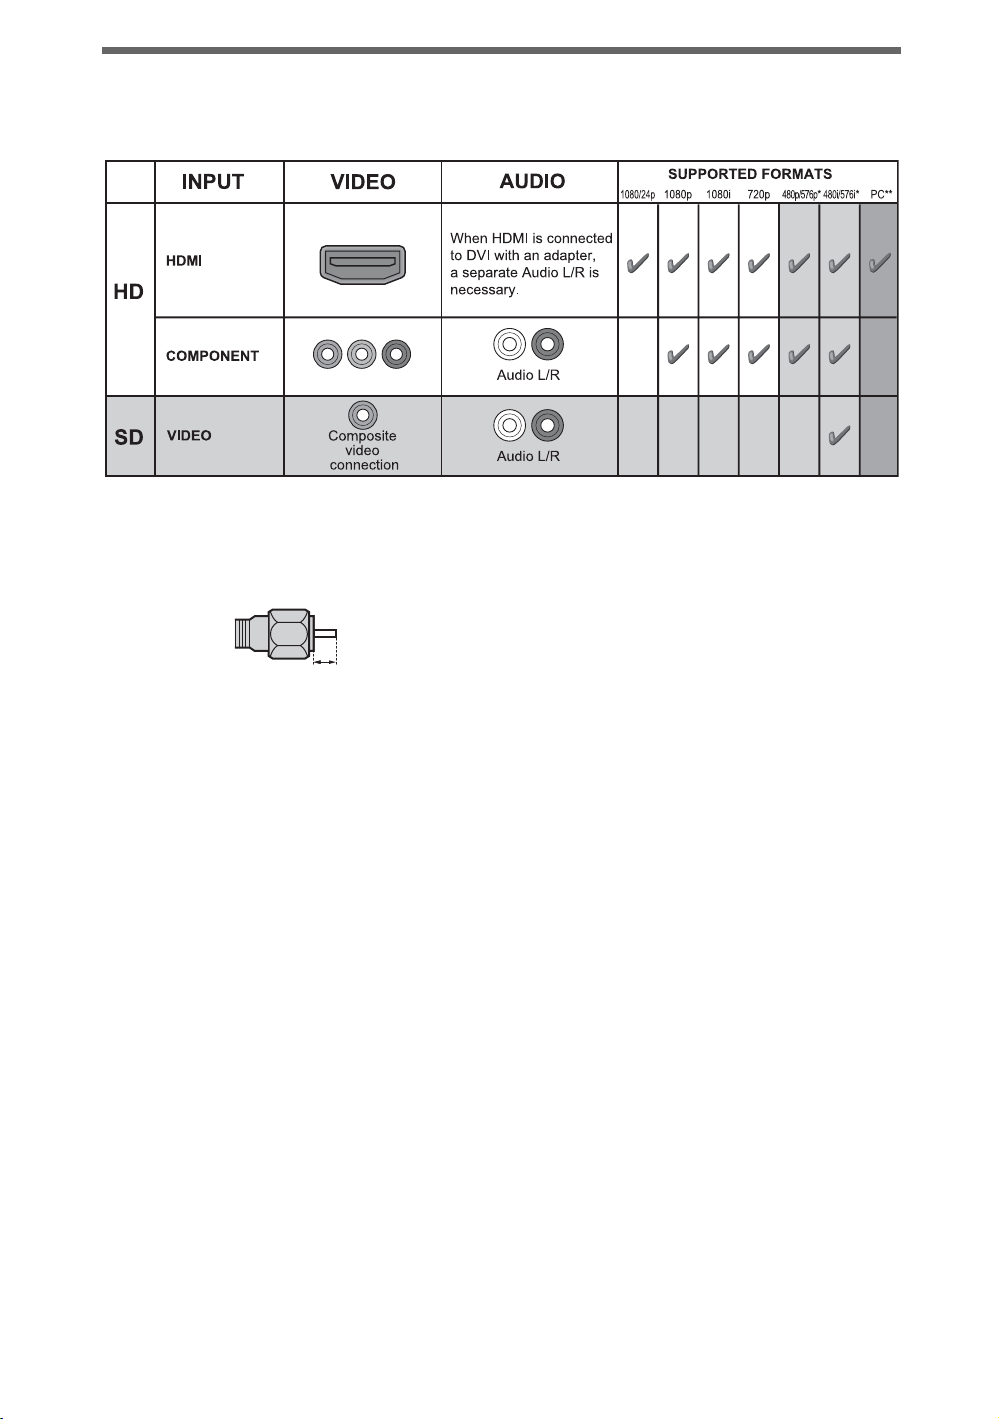
Connecting the TV
The following chart shows the high-definition (HD) and standard-definition (SD) video formats
supported by your BRAVIA TV inputs.
* 576i, 576p: Not available with EX707 and EX607 models.
** For supported PC formats refer to the i-Manual.
Recommendation of the F type plug
Projection of the inner wire from the
connection part must be less than 1.5 mm.
1.5 mm
6

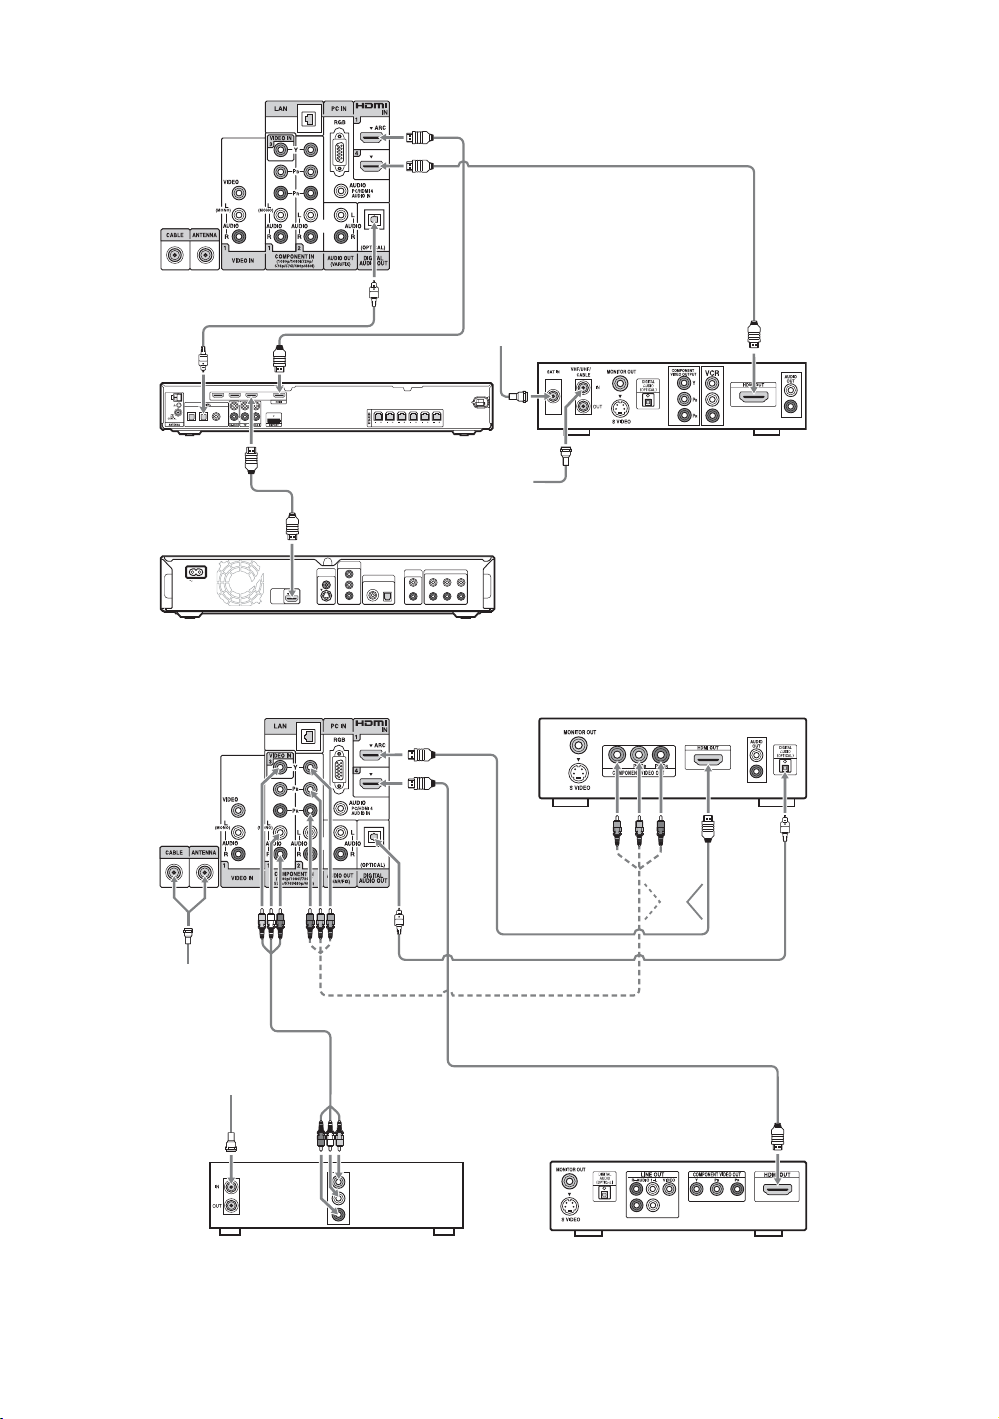
Shown with a Set Top Box with HDMI
connection
Shown with a Set Top Box with
COMPONENT connection
Setting up your TV
Set Top Box
Cable System or VHF/UHF Antenna System
Cable
Antenna
Set Top Box
(Continued)
7
Shown with HD BRAVIA® Sync™ Basic Connection
*Rear of TV
SAT
(Dish)
*A/V Receiver
AM
* Signifies a BRAVIA Sync capable device.
DVD INSAT IN VIDEO 2/BD IN OUT
L
RLR
OPT IN
OPT IN
COAX IN AUDIO IN
AUDIO IN AUDIO IN
SAT
VIDEO 1
DVD
FRONT R
FRONT L SUR R SUR L CENTER SUBWOOFER
Cable/
Antenna
*Blu-ray Disc
COMPONENT
VIDEO OUT
VIDEO
OUT
Y
DIGITAL OUT
VIDEO
AC IN
HDMI
OUT
PCM/DTS/DOLBY DIGITAL
COAXIAL OPTICAL
B
B
/
P
C
R
/
R
P
C
S VIDEO
L
R
AUDIO
OUT
5.1CH OUTPUT
FRONT REAR CENTER
L
R
WOOFER
HD Cable Box or
HD Satellite Receiver
Shown with HD Basic Connection with Home Theater System
Rear of TV
Cable/
Antenna
Cable/SAT
(Dish)
SD Cable Box or
SD Satellite Receiver
Home Theater System
Blu-ray Disc/DVD
or
8
 Loading...