

Page 1
LCD
4-267-385-12(1)
Getting Started
Using Your BRAVIA TV
Digital Color TV
Setup Guide (Operating Instructions)
Network Setup
Additional Information
Sony Customer Support
U.S.A.: www.sony.com/tvsupport
Canada: www.sony.ca/support
United States Canada
1.800.222.SONY 1.877.899.SONY
Please Do Not Return
the Product to the Store
KDL-46EX523 / 46EX521 / 46EX520 / 40EX523 / 40EX521 / 40EX520 / 32EX523 / 32EX521
KDL-32EX520
Page 2
Owner’s Record
The model and serial numbers are
located at the side and rear of the
TV. Record these numbers in the
spaces provided below. Refer to
them whenever you call upon your
Sony dealer regarding this TV.
Model Name
Serial No.
CAUTION
To prevent electric shock and blade
exposure, do not use this polarized AC
plug with an extension cord, receptacle
or other outlet unless the blades can be
fully inserted.
• Operate the TV only on 110-240 V
AC (U.S.A./Canada 120 V AC)
Licensing Information
Macintosh is a trademark of Apple Inc.,
registered in the U.S. and other
countries.
HDMI, the HDMI Logo, and HighDefinition Multimedia Interface are
trademarks or registered trademarks of
HDMI Licensing LLC in the United
States and other countries.
Fergason Patent Properties, LLC:
U.S. Patent No. 5,717,422
U.S. Patent No. 6,816,141
Manufactured under license from Dolby
Laboratories. Dolby and the double-D
symbol are trademarks of Dolby
Laboratories.
Rovi and Rovi On Screen Guide are
trademarks of Rovi Corporation and/or
its subsidiaries.
The Rovi On Screen Guide system is
manufactured under license from Rovi
Corporation and/or its subsidiaries.
The Rovi On Screen Guide system is
protected by one or more United States
patents of Rovi Corporation and/or its
subsidiaries.
Rovi Corporation and/or its subsidiaries
and related affiliates are not in any way
liable for the accuracy or availability of
the program schedule information or
other data in the Rovi On Screen Guide
system and cannot guarantee service
availability in your area. In no event
shall Rovi Corporation and/or its related
affiliates be liable for any damages in
connection with the accuracy or
availability of the program schedule
information or other data in the Rovi On
Screen Guide system.
Blu-ray Disc is a trademark.
“BRAVIA” and , S-Force,
BRAVIA Sync, and are trademarks
or registered marks of Sony
Corporation.
“PlayStation” is a registered trademark
and “PS3” is a trademark of Sony
Computer Entertainment Inc.
®
DLNA
CERTIFIED
marks, or certification marks of the
Digital Living Network Alliance.
TrackID is a trademark or registered
trademark of Sony Ericsson Mobile
Communications AB.
Music and video recognition technology
and related data are provided by
Gracenote
standard in music recognition
technology and related content delivery.
For more information, please visit
www.gracenote.com.
CD, DVD, Blu-ray Disc, and music and
video-related data from Gracenote, Inc.,
copyright © 2000-present Gracenote.
Gracenote Software, copyright © 2000present Gracenote. One or more patents
owned by Gracenote apply to this
product and service. See the Gracenote
website for a nonexhaustive list of
applicable Gracenote patents.
Gracenote, CDDB, MusicID,
MediaVOCS, the Gracenote logo and
logotype, and the “Powered by
Gracenote” logo are either registered
trademarks or trademarks of Gracenote
in the United States and/or other
countries.
, the DLNA Logo and DLNA
®
are trademarks, service
®
. Gracenote is the industry
Your BRAVIA TV is
ENERGY STAR
qualified in the “Home”
mode.
It meets strict energy
efficiency guidelines
set by the U.S.
Environmental Protection Agency and
Department of Energy. ENERGY
STAR is a joint program of these
government agencies, designed to
promote energy efficient products and
practices.
Changes to certain features, settings,
and functionalities of this TV (i.e. Rovi
On Screen Guide, Picture/Sound, Light
Sensor, Power Savings) can increase or
change the power consumption.
Depending upon such changed settings,
the power consumption may exceed the
limits required for the ENERGY STAR
qualification in the “Home” mode.
The 32 class has a 31.5 inch viewable
image size (measured diagonally).
®
~
• The “x” that appears in the model
name corresponds to a numeric digit,
related to design, color or TV system.
• The illustrations of the remote control
used in this manual are of the RMYD063 unless otherwise stated.
• The illustrations used in this manual
may differ depending on your TV
model.
• Retain this manual for future
reference.
2
Page 3
The BRAVIA® Full HDTV
Experience
Thank you for choosing Sony! Your new
BRAVIA
HDTV Experience.” This document will help
you get the most out of your TV.
Please take a moment to register your TV at:
®
TV opens the door to the “Full
U.S.A.: http://productregistration.sony.com
Canada: http://www.SonyStyle.ca/registration
• Receive over-the-air HD broadcasts with
an HD-quality antenna connected directly
to the back of your TV.
Visit www.antennaweb.org for more
information on antenna selection and setup.
• Discover the wealth of entertainment now
available on super-high resolution Blu-ray
Disc™ player and other Sony HD
equipment.
Four Steps to a Full HD Experience
Set, Source, Sound, and Setup.
1 Set
Now that you have made the best selection in
LCD TV technology, be sure to remove all
accessory contents from the packaging before
setting up your TV.
2 Source
To experience the stunning detail of your
BRAVIA TV, you need access to HD
programming.
• Upgrade your signal or content source to
high-definition (HD) by contacting your
HD service provider.
This TV displays all video input signals in a resolution of 1,920 dots × 1,080 lines.
3 Sound
Complete the high-definition experience with
a BRAVIA Sync™ surround sound system
or A/V receiver from Sony.
4 Setup
Install your TV and connect your sources.
See page 9 for sample connection diagrams.
To help assure the highest quality for your
HD experience, use Sony HDMI (HighDefinition Multimedia Interface) cables.
To learn more about HDTV, visit:
U.S.A.: http://www.sony.com/HDTV
Canada: http://www.SonyStyle.ca/hd
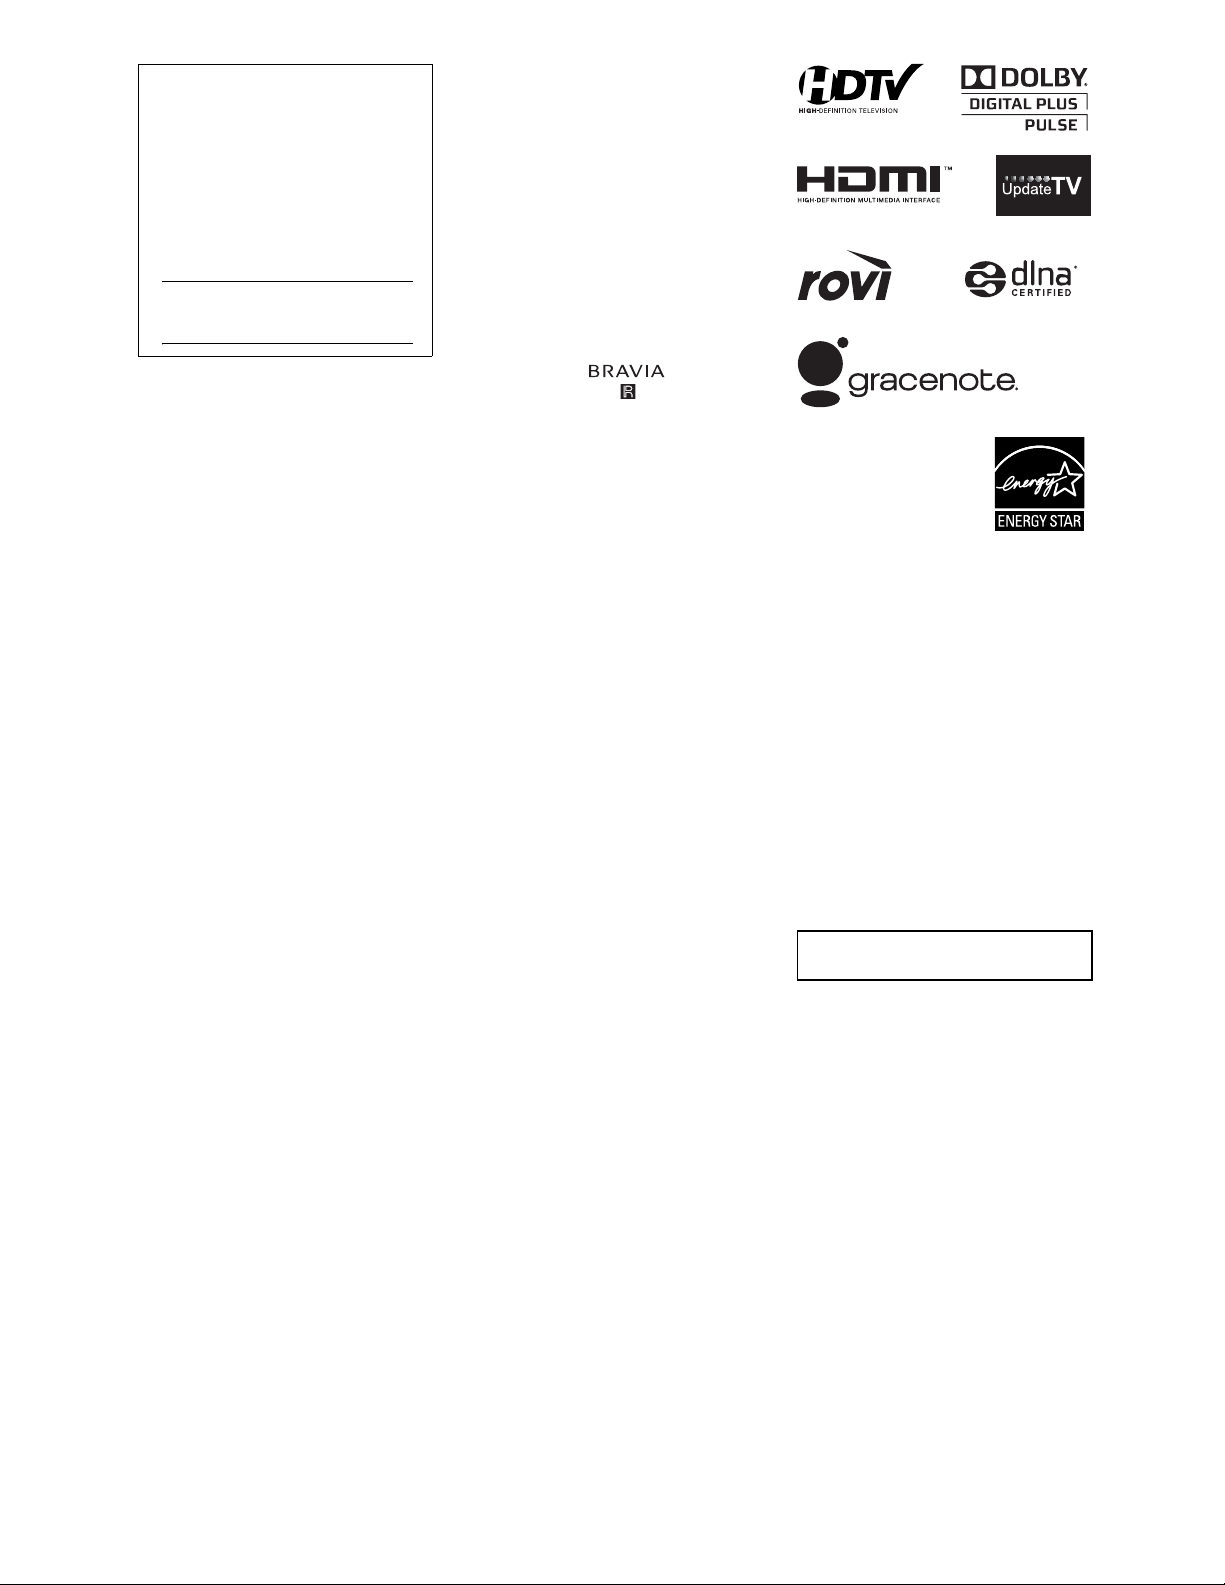
The following chart shows the high-definition (HD) and standard-definition (SD) video
formats supported by your BRAVIA TV inputs.
* For supported PC formats refer to the i-Manual.
3
Page 4

Table of Contents
Getting Started
Checking the accessories ...........................................................................................6
Inserting batteries into the remote control...................................................................6
Before setting up your TV ...........................................................................................7
1: Attaching the Table-Top Stand ...............................................................................7
2: Adjusting the viewing angle of the TV .....................................................................8
3: Connecting the TV ..................................................................................................9
4: Securing the TV ....................................................................................................12
5: Bundling the cables...............................................................................................13
6: Running initial setup..............................................................................................14
Using a Wall-Mount Bracket......................................................................................14
Installing the TV Against a Wall or Enclosed Area.................................................... 15
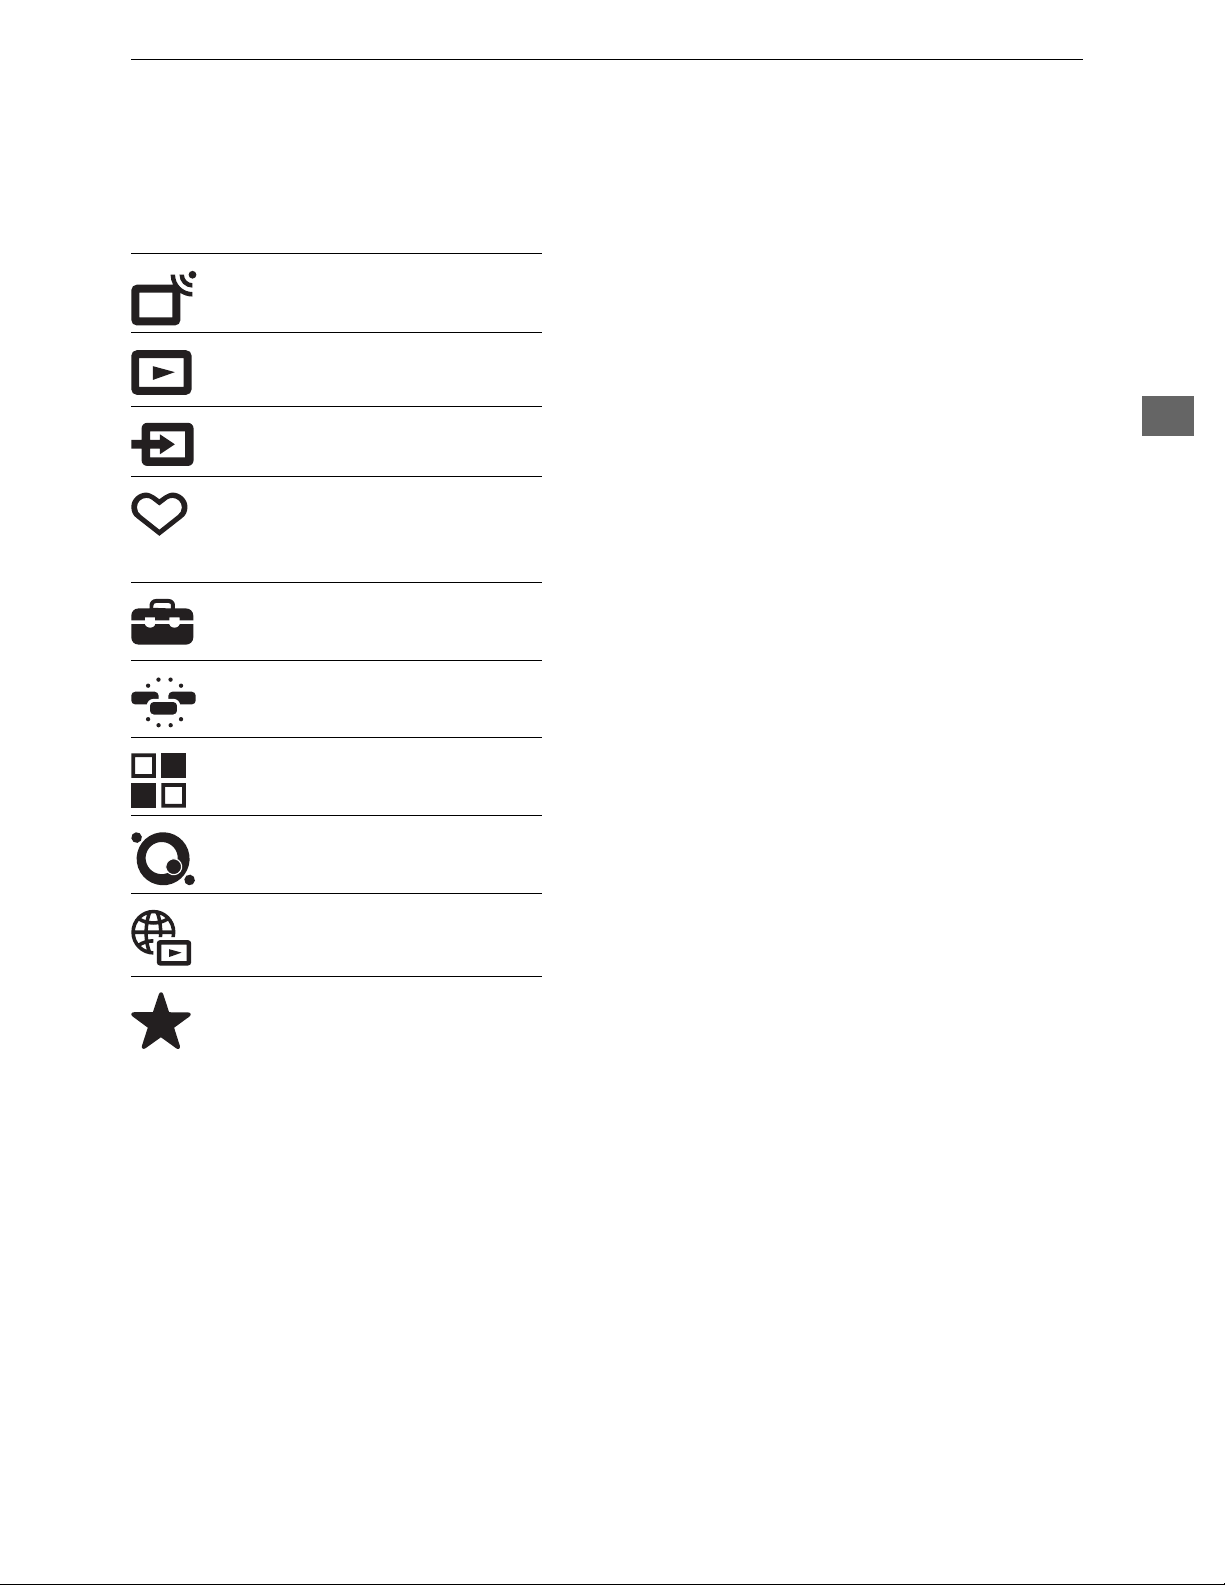
Using Your BRAVIA TV
Watching the TV........................................................................................................16
Selecting various functions and settings (Home Menu) ............................................18
Displaying Operating Instructions (i-Manual) ............................................................ 20
Network Setup
Preparing a wired network ........................................................................................22
Preparing a wireless LAN..........................................................................................22
Setting up the Internet connection ............................................................................23
If you cannot connect to the Internet.........................................................................24
Adjusting the server display settings.........................................................................25
Additional Information
Troubleshooting ........................................................................................................26
Specifications............................................................................................................28
4
Page 5
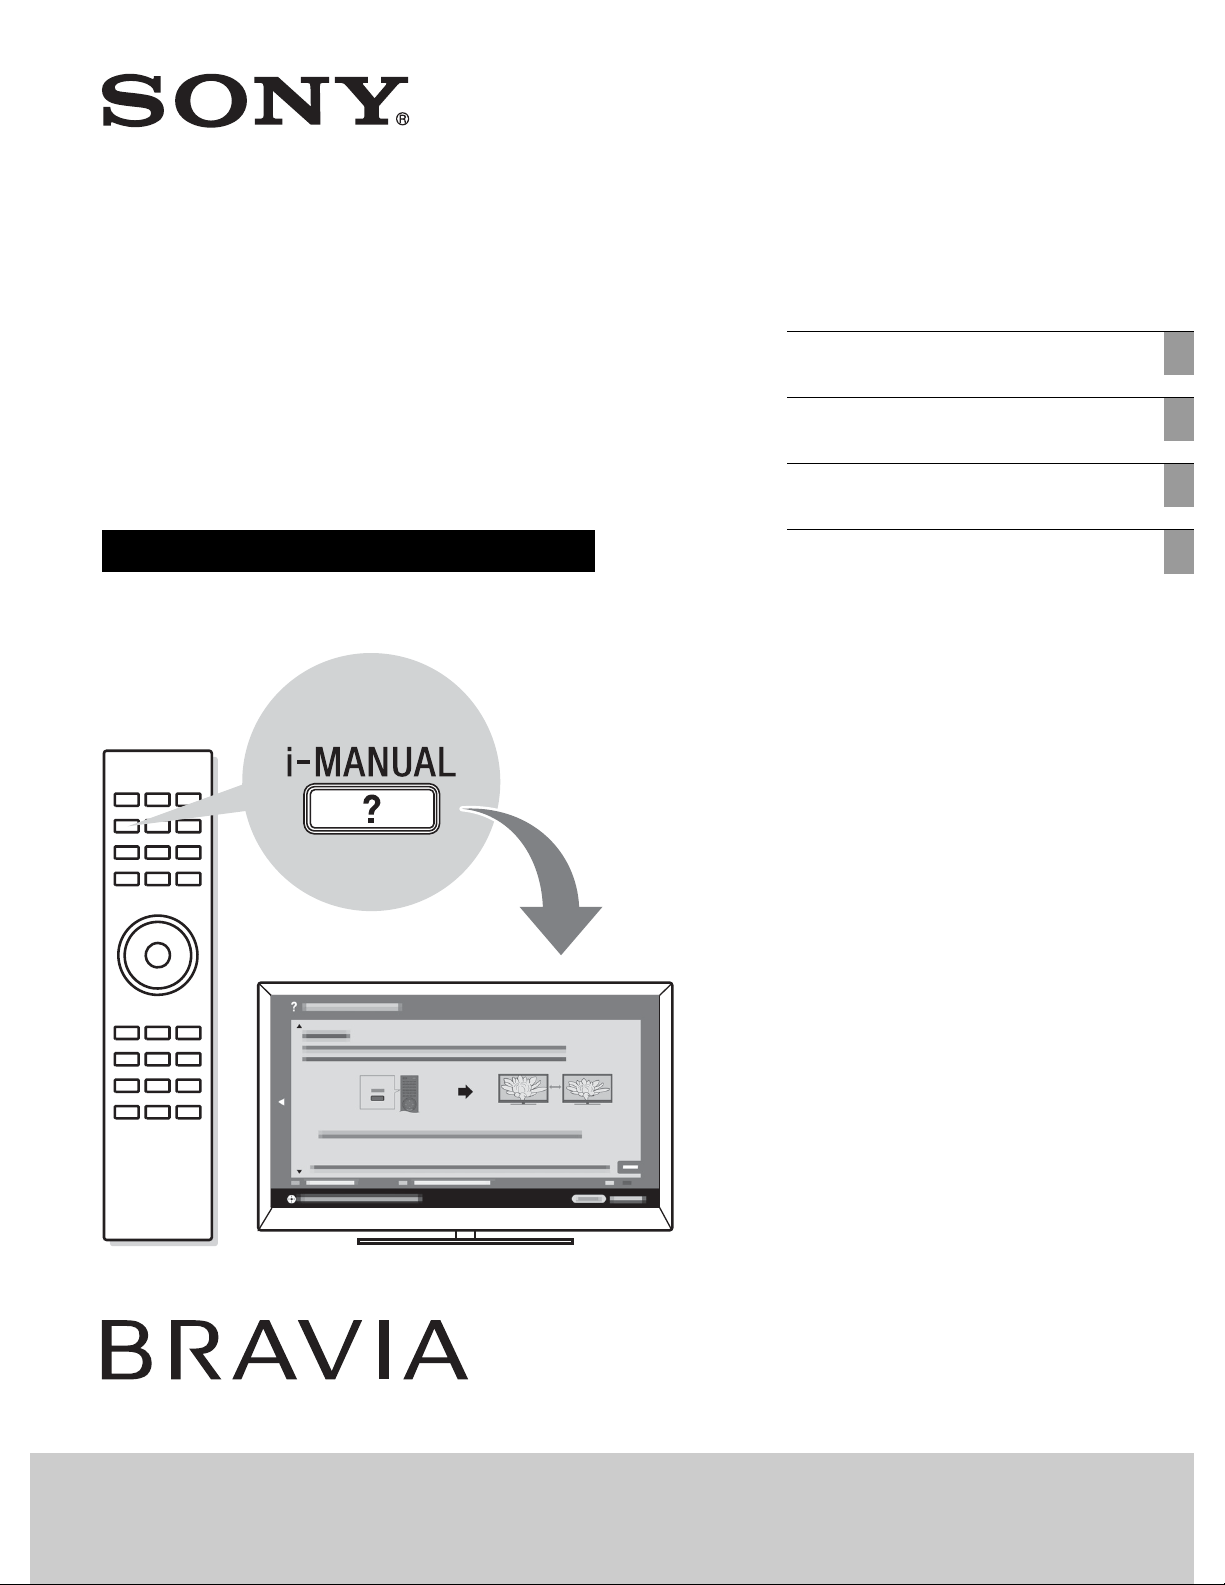
After setting up your BRAVIA TV and learning basic
operations with this manual, see the built-in manual (i-Manual)
for further explanation of the features of your TV.
This TV has a built-in manual (i-Manual). To access the i-Manual, press i-MANUAL on the
remote control, and select an item. For details, see page 20 of this manual. Contents of the
i-Manual may differ depending on the model/region/area.
Contents of the i-Manual
How to Use i-Manual
“BRAVIA” TV Features
Presence Sensor
“BRAVIA” Internet Video
Wireless LAN / Wireless LAN Ready
“BRAVIA” Sync with “Control for
HDMI”
TrackID™/Music Search/Video
Search
Watching TV
Rovi On Screen Guide™
Favorites
Wide Mode
Picture Mode
Photos/Music/Videos
Twin Picture (PIP)
Twin Picture (P&P)
Settings/Home Menu
About the Home Menu
Settings
Picture & Display
Sound
Preferences
i-Manual
Channels & Inputs
Network
Product Support
Using Other Equipment/
Internet
VCR/DVD Player
Audio System
USB Device (e.g. Digital Camera)
Picture Frame
HDMI Equipment
Internet/Wireless LAN
Home Network
PC
Parts Description
Remote Control
TV Controls and Indicators
Terminals
Troubleshooting
Index
Bookmarks
5
Page 6
Getting Started
Checking the accessories
Remote control (1)
Size AAA batteries (2)
Table-Top Stand (1)
Fixing screws for Table-Top Stand
(M5 × 16) (3)
Assembling screws for Table-Top
Stand (M6 × 14) (4) (for KDL-46EX52x)
Assembling screws for Table-Top
Stand (M6 × 14) (3) (for
KDL-40/32EX52x except
KDL-40/32EX521 (Mexico models))
Assembling screws for Table-Top
Stand (M5 × 16) (2) (for
KDL-40/32EX521 (Mexico models))
Hexagon wrench (1) (except
KDL-40/32EX521 (Mexico models))
Operating Instructions (this manual)
and other documents
*1Please refer to the model name printed on the
remote control.
*2Assembling the Table-Top Stand is required.
Refer to the supplied Table-Top Stand leaflet
to assemble the Table-Top Stand.
*1
*2
Inserting batteries into the
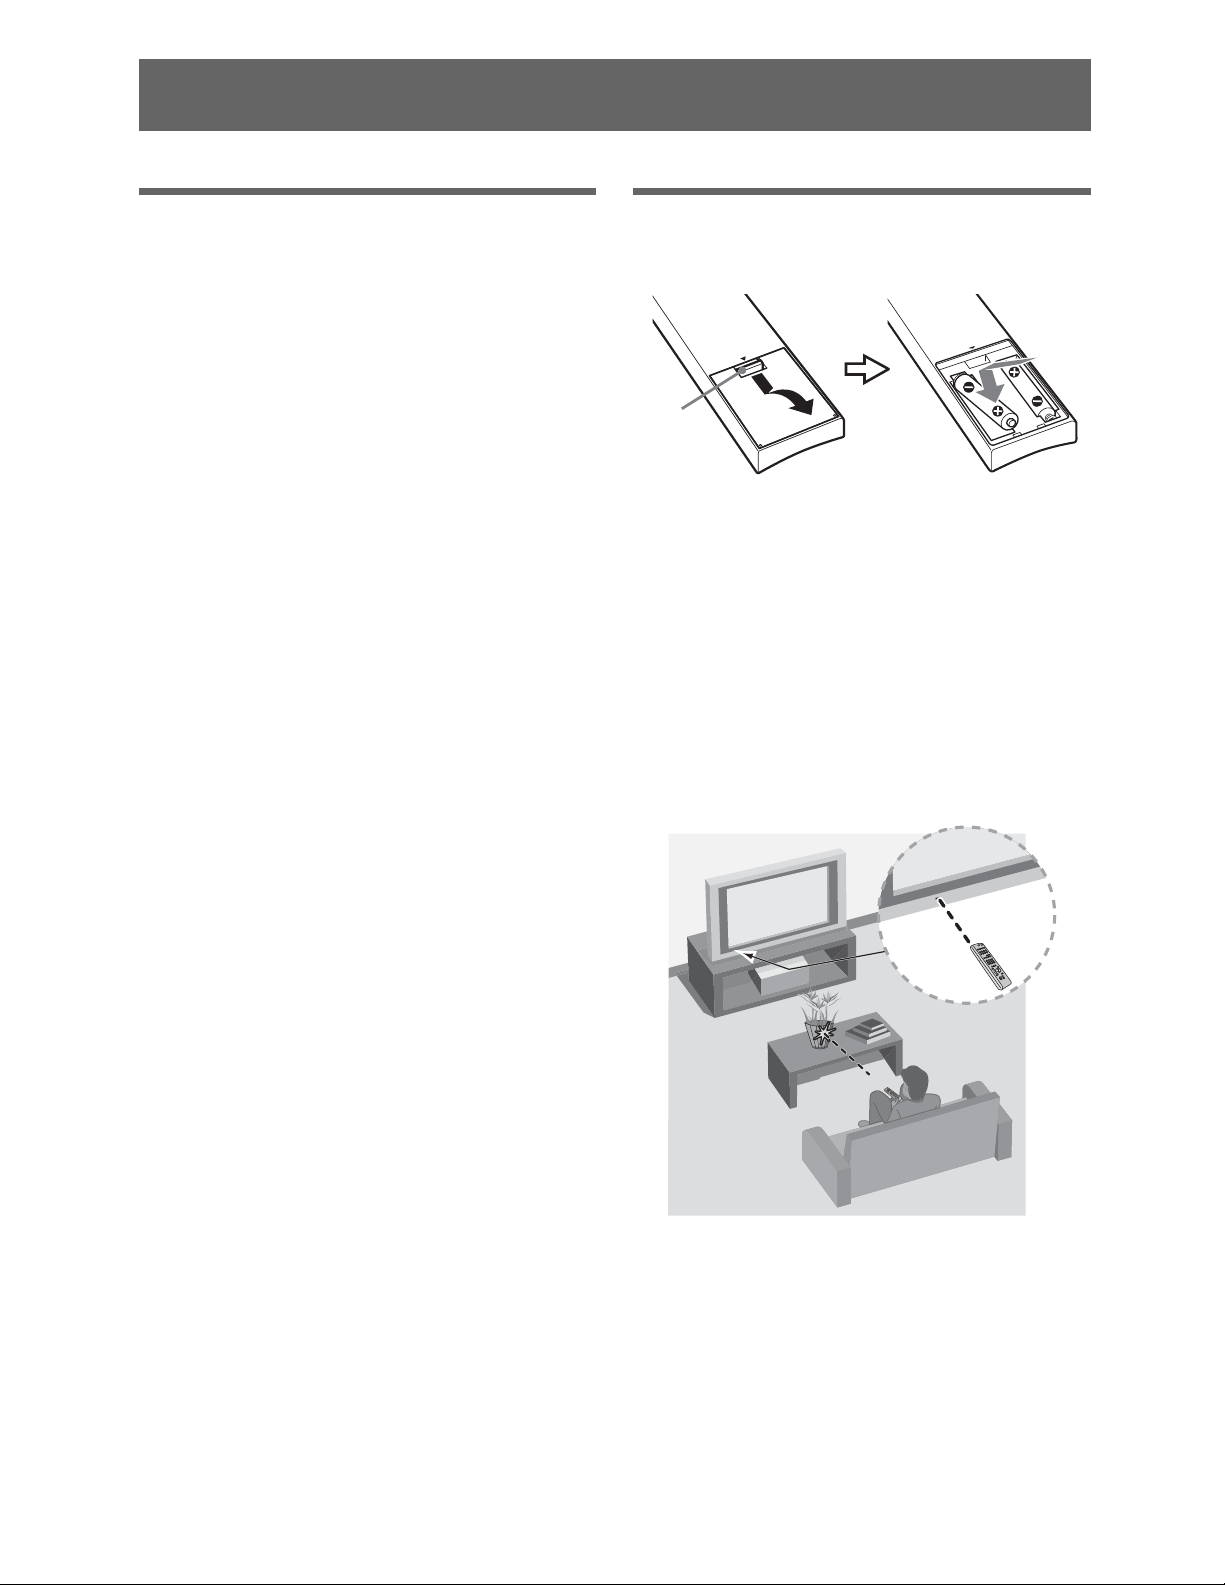
remote control
Push to
open
1 Remove the protection sheet.
2 Push and lift the cover to open.
Guidelines for Remote Control
• Point your remote control directly at the
IR sensor located on your TV.
• Make sure that no objects are blocking
the path between the remote control and
the IR sensor on your TV.
6
• Fluorescent lamps can interfere with
your remote control; try turning off the
fluorescent lamps.
• If you are having problems with the
remote control, reinsert or replace your
batteries and make sure that they are
correctly inserted.
Page 7
Before setting up your TV
Some TV models are packaged with a
detached Table-Top Stand so you can
mount your TV to a wall right away. If you
are not mounting the TV to a wall, you will
need to attach the Table-Top Stand. You
will need a Phillips screwdriver and the
supplied screws to complete the task. Look
for the supplied Table-Top Stand instruction
leaflet.
Be sure to consider the following while
setting up your TV:
• Disconnect all cables when carrying the
TV.
• Carry the TV with the adequate number
of people; larger size TVs require two or
more people.
• Correct hand placement while carrying
the TV is very important for safety and
to avoid damage.
• Ensure that there are no objects in front
of the TV.
• Do not expose the Presence Sensor to
direct sunlight or other strong light, as
malfunction may occur.
IR Sensor
Getting Started
Presence Sensor
1: Attaching the Table-Top
Stand
Refer to the supplied Table-Top Stand
instruction leaflet for proper attachment.
1 Place the TV unit on the Table-Top
Stand.
• Ensure your TV has adequate
ventilation, see page 15.
• For best picture quality, do not expose
the screen to direct illumination or
sunlight.
• Avoid installing the TV in a room with
reflective wall and floor materials.
• Avoid moving the TV from a cold area
to a warm area. Sudden room
temperature changes may cause moisture
condensation. This may cause the TV to
show poor picture and/or poor color.
Should this occur, allow moisture to
evaporate completely before powering
the TV on.
~
• Do not put stress on the LCD panel or the
frame around the screen.
• Be careful to not pinch your hands or the AC
power cord when you install the TV unit to the
Table-Top Stand.
B KDL-46/40/32EX52x (except
KDL-40/32EX521 (Mexico models))
Guide
pins
(Continued)
7
Page 8
B KDL-40/32EX521 (Mexico models)
Guide
pins
~
• Align the TV from the top, slide it in until the
guide pins cannot be seen.
2 Use the supplied screws to attach the
TV unit to the Table-Top Stand.
B KDL-46/40/32EX52x (except
KDL-40/32EX521 (Mexico models))
Detaching the Table-Top
Stand from the TV
To detach the Table-Top Stand from the
TV, remove the screws fixed in step 2.
~
• Do not remove the Table-Top Stand for any
reason other than to install corresponding
accessories on the TV.
• When removing the Table-Top Stand from the
TV, lay the display face down on a stable work
surface that is larger than the TV.
• To prevent damaging the surface of the LCD
display, make sure to place a soft cloth on the
work surface.
• When installing the TV on a wall, remove the
screws from the rear of the TV. The screws and
number of screws depends on the TV model.
(They are fastened in the screw holes for wall
mounting.) Be sure to store the removed
screws in a safe place, keeping them away
from children.
• When attaching the Table-Top Stand again, be
sure to fasten the screws (previously removed)
to the original holes on the rear of the TV.
B KDL-40/32EX521 (Mexico models)
~
• If you use an electric screwdriver, set the
torque at approximately 1.5 N·m {15 kgf·cm}.
2: Adjusting the viewing
angle of the TV
This TV can be adjusted within the angles
as illustrated.
Angle adjustment (Swivel)
~
• When adjusting the angle, hold the stand with
one hand to avoid having the stand slip or TV
tip over.
B KDL-46/40/32EX52x (except
KDL-40/32EX521 (Mexico models))
20°
20°
20°
20°
8
Page 9
B KDL-40/32EX521 (Mexico models)
3: Connecting the TV
15°
15°
15°
15°
Angle adjustment (Tilt)
~
• Be careful not to pinch your fingers between
the TV and stand when adjusting the angle.
B KDL-46/40/32EX52x (except
KDL-40/32EX521 (Mexico models))
0° - 6°
Shown with a Set Top Box with HDMI
connection
Getting Started
Set Top Box
B KDL-40/32EX521 (Mexico models)
0°
Recommendation of the F type plug
The one based on the following drawing is
recommended about the F type plug.
Projection of the inner wire from the
connection part must be less than 1.5 mm.
1.5 mm max.
(Reference drawing of the F type plug)
6°
(Continued)
9
Page 10
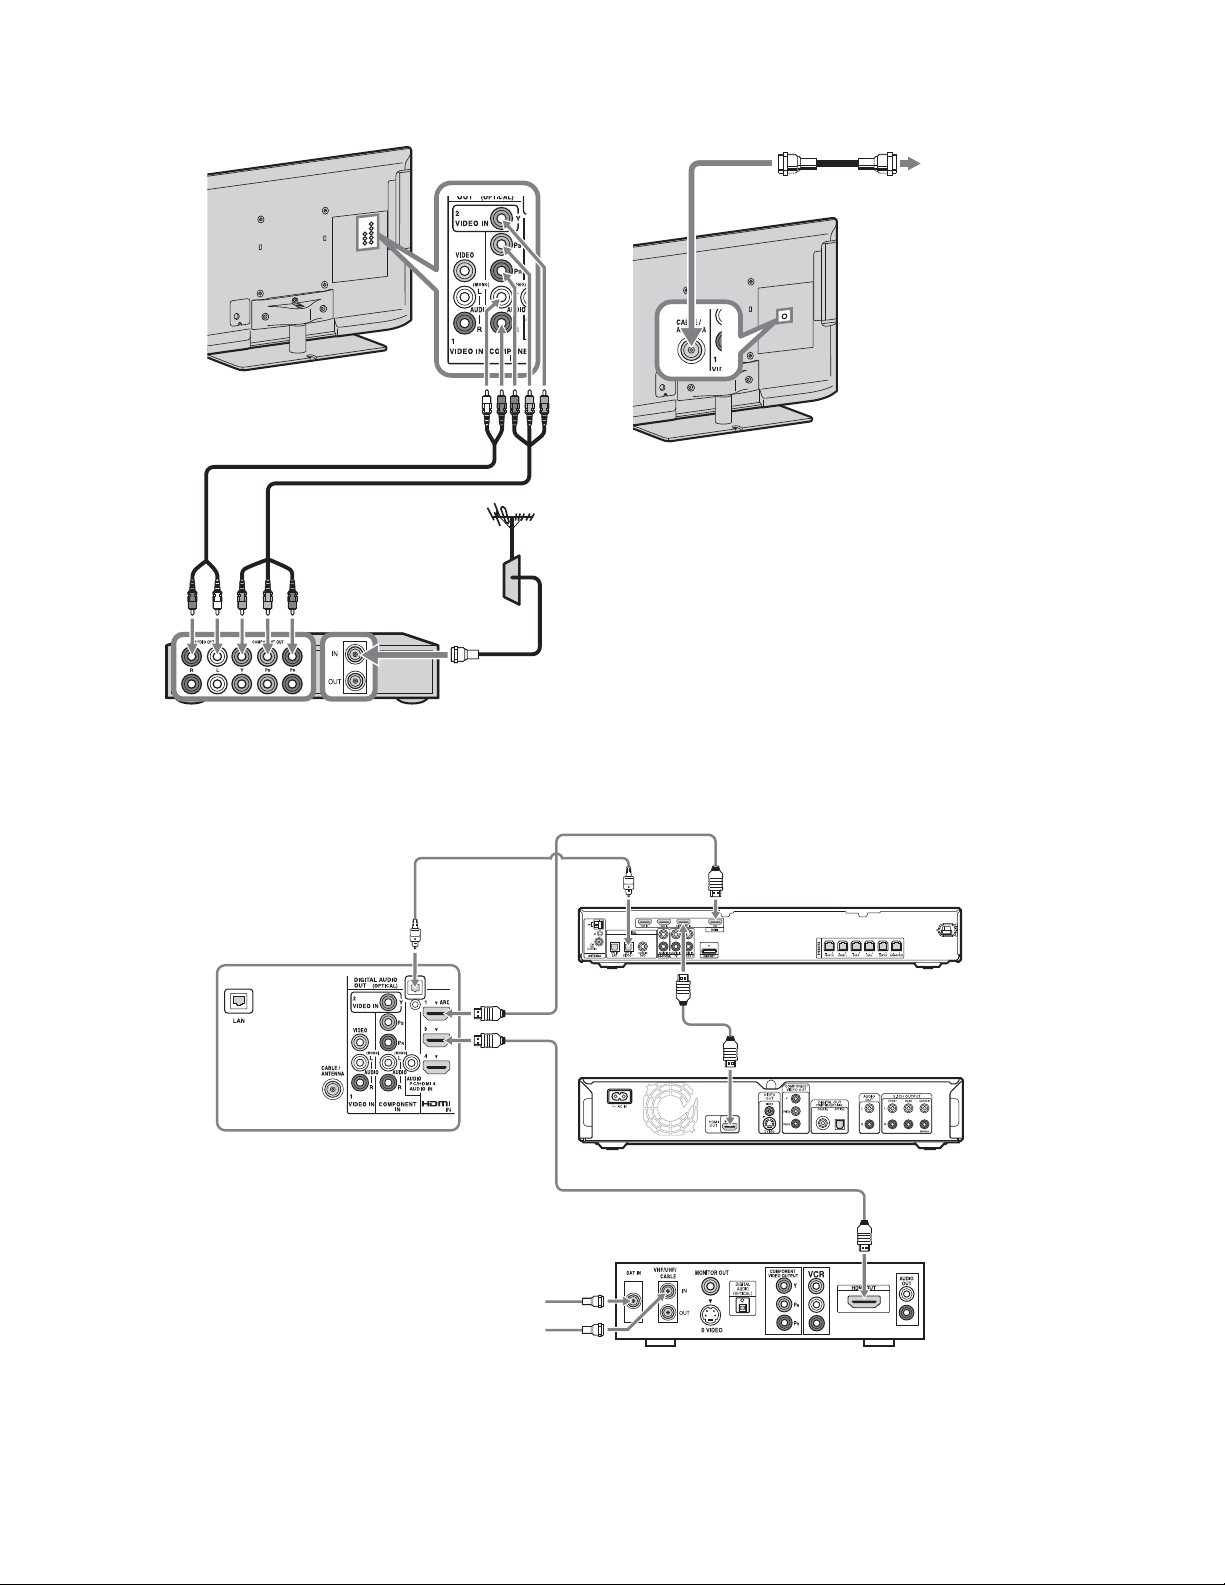
Shown with a Set Top Box with
COMPONENT connection
Cable System or VHF/UHF Antenna
System
Cable or
Antenna
Set Top Box
Shown with HD BRAVIA
**Optical
*Rear of TV
®
Sync™ Basic Connection
Connection
HD Cable Box or
HD Satellite Receiver
SAT
(Dish)
Cable/
Antenna
*A/V Receiver
*Blu-ray Disc
* Signifies a BRAVIA Sync capable device.
** The optical connection is only needed for A/V receivers that do not support ARC (Audio
Return Channel).
10
Page 11
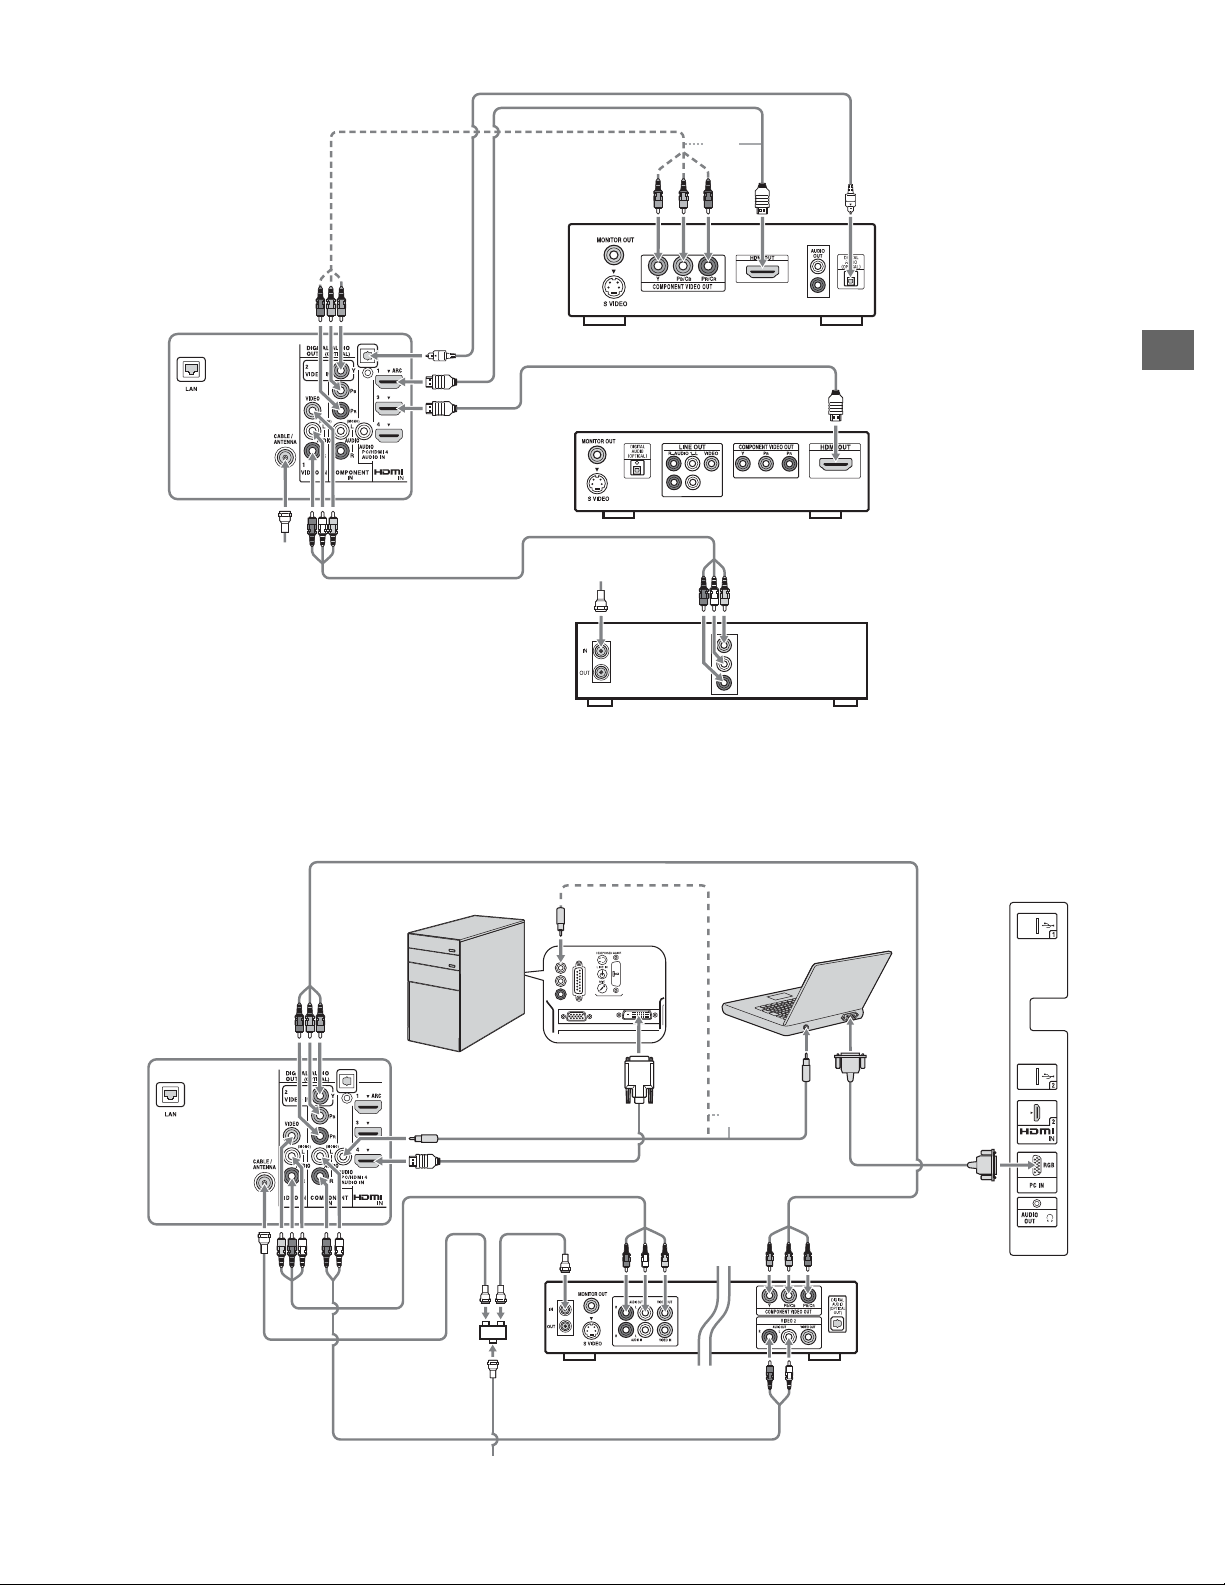
Shown with HD Basic Connection with Home Theater System
*Optical Connection
or
Rear of TV
Home Theater System
Blu-ray Disc/DVD
Getting Started
Cable/
Antenna
* The optical connection is only needed for A/V receivers that do not support ARC (Audio
Return Channel).
Cable/SAT (Dish)
SD Cable Box or
SD Satellite Receiver
Shown with PC Connection with SD VCR/DVD
Notebook PC
Rear of TV
PC
or
Side Panel
Splitter
Cable/Antenna
DVDVCR
VCR/DVD Combo
11
Page 12
4: Securing the TV
Sony strongly recommends
taking measures to prevent
the TV from toppling over.
Unsecured TVs may topple
and result in property
damage, serious bodily
injury or even death.
Preventing the TV from
1 Secure the Stand for the TV.
Make sure the Stand can adequately support
the weight of the TV. Use two angle braces
(not supplied) to secure the stand. For each
angle brace use the appropriate hardware to:
• Attach one side of the angle brace to the
wall stud.
• Attach the other side to the Stand.
Angle brace
(not supplied)
Toppling
• Secure the TV to a wall and/or stand.
• Do not allow children to play or climb on
furniture and TV sets.
• Avoid placing or hanging items on the
TV.
• Never install the TV on:
– slippery, unstable and/or uneven
surfaces.
– furniture that can easily be used as
steps, such as a chest of drawers.
• Install the TV where it cannot be pulled,
pushed, or knocked over.
• Route all AC power cords and
connecting cables so that they are not
accessible to curious children.
Recommended Measures to
Stand
2 Secure the TV to the Stand.
Use the optional hardware listed as follows
(not supplied):
• M4 × 10 machine screw (screwed into
the TV’s Table-Top Stand)
• A screw or similar (attach it to the Stand)
• Rope or chain (strong enough to support
the weight of the TV). Make sure that
there is no excess slack in the rope or
chain.
An alternative way to secure the TV is with
an optional Sony Support Belt Kit.
M4 × 10
machine
screw (not
supplied)
Secure the TV
Consider the following measures when
securing your TV to a Stand (not supplied).
12
Rope or chain
(not supplied)
Screw hole on the
Table-Top Stand
~
Contact Sony Customer Support to obtain the
optional Support Belt Kit by providing your TV
model name.
• For United States call: 1-800-488-7669 or
visit: www.sony.com/accessories
• For Canada call: 1-877-899-7669
Screw (not supplied)
Page 13
3 Anchor the TV to the Wall.
4
4
3
3
1
1
2
2
Anchor the TV to the wall by using bolts,
wall anchor and chain (or rope).
Anchor bolts (M6) (not supplied)
Rope or
Wallmount
holes
chain
(not
supplied)
Wall-anchor
(not
supplied)
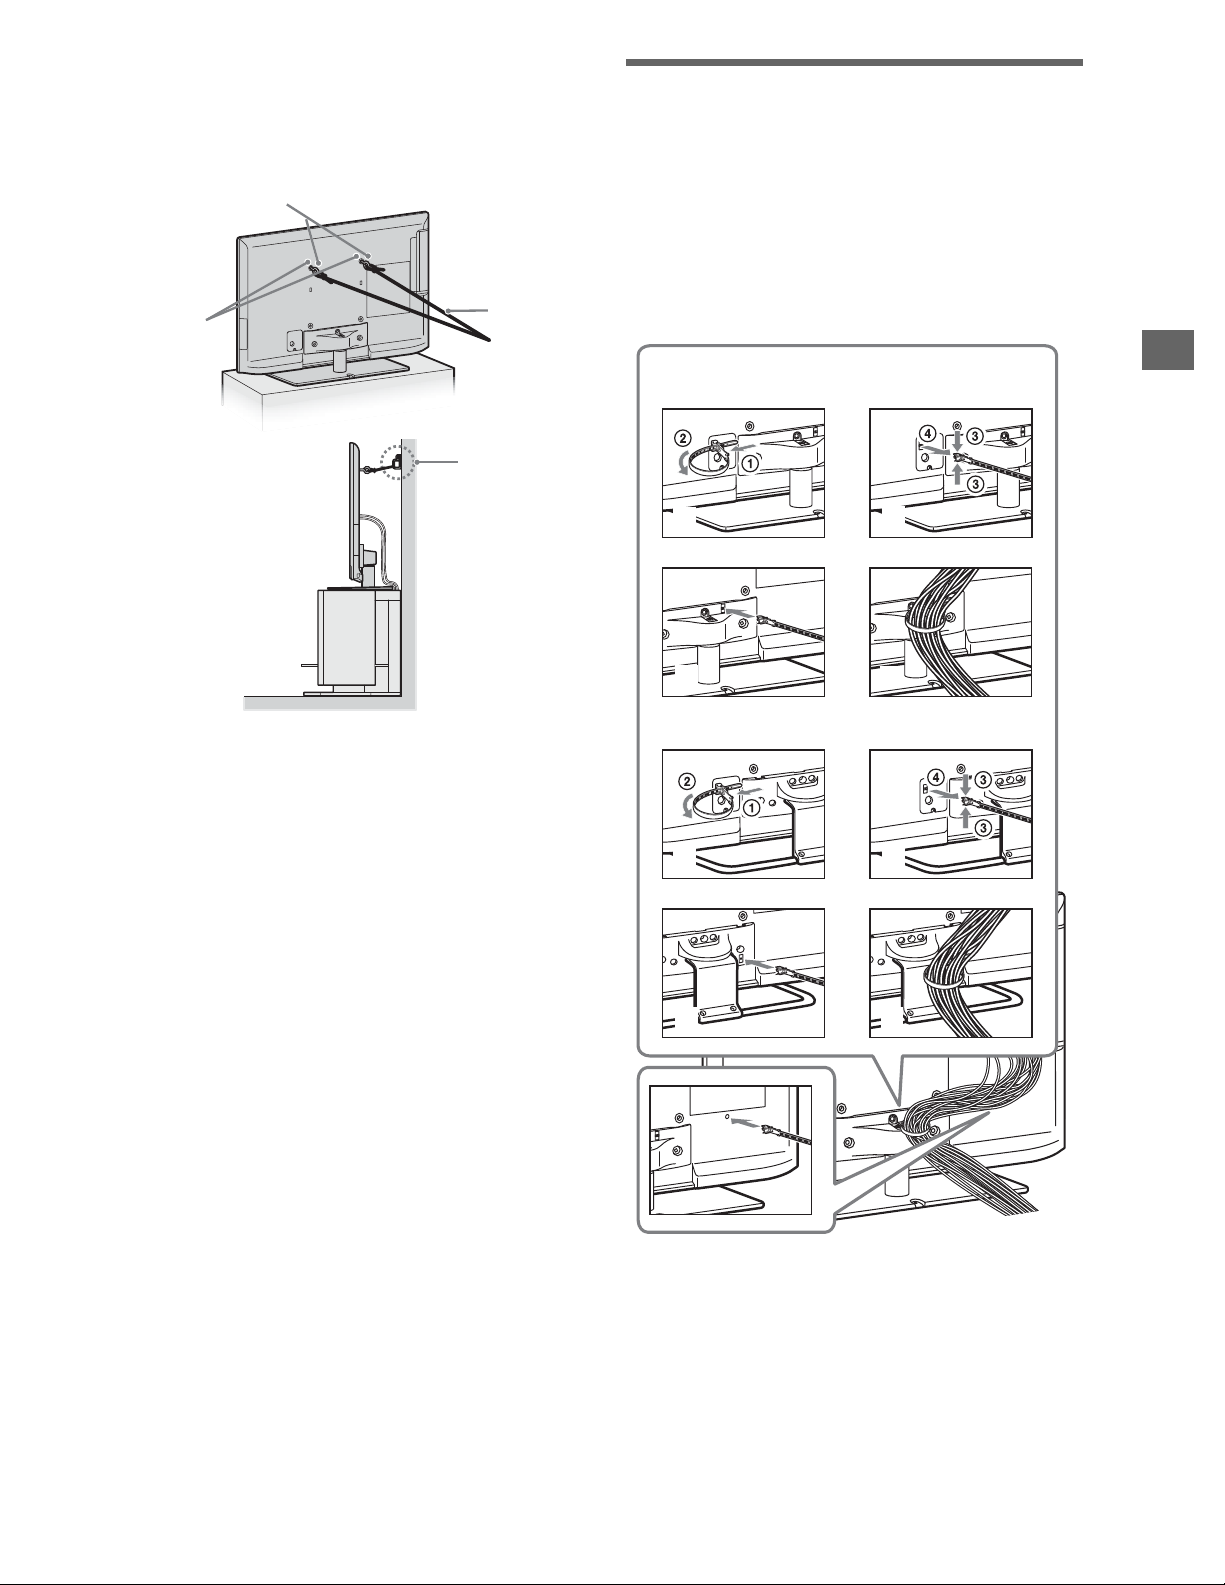
5: Bundling the cables
~
• Before bundling the cables, remove the cable
holder from the AC cover (see step 1 and 2).
Reuse the cable holder (see step 3) to bundle
the other cables (see step 4).
• Do not bundle the AC power cord together
with other cables.
KDL-46/40/32EX52x (except
KDL-40/32EX521 (Mexico models))
2
1
Getting Started
~
• Your TV is shipped with screws attached to the
rear of the TV depending on the TV model.
(They are fastened in the screw holes for wall
mounting.) Be sure to remove the upper two
screws prior to anchoring the TV on a wall.
• Securing the TV to the stand without securing
the TV and the stand to the wall provides
minimum protection against the TV toppling
over. For further protection, be sure to follow
the three measures recommended.
3
KDL-40/32EX521 (Mexico models)
1
3
4
2
4
*
* When installing on the wall, attach the cable
holder under the terminals.
13
Page 14
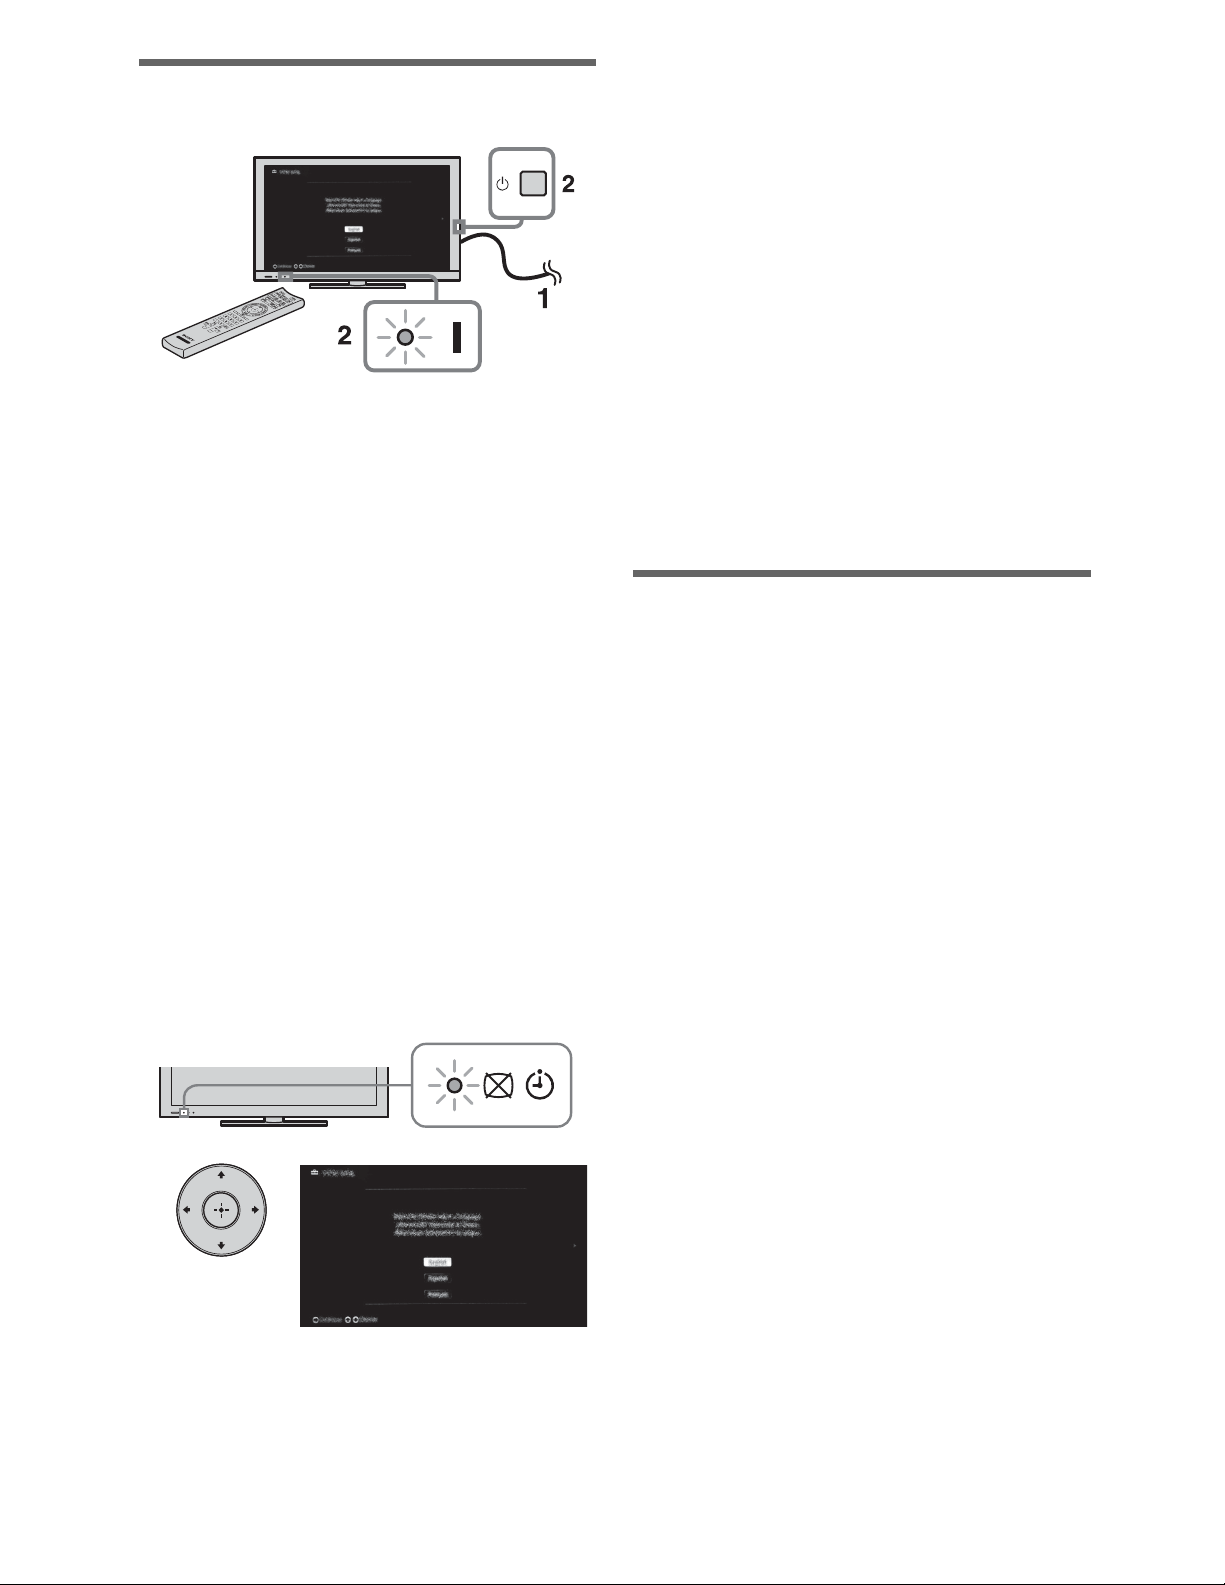
6: Running initial setup
1 Complete your cable connections
before proceeding with the Initial
Setup.
Connect the TV to your nearest
power outlet.
4 Select Continue to scan for
available channels and enable the
Rovi On Screen Guide™ feature.
If you receive channels from a cable
box or satellite receiver and do not
wish to use the TV’s built-in tuner,
select Skip.
Selecting Skip will disable the Rovi
On Screen Guide feature, which
is only available when the TV’s
tuner is used.
~
• If you skip the channel scan while in the setup
menus, Rovi On Screen Guide will be disabled.
2 Press 1 (power) on the TV. The "
(power) indicator will light green.
When you switch the TV on for the
first time, the Language menu
appears on the screen.
~
• When you turn on the TV for the first time, the
TV requires some internal processing for
optimization before you can perform the initial
setup. There will be no picture and sound, and
the timer indicator on the front of the TV
blinks orange for about 40 seconds. Do not turn
off the TV during this process. This process
has been completed at the factory on some
TVs.
3
Follow the instructions on the screen.
Using a Wall-Mount Bracket
Your TV can be mounted on a wall using a
Wall-Mount Bracket (not supplied) out of
the box as packaged. If the Table-Top Stand
is attached to the TV, the TV may require
detaching the Table-Top Stand; see step 2
on page 8.
Prepare the TV for the Wall-Mount Bracket
before making cable connections.
For product protection and safety
reasons, Sony strongly recommends that
you use the Wall-Mount Bracket
designed for your TV and the installation
should be performed by a Sony dealer or
licensed contractor.
• Follow the instruction guide provided
with the Wall-Mount Bracket for your
model. Sufficient expertise is required in
installing this TV, especially to
determine the strength of the wall for
withstanding the TV’s weight.
~
• Home mode sets the TV to settings optimized
for home viewing (this setting is ENERGY
STAR compliant).
14
Page 15
• Be sure to use the screws supplied with
the Wall-mount bracket when attaching
the mounting hooks to the TV set.
The supplied screws are designed so that
they are 8 mm to 12 mm in length when
measured from the attaching surface of
the mounting hook.
The diameter and length of the screws
differ depending on the Wall-mount
bracket model. Use of screws other than
those supplied may result in internal
damage to the TV set or cause it to fall,
etc.
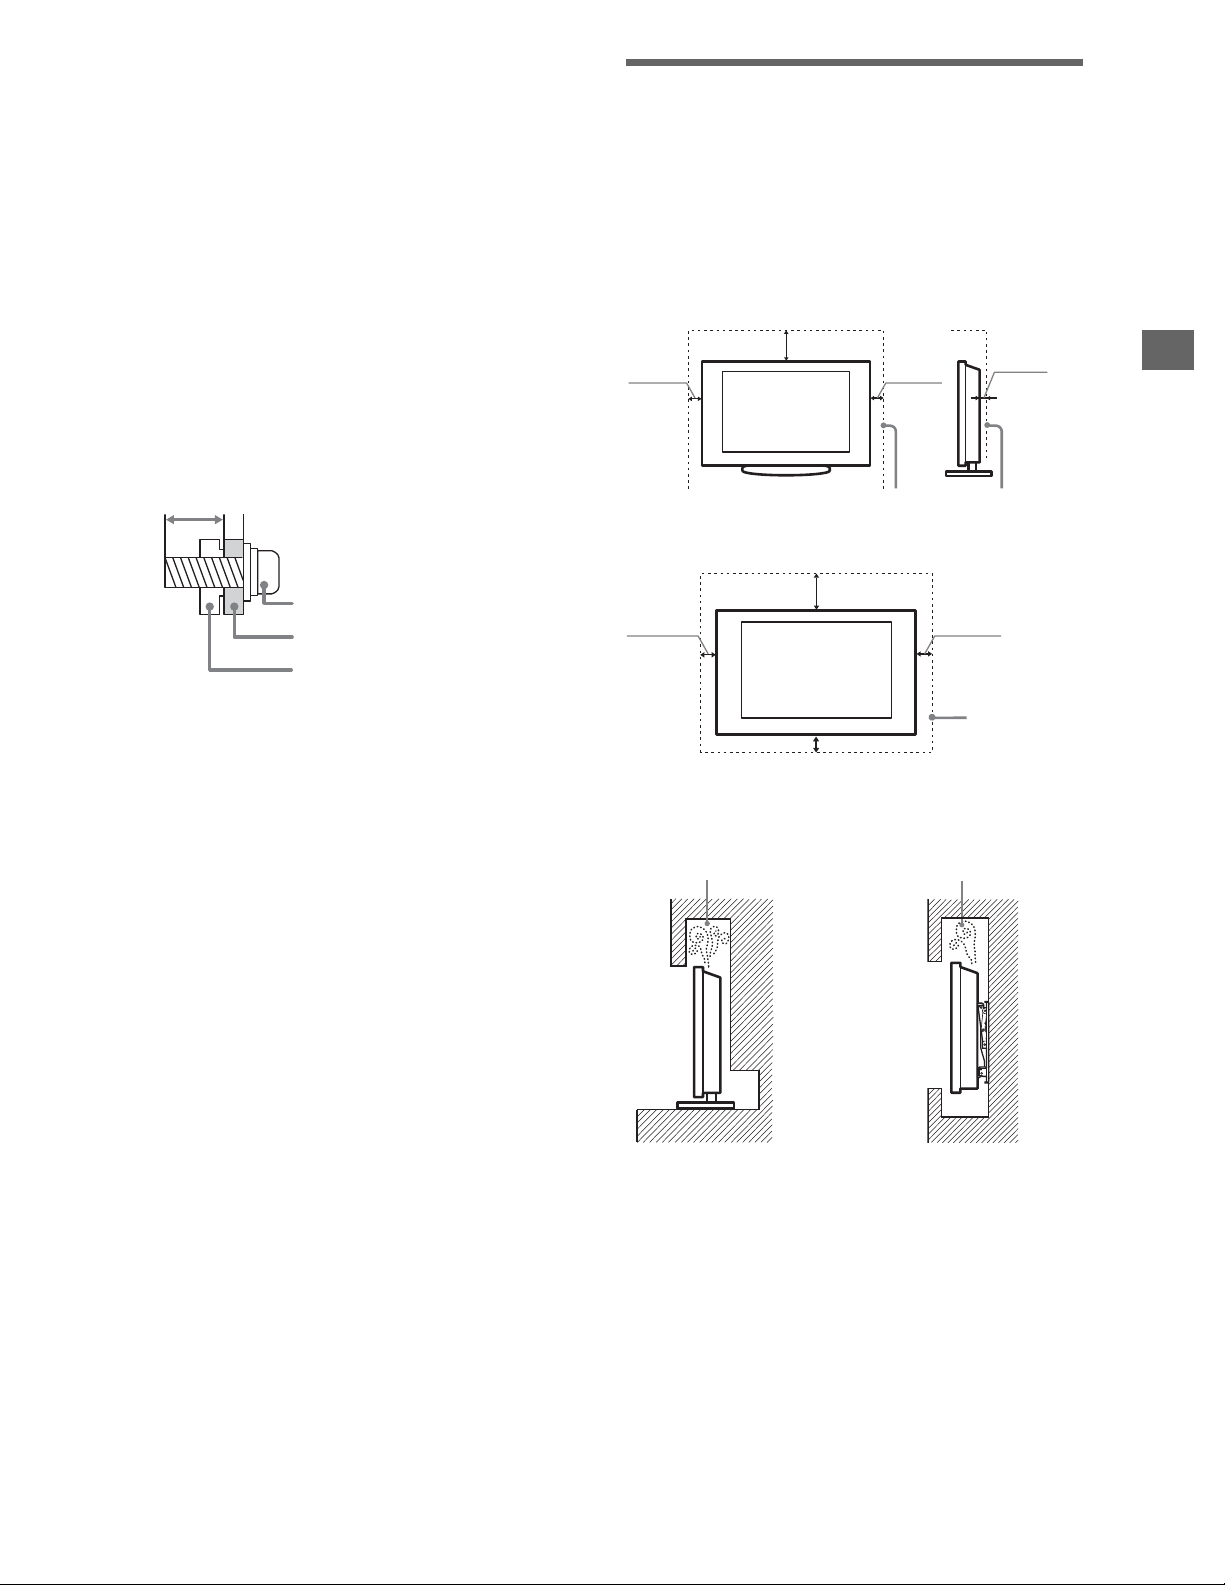
Installing the TV Against a Wall or Enclosed Area
Make sure that your TV has adequate
ventilation. Allow enough space around the
TV as shown in the illustration.
Installed with stand
7
11
/
inches
8
4 inches
(10 cm)
(30 cm)
4 inches
(10 cm)
3
/
inches
2
8
(6 cm)
Getting Started
8-12 mm
Screw
(supplied with the
Wall-mount bracket)
Mounting Hook
Hook attachment on rear of
TV set
• Be sure to store the unused screws and
Table-Top Stand in a safe place until you
are ready to attach the Table-Top Stand.
Keep the screws away from small
children.
~
• Read the supplied Safety Booklet for
additional safety information.
Leave at least this much space around the set.
Installed on the wall
7
11
inches
/
8
(30 cm)
4 inches
(10 cm)
4 inches (10 cm)
4 inches
(10 cm)
Leave at
least this
much space
around the
set.
Never install the TV set as follows:
Air circulation is blocked. Air circulation is blocked.
Wall Wall
~
• Inadequate ventilation can lead to overheating
of the TV and may cause damage to your TV
or cause a fire.
15
Page 16

Using Your BRAVIA TV
Watching the TV
Turn on the TV.
1
Press 1 (power) on the TV or I/1 on the
remote control to turn on the TV.
Select a TV channel or select an
2
1
input.
or
1
2
GUIDE
0-9
2
To use the Guide
Press GUIDE to display the Rovi On
Screen Guide to view scheduled programs
or to select a program to watch. Press again to
exit the Guide.
To use 0-9
For example, to enter 2.1, press ,
and .
16
Page 17
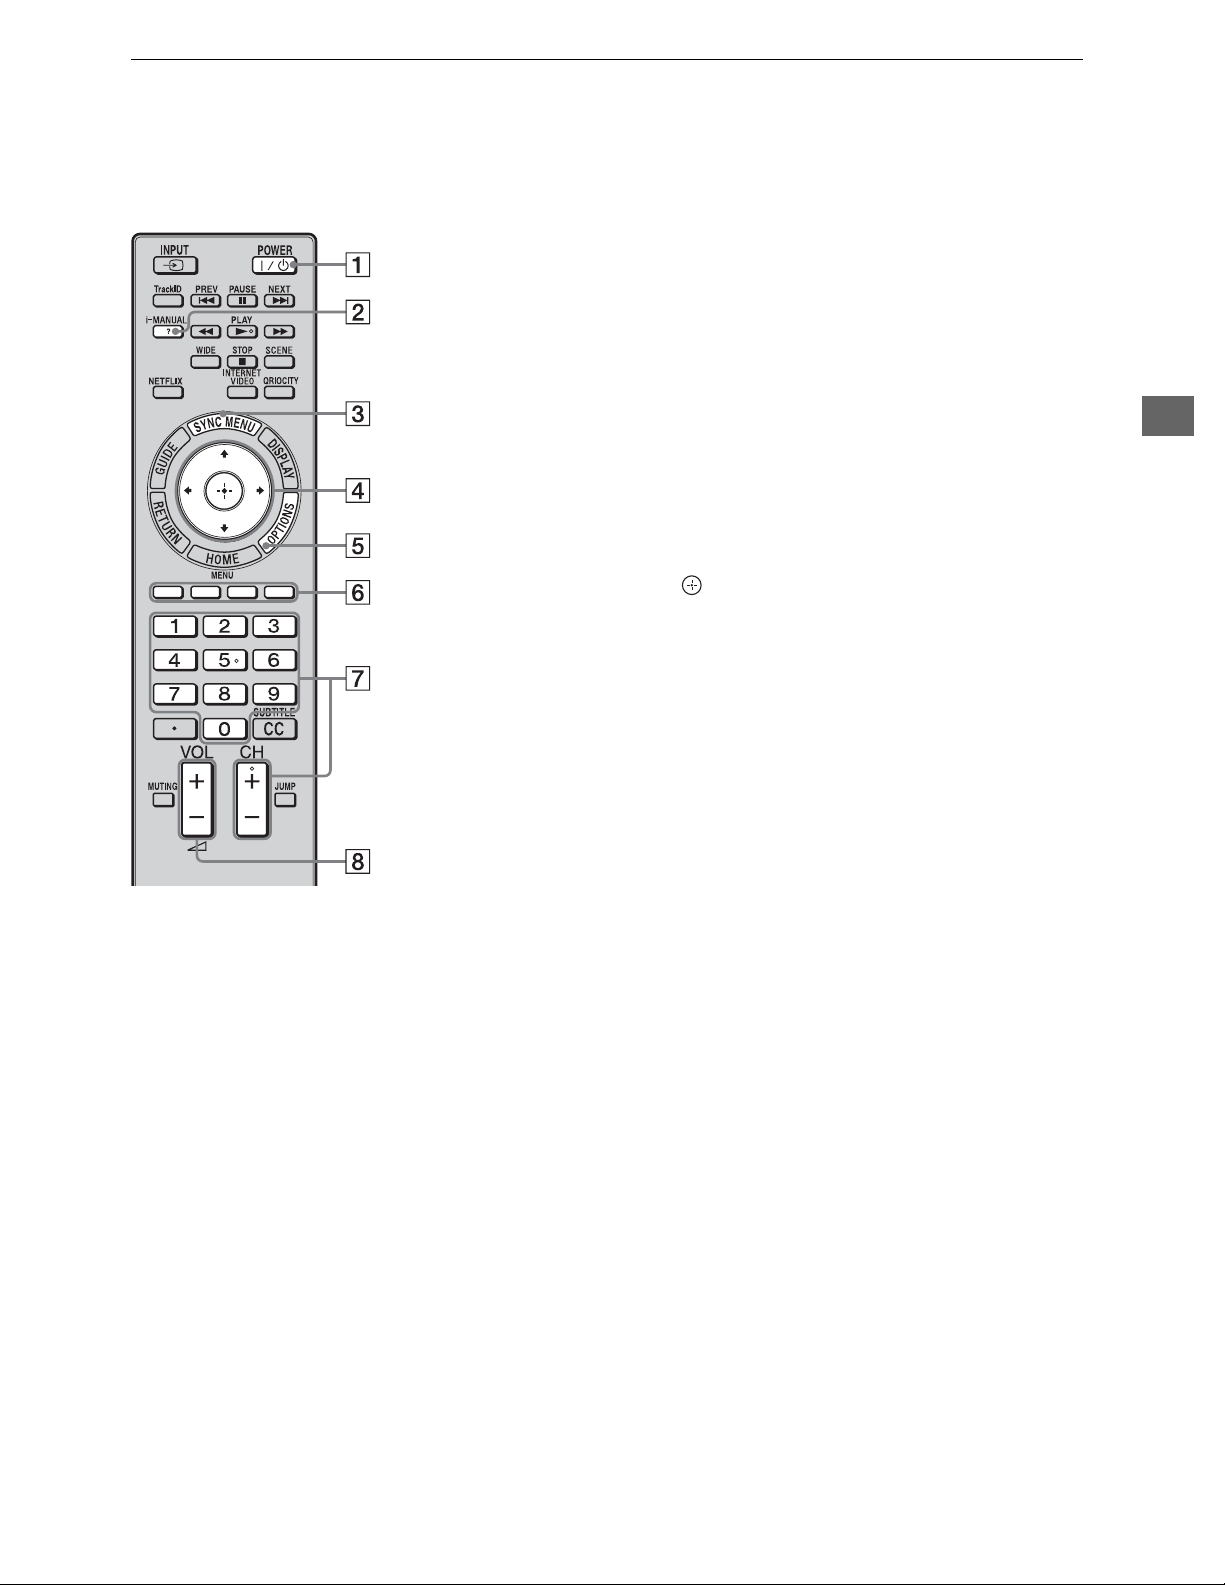
Parts and controls of the remote control
Use the supplied remote control to control your TV. Basic remote control operations are
explained here. For details on all of the remote control functions, press i-MANUAL and see
the built-in manual (i-Manual) (page 20).
1 :/1
Press to turn the TV on and off from standby
mode.
2 i-MANUAL
Displays the built-in manual (i-Manual).
3 SYNC MENU
Displays the BRAVIA Sync Menu to operate
the BRAVIA Sync-compatible equipment that
is connected to the TV.
4 F/f/G/g/
Moves the on-screen cursor, and confirms the
item.
5 OPTIONS
Displays a list of convenient functions and
menu shortcuts. The menu items vary based on
the current input and/or content.
6 Color buttons
When the color buttons are available, an
operation guide appears on the screen.
7 CH +/–/Number buttons
Select channels in the TV mode.
Using Your BRAVIA TV
8 VOL/2 +/–
Adjusts the volume.
17
Page 18
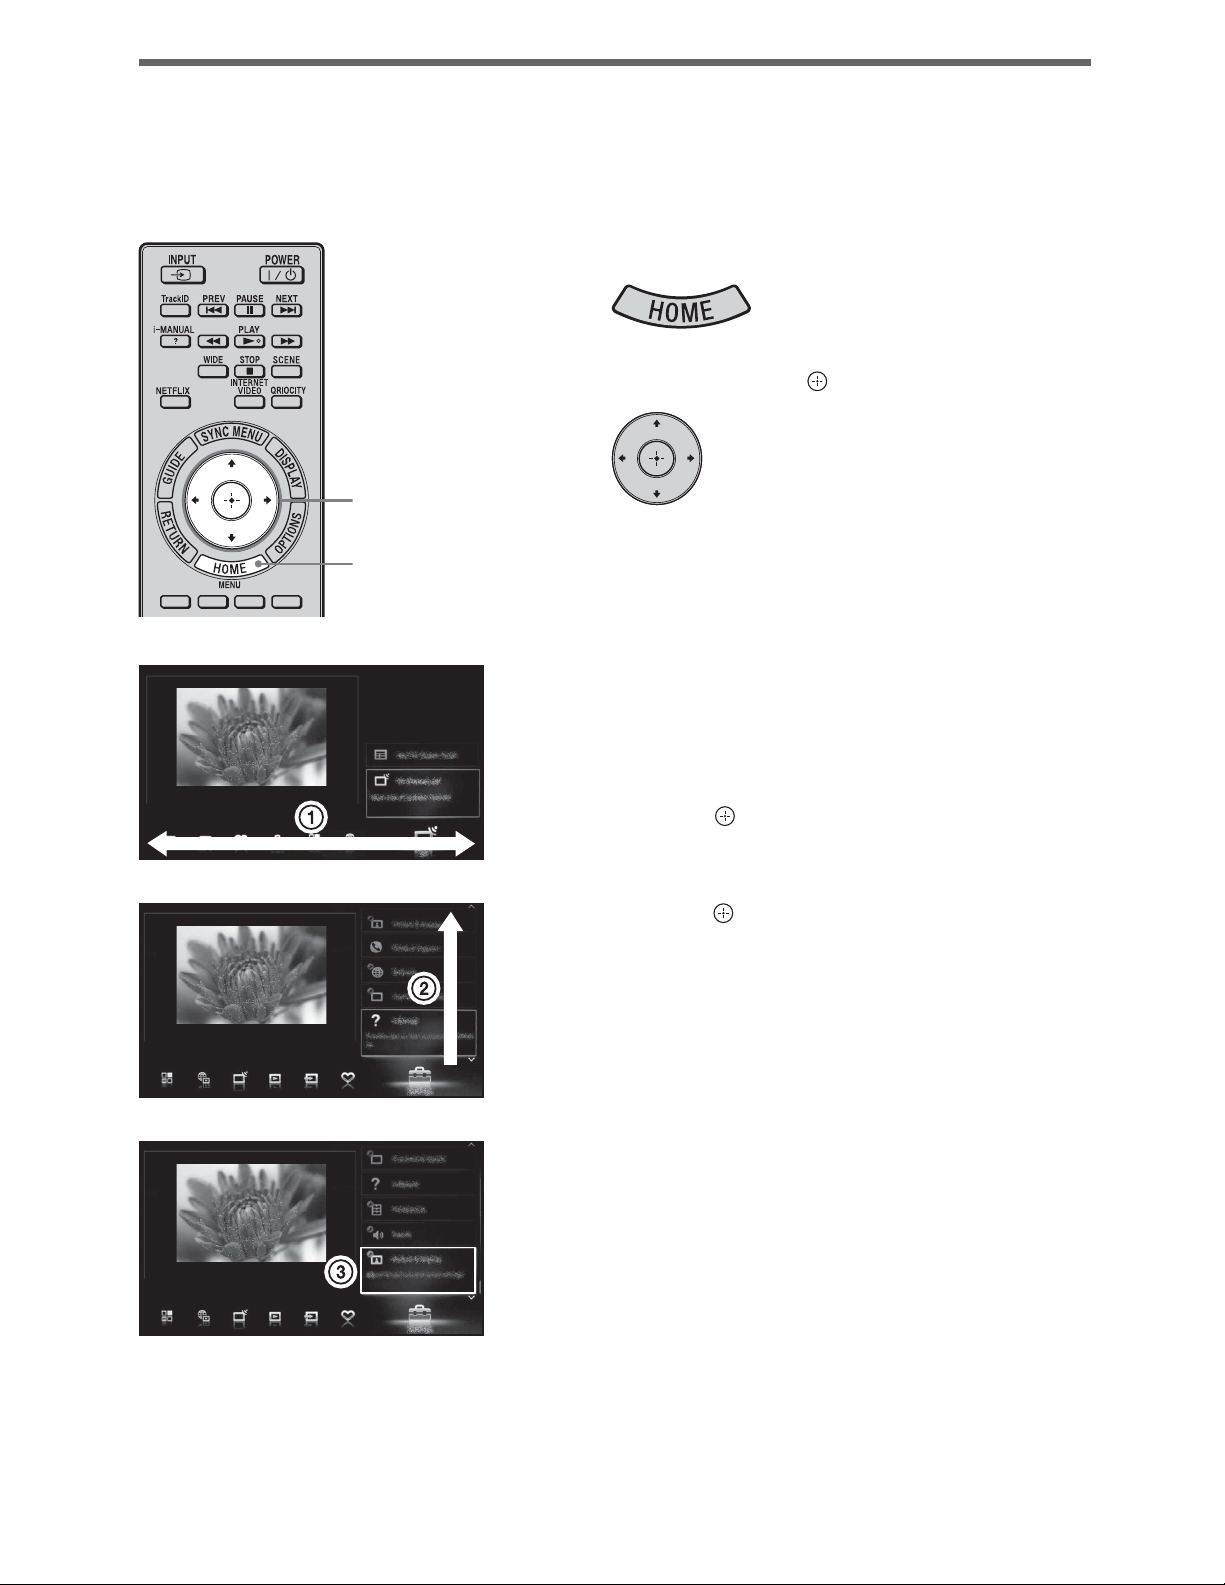
Selecting various functions and settings (Home Menu)
You can select the features of your TV from the Home menu.
See page 19 for the Home menu map.
Press HOME.
1
Press F/f/G/g/ to select items.
2
2
1, 3
To select items in the Home menu
(e.g., selecting “Settings”)
1 Press G/g to select Settings.
The contents of Settings are
displayed on the right.
2 Press F/f to select Picture &
Display.
3 Press to launch the menu.
According to the screen instruction,
press F/f/G/g to select items and
press to confirm.
Press HOME to exit.
3
18
Page 19
Home menu map
After pressing HOME on the remote control, following icons are displayed as categories.
The categories are available depending on your TV model, region, country and broadcasting
conditions.
TV You can select a list of TV channels, or a program
guide.
Media You can enjoy photo/music/video content via USB
devices or the home network.
Inputs You can select equipment connected to the TV.
Favorites/History Provides quick access to your frequently used and
recently viewed items, such as TV channels,
external inputs or your media files.
Settings Contains all of the necessary configurations to
customize your TV settings.
Using Your BRAVIA TV
Widgets Provides access to Widgets.
Applications You can enjoy various applications such as Music
Search, Internet Browser, etc.
Qriocity Provides access to the Qriocity online service.
Internet Content You can enjoy Internet content services.
Recommendations Presents recommendations for programs you may
like, based on your viewing history.
19
Page 20
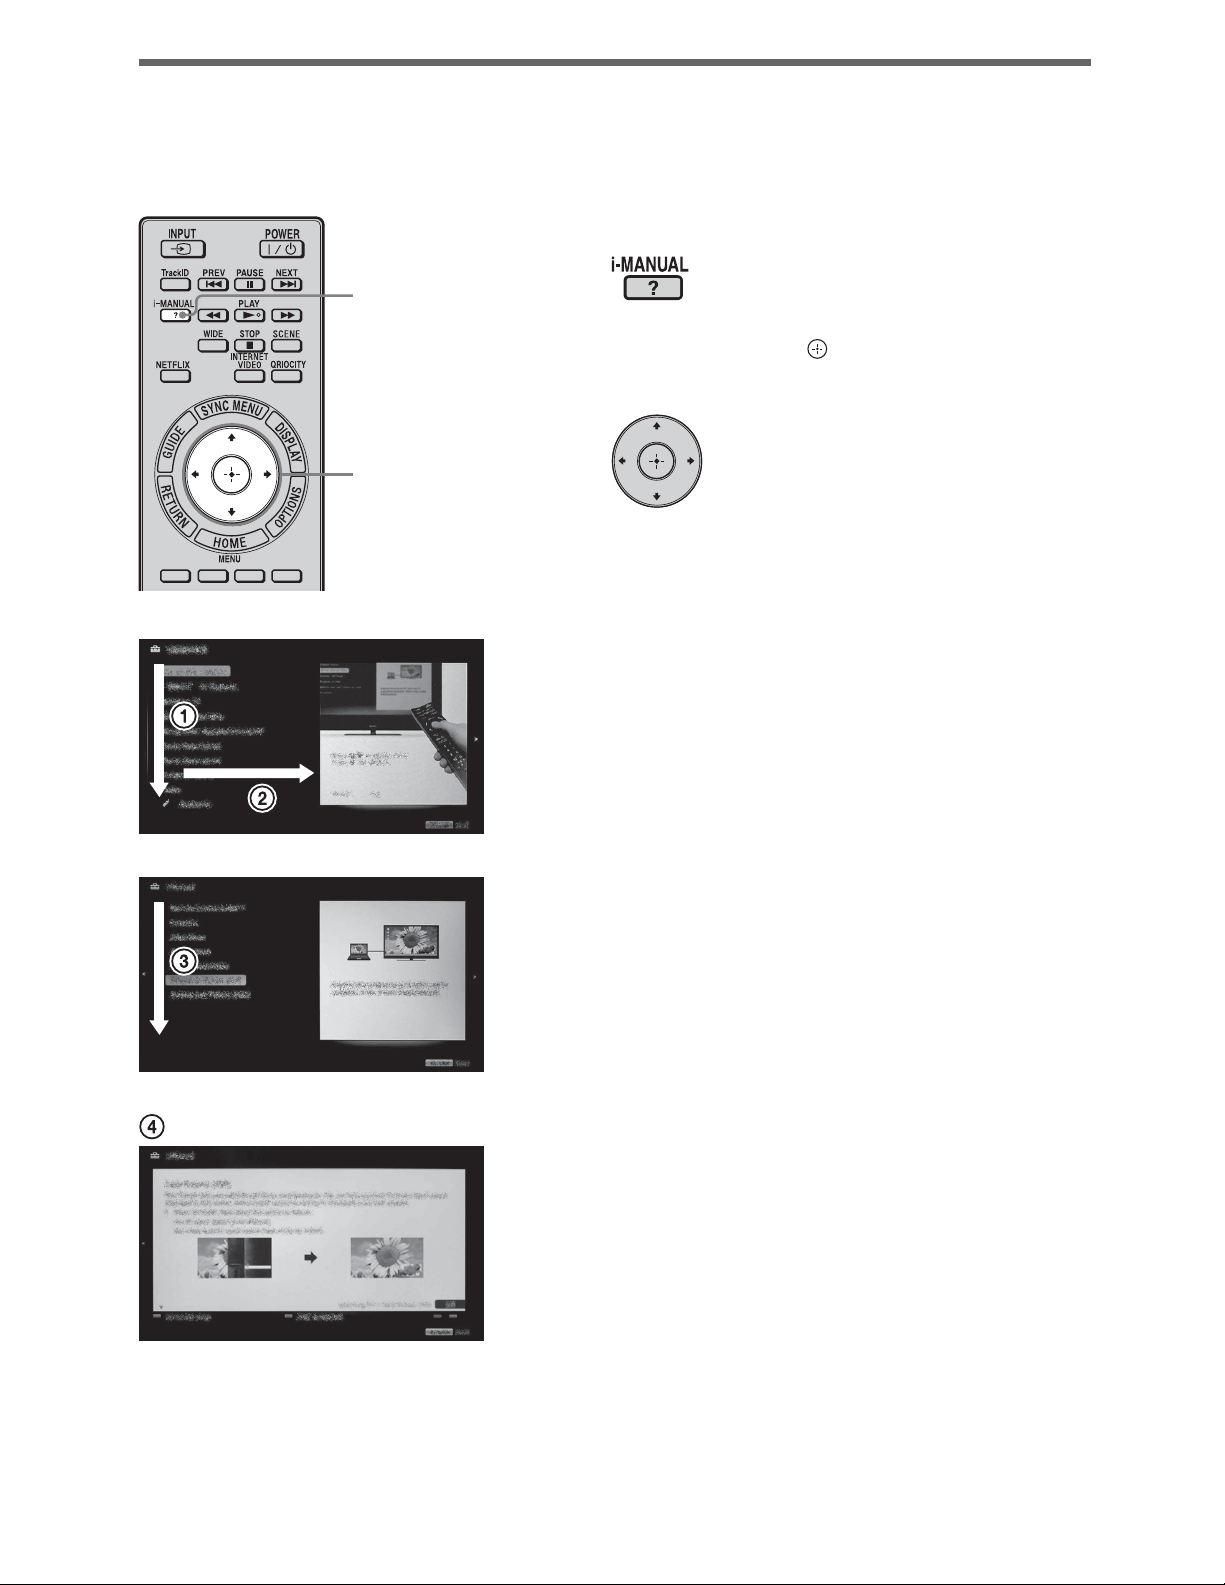
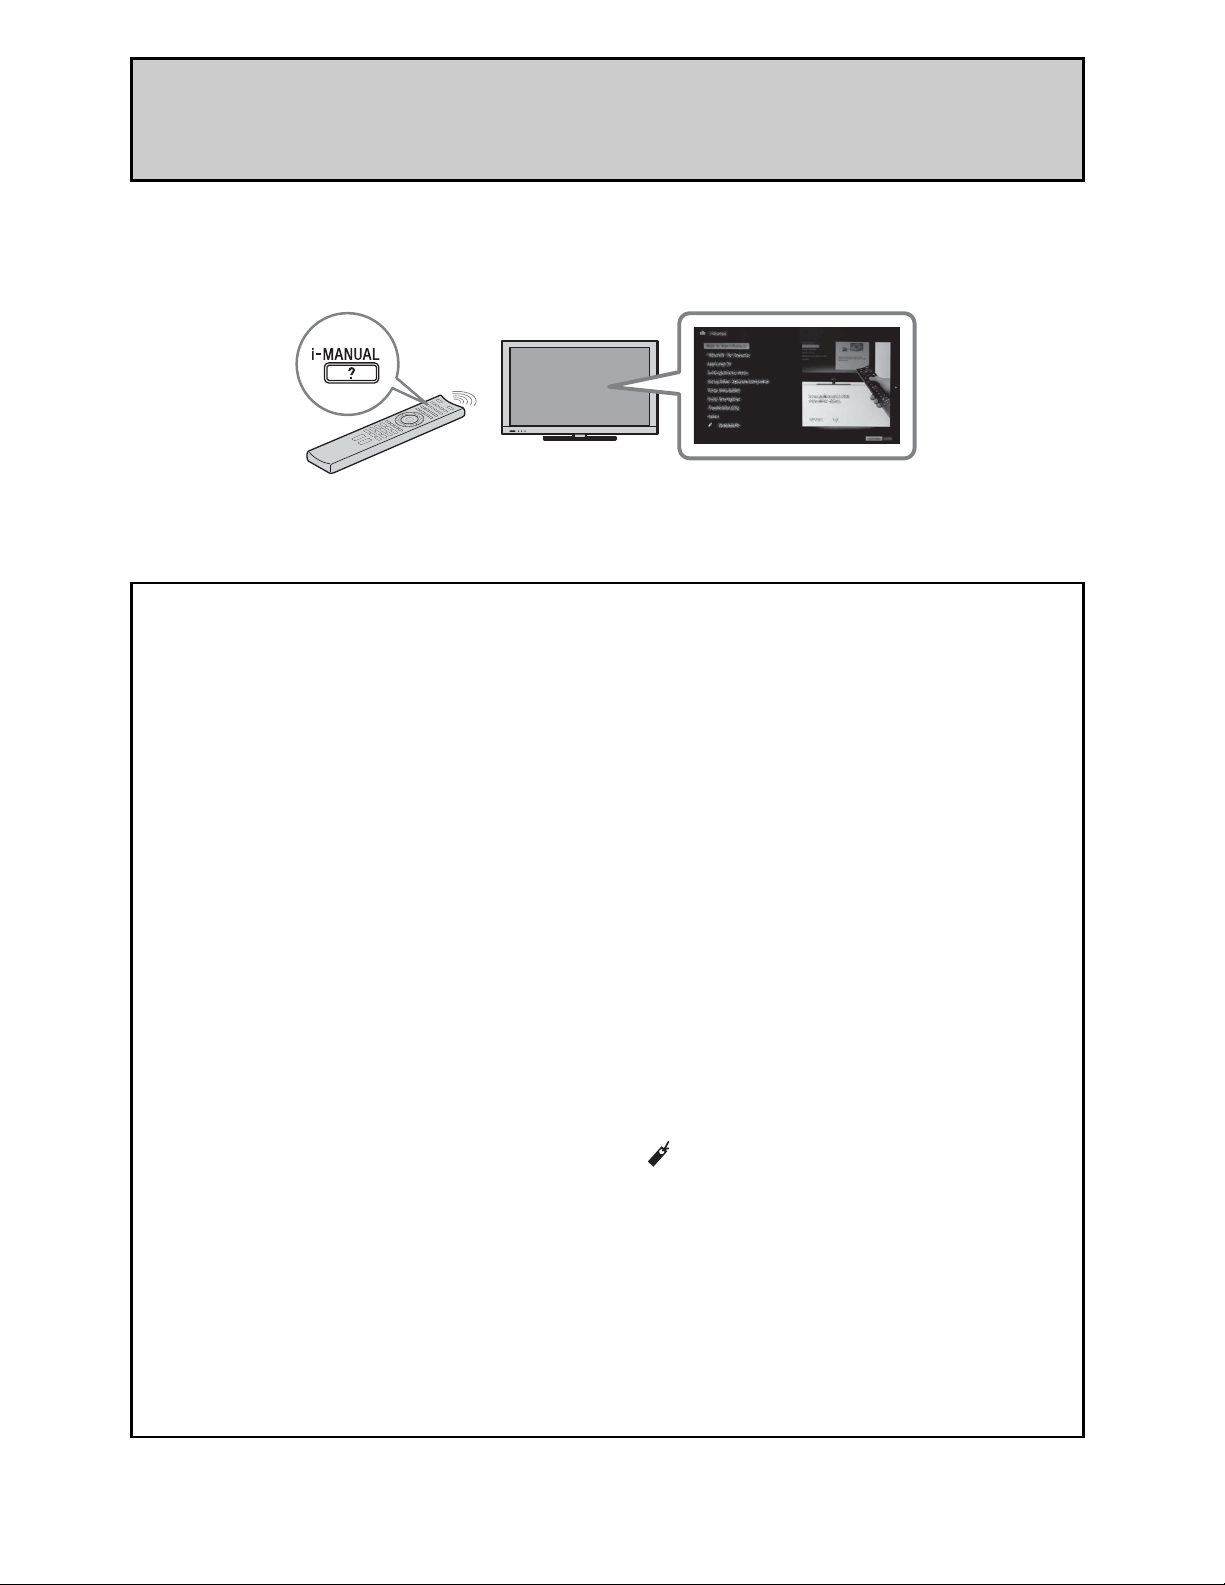
Displaying Operating Instructions (i-Manual)
Operating instructions are built into your BRAVIA TV and can be displayed on the screen.
To learn more about your TV features, access your i-Manual with the touch of a button.
Press i-MANUAL.
1
1
Press F/f/G/g/ to navigate and
2
select items.
2
To select items in the i-Manual
1 Press F/f to select an item.
The contents are displayed to the right
as the second layer.
2 Press g to move to the second layer.
3 Press F/f to select an item from the
second layer.
A description of the item is displayed
to the right.
If a third layer is available, repeat this
step to display the details.
4 Press g to select an item.
The content is displayed.
20
Page 21
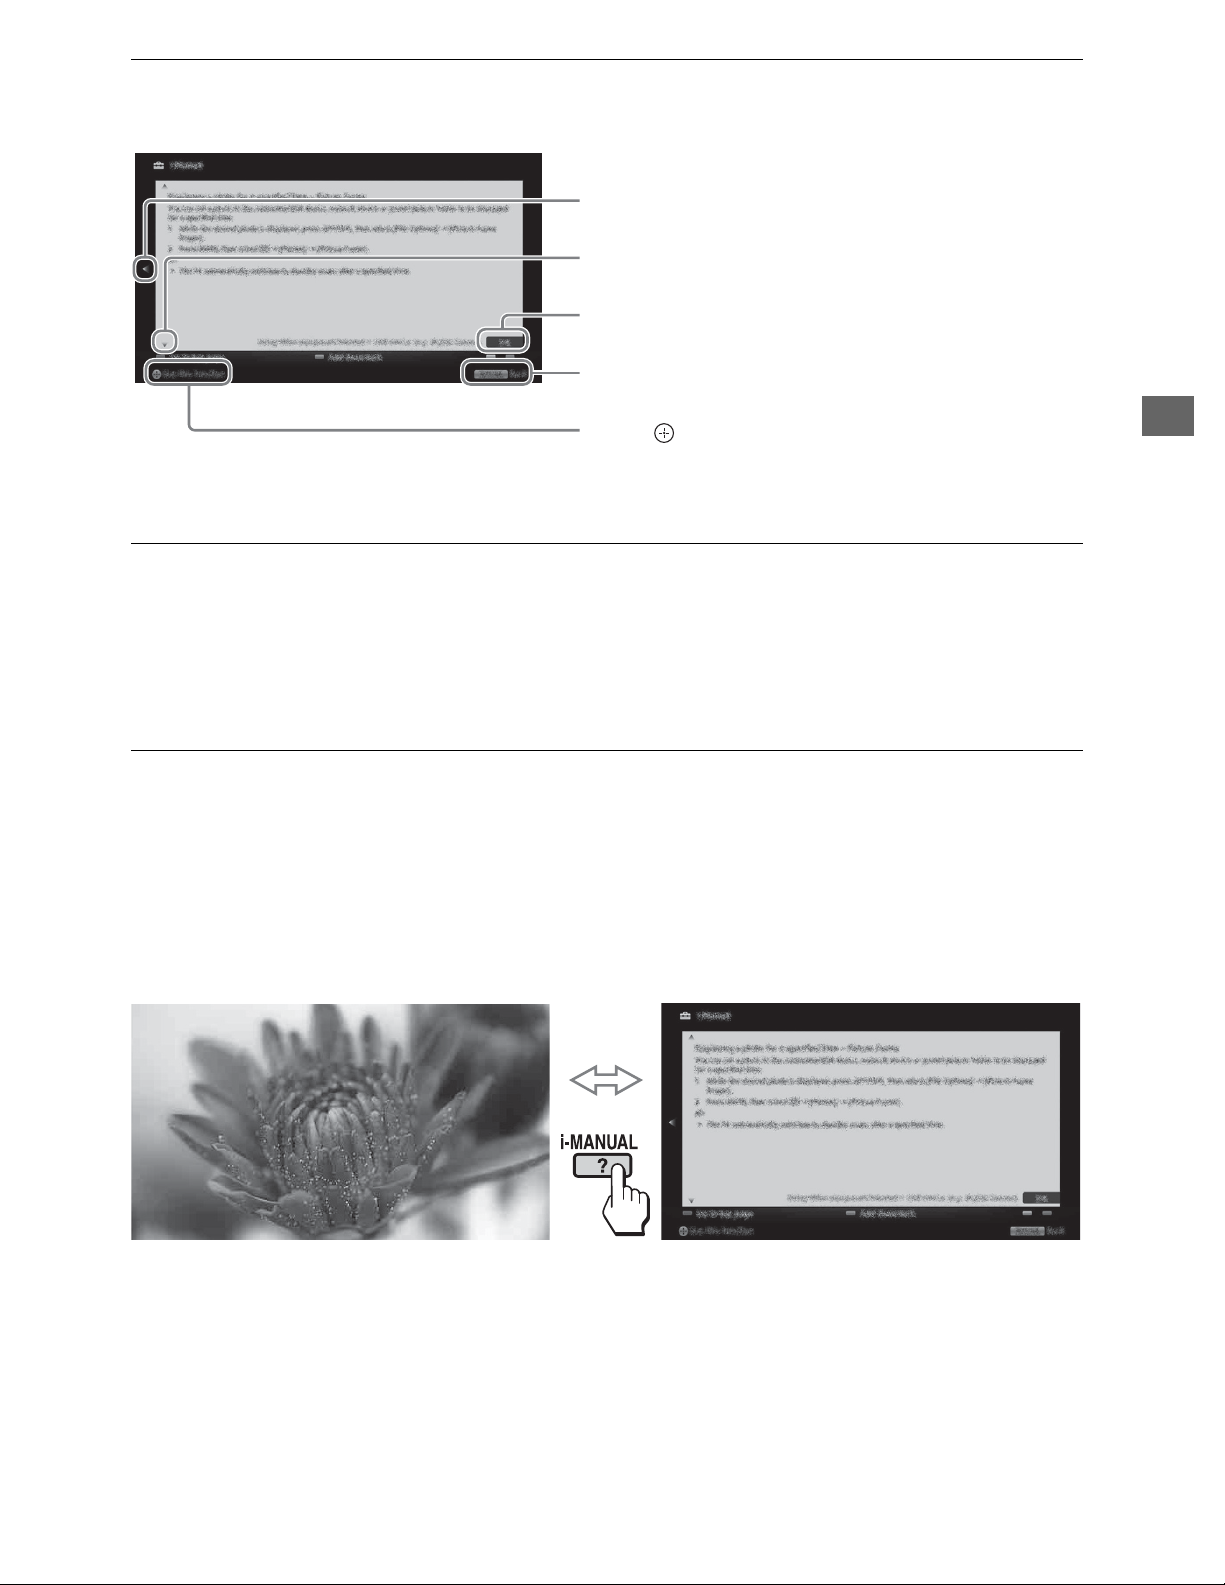
Description of the i-Manual screen
Press G to go back to the previous page
Press f to go to the next page
Page number/Total number of pages
Press RETURN to go back to the previous
page
Press to launch the function
To use the bookmark
The i-Manual has a bookmark function. Pages can be bookmarked with the color buttons,
according to the instructions at the bottom of the screen. To access your registered
bookmarks, go to the top page of the i-Manual and select Bookmarks.
Using Your BRAVIA TV
To memorize the last displayed page
i-Manual memorizes the last displayed page. When in the i-Manual screen, press
i-MANUAL to return to the TV screen. If you press i-MANUAL again, the information you
saw last time appears. For viewing from the top page of the i-Manual, return to the top page
according to the instructions on screen, or press HOME and select i-Manual of Settings in
the Home menu.
~
• Last page memory is automatically reset when you switch the TV to standby mode.
21
Page 22
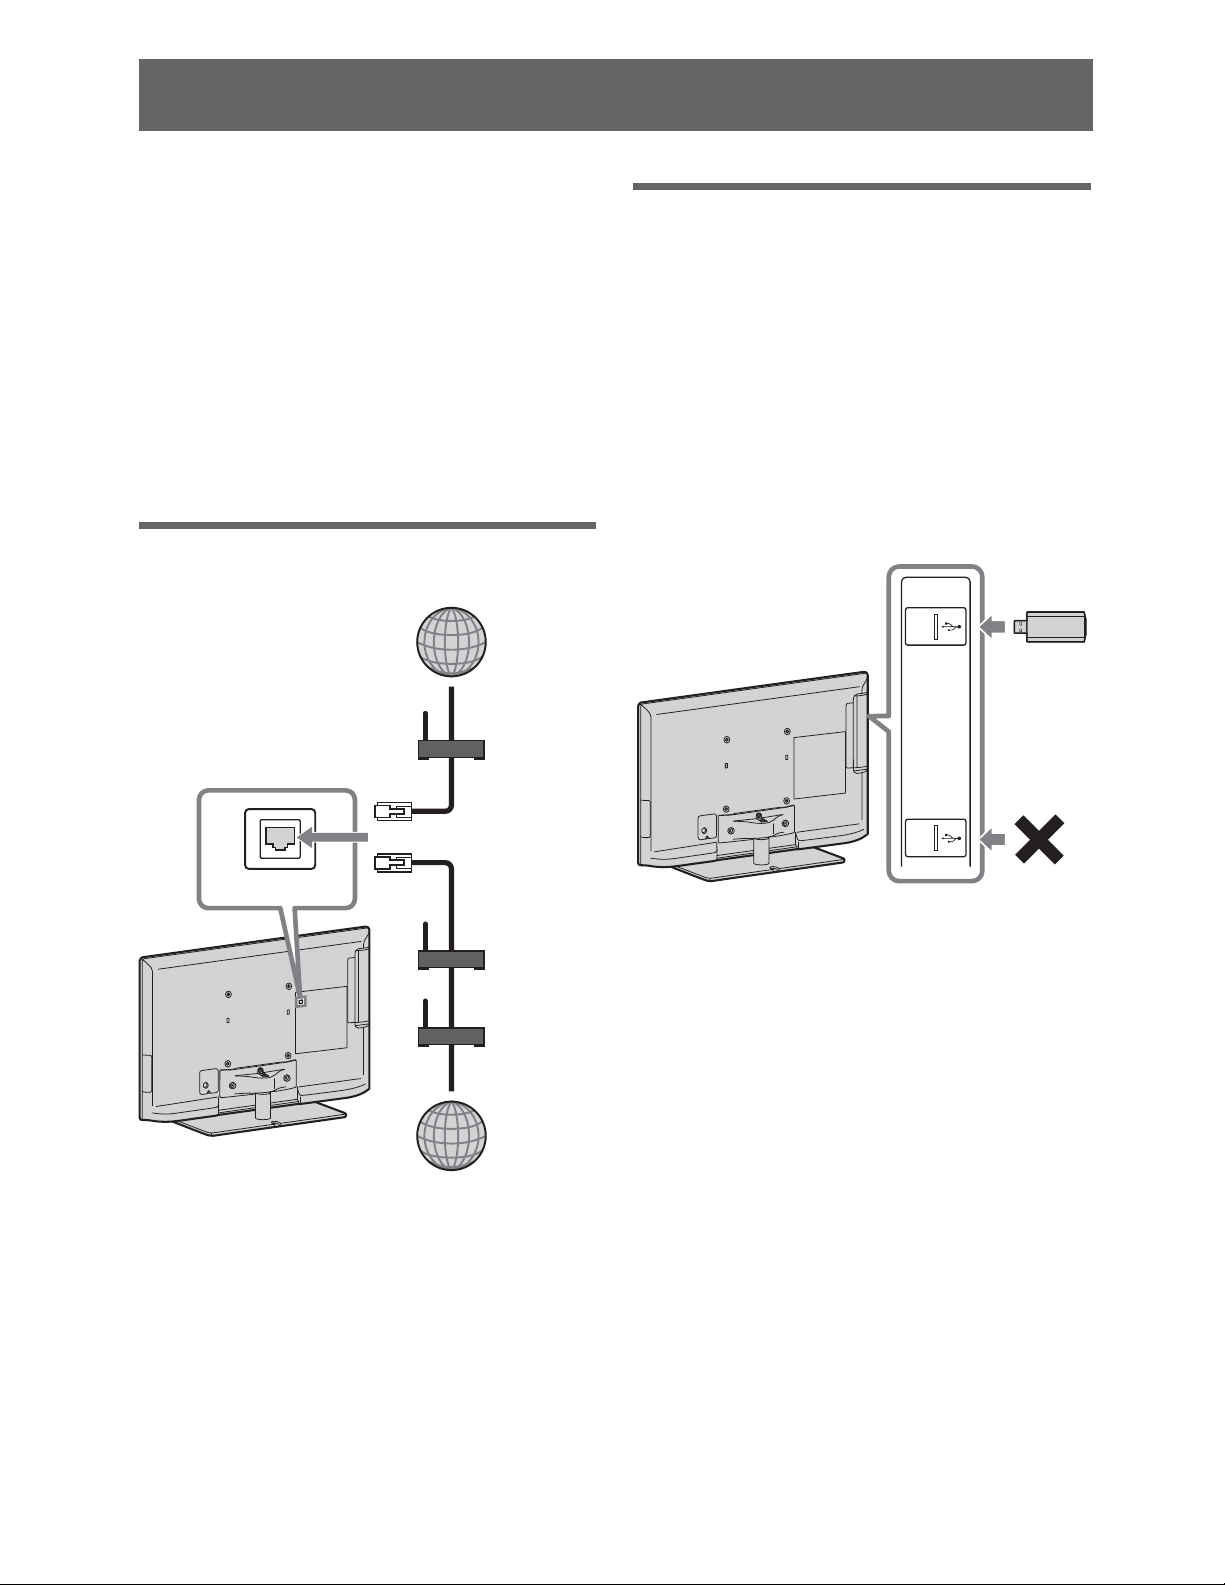
Network Setup
When you connect this TV to the Internet,
you can enjoy multiple functions:
displaying a photograph that shows its
location on the map, enjoying Internet
video, etc. For details on the functions, refer
to the i-Manual.
~
• You will need to contract with an Internet
service provider to connect to the Internet.
Preparing a wired network
Internet
Preparing a wireless LAN
Wireless LAN Ready lets you easily access
the Internet and your home network with the
USB Wireless LAN Adapter UWA-BR100
(as of January 2010). By inserting the USB
Wireless LAN Adapter into your TV’s USB
port, you can easily create a cable-free
network. Before setting up the wireless
LAN function of the TV, be sure to set up a
wireless LAN router.
Modem
with router
functions
or
LAN
TV
Router
Modem
Internet
~
• For LAN connections, use a Category 7 cable
(not supplied).
~
• The USB Wireless LAN Adapter is available
as an optional accessory, depending on your
TV model.
22
Page 23

Setting up the Internet
connection
Type 1: Secured network with
Wi-Fi Protected Setup (WPS)
Using the network feature you can connect
the TV to the Internet. The setup procedure
differs depending on the type of network
and LAN router. Before setting up the
Internet connection, be sure to set up a LAN
router. Check your wireless LAN
environment using the following chart.
Wireless LAN
Secure Wireless LAN?
YES m
Do you use a wireless LAN
router compatible with Wi-Fi
Protected Setup (WPS)?
YES m
Type 1*
Wired LAN
* Type 1 is easier to set up if your router has an
automatic setting button, e.g. Air Station OneTouch Secure System (AOSS). Most of the
latest routers have this function. Check your
router.
, Type 4
NO
k
NO
k
Type 3
Type 2
The WPS standard makes security of a
wireless home network as straightforward
as pressing the WPS button on the wireless
LAN router. Before setting up a wireless
LAN, check the location of the WPS button
on the router and verify how to use it.
For security purpose, WPS (PIN) provides
a PIN code for your router. PIN code is
renewed every time you select WPS (PIN).
1 Press HOME, then select >
Network > Network Setup.
2 Select Wireless Setup.
3 Select WPS (Push Button) for
Push Button method or WPS (PIN)
for PIN method.
~
• Button name of the WPS may differ
depending on the router (e.g. AOSS
button).
4 Follow the instructions on the setup
screen.
Type 2: Secured network
without Wi-Fi Protected Setup
Network Setup
Type 1: Follow the configuration for
“Secured Network with Wi-Fi Protected
Setup (WPS)”.
Type 2: Follow the configuration for
“Secured Network without Wi-Fi Protected
Setup (WPS)”.
Type 3: Follow the configuration for
“Unsecured Network with Any Type of
Wireless LAN Router”.
Type 4: Follow the configuration for
“Wired network setup”.
(WPS)
To set up a wireless LAN, SSID (wireless
network name) and security key (WEP or
WPA key) will be required. If you do not
know them, consult the instruction manual
of your router.
1 Press HOME, then select >
Network > Network Setup.
2 Select Wireless Setup.
(Continued)
23
Page 24

3 Select Scan, then select a network
from the list of scanned wireless
networks.
4 Follow the instructions on the setup
screen.
~
• If you use WPS for network setup, the security
settings of the wireless LAN router activate,
and any equipment previously connected to the
wireless LAN in a non-secure status will be
disconnected from the network.
In this case, activate the security settings of the
disconnected equipment and then reconnect.
Or, you can deactivate the security settings of
the wireless LAN router, and then connect the
equipment to a TV in a non-secure status.
Type 4: Wired network setup
Enter the respective alphanumeric values
for your router if necessary. The items that
need to be set (e.g. IP Address, Subnet
Mask, DHCP) may differ depending on the
Internet service provider or router. For
details, refer to the instruction manuals
provided by your Internet service provider,
or those supplied with the router.
1 Press HOME, then select >
Network > Network Setup.
2 Select Wired Setup.
3 Select Auto to set the IP Address
and proxy server automatically, or
Custom to set them manually.
Type 3: Unsecured network
with any type of wireless LAN
router
To set up a wireless LAN, SSID (wireless
network name) will be required.
1 Press HOME, then select >
Network > Network Setup.
2 Select Wireless Setup.
3 Select Scan, then select a network
from the list of scanned wireless
networks.
4 Follow the instructions on the setup
screen.
~
• Security key (WEP or WPA key) will not be
required because you do not need to select any
security method in this procedure.
4 Follow the instructions on the setup
screen.
Viewing the network status
You can confirm your network status.
1 Press HOME, then select >
Network > Network Setup.
2 Select View Network Status.
If you cannot connect to
the Internet
Use the diagnostic to check possible causes
for network connection failures, and
settings.
24
1 Press HOME, then select >
Network > Network Setup.
2 Select View Network Status.
Page 25

3 Select Check Connection.
This may take several minutes. You
cannot cancel the diagnostic after
selecting Check Connection.
Adjusting the server
display settings
You can select home network servers to be
displayed on the Home Menu. Up to 10
servers can be displayed in the Home Menu
automatically.
1 Press HOME, then select >
Network > Home Network
Setup.
2 Select Show/Hide Media
Servers.
3 Select the server you want to display
on the Home Menu, and adjust the
settings.
If you cannot connect to your
home network
The TV detects if the server is being
correctly recognized when you cannot
connect it to your home network. If the
diagnostic results indicate a failure, check
possible causes, and network connections
and settings.
Network Setup
1 Press HOME, then select >
Network > Home Network
Setup.
2 Select Media Server
Troubleshooting.
The server diagnostic starts. When the
server diagnostic is complete, the
diagnostic result list appears.
25
Page 26

Additional Information
Troubleshooting
When the 1 (standby) indicator is flashing, count how many times it flashes
(interval time is three seconds).
Press 1 (power) on the TV to turn it off, disconnect the AC power cord, and contact Sony
Customer Support (information provided on the front cover) with how many times the
indicator flashes.
When the 1 (standby) indicator is not flashing, check the items in the table as
follows.
Also refer to “Troubleshooting” in the i-Manual. If the problem persists, contact Sony
Customer Support (information provided on the front cover).
Condition Explanation/Solution
There is no picture
(screen is dark) and no
sound.
Tiny black dots and/or
bright dots appear on the
screen.
Some programs cannot
be tuned.
The TV turns off
automatically (the TV
enters standby mode).
• Check the antenna/cable connection.
• Connect the TV to the AC power, and press 1 (power) on
the TV.
• If the 1 (standby) indicator lights up in red, press "/1 on
the remote control.
• The screen is composed of pixels. Tiny black dots and/or
bright dots (pixels) on the screen do not indicate a
malfunction.
• Check the antenna or dish.
• Check if the Sleep Timer, Timer, or Idle TV Standby is
activated.
• The Auto Shut-off setting may be set to On. If Auto
Shut-off is activated and TV receives no signal, the TV will
automatically enter standby mode in 15 minutes. Check
Auto Shut-off is activated under Eco feature of this TV.
• Check if Presence Sensor in Eco is activated. When no
viewer is detected in front of the TV for a preset time, the
picture automatically turns off, while leaving only the TV
sound on. Additionally, after 30 minutes in picture off mode,
the TV will switch to standby mode.
26
Page 27

Condition Explanation/Solution
The remote control does
not function.
The TV and its
surrounding become
warm.
The Parental Lock
password has been
forgotten.
• Replace the batteries.
• Your TV may be in SYNC mode. Press SYNC MENU,
select TV Control and then select Home (Menu) or
Options to control the TV.
• When the TV is used for an extended period of time, the TV
and its surroundings may become warm to touch. This is not
a malfunction of the TV.
• Enter 4357 for the PIN code. (PIN code 4357 is always
accepted.)
How to Care for Your BRAVIA
Safety is very important. Please read and follow the safety documentation (Safety Booklet)
separately provided.
Unplug the TV and other connected equipment from the
wall outlet before you begin cleaning your TV.
• Wipe the LCD screen gently with a soft cloth.
• Stubborn stains may be removed with a cloth slightly
moistened with a solution of mild soap and warm
water.
• If using a chemically pretreated cloth, please follow the instruction provided on the
package.
• Never use strong solvents such as a thinner, alcohol or benzine for cleaning.
• Do not plug in the TV into the wall outlet until the moisture from cleaning has
evaporated.
The TV should also be placed on a stable surface to prevent it from toppling over (see
page 12). If you have young children or pets at home, check regularly to ensure the TV is
securely fastened.
Additional Information
27
Page 28

Specifications
System
Television system NTSC: American TV standard
ATSC (8VSB terrestrial): ATSC compliant 8VSB
QAM on cable: ANSI/SCTE 07 2000 (Does not include CableCARD functionality)
Channel coverage Analog terrestrial: 2 - 69 / Digital terrestrial: 2 - 69
Analog Cable: 1 - 135 / Digital Cable: 1 - 135
Panel system LCD (Liquid Crystal Display) Panel
Speaker output 10 W + 10 W
Input/Output jacks
CABLE/ANTENNA 75-ohm external terminal for RF inputs
VIDEO IN 1/2 VIDEO / AUDIO
COMPONENT IN YP
HDMI IN 1/2/3/4 HDMI: Video: 480i, 480p, 720p, 720/24p/30p, 1080i, 1080p, 1080/24p/30p
AUDIO OUT/Headphones 500 mVrms (typical)
DIGITAL AUDIO OUT
(OPTICAL)
PC IN D-sub 15-pin, analog RGB
PC/HDMI 4 AUDIO IN Stereo mini jack
LAN 10BASE-T/100BASE-TX connector (Connection speed may differ depending on the
USB/DLNA Refer to the i-Manual for supported format.
BPR (Component Video) / Signal format: 480i, 480p, 720p, 1080i, 1080p
AUDIO
HDMI:
Audio: Two channel linear PCM 32, 44.1 and 48 kHz, 16, 20 and 24 bits, Dolby Digital
Analog audio input (minijack) (HDMI IN 4 only)
ARC (Audio Return Channel) (HDMI IN 1 only)
Stereo mini jack / Impedance: 16 ohms
PCM/Dolby Digital optical signal
network environment. 10BASE-T/100BASE-TX communication rate and communication
quality are not guaranteed for this TV.)
Model name KDL- 46EX52x 40EX52x*140EX521*
2
32EX52x*
3
32EX521*
Power and others
Power requirement 110-240 V AC, 50/60 Hz (U.S.A./Canada 120 V AC, 60 Hz)
Power consumption
in use
in DAM*
4
in standby Less than 0.2 W with 120 V AC and less than 0.3 W with 240 V AC
Screen size
(inches measured diagonally)
Display resolution 1,920 dots (horizontal) × 1,080 lines (vertical)
Speaker
Full range (mm)
(inches)
Dimensions with stand (mm)
(inches)
without stand (mm)
(inches)
wall-mount hole pattern
(mm)
wall-mount screw size
(mm)
Mass with stand (kg)/(lb.) 17.8 / 39.2 14.4 / 31.8 13.8 / 30.4 10.2 / 22.5 9.9 / 21.8
without stand (kg)/(lb.) 14.2 / 31.3 11.2 / 24.7 11.2 / 24.7 7.7 / 17 7.7 / 17
Supplied accessories See “Checking the accessories” (page 6).
Optional accessories Connecting cables
103 W 102 W 77 W
0.02 kWh/Day
(You may hear a clicking noise during the download but this is normal.)
46 inches 40 inches
30 × 150 (2)
3
1
/16 × 6 (2)
1,078 × 690 ×
260
1
/2 × 27 1/4 ×
42
10
1
/
4
1,078 × 660 ×
42
1
42
/2 × 26 ×
11
1
/
16
943 × 616 ×
250
1
37
/4 × 24 3/8 ×
7
9
943 × 586 ×
42
1
37
/4 × 23 1/8 ×
11
1
943 × 604 ×
254
1
37
/4 × 23 7/8 ×
/
8
10
943 × 588 ×
45
1
37
/4 × 23 1/4 ×
13
/
16
1
/
16
755 × 510 ×
216
3
29
/4 × 20 1/8 ×
5
8
755 × 480 ×
42
3
29
/4 × 19 ×
11
1
300 × 300 200 × 200
M6 (length: refer to diagram on page 15.)
Support Belt Kit
Wall-Mount Bracket: SU-WL500
USB Wireless LAN Adapter
31.5 inches
(32 class)
30 × 100 (2)
1 3/16 × 4 (2)
/
8
/
16
755 × 498 ×
225
3
29
/4 × 19 5/8 ×
7
8
755 × 482 ×
42
3
29
/4 × 19 ×
11
1
/
8
/
16
2
28
Page 29

Model name KDL- 46EX52x 40EX52x*140EX521*
Operating temperature 32 °F - 104 °F (0 °C - 40 °C)
2
32EX52x*
3
32EX521*
*1Except KDL-40EX521 (Mexico model).
*2Mexico model.
*3Except KDL-32EX521 (Mexico model).
*4Download Acquisition Mode (DAM) is used for software updates and/or collecting data for Rovi
On Screen Guide.
• Optional accessories availability depends on its stock.
• Design and specifications are subject to change without notice.
2
Additional Information
(Continued)
29
Page 30

Declaration of Conformity
Trade Name: SONY
Model: KDL-46EX523/KDL-46EX521/
KDL-46EX520/KDL-40EX523/KDL-40EX521/
KDL-40EX520/KDL-32EX523/KDL-32EX521/
KDL-32EX520
Responsible Party: Sony Electronics Inc.
Address: 16530 Via Esprillo,
San Diego, CA 92127 U.S.A.
Telephone Number: 858-942-2230
This device complies with part 15 of the FCC rules.
Operation is subject to the following two conditions:
(1) This device may not cause harmful interference,
and (2) this device must accept any interference
received, including interference that may cause
undesired operation.
For customers in Canada
This Class B digital apparatus complies with Canadian
ICES-003.
FCC Related Information
This equipment has been tested and found to comply
with the limits for a Class B digital device, pursuant to
Part 15 of the FCC Rules. These limits are designed to
provide reasonable protection against harmful
interference in a residential installation. This
equipment generates, uses and can radiate radio
frequency energy and, if not installed and used in
accordance with the instructions, may cause harmful
interference to radio communications. However, there
is no guarantee that interference will not occur in a
particular installation. If this equipment does cause
harmful interference to radio or television reception,
which can be determined by turning the equipment off
and on, the user is encouraged to try to correct the
interference by one or more of the following measures:
❑ Reorient or relocate the receiving antenna.
❑ Increase the separation between the equipment and
receiver.
❑ Connect the equipment into an outlet on a circuit
different from that to which the receiver is
connected.
❑ Consult the dealer or an experienced radio/TV
technician for help.
Pursuant to FCC regulations, you are cautioned that
any changes or modifications not expressly
approved in this manual could void your authority to
operate this equipment.
Safety and Regulatory (for models with
built-in wireless LAN device)
This equipment complies with FCC/IC radiation
exposure limits set forth for an uncontrolled
environment. This equipment should be installed and
operated with minimum distance 20 cm between the
radiator and your body (excluding extremities: hands,
wrists and feet).
This device and its antenna(s) must not be co-located
or operating with any other antenna or transmitter
except Grant condition.
Note
This television includes a QAM demodulator which
should allow you to receive unscrambled digital cable
television programming via subscription service to a
cable service provider. Availability of digital cable
television programming in your area depends on the
type of programming and signal provided by your
cable service provider.
Compatible Wall-Mount Bracket Information
Use the following Sony Wall-Mount Bracket with your
TV model.
Sony TV Model No.
KDL-46EX523/KDL-46EX521/
KDL-46EX520/KDL-40EX523/
KDL-40EX521/KDL-40EX520/
KDL-32EX523/KDL-32EX521/
KDL-32EX520
Sony WallMount
Bracket
Model No.
Use with other Wall-Mount Brackets* may cause
instability and could result in property damage or injury.
* For instructions on using the Wall-Mount bracket
with your TV please go to http://esupport.sony.com
for your TV model and download “Additional
Information for Using Sony Wall-Mount Bracket”.
To Customers
Sufficient expertise is required for TV installations. Be
sure to subcontract the installation to a Sony dealer or
licensed contractor and pay adequate attention to safety
during the installation.
SU-WL500
30
Page 31

Online
Registration:
For Your Convenience
Be sure to register your TV.
United States
Canada
Your TV is capable of receiving software updates. For the
latest information about software updates for your TV, visit:
http://productregistration.sony.com
http://www.SonyStyle.ca/registration
Software
Updates:
United States
Canada
NOTE: If your TV is connected to the Internet, you can check
for software updates by selecting Settings, Product
Support and then Automatic Software Update.
http://www.sony.com/tvsupport
http://www.sony.ca/support
© 2011 Sony Corporation Printed in U.S.A.
Page 32

ɃɄ Ʌ Ɇɇ Ɉ
1
4-270-904-11(1)
1
2
Ƀ
ʓ
ʔ
Ʉ
Ʌ
*
32, 37, 40 46, 55
ʓ
ʔ
Ɇ
x 2
3
ɇ
© 2011 Sony Corporation
Ɇ
Ɇ
x 3
3 N•m {30 kgf•cm}
*
*
Ʌ
Page 33

2
1
2
0°
x 3
Ɉ
x 3
1.5 N•m/1,5 N•m
{15 kgf•cm}
6°
Page 34

SONY:
4-282-489-31
1III1111111111111111111111111
4282489311
(1)
Tips
This
TV
presence
The default setting for this feature
When
certain period
To
set [Presence Sensor] to [Off]
then
select [Preferences] > [Eco] > [Presence Sensor] > the desired option.
on
helps to reduce power consumption by monitoring a viewer
or
motions (Presence Sensor).
TV detects no viewer presenceormotion in frontofthe TV for a
Outlineof[Presence Sensor]
[Presence Sensor]
is
[On].
of
time, the picture will automatically
or
select other options, press HOME,
turn
setting
off.
~
- rr=======:::::::;,
[Eco]
©
2011
Sony Corporation Printed in Mexico
••
•
••
No presence
or
motion
.
~
Page 35

ENGLISH
FRANc;AIS
ESPANOL
PreventingTVTip-Over Accidents
The
U.S.
Commission
at least 3,000
were
rooms becauseofinjuries associated
TV tip-overs.Inaddition,
2005,
deaths.
deaths
and deaths
climb
uponshelves, bookcases, dressers, desks,
chests and television stands. In some
televisions placedontopoffurniture
and cause achildtosuffer a
sometimes fatal injury.
Consumer
treated
CPSC
More
involved
onto, fall againstorpull themselves
Product
(CPSC)
children
in U.s. hospitals
received reportsof36TVtip-over
than80percentofall these
young
frequently
Safety
estimates
that
younger
from
children.The injuries
take place
in 200S
than
emergency
2000
when
traumatic
age 5
with
through
cases,
tip
and
Watch Out!
Faites attention!
kids
over
Eviter les accidents
de
renversement de televiseur
La
commission de surveillance des
de
consommation
qu'en 2005 au
de cinq ans
d'urgence
blessures associees ades renversements
televiseurs. De plus,
re<;:u
des
renversementdeteleviseur. Plusde80
centdeces
enfants.
lieu lorsque les enfants
grimpentouse
bibliotheques,
des armoiresetdes
Dans certains
des meublesserenversentetcausent
blessure grave
rapports
Les
(CSPC)
moins
ont
ete traites dans les salles
des
h6pitaux
deces
blessuresetles deces
hissent sur des tablettes, des
des commodes, des bureaux,
cas,
et
parfois fatale aI'enfant.
des
3 000 enfantsdemoins
etats-uniens
de
2000 a2005,
de 36 deces causes par un
impliquaientdejeunes
tombent
supportsdeteleviseur.
les televiseurs places sur
E.-U.
produits
estime
pour
la
ont
contre,
une
des
de
CSPC
pour
souvent
Prevenciondeaccidentes
vuelco y caida del televisor
La
ComisiondeSeguridaddeProductos
EE.UU.
(CPSC)
calcula
que
10
menos
3,000
recibieron
hospitalesdeEstados Unidos
lesiones recibidasalvolcarseuntelevisor.
a
Asimismo,
recibio
informesde36
por
volcarse un televisor. Mas del 80%
las
muertes
frecuencia,
cuandounninosetrepa auntelevisor, cae
sobre el 0 tratadesubirse en repisas, roperos,
escritorios 0 bases de televisor.Enalgunos
casos,
cuandosecoloca untelevisor
de
un mueble, este
causando
ninos.
;:..
ninos
tratamientodeemergencia en
entre
los anos 2000 y 2005,laCPSC
fueron
las
lesiones y
trauma
en el 2005
menoresde5 anos
debidoalas
muertes
de ninos pequenos. Con
muertes
puede
fisico y hastalamuerte
volcarse y caer
:'l'
I,
por
de
par
causadas
de
suceden
encima
en
r
il
jCuidado!
The following safety tips are
to
recommended
furniture or
• Verify
that
furniture
added
attachtothewaIIora
entertainment
shelving, and bureaus using
hardware, suchasbrackets, screws,
toggles.
• Place
appropriate
rise base.
• Push
• Place electrical cords and audio/visual cables
outofa child's reach,
play
• Remove items
climbonor
and
furniture.
See
informationonhowtosecure
televisionisplaced
thatisstableonits
securityitis
units,TV stands, bookcases,
the
televisiononsturdy
for
the
televisionasfar backaspossible.
with
them.
that
near
remote
controls,
the
operating
prevent
TV
tip-overs:
only
recommended
the
sizeoftheTVorona
might
the
instruction
own.
nchortothe
appropriate
furniture
and
teach kids
tempt
television, suchastoys
from
topofthe
for
the
on
For
that
flooraII
or
kids
more
TV.
you
low-
not
to
to
TV and
Les
conseilsdesecurite suivants
sont recommandes pour eviter
les renversements
de televiseurs:
ou
• Assurez-vous
seulement
par
lui-meme.
il
est
recommandedefixer au
soltoutes les unitesdedivertissement, les
supportsdeteleviseur, les
les
tablettesetles bureaux au
la
quincaillerie
supports, des visoudes
• PlacezIeteleviseur sur un
approprie
une
base basse.
• PoussezIeteleviseur aussi loin
vers I'arriere.
• Placez les cordons electriquesetles cables
audio/video
montrez-Ieur
• Retirezdudessusduteleviseuretdes
meubles
enfants a
comme
Reportez-vous aux directives
pour
obtenir
la
fa<;:ondesecuriserIeteleviseur.
queIeteleviseur est place
sur un
Pour
appropriee,
pourlatailleduteleviseurousur
horsdela
de ne pas
les
objets
grimper
des
jouetsoudes telecommandes.
d'autres renseignements sur
de meubles
meuble
qui
augmenterlasecurite,
qui
suroupresduteleviseur,
est stable
murouau
bibliotheques,
moyen
comme
boulons
meuble
que
portee
des enfants
jouer
avec eux.
pourraient
d'utilisation
de
des
aailettes.
robuste
possible
inciter
~
A continuacionsepresentan
algunos consejos
de
recomendados para prevenir el
vuelco y la caida
• Aseguresedeque
colocado
en
sf.
que
bases para televisor, libreros, repisas 0 buros
se
sujeten a la pared 0alpiso usando
mensulas,
•
Coloque
adecuadoaltamano
base
•
Coloque
que
•
Coloque
audiovisual fuera del alcancedelos ninos y
enseneles a
et
• Retire
o
controles
les
televisor 0
los ninos a treparse eneltelevisor 0 cerca
el.
Consulte
funcionamiento
informacion
televisor.
sobre
Para
mayor
todas
las
unidadesdeentretenimiento,
tornillos
el televisor enunmueble
quenosea
el televisor10mas atras del
sea
posible.
los cables electricos y del sistema
quenodeben
cualquier
remoto
del
las
instrucciones
sobre
de televisores:
el televisor
muebles
seguridad,serecomienda
0 abrazaderas adecuadas.
del aparato 0 en una
alta.
objeto
como
que
para
obtener
como
este encima del
muebleyque
\,\:
seguridad
solamente
que
sean estables
jugar
con cables.
juguetes
pudiera
de
mas
asegurar el
las
solido
mueble
incitar
este
a
de
© 2009 Sony Corporation
PrintedinU.S.A.
Page 36

ENGLISH
Does
your
picture
quality
seem
poor?
Do
you
haveacableorsatellite
Factors
other
than
quality.
1) Cable
Request an HD
and review your
You
and picturesettings, otherwise you may
experience issues such
black bars on
audio,
Contact your service provider
questions on
or
may needtoadjust
empty
2) Broadcaster
The broadcaster controls
program. Some programs are broadcast in
High Definition
are broadcast in Standard Definition
even on HD stations.
HD
broadcast
Crisp,
clear
picture
yourTV
Satellite Set-Top Box
STB
from
STB
settings.
the
black boxes on
STB
as:
top
or sidesofthe screen,
usage.
(HD),
while
box?
can affect picture
(STB)
your
service provider
your
STB
audio
Poor picture quality,
the
screen.
if
you have any
the
qualityofthe
other
programs
(SD),
SD
broadcast
Fuzzy
picture,
often
black
bars
with
FRANC;:AIS
Est-ce
que
la
qua
lite
de
votre
mauvaise?
Est-ce
que
vous
avezIecableouun
Facteurs autres
affecterlaqualite de I'image.
1)
Decodeurdecable ou satellite
Demandez un
fournisseur de service
reglages de votre decodeur.
Vous devrezajuster
no
et d'image de votre decodeur, sinon vous
pourriez constater
mauvaise qualite d'image, barres noires dans
Ie
hautoules
boites noires vides
Communiquez
si
service
I'utilisation du decodeur.
2)
Telediffuseur
Le
telediffuseur contralelaqua lite de
I'emission.
Certaines emissions sonttelediffusees en
definition
haute
sont telediffusees en
meme
sur des postes
que
votre televiseur
decodeur
HD avotre
et
examinez
les
reglages de son
les
problemes suivants :
cotes de I'ecran,
aI'ecran.
avec votre fournisseur de
vous avez des questionsausujet de
(HD), tandis qued'autres
definition
HD.
image
les
pas
de son,
standard
semble
satellite?
pouvant
(SD),
ESPANOL
,La
calidaddela
,Tieneunreceptordecable0satelite?
Existen factores apartedel televisor
pueden afectarlacalidad delaimagen.
1) Receptores
Top Box
Solicite un receptor de alta definici6n (HD) de
la
compania queIeofreceelservicio y cheque
la
configuraci6n del receptor.
Es
posible
configuraci6n de audio e imagen de
receptor, denoser
siguiente: mala calidad delaimagen, barras
negras en
la
pantalla, falta de audio, recuadros negros
de
vacios en
Comuniquese con
servicio
de
2) Cadenas transmisoras
La
programa. Algunos programas
en alta definici6n
transmite en definici6n estandar
en estaciones
si
su
receptor.
cadena transmisora controlalacalidad del
imagennoes
de
cable 0 satelite (Set-
0
STB)
que
necesite ajustar
asi,
podrfa observar
la
parte superior 0 en los costados
la
pantalla.
la
tiene alguna pregunta sobreeluso
compania proveedora de
(HD),
de
alta definici6n.
mientras
optima?
que
la
su
se
transmiten
que
otros
(SD)
0 hasta
10
se
Typeofcontent
SD
Content
HD Content
Both HD &
content
SD
contentonHD
HD
picture
stations can broadcast:
SD
Station HD Station
SD
channels does
l
X X
3) Original Recording Quality
The
qualityofthe
depends on the type
the original recording was made.
picture you
of
camera used when
see
not
also
X
X
create an
Teh'diffusion
Image
Type de contenu
diffuser:
Contenu
Contenu
ContenuHDet
Le
une image
3)
La
aussi
I'enregistrement initial.
HD
claire,
precise
SD
HD
contenuSDsur des canaux HD ne cree pas
HD!
QualitedeI'enregistrement initial
qualite de I'image que vous voyez depend
du
type
de camera utilise lors de
Telediffusion
Image
des
que
les
stations peuvent
StationsSDStations
SD
SD
fioue,
souvent
barres
noires
HD
X X
avec
X
X
Transmisi6nenAlta
Definici6n
(HD)
Imagen
claraynitida
contenido
Tipo de
transmitir:
Contenido
Contenido HD
Contenido tanto
como
iEI
contenidoSDen canalesHDno
imagen en alta definici6n!
SD
SD
Transmisi6nenDefinici6n
Estandar
Imagen
frecuencia
negras
que
las
Estaci6n
HD
(SD)
borrosa,
con
aparecen
estaciones pueden
SD
Estaci6n
HD
X
crea una
3) Calidad originaldela filmacion
La
calidad delaimagen
depende
cuando
del
tipo
se
hizolafilmaci6n original.
quevetambien
de camara
queseus6
barras
X
X
X
Page 37

4-273-074-11(1)
Safety and Regulatory Booklet _____________________
Read and understand the contents of this booklet before operating
your new TV.
Feuillet de consignes d'utilisation et de sécurité ______
Veuillez lire et vous assurer de comprendre le contenu de ce feuillet
avant d'utiliser votre nouveau téléviseur.
Folleto de instrucciones de seguridad ________________
Lea y entienda el contenido de este folleto antes de operar su nuevo
US
FR
ES
televisor.
© 2010 Sony Corporation
Page 38

Important Safety Instructions
1) Read these instructions.
2) Keep these instructions.
3) Heed all warnings.
4) Follow all instructions.
5) Do not use this apparatus
near water.
6) Clean only with dry cloth.
7) Do not block any
ventilation openings.
Install in accordance with
the manufacturer’s
instructions.
10) Protect the power cord
from being walked on or
pinched particularly at
plugs, convenience
receptacles, and the point
where they exit from the
apparatus.
11) Only use attachments/
accessories specified by
the manufacturer.
12) Use only with the cart,
stand, tripod, bracket, or
table specified by the
manufacturer, or sold
with the apparatus. When
a cart is used, use caution
when moving the cart/
apparatus combination to
avoid injury from
tip-over.
13) Unplug this apparatus
during lightning storms
or when unused for long
periods of time.
8) Do not install near any
heat sources such as
radiators, heat registers,
stoves, or other apparatus
(including amplifiers) that
produce heat.
9) Do not defeat the safety
purpose of the polarized
or grounding-type plug. A
polarized plug has two
blades with one wider than
the other. A grounding
type plug has two blades
and a third grounding
prong.
The wide blade or the
third prong are provided
for your safety. If the
provided plug does not fit
into your outlet, consult an
electrician for replacement
of the obsolete outlet.
14) Refer all servicing to
qualified service
personnel. Servicing is
required when the
apparatus has been
damaged in any way, such
as power-supply cord or
plug is damaged, liquid
has been spilled or objects
have fallen into the
apparatus, the apparatus
has been exposed to rain
or moisture, does not operate normally, or
has been dropped.
Please observe the Additional Safety DOs and
DON’Ts to avoid electrical shock, shortcircuit, fire, bodily injury or property damage.
US
2
Page 39

WARNING
To reduce the risk of fire or electric shock, do
not expose this TV to rain or moisture.
The TV must never be exposed to dripping,
splashing, or spilling liquids of any kind.
CA UTION
RISK OF ELECTRIC SHOCK
DO NOT OPEN
ATTENTION
RISQUE DE CHOC ELECTRIQUE,
NE PAS OUVRIR
PRECA UCION
RIESGO DE CHOQUE ELECTRICO
This symbol is intended to alert
the user to the presence of
uninsulated “dangerous voltage”
within the TV’s enclosure that
may be of sufficient magnitude to
constitute a risk of electric shock
to persons.
This symbol is intended to alert
the user to the presence of
important operating and
maintenance (servicing)
instructions in the literature
accompanying the TV.
Replace only with the same or
equivalent type of batteries. Using
incorrect replacement batteries
can lead to an explosion.
Outdoor Antenna Grounding
NO ABRIR
Antenna lead-in wire
Additional Safety DOs
and DON’Ts
MOISTURE
☐ Do not place liquid filled objects such as a
vase or potted plant on the TV.
☐ Do not use a power line
operated TV set near water;
for example, near a bathtub,
washbowl, kitchen sink,
laundry tub, wet basement or
near a swimming pool, etc.
☐ Do not install the TV in a
location where sulfur is
present (e.g., hot springs).
This may cause a fire, electric shock or
damage to your TV.
CLEANING
When cleaning, be sure to unplug the power
cord to avoid any chance of electric shock.
☐ Clean the cabinet of the TV with
a dry soft cloth.
☐ Wipe the LCD screen gently
with a soft cloth.
☐ Stubborn stains may be removed with a
cloth slightly moistened with a solution of
mild soap and warm water.
☐ Do not spray water or detergent directly on
the TV set. It may drip to the bottom of the
screen or exterior parts, and may cause a
malfunction.
☐ If using a chemically pretreated cloth, please
follow the instruction provided on the
package.
☐ Never use strong solvents such as a thinner,
alcohol or benzine for cleaning.
☐ Periodic vacuuming of the ventilation
openings is recommended to ensure to
proper ventilation.
US
Ground clamps
Electrical service
equipment
NEC: National Electrical
Code
Antenna discharge
unit
(NEC Section 810-20)
Grounding conductors
(NEC section 810-21)
Ground clamps
Power service grounding
electrode system
(NEC Art 250 Part H)
VENTILATION
The ventilation openings in the TV are
necessary to ensure reliable operation of the
TV and to protect it from overheating.
☐ Do not block or cover the
ventilation openings with
cloth or other materials.
☐ Never place the TV on a bed,
sofa, rug or other similar
surface where ventilation
openings may be blocked.
US
3
Page 40

☐ Unless proper ventilation is provided, the
TV may accumulate dust and cause damage.
☐ Never allow liquid or solid
objects to fall into the
ventilation openings.
☐ If any liquid or solid object falls
inside the TV, unplug the TV
immediately and have it
checked by qualified service personnel
before operating it further.
☐ Never push objects of any kind into the TV
through the ventilation openings as they
may come in contact with dangerous voltage
points or short out parts that could result in
a fire or an electric shock.
Allow adequate space around the TV set to
ensure proper air circulation.
☐ Never place the TV in a
confined space, such as a
bookcase or built-in cabinet,
unless proper ventilation is
provided.
☐ There should be a clearance of at least 11
7/8 inches (30 cm) above the TV set and 4
inches (10 cm) on each side. If mounted on
the wall, allow at least 4 inches (10 cm) of
clearance at the bottom of the screen. (See
additional information provided in the
Operating Instructions manual.)
INSTALLATION
The TV should be installed near an easily
accessible AC power outlet.
☐ Do not install the TV face up or down,
upside down or on its side.
☐ Do not install the TV in hot,
humid, excessively dusty
places or in areas with oily
smoke or steam (e.g., near a
stove or humidifier). Fire, electric shock, or
warping may occur.
☐ Do not install the TV in places
subject to extreme temperature,
such as in direct sunlight, near
a radiator or a heating vent.
The TV may overheat in such
conditions which can cause
deformation of the enclosure
and/or TV malfunction.
☐ Do not install the TV in a place
exposed to direct air
conditioning; moisture may
condense inside and may cause
TV malfunction.
US
4
☐ Do not install the TV where it may be
exposed to mechanical vibration.
☐ Do not install the TV where insects may
enter.
☐ Do not install the TV so that
it protrudes into an open
space. Injury or damage may
result from a person or object
bumping into the TV.
☐ To prevent fire keep
flammable objects or open flame (e.g.
candles) away from the TV.
☐ Do not place optional equipment on top of
the TV.
Prevent the TV from toppling over
Take measures to prevent the TV
from toppling over and causing
injury or damage to the TV and
property.
☐ Secure the TV to a wall and/or stand.
☐ Never install the TV on unstable and/or
uneven surfaces.
☐ Do not allow children to climb on or play
with furniture and TV sets.
☐ Do not install the TV on furniture that can
easily be used as steps, such as a chest of
drawers.
☐ Care should be taken to install the TV
where it cannot be pushed, pulled over, or
knocked down.
☐ Care should be taken to route all AC power
cords and connecting cables so that they
cannot be pulled or grabbed by curious
children.
Medical institutions
Do not place this TV in a place
where medical equipment is in
use. It may cause a medical
equipment malfunction.
Outdoor use
Do not install this TV outdoors. The TV
should not be exposed to rain or direct
sunlight in order to avoid damage and possible
fire or electric shock.
Do not install this TV in a vehicle, ship
or other vessel
☐ Excessive bumping motion of
a moving vehicle or
continuous swaying motion on
a boat may cause the TV to fall
down and cause injury.
☐ Exposing the TV to seawater
may cause a fire, electric shock
or damage to your TV.
Page 41

Magnetic influence
☐ This TV contains a strong magnet in the
speaker unit that generates a magnetic field.
Keep any items susceptible to magnetic
fields away from the speaker.
☐ Electro-magnetic radiation emitted from
optional equipment installed too close to
the TV may cause picture distortion and/or
noisy sound.
Wall-mount use
☐ Wall-mount installation
requires the use of a
Wall-Mount Bracket. When
installing or removing the TV
and the Wall-Mount Bracket, be sure to use
qualified contractors. If not properly
secured during installation or removal from
the Wall-Mount Bracket, the TV may fall
and cause serious injury.
☐ Be sure to follow the installation guide
supplied with the Wall-Mount Bracket when
installing the TV.
☐ Be sure to attach the brackets with the
specified parts supplied with the
Wall-Mount Bracket.
☐ Do not hang the TV from the ceiling. It may
fall and cause serious injury.
☐ Do not hang anything on the TV.
☐ Do not allow children to climb
on the TV.
AC POWER CORD
☐ Do not touch the AC power cord
and its plug with wet hands as it
may cause electric shock.
☐ When disconnecting the AC
power cord, grasp the plug and
disconnect from the wall outlet
first. Do not pull by the cord.
☐ Keep the power cord away from
heat sources.
A TV set with a three-wire grounding type AC
power cord plug must be connected to an AC
power outlet with a protective earthing
connection.
☐ Do not convert or damage the AC power
cord.
☐ Consult your electrician to have the outlet
changed to suit your TV.
Subjecting the AC power cord to wear and/or
abuse can damage the AC power cord and
your TV.
☐ Do not place the TV where the power cord
can be easily pinched, bent, twisted, or catch
your feet.
☐ Do not allow anything to rest on or roll over
the cord.
☐ Before connecting cables, be sure to unplug
the AC power cord for your safety.
☐ Do not move the TV with the AC power
cord (or other cables such as audio and
video) connected.
☐ Use only an original Sony AC power cord
with your TV; no brand substitution is
allowed.
☐ Do not use AC power cord supplied with
the TV with any other equipment.
☐ Never use a damaged AC
power cord. A damaged AC
power cord can cause a
short-circuit, which may result
in a fire or electric shock.
Do not use a damaged or poorly
fitting AC power outlet as your
TV’s power source.
☐ Insert the plug fully into the
outlet. If it is loose, it may cause
arcing and result in a fire.
☐ Do not overload the same AC
power outlet.
Unplugging the AC power cord from the wall
outlet will completely remove power from the
TV.
☐ During lightning storms or
when the TV is left
unattended and unused for
extended periods of time,
the AC power cord should
be unplugged from the wall
outlet. This will avoid
possible damage to your TV.
Also unplug the antenna to prevent damage
to the TV.
☐ For energy conservation and safety reasons,
practice unplugging the AC power cord
from the AC power outlet.
US
5
Page 42

Clean the AC power plug
Unplug the AC power plug
and clean it occasionally to
avoid dust from accumulating.
While cleaning, look for signs
of damage. A damaged AC power cord should
never be used.
ACCESSORIES
Keep small accessories out of children’s reach.
Use only the specified accessories with this TV.
Volume Adjustment
☐ When using headphones,
adjust the volume to avoid
excessive audio levels from
causing possible hearing loss.
BATTERIES
☐ To preserve our environment, dispose of
used batteries according to your local laws
or regulations.
☐ Do not dispose of batteries in a fire.
☐ Do not short-circuit, disassemble or
overheat the batteries.
☐ Batteries must not be exposed to excessive
heat such as sunshine, fire or the like.
LCD SCREEN
☐ Although the LCD screen is made with
high-precision technology and has effective
pixels of 99.99% or more, black dots or
bright points of light (red, blue, or green)
may appear constantly on the LCD screen.
This is a structural property of the LCD
panel and is not a malfunction.
☐ The LCD screen is made with
high-precision technology and to achieve a
high level of performance and picture
quality, this TV’s backlight setting is set to
maximize the brightness of the TV.
However, uneven brightness may be
observed when the LCD TV is viewed in a
dark ambient without an input source or
with a blank screen. This condition is
normal and not a malfunction of the TV.
Changing the Picture mode, Backlight
setting, enabling the Light Sensor (if
applicable), or turning on the Power
Management will improve this condition.
☐ To avoid damaging the LCD panel, do not
expose the LCD screen to direct sunlight.
☐ Do not push or scratch the LCD screen, or
place objects on top of the TV. The images
may be uneven or the LCD panel may be
damaged.
☐ If the TV is used in a cold place, the picture
may smear or become dark. This does not
indicate a failure. These phenomena
improve as the temperature rises.
☐ Ghosting may occur when still pictures are
displayed continuously. It should disappear
after a few moments.
☐ The LCD screen and enclosure get warm
when the TV is in use. This is not a
malfunction.
☐ Avoid spraying insect repellent with volatile
material on the LCD screen.
☐ Avoid prolonged contact with rubber or
plastic material to the LCD screen.
Broken screen panel
Do not throw anything at the
LCD screen and its edges as the
impact can cause the LCD screen
glass to crack, break or shatter.
☐ If damage occurs to the LCD
panel, small traces of liquid crystal
sandwiched between the glass may be found
on scattered broken glass.
☐ Do not touch the broken glass with bare
hands. As with any broken glass pieces,
avoid skin contact and exposure to your
eyes or mouth. Avoid direct contact with
liquid or damp surfaces of the glass as these
may have an adverse effect on some people.
The contacted area should be rinsed
thoroughly with water. If conditions persist,
see your doctor.
☐ If the surface of the TV cracks, do not touch
the TV until you have unplugged the AC
power cord. Otherwise electric shock may
result.
US
6
Page 43

SERVICING
Do not use the TV if you
suspect the TV is damaged
or if the TV is damaged.
☐ Do not attempt to service
the TV yourself since
opening the cabinet may
expose you to dangerous
voltage levels or other
hazards. Refer all
servicing to qualified service personnel.
☐ If replacement parts are
required, acquire a written
certification from the service
technician which states that
adequate replacement parts with
the same or similar characteristics as the
original parts have been used. Unauthorized
substitutions may result in a fire, an electric
shock or other hazards.
Safety check
☐ Upon completion of any TV
servicing or repair, ask the
service technician to perform
routine safety checks as
specified by Sony and to
certify that the TV is safe to operate. Have a
qualified service technician dispose of the
TV if it is not safe to operate.
CAUTION
☐ Some people may experience discomfort
(such as eye strain, fatigue, or nausea) while
watching 3D video images or playing
stereoscopic 3D games. Sony recommends
that all viewers take regular breaks while
watching 3D video images or playing
stereoscopic 3D games. The length and
frequency of necessary breaks will vary
from person to person. You must decide
what works best. If you experience any
discomfort, you should stop watching the
3D video images or playing stereoscopic 3D
games until the discomfort ends; consult a
doctor if you believe necessary. The vision
of young children (especially those under
six years old) is still under development.
Consult your doctor (such as a pediatrician
or eye doctor) before allowing young
children to watch 3D video images or play
stereoscopic 3D games. Adults should
supervise young children to ensure they
follow the recommendations listed above.
US
7
Page 44

Printed in Mexico
Page 45

SONY:
4-272-249-11 (1)
END
FOR
IMPORTANT-READ
BEFORE
USING
ACCEPTANCEOFTHIS
This
("EULA")isa
you
the
the
other
"Excluded
Sony
shallbecollectively
"Sony
.Sony
party
and
documentation.
includes
other
modified
by
Sony,
downloadedtothe
method.
This
BRAVIA®
provides
services
content
other
Party
The
also
Sony
Services"),
content
considered
EULA.
feature
Your
the
subjecttoyour
and
Internet
abilitytoaccess
qualityofthe
USING
YOUR
End
User
and
Sony
licensorofthe
software
licensesasindicated
Software")
Product
Software."
Software
licensors
accompanying
softwareinyour
software,
software,
whether
Sony
BRAVIA®
provides
qualityofthe
termsaswellasthe
Product
Internet
accesstoselected
("Services")
providers
than
Sony
Providers")asa
content
which
("Sony
Sony
The
BRAVIA®
requiresanInternet
abilitytoaccess
connection
CERTAIN
YOUR
PRODUCT
License
legal
agreement
Electronics
software
whichisgoverned
and
related
referredtoas
This
and
thatofSony's
("Third
printedoronline
The
Sony
including
providedtoyou
storedonmedia
Sony
also
Video
including
Electronics
Internet
you
accesstoselected
services
services
Content")
Software
Services
Internet
speed
the
Services,
Services
USER
SOFTWARE
WITH
THIS
AGREEMENT
SONY
INDICATES
AGREEMENT.
Agreement
Inc.
(other
below,
includedinthis
materials
EULA
Party
Software
Sony
updates
Product
includes
feature
c~ntent
from
third
Sony
Inc.
courtesytoyou.
Video
("Sony
Internet
the
presented,
feature
and
shall
under
connection.
Services,
pr~se~ted,
providersservice
broadband
you
YOUR
PRODUCT.
between
("Sony"),
than
by
the
the
covers
third"
Licensors
Product,
or
.or
via
th~
which
part~
entIties
("Third
Content
related
both.
thiS
Video
and
use.
and
the
are
LICENSE
AND
SONY
subjecttoyour
and
YOUR
which
the
)
any
.
be
a~e
Your
size
speedofyour
your
the
including
sound,
graphics,
video,
providedbyThird
("Content")
Services
under
Providers.
each
pursuanttothe
of
Content
registration
throughacomputer.
Content
personal,
be
any
a
or
public
.
maybechanged
unavailable
THE
SERVICES
THIRD
OTHER
DATA
MONITOR
AND
OR
SOFTWARE.
TO
AGREETOSONY'S
POLICY
HTIP://PRODUCTS.SEL.SONY.COM/
SEL/LEGAL/PRIVACY.
PRIVACY
TIMETOTIME;
AGREEMENT
SERVICE
PRODUCT
terms.
varies
Internet
Third
that
used
venueinwhich)anadmISSion,
viewing
INTERACTING
SUCH
Party
but
audio,
likenesses,
messages,
areatthe
the
controlofthe
Third
Third
may
may
private
for
viewingorexhibition
exhibitionorviewing.
SONY
PARTY
THIRD
FROM,
OTHER
ACTIVITIES.
THATISAVAILABLE
POLICY
TO
BE
USED
Intern~t
Video
andisdependent
The
Party
non-theatrical
feeischarged,orfor
from
SOFTWARE
MAY
THE
quality
broadband
provider
Providers.
not
limited
photographs,
tags,orother
Party
and
the
Content
Provider
terms
Party
require
with
the
onlybeused
viewing,
atany
timetotime.
ALLOW
PROVIDERS,
PARTIESTOCOLLECT
CONTROL,
SONY
DEVICES
WITH
YOU
MAY
PLEASE
provid~r's
and
picture
upon
service
and
delivery
The
to
~ata,
Images,
software,
Providers
avail~bility.of
sole
discretion
Third
and
Services
are
and
conditio.ns
Provider.
additional
Third
The
PRODUCT
RUNNING
HEREBY
CURRENT
HTML.
Premium
Party
Services·and
for
and
exhibition,
!or.whrch
The
time
and
AND
THE
SONY,
AND/OR
AND/OR
THE
SONY
CONSENT
YOU
ALSO
AT
SUCH
CHANGE
CONSULT
conte~t,
text,
matenals,
Party
provided
fees
your
.s~?11
any
THE
PRIVACY
service
the
from
by
mUSIC,
.
the
and
of
and/or
Provider
the
own
not
or
(or
in
access,
.
Services
may
be
FROM
THE
1
Page 46

ABOVEMENTIONED
UPDATESTOTHE
.
CONTACT
PROVIDERSOROTHER
FOR
THEIR
SONY'
BOUNDBYTHE
AND
do
not
Sony's
timetotimebySonyinits
Sonyisunwillingtolicense
Softwaretoyou
to
access
promptly
the
returnofthe
included
purchase
SOFTWARE
You
cannot
as
specified
is
licensed,
Party
to
use
Product:
data
Sony
such
the
Sony
licensedasa
not
separate
on
more
authorizedbySony.
modify,
disassemble
orinpartorto
wholeorin
than
you
may
sell
the
transfer
onlyaspartofa
Sony
copies,
(including
any
media,
and
any
and
this
to
the
Third
that
this
APPLICABLE
PRIVACY
SERVICES.BYUSING
PRODUCT,
SONY'S
agreetothe
privacy
Licensors
the
files
Software,
data
allowed
Sony
Product
transfer
termsofthis
Party
PRIVACY
the
Services,
contact
Sony
priceofthe
LICENSE
use
herein.
not
Sony
The
Sony
automatically
f.iles
Software.
single
its
than
one
reverse
the
part
under
not
rent,
Software,
allofyour
provided
all
copies,
printed
upgradesofthe
EULA),
Licensors
EULA
LINK
POLICY.
THIRD
THIRD
POLICIES
YOU
AGREETOBE
TERMSOFTHIS
POLICY.Ifyou
termsofthis
policy,asamended
and
unwillingtoallow
and
Sony
for
entire
Software
the
sold.
grant
Software
and
are
component
engineer,
Sony
use
for
saleortransferofthe
allofthe
and
does
Sony
forarefundofthe
Sony
Sony
The
Sony
Sony
youalimited
Software
for
you
agree
deemedtobeapart
The
Sony
product,
device
You
Softwareinwhole
the
Sony
any
purpose
this
EULA.Inaddition,
lease,
sublicense,
but
rights
you
component
materials,
the
recipient
EULA.
retain
not
expressly
FOR
ANY
PLEASE
PARTY
PARTIES
RELATED
YOUR
EULA
EULA
from
discretion,
the
Sony
you
should
instructions
Product
Product.
Software
Software
and
its
Third
onlyonthe
may
create
use
with
that
Software
and
you
parts
for
unless
agree
decompile
under
Sony
Sony
Sony
expressly
not
Software
other
you
may
this
retain
Software
parts,
all
versions
Software,
agrees
and
all
rights
no
grant
TO
or
you
on
and
except
license
Sony
the
any
of
is
may
use
to
or
in
or
EULA
its
to
you.
You
shall
not
(a)
bypass,
defeat,orcircumvent
or
protectionsofthe
any
mechanisms
the
Sony
Software;or(b)
cover,ordeface
on
the
Sony
Software.
acknowledge,
network
than
the
Sony
Software's
mightbeinterruptedordiscontinued
the
discretionofthe
suppliers,
Providers,
USER
As
access,
the
other
establishauser
for
true,
information
promptly
are
confidentialityofany
passwords
Account.
SONY'S
If
materialstoSonybyelectronic
otherwise
selections,
suggestions,orthe
Materials
non-confidential
Thus,
such
including
proprietaryorother
of
or
the
such
adapted,
disclosed,
published,
by
medium,
compensationtoyou.
.
hereby
ACCOUNT
partofthe
browse,oruse
Content,
third
which
accurate,
responsible
you
send
you
Materials
publicity,
ideas,orany
righttoapprove
Materials.
Sony
assign
and
services,orother
Sony
Software
service
etc.)orSony.
agreementtoallow
Third
parties
you
must
current,
about
update
associated
RIGHTSTOUSER'S
any
("Materials"),
comments,
are,
and
giveupany
violates
moral
rightstocredit
broadcast,
licensed,
sold,
anywhereinthe
forever
all
anyofthe
Sony
Software
operatively
remove,
any
trademarksornotices
You
agree
performance
providers,
Party
may
account
yourself
such
for
communications
willbetreated
and
rights,
other
Any
transmitted,orused
and
right,
that
products
upon
suppliers
the
Services
Providers
require
("Account")
provide
and
complete
and
information.
maintaining
and
allofyour
with
any
including
data,
like,
all
such
non-proprietary.
claim
anyofyour
privacy
property
for
right,
the
way
Material
changed,
performed,
world,inany
without
Furthermore,
title,
modify,
functions
linked
understand,
the
software,
which
may
(software
Third
you
that
them
with
maintain/
the
such
MATERIAL
or
mail
questions,
as,
that
use
rights,
rights,
material
including
Sony
may
copied,
posted,
attribution
and
interest
or
to
alter,
other
the
depend
at
Party
to
and
and/or
you
You
or
any
of
rights
rights
uses
be
or
you
2
Page 47

in
and
Sonyisfreetouse,
compensationtoyou,
how,
concepts,
intellectual
the
Materials,
for
any
purpose
not
limitedtodeveloping,
having
manufactured,
marketing,
such
Materials.
understand
use
any
such
or
techniquesorMaterials,
no
righttocompel
TRANSMITTED
I
nternet
transmissions
completely
understand
information
or
interceptedbyothers,
a
special
(for
is
encrypted
notice
example,
techniques,orot.her
property
whetherornot
whatsoever,
and
selling
However,
that
Sonyisnot
ideas,
MATERIAL
privateorsecure.
that
any
you
sendtoSony
thataparticular
credi~
(sentIncode).
messagetoSony
have
any
special
DIGITAL
Content
digital
RIGHTS
owners
rights
use
management
any
rights
licensing,
products
know-how,
such
are
message
card
does
responsibilitytoyou.
MANAGEMENT
Windows
("WMDRM")toprotect
property,
Sony
access
the
WMDRM
the
Content,
Microsoft
to
revoke
including
Product
copyrights.
uses
WMDRM
WMDRM-protected
software
Content
Corporation
the
Service's
failstoprotect
owners
("Microsoft")
abilitytouse
WMDRMtoplayorcopy
Content:
unprotected
licenses
that
list
with
require
their
you
requires
ADVERTISEMENTS,
Revocation
Content.Ifyou
for
protected
Microsoft
the
may
includearevocation
licenses.
youtoupgrade
Content.Ifyou
will
notbeabletoaccess
the
upgrade.
SERVICE
does
Content,
Content
WMDRMtoaccess
declineanupgrade,
COMMUNICATIONS
Inclusionofthe
Provider
approves
does
of,orendorses,orrecommends
Serviceofa
not
mean
without
ideas,
any
know-
.
contained
In
patentable,
including
but
manufacturing,
using
you
agree
obligated
and
to
concepts,
and
you
have
.
use.
never
You
or
mayberead
unless
there
is
message
informat~on)
not
Sending
cause
a
Sony
to
Media
technology
their
intell~ctual
This
software
Content.
may
to
If
ask
protected
not
affect
download
you
agree
that
owners
Content
Third
Sony
may
that
Party
that
Third
You
understand
Services
advertisements
that
these
in
order
You
also
useofthe
may
SonyorThird
service
messages,
("Service
that
you
receiving
SONY,
THIRD
ALL
WARRANTIES,
IMPLIED,ASTO
LEGALITY,
OF
ANY
COMMUNICATIONS,
AS
WELLASANY
UNDER
THE
ADVERTISEMENTS,
COMMUNICATIONS,
OBJECTIONABLE
FOR
Certain
minorsorother
mayor
having
being
you
acknowledge
the
Servicesatyour
Sony
Content
be
offen'sive.
supervising
the
Sony
Services,
you
are
ask
your
you:
(i)
sendinany
contestorgame
about
cluborgroup;
any
bulletilJ
or
(vi)
Party
and/or
Providerorits
and
agree
Content
("Advertisements"),
Advertisements
for
the
Servicestobe
understand
BRAVIA®
include
certain
Party
and
Internet
communications
Provider~
announcements,
newsletters,
Communications"),
will
notbeabletoopt
such
Service
ITS
AFFILIATES,
PARTY
PROVIDERS
EXPRESS
THE
RELIABILITY,
ADVERTISMENT,
OR
LIABILITY
ANY
THEORYOFLAW
AND
CONTENT
MINORS
Content
(UNDER
may
notbesuitable
users.
may
notberated
explicit
foramature
language,orotherWise
audience.
that
own
hasnoliabilitytoyou
including
the
Software,
and
under
any
You
are
useofthe
Excluded
the
Contentbyany
the
ageof16,
parent(s)ora
e-mail
Sony
via
information;
that
requires
youoroffersaprize;
(v)
post
boardorenter
buy
anything
online.
Content.
that
the
may
include
and
are
necessary
provided.
agree
that
Video
the
feature
from
s.uch
~s
administrative
and
the
like
and
o~t
o.f
Communications.
AND
ITS
DISCLAIM
OR
ACCURACY,
OR
VALIDITY
SERVICE
CONTENT,
ARISING
FOR
SERVICE
CONTENT.
AND
RULES
AGE
16)
for
Such
Content
or
identifi~d
Th~refore,
you
,are
uSing
risk
and
for
the
Content
that
responsible
Sony
Softw~re,
as
that
may
for
Product,
minor.
you
should
guardian.
the
(iii)
befo.~e
Service;
enter
any
(II)
information
(iv)
join
any
any
information
any
chatroom;
.
the
If
on
3
Page 48

EXCLUSIONOFWARRANTY
YOU
UNDERSTAND,
AND
AGREE
SERVICES
PARTY
IS
PROVIDED
WHICH
SELECTION,
PICTURE
SUCH
ARE
SUCH
CONTENT
THE
THIRD
OTHER
COMPLY
AND
CONDITIONS
PARTY
SERVICE,
YOU
FURTHER
THAT
ARE
PROVIDERS
BYTHIRD
SONY
HASNOCONTROL.
PROVISION,
SIZE,
SOLE
PARTY
THIRD
PARTY.
WITH
PROVIDERS
CONTENT
ACKNOWLEDGE,
ACCESS,
THE
SERVICE
WHICH
INCLUDING
BROWSING,
SERVICES
PROVIDEDBYYOU,
YOU
ARE
BUT
PAYMENTOFANY
(SUCHASINTERNET
OR
AIRTIME
ACCESS
OF
ADVERTISEMENTS
WITH
OF
THE
THE
FEATURE
CHARGES)
AND
FOR
SERVICES.
BRAVIA®
AND
THE
LIMITEDORRESTRICTED
ON
THE
CAPABILITIES,
OR
TECHNICAL
YOUR
ITS
PARTY
INTERNET
AFFILIATES,
PROVIDERS
RESPONSIBILITY
DELETION,
TO
STORE
OR
PERSONALIZED
THE
SONY
MIS-DELIVERY,ORFAILURE
ANY
SOFTWARE
ACCOMPANYING
THE
SERVICES,
ARE
FURNISHEDTOYOU
AND
WITHOUT
CONDITIONS,
STATUTORY
OTHERWISE,OFANY
ITS
AFFILlATE~,
LICENSORS,
PROVIDERS
ALL
WARRANTIES
4
AND
EXPRESSLY
ACKNOWLEDGE,
THE
CONTENT
PROVIDEDBYTHIRD
AND/OR
PARTIES
QUALITY,
AND
AVAILABILITY
AND/OR
SOFTWARE
RESPONSIBILITY
PROVIDER
YOU
ANY
AND
ALL
THAT
MAY
THE
SET
AND/OR
UNDERSTAND,
AND
AGREE
AND
USAGE
REQUIRES
SOLELY
NOT
THIRD
INTERNET
RESPONSIBLE,
LIMITEDTOTHE
PARTY
SERVICE
FOR
DISPLAYORDELIVERY
INCLUDED
OPERATION
INTERNET
SERVICE
DEPENDING
BANDWIDTH
LIMITATIONS
SERVICE.
AND
ITS
THIRD
SHALL
FOR
USER
HAVE
THE
TIMELINESS,
COMMUNICATIONS
SETTINGS.
AND
DOCUMENTATION,
AND
THE
CONTENT
"AS
WARRANTIES
OR
KIND.
ITS
THIRD
ITS
PARTY
THIRD
DISCLAIM
AND
CONDITIONS,
AND
SOFTWARE
OVER
THE
OF
OF
OR
AGREE
TO
TERMS
THIRD
FOR
ITS
SOFTWARE.
THAT
OF
AND
FOR
FEES
PROVIDER
SUCH
VIDEO
MAY
BE
OF
SONY,
NO
IS"
OR
SONY,
PARTY
EXPRESSORIMPLIED,
BUT
NOT
LIMITEDTOTHE
INCLUDNG
IMPLIED
WARRANTIESOFNON-INFRINGEMENT,
TITLE,
FORAPARTICULAR
ITS
LICENSORS,
PROVIDERSDONOT
THAT
ACCOMPANYING
THE
WILL
THAT
SOFTWARE,
CONTENT
OR
SONY,
PARTY
PARTY
OR
CONDITIONS
OR
SONY
OR
CORRECTNESS,
OR
INFORMATIONORADVICE
SONY,
AUTHORIZED
SHALL
CONDITION,ORIN
THIS
CONDITION.
MEDIAONWHICH
FURNISHED,
SERVICES,ORTHE
DEFECTIVE,
SONY
ASSUME
NECESSARY
MERCHANTABILITY,
PURPOSE.
AFFILIATES,
ITS
AND
THIRD
ITS
AND
PARTY
THIRD
FITNESS
SONY,
PARTY
WARRANT
THE
SONY
SOFTWARE
OR
DOCUMENTATION,
SERVICES,ORTHE
MEET
THE
YOUR
OPERATIONOFTHE
THE
SERVICES,ORTHE
CONTENT
REQUIREMENTS
OR
SONY
WILLBEUNINTERRUPTED
ERROR
MAKE
THE
THE
FREE.
ITS
AFFILIATES,
LICENSORS,
PROVIDERSDONOT
ANY
RESULTSOFTHE
SOFTWARE,
FURTHERMORE,
ITS
THIRD
AND
ITS
THIRD
WARRANT
REPRESENTATIONS
REGARDING
THE
USE
USEOFTHE
THE
SERVICES
CONTENTINTERMSOFITS
ACCURACY,
RELIABILITY
OR
OTHERWISE.NOORALORWRITTEN
ITS
AFFILIATES,ORA
GIVEN
BY
SONY
REPRESENTATIVE
CREATEAWARRANTY
ANY
WAY
EXCLUSIONOFWARRANTY
SHOULD
THE
THE
SOFTWARE
DOCUMENTATION,
CONTENT
YOU
(AND
AUTHORIZED
THE
ENTIRE
NOT
REPRESENTATIVE)
COSTOFALL
SERVICING,
OR
CHANGE
AND
SOFTWARE,
IS
THE
PROVE
SONYORA
REPAIR,
OR
CORRECTION.
LIMITATIONOFLIABILITY
IN
NO
EVENT
BUT
NOT
ISSUES
LICENSORSORTHIRD
PROVIDERS),
THIRD
THIRD
TO
PARTY
PARTY
YOU
INCIDENTAL,
OR
CONSEQUENTIAL
KIND,
INCLUDING
WILL
LIMITEDTOANY
SONY
(INCLUDING
NEGLIGENCE
RELATEDTOTHIRD
PARTY
ITS
AFFILIATES,
LICENSORSORITS
PROVIDERSBELIABLE
FOR
ANY
SPECIAL,
PUNITIVE,
EXEMPLARY,
DAMAGESOFANY
BUT
NOT
PARTY
ITS
INDIRECT,
LIMITED
Page 49

TO
COMPENSATION,
OR
DAMAGESINCONNECTION
ARISING
THIS
LOSSOFUSEOFTHE
DOCUMENTATION,
CONTENT,
LOSSOFPRESENT
PROFITS,
OF
ANY
OTHER
ANY
EVENIFSONY,
THIRD
THIRD
ADVISEDOFTHE
DAMAGES.
ACCOMPANYING
THE
FURNISHEDTOYOU
OWN
THIRD
THIRD
LIABLE
ANY
OR
CONDITION,
NEGLIGENCE,
OTHER
SONY
CONTENT,
Some
exclusionsorlimitationsofincidental
or
consequential
or
limitationsofimplied
conditions,orallow
longanimplied
above
applytoyou.
LIMITED
In
situations
or
any
media,
of
ninety
deliverytoyou,
Sony
be
free
workmanship
limited
original
your
of
the
warranty.
OUTOFOR
EULA,
OTHER
SERVICES,
RISK.
EXPRESS
SOFTWARE,
jurisdictions
limitationsorexclusions
part
Softwareisfurnishedtoyou
exclusive
media
ON
DOWN
LOSSOFDATA,
KIND,
COMMERCIAL
PARTY
PARTY
PARTY
PARTY
FOR
LEGAL
Sony
(90)
from
warranty
licensee.
BUSINESS
REASON
ITS
LICENSORS,
PROVIDERS
THE
SONY,
LICENSORS,
PROVIDERS
DAMAGES
OR
STRICT
THEORY
OR
THIS
warranty
WARRANTY
where
thereofisfurnished
warrants
days
the
defectsinmaterials
under
remedy
not
ANY
IMPLIED
REIMBURSEMENT
WITH,
RELATING
ACCOUNTOFTHE
SONY
THE
SERVICES,
TIME
POSSIBILITYOFSUCH
SONY
DOCUMENTATION,
AND
BREACHOFCONTRACT,
damages,
extends
Sony's
meeting
AND
OR
PROSPECTIVE
INFORMATION
PROFITS,
LOSS,
WHATSOEVER,
AFFILIATES,
SOFTWARE
THE
CONTENT
FOR
USEATYOUR
ITS
AFFILIATES,
FOR
IMPLIED
LIABILITY
RELATEDTOTHE
THE
SERVICES,
EULA.
may
not
warranties
limitationsonhow
lasts,sothe
ON
MEDIA
the
Sony
that
foraperiod
from
the
mediaonwhich
normal
onlytoyouasthe
entire
will
be
Sony's
WARRANTIES
TO
PRODUCT,
YOUR
OR
FOR
ITS
OR
ITS
HAVE
AND
WILL
allow
exclusions
dateofits
use.
BEEN
AND
ITS
NOT
BREACH
WARRANTY
OR
or
may
Software
on
will
and
This
liability
replacement
limited
THE
TIME,
OR
ARE
ITS
BE
OF
ANY
THE
not·
the
and
OR
CONDITIONS
INCLUDING
AND
CONDITIONSOFMERCHANTABILITY,
TITLE,
FITNESS
ARE
(90)
SOME
LIMITATIONS
WARRANTY
THESE
TO
SPECIFIC
ALSO
FROM
FEES
Sony
the
accesstonew
ortoportionsofthe
or
In
charge
no
any
Services
Provider
pay
to
have
for
INTEllECTUAL
CLAIMSOFINTEllECTUAL
VIOLATIONS
Sony
rightsofothers,
do
discretionasappropriate,
and/or
Providersorusersofthe
may
copyrightsorother
rightsofSony,
or
of
to
for
such
for
rights.
are
international
NON-INFRINGEMENT,
FORAPARTICULAR
LIMITEDINDURATIONTONINETY
DAYS
YOU.
rightatany
Services,orthe
addition,
event
portionorallofthe
such
such
accesstopaid
which
the
infringeorrepeatedly'
others;
intellectual
Third
review
Third
protectionofintellectual
protectedbycopyright
FROM
JURISDICTIONS
LIMITATIONS
THIS
LEGAL
HAVE
JURISDICTIONTOJURISDICTION.
and
its
Third
fees
for
will
unless
obtain
charges.Ifyoudonot
charges,
such
respects
same.Itis
disable
and/or
Party
and
Party
The
Sony
ON
THE
MEDIA,
THE
IMPLIED
THE
ON
HOW
OR
CONDITION
WARRANTY
RIGHTS,
OTHER
Third
youbecharged
AND
the
the
property
Providers
action
copyright
RIGHTS
Party
timetocharge
Contentornew
existing
Servicesasa
Party
accesstotheir
Sony
your
prior
however,
ContentorServices
charges.
PROPERTYINOTICE
AGENT
intellectual
andweask
Sony's
ContentofThird
intellectual
its
Third
(b)toforward
Provider's
Software
WARRANTIES
AND/OR
DATEOFDELIVERY.
DO
NOT
LONGANIMPLIED
LASTS,
MAY
NOT
GIVES
AND
WHICH
Providers
Content
Providers
for
Content
and/oraThird
agreement
you
apply.
PROPERTY·
FOR
property
you
policy,atits
(a)toterminate
Services
infringe
Party
rights
per
treaties,aswell
Providers
violations
and
others
the
terms
procedures
property
and
laws
PURPOSE,
ALLOW
APPLY
YOU
fees
Services
whole.
Content.
access
and/or
consent
may
NOTICE
to
property
reports
Content
and
SO
YOU
MAY
VARY
reserve
for
may
In
to
the
Party
to
not
FOR
Party
who
the
of
5
Page 50

as
other
treaties.
logos,
likenesses,
Sony
Services.Bymaking
and
Sony
not
those
trademarks,
Any
Software,
violate
the
and
interestinandtothe
the
portions
licensors,
and/or
not
are
Party
Party
You
hereunder,
incurred
useofthe
who
ProductorAccount
User
the
Content
may
sell,ortransmit
from
or
to
any
photographs,
music,
for
purpose.Aslongasyou
the
a
nonexclusive,
righttouse
featuretoaccess
Contentasset
further
intellectual
There
service
Software,
Content
and
granting
proprietary
maybeproprietary
marks,
and
trade
the
availableonthe
the
Third
you
any
logos,
likenesses,ortrade
unauthorized
the
copyright
useofthe
Services,orthe
laws,
lawsofprivacy
criminal
Content,
Third
specifically
statutes.
and
thereof,
Third
Party
granted
any
are
Party
Providers.
reservedbySony,
Licensors,
suppliers
Providers.
are
responsible
including
from
access,
Servicesbyyouorby
use
the
Services
Account
Sony
not
section).
Software,
for
lawful
distribute,
purposes
anything
the
the
Content,
data,
Sony
Software,
including
text,
software,
images,
sound,
any
business,
termsofthis
video,
commercial,orpublic
EULA,
nontransferable,
the
BRAVIA®
the
forthinthis
agree
nottointerrupt/disrupt
property
trademarks,
names
Content,oron
the
Sony
Party
Providers
licensetoutilize
service
trademark
and
publicity,
All
Sony
and
all
ownedbySony,
Licensors,
under
its
licensors,
for
all
all
legal
browsing,
via
your
(as
definedinthe
You
the
Services,
exchange,
you
the
but
graphics,
messages,
comply
Sony
Services
attempttointerrupt/disrupt
of
the
Sony
Software,
Contentinany
way.
the
laws
and
foundinthe
the
Software
Services,
are
marks,
names.
Sony
Content
laws,
and
civil
right,
title,
Software
copies
and
and
or
its
suppliers·
All
rights
this
EULA
Third
and/or
your
Third
activities
liability
or
others
Sony
may
use
and
the
only.
You
modify,
may
copy
Services,
not
limited
likenesses,
audio,
and
tags,
with
grants
you
limited
Internet
EULA.
and
Video
the
You
or
the
operation
Serviceorthe
may
If
you
believe
inaway
infringement,orthat
property
violated,
Party
If
Party
is
Provider
you
are
Provider,orthe
Sony's,
Intellectual
with
the
notice:
(a)anelectronicorphysical
signatureofthe
actonbehalfofthe
intellectual
descriptionofthe
other
has
intellectual
been
particular
that
you
such
Service,
may
find
telephone
(e)astatementbyyou
good
is
faith
not
authorizedbythe
intellectual
or
the
law;
made
the
under
above
accurate
intellectual
to
actonthe
property
your
work
has
that
constitutes
copyright
your
rights
please
have
first
for
otherwise
contact
the
particular
unabletocontact
contentatissue
you
may
contact
Property
following
Agent
informationina
person
authorized
copyrightorother
property
interest;
copyrighted
property
infringed;
Service
(c)adescriptionofthe
and
where
claimisinfringingislocated
with
enough
the
material;
number,
and
(d)
e-mail
that
belief
that
the
disputed
copyright
property
and
owner,
(f)astatementbyyou,
penaltyofperjury,
informationinyour
and
that
you
are
property·ownerorauthorized
copyrightorintellectual
owner's
behalf.
Sony's
noticeofcopyrightorother
property
Intellectual
Electronics
Diego,CA92127;
9123;
INDEMNIFICATION
You
hold
directors,
providers,
affiliates,
and
"Indemnified
any
without
costs)
in
connection
right
infringementisas
Property
Inc.,
Agent,
16530
Via
Facsimile
E-MaiIIPagent@am.sony.com
agreetoindemnify,
harmless
Sony
officers,
licensors
content
indirect
providers,
parent(s)
Parties")
and
all
liability
limitation,
incurredbythe
with
defend,
and
allofits
employees,
and
licensees,
(collectively,
from
and
costs
attorneys'
Indemnified
any
claim
been
copied
intellectual
been
the
Third
Service.
such
Third
Sony'.s
(listed
below)
written
to
(b)
a
work
that
you
claim
the
material
detail
your
that
address,
address;
you
have
use
or
its
agent,
that
notice
the
copyright
agent
intellectual
follows:
c/o
Sony
Esprillo,
(858)
942-
and
agents,
information
and
direct
and
against
(including,
fees
and
Parties
arising
or
on
we
a
is
or
for
San
6
Page 51

,
out
of
(i)
any
breachoralleged
by
youofthis
any
information
hereunder,
breachbyyouofa
any
damage
been
causedbyyoutothe
the
Services,orthe
select
for
EULAinany
you
submittoSony
(iii)
any
breachoralleged
third
causedbyor
Content.
defenseorsettlementofa
mustbeconsentedtoby
IndemnifiedParty(s)
being
and/or
your
reasonably
engagedtorepresent
Indemnified
counsel
will
requiredbythe
priortocounsel
Party(s).
cooperateasfully
party's
Sony
breach
manner,
rights,
allegedtohave
Sony
Software,
Counsel
and/or,
you
and
You
and
Indemnified
Party(s)indefenseorsettlementofany
claim.
reserve
to
'settlement,
otherwise
you.
to
or
interestofSonyorany
without
and/orIndemnifie.d
AUTOMATIC
Sony
the
right,atits
assume
the
and
subjecttoindemnification
You
shall
any
judgment,
lien,orany
the
prior
and/or
Indemnified
exclusive
controlofany
notinany
settlement,
other
act
written
Party(
UPDATE
FEATURE
Party(s)
own
expense,
defense
or
matter
event
consent
attachment,
adversetothe
Indemnified
consentofSony
s).
/
MODIFICATIONOFEUlAASTO
SERVICES
From
,modify
correction,
and
Such
changeordelete
or
including
You
occuratSony's
Sony
,
the
installationoracceptanceofsuch
or
change,orremove
conditionofthe
Sony
Contentatany
to
or
timetotime,
may
automatically
the
but
not
limited
Sony
Sonyorthird
updateorotherwise
Software,
to,
for
improvementoffeatures,
enhancementofsecurity
updatesormodifications
the
other
aspectsofthe
features
hereby
agree
you
that
sole
may
condition
Sony
Software
modifications.
upon
Sony
any
EULAasit
Software,
the
time
you.
Any
such
additions,
removalsorany
terms
parties
for
example,
purposesoferror
features.
may
natureoffeatures
Sony
may
such
discretion
continued
Software,
rely
activities
your
upon.
and
use
complete
update
may
add
to,
part,
term,
or
appliestothe
Services,
without
and/or
prior
notice
changes,
postedinthe
of
(ii)
(iv)
you
claim
Sony
as
by
Party
may
that
the
BRAVIA®
as
soonasthey
to
ac.cess
Services,
Content
your
ADD,
OR
SUSPEND
OR
THE
TEMPORARILY
AT
ANY
AND
PREJUDICETOANY
SONY
THIS
THE
CONTENT,
IMMEDIATELY
FAILTOCOMPLY
CONDITIONSOFTHIS
take
to
prevent
this
immediate
to
the
discretion
HIGH
The
is
not
for
useorresaleason-line
Internet
Videofeature
are
the
Services,
the
Content,
aftersoposted,
acceptance
CHANGE,
thereto.
DISCONTINUE,
ANYOFTHE
SONY
CONTENT
OR
TIME,
WITHOUT
MAY
WITHOUT
LIABILITY.
SUSPEND
EULAASTO
SONY
CONTENT
AND/OR
UPON
WITH
any
legal
and
technical
violationofand/ortoenforce
EULA,
including,
terminationofyour
Services,ifSony
that
you
RISK
ACTIVITIES
Sony
Softwareisnot
designed,
manufacturedorintended
posted.Bycontinuing
and/or
PERMANENTLY,
OTHER
OR
THE
SERVICES,
THE
NOTICEIFYOU
EULA.
without
are
violating
equipmentinhazardous
requiring
asinthe
aircraft
systems,
support
in
which
could
severe
("High
THE
EACHOFTHEIR
SPECIFICALLY
OR
IMPLIED
OF
FITNESS
RESTRICTIONS
ENCRYPTION
The
may
acknowledge
Softwareorthe
encryption
fail-safe
performance,
operationofnuclear
navigationorcommunication
air
traffic
control,
machines,orweapons
the
failureofthe
leadtodeath,
personal
physicalorenvironmental
Risk
Activities").
THIRD
PARTY
LICENSORS,
RESPECTIVE
DISCLAIM
WARRANTY
FOR
HIGH
ON
EXPORT
TECHNOLOGY
Sony
Software
contain
and
encryption
that
any
exportofSony
Content
technology
from
shall
the
Sony
you
SONY
Content
the
Sony
are
indicating
MAY
REMOVE,
SERVICES
SERVICES,
NOTICE
WITHOUT
RIGHTS,
TERMINATE
SERVICES,
THE
SONY
THE
CONTENT
TERMS
Sony
remedies
limitation,
access
believesinits
this
fault-tolerant
control
environments
such
facilities,
direct
life
systems,
Sony
Software
injury,
damage
SONY,
EACH
AND
AFFILIATES
ANY
EXPRESS
OR
CONDITION
RISK
ACTIVITIES.
OF
the
Content
technology.
containing
the
United
apply
AND
may
-
EULA.
and
or
OF
You
7
Page 52

StatesorsUbsequent
softwarebya
of
the
United
or
other
person
States
authorization
DepartmentofCommerce's
of
Industry
acknowledge
Content
and
acquired
for
usebya
By
accepting
and
Security.
that
containing
from
foreign
this
agreetoabidebyall
laws
and
regulationsinthe
useofthe
including
regulations
of
cryptographic
or
authorize
Softwareorthe
Sony
but
not
relatingtothe
the
Contenttoa
re-exportofsuch
located
outside
requiresalicense,
from
the
Bureau
You
further
the
Sony
Softwareorthe
encryption
Sonyisnot
government
license
agreement,
relevant
U.S.
purchase
product
being
limitedtothose
export
items
and
nottotransfer,
transfer,ofthe
prohibited
U.S.
technology·
intended
end
export
acquired,
control
Sony
countryorotherwiseinviolationofany
such
restrictionsorregulations.
US
GOVERNMENT
The
Sony
Softwareisprovided
RESTRICTED
or
disclosurebythe
RESTRICTED
RIGHTS.
United
Use,
duplication
States
RIGHTS
with
Governmentissubjecttorestrictions
.asset
and
Software
subparagraph
Technical
clauseatDOD
any
laworregulation.
Electronics
forthinsubparagraphs
(c)(2)ofthe
clauseatFAR
Commercial
52.227
(c)(i)(ii)ofthe
Data
and
Computer
FAR
252.227-7013
comparable
federal,
stateorlocal
ManufacturerisSony
Inc.,
16530
Via
(c)(1)
Computer
19,
Rights
Software
and
Esprillo,
Diego,CA92127.
JURY
THE
JURY
ARISING
EULA.
with
commenced
claimorcauseofaction
ENTIRE
TRIAL
PARTIES
WITH
WAIVER
HERETO
RESPECTTOANY
UNDER
Any
causeofaction
respecttothe
within
AGREEMENT,
WAIVE
TRIAL
MAnERS
OR
RELATINGTOTHIS
you
may
Services
one
(1)
must
year
after
arises.
NOTICE,
WAIVER,
be
SEVERABILITY
This
EULA,
accompanying
then-current
additional
the
Services,
agreement
8
the
limited
the
privacy
terms
and
together
between
warranty
Sony
Product,
policy,
conditions
constitute
you
and
and
Sony·
Sony's
any
posted
the
with
user.
you
and
.
and
in
San
BY
have
the
entire
on
respecttothe
Software,
Any
noticebySony
madebyletter,
Services.
or
enforce
EULA
shall
Sony
Product,
the
Services,
hereunder
e-mail,orpostingonthe
The
failureofSonytoexercise
any
rightorprovisionofthis
not
constituteawaiverofsuch
rightorprovision.Ifany
is
held
invalid,
that
provision
maximum
maintain
other
parts
the
illegal,orunenforceable,
shallbeenforcedtothe
extent
permissiblesoas
intentofthis
will
remaininfull
effect.
THIRD
Each
Party
third-party
the
this
service,
such
EXCLUDED
Excluded
Productisnot
Please
entitled
SOFTWARE
a
and
Excluded
PARTY
Third
BENEFICIARIES
Party
Providerisan
beneficiary
righttoenforce,
EULA
with
and
content,asapplicable,
party.
SOFTWARE
Software
subjecttothis
refertothe
"N01ICES
USEDINTHIS
listofthe
applicable
conditions
Software.
Licensor
express
of,
each
respecttothe
includedinthe
sectionofthis
AND
software
governing
TERM
This
EULAiseffective
Sony
may
terminate
immediatelyifyou
termsbygiving
you
must
and
accompanying
all
copies
addition,
no
recourse
its
Third
Party
the
Sony
destroy
you
upon
Party
Providers
Softwareorthe
documentation,
you
have
termination
against
Licensors,orits
for
the
until
this
failtocomply
notice.Insuch
the
Sony
documentation,
madeofthem.
Sony,
your
Services,orthe
Content.
Should
concerning
you
have
this
any
questions
EULA,
you
SonybywritingtoSony
16530
92127
Via
Esprillo,
U.S.A.
San
the
Sony
and
the
Content.
may
be
partofthis
to
EULA,
and
and
force
each
and
Third
intended
and
shall
have
provision
of
software,
of
Sony
EULA.
booklet
LICENSES
FOR
PRODUCT"
and
terms
the
useofsuch
terminated.
EULA
with
event,
Software
and
In
you
will
have
its
affiliates,
Third
inabilitytouse
accompanying
may
contact
Electronics
Diego,
Inc.
California
EULA
the
for
its
Page 53

NOTICES
AND
LICENSES
FOR
SOFTWARE
USEDINTHIS
PRODUCT
GPLIlGPL
The
following
are
usedinthis
LGPL
License
documentation:
Package
linux-kernel
gcc-for-dev
alsa-lib
busybox
directfb
dosfstools
fuse
glib
glibc-for-dev
iptables
libmicrohttpd
pump-autoip
Iibjs
exceptionmonitor
crypto
cairo
pango
WebCore
JavaScriptCore
Linux
Video
iconv
Source
as
obtained
http://www.sony.net/Prod
==========================================
Copyright
Inc.,51Franklin
02110-1301,
distribute
but
list:
UVC
for
Linux
code
for
wellasother
using
GNU
(C)
1989,
USA.
verbatim
changingitis
LICENSED
GPL
executables
product
Agreements
Two
these
executables
the
GENERAL
and
(V4L2)
executables
following
Version2,June
1991
Street,
Fifth
Everyoneispermittedtocopy
copiesofthis
not
allowed.
SOFTWARE
and
LGPL
are
subjecttothe
includedaspartofthis
and
and
libraries,
link:
ucts/Linuxl
PUBLIC
LICENSE
1991
Free
Software
Floor,
Boston,
license
libraries
GPU
libraries,
can
be
Foundation,
MA
document,
and
Preamble
The
licenses
take
away
contrast,
to
guarantee
software--to
users.
of
the
any
other
it.
(Some
coveredbythe
instead.)
Whenwespeakoffree
freedom,
designedtomake
distribute
for
your
the
GNU
your
make
This
General
Free
Software
program
other
GNU
You
can
not
price.
copiesoffree
most
software
freedomtoshare
General
freedomtoshare
sure
the
Public
Foundation's
whose
Free
Software
Library
applyitto
software,weare
Our
General
sure
that
software
are
Public
softwareisfree
License
authors
Foundation
General
your
you
designed
and
Licenseisintended
and
appliestomost
software
committousing
Public
programs,
Public
have
the
(and
change
change
for
and
software
License
too.
referring
Licenses
freedom
charge
to
it.
for
By
free
all
to
are
its
is
to
to
this
serviceifyou
or
can
softwareoruse
and
that
To
protect
that
forbid
ask
youtosurrender
translatetocertain
distribute
For
example,ifyou
program,
the
recipients
make
sure
source
so
they
We
protect
the
software,
gives
you
modify
Also,
for
to
make
isnowarranty
is
modifiedbysomeone
its
recipientstoknow
original,sothat
will
not
Finally,
by
software
that
redistributorsofa
obtain
patent
proprietary.Toprevent
that
any
useornot
The
precise
distribution
GNU
CONDITIONS
O.
This
which
containsanotice
holder
sayingitmaybedistributed
of
this
General
below,
a
Programorany
thatisto
portionofit,
and/or
translationisincluded
"modification".)
Activities
modification
are
is
is
referstoany
"work
translated
outside
not
restricted,
covered
wish),
getitif
any
License
you
want
piecesofitinnew
you
know
you
your
rights,weneedtomake
anyonetodeny
responsibilities
copiesofthe
distribute
whether
that
code.
know
your
legal
the
software.
each
certain
reflectonthe
free
patent
licensedatall.
GENERAL
basedonthe
say,awork
other
its
onlyifits
gratisorforafee,
all
the
they,
And
you
their
rights.
rights
and
(2)
permissiontocopy,
author's
that
everyone
for
this
any
problems
programisthreatened
patents.Wewishtoavoid
licenses,ineffect
mustbelicensed
terms
and
and
modification
PUBLIC
FOR
COPYING,
MODIFICATION
appliestoany
Public
such
derivative
either
verbatimorwith
into
Each
than
copying,
are
not
coveredbythis
scope.
and
the
contents
that
you
receive
it,
that
cand6these
you
the
rights.
software,orif
copiesofsuch
rights
that
too,
receiveorcan
must
show
with
two
ofter
you
protection
understands
free
software.Ifthe
else
and
that
what
original
conditions
License.
Program"
containing
another
without
licenseeisaddressedas"you".
The
authors'
free
program
this,wehave
follow.
LICENSE
programorother
placedbythe
programorwork,
work
language.
limitationinthe
distribution
actofrunning
output
constituteawork
source
you
can
free
things.
these
rightsorto
These
for
you
you
have.
them
steps:
this
license
distribute
and
passed
they
haveisnot
introducedbyothers
will
making
madeitclear
for
everyone's
for
copying,
TERMS
DISTRIBUTION
under
The
"Program",
means
under
the
Programora
modifications
License;
from
the
code
change
programs;
restrictions
youifyou
you
get
these
(1)
ours,wewant
reputations.
constantly
the
the
copyright
either
copyright
the
restrictions
modify
a
must
give
You
must
the
terms
copyright
which
and/or
that
there
software
on,wewant
the
danger
individually
program
free
AND
AND
work
the
terms
and
the
law:
(Hereinafter,
term
and
they
the
Program
Program
.
it.
9
Page 54

basedonthe
madebyrunning
dependsonwhat
1.
You
of
the
Program's
any
medium,
appropriately
copyright
intact
all
to
the
absenceofany
recipientsofthe
along
with
You
may
transferringacopy,
warranty
2.
You
Programorany
basedonthe
modificationsorwork
1
above,
conditions:
a)
You
prominent
and
the
b)
You
publish,
from
the
asawholeatno'
termsofthis
Program
the
the
may
copy
and
source
provided
publishoneach
notice
and
the
notices
Programacopyofthis
the
Program.
chargeafee
protectioninexchange
may
modify
provided
must
notices
dateofany
must
thatinwholeorin
Programorany
your
portionofit,
Program,
that
cause
stating
cause
chargetoall
License.
(independentofhaving
Program).
Program
distribute
codeasyou
that
disclaimerofwarranty;
that
warranty;
for
and
you
copyorcopiesofthe
and
under
you
the
modified
change.
any
work
Whether
does.
verbatim
receive
you
conspicuously
copyanappropriate
refertothis
the
physical
mayatyour
thus
copy
the
also
that
that
part
part
thereof,tobe
third
License
and
give
act
forafee.
formingawork
and
distribute
termsofSection
meet
allofthese
fil~s
to
you
changed
you
distribute
containsoris
parties
been
thatistrue
copies
it,
in
and
keep
and
any
other
License
of
option
offer
such
carry
the
files
derived
licensed
under
or
the
the
Program.
In
addition,
basedonthe
a
work
storageordistribution
other
3.
You
work
executable
above
a)
Accompanyitwith
machine-readable
distributed
aboveona
interchange;
b)
Accompanyitwithawritten
three
more
distribution,acomplete
the
corresponding
under
medium
or,
e)
Accompanyitwith
receivedasto
source
noncommercial
the
programinobject
suchanoffer,inaccord
mere
aggregationofanother
Program
basedonthe
work
under
may
copy
basedonit,
form
provided
under
medium
or,
years,togive
than
your
the
termsofSections1and2aboveona
customarily
code.
(This
Program)ona
the
scopeofthis
and
distribute
under
under
that
you
the
source
the
termsofSections1and
customarily
any
costofphysically
source
used
the
the
offertodistribute
alternativeisallowed
distribution
codeorexecutable
work
wjth
the
Program
medium
Section2)in
the
third
machine-readable
with
does
the
termsofSections1and
alsodooneofthe
complete
code,
which
used
offer,
party,
code,tobe
for
software
information
and
onlyifyou
Subsectionbabove.)
(or
volumeofa
not
bring
License.
Program
object
corresponding
must
for
valid
foracharge
performing
distributed
interchange;
you
corresponding
only
not
with
the
(or
a
code
following:
be
2
software
foratleast
no
source
copy
of
for
received
form
with
or
2
e)
If
the
modified
commands
it,
when
started
in
the
most
announcement
notice
andanotice
else,
saying
users
may
redistribute
conditions,
of
this
License.
is
interactive
announcement,
not
requiredtoprintanannouncement.)
These
requirements
a
whole.Ifidentifiable
derived
considered
themselves,
applytothose
separate
sectionsaspartofa
the
on
other
to
Thus,itis
or
rather,
distributionofderivativeorcollective
from
works.
Program,
the
termsofthis
licensees
each
and
contest
the
not
your
intentisto
program
interactively
running
ordinary
includinganappropriate
that
that
you
and
telling
(Exception:ifthe
but
does
your
the
Program,
independent
then
this
sections
But
the
distributionofthe
extendtothe
every
part
the
intentofthis
rightstowork
normally
when
run,
for
such
way,toprintordisplay
thereisno
provideawarranty)
the
program
the
user
not
normally
work
basedonthe
applytothe
sectionsofthat
and
and
separate
License,
when
whole
License,
regardlessofwho
exercise
when
you
whichisa
and
you
whose
entire
written
you
interactive
warranty
howtoviewacopy
Program
modified
canbereasonably
its
distribute
distribute
sectiontoclaim
the
righttocontrol
reads
must
cause
use
an
copyright
(or
and
that
under
these
itself
print
such
an
Program
work
work
are
works
in
terms,donot
them
the
same
work
based
whole
must
permissions
whole,
and
wrote
entirelybyyou;
works
based
is
as
not
as
on
be
for
thus
it.
rights
the
The
source
formofthe
an
executable
the
source
associated
usedtocontrol
executable.
source
thatisnormally
binary
kernel,
the
executable
accompanies
If
distributionof-executableorobject
by
offering
then
code
the
source
compelledtocopy
code.
4.
You
distribute
under
m.odify,
and
this
copies,orrights,
not
have
on
parties
code
for a
work
work
for
making
work,
complete
code
for
all
interface
However,asa
code
distributed
form)
with
andsoon)ofthe
accesstocopy
offering
from
will
License.
equivalent
the
code,
may
not
the
this
License.
sublicenseordistribute
automatically
their
remaininfull
definition
compilation
distributed
the
major
runs,
unless
the
executable.
same
place
even
the
copy,
modify,
Program
Any
However,
from
licenses
compliance.
though
terminate
means
modulesitcontains,
special
need
(in
operating
fromadesignated
accesstocopy
countsasdistribution
source
exceptasexpressly
attempt
parties
you
under
terminatedsolongassuch
the
preferred
modificationstoit.
source
files,
and
not
components
that
third
along
sublicense,
code
means
plus
plus
the
installationofthe
exception,
include
either
component
otherwisetocopy,
the
your
who
anything
source
(compiler,
systemonwhich
codeismade
the
source
parties
have
this
are
with
the
or
provided
Programisvoid,
rights
received
License
scripts
the
or
itself
place,
not
object
under
will
For
all
any
of
10
Page 55

5.
You
are
not
requiredtoaccept
you
have
not
signed
it.
However,
you
permissiontomodify
or
its
derivative
by
lawifyoudonot
by
modifyingordistributing
work
basedonthe
acceptanceofthis
and
conditions
the
Programorworks
6.
Each
time
any
work
automatically
licensortocopy,
subjecttothese
impose
any
exerciseofthe
responsible
to
this
License.
7.
If,asa
allegationofpatent
reason
(not
imposedonyou
or
otherwise)
License,
of
this
License.Ifyou
satisfy
simultaneously
License
and
consequence'you
all.
For
example,ifa
royalty-free
who
receive
then
the
only
License
of
If
wouldbeto
the
Program.
any
portionofthis
unenforceable
the
balanceofthe
the
sectionasa
circumstances.Itis
induce
right
this
youtoinfringe
claimsorto
section
integrityofthe
works.
These
accept
Program),
Licensetodo
for
copying,
basedonit.
you
redistribute
basedonthe
Program),
receivesalicense
distributeormodify
terms
and
further
for
restrictionsonthe
rights
granted
enforcing
compliancebythird
consequenceofa
infringementorfor
limitedtopatent
(whetherbycourt
that
contradict
theydonot
excuse
cannot
your
any
other
pertinent
may
not
patent
redistributionofthe
copies
directlyorindirectly
way
you
could
refrain
sectionisheld
under
any
particular
sectionisintendedtoapply
wholeisintendedtoapplyinother
not
the
any
has
contest
the
free
validityofany
sole
purposeofprotecting
software
whichisimplementedbypublic
Many
people
have
made
generous
the
wide
rangeofsoftware
systeminrelianceonconsistent
system;itisupto
the
author/donortodecideifhe
sheiswillingtodistribute
system
This
andalicensee
cannot
sectionisintendedtomake
this
License,
nothing
or
dist~ibute
actions
this
License.
the
you
the
are
Program
indicate
so,
and
Therefore,
all
distributingormodifying
the
Program
the
recipient,
.from
the
the
conditions.
You
recipients'
herein.
court
You
judgment
any
issues),
conditions
order,
the
conditionsofthis
you
from
the
distributesoas
obligations
under
obligations,
distribute
license
the
would
Program
Programbyall
through
satisfy
entirely
bothitand
from
invalid
circumstance
purposeofthis
patentsorother
such
distribution
license
system,
practices.
contributions
distributed
through
applicationofthat
software
through
impose
that
thoroughly
whatisbelievedtobeaconsequenceofthe
this
License.
8.Ifthe
restrictedincertain
copyrighted
who
addanexplicit
excluding
distribution
places
those
and/or
countries
interfaces,
the
Program
geographical
countries,sothat
useofthe
eitherbypatentsorby
the
original
under
this
copyright
License
distribution
distribution
Program
limitation
since
else
grants
Prowam
prohibited
(or
any
your
its
terms
(or
original
Program
may
not
are
not
parties
or
other
are
agreement
conditions
to
this
thenasa
at
not
permit
those
you,
this
distribution
or
L
and
section
property
claims;
the
to
that
or
any
other
choice.
clear
rest
of
is
holder
may
is
permitted
excluded.Insuch
limitationasif
9.
The
and/or
from
in
spirittothe
detailtoaddress
Each
number.Ifthe
of
this
version",
and
version
If
the
of
this
publishedbythe
10.Ifyou
into
conditions
permission.
Free
onlyinor
among
case,
this
writteninthe
Free
Software
new
versionsofthe
timetotime.
Such
present
new
Foundation
new
version,
problemsorconcerns.
versionisgivenadistinguishing
License
you
conditions
Program
which
have
eitherofthat
specifiesaversion number
appliestoit
the
optionoffollowing
publishedbythe
Program
License,
does
you
Free
not
specifyaversion
may
choose
Software
wishtoincorporate
other
free
programs
are
For
Software
different,
software
Foundation,
writetothe
Foundation;wesometimes
this.
Our
decision
preserving
software
software
NO
andofpromoting
generally.
WARRANTY
BECAUSE
CHARGE,
PROGRAM,TOTHE
APPLICABLE
STATEDINWRITING
AND/OR
"AS
EITHER
BUT
OF
PARTICULAR
to
TO
OTHER
IS~'
WITHOUT
EXPRESSEDORIMPLIED,
NOT
LIMITED
MERCHANTABILITY
THE
QUALITY
PROGRAMISWITH
PROVE
DEFECTIVE,
NECESSARY
INNOEVENT
LAWORAGREEDTOIN
COPYRIGHT
WHO
MAY
THE
THEREISNO
MODIFY
willbeguidedbythe
the
free
statusofall
PROGRAMISLICENSED
WARRANTY
EXTENT
LAW.
EXCEPT
THE
PARTIES
WARRANTYOFANY
TO,
THE
AND
PURPOSE.
AND
PERFORMANCEOFTHE
YOU.
YOU
SERVICING,
UNLESS
REQUIREDBYAPPLICABLE
WRITING
HOLDER,ORANY
AND/OR
PROGRAMASPERMITIED
YOU
FOR
DAMAGES,
SPECIAL,
INCIDENTALORCONSEQUENTIAL
DAMAGES
TO
USE
THE
ARISING
PROGRAM
INCLUDING
OUTOFTHE
(INCLUDING
LIMITEDTOLOSSOFDATAORDATA
RENDERED
BY
YOUORTHIRD
THE
PROGRAMTOOPERATE
PROGRAMS),
PARTY
SUCH
INACCURATEORLOSSES
PARTIESORA
EVENIFSUCH
HAS
BEEN
ADVISEDOFTHE
DAMAGES.
countries
License
bodyofthis
General
versions
incorporates
may
Public
but
may
not
thus
License.
publish
revised
License
willbesimilar
differ
in
the
version
and
"any
later
the
terms
versionorof
Free
Software
any
later
Foundation.
number
any
version
ever
Foundation.
partsofthe
whose
distribution
Program
authortoask
for
whichiscopyrightedbythe
writetothe
make
the
sharing
PERMITIED
WHEN
COPYRIGHT
PROVIDE
Free
Software
exceptions
two
for
goals
derivativesofour
and
reuse
FREE
OF
FOR
THE
BY
OTHERWISE
HOLDERS
THE
PROGRAM
of
free
of
KIND,
INCLUDING,
IMPLIED
FITNESS
THE
ENTIRE
SHOULD
ASSUME
WARRANTIES
FOR
A
RISK
AS
THE
PROGRAM
THE
COSTOFALL
REPAIRORCORRECTION.
WILL
ANY
OTHER
REDISTRIBUTE
ABOVE,BELIABLE
PARTY
ANY
GENERAL,
THE
TO
USEORINABILITY
BUT
NOT
BEING
SUSTAINED
WITH
FAILURE
ANY
OF
OTHER
HOLDEROROTHER
POSSIBILITY
OF
11
Page 56

ENDOFTERMS
HowtoApply
If
you
developanew
of
the
greatest
waytoachieve
everyone
terms.
Todoso,
Itissafesttoattach
source
of
"copyright"
is
ideaofwhatitdoes.>
of
This
and/or
Public
Foundation;
your
This
be
even
FITNESS
GNU
You
Public
.tothe
Also
electronic
filetomost
warranty;
found.
<one
linetogive
author>
programisfree
modifyitunder
Licenseaspublishedbythe
option)
programisdistributedinthe
useful,
the
implied
General
should
License
Free
Street,
If
notice
Gnomovision
author
WARRANTY;
Thisisfree
redistributeitunder
for
The
should
asaprogrammer)oryour
Fifth
add
informationonhowtocontact
the
programisinteractive,
like
Gnomovision
details.
hypothetical
show
Public
License.Ofcourse,
maybecalled
'show
c';
items--whatever
You
should
"copyright
Hereisa
Yoyodyne,
interestinthe
passesatcompilers)
<signatureofTy
Ty
Coon,
This
General
incorporating
programs.Ifyour
AND
These
TermstoYour
program,
possible
thisisto
can
redistribute
attach
the
following
themtothe
effectively
and
each
line
andapointertowhere
the
software;
either
version2of
any
later
but
WITHOUT
warrantyofMERCHANTABILITY
FORAPARTICULAR
Public
License
have
receivedacopyofthe
along
Software
Floor,
and
this
for
software,
the
they
also
disclaimer"
sample;
Inc.,
PresidentofVice
Public
Foundation,
Boston,MA02110-1301,
paper
mail.
whenitstartsinan
version
comes
details
certain
commands
appropriate
something
could
evenbemouse-clicksormenu
suits
get
your
alter
hereby
program
Coon>,1April
License
your
program
programisa
CONDITIONS
New
and
you
usetothe
makeitfree
and
file
should
program's
Copyright
the
termsofthe
version.
ANY
with
this
69,
Copyright
type
and
you
the
other
your
employer
school,ifany,tosign
for
the
the
names:
disclaims
'Gnomovision'
writtenbyJames
public,
software
change
noticestothe
startofeach
convey
haveatleast
name
(C)
<year>
you
can
Free
the
License,or(at
hope
WARRANTY;
PURPOSE.
for
more
program;ifnot,
Inc.,51Franklin
makeitoutputashort
interactive
(C)
with
ABSOLUTELY
'show
w'.
are
welcome
conditions;
'showw'and
partsofthe
commands
than
'showw'and
program.
(if
program,ifnecessary.
all
copyright
1989
does
not
into
proprietary
subroutine
Programs
wantitto
the
best
under
these
program.
the
exclusion
the
full
andabrief
<name
redistribute
GNU
General
Software
thatitwill
without
See
details.
GNU
General
USA.
you
by
year
name
to
type
'show
'show
General
you
you
work
(which
Hacker.
permit
library,
be
which
the
notice
or
the
write
mode:
NO
c'
.
use
a
makes
you
may
consideritmore
proprietary
what
Public
==========================================
you
wanttodo,
License
GNU
applications
insteadofthis
LESSER
Version
Copyright
Inc.51Franklin
02110-1301,
distribute
but
[Thisisthe
It
also
Public
2.1.]
it
(C)
1991,
USA.
verbatim
changingitis
first
countsasthe
License,
Street.
not
released
version2,hence
usefultopermit
with
the
library.Ifthisis
use
the
GNU
Library
License.
GENERAL
2.1,
1999
Everyoneispermittedtocopy
copiesofthis
allowed.
successorofthe
PUBLIC
February
Free
Software
Fifth
Floor,
versionofthe
the
LICENSE
1999
Foundation,
Boston,
license
Lesser
GNU
version
Preamble
The
licenses
take
away
By
contrast,
intendedtoguarantee
change
free
for
This
license,
appliestosome
packages-typically
Foundation
You
can
carefully
General
any
particular
Whenwespeakoffree
to
freedomofuse,
Licenses
of
the
freedomtodistribute
charge
source
change
c'
programs;
these
To
protect
that
forbid
ask
youtosurrender
translatetocertain
distribute
For
example,ifyou
whether
recipients
must
the
source
library,
the
recipients,sothat
the
library
recompiling
so
they
We
protect
we
copyright
license,
for
most
your
freedomtoshare
the
GNU
free
software-to
all
its
users.
the
Lesser
specially
libraries--of
and
other
useittoo,
about
Public
are
for
this
codeorcan
the
software
and
things.
your
distributorstodeny
copiesofthe
gratisorforafee,
all
make
code.Ifyou
you
after
know
which
butwesuggest
whether
Licenseisthe
case,
not
designedtomake
serviceifyou
that
rights,weneedtomake
responsibilities
the
rights
sure
that
must
provide
making
it.
And
their
rights.
your
rights
the
library,
gives
software
General
your
authors
basedonthe
software,weare
price.
getitif
and
you
these
distribute
thatwegave
they,
they
you
withatwo-step
you
are
Public
freedomtoshare
make
sure
General
designated
the
who
this
licenseorthe
better
Our
sure
copiesoffree
wish);
you
use
piecesofitinnew
are
informed
rights.
libraryorif
copiesofthe
you
too,
link
other
complete
can
changestothe
must
show
and
(2)weoffer
legal
permissiontocopy,
designed
and
change
Licenses
the
software
Public
License,
software
Free
Software
decidetouse
you
first
strategytouse
explanations
referring
General
that
software
that
you
want
it;
that
that
you
these
These
for
youifyou
you
modify
must
give
you.
receiveorcan
code
with
object
rei
ink
them
library
them
method:
linking
General
MA
and
document,
GPL.
Library
number
to
it.
are
and
is
it.
think
ordinary
below.
Public
you
have
(and
receive
you
can
free
you
can
restrictions
rightsorto
restrictions
it.
library,
the
You
get
the
files
to
with
and
these
terms
(1)
you
this
in
do
12
Page 57

distribute
To
clear
Also,ifthe
passed
haveisnot
author's
that
Finally,
existenceofany
thatacompany
a
free
a
patent
license
consistent
this
Most
coveredbythe
This
appliestocertain
different
We
permit
protect
that
and/or
thereisno
modify
each
distributor,wewant
warranty
the
libraryismodifiedbysomeone
on,
the
recipients
the
original
reputation
should
version,sothat
will
notbeaffectedbyproblems
mightbeintroducedbyothers.
software
patents
free
cannot
poseaconstant
program.Wewishtomake
effectively
programbyobtainingarestrictive
holder.
obtained
Therefore,weinsist
foraversionofthe
with
the
full
freedomofuse
license.
GNU
software,
license,
the
including
ordinary
GNU
Lesser
GNU
designated
from
the
ordinary
use
this
license
linking
those
for
certain
libraries
Whenaprogramislinked
staticallyorusingashared
of
the
twoislegally
derivativeofthe
Public
License
if
the
entire
combination
The
Lesser
General
criteria
We
License
freedom
It
for
call
this
becauseitdoes
than
also
provides
linking
license
ofanadvantage
These
disadvantages
ordinary
However,
certain
For
special
ofacertain
General
the
special
example,onrare
needtoencourage
library,sothatitbecomesade-facto
standard.Toachieve
be
allowedtouse
thatafree
non-free
by
limiting
we
In
other
in
non-free
of
peopletousealarge
example,
non-free
use
variant,
Although
library
libraries.Inthis
the
use
the
Lesser
cases,
programs
permissiontouse
programs
the
whole
the
GNUILinux
the
protectiveofthe
speakingacombined
original
therefore
library.
permits
fits
Public
other
code
the
"Lesser"
Lesstoprotect
the
ordinary
other
free
over
competing
are
the
Public
License
Lesser
license
circumstances.
occasions,
this,
non-free
the
library.Amore
does
the
case,
free
librarytofree
General
permissiontouseaparticular
enablesagreater
bodyoffree
enables
GNU
operating
operating
Lesser
General
users'
freedom,itdoes
library.
to
ma~e
for
the
free
know
that
the
threattothe
restrict
the
license
that
any
library
specified
some
libraries,
General
General
libraries,
General
Public
Public
a~d
Public
librariesinorder
into
non-free
withalibrary,
library,
whether
the
combination
work,
The
ordinary
such
linking
its
criteriaoffreedom.
License
with
General
permits
the
library.
Public
the
General
software
Public
developers
non-free
License.
programs.
reasonweuse
for
many
libraries.
provides
the
widest
advantages
there
possible
maybea
programs
frequent
same
jobaswidely
thereislittletogain
software
Public
License.
number
software.
the
GNUCLibrary
many
more
people
system,aswellasits
system.
Public
LicenseisLess
ensure
it
very
library.
else
and
w~~t
they
ongmal
sure
users
from
patent
must
be
in
is
License.
License,
i~
quite
License.
to
programs.
a
General
only
more
lax
user's
Less
the
in
use
must
case
used
only,
so
library
For
in
to
that
the
userofa
has
the
program
The
precise
distribution
attentiontothe
on
the
The
former
whereas
in
ordertorun.
of
GNU
AND
O.
This
libraryorother
placedbythe
party
this
Lesser
License").
A
"library"
and/or
with
application
functions
The
"Library",
libraryorwork
these
either
copyright
Libraryora
modifications
another
without
"Source
of
the
library,
code
for
interface
control
Activities
modification
outside
the
Libraryisnot
programiscovered
work
is
basedonthe
of
the
true
dependsonwhat
program
1.
You
the
Library's
in
any
appropriately
copyright
intact
the
absenceofany
this
License
You
may
transferringacopy,
warranty
program
freedom
usingamodified
terms
and
library"
anda"work
contains
the
latter
LESSER
CONDITIONS
License
copyright
thatislinked
and
the
wherewithaltorun
versionofthe
and
conditions
modification
difference
follow.
betweena"work
that
code
derived
mustbecombined
GENERAL
AND
Agreement
program
PUBLIC
FOR
COPYING,
MODIFICATION
appliestoany
which
holderorother
uses
contains
sayingitmaybedistributed
General
Each
Public
License
licenseeisaddressedas"you".
meansacollectionofsoftware
data
preparedsoastobe
programs
and
data)toform
below,
which
terms.A"work
the
Libraryorany
law:
thatisto
portionofit,
and/or
language.
(Hereinafter,
limitationinthe
code"
forawork
work
for
making
complete
all
source
modulesitcontains,
definition
compilation
other
than
are
not
its
scope.
The
restricted,
Libraryina
that
may
uses
copy
tool
and
complete
medium,
provided
publishoneach
notice
and
all
the
notices
along
with
chargeafee
files,
Library
the
warranty;
(which
executables.
referstoany
has
been
distributed
basedonthe
derivative
say,awork
either
verb.atlmorWith
translated
straightforwardly
translationisincluded
term
"modification".)
means
modificationstoit.
code
means
plus
the
and
installationofthe
copying,
distribution
coveredbythis
actofrunningaprogram
and
onlyifits
contents
(independentofthe
for
writing
the
Library
Library
distribute
source
does.
codeasyou
that
you
verbatim
copyanappropnate
disclaimerofwarranty;
that
refertothis
and
the
Library.
for
the
physical
and
you
mayatyour
protectioninexchange
with
the
Library
that
Library.
for
copying,
Pay
close
based
the
library".
from
the
library,
with
the
library
LICENSE
TERMS
DISTRIBUTION
software
a
noti~e
authonzed
under
the
terms.
of
(also
called
"this
functions
conveniently
use
someofthose
such
linked
software
under
Library"
work
c~ntainin~
means
under
the
.
mto
the
preferred
plus
scripts
all
any
form
For
a
the
sou,rce
associated
used
to
library.
and
License;
they
are
using
output
from.such
constitute
a
a
use
it).
Whether
does
conspicuou~ly
and
copies
that
what
of
receive
is
the
it,
and
keep
License
distributeacopy
and
to
of
actof.
option
offer
forafee.
13
Page 58

2.
You
may.
modify
or
any
portionofit,
Library,
or
that
a)
library.
b)
prominent
and
c.)
licensedatno
termsofthis
d)
functionora
application
asanargument
then
that,inthe
such
and
meaningful.
(For
square
defined
Subsection2drequires
functionortable
optional:ifthe
square
roots.)
These
a
derived
considered
themselves,
applytothose
separate
sectionsaspartofa
on
on
other
to
Thus,itis
or
rather,
distributionofderivativeorcollective
the
In
basedonthe
basedonthe
distribution
under
3.
GNU
toagiven
alter
that
License,
and
work
under
you
also
The
modified
You
must
notices
the
dateofany
You
must
Ifafacilityinthe
program
you
must
eventanapplication
functionortable,
performs
example,afunctionina
roots
independentofthe
root
function
requirements
whole.Ifidentifiable
from
independent
works.
the
Library,
the
termsofthis
licensees
each
and
not
contest
addition,
You
your
the
intentisto
Library.
the
scopeofthis
may
General
copyofthe
all
the
notices
they
refertothe
version2,insteadofto
your
copyorcopiesofthe
thus
formingawork
copy
and
distribute
the
termsofSection1above,
meet
allofthese
work
must
cause
the
stating
change.
cause
the
wholeofthe
chargetoall
License.
modified
tableofdatatobe
that
passed
makeagood
the
whatever
hasapurpose
usedbythis
application
must
applytothe
sectionsofthat
the
Library,
then
this
License,
sections
But
when
whole
the
distributionofthe
License,
extendtothe
every
part
regardlessofwho
the
intentofthis
rightstowork
exercise
mere
aggregationofanother
Library
Library)ona
medium
opttoapply
Public
with
does
License
Library.Todo
that
ordinary
conditions:
itselfbea
files
modifiedtocarry
that
you
third
Library
uses
the
when.the
faith
facility
partofits
librarytocompute
thatisentirely
application.
that
any
function
does
still
compute
and
canbereasonably
and
separate
when
you
you
whichisa
whose
entire
written
the
Library
volumeofa
not
bring
License.
the
termsofthe
insteadofthis
refertothis
GNU
such
changed
parties
suppliedbyan
facility,
facilityisinvoked,
efforttoensure
does
still
purpose
application-supplied
not
modified
and
distribute
distribute
sectiontoclaim
the
righttocontrol
this
basedonthe
modifications
provided
software
the
worktobe
under
referstoa
other
not
supply
operates,
remains
well-
Therefore,
must
be
supply
its
whole,
General
it,
the
square
work
work
are
works
in
terms,donot
them
the
same
work
based
whole
must
permissions
and
wrote
entirelybyyou;
works
based
work
(or
withawork
storage
the
other
ordinary
License
this,
you
License,
License.
so
Public
Library
files
the
than
as
not
as
be
for
thus
it.
rights
the
on
not
or
work
must
(If
a
newer
version
General
specify
any
other
Once
this
irreversible
General
copies
and
This
optionisuseful
the
codeofthe
library.
4.
You
may
portionorderivativeofit,
codeorexecutable
1
and2above
the
complete
source
termsofSections1and2aboveona
customarily
If
accesstocopy
equivalent
same
the
compelledtocopy
code.
5.Aprogram
portionofthe
the
calleda"work
isolation,isnotaderivative
therefore
However,
the
of
Library),
The
Whena"work
fromaheader
code,
distributionofobject
place
source
Librarybybeing
Library
the
Library
executableistherefore
Section6states
executables.
object
code
of
the
Library
Whether
work
canbelinked
is
itselfalibrary.
not
precisely
If
suchanobject
data
structure
macros
length),
regardlessofwhetheritis
(Executables
portionsofthe
Otherwise,ifthe
you
may
the
termsofSection6..
that
work
than
version2of
Public
License
that
version
changeinthese
changeismadeina
for
that
Public
License
derivative
Library
copy
provided
corresponding
which
used
fromadesignated
accesstocopy
satisfies
code,
that
Library,
that
falls
outside
linkinga"work
createsanexecutable
(becauseitcontains
rather
thana"work
that
file
for
the
even
thisistrueisespecially
definedbylaw.
layouts
and
small
then
the
containing
Library
distribute
also
fall
has
appeared,
insteadifyou
notices.
copy,sothe
appliestoall
works
when
you
intoaprogram
and
distribute
under
form
under
that
mustbedistributed
for
software
codeismadebyoffering
the
the
requirementtodistribute
even
though
the
source
containsnoderivativeofany
butisdesignedtowork
compiledorlinked
uses
the
workofthe
the
scopeofthis
that
coveredbythis
terms
for
distributionofsuch
uses
the
thatispartofthe
work
maybea
though
without
The
file
inline
useofthe
workisa
the
under
the
the
threshold
uses
only
and
accessors,
functions
object
legallyaderivative
this
will
still
derivativeofthe
object
Any
Section6,whetherornot
the
wish.)Donot
given
ordinary
made
from
wishtocopy
the
Library
Section2)in
the
termsofSections
you
accompanyitwith
machine-readable
interchange.
place,
source
third
parties
along
Library".
uses
the
thatisa
portionsofthe
that
uses
Library"
derivative
source
significantifthe
Library,orif
for
thistobe
numerical
(ten
fileisunrestricted,
object
fall
under
code
executables
ordinary
copy,itis
subsequent
code
with
Suchawork,
uses
Library,
code
for
GNU
then
you
GNU
that
copy.
part
thatisnot
(or
object
under
medium
then
offering
from
are
the
object
with
it,
Library,
License.
Library"
derivative
the
library".
License.
material
the
work
codeisnot.
the
true
parameters,
and
small
linesorless
plus
Section
Library,
the
work
containing
can
make
of
a
a
the
the
not
with
is
in
and
with
work
is
in
work.
6.)
under
14
Page 59

they
are
lin.ked
6.Asan
also
with
portionsofthe
under
permit
own
modifications.
You
the
Library
You
during
,
must
among
to
these
a)
corresponding
Library
work
and2above);
with
"work
source
and
containing
that
filesinthe
to
definitions.)
b)
linking
that
presentonthe
copying
(2)
the
modified
version
e)
foratleast
materials
chargenomore
distribution.
d)
accesstocopy
equivalent
materials
e)
of
useracopy.
Foranexecutable,
that
and
executable
the
exceptiontothe
combineorlinka"work
the
Librarytoproduceawork
termsofyour
modificationofthe
use
and
reverse
must
give
prominent
work
that
the
and
its
must
supplyacopyofthis
execution
include
the
things:
Accompany
(which
the
then
the
recompile
Useasuitable
(1)
will
library,ifthe
Accompany
If
distributionofthe
Verify
these
uses
utility
materialstobe
the
them,aswellasa
copyofthis
including
mustbedistributed
and,ifthe
Library,
that
uses
code,sothat
relinktoproduceamodified
the
modified
user
who
Library
the
with
the
usesatrun
user's
library
operate
versionisinterface-compatible
that
the
three
specifiedinSubsection
accesstocopy
from
the
that
the
materialsorthat
the
Library"
programs
from
directly
Library,
use
the
machine-readable
Library.Asuitable
functions
properly
work
the
fromadesignated
with
the
Library
Sections
that
and
distribute
choice,
engineering
Libraryisusedinit
are
displays
copyright
License.
work
whatever
with
the
Library",asobject
the
changes
will
applicationtouse
shared
timeacopyofthe
user
work
years,togive
than
the
same
user
the
needed
it.
However,asa
distributed
provided
work
for
notice
coveredbythis
License.Ifthe
copyright
notice
reference
Also,
with
the
changes
workisan
the
complete
user
can
Library.
the
contentsofdefinitions
not
necessarilybeable
library
mechanism
computer
installs
was
workismadebyoffering
has
required
must
system,
into
the
withamodified
one,aslongasthe
made
with.
withawritten
the
costofperforming
the
above
place.
already
you
have
formofthe
include
for
reproducing
need
with
(Itisunderstood
itself.
above,
you
may
uses
the
Ubrary"
containing
that
work
that
the
terms
the
customer's
for
debugging
each
and
License.
notices,
for
the
directing
you
mustdoone
complete
source
under
executable,
6a,
special
code
were
Sections
executable
machine-readable
code
modify
executable
the
modified
mechanismisone
library
rather
version
with
offer,
same
user
above,
place,
offer
specified
receivedacopy
already
any
data
exception,
not
include
such
copy
of
that
the
work
you
Library
the
user
for
usedinthe
1
linked
and/or
the
Library
for
already
than
and
of
the
valid
the
for
a
this
sent
this
"work
the
of
the
anything
sourceorbinary
(compiler,
on
itself
It
license
do
Suchacontradiction-means
them
you
7.
basedonthe
together
this
provided
basedonthe
is
these
a)
the
with
distributed
b)
libraryofthe
on
accompanying
8.
with,ordistribute
provided
to
the
your
have
License
longassuch
9.
you
you
or
by
by
basedonthe
of
conditions
Libraryorworks
10.
any
automatically
licensortocopy,
Library
may
recipients'
are
parties
11.
allegationofpatent
reason
that
.is
normally
form)
kernel,
which
the
accompanies
may
happen
restrictionsofother
not
normally
and
the
distribute.
You
may
with
License,
that
otherwise
two
things:
Accompany
same
work
any
other
Give
prominent
the
Library,
You
may
under
copy,
modify,
Libraryisvoid,
rights
received
will
You
are
not
have
not
permissiontomodifyordistribute
its
derivative
lawifyoudonot
modifyingordistributing
this
Licensetodo
for
Each
time
work
basedonthe
subjectto
not
impose
exerciseofthe
not
responsible
with
If,asa
consequenceofa
(not
andsoon)ofthe
executable
that
accompany
Library
place
library
Library
other
and
distribute
the
separate
Library
permitted,
the
basedonthe
library
under
the
fact
that
and
uncombined
not
copy,
the
this
sublicense,
under
this
copies,orrights,
not
have
parties
requiredtoaccept
signed
works.
Library),
copying,
basedonit.
you
receivesalicense
distribute,
these
any
this
License.
limitedtopatent
distributed
with
runs,
the
executable.
this
requirement
togetherinan
facilities
side-by-sideina
library
facilities
suchacombined
distributionofthe
andofthe
and
combined
facilities.
termsofthe
notice
with
partofitisa
explaining
modify,
Library
License.
and
will
automatically
License.
their
licenses
remaininfull
it.
However,
These
accept
this
you
indicate
so,
and
distributingormodifying
redistribute
Library),
link
terms
further
rights
for
enforcing
infringementorfor
(in
either
the
major
components
operating
unless
proprietary
the
you
provided
library
Library,
wheretofind
formofthe
sublicense,
exceptasexpressly
Any
link
actions
the
all
the
and
restrictionsonthe
court
issues),
that
component
contradicts
libraries
operating
cannot
that
other
This
Sections
the
combined
attempt
with,ordistribute
However,
from
terminated
compliance.
this
nothing
License.
Library
its
terms
Library
the
from
withormodify
conditions.
granted
compliancebythird
judgment
system.
use
both
executable
areawork
single
not
covered
library
that
you
withacopy
uncombined
must
be
above.
work
based
the
same
link
otherwise
terminate
parties
you
under
License,
else
the
Library
are
prohibited
Therefore,
(or
any
your
acceptance
and
(or
recipient
the
original
herein.
any
other
conditions
system
the
that
that
library
by
library,
work
facilities
do
of
work.
who
this
so
since
grants
work
the
the
You
You
or
are
15
Page 60

imposedonyou
or
otherwise)
License,
of
satisfy
License
a
all.
theydonot
this
License.Ifyou
simultaneously
and
consequence
For
example,ifa
royalty-free
who
receive
then
the
only
License
of
If
wouldbeto
the
Library.
any
portionofthis
unenforceable
the
balanceofthe
the
sectionasa
(whetherbycourt
that
contradict
excuse
cannot
your
any
other
pertinent
you
may
not
patent
license
redistributionofthe
copies
directlyorindirectly
way
you
could
refrain
entirely
sectionisheld
under
any
particular
order,
the
conditionsofthis
you
from
the
distributesoas
obligations
obligations,
distribute
the
would
Librarybyall
satisfy
bothitand
from
invalid
circumstance,
sectionisintendedtoapply,
wholeisintendedtoapplyinother
circumstances.
Itisnot
infringe
ortocontest
has
of
implementedbypublic
people
rangeofsoftware
in
itisuptothe
is
system
This
the
purposeofthis
any
patentsorother
validityofany
the
sole
purposeofprotecting
the
free
software
distribution
license
have
made
generous
distributed
relianceonconsistent
applicationofthat
author/donortodecideifheorshe
willingtodistribute
andalicensee
software
cannot
sectionisintendedtomake
sectiontoinduce
property
such
right
claims;
the
integrity
system
practices.
contributionstothe
through
that
through
impose
that
thoroughly
whatisbelievedtobeaconsequenceofthe
this
License.
12.Ifthe
restrictedincertain
by
holder
addanexplicit
excluding
permitted
excluded.Insuch
limitationasif
13.
revised
Public
willbesimilarinspirittothe
may
distribution
and/or
countries
copyrighted
who
interfaces,
places
the
Library
geographical
those
countries,sothat
onlyinor
among
case,
this
writteninthe
The
Free
Software
and/or
License
new
from
Foundation
versionsofthe
timetotime.
differindetailtoaddress
useofthe
eitherbypatents
the
original
under
copyright
this
distribution
distribution
countries
License
not
incorporates
bodyofthis
may
Lesser
Such
present
new
version,
problems
concerns.
Each
versionisgivenadistinguishing
number.Ifthe
of
this
License
version",
and
C~lOditions
.
version
If
the
Library
number,
by
the
Free
14.Ifyou
into
other
Library
which
appliestoit
you
have
the
eitherofthat
publishedbythe
does
not
you
may
choose
Software
Foundation.
wishtoincorporate
free
programs
specifiesaversion
optionoffollowing
versionorof
Free
Software
specifyalicense
any
version
partsofthe
whose
version
and
"any
ever
distribution
16
agreement
conditions
to
under
this
then
as
Library
not
permit
those
through
you,
this
distribution
or
and
you
claims
this
section
which
is
Many
wide
system
system;
any
other
choice.
clear
rest
of
Library
is
or
License
may
limitation
is
thus
License.
publish
General
new
versions
but
or
number
later
the
terms
any
later
Foundation.
version
published
Library
at
to
the
conditions
authortoask
copyrightedbythe
to
the
make
by
the
derivativesofour
sharing
NO
WARRANTY
15.
BECAUSE
OF
CHARGE,
THE
APPLICABLE
STATEDINWRITING
AND/OR
"AS
EITHER
BUT
OF
MERCHANTABILITY
PARTICULAR
TO
THE
LIBRARYISWITH
PROVE
NECESSARY
16.INNO
APPLICABLE
WILL
PARTY
THE
TO
YOU
SPECIAL,
DAMAGES
TQ
USE
are
incompatible
for
permission.
Free
Free
Software
exceptions
two
goalsofpreserving
Foundation;wesometimes
for
this.
free
and
reuseofsoftware
THE
LIBRARYISLICENSED
THEREISNO
LIBRARY,TOTHE
LAW.
EXCEPT
OTHER
IS"
WITHOUT
PARTIES
WARRANTYOFANY
with
Software
Our
software
WARRANTY
EXTENT
WHEN
THE
COPYRIGHT
PROVIDE
these,
For
software
Foundation,
decision
the
free
andofpromoting
generally.
PERMITIED
EXPRESSEDORIMPLIED,
NOT
LIMITED
QUALITY
DEFECTIVE,
EVENT
TO,
THE
AND
PURPOSE.
AND
THE
PERFORMANCEOFTHE
YOU.
SHOULD
YOU
ASSUME
SERVICING,
UNLESS
IMPLIED
FITNESS
ENTIRE
THE
THE
REPAIRORCORRECTION.
REQUIRED
LAWORAGREEDTOIN
ANY
COPYRIGHT
WHO
MAY
LIBRARYASPERMITIED
FOR
DAMAGES,
HOLDER,ORANY
MODIFY
AND/OR
ABOVE,BELIABLE
INCLUDING
INCIDENTALORCONSEQUENTIAL
ARISING
THE
LIBRARY
OUTOFTHE
(INCLUDING
USEORINABILITY
OTHERWISE
THE
INCLUDING,
BUT
LIMITEDTOLOSSOFDATAORDATA
RENDERED
BY
YOUORTHIRD
THE
LIBRARYTOOPERATE
SOFTWARE),
PARTY
SUCH
ENDOFTERMS
HowtoApply
If
you
beofthe
recommend
can
redistribute
permitting
alternatively,
Public
To
apply
to
the
of
each
exclusionofwarranty;
least
full
noticeisfound.
<one
INACCURATEORLOSSES
PARTIESORA
EVENIFSUCH
HAS
BEEN
ADVISEDOFTHE
DAM"'GES.
AND
CONDITIONS
These
TermstoYour
developanew
greatest
library,
possible
makingitfree
and
change.
redistribution
under
the
termsofthe
License).
these
terms,
library.Itis
source
attach
safesttoattach
filetomost
and
the
"copyright"
linetogive
the
line
library's
FAILURE
WITH
ANY
HOLDEROROTHER
New
and
you
usetothe
software
under
You
these
that
candoso
ordinary
the
following
themtothe
effectively
each
file
should
andapointertowhere
name
andabrief
whatitdoes.>
Copyright
This
(C)
<year>
libraryisfree
<nameofauthor>
software;
you
can
writetothe
which
is
write
willbegUided
statusofall
the
FREE
FOR
BY
HOLDERS
LIBRARY
KIND,
WARRANTIES
FOR
A
RISK
AS
LIBRARY
COSTOFALL
BY
WRITING
OTHER
REDISTRIBUTE
ANY
GENERAL,
NOT
BEING
SUSTAINED
OF
OTHER
POSSIBILITY
libraries
OF
wantitto
public,
we
everyone
by
terms
(or,
General
notices
start
convey
the
have
at
the
idea
of
redistribute
Page 61

it
and/or
Lesser
Free
License,or(at
This
useful,
even
FITNESS
GNU
You
General
not,
Franklin
modifyitunder
General
Software
Foundation;
Public
your
the
termsofthe
licenseaspublishedbythe
either
option)
any
libraryisdistributedinthe
but
the
implied
WITHOUT
ANY
WARRANTY;
warrantyofMERCHANTABILITY
FORAPARTICULAR
Lesser
should
writetothe
General
have
Public
Street,
Public
License
receivedacopyofthe
License
Fifth
Free
along
Software
Floor,
Boston,MA02110-1301,
version
later
version.
hope
thatitwill
PURPOSE.
for
more
GNU
with
this
library;
Foundation,
GNU
2.1ofthe
without
See
the
details.
Lesser
if
Inc.,
be
or
51
USA.
Also
add
informationonhowtocontact
electronic
You
asaprogrammer)oryour
"copyright
Hereisa
Yoyodyne,
interest·in
knobs)
<signatureofTy
Ty
====================================~=====
and
paper
should
also
disclaimer"
sample;
Inc.,
the
library
writtenbyJames
Coon,
PresidentofVice
mail.
get
your
employer
school,ifany,tosign
for
the
alter
the
names:
hereby
disclaims
'Frob'(alibrary
Random
Coon>,1April
library,ifnecessary.
1990
(if
you
all
copyright
for
Hacker.
you
by
work
tweaking
a
NotificationofBSD
Copyright
Inc.
Redistribution
withorwithout
that
1.
Redistributionsofsource
above
following
2.
Redistributionsinbinary
above
the
other
3.
All
or
useofthis
(c)
All
rights
the
following
copyright
disclaimer.
copyright
following
materials
advertising
1994-2004
The
reserved.
and
useinsource
modification,
conditions
code
notice,
this
listofconditions
form
notice,
this
listofconditions
disclaimerinthe
provided
materials
software
with
mentioning
must
NetBSD
are
are
Foundation,
and
binary
permitted
met:
must
retain
must
reproduce
documentation
the
distribution.
features
display
the
following
forms,
provided
the
and
the
the
and
and/or
acknowledgement:
This
product
NetBSD
4.
Neither
the
namesofits
or
promote
without
THIS
SOFTWAREISPROVIDEDBYTHE
AND
CONTRIBUTORS
OR
IMPLIED
NOT
LIMITED
OF
MERCHANTABILITY
PARTICULAR
INNOEVENT
CONTRIBUTORSBELIABLE
INDIRECT,
includes
Foundation,
the
nameofThe
contributors
products
specific
prior
WARRANTIES,
TO,
THE
PURPOSE
SHALL
INCIDENTAL,
software
Inc.
and
derived
written
"AS
IMPLIED
AND
ARE
THE
REGENTS
SPECIAL,
developedbythe
its
contributors.
NetBSD
Foundation
nor
maybeusedtoendorse
from
this
software
permission.
REGENTS
IS"
AND
ANY
EXPRESS
INCLUDING,
BUT
WARRANTIES
FITNESS
FOR
A
DISCLAIMED.
OR
FOR
ANY
DIRECT,
EXEMPLARY,
OR
CONSEQUENTIAL
NOT
LIMITED
TO,
GOODSORSERVICES;
PROFITS;ORBUSINESS
CAUSED
ANDONANY
WHETHERINCONTRACT,
TORT
(INCLUDING
ARISINGINANY
SOFTWARE,
OF
SUCH
The
following
license
in
this
This
product
NetBSD
This
product
EVENIFADVISEDOFTHE
DAMAGE.
notices
termsofthe
document:
includes
Foundation,
includes
UniversityofCalifornia,
This
product
includes
DAMAGES
(INCLUDING,
BUT
PROCUREMENTOFSUBSTITUTE
LOSSOFUSE,
INTERRUPTION)
DATA,
OR
HOWEVER
THEORYOFLIABILITY,
STRICT
LIABILITY,
OR
NEGLIGENCEOROTHERWISE)
WAY
OUTOFTHE
USEOFTHIS
POSSIBILITY
are
requiredtosatisfy
software
thatwehave
software
Inc.
and
its
software
Berkeley
software
developedbythe
contributors.
developedbythe
and
developedbyJohn
the
mentioned
its
contributors.
Polstra.
This
product
NetBSD
information
This
product
Strategies,
This
product
includes
Project.
about
includes
Inc.
includes
software
See
http://www.NetBSD.org/
developed
NetBSD.
software
software
developedbyWinning
developedbyMichael
for
the
for
Graff.
This
product
Christos
This
product
Jonathan
This
product
ChristopherG.Demetriou
This
product
includes
Zoulas.
includes
Stone
includes
includes
for
software
software
the
NetBSD
software
software
developed
developed
Project.
developed
for
the
NetBSD
developedbyNiels
by
by
by
Project.
Provos.
This
product
includes
software
developedbyTooLs
GmbH.
This
product
the
UniversityofCalifornia,
includes
software
Lawrence
developed
Berkeley
by
Laboratory.
This
product
Project
==========================================
INDEPENDENT
This
softwareisbasedinpartonthe
Independent
==========================================
SOFTWARE
PROJECT
Copyright
rights
Redistribution
withorwithout
that
the
1.
Redistributionsofsource
above
following
2.
Redistributionsinbinary
above
includes
and
its
JPEG
(c)
1998-2008
reserved.
following
copyright
disclaimer.
copyright
software
developedbyWIDE
contributors.
JPEG
GROUP
Group.
DEVELOPEDBYTHE
FOR
USEINTHE
The
OpenSSL
and
useinsource
modification,
conditions
are
are
code
notice,
this
listofconditions
form
notice,
this
listofconditions
SOFTWARE
workofthe
OPENSSL
SSL
TOOLKIT
Project.
and
binary
permitted
provided
met:
must
retain
must
reproduce
All
forms,
the
and
and
the
the
17
Page 62

the
following
other
~aterials
3.
All
advertising
or
useofthis
acknowledgment:
developedbythe
OpenSSL
4.
The
Project"
products
written
contact
5.
Products
called
their
names
OpenSSL
6.
Redistributionsofany
retain
the
includes
for
useinthe
disclaimerinthe
provided
materials
software
OpenSSL
Toolkit.
names
must
derived
permission.
openssl-core@openssl.org.
"OpenSSL"
Project.
following
software
(<http://www.openssl.org/>)''
"OpenSSL
notbeusedtoendorseorpromote
from
derived
without
OpenSSL
with
must
"This
product
Toolkit"
this
For
written
from
this
nor
may
prior
written
form
acknowledgment:
developedbythe
Toolkit
orgl»"
THIS
SOFTWAREISPROVIDEDBYTHE
PROJECT
IMPLIED
NOT
OF
PARTICULAR
EVENT
CONTRIBUTORSBELIABLE
INDIRECT,
OR
NOT
GOODSORSERVICES;
PROFITS;ORBUSINESS
CAUSED
WHETHERINCONTRACT,
TORT
ARISINGINANY
SOFTWARE,
OF
This
by
includes
cryptsoft.com).
Original
Copyright
com)
implementation
cryptsoft.com).
The
with
This
commercial
are
code
Ihash,
"AS
IS"
AND
ANY
WARRANTIES,
LIMITED
MERCHANTABILITY
CONSEQUENTIAL
LIMITED
(INCLUDING
SUCH
product
Eric
All
implementation
Netscapes
libraryisfree
adhered
foundinthis
DES,
TO,
THE
IMPLIED
AND
PURPOSE
SHALL
Young
THE
OpenSSL
INCIDENTAL,
DAMAGES
TO,
PROCUREMENTOFSUBSTITUTE
LOSSOFUSE,
ANDONANY
EVENIFADVISEDOFTHE
DAMAGE.
includes
(eay@cryptsoft.com).
software
SSLeay
(C)
1995-1998
rights
reserved.
SSL.
useaslongasthe
to.
The
etc.,
THEORYOFLIABILITY,
NEGLIGENCEOROTHERWISE)
WAY
OUTOFTHE
cryptographic
writtenbyTim
License
writtenbyEric
was
for
commercial
following
distribution,beit
code;
not
INCLUDING,
ARE
SPECIAL,
INTERRUPTION)
Eric
This
writtensoastoconform
documentation
the
distribution.
mentioning
display
Project
software
permission,
software
"OpenSSL"
whatsoever
(<http://www.openssl.
EXPRESSED
FITNESS
DISCLAIMED.INNO
PROJECTORITS
FOR
STRICT
Young
packageisan
Young
following
conditions
just
the
features
the
following
includes
and
permissionofthe
WARRANTIES
ANY
(INCLUDING,
Hudson
software
for
useinthe
"OpenSSL
without
may
appear
must
"This
OpenSSL
OpenSSL
OR
BUT
FOR
A
DIRECT,
EX~PLARY,
DATA,
HOWEVER
LIABILITY,
USEOFTHIS
POSSIBILITY
software
This
product
(tjh@
(eay@cryptsoft.
(eay@
and
non-
conditions
applytoall
the
RC4,
SSL
code.
and/or
prior
please
not
be
in
product
Project
BUT
OR
OR
written
SSL
RSA,
The
SSL
documentation
coveredbythe
holderisTim
Copyright
any
removed.Ifthis
Young
of
the
formofa
documentation
package.
Redistribution
withorwithout
that
1.
Redistributionsofsource
copyright
following
2.
Redistributionsinbinary
above
the
other
3.
All
or
useofthis
acknowledgement:
cryptographic
cryptsoft.com)".
outifthe
cryptographic
4.Ifyou
a
derivative
(application
acknowledgement:
writtenbyTim
THIS
"AS
WARRANTIES,
THE
AND
DISCLAIMED.INNO
OR
INDIRECT,
OR
NOT
GOODSORSERVICES;
PROFITS;ORBUSINESS
CAUSED
WHETHERINCONTRACT,
TORT
ARISINGINANY
SOFTWARE,
OF
SUCH
The
available
changed.
put
GNU
remains
Copyright
shouldbegiven
partsofthe
textual
the
following
notice,
disclaimer.
copyright
following
materials
advertising
routines
include
thereof)
code)
SOFTWAREISPROVIDEDBYERIC
IS"
AND
IMPLIED
FITNESS
CONTRIBUTORSBELIABLE
INCIDENTAL,
CONSEQUENTIAL
LIMITED
ANDONANY
(INCLUDING
EVENIFADVISEDOFTHE
DAMAGE.
license
under
and
versionorderivativeofthis
Le.
this
another
Public
License.]
included
same
copyright
Hudson
noticesinthe
and
disclaimerinthe
software
software
related:-).
ANY
WARRANTIESOFMERCHANTABILITY
FORAPARTICULAR
TO,
(tjh@cryptsoft.com).
Eric
Young's,
packageisusedina
attributionasthe
library
used.
messageatprogram
(onlineortextual)
useinsource
modification,
conditions
this
listofconditions
form
notice,
this
provided
materials
The
any
Hudson
INCLUDING,
WAY
distribution
code
with
mentioning
must
"This
product
writtenbyEric
word
'cryptographic'
from
the
library
Windows
from
the
you
must
"This
product
(tjh@cryptsoft.com)".
EXPRESSORIMPLIED
EVENT
SPECIAL,
DAMAGES
PROCUREMENTOFSUBSTITUTE
LOSSOFUSE,
INTERRUPTION)
THEORYOFLIABILITY,
STRICT
NEGLIGENCEOROTHERWISE)
OUTOFTHE
cannot
distribution
with
this
distribution
terms
except
andassuch
code
are
nottobe
product,
author
This
canbein
startuporin
provided
and
binary
are
permitted
are
met:
.code
must
retain
and
must
reproduce
listofconditions
documentation
the
distribution.
features
display
include
BUT
SHALL
tetms
the
following
includes
Young
canbeleft
being
used
specific
apps
simplybecopied
license
code
directory
an
includes
NOT
FOR
EXEMPLARY,
(INCLUDING,
LIABILITY,
for
software
YOUNG
LIMITED
PURPOSE
THE
AUTHOR
ANY
DIRECT,
DATA,
HOWEVER
USEOFTHIS
POSSIBILITY
any
publically
code
cannot
[including
that
the
Eric
the
with
the
forms,
provided
the
the
the
and
and/or
(eay@
are
not
(or
TO,
ARE
BUT
OR
OR
be
and
the
is
.
18
Page 63

==========================================
FREETYPE2
The
softwareisbasedinpartofthe
FreeType
=========~================================
Team.
EXPAT
SOFTWARE
workofthe
SOFTWARE
Software
copyright
==========================================
without
holder.
libpixregion
Copyright
1987,
prior
written
lIBPIXMAN
1998
The
authorizationofthe
Open
Group.
Copyright
Software
Copyright
Expat
Permissionishereby
any
associated
dealinthe
without
merge,
copiesofthe
whom
the
The
notice
portionsofthe
THE
WARRANTYOFANY
IMPLIED,
WARRANTIESOFMERCHANTABILITY,
A
PARTICULAR
INNOEVENT
HOLDERSBELIABLE
OR
OF
FROM,
SOFTWAREORTHE
THE
==========================================
COPYRIGHT
(c)
All
Permissiontouse,
this
hereby
notice
copies.
WITHOUT
IMPLIED,
WARRANTIESOFMERCHANTABILITY,
A
PARTICULAR
OF
AUTHORSORCOPYRIGHT
FOR
WHETHERINAN
OR
CONNECTION
OR
as
containedinthis
holder
to
promote
(c)
1998,
1999,
2000
Center
Ltd
and
Clark
(c)
2001,
2002, 2003,
maintainers.
granted,
person
following
above
obtainingacopyofthis
documentation
Software
limitation
publish,
the
distribute,
Software,
the
Softwareisfurnishedtodo
files
without
rightstouse,
sublicense,
andtopermit
conditions:
copyright
notice
and
restriction,
shallbeincludedinall
Software.
SOFTWAREISPROVIDED
KIND,
EXPRESS
INCLUDING
SHALL
OTHER
LIABILITY,
CONTRACT,
BUT
NOT
PURPOSE
AND
THE
AUTHORSORCOPYRIGHT
FOR
ANY
WHETHERINAN
TORTOROTHERWISE,
OUTOFORINCONNECTION
USEOROTHER
SOFTWARE.
CURL
SOFTWARE
AND
PERMISSION
1996-2009,
rights
reserved.
software
granted,
and
THE
Daniel
Stenberg,
copy,
modify,
for
any
purpose
this
permission
provided
that
notice
SOFTWAREISPROVIDED
WARRANTYOFANY
THIRD
INCLUDING
PARTY
BUT
NOT
PURPOSE
AND
RIGHTS.INNO
HOLDERSBELIABLE
ANY
CLAIM,
DAMAGESOROTHER
ACTIONOFCONTRACT,
OTHERWISE,
OTHER
shall
ARISING
WITH
FROM,
THE
SOFTWAREORTHE
DEALINGSINTHE
notice,
the
notbeusedinadvertisingorotherwise
the
sale,
useorother
Thai
Open
Source
Cooper
2004,2005,
freeofcharge,
software
(the
"Software"),
2006
to
and
to
including
copy,
modify,
and/or
sell
persons
this
permission
so,
to
subject
copiesorsubstantial
"AS
IS",
WITHOUT
OR
LIMITEDTOTHE
FITNESS
NON
INFRINGEMENT.
CLAIM,
DAMAGES
FOR
ACTION
ARISING
WITH
THE
DEALINGS
NOTICE.
IN
Copyright
<daniel@haxx.se>.
and
distribute
withorwithout
the
above
fee
copyright
appearinall
"AS
IS",
KIND,
EXPRESS
OR
LIMITEDTOTHE
FITNESS
FOR
NONINFRINGEMENT
EVENT
SHALL
THE
LIABILITY,
TORT
OUTOFOR
IN
USE
SOFTWARE.
nameofa
Except
copyright
dealingsinthis
to
is
Permissiontouse,
this
software
is
hereby
above
both
granted
copyright
that
copyright
appearinsupporting
copyright
notice
includedinall
Software.
WITHOUT
IMPLIED,
THE
WARRANTYOFANY
INCLUDING
WARRANTIESOFMERCHANTABILITY,
A
PARTICULAR
INNOEVENT
FOR
ANY
CLAIM,
WHETHERINAN
OR
OTHERWISE,
CONNECTION
OR
OTHER
as
containedinthis
Group
to
promote
Software
Open
Copyright
Maynard,
DEALINGSINTHE
shall
the
without
Group.
1987byDigital
Massachusetts.
Permissiontouse,
software
and
the
that
notice
that
or
without
and
without
above
copyright
both
that
appearinsupporting
the
nameofDigital
publicity
pertainingtodistributionofthe
specific,
DISCLAIMS
TO
THIS
SOFTWARE,
WARRANTIESOFMERCHANTABILITY
INNOEVENT
SPECIAL,
OR
FROM
INDIRECTORCONSEQUENTIAL
ANY
DAMAGES
LOSSOFUSE,
INANACTIONOFCONTRACT,
OTHER
TORTIOUS
CONNECTION
THIS
SOFTWARE.
copy,
modify,
and
its
documentation
without
notice
appearinall
notice
documentation.
and
this
permission
copiesorsubstantial
fee,
and
distribute,
for
provided
copies
this
permission
The
notice
portionsofthe
any
that
SOFTWAREISPROVIDED
KIND,
EXPRESS
BUT
NOT
LIMITEDTOTHE
FITNESS
PURPOSE
SHALL
DAMAGESOROTHER
THE
AND
NONINFRINGEMENT.
OPEN
GROUPBELIABLE
LIABILITY,
ACTIONOFCONTRACT,
ARISING
WITH
FROM,
THE
SOFTWAREORTHE
OUTOFOR
SOFTWARE.
notice,
the
nameofThe
notbeusedinadvertisingorotherwise
sale,
useorother
prior
written
copy,
its
documentation
feeishereby
notice
copyright
Equipment
All
modify,
granted,
notice
dealingsinthis
authorization
Corporation,
Rights
Reserved.
and
for
any
provided
appearinall
and
this
distribute
purpose
copies
permission
documentation,
notbeusedinadvertising
written
ALL
WARRANTIES
prior
permission.
WITH
INCLUDING
REGARD
ALL
IMPLIED
AND
SHALL
DIGITALBELIABLE
WHATSOEVER
RESULTING
DATAORPROFITS,
NEGLIGENCE
WITH
ACTION,
THE
ARISING
OUTOFOR
USEORPERFORMANCE
libic
Copyright©2001
Permissiontouse,
this
software
is
hereby
above
granted
copyright
and
Keith
Packard.
copy,
modify,
its
documentation
without
notice
fee,
appearinall
distribute,
for
provided
copies
any
that
and
sell
purpose
the
and
that
notice
above
shall
be
"AS
IS",
OR
FOR
TORT
IN
USE
Except
Open
from
The
this
that
and
and
software
DIGITAL
FITNESS,
FOR
ANY
DAMAGES
WHETHER
OR
IN
OF
and
sell
purpose
the
and
that
19
Page 64

both
that
copyright
appearinsupporting
nameofKeith
publicity
without
Packard
pertainingtodistributionofthe
specific,
makesnorepresentations
suitabilityofthis
provided
KEITH
WITH
ALL
AND
"as
PACKARD
REGARDTOTHIS
IMPLIED
FITNESS,INNO
PACKARDBELIABLE
OR
CONSEQUENTIAL
WHATSOEVER
DATAORPROFITS,
CONTRACT,
ACTION,
WITH
NEGLIGENCEOROTHER
ARISING
THE
USEORPERFORMANCEOFTHIS
notice
and
this
documentation,
Packard
permission
and
notbeusedinadvertising
that
notice
the
or
software
is"
without
written
software
prior
for
expressorimplied
DISCLAIMS
SOFTWARE,
permission.
about
any
purpose.Itis
ALL
WARRANTIES
INCLUDING
Keith
the
warranty.
WARRANTIESOFMERCHANTABILITY
EVENT
FOR
DAMAGESORANY
RESULTING
WHETHERINAN
SHALL
ANY
FROM
KEITH
SPECIAL,
INDIRECT
DAMAGES
LOSSOFUSE,
ACTION
OF
TORTIOUS
OUTOFORINCONNECTION
SOFTWARE.
slim
is
Copyright©2003
slim
Permissiontouse,
sell
this
software
purposeishereby
the
above
copyright
that
both
that
notice
appearinsupporting
that
the
nameofRichard
and
granted
copyright
advertisingorpublicity
of
the
software
permission.
representations
for
any
purpose.Itis
without
Richard
about
expressorimplied
RICHARD
WARRANTIES
INCLUDING
HENDERSON
WITH
ALL
IMPLIED
MERCHANTABILITY
SHALL
SPECIAL,
OR
FROM
RICHARD
HENDERSONBELIABLE
INDIRECTORCONSEQUENTIAL
ANY
DAMAGES
LOSSOFUSE,
INANACTIONOFCONTRACT,
OTHER
CONNECTION
THIS
==========================================
TORTIOUS
WITH
SOFTWARE.
GIFLIB
The
GIFLIB
distributionisCopyright
Richard
copy,
modify,
its
documentation
without
notice
appearinall
notice
Henderson
distribute,
fee,
and
this
documentation,
Henderson
notbeused
pertainingtodistribution
specific,
Henderson
the
provided
written
makes
suitabilityofthis
"as
is"
without
warranty.
DISCLAIMS
ALL
REGARDTOTHIS
WARRANTIES
AND
FITNESS,INNO
WHATSOEVER
RESULTING
DATAORPROFITS,
NEGLIGENCE
ACTION,
THE
ARISING
OUTOFOR
USEORPERFORMANCE
SOFTWARE
(c)
and
for
any
provided
copies
that
and
permission
and
in
prior
no
software
•
SOFTWARE,
OF
EVENT
FOR
ANY
DAMAGES
WHETHER
OR
IN
OF
1997
Eric
S.
Raymond
Permissionishereby
any
person
associated
dealinthe
without
merge,
copiesofthe
obtainingacopyofthis
documentation
Software
limitation
publish,
Software,
granted,
without
the
rightstouse,
distribute,
and
freeofcharge,
software
files
(the
"Software"),
restriction,
copy,
sublicense,
to
per~it
including
modify,
and/or
persons
to
and
to
sell
to
whom
the
Softwareisfurnishedtodo
the
following
The
above
notice
portionsofthe
THE
SOFTWAREISPROVIDED
WARRANTYOFANY
IMPLIED,
conditions:
copyright
notice
shallbeincludedinall
Software.
KIND,
INCLUDING
BUT
and
copiesorsubstantial
EXPRESS
NOT
WARRANTIESOFMERCHANTABILITY,
A
PARTICULAR
INNOEVENT
HOLDERSBELIABLE
OR
OTHER
OF
CONTRACT,
FROM,
OUTOFORINCONNECTION
SOFTWAREORTHE
THE
SOFTWARE.
==========================================
Copyright
PURPOSE
SHALL
LIABILITY,
AND
THE
AUTHORSORCOPYRIGHT
FOR
ANY
WHETHERINAN
TORTOROTHERWISE,
USEOROTHER
802.11
WLAN
(c)
2002-2005
DRIVER
Sam
Leffler,
so,
subject
this
permission
"AS
IS",
WITHOUT
OR
LIMITEDTOTHE
FITNESS
NON
INFRINGEMENT.
CLAIM,
DAMAGES
ACTION
ARISING
WITH
THE
DEALINGS
SOFTWARE
Errno
to
FOR
IN
Consulting
Copyright
(c)
2002-2005
Atheros
Communications,
Inc.
Copyright
(c)
2008-2010,
Atheros
Communications
Inc.
Permissiontouse,
this
software
hereby
notice
granted,
and
this
copy,
for
any
purpose
provided
permission
m9dify,
and/or
withorwithout
that
the
notice
distribute
above
copyright
appearinall
fee
is
copies.
THE
SOFTWAREISPROVIDED
AUTHOR
REGARDTOTHIS
IMPLIED
FITNESS.INNO
LIABLE
CONSEQUENTIAL
WHATSOEVER
DATAORPROFITS,
CONTRACT,
ACTION,
WITH
DISCLAIMS
SOFTWARE
WARRANTIESOFMERCHANTABILITY
EVENT
FOR
ANY
SPECIAL,
DAMAGESORANY
RESULTING
WHETHERINAN
NEGLIGENCEOROTHER
ARISING
THE
USEORPERFORMANCEOFTHIS
OUTOFORINCONNECTION
ALL
SHALL
"AS
IS"
AND
WARRANTIES
WITH
INCLUDING
THE
AUTHOR
DIRECT,
INDIRECT,
DAMAGES
FROM
LOSSOFUSE,
ACTION
TORTIOUS
THE
ALL
AND
BE
OR
OF
SOFTWARE.
HostAPcrypt:
implementation
Copyright
host-based
for
(c)
2003-2004,
CCMP
HostAPdriver
Jouni
Malinen
encryption
<jkmaline@
cC.hutfi>
This
programisfree
and/or
modifyitunder
Public
License
Software
more
Foundation:
details.
Alternatively,
the
termsofBSD
Copyright
(C)
this
software;
the
version2as
See
software
license.
2010
Denali
you
can
redistribute
termsofthe
GNU
publishedbythe
README
and
COPYING
maybedistributed
Software
Inc.
All
General
Free
under
rights
it
for
•
reserved
20
Page 65

Copyright
reserved.
Redistribution
withorwithout
that
1.
Redistributionsofsource
above
following
2.
Redistributionsinbinary
above
the
other
3.
The
endorseorpromote
software
THIS
YOUNG
WARRANTIES,
THE
AND
ARE
YOUNGBELIABLE
INCIDENTAL,
CONSEQUENTIAL
NOT
GOODSORSERVICES;
PROFITS;ORBUSINESS
CAUSED
WHETHERINCONTRACT,
TORT
ARISINGINANY
SOFTWARE,
OF
Copyright
The
reserved.
Redistribution
withorwithout
that
1.
Redistributionsofsource
above
following
2.
Redistributionsinbinary
above
the
other
3.
All
or
acknowledgement:
developedbythe
and
4.
of
promote
specific
THIS
(c)
2003,
2004
David
and
useinsource
modification,
the
following
copyright
disclaimer.
copyright
following
materials
nameofDavid
without
SOFTWAREISPROVIDEDBYDAVID
"AS
IMPLIED
FITNESS
DISCLAIMED.INNO
LIMITED
ANDONANY
(INCLUDING
SUCH
DAMAGE.
(c)
Regentsofthe
the
following
copyright
disclaimer.
copyright
following
materials
advertising
useofthis
its
contributors.
Neither
its
the
contributors
products
prior
SOFTWAREISPROVIDEDBYTHE
conditions
notice,
notice,
disclaimerinthe
provided
products
specific
IS"
AND
ANY
INCLUDING,
WARRANTIESOFMERCHANTABILITY
FORAPARTICULAR
FOR
SPECIAL,
DAMAGES
TO,
PROCUREMENTOFSUBSTITUTE
NEGLIGENCEOROTHERWISE)
WAY
EVENIFADVISEDOFTHE
1988,
1993
UniversityofCalifornia.
and
useinsource
modification,
conditions
notice,
notice,
disclaimerinthe
provided
materials
software
This
UniversityofCalifornia,
nameofthe
maybeusedtoendorse
derived
written
permission.
are
are
code
this
listofconditions
form
this
listofconditions
with
Young
may
prior
EXPRESSORIMPLIED
BUT
EVENT
ANY
DIRECT,
EXEMPLARY,
LOSSOFUSE,
INTERRUPTION)
THEORYOFLIABILITY,
STRICT
OUTOFTHE
are
are
code
this
listofconditions
form
this
listofconditions
with
mentioning
must
display
product
University
from
Young.
documentation
the
derived
written
(INCLUDING,
documentation
the
'All
and
binary
permitted
met:
must
retain
must
reproduce
distribution.
notbeused
from
permission.
NOT
LIMITED
PURPOSE
SHALL
and
permitted
met:
must
includes
this
DAVID
INDIRECT,
OR
DATA,
LIABILITY,
USEOFTHIS
POSSIBILITY
binary
must
retain
reproduce
distribution.
features
the
following
nor
the
software
REGENTS
rights
provided
this
HOWEVER
software
Berkeley
forms,
the
and
the
the
and
and/or
to
TO,
BUT
OR
OR
All
rights
forms,
provided
the
and
the
the
and
and/or
names
or
without
AND
CONTRIBUTORS
OR
IMPLIED
NOT
LIMITED
OF
MERCHANTABILITY
PARTICULAR
INNOEVENT
CONTRIBUTORSBELIABLE
INDIRECT,
OR
CONSEQUENTIAL
NOT
LIMITED
GOODSORSERVICES;
PROFITS;ORBUSINESS
CAUSED
WHETHERINCONTRACT,
TORT
ARISINGINANY
SOFTWARE,
OF
SUCH
@(#)iUlc.h
$FreeBSD:
06:25:08
Copyright
Copyright
Permissiontouse,
this
software
hereby
notice
copies.
THE
SOFTWAREISPROVIDED
AUTHOR
REGARDTOTHIS
IMPLIED
FITNESS.INNO
LIABLE
CONSEQUENTIAL
WHATSOEVER
DATAORPROFITS,
CONTRACT,
ACTION,
WITH
SOFTWARE.
Atheros
Copyright
Jonathan
reserved.
This
softwareisderived
by
Matt
Redistribution
withorwithout
that
the
1.
Redistributionsofsource
above
following
2.
Redistributionsinbinary
above
the
following
WARRANTIES,
TO,
PURPOSE
SHALL
INCIDENTAL,
TO,
ANDONANY
(INCLUDING
EVENIFADVISEDOFTHE
DAMAGE.
8.1
src/sys/neViUlc.h,v
alfred
(c)
2004
(c)
2004
for
granted,
and
this
DISCLAIMS
WARRANTIESOFMERCHANTABILITY
FOR
ANY
NEGLIGENCEOROTHER
ARISING
THE
USEORPERFORMANCEOFTHIS
rate
control
(c)
1997
Stone
Thomas.
and
following
copyright
disclaimer.
copyright
disclaimerinthe
"AS
IS"
THE
IMPLIED
AND
ARE
THE
REGENTS
SPECIAL,
DAMAGES
PROCUREMENTOFSUBSTITUTE
LOSSOFUSE,
INTERRUPTION)
THEORYOFLIABILITY,
STRICT
NEGLIGENCEOROTHERWISE)
WAY
OUTOFTHE
(Berkeley)
Exp
Vide054
Atheros
copy,
any
provided
permission
SOFTWARE
EVENT
SPECIAL,
DAMAGESORANY
RESULTING
OUTOFORINCONNECTION
and
useinsource
modification,
conditions
notice,
notice,
6/10/93
$
modify,
purpose
that
ALL
WARRANTIES
SHALL
WHETHERINAN
algorithm
JasonR.Thorpe.
from
this
this
AND
ANY
EXPRESS
INCLUDING,
WARRANTIES
FITNESS
DISCLAIMED.
FOR
ANY
(INCLUDING,
1.9
Technologies,
Communications,
and/or
withorwithout
the
above
notice
appearinall
"AS
INCLUDING
THE
DIRECT,
FROM
information
and
are
permitted
are
met:
code
listofconditions
form
must
listofconditions
documentation
BUT
FOR
A
OR
DIRECT,
EXEMPLARY,
DATA,
HOWEVER
LIABILITY,
USEOFTHIS
POSSIBILITY
2002/09/23
Inc.
distribute
copyright
IS"
AND
WITH
ALL
AUTHOR
INDIRECT,
DAMAGES
LOSSOFUSE,
ACTION
TORTIOUS
All
rights
provided
binary
must
retain
reproduce
BUT
OR
OR
Inc.
fee
is
THE
AND
BE
OR
OF
forms,
provided
the
and
the
the
and
and/or
21
Page 66

other
materials
3.
All
advertising
or
useofthis
acknowledgement:
developedbyJonathan
for
the
NetBSD
4.
The
namesofthe
endorseorpromote
software
THIS
SOFTWAREISPROVIDEDBYTHE
"AS
IS"
AND
WARRANTIES,
THE
IMPLIED
AND
FITNESS
DISCLAIMED.INNO
LIABLE
SPECIAL,
DAMAGES
PROCUREMENTOFSUBSTITUTE
SERVICES;
BUSINESS
ANDONANY
IN
(INCLUDING
ARISINGINANY
SOFTWARE,
OF
==========================================
WPA
Copyright
and
Redistribution
withorwithout
that
1.
above
following
2.
above
the
other
3.
holder(s)
be
from
permission.
THIS
HOLDERS
EXPRESSORIMPLIED
BUT
OF
A
NO
CONTRIBUTORSBELIABLE
INDIRECT,
CONSEQUENTIAL
FOR
CONTRACT,
SUCH
Supplicant
contributors
the
following
Redistributionsofsource
copyright
Redistributionsinbinary
copyright
following
materials
Neither
usedtoendorseorpromote
this
SOFTWAREISPROVIDEDBYTHE
NOT
MERCHANTABILITY
PARTICULAR
EVENT
provided
materials
software
Project.
without
DAMAGE.
disclaimer.
the
nor
software
LIMITED
specific
ANY
INCLUDING,
WARRANTIESOFMERCHANTABILITY
FORAPARTICULAR
ANY
EXEMPLARY,ORCONSEQUENTIAL
(INCLUDING,
LOSSOFUSE,
INTERRUPTION)
THEORYOFLIABILITY,
STRICT
NEGLIGENCEOROTHERWISE)
WAY
EVENIFADVISEDOFTHE
WPA
SUPPLICANT
(c)
2003-2010,
All
and
modification,
notice,
notice,
disclaimerinthe
provided
name(s)ofthe
the
namesofits
AND
CONTRIBUTORS
PURPOSE
SHALL
INCIDENTAL,
with
the
distribution.
mentioning
must
display
This
product
Stone
and
authors
products
EXPRESSORIMPLIED
EVENT
DIRECT,
may
derived
prior
written
BUT
SHALL
INDIRECT,
BUT
NOT
DATA,ORPROFITS;
HOWEVER
LIABILITY,ORTORT
OUTOFTHE
features
the
includes
JasonR.Thorpe
notbeused
from
permission.
NOT
LIMITED
PURPOSE
THE
INCIDENTAL,
LIMITED
GOODS
WHETHER
USEOFTHIS
SOFTWARE
Jouni
Malinen
Rights
useinsource
conditions
without
TO,
THE
DAMAGES
Reserved.
and
binary
are
permitted
are
met:
code
must
this
listofconditions
form
must
this
listofconditions
documentation
with
the
distribution.
above-listed
contributors
products
specific
WARRANTIES,
THE
AND
ARE
COPYRIGHT
SPECIAL,
prior
"AS
IS"
IMPLIED
FITNESS
FOR
(INCLUDING,
WARRANTIES
FOR
DISCLAIMED.
OWNER
ANY
DIRECT,
EXEMPLARY,
retain
reproduce
INCLUDING,
following
software
this
AUTHORS
AUTHOR
TO,
OR
CAUSED
POSSIBILITY
<j@w1.fi>
forms,
provided
the
and
and
copyright
may
derived
written
COPYRIGHT
AND
OR
BUT
to
TO,
ARE
BE
OR
the
the
and/or
ANY
IN
OR
NOT
LIMITED
GOODSORSERVICES;
PROFITS;ORBUSINESS
CAUSED
WHETHERINCONTRACT,
TORT
ARISINGINANY
SOFTWARE,
OF
==========================================
Except
(e.g.
are
Copyright
Copyright
Reserved.
Permissionishereby
any
associated
dealinthe
without
merge,
copiesofthe
whom
the
The
notice
portionsofthe
THE
WARRANTYOFANY
IMPLIED,
WARRANTIESOFMERCHANTABILITY,
A
INNOEVENT
LIABLE
LIABILITY,
TORTOROTHERWISE,
IN
OR
Exceptascontainedinthis
Veillard
to
Software
him.
==========================================
Copyright
[You
if
you
For
"Contributing
of
Gerard
Glenn
sourceforge.net
Raphael
ohn
TO,
PROCUREMENTOFSUBSTITUTE
LOSSOFUSE,
INTERRUPTION)
ANDONANY
(INCLUDING
EVENIFADVISEDOFTHE
SUCH
DAMAGE.
THEORYOFLIABILITY,
NEGLIGENCEOROTHERWISE)
WAY
OUTOFTHE
L1BXML2
where
otherwise
the
files
hash.c,
coveredbya
person
limitation
publish,
the
following
above
shallbeincludedinall
SOFTWAREISPROVIDED
PARTICULAR
FOR
CONNECTION
OTHER
shall
promote
without
similar
notices)
(C)
1998-2003
obtainingacopyofthis
documentation
Software
distribute,
Software,
Softwareisfurnishedtodo
conditions:
copyright
Software.
INCLUDING
PURPOSE
SHALL
ANY
WHETHERINAN
DEALINGSINTHE
notbeusedinadvertisingorotherwise
the
sale,
L1BMNG
(c)
2000-2007
may
insert
additional
modify
the
individuals:
Randers-Pehrson-glennrp
Stiles
this
purposesofthis
Authors"isdefinedasthe
Juyn-
gjuyn
Assenat-
notedinthe
list.c
licence
all
the
files
granted,
without
the
rightstouse,
andtopermit
notice
KIND,
BUT
THE
CLAIM,
ARISING
WITH
THE
useorother
prior
written
SOFTWARE
Gerard
source]
copyright
:at:
users.sourceforge.net
raph
:at:
DATA,
OR
HOWEVER
STRICT
LIABILITY,
USEOFTHIS
POSSIBILITY
OR
SOFTWARE
source
code
and
the
trio
files,
which
but
with
different
are:
Daniel
Veillard..
freeofcharge,
files
(the
restriction,
sublicense,
and
this
copiesorsubstantial
"AS
EXPRESS
NOT
LIMITEDTOTHE
AND
NONINFRINGEMENT.
DANIEL
DAMAGESOROTHER
ACTIONOFCONTRACT,
FROM,
SOFTWAREORTHE
SOFTWARE.
notice,
the
dealingsinthis
authorization
Juyn
notices
raphnet.net
after
and
:at:
All
Rights
software
"Software"),
copy,
permission
IS",
VEILLARD
users.
and
including
modify,
and/or
persons
so,
subject
WITHOUT
OR
FIT-NESS
OUTOFOR
nameofDaniel
from
this
sentence
license,
following
to
sell
to
BE
to
to
FOR
USE
set
22
Page 67

The
MNG
libraryissupplied
Contributing
Authors
disclaim
expressedorimplied,
the
warrantiesofmerchantability
any
no
liability
purpose.
for
The
Contributing
direct,
indirect,
exemplary,orconsequential
result
from
the
useofthe
advisedofthe
Permissionishereby
and
distribute
for
any
possibilityofsuch
this
purpose,
without
grantedtouse,
source
"AS
IS".
all
warranties,
including,
without
andoffitness
Authors
incidental,
damages,
MNG
Library,
damage.
code,orportions
fee,
subjecttothe
The
limitation,
assu~e
special,
which
even
copy,
modify,
following
for
may
if
hereof,
restrictions:
1.
The
originofthis
misrepresented;
the
2.
Altered
and
original
must
software.
versions
notbemisrepresentedasbeing
source
you
must
code
not
mustbeplainly
must
not
claim
that
markedassuch
be
you
the
wrote
original
source.
3.
This
or
altered
Copyright
from
notice
may
any
sourceoraltered
notberemoved
source
distribution.
The
Contributing
fee,
and
encourage
a
componenttosupporting
formatincommercial
source
highly
codeina
appreciated.
Partsofthis
libpng
package.
Although
PNG
not
It
does
jpeg
Maria
and
This
MNG
this
specification
require
require
library,
(dependingonthe
Full-Color-Management
library's
animations,Itis
image-editing
creation
(future
support
==========================================
and
modifications
for
Authors
the
useofthis
specifically
source
the
MNG
products.Ifyou
product,
software
library
the
Iibpng
the
and/or
(as
zlib
acknowledgment
have
been
supports
MNG
descends
package,
library
the
"Iittle-cms"
adapted
all
features
and
optionally
librarybyMarti
inclusionofsupport
respectively.
functionisprimarilytoread
not
meantasa
component!Itdoes
editing
creation
functionalityatthe
may
include
andorediting)
FONTCONFIG
however
some
SOFTWARE
permit,
and
use
code
JNG.
this
without
~s
file
would
from
the
from
the
from
it)itdoes
the
for
and
display
full-featured
offer
chunk
level.
more
be
IJ.G
JNG
fontconfig/fontconfig/fontconfig.h
Copyright
Permissiontouse,
this
is
hereby
above
both
appearinsupporting
nameofKeith
publicity
without
Packard
suitabilityofthis
(c)
2001
Keith
Packard
copy,
modify,
software
that
and
granted
copyright
copyright
its
documentation
without
notice
fee,
appearinall
notice
and
documentation,
Packard
notbeusedinadvertising
pertainingtodistributionofthe
specific,
written
prior
makesnorepresentations
software
for
distribute,
for
any
provided
that
copies
this
permission
and
permission.
about
any
purpose.Itis
and
sell
purpose
the
and
that
notice
that
the
software
Keith
the
or
provided
THE
WITH
ALL
AND
BE
CONSEQUENTIAL
WHATSOEVER
DATAORPROFITS,
CONTRACT,
ACTION,
WITH
"as
is"
without
AUTHOR(S)
REGARDTOTHIS
IMPLIED
WARRANTIESOFMERCHANTABILITY
FITNESS,INNO
LIABLE
FOR
ANY
RESULTING
NEGLIGENCEOROTHER
ARISING
THE
USEORPERFORMANCEOFTHIS
expressorimplied
DISCLAIMS
ALL
SOFTWARE,
EVENT
SPECIAL,
SHALL
INDIRECT
DAMAGESORANY
FROM
WHETHERINAN
WARRANTIES
LOSSOFUSE,
warranty.
INCLUDING
THE
AUTHOR(S)
OR
DAMAGES
ACTION
TORTIOUS
OUTOFORINCONNECTION
OF
SOFTWARE.
==========================================
Copyright
C·ARES
1998bythe
SOFTWARE
Massachusetts
Institute
of
Technology.
Copyright
Permissiontouse,
software
and
above
both
appearinsupporting
nameofM.I.T.
pertainingtodistributionofthe
specific,
M.I.T.
of
this
is"
==========================================
ICU
Copyright
Machines
Permissionishe'reby
any
associated
dealinthe
without
merge,
the
Softwareisfurnishedtodo
above
appearinall
above
appearinsupporting
THE
WARRANTYOFANY
IMPLIED,
WARRANTIESOFMERCHANTABILITY,
A
PARTICULAR
OF
COPYRIGHT
THIS
SPECIAL
OR
FROM
(C)
2007-2008byDaniel
copy,
modify,
and
its
documentation
without
copyright
that
copyright
feeishereby
notice
appearinall
notice
granted,
and
documentation.,
notbeusedinadvertlsmgorpubliCIty
written
prior
permission.
makesnorepresentations
software
without
License·
for
any
purpose.Itis
expressorimplied
ICU
1.8.1
and
PERMISSION
(c)
1995-2009
Corporation
International
and
later
NOTICE
others
granted,
person
Software,
obtainingacopyofthis
documentation
Software
limitation
publish,
without
the
rightstouse,
distribute,
andtopermit
files
restriction,
and/or
personstowhom
so,
copyright
copyright
notice(s)
copiesofthe
notice(s)
and
Software
and
documentation.
SOFTWAREISPROVIDED
KIND,
EXPRESS
THIRD
INCLUDING
PARTY
BUT
NOT
PURPOSE
AND
RIGHTS.INNO
HOLDERORHOLDERS
NOTICEBELIABLE
FOR
INDIRECTORCONSEQUENTIAL
ANY
DAMAGES
LOSSOFUSE,
WHATSOEVER
DATAORPROFITS,
Stenberg
and
for
any
provided
copies
this
permission
software
distribute
purpose
~nd
this
that
the
and
that
notice
that
th~
.
~ithout
, ..
about
the
sUitability
provided
"as
warranty.
COPYRIGHT
AND
Business
All
rights
reserved.
freeofcharge,
software
(the
"Software"),
to
and
to
including
copy,
modify,
sell
copies
of
the
provided
this
this
"AS
that
the
permission
and
~ha.t
both
permisSion
IS",
WITHOUT
notice
~he
notice
OR
LIMITEDTOTHE
FITNESS
FOR
NONINFRINGEMENT
EVENT
SHALL
THE
INCLUDED
ANY
CLAIM,ORANY
IN
DAMAGES,
RESULTING
WHE~HER
23
Page 68

AND
INANACTIONOFCONTRACT,
OTHER
CONNECTION
THIS
Exceptascontainedinthis
copyright
otherwisetopromote
in
the
TORTIOUS
SOFTWARE.
holder
this
Software
copyright
ACTION,
WITH
shall
without
holder.
THE
notbeusedinadvertising
the
NEGLIGENCE
ARISING
USEORPERFORMANCE
notice,
the
sale,
useorother
prior
written
authorization
OR
OUTOFOR
nameofa
or
dealings
IN
OF
of
==========================================
FreeBSD
Copyright
UniversityofCalifornia.
Redistribution
withorwithout
that
1.
Redistributionsofsource
above
following
2.
Redistributionsinbinary
the
the
other
3.
Neither
of
its
promote
specific
(c)
the
following
copyright
disclaimer.· .
above
copyright
following
materials
the
contributors
products
prior
1982,
and
modification,
conditions
notice,
disclaimerinthe
provided
nameofthe
maybeusedtoendorse
derived
written
SOFTWARE
1986,
1993
All
rights
useinsource
are
are
code
this
listofconditions
form
notice,
this
documentation
with
the
University
from
permission.
The
Regentsofthe
reserved.
and
binary
forms,
permitted
met:
must
must
listofconditions
distribution.
this
provided
retain
reproduce
nor
the
or
software
the
and
and/or
names
without
the
and
NON-COMMERCIAL
OBTAINED
MPEGLATO
NO
LICENSEISGRANTEDORSHALLBEIMPLIED
FOR
INCLUDING
INTERNAL
LICENSING
LLC.SEE
HTIP://WWW.MPEGLA.COM
FROMAVIDEO
PROVIDE
ANY
OTHER
THAT
AND
COMMERCIAL
MAYBEOBTAINED
USE.
ADDITIONAL
RELATINGTOPROMOTIONAL,
==========================================
NotificationofMPEG-4
THIS
PRODUCTISLICENSED
PATENT
AND
(i)
STANDARO
AND/OR
(ii)
CONSUMER
NON-COMMERCIAL
OBTAINED
TO
OR
ADDITIONAL
FROM
HTIP://WWW.MPEGLA.COM
PORTFOLIO
NON-COMMERCIAL
ENCODE
DECODE
PROVIDE
SHALLBEIMPLIED
VIDEOINCOMPLIANCE
("AVC
AVC
ENGAGEDINA
FROMAVIDEO
AVC
INFORMATION
MPEG
LA,
LICENSE
VIDEO")
VIDEO
ACTIVITY
VIDEO.NOLICENSEISGRANTED
L.L.C.
==========================================
THIS
SOFTWAREISPROVIDEDBYTHE
AND
CONTRIBUTORS
OR
IMPLIED
.
NOT
LIMITED
OF
MERCHANTABILITY
PARTICULAR
INNOEVENT
CONTRIBUTORSBELIABLE
INDIRECT,
OR
CONSEQUENTIAL
NOT
LIMITED
GOODSORSERVICES;
PROFITS;ORBUSINESS
CAUSED
WHETHERINCONTRACT,
TORT
ARISINGINANY
SOFTWARE,
OF
SUCH
WARRANTIES,
TO,
PURPOSE
SHALL
INCIDENTAL,
TO,
ANDONANY
(INCLUDING
EVENIFADVISEDOFTHE
DAMAGE.
"AS
THE
IMPLIED
AND
ARE
THE
DAMAGES
PROCUREMENTOFSUBSTITUTE
LOSSOFUSE,
THEORYOFLIABILITY,
NEGLIGENCEOROTHERWISE)
WAY
OUTOFTHE
IS"
AND
INCLUDING,
WARRANTIES
FITNESS
DISCLAIMED.
REGENTS
FOR
SPECIAL,
INTERRUPTION)
STRICT
REGENTS
ANY
EXPRESS
BUT
FOR
A
OR
ANY
DIRECT,
EXEMPLARY,
(INCLUDING,
DATA,
OR
HOWEVER
LIABILITY,
USEOFTHIS
OR
POSSIBILITY
BUT
NotificationofVC-1
THIS
PRODUCTISLICENSED
PATENT
AND
(i)
STANDARD
AND/OR
(ii)
CONSUMER
COMMERCIAL
FROMAVIDEO
VC-1
NO
FOR
MAYBEOBTAINED
HTIP://WWW.MPEGLA.COM
PORTFOLIO
NON-COMMERCIAL
ENCODE
DECODE
LICENSEISGRANTEDORSHALLBEIMPLIED
ANY
VIDEOINCOMPLIANCE
("VC-1
VC-1
ENGAGEDINA
VIDEO.
OTHER
LICENSE
VIDEO")
VIDEO
ACTIVITY
PROVIDER
USE.
ADDITIONAL
FROM
==========================================
Opera®
==========================================
This
NotificationofMPEG-4
THIS
PRODUCTISLICENSED
VISUAL
PERSONAL
CONSUMER
(i)
MPEG-4
AND/OR
(ii)
BYACONSUMER
PATENT
AND
FOR
ENCODING
DECODING
VIDEOINCOMPLIANCE
VISUAL
PORTFOLIO
NON-COMMERCIAL
STANDARD
MPEG-4
ENGAGEDINA
LICENSE
("MPEG-4
VIDEO
Visual
UNDER
THE
USEOFA
THAT
WAS
PERSONAL
MPEG-4
FOR
THE
WITH
THE
VIDEO")
ENCODED
softwareisbeing
basis.
Opera
and
its
suppliers
regarding
statutoryorotherwise,
warrantiesoffunctionality,
purposeornon-infringement.
(a)
embeddedonthis
(b)
the
software,
restrict
prohibit,tothe
useofOpera
providedonan
disclaim
including
Product
extent
ACTIVITY
PROVIDER
MPEG-4
AND/OR
LICENSED
VIDEO.
INFORMATION
USES
AND
FROM
MPEG
AVC
UNDER
FOR
USEOFA
THAT
WAS
PERSONAL
AND/OR
PROVIDER
FOR
ANY
MAYBEOBTAINED
SEE
UNDER
FOR
USEOFA
THAT
PERSONAL
AND/OR
LICENSEDTOPROVIDE
MPEG
Browser
either
expressorimplied,
fitness
BrowserinObject
for
personal
permittedbyapplicable
THE
THE
PERSONAL
CONSUMER
WITH
ENCODEDBYA
AND
WAS
LICENSED
OTHER
WAS
WAS
LA,
all
without
foraparticular
USE.
THE
THE
PERSONAL
CONSUMER
WITH
ENCODEDBYA
AND
OBTAINED
INFORMATION
L.L.C.
«as
warranties
limitation
use
AVC
THE
VC-1
THE
SEE
is»
Code
only;
WAS
BY
LA,
TO
AVC
TO
VC-1
NON-
law,
24
Page 69

the
duplication,
de-compilationofany
(c)
disclaimorlimit,tothe
applicable
indirect,
•
expensesofany
(d)
applicable
Opera
limitation
particular
Opera®
1995-2010
The
code:
•
OpenSSL
•
writtenbyEric
•
•
•
•
2004
•
licenses:
•
conversions
==========================================
David
and
The
Copyright
Technologies.
Permissiontouse,
this
consequential
disclaimorlimit,tothe
and/or
Browser
Opera®
This
product
This
product
Eberhard
Doug
Lea.
DavidM.Gay.
Portionsofthis
The
The
.OpenSSL
Number-to-string
The
authorofthis
Copyright©1991,
Technologies.
Permissiontouse,
this
hereby
is
includedinall
isorincludesacopyormodificationofthis
software
documentation
THIS
IS",
WARRANTY.INPARTICULAR,
THE
REPRESENTATIONORWARRANTYOFANY
KIND
OF
THIS
PARTICULAR
Gay's
strtod)
authorofthis
software
reverse
law,
Opera's
kind;
law,
any
Opera
warrantiesoffunctionality,
purposeornon-infringerflent;
from
Opera
Browser
includes
Project
includes
Young.
Mattes.
FreeType
Toolkitiscoveredbythe
are
coveredbythe
software
granted,
andinall
SOFTWAREISBEING
WITHOUT
AUTHOR
CONCERNING
SOFTWAREORITS
binary/decimal
(c)
1991,
for
engineering,
portionofOpera
extent
permitted
liability
and
warrantiesinrelationtoor
Browser,
Opera
Software
uses
for
useinthe
software
Project.
and
softwareisDavidM.Gay.
•
copy,
for
any
provided
copiesofany
copiesofthe
for
such
ANY
NOR
PURPOSE.
dtoa
softwareisDavidM.Gay.
2000,
copy,
any
purpose
for
any
similar
extent
ASA.
the
software
cryptographic
are
All
string-to-number
1996,
purpose
EXPRESSORIMPLIED
LUCENT
THE
and
2001byLucent
modify,
damages,
permitted
including
Software
All
rights
following
developedbythe
OpenSSL
copyright©1996rights
following
2000,
modify,
without
that
this
software
software.
PROVIDED
NEITHER
MAKES
MERCHANTABILITY
FITNESS
strtod
conversion
and
without
disassembly
Browser;
by
direct,
costs
by
by
without
fitness
for
ASA.
Copyright
reserved.
third
party
Toolkit.
software
reserved.
OpenSSL
license:
2001byLucent
and
distribute
fee
is
entire
notice
which
supporting
"AS
ANY
FOR
code
(dtoa
distribute
feeishereby
or
a
ANY
granted,
all
or
the
or
THIS
WITHOUT
IN
LUCENT
WARRANTYOFANY
MERCHANTABILITYOFTHIS
FITNESS
==========================================
This
from
("Gracenote").
"Gracenote
perform
music-related
track,
online
"Gracenote
You
intended
device.
You
Gracenote
your
agree
Gracenote
third
GRACENOTE
OR
PERMITIED
You
the
Gracenote
restrictions.Ifyour
to
Gracenote
Gracenote
the
Servers,
circumstances
paymenttoyou
You
under
name.
The
track
a
Gracenote
anything
see
the
The
Data
no
regarding
provided
copiesofany
modificationofthis
supporting
SOFTWAREISBEING
ANY
PARTICULAR,
MAKES
FOR
Gracenote®
applicationordevice
Gracenote,
disc
and
title
serversorembedded
may
use
End-User
agree
that
Software,
own
personal
nottoassign,
Softwareorany
party.
GRACENOTE
agree
that
Gracenote
Servers
cease
any
Software,
reserves
Gracenote
including
agree
that
this
Agreement
Gracenote
queries
randomly
about
the
web
Gracenote
Gracenote
are
licensedtoyou
representationsorwarranties,
the
that
this
entire
software
documentation
EXPRESSORIMPLIED
NEITHER
ANY
ANY
End
Inc.ofEmeryville,
The
Software")
and/or
information,
information
Servers")
Gracenote
you
YOU
AGREE
DATA,
SERVERS,
HEREIN.
your
Data,
and
all
Software,
will
for
Gracenote,
service
for
statistical
assigned
servicetocount
who
page
for
service.
Software
accuracyofany
whichisor
software
PROVIDED
THE
REPRESENTATION
KIND
CONCERNING
PARTICULAR
User
License
contains
software
file
functionsofthis
will
and
non-commercial
copy,
THE
non-exclusive
the
will
license
useofthe
and
all
all
Gracenote
any
you
from
enables
identification
including
("Gracenote
databases
andtoperform
Data
use
Gracenote
Gracenote
transferortransmit
Gracenote
NOTTOUSEOREXPLOIT
GRACENOTE
EXCEPTASEXPRESSLY
Gracenote
terminateifyou
terminates,
Gracenote
rightsinGracenote
and
ownership
information
Inc.
against
usesaunique
purposes.
numeric
queries
are.
the
Gracenote
and
"AS
the
For
each
IS."
noticeisincluded
includesacopy
andinall
for
such
AUTHOR
SOFTWAREORITS
PURPOSE.
copies
software.
"AS
WARRANTY.
NOR
OR
THE
Agreement
software
California
Gracenote
this
application
and
obtain
name,
Data")
(collectively,
other
onlybymeansofthe
application
Data,
Servers
use
only.
Datatoany
SOFTWARE,
licensetouse
Software,
violate
you
Gracenote
Gracenote
rights.
become
may
you
identifieristo
more
Gracenote
expressorimplied,
Gracenote
Data,
Servers.
Under
liable
that
you
enforce
directlyinits
identifier
The
purpose
without
information,
Privacy
itemofGracenote
Data
of
IS",
(the
to
artist,
from
functions.
or
the
for
You
the
and
these
agree
the
Data,
no
for
any
provide.
its
rights
own
to
allow
the
knowing
Policy
makes
from
in
of
for
25
Page 70

in
the
Gracenote
righttodelete
change
deems
Gracenote
freeorthat
Gracenote
is
or
may
its
data
sufficient.Nowarrantyismade
not
obligatedtoprovide
additional
provideinthe
servicesatany
Servers.
data
from
categories
SoftwareorGracenote
functioningofGracenote
Servers
data
for
willbeuninterrupted.
typesorcategories
future
time.
Gracenote
the
Gracenote
any
you
andisfreetodiscontinue
cause
Servers
with
reserves
Serversorto
that
Gracenote
that
the
are
Software
Gracenote
new
enhanced
that
Gracenote
the
error-
or
.
GRACENOTE
EXPRESSORIMPLIED,
NOT
LIMITED
MERCHANTABILITY,
PURPOSE,
GRACENOTE
THAT
WILLBEOBTAINEDBYYOUR
GRACENOTE
SERVER.INNO
LIABLE
DAMAGESORFOR
REVENUES.
DISCLAIMS
TO,
IMPLIED
FITNESS
TITLE,
AND
DOES
NOT
SOFTWAREORANY
CASE
FOR
ANY
CONSEQUENTIALORINCIDENTAL
ANY
WILL
ALL
WARRANTIES
INCLUDING,
WARRANTIES
NON-INFRINGEMENT.
WARRANT
GRACENOTE
LOST
BUT
OF
FORAPARTICULAR
THE
RESULTS
USEOFTHE
GRACENOTE
BE
PROFITSORLOST
26
Page 71

©
2011
Sony
Corporation
PrintedinU.S.A.
IIII1I1I111111111111111111111
4272249111
Page 72

SONY;;
I
LCD
4-144-386-01(2)
Television
12M
I
LIMITED
SONY
ELECTRONICS
for
the
original
forth
below.
refurbished
a
productorpart
remedies.
Term:
dateofpurchase
product
end
user
not
accepted
Product
assistance
is
provided
a
productorpartisexchanged,
provided
product
Under
partsor(ii)
SONY
One
(1)
year
does
not
purchaseisrequiredtodetermine
Coverage:
for
hardwareorsoftware
"AS
under
and
may
INC.
and
any
this
that
has
does
from
for
commercial
extend
for
warranty
Only
IS"
unless
this
limited
not
include
("SONY")
subsequent
Limited
replace
been
not
warrant
the
original
the
term.
the
expressly
warranty
warrants
end
user
Warranty,
the
product
returnedtoits
that
the
dateofpurchaseofthe
use).
This
A
copyofthe
verification.
hardware
any
components
usage
provided
the
original
may
original
engravingorsimilar
WARRANTY(u.s.oNLY)
this
product
owner(s)
SONY
will,atits
withaneworrefurbished
original
operationofthe
Limited
Warrantyistransferable.
dated
coverage.
packaged
and
any
forinany
item
becomes
varyinthe
against
("You"or"Your")
option,
specifications.
product
defectsinmaterialorworkmanship
(i)
repair
product.
These
willbeuninterruptedorerror-free.
product
(or
receiptorbillofsale
Online
with
the
Product
software
color
products
enclosed
SONY's
and/or
software
property.
cosmetic
customization.
are
for
the
time
the
ninety
(90)
However,
auction
not
Limited
Any
design
periods
product
"Refurbished"
are
using
Your
days
from
any
transferofthis
from
the
confirmations
are
covered.
covered.
replacement
Any
Warranty.
from
the
andasset
new
or
means
exclusive
original
original
are
Technical
software
When
product
original
Instructions:
service.
SONYoran
packagingorpackaging
For
specific
You
must
contact
SONY
will
not
reimburse
authorized
instructionsonobtaining
Or
call
Foranaccessoryorpart
If
You
purchasedanextended
termsofserviceasthey
Repair/Replacement
replacement
whicheverislonger.
product
Warranty:
for
SONYoran
You
for
servicer,
affordinganequal
Visit
You
SONY's
the
Sony
must
warranty
Web
Customer
1-800-222-S0NY
not
1-800-488-S0NY
service
are
not
the
remainderofthe
plan,
governedbythis
This
Limited
authorized
service
deliver
degreeofprotectiontothe
Site:
servicer
performedbyothers.
the
service
priortoreturning
product,
for
your
product,
freight
www.sony.com/support
Information
Service
(7669)
available
from
Your
(7669)
please
refertothe
Limited
Warranty
original
service
Warranty.
shall
applytoany
Limited
Warranty
any
Unless
prepaid,ineither
facility
specifiedbySONY.
Center
authorized
plan
for
the
repair,
periodorfor
product
otherwise
dealer,
coverage,
call:
replacement
ninety
for
warranty
instructed
its
original
duration
(90)
and
part
days,
by
or
(See reverse for additional terms
and
conditions.)
Printed in U.S.A.
Page 73

Limitations:
workmanship
including
damage,
adjustmentsorsignal
of
the
with
the
by
SONY;
but
including
SONY
owner's
damage
This
Limited
during
ordinary
not
limited
to,
contact
reception
product,
including
manual
and
causedbyservicing
Warranty
consumer
(i)
with
other
causedbycomputerorinternet
coverupto
Display
of
pixels
This
Limited
or
similar
not
replace
auction.
from
the
States
SONY
a
product
.01%pixel
contains
hundredsofthousandsofindividual
thatdonot
Warranty
notations
missing
This
Limited
prodUCt.
(excluding
territories)orUnited
specifically
exchange
outages
function
and
does
does
normally.
not
not
components
Warrantyisinvalidifthe
This
Limited
does
not
represent
without
risktoor
only
covers
use;itdoes
product
liquid,
issues;
the
viruses,
(small
cover
from
issues
extreme
(v)
antenna;
SONY
instruction;
not
bugs,
dot
SONY
cover
consumables
any
package
duetoactsofGodornature;
heatorforeign
limitationsoftechnology;
(vii)
cosmetic
authorizedbySONYorthird-party
wormsorTrojan
picture
products
factory-applied
Warrantyisvalid
States
onlyonproducts
military
thatitwillbeabletorepair
lossofprogramsordata.
product
not
cover
issues
product
causedbydefectsinmaterial
issues
causedbyany
(ii)
material;
damage;
(ix)
useofpartsorperipherals
Horses.
elements
pixels.
sold
that
Displays
"AS
(iv)
customer
(vi)
modificationofortoany
(viii)
useorinstallation
This
Limited
are
darkorincorrectly
typically
IS",
"Open
Box",
(suchasfusesordisposable
purchased
"AS
serial
IS",
"Open
number
has
purchased
facilities.
any
product
under
or
other
reason,
misuse;
(iii)
accidental
installation,
set
up
part
inconsistent
not
recommended
calibration;or(x)
Warranty
containasmall
"WITH
batteries).
damage
does
not
illuminated).
number
ALL
FAULTS"
SONY
will
A
Box"orthroughanonline
been
alteredorremoved
and
locatedinthe
this
warrantyormake
United
LIMITATIONONDAMAGES:
DAMAGES
FOR
BREACHOFANY
RECOVERYOFANY
KIND
SONY
SHALL
EXPRESSORIMPLIED
AGAINST
PRODUCT.
DURATIONOFIMPLIED
ANY
IMPLIED
THIS
PRODUCTISLIMITEDINDURATIONTOTHE
COMMERCIAL
OF
MERCHANTABILITY
WARRANTYOFMERCHANTABILITYORFITNESS
PURCHASERS,
WARRANTIES:
ALL
IMPLIED
AND
FITNESS
DISCLAIMED.
Some
statesdonot
limitationsonhow
to
You.
This
Limited
from
statetostate.
No
Sony
reseller,
this
warranty.
allow
the
exclusionorlimitationofincidentalorconsequential
longanimplied
Warranty
gives
warranty
You
agentoremployeeisauthorizedtomake
NOTBELIABLE
FOR
WARRANTYONTHIS
SONYBEGREATER
EXCEPTTOTHE
THAN
EXTENT
DURATIONOFTHIS
WARRANTIES,
INCLUDING
FORAPARTICULAR
lasts,sothe
specific
legal
above
rights
and
any
ANY
INCIDENTALORCONSEQUENTIAL
THE
PURCHASE
PRODUCT
NOR
SHALL
PRICEOFTHE
PROHIBITEDBYAPPLICABLE
FORAPARTICULAR
WARRANTY.
THE
IMPLIED
PURPOSE,
ARE
PURPOSE
WITH
RESPECT
WARRANTIES
EXCLUDED
damages,orallow
limitationsorexclusions
You
may
have
other
modification,
extensionoraddition
may
rights
not
which
apply
LAW,
ON
TO
AND
vary
to
A-
"vJ
FSC
MIX
Peper
FSC" C014659
11111111111111111111111111111
4144386012
 Loading...