

Page 1
4-436-788-11(1)
LCD TV
Operating Instructions
Introducing Your New
BRAVIA
Getting Started
Operating the TV
Using Features
Using the Menus
Other Information
®
Sony Customer Support
U.S.A.: http://www.sony.com/tvsupport
Canada: http://www.sony.ca/support
United States
1.800.222.SONY
Please Do Not Return
the Product to the Store
KDL-60EX645 / 55EX645 / 50EX645 / 46EX645 / 46EX641 / 40EX645
Canada
1.877.899.SONY
Page 2
Owner’s Record
The model and serial numbers are located at the side
and rear of the TV. Record these numbers in the spaces
provided below. Refer to them whenever you call upon
your Sony dealer regarding this TV.
Model Name
Serial No.
CAUTION
To prevent electric shock and blade exposure, do not use
this polarized AC plug with an extension cord, receptacle or
other outlet unless the blades can be fully inserted.
❑ Operate the TV only on 110-240 V AC
(USA/Canada 120 V AC).
❑ Avoid operating the TV at temperatures
below 41°F (5°C).
Licensing Information
Macintosh is a trademark of Apple Inc., registered in the U.S.
and other countries.
HDMI, the HDMI logo, and High-Definition Multimedia
Interface are trademarks or registered trademarks of HDMI
Licensing, LLC in the United States and other countries.
Fergason Patent Properties, LLC:
U.S. Patent No. 5,717,422
U.S. Patent No. 6,816,141
Manufactured under license from Dolby Laboratories. Dolby
and the double-D symbol are trademarks of Dolby
Laboratories.
Blu-ray Disc is a trademark.
“BRAVIA” and , BRAVIA Sync, and are
trademarks or registered marks of Sony Corporation.
“PlayStation” is a registered trademark and “PS3” is a
trademark of Sony Computer Entertainment Inc.
®
Opera
Browser from Opera Software ASA. Copyright 1995-
2012 Opera Software ASA. All rights reserved.
®
, the DLNA Logo and DLNA CERTIFIED® are
DLNA
trademarks, service marks, or certification marks of the
Digital Living Network Alliance.
Cleaning
When cleaning, be sure to unplug the power
cord to avoid any chance of electric shock.
• Wipe the LCD screen gently with a soft cloth.
• Stubborn stains may be removed with a
cloth slightly moistened with a solution of
mild soap and warm water.
• If using a chemically pretreated cloth, please
follow the instruction provided on the
package.
• Never use strong solvents such as a thinner,
alcohol or benzine for cleaning.
• See the supplied Safety Booklet for
additional information.
Your BRAVIA TV is ENERGY STAR® qualified
in the “Home” mode. It meets strict energy
efficiency guidelines set by the U.S.
Environmental Protection Agency and
Department of Energy.
ENERGY STAR is a joint program of these
government agencies, designed to promote energy efficient
products and practices. Changes to certain features,
settings, and functionalities of this TV (i.e. TV Guide, Picture/
Sound, Light Sens or, Power Savings) can increase or change
the power consumption. Depending upon such changed
settings, the power consumption may exceed the limits
required for the ENERGY STAR qualification in the “Home”
mode.
Wi-Fi Protected Set-up ™ (WPS) is a mark of the Wi-Fi
Alliance.
Wi-Fi Protected Access ™ (WPA) is a mark of the Wi-Fi
Alliance.
The 55 class has a 54.6 inch viewable image size (measured diagonally).
2
Page 3

Contents
Introducing Your New BRAVIA
Welcome to the World of BRAVIA® . . . . . . . .4
Experiencing Stunning HD with Your
BRAVIA . . . . . . . . . . . . . . . . . . . . . . . . . . .4
The Four Steps to a Stunning HD
Experience . . . . . . . . . . . . . . . . . . . . . . . . .5
TV Feature Highlights . . . . . . . . . . . . . . . . . . .5
®
Getting Started
Setting Up Your TV. . . . . . . . . . . . . . . . . . . . .7
Attaching the Table-Top Stand . . . . . . . . . . . .8
Adjusting the viewing angle of the TV
(except KDL-60EX645) . . . . . . . . . . . . . .10
Locating Inputs and Outputs . . . . . . . . . . . . .11
Connecting the TV . . . . . . . . . . . . . . . . . . . .13
Connecting Other Equipment . . . . . . . . . . . .17
When Installing the TV Against a Wall or
Enclosed Area . . . . . . . . . . . . . . . . . . . . .18
Securing the TV . . . . . . . . . . . . . . . . . . . . . .19
Bundling the cables. . . . . . . . . . . . . . . . . . . .21
Running Initial Setup. . . . . . . . . . . . . . . . . . .22
Operating the TV
Using the Remote Control. . . . . . . . . . . . . . .24
Remote Control Button Description . . . . . . .25
TV Controls and Indicators . . . . . . . . . . . . . .28
Using Features
BRAVIA® Sync™ with Control for HDMI. . . .30
Using PIP Feature. . . . . . . . . . . . . . . . . . . . .31
Using PAP feature . . . . . . . . . . . . . . . . . . . .32
Favorites . . . . . . . . . . . . . . . . . . . . . . . . . . . .33
Wide Mode . . . . . . . . . . . . . . . . . . . . . . . . . .33
Wide Mode with PC . . . . . . . . . . . . . . . . . . .34
Inputs . . . . . . . . . . . . . . . . . . . . . . . . . . . . . .35
Playing back Photo/Music/Video via USB. . .35
Home Network . . . . . . . . . . . . . . . . . . . . . . .38
Photo Frame . . . . . . . . . . . . . . . . . . . . . . . . .39
Using Home Network Features. . . . . . . . . . . 40
Setting up the Internet Connection . . . . . . . .41
If You Cannot Connect to the Internet . . . . .43
Adjusting the Server Display Settings. . . . . . 44
Browsing Websites . . . . . . . . . . . . . . . . . . . .44
Enjoying Sony Entertainment Network . . . . .45
Enjoying Yahoo! Widgets . . . . . . . . . . . . . . .46
Using the Menus
Navigating through TV Menus . . . . . . . . . . .47
Using the Picture Settings. . . . . . . . . . . . . . .49
Using the Sound Settings . . . . . . . . . . . . . . .51
Using the Screen Settings . . . . . . . . . . . . . .53
Using the Channel Settings . . . . . . . . . . . . .55
Using the Parental Lock Settings . . . . . . . . .56
Using the Setup Settings . . . . . . . . . . . . . . .59
Using the Eco Settings . . . . . . . . . . . . . . . . .65
Other Information
PC Input Signal Reference Chart for
PC and HDMI IN. . . . . . . . . . . . . . . . . . . .66
Using a Wall-Mount Bracket . . . . . . . . . . . . .67
Installing the Wall-Mount Bracket . . . . . . . . .68
Troubleshooting . . . . . . . . . . . . . . . . . . . . . .73
Important Notices . . . . . . . . . . . . . . . . . . . . .80
Specifications . . . . . . . . . . . . . . . . . . . . . . . .82
Index . . . . . . . . . . . . . . . . . . . . . . . . . . . . . . .85
Customer Support
United States
http://www.sony.com/tvsupport
Canada
http://www.sony.ca/support
On-line Registration
United States
http://productregistration.sony.com
Canada
http://www.sony.ca/registration
3
Page 4

Introducing Your New BRAVIA
®
Welcome to the World of BRAVIA
®
Thank you for choosing this Sony
documentation listed below to get the most out of your TV.
Safety Booklet
Contains precautionary measures to
keep you and your TV safe. Read
this information prior to setting up
your TV.
Operating Instructions
Provides the most detailed
information to operate your TV.
BRAVIA® high-definition television. Use the
Quick Setup Guide
Provides TV setup information with
sample connection diagrams.
Experiencing Stunning HD with Your BRAVIA
The quality of the image you see on your BRAVIA
signal it receives. To experience the stunning detail of your new
access to HD programming. Your
from:
• Over-the-air broadcasting via HD-quality antenna
• HD cable subscription
• HD satellite subscription
• Blu-ray Disc™ player or other HD compatible external equipment
BRAVIA
TV can receive and display HD programming
TV is only as good as the quality of the
BRAVIA
TV, you need
Contact your cable, satellite or HD service provider for information on upgrading to HD
programming.
4
Page 5
The Four Steps to a Stunning HD Experience
Set, Source, Sound, and Setup
Along with your BRAVIA TV set, a complete HD system requires a source of HD
programming, an HD sound system, and a proper connection setup. Refer to the Quick
Setup Guide, enclosed separately, for connecting optional equipment.
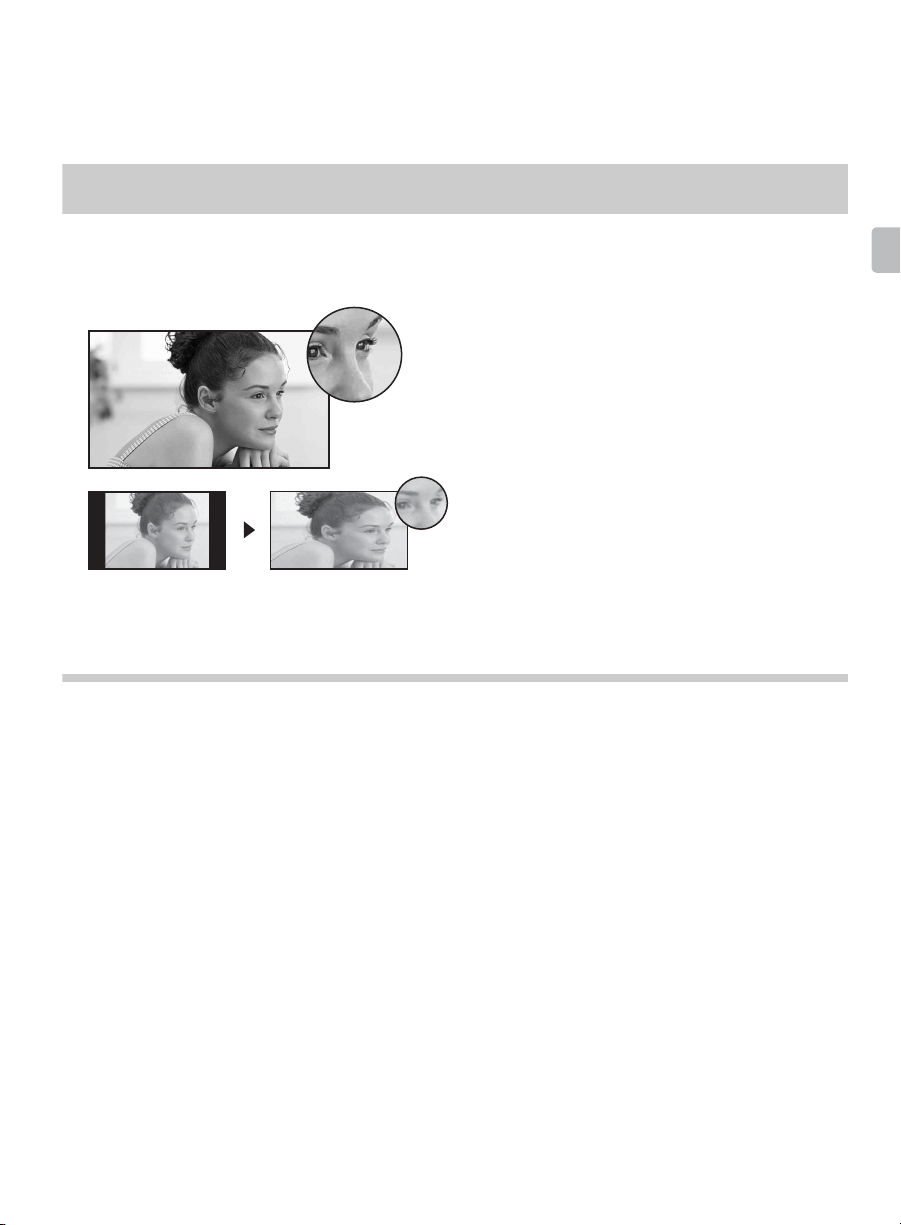
You can enjoy crisp, clear images, smooth
movement, and high-impact visuals from 1080 HD
signals as shown here.
When you compare a high-definition signal to a
standard analog signal, you will notice a big
difference in picture quality. If black bars appear as
shown here, press WIDE on the remote control to fill
the screen.
TV Feature Highlights
Introducing Your New BRAVIA
®
Your BRAVIA comes with many convenient features, such as:
®
➢ BRAVIA
equipment supporting the Control for HDMI function (page 30).
➢ Digital Media Accessibility: Use the Photo, Music, and Video icons to
access photo, music, and video files from DLNA Certified™ networked
equipment or Sony USB equipment (page 35).
➢ PIP (Picture in Picture): You can work on your PC and watch your favorite TV
program simultaneously (page 31).
➢ PAP (Picture and Picture): You can display two pictures (left and right) on the
screen simultaneously (page 32).
➢ Favorites: Your favorite channels and inputs are at your finger tips for easy
access (page 33).
➢ Auto Wide Mode: Set your TV to automatically adjust the screen based on the
signal resolution (page 33).
➢ Input Selection: Allows you to easily switch between the connected equipment
(page 35).
Sync™: Allows your BRAVIA TV to communicate with other Sony
5
Page 6

➢ Scene Select: Allows you to easily adjust your TV to the most suitable picture
and sound settings based on the scenes for the best quality result for the
contents genre you are watching (page 26).
➢ Yahoo! Widgets: Yahoo! TV Widgets bring the best of the Internet to your TV
(page 46). Yahoo! Widgets allow you to access local weather, news and much
more.
➢ DLNA: You can enjoy various content (e.g. photo/music/video files) stored on
DLNA Certified™ media servers. The home network feature allows you to enjoy
network content in other rooms. (page 38).
➢ Internet Video: Internet Video brings videos, movies and much more from the
Internet to your TV (page 45).
➢ Browser: Allows you easily browse websites.
➢ Photo Frame: You can enjoy the large photo frame display with music.
➢ On Timer: Set timer to wake up TV automatically with preferred setting of input
and volume. You can also wake up with your favorite photo and music through
photo frame feature (page 62).
6
Page 7
Getting Started
Setting Up Your TV
Some TV models are packaged with a detached Table-Top Stand so you can mount
your TV to a wall right away. If you are not mounting the TV to a wall, you will need to
attach the Table-Top Stand. You will need a Phillips screwdriver and the supplied
screws to complete the task. Look for the attachment instructions provided with the TV.
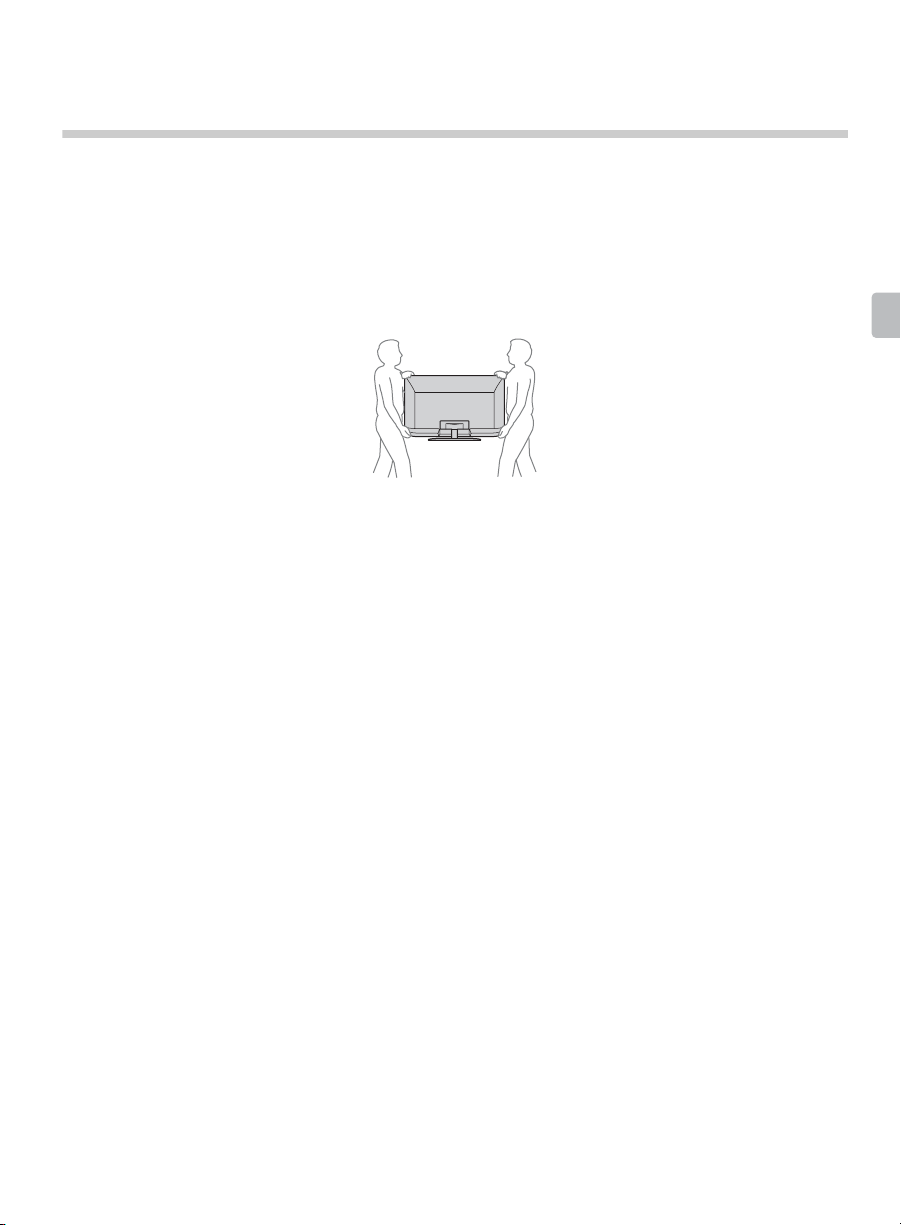
Be sure to consider the following while setting up your TV:
• Disconnect all cables when carrying the TV.
• Carry the TV with the adequate number of people; larger size TVs require two or more people.
• Correct hand placement while carrying the TV is very important for safety and to avoid damage.
• Ensure your TV has adequate ventilation, see page 18.
• For best picture quality, do not expose the screen to direct illumination or sunlight.
• Avoid installing the TV in a room with reflective wall and floor materials.
• Avoid moving the TV from a cold area to a warm area. Sudden room temperature changes may
cause moisture condensation. This may cause the TV to show poor picture and/or poor color.
Should this occur, allow moisture to evaporate completely before powering the TV on.
Getting Started
7
Page 8
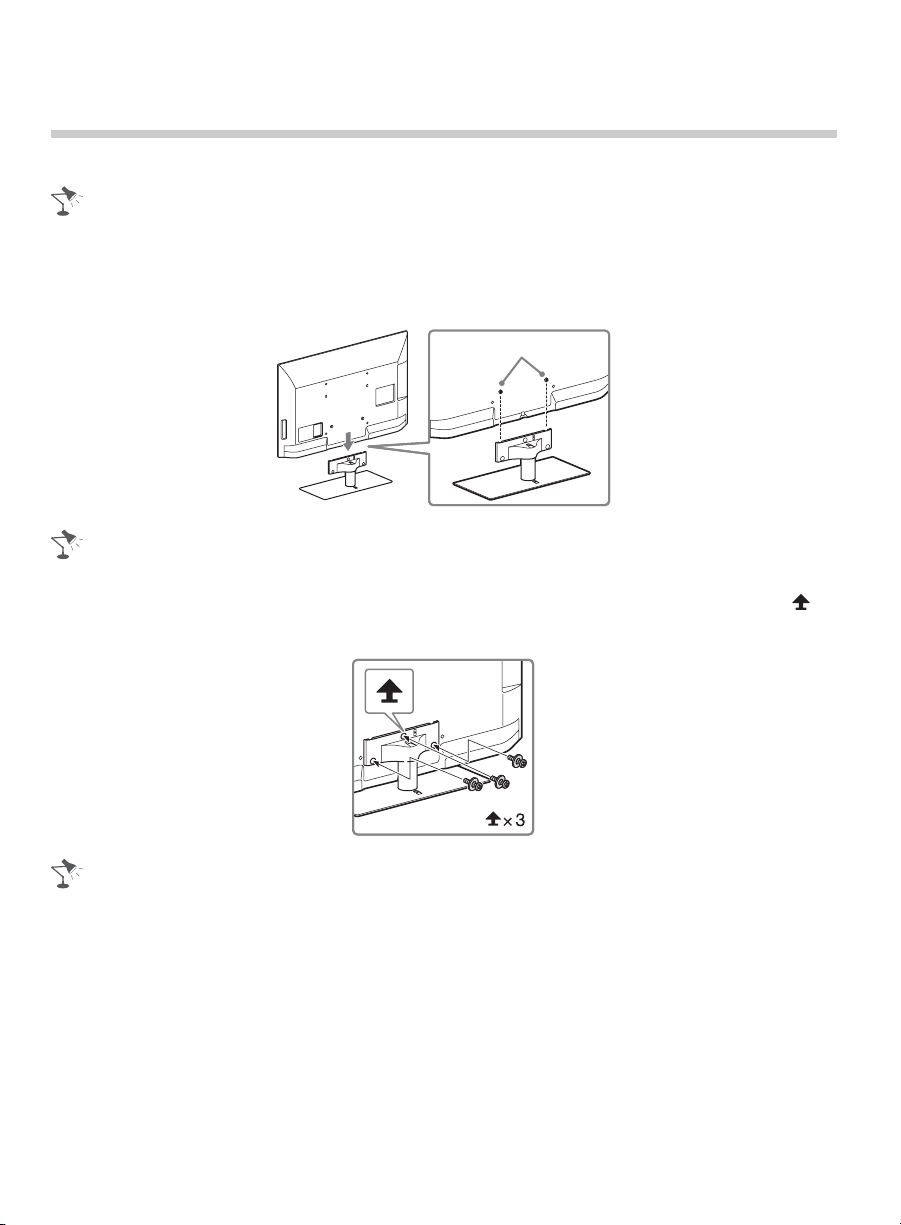
Attaching the Table-Top Stand
Refer to the supplied Table-Top Stand leaflet for proper attachment.
• Do not put stress on the LCD panel or the frame around the screen.
• Be careful to not pinch your hands or the AC power cord when you install the TV set to the TableTop Stand.
1 Place the TV set on the Table-Top Stand.
Guide pins
• Align the TV from the top, slide it in until the guide pins cannot be seen.
2 Fix the TV to the Table-Top Stand using the supplied screws. The arrow marks
indicate the location of the screw holes used for securing the Table-Top Stand.
• If using an electric screwdriver, set the torque at approximately 1.5 N·m {15 kgf·cm}.
8
Page 9

Detaching the Table-Top Stand from the TV
To detach the Table-Top Stand from the TV, remove the screws fixed in step 2.
• Do not remove the Table-Top Stand for any reason other than to install corresponding
accessories on the TV.
• When removing the Table-Top Stand from the TV, lay the display face down on a stable work
surface that is larger than the TV.
• To prevent damaging the surface of the LCD display, make sure to place a soft cloth on the work
surface.
• When installing the TV on a wall, remove the screws from the rear of the TV. Be sure to store the
removed screws in a safe place, keeping them away from children.
• When attaching the Table-Top Stand again, be sure to fasten the screws (previously removed)
to the original holes on the rear of the TV.
Getting Started
9
Page 10
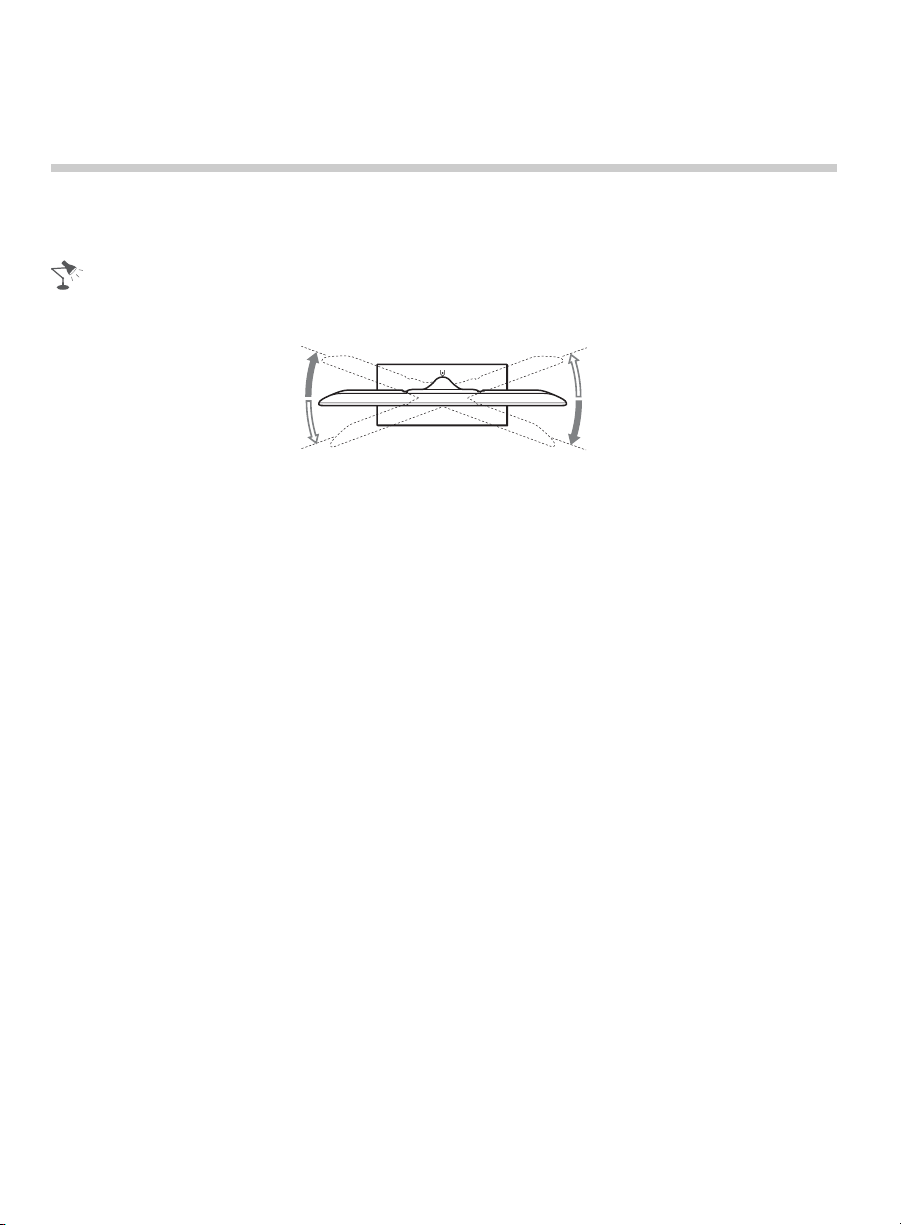
Adjusting the viewing angle of the TV (except KDL-60EX645)
This TV can be adjusted within the angles as illustrated.
x Angle Adjustment (Swivel)
• When adjusting the angle, hold the stand with one hand to avoid having the stand slip or TV tip
over.
*15°
*15°
* The angle is approximate value.
*15°
*15°
10
Page 11
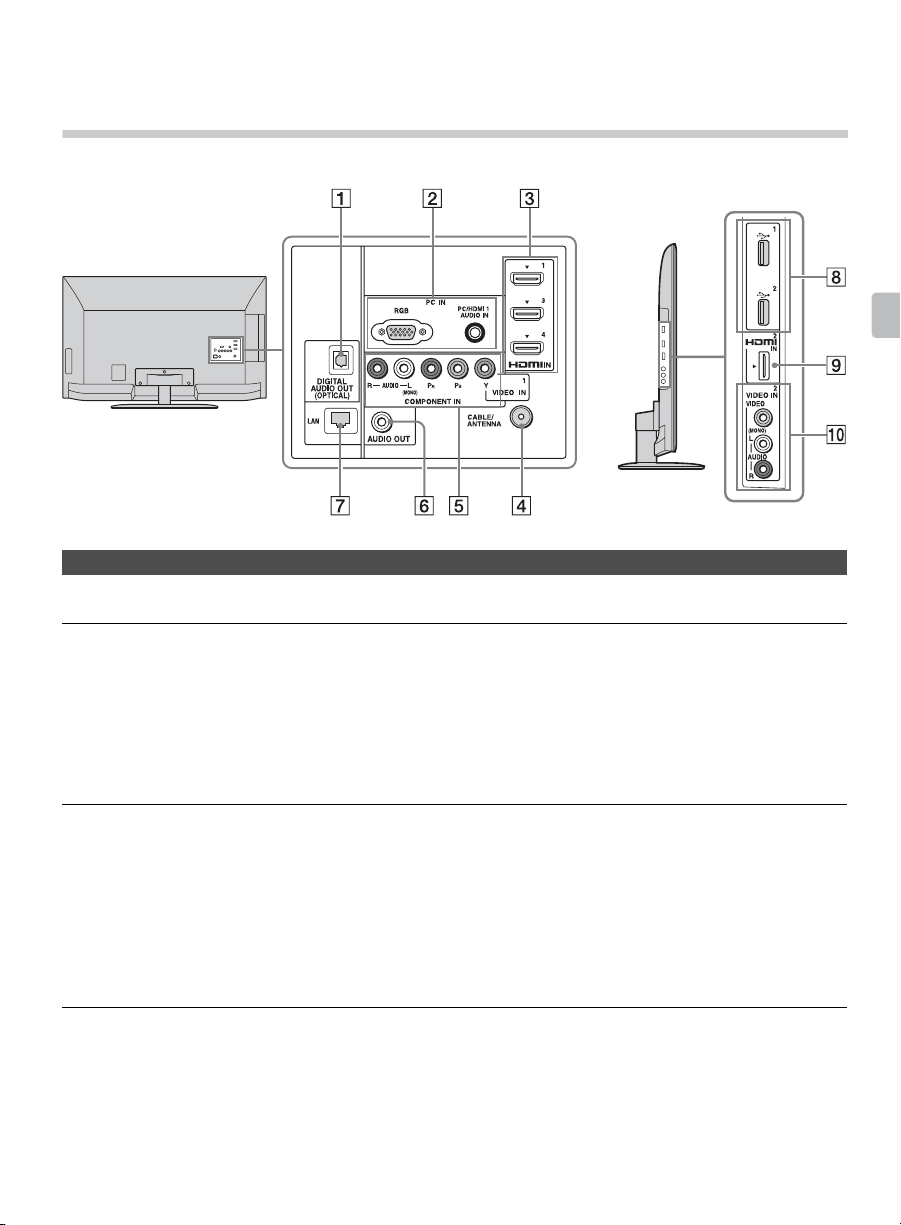
Locating Inputs and Outputs
Side PanelRear Panel
Item Description
1 DIGITAL AUDIO
OUT (OPTICAL)
2 PC IN (RGB) Connects to a personal computer’s video and audio output connector. Can
3, 9
HDMI IN 1/2/3/4
* Manufactured under license from Dolby Laboratories. Dolby and the double-D symbol are
trademarks of Dolby Laboratories.
Connects to the optical audio input of digital audio equipment that is PCM/
Dolby* Digital compatible.
also be connected to other analog RGB equipment. See “PC Input Signal
Reference Chart” on page 66 for the signals that can be displayed.
For some Apple Macintosh computers, it may be necessary to use an
adapter (not supplied). If an adapter is used, connect the adapter to the
computer before connecting the HD15-HD15 cable.
You may need to adjust the TV settings or your PC’s resolution and timing.
See page 16 for information on how to setup your PC to this TV.
HDMI (High-Definition Multimedia Interface) provides an uncompressed,
all-digital audio/video interface between this TV and any HDMI-equipped
audio/video equipment, such as a set-top box, DVD player, and A/V
receiver. HDMI supports enhanced, or high-definition video, plus digital
audio. Be sure to use only an HDMI cable that bears the HDMI logo.
Use the HDMI IN 1 port when connecting DVI equipment. Use a DVI-toHDMI cable or adapter (not supplied). Equipment using a DVI connection
also requires an additional audio connection using an audio cable
connected to PC/HDMI 1 AUDIO IN of PC IN.
Getting Started
(Continued)
11
Page 12

Item Description
4 CABLE/
ANTENNA
5 VIDEO IN 1/
COMPONENT
IN/R-AUDIO-L
(MONO)
6 AUDIO OUT Connects to the audio input jack of your analog audio equipment. You can
7 LAN You can enjoy contents stored in DLNA Certified™ devices via a network
8 USB Connects to USB equipment to access photo, music, and video files.
0 VIDEO IN 2
VIDEO/L
(MONO)AUDIO-R
RF input that connects to your Cable or VHF/UHF antenna.
This input port can be used as a composite video input (VIDEO 1) or as a
component video input (COMPONENT). For composite use, connect the
yellow jack to Y for video and use audio L (mono) and R for audio signal.
For component connection, use Y, PB, PR for video signals and also
connect the audio L (mono) and R for audio signal.
This TV can auto detect and switch between the VIDEO 1 and
COMPONENT when VIDEO 1 or COMPONENT is connected.
To set to auto detection, press HOME, select Settings, and then select the
Setup settings. Select the Video1/Component Selection option in AV
Setup then set to Auto.
use this output to listen to your TV’s audio through your stereo system.
(page 35), and also IPTV, Yahoo! Widgets and Internet Browser are
available.
A standard USB mouse and USB keyboard can also be connected to the
USB ports. An USB mouse or USB keyboard can only operate while
navigating on the internet browser (page 44).
Connects to the composite video output jack of video equipment.
If you have mono equipment, connect its audio output port to the TV’s L
(MONO) audio input port.
• An HDMI or Component video (YPBPR) connection is required to view 480i, 480p, 720p, 1080i
and 1080p video formats. 1080/24p is available only with HDMI connection.
12
Page 13
Connecting the TV
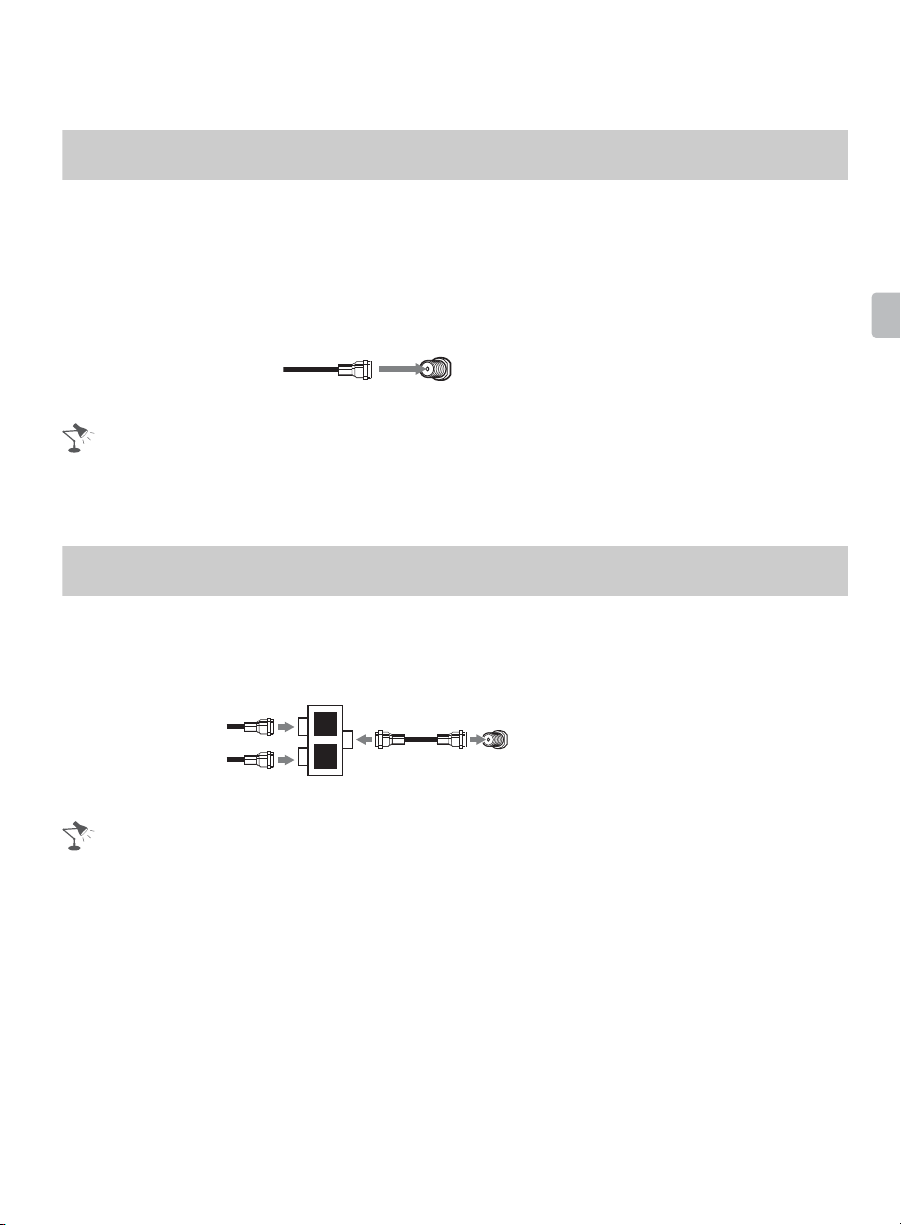
Cable System or VHF/UHF Antenna System
You can enjoy high-definition and standard-definition digital programming (if available in
your area) along with standard-definition analog programming.
This TV is capable of receiving unscrambled digital programming for both cable (QAM
and 8VSB) and external VHF/UHF antenna (ATSC).
x Cable or VHF/UHF (or VHF only)
75-ohm coaxial cable Rear of TV
CABLE/ANTENNA
• It is strongly recommended that you connect the CABLE/ANTENNA input using a 75-ohm
coaxial cable to receive optimum picture quality. A 300-ohm twin lead cable can easily be
affected by radio frequency interference, resulting in signal degradation.
Cable System and VHF/UHF Antenna System
Use an optional A-B RF switch (not supplied) to switch between the cable and over-theair antenna programming, as indicated below.
Getting Started
A/B RF Switch
Cable
Antenna
• Be sure to set the Signal Type setting to Cable or Antenna found under the Channel settings
for your input signal (page 55).
A
B
Rear of TV
CABLE/ANTENNA
13
Page 14
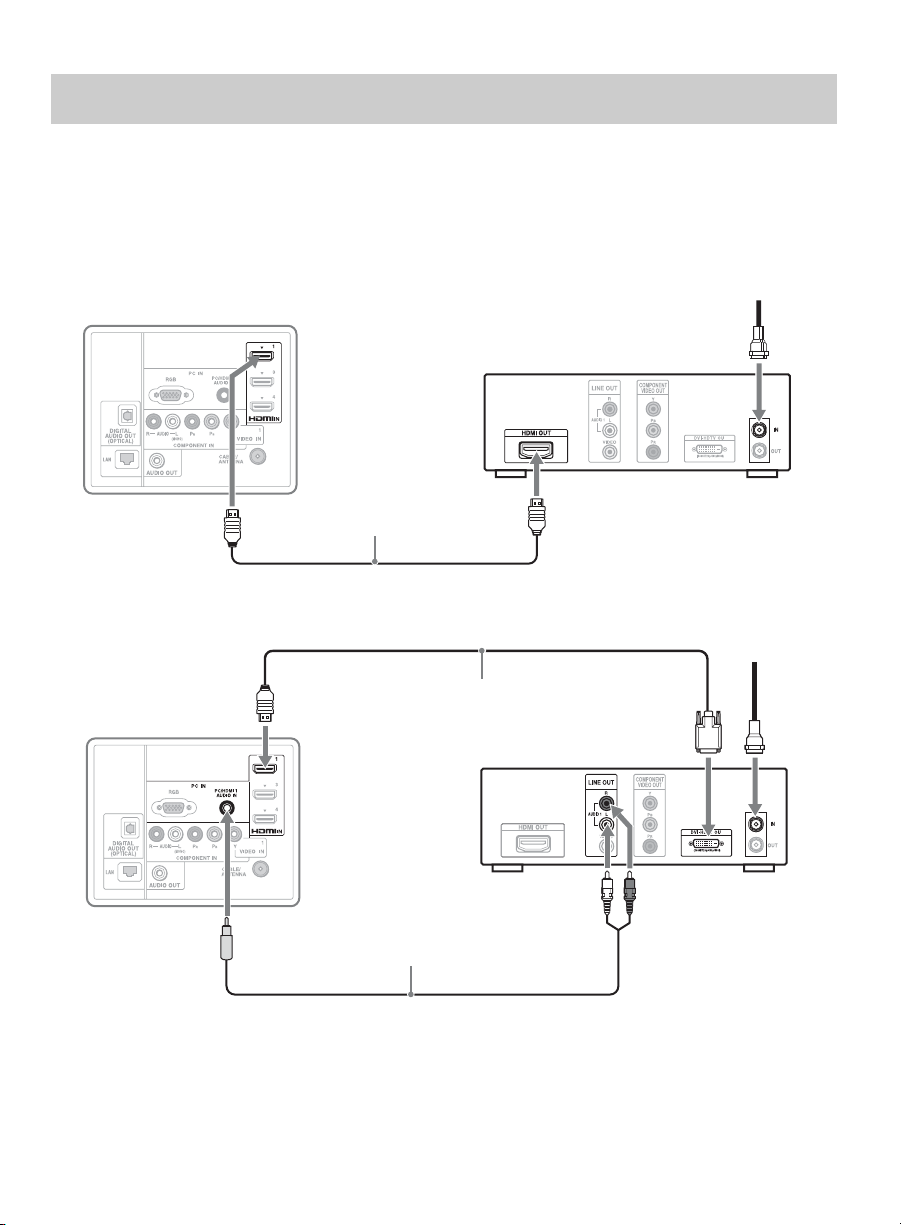
HD Cable Box/HD Satellite Box
You can enjoy high-definition programming by subscribing to a high-definition cable
service or a high-definition satellite service. For the best possible picture, make sure you
connect this equipment to your TV via the HDMI or component video (with audio) input
located on the back of your TV.
x Shown with HDMI Connection
CATV/Satellite antenna cable
Rear of TV
HD cable box/
HD satellite box
HDMI cable
x Shown with DVI Connection
CATV/Satellite
antenna cable
14
Rear of TV
DVI-to-HDMI cable
HD cable box/
HD satellite box
Audio cable
(stereo mini plugs)
Page 15
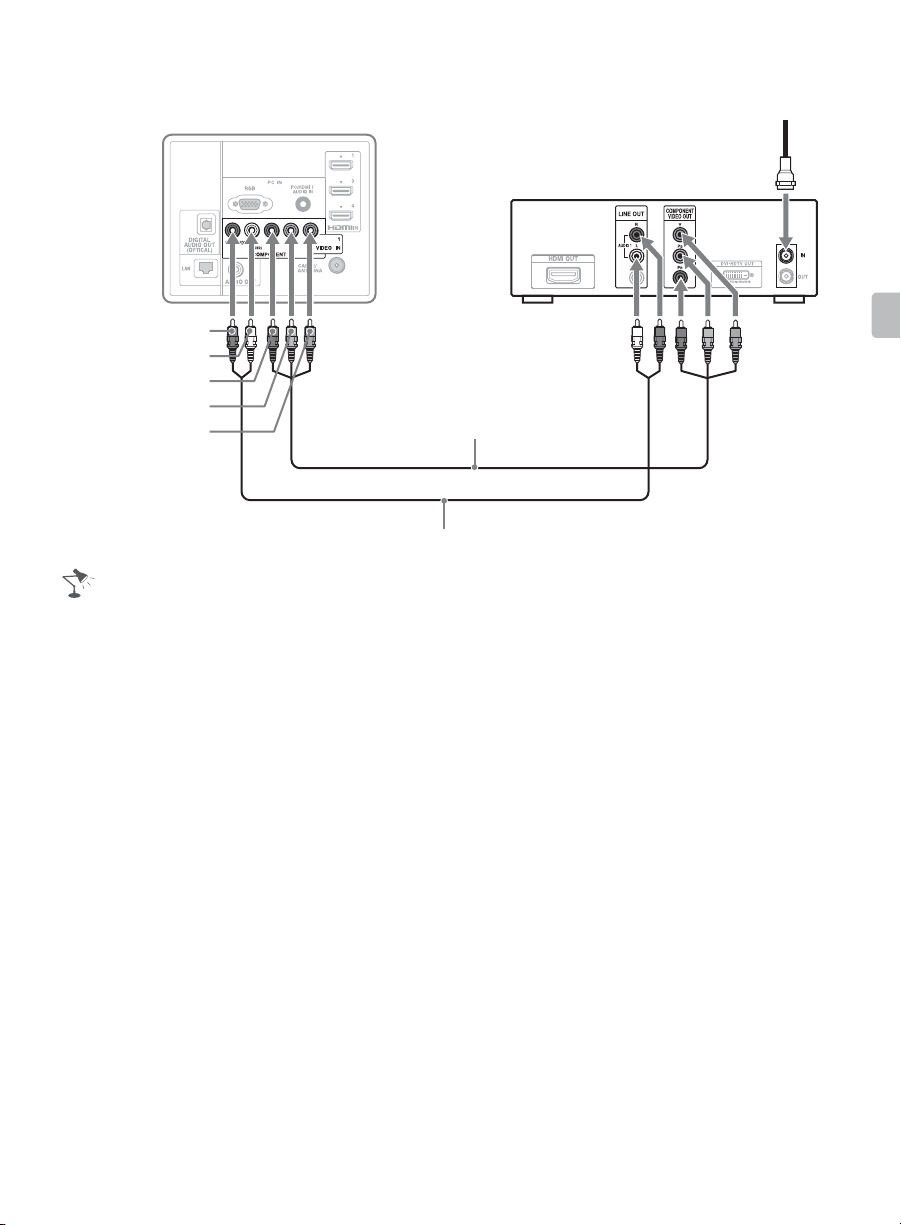
x Shown with Component Connection
Rear of TV
CATV/Satellite antenna cable
HD cable box/
HD satellite box
AUDIO-R (red)
AUDIO-L (white)
(red)
P
R
P
(blue)
B
Y (green)
Component video cable
Audio cable
• If your equipment has a DVI output and not an HDMI output, connect the DVI output to the HDMI
IN 1 (with DVI-to-HDMI cable or adapter) and connect the audio output to the AUDIO IN of PC
IN. For details, see page 11.
Getting Started
15
Page 16
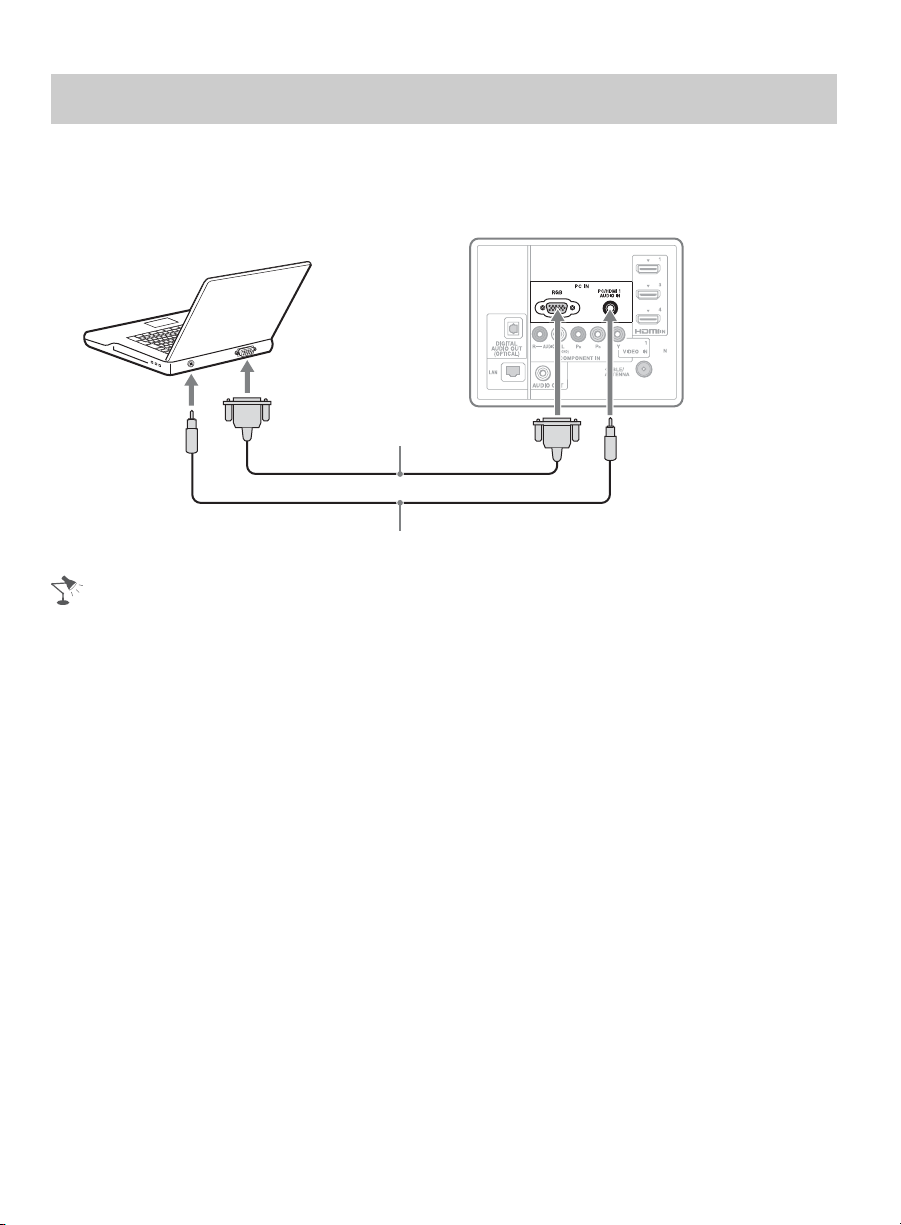
PC
Use the TV as a monitor for your PC by connecting an HD15-HD15 cable connection as
shown below. This TV can also be connected to a PC with a DVI or HDMI output. (Refer
to the separate Quick Setup Guide.)
Rear of TV
HD15-HD15 cable
(analog RGB)
Audio cable (stereo mini plugs)
• Connect the PC IN jack to the PC using an HD15-HD15 cable with ferrite core (analog RGB) and
audio cable (page 11).
16
Page 17
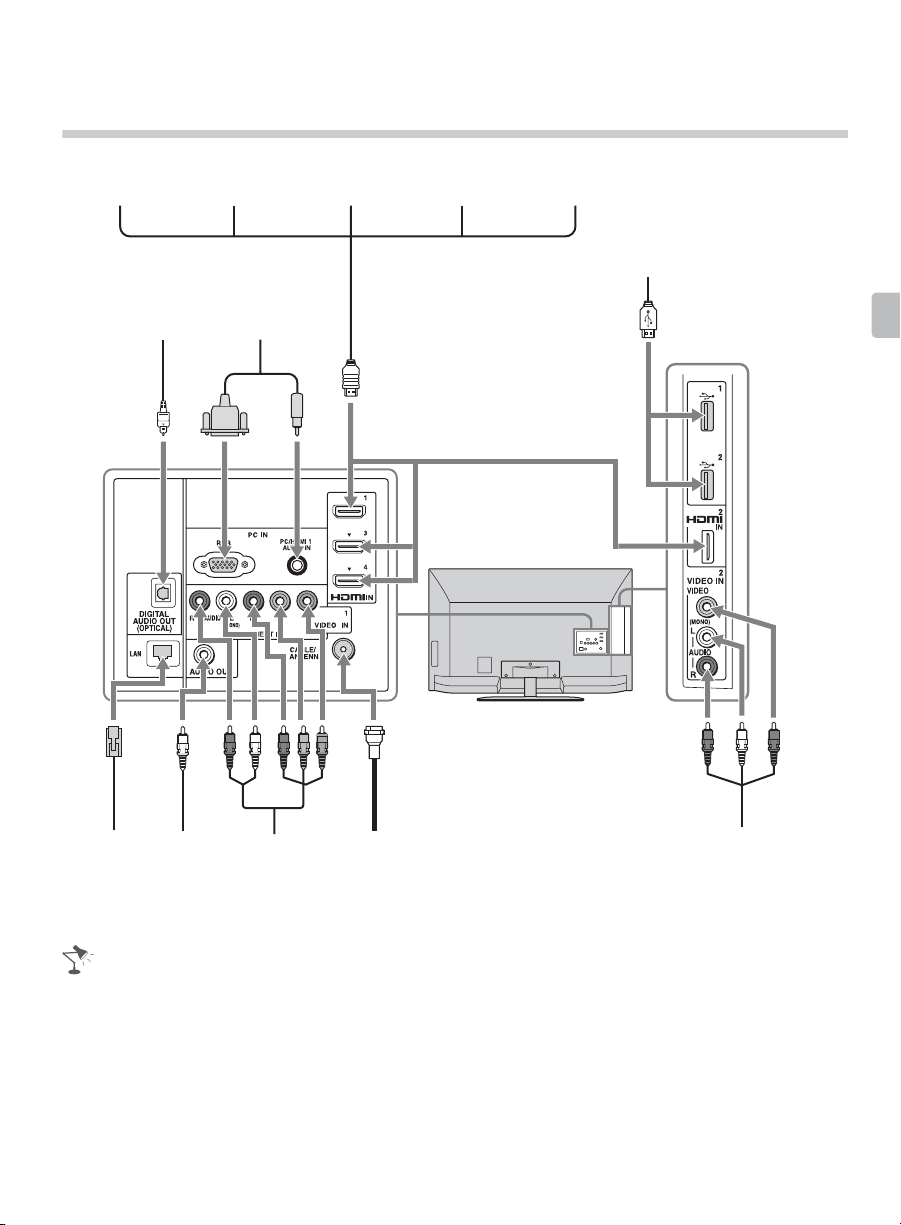
Connecting Other Equipment
Blu-ray Disc
Player/“PS3”
Digital audio
equipment
(A/V Receiver/
Home Theater)
DVD
player
Personal
computer
Digital satellite
receiver
Digital
cable box
Audio
system
USB
Getting Started
Router/
Modem
Analog audio
equipment
(A/V Receiver/
HomeTheater)
Digital
recorder
CABLE/
ANTENNA
VCR/Game system/
Camcorder
• Refer to the Quick Setup Guide (supplied) when connecting other equipment to your TV.
17
Page 18
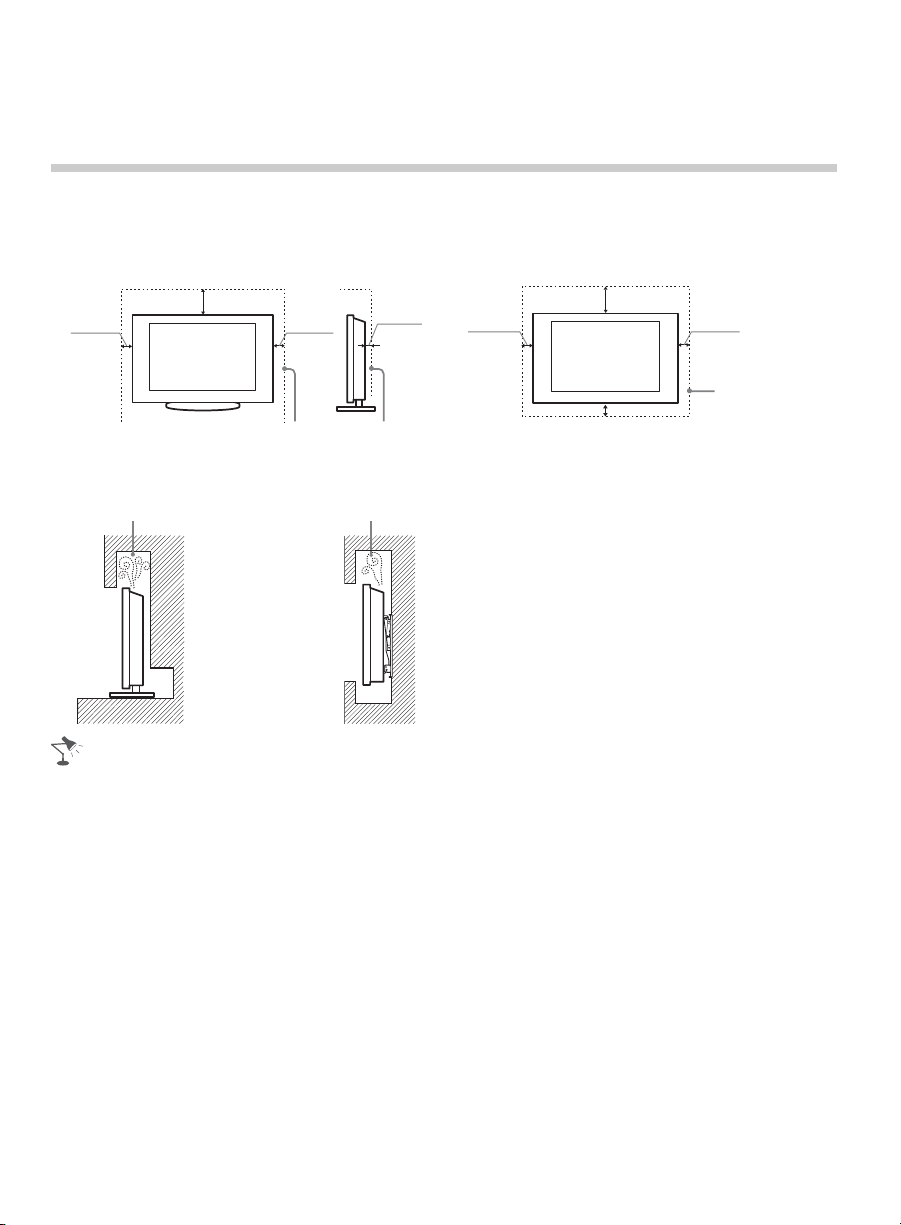
When Installing the TV Against a Wall or Enclosed Area
Make sure that your TV has adequate ventilation. Allow enough space around the TV as
shown below. Avoid operating the TV at temperatures below 41 °F (5 °C).
Installed with stand
11
4 inches
(10 cm)
7
/
8
(30 cm)
inches
4 inches
(10 cm)
3
inches
/
2
8
(6 cm)
Installed on the wall
11
4 inches
(10 cm)
7
inches
/
8
(30 cm)
4 inches
(10 cm)
Leave at least
this much space
4 inches (10 cm)
around the set.
Leave at least this much space around the set.
Never install the TV set as follows:
Air circulation is blocked.
Wall Wall
Air circulation is blocked.
• Inadequate ventilation can lead to overheating of the TV and may cause TV damage or cause a
fire.
18
Page 19
Securing the TV
Sony strongly recommends taking measures to prevent the TV from toppling
over. Unsecured TVs may topple and result in property damage, serious bodily
injury or even death.
Preventing the TV from Toppling
❑ Secure the TV to a wall and/or stand.
❑ Do not allow children to play or climb on furniture and TV sets.
❑ Avoid placing or hanging items on the TV.
❑ Never install the TV on:
• Slippery, unstable and/or uneven surfaces.
• Furniture that can easily be used as steps, such as a chest of drawers.
❑ Install the TV where it cannot be pulled, pushed, or knocked over.
❑ Route all AC power cords and connecting cables so that they are not accessible to curious
children.
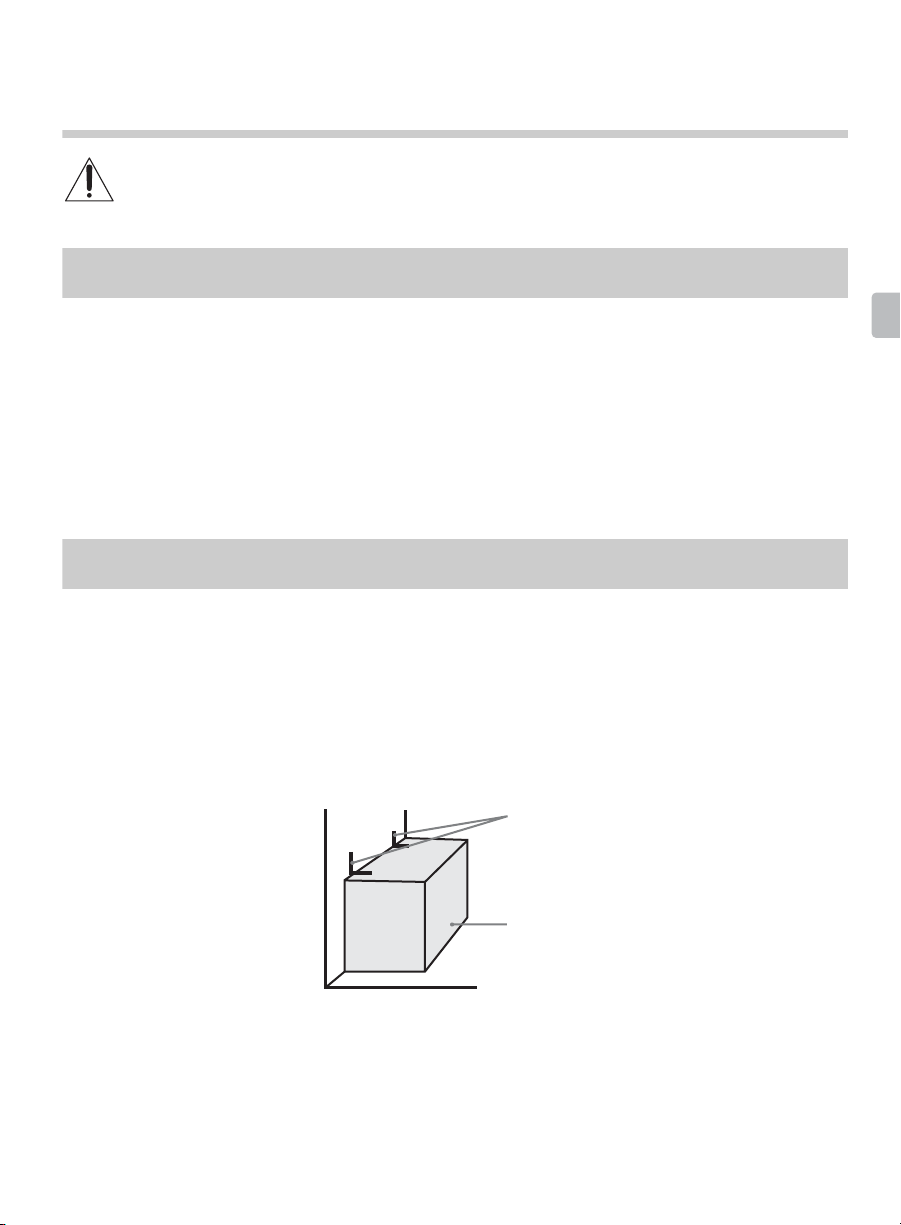
Recommended Measures to Secure the TV
Consider the following measures when securing your TV to a TV stand (not supplied).
1 Secure the stand for the TV.
Make sure the TV stand can adequately support the weight of the TV. Use two angle
braces (not supplied) to secure the stand.
For each angle brace use the appropriate hardware to:
• Attach one side of the angle brace to the wall stud.
• Attach the other side to the TV stand.
Getting Started
Angle braces
Stand
(Continued)
19
Page 20
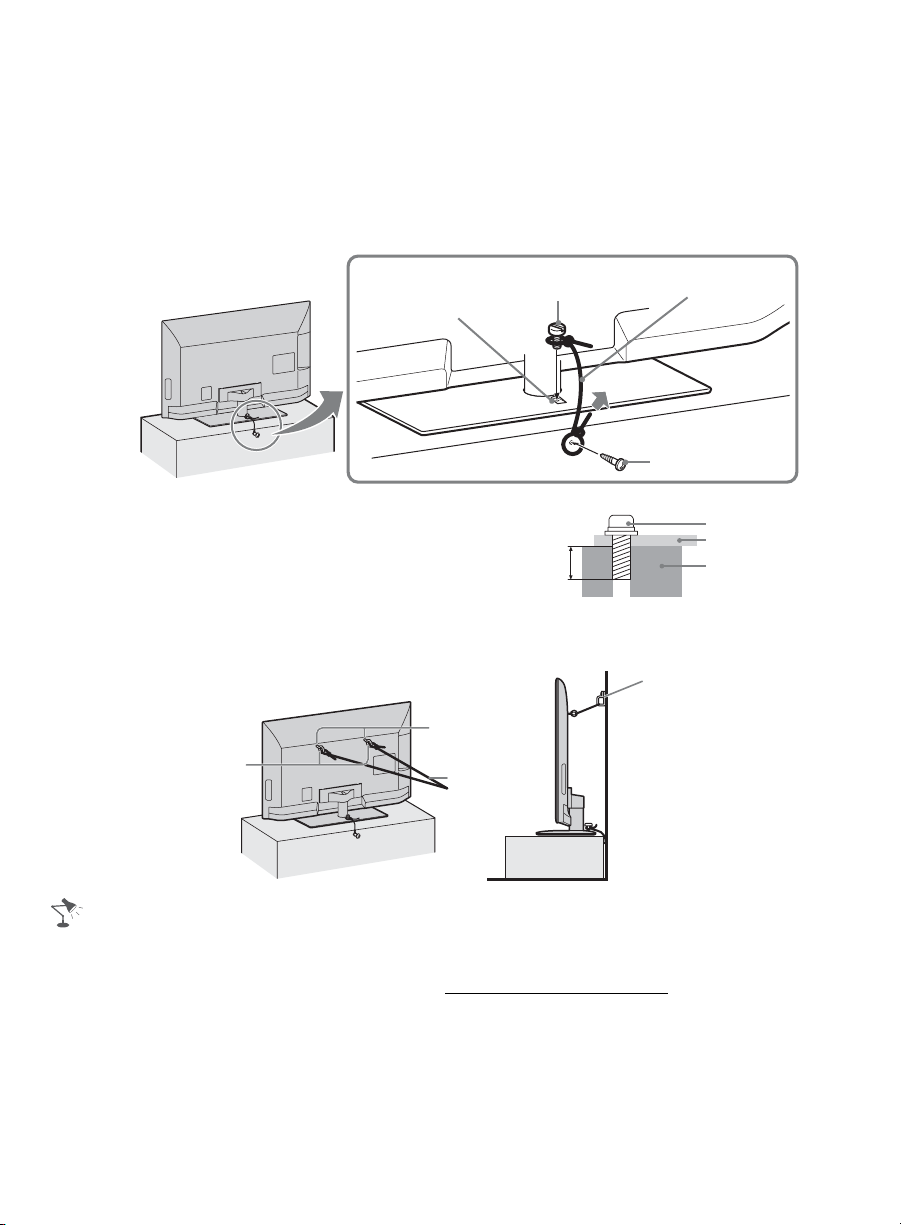
2 Secure the TV to the stand.
Use the optional hardware listed below (not supplied):
• M4 machine screw (screwed into the TV’s Table-Top Stand).
• A screw or similar (attach it to the TV stand).
• Rope or chain (strong enough to support the weight of the TV). Make sure that there is
no excess slack in the rope or chain.
An alternative way to secure the TV is with an optional Sony Support Belt Kit.
Screw hole on the
Table-Top Stand
M4 machine screw
(not supplied)
Rope or chain
(not supplied)
Screw
(not supplied)
The length of the M4 machine screw differs
depending on the rope or chain diameter.
Please refer to right illustration.
6-8 mm
Screw M4
rope or chain
TV’s Table-Top
Stand
3 Anchor the TV to the wall.
Anchor the TV to the wall by using bolts, wall anchor and chain (or rope).
Wall-anchor
Wall-mount
holes
Anchor bolts
(not supplied)
Rope or chain
(not supplied)
• Contact Sony Customer Support to obtain the optional Support Belt Kit by providing your TV
model name.
For United States call: 1-800-488-7669 or visit: www.sony.com/accessories
For Canada call: 1-877-899-7669
• Securing the TV to the stand without securing the TV and the stand to the wall provides minimum
protection against the TV toppling over. For further protection, be sure to follow the three
measures recommended.
(not supplied)
20
Page 21
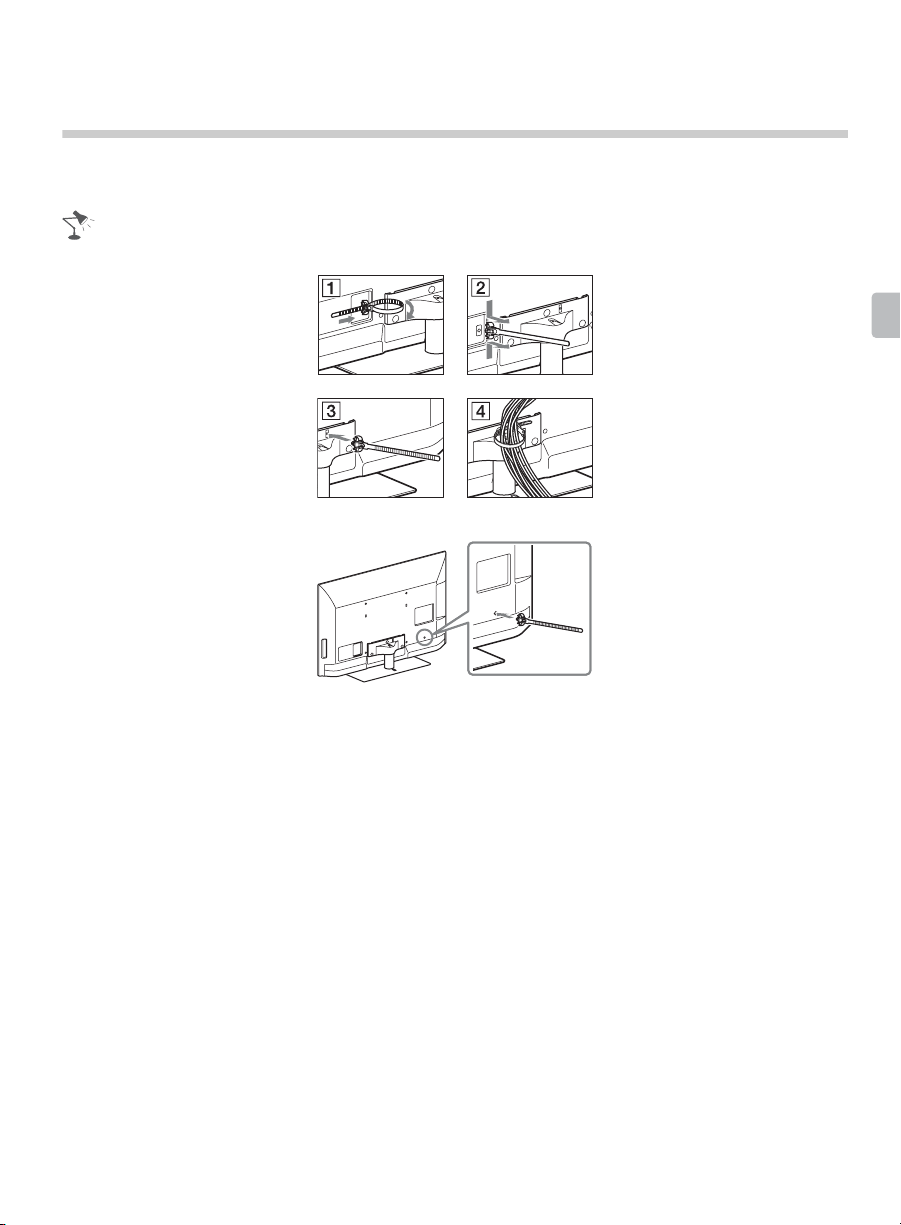
Bundling the cables
Before bundling the cables, remove the cable holder from the AC cover. Reuse the
cable holder to bundle the other cables.
• Do not bundle the AC power cord together with other cables.
*
* When installing on the wall, attach the cable holder under the terminals.
Getting Started
21
Page 22
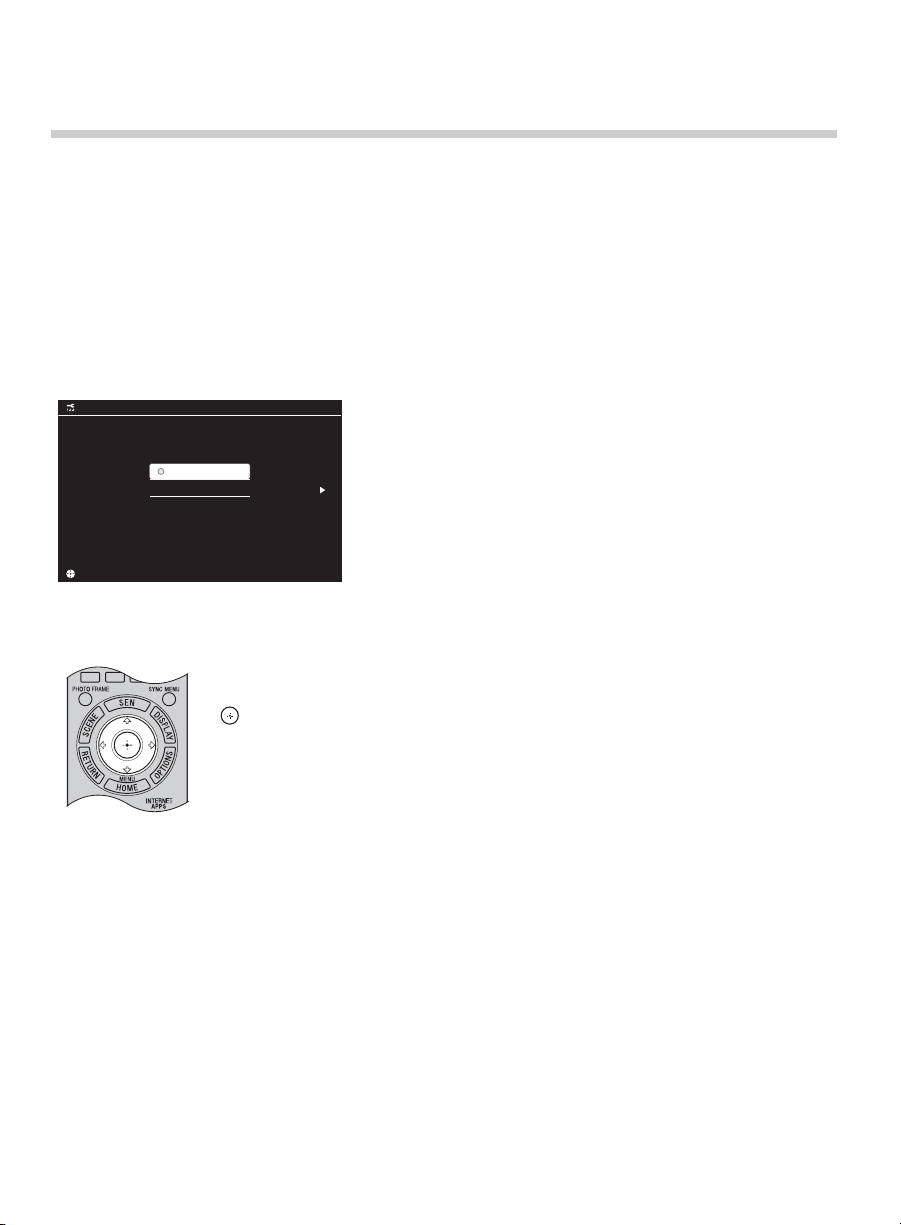
Running Initial Setup
During initial setup, you will perform the following:
• Set the language for the On Screen Display (OSD) text
• Choose your viewing country
• Select the type of use
• Scan for digital and analog channels
• Set the current time
• Set the network setup
• Download the software
Complete your cable connections before beginning the Initial Setup. Refer to the Quick
Setup Guide (supplied) for sample connection diagrams.
Initial Setup
Please select your language:
English
Español
Français
ConfirmConfirm
2 Use the remote control buttons described below to navigate through the Initial
Setup.
V/v/B/b buttons:
Allow you to navigate and highlight options where applicable.
button:
Allows you to select the highlighted option and advance to the next screen.
1 Turn on the TV.
The Initial Setup screen will appear.
3 Auto Program will scan for available channels from the signal source directly
connected to the TV’s CABLE/ANTENNA input. Follow the help text provided on the
screen to run the Auto Program.
22
Page 23
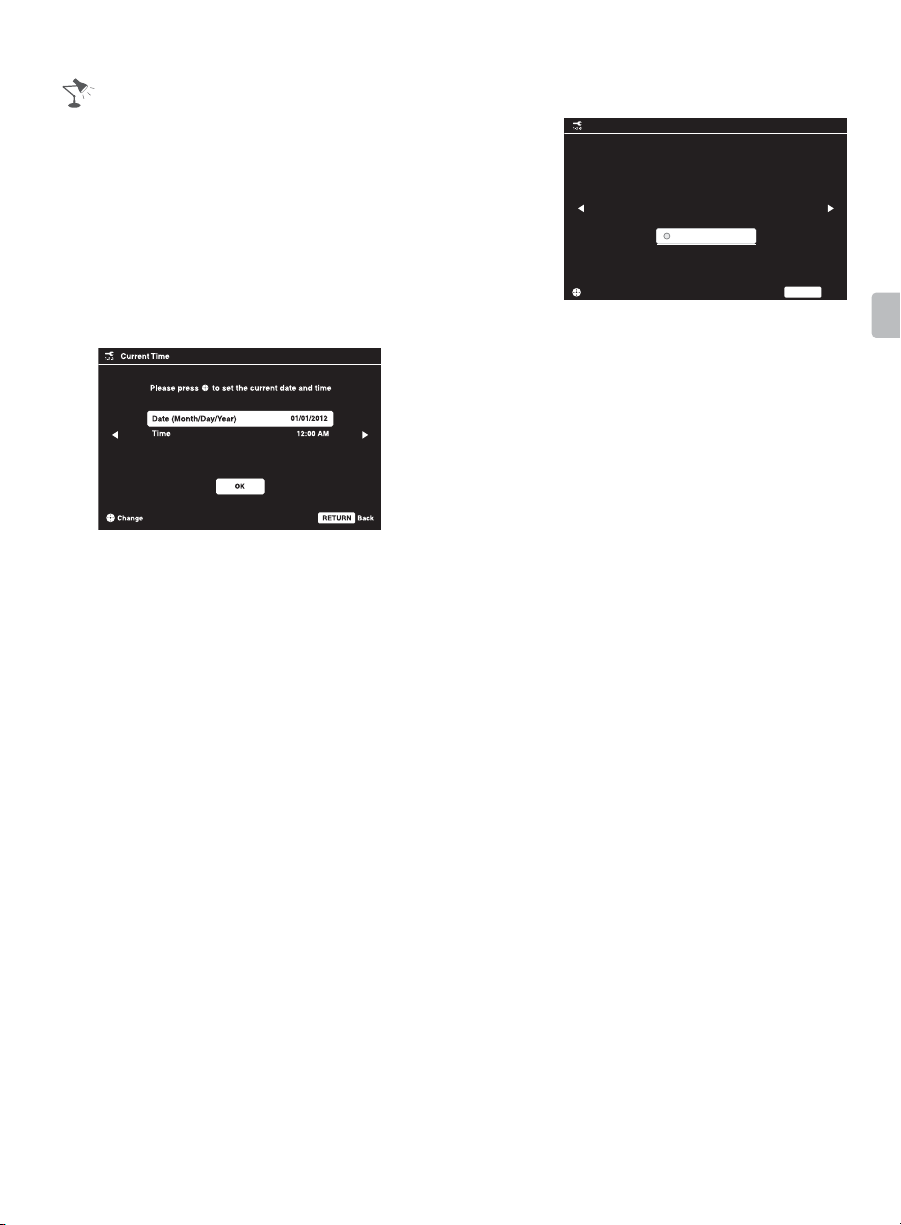
• If you cancel the Auto Program, any channels you have
selected are not registered. To rescan for available
channels, run Auto Program.
• Connect either your cable or antenna to the TV (you can
connect both using an A-B RF switch (not supplied)); for
more details see page 13.
• When promoted to select Retail or Home, be sure to
select Home for ENERGY STAR compliant mode.
4 Set the current date and time.
Location
Please select the type of use for this TV.
"Home" optimizes the picture for normal home use and is ENERGY
STAR qualified.
"Retail" optimizes the picture for store display.
Home
Retail
ConfirmConfirm
RETURN
Back
Getting Started
23
Page 24
Operating the TV
Using the Remote Control
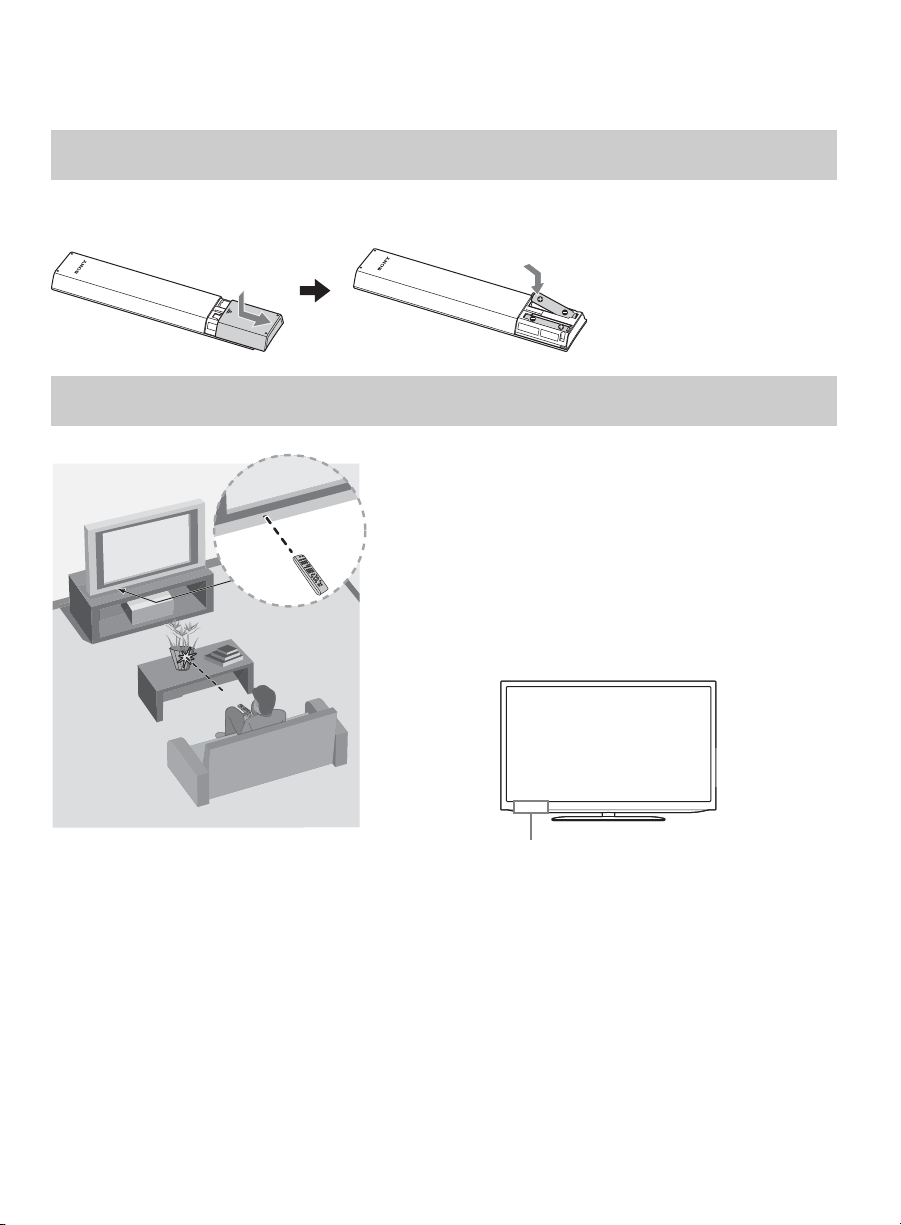
To Insert Batteries into the Remote Control
Insert two size AAA batteries (supplied) by matching e and E on the batteries to the
diagram inside the battery compartment of the remote control.
Guidelines to follow
• Point your remote control directly at the IR sensor
located on your TV.
• Make sure that no objects are blocking the path
between the remote control and the IR sensor on your
TV.
• Fluorescent lamps can interfere with your remote
control; try turning off the fluorescent lamps.
• If you are having problems with the remote control,
reinsert or replace your batteries and make sure that
they are correctly inserted.
• Ensure that there are no objects in front of the TV.
24
IR Sensor
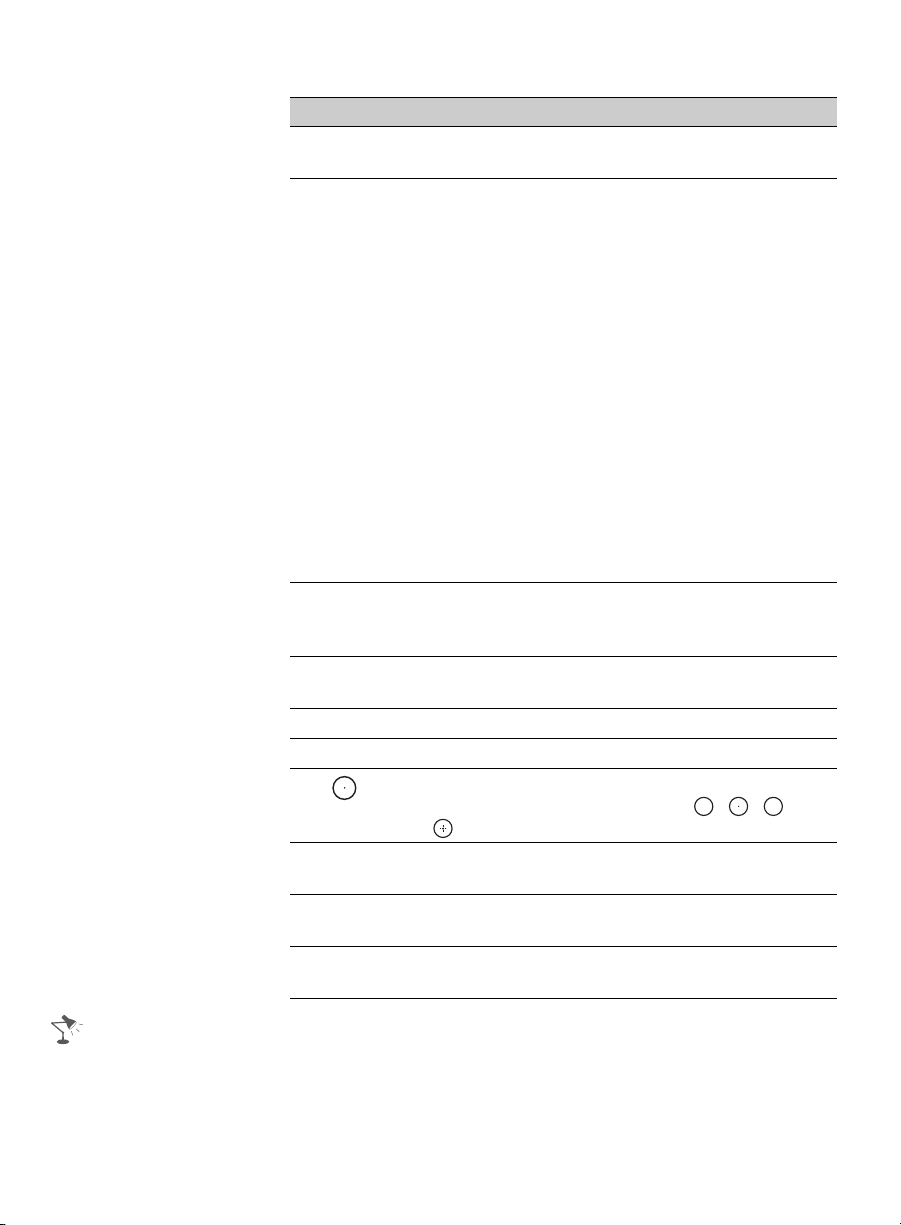
Page 25

Remote Control Button Description
1
2
3
4
5
6
7
8
9
0
qa
qs
qd
Button Description
qf
1 INPUT Press to display the list of External Inputs and TV
mode. Press repeatedly to toggle through the
qg
2 WIDE Press repeatedly to cycle through the available
qh
qj
3 Equipment
qk
ql
w;
wa
ws
wd
Control
4 Colored
buttons
inputs. See page 35.
Wide Mode settings. See page 33.
These buttons are used to control the equipment
connected to the TV by using the Control for
HDMI function (not available on all Control for
HDMI equipment). Some other buttons on the
remote control may also operate BRAVIA
Sync™ equipment.
.
(PREV): Press to replay the current program
from the previous chapter mark.
X (PAUSE): Press to pause playback.
x (STOP): Press to stop playback.
> (NEXT): Press to advance forward to the
next chapter mark.
m (fast reverse): Press to play a program in
fast rewind mode.
N (PLAY): Press to play a program at a normal
speed.
M (fast forward): Press to play a program in
fast forward mode.
When the colored buttons are available, an
operation guide appears on the screen.
®
Operating the TV
• The 5, N and CH + buttons have a tactile dot. Use them as a reference when operating the TV.
(Continued)
25
Page 26
Button Description
5 PHOTO
FRAME
6 SCENE Optimizes picture and sound quality by selecting
7 RETURN Press to go back to the previous screen or exit
8 HOME/
MENU
9 NETFLIX Press to display the NETFLIX menu.
0 0-9 Press 0-9 to select a channel.
qa Use with 0-9 to select digital channels.
qs MUTING Press to mute the sound. Press again or press
qd VOL (2)
+/–
qf POWER
"/1
Press to display the Photo Frame. See page 39.
the following items.
Auto: Automatically optimizes picture and sound
quality according to the input source.
General: No optimized picture and sound quality
for any scene.
Photo: Reproduces the texture and color of a
printed photo.
Music: Lets you experience dynamic and clear
sound just like at a concert.
Cinema: Delivers picture and sound just like in a
theater.
Game: Broadens your game-playing experience
with superb picture and sound quality.
Graphics: Eases prolonged monitor viewing with
clearer detailed pictures.
Sports: Presents realistic pictures and sound just
like in a stadium.
from the screen when displaying menu items and
settings.
Press to display the menu with TV functions and
settings. See “Using the Menus” on page 47.
For example, to enter 2.1, press , , and
.
VOL + to restore the sound.
Press to adjust the volume.
Press to turn on and off the TV.
2 1
• When you set Scene Select to Photo, Music, Cinema, Game or Sports, Sound Mode is
automatically set to Standard.
• The scene select function is not compliant with USB/DLNA-Photo, -Music, -Video, IPTV, Yahoo!
Widgets and Internet Browser.
26
Page 27
Button Description
qg SYNC
MENU
qh SEN Enables selection of content from the online
qj DISPLAY Press once to display the banner with channel/
qk V/v/B/b Press V/v/B/b to move focus/highlight. Press
ql OPTIONS Press to display a list of convenient functions and
w; INTERNET
APPS
wa CC/
SUBTITLE
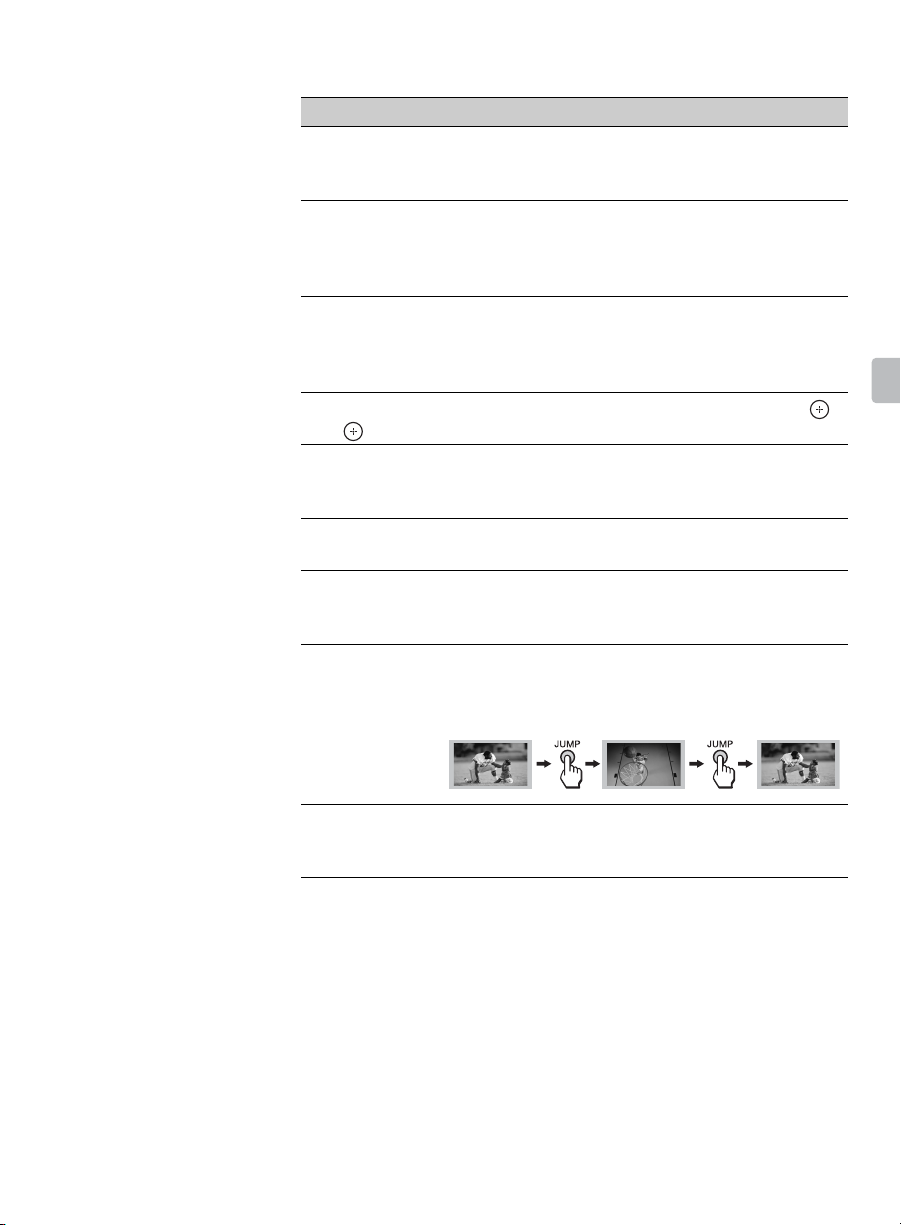
ws JUMP Press to jump back and forth between two
Press to display the BRAVIA Sync Menu and then
HDMI
select connected HDMI equipment from
Device Selection
service “SEN” (Sony Entertainment Network). If
“SEN” is unavailable, the “SEN” category is not
displayed.
program information you are watching. The
banner will time out in a few seconds or press
again to exit.
to select/confirm an item.
menu shortcuts. The options menu items vary
based on current input and content.
Press to display the Yahoo! Widgets.
Press to cycle through the available settings for
Closed Captions (CC) : On, Off, and On when
Muting.
channels and external inputs. The TV alternates
between the current/last channel or external input
selected.
.
Operating the TV
wd CH +/– Press to scan through channels. To scan quickly
through channels, press and hold down either CH
+/–.
27
Page 28

TV Controls and Indicators
Item Description
1 Light sensor
(IR) Infrared
Receiver
2 (Picture
Off)/
(Timer) LED
3 1 (Standby)
LED
4 " (Power) LED Lights up in green when the TV is turned on.
5 "/1 (Power) Press to turn on and off the TV.
6 – CH + Press to scan through channels. To scan quickly through channels, press and
7 – 2 +Press to adjust the volume. In the menu screen, these buttons serve as left/
8
t (Input)
9 HOME Press to display menu with TV functions and settings (see “Using the Menus”
Senses room light level and adjusts the screen brightness accordingly. Do not
put anything over the sensor, doing so may affect its function.
Receives IR signal from the remote control.
Lights up in orange when the On Timer/Sleep Timer/Photo Frame is set. If
you set to On Timer, lights up in orange while the TV is also in standby mode.
Lights up in green when the Power Saving is set to Picture Off.
Lights up in red when the TV is in standby mode.
hold down either CH –/+. In the menu screen, these buttons serve as up/down
buttons.
right buttons.
Press to display the list of external inputs. Press repeatedly to toggle through
the inputs.
In the menu screen, this button serves as confirming the selection or setting.
on page 47).
28
Page 29

• For more information about setting up the external inputs labels, see page 62.
• The CH + button has a tactile dot. Use it as a reference when operating the TV.
• Make sure that the TV is completely switched off before unplugging the power cord.
Operating the TV
29
Page 30

Using Features
BRAVIA® Sync™ with Control for HDMI
With the Control for HDMI function,
BRAVIA Sync helps to communicate with
BRAVIA Sync-compatible equipment
using HDMI CEC (Consumer Electronics
Control). Use the following settings and
tips to help unify control of your
connected equipment.
1 Press HOME and select Settings,
then select the Setup settings.
2 Select the HDMI Settings, then
highlight Control for HDMI, and set to
On.
x Controlling BRAVIA Sync-
Compatible Equipment
To control the equipment by using the
remote control, press SYNC MENU and
select the desired equipment from HDMI
Device Selection.
Sync Menu
HDMI Device Selection
Device Control
Speakers
TV Control
Return to TV
RETURN
HDMI 1
Exit
x AV Amplifier
• Automatically turns the connected AV
amplifier on and switches the sound output
from the TV speaker to the audio system
when you turn the TV on.
• Automatically switches the sound output to
the AV amplifier by turning the AV amplifier
on when the TV is turned on.
• Automatically turns the connected AV
amplifier off when you switch the TV to
standby mode.
• Adjusts the volume (VOL +/-) and mutes the
sound (MUTING) of the connected AV
amplifier through the TV’s remote control.
x Video Camera
• Automatically turns the TV on and switches
the input to the connected video camera
when the connected video camera is turned
on.
• Automatically turns the connected video
camera off when you switch the TV to
standby mode.
• Control for HDMI (BRAVIA Sync) is only
available for the connected Sony equipment
that has the BRAVIA Sync or is compatible
with Control for HDMI.
• The Control for HDMI settings must be set
on both the TV and connected equipment.
For settings on the connected equipment,
refer to their instruction manuals.
• When specific Sony equipment compatible
with Control for HDMI (BRAVIA Sync) is
connected, BRAVIA sync is automatically
activated on the equipment.
x BD/DVD Player
• Automatically turns the BRAVIA Sync-
compatible equipment on and switches the
input to that equipment when you select it
from the Sync Menu.
• Automatically turns the TV on and switches
the input to the connected equipment when
the equipment starts to play.
• Automatically turns the connected
equipment off when you switch the TV to
standby mode.
30
Page 31

Using PIP Feature
PIP (picture in picture) displays a picture
from a connected PC in full screen, and a
TV program or other external input (see
below “To Enter PIP” table) in an inset
window. (Closed Captions (CC) is not
available with PIP mode.)
Sub Window
(Location of the
Main
Window
(PC)
To Enter PIP
PIP Supported Inputs
In main window In sub window
PC TV channel (CABLE/
ANTENNA), VIDEO IN
1/2, HDMI IN 1/2/3/4
(video timing)
HDMI IN (PC timing) TV channel (CABLE/
ANTENNA), VIDEO IN
1/2, COMPONENT IN
Sub Window
can be moved
by pressing
V/v/B/b.)
x To Swap Audio
You can swap audio between the main
and sub window.
1 Press OPTIONS.
2 Press V/v to highlight Audio Swap
and press .
3 Press V/v to highlight the window to
be audible, then press .
Using Features
1 Press OPTIONS while in the PC
mode.
2 Select PIP from the OPTIONS menu.
3 The sub window will appear.
x To Change Channels
You can change the channel of the sub
window by pressing CH +/– or entering
the channel number using the 0-9 numeric
buttons.
x To Exit from PIP
1 Press OPTIONS.
2 Press V/v to highlight Exit PIP and
press to exit to full PC screen.
31
Page 32

Using PAP feature
PAP (picture and picture) displays two
pictures (left and right) on the screen
simultaneously (e.g. external input and TV
program). For details on external
equipment, see page 17.
3 Press .
Main window
Sub window
To Enter PAP
PAP Supported Inputs
In main window In sub window
Component TV channel (CABLE/
ANTENNA), VIDEO IN
2
HDMI IN (except PC
timing)
TV channel (CABLE/
ANTENNA), VIDEO IN
1/2, COMPONENT IN
1 Press OPTIONS and then select P&P.
2 Press B/b to select active picture.
x To change channels
You can change the channel of the sub
window by pressing CH +/– or entering
the channel number using the 0-9 numeric
buttons.
x To change the picture size
You can change the picture size by
pressing V/v buttons.
x To Exit from PAP
You can exit from PAP, using any of the
following methods:
1 Press RETURN.
2 Press V/v to highlight Single Picture
and press to exit to Single Picture
from Options menu.
32
Page 33

Favorites
Wide Mode
Your favorite channels and external inputs
can be accessed by pressing the HOME
button once they are added to the list.
1 Press HOME.
2 Press V/v to select Favorites, then
press .
Favorites
Add to Favorites
Cable 4.61 ABC
Antenna 12 BBCNEWS
Component 3 DVD
Antenna 24.6 BBO
Cable 34 ESPN HD
Cable 36.1 STAR Ch
HDMI 1 BD
HDMI 3 Recorder
Antenna 52.5 NHKHi
Cable 88.6 NHK BS2
Select Confirm
RETURN
Exit
The favorites list appears.
3 Press V/v to select a channel or input,
then press .
x To add to Favourites
While tuned to the channel you want to
watch or viewing connected equipment,
press HOME and select Favorites to
display the list. Highlight Add to
Favorites, then press . Your newly
added item will be listed at the top of the
list. When you continue to add items
beyond the 10th item, the item listed at the
bottom of the list will be automatically
removed from the list.
• Favorite channels and external inputs can
also be added using the OPTIONS button
on the remote control.
• Your Favorites list will be cleared each time
you run the Auto Program.
The Wide Mode feature allows you to
select the screen display of your
preference. Based on the original signal
source, you may see black bars around
the picture or just on the both sides of the
screen. Sometimes you will see the
picture filled or with the full screen. This is
due to the signals your TV receives.
You can manually select available Wide
Mode settings as you watch your TV by
pressing the WIDE button on your remote
control or you can set your TV to Auto
Wide.
x To set Auto Wide
Press HOME and select Settings, then
select the Screen settings.
Select Auto Wide and set to On.
x To change the Wide Screen Mode
Press WIDE repeatedly to cycle through
the available modes.
4:3 Original source 16:9 Original source
Standarddefinition source
mm
Wide Zoom Wide Zoom
Normal Normal
Full Full
High-definition source
This mode is not
available.
Using Features
(Continued)
33
Page 34

4:3 Original source 16:9 Original source
Zoom Zoom
Normal is available with 480i or 480p
sources only.
Wide Mode with PC
Wide Mode is also available for the PC
settings. When a PC is connected to the
TV and PC input is selected, you can
change the PC Screen settings.
PC Settings
Picture
Sound
Screen
Channel
Parental Lock
Setup
Eco
ConfirmConfirm
Wide Mode
Reset
Auto Adjustment
Phase
Pitch
Horizontal Center
Vertical Center
x To change the Wide Screen Mode for
PC Timing
Press WIDE repeatedly to cycle through
the available modes while in the PC input
mode.
Incoming PC signal
Normal
RETURN
PC
0
0
0
0
Back
34
800 × 600
m
Normal
Full 1
Full 2
• Use the Auto Adjustment to adjust the
display position and phase of the picture
when the TV receives an input signal from
the connected PC.
Page 35

Inputs
Press INPUT to display the Input menu
and toggle through the external inputs to
select your video signal for viewing
including the TV mode. The inputs list
consists of TV mode and other equipment
connected to the TV.
You can label your external inputs to
identify them easily.
x To Manage on Input
Press HOME and select Settings, then
select the Setup settings. Select the
Manage Inputs option in AV Setup. Press
V/v to highlight the video input (HDMI 1-4,
Video 1-2, Component, PC) to which you
want to assign a label; press to select
the input of your choice.
x To Manage Label
Press B/b to highlight one of the
displayed labels that corresponds to your
connected equipment, then press .
x To Manage Enable
1 Press B/b to select enable column.
2 Press V/v to select Auto, Always or
Off when Auto is selected. The
selected input will be listed always.
Playing back Photo/ Music/Video via USB
You can enjoy photo/music/video files
stored in a Sony digital still camera or
camcorder through a USB cable or USB
storage device on your TV.
1 Connect a supported USB device to
the TV.
2 Press HOME.
3 Press V/v to select Media, then press
V/v/B/b to select Photo, Music,
Video, then press .
4 Press V/v/B/b to select a file, folder or
device, then press .
When you select a folder, select a file,
then press .
Playback starts.
x Photo Playback Auto Start
The TV automatically displays the
thumbnail view screen when the TV is
turned on and a digital still camera or
other device storing photo files is
connected to the USB port then turned on
(page 60).
Using Features
(Continued)
35
Page 36

x Notes when playing back files
• While the TV is accessing the data on
the USB device, observe the following:
– Do not turn off the TV or connect USB
device.
– Do not disconnect the USB cable.
– Do not remove the USB device.
The data on the USB device may be
damaged.
• Sony will not be held liable for any
damage to, or loss of, data on the
recording media due to a malfunction of
any connected devices or the TV.
• Playback does not start automatically if
the TV is turned on after connecting the
digital still camera or other device to the
USB port.
• The USB device supports FAT16, FAT32
and NTFS.
• Photo Playback Auto Start works only for
photo files in the newest digital still
camera folder (DCF-compliant, highestnumbered “DCIM” folder).
• Playback may not start automatically
when some digital still cameras (such as
cameras with internal memory) are
connected.
• The file name and folder name support
only English.
• When you connect a Sony digital still
camera, set the camera’s USB
connection mode to “Auto” or “Mass
Storage.” For more information about
USB connection mode, refer to the
instructions supplied with your digital
camera.
• Use a USB storage device that is
compliant with USB Mass Storage Class
standards.
• If a selected file has incorrect container
information, or is incomplete, it cannot
be played back.
36
Page 37

USB Video format
Extension Container Video Codec Audio Codec
.avi AVI
.wmv
.asf
.mp4
.mov
.3gp
.mkv MKV
.mpg
.mpeg
.vob
.vro
.ts, .m2ts TS
ASF
MP4
PS
XviD
MPEG1
MPEG2 MP
H.264 BP/MP/HP
MPEG-4 SP/ASP
WMV v9
XviD
MPEG-4 SP/ASP
VC-1
H.264 BP/MP/HP MPEG1 Layer1, 2 / MP3 /
MPEG-4 SP/ASP
H.263
H.264 BP/MP/HP PCM / MPEG1 Layer1, 2 / MP3 /
MPEG-4 SP/ASP
WMV v9
VC-1
MPEG1
MPEG2 MP
MPEG2 MP MPEG1 Layer1, 2 / MP3 /
VC-1
H.264 BP/MP/HP
PCM / MPEG1 Layer1, 2 / MP3 /
MPEG2 AAC (2ch) /
MPEG4 AAC (2ch) /
MPEG4 HE-AAC (2ch) /
Dolby Digital (2ch) /
MP3 / WMA v8
MPEG2 AAC /
MPEG4 AAC /
MPEG4 HE-AAC
MPEG2 AAC (2ch) /
MPEG4 AAC (2ch) /
MPEG4 HE-AAC (2ch) /
Dolby Digital (2ch) /
MPEG1 Layer1, 2 / MP3 /
Dolby Digital (2ch)
MPEG2 AAC (2ch) /
MPEG4 AAC (2ch) /
MPEG4 HE-AAC (2ch)
WMA v8
Using Features
WMA v8
USB Music format USB Photo format
Extension Audio Codec
.mp3 MP3
.wma WMA v8
• Playback of the above file formats is not guaranteed.
Extension Image Codec
.jpg, .jpeg JPEG
DCF2.0 or EXIF2.21 supported.
37
Page 38

Home Network
Connecting to a Home
Network
You can enjoy various content (e.g. photo/
music/video files) stored on DLNA
Certified™ media servers. The home
network feature allows you to enjoy
network content in other rooms.
x Playing photo/music/video
1 Press HOME, then select Media >
Photo, Music or Video > the desired
media server.
2 Select files or folders to play from the
list.
• The server is required to be DLNA
Certified™.
• Files from a network device need to be in the
following formats:
– Still images: JPEG
– Music: MP3, linear PCM, WMA
– Video: AVCHD, MPEG2, MPEG1, MP4
(AVC), MP4 (MPEG4), WMV
• Depending on the file, playback may not be
possible even when using the supported
formats.
Renderer
You can play back photo, music and
video files stored in network devices (e.g.
digital still cameras, mobile phones, PC)
on the TV screen by directly operating the
target device. The network should also be
renderer-compatible.
x Adjusting the renderer settings
Press HOME, then select Settings >
Setup > Network > Home Network
Setup > Renderer > the desired setting.
Display Settings for Media
Servers
Select home network servers to be
displayed in the Home Menu. Up to 10
servers can be displayed in the Home
Menu automatically.
1 Press HOME, then select Settings >
Setup > Network > Home Network
Setup > Show/Hide Media Servers.
2 Select the server to display in the
Home Menu.
38
Page 39

Photo Frame
You can enjoy looking at a photo, listening
to music, or the clock and calendar, at the
same time.
Photo Frame Mode
Toda y NextPrevious
You can enter photo frame mode using
any of the following methods:
1 Press HOME, and then select Photo
Frame Mode.
2 Press Photo Frame.
3 Press OPTIONS, when you are playing
back the photo/music files.
You can switch the frame, e.g. image and
clock, full screen image or full screen
clock.
For more details, see page 60.
x To select photo
You can select photos from USB memory
or the DLNA Certified™ server, using any
of the following methods:
3 Press HOME, and then select Media, then
select Photo. When playing back a photo,
press OPTIONS > Photo Frame Mode to
launch Photo Frame with the selected
photo.
x To select music
You can select music from USB memory
or the DLNA Certified™ server, using any
of the following methods:
1 Press HOME and select Settings, then
Setup > Photo Frame Settings > Music
Selection.
Select the device/server and then press
to select the file from thumbnail view.
2 In photo frame mode, press OPTIONS >
Music Selection.
Select the device/server and then press
to select the file from thumbnail view.
3 Press HOME, and then select Media, then
select Music. When playing back music,
press OPTIONS > Photo Frame Mode to
launch Photo Frame with the selected
music.
x To select Display mode
You can change the photo frame display
by selecting Display Mode (page 60).
• Image and Clock
Using Features
1 Press HOME and select Settings, then
Setup > Photo Frame Settings > Image
Selection.
Select the device/server and then press the
blue button or to select the file from
thumbnail view.
2 In photo frame mode, press OPTIONS >
Image Selection. Select the device/server
and then press the blue button or to
select the file from thumbnail view.
• Full Screen Image
• Full Screen Clock
(Continued)
39
Page 40

x To select Clock Display mode
There are five calendar display modes.
When the Display Mode setting is set to
Image and Clock, you can set to
Calendar, Analog Clock or Digital
Clock. When the Display Mode setting is
set to Full Screen Clock, you can set to
Calendar, Calendar and Clock or Clock.
For more details, see page 60:
• Calendar
• Analog Clock
• Digital Clock
• Calendar and Clock
•Clock
x Duration
To save power, photo frame mode will
shut down after 24 hours of TV with power
off automatically. After running photo
frame mode for 24 hours, not use this
mode for at least one hour, to avoid panel
burn-in.
Duration time can be set to Duration in
Photo Frame Settings. For more details,
see page 60.
Using Home Network Features
When you connect this TV to the Internet,
you can enjoy multiple functions: enjoying
Internet video, etc.
• You will need to contract with an Internet
service provider to connect to the Internet.
Preparing a Wired Network
Internet
Modem
with router
TV
or
functions
To avoid panel burn-in, the position of the
photo, clock and calendar are switched
automatically every hour.
40
Router
Modem
Internet
• For LAN connections, use a Category 7
cable (not supplied).
Page 41

Setting up the Internet Connection
Type 1: Secured network
with Wi-Fi Protected Setup™
(WPS)
Using the network feature you can
connect the TV to the Internet. The set-up
procedure differs depending on the type
of network and LAN router. Before setting
up the Internet connection, be sure to set
up a LAN router. Check your wireless LAN
environment using the following chart.
Wireless LAN
Secure Wireless LAN? NO
k
Type 3
YES m
Do you use a wireless LAN
router compatible with Wi-Fi
Protected Setup™ (WPS)?
YES m
Type 1*
Wired LAN , Type 4
* Type 1 is easier to set up if your router has
an automatic setting button, e.g. Air Station
One-Touch Secure System (AOSS). Most of
the latest routers have this function. Check
your router.
Type 1: Follow the configuration for
Secured network with Wi-Fi Protected
Set-up™ (WPS).
Type 2: Follow the configuration for
Secured network without Wi-Fi
Protected Set-up™ (WPS).
Type 3: Follow the configuration for
Unsecured network with any type of
wireless LAN router.
Type 4: Follow the configuration for Wired
network set-up.
NO
k
Type 2
The WPS standard makes security of a
wireless home network as straightforward
as pressing the WPS button on the
wireless LAN router. Before setting up a
wireless LAN, check the location of the
WPS button on the router and verify how
to use it.
For security purpose, WPS (PIN) provides
a PIN code for your router. PIN code is
renewed every time you select WPS
(PIN).
1 Press HOME, then select Settings >
Setup > Network > Network Setup.
2 IP Address setting/Proxy server:
– automatic setting:
Setup network connection > Auto
– manual setting:
Setup network connection >
Custom > Wireless Setup
3 Select WPS (Push Button) for Push
Button method or WPS (PIN) for PIN
method.
• Button name of the WPS may differ
depending on the router (e.g. AOSS button).
4 Follow the instructions on the set-up
screen.
Using Features
41
Page 42

Type 2: Secured network
without Wi-Fi Protected
Setup™ (WPS)
Type 3: Unsecured network
with any type of wireless
LAN router
To set up a wireless LAN, SSID (wireless
network name) and security key (WEP or
WPA key) will be required. If you do not
know them, consult the instruction manual
of your router.
1 Press HOME, then select Settings >
Setup> Network > Network Setup.
2 IP Address setting/Proxy server:
– automatic setting:
Setup network connection > Auto
– manual setting:
Setup network connection >
Custom > Wireless Setup
3 Select Scan, then select a network
from the list of scanned wireless
networks.
4 Follow the instructions on the set-up
screen.
• If you use WPS for network set-up, the
security settings of the wireless LAN router
activate, and any equipment previously
connected to the wireless LAN in a nonsecure status will be disconnected from the
network.
In this case, activate the security settings of
the disconnected equipment and then
reconnect. Or, you can deactivate the
security settings of the wireless LAN router,
and then connect the equipment to a TV in a
non-secure status.
To set up a wireless LAN, SSID (wireless
network name) will be required.
1 Press HOME, then select Settings >
Setup > Network > Network Setup.
2 IP Address setting/Proxy server:
– automatic setting:
Setup network connection > Auto
– manual setting:
Setup network connection >
Custom > Wireless Setup
3 Select Scan, then select a network
from the list of scanned wireless
networks.
4 Follow the instructions on the set-up
screen.
• Security key (WEP or WPA key) will not be
required because you do not need to select
any security method in this procedure.
Type 4: Wired network
set-up
Enter the respective alphanumeric values
for your router if necessary. The items that
need to be set (e.g. IP Address, Subnet
Mask, DHCP) may differ depending on
the Internet service provider or router. For
details, refer to the instruction manuals
provided by your Internet service
provider, or those supplied with the router.
1 Press HOME, then select Settings >
Setup > Network > Network Setup.
42
Page 43

2 IP Address setting/Proxy server:
– automatic setting:
Setup network connection > Auto
– manual setting:
Setup network connection >
Custom > Wired Setup
3 Follow the instructions on the set-up
screen.
Network Setup can also be set from
Initial Setup menu.
• Allows automatic configuration of your wired/
wireless network.
– When connecting with LAN cable: Wired
– When connecting with built-in Wireless
LAN: Wireless
– When connecting with USB Wireless
adaptor: Wireless
– When connecting with both of the cables:
Wired
•Set to Auto, sets the IP address
automatically. For proxy server is not use.
If You Cannot Connect to the Internet
Use the diagnosis to check possible
causes for network connection failures,
and settings.
1 Press HOME, then select Settings >
Setup > Network > Network Setup.
2 Select View Network settings and
status.
3 Select Check Connection.
This may take several minutes. You
cannot cancel the diagnosis after
selecting Check Connection.
Using Features
Viewing the network status
You can confirm your network status.
1 Press HOME, then select Settings >
Setup > Network > Network Setup.
2 Select View Network settings and
status.
43
Page 44

Adjusting the Server Display Settings
You can select home network servers to
be displayed on the Home Menu. Up to 10
servers can be displayed in the Home
Menu automatically.
1 Press HOME, then select Settings >
Setup > Network > Home Network
Setup.
2 Select Show/Hide Media Servers.
3 Select the server you want to display
on the Home Menu, and adjust the
settings.
x If you cannot connect to your home
network
The TV detects if the server is being
correctly recognised when you cannot
connect it to your home network. If the
diagnostic results indicate a failure, check
possible causes, and network
connections and settings.
1 Press HOME, then select Settings >
Setup > Network > Home Network
Setup.
2 Select Media Server
Troubleshooting.
Press Yes, then the server diagnostic
starts. When the server diagnostic is
complete, the diagnostic result list
appears.
Browsing Websites
When the TV is connected to the Internet,
you can browse websites.
Press HOME, then select Internet
Browser to launch the browser.
You can bookmark your favorite sites for
easy access.
• Web content may not be displayed correctly,
or some functions may not work properly, if
the TV does not support functions provided
by certain Internet services. Also, the TV
may not support functions developed in the
future.
x Note on Internet Browser
In no event shall Sony be liable for any
damage caused or associated with the
use of Internet browser, malfunction
(including software) or communication
failure.
x When using a USB mouse/USB
keyboard
• You can move the cursor with the USB
mouse.
• You can enter text with a keyboard.
• Depending on the USB equipment, you may
not be able to control the browser.
44
Page 45

Enjoying Sony Entertainment Network
• To update Sony Entertainment Network
content services, Press HOME, then select
Settings > Setup > Network > Refresh
Internet Content.
Sony Entertainment Network serves as a
gateway to Internet content, delivering a
variety of on-demand entertainment
straight to your TV. By making a
broadband Internet connection, you can
enjoy video content, including movies and
cartoons.
• Be sure to connect your TV to the broadband
Internet and complete Network Setup
(page 59).
x To Use Sony Entertainment Network
1 Press HOME, then select Internet
Contents > Internet Video.
2 Press V/v/B/b to select the desired
video service in Service list and press
.
3 Highlight the desired content, then
press .
x To exit Sony Entertainment Network
Press HOME.
x To launch Internet Video
Internet Video can also launched by
pressing the SEN button on the remote
control.
x Seeking forward/backward in video
content
Press the buttons on the remote controls
that correspond with the control
indications on the screen.
Using Features
Control indications
x To use NETFLIX
Press NETFLIX button on the remote
control to launch menu.
x To use YouTube Leanback
Follow the steps in “To Use Sony
Entertainment Network” (page 45) to
launch Sony Entertainment Network,
then select YouTube to launch the
YouTube Leanback.
• It is possible that Netflix cannot be used via
a Proxy server.
• If you experience difficulties with this feature,
check that the Internet connection is set up
properly.
• Information about the highlighted icon
appears in the information banner.
• The interface to Internet content depends on
the Internet content providers.
• Services block video content is based on the
“Parental Lock” setting of the TV. Some
service providers do not support this
function (page 56).
(Continued)
45
Page 46

Enjoying Yahoo!
4 Select the desired Widget to activate.
Widgets
With the Widgets feature, you can display
a variety of information on the screen.
Widgets are small downloadable
applications that provide easy access to
interactive content when your TV is
connected to the Internet.
• Be sure to connect your TV to the Internet,
and complete Network Setup.
• If you experience difficulties with this feature,
check that the Internet connection is set up
properly.
• This feature may not be available in some
regions/countries.
• Available Widgets depend on your region/
country.
• MAC address and IP address are
transmitted automatically from the TV to
servers while an Internet connection is
available. The servers are under the control
of Sony, and MAC address will never be
transmitted to servers controlled by other
parties.
• It is possible that Yahoo! Widgets cannot be
used via a Proxy server.
x To launch Yahoo! Widgets
Yahoo! Widgets can also launched by
pressing the SEN button on the remote
control.
1 Press HOME.
2 Press V/v to select Applications, and
press .
3 Select the desired Widget to display
on the screen.
You can access Yahoo! Widgets by
pressing the INTERNET APPS button.
x To activate additional Widgets
1 Press HOME.
2 Press V/v to select Applications, and
press .
3 Press B/b to select CONNECTED TV
STORE, and press .
46
Page 47

Using the Menus
Navigating through TV Menus
The HOME button allows you to access a variety of TV settings and USB media files.
1 Press on the remote control to display the menu
options.
2 Press V/v/B/b to navigate on the menu or adjust the
settings.
2
3
,
3 Press to select or confirm.
4 Press to exit.
1
4
,
You can select the frame image which enables you to enjoy with photo,
Photo Frame
Mode
music and clock. For details, see page 39.
Internet
Contents
Applications
Internet
Browser
Favorites
Enables access to Internet services for TV. For details, see page 45.
Internet Apps are small downloadable applications that provide easy access
to interactive content when your TV is connected to the Internet. You can
display a variety of information on the screen.
Internet Apps may not be available in some region/country. For details, see
page 46.
When the TV is connected to the Internet, you can browse websites. Select
the browser and enter a URL.
The Favorites feature provides quick access to your frequently used items,
such as preferred TV channels or external inputs (e.g. game console, DVD
player). For details, see page 33.
Using the Menus
(Continued)
47
Page 48

Media
Settings
Photo
The Photo, Music, and Video icons organize your photo, music, and
video files from DLNA Certified™ networked equipment or Sony USB
connected equipment. Be sure to select the correct icon when
Music
accessing files. Refer to the feature section for more information on
these icons.
Video
The Settings icon contains all of the necessary configurations to customize
your TV settings. The options you can select may vary. Unavailable options
are grayed out or not displayed.
Picture: adjust the picture on your TV to fit your viewing preference.
Sound: customize your sound settings to suit your audio preference. You can
also change the settings to output the sound to your connected audio
equipment.
Screen: adjust the size and shape of the images you see on the screen.
Channel: navigate your favorite channels and inputs and select the signal type,
as well as autoprogram channels. You can also customize the channels you see
and the labels assigned to them.
Parental Lock: set the password and limit access to programming based on
rating levels. You can also block channels and inputs.
Setup: modify and customize a variety of general setting options.
Eco: changes the settings related to power consumption.
48
Page 49

Using the Picture Settings
Option Description
Picture Mode
Customized
picture viewing
Reset Resets the current Picture settings to their defaults, except Picture Mode.
Backlight Adjust to brighten or darken the backlight.
Picture Adjust to increase or decrease picture contrast.
Brightness Adjust to brighten or darken the picture.
Color Adjust to increase or decrease color intensity.
Hue Adjust to increase or decrease the green tones.
Sharpness Adjust to sharpen or soften the picture.
Color
Temperature
White adjustment
Noise Reduction Select to reduce the picture noise level. Select from Auto, High, Medium,
MPEG Noise
Reduction
Motionflow Provides smoother picture movement and reduces picture blur.
Displays the options selected in the Scene Select settings (page 26). When
Scene Select is set to General, the options below can be selected.
Vivid Select for enhanced picture contrast and sharpness.
Standard Select for standard picture settings. Recommended for home
entertainment.
Custom Select to store your preferred settings.
Cinema For film-based content. Suitable in a theater-like environment.
Photo For standard viewing of photographs.
Sports Optimizes picture quality for viewing sports.
Game For standard picture suitable for games.
Graphics Optimizes picture quality for viewing graphics.
Cool Select to give the white colors a bluish tint.
Neutral Select to give the white colors a neutral tint.
Warm 1/Warm 2Select to give the white colors a reddish tint. Warm 2 gives a
redder tint than Warm 1.
Low and Off.
Select to reduce the picture noise in MPEG-compressed videos. This is
effective when viewing a DVD or digital broadcast. Select from High, Medium,
Low and Off.
High Provides smoother picture movement such as for film-based
contents.
Standard Provides smooth picture movement. Use this setting for
standard use.
Off Use this setting when the High and Standard settings result
in noise.
Using the Menus
• You can change the IPTV picture setting, only when watching Internet video.
(Continued)
49
Page 50

Option Description
CineMotion Provides improved picture movement and reduces picture blur and graininess
for film-based content. Select Auto 1 to represent original film-based content
as is, or Auto 2 for standard use. (Setting items vary depending on the TV
model.)
Advanced
Settings
• Available Picture options, including options in Advanced Settings depend on Scene Select
and Picture Mode.
Reset Resets the advanced settings to the default values.
Adv. Contrast
Enhancer
Black
Corrector
Gamma Adjusts the balance between bright and dark areas of the
Clear White Emphasizes white colors. Select from High, Low and Off.
Live Color Makes colors more vivid. Select from High, Medium, Low
LED Motion
Mode
White Balance Adjusts the color temperature in detail.
Automatically adjusts backlight and contrast to the most
suitable settings judging from the brightness of the screen.
This setting is especially effective for dark scenes, and will
increase the contrast distinction of the darker picture scenes.
Select from High, Medium, Low and Off.
Enhances black areas of the picture for stronger contrast.
Select from High, Medium, Low and Off.
picture.
and Off.
Lights up the backlight adequately, reducing blur in movies,
but the brightness decreases.
50
Page 51

Using the Sound Settings
Option Description
Sound Mode
Customized
sound listening
Reset Resets the current Sound settings to their defaults, except MTS Audio,
Equalizer Adjust allows you to select your frequency response curve. Select Reset to
Balance Adjust to emphasize left or right speaker balance.
Steady Sound Select On to stabilize the volume across all programs and commercials.
Volume Offset Adjust the volume level of the current input relative to other inputs.
Surround Allows you to select the suitable surround effects depending on the genre of
Bass Booster Produces a fuller sound for more impact, by emphasizing the bass sounds.
Sets a sound mode. Sound Mode includes options best suited for video and
photographs, respectively. The available options depend on the scene select
settings.
Dynamic Enhances treble and bass.
Standard Standard sound optimized for home use.
Clear Voice Suitable for spoken dialog.
Custom Select to store your preferred settings.
Alternate Audio and Speakers.
reset the Equalizer settings to the default values.
Select Off to disable this function.
TV program (movie, sport, music, etc.) or video game. The available options
depend on the scene select setting.
On/Off Select On to optimize the sound quality to enjoy the effects of
the Surround option and to create a virtual surround sound
using the 2ch speaker.
Cinema/Off Provides surround effects just like the high-grade audio
systems found in movie theaters. This option is available
when you select Cinema in the scene select setting.
Music/Off Provides surround effects that make you feel like you are
surrounded by sound as in a music hall. This option is
available when you select Photo or Music in the scene select
setting.
Sports/Off Provides surround effects that make you feel like you are
watching a live sports contest. This option is available when
you select Sports in the scene select setting.
Game/Off Provides surround effects that enhance game sound. This
option is available when you select Game in the scene select
setting.
Using the Menus
(Continued)
51
Page 52

Option Description
MTS Audio
Enjoy stereo,
bilingual and
mono programs
Alternate Audio
Digital channels
only
Speakers TV Speakers Select to use the TV speakers.
Audio Out Variable Adjusts the volume with the TV’s remote control, when using
HDMI/DVI Audio
Source
Stereo Select for stereo reception when viewing a program
broadcast in stereo.
Auto SAP Select to automatically switch the TV to second audio
programs when a signal is received. If no SAP signal is
present, the TV remains in Stereo mode.
Mono Select for mono reception. Use to reduce noise during weak
stereo broadcasts.
Select among the available options to switch among the alternate audio
streams. The program you are tuned to may be broadcasted in a different
language in the alternate audio streams.
Audio System Select to use an external audio system for the TV sound. By
selecting this option you are disabling the TV speakers.
an external audio system.
Fixed Adjusts the volume using the connected audio system’s
remote control.
Sets the audio signal source for HDMI/DVI input.
Auto Automatically sets the audio signal source based on the
video signal.
HDMI Audio Sets the HDMI input as the audio signal source.
PC Audio Sets the PC/HDMI audio input as the audio signal source.
• MTS Audio is only available for analog programs.
• Alternate Audio is only available if the program is broadcast with alternate audio streams.
• You can also access Sound Mode, MTS Audio and Alternate Audio by using the OPTIONS
button on the remote control.
52
Page 53

Using the Screen Settings
Option Description
Wide Mode Wide Zoom Fills the screen with minimum distortion.
Normal Select to display 4:3 picture in original size when the original
source is 4:3.
Full Select to enlarge the picture horizontally to fill the screen when
the original source is 4:3 (Standard definition source). When the
original source is 16:9 (High-definition source), select this mode
to display the 16:9 picture in its original size.
Zoom Select to enlarge the original picture without distorting the aspect
ratio.
Auto Wide On Select On to automatically change Wide Mode setting based on
the content.
Off If frequent screen changes are disturbing to you, select Off.
Choose one of the Wide Mode options when this function is set
to Off.
4:3 Default
Select the default
Screen Mode to
use for 4:3
sources
Auto Display
Area
Display Area Each setting depends on the resolution you are watching.
Horizontal
Center
Vertical Center Allows you to move the position of the picture up and down. (Available in Wide
Wide Zoom Enlarges the 4:3 picture to fill the 16:9 screen, displaying as
much of the original image as possible.
Normal Select to display the 4:3 picture in its original size.
Off Select to continue using the current Wide Mode setting when the
channel or input is changed.
Automatically adjusts the picture to the most appropriate display area.
Full Pixel Displays pictures in their original size when parts of the picture
are cut off (available depending on the TV model).
+1 Displays pictures in their original size.
Normal Displays pictures in their recommended size.
-1 Enlarges the picture so that the edges are outside the visible
display area.
Allows you to move the position of the picture left and right. (Available in Wide
Zoom and Zoom.)
Zoom and Zoom.)
Using the Menus
(Continued)
53
Page 54

• Normal in the 4:3 Default setting is not available when you are watching a 720p, 1080i or 1080p
source.
• If 4:3 Default is set to anything but Off, the Wide Mode setting changes only for the current
channel. When you change channels (or inputs), Wide Mode is automatically replaced with the
4:3 Default setting for 4:3 sources. To retain the current Wide Mode setting as channels and
inputs are changed, set 4:3 Default to Off.
• 4:3 Default is not available if Auto Wide is set to Off.
Option Description
PC Settings When a PC is connected to the TV and the PC input is selected, the PC
settings screen appears instead of the Screen settings.
You can also select the PIP feature which allows you to view two pictures
simultaneously from OPTIONS button (page 31).
Wide Mode Normal Select to display in the original image size.
Full 1 Select to enlarge the picture to fill the display area,
keeping its original aspect ratio.
Full 2 Select to enlarge the picture to fill the display area.
Reset Resets all PC settings to the default values.
Auto
Adjustment
Phase Adjust after Pitch to fine tune overall sharpness.
Pitch Adjust uneven sharpness on screen.
Horizontal
Center
Vertical
Center
Select to automatically adjust the display position and phase of
the picture when the TV receives an input signal from the
connected PC. Note that Auto Adjustment may not work well
with certain input signals. In such cases, manually adjust the
options below.
Allows you to move the position of the picture left and right.
Allows you to move the position of the picture up and down.
• For the PC Input Signal Reference Chart, see page 66.
• Auto Adjustment, Phase and Pitch are not available with PC signal connected to HDMI input.
54
Page 55

Using the Channel Settings
Option Description
Signal Type Cable Select if you are receiving cable channels via Cable TV
provider.
Antenna Select if you are using an antenna.
Auto Program Automatically sets up the channel list on the TV for all receivable channels.
1 Select Auto Program.
2 Select OK to start Auto Program.
Add Digital
Channels
Show/Hide
Channels
Edit Channel
Labels
Analog Fine
Tune
1 Select Add Digital Channels.
2 Select OK to add digital channels.
Allows you to show or hide channels that appear when you use the CH +/–
buttons.
1 Press V/v to scroll through the channels until you find the channel you
want to show or hide. Then press to select it.
2 Press V/v to determine if the channel will be shown or hidden. Then press
to select it.
Allows you to assign labels (such as station call letters) to channel numbers.
1 Press V/v to scroll through the channel numbers. Then press to
select the channel number that you want to assign a label.
2 Press V/v to scroll through the label characters (A-Z, 0-9, etc.). Press b to
move to the next character. Repeat the previous steps to add up to seven
characters to the label. When finished, press .
Allows you to fine-tune the selected analog channel manually if you feel that a
slight tuning adjustment may improve picture quality. Select Auto to adjust to
the most appropriate analog channel.
Using the Menus
• You should run Auto Program after changing the Signal Type setting.
• Running Auto Program will clear the Favorites list.
• Channels that you set to be hidden can be accessed by the 0-9 and buttons.
• You can set channels to be hidden that are automatically set in Auto Program.
55
Page 56

Using the Parental Lock Settings
Option Description
Password The Parental Lock settings allow you to set up the TV to block programs
according to their content and rating levels. Use 0-9 on the remote control to
enter a four-digit password. The first time you create a password, confirm the
password by entering it again.
Change
Password
Country U.S.A. Select to use U.S.A. ratings (page 57).
Rating Off Turn Parental Lock off. No programs are blocked from
Downloadable
U.S. Rating
(Available only
in U.S.A.
where advanced
ratings exist)
Unrated
(Available only
when Country is
set to U.S.A.)
Channel Block Allows you to block channels regardless of program ratings.
External Input
Block
Select to change your password.
Canada Select to use Canadian ratings (page 58).
viewing.
Child Maximum ratings permitted are:
U.S.: TV-Y, TV-G, G
Canada: C, G, TV-Y
Youth Maximum ratings permitted are:
U.S.: TV-PG, PG
Canada: C8+, PG, 8 ans+, TV-PG
Young Adult Maximum ratings permitted are:
U.S.: TV-14, PG-13
Canada: 14+, 13 ans+, TV-14
Custom Select to set ratings manually.
U.S.: See page 57 for details.
Canada: See page 58 for details.
Off Turn Downloadable U.S. Rating off. No programs that contain
downloadable ratings are blocked from viewing.
Custom Select to block programs based on downloadable ratings.
Clear All Select to clear the entire downloadable rating system.
Allow Allows programs and movies that are broadcasted without a
rating.
Block Blocks all programs and movies that are broadcasted without
a rating.
To View a Blocked Channel
Press when tuned to the blocked channel then enter the password.
Allows you to block external inputs regardless of program ratings.
To View a Blocked External Input
Press when tuned to the blocked input then enter the password.
56
Page 57

• You need your password for any future access into the Parental Lock settings. If you lose your
password, see “Lost password” on page 77.
• Selecting Clear All will delete the current Downloadable U.S. Rating menu and the menu will
no longer be available until the TV is tuned to a channel that contains downloadable ratings.
• If you block unrated TV programs, be aware that the following types of programs may be
blocked: programs broadcasted from another country, emergency broadcasts, political
programs, sports, news, public service announcements, religious programs and weather.
US Models: Selecting Custom Parental Lock Rating Options
To select custom rating options for the U.S., select U.S.A. in the Country setting (page
56).
Option Description
Movie Rating G All children and general audience.
PG Parental guidance suggested.
PG-13 Parental guidance for children under 13.
R Restricted viewing, parental guidance is suggested for
children under 17.
NC-17 and X No one 17 or under allowed.
TV Rating
Block programs
by their rating,
content or both
Age-Based Ratings
TV-Y All children.
TV-Y7 Directed to children age 7 and older.
TV-G General audience.
TV-PG Parental guidance suggested.
TV-14 Parents strongly cautioned.
TV-MA Mature audience only.
Content-Based Ratings
FV Fantasy violence.
D Suggestive dialogue.
L Strong language.
S Sexual situations.
V Violence.
Using the Menus
• To ensure maximum blocking capability, set the Age-Based Ratings.
57
Page 58

Canadian Models: Selecting Custom Parental Lock Rating
Options
To select custom rating options for Canada, select Canada in the Country setting (page
56).
Option Description
English Rating C All children.
C8+ Children 8 years and older.
G General programming.
PG Parental guidance.
14+ Viewers 14 and older.
18+ Adult programming.
French Rating G General programming.
8 ans+ Not recommended for young children.
13 ans+ Not recommended for ages under 13.
16 ans+ Not recommended for ages under 16.
18 ans+ Programming restricted to adults.
U.S.A. Rating See “US Models” on page 57 for details.
Viewing Blocked Programs
You can view blocked programs by entering your password. Press when tuned to a
blocked program, then enter the password. This temporarily deactivates the parental
control feature. To reactivate the Parental Lock settings, turn off the TV. When the TV is
turned on again, your Parental Lock settings are reactivated.
58
Page 59

Using the Setup Settings
Option Description
Network Network Setup Sets the network status settings.
Built-in
Wireless LAN
Refresh
Internet
Content
Home Network
Setup
Turns the built-in wireless LAN On or Off.
Set to Off, if you do not use the built-in wireless LAN.
When you switch from Off to On, make the settings in Network
Setup.
Reconnects to the Internet to receive available Internet content
services.
Show/Hide
Media
Servers
Media Server
Troubleshooting
Renderer Renderer Enables the TV to play photo/
Displays the connected server list. You can select
the server to display in the Home menu.
Diagnoses whether the TV can connect to each
server on the home network.
Renderer
Access
Control
Renderer
Options
music/video files on a device
(e.g. digital still camera) by
operating the device via the
network.
Allows access from a specified
control device.
Adjusts the Renderer Options
detailed settings.
Using the Menus
(Continued)
59
Page 60

Option Description
Photo Frame
Settings
USB Auto
Start
Display Mode Allows you to select the display mode. Select from Image and
Clock Display Allows you to select the clock display. Select from Calendar,
Audio
Application
Image
Selection
Music
Selection
Slideshow
Setting
Music
Playback
Setting
Duration Selects the time period (1h, 2h, 4h or 24h) after which the TV
First day of the
week
On to start photo/music/video playback automatically when the TV is
Select
turned on and a digital still camera or other device containing photo files is
connected to the USB port then turned on.
Clock, Full Screen Image and Full Screen Clock. See page
39.
Analog Clock, Digital Clock, Calendar and Clock and Clock.
When the Display Mode setting is set to Image and Clock, you
can set to Calendar, Analog Clock or Digital Clock. When the
Display Mode setting is set to Full Screen Clock, you can set
to Calendar, Calendar and Clock or Clock.
Calendar and Clock can be displayed only when Display
Mode is Full Screen Clock.
Music You can enjoy music with this function.
Off Turns off the music.
Select image.
Select music.
Slideshow You can play a slideshow of photos.
Single View Displays one photo only.
All Tracks Listen to all music tracks.
Single Track Set to listen to a single music track.
automatically switches to standby mode.
Set Sunday or Monday as the first day of the week on the
calendar.
60
Page 61

Option Description
Closed
Captions
(CC)
Allows you to select from several closed caption modes (for programs that are
broadcast with closed captioning).
CC Display On Closed Captions (CC) is turned on.
Analog CC Allows you to select basic analog (EIA-608) closed caption
Digital CC When the digital closed caption service is available, select from
Digital CC
Options
Off Closed Captions (CC) is turned off.
On when
Muting
options.
CC1, CC2,
CC3, CC4
Text1, Text2,
Text3, Text4
the Service 1-6 or CC1-4.
Allows you to make additional settings for digital closed caption
options. Select As Broadcast or Custom. The Custom option is
available on the Digital CC setting.
Custom Allows you to customize the following settings:
Closed Captions (CC) is turned on when the TV
is muted.
Displays a printed version of the dialogue or
sound effects of a program. (Should be set to
CC1 for most programs.)
Displays network/station information presented
using either half or the whole screen (if available).
Character
Size
Character
Style
Character
Color
Character
Opacity
Edge Type None, Raised, Depressed,
Edge Color Color 1-8
Background
Color
Background
Opacity
Small, Standard, Large
Style 1-7
Color 1-8
Solid, Translucent
Outline, Left Shadow,
Right Shadow
Color 1-8
Solid, Translucent
Using the Menus
• You can turn on Closed Captions (CC) options (On, Off or On when Muting) by pressing the
CC button on the remote control.
(Continued)
61
Page 62

Option Description
Info Banner Select Small to display minimal channel and program title or select Large to
display detailed channel and program information along with the TV icon if you
are viewing the TV. This information will appear if it is available from the
broadcaster.
Info Banner appears on the screen each time the channel and external inputs
are changed or when DISPLAY on the remote control is pressed.
Clock/Timers Sleep Timer Set the time in minutes (Off, 15, 30, 45, 60, 90, or 120) that you
would like the TV to remain on before shutting off automatically.
On Timer Turns on the TV from standby mode at a time you set, and tuned
to a channel or input of your preference or photo frame mode.
Before setting this function, make sure you set the correct
current Time.
Current Time Set the current time manually. This can be set from Initial Setup
or Clock/Timers. Adjust the Current Time for Daylight Saving
Time.
• This TV does not have a battery powered backup for the
clock. Therefore, if there is a power failure or if you disconnect
the power cord, be sure to reset the current date and time.
Initial Setup If you miss the Initial Setup when you first connected the TV or if you want to
scan all receivable channels, select Initial Setup. Follow the instructions on the
screen. Some settings such as Picture, Sound, and Parental Lock will not be
affected by this Initial Setup. If you wish to return your TV to factory settings,
please see the Troubleshooting section on page 77.
Language Select to display all on-screen settings in your language of choice: English,
Español, Français.
Startup Logo Select On to display the logo when the TV is turned on. Select Off to disable it.
AV Setup Manage Inputs Assigns name to external equipment.
Select Auto to display names only when the equipment is
connected, or Always to display regardless of connection
status.
Video1/
Component
Selection
Select Auto to have the TV detect and switch between the
Video 1 or Component when Video 1 or Component is
connected.
• Favorite channel list will be cleared each time you run the Initial Setup.
• You can assign following labels for each input:
–, Cable, Satellite, VCR, DVD/BD, Home Theater, Game, Camcorder, Digital Camera, PC,
Edit (except PC IN)
–, Edit (for PC IN)
•“–” indicates that no labels are assigned.
• If you select Edit, you can edit video labels. Follow the same steps for Edit Channel Labels on
page 55.
62
Page 63

Option Description
HDMI
Settings
Picture
Adjustments
Lock
Software
Update
Communicates with equipment compatible with the Control for HDMI function.
Control for
HDMI
Device Auto
Power Off
TV Auto Power OnSelect On to control your TV’s power on from your connected
Device List Displays a list of equipment with Control for HDMI function
Device Control
Keys
•Press OPTIONS while the equipment supporting Control for HDMI is
connected to display the Device Control options. The Device Control option
provides access to the Home (Menu), Options and Content List of your
connected equipment with your TV remote control.
• Some equipment with Control for HDMI
feature.
• HDMI Settings must be setup on the connected equipment.
Select Lock so no adjustment can be made to items grayed out.
Select Unlock to allow adjustment to any of the Picture settings.
Updates the TV system using USB memory or through Network. Select USB or
Network to update.
Links the operations of the TV and the equipment.
For specific Sony equipment compatible with Control for HDMI,
this setting is applied automatically to the connected equipment
when set to On.
Select On to have your connected equipment with Control for
HDMI function power off automatically when the TV is turned off.
Select Off to disable this function. This feature is available when
Control for HDMI is On.
equipment with Control for HDMI function. Select Off to disable
this function. This feature is available when Control for HDMI is
On.
connected to the TV.
Select button functions of the TV’s remote control to operate the
connected equipment.
None Deactivates the control by the TV’s remote
control.
Normal Enables basic operations, such as navigation
buttons (up, down, left or right, etc.).
Tuning Keys For basic operations and operation of channel-
related buttons, such as CH +/– or 0-9, etc. Useful
when you control a tuner or set-top box, etc; via
the remote control.
Menu Keys For basic operations and operation of the HOME/
OPTIONS buttons. Useful when you select menus
of a BD player, etc; via the remote control.
Tuning and
Menu Keys
For basic operations and operation of channelrelated buttons and HOME/OPTIONS buttons.
does not support the Device Control
Using the Menus
63
Page 64

Option Description
Automatic
Software
Download
Product
Support
Select On to download the software automatically. Select Off to disable it.
Contact Sony Sony contact information is available on this screen for your
Signal
Diagnostics
Initialize
Personal
Information
convenience. TV specific information such as Model Name,
Serial Number, Software Version and downloadable ratings (if
available from the TV) are displayed here.
Press to display the diagnostics information for the current
signal.
You can erase your personal information stored in the TV.
64
Page 65

Using the Eco Settings
Option Description
Reset Resets the current Eco settings to the default values.
Power Saving Select from Off, Low, High, Picture Off to adjust your TV’s power consumption.
By selecting the High option, you will reduce the power consumption more than
the other available settings.
While Picture Off is set, pressing VOL +/– or MUTING buttons will not disable this
function. Press other buttons to disable it.
Idle TV
Standby
Light Sensor Optimizes the picture settings according to the ambient lighting.
Auto Shut Off Select On to automatically power off the TV when no input signal is detected for a
Select to automatically power off the TV after 1h, 2h, or 4h when no buttons are
pressed on the remote control or the TV. Select Off to disable this function.
This setting is not available if Internet Contents, Applications or Internet
Browser are running.
certain period of time. Select Off to disable this function.
Using the Menus
65
Page 66

Other Information
PC Input Signal Reference Chart for PC and HDMI IN
After connecting the PC to the TV, set the output signal from the PC according to the
chart below.
Resolution
Signals Horizontal
(Pixel)
VGA 640 × 480 31.5 60 VGA
SVGA 800 × 600 37.9 60 VESA Guidelines
XGA 1,024 × 768 48.4 60 VESA Guidelines
WXGA 1,280 × 768 47.4 60 VESA
1,280 × 768 47.8 60 VESA
1,360 × 768 47.7 60 VESA
SXGA 1,280 × 1,024 64.0 60 VESA
HDTV* 1,920 × 1,080 67.5 60 CEA-861*
× Vertical
(Line)
* The 1080p timing when applied to the HDMI input will be treated as a video timing and not PC
timing. This affects Picture settings and Wide Mode settings. To view PC content set Scene
Select to Graphics, Wide Mode to Full, and Display Area to Full Pixel.
Horizontal
frequency (kHz)
Vertical
frequency (Hz)
Standard
• This TV’s PC input does not support Sync on Green or Composite Sync.
• This TV’s PC VGA input does not support interlaced signals.
• Your PC must support one of the above PC input signals to display on the television.
• In plug and play, signals with a 60 Hz vertical frequency will be detected automatically. (PC
reboot may be necessary.)
66
Page 67

Using a Wall-Mount Bracket
Your TV can be mounted on a wall using a Wall-Mount Bracket (not supplied) out of the
box as packaged. Some larger size TV may require removing the Table-Top Stand; refer
to the instructions provided with the TV.
Prepare the TV for the Wall-Mount Bracket before making cable connections.
For product protection and safety reasons, Sony strongly recommends that you
use the Wall-Mount Bracket designed for your TV and the installation should be
performed by a Sony dealer or licensed contractor.
• Follow the instruction guide provided with the Wall-Mount Bracket for your model.
Sufficient expertise is required in installing this TV, especially to determine the strength
of the wall for withstanding the TV’s weight.
• Be sure to use the screws supplied with the Wall-Mount Bracket when attaching the
mounting hooks to the TV set.
The supplied screws are designed so that they are 8 mm to 12 mm in length when
measured from the attaching surface of the mounting hook.
The diameter and length of the screws differ depending on the Wall-Mount Bracket
model. Use of screws other than those supplied may result in internal damage to the
TV set or cause it to fall, etc.
8-12 mm
Screw (supplied with the Wall-Mount Bracket)
Mounting Hook
Hook attachment on rear of TV set
• Be sure to store the unused screws and Table-Top Stand in a safe place until you are
ready to attach the Table-Top Stand. Keep the screws away from small children.
• Read the supplied Safety Booklet for additional safety information.
Other Information
67
Page 68

Installing the Wall-Mount Bracket
x To Customers
Your TV can be wall-mounted using SU-WL500 Wall-Mount Bracket (sold separately).
Please provide this installation information as well as the instruction supplied with SUWL500 Wall-Mount Bracket to your installer.
x To Sony Dealers and Licensed Contractors
To avoid injury and property damage, read these instructions carefully. Periodic
inspection and maintenance is highly recommended to ensure that TV is securely
mounted.
x Note when installing
When using the SU-WL500 Wall-Mount Bracket, the space between the wall and the TV
will be 2
3
/8 inches (6 cm). Use this space to route cables to the TV.
23/8 inches (6 cm)
68
Page 69

For SU-WL500
Step 1: Check the parts required for the installation
Open the Wall-Mount Bracket package and check the contents for all required parts
along with the Instructions.
Step 2: Decide on the installation location
Decide where you want to install your TV. Refer to the TV installation dimensions table.
Refer to the Instructions for SU-WL500.
x Dimension Table
Screen center point
Unit: mm (inches)
TV Model
KDL-60EX645 1,386
KDL-55EX645 1,269
KDL-50EX645 1,152
KDL-46EX645
KDL-46EX641
KDL-40EX645 941
TV Dimensions Screen center
dimensions
Length for each mounting angle
Angle (0°) Angle (20°)
AB C DEFGH
(54
(50)
(45
1,074
(42
(37
5
3
3
1
828
/8)
(32 5/8)
760
(30)
693
/8)
(27 3/8)
649
/8)
(25 5/8)
575
/8)
(22 3/4)
41
(1 5/8)
78
1
(3
111
(4 3/8)
133
(5 1/4)
170
(6 3/4)
466
(18 3/8)
/8)
468
(18 1/2)
467
(18 1/2)
468
(18 1/2)
468
(18 1/2)
112
(4 1/2)
108
(4 3/8)
109
(4 3/8)
108
(4 3/8)
107
(4 1/4)
359
(14 1/4)
332
(13 1/8)
311
(12 1/4)
294
(11 5/8)
268
(10 5/8)
767
(30 1/4)
703
(27 3/4)
641
(25 1/4)
599
(23 5/8)
529
(20 7/8)
476
(18 3/4)
476
(18 3/4)
476
(18 3/4)
476
(18 3/4)
475
(18 3/4)
Figures in the above table may differ slightly depending on the installation.
CAUTION
The wall that the TV will be installed on should be capable of supporting a weight of at
least four times that of the TV. Refer to your TV’s operating instructions for its weight.
(Continued)
69
Other Information
Page 70

Step 3: Install the Base Bracket on the wall
Refer to the Instructions for SU-WL500.
Step 4: Prepare the TV for wall mount installation
Follow the steps below to prepare for installing the TV.
1 Disconnect all the cables from the TV.
2 Detach the Table-Top Stand from the TV.
Remove the screws guided by the arrow marks and of the TV.
Do not remove any other screws from the TV.
3 Place the TV with its screen facing down on a level and stable surface covered with
a thick and soft cloth.
• Before attaching the Wall-Mount Bracket, hang the AC power cord down behind the TV.
70
Thick and soft cloth
Page 71

For KDL-60EX645 only
When you install the TV on the wall, make sure you align the AC power cord in the
groove, and do not pinch the AC power cord between the TV and the Wall-Mount
Bracket.
AC power cord
4 Secure the Mounting Hook to the rear of the TV.
Determine the screw locations and secure the Mounting Hooks to the rear of the TV.
Refer to the “Screw and Hook Locations Diagram/Table” shown below.
1 Secure the Mounting Hooks to the rear of the TV using only the supplied screws
(M6 × 16).
2 Be sure to tighten the screws with equal torque strength.
Screw
(M6 × 16)
Mounting
Hook
Other Information
Tab
Square
hole
Square
hole
x Screw and Hook Locations Diagram/Table
TV Model Screw location Hook location
KDL-60EX645 e, j a
KDL-50EX645 d, j b
KDL-55EX645/46EX645/46EX641/40EX645 e, j b
(Continued)
71
Page 72

Screw location
When installing the Mounting Hooks on
the TV.
5 Adjust the angle of the Mounting Hook.
Refer to the Instructions for SU-WL500.
Step 5: Install the TV on the wall
Refer to the Instructions for SU-WL500.
Hook location
When installing the TV onto Base Bracket.
Wall
TV
~
• When you put the TV back on the Table-Top Stand, reverse the above steps.
• When moving the TV, do not squeeze the bottom of the front panel too tight.
• Remove the screws or install the Mounting Hook on a stable and level surface.
72
Page 73

Troubleshooting
Many of the poor pictures and poor sound conditions are related to improper connection
of the cables; refer to the Quick Setup Guide provided for connections.
If you have questions, service needs, or require technical assistance related to the use
of your Sony TV even after you read this operating instructions manual, contact the
following:
For US Support:
http://www.sony.com/tvsupport
For Canadian Support:
http://www.sony.ca/support
x Things to consider
• Check the input selection by pressing the INPUT button. You may be watching the
wrong input.
• If you cannot hear sound from the TV, you may have accidentally pressed the MUTING
button on your remote control; press the MUTING button again or press VOL + to
deactivate muting.
• If the remote control is not functioning properly, the batteries may be installed
incorrectly or may be low or an object or light may be interfering with the remote
control.
• To reset the TV to factory default settings:
1 Turn on the TV.
2 Press and hold down the V button on the remote, press the 1 button on the TV set.
(The TV will turn itself off, then back on again.)
3 Release the V button when the TV is turn on.
IMPORTANT: The factory reset will clear all of your customized settings including the
Parental Lock setting.
When the Password is lost or cannot be remembered, enter the master password: 4357.
This password clears your previous password and allows you to enter a new password.
or call 1-800-222-SONY (7669)
or call 1-877-899-SONY (7669)
Other Information
Condition Explanation/Solution
No picture
No picture • Check the Power Saving settings (see page 65).
Cannot receive any
channels
• Make sure the power cord is connected securely.
• Turn on the power of the TV.
• Check cable/antenna connections.
• Make sure the Signal Type setting is correct for your TV signal
source.
(Continued)
73
Page 74

Condition Explanation/Solution
TV is locked to one
channel
Cannot receive or select
channels
The TV turns off
automatically
No picture from some
video sources
Poor picture
Picture quality not as
good as viewed at the
store
Broadcast HD formats
have poor quality
Double images or ghosts • Check cable/antenna connections.
Only snow and noise
appear on the screen
Dotted lines or stripes • Keep the TV away from noise sources such as cars, motorcycles,
No color / Dark picture /
Color is not correct / The
picture is too bright
Noisy picture • Make sure that the antenna is connected using a 75-ohm coaxial
Blurry picture / Poor color • Transporting the TV from a cold to a warm location or a sudden
•Perform Auto Program to add receivable channels that are not
present in the TV’s memory (see pages 22 and 55).
•Perform Auto Program to add receivable channels that are not
present in the TV’s memory (see pages 22 and 55).
• To receive or select cable channels, make sure that Signal Type
in the Channel settings is set to Cable (see page 55). To receive
or select UHF channels over an antenna, make sure Signal Type
is set to Antenna.
• Check if Sleep Timer is activated (see page 62).
• Check Idle TV Standby in the Eco settings.
• Check the connection between the optional video equipment
and the TV.
•Press INPUT on the remote control (see page 35).
• Picture quality depends on the signal content. See Quick Setup
Guide (supplied) to display the best possible picture for that
signal.
• Content and signal quality are controlled by the signal provider.
Many HD channels and content are actually upscaled versions of
standard-definition broadcasts. The picture is affected by the
quality of the signal received, which varies between channel and
program.
• Check the antenna location and direction.
• Check if the antenna is broken or bent.
• Check if the antenna has reached the end of its serviceable life.
(3-5 years in normal use, 1-2 years at the seaside.)
or hair-dryers.
• If using 300 ohm twin lead, move the excess lead away from the
TV or try using 75-ohm coaxial cable instead.
• Adjust the Picture Mode options in the Picture settings (see
page 49).
• If you set the Power Saving mode to Low or High, it will
enhance the black level.
cable (not supplied).
• Keep the antenna cable away from other connecting cords.
• To avoid TV interference, make sure to use an undamaged
antenna cable.
change in room temperature may cause moisture condensation,
resulting in a blurry picture or poor color. Turn off your TV and
wait a few hours before powering on again.
74
Page 75

Condition Explanation/Solution
No sound / Noisy sound
No sound but good
picture
Audio noise • Make sure that the antenna is connected using a 75-ohm coaxial
No audio or low audio
with Home Theater
System
No color / Irregular
picture
BRAVIA Sync
Cannot find connected
BRAVIA Sync HDMI
device
Second A/V receiver is
not listed on the Device
List
PC Input
No picture / No signal • Confirm the PC is correctly connected to the TV with either the
Poor Picture • Adjust the resolution (see page 66).
• Check the volume control.
•Press MUTING or VOL + so that “Muting” disappears from the
screen (see page 26).
•Set Speakers to TV Speakers in the Sound settings (see page
52). If it is set to Audio System, sound is not output from the TV’s
speakers regardless of the TV’s volume control.
• When using HDMI input with Super Audio CD or DVD-Audio,
DIGITAL AUDIO OUT (OPTICAL) may not provide an audio
signal.
• When tuned to a digital channel with Alternate Audio, the
broadcaster may not be broadcasting your preferred Alternate
Audio language. Press OPTIONS, highlight and select Alternate
Audio, and change the Alternate Audio language (see page
52).
cable (not supplied).
• Keep the antenna cable away from other connecting cords.
• To avoid TV interference, make sure to use an undamaged
antenna cable.
•Set Speakers to Audio System in the Sound settings (see page
52).
•Set Audio Out to Fixed in the Sound settings (see page 52).
• Verify that the Video1/Component Selection (see page 62) is
set to the current input type in use. We suggest leaving this
setting to Auto.
• Make sure that the Control for HDMI is set up on both the TV
and the optional device compatible with BRAVIA Sync (see
page 30).
• Only one A/V receiver may be used with the BRAVIA Sync and
Control for HDMI functions at one time (see page 63).
PC IN (with an HD15 cable) or with the HDMI IN.
• Ensure the output signal from the PC is one of the formats listed
on page 66.
• Turn the PC off. Confirm the PC connection and restart the PC.
Plug-and-play will auto-detect the TV and correctly set up PC
timing.
• Verify the PC is not in standby or hibernation mode.
•Adjust Pitch and Phase (see page 54).
Other Information
(Continued)
75
Page 76

Condition Explanation/Solution
General
TV screen feels warm • Due to the thin profile of this television, the heat generated by the
Wide Mode changes
automatically
Suddenly the picture
gets smaller
“Black box” on screen • You have selected a text option and no text is available (see
Black bands appear at
the edges of the screen
LCD panel backlight and supporting electronics will be more
noticeable. This is normal operation and not a cause for concern.
• The current Wide Mode setting is automatically replaced with the
4:3 Default setting when you change the channel or video input,
if 4:3 Default in the Screen settings is set to other than Off. If you
want to lock in Wide Mode selected with WIDE on the remote
control, set 4:3 Default to Off in the Screen settings (see page
53).
• Check the Auto Wide option in the Screen settings (see page
53).
• The picture gets smaller during the commercials due to the
method in which the provider broadcasts their content. When HD
content channels switch to SD content (commercials), the picture
may be small with a black border.
• Auto Wide will not expand the picture during these content
changes since the content information is regulated by the
channel signal provider. You can manually change the Wide
Mode if you prefer (see page 33). This setting will remain in
effect until you change the channel or input or manually change
the Wide Mode again.
page 61). To turn off this feature, set the CC Display option to
Off. If you were trying to select closed captioning, select CC1
instead of Text1-4.
• Some wide screen programs are filmed in aspect ratios that are
greater than 16:9 (this is especially common with theatrical
releases). Your TV will show these programs with black bands at
the top and bottom of the screen. For more details, check the
documentation that came with your DVD/Blu-ray (or contact your
program provider).
• Programs in 4:3 aspect ratio will have bands on left and right
sides of the screen.
• Programs broadcast in HD formats (720p and 1080i) with 4:3
content will commonly have black bands on the left and right
sides of the screen which are added by the broadcaster (see
image on left).
• Auto Wide will not expand the picture when the black bands on
the sides of the screen are added by the broadcaster. You can
manually change the Wide Mode to Wide Zoom, or Zoom to fill
the screen, which will remain in effect until you change the
channel or input or manually change the Wide Mode again.
76
Page 77

Condition Explanation/Solution
Certain programs on
DVD or other digital
sources display a loss of
detail, especially during
fast-motion or dark
scenes
Remote control does not
operate
Some digital cable
channels are not being
displayed
Some photo, music, or
video files are not
displaying from my USB
equipment
Photo images appear
small in the screen
Photo images or folders
take time to display
Lost password • Select the Password settings on the Parental Lock settings,
How to reset the TV to
factory settings
• This is due to the digital compression of the source content used
by certain digital broadcasts and DVDs which may cause your
TV’s screen to display less detail than usual, or cause artifacts
(small blocks or dots, pixelations) to appear on your screen.
These signal compressions are more visible and are dependent
on the clarity and resolution of the TV.
• To determine if the problem is with the remote control or not,
press a button on the TV.
• Check the polarity of the batteries or replace the batteries.
• Point the remote control at the remote control sensor located at
the front of the TV.
• Keep the remote control sensor area clear from obstacles.
• Fluorescent lamps can interfere with your remote control
operation; try turning off the fluorescent lamps.
• Certain cable companies have limitations on the broadcast of
digital cable channels. Check with your cable company for more
information.
• The digital cable channel may be set to Hidden in the Show/
Hide Channels setting (see page 55).
• The accessible file or folder limit in a directory is 1,000 for USB
connected equipment. This limit includes non-supported files or
just folders. Files or folders are populated based on their time
stamps. Photo, music files or folders exceeding the limit will not
be displayed.
• Set display size to expanded.
• Whether photo images can be displayed in full screen or not
depends on the resolution or aspect ratio of the file.
• Depending on the image dimension, file size, and number of files
in a folder, some photo images or folders take time to display.
• The first time a camera is connected to the TV via USB cable, it
may take up to a couple of minutes for the photos to display.
then enter the following master password: 4357. This password
clears your previous password and allows you to enter a new
password (see page 56).
• Turn on the TV. While holding down V on the remote control,
press 1 on the TV. (The TV will turn itself off, then back on
again.) Release V.
IMPORTANT: The reset will clear all of your customized settings
including the Parental Lock setting.
Other Information
(Continued)
77
Page 78

Condition Explanation/Solution
Sometimes video
streaming quality is poor
when using the wireless
LAN
Wireless LAN connection
fails or radio reception
conditions are poor
Poor picture on Internet
Video
Small picture on Internet
Video
Certain Internet video
content displays a loss of
detail, especially during
fast-motion or dark
scenes
Good picture quality but
no sound on the Internet
video content
You do not see many
videos in the Internet
Video Guide
Widgets are inaccessible • Check that the LAN cable or AC power cord (mains lead) of the
• The wireless network connection quality varies depending on the
distance or obstacles (e.g. wall) between the TV/USB Wireless
LAN Adapter and the wireless router (access point), environment
interference, and quality of the wireless router (access point). If
using USB Wireless LAN Adapter, it is suggested to use a
wireless router (access point) supporting 5GHz operation for
video streaming and place it closer to the USB Wireless LAN
Adapter (not applicable for models with built-in wireless LAN
device).
• Check the installation location of the TV and wireless router
(access point). Signal condition may be affected for the following
reasons.
- Other wireless devices, microwaves, fluorescent lights, etc.,
are placed nearby.
- There are floors or walls between the wireless router (access
point) and TV.
If the problem persists even after checking the above, try
making a wired LAN connection.
• Quality depends on the original video provided by the video
content provider and your connection bandwidth.
• Use the color buttons to zoom in and out.
• Video quality and picture size depend on broadband speed and
delivery by content providers.
• Quality depends on the original content provided by the video
content provider and your connection bandwidth.
• Due to the nature of Internet video, not all videos will contain
sound.
•Press OPTIONS and select categories to view more content.
• Check the Parental Lock ratings on the TV; some Internet
content may be blocked based on the rating.
router/modem* has been connected properly.
* Your router/modem must be set in advance to connect to
the Internet. Contact your Internet service provider for
router/modem settings.
• Try using Widgets later. The Widget content provider’s server
may be out of service.
You cannot add a new
Widget
• Your TV comes with preinstalled apps which occupy a certain
amount of the allotted app memory. To add a new app, you may
have to delete an existing app. Press Home, then press V/v to
select Applications, press , then press B/b to select the
Widget you want to delete. Press yellow button, then press V/v to
select Delete App, and press .
78
Page 79

Condition Explanation/Solution
Your TV cannot connect
to the server
A message appears
starting that the TV
cannot connect to your
network
DLNA Certified™ media
server is inaccessible
although it is listed under
[Media] in the Home
Menu
Some photos, music,
video files in the
connected USB device
or DLNA Certified™
media server are not
displayed
When using the renderer
function, music files
cannot be played back
The TV surrounds
become warm.
• Check the LAN cable or connection to your server and your TV.
• Check if your network is properly configured on your TV.
• Check the current network settings. Press HOME, then select
Settings > Setup > Network > Network Setup > View Network
settings and status. If all of your network settings are “-”, your
server may not be connected properly. Check your network
connections and/or server’s instruction manual for connection
information.
• Reconfigure your network settings.
• If the LAN cable is connected to an active server and the TV has
acquired an IP address, check your DLNA Certified™ media
server’s connections and configurations.
• Your IP address configuration can be viewed by selecting the
View Network settings and status option.
• Check your LAN cable/connection or your server connections.
The TV may have lost connection with the server.
•Perform Media Server Troubleshooting to check if your media
server is properly communicating with the TV. Press HOME, then
select Settings > Setup > Network > Home Network Setup >
Media Server Troubleshooting.
• Unsupported files may not be displayed.
• The accessible file or folder limit in a directory is 1,000 for USB
and a DLNA Certified™ media server. This limit includes nonsupported files or just folders. Files or folders are populated
based on their timestamps. Photo, music files or folders
exceeding the limit will not be displayed.
• Some applications display a photo file pre-installed in the PC
simultaneously with music playback when using the renderer
function. Depending on the pre-installed photo file, music
playback may not be possible, but may become possible by
changing the photo file.
• When the TV is used for an extended period, the TV surrounds
become warm. You may feel hot when touching there by the
hand.
Other Information
79
Page 80

Important Notices
Declaration of Conformity
Trade Name: SONY
Model: KDL-60EX645/55EX645/50EX645/46EX645/
46EX641/40EX645
Responsible Party: Sony Electronics Inc.
Address: 16530 Via Esprillo,
San Diego, CA 92127 U.S.A.
Telephone Number: 858-942-2230
This device complies with part 15 of the FCC rules.
Operation is subject to the following two conditions: (1)
This device may not cause harmful interference, and (2)
this device must accept any interference received,
including interference that may cause undesired
operation of the device.
For Customers in Canada
This Class B digital apparatus complies with Canadian
ICES-003.
FCC Related Information
This equipment has been tested and found to comply with
the limits for a Class B digital device, pursuant to Part 15 of
the FCC Rules. These limits are designed to provide
reasonable protection against harmful interference in a
residential installation. This equipment generates, uses and
can radiate radio frequency energy and, if not installed and
used in accordance with the instructions, may cause harmful
interference to radio communications. However, there is no
guarantee that interference will not occur in a particular
installation. If this equipment does cause harmful
interference to radio or television reception, which can be
determined by turning the equipment off and on, the user is
encouraged to try to correct the interference by one or more
of the following measures:
❑ Reorient or relocate the receiving antenna.
❑ Increase the separation between the equipment and
receiver.
❑ Connect the equipment into an outlet on a circuit
different from that to which the receiver is connected.
❑ Consult the dealer or an experienced radio/TV
technician for help.
Pursuant to FCC regulations, you are cautioned that any
changes or modifications not expressly approved in this
manual could void your authority to operate this
equipment.
Safety and Regulatory
This equipment complies with FCC/IC radiation exposure
limits set forth for uncontrolled equipment and mee ts the FCC
radio frequency (RF) Exposure Guidelines in Supplement C
to OET65 and RSS-102 of the IC radio frequency (RF)
Exposure rules. This equipment has very low levels of RF
energy that it deemed to comply without maximum
permissive exposure evaluation (MPE). But it is desirable that
it should be installed and operated with at least 20 cm and
more between the radiator and person’s body (excluding
extremities: hands, wrists, feet and ankles).
This device and its antenna(s) must not be co-located or
operating with any other antenna or transmitter except Grant
condition.
Compatible Wall-Mount Bracket
Information
Use the following Sony Wall-Mount Bracket with your TV
model.
Sony TV Model No.
KDL-60EX645/KDL-55EX645/
KDL-50EX645/KDL-46EX645/
KDL-46EX641/KDL-40EX645
Sony Wall-Mount
Bracket Model
No.
Use with other Wall-Mount Brackets may cause instability
and could result in property damages or injury.
Note
This television includes a QAM demodulator which should
allow you to receive unscrambled digital cable television
programming via subscription service to a cable service
provider. Availability of digital cable television programming
in your area depends on the type of programming and signal
provided by your cable service provider.
To Customers
Sufficient expertise is required for TV installations. Be sure to
subcontract the installation to a Sony dealer or licensed
contractor and pay adequate attention to safety during the
installation.
Pour les clients résidant au Canada
Cet appareil numérique de la classe B est conforme à la norme
NMB-003 du Canada.
SU-WL500
80
Page 81

Information sur le support de fixation murale
compatible
Utilisez le support de fixation murale Sony cidessous
correspondant au modèle de votre téléviseur.
Numéro de modèle de
téléviseur Sony
KDL-60EX645/KDL-55EX645/
KDL-50EX645/KDL-46EX645/
KDL-46EX641/KDL-40EX645
Numéro de
modèle du
support de
fixation murale
Sony
L’utilisation d’un autre support de fixation murale peut provoquer
l’instabilité de l’appareil et causer des blessures ou des dommages
matériels.
SU-WL500
Other Information
81
Page 82

Specifications
System
Television system NTSC: American TV standard
Channel coverage Analog terrestrial: 2 - 69 / Digital terrestrial: 2 - 69
Panel system LCD (Liquid Crystal Display) Panel LED backlight
Speaker output 10 W + 10 W
Input/Output jacks
CABLE/ANTENNA 75-ohm external terminal for RF inputs
VIDEO IN 1/2 VIDEO: 1 Vp-p, 75 ohms unbalanced, sync negative
COMPONENT IN YP
HDMI IN 1/2/3/4 HDMI: Video: 480i, 480p, 720p, 1080i, 1080p, 1080/24p
AUDIO OUT 500 mVrms (typical)
DIGITAL AUDIO OUT
(OPTICAL)
PC IN D-sub 15-pin, analog RGB, 0.7 Vp-p, 75 ohms, positive
PC/HDMI IN 1 AUDIO IN Stereo mini jack, 500 mVrms, (Typical) / Impedance: 47 kilohms
USB Compliant with USB mass storage e.g. digital camera or USB memory. Also compliant with
DLNA DLNA Certified™ codec is the same as USB. (Some DLNA Certified™ servers may not be
LAN 10BASE-T/100BASE-TX connector (Depending on the operating environment of the
ATSC (8VSB terrestrial): ATSC compliant 8VSB
QAM on cable: ANSI/SCTE 07 2000 (Does not include CableCARD functionality)
Analog Cable: 1 - 135 / Digital Cable: 1 - 135
(KDL-60EX645/55EX645/50EX645)
AUDIO: 500 mVrms (Typical) / Impedance: 47 kilohms
BPR (Component Video): Y: 1.0 Vp-p, 75 ohms unbalanced, sync negative / PB: 0.7 Vp-p,
75 ohms
R: 0.7 Vp-p, 75 ohms / Signal format: 480i, 480p, 720p, 1080i, 1080p
P
AUDIO: 500 mVrms (Typical) / Impedance: 47 kilohms
Audio: Two channel linear PCM 32, 44.1 and 48 kHz, 16, 20 and 24bits, Dolby Digital
PC Input (see page 66)
PCM/Dolby Digital optical signal
See the PC Input Signal Reference Chart for PC and HDMI IN on page 66.
UWA-BR100 as WiFi Dongle.
able to play back.)
network, connection speed may differ. 10BASE-T/100BASE-TX communication rate and
communication quality are not guaranteed for this TV.)
(KDL-46EX645/46EX641/40EX645)
8 W + 8 W
82
Page 83

Model name KDL- 60EX645 55EX645
Power and others
Power requirement 110-240 V AC, 50/60 Hz (U.S.A./Canada 120 V AC, 60 Hz)
Power consumption
in use
in standby Less than 0.25 W with 120 V AC and with 240
Screen size*
(inches measured diagonally)
Display resolution 1,920 dots (horizontal) × 1,080 lines (vertical)
Speaker/Full range (2) (mm)
Dimensions* with stand (mm)
without stand (mm)
wall-mount hole pattern
(mm)
wall-mount screw size
(mm)
Mass* with stand (kg)
without stand (kg)
Supplied accessories Remote control RM-YD075 (1)/Size AAA batteries (2)/Operating Instructions (this manual)
common to all models
individual models Screw (7)
Optional accessories Connecting cables / Support Belt Kit / Wall-Mount Bracket: SU-WL500
(inches)
(inches)
(inches)
V AC less than 0.4 W
(lb.)
(lb.)
(1)/Quick Setup Guide (1)/Warranty Card (1)/Safety and Regulatory Booklet (1)/Software
License (1)/Stand installation guide (1)/Table-Top Stand (1 set)
170 W 152 W
Less than 0.2 W with 120 V AC and with 240
V AC less than 0.25 W
60 54.6 (55 class)
30 × 150
3
/16 × 6)
(1
1,386 × 865 × 311
5
/8 × 34 1/8 × 12 1/4
54
1,386 × 828 × 65
5
54
/8 × 32 5/8 × 2 5/8
400 × 300 300 × 300
M6 (length: refer to diagram on page 67)
31.1
68.6
26.7
58.9
50 × 31
1,269 × 797 × 311
1
/2 × 12 1/4
1,269 × 760 × 60
50 × 30 × 2
23.4
51.6
18.9
41.7
3
/8
Other Information
(Continued)
83
Page 84

Model name KDL- 50EX645 46EX645/46EX641 40EX645
Power and others
Power requirement 110-240 V AC, 50/60 Hz (U.S.A./Canada 120 V AC, 60 Hz)
Power consumption
in use
in standby Less than 0.3 W with 120 V
Screen size*
(inches measured diagonally)
Display resolution 1,920 dots (horizontal) × 1,080 lines (vertical)
Speaker/Full range (2) (mm)
Dimensions* with stand (mm)
without stand (mm)
wall-mount hole pattern
(mm)
wall-mount screw size
(mm)
Mass* with stand (kg)
without stand (kg)
Supplied accessories Remote control RM-YD075 (1)/Size AAA batteries (2)/Operating Instructions (this manual)
common to all models
individual models Screw (7)
Optional accessories Connecting cables / Support Belt Kit / Wall-Mount Bracket: SU-WL500
AC and with 240 V AC less
than 0.35 W
(inches)
(inches)
(inches)
(lb.)
(lb.)
(1)/Quick Setup Guide (1)/Warranty Card (1)/Safety and Regulatory Booklet (1)/Software
License (1)/Stand installation guide (1)/Table-Top Stand (1 set)
146 W 117 W 100 W
Less than 0.2 W with 120 V AC and with 240 V AC less than
0.3 W
50 46 40
30 × 150
3
(1
/16 × 6)
1,152 × 731 × 251
3
/8 × 28 7/8 × 10
45
1,152 × 693 × 61
3
/8 × 27 3/8 × 2 1/2
45
300 × 400 300 × 300
M6 (length: refer to diagram on page 67)
22.8
50.3
19.6
43.2
1,074 × 686 × 251
42 3/8 × 27 1/8 × 10
1,074 × 649 × 60
3
/8 × 25 5/8 × 2 3/8
42
17.4
38.4
14.2
31.3
941 × 612 × 231
37 1/8 × 24 1/8 × 9 1/8
941 × 575 × 60
1
/8 × 22 3/4 × 2 3/8
37
14.3
31.5
11.7
25.8
• Optional accessories availability depends on its stock.
• Design and specifications are subject to change without notice.
* Dimensions and mass are approximate values.
84
Page 85

Index
0-9 buttons 26
4:3 Default 53
A
Add Digital Channels 55
Advanced Settings 50
Alternate Audio 52
Analog Fine Tune 55
AUDIO OUT 12
Audio Out 52
Auto Display Area 53
Auto Program 22, 55
Auto Shut Off 65
Auto Wide 53
Automatic Software Download 64
AV Setup 62
B
Backlight 49
Balance 51
Bass Booster 51
Brightness 49
C
CABLE/ANTENNA 12
CC button 27
CH +/– button 27, 28
Change Password 56
Channel Block 56
CineMotion 50
Clock/Timers 62
Closed Captions (CC) 61
Color 49
Color Temperature 49
Colored buttons 25
COMPONENT IN 12
Country 56
D
DIGITAL AUDIO OUT (OPTICAL)
11
Display Area 53
DISPLAY button 27
DLNA 6
Downloadable U.S. Rating 56
E
Edit Channel Labels 55
English Rating 58
Equalizer 51
Equipment Control button 25
External Input Block 56
F
French Rating 58
H
HDMI IN 11
HDMI Settings 63
HDMI/DVI Audio Source 52
Home Network Setup 59
HOME/MENU button 26, 28
Horizontal Center 53, 54
Hue 49
I
Idle TV Standby 65
Info Banner 62
Infrared Receiver (IR) 28
Initial Setup 62
INPUT button 25, 28
Installing the TV on a wall 67, 68
J
JUMP button 27
L
Language 62
Light sensor 28, 65
M
Manage Inputs 62
Movie Rating 57
MPEG Noise Reduction 49
MTS Audio 52
Music 35
MUTING button 26
N
Netflix 26, 45
Network Setup 59
Noise Reduction 49
O
OPTIONS 27
P
PAP 32
Password 56
PC IN 11
PC Settings 54
Photo 35
Photo Frame 26, 39
Photo Frame Settings 60
Picture 49
Picture Adjustments Lock 63
Picture Mode 49
Picture Off ( ) LED 28
PIP 31
Power (1) button 28
POWER ("/1) button 26
POWER (") LED 28
Power Saving 65
Product Support 64
R
Rating 56
Reset 49, 51, 65, 77
RETURN button 26
S
SCENE button 26
Settings
Channel
Eco 65
Parental Lock 56
Picture 49
Screen 53
Setup 59
Sound 51
Sharpness 49
Show/Hide Channels 55
Signal Type 55
Sleep Timer 62
Software Update 63
Sony Entertainment Network 45
Sound Mode 51
Speakers 52
Standby (1) LED 28
Startup Logo 62
Steady Sound 51
Surround 51
SYNC MENU button 27
55
T
Timer ( ) LED 28
Troubleshooting 73–79
TV Rating 57
U
U.S.A. Rating 58
Unrated 56
USB 12
USB Auto Start 60
V
Vertical Center 53, 54
Video 35
VIDEO/AUDIO (L/R) 12
Viewing Blocked Programs 58
VOL (2) +/– button 26, 28
Volume Offset 51
W
WIDE button 25
Wide Mode 53, 54
Y
Yahoo! Widgets 46
YouTube Leanback 45
Other Information
85
Page 86

Page 87

Page 88

Online
Registration:
For Your Convenience
Be sure to register your TV.
United States
Canada
Your TV is capable of receiving software updates. For the
latest information about software updates for your TV, visit:
http://productregistration.sony.com
http://www.sony.ca/registration
Software
Updates:
United States
Canada
NOTE: If your TV is connected to the Internet, you can check
for software updates by selecting Settings, Product
Support and then Automatic Software Update.
http://www.sony.com/tvsupport
http://www.sony.ca/support
© 2012 Sony Corporation Printed in U.S.A.
4-436-788-11(1)
 Loading...