

Page 1
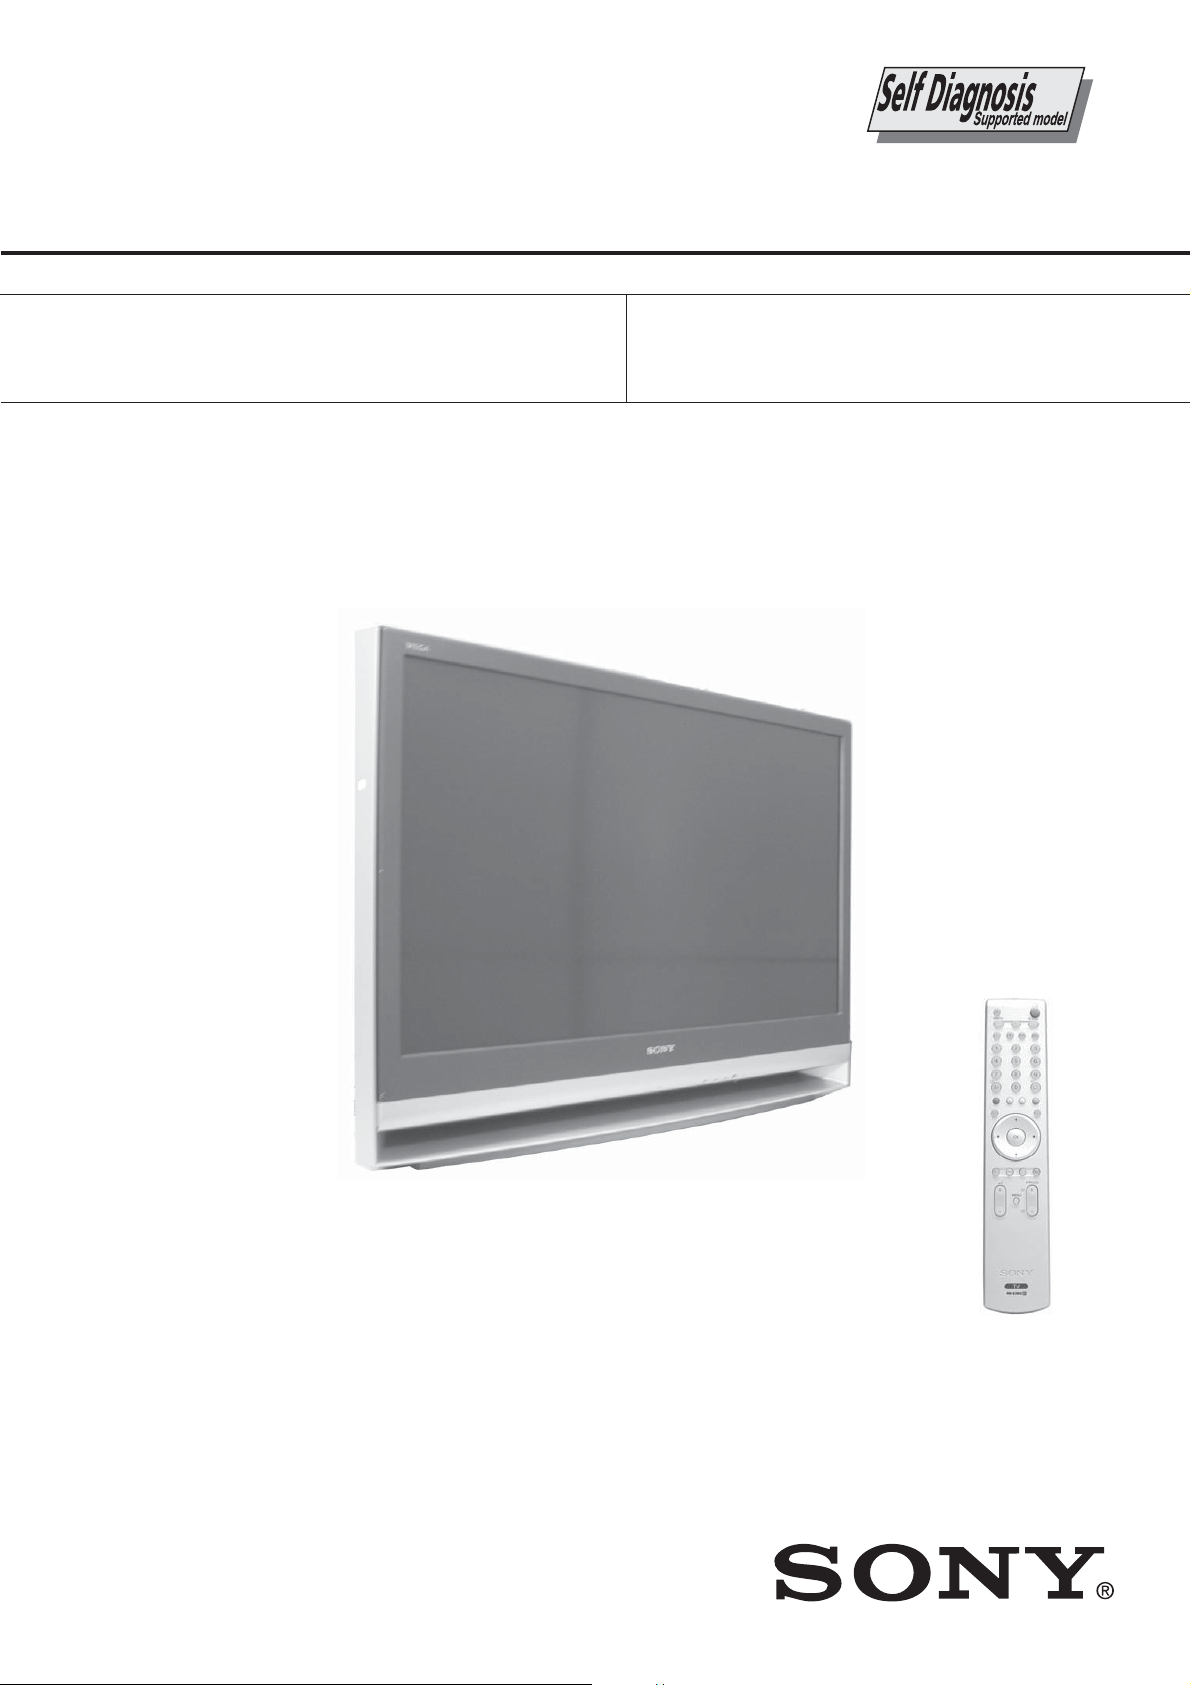
KDF-E42/50A12U
RM-ED002
SERVICE MANUAL
MODEL
KDF-E42A12U
COMMANDER DEST
RM-ED002 UK
LE-4B
MODEL
KDF-E50A12U
CHASSIS
COMMANDER DEST
RM-ED002 UK
KDF-E42/50A12U
- 1 -
RM-ED002
LCD PROJECTION TV
Page 2

KDF-E42/50A12U
RM-ED002
TABLE OF CONTENTS
Section Title Page Section Title Page
Caution ................................................................ 3
Specifications ...................................................... 4
Connectors .......................................................... 5
1. SELF DIAGNOSIS FUNCTION
LE-4B Self Diagnostic Software ........................ 6
2. GENERAL ................................................................... 8
3. DISASSEMBLY
3-1. Rear Cover Removal .......................................... 22
3-2. Pillar Removal .................................................... 22
3-3. Main Bracket Cover Removal ............................ 22
3-4. Main Bracket Removal ...................................... 22
3-5. Service Position ................................................. 23
3-6. N, JB, AG Boards ............................................. 23
3-7. Power Block Removal ........................................ 23
3-8. Optical Unit ......................................................... 23
3-9. C Board Removal ................................................ 24
3-10. Screen, Mirror Block Assembly Removal .......... 24
3-11. Mirror Cover Block Assembly Removal ............ 25
3-12. Contrast Screen, Diffusion Plate Removal ......... 25
3-13. Mirror Removal .................................................. 26
3-14. H3 Removal ........................................................ 26
3-15. Speaker Removal ................................................ 26
4. SET-UP ADJUSTMENTS
4-1. Signal Adjustment .............................................. 27
4-1-1. PAL Auto adjustment (CVBS) ...................... 27
4-1-2. PAL Auto adjustment (RGB) ......................... 27
4-1-3. SECAM Auto adjustment (CVBS) ................ 27
4-2. White Balance Adjustment .................................. 27
4-2-1. White Balance Adjustment (H/L) ................... 27
4-2-2. White Balance Adjustment (C/O) ................... 28
4-2-3. SECAM White Balance Adjustment (H/L) .... 28
4-2-4. SECAM White Balance Adjustment (C/O) .... 29
4-3. Test Test Mode ................................................... 29
5. DIAGRAMS
5-1. Block Diagram (1) .............................................. 30
Block Diagram (2) .............................................. 31
Block Diagram (3) .............................................. 32
Block Diagram (4) .............................................. 33
Block Diagram (5) .............................................. 34
Block Diagram (6) .............................................. 35
Block Diagram (7) .............................................. 36
Block Diagram (8) .............................................. 37
5-2. Circuit Boards Location ...................................... 37
5-3. Schematic Diagrams and Printed Wiring
Boards ................................................................. 37
AG Board Schematic Diagram ........................... 38
AG Printed Wiring Board ................................. 41
C Board Schematic Diagram ............................... 43
C Printed Wiring Board .................................... 47
JB Board Schematic Diagram ............................. 48
JB Printed Wiring Board .................................. 57
H1 Schematic Diagram ....................................... 59
H1 Printed Wiring Board .................................. 60
H2 Board Schematic Diagram ............................ 59
H2 Printed Wiring Board .................................. 60
H3 Board Schematic Diagram ............................ 59
H3 Printed Wiring Board .................................. 60
T1 Board Schematic Diagram ........................... 59
T1 Printed Wiring Board .................................. 60
T2 Board Schematic Diagram ........................... 59
T2 Printed Wiring Board .................................. 60
N Board Schematic Diagram .............................. 61
N Printed Wiring Board .................................... 68
5-4. Semiconductors .................................................. 69
6. EXPLODED VIEWS
6-1. Screen Mirror Block, Covers ........................... 71
6-2. Chassis/Bottom Block Assembly ....................... 72
6-3. Lamp Duct Assembly, Optics Unit Block .......... 73
WARNING !!
AN ISOLATION TRANSFORMER SHOULD BE USED DURING
ANY SERVICE WORK TO AVOID POSSIBLE SHOCK HAZARD
DUE TO LIVE CHASSIS, THE CHASSIS OF THIS RECEIVER IS
DIRECTLY CONNECTED TO THE POWER LINE.
7. ELECTRICAL PARTS LIST .................................. 74
SAFETY-RELATED COMPONENT WARNING !!
COMPONENTS IDENTIFIED BY SHADING AND MARKED
THE SCHEMATIC DIAGRAMS, EXPLODED VIEWS AND IN THE
PARTS LIST ARE CRITICAL FOR SAFE OPERATION. REPLACE
THESE COMPONENTS WITH SONY PARTS WHOSE PART
NUMBERS APPEAR AS SHOWN IN THIS MANUAL OR IN
SUPPLEMENTS PUBLISHED BY SONY.
- 2 -
ON
Page 3
CAUTION
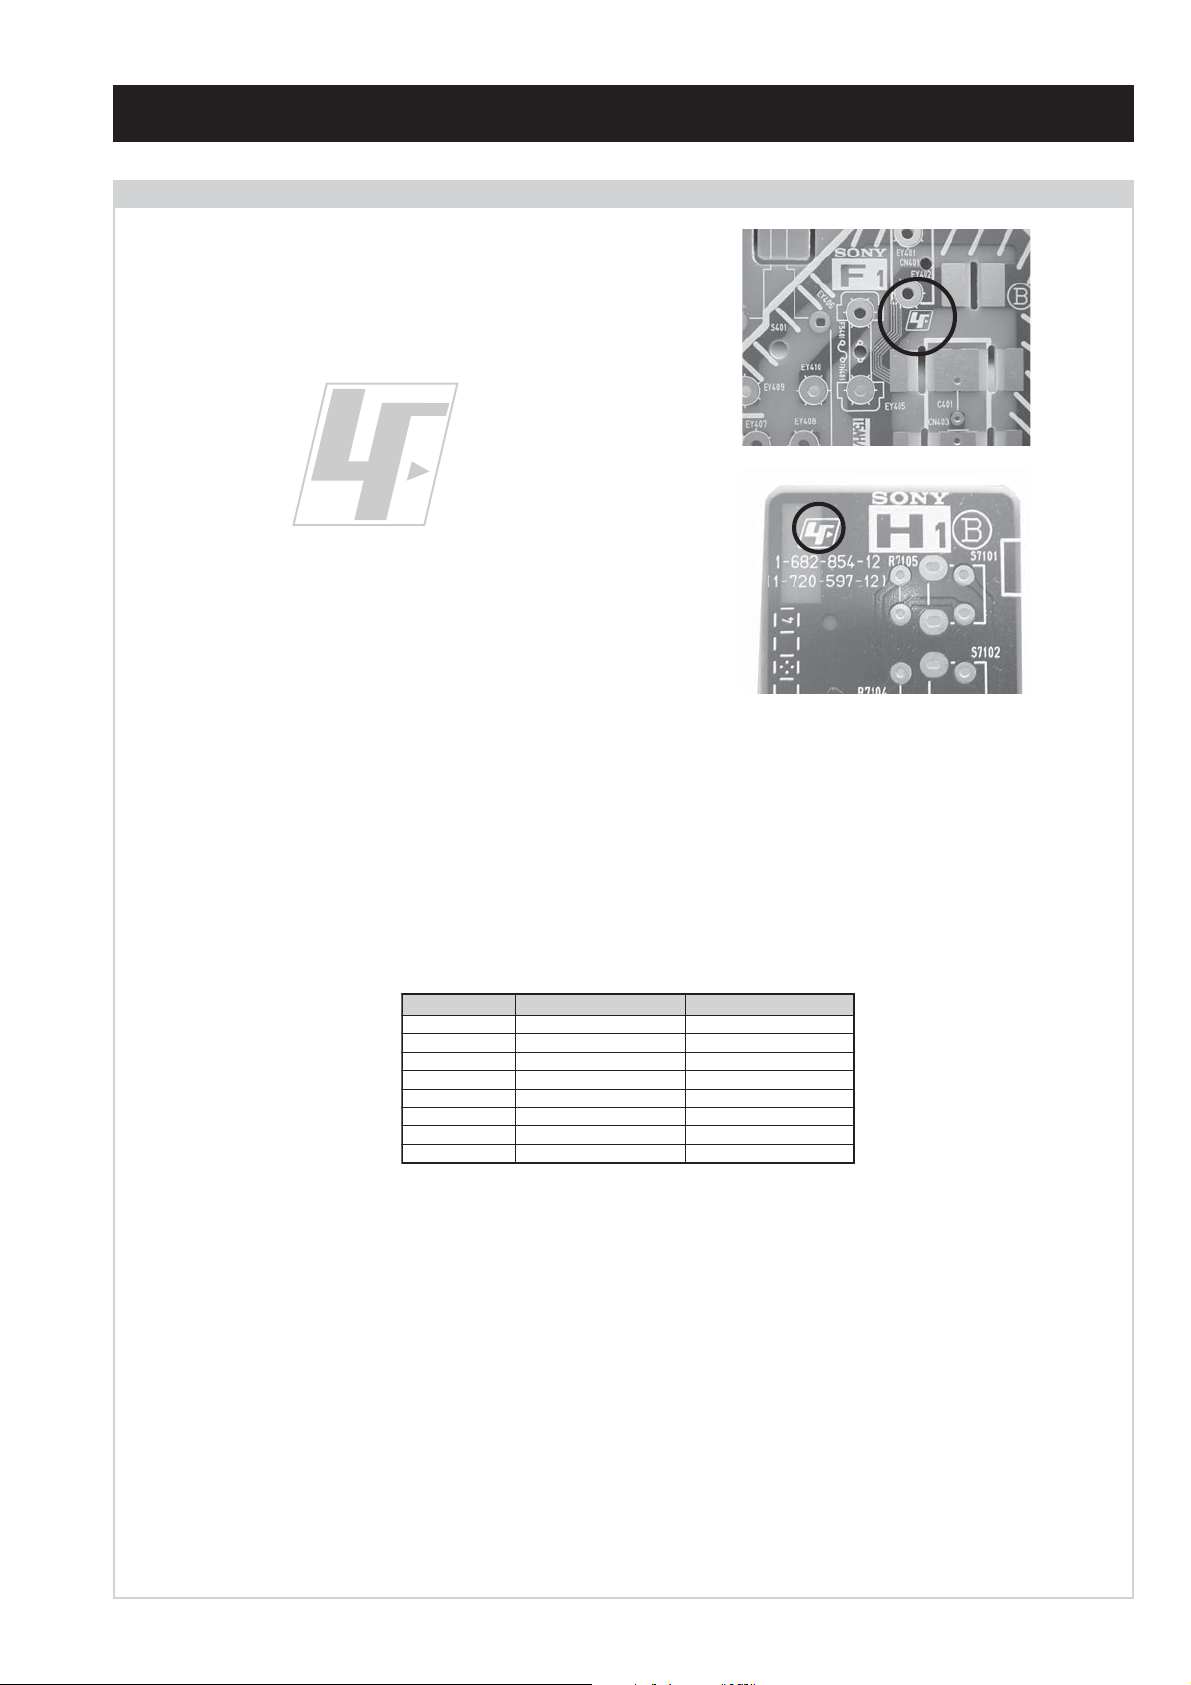
Lead Free Soldered Boards
The circuit boards used in these models have been processed using
Lead Free Solder. The boards are identified by the LF logo located
close to the board designation e.g. F1, H1 etc [ see examples ]. The
servicing of these boards requires special precautions to be taken as
outlined below.
KDF-E42/50A12U
RM-ED002
example 1
example 2
It is strongly recommended to use Lead Free Solder material in order to guarantee optimal quality of new solder joints. Lead Free Solder is
available under the following part numbers :
rebmuntraP retemaiD skrameR
91-500-046-7mm3.0gK52.0
02-500-046-7mm4.0gK05.0
12-500-046-7mm5.0gK05.0
22-500-046-7mm6.0gK52.0
32-500-046-7mm8.0gK00.1
42-500-046-7mm0.1gK00.1
52-500-046-7mm2.1gK00.1
62-500-046-7mm6.1gK00.1
Due to the higher melting point of Lead Free Solder the soldering iron tip temperature needs to be set to 370 degrees centigrade. This requires
soldering equipment capable of accurate temperature control coupled with a good heat recovery characteristics.
For more information on the use of Lead Free Solder, please refer to http://www.sony-training.com
- 3 -
Page 4
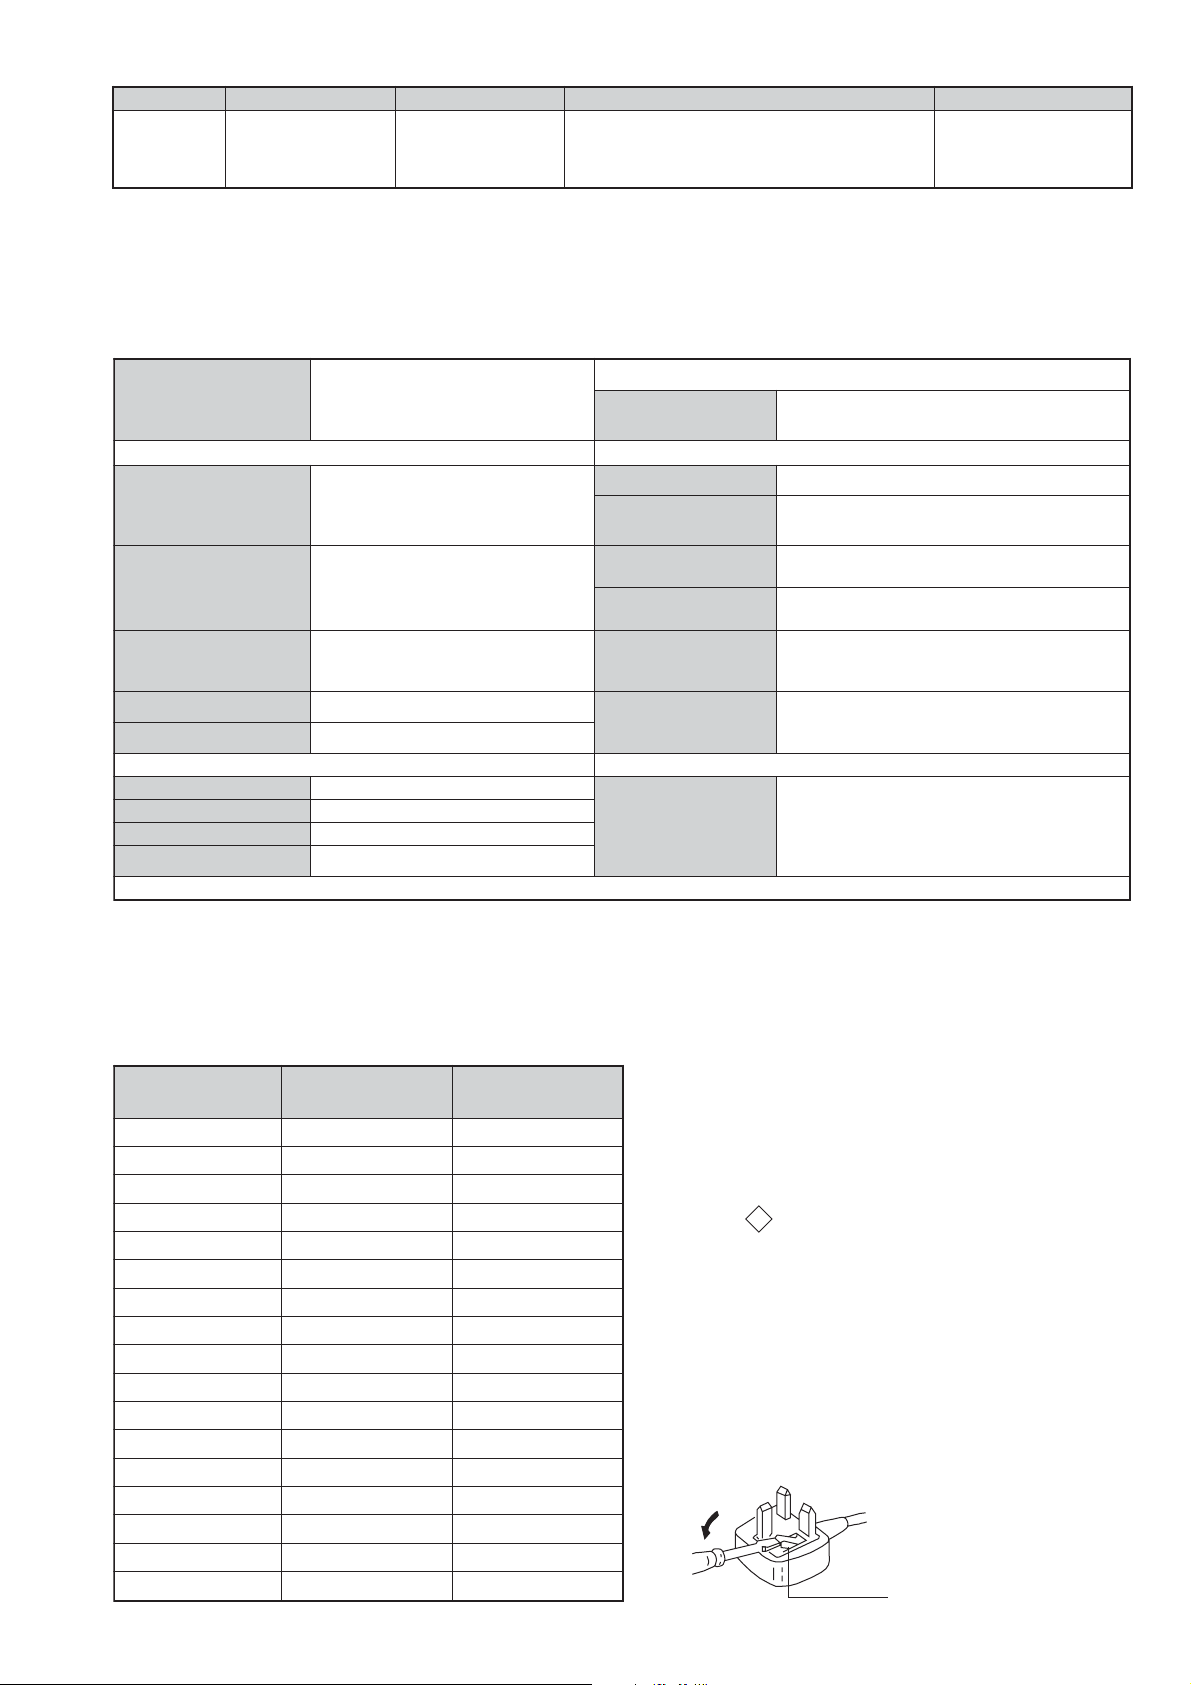
How to replace the fuse.
Open the fuse compartment with
a screwdriver blade and replace
the fuse.
FUSE
LEDOMMETI metsySnoisiveleT metsySoeretS egarevoClennahC metsySroloC
UT-BVD,IoeretSMACIN96B-12B:FHU
KDF-E42/50A12U
RM-ED002
MACES,LAP
34.4/85.3CSTN
)YLNOOEDIV(
LM@PM2-GEPM
eziSerutciPdetcejorP
rotcennocoruEnip-12:1
)dradnatsCELENEC(
rotcennocoruEnip-12:2
)dradnatsCELENEC(
skcaJonohP
kcajiniM.oiduACProftupnI
rotcennocepytD.tupniCP
kcajenohpdaeHkcajinimoerets
stupnioiduAskcajonohp
stupnioediVskcajonohp
tupnioediVSNIDnip4
U21A24E-FDK
)sehcni24(mc701xorppA
)sehcni05(mc721xorppA
U21A05E-FDK
]RAER[slanimreTtuptuO/tupnI snoitacificepSlareneG
.slangisoediVdnaoiduArofstupnI
.BGRrofstupnI
oiduAdnaoediVVTfostuptuO
.slangis
.slangisoediVdnaoiduArofstupnI
.BGRrofstupnI
slangisoiduAdnaoediVrofstuptuO
.ecafretnikniltramS.)elbatceles(
oiduArofelbairavsrotcennoCtuptuO
.slangiS
]TNORF[slanimreTtuptuO/tupnI lortnocderarfnI:metsyslortnocetomeR
tuptuOdnuoS
rekaepstfeLdnathgiR)SMR(W01x2)rewoPcisuM(W02x2
stnemeriuqeRrewoPV042-022
ybdnatS
/noitpmusnoCrewoP
snoisnemiD
thgieW
seirosseccAdeilppuS
serutaeFrehtO
cdV3
stnemeriuqerrewoP
W8.0/W571xorppA
)U21A24E-FDK(mm053x0001x027xorppA
)U21A05E-FDK(mm593x0811x528xorppA
)U21A24E-FDK(gk1.52xorppA
)U21A05E-FDK(gk6.92xorppA
)1(rednammoCetomeR200DE-MR
)2(yrettab6RdetangisedCEI
)1(elbaClaixaoC
,TAP,weiVtxeN,txeteleT,retliFbmoCD3
,MACIN,EBB,ybloDlautriV,kniltramS
.tuomedom,AICMCP,tupniIMDH
noitangisedCEIseirettab2
)AAAezis(30RL
.ecitontuohtiwegnahcottcejbuserasnoitacificepsdnangiseD
metI
PAPFFOFFO
TAPNONO
1tracSNONO
2tracSNONO
ImroNNONO
LmroNFFOFFO
MmroNFFOFFO
txeteleTNONO
emaNledoM
ytiroirPBGRNONO
refooWbuSFFOFFO
)4(nitnorFNONO
rotcejorPNONO
G/BmroNFFOFFO
K/DmroNFFOFFO
SUAmroNFFOFFO
TASmroNFFOFFO
oeretSmaciNNONO
U21A24E-FDK U21A05E-FDK
WARNING (UK Models only)
The flexible mains lead is supplied connected to a B.S. 1363 fused
plug having a fuse of 5 AMP rating. Should the fuse need to be
replaced, use a 5AMP FUSE approved by ASTA to BS 1362, ie one
that carries the
IF THE PLUG SUPPLIED WITH THIS APPLIANCE IS NOT SUITABLE FOR THE OUTLET SOCKETS IN YOUR HOME, IT SHOULD
BE CUT OFF AND AN APPROPRIATE PLUG FITTED. THE PLUG
SEVERED FROM THE MAINS LEAD MUST BE DESTROYED AS A
PLUG WITH BARED WIRES IS DANGEROUS IF ENGAGED IN A
LIVE SOCKET.
When an alternative type of plug is used, it should be fitted with a
5 AMP FUSE, otherwise the circuit should be protected by a 5AMP
FUSE at the distribution board.
- 4 -
ASA
T
mark.
Page 5
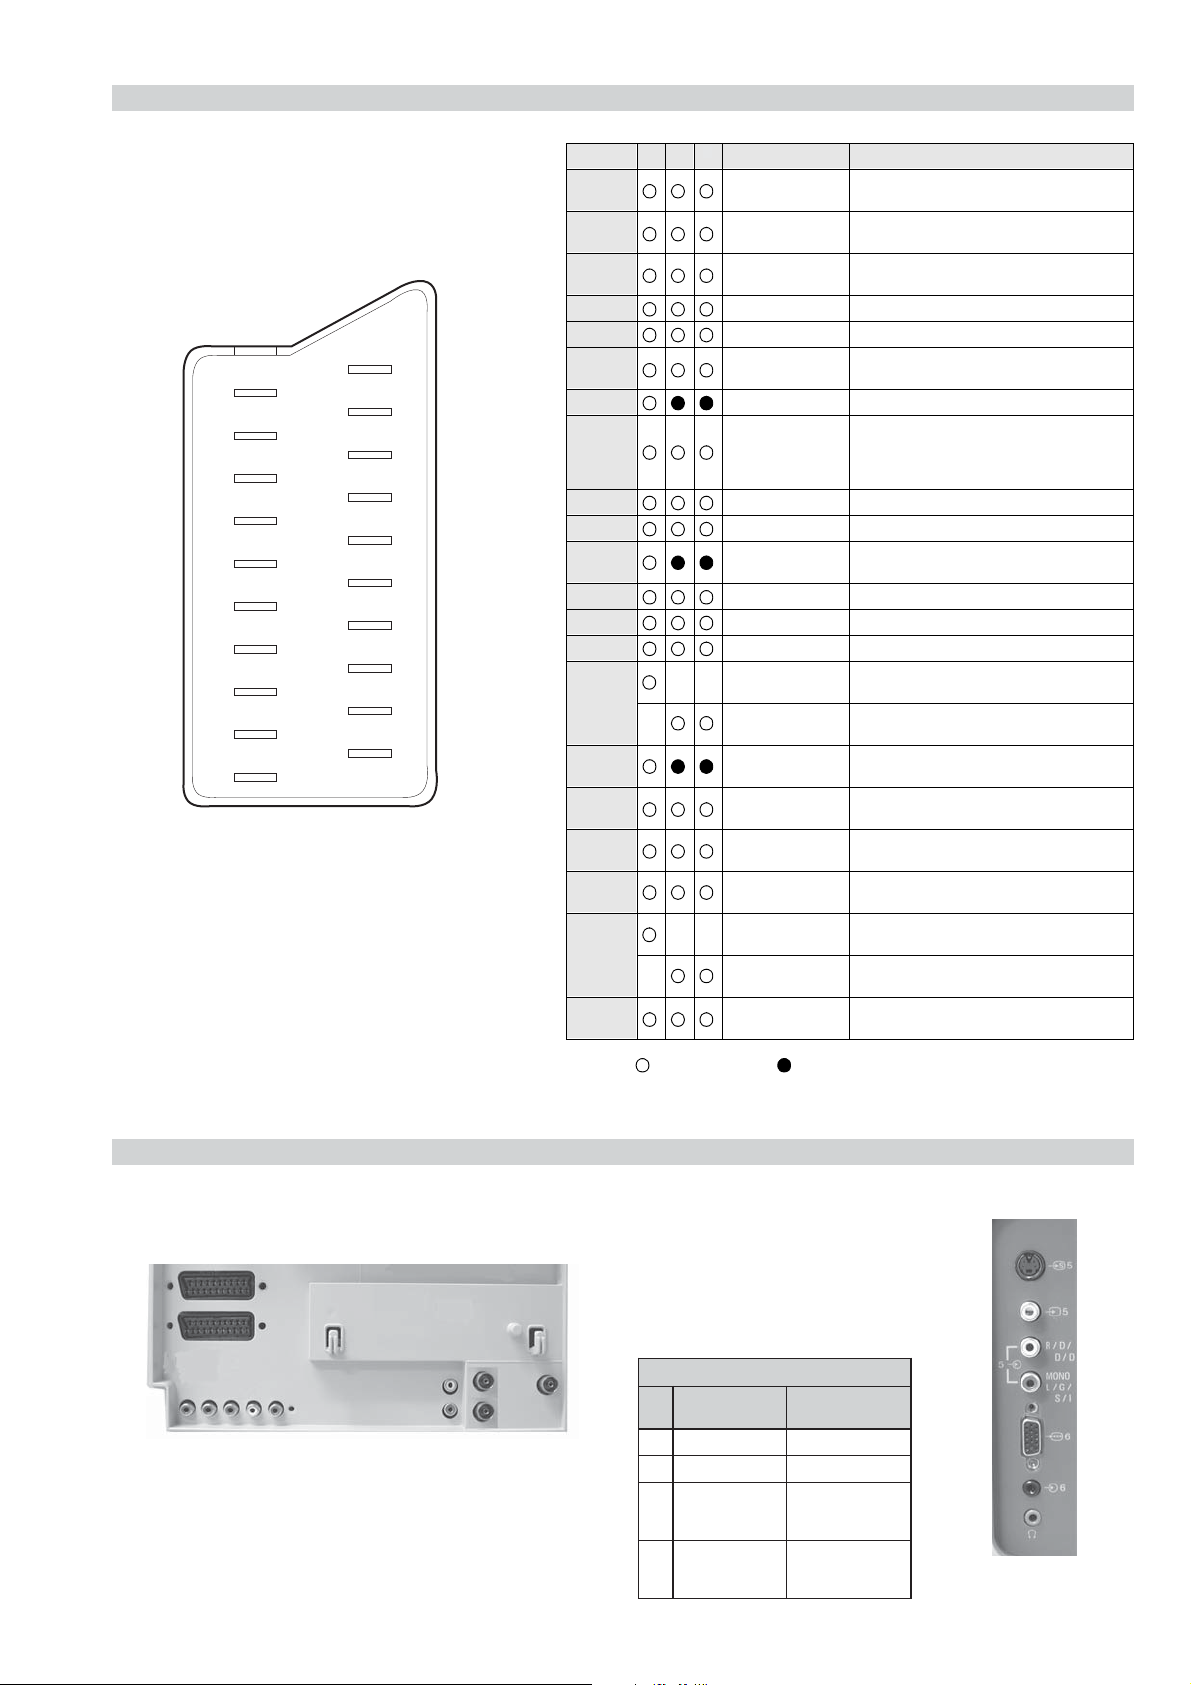
21 pin connector
KDF-E42/50A12U
RM-ED002
21
19
17
15
13
11
9
7
5
3
1
20
18
16
14
12
10
8
6
4
2
Pin No 1 2 4 Signal Signal level
1 Audio output B
2
3
4 Ground (audio)
5 Ground (blue)
6 Audio input A
7 Blue input 0.7 +/- 3dB, 75 ohms positive
8 Function select
9 Ground (green)
10 Open
11 Green Green signal : 0.7 +/- 3dB, 75 ohms,
12 Open
13 Ground (red)
14 Ground (blanking)
15
16 Blanking input
17 Ground (video
18 Ground (video
19 Video output 1V +/- 3dB, 75ohms, positive sync 0.3V
20
21 Common ground
3
(right)
Audio input B
(right)
Audio output A
(left)
(left)
(AV control)
_ _ Red input 0.7 +/- 3dB, 75 ohms, positive
_ (S signal Chroma
input)
(Ys signal)
output)
input)
_ _ Video input 1V +/- 3dB, 75ohms, positive sync 0.3V
_ Video input
Y (S signal)
(plug, shield)
Standard level : 0.5V rms
Output impedence : Less than 1kohm*
Standard level : 0.5V rms
Output impedence : More than 10kohm*
Standard level : 0.5V rms
Output impedence : Less than 1kohm*
Standard level : 0.5V rms
Output impedence : More than 10kohm*
High state (9.5-12V) : Part mode
Low state (0-2V) : TV mode
Input impedence : More than 10K ohms
Input capacitance : Less than 2nF
positive
0.3 +/- 3dB, 75 ohms, positive
High state (1-3V) Low state (0-0.4V)
Input impedence : 75 ohms
(-3+10dB)
(-3+10dB)
1V +/- 3dB, 75ohms, positive sync 0.3V
(-3+10dB)
Connected Not Connected (open) * at 20Hz - 20kHz
Rear Connection Panel Front Connection Panel
niP
oN
1dnuorG-
2dnuorG-
3tupni)langisS(Y,mho57Bd3-/+V1
4tupni)langisS(CBd3-/+V3.0
langiS leveLlangiS
.cnyS
noitarugifnocniptekcosoediVS
Bd01+3-
S-Video
socket
V3.0.cnySevitisop
evitisop,mho57
- 5 -
Page 6
KDF-E42/50A12U
V
RM-ED002
SECTION 1 SELF DIAGNOSIS FUNCTION
LE-4B Self Diagnostic Software
LE-4B chassis TV’s contain a self diagnosis function. In the event of an error occurring, the STANDBY LED indicator will automatically begin
to flash. The number of times the STANDBY LED indicator flashes translates to a probable source of the problem. If an error symptom cannot
be reproduced, the remote commander can be used to review the failure occurrence data stored in memory to reveal past problems and how often
these problems occur.
1. DIAGNOSTIC TEST INDICATORS
When an error occurs, the STANDBY indicator will flash a set number of times to indicate the possible cause of the problem. If there is more
than one error, the indicator will identify the first of the problem areas.
The result for all of the following diagnosis items are displayed on screen. No error has occured if the screen displays a “0”.
egasseMrorrE edoCDEL noitacoLesuaCelbaborP motpmyS
rorrErevoCpmaL20
torPpmaL30
torPnaF40
torPpmeT50
torPPS60.rorrenoitcetorPsrekaepS-dnuosoN/erutcipoN-
latigiD80.rorredraobN-dnuosoN/erutcipoN-
renuT90.rorrerenuT-dnuosoN/erutcipoN-
PS01.rorrerosecorpdnuoS-
PVS11.rorrerosecorpoediV-
CEDC21.rorreredocedamorhC-
hctiwSVA31.rorrehctiwsVA-
CTR41.rorrekcolcemiTlaeR-
1PXEP61.rorre1rednapxetroP-
2PXEP71.rorre2rednapxetroP-
MVN91.rorreMVN-
CII02.rorresubC2I-dnuosoN/erutcipoN-
tonsirevocpmaL-
.ylerucesdehcatta
.ylerucestestonsipmaL-
ecruosthgilrofpmaL-
.tuosnrub
.rewoponsahnaF-
tonsirotcennocnaF-
.ylerucesdehcatta
hgihsierutarepmetteS-
rotcennocrosnespmeT-
.ylerucesdehcattatonsi
dnuosoN/erutcipoN-
dnuosoN/erutcipoN-
dnuosoN/erutcipoN-
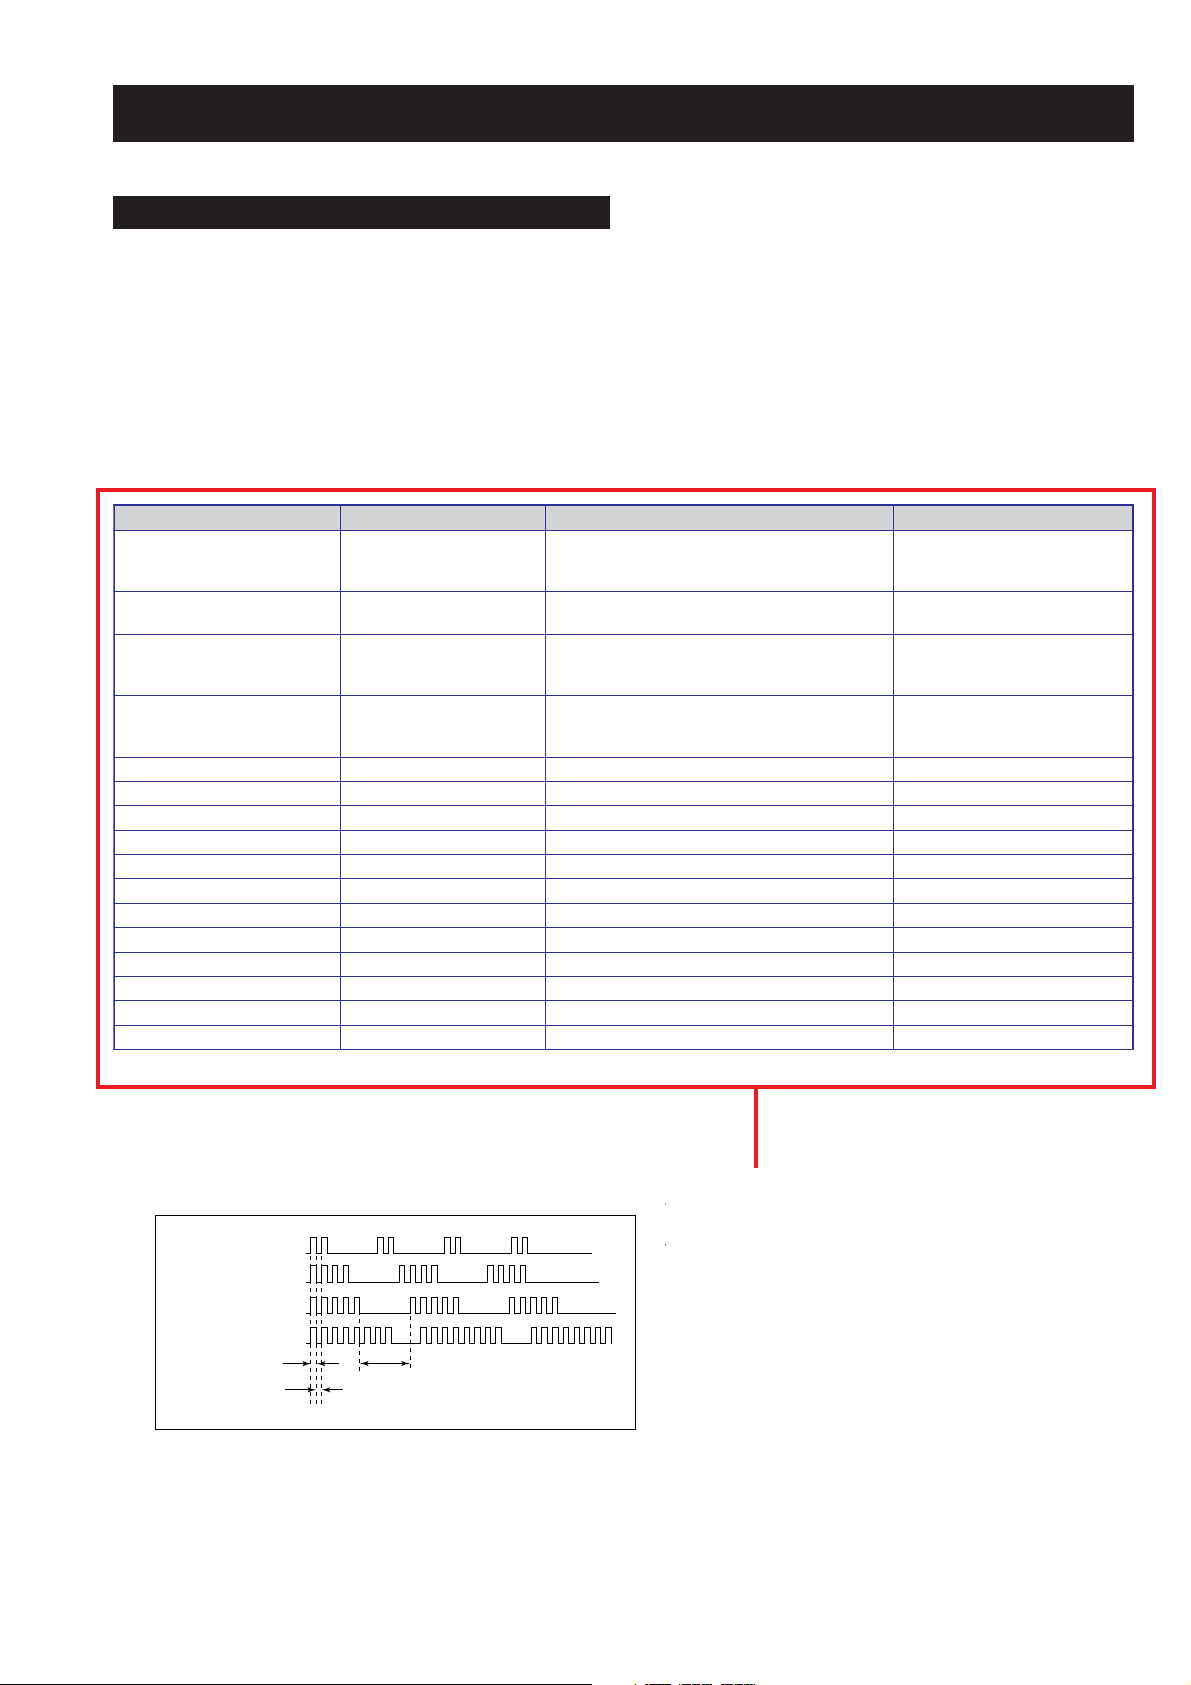
2. DISPLAY OF STANDBY INDICATOR FLASH COUNT
Lamp ON 300ms
Lamp OFF 300ms
Lamp OFF 3 sec
Revision 2.0
(Click on table to see related change)
- 6 -
Page 7

KDF-E42/50A12U
RM-ED002
3. STOPPING THE STANDBY INDICATOR FLASH
Turn off the power switch on the TV to stop the STANDBY indicator from flashing.
4. SELF-DIAGNOSTIC SCREEN DISPLAY
For errors with symptoms such as “power sometimes shuts off” or “screen sometimes goes off” that cannot be confirmed, it is possible to bring
up past occurrences of failure on the screen for confirmation.
To bring up the screen test
In standby mode, press buttons on the remote commander sequentially in rapid sucession as shown below:
i+
(ON SCREEN (DIGIT 5) (VOLUME +) (TV)
DISPLAY)
5
The following screen will be displayed indicating the error count.
REVOCPMAL:20E)552,0(0
TORPPMAL:30E)552,0(0
TORPNAF:40E)552,0(0
TORPPMET:50E)552,0(0
TORPPS:60E)552,0(0
LATIGID:80E)552,0(0
RENUT:90E)552,0(0
CORPDNUOS:01E)552,0(0
PTCV:11E)552,0(0
CEDC:21E)552,0(0
HCTIWSVA:31E)552,0(0
CTR:41E)552,0(0
1PXETROP:61E)552,0(0
2PXETROP:71E)552,0(0
MVN:91E)552,0(0
CII:02E)552,0(0
+
Note that this differs from entering the service mode (volume + )
Numeral “0” means that no fault was detected.
Numeral “1” means the number of a fault occurrence (1 ~ 255).
EMITGNIKROW
SRUOH)53556,0(2
SETUNIM)95,0(85
Revision 2.0
(Click on table to see related change)
To clear the error display count press “8” then “0” on the remote commander.
To exit the self-diagnostic screen, turn off the power switch on the TV set.
- 7 -
Page 8
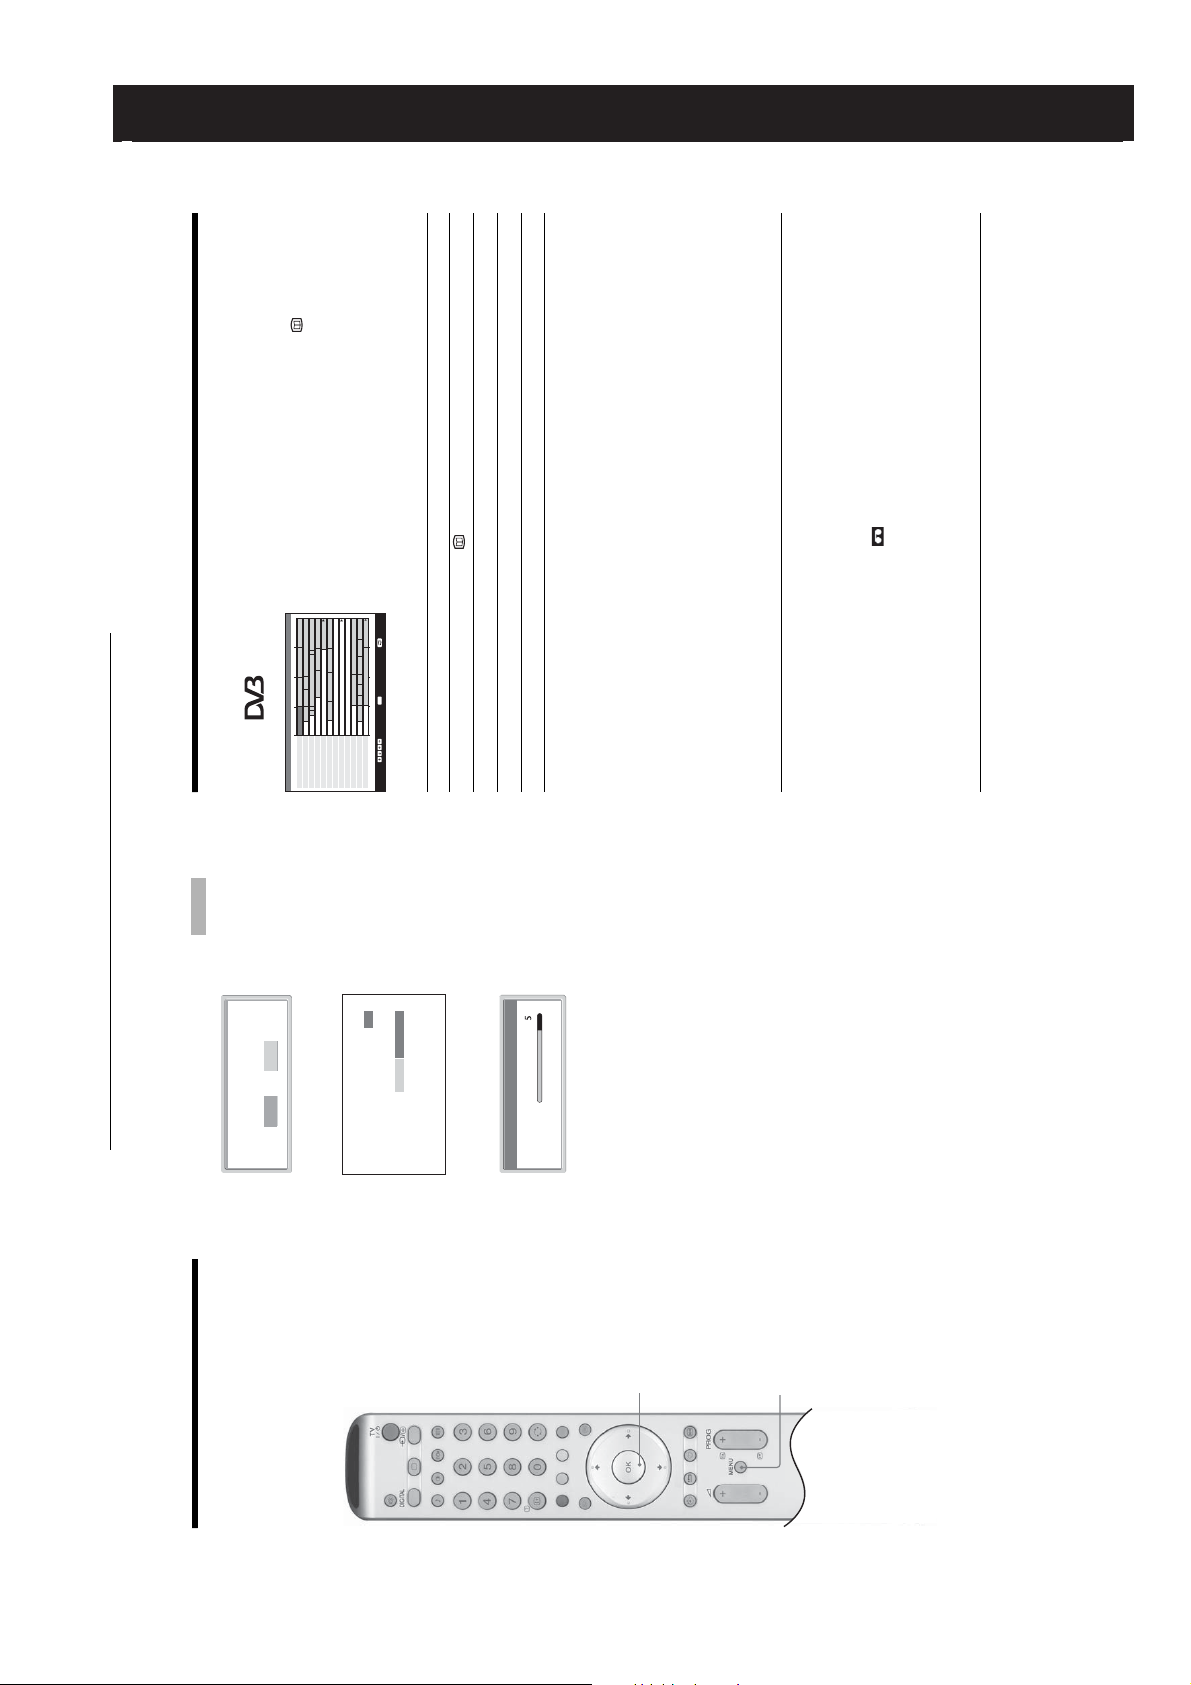
In digital mode, press to display the
Digital Electronic Programme Guide
(EPG).2Perform the desired operation in following
table.
1
SECTION 2 GENERAL
The categories available include:
Favourite
Contains all the channels that have been stored in the Favourite list
(page 18).
All categories
Contains all available channels.
News
1 Press the blue button.
displayed on the side.
2 Press m/M/</, to select a category. The category name is
Contains all news channels.
The Digital Electronic Programme Guide (EPG) now only displays the
current programmes from the category selected.
3 Press OK.
1 Press m/M/</, to select the future programme you want to
record.
2 Press OK.
A symbol appears by that programme’s information.
3 Press m/M to select “Timer REC”.
4 Press OK to set the TV and your VCR timers.
KDF-E42/50A12U
VCRs. If your VCR is not Smartlink compatible, a message will be displayed to
remind you to set your VCR timer.
• You can set VCR timer recording on the TV only for Smartlink compatible
switch off the TV completely or the recording may be cancelled.
• Once a recording has begun, you can switch the TV to standby mode, but do not
Notes
RM-ED002
11:30 12:00
OK
Thu 27 May 10:31
City Hospital Houses Be… Bargain Hu… Cash in the…
The… The… Sch… Sch… The Daily Politics
This M… i i This Morning i This Morning
10:30 11:00
Thu 27 May
BBC ONE Wales
BBC 2W
ITV 1 Wales
001
002
003
Checking the Digital Electronic Programme Guide
All Categories
(EPG)
NextPrevious 30 min view Category
Sally Jessy Rap… Judge Judy Judge J… Judge J…
This is BBC THREE This is BB…
Self… The Vi… Teen Big B… From Th… News at N…
No Event Information
E4 Preview
No Event Information
Food and D… Ready Stea… No Event Information
Mat… Mat… K… K… K… Look… Look… Zig Zag
BBC News BBC News BBC News
ITV 2
BBC THREE
Channel 4
TeletextE4price-drop.tv
UKTV FOOD
CBBC Channel
BBC NEWS 24
006
Select: Action list: +/- 1 day on/off
007
008
009
014
024
029
030
040
Digital Electronic Programme
Guide (EPG)
To Do this
Turn off the EPG Press .
Move through the EPG Press m/M/</,.
Display the previous or next six channels Press the red (previous) or green (next) button.
Watch a current programme Press OK while the current programme is selected.
Getting Started
m
Yes No
automatic tuning ?
The operating instructions mentioned here are partial abstracts
from the Operating Instruction Manual. The page numbers of
the Operating Instruction Manual remain as in the manual.
Do you want to start
Press OK to select “Yes”.
Number of Services found 14
Digital auto-tune display
Searching. 40%
m
Programmes found:
Auto Tuning
Analogue auto-tune display
1
Sort the programme information by
category – Category list
Searching...
The TV starts searching for all available digital
channels followed by all available analogue
channels. This may take some time, please be
patient and do not press any buttons on the TV or
remote.
Once all available digital and analogue channels
have been stored, the TV returns to normal
operation, displaying the digital channel stored on
channel number 1. If no digital channels are
found, the analogue channel stored on channel 1 is
displayed.
When a message appears for you to confirm the
aerial connections
Set a programme to be recorded – Timer
REC
No digital or analogue channels are found. Check
all the aerial connections and press OK twice to
start auto-tuning again.
the screen.
Note
2 The Programme Sorting menu appears on
If some digital channel is found, this step will
not appear
are stored on the TV. See page 29.
The TV has now tuned in all the available
3 To change the order in which the channels
4 Press MENU to exit.
16
13
channels.
6: Auto-tuning the TV
When you switch on the TV for the first time, the
message confirming the TV start auto-tuning appears
on the screen.
You must tune the TV to receive channels (TV
broadcasts). Do the following to search and store all
available channels.
– 8 –
1
4
Page 9

Using the Menu
KDF-E42/50A12U
RM-ED002
19
Continued
Using the Menu
Navigating through
menus
Viewing pictures from
connected equipment
Switch on the connected equipment, then
perform one of the following operation.
For equipment connected to the scart sockets using a
fully-wired 21-pin scart lead
Start playback on the connected equipment.
The picture from the connected equipment appears on
the screen.
For an auto-tuned VCR page 11
Press PROG +/-, or the number buttons, to select the
video channel. You can also press / repeatedly
until the correct input symbol (see below) appears on
the screen.
For other connected equipment
Press / repeatedly until the correct input
symbol (see below) appears on the screen or press OK
to select
,
access the Input signal index table. Press
to
an input source, press m/M, then press OK.
1/ 1, 2/ 2:
Audio/video or RGB input signal through the scart
2,3,4
socket / 1 or 2. appears only if an RGB
source has been connected.
3:
4
R
/C
R
, P
B
/C
B
Component input signal through the Y, P
sockets / 3, and audio input signal through the
1
Press MENU to display the menu.
Press M/m to select a menu icon, press ,.3Press M/m/</, to select an option.4Press M/m/</, to change/set the
1
2
4/ 4:
L/G/S/I, R/D/D/D sockets / 3.
Video input signal through the video socket 4, and
audio input signal through the audio socket L/G/S/I
(MONO), R/D/D/D sockets 4. appears only if
5:
the equipment is connected to the S video socket 4
instead of the video socket 4, and S video input
signal is input through the S video socket 4.
RGB input signal through the PC connectors 5, and
audio input signal through the socket 5.6:Digital audio/video signal is input through the HDMI IN
setting, then press OK.
To exit the menu, press MENU.
To return to the last display, press <.
6 socket. Audio input signal is analogue only if the
equipment has been connected using the DVI and audio
out socket.
Additional operations
To Do this
Press DIGITAL or .
Return to the normal
TV operation
to select an
,
Press OK. Press
input source, press m/M, then press
OK.
Access the Input
signal index table
1 Press m/M/</, to select the future programme you want to
display.
2 Press OK.
Watching TV
A c symbol appears by that programme’s information.
when the programme starts.
Note
If you switch the TV to standby mode, it will automatically turn itself on
3 Press m/M to select “Reminder”.
4 Press OK to automatically display the selected programme
when the programme is about to start.
1 Press OK.
2 Press m/M to select “Manual Timer REC”.
3 Press m/M to select the date, then press ,.
4 Set the start and stop time in the same way as in step 3.
and your VCR timers.
5 Press m/M to select the channel, then press OK to set the TV
A symbol appears by that programme’s information.
Notes
• You can set VCR timer recording on the TV only for Smartlink compatible
VCRs. If your VCR is not Smartlink compatible, a message will be displayed to
remind you to set your VCR timer.
switch off the TV completely or the recording may be cancelled.
• Once a recording has begun, you can switch the TV to standby mode, but do not
1 Press OK.
2 Press m/M to select “Timer list”.
3 Press m/M to select the programme you want to cancel, then
press OK.
A display appears to confirm that you want to cancel the programme.
4 Press < to select “Yes”, then press OK to confirm.
17
Set a programme to be displayed
To Do this
automatically on the screen when it starts
– Reminder
Set the time and date of a programme you
want to record – Manual Timer REC
Cancel a recording/reminder – Timer list
– 9 –
Page 10

You can select the options listed below on the Picture
Adjustment menu. To select options, see “Navigating
through menus” (page 19).
Tip
When you set the “Picture Mode” option to “Vivid” or
“Standard,” you can adjust only “Contrast,” and “Reset.”
Custom
Max5050015
Warm
KDF-E42/50A12U
RM-ED002
Using the Menu
21
Continued
MENU
End:
Auto
High
OK
Press OK to select “Picture Mode”.
Selects the picture mode.
1
Press m/M to select one of the following picture modes, then press OK.
• Vivid: For big lighted spaces.
• Standard: Optimal picture for home use.
• Custom: Allows you to store your own prefered settings.
2
Tip
You can change the picture mode by pressing repeatedly.
Press OK to select the option.2Press </, to set the level, then press OK.
1
Tip
“Hue” can only be adjusted for an NTSC colour signal (e.g., U.S.A. video tapes).
“Brightness”, “Colour”, “Hue” and “Sharpness” only appear and can be adjusted if “Picture Mode”
is set to “Custom”.
Press OK to select “Colour Tone”.
Press m/M to select one of the following, then press OK.
• Cool: Gives the white colours a blue tint.
• Neutral: Gives the white colours a neutral tint.
• Warm: Gives the white colours a red tint.
Tip
“Warm” only appears and can be adjusted if “Picture Mode” is set to “Custom”.
1
2
Picture Mode
Contrast
Brightness
Colour
Hue
Sharpness
Colour Tone
Reset
Noise Reduction
Iris
Select: Set: Back:
Picture Adjustment
Picture Adjustment menu
Sleep Timer (28)
Clock Set (28)
Timer (28)
Auto Start Up (29)
Auto Tuning (29)
Programme Sorting (29)
5 Timer
6 Set Up
Programme Labels (30)
Picture Mode
–Label/Skip
– Programme/Channel/Label/AFT/Audio
AV Preset (30)
Manual Programme Preset (30)
Filter/Skip/ATT/Confirm
Digital Set Up (32)
– Digital Tuning/Digital Set-up
Contrast/Brightness/Colour/Hue/Sharpness
Colour Tone
Custom
Picture Mode
Picture Adjustment
Overview of the menus
The following options are available in each menu. For
details on navigating through menus, see (page 19).
Also, see page in parentheses for details of each menu.
12345
Max5050015
Contrast
Brightness
Colour
Hue
Sharpness
Warm
Colour Tone
Auto
High
Reset
Noise Reduction
Iris
6
MENU
OK
Select: Set: End:
1 Picture Adjustment
Picture Mode (21)
Contrast/Brightness/Colour/Hue/
Sharpness (21)
Colour Tone (21)
Reset (22))
Noise Reduction (22)
Iris (22)
Sound Effect (23)
Treble/Bass/Balance (23)
Reset (23)
Dual Sound (24)
Auto Volume (24)
Auto Format (25)
Screen Format (25)
RGB Center (25)
AV2 Output (26)
TV Speakers (26)
2 Sound Adjustment
3 Screen
PC Adjustment (27)
4 Features
20
– 10 –
Page 11

You can select the options listed below on the Sound
Adjustment menu. To select options, see “Navigating
through menus” (page 19).
Dynamic00 0A
Off
KDF-E42/50A12U
RM-ED002
Using the Menu
23
Continued
: Uses the TV speakers to simulate the surround effect produced by a multi
*2
.”
*1
MENU
End:
Press OK to select “Sound Effect”.
1
OK
using the “BBE High definition Sound System.”
channel system.
System
• Dynamic: Intensifies clarity and sound presence for better intelligibility and musical realism by
• Dolby Virtual
Press m/M to select one of the following sound effects, then press OK.
• Natural: Enhances clarity, detail, and sound presence by using “BBE High definition Sound
• Off: Flat response.
2
Tips
• You can change sound effect by pressing 9 repeatedly.
trademarks of BBE Sound, Inc.
Licensed by BBE Sound, Inc. under USP4638258, 4482866. “BBE” and BBE symbol are
Manufactured under license from Dolby Laboratories. “Dolby” and the double-D symbol
are trademarks of Dolby Laboratories.
*1
*2
• If you set “Auto Volume” to “On”, “Soud Effect” changes to “Natural”.
Press OK to select the option.2Press </, to set the level, then press OK.
Adjusts higher-pitched sounds (Treble), adjusts lower-pitched sounds (Bass), and
emphasizes left or right speaker balance (Balance).
1
Resets the “Treble,” “Bass” and “Balance” settings to the factory settings.
Press OK to select “Reset”.2Press m/M to select “OK,” then press OK.
1
Sound Effect:
Treble:
Bass:
Balance:
Reset
Dual Sound:
Auto Volume:
Sound Adjustment
Sound Adjustment menu
Select: Set: Back:
Sound Effect
sockets of / 3.
R
/C
R
, P
B
/C
B
Treble/Bass/Balance
Reset
Press OK to select “Reset”.2Press m/M to select “OK,” then press OK.
Reset all the picture settings to the factory settings.
1
Reset
Press OK to select “Noise Reduction”.2Press m/M to select “Auto”, then press OK.
Reduces the picture noise (snowy picture) in a weak broadcast signal.
1
Noise Reduction
Tip
This option cannot be used for an input signal from the Y, P
Enhances the contrast for dark scenes.
Press OK to select “Iris”.2Press m/M to select “High”, “Mid”, “Low” or “Off” then press OK.
1
Iris
22
– 11 –
Page 12

You can select the options listed below on the
Features menu. To select options, see “Navigating
through menus” (page 19).
KDF-E42/50A12U
RM-ED002
TV
On
AV2 Output
TV Speakers
PC Adjustment
Features
Features menu
MENU
End:
OK
Select: Set: Back:
Sets a signal to be output through the socket labelled / 2 on the rear of the TV. If
you connect a VCR to the / 2 socket, you can then record from the equipment
connected to other sockets of the TV.
AV2 Output
Press OK to select “AV2 Output”.2Press m/M to select one of the following, then press OK.
• D-TV: Outputs a digital broadcast.
• A-TV: Outputs an analogue broadcast.
• AV1: Outputs signals from equipment connected to the / 1 socket.
• AV4: Outputs signals from equipment connected to the 4/ 4 socket.
• Auto: Outputs whatever is being viewed on the screen.
1
TV Speakers
Press OK to select “TV Speakers”.2Press m/M to select one of the following, then press OK.
1
Turns off the TV speakers e.g. to listen to the sound through external audio equipment
connected to the TV.
sound from external audio equipment.
• On: the sound is output from the TV speakers.
• One Time Off: the TV speakers are temporarily turned off allowing you to listen to the
Tip
the sound from external audio equipment.
The “TV speakers” option automatically returns to “On” when the TV set is switched off.
• Permanent Off: the TV speakers are permanently turned off allowing you to listen to
Tip
To turn on the TV speakers again, change to on.
26
Press OK to select “Dual Sound”.
Selects the sound from the speaker for a stereo or bilingual broadcast.
1
Dual Sound
or “Mono” for a mono channel, if available.
Press m/M to select one of the following, then press OK.
• Stereo/Mono: For a stereo broadcast.
• A/B/Mono: For a bilingual broadcast, select “A” for sound channel 1, “B” for sound channel 2,
Tip
If you select other equipment connected to the TV, set “Dual Sound” to “Stereo,” “A” or “B.”
2
Auto Volume
Press OK to select “Auto Volume”.
Press m/M to select “On,” then press OK.
Tip
Keeps a constant volume level even when volume level gaps occur (e.g., adverts tend to be
louder than programmes).
1
If you set “Sound Effect” to “Dolby Virtual”, “Auto Volume” will automatically be switched to
2
“Off”.
24
– 12 –
Page 13

KDF-E42/50A12U
RM-ED002
Using the Menu
29
Continued
You can select the options listed below on the Set Up
menu. To select options, see “Navigating through
menus” (page 19).
MENU
End:
Starts the “first time operation menu” to tune in all the available digital and analogue
channels. Usually you do not need to do this operation because the channels are already
OK
tuned when the TV was first installed ((page 13)). However, this option allows you to repeat
the process (e.g., to retune the TV after moving house, or to search for new channels that
have been launched by broadcasters).
Press OK to select “Auto Start Up”.2Press OK to select “Yes.”
The auto-tune display appears on the screen.
1
Follow steps 1 to 4 of “Auto-tuning the TV” (13).
3
Press OK to select “Auto Tuning”.
Follow step 1 and 2 of “Auto-tuning the TV” (13).
When all available analogue channels have been tuned, the TV returns to normal
Tunes in all the available analogue channels.
Usually you do not need to do this operation because the channels are already tuned when
the TV was first installed (13). However, this option allows you to repeat the process (e.g.,
to retune the TV after moving house, or to search for a new channels that have been launched
by broadcasters).
1
operation.
2
Changes the order in which the analogue channels are stored on the TV.
then press OK.
Press OK to select “Programme Sorting”.2Press M/m to select the channel you want to move to a new position,
1
Press M/m to select the new position for your channel, then press OK.
3
Repeat the procedure in steps 2 and 3 to move other channels if required.
Auto Start Up
Auto Tuning
Programme Sorting
Programme Labels
AV Preset
Manual Programme Preset
Digital Set Up
Set Up
Set Up menu
Select: Set: Back:
Auto Start Up
Using the Menu
Auto Tuning (Analogue mode only)
Programme Sorting (Analogue mode only)
27
Press OK to select “PC Adjustment”.2Press m/M to select one of the following, then press OK.
• Phase: Adjust the screen when a part of a displayed text or image is not clear.
• Pitch: Enlarges or shrinkes the screen size horizontally.
Customizes the TV screen as a PC monitor.
1
• H Center: Moves the screen to the left or to the right.
PC Adjustment
• V Center: Moves the screen up or down.
• Power saving: Turns to standby mode if no PC signal is received.
• Reset: Resets to the factory settings.
Tip
This option is only available if you are in PC Mode.
– 13 –
Page 14

Option Description
Programme Presets programme channels manually.
1 Press M/m to select “Programme”, then press OK.
2 Press M/m to select the programme number you want
Channel
Press M/m to search for the next available channel. When a
channel has been found, the search will stop. To continue
searching, press M/m.
to manually tune (if tuning a VCR, select channel 0),
then press <.
If you do not know the channel number (frequency)
3 Press M/m to select “Channel”, then press OK.
4 Tune the channels as follows:
If you know the channel number (frequency)
Using the Menu
Press the number buttons to enter the channel number of the
broadcast you want or your VCR channel number.
5 Press OK.
6 Press OK to select “Confirm”, then press OK.
KDF-E42/50A12U
RM-ED002
31
Continued
If you do not experience any sound distortion, we recommend
Repeat the procedure above to preset other channels manually.
selected channel. This name will be displayed briefly on the screen
Label Assigns a name of your choice, up to five letters or numbers, to the
1 Follow steps 3 to 5 of “Programme Labels” (page 30).
2 Press OK to select “Confirm”, then press OK.
when the channel is selected.
AFT Fine-tunes the selected programme number manually if you feel
to +15, then press OK.
1 Press M/m to adjust the fine tuning over a range of -15
that a slight tuning adjustment will improve the picture quality.
(Normally, fine tuning is performed automatically.)
2 Press “OK” twice.
To restore automatic fine tuning, select “On” in step 1.
Audio Filter Improves the sound for individual channels in the case of distortion
in mono broadcasts. Sometimes a non-standard broadcast signal
can cause sound distortion or intermittent sound muting when
that you leave this option set to the factory setting “Off”.
1 Press m/M to select “Low” or “High”, then press OK.
2 Press OK to select “Confirm”, then press OK.
Note
You cannot receive stereo or dual sound when “Low” or “High” is
watching mono programmes.
selected.
Press OK to select “Programme Labels”.2Press M/m to select the channel you want to name, then press OK.3Press M/m/</, to select the desired letter or number (“s” for a blank
Assigns a channel name of your choice up to five letters or numbers. The name will be
displayed briefly on the screen when the channel is selected. (Names for channels are usually
taken automatically from Analogue Text (if available).)
1
If you input a wrong character
Press M/m/</, to select %/5 and press OK repeatedly until the wrong character is
space), then press OK.
selected. Then, press M/m/</, to select the correct character and press OK.
Repeat the procedure in step 3 until the name is complete.5Press M/m/</, to select “End,” then press OK.
4
Programme Labels (Analogue mode only)
Press OK to select “AV Preset”.2Press M/m to select the desired input source, then press OK.
Do the following options.
1
AV Preset
– 14 –
sockets. The name will be displayed briefly on the screen when the
equipment is selected.
Press OK. Then press M/m to select the desired option below, then
press OK.
Option Description
3
Label Assigns a name to any equipment connected to the side and rear
Press M/m to select one of the following, then press OK.
AV1 (or AV2/AV3/AV4/PC/HDMI) VIDEO/DVD/CABLE/
GAME/CAM/SAT: Uses one of these preset labels.
Edit: Creates your own label. Follow steps 3 through 5 of
Programme Labels (page 30).
to select “Sound Offset”, then press OK. Press M/m to
,
After selecting this option, press OK.
Sound Offset:
Sets an independent volume level to each equipment connected to
the TV.
Press
Skip:
Skips an input source that is not connected to any equipment when
you press M/m to select the input source.
select the desired volume level.
Press OK to select “Manual Programme Preset”.2Press M/m to select one of the following options, then press OK.
Before selecting “Label”/“AFT”/“Audio Filter”/“Skip”/“ATT”, press PROG +/- to select the
programme number with the channel. You cannot select a programme number that is set to
skip (page 32).
1
Manual Programme Preset (Analogue mode only)
30
Page 15
Option Description
Removes any unwanted digital channels stored on the TV, and
changes the order of the digital channels stored on the TV.
1 Press m/M to select the channel you want to remove
Programme
List Edit
or move to a new position.
If you know the channel number (frequency)
Press the number buttons to enter the three-digit programme
number of the broadcast you want.
To display the previous or next five channels
Press the red button (previous) or the green button (next).
follows:
2 Remove or change the order of the digital channels as
Using the Menu
To remove the digital channel
Press OK. A message that confirms whether the selected
digital channel is to be deleted appears. Press < to select
“Yes”, then press OK.
To change the order of the digital channels
Press ,, then press m/M to select the new position for the
channel and press OK. Repeat the procedure in step 2 to
move other channels if required.
3 Press <.
Tunes the digital channels manually.
Digital Manual
you want to manually tune, then press m/M to tune the
1 Press the number button to select the channel number
Tuning
channel.
2 When the available channels are found, press m/M to
Press the red button (previous) or the green button (next).
select the channel you want to store, then press OK.
To display the previous or next five channels
3 Press m/M to select the programme number where
you want to store the new channel, then press OK.
KDF-E42/50A12U
RM-ED002
33
Continued
Repeat the procedure above to tune other channels manually.
Press m/M to select “Off”, “Basic”, or “For Hard of Hearing”, then
press OK.
Subtitle Setting
Digital Set-up Displays digital subtitles on the screen.
When “For hard of hearing” is selected, some visual aids may also
be displayed with the subtitles (if TV channels broadcast such
information).
Selects which language subtitles are displayed in.
Subtitle
Press m/M to select the language, then press OK.
Language
Selects the language used for a programme. Some digital channels
Audio
may broadcast several audio languages for a programme.
Language
Press m/M to select the audio language, then press OK.
OK.
Increases the sound level (only for Hard of Hearing).
Press m/M to select “Basic” or “For Hard of Hearing”, then press
Audio Type
Option Description
select channels. (You can still select a skipped channel using the
number buttons.)
Skip Skips unused analogue channels when you press PROG +/- to
1 Press M/m to select “Yes”, then press OK.
To restore a skipped channel, select “No” in step 1.
1 Press m/M to select “On”, then press OK.
interference may be displayed.
2 Press OK to select “Confirm”, then press OK.
ATT Attenuates the RF signal. In case of a strong RF signal, some video
2 Press OK to select “Confirm”, then press OK.
Tip
This option cannot be used if “AV2 Output” is set to “D-TV” (page 26).
Digital Manual Tuning
Programme List Edit
Digital Tuning
Digital Auto Tuning
Press OK to select “Digital Set Up”.2Press m/M to select the desired icon below, then press OK.3Press m/M to select one of the following options, then press OK.
Displays the “Digital Set Up” menu. You can change/set the digital settings using this menu.
1
Digital Set Up
– 15 –
OK
Select:Back: Enter:
Digital Tuning menu
Option Description
Usually you do not need to do this operation because the channels
Digital Auto
Digital Tuning Tunes in all the available digital channels.
are already tuned when the TV was first installed (page 13).
However, this option allows you to repeat the process (e.g., to
Tuning
When all available digital channels have been tuned, a message
1 Press OK to start digital auto-tuning.
retune the TV after moving house, or to search for new channels
that have been launched by broadcasters).
stating that the auto-tuning process is finished appears.
2 Press < .
32
Page 16

To connect Do this
Connect to the i socket to listen to
sound from the TV on headphones.
C
Headphones
Using Optional Equipment
KDF-E42/50A12U
RM-ED002
35
Continued
4 or the video socket 4,
4 at the same time. If you
4 and the S video socket
Connect to the S video socket
and the audio sockets 4. To
avoid picture noise, do not connect
the camcorder to the video socket
connect mono equipment, connect
5 and the audio socket 5.
to the L/G/S/I sockets 4, and
set “Dual Sound” to “A”
(page 24).
Connect to the PC Input socket
Using Optional Equipment
Connecting optional equipment
You can connect a wide range of optional equipment to your TV. Connecting cables are not supplied.
Connecting to the side of the TV
code.
entered correctly.
If you have not previously set a PIN, a message appears to
1 Press the number buttons to enter your existing PIN
Sets an age restriction for programmes. Any programme that
exceeds the age restriction can only be watched after a PIN Code is
inform you. Press OK, then follow the instruction of “PIN code”
below.
unrestricted watching), then press OK.
2 Press m/M to select the age restriction or “None” (for
3 Press <.
Sets a PIN code for the first time, or to change your PIN code.
1 Enter a PIN as follows:
If you have previously set a PIN
Press the number buttons to enter your existing PIN.
If you have not set a PIN:
Press the number buttons to enter the factory setting PIN of
S VHS/Hi8/DVC
camcorder
9999.
2 Press the number buttons to enter the new PIN code.
the new PIN again for confirmation.
3 When requested, press the number buttons to enter
A message appears to inform you that the new PIN has been
accepted.
4 Press <.
Tip
PIN code 9999 is always accepted.
Displays the Technical Set-up menu. Do the following options.
1 Press m/M to select the desired option, then press
Headphones
• Auto Service Update: Enables the TV to detect and store new
OK.
digital services as they become available.
A
To connect Do this
S VHS/Hi 8/DVC
camcorder
software updates, free through your existing aerial (when
issued). Sony recommends that this option is set to “On” at all
times. If you do not want your software to be updated, set this
option to “Off”.
• Software download: Enables the TV to automatically receive
• System Information: Displays the current software version and
the signal level. Instead of step 2, Press <.
2 Press m/M to select the “On”, then press OK.
This option will allow you to access a Pay Per View service once
B
Personal Computer
you obtain a Conditional Access Module (CAM) and a view card.
See page 36 for the location of the MODEM and (PCMCIA)
sockets.
Note:
It is recommended to use a PC cable with ferrites.
Option Description
Parental Lock
PIN Code
Technical
Set-up
CA Module
Set-up
34
– 16 –
Page 17

Using Optional Equipment
KDF-E42/50A12U
RM-ED002
37
Continued
1. When you connect the
Connect to the scart socket /
To connect Do this
“PlayStation 2”,
DVD player or
decoder, the scrambled signal from
the TV tuner is output to the
decoder, then the unscrambled
decoder D
signal is output from the decoder.
Connect to the scart socket /
DVD recorder or
2. SmartLink is a direct link
VCR that supports
between the TV and a VCR/DVD
SmartLink E
recorder. For more information on
SmartLink, refer to the instruction
manual supplied with your VCR or
DVD recorder.
Connect to the component socket
DVD player with
3 and the audio sockets 3.
The component signal containing
576p signal format and audio
signal are input from the DVD
player.
component output
F
Digital satellite
6
/
R L
Connect only to the HDMI IN 6
socket. The digital video and audio
G
Digital satellite
receiver
receiver / DVD
signals are input from the digital
satellite receiver. If the digital
satellite receiver has a DVI socket
Remove the dummy card from the
CAM slot and insert the CAM.
Insert the viewing card into the
R L
CAM.
H
For encripted PPV
(Pay per View)
services.
CAM (Conditional
Access Module)
6
/
L/G/S/I
R/D/D/D
(VARIABLE)
For future use only.
you remove the CAM.
Notes:
• Switch off the TV before inserting the CAM.
• Keep always the dummy card into the CAM slot when
Modem connector
I
Connect to the audio output
sockets to listen to the sound
Hi-Fi audio
equipment J
from the TV on Hi-Fi audio
equipment. To turn off the sound
of the TV speakers, set “Speaker”
Hi-Fi
to “Off” (page 26).
and not an HDMI socket, connect
the DVI socket to the HDMI IN 6
socket, and connect the audio
socket to the audio sockets HDMI
IN 6. The digital video and
analogue audio signals are input
from the digital satellite receiver.
MODEM
5V 200 mA
Connecting to the rear of the TV
PlayStation 2
CAM eject button
(SmartLink)
/
R/D/
D/D
L/G/
S/I
B
/C
B
P
R
/C
R
P
Y
DVD player with
component
output
DVD
Decoder
VCR
DVD recorder / Hard
disc recorder
Decoder
36
– 17 –
Page 18

on the TV set flashes, replace
KDF-E42/50A12U
RM-ED002
Additional Information
39
on the TV set flashes.
after the power has been turned off for 30 minutes.
Replacing the lamp
When the lamp becomes dark or the picture colour is not normal or the lamp indicator
Tips
• Only use the lamp XL-2400 for replacement. If you use another lamp, it may cause damage to the TV set.
• Do not remove the lamp except when replacing it.
• Before replacing the lamp, turn off the power and disconnect the power cord.
with a new lamp.
• Replace the lamp only after it becomes cool. The front glass of the lamp remains at least 100 °C (212 °F) even
• Do not place the old lamp in proximity to children or flammable material.
• Do not get the old lamp wet, or insert objects inside the lamp. It may cause the lamp to explode.
• Do not place the old lamp near easily flammable objects, as this may cause fire. Also, do not put your hand inside
12U
and m
F-E42A
D
K
1.8 m
F-E
D
K
the lamp compartment, as you may be burned.
• Attach the new lamp securely. If it is not securely attached, the picture may become dark.
:
ore
12U
50A
2.0 m
dirty, the picture quality may deteriorate or the lamp life may shorten.
• Do not touch or stain the front glass of the new lamp or the glass of the lamp compartment. If the glass become
:
ore
and m
• Attach the lamp cover firmly. If it is not firmly attached, the power will not turn on.
• When the lamp burns out, a noise is audible. This does not indicate damage to the TV set.
• Consult your nearest Sony service center to obtain a new lamp.
• Always remember to dispose of used lamps in an evironmentally friendly way.
°
65
°
65
lamp life.
• Do not shake the lamp. Vibration can damage the lamp or shorten its life.
Disconnect the power cord to continue changing the lamp.
If you start changing the lamp without disconnecting the power cord, the standby indicator
Turn off the power and disconnect the power cord.
Replace the lamp 30 minutes or more after the power is turned off to allow it to cool.
1
Take the new lamp out of the box.
2
3
• Avoid touching the front glass of a new lamp or the glass of the lamp receptacle. This may reduce picture quality or
Do not touch the glass portion of the new lamp.
Tips
Remove the outside lamp cover
4
ore
ore
and m
and m
KDF-E42A12U:
KDF-E50A12U:
1.8 m
2.0 m
Remove the lamp door.
Turn the knob counterclockwise to OPEN and pull out the cover.
5
30°
30°
Additional Information
Optimum Viewing Area
For the best picture quality, try to position the TV set so that you can view the screen from within the areas shown below.
Horizontal viewing area
– 18 –
Vertical viewing area
38
Page 19
Additional Information
KDF-E42/50A12U
RM-ED002
41
the TV to fall, damaging the TV, the TV stand and the floor.
• Consult your Sony dealer for a Sony XL-2400 replacement lamp.
Put the outside lamp cover back in its place.
• Take great care when replacing the lamp or plugging in/unplugging the connecting cords. Rough handling may cause
Tips
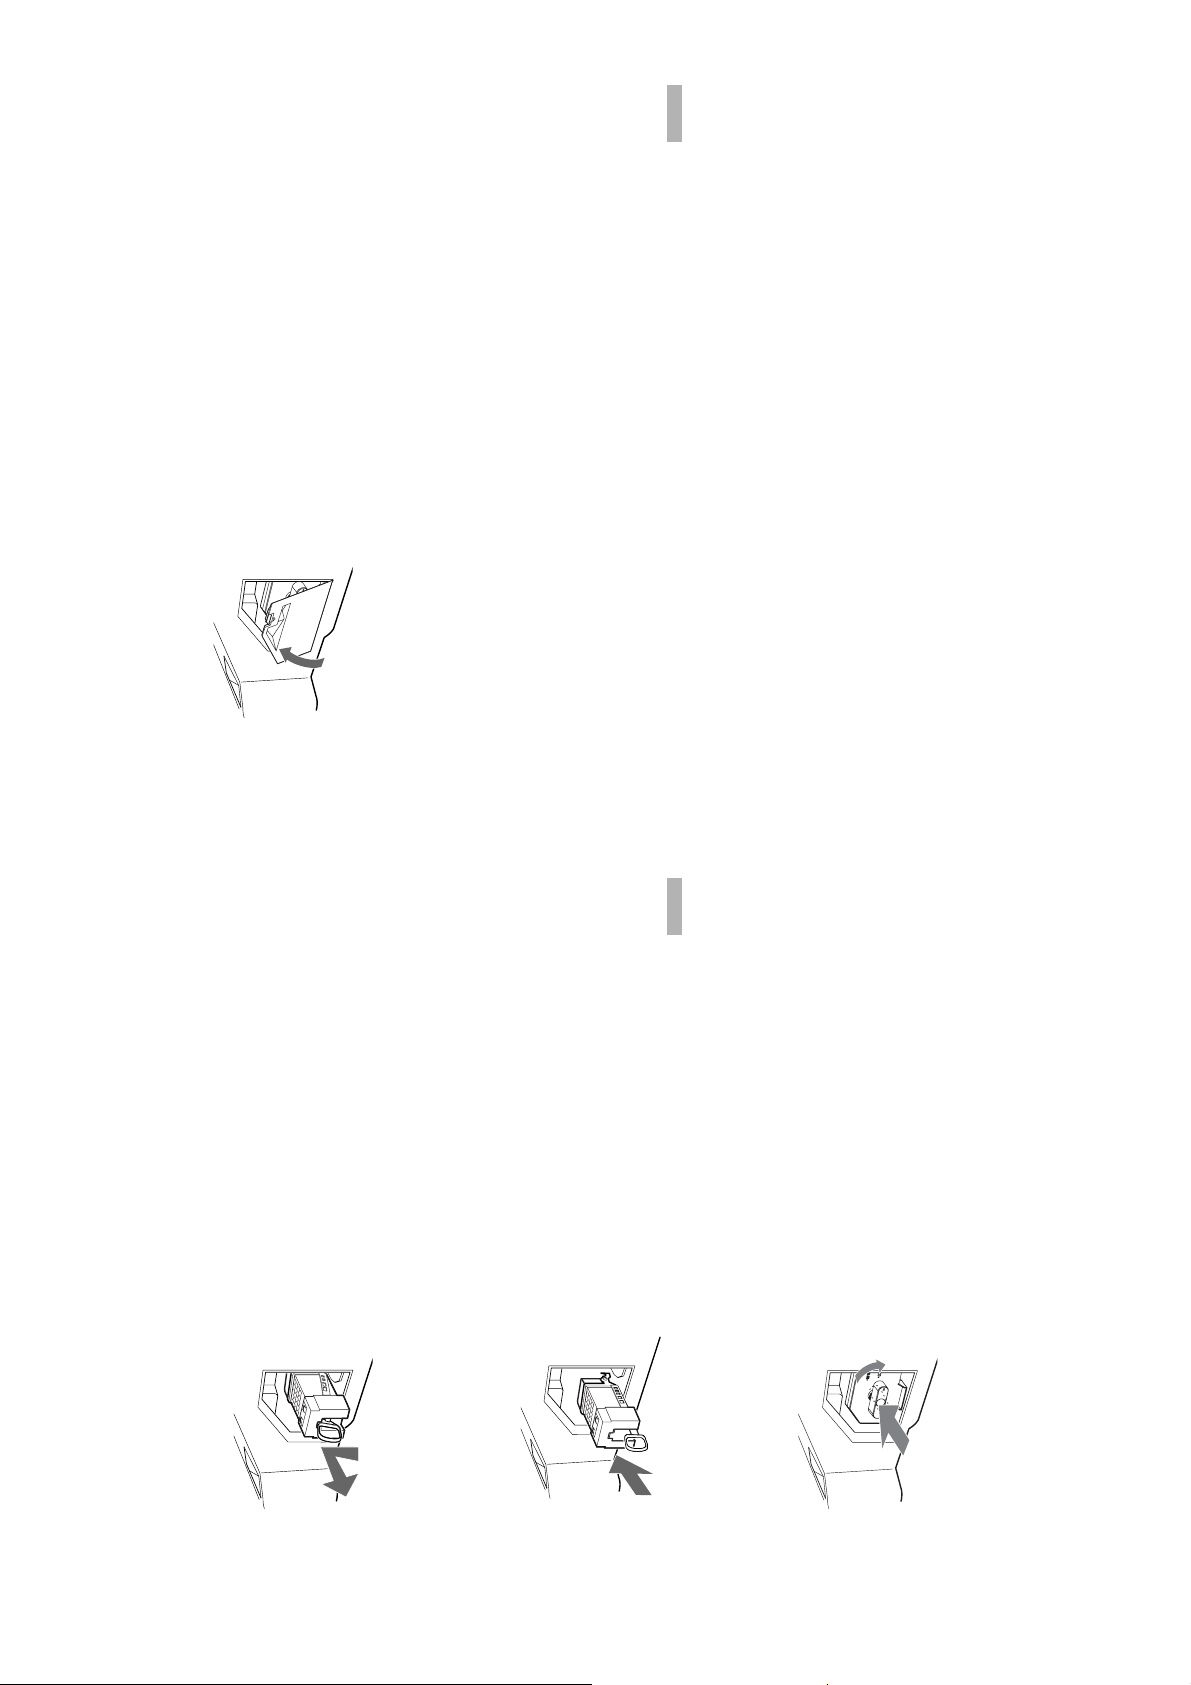
9
Additional Information
40
Pull out the lamp.
Hook a finger through the loop of the lamp handle and pull the handle upwards. Then pull the lamp straight out.
6
a plastic bag.
• The lamp is very hot immediately after use. Never touch the glass portion of the lamp or the surrounding parts.
• After the used lamp has cooled, place it into the empty box of the replacement lamp. Never put the used lamp into
Tips
Put the new lamp into its place.
Mount the new lamp securely. Failure to do so may cause a fire or the screen to go dark.
7
Tip
indicator flashes three times (see page 9).
• If the lamp is not securely reattached, the self-diagnostic function may be triggered and the POWER/STANDBY
Reattach the lamp door.
8
Turn the knob back to CLOSE and secure the cover.
– 19 –
Page 20

Additional Information
KDF-E42/50A12U
RM-ED002
43
Optional Accessories
• TV stand SU-RG11S (KDF-E42A12U)
• TV stand SU-RG11M (KDF-E50A12U)
• Lamp: XL-2400
Terminals
Design and specifications are subject to change
without notice.
audio/video input, RGB input, and TV audio/video
output.
21-pin Scart connector (CENELEC standard) including
• AV1: / 1
PC Input Specifications
PC Input Timing
Input signal frequency:
Horizontal: 31,4 - 48,4 KHz.
Vertical: 59 - 61 Hz.
Maximum Resolution: 1024 dots x -768 lines.
3 Audio input (phono jacks)
4 Video input (phono jack)
500 mVrms
:0.7 Vp-p, 75 ohms
:0.7 Vp-p, 75 ohms
B
audio/video input, RGB input, selectable audio/video
21-pin Scart connector (CENELEC standard) including
• AV2: / 2 (SMARTLINK)
R
output, and SmartLink interface
Y:1 Vp-p, 75 ohms, 0.3V negative sync
P
P
• AV3: 3
Impedance: 47 kilo ohms
• AV4: 4S video input (4-pin mini DIN)
(dots x lines) frequency frequency
Preset mode timing table for PC
Nº Resolution Graphic mode Horizontal Vertical
(kHz) (Hz)
1 640 x 480 VESA 60 31.469 59.940
2 800 x 600 VESA 60 37.879 60.317
48 kHz, 16, 20 and 24 bits.
4 Audio input (phono jacks)
PC Input (15 Dsub) (see page 36)
G: 0.7 Vp-p, 75 ohms, non Sync on Green
B: 0.7 Vp-p, 75 ohms, non Sync on Green
R: 0.7 Vp-p, 75 ohms, non Sync on Green
HD: 1-5 Vp-p
VD: 1-5 Vp-p
• AV5: 5
Audio: Two channel linear PCM 32, 44.1 and
PC audio input: minijack.
AUDIO:500 mVrms (100% modulation)
HDMI: Video: 480i, 576i, 480p, 576p, 720p, 1080i
• Audio output (Left/Right) (phono jacks)
• AV6: 6
3 1024 x 768 VESA 60 48.363 60.004
This TV does not support Sync on Green or Composite Sync.
Impedance: 47 kilohms
• i Headphones jack
Sound Output
10 W +10 W (RMS)
Supplied Accessories
• Remote RM-ED002 (1)
If a signal other than in the above chart is input, it may not be displayed properly or may not be displayed as you set.
Using the Vertical frequency (Hz) of the personal computer at 60 is recommended.
• Size AA batteries (R6 type) (2)
• Coaxial Cable (1)
220–240 V AC, 50 Hz
Additional Information
Specifications
KDF-E50A12U: 50 inches
Display Unit
Power Requirements:
Screen Size:
Approx. 825 x 1180 x 395 mm
KDF-E42A12U: 42 inches
1280 dots xlines
175 W
Display Resolution (horizontal x vertical):
0,8 W
Power Consumption:
Standby Power Consumption:
Approx. 720 x 1000 x 350 mm
KDF-E50A12U:
KDF-E42A12U:
Dimensions (w × h × d):
Weight:
Approx. 29.6 kg
Approx. 25.1 kg
KDF-E50A12U:
KDF-E42A12U:
Panel System
LCD (Liquid Crystal Display) Panel
TV SystemI.Colour System
PAL, SECAM
NTSC 3.58, 4.43 (only Video In)
MPEG-2 MP@ML
Aerial
75 ohm external terminal for VHF/UHF
– 20 –
Channel Coverage
I: UHF B21–B69
42
Page 21

KDF-E42/50A12U
RM-ED002
Additional Information
45
Continued
jacks of 3.
R
/C
R
, P
B
jacks of 3 are firmly seated in their
/C
R
B
/C
R
, P
B
/C
B
settings (page 22).
• Select “Reset” in the “Picture Adjustment” menu to return to the factory
No colour on programmes
Problem Cause/Remedy
respective sockets.
• Check the connection of the Y, P
• Make sure that the Y, P
3
No colour or irregular colour
when viewing a signal from the
Y, PB/CB, PR/CR jacks of
Sound
Problem Cause/Remedy
• Press 2 +/– or % (Mute).
• Check that “TV Speakers” is set to “on” in the “Features” menu (page 26).
No sound, but good picture
• See the “Picture noise” causes/remedies on page 44.
Noisy sound
Channels
Problem Cause/Remedy
analogue channel.
• Switch between digital and analogue mode and select the desired digital/
The desired channel cannot be
selected
service.
• Scrambled/Subscription only channel. Subscribe to the Pay Per View
Some channels are blank
equipment).
• Check that the aerial is plugged directly into the TV (not through other
Digital channel is not displayed
your area.
• Contact a local installer to find out if digital transmissions are provided in
• Upgrade to a higher gain aerial.
• Channel is used only for data (no picture or sound).
• Contact the broadcaster for transmission details.
General
minutes, the TV automatically switches to standby mode.
• Check if the “Timer” is activated (page 28).
• If no signal is received or no operation is performed in the TV mode for 10
Problem Cause/Remedy
The TV turns off automatically
(the TV enters standby mode)
source (page 30).
• Check if the “Timer” is activated (page 28)
• Select “AV Preset” in the “Set Up” menu and cancel “Skip” of the input
The TV turns on automatically
Some input sources cannot be
selected
replace the internal lamp. For details refer to page 39 to 41.
• Replace the batteries.
• Turn the TV off. Turn the TV on again, if the lamp indicator is still lit then
of the TV set is lit.
The remote does not function
The lamp indicator on front
For example, the indicator flashes for two seconds, stops flashing for one second, and flashes for two seconds.
Troubleshooting
Check whether the 1 (standby) indicator is flashing in red.
When it is flashing
The self-diagnosis function is activated.
Sony service centre of how the indicator flashes (duration and interval).
1 Measure how long the 1 (standby) indicator flashes and stops flashing.
2 Press 1 on the TV (Front side) to switch it off, disconnect the mains lead, and inform your dealer or
When it is not flashing
equipment and the TV.
• Connect the TV to the mains, and press 1 on the TV (front side).
• If the 1 (standby) indicator lights up in red, press TV "/1.
no sound
the correct input symbol is displayed on the screen.
• Check that the optional equipment is on and press / repeatedly until
• Check the connection between the optional equipment and the TV.
No picture or no menu
information from equipment
connected to the scart
connector
• Check the aerial connection.
Picture
Problem Cause/Remedy
1 Check the items in the tables below.
2 If the problem still persists, have your TV serviced by qualified service personnel.
No picture (screen is dark) and
equipment connected to the scart connector on the rear of the TV.
• When installing optional equipment, leave some space between the optional
• When changing programmes or selecting digital/analogue Text, turn off any
• Check aerial/cable connections.
Distorted picture
Double images or ghosting
• Check the aerial location and direction.
• Check if the aerial is broken or bent.
• Check if the aerial has reached the end of its serviceable life (three to five
Only snow and noise appear
on the screen
years in normal use, one to two years at the seaside).
or hair-dryers.
• Keep the TV away from electrical noise sources such as cars, motorcycles,
Picture (dotted lines or stripes)
noise
(Automatic Fine Tuning) to obtain better picture reception (page 31).
• Make sure that the aerial is connected using the supplied coaxial cable.
• Keep the aerial cable away from other connecting cables.
• Do not use a 300-ohm twin lead cable as interference may occur.
noise in the picture (page 22).
• Select “Manual Programme Preset” in the “Set Up” menu and adjust “AFT”
• Select “Noise Reduction” in the “Picture Adjustment” menu to reduce the
• Video head interference. Keep your VCR away from the TV.
• Leave a space of 30 cm between your VCR and the TV to avoid noise.
Picture noise when viewing a
TV channel
Stripe noise during playback/
recording of a VCR
• Avoid installing your VCR in front of the TV or beside the TV.
• The picture of a display unit is composed of pixels. Tiny black points and/or
Some tiny black points and/or
bright points (pixels) on the screen do not indicate a malfunction.
bright points on the screen
44
– 21 –
Page 22

SECTION 3 DISASSEMBLY
3-2. PILLAR REMOVAL3-1. REAR COVER REMOVAL
KDF-E42/50A12U
RM-ED002
3-4. MAIN BRACKET REMOVAL3-3. MAIN BRACKET COVER REMOVAL
– 22 –
Page 23

3-5. SERVICE POSITION
KDF-E42/50A12U
RM-ED002
3-6. N, JB, AG BOARDS
4
3-7. POWER BLOCK REMOVAL 3-8. OPTICAL UNIT
– 23 –
Page 24

3-9. C BOARD REMOVAL
KDF-E42/50A12U
RM-ED002
3-10. SCREEN, MIRROR BLOCK ASSEMBLY REMOVAL
– 24 –
Page 25
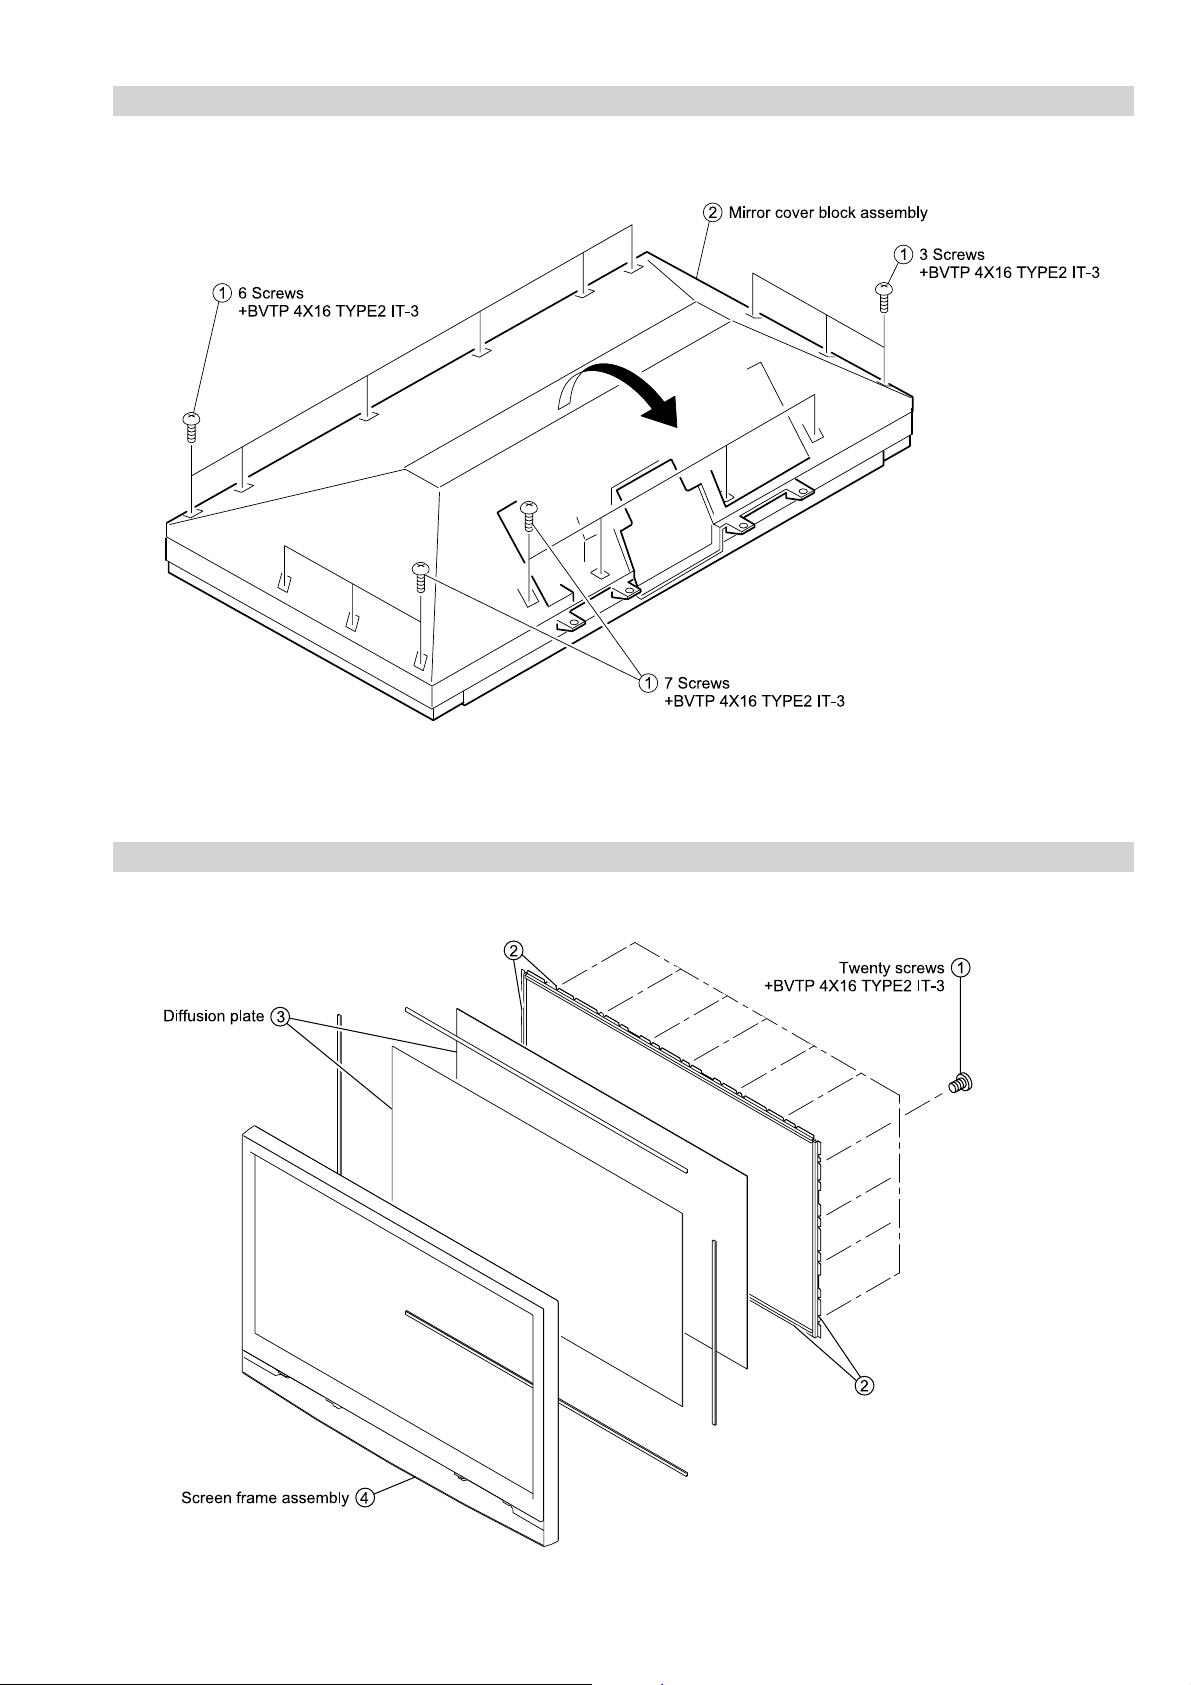
3-11. MIRROR COVER BLOCK ASSEMBLY REMOVAL
KDF-E42/50A12U
RM-ED002
3-12. CONTRAST SCREEN, DIFFUSION PLATE REMOVAL
– 25 –
Page 26

3-13. MIRROR REMOVAL
KDF-E42/50A12U
RM-ED002
3-14. H3 REMOVAL
3-15. SPEAKER REMOVAL
– 26 –
Page 27

SECTION 4 SET-UP ADJUSTMENTS
4-1. Signal Adjustment
Service adjustments to this model can be performed using the
supplied remote Commander RM-ED002.
How to enter into the Service Mode
1. Turn on the power to the TV set and enter into the stand-by
mode.
2. Press the following sequence of buttons on the Remote
Commander.
KF-E42/50A12U
RM-ED002
4-1-3.
SECAM auto adjustment (CVBS)
1. Select AV1 and input SECAM signal. (SECAM CVBS: CB 75%Y/
75%C from signal generator).
2. Set the TV in Service Mode (See above) and send “TT53”
command.
Note :
• While Auto adjustment is in process the RED LED is ON, till it
finishes.
i+
(ON SCREEN (DIGIT 5) (VOLUME +) (TV)
DISPLAY)
5
+
‘TT—’ will appear in the upper right corner of the screen.
Other status information will also be displayed.
3. Press ‘MENU’ on the remote commander to obtain the following
menu on the screen.
XEPVStnedirT
redoceDamorhC
sevirDDCL
ammaGlatigiD
uneMpmaL
dnuoS
tsujdAFI
hctiwSVA
unemrorrE
23:31:emiTgnikroW
)ecnalaBetihW(uneMecivreS
552vMVNB21.0vB4EL
11111111:atadyrotcaF
4. Move to the corresponding adjustment item using the
up or down arrow buttons on the Remote Commander.
5. Press the right arrow button to enter into the required menu item.
6. Press the ‘Menu’ button on the Remote Commander to quit the
Service Mode when all adjustments have been completed.
4-2. White Balance Adjustment
4-2-1. White Balance adjustment (H/L)
1. Select AV0.
2. Change the TV to Custom Mode and set the following registers by
sending “TT54”.
ENOTROLOCLARTUEN
TESFFO_CIP_U042
TESFFO_TRB_U252
TESFFO_ROLOC_U821
HME_ROLOC0
TSARTNOCXAM
SSENTHGIRB05
ROLOC0
EUH0
SSENPRAHS0
THGILKCABXAM
RNOTUAFFO
ELBATTS_KCALB0
ROSNESTHGILFFO
GNIVASREWOPDRADNATS
Note :
• After carrying out the service adjustments, to prevent the
customer accessing the ‘Service Menu’ switch the TV set OFF
and then ON.
4-1-1.
PAL auto adjustment (CVBS)
1. Select AV1 and input PAL signal. (PAL CVBS: CB 75%Y/75%C
from signal generator).
2. Set the TV in Service Mode (See above) and send “TT51”
command.
PAL auto adjustment (RGB)
4-1-2.
1. Select AV1 and input RGB signal. (PAL RGB: CB 100%Y/100%C
from signal generator).
2. Set the TV in Service Mode (See above) and send “TT52”
command.
3. Input PAL CVBS 60 IRE Full Field Signal to AV1.
4. Adjust Highlight registers:
NORMAL_PAL_RD (R Drive)
NORMAL_PAL_BD (B Drive)
High light adjustment value (9300K-0MPCD)
- 27 -
Page 28
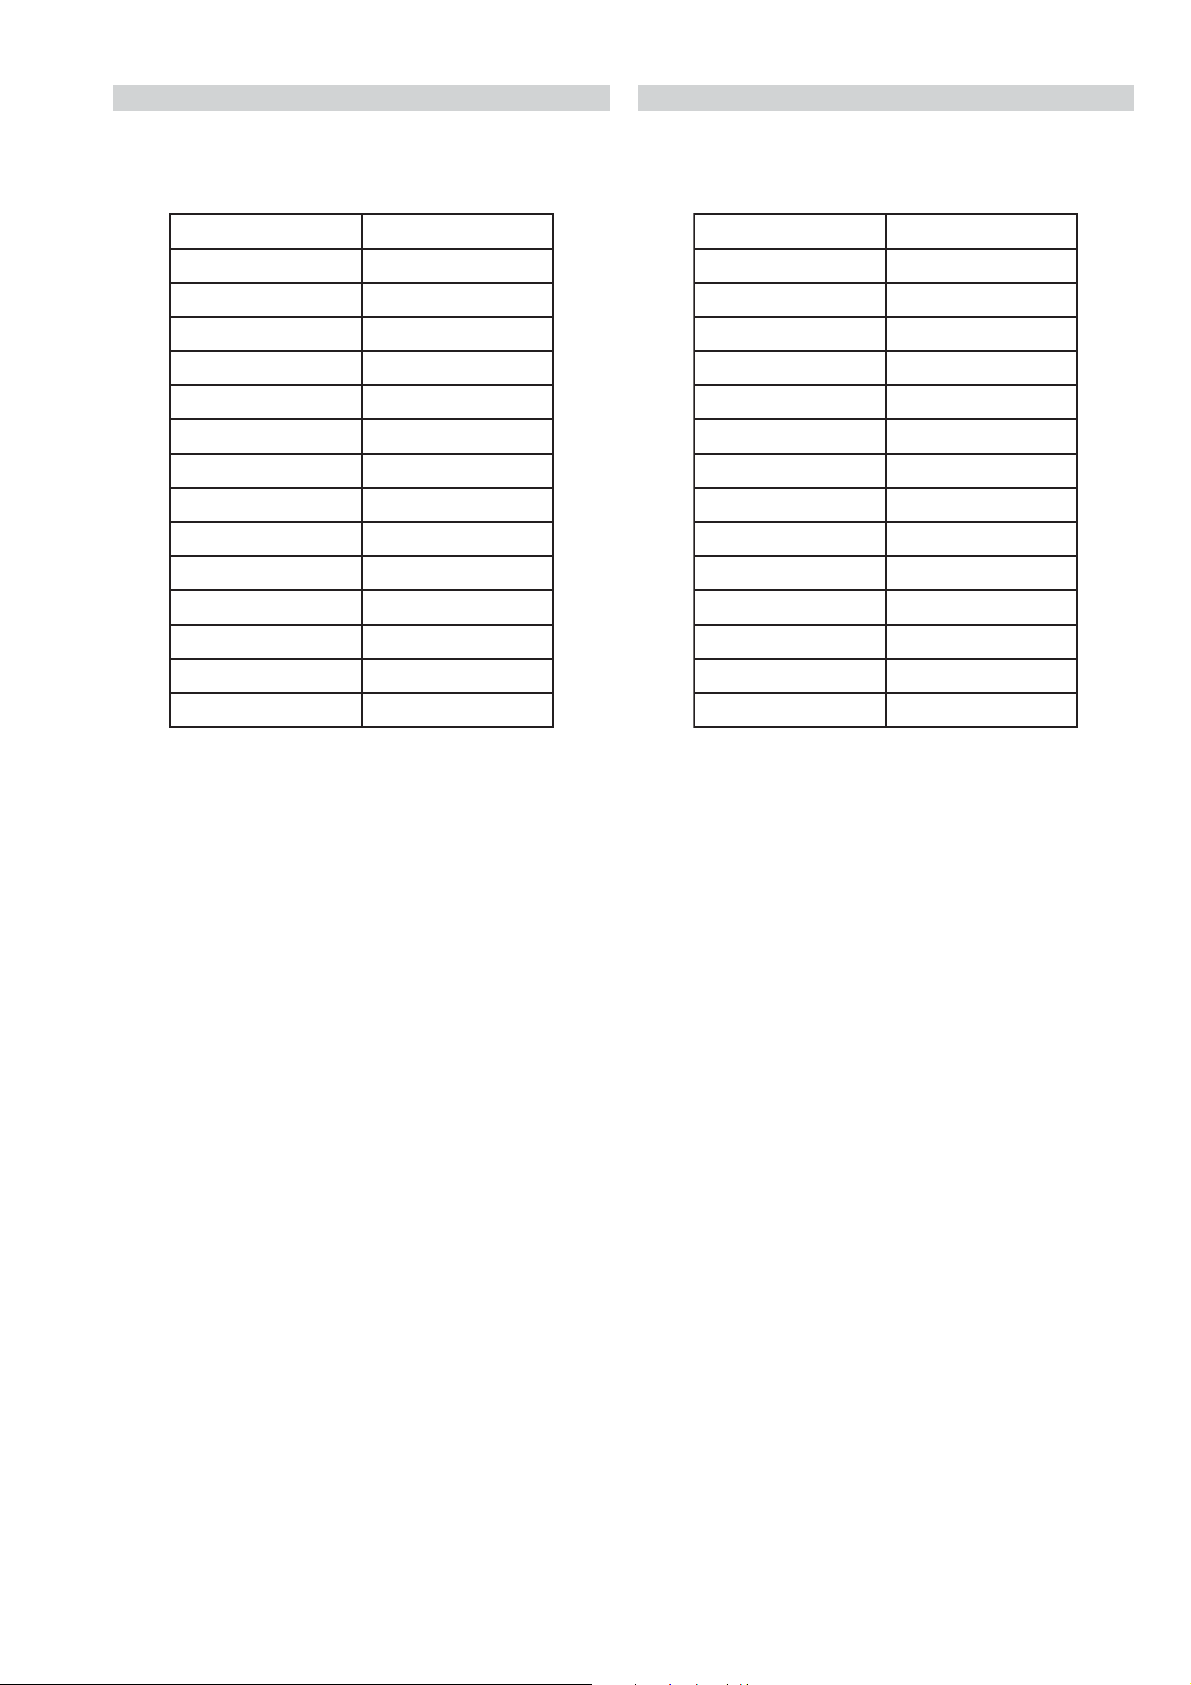
4-2-2. White Balance adjustment (C/O)
KF-E42/50A12U
RM-ED002
4-2-3. SECAM White Balance adjustment (H/L)
1. Select AV0.
2. Change the TV to Custom Mode and set the following registers by
sending “TT54”.
ENOTROLOCLARTUEN
TESFFO_CIP_U042
TESFFO_TRB_U252
TESFFO_ROLOC_U821
HME_ROLOC0
TSARTNOCXAM
SSENTHGIRB05
ROLOC0
EUH0
SSENPRAHS0
THGILKCABXAM
RNOTUAFFO
ELBATTS_KCALB0
ROSNESTHGILFFO
GNIVASREWOPDRADNATS
1. Select AV0.
2. Change the TV to Custom Mode and set the following registers by
sending “TT54”.
ENOTROLOCLARTUEN
TESFFO_CIP_U042
TESFFO_TRB_U252
TESFFO_ROLOC_U821
HME_ROLOC0
TSARTNOCXAM
SSENTHGIRB05
ROLOC0
EUH0
SSENPRAHS0
THGILKCABXAM
RNOTUAFFO
ELBATTS_KCALB0
ROSNESTHGILFFO
GNIVASREWOPDRADNATS
3. Input PAL CVBS 20 IRE Full Field Signal to AV1.
4. Adjust CutOff registers:
NORMAL_PAL_RC (R cutoff)
NORMAL_PAL_BC (B cutoff)
Low light ( Cut Off) adjustment value (9300K-0MPCD)
3. Input SECAM CVBS 60 IRE Full Field Signal to AV1.
4. Adjust Drive registers:
SECAM_OFFSET_RD (R Drive)
SECAM_OFFSET_BD (B Drive)
High light adjustment value (9300K-0MPCD)
- 28 -
Page 29

KF-E42/50A12U
00
ffoedom'TT'
10
mumixamerutciP
20
muminimerutciP
30
%53otemuloVteS
40
%05otemuloVteS
50
%56otemuloVteS
60
%08otemuloVteS
70
edomgniegA
80
noitidnoCgnippihS
61
%05levelerutciP
91
)ffo/no(elggotedoMyrotcaF
42
noitanitseDU
52
noitanitseDPEA
72
)FFO/NO(elggotedomABC
13
)FFO/NO(elggotedomSCE
23
teserpslennahcNCBteS
33
)FFO/NO(elggotEDOMLIF
43
teserpslennahcYNIteS
14
MVNesilaitini-eR
34
AdnuoSlauDtceleS
44
BdnuoSlauDtceleS
54
onoMdnuoSlauDtceleS
64
oeretSdnuoSlauDtceleS
84
nigriv-nonsaMVNteS
94
nigrivsaMVNteS
15
tnemtsujdaotuALAP
25
tnemtsujdaotuABGR
35
tnemtsujdaotuAMACES
45
snoitidnoctinIBW
55
elggotgodhctaW
65
snoitaunettalennahcllateseR
26
galfedomlatigiDelggoT
36
)CIRFA(dnabesabmorfMA
46
sgnittes"04tes
76
elbasid/elbanenoitcnufetuMreirraCotuAPSM
17
sgnittes"91teS
27
sgnittes"32teS
37
sgnittes"62teS
47
sgnittes"23teS
57
noitisopretnecotecnalaB
67
mumixamemuloV
77
muminimemuloV
87
tfelllufecnalaB
97
thgirllufecnalaB
18
yalpsidREBlatigiD
28
unemecivreSlatigiD
38
CNEDmorftuptuorabruoloclatigiD
48
hguorhthtapICST
58
nwodrewoprenutlatigiD
68
sknabWSlatigidowtneewtebhctiwS
78
tsetsyeklacoL
88
snoitidnocgnippihslatigiD
98
tsetDEL
39
dnuoslatigiDrofdesuoiduaeugolana/S2I
69
elbasiD/elbanE:tupuogubeDlatigiD
79
elbasiD/elbanEtuptuo656latigiD
89
elbasiD/elbanEnoitcnufteseRotuAlatigiD
99
unememiTgnikroWdnarorrEyalpsiD
RM-ED002
4-2-4. SECAM White Balance adjustment (C/O)
1. Select AV0.
2. Change the TV to Custom Mode and set the following registers by
sending “TT54”.
ENOTROLOCLARTUEN
TESFFO_CIP_U042
TESFFO_TRB_U252
3. Input SECAM CVBS 20 IRE Full Field Signal to AV1.
4. Adjust CutOff registers:
SECAM_OFFSET_RC (R cutoff)
SECAM_OFFSET_BC (B cutoff)
Low light (Cut Off) adjustment value (9300K-0MPCD)
TESFFO_ROLOC_U821
HME_ROLOC0
TSARTNOCXAM
SSENTHGIRB05
ROLOC0
EUH0
SSENPRAHS0
THGILKCABXAM
RNOTUAFFO
ELBATTS_KCALB0
ROSNESTHGILFFO
GNIVASREWOPDRADNATS
- 29 -
4-3. TEST TEST MODE
Test Test Mode is available in Service Mode, OSD ‘TT’ appears. The
functions described below are available by selecting the two numbers.
To release ‘Test Test mode’, press 00 or switch the TV set into
Stand-by mode.
Page 30

5-1. BLOCK DIAGRAMS (1)
TO LAMP DRIVER
TO TUNER
B_INTERFACE
N_INTERFACE
DIG_TUNER
CN3001
CN3000
CN1616
CN1603
CN1601
CN1612
CN2303
(Digital Only)
CN5201
1
2
4
5
1
3
5
7
8
9
1
3
1
3
1
2
1
2
3
5
7
8
2
5
6
8
9
10
11
12
13
14
15
17
18
25
26
28
30
32
FAN B PW
FAN B PROT
FAN LAMP POW
FAN LAMP PROT
LAMP COV
LAMP CONV
FAN O.V. POW
FAN O.V. PROT
FAN LAMP POW
FAN LAMP PROT
AC
AC
BIMETAL
BIMETAL
AC
AC
FH1601
E
D-IF1
D-IF2
IF AGC
TSDA
TSCL
AM
SCL
SDA
AC ON/OFF
A.
MUTE
ATT
MAIN_SW
AGCDEF
12CD15
LMP_COV
FAN_PROT
FAN_CTL
CVBSARF
SP_PROT
POFFMUTE
LEFT
RIGHT
QSS
IC6210
O
D3001
D1602
D1631
4
3
T1605
D6207
D6208
D6209
Q6201
Q6202
1
2
O
Q1603
Q1604
Q1605
MAIN POWER SUPPLY, TUNER, AUDIO AMPLIFIER
D6306
1
2
4
6
8
VSENSE
F/
B
RT
TIMER
VC1
5
5
4
IC1601
(
Q1606
Q1607
18
VD
VG(H)
P-GND
Q6203
Q6203
16
VS
15
14
VB
11
10
VC2
+17V
+11V
D1607
D1609
D1632
BYPASS
TU1200
6
5
Real time clock
(Digital Only)
AG
IC6205
TU1230
SDA
SCL
IF AGC
IF DIGITAL
IF DIGITAL
TU1231
(Digital Only)
SDA
SCL
IF AGC
IF DIGITAL
IF DIGITAL
IC6201
AC ON/OFF
D6304
T6300
1
4
STBY
7V
7
8
9
D6302
Q6302
Q6305
+ 5V
IC4200
)
+5VD
3
8
2
1
IC1602
Q2000
Q2500
Q2501
1
R
3
K
11V voltage sensor
11VD1620
D1613
D1616
D1617
CN1602
1
+ DC
3
- DC
+33VAD1601
CN2003
1
L
TO H3 BOARD
3
R
CN4305
CN5209
2
SCL
3
SDA
TO TUNER
4
CS
5
NC
IC2500
AUDIO AMP
R+IN
11
R-IN10
L-IN8
L+IN7
M
5
PH1601
4
3
D1618
D1619
T1603
1
2
3
4
D1620
STBY
10
11
12
13
17
9
18
8
+5V
AV GND
D1608
D1612
D1635
D1636
D1624
17VD1621
+AV
-AV
Q2502
Q2503
Q2504
1
2
- 30 -
AGC
CLOCK
DATA
DATA
TU1001
IF OUT
D1004
D1006
SF1001
9
10
Q1002
1
Q1003
7
6
IC1001
IF on board
VI
1
F
VI
2
F
FM
8
10
VIDEO 17
AF
SDA
TU AGC 14
SCL11
QSS12
Q1004
Q1008
Q1009
Q1007
Page 31
5-1. BLOCK DIAGRAMS (2)
CN3200
1
RA -
RA +
2
4
RB -
5
RB +
RC -
7
8
RC +
10
RCKL -
11
RCKL +
RD -
13
14
RD +
C ( )
L3201
1
2
L3202
1
2
L3203
1
2
L3204
1
2
L3205
1
2
LCD PANEL DRIVER BOARD
IC2501
FRP
SDA
SCL
PRG
FRP
SDA
SCL
PRG
FRP
SDA
SCL
PRG
R DRIVE
B0
D-A 0
85
D-A 1B184
D-A 2B283
D-A 3B382
D-A 4B481
D-A 5B580
D-A 6B679
D-A 7B778
D-A 8B877
D-A 9B976
MCLKX
3
FRP
4
SHST
5
SDA
8
SCL
9
PRG
60
IC2701
B DRIVE
R0
D-A 0
85
D-A 1R184
D-A 2R283
D-A 3R382
D-A 4R481
D-A 5R580
D-A 6R679
D-A 7R778
D-A 8R877
D-A 9R976
MCLKX
3
FRP
4
SHST
5
SDA
8
SCL
9
PRG
60
IC2601
G DRIVE
G0
G5
SID OUT
D-A 0
85
D-A 1G184
SH OUT 1
D-A 2G283
SH OUT 2
D-A 3G382
SH OUT 3
D-A 4G481
SH OUT 4
80
D-A 5
SH OUT 5
D-A 6G679
SH OUT 6
D-A 7G778
SH OUT 7
D-A 8G877
SH OUT 8
D-A 9G976
SH OUT 9
MCLKX
SH OUT 0
3
FRP
4
SH OUT 1
SHST
5
SH OUT 2
SDA
8
SCL
9
PRG
60
SID OUT
SH OUT 1
SH OUT 2
SH OUT 3
SH OUT 4
SH OUT 5
SH OUT 6
SH OUT 7
SH OUT 8
SH OUT 9
SH OUT 0
SH OUT 1
SH OUT 2
SID OUT
SH OUT 1
SH OUT 2
SH OUT 3
SH OUT 4
SH OUT 5
SH OUT 6
SH OUT 7
SH OUT 8
SH OUT 9
SH OUT 0
SH OUT 1
SH OUT 2
57
51
49
47
45
43
41
35
33
31
29
27
25
53
57
51
49
47
45
43
41
35
33
31
29
27
25
53
57
51
49
47
45
43
41
35
33
31
29
27
25
53
SID OUT
B-SIG 01
B-SIG 02
B-SIG 03
B-SIG 04
B-SIG 05
B-SIG 06
B-SIG 07
B-SIG 08
B-SIG 09
B-SIG 10
B-SIG 11
B-SIG 12
V COM OUT
SID OUT
R-SIG 01
R-SIG 02
R-SIG 03
R-SIG 04
R-SIG 05
R-SIG 06
R-SIG 07
R-SIG 08
R-SIG 09
R-SIG 10
R-SIG 11
R-SIG 12
V COM OUT
SID OUT
G-SIG 01
G-SIG 02
G-SIG 03
G-SIG 04
G-SIG 05
G-SIG 06
G-SIG 07
G-SIG 08
G-SIG 09
G-SIG 10
G-SIG 11
G-SIG 12
V COM OUT
Q2502
Q2504
Q2702
Q2704
Q2602
Q2604
P SIG-OR
IC2614
IC3200
LVDS Receiver
CLK OUT
4
3
4
3
4
3
4
3
4
3
RA -9
RA +10
RB -11
RC -15
RC +16
RCLK -29
RCLK +30
RD -35
RD +36
IC3101
RESET
OUT
26
RC4
3
RC5
5
R-D 0
7
R-D 1
34RB +12
R-A 0
37
R-A 1
29
R-A 2
30
R-A 3
32
R-A 4
33
R-A 5
35
R-A 6
41
R-D 1
42
37
R-A 0
38
R-A 1
40
R-A 2
43
R-A 3
45
R-A 4
46
R-B 5
49R-D 4
50
R-D 5
R-B 5
47
R-B 6
51
R-C 0
53
R-C 1
54
R-C 2
55
R-C 3
1
1
SCL-D-GAMMA1
PCLK1
H-OUT
V-OUT
R-OUT 2
R-OUT 3
R-OUT 4
R-OUT 5
R-OUT 6
R-OUT 7
R-OUT 8
R-OUT 9
G-OUT 2
G-OUT 3
G-OUT 4
G-OUT 5
G-OUT 6
G-OUT 7
G-OUT 8
G-OUT 9
B-OUT 2
B-OUT 3
B-OUT 4
B-OUT 5
B-OUT 6
B-OUT 7
B-OUT 8
B-OUT 9
Q2602
Q2604
Q3003
S1
G1 G2
D2 D1
S2
E0
1
E12
E23
SCL-D-GAMMA
IC3102
EPROM
SCL
SDA
WR-128K
W2
7
RSC
6
RSD
5
BUFFER
Q206
B OUT-0
B OUT-1
B OUT-2
B OUT-3
B OUT-4
B OUT-5
B OUT-6
B OUT-7
B OUT-8
B OUT-9
G OUT-0
G OUT-1
G OUT-2
G OUT-3
G OUT-4
G OUT-5
G OUT-6
G OUT-7
G OUT-8
G OUT-9
R OUT-0
R OUT-1
R OUT-2
R OUT-3
R OUT-4
R OUT-5
R OUT-6
R OUT-7
R OUT-8
R OUT-9
H-OUT
V-OUT
PCLK1
RSC
RSD
RESET
P-MUTE
SCL-D-GAMMA1
SDA-D-GAMMA
PAWN
BIN 0
5
BIN 1147
BIN 26
81
BIN 3
BIN 47
BIN 582
BIN 68
BIN 7150
B OUT 10
BIN 89
BIN 984
B OUT 11
GIN 085
GIN 1152
GIN 211
GIN 386
GIN 412
GIN 5
G OUT 7
87
G OUT 8
GIN 6
13
G OUT 9
GIN 7155
G OUT 10
GIN 814
G OUT 11
GIN 9156
R OUT 2
RIN 015
RIN 190
R OUT 4
RIN 214
91
RIN 3
17
RIN 4
RIN 592
RIN 618
RIN 793
RIN 819
RIN 920
HSW
29
3
VSIN
BOTCLK4
RSC51
RSD122
95
RESET
78
MUTE
48
HSC
HSD119
B OUT 2
B OUT 3
B OUT 4R2203
B OUT 5R3143
B OUT 6R474
B OUT 7
B OUT 8
B OUT 9
G OUT 2
G OUT 3
G OUT 4
G OUT 5
G OUT 6
R OUT 3
R OUT 5
R OUT 6
R OUT 7
R OUT 8
R OUT 9
R OUT 10
R OUT 11
HST
HCK
HCK
ENB
VCK
VS
T
CLR
SHST1
SHST2
SHST3
LCLKB
LCLKG
LCLKR
FRP
FRPL
141
72
144
75
77
76
2
134
65
196
66
156
67
196
68
138
69
127
58
128
59
60
130
61
131
62
132
116
45
44
170
28
102
113PCG
106
118
117
66
70
43
189
39
112
175PRG
RO
R1
R5
R6
R7
R8
R9
G0
G1
G2
G3
G4
G5
G6
G7
G8
G9
B0
B1
B2
B3
B4
B5
B6
B7
B8
B9
HST
HCK1
HCK2
ENB1
VCK1
VST1
PCG1
CLR1
SHST-R
SHST-G
SHST-B
CLK-R 70
CLK-G 43
CLK-B 189
FRP
FRPN
PRG
IC2007
OCTAL BUS BUFFER (3-state)
HST
A3
4
HST
A4
5
HCK1
A5
6
HCK1
A7
8
HCK2
A6
7
HCK2
A8
9
OCTAL BUS BUFFER (3-state)
HST
A3
4
HCK1
A1
2
HCK2
A2
3
ENB1
A4
5
VCK1
A5
6
VST1
A6
7
PCG1
A7
8
CLR1
A8
9Y8
Y6
Y7
IC2006
Y1
Y2
Y3
Y4
Y5
Y6
Y7
CLK B
SHST
HCK1-R
Y5
14
HCK2-R
13
HST R
Y3
16
HST-G
Y4
15
HCK1-G
12
HCK2-G
Y8
11
HCK1-B
18
HCK2-B
17
HST
B
16
ENB
15
VCK
14
VS
T
13
PCG
12
CLR
11
CLK R
SHST
CLK G
SHST
P SIG-OB
SIG B6
SIG B5
SIG B4
SIG B3
SIG B2
SIG B1
SIG A6
SIG A5
SIG A4
SIG A3
SIG A2
SIG A1
V COM
PCG
CLR
VCK
ENB
HST
HST1
HST2
SIG B6
SIG B5
SIG B4
SIG B3
SIG B2
SIG B1
SIG A6
SIG A5
SIG A4
SIG A3
SIG A2
SIG A1
V COM
PCG
CLR
VS
VCK
ENB
HST
HST1
HST2
P SIG-OG
SIG B6
SIG B5
SIG B4
SIG B3
SIG B2
SIG B1
SIG A6
SIG A5
SIG A4
SIG A3
SIG A2
SIG A1
V COM
PCG
CLR
VS
VCK
ENB
HST
HST1
HST2
CN2551
1
14
13
12
11
10
9
8
7
6
5
RED DRIVE
4
3
31
29
28
VST
25
24
23
17
18
19
CN2601
1
14
13
12
11
10
9
8
7
6
5
BLUE DRIVE
4
3
31
29
28
25
T
24
23
17
18
19
CN2651
1
14
13
12
11
10
9
8
7
6
5
4
3
GREEN DRIVE
31
29
28
25
T
24
23
17
18
19
IC2009
Temperature Sensor
SDA
SCL
CN3004
SDA-33
1
2
SCL-33
WP-128K
P-MUTE
3
5
7
8
- 31 -
Page 32
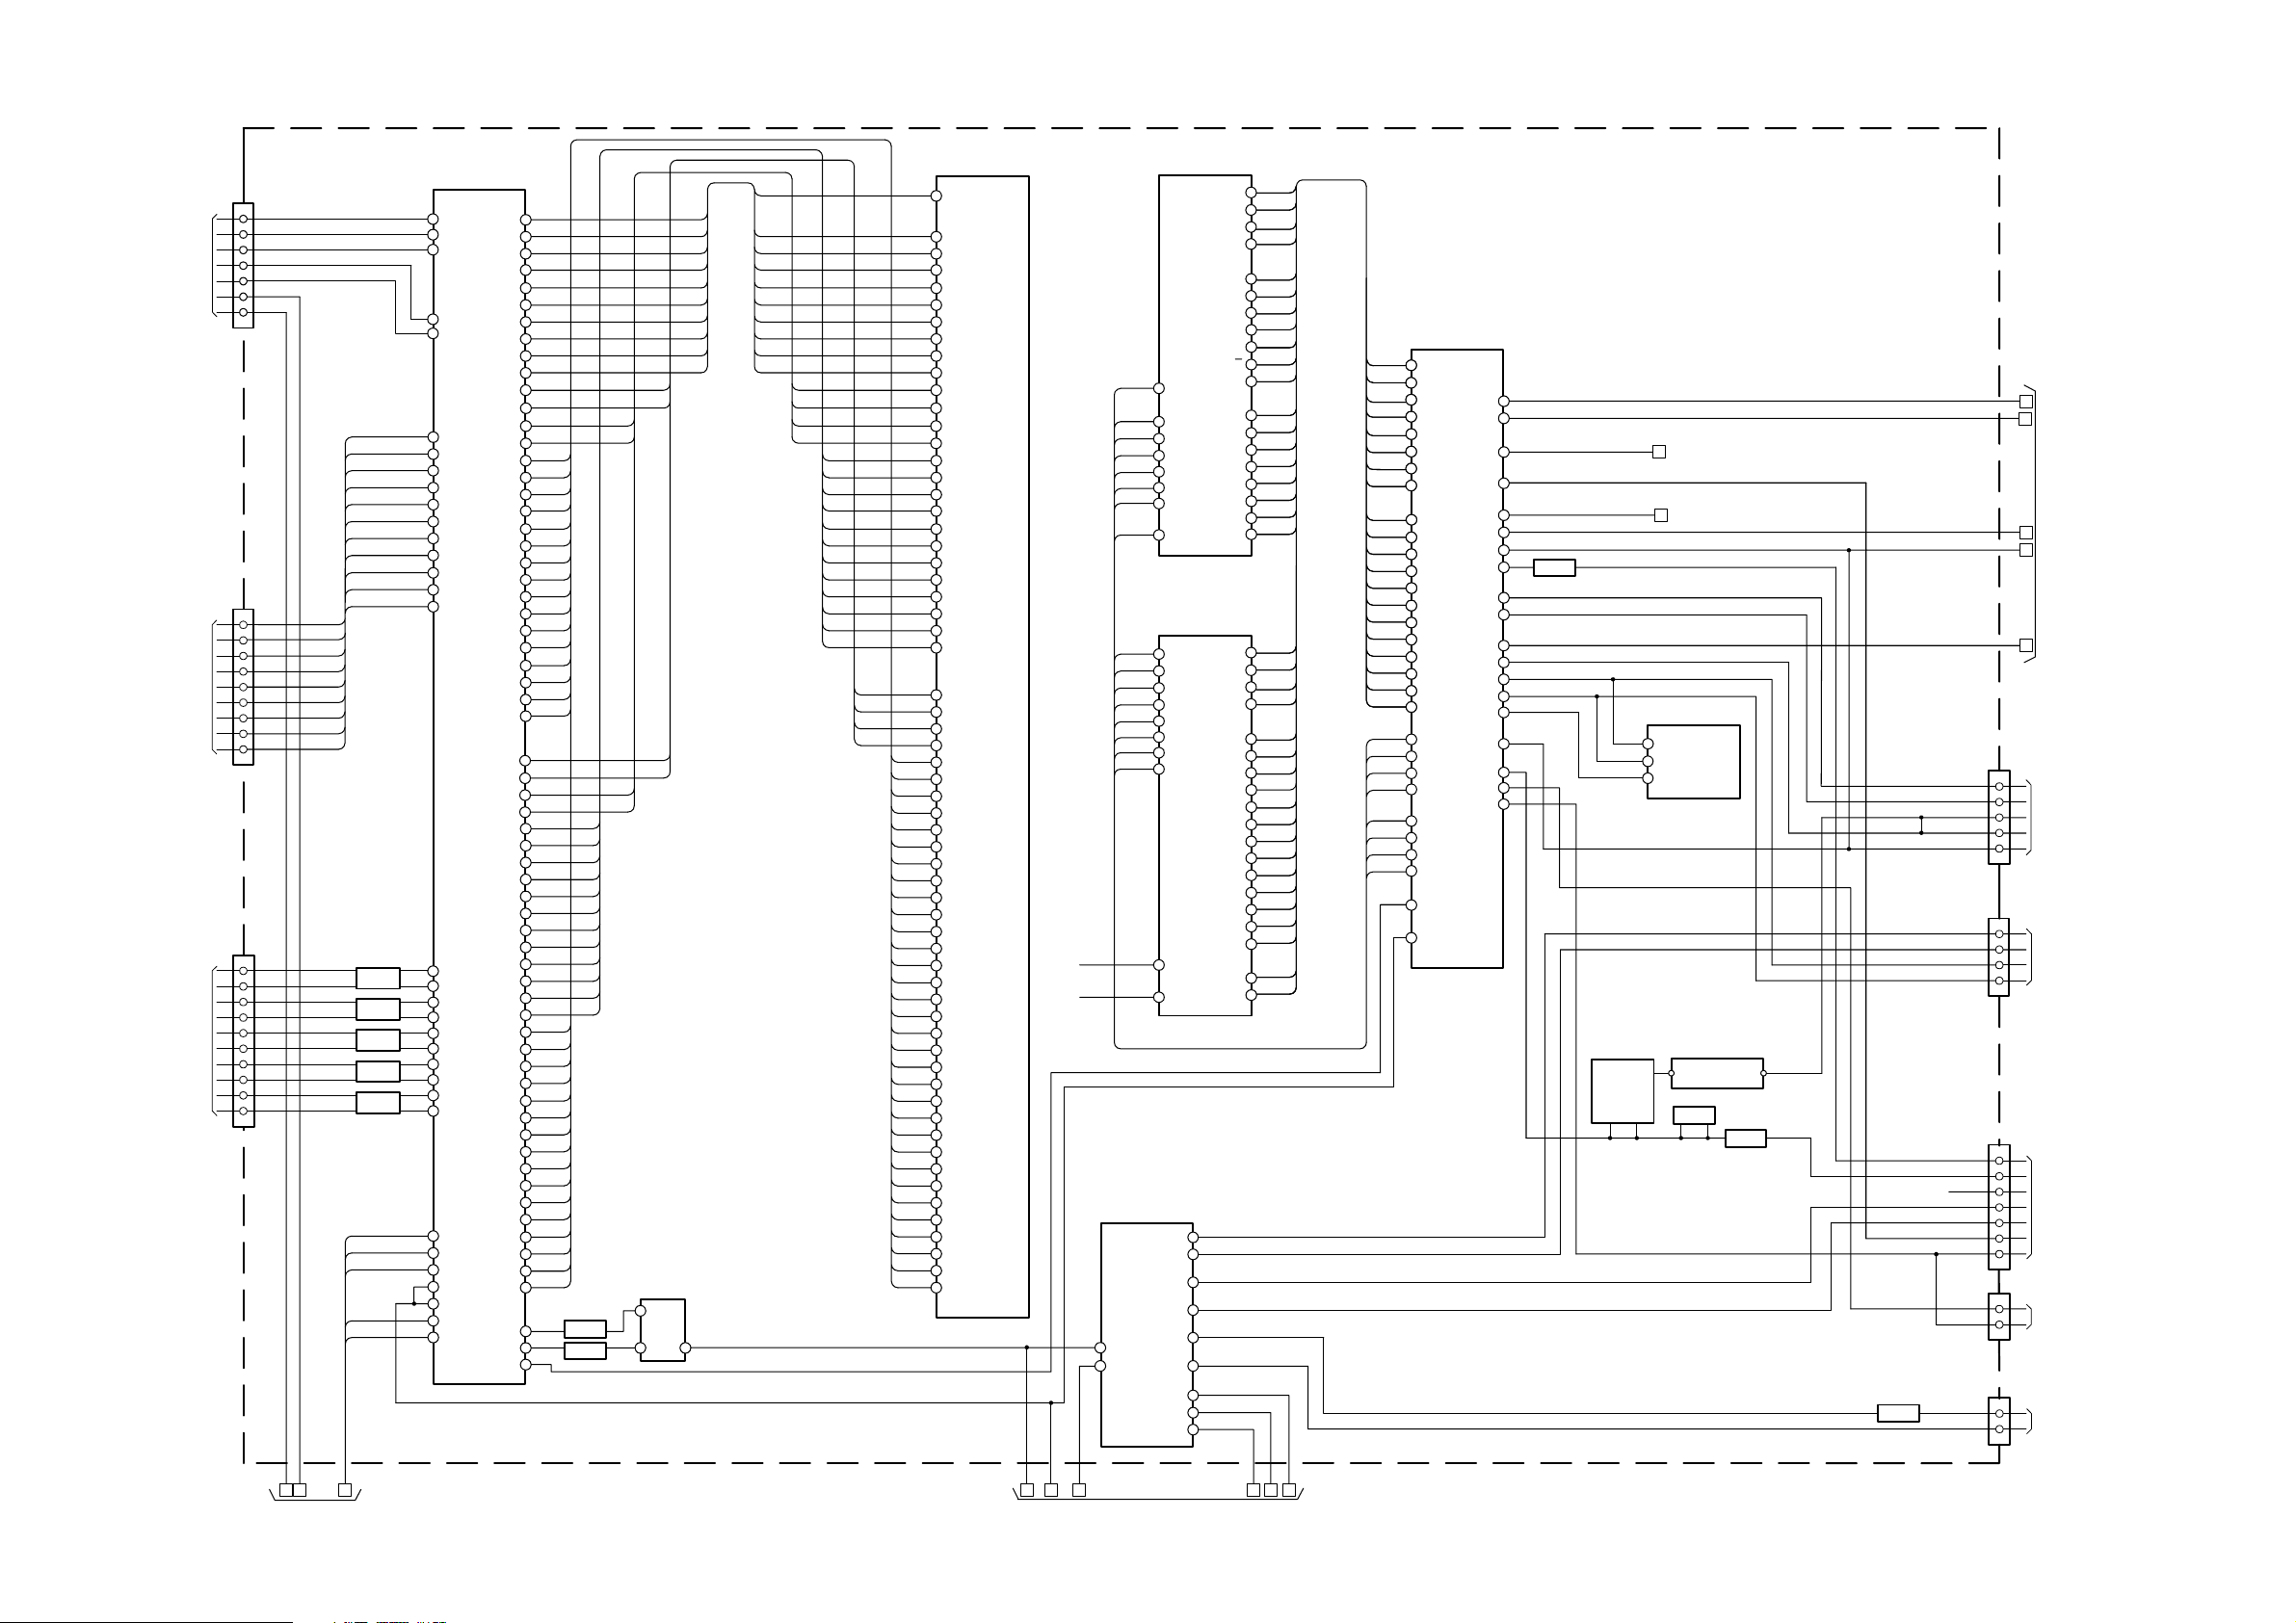
5-1. BLOCK DIAGRAMS (3)
CN9511
CN5404
(Digital Only)
CN9510
IC5500
MD[16]
MD[18]
MD[17]
MD[19]
MD[20]
MD[21]
MD[22]
MD[23]
MD[0]
MD[1]
MD[3]
MD[2]
MD[4]
MD[5]
MD[6]
MD[7]
MD[24]
MD[25]
MD[26]
MD[27]
MD[29]
MD[28]
MD[31]
MD[30]
MD[8]
MD[9]
MD[10]
MD[11]
MD[12]
MD[13]
MD[14]
MD[15]
Video Processor Memory
K12
N13 VREF
M5 BA1
C2
N4 BA0
B13
B4
N12 CKE
B8
L3 WE
B7
L2 CAS
B6
M2 RAS
B5
N2 CS
B3
M12 CK
B2
M11 CK
B9
B2 DQS0
B10
H13 DQS1
B11
H2 DQS2
B12
B13 DQS3
C3
N5 A0
C4
N6 A1
C5
M6 A2
C6
N7 A3
C7
N8 A4
C8
M9 A5
C9
N9 A6
C10
N10 A7
C11
N11 A8/AP
C12
M8 A9
C13
L6 A10
D2
M7 A11
E5
B12 DM3
E4
H3 DM2
E3
H12 DM1
E2
B3 DM0
G13
B8 DQ31
G12
C9 DQ30
G11
B9 DQ229
G10
B10 DQ28
G9
C13 DQ27
G8
D12 DQ26
G7
D13 DQ25
G6
E13 DQ24
G5
K3 DQ23
G4
K2 DQ22
G3
J2 DQ21
G2
J3 DQ20
F1
G2 DQ19
3
F1
G3 DQ18
2
F11
F2 DQ17
F1
F3 DQ16
0
F9
F12 DQ15
F8
F13 DQ14
F7
G12 DQ13
F6
G13 DQ12
F5
J12 DQ11
F4
J13 DQ10
F3
K12 DQ9
F2
K13 DQ8
E13
E2 DQ7
E12
D2 DQ6
E11
D3 DQ5
E10
C2 DQ4
E9
B5 DQ3
E8
B6 DQ2
E7
C6 DQ1
E6
B7 DQ0
RD_RAM ??
WR_RAM ??
14
15
D0
D1
D2
D3
D4
D5
D6
D7
D0
D1
D2
D3
D4
D5
D6
D7
Port Expander
SDA
SCL
IC7402
IC5000
Video Processor
1
B-PC
3
G_PC
5
R_PC
V_PC
7
H_PC
9
13
L
15
R
2
3
5
6
8
9
11
12
14
14
13
11
10
8
7
5
4
2
1
DT_C_DY7
DT_C_DY6
DT_C_DY5
DT_C_DY4
DT_C_DY3
DT_C_DY2
DT_C_DY1
DT_C_DY0
DT_C_CLK
RXIN3+
RXIN3-
RXCLK+
RXCLK-
RXIN2+
RXIN2-
RXIN1+
RXIN1-
RXIND+
RXIND-
L5013
L5014
L5012
L5008
L5009
CR_IN
YC_C
CB_B1
YC_Y
Y_IN
DT_C_HS
DT_C_VS
DT_C_CLK
DT_C_DY7
DT_C_DY6
DT_C_DY5
DT_C_DY4
DT_C_DY3
DT_C_DY2
DT_C_DY1
DT_C_DY0
PB_B2
233
243
Y_G2
226
PR_P2
11
AIN_VS
AIN_HS
10
H
21
22
V
CLK
56
DIN7
57
58
DIN6
59
DIN5
60
DIN4
DIN3
61
DIN2
62
63
DIN1
64
DIN0
36
TA1+
37
TA1-
TB1+
34
35
TB1-
30
TC1+
31
TC1-
28
TCLK+
29
TCLK-
26
TD1+
27
TD1-
225
PR_P1
231
C
232
PB_B1
242
CVBS1
243
CVBS2
244
CVBS3
246
Y_G1
CLKE
WE#
MVREF
CAS#
RAS#
CS0#
MCLK0
DQM3
DQM2
DQS3
DQS2
MD31
MD30
MD29
MD28
MD27
MD26
MD25
MD24
MD23
MD22
MD21
MD20
MD19
MD18
MD17
MD16
DQM1
DQM0
DQS1
DQS0
MA4
MA7
MA10
MA11
MD15
MD14
MD13
MD12
MD11
MD10
MD3
SDA
RESET
BA1
BA0
MA0
MA1
MA2
MA3
MA5
MA6
MA8
MA9
MD9
MD8
MD7
MD6
MD5
MD4
MD2
MD1
MD0
SCL
147
145
144
142
140
138
137
133
131
130
177
159
174
156
183
181
180
178
172
170
168
166
165
163
162
160
154
152
150
148
97
79
100
82
126
125
123
122
120
118
117
115
114
112
111
109
108
106
104
102
96
94
93
91
90
88
86
84
78
76
75
73
14
16
13
MD[31]
MD[30]
MD[29]
MD[28]
MD[27]
MD[26]
MD[25]
MD[24]
MD[23]
MD[22]
MD[21]
MD[20]
MD[19]
MD[18]
MD[17]
MD[16]
1000p 50V
MD[15]
MD[14]
MD[13]
MD[12]
MD[11]
MD[10]
MD[9]
MD[8]
MD[7]
MD[6]
MD[5]
MD[4]
MD[3]
MD[2]
MD[1]
MD[0]
DQS[3]
DQS[2]
DQS[1]
DQS[0]
MA[0]
MA[1]MA[1]
MA[2]
MA[3]
MA[4]
MA[5]
MA[6]
MA[7]
MA[8]
MA[9]
MA[10]
MA[11]
Q7413
Q7414
BA1
BA0
CKE
WE#
MVREF
CAS#
RAS#
CS#
MCLK0#
MCLK0
DQM[3]
DQM[2]
DQM[1]
DQM[0]
Q9602
S1
S2 D2
MVREF
BA1
BA0
CKE
WE#
CAS#
RAS#
CS#
MCLK0#
MCLK0
DQS[1]
DQS[3]
DQS[0]
DQS[2]
MA[0]
MA[1]
MA[2]
MA[3]
MA[4]
MA[5]
MA[6]
MA[7]
MA[8]
MA[9]
MA[10]
MA[11]
DQM[2]
DQM[0]
DQM[3]
DQM[1]
OTP (Software)
Q0
13
Q1
14
15
Q2
17
Q3
Q4
18
Q5
19
Q6
20
Q7
21
Ram Memory Micro
D(0)
21
D(1)
22
23
D(2)
25
D(3)
D(4)
26
D(5)
27
D(6)
28
D(7)
29
OE
32
WE
5
DAC3
DAC4
DAC1
SW3
DAC2
SW2
DAC0
SW1
SW0
IC7403
4
3
6
10
5
9
7
1
2
IC1002
A(11)
A(12)
A(13)
A(14)
A(15)
A(16)
A(17)
A(10)
A12
4
A12
A15
A15
3
A16
2
A16
A17
30
A17
A14
29
A14
A13
28
A13
A8
27
A8
A9
26
A9
A11
25
A11
PSEN
24
G
A10
A10
23
A7
85
A7
A6
86
A6
A5
88
A5
A4
89
A4
A3
90
A3
A2
93
A2
A1
94
A1
A0
97
A0
A7
A13
A12
A14
A15
A17
A16
A18
A18
A8
A6
A9
A5
A5
A11
A4
PSEN
PSEN
A3
A0
20
A(0)
A1
A(1)
19
A2
18
A(2)
A3
17
A(3)
A4
16
A(4)
A5
15
A(5)
A6
14
A(6)
A7
13
A(7)
A8
3
A(8)
A9
2
A(9)
A11
1
A12
12
A13
4
A14
11
A15
7
A16
10
A17
9
A10
31
CE
30
CE
A3
A10
A10
A2
A2
A1
A1
A0
A0
D7
D6
D0
D5
D1
D4
D2
D3
IC1003
Micro
79
79
A7
A7
A13
78
A13
78
A12
77
A12
77
76
76
71
71
70
70
69
69
68
68
81
81
82
82
83
83
84
84
85
85
86
86
88
88
89
89
90
90
93
93
94
94
97
97
96
98
99
100
A14
A14
A15
A15
A17
A17
A16
A16
A18
A18
A8
A8
A6
A6
A9
A9
A5
A5
A11
A11
A4
A4
PSEN#
PSEN#
A3
A3
A10
A10
A2
A2
A1
A1
A0
A0
D7
D6
D0
D5
HS/SSC
VS
P1.7
A19
P3.6
P3.5
P3.1
P3.2
RD#
WR#
P4.3
RST#
P1.3
P1.2
P1.1
ALE
P2.1
P2.3
P2.0
D1
1
D4
2
3
D2
4
D3
45
P1.4
21
CVBS
JB 1/2 ( )
29
30
62
67
37
36
32
33
Q7412
65
64
49
50
44
43
42
87
25
27
24
Q1000
Q1002
Q7411
Chroma Decoder, Video Processor,
Audio Processor, AV Switch, Main Micro
B
A
IC1005
NVM Micro
5
SDA
6
SCL
7
WC
IC1010
Dual OPAM (AV link)
OUTVCC
RD_RAM
WR_RAM
RST_I
ALE_M
P_MUTE
WP_256K
SCL_B
SDA_B
CN5402
1
2
3
4
5
CN9506
3
4
6
8
J
I
T
O
S
H
E
E
T
P
2
Q
Q7419
Q8490
POWER/RESERVE_LED/RX
LAMP LED
TIMER LED
STBY LED
SIRCS
STBY5
KEY_2
CN9507
2
4
6
7
TO H2 BOARD
CN1000
8
9
KEY
11
CN9509
2
TO H1 BOARD
3
KEY
CN4404
CN9508
Q7412
LMP_CTL
LMP_PROT
3
5
E
TO SHEET 2 TO SHEET 2
CDGH
- 32 -
KLMNF
Page 33
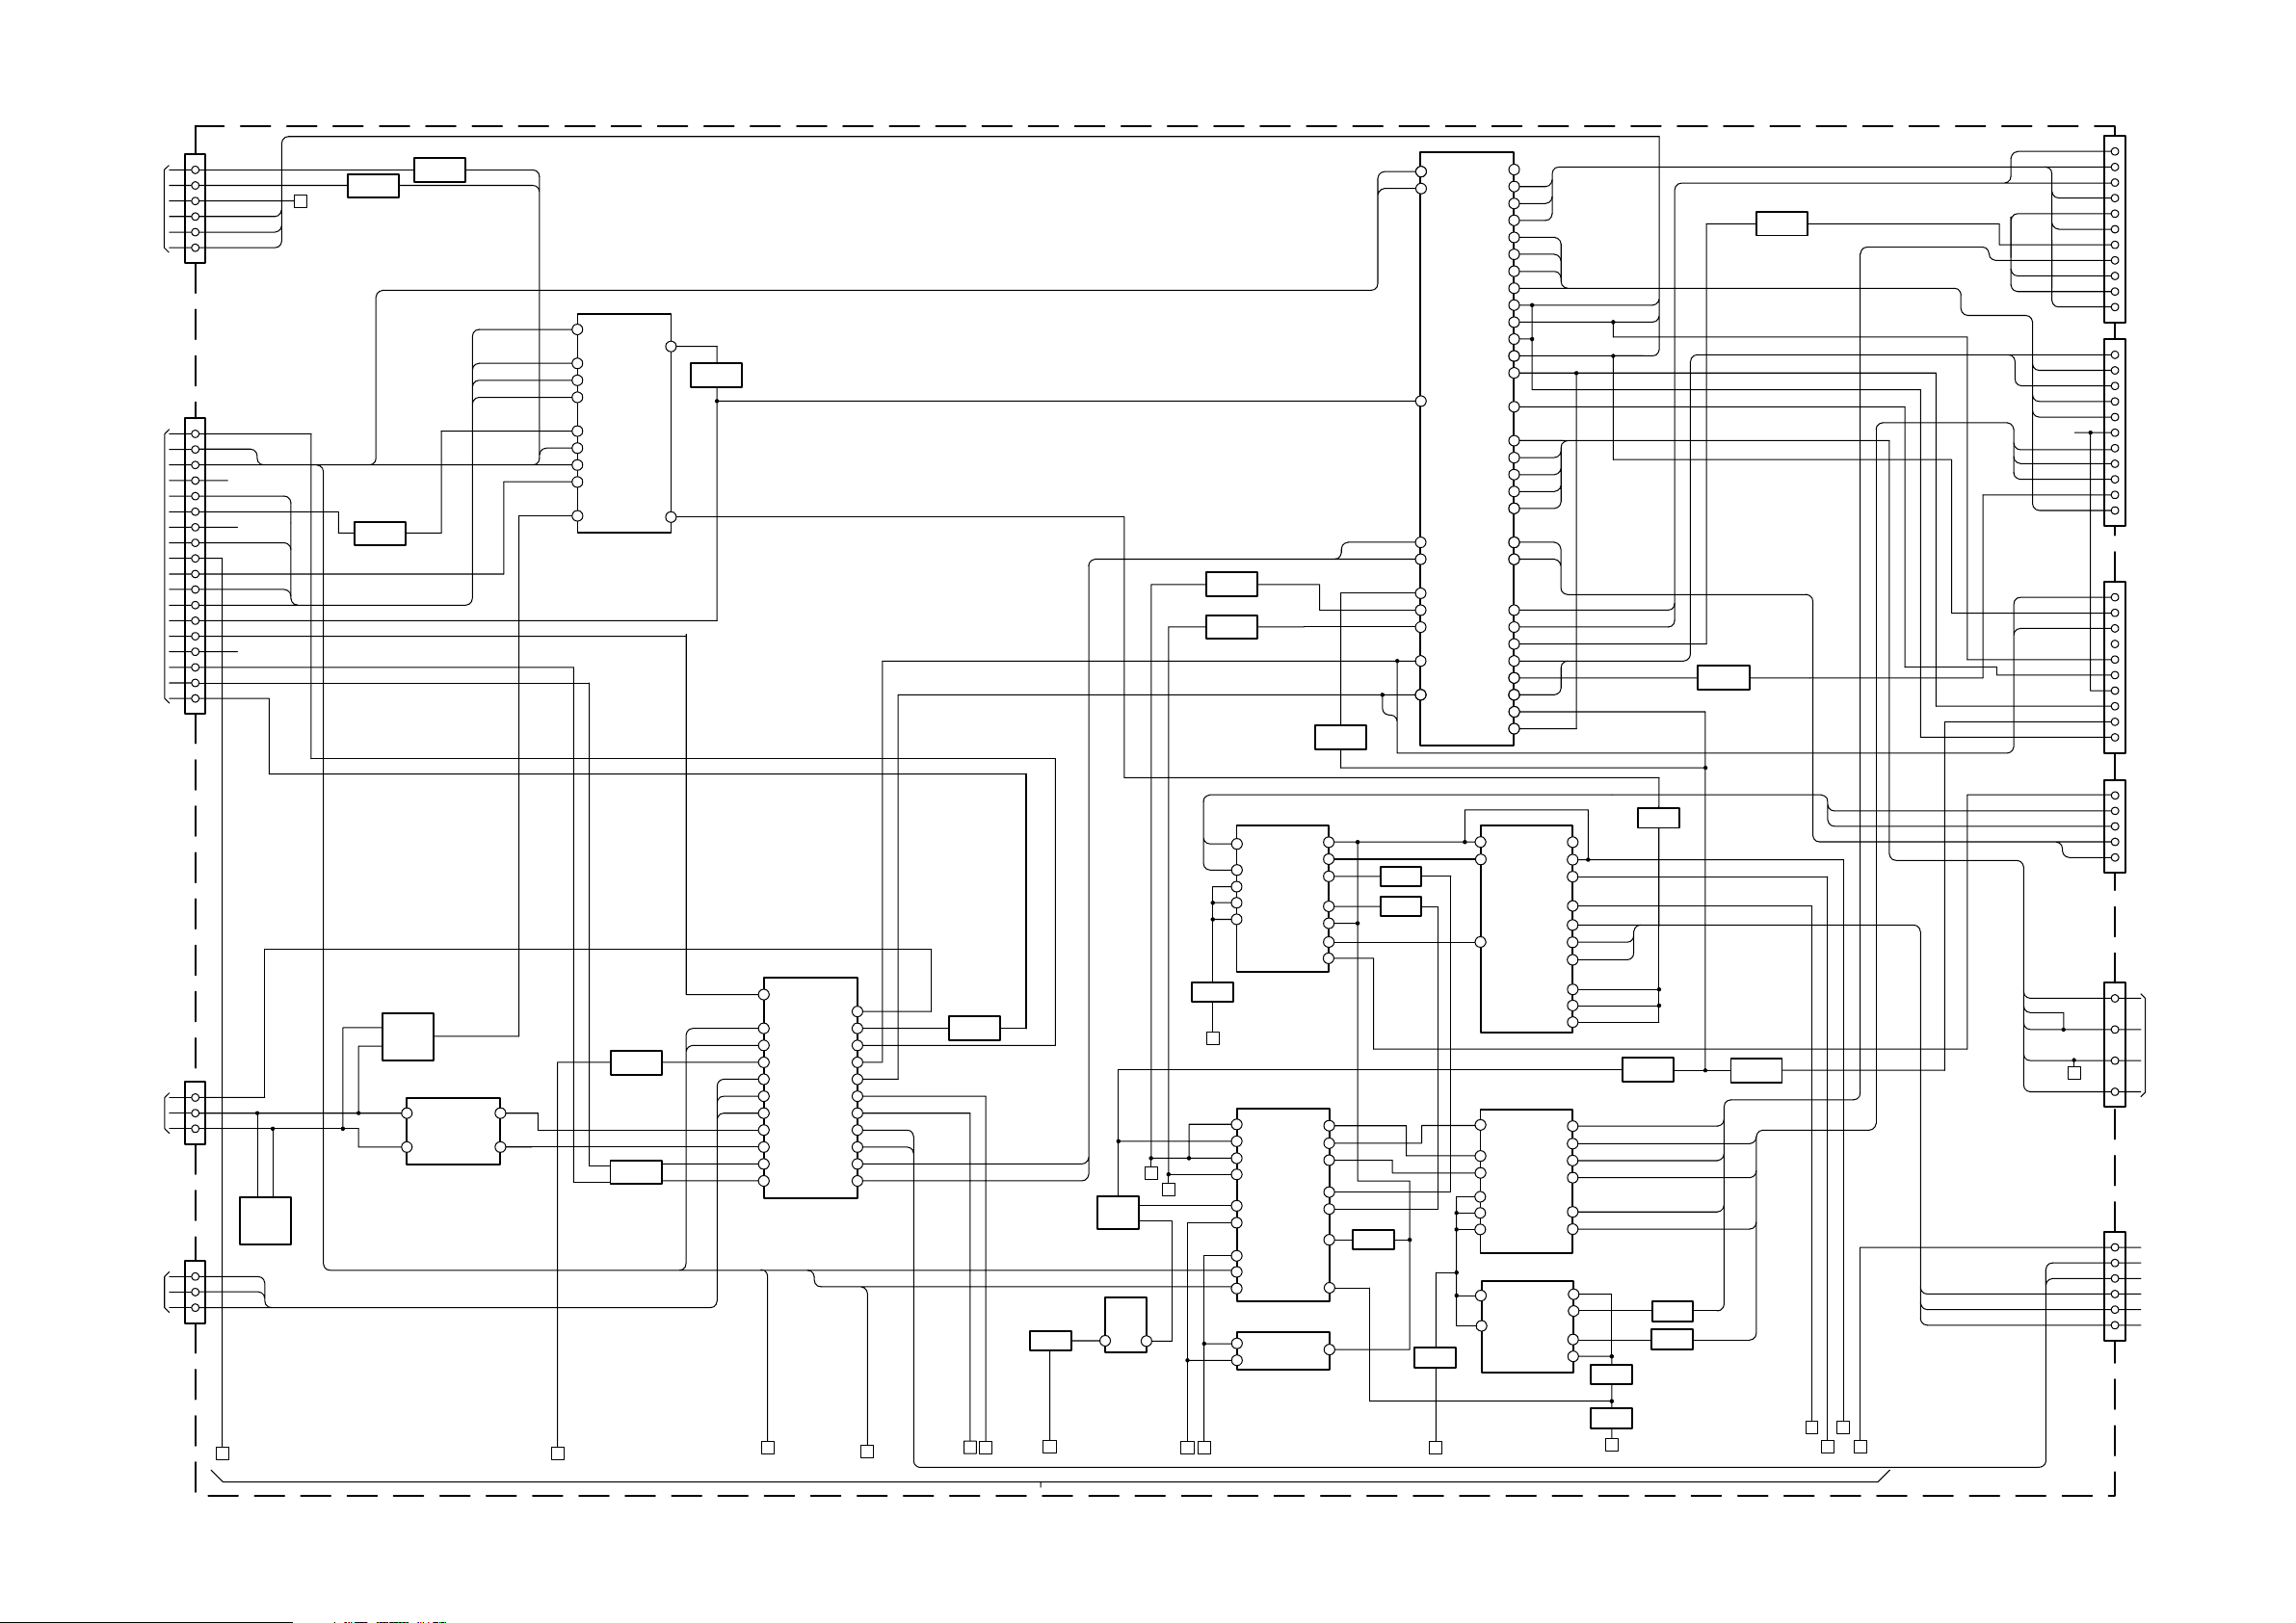
5-1. BLOCK DIAGRAMS (4)
CN8551
(Digital Only)
CN9512
2
3
5
7
9
11
2
5
6
8
9
10
11
13
14
15
17
18
25
26
28
30
30
32
SCL_TV
SDA_TV
N_RST
DIGITAL_R
DIGITAL_L
DIGITAL_CVBS
SCL
SDA
??
SP_MUTE
ATT
??
AGC_DEFECT
FAN_PORT
FAN_CLT
??
To Sheet 1
P
Q9606
(Digital Only)
Q8507
Q9607
(Digital Only)
SCL
SDA
FAN_PORT
AGC_DEFECT
SP_MUTE
FAN_CLT
CN9501
LOUT2
ROUT2
RV2
1
2
3
6
8
9
11
15
15
16
20
CN9501
1
2
V2
3
6
LV2
8
10
11
15
16
19
20
CN3803
(Digital Only)
1
2
3
4
6
8
10
15
19
20
IC9500 AV Switch
LV1
RV1
S2-1
LV2
RV2
S2-2
LV3
RV3
S2-3
LV4
RV4
LV5
RV5
LOUT3
ROUT3
VOUT3
LOUT2
V/YOUT2
ROUT2
VOUT1
CIN1
V1
1
V1
LV1
2
RV1
4
S2-1
6
V2
8
V2
LV2
9
RV2
11
S2-2
13
15
V3
16
17
Y3
18
19
C3
20
V4
22
V4
LV4
23
Y4
24
Y4
RV4
25
C4
26
C4
LV5
29
RV5
V3
LV3
RV3
Q9500
AVLINK
??
S2-2
ROUT1
38
40
41
LOUT2
43
44
ROUT2
45
53
51
Q9512
LOUT1
SCL
33
SCL
SDA
34
Chroma Decoder, Video Processor,
JB 2/2 ( )
IC8500
Port Expander
1
SW1
3
DAC4
4
DAC3
5
DAC2
7
DAC0
SCL
15
SCL
SDA
14
SDA
10
SW3
8
SW2
DAC1
SW0
2
Q9603
Q9604
6
Audio Processor, AV Switch, Main Micro
TUNER_R
TUNER_L
Q9515
Q9510
Q9514
ROUT1
LOUT1
SDA
63
TV
64
RTV
64 31
LTV
60
V6
58
COUT1
56
YOUT1
54
ROUT1
52
LOUT1
Q9601
TO H3 BOARD
CN4301
(Digital Only)
CN9513
CN8550
J9154
IC2506
Analog Switch
(YUV Input Selector)
K p3
5
J p3
12
11
10
9
IC7804
Sound Processor
78
D_CTR_I/O_0
Q3678
Q3880
Q3881
Q7801
2
HP_DEP
3
HP_L
4
HP_R
17
R OUT
R_IN
L OUT
L_IN
36
Q7802
Q7806
SCL_5V
SDA_5V
ABCK
ALRCK
ADD
2
I2C_CL
3
I2C_DA
13
DVSUP
19
I2S_CL3
20
I2S_WS3
22
I2C_DA_IN3
24
DACA_R
25
DACA_L
27
DACM_R
28
DACM_L
J2802
2
ALRCK
3
ABCK
4
ADD
D_CTR_I/O_1
ANA_IN1+
SC5_IN_R
SC1_IN_R
SC1_IN_L
SC2_IN_R
SC2_IN_L
SC3_IN_R
SC3_IN_L
SC2_OUT_L
SC2_OUT_R
77
67
60
57
56
54
53
51
50
34
33
HDMI_R[0]
HDMI_L[0]
Q7810
Q7811
TUNER_L
TUNER_R
Q2501
FL2500
Q2503
3
Q2508
N
To Sheet 1
Chroma Decoder
C3-IN
39
CVBS341
43
C2-IN
H
To Sheet 1
H
2
CVBS2
44
CVBS-OUT
3
4
VS
9
HS
SCL
13
SDA
14
Logic Gate (Sync Adder)
B
2
1
A
IC2501
IC2500
R1-IN
G1-IN
B1-IN
CR-OUT
CB-OUT
Y-OUT
YS3
15
14
13
3
1
4
2
27
26
25
23
22
21
15
Q2502
Q2504
Q2505
Y 4
Q2506
1
13
IC2601
Analog Switch
(YUV Input Selector)
3
IC2504
Analog Switch
(RGB Input Selector)
4
15
14
11
10
9
IC2507
Analog Switch (FB Selector)
1
7
16
15
14
4
2
5
12
11
10
9
1
2
3
5
13
12
6
5
2
3
Q2513
Q2601
L
LV5
R
RV5
Y
CB
CR
C4
Y4
CN9514
V4
Q9511
Q9516
Q9516
LV4
RV4
Q
To Sheet 1
C p3
F p3
B p3
E p3
A p3
Q2510
Q2509
H p3
G p3
D p3
HDMI_RST
CR
CB
Y
CN9505
2
7
R
8
L
10
CR
12
CB
14
Y
A B
Q2514
E
C
D
F
G
KJI
L
HHH
M
To Sheet 1
- 33 -
Page 34
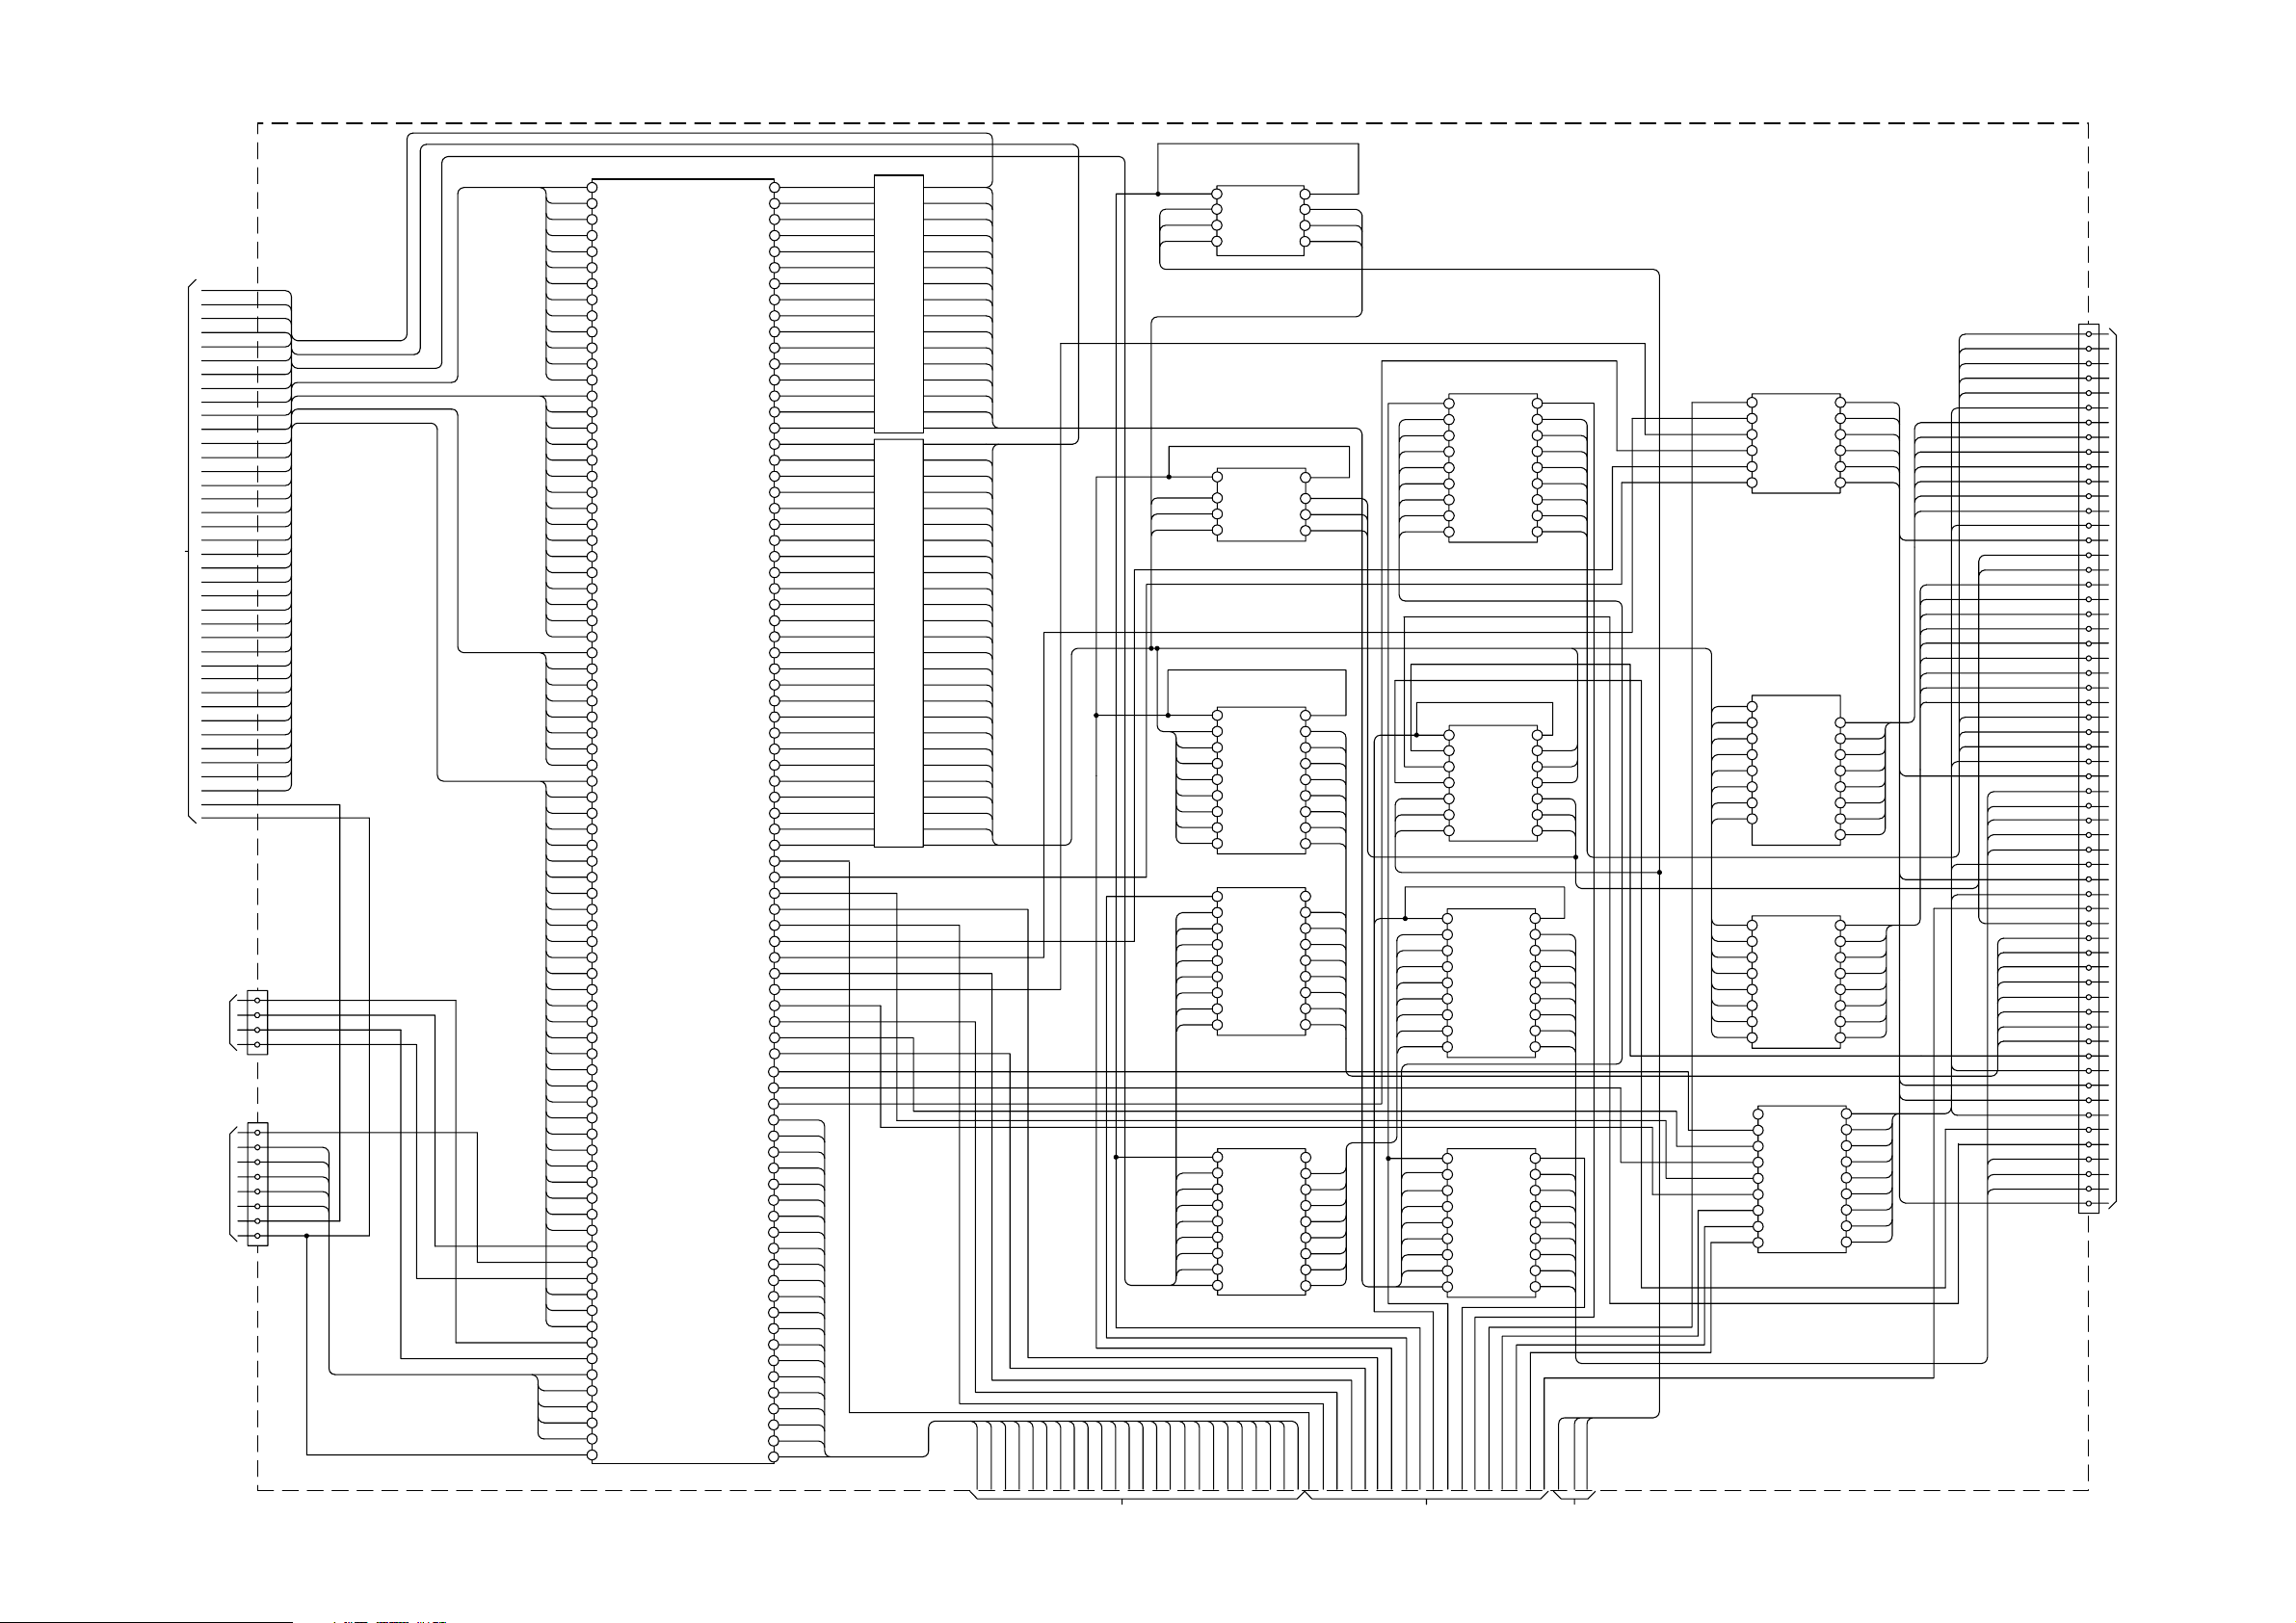
5-1. BLOCK DIAGRAMS (5)
TO
SHEET
IC3100
DADD4
DADD5
DADD7
DADD8
DADD11
DADD2
DVREF
DCLKB
DCASB
DBA1
RADD (0-25)
RDATA (0-15)
IN-TSD (0-7)
DADD (0-12)
DQ (0-15)
VDO (0-7)
RXD2B
DRASB
DCLK
DQM0
DQS1
TXD38
DQM1
TXD2B
DBA0
DQS0
2
IORDB
DWEB
VCK
DAMON-INTB
FCSB1
VS2B
FCSB0
CLK27M
IORDB
RTS1B
YC-C
CTS1B
YC-Y
JTCK
NAND-ALE
ATX
ADO
nBOARD-RST
NMI
DADD6
DADD10
DADD9
DADD12
DADD3
DADD1
DADD0
DQ (9)
DQ (11)
DQ (13)
DQ (15)
DQ (8)
DQ (10)
DQ (12)
DQ (14)
DQ (6)
DQ (4)
DQ (2)
DQ (0)
DQ (7)
DQ (5)
DQ (3)
DQ (1)
VD (7)
VD (3)
VD (5)
VD (2)
VD (6)
VD (4)
VD (0)
VD (1)
RXD2B
DRASB
DCLK
DQM0
DQS1
TXD38
DCASB
DQM1
DVREF
TXD2B
DBA1
DBA0
DCSB
CN3601
PMSSCLK
2
PMSDIO
3
4
PMSBS
5
PMSINS
DCLKB
DQS0
SPKRB
RXD38
DWEB
VCK
DAMON-INTB
FCSB1
CN3603
2
3
4
5
6
9
10
12
JTCK
JTDO
JTMS
JTRST
JTDI
EDINT
nEMMA_RST
NMI
VS2B
FCSB0
CLK27IN
IORDB
RTS1B
YC-C
CTS1B
YC-Y
PMSDI0
JTCK
PMSINS
NAND-ALE
ATX
ADO
PMSSCLK
PMSBS
JTD0
JTMS
JTRST
JTD1
JEDINT
NMI
MULTIMEDIA PROCESSOR
5
DADD4
6
DADD5
7
DADD7
8
DADD8
9
DADD11
26
DADD2
27
DADD6
29
DADD10
28
DADD9
29
DADD12
30
DADD3
46
DADD1
48
DADD0
15
DQ9
16
DQ11
17
DQ13
18
QQ15
35
DQ8
36
DEQ10
37
DQ12
38
DQ14
54
DQ6
55
DQ4
56
DQ2
57
DQ0
73
DQ7
74
DQ5
75
DQ3
76
DQ1
60
MMCLK/DTR0B
158
MMRST/1284-SELECT
159
MMMUTEB/R10B
167
MMDIN/1284-AUTOFD
168
MMPWRCNTDCD0D
175
MMFS/1284-INIT
176
MMHCO
184
MMBCLK/1294-NSTROBE
3
RXD2B
1
DRASB
0
11
DCLK
12
DQM0
13
DQS1
24
TXD38
31
DCASB
32
DQM1
33
DVREF
44
TXD2B
49
DBA1
50
DBA0
51
DCSB
52
DCLKB
53
DQS0
31
HSEDE/1284-NACK
65
RXD38
72
DWEB
80
MMDOUT/DSR0B
85
IRIN0
87
FCSB1
98
HSDCLK/1284-PERROR
108
FCSB0
111
CLK27IN
169
SMRST1
174
RTS1B
182
VAC
183
CTS1B
189
VAY
201
DTR1B/PMSDI0
204
JTCK
21
DSR1B/PMSINS
2
216
NAND-ALE
217
ATX
218
ADO
220
PPORT5/PMSSCLK
RI1B/PMSBS
241
245
JTD0
265
JTMS
225
JTRST
224
JTD1
243
EDINT
246
NMI
RDATAA9/HSD1
RDATAA2
RDATAA10/HSD2
RDATAA0
RDATAA8/HSD0
RDATAA1
RDATAA15/HSD7
RDATAA6
RDATAA13/HSD5
RDATAA7
RDATAA14/HSD6
RDATAA11/HSD3
RDATAA5
RDATAA12/HSD4
RDATAA4
RDATAA3
RADD1
RADD0
RADD3
RADD2
RADD4
RADD6
RADD5
RADD24/STPDAT6
RADD7
RADD25/STPDAT7
RADD15/STPCLK
RADD23/STPDAT5
RADD12
RADD21/STPDAT3
RADD16/STPEN
RADD22/STPDAT4
RADD20/STPDAT2
RADD18/STPDAT0
RADD14
RADD18/STPDAT1
RADD8
RADD17/STRT
RADD13
RADD9
RADD11
RADD10
PPORT49
SMCLK1
OFF1
FEWEB
FOEB
SMRST0
SMDAT0
GCSB0
PPORT34
CMDVCO
PPORT50
SMDAT1
GRDYB
GMDVCC1
SMCLK0
OFF
SDA0
VAR
NAND-CLE
TXD1B
ALRCK
ABCK
PPORT1
PPORT4
SCL0
VACOMP
NAND-R/BB
GCSB1
RXD1B
PWMOUT
AMCK
PPORT0
PPORT3
SDA1
SCL1
JTMS
VAG
VAB
EMMA RDATA (9)
21
EMMA RDATA (2)
22
EMMA RDATA (10)
23
EMMA RDATA (0)
41
EMMA RDATA (8)
42
EMMA RDATA (1)
43
EMMA RDATA (15)
186
EMMA RDATA (6)
193
EMMA RDATA (13)
194
EMMA RDATA (7)
195
EMMA RDATA (14)
196
EMMA RDATA (11)
213
EMMA RDATA (5)
214
EMMA RDATA (12)
215
EMMA RDATA (4)
234
EMMA RDATA (3)
253
EMMA-RADD(1)
61
EMMA-RADD(0)
63
EMMA-RADD(3)
81
EMMA-RADD(2)
83
EMMA-RADD(4)
90
EMMA-RADD(6)
97
EMMA-RADD(5)
99
EMMA-RADD(24)
105
EMMA-RADD(7)
106
EMMA-RADD(25)
107
EMMA-RADD(15)
113
EMMA-RADD(23)
114
EMMA-RADD(12)
115
EMMA-RADD(21)
125
EMMA-RADD(16)
126
EMMA-RADD(22)
127
EMMA-RADD(20)
138
EMMA-RADD(18)
141
EMMA-RADD(14)
159
EMMA-RADD(19)
151
EMMA-RADD(8)
161
EMMA-RADD(17)
162
EMMA-RADD(13)
163
EMMA-RADD(9)
170
EMMA-RADD(11)
179
EMMA-RADD(10)
187
GCSB2
4
INPACK B
82
CARD-RESET
89
FWEB
137
FOEB
177
IREQB
139
VS1B
178
GCSB0
185
CD2B
2
I0S16B
1
GCSB3
45
REGB
84
GRDYB
91
IOWRB
171
PCE08
188
CD1B
233
SDA-N
232
YUV-V
227
NAND-CLE
235
TXD1B
236
ALRCK
237
ABCK
238
PPORT1
239
PPORT4
240
SCL-N
244
CVBS
251
NAND-R/BB
254
GCSB1
255
RXD1B
256
PWMOUNT
257
AMCK
258
PPORT0
259
PPORT3
260
SDA-TV
263
SCL-TV
264
JTMS
265
YUV-V
270
YUV-U
272
RB3100
RB3104
RDATA (9)
RDATA (2)
RDATA (10)
RDATA (0)
RDATA (8)
RDATA (1)
RDATA (15)
RDATA (6)
RDATA (13)
RDATA (7)
RDATA (14)
RDATA (11)
RDATA (5)
RDATA (12)
RDATA (4)
RDATA (3)
RADD(1)
RADD(0)
RADD(3)
RADD(2)
RADD(4)
RADD(6)
RADD(5)
RADD(24)
RADD(7)
RADD(25)
RADD(15)
RADD(23)
RADD(12)
RADD(21)
RADD(16)
RADD(22)
RADD(20)
RADD(18)
RADD(14)
RADD(19)
RADD(8)
RADD(17)
RADD(13)
RADD(9)
RADD(11)
RADD(10)
IN-TS-BCLK
IN-TS-PSYNC
IN-TS-PVAL RADD(17)
nPC-EN
RADD(15) MICLK
RADD(16)
RADD(17)
nPC-EN
RADD(25)
RADD(24)
RADD(23)
RADD(22)
RADD(21)
RADD(20)
RADD(19)
RADD(18)
nCL-EN
IN-TSD (7)
IN-TSD (6)
IN-TSD (5)
IN-TSD (4)
IN-TSD (3)
IN-TSD (2)
IN-TSD (1)
IN-TSD (0)
IN-TSD (7)
IN-TSD (6)
IN-TSD (5)
IN-TSD (4)
IN-TSD (3)
IN-TSD (2)
IN-TSD (1)
IN-TSD (0)
T
E
L
1
T
C
B
-
K
R
1
N
A
D
S
K
D
C
O
D
V
C
N
-
R
P
X
B
A
L
U
T
P
A
N
A
Y
B
N
B
4
T
T
N
N
I
R
-
D
L
O
E
P
C
J
P
S
TO SHEET
U
R
1
-
B
K
I
O
B
S
D
C
D
M
S
B
N
X
M
C
N
A
W
R
A
P
G
C
N
2
IC3314
OCTAL BUFFER
!OE1!
1
7
A 5
8
A 6
9
A 7
IC3313
OCTAL BUFFER
1
!OE1!
7
A 5
8
A 6
9
A 7
IC3309
OCTAL BUFFER
1
!OE1!
2
A 0
3
A 1
4
A 2
5
A 3
6
A 4
7
A 5
8
A 6
9
A 7
IC3308
OCTAL BUFFER
1
!OE1!
2
A 0
3
A 1
4
A 2
5
A 3
6
A 4
7
A 5
8
A 6
9
A 7
IC3310
OCTAL BUFFER
1
!OE1!
2
A 0
3
A 1
4
A 2
5
A 3
6
A 4
7
A 5
8
A 6
9
A 7
0
3
1
0
T
V
T
E
E
T
R
R
-
D
D
O
A
O
O
O
P
P
D
M
M
P
P
S
T
T
nBYPASS-ENnBYPASS-EN
19
!OE2!
RADD(15)
13
Y 5
RADD(16)
12
Y 6
11
Y 7
IC3311
DIGITAL TRANSCIVER
DIR
1
DIR
RDATA (8)
2
A 0
RDATA (9)
3
A 1
RDATA (10)
4
A 2
RDATA (11)
5
nPC-EN
19
!OE2!
13
Y 5
MISTRT
12
Y 6
MIVAL
11
Y 7
19
!OE2!
MDI (7)
18
Y 0
MDI (6)
17
Y 1
MDI (5)
16
Y 2
MDI (4)
15
Y 3
MDI (3)
14
Y 4
MDI (2)
13
Y 5
MDI (1)
12
Y 6
MDI (0)
11
Y 7
19
!OE2!
MDI (7)
18
Y 0
MDI (6)
17
Y 1
MDI (5)
16
Y 2
MDI (4)
15
Y 3
MDI (3)
14
Y 4
MDI (2)
13
Y 5
MDI (1)
12
Y 6
MDI (0)
11
Y 7
19
!OE2!
RADD(25)
18
Y 0
RADD(24)
17
Y 1
RADD(23)
16
Y 2
RADD(22)
15
Y 3
RADD(21)
14
Y 4
RADD(20)
Y 5
13
RADD(19)
12
Y 6
RADD(18)
11
Y 7
Y
V
2
-
B
U
T
B
-
-
V
E
S
V
L
U
O
C
U
C
Y
F
G
Y
S
N
B
0
3
B
E
Y
B
B
-
E
D
S
S
C
W
R
C
C
P
F
n
G
G
G
RDATA (12)
RDATA (13)
RDATA (14)
RDATA (15)
n CI EN
MOCLK
MODTRT
MOVAL
IN-TS-BCLK
IN-TS-PSYNC
IN-TS-PVAL
nCI-EN
RADD(25)
RADD(24)
RADD(23)
RADD(22)
RADD(21)
RADD(20)
RADD(19)
RADD(18)
RDATA(7)
RDATA(6)
RDATA(5)
RDATA(4)
RDATA(3)
RDATA(2)
RDATA(1)
RDATA(0)
N
E
S
S
A
N
P
E
-
Y
L
B
C
n
n
TO SHEET
3
A 3
6
A 4
7
A 5
8
A 6
9
A 7
OCTAL BUFFER
2
A 0
4
A 2
5
A 3
6
A 4
7
A 5
8
A 6
9
A 7
OCTAL BUFFER
19
!OE2!
18
Y 0
17
Y 1
16
Y 2
15
Y 3
14
Y 4
13
Y 5
12
Y 6
11
Y 7
OCTAL TRANSCEIVER
1
DIR
2
A 0
3
A 1
4
A 2
5
A 3
6
A 4
7
A 5
8
A 6
9
A 7
N
E
T
A
N
D
-
E
-
I
C
R
I
C
P
D
n
n
N
E
A
T
A
D
C
P
I
C
n
IC3312
IC3306
IC3307
n CIPC-DAITA-EN
19
!OE2!
CD (0)
18
B 0
CD (1)
17
B 1
CD (2)
16
B 2
CD (3)
15
B 3
CD (4)
14
B 4
CD (5)
13
B 5
CD (6)
12
B 6
CD (7)
11
B 7
19
!OE2!
RADD (15)
16
Y 2
RADD (17)
15
Y 3
RADD (16)
14
Y 4
MICLK
13
Y 5
MISTRT
12
Y 6
MIVAL
11
Y 7
nCI-EN
1
!OE1!
MDO(7)
2
A 0
MDO(6)
3
A 1
MDO(5)
4
A 2
MDO(4)
5
A 3
MDO(3)
6
A 4
MDO(2)
7
A 5
MDO(1)
8
A 6
MDO(0)
9
A 7
19
!OE1!
MDO(7)
18
B 0
MDO(6)
17
B 1
MDO(5)
16
B 2
MDO(4)
15
B 3
MDO(3)
14
B 4
MDO(2)
13
B 5
MDO(1)
12
B 6
MDO(0)
11
B 7
H
R
C
W
L
K
N
O
L
T
I
A
3
B
W
B
-
E
I
S
W
C
C
n
F
G
A
I
Y
-
V
C
S
Y
P
B
B
P
-
-
A
-
R
L
S
S
S
E
T
T
T
W
-
-
-
D
O
N
N
N
I
n
I
I
I
TO SHEET
2
nCI WAIT
VS1B
CD2 B
CD1 B
IREQB
INPACKB
RADD(8)
RADD(9)
RADD(10)
RADD(11)
RADD(12)
RADD(13)
RADD(14)
FOEB
RADD(0)
RADD(1)
RADD(2)
RADD(3)
RADD(4)
RADD(5)
RADD(6)
RADD(7)
PCE08
CARD-RESET
IOSI16B
IOWRB
FWEB
GCSB3
RECB
IORB
17
16
15
14
13
12
N 1/3 ( )
IC3301
Y1
Y6
Y 5
Y 4
Y3
Y 2
2
A 0
3
A 1
4
A 2
5
A 3
6
A 4
7
A 5
8
A 6
9
A 7
2
A 0
3
A 1
4
A 2
5
A 3
6
A 4
7
A 5
8
A 6
9
A 7
1
!OE1!
4
A 2
8
A 6
5
A 3
7
9
2
A 0
3
A 1
8
A 4
OCTAL BUFFER
OCTAL BUFFER
OCTAL BUFFER
OCTAL BUFFER
A 5
A7
IC3305
IC3304
IC3302
A 2
A 3
A 4
A 5
A 6
A 7
Y 0
Y 1
Y 2
Y 3
Y 4
Y 5
Y 6
Y 7
Y 0
Y 1
Y 2
Y 3
Y 4
Y 5
Y 6
Y 7
!OE2!
4
5
6
7
8
9
18
17
16
15
14
13
12
11
18
17
16
15
14
13
12
11
19
18
Y 0
17
Y 1
16
Y 2
15
Y 3
14
Y 4
13
Y 5
12
Y 6
11
Y 7
n WAIT
VS1
n CD2
n CD1
n IREQ
INPACK
CA(8)
CA(9)
CA(10)
CA(11)
CA(12)
CA(13)
CA(14)
CARD-OEB
CA(0)
CA(1)
CA(2)
CA(3)
CA(4)
CA(5)
CA(6)
CA(7)
nCE1
nCARD-WE
nCE2
nIORD
nIOWR
nCARD-RST
nREG
IOSI16B
Digital I/F
CE1 #
CARD_OEB
IREQ #
MIVAL
MICLK
CA(12)
CA(7)
CA(6)
CA(5)
CA(4)
CA(3)
CA(2)
CA(1)
CA(0)
CD(0)
CD(1)
CD(2)
nIOSI16
nCD1
MDO (3)
MDO (4)
MDO (5)
MDO (6)
MDO (7)
nCE2
nIORD
nDELAY-IOWR
MISTRT
MDI (0)
MDI (1)
MDI (2)
MDI (3)
MDI (4)
MDI (5)
MDI (6)
MDI (7)
MOCLK
PCCARD-RST
nWAIT
INPACK
nREG
MOVAL
MOSTRT
MDO (0)
MDO (1)
MDO (2)
nCD2
CN3200
D3
2
D4
3
4
D5
5
D6
6
D7
7
8
A10
9
A11
10
11
A9
12
A8
A13
13
A14
14
15
16
19
20
20
21
22
22
23
24
25
26
27
28
To
????
29
30
31
36
37
38
39
40
41
42
VS1
43
44
45
46
47
48
49
50
53
54
55
56
57
58
59
60
61
62
63
64
65
66
67
- 34 -
Page 35
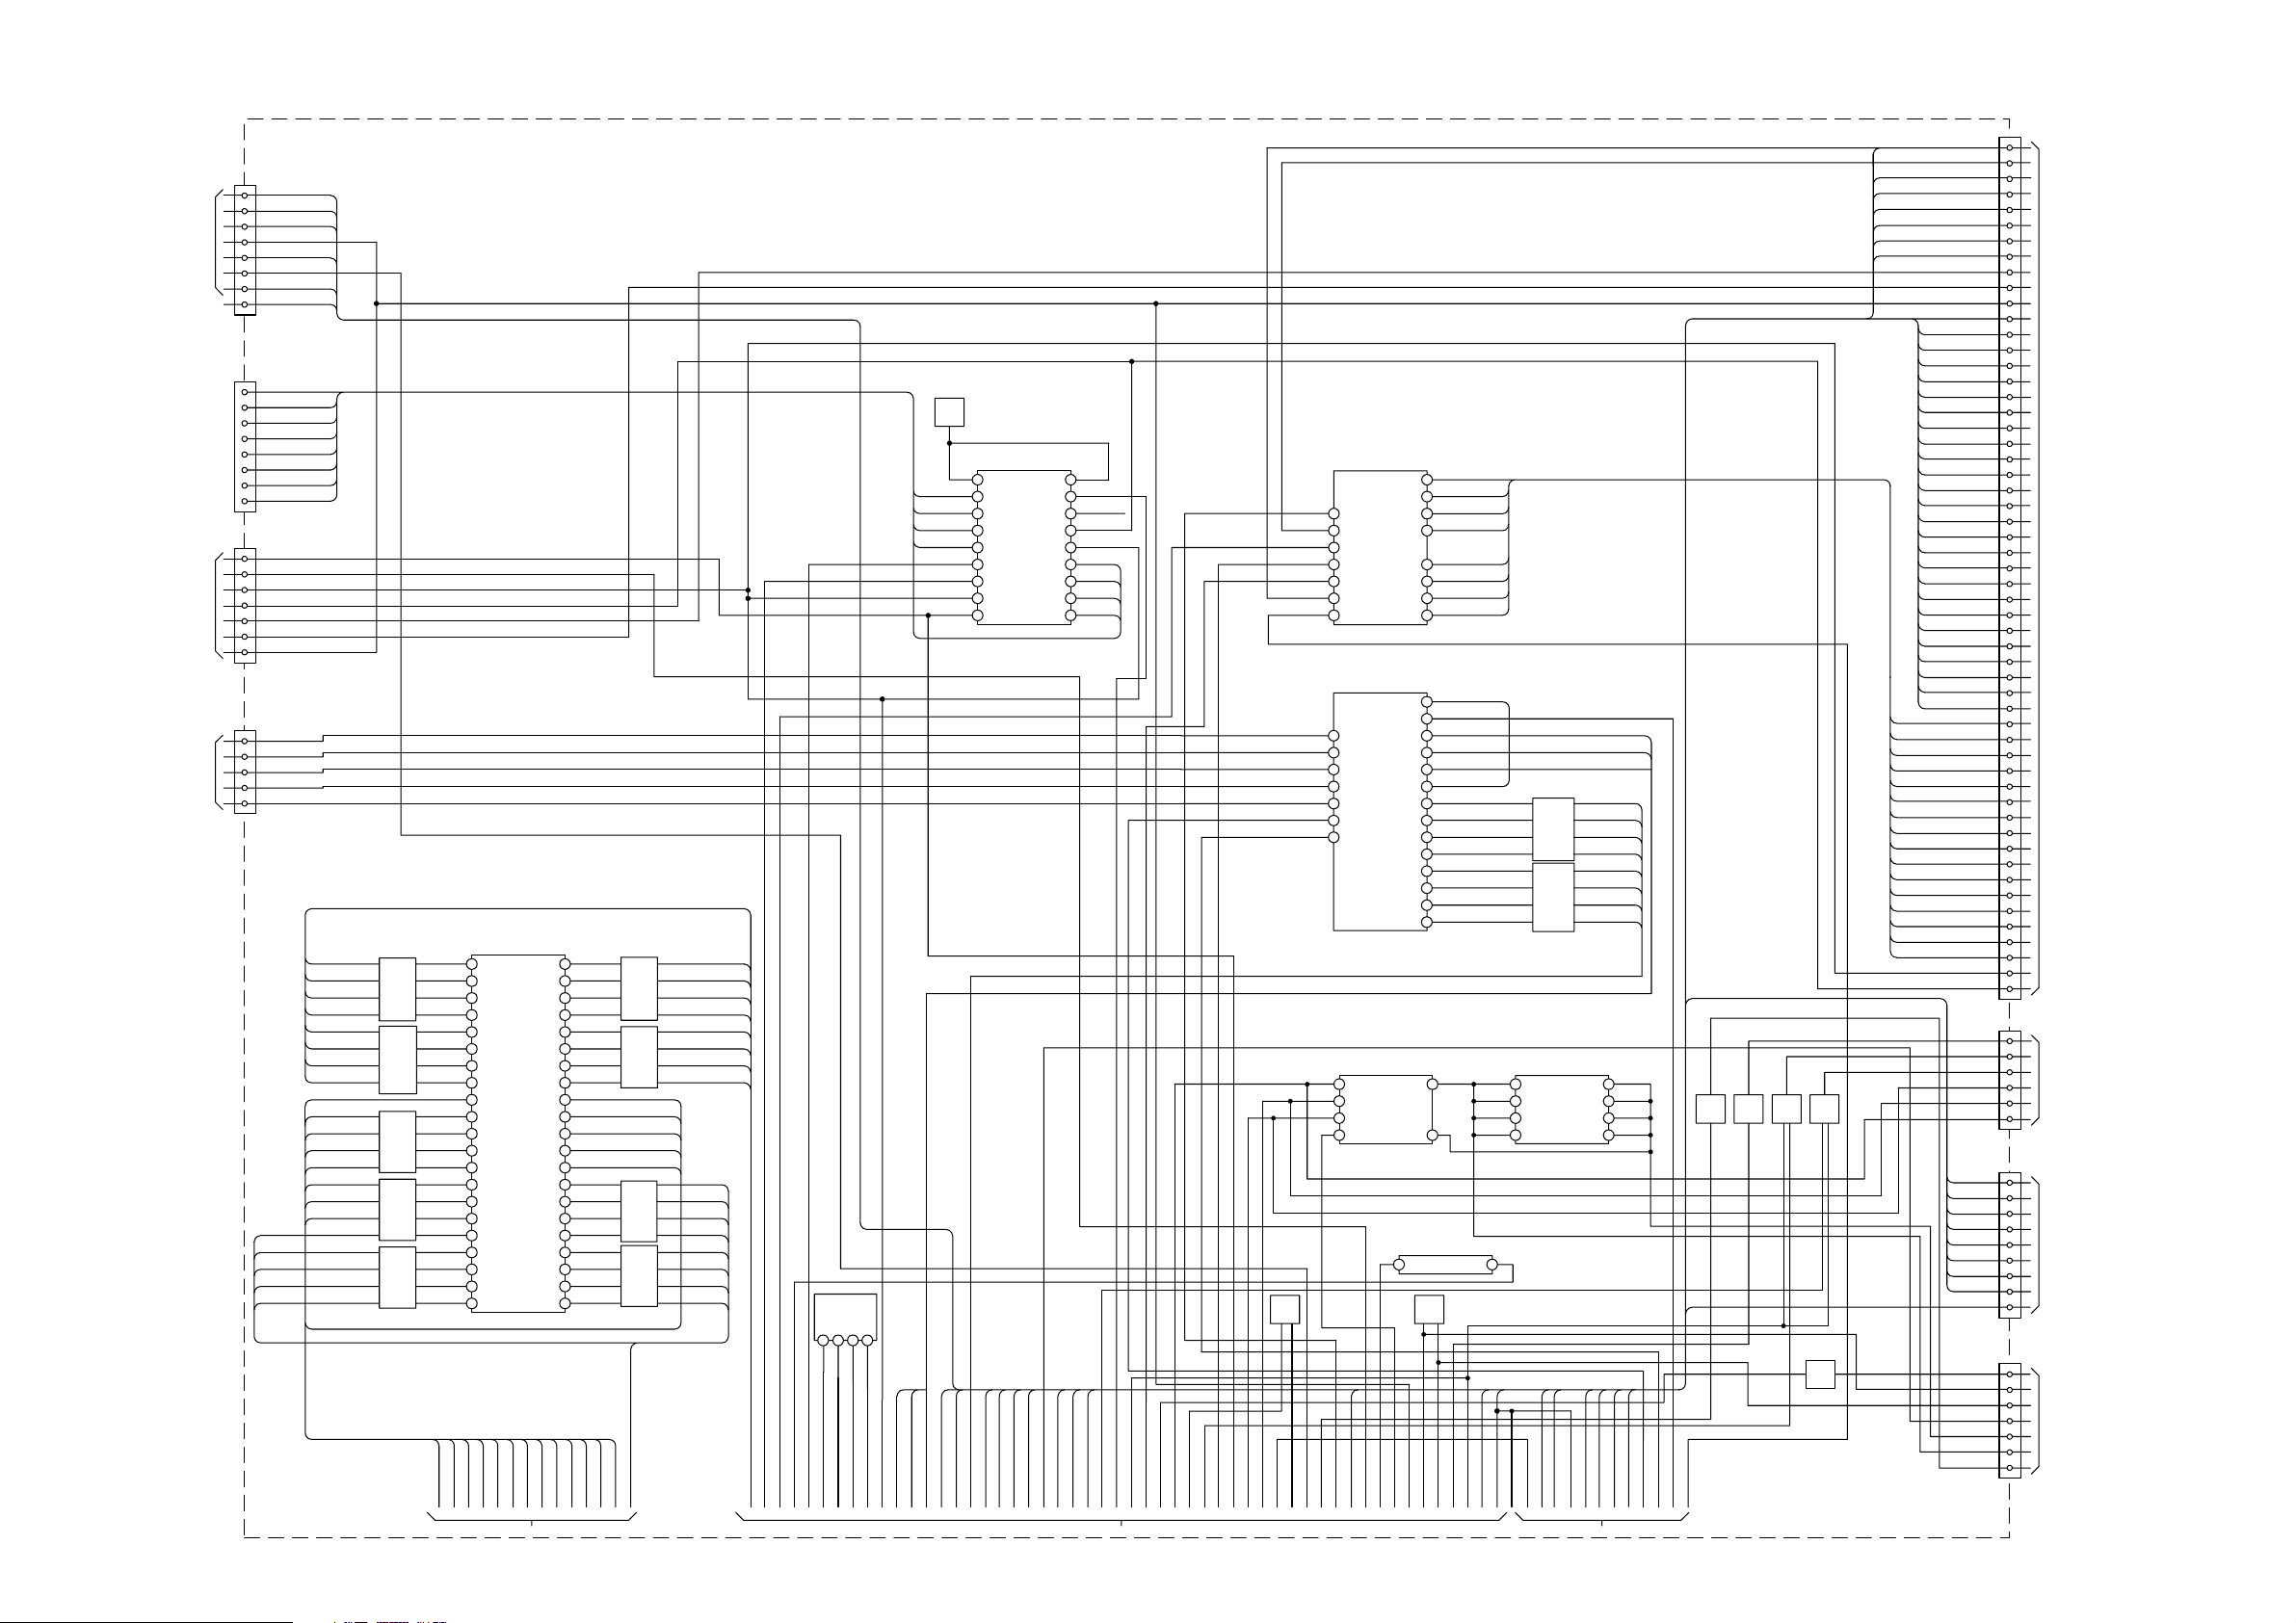
5-1. BLOCK DIAGRAMS (6)
CN3608
2
RDATA [11]
nMASTER_RESET
3
4
CN3500
?????
CN3503
5
6
7
8
10
2
3
4
5
6
7
8
9
5
6
7
8
9
10
11
8
7
5
3
2
RDATA [12]
JIG MODE
RDATA [13]
NMI
RDATA [14]
RDATA [15]
2 - nSMC_INT
3 - DTE-CTS
4 -DTE-RTS
5 - nSMC_RXD
6 - SMC_RXD
7 - SMC_TXD
8 - DTE-TXD
9 - DTE-RXD
TXD1B
RXD1B
TXD2B
RXD2B
TXD3B
RXD3B
JIG MODE
SCL_TUNER
SDA_TUNER
IF AGC
DIGITAL IF2
DIGITAL IF1
DADD (10)
DADD (0)
DADD (1)
DADD (2)
DADD (3)
TO
????
TO
MODEM
TO
????
TO
????
DQ (0)
DQ (1)
DQ (2)
DQ (2)
DQ (3)
DQ (4)
DQ (5)
DQ (6)
DQ (7)
DQM0
DQM0
DWEB
DRASB
DRASB
DCSB
DBA0
DBA1
N 2/3 ( )
DQ (0)
RB3203
RB3204
RB3200
RB3201
RB3202
DQ (1)
DQ (2)
DQ (3)
DQ (4)
DQ (5)
DQ (6)
DQ (7)
DQM0
DWEB
DRASB
DRASB
DCSB
DBA0
DBA1
DADD (10)
DADD (0)
DADD (1)
DADD (2)
DADD (3)
F
E
R
V
D
2
DQ0
4
DQ1
5
DQ2
6
DQ3
4
DQ4
5
DQ5
6
DQ6
7
DQ7
8
LDQS
9
LDM
10
WE
1
CAS
RAS
2
3
CS
4
BS0
5
BS1
6
A10
7
A0
8
A1
9
A2
10
A3
B
B
B
1
S
S
K
L
A
A
A
B
C
R
C
D
D
D
D
Digital I/F
IC3200
DQ15
DQ14
DQ13
DQ12
DQ11
DQ10
UDQS
VREF
0
K
L
M
C
Q
D
D
FROM SHEET
1
UDM
CN3607
2
FWEB
FOEB
4
6
GCB0
8
FCSB0
JIG-MODE
TXD3B
RXD3B
RADD [0]
RADD [1]
RADD [2]
RADD [3]
RADD [4]
RADD [5]
RADD [6]
RADD [7]
RADD [8]
RADD [9]
RADD [10]
RADD [11]
RADD [12]
RADD [13]
RADD [14]
RADD [15]
RADD [16]
RADD [17]
RADD [18]
RADD [19]
RADD [20]
RADD [21]
RADD [22]
RADD [23]
RADD [24]
RADD [25]
RDATA (0)
RDATA (1)
RDATA (2)
RDATA (3)
RDATA (4)
RDATA (5)
RDATA (6)
RDATA (7)
RDATA (8)
RDATA (9)
RDATA (10)
RDATA (11)
RDATA (12)
RDATA (13)
RDATA (14)
RDATA (15)
ABCK_OUT
ADO_OUT
VDO [7]
VDO [6]
VDO [5]
VDO [4]
VDO [3]
VDO [2]
VDO [1]
VDO [0]
VCLK
SPDIF
SCL_TV
SDA_TV
RIGHT-N
LEFT-N
CVBS-OUT
10
12
14
NMI
18
20
48
49
52
53
54
55
56
57
58
59
61
62
63
64
65
66
67
68
TO
????
69
70
71
72
73
74
75
76
77
78
81
82
83
84
85
86
87
88
89
90
91
92
93
94
95
96
98
TX1
99
RX1
CN3402
1
3
5
TO
8
????
9
10
CN3400
2
3
5
6
8
TO
????
9
11
12
14
CN3401
1
4
5
7
TO A2E BOARD
CN85511
9
11
13
nRDY-DAMON
DAMON-INTB
nDAMON-RST
Q3412
nMODEM_EN
IC3502
OCTAL
TRANSCEIVER
DTE-CTG
nSMC-INT
DTE-RXD
SMC-RXD
nSMC-RST
RST1B
TXD2B
TXD1B
1
2
3
4
5
6
7
8
9
!OE1!
A0
A1
A2
A3
A4
A5
A6
A7
!OE2!
19
CTS1B
18
Y0
nSMC_INT
17
Y1
RXD1B
16
Y2
RXD2B
15
Y3
nSMC-RST
14
Y4
DTE-RTS
13
Y5
SMC-RXD
12
Y6
DTE-RXD
11
Y7
NAND-RBB
FOEB
FOSB1
NAND-CLE
NAND-ALE
FWEB
nNAND-WPV
SDA-TIMER
SCL-TUNNER
IF-AGC
DIGITAL-IF2
DIGITAL-IF1
SDA-COFDM
SCL-COFDM
DQ15
DQ14
DQ13
DQ12
DQ11
DQ10
DQ9
DQ8
DADD (12)
DADD (11)
DADD (9)
DADD (8)
DADD (7)
DADD (6)
DADD (5)
DADD (4)
RB3208
RB3209
RB3206
RB3207
DQS1
DVREF
DQM1
DCLKB
DCLK
DADD (12)
DADD (11)
DADD (9)
DADD (8)
DADD (7)
DADD (6)
DADD (5)
DADD (4)
ADO
ABCK
ALRCK
AMCK
A
B
_
_
B
A
G
G
_
_
A
A
N
N
L
L
E
E
F
F
1
2
3
4
Q3600
Q3601
65
63
63
60
57
56
56
DQ9
54
DQ8
51
49
47
46
CLK
45
CLK
42
A12
41
A11
40
A9
39
A8
38
A7
37
A6
36
A5
35
A4
IC3506
128-MBIT
EEPROM
IO/8
44
43
RB
FOE
CE
CLE
ALE
WE
WP
demodulator
QSD
A
QSCL
K
IFAG
C
AIN
N
AIN
P
SD
A
SC
L
DATA
BCKI
LRCK
MCK
IC3504
COFDM
INTRR??
RESEIN
TSCLK
TS?????
TSSYNCH
TSERR
TSD 0
TSD 1
TSD 2
TSD 3
TSD 4
TSD 5
TSD 6
TSD 7
IC3400
D/A
CONVERTER
PWMOUNT
IO/7
IO/6
IO/5
IO/4
IO/3
IO/2
IO/1
4
42
41
32
31
30
29
3
4
5
6
7
8
11
12
13
14
15
16
17
18
LO
RO
CONTROLLED
OSCILLATOR
Q3602
Q3603
nFE-RST
IN-TS-BCLK
IN-TS-PYS
IN-TS-SYNCH
IN-TSD (0)
IN-TSD (1)
IN-TSD (2)
IN-TSD (3)
IN-TSD (4)
IN-TSD (5)
IN-TSD (6)
IN-TSD (7)
8
5
IC3201
CRYSTAL
REF
OUT
IN-TSD (0)
IN-TSD (1)
RB3500
IN-TSD (2)
IN-TSD (3)
IN-TSD (4)
IN-TSD (5)
RB3501
IN-TSD (6)
IN-TSD (7)
YUV_U_OUT
IC3401
OPERATIONAL
AMPLIFIER
8
V+
7
B_OUT
6
B-IN
5
B+IN
CLK27M
5
_OUT
RIGHT-NLEFT-N
A
1
A-
2
IN
A+I
3
N
4
V-
Q3400
Q3403
Q3409
Q3402
Q3407
Q3410
Q3404
Q3408
Q3411
Q3401
Q3405
Q3406
YUV_V_OUT
YUV_Y_OUT
ALRCK_OUT
7
8
9
16
17
18
19
59
53
57
34
53
62
67
1
2
3
4
Q3412
nBOARD-RST
T
H
)
C
5
)
)
2
1
0
(
1
1
S
M
Q
Q
D
D
B
0
0
B
D
E
S
A
S
D
B
Q
C
W
A
D
D
D
D
D
)
5
1
B
-
1
0
(
S
T
Q
R
D
N
T
E
S
-
1
R
M
R
-
1
B
C
S
F
T
7
C
R
W
2
M
P
K
O
-
L
I
S
P
n
C
C
P
N
L
N
Y
A
E
S
-
0
T
R
O
P
P
V
P
M
P
-
B
-
E
S
2
S
D
T
D
T
-
-
O
X
N
N
I
R
I
M
)
K
1
5
7
-
-
L
C
B
S
T
N
I
)
2
0
-
0
7
(
(
-
0
(
1
B
D
D
A
R
B
(
A
D
3
3
T
A
D
R
S
O
D
D
T
-
D
X
X
N
V
T
R
I
B
T
T
S
N
R
I
-
D
N
B
2
D
X
T
0
R
O
B
A
S
K
M
O
C
A
C
B
F
V
D
B
1
Y
-
S
C
-
C
T
C
Y
C
Y
FROM SHEET
1
E
L
A
D
N
X
A
T
N
A
E
L
C
-
V
N
D
-
-
O
N
V
A
D
A
U
D
A
N
Y
S
4
T
K
B
1
D
X
T
N
-
R
K
C
C
R
L
B
A
A
S
I
L
B
O
C
M
P
V
S
N
P
C
T
B
N
B
R
-
1
D
B
N
S
A
C
N
G
3
U
T
V
V
O
B
I
K
M
D
C
X
W
M
R
P
A
Y
U
T
-
-
T
R
-
O
L
P
C
P
S
B
V
V
E
A
U
U
O
D
Y
Y
F
S
)
5
1
-
T
0
S
(
R
-
A
B
B
B
T
C
E
E
E
A
M
O
W
W
D
S
F
F
F
R
n
)
4
1
(
B
D
E
D
A
W
R
F
FROM SHEET
E
S
T
N
E
S
O
R
R
-
R
N
E
O
T
M
S
A
A
D
M
n
n
P
M
W
A
T
-
D
S
D
-
N
N
-
-
R
Y
N
-
L
A
A
D
E
C
D
N
R
F
S
S
n
n
n
3
- 35 -
Page 36
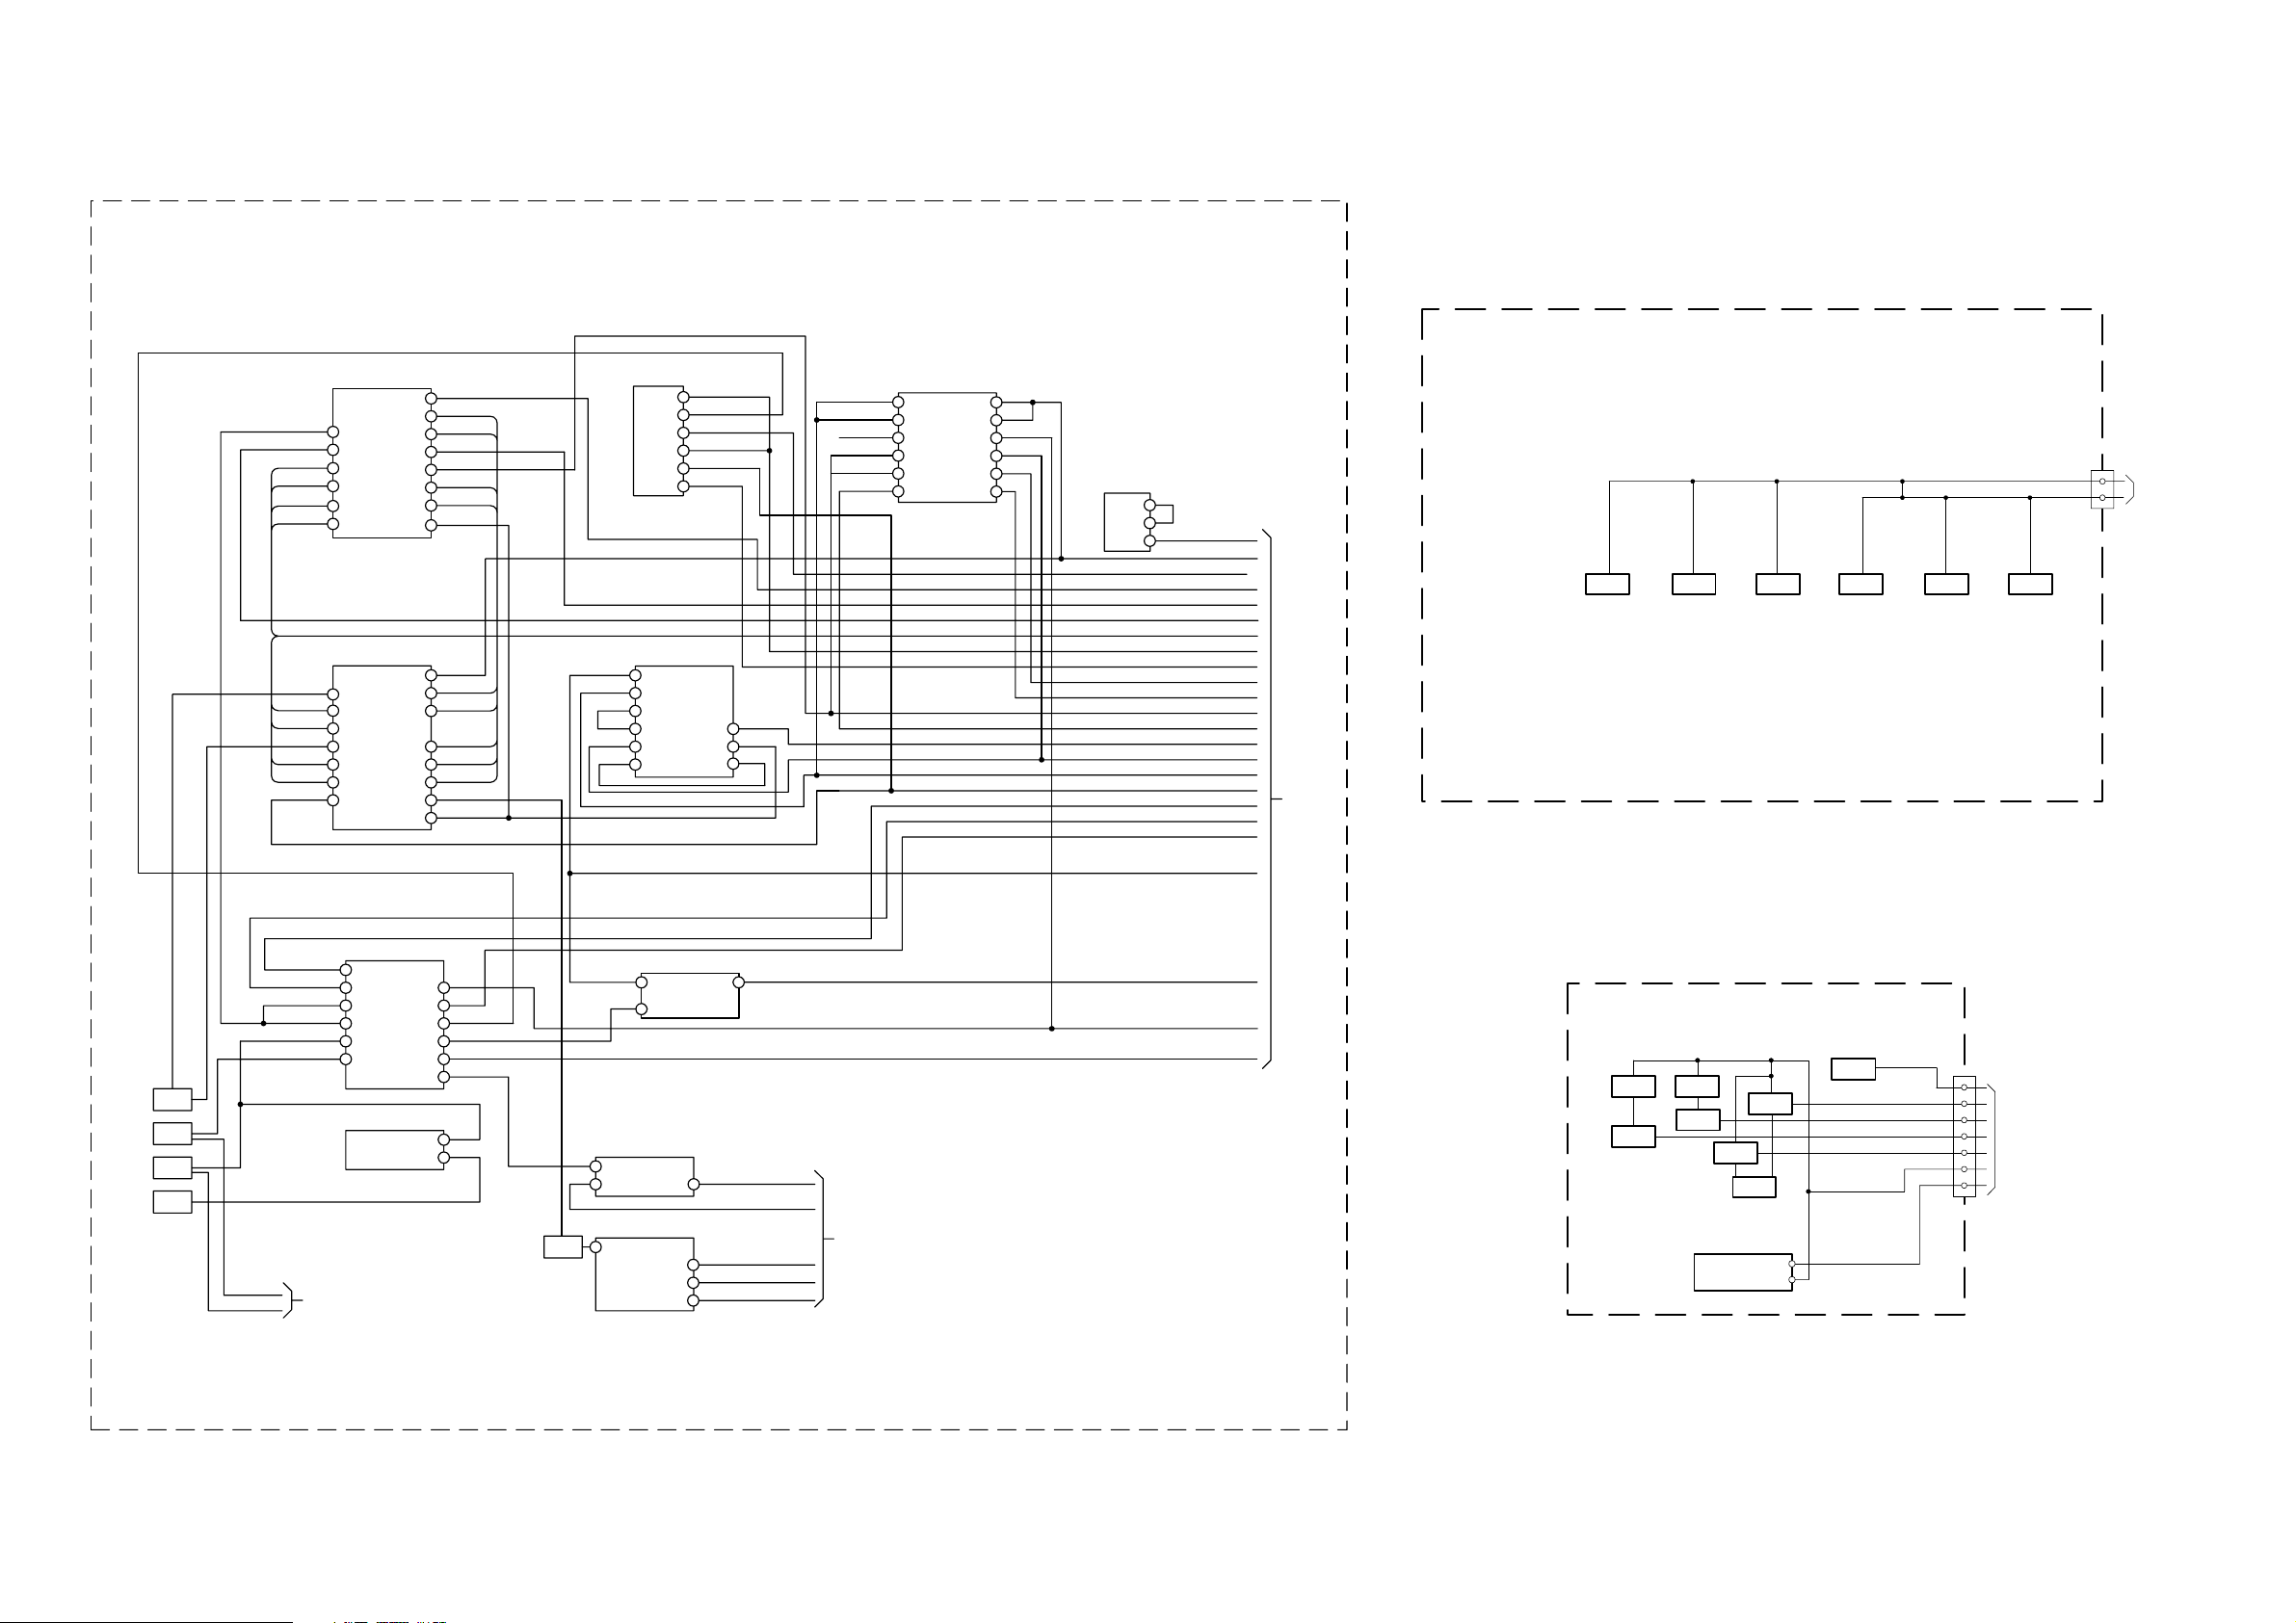
Q1010
Q1011
Q1012
Q1013
TO
JB BOARD
CN9507
CN1000
KEY1 (MAIN SW)
STBY LED
TIMER LED
LAMP LED
POWER ON LED
STBY +5V
SIRCS
S1000
D1704D1705
D1702
VCC
OUT
IC1000
SIRCS
10
8
6
5
4
3
1
H2 ( )
Front Led
5-1. BLOCK DIAGRAMS (7)
nRESET
nSMC-RST
nDATA (8)
nDATA (9)
nDATA (10)
nDATA (11)
nRESET
RDATA (0)
RDATA (1)
NVM-WE
RDATA (2)
RDATA (3)
PCARD_EN
1
!CL!
2
1 Q
3
1 D
4
2 D
7
3 D
8
4 D
1
!CL!
3
1 D
4
2 D
6
3 Q
7
3 D
8
4 D
9
4 Q
IC3801
GP OUTPUT
IC3802
OCTAL D-TYPE
FLIP/FLOP
8 Q
8 D
7 D
7 Q
6 Q
6 D
5 D
CLK
8 Q
8 D
7 D
6 Q
6 D
5 D
5 Q
CLK
CI-PWR-EN
19
RDATA (15)
18
RDATA (14)
17
MODEM-EN
16
CI-BYPASS
15
RDATA (13)
14
RDATA (12)
13
GAD-CLK
11
CI-EN
19
RDATA (7)
18
RDATA (6)
17
nSW-FE-RESET
15
RDATA (5)
14
RDATA (4)
13
NVM-RST
12
GAD-CLK
11
GCSB0
RADD (14)
FWEB
IC3815
????
GCSB3
13
4B
12
4 A
11
4 Y
GCSB3
10
3B
3 A
3 Y
IC3804
QUAD 2 I/P OR GATE
1
1 A
2
1 B
3
1 Y
4
2 A
5
2 B
6
2 Y
GCSB3
nCIPC-EN
nCIPC-DATA-EN
GCSB3
nPC-EN
9
nPCDATA-EN
8
3 B
3 Y
3 A
10
8
9
FOEB
GAD-CLK
nPCARD-EN
nPCARD-EN
nPC-EN
CI-BYPASS
CI-BYPASS
nBYPASS-EN
1
2
3
4
5
6
NAND GATES
1 A
1 B
1 Y
2 A
2 B
2 Y
IC3303
DIR
N 3/3 ( )
CI-EN
13
4 B
CI-EN
12
4 A
nCI-EN
11
4 Y
FWEB
10
3 B
IOWRB
9
3 A
DIR
8
3 Y
Digital I/F
IC3318
H1 ( )
12
6 Y
11
5 A
10
5 Y
nDELAY-IOWR
CI-EN
nCIPC-DATA-EN
CI-PWR-EN
MODEM-EN
nSMC RST
RDATA (0-15)
GCSB3
nPCDATA-EN
IOWRB
DIR
CI-BYPASS
nBYPASS-EN
FOEB
FWEB
RADD(14)
PCCARD-EN
nDAMON-RST
nMASTER-RESET
TO SHEET
1
Front Buttons
CN4404
2
KEY
KEY 1
S4405S4404S4403S4402S4400
S4406
TO JB BOARD
3
CN9509
nPC-EN
Q3801
Q3804
Q3806
Q3800
Q3805
nRESET
nRESET
nFE-RST
nNAND-WP
n DAMON - RST
n MASTER - RESET
nSW-FE -RESET
n-FE -RESET
TO SHEET
QUAD AND GATE
1
1 A
2
1 B
3
1 Y
4
2 A
5
2 B
6
2 Y
2
IC3805
IC3800
RESET IC
OUT
4 B
4 A
4 Y
3 B
3 A
3 Y
CD
nCI-EN
13
nPC-EN
12
nCIPC-EN
11
10
RDT-DAMON
9
8
4
3
Q3808
GCSB0
AND gate (2 inputs)
1
A
2
B
EEPROM
8
VCC
AND gate (2 inputs)
2
B
4
Y
IC3803
IC3807
TEST
SCL
SDA
Y
IC3806
GCSB0
nCI-WAIT
1
A
nCI-WAIT
nCI-EN
nRDY-DAMON
4
GRDYB
GCSB2
TO SHEET
7
6
5
SDA-N
SCL-N
NVM-WP
1
- 36 -
Page 37
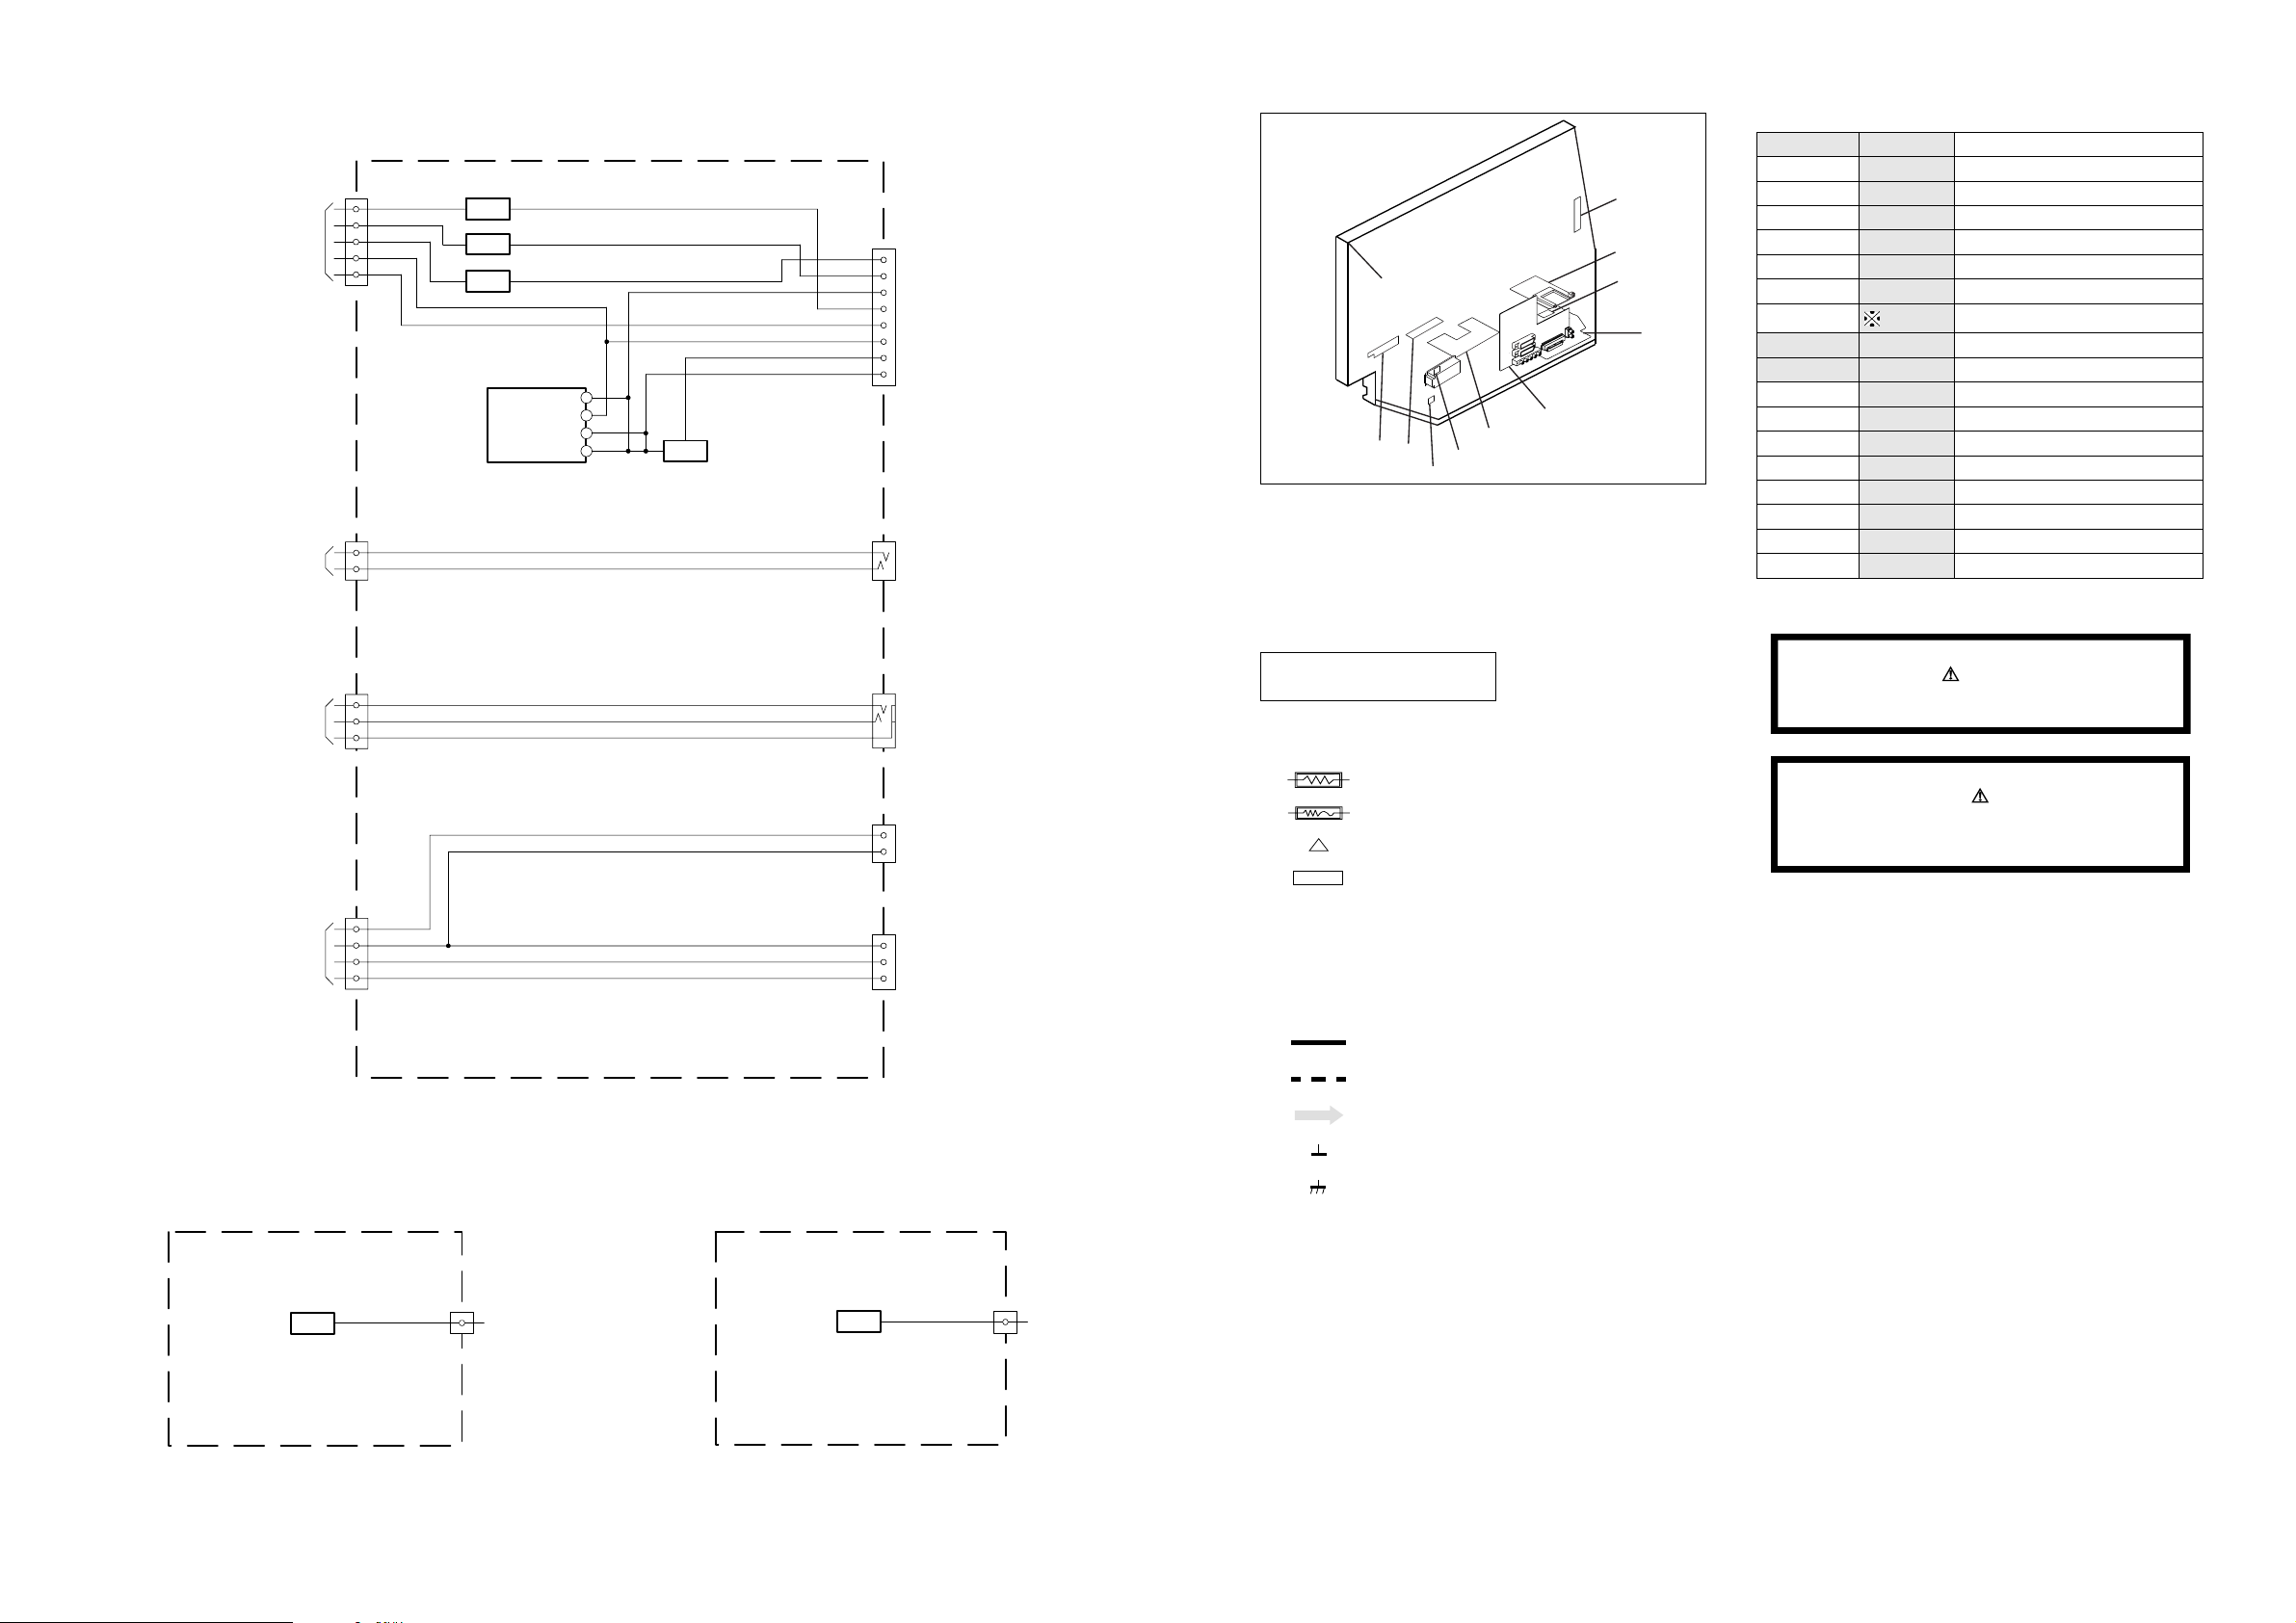
5-2. CIRCUIT BOARD LOCATION
5-3. SCHEMATIC DIAGRAMS AND
PRINTED WIRING BOARDS
Note :
• All capacitors are in µF unless otherwise noted.
• pF : µµF 50WV or less are not indicated except for
electrolytic types.
• Indication of resistance, which does not have one for
rating electrical power, is as follows.
Pitch : 5mm
Electrical power rating : 1/4W
• Chip resistors are 1/10W
• All resistors are in ohms.
k = 1000 ohms, M = 1000,000 ohms
• : nonflammable resistor.
• : fusible resistor.
• : internal component.
• : panel designation or adjustment for repair.
• All variable and adjustable resistors have
characteristic curve B, unless otherwise noted.
• All voltages are in Volts.
• Readings are taken with a 10Mohm digital mutimeter.
• Readings are taken with a color bar input signal.
• Voltage variations may be noted due to normal production
tolerences.
•: B + bus.
• : B - bus.
• : RF signal path.
• : earth - ground.
• : earth - chassis.
Reference Information
RESISTOR RN
: METAL FILM
RC
: SOLID
FPRD
: NON FLAMMABLE CARBON
FUSE
: NON FLAMMABLE FUSIBLE
RS
: NON FLAMMABLE METAL OXIDE
RB
: NON FLAMMABLE CEMENT
RW
: NON FLAMMABLE WIREWOUND
: ADJUSTMENT RESISTOR
COIL LF-8L
: MICRO INDUCTOR
CAPACITOR TA
: TANTALUM
PS
: STYROL
PP
: POLYPROPYLENE
PT
: MYLAR
MPS
: METALIZED POLYESTER
MPP
: METALIZED POLYPROPYLENE
ALB
: BIPOLAR
ALT
: HIGH TEMPERATURE
ALR
: HIGH RIPPLE
Les composants identifiés par une trame et
par une marque sont d'une importance
critique pour la sécurité. Ne les remplacer
que par des pièces de numéro spécifié.
specified.
Note :
The components identified by shading
and marked are critical for safety.
Replace only with the part numbers
specified in the parts list.
Note :
CVM Board
A Board
S1 Board
VM
C
H
D1
A
J
A2
N
D
A1
D2
C
A
5-1. BLOCK DIAGRAMS (8)
H3
N
P
AG
JB
C
T2
H1
H2
CN4302
1
B_PC
G_PC
3
5
R_PC
7
V_PC
9
H_PC
TO
AG BOARD
CN2003
TO
JB BOARD
CN9513
????
CN4305
L
2
R
4
CN4301
3
4
5
CN4303
C
2
Y/CVBS
4
TO
L
6
8
R
Q4301
Q4302
Q4303
PC Input EDID NVM
IC4300
5
7
6
8
Q4300
H3 ( )
PC In, Mini Jack, S-Video, CVBS, Audio L & R
R_PC
G_PC
B_PC
H_PC
V_PC
HP_R
HP_L
HP_DET
CN4300
J4301
MINI JACK
J4302
AUTIO L & R
CN4304
3
S-VIDEO
4
J4300
V
L
CVBS
R
PC IN
T1 ( )
Lamp Door Switch
S4320
LAMP COV
3
CN4306
T2 ( )
TO
???
Lamp Position Switch
S4340
LAMP COV
3
CN4340
TO
???
- 37 -
Page 38
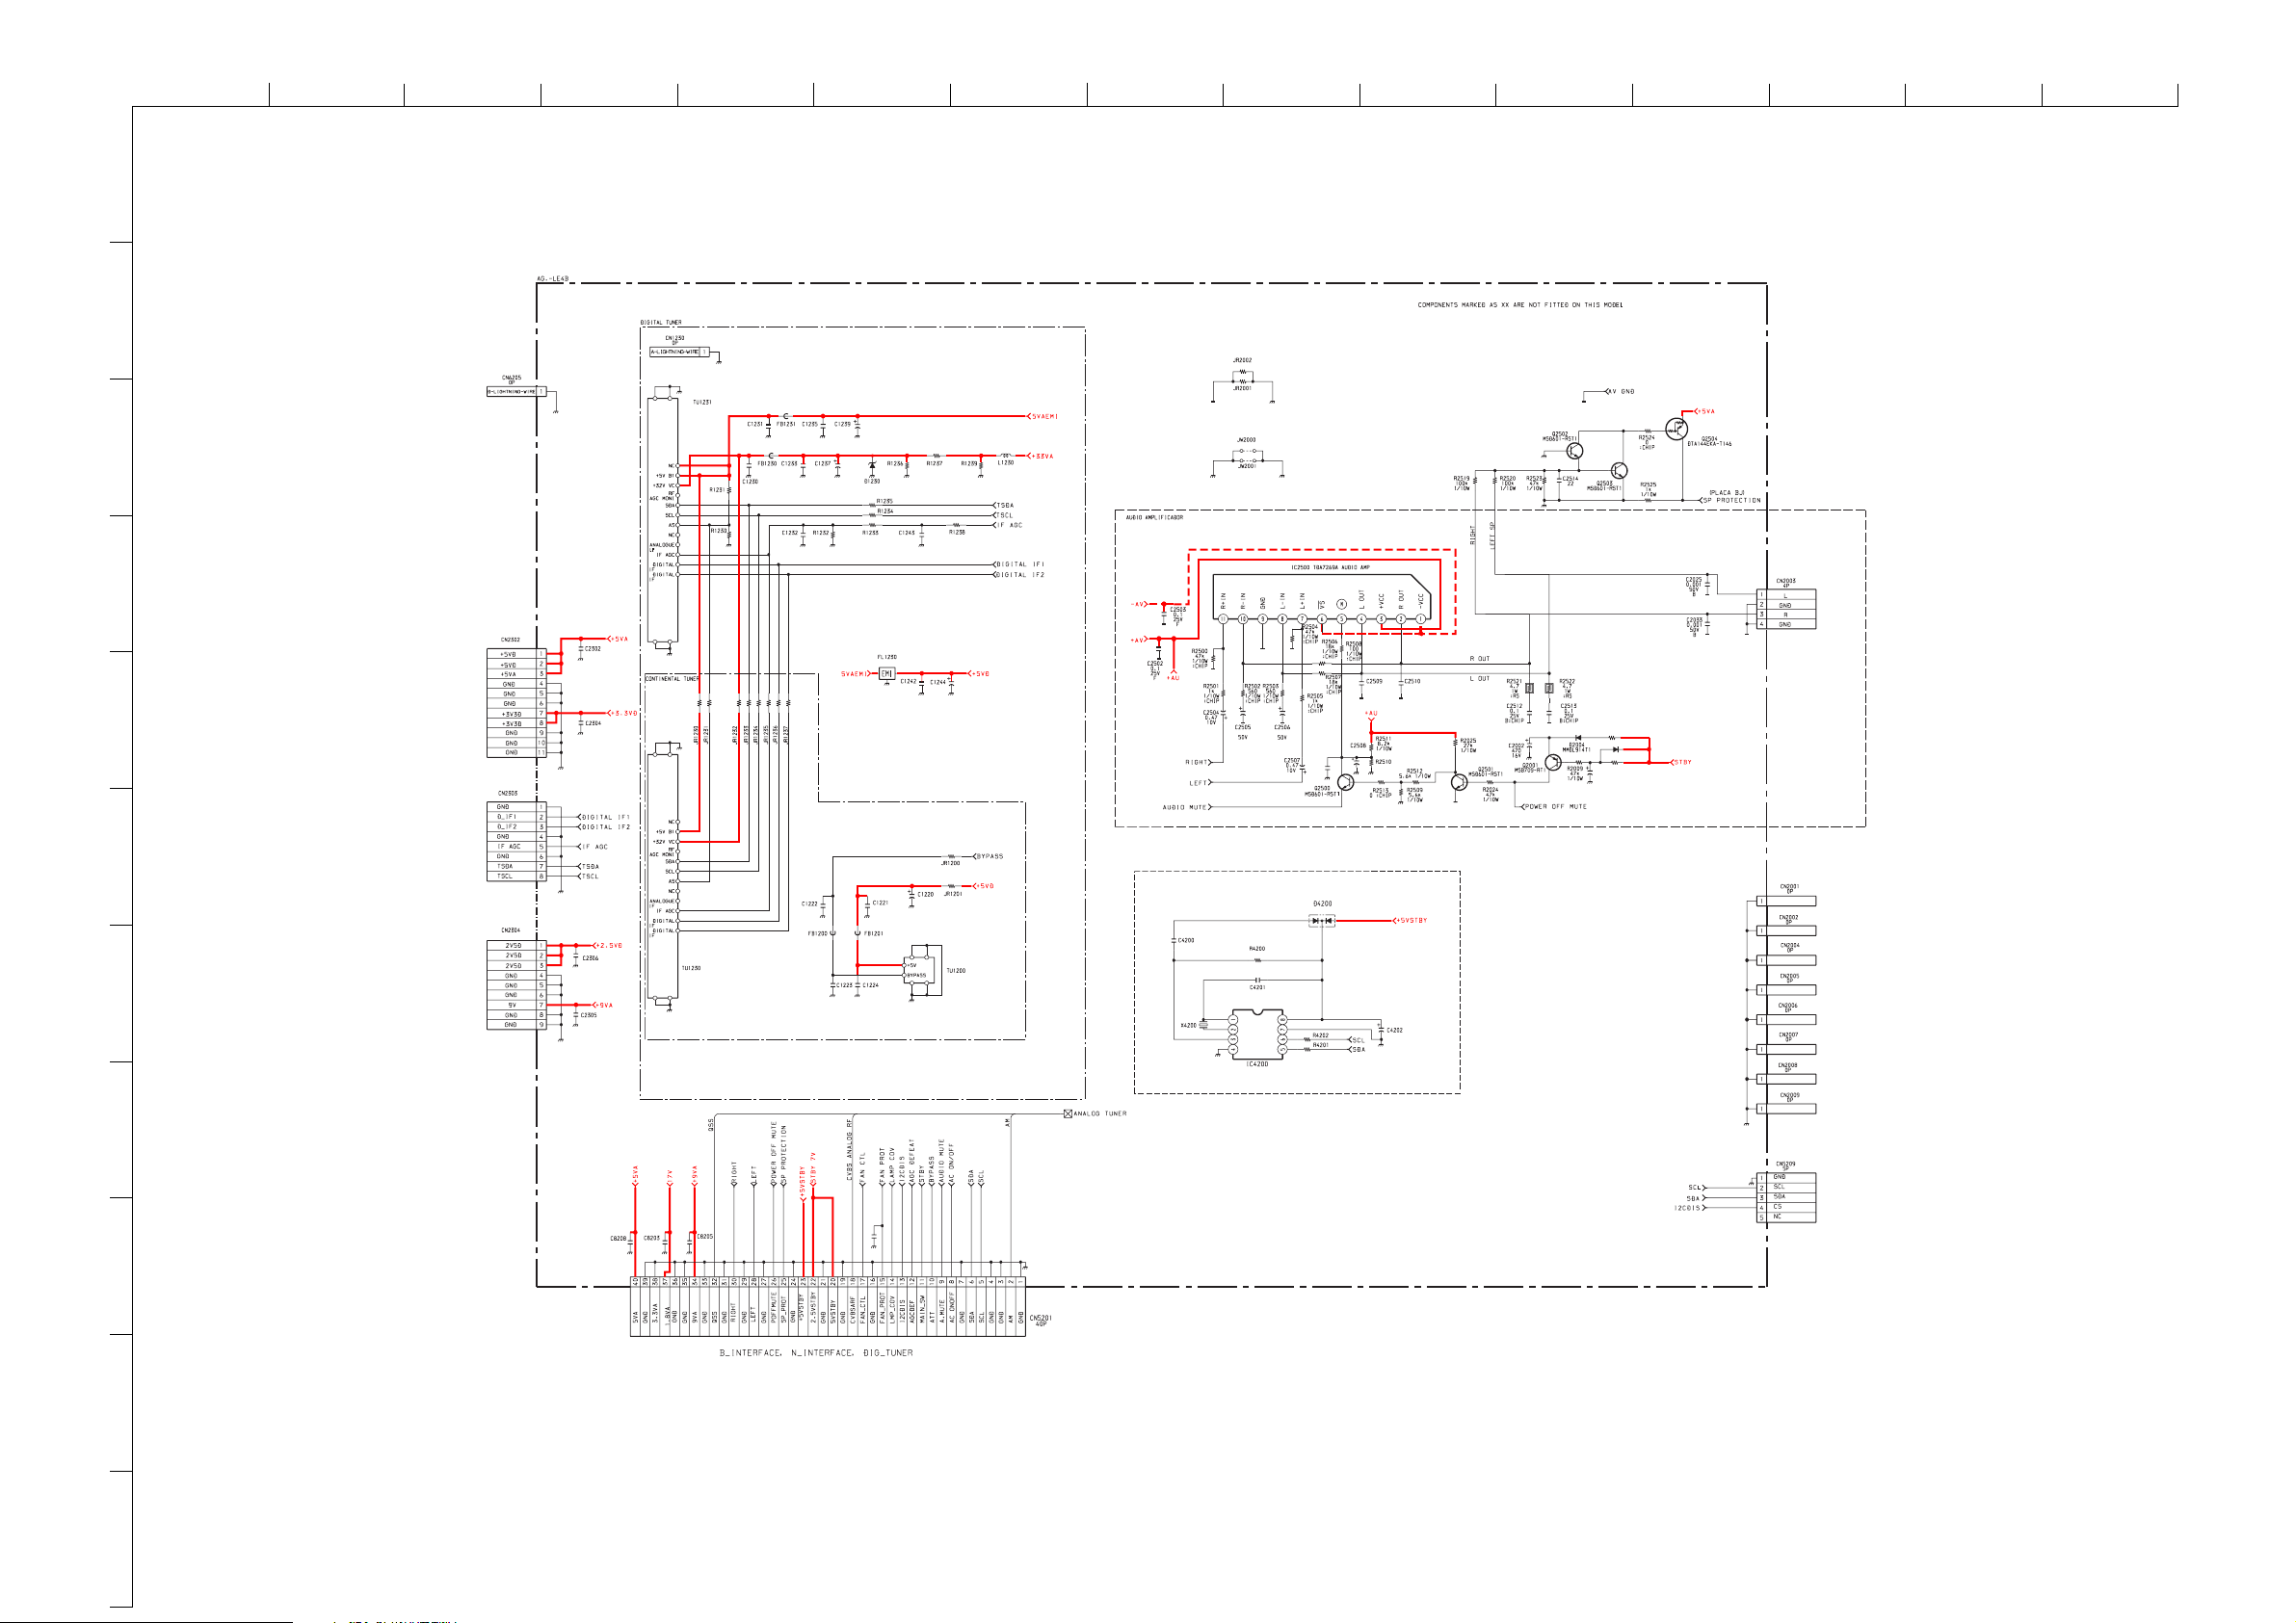
ABCDE F
G
HI JKLMN
O
1
2
XX
FSS BTP-DU601
0.01 0UH
0.1 100
16V
3
UDZS-33B
10K
XX
1K
100
100
0.1
16V
0UH
0.01
XX
XX
50V
0.1
XX
10
0.01
10UH
47K
1K
XX
XX
XX
50V
4
TO H3 BOARD
CN4305
11P
5
8P
0.1
XX
XX
XX
XX
XX
0.1
XX
XX
XX
0UH
0.1
100
16V
22
22
C2511
0.1
25V
XX
XX
R2026
0
XX
120K
D2005 MMDL914T1
C2003
22
50V
R2027
470K
10
6
XX
9P
+
+
+
7
+
0.1
0.1
XX
XX
XX
XX
XX
XX
XX
XX
XX
0.22
XX
47K
20PF
PCF8593/T118
REAL TIME CLOCK
DAN202K
100
100
0.22
5.5V
8
C8206
0.01
25V
XX
XX
XX
AG
1/3 MAIN POWER SUPPLY, TUNER, AUDIO AMPLIFIER
9
11
~ AG Board Schematic Diagram [ Main Power Supply, Tuner, Audio Amplifier ] Page 1/3 ~
- 38 -
Page 39
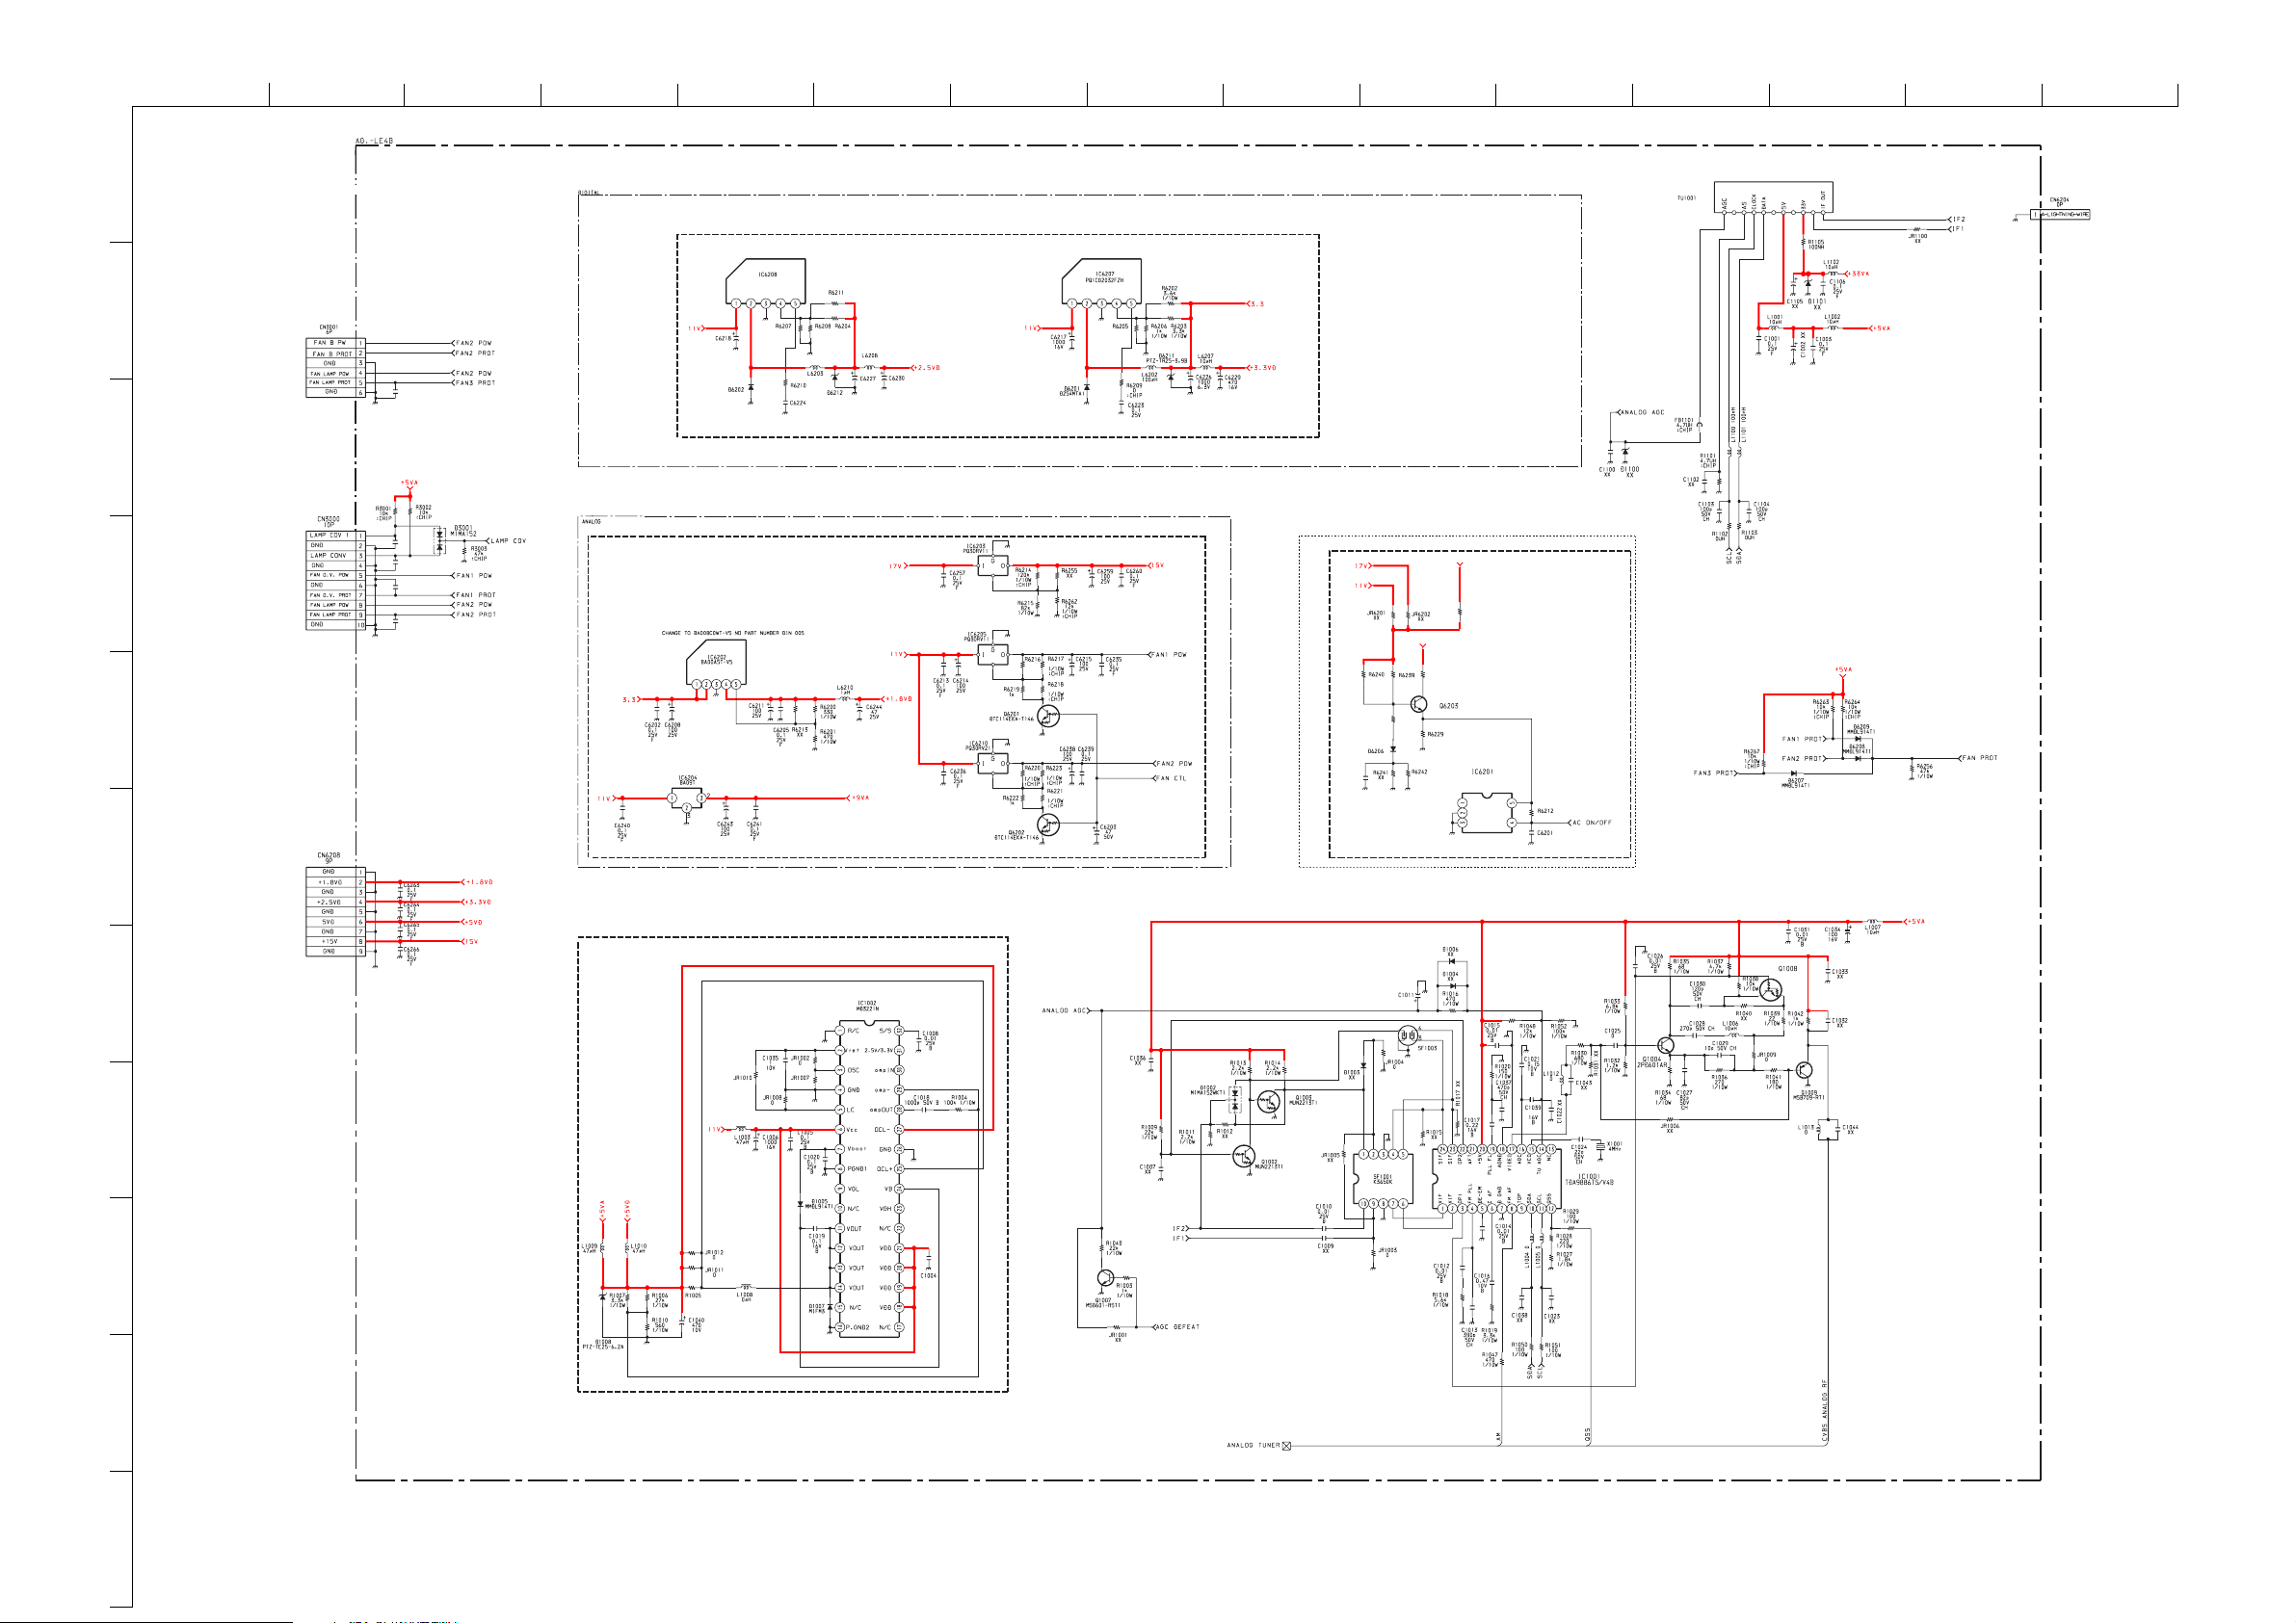
ABCDE F
G
HI JKLMN
O
1
FSS BTP-AU631
PQ1CG2032FZ
2.5V REGULATOR
1.3K
3.3V REGULATOR
2
TO OPTICS BLOCK
C3004
1000
16V
0.01
1.2K
D2S4MF
0
0.1
XX
100UH
PTZ-TE25-3.9B
XX
10UH
470
1000
16V
6.3V
XX
3
C3000
0.01
C3001
4
TO LAMP DRIVER
5
C3002
C3003
0.01
0.01
0.01
1.2K
1.8V REGULATOR
1.8K
180
560
560
100
C6200
25V
0.1
5.6K
JR6225
MMDL94T1
0
180K
STBY +5V
11K
STBY +7V
JR6238
0
MSD601-RST1
10K
JR6224
0
PST600IMT
AC ON/OFF
10K
0.1
6
10
TO C BOARD
CN3002
MUN2232T1
7
5V SWITCH REGULATOR
XX
XX
22
25V
XX
0.047
8
IF ON BOARD
9
XX
COMPONENTS MARKED AS XX ARE NOT FITTED ON THIS MODEL
XX
AG
2/3
11
~ AG Board Schematic Diagram [ Main Power Supply, Tuner, Audio Amplifier ] Page 2/3 ~
- 39 -
Page 40
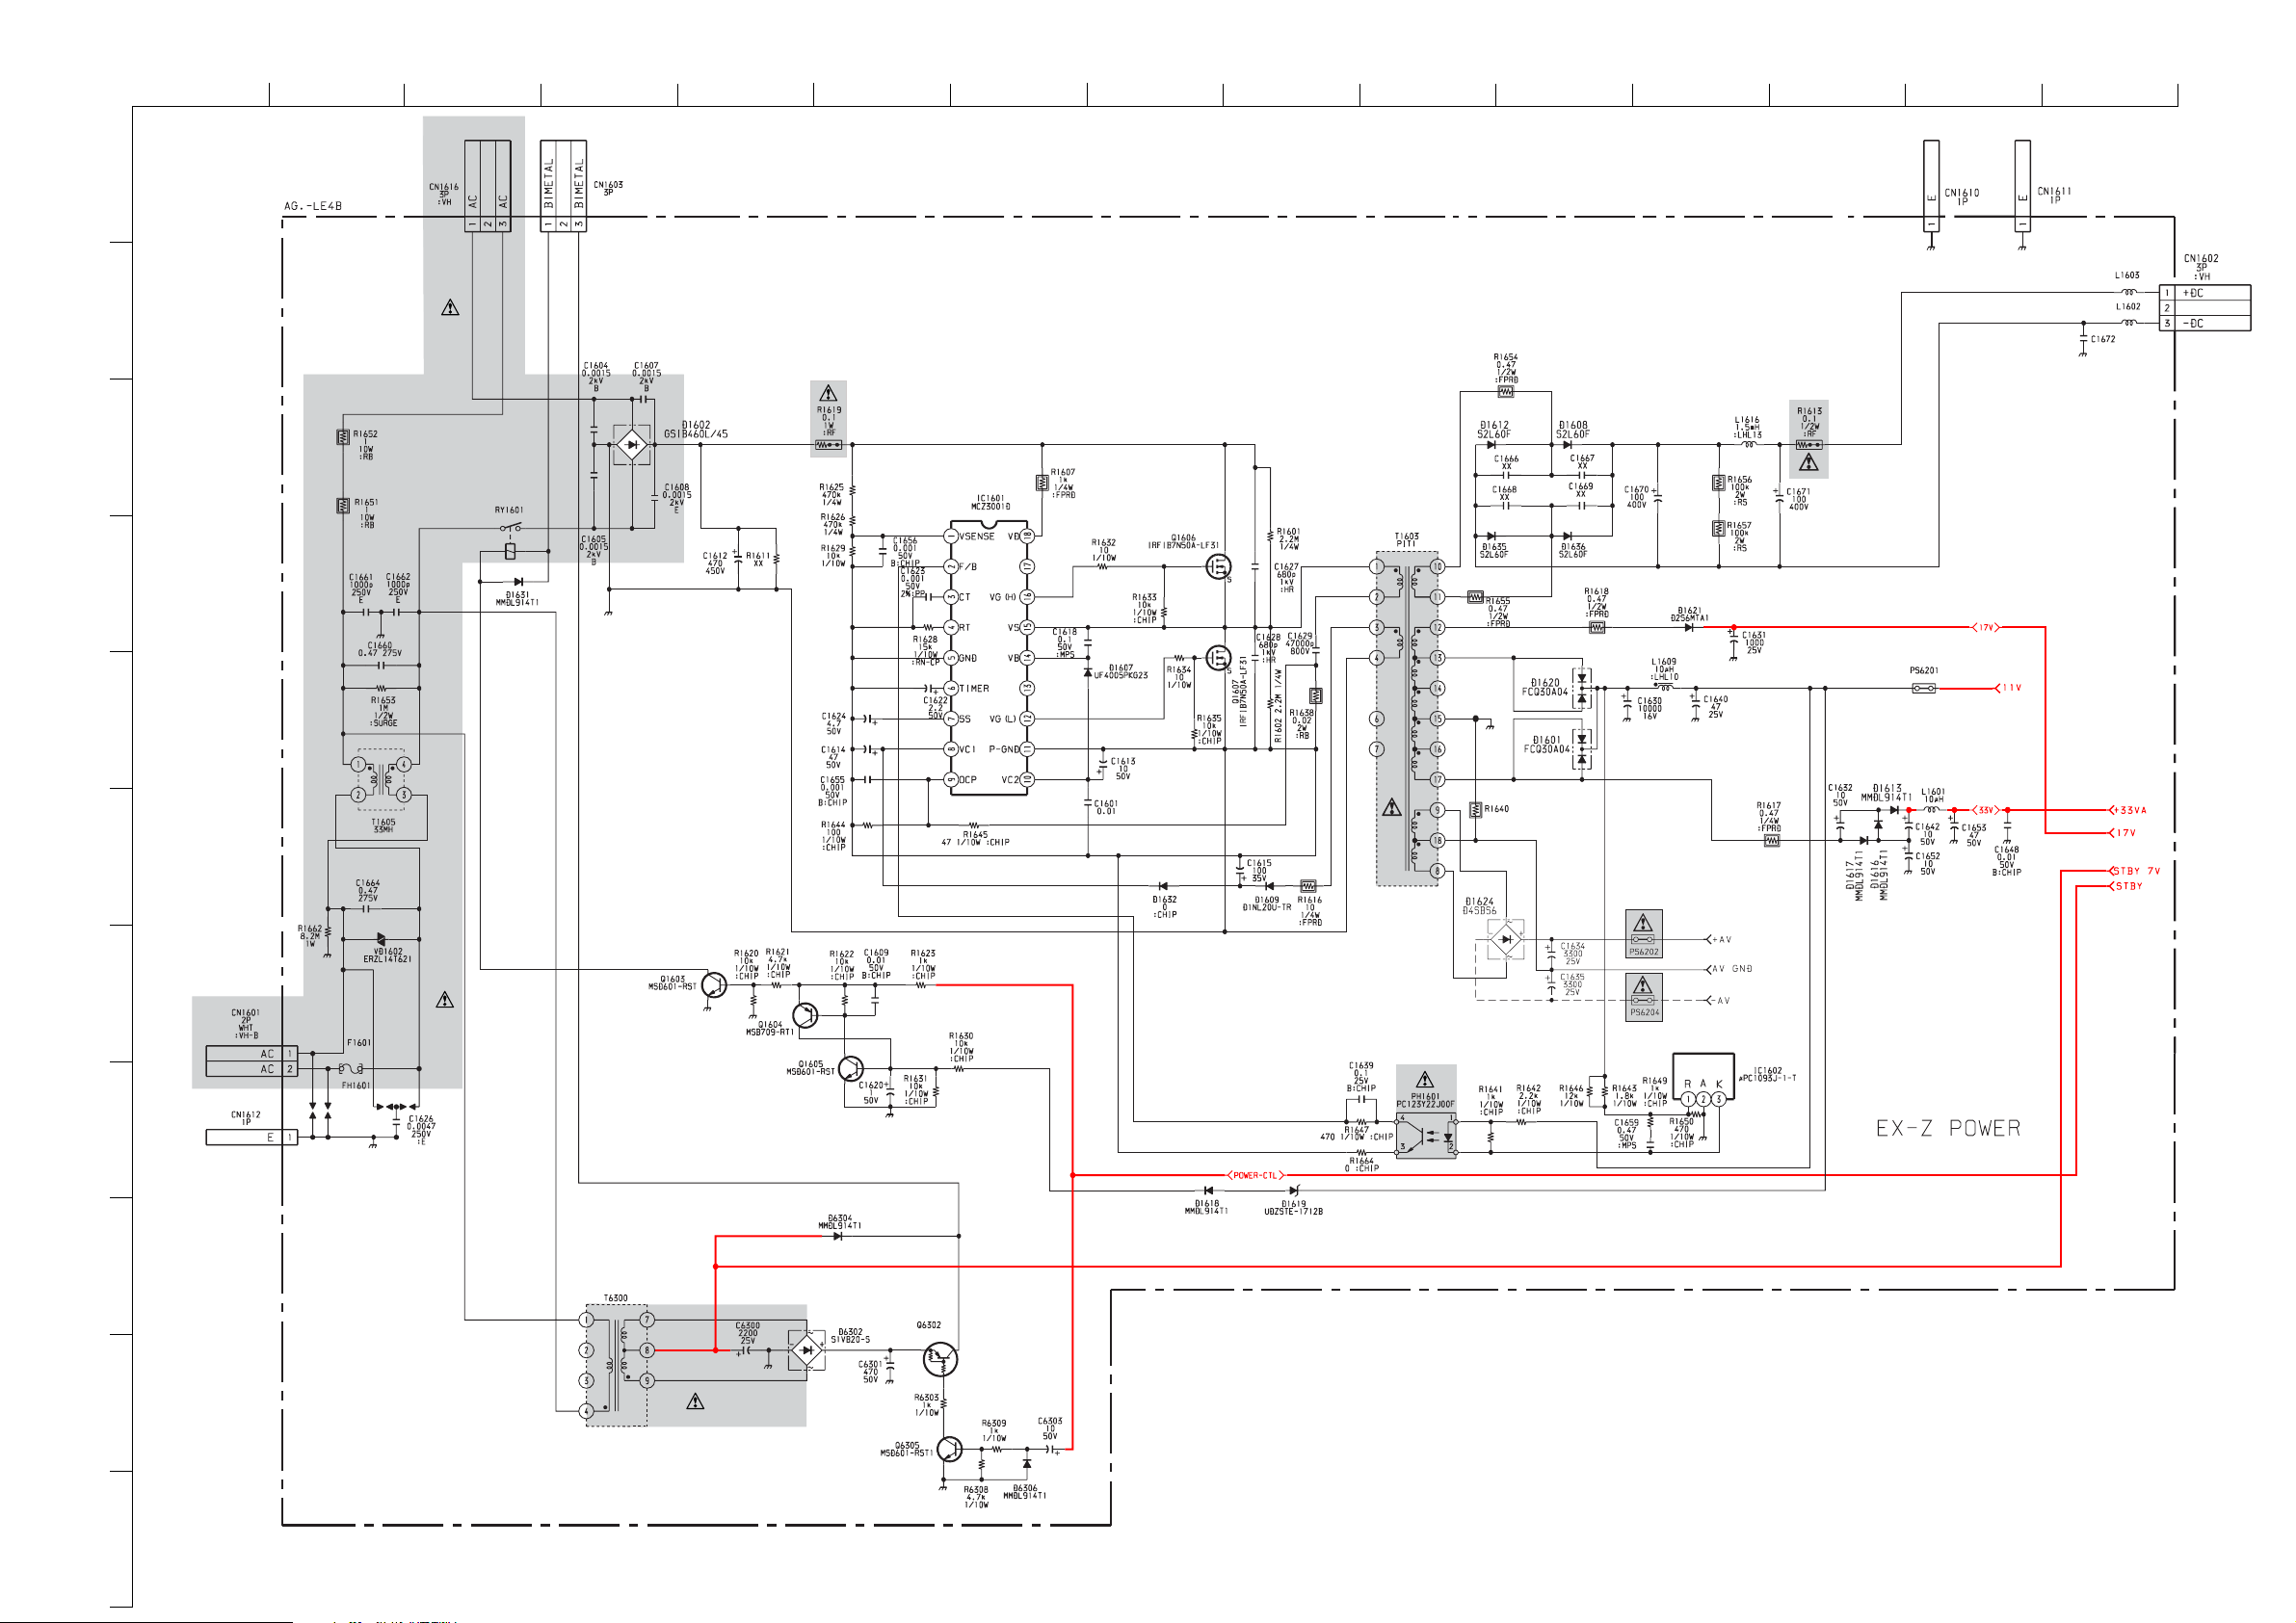
ABCDE F
TO POWER BLOCK
G
HI JKLMN
O
1
1.1UH
2
AG
3/3
0.0047
500V
1.1UH
3
POWER SUPPLY
4
XX
5
XX
6
7
AC INPUT
11V VOLTAGE
SENSOR
8
10
11
9
DTA144EK
COMPONENTS MARKED AS XX ARE NOT FITTED ON THIS MODEL
~ AG Board Schematic Diagram [ Main Power Supply, Tuner, Audio Amplifier ] Page 3/3 ~
- 40 -
Page 41
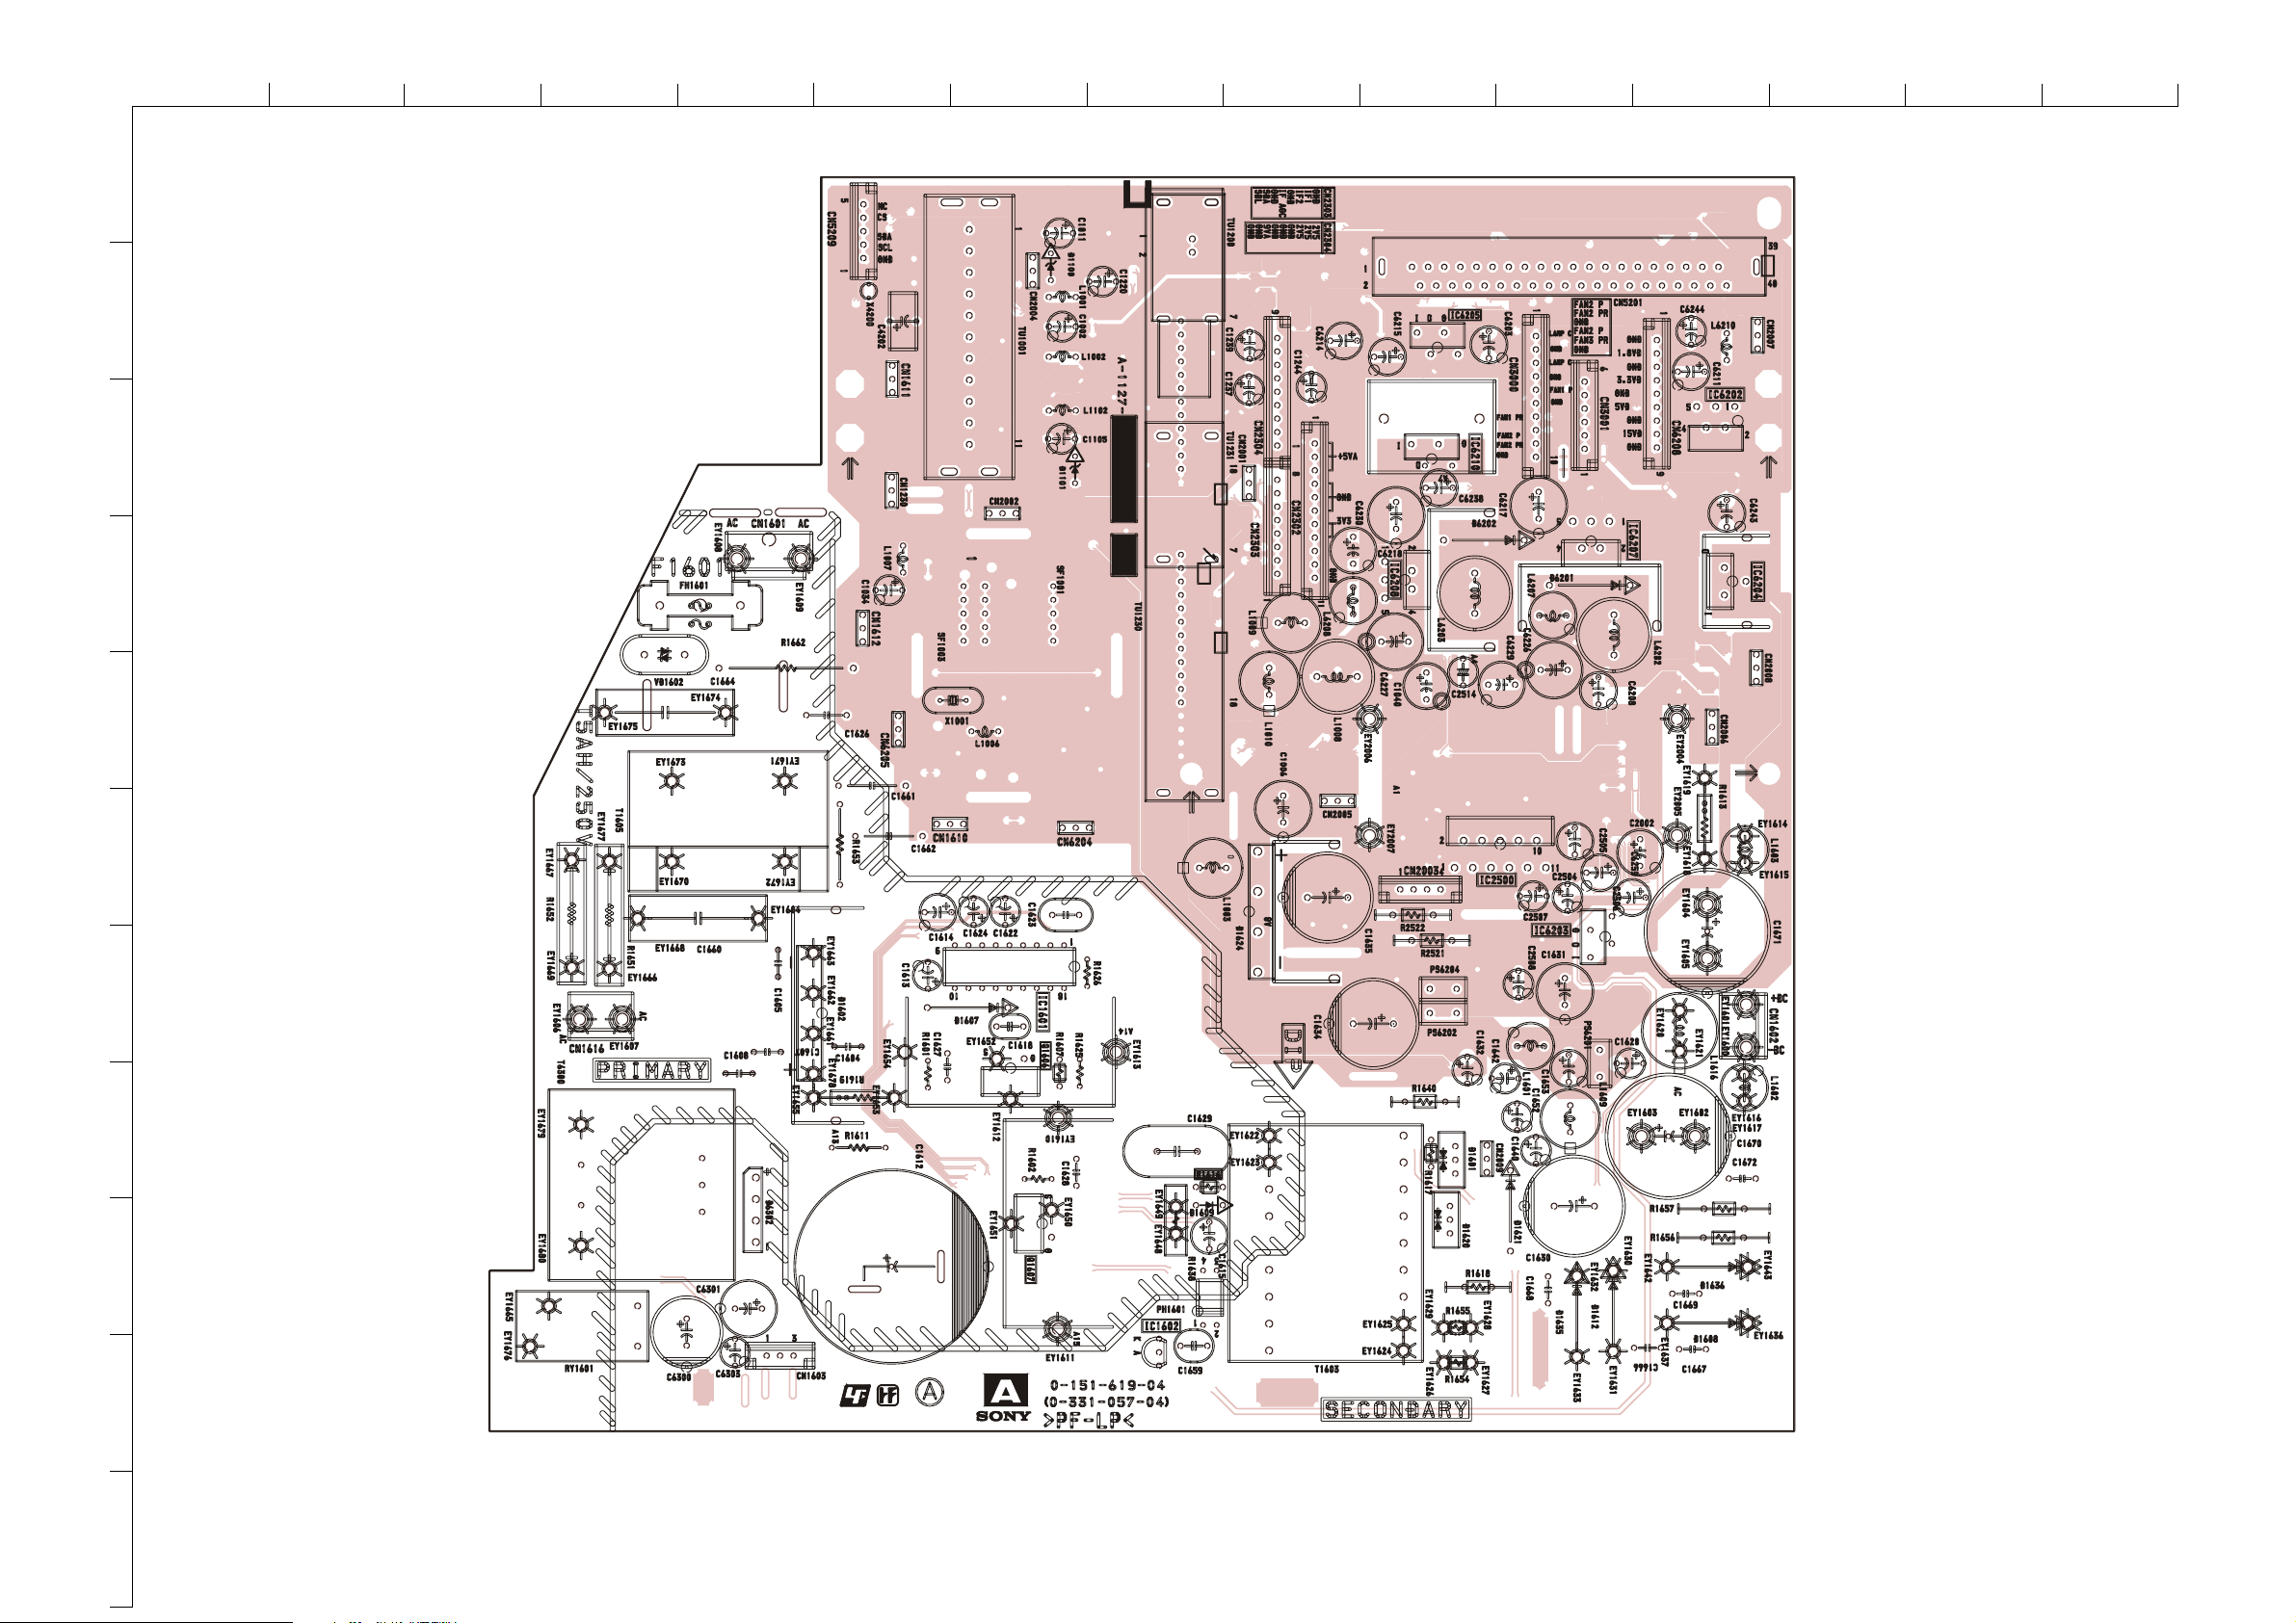
ABCDE F
1
2
3
4
G
HI JKLMN
O
5
6
7
8
9
10
11
~ AG Printed Wiring Board Conductor Side A ~
- 41 -
Page 42
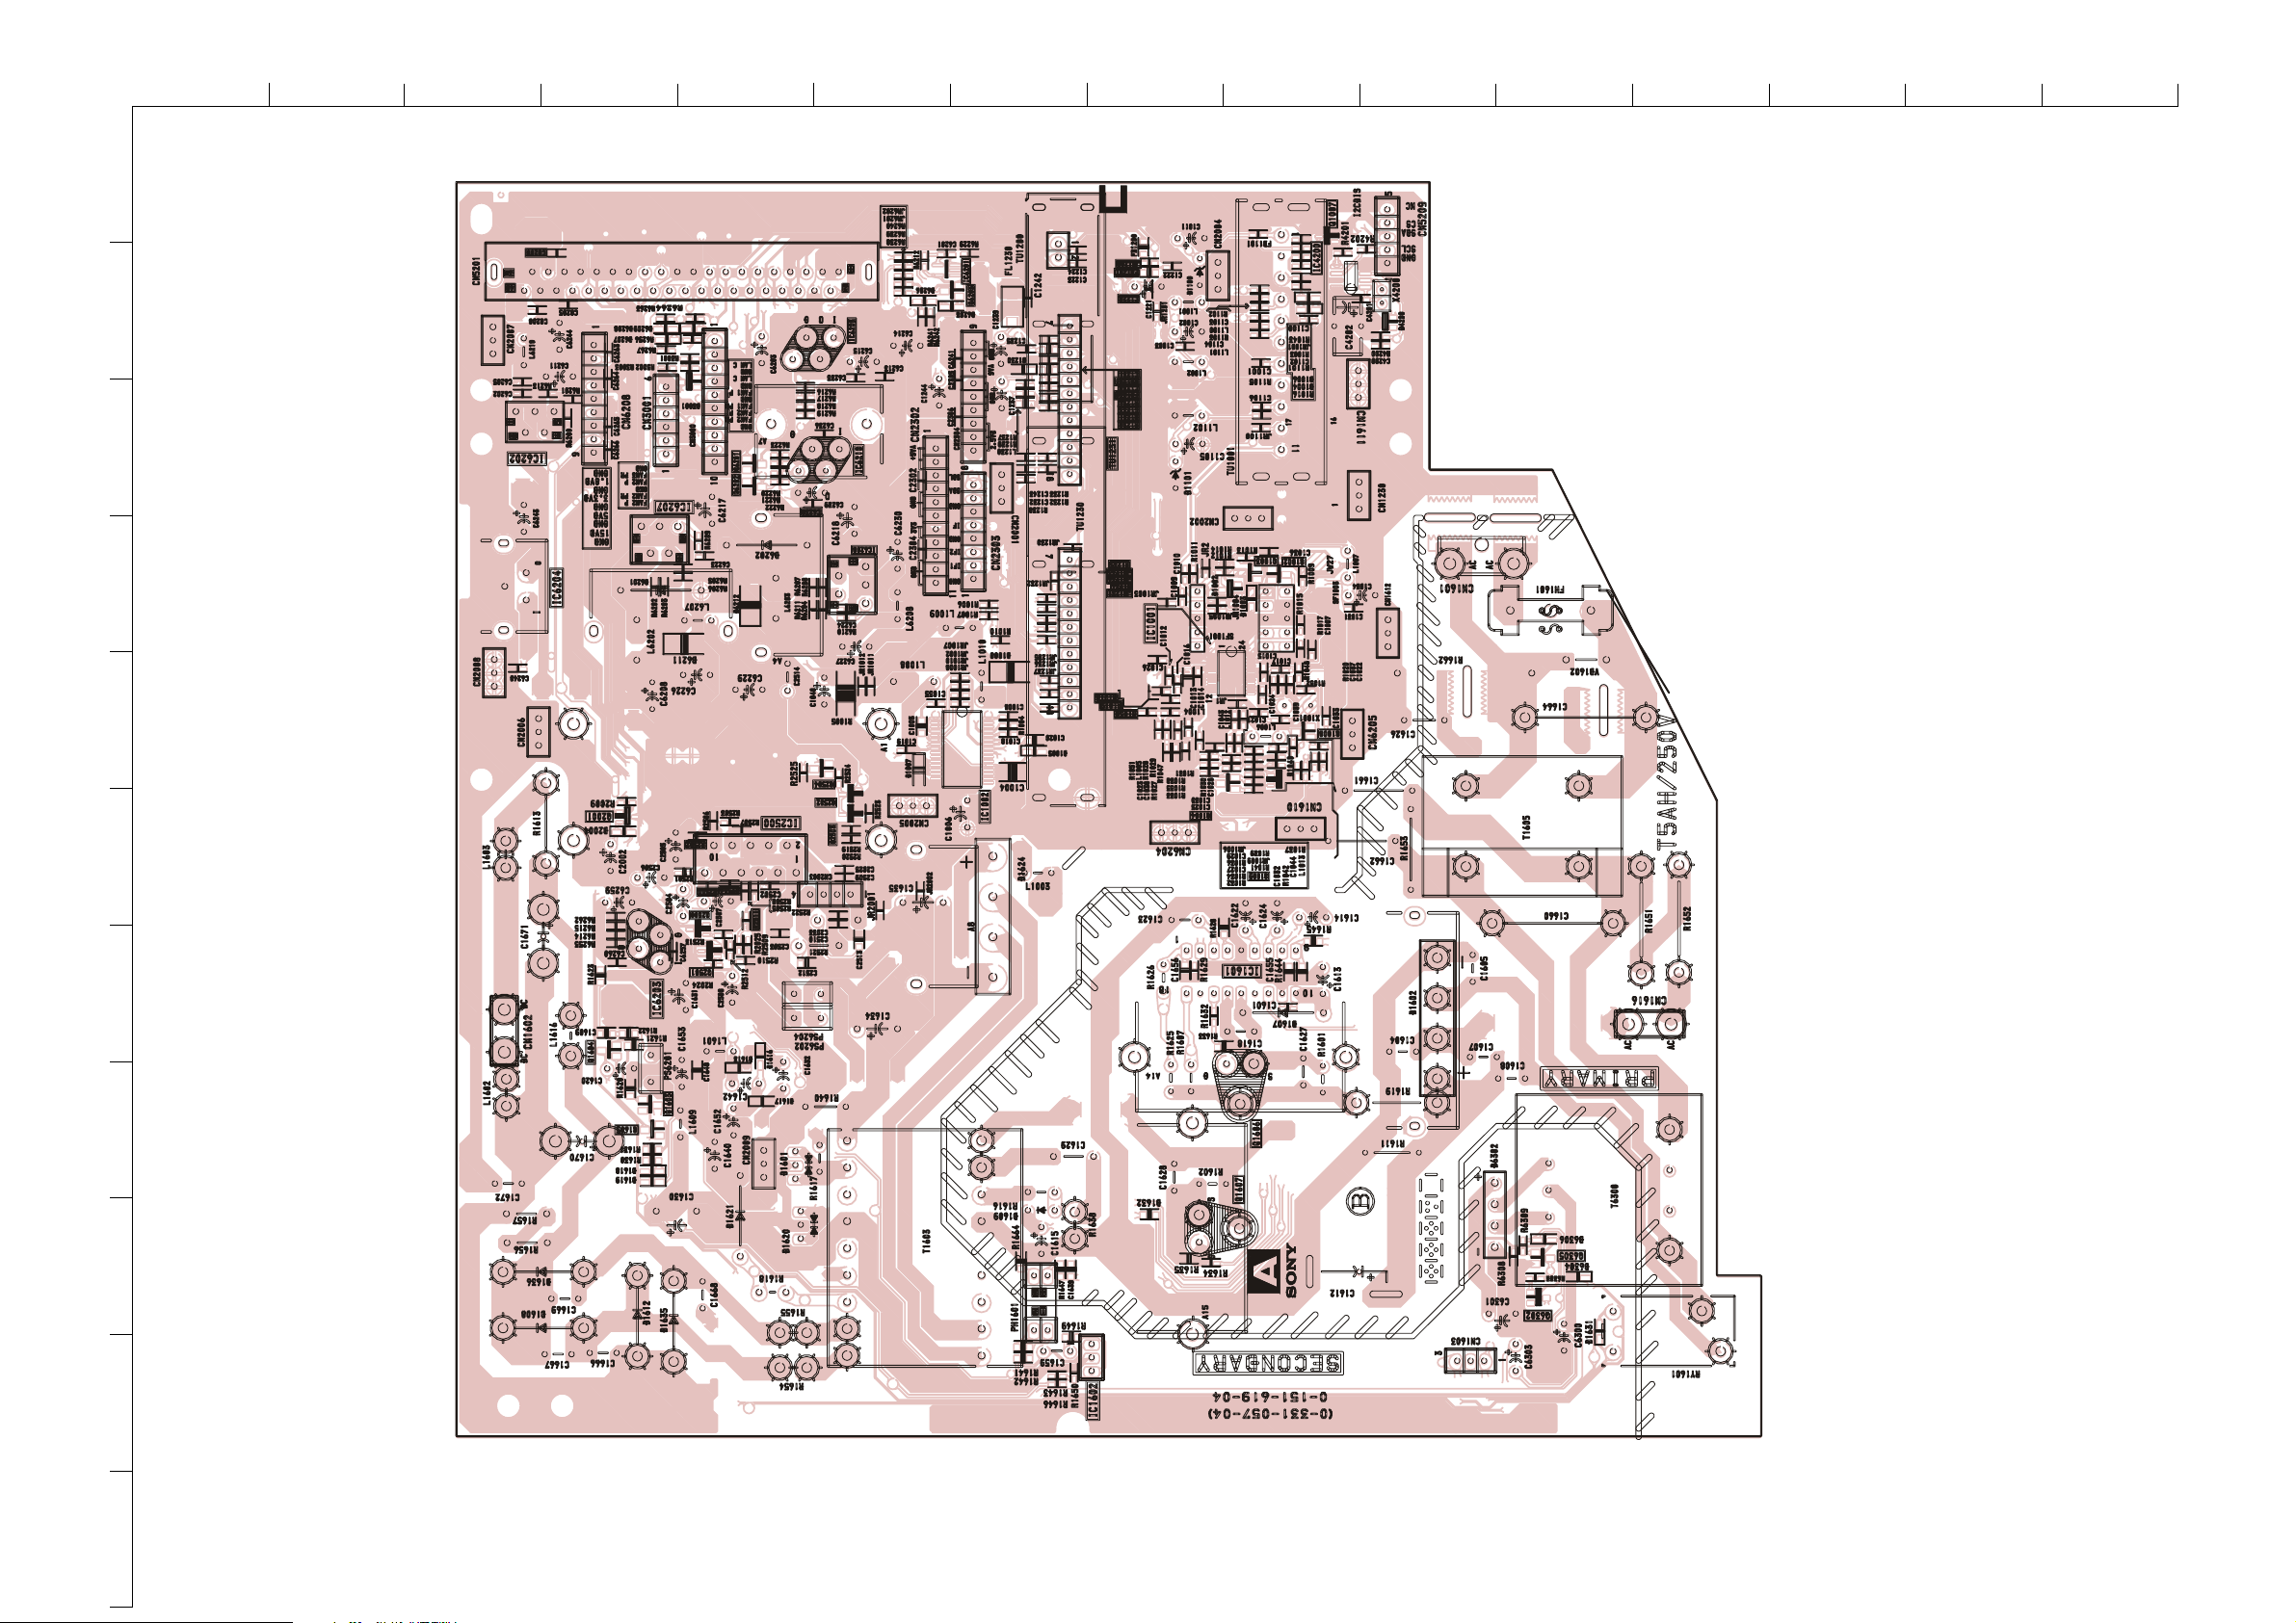
ABCDE F
1
2
3
4
G
HI JKLMN
O
5
6
7
8
9
10
11
~ AG Printed Wiring Board Conductor Side B ~
- 42 -
Page 43
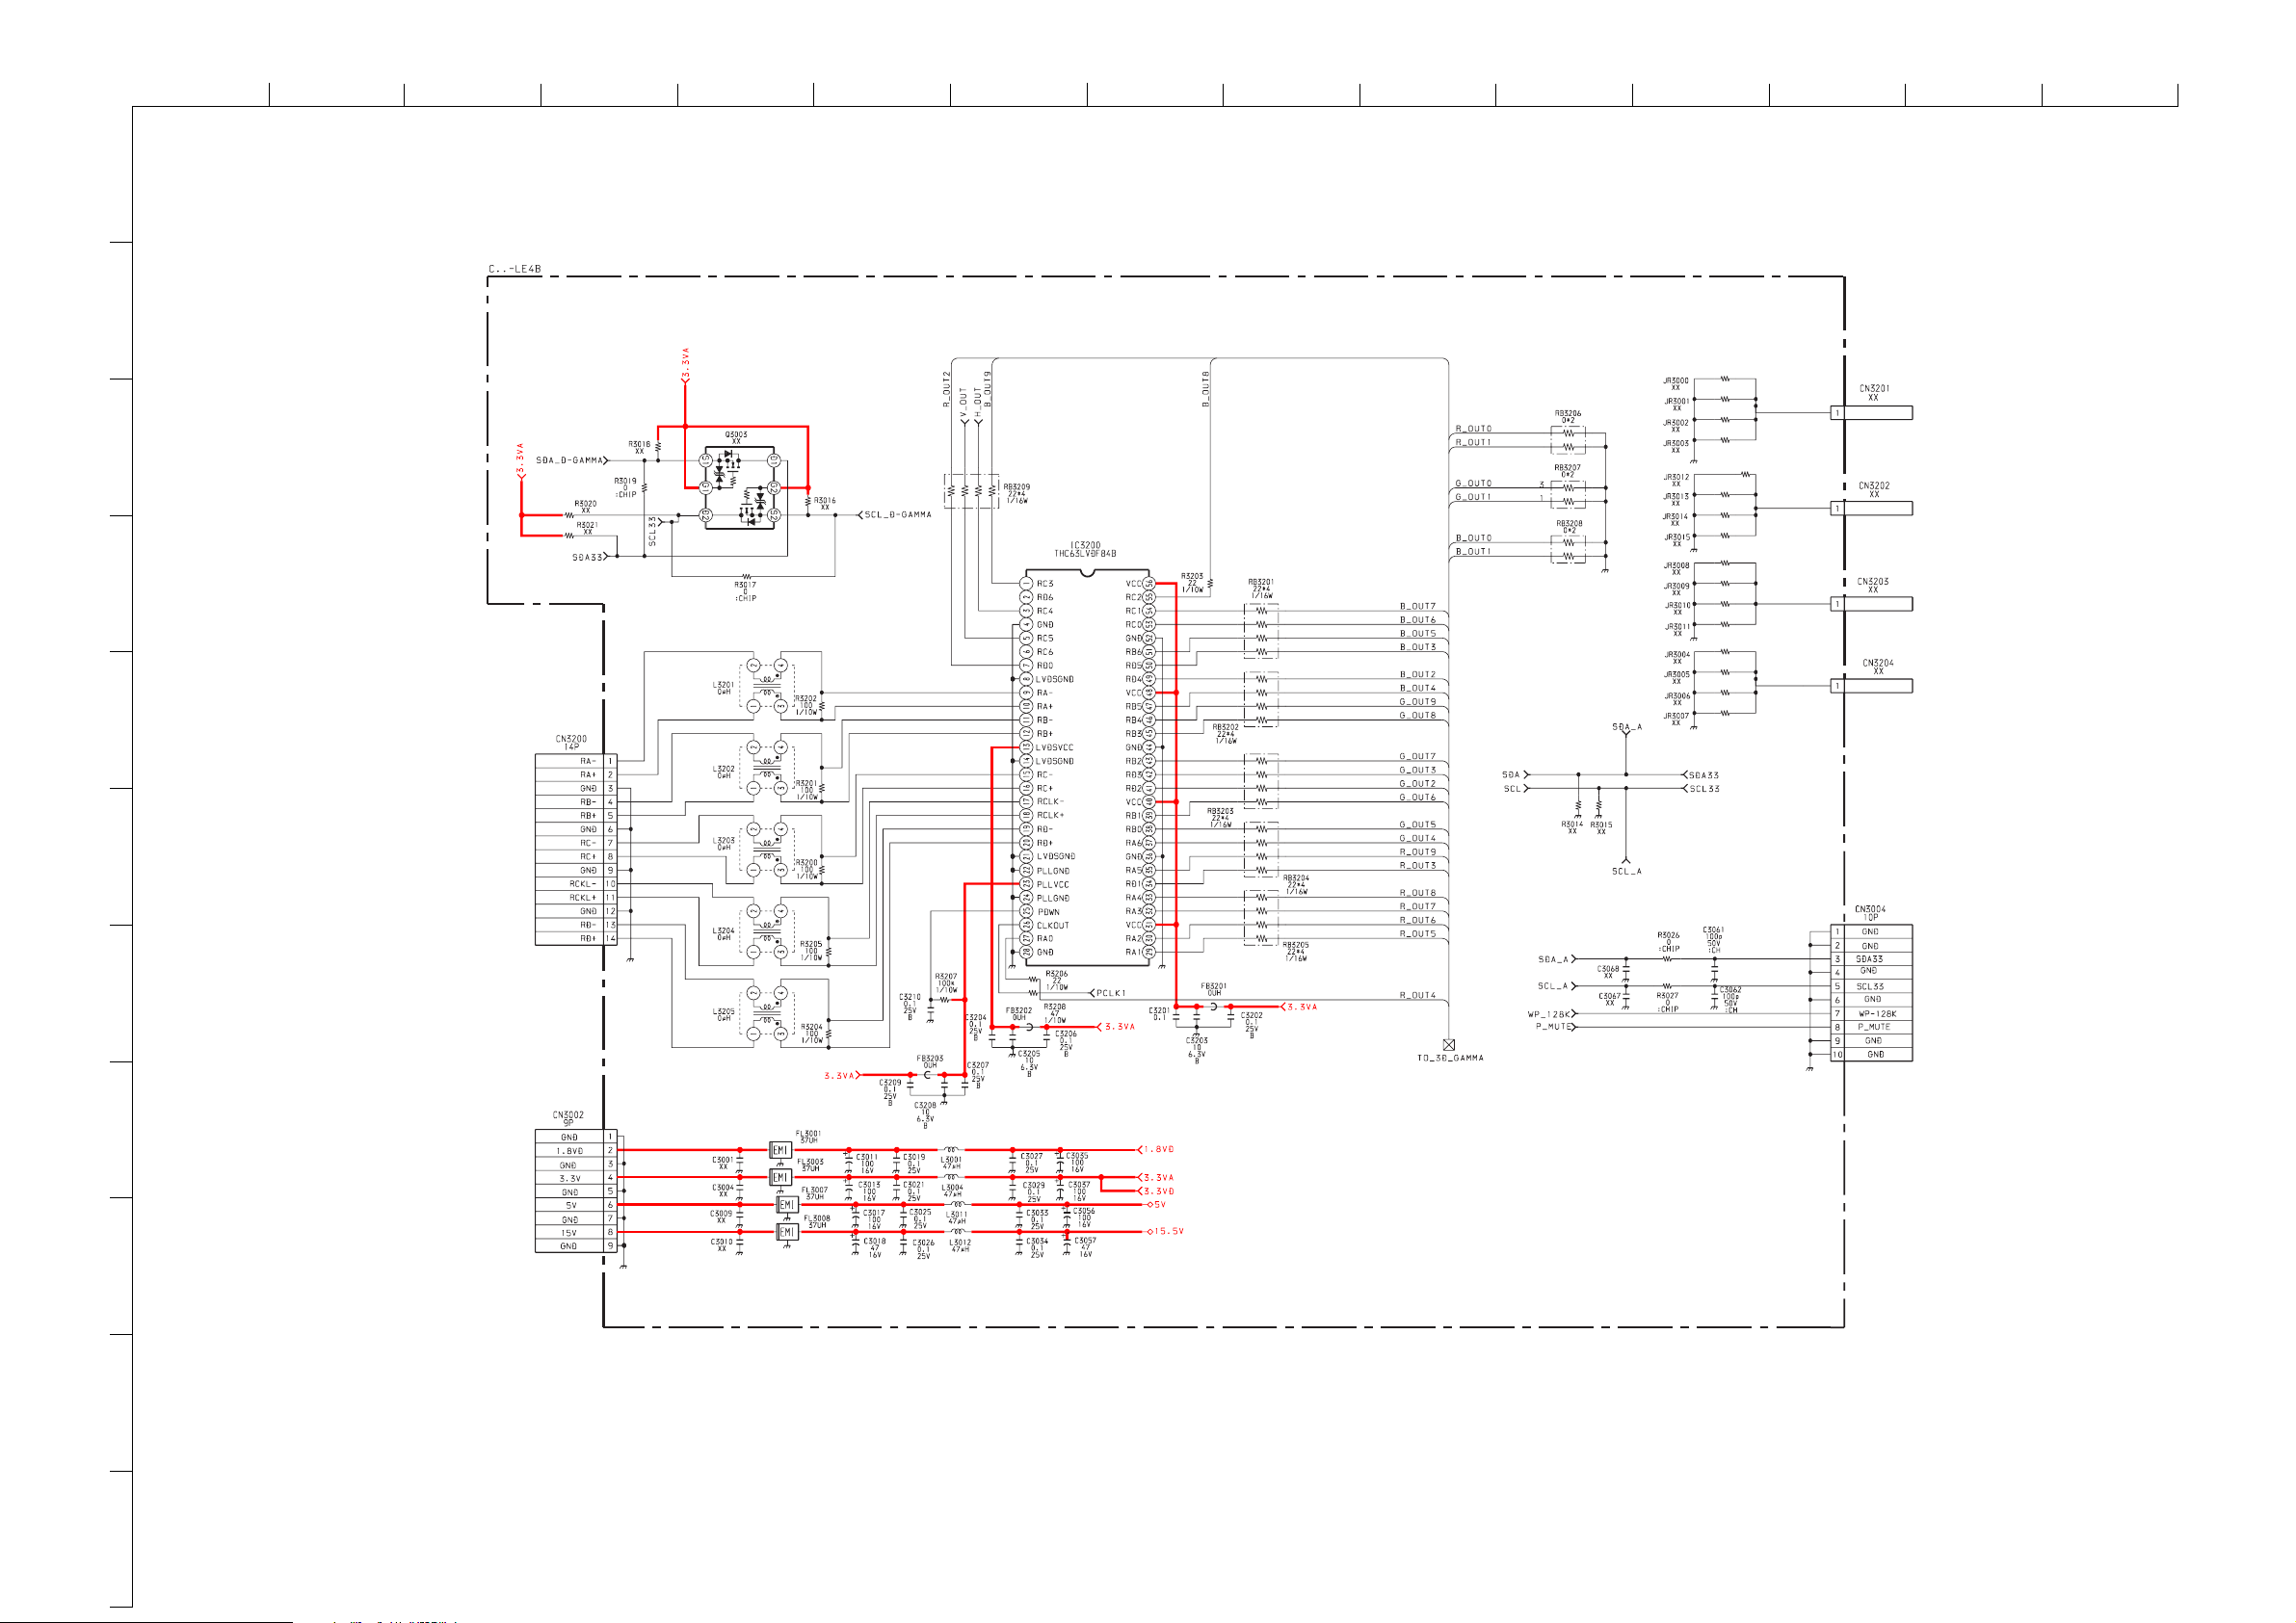
ABCDE F
G
HI JKLMN
O
1
2
COMPONENTS MARKED AS XX ARE NOT FITTED ON THIS MODEL
3
LVDS RECEIVER
4
5
TO JB BOARD
6
CN9510
10
11
7
TO JB BOARD
CN9506
8
+
TO AG BOARD
CN6208
+
+
+
C
1/4 LCD PANEL DRIVER BOARD
9
~ C Board Schematic Diagram [ LCD Panel Driver Board ] Page 1/4 ~
- 43 -
Page 44
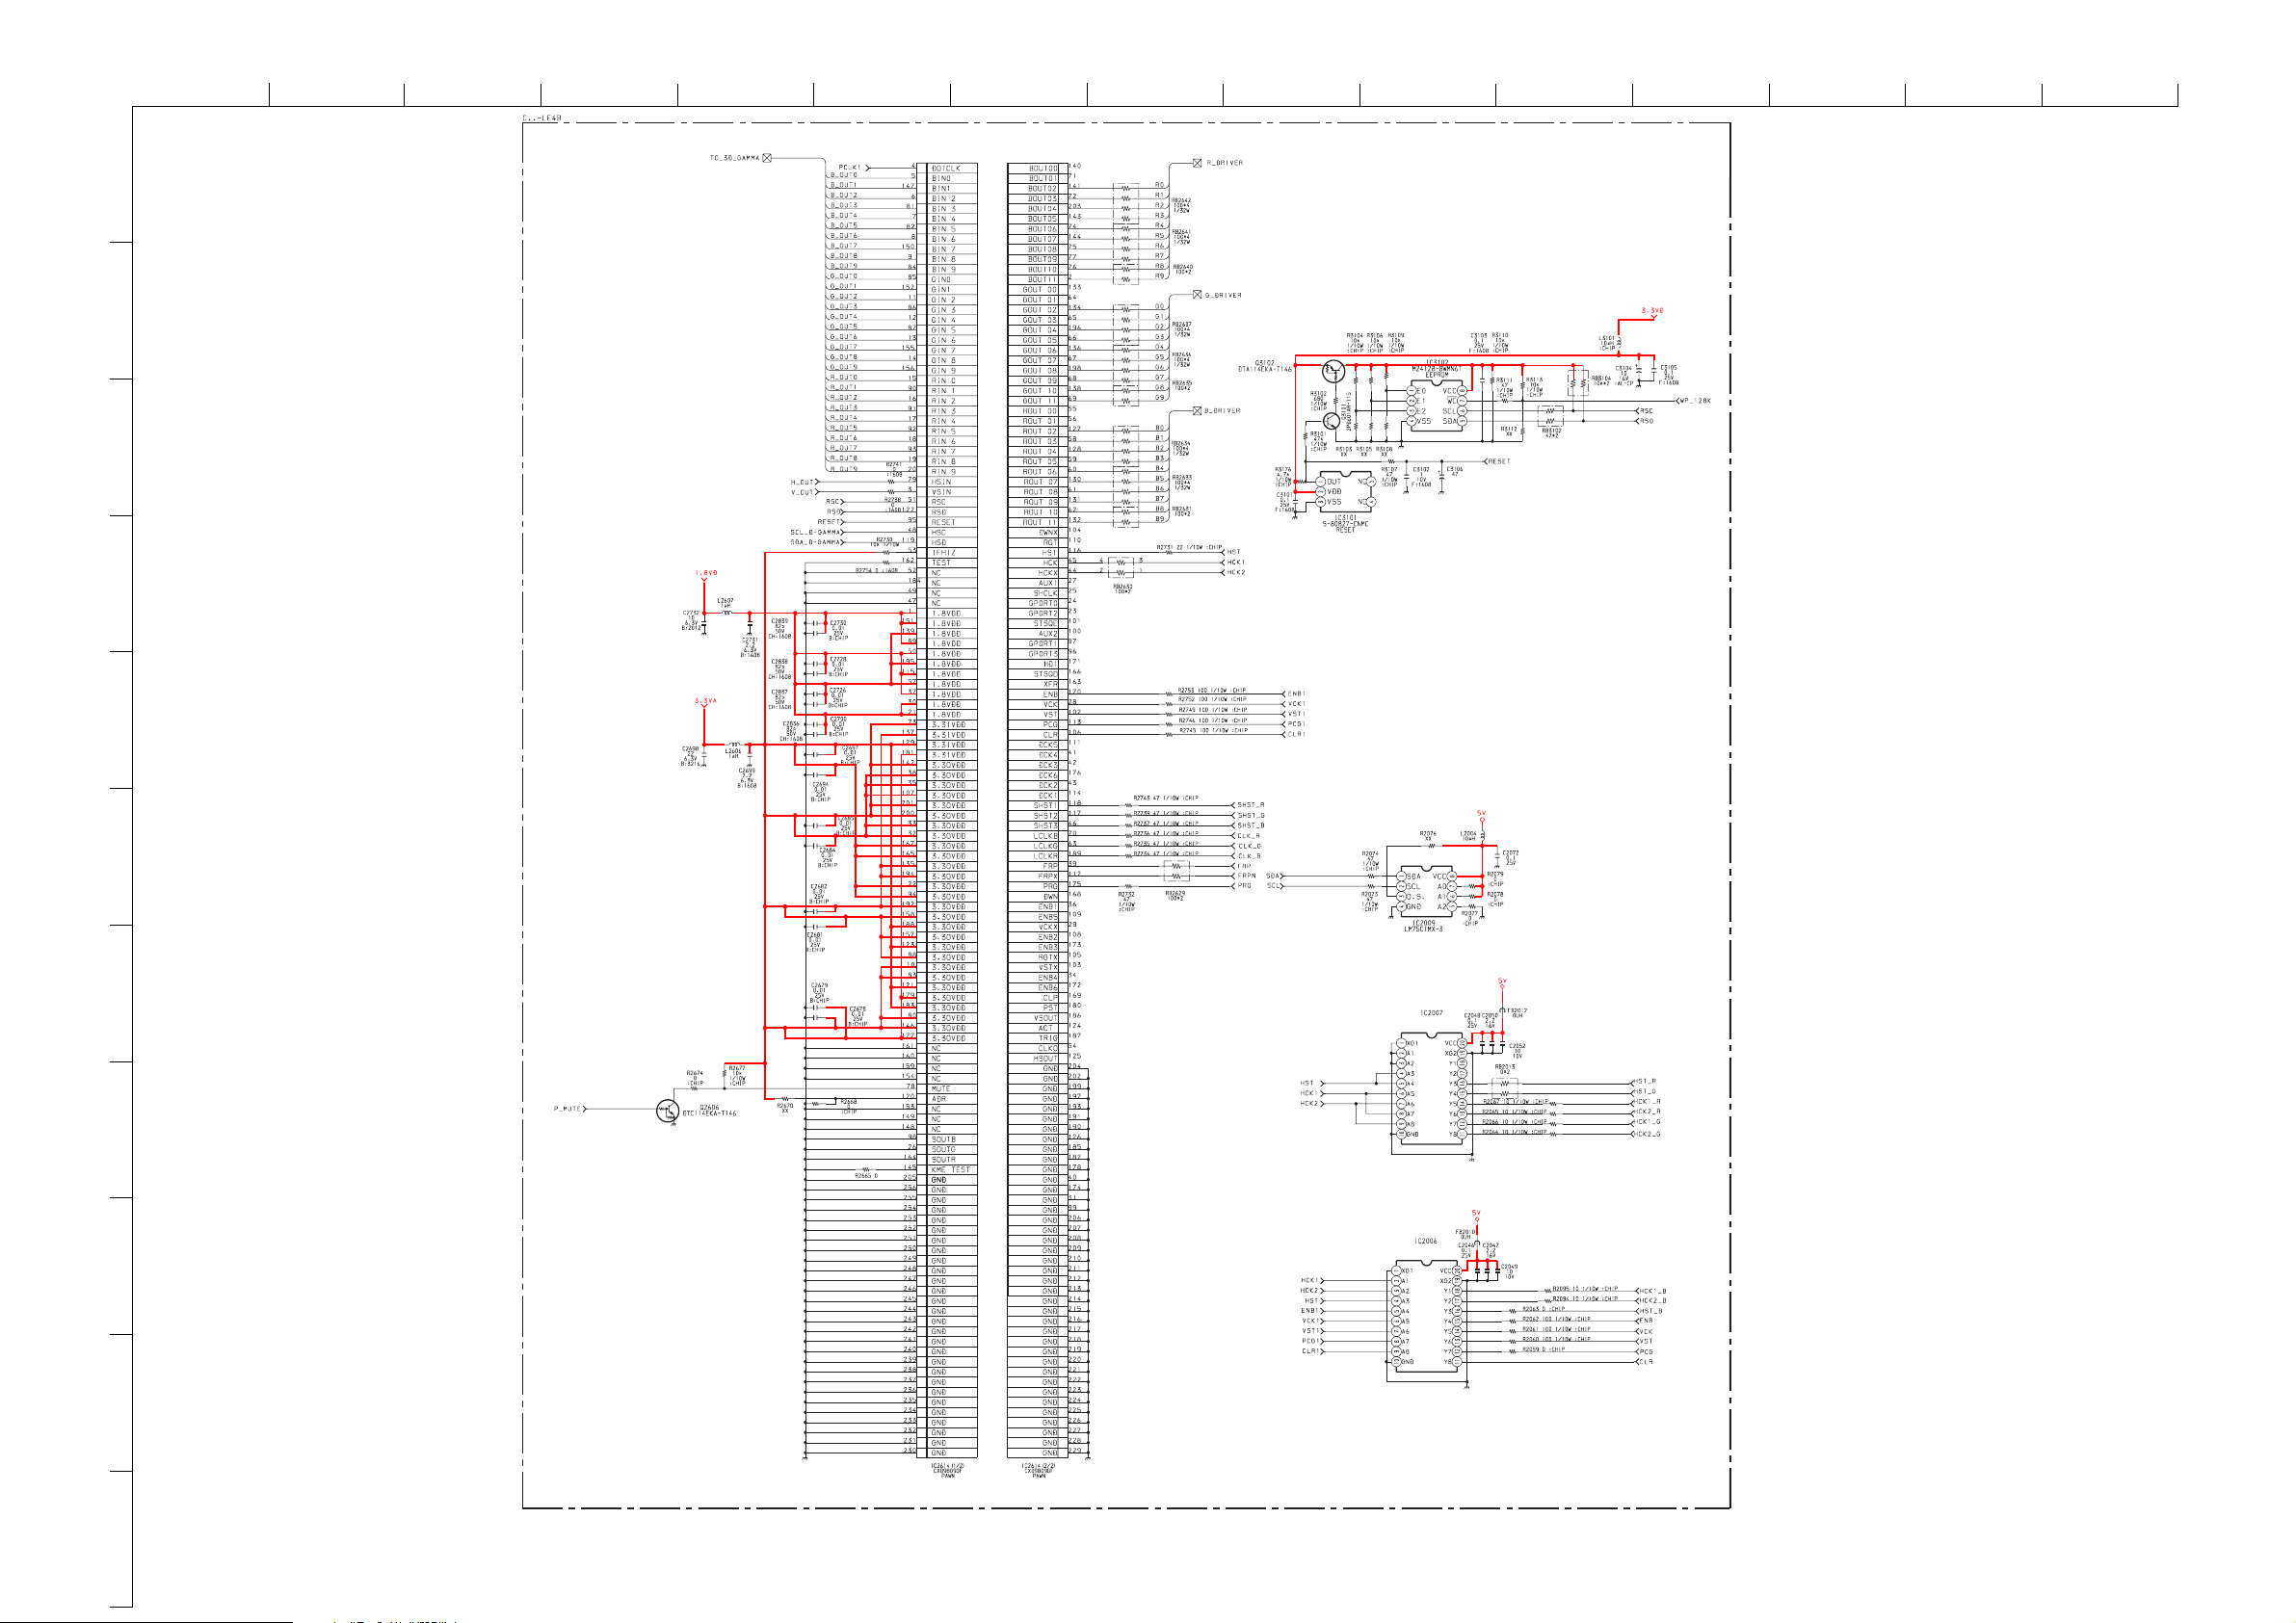
ABCDE F
G
HI JKLMN
COMPONENTS MARKED AS XX ARE NOT FITTED ON THIS MODEL
O
1
2
3
16V
4
5
6
TEMPERATURE SENSOR
7
TC74VHCT541AFT
OCTAL BUS BUFFER
8
TC74VHCT541AFT
9
OCTAL BUS BUFFER
10
11
C
2/4
~ C Board Schematic Diagram [ LCD Panel Driver Board ] Page 2/4 ~
- 44 -
Page 45
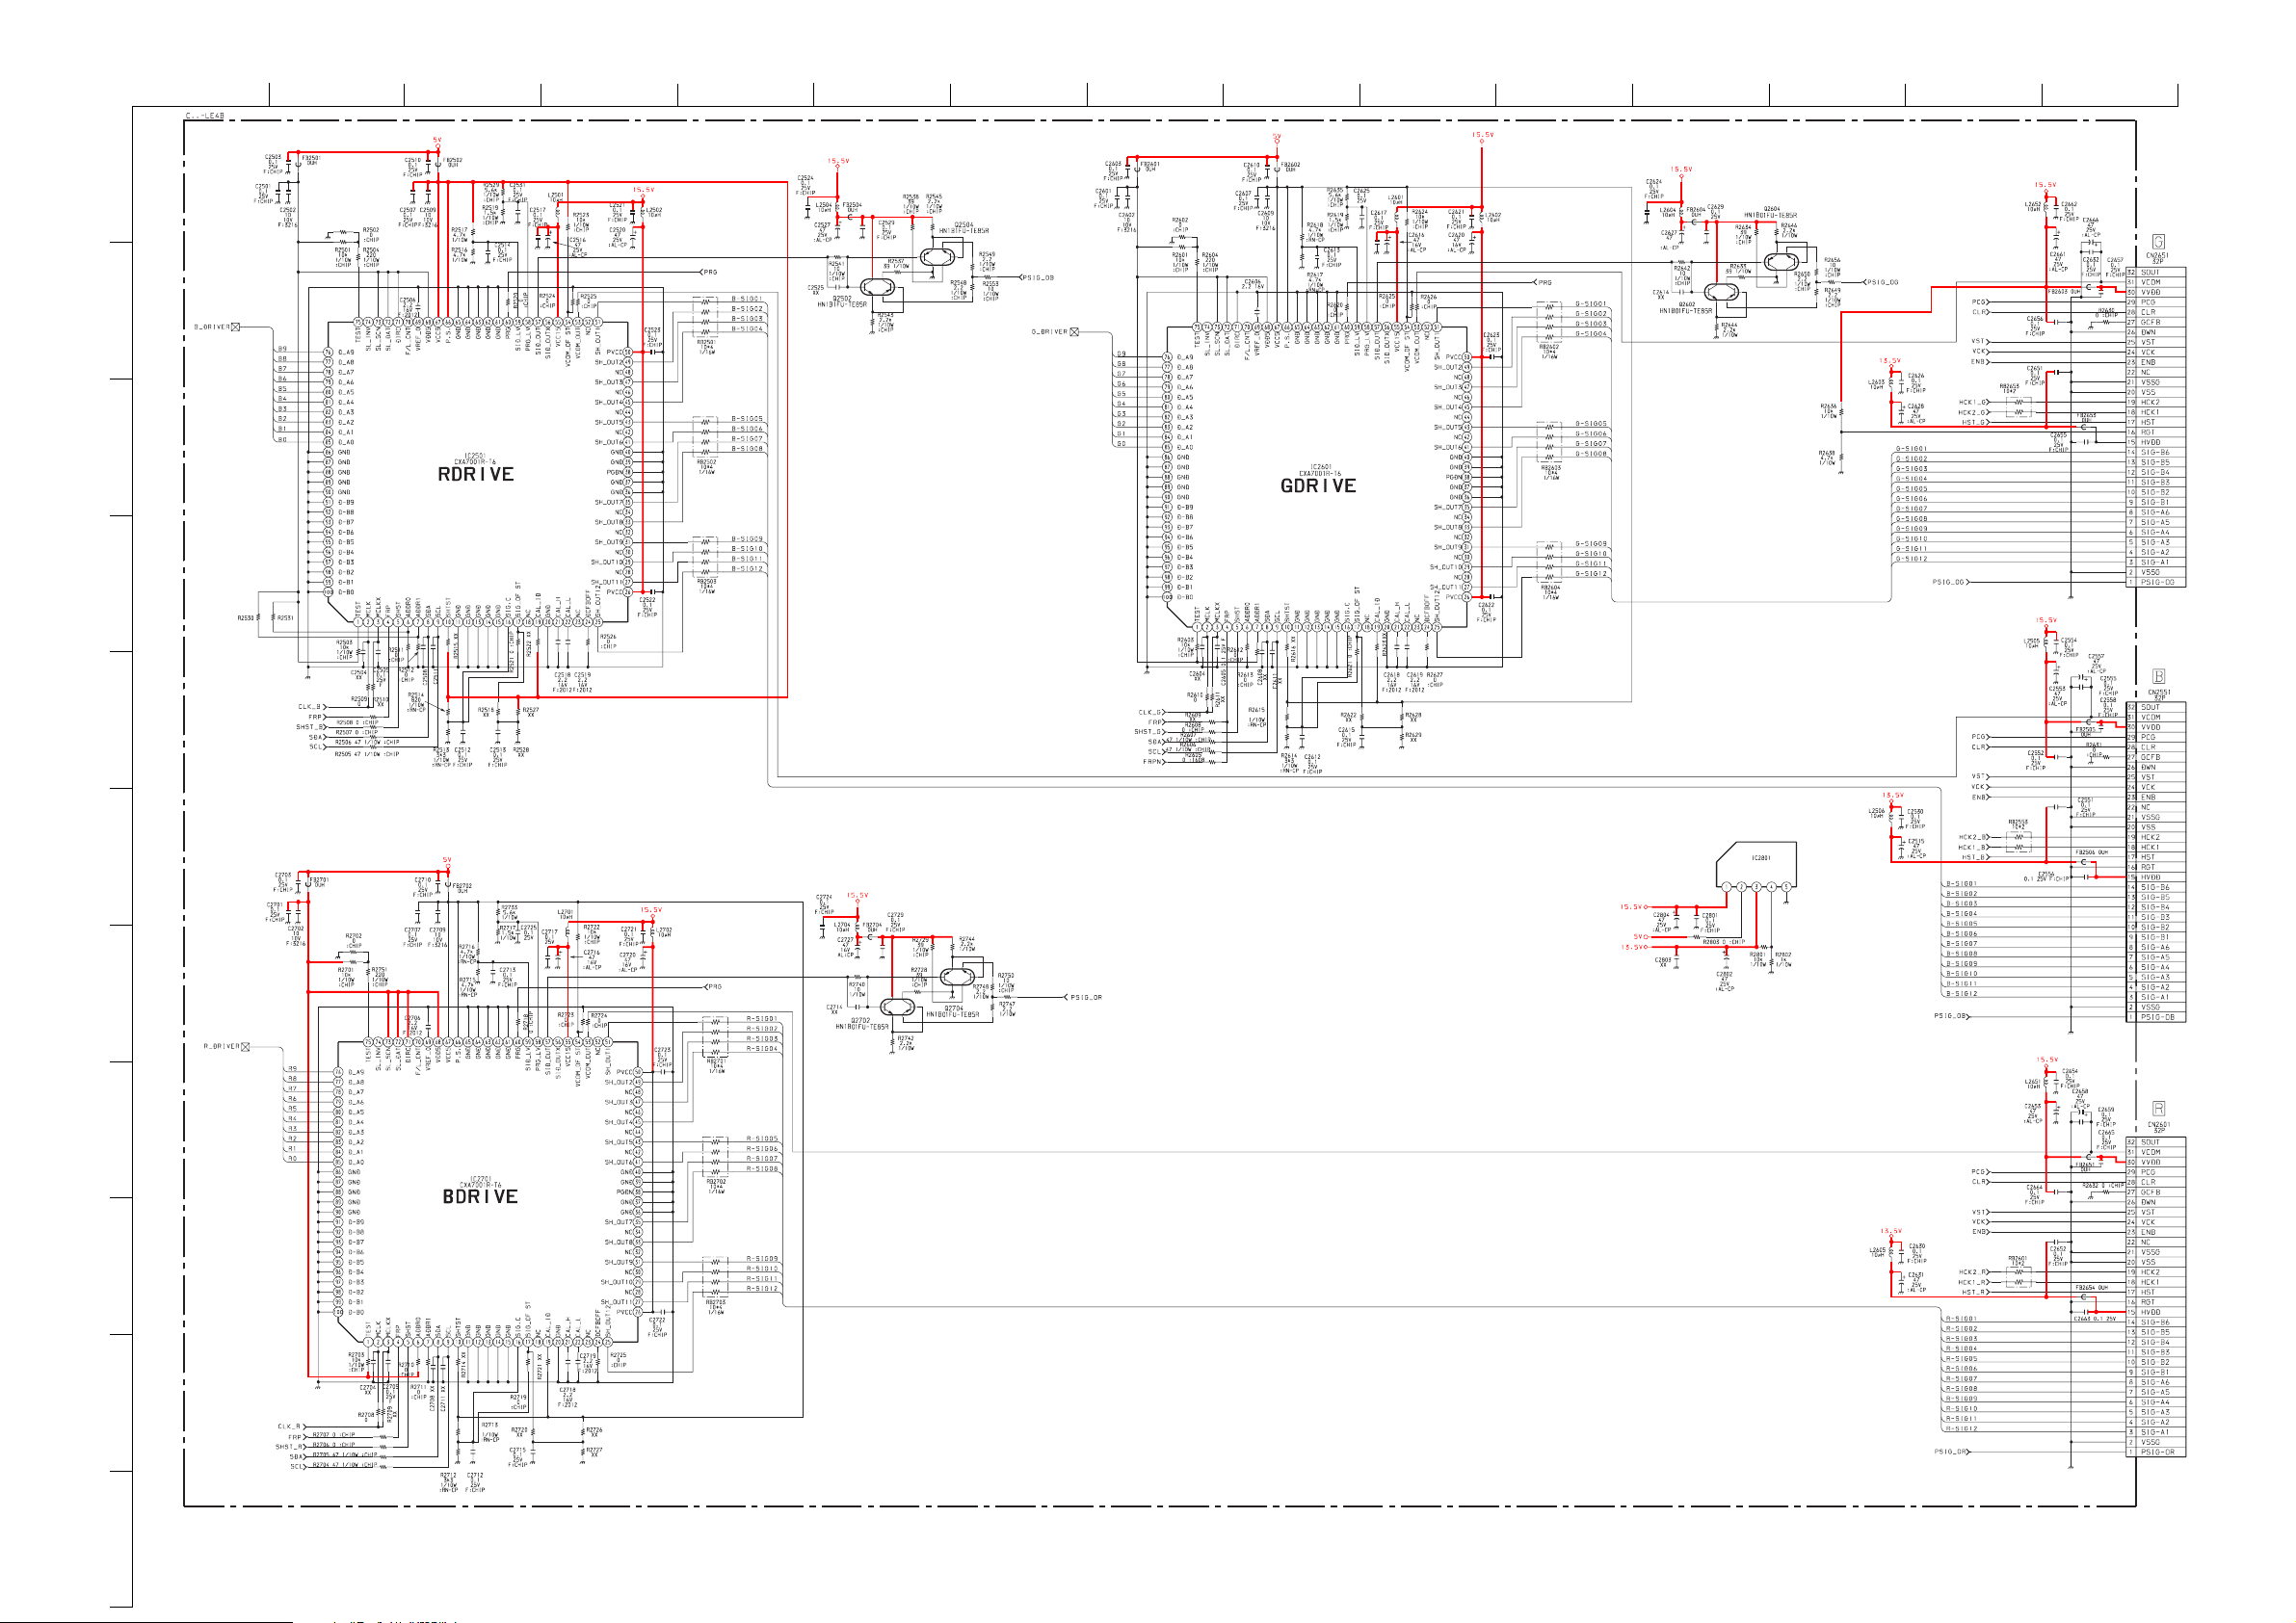
ABCDE F
G
HI JKLMN
COMPONENTS MARKED AS XX ARE NOT FITTED ON THIS MODEL
O
1
16V
2
3
4
XX
XX
XX
XX
5
6
820
PQ20VZ1UJ00H
13.5V REGULATOR
7
8
10
11
9
C
820
3/4
~ C Board Schematic Diagram [ LCD Panel Driver Board ] Page 3/4 ~
- 45 -
Page 46
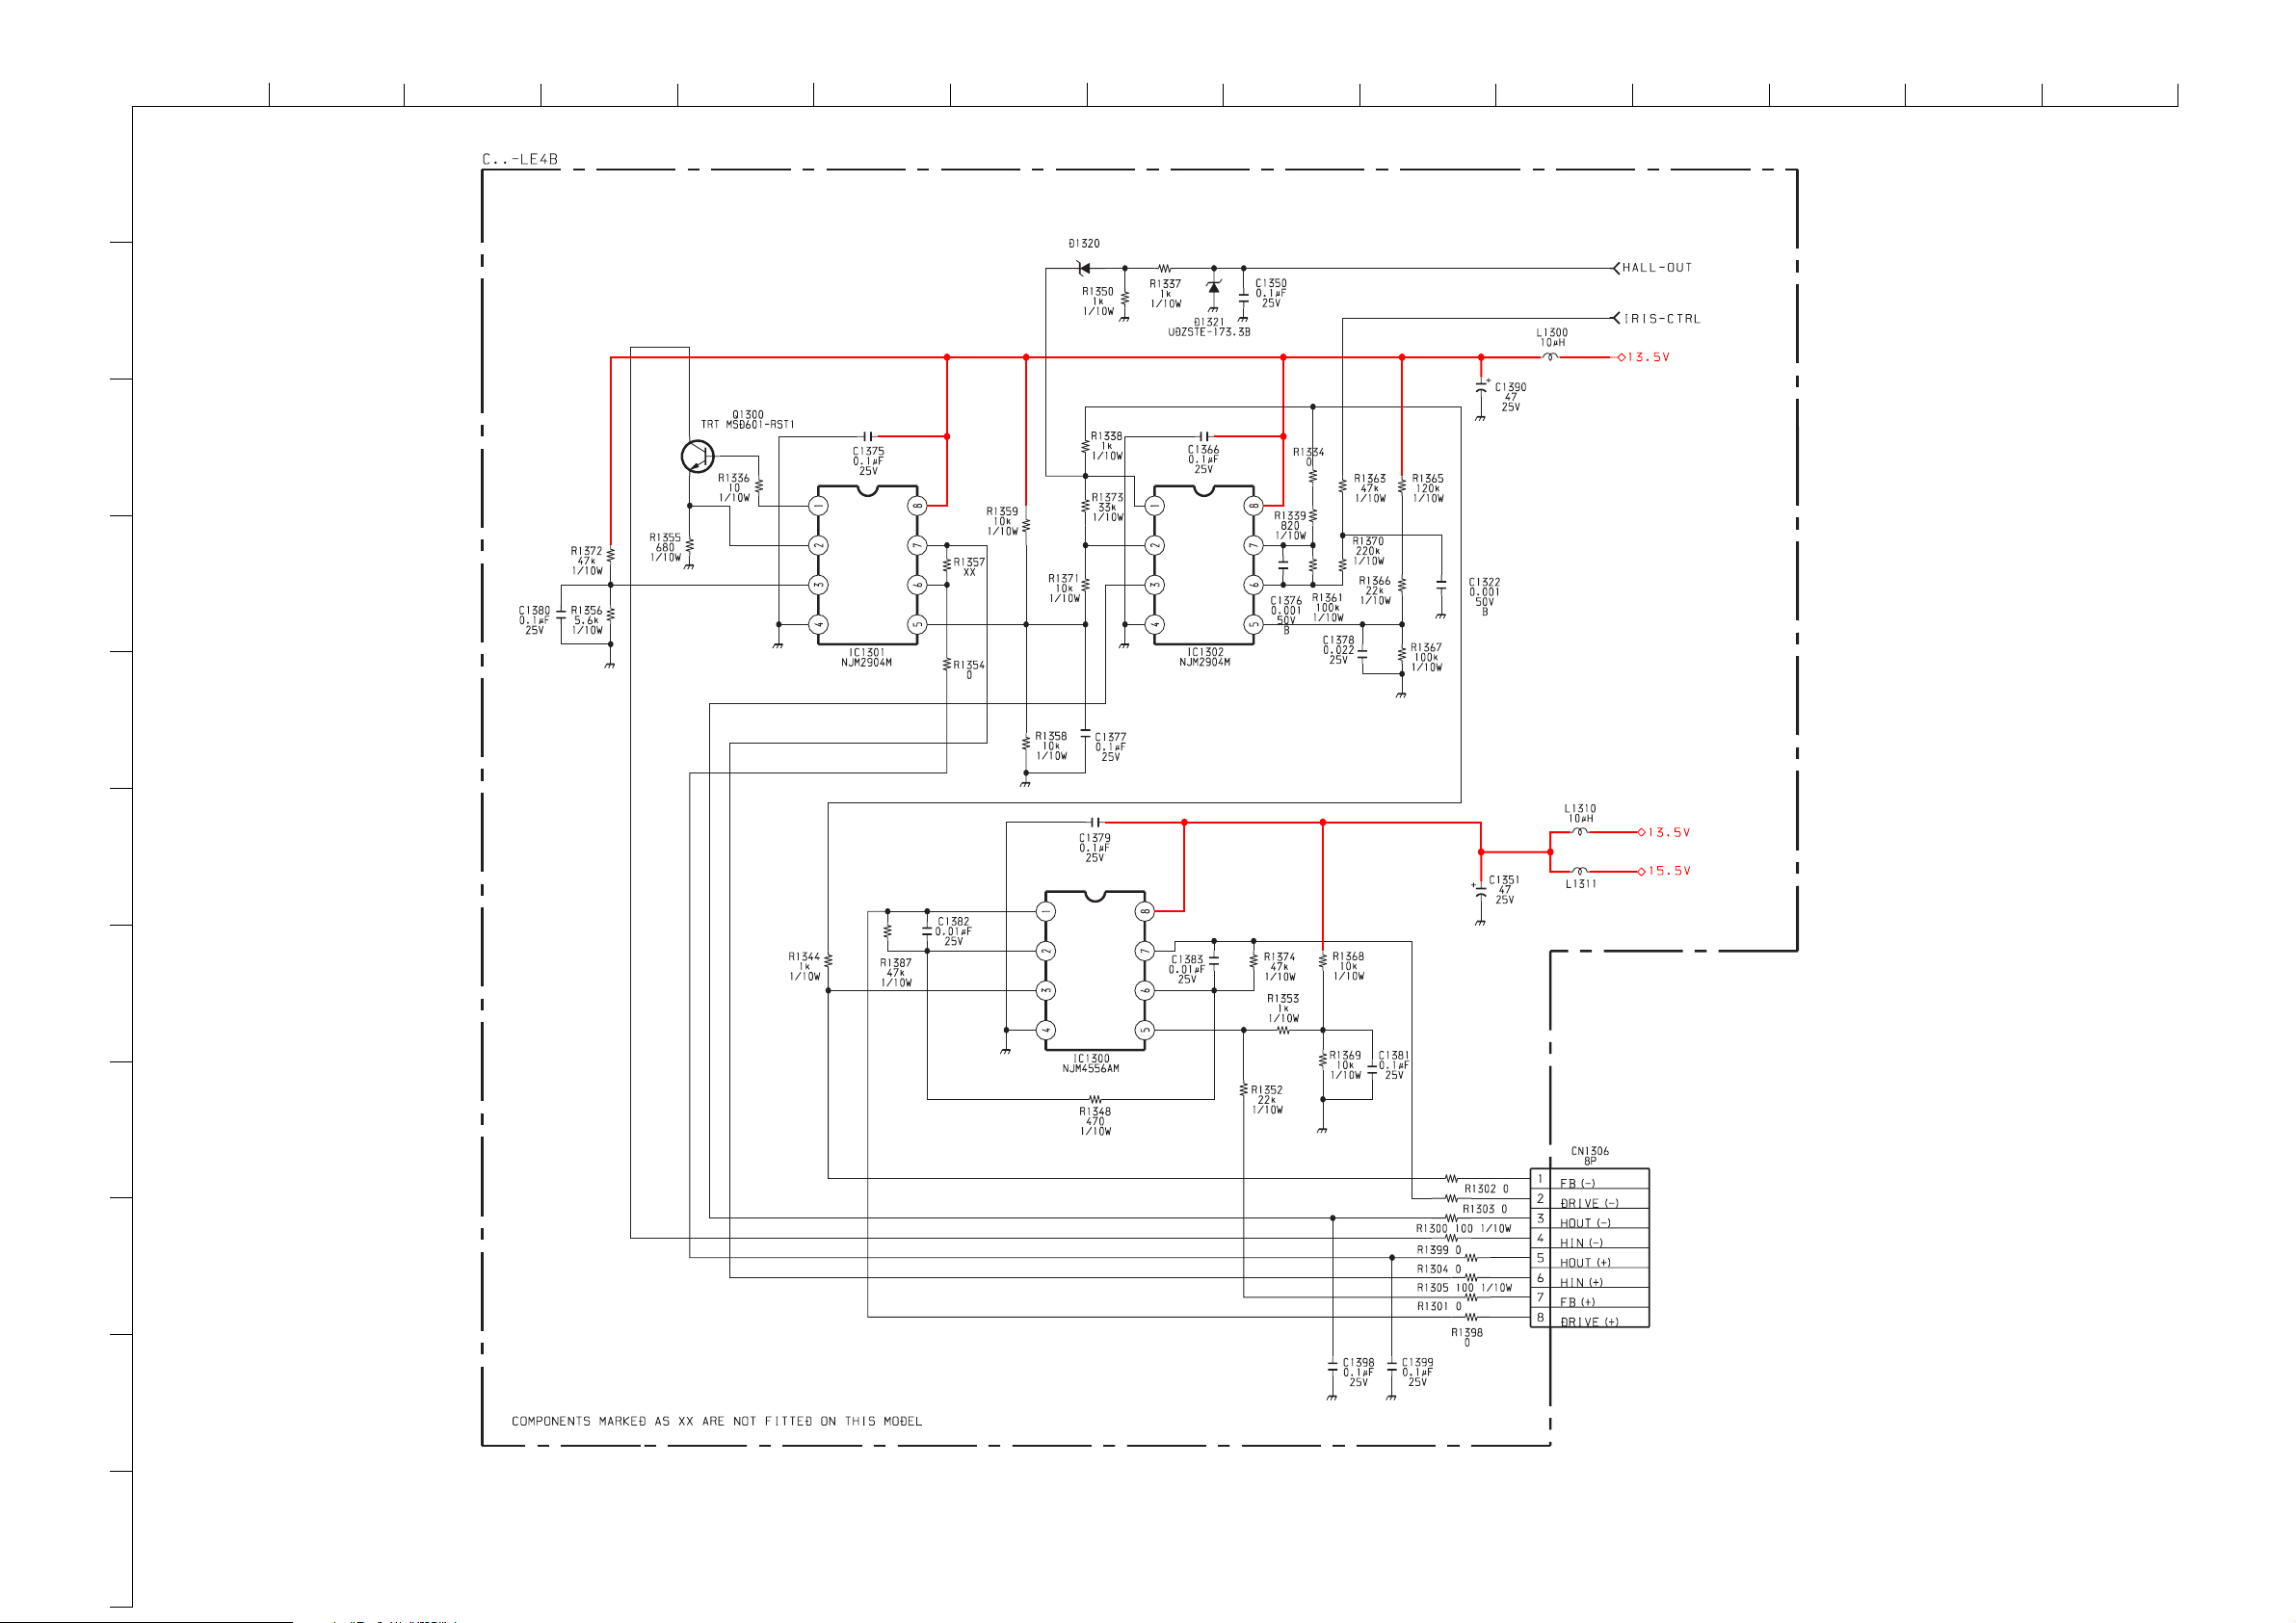
ABCDE F
G
HI JKLMN
O
1
4/4
C
UDZS-5.6B
2
3
4
DUAL OPERATIONAL AMP
DUAL OPERATIONAL AMP
5
6
XX
7
DUAL OPERATIONAL AMP
8
10
11
9
~ C Board Schematic Diagram [ LCD Panel Driver Board ] Page 4/4 ~
- 46 -
Page 47
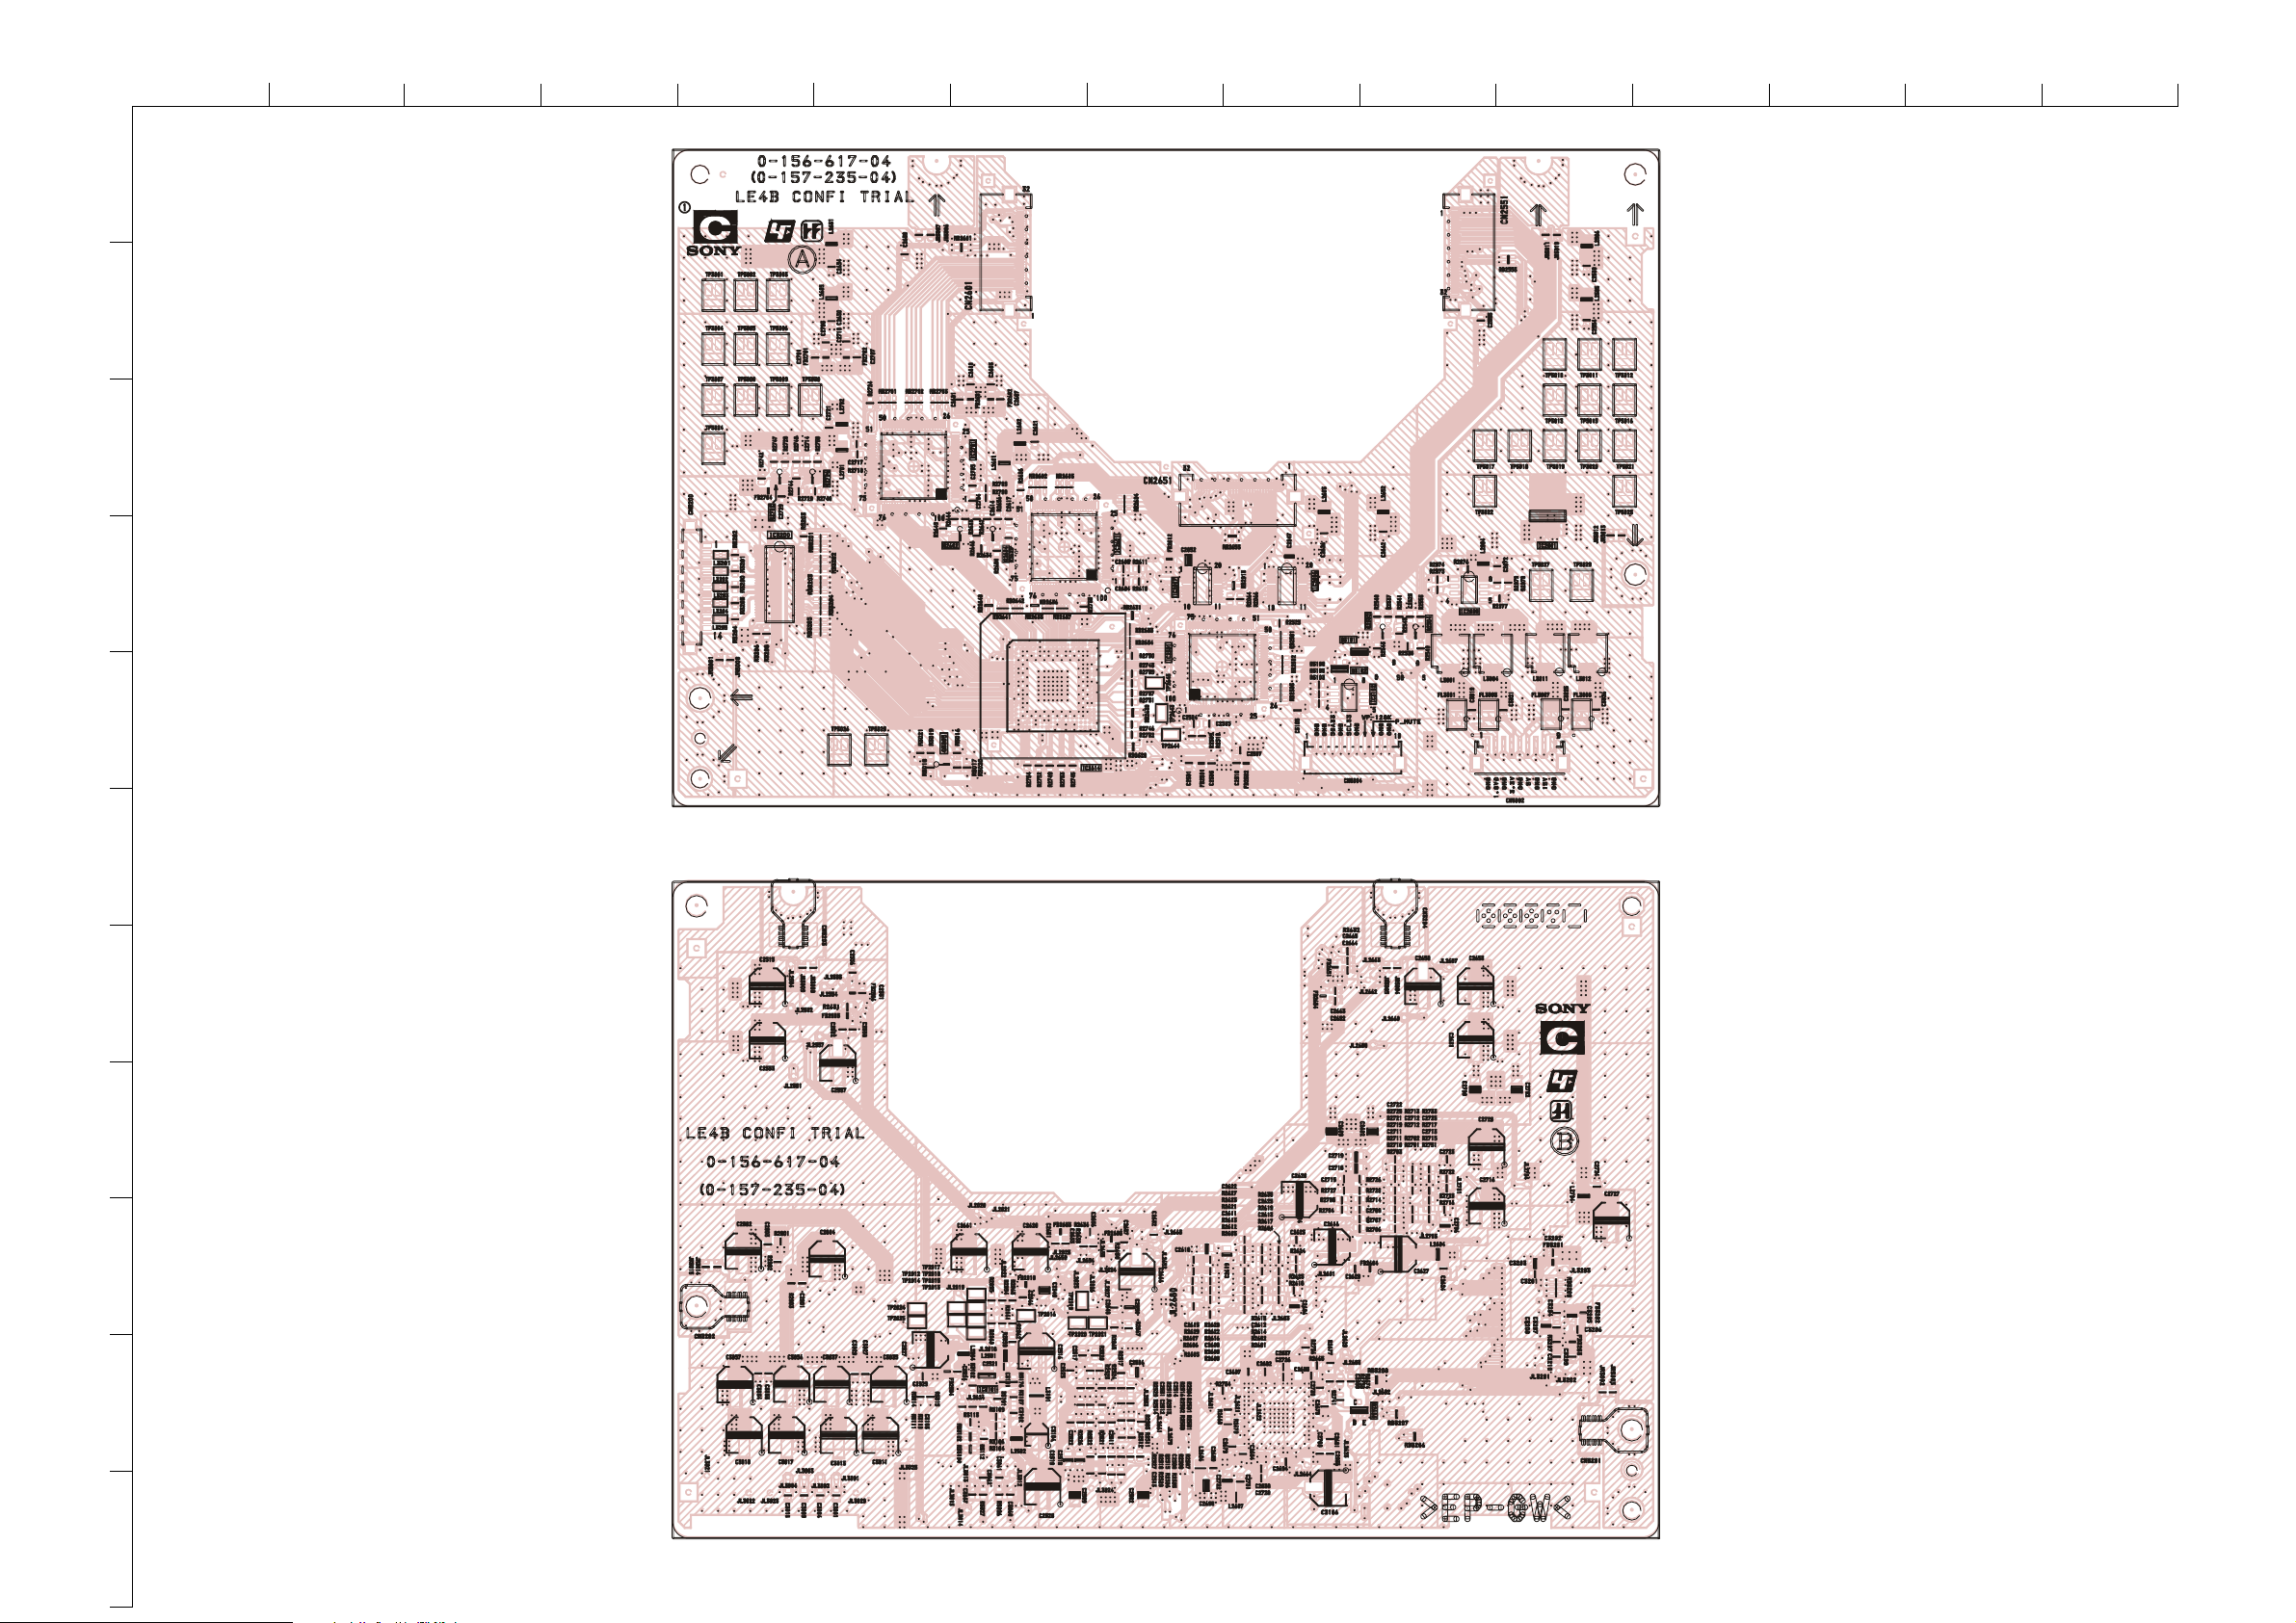
ABCDE F
G
HI JKLMN
O
~ C Printed Wiring Board Conductor Side A ~
1
2
3
4
5
6
7
8
9
~ C Printed Wiring Board Conductor Side B ~
10
11
- 47 -
Page 48
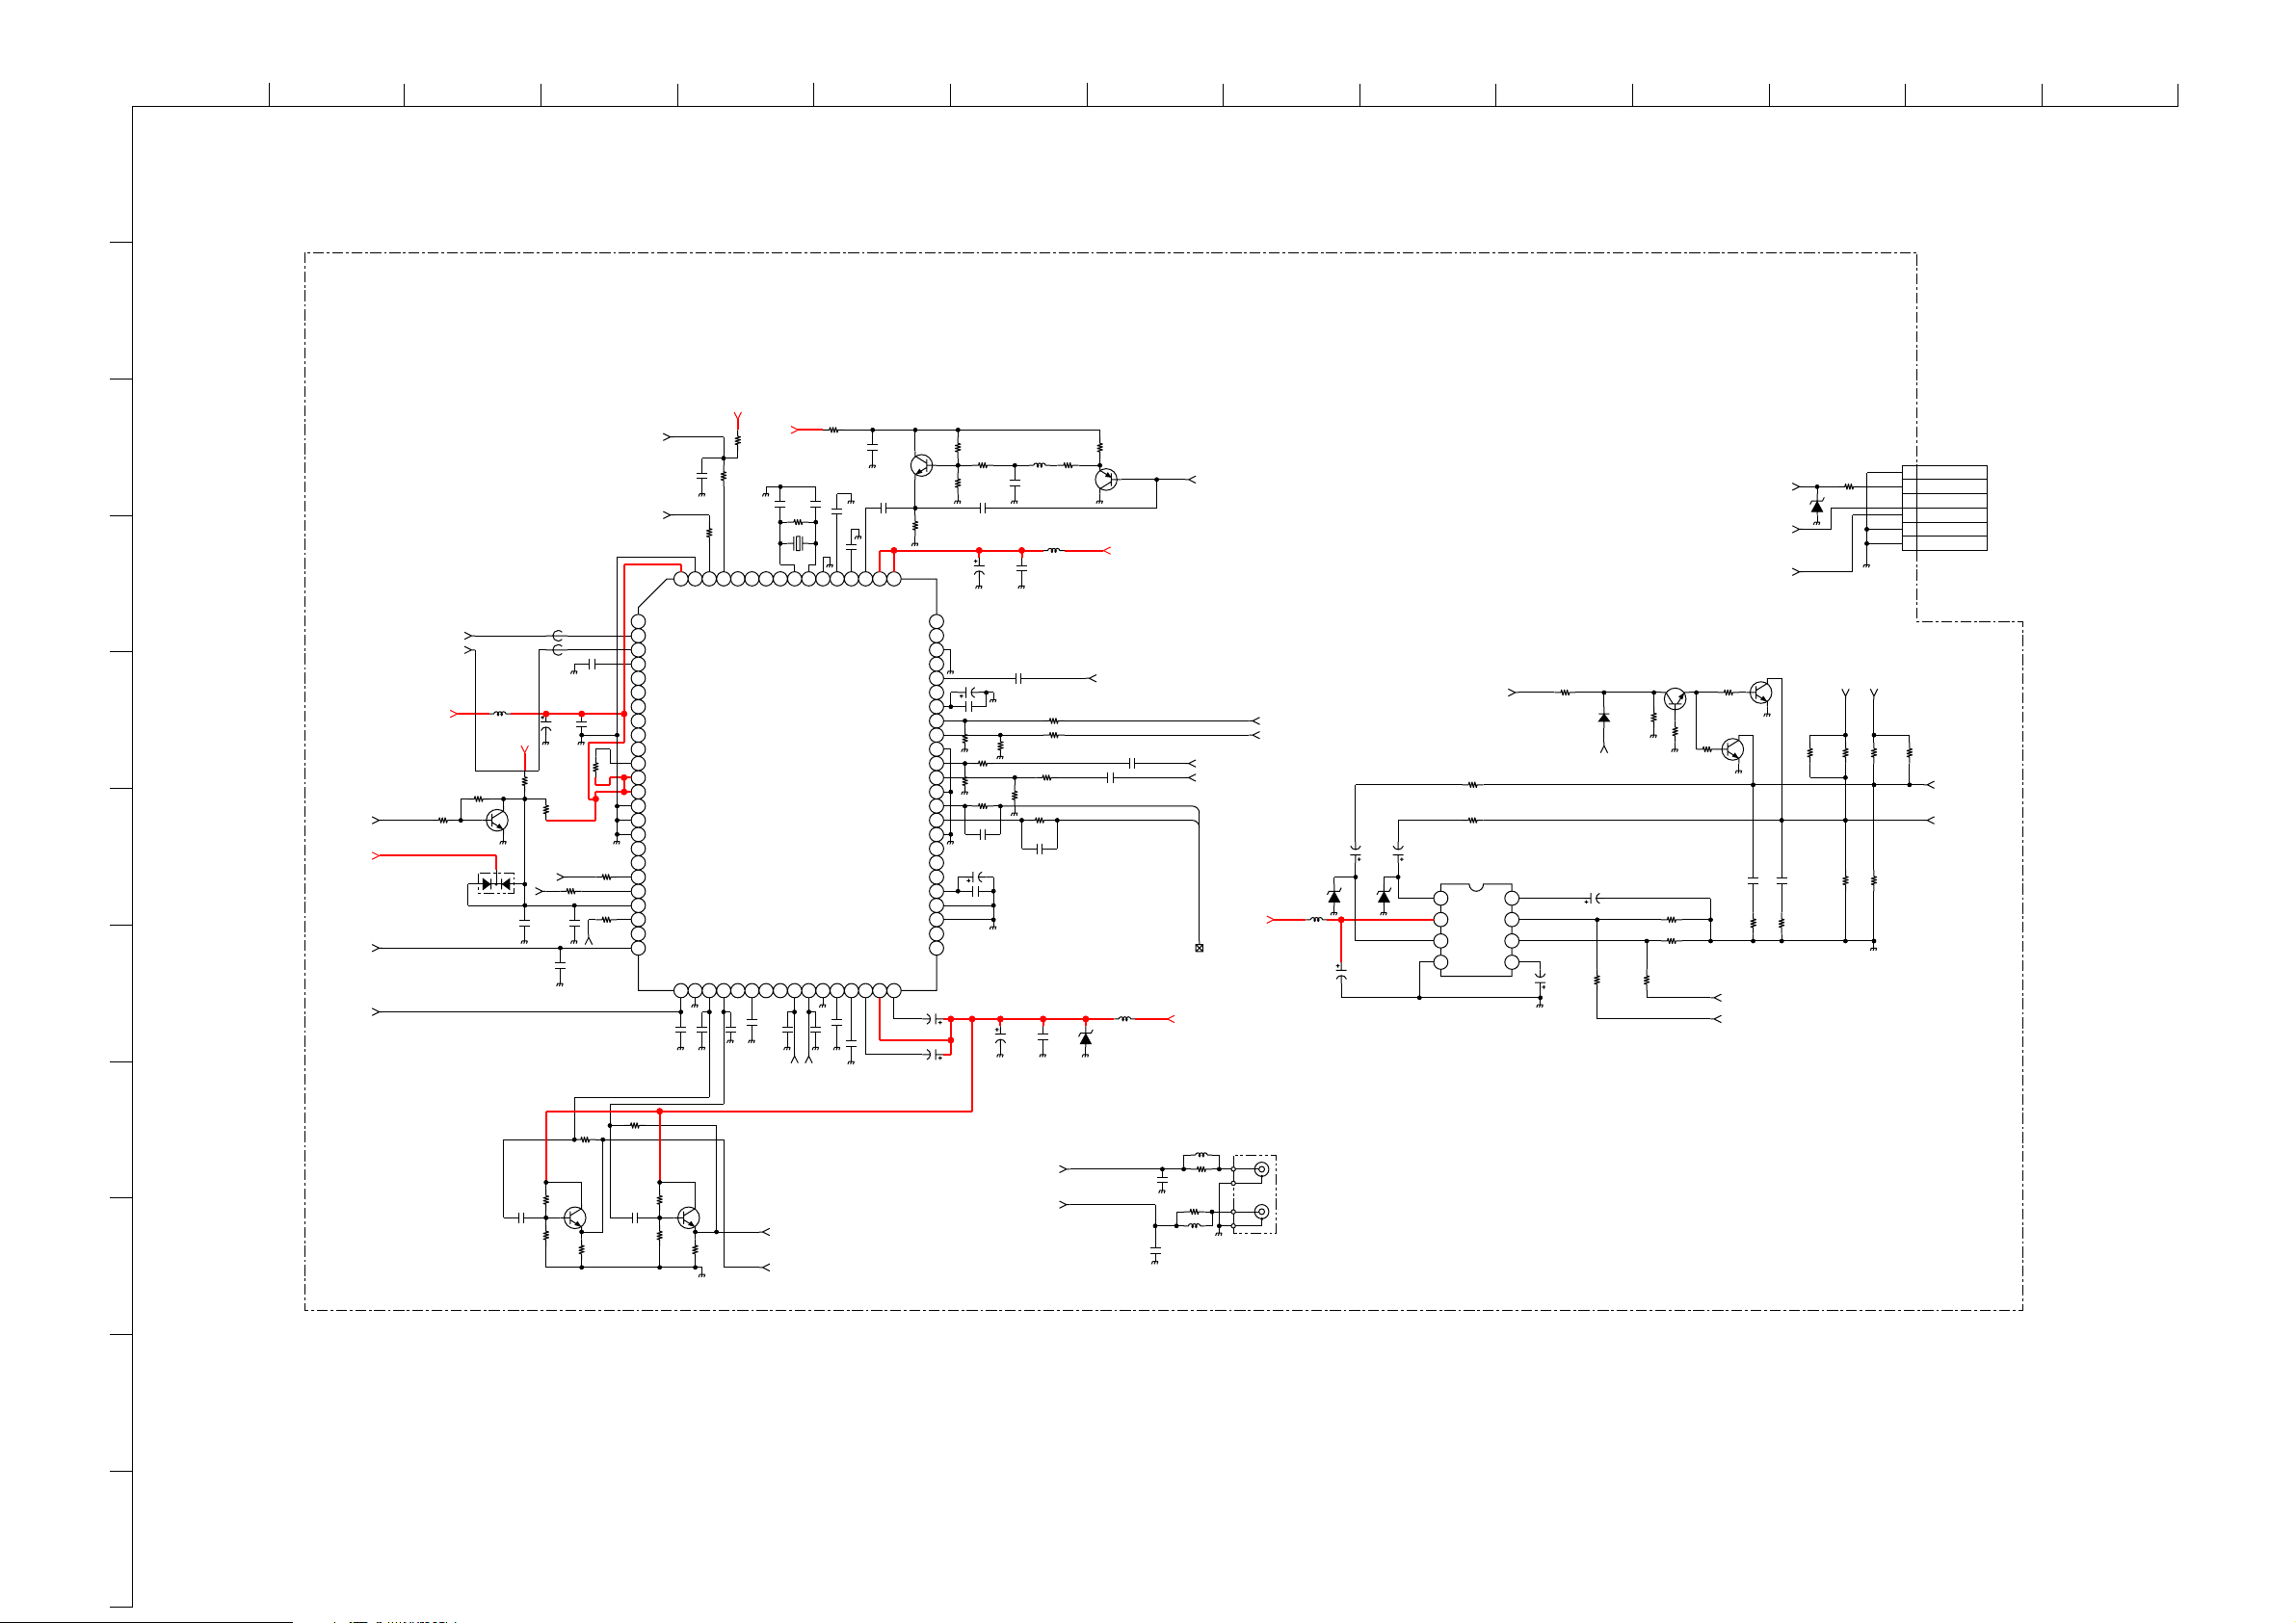
ABCDE F
G
HI JKLMN
O
1
JB.-LE4B
2
JB
3
4
SCL_5V
SDA_5V
R7805
4.7k
1/10W
A5V
5
RESET_AUDIO
6
+8V
AP_R_OUT
7
AP_L_OUT
8
9
1/9 AUDIO PROCESSOR, AV SWITCH, CHROMA DECODER, VIDEO PROCESSOR, MAIN MICRO
R7820
XX
Q7801
MSD601-RST1
D7803
XX
L7803
10uH
R7821
C7818
25V
0.1
XX
C7821
0.47
R7828
16V
18k
FB7800
0uH
FB7801
0uH
C7815
47
16V
STBY5V
R7972
0
CHIP
R7822
100k
I2S_CL3/ABCK
R7970
I2S_WS3/ALRCK
C7820
XX
C7819
0.0022
R7826
R7829
33k
C7816
XX
C7817
0.1
25V
R7969
0
0
R7971
0
I2S_DA_IN3/ADD
R7827
XX
Q7802
MSD601-RST1
C7822
0.47
R7830
560
HP_DET
AU_PROT
1 2 3 4 5 6 7 8 9 101112131415161718192021222324
R7847
18k
16V
A5V
R7841
10k
C7824
NC
I2C_CL
I2C_DA
I2S_CL
I2S_WS
I2S_DATA_OUT
I2S_DA_IN1
I2S_DEL_IN
I2S_DEL_OUT
I2S_DEL_WS
I2S_DEL_WS
DVSUP
DVSUP
DVSS
DVSS
DVSS
I2S_DA_IN2
NC
I2S_CL3
I2S_WS3
RESETQ
I2S_DA_IN3
I2S_DA_IN4
DACA_R
DACA_L
C7826
0.0022
XX
R7848
33k
R7840
100
XX
C7825
ADR_SEL
D_CTR_I/O_0
DACM_R
VREF2
Q7806
MSD601-RST1
R7849
560
1.5p
X7800
18.432MHz
NC
SPDIF_OUT
D_CTR_I/O_1
MSP3411G-QA-B11
SOUND PROCESSOR
DACM_L
DACM_C
DACM_SUB
C7800
1000p
50V
C7828
C7829
2200p
50V
R7843
100
80
STANDBYQ
252627282930313233343536373839
C7827
2200p
50V
+8V
C7833
1.5p
R7844
100k
TP
XTAL_OUT
AUD_CL_OUT
IC7804
DACM_SL
DACM_SR
SC2_OUT_R
XX
TUNER_R
POW_IN_L
POW_IN_R
R7854
0
C7832
C7834
100p
50V
XTAL_IN
TESTEN
ANA_IN2+
VREF1
SC2_OUT_L
C7843
XX
C7845
2200p
TUNER_L
XX
C7836
50V
4700p
100p
50V
C7835
ANA_IN-
ANA_IN1+
SC3_OUOT_L
SC3_OUT_R
SC1_OUT_L
CAPL_A
SC1_OUT_R
2200p
C7844
50V
MSD601-RST1
AVSUP
SC5_IN_R
SC5_IN_L
VREFTOP
SC1_IN_R
SC1_IN_L
SC2_IN_R
SC2_IN_L
SC3_IN_R
SC3_IN_L
SC4_IN_R
SC4_IN_L
Q7810
656667686970717273747576777879
AVSUP
AVSS
AVSS
ASG
ASG
ASG
AGNDC
AHVSS
AHVSS
AHVSUP
40
C7846
10
16V
R7858
R7857
NC
NC
NC
CAPL_M
C7847
10
16V
R7855
R7856
XX
1k
C7838
47
16V
C7839
10
16V
C7840
1/10W
R7866
R9724
R7993
414243444546474849505152535455565758596061626364
XX
0
C7837
XX
0.1
R9722
15k
XX
C7993
1
C7850
25V
XX
C7852
47
16V
0.1
25V
C7851
0.47
10V
R9723
1/10W
0
C7841
10
16V
C7842
0.1
25V
VAR_ROUT
L7805
8.2uH
C7849
120p
L7806
10uH
R7860
15k
R7842
XX
R7994
XX
C7994
1
C7853
0.1
25V
VAR_LOUT
R7859
4.7k
4.7k
R7864
47
FM/AM
R7867
0
CHIP
D7807
UDZSTE-179.1B
R7865
1k
Q7811
MSB709-RT1
A5V
C9652
1
16V
C9653
1
16V
L7807
10uH
C6398
0.01
25V
C6399
0.01
25V
MAIN_R_IN
MAIN_L_IN
HDMI_R[0]
HDMI_L[0]
+8V
R6588
XX
L6317
10uH
R6589
L6316
10uH
QSS
PC_RI
PC_L
HDMI_LR
XX
MAIN_R_IN
MAIN_L_IN
UDZSTE-179.1B
AU_9V
J2802
L
R
D9603
L6308
1uH
C6371
47
16V
C6372
100
16V
D9604
HP_MUTE
R6527
47
1/10W
RN-CP
C6370
47
IC6309
16V
TDA2822D013TR
DUAL LOW VOLTAGE POWER AMP
UDZSTE-179.1B
R OUT
+9V
L OUT
4321
GND
R6528
47
1/10W
RN-CP
8765
R IN
L IN
R6545
1k
1/10W
RN-CP
D9601
MMDL914T1
POWER_OFF_MUTE
C6374
16V
C6373
47
16V
R6531
22k
1/10W
RN-CP
D9602
UDZSTE-179.1B
HP_DET
HP_L
HP_R
Q3881
R6541
1k
Q3880
MSB709-RT1
R6544
XX
R6543
1k
1/10W
R6529
47
2.2k
1/10W
RN-CP
R6530
2.2k
1/10W
RN-CP
R6532
22k
1/10W
RN-CP
COMPONENTS MARKED AS XX ARE NOT FITTED ON THIS MODEL
1/10W
RN-CP
Q3878
MSD601-RST1
R6542
1k
1/10W
C6375
0.1
16V
R6533
AP_L_OUT
AP_R_OUT
MSD601-RST1
XX
R6539
100
1/10W
RN-CP
C6376
R6534
R6538
100
1/10W
RN-CP
R6535
0.1
1/10W
16V
RN-CP
XX
CN9513
6P
1
GND
2
HP_L
R6537
1/10W
RN-CP
R6536
1/10W
RN-CP
HP_DET
3
HP_L
4
HP_R
5
GND
6
GND
R6540
100
100
1/10W
RN-CP
VAR_LOUT
VAR_ROUT
220
TO H3 BOARD
CN4301
R9750
1k
HP_R
220
10
11
~ JB Board Schematic Diagram [ Audio Processor, AV Switch, Chroma Decoder, Video Processor, Main Micro ] Page 1/9 ~
- 48 -
Page 49
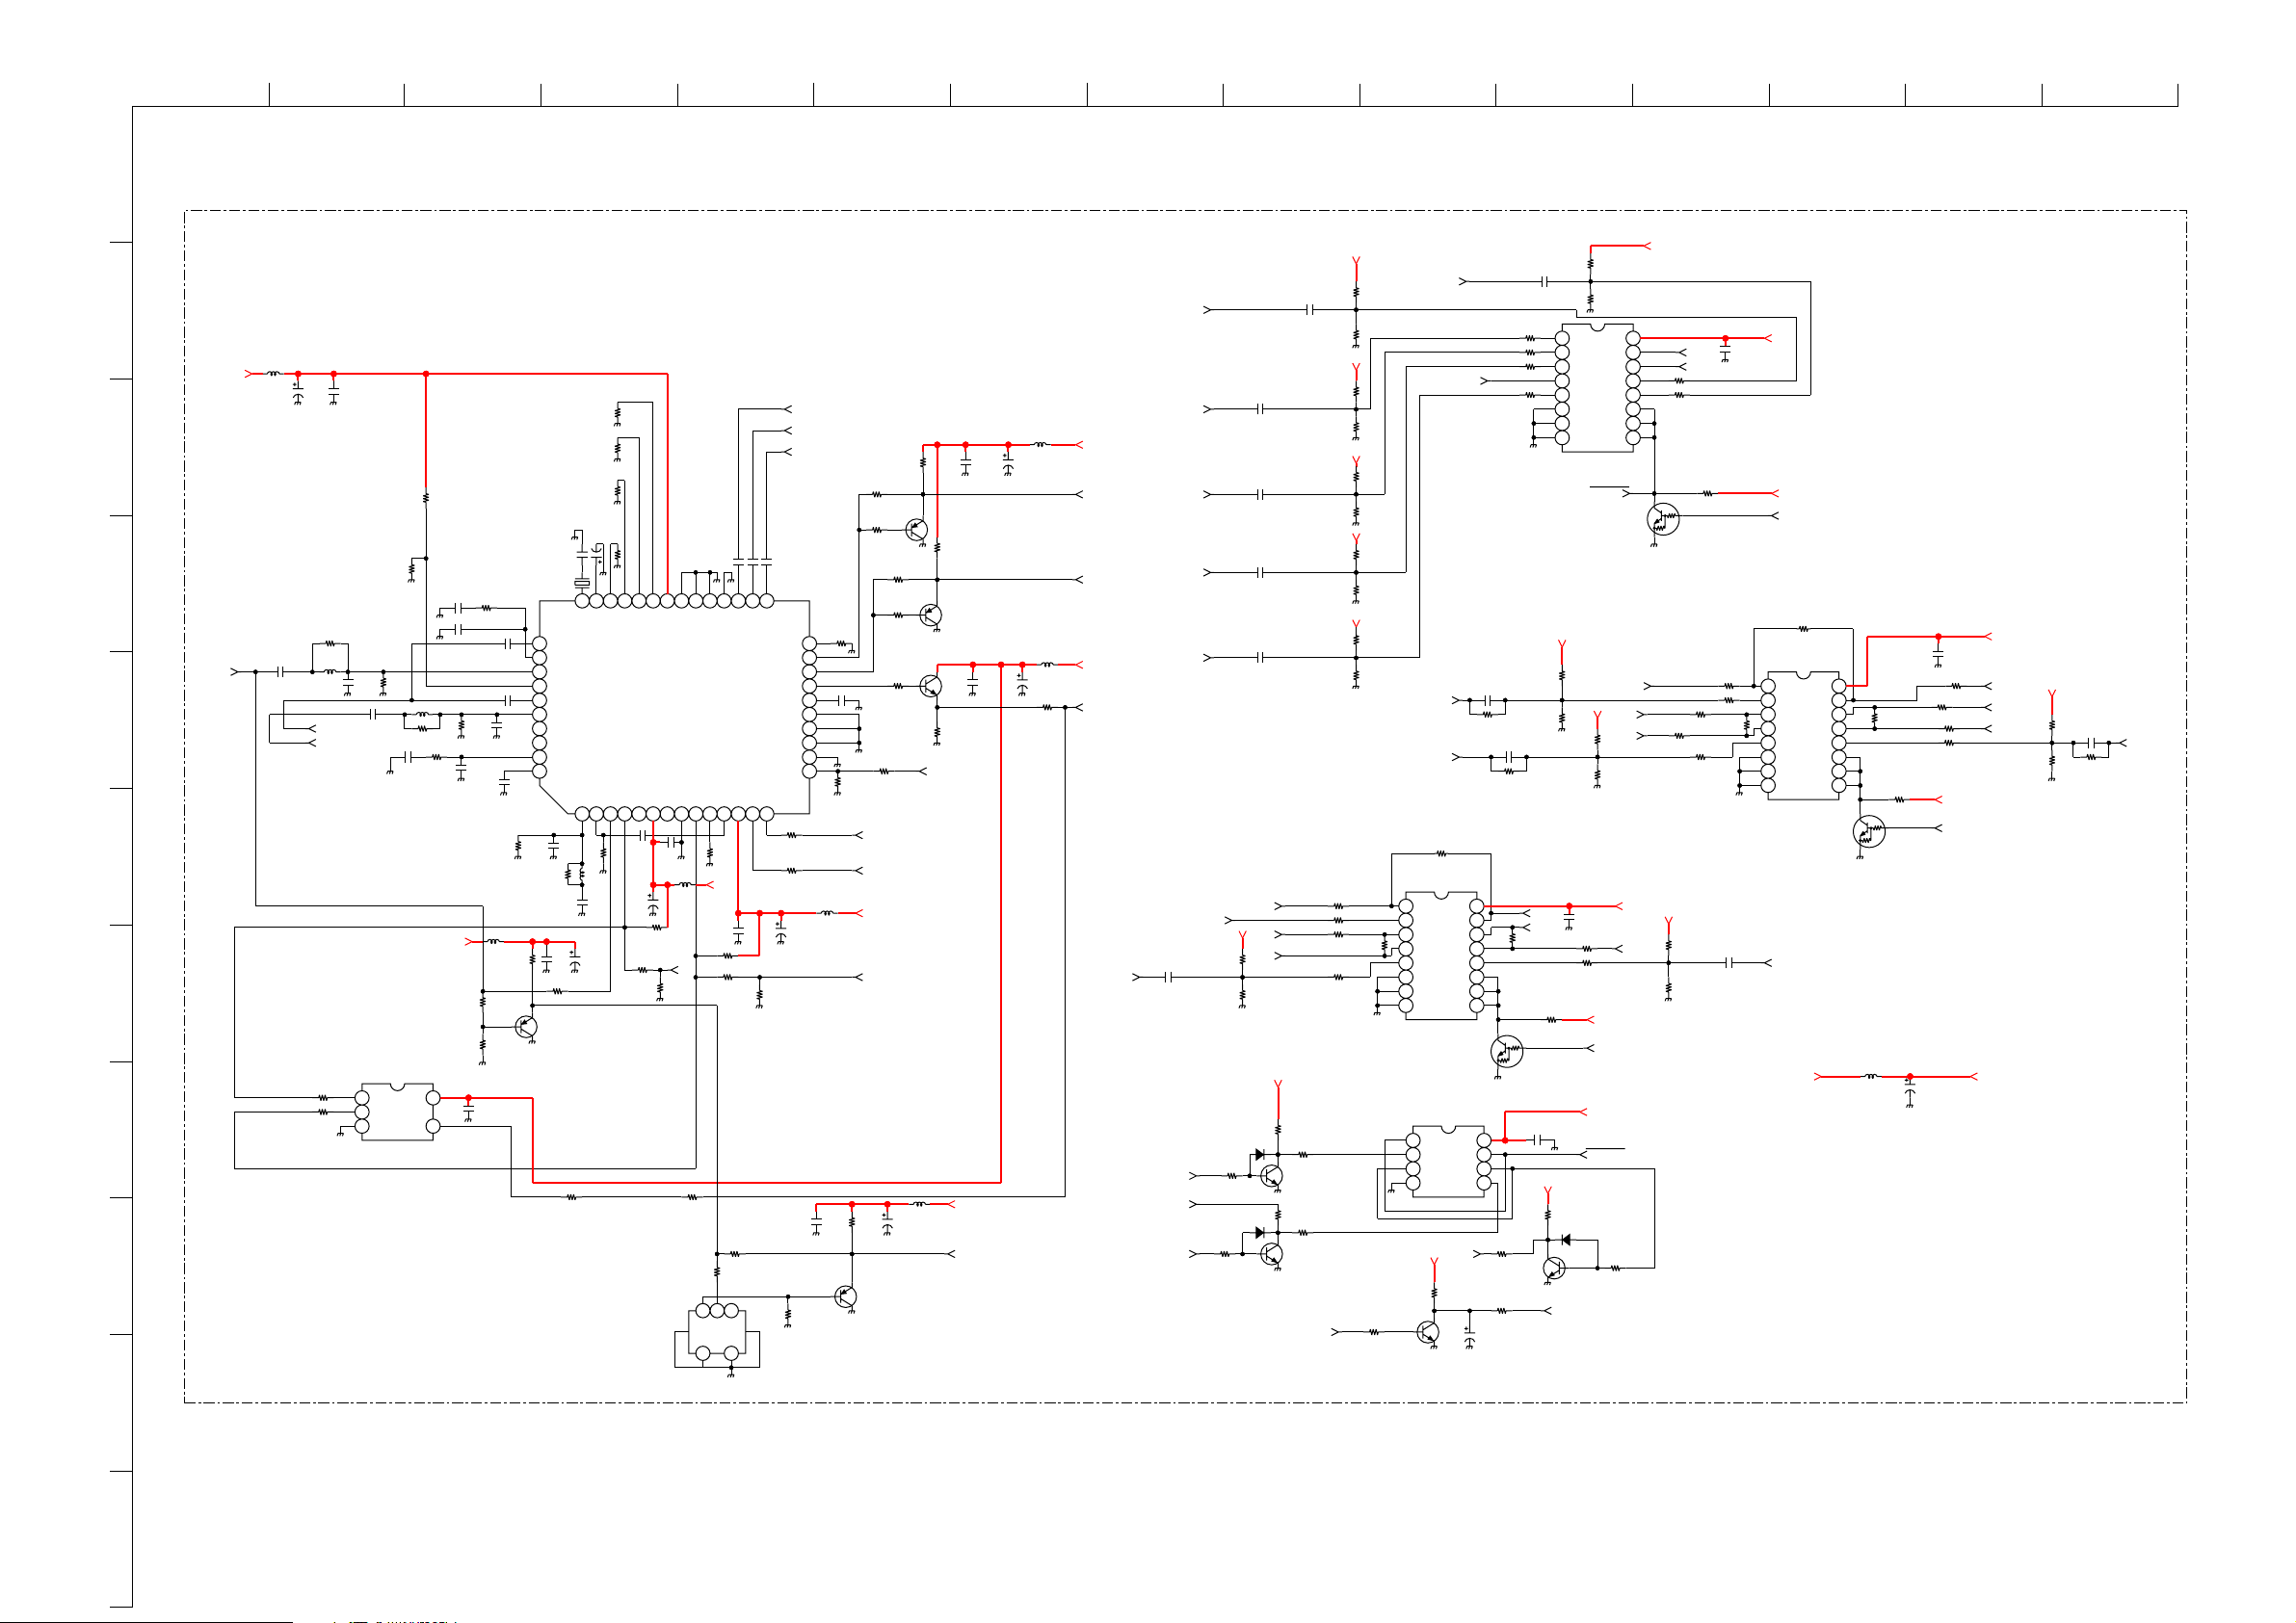
ABCDE F
G
HI JKLMN
O
1
JB.-LE4B
10
A5V_1
XX
Q2514
MSD601-RST1
R2597
6.8k
1/10W
B_SCART2
R2559
R2560
G_IN
Y_HDMI
CB_HDMI
R2570
XX
IC2506
MC74LVX8053DTR2
YUV INPUT
87654321
Q2508
DTC115EUA-T106
IC2507
TC7WT241FU(TE12R)
ANALOG SWITCH
4321
FB_IN
A5V
R2598
10k
1/10W
C2591
10
16V
0
CHIP
0
CHIP
R2561
C2601
XX
R2627
0
CHIP
C2602
R2613
0
CHIP
16 15 14 13 12 11 10 9
8765
R2595
1k
1/10W
R2599
100
1/10W
R2558
0
R2585
C2543
0.1
16V
R2596
1/10W
C2550
CHIP
0
CHIP
XX
Y_OUT1
CR_OUT1
XX
R2588
4.7k
0.47
A5V
R2592
1/10W
10k
R2591
100
1/10W
R2594
10k
1/10W
R2593
100
1/10W
C2551
0.47
10V
R2568
FB_IN
R2567
R2569
R2513
1/10W
R2565
10k
1/10W
R2580
10k
1/10W
R2581
10k
1/10W
R2582
10k
1/10W
R2583
10k
1/10W
R2566
10k
1/10W
R2562
10k
1/10W
R2563
10k
1/10W
R2564
10k
1/10W
R2571
CHIP
10k
0
0
0
0
A5V_1
A5V_1
A5V_1
A5V_1
CHIP
CHIP
CHIP
R2572
JB
2/9
CB_HD
B_SCART1
R_SCART1
R_SCART2
G_SCART1
G_SCART2
C2559
0.47
10V
FB2
A5V
FB1
YHD_M
A5V_1
R2579
10k
1/10W
R2600
10k
1/10W
D2501
MMDL914T1
R2573
4.7k
RN-CP
Q2509
MSD601-RST1
D2502
MMDL914T1
R2590
4.7k
RN-CP
C2552
0.47
10V
C2553
0.47
10V
C2554
0.47
10V
C2555
0.47
10V
YSYNC
CB
CB_OUT1
Q2510
MSD601-RST1
2
L2500
10uH
A5V
R2518
C2500
C2501
0.1
47
16V
16V
3
R2503
1k
1/10W
R2505
XX
C2506
0
XX
R2508
3.9k
1/10W
C2511
0.47
R2506
1/10W
10V
0.01
R2509
XX
C2510
0.022
25V
4
R2500
0
CHIP
C2502
0.1
L2501
CVBS_MAIN
5
16V
XX
C2503
XX
C_MAIN
Y_MAIN
C2504
0.1
16V
R2504
XX
C2509
L2503
2.2
10V
R2507
CHIP
6
A5V
7
IC2500
TC7SET02FU(T5RSOJF)
R2501
LOGIC GATE(SYNC ADDER)
100
1/10W
R2502
8
100
1/10W
A
B
321
GND
VCC
Y
54
C2517
0.22
16V
27k
R2510
L2504
R2514
R2517
1/10W
25V
CHIP
25V0.01C2507
C2508
0.01
XX
R2515
1/10W
0
1k
C2512
XX
C2513
10uH
470
XX
X2500
16.2MHz
39
40
41
42
43
44
45
46
47
48
C2514
R2523
MSB709-RT1
9
COMPONENTS MARKED AS XX ARE NOT FITTED ON THIS MODEL
0
CHIP
R2519
0
CHIP
R2520
0
CHIP
R2521
0
C2519
10
CHIP
16V
C2518
10p
50V
XTAL
C3-IN
APC-FIL
CVBS3
ADDRESS
C2-IN
CVBS2
COMB SYS
FSC-OUT
AFC-FIL
C1-IN
0
CHIP
C2523
C2516
0.01
25V
R2516
Q2501
YS2-YM
BPH-FIL
CVBS1/Y1-IN
SYNC-IN
CVBS-OUTVSCOMB Y-IN
1234567891011121314
XX
R2604
C2520
1M
L2505
XX
0.1
16V
R2529
CHIP
C2524
16V
C2522
47
16V
R2525
XX
0
Y2-IN
B2-IN
R2-IN
G2-IN
Y/C-VCC
IC2501
CXA2163AQ-T6
CHROMA DECODER
D-VDD
COMB C-IN
D-GNDHSSCP
C2521
0.1
0.01
16V
25V
L2506
10uH
47
R2524
6.8k
1/10W
VS
R2526
XX
XX
R2530
820
1/10W
R2531
1/10W
CB2-IN
CR2-IN
R2522
6.8k
1/10W
A5V
C2530
0.01
25V
R2527
R2528
0
R2532
560
FL2500
46
Y/C-GND
YVI-OUT
XX
123
16V
16V
0.1
0.1
C2527
C2526
R1-IN
G1-IN
SYNC-GND
SCL
SYNC-VCC
XX
16V
0.1
C2528
2526272829303132333435363738
B1-IN
YS1
CR-OUT
CB-OUT
Y-OUT
APL-FIL
Y1-IN
CB1-IN
CR1-IN
YS3
SDA
R2539
1/10W
R2540
1/10W
R2543
XX
R_IN
G_IN
100
100
C2531
47
16V
C2533
0.01
25V
R2544
1/10W
B_IN
5.6k
L2509
10uH
L2510
10uH
C2537
47
16V
R2549
1/10W
A5V
CR
CB
A5V
YSYNC
47
C2535
R2547
2.2k
1/10W
MSB709-RT1
C2536
R2548
150
1/10W
FB_IN
16V
C2534
0.1
16V
Q2504
0.1
A5V
CVBS_TRIDENT
47
16V
R2546
2.2k
1/10W
R2533
XX
R2535
100
1/10W
Q2502
MSB709-RT1
R2536
XX
R2534
R2537
0
R2541
XX
C2532
16V
100
1/10W
Q2505
MSD601-RST1
R2538
C2529
100
4.7
1/10W
6.3V
R2542
100
1/10W
SDA_5V
SCL_5V
A5V
HS
47
Q2503
MSB709-RT1
L2508
10uH
CHIP
24
23
22
21
20
19
18
17
16
15
L2507
10uH
R2545
470
1/10W
R2511
1/10W
10V
87654321
IC2504
MC74LVX8053DTR2
ANALOG SWITCH (RGB)
RGB_SEL
A5V_1
R2625
10k
1/10W
A5V_1
R2603
10k
1/10W
R2612
10k
1/10W
C2542
XX
R2587
CHIP0
CHIP
0
R2586
10k
1/10W
A5V_1
HD
A5V
RGB_SEL
A5V
D2503
MMDL914T1
Q2513
MSD601-RST1
FB_DET
10k
R2512
10k
1/10W
Y_OUT1
CB_OUT1
CB_OUT
R2611
10k
1/10W
R2589
4.7k
RN-CP
A5V_1
CR
16 15 14 13 12 11 10 9
A5V_1
R_IN
B_IN
R2576
R2577
Q2506
DTC115EUA-T106
CHIP
0
R2607
CHIPR2608 0
R2610
CHIP
A5V_1
R2601
10k
1/10W
R2602
10k
1/10W
R2578
10k
1/10W
R2624
0
0
0
R2605
CHIP
0
R2609
XX
C2560
0.47
10V
CHIP
CHIP
0
CHIP
C2540
XX
A5V_1
A5V_1
RGB_SEL
R2606
XX
IC2601
MC74LVX8053DTR2
ANALOG SWITCH (YUV)
87654321
Q2601
DTC115EUA-T106
CR_HD
A5V
C2603
0.01
25V
16 15 14 13 12 11 10 9
R2617
R2618
XX
R2623
10k
1/10W
L2502
10uH
C2505
16V
47
R2615
CHIP
0
0
CHIP
R2619
0
CHIP
A5V_1
HDMI_SEL
A5V_1
0
CHIPR2616
A5V_1
Y_OUT
CR_OUT
CR_OUT1
R2620
10k
1/10W
A5V_1
R2621
10k
1/10W
C2604
R2622
CHIP
XX
CR_HDMI
0
11
~ JB Board Schematic Diagram [ Audio Processor, AV Switch, Chroma Decoder, Video Processor, Main Micro ] Page 2/9 ~
- 49 -
Page 50
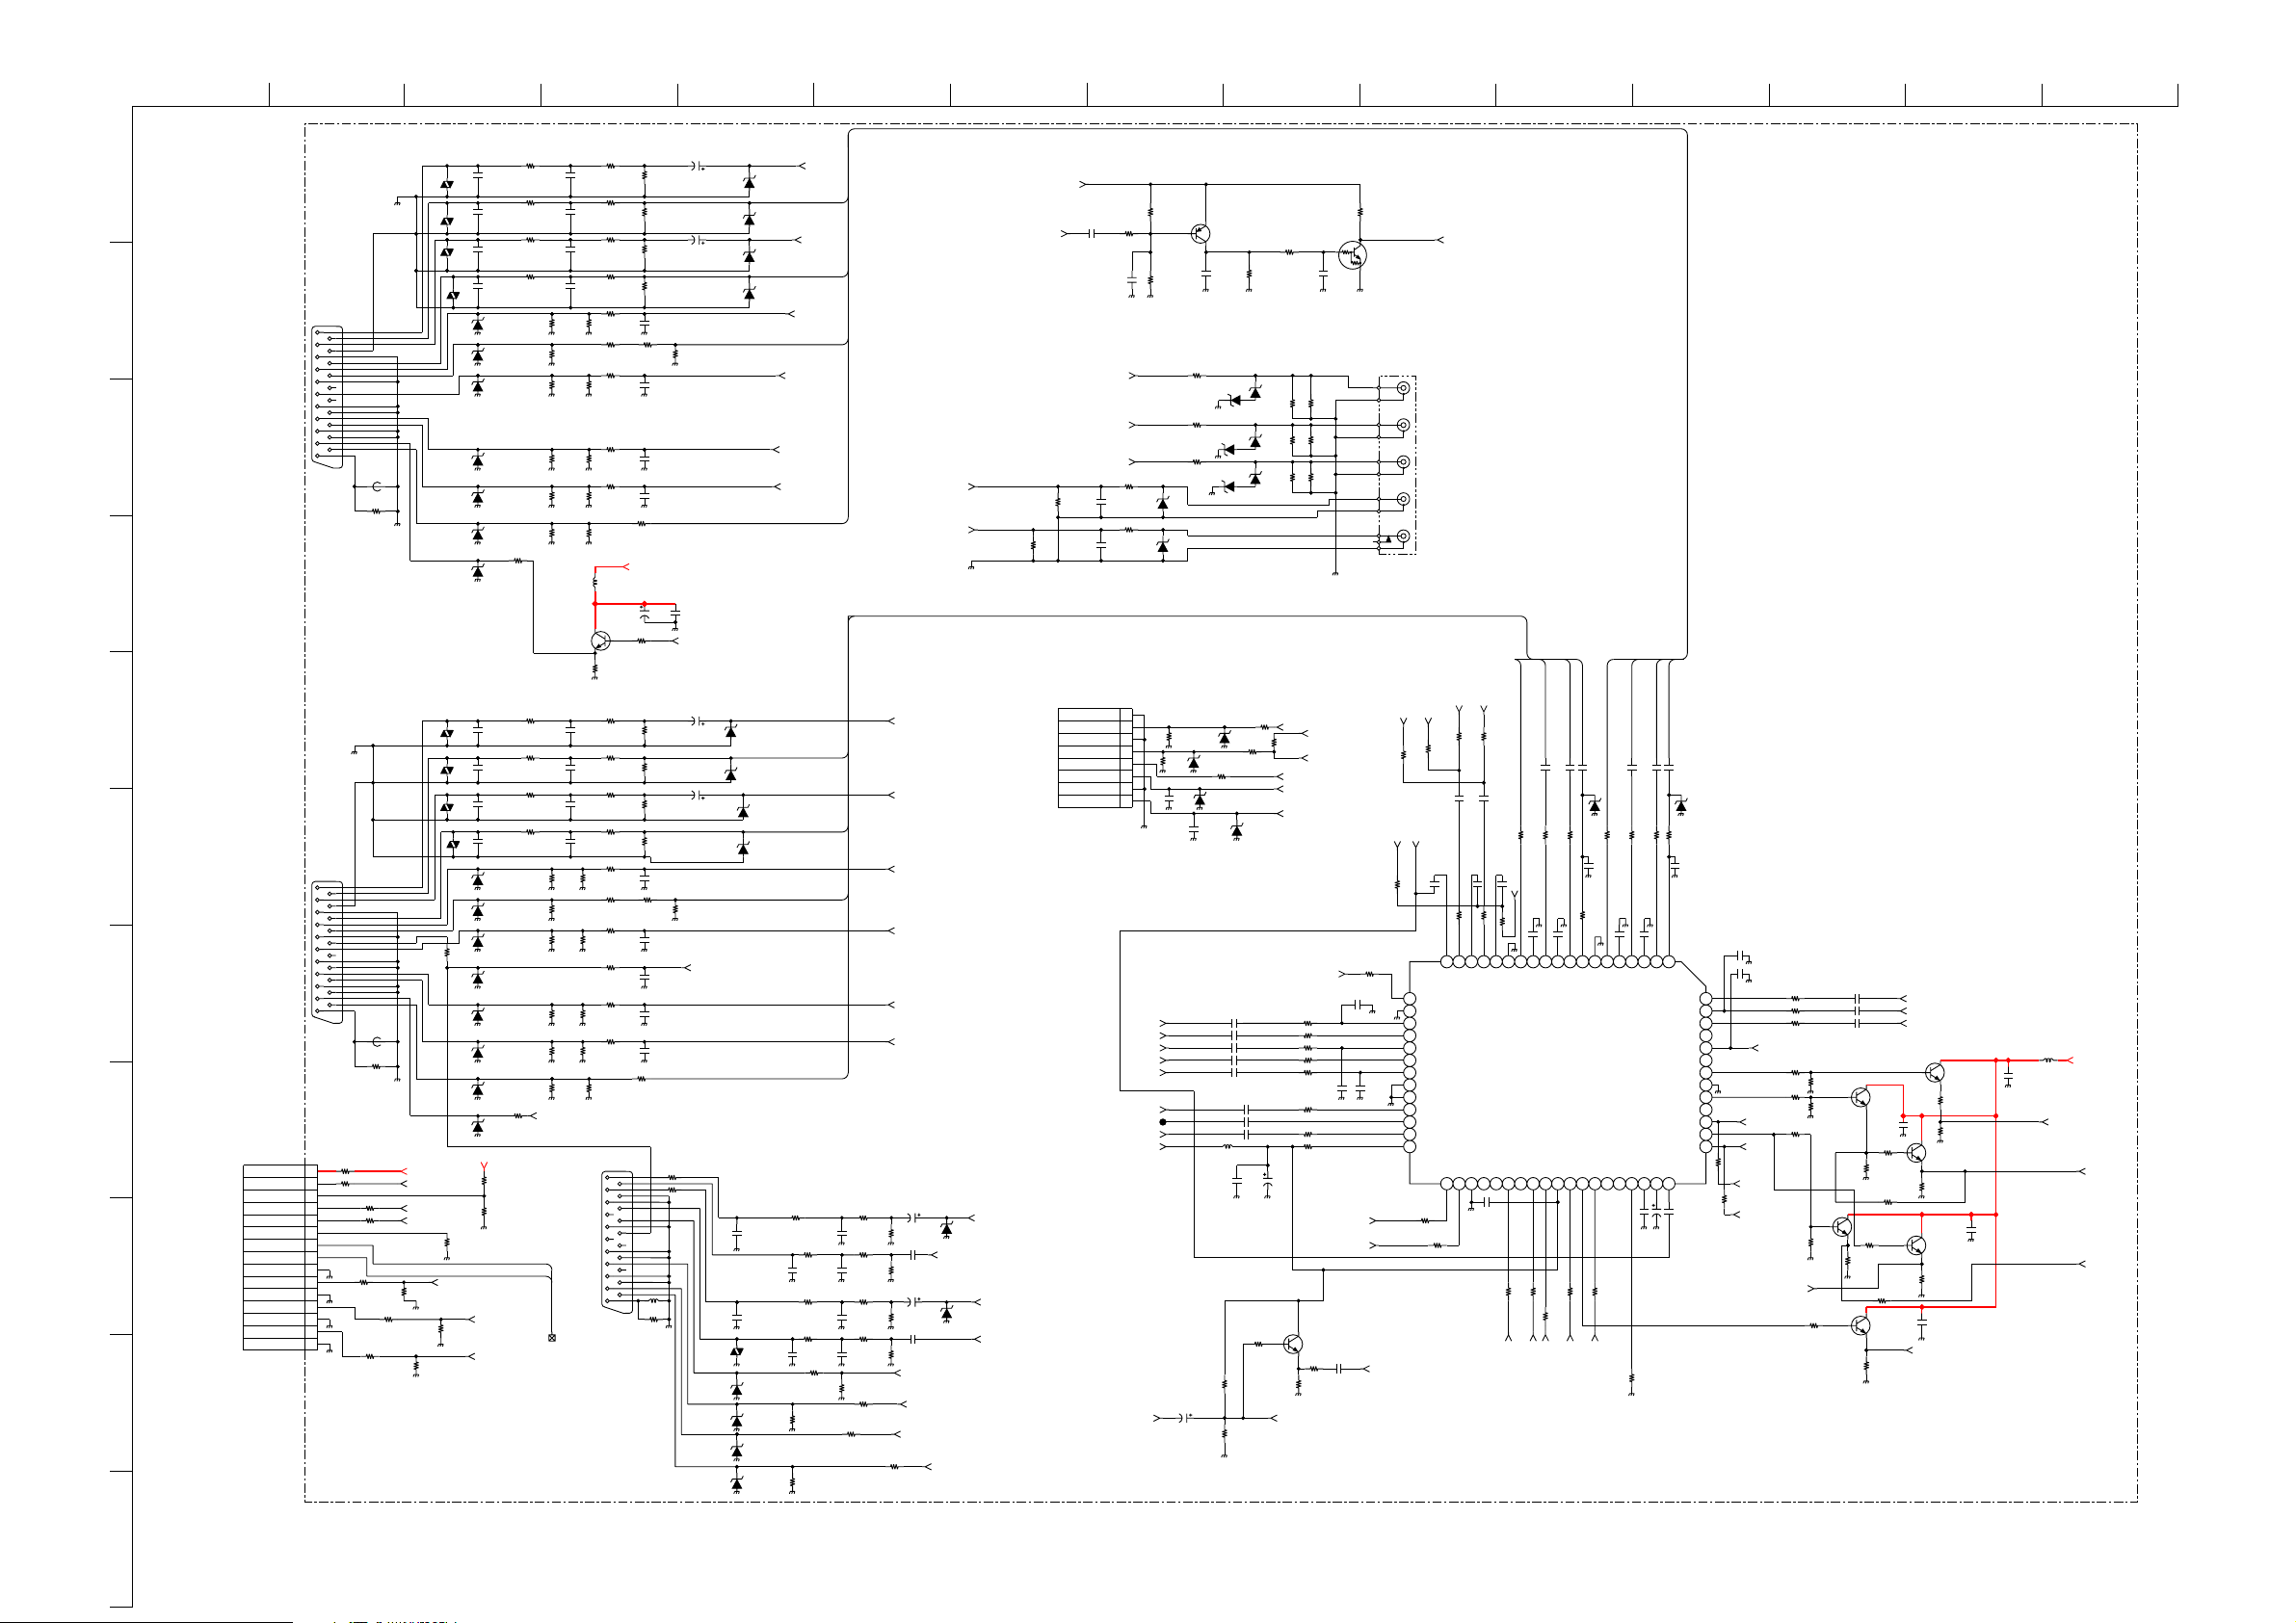
R_OUT2
B_SCART1
Q9514
HDMI_RST
UDZSTE-179.1B
D9511
CVBS_MAIN
STBY5V
D9541
XX
TUNER_R
1/10W
100
R9679
25V
47
C9540
21P
CN9501
1
2
3
4
5
6
7
8
9
10
11
12
13
14
15
16
17
18
19
20
21
YHD_AV
SCL_B
HD_R
D9540
XX
Y_HD
UDZSTE-179.1B
D9505
12345678910111213141516171819
20
21
22
23
24
25
26
27
28
29
30
31
32
33343536373839404142434445464748
4950
51
52
53
54
55
56
57
58
59
60
61
62
63
64
CXA2069Q-TL
IC9500
V1
LV1
Y1
RV1
C1
S2-1
S-1V2LV2
Y2
RV2
C2
S2-2
S-2
V3
LV3
Y3
RV3
C3
S2-3
S-3
V4
LV4
Y4
RV4
C4
S2-4
S-4
LV5
V5
RV5
ADR
SCL
SDA
AGND
DC OUT
COUT3
LOUT3
YOUT3
ROUT3
VOUT3
VCC
LOUT2
V/YOUT2
ROUT2
TRAP2
COUT2
MUTE
YIN1
BIAS
CIN1
LOUT1
VOUT1
ROUT1
TRAP1
YOUT1
VGND
COUT1
LV6
V6
RV6
LTV
TV
RTV
D9527
XX
SDA_B
R_SCART1
G_SCART1
10V
2.2
C9641
VDR010
Q9511
VDR007
1/10W
1k
R9680
UDZSTE-179.1B
D9503
C_MAIN
G_SCART2
UDZSTE-179.1B
D9544
SCL_5V
Q9516
V_OUT1
1/10W
100
R9681
22uH
L9502
AU_9V
25V
47
C9542
10uH
L9500
D9528
XX
UDZSTE-175.6B
D9509
1
2
3
4
5
6
7
8
9
10
11
12
13
14
15
BRN
15P
CN9505
+10.5V
HDMI_RST
CEC
SCL
SDA
AGND
R
L
GND
CR
GND
CB
GND
Y
GND
Y_MAIN
MSD601-RST1
Q9601
MAIN_L_IN
2SC4617R
Q9510
Y_HDMI
SDA_5V
L_OUT1
CVBS_RF
D9523
XX
FB1
UDZSTE-179.1B
D9500
25V
47
C9539
D9524
XX
CB_HDMI
UDZSTE-179.1B
D9507
HD_R
HDMI_LR
CB_HD
MSD601-RST1
Q9500
CR_HD
XX
FB9500
VDR011
UDZSTE-175.6B
D9506
VDR008
VDR004
V_OUT2
YHD_M
TUNER_L
UDZSTE-179.1B
D9545
UDZSTE-175.6B
D9512
D9525
XX
CR_HDMI
D9529
XX
DIGITAL_R
2SC1623-L5L6
Q9515
V_OUT1
UDZSTE-175.6B
D9504
AU_9V
HD_L
Q9512
AVLINK
R_OUT1
XX
FB9501
16V
47
C2558
25V
47
C9520
UDZSTE-1713B
D9501
YHD_AV
UDZSTE-1713B
D9508
D9526
XX
21P
CN9500
1
2
3
4
5
6
7
8
9
10
11
12
13
14
15
16
17
18
19
20
21
FB2
UDZSTE-179.1B
D9513
R_SCART2
MAIN_R_IN
Y_HD
DIGITAL_L
V_OUT2
B_SCART2
1/10W
4.7k
R2574
AU_9V
22uH
L9510
UDZSTE-175.6B
D9510
1/10W
12k
R2556
UDZSTE-175.6B
D9502
VDR005
VDR009
16V
100
C9570
16V
10
C9603
VDR006
AU_9V
25V
47
C9543
UDZSTE-175.6B
D9514
D9522
XX
HD_L
L_OUT2
L_OUT1
R_OUT1
R_OUT2
L_OUT2
D2834
XX
D3819
XX
D2835
XX
CN3803
XX
RIGHT OUT
RIGHT IN
LEFT OUT
GND
GND
LEFT IN
BLUE IN
MODE
GND
NC
GREEN IN
NC
GND
GND
C IN/RED IN
BLANKING
GND
GND
VIDEO OUT
VIDEO IN
GND
D3814
XX
D3818
XX
L3810
XX
C2839
XX
D3815
XX
C2838
XX
VD0006
XX
CHIP
0
R9751
CIN3
SC3_IN_L
MODE3
SC3_OUT_L
SC3_IN_R
SC3_OUT_R
VIN3
1
2
3
4
5
6
7
8
8P
CN9514
GND
C
GND
Y/CVBS
GND
L
GND
R
1/10W
75
R9752
75
R9753
UDZSTE-175.6B
D9605
UDZSTE-175.6B
D9606
1/10W
100
R9754
100
R9730
C_F
Y_F
LIN_F
TX
CVBS_F
RIN_F
16V
1
C9650
16V
1
C9651
D9607
XX
D9608
XX
CVBS_F
LIN_F
Y_F
RIN_F
C_F
JL9611
XX
R9755
MODE3
CIN3
C9580
XX
XX
R9756
XX
R9757
XX
R9758
SC3_IN_R
R9759
0
R9760
0
VIN3
SC3_IN_L
C9582
XX
16V
2.2
C9585
DIGITAL_CVBS
R9761
0
SC3_OUT_R
CHIP
0
R9762
CHIP
0
R9763
SC3_OUT_L
CHIP
0
R9764
25V
0.1
C9654
CVBS_RF
1/10W
470
R9744
1/10W
22k
R9745
1/10W
220k
R9746
50V
270p
C9655
MSB709-RT1
Q9603
A5V
COINCIDENCE
50V
100p
C9656
1/10W
33k
R9747
1/10W
33k
R9748
25V
0.22
C9657
MUN2213T1
Q9604
1/10W
10k
R9749
1/10W
470k
R9507
XX
C2832
XX
R3835
R2842
XX
10V
0.47
C9561
XX
JR3810
50V
1000p
C9513
CHIP
0
R9634
1/10W
1k
R9532
1/10W
150
R9521
1/10W
22k
R9548
1/10W
R9678
1k
1/10W
150
R9543
XX
C2829
XX
R3836
50V
470p
C9502
XX
C9599
XX
R9519
XX
C9571
16V
0.22
C9588
1/10W
150
R9707
1/10W
6.8k
R9662
1/10W
100
R9613
XX
R9542
XX
R2855
CHIP
R9695
0
XX
C9595
1/10W
220
R9537
1/10W
1k
R9534
1/10W
150
R9709
CHIP
0
R9500
R2836
XX
CHIP
0
R9544
1/10W
150
R9555
XX
C9525
1/10W
220
R9673
1/10W
150
R9520
1/10W
150
R9510
1/10W
75
R9526
CHIP
0
R9644
XX
C9516
25V
0.022
C9514
XX
C9529
R9690
1k
1/10W
1/10W
12k
R9588
16V
0.22
C9601
R9689
1k
1/10W
1/10W
2.2k
R9612
1/10W
2.2k
R9618
XX
C9527
1/10W
100
R9663
100
R9626
25V
0.01
C9541
16V
0.22
C9604
1/10W
470k
R9517
1/10W
100
R9547
XX
C3880
2.2
C9569
1/10W
75
R9551
1/10W
100
R9617
CHIP
0
R9632
R2839
XX
10V
2.2
C9616
1/10W
3.9k
R9664
1/10W
470k
R9516
1/10W
100
R9529
XX
C9518
1/10W
150
R9693
1/10W
100
R9513
XX
R3829
50V
470p
C9500
16V
2.2
C9596
XX
C9633
16V
0.22
C9622
XX
R9720
1/10W
470k
R9550
16V
2.2
C9615
1/10W
100
R9557
1/10W
470k
R9549
16V
0.22
C9602
CHIP
0
R9633
XX
C9566
XX
C2834
XX
R3834
0
R9713
16V
0.22
C9563
16V
0.22
C9605
1/10W
12k
R9589
XX
R2845
16V
2.2
C9583
R9691
470k
1/10W
XX
C9501
XX
C2837
10V
2.2
C9594
1/10W
150
R9553
1/10W
150
R9698
XX
C9505
1/10W
100
R9530
2.2k
R9653
1/10W
2.2k
R9616
50V
1000p
C9524
XX
C3879
2.2k
R9629
XX
R2844
XX
C2831
100
R9631
1/10W
150
R9705
1/10W
470k
R9518
1/10W
2.2k
R9652
1/10W
470k
R9539
1/10W
100R9611
1/10W
150
R9552
CHIP
0
R9506
25V
0.022
C9521
50V
1000p
C9522
1/10W
100
R9545
1/10W
150
R9701
16V
0.22
C9587
50V
470p
C9506
CHIP
0
R9536
2.2
C9568
1/10W
150
R9699
CHIP
0
R9512
1/10W
330
R9508
1/10W
100
R9643
1/10W
2.2k
R9619
XX
R2882
1/10W
150
R9554
R9692
470k
1/10W
1/10W
1k
R9677
1/10W
100
R9525
1/10W
2.2k
R9627
1/10W
1k
R9509
1/10W
100
R9639
1/10W
2.2k
R9641
XX
C9517
1/10W
100
R9524
XX
C9632
16V
2.2
C9586
1/10W
150
R9702
1/10W
150
R9522
1/10W
1k
R9540
XX
C9519
1/10W
150
R9700
1/10W
100
R9523
XX
C9572
16V
0.22
C9621
R2838
XX
1/10W
100
R9642
16V
2.2
C9593
16V
0.22
C9620
XX
R9721
1/10W
330
R9531
25V
0.022
C9523
1/10W
150
R9528
XX
C9612
16V
0.22
C9600
100
R9656
XX
C2833
1/10W
2.2k
R9640
XX
C2835
1/10W
150
R9703
10V
2.2
C9598
1/10W
100
R9558
1/10W
100
R9556
XX
R2856
16V
2.2
C9565
2.2k
R9628
1/10W
22k
R9515
1/10W
100
R9559
XX
C2836
1/10W
5.6k
R9661
XX
R2881
XX
C9528
16V
2.2
C9617
1/10W
220
R9505
XX
C9526
25V
0.022
C9512
XX
C9611
CHIP
R9696
0
1/10W
150
R9704
16V
0.22
C9623
1/10W
330
R9533
XX
R2846
1/10W
1k
R9675
CHIP
0
R9645
50V
1000p
C9515
10V
2.2
C9559
R2837
XX
1/10W
1k
R9672
XX
R3828
1/10W
1k
R9615
1/10W
470k
R9538
1/10W
220
R9511
R3833
XX
1/10W
100
R9546
1/10W
100
R9514
16V
2.2
C9597
XX
C9507
1/10W
1k
R9504
1/10W
220
R9535
1/10W
100
R9630
150
R9697
50V
470p
C9504
1/10W
150
R9706
10V
2.2
C9560
XX
C9503
CHIP
0
R9501
XX
R2847
1/10W
2.2k
R9638
XX
R9712
1/10W
150
R9708
10V
2.2
C9562
XX
R9665
R2840
XX
1/10W
330
R9503
CHIP
0
R9614
1/10W
1k
R9676
1/10W
150
R9527
16V
2.2
C9581
16V
2.2
C9567
1/10W
6.8k
R9659
1/10W
150
R9541
1/10W
3.3k
R9660
CHIP
R9694
0
XX
R3830
CHIP
R9606
0
0
R9774
CHIP
R9567
0
CHIP
0
R9569
CHIP
0
R9565
CHIP
0
R9564
CHIP
0
R9562
CHIP
0
R9561
CHIP
0
R9560
1/10W
75
R9568
1/10W
75
R9570
1/10W
R9566
75
UDZSTE-175.6B
D9617
UDZSTE-175.6B
D9618
UDZSTE-175.6B
D9619
UDZSTE-175.6B
D9620
UDZSTE-175.6B
D9621
UDZSTE-175.6B
D9622
R9731
100
R9666
100
SC3_OUT_VIDEO
1/10W
5.6k
R9658
L
R
R
J9154
MODE1
MODE2
VIN2
RIN2
LIN1
LIN1
HDMI_L[0]
RIN1
LIN2
VIN1
LIN2
MODE1
HDMI_R[0]
RIN2
VIN2
VIN1
RIN1
MODE2
SC3_OUT_VIDEO
JB
3/9
JB.-LE4B
COMPONENTS MARKED AS XX ARE NOT FITTED ON THIS MODEL
2SC4617R
2SC1623-L5L6
2SC1623-L5L6
2SC1623-L5L6
AV SWITCH
ABCDE F
G
HI JKLMN
O
1
2
3
4
5
6
7
8
9
10
11
~ JB Board Schematic Diagram [ Audio Processor, AV Switch, Chroma Decoder, Video Processor, Main Micro ] Page 3/9 ~
- 50 -
Page 51
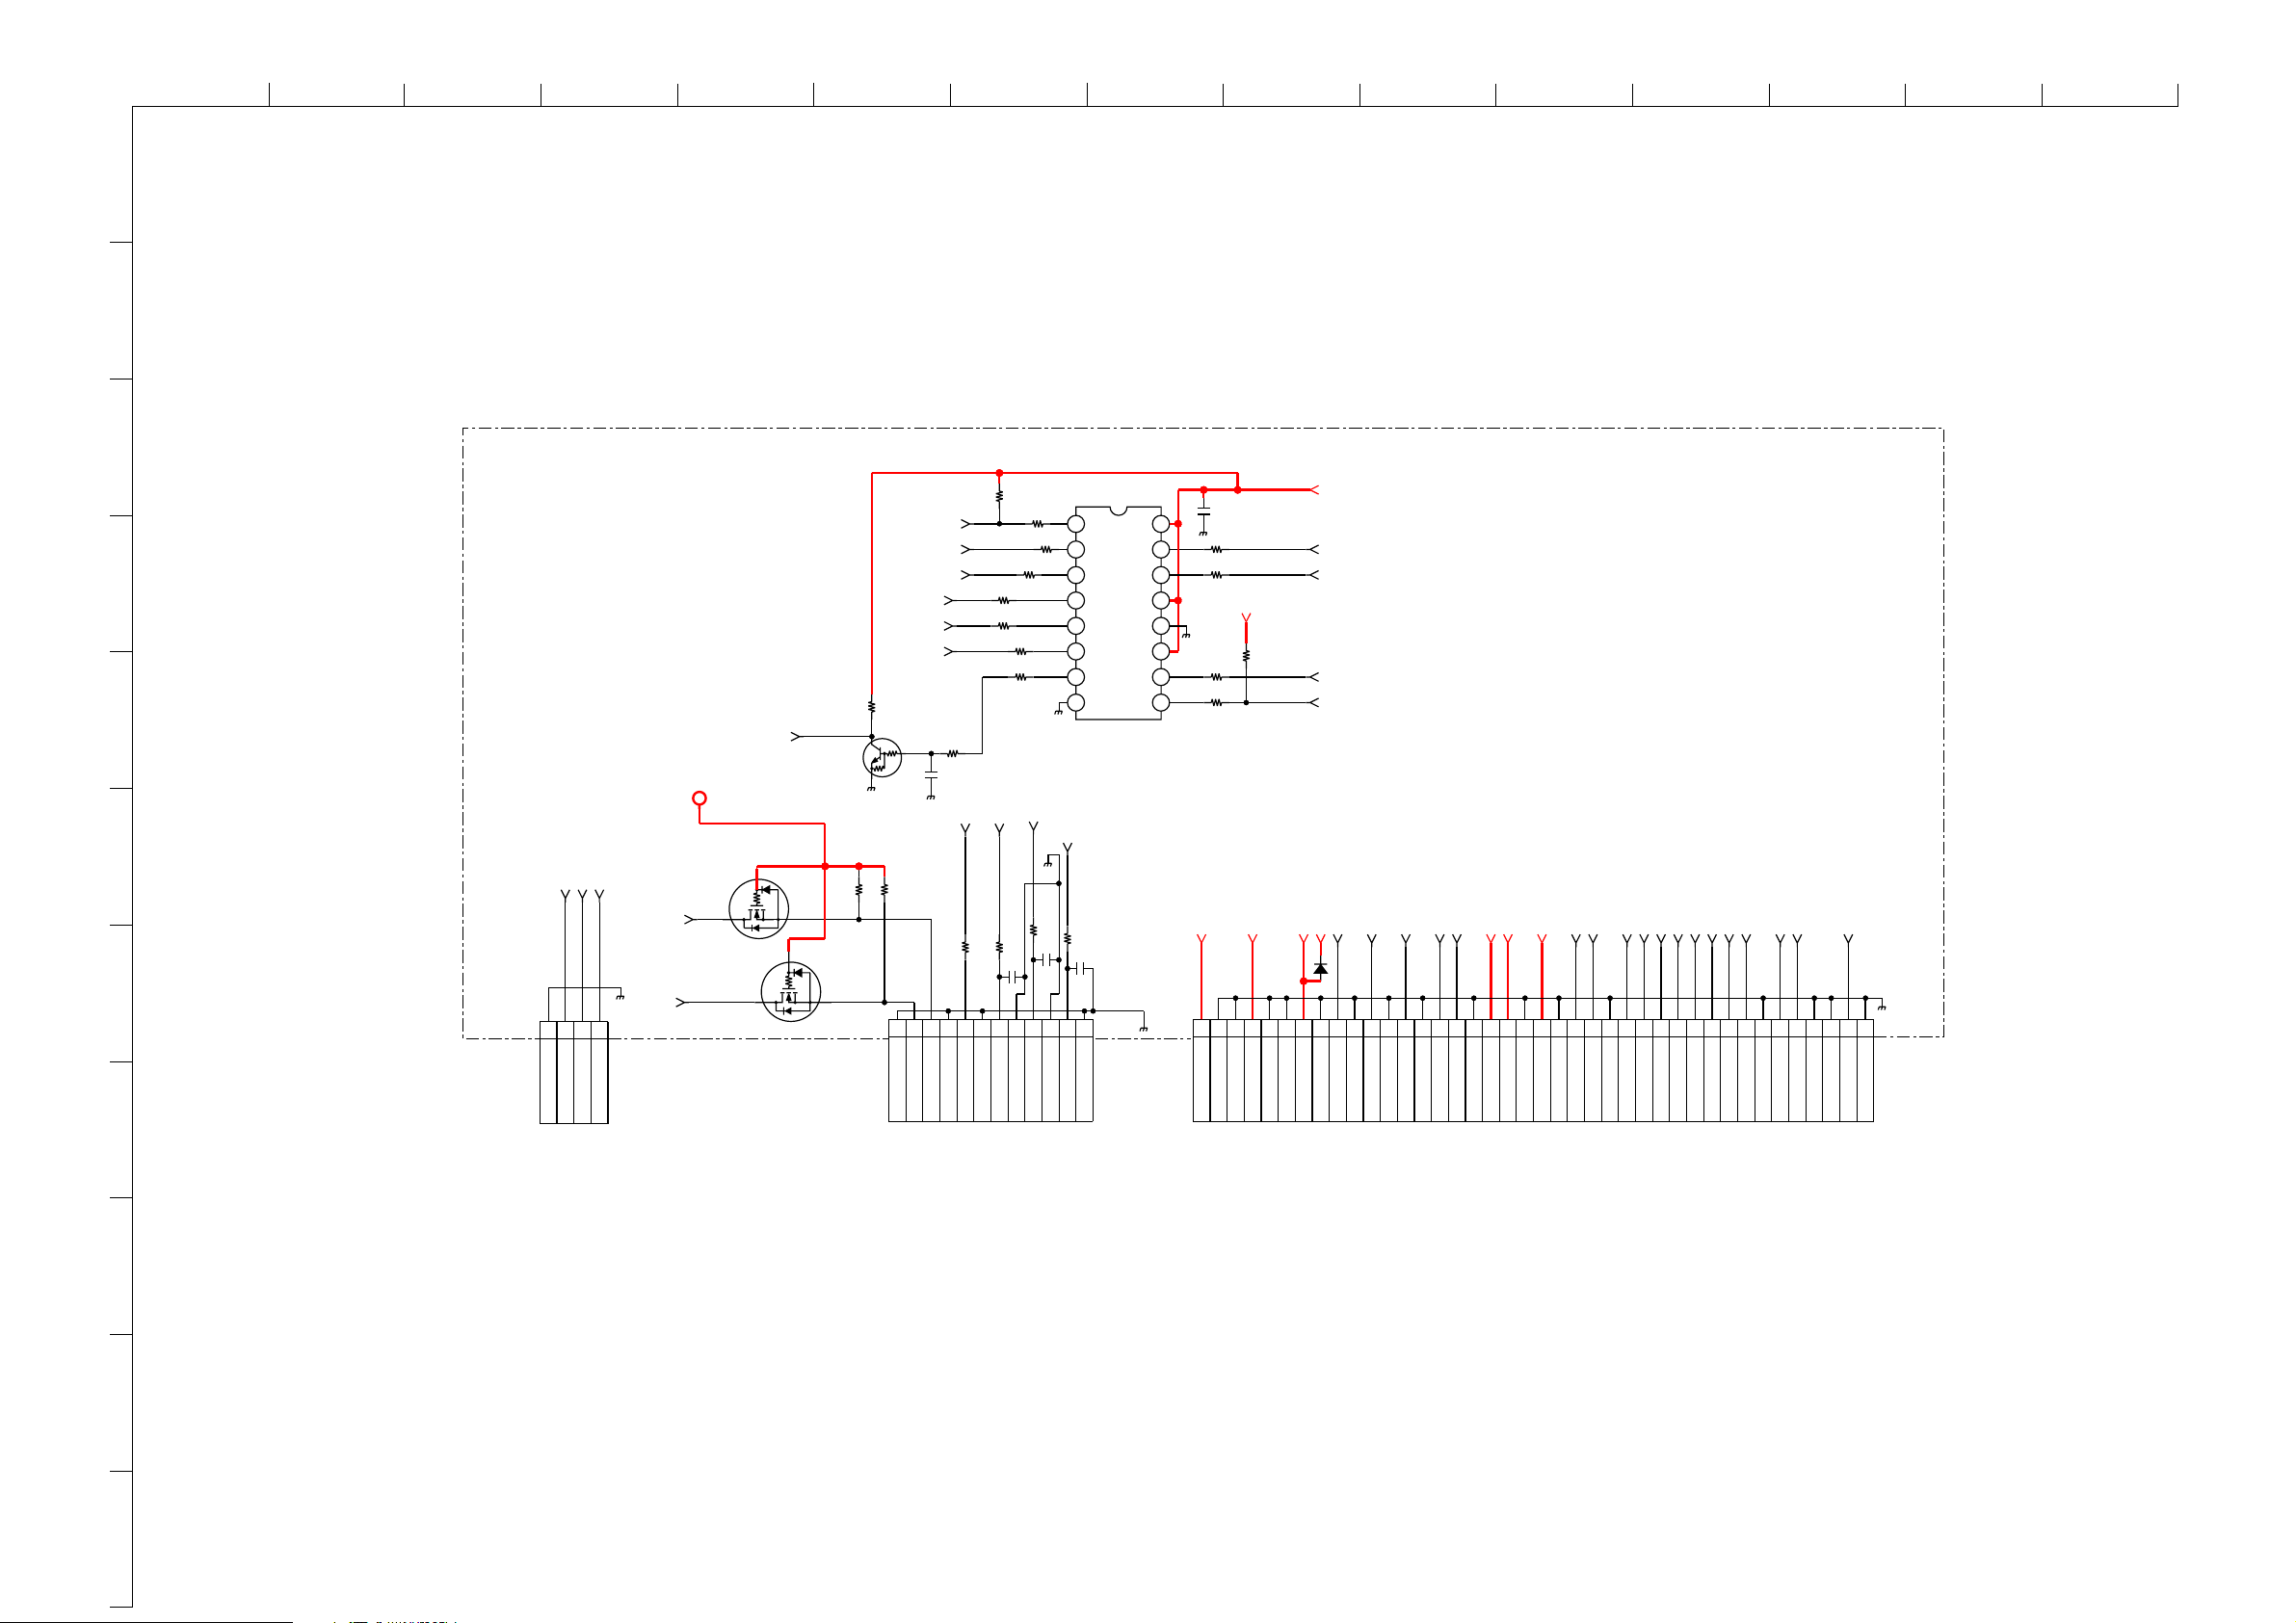
ABCDE F
G
HI JKLMN
O
1
2
JB.-LE4B
3
IC8500
XX
R8597
R9770
R8529
N_RESET
R8000
R8531
R8532
0
0
0
R8530
XX
DIGITAL_R
R8001
JB
4/9
4
5
BYPASS
Q8507
VD3_3
XX
FAN_PROT
COINCIDENCE
AGC_DEFEAT
SP_MUTE
FAN_CTL
HDMI_SEL
R8582
XX
C9658
XX
R8581
XX
0
CHIP
0
0
DIGITAL_L
CXA1875AM-T4
PORT EXPANDER
1
SW1
VCC
2
SW0
SCL
DAC4
SDA
DAC3
SDA2
DAC2
SDA1
DAC1
SDA0
DAC0
SW3
876543
GND
SW2
DIGITAL_CVBS
C8500
R8539
0
CHIP
R9773
R8541
CHIP
0
CHIP
0
XX
R8538
0
STBY5V
R8003
1/10W
16 15 14 13 12 11 10 9
A5V
SCL_5V
SDA_5V
10k
LAMP_COVER
HP_MUTE
COMPONENTS MARKED AS XX ARE NOT FITTED ON THIS MODEL
6
I2S_CL3/ABCK
I2S_DA_IN3/ADD
I2S_WS3/ALRCK
7
123
4
ADD
GND
ABCK
ALRCK
CN8550
2SK2036(TE8L)
SDA_5V
SCL_5V
Q9606
Q9607
2SK2036(TE8L)
R9781
10k
S
S
CN8551
12P4P
R9782
10k
R8560
R8561
0
0
C8550
XX
123456789
GND
GND
GND
RIGHT
N_RST
SCL_TV
SDA_TV
R8562
C8551
XX
LEFT
A-GND
0
101112
A-GND
R8563
CVBS
0
C8552
A-GND
D9616
EC21QS03L-TE12L
FAN_CTL
15
16
GND
FAN_CTL
CS
LAMP_COVER
FAN_PROT
13
14
I2CDIS
LMP_COV
FAN_PROT
BYPASS
AGC_DEFEAT
PSW_MAIN
10
11
12
ATT
AGCDEF
MAIN_SW
AC_OFF_DET
SP_MUTE
789
A_MUTE
ACONOFF
GND
SDA_5V
SCL_5V
SCL
SDA
GND
FM/AM
23456
GND
MONO_IN
1
GND
29
GND
POW_IN_L
28
LEFT
POWER_OFF_MUTE
27
26
GND
POFFMUTE
A5V
XX
37
38
39
40
5VA
GND
CN9512
40P
GND
REG17.5V
35
36
17V
GND
GND
+8V
AU_9V
34
9VA
33
GND
32
QSS
QSS
31
GND
POW_IN_R
30
RIGHT
STBY5V
AU_PROT
24
25
GND
SP_PROT
23
STBY5V
STBY
22
STBY
21
STBY
GND
20
STBY
19
GND
CVBS_RF
17
18
CVBSARF
10
11
8
TO AG BOARD
CN5201
9
~ JB Board Schematic Diagram [ Audio Processor, AV Switch, Chroma Decoder, Video Processor, Main Micro ] Page 4/9 ~
- 51 -
Page 52
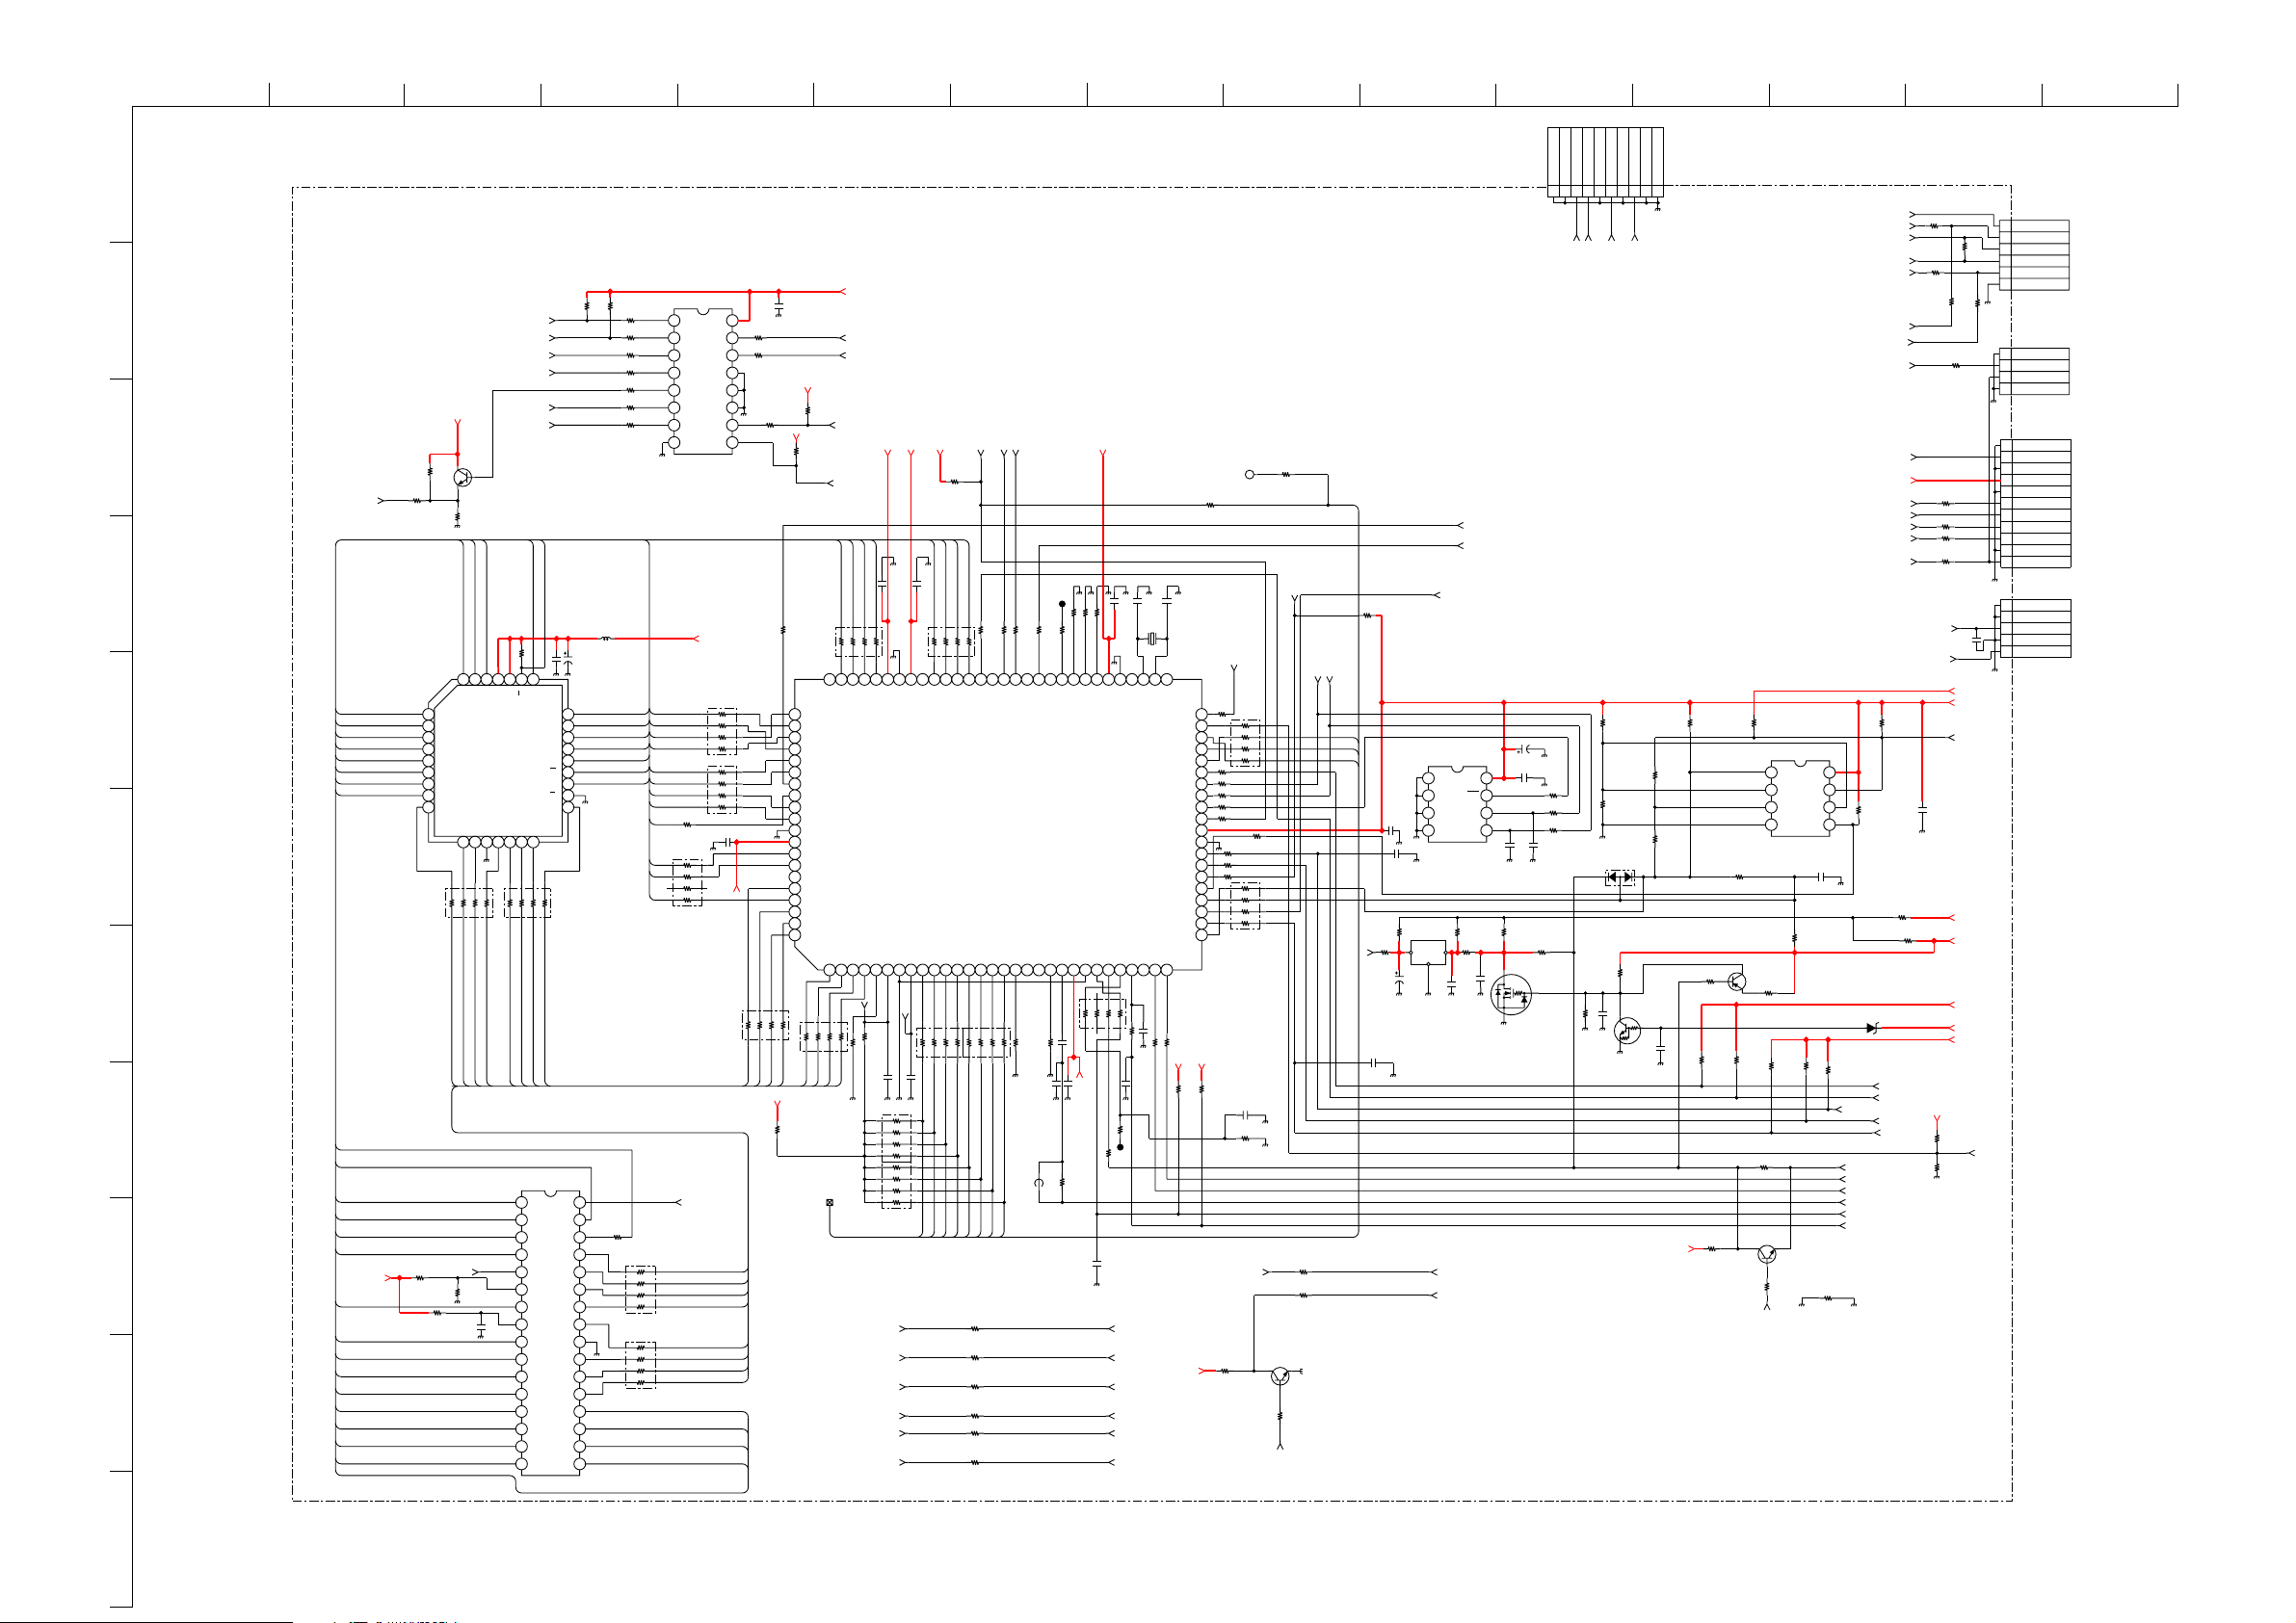
1
JL1004
STBY2.5V
WR_RAM
CR_IN
STBY3.3V
VS
SCL_B
POWER2
N_RESET
123456789101112131415161718192021222324252627282930
31
32
33
34
35
36
37
38
39
40
41
42
43
44
45
46
47
48
49
50
515253545556575859606162636465666768697071727374757677787980
81
82
83
84
85
86
87
88
89
90
91
92
93
94
95
96
97
98
99
100
IC1003
SDA5550M-QB-T
D1D4D2D3XROM#
VDD2.5
VSS
VDD3.3
P0.0
P0.1
P0.2
P0.3
P0.4
P0.5
P0.6
P0.7
ENE#
STOP#
OCF
EXTIF#
CVBS
VDDA2.5
VSSA
P2.0
P2.1
P2.2
P2.3
N.C.
HS/SSC
VS
P3.0
P3.1
P3.2
P3.3
P3.4
P3.5
P3.6
P3.7
VSS
VDD3.3
P1.0
P1.1
P1.2
P1.3
P1.4
P1.5
P1.6
P4.2
P4.3
RST#
N.C.
XTAL2
XTAL1
N.C.
VSSA
VDDA2.5
R
G
B
BLANK/COR
N.C.
P1.7
N.C.
WR#
RD#
N.C.
A19
A18
A16
A17
A15
FL_PGM
VDD2.5
VSS
VDD3.3
A14
A12
A13
A7
FL_RST
A8
A6
A9
A5
A11
A4
ALE
PSEN#
A3
A10
VSS
VDD3.3
A2
A1
FL_CE
D7
A0
D6
D0
D5
RD_RAM
STBY3.3V
CS
47
RB1005
2143658
7
Q1002
XX
6MHz
X1000
WR_RAM
RD_RAM
47
RB1012
1
2
3
4
5
6
7
8
STBY2.5V
100
RB1011
1
2
345
6
7
8
CB_IN
47
RB1000
1
2
345
6
7
8
16V
47
C1029
STBY3.3V
SCL_5V
POWER_AV
STBY3.3V
STBY3.3V
STBY5V
56789
10 11 12 13
14151617181920
21222324
2526272829
303132
123
4
IC1002
OTP
A7
A6
A5
A4
A3
A2
A1
A0
Q0
Q1
Q2
VSS
Q3
Q4
Q5
Q6
Q7
E
A10
G
A11
A9
A8
A13
A14
VPP
A16
A15
A12
A17
P
VCC
STBY2.5V
AC_DEF_DET
STBY_LED
RD_RAM
47
RB1001
1
2
345
6
7
8
SIRCS
CVBS_1
ALE_M
STBY3.3V
P_MUTE
WP_256K
WR_RAM
RST_O
16 15 14 13 12 11 10 9
87654321
CXA1875AM-T4
IC7402
SW1
SW0
DAC4
DAC3
DAC2
DAC1
DAC0
GND SW2
SW3
SDA0
SDA1
SDA2
SDA
SCL
VCC
CVBS_1
STBY3.3V
0uH
FB1000
ALE_M
STBY5V
Q7419
XX
STBY3.3V
100
RB1017
1
2
345
6
7
8
SDA_B
HD
STBY3.3V
RST_I
100
RB1010
1
2
345
6
7
8
1k
R1033
RGB_SEL
8765
4321
M24C32-WMN6T(B)
IC1005
E0
E1
E2
VSS SDA
SCL
WC
VCC
100
RB1002
1
2
3
4
5
6
7
8
RST_I
1/10W
100k
R7602
D1001
XX
S
Q1000
XX
RST_O
STBY2.5V
SDA_5V
1
2
3
4
5
6
6P
CN5402
RD/ECS_NC
WR/ESC_RX
RST_O/ECS_NC
RST_I/ECS_NC
ALE_M/ECS_TX
GND
KEY2
STBY2.5V
47
RB1006
2143658
7
10uH
L1000
FB_DET
100
RB1016
1
2
3
4
5
6
7
8
STBY2.5V
YC_C
VCC
GND
OUT
PST600IMT
IC1006
RESET_AUDIO
STBY5V
RB1008
4.7k
1
2
3
4
5
6
7
8
YC_Y
1k
R1031
RB1009
4.7k
1
2
3
4
5
6
7
8
16V
47
C1028
ON_TIMER
100
RB1004
1
2
3
4
5
6
7
8
AC_DEF_DET
100
RB1003
1
2
3
4
5
6
7
8
AVLINK
8765
4321
LM393DT (A)
IC1010
OUT1
-IN1
+IN1
VSS
+IN2
-IN2
OUT2
VCC
STBY3.3V
Y_IN
STBY3.3V
100
RB1007
1
2
345
6
7
8
Q7411
XX
1PS181-115
D7402
STBY3.3V
16V
10
C1007
16V
0.22
C9004
LAMP_LED
100
RB1014
1
2
345
6
7
8
POWER_AV
RESET_TR
STBY3.3V
A5V
KEY
HDMI_RST
STBY2.5V
TRIDENT_BUS
47
RB1013
1
2
3
4
5
6
7
8
100
RB1015
1
2
3
4
5
6
7
8
REG17.5V
HS
LAMP_FLAG
123456789
10
BRN
10P
CN9506
GND
GND
P_MUTE
WP_256K
GND
SCL_33
GND
SDA_33
GND
GND
P_MUTE
WP_256K
SCL_B
SDA_B
1
2
3
4
5
6
7
8
9
10
11
11P
CN9507
GND
SIRCS
GND
STBY+5V
GND
POWER ON LED
LAMP LED
TIMER LED
STBY LED
GND
KEY
LAMP_CTL
LAMP_FLAG
1
2
3
4
4P
CN9509
GND
KEY2
KEY
GND
CHIP
0
R9725
POWER/RESERVE_LED/RX
KEY2
SIRCS_OUT
STBY5V
0
R9726
LAMP_LED
0
R9727
ON_TIMER
STBY_LED
0
R9728
CHIP
0
R9729
KEY
CR_OUT
C_MAIN
Y_MAIN
Y_OUT
CB_OUT
CVBS_TRIDENT
PSW_MAIN
STBY5V
AC_OFF_DET
Q8490
MSD601-RST1
JL9619
LUMISPONDER
XX
R7579
MSD601-RST1
Q9605
A5V
1/16W
10k
R9766
1/10W
100
R9767
XX
R9768
LAMP_CTL
POWER/RESERVE_LED/RX
TX
1
2
3
4
5
5P
CN9508
GND
GND
LMP_CTL
GND
LMP_PROT
50V
100p
C1024
50V
33p
C1021
XX
C1035
CHIP0
R1044
1/16W
R7545
10k
XX
R7547
XX
R7549
CHIP
0
R1105
10V
0.1
C1011
XX
C7435
10V
0.1
C1020
1/16W
10k
R7493
XX
R7544
CHIP
0
R1046
1/10W
5%
100
R1001
CHIP
0
R1016
1/16W
100
R1126
XX
R7546
1/10W
100
R7504
XX
R7500
100R7511
16V
0.22
C1037
1/16W
10k
R7578
100
R1028
XX
C1031
XX
R7535
CHIP
0
R1103
0
R8499
1/16W
10k
R1083
0
R1082
1/16W
10k
R7497
50V
33p
C1019
10K
R8498
XX
R7590
CHIP
0
R7532
CHIP
0
R7537
0R1011
XX
R1000
CHIP
0
R1002
50V
100p
C1022
0R1010
10V0.1
C1010
XX
R7593
10V
0.1
C1006
1/16W
10k
R7592
10V
0.1
C1023
CHIP
0
R1102
47kR1020
16V
0.22
C9001
47k
R1021
XX
R7530
XX
R7570
100
R7510
XX
C1030
XX
C1013
CHIP0R1017
CHIP
0
R1034
50V
100p
C1018
10V
0.1
C1017
0
R7563
XX
R1061
0
R1047
0
R7531
1/16W
10k
R7494
CHIP1kR1045
XX
C1033
100
R7506
XX
C7436
CHIP
0
R7550
0
R1027
XX
R7503
0R1043
10V
0.1
C1009
CHIP
0
R1012
1/16W
R7580
10k
CHIP
0
R1106
1/16W
10k
R7588
100R1040
0
R1042
100R1041
0
R7538
XX
R7591
100R7509
10V
0.1
C1015
1/16W
10k
R1069
XX
R1067
XX
R7551
XX
R7498
1/10W
100
R1063
XX
R7501
CHIP
0
R1018
1/16W
10k
R7492
CHIP
0
R7529
1/10W
47k
R7495
50V
100p
C1016
XX
C1034
100R7505
XX
R7502
1/10W
100
R1065
CHIP
0
R1104
10V
0.1
C1012
100
R1064
1/16W
10k
R7499
0
R1115
XX
R7543
47k
R1019
100
R1039
1/10W
100
R7577
XX
R1125
0
R7533
10V
0.1
C1032
1/10W
100
R1059
XX
C8536
10V
0.1
C1008
XX
R1081
100
R1030
1/16W
10k
R7496
0
R7534
100
R7512
10V
0.1
C1014
CHIP
0
R1014
CHIP
0
R7568
XX
R1070
CHIP
0
R1003
100
R7507
32 31 30 29 28
27
123
45
6
26 25 24
789
23 22 21 20
10 11 12
19 18
17
13 14 15
16
K6F2008V2E-YF70T
IC7403
A(11)
A(9)
A(8)
A(13)
WE
CE2
A(15)
VCC
A(17)
A(16)
A(14)
A(12)
A(7)
A(6)
A(5)
A(4) A(3)
A(2)
A(1)
A(0)
D(0)
D(1)
D(2)
GND
D(3)
D(4)
D(5)
D(6)
D(7)
CE
A(10)
OE
4.7k
R1009
1/10W
CHIP
0
R7599
VD3_3
XX
R1130
XX
R1131
0
R1132
CHIP
0
R1133
POWER/RESERVE_LED/RX
TX
10V
0.1
C9590
1kR7508
1/10W
470
R1060
A17
A7
A3
D3
A0
D4
A16
A2
A0
D7
A4
D2
A1
A5
D5
A11
D0
A15
AD5
PSEN
A1
AD0
A2
A12
D2
A12
D4
A6
A13
D1
A18
A8
A14
A7
D4
A11
A9
A12
D5
A5
AD1
A14
D6
A7
A6
A9
A10
A14
A1
A15A2A17
A15
D6A5D7
RD#
A16
A4
A17
A6
A18
WR#
A0
AD7
A8
A18
D7
ALE#
D1
AD3
A9
A16
D6
A4
PSEN
D2
A11
A13
D5
A8
AD4
D1
A13
D0
AD6
D0
D3
A3
D3
A3
AD2
A10
A10
PS
JB
5/9
JB.-LE4B
COMPONENTS MARKED AS XX ARE NOT FITTED ON THIS MODEL
TO H2 BOARD
CN1000
TO H1 BOARD
CN4404
MICRO
RAM MEMORY MICRO
NVM MICRO
DUAL OPAM
PORT EXPANDER
TO C BOARD
CN3004
2
3
4
5
6
7
8
10
11
9
ABCDE F
G
HI JKLMN
~ JB Board Schematic Diagram [ Audio Processor, AV Switch, Chroma Decoder, Video Processor, Main Micro ] Page 5/9 ~
O
- 52 -
Page 53
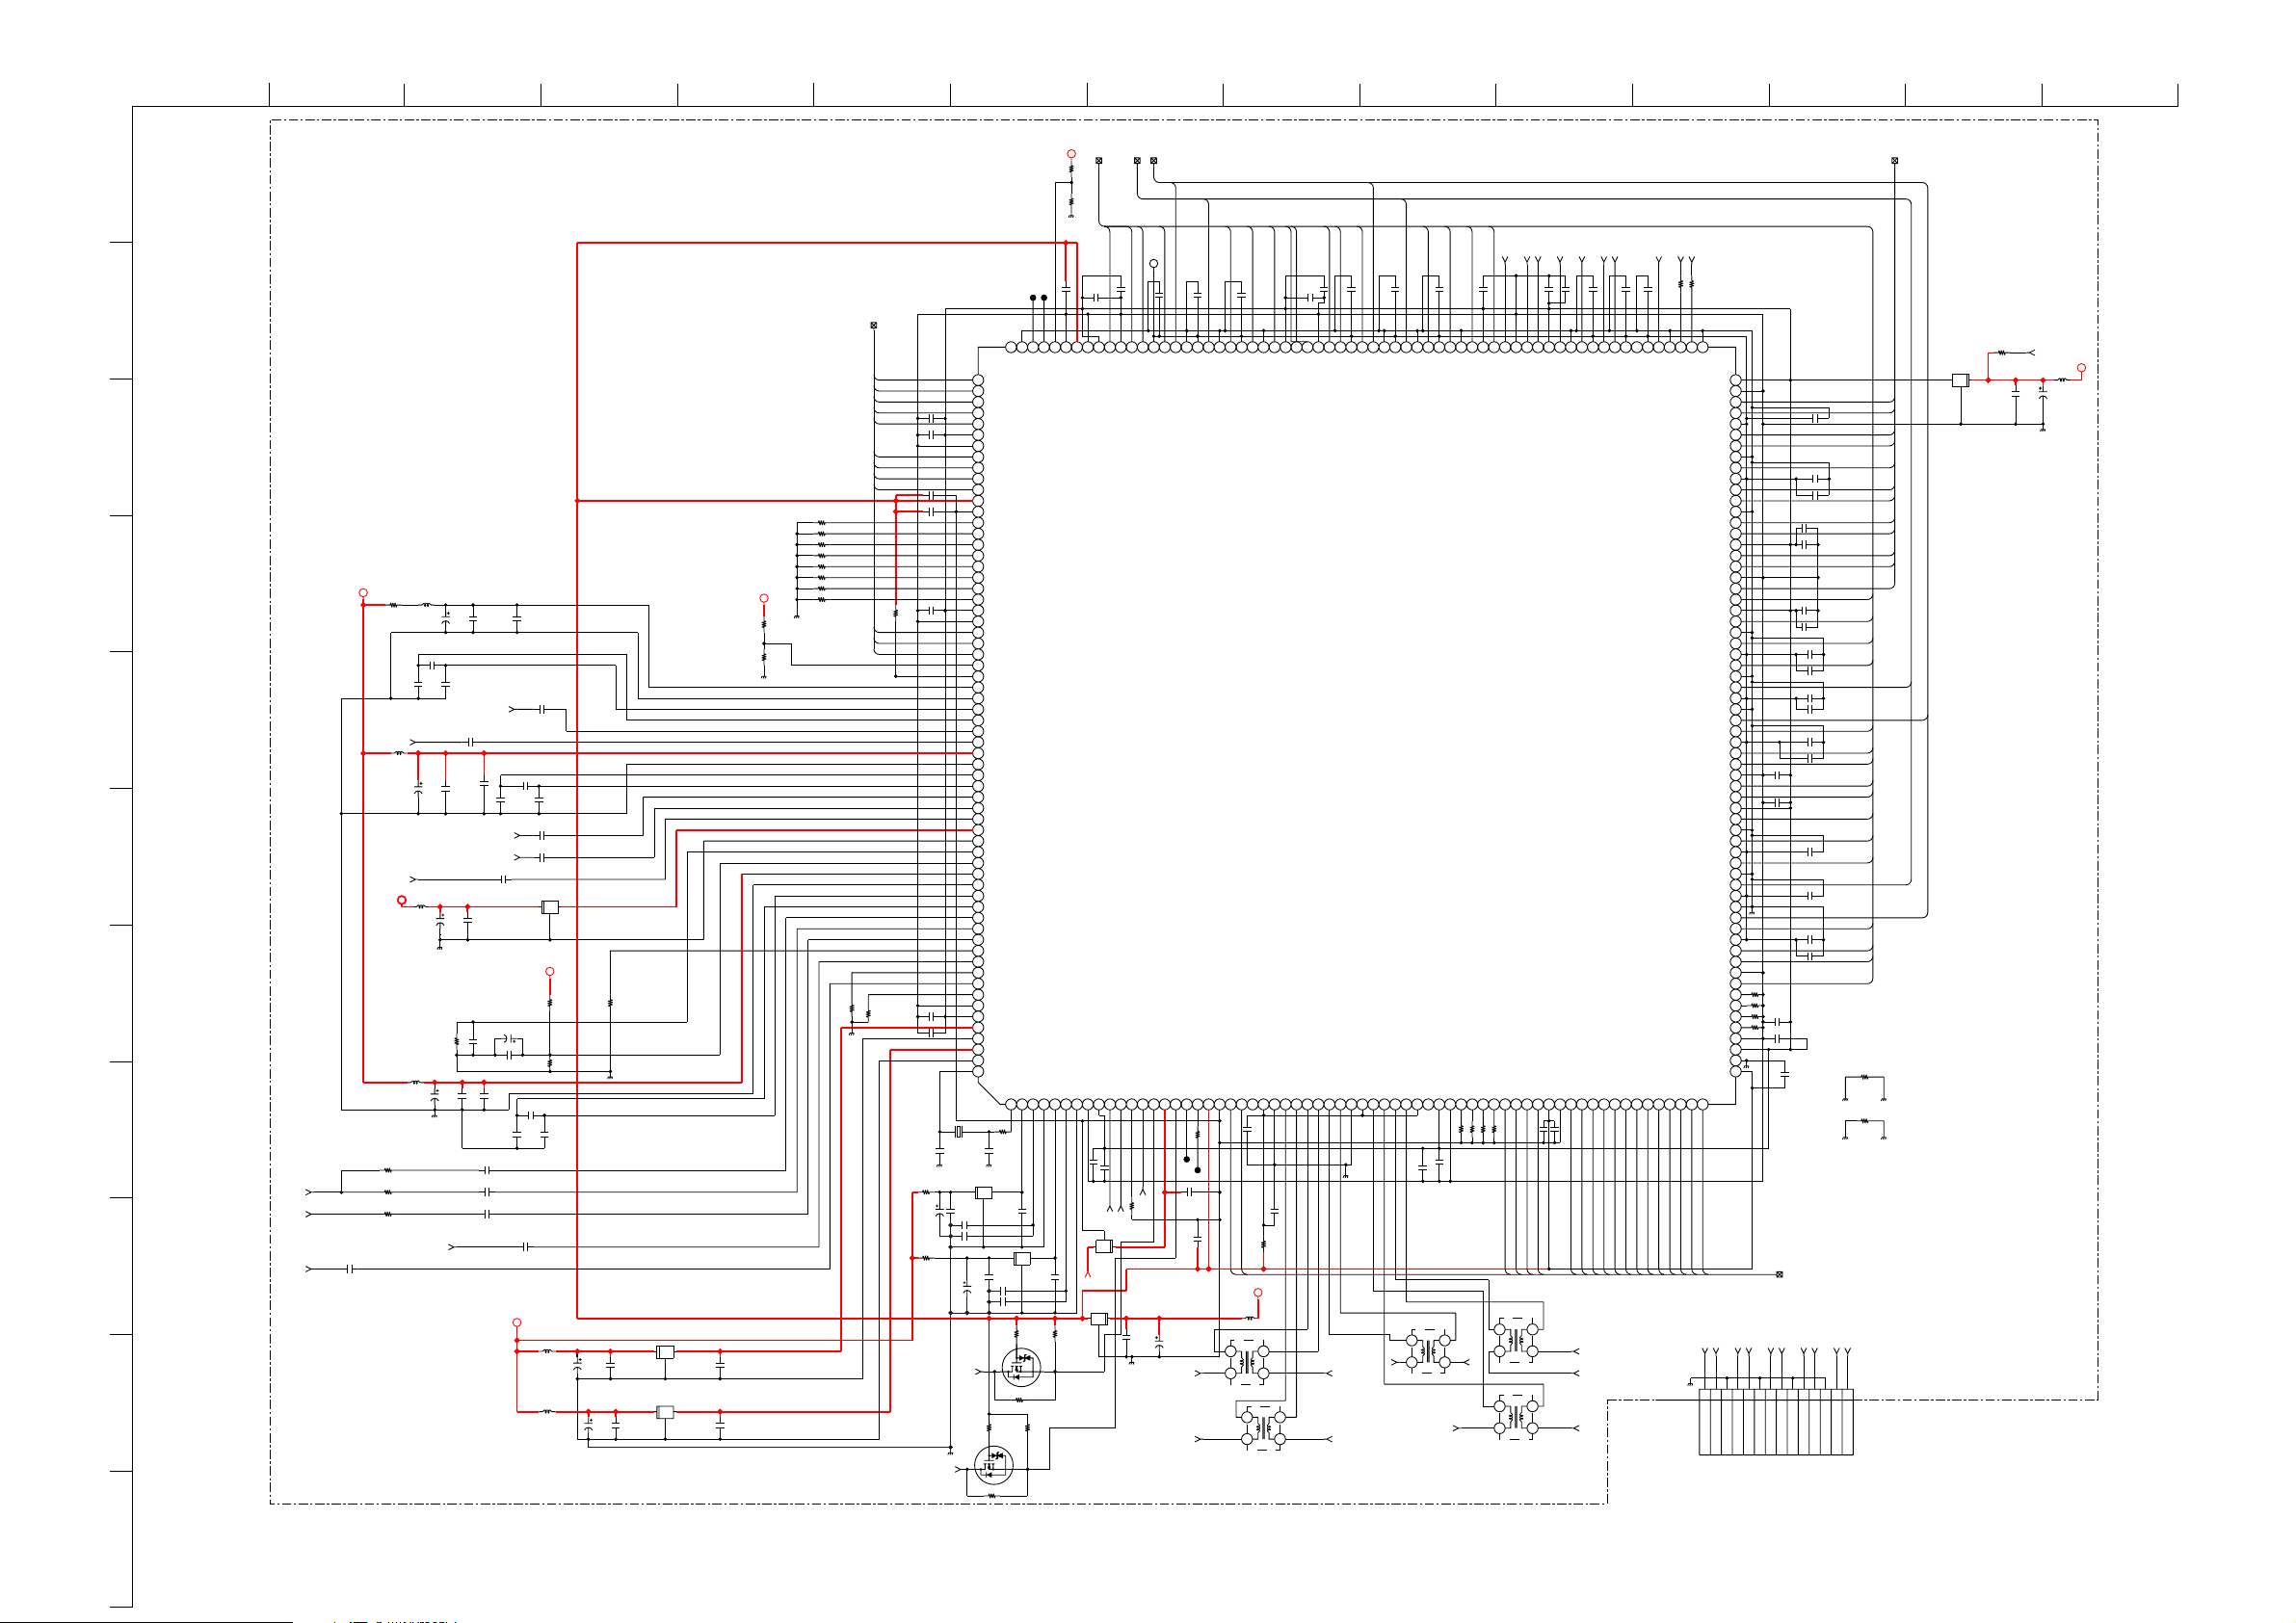
1
CS#
VD3_3
SDA_B
CVBS_1
16V
10
C5030
VD3_3
MAIN_DIN
Y_IN
EMI
G
FL5001
0uH
MCLK0#
CKE
WE#
L5005
0uH
X5000
14.31818MHz
CR_IN
SCL_B
VD1_8
S
Q7413
XX
DQM[0-3]
EMI
G
FL5005
0uH
EMI
G
FL5007
0uH
2.2uH
L5002
16V
10
C5003
L5004
0uH
YC_Y
VD3_3
TRIDENT_BUS
EMI
G
FL5003
0uH
BA0
VL1_8
EMI
G
FL5004
0uH
1
2
VA1_8
4
12
3
0uH
L5014
RAS#
2.2uH
L5000
JL5023
L5015
0uH
4
12
3
0uH
L5012
CAS#
BA1
16V
10
C5004
MA[0-11]
4
12
3
0uH
L5008
16V
10
C5050
RESET_TR
PC_R
10
C5039
PC_H
MCLK0
PC_B
16V
10
C5069
2.2uH
L5001
CB_IN
JL5010
16V
10
C5040
4
12
3
0uH
L5009
4
12
3
0uH
L5013
EMI
G
FL5000
0uH
2.2uH
L5003
VD3_3
JL5022
PC_G
DQS[0-3]
MVREF
L5010
0uH
VA1_8
EMI
G
FL5002
0uH
PC_V
VDDMQ
MD[0-31]
S
Q7414
XX
XX
C5008
EMI
G
FL5006
0uH
YC_C
3P
3N
CLKP
CLKN
2P
2N
0N
0P
1N
1P
0P
0N
1N
1P
2N
2P
CLKN
CLKP
3P
3N
1/16W
22
R9769
SENSE
1234567
8
9
1011121314
14P
CN9510
RXIND-
RXIND+
DRAIN
RXIN1-
RXIN1+
DRAIN
RXIN2-
RXIN2+
DRAIN
RXCLK-
RXCLK+
DRAIN
RXIN3-
RXIN3+
A5V
25V
0.1
C5088
0.1
C5017
0
R5001
XX
R5019
XX
R5028
1/10W
47k
R7552
25V
0.1
C5065
XX
R5030
0
R5000
50V
1000p
C5111
1/10W
1k
R5010
XX
R5029
50V
1000p
C5103
25V
0.1
C5035
CHIP
0
R5005
L5006
22
1/10W
0.1
C5031
50V
1000p
C5106
25V
0.1
C5064
25V
0.1
C5012
50V
1000p
C5109
25V
0.1
C5047
CHIP
0
R5034
50V
18p
C5038
25V
0.1
C5063
25V
0.1
C5058
25V
0.1
C5027
25V
0.1
C5060
50V
1000p
C5100
CHIP
0
R5009
0.1
C5021
CHIP
0
R5007
50V
1000p
C5117
CHIP
0
R7484
0.1
C5090
XX
R5536
0.1
C5089
0
R5023
50V
1000p
C5073
25V
0.1
C5018
XX
R5027
25V
0.1
C5086
25V
0.1
C5085
50V
1000p
C5116
0.1
C5061
15p
C5044
25V
0.1
C5000
25V
0.1
C5009
25V
0.1
C5034
25V
0.1
C5037
XX
R7554
1000p
C5112
50V
1000p
C5101
CHIP
0
R7491
50V
1000p
C5076
CHIP
0
R5008
25V
0.1
C5043
50V
1000p
C5074
25V
0.1
C5052
1/10W
4.7k
R5012
XX
C5011
XX
R5026
0
R7487
25V
0.1
C5096
50V
1000p
C5104
25V
0.1
C5051
XX
R5534
0
R7486
25V
0.1
C5093
1/10W
1k
R5003
1000p
C5077
C5042
2200p
50V
1000p
C5078
50V
1000p
C5114
50V
1000p
C5071
25V
0.1
C5014
L5007
22
1/10W
50V
470p
C5079
XX
R7562
25V
0.1
C5066
25V
0.1
C5049
0.1
C5026
XX
C5025
50V
1000p
C5070
0
R7489
CHIP
0
R7488
0
R7490
1000p
C5113
XXC5016
1/10W
47k
R7553
25V
0.1
C5082
1/10W
47k
R7561
CHIP
0
R5015
25V
0.1
C5015
25V
0.1
C5036
25V
0.1
C5083
C5045
2200p
25V
0.1
C5033
25V
0.1
C5019
25V
0.1
C5048
XX
R5006
RN-CP
47k
R7560
1/16W
22
R5033
470p
C5080
25V
0.1
C5024
25V
0.1
C5092
25V
0.1
C5010
25V
0.1
C5013
50V
1000p
C5072
25V
0.1
C5087
50V
1000p
C5107
0.1
C5046
50V
1000p
C5110
XX
R5011
XX
C5023
0.1
C5067
25V
0.1
C5095
1000p
C5075
CHIP
0
R5002
XX
R5004
50V
1000p
C5102
25V
0.1
C5022
25V
0.1
C5097
0
R7485
1000p
C5105
25V
0.1
C5032
25V
0.1
C5062
25V
0.1
C5068
XX
R5024
1/16W
22
R5032
1/10W
47k
R5043
25V
0.1
C5081
XX
R5031
25V
0.1
C5006
25V
0.1
C5094
25V
0.1
C5059
0.1
C5041
XX
R5020
XX
C5002
50V
1000p
C5108
0.1
C5091
0.1
C5020
50V
1000p
C5115
0.1
C5028
25V
0.1
C5007
25V
0.1
C5084
XX
R5025
12345678910111213141516171819202122232425262728293031323334353637383940414243444546474849505152535455565758596061626364
65
66
67
68
69
70
71
72
73
74
75
76
77
78
79
80
81
82
83
84
85
86
87
88
89
90
91
92
93
94
95
96
97
98
99
100
101
102
103
104
105
106
107
108
109
110
111
112
113
114
115
116
117
118
119
120
121
122
123
124
125
126
127
128
129130131132133134135136137138139140141142143144145146147148149150151152153154155156157158159160161162163164165166167168169170171172173174175176177178179180181182183184185186187188189190191192
193
194
195
196
197
198
199
200
201
202
203
204
205
206
207
208
209
210
211
212
213
214
215
216
217
218
219
220
221
222
223
224
225
226
227
228
229
230
240
231
232
233
234
235
236
237
238
239
241
242
243
244
255
256
245
246
247
248
249
250
251
252
253
254
IC5000
SVPEX-SREVB
XTALO
PAVDD1
MLF1
PAVSS1
PAVDD2
PLF2
PAVSS2
VSSC
VDDC
AIN_HS
AIN_VS
TESTMODE
RESET
SCL
V5SF
SDA
PWM
FLD/IO
VDDH
VSSHHVDEPLL_VCC
PLL_GND
TD1+
TD1-
TCLK+
TCLK-
TC1+
TC1-
LVDSGND
LVDSVCC
TB1+
TB1-
TA1+
TA1-
LVDSVDDP
GPO
VDDC
VSSC
DIN19
DIN18
DIN17
DIN16
DIN15
DIN14
DIN13
DIN12
VDDH
VSSH
DIN11
DIN10
DIN9
DIN8
CLK
DIN7
DIN6
DIN5
DIN4
DIN3
DIN2
DIN1
DIN0
VDDH
VSSH
VDDC
VSSC
DIN23
DIN22
DIN21
DIN20
MD0
VSSC
MD1
MD2
VDDM
MD3
DQM0
VSSM
VDDM
DQS0
VSSM
MD4
VDDM
MD5
VSSM
MD6
VDDC
MD7
MD8
VSSC
MD9
MD10
VDDM
MD11
DQM1
VSSM
VDDM
DQS1
VSSM
MD12
VDDM
MD13
VSSM
MD14
VDDC
MD15
MA11
VSSC
MA10
MA9
VDDC
MA8
MA7
VSSM
MA6
MA5
VDDM
MA4
VSSM
MA3
MA2
VDDM
MA1
MA0
VSSL
VDDL
VSSM
MCLK0
MCLK0#
VSSM
CS0#
VDDM
CS1#
VDDM
RAS#
CAS#
VDDR
MVREF
VSSR
WE#
VDDC
CLKE
BA0
VSSC
BA1
MD16
VDDC
MD17
VSSM
MD18
VDDM
MD19
VSSM
DQS2
VDDM
VSSM
DQM2
MD20
VDDM
MD21
MD22
VSSC
MD23
MD24
VDDC
MD25
VSSM
MD26
VDDM
MD25
VSSM
DQS3
VDDM
VSSM
DQM3
MD28
VDDM
MD29
MD30
VSSC
MD31
VDDC
VSSC
VDDH
VSSH
MPUGPIO4
MPUGPIO3
MPUGPIO2
MPUGPIO1
NC
MPUGPIO0
A_D0
A_D1
A_D2
A_D3
VDDC
VSSC
A_D4
A_D5
A_D6
A_D7
VDDH
VSSH
ADDR0
ADDR1
ADDR2
ADDR3
ADDR4
ADDR5
ADDR6
ADDR7
VDDC
VSSC
RD#
WR#
ALE
MPUCS0N
INT#
AVDD_ADC3
AVSS_ADC3
VREFN3
VREFP_3
PR_P1
PR_P2
AVDD_ADC2
AVSS_ADC2
VREFN_2
VREFP_2
C
PB_B1
PB_B2
AVDD3_AVSP2
AVSS3_BG_ASS
CVBS_OUTP
CVBS_OUTN
AVDD_ADC1
AVSS_ADC1
VREFN_1
VREFP_1
CVBS1
CVBS2
CVBS3
AIN_N1
Y_G1
AIN_N2
Y_G2
AIN_N3
VSSC
VDDC
PDVDD
PDVSS
PAVDD
PAVSS
XTALI
JL9620
16V
10
C5001
16V
10
C5005
16V
10
C5029
DT_C_CLK
DQS[1]
DT_C_DY7
MA[7]
DQM[0]
MA[3]
MD[12]
DT_C_DC1
DQM[3]
MD[7]
DT_C_DY5
MD[5]
AD7
DT_C_DY1
ALE#
MD[9]
AD3
MA[6]
MD[18]
AD0
AD1
DT_C_DC4
MA[4]
DQM[1]
DT_C_DY2
DQM[2]
DT_C_DC0
AD4
AD6
MA[11]
MD[20]
PS
DT_C_DY0
DT_C_VS
DT_C_DY6
MD[23]
DQS[2]
DQS[3]
WR#
DT_C_DC3
MD[24]
MD[25]
MD[0]
MD[15]
DT_C_DC5
MD[14]
AD5
DT_C_HS
MD[16]
MD[21]
MA[0]
DT_C_DC6
MD[19]
MA[2]
MD[1]
DT_C_DC2
MA[9]
MD[3]
MD[8]
MD[22]
MD[30]
MD[28]
DT_C_DC7
DT_C_DY4
DQS[0]
MD[4]
MD[27]
MD[26]
MD[10]
MA[10]
MD[2]
MD[13]
RD#
MD[17]
MA[5]
MA[8]
MD[6]
AD2
DT_C_DY3
MA[1]
MD[31]
MD[29]
MD[11]
JB
6/9
JB.-LE4B
COMPONENTS MARKED AS XX ARE NOT FITTED ON THIS MODEL
VIDEO PROCESSOR
TO C BOARD
CN3200
2
3
4
5
6
7
8
9
10
11
ABCDE F
G
HI JKLMN
~ JB Board Schematic Diagram [ Audio Processor, AV Switch, Chroma Decoder, Video Processor, Main Micro ] Page 6/9 ~
- 53 -
O
Page 54
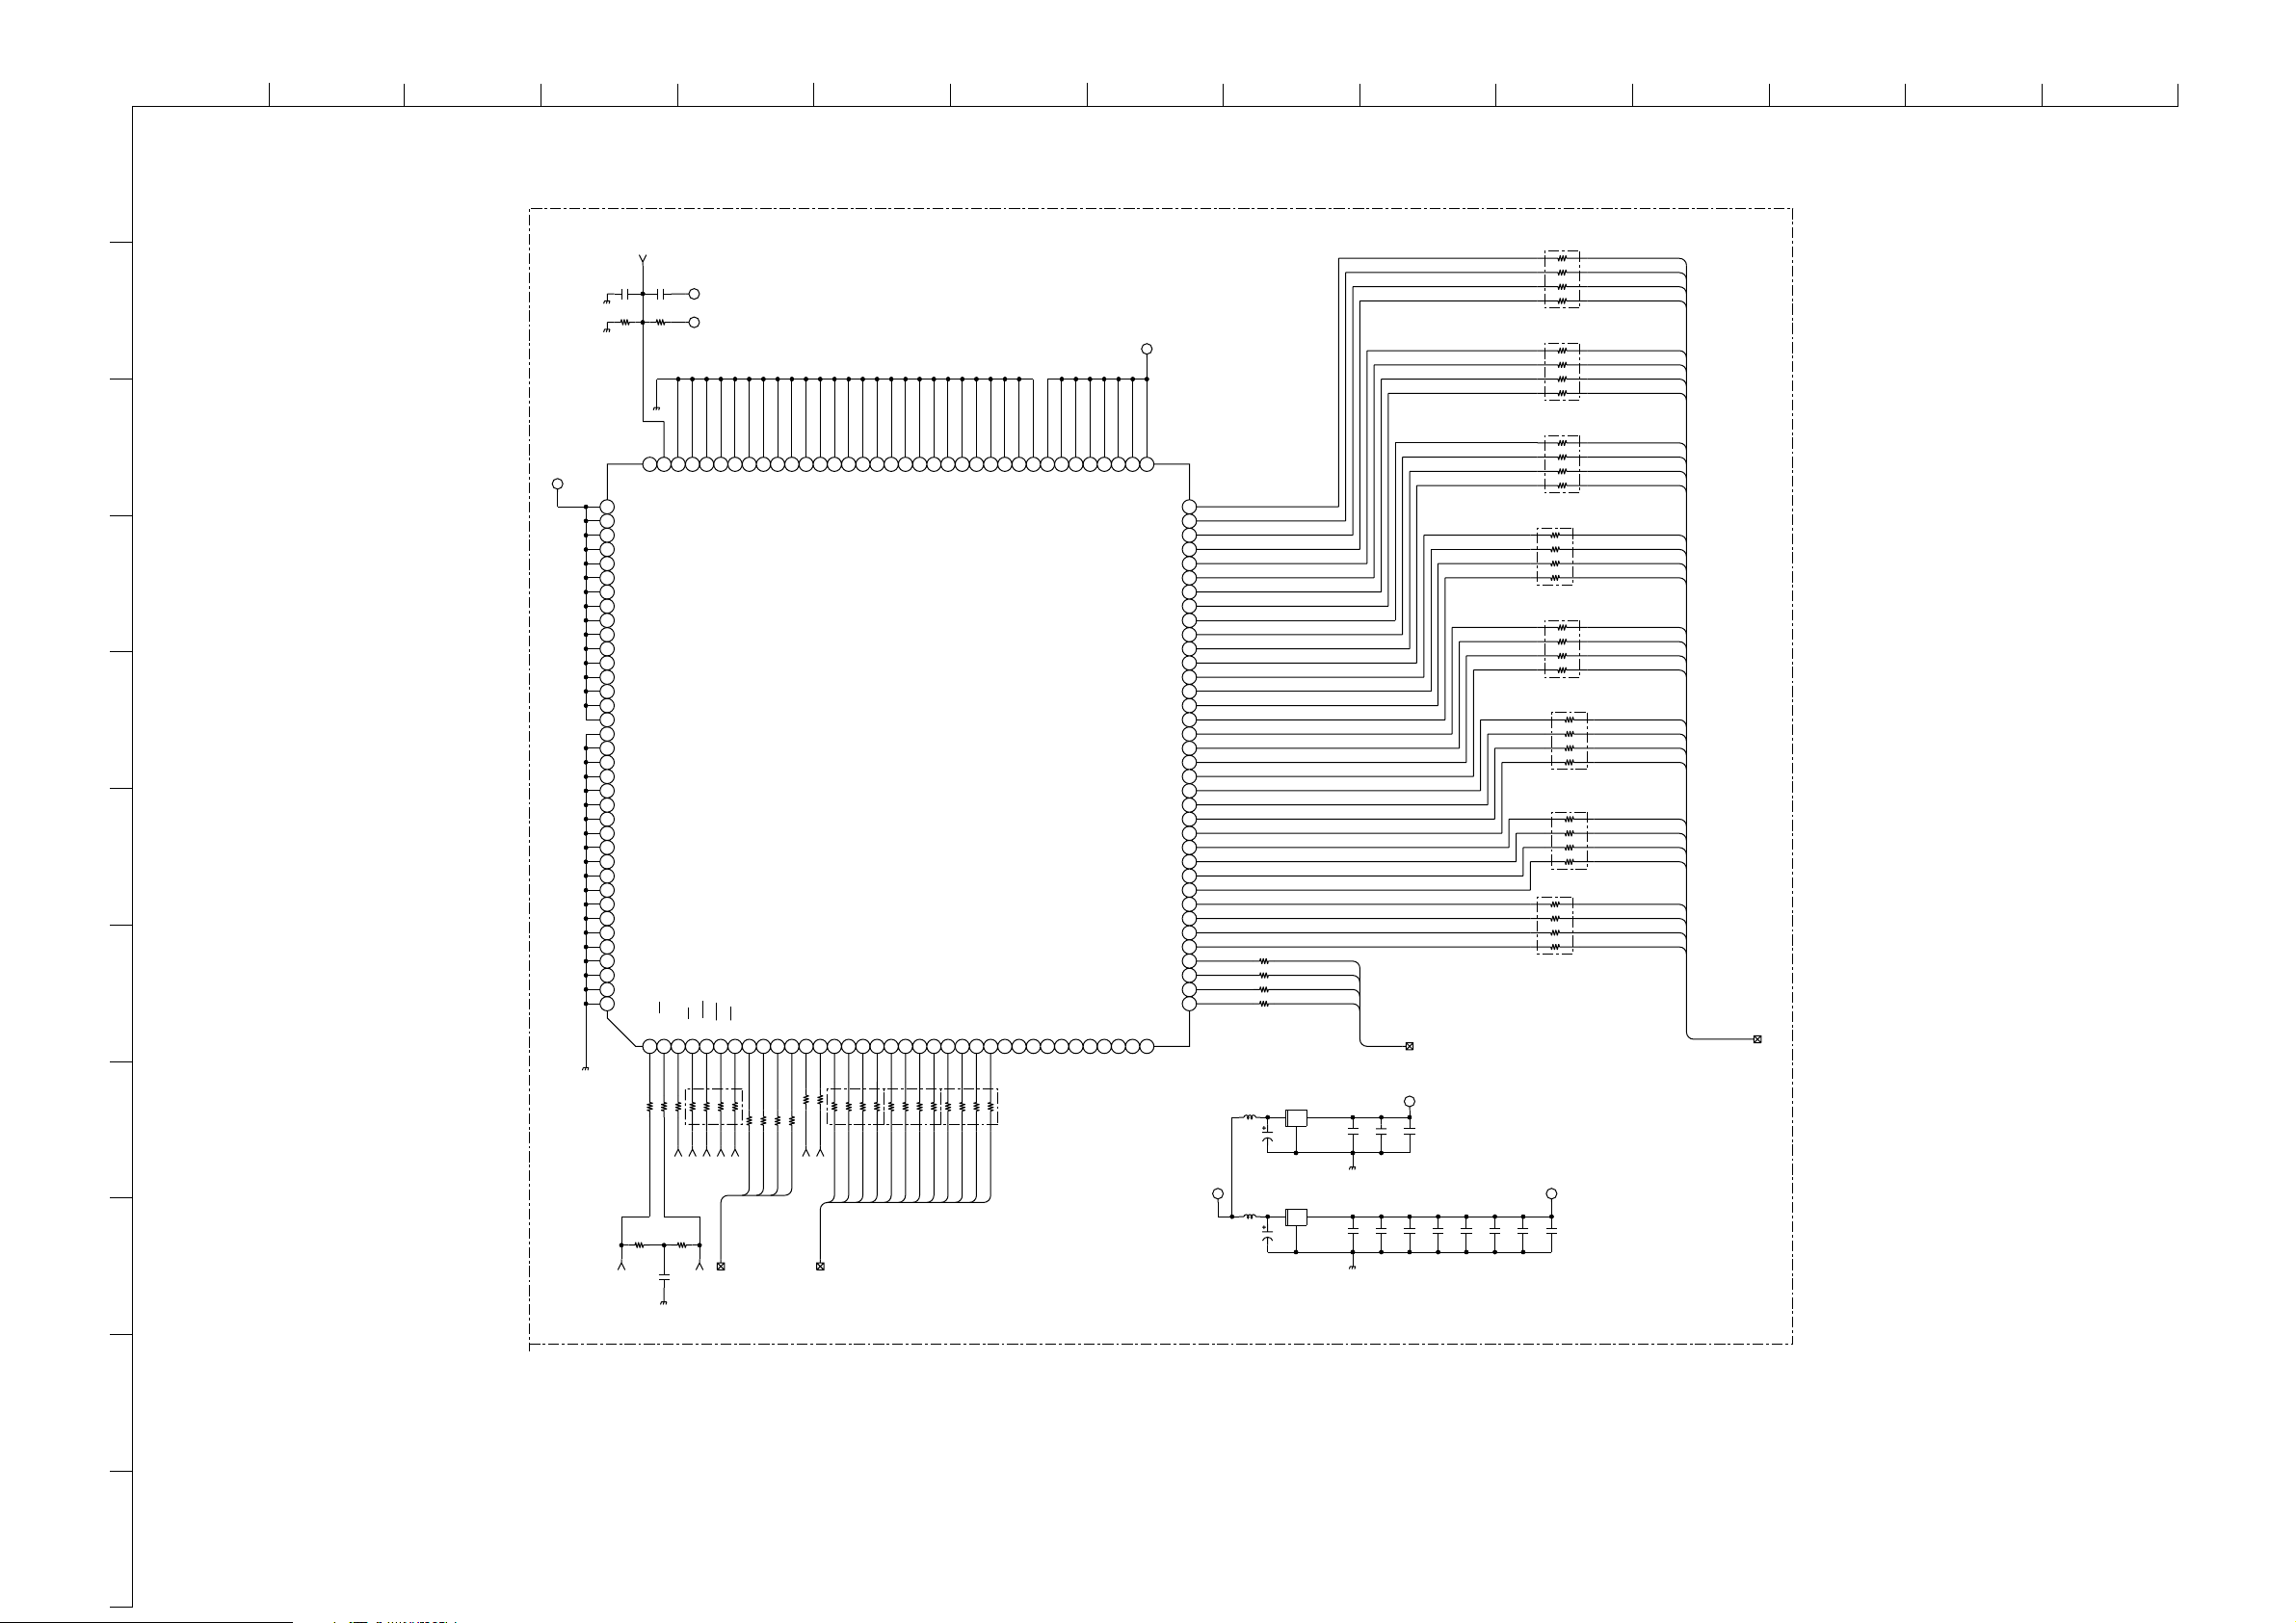
ABCDE F
G
HI JKLMN
O
1
JB.-LE4B
MVREF
C5516
C5503
0.1
0.1
25V
25V
VDDMQ
2
R5501
1k
1/10W
3
VDDMQ
L2
C3 VDDQ
L3
C5 VDDQ
L4
C7 VDDQ
L5
C8 VDDQ
L6
C10 VDDQ
L7
4
5
6
7
L8
L9
L10
L11
L12
L13
M2
M3
M4
M5
M6
M7
M8
M9
M10
M11
M12
M13
N2
N3
N4
N5
N6
N7
N8
N9
N10
N11
N12
N13
C12 VDDQ
E3 VDDQ
E12 VDDQ
F4 VDDQ
F11 VDDQ
G4 VDDQ
G11 VDDQ
J4 VDDQ
J11 VDDQ
K4 VDDQ
K11 VDDQ
B4 VSSQ
B11 VSSQ
D4 VSSQ
D5 VSSQ
D6 VSSQ
D9 VSSQ
D10 VSSQ
D11 VSSQ
E6 VSSQ
E9 VSSQ
F5 VSSQ
F10 VSSQ
G5 VSSQ
G10 VSSQ
H5 VSSQ
H10 VSSQ
J5 VSSQ
J10 VSSQ
K5 VSSQ
K10 VSSQ
8
R5502
51
9
1/10W
MCLK0
VDDMQ
R5500
1k
1/10W
K7
M13 MCL
N13 VREF
J6 VSS_THERMAL
J7 VSS_THERMAL
J8 VSS_THERMAL
J9 VSS_THERMAL
M11 CK
M12 CK
N12 CKE
N2 CS
0
R5511
R5503
1/10W
C5513
22R5512
51
0.01
25V
CKE
CS#
M2 RAS
22
RB5512
RAS#
MCLK0#
CAS#
DQS[0-3]
B2 B3 B4 B5 B6 B7 B8 B9 B10 B11 B12 C2 C3 C4 C5 C6 C7 C8 C9 C10 C11 C12 D2 D3 D4 D5 D6 D7 D8 D9 D10 D11 D12
0R5510
H7 VSS_THERMAL
H8 VSS_THERMAL
H9 VSS_THERMAL
L2 CAS
L3 WE
B2 DQS0
H13 DQS1
22
22
22
R5504
R5505
R5506
WE#
DQS[3]
DQS[1]
H6 VSS_THERMAL
G8 VSS_THERMAL
G9 VSS_THERMAL
H2 DQS2
B13 DQS3
N4 BA0
B13 C13 D13
22
R5508
22
22R5507
R5509
BA1
BA0
DQS[2]
DQS[0]
JB
L10 VSS
F6 VSS_THERMAL
F7 VSS_THERMAL
F8 VSS_THERMAL
F9 VSS_THERMAL
G6 VSS_THERMAL
G7 VSS_THERMAL
IC5500
K4D263238G-VC36T
VIDEO PROCESSOR MEMORY
M5 BA1
N5 A0
N6 A1
M6 A2
N7 A3
N8 A4
M9 A5
22
22
RB5509
RB5510
6
2
2
8
1
7
1
345
345
MA[0]
MA[1]
MA[4]
MA[2]
MA[3]
MA[5]
MA[0-11]
6
MA[6]
7/9
L5 VSS
K9 VSS
N9 A6
N10 A7
8
7
MA[7]
K8 VSS
N11 A8/AP
22
RB5511
2
1
MA[9]
MA[8]
K7 VSS
M8 A9
345
MA[10]
H13J13K12K13
K6 VSS
L6 A10
6
8
7
MA[11]
E8 VSS
E10 VSS
M7 A11
C4 NC
E7 VSS
C11 NC
H4 NC
E5 VSS
L11 VDD
H11 NC
L7 VDD
L8 VDD
L12 NC
L13 NC
L4 VDD
E11 VDD
M3 NC
M4 NC
VDDM
E4 VDD
B9 DQ229
B10 DQ28
C13 DQ27
D12 DQ26
D13 DQ25
E13 DQ24
F12 DQ15
F13 DQ14
G12 DQ13
G13 DQ12
J12 DQ11
J13 DQ10
N3 NC
L9 RFU1
H2H3H4H5H6H7H8H9H10H11H12J2J3J4J5J6J7J8J9J10J11J12K2K3K4K5K6K7K8K9K10K11
D7 VDD
D8 VDD
B8 DQ31
C9 DQ30
K3 DQ23
K2 DQ22
J2 DQ21
J3 DQ20
G2 DQ19
G3 DQ18
F2 DQ17
F3 DQ16
K12 DQ9
K13 DQ8
E2 DQ7
D2 DQ6
D3 DQ5
C2 DQ4
B5 DQ3
B6 DQ2
C6 DQ1
B7 DQ0
B12 DM3
H3 DM2
H12 DM1
B3 DM0
M10 RFU2
G13
G12
G11
G10
G9
G8
G7
G6
G5
G4
G3
G2
F13
F12
F11
F10
F9
F8
F7
F6
F5
F4
F3
F2
E13
E12
E11
E10
E9
E8
E7
E6
E5
E4
E3
E2
VDDMQO
FB5500
0uH
C5509
10
50V
FB5501
0uH
C5500
10
50V
R5516
R5515
R5514
R5513
FL5501
FL5500
0uH
EMI
0uH
EMI
RB5507
22
8
7
6
5
4
3
2
1
RB5506
22
8
7
6
5
4
3
2
1
RB5505
22
8
7
6
5
4
3
2
1
RB5504
22
8
7
6
5
4
3
2
1
RB5503
22
8
6
4
2
RB5502
22
8
6
4
2
RB5501
22
8
7
6
5
4
3
2
22
DQM[2]
22
22
DQM[0]
DQM[3]
22
DQM[1]
RB5500
22
1
DQM[0-3]
VDDM
C5501
C5504
G
0.1
16V
C5507
0.1
16V
0.01
50V
VDDMQ
C5502
C5505
G
0.1
0.1
16V
16V
C5508
0.01
50V
C5510
0.01
50V
C5511
0.01
50V
C5512
0.01
50V
C5514
4700p
50V
C5515
4700p
50V
MD[16]
MD[18]
MD[17]
MD[19]
MD[20]
MD[21]
MD[22]
MD[23]
MD[0]
MD[1]
MD[3]
MD[2]
MD[4]
MD[5]
MD[6]
MD[7]
MD[24]
MD[25]
MD[26]
MD[27]
7
MD[29]
5
MD[28]
3
MD[31]
1
MD[30]
7
5
3
1
MD[8]
MD[9]
MD[10]
MD[11]
MD[12]
MD[13]
MD[14]
MD[15]
MD[0-31]
COMPONENTS MARKED AS XX ARE NOT FITTED ON THIS MODEL
10
11
~ JB Board Schematic Diagram [ Audio Processor, AV Switch, Chroma Decoder, Video Processor, Main Micro ] Page 7/9 ~
- 54 -
Page 55
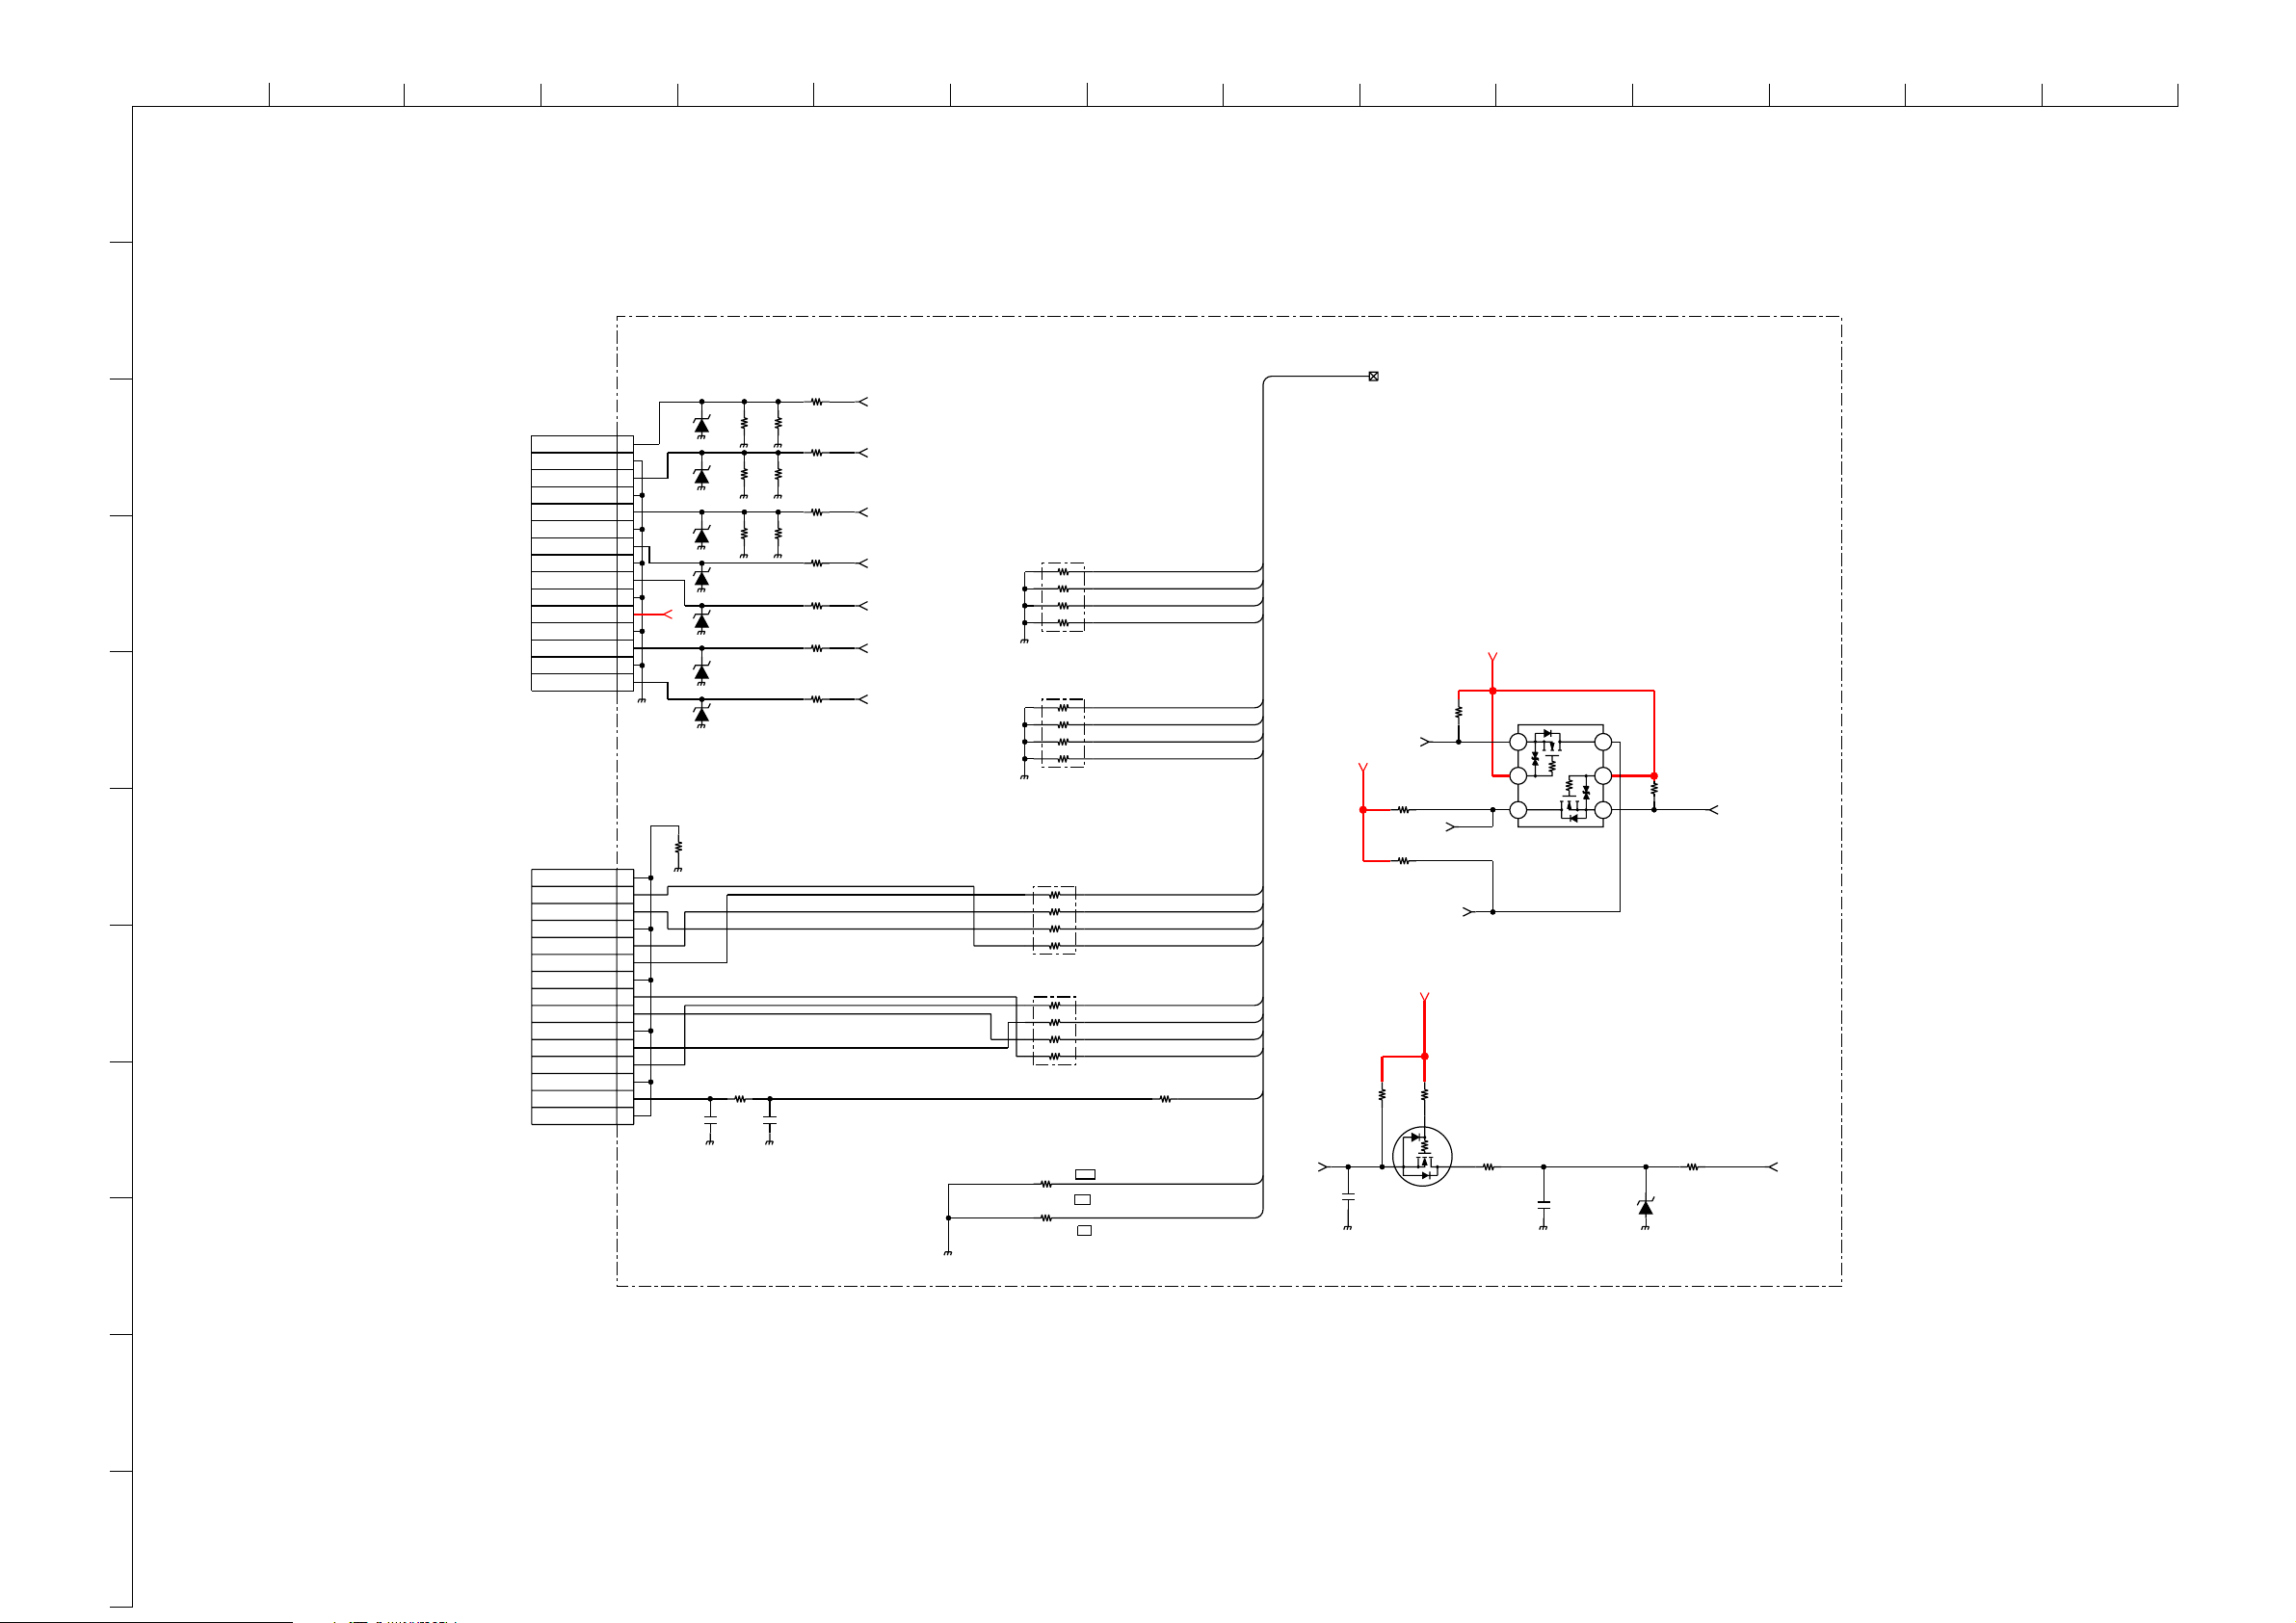
ABCDE F
G
HI JKLMN
O
1
CN9511
15P
BRN
15P
BRN
VDO(7)
VDO(6)
VDO(5)
VDO(4)
VDO(3)
VDO(2)
VDO(1)
VDO(0)
VD_CLK
B_PC
GND
G_PC
GND
R_PC
GND
V_PC
GND
H_PC
GND
+5VA
GND
GND
GND
GND
GND
GND
GND
GND
L
R
JB.-LE4B
1
2
3
4
5
6
7
8
9
10
11
12
13
14
15
1
2
3
4
5
6
7
8
9
10
11
12
13
14
15
D9609
UDZSTE-175.6B
D9610
UDZSTE-175.6B
D9611
UDZSTE-175.6B
A5V
UDZSTE-175.6B
D9615
R7542
XX
C8537
XX
COMPONENTS MARKED AS XX ARE NOT FITTED ON THIS MODEL
R9736
100
R9775
150
1/10W
R9777
150
1/10W
R9779
150
1/10W
D9612
UDZSTE-175.6B
D9613
D9614
XX
XX
R7541
0
R9776
150
1/10W
R9778
150
1/10W
R9780
150
1/10W
C8538
XX
1/10W
R9739
100
1/10W
R9740
100
1/10W
R9741
100
1/10W
R9742
100
1/10W
R9737
100
1/10W
R9738
100
1/10W
PC_B
PC_G
PC_R
PC_V
PC_H
PC_L
PC_RI
RB4705
8
6
4
2
8
6
4
2
RB4706
1
3
5
7
RB4703
R4703
XX
R4704
XX
RB4704
22
2
4
6
8
22
XX
22
CLK
VS
INPUT TO Trident
MAIN_DIN
JB
R7571
0
DT_C_DC0
DT_C_DC1
DT_C_DC2
DT_C_DC3
DT_C_DC4
DT_C_DC5
DT_C_DC6
DT_C_DC7
DT_C_DY4
DT_C_DY5
DT_C_DY6
DT_C_DY7
DT_C_DY0
DT_C_DY1
DT_C_DY2
DT_C_DY3
DT_C_CLK
DT_C_VS
DT_C_HS
SIRCS
R1209
10k
1/16W
C8535
100p
STBY5V
R9735
1/10W
50V
SCL_B
R9734
4.7k
1/10W
4.7k
R1205
10k
1/16W
S
R9732
4.7k
1/10W
SDA_5V
SCL_5V
STBY3.3V
STBY3.3V
SSM6N15FU(TE85R)
D2G1S1
Q7412
2SK2036(TE85L)
R1120
0
CHIP
Q9602
C1050
100p
50V
D1
G2
S2
1
3
5
7
7
5
3
1
7
5
3
1
2
4
6
8
HS
8/9
R9733
4.7k
1/10W
R1215
0
CHIP
D1007
MM3Z5V6ST1
SDA_B
SIRCS_OUT
2
3
TO H3 BOARD
CN4302/CN4305
4
5
6
CN5404
7
8
9
10
11
~ JB Board Schematic Diagram [ Audio Processor, AV Switch, Chroma Decoder, Video Processor, Main Micro ] Page 8/9 ~
- 55 -
Page 56
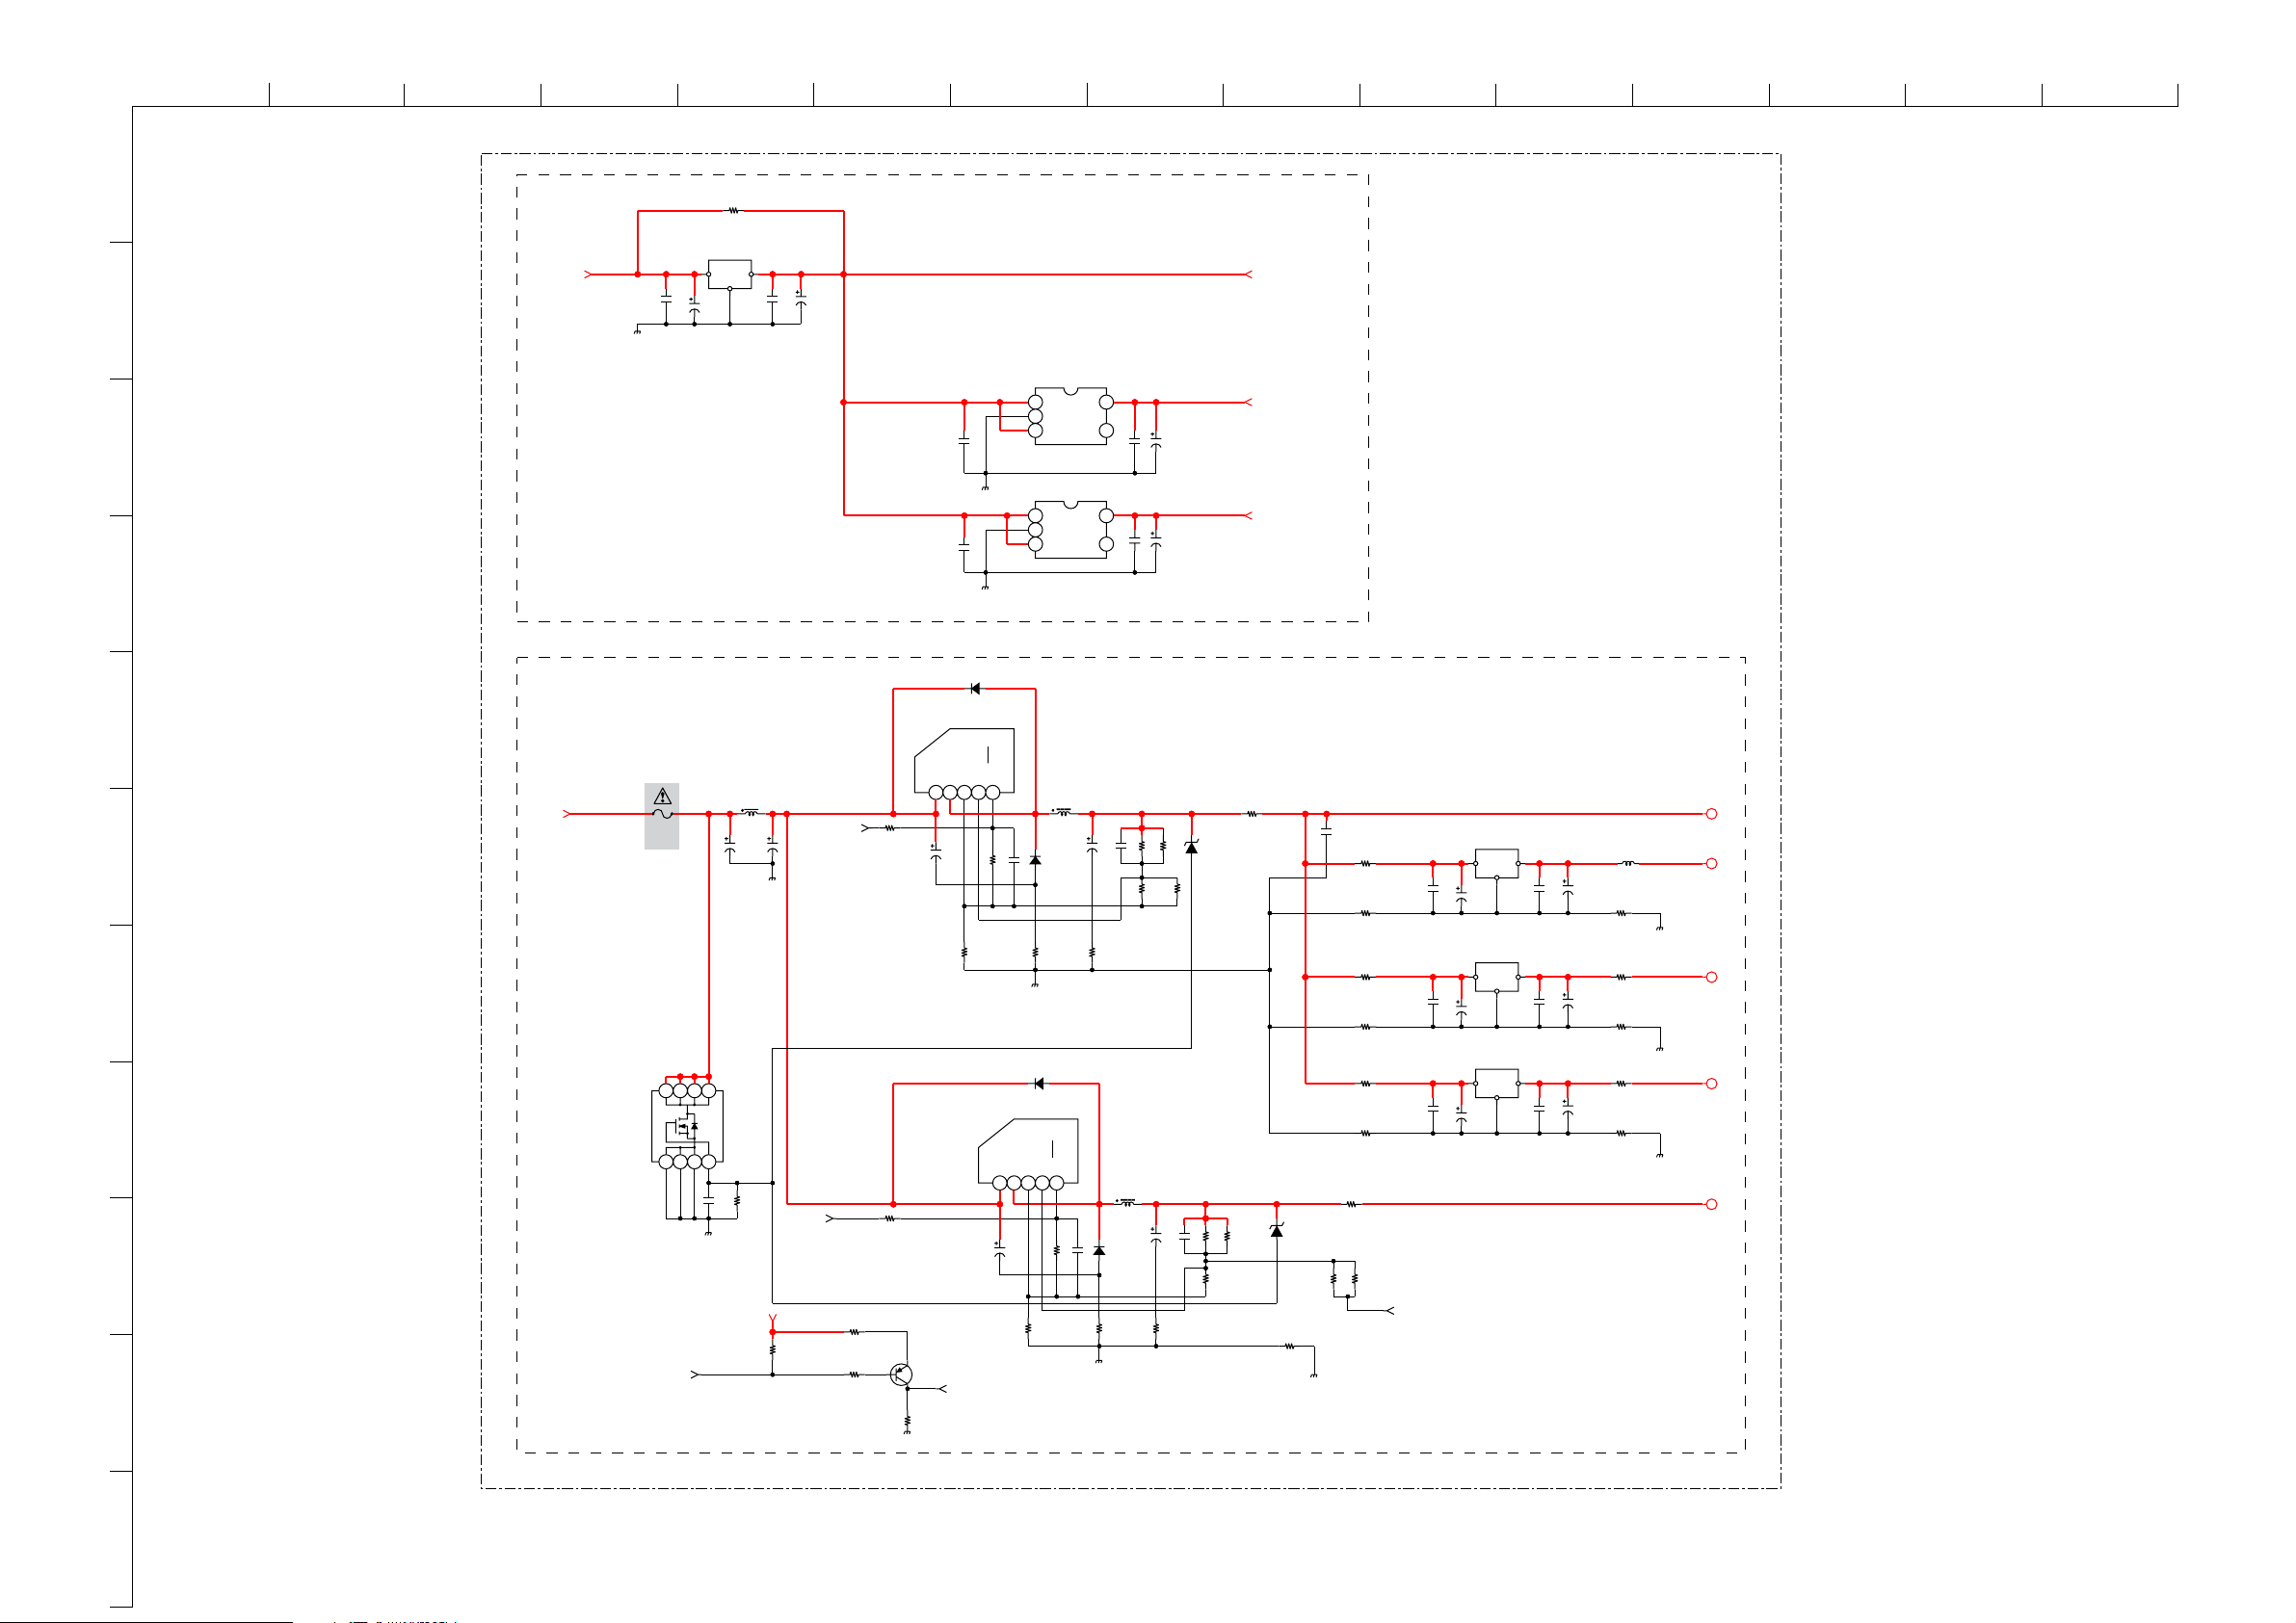
ABCDE F
G
HI JKLMN
O
JB.-LE4B
1
R9743
XX
IC5740
L88M05T-FA-TL
STBY
C5740
2
0.1
25V
3
4
VCC
C5741
100
25V
OUT
GND
C5742
0.1
25V
C5743
100
25V
C1000
0.1
25V
C1001
0.1
25V
IC1000
S-1111B33MC-NYSTFG
3.3V STBY VOLTAGE REG
VIN
VOUT
GND
321
NC
ON/OFF
IC1001
BH25FB1WG-TR
2.5V STBY VOLTAGE REG
NC
VIN
GND
321
ON/OFF
VOUT
54
C1002
0.1
25V
54
C1003
0.1
25V
C1004
10
16V
C1005
10
16V
STBY5V
STBY3.3V
STBY2.5V
JB
9/9
10
D5700
XX
5
REG17.5V
6
TRIDENT POWER SUPPLY LINES
F5700
2A
32V
C5701
100
25V
L5700
10uH
C5702
100
POWER2
25V
1
R5701
1k
1/10W
C5703
7
8765
D1D2D3D4
8
Q5700
FDS6690A
S1 S2 S3 G
4321
C5700
0.1
25V
R5700
1k
1/10W
POWER2
R5702
1k
1/10W
9
STBY3.3V
4.7k
R7567
100
1/10W
R7564
CHIP
0
POWER_AV
R7565
1/10W
PQ1CZ41H2ZPH
3.3V VOLTAGE REG
VIN
VOUT
12345
R5704
4.7
25V
IC5701
PQ1CZ41H2ZPH
1.8V VOLTAGE REG
Q7416
MSB709-RT1
POWER2
R7566
4.7k
1/10W
IC5700
COM
47k
R5703
XX
C5704
4.7
25V
0ADJ
ON/OFF
L5701
47uH
C5705
0.01
25V
D5701
R5706
XX
D5702
XX
VIN
VOUT
COM
0ADJ
12345
R5707
R5705
XX
C5708
C5707
470
6.3V
EC21QS03L-TE12L
R5708
XX
ON/OFF
L5702
C5706
0.01
25V
47k
D5703
R5709
XX
R5710
2.2k
1/10W
XX
R5713
XX
R5711
R5732
1.8k
4.7k
47uH
C5709
C5710
XX
470
6.3V
EC21QS03L-TE12L
R5712
XX
D5704
MM3Z4V3ST1
R5714
R5716
2.2k
1/10W
R5715
2.2k
1/10W
R5717
0
CHIP
2.2k
D5705
MM3Z4V3ST1
R9771
2.2k
1/10W
R5719
XX
C5711
XX
R5718
CHIP
R5728
CHIP
R5731
R5724
CHIP
R5725
R5720
CHIP
R5721
0
0
XX
0
XX
0
XX
R9772
1/10W
2.2k
C5728
0.1
6.3V
C5724
0.1
6.3V
SENSE
C5720
0.1
25V
IC5722
BA25BC0FP-E2
2.5V VOLTAGE REG
OUT
VCC
GND
C5729
100
25V
IC5721
BA18BC0FP-E2
1.8V VOLTAGE REG
OUT
VCC
GND
C5725
100
25V
IC5720
BA18BC0FP-E2
1.8V VOLTAGE REG
OUT
VCC
GND
C5721
100
6.3V
C5730
100
6.3V
C5726
100
6.3V
C5722
0.1
25V
C5723
100
6.3V
C5731
0.1
25V
C5727
25V
VD3_3
L5729
4.7uH
R5730
XX
R5726
0
CHIP
0.1
R5727
XX
R5722
0
CHIP
R5723
XX
VDDMQO
VA1_8
VL1_8
VD1_8
11
COMPONENTS MARKED AS XX ARE NOT FITTED ON THIS MODEL
~ JB Board Schematic Diagram [ Audio Processor, AV Switch, Chroma Decoder, Video Processor, Main Micro ] Page 9/9 ~
- 56 -
Page 57
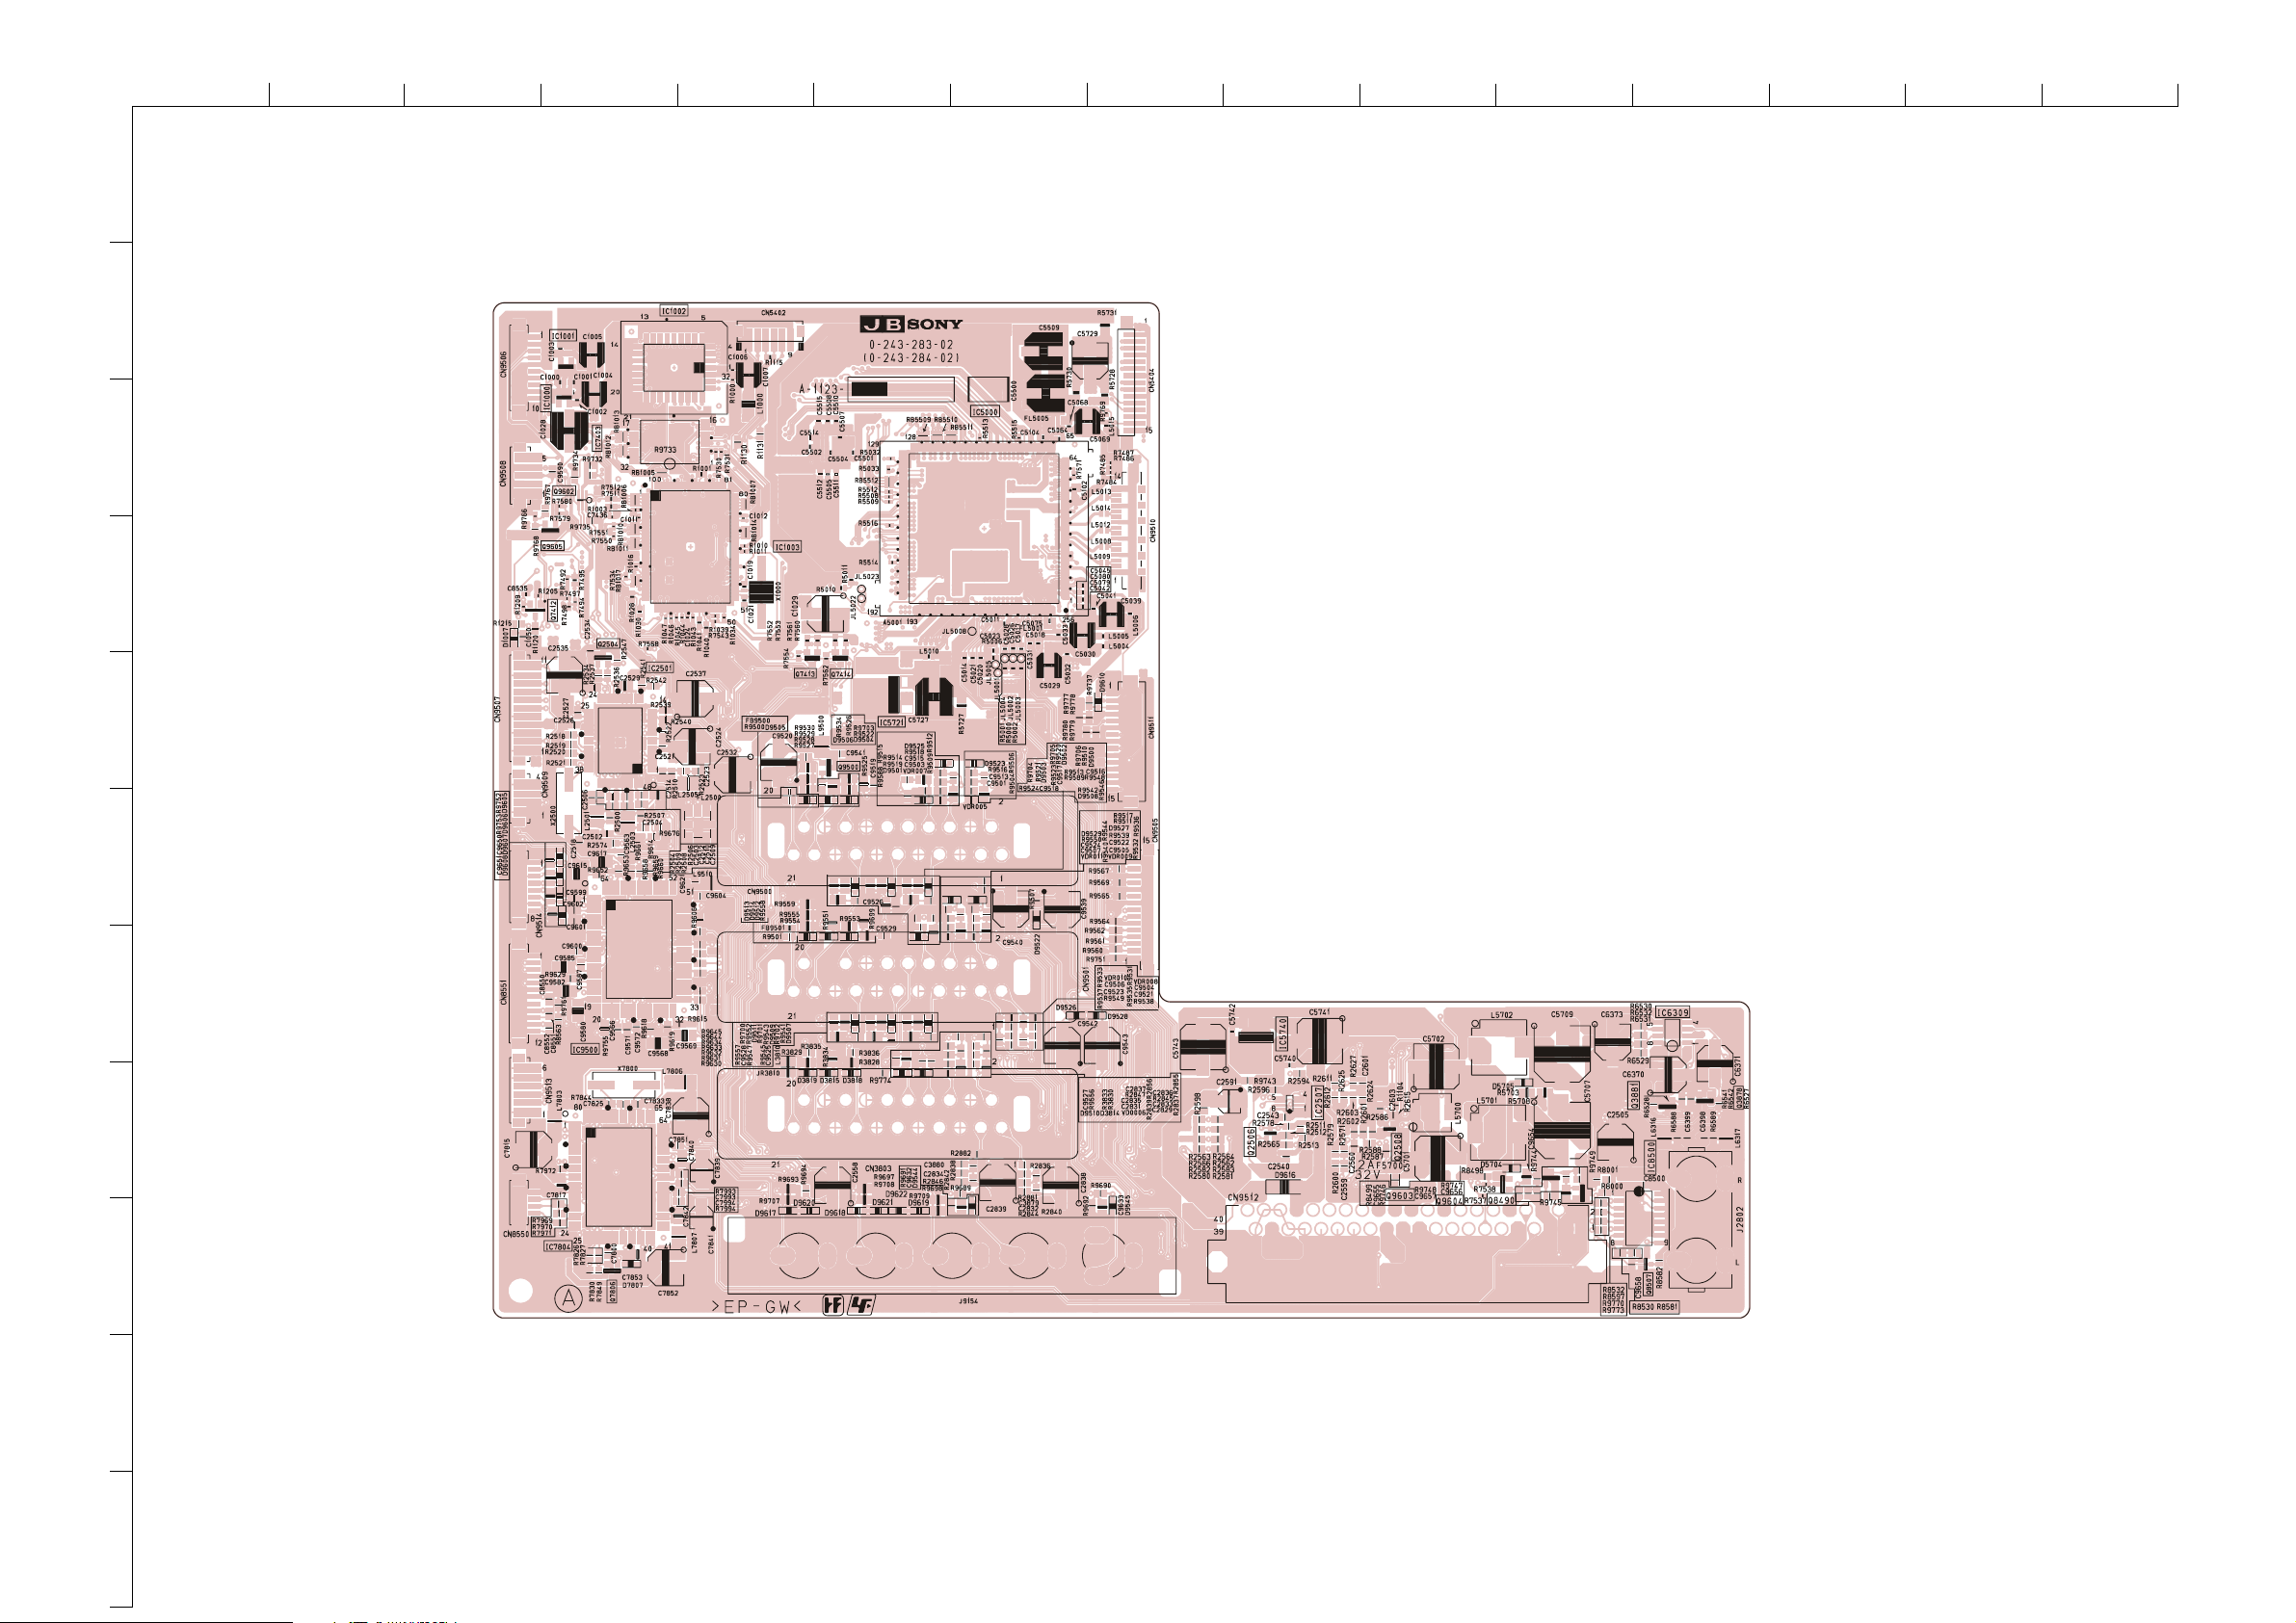
ABCDE F
1
2
3
4
G
HI JKLMN
O
5
6
7
8
9
10
11
~ JB Printed Wiring Board Conductor Side A ~
- 57 -
Page 58
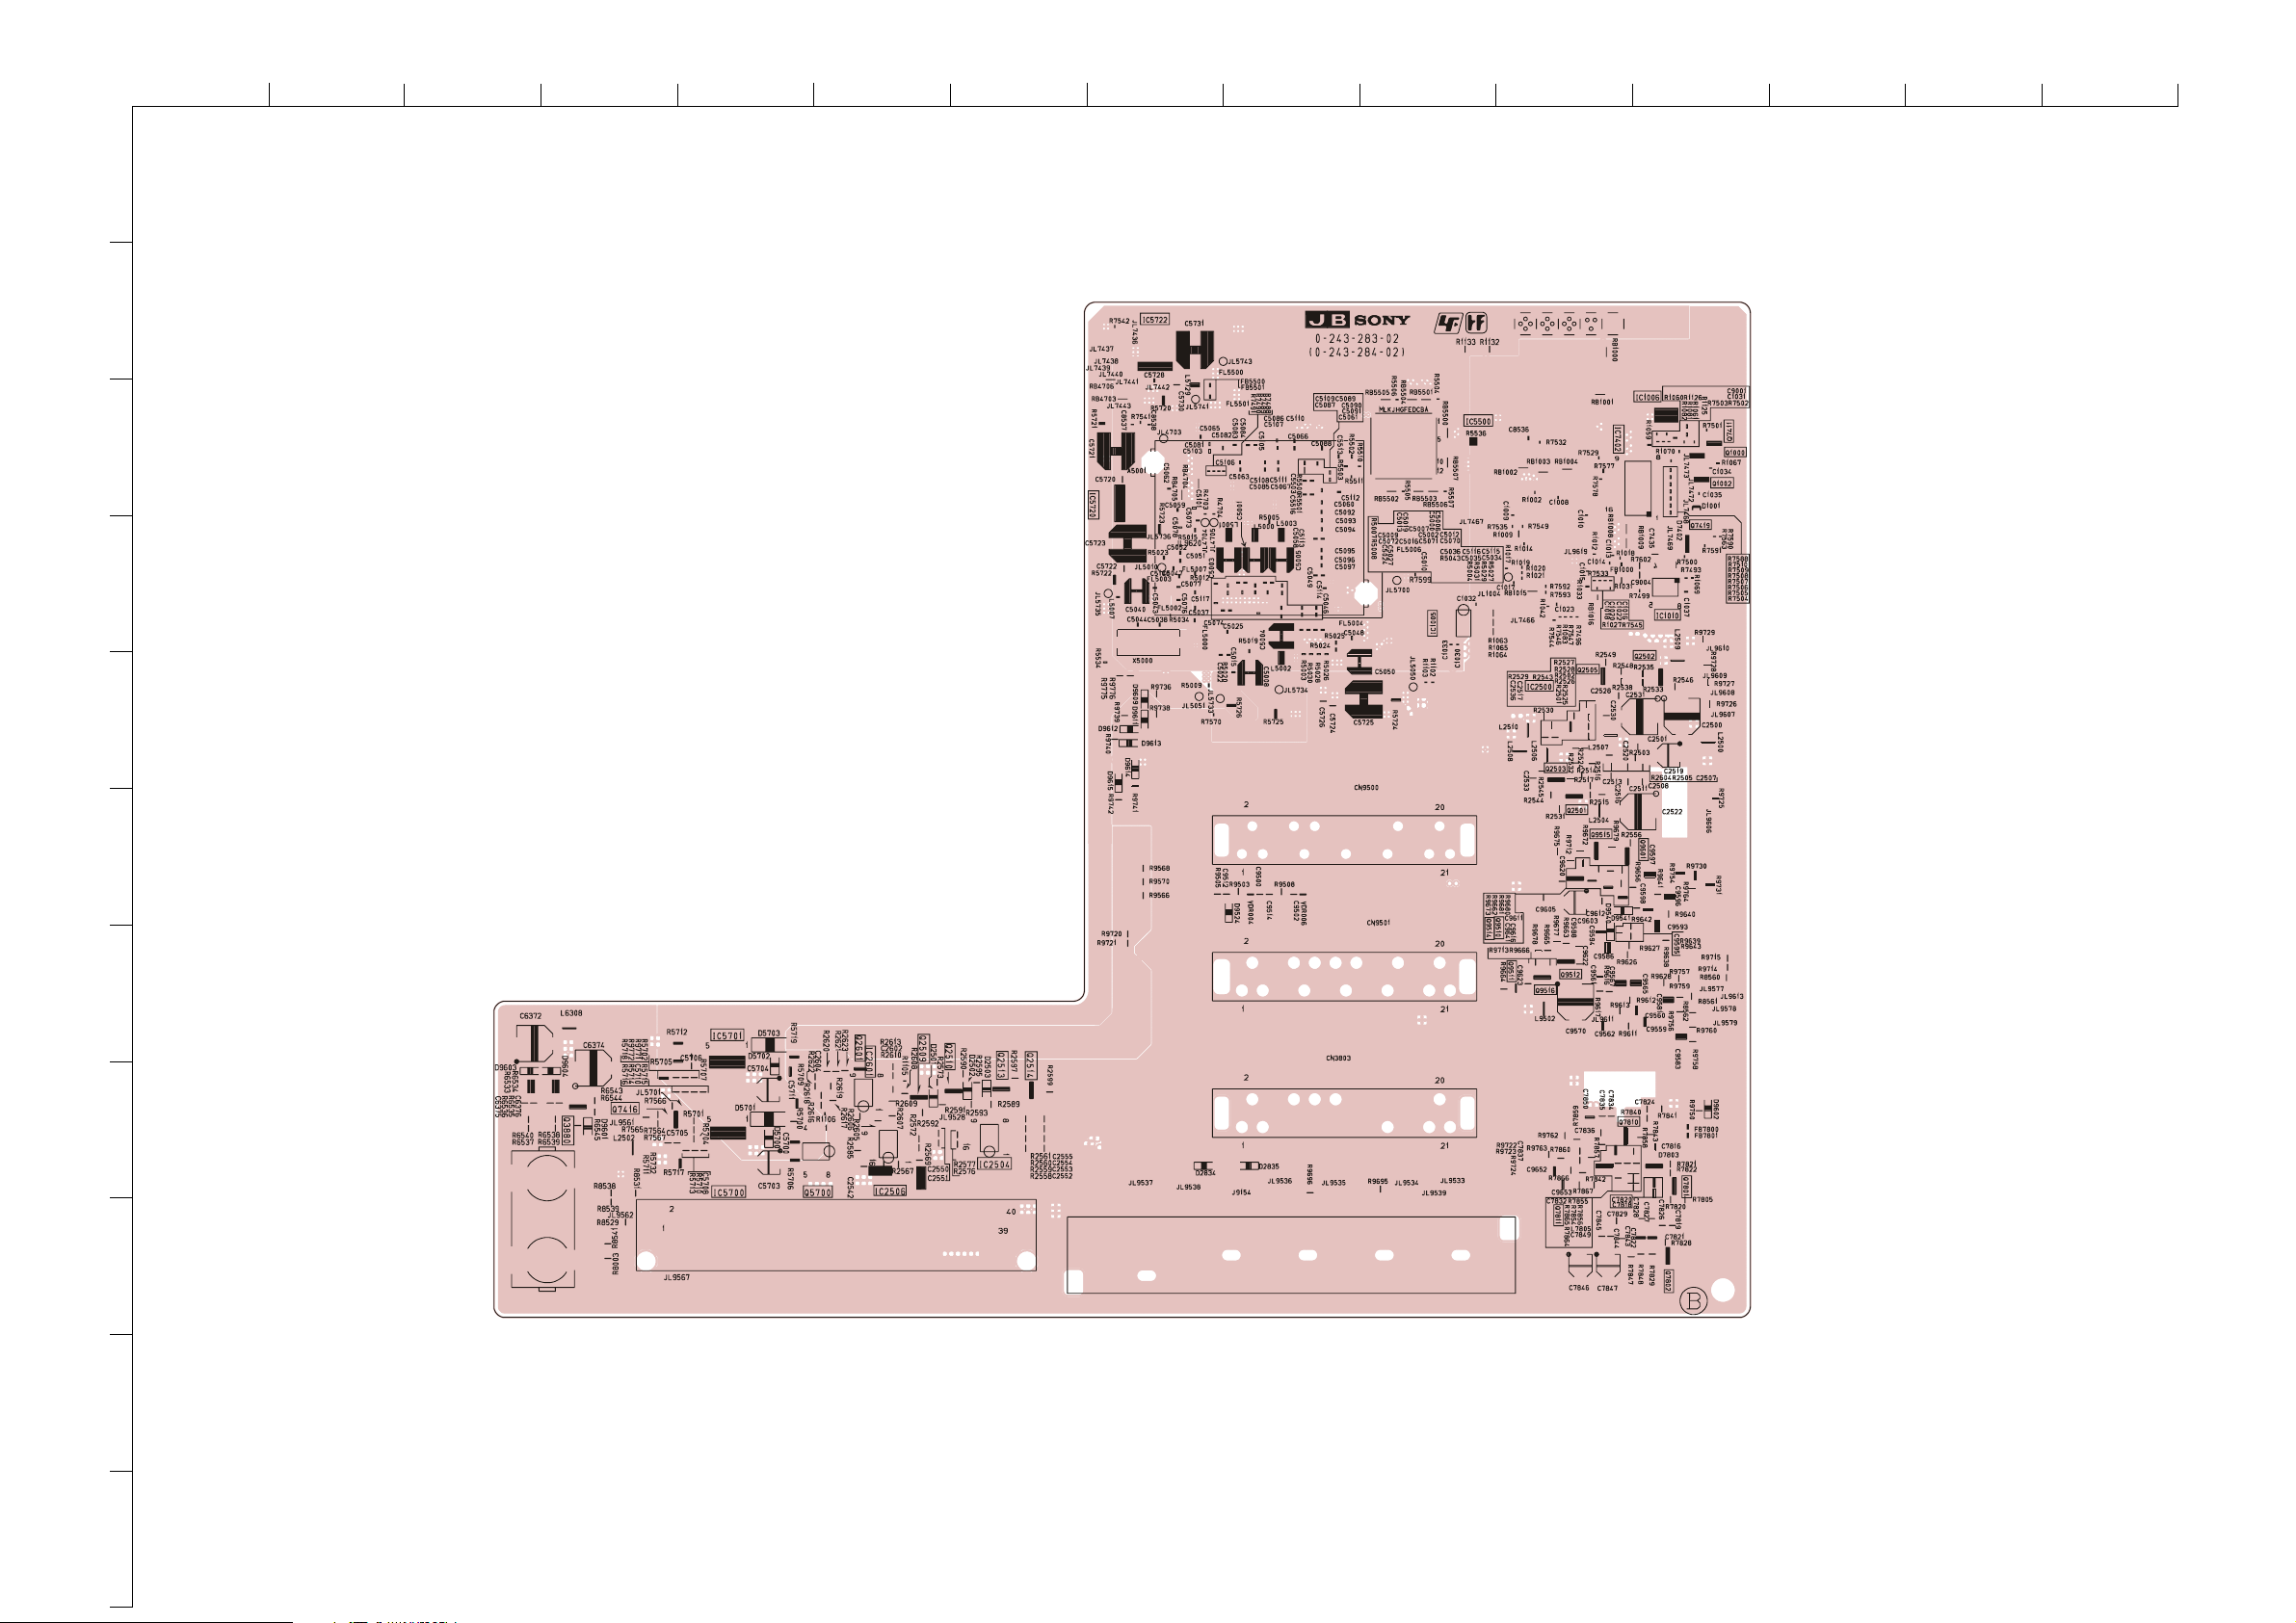
ABCDE F
1
2
3
4
G
HI JKLMN
O
5
6
7
8
9
10
11
~ JB Printed Wiring Board Conductor Side B ~
- 58 -
Page 59
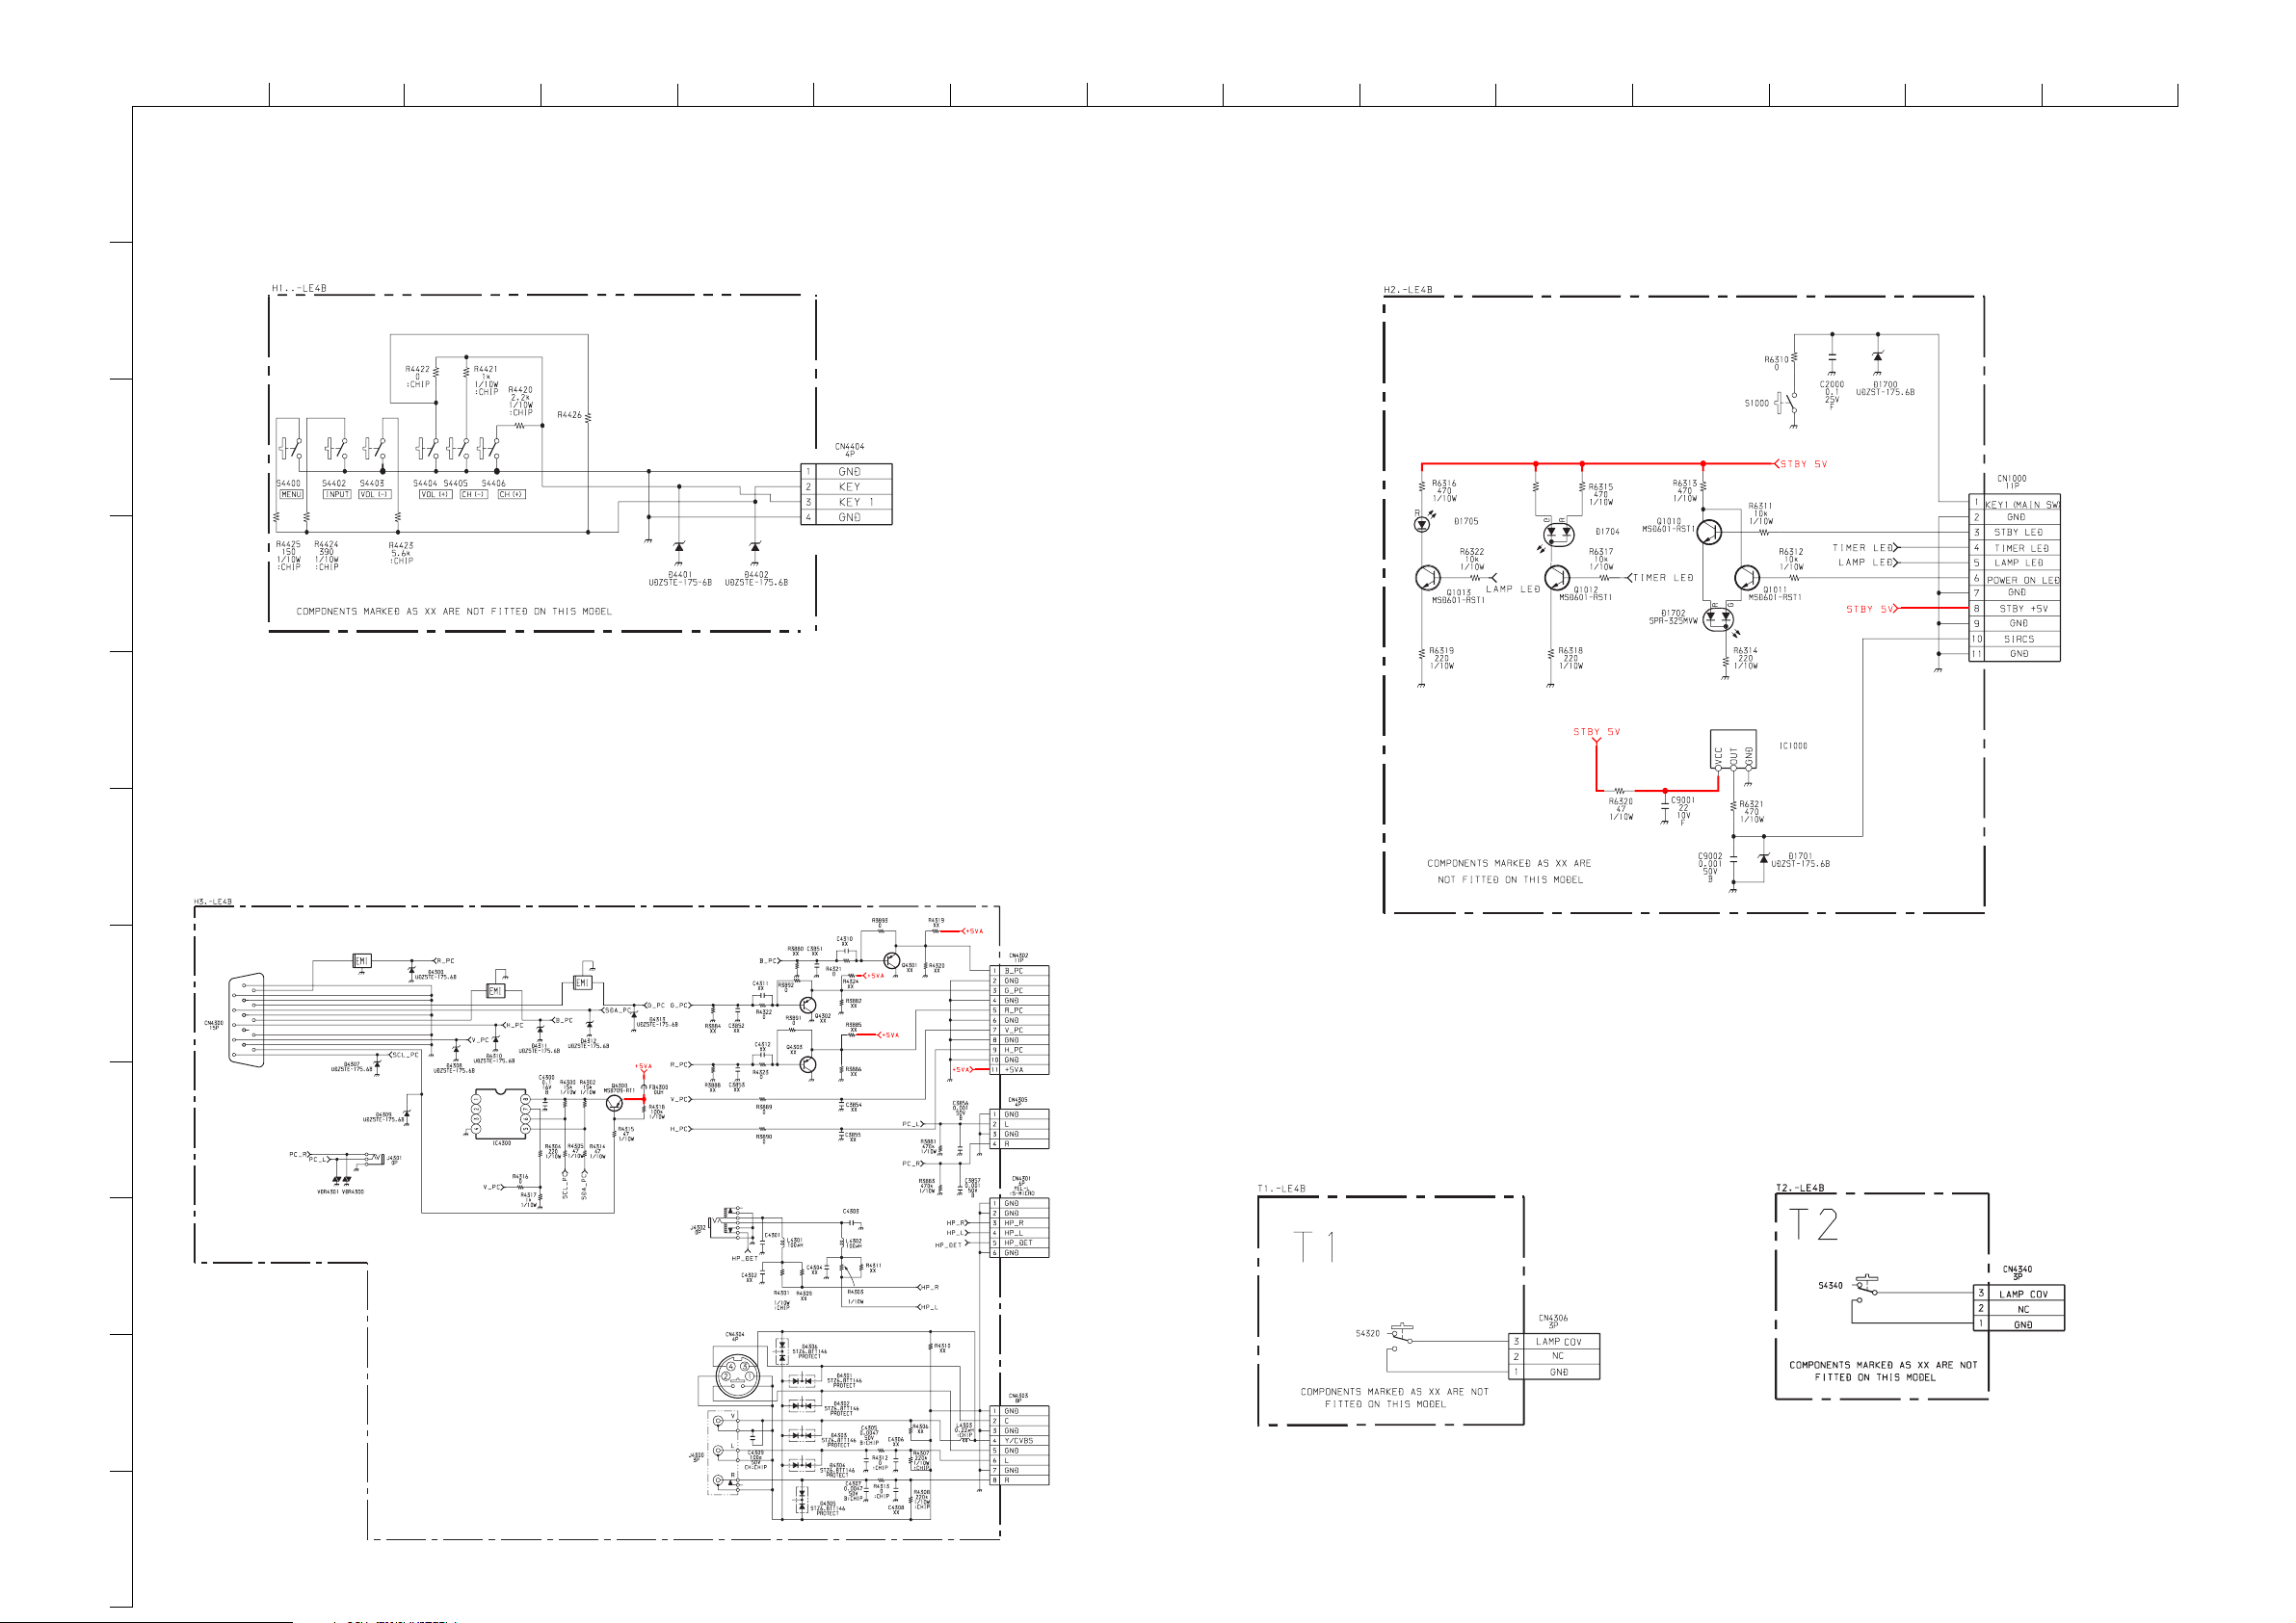
ABCDE F
STR-325VCT31
TO JB BOARD
CN9507
SPR-325MVW
GP1UE26SXK0F
R6323
390
1/10W
FRONT LED
H2
SIRCS
G
HI JKLMN
O
1
~ H1 Board Schematic Diagram [ Front Buttons ] ~
~ H2 Board Schematic Diagram [ Front LED ] ~
2
H1
FRONT BUTTONS
XX
3
TO H1 BOARD
CN9509
4
5
6
7
8
9
10
~ H3 Board Schematic Diagram [ PC In, Minijack, S-Video, CVBS, Audio L+R ] ~
FL4300
0UH
FL4302
0UH
0.001
47
FL4301
0UH
ST24FC21M6TR
PC INPUT EDID NVM
H3
PC IN, MINI JACK, S-VIDEO, CVBS, AUDIO L & R
TO JB BOARD
CN9511
TO AG BOARD
CN2003
~ T1 Board Schematic Diagram [ Lamp Door Switch ] ~
0.001
47
TO JB BOARD
CN9513
LAMP DOOR SWITCH
~ T2 Board Schematic Diagram [ Lamp Position Switch ] ~
LAMP POSITION SWITCH
11
COMPONENTS MARKED AS XX ARE NOT FITTED ON THIS MODEL
- 59 -
Page 60
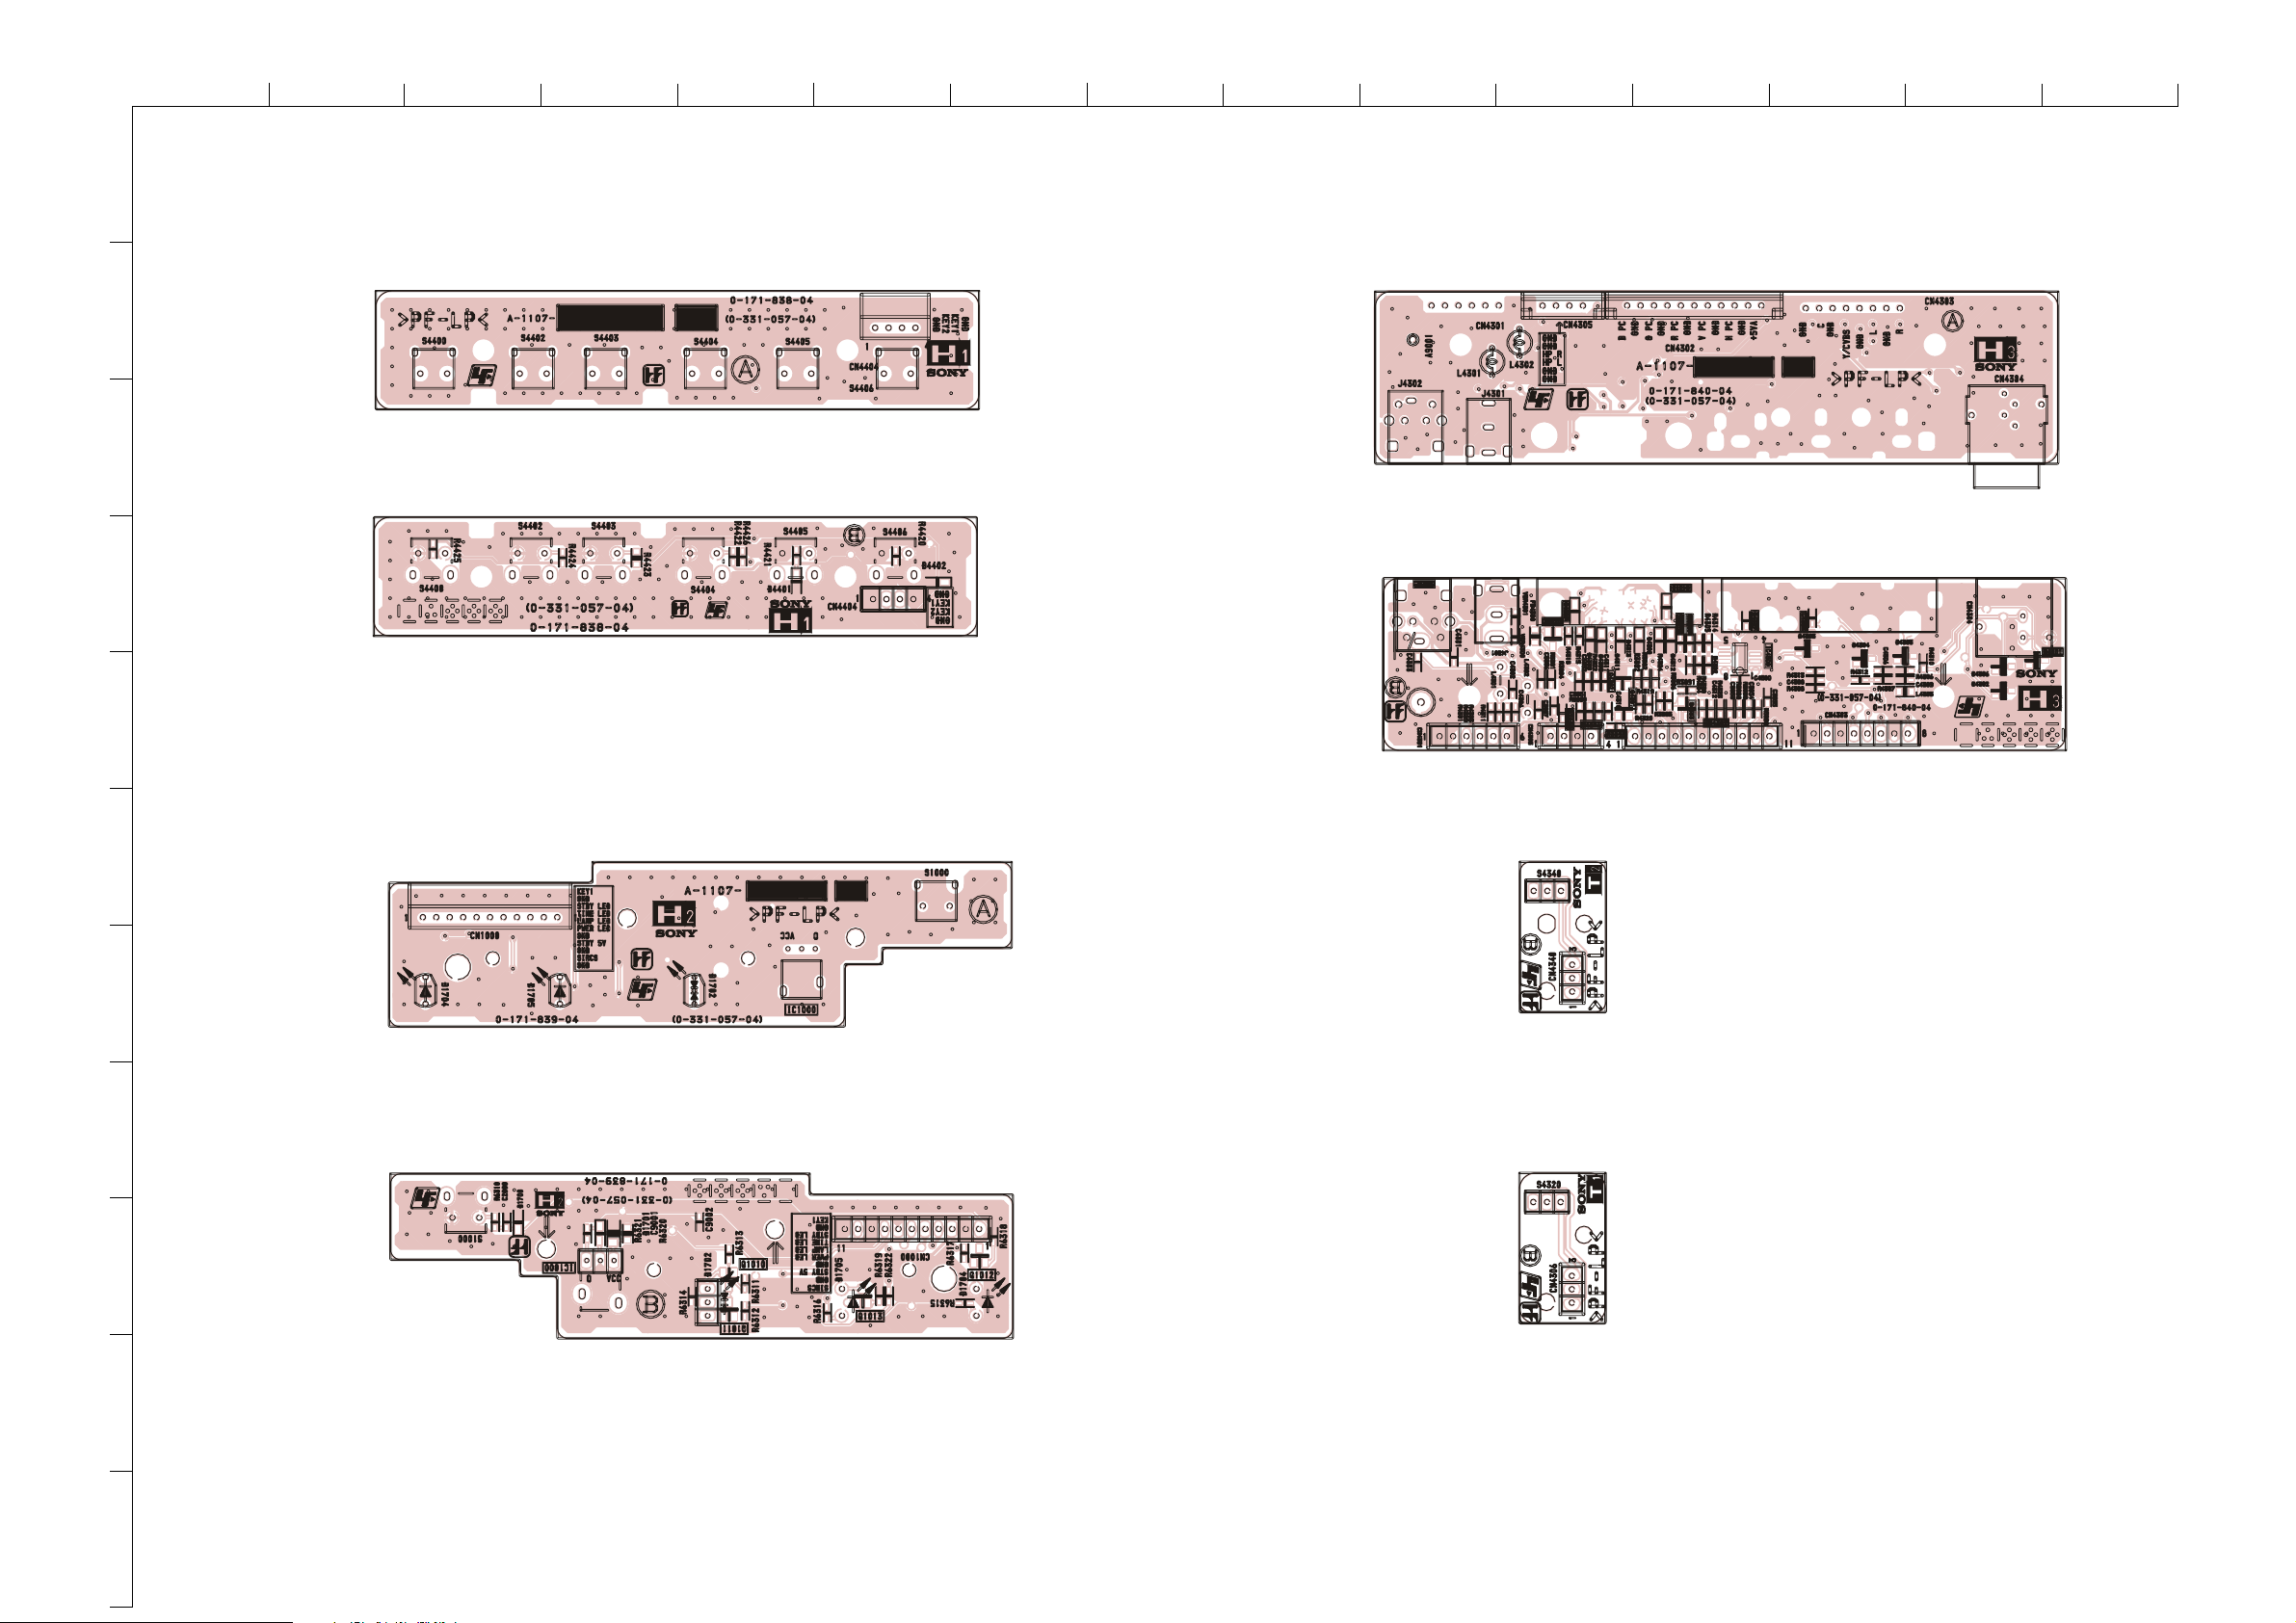
ABCDE F
1
G
HI JKLMN
O
~ H1 Printed Wiring Board Conductor Side A ~
2
3
~ H3 Printed Wiring Board Conductor Side A ~
~ H1 Printed Wiring Board Conductor Side B ~
~ H3 Printed Wiring Board Conductor Side B ~
4
5
~ H2 Printed Wiring Board Conductor Side A ~
6
7
8
9
~ H2 Printed Wiring Board Conductor Side B ~
~ T2 Printed Wiring Board Conductor Side ~
~ T1 Printed Wiring Board Conductor Side ~
10
11
- 60 -
Page 61
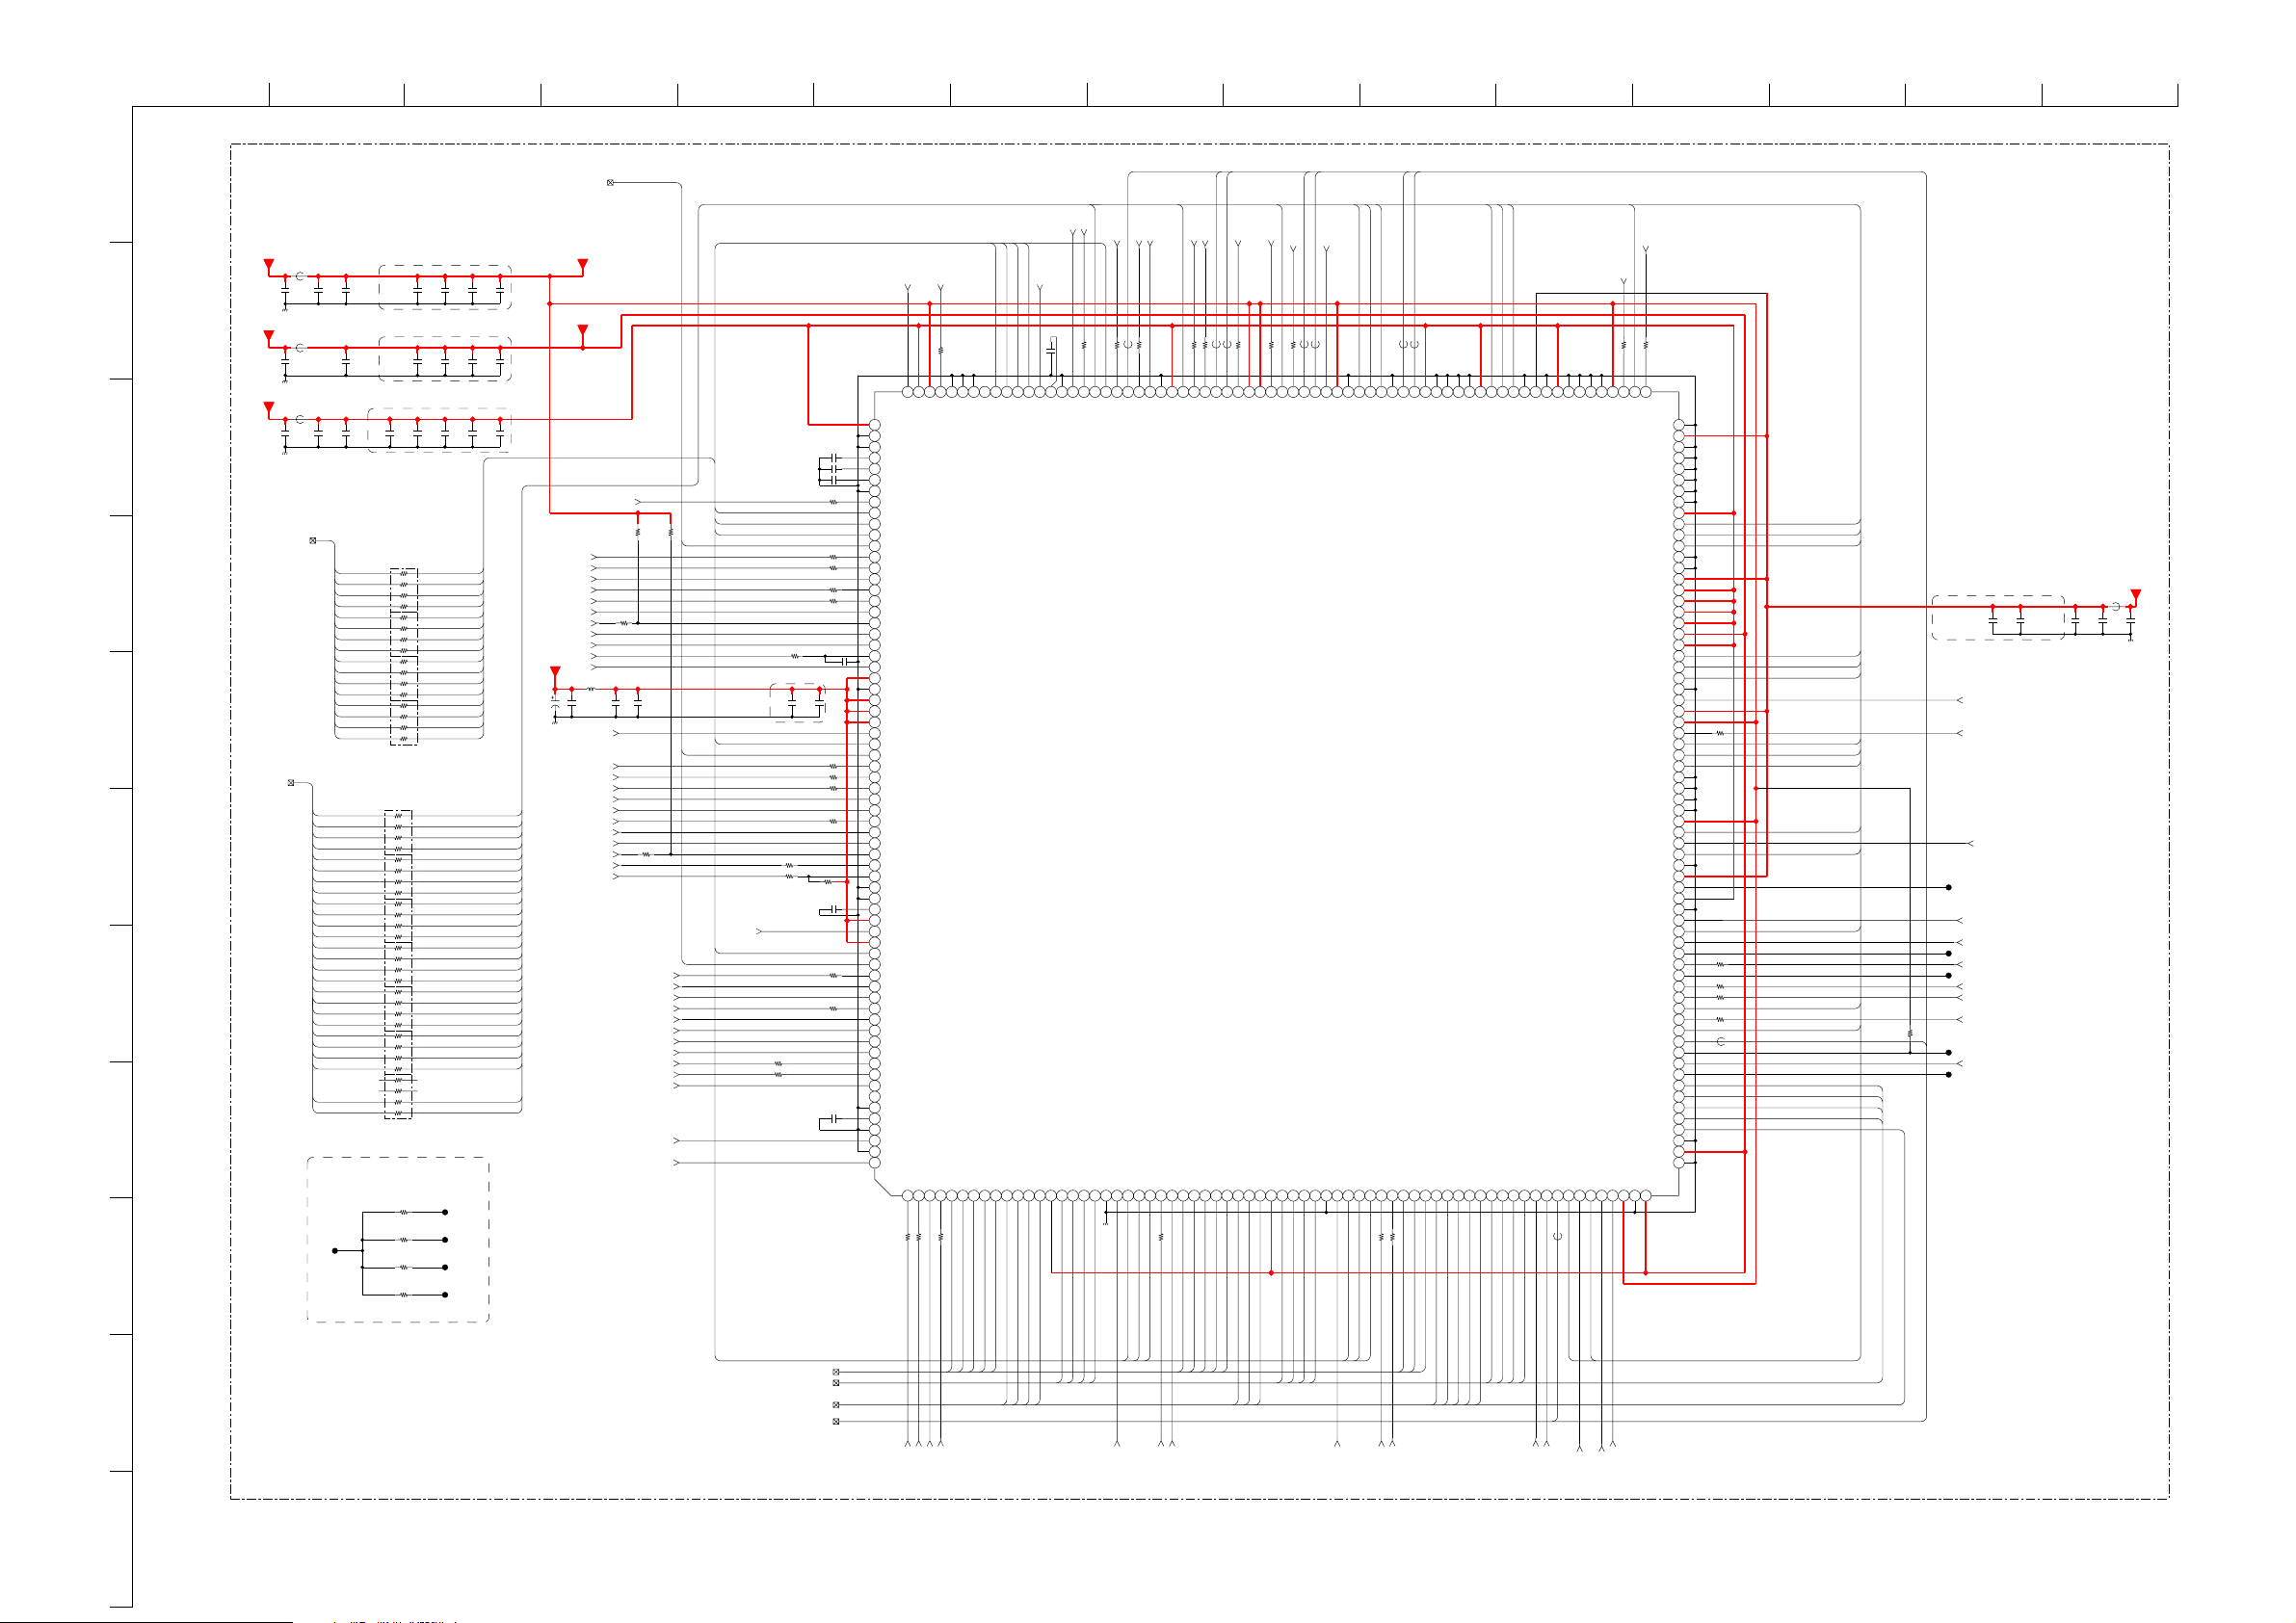
PMSSCLK
+1V5D
TXD2B
DQ[0-15]
TXD3B
PMSDIO
PPORT44
IOWRB
CTS1B
AMCK
+2V5D
JEDINT
NAND_ALE,NAND_CLE,NAND_RBB
CD2B
RTS1B
PPORT2
YUV_V
PPORT48
DBA0,DBA1,DCASB,DCLK,DCLKB,DCSB,DQM0,DQM1,DQS0,DQS1,DRASB,DVREF,DWEB
PMSBS
ADO
JTDO
PPORT4
nRESET
+3V3D
SCL_N
PPORT3
+3V3D
INPACKB
PPORT0
RXD1B
ATX
JTMS
CARD_RESET
PPORT47
JTDI
PMSPON
CVBS
PPORT13
PPORT45
PCE0B
YUV_Y
RXD2B
NMI
JTCK
CLK27M
SDA_N
RXD3B
JTRST
PPORT12
PPORT1
YC_Y
GCSB3
VS1B
YUV_U
PPORT46
PWMOUT
+1V5D
CD1B
ALRCK
IORDB
YC_C
DADD[0-12]
PMSINS
IOSI16B
TXD1B
REGB
ABCK
VDO[0-7],VCK
DAMON_INTB
GCSB0
GCSB1
SDA_TV
SCL_TV
PPORT42
RADD[0-25]
RDATA[0-15]
FOEB
FWEB
FCSB0
FCSB1
GRDYB
0uH
FB3100
0uH
FB3101
0uH
FB3102
0uH
FB3104
JL3109
JL3112
JL3110
1 2 3 4 5 6 7 8 9 10 11 12 13 14 15 16 17 18 19 20 21 22 23 24 25 26 27 28 29 30 31 32 33 34 35 36 37 38 39 40 41 42 43 44 45 46 47 48 49 50 51 52 53 54 55 56 57 58 59 60 61 62 63 64 65
89
90
91
92
93
94
95
96
97
98
99
100
101
102
103
104
105
106
107
108
109
110
111
112
113
114
115
116
117
118
119
120
121
122
123
124
125
126
127
128
129
130
161162163164165166167168169170171172173174175176177178179180181182183184185186187188189190191192193194195196197198199200201202203204
205
206
207
208
209
210
211
212
213
214
215
216
217
218
219
220
221
222
223
224
225
226
227
228
229
230
240
231
232
233
234
235
236
237
238
239
241
242
243
244
255
256
245
246
247
248
249
250
251
252
253
254
257
258
259
260
66 67 68
69
72
70
71
75
73
74
78
76
77
81
79
80
84
82
83
87
85
86
88
131
132
133
137
135
136
134
139 138140147159 146158 155 143145160 144157 151 150152154 148156 142 141153 149
264
263
261
262
268
272
271
267
266
265
270
269
UPD61120AF1-100-JN1-A
IC3100
CMDVCC0
PPORT34
RXD2B
PPORT49
DADD4
DADD5
DADD7
DADD8
DADD11
DRASB
DCLK
DQM0
DQS1
VDD2
DQ9
DQ11
DQ13
DQ15
GND2
PPORT46/CTS0B
RDATA9/HSD1
RDATA2
RDATA10/HSD2
TXD3B
PPORT48/TXD0B
DADD2
DADD6
DADD10
DADD9
DADD12
DCASB
DQM1
DVREF
VDD2
DQ8
DQ10
DQ12
DQ14
GND2
PPORT45/RTS0B
RDATA0
RDATA8/HSD0
RDATA1
TXD2B
PPORT50
DADD3
DADD1
DADD0
DBA1
DBA0
DCSB
DCLKB
DQS0
DQ6
DQ4
DQ2
DQ0
IRIN1
PPORT47/RXD0B
MMCLK/DTR0B
RADD1
HSDE/1284_NACK
RADD0
PKTSTRT/1284_BUSY
RXD3B
OFF1
RADD4
GRDYB
GND
VDD1
SDIN
AVDD1_6
VRCLKIN
RADD6
HSDCLK/1284_PERROR
RADD5
VDD3
GND
AGND1_6
AGND1_266
MCLKIN
RADD24/STPDAT6
RADD7
RADD25/STPDAT7
FCSB0
VDD3
AVDD1_266
CLK27IN
AGND1_162
RADD15/STPCLK
RADD23/STPDAT5
RADD12
VDD1
VDD2
VDD1
VDD1
VDD1
VDD1
AVDD1_162
SYSCLKIN
EVCK
RADD21/STPDAT3
RADD16/STPEN
RADD22/STPDAT4
VDD1
GND
GND
GND
GND
GND
AVSYSCLKIN
AVDD1_16
AGND1_16
FEWB
RADD20/STPDAT2
SMRST0
VDD3
GND
GND
GND
GND
VDD1
GND
AVDD1_18
AGND1_18
RADD18/STPDAT0
RADD14
RADD19/STPDAT1
VDD1
GND
FOEB
SMDAT0
RADD11
VDD1
GND
VAC
CTS1B
MMBCLK/1294_NSTROBE
GCSB0
RDATA15/HSD7
RADD10
SMCLK0
VAY
AGND5
CBPF
MMRINGB/1284_NSELECTIN
RDATA6
RDATA13//HSD5
RDATA7
RDATA14/HSD6
NAND_SEB
GND
GND
GND
DTR1B/PMSDIO
VDD3
VDD1
JTCK
VDD1
GND
GND
CBPC
CBPD
CBPE
AGND4
DSR1B/PMSINS
RDATA11/HSD3
RDATA5
RDATA12/HSD4
NAND_ALE
ATX
ADO
PPORT2
PPORT5/PMSSCLK
DCD1B/PMSPON
TEST
SDA0
JTDI
JTRST
RSTSWB
VAR
AVDD1
AGND2
AVDD3
AVDD4
AVDD5
OFF0
RDATA4
NAND_CLE
TXD1B
ALRCK
ABCK
PPORT1
PPORT4
RI1B/PMSBS
VDD3
GND2
VDD2
GND2
VDD2
GND2
DWEB
DQ7
DQ5
DQ3
DQ1
SCKINOUT
IROUT
STPERRB
MMDOUT/DSR0B
RADD3
SMCLK1
RADD2
SMDAT1
IRIN0
SDOUT
FCSB1
PPORT35
GND
GND
GND
VDD1
MMRST/1284_SELECT
MMMUTEB/RI0B
ACLKIN
RADD8
RADD17/STPSTRT
RADD13
GND
VDD3
MMOFFHOOK/1284_NFAULT
MMDIN/1284_AUTOFD
MMPWRCNT/DCD0B
SMRST1
RADD9
CMDVCC1
VDD3
VDD3
RTS1B
MMFS/1284_INIT
MMHCO
TMODE2
EDINT
SCL0
JTDO
NMI
EIVHS
AGND1
CBPB
AVDD0
VACOMP
AVDD2
RDATA3
NAND_R/BB
GCSB1
RXD1B
PWMOUT
AMCK
PPORT0
PPORT3
TMODE0
TMODE1
SDA1
SCL1
EIVVS
CBPA
AGND0
VAG
AGND3
VAB
JTMS
RSTOUT
+3V3D_STRAPS
+2V5D_DDR
JL3159
JL3160
22
RB3105
2
1
4
3
6
5
8
7
22
RB3103
22
RB3101
22
RB3106
2
1
4
3
6
5
8
7
22
RB3108
2
1
4
3
6
5
8
7
22
RB3102
22
RB3110
2
1
4
3
6
5
8
7
22
RB3109
2
1
4
3
6
5
8
7
22
RB3104
2
1
4
3
6
5
8
7
22
RB3107
2
1
4
3
6
5
8
7
22
RB3100
TESTPIN
TMODE2
TMODE0
TMODE1
SPKRB
STSCHGB
VS2B
GCSB2
JL3118
JL3117
JL3116
JL3119
JL3115
0.1
C3135
100R3115
0.1
C3105
47R3118
100R3109
0.1C3128
0.1
C3110
0.1
C3124
47
R3136
0.1
C3114
1
C3102
47
R3127
100R3129
47
R3132
0.1
C3120
47
R3107
47
R3112
0.1
C3126
47
R3111
47
R3100
0.1
C3113
XX
R3146
47
R3108
0.1
C3134
10k
R3119
47
R3123
0.1
C3103
0.1
C3136
0.1
C3107
1
C3138
47
R3135
0.1
C3122
47
R3137
XX
R3151
47
R3148
25V
0.1
C3130
0.1
C3104
0.1C3129
0.1
C3108
47
R3110
47
R3105
0.1
C3109
47
R3126
47R3104
47R3121
47
R3106
0.1
C3137
47
R3160
0
R3140
10k
R3157
47
R3116
0.1
C3112
47
R3102
R3125
4.7k
0.1
C3121
0.1
C3119
0.1
C3131
0.1
C3111
10pF
C3132
1
C3100
47
R3114
47R3141
0.1C3127
47R3145
100
R3130
47R3103
47R3122
0.1
C3116
47
R3133
100
R3101
47R3113
0.1
C3123
0.1
C3115
47R3131
47
R3149
47R3156
XX
R3139
0.1
C3117
47
R3120
47
R3117
47
R3147
0.1
C3106
R3124
4.7k
0.1
C3133
0.1
C3125
0UH
FB3111
0UH
FB3112
0UH
FB3110
0UHFB3109
0UH
FB3105
0UH
FB3106
0UHFB3107
0UH
FB3108
0uHFB3103
100
C3101
4.7
C3118
0.82UH
L3100
DVREF
EMMA_RDATA[2]
EVFIELD
EMMA_RDATA[5]
EMMA_RADD[5]
EMMA_RDATA[7]
EMMA_RDATA[6]
EMMA_RADD[6]
VDO[7]
EMMA_RADD[0]
EMMA_RADD[3]
IREQB
EMMA_RDATA[0]
EMMA_RADD[2]
EMMA_RDATA[4]
NAND_CLE
EMMA_RADD[11]
EMMA_RDATA[1]
EMMA_RADD[13]
EMMA_RADD[9]
NAND_RBB
EMMA_RADD[8]
EMMA_RADD[4]
GCSB2
NAND_ALE
EMMA_RADD[7]
EMMA_RADD[10]
EMMA_RADD[1]
EMMA_RADD[12]
EMMA_RDATA[3]
PCE1B
VCK
EMMA_RADD[24]
EMMA_RADD[25]
EMMA_RADD[15]
EMMA_RADD[21]
EMMA_RADD[16]
EMMA_RDATA[8]
EMMA_RADD[20]
EMMA_RADD[18]
EMMA_RADD[19]
VDO[3]
VDO[5]
EMMA_RADD[17]
VDO[0]
VDO[1]
EMMA_RDATA[15]
VDO[2]
RADD[9]
RADD[17]
RADD[14]
RADD[8]
RADD[15]
RADD[7]
RADD[23]
RADD[24]
RADD[3]
RADD[1]
RADD[4]
RADD[6]
EMMA_RADD[14]
EMMA_RADD[9]
EMMA_RADD[17]
EMMA_RADD[8]
EMMA_RADD[14]
EMMA_RADD[15]
EMMA_RADD[23]
EMMA_RADD[7]
EMMA_RADD[24]
EMMA_RADD[3]
EMMA_RADD[6]
EMMA_RADD[4]
EMMA_RADD[1]
EMMA_RADD[0]
EMMA_RDATA[14]
EMMA_RDATA[13]
EMMA_RDATA[12]
EMMA_RDATA[11]
EMMA_RDATA[10]
EMMA_RDATA[9]
EMMA_RDATA[8]
EMMA_RDATA[7]
EMMA_RDATA[6]
EMMA_RDATA[5]
EMMA_RDATA[4]
EMMA_RDATA[3]
EMMA_RDATA[2]
EMMA_RDATA[1]
EMMA_RDATA[0]
RDATA[14]
RDATA[13]
RDATA[12]
RDATA[11]
RDATA[9]
RDATA[8]
RDATA[10]
RDATA[7]
RDATA[5]
RDATA[4]
RDATA[6]
RDATA[3]
RDATA[1]
RDATA[0]
RDATA[2]
RDATA[15] EMMA_RDATA[15]
STPERRB
VDO[6]
VDO[4]
DADD[4]
DADD[5]
DADD[7]
DADD[8]
DADD[11]
DRASB
DCLK
DQM0
DQS1
DQ[9]
DQ[11]
DQ[13]
DQ[15]
DADD[2]
DADD[6]
DADD[10]
DADD[9]
DADD[12]
DCASB
DQM1
DQ[8]
DQ[10]
DQ[12]
DQ[14]
DADD[3]
DADD[1]
DADD[0]
DBA1
DBA0
DCSB
DCLKB
DQS0
DQ[6]
DQ[4]
DQ[2]
DQ[0]
DWEB
DQ[7]
DQ[5]
DQ[3]
DQ[1]
GRDYB
EMMA_RDATA[11]
EMMA_RDATA[12]
EMMA_RDATA[9]
EMMA_RDATA[10]
EMMA_RDATA[14]
EMMA_RDATA[13]
EMMA_RADD[22]
EMMA_RADD[23]
STSCHGB
SPKRB
VS2B
VHS
VVS
sht1_1.5V
EMMA_RADD[2]
EMMA_RADD[5]
EMMA_RADD[25]
EMMA_RADD[12]
EMMA_RADD[22]
EMMA_RADD[10]
EMMA_RADD[11]
EMMA_RADD[13]
EMMA_RADD[19]
EMMA_RADD[18]
EMMA_RADD[20]
EMMA_RADD[16]
EMMA_RADD[21]
RADD[5]
RADD[25]
RADD[12]
RADD[22]
RADD[18]
RADD[20]
RADD[16]
RADD[21]
RADD[19]
RADD[13]
RADD[11]
RADD[10]
RADD[2]
RADD[0]
THESE CAPACITORS TO BE PLACED UNDERNEATH BGA
THESE CAPACITORS TO BE PLACED UNDERNEATH BGA
THESE CAPACITORS TO BE PLACED UNDERNEATH BGA
THESE CAPACITORS TO BE PLACED UNDERNEATH BGA
THESE CAPACITORS TO BE PLACED UNDERNEATH BGA
BOARD VERSION RESISTORS - MOUNT ON
SIDE-A WITH JL’S ON SIDE-B
N
1/7 DIGITAL I/F
N..-LE4B
MULTI-MEDIA PROCESSOR
6.3V
COMPONENTS MARKED AS XX ARE NOT FITTED ON THIS MODEL
ABCDE F
G
HI JKLMN
O
1
2
3
4
5
6
7
8
9
10
11
- 61 -
~ N Board Schematic Diagram [ Digital I/F ] Page 1/7 ~
Page 62
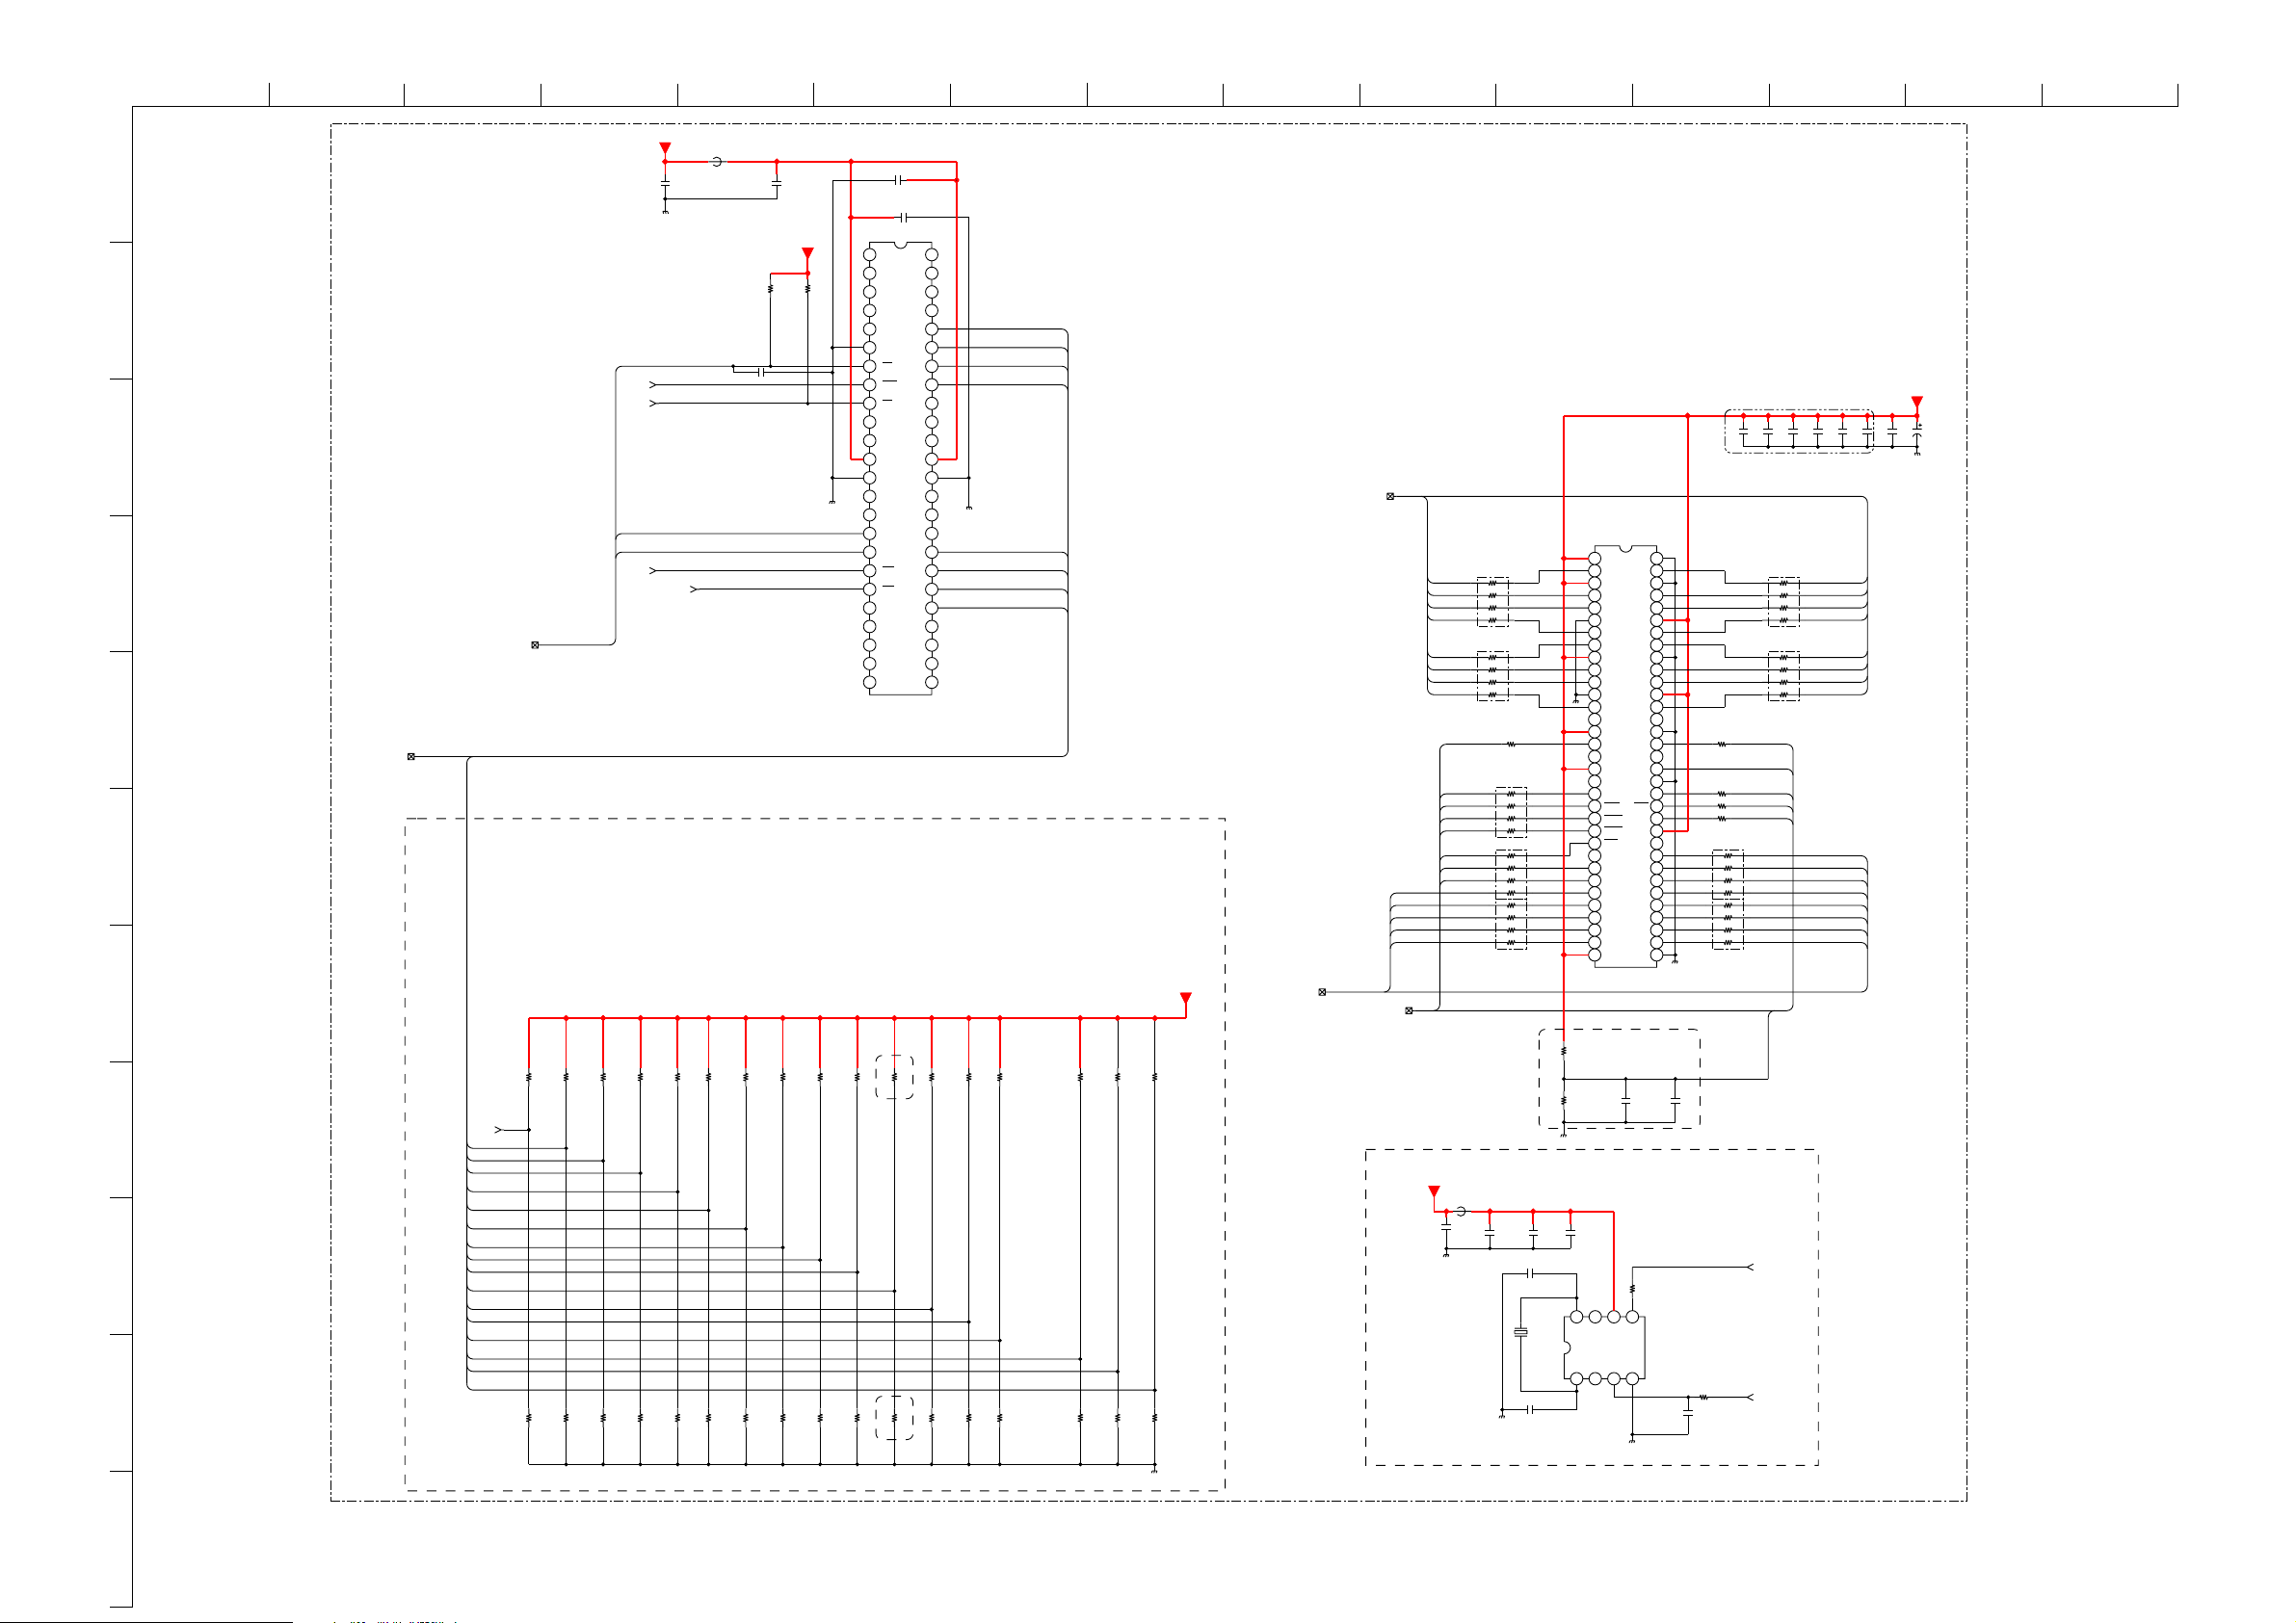
10
ABCDE F
G
HI JKLMN
O
N..-LE4B
+3V3D
nNAND_WP
R3214
2.2k
RESERVED
R3219
XX
C3205
0.1
10V
R3215
XX
EXTERNAL BOOT
R3220
2.2k
FB3201
0uH
R3216
1k
8 BIT MODE
R3221
XX
R3251
470
0.001
C3230
R3217
XX
ROM BUS BIG ENDIAN
R3222
1k
C3206
1
10V
+3V3D
R3238
1k
R3218
1k
132.75 MHz DDR CLK
R3223
XX
4321
65
987
10
11
12
151413
181716
242322212019
TC58DVM72A1TG00
128-MB1T EEPROM
R3224
1k
132.75 MHz DDR CLK
132.75 MHz DDR CLK
R3228
XX
R3229
C3209
NC
NC
NC
NC
NC
GND
RB
FOE
CE
NC
NC
VCC
VSS
NC
NC
CLE
ALE
WE
WP
NC
NC
NC
NC
NC NC
1k
0.1C3208
0.1
IO/8
IO/7
IO/6
IO/5
VCC
VSS
IO/4
IO/3
I/O2
I/O1
IC3206
R3225
XX
FIT FOR
EJTAG
EDINT DISABLED
FIT FOR
JTAG
10V
10V
48 43
NC
47 45 44
NC
46
NC
NC
42 41
NC
3940
NC
NC
3738
36
NC
3435
NC
NC
313233
30 29 28 27 26
NC
NC
NC
25
NAND FLASH
R3226
R3227
XX
1k
166MHz MAIN CPU CLOCK
166MHz MAIN CPU CLOCK
R3230
R3231
1k
XX
RDATA[7]
RDATA[6]
RDATA[5]
RDATA[4]
RDATA[3]
RDATA[2]
RDATA[1]
RDATA[0]
R3263
XX
FIXED (DEBUG)
R3262
1k
R3235
XX
R3232
1k
FULL MERGE
R3236
1k
R3233
XX
FULL MERGE
R3237
XX
+3V3D_STRAPS
R3234
1k
BIG ENDIAN
N
2/7
DQ[0-15]
RB3203
68
DQ[0]
1
3
5
7
RB3204
1
3
5
7
2
4
6
8
68
2
4
6
8
R3240
68
RB3200
100
1
3
5
7
100RB3201
1
3
5
7
1
3
5
7
RB3202
100
DQ[1]
DQ[2]
DQ[3]
DQ[4]
DQ[5]
DQ[6]
DQ[7] DQ[8]
DQS0
DQM0
DWEB
DCASB
DRASB
DCSB
DBA0
DBA1
DADD[10]
DADD[0]
DADD[1]
DADD[2]
DADD[3]
DADD[0-12]
DBA0,DBA1,DCASB,DCLK,DCLKB,DCSB,DQM0,DQM1,DQS0,DQS1,DRASB,DVREF,DWEB
27MHZ CLOCK
+3V3D
FB3200
0uH
C3215
C3214
0.1
0.001
10V
50V
C3204
C3213
6p
PLACE THESE CAPACITORS CLOSE TO IC PINS.
C3219
0.1
IC3200
EDD1216AATA-6B-E
DDR MEMORY
1
VDD
VSS
DQ0
VDDQ
DQ1
DQ4
VDDQ
DQ5
DQ6
VSSQ
DQ7
NC
VDDQ
LDQS
C3200
10V
NC
NC
DQ2
VSSQ
DQ3
NC
VDD
NC
LDM
WE
CAS
RAS
CS
NC
BS0
BS1
A10
A0
A1
A2
A3
VDD
0.1
Vcc
6566
DQ15
64
VSSQ
63
DQ14
DQ13
6162
VDDQ
60
DQ12
59
DQ11
58
VSSQ
57
DQ10
56
DQ9
55
VDDQ
54
DQ8
53
NC
52
VSSQ
51
UDQS
50
NC
49
VREF
48
VSS
47
UDM
46 45
CLK
CLK
44
CKE
43
NC
42
A12
41 40 39 38 37 36 35
A11
A9
A8
A7
A6
A5
A4
34
VSS
C3201
4.7
10V
R3205
47
1/16W
CRYSTAL CONTROLLED
REFOUT
GND
VIN
4321
2
345678
9
10
11 12 13 14 15
16 17 18 19 20 21
2
6p
4
6
8
2
4
6
8
2
4
6
8
X3200
27MHz
22
23
24 3225 31302926 27 28
33
PLACE THESE CLOSE TO PIN 49 OF IC
R3200
100
1/16W
RN-CP
R3201
100
1/16W
LAYOUT NOTE:REMOVE GND PLANE AROUND IC3201 AND X3200
AND ALSO FROM UNDERNEATH X3200 AND IC3201
INCLUDING TRACKS FROM XTAL TO IC.
C3216
C3217
0.1
4.7
10V
10V
8765
X2
X1
R3203
R3204
IC3201
KA5SDKASO1TSL
OSCILLATOR
R3239
10k
C3218
0.1
10V
1
3
5
7
1
3
5
7
DDR SDRAM
R3202
68
R3242
100
100
100
RB3206
100
RB3207
100
C3220
0.1
2
4
6
8
2
4
6
8
RB3208
1
3
5
7
1
3
5
7
DQS1
DVREF
DQM1
DCLKB
DCLK
CLK27M
PWMOUT
C3202
68
RB3209
68
DVREF
0.1
C3203
+2V5D_DDR
C3210
0.1
0.1
C3207
0.1
DQ[15]
2
DQ[14]
4
DQ[13]
6
DQ[12]
8
DQ[11]
2
DQ[10]
4
DQ[9]
6
8
DADD[12]
DADD[11]
DADD[9]
DADD[8]
DADD[7]
DADD[6]
DADD[5]
DADD[4]
C3211
4.7
10V
C3212
100
6.3V
COMPONENTS MARKED AS XX ARE NOT FITTED ON THIS MODEL
1
2
NAND_RBB
FOEB
FCSB1
3
NAND_CLE
NAND_ALE
FWEB
4
NAND_ALE,NAND_CLE,NAND_RBB
5
RDATA[0-15]
STRAP PINS
6
RDATA[0] = 1 -> MIPS32 IS BIG-ENDIAN
RDATA[2:1] = 10 -> FULL MERGE MODE
RDATA[3] = 0 -> FIXED (DEBUG)
RDATA[5:4] = 01 -> VRCLK = 166 MHz
RDATA[6] = 0 -> EDINT DISABLED
RDATA[9:7] = 011 -> MEMORY MCLK = 133 MHz
RDATA[10] = 1 -> ROM IS BIG ENDIAN
RDATA[11] = 0 -> NAND FLASH IS 256Mb OR LESS
RDATA[12] = 1 -> USE INTERNAL BOOT ROM
RDATA[15:13] = 000 -> USE NAND FLASH
ATX (SPDIF) = 1 -> USE FCS1B FOR NAND BOOT
R3208
XX
RESERVED
R3212
2.2k
R3209
RESERVED
R3213
XX
2.2k
7
R3206
R3207
1k
XX
ATX
8
9
ATX
RDATA[15]
RDATA[14]
RDATA[13]
RDATA[12]
RDATA[11]
RDATA[10]
RDATA[9]
RDATA[8]
RDATA[7]
RDATA[6]
RDATA[5]
RDATA[4]
RDATA[3]
RDATA[2]
RDATA[1]
RDATA[0]
PLACE ALL THE STRAP RESISTORS IN THE SAME LOCATION ON THE PWB
R3210
XX
NAND BOOT FCSB1
R3211
2.2k
11
~ N Board Schematic Diagram [ Digital I/F ] Page 2/7 ~
- 62 -
Page 63
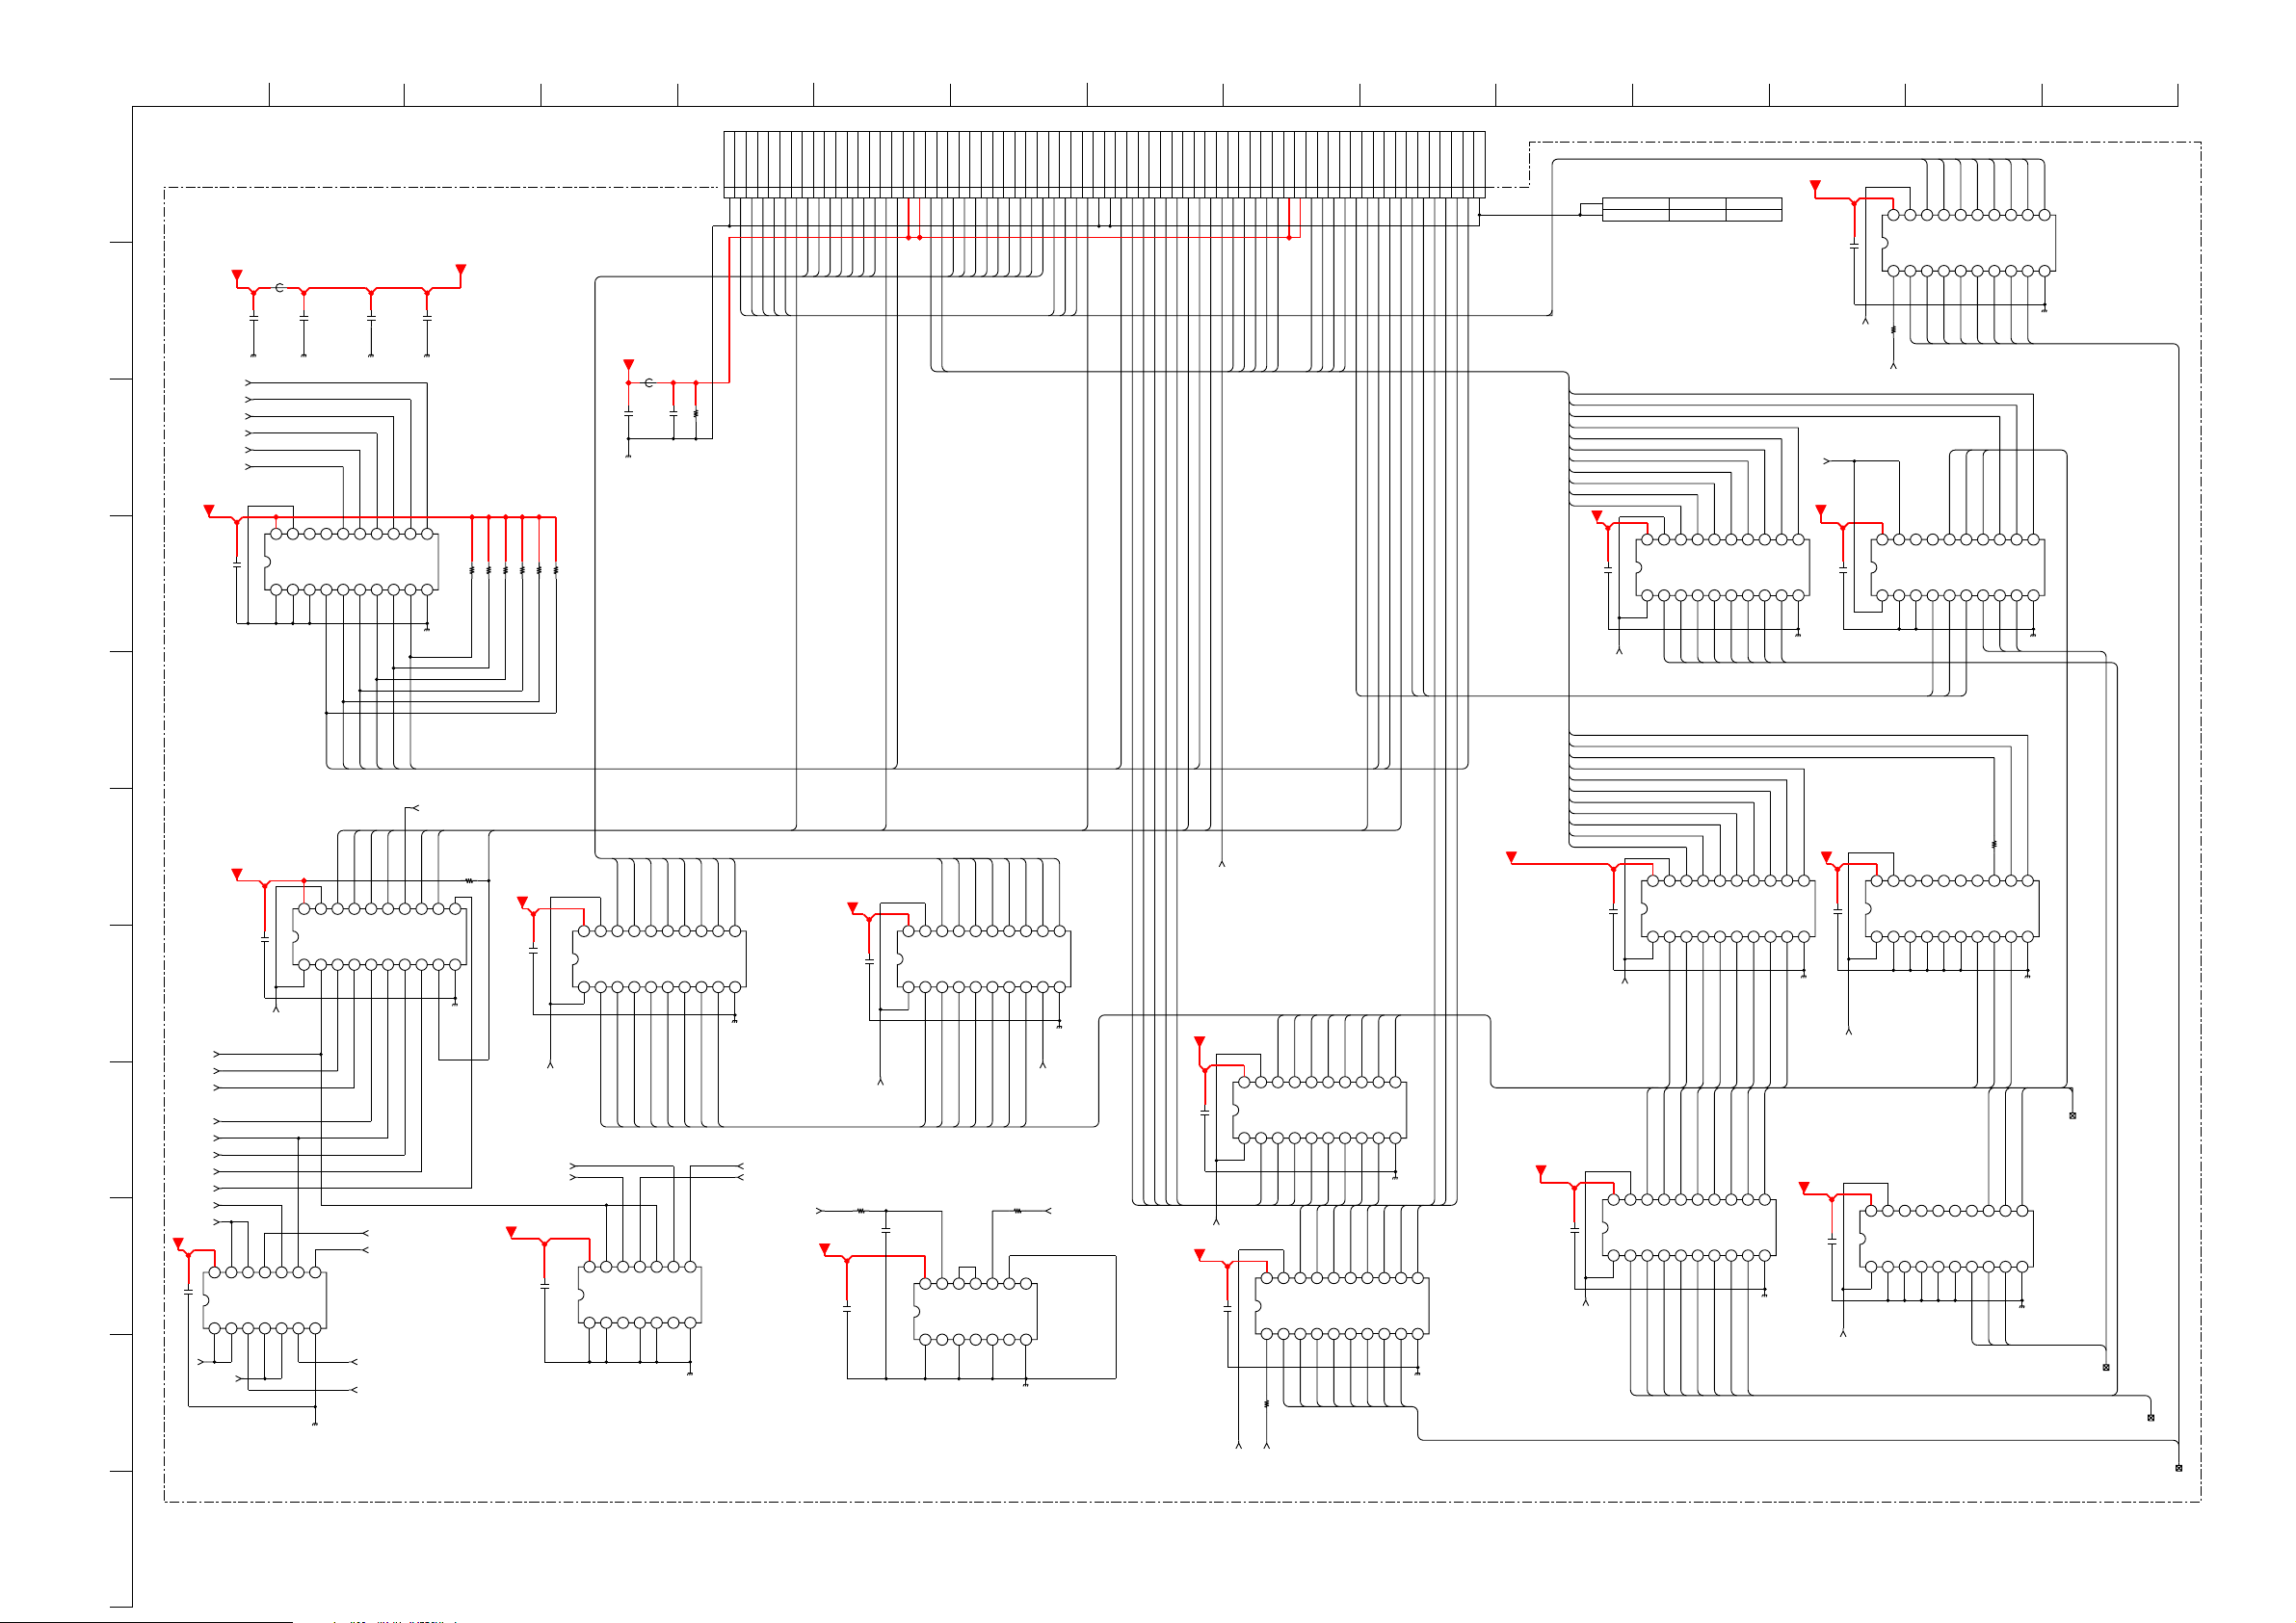
ABCDE F
G
HI JKLMN
O
EXTERNAL CONNECTOR
CN3300
D3
R3303
1/16W
1k
GNDD4D5D6D7
123456789
CD[3]
1
N..-LE4B
COMPONENTS MARKED AS XX ARE NOT FITTED ON THIS MODEL
CD2B
+3V3D_31
C3301
0.1
10V
+5VD_CI
FB3301
0uH
C3326
C3307
0.1
4.7
10V
10V
nCI_WAIT
VS1B
Y7
Y6
Y5
10k
10kR3314
10k
10k
10k
GND
R3310
109876
R3311
R3312
R3313
4.7k
R3317
+3V3D
FB3300
0uH
2
nCI_WAIT
VS1B
CD2B
CD1B
+3V3D_31
C3306
IREQB
INPACKB
0.1
10V
OCTAL BUFFER
3
4
C3300
C3324
0.1
10V
IC3301
74LVC541APW
20 19 18 17 16
Vcc
!OE1!A0A1A2A3A4A5A6A7
!OE2!
4.7
10V
Y0
C3320
4.7
10V
INPACKB
15 14 13 12 11
Y2
Y1
1
54321
IREQB
Y3
CD1B
Y4
CD[4]
CD[5]
CE1#
A10
CARD_OEB
A11A9A8
A13
A14
WE#
IREQ#
VCC
VPP1
MIVAL/A16
MCLKI/A15
1011121314151617181920212223242526272829303132333435363738394041424344454647484950515253545556575859606162636465666768
CA[11]
CA[10]
CA[9]
CA[8]
CA[14]
CA[13]
CARD_OEB
CD[6]
CD[7]
A12A7A6A5A4A3A2A1A0D0D1D2IOIS16#
CA[0]
CA[1]
CA[2]
CA[5]
CA[3]
CA[6]
CA[4]
CA[7]
CA[12]
MIVAL
MICLK
CD[0]
CD[1]
CD[2]
GND
GND
CD1#
MDO3/D11
MDO4/D12
MDO5/D13
MDO6/D14
MDO7/D15
CE2#
VS1#
IORD#
IOWR#
MISTRT/A17
MDI0/A18
MDI1/A19
MDI2/A20
MDI3/A21
VCC
VPP2
MDI4/A22
MDI5/A23
MDI6/A24
MDI7/A25
MDI[1]
MDI[2]
MDI[3]
MDI[4]
MDI[5]
MDI[6]
MDI[7]
MDI[0]
MISTRT
MCLK0/VS2#
RESET
WAIT#
INPACK#
REG#
MOVAL/SPKR#
MOSTRT/STSCHG#
MDO0
68P
MDO1
MDO2
CD2#
GND
Mount Mecha
A3300
181564021
+3V3D_31
C3315
0.1
10V
20 19 18 17 16
Vcc
DIR
R3308
100
CHIP
RDATA[8]
CD[0]
B0
!OE!
A0A1A2
RDATA[9]
CD[1]
CD[2]
B1
54321
RDATA[10]
RDATA[11]
B2
5
A3
CD[3]
CD[4]
CD[5]
CD[6]
15 14 13 12 11
B6
B4
B5
B3
A4A5A6A7GND
RDATA[12]
RDATA[13]
RDATA[14]
RDATA[15]
CD[7]
B7
109876
IC3311
74LVT245PW-T
OCTAL
TRANSCEIVER
D[15:8]
nCIPC_DATA_EN
+3V3D_31
C3312
0.1
10V
nCI_EN
+3V3D_31
MDI[4]
MDI[5]
MDI[3]
MDI[1]
15 14 13 12 11
Y4
Y3
Y2
54321
MDI[2]
MDI[0]
Y7
Y6
Y5
C3316
0.1
10V
GND
109876
MDI[6]
MDI[7]
20 19 18 17 16
Y1
Y0
Vcc
!OE2!
11 6
!OE1!A0A1A2A3A4A5A6A7
DIR
RADD[16]
RADD[17]
RADD[15]
Y0
15 14 13 12 11
Y2
Y1
54321
Y3
20 19 18 17 16
Vcc
!OE2!
A0A1A2A3A4A5A6A7GND
!OE1!
TS_BCLK,
TP_SYNC,
TP_EN /
A[17:15]
TO DMX
MIVAL
MICLK
MISTRT
Y7
Y6
Y5
Y4
109876
IC3312
74LVC541APW
OCTAL BUFFER
10
IC3308
74LVC541APW
IN_TSD[2]
IN_TSD[1]
IN_TSD[0]
OCTAL BUFFER
MOCLK
MOSTRT
MOCLK
MOVAL
MOSTRT
IN_TSD[6]
IN_TSD[7]
nCI_EN
TS_IN[7:0] FROM COFDM
IN_TSD[5]
IN_TSD[4]
IN_TSD[3]
5
C3309
10V
0.1
R3321
100
C3323
0.1
nIREQ
nCARD_WE
IC3305
74LVC541APW
OCTAL BUFFER
nCIPC_EN
nCIPC_EN
CA[8]
20 19 18 17 16
Vcc
!OE2!
!OE1!A0A1A2A3A4A5A6A7
RADD[8]
RADD[9]
C3322
1000p
14 13 12 11 10 9 8
Vcc
1A1Y2A2Y3A3YGND
CA[9]
CA[10]
Y1
Y0
54321
RADD[10]
RADD[11]
ADD[8:14]
6Y
6A
CA[11]
CA[12]
15 14 13 12 11
Y4
Y3
Y2
2
RADD[12]
RADD[13]
R3324
100
1/16W
4A
5Y
5A
CA[13]
CA[14]
Y6
Y5
FOEB
RADD[14]
4Y
SCHMITT TRIGGERS
7654321
CARD_OEB
109876
nDELAY_IOWR
74LVC14APW
nWAIT
VS1
nCD2
nCD1
INPACK
nIREQ
nIOWR
nCE1
!OE2!
nCARD_WE
Y0
nCE2
Y2
Y1
4
54321
6
+3V3D_31
IC3302
74LVC541APW
OCTAL BUFFER
C3303
0.1
10V
20 19 18 17 16
Vcc
!OE1!A0A1A2A3A4A5A6A7
7
IORDB
FWEB
GCSB3
GCSB3
FWEB
PCE0B
8
9
IORDB
IOWRB
CARD_RESET
IOSI16B
+3V3D_31
C3304
0.1
10V
PCCARD_EN
REGB
FWEB
CI_EN
CI_BYPASS
14 13 12 11 10 9 8
Vcc
1A1B1Y2A2B2YGND
nCIPC_EN
nCI_EN
DIR
3Y
3A
3B
4Y
4A
4B
7654321
IC3303
74LVC00-PW
NAND GATES
nBYPASS_EN
nPC_EN
nREG
nIORD
nIOWR
PCCARD_RST
15 14 13 12 11
Y6
Y5
Y4
Y3
REGB
CARD_RESET
IOWRB
nIOSI16
R3318
1/16W
109876
nIOSI16
10k
+3V3D_31
20 19 18 17 16
nCIPC_EN
nCIPC_EN
Vcc
!OE1!
!OE2!
A0
RADD[0]
C3308
GND Y7
0.1
10V
CA[0]
CA[1]
Y0
A1A2A3
RADD[1]
RADD[2]
CA[3]
CA[2]
15 14 13 12 11
Y1
Y2
3
54321
RADD[3]
RADD[4]
Y3
A4
CA[5]
CA[4]
Y4
A5A6A7
RADD[6]
RADD[5]
CA[6]
CA[7]
Y6
Y5
109876
RADD[7]
ADD[0:7]
nPC_EN
nCIPC_EN
+3V3D_31
14 13 12 11 10 9 8
Vcc
C3321
GCSB3
0.1
10V
1A1B1Y2A2B2YGND 3Y
N
4B
3A
3B
4Y
4A
GCSB3
7654321
IC3315
74LVC32A-PW
4 OR GATES
3/7
nCE1
+3V3D_31
Y7
IC3304
74LVC541APW
OCTAL BUFFER
GND
PCCARD MODE LO ADDRESS
nPC_DATA_EN
nCIPC_DATA_EN
nIOWR
+3V3D_31
Y7
GND
IC3316
nIOSI16
nCD1
MDO[3]
MDO[4]
MDO[5]
MDO[6]
C3310
0.1
10V
MDO[7]
+3V3D_31
VS1
nCE2
+3V3D_31
C3311
nIORD
nDELAY_IOWR
TS[7:0] TO DMX
IC3306
74LVC541APW
OCTAL BUFFER
nCI_EN
0.1
10V
RADD[25]
20 19 18 17 16
Y0
Vcc
!OE2!
!OE1!A0A1A2A3A4A5A6A7
MDO[6]
MDO[7]
20 19 18 17 16
Vcc
!OE!
DIR
RDATA[7]
R3306
100
CHIP
DIR
nPC_DATA_EN
MDO[5]
A0
RADD[24]
Y1
MDO[7]
B0
A1
RDATA[6]
RADD[23]
RADD[22]
15 14 13 12 11
Y3
Y2
7
54321
MDO[2]
MDO[3]
MDO[4]
MDO[4]
MDO[5]
MDO[6]
15 14 13 12 11
B1
B2
8
A2
A3
54321
RDATA[5]
RDATA[4]
RDATA[3]
D[7:0]
RADD[21]
Y4
MDO[1]
B3
A4
nWAIT
INPACK
PCCARD_RST
RADD[19]
RADD[20]
Y6
Y5
109876
MDO[0]
MDO[2]
MDO[3]
B4
B5
A5A6A7
RDATA[1]
RDATA[2]
nREG
RADD[18]
GND Y7
MDO[1]
B6
RDATA[0]
MDO[0]
B7
GND
109876
nCD2
MDO[0]
MDO[1]
MDO[2]
IC3307
74LVT245PW-T
OCTAL TRANSCEIVER
+3V3D_31
74LVC541APW
OCTAL BUFFER
ADD[25:18]
+3V3D_31
C3314
0.1
10V
MDI[0]
MDI[1]
MDI[2]
MDI[3]
MDI[4]
MDI[5]
MDI[6]
MDI[7]
C3313
0.1
10V
IC3309
nPC_EN
IC3310
74LVC541APW
OCTAL BUFFER
20 19 18 17 16
Vcc
!OE1!
nBYPASS_EN
IN_TSD[7]
TS_IN[7:0] FROM COFDM
MDI[4]
MDI[5]
MDI[6]
MDI[7]
Y1
Y0
10
54321
RADD[24]
RADD[23]
RADD[22]
RADD[21]
RADD[22]
RADD[23]
15 14 13 12 11
Y4
Y2
Y3
A5
A4
A3
54321
IN_TSD[2]
IN_TSD[3]
IN_TSD[4]
15 14 13 12 11
Y2
RADD[21]
RADD[20]
Y5
A6
IN_TSD[1]
20 19 18 17 16
Vcc
!OE2!
!OE1!A0A1A2A3A4A5A6A7
RADD[25]
RADD[24]
RADD[25]
Y1
Y0
!OE2!
12
A0
A1
A2
IN_TSD[5]
IN_TSD[6]
MDI[2]
MDI[3]
Y5
Y4
Y3
RADD[19]
RADD[20]
RADD[18]
RADD[19]
Y7
Y6
A7
GND
109876
BYPASS MODE
IN_TSD[0]
MDI[0]
MDI[1]
+3V3D_31
20 19 18 17 16
C3317
Y7
Y6
RADD[18]
10V
GND
109876
Vcc
0.1
!OE1!A0A1A2A3A4A5A6A7
nPC_EN
PCCARD MODE HI ADDRESS
A[25:15] / TS TO DMX
+3V3D_31
20 19 18 17 16
Vcc
C3318
0.1
10V
!OE2!
!OE1!A0A1A2A3A4A5A6A7
TS_BCLK,
TS_PSYNC,
TS_EN
FROM COFDM
nBYPASS_EN
IC3313
74LVC541APW
OCTAL BUFFER
Y1
Y0
!OE2!
ADD[17:15]
Y1
Y0
Y2
9
54321
15 14 13 12 11
Y2
13
54321
IN_TS_PVAL
IN_TS_PSYNC
IN_TS_BCLK
TS_BCLK,
TS_PSYNC,
MOVAL
TS_EN
FROM COFDM
MIVAL
MISTRT
MICLK
R3325
47
15 14 13 12 11
Y3
Y3
IN_TS_BCLK
IN_TS_BCLK,IN_TS_PVAL,IN_TS_PSYNC
Y4
RADD[17]
RADD[15]
RADD[15]
Y5
Y4
IN_TS_PSYNC
Y6
Y5
RADD[16]
RADD[17]
Y6
IN_TS_PVAL
Y7
GND
109876
RADD[16]
74LVC541APW
OCTAL BUFFER
GND Y7
109876
IC3314
RADD[0-25]
IN_TSD[0-7]
RDATA[0-15]
11
~ N Board Schematic Diagram [ Digital I/F ] Page 3/7 ~
- 63 -
Page 64
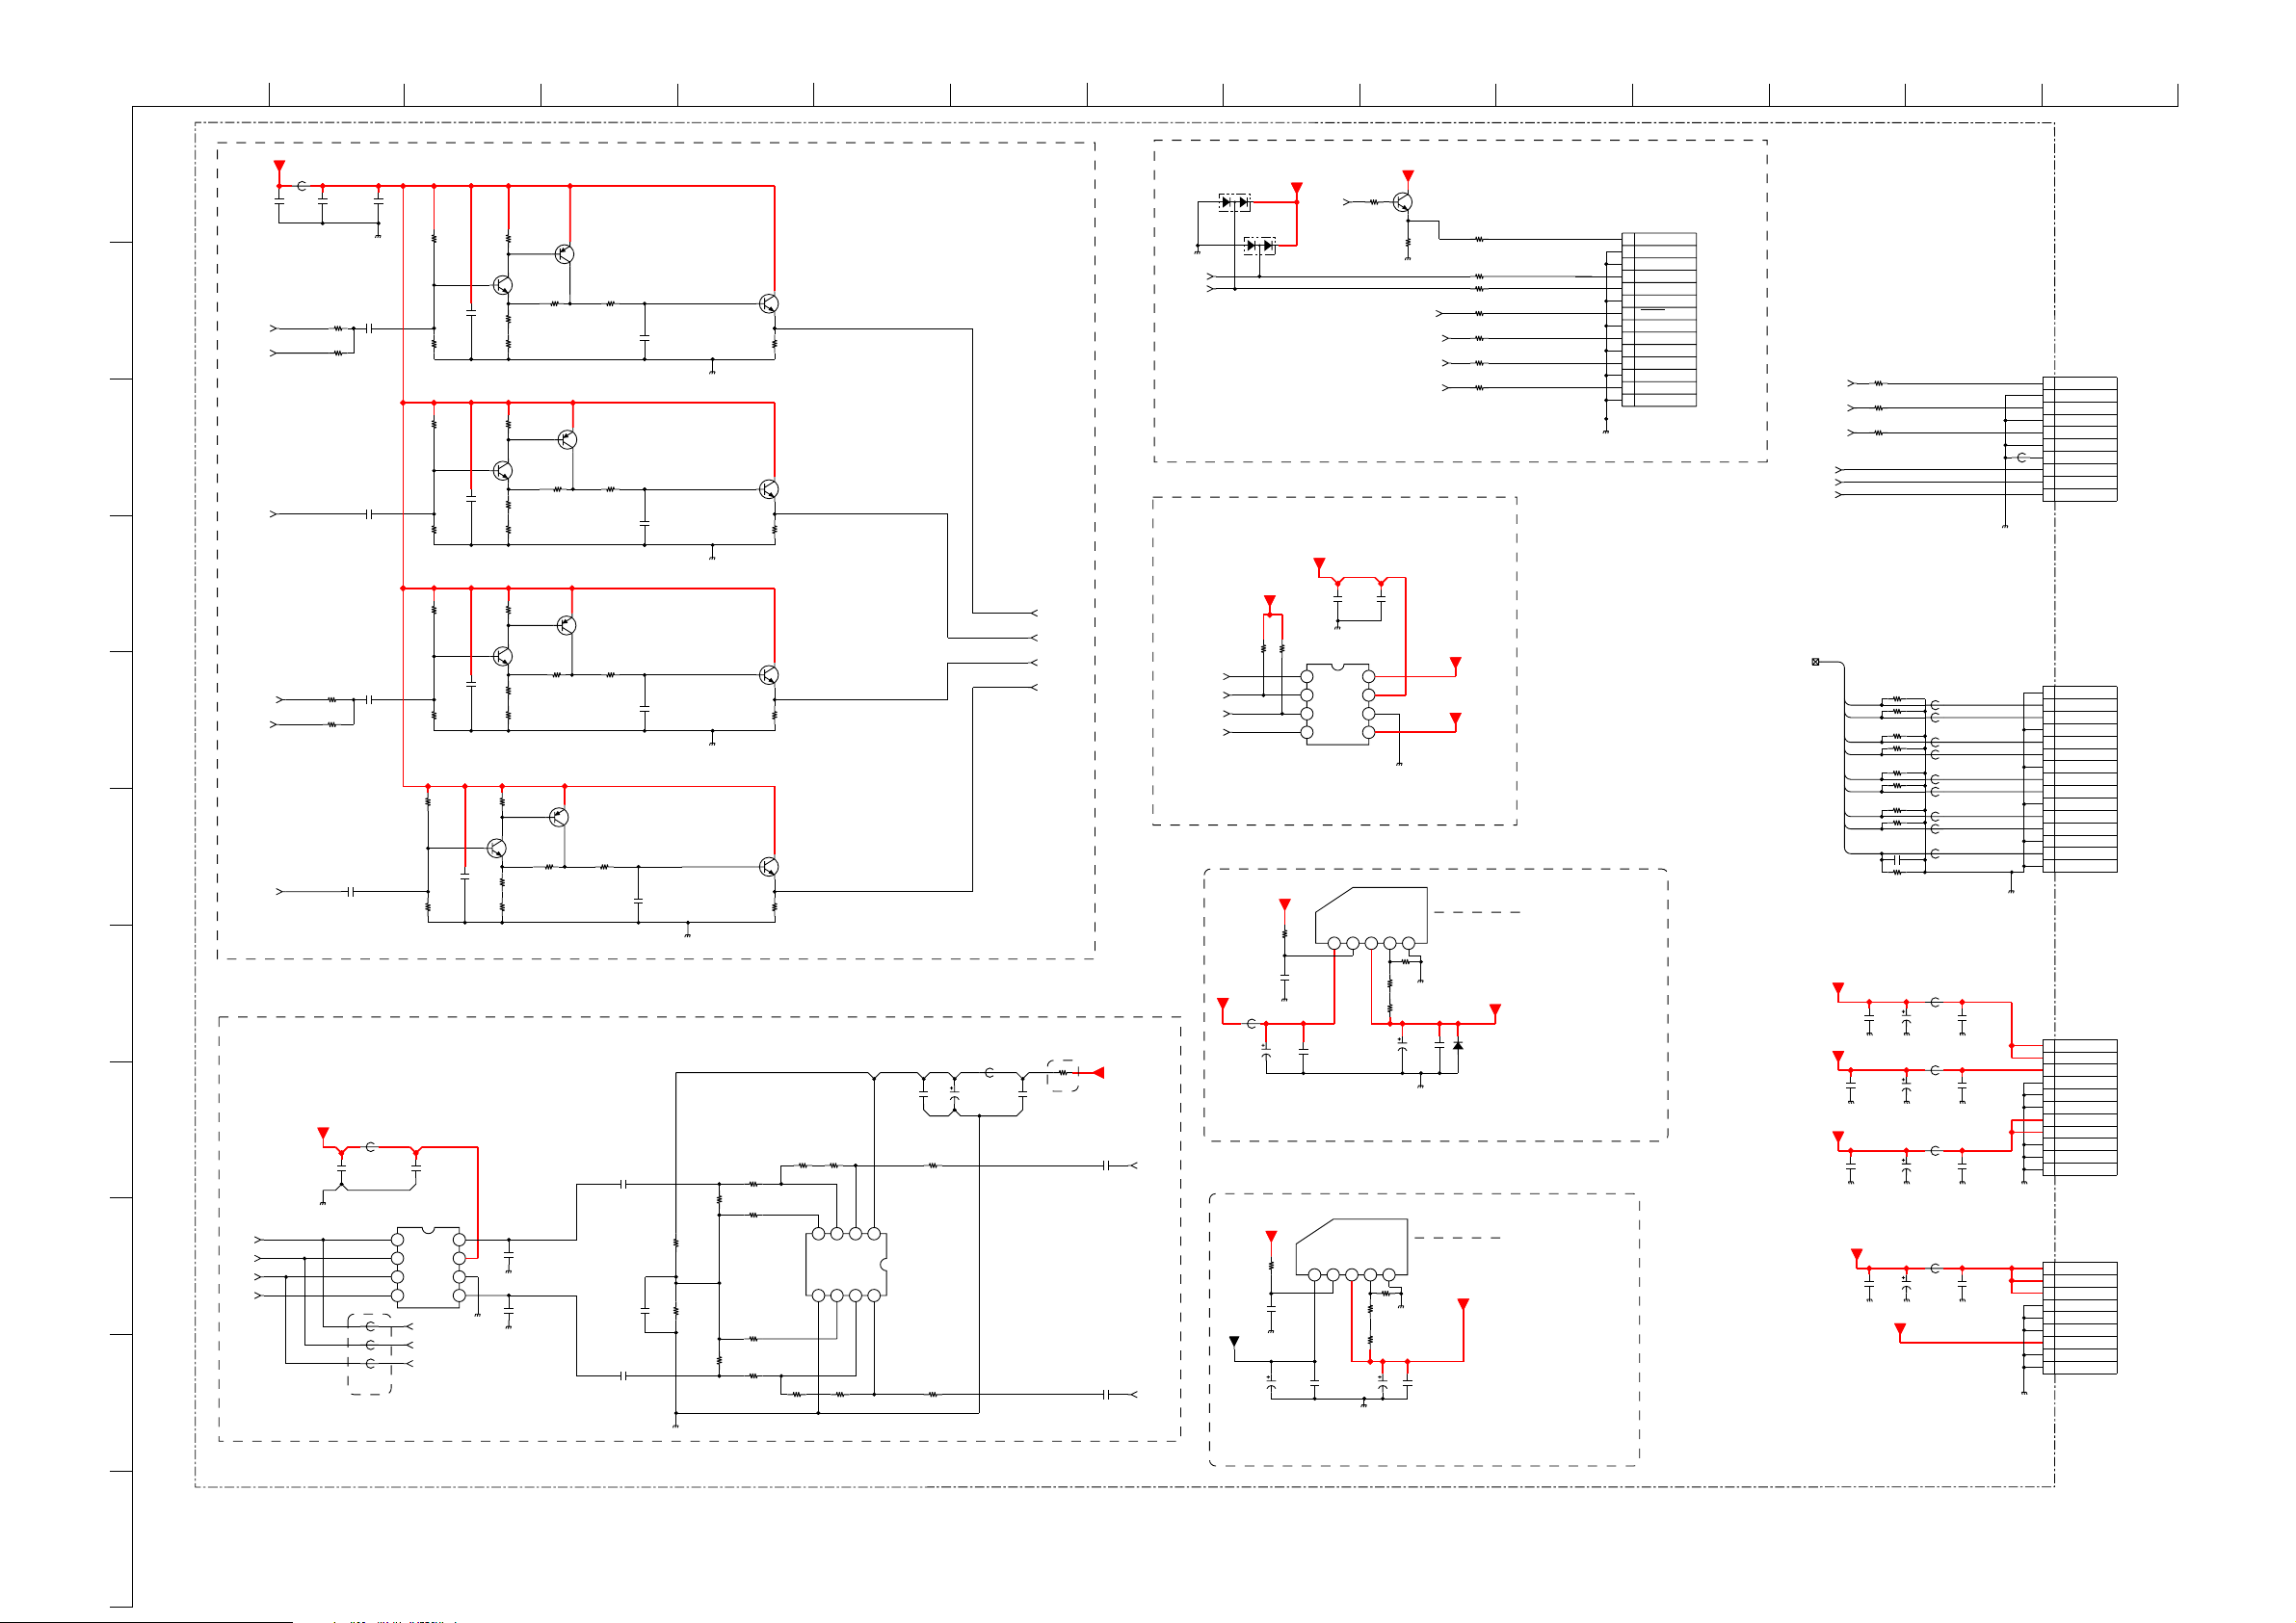
ABCDE F
N..-LE4B
G
HI JKLMN
O
10
+5VA
FB3402
1
2
3
4
5
6
7
8
9
ABCK
ALRCK
AMCK
0uH
C3403
0.1
10V
C3402
0.1
R3485
R3421
R3477
R3476
0
XX
0
XX
C3400
22
6.3V
YUV_Y
YC_Y
YUV_U
YUV_V
YC_C
CVBS
AUDIO DAC CIRCUIT
+5VD
C3414
0.1
ADO
C3404
0.01
16V
C3444
22
6.3V
C3445
22
6.3V
C3446
22
6.3V
FB3400
0uH
0UH
FB3409
FB3410
0UH
FB3411
0UH
PLACE CLOSE TO IC
R3438
12k
R3465
12k
R3466
R3467
12k
R3400
12k
C3405
R3401
15k
C3416
0.1
IC3400
WM8727GED/RV
D/A CONVERTER
DATA
BCKI
VDD
LRCK
VSS
4321
MCK
ADO_OUT
ABCK_OUT
ALRCK_OUT
C3447
0.1
R3456
15k
C3448
0.1
15k
R3475
C3449
0.1
R3468
15k
R3406
470
0.1
8765
LO
RO
R3469
470
R3472
470
470
Q3401
2SC5658T2LQ/R
R3482
R3470
470
R3471
820
Q3402
2SC5658T2LQ/R
R3483
R3473
470
R3474
820
Q3404
2SC5658T2LQ/R
R3486
R3478
470
R3479
820
Q3400
2SC5658T2LQ/R
R3415
R3407
470
470
R3408
820
DAC_L
C3419
100p
DAC_R
C3420
100p
390
390
390
Q3405
2SA2029T2LQ/R
R3487
220
Q3410
2SA2029T2LQ/R
R3488
220
Q3411
2SA2029T2LQ/R
R3489
220
Q3403
2SA2029T2LQ/R
R3424
220
GAIN = R3482 + (R3470 + R3471)
---------------------- (R3470 + R3471)
C3450
10p
GAIN = R3483 + (R3473 + R3474)
---------------------- (R3473 + R3474)
C3451
10p
GAIN = R3486 + (R3478 + R3479)
---------------------- (R3478 + R3479)
C3452
10p
GAIN = R3415 + (R3407 + R3408)
---------------------- (R3407 + R3408)
COMPOSITE
C3411
10p
C3421
4.7
10V
C3423
0.1
C3422
4.7
10V
R3444
1k
R3445
R3446
1k
R3447
39k
39k
Q3406
2SC5658T2LQ/R
R3427
470
Q3407
2SC5658T2LQ/R
R3428
470
Q3408
2SC5658T2LQ/R
R3429
470
Q3409
2SC5658T2LQ/R
R3430
1k
AMPLIFIER GAIN = 2.0
R3452
15k
R3449
15k
R3450
10k
B+IN
IC3401
NJM3404AM-TE1
OPERATIONAL
AMPLIFIER
R3448
10k
R3451
15k
R3453
4321
15k
VIDEO CIRCUIT
R3490
15k
8765
V+
B-IN
B_OUT
A+INV-
A-IN
A_OUT
15k
R3491
C3424
0.1
25V
R3480
100
R3481
100
C3425
10
16V
FB3401
0uH
VIDEO
C3406
0.1
25V
YUV_Y_OUT
YUV_U_OUT
YUV_V_OUT
CVBS_OUT
OPEN/SHORTS COUNTERMEASURE
+9VA
R3484
10
C3440
1
10V
C3441
1
10V
D3400
RB706F-40
SCL_TV
SDA_TV
ALL VIDEO SIGNALS (YUV AND CVBS)
ARE NOT DESIGNED TO DRIVE A LOW IMPEDANCE LOAD
+3V3D
D3401
RB706F-40
MODEM & CI PWR SWITCH
+5VD
+3V3D
C3438
1
10V
10k
CI_PWR_EN
nCI_OVR
nMODEM_OVR
MODEM_EN
+3V3D
R3461
10k
FB3403
C3407
10
16V
C3442
0uH
R3463
1/16W
0.1
25V
+3V3D
1k
LM3526MX-H/J5000396
5V POWER SWITCH
R3462
EN_A
FLAG_A
FLAG_B
EN_B
4321
C3408
0.1
10V
1V8 REG
LEFT_N
+3V3D
VinVcVo
12345
C3410
0.1
10V
RIGHT_N
+2V5D
R3464
1/16W
C3443
0.1
25V
C3409
16V
1k
10
ATX
IC3404
OUT_A
OUT_B
VINENVOUT
12345
R3442
470
C3439
0.1
10V
8765
Vcc
GND
R3454
390
1/16W
C3412
100
6.3V
Vadj
R3458
100
R3459
100
C3413
100
6.3V
+3V3D
2SC5658T2LQ/R
R3492
nBOARD_RST
RIGHT_N
LEFT_N
CVBS_OUT
VREF
GND
R3457
1k
1/16W
R3455
47
1/16W
C3417
0.1
10V
PQ070XZ01ZPH
GND
REGULATOR
R3460
1k
C3415
10V
Q3412
1k
+5VD_CI
+5VD_MODEM
PQ070XZ01ZPH
REGULATOR
IC3403
0.1
R3493
100
R3441
47
R3422
47
R3423
47
R3436
47
IC3402
1V8EMI
D3402
RB501V-40TE-17
+1V5D
0
R3439
0
R3440
Cu Heatsink
-----------
Add 20mmx20mm area
Connect to TAB of
Regulator
Cu Heatsink
-----------
Add 20mmx20mm area
Connect to TAB of
Regulator
CN3401
14P
BRN
1
SPDIF
2
GND
3
GND
4
SCL_TV
5
SDA_TV
6
GND
7
N_RST
8
GND
9
RIGHT
10
GND
11
LEFT
12
GND
13
CVBS
14
GND
ALRCK_OUT
VDO[0-7],VCK
YUV_U_OUT
YUV_V_OUT
YUV_Y_OUT
ABCK_OUT
ADO_OUT
C3418
0.1
10V
C3426
10V
+5VD
+5VA
+3V3D
0.1
C3427
0.1
10V
+2V5D
C3428
0.1
10V
VDO[7]
VDO[6]
VDO[5]
VDO[4]
VDO[3]
VDO[2]
VDO[1]
VDO[0]
VCK
C3401
N
4/7
CN3402
10P
R3433
47
47
R3434
47
R3435
FB3408
0uH
R3412
XX
XX
R3411
R3410
XX
XX
R3409
R3405
XX
XX
R3404
R3403
XX
R3402
XX
XX
R3413
XX
C3433
220
6.3V
C3434
100
6.3V
C3435
100
6.3V
C3436
100
6.3V
+9VA
FB3404
0uH
FB3405
0uH
FB3406
0uH
FB3407
0uH
FB3412
FB3413
FB3414
FB3415
FB3416
FB3417
FB3418
FB3419
FB3420
0UH
0UH
0UH
0UH
0UH
0UH
0UH
0UH
0UH
C3429
0.1
10V
C3430
0.1
10V
C3431
10V
C3432
0.1
10V
0.1
BRN
1
YUV_U
2
GND
3
YUV_V
4
GND
5
YUV_Y
6
GND
7
GND
8
ALRCK
9
ABCK
10
ADO
CN3400
15P
BRN
1
GND
2
VDO[7]
3
VDO[6]
4
GND
5
VDO[5]
6
VDO[4]
7
GND
8
VDO[3]
9
VDO[2]
10
GND
11
VDO[1]
12
VDO[0]
13
GND
14
VCLK
15
GND
CN3403
1
+5VD
2
+5VD
3
+5VA
4
GND
5
GND
6
GND
7
+3V3D
8
+3V3D
9
GND
10
GND
11
GND
1
+2V5D
2
+2V5D
3
+2V5D
4
GND
5
GND
6
GND
7
+9VA
8
GND
9
GND
11P
CN3404
9P
TO JB BOARD
CN5404
TO AG BOARD
CN2302
TO AG BOARD
CN2304
1V5 REG
COMPONENTS MARKED AS XX ARE NOT FITTED ON THIS MODEL
11
~ N Board Schematic Diagram [ Digital I/F ] Page 4/7 ~
- 64 -
Page 65
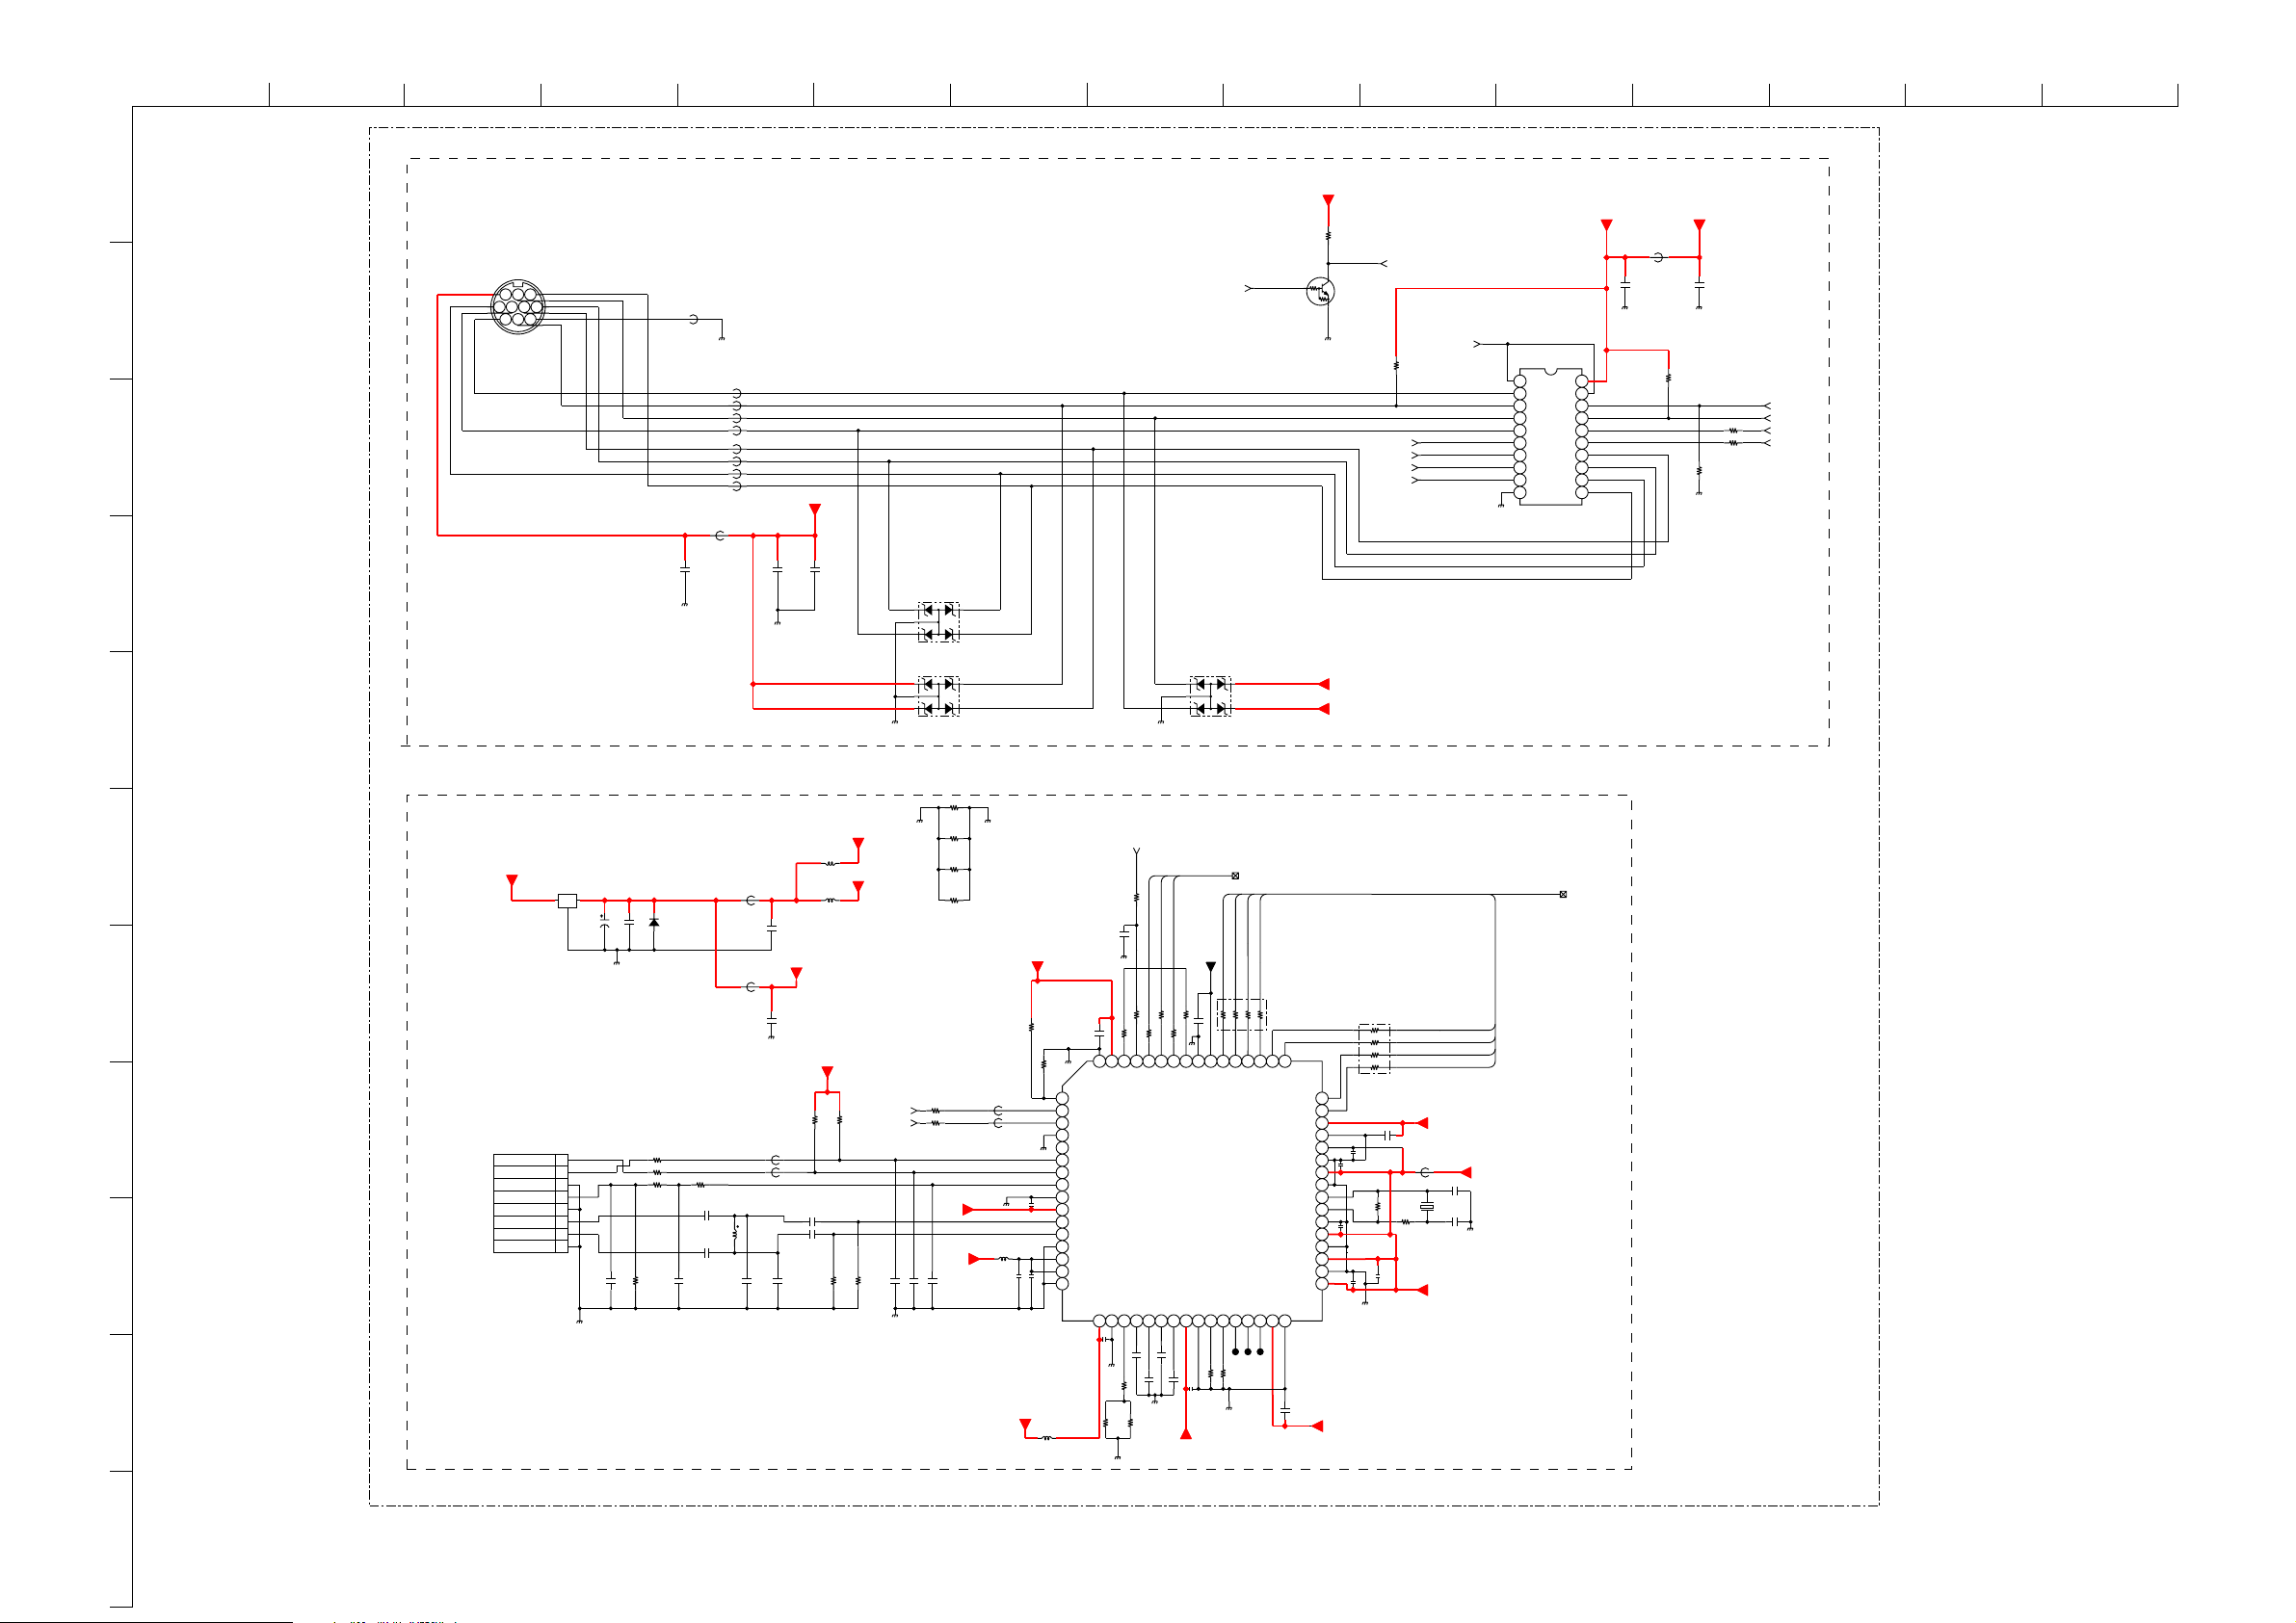
ABCDE F
N..-LE4B
G
HI JKLMN
O
1
CN3500
MODEM
2
3
4
10
7
3
8
9
654
1
2
C3571
0.1
10V
FB3555
0uH
FB3548
FB3547
FB3553
FB3551
FB3546
FB3549
FB3550
FB3554
0uH
SMARTCARD AND MODEM
SMC/MODEM Connector
0uH
0uH
0uH
0uH
0uH
0uH
0uH
0uHFB3552
+5VD_MODEM
C3509
4.7
10V
PIN 1 : GND
PIN 2 : nSMC_INT
PIN 3 : DTE-CTS
PIN 4 : DTE-RTS
PIN 5 : nSMC_RST
PIN 6 : SMC_RXD
PIN 7 : SMC_TXD
PIN 8 : DTE-TXD
PIN 9 : DTE-RXD
PIN 10: Vcc
C3518
0.1
D3500
BZA862AVL
D3502
BZA862AVL
MODEM_EN
D3501
BZA862AVL
DTC114EKA-T146
5
Q3504
+3V3D
R3537
2.2k
CHIP
+3V3D_MODEM
+5VD
nMODEM_EN
nSMC_RST
RTS1B
TXD2B
TXD1B
R3509
1k
nMODEM_EN
+3V3D_MODEM
!OE1!
VCC
A0
!OE2!
A1
A2
A3
A4
A5
A6
A7
GND
IC3502
74LVC541APW
20 19 18 17 16 15 14 13
Y0
Y1
Y2
Y3
Y4
Y5
12 11
Y6
Y7
12345678
910
OCTAL TRANSCEIVER
C3504
0.1
10V
FB3557
0uH
R3518
10k
1/16W
+3V3D
C3570
0.1
10V
R3554
10k
R3517 47
CTS1B
nSMC_INT
47R3516
RXD1B
RXD2B
10
R3500
0
C3528
CHIP
R3501
0
CHIP
R3502
0
CHIP
R3508
0
CHIP
3V3FILTER+
R3548
10k
1/16W
R3547
100
1/16W
R3546
1/16W
22p
50V
100
1V8FILTER
C3532
100p
50V
3V3AVDD
FB3507
0uH
FB3505
0uH
L3502
0.1uH
C3535
0.01
16V
C3533
3V3AVDD
C3534
0.01
C3537
0.01
16V
R3549
XX
64
A0
63
SCL
62
SDA
61
TESTMODE
60
RFAGC/GPO
59
QSDA
58
QSCLK
57
IFAGC
0.01
56
CVss
55
CVdd
54
AINN
53
AINP
52
AVss
51
AVdd
50
AVdd
49
AVss
C3536
0.01
16V
R3550
47k
1/16W
L3503
0.1uH
nFE_RST
R3561
100
1/16W
C3538
0.01
16V
IN_TS_BCLK
47
R3560
100
XX
R3562
R3553
12345678
DVss
DVdd
TSCLK
RESETN
INTRPTN
COFDM DEMODULATOR
AVss
AVdd
REXT
DAREFN
DAREFP
0.1
0.1
0.01
C3539
C3541
C3540
R3558
1.5k
1/16W
R3559
47k
1/16W
IN_TS_PVAL
IN_TS_PSYNC
C3544
0.01
16V
100
100
100
R3563
R3565
R3564
910111213141516
CVss
TSERR
TSVALID
TSSYNC
IC3504
CXD1976R-T6
REF1 VIN
CVdd
CVss
VCM
41 42 43 44 45 46 47 48
0.1
4.7k
C3542
R3510
C3543
0.01
16V
1V8FILTER
IN_TS_BCLK,IN_TS_PVAL,IN_TS_PSYNC
IN_TSD[0]
IN_TSD[1]
IN_TSD[2]
IN_TSD[3]
1V8FILTER
RB3500
47
CVdd
TSD0
TSD1
TSD2
TSD3
TSD4
TSD5
TSD6
TSD7
DVdd
DVss
CVdd
CVss
CVdd
CVss
XTALI
XTALO
CVss
CVdd
CVss
CVdd
CVss
CVdd
TMS
TDI
JL3511
TDO
JL3512
DVdd
DVss
33 34 35 36 37 38 39 40
C3545
0.01
16V
TRSTN
4.7k
R3511
TCK
JL3510
17
18
19
20
C3549
21
22
C3546
23
24
25
26
27
28
29
30
31
32
C3548
0.01
16V
3V3FILTER+
C3547
0.01
16V
RB3501
47
0.01
R3566
C3550
0.01
0.01
16V
1M
C3551
0.01
16V
FB3509
0uH
X3500
20.480MHz
R3567
100
1/16W
IN_TSD[4]
IN_TSD[5]
IN_TSD[6]
IN_TSD[7]
3V3FILTER+
C3552
18p
50V
C3553
18p
50V
1V8FILTER
1V8EMI
COFDM
IN_TSD[0-7]
N
5/7
3V3FILTER+
L3504
C3521
0.1
10V
3V3AVDD
C3522
0.1
10V
R3542
1/16W
0uH
0uH
C3529
82p
50V
10k
C3531
0.001
50V
C3530
0.001
50V
0.1uH
L3500
10uH
3V3_IIC
R3543
2.2k
1/16W
3V3_IIC
R3544
10k
1/16W
R3545
1/16W
SCL_COFDM
SDA_COFDM
C3526
22p
50V
2.2k
6
7
8
9
+3V3D
EMI
FL3500
CN3503
8P
GND
IF AGC
GND
DIGITAL IF1
GND
8
7
6
5
4
3
2
1
SCL_TUNER
SDA_TUNER
DIGITAL IF2
COMPONENTS MARKED AS XX ARE NOT FITTED ON THIS MODEL
C3520
10V
C3513
0.1
100
6.3V
C3514
0.1
10V
RB501V-40TE-17
R3503
XX
D3504
R3507
100
C3523
FB3501
0uH
FB3502
0uH
FB3504
100
R3506
R3504
10k
FB3503
R3505
1k
1/16W
L3501
C3524
0.47uH
0.001
50V
C3525
0.001
50V
0.1
10V
C3527
82p
50V
11
~ N Board Schematic Diagram [ Digital I/F ] Page 5/7 ~
- 65 -
Page 66
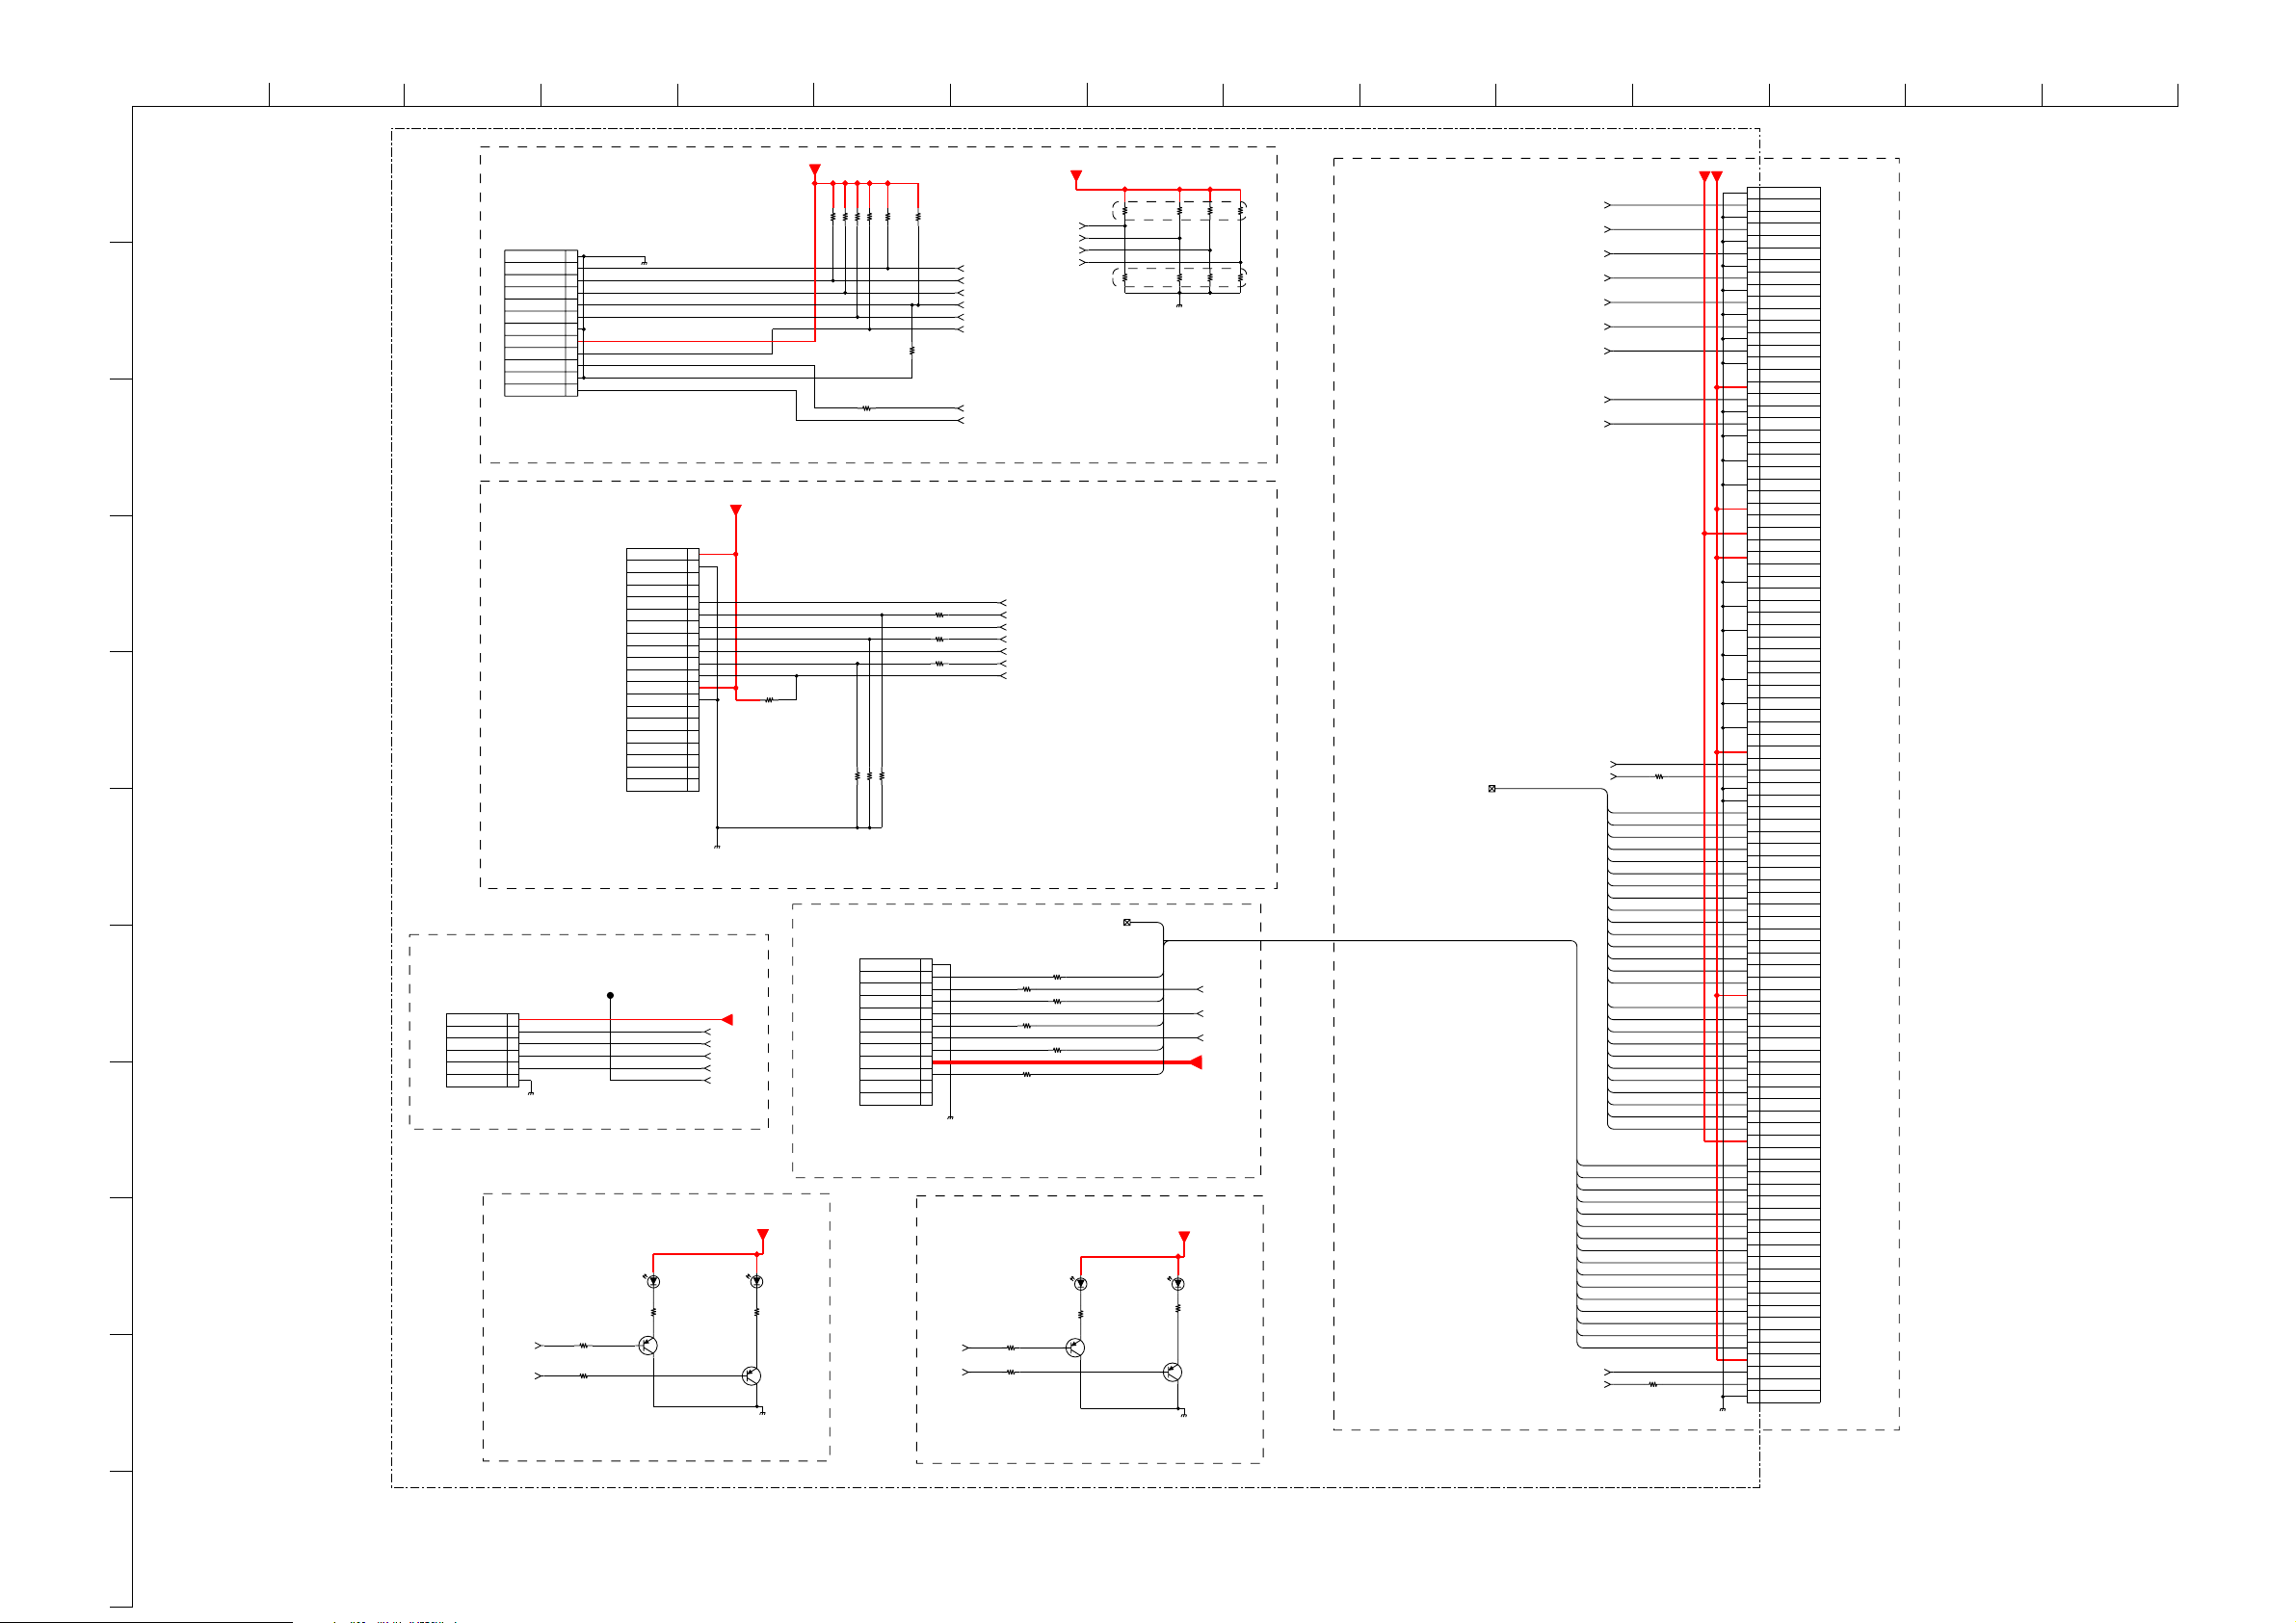
10
ABCDE F
G
HI JKLMN
O
N..-LE4B
1
10kR3617
10k
10k
CN3603
XX
GND
1
2
JTCK
JTDO
3
4
JTMS
5
2
JTRST
JTDI
GND
+3V3D
EDINT
nEMMA_RST
GND
6
7
8
9
10
11
NMI
12
R3616
R3613
100
R3646
10k
R3647
R3628
XX
10k
R3623
FIT FOR
EJTAG
FIT FOR
JTAG
10k
R3629
JTCK
JTDO
JTMS
JTRST
JTDI
JEDINT
nBOARD_RST
NMI
3
+3V3D_STRAPS
+3V3D_STRAPS
TESTPIN
TMODE2
TMODE0
TMODE1
FIT FOR
EJTAG
FIT FOR
JTAG
R3630
XX
R3631
10k
R3632
XX
JTAG/EJTAG CONNECTION
R3633
10k
R3634
R3635
10k
R3636
XX
XX
R3645
10k
+3V3D
CN3602
XX
1
+3V3D
2
GND
3
4
5
6
TXD1B_MAIN
RXD1B_MAIN
TXD2B_MAIN
RXD2B_MAIN
TXD3B_MAIN
RXD3B_MAIN
JIG_MAIN
+3V3D
GND
NC
4
NC
5
6
7
8
9
10
11
12
13
14
NC
15
NC
16
NC
17
NC
18
NC
19
NC
20
NC
R3601
1k
10kR3611
10kR3610
10kR3604
R3603
100R3609
100R3602
100
TXD1B
RXD1B
TXD2B
RXD2B
TXD3B
RXD3B
JIG_MODE
DEGUG UARTS
RDATA[0-15]
CN3608
XX
1
GND
2
RDATA[11]
RDATA[12]
JIG switch
RDATA[13]
RDATA[14]
+3V3D
RDATA[15]
3
4
5
6
7
NMI
8
9
10
11
NC
12
NC
7
CN3601
XX
PMSSCLK
PMSDIO
PMSBS
PMSINS
+3V3D
GND
1
2
3
4
5
6
PMSSCLK
PMSDIO
PMSBS
PMSINS
PMSPON
+3V3D
JL3628
nMASTER_RESET
MEMORY STICK
R3641
390
R3637
390
100R3642
R3638
390R3639
390R3640
RDATA[11]
RDATA[12]
390
RDATA[13]
RDATA[14]
RDATA[15]
nMASTER_RESET
JIG_MODE
NMI
+3V3D
8
BOOT STRAP (DaMON/NAND FLASH)
+3V3D
9
SCL_TV
SDA_TV
R3605
R3606
XX
XX
D3601
R3625
XX
Q3600
XX
XX
R3624
XX
D3602
XX
Q3601
XX
SCL_N
SDA_N
R3607
XX
R3608
D3604
XX
R3627
XX
Q3603
XX
XX
I2C_TV
+3V3D
D3603
XX
R3626
XX
Q3602
XX
I2C_N
COMPONENTS MARKED AS XX ARE NOT FITTED ON THIS MODEL
FWEB
FOEB
GCSB1
FCSB0
nRDY_DAMON
DAMON_INTB
nDAMON_RST
JIG_MODE
TXD3B
RADD[0-25]
RXD3B
DaMON CONNECTOR
TXD2B
RXD2B
N
6/7
NMI
RDATA[0]
RDATA[1]
RDATA[2]
RDATA[3]
RDATA[4]
RDATA[5]
RDATA[6]
RDATA[7]
RDATA[8]
RDATA[9]
RDATA[10]
RDATA[11]
RDATA[12]
RDATA[13]
RDATA[14]
RDATA[15]
RADD[0]
RADD[1]
RADD[2]
RADD[3]
RADD[4]
RADD[5]
RADD[6]
RADD[7]
RADD[8]
RADD[9]
RADD[10]
RADD[11]
RADD[12]
RADD[13]
RADD[14]
RADD[15]
RADD[16]
RADD[17]
RADD[18]
RADD[19]
RADD[20]
RADD[21]
RADD[22]
RADD[23]
RADD[24]
RADD[25]
R3620
100
R3621
100
+5VD
+3V3D
1
GND
2
FWEB
3
GND
4
FOEB
5
GND
6
GCSB
7
GND
8
FCSB
9
GND
10
nRDY
11
GND
12
nINT
13
GND
14
NMI
15
GND
16
NC
17
+3V3D
18
nRST
19
GND
20
JIG
21
GND
22
NC
23
GND
24
NC
25
GND
26
NC
27
+3V3D
28
NC
29
+5VD
30
NC
31
+3V3D
32
NC
33
GND
34
NC
35
GND
36
NC
37
GND
38
NC
39
GND
40
NC
41
GND
42
NC
43
GND
44
NC
45
GND
46
NC
47
+3V3D
48
TX2
49
RX2
50
GND
51
GND
52
ADD[0]
53
ADD[1]
54
ADD[2]
55
ADD[3]
56
ADD[4]
57
ADD[5]
58
ADD[6]
59
ADD[7]
60
ADD[8]
61
ADD[9]
62
ADD[10]
63
ADD[11]
64
ADD[12]
65
ADD[13]
66
ADD[14]
67
+3V3D
68
ADD[15]
69
ADD[16]
70
ADD[17]
71
ADD[18]
72
ADD[19]
73
ADD[20]
74
ADD[21]
75
ADD[22]
76
ADD[23]
77
ADD[24]
78
ADD[25]
79
+5VD
80
NC
81
DATA[0]
82
DATA[1]
83
DATA[2]
84
DATA[3]
85
DATA[4]
86
DATA[5]
87
DATA[6]
88
DATA[7]
89
DATA[8]
90
DATA[9]
91
DATA[10]
92
DATA[11]
93
DATA[12]
94
DATA[13]
95
DATA[14]
96
DATA[15]
97
+3V3D
98
TX1
99
RX1
100
GND
CN3607
XX
11
~ N Board Schematic Diagram [ Digital I/F ] Page 6/7 ~
- 66 -
Page 67
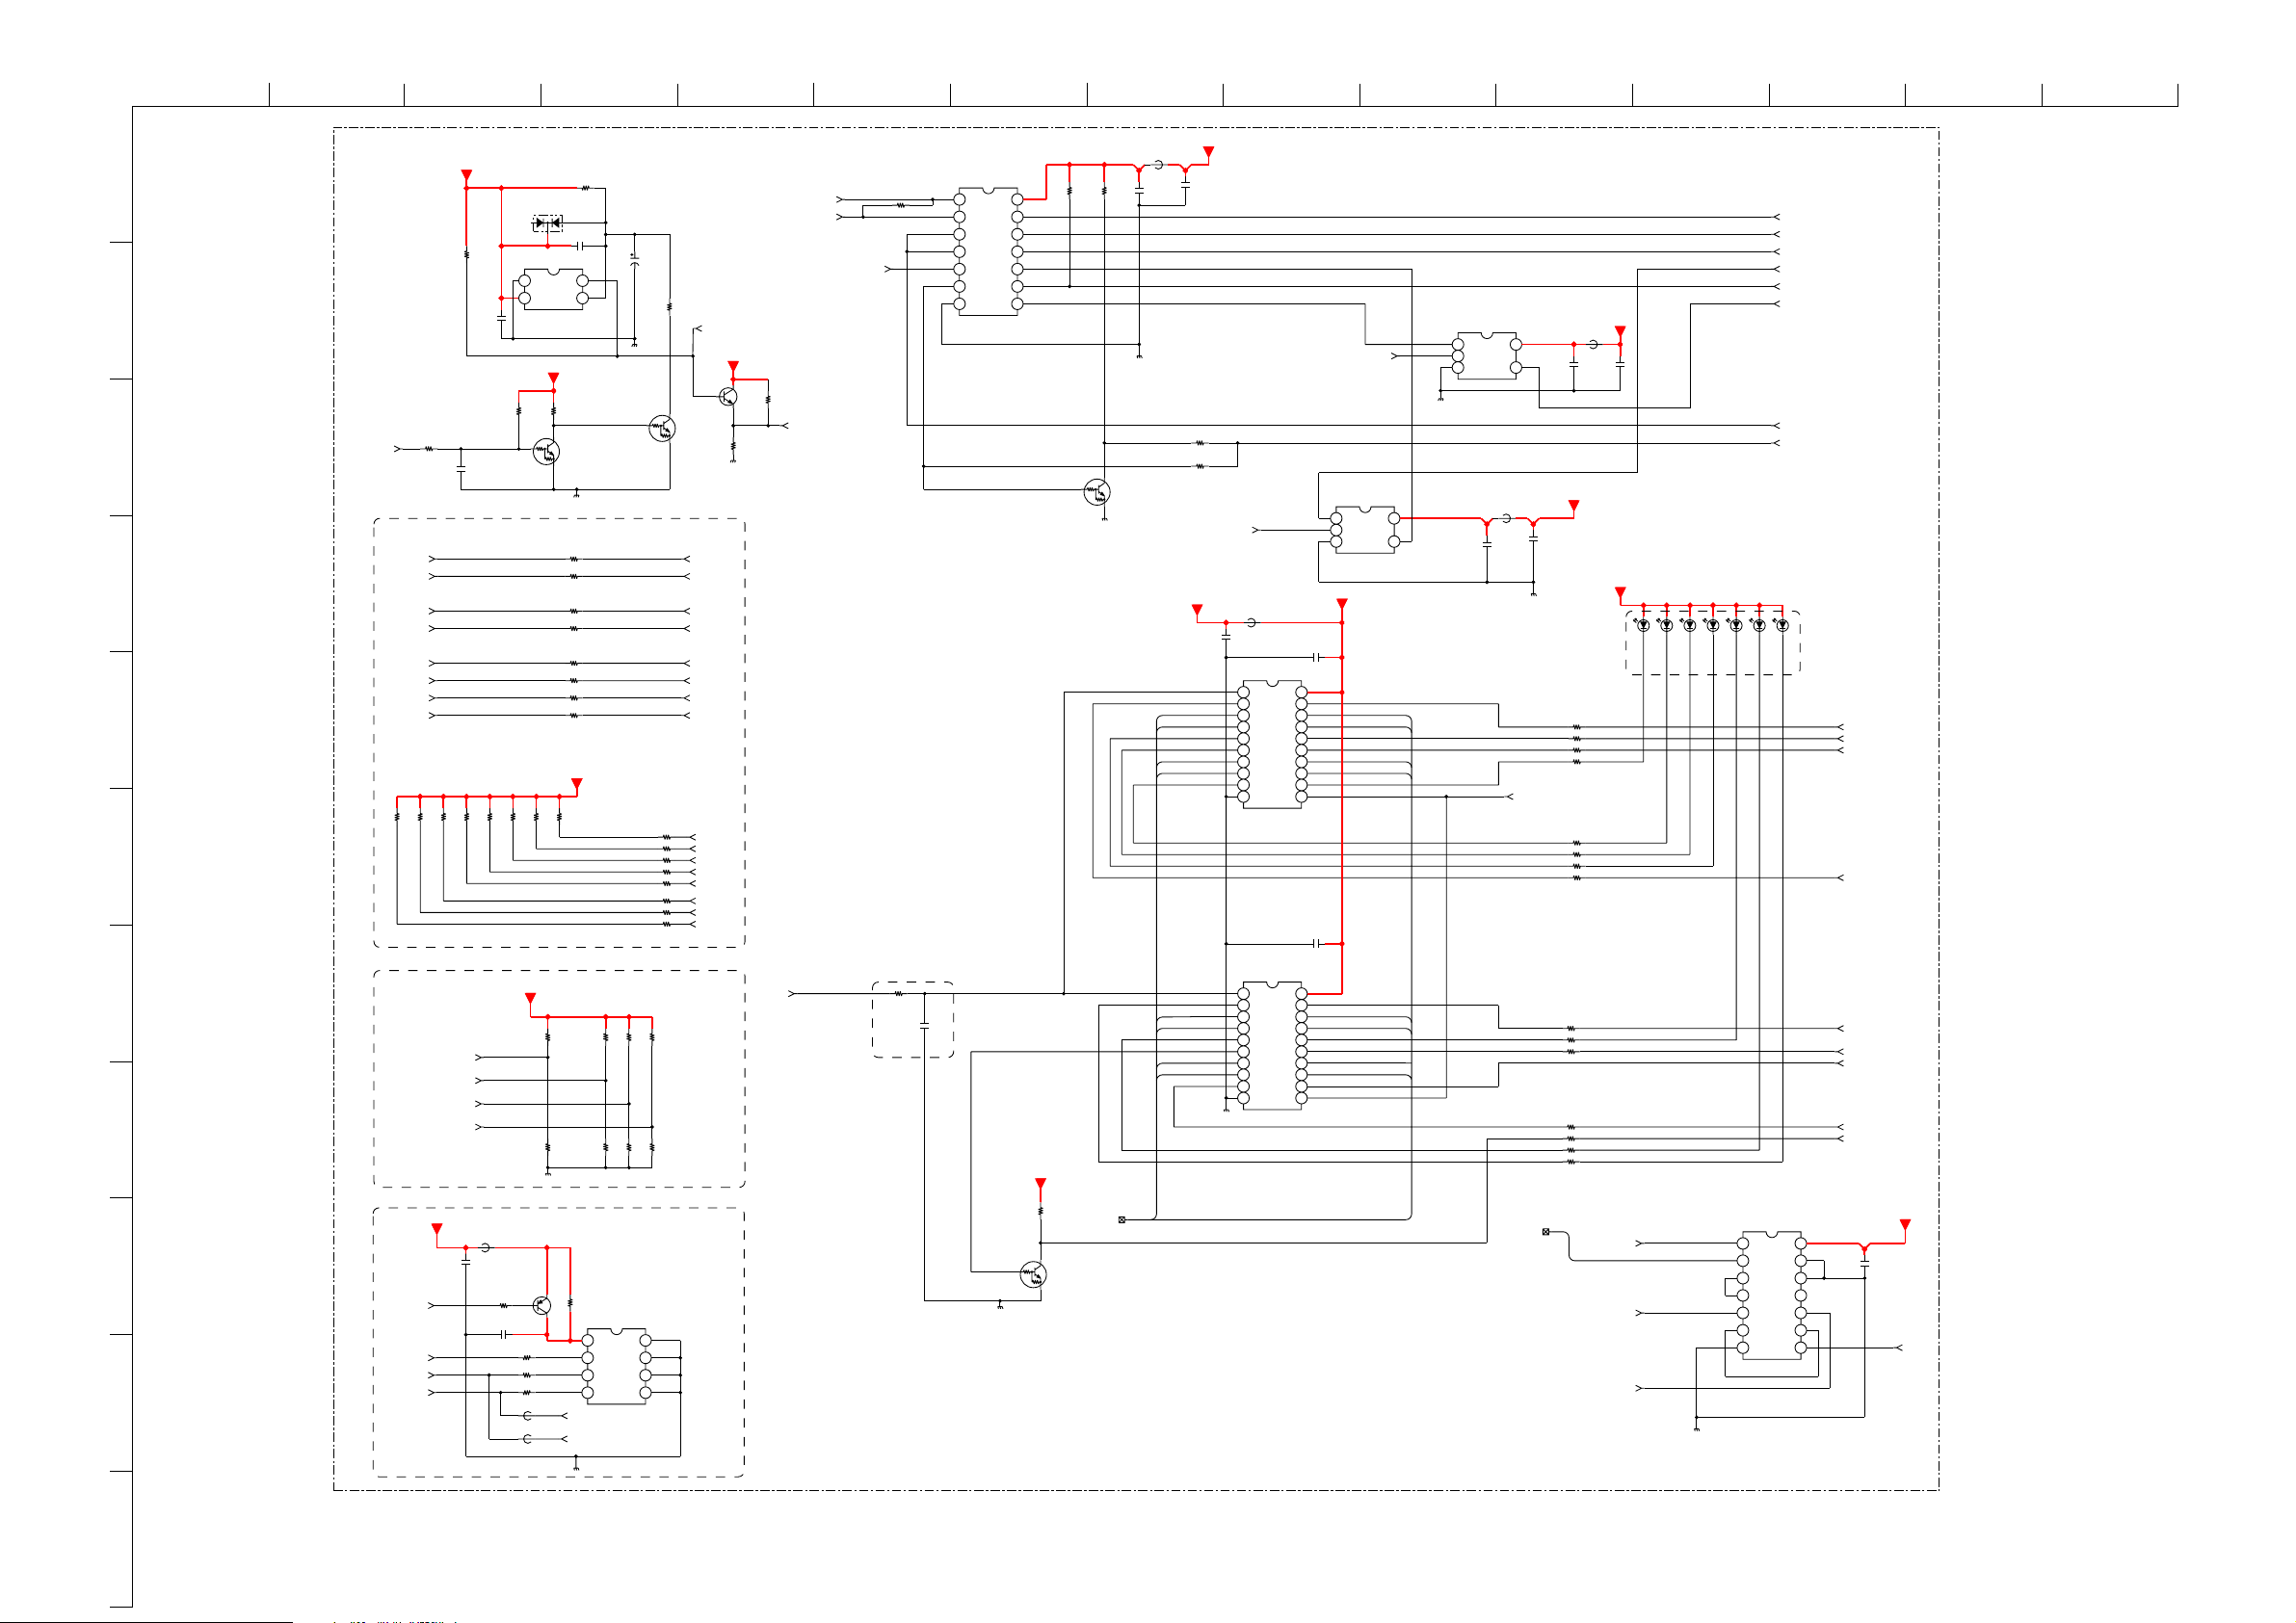
10
ABCDE F
G
HI JKLMN
O
N..-LE4B
+3V3D
R3827
1k
Q3804
DTC114EKA-T146
FB3801
0uH
C3809
0.1
10V
RDATA[8]
RDATA[9]
MODEM_DTR
RDATA[10]
RDATA[11]
RDATA[0]
RDATA[1]
RDATA[2]
RDATA[3]
C3810
0.1
10V
R3828
R3829
+3V3D
FASTBLK_GPIO
NVM_WE
PCCARD_EN
100
XX
GCSB0
FB3800
0uH
C3804
0.1
10V
12345678
910
SIGN11532
OCTAL D-TYPE
12345678
910
VCC
!CL!
1Q
1D
2D
2Q
3Q
3D
4D
4Q
CLK
GND
IC3801
74LVC273PW
GP OUTPUT
IC3802
74LVC273PW
FLIP/FLOP
VCC
!CL!
1Q
1D
2D
2Q
3Q
3D
4D
4Q
CLK
GND
C3805
20 19 18 17 16 15 14 13
8Q
8D
7D
7Q
6Q
6D
5D
12 11
5Q
20 19 18 17 16 15 14
8Q
8D
7D
7Q
6Q
6D
13
5D
12 11
5Q
TC7SH08FU(T5RSOYJF)
2 I/P GATE AND
A
B
321
GND
+3V3D_81
0.1
10V
CI_PWR_EN
MODEM_EN
CI_BYPASS
C3806
0.1
10V
CI_EN
nSW_FE_RESET
NVM_RST
IC3806
GCSB2
Vcc
Y
RDATA[15]
RDATA[14]
RDATA[13]
RDATA[12]
RDATA[7]
RDATA[6]
RDATA[5]
RDATA[4]
5
4
1
2
3
4
5
nBOARD_RST
R3822
JIG_MODE
nCI_OVR
nMODEM_OVR
nSMC_INT
nFTV2005_SEL
FTV_CONFIG0
FTV_CONFIG1
FTV_CONFIG2
R3824
10k
+3V3D
R3801
1k
1/16W
C3800
0.1
10V
R3831
100
C3811
470p
50V
R3836
R3837
R3825
10k
10k
10k
10k
6
7
nFTV2005_SEL
FTV_CONFIG0
FTV_CONFIG1
NVM_RST
NVM_WP
SCL_N
SDA_N
FTV_CONFIG2
+3V3D
FB3803
0uH
C3814
0.1
10V
2SA2029T2LQ/R
8
9
RESET SIGNAL GENERATION
R3800
22k
D3800
1/16W
1PS184-115
C3801
10V
0.1
12
R3862
4.7k
1/16W
GP INPUT TO EMMA
R3838
R3840
10k
10k
+3V3D
R3898
Q3808
R3850
1k
C3816
0.1
R3843
R3844
R3842
FB3805
FB3806
43
OUT
GND
Vcc
CD
IC3800
PST3629UL
RESET IC
+3V3D
R3841
10k
1/16W
Q3805
DTC114EKA-T146
R3809
100
R3815
100
100
R3806
100R3810
100R3818
100
R3852
100
R3861
R3830
100
+3V3D
R3848
10k
S/W OPTION SELECT R’s
R3892
10k
XX
R3893
R3899
XX
10k
R3851
XX
M24128-BWMN6T(A)
8765
100
100
100
SDA_COFDM
0uH
SCL_COFDM
0uH
Q3800
DTC114EKA-T146
R3894
XX
R3895
10k
IC3807
EEPROM
VCC
TEST
SCL
SDA
VSS
C3802
10
16V
R3849
R3853
R3855
R3856
R3857
R3859
100
R3896
10k
R3897
XX
EEPROM
SD
!S1!
S2
4321
R3803
100
Q3806
2SC5658T2LQ/R
PPORT3
PPORT0
PPORT1
PPORT4
PPORT2
PPORT44
PPORT12
PPORT13
100
PPORT42
100
PPORT45
100R3854
PPORT46
100
PPORT47
100
PPORT48
100
SPKRB
100R3858
STSCHGB
VS2B
nMASTER_RESET
+3V3D
R3846
470
1/16W
nDAMON_RST
nMASTER_RESET
nSW_FE_RESET
R3847
XX
nNAND_WP
nRESET
THIS RESISTOR AND
CAPACITOR TO BE PLACED
CLOSE TO IC3801 AND IC3802
R3832
R3802
100
IC3805
74LVC08APW
QUAD AND GATE
1A
654321
7
nFE_RESET
1B
2B
2Y
GND
VDD
4B
4A
1Y
2A
4Y
3B
3A
3Y
R3804
0
C3803
XX
N
14 13 12 11 10 9
8
CHIP
2.2k
+3V3D
DTC114EKA-T146
7/7
R3839
1/16W
RDATA[0-15]
Q3801
1k
COMPONENTS MARKED AS XX ARE NOT FITTED ON THIS MODEL
IC3803
TC7SH08FU(T5RSOYJF)
2 I/P GATE AND
A
B
321
GND
VCC
Y
FB3802
0uH
C3807
0.1
10V
RADD[0-25]
5
4
GPO_CLK
C3813
0.1
10V
C3812
0.1
10V
R3816
R3835
R3821
R3819
R3860
R3826
R3817
R3805
R3808
R3813
R3823
R3814
+3V3D
FB3804
0uH
100
100
100
XX
XX
XX
XX
100
100R3820
XXR3807
100
100
100
XXR3834
XX
RADD[14]
C3817
10V
nCI_EN
nPC_EN
nCIPC_EN
nCI_WAIT
nRDY_DAMON
+3V3D
0.1
XX
XX
XX
D3804
RDATA[11]
D3805
RDATA[10]
XX
D3806
RDATA[9]
+3V3D
GCSB0
FWEB
FOEB
D3802
RDATA[12]
GRDYB
nFE_RST
XX
D3801 XX
D3803
RDATA[6]
RDATA[1]
RDATA[0]
IC3804
74LVC32A-PW
QUAD 2 I/P OR GATE
1A
1B
1Y
2A
2B
654321
2Y
7
GND
nRESET
XX
D3807
PLACE CLOSE TOGETHER
14 13 12 11 10 9
Vcc
4B
4A
4Y
3B
3A
8
3Y
CI_PWR_EN
MODEM_EN
CI_BYPASS
nSMC_RST
CI_EN
nSW_FE_RESET
NVM_RST
PCCARD_EN
NVM_WP
C3808
0.1
10V
<- RDATA[15]
<- RDATA[14]
<- RDATA[13]
<- RDATA[8]
<- RDATA[7]
<- RDATA[5]
<- RDATA[4]
<- RDATA[3]
<- RDATA[2]
+3V3D_81
GPO_CLK
11
~ N Board Schematic Diagram [ Digital I/F ] Page 7/7 ~
- 67 -
Page 68
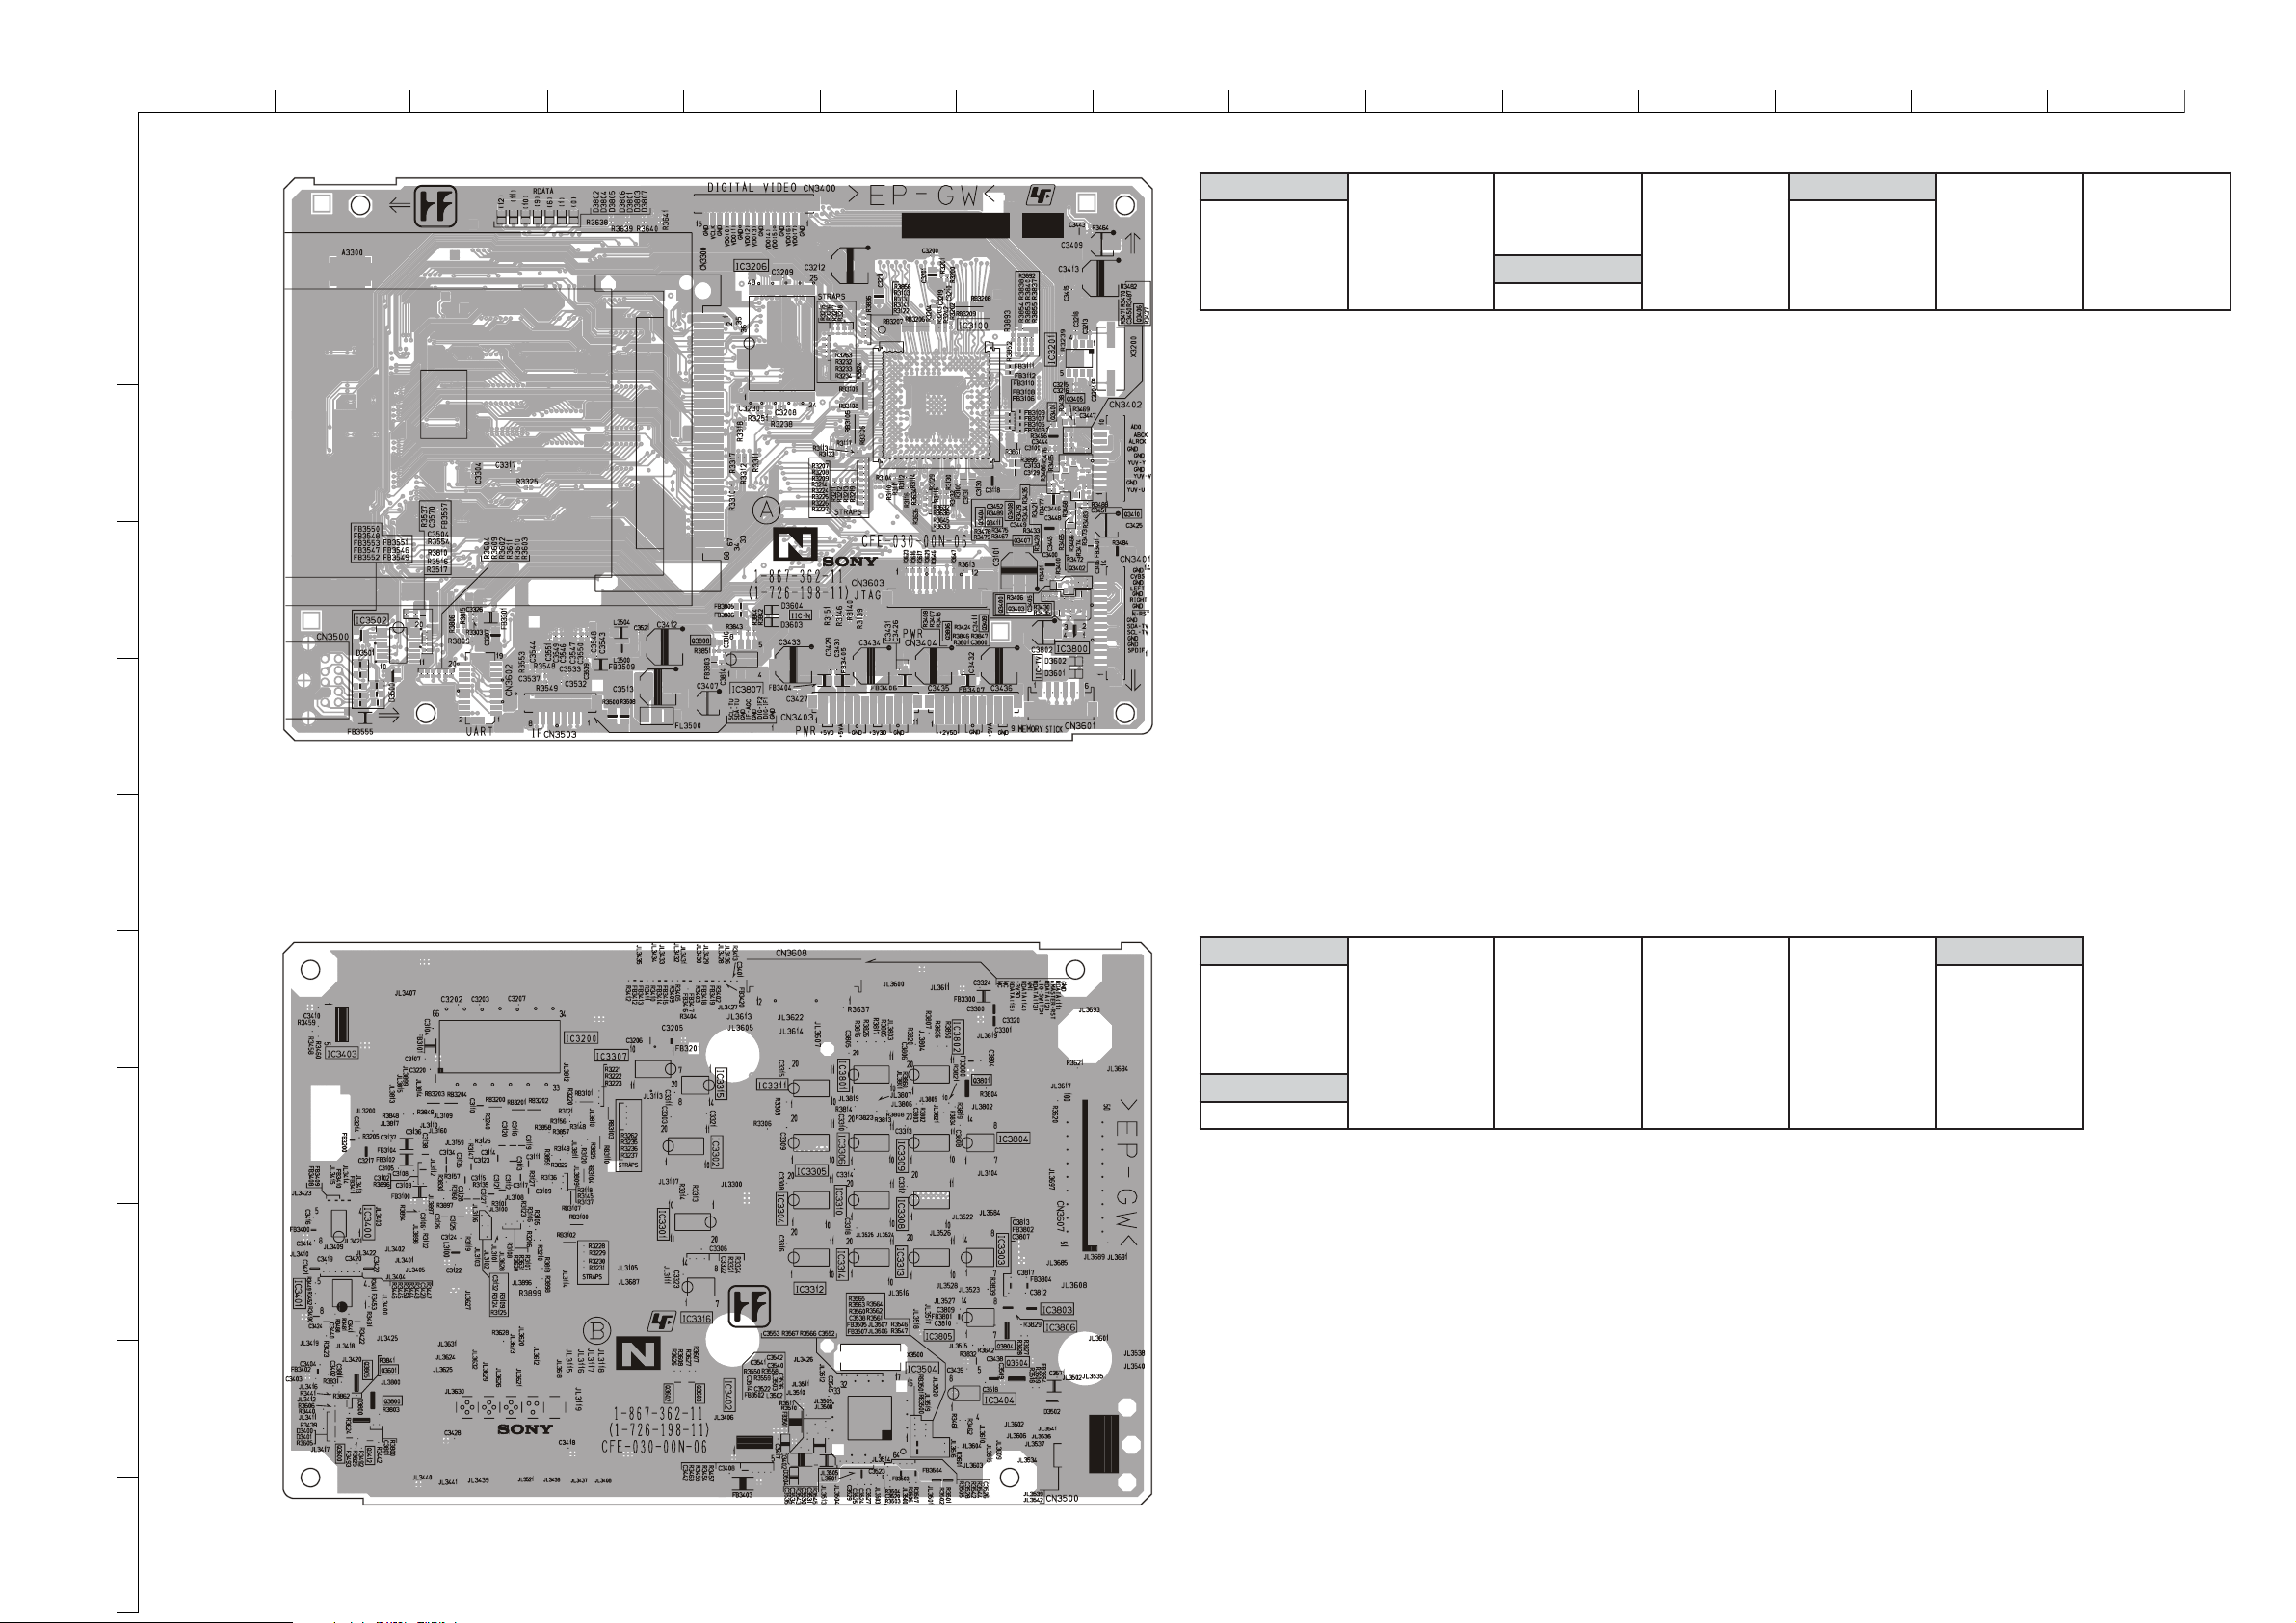
ABCDE F
EDOID
4063D4-E5083D1-D1023CI2-G
ROTSISNART
4043Q4-G9043Q4-G
1053D4-B1083D1-D6083D1-D5023CI2-E0043Q4-G5043Q3-G0143Q4-H
1063D5-G2083D1-D7083D1-D2053CI4-B1043Q3-G6043Q2-H1143Q4-G
2063D5-G3083D1-D
CI
0083CI4-G2043Q4-G7043Q4-G6083Q4-F
3063D4-E4083D1-D0013CI2-G7083CI5-E3043Q4-G8043Q4-E8083Q4-E
EDOID
1033CI9-D8033CI8-F5133CI8-D4053CI01-F
ROTSISNART
0043D01-B2033CI8-D9033CI8-F6133CI9-D1083CI8-E2143Q01-B
1043D01-B3033CI9-G0133CI8-F0043CI9-B2083CI7-F4053Q01-G
2043D01-E4033CI8-E1133CI8-E1043CI9-B3083CI9-G0083Q01-B
4053D01-E5033CI8-E2133CI9-E2043CI01-E4083CI8-G1083Q8-G
CI
6033CI8-F3133CI9-F3043CI7-B5083CI9-F4083Q9-G
0023CI7-D7033CI7-D4133CI9-E4043CI01-G6083CI9-G5083Q01-B
G
HI JKLMN
O
~ N Printed Wiring Board Conductor Side A ~
~ N Board Semiconductor Location Table Side A ~
1
2
3
4
5
6
~ N Printed Wiring Board Conductor Side B ~
~ N Board Semiconductor Location Table Side B ~
7
8
9
10
11
- 68 -
Page 69
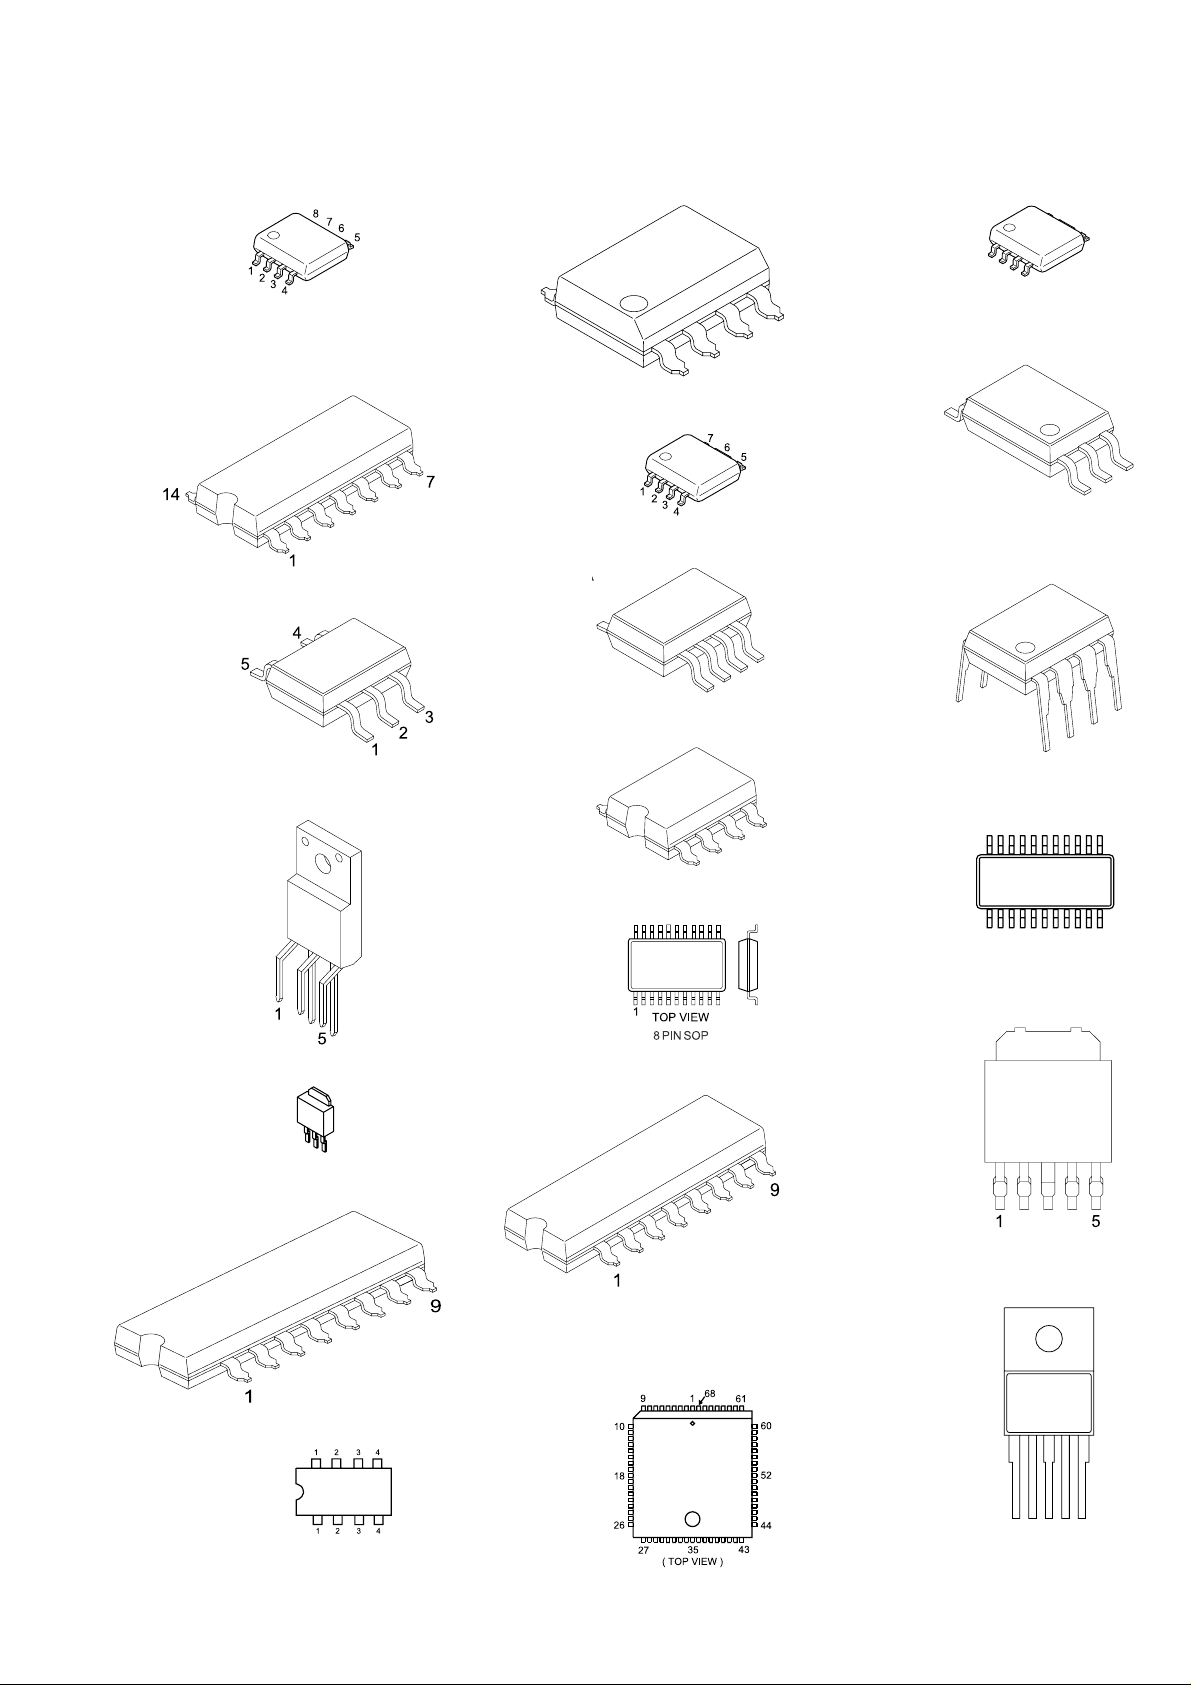
5-4. SEMICONDUCTORS
24LC21AT
74LVC32A-PW
74LVC00-PW
74LVC08A-PW
74LVC541A-PW
74LVC273-PW
74LVC541APW
74LVC08APW
74LVC14APW
74LVC273PW
74LVC32A-PW
74LVT245PW-T
LM3526MX
LM75C1MX-3
LM75C1MX-5
M24128 BWMN6T A
M24128-BWMN6T
M24128-BWMN6T(A)
NJM2904M
NJM3404AM-T1
NJM4556AM
NJM4556AD
BA09ST_V5
BA18BC0FP-E
CXAB070AP
PCF8593/T118
M24C32-WMN6T(B)
MC14053 BDR2
PQ070XZ01ZPH
MCZ3001D
PQ1CG2032FZ
MSP3411G-QA-B10
MSP3411G-QA-B11
LM318P
LM358N
LM393DT
LM393DT(A)
LM393N
M24C16-MN6T(A)
- 69 -
Page 70
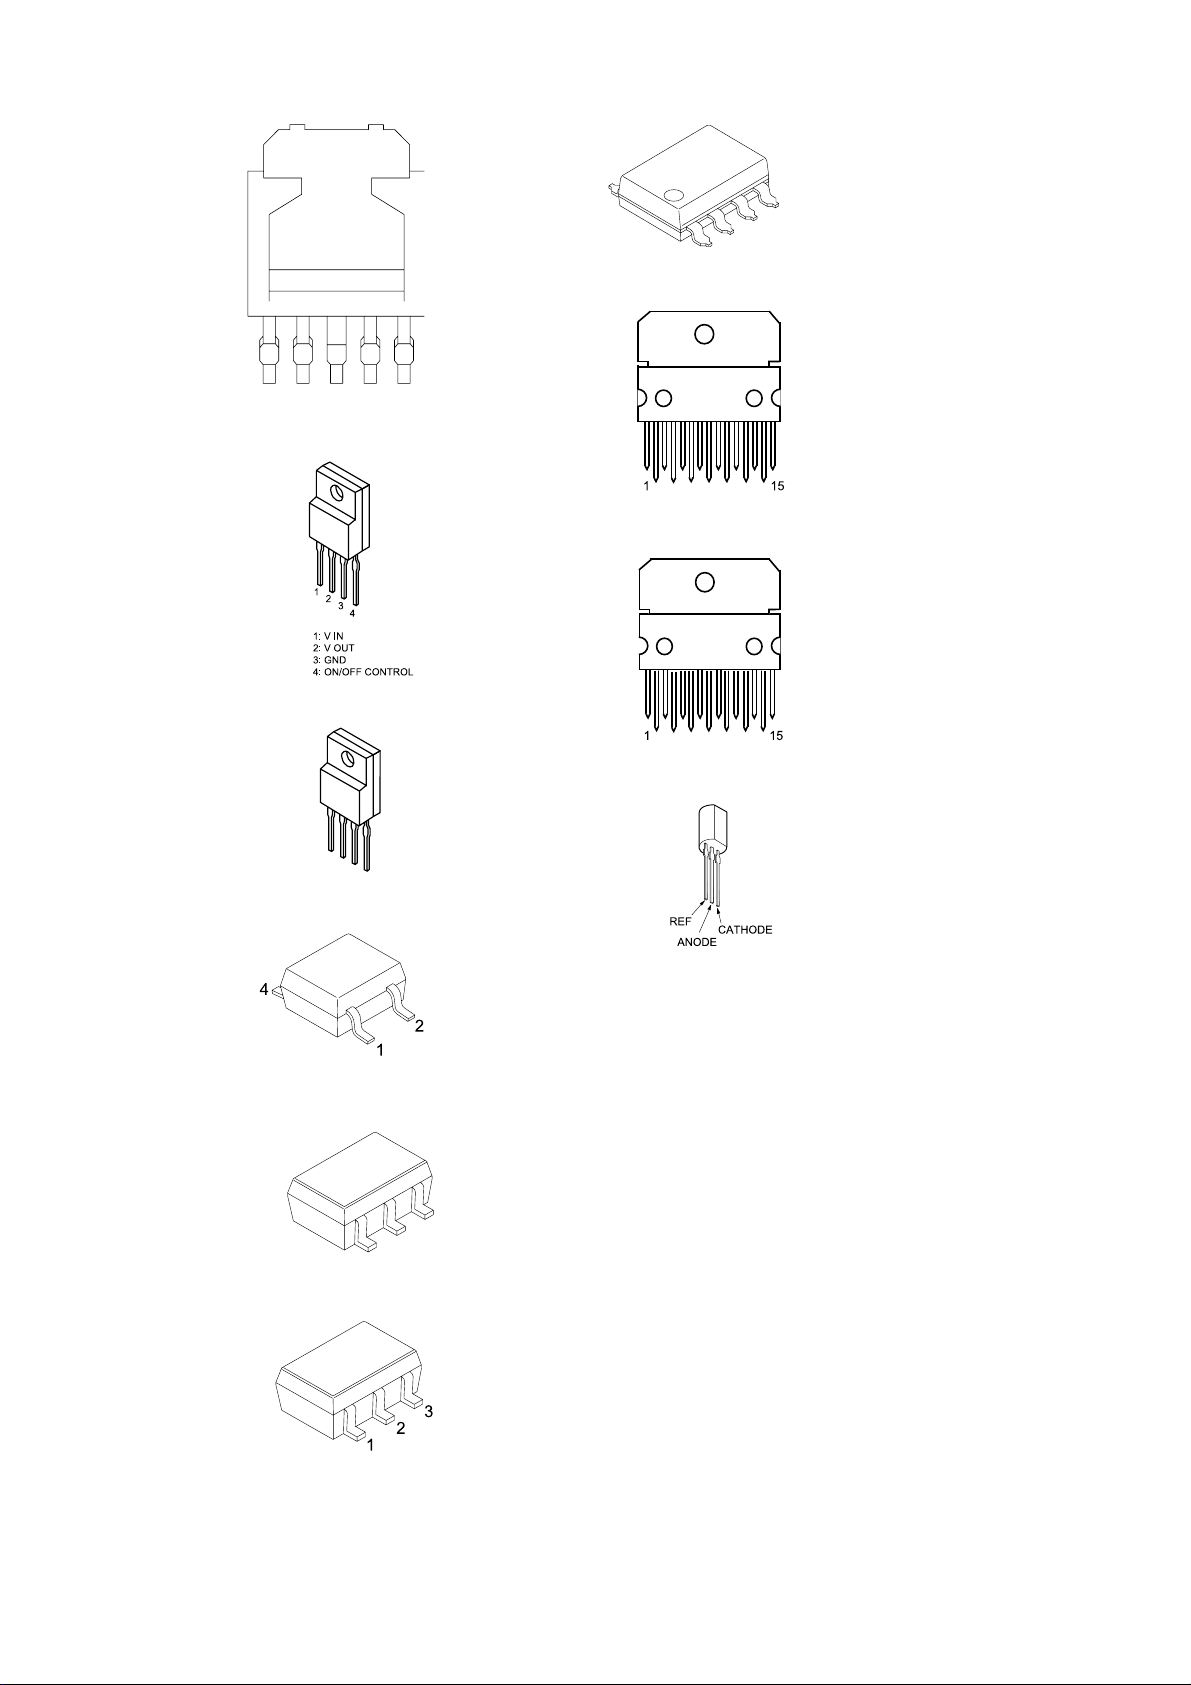
PQ20VZ-U
PQ30RV11
TDA2822D
TDA7269A
TDA7482
PQ30RV21
PST3629UL
TC7SH08FU(T5RSOYJF)
UPC1093J-1-T
TC7SH08F-TE85R
- 70 -
Page 71
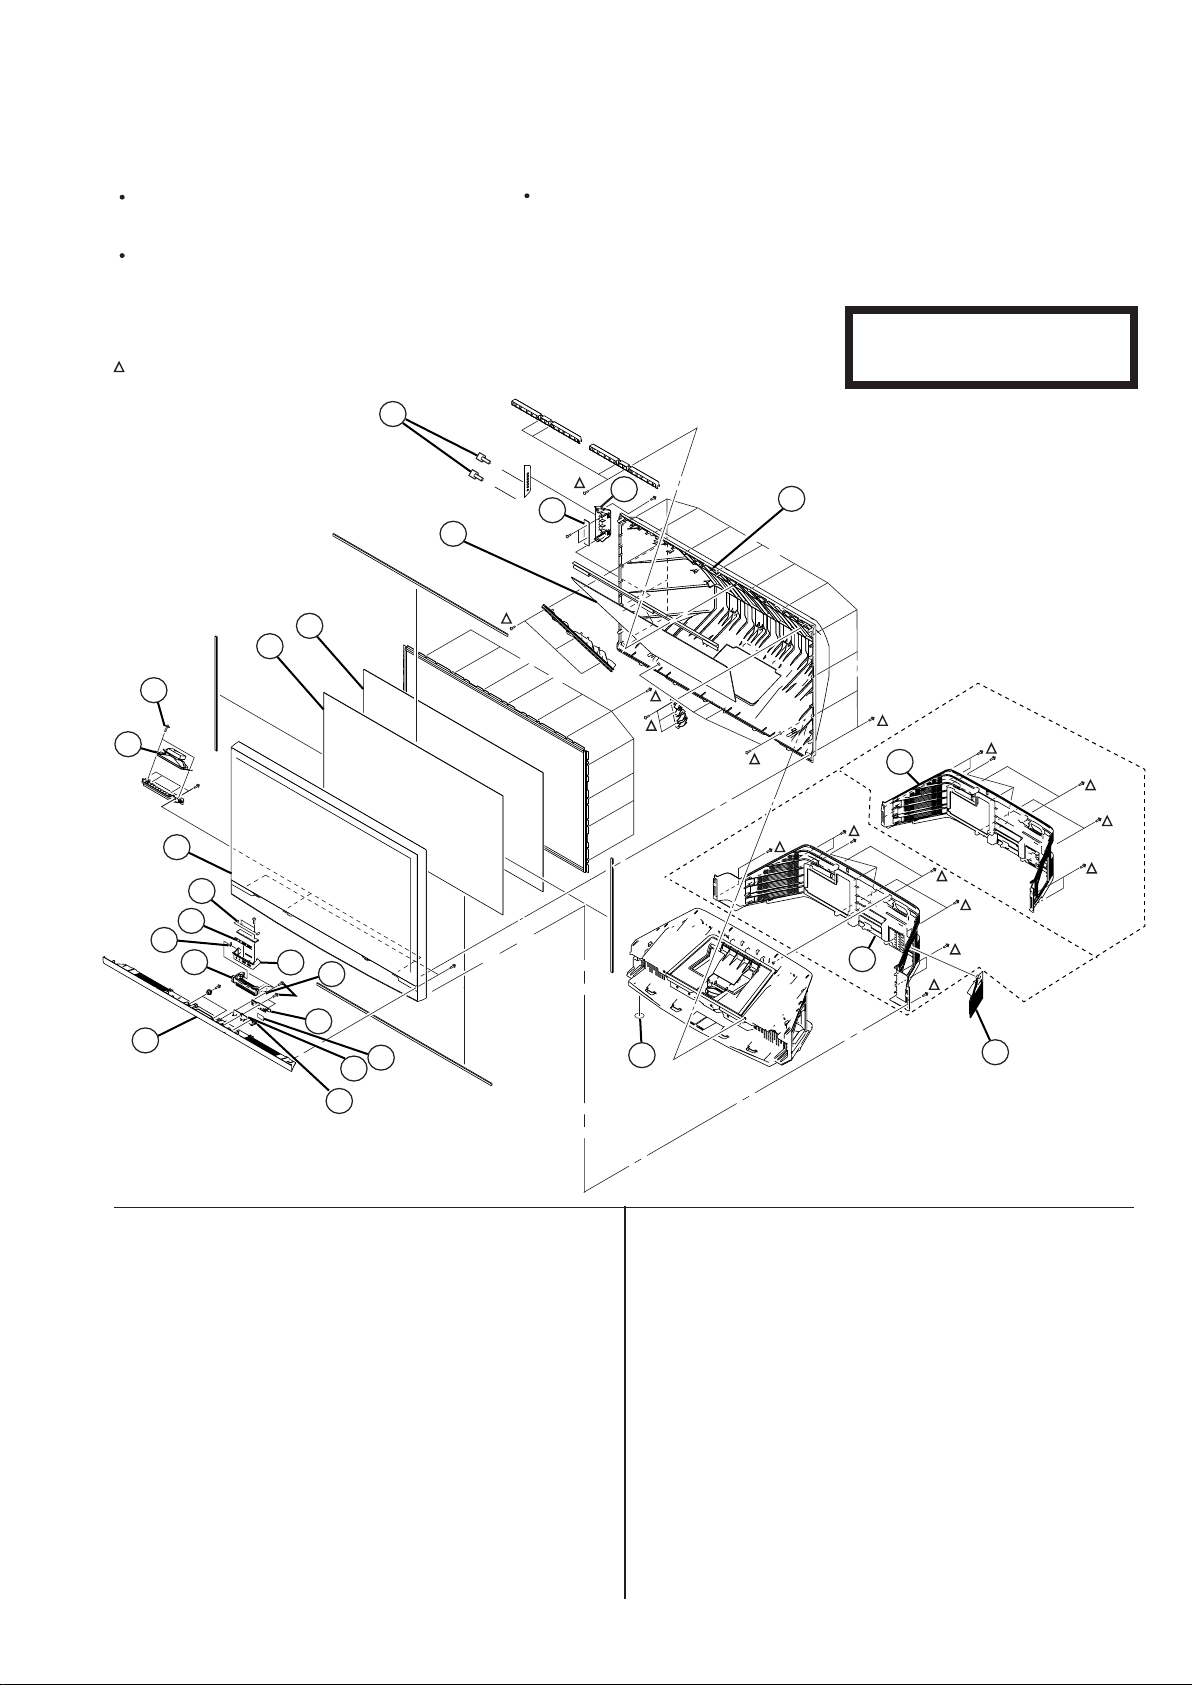
SECTION 6
SECTION 6
EXPLODED VIEWS
EXPLODED VIEWS
NOTE :
NOTE :
Items marked “*” are not stocked
Items with no part number and no description are not
Items with no part number and no description are not
stocked because they are seldom required for routine
stocked because they are seldom required for routine
service.
service.
The construction parts of an assembled part are indicated
The construction parts of an assembled part are indicated
with a collation number in the remarks column.
with a collation number in the remarks column.
6-1. SCREEN MIRROR BLOCK, COVERS
6-1. SCREEN MIRROR BLOCK, COVERS
: 7-685-648-79 SCREW +BVTP 3X12 TYPE2 IT-3
: 7-685-663-79 SCREW +BVTP 4X16 TYPE2 IT-3
24
Items marked “*” are not stocked
since they are seldom required for
since they are seldom required for
routine service. Some delay should
routine service. Some delay should
be anticipated when ordering these
be anticipated when ordering these
items.
items.
KDF-E42/50A12U
RM-ED002
The components identified by shading
and mark are critical for safety.
Replace only with part number specified.
£
10
12
9
8
7
5
4
6
18
3
17
19
1
16
20
22
23
21
2
15
11
E42A12
13
13
E50A12
14
REF.NO. PART.NO DESCRIPTION REMARK REF.NO. PART.NO DESCRIPTION REMARK
1 2-631-806-11 GRILLE, SPEAKER(42) (E42A12U)
2-631-808-11 GRILLE, SPEAKER(50) (E50A12U)
2 2-590-913-11 BUTTON, POWER
3 2-590-914-11 BUTTON, MULTI
4 1-826-219-11 LOUD SPEAKER (5.5X15CM)
5 4-058-870-01 SCREW, (4X16) W (+) P TAPPING
6 X-2067-166-1 FRAME ASSY SCREEN (E42A12U)
X-2067-114-1 FRAME ASSY SCREEN (E50A12U)
7 2-590-449-21 PLATE (42L), DIFFUSION (E42A12U)
2-590-451-21 PLATE (50L), DIFFUSION (E50A12U)
8 2-590-450-21 PLATE (42F), DIFFUSION (E42A12U)
2-590-452-11 PLATE (50F), DIFFUSION (E50A12U)
9 2-592-457-11 MIRROR (E42A12U)
2-592-456-11 MIRROR (E50A12U)
10 *2-649-045-01 BRACKET H3 (42) (E42A12U)
*2-637-136-01 BRACKET H3 (50) (E50A12U)
11 2-590-902-31 COVER, MIRROR (42) (E42A12U)
2-590-907-31 COVER, MIRROR (50) (E50A12U)
12 *A-1107-972-A H3 BOARD COMPLETE
13 2-631-704-11 COVER REAR (42) (E42A12U)
2-631-704-01 COVER REAR (50) (E50A12U)
14 2-591-156-21 DOOR, LAMP
15 4-097-548-01 CUSHION, FOOT
16 *2-590-915-21 TRAY, CONTROL
17 2-593-048-01 DAMPER
18 2-590-916-11 TRAY, CONTROL (TOP)
19 2-590-917-11 BRACKET, CONTROL TRAY
20 2-593-049-01 LATCH ASSY
21 2-590-918-21 GUIDE, LED
22 *A-1107-970-A H1 BOARD COMPLETE
23 *A-1107-971-A H2 BOARD COMPLETE
24 4-635-966-01 SCREW (HEX)
- 71 -
Page 72
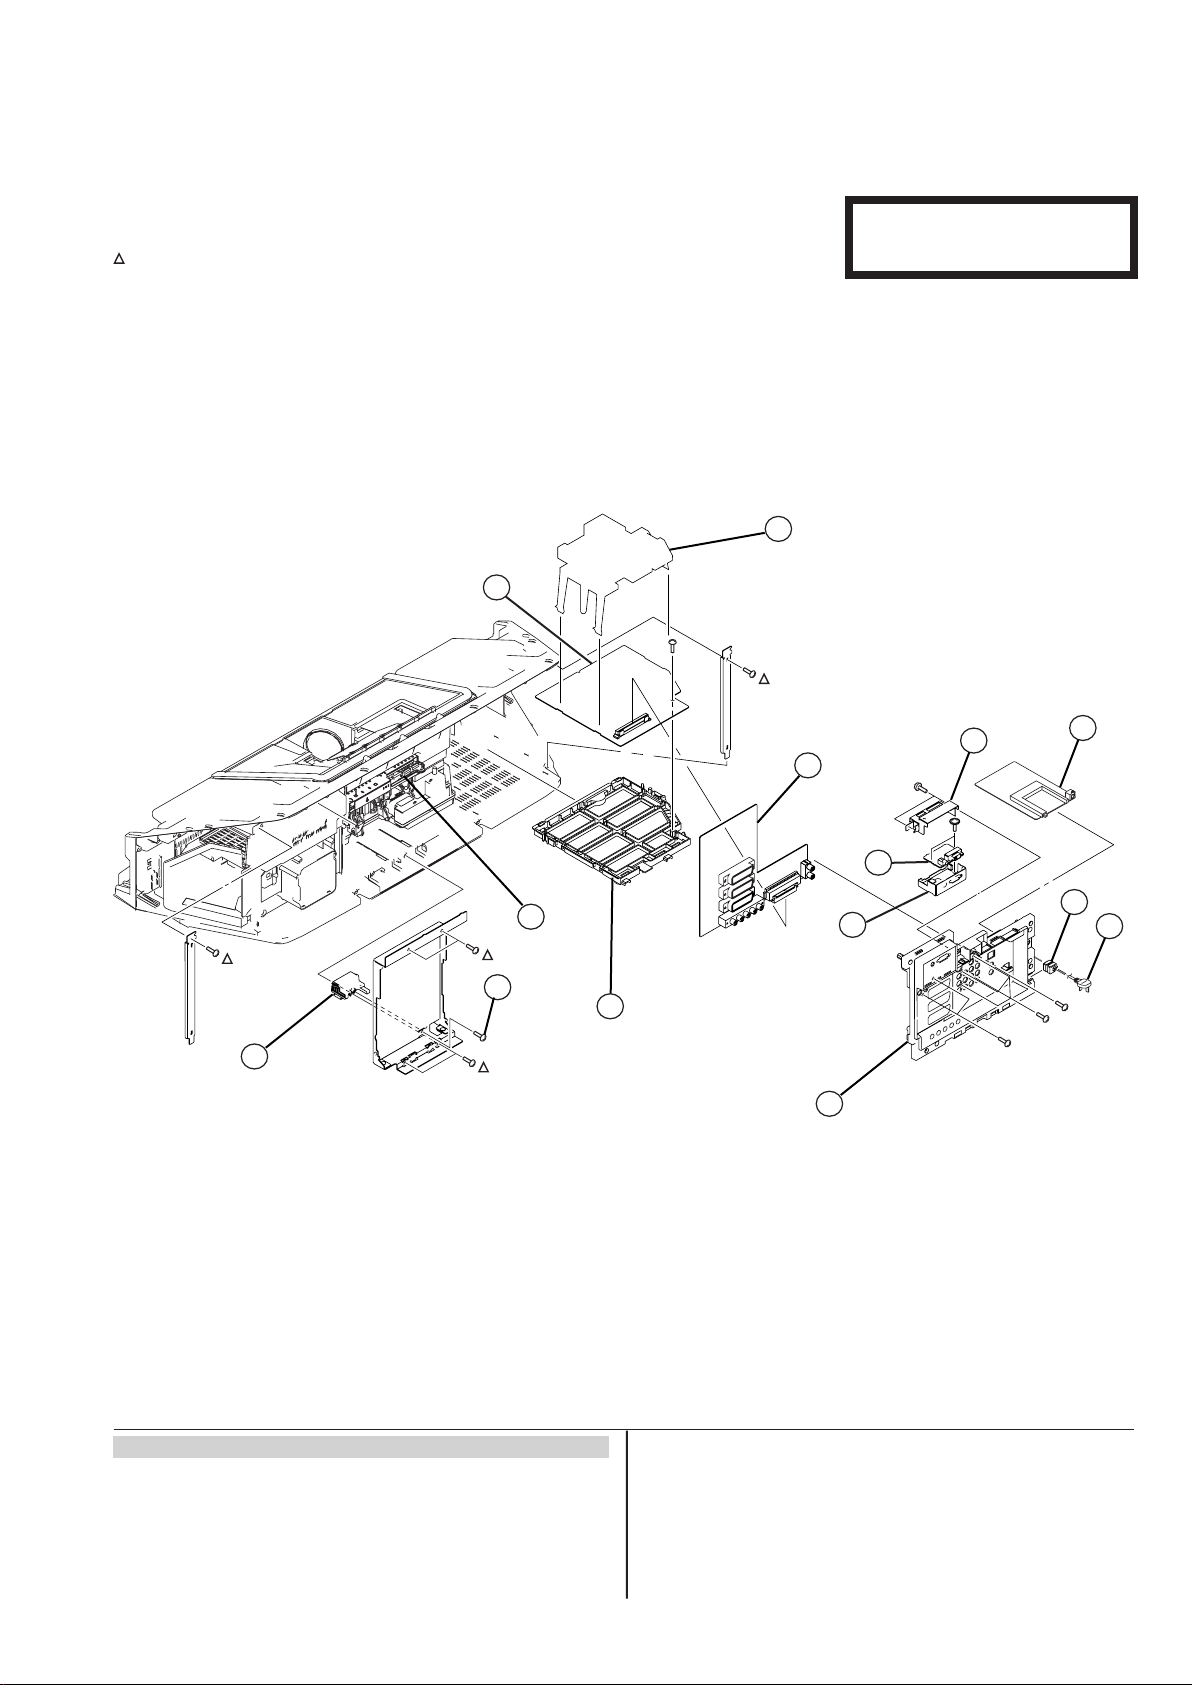
KDF-E42/50A12U
RM-ED002
6-2. CHASSIS / BOTTOM BLOCK ASSY
: 7-685-648-79 SCREW +BVTP 3X12 TYPE2 IT-3
: 7-685-663-79 SCREW +BVTP 4X16 TYPE2 IT-3
26
The components identified by shading
and mark are critical for safety.
Replace only with part number specified.
33
£
28
27
30
25
34
22
29
24
31
32
REF.NO. PART.NO DESCRIPTION REMARK REF.NO. PART.NO DESCRIPTION REMARK
21 £ 1-776-204-32 CORD, POWER (FILTER)
22 3-701-810-72 SCREW, TERMINAL
23 4-065-070-01 HOLDER, AC CORD
24 X-2067-113-1 BLOCK, ADJUSTER ASSY
25 *A-1115-078-B P COMPL
26 *A-1127-038-A AG COMPLETE DIG
27 *A-1129-435-A JB WAX COMPLETE DIG
28 *A-1122-473-A N COMPLETE UK
29 *2-593-078-21 BRACKET, G
30 *2-595-154-02 SHEILD (UPPER A), HDMI
31 *2-632-907-01 BRACKET HDMI
32 *2-637-134-11 BRACKET, TERMINAL
33 *2-637-135-01 BRACKET F
34 *A-1087-559-A C BOARD COMPLETE
23
21
- 72 -
Page 73
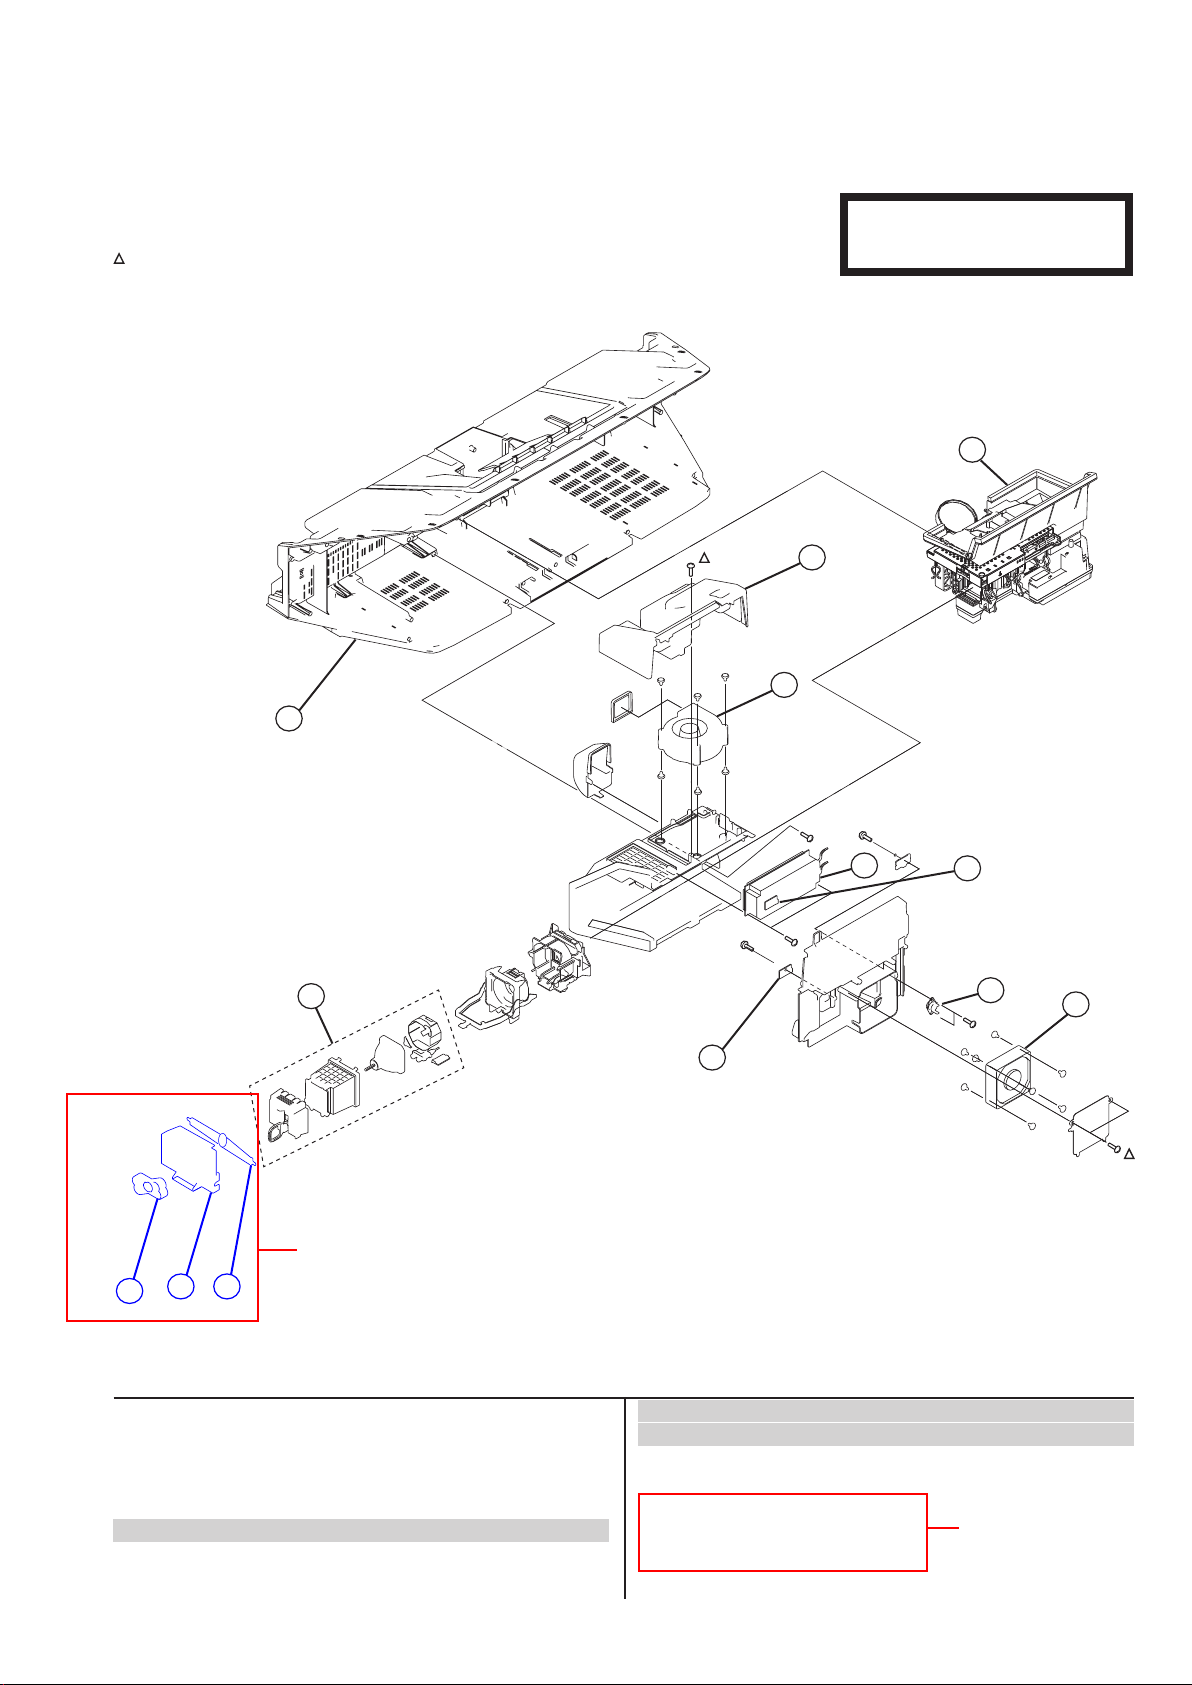
KDF-E42/50A12U
RM-ED002
6-3. LAMP DUCT ASSEMBLY, OPTICS UNIT BLOCK
: 7-685-648-79 SCREW +BVTP 3X12 TYPE2 IT-3
: 7-685-663-79 SCREW +BVTP 4X16 TYPE2 IT-3
55
54
The components identified by shading
and mark are critical for safety.
Replace only with part number specified.
47
£
50
49
46
53
48
52
Revision 2.0
(Click inside red box to see related change)
58
57
56
REF.NO. PART.NO DESCRIPTION REMARK REF.NO. PART.NO DESCRIPTION REMARK
46 *A-1122-463-A T1 MOUNT
47 *2-590-723-21 COVER, SIROCCO FAN
48 *A-1127-037-A T2 MOUNT
49 A-1127-024-A LAMP BLOCK ASSY
50 A-1134-461-A OPTICS UNIT BLOCK ASSY (E50A10E/E50A10U)
51 £ 1-787-373-11 D.C. FAN
52 1-576-912-11 THERMOSTAT
53 £ 1-468-936-11 POWER SUPPLY BLOCK
54 £ 1-787-231-11 D.C.FAN (SIROCCO)
55 2-630-699-11 CABINET,BOTTOM (E42A12U)
2-630-699-01 CABINET,BOTTOM (E50A12U)
56 2-590-737-21 KNOB,DOOR
57 2-590-735-11 DOOR,LAMP
58 2-590-736-11 LEVER,LOCK
Revision 2.0
(Click inside red box to
see related change)
51
- 73 -
Page 74

SECTION 7
.OTE )TEMSMARKEDhvARENOTSTOCKEDSINCETHEYARESELDOMREQUIREDFORROUTINESERVICE
3OMEDELAYSHOULDBEANTICIPATEDWHENORDERINGTHESEITEMS
0ARTSINDICATED88ONTHE3CHEMATIC$IAGRAMARENOTUSEDINTHISMODELAND
THEREFOREDONOTAPPEARINTHE0ARTS,IST
ELECTRICAL PARTS LIST
PARTS LISTING TABLE OF CONTENTS
Page
T1 BOARD COMPLETE Parts List : ........................................................................................................................................ 75
T2 BOARD COMPLETE Parts List : ........................................................................................................................................ 75
H2 BOARD COMPLETE Parts List : ........................................................................................................................................ 75
H1 BOARD COMPLETE Parts List : ........................................................................................................................................ 75
N BOARD COMPLETE Parts List : .......................................................................................................................................... 75
AG BOARD COMPLETE Parts List : ....................................................................................................................................... 82
JB BOARD COMPLETE Parts List : ......................................................................................................................................... 87
H3 BOARD COMPLETE Parts List : ........................................................................................................................................ 98
C BOARD COMPLETE Parts List : .......................................................................................................................................... 99
MISCELLANEOUS : ............................................................................................................................................................... 104
ACCESSORIES AND CONNECTORS : ................................................................................................................................. 104
REMOTE COMMANDER : ...................................................................................................................................................... 104
Note: The P Board Schematic Diagram, Printed Wiring Board and Parts List are not indicated
in this manual as the PWB is regarded as a non service item for exchange only.
- 74 -
Page 75
REF.NO. PART NO. DESCRIPTION REMARK REF.NO. PART NO. DESCRIPTION REMARK
*A-1122-463-A T1 BOARD COMPLETE
< CONNECTOR >
CN4306 *1-816-974-51 PLUG, CONNECTOR 3P
< SWITCH >
S4320 1-786-591-11 SWITCH, MICRO
*A-1127-037-A T2 BOARD COMPLETE
< CONNECTOR >
CN4340 *1-564-518-11 PLUG, CONNECTOR 3P
< SWITCH >
S4340 1-786-591-11 SWITCH, MICRO
*A-1107-971-A H2 BOARD COMPLETE
< CAPACITOR >
C2000 1-164-156-11 CERAMIC CHIP 0.1UF 25V
C9001 1-119-667-11 CERAMIC CHIP 22UF 10V
C9002 1-162-964-11 CERAMIC CHIP 0.001UF 10.00% 50V
< CONNECTOR >
CN1000 *1-564-526-31 PLUG, CONNECTOR 11P
< DIODE >
D1700 8-719-069-55 DIODE UDZSTE-175.6B
D1701 8-719-069-55 DIODE UDZSTE-175.6B
D1702 8-719-064-11 DIODE SPR-325MVW
D1704 8-719-053-43 DIODE SLR-325VCT31
D1705 8-719-053-43 DIODE SLR-325VCT31
< IC >
IC1000 6-600-271-01 IC RPM7140-H8
< TRANSISTOR >
Q1010 8-729-010-29 TRANSISTOR MSD601-RST1
Q1011 8-729-010-29 TRANSISTOR MSD601-RST1
Q1012 8-729-010-29 TRANSISTOR MSD601-RST1
Q1013 8-729-010-29 TRANSISTOR MSD601-RST1
< RESISTOR >
R6310 1-216-864-11 SHORT CHIP 0
R6311 1-216-833-11 METAL CHIP 10K 5% 1/10W
R6312 1-216-833-11 METAL CHIP 10K 5% 1/10W
R6313 1-216-817-11 METAL CHIP 470 5% 1/10W
R6314 1-216-813-11 METAL CHIP 220 5% 1/10W
R6315 1-216-817-11 METAL CHIP 470 5% 1/10W
R6316 1-216-817-11 METAL CHIP 470 5% 1/10W
R6317 1-216-833-11 METAL CHIP 10K 5% 1/10W
R6318 1-216-813-11 METAL CHIP 220 5% 1/10W
R6319 1-216-813-11 METAL CHIP 220 5% 1/10W
R6320 1-216-017-91 RES-CHIP 47 5% 1/10W
R6321 1-216-817-11 METAL CHIP 470 5% 1/10W
R6322 1-216-833-11 METAL CHIP 10K 5% 1/10W
< SWITCH >
S1000 1-692-431-21 SWITCH, TACTILE
*A-1107-970-A H1 BOARD COMPLETE
< CONNECTOR >
CN4404 *1-564-519-11 PLUG, CONNECTOR 4P
< DIODE >
D4401 8-719-069-55 DIODE UDZSTE-175.6B
D4402 8-719-069-55 DIODE UDZSTE-175.6B
< RESISTOR >
R4420 1-218-855-11 METAL CHIP 2.2K 0.5% 1/10W
R4421 1-218-847-11 METAL CHIP 1K 0.5% 1/10W
R4422 1-216-864-11 SHORT CHIP 0
R4423 1-208-800-11 METAL CHIP 5.6K 0.5% 1/10W
R4424 1-218-837-11 METAL CHIP 390 0.5% 1/10W
R4425 1-218-827-11 METAL CHIP 150 0.5% 1/10W
< SWITCH >
S4400 1-692-431-21 SWITCH, TACTILE
S4402 1-692-431-21 SWITCH, TACTILE
S4403 1-692-431-21 SWITCH, TACTILE
S4404 1-692-431-21 SWITCH, TACTILE
S4405 1-692-431-21 SWITCH, TACTILE
S4406 1-692-431-21 SWITCH, TACTILE
*A-1122-473-A N BOARD COMPLETERD COMPLETE
2-580-625-01 SCREW, +B M2X8
4-204-791-01 SCREW + B, 2X8
A3300 *1-815-640-21 CONNECTOR, CARD (PCMCIA CARD)
< CAPACITOR >
C3100 1-165-908-11 CERAMIC CHIP 1UF 10% 10V
C3101 1-126-206-11 ELECT CHIP 100UF 20.00% 6.3V
C3102 1-165-908-11 CERAMIC CHIP 1UF 10% 10V
C3103 1-125-777-11 CERAMIC CHIP 0.1UF 10.00% 10V
C3104 1-125-777-11 CERAMIC CHIP 0.1UF 10.00% 10V
NT1 T2 H2 H1
- 75 -
Page 76
REF.NO. PART NO. DESCRIPTION REMARK REF.NO. PART NO. DESCRIPTION REMARK
C3105 1-125-777-11 CERAMIC CHIP 0.1UF 10.00% 10V
C3106 1-125-777-11 CERAMIC CHIP 0.1UF 10.00% 10V
C3107 1-125-777-11 CERAMIC CHIP 0.1UF 10.00% 10V
C3108 1-125-777-11 CERAMIC CHIP 0.1UF 10.00% 10V
C3109 1-100-597-91 CERAMIC CHIP 0.1UF 10% 25V
C3110 1-100-597-91 CERAMIC CHIP 0.1UF 10% 25V
C3111 1-100-597-91 CERAMIC CHIP 0.1UF 10% 25V
C3112 1-100-597-91 CERAMIC CHIP 0.1UF 10% 25V
C3113 1-100-597-91 CERAMIC CHIP 0.1UF 10% 25V
C3114 1-100-597-91 CERAMIC CHIP 0.1UF 10% 25V
C3115 1-100-597-91 CERAMIC CHIP 0.1UF 10% 25V
C3116 1-100-597-91 CERAMIC CHIP 0.1UF 10% 25V
C3117 1-100-597-91 CERAMIC CHIP 0.1UF 10% 25V
C3118 1-117-720-11 CERAMIC CHIP 4.7UF 10V
C3119 1-100-597-91 CERAMIC CHIP 0.1UF 10% 25V
C3120 1-100-597-91 CERAMIC CHIP 0.1UF 10% 25V
C3121 1-100-597-91 CERAMIC CHIP 0.1UF 10% 25V
C3122 1-125-777-11 CERAMIC CHIP 0.1UF 10.00% 10V
C3123 1-100-597-91 CERAMIC CHIP 0.1UF 10% 25V
C3124 1-125-777-11 CERAMIC CHIP 0.1UF 10.00% 10V
C3125 1-100-597-91 CERAMIC CHIP 0.1UF 10% 25V
C3126 1-100-597-91 CERAMIC CHIP 0.1UF 10% 25V
C3127 1-100-597-91 CERAMIC CHIP 0.1UF 10% 25V
C3128 1-100-597-91 CERAMIC CHIP 0.1UF 10% 25V
C3129 1-100-597-91 CERAMIC CHIP 0.1UF 10% 25V
C3130 1-100-597-91 CERAMIC CHIP 0.1UF 10% 25V
C3131 1-100-597-91 CERAMIC CHIP 0.1UF 10% 25V
C3132 1-164-850-11 CERAMIC CHIP 10PF 0.50PF 50V
C3133 1-100-597-91 CERAMIC CHIP 0.1UF 10% 25V
C3134 1-100-597-91 CERAMIC CHIP 0.1UF 10% 25V
C3135 1-100-597-91 CERAMIC CHIP 0.1UF 10% 25V
C3136 1-125-777-11 CERAMIC CHIP 0.1UF 10.00% 10V
C3137 1-125-777-11 CERAMIC CHIP 0.1UF 10.00% 10V
C3138 1-165-908-11 CERAMIC CHIP 1UF 10% 10V
C3200 1-125-777-11 CERAMIC CHIP 0.1UF 10.00% 10V
C3201 1-117-720-11 CERAMIC CHIP 4.7UF 10V
C3202 1-125-777-11 CERAMIC CHIP 0.1UF 10.00% 10V
C3203 1-125-777-11 CERAMIC CHIP 0.1UF 10.00% 10V
C3204 1-164-846-11 CERAMIC CHIP 6PF 0.50PF 50V
C3205 1-125-777-11 CERAMIC CHIP 0.1UF 10.00% 10V
C3206 1-165-908-11 CERAMIC CHIP 1UF 10% 10V
C3207 1-125-777-11 CERAMIC CHIP 0.1UF 10.00% 10V
C3208 1-125-777-11 CERAMIC CHIP 0.1UF 10.00% 10V
C3209 1-125-777-11 CERAMIC CHIP 0.1UF 10.00% 10V
C3210 1-125-777-11 CERAMIC CHIP 0.1UF 10.00% 10V
C3211 1-117-720-11 CERAMIC CHIP 4.7UF 10V
C3212 1-126-206-11 ELECT CHIP 100UF 20.00% 6.3V
C3213 1-164-846-11 CERAMIC CHIP 6PF 0.50PF 50V
C3214 1-125-777-11 CERAMIC CHIP 0.1UF 10.00% 10V
C3215 1-164-937-11 CERAMIC CHIP 0.001UF 10.00% 50V
C3216 1-125-777-11 CERAMIC CHIP 0.1UF 10.00% 10V
C3217 1-117-720-11 CERAMIC CHIP 4.7UF 10V
C3218 1-125-777-11 CERAMIC CHIP 0.1UF 10.00% 10V
C3219 1-125-777-11 CERAMIC CHIP 0.1UF 10.00% 10V
C3220 1-125-777-11 CERAMIC CHIP 0.1UF 10.00% 10V
C3230 1-164-937-11 CERAMIC CHIP 0.001UF 10.00% 50V
C3300 1-117-720-11 CERAMIC CHIP 4.7UF 10V
C3301 1-125-777-11 CERAMIC CHIP 0.1UF 10.00% 10V
C3303 1-125-777-11 CERAMIC CHIP 0.1UF 10.00% 10V
C3304 1-125-777-11 CERAMIC CHIP 0.1UF 10.00% 10V
C3306 1-125-777-11 CERAMIC CHIP 0.1UF 10.00% 10V
C3307 1-117-720-11 CERAMIC CHIP 4.7UF 10V
C3308 1-125-777-11 CERAMIC CHIP 0.1UF 10.00% 10V
C3309 1-125-777-11 CERAMIC CHIP 0.1UF 10.00% 10V
C3310 1-125-777-11 CERAMIC CHIP 0.1UF 10.00% 10V
C3311 1-125-777-11 CERAMIC CHIP 0.1UF 10.00% 10V
C3312 1-125-777-11 CERAMIC CHIP 0.1UF 10.00% 10V
C3313 1-125-777-11 CERAMIC CHIP 0.1UF 10.00% 10V
C3314 1-125-777-11 CERAMIC CHIP 0.1UF 10.00% 10V
C3315 1-125-777-11 CERAMIC CHIP 0.1UF 10.00% 10V
C3316 1-125-777-11 CERAMIC CHIP 0.1UF 10.00% 10V
C3317 1-125-777-11 CERAMIC CHIP 0.1UF 10.00% 10V
C3318 1-125-777-11 CERAMIC CHIP 0.1UF 10.00% 10V
C3320 1-117-720-11 CERAMIC CHIP 4.7UF 10V
C3321 1-125-777-11 CERAMIC CHIP 0.1UF 10.00% 10V
C3322 1-164-937-11 CERAMIC CHIP 0.001UF 10.00% 50V
C3323 1-125-777-11 CERAMIC CHIP 0.1UF 10.00% 10V
C3324 1-125-777-11 CERAMIC CHIP 0.1UF 10.00% 10V
C3326 1-125-777-11 CERAMIC CHIP 0.1UF 10.00% 10V
C3400 1-100-611-91 CERAMIC CHIP 22UF 20% 6.3V
C3402 1-125-777-11 CERAMIC CHIP 0.1UF 10.00% 10V
C3403 1-125-777-11 CERAMIC CHIP 0.1UF 10.00% 10V
C3404 1-164-943-81 CERAMIC CHIP 0.01UF 10.00% 16V
C3405 1-125-777-11 CERAMIC CHIP 0.1UF 10.00% 10V
C3406 1-100-597-91 CERAMIC CHIP 0.1UF 10% 25V
C3407 1-124-779-00 ELECT CHIP 10UF 20.00% 16V
C3408 1-125-777-11 CERAMIC CHIP 0.1UF 10.00% 10V
C3409 1-124-779-00 ELECT CHIP 10UF 20.00% 16V
C3410 1-125-777-11 CERAMIC CHIP 0.1UF 10.00% 10V
C3411 1-164-850-11 CERAMIC CHIP 10PF 0.50PF 50V
C3412 1-126-206-11 ELECT CHIP 100UF 20.00% 6.3V
C3413 1-126-206-11 ELECT CHIP 100UF 20.00% 6.3V
C3414 1-125-777-11 CERAMIC CHIP 0.1UF 10.00% 10V
C3415 1-125-777-11 CERAMIC CHIP 0.1UF 10.00% 10V
C3416 1-125-777-11 CERAMIC CHIP 0.1UF 10.00% 10V
C3417 1-125-777-11 CERAMIC CHIP 0.1UF 10.00% 10V
C3418 1-125-777-11 CERAMIC CHIP 0.1UF 10.00% 10V
C3419 1-164-874-11 CERAMIC CHIP 100PF 5.00% 50V
C3420 1-164-874-11 CERAMIC CHIP 100PF 5.00% 50V
C3421 1-117-720-11 CERAMIC CHIP 4.7UF 10V
N
- 76 -
Page 77
REF.NO. PART NO. DESCRIPTION REMARK REF.NO. PART NO. DESCRIPTION REMARK
C3422 1-117-720-11 CERAMIC CHIP 4.7UF 10V
C3423 1-125-777-11 CERAMIC CHIP 0.1UF 10.00% 10V
C3424 1-100-597-91 CERAMIC CHIP 0.1UF 10% 25V
C3425 1-124-779-00 ELECT CHIP 10UF 20.00% 16V
C3426 1-125-777-11 CERAMIC CHIP 0.1UF 10.00% 10V
C3427 1-125-777-11 CERAMIC CHIP 0.1UF 10.00% 10V
C3428 1-125-777-11 CERAMIC CHIP 0.1UF 10.00% 10V
C3429 1-125-777-11 CERAMIC CHIP 0.1UF 10.00% 10V
C3430 1-125-777-11 CERAMIC CHIP 0.1UF 10.00% 10V
C3431 1-125-777-11 CERAMIC CHIP 0.1UF 10.00% 10V
C3432 1-125-777-11 CERAMIC CHIP 0.1UF 10.00% 10V
C3433 1-126-206-11 ELECT CHIP 100UF 20.00% 6.3V
C3434 1-126-206-11 ELECT CHIP 100UF 20.00% 6.3V
C3435 1-126-206-11 ELECT CHIP 100UF 20.00% 6.3V
C3436 1-126-206-11 ELECT CHIP 100UF 20.00% 6.3V
C3438 1-165-908-11 CERAMIC CHIP 1UF 10% 10V
C3439 1-125-777-11 CERAMIC CHIP 0.1UF 10.00% 10V
C3440 1-165-908-11 CERAMIC CHIP 1UF 10% 10V
C3441 1-165-908-11 CERAMIC CHIP 1UF 10% 10V
C3442 1-100-597-91 CERAMIC CHIP 0.1UF 10% 25V
C3443 1-100-597-91 CERAMIC CHIP 0.1UF 10% 25V
C3444 1-100-611-91 CERAMIC CHIP 22UF 20% 6.3V
C3445 1-100-611-91 CERAMIC CHIP 22UF 20% 6.3V
C3446 1-100-611-91 CERAMIC CHIP 22UF 20% 6.3V
C3447 1-125-777-11 CERAMIC CHIP 0.1UF 10.00% 10V
C3448 1-125-777-11 CERAMIC CHIP 0.1UF 10.00% 10V
C3449 1-125-777-11 CERAMIC CHIP 0.1UF 10.00% 10V
C3450 1-164-850-11 CERAMIC CHIP 10PF 0.50PF 50V
C3451 1-164-850-11 CERAMIC CHIP 10PF 0.50PF 50V
C3452 1-164-850-11 CERAMIC CHIP 10PF 0.50PF 50V
C3504 1-125-777-11 CERAMIC CHIP 0.1UF 10.00% 10V
C3509 1-117-720-11 CERAMIC CHIP 4.7UF 10V
C3513 1-126-206-11 ELECT CHIP 100UF 20.00% 6.3V
C3514 1-125-777-11 CERAMIC CHIP 0.1UF 10.00% 10V
C3518 1-125-777-11 CERAMIC CHIP 0.1UF 10.00% 10V
C3520 1-125-777-11 CERAMIC CHIP 0.1UF 10.00% 10V
C3521 1-125-777-11 CERAMIC CHIP 0.1UF 10.00% 10V
C3522 1-125-777-11 CERAMIC CHIP 0.1UF 10.00% 10V
C3523 1-125-777-11 CERAMIC CHIP 0.1UF 10.00% 10V
C3524 1-164-937-11 CERAMIC CHIP 0.001UF 10.00% 50V
C3525 1-164-937-11 CERAMIC CHIP 0.001UF 10.00% 50V
C3526 1-164-858-11 CERAMIC CHIP 22PF 5.00% 50V
C3527 1-164-872-11 CERAMIC CHIP 82PF 5.00% 50V
C3528 1-164-858-11 CERAMIC CHIP 22PF 5.00% 50V
C3529 1-164-872-11 CERAMIC CHIP 82PF 5.00% 50V
C3530 1-164-937-11 CERAMIC CHIP 0.001UF 10.00% 50V
C3531 1-164-937-11 CERAMIC CHIP 0.001UF 10.00% 50V
C3532 1-164-874-11 CERAMIC CHIP 100PF 5.00% 50V
C3533 1-164-943-81 CERAMIC CHIP 0.01UF 10.00% 16V
C3534 1-164-943-81 CERAMIC CHIP 0.01UF 10.00% 16V
C3535 1-164-943-81 CERAMIC CHIP 0.01UF 10.00% 16V
C3536 1-164-943-81 CERAMIC CHIP 0.01UF 10.00% 16V
C3537 1-164-943-81 CERAMIC CHIP 0.01UF 10.00% 16V
C3538 1-164-943-81 CERAMIC CHIP 0.01UF 10.00% 16V
C3539 1-125-777-11 CERAMIC CHIP 0.1UF 10.00% 10V
C3540 1-125-777-11 CERAMIC CHIP 0.1UF 10.00% 10V
C3541 1-164-943-81 CERAMIC CHIP 0.01UF 10.00% 16V
C3542 1-125-777-11 CERAMIC CHIP 0.1UF 10.00% 10V
C3543 1-164-943-81 CERAMIC CHIP 0.01UF 10.00% 16V
C3544 1-164-943-81 CERAMIC CHIP 0.01UF 10.00% 16V
C3545 1-164-943-81 CERAMIC CHIP 0.01UF 10.00% 16V
C3546 1-164-943-81 CERAMIC CHIP 0.01UF 10.00% 16V
C3547 1-164-943-81 CERAMIC CHIP 0.01UF 10.00% 16V
C3548 1-164-943-81 CERAMIC CHIP 0.01UF 10.00% 16V
C3549 1-164-943-81 CERAMIC CHIP 0.01UF 10.00% 16V
C3550 1-164-943-81 CERAMIC CHIP 0.01UF 10.00% 16V
C3551 1-164-943-81 CERAMIC CHIP 0.01UF 10.00% 16V
C3552 1-164-856-81 CERAMIC CHIP 18PF 5.00% 50V
C3553 1-164-856-81 CERAMIC CHIP 18PF 5.00% 50V
C3570 1-125-777-11 CERAMIC CHIP 0.1UF 10.00% 10V
C3571 1-125-777-11 CERAMIC CHIP 0.1UF 10.00% 10V
C3800 1-125-777-11 CERAMIC CHIP 0.1UF 10.00% 10V
C3801 1-125-777-11 CERAMIC CHIP 0.1UF 10.00% 10V
C3802 1-124-779-00 ELECT CHIP 10UF 20.00% 16V
C3804 1-125-777-11 CERAMIC CHIP 0.1UF 10.00% 10V
C3805 1-125-777-11 CERAMIC CHIP 0.1UF 10.00% 10V
C3806 1-125-777-11 CERAMIC CHIP 0.1UF 10.00% 10V
C3807 1-125-777-11 CERAMIC CHIP 0.1UF 10.00% 10V
C3808 1-125-777-11 CERAMIC CHIP 0.1UF 10.00% 10V
C3809 1-125-777-11 CERAMIC CHIP 0.1UF 10.00% 10V
C3810 1-125-777-11 CERAMIC CHIP 0.1UF 10.00% 10V
C3811 1-164-935-11 CERAMIC CHIP 470PF 10.00% 50V
C3812 1-125-777-11 CERAMIC CHIP 0.1UF 10.00% 10V
C3813 1-125-777-11 CERAMIC CHIP 0.1UF 10.00% 10V
C3814 1-125-777-11 CERAMIC CHIP 0.1UF 10.00% 10V
C3816 1-125-777-11 CERAMIC CHIP 0.1UF 10.00% 10V
C3817 1-125-777-11 CERAMIC CHIP 0.1UF 10.00% 10V
< CONNECTOR >
CN3300 *1-815-641-11 CONNECTOR, CARD (PCMCIA CARD)
CN3400 1-695-209-21 PIN, CONNECTOR (PC BOARD) 15P
CN3401 1-764-087-21 PIN, CONNECTOR (PC BOARD) 14P
CN3402 1-695-889-21 PIN, CONNECTOR (PC BOARD) 10P
CN3403 *1-779-268-21 PIN, CONNECTOR (1.5MM)(SMD)11P
CN3404 *1-766-376-11 PIN, CONNECTOR (1.5MM)(SMD) 9P
CN3500 1-770-501-11 JACK 10P
CN3503 *1-764-080-21 PIN, CONNECTOR (PC BOARD) 8P
N
- 77 -
Page 78
REF.NO. PART NO. DESCRIPTION REMARK REF.NO. PART NO. DESCRIPTION REMARK
< DIODE >
D3400 8-719-070-20 DIODE RB706F-40
D3401 8-719-070-20 DIODE RB706F-40
D3402 8-719-058-24 DIODE RB501V-40TE-17
D3500 6-501-233-01 DIODE BZA862AVL
D3501 6-501-233-01 DIODE BZA862AVL
D3502 6-501-233-01 DIODE BZA862AVL
D3504 8-719-058-24 DIODE RB501V-40TE-17
D3800 8-719-066-11 DIODE 1PS184-115
< FERRITE BEAD >
FB3100 1-469-869-21 FERRITE 0UH
FB3101 1-469-869-21 FERRITE 0UH
FB3102 1-469-869-21 FERRITE 0UH
FB3103 1-400-833-21 FERRITE 0UH
FB3104 1-469-869-21 FERRITE 0UH
FB3105 1-400-833-21 FERRITE 0UH
FB3106 1-400-833-21 FERRITE 0UH
FB3107 1-400-833-21 FERRITE 0UH
FB3108 1-400-833-21 FERRITE 0UH
FB3109 1-400-833-21 FERRITE 0UH
FB3110 1-400-833-21 FERRITE 0UH
FB3111 1-400-833-21 FERRITE 0UH
FB3112 1-400-833-21 FERRITE 0UH
FB3200 1-400-244-11 FERRITE 0UH
FB3201 1-400-244-11 FERRITE 0UH
FB3300 1-469-869-21 FERRITE 0UH
FB3301 1-469-869-21 FERRITE 0UH
FB3400 1-400-244-11 FERRITE 0UH
FB3401 1-400-244-11 FERRITE 0UH
FB3402 1-400-244-11 FERRITE 0UH
FB3403 1-469-458-91 FERRITE 0UH
FB3404 1-469-869-21 FERRITE 0UH
FB3405 1-469-869-21 FERRITE 0UH
FB3406 1-469-869-21 FERRITE 0UH
FB3407 1-469-869-21 FERRITE 0UH
FB3408 1-400-461-21 FERRITE 0UH
FB3409 1-400-461-21 FERRITE 0UH
FB3410 1-400-461-21 FERRITE 0UH
FB3411 1-400-461-21 FERRITE 0UH
FB3412 1-400-834-11 FERRITE 0UH
FB3413 1-400-834-11 FERRITE 0UH
FB3414 1-400-834-11 FERRITE 0UH
FB3415 1-400-834-11 FERRITE 0UH
FB3416 1-400-834-11 FERRITE 0UH
FB3417 1-400-834-11 FERRITE 0UH
FB3418 1-400-834-11 FERRITE 0UH
FB3419 1-400-834-11 FERRITE 0UH
FB3420 1-400-834-11 FERRITE 0UH
FB3501 1-469-458-91 FERRITE 0UH
FB3502 1-469-458-91 FERRITE 0UH
FB3503 1-400-244-11 FERRITE 0UH
FB3504 1-400-244-11 FERRITE 0UH
FB3505 1-400-244-11 FERRITE 0UH
FB3507 1-400-244-11 FERRITE 0UH
FB3509 1-414-772-11 FERRITE 0UH
FB3546 1-400-244-11 FERRITE 0UH
FB3547 1-400-244-11 FERRITE 0UH
FB3548 1-400-244-11 FERRITE 0UH
FB3549 1-400-244-11 FERRITE 0UH
FB3550 1-400-244-11 FERRITE 0UH
FB3551 1-400-244-11 FERRITE 0UH
FB3552 1-400-244-11 FERRITE 0UH
FB3553 1-400-244-11 FERRITE 0UH
FB3554 1-469-869-21 FERRITE 0UH
FB3555 1-469-869-21 FERRITE 0UH
FB3557 1-400-244-11 FERRITE 0UH
FB3800 1-400-244-11 FERRITE 0UH
FB3801 1-400-244-11 FERRITE 0UH
FB3802 1-400-244-11 FERRITE 0UH
FB3803 1-400-244-11 FERRITE 0UH
FB3804 1-400-244-11 FERRITE 0UH
FB3805 1-400-244-11 FERRITE 0UH
FB3806 1-400-244-11 FERRITE 0UH
< FILTER >
FL3500 1-239-899-21 FERRITE 0UH
< IC >
IC3100 6-702-498-21 IC UPD61120AF1-100-JN1-A
IC3200 6-707-809-01 IC EDD1216AATA-6B-E
IC3201 6-705-271-01 IC KA5SDKASO1TSL
IC3206 6-704-621-01 IC TC58DVM72A1TG00
IC3301 8-759-644-48 IC 74LVC541APW
IC3302 8-759-644-48 IC 74LVC541APW
IC3303 8-759-564-22 IC 74LVC00-PW
IC3304 8-759-644-48 IC 74LVC541APW
IC3305 8-759-644-48 IC 74LVC541APW
IC3306 8-759-644-48 IC 74LVC541APW
IC3307 8-759-298-90 IC 74LVT245PW
IC3307 8-759-298-91 IC 74LVT245PW-T
IC3308 8-759-644-48 IC 74LVC541APW
IC3309 8-759-644-48 IC 74LVC541APW
IC3310 8-759-644-48 IC 74LVC541APW
IC3311 8-759-298-90 IC 74LVT245PW
IC3311 8-759-298-91 IC 74LVT245PW-T
IC3312 8-759-644-48 IC 74LVC541APW
IC3313 8-759-644-48 IC 74LVC541APW
IC3314 8-759-644-48 IC 74LVC541APW
N
- 78 -
Page 79
REF.NO. PART NO. DESCRIPTION REMARK REF.NO. PART NO. DESCRIPTION REMARK
IC3315 8-759-564-09 IC 74LVC32A-PW
IC3316 6-708-132-01 IC 74LVC14APW
IC3400 6-707-808-01 IC WM8727GED/RV
IC3401 8-759-701-40 IC NJM3404AM-T1
IC3402 6-705-403-01 IC PQ070XZ01ZPH
IC3403 6-705-403-01 IC PQ070XZ01ZPH
IC3404 6-705-789-01 IC LM3526MX-H/J5000396
IC3502 8-759-644-48 IC 74LVC541APW
IC3504 8-753-212-44 IC CXD1976R-T6
IC3800 6-703-175-01 IC PST3629UL
IC3801 8-759-670-18 IC 74LVC273PW
IC3802 8-759-670-18 IC 74LVC273PW
IC3803 6-706-487-01 IC TC7SH08FU(T5RSOYJF)
IC3804 8-759-564-09 IC 74LVC32A-PW
IC3805 8-759-564-91 IC 74LVC08APW
IC3806 6-706-487-01 IC TC7SH08FU(T5RSOYJF)
IC3807 6-704-067-01 IC M24128-BWMN6T(A)
< COIL >
L3100 1-400-859-41 INDUCTOR 0.82UH
L3500 1-412-006-31 INDUCTOR 10UH
L3501 1-469-842-21 INDUCTOR 0.47UH
L3502 1-410-981-42 INDUCTOR 0.1UH
L3503 1-410-981-42 INDUCTOR 0.1UH
L3504 1-410-981-42 INDUCTOR 0.1UH
< TRANSISTOR >
Q3400 6-550-237-01 TRANSISTOR 2SC5658T2LQ/R
Q3401 6-550-237-01 TRANSISTOR 2SC5658T2LQ/R
Q3402 6-550-237-01 TRANSISTOR 2SC5658T2LQ/R
Q3403 6-550-232-01 TRANSISTOR 2SA2029T2LQ/R
Q3404 6-550-237-01 TRANSISTOR 2SC5658T2LQ/R
Q3405 6-550-232-01 TRANSISTOR 2SA2029T2LQ/R
Q3406 6-550-237-01 TRANSISTOR 2SC5658T2LQ/R
Q3407 6-550-237-01 TRANSISTOR 2SC5658T2LQ/R
Q3408 6-550-237-01 TRANSISTOR 2SC5658T2LQ/R
Q3409 6-550-237-01 TRANSISTOR 2SC5658T2LQ/R
Q3410 6-550-232-01 TRANSISTOR 2SA2029T2LQ/R
Q3411 6-550-232-01 TRANSISTOR 2SA2029T2LQ/R
Q3412 6-550-237-01 TRANSISTOR 2SC5658T2LQ/R
Q3504 8-729-027-43 TRANSISTOR DTC114EKA-T146
Q3800 8-729-027-43 TRANSISTOR DTC114EKA-T146
Q3801 8-729-027-43 TRANSISTOR DTC114EKA-T146
Q3804 8-729-027-43 TRANSISTOR DTC114EKA-T146
Q3805 8-729-027-43 TRANSISTOR DTC114EKA-T146
Q3806 6-550-237-01 TRANSISTOR 2SC5658T2LQ/R
Q3808 6-550-232-01 TRANSISTOR 2SA2029T2LQ/R
< RESISTOR >
R3100 1-218-937-11 RES-CHIP 47 5% 1/16W
R3101 1-218-941-81 RES-CHIP 100 5% 1/16W
R3102 1-218-937-11 RES-CHIP 47 5% 1/16W
R3103 1-218-937-11 RES-CHIP 47 5% 1/16W
R3104 1-218-937-11 RES-CHIP 47 5% 1/16W
R3105 1-218-937-11 RES-CHIP 47 5% 1/16W
R3106 1-218-937-11 RES-CHIP 47 5% 1/16W
R3107 1-218-937-11 RES-CHIP 47 5% 1/16W
R3108 1-218-937-11 RES-CHIP 47 5% 1/16W
R3109 1-218-941-81 RES-CHIP 100 5% 1/16W
R3110 1-218-937-11 RES-CHIP 47 5% 1/16W
R3111 1-218-937-11 RES-CHIP 47 5% 1/16W
R3112 1-218-937-11 RES-CHIP 47 5% 1/16W
R3113 1-218-937-11 RES-CHIP 47 5% 1/16W
R3114 1-218-937-11 RES-CHIP 47 5% 1/16W
R3115 1-218-941-81 RES-CHIP 100 5% 1/16W
R3116 1-218-937-11 RES-CHIP 47 5% 1/16W
R3117 1-218-937-11 RES-CHIP 47 5% 1/16W
R3118 1-218-937-11 RES-CHIP 47 5% 1/16W
R3119 1-218-965-11 RES-CHIP 10K 5% 1/16W
R3120 1-218-937-11 RES-CHIP 47 5% 1/16W
R3121 1-218-937-11 RES-CHIP 47 5% 1/16W
R3122 1-218-937-11 RES-CHIP 47 5% 1/16W
R3123 1-218-937-11 RES-CHIP 47 5% 1/16W
R3124 1-218-961-11 RES-CHIP 4.7K 5% 1/16W
R3125 1-218-961-11 RES-CHIP 4.7K 5% 1/16W
R3126 1-218-937-11 RES-CHIP 47 5% 1/16W
R3127 1-218-937-11 RES-CHIP 47 5% 1/16W
R3129 1-218-941-81 RES-CHIP 100 5% 1/16W
R3130 1-218-941-81 RES-CHIP 100 5% 1/16W
R3131 1-218-937-11 RES-CHIP 47 5% 1/16W
R3132 1-218-937-11 RES-CHIP 47 5% 1/16W
R3133 1-218-937-11 RES-CHIP 47 5% 1/16W
R3135 1-218-937-11 RES-CHIP 47 5% 1/16W
R3136 1-218-937-11 RES-CHIP 47 5% 1/16W
R3137 1-218-937-11 RES-CHIP 47 5% 1/16W
R3139 1-218-990-81 SHORT CHIP 0
R3141 1-218-937-11 RES-CHIP 47 5% 1/16W
R3145 1-218-937-11 RES-CHIP 47 5% 1/16W
R3147 1-218-937-11 RES-CHIP 47 5% 1/16W
R3148 1-218-937-11 RES-CHIP 47 5% 1/16W
R3149 1-218-937-11 RES-CHIP 47 5% 1/16W
R3156 1-218-937-11 RES-CHIP 47 5% 1/16W
R3157 1-218-965-11 RES-CHIP 10K 5% 1/16W
R3160 1-218-937-11 RES-CHIP 47 5% 1/16W
R3200 1-218-941-11 RES-CHIP 100 5% 1/16W
R3201 1-218-941-11 RES-CHIP 100 5% 1/16W
R3202 1-218-939-11 RES-CHIP 68 5% 1/16W
N
- 79 -
Page 80
REF.NO. PART NO. DESCRIPTION REMARK REF.NO. PART NO. DESCRIPTION REMARK
R3203 1-218-941-81 RES-CHIP 100 5% 1/16W
R3204 1-218-941-81 RES-CHIP 100 5% 1/16W
R3205 1-218-937-11 RES-CHIP 47 5% 1/16W
R3206 1-218-953-11 RES-CHIP 1K 5% 1/16W
R3211 1-218-957-11 RES-CHIP 2.2K 5% 1/16W
R3429 1-218-949-11 RES-CHIP 470 5% 1/16W
R3430 1-218-953-11 RES-CHIP 1K 5% 1/16W
R3433 1-218-937-11 RES-CHIP 47 5% 1/16W
R3434 1-218-937-11 RES-CHIP 47 5% 1/16W
R3435 1-218-937-11 RES-CHIP 47 5% 1/16W
N
R3212 1-218-957-11 RES-CHIP 2.2K 5% 1/16W
R3213 1-218-957-11 RES-CHIP 2.2K 5% 1/16W
R3214 1-218-957-11 RES-CHIP 2.2K 5% 1/16W
R3216 1-218-953-11 RES-CHIP 1K 5% 1/16W
R3218 1-218-953-11 RES-CHIP 1K 5% 1/16W
R3220 1-218-957-11 RES-CHIP 2.2K 5% 1/16W
R3222 1-218-953-11 RES-CHIP 1K 5% 1/16W
R3224 1-218-953-11 RES-CHIP 1K 5% 1/16W
R3227 1-218-953-11 RES-CHIP 1K 5% 1/16W
R3229 1-218-953-11 RES-CHIP 1K 5% 1/16W
R3230 1-218-953-11 RES-CHIP 1K 5% 1/16W
R3232 1-218-953-11 RES-CHIP 1K 5% 1/16W
R3234 1-218-953-11 RES-CHIP 1K 5% 1/16W
R3236 1-218-953-11 RES-CHIP 1K 5% 1/16W
R3238 1-218-953-11 RES-CHIP 1K 5% 1/16W
R3239 1-218-965-11 RES-CHIP 10K 5% 1/16W
R3240 1-218-939-11 RES-CHIP 68 5% 1/16W
R3242 1-218-941-81 RES-CHIP 100 5% 1/16W
R3251 1-218-949-11 RES-CHIP 470 5% 1/16W
R3262 1-218-953-11 RES-CHIP 1K 5% 1/16W
R3303 1-218-953-11 RES-CHIP 1K 5% 1/16W
R3306 1-218-941-81 RES-CHIP 100 5% 1/16W
R3308 1-218-941-81 RES-CHIP 100 5% 1/16W
R3310 1-218-965-11 RES-CHIP 10K 5% 1/16W
R3311 1-218-965-11 RES-CHIP 10K 5% 1/16W
R3436 1-218-937-11 RES-CHIP 47 5% 1/16W
R3438 1-218-966-11 RES-CHIP 12K 5% 1/16W
R3439 1-218-990-81 SHORT CHIP 0
R3440 1-218-990-81 SHORT CHIP 0
R3441 1-218-937-11 RES-CHIP 47 5% 1/16W
R3442 1-218-949-11 RES-CHIP 470 5% 1/16W
R3444 1-208-683-11 METAL CHIP 1K 0.5% 1/16W
R3445 1-208-683-11 METAL CHIP 1K 0.5% 1/16W
R3446 1-218-972-11 RES-CHIP 39K 5% 1/16W
R3447 1-218-972-11 RES-CHIP 39K 5% 1/16W
R3448 1-218-965-11 RES-CHIP 10K 5% 1/16W
R3449 1-218-967-11 RES-CHIP 15K 5% 1/16W
R3450 1-218-965-11 RES-CHIP 10K 5% 1/16W
R3451 1-218-967-11 RES-CHIP 15K 5% 1/16W
R3452 1-218-967-11 RES-CHIP 15K 5% 1/16W
R3453 1-218-967-11 RES-CHIP 15K 5% 1/16W
R3454 1-218-948-11 RES-CHIP 390 5% 1/16W
R3455 1-218-937-11 RES-CHIP 47 5% 1/16W
R3456 1-218-967-11 RES-CHIP 15K 5% 1/16W
R3457 1-208-683-11 METAL CHIP 1K 0.5% 1/16W
R3458 1-218-941-11 RES-CHIP 100 5% 1/16W
R3459 1-218-941-11 RES-CHIP 100 5% 1/16W
R3460 1-208-683-11 METAL CHIP 1K 0.5% 1/16W
R3461 1-218-965-11 RES-CHIP 10K 5% 1/16W
R3462 1-218-965-11 RES-CHIP 10K 5% 1/16W
R3312 1-218-965-11 RES-CHIP 10K 5% 1/16W
R3313 1-218-965-11 RES-CHIP 10K 5% 1/16W
R3314 1-218-965-11 RES-CHIP 10K 5% 1/16W
R3317 1-218-961-11 RES-CHIP 4.7K 5% 1/16W
R3318 1-218-965-11 RES-CHIP 10K 5% 1/16W
R3321 1-218-941-81 RES-CHIP 100 5% 1/16W
R3324 1-218-941-81 RES-CHIP 100 5% 1/16W
R3325 1-218-937-11 RES-CHIP 47 5% 1/16W
R3400 1-218-966-11 RES-CHIP 12K 5% 1/16W
R3401 1-218-967-11 RES-CHIP 15K 5% 1/16W
R3406 1-218-949-11 RES-CHIP 470 5% 1/16W
R3407 1-208-675-11 METAL CHIP 470 0.5% 1/16W
R3408 1-208-885-11 METAL CHIP 820 0.5% 1/16W
R3415 1-208-675-11 METAL CHIP 470 0.5% 1/16W
R3421 1-218-990-81 SHORT CHIP 0
R3422 1-218-937-11 RES-CHIP 47 5% 1/16W
R3423 1-218-937-11 RES-CHIP 47 5% 1/16W
R3424 1-218-945-11 RES-CHIP 220 5% 1/16W
R3427 1-218-949-11 RES-CHIP 470 5% 1/16W
R3428 1-218-949-11 RES-CHIP 470 5% 1/16W
R3463 1-218-953-11 RES-CHIP 1K 5% 1/16W
R3464 1-218-953-11 RES-CHIP 1K 5% 1/16W
R3465 1-218-966-11 RES-CHIP 12K 5% 1/16W
R3466 1-218-967-11 RES-CHIP 15K 5% 1/16W
R3467 1-218-966-11 RES-CHIP 12K 5% 1/16W
R3468 1-218-967-11 RES-CHIP 15K 5% 1/16W
R3469 1-218-949-11 RES-CHIP 470 5% 1/16W
R3470 1-208-675-11 METAL CHIP 470 0.5% 1/16W
R3471 1-208-885-11 METAL CHIP 820 0.5% 1/16W
R3472 1-218-949-11 RES-CHIP 470 5% 1/16W
R3473 1-208-675-11 METAL CHIP 470 0.5% 1/16W
R3474 1-208-885-11 METAL CHIP 820 0.5% 1/16W
R3475 1-218-949-11 RES-CHIP 470 5% 1/16W
R3478 1-208-675-11 METAL CHIP 470 0.5% 1/16W
R3479 1-208-885-11 METAL CHIP 820 0.5% 1/16W
R3480 1-218-941-81 RES-CHIP 100 5% 1/16W
R3481 1-218-941-81 RES-CHIP 100 5% 1/16W
R3482 1-218-948-11 RES-CHIP 390 5% 1/16W
R3483 1-218-948-11 RES-CHIP 390 5% 1/16W
R3484 1-216-001-00 RES-CHIP 10 5% 1/10W
- 80 -
Page 81
REF.NO. PART NO. DESCRIPTION REMARK REF.NO. PART NO. DESCRIPTION REMARK
R3485 1-218-990-81 SHORT CHIP 0
R3486 1-218-948-11 RES-CHIP 390 5% 1/16W
R3487 1-218-945-11 RES-CHIP 220 5% 1/16W
R3488 1-218-945-11 RES-CHIP 220 5% 1/16W
R3489 1-218-945-11 RES-CHIP 220 5% 1/16W
R3613 1-218-941-81 RES-CHIP 100 5% 1/16W
R3616 1-218-965-11 RES-CHIP 10K 5% 1/16W
R3617 1-218-965-11 RES-CHIP 10K 5% 1/16W
R3620 1-218-941-81 RES-CHIP 100 5% 1/16W
R3621 1-218-941-81 RES-CHIP 100 5% 1/16W
N
R3490 1-218-967-11 RES-CHIP 15K 5% 1/16W
R3491 1-218-967-11 RES-CHIP 15K 5% 1/16W
R3492 1-218-953-11 RES-CHIP 1K 5% 1/16W
R3493 1-218-941-81 RES-CHIP 100 5% 1/16W
R3500 1-216-295-91 SHORT CHIP 0
R3501 1-216-295-91 SHORT CHIP 0
R3502 1-216-295-91 SHORT CHIP 0
R3504 1-218-965-11 RES-CHIP 10K 5% 1/16W
R3505 1-218-953-11 RES-CHIP 1K 5% 1/16W
R3506 1-218-941-81 RES-CHIP 100 5% 1/16W
R3507 1-218-941-81 RES-CHIP 100 5% 1/16W
R3508 1-216-295-91 SHORT CHIP 0
R3509 1-218-953-11 RES-CHIP 1K 5% 1/16W
R3510 1-218-961-11 RES-CHIP 4.7K 5% 1/16W
R3511 1-218-961-11 RES-CHIP 4.7K 5% 1/16W
R3516 1-218-937-11 RES-CHIP 47 5% 1/16W
R3517 1-218-937-11 RES-CHIP 47 5% 1/16W
R3518 1-218-965-11 RES-CHIP 10K 5% 1/16W
R3537 1-218-957-11 RES-CHIP 2.2K 5% 1/16W
R3542 1-218-965-11 RES-CHIP 10K 5% 1/16W
R3543 1-218-957-11 RES-CHIP 2.2K 5% 1/16W
R3544 1-218-965-11 RES-CHIP 10K 5% 1/16W
R3545 1-218-957-11 RES-CHIP 2.2K 5% 1/16W
R3546 1-218-941-81 RES-CHIP 100 5% 1/16W
R3547 1-218-941-81 RES-CHIP 100 5% 1/16W
R3623 1-218-965-11 RES-CHIP 10K 5% 1/16W
R3629 1-218-965-11 RES-CHIP 10K 5% 1/16W
R3631 1-218-965-11 RES-CHIP 10K 5% 1/16W
R3633 1-218-965-11 RES-CHIP 10K 5% 1/16W
R3635 1-218-965-11 RES-CHIP 10K 5% 1/16W
R3637 1-218-948-11 RES-CHIP 390 5% 1/16W
R3638 1-218-948-11 RES-CHIP 390 5% 1/16W
R3639 1-218-948-11 RES-CHIP 390 5% 1/16W
R3640 1-218-948-11 RES-CHIP 390 5% 1/16W
R3641 1-218-948-11 RES-CHIP 390 5% 1/16W
R3642 1-218-941-81 RES-CHIP 100 5% 1/16W
R3645 1-218-965-11 RES-CHIP 10K 5% 1/16W
R3646 1-218-965-11 RES-CHIP 10K 5% 1/16W
R3647 1-218-965-11 RES-CHIP 10K 5% 1/16W
R3800 1-218-969-11 RES-CHIP 22K 5% 1/16W
R3801 1-218-953-11 RES-CHIP 1K 5% 1/16W
R3802 1-218-941-81 RES-CHIP 100 5% 1/16W
R3803 1-218-941-81 RES-CHIP 100 5% 1/16W
R3804 1-218-957-11 RES-CHIP 2.2K 5% 1/16W
R3806 1-218-941-81 RES-CHIP 100 5% 1/16W
R3809 1-218-941-81 RES-CHIP 100 5% 1/16W
R3810 1-218-941-81 RES-CHIP 100 5% 1/16W
R3814 1-218-941-81 RES-CHIP 100 5% 1/16W
R3815 1-218-941-81 RES-CHIP 100 5% 1/16W
R3816 1-218-941-81 RES-CHIP 100 5% 1/16W
R3548 1-218-965-11 RES-CHIP 10K 5% 1/16W
R3550 1-208-927-11 METAL CHIP 47K 0.5% 1/16W
R3554 1-218-965-11 RES-CHIP 10K 5% 1/16W
R3558 1-208-687-11 METAL CHIP 1.5K 0.5% 1/16W
R3559 1-208-927-11 METAL CHIP 47K 0.5% 1/16W
R3560 1-218-937-11 RES-CHIP 47 5% 1/16W
R3561 1-218-941-81 RES-CHIP 100 5% 1/16W
R3562 1-218-941-81 RES-CHIP 100 5% 1/16W
R3563 1-218-941-81 RES-CHIP 100 5% 1/16W
R3564 1-218-941-81 RES-CHIP 100 5% 1/16W
R3565 1-218-941-81 RES-CHIP 100 5% 1/16W
R3566 1-218-989-11 RES-CHIP 1M 5% 1/16W
R3567 1-218-941-81 RES-CHIP 100 5% 1/16W
R3601 1-218-953-11 RES-CHIP 1K 5% 1/16W
R3602 1-218-941-81 RES-CHIP 100 5% 1/16W
R3603 1-218-941-81 RES-CHIP 100 5% 1/16W
R3604 1-218-965-11 RES-CHIP 10K 5% 1/16W
R3609 1-218-941-81 RES-CHIP 100 5% 1/16W
R3610 1-218-965-11 RES-CHIP 10K 5% 1/16W
R3611 1-218-965-11 RES-CHIP 10K 5% 1/16W
R3817 1-218-941-81 RES-CHIP 100 5% 1/16W
R3818 1-218-941-81 RES-CHIP 100 5% 1/16W
R3819 1-218-941-81 RES-CHIP 100 5% 1/16W
R3820 1-218-941-81 RES-CHIP 100 5% 1/16W
R3821 1-218-941-81 RES-CHIP 100 5% 1/16W
R3822 1-218-965-11 RES-CHIP 10K 5% 1/16W
R3824 1-218-965-11 RES-CHIP 10K 5% 1/16W
R3825 1-218-965-11 RES-CHIP 10K 5% 1/16W
R3826 1-218-941-81 RES-CHIP 100 5% 1/16W
R3827 1-218-953-11 RES-CHIP 1K 5% 1/16W
R3828 1-218-941-81 RES-CHIP 100 5% 1/16W
R3830 1-218-941-81 RES-CHIP 100 5% 1/16W
R3831 1-218-941-81 RES-CHIP 100 5% 1/16W
R3832 1-218-990-81 SHORT CHIP 0
R3835 1-218-941-81 RES-CHIP 100 5% 1/16W
R3836 1-218-965-11 RES-CHIP 10K 5% 1/16W
R3837 1-218-965-11 RES-CHIP 10K 5% 1/16W
R3838 1-218-965-11 RES-CHIP 10K 5% 1/16W
R3839 1-218-953-11 RES-CHIP 1K 5% 1/16W
R3840 1-218-965-11 RES-CHIP 10K 5% 1/16W
- 81 -
Page 82
REF.NO. PART NO. DESCRIPTION REMARK REF.NO. PART NO. DESCRIPTION REMARK
R3841 1-218-965-11 RES-CHIP 10K 5% 1/16W
R3842 1-218-941-81 RES-CHIP 100 5% 1/16W
R3843 1-218-941-81 RES-CHIP 100 5% 1/16W
R3844 1-218-941-81 RES-CHIP 100 5% 1/16W
R3846 1-218-949-11 RES-CHIP 470 5% 1/16W
R3848 1-218-965-11 RES-CHIP 10K 5% 1/16W
R3849 1-218-941-81 RES-CHIP 100 5% 1/16W
R3850 1-218-953-11 RES-CHIP 1K 5% 1/16W
R3852 1-218-941-81 RES-CHIP 100 5% 1/16W
R3853 1-218-941-81 RES-CHIP 100 5% 1/16W
R3854 1-218-941-81 RES-CHIP 100 5% 1/16W
R3855 1-218-941-81 RES-CHIP 100 5% 1/16W
R3856 1-218-941-81 RES-CHIP 100 5% 1/16W
R3857 1-218-941-81 RES-CHIP 100 5% 1/16W
R3858 1-218-941-81 RES-CHIP 100 5% 1/16W
R3859 1-218-941-81 RES-CHIP 100 5% 1/16W
R3861 1-218-941-81 RES-CHIP 100 5% 1/16W
R3862 1-218-961-11 RES-CHIP 4.7K 5% 1/16W
R3892 1-218-965-11 RES-CHIP 10K 5% 1/16W
R3895 1-218-965-11 RES-CHIP 10K 5% 1/16W
R3896 1-218-965-11 RES-CHIP 10K 5% 1/16W
R3899 1-218-965-11 RES-CHIP 10K 5% 1/16W
< RESISTOR CHIP >
RB3100 1-234-370-21 RES, NETWORK 22 (1005X4)
RB3101 1-234-370-21 RES, NETWORK 22 (1005X4)
RB3102 1-234-370-21 RES, NETWORK 22 (1005X4)
RB3103 1-234-370-21 RES, NETWORK 22 (1005X4)
RB3104 1-234-370-21 RES, NETWORK 22 (1005X4)
RB3105 1-234-370-21 RES, NETWORK 22 (1005X4)
RB3106 1-234-370-21 RES, NETWORK 22 (1005X4)
RB3107 1-234-370-21 RES, NETWORK 22 (1005X4)
RB3108 1-234-370-21 RES, NETWORK 22 (1005X4)
RB3109 1-234-370-21 RES, NETWORK 22 (1005X4)
RB3110 1-234-370-21 RES, NETWORK 22 (1005X4)
RB3200 1-234-372-21 RES, NETWORK 100 (1005X4)
RB3201 1-234-372-21 RES, NETWORK 100 (1005X4)
RB3202 1-234-372-21 RES, NETWORK 100 (1005X4)
RB3203 1-234-702-11 RES, NETWORK 68 (1005X4)
RB3204 1-234-702-11 RES, NETWORK 68 (1005X4)
RB3206 1-234-372-21 RES, NETWORK 100 (1005X4)
RB3207 1-234-372-21 RES, NETWORK 100 (1005X4)
RB3208 1-234-702-11 RES, NETWORK 68 (1005X4)
RB3209 1-234-702-11 RES, NETWORK 68 (1005X4)
RB3500 1-234-371-21 RES, NETWORK 47 (1005X4)
RB3501 1-234-371-21 RES, NETWORK 47 (1005X4)
< CRYSTAL >
X3200 1-813-055-11 QUARTZ CRYSTAL UNIT
X3500 1-813-547-11 QUARTZ CRYSTAL UNIT
*A-1127-038-A AG COMPLETE DIG
4-382-854-01 SCREW (M3X8), P, SW (+)
< CAPACITOR >
C1001 1-164-156-11 CERAMIC CHIP 0.1UF 25V
C1003 1-164-156-11 CERAMIC CHIP 0.1UF 25V
C1004 1-135-960-91 CERAMIC CHIP 10UF 10% 25V
C1005 1-164-004-11 CERAMIC CHIP 0.1UF 10.00% 25V
C1006 1-126-767-11 ELECT 1000UF 20.00% 16V
C1008 1-162-970-11 CERAMIC CHIP 0.01UF 10.00% 25V
C1010 1-162-970-11 CERAMIC CHIP 0.01UF 10.00% 25V
C1011 1-126-947-11 ELECT 47UF 20.00% 35V
C1012 1-162-970-11 CERAMIC CHIP 0.01UF 10.00% 25V
C1013 1-163-131-00 CERAMIC CHIP 390PF 5.00% 50V
C1014 1-162-970-11 CERAMIC CHIP 0.01UF 10.00% 25V
C1015 1-162-970-11 CERAMIC CHIP 0.01UF 10.00% 25V
C1016 1-125-891-11 CERAMIC CHIP 0.47UF 10.00% 10V
C1017 1-127-715-91 CERAMIC CHIP 0.22UF 10% 16V
C1018 1-162-964-11 CERAMIC CHIP 0.001UF 10.00% 50V
C1019 1-107-826-11 CERAMIC CHIP 0.1UF 10.00% 16V
C1020 1-164-004-11 CERAMIC CHIP 0.1UF 10.00% 25V
C1021 1-107-826-11 CERAMIC CHIP 0.1UF 10.00% 16V
C1024 1-162-919-11 CERAMIC CHIP 22PF 5.00% 50V
C1025 1-216-864-11 SHORT CHIP 0
C1026 1-162-970-11 CERAMIC CHIP 0.01UF 10.00% 25V
C1027 1-162-926-11 CERAMIC CHIP 82PF 5.00% 50V
C1028 1-164-388-91 CERAMIC CHIP 270PF 5.00% 50V
C1029 1-162-915-11 CERAMIC CHIP 10PF 0.50PF 50V
C1030 1-162-928-11 CERAMIC CHIP 120PF 5.00% 50V
C1031 1-162-970-11 CERAMIC CHIP 0.01UF 10.00% 25V
C1034 1-126-933-11 ELECT 100UF 20.00% 16V
C1035 1-165-908-11 CERAMIC CHIP 1UF 10% 10V
C1037 1-164-315-11 CERAMIC CHIP 470PF 5.00% 50V
C1039 1-107-826-11 CERAMIC CHIP 0.1UF 10.00% 16V
C1040 1-135-372-31 ELECT 470UF 20% 10V
C1103 1-162-927-11 CERAMIC CHIP 100PF 5.00% 50V
C1104 1-162-927-11 CERAMIC CHIP 100PF 5.00% 50V
C1106 1-164-156-11 CERAMIC CHIP 0.1UF 25V
C1230 1-162-970-11 CERAMIC CHIP 0.01UF 10.00% 25V
C1231 1-162-970-11 CERAMIC CHIP 0.01UF 10.00% 25V
C1232 1-107-826-11 CERAMIC CHIP 0.1UF 10.00% 16V
C1233 1-162-970-11 CERAMIC CHIP 0.01UF 10.00% 25V
C1235 1-107-826-11 CERAMIC CHIP 0.1UF 10.00% 16V
C1237 1-126-964-11 ELECT 10UF 20.00% 50V
C1239 1-126-933-11 ELECT 100UF 20.00% 16V
C1242 1-107-826-11 CERAMIC CHIP 0.1UF 10.00% 16V
C1243 1-107-826-11 CERAMIC CHIP 0.1UF 10.00% 16V
AGN
- 82 -
Page 83
REF.NO. PART NO. DESCRIPTION REMARK REF.NO. PART NO. DESCRIPTION REMARK
C1244 1-126-933-11 ELECT 100UF 20.00% 16V
C1601 1-162-970-11 CERAMIC CHIP 0.01UF 10.00% 25V
C1604 £ 1-104-571-91 CERAMIC 0.0015UF 10.00% 2KV
C1605 £ 1-104-571-91 CERAMIC 0.0015UF 10.00% 2KV
C1607 £ 1-104-571-91 CERAMIC 0.0015UF 10.00% 2KV
C2504 1-107-901-11 ELECT 0.47UF 20% 50V
C2505 1-107-909-11 ELECT 47UF 20% 50V
C2506 1-128-526-11 ELECT 100UF 20% 25V
C2507 1-126-959-11 ELECT 0.47UF 20.00% 50V
C2512 1-164-004-11 CERAMIC CHIP 0.1UF 10.00% 25V
AG
C1608 £ 1-104-571-91 CERAMIC 0.0015UF 10.00% 2KV
C1609 1-163-021-91 CERAMIC CHIP 0.01UF 10.00% 50V
C1612 1-117-753-11 ELECT(BLOCK) 470UF 20.00% 450V
C1613 1-126-964-11 ELECT 10UF 20.00% 50V
C1614 1-126-967-11 ELECT 47UF 20.00% 50V
C1615 1-126-948-11 ELECT 100UF 20.00% 35V
C1618 1-136-497-81 FILM 0.1UF 5.00% 50V
C1620 1-107-902-11 ELECT 1UF 20% 50V
C1622 1-126-961-11 ELECT 2.2UF 20.00% 50V
C1623 1-136-479-11 FILM 0.001UF 5.00% 100V
C1624 1-126-963-11 ELECT 4.7UF 20.00% 50V
C1626 1-113-924-11 CERAMIC 0.0047UF 20.00% 250V
C1627 1-125-969-91 CERAMIC 680PF 10.00% 1KV
C1628 1-125-969-91 CERAMIC 680PF 10.00% 1KV
C1629 1-135-946-22 FILM 47000PF 3% 800V
C1630 1-126-939-11 ELECT 10000UF 20.00% 16V
C1631 1-107-914-11 ELECT 1000UF 20% 50V
C1632 1-126-964-11 ELECT 10UF 20.00% 50V
C1634 1-126-944-11 ELECT 3300UF 20.00% 25V
C1635 1-126-944-11 ELECT 3300UF 20.00% 25V
C1639 1-164-004-11 CERAMIC CHIP 0.1UF 10.00% 25V
C1640 1-107-888-11 ELECT 47UF 20% 25V
C1642 1-107-906-11 ELECT 10UF 20% 50V
C1648 1-163-021-91 CERAMIC CHIP 0.01UF 10.00% 50V
C1652 1-107-906-11 ELECT 10UF 20% 50V
C2513 1-164-004-11 CERAMIC CHIP 0.1UF 10.00% 25V
C2514 1-107-715-11 ELECT 22UF 20% 50V
C4200 1-127-715-91 CERAMIC CHIP 0.22UF 10% 16V
C4201 1-164-160-11 CERAMIC CHIP 20PF 5.00% 50V
C4202 1-115-456-21 DOUBLE LAYER 0.22F 5.5V
C6202 1-164-156-11 CERAMIC CHIP 0.1UF 25V
C6203 1-107-909-11 ELECT 47UF 20% 50V
C6205 1-164-156-11 CERAMIC CHIP 0.1UF 25V
C6208 1-128-526-11 ELECT 100UF 20% 25V
C6211 1-104-665-11 ELECT 100UF 20.00% 25V
C6213 1-164-156-11 CERAMIC CHIP 0.1UF 25V
C6214 1-128-526-11 ELECT 100UF 20% 25V
C6215 1-128-526-11 ELECT 100UF 20% 25V
C6217 1-126-767-11 ELECT 1000UF 20.00% 16V
C6218 1-126-767-11 ELECT 1000UF 20.00% 16V
C6223 1-164-156-11 CERAMIC CHIP 0.1UF 25V
C6224 1-164-156-11 CERAMIC CHIP 0.1UF 25V
C6226 1-128-942-31 ELECT 1000UF 20% 6.3V
C6227 1-128-942-31 ELECT 1000UF 20% 6.3V
C6229 1-128-528-11 ELECT 470UF 20% 25V
C6230 1-126-935-11 ELECT 470UF 20.00% 16V
C6235 1-164-156-11 CERAMIC CHIP 0.1UF 25V
C6236 1-164-156-11 CERAMIC CHIP 0.1UF 25V
C6238 1-128-526-11 ELECT 100UF 20% 25V
C6239 1-164-156-11 CERAMIC CHIP 0.1UF 25V
C1653 1-107-909-11 ELECT 47UF 20% 50V
C1655 1-163-009-91 CERAMIC CHIP 0.001UF 10.00% 50V
C1656 1-163-009-91 CERAMIC CHIP 0.001UF 10.00% 50V
C1659 1-137-194-81 FILM 0.47UF 5.00% 50V
C1660 £ 1-165-530-11 MYLAR 0.47UF 10 275V
C1661 £ 1-119-887-51 CERAMIC 1000PF 20.00% 250V
C1662 £ 1-119-887-51 CERAMIC 1000PF 20.00% 250V
C1664 £ 1-165-530-11 MYLAR 0.47UF 10 275V
C1670 1-125-497-11 ELECT(BLOCK) 100UF 20% 400V
C1671 1-125-497-11 ELECT(BLOCK) 100UF 20% 400V
C1672 1-161-830-00 CERAMIC 0.0047UF 500V
C2002 1-128-528-11 ELECT 470UF 20% 25V
C2025 1-162-964-11 CERAMIC CHIP 0.001UF 10.00% 50V
C2033 1-162-964-11 CERAMIC CHIP 0.001UF 10.00% 50V
C2302 1-164-156-11 CERAMIC CHIP 0.1UF 25V
C2304 1-164-156-11 CERAMIC CHIP 0.1UF 25V
C2305 1-164-156-11 CERAMIC CHIP 0.1UF 25V
C2306 1-164-156-11 CERAMIC CHIP 0.1UF 25V
C2502 1-164-156-11 CERAMIC CHIP 0.1UF 25V
C2503 1-164-156-11 CERAMIC CHIP 0.1UF 25V
C6240 1-164-156-11 CERAMIC CHIP 0.1UF 25V
C6241 1-164-156-11 CERAMIC CHIP 0.1UF 25V
C6243 1-104-665-11 ELECT 100UF 20.00% 25V
C6244 1-126-947-11 ELECT 47UF 20.00% 35V
C6257 1-164-156-11 CERAMIC CHIP 0.1UF 25V
C6259 1-104-665-11 ELECT 100UF 20.00% 25V
C6260 1-164-156-11 CERAMIC CHIP 0.1UF 25V
C6263 1-164-156-11 CERAMIC CHIP 0.1UF 25V
C6264 1-164-156-11 CERAMIC CHIP 0.1UF 25V
C6265 1-164-156-11 CERAMIC CHIP 0.1UF 25V
C6266 1-164-156-11 CERAMIC CHIP 0.1UF 25V
C6300 £ 1-126-943-11 ELECT 2200UF 20.00% 25V
C6301 1-126-971-11 ELECT 470UF 20.00% 50V
C6303 1-126-964-11 ELECT 10UF 20.00% 50V
< CONNECTOR >
CN1230 1-695-915-11 TAB (CONTACT)
CN1601 £ *1-580-843-11 PIN, CONNECTOR (POWER)
CN1602 *1-691-960-11 PIN, CONNECTOR (PC BOARD) 3P
CN1603 *1-816-974-51 PLUG, CONNECTOR 3P
- 83 -
Page 84
REF.NO. PART NO. DESCRIPTION REMARK REF.NO. PART NO. DESCRIPTION REMARK
CN1610 1-695-915-11 TAB (CONTACT)
CN1611 1-695-915-11 TAB (CONTACT)
CN1612 1-695-915-11 TAB (CONTACT)
CN1616 £ *1-691-960-11 PIN, CONNECTOR (PC BOARD) 3P
CN2001 1-695-915-11 TAB (CONTACT)
D4200 8-719-914-43 DIODE DAN202K
D6201 8-719-022-97 DIODE D2S4MF
D6202 8-719-022-97 DIODE D2S4MF
D6207 8-719-081-97 DIODE MMDL914T1
D6208 8-719-081-97 DIODE MMDL914T1
AG
CN2002 1-695-915-11 TAB (CONTACT)
CN2003 *1-564-507-11 PLUG, CONNECTOR 4P
CN2004 1-695-915-11 TAB (CONTACT)
CN2005 1-695-915-11 TAB (CONTACT)
CN2006 1-695-915-11 TAB (CONTACT)
CN2007 1-695-915-11 TAB (CONTACT)
CN2008 1-695-915-11 TAB (CONTACT)
CN2009 1-695-915-11 TAB (CONTACT)
CN2302 1-764-334-11 PIN, CONNECTOR(PCB)(V TYPE)11P
CN2303 *1-816-985-71 PLUG, CONNECTOR 8P
CN2304 *1-564-512-11 PLUG, CONNECTOR 9P
CN3000 1-764-333-11 PIN, CONNECTOR(PCB)(V TYPE)10P
CN3001 *1-816-983-71 PLUG, CONNECTOR 6P
CN5201 *1-823-330-11 CONNECTOR, BOARD TO BOARD 40P
CN5209 *1-564-508-11 PLUG, CONNECTOR 5P
CN6204 1-695-915-11 TAB (CONTACT)
CN6205 1-695-915-11 TAB (CONTACT)
CN6208 *1-564-512-11 PLUG, CONNECTOR 9P
< DIODE >
D1002 8-719-050-38 DIODE M1MA152WK-T1
D1005 8-719-081-97 DIODE MMDL914T1
D1007 8-719-081-67 DIODE M1FM3
D1008 8-719-073-69 DIODE PTZ-TE25-6.2A
D1230 8-719-083-87 DIODE UDZS-TE17-33B
D1601 8-719-055-40 DIODE FCQ30A04
D1602 6-500-067-01 DIODE GSIB460L/45
D1607 8-719-979-64 DIODE UF4005/23
D1608 8-719-060-90 DIODE S2L60F
D1609 8-719-063-73 DIODE D1NL20U-TR
D1612 8-719-060-90 DIODE S2L60F
D1613 8-719-081-97 DIODE MMDL914T1
D1616 8-719-081-97 DIODE MMDL914T1
D1617 8-719-081-97 DIODE MMDL914T1
D1618 8-719-081-97 DIODE MMDL914T1
D1619 8-719-083-82 DIODE UDZS-TE17-12B
D1620 8-719-055-40 DIODE FCQ30A04
D1621 8-719-018-84 DIODE D2S6M
D1624 8-719-060-88 DIODE D4SBS6
D1631 8-719-081-97 DIODE MMDL914T1
D1632 1-216-295-91 SHORT CHIP 0
D1635 8-719-060-90 DIODE S2L60F
D1636 8-719-060-90 DIODE S2L60F
D2004 8-719-081-97 DIODE MMDL914T1
D3001 8-719-050-38 DIODE M1MA152WK-T1
D6209 8-719-081-97 DIODE MMDL914T1
D6211 6-500-294-01 DIODE PTZ-TE25-3.9B
D6212 6-500-294-01 DIODE PTZ-TE25-3.9B
D6302 8-719-511-40 DIODE S1VB40
D6304 8-719-081-97 DIODE MMDL914T1
D6306 8-719-081-97 DIODE MMDL914T1
< FUSE >
F1601 £ 1-576-232-12 FUSE 5A 250V
< FERRITE BEAD >
FB1101 1-412-987-31 INDUCTOR 4.7UH
FB1230 1-469-869-21 FERRITE 0UH
FB1231 1-469-869-21 FERRITE 0UH
< CLIP FUSE >
FH1601 £ 1-533-725-11 FUSE HOLDER 0A 0V
< FILTER >
FL1230 1-239-899-21 FERRITE 0UH
< IC >
IC1001 6-704-747-01 IC TDA9886TS/V4,118
IC1002 6-704-120-01 IC MD3221N
IC1601 6-705-810-01 IC MCZ3001DB
IC1602 8-759-198-31 IC UPC1093J-1-T
IC2500 8-759-590-05 IC TDA7269A
IC4200 8-759-478-44 IC PCF8593/T118
IC6202 6-708-659-01 IC BA00BC0WT-V5
IC6203 8-759-098-24 IC PQ30RV11J00H
IC6204 8-759-394-36 IC BA09T
IC6205 8-759-098-24 IC PQ30RV11J00H
IC6207 8-759-640-19 IC PQ1CG2032FZ
IC6208 8-759-640-19 IC PQ1CG2032FZ
IC6210 8-759-520-49 IC PQ30RV21J00H
< JUMPER RESISTOR >
JR1 1-216-295-91 SHORT CHIP 0
JR2 1-216-295-91 SHORT CHIP 0
JR1002 1-216-864-11 SHORT CHIP 0
JR1003 1-216-864-11 SHORT CHIP 0
JR1004 1-216-864-11 SHORT CHIP 0
JR1008 1-216-864-11 SHORT CHIP 0
- 84 -
Page 85
REF.NO. PART NO. DESCRIPTION REMARK REF.NO. PART NO. DESCRIPTION REMARK
JR1009 1-216-864-11 SHORT CHIP 0
JR1011 1-216-864-11 SHORT CHIP 0
JR1012 1-216-864-11 SHORT CHIP 0
JR2001 1-216-295-91 SHORT CHIP 0
JR2002 1-216-295-91 SHORT CHIP 0
< COIL >
L1001 1-414-934-21 INDUCTOR 10UH
L1002 1-414-934-21 INDUCTOR 10UH
L1003 1-406-663-21 INDUCTOR 47UH
L1004 1-216-864-11 SHORT CHIP 0
L1005 1-216-864-11 SHORT CHIP 0
L1006 1-410-509-11 INDUCTOR 10UH
L1007 1-414-934-21 INDUCTOR 10UH
L1008 1-457-154-11 INDUCTOR 0UH
L1009 1-406-663-21 INDUCTOR 47UH
L1010 1-406-663-21 INDUCTOR 47UH
L1012 1-216-864-11 SHORT CHIP 0
L1013 1-216-864-11 SHORT CHIP 0
L1100 1-414-580-21 INDUCTOR 100NH
L1101 1-414-580-21 INDUCTOR 100NH
L1102 1-414-934-21 INDUCTOR 10UH
L1230 1-412-006-31 INDUCTOR 10UH
L1601 1-412-525-31 INDUCTOR 10UH
L1602 1-412-523-41 INDUCTOR 6.8UH
L1603 1-412-523-41 INDUCTOR 6.8UH
L1609 1-406-659-11 INDUCTOR 10UH
Q1603 8-729-010-29 TRANSISTOR MSD601-RST1
Q1604 8-729-010-05 TRANSISTOR MSB709-RT1
Q1605 8-729-010-29 TRANSISTOR MSD601-RST1
Q1606 8-729-052-32 TRANSISTOR IRFIB7N50A-LF31
Q1607 8-729-052-32 TRANSISTOR IRFIB7N50A-LF31
Q2001 8-729-010-05 TRANSISTOR MSB709-RT1
Q2500 8-729-010-29 TRANSISTOR MSD601-RST1
Q2501 8-729-010-29 TRANSISTOR MSD601-RST1
Q2502 8-729-010-29 TRANSISTOR MSD601-RST1
Q2503 8-729-010-29 TRANSISTOR MSD601-RST1
Q2504 8-729-027-38 TRANSISTOR DTA144EKA-T146
Q6201 8-729-027-43 TRANSISTOR DTC114EKA-T146
Q6202 8-729-027-43 TRANSISTOR DTC114EKA-T146
Q6302 8-729-901-06 TRANSISTOR DTA144EK
Q6305 8-729-010-29 TRANSISTOR MSD601-RST1
< RESISTOR >
R1003 1-216-821-11 METAL CHIP 1K 5% 1/10W
R1004 1-216-845-11 METAL CHIP 100K 5% 1/10W
R1006 1-216-838-11 METAL CHIP 27K 5% 1/10W
R1007 1-216-827-11 METAL CHIP 3.3K 5% 1/10W
R1009 1-216-837-11 METAL CHIP 22K 5% 1/10W
R1010 1-216-818-11 METAL CHIP 560 5% 1/10W
R1011 1-216-825-11 METAL CHIP 2.2K 5% 1/10W
R1013 1-216-825-11 METAL CHIP 2.2K 5% 1/10W
R1014 1-216-825-11 METAL CHIP 2.2K 5% 1/10W
R1016 1-216-817-11 METAL CHIP 470 5% 1/10W
AG
L1616 1-406-984-11 INDUCTOR 1.5MH
L6202 1-456-803-11 INDUCTOR 100UH
L6203 1-456-803-11 INDUCTOR 100UH
L6207 1-412-525-31 INDUCTOR 10UH
L6208 1-412-525-31 INDUCTOR 10UH
L6210 1-414-928-21 INDUCTOR 1UH
< PHOTOCOUPLER >
PH1601 £ 6-600-187-01 PHOTO COUPLER PC123Y22JOOF
< PROTECTOR MODULE >
PS6202 £ 1-801-549-21 IC LINK 4A 0V
PS6204 £ 1-801-549-21 IC LINK 4A 0V
< TRANSISTOR >
Q1002 8-729-421-19 TRANSISTOR UN2213
Q1003 8-729-421-19 TRANSISTOR UN2213
Q1004 8-729-422-33 TRANSISTOR 2SD601A-Q-TX
Q1007 8-729-010-29 TRANSISTOR MSD601-RST1
Q1008 8-729-421-19 TRANSISTOR UN2213
Q1009 8-729-010-05 TRANSISTOR MSB709-RT1
R1018 1-216-830-11 METAL CHIP 5.6K 5% 1/10W
R1019 1-216-827-11 METAL CHIP 3.3K 5% 1/10W
R1020 1-216-811-11 METAL CHIP 150 5% 1/10W
R1027 1-216-824-11 METAL CHIP 1.8K 5% 1/10W
R1028 1-216-813-11 METAL CHIP 220 5% 1/10W
R1029 1-216-809-11 METAL CHIP 100 5% 1/10W
R1030 1-216-819-11 METAL CHIP 680 5% 1/10W
R1032 1-216-822-11 METAL CHIP 1.2K 5% 1/10W
R1033 1-218-867-11 METAL CHIP 6.8K 0.5% 1/10W
R1034 1-216-807-11 METAL CHIP 68 5% 1/10W
R1035 1-216-807-11 METAL CHIP 68 5% 1/10W
R1036 1-216-814-11 METAL CHIP 270 5% 1/10W
R1037 1-216-829-11 METAL CHIP 4.7K 5% 1/10W
R1038 1-216-833-11 METAL CHIP 10K 5% 1/10W
R1039 1-216-801-11 METAL CHIP 22 5% 1/10W
R1041 1-216-812-11 METAL CHIP 180 5% 1/10W
R1042 1-216-821-11 METAL CHIP 1K 5% 1/10W
R1043 1-216-837-11 METAL CHIP 22K 5% 1/10W
R1047 1-216-817-11 METAL CHIP 470 5% 1/10W
R1048 1-216-834-11 METAL CHIP 12K 5% 1/10W
R1050 1-216-809-11 METAL CHIP 100 5% 1/10W
R1051 1-216-809-11 METAL CHIP 100 5% 1/10W
R1052 1-216-845-11 METAL CHIP 100K 5% 1/10W
- 85 -
Page 86
REF.NO. PART NO. DESCRIPTION REMARK REF.NO. PART NO. DESCRIPTION REMARK
R1101 1-412-987-31 INDUCTOR 4.7UH
R1102 1-414-760-21 FERRITE 0UH
R1103 1-414-760-21 FERRITE 0UH
R1105 1-414-580-21 INDUCTOR 100NH
R1233 1-216-833-11 METAL CHIP 10K 5% 1/10W
R1662 £ 1-218-265-11 METAL 8.2M 5% 1W
R1664 1-216-295-91 SHORT CHIP 0
R2009 1-216-841-11 METAL CHIP 47K 5% 1/10W
R2024 1-216-841-11 METAL CHIP 47K 5% 1/10W
R2025 1-216-838-11 METAL CHIP 27K 5% 1/10W
AG
R1234 1-216-809-11 METAL CHIP 100 5% 1/10W
R1235 1-216-809-11 METAL CHIP 100 5% 1/10W
R1237 1-216-821-11 METAL CHIP 1K 5% 1/10W
R1238 1-216-821-11 METAL CHIP 1K 5% 1/10W
R1239 1-216-841-11 METAL CHIP 47K 5% 1/10W
R1601 1-245-494-21 METAL 2.2M 2% 1/4W
R1602 1-245-494-21 METAL 2.2M 2% 1/4W
R1607 1-249-417-11 CARBON 1K 5% 1/4W
R1613 £ 1-202-933-61 FUSIBLE 0.1 10% 1/2W
R1616 1-249-393-11 CARBON 10 5% 1/4W
R1617 1-249-377-11 CARBON 0.47 5% 1/4W
R1618 1-260-288-11 CARBON 0.47 5% 1/2W
R1619 £ 1-202-933-61 FUSIBLE 0.1 10% 1/2W
R1620 1-216-073-91 RES-CHIP 10K 5% 1/10W
R1621 1-216-065-91 RES-CHIP 4.7K 5% 1/10W
R1622 1-216-073-91 RES-CHIP 10K 5% 1/10W
R1623 1-216-049-11 RES-CHIP 1K 5% 1/10W
R1625 1-245-478-21 METAL 470K 1% 1/4W
R1626 1-245-478-21 METAL 470K 1% 1/4W
R1628 1-208-810-11 METAL CHIP 15K 0.5% 1/10W
R1629 1-218-869-11 METAL CHIP 8.2K 0.5% 1/10W
R1630 1-216-073-91 RES-CHIP 10K 5% 1/10W
R1631 1-216-073-91 RES-CHIP 10K 5% 1/10W
R1632 1-216-797-11 METAL CHIP 10 5% 1/10W
R1633 1-216-073-91 RES-CHIP 10K 5% 1/10W
R2500 1-216-841-11 METAL CHIP 47K 5% 1/10W
R2501 1-216-821-11 METAL CHIP 1K 5% 1/10W
R2502 1-216-818-11 METAL CHIP 560 5% 1/10W
R2503 1-216-818-11 METAL CHIP 560 5% 1/10W
R2504 1-216-841-11 METAL CHIP 47K 5% 1/10W
R2505 1-216-821-11 METAL CHIP 1K 5% 1/10W
R2506 1-216-836-11 METAL CHIP 18K 5% 1/10W
R2507 1-216-836-11 METAL CHIP 18K 5% 1/10W
R2508 1-216-809-11 METAL CHIP 100 5% 1/10W
R2509 1-216-830-11 METAL CHIP 5.6K 5% 1/10W
R2511 1-216-832-11 METAL CHIP 8.2K 5% 1/10W
R2512 1-216-830-11 METAL CHIP 5.6K 5% 1/10W
R2513 1-216-864-11 SHORT CHIP 0
R2519 1-216-845-11 METAL CHIP 100K 5% 1/10W
R2520 1-216-845-11 METAL CHIP 100K 5% 1/10W
R2521 1-243-826-21 METAL OXIDE 4.7 5% 1W
R2522 1-243-826-21 METAL OXIDE 4.7 5% 1W
R2523 1-216-841-11 METAL CHIP 47K 5% 1/10W
R2524 1-216-864-11 SHORT CHIP 0
R2525 1-216-821-11 METAL CHIP 1K 5% 1/10W
R3001 1-216-833-11 METAL CHIP 10K 5% 1/10W
R3002 1-216-833-11 METAL CHIP 10K 5% 1/10W
R3003 1-216-841-11 METAL CHIP 47K 5% 1/10W
R4200 1-216-841-11 METAL CHIP 47K 5% 1/10W
R4201 1-216-809-11 METAL CHIP 100 5% 1/10W
R1634 1-216-797-11 METAL CHIP 10 5% 1/10W
R1635 1-216-073-91 RES-CHIP 10K 5% 1/10W
R1638 1-202-965-11 METAL 0.02 10% 2W
R1640 1-216-350-11 METAL OXIDE 1.2 5% 1W
R1641 1-216-049-11 RES-CHIP 1K 5% 1/10W
R1642 1-216-057-00 RES-CHIP 2.2K 5% 1/10W
R1643 1-218-853-11 METAL CHIP 1.8K 0.5% 1/10W
R1644 1-216-025-11 RES-CHIP 100 5% 1/10W
R1645 1-216-017-91 RES-CHIP 47 5% 1/10W
R1646 1-218-873-11 METAL CHIP 12K 0.5% 1/10W
R1647 1-216-041-00 RES-CHIP 470 5% 1/10W
R1649 1-216-049-11 RES-CHIP 1K 5% 1/10W
R1650 1-218-839-11 METAL CHIP 470 0.5% 1/10W
R1651 £ 1-205-998-11 CEMENTED 1 5% 10W
R1652 £ 1-205-998-11 CEMENTED 1 5% 10W
R1653 £ 1-202-719-00 SOLID 1M 20% 1/2W
R1654 1-249-377-11 CARBON 0.47 5% 1/4W
R1655 1-249-377-11 CARBON 0.47 5% 1/4W
R1656 1-215-904-11 METAL OXIDE 100K 5% 2W
R1657 1-215-904-11 METAL OXIDE 100K 5% 2W
R4202 1-216-809-11 METAL CHIP 100 5% 1/10W
R6200 1-218-835-11 METAL CHIP 330 0.5% 1/10W
R6201 1-218-839-11 METAL CHIP 470 0.5% 1/10W
R6202 1-218-860-11 METAL CHIP 3.6K 0.5% 1/10W
R6203 1-218-859-11 METAL CHIP 3.3K 0.5% 1/10W
R6206 1-218-847-11 METAL CHIP 1K 0.5% 1/10W
R6207 1-218-849-11 METAL CHIP 1.2K 0.5% 1/10W
R6209 1-216-864-11 SHORT CHIP 0
R6210 1-216-864-11 SHORT CHIP 0
R6211 1-218-850-11 METAL CHIP 1.3K 0.5% 1/10W
R6214 1-216-846-11 METAL CHIP 120K 5% 1/10W
R6215 1-216-844-11 METAL CHIP 82K 5% 1/10W
R6217 1-216-841-11 METAL CHIP 47K 5% 1/10W
R6218 1-216-840-11 METAL CHIP 39K 5% 1/10W
R6219 1-216-836-11 METAL CHIP 18K 5% 1/10W
R6220 1-218-871-11 METAL CHIP 10K 0.5% 1/10W
R6221 1-218-875-11 METAL CHIP 15K 0.5% 1/10W
R6222 1-218-855-11 METAL CHIP 2.2K 0.5% 1/10W
R6223 1-218-871-11 METAL CHIP 10K 0.5% 1/10W
R6256 1-216-841-11 METAL CHIP 47K 5% 1/10W
- 86 -
Page 87
REF.NO. PART NO. DESCRIPTION REMARK REF.NO. PART NO. DESCRIPTION REMARK
R6262 1-216-834-11 METAL CHIP 12K 5% 1/10W
R6263 1-216-833-11 METAL CHIP 10K 5% 1/10W
R6264 1-216-833-11 METAL CHIP 10K 5% 1/10W
R6267 1-216-833-11 METAL CHIP 10K 5% 1/10W
R6303 1-216-821-11 METAL CHIP 1K 5% 1/10W
C1014 1-125-777-11 CERAMIC CHIP 0.1UF 10.00% 10V
C1015 1-125-777-11 CERAMIC CHIP 0.1UF 10.00% 10V
C1016 1-164-874-11 CERAMIC CHIP 100PF 5.00% 50V
C1017 1-125-777-11 CERAMIC CHIP 0.1UF 10.00% 10V
C1018 1-164-874-11 CERAMIC CHIP 100PF 5.00% 50V
JBAG
R6308 1-216-829-11 METAL CHIP 4.7K 5% 1/10W
R6309 1-216-821-11 METAL CHIP 1K 5% 1/10W
< RELAY >
RY1601 £ 1-755-395-11 RELAY (AC POWER)
SF1001 1-795-617-11 SAW FILTER
SF1003 1-767-083-11 FILTER, SURFACE WAVE
< TRANSFORMER >
T1603 £ 1-435-512-21 TRANSFORMER, CONVERTER (PIT)
T1605 £ 1-433-488-31 TRANSFORMER, LINE FILTER
T6300 £ 1-443-114-11 TRANSFORMER, STANDBY
< TUNER >
TU1001 8-597-954-00 TUNER, FSS BTP-AU631
TU1231 8-597-929-10 TUNER, FSS BTP-DU601
< VARISTOR >
VD1602 £ 1-804-995-11 VARISTOR
< CRYSTAL >
X1001 1-767-704-11 VIBRATOR, CRYSTAL
X4200 1-760-105-11 VIBRATOR, CRYSTAL
*A-1129-435-A JB_WAX COMPLETE DIG
4-087-203-01 PLASTIC RIVET
A5001 4-098-157-01 HEAT SINK (DTT)
< CAPACITOR >
C1000 1-164-156-11 CERAMIC CHIP 0.1UF 25V
C1001 1-164-156-11 CERAMIC CHIP 0.1UF 25V
C1002 1-164-156-11 CERAMIC CHIP 0.1UF 25V
C1003 1-164-156-11 CERAMIC CHIP 0.1UF 25V
C1004 1-124-779-00 ELECT CHIP 10UF 20.00% 16V
C1005 1-124-779-00 ELECT CHIP 10UF 20.00% 16V
C1006 1-125-777-11 CERAMIC CHIP 0.1UF 10.00% 10V
C1007 1-124-779-00 ELECT CHIP 10UF 20.00% 16V
C1008 1-125-777-11 CERAMIC CHIP 0.1UF 10.00% 10V
C1009 1-125-777-11 CERAMIC CHIP 0.1UF 10.00% 10V
C1010 1-125-777-11 CERAMIC CHIP 0.1UF 10.00% 10V
C1011 1-125-777-11 CERAMIC CHIP 0.1UF 10.00% 10V
C1012 1-125-777-11 CERAMIC CHIP 0.1UF 10.00% 10V
C1019 1-162-921-11 CERAMIC CHIP 33PF 5.00% 50V
C1020 1-125-777-11 CERAMIC CHIP 0.1UF 10.00% 10V
C1021 1-162-921-11 CERAMIC CHIP 33PF 5.00% 50V
C1022 1-164-874-11 CERAMIC CHIP 100PF 5.00% 50V
C1023 1-125-777-11 CERAMIC CHIP 0.1UF 10.00% 10V
C1024 1-164-874-11 CERAMIC CHIP 100PF 5.00% 50V
C1028 1-126-396-11 ELECT CHIP 47UF 20.00% 16V
C1029 1-126-396-11 ELECT CHIP 47UF 20.00% 16V
C1032 1-125-777-11 CERAMIC CHIP 0.1UF 10.00% 10V
C1037 1-127-715-91 CERAMIC CHIP 0.22UF 10% 16V
C1050 1-162-927-11 CERAMIC CHIP 100PF 5.00% 50V
C2500 1-126-396-11 ELECT CHIP 47UF 20.00% 16V
C2501 1-107-826-11 CERAMIC CHIP 0.1UF 10.00% 16V
C2502 1-107-826-11 CERAMIC CHIP 0.1UF 10.00% 16V
C2504 1-107-826-11 CERAMIC CHIP 0.1UF 10.00% 16V
C2505 1-126-396-11 ELECT CHIP 47UF 20.00% 16V
C2506 1-125-891-11 CERAMIC CHIP 0.47UF 10.00% 10V
C2507 1-162-970-11 CERAMIC CHIP 0.01UF 10.00% 25V
C2508 1-162-970-11 CERAMIC CHIP 0.01UF 10.00% 25V
C2509 1-125-889-91 CERAMIC CHIP 2.2UF 10% 10V
C2510 1-164-227-11 CERAMIC CHIP 0.022UF 10.00% 25V
C2511 1-162-970-11 CERAMIC CHIP 0.01UF 10.00% 25V
C2516 1-162-970-11 CERAMIC CHIP 0.01UF 10.00% 25V
C2517 1-127-715-91 CERAMIC CHIP 0.22UF 10% 16V
C2518 1-162-915-11 CERAMIC CHIP 10PF 0.50PF 50V
C2519 1-126-394-11 ELECT CHIP 10UF 20.00% 16V
C2520 1-107-826-11 CERAMIC CHIP 0.1UF 10.00% 16V
C2521 1-162-970-11 CERAMIC CHIP 0.01UF 10.00% 25V
C2522 1-126-396-11 ELECT CHIP 47UF 20.00% 16V
C2523 1-107-826-11 CERAMIC CHIP 0.1UF 10.00% 16V
C2524 1-126-396-11 ELECT CHIP 47UF 20.00% 16V
C2526 1-107-826-11 CERAMIC CHIP 0.1UF 10.00% 16V
C2527 1-107-826-11 CERAMIC CHIP 0.1UF 10.00% 16V
C2528 1-107-826-11 CERAMIC CHIP 0.1UF 10.00% 16V
C2529 1-127-760-11 CERAMIC CHIP 4.7UF 10% 6.3V
C2530 1-162-970-11 CERAMIC CHIP 0.01UF 10.00% 25V
C2531 1-126-396-11 ELECT CHIP 47UF 20.00% 16V
C2532 1-126-396-11 ELECT CHIP 47UF 20.00% 16V
C2533 1-162-970-11 CERAMIC CHIP 0.01UF 10.00% 25V
C2534 1-107-826-11 CERAMIC CHIP 0.1UF 10.00% 16V
C2535 1-126-396-11 ELECT CHIP 47UF 20.00% 16V
C2536 1-107-826-11 CERAMIC CHIP 0.1UF 10.00% 16V
C2537 1-126-396-11 ELECT CHIP 47UF 20.00% 16V
C2543 1-107-826-11 CERAMIC CHIP 0.1UF 10.00% 16V
C2550 1-125-891-11 CERAMIC CHIP 0.47UF 10.00% 10V
- 87 -
Page 88

REF.NO. PART NO. DESCRIPTION REMARK REF.NO. PART NO. DESCRIPTION REMARK
C2551 1-125-891-11 CERAMIC CHIP 0.47UF 10.00% 10V
C2552 1-125-891-11 CERAMIC CHIP 0.47UF 10.00% 10V
C2553 1-125-891-11 CERAMIC CHIP 0.47UF 10.00% 10V
C2554 1-125-891-11 CERAMIC CHIP 0.47UF 10.00% 10V
C2555 1-125-891-11 CERAMIC CHIP 0.47UF 10.00% 10V
C5046 1-100-566-91 CERAMIC CHIP 0.1UF 10.00% 25V
C5047 1-100-566-91 CERAMIC CHIP 0.1UF 10.00% 25V
C5048 1-100-566-91 CERAMIC CHIP 0.1UF 10.00% 25V
C5049 1-100-566-91 CERAMIC CHIP 0.1UF 10.00% 25V
C5050 1-124-779-00 ELECT CHIP 10UF 20.00% 16V
JB
C2558 1-126-396-11 ELECT CHIP 47UF 20.00% 16V
C2559 1-125-891-11 CERAMIC CHIP 0.47UF 10.00% 10V
C2560 1-125-891-11 CERAMIC CHIP 0.47UF 10.00% 10V
C2591 1-126-394-11 ELECT CHIP 10UF 20.00% 16V
C2603 1-162-970-11 CERAMIC CHIP 0.01UF 10.00% 25V
C5000 1-100-566-91 CERAMIC CHIP 0.1UF 10.00% 25V
C5001 1-126-394-11 ELECT CHIP 10UF 20.00% 16V
C5003 1-124-779-00 ELECT CHIP 10UF 20.00% 16V
C5004 1-124-779-00 ELECT CHIP 10UF 20.00% 16V
C5005 1-126-394-11 ELECT CHIP 10UF 20.00% 16V
C5006 1-100-566-91 CERAMIC CHIP 0.1UF 10.00% 25V
C5007 1-100-566-91 CERAMIC CHIP 0.1UF 10.00% 25V
C5009 1-100-566-91 CERAMIC CHIP 0.1UF 10.00% 25V
C5010 1-100-566-91 CERAMIC CHIP 0.1UF 10.00% 25V
C5012 1-100-566-91 CERAMIC CHIP 0.1UF 10.00% 25V
C5013 1-100-566-91 CERAMIC CHIP 0.1UF 10.00% 25V
C5014 1-100-566-91 CERAMIC CHIP 0.1UF 10.00% 25V
C5015 1-100-566-91 CERAMIC CHIP 0.1UF 10.00% 25V
C5017 1-100-566-91 CERAMIC CHIP 0.1UF 10.00% 25V
C5018 1-100-566-91 CERAMIC CHIP 0.1UF 10.00% 25V
C5019 1-100-566-91 CERAMIC CHIP 0.1UF 10.00% 25V
C5020 1-100-566-91 CERAMIC CHIP 0.1UF 10.00% 25V
C5021 1-100-566-91 CERAMIC CHIP 0.1UF 10.00% 25V
C5022 1-100-566-91 CERAMIC CHIP 0.1UF 10.00% 25V
C5024 1-100-566-91 CERAMIC CHIP 0.1UF 10.00% 25V
C5051 1-100-566-91 CERAMIC CHIP 0.1UF 10.00% 25V
C5052 1-100-566-91 CERAMIC CHIP 0.1UF 10.00% 25V
C5058 1-100-566-91 CERAMIC CHIP 0.1UF 10.00% 25V
C5059 1-100-566-91 CERAMIC CHIP 0.1UF 10.00% 25V
C5060 1-100-566-91 CERAMIC CHIP 0.1UF 10.00% 25V
C5061 1-100-566-91 CERAMIC CHIP 0.1UF 10.00% 25V
C5062 1-100-566-91 CERAMIC CHIP 0.1UF 10.00% 25V
C5063 1-100-566-91 CERAMIC CHIP 0.1UF 10.00% 25V
C5064 1-100-566-91 CERAMIC CHIP 0.1UF 10.00% 25V
C5065 1-100-566-91 CERAMIC CHIP 0.1UF 10.00% 25V
C5066 1-100-566-91 CERAMIC CHIP 0.1UF 10.00% 25V
C5067 1-100-566-91 CERAMIC CHIP 0.1UF 10.00% 25V
C5068 1-100-566-91 CERAMIC CHIP 0.1UF 10.00% 25V
C5069 1-124-779-00 ELECT CHIP 10UF 20.00% 16V
C5070 1-162-964-11 CERAMIC CHIP 0.001UF 10.00% 50V
C5071 1-162-964-11 CERAMIC CHIP 0.001UF 10.00% 50V
C5072 1-162-964-11 CERAMIC CHIP 0.001UF 10.00% 50V
C5073 1-162-964-11 CERAMIC CHIP 0.001UF 10.00% 50V
C5074 1-162-964-11 CERAMIC CHIP 0.001UF 10.00% 50V
C5075 1-162-964-11 CERAMIC CHIP 0.001UF 10.00% 50V
C5076 1-162-964-11 CERAMIC CHIP 0.001UF 10.00% 50V
C5077 1-162-964-11 CERAMIC CHIP 0.001UF 10.00% 50V
C5078 1-162-964-11 CERAMIC CHIP 0.001UF 10.00% 50V
C5079 1-162-962-11 CERAMIC CHIP 470PF 10.00% 50V
C5080 1-162-962-11 CERAMIC CHIP 470PF 10.00% 50V
C5026 1-100-566-91 CERAMIC CHIP 0.1UF 10.00% 25V
C5027 1-100-566-91 CERAMIC CHIP 0.1UF 10.00% 25V
C5028 1-100-566-91 CERAMIC CHIP 0.1UF 10.00% 25V
C5029 1-126-394-11 ELECT CHIP 10UF 20.00% 16V
C5030 1-124-779-00 ELECT CHIP 10UF 20.00% 16V
C5031 1-100-566-91 CERAMIC CHIP 0.1UF 10.00% 25V
C5032 1-100-566-91 CERAMIC CHIP 0.1UF 10.00% 25V
C5033 1-100-566-91 CERAMIC CHIP 0.1UF 10.00% 25V
C5034 1-100-566-91 CERAMIC CHIP 0.1UF 10.00% 25V
C5035 1-100-566-91 CERAMIC CHIP 0.1UF 10.00% 25V
C5036 1-100-566-91 CERAMIC CHIP 0.1UF 10.00% 25V
C5037 1-100-566-91 CERAMIC CHIP 0.1UF 10.00% 25V
C5038 1-162-918-11 CERAMIC CHIP 18PF 5.00% 50V
C5039 1-124-779-00 ELECT CHIP 10UF 20.00% 16V
C5040 1-124-779-00 ELECT CHIP 10UF 20.00% 16V
C5041 1-100-566-91 CERAMIC CHIP 0.1UF 10.00% 25V
C5042 1-162-966-11 CERAMIC CHIP 0.0022UF 10.00% 50V
C5043 1-100-566-91 CERAMIC CHIP 0.1UF 10.00% 25V
C5044 1-162-917-11 CERAMIC CHIP 15PF 5.00% 50V
C5045 1-162-966-11 CERAMIC CHIP 0.0022UF 10.00% 50V
C5081 1-100-566-91 CERAMIC CHIP 0.1UF 10.00% 25V
C5082 1-100-566-91 CERAMIC CHIP 0.1UF 10.00% 25V
C5083 1-100-566-91 CERAMIC CHIP 0.1UF 10.00% 25V
C5084 1-100-566-91 CERAMIC CHIP 0.1UF 10.00% 25V
C5085 1-100-566-91 CERAMIC CHIP 0.1UF 10.00% 25V
C5086 1-100-566-91 CERAMIC CHIP 0.1UF 10.00% 25V
C5087 1-100-566-91 CERAMIC CHIP 0.1UF 10.00% 25V
C5088 1-100-566-91 CERAMIC CHIP 0.1UF 10.00% 25V
C5089 1-100-566-91 CERAMIC CHIP 0.1UF 10.00% 25V
C5090 1-100-566-91 CERAMIC CHIP 0.1UF 10.00% 25V
C5091 1-100-566-91 CERAMIC CHIP 0.1UF 10.00% 25V
C5092 1-100-566-91 CERAMIC CHIP 0.1UF 10.00% 25V
C5093 1-100-566-91 CERAMIC CHIP 0.1UF 10.00% 25V
C5094 1-100-566-91 CERAMIC CHIP 0.1UF 10.00% 25V
C5095 1-100-566-91 CERAMIC CHIP 0.1UF 10.00% 25V
C5096 1-100-566-91 CERAMIC CHIP 0.1UF 10.00% 25V
C5097 1-100-566-91 CERAMIC CHIP 0.1UF 10.00% 25V
C5100 1-162-964-11 CERAMIC CHIP 0.001UF 10.00% 50V
C5101 1-162-964-11 CERAMIC CHIP 0.001UF 10.00% 50V
C5102 1-162-964-11 CERAMIC CHIP 0.001UF 10.00% 50V
- 88 -
Page 89

REF.NO. PART NO. DESCRIPTION REMARK REF.NO. PART NO. DESCRIPTION REMARK
C5103 1-162-964-11 CERAMIC CHIP 0.001UF 10.00% 50V
C5104 1-162-964-11 CERAMIC CHIP 0.001UF 10.00% 50V
C5105 1-162-964-11 CERAMIC CHIP 0.001UF 10.00% 50V
C5106 1-162-964-11 CERAMIC CHIP 0.001UF 10.00% 50V
C5107 1-162-964-11 CERAMIC CHIP 0.001UF 10.00% 50V
C5730 1-164-156-11 CERAMIC CHIP 0.1UF 25V
C5731 1-126-392-11 ELECT CHIP 100UF 20.00% 6.3V
C5740 1-164-156-11 CERAMIC CHIP 0.1UF 25V
C5741 1-128-536-11 ELECT CHIP 100UF 20.00% 25V
C5742 1-164-156-11 CERAMIC CHIP 0.1UF 25V
JB
C5108 1-162-964-11 CERAMIC CHIP 0.001UF 10.00% 50V
C5109 1-162-964-11 CERAMIC CHIP 0.001UF 10.00% 50V
C5110 1-162-964-11 CERAMIC CHIP 0.001UF 10.00% 50V
C5111 1-162-964-11 CERAMIC CHIP 0.001UF 10.00% 50V
C5112 1-162-964-11 CERAMIC CHIP 0.001UF 10.00% 50V
C5113 1-162-964-11 CERAMIC CHIP 0.001UF 10.00% 50V
C5114 1-162-964-11 CERAMIC CHIP 0.001UF 10.00% 50V
C5115 1-162-964-11 CERAMIC CHIP 0.001UF 10.00% 50V
C5116 1-162-964-11 CERAMIC CHIP 0.001UF 10.00% 50V
C5117 1-162-964-11 CERAMIC CHIP 0.001UF 10.00% 50V
C5500 1-126-197-11 ELECT CHIP 10UF 20.00% 50V
C5501 1-107-826-11 CERAMIC CHIP 0.1UF 10.00% 16V
C5502 1-107-826-11 CERAMIC CHIP 0.1UF 10.00% 16V
C5503 1-100-566-91 CERAMIC CHIP 0.1UF 10.00% 25V
C5504 1-107-826-11 CERAMIC CHIP 0.1UF 10.00% 16V
C5505 1-107-826-11 CERAMIC CHIP 0.1UF 10.00% 16V
C5507 1-162-974-11 CERAMIC CHIP 0.01UF 50V
C5508 1-162-974-11 CERAMIC CHIP 0.01UF 50V
C5509 1-126-197-11 ELECT CHIP 10UF 20.00% 50V
C5510 1-162-974-11 CERAMIC CHIP 0.01UF 50V
C5511 1-162-974-11 CERAMIC CHIP 0.01UF 50V
C5512 1-162-974-11 CERAMIC CHIP 0.01UF 50V
C5513 1-162-970-11 CERAMIC CHIP 0.01UF 10.00% 25V
C5514 1-162-968-11 CERAMIC CHIP 0.0047UF 10.00% 50V
C5515 1-162-968-11 CERAMIC CHIP 0.0047UF 10.00% 50V
C5743 1-128-536-11 ELECT CHIP 100UF 20.00% 25V
C6370 1-126-396-11 ELECT CHIP 47UF 20.00% 16V
C6371 1-126-396-11 ELECT CHIP 47UF 20.00% 16V
C6372 1-117-681-11 ELECT CHIP 100UF 20.00% 16V
C6373 1-126-396-11 ELECT CHIP 47UF 20.00% 16V
C6374 1-126-396-11 ELECT CHIP 47UF 20.00% 16V
C6375 1-107-826-11 CERAMIC CHIP 0.1UF 10.00% 16V
C6376 1-107-826-11 CERAMIC CHIP 0.1UF 10.00% 16V
C6398 1-162-970-11 CERAMIC CHIP 0.01UF 10.00% 25V
C6399 1-162-970-11 CERAMIC CHIP 0.01UF 10.00% 25V
C7800 1-162-964-11 CERAMIC CHIP 0.001UF 10.00% 50V
C7815 1-126-396-11 ELECT CHIP 47UF 20.00% 16V
C7817 1-164-004-11 CERAMIC CHIP 0.1UF 10.00% 25V
C7818 1-164-004-11 CERAMIC CHIP 0.1UF 10.00% 25V
C7821 1-107-823-11 CERAMIC CHIP 0.47UF 10.00% 16V
C7822 1-107-823-11 CERAMIC CHIP 0.47UF 10.00% 16V
C7825 1-162-906-11 CERAMIC CHIP 1.5PF 0.25PF 50V
C7827 1-162-966-11 CERAMIC CHIP 0.0022UF 10.00% 50V
C7828 1-162-966-11 CERAMIC CHIP 0.0022UF 10.00% 50V
C7833 1-162-906-11 CERAMIC CHIP 1.5PF 0.25PF 50V
C7834 1-162-927-11 CERAMIC CHIP 100PF 5.00% 50V
C7835 1-162-927-11 CERAMIC CHIP 100PF 5.00% 50V
C7836 1-162-968-11 CERAMIC CHIP 0.0047UF 10.00% 50V
C7838 1-126-396-11 ELECT CHIP 47UF 20.00% 16V
C7839 1-126-394-11 ELECT CHIP 10UF 20.00% 16V
C5516 1-100-566-91 CERAMIC CHIP 0.1UF 10.00% 25V
C5700 1-164-004-11 CERAMIC CHIP 0.1UF 10.00% 25V
C5701 1-128-536-11 ELECT CHIP 100UF 20.00% 25V
C5702 1-128-536-11 ELECT CHIP 100UF 20.00% 25V
C5703 1-126-398-11 ELECT CHIP 4.7UF 20.00% 35V
C5704 1-126-398-11 ELECT CHIP 4.7UF 20.00% 35V
C5705 1-162-970-11 CERAMIC CHIP 0.01UF 10.00% 25V
C5706 1-162-970-11 CERAMIC CHIP 0.01UF 10.00% 25V
C5707 1-137-894-21 ELECT CHIP 470UF 20% 25V
C5709 1-137-894-21 ELECT CHIP 470UF 20% 25V
C5720 1-164-156-11 CERAMIC CHIP 0.1UF 25V
C5721 1-126-392-11 ELECT CHIP 100UF 20.00% 6.3V
C5722 1-164-156-11 CERAMIC CHIP 0.1UF 25V
C5723 1-126-392-11 ELECT CHIP 100UF 20.00% 6.3V
C5724 1-164-156-11 CERAMIC CHIP 0.1UF 25V
C5725 1-126-392-11 ELECT CHIP 100UF 20.00% 6.3V
C5726 1-164-156-11 CERAMIC CHIP 0.1UF 25V
C5727 1-126-392-11 ELECT CHIP 100UF 20.00% 6.3V
C5728 1-164-156-11 CERAMIC CHIP 0.1UF 25V
C5729 1-126-392-11 ELECT CHIP 100UF 20.00% 6.3V
C7840 1-164-004-11 CERAMIC CHIP 0.1UF 10.00% 25V
C7841 1-126-394-11 ELECT CHIP 10UF 20.00% 16V
C7842 1-164-004-11 CERAMIC CHIP 0.1UF 10.00% 25V
C7844 1-162-966-11 CERAMIC CHIP 0.0022UF 10.00% 50V
C7845 1-162-966-11 CERAMIC CHIP 0.0022UF 10.00% 50V
C7846 1-126-394-11 ELECT CHIP 10UF 20.00% 16V
C7847 1-126-394-11 ELECT CHIP 10UF 20.00% 16V
C7849 1-162-928-11 CERAMIC CHIP 120PF 5.00% 50V
C7850 1-164-004-11 CERAMIC CHIP 0.1UF 10.00% 25V
C7851 1-125-891-11 CERAMIC CHIP 0.47UF 10.00% 10V
C7852 1-126-396-11 ELECT CHIP 47UF 20.00% 16V
C7853 1-164-004-11 CERAMIC CHIP 0.1UF 10.00% 25V
C7993 1-165-908-11 CERAMIC CHIP 1UF 10% 10V
C7994 1-165-908-11 CERAMIC CHIP 1UF 10% 10V
C8535 1-164-874-11 CERAMIC CHIP 100PF 5.00% 50V
C9001 1-127-715-91 CERAMIC CHIP 0.22UF 10% 16V
C9004 1-127-715-91 CERAMIC CHIP 0.22UF 10% 16V
C9500 1-162-962-11 CERAMIC CHIP 470PF 10.00% 50V
C9502 1-162-962-11 CERAMIC CHIP 470PF 10.00% 50V
C9504 1-162-962-11 CERAMIC CHIP 470PF 10.00% 50V
- 89 -
Page 90

REF.NO. PART NO. DESCRIPTION REMARK REF.NO. PART NO. DESCRIPTION REMARK
C9506 1-162-962-11 CERAMIC CHIP 470PF 10.00% 50V
C9512 1-164-227-11 CERAMIC CHIP 0.022UF 10.00% 25V
C9513 1-162-964-11 CERAMIC CHIP 0.001UF 10.00% 50V
C9514 1-164-227-11 CERAMIC CHIP 0.022UF 10.00% 25V
C9515 1-162-964-11 CERAMIC CHIP 0.001UF 10.00% 50V
C9623 1-127-715-91 CERAMIC CHIP 0.22UF 10% 16V
C9641 1-125-889-91 CERAMIC CHIP 2.2UF 10% 10V
C9650 1-164-346-11 CERAMIC CHIP 1UF 16V
C9651 1-164-346-11 CERAMIC CHIP 1UF 16V
C9652 1-164-346-11 CERAMIC CHIP 1UF 16V
JB
C9520 1-128-992-21 ELECT CHIP 47UF 20% 25V
C9521 1-164-227-11 CERAMIC CHIP 0.022UF 10.00% 25V
C9522 1-162-964-11 CERAMIC CHIP 0.001UF 10.00% 50V
C9523 1-164-227-11 CERAMIC CHIP 0.022UF 10.00% 25V
C9524 1-162-964-11 CERAMIC CHIP 0.001UF 10.00% 50V
C9539 1-128-992-21 ELECT CHIP 47UF 20% 25V
C9540 1-128-992-21 ELECT CHIP 47UF 20% 25V
C9541 1-162-970-11 CERAMIC CHIP 0.01UF 10.00% 25V
C9542 1-128-992-21 ELECT CHIP 47UF 20% 25V
C9543 1-128-992-21 ELECT CHIP 47UF 20% 25V
C9559 1-125-889-91 CERAMIC CHIP 2.2UF 10% 10V
C9560 1-125-889-91 CERAMIC CHIP 2.2UF 10% 10V
C9561 1-125-891-11 CERAMIC CHIP 0.47UF 10.00% 10V
C9562 1-125-889-91 CERAMIC CHIP 2.2UF 10% 10V
C9563 1-127-715-91 CERAMIC CHIP 0.22UF 10% 16V
C9565 1-127-861-11 CERAMIC CHIP 2.2UF 10% 16V
C9567 1-127-861-11 CERAMIC CHIP 2.2UF 10% 16V
C9568 1-127-861-11 CERAMIC CHIP 2.2UF 10% 16V
C9569 1-127-861-11 CERAMIC CHIP 2.2UF 10% 16V
C9570 1-117-681-11 ELECT CHIP 100UF 20.00% 16V
C9581 1-127-861-11 CERAMIC CHIP 2.2UF 10% 16V
C9583 1-127-861-11 CERAMIC CHIP 2.2UF 10% 16V
C9585 1-127-861-11 CERAMIC CHIP 2.2UF 10% 16V
C9586 1-127-861-11 CERAMIC CHIP 2.2UF 10% 16V
C9587 1-127-715-91 CERAMIC CHIP 0.22UF 10% 16V
C9588 1-127-715-91 CERAMIC CHIP 0.22UF 10% 16V
C9590 1-165-908-11 CERAMIC CHIP 1UF 10% 10V
C9591 1-165-908-11 CERAMIC CHIP 1UF 10% 10V
C9593 1-127-861-11 CERAMIC CHIP 2.2UF 10% 16V
C9594 1-125-889-91 CERAMIC CHIP 2.2UF 10% 10V
C9596 1-127-861-11 CERAMIC CHIP 2.2UF 10% 16V
C9597 1-127-861-11 CERAMIC CHIP 2.2UF 10% 16V
C9598 1-125-889-91 CERAMIC CHIP 2.2UF 10% 10V
C9600 1-127-715-91 CERAMIC CHIP 0.22UF 10% 16V
C9601 1-127-715-91 CERAMIC CHIP 0.22UF 10% 16V
C9602 1-127-715-91 CERAMIC CHIP 0.22UF 10% 16V
C9603 1-124-779-00 ELECT CHIP 10UF 20.00% 16V
C9604 1-127-715-91 CERAMIC CHIP 0.22UF 10% 16V
C9605 1-127-715-91 CERAMIC CHIP 0.22UF 10% 16V
C9615 1-127-861-11 CERAMIC CHIP 2.2UF 10% 16V
C9616 1-125-889-91 CERAMIC CHIP 2.2UF 10% 10V
C9617 1-127-861-11 CERAMIC CHIP 2.2UF 10% 16V
C9620 1-127-715-91 CERAMIC CHIP 0.22UF 10% 16V
C9621 1-127-715-91 CERAMIC CHIP 0.22UF 10% 16V
C9622 1-127-715-91 CERAMIC CHIP 0.22UF 10% 16V
C9653 1-164-346-11 CERAMIC CHIP 1UF 16V
C9654 1-164-004-11 CERAMIC CHIP 0.1UF 10.00% 25V
C9655 1-164-388-91 CERAMIC CHIP 270PF 5.00% 50V
C9656 1-162-927-11 CERAMIC CHIP 100PF 5.00% 50V
C9657 1-115-340-11 CERAMIC CHIP 0.22UF 10.00% 25V
< CONNECTOR >
CN5402 1-573-806-21 PIN, CONNECTOR (1.5MM) (SMD)6P
CN5404 1-695-209-21 PIN, CONNECTOR (PC BOARD) 15P
CN8550 1-764-079-21 PIN, CONNECTOR (PC BOARD) 4P
CN8551 *1-695-890-21 PIN, CONNECTOR (PC BOARD) 12P
CN9500 1-695-549-11 SOCKET, PIN 21P
CN9501 1-695-549-11 SOCKET, PIN 21P
CN9505 1-695-209-21 PIN, CONNECTOR (PC BOARD) 15P
CN9506 1-695-889-21 PIN, CONNECTOR (PC BOARD) 10P
CN9507 *1-779-268-21 PIN, CONNECTOR (1.5MM)(SMD)11P
CN9508 *1-573-768-21 PIN, CONNECTOR (1.5MM) (SMD)5P
CN9509 1-573-290-21 PIN, CONNECTOR (1.5MM) (SMD)4P
CN9510 *1-817-752-21 CONNECTOR (RECEPTACLE) 14P
CN9511 *1-695-210-21 PIN, CONNECTOR (PC BOARD) 15P
CN9512 *1-793-497-11 CONNECTOR, BOARD TO BOARD 40P
CN9513 1-573-806-21 PIN, CONNECTOR (1.5MM) (SMD)6P
CN9514 *1-764-080-21 PIN, CONNECTOR (PC BOARD) 8P
< DIODE >
D2501 8-719-081-97 DIODE MMDL914T1
D2502 8-719-081-97 DIODE MMDL914T1
D2503 8-719-081-97 DIODE MMDL914T1
D5701 8-719-073-34 DIODE EC21QS03L-TE12L
D5703 8-719-073-34 DIODE EC21QS03L-TE12L
D5704 6-500-020-01 DIODE MM3Z4V3ST1
D5705 6-500-020-01 DIODE MM3Z4V3ST1
D7402 8-719-066-10 DIODE 1PS181-115
D7807 8-719-069-60 DIODE UDZSTE-179.1B
D9500 8-719-069-60 DIODE UDZSTE-179.1B
D9501 8-719-083-63 DIODE UDZSTE-1713B
D9502 8-719-069-55 DIODE UDZSTE-175.6B
D9503 8-719-069-60 DIODE UDZSTE-179.1B
D9504 8-719-069-55 DIODE UDZSTE-175.6B
D9505 8-719-069-60 DIODE UDZSTE-179.1B
D9506 8-719-069-55 DIODE UDZSTE-175.6B
D9507 8-719-069-60 DIODE UDZSTE-179.1B
D9508 8-719-083-63 DIODE UDZSTE-1713B
D9509 8-719-069-55 DIODE UDZSTE-175.6B
D9510 8-719-069-55 DIODE UDZSTE-175.6B
- 90 -
Page 91
REF.NO. PART NO. DESCRIPTION REMARK REF.NO. PART NO. DESCRIPTION REMARK
D9511 8-719-069-60 DIODE UDZSTE-179.1B
D9512 8-719-069-55 DIODE UDZSTE-175.6B
D9513 8-719-069-60 DIODE UDZSTE-179.1B
D9514 8-719-069-55 DIODE UDZSTE-175.6B
D9544 8-719-069-60 DIODE UDZSTE-179.1B
D9545 8-719-069-60 DIODE UDZSTE-179.1B
D9601 8-719-081-97 DIODE MMDL914T1
D9602 8-719-069-60 DIODE UDZSTE-179.1B
D9603 8-719-069-60 DIODE UDZSTE-179.1B
D9604 8-719-069-60 DIODE UDZSTE-179.1B
D9605 8-719-069-55 DIODE UDZSTE-175.6B
D9606 8-719-069-55 DIODE UDZSTE-175.6B
D9609 8-719-069-55 DIODE UDZSTE-175.6B
D9610 8-719-069-55 DIODE UDZSTE-175.6B
D9611 8-719-069-55 DIODE UDZSTE-175.6B
D9612 8-719-069-55 DIODE UDZSTE-175.6B
D9613 8-719-069-55 DIODE UDZSTE-175.6B
D9616 8-719-073-34 DIODE EC21QS03L-TE12L
D9617 8-719-069-55 DIODE UDZSTE-175.6B
D9618 8-719-069-55 DIODE UDZSTE-175.6B
D9619 8-719-069-55 DIODE UDZSTE-175.6B
D9620 8-719-069-55 DIODE UDZSTE-175.6B
D9621 8-719-069-55 DIODE UDZSTE-175.6B
D9622 8-719-069-55 DIODE UDZSTE-175.6B
< FUSE >
F5700 £ 1-576-415-21 FUSE 2A 32V
< FERRITE BEAD >
FB1000 1-414-760-21 FERRITE 0UH
FB5500 1-400-179-21 INDUCTOR 0UH
FB5501 1-400-179-21 INDUCTOR 0UH
FB7800 1-414-760-21 FERRITE 0UH
FB7801 1-414-760-21 FERRITE 0UH
< FILTER >
FL2500 1-233-765-21 FILTER
FL5000 1-234-177-21 FERRITE 0UH
FL5001 1-234-177-21 FERRITE 0UH
FL5002 1-234-177-21 FERRITE 0UH
FL5003 1-234-177-21 FERRITE 0UH
FL5004 1-234-177-21 FERRITE 0UH
FL5005 1-234-177-21 FERRITE 0UH
FL5006 1-234-177-21 FERRITE 0UH
FL5007 1-234-177-21 FERRITE 0UH
FL5500 1-234-177-21 FERRITE 0UH
FL5501 1-234-177-21 FERRITE 0UH
< IC >
IC1000 6-704-117-01 IC S-1111B33MC-NYSTFG
IC1001 6-706-640-01 IC BH25FB1WG-TR
IC1002 1-540-151-21 SOCKET, IC
IC1003 6-706-232-01 IC SDA5550M-QB-T
IC1005 6-704-573-01 IC M24C32-WMN6T(B)
IC1006 6-702-313-01 IC PST600IMT
IC1010 6-706-419-01 IC LM393DT (A)
IC2500 6-706-475-01 IC TC7SET02FU(T5RSOJF)
IC2501 8-753-212-10 IC CXA2163AQ-T6
IC2504 6-704-465-01 IC MC74LVX8053DTR2
IC2506 6-704-465-01 IC MC74LVX8053DTR2
IC2507 8-759-524-24 IC TC7WT241FU(TE12R)
IC2601 6-704-465-01 IC MC74LVX8053DTR2
IC5000 6-708-533-01 IC SVPEX-SREVB
IC5500 6-708-183-01 IC K4D263238G-VC36T
IC5700 6-704-407-01 IC PQ1CZ41H2ZPH
IC5701 6-704-407-01 IC PQ1CZ41H2ZPH
IC5720 8-759-832-05 IC BA18BC0FP-E2
IC5721 8-759-832-05 IC BA18BC0FP-E2
IC5722 6-700-394-01 IC BA25BC0FP-E2
IC5740 8-759-533-85 IC L88M05T-FA-TL
IC6309 8-759-576-76 IC TDA2822D013TR
IC7402 8-752-072-94 IC CXA1875AM-T4
IC7403 6-706-137-01 IC K6F2008V2E-LF70T00
IC7804 6-701-031-11 IC MSP3411G-QA-B11
IC8500 8-752-072-94 IC CXA1875AM-T4
IC9500 8-752-089-33 IC CXA2069Q-TL
< SOCKET >
J2802 1-819-255-11 PIN JACK 2P
J9154 1-819-721-11 PIN JACK 5P
< COIL >
L1000 1-412-058-11 INDUCTOR 10UH
L2500 1-412-029-11 INDUCTOR 10UH
L2502 1-412-029-11 INDUCTOR 10UH
L2504 1-412-029-11 INDUCTOR 10UH
L2506 1-412-029-11 INDUCTOR 10UH
L2507 1-412-029-11 INDUCTOR 10UH
L2508 1-412-029-11 INDUCTOR 10UH
L2509 1-412-029-11 INDUCTOR 10UH
L2510 1-412-029-11 INDUCTOR 10UH
L5000 1-414-394-11 INDUCTOR 2.2UH
L5001 1-414-394-11 INDUCTOR 2.2UH
L5002 1-414-394-11 INDUCTOR 2.2UH
L5003 1-414-394-11 INDUCTOR 2.2UH
L5004 1-400-179-21 INDUCTOR 0UH
L5005 1-400-179-21 INDUCTOR 0UH
JB
- 91 -
Page 92

REF.NO. PART NO. DESCRIPTION REMARK REF.NO. PART NO. DESCRIPTION REMARK
L5006 1-216-801-11 METAL CHIP 22 5% 1/10W
L5007 1-216-801-11 METAL CHIP 22 5% 1/10W
L5008 1-456-984-11 INDUCTOR 0UH
L5009 1-456-984-11 INDUCTOR 0UH
L5010 1-400-179-21 INDUCTOR 0UH
Q9511 8-729-927-99 TRANSISTOR 2SC4617R
Q9512 8-729-120-28 TRANSISTOR 2SC1623-L5L6
Q9514 8-729-120-28 TRANSISTOR 2SC1623-L5L6
Q9515 8-729-120-28 TRANSISTOR 2SC1623-L5L6
Q9516 8-729-120-28 TRANSISTOR 2SC1623-L5L6
JB
L5012 1-456-984-11 INDUCTOR 0UH
L5013 1-456-984-11 INDUCTOR 0UH
L5014 1-456-984-11 INDUCTOR 0UH
L5015 1-400-179-21 INDUCTOR 0UH
L5700 1-409-529-41 INDUCTOR 10UH
L5701 1-456-786-21 INDUCTOR 47UH
L5702 1-456-786-21 INDUCTOR 47UH
L5729 1-400-784-21 INDUCTOR 4.7UH
L6308 1-412-026-11 INDUCTOR 1UH
L6316 1-412-029-11 INDUCTOR 10UH
L6317 1-412-029-11 INDUCTOR 10UH
L7803 1-412-029-11 INDUCTOR 10UH
L7805 1-412-990-41 INDUCTOR 8.2UH
L7806 1-412-029-11 INDUCTOR 10UH
L7807 1-412-029-11 INDUCTOR 10UH
L9500 1-412-029-11 INDUCTOR 10UH
L9502 1-412-030-11 INDUCTOR 22UH
L9510 1-412-030-11 INDUCTOR 22UH
< TRANSISTOR >
Q2501 8-729-010-05 TRANSISTOR MSB709-RT1
Q2502 8-729-010-05 TRANSISTOR MSB709-RT1
Q2503 8-729-010-05 TRANSISTOR MSB709-RT1
Q2504 8-729-010-05 TRANSISTOR MSB709-RT1
Q2505 8-729-010-29 TRANSISTOR MSD601-RST1
Q2506 8-729-029-00 TRANSISTOR DTC115EUA-T106
Q2508 8-729-029-00 TRANSISTOR DTC115EUA-T106
Q2509 8-729-010-29 TRANSISTOR MSD601-RST1
Q2510 8-729-010-29 TRANSISTOR MSD601-RST1
Q2513 8-729-010-29 TRANSISTOR MSD601-RST1
Q2514 8-729-010-29 TRANSISTOR MSD601-RST1
Q2601 8-729-029-00 TRANSISTOR DTC115EUA-T106
Q3878 8-729-010-29 TRANSISTOR MSD601-RST1
Q3880 8-729-010-29 TRANSISTOR MSD601-RST1
Q3881 8-729-010-29 TRANSISTOR MSD601-RST1
Q5700 8-729-046-04 TRANSISTOR FDS6690A
Q7412 8-729-028-28 TRANSISTOR 2SK2036(TE85L)
Q7416 8-729-010-05 TRANSISTOR MSB709-RT1
Q7801 8-729-010-29 TRANSISTOR MSD601-RST1
Q7802 8-729-010-29 TRANSISTOR MSD601-RST1
Q7806 8-729-010-29 TRANSISTOR MSD601-RST1
Q7810 8-729-010-29 TRANSISTOR MSD601-RST1
Q7811 8-729-010-05 TRANSISTOR MSB709-RT1
Q9500 8-729-010-29 TRANSISTOR MSD601-RST1
Q9510 8-729-927-99 TRANSISTOR 2SC4617R
Q9601 8-729-010-29 TRANSISTOR MSD601-RST1
Q9602 6-550-014-01 TRANSISTOR SSM6N15FU(TE85R)
Q9603 8-729-010-05 TRANSISTOR MSB709-RT1
Q9604 8-729-421-19 TRANSISTOR UN2213
Q9605 8-729-010-29 TRANSISTOR MSD601-RST1
Q9606 8-729-028-28 TRANSISTOR 2SK2036(TE85L)
Q9607 8-729-028-28 TRANSISTOR 2SK2036(TE85L)
< RESISTOR >
R1001 1-216-809-11 METAL CHIP 100 5% 1/10W
R1002 1-218-990-81 SHORT CHIP 0
R1003 1-218-990-81 SHORT CHIP 0
R1009 1-216-829-11 METAL CHIP 4.7K 5% 1/10W
R1010 1-218-990-81 SHORT CHIP 0
R1011 1-218-990-81 SHORT CHIP 0
R1012 1-218-990-81 SHORT CHIP 0
R1014 1-218-990-81 SHORT CHIP 0
R1016 1-218-990-81 SHORT CHIP 0
R1017 1-218-990-81 SHORT CHIP 0
R1018 1-218-990-81 SHORT CHIP 0
R1019 1-218-973-11 RES-CHIP 47K 5% 1/16W
R1020 1-218-973-11 RES-CHIP 47K 5% 1/16W
R1021 1-218-973-11 RES-CHIP 47K 5% 1/16W
R1027 1-218-990-81 SHORT CHIP 0
R1028 1-216-809-11 METAL CHIP 100 5% 1/10W
R1030 1-216-809-11 METAL CHIP 100 5% 1/10W
R1031 1-218-847-11 METAL CHIP 1K 0.5% 1/10W
R1033 1-218-847-11 METAL CHIP 1K 0.5% 1/10W
R1034 1-218-990-81 SHORT CHIP 0
R1039 1-218-953-11 RES-CHIP 1K 5% 1/16W
R1040 1-216-809-11 METAL CHIP 100 5% 1/10W
R1041 1-216-809-11 METAL CHIP 100 5% 1/10W
R1042 1-218-990-81 SHORT CHIP 0
R1043 1-218-990-81 SHORT CHIP 0
R1044 1-218-990-81 SHORT CHIP 0
R1045 1-218-953-11 RES-CHIP 1K 5% 1/16W
R1046 1-218-990-81 SHORT CHIP 0
R1047 1-218-990-81 SHORT CHIP 0
R1059 1-216-809-11 METAL CHIP 100 5% 1/10W
R1060 1-216-817-11 METAL CHIP 470 5% 1/10W
R1063 1-216-809-11 METAL CHIP 100 5% 1/10W
R1064 1-216-809-11 METAL CHIP 100 5% 1/10W
R1065 1-216-809-11 METAL CHIP 100 5% 1/10W
R1069 1-218-965-11 RES-CHIP 10K 5% 1/16W
- 92 -
Page 93

REF.NO. PART NO. DESCRIPTION REMARK REF.NO. PART NO. DESCRIPTION REMARK
R1082 1-218-990-81 SHORT CHIP 0
R1083 1-218-965-11 RES-CHIP 10K 5% 1/16W
R1102 1-218-990-81 SHORT CHIP 0
R1103 1-218-990-81 SHORT CHIP 0
R1104 1-218-990-81 SHORT CHIP 0
R2547 1-216-825-11 METAL CHIP 2.2K 5% 1/10W
R2548 1-216-811-11 METAL CHIP 150 5% 1/10W
R2549 1-211-985-11 METAL CHIP 47 0.5% 1/10W
R2556 1-216-834-11 METAL CHIP 12K 5% 1/10W
R2558 1-216-864-11 SHORT CHIP 0
JB
R1105 1-218-990-81 SHORT CHIP 0
R1106 1-218-990-81 SHORT CHIP 0
R1115 1-216-864-11 SHORT CHIP 0
R1120 1-216-864-11 SHORT CHIP 0
R1126 1-218-941-81 RES-CHIP 100 5% 1/16W
R1127 1-216-864-11 SHORT CHIP 0
R1132 1-216-864-11 SHORT CHIP 0
R1133 1-216-864-11 SHORT CHIP 0
R1205 1-218-965-11 RES-CHIP 10K 5% 1/16W
R1209 1-218-965-11 RES-CHIP 10K 5% 1/16W
R1215 1-216-864-11 SHORT CHIP 0
R2500 1-216-864-11 SHORT CHIP 0
R2501 1-216-809-11 METAL CHIP 100 5% 1/10W
R2502 1-216-809-11 METAL CHIP 100 5% 1/10W
R2503 1-216-821-11 METAL CHIP 1K 5% 1/10W
R2506 1-216-838-11 METAL CHIP 27K 5% 1/10W
R2507 1-216-864-11 SHORT CHIP 0
R2508 1-216-828-11 METAL CHIP 3.9K 5% 1/10W
R2511 1-216-833-11 METAL CHIP 10K 5% 1/10W
R2512 1-216-833-11 METAL CHIP 10K 5% 1/10W
R2513 1-216-833-11 METAL CHIP 10K 5% 1/10W
R2514 1-216-864-11 SHORT CHIP 0
R2515 1-216-817-11 METAL CHIP 470 5% 1/10W
R2517 1-216-821-11 METAL CHIP 1K 5% 1/10W
R2518 1-216-864-11 SHORT CHIP 0
R2559 1-216-864-11 SHORT CHIP 0
R2560 1-216-864-11 SHORT CHIP 0
R2561 1-216-864-11 SHORT CHIP 0
R2562 1-216-833-11 METAL CHIP 10K 5% 1/10W
R2563 1-216-833-11 METAL CHIP 10K 5% 1/10W
R2564 1-216-833-11 METAL CHIP 10K 5% 1/10W
R2565 1-216-833-11 METAL CHIP 10K 5% 1/10W
R2566 1-216-833-11 METAL CHIP 10K 5% 1/10W
R2567 1-216-864-11 SHORT CHIP 0
R2568 1-216-864-11 SHORT CHIP 0
R2569 1-216-864-11 SHORT CHIP 0
R2571 1-216-864-11 SHORT CHIP 0
R2573 1-216-829-11 METAL CHIP 4.7K 5% 1/10W
R2574 1-216-829-11 METAL CHIP 4.7K 5% 1/10W
R2576 1-216-864-11 SHORT CHIP 0
R2577 1-216-864-11 SHORT CHIP 0
R2578 1-216-833-11 METAL CHIP 10K 5% 1/10W
R2579 1-216-833-11 METAL CHIP 10K 5% 1/10W
R2580 1-216-833-11 METAL CHIP 10K 5% 1/10W
R2581 1-216-833-11 METAL CHIP 10K 5% 1/10W
R2582 1-216-833-11 METAL CHIP 10K 5% 1/10W
R2583 1-216-833-11 METAL CHIP 10K 5% 1/10W
R2586 1-216-833-11 METAL CHIP 10K 5% 1/10W
R2587 1-216-864-11 SHORT CHIP 0
R2588 1-216-864-11 SHORT CHIP 0
R2519 1-216-864-11 SHORT CHIP 0
R2520 1-216-864-11 SHORT CHIP 0
R2521 1-216-864-11 SHORT CHIP 0
R2522 1-218-867-11 METAL CHIP 6.8K 0.5% 1/10W
R2523 1-216-864-11 SHORT CHIP 0
R2524 1-218-867-11 METAL CHIP 6.8K 0.5% 1/10W
R2528 1-216-864-11 SHORT CHIP 0
R2529 1-216-864-11 SHORT CHIP 0
R2530 1-216-820-11 METAL CHIP 820 5% 1/10W
R2531 1-216-818-11 METAL CHIP 560 5% 1/10W
R2534 1-216-864-11 SHORT CHIP 0
R2535 1-216-809-11 METAL CHIP 100 5% 1/10W
R2537 1-216-809-11 METAL CHIP 100 5% 1/10W
R2538 1-216-809-11 METAL CHIP 100 5% 1/10W
R2539 1-216-809-11 METAL CHIP 100 5% 1/10W
R2540 1-216-809-11 METAL CHIP 100 5% 1/10W
R2542 1-216-809-11 METAL CHIP 100 5% 1/10W
R2544 1-216-830-11 METAL CHIP 5.6K 5% 1/10W
R2545 1-216-817-11 METAL CHIP 470 5% 1/10W
R2546 1-216-825-11 METAL CHIP 2.2K 5% 1/10W
R2589 1-216-829-11 METAL CHIP 4.7K 5% 1/10W
R2590 1-216-829-11 METAL CHIP 4.7K 5% 1/10W
R2591 1-216-809-11 METAL CHIP 100 5% 1/10W
R2592 1-216-833-11 METAL CHIP 10K 5% 1/10W
R2593 1-216-809-11 METAL CHIP 100 5% 1/10W
R2594 1-216-833-11 METAL CHIP 10K 5% 1/10W
R2595 1-216-821-11 METAL CHIP 1K 5% 1/10W
R2596 1-216-829-11 METAL CHIP 4.7K 5% 1/10W
R2597 1-218-867-11 METAL CHIP 6.8K 0.5% 1/10W
R2598 1-216-833-11 METAL CHIP 10K 5% 1/10W
R2599 1-216-809-11 METAL CHIP 100 5% 1/10W
R2600 1-216-833-11 METAL CHIP 10K 5% 1/10W
R2601 1-216-833-11 METAL CHIP 10K 5% 1/10W
R2602 1-216-833-11 METAL CHIP 10K 5% 1/10W
R2603 1-216-833-11 METAL CHIP 10K 5% 1/10W
R2604 1-216-857-11 METAL CHIP 1M 5% 1/10W
R2605 1-216-864-11 SHORT CHIP 0
R2607 1-216-864-11 SHORT CHIP 0
R2608 1-216-864-11 SHORT CHIP 0
R2610 1-216-864-11 SHORT CHIP 0
- 93 -
Page 94

REF.NO. PART NO. DESCRIPTION REMARK REF.NO. PART NO. DESCRIPTION REMARK
R2611 1-216-833-11 METAL CHIP 10K 5% 1/10W
R2612 1-216-833-11 METAL CHIP 10K 5% 1/10W
R2613 1-216-864-11 SHORT CHIP 0
R2615 1-216-864-11 SHORT CHIP 0
R2616 1-216-864-11 SHORT CHIP 0
R5703 1-216-295-91 SHORT CHIP 0
R5704 1-216-841-11 METAL CHIP 47K 5% 1/10W
R5705 1-216-295-91 SHORT CHIP 0
R5706 1-216-295-91 SHORT CHIP 0
R5707 1-216-841-11 METAL CHIP 47K 5% 1/10W
JB
R2618 1-216-864-11 SHORT CHIP 0
R2619 1-216-864-11 SHORT CHIP 0
R2620 1-216-833-11 METAL CHIP 10K 5% 1/10W
R2621 1-216-833-11 METAL CHIP 10K 5% 1/10W
R2622 1-216-864-11 SHORT CHIP 0
R2623 1-216-833-11 METAL CHIP 10K 5% 1/10W
R2624 1-216-864-11 SHORT CHIP 0
R2625 1-216-833-11 METAL CHIP 10K 5% 1/10W
R2627 1-216-864-11 SHORT CHIP 0
R5000 1-216-864-11 SHORT CHIP 0
R5001 1-216-864-11 SHORT CHIP 0
R5002 1-216-864-11 SHORT CHIP 0
R5003 1-216-821-11 METAL CHIP 1K 5% 1/10W
R5005 1-216-864-11 SHORT CHIP 0
R5007 1-216-864-11 SHORT CHIP 0
R5008 1-216-864-11 SHORT CHIP 0
R5009 1-216-864-11 SHORT CHIP 0
R5010 1-216-821-11 METAL CHIP 1K 5% 1/10W
R5012 1-216-829-11 METAL CHIP 4.7K 5% 1/10W
R5015 1-216-864-11 SHORT CHIP 0
R5023 1-216-864-11 SHORT CHIP 0
R5032 1-218-933-11 RES-CHIP 22 5% 1/16W
R5033 1-218-933-11 RES-CHIP 22 5% 1/16W
R5034 1-218-990-81 SHORT CHIP 0
R5043 1-216-841-11 METAL CHIP 47K 5% 1/10W
R5708 1-216-295-91 SHORT CHIP 0
R5709 1-216-295-91 SHORT CHIP 0
R5710 1-218-855-11 METAL CHIP 2.2K 0.5% 1/10W
R5711 1-218-853-11 METAL CHIP 1.8K 0.5% 1/10W
R5712 1-216-295-91 SHORT CHIP 0
R5714 1-218-855-11 METAL CHIP 2.2K 0.5% 1/10W
R5715 1-218-855-11 METAL CHIP 2.2K 0.5% 1/10W
R5716 1-218-855-11 METAL CHIP 2.2K 0.5% 1/10W
R5717 1-216-295-91 SHORT CHIP 0
R5718 1-216-295-91 SHORT CHIP 0
R5719 1-216-295-91 SHORT CHIP 0
R5720 1-216-295-91 SHORT CHIP 0
R5721 1-216-295-91 SHORT CHIP 0
R5722 1-216-295-91 SHORT CHIP 0
R5723 1-216-295-91 SHORT CHIP 0
R5724 1-216-295-91 SHORT CHIP 0
R5725 1-216-295-91 SHORT CHIP 0
R5726 1-216-295-91 SHORT CHIP 0
R5727 1-216-295-91 SHORT CHIP 0
R5728 1-216-295-91 SHORT CHIP 0
R5730 1-216-295-91 SHORT CHIP 0
R5731 1-216-295-91 SHORT CHIP 0
R5732 1-218-863-11 METAL CHIP 4.7K 0.5% 1/10W
R6527 1-216-805-11 METAL CHIP 47 5% 1/10W
R6528 1-216-805-11 METAL CHIP 47 5% 1/10W
R5500 1-218-847-11 METAL CHIP 1K 0.5% 1/10W
R5501 1-218-847-11 METAL CHIP 1K 0.5% 1/10W
R5502 1-211-986-11 METAL CHIP 51 0.5% 1/10W
R5503 1-211-986-11 METAL CHIP 51 0.5% 1/10W
R5504 1-218-933-11 RES-CHIP 22 5% 1/16W
R5505 1-218-933-11 RES-CHIP 22 5% 1/16W
R5506 1-218-933-11 RES-CHIP 22 5% 1/16W
R5507 1-218-933-11 RES-CHIP 22 5% 1/16W
R5508 1-218-933-11 RES-CHIP 22 5% 1/16W
R5509 1-218-933-11 RES-CHIP 22 5% 1/16W
R5510 1-218-990-81 SHORT CHIP 0
R5511 1-218-990-81 SHORT CHIP 0
R5512 1-218-933-11 RES-CHIP 22 5% 1/16W
R5513 1-218-933-11 RES-CHIP 22 5% 1/16W
R5514 1-218-933-11 RES-CHIP 22 5% 1/16W
R5515 1-218-933-11 RES-CHIP 22 5% 1/16W
R5516 1-218-933-11 RES-CHIP 22 5% 1/16W
R5700 1-216-821-11 METAL CHIP 1K 5% 1/10W
R5701 1-216-821-11 METAL CHIP 1K 5% 1/10W
R5702 1-216-821-11 METAL CHIP 1K 5% 1/10W
R6529 1-216-825-11 METAL CHIP 2.2K 5% 1/10W
R6530 1-216-825-11 METAL CHIP 2.2K 5% 1/10W
R6531 1-216-837-11 METAL CHIP 22K 5% 1/10W
R6532 1-216-837-11 METAL CHIP 22K 5% 1/10W
R6533 1-220-234-11 METAL CHIP 4.7 10% 1/4W
R6534 1-220-234-11 METAL CHIP 4.7 10% 1/4W
R6535 1-216-813-11 METAL CHIP 220 5% 1/10W
R6536 1-216-813-11 METAL CHIP 220 5% 1/10W
R6537 1-216-809-11 METAL CHIP 100 5% 1/10W
R6538 1-216-809-11 METAL CHIP 100 5% 1/10W
R6539 1-216-809-11 METAL CHIP 100 5% 1/10W
R6540 1-216-809-11 METAL CHIP 100 5% 1/10W
R6541 1-216-821-11 METAL CHIP 1K 5% 1/10W
R6542 1-216-821-11 METAL CHIP 1K 5% 1/10W
R6543 1-216-821-11 METAL CHIP 1K 5% 1/10W
R6545 1-216-821-11 METAL CHIP 1K 5% 1/10W
R7484 1-218-990-81 SHORT CHIP 0
R7485 1-218-990-81 SHORT CHIP 0
R7486 1-218-990-81 SHORT CHIP 0
R7487 1-218-990-81 SHORT CHIP 0
- 94 -
Page 95

REF.NO. PART NO. DESCRIPTION REMARK REF.NO. PART NO. DESCRIPTION REMARK
R7488 1-218-990-81 SHORT CHIP 0
R7489 1-218-990-81 SHORT CHIP 0
R7490 1-218-990-81 SHORT CHIP 0
R7491 1-218-990-81 SHORT CHIP 0
R7492 1-218-965-11 RES-CHIP 10K 5% 1/16W
R7829 1-216-839-11 METAL CHIP 33K 5% 1/10W
R7830 1-218-841-11 METAL CHIP 560 0.5% 1/10W
R7840 1-216-809-11 METAL CHIP 100 5% 1/10W
R7841 1-216-833-11 METAL CHIP 10K 5% 1/10W
R7843 1-216-809-11 METAL CHIP 100 5% 1/10W
JB
R7493 1-218-965-11 RES-CHIP 10K 5% 1/16W
R7494 1-218-965-11 RES-CHIP 10K 5% 1/16W
R7495 1-216-841-11 METAL CHIP 47K 5% 1/10W
R7496 1-218-965-11 RES-CHIP 10K 5% 1/16W
R7497 1-218-965-11 RES-CHIP 10K 5% 1/16W
R7499 1-218-965-11 RES-CHIP 10K 5% 1/16W
R7504 1-216-809-11 METAL CHIP 100 5% 1/10W
R7505 1-216-809-11 METAL CHIP 100 5% 1/10W
R7506 1-216-809-11 METAL CHIP 100 5% 1/10W
R7507 1-216-809-11 METAL CHIP 100 5% 1/10W
R7508 1-218-847-11 METAL CHIP 1K 0.5% 1/10W
R7509 1-216-809-11 METAL CHIP 100 5% 1/10W
R7510 1-216-809-11 METAL CHIP 100 5% 1/10W
R7511 1-216-809-11 METAL CHIP 100 5% 1/10W
R7512 1-216-809-11 METAL CHIP 100 5% 1/10W
R7529 1-218-990-81 SHORT CHIP 0
R7531 1-218-990-81 SHORT CHIP 0
R7532 1-218-990-81 SHORT CHIP 0
R7533 1-218-990-81 SHORT CHIP 0
R7537 1-218-990-81 SHORT CHIP 0
R7541 1-218-990-81 SHORT CHIP 0
R7542 1-218-990-81 SHORT CHIP 0
R7545 1-218-965-11 RES-CHIP 10K 5% 1/16W
R7550 1-218-990-81 SHORT CHIP 0
R7552 1-216-841-11 METAL CHIP 47K 5% 1/10W
R7844 1-216-845-11 METAL CHIP 100K 5% 1/10W
R7847 1-216-836-11 METAL CHIP 18K 5% 1/10W
R7848 1-216-839-11 METAL CHIP 33K 5% 1/10W
R7849 1-218-841-11 METAL CHIP 560 0.5% 1/10W
R7854 1-216-864-11 SHORT CHIP 0
R7856 1-216-864-11 SHORT CHIP 0
R7857 1-216-821-11 METAL CHIP 1K 5% 1/10W
R7859 1-216-829-11 METAL CHIP 4.7K 5% 1/10W
R7860 1-216-829-11 METAL CHIP 4.7K 5% 1/10W
R7864 1-216-805-11 METAL CHIP 47 5% 1/10W
R7865 1-216-821-11 METAL CHIP 1K 5% 1/10W
R7866 1-216-864-11 SHORT CHIP 0
R7867 1-216-864-11 SHORT CHIP 0
R7969 1-216-864-11 SHORT CHIP 0
R7970 1-216-864-11 SHORT CHIP 0
R7971 1-216-864-11 SHORT CHIP 0
R7972 1-216-864-11 SHORT CHIP 0
R8000 1-216-864-11 SHORT CHIP 0
R8003 1-216-833-11 METAL CHIP 10K 5% 1/10W
R8529 1-216-864-11 SHORT CHIP 0
R8530 1-216-864-11 SHORT CHIP 0
R8531 1-216-864-11 SHORT CHIP 0
R8532 1-216-864-11 SHORT CHIP 0
R8538 1-216-864-11 SHORT CHIP 0
R8539 1-216-864-11 SHORT CHIP 0
R7553 1-216-841-11 METAL CHIP 47K 5% 1/10W
R7560 1-216-841-11 METAL CHIP 47K 5% 1/10W
R7561 1-216-841-11 METAL CHIP 47K 5% 1/10W
R7564 1-216-864-11 SHORT CHIP 0
R7565 1-216-829-11 METAL CHIP 4.7K 5% 1/10W
R7566 1-216-829-11 METAL CHIP 4.7K 5% 1/10W
R7567 1-216-809-11 METAL CHIP 100 5% 1/10W
R7568 1-218-990-81 SHORT CHIP 0
R7570 1-218-990-81 SHORT CHIP 0
R7571 1-218-990-81 SHORT CHIP 0
R7577 1-216-809-11 METAL CHIP 100 5% 1/10W
R7578 1-218-965-11 RES-CHIP 10K 5% 1/16W
R7580 1-218-965-11 RES-CHIP 10K 5% 1/16W
R7588 1-218-965-11 RES-CHIP 10K 5% 1/16W
R7592 1-218-965-11 RES-CHIP 10K 5% 1/16W
R7599 1-218-990-81 SHORT CHIP 0
R7602 1-216-845-11 METAL CHIP 100K 5% 1/10W
R7805 1-216-829-11 METAL CHIP 4.7K 5% 1/10W
R7822 1-216-845-11 METAL CHIP 100K 5% 1/10W
R7828 1-216-836-11 METAL CHIP 18K 5% 1/10W
R8541 1-216-864-11 SHORT CHIP 0
R8560 1-216-864-11 SHORT CHIP 0
R8561 1-216-864-11 SHORT CHIP 0
R8562 1-216-864-11 SHORT CHIP 0
R8563 1-216-864-11 SHORT CHIP 0
R8581 1-216-864-11 SHORT CHIP 0
R8590 1-216-864-11 SHORT CHIP 0
R8597 1-216-864-11 SHORT CHIP 0
R9500 1-216-864-11 SHORT CHIP 0
R9501 1-216-864-11 SHORT CHIP 0
R9503 1-216-815-11 METAL CHIP 330 5% 1/10W
R9504 1-216-049-11 RES-CHIP 1K 5% 1/10W
R9505 1-216-813-11 METAL CHIP 220 5% 1/10W
R9506 1-216-864-11 SHORT CHIP 0
R9507 1-216-853-11 METAL CHIP 470K 5% 1/10W
R9508 1-216-815-11 METAL CHIP 330 5% 1/10W
R9509 1-216-049-11 RES-CHIP 1K 5% 1/10W
R9510 1-216-029-00 RES-CHIP 150 5% 1/10W
R9511 1-216-813-11 METAL CHIP 220 5% 1/10W
R9512 1-216-864-11 SHORT CHIP 0
- 95 -
Page 96

REF.NO. PART NO. DESCRIPTION REMARK REF.NO. PART NO. DESCRIPTION REMARK
R9513 1-216-025-11 RES-CHIP 100 5% 1/10W
R9514 1-216-025-11 RES-CHIP 100 5% 1/10W
R9515 1-216-837-11 METAL CHIP 22K 5% 1/10W
R9516 1-216-853-11 METAL CHIP 470K 5% 1/10W
R9517 1-216-853-11 METAL CHIP 470K 5% 1/10W
R9566 1-218-285-11 METAL CHIP 75 5% 1/10W
R9567 1-216-864-11 SHORT CHIP 0
R9568 1-218-285-11 METAL CHIP 75 5% 1/10W
R9569 1-216-864-11 SHORT CHIP 0
R9570 1-218-285-11 METAL CHIP 75 5% 1/10W
JB
R9518 1-216-853-11 METAL CHIP 470K 5% 1/10W
R9520 1-216-029-00 RES-CHIP 150 5% 1/10W
R9521 1-216-029-00 RES-CHIP 150 5% 1/10W
R9522 1-216-029-00 RES-CHIP 150 5% 1/10W
R9523 1-216-025-11 RES-CHIP 100 5% 1/10W
R9524 1-216-025-11 RES-CHIP 100 5% 1/10W
R9525 1-216-025-11 RES-CHIP 100 5% 1/10W
R9526 1-216-022-00 RES-CHIP 75 5% 1/10W
R9527 1-216-029-00 RES-CHIP 150 5% 1/10W
R9528 1-216-029-00 RES-CHIP 150 5% 1/10W
R9529 1-216-025-11 RES-CHIP 100 5% 1/10W
R9530 1-216-809-11 METAL CHIP 100 5% 1/10W
R9531 1-216-815-11 METAL CHIP 330 5% 1/10W
R9532 1-216-049-11 RES-CHIP 1K 5% 1/10W
R9533 1-216-815-11 METAL CHIP 330 5% 1/10W
R9534 1-216-821-11 METAL CHIP 1K 5% 1/10W
R9535 1-216-813-11 METAL CHIP 220 5% 1/10W
R9536 1-216-864-11 SHORT CHIP 0
R9537 1-216-813-11 METAL CHIP 220 5% 1/10W
R9538 1-216-853-11 METAL CHIP 470K 5% 1/10W
R9539 1-216-853-11 METAL CHIP 470K 5% 1/10W
R9540 1-216-049-11 RES-CHIP 1K 5% 1/10W
R9541 1-216-029-00 RES-CHIP 150 5% 1/10W
R9543 1-216-029-00 RES-CHIP 150 5% 1/10W
R9544 1-216-864-11 SHORT CHIP 0
R9588 1-216-834-11 METAL CHIP 12K 5% 1/10W
R9589 1-216-834-11 METAL CHIP 12K 5% 1/10W
R9606 1-216-864-11 SHORT CHIP 0
R9611 1-216-809-11 METAL CHIP 100 5% 1/10W
R9612 1-216-825-11 METAL CHIP 2.2K 5% 1/10W
R9613 1-216-809-11 METAL CHIP 100 5% 1/10W
R9614 1-216-864-11 SHORT CHIP 0
R9615 1-216-821-11 METAL CHIP 1K 5% 1/10W
R9616 1-216-825-11 METAL CHIP 2.2K 5% 1/10W
R9617 1-216-809-11 METAL CHIP 100 5% 1/10W
R9618 1-216-825-11 METAL CHIP 2.2K 5% 1/10W
R9619 1-216-825-11 METAL CHIP 2.2K 5% 1/10W
R9626 1-216-809-11 METAL CHIP 100 5% 1/10W
R9627 1-216-825-11 METAL CHIP 2.2K 5% 1/10W
R9628 1-216-825-11 METAL CHIP 2.2K 5% 1/10W
R9629 1-216-825-11 METAL CHIP 2.2K 5% 1/10W
R9630 1-216-809-11 METAL CHIP 100 5% 1/10W
R9631 1-216-809-11 METAL CHIP 100 5% 1/10W
R9632 1-216-864-11 SHORT CHIP 0
R9633 1-216-864-11 SHORT CHIP 0
R9634 1-216-864-11 SHORT CHIP 0
R9638 1-216-825-11 METAL CHIP 2.2K 5% 1/10W
R9639 1-216-809-11 METAL CHIP 100 5% 1/10W
R9640 1-216-825-11 METAL CHIP 2.2K 5% 1/10W
R9641 1-216-825-11 METAL CHIP 2.2K 5% 1/10W
R9545 1-216-025-11 RES-CHIP 100 5% 1/10W
R9546 1-216-025-11 RES-CHIP 100 5% 1/10W
R9547 1-216-025-11 RES-CHIP 100 5% 1/10W
R9548 1-216-837-11 METAL CHIP 22K 5% 1/10W
R9549 1-216-853-11 METAL CHIP 470K 5% 1/10W
R9550 1-216-853-11 METAL CHIP 470K 5% 1/10W
R9551 1-216-022-00 RES-CHIP 75 5% 1/10W
R9552 1-216-029-00 RES-CHIP 150 5% 1/10W
R9553 1-216-029-00 RES-CHIP 150 5% 1/10W
R9554 1-216-029-00 RES-CHIP 150 5% 1/10W
R9555 1-216-029-00 RES-CHIP 150 5% 1/10W
R9556 1-216-025-11 RES-CHIP 100 5% 1/10W
R9557 1-216-025-11 RES-CHIP 100 5% 1/10W
R9558 1-216-025-11 RES-CHIP 100 5% 1/10W
R9559 1-216-025-11 RES-CHIP 100 5% 1/10W
R9560 1-216-864-11 SHORT CHIP 0
R9561 1-216-864-11 SHORT CHIP 0
R9562 1-216-864-11 SHORT CHIP 0
R9564 1-216-864-11 SHORT CHIP 0
R9565 1-216-864-11 SHORT CHIP 0
R9642 1-216-809-11 METAL CHIP 100 5% 1/10W
R9643 1-216-809-11 METAL CHIP 100 5% 1/10W
R9644 1-216-864-11 SHORT CHIP 0
R9645 1-216-864-11 SHORT CHIP 0
R9652 1-216-825-11 METAL CHIP 2.2K 5% 1/10W
R9653 1-216-825-11 METAL CHIP 2.2K 5% 1/10W
R9656 1-216-809-11 METAL CHIP 100 5% 1/10W
R9658 1-216-830-11 METAL CHIP 5.6K 5% 1/10W
R9659 1-218-867-11 METAL CHIP 6.8K 0.5% 1/10W
R9660 1-218-859-11 METAL CHIP 3.3K 0.5% 1/10W
R9661 1-216-830-11 METAL CHIP 5.6K 5% 1/10W
R9662 1-218-867-11 METAL CHIP 6.8K 0.5% 1/10W
R9663 1-216-809-11 METAL CHIP 100 5% 1/10W
R9664 1-218-861-11 METAL CHIP 3.9K 0.5% 1/10W
R9666 1-216-809-11 METAL CHIP 100 5% 1/10W
R9672 1-216-821-11 METAL CHIP 1K 5% 1/10W
R9673 1-216-813-11 METAL CHIP 220 5% 1/10W
R9675 1-216-821-11 METAL CHIP 1K 5% 1/10W
R9676 1-216-821-11 METAL CHIP 1K 5% 1/10W
R9677 1-216-821-11 METAL CHIP 1K 5% 1/10W
- 96 -
Page 97

REF.NO. PART NO. DESCRIPTION REMARK REF.NO. PART NO. DESCRIPTION REMARK
R9678 1-216-821-11 METAL CHIP 1K 5% 1/10W
R9679 1-216-809-11 METAL CHIP 100 5% 1/10W
R9680 1-216-821-11 METAL CHIP 1K 5% 1/10W
R9681 1-216-809-11 METAL CHIP 100 5% 1/10W
R9689 1-216-821-11 METAL CHIP 1K 5% 1/10W
R9748 1-216-839-11 METAL CHIP 33K 5% 1/10W
R9749 1-216-833-11 METAL CHIP 10K 5% 1/10W
R9750 1-216-821-11 METAL CHIP 1K 5% 1/10W
R9751 1-216-864-11 SHORT CHIP 0
R9752 1-216-022-00 RES-CHIP 75 5% 1/10W
JB
R9690 1-216-821-11 METAL CHIP 1K 5% 1/10W
R9691 1-216-853-11 METAL CHIP 470K 5% 1/10W
R9692 1-216-853-11 METAL CHIP 470K 5% 1/10W
R9693 1-216-029-00 RES-CHIP 150 5% 1/10W
R9694 1-216-864-11 SHORT CHIP 0
R9695 1-216-864-11 SHORT CHIP 0
R9696 1-216-864-11 SHORT CHIP 0
R9697 1-216-029-00 RES-CHIP 150 5% 1/10W
R9698 1-216-029-00 RES-CHIP 150 5% 1/10W
R9699 1-216-029-00 RES-CHIP 150 5% 1/10W
R9700 1-216-029-00 RES-CHIP 150 5% 1/10W
R9701 1-216-029-00 RES-CHIP 150 5% 1/10W
R9702 1-216-029-00 RES-CHIP 150 5% 1/10W
R9703 1-216-029-00 RES-CHIP 150 5% 1/10W
R9704 1-216-029-00 RES-CHIP 150 5% 1/10W
R9705 1-216-029-00 RES-CHIP 150 5% 1/10W
R9706 1-216-029-00 RES-CHIP 150 5% 1/10W
R9707 1-216-029-00 RES-CHIP 150 5% 1/10W
R9708 1-216-029-00 RES-CHIP 150 5% 1/10W
R9709 1-216-029-00 RES-CHIP 150 5% 1/10W
R9713 1-216-864-11 SHORT CHIP 0
R9722 1-218-875-11 METAL CHIP 15K 0.5% 1/10W
R9723 1-218-875-11 METAL CHIP 15K 0.5% 1/10W
R9725 1-216-864-11 SHORT CHIP 0
R9726 1-216-864-11 SHORT CHIP 0
R9727 1-216-864-11 SHORT CHIP 0
R9728 1-216-864-11 SHORT CHIP 0
R9729 1-216-864-11 SHORT CHIP 0
R9730 1-216-025-11 RES-CHIP 100 5% 1/10W
R9731 1-216-025-11 RES-CHIP 100 5% 1/10W
R9732 1-216-829-11 METAL CHIP 4.7K 5% 1/10W
R9733 1-216-829-11 METAL CHIP 4.7K 5% 1/10W
R9734 1-216-829-11 METAL CHIP 4.7K 5% 1/10W
R9735 1-216-829-11 METAL CHIP 4.7K 5% 1/10W
R9736 1-216-809-11 METAL CHIP 100 5% 1/10W
R9737 1-216-809-11 METAL CHIP 100 5% 1/10W
R9738 1-216-809-11 METAL CHIP 100 5% 1/10W
R9739 1-216-809-11 METAL CHIP 100 5% 1/10W
R9740 1-216-809-11 METAL CHIP 100 5% 1/10W
R9741 1-216-809-11 METAL CHIP 100 5% 1/10W
R9742 1-216-809-11 METAL CHIP 100 5% 1/10W
R9744 1-216-817-11 METAL CHIP 470 5% 1/10W
R9745 1-216-837-11 METAL CHIP 22K 5% 1/10W
R9746 1-216-849-11 METAL CHIP 220K 5% 1/10W
R9747 1-216-839-11 METAL CHIP 33K 5% 1/10W
R9753 1-216-022-00 RES-CHIP 75 5% 1/10W
R9754 1-216-025-11 RES-CHIP 100 5% 1/10W
R9759 1-216-864-11 SHORT CHIP 0
R9760 1-216-864-11 SHORT CHIP 0
R9761 1-216-864-11 SHORT CHIP 0
R9762 1-216-864-11 SHORT CHIP 0
R9763 1-216-864-11 SHORT CHIP 0
R9764 1-216-864-11 SHORT CHIP 0
R9766 1-218-965-11 RES-CHIP 10K 5% 1/16W
R9767 1-216-809-11 METAL CHIP 100 5% 1/10W
R9769 1-218-933-11 RES-CHIP 22 5% 1/16W
R9770 1-216-809-11 METAL CHIP 100 5% 1/10W
R9771 1-218-855-11 METAL CHIP 2.2K 0.5% 1/10W
R9772 1-218-855-11 METAL CHIP 2.2K 0.5% 1/10W
R9773 1-216-864-11 SHORT CHIP 0
R9774 1-216-864-11 SHORT CHIP 0
R9775 1-218-827-11 METAL CHIP 150 0.5% 1/10W
R9776 1-218-827-11 METAL CHIP 150 0.5% 1/10W
R9777 1-218-827-11 METAL CHIP 150 0.5% 1/10W
R9778 1-218-827-11 METAL CHIP 150 0.5% 1/10W
R9779 1-218-827-11 METAL CHIP 150 0.5% 1/10W
R9780 1-218-827-11 METAL CHIP 150 0.5% 1/10W
R9781 1-216-833-11 METAL CHIP 10K 5% 1/10W
R9782 1-216-833-11 METAL CHIP 10K 5% 1/10W
< RESISTOR CHIP >
RB1000 1-234-371-21 RES, NETWORK 47 (1005X4)
RB1001 1-234-371-21 RES, NETWORK 47 (1005X4)
RB1002 1-234-372-21 RES, NETWORK 100 (1005X4)
RB1003 1-234-372-21 RES, NETWORK 100 (1005X4)
RB1004 1-234-372-21 RES, NETWORK 100 (1005X4)
RB1005 1-234-371-21 RES, NETWORK 47 (1005X4)
RB1006 1-234-371-21 RES, NETWORK 47 (1005X4)
RB1007 1-234-372-21 RES, NETWORK 100 (1005X4)
RB1008 1-234-377-21 RES, NETWORK 4.7K (1005X4)
RB1009 1-234-377-21 RES, NETWORK 4.7K (1005X4)
RB1010 1-234-372-21 RES, NETWORK 100 (1005X4)
RB1011 1-234-372-21 RES, NETWORK 100 (1005X4)
RB1012 1-234-371-21 RES, NETWORK 47 (1005X4)
RB1013 1-234-371-21 RES, NETWORK 47 (1005X4)
RB1014 1-234-372-21 RES, NETWORK 100 (1005X4)
RB1015 1-234-372-21 RES, NETWORK 100 (1005X4)
RB1016 1-234-372-21 RES, NETWORK 100 (1005X4)
RB1017 1-234-372-21 RES, NETWORK 100 (1005X4)
RB4703 1-234-370-21 RES, NETWORK 22 (1005X4)
- 97 -
Page 98
REF.NO. PART NO. DESCRIPTION REMARK REF.NO. PART NO. DESCRIPTION REMARK
RB4704 1-234-370-21 RES, NETWORK 22 (1005X4)
RB4705 1-234-370-21 RES, NETWORK 22 (1005X4)
RB4706 1-234-370-21 RES, NETWORK 22 (1005X4)
RB5500 1-234-370-21 RES, NETWORK 22 (1005X4)
RB5501 1-234-370-21 RES, NETWORK 22 (1005X4)
RB5502 1-234-370-21 RES, NETWORK 22 (1005X4)
RB5503 1-234-370-21 RES, NETWORK 22 (1005X4)
RB5504 1-234-370-21 RES, NETWORK 22 (1005X4)
RB5505 1-234-370-21 RES, NETWORK 22 (1005X4)
RB5506 1-234-370-21 RES, NETWORK 22 (1005X4)
RB5507 1-234-370-21 RES, NETWORK 22 (1005X4)
RB5509 1-234-370-21 RES, NETWORK 22 (1005X4)
RB5510 1-234-370-21 RES, NETWORK 22 (1005X4)
RB5511 1-234-370-21 RES, NETWORK 22 (1005X4)
RB5512 1-234-370-21 RES, NETWORK 22 (1005X4)
< VARISTOR >
VDR004 1-803-974-21 VARISTOR, CHIP (1608)
VDR005 1-803-974-21 VARISTOR, CHIP (1608)
VDR006 1-803-974-21 VARISTOR, CHIP (1608)
VDR007 1-803-974-21 VARISTOR, CHIP (1608)
VDR008 1-803-974-21 VARISTOR, CHIP (1608)
VDR009 1-803-974-21 VARISTOR, CHIP (1608)
VDR010 1-803-974-21 VARISTOR, CHIP (1608)
VDR011 1-803-974-21 VARISTOR, CHIP (1608)
< CRYSTAL >
X1000 1-795-537-21 VIBRATOR, CRYSTAL
X2500 1-781-730-11 VIBRATOR, CRYSTAL
X5000 1-795-790-11 VIBRATOR, CRYSTAL
X7800 1-795-612-11 VIBRATOR, CRYSTAL
*A-1107-972-A H3 BOARD COMPLETE
A9001 *4-042-408-02 PIN(45), WIRE
< CAPACITOR >
C3856 1-162-964-11 CERAMIC CHIP 0.001UF 10.00% 50V
C3857 1-162-964-11 CERAMIC CHIP 0.001UF 10.00% 50V
C4300 1-107-826-11 CERAMIC CHIP 0.1UF 10.00% 16V
C4305 1-162-968-11 CERAMIC CHIP 0.0047UF 10.00% 50V
C4307 1-162-968-11 CERAMIC CHIP 0.0047UF 10.00% 50V
C4309 1-162-927-11 CERAMIC CHIP 100PF 5.00% 50V
< CONNECTOR >
CN4300 1-784-828-11 CONNECTOR, D SUB
CN4301 1-564-509-11 PLUG, CONNECTOR 6P
CN4302 1-764-334-11 PIN, CONNECTOR(PCB)(V TYPE)11P
CN4303 *1-816-979-51 PLUG, CONNECTOR 8P
CN4304 1-565-666-12 TERMINAL, S 4P
CN4305 *1-564-507-11 PLUG, CONNECTOR 4P
< DIODE >
D4300 8-719-069-55 DIODE UDZSTE-175.6B
D4301 8-719-016-73 DIODE STZ6.8T
D4302 8-719-016-73 DIODE STZ6.8T
D4303 8-719-016-73 DIODE STZ6.8T
D4304 8-719-016-73 DIODE STZ6.8T
D4305 8-719-016-73 DIODE STZ6.8T
D4306 8-719-016-73 DIODE STZ6.8T
D4307 8-719-069-55 DIODE UDZSTE-175.6B
D4308 8-719-069-55 DIODE UDZSTE-175.6B
D4309 8-719-069-55 DIODE UDZSTE-175.6B
D4310 8-719-069-55 DIODE UDZSTE-175.6B
D4311 8-719-069-55 DIODE UDZSTE-175.6B
D4312 8-719-069-55 DIODE UDZSTE-175.6B
D4313 8-719-069-55 DIODE UDZSTE-175.6B
< FERRITE BEAD >
FB4300 1-414-813-11 FERRITE 0UH
< IC >
IC4300 8-759-661-55 IC ST24FC21M6TR
< SOCKET >
J4300 1-580-443-11 JACK, PIN 3P
J4301 1-566-822-21 JACK
J4302 1-568-267-11 JACK
< COIL >
L4301 1-414-189-31 INDUCTOR 100UH
L4302 1-414-189-31 INDUCTOR 100UH
L4303 1-410-985-42 INDUCTOR 0.22UH
< TRANSISTOR >
Q4300 8-729-010-05 TRANSISTOR MSB709-RT1
Q4303 8-729-010-05 TRANSISTOR MSB709-RT1
< RESISTOR >
R3881 1-216-853-11 METAL CHIP 470K 5% 1/10W
R3883 1-216-853-11 METAL CHIP 470K 5% 1/10W
R3889 1-216-864-11 SHORT CHIP 0
R3890 1-216-864-11 SHORT CHIP 0
R3891 1-216-864-11 SHORT CHIP 0
R3892 1-216-864-11 SHORT CHIP 0
R3893 1-216-864-11 SHORT CHIP 0
R4300 1-216-835-11 METAL CHIP 15K 5% 1/10W
R4301 1-216-816-11 METAL CHIP 390 5% 1/10W
R4302 1-216-835-11 METAL CHIP 15K 5% 1/10W
H3JB
- 98 -
Page 99
H3
REF.NO. PART NO. DESCRIPTION REMARK REF.NO. PART NO. DESCRIPTION REMARK
R4303 1-216-864-11 SHORT CHIP 0
R4304 1-216-813-11 METAL CHIP 220 5% 1/10W
R4305 1-216-805-11 METAL CHIP 47 5% 1/10W
R4307 1-216-849-11 METAL CHIP 220K 5% 1/10W
R4308 1-216-849-11 METAL CHIP 220K 5% 1/10W
C2503 1-164-156-11 CERAMIC CHIP 0.1UF 25V
C2505 1-164-156-11 CERAMIC CHIP 0.1UF 25V
C2506 1-164-505-11 CERAMIC CHIP 2.2UF 16V
C2507 1-164-156-11 CERAMIC CHIP 0.1UF 25V
C2509 1-117-370-11 CERAMIC CHIP 10UF 10V
C
R4309 1-216-816-11 METAL CHIP 390 5% 1/10W
R4311 1-216-816-11 METAL CHIP 390 5% 1/10W
R4312 1-216-864-11 SHORT CHIP 0
R4313 1-216-864-11 SHORT CHIP 0
R4314 1-216-805-11 METAL CHIP 47 5% 1/10W
R4315 1-216-805-11 METAL CHIP 47 5% 1/10W
R4316 1-216-864-11 SHORT CHIP 0
R4317 1-216-821-11 METAL CHIP 1K 5% 1/10W
R4318 1-216-845-11 METAL CHIP 100K 5% 1/10W
R4321 1-216-864-11 SHORT CHIP 0
R4322 1-216-864-11 SHORT CHIP 0
R4323 1-216-807-11 METAL CHIP 68 5% 1/10W
< VARISTOR >
VDR4300 1-803-974-21 VARISTOR, CHIP (1608)
VDR4301 1-803-974-21 VARISTOR, CHIP (1608)
*A-1087-559-A C BOARD COMPLETE
< CAPACITOR >
C1322 1-164-227-11 CERAMIC CHIP 0.022UF 10.00% 25V
C1350 1-100-566-91 CERAMIC CHIP 0.1UF 10.00% 25V
C1351 1-128-992-21 ELECT CHIP 47UF 20% 25V
C1366 1-100-566-91 CERAMIC CHIP 0.1UF 10.00% 25V
C1375 1-100-566-91 CERAMIC CHIP 0.1UF 10.00% 25V
C1376 1-100-566-91 CERAMIC CHIP 0.1UF 10.00% 25V
C1377 1-100-566-91 CERAMIC CHIP 0.1UF 10.00% 25V
C1378 1-164-227-11 CERAMIC CHIP 0.022UF 10.00% 25V
C1379 1-100-566-91 CERAMIC CHIP 0.1UF 10.00% 25V
C1380 1-100-566-91 CERAMIC CHIP 0.1UF 10.00% 25V
C1381 1-100-566-91 CERAMIC CHIP 0.1UF 10.00% 25V
C1382 1-162-970-11 CERAMIC CHIP 0.01UF 10.00% 25V
C1383 1-162-970-11 CERAMIC CHIP 0.01UF 10.00% 25V
C1390 1-128-992-21 ELECT CHIP 47UF 20% 25V
C1398 1-100-566-91 CERAMIC CHIP 0.1UF 10.00% 25V
C1399 1-100-566-91 CERAMIC CHIP 0.1UF 10.00% 25V
C2046 1-164-156-11 CERAMIC CHIP 0.1UF 25V
C2047 1-164-505-11 CERAMIC CHIP 2.2UF 16V
C2048 1-164-156-11 CERAMIC CHIP 0.1UF 25V
C2049 1-117-370-11 CERAMIC CHIP 10UF 10V
C2050 1-164-505-11 CERAMIC CHIP 2.2UF 16V
C2052 1-117-370-11 CERAMIC CHIP 10UF 10V
C2072 1-164-156-11 CERAMIC CHIP 0.1UF 25V
C2501 1-164-156-11 CERAMIC CHIP 0.1UF 25V
C2502 1-117-370-11 CERAMIC CHIP 10UF 10V
C2510 1-164-156-11 CERAMIC CHIP 0.1UF 25V
C2512 1-164-156-11 CERAMIC CHIP 0.1UF 25V
C2513 1-164-156-11 CERAMIC CHIP 0.1UF 25V
C2514 1-164-156-11 CERAMIC CHIP 0.1UF 25V
C2515 1-128-992-21 ELECT CHIP 47UF 20% 25V
C2516 1-128-992-21 ELECT CHIP 47UF 20% 25V
C2517 1-164-156-11 CERAMIC CHIP 0.1UF 25V
C2518 1-164-505-11 CERAMIC CHIP 2.2UF 16V
C2519 1-164-505-11 CERAMIC CHIP 2.2UF 16V
C2520 1-128-992-21 ELECT CHIP 47UF 20% 25V
C2521 1-164-156-11 CERAMIC CHIP 0.1UF 25V
C2522 1-164-156-11 CERAMIC CHIP 0.1UF 25V
C2523 1-164-156-11 CERAMIC CHIP 0.1UF 25V
C2524 1-164-156-11 CERAMIC CHIP 0.1UF 25V
C2527 1-128-992-21 ELECT CHIP 47UF 20% 25V
C2529 1-164-156-11 CERAMIC CHIP 0.1UF 25V
C2530 1-164-156-11 CERAMIC CHIP 0.1UF 25V
C2531 1-164-156-11 CERAMIC CHIP 0.1UF 25V
C2551 1-164-156-11 CERAMIC CHIP 0.1UF 25V
C2552 1-164-156-11 CERAMIC CHIP 0.1UF 25V
C2553 1-128-992-21 ELECT CHIP 47UF 20% 25V
C2554 1-164-156-11 CERAMIC CHIP 0.1UF 25V
C2555 1-164-156-11 CERAMIC CHIP 0.1UF 25V
C2556 1-164-156-11 CERAMIC CHIP 0.1UF 25V
C2557 1-128-992-21 ELECT CHIP 47UF 20% 25V
C2558 1-164-156-11 CERAMIC CHIP 0.1UF 25V
C2601 1-164-156-11 CERAMIC CHIP 0.1UF 25V
C2602 1-117-370-11 CERAMIC CHIP 10UF 10V
C2603 1-164-156-11 CERAMIC CHIP 0.1UF 25V
C2605 1-164-156-11 CERAMIC CHIP 0.1UF 25V
C2606 1-164-505-11 CERAMIC CHIP 2.2UF 16V
C2607 1-164-156-11 CERAMIC CHIP 0.1UF 25V
C2609 1-117-370-11 CERAMIC CHIP 10UF 10V
C2610 1-164-156-11 CERAMIC CHIP 0.1UF 25V
C2612 1-164-156-11 CERAMIC CHIP 0.1UF 25V
C2613 1-164-156-11 CERAMIC CHIP 0.1UF 25V
C2615 1-164-156-11 CERAMIC CHIP 0.1UF 25V
C2616 1-126-396-11 ELECT CHIP 47UF 20.00% 16V
C2617 1-164-156-11 CERAMIC CHIP 0.1UF 25V
C2618 1-164-505-11 CERAMIC CHIP 2.2UF 16V
C2619 1-164-505-11 CERAMIC CHIP 2.2UF 16V
C2620 1-126-204-11 ELECT CHIP 47UF 20.00% 16V
C2621 1-164-156-11 CERAMIC CHIP 0.1UF 25V
C2622 1-164-156-11 CERAMIC CHIP 0.1UF 25V
C2623 1-164-156-11 CERAMIC CHIP 0.1UF 25V
- 99 -
Page 100

REF.NO. PART NO. DESCRIPTION REMARK REF.NO. PART NO. DESCRIPTION REMARK
C2624 1-164-156-11 CERAMIC CHIP 0.1UF 25V
C2625 1-164-156-11 CERAMIC CHIP 0.1UF 25V
C2626 1-164-156-11 CERAMIC CHIP 0.1UF 25V
C2627 1-126-396-11 ELECT CHIP 47UF 20.00% 16V
C2628 1-128-992-21 ELECT CHIP 47UF 20% 25V
C2720 1-126-396-11 ELECT CHIP 47UF 20.00% 16V
C2721 1-164-156-11 CERAMIC CHIP 0.1UF 25V
C2722 1-164-156-11 CERAMIC CHIP 0.1UF 25V
C2723 1-164-156-11 CERAMIC CHIP 0.1UF 25V
C2724 1-164-156-11 CERAMIC CHIP 0.1UF 25V
C
C2629 1-164-156-11 CERAMIC CHIP 0.1UF 25V
C2630 1-164-156-11 CERAMIC CHIP 0.1UF 25V
C2631 1-128-992-21 ELECT CHIP 47UF 20% 25V
C2632 1-164-156-11 CERAMIC CHIP 0.1UF 25V
C2651 1-164-156-11 CERAMIC CHIP 0.1UF 25V
C2652 1-164-156-11 CERAMIC CHIP 0.1UF 25V
C2653 1-128-992-21 ELECT CHIP 47UF 20% 25V
C2654 1-164-156-11 CERAMIC CHIP 0.1UF 25V
C2655 1-164-156-11 CERAMIC CHIP 0.1UF 25V
C2656 1-164-156-11 CERAMIC CHIP 0.1UF 25V
C2657 1-164-156-11 CERAMIC CHIP 0.1UF 25V
C2658 1-128-992-21 ELECT CHIP 47UF 20% 25V
C2659 1-164-156-11 CERAMIC CHIP 0.1UF 25V
C2661 1-128-992-21 ELECT CHIP 47UF 20% 25V
C2662 1-164-156-11 CERAMIC CHIP 0.1UF 25V
C2663 1-164-156-11 CERAMIC CHIP 0.1UF 25V
C2664 1-164-156-11 CERAMIC CHIP 0.1UF 25V
C2665 1-164-156-11 CERAMIC CHIP 0.1UF 25V
C2666 1-128-992-21 ELECT CHIP 47UF 20% 25V
C2678 1-162-970-11 CERAMIC CHIP 0.01UF 10.00% 25V
C2679 1-162-970-11 CERAMIC CHIP 0.01UF 10.00% 25V
C2681 1-162-970-11 CERAMIC CHIP 0.01UF 10.00% 25V
C2682 1-162-970-11 CERAMIC CHIP 0.01UF 10.00% 25V
C2684 1-162-970-11 CERAMIC CHIP 0.01UF 10.00% 25V
C2685 1-162-970-11 CERAMIC CHIP 0.01UF 10.00% 25V
C2725 1-164-156-11 CERAMIC CHIP 0.1UF 25V
C2726 1-162-970-11 CERAMIC CHIP 0.01UF 10.00% 25V
C2727 1-126-396-11 ELECT CHIP 47UF 20.00% 16V
C2728 1-162-970-11 CERAMIC CHIP 0.01UF 10.00% 25V
C2729 1-164-156-11 CERAMIC CHIP 0.1UF 25V
C2730 1-162-970-11 CERAMIC CHIP 0.01UF 10.00% 25V
C2731 1-165-884-91 CERAMIC CHIP 2.2UF 10% 6.3V
C2732 1-165-989-11 CERAMIC CHIP 10UF 10% 6.3V
C2801 1-164-156-11 CERAMIC CHIP 0.1UF 25V
C2802 1-128-992-21 ELECT CHIP 47UF 20% 25V
C2804 1-128-992-21 ELECT CHIP 47UF 20% 25V
C2836 1-162-926-11 CERAMIC CHIP 82PF 5.00% 50V
C2837 1-162-926-11 CERAMIC CHIP 82PF 5.00% 50V
C2838 1-162-926-11 CERAMIC CHIP 82PF 5.00% 50V
C2839 1-162-926-11 CERAMIC CHIP 82PF 5.00% 50V
C3011 1-117-681-11 ELECT CHIP 100UF 20.00% 16V
C3013 1-117-681-11 ELECT CHIP 100UF 20.00% 16V
C3017 1-117-681-11 ELECT CHIP 100UF 20.00% 16V
C3018 1-126-204-11 ELECT CHIP 47UF 20.00% 16V
C3019 1-164-156-11 CERAMIC CHIP 0.1UF 25V
C3021 1-164-156-11 CERAMIC CHIP 0.1UF 25V
C3025 1-164-156-11 CERAMIC CHIP 0.1UF 25V
C3026 1-164-156-11 CERAMIC CHIP 0.1UF 25V
C3027 1-164-156-11 CERAMIC CHIP 0.1UF 25V
C3029 1-164-156-11 CERAMIC CHIP 0.1UF 25V
C2694 1-162-970-11 CERAMIC CHIP 0.01UF 10.00% 25V
C2697 1-162-970-11 CERAMIC CHIP 0.01UF 10.00% 25V
C2698 1-100-159-91 CERAMIC CHIP 22UF 10% 6.3V
C2699 1-165-884-91 CERAMIC CHIP 2.2UF 10% 6.3V
C2700 1-162-970-11 CERAMIC CHIP 0.01UF 10.00% 25V
C2701 1-164-156-11 CERAMIC CHIP 0.1UF 25V
C2702 1-117-370-11 CERAMIC CHIP 10UF 10V
C2703 1-164-156-11 CERAMIC CHIP 0.1UF 25V
C2705 1-164-156-11 CERAMIC CHIP 0.1UF 25V
C2706 1-164-505-11 CERAMIC CHIP 2.2UF 16V
C2707 1-164-156-11 CERAMIC CHIP 0.1UF 25V
C2709 1-117-370-11 CERAMIC CHIP 10UF 10V
C2710 1-164-156-11 CERAMIC CHIP 0.1UF 25V
C2712 1-164-156-11 CERAMIC CHIP 0.1UF 25V
C2713 1-164-156-11 CERAMIC CHIP 0.1UF 25V
C2715 1-164-156-11 CERAMIC CHIP 0.1UF 25V
C2716 1-126-396-11 ELECT CHIP 47UF 20.00% 16V
C2717 1-164-156-11 CERAMIC CHIP 0.1UF 25V
C2718 1-164-505-11 CERAMIC CHIP 2.2UF 16V
C2719 1-164-505-11 CERAMIC CHIP 2.2UF 16V
C3033 1-164-156-11 CERAMIC CHIP 0.1UF 25V
C3034 1-164-156-11 CERAMIC CHIP 0.1UF 25V
C3035 1-117-681-11 ELECT CHIP 100UF 20.00% 16V
C3037 1-117-681-11 ELECT CHIP 100UF 20.00% 16V
C3056 1-117-681-11 ELECT CHIP 100UF 20.00% 16V
C3057 1-126-204-11 ELECT CHIP 47UF 20.00% 16V
C3061 1-162-927-11 CERAMIC CHIP 100PF 5.00% 50V
C3062 1-162-927-11 CERAMIC CHIP 100PF 5.00% 50V
C3101 1-164-156-11 CERAMIC CHIP 0.1UF 25V
C3102 1-115-156-11 CERAMIC CHIP 1UF 10V
C3103 1-164-156-11 CERAMIC CHIP 0.1UF 25V
C3104 1-124-779-00 ELECT CHIP 10UF 20.00% 16V
C3105 1-164-156-11 CERAMIC CHIP 0.1UF 25V
C3106 1-126-204-11 ELECT CHIP 47UF 20.00% 16V
C3201 1-100-597-91 CERAMIC CHIP 0.1UF 10% 25V
C3202 1-100-597-91 CERAMIC CHIP 0.1UF 10% 25V
C3203 1-165-989-11 CERAMIC CHIP 10UF 10% 6.3V
C3204 1-100-597-91 CERAMIC CHIP 0.1UF 10% 25V
C3205 1-165-989-11 CERAMIC CHIP 10UF 10% 6.3V
C3206 1-100-597-91 CERAMIC CHIP 0.1UF 10% 25V
- 100 -
 Loading...