

Page 1

©B64-2223-00 (KW/EW)
COMPACT
DIGITAL AUDIO
Take the time to read through this instruction manual.
Familiarity with installation and operation procedures will help you
obtain the best performance from your new compact disc auto changer.
For your records
Record the serial number, found on the back of the unit, in the spaces designated on the warranty card, and in the space provided below. Refer to the
model and serial numbers whenever you call upon your KENWOOD dealer for
information or service on the product.
Model KDC-CMP59FM Serial number
10 DISC MP3 CD AUTOCHANGER / CONTROLLER / FM MODULATOR SYSTEM
INSTRUCTION MANUAL
CHANGEUR AUTOMATIQUE DE MP3 CD 10 DISQUES / CONTROLEUR /
SYSTEME A MODULATION DE FM
SISTEMA DEL MODULADOR DE FM / CONTROLADOR / CAMBIADOR
AUTOMATICO DE 10 DISCOS MP3 CD
MANUAL DE INSTRUCCIONES
SISTEMA MODULADOR FM/CONTROLADOR / CHANGER AUTOMÁTICO DE
10
DISCOS MP3 CD
MANUAL DE INSTRUÇÕES
KDC-CMP59FM
MODE D’EMPLOI
Page 2

Contents
Before use
Warning.........................................................................................3
English
Safety Precautions........................................................................4
Notes on playing MP3...................................................................6
Handling Compact Discs...............................................................8
Loading Compact Discs ................................................................9
Buttons
Display Unit ................................................................................10
Remote .......................................................................................10
Operations
Playing CD & MP3.......................................................................10
Fast Fowarding and Reversing....................................................11
Track Search................................................................................11
Album Search..............................................................................11
Direct Track Search.....................................................................12
Direct Album Search...................................................................12
Track Repeat...............................................................................12
Album Repeat .............................................................................12
Track Scan...................................................................................13
Random Play...............................................................................13
Folder Search..............................................................................13
Changing the Transmission Frequency.......................................14
Modulation level/Dynamic control...............................................15
Installation
Accessories.................................................................................16
Installation Procedure..................................................................16
Installation...................................................................................17
Connecting Wires to Terminals...................................................19
Troubleshooting guide........................................................20
Specifications..........................................................................23
— 2 —
Page 3

2Warning
2CAUTION
Use of controls or adjustments or
performance of procedures other than those
specified herein may result in hazardous
radiation exposure.
In compliance with Federal Regulations,
following are reproductions of labels on, or
inside the product relating to laser product
safety.
KENWOOD CORPORATION
2967-3, ISHIKAWA-CHO,
HACHIOJI-SHI
TOKYO, JAPAN
KENWOOD CORP. CERTIFIES THIS EQUIPMENT
CONFORMS TO DHHS REGULATIONS N0.21 CFR
1040. 10, CHAPTER I, SUBCHAPTER J.
Location : Rear Panel
FCC WARNING
This equipment may generate or use radio
frequency energy. Changes or modifications
to this equipment may cause harmful
interference unless the modifications are
expressly approved in the instruction manual.
The user could lose the authority to operate
this equipment if an unauthorized change or
modification is made.
NOTE
This equipment has been tested and found to
comply with the limits for a Class B digital
device, pursuant to Part 15 of the FCC Rules.
These limits are designed to provide
reasonable protection against harmful
interference in a residential installation. This
equipment may cause harmful interference
to radio communications, if it is not installed
and used in accordance with the instructions.
However, there is no guarantee that
interference will not occur in a particular
installation. If this equipment does cause
harmful interference to radio or television
reception, which can be determined by
turning the equipment off and on, the user is
encouraged to try to correct the interference
by one or more of the following measures:
•Reorient or relocate the receiving antenna.
•Increase the separation between the
equipment and receiver.
•Connect the equipment into an outlet on a
circuit different from that to which the
receiver is connected.
•Consult the dealer or an experienced radio/TV
technician for help.
NOTE
This Class B digital apparatus complies with
Canadian ICES-003.
The marking of products using lasers
(Except for some areas)
CLASS 1
LASER PRODUCT
The label is attached to the chassis/case and
says that the component uses laser beams
that have been classified as Class 1. It means
that the unit is utilizing laser beams that are
of a weaker class. There is no danger of
hazardous radiation outside the unit.
— 3 —
Page 4

Safety Precautions
2WARNING
Take the following precautions to prevent
English
fire and avoid personal injury:
•When extending the ignition wire, battery
wire, or ground wire, use 0.75mm
or larger automotive grade wire to avoid wire
deterioration or damage to the covering.
•Check that no metal objects (coins, tools,
etc.) are left inside the unit to avoid short
circuits.
•If you smell or see smoke, turn the power off
immediately and consult your Kenwood
dealer.
•Do not touch the liquid crystal fluid if the LCD
is damaged or broken due to shock. The
liquid crystal fluid may be dangerous to your
health or even fatal.
If the liquid crystal fluid from the LCD
contacts your body or clothing, wash it off
with soap immediately.
2
(AWG18)
•When replacing a fuse, only use a new one
with the prescribed rating. Using a fuse with
the wrong rating may cause your unit to
malfunction. on hot places such as above the
dashboard.
•To prevent a short circuit when replacing a
fuse, first disconnect the wiring harness.
NOTE
•If you have difficulty in installing this unit in
your vehicle, contact your Kenwood dealer.
•If it doesn’t seem to be working properly,
first press the Reset button. If the
malfunction persists, consult your Kenwood
dealer.
REP
RDM
DISC
3
/
8
MHz
-
+
'
CD AUTO CHANGER CONTROLLER
TRACK
FREQ
LEVEL
RDM REP
TRACK DISC
4¢PWR
Cleaning the Unit
If the front panel gets dirty, turn off the
power and wipe the panel with a dry silicon
cloth or soft cloth.
2CAUTION
Do not use hard cloths or paint thinner,
alcohol, or other volatile solvents. These may
damage external surfaces or remove
indicator characters.
Lens fogging
In cold climates, there may be a period after
you turn on your vehicle’s heater when the
lens that guides the laser beam used in your
CD player fogs up. If this happens, you
cannot play compact discs. Take out discs
and the fogging will disappear. If it does not
return to normal after several hours, contact
your Kenwood dealer.
2CAUTION
Take the following precautions to
keep the unit in proper working order.
•Be sure the unit is connected to a 12V DC
power supply with a negative ground
connection.
•Do not open the top or bottom cover.
•Do not install the unit in places it is exposed
to direct sunlight, high heat or humidity,
water may splash over it, or dust exists.
Reset button
•Some car stereos cause the sound of the
tuner to make for a moment when an
engine is activated.
•The reception of the tuner may be reduced
a little if the KDC-CMP59FM is used.
•If the sound is lower than the tuner sound,
raise up the volume level of the CD with
using the receiver.
•Do not use your own screws. Use only the
screws provided. If you use the wrong
screws, you could damage the unit.
— 4 —
Page 5

Safety Precautions
2CAUTION
Do not set the remote on hot places such
as above the dashboard.
Loading and Replacing the Batteries:
Use two "AAA" batteries.
Slide the cover while pressing
downwards to remove it as illustrated.
Insert the batteries with the
poles aligned properly, following the
illustration inside the case.
2WARNING
Store unused batteries out of the reach
of children. Contact a doctor immediately
if the battery is accidentally swallowed.
NOTE
•The provided batteries are intended for
use in operation checking, and their
service life may be short.
•When the remote controllable distance
becomes short, replace both of the
batteries with new ones.
NOTE
A portion of the operations may not be
possible, depending on the unit that is
connected.
+ and –
— 5 —
Page 6

Notes on playing MP3
This unit can play MP3(MPEG1, 2, 2.5 Audio Layer 3). Note,
however, that the MP3 recording media and formats acceptable are
limited. When writing MP3, pay attention to the following
restrictions.
English
Acceptable media
The MP3 recording media acceptable to this unit are CD-ROM, CD-R,
and CD-RW.
When using CD-RW, do full format not quick format to prevent
malfunction.
Acceptable medium formats
The following formats are available for the media used in this unit. The
maximum number of characters used for file name including the
delimiter (".") and three-character extension are indicated in
parentheses.
• ISO 9660 Level 1
• ISO 9660 Level 2
• Joliet
• Romeo
The media reproducible on this unit has the following limitations:
• Maximum number of directory levels: 8
• Maximum number of files per folder: 255
• Maximum number of folders: 50
MP3 written in the formats other than the above may not be
successfully played and their file names or folder names are not
properly displayed.
Settings for your MP3 encoder and CD writer
When you use your CD writer to record MP3 up to the maximum disc
capacity, disable additional writing. For recording on an empty disc up
to the maximum capacity at once, check Disc at Once.
Entering file and folder names
The unit recognizes and plays only those MP3 which have the MP3
extension (.MP3).
Writing files into a medium
When a medium containing MP3 data is loaded, the unit checks all the
data on the medium. If the medium contains a lot of folders or nonMP3 files, therefore, it takes a long time until the unit starts playing
MP3.
In addition, it may take time for the unit to move to the next MP3 file or
a Track Search or Album Search may not be performed smoothly.
Loading such a medium may produce loud noise to damage the speakers.
• Do no attempt to play a medium containing a non-MP3
MP3 extension.
The unit mistakes non-MP3
the MP3 extension.
• Do not attempt to play a medium containing non MP3.
files for MP3 data as long as they have
file with the
— 6 —
Page 7
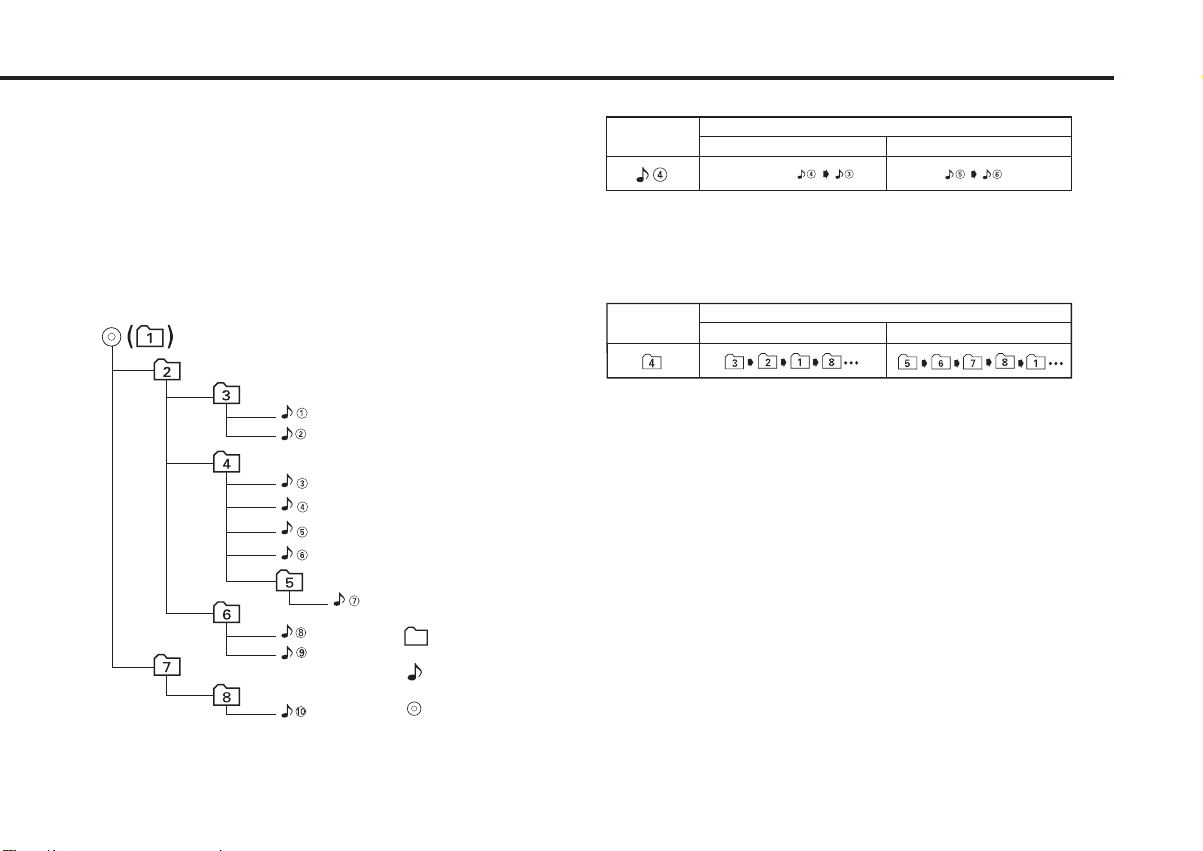
MP3 playing order
– Button + Button
Operation of the button
Current
folder number
Current
file number
4 Button
¢ Button
Operation of the button
Beginning of file
Folder
Example of a medium's folder/file hierarchy
Level 2 Level 4
Level 1 Level 3
File
Root
When selected for play, Track Search, or for Folder Search, files and
folders are accessed in the order in which they were written by the CD
writer.
Because of this, the order in which they are expected to be played may
not match the order in which they are actually played. You may be able
to set the order in which MP3 are to be played by writing them onto a
medium such as a CD-R with their file names beginning with play
sequence numbers such as "01" to "99", depending on your CD writer.
For example, a medium with the following folder/ file hierarchy is
subject to Track Search, or Folder Search as shown below.
When a Track Search is executed with file ¡$ being played ...
When Folder Search is selected with file ¡$ being played to move
from folder to folder ...
(Press the
6 button to stop the playback and then to carry out
Folder search.)
— 7 —
Page 8

Handling Compact Discs
Playing a CD that is dirty, scratched or
warped can cause the sound to skip and
the unit to operate incorrectly, resulting in
worsened sound quality. Take the
English
following precautions to prevent your CDs
from getting scratched or damaged.
Handling CDs
• Do not touch the recorded side of the CD (the side
opposite the label) when holding it.
music CD to damage from high temperatures and
humidity, and in some cases, may become
unusable if left in the car for long periods of time.
• Remove CDs from the unit when not listening to
them for a while, and put them back in their cases.
Do not pile up CDs that are removed from their
cases or prop them against something.
Cleaning CDs
f a CD has gotten dirty, wipe it off gently using a
I
commercially available cleaning cloth or a soft
cotton cloth, starting from the center of the disc
and moving outward. Do not clean CDs with
conventional record cleaners, anti-static formulas,
or chemicals such as paint thinner or benzene.
Do Not Load CD Accessories
Do not use commercially available CD accessories
that can be loaded into the CD slot, such as
stabilizers, protective sheets, or CD cleaning discs,
since they can cause the unit to malfunction.
2CAUTION
Do Not Use Special Shape CDs
• Be sure to use round shape CDs only for this unit
and do not use any special shape CDs. Use of
special shape CDs may cause the unit to
malfunction.
• The reflective film on a CD-R or a CD-RW is more
fragile than that on an ordinary music CD, and may
peel off if scratched. Fingerprints on a CD-R or CDRW are also more likely to cause skipping when the
disc is played. For these reasons, handle the disc
very carefully. Detailed handling instructions will
appear on the CD-R or CD-RW package: read this
information carefully before using the disc.
• Do not stick tape on either side of the CD.
Tape
Storing CDs
• Do not store CDs in areas exposed to direct
sunlight (such as a car seat or the dashboard) or
other hot places.
A CD-R or CD-RW is more susceptible than a
Checking New CDs for Burrs
When playing a new CD for the first time, check
that there are not any burrs stuck to the perimeter
of the disc or in the central hole. CDs with burrs
stuck on them may not load properly or may skip
while playing. Remove burrs using a ballpoint pen
or a similar utensil.
Burrs
Burrs
— 8 —
•Be sure to use CDs with disc mark
only for this unit.
• CD-Rs and CD-RWs which have not undergone
finalization processing cannot be played. (For more
information on finalization processing, refer to the
manual for your CD-R/CD-RW writing software or
CD-R/CD-RW recorder.) Additionally, depending on
the recording status, it may prove impossible to
play certain CDs recorded on CD-R or CD-RW.
Do Not Use CDs with Sticker on the
Labeled Side
Do not use the CD with the label sticker stuck on
it.
Using such a CD may cause the CD to be
deformed and the sticker to peel off, resulting in
malfunction of the unit.
Page 9

'
'
'
'
Loading Compact Discs
1
"KENWOOD"
Projection
Make sure the disc magazine is the
right way up with the Kenwood logo
on the top. Pull the tray out by the
projection.
2
Place the disc on the tray with the
label facing upwards. Insert the tray
into the disc magazine until it locks.
The discs are numbered from the
bottom from 1 to 10.
2CAUTION
•Take care to insert the tray into the
correct grooves in the disc magazine.
•8-cm discs cannot be used. If an 8-cm disc
adapter is used, the disc cannot be ejected.
•Keep all the trays in the magazine even
when empty.
3
Open the CD changer door.
4
Insert the magazine into the CD changer
until it clicks.
5
Close the CD changer door.
NOTE
Use the CD changer with its door closed
to prevent the entry of dust into the
changer.
Magazine ejection
6
O
- N
'
Open the CD changer door, and press the
"EJECT" button.
NOTE
Be sure to open the door completely before
pressing the EJECT button. If the door is not
completely open, the magazine may hit the
door and cause damage of malfunction.
— 9 —
Page 10

Buttons
SCAN (M.RDM)
D.DOWN
RDM
D.REPEAT
123
456
799
0
38
REP
T.DOWN
T.UP
D.UP
POWER
CD AUTO CHANGER CONTROLLER
REP
RDM
3
-
+
4¢PWR
'
RDM REP
TRACK DISC
8
/
MHz
DISC
TRACK
FREQ
LEVEL
Display Unit
English
Reset button
-
/ +buttons
Operations
Set the car radio FM station to 88.3 MHz. See Page 14 for
more information on changing the transmission frequency.
Playing CD & MP3
Play:
Press the PWR button.
The power goes ON and the disc play start. When the unit
receives any signal from the remote controller, the
mark lights up.
Play indicator
TRACK
DISC
Disc No.
Remote
T. DOWN button
D. REPEAT button
PWR button
-
SCAN button
PWR button
4 / ¢ buttons
+button
button
6 button
RDM button
REP button
Pause indicator
Track No. / File No.
When the player reaches the end of the last track on the disc
you are playing, it will shift automatically to the first track on
the next disc. When the player plays the last disc, it will return
to the first disc.
The play display blinks during disc replacement.
Disc No. 10 is displayed as "0".
RDM button
REPEAT button
38 button
T. UP button
Power off :
Press the PWR button.
The power goes OFF.
To listen to the radio :
Press the PWR button.
The FM modulator is turned OFF and the radio can be heard.
Pause :
Press the
6 (38...Remote)
button.
Disc play is temporarily paused.
If you press the switch once more, the disc is replayed from
the paused part.
Number buttons
— 10 —
NOTE
•Be sure to turn down the volume whenever you listen to the
radio or a cassette tape after stopping the disc play.
•During the disc play is being conducted, you are not able to
receive ordinary Radio broadcasting because antenna output is
switched into compact disc player‘s side.
Page 11

•The MP3 media that this unit can play are CD-ROM, CD-R, and
CD-RW.
The medium formats must be ISO 9660 Level 1, Level 2, Joliet, or
Romeo. The methods and precautions to be followed for writing
MP3 data are covered in <Notes on playing MP3> (page 6).
Check that section before creating your MP3 media.
•It takes time for the unit to check each medium to see if it
contains any MP3 file before it starts playing the medium.
•Only two digits of File No. are displayed. For example, “61” may
be displayed for the 161st. track.
Making a Forward Track Search:
Press the ¢ (T. UP...Remote) button to display the desired
track number.
Press once to fast forward to the next track, twice to fast
forward to the track after that, and so forth.
Play starts at the beginning of the displayed track number.
NOTE
You cannot make a forward track search when listening to the last
track on a disc.
Fast Forwarding and Reversing
Fast Forwarding :
Hold down on the ¢ button.
Release your finger to play the disc at that point.
Reversing :
Hold down on the 4 button.
Release your finger to play the disc at the point.
Track Search
Selecting the song you want to hear.
Searching for a song on the disc or in the MP3 folder.
Making a Reverse Track Search :
Press the 4 (T. DOWN...Remote
desired track number.
Press once to search back to the beginning of the current track,
twice to search back to the beginning of the previous track, and
so forth.
Play starts at the beginning of the displayed track number.
NOTE
Pressing the 4 (T. DOWN...Remote
track 1 will only search back to the beginning of that track. The
reverse search is not "recycled" to the last track on the disc.
) button to display the
) button while listening to
Album Search
Selecting the disc you want to hear.
Making a Reverse Disc Search :
Press the
Each time the button is pressed, the displayed disc number
decreases by one.
Play starts at the beginning of the displayed disc.
Making a Forward Disc Search :
Press the
Each time the button is pressed, the displayed disc number
increases by one.
Play starts at the beginning of the displayed disc.
–
button to display the desired disc number.
+ button to display the desired discnumber.
— 11 —
Page 12

Operations
Direct Track Search Function of Remote
Using the remote, directly input the track number that you want
to listen to.
English
1
Using the number buttons on the remote, input the number of
the track that you want to listen to.
The selected track number will blink in the display for 10
seconds.
If you make no further input in the 10-second period, the
number entry mode will automatically be canceled.
2
Press either the T. DOWN or T. UP button while the track
number is blinking.
The track starts playing.
Canceling Direct Track Search While It Is Operating :
Press the 38 button.
NOTE
Direct Track Search is enabled for up to 99.
Direct Album Search Function of remote
Using the remote, directly input the disc number that you want
to listen to.
1
Using the number buttons on the remote, input the number of
the disc that you want to listen to.
The selected disc number will blink in the display for 10
seconds.
If you make no further input in the 10-second period, the
number entry mode will automatically be canceled.
NOTE
•Input "0" to select disc 10.
•If you input more than two numbers all at once, a search will be
made only of the last number input.
2
Press either the
blinking.
The disc starts playing.
Canceling Direct Album Search While It Is Operating :
+ or – button while the number inputted is
Press the 38 button.
Track Repeat
Replaying the song you're listening to.
To repeat track :
Press the REP (REPEAT...Remote
The REP indicator will appear on the display and the Track repeat
function will turn on.
The same track is played repeatedly.
To cancel :
Press the REP (REPEAT...Remote
The REP indicator disappears and the Track repeat function is
canceled.
NOTE
When disc play stops, Track repeat is canceled.
) button.
) button.
Album Repeat Function of remote
Replaying the disc in the Disc changer or MP3 folder you're
listening to.
To repeat disc :
Press the D. REPEAT button.
The D.REP indicator will appear on the display and the Disc
repeat function will turn on.
The same disc is played repeatedly.
To cancel :
Press the D. REPEAT button.
The D.REP indicator disappears and the Disc repeat function is
canceled.
NOTE
•When disc play stops, Disc repeat is canceled.
•Folder Repeat only is enabled in MP3, but Disk Repeat is
disabled.
— 12 —
Page 13

Track Scan Function of remote
TRACK
DISC
Playing the first part of each song on the disc or MP3 folder you are
listening to and searching for the song you want to listen to.
Starting the Track Scan:
Press the T.SCAN button. The SCN indicator will appear on the
display and the player will play the first 10 seconds of each
track in succession.
Stopping to Listen to the Track Being Scanned :
Press the 38 or T.SCAN button.
The SCN indicator disappears and the Track scan is canceled.
Normal playback starts.
NOTE
•When disc play stops, Track scan is canceled.
•When all tracks on the disc you are listening to are scanned,
Track scan is canceled.
•Scanning within a folder is enabled in MP3, but scanning in the
entire disk is disabled.
Random Play
Play all the songs on the disc or MP3 folder in random order.
1
Press the RDM button to switch the random play function on
and off.
The RDM indicator lights up when the random play function is
turned on.
The display of the track number changes continuously as the
next track is being selected.
When the track has been selected, play starts.
NOTE
When all the tracks on a certain disc have been played using the
random play function, the next disc on the changer starts playing
(with the random play function still turned on).
2
To change the track being heard, press the ¢
button.
Another track is selected and played.
(T. UP...Remote)
NOTE
•The random play function is cancelled when you stop playing a
disc.
•Random selection within a folder is enabled in MP3, but random
selection in the entire disk is disabled.
•Magazine Random Play is disabled in this unit.
Folder Search (Function of MP3)
Selecting the folder you want to listen to.
1 Enter Folder Search mode
Press the 6 (38...Remote) button.
During Folder Search mode the folder information is displayed as
shown below.
Folder No.
2 Select the folder
Press the +or –button.
With the –button you move to the previous folder, and with the
+button to the next folder.
3 Decide the folder to play
Press the 6 (38...Remote) button.
The Folder Search mode releases, and the MP3 in the folder
being displayed is played.
See <Notes on playing MP3> (page 7) for details of the search action
in the Folder search mode.
— 13 —
Page 14

87.7MHz
87.9MHz
88.1MHz
88.3MHz (initial value)
88.5MHz
88.7MHz
89.9MHz
89.7MHz
89.5MHz
89.3MHz
89.1MHz
88.9MHz
→→→→→
→→→→→
→
→
→→
→
→ → → →
→ → → → →
¢
¢
Operations
English
Changing the Transmission Frequency
1
To set the frequency change mode
Press the REP button for at least three seconds. The FREQ
indicator will light up and the currently set frequency will be
displayed.
FREQ
MHz
NOTE
•The initial value is 88.3MHz.
•If this function is on, the functions other than power on / off,
reset, and modulation level / dynamic control, cannot be
operated.
•This function is not available when the random play, repeat play,
or scan play function is on. Before using this function, cancel
the other functions. This function cannot be used while loading
a disc (while the play indicator is blinking).
2
To change the frequency
Press either the 4 or ¢ button.
Each time you press the 4 or ¢ button, the mode switches
as follows :
NOTE
Some car radios cannot receive a 87.7 MHz frequency.
To cancel :
Press the REP button on the display unit for at least three
seconds.
The FREQ indicator will go off and the frequency change will
take effect.
The frequency change mode is automatically canceled if you
do nothing for 15 seconds.
— 14 —
Page 15

Modulation level / Dynamic control
1
To set the control mode
Press the RDM button on the display unit for at least three
seconds.
The LEVEL indicator will light up and the currently set
modulation level will be displayed.
Modulation level
LEVEL
Number for prevention of
NOTE
•If this function is on, the functions other than power on / off,
reset, and changing the transmission frequency, cannot be
operated.
•This function is not available when the random play, repeat play,
or scan play function is on. Before using this function, cancel
the other functions. This function cannot be used while loading
a disc (while the play indicator is blinking).
2
To change the modulation level
Press either the 4 or ¢ button.
Each time the 4 or ¢ button is pressed, the modulation
level changes in the range from 1 to 4. As the number
increases, the modulation level increases.The initial setting is 2.
distortion setting
NOTE
Dynamic control
The unit comes with the prevention of distortion function to
reduce sound distortion.
If the sound is distorted severely, press the + button on the
display unit and then set the function to "2" (ON). If the
prevention of distortion function is set to "2" (ON), the sound
extension is reduced.
The initial setting is "1" (OFF).
2CAUTION
If a disc with a high recording level is used, the sound may
distort even if the prevention of distortion function is set to "2"
(ON). In this case, reduce the modulation level.
To cancel :
Press the RDM button on the display unit for at least three
seconds.
The LEVEL indicator will go off and the modulation level
change will take effect. The control mode is automatically
canceled if you do nothing for 15 seconds.
— 15 —
Page 16

Accessories
External view
1
2
English
3
5
7
2CAUTION
The use of any accessories except for those provided might result
in damage to the unit. Make sure only to use the accessories
shipped with the unit, as shown above.
4
6
8
9
Europe sales area only.
Installation Procedure
1. To prevent a short circuit, remove the key from the ignition and
disconnect the - battery.
2. Make the proper input and output wire connections for each unit.
3. Connect the wiring harness wires in the following order: ground,
battery, ignition.
4. Install the unit in your car.
5. Reconnect the - battery.
6. Press the reset button.
2WARNING
When drilling a hole in the car chassis to install the unit, check
first that nothing is on the other side.
2CAUTION
•If the fuse blows, first make sure the wires aren’t touching to
cause a short circuit, then replace the old fuse with one with the
same rating.
•Do not let unconnected wires or terminals touch metal on the car
or anything else conducting electricity. To prevent a short circuit,
do not remove the caps on the ends of the unconnected wires or
the terminals.
•After the unit is installed, check whether the brake lamps,
blinkers, wipers, etc. on the car are working properly.
•Insulate unconnected wires with vinyl tape or other similar
material.
•Some disc changers need conversion cords for connection. See
the section on "Safety Precautions" for details.
■
Removing the transportation screws
Remove all 3 transportation screws for protecting the internal
mechanism before you start to install the unit.
Transportation
screws
NOTE
After removing the transport screw, retain it carefully and
attach it again before transporting the unit again.
— 16 —
Page 17

Installation Procedure
9090
0
45
90
0
45
CD AUTO CHANGER CONTROLLER
REP
RDM
3
1¡
PWR
'
RDM
REP MHz
TRACK DISC
8
/
TRACK
FREQ
LEVEL
-
+
D
I
S
C
■
Angle adjustment switches
The angle adjustment switches on the both saides of the unit
are to be set according to the angle of installation of the CD
auto changer. Set both of the two switches to the same
position. If the switches are not set properly, sound skip or
other malfunction may occur.
Set the angle adjustment switches with a coin or other flat
object.
Change the switch step by step by detaching and reusing the
object at the end of each step.
Angle adjustment switches
Installation
■
Installation of Display unit
• Installation without using the trim mount plate 7
Display unit
Attach one velcro to the
slanted-line of the the display
units as shown above, and
attach the other velcro to the
parts where you wish to
attach the display units.
Then, put velcros together
5
and install the display units.
• Installation using the trim mount plate 7
Angle
adjustment
switch
position
Right side
Installation
angle
0°~5° 40°~50°
0
45
90
0
45
90
•It is not possible to install at an angle of
40°~50° if only 1 is used.
Left side
85°~90°
45
90
Display unit
7
0
Pass the wire from the display unit through the hole on the
trim mount plate and push fit the display unit into the trim
mount plate until it locks.
2CAUTION
•Be sure not to place the unit on such place as where it is
exposed to direct sunlight and temperature eventually rises.
It results in the deformation of the case.
•Depending on the installing location, the display unit may not
be able to receive the signals from the controller unit. Install
them after confirming that the signals can be received.
•Install the unit in such a way that it does not disturb driving.
— 17 —
Page 18

Installation
90
0
45
90
0
45
9
0
0
4
5
90
0
45
90
0
45
90
45
0
90
0
45
90
0
45
9
0
0
4
5
■
Horizontal installation
Use the holes marked (¶) to install the unit.
■
In case of hanging in the trunk
Use the holes marked (¶) to install the unit.
Side view
English
■
Vertical installation
Use the holes marked (¶) to install the unit.
Side view
1
1
φ
φ
2
3
4
2
3
4
— 18 —
Side view
■
Installation of FM modulator unit
6
2CAUTION
Take sufficient care so
that the wires are not
caught under the seat.
If they are caught, they
may break.
φ
3
Install the FM modulator unit beneath the front seat using
Metal fixture and Bind head screw as shown in the above
figure.
φ
4
1
3
2
Page 19

CD AUTO CHANGER CONTROLLER
REP
RDM
3
-
+
4¢PWR
M.RDM D.REP
TRACK DISC
8
/
D.SCN
MHz
DISC
TRACK
FREQ
LEVEL
Connecting Wires to Terminals
ON
Display unit
Control output
Changer connection wire 4
Control input
CD auto - changer input
FM modulator unit
FM/AM antenna input
FM/AM antenna output
Ignition wire
Battery wire + (Yellow)
Ground wire (Black)
2WARNING
To prevent fire when the ignition wire (Red) or battery wire
(Yellow) is short-circuited by coming into contact with the
vehicle chassis (ground), only connect the power supply after
making the fuse box connections.
2CAUTION
Be sure to press the reset button after installation.
+ (Red)
- (To car chassis)
8
ACC
— 19 —
CD auto-changer
Output
O-N selection switch
"O"
9
Antenna plug
for automobile
Car stereo
with FM tuner
Ignition key
switch
Car fuse box
Battery
NOTE
Do not install an antenna of radio equipment or distribute the
antenna wire near the changer output wire, for this could
cause malfunction with this unit.
Page 20

Troubleshooting guide
What might seem to be a malfunction in your unit may
just be the result of slight misoperation or miswiring.
Before calling service, first check the following table for
possible problems.
English
General
? The power does not turn ON.01
✔ The fuse has blown.
☞ After checking for short circuits in the wires, replace the fuse with
one with the same rating.
✔ No ACC position on vehicle ignition.02
☞ Connect the same wire to the ignition as the battery wire.
? Nothing happens when the buttons are pressed.04
✔ The computer chip in the unit is not functioning normally.
☞ Press the reset button on the unit (page 4).
Disc source
? The specified disc does not play, but another one plays instead.52
✔ The specified CD is quite dirty.
☞ Clean the CD.
✔ The CD is upside-down.53
☞ Load the CD with the labeled side up.
✔ The disc is loaded in a different slot from that specified.54
☞ Eject the disc magazine and check the number for the specified
disc.
✔ The disc is severely scratched.55
☞ Try another disc instead.
? The specified track will not play.58
✔ Random play or magazine random play has been selected.
☞ Turn off random play or magazine random play.
? Cannot play CD-R or CD-RW.60
✔ Finalization processing is not being conducted for CD-R/CD-RW.
☞ Conduct finalization processing with CD recorder.
? Direct Track Search and Direct Album Search can’t be done.66-1
✔ Another function is ON.
☞ Turn Random Play or other functions OFF.
? Track Search can't be done.66-2
✔ For the albums first or last song.
☞ For each album, Track Search can't be done in the backward
direction for the first song or in the forward direction for the last
song.
— 20 —
Page 21

Troubleshooting guide
MP3 source
? Cannot play an MP3.67
✔ Not conforming to ISO 9660 Level 1/2, Joliet, and Romeo.
☞ Use a medium conforming to ISO 9660 Level 1/2, Joliet, and
Romeo.
✔ The MP3 has no or invalid track name extension.68
☞ Add the ".MP3" extension to the MP3 track name.
✔ The media is scratched or dirty.69
☞ Clean the media, referring to the section on <CD cleaning> (page
8).
? Noise or no sound generated when an MP3 is played.70
✔ The track has the MP3 track name extension while it is not an MP3.
☞ Do not use the ".MP3" extension in non-MP3.
? Takes time before the unit starts playing MP3.71
✔ The medium contains many albums, tracks, and hierarchical levels.
☞ The unit checks all tracks on the loaded medium first. If the
medium has many tracks recorded, it may take a long time for the
unit before it starts playing MP3.
? Fails to play MP3 in the intended order.72
✔ The MP3 tracks were not written by the CD writer in the order in
which you wanted them to be played.
☞ Depending on the CD writer, you may be able to set the order in
which MP3 tracks are to be played by writing them onto a medium
with their track names beginning with play sequence numbers
such as "01" to "99".
? The sound skips when an MP3 is being played.73-1
✔ The media is scratched or dirty.
☞ Clean the media, referring to the section on <CD cleaning> (page
8).
✔ The recording condition is bad.73-2
☞ Record the media again or use another media.
? Can’t enter Folder Search mode.76
✔ There’s no folder recorded in the MP3 media.
☞ Use a media with levels.
? The songs in the selected folder aren’t played in Folder Search
mode.77
✔ There are no MP3 in the selected folder.
☞ Make sure there’s recorded content in the MP3 media.
? The MP3 track search takes time.78
✔ Many tracks are recorded on the media.
☞ When the media directory is complex, the track search can take
time.
— 21 —— 21 —
Page 22

Troubleshooting guide
The following messages are displayed when certain problems are occurring in your system. Take the recommended
actions.
01 E: No disc magazine has been loaded in the changer. The disc magazine is not completely loaded.E01
➪
Load the disc magazine properly.
English
02 E: No disc has been loaded in the disc magazine.E02
➪
Load a disc into the disc magazine.
04 E: No disc has been loaded in the disc magazine.E04
➪
Load a disc into the disc magazine.
The CD is quite dirty. The CD is upside-down. The CD is scratched a lot.
➪ Clean the CD and load it correctly.
77 E: The unit is malfunctioning for some reason.E77
➪
Press the reset button on the unit. If the "77 E" code does not disappear, consult your nearest service center.
99 E: Something is wrong with the disc magazine. Or the unit is malfunctioning for some reason.E99
➪
Check the disc magazine. And then press the reset button on the unit. If the "99 E" code does not disappear, consult your nearest service
center.
0d E: The protective circuit in the unit activates when the temperature inside the automatic disc changer exceeds 60°C (140°F), stopping all
operation.E0d
➪
Cool down the unit by opening the windows or turning on the air conditioner. As the temperature falls below 60°C (140°F), the disc will
start playing again.
— 22 —
Page 23

Specifications
Specifications subject to change without notice.
Disc section
Laser Diode.....................................................GaAlAs (λ=780 nm)
Digital Filter (D/A) ......................................8 Times Over Sampling
D/A Converter.........................................................................1 bit
Spindle speed ............................................1000 ~ 400 rpm (CLV)
Wow & Flutter .........................................Below Measurable Limit
Frequency Response (±1 dB) ................................10 Hz ~ 20 kHz
Modulating Frequency (200KHz STEP)........87.7, 87.9, 88.1, 88.3,
88.5, 88.7, 88.9, 89.1,
89.3, 89.5, 89.7, 89.9,
General
Operating Voltage..............................................14.4 V (11 ~ 16 V)
Current consumption.............................................................1.4 A
Operating Temperature ...............................................–10 ~ 50 °C
Size (W × H × D)
CD changer.................................................250 × 80 × 176 mm
(9-13/16 × 3-1/8 × 6-13/16 in.)
Controller.....................................................43 × 135 × 22 mm
(1-11/16 × 5-5/16 × 7/8 in.)
Display unit..................................................105 × 40 × 18 mm
(4-1/8 × 1-9/16 × 11/16 in.)
FM modulator unit........................................150 × 30 × 80 mm
(5-7/8 × 1-3/16 × 3-1/8 in.)
Trim mount plate............................................188 × 58 × 2 mm
(7-3/8 × 2-5/16 × 1/16 in.)
Weight
CD changer..........................................................2.0 kg (4.4 lbs)
Controller.......................................................0.050 kg (0.11 lbs)
Display unit ....................................................0.125 kg (0.28 lbs)
FM modulator unit...........................................0.600 kg (1.3 lbs)
MHz
— 23 —
 Loading...