

Sony KD-70X6700E, KD-60X6700E Operating Instructions Manual
4-696-727-01(1)
Television
Operating Instructions
Parts and Con tro ls
Connecting TV to the Internet
Watching TV
Navigating through Home Menu
Viewing Pictures from Connected
Equipment
Additional Information
KD-70X6700E / 60X6700E

Table of Contents
Safety Information . . . . . . . . . . . . . . . . . . . . . 3
Precautions . . . . . . . . . . . . . . . . . . . . . . . . . . . 5
Parts and Controls
TV. . . . . . . . . . . . . . . . . . . . . . . . . . . . . . . . . 7
Remote Control . . . . . . . . . . . . . . . . . . . . . 8
Connecting TV to the Internet
Setting up the Internet Connection . . . . 10
Type 1: Secured network with Wi-Fi
Protected Setup™ (WPS) . . . . . . . . . . . . . . . 10
Type 2: Secured network without Wi-Fi
Protected Setup™ (WPS) . . . . . . . . . . . . . . . 11
Type 3: Unsecured network with any
type of wireless LAN router . . . . . . . . . . . . . 11
Type 4: Wired network set-up . . . . . . . . . . . 11
Preparing a Wired Network . . . . . . . . . . . . . 12
Viewing the Network Status . . . . . . . . . . . . 12
If You Cannot Connect to the
Internet . . . . . . . . . . . . . . . . . . . . . . . . . . . 12
Privacy Policy . . . . . . . . . . . . . . . . . . . . . . 12
Watching TV
Changing the Viewing Style . . . . . . . . . . 13
Changing the Wide Mode . . . . . . . . . . . . . . 13
Setting Scene Select. . . . . . . . . . . . . . . . . . . 14
Navigating through Home
Menu
All Apps . . . . . . . . . . . . . . . . . . . . . . . . . . . 15
Photo Sharing Plus . . . . . . . . . . . . . . . . . . . . 15
Using the TV as a Photo Frame Mode. . . . . 16
Listening to FM Radio. . . . . . . . . . . . . . . . . . 16
Programme List. . . . . . . . . . . . . . . . . . . . . 17
Digital EPG . . . . . . . . . . . . . . . . . . . . . . . . . 17
Recordings. . . . . . . . . . . . . . . . . . . . . . . . . 17
Media . . . . . . . . . . . . . . . . . . . . . . . . . . . . . 17
Playback Photo/Music/Video via USB . . . . 17
Playback Photo/Music/Video via Home
Network . . . . . . . . . . . . . . . . . . . . . . . . . . . . . 19
Settings . . . . . . . . . . . . . . . . . . . . . . . . . . . 19
System Settings . . . . . . . . . . . . . . . . . . . . . . 19
Customer Support . . . . . . . . . . . . . . . . . . . . 29
Viewing Pictures from
Connected Equipment
Connection Diagram. . . . . . . . . . . . . . . . 30
Using Audio and Video Equipment . . . . .32
Using Screen mirroring. . . . . . . . . . . . . . .32
Additional Information
Installing the TV to the Wall . . . . . . . . . . .33
Troubleshooting . . . . . . . . . . . . . . . . . . . .37
Picture . . . . . . . . . . . . . . . . . . . . . . . . . . . . . . 37
Sound. . . . . . . . . . . . . . . . . . . . . . . . . . . . . . . 37
Channels . . . . . . . . . . . . . . . . . . . . . . . . . . . .38
Network . . . . . . . . . . . . . . . . . . . . . . . . . . . . .38
General . . . . . . . . . . . . . . . . . . . . . . . . . . . . . 39
Specifications . . . . . . . . . . . . . . . . . . . . . 40
GB
2
GB
Note
Screw (M6)
Wall-Mount Bracket
8 mm - 12 mm
TV’s rear cover
Introduction
Thank you for choosi ng this Sony product.
Before operating the TV, please read this manual tho roughly and
retain it for fu ture ref erence.
• Before operating the TV, please read the “Safety Information”
(page 3).
• Instructions a bout “Installing the TV to the Wall” are included
within this TV’s instructions manual.
• Images an d illustrations used in the Setu p Guide and this
manual are for reference only and m ay differ from the actual
product.
Location of the Setup Guide
Setup Guide is placed on to p of the cushion insi de the TV carton.
Location of the identification label
Labels for the TV Model No. and Power Supply rating are located
on the rear of the TV.
Notes for Australia and New Zealand model
This produc t is ENERGY RATING qualified in the [Home] m ode.
ENERGY RATING is a programme designed to promote energy
efficient products and practices.
• When the TV is initially set up, it is designed to meet ENERGY
RATING requiremen ts while main taining opt imum picture
quality.
• Changes to cer tain features, settings and functi onalities of this
TV (e.g. TV Guide, Picture/S ound, Eco setting) can slightly
change the power co nsumption.
Depending upon suc h changed settings (e.g. [Shop] m ode), the
power consumption may vary which possibly could exceed the
stated energy rating.
To reset the TV to ENERGY RATING qualified settings, select
[Home] mode from the initial set-up procedure in [Factory
Settings] under the [Custom er Support] menu.
Safety Information
WARN ING
Batteries must not be expose d to excessive heat such as
sunshine, fire or the like.
Never place a television set in an unstable location . A television
set may fall, causing ser ious personal injur y or death. Many
injuries, particularly to children, can be avoided by taking simple
precautions such as:
Using cabi nets or stands recommended by the manufacturer of
the television set.
Only using furnit ure that can safe ly support the television se t.
Ensuring the television set is not overhan ging the edge of the
supporting furniture.
Not placing the television set on tall furniture (for example,
cupboards or bookcases) w ithout anchoring both the furniture
and the television set to a suitable support.
Not placin g the television set on cl oth or other materials that
may be located between the television set and supporting
furniture.
Educating c hildren about the dangers of cli mbing on furniture
to reach the television se t or its controls.
If your existing television set is b eing retained and relocated, the
same considerations as above should be app lied.
Installation/Set-up
Install and use the TV s et in accordance with the instruction s
below in order to avoid any risk of fire, electric shock or damage
and/or in juries.
Installation
• The TV set sho uld be installed near an eas ily accessible AC
power outlet (mains so cket).
• Place the TV o n a stable, level surface to prev ent it from falling
over and causing personal injury or property damage.
• Install the TV where it cannot be pulled, pushed, or knocked
over.
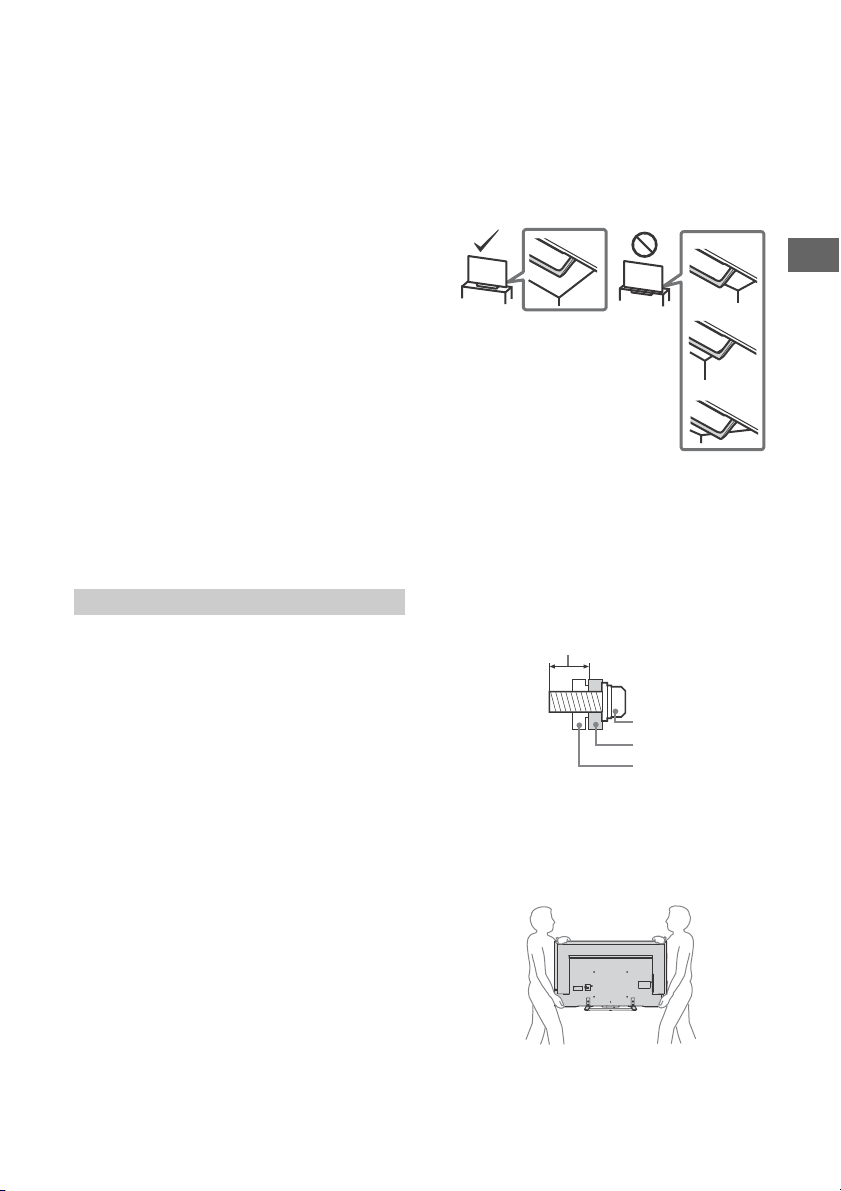
• Install the TV so that the TV's Table-Top Stand does not
protrudes out from the TV stand (not supplied). If the Table-Top
Stand protrudes out from the TV stand, it may cause TV set to
topple over, fall down, and cause personal injury or damage to
the TV.
• Only qualified service personnel should carry out wall-mount
installations.
• For safety reasons, it is strongly recommended that you use
Sony accesso ries, including:
Wall-Mount Bracket: SU-WL450
• Be sure to use the screws supplied with the Wall-Mount Bracket
when attaching the Wall-Mou nt Bracket to the TV set. The
supplied screws are designed as indicated by illustration when
measured from the attaching surface of the Wall-Mount Bracket.
The diameter and length of the screws differ depending on the
Wall-Mount Bracket model.
Use of screws other than those supplied may resul t in internal
damage to the TV set or cause it to fall, etc.
Tran spo rti ng
• Before transpor ting the TV set, disconnect al l cables.
• Two or three people are needed to transport a large TV set.
• When transpo rting the TV set by hand, hold it as shown below.
Do not put stress on the LCD panel and the frame around the
screen.
• When lifting or moving the TV set, hold it firmly from the
bottom.
• When transpo rting the TV set, do not sub ject it to jolts or
excessive vibration.
• When transpo rting the TV set for repairs o r when moving, pack
it using the original carton and packing material.
3
GB
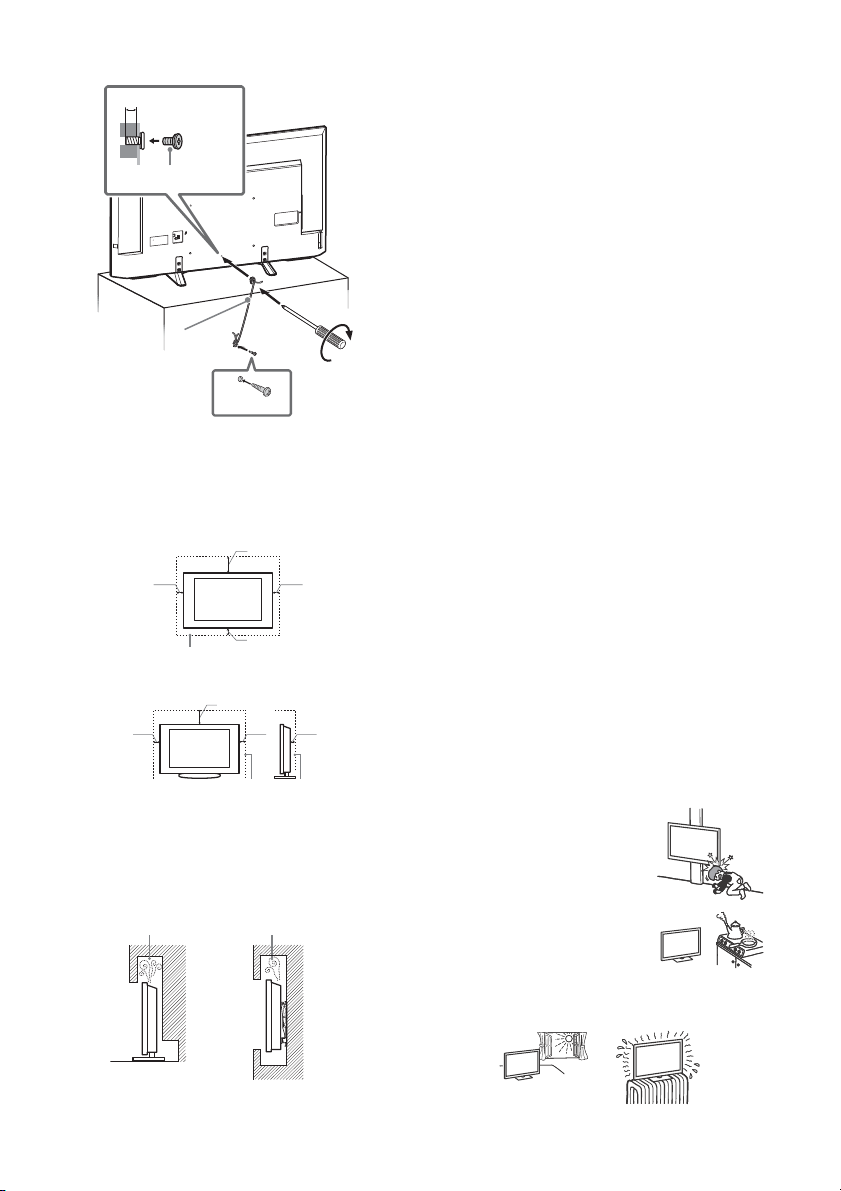
Topple prevention
Note
8 mm - 12 mm
5 kgf·cm
M4 screw
(not supplied)
Cord
(not supplied)
Screw
(not supplied)
30 cm
10 cm
10 cm
10 cm
Leave at least this space around the set.
30 cm
10 cm
10 cm
Leave at least this space around the set.
6 cm
Air circulation is blocked.
Wall Wall
Ventila tion
• Never cover the v entilation holes or inser t anything in the
cabinet.
• Leave space around the TV set as shown below.
• It is strongly recommen ded that you use a Sony Wall-Mou nt
Bracket in order to provide adequate air circulation .
Installed on the wall
Installed with stand
• To ensure proper ventilation and prevent the collection of dirt or
dust:
Do not lay the TV set flat, install upside down, backwards, or
sideways.
Do not pl ace the TV set on a shelf, rug, bed or in a closet.
Do not cover the T V set with a cloth, such as curtain s, or items
such as newspapers, etc.
Do not ins tall the TV set as shown be low.
AC power cord (mains lead)
Handle the AC power cord (ma ins lead) and outlet (mains soc ket)
as follows in order to avoid any risk of fire, electric shock or
damage and/or injuries:
The shape of AC power plug (mains plug), which is supplied
with the TV set, varies de pending on the region. Be sure to
connect the appropriate supplied AC power cord (mains lead)
with the plug that fits i nto the AC power outlet (main s socket).
Use only Sony supplied AC power cords (mains lead), not those
of other brands.
Inser t the plug fully into the AC pow er outlet (mains socket).
Operate the TV set on a 110 V - 240 V AC supply only.
When wiring cables, be sure to unplug the AC power cord
(mains lead) for yo ur safety and take care not to catch your feet
on the cables.
Disconnect the AC power cord (main s lead) from the AC power
outlet (mains socket) before working on or moving the TV set.
Keep the AC pow er cord (mains lead) away from heat s ources.
Unplug the AC power plug (mains plug) and clean it regularly. If
the plug is covered with dust and it picks up moisture, its
insulation m ay deteriorate, which could resu lt in a fire.
• Do not use th e supplied AC power cord (mains le ad) on any
other equipment.
• Do not pinch, bend, or twist the AC power cord (mains lead)
excessively. The core conductors may be exposed or broken.
• Do not modif y the AC power cord (mains lead ).
• Do not put any thing heavy on the AC po wer cord (mains lead).
• Do not pull on the AC power cord (mains lead) its elf when
disconnecting the AC po wer cord (mains lead).
• Do not connect too many appliances to the sa me AC power
outlet (mains socket).
• Do not use a poor fitting AC power outlet (mains socket).
Prohibited Usage
Do not install/use the TV set in locations, environments or
situations such as tho se listed below, or the TV set may
malfunction and cause a fire, electric shock, damage and/or
injuries.
Locations:
• Outdoors (in direct su nlight), at the seashore, on a ship or other
vessel, inside a vehicle, in medical institutions, unsta ble
locations, near water, rain, moist ure or smoke.
Environments:
• Places that are hot, humid, or excessively dusty; where insects
may enter; where it migh t be exposed to mechanical vib ration,
near flammable objects (candles, etc.). The T V set shall not be
exposed to dripping or splashing and no objects filled with
liquids, such as vases, shall be placed on the TV.
Situations:
• Use when yo ur hands are wet, with the cab inet removed, or
with attachments no t recommended by the manufacturer.
Disconnect the TV set from AC power outlet (mains socket) and
antenna (aerial) during lightning storms.
• Install the TV s o that it sticks out into an
open space. Injury or damage from a
person or object bumping into the TV
may result.
• Place the TV in a humid or dusty space, or
in a room with oily smoke or steam (near
cooking tables or humidifiers). Fi re,
electric shock, or warping may result.
• Install the TV in places subject to extreme
temperature such as in direct sunli ght, near a radiator or a
heating vent. The TV may overheat in such condition which can
cause deformation of the enclosure and/or TV malfunction.
GB
4
GB
• If th e TV is placed in the changing room of a
public bath or hot spring , the TV may be
damaged by airborne sulphur, etc.
• For best picture quality, do not expose the screen to direct
illumination or sunlight.
• Avoid moving the TV from a cold area to a warm area. Sudden
room temperature changes may cause moisture condensation .
This may cause the TV to show poor picture and/or poor colour.
Should this occur, allow mois ture to evaporate completely
before powering the TV on.
Broken pieces:
• Do n ot throw anything at the TV set. T he screen glass may break
by the impact and cause serious injury.
• If the surface of th e TV set cracks, do not touch it until you ha ve
unplugged the AC po wer cord (mains lead). Other wise this may
cause an electric shock.
When not in use
• If you will not be using the TV set for several d ays, the TV set
should be disconnected from the AC power (mains) for
environmental and sa fety reasons.
• As the TV set i s not disconnected from the AC power (m ains)
when the TV set is just turned off, pull the plug from the AC
power outlet (mains socket) to disconnect the TV set
completely.
• Some TV se ts may have features that require the TV se t to be
left in standby to work correctly.
For children
• Do not allow children to climb on the TV s et.
• Keep small accessories ou t of the reach of children, so that they
are not mistakenly swallowe d.
If the following problems occur...
Turn off the T V set and unplug the AC pow er cord (mains lead)
immediately if any of the following prob lems occur.
Ask your dealer or Sony service centre to have it checked by
qualified service personnel.
When:
AC power cord (mains lead) is damaged.
Poor fitting o f AC power outlet (mains so cket).
TV set is damaged by being dropped, hit or having something
thrown at it.
Any liquid or solid object falls through openings in the cabinet.
About LCD TV Temperature
When the LCD TV is used for an extended period, the panel
surrounds become warm. You may feel hot wh en touching there
by the hand.
Precautions
Viewing the TV
• Vi ew the TV i n moderate li ght, as view ing the TV i n poor ligh t or
during long period of time, strains your eyes.
• When using he adphones, adjust the volume so as to avoid
excessive levels , as hearin g damage may result.
LCD Screen
• Although th e LCD screen is made with high-precision
technology and 99.99 % o r more of the pixels are effective,
black dots may appear or bright points of light (red, blue, or
green) may appear cons tantly on the LCD screen. This is a
structural property of th e LCD screen and is not a malfunction.
• Do not push or sc ratch the front filter, or place objects on top of
this TV set. The image may be uneven or the LCD screen may be
damaged.
• If this TV set is u sed in a cold place, a smear may occur in the
picture or the picture may become dark. This does not indicate a
failure. These phenomena d isappear as the temperature rises.
• Ghosting may occur when still pictures are displayed
continuously. It may disappear after a few m oments.
• The screen and cabinet get warm when this TV set is in use. This
is not a malfunction.
• The LCD screen contai ns a small amount of liquid crys tal. Follow
your local ordinances and regulatio ns for disposal.
Handling and cleaning the screen surface/
cabinet of the TV set
Be sure to unplug the AC powe r cord (mains lead) connected to
the TV set from AC power outlet (mains socket) before cl eaning.
To avoid material degradation or screen coating de gradation,
observe the following precautions.
• To remove dust from the screen surface/cabinet, wipe gently
with a soft cloth. If dust is persistent, wipe with a soft cloth
slightly mo istened with a diluted mild de tergent solution .
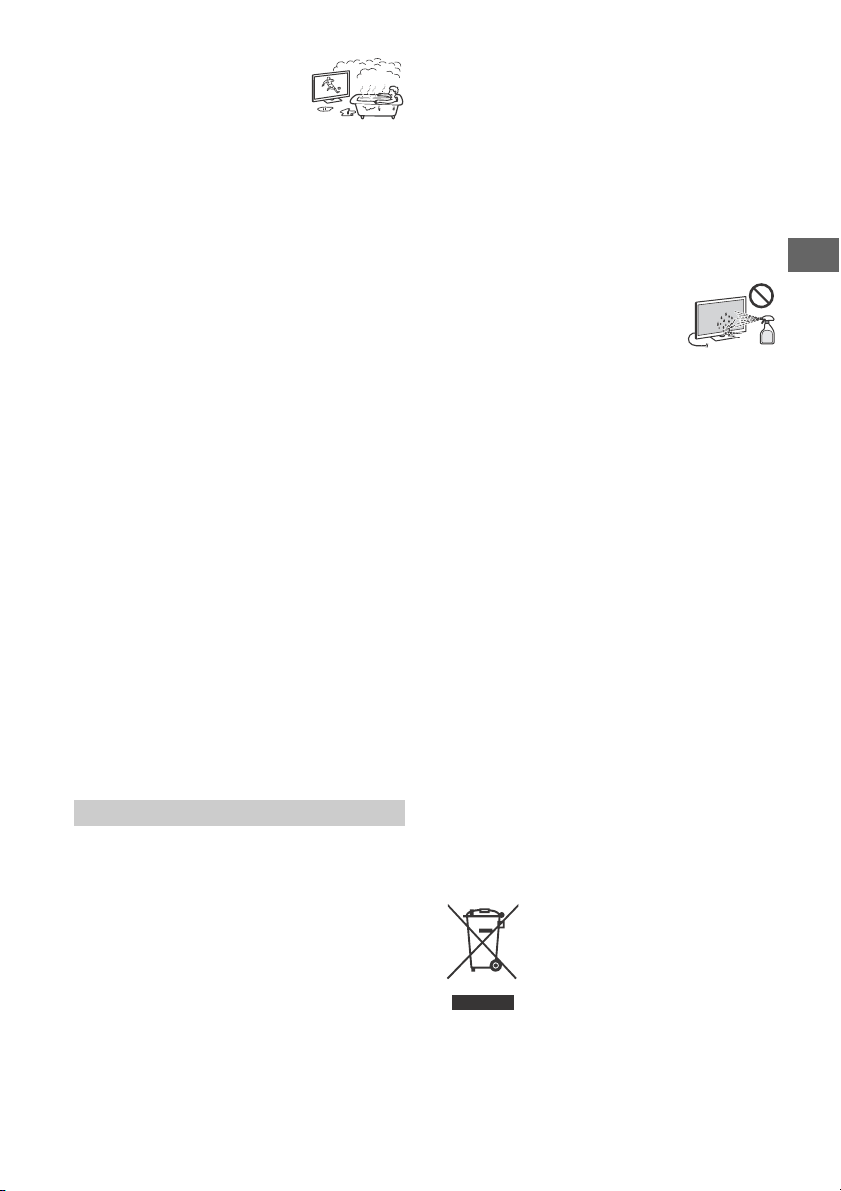
• Never spray water or detergent directly on
the TV set. It may drip to the bottom of the
screen or exterior parts and enter the TV
set, and may cause dam age to the TV set.
• Never use any type of abrasive pad,
alkaline/acid cleaner, scouring po wder, or volatile solvent, such
as alcohol, benzene, thinner or in secticide. Using such materials
or maintaining prolonged contac t with rubber or vinyl materials
may result in damage to th e screen surface and cabinet
material.
• Do not touch th e TV if your hand is covered in any ch emical
substance such as hand cream or sunblock.
• Periodic vacuuming of the vent ilation openi ngs is
recommended to ensure proper ventilation.
• When adj usting the angle of the TV set, move it slowly so as to
prevent the TV set from moving or slipping off from its table
stand.
Optional Equipment
Keep optional components or any equipment emitting
electromagnetic radiation away from the TV set. Otherwise
picture distortion and/or noisy sound may occur.
Wireless Function of the unit
• Do not operate this u nit near medical equipm ent (pacemaker,
etc.), as malfunction of th e medical equipment m ay result.
• Altho ugh this un it transmits/rece ives scrambled signals, be
careful of unauthorised i nterception. We cannot be responsible
for any trouble as a result.
Caution about handling the remote control
• Obser ve the correct polarity when inse rting batteries.
• Do not use di fferent types of batteries to gether or mix old and
new batteries.
• Disp ose of batterie s in an environme ntally frien dly way. Certain
regions may regulate the disp osal of batteries. Please consult
your local au thority.
• Handle the rem ote control with care. Do not drop or step on it,
or spill liquid of any kind onto it.
• Do not pla ce the remote control in a location near a heat source,
a place subject to direct sunligh t, or a damp room.
Disposal of the TV set
Disposal of Old Electrical &
Electronic Equipment (Applicable in
the European Union and other
European countries with separate
collection systems)
GB
5

Notice for customer in UAE
TRA
REGISTERED No: ER54252/17
DEALER No:
DA56116/16
GB
6
GB
Parts and Controls
Note
Parts and Controls
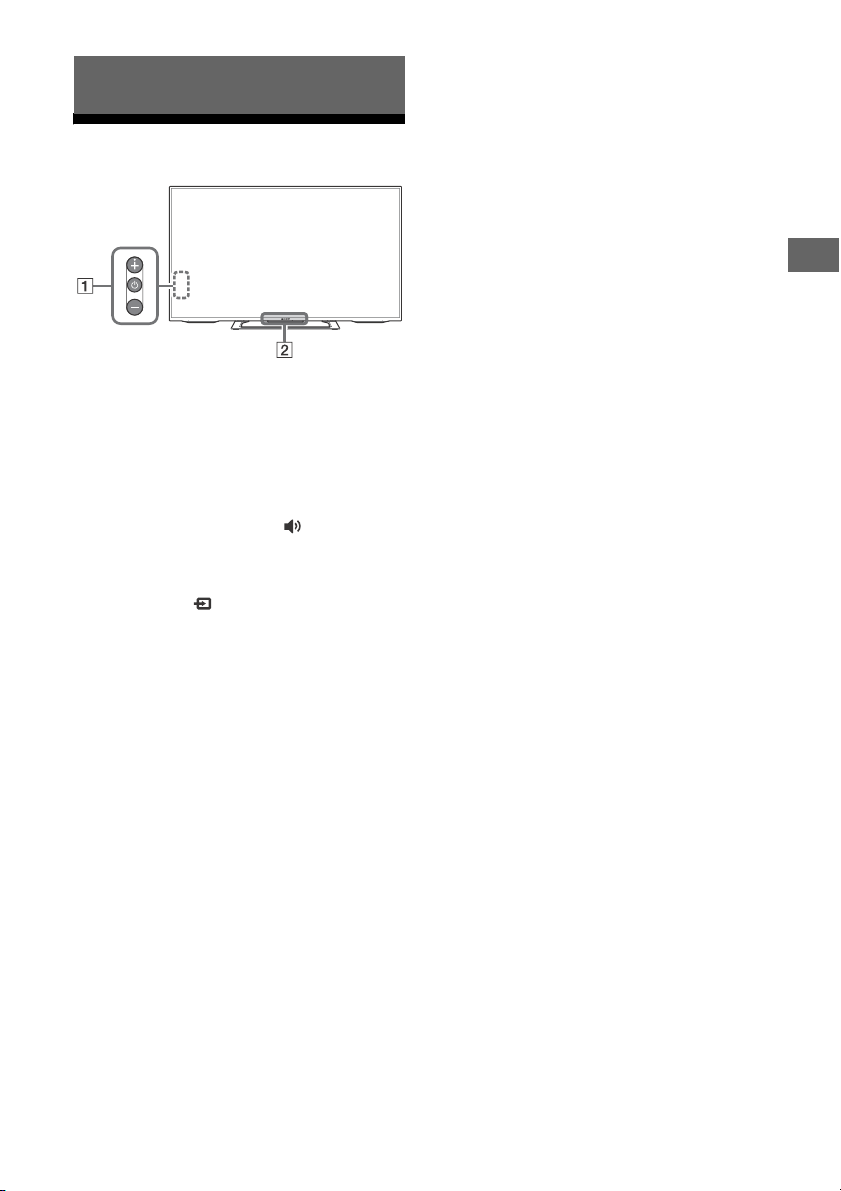
TV
(Power) / + / –
Short press to turn the TV on.
Long press until the TV turn off.
When the TV is on,
Volume
Press + or – button to increase/decrease the
volume.
You can also press until notification is
displayed. Increases/decreases the volume
by pressing the + or – button.
Input
Press until notification is displayed.
Moves the selected input source by pressing
+ (up) or – (down) button.
Programme
Press until PROG notification is displayed.
Select the programme by pressing + (up) or
– (down) button.
(Sensors/LED indicator)
• Receives signals from the remote control.
Do not put anything over the sensor.
Doing so may affect its function.
• Lights up in amber when the [Sleep Timer]
or [On Timer] is set (page 26), or the TV is
in Photo Frame Mode (page 16).
• Lights up in green when [Power Saving] is
set to [Picture Off] (page 28).
• Lights up in green when the TV is turned
on.
• Does not light up when the TV is in
standby mode.
• Flashes while the remote control is being
operated.
• Lights up in red in recording mode.
• Make sure that the TV is completely turned off before
unplugging the AC power cord (mains lead).
• To disconnect the TV from the AC power completely,
pull the plug from the mains socket.
• Please wait for a while when perform input selection
to change to other input.
GB
7
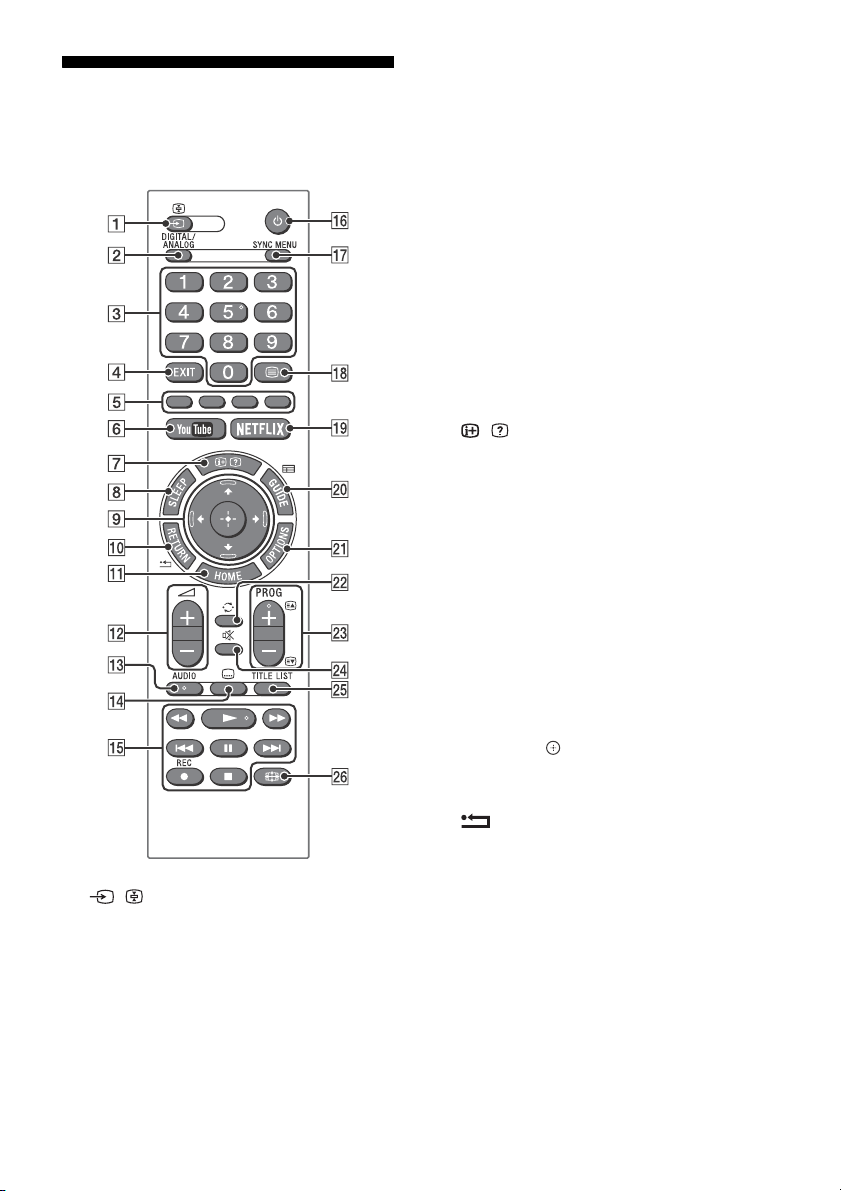
Remote Control
The remote control shape, location, availability
and function of remote control button may vary
depending on your region/country/TV model.
/ (Input select / Text hold)
• Displays and selects the input source.
• In text mode, holds the current page.
DIGITAL/ANALOG
Switches to digital or analogue input.
Number buttons
• Select channels. For channel numbers 10
and above, enter the next digit quickly.
• In text mode, enter the three digit page
number to select the page.
EXIT
Return to the previous screen or exit from
the menu. When an Interactive Application
service is available, press to exit from the
service.
Colour buttons
Displays operation guide (when colour
buttons are available).
YouTube (Only on limited region/
country/TV model)
Accesses the “YouTube” online service.
/ (Info / Text reveal)
• Displays information. Press once to
display information about the
programme/input you are viewing. Press
again to remove the display from the
screen.
• In text mode, reveals hidden information
(e.g. answers to a quiz).
SLEEP
Press repeatedly until the TV displays the
time in minutes ([Off]/[15 min]/[30 min]/
[45 min]/[60 min]/[90 min]/[120 min]) that
you want the TV to remain on before
shutting off. To cancel the sleep timer, press
SLEEP repeatedly until [Off] appears.
//// (Item select / Enter)
• Select or adjust items.
• Confirm selected items.
RETURN
• Returns to the previous screen of any
displayed menu.
• Stops playback when playing photo/
music/video file.
HOME
Displays or cancels the menu.
+/– (Volume)
Adjust the volume.
GB
8
GB
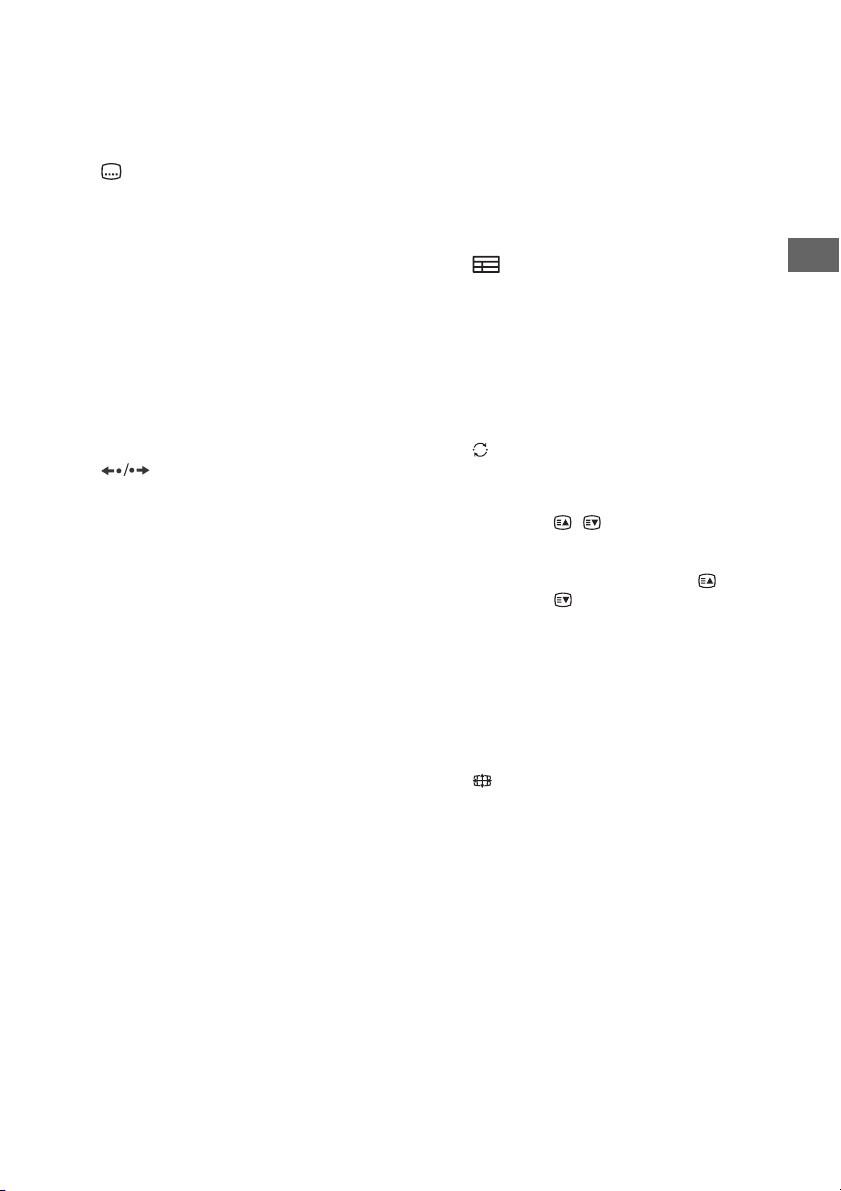
Parts and Controls
Hint
AUDIO
Select the sound of multilingual source or
dual sound for the programme currently
being viewed (Depend on programme
source).
(Subtitle)
Changes the subtitle setting (page 22).
//////
• Operate media contents on TV and
connected BRAVIA Sync-compatible
device.
• This key also can be used to operate VOD
(Video on Demand) service playback.
Availability is depend on VOD service.
REC (Australia and New Zealand
model only)
Record the current programme with the USB
HDD recording function.
(Except Australia and New
Zealand model)
Replays the scene/briefly fast forwards the
scene.
(TV standby)
Turns the TV on or switches to standby
mode.
SYNC MENU
Press to display the BRAVIA Sync Menu and
then select connected HDMI equipment
from [Device Selection].
The following options can be selected from
BRAVIA Sync Menu.
Device Control:
Use the [Device Control] to operate
equipment that is compatible with BRAVIA
Sync Control. Select options from [Home
(Menu)], [Options], [Content List] and [Power
Off] to operate the equipment.
Speakers:
Select [TV Speakers] or [Audio System] to
output the TV’s sound from the TV speakers
or connected audio equipment.
TV Control:
Use the [TV Control] menu to operate the TV
from the [Home (Menu)] or [Options] menu.
Return to TV:
Select this option to return to TV
programme.
(Text)
In text mode, displays Text broadcast.
Each time you press , the display changes
cyclically as follows:
Tex t Text over the TV picture (mix mode)
No Text (exit the Text service)
NETFLIX (Only on limited region/
country/TV model)
Accesses the “NETFLIX” online service.
GUIDE (EPG)
Displays the Digital EPG (Electronic
Programme Guide) (page 17).
OPTIONS
Displays a list that contains shortcuts to
some setting menus.
The listed options vary depending on the
current input and content.
(Jump)
Returns to the previous channel or input
viewed more than 15 seconds.
PROG +/–/ /
• Selects the next (+) or previous (–)
channel.
• In text mode, selects the next ( ) or
previous ( ) page.
(Mute)
Mutes the sound. Press again to restore the
sound.
TITLE LIST (Australia and New Zealand
model only)
Display the Title list.
(Wide Mode)
Adjusts the screen display. Press repeatedly
to select the desired wide mode (page 13).
• The number 5, , PROG + and AUDIO buttons have
tactile dots. Use the tactile dots as references when
operating the TV.
GB
9
Note
Connecting TV to the Internet
Setting up the Internet Connection
To use the network features of your TV it needs
to be connected to the Internet. The set-up
procedure differs depending on the type of
network and LAN router. Before setting up the
Internet connection, be sure to set up a LAN
router. Check your wireless LAN environment
using the following chart.
Wireless LAN
Secure Wireless LAN? NO
YES
Do you use a wireless LAN router
compatible with Wi-Fi Protected
Setup™ (WPS)?
YES
Typ e 1*
Wired LAN Typ e 4
* Type 1 is easier to set up if your router has an
automatic setting button, e.g. Air Station OneTouch Secure System (AOSS). Most of the latest
routers have this function. Check your router.
Typ e 1: Follow the configuration for Secured
Typ e 2: Follow the configuration for Secured
Typ e 3: Follow the configuration for
Typ e 4: Follow the configuration for Wired
network with Wi-Fi Protected
Setup™ (WPS).
network without Wi-Fi Protected
Setup™ (WPS).
Unsecured network with any type of
wireless LAN router.
network set-up.
Typ e 3
NO
Typ e 2
Type 1: Secured network with Wi-Fi Protected Setup™ (WPS)
The WPS standard makes security of a wireless
home network as straightforward as pressing
the WPS button on the wireless LAN router.
Before setting up a wireless LAN, check the
location of the WPS button on the router and
verify how to use it.
For security purpose, [WPS (PIN)] provides a PIN
code for your router. PIN code is renewed every
time you select [WPS (PIN)].
1 Press HOME, then select [Settings]
[System Settings] [Set-up]
[Network] [Network Set-up].
2 IP Address setting/Proxy server:
– automatic setting:
[Set up network connection] [Easy]
– manual setting:
[Set up network connection] [Expert]
[Wired Set-up] or [Wireless Set-up]
3 Select [WPS (Push Button)] for Push
Button method or [WPS (PIN)] for PIN
method.
Note
Button name of the WPS may differ depending on
the router (e.g. AOSS button).
4 Follow the instructions on the set-up
screen.
• If you use WPS for network set-up, the security
settings of the wireless LAN router activate, and any
equipment previously connected to the wireless LAN
in a non-secure status will be disconnected from the
network.
In this case, activate the security settings of the
disconnected equipment and then reconnect. Or, you
can deactivate the security settings of the wireless
LAN router, and then connect the equipment to a TV
in a non-secure status.
• To use the network with IPv6, select [Settings]
[System Settings] [Set-up] [Network]
[IPv6/IPv4 Priority] [IPv6], then select [Easy] in [Set
up network connection].
• When IPv6 is selected, HTTP Proxy cannot be set.
10
GB

GB
Connecting TV to the Internet
Note
Note
Type 2: Secured network without Wi-Fi Protected Setup™ (WPS)
To set up a wireless LAN, SSID (wireless network
name) and security key (WEP or WPA key) will be
required. If you do not know them, consult the
instruction manual of your router.
1 Press HOME, then select [Settings]
[System Settings] [Set-up]
[Network] [Network Set-up].
2 IP Address setting/Proxy server:
– automatic setting:
[Set up network connection] [Easy]
– manual setting:
[Set up network connection] [Expert]
[Wired Set-up] or [Wireless Set-up]
3 Select [Scan], then select a network from
the list of scanned wireless networks.
4 Follow the instructions on the set-up
screen.
• To use the network with IPv6, select [Settings]
[System Settings] [Set-up] [Network]
[IPv6/IPv4 Priority] [IPv6], then select [Easy] in [Set
up network connection].
• When IPv6 is selected, HTTP Proxy cannot be set.
• Please make sure your surrounding is secure when
you key in your password.
Type 3: Unsecured network with any type of wireless LAN router
To set up a wireless LAN, SSID (wireless network
name) will be required.
1 Press HOME, then select [Settings]
[System Settings] [Set-up]
[Network] [Network Set-up].
2 IP Address setting/Proxy server:
– automatic setting:
[Set up network connection] [Easy]
– manual setting:
[Set up network connection] [Expert]
[Wired Set-up] or [Wireless Set-up]
3 Select [Scan], then select a network from
the list of scanned wireless networks.
4 Follow the instructions on the set-up
screen.
• Security key (WEP or WPA key) will not be required
because you do not need to select any security
method in this procedure.
• To use the network with IPv6, select [Settings]
[System Settings] [Set-up] [Network]
[IPv6/IPv4 Priority] [IPv6], then select [Easy] in [Set
up network connection].
• When IPv6 is selected, HTTP Proxy cannot be set.
Type 4: Wired network set-up
Enter the respective alphanumeric values for
your router if necessary. The items that need to
be set (e.g. IP Address, Subnet Mask, DHCP)
may differ depending on the Internet service
provider or router. For details, refer to the
instruction manuals provided by your Internet
service provider, or those supplied with the
router.
1 Press HOME, then select [Settings]
[System Settings] [Set-up]
[Network] [Network Set-up].
2 IP Address setting/Proxy server:
– automatic setting:
[Set up network connection] [Easy]
– manual setting:
[Set up network connection] [Expert]
[Wired Set-up] or [Wireless Set-up]
GB
11
3 Follow the instructions on the set-up
Note
Note
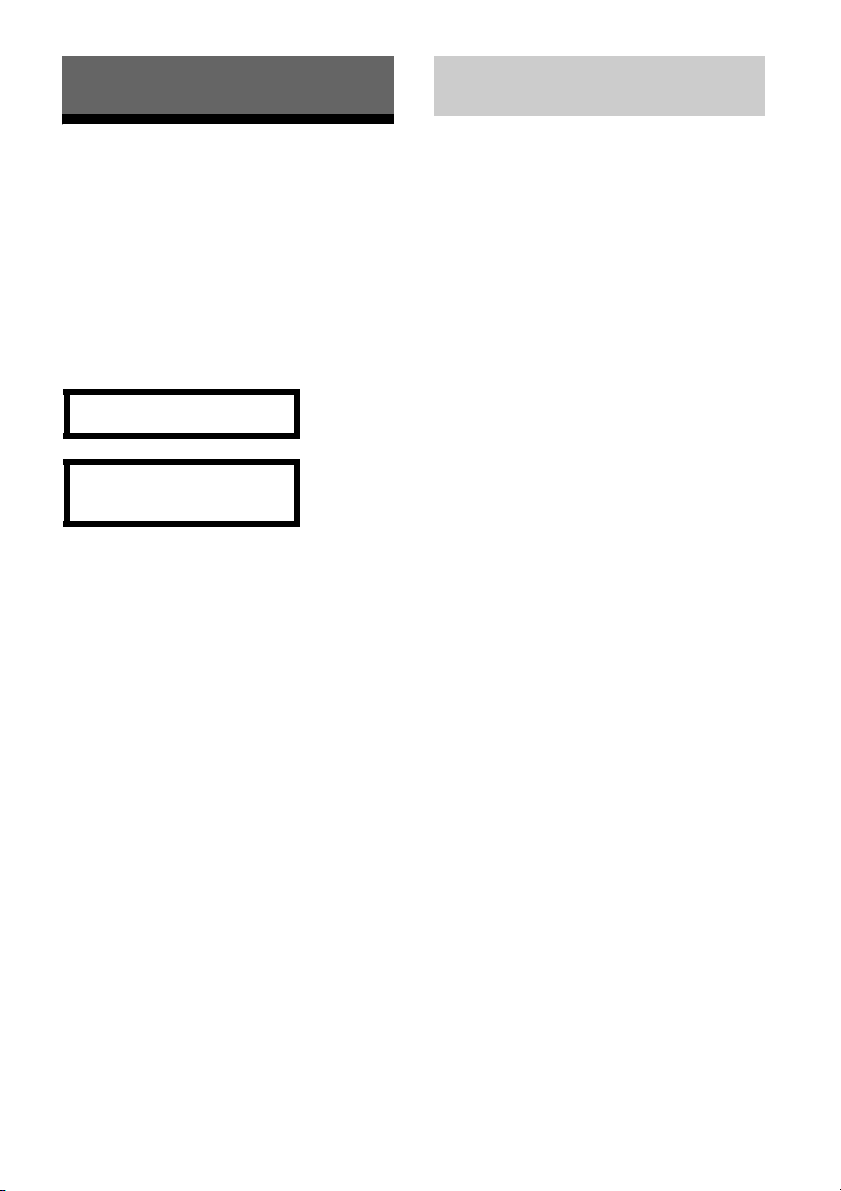
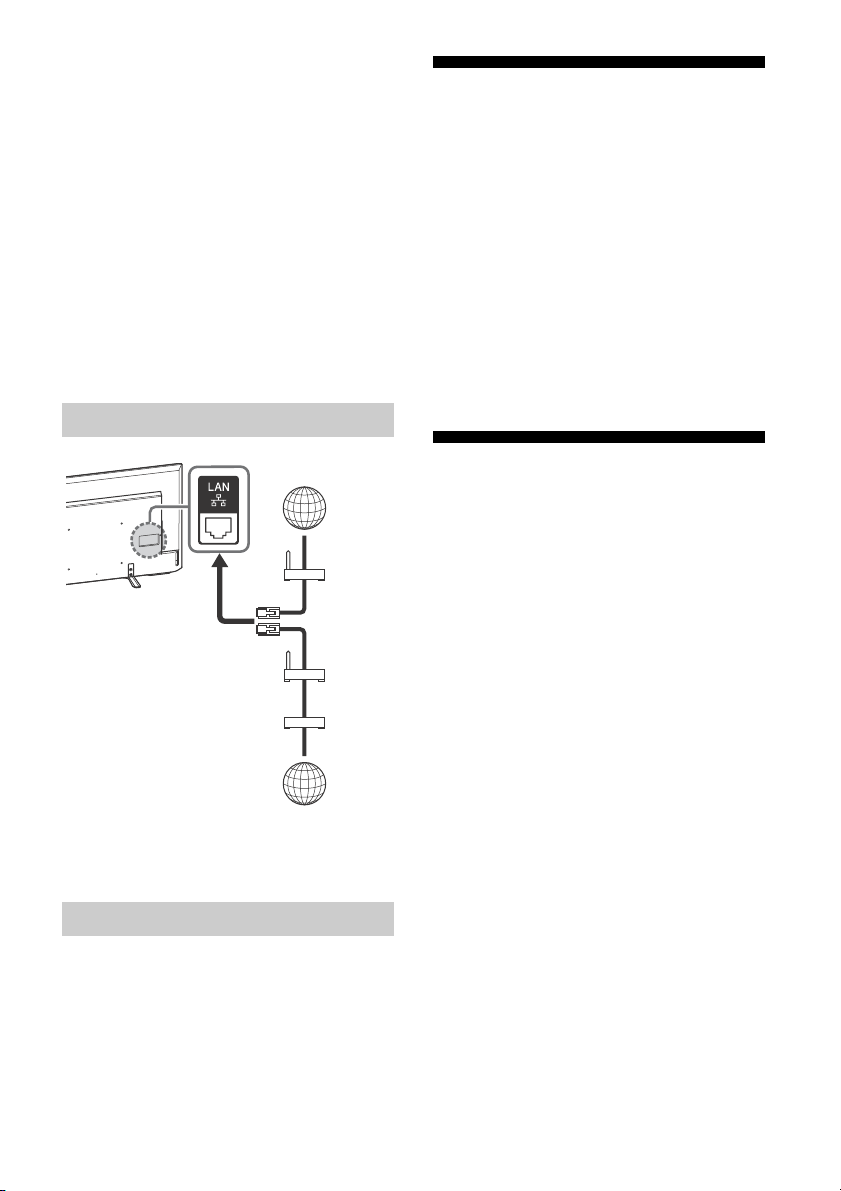
TV
Internet
Modem
with
router
functions
or
Router
Modem
Internet
screen.
[Network Set-up] can also be set from [Auto
Start-up] menu.
• Allows automatic configuration of your wired/
wireless network.
When connecting with LAN cable: Wired
When connecting with built-in Wireless LAN:
Wireless
When connecting with both of the cables: Wired
• Set to [Easy], sets the IP address automatically. For
proxy server is not use.
• To use the network with IPv6, select [Settings]
[System Settings] [Set-up] [Network]
[IPv6/IPv4 Priority] [IPv6], then select [Easy] in [Set
up network connection].
• When IPv6 is selected, HTTP Proxy cannot be set.
Preparing a Wired Network
If You Cannot Connect to the Internet
Use the diagnosis to check possible causes for
network connection failures, and settings.
1 Press HOME, then select [Settings]
[System Settings] [Set-up]
[Network] [Network Set-up].
2 Select [View Network setting and
status].
3 Select [Check Connection].
This may take several minutes. You cannot
cancel the diagnosis after selecting [Check
Connection].
Privacy Policy
When you use the following functions to
connect to the Internet, certain information will
be sent to Sony Corporation’s global servers,
which is considered to be personal information,
and requires your agreement in order for service
providers to use it.
• System software updates by connecting to
Sony Corporation’s global servers via the
Internet.
• Internet contents or other Internet services
from service providers like YouTube.
• For LAN connections, use a Category 7 cable (not
supplied).
Viewing the Network Status
You can confirm your network status.
1 Press HOME, then select [Settings]
[System Settings] [Set-up]
[Network] [Network Set-up].
2 Select [View Network setting and
status].
GB
12
This TV has the setting screens in Auto Start-up
or Setting Menu to confirm your agreement to
this after you read the detail of the Privacy
Policy. If you want to use these functions, please
check [Agree] in each setting screen. If
[Disagree] is checked, the above two functions
are not available.
However, even in this case, if [On] is selected at
[Automatic Software Download] in Auto Start-up
or Setting Menu, the system software updating
is available.
You can change this setting by pressing HOME,
then select [Settings] [System Settings]
[Set-up] [Privacy Policy].
GB
Watching TV
Watching TV
Changing the Viewing Style
1 Press on the TV or the remote control
to turn on the TV.
2 Press DIGITAL/ANALOG to switch
between digital and analogue inputs.
3 Press the number buttons or PROG +/–
to select a TV channel.
4 Press +/– to adjust the volume.
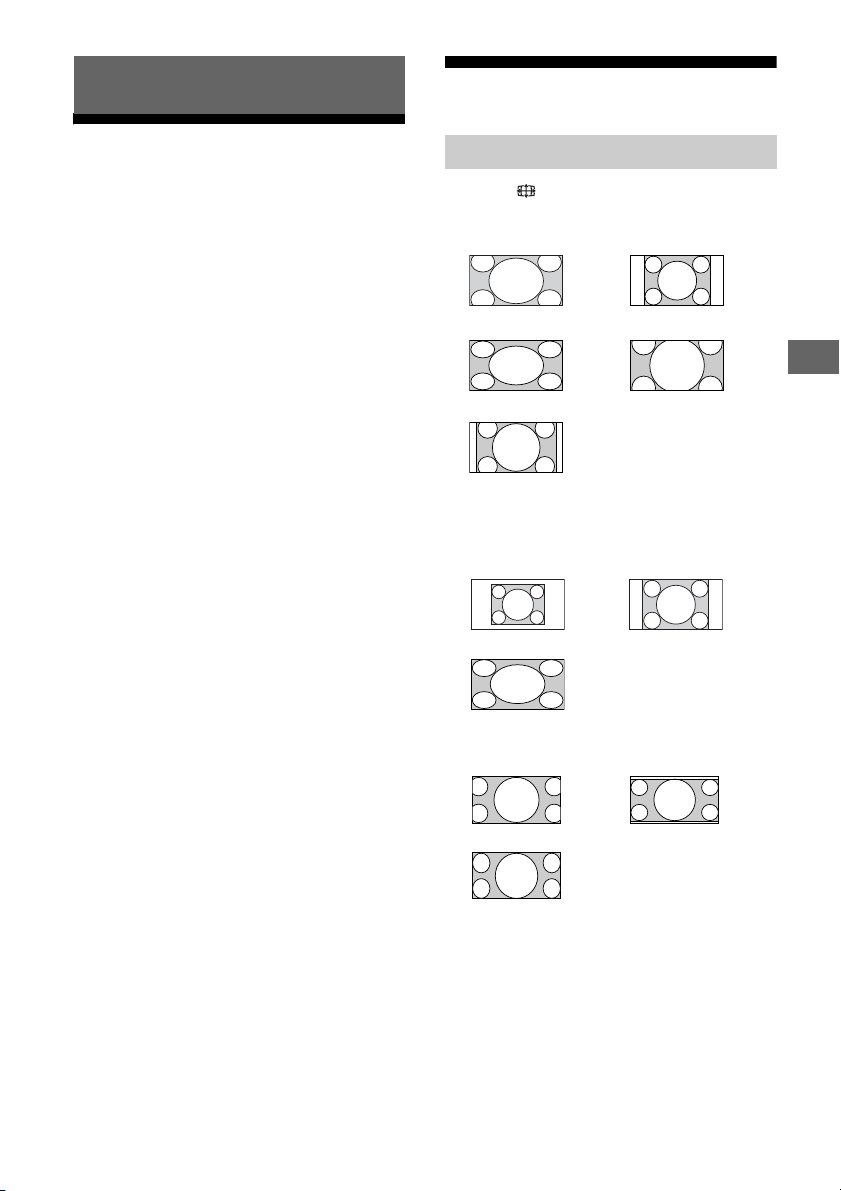
Changing the Wide Mode
1 Press repeatedly to select the wide
mode.
[Wide Zoom]* [Normal]
[Full] [Zoom]*
[14:9]*
* Parts of the top and bottom of the picture may
be cut off.
For HDMI PC Input (PC timing)
[Normal] [Full 1]
[Full 2]
For HDMI DCI 4K (4096 × 2160p)
[Normal] [Full 1]
[Full 2]
GB
13

Setting Scene Select
1 Press OPTIONS.
2 Press / then to select [Scene
Select].
When you select the desired scene option,
the optimum picture and sound quality for
selected scene are automatically set. The
options you can select may vary. Unavailable
options are greyed out.
GB
14
 Loading...