

Sony KD-65XE7096, KD-65XE7005, KD-49XE70, KD-55XE70, KD-55XE7096 Operating Instructions Manual
...
4-686-048-E2(1)
Television
Operating Instructions
Parts and Con tro ls
Connecting TV to the Internet
Watching TV
Navigating through Home Menu
Viewing Pictures from Connected
Equipment
Additional Information
KD-65XE70xx / 55XE70xx / 49XE70xx / 43XE70xx

Table of Contents
ВАЖНОЕ ПРИМЕЧАНИЕ . . . . . . . . . . . . . . . . 3
ВАЖЛИВА ПРИМІТКА . . . . . . . . . . . . . . . . . .4
ЕСКЕРТУ. . . . . . . . . . . . . . . . . . . . . . . . . . . . . 4
Safety Information . . . . . . . . . . . . . . . . . . . . .4
Precautions . . . . . . . . . . . . . . . . . . . . . . . . . . . 7
Parts and Controls
TV. . . . . . . . . . . . . . . . . . . . . . . . . . . . . . . . . 8
Remote Control . . . . . . . . . . . . . . . . . . . . . 9
Connecting TV to the Internet
Setting up the Internet Connection . . . . .11
Type 1: Secured network with Wi-Fi
Protected Setup™ (WPS) . . . . . . . . . . . . . . . 11
Type 2: Secured network without Wi-Fi
Protected Setup™ (WPS) . . . . . . . . . . . . . . . 12
Type 3: Unsecured network with any
type of wireless LAN router . . . . . . . . . . . . . 12
Type 4: Wired network set-up . . . . . . . . . . . 12
Preparing a Wired Network . . . . . . . . . . . . . 13
Viewing the Network Status . . . . . . . . . . . . 13
If You Cannot Connect to the
Internet . . . . . . . . . . . . . . . . . . . . . . . . . . . 13
Privacy Policy . . . . . . . . . . . . . . . . . . . . . . 13
Navigating through Home
Menu
All Apps . . . . . . . . . . . . . . . . . . . . . . . . . . . 16
Photo Sharing Plus . . . . . . . . . . . . . . . . . . . . 16
Using the TV as a Photo Frame Mode. . . . . 17
Listening to FM Radio. . . . . . . . . . . . . . . . . . 17
Programme List. . . . . . . . . . . . . . . . . . . . . 18
Digital EPG . . . . . . . . . . . . . . . . . . . . . . . . .18
Recordings. . . . . . . . . . . . . . . . . . . . . . . . .18
Media . . . . . . . . . . . . . . . . . . . . . . . . . . . . .18
Playback Photo/Music/Video via USB . . . . 18
Playback Photo/Music/Video via Home
Network . . . . . . . . . . . . . . . . . . . . . . . . . . . . .20
Settings . . . . . . . . . . . . . . . . . . . . . . . . . . 20
System Settings . . . . . . . . . . . . . . . . . . . . . . 20
Customer Support . . . . . . . . . . . . . . . . . . . . 29
Viewing Pictures from
Connected Equipment
Connection Diagram. . . . . . . . . . . . . . . . 30
Using Audio and Video Equipment . . . . .32
Using Screen mirroring. . . . . . . . . . . . . . .32
Installing the TV to the Wall . . . . . . . . . . .33
Watching TV
Changing the Viewing Style . . . . . . . . . . 14
Changing the Screen Format . . . . . . . . . . . . 14
Setting Scene Select. . . . . . . . . . . . . . . . . . . 15
GB
2
Additional Information
Troubleshooting . . . . . . . . . . . . . . . . . . . 34
Picture . . . . . . . . . . . . . . . . . . . . . . . . . . . . . . 34
Sound. . . . . . . . . . . . . . . . . . . . . . . . . . . . . . . 35
Channels . . . . . . . . . . . . . . . . . . . . . . . . . . . . 35
Network . . . . . . . . . . . . . . . . . . . . . . . . . . . . . 35
General . . . . . . . . . . . . . . . . . . . . . . . . . . . . . 36
Specifications . . . . . . . . . . . . . . . . . . . . . .37
GB
Note
Internet Connection and Data Privacy
This product connects to the i nternet during initial setup as
soon as a network is conn ected in order to confirm internet
connection, and later to configure the Home screen. Your IP
address is use d in these an d all other inter net connectio ns. If
you do not want your IP address be used at all, do not set-up
the wireless internet functi on and do not connect an i nternet
cable. Please refer to the privacy information presented in the
set-up screens for further detai ls of internet connections.
Introduction
Thank you for choosi ng this Sony product.
Before operating the TV, please read this manual tho roughly and
retain it for fu ture ref erence.
• Before operating the TV, please read the “Safety information”
(page 4).
• Images an d illustrations used in the Setu p Guide and this
manual are for reference only and m ay differ from the actual
product.
• The “xx” that a ppears in the model name corresponds to a
numeric digit, related to design, colour or TV system.
• Sales shoul d be performed in accordance with cu rrent
applicable local regulation. Product which cannot be used
anymore should be utilized in accordance with current
applicable local regulation.
Location of the Setup Guide
Setup Guide is placed on to p of the cushion insi de the TV carton.
Location of the identification label
Labels for the TV Mode l No., Production Date (year/mo nth) and
Power Supply rating are located on the rear of the TV or package.
For models with supplied mains adaptor:
Labels for the mains ad aptor Model No. and Serial No. are located
on the bottom of the m ains adaptor.
Дата изготовления указана на изделии и упаковке на этикетке
со штрих-кодом в следующем фо рмате:
YYYY/MM, где YYYY - год, MM - месяц изготовления.
Дата виготовлення зазначена на виробі та упаковці на
етикетці зі штрих-кодом у наступному форматі:
YYYY/MM, де YYYY – рік, MM – місяць виготовлення.
Өндіруші: Сони Корпор ейшн
Өндіруші мекенж айы: 1-7-1 Конан Минато-ку Токио,
108-0075 Жапония
Словакияда немесе Малайзияда жасалған.
Өндіруші ел өнімде жəне қорапта к өрсетілген.
Кеден одағы жеріндегі шетелден əкелуші
«Сони Электроникс» АҚ, Ресей, 123103, Мəскеу,
Карамышевский өтпе көшесі, 6
Қазақстан жеріндегі тұтынушылардың шағым-талаптарын
қабылдауға уəкілетті ұйым «Сони Электроникс» АҚ
Қазақстандағы Өкілдігі, 050010, Қазақстан Р
Алматы қ., Достық даңғылы, 117/7 үй
еспубликасы,
WARNING
TO PREVENT THE
SPREAD OF FIRE, KEEP
CANDLES OR OTHER OPEN
FLAMES AWAY FROM THIS
PRODUCT AT ALL TIMES.
Для покупателей в России
Устройство предназначено только для использования в
помещениях.
Информация для покупателей в Украине
Уполномоченный представитель в Украине по
вопросам соответствия требованиям
технических регламентов:
ООО «Со ни Укра ина», ул. И льинска я, 8, г. Ки ев,
04070, Украина.
Оборудование отвечает требованиям:
Технического регламента ограничения
использования некоторых опасных веществ в
электрическ ом и электронно м оборудовании
(постановление КМУ от 03.12.2008 № 1057);
Технического регламента по электромагнитной
совместимости оборудования (постановление КМУ от
16.12.2015 № 1077);
Технического регламента низковольтного электрического
оборудования (пос тановление КМУ от 16.12.2015 № 1067).
Настоящим Сони Корпорейшн заявляет, что телевизоры
моделей KD-65XE7096, KD-65XE7005, KD-55XE7096,
KD-55XE7077, KD-55XE7005, KD-49XE7096, KD-49XE7077,
KD-49XE7005, KD-43XE7096, KD-43XE7077, KD-43XE7005
соответствуют Техническому регламенту радиооборудования
и телекоммуни кационного конечного (терм инального)
оборудования. Полный текст декларации о соответствии
доступен в Интернете по адресу: info@sony.ua.
ВАЖНОЕ ПРИМЕЧАНИЕ
Название продукта: Телевизор
Производитель: Сони Корпорейшн, 1-7-1 Конан Минато-ку
Токио, 108-0075 Япония
Сделано в Словакии или Малайзии.
Страна производс тва указана на изделии и упак овке.
Импортер на территории стран Таможенного союза: АО
«Сони Электроникс», Россия, 123103, Москва, Карамышевский
проезд, 6
GB
3
ВАЖЛИВА ПРИМІТКА
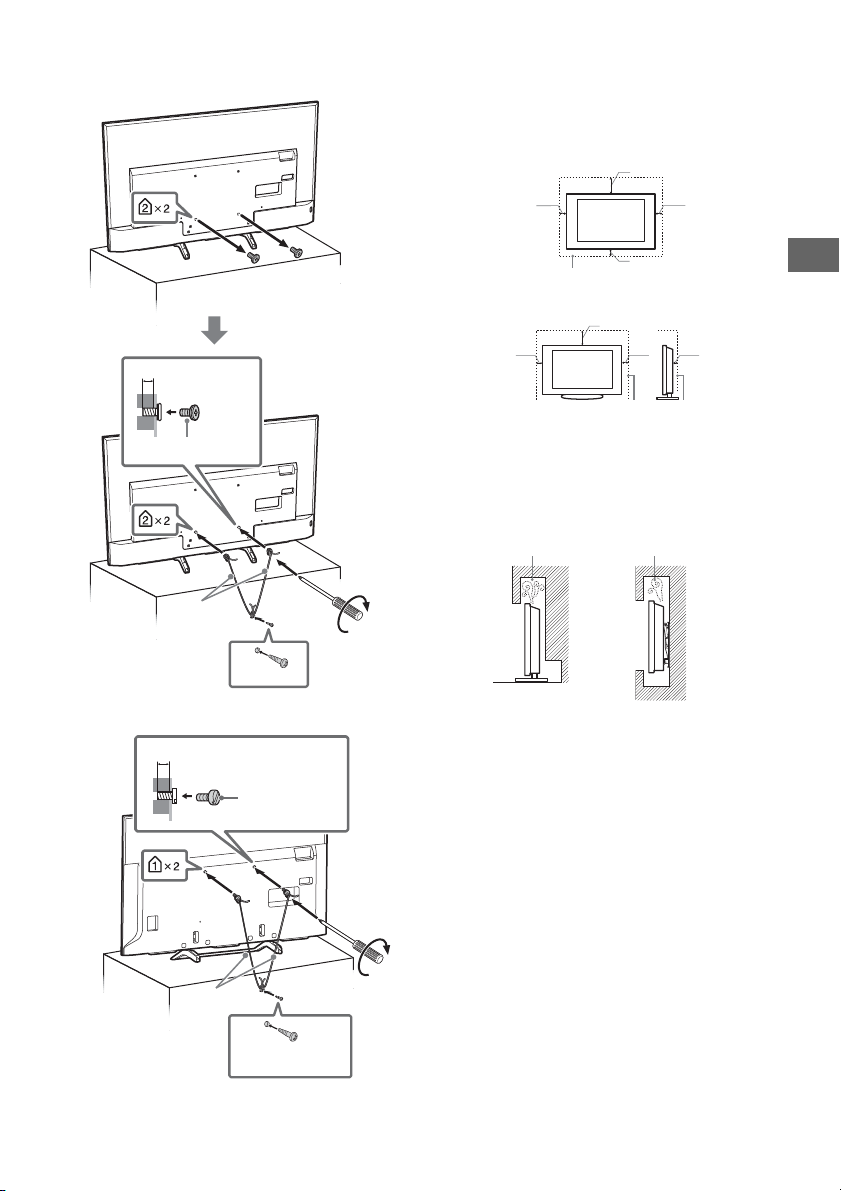
Screw (M6)
Wall-Mount Bracket
8 mm - 12 mm
TV’s rear cover
Назва виробу: Телевізор
Обладнання відповідає вимогам:
Технічного регламенту обмеження
використання д еяких небезпечних ре човин в
електричному та електронному обладнанні
(постанова КМУ від 03.12.2008 № 1057);
Технічн ого регламенту з електр омагнітної
сумісності облад нання (постанова КМУ від
16.12.2015 № 1077);
Технічного регламенту низьковольтного електричного
обладнання (постанова КМУ від 16.12.2015 № 1067).
Справжнім Соні Корпорейшн заявляє, що телевізори моделей
KD-65XE7096, KD-65XE7005, KD-55XE7096, KD-55XE7077,
KD-55XE7005, KD-49XE7096, KD-49XE7077, KD-49XE7005,
KD-43XE7096, KD-43XE7077, KD-43XE7005 відповідають
Технічному регламенту радіообладнання і
телекомунікаційного кінцевого (термінального) обладнання.
Повний текст декларації про відповідність доступний в
Інтернеті за такою адресою: info@sony.ua.
Виробник: Соні Корпорейшн, 1-7-1 Конан Мінато -ку Токіо, 1080075 Японія
Вироблено у Сло ваччині або Мала йзії.
Країна виробництва зазначається на виробі та його пакуванні.
Уповноважений представник в Україні з питань відповідності
вимогам технічних регламентів:
ТОВ «Соні Україна», вул. Іллінська, 8, м. Київ, 04070, Україна.
ЕСКЕРТУ
Θнім атауы: Телевизор
Safety Information
WARN ING
Batteries must not be expose d to excessive heat such as
sunshine, fire or the like.
Never place a television s et in an unstable location. A tele vision
set may fall, causing serious personal injury or death. Many
injuries, particularly to children, can be avoided by taking simple
precautions such as:
Using cabinets or stands recommended by the manufacturer of
the television set.
Only using furniture that can safely support the television set.
Ensurin g the television set is not overh anging the edge of the
supporting furniture.
Not placing the television set on tall furniture (for example,
cupboards or bookcases) without anchoring both the furniture
and the television set to a s uitable support.
Not placing the television set on cloth or other materials that
may be located between the television set and supporting
furniture.
Educating ch ildren about the dangers o f climbing on furniture
to reach the television set or its controls.
If your existing television set i s being retained and relocated, the
same considerations as above should be applied.
Installation/Set-up
Install and use the TV set in accordance with the instructions
below in order to avoid any risk of fire, electric shock or damage
and/or injuries.
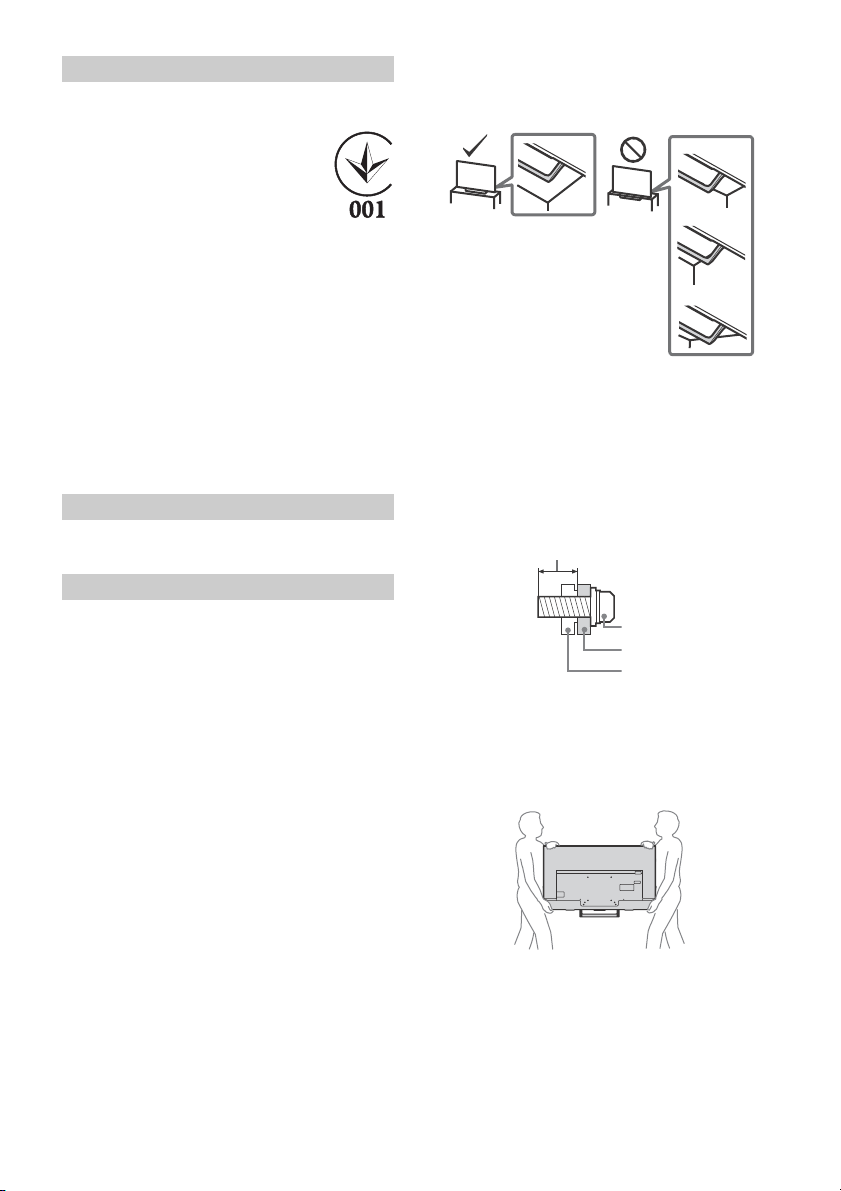
Installation
• The TV set sho uld be installed near an easily accessi ble mains
socket.
• Place the TV on a stable, level surface to prevent it from falling
over and caus ing personal injury or prope rty damage.
• Install the TV where it cannot be pulled, pushed, or knocked
over.
• Install the TV s o that the TV's Table-Top Stand does not
protrudes out from the TV stand (not supplied). If the Table-Top
Stand protrudes out from the TV stand, it may cause TV set to
topple over, fall down, and cause personal injury or damage to
the TV.
• Only qualified service personnel should carry out wall-mount
installations.
• For safety reasons, it i s strongly recommended that you u se
Sony accessories, inc luding:
Wall-Mount Bracket: SU-WL450
• Be sure to use the screws supplied with the Wall-Mount Bracket
when attaching the Wall-Moun t Bracket to the TV set. The
supplied screws are designed as indicated by illustration when
measured from the attaching surface of the Wall-Mount Bracket.
The diameter and length of the screws differ depending on the
Wall-Mount Bracket model.
Use of screws other than t hose supplied may result in internal
damage to the TV se t or cause it to fall, etc.
Tran spo rti ng
• Before transpor ting the TV set, disconnect all cables.
• Two or three people are needed to transp ort a large TV set.
• When transpo rting the TV set by han d, hold it as shown belo w.
Do not put stress on the LCD pan el and the frame around the
screen.
• When lifting or moving the TV set, hold it firmly from the
bottom.
• When transpo rting the TV set, do not sub ject it to jolts or
excessive vibration.
• When transpo rting the TV set for repairs o r when moving, pack
it using the original car ton and packing material.
GB
4
GB
Note
8 mm - 12 mm
1.5 N·m/1,5 N·m
{15 kgf·cm}
M6 screw
(previ ously remov ed)
Cord
(not supplied)
Screw
(not supplied)
8 mm - 12 mm
M6 screw
(not supplied)
Cord
(not supplied)
Screw
(not supplied)
1.5 N·m/1,5 N·m
{15 kgf·cm}
30 cm
10 cm
10 cm
10 cm
Leave at least this space around the set.
30 cm
10 cm
10 cm
Leave at least this space around the set.
6 cm
Air circulation is blocked.
Wall Wall
Topple prevention
KD-65XE70xx
Ventilation
• Never cover the ventilation holes or insert anything in the
cabin et.
• Leave space around the TV set as shown below.
• It is strongly recomme nded that you use a Sony Wall-Mount
Bracket in order to provide adequate air circulation.
Installed on the wall
Installed with stand
• To ensure proper ventilation and prevent the collection of dirt or
dust:
Do not lay th e TV set flat, install upside down, backwards , or
sideways.
Do not place th e TV set on a shelf, rug, bed or in a cl oset.
Do not cover the TV set with a cloth , such as curtains, or items
such as newspapers, etc.
Do not install the TV s et as shown bel ow.
Except KD-65XE70xx
Mains lead
Handle the main s lead and socket as follows in order to avo id any
risk of fire, electric shock or damage and/or injuries:
Use only mains leads supplied by Sony, not other suppliers.
Inse rt the plug fully into th e mains socket.
Operate the TV set on a 220 V - 240 V AC supply only.
When wiring cables, be sure to unplug the mains lead for your
safety and take care not to catch your feet on t he cables.
Disco nnect the mains lead from the mains socket before
working on or moving the TV set.
Keep th e mains lead away from heat s ources.
Unplug the mains plug and clean it regularly. If the plug is
covered with du st and it picks up moisture, its insu lation may
deteriorate, wh ich could result in a fire.
• Do not use t he supplied mains lea d on any other equipmen t.
• D o not pinch, bend, or twist the main s lead excessively. The core
conductors may be exposed or broken.
• Do not mod ify the mains lead.
• Do not put a nything heavy on the mai ns lead.
• Do not pull o n the mains lead itself whe n disconnecting the
mains lead.
• Do not connec t too many appliances to the sa me mains socket.
• Do not use a poor fitting mains socket.
5
GB
NOTE ON MAINS ADAPTOR (models with
supplied mains adaptor only)
Warning
To reduce the risk of fire or electric shock, do not expose this
apparat us to rain or m oistu re.
To prevent fire or shock hazard, do not place objects filled with
liquids, such as vase s, on the apparatus. Do not in stall this
equipment in a confined space, such as a bookshelf or similar
unit.
• Please ensu re that the mains socket is installed n ear the
equipment and sh all be easily accessible.
• Be sure to use the supplied mains adaptor and mains lead.
• Do not use any othe r mains adaptor. It may cause a
malfunction.
• Connect the ma ins adaptor to an easily accessible m ains socket.
• Do not coil the ma ins lead around the
mains adaptor. The core wire may be cut
and/or it may cause a m alfunction of the
media receiver.
• Do not touch the mains adaptor with wet
hands.
• If you notice an abn ormality in the mains adaptor, disconnect it
from the mains socket immediately.
• The set is not disconn ected from the mains source as long as it
is connected to the mains socket, even if the set itself has been
turned off.
• As the ma ins adaptor will become warm when it is used for a
long time, you may feel hot when touching it by hand.
Prohibited Usage
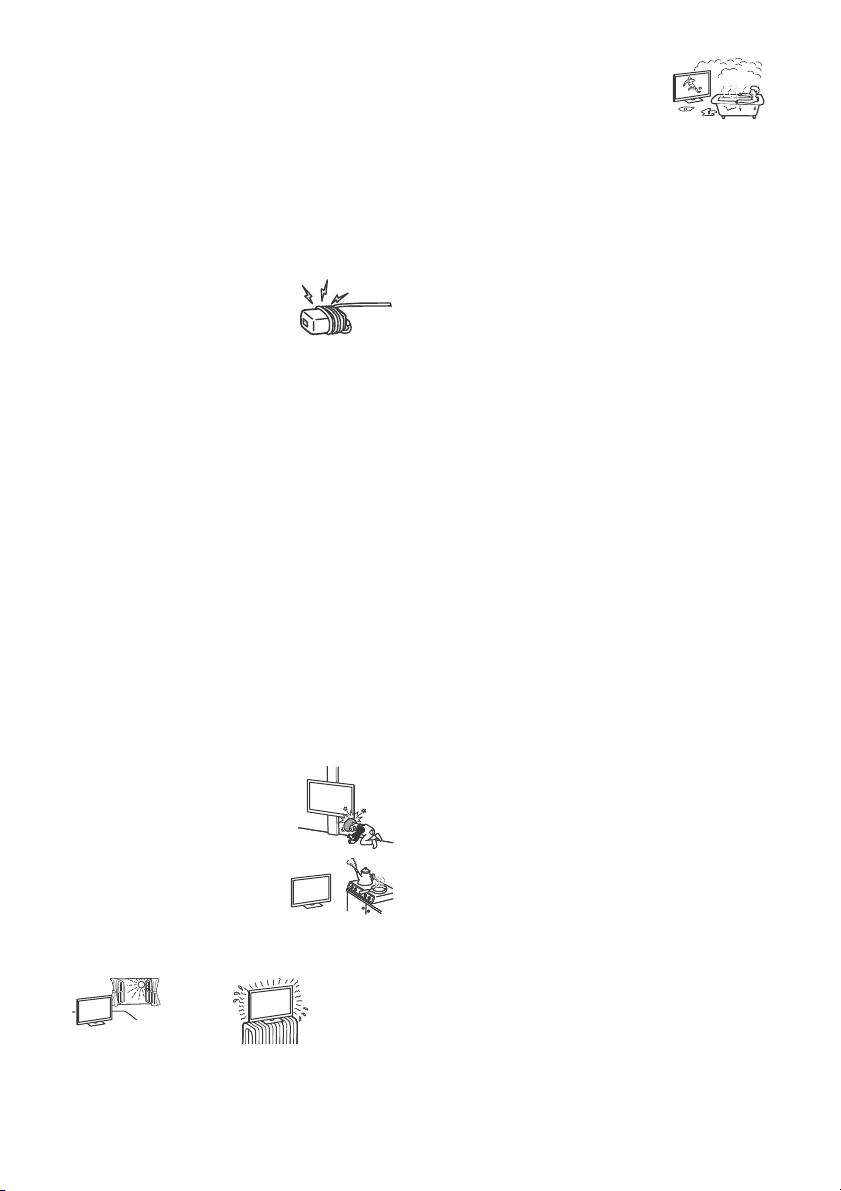
Do not install/use the TV s et in locations, environments or
situations such as t hose listed below, or the TV set ma y
malfunction and cau se a fire, electric shock, dama ge and/or
injuries.
Locations:
• Outdoors (in d irect sunlight), at the seashore, on a sh ip or other
vessel, inside a vehicle, in medical institutions, unstable
locations, near water, rain, moisture or s moke.
Environments:
• Places that are hot, hu mid, or excessively dusty; where insects
may enter; where it mig ht be exposed to mechanical vibration,
near flammable objects (candles, etc.). The TV set shall not be
exposed to dripping or splashing and no objects filled with
liquids, such as va ses, shall be placed on the TV.
Situations:
• Use when yo ur hands are wet, with the cabine t removed, or
with attachments not recomm ended by the manufacturer.
Disconnect the TV set from mains socket and aerial durin g
lightning storms.
• Install the TV so that it sticks out into an
open space. Injury or damage from a
person or object b umping into the TV may
result .
• If the TV is placed in the changing room of
a public bath or hot spring, the TV may be
damaged by airborne sulfur, etc.
• For best picture quality, do not expose the screen to direct
illumination or sunlight.
• Avoid moving the TV from a cold area to a warm area. Sudden
room temperature changes ma y cause moisture condensation .
This may cause the TV to show poor picture and/or poor colour.
Should this occur, allow mo isture to evaporate completely
before powering the TV on.
Broken pieces:
• Do n ot throw anything at the TV set. T he screen glass may break
by the impact and cause serious injury.
• If the surface of th e TV set cracks, do not touch it until you ha ve
unplugged the mains lead. Otherwise this may cause an electric
shock.
When not in use
• If you will not be using the TV set for several d ays, the TV set
should be disconnected from the mains for environmental and
safety reasons.
• As the TV s et is not disconnected from the mains when the TV
set is just turned off, pull the plu g from the mains to disconnect
the TV set completely.
• Some TV se ts may have features that require the TV s et to be
left in standby to work correctly.
For children
• Do not allow children to climb on the TV s et.
• Keep small accessorie s out of the reach of children, so that they
are not mistakenly swallowe d.
If the following problems occur...
Turn off the T V set and unplug the main s lead immediately if any
of the following problems occur.
Ask your dealer or Sony service centre to have it checked by
qualified service personnel.
When:
Mains lead is damaged.
Poo r fitt ing of mai ns soc ket.
TV set is damaged by being dropped, hit or having something
thrown at it.
Any liquid or solid object falls through openings in the cabinet.
About LCD TV Temperature
When the LCD TV is used for an extended period, the panel
surrounds become warm. You may feel hot wh en touching there
by the hand.
• Place the T V in a humid or d usty space,
or in a room with oily smoke or steam
(near cooking tables or humidifiers). Fire,
electric shock, or warping may result.
• Install the TV in p laces subject to
extreme temperature such as in direct sun light, near a radiator
or a heating vent. The TV may overheat in such condition which
can cause deformation of the enclosure and/or TV malfunc tion.
GB
6
GB
1.5 mm max.
(Reference drawing of the F-type plug)
7 mm max.
Precautions
Viewing the TV
• Vi ew the TV i n moderate li ght, as view ing the TV i n poor ligh t or
during long period of time, strains your eyes.
• When using he adphones, adjust the volume so as to avoid
excessive levels , as hearing damage may result.
LCD Screen
• Although th e LCD screen is made with high-precision
technology and 99.99 % o r more of the pixels are effective,
black dots may appear or bright points of light (red, blue, or
green) may appear cons tantly on the LCD screen. This is a
structural property of th e LCD screen and is not a malfunction.
• Do not push or sc ratch the front filter, or place objects on top of
this TV set. The image may be uneven or the LCD screen may be
damaged.
• If this TV set is u sed in a cold place, a smear may occur in the
picture or the picture may become dark. This does not indicate a
failure. These phenomena d isappear as the temperature rises.
• Ghos ting may occ ur when still p ictures are dis played
continuously. It may disappe ar after a few moments.
• The screen an d cabinet get warm when this TV s et is in use. This
is not a malfunction.
• The LCD screen con tains a small amount of liquid cry stal. Follow
your local ordi nances and regu lations for dispos al.
Handling and cleaning the screen surface/
cabinet of the TV set
Be sure to unplug the mai ns lead connected to the TV set from
mains socket before cleaning.
To avoid material degradation or screen coating deg radation,
observe the following precautions.
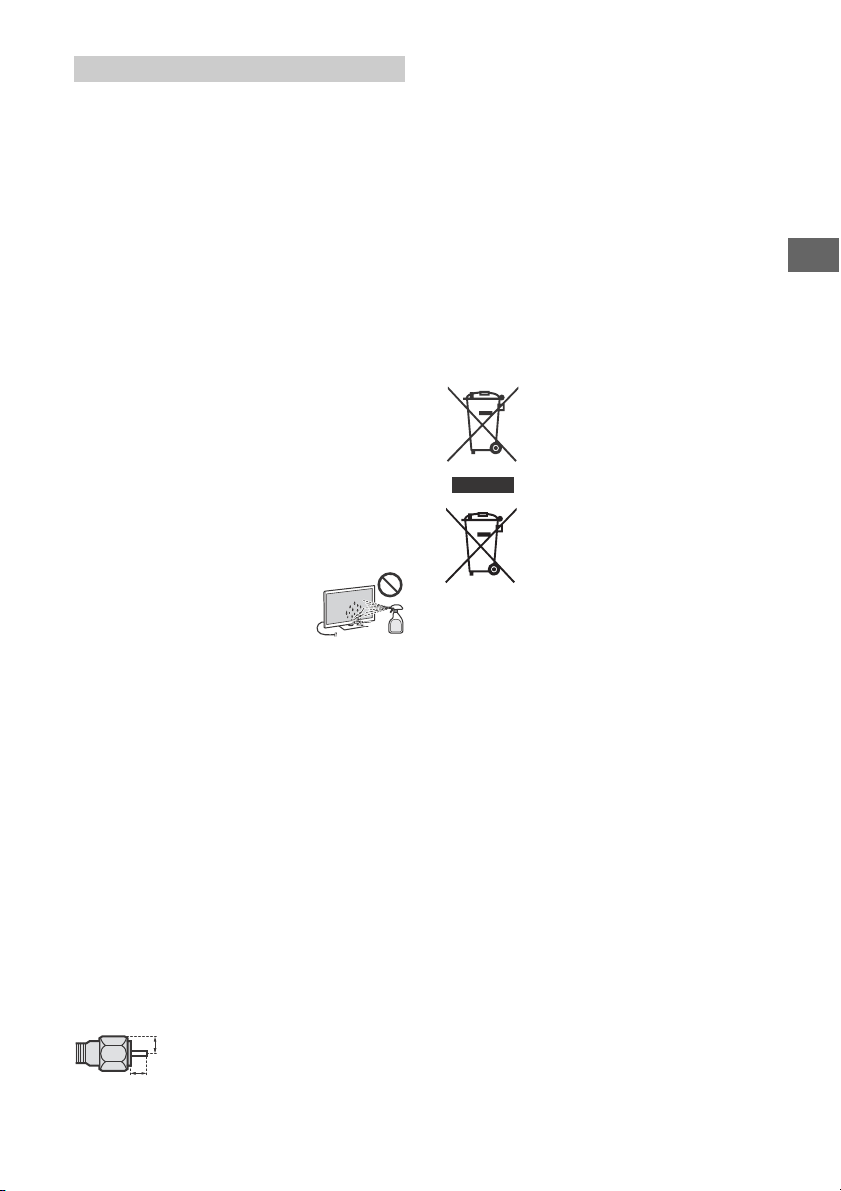
• To remove dust from the screen surface/cabinet, wipe gently
with a soft cloth. If dust is persistent, wipe with a soft cloth
slightly moistened w ith a diluted mild detergent solu tion.
• Never spray water or d etergent directly on
the TV set. It may drip to the bottom of the
screen or exterior parts and enter the TV
set, and may cause da mage to the TV set.
Caution about handling the remote control
• Obser ve the correct polarity when inse rting batteries.
• Do not use di fferent types of batteries to gether or mix old and
new batteries.
• Disp ose of batterie s in an environme ntally frien dly way. Certain
regions may regulate the disp osal of batteries. Please consult
your local au thority.
• Handle the rem ote control with care. Do not drop or step on it,
or spill liquid of any kind onto it.
• Do not pla ce the remote control in a location near a heat source,
a place subject to direct sunligh t, or a damp room.
Wireless Function of the unit
• Do not operate this u nit near medical equipm ent (pacemaker,
etc.), as malfunction of th e medical equipment m ay result.
• Altho ugh this un it transmits/rece ives scrambled signals, be
careful of unauthorised i nterception. We cannot be responsible
for any trouble as a result.
• This equipment should be installed and operated keeping a
separation distance of 20 cm o r more between the antenna of
this device and a person's body.
Disposal of the TV set
Disposal of Old Electrical &
Electronic Equipment (Applicable in
the European Union and other
European countries with separate
collection systems)
Disposal of waste batteries
(applicable in the European Union
and other European countries with
separate collection systems)
• Never use any type of abrasive pad,
alkaline/acid cleaner, scouring powder, or volatile solvent, such
as alcohol, benzene, thinner or insecticide. Using such materials
or maintaining p rolonged contact with rubber or vinyl materials
may result in damage to the screen surface and cabinet
material.
• Do not touch the TV if your hand is covered in any che mical
substance such as ha nd cream or sunblock.
• Periodic vacuuming of the ventilation openings is
recommended to ensure proper ventilation.
• When adju sting the angle of the TV s et, move it slowly so as to
prevent the TV set from m oving or slipping off from i ts table
stand.
Optional Equipment
• Keep optional comp onents or any equipm ent emitting
electromagnetic radiation a way from the TV set. Otherw ise
picture distortion a nd/or noisy sound m ay occur.
• This equipm ent has been tested and foun d to comply with the
limits set out in the EMC Directive using a connect ion signal
cable shorter than 3 m eters.
• This equipm ent has been tested and foun d to comply with the
limits set out in the EMC Directive using a RF cable shorte r than
30 meters for terrestrial/satellite/C ATV terminal.
Recommendation of F-type plug
Projection of the inner wi re from the connection par t must be less
than 1.5 mm.
GB
7
Note
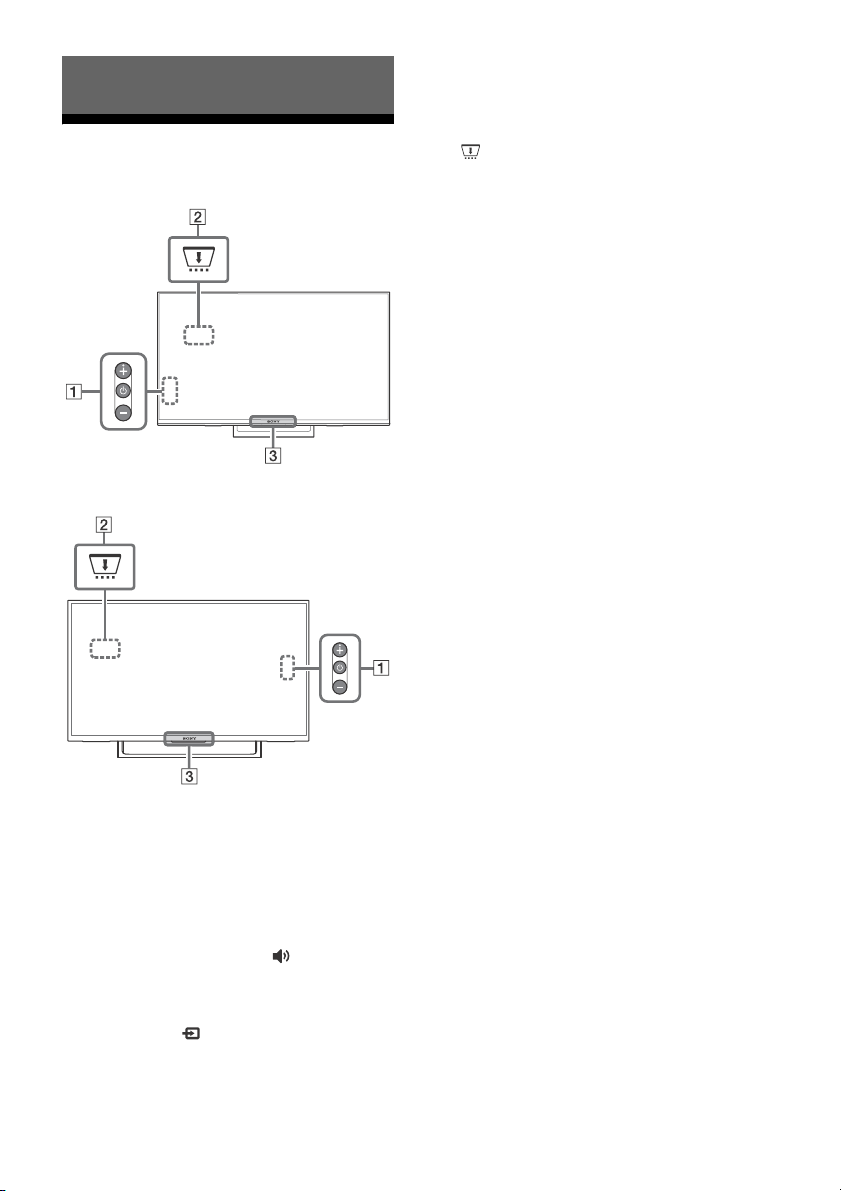
Parts and Controls
TV
KD-65XE70xx
Except KD-65XE70xx
Programme
Press until PROG notification is displayed.
Select the programme by pressing + (up) or
– (down) button.
CAM (Conditional Access Module)
• Provides access to pay TV services. For
details, refer to the instruction manual
supplied with your CAM.
• Do not insert the smart card directly into
the TV CAM slot. It must be fitted into the
Conditional Access Module provided by
your authorised dealer.
• CAM is not supported in some countries/
areas. Check with your authorised dealer.
• A CAM message may appear when you
switch to a digital programme after using
the Internet video.
(Sensors/LED indicator)
• Receives signals from the remote control.
Do not put anything over the sensor.
Doing so may affect its function.
• Lights up in amber when the [Sleep Timer]
or [On Timer] is set (page 26), or the TV is
in Photo Frame Mode (page 17).
• Lights up in white when [Power Saving] is
set to [Picture Off] (page 29).
• Lights up in white when the TV is turned
on.
• Does not light up when the TV is in
standby mode.
• Flashes while the remote control is being
operated.
• Lights up in red in recording mode.
(Power) / + / –
Short press to turn the TV on.
Long press until the TV turn off.
When the TV is on,
Volume
Press + or – button to increase/decrease the
volume.
You can also press until notification is
displayed. Increases/decreases the volume
by pressing the + or – button.
Input
Press until notification is displayed.
Moves the selected input source by pressing
+ (up) or – (down) button.
GB
8
• Make sure that the TV is completely turned off before
unplugging the AC power cord (mains lead).
• To disconnect the TV from the AC power completely,
pull the plug from the mains socket.
• Please wait for a while when perform input selection
to change to other input.
GB
Parts and Controls
Remote Control
The remote control shape, location, availability
and function of remote control button may vary
depending on your region/country/TV model.
/ (Input select / Text hold)
• Displays and selects the input source.
• In text mode, holds the current page.
DIGITAL/ANALOG
Switches to digital or analogue input.
Number buttons
• Select channels. For channel numbers 10
and above, enter the next digit quickly.
• In text mode, enter the three digit page
number to select the page.
EXIT
Return to the previous screen or exit from
the menu. When an Interactive Application
service is available, press to exit from the
service.
Colour buttons
Displays operation guide (when colour
buttons are available).
YouTube (Only on limited region/
country/TV model)
Accesses the “YouTube” online service.
/ (Info / Text reveal)
• Displays information. Press once to
display information about the
programme/input you are viewing. Press
again to remove the display from the
screen.
• In text mode, reveals hidden information
(e.g. answers to a quiz).
SLEEP
Press repeatedly until the TV displays the
time in minutes ([Off]/[15 min]/[30 min]/
[45 min]/[60 min]/[90 min]/[120 min]) that
you want the TV to remain on before
shutting off. To cancel the sleep timer, press
SLEEP repeatedly until [Off] appears.
//// (Item select / Enter)
• Select or adjust items.
• Confirm selected items.
RETURN
• Returns to the previous screen of any
displayed menu.
• Stops playback when playing photo/
music/video file.
HOME
Displays or cancels the menu.
+/– (Volume)
Adjusts volume.
GB
9
AUDIO
Hint
Note
Select the sound of multilingual source or
dual sound for the programme currently
being viewed (Depend on programme
source).
(Subtitle)
Changes the subtitle setting (page 23).
//////
• Operate media contents on TV and
connected BRAVIA Sync-compatible
device.
• This key also can be used to operate VOD
(Video on Demand) service playback.
Availability is depend on VOD service.
REC (Not available for Italy)
Record the current programme with the USB
HDD recording fun ction.
(TV standby)
Turns the TV on or switches to standby
mode.
SYNC MENU
Press to display the BRAVIA Sync Menu and
then select connected HDMI equipment
from [Device Selection].
The following options can be selected from
BRAVIA Sync Menu.
Device Control:
Use the [Device Control] to operate
equipment that is compatible with BRAVIA
Sync Control. Select options from [Home
(Menu)], [Options], [Content List] and [Power
Off] to operate the equipment.
Speakers:
Select [TV Speakers] or [Audio System] to
output the TV’s sound from the TV speakers
or connected audio equipment.
TV Control:
Use the [TV Control] menu to operate the TV
from the [Home (Menu)] or [Options] menu.
Return to TV:
Select this option to return to TV
programme.
(Text)
In text mode, displays Text broadcast.
Each time you press , the display changes
cyclically as follows:
Tex t Text over the TV picture (mix mode)
No Text (exit the Text service)
NETFLIX (Only on limited region/
country/TV model)
Accesses the “NETFLIX” online service.
GUIDE (EPG)
Displays the Digital EPG (Electronic
Programme Guide) (page 18).
OPTIONS
Displays a list that contains shortcuts to
some setting menus.
The listed options vary depending on the
current input and content.
(Jump)
Returns to the previous channel or input
viewed more than 15 seconds.
PROG +/–/ /
• Selects the next (+) or previous (–)
channel.
• In text mode, selects the next ( ) or
previous ( ) page.
(Mute)
Mutes the sound. Press again to restore the
sound.
TITLE LIST (Not available for Italy)
Display the Title list.
(Wide Mode)
Adjusts the screen display. Press repeatedly
to select the desired wide mode (page 14).
• The number 5, , PROG + and AUDIO buttons have
tactile dots. Use the tactile dots as references when
operating the TV.
• If subtitles are selected and the user launches a
digital text application via ‘text’ key, subtitles may,
under certain circumstance stop being displayed.
When the user exits the digital text application,
subtitle decoding will resume automatically.
10
GB
GB
Connecting TV to the Internet
Note
Connecting TV to the Internet
Setting up the Internet Connection
To use the network features of your TV it needs
to be connected to the Internet. The set-up
procedure differs depending on the type of
network and LAN router. Before setting up the
Internet connection, be sure to set up a LAN
router. Check your wireless LAN environment
using the following chart.
Wireless LAN
Secure Wireless LAN? NO
YES
Do you use a wireless LAN router
compatible with Wi-Fi Protected
Setup™ (WPS)?
YES
Type 1 *
Wired LAN Typ e 4
* Type 1 is easier to set up if your router has an
automatic setting button, e.g. Air Station OneTouch Secure System (AOSS). Most of the latest
routers have this function. Check your router.
Type 1: Follow the configuration for Secured
Type 2: Follow the configuration for Secured
Type 3: Follow the configuration for
Type 4: Follow the configuration for Wired
network with Wi-Fi Protected
Setup™ (WPS).
network without Wi-Fi Protected
Setup™ (WPS).
Unsecured network with any type of
wireless LAN router.
network set-up.
Typ e 3
NO
Typ e 2
Type 1: Secured network with Wi-Fi Protected Setup™ (WPS)
The WPS standard makes security of a wireless
home network as straightforward as pressing
the WPS button on the wireless LAN router.
Before setting up a wireless LAN, check the
location of the WPS button on the router and
verify how to use it.
For security purpose, [WPS (PIN)] provides a PIN
code for your router. PIN code is renewed every
time you select [WPS (PIN)].
1 Press HOME, then select [Settings]
[System Settings] [Set-up]
[Network] [Network Set-up].
2 IP Address setting/Proxy server:
– automatic setting:
[Set up network connection] [Easy]
– manual setting:
[Set up network connection] [Expert]
[Wired Set-up] or [Wireless Set-up]
3 Select [WPS (Push Button)] for Push
Button method or [WPS (PIN)] for PIN
method.
Note
Button name of the WPS may differ depending on
the router (e.g. AOSS button).
4 Follow the instructions on the set-up
screen.
• If you use WPS for network set-up, the security
settings of the wireless LAN router activate, and any
equipment previously connected to the wireless LAN
in a non-secure status will be disconnected from the
network.
In this case, activate the security settings of the
disconnected equipment and then reconnect. Or, you
can deactivate the security settings of the wireless
LAN router, and then connect the equipment to a TV
in a non-secure status.
• To use the network with IPv6, select [Settings]
[System Settings] [Set-up] [Network]
[IPv6/IPv4 Priority] [IPv6], then select [Easy] in [Set
up network connection].
• When IPv6 is selected, HTTP Proxy cannot be set.
GB
11

Note
Note
Note
Type 2: Secured network without Wi-Fi Protected Setup™ (WPS)
To set up a wireless LAN, SSID (wireless network
name) and security key (WEP or WPA key) will be
required. If you do not know them, consult the
instruction manual of your router.
1 Press HOME, then select [Settings]
[System Settings] [Set-up]
[Network] [Network Set-up].
2 IP Address setting/Proxy server:
– automatic setting:
[Set up network connection] [Easy]
– manual setting:
[Set up network connection] [Expert]
[Wired Set-up] or [Wireless Set-up]
3 Select [Scan], then select a network from
the list of scanned wireless networks.
4 Follow the instructions on the set-up
screen.
• To use the network with IPv6, select [Settings]
[System Settings] [Set-up] [Network]
[IPv6/IPv4 Priority] [IPv6], then select [Easy] in [Set
up network connection].
• When IPv6 is selected, HTTP Proxy cannot be set.
• Please make sure your surrounding is secure when
you key in your password.
Type 3: Unsecured network with any type of wireless LAN router
To set up a wireless LAN, SSID (wireless network
name) will be required.
1 Press HOME, then select [Settings]
[System Settings] [Set-up]
[Network] [Network Set-up].
2 IP Address setting/Proxy server:
– automatic setting:
[Set up network connection] [Easy]
– manual setting:
[Set up network connection] [Expert]
[Wired Set-up] or [Wireless Set-up]
3 Select [Scan], then select a network from
the list of scanned wireless networks.
4 Follow the instructions on the set-up
screen.
• Security key (WEP or WPA key) will not be required
because you do not need to select any security
method in this procedure.
• To use the network with IPv6, select [Settings]
[System Settings] [Set-up] [Network]
[IPv6/IPv4 Priority] [IPv6], then select [Easy] in [Set
up network connection].
• When IPv6 is selected, HTTP Proxy cannot be set.
Type 4: Wired network set-up
Enter the respective alphanumeric values for
your router if necessary. The items that need to
be set (e.g. IP Address, Subnet Mask, DHCP)
may differ depending on the Internet service
provider or router. For details, refer to the
instruction manuals provided by your Internet
service provider, or those supplied with the
router.
1 Press HOME, then select [Settings]
[System Settings] [Set-up]
[Network] [Network Set-up].
2 IP Address setting/Proxy server:
– automatic setting:
[Set up network connection] [Easy]
– manual setting:
[Set up network connection] [Expert]
[Wired Set-up] or [Wireless Set-up]
3 Follow the instructions on the set-up
screen.
[Network Set-up] can also be set from [Auto
Start-up] menu.
• Allows automatic configuration of your wired/
wireless network.
When connecting with LAN cable: Wired
When connecting with built-in Wireless LAN:
Wireless
When connecting with both of the cables: Wired
• Set to [Easy], sets the IP address automatically. For
proxy server is not use.
• To use the network with IPv6, select [Settings]
[System Settings] [Set-up] [Network]
[IPv6/IPv4 Priority] [IPv6], then select [Easy] in [Set
up network connection].
• When IPv6 is selected, HTTP Proxy cannot be set.
GB
12
GB
Connecting TV to the Internet
Note
TV
Internet
Modem
with
router
functions
or
Router
Modem
Internet
Preparing a Wired Network
• For LAN connections, use a Category 7 cable (not
supplied).
Viewing the Network Status
You can confirm your network status.
1 Press HOME, then select [Settings]
[System Settings] [Set-up]
[Network] [Network Set-up].
2 Select [View Network setting and
status].
If You Cannot Connect to the Internet
Use the diagnosis to check possible causes for
network connection failures, and settings.
1 Press HOME, then select [Settings]
[System Settings] [Set-up]
[Network] [Network Set-up].
2 Select [View Network setting and
status].
3 Select [Check Connection].
This may take several minutes. You cannot
cancel the diagnosis after selecting [Check
Connection].
Privacy Policy
When you use the following functions to
connect to the Internet, certain information
which is considered to be personal information,
will be sent to Sony Corporation's global
servers.
Your agreement is required in order for it to be
collected and used.
• System software updates by connecting to
Sony Corporation’s global servers via the
Internet.
• Internet contents or other Internet services
from service providers like YouTube.
This TV has the setting screens in Auto Start-up
or Setting Menu to confirm your agreement to
this after you read the detail of the Privacy
Policy. If you want to use these functions, please
check [Agree] in each setting screen. If
[Disagree] is checked, the above two functions
are not available.
You can change this setting by pressing HOME,
then select [Settings] [System Settings]
[Set-up] [Privacy Policy].
GB
13

Note
Watching TV
Changing the Viewing Style
1 Press on the TV or the remote control
to turn on the TV.
2 Press DIGITAL/ANALOG to switch
between digital and analogue inputs.
3 Press the number buttons or PROG +/–
to select a TV channel.
4 Press +/– to adjust the volume.
In digital mode
An information banner appears briefly. The
following icons may be indicated on the
banner.
: Data service (Broadcast application)
: Radio service
: Scrambled/Subscription service
: Multiple audio languages available
: Subtitles available
Subtitles and/or audio available for the
:
hearing impaired
Recommended minimum age for
:
current programme (from 3 to 18 years)
:Parental Lock
: Digital Programme Lock
Audio available for the visually
:
impaired
Changing the Screen Format
1 Press repeatedly to select the screen
format.
[Wide Zoom]* [Normal]
[Full] [Zoom]*
[14:9]*
* Parts of the top and bottom of the picture may
be cut off.
• You cannot select [14:9] for HD source pictures.
For HDMI PC Input (PC timing)
[Normal] [Full 1]
[Full 2]
For HDMI DCI 4K (4096 × 2160p)
[Normal] [Full 1]
: Spoken subtitle audio available
: Multi-channel audio available
GB
14
[Full 2]
 Loading...