

Page 1

Television
Reference Guide
4-736-801-11(1)
KD-65A9F / 55A9F
Page 2

Table of Contents
Note
Safety Information . . . . . . . . . . . . . . . . . . . . . 3
Precautions . . . . . . . . . . . . . . . . . . . . . . . . . . . 5
Protecting the TV Screen (OLED TV) . . . . . . . 6
Parts and Controls . . . . . . . . . . . . . . . . . . . 7
Controls and Indicators . . . . . . . . . . . . . . . . . 7
Using Remote Control . . . . . . . . . . . . . . . . 8
Remote Control Parts Description. . . . . . . . . 8
Connection Diagram . . . . . . . . . . . . . . . . 10
Installing the TV to the Wall . . . . . . . . . . 12
SU-WL450 . . . . . . . . . . . . . . . . . . . . . . . . . . . 19
Troubleshooting . . . . . . . . . . . . . . . . . . . . 22
Troubles and Solutions. . . . . . . . . . . . . . . . . 22
Specifications . . . . . . . . . . . . . . . . . . . . . . 23
Introduction
Thank you for choosi ng this Sony product.
Before operating the TV, please read this manual thoroughly and
retain it for fu ture ref erence.
• Before operating the TV, please read the “Safety Information”
(page
3).
• Instructio ns about “Installing the TV to the Wall” are included
within this TV’s instruction manual.
• Imag es and illust rations used in t he Setup Guid e and this
manual are for reference only and may differ from the actual
product.
Attaching the Table-Top Stand to the TV
Refer to the Setup Guide o n top of the cushion.
Help
Find more troubleshooting and other useful information
directly from your TV. Press HELP on the remote control to
display a list of top ics, or to search by keyword.
Help Guide (Manual)
For more detailed information, select [He lp Guide] from the
Hel p men u on yo ur TV. You c an al so che ck the Help G uide from
your PC or smartphone (information provided on the back
cover).
Location of the identification label
Labels for the TV Model No. and Power Supply rating are located
on the rear of the TV. They can be found by removing the centre
cover .
Notice for customers in Thailand
This telecommunication equi pment and device conforms with
NBTC standard or NBTC requirements.
This radio communication eq uipment has the electrom agnetic
field strength in compliance with the Safety Standard for the Use
of Radio communication E quipment on Human H ealth
announced by the Natio nal Telecommunications Commission.
Notes for Australia and New Zealand model
This product is ENERGY RATING qualified in the default mode.
ENERGY RATING is a programme designed to promote energy
efficient products and p ractices.
• When the TV is initially set up, it is designed to meet ENERGY
RATING requirement s while main taining optim um picture
quality.
• Changes to cer tain features, settings and functi onalities of this
TV (
e.g. TV Guide, Picture/Sound, Eco setting) can slightly
change the power consumption.
Depending upon suc h changed settings (e.g. S hop mode), the
power consumption may vary which possibly could exceed the
stated energy rating.
To reset the TV to ENERGY RATING qualified settings, compl ete
t
he initial set-up procedure in [Settings] [Sto rage & re set]
[Factory data reset].
After factory data reset, down loaded application data w ill be
deleted. Please download them again.
GB
2
Page 3

Safety Information
A
Screw (M6)
Wall-Mount Bracket
8 mm - 12 mm
TV’s rear cover
WARN ING
Caution
Risk of explosion if the battery is replaced by an incorrect typ e.
Batteries must not be expose d to excessive heat such as
sunshine, fire or the like or extremely low air pressure that can
result in an explosion or leakage of flammable liquid or gas.
Stability Hazard
The television se t may fall, causing seri ous personal injur y or
death.
Never place a television set in an unstable locati on. A television
set may fall, causing ser ious personal injur y or death. Many
injuries, particularly to children, can be avoided by taking simple
precautions such as:
• Using cabin ets or stands recommended by the manufacturer of
th
e television set.
• Only using furniture that can safely suppor t the television set.
• Ensuring the television set is not overhanging the edge of the
supporting furniture.
• Not placing the television set on tall furni ture (for example,
cupboards or bookcases) without anchoring both the furniture
and the television s et to a suitable support.
• Not placing the television set on cloth or oth er materials that
m
ay be located between the television set and supporting
furniture.
• Educating children about the dangers of climbing on furniture
to reach the television set o r its controls.
If your existing television set is b eing retained and relocated, the
sa
me considerations as abo ve should be appl ied.
Installation/Set-up
Sufficient expertis e is required when installing th e TV to the
Table-Top Stand.
Refer to the Setup Guide supplied with the TV for stand
nstallation.
i
Sony is not liable for any d amage or injury cause d by
m
ishandling or imp roper installation.
Install and use the TV s et in accordance with the instruction s
below in order to avoid any risk of fire, electric shock or damage
and/or in juries.
Apparatus connected to the protective e arthing of the building
i
nstallation through the m ains connection or through oth er
apparatus with a connection to protective earthing – and to a
television distribution system using coaxial cable, may in some
circumstances create a fire haza rd. Connection to a television
distribution system therefore has to be provided through a device
providing electrical isolation b elow a certain frequency range
(galvanic isolator, see EN 60728-11).
Installation
• Slide and hold the hinge lock as shown, and pull the centre
block until a click is heard. Otherw ise the TV may fall, causing
serious personal injury or damage to the TV.
• Install the T V so that the TV bottom do es not protrude out from
he TV stand (not supplied). If the TV bottom protrudes out from
t
the TV stand, it may caus e TV set to topple over, fall down, and
cause personal injury or damage to the TV.
• For safety reasons, b e sure to attach the centre covers to the
ear of the TV when TV in Table-Top condition.
r
• Only qualified service personnel should carry out wall-mount
i
nstallations.
• For safety reasons, it is strongly recommended that you use
Sony accesso ries, including:
Wall-Mount Bracket SU-WL450
• Be sure to use the screws supplied with the Wall-Mount Bracket
wh
en attaching the Wall-Mount Bracket to the TV set. The
supplied screws are designed as indicated by illustration when
measured from the attaching surface of the Wall-Mount Bracket.
The diameter and length of the screws differ depending on the
Wall-Mount Bracket model.
Use of screws other than those supplied may resul t in internal
d
amage to the TV set or caus e it to fall, etc.
Tran spo rti ng
• Before transpor ting the TV set, disconnect all cables.
• Two or three people are needed to transport a large TV set.
• When transpo rting the TV set by hand , hold it as shown below.
Do not put stress on th e panel and the frame around the screen.
• The TV se t should be insta lled near an easily accessible AC
p
ower outlet (mains soc ket).
• Place the TV set o n a stable, level surface to preven t it from
falling over and causing personal injury or property damage.
• Install the TV where it cannot be pulled, pushed, or knocked
over.
• When handli ng or mounting the
T
V set, do not lay down the TV.
• When transpo rting the TV set, do
not s
ubject it to jolts or excessive vibration .
• When transpo rting the TV set for repairs o r when moving, pa ck
i
t using the original carton and packing material.
3
GB
Page 4

Topple prevention
Note
M6 screw (not supplied)
Cord
(not supplied)
Screw (not supplied)
8 mm - 12 mm
30 cm
10 cm
10 cm
10 cm
Leave at least this space around t he set.
30 cm
10 cm 10 cm
Leave at least this space around the set.
1 cm
Wall
Air circulation is blocked.
Wall Wall
(Except models with supplied support belt kit)
1
Remove the centre covers.
2 Secure the TV to the TV stand .
Ventilation
• Never cover the v entilation holes or inser t anything in the
cabinet.
• Leave space around the TV set as shown belo w.
• It is strongly recommen ded that you use a Sony Wall-M ount
Bracket in order to provide adequate air circulation .
Installed on the wall
4
GB
Installed with stand
• To ensure proper ventilation and prevent the collection of dirt or
dust:
Do no t lay the TV set flat, install ups ide down, backwards, o r
sideways.
D
o not place the TV set on a she lf, rug, bed or in a closet.
Do not cover th e TV set with a cloth, such as curtains, or items
such as newspapers, etc.
Do no t install the TV set as show n below.
AC power cord (mains lead)
Handle the AC power cord (ma ins lead) and outlet (mains s ocket)
as follows in order to avoid any risk of fire, electric shock or
damage and/or injuries:
• The shape of AC power plug (mains plug), which is supplied
w
ith the TV set, varies depe nding on the region. Be su re to
connect the appropriate supp lied AC power cord (mains lead)
with the plug that fits i nto the AC power outlet (m ains socket).
• Use only Sony supplied AC power cords (mains lead), not those
of other brands.
• Insert the pl ug fully into the AC powe r outlet (mains socket).
• Operate the TV set on a 110 V - 240 V AC supply only.
• When wiring cables, be sure to unplug the AC power cord
(
mains lead) for your safety a nd take care not to catch your feet
on the cables.
• Disconnect the AC power cord (mains lead) f rom the AC power
o
utlet (mains socket) before wo rking on or moving the TV set.
• Keep the AC power cord (m ains lead) away from heat s ources.
• Unplug the AC power plug (mains plug) and clean it regularly. If
the plug is covered with dust and it picks up moisture, its
insulation may deteriorate, whic h could result in a fire.
• Do not use th e supplied AC power cord (mains lead) on any
other equipment.
• Do not pinch, bend, or twist the AC power cord (mains lead)
excessively. The core conductors may be exposed or broken.
• Do not modif y the AC power cord (mains lea d).
• Do not put any thing heavy on the AC po wer cord (mains lead).
• Do not pull on the AC power cord (mains lead) itself when
d
isconnecting the AC powe r cord (mains lead).
• Do not connect too many appliances to the sa me AC power
outlet (mains socket).
• Do not use a poor fitting AC power outlet (mains socket).
Prohibited Usage
Do not install/use the TV set in locations, environments or
situations such as tho se listed below, or the TV set may
malfunction and cause a fire, electric shock, damage and/or
injuries.
Locations:
• Outdoors (in direct su nlight), at the seashore, on a ship or other
vessel, inside a vehicle, in medical institutions, u nstable
locations, near water, rain, moist ure or smoke.
Page 5

Environments:
• Places that a re hot, humid, or excessively du sty; where insects
may enter; where it migh t be exposed to mechanical vi bration,
near flammable objects (candles, etc.). Th e TV set shall not be
exposed to dripping or splashing and no objects filled with
liquids, such as vases, shall be placed on the TV.
Situations:
• Use when your hands are wet, with the cabinet removed, or
with attachments not recommended by the manufac turer.
Disconnect the TV s et from AC power outlet (m ains socket) and
antenna (aerial) during lightning storms.
• Install the TV s o that it sticks out into an
o
pen space. Injury or damage from a
person or obje ct bumping into the TV may
result .
• Place the TV in a humid or dusty space,
o
r in a room with oi ly smoke or steam
(near cooki ng tables or humidif iers). Fire,
electric shock, o r warping may result.
• Install the TV i n places subject to
e
xtreme temperature such as in direct sun light, near a radiator
or a heating vent. The TV may ov erheat in such condition which
can cause deformation of the enclosure and/or TV malfunction.
• If the TV is place d in the changing room o f
public bath or hot spring, the TV may be
a
damaged by airborne sulfur, etc.
• For best picture quality, do not expose the screen to direct
il
lumination or sunlight.
• Avoid moving the TV from a cold area to a warm area. Sudden
r
oom temperature changes m ay cause moisture condensati on.
This may cause the TV to show poor picture and/or poor colour.
Should this occur, allow mois ture to evaporate completely
before powering the TV on.
Broken pieces:
• Do n ot throw anything at the TV set. T he screen glass may break
by the impact and cause serious injury.
• If the surface of th e TV set cracks, do not touch it until you ha ve
unplugged the AC po wer cord (mains lead). Other wise this may
cause an electric shock.
When not in use
• If you will not be using the TV set for seve ral days, the TV set
should be disconnected from the AC power (mains) for
environmental and sa fety reasons.
• As the TV set i s not disconnected from the AC powe r (mains)
when the TV set is just turned off, pull the plug from the AC
power outlet (mains socket) to disconnect the TV set
completely.
• Some TV se ts may have features that require the TV set to be
l
eft in standby to work correctly.
For children
• Do not allow children to climb on the T V set.
• Keep small accessories ou t of the reach of children, so that they
are not mistakenly swallowe d.
If the following problems occur...
Turn off the T V set and unplug the AC pow er cord (mains lead)
immediately if any of the following pro blems occur.
Ask your dealer or Sony service centre to have it checked by
qualified service personnel.
When:
• AC power cord (mains lead) is damaged.
• Poor fitting of AC power outlet (main s socket).
• TV set is damaged by being dropped, hit or having something
thrown at it.
• Any li quid or solid o bject falls through openin gs in the cab inet.
About TV Temperature
When the TV is used for an extended pe riod, the panel surrounds
become warm. You may feel hot when touching there by the
hand.
Precautions
Viewing the TV
• View the TV in mode rate light, as viewing the TV in poor light or
during long period of tim e, strains your eyes.
• When usin g headphones, adj ust the volume so as to a void
excessive levels, as hearing damage may result.
OLED Screen
• Although the OLED screen is made with hi gh-precision
technology and 99.99 % or more of the pixels are effective,
black dots may appear or bright points of light (white, red, blue,
or green) may appear constantly on the OLED screen. This is a
structural property of the OL ED screen and is not a malfu nction.
• Do not push or scratch the front filter, or place objects on top of
t
his TV set. The image may be uneven or the OLED screen may
be damaged.
• The screen and cabinet get warm when this TV set is in use. This
i
s not a malfunction.
• W hen disposi ng of your TV be sure to foll ow your loca l laws and
regulations.
Handling and cleaning the screen surface/
cabinet of the TV set
Be sure to unplug the AC powe r cord (mains lead) connected to
the TV set from AC power outlet (mains socket) befo re cleaning.
To avoid material degradation or screen coating de gradation,
observe the following precautions.
• To remove dust from the screen surface/cabinet, wipe gently
with a soft cloth. If dust is persistent, wipe with a soft cloth
slightly mo istened with a diluted mild d etergent soluti on.
• Never spray water or detergent directly on
t
he TV set. It may drip to the bottom of the
screen or exterior parts and enter the TV
set, and may cause dam age to the TV set.
• Never use any type of abrasive pad,
a
lkaline/acid cleaner, scouring powder, or
volatile solvent, such as alcohol, benzene,
thinner or in secticide. Us ing such materials or ma intaining
prolonged contact with rubbe r or vinyl materials may resul t in
damage to the screen su rface and cabinet material.
• Do not touch th e TV if your hand is covered in any ch emical
sub
stance such as hand cream or sunblock.
• Periodic vacuuming of the vent ilation openi ngs is
recommended to ensure proper ventilation.
• When adj usting the angle of the T V set, move it slowly so as to
prevent the TV set from moving or slipping off from its table
stand.
Optional Equipment
Keep optional components or any equipment emitting
electromagnetic radiation away from the TV set. Otherwise
picture distortion and/or noisy sound may occur.
Wireless Function of the unit
• Do not operate this u nit near medical equipm ent (pacemaker,
etc.), as thi s may result i n the malfu nction of th e medical
equipme nt.
• Altho ugh this un it transmits/re ceives scramble d signals, be
careful of unauthorised i nterception. We cannot be responsible
for any trouble as a result.
GB
5
Page 6

Caution about handling the remote control
• Observe th e correct polarity when inserting batteri es.
• Do not use different ty pes of batteries together o r mix old and
new batteries.
• Dispose o f batteries in an environmentall y friendly way. Certain
regions may regulate the d isposal of batteries. Pleas e consult
your local autho rity.
• Handle the remote control with care. Do not drop or step on it,
or
spill liquid of any kind onto it.
• Do no t place the remote control in a location n ear a heat source,
a place subject to direct sun light, or a damp room.
Disposal of the TV set
Disposal of old electrical &
electronic equipment (applicable in
the European Union and other
countries with separate collection
systems)
Disposal of Old Electrical &
Electronic Equipment (Applicable
in Republic of India)
This symbol and its vari ations indicate that this
product and its compon ents, consumables,
parts or spares thereof shal l not be treated as
household waste and may not be dropped in
garbage bins. Product ow ners are advised to
point for the recycling of electrical and electronic equipment. Your
co-operation shall facilitate proper dis posal and help prevent
potential negative conseque nces/hazards to the environmen t
and human health, which could otherwise be caused by
inappropriate waste disposal including improper handling,
accidental breakage, damage and/or improper recycling of ewaste. The recycling of material s will help to conserve n atural
resources. For more detailed informatio n about recycling of this
product, please contact yo ur local civic office, your household
waste disposal service provider or the store where you made the
purchase. You may contact our company’s toll free numbe r in
India for assistance.
Tol l Fre e: 1 800 -103 -77 99
Visit: www.sony.co.in for product recycling
deposit their product at the nearest collection
Reduction in the Use of Hazardous Substances
in Electrical & Electronic Equipment (Applicable
in Republic of India)
This product and its com ponents, consumables , parts or
spares comply with the hazardous substances restriction of
India’s E-Waste (Management) Rules. The ma ximum allowable
concentrations of the restricted sub stances are 0.1 % by weight
in homogenous materi als for Lead, Mercury, Hexavalent
Chromium, Polybrominated Biphenyls (PBB) and
Polybrominated Diphenyl Ethers (PBDE), and
0.01 % by weight in homogeno us materials for Cadmium,
e
xcept for the exemptions specified in Schedule II of the
aforesaid Rules.
Notice for customer in UAE
Protecting the TV Screen (OLED TV)
Precautions to Protect the Screen from
mage
Da
Image retention
OLED TV‘s are susceptible to image retention (b urn-in) due to the
characteristics of the m aterials used. Image retention may occur if
images are displayed in the same location on the screen
repeatedly or over extended period s of time. This is not a
malfunction of the TV. Avoid displaying images that may cause
image rete ntion.
The following are examples of images that may
cause image retention:
• Content with black bars either on the top and bottom and/or
the left and ri ght sides of the screen. (for example, Letterboxed,
4:3 screen, Standard defini tion)
• Static images suc h as photos.
• Video gam es that might have static content in some part of the
s
creen.
• On-screen menus, programme guides, channel logos etc.
• Static content from ap plications.
• On-screen tickers , such as those used for n ews and headlines.
To reduce the risk of image retention:
• Sony recomm ends that you turn off the TV normally by pressing
the power button on the remote control or the TV.
• Fill the screen by changing [Wide mode] to eliminate the black
bars. Select [Wide m ode] other than [Norm al].
• Turn off the OSD (On Screen Display) by pressing the /
button, and turn off th e menus from connected eq uipment. For
d
etails, refer to the instructio n manuals for the connected
equipment.
• Avoid display ing static images with br ight colours (including
white), clocks or logos on any portion of the screen.
• Set the picture settings based on the ambient conditions. The
Standard Picture is recommended for hom e use and when
viewing content that ofte n displays the station logo s, etc.
The TV has fo llowi ng feat ures to help re duce/p revent imag e
re
tentio n.
Panel ref resh
Panel refresh will automatically run to a djust the uniformity of the
TV screen after it has been in use for long periods of time. Panel
refresh can also be performed manually and should only be used
if image retention is very noticeable or you see the following
message: [Panel refresh did not finish…]
Caution:
• The Panel refresh function m ay affect the panel. A s a reference,
perform the Panel refresh only o nce a year, do not perform it
more than once a year as it may affect the usable life of the
panel.
• Panel refresh takes about one hour to complete.
• A white line may be displayed on the screen during the Panel
re
fresh, this is not a malfunc tion of the TV.
• Panel refresh will only work when the room temperature is
between 10 ºC and 40 ºC.
Pixel shift
Automatically moves the image on the screen to prevent image
retent ion.
Other feature
The screen brightness is automatically reduced when displaying
still image s, clocks, bri ght colours or lo gos etc.
TRA
REGISTERED No: ER59077/17
DEALER No:
GB
6
DA0065531/11
Page 7

Parts and Controls
ȫȬȪ
Controls and Indicators
(Power) / + / –
When the TV is off,
Press to
When the TV is on,
Press and hold to
Press
then press + or – button to:
•Adjust the volume.
• Select the channel.
• Select the input source of TV.
Remote Control sensor*1 /
Light sensor*
The illumination LED lights up or blinks
according to the status of the TV.
For more information, refer to the Help
Gu
power on.
repeatedly to change the function,
ide.
power off.
1
/ Illumination LED
Built-in MIC*2*
Use the hands-free built-in microphone for
Voice Search. To enable the built-in MIC,
press HOME, then select [Settings]
[Google].
Built-in MIC LED
The built-in MIC LED lights up in amber
when the built-in MIC is enabled. The builtin MIC LED can be disabled.*
*1 Do not place anything near the sensor.
*2 The built-in MIC will be available when software is
updated. For the latest information, visit Sony
support website (information provided on the back
cover).
The Voice Search requires an Internet connection.
The Voice Search with the built-in MIC is available
only on limited region/country/language.
Standby power consumption will increase because
the built-in MIC is always listening when the Voice
Search with the built-in MIC is enabled.
*3 For more information, see the Online Help Guide
(page 2).
3
3
GB
7
Page 8
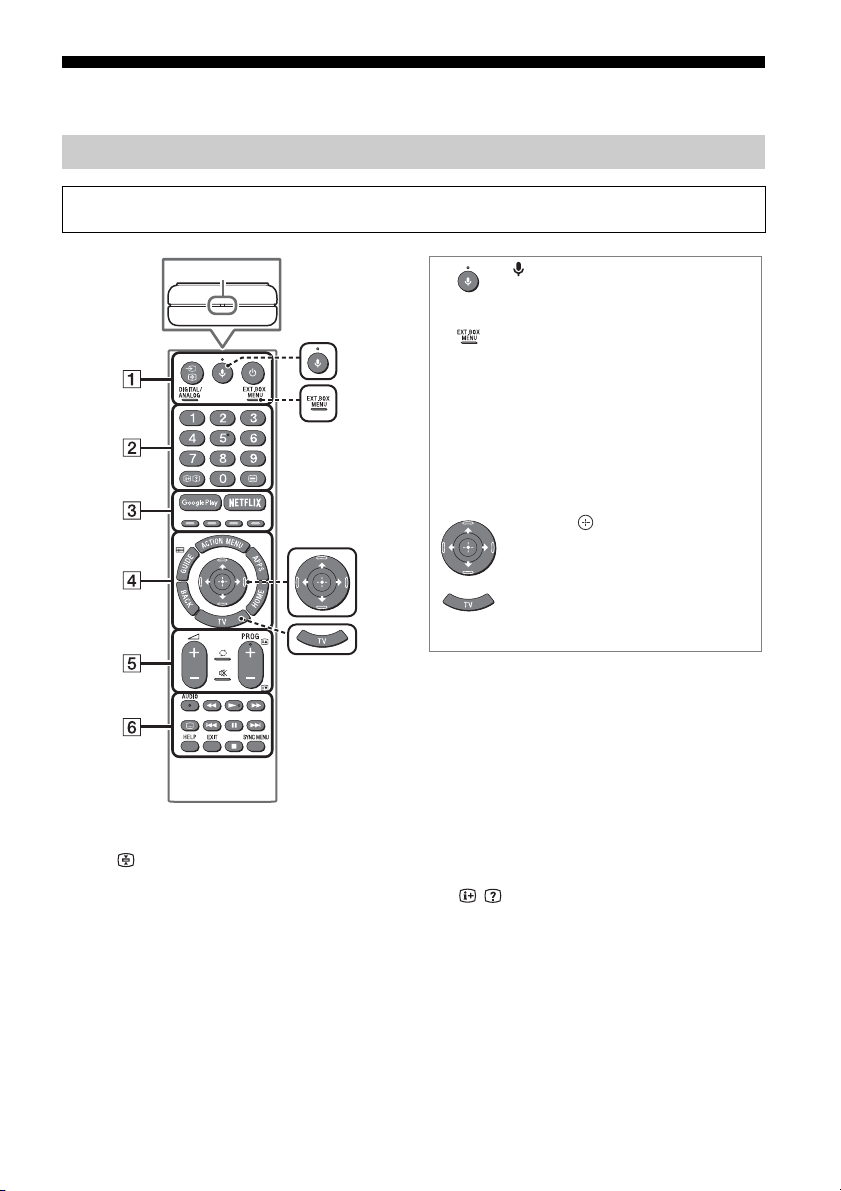
Using Remote Control
MIC
(Microphone)
Use Voice Search*. (e.g., Search
various content by voice.)
EXT.BOX MENU
Display the connected External Box
(cable/satellite box) menu.
• For models with supplied IR Blaster,
connect and set up the IR Blaster
(page 11).
• The External Box menu may be
displayed for some HDMI CEC
compatible devices when the IR
Blaster is not supplied/connected.
//// (Navigation D-Pad)
On screen menu navigation and
selection.
TV
Switch to a TV channel or input and
display the TV Menu Bar.
* The Voice Search requires an Internet connection.
Remote Control Parts Description
The remote control shape, location, availability and function of remote control buttons may vary
depending on your region/country/TV model.
/ (Input select/Text hold)
In TV mode: Display and select the input
source.
In Text mode: Hold the current page.
(TV standby)
Turn on or turn off the TV (standby mode).
DIGITAL/ANALOG
Switch between digital and analogue mode.
GB
8
Number buttons
/ (Info/Text reveal)
Display information.
(Text)
Display text information.
Page 9

Google Play
Hint
Access the “Google Play” online service.
NETFLIX (Only on limited region/
country/TV model)
Access the “NETFLIX” online service.
Colour buttons
Execute corresponding function at that time.
ACTION MENU
Display a list of contextual functions.
GUIDE/
Display the digital programme guide.
APPS
Access various services and applications.
BACK
Return to the previous screen.
HOME
Display the TV Home Menu.
+/– (Volume)
Adjust the volume.
(Jump)
Jump back and forth between two channels
or inputs. The TV alternates between the
current channel or input and the last
channel or input that was selected.
(Muting)
Mute the sound. Press again to restore the
sound.
• You can switch the accessibility on and off by
pressing and holding .
PROG +/–//
In TV mode: Select the channel.
In Text mode: Select the next () or
previous () page.
AUDIO
Change the language for the programme
currently being viewed.
//////
Operate media contents on the TV and
connected BRAVIA Sync-compatible device.
(Subtitle setting)
Turn subtitles on or off (when the feature is
available).
HELP
Display the Help menu. Help Guide can be
accessed from here.
EXIT
Return to the previous screen or exit from
the menu. When an Interactive Application
service is available, press to exit from the
service.
SYNC MENU
Display the BRAVIA Sync Menu.
GB
9
Page 10

Connection Diagram
Ȭ
Ȯ
ȭ
Ȭ
ȫ
ȭ
Ȫ
Digital still
camera/
Camcorder/
USB storage
media
VCR/Video
game
equipment/
DVD player/
Camcorder
IR Blaster
HDMI
Device
< 14 mm
Cable/
Antenna
Router
Audio System
with Optical
Audio Input
Audio
System
with ARC/
HDMI
Device
HDMI
Device
Digital still camera/
Camcorder/USB
storage media
Headphone
HDMI Device
AV Receiver
For more information on connections, refer to the Help Guide by pressing HELP on the remote control.
10
GB
Page 11

CENTER SPEAKER IN
Note
10 mm
3.5 mm
1234
1: L
2: Video
3: Ground
4: R
< 12 mm
< 21 mm
• To use your TV speakers as the centre
speaker, connect the output of your AV
receiver to the CENTER SPEAKER IN on
your TV.
• Before connecting cables, disconnect the
AC
power cord (mains lead) of both TV
and AV receiver.
• Make sure the [Speakers] is set to [Audio
s
ystem]: Press ACTION MENU, then select
[Speakers] [Audio system].
To prevent hiss when not connecting the
CEN
TER SPEAKER IN to an AV receiver,
change the following setting. Press HOME,
select [Settings] [Sound] then disable [TV
centre speaker mode].
/ VIDEO IN
• For a composite connection, use an
Analogue Extension Cable (not supplied).
•
IR BLASTER*
• Use your Sony remote control to control
your External Box (cable/satellite box).
Connect the IR Blaster Cable* to the IR
Blaster port on your TV. Place the other
end as shown below.
HDMI IN 1/2/3/4
• HDMI interface can transfer the digital
video and audio on a single cable.
•
• To enjoy high quality 4K 50p/60p
contents, connect a Premium High Speed
HDMI cable and set the [HDMI signal
format] to [Enhanced format].
Do this setting individually for each
c
onnected HDMI IN terminal. For details of
supported formats, refer to the
“Specifications“ in this manual (page 23-
25).
• HD
MI IN 3 ARC (Audio Return Channel)
Connect your audio system to the
HDMI IN 3 to route TV audio to your audio
sy
stem. An audio system that supports
HDMI ARC can send video to the TV, and
receive audio from the TV via the same
HDMI cable. If your audio system does not
support HDMI ARC, an additional
connection with DIGITAL AUDIO OUT
(OPTICAL) is necessary.
USB 1/2, USB 3
• Connecting a large USB device may
interfere with other connected devices
beside it.
• When connecting a large USB device,
c
onnect to the USB 1 port.
(Headphone)
• Supports 3-pole stereo mini jack only.
• You cannot output sound from both the
hea
dphone and the TV speakers at the
same time.
* Only on limited region/country/TV model.
• You cannot attach the side covers and
while the cables are connected to side terminal.
• Be sure to store the side covers in a safe place for
ture use.
fu
• To perform IR Blaster setup, press HO
and select [Settings] [External inputs]
[IR Blaster setup].
ME
GB
11
Page 12

Installing the TV to the Wall
Note
This TV’s instruction manual only shows the steps on preparing the installation of the TV before
installing to the wall.
To Custo m er s :
For product protection and safety reasons, Sony strongly recommends that installation of your TV be
performed by Sony dealers or licensed contractors. Do not attempt to install it yourself.
To Sony Dealers and Contractors:
Provide full attention to safety during the installation, periodic maintenance and examination of this
product.
Sufficient expertise is required for installing this product, especially to determine the strength of the wall for
withstanding the TV’s weight. Be sure to entrust the attachment of this product to the wall to Sony dealers or
licensed contractors and pay adequate attention to safety during the installation. Sony is not liable for any
damage or injury caused by mishandling or improper installation.
Use the Wall-Mount Bracket SU-WL450 (not supplied) to install the TV to the wall.
When installing the Wall-Mount Bracket, also refer to the Operating Instructions and Installation Guide
supp
lied with the Wall-Mount Bracket.
• Be sure to store the removed screws in a safe place, keeping them away from children.
• Be sure to hold the TV while preparing it for wall-mount installation.
• Please remove the corner guards after installing the TV to the wall.
GB
12
Page 13
Installing the TV to the Wall from Carton
Note
1 Remove the cushion and attach (supplied with the TV) to the rear of the TV.
• If using an electric screwdriver, set the torque at approximately 1.5 N·m {15 kgf·cm}.
GB
13
Page 14

2 Remove the screws from the rear of the TV.
GB
14
Page 15

Installing the TV to the Wall from Table-Top Stand
x 3
1 Insert the corner guards.
2 Remove the centre covers.
3 Remove the screws.
GB
15
Page 16

4 Detach the stand base.
ʓ
ʔ
5 Close the centre block by releasing the hinge lock.
GB
16
Page 17

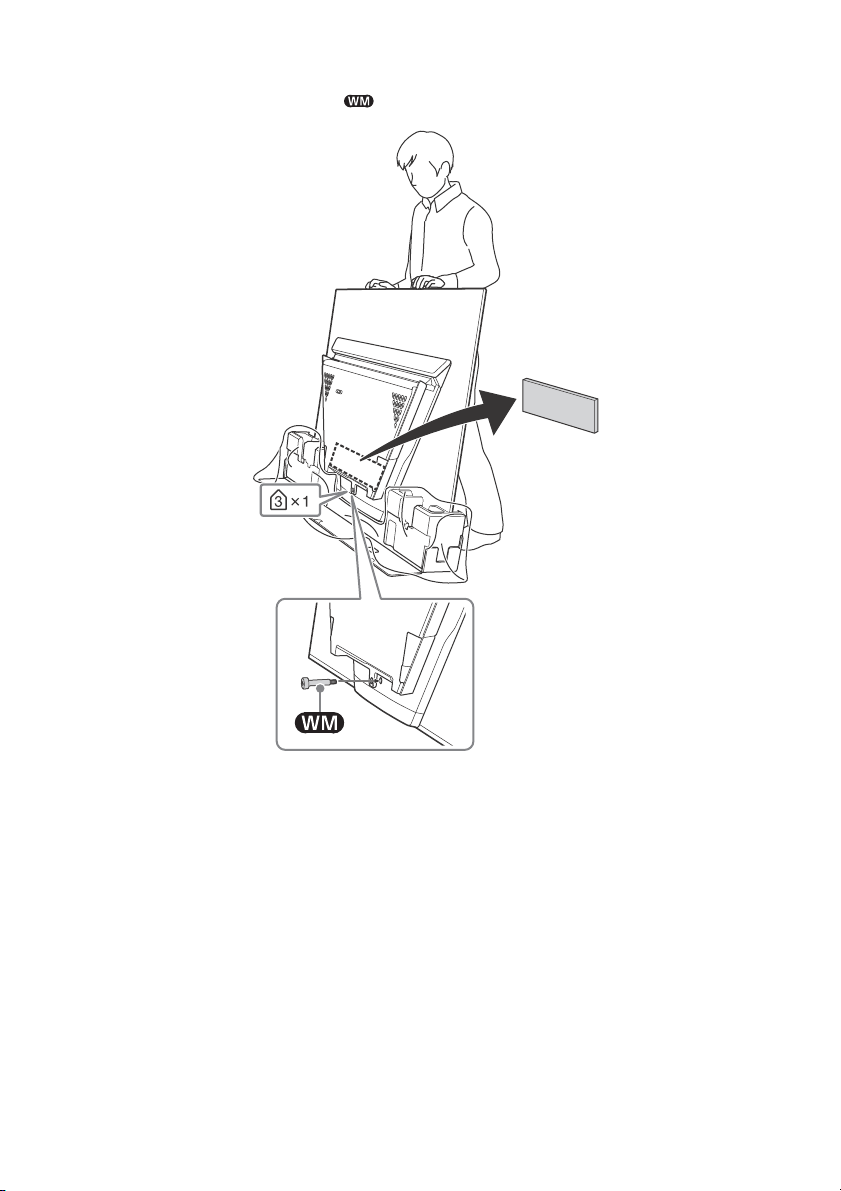
6 Attach (supplied with the TV) to the rear of the TV.
Note
• If using an electric screwdriver, set the torque at approximately 1.5 N·m {15 kgf·cm}.
GB
17
Page 18

7 Remove the screws from the rear of the TV.
GB
18
Page 19

Note
SU-WL450
Screen centre poin t
Slim
mounting
Standard
mounting
1 Make sure that the wall has enough space for the TV and is capable of supporting a
weight of at least four times that of the TV.
Refer to the following table on installing the TV to the wall. See page 23-25 (Specifications)
for the TV’s weight.
Screen
Display dimensions
Model Name
KD-65A9F 1,449 835 70 493 148 106
KD-55A9F 1,228 711 131 493 148 106
• Figures in the table may differ slightly depending on the installation.
• When your TV is installed on the wall, the upper side of the TV slightly leans forward.
ntre
ce
dimension
Length for mounting
Standard
mo
unting
Unit: mm
Slim
mounting
GB
19
Page 20

2 Attach the Attachment parts for Wall-Mount Bracket. Check the Attachment parts by
Note
Note
Screw (+PSW 6 x 20)
Pulley
Spacer (60 mm)
Screw (+PSW 6 x 50)
Belt
Pulley
Spacer (20 mm)
Screw (+PSW 6 x 20)
Belt
referring to “1” of the Wall-Mount Bracket Installation Guide.
• If using an electric screwdriver, set the torque at approximately 1.5 N·m {15 kgf·cm}.
• Be sure to store the unused parts in a safe place for future use. Retain this manual for future reference.
Standard mounting
Slim mounting
3 Connect necessary cables to the TV.
• You cannot access to any terminal after installing the TV to the wall.
20
GB
Page 21

4 Install the TV to the Base. Refer to “5” of Installation Guide and “Installing the TV to the
a
b
c
d
Wall” of Operating Instructions supplied with the Wall-Mount Bracket.
Model Name Hook location
KD-65A9F
K
D-55A9F
a
Refer to the instructions supplied with the Wall-Mount Bracket for your model to install the TV on the wall.
GB
21
Page 22

Troubleshooting
Note
General troubleshooting for issues like: black
screen, no sound, frozen picture, TV does not
respond, or network is lost, do the following
steps.
1 Restart your TV by pressing the power button
on the remote control until a message
appears. The TV will restart. If the TV does not
recover, try unplugging the TV from the AC
power cord (mains lead) for three minutes
and then plug it in again.
2 Refer to the Help menu by pressing HELP on
the remote control.
3 Connect your TV to the Internet and perform
a software update. Sony recommends you to
keep your TV software updated. Software
updates provide new features and
performance improvements.
4 Visit Sony support website (information
provided on the back cover).
When you plug in the TV, the TV may not be
able to turn on for a while even if you press
the power button on the remote control or
the TV.
It takes time to initialize the system. Wait for
ab
out one minute, then operate it again.
Troubles and Solutions
When the illumination LED is flashing in red.
Count how many times it flashes (interval time is
three seconds).
Reboot the TV by disconnecting the AC power
c
ord (mains lead) for three minutes, then turn on
the TV.
If the problem persists, disconnect the AC power
c
ord (mains lead), and contact your dealer or Sony
service centre with the number of times the
illumination LED flashes.
There is no picture (screen is dark) and no
sound.
Check the antenna (aerial)/cable connection.
Connect the TV to the AC power (mains), and
press the power button on the TV or the remote
control.
Some programmes cannot be tuned.
Check the antenna (aerial)/cable connection.
The remote control does not function.
Replace the batteries.
The EXT.BOX MENU button on the remote
control does not work.
Connect and set up the IR Blaster (models with
supplied IR Blaster only) (page 11).
Connect HDMI CEC compatible device (except
models with supplied IR Blaster) and change to
that input.
The parental lock for broadcast password has
been forgotten.
Enter 9999 for the PIN code and select [Change
PIN code].
The TV surrounds become warm.
Whe n the TV is used for an extended period, the
TV surrounds become warm. You may feel hot
when touching there by the hand.
The screen becomes darker while watching
TV.
If the whole image or part of the image remains
still, the screen brightness will be gradually
reduced to prevent image retention. This is not a
malfunction of the TV.
You are concerned about image retention.
If the same image is displayed repeatedly or for
ng periods of time, image retention may
lo
occur. To reduce image retention, we
recommend that you turn off the TV normally by
pressing the power button on the remote
control or the TV.
• Perform Panel refresh manually only when image
retention is particularly noticeable. As a reference,
perform it only once a year. Avoid performing it more
than once a year because it may affect the usable life
of the panel.
• Images that include clocks, logos and bright colours
(including white) easily cause image retention. Avoid
displaying these types of images for long periods of
time, otherwise image retention may occur.
A white line appears on the screen.
Panel refresh automatically runs after the TV has
been used for long periods of time to reduce
image retention. Panel refresh starts after the TV
is turned off and takes about one hour to
complete. A white line may be displayed on the
screen during the Panel refresh. This is not a
malfunction of the TV.
GB
22
Page 23

The message [Panel refresh did not finish…] is
displayed.
Panel refresh automatically runs after the TV has
bee
n used for long periods of time to reduce
image retention. If the TV is turned on, the AC
power cord (mains lead) is unplugged, or the
room temperature falls outside of the range
between 10 ºC and 40 ºC during the Panel
refresh, the process will not be completed and
this message will appear.
If Panel refresh started automatically, it will restart
when you turn off the TV with the remote control.
If Panel refresh initiated manually, you must
select it again.
Specifications
System
Panel system
OLED (Organic Light Emitting Diode) Panel
TV system
Depend on your country/area selection
Analogue: B/G, I, D/K, M
Digital: DVB-T/DVB-T2
Colour system
PAL/SECAM/NTSC3.58/NTSC4.43
Channel coverage
Depend on your country/area selection
Analogue: UHF/VHF/Cable
Digital: UHF/VHF
Sound output
13 W + 13 W + 13 W + 13 W + 13 W + 13 W + 10 W +
10 W
Wireless technology
Protocol IEEE802.11ac/a/b/g/n
(IEEE802.11ac may not be available depending on
c
ountries/regions.)
Bluetooth Version 4.2
Input/Output jacks
Antenna (aerial)/cable
75 ohm external terminal for VHF/UHF
/ VIDEO IN
Video/Audio input (mini jack)
HDMI IN 1/2/3/4 (support 4K resolution, HDCP
2.3-compatible)
Video:
4096 × 2160p (50, 60 Hz)*
1
(24 Hz)*
, 3840 × 2160p (50, 60 Hz)*2,
3840 × 2160p (24, 25, 30 Hz), 1080p (30, 50,
60, 100, 120 Hz), 1080/24p, 1080i (50, 60 Hz),
7
20p (30, 50, 60 Hz), 720/24p, 576p, 480p,
PC Formats*
*1When 4096 × 2160p is input and [Wide
2
*
3
*
3
mode] is set to [Normal], the resolution is
displayed as 3840 × 2160p. To display 4096 ×
2160p, set [Wide mode] setting to [Full 1] or
[Full 2].
To support 18 Gbps, set [HDMI signal format]
to [Enhanced format].
Refer to the Help Guide for details.
1*2
, 4096 × 2160p
23
GB
Page 24

Audio:
In eARC (Enhanced Audio Return Channel)
mod
e*
Refer to the Help Guide for details.
Except eARC mode
5.1 channel linear PCM: 32/44.1/48/88.2/96/
17
6.4/192 kHz 16/20/24 bits, Dolby Digital,
Dolby Digital Plus, DTS
* eARC will be available when software is
upd
ated. Visit Sony support website
(information provided on the back cover) for
the latest information.
eARC mo de is active w hen [eARC mode] is set
to [Auto], [Speakers] is set to [Audio system]
and eARC compatible audio system is
connected.
ARC (Audio Return Channel) (HDMI IN 3 only)
In eARC mode*
Refer to the Help Guide for details.
In ARC mode
Two channel linear PCM: 48 kHz 16 bits, Dolby
D
igital, Dolby Digital Plus, DTS
* eARC will be available when software is
up
dated. Visit Sony support website
(information provided on the back cover) for
the latest information.
eARC mode is active when [eARC mode] is set
to [Auto], [Speakers] is set to [Audio system]
and eARC compatible audio system is
connected.
DIGITAL AUDIO OUT (OPTICAL)
Digital optical jack (Two channel linear PCM:
48 kHz 16 bits, Dolby Digital, DTS)
(Stereo mini jack)
Headphone
1, 2, 3
USB port 1 and 2 support High Speed USB
(USB 2.0)
USB port 3 supports Super Speed USB (USB 3.1
Ge
n 1)
LAN
10BASE-T/100BASE-TX connector (Depending on
the operating environment of the network,
connection speed may differ. 10BASE-T/
100BASE-TX communication rate and
c
ommunication quality are not guaranteed for
this TV.)
IR BLASTER*
IR Blaster Cable input (mini jack)
1
CENTER SPEAKER IN
Centre speaker input (Binding post)
Others
Optional accessories
Wall -Moun t Bracket: SU-W L45 0
Operating temperature
0 ºC – 40 ºC
Power and others
Power requirements
110 V - 240 V AC, 50/60 Hz
Energy Efficiency Class*
KD-65A9F: B
2
Screen size (measured diagonally) (Approx.)
KD-65A9F: 65 inches / 163.9 cm
KD-55A9F: 55 inches / 138.8 cm
Power consumption
Indicated on the rear of the TV
Power Consumption*
in [Standard] mode
KD-65A9F: 190 W
in [Vivid] mode
KD-65A9F: 500 W
Average annual energy consumption*2*
KD-65A9F: 264 kWh
Standby power consumption*2*4*
0.50 W
2
3
5
Display resolution
3,840 pixels (horizontal) × 2,160 lines (vertical)
Output Rating
USB 1/2
5 V , 500 mA MAX
USB 3
5 V , 900 mA MAX
Dimensions (Approx.) (w × h × d)
wi t h Tabl e-Top S tan d
KD-65A9F: 1,449 × 832 × 320 mm
KD-55A9F: 1,228 × 709 × 320 mm
without Table-Top Stand
KD-65A9F: 1,449 × 835 × 86 mm
KD-55A9F: 1,228 × 711 × 86 mm
Mass (Approx.)
wi t h Tabl e-Top S tan d
KD-65A9F: 35.6 kg
KD-55A9F: 30 kg
without Table-Top Stand
KD-65A9F: 27.2 kg
KD-55A9F: 23.8 kg
1
*
Only on limited region/country/TV model.
2
*
This information is for EU and other countries
whose relevant regulation is based on EU energy
labelling regulation.
24
GB
Page 25

*3Energy consumption per year, based on the
Note
power consumption of the television operating
4 hours per day for 365 days. The actual energy
consumption will depend on how the television is
used.
4
*
Specified standby power is reached after the TV
finishes necessary internal processes.
5
*
Standby power consumption will increase when
your TV is connected to the network.
• Optional accessories availability depends on
countries/region/TV model/stock.
• Design and specifications are subject to change
without notice.
Notes on Digital TV function
• Any functions related to Digital TV ( )
will only work in countries or areas where
B-T/DVB-T2 (MPEG-2 and H.264/
DV
MPEG-4 AVC) digital terrestrial signals are
oadcast. Please confirm with your local
br
dealer if you can receive a DVB-T/DVB-T2
signal where you live.
• This TV set complies with DVB-T/DVB-T2
pecifications, but compatibility with future
s
DVB-T/DVB-T2 digital terrestrial broadcasts
are not guaranteed.
• Some Digital TV functions may not be
ailable in some countries/areas.
av
Trademark Information
• The terms HDMI and HDMI High-Definition
Multimedia Interface, and the HDMI Logo
are trademarks or registered trademarks of
HDMI Licensing Administrator, Inc. in the
United States and other countries.
• Manufactured under license from Dolby
aboratories. Dolby, Dolby Audio, Dolby
L
Vision, and the double-D symbol are
trademarks of Dolby Laboratories.
•“BRAVIA”, and BRAVIA Sync are
trademarks or registered marks of Sony
orporation.
C
• Gracenote, the Gracenote logo and
otype, “Powered by Gracenote” logo are
log
either registered trademarks or trademarks
of Gracenote, Inc. in the United States and/
or other countries.
• Vewd® Core. Copyright 1995-2017 Vewd
oftware AS. All rights reserved.
S
• Google, Android TV, Google Play,
hromecast built-in, YouTube and other
C
related marks and logos are trademarks of
Google LLC.
• Wi-Fi®, Wi-Fi Alliance® and Wi-Fi Direct® are
egistered trademarks of Wi-Fi Alliance.
r
• Wi-Fi Protected Setup™ is a trademark of
i-Fi Alliance.
W
• The Wi-Fi CERTIFIED™ Logo is a
ertification mark of Wi-Fi Alliance.
c
• For DTS patents, see
http://patents.dts.com. Manufactured
license from DTS, Inc.
under
DTS, the Symbol, & DTS and the Symbol
ogether are registered trademarks, and
t
DTS Digital Surround is a trademark of DTS,
Inc. © DTS, Inc. All Rights Reserved.
• The Bluetooth® word mark and logos are
egistered trademarks owned by the
r
Bluetooth SIG, Inc. and any use of such
marks by Sony Corporation is under
license. Other trademarks and trade names
are those of their respective owners.
• Netflix is a registered trademark of Netflix,
.
Inc
• TUXERA is a registered trademark of Tuxera
. in the US and other countries.
Inc
• USB-IF SuperSpeed USB Trident logo is a
egistered trademark of USB Implementers
r
Forum, Inc.
• All other trademarks are the property of
heir respective owners.
t
25
GB
Page 26
26
GB
Page 27

Page 28

Customer Support and Contact:
Help Guide
http://rd1.sony.net/help/tv/fga2/h_ga/
© 2018 Sony Visual Products Inc. Printed in Malaysia
 Loading...