

Sony KD-32FS130, KD-36FS130 Operating Instruction
Connecting Additional Equipment
Operating Instructions
2-591-502-21(1)
© 2005 by Sony Corporation
KD-32FS130
KD-36FS130

Contents
Introduction
Introducing the FD Trinitron WEGA
Features ...................................................... 7
About this Manual ........................................... 8
Batteries for the Remote Control ................... 8
Front Panel Menu Controls ............................8
Using the Remote Control
Remote Control Description ...........................9
Programming the Remote Control ..............11
Using your TV Remote Control with Other
Equipment................................................13
Connecting Your TV
TV Rear Panel ................................................15
Basic Connections ..........................................16
Connecting Additional Equipment ............. 17
Setting Up the TV........................................27
Using the Digital Features
Overview .........................................................29
Tuning to a Digital Channel .........................29
Using the Digital Program Guide ................30
Using the Screen Mode Feature ...................32
Using Digital Favorite Channels..................33
Using the Analog Menus
Overview ........................................................ 35
Menu Descriptions ........................................ 35
Using the Remote Control to
Navigate the On-Screen
Analog Menus......................................... 37
Using the Video Menu ................................. 38
Using the Audio Menu ................................ 39
Using the Channel Setup Menu ................. 41
Using the Parental Control Menu .............. 43
Parental Control ......................................... 44
United States:
Selecting Custom Rating Options .... 46
Canada:
Selecting Custom Rating Options .... 48
Using the Timer Menu ................................. 49
Using the Setup Menu ................................. 50
Using the Digital Features Menu ............... 51
Using the Digital Menus
Overview ........................................................ 53
Menu Descriptions ........................................ 53
Using the Remote Control to
Navigate the On-Screen
Digital Menus.......................................... 54
Displaying Digital Menus ............................ 54
Using the Digital Channels Menu ............... 55
Using the Digital Setup Menu .................... 57
Other Information
Troubleshooting............................................. 59
Specifications.................................................. 63
Index....................................................... 65
5


Introduction
Congratulations on your purchase of the Sony FD Trinitron WEGA®.
Introducing the FD Trinitron WEGA Features
Some of the features you will enjoy include:
❏ FD Trinitron Flat CRT — Delivers a picture with uncompromising accuracy and
outstanding image detail via a technologically advanced tube.
❏ Analog and Digital Receivers — Built-in tuners allow you to receive both analog (NTSC)
and digital (ATSC and clear-QAM) programming. Digital programming is available via
terrestrial signals (over-the-air) or unscrambled cable signals provided by your cable
company. (Contact your cable provider for details of digital cable programming
availability and restrictions.)
❏ Wide Screen Mode — Watch digital 16:9 (widescreen) broadcasts in their original
widescreen format, or zoom to fill the 4:3 aspect ratio screen.
❏ Y PB PR Inputs — Provides component video inputs for superior picture quality
(480i only).
❏ BBE — Gives sound more impact by using audio technology to compensate for phase
effects in speakers.
❏ SRS — Produces a dynamic three-dimensional sound for stereo programs.
❏ Parental Control (V-Chip) — Helps parents monitor what their children watch on TV by
establishing rating limits.
❏ ClearEdge VM — Sharpens picture definition to give objects a crisp, clean edge.
❏ Favorite Channels — Enables you to set up separate Favorite Channel lists for analog and
digital channels.
❏ Digital Program Guide — Select digital channels from an on-screen program guide.
❏ Universal Remote Control — Operates your connected cable box, VCR, digital satellite
receiver, DVD player, or DVD/VCR combination unit.
❏ Energy Star
❏ Front Panel Controls — Allows access to the on-screen menus without the use of a remote
control.
❏ Front A/V Inputs — Lets you quickly connect video games, camcorders, or stereo/mono
equipment.
®
— Meets the Energy Star guidelines for energy efficiency.
Introduction
7
About this Manual
This manual provides instructions to help you enjoy your new TV. It shows you how to
connect to an antenna or cable, cable box, VCR, DVD, satellite receiver, stereo system, or
camcorder. Once your TV is connected, follow the instructions and use the remote control to
access the on-screen menus.
Introduction
Batteries for the Remote Control
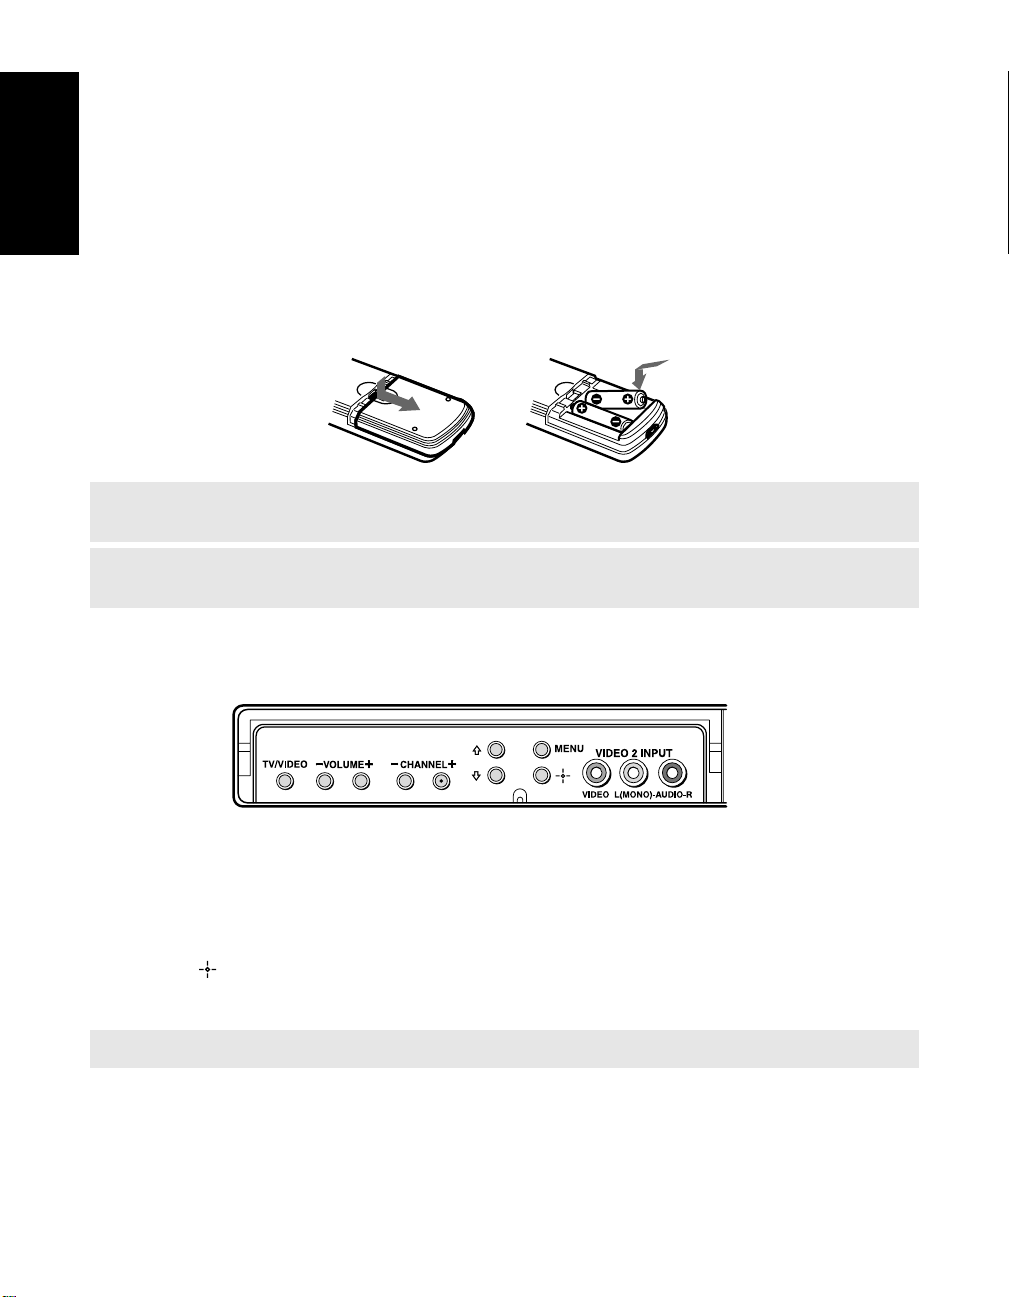
Insert two AA (R6) batteries (supplied) into the remote control using the following illustration
as a guide.
✍ Under normal conditions, batteries will last up to six months. If the remote control does not operate
properly, the batteries might be worn out.
✍ If you will not be using the remote control for an extended period of time, remove the batteries to
avoid possible damage from battery leakage.
Front Panel Menu Controls
4-089-016>PC
The front Audio/Video panel controls allow you to access the menu without the remote
control.
❏ Press the MENU button to display the on-screen menu.
❏ Use the F and f buttons on the front Audio/Video panel instead of your remote control.
❏ Use the button on the front Audio/Video panel to navigate through the menus, then
select an item. The front panel controls also allow you to change your channels
-CHANNEL+), adjust the volume (-VOLUME+), and change video inputs (TV/VIDEO).
(
<
✍ To navigate the menus with your remote control, see pages 37 and 54.
8
Using the Remote Control
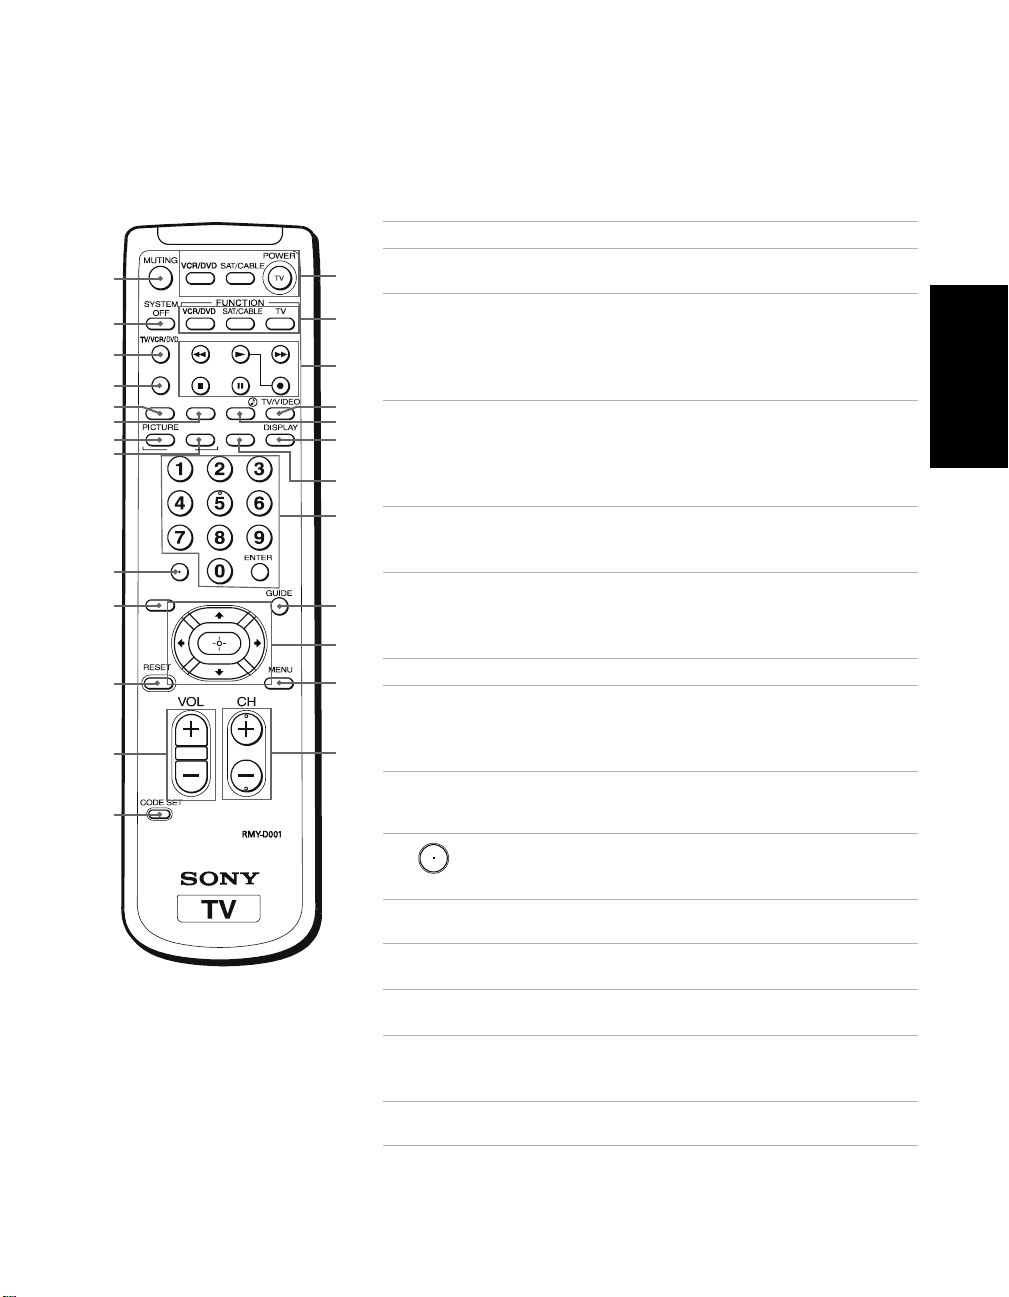
Remote Control Description
Button Description
MUTING Press to turn off the sound. Press again or press VOL+
1
A
B
C
D
5
6
7
8
9
0
qa
qs
qd
JUMP
SLEEP
ANALOG
/ DIGITAL
EXIT
SCREEN FAVORITES
MODE
TV/SAT
qf
qg
qh
qj
qk
ql
w;
wa
ws
wd
wf
wg
to restore sound.
SYSTEM
2
OFF
TV/VCR/DVD Press to change the VHF/UHF output of the VCR (or
3
JUMP Press to jump back and forth between the current
4
SLEEP Press repeatedly until the TV displays the time in
5
EXIT Press to exit menus and other on-screen displays.
6
PICTURE
7
MODE
SCREEN
8
MODE
9
ANALOG
0
/DIGITAL
RESET Press to return to factory settings while in an
qa
VOL
qs
(volume)
CODE SET Press to program your remote control to operate
qd
Press to turn off the equipment programmed into the
remote control. See “Programming the Remote
Control” on page 11. This button does not work with
DVD/VCR combo units, and may not work with older
Sony equipment.
DVD/VCR combination unit). If you have a non-Sony
VCR or DVD, you will need to program the remote
control to recognize your VCR or DVD. For details, see
“Programming the Remote Control” on page 11.
channel and the last channel that you selected
does not switch between analog and digital channels.)
minutes (15, 30, 45, 60, or 90) that you want the TV to
remain on before shutting off automatically. Cancel by
pressing until Sleep Off appears.
Press repeatedly to step through the available video
picture modes: Vivid, Standard, Movie, and Pro. Also
available in the Video menu. See “Using the Video
Menu” on page 38 for details.
D
Press to toggle among the Screen Mode options. For
details on using Screen Mode, see page 32. Also available
in the Digital Setup menu (see page 57).
D
Use with 0-9 and
channels (for example, 2.1). For details on selecting digital
channels, see page 29.
Press to switch between analog and digital tuning
modes.
on-screen menu.
Press (+) or (-) to adjust the volume.
connected video equipment. See “Programming the
Remote Control” on page 11.
ENTER
buttons to select digital
Remote Control
. (JUMP
D Indicates feature available only in digital tuning mode.
9
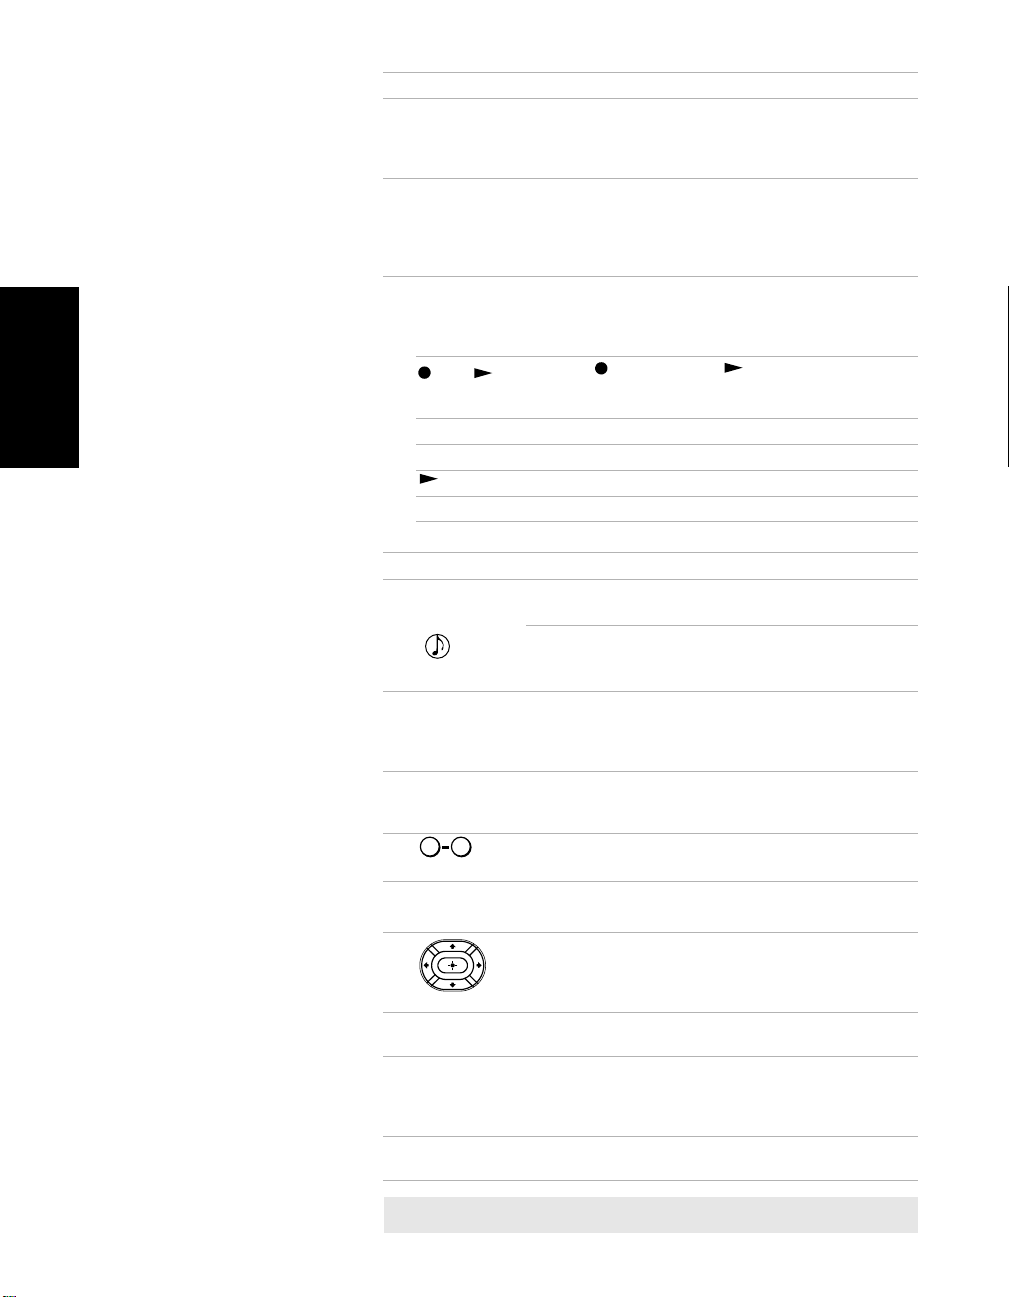
Button Description
POWER
qf
buttons
FUNCTION
qg
buttons
VCR/DVD
qh
(operating)
and
(to record)
m Rewind.
Remote Control
M Fast-forward.
x Stop.
X
TV/VIDEO Press to cycle through available video inputs.
qj
TV/SAT Press to switch between the TV and SAT (satellite)
qk
DISPLAY Press once to display the current time (if set) and the
ql
FAVORI TES
w;
wa
0 9
ENTER
GUIDE D Press to display the digital program guide. For
ws
wd
MENU Press to display and exit the analog menu. For details,
wf
CH (channel)
wg
Press to turn on and off the TV and other audio/video
equipment you have programmed into the remote
control. For instructions, see “Programming the
Remote Control” on page 11.
Press to select the equipment (VCR/DVD, SAT/
CABLE, TV) that you want to operate with the remote
control. The indicator (LED) lights up momentarily
when pressed to show which device the remote
control is operating.
Press to operate your VCR or DVD. The VCR or DVD
must be programmed into the remote control. For
instructions, see “Programming the Remote Control”
on page 11.
Press the button and the button at the same
time to record programs with your VCR. The remote
control must be programmed before you can record.
Play.
Pause. Press again to resume normal playback.
inputs when in SAT FUNCTION mode.
Press for a direct selection of Effect settings (Simulated,
SRS, Off) when the remote is in TV FUNCTION mode.
See “Using the Audio Menu” on page 39 for details.
program status such as channel number, Channel
Label (if set), video input, Video Label (if set), and Info
Banner (if set). Press again to turn off the display.
Press to display the analog or digital Favorite Channels
list, depending on the current tuning mode (analog or
digital).
and
Press to change channels. The channel changes after
two seconds.
details, see page 30.
Press the arrow buttons to move the cursor in the onscreen menus. Press the center button to select an
option. (If no menu or display is shown, pressing the
center button displays the Favorite Channels list.)
see page 35. (To display the digital menu, see page 54.)
Press to change analog or digital channels, depending on
the current tuning mode (analog or digital). To scan
rapidly through the channels, press and hold down the
CH+
or
CH-
button.
10
D Indicates feature available only in digital tuning mode.
✍ If you lose your remote control, see page 60.
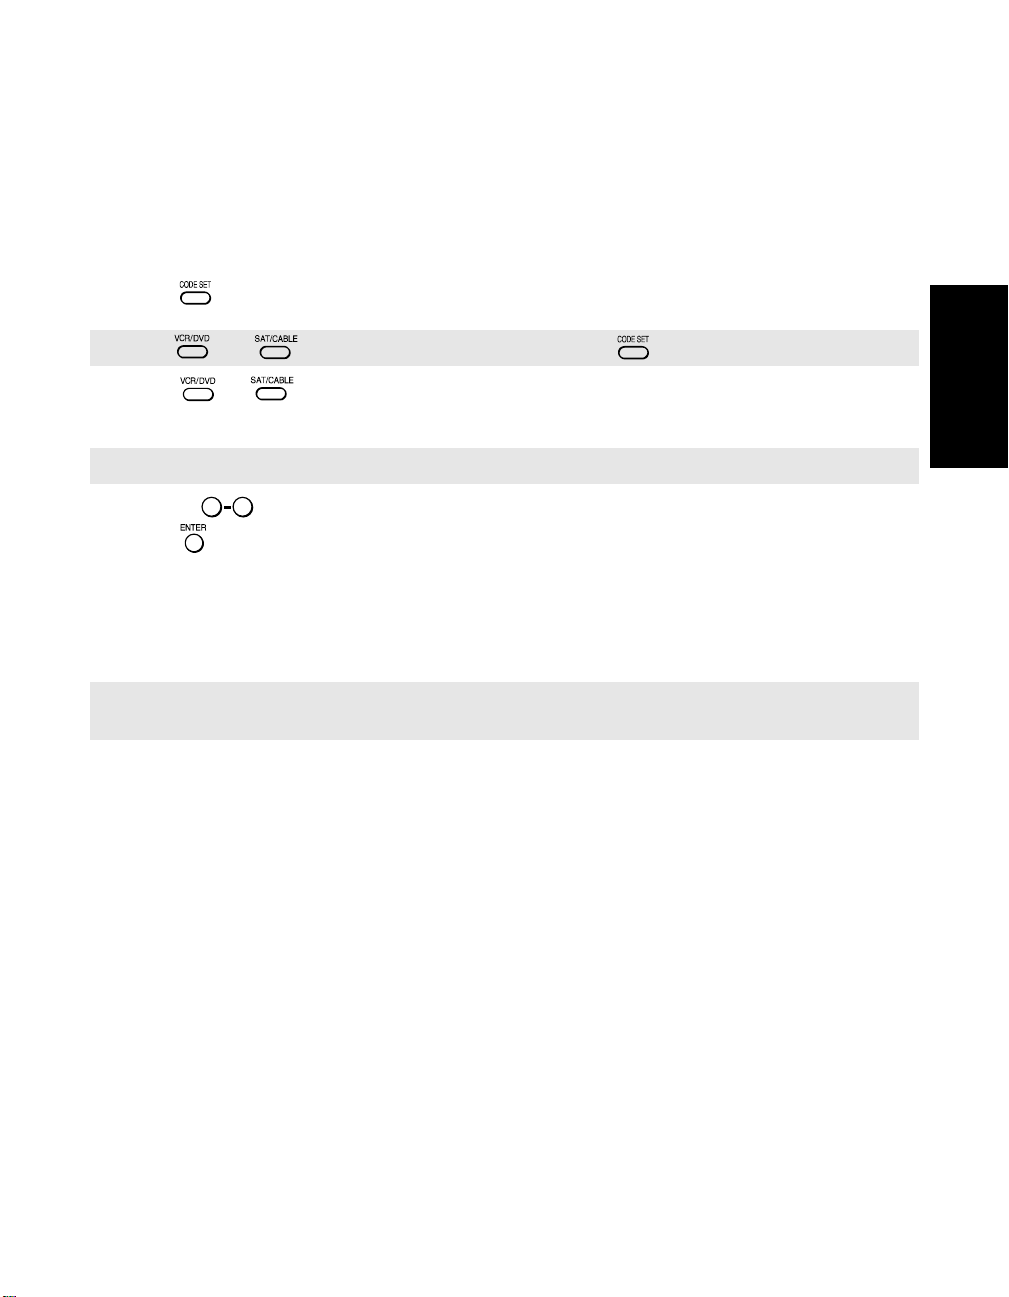
Programming the Remote Control
If you have video equipment other than Sony brand (or if you have a Sony DVD/VCR
combination unit) that you want to control with the TV’s remote control, use the following
procedure to program the remote control.
1 Check the list of “Manufacturer’s Codes” on page 12 and find the three-digit code number
for the manufacturer of your component. If more than one code number is listed, use the
number listed first.
2 Press .
✍ The and FUNCTION button flash when you press .
3 Press or FUNCTION button to indicate the type of component you want to
program with the remote control.
✍ You must do step 4 within 10 seconds of step 3, or you must redo steps 2 and 3.
Remote Control
4 Use the buttons to enter the three-digit manufacturer’s code number.
0 9
5 Press .
6 To check if the code number works, aim the TV’s remote control at the component and
press the green
component. If it responds, you are done. If not try using another code listed for that
manufacturer.
POWER button (VCR/DVD, SAT/CABLE) that corresponds with that
✍ If you have problems programming your remote control, see the remote control troubleshooting
section on page 60.
11
Manufacturer’s Codes
VCRs
Manufacturer Code
Sony 301, 302, 303
Admiral
(M. Ward)
Aiwa 338, 344
Audio Dynamic 314, 337
Broksonic 319, 317
Canon 309, 308
Citizen 332
Craig 302, 332
Criterion 315
Curtis Mathes 304, 338, 309
Daewoo 341, 312, 309
DBX 314, 336, 337
Remote Control
Dimensia 304
Emerson 319, 320, 316, 317,
Fisher 330, 335
Funai 338
General Electric 329, 304, 309
Go Video 322, 339, 340
Goldstar 332
Hitachi 306, 304, 305, 338
Instant Replay 309, 308
JC Penney 309, 305, 304, 330,
JVC 314, 336, 337, 345,
Kenwood 314, 336, 332, 337
LXI (Sears) 332, 305, 330, 335,
Magnavox 308, 309, 310
Marantz 314, 336, 337
Marta 332
Memorex 309, 335
Minolta 305, 304
Mitsubishi/
MGA
Multitech 325, 338, 321
NEC 314, 336, 337
Olympic 309, 308
Optimus 327
Panasonic 308, 309, 306, 307
Pentax 305, 304
327
318, 341
314, 336, 337
346, 347
338
323, 324, 325, 326
Philco 308, 309
Philips 308, 309, 310
Pioneer 308
Quasar 308, 309, 306
RCA/PROSCAN 304, 305, 308, 309,
Realistic 309, 330, 328, 335,
Sansui 314
Samsung 322, 313, 321
Sanyo 330, 335
Scott 312, 313, 321, 335,
Sharp 327, 328
Shintom 315
Signature 2000
(M. Ward)
SV2000 338
Sylvania 308, 309, 338, 310
Symphonic 338
Tashiro 332
Tatung 314, 336, 337
Teac 314, 336, 338, 337
Technics 309, 308
Toshiba 312, 311
Wards 327, 328, 335, 331,
Yamaha 314, 330, 336, 337
Zenith 331
311, 312, 313, 310,
329
324, 338
323, 324, 325, 326
338, 327
332
Laserdisc Players
Manufacturer Code
Sony 701
Panasonic 704, 710
Pioneer 702
DVD/VCR Combination
Units
Manufacturer Code
Sony 601
Broksonic 605
JVC 604
Panasonic 609
Samsung 603
Toshiba 602
DVD Players
Manufacturer Code
Sony 751
Hitachi 758
JVC 756
Magnavox 757
Mitsubishi 761
Onkyo 762
Oritron 759
Panasonic 753
Philips 757
Pioneer 752
RCA 755
Samsung 758
Tos hiba 75 4
Zenith 760
Cable Boxes
Manufacturer Code
Sony 230
Hamlin/Regal 222, 223, 224, 225,
Jerrold/G.I./
Motorola
Oak 227, 228, 229
Panasonic 219, 220, 221
Pioneer 211, 214, 215
Scientific Altanta 209, 210, 211
Toc om 216, 217
Zenith 212, 213
226
201, 202, 203, 204,
205, 206, 207, 208,
218
Satellite Receivers
Manufacturer Code
Sony 801
DIRECT TV 809
Dish Network 810
Echostar 810
General Electric 802
Hitachi 805
Hughes 804
Mitsubishi 809
Panasonic 803
Philips 811
RCA/PROSCAN 802, 808
Samsung 812
Tos hiba 80 6, 807
12

Using your TV Remote Control with Other Equipment
Operating a VCR
Press To
Activate the remote control to operate the VCR (
FUNCTION button)
ENTER
0 9
or ,
(using tuner)
or
and
(Simultaneously)
Operating a DVD Player
Press To
ENTER
0 9
,
or
Power on/off the VCR (
VCR/DVD green button)
Change channels
Play video tape
Stop
Rewind or Fast-forward a video tape
Pause
Record
Switch between VCR and TV inputs
Activate the remote control to operate the DVD (
Power on/off the DVD (
VCR/DVD green button)
FUNCTION button)
Select chapters
Search chapters forward or backward
Play DVD
Stop
Pause
Search the picture forward or backward during playback
Display the DVD menu
Remote Control
Use the arrow buttons to move the cursor in the menu, and the
center button to select an option
Switch between DVD and TV inputs
13
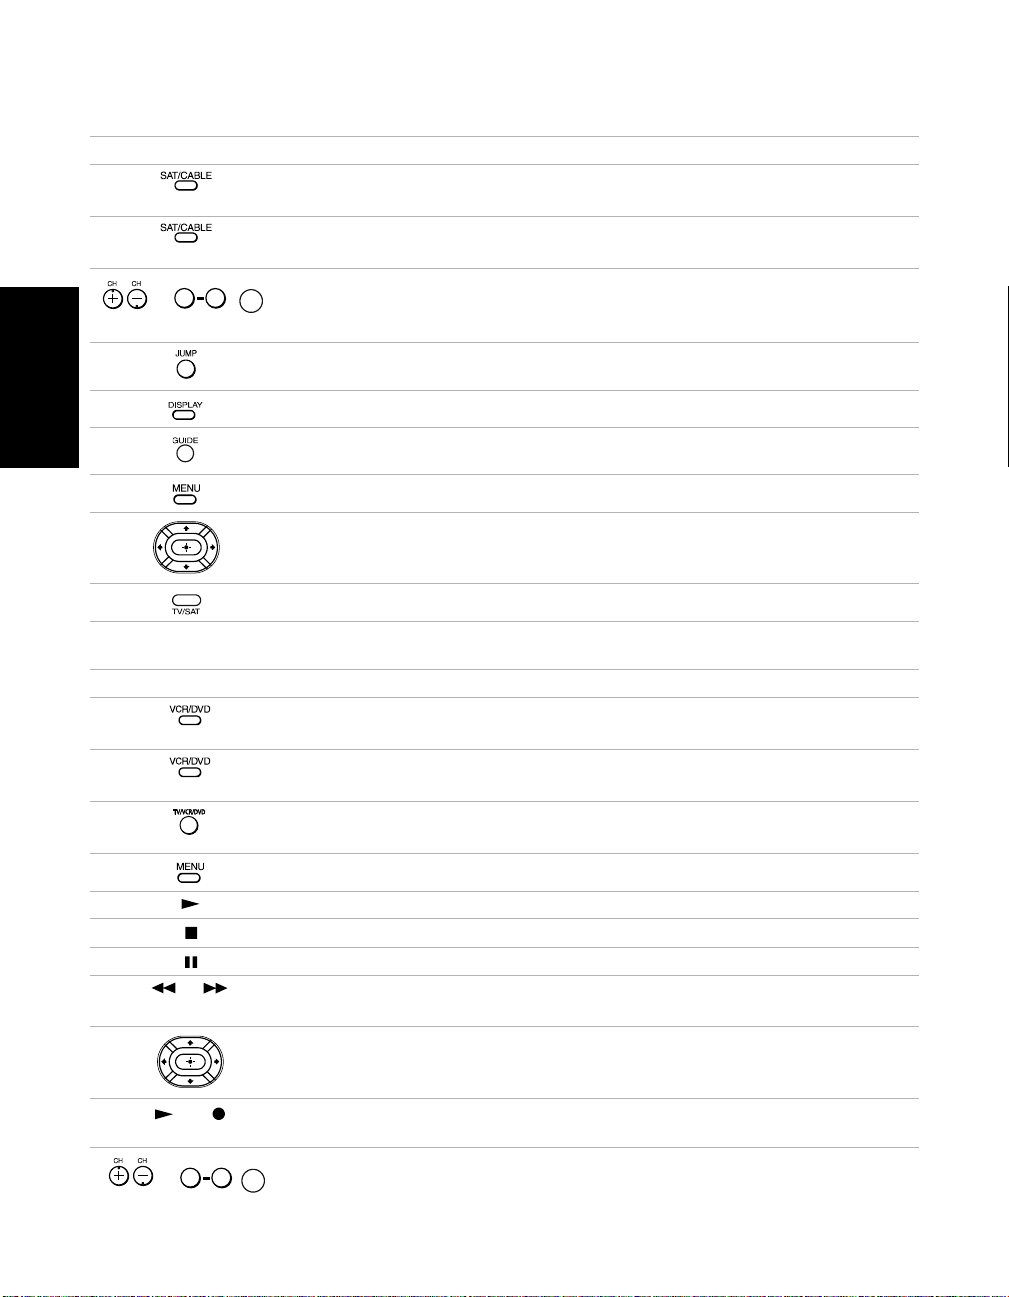
Operating a Cable Box or Satellite Receiver
Press To
Activate the remote control to operate the cable box or satellite
receiver (
FUNCTION button)
Power on/off the cable box or satellite receiver (
button)
0 9
or ,
(using tuner)
ENTER
Change channels
Change back to previous channel
Display channel number (satellite receiver)
SAT/CABLE green
Remote Control
Display SAT guide (satellite receiver)
Display SAT menu (satellite receiver)
Use the arrow buttons to move the cursor in the menu, and the
center button to select an option (satellite receiver)
Press to switch between the TV and SAT inputs (satellite receiver)
Operating a DVD/VCR Combination Unit
Press To
Activate the remote control to operate the
button)
Power on/off the DVD/VCR Combination unit (
button)
When the VCR is not playing, this button switches between the
DVD player and VCR’s tuner
Display the DVD menu
Play
Stop
Pause
or
Rewind or fast-forward a video tape (VCR)
Search the picture forward or backward during playback (DVD)
Use the arrow buttons to move the cursor in the menu, and the
center button to select an option (DVD)
DVD/VCR (FUNCTION
VCR/DVD green
(Simultaneously)
(using tuner)
14
and
0 9
or ,
ENTER
Record (VCR)
Change channels (VCR)
Connecting Your TV
Read this section before setting up your TV for the first time. This section explains how to
make the basic connections and how to connect optional equipment.
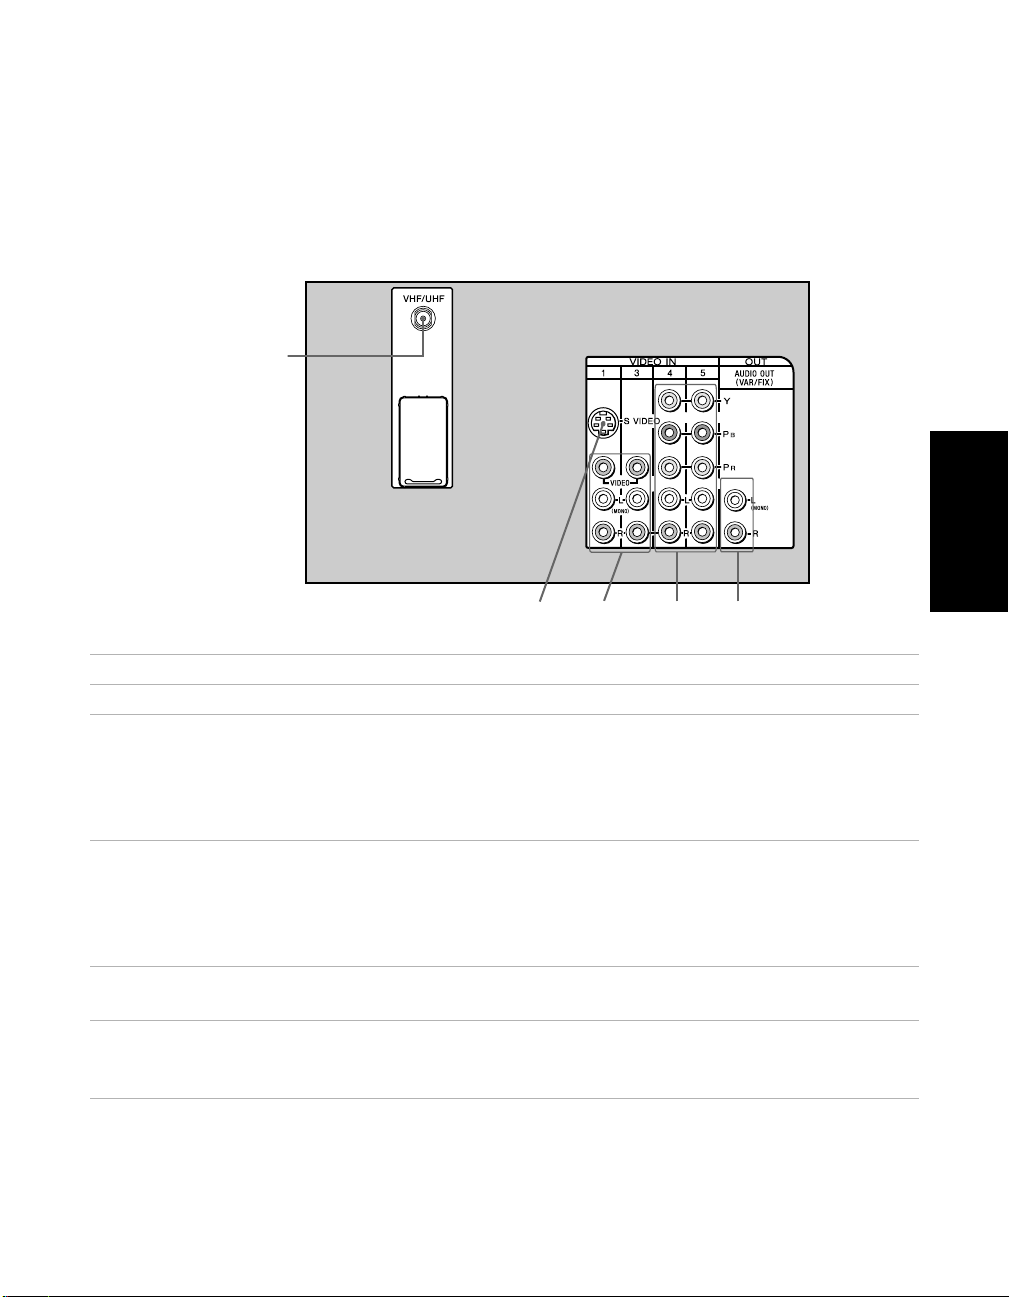
TV Rear Panel
1
Connections
2
Jack Description
1 VHF/UHF This input connects to your VHF/UHF antenna or cable.
2 S VIDEO This input connects to the S VIDEO OUT jack on your VCR or
other video equipment that has S VIDEO. S VIDEO provides
better picture quality than the VHF/UHF jacks or the video
input jack. S VIDEO does not provide sound, so you still must
connect the audio cables.
3 VIDEO/AUDIO
L(MONO), R
4
Y PB PR/ L, R
5 AUDIO OUT
(VAR/FIX)
L(MONO), R
This input connects to the AUDIO/VIDEO output jacks on your
VCR or other video equipment. A third video input jack
(VIDEO 2) is located on the front panel of the TV. These
AUDIO/VIDEO input jacks provide better picture quality than
the VHF/UHF jack.
This input connects to the component video Y PB PR and AUDIO
L, R jacks on your DVD player or digital set-top box (480i only).
This jack connects to the AUDIO input jacks on your audio
equipment. You can listen to your TV’s audio through your
stereo system.
3
45
15
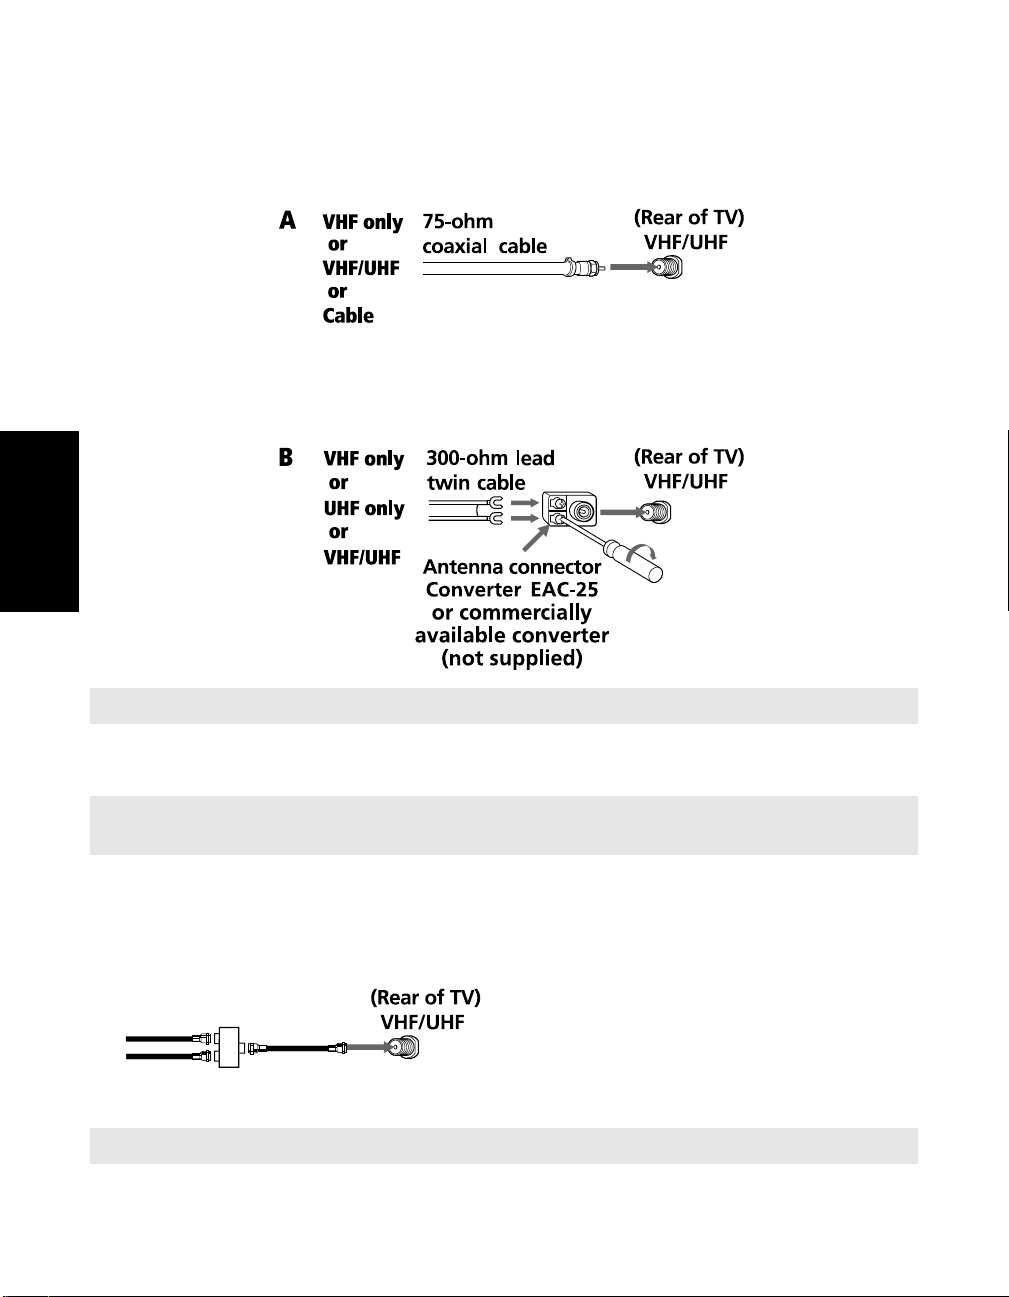
Basic Connections
TV with Cable, Indoor, or Outdoor Antenna
Depending on the cable system available in your home, choose one of the connections below:
Use option A to connect the TV to a cable system or an antenna with a 75-ohm cable
(usually built into newer homes).
Connections
✍ Converter EAC-25 is commercially known as a 300-to-75 ohm antenna adapter.
Use option B to connect the TV to a dipole antenna, also known as a “rabbit ears antenna“
(usually found in older homes).
✍ If you are connecting to an indoor or outdoor antenna, you may need to adjust the orientation of the
antenna for the best reception.
Connecting Two RF Inputs
If you want to watch RF signals for both antenna (over-the-air) and cable broadcast signals,
you’ll need to use an optional A-B switch for RF inputs (not supplied), as shown below.
Use the A-B selector to switch between the
over-the-air signals and the cable signals.
Then set the Cable setting in the Channel
Setup menu to On or Off, as described on
page 41.
Cable
Antenna
A/B
RF Switch
A
B
✍ For best results, be sure to use an RF switch, as shown above, instead of a simple splitter.
16

Connecting Additional Equipment
Connecting a TV and VCR
Rear of TV
2
VCR
LINE
1
From
cable/antenna
1 Connect the coaxial cable from your TV antenna or cable service to the IN jack on your
VCR.
2 Connect a coaxial cable (not supplied) from the OUT jack on your VCR to the VHF/UHF
jack on the TV.
IN
VIDEO
AUDIO L AUDIO R
LINE
OUT
Optional connection
Audio R (red)
Audio L (white)
Video (yellow)
Connections
Optional connection
❏ If your VCR is equipped with video outputs, you can get better picture quality by
connecting audio/video cables (not supplied) from AUDIO/VIDEO OUT on your VCR to
AUDIO/VIDEO IN on your TV.
❏ For better picture quality, use S VIDEO instead of the yellow video cable. S VIDEO does
not provide sound, so you still must connect the audio cables.
Using your TV with this connection
❏ Program your Sony remote control to operate your VCR (see “Programming the Remote
Control” on page 11).
❏
To activate your remote, press the
FUNCTION
button to operate your VCR. In order to do
this, first program your remote control, then use the Channel Fix feature to set your TV to
channel 3 or 4 (see page 41).
❏ Press repeatedly to switch between VCR input (VIDEO input) and VHF/UHF
(local channels).
17
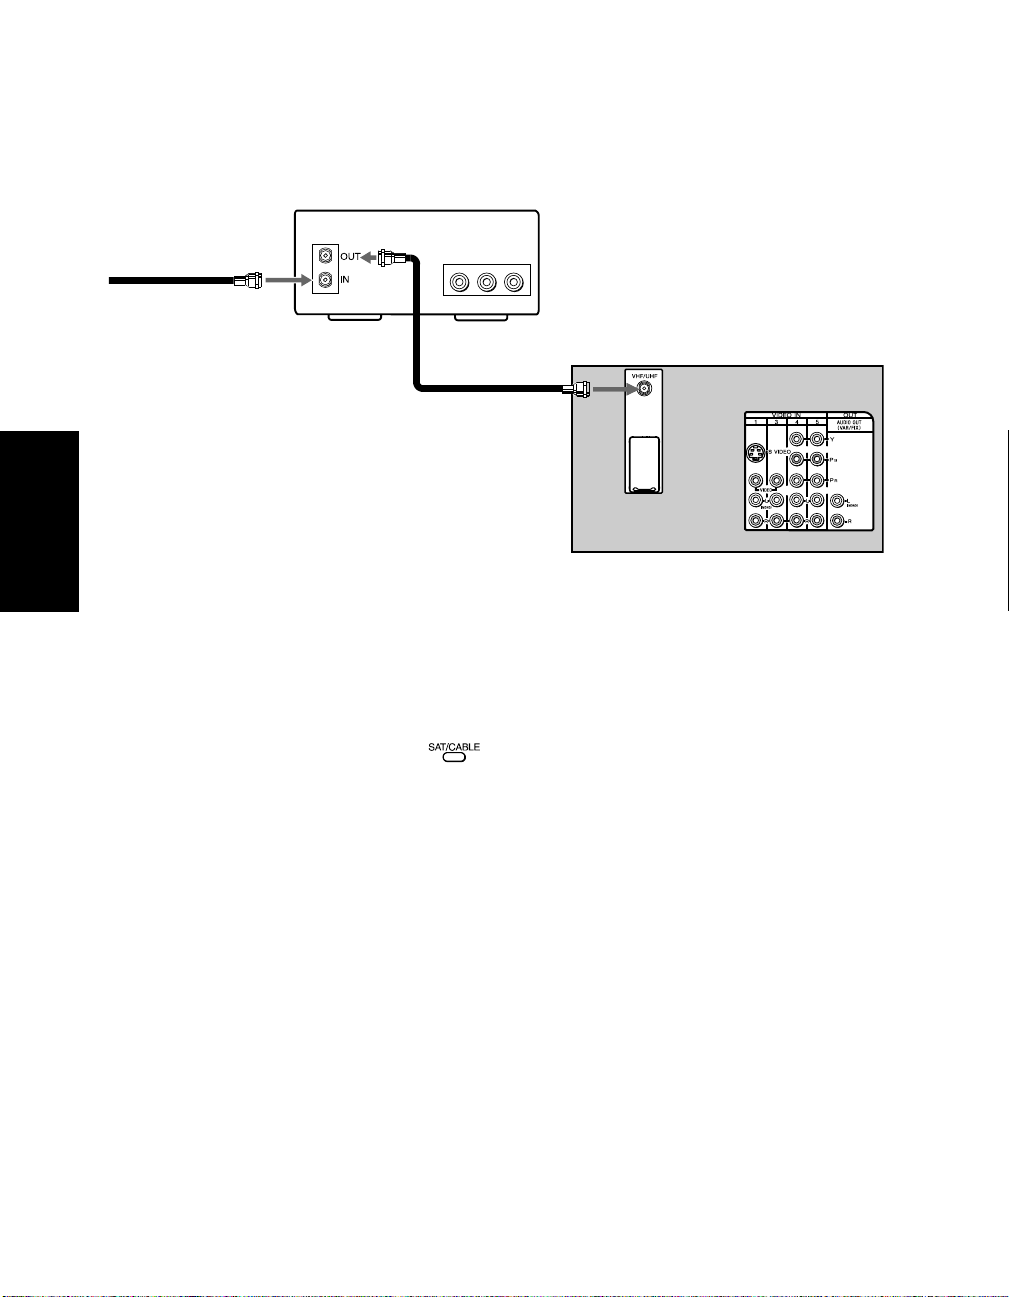
Connecting a TV and Cable Box
Some cable TV systems use scrambled or encoded signals that require a cable box to view all
channels. If you subscribe to such type of service, use this connection.
Cable box
1
VIDEO
AUDIO L AUDIO R
LINE
OUT
From cable/
antenna
2
Connections
1 Connect the coaxial cable from your cable service to the IN jack on your cable box.
Rear of TV
2 Connect a coaxial cable (not supplied) from the OUT jack on your cable box to the
VHF/UHF jack on your TV.
Using your TV with this connection
❏ Program your Sony remote control to operate your cable box.
❏ To activate your remote, press the FUNCTION button to operate your cable box. Then
--9 buttons or CH+/- buttons to change the channels. In order to do this, first program
use
your remote control, then use the Channel Fix feature to set your TV to channel 3 or 4 (see
page 41).
18
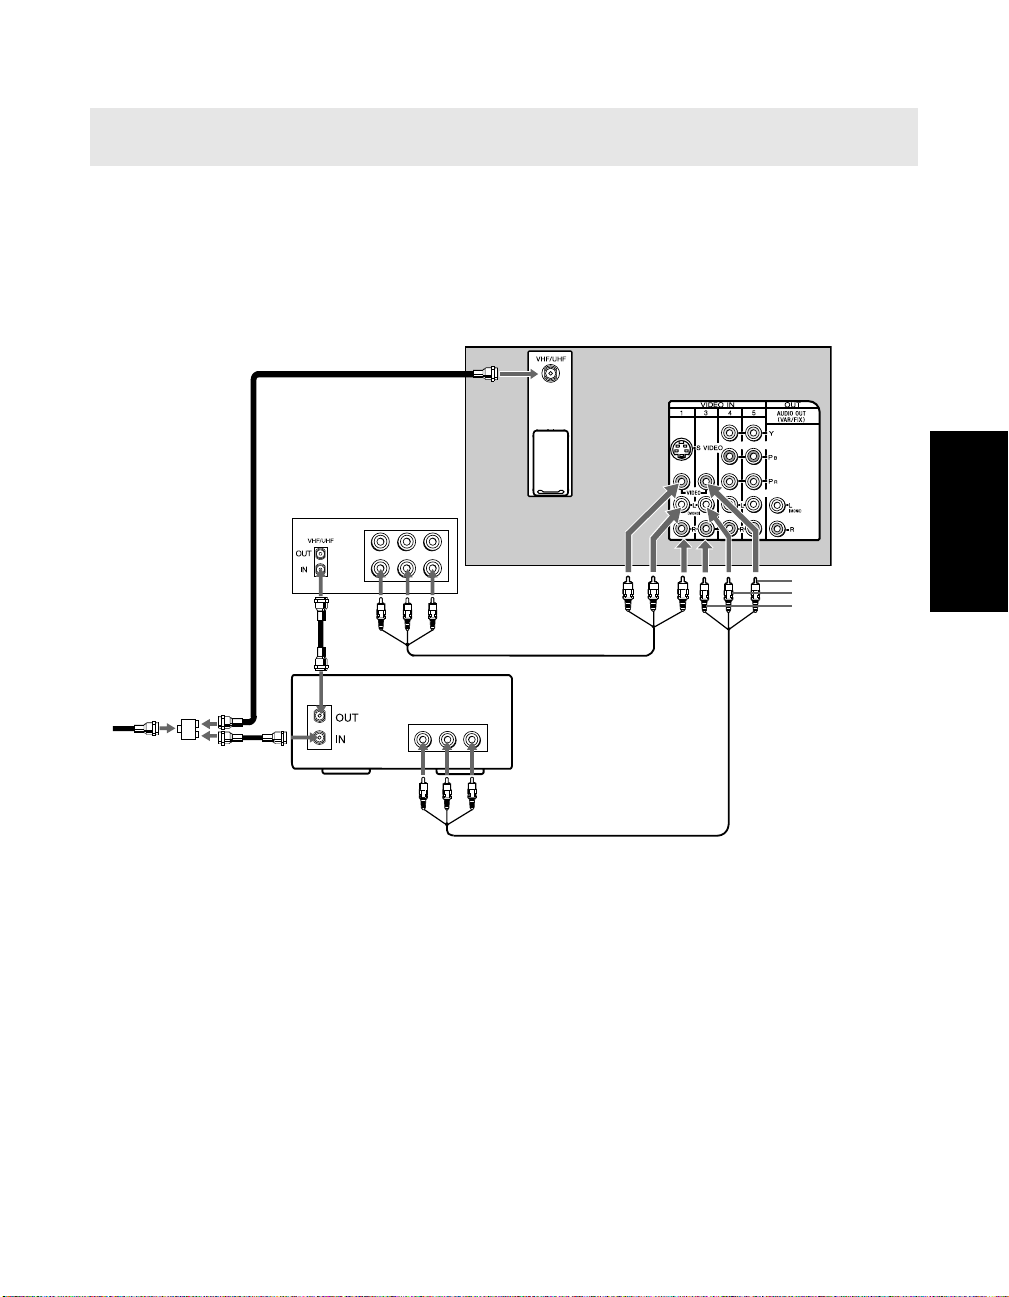
Connecting a TV, VCR, and Cable Box
✍ DIGITAL CABLE BOX USERS: If you are connecting a digital cable box, you will need a special bi-
directional splitter (5-900 Mhz minimum) that is designed to work with your digital cable box.
Use this connection if you subscribe to a cable system that scrambles some channels (pay
channels), but not all of them. This setup allows you to:
❏ change channels through your cable box or VCR when you are receiving a
scrambled signal
❏ change channels through your TV
Rear of TV
2b
VCR
LINE
IN
VIDEO
AUDIO L AUDIO R
LINE
OUT
3
4
Video (yellow)
Audio L (white)
Audio R (red)
Connections
Cable box
1
Cable
Splitter
2a
VIDEO
AUDIO L AUDIO R
LINE
OUT
5
1 Connect the single input jack of the splitter (not supplied) to your incoming cable
connection.
2 Using coaxial cables (not supplied), connect the two output jacks of the splitter
(not supplied) to:
a) the IN jack on your cable box
b) the VHF/UHF jack on the TV
3 Using a coaxial cable (not supplied), connect the OUT jack on your cable box to the IN jack
on your VCR.
4 Using audio/video cables (not supplied), connect AUDIO/VIDEO OUT on your VCR to
AUDIO/VIDEO IN on your TV.
5 Using audio/video cables (not supplied), connect AUDIO/VIDEO OUT on your cable
box to AUDIO/VIDEO IN on your TV.
19
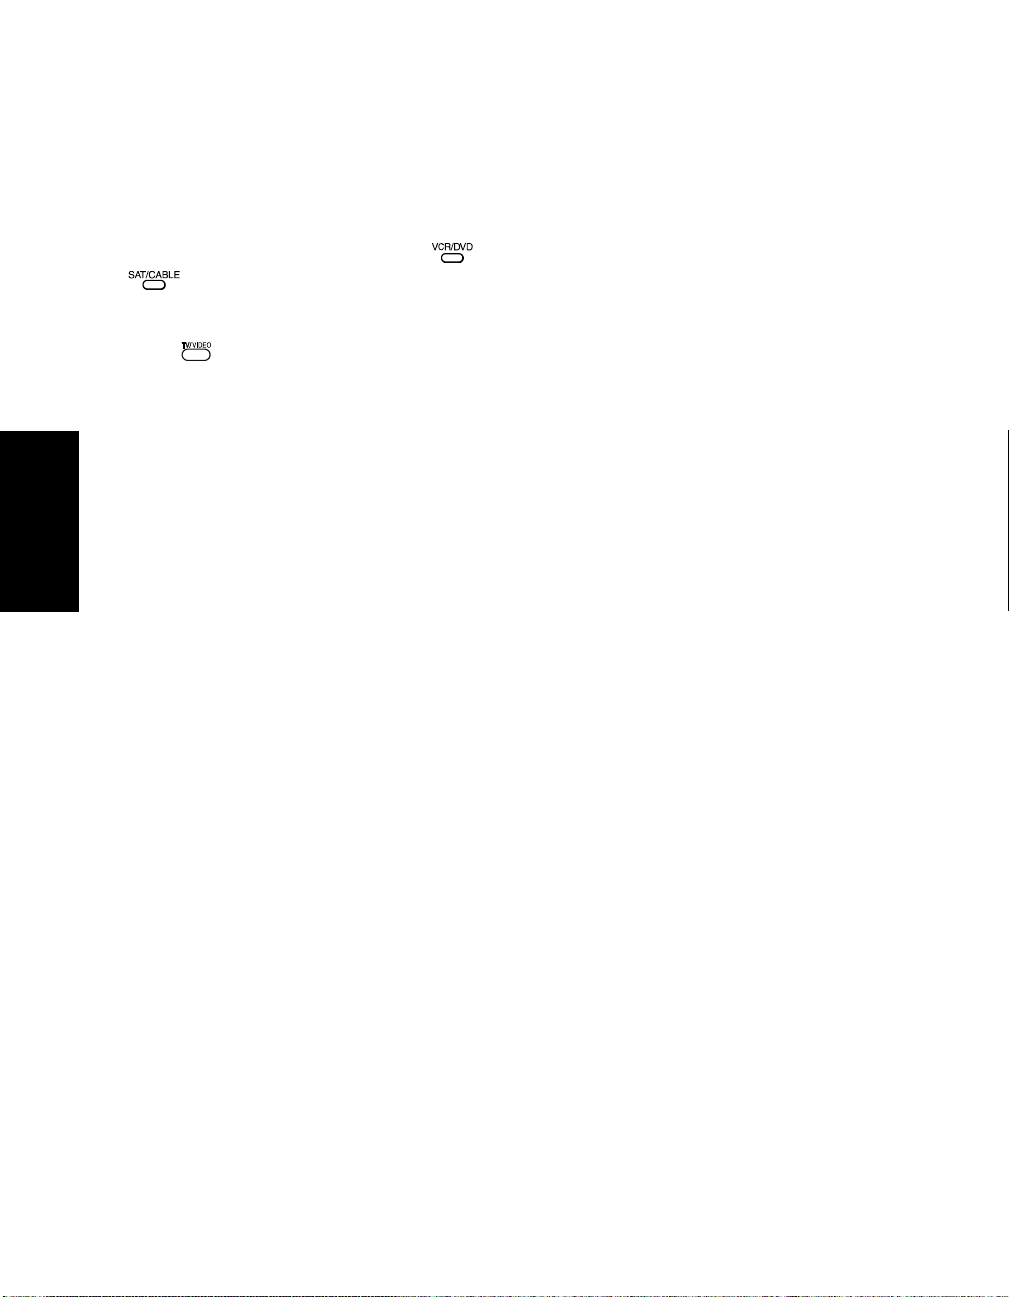
Optional connection
❏ For better picture quality, use S VIDEO instead of the yellow video cable. S VIDEO does
not provide sound, so you still must connect the audio cables.
Using your TV with this connection
❏ Program your Sony remote control to operate your VCR or cable box (see page
“Programming the Remote Control” on page 11).
❏ To activate your remote, press the
FUNCTION button to operate your cable box. In order to do this, first program your
FUNCTION button to operate your VCR or the
remote control, then use the Channel Fix feature to set your TV to channel 3 or 4 (see page
41
).
❏ Press repeatedly to switch between VCR input (VIDEO input), VHF/UHF (local
channels or unscrambled), or cable box (cable system or scrambled channels).
Connections
20
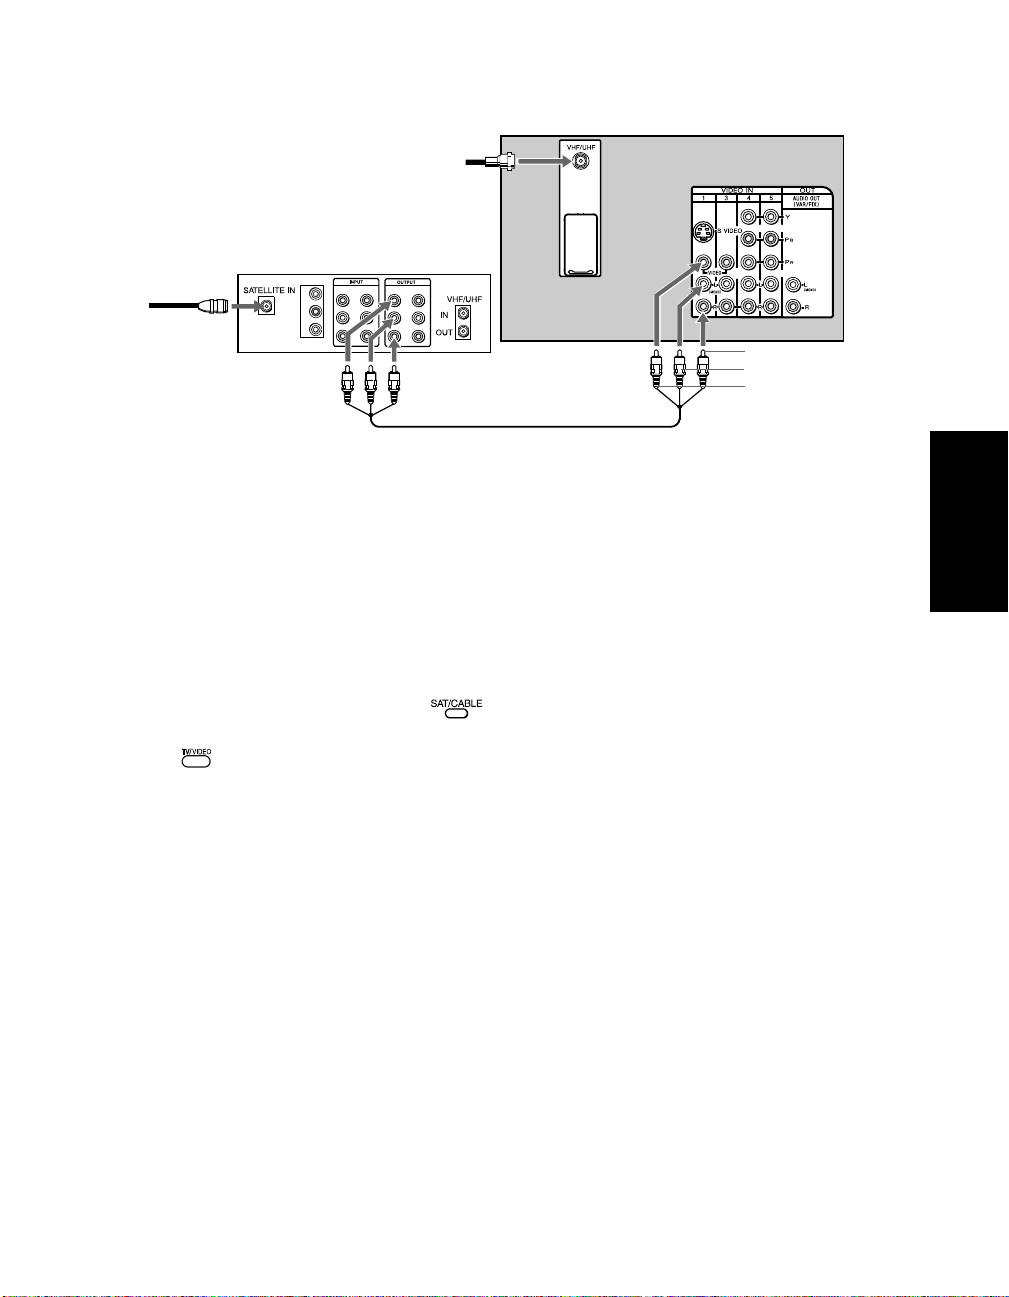
Connecting a TV and Satellite Receiver
From
cable/
2
Rear of TV
antenna
Satellite receiver
1
Satellite
antenna
cable
Y
P
B
R
P
VIDEO 1
L
L
R
R
Audio R (red)
Audio L (white)
Video (yellow)
3
1 Connect the cable from your satellite antenna to SATELLITE IN on your satellite receiver.
2 Connect the coaxial cable from your cable service or antenna to the VHF/UHF jack on
your TV.
3 Using audio/video cables (not supplied), connect AUDIO/VIDEO OUT on your satellite
receiver to AUDIO/VIDEO IN on your TV.
Using your TV with this connection
❏ Program your Sony remote control to operate your satellite receiver (see “Programming
the Remote Control” on page 11).
❏ To activate your remote, press the FUNCTION button to operate your satellite
receiver. See page 14 for details on using other functions.
❏ Press repeatedly to switch to satellite receiver input (VIDEO input).
Connections
21
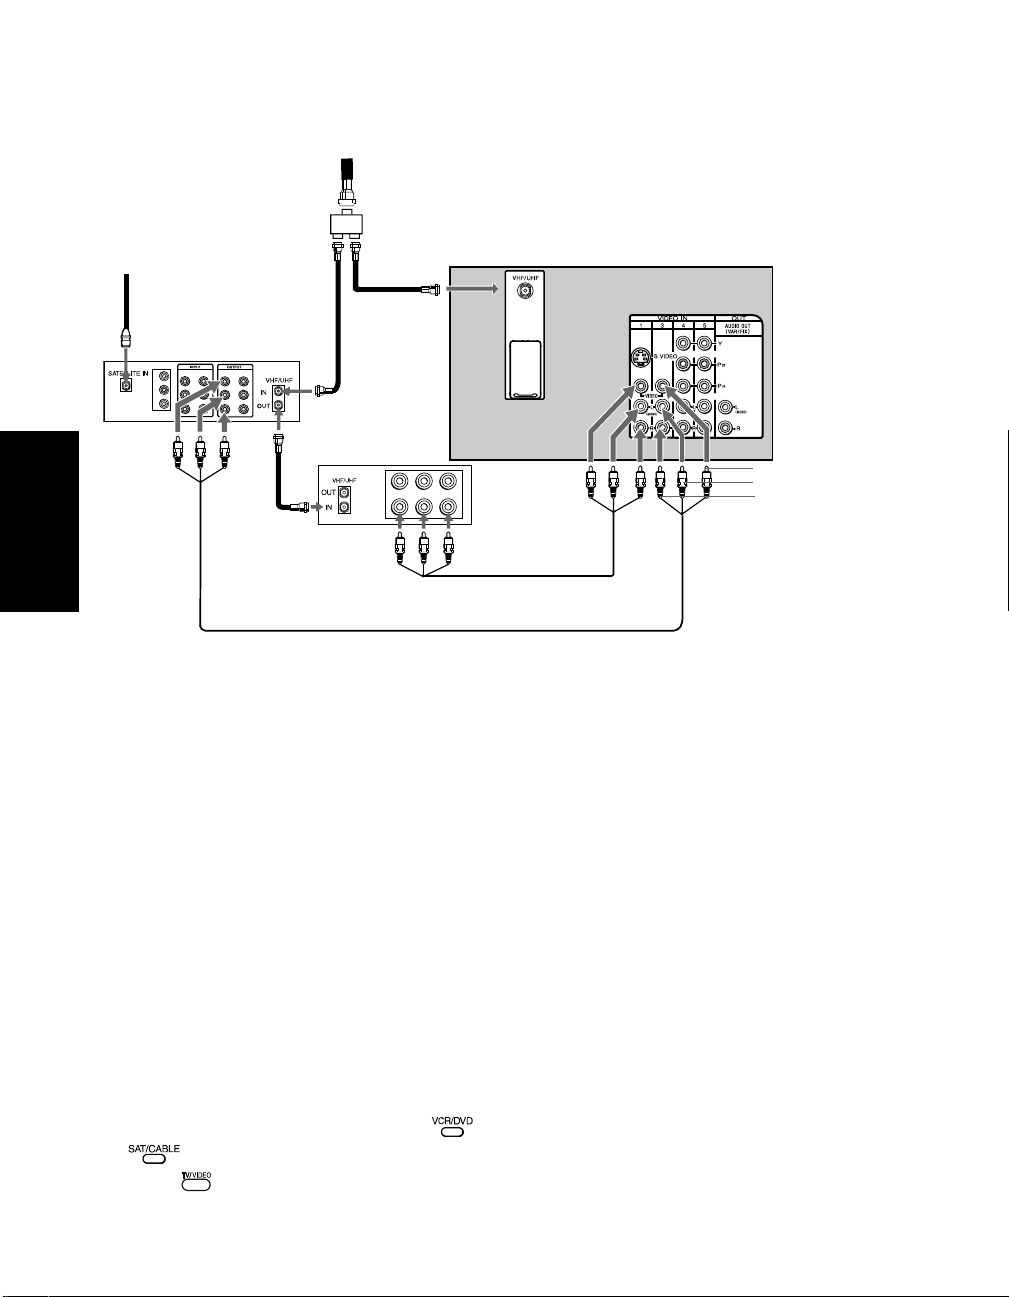
Connecting a TV, VCR, Cable/Antenna, and Satellite Receiver
using Composite Video (VIDEO/AUDIO L(MONO), R)
From
cable or
2
Optional
antenna
Satellite antenna
cable
1
3a
Splitter
Rear of TV
3b
For Viewing
Satellite receiver
VIDEO 1
VIDEO 2
VIDEO 2
Y
P
B
R
P
VIDEO 1
L
L
R
R
For Recording
4
LINE
IN
VIDEO
AUDIO L AUDIO R
LINE
OUT
Video (yellow)
Audio L (white)
Audio R (red)
VCR
Connections
6
For Viewing
For Playback
5
1 Connect the cable from your satellite antenna to SATELLITE IN on your satellite receiver.
2
Connect the single input jack of the splitter (not supplied) to your incoming cable/antenna
(optional connection to view local channels or broadcast).
3 Using coaxial cables (not supplied), connect the two output jacks of the splitter
(not supplied) to:
a) the IN jack on your satellite receiver
b) the VHF/UHF jack on the TV
4 Using a coaxial cable (not supplied), connect the OUT jack on your satellite receiver to the
VHF/UHF IN on your VCR.
5 Using audio/video cables (not supplied), connect AUDIO/VIDEO OUT on your VCR to
AUDIO/VIDEO IN on your TV.
6 Using audio/video cables (not supplied), connect AUDIO/VIDEO OUT on your satellite
receiver to AUDIO/VIDEO IN on your TV.
Using your TV with this connection
❏
Program your Sony remote control to operate your VCR or satellite receiver (
“Programming the Remote Control” on page 11
❏ To activate your remote, press the
FUNCTION button to operate your satellite receiver.
❏ Press repeatedly to switch between VCR input (VIDEO input), VHF/UHF
FUNCTION button to operate your VCR or the
).
(local channels or unscrambled), or your cable box (cable system or scrambled channels).
22
see
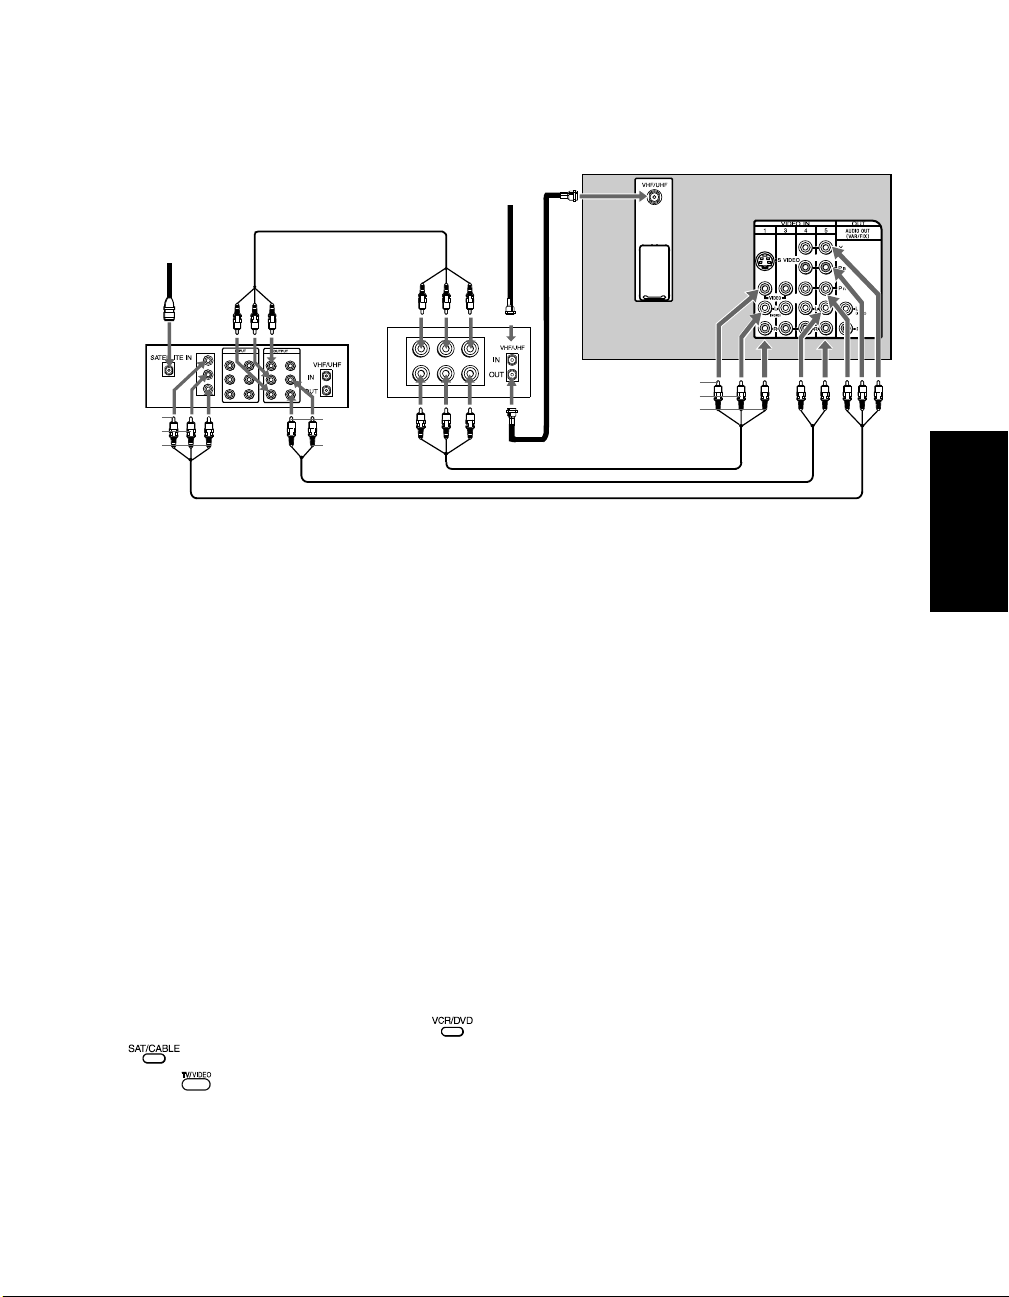
Connecting a TV, VCR, and Satellite Receiver using
Component Video (Y PB PR)
From
cable/
Rear of TV
antenna
4
2
1
Y (green)
PB (blue)
PR (red)
Satellite
Receiver
Y
P
B
R
P
VIDEO 1
L
L
R
R
76
Audio R
(red)
Audio L
(white)
VCR
LINE
IN
LINE
OUT
5
VIDEO
3
AUDIO L AUDIO R
Video (yellow)
Audio L (white)
Audio R (red)
1 Connect the coaxial cable from your satellite antenna to SATELLITE IN on the satellite
receiver.
2 Connect the coaxial cable from your cable service or antenna to the IN jack on your VCR.
3 Using a coaxial cables (not supplied), connect the OUT jack on your VCR to the
VHF/UHF jack on your TV.
4 Using audio/video cables (not supplied), connect AUDIO/VIDEO OUT on your satellite
receiver to AUDIO/VIDEO IN on your VCR.
Connections
5 Using audio/video cables (not supplied), connect AUDIO/VIDEO OUT on your VCR to
AUDIO/VIDEO IN on your TV.
6 Using component video cables (not supplied), connect Y PB PR OUT on your satellite
receiver to Y P
B PR IN on your TV.
7 Connect AUDIO OUT on your satellite receiver to AUDIO IN on your TV.
Using your TV with this connection
❏
Program your Sony remote control to operate your VCR or satellite receiver (
“Programming the Remote Control” on page 11
❏ Turn on your VCR to enable your satellite receiver to work with this connection.
❏ To activate your remote, press the
FUNCTION button to operate your satellite receiver.
❏ Press repeatedly to switch between VCR input (VIDEO input), VHF/UHF
FUNCTION button to operate your VCR or the
).
(local channels or unscrambled), or your cable box (cable system or scrambled channels).
see
23
 Loading...