

Sony K800i User Manual

Contents
Sony Ericsson K800i
Getting started ................... 4
Assembly, SIM card, battery,
turning on, help, calls.
Connectivity ..................... 61
Settings, using Internet, RSS,
synchronizing, Bluetooth, infrared,
USB cable, update service.
Getting to know
the phone ............................ 8
Phone overview, icons, menus, entering letters, activity menu, file manager,
Memory Stick Micro™ (M2™).
Calling ............................... 19
Calls, video calls, contacts, voice
control, call options.
Messaging ........................ 33
Text messaging, picture messaging,
voice messaging, email, My friends.
Imaging ............................. 45
Camera, vide o, blog, pictu res.
More features ................... 73
Alarm clock, calendar, tasks, profiles,
time and date, SIM card lock, etc.
Troubleshooting ............... 80
Why doesn’t the phone work the way
I want it to?
Important information ...... 85
Sony Ericsson Consumer Web site,
servi ce and su pport, s afe and effici ent
use, end user license agreement,
warranty, declaration of conformity.
Index ................................. 94
Entertainment ................... 52
Handsfree, Music and Video player,
radio, PlayNow™, MusicDJ™,
Vid eoD J™ , th emes, games and more.
This is the Internet version of the user's guide. © Print only for private use.
1Contents

Sony Ericsson
UMTS 2100 GSM 900/1800/1900
This user guide is published by Sony Ericsson
Mobile Communications AB, without a ny warranty.
Impro vement s and chan ges t o thi s u ser g ui de
nece ssitate d by t ypo graphic al e rrors, i naccu raci es
of current information, or improvements to
programs and/or equipme nt, may be made by
Sony Ericsson Mobile Communications AB at any
time and without notice. Such changes will,
howe ver, be incor por ated into n ew edit ions
of this user guide.
All rights reserved.
©Sony Ericsson Mobile Communications AB, 2006
Publication number: EN/LZT 108 8587 R1A
Please note:
Som e of th e s ervi ces in t hi s u ser g ui de are not
supported by all networks.
GSM International Emergency Number 112
Ple ase con tac t your ne tw ork opera tor or se rvic e
pro vide r i f you are in doubt whe the r yo u ca n use
a par ticula r serv ice o r not.
Please read the
and the
use
use your mobile phone.
Your mobile phone has the capability to download,
store and f orw ard additiona l content, e.g . ri ngtones.
The use of such content may be restricted or
prohibited by rights of third parties, including
but not limited to restriction under applicable
copyright laws. You, and not Sony Ericsson, are
entirely responsible for additional content that you
download to or for ward from your mobile phone.
Prio r to your u se of any add iti ona l content, plea se
verify that your intended use is properly licensed
or is otherwise authorized. Sony Ericsson does not
guar antee t he accura cy, int egrity or qual ity of any
Limited warranty
This also applies to the
Guidel ine s for s afe and effi cien t
chapt ers befo re yo u
.
add iti onal content or a ny other th ird pa rty conten t.
Under no circumstances will Sony Ericsson be
liabl e in any way fo r your impr oper u se of additio nal
content or other third party content.
Blu etooth™ is a tra demark o r regis te red tra dema rk
of Bluet ooth SIG Inc.
Be stPi c, Pl ayNo w, Mu sic DJ, Pho toD J and Vide oDJ
are trademarks or registered trademarks of
Sony Ericsson Mobile Communications AB.
Cyber-shot™ is a trademark of Sony Corporation.
Memory Stick Micro™ a nd M2™ a re r egist er ed
trademarks of Sony Corporation.
Real is a trademark or a registered trademark
of RealNetworks, Inc. RealPlayer® for Mobile
is included under license from RealNetworks, Inc.
Copyrig ht 1995- 2004, R ealNetw orks, Inc. All r ights
reserved.
Adobe® Photoshop® Alb um Starter Edition
is a r egister ed trad emar k of Ado be Sy stem s
Incorporated.
Microsoft, Windows and PowerPoint are either
registered trademarks or trademarks of Microsoft
Corporation in the U.S and other countries.
Mac OS is a trade mar k of App le Compu ter , Inc.,
registered in the U.S. and other countries.
T9™ Text Input is a trademark or a registered
trademark of Tegic Comm unications. T9™ Text
Input i s licens ed under one or more of the fo ll owing:
U.S. Pat. Nos. 5,818,437, 5,953,541, 5,187,480,
5,945,928, and 6,011,554; Canadian Pat. No.
1,331,057, United Kingdom Pat. No. 2238414B;
Hong Kong Standard Pat. No. HK0940329;
Republic of Singapore Pat. No. 51383;
Euro.Pat. No. 0 842 463(96927260.8) DE/DK, FI,
FR, IT, NL, PT, ES, SE, G B; and ad ditiona l patents
are pen ding worldwi de.
Java and all Java based trademark s and logos
are trademarks or registered trademarks of Sun
Microsystems, Inc. in the U.S. and other countries.
2 Contents
This is the Internet version of the user's guide. © Print only for private use.
End-user license agreement for Sun™ Java™
J2ME™.
Smart -Fit Ren derin g is a tradem ar k or regist ered
trademark of ACCESS CO., LTD. in Japan and
other countries.
1 Restrictions: Software is confidential copyrighted
information of Sun and title to all copies is retained
by Sun and/or its licensors. Customer shall not
modify, de compil e, disassemb le, de crypt, ex tract,
or otherwise reverse engineer Software. Software
may not be leased, a ssigned, or sublicensed, in
whole or i n part.
2 Export Regulations: Software, including technical
data , is s ubj ect to U. S. exp ort cont rol laws,
including the U.S. Export Administration Act and
its associated regulations, and may be subject to
export or import regulations in other countries.
Customer agrees to comply strictly with all such
regulations and acknowledges that it has the
responsibility to obtain licenses to export, reexport, or import Software. S oftware may not be
downl oa ded, o r ot he rwi se e xported or re-export ed
(i) i nto , or to a na tion al or res iden t of, Cuba, Iraq,
Iran, North Korea, Libya, Sudan, Syria (as such
listing may be revised from time to time) or any
country to which the U.S. has embargoed goods;
or (i i) to anyon e on the U .S. Treasury Departme nt’ s
list of Specially Designated Nat ions or the U.S.
Com merc e Depar tmen t’s T ab le o f D enial O rders.
3 Restricted Rights: Use, duplication or disc losure
by the United States government is subject to
the restrictions as s et forth in the Rights in
Tec hni cal Dat a an d Compu ter Sof tware Cla use s
in DFARS 252.227-7013(c) (1) (ii) and
FAR 52.227-19(c) (2) as applicable.
Part of the software in this product is copyright ©
SyncML initiative Ltd. (1999-2002). All rights
reserved.
Other product and company names mentioned
herein may be the trademarks of their respective
owners.
Any rights not expressly granted herein are reserved.
All illustrations are f or illustration only and may n ot
accurately depict the actual phone.
Instruction symbols
The following appear in the user guide:
Note
A service or function is networkor subscripti on-depend ent.
Contact your network operator
for details.
% See also page...
} Use a selection or navigation
key to scroll and select
%
12 Navig ation
Press the navigation key centre.
Press the navigation key up.
Press the navigation key down.
Press the navigation key left.
Press the navigation key right.
.
This is the Internet version of the user's guide. © Print only for private use.
3Contents

Getting started
Assembly, SIM card, battery,
turning on, help, calls.
More information and downloads
are available at
www.sonyericsson.com/support.
Assembly
To use your phone
1 Insert the SIM card and the battery.
2 Charge the battery.
3 Tur n on you r pho n e .
SIM card
When you register as a subscriber with
a network operator, you get a SIM
(Subscriber Identity Module) card.
The SIM card contains a computer
chip that ke eps track of ite ms suc h
as your ph one numbe r, the services
included in your subscription, and
names and numbers in your contacts.
Save contact in formation on your
SIM card before removing it from another
phone; for example, contacts may be
saved in the phone memory.
PIN
You may need a PIN (Personal Identity
Number) for your SIM card to star t
your phone and activate services.
When you enter your PIN, each digit
appears as *, unless it starts with the
same digits as an emergency number,
for example 112. This allows for
emergency calls without entering
a PIN. Press to correct mistakes.
If you enter the wrong PIN three
times in a row,
To unblock it, you need to enter
your PUK (Personal Unblocking Key)
%
77 SIM card lock.
Battery
Some functions use more batter y
power than others and m ay ca use
a ne ed for more frequent re-c harging.
If talk time or standby time becomes
noticeably shorter, you may have
to replace the battery. Only use
approved batteries from Sony Ericsson
%
88 Battery
PIN blocked
.
appears.
4 Getting started
This is the Internet version of the user's guide. © Print only for private use.
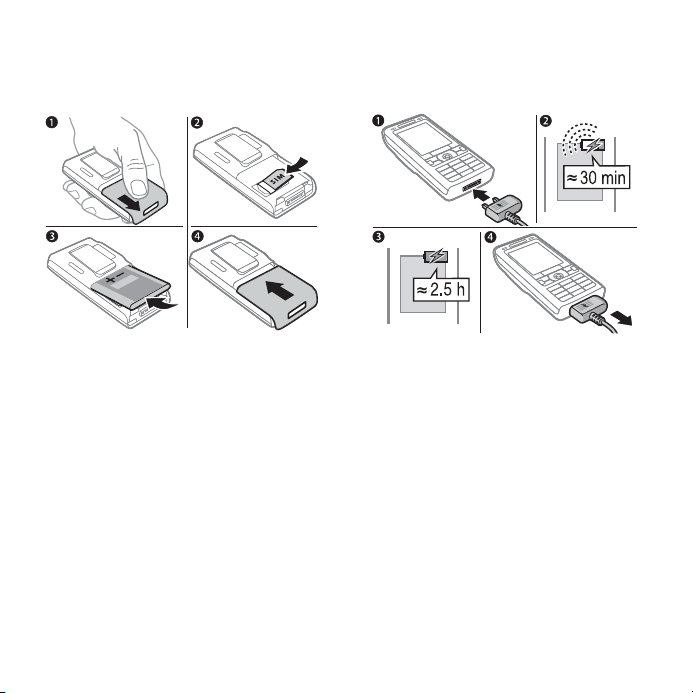
SIM card and battery
To insert SIM card and battery
To charge the battery
1 Remove the battery cover.
2 Slide the SIM card into its holder with
the contacts facing down.
3 Insert the battery with the label side up
and the connectors facing each other.
4 Slide the battery cover into place.
This is the Internet version of the user's guide. © Print only for private use.
1 Connect the charger plug to the phone
with the symbol facing upwards.
2 It may take up to 30 minutes before
the battery icon appears.
3 Wait approximately 2.5 hours or until
the battery icon indicates a full charge.
Press a key to activate the screen.
4 Pull out the charger plug.
5Getting started
Turning on your phone
Make sure the phone is charged and
a SIM card inser ted b efore turning
it on. After turning on, use the setup
wiza rd to quickly and easi ly pre pare
for use.
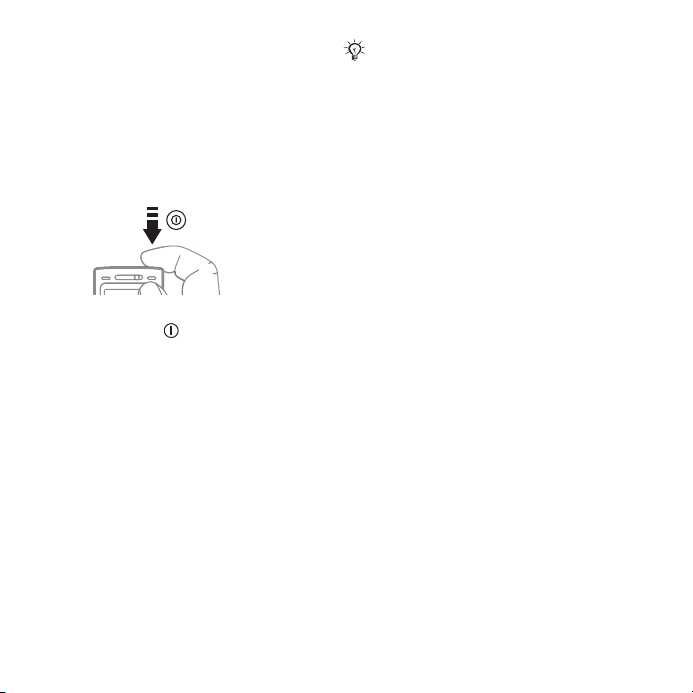
To turn on the phone
1 Press and hold . The first start-up
may take a few minutes.
2 Select to use the phone in:
• Normal mode – full functionality or
• Flight mode – limited functionality
with network, FM radio, Bluetooth™
transceivers off
menu
.
3 Enter your SIM card PIN, if requested.
4 At first start-up, select the language
for your phone menus.
5 } Yes for the setup wizard to help you.
6 Follow instructions to complete setup.
%
7Flight mode
If predefined settings exist in your
phone, you may not need more settings.
If yo u use
accept to register the phone at
Sony Ericsson
No personal data will be transferred
to or processed by Sony Ericsson.
Contact your network operator or
service provider for more information.
Settings download
. A text message is sent.
, you must
Help in your phone
Help and information is available
in your phone at any time.
To use the setup wizard
} Settings } the General tab
} Setup wizard and select an option:
• Settings download
• Basic setup
• Tips and tricks.
To view information about functions
Scroll to a function } More } Info,
if avai lable.
To view the phone demonstration
} Entertainment } Demo tour.
Settings download
Automatically set up functions in your
phone that use the Internet; Internet,
picture messaging, email, My friends,
synchronization, update service,
blog and streaming.
6 Getting started
This is the Internet version of the user's guide. © Print only for private use.

You can use Settings download if
your SIM supports the service, your
phone is connected to a network, it is
starte d in normal mode and does not
already have predefined settings.
Contact your network operator or
service provider for more information.
Flight mode menu
If you turn o n the phone and
Flight mode menu is activated, select
from Normal mode with full
functionality or Flight mode with
limited functionality. Network, radio
and Bluetooth transceivers are turned
off to prevent disturbance to sensitive
equipment. You can, for example, play
music or write a text message to send
later but not make calls in an
aeroplane.
Follow onboard regulations, flight crew
instructions for use of electronic devices.
To view Flight mode menu o ptions
} Settings and scroll to the General
tab } Flight mode and select an option.
Making and receiving calls
The phone must be in normal mode.
To make and receive calls
Enter a phone number (with
international prefix and area code if
applicable) } Call to make the call or
} More } Make video call %
call
. } End call to end the call.
To receive a call
When the phone rings } Answer
or } Busy to reje ct the ca ll.
To end a call
} End call.
21 Video
This is the Internet version of the user's guide. © Print only for private use.
7Getting started
Getting to know the phone
Phone overview, icons, menus, entering letters, activity menu, file manager,
Memory Stick Micro™ (M2™).
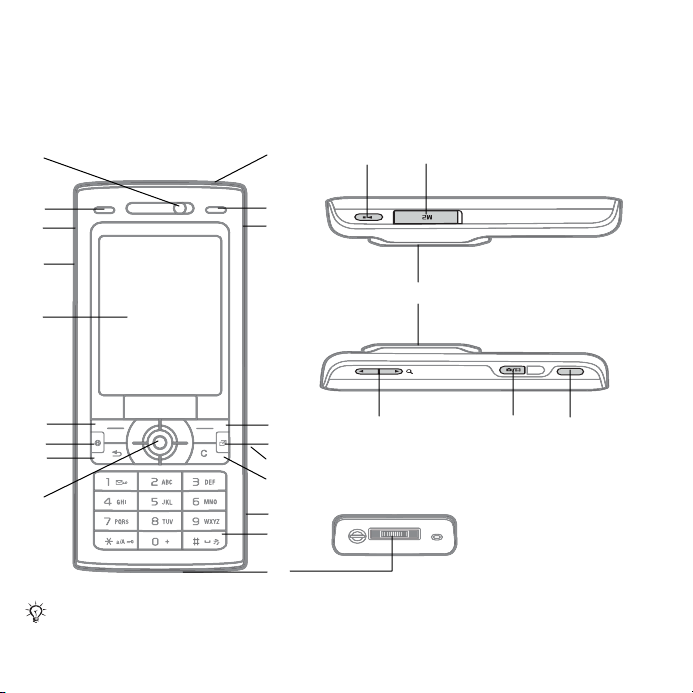
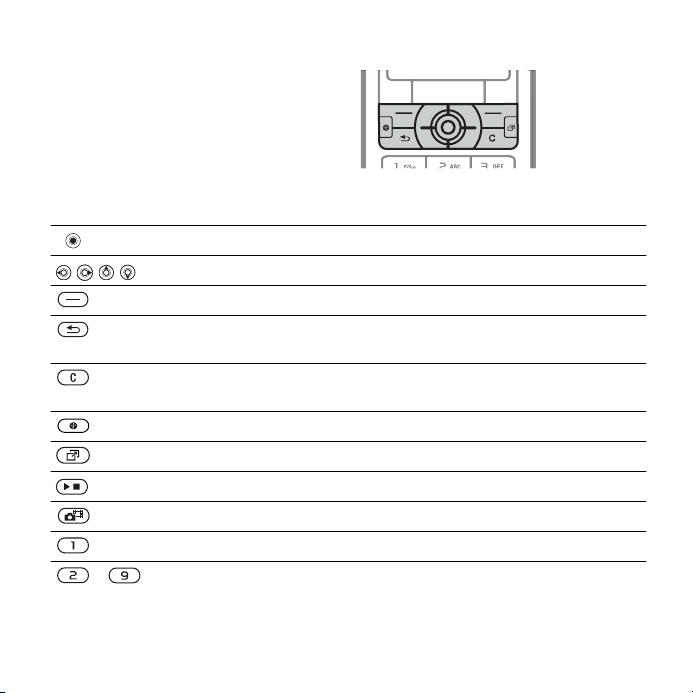
Phone overview
1
10
34
2
3
4
5
6
7
8
9
Some icons on keys may differ.
8 Getting to know the phone
This is the Internet version of the user's guide. © Print only for private use.
11
12
13
14
15
16
17
18
19
20
12 15 17

1 Video call camera, ear speaker
2 Photo key: (left) from standby, view camera album pictures in full view
3 Play/stop button
4 Memory Stick Micro™ (M2™) slot
5 Screen
6 Selecti on key
7 Internet key
8 Back key
9 Navigation key/Music player control
10 Power on/off button
11 Photo key: (right) from standby, view camera album thumbnail pictures
12 Volume, camera digital zoom buttons
13 Selecti on key
14 Activity menu key
15 Camera button
16 Clea r ke y
17 Infrared port
18 Silent key
19 Connecto r for charger, handsfree and USB cabl e
20 Active camera lens cover
For more information
or (lower) with the camera for shoot modes.
or (upper) with the camera for camera scenes/video night mode.
%
12 Navigation
This is the Internet version of the user's guide. © Print only for private use.
9Getting to know the phone

Menu overview
PlayNow™* Internet* Entertainment
Online services*
Radio
Games
Video player
Vide oDJ ™
PhotoDJ™
MusicDJ™
Remot e contro l
Record sound
Demo tour
Cyber-shot™ Messaging Music player
File manager** Contacts
Camera album
Music
Pictures
Videos
Themes
Web pages
Games
Ap plic ation s
Other
Write new
Inbox
Email
RSS reader
Drafts
Outbox
Sent messages
Saved messages
My friends*
Call voicemail
Templates
Settings
New contact
Now playing
Artists
Tracks
Playlists
Video call
10 Getting to know the phone
This is the Internet version of the user's guide. © Print only for private use.

Calls** Organizer
All Answered Dialled Missed
Settings**
Alarms
Applications
Calendar
Tasks
Notes
Synchronization
Timer
Stopwatch
Calculator
Code memo
General
Profiles
Time & date
Language
Update servi ce
Voice cont rol
New events
Shortcuts
Flight mode
Security
Setup wizard
Phone status
Master reset
* Some menus are op era tor- , network - an d subs cripti on- dep endent .
** Use the navigation key to move across tabs in submenus. For more information
Sounds & alerts
Ring volume
Ringtone
Silent mode
Increasing ring
Vibrating alert
Message alert
Key sound
Display
Wallpaper
Them es
Star t-up scre en
Screen saver
Clock size
Brightness
Sleep mode clock
Edit line names*
Calls
Divert calls
Manage calls
Time & cost*
Show/hide my no.
Handsfree
Sw itch to lin e 2*
%
Connectivity*
Bluetooth
Inf rared port
USB
Synchronization
Device mana gement
Mobile networks
Data communication
Internet settings
Streaming settings
Accessories
12 Navigation.
This is the Internet version of the user's guide. © Print only for private use.
11Getting to know the phone
Navigation
The main menus are shown as icons.
Some submenus include tabs. Scroll
to a tab by pressing the navigation key
left or right and selecting an o ption.
Key
Go to the main menus or to select highlighted items.
Move through the menus and tabs.
Select options shown immediately above these keys on the screen.
Go back one level in the menus.
Press and hold to return to standby or to end a function.
Del ete items, such as pictures, sounds and contacts.
During a call, press and hold to mute the microphone.
Open the browse r.
Open the activity menu %
Open or minimize the Music player.
Press and hold to take a picture or record a video clip.
Press and hold to call your voicemail service (if set).
- Press an d hold any of these keys to reach a contact begi nni ng with
a specific letter.
Navigation keys
16 Activity menu
.
12 Getting to know the phone
This is the Internet version of the user's guide. © Print only for private use.
- Press a number key and } Call to sp eed dial.
Turn off th e ringtone when rec eiving a call.
Press and hold to set the phone to silent. The alarm signals even
if the phone is set to silent.
View status informa tion in standby.
Increase the volume during a call, or when using the Music player.
Zoom out when using the camera or viewing pictures.
Press an d hold to go back one tra ck.
Press twice to reject a call.
Press and hold to voice dial, alternatively say your magic word (if set)
%
27 Voice dialling
Dec rea se the volume during a call , or when us ing the Music player.
Zoom in when using the camera or vi ewing pictures.
Press and h ol d to g o forward one track.
Press and hold to voice dial, alternatively say your magic word (if set)
%
27 Voice dialling
Use left or right photo keys to view camera album pictures from
standby, for full or thumbnail views.
} Info Find more information, explanations or tips about selected features,
} More Enter a list of options. There are different alternatives in the list
menus or functions available in your phone %
of options depending on where you are in the menus.
.
.
6 Help in your phone
.
This is the Internet version of the user's guide. © Print only for private use.
13Getting to know the phone
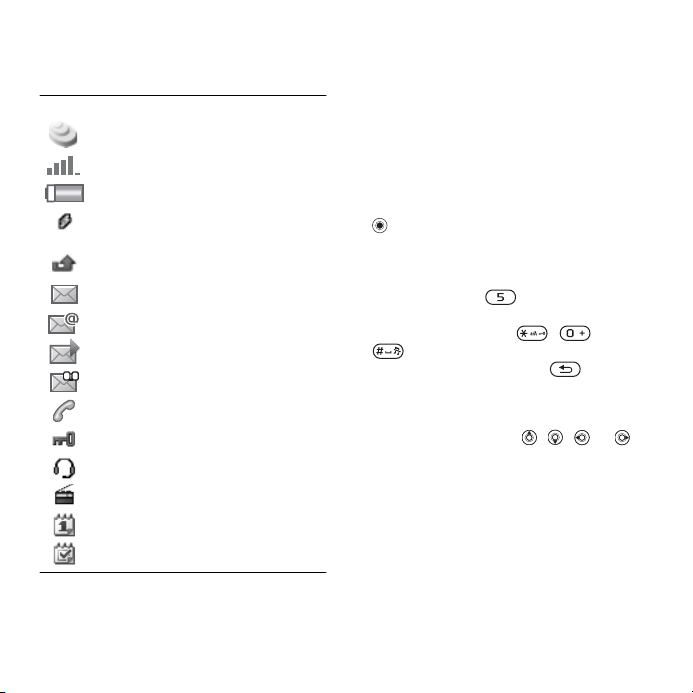
Status bar
Some of the icons that may appear:
Icon Description
3G (UMTS) network is available.
GSM network signal strength.
Battery status.
Battery charging, appears with
battery status icon.
Missed in coming ca ll.
Text message received.
Email message received.
Picture message received.
Voice message received.
Ongoing call.
Keylock is on.
Handsfree is conne cte d.
Radio playing in the ba ckg round.
Cale nda r rem inde r.
Task reminder.
Shortcuts
Use keypad shortcuts to quickly go to
a menu, and you can use predefined
navigation key shortcuts to quickly
reach certain functions. Edit the
navigation key shortcuts to suit your
own needs.
Using keypad shortcuts
In standby, go to menus by pressing
and then ente r the numb er of the
menu. Menu numbering starts from
the top left icon and moves across
and then down row by row, for
example, press for the fifth menu
item. For the tenth, eleventh and
twelfth items, press , and
respectively. To go back to
standby, press and hold .
Using navigation key shortcuts
In standby, go to a shortcuts menu or
function by pressing , , or .
To edit a navigation key shortcut
} Settings } General tab } Shortcuts
and select a shortcut } Edit.
14 Getting to know the phone
This is the Internet version of the user's guide. © Print only for private use.
Phone language
Select the language to use in the
phone menus or when writing text.
To change the phone language
} Settings } General tab } Language
} Phone language. Sele ct a la ngua ge.
In standby, you can also press
8888 for automatic language.
0000 for English.
Most SIM cards automatically set the
menu lang uage to the country where
you bought your SIM card. If not,
the predefined language is English.
To select writing language
1 } Settings } the General tab
} Language } Writing language.
2 Scroll to the language to use and m ark
it. } Save to exit the menu.
Entering letters
Enter letters in one of the following
ways (text input methods), for
example, when writing messages:
• Multi tap text input
• T9™ Text Input
To change the text input method
Before, or when entering letters, press
and hold to change the method.
Options when entering letters
} More for options when w riting
a message.
To enter letters using multitap input
• Press - repeatedly until
the desired character appears.
• Press to shift between capital
and low er-case letters.
• Press and hold - to enter
numbers.
• Press to delete letters or numbers.
• Press for the most common
punctuation marks.
• P ress to add a space.
T9™ Text Input
The T9 Text Input method uses a builtin dictionary to recognize the most
commonly used word for each
sequence of key presses. This way,
you press each key only once, even
if the letter you want is not the first
letter on the key.
To enter letters using T9 Text Input
1 To enter text, you have to be in a
function where text input is possible,
for example, } Messaging
} Write new } Text message.
2 For ex ample , to wri te the word “Jane”,
press , , , .
This is the Internet version of the user's guide. © Print only for private use.
15Getting to know the phone

3 If the word shown is the one you want ,
press to acce pt and add a
space. To accept a word without
adding a space, press . If the word
shown is not the one you want, press
or repeatedly to view alternative
words. Accept a word and add a
space by pressing .
4 Continue writing the messag e.
To enter a punctuation mark, press
and then or repeatedly,
press to accept and add a space.
To add words to the T9 Text Input
dictionary
1 When entering letters } More
} Spell word.
2 Edit the word by using multitap input.
Use and to move the cursor
between the letters. To delete a
character, press . To delete the
entire word, press and hold .
When you have edited the word
} Insert. The word is added to the
T9 Text Input dictionary. Next time you
enter this word using T9 Text Input,
it appears in alte rnativ e word s.
Next word prediction
When w riting a mes sag e, you c an use
T9 Text Input to predict the next word,
if previously used in a sentence.
To turn next word prediction on/off
When entering letters } More
} Writing options } Next word pred.
To use next word prediction
When entering letters, press
to accept or continue.
Activity menu
You can open the activity menu
almost anywhere in the phone to view
and handle new events, and access
bookmarks and shortcuts.
To open and close the activity menu
Press .
Activity menu tabs
• New events – such as missed calls
and messag es . When a new ev ent
occurs, the tab appears. Press
to dismiss an event from the event
tab. New events can also be set to
appear as pop-up text instead,
} Settings } the General tab
} New events } Pop-up.
• Running apps – ap plications t hat
are running in the background.
Select an application to return
to it or press to end it.
16 Getting to know the phone
This is the Internet version of the user's guide. © Print only for private use.
• My shortcuts – add, de lete a nd
change the order of shortcuts.
When you select a shortcut and the
application opens, other progr ams
are cl os ed or minim ized.
• Internet – your Internet bookmarks.
When you select a bookmark and
the browser opens, other programs
are cl os ed or minim ized.
File manager
Use the file m anager to handle items
such as pictures, videos, music,
themes, Web pages, games and
applications saved in the phone
memory or on a Memory Stick Micro™
(M2™) memory card.
You may have to purchase a memory
card separately from your phone.
Memory Stick Micro™ (M2™)
Your phone supports Memory Stick
Micro™ (M2™) memory card adding
more storage space to your phone
to save files containing pictures or
music, for example. It can also be
used as a portable memory card with
other compatible devices.
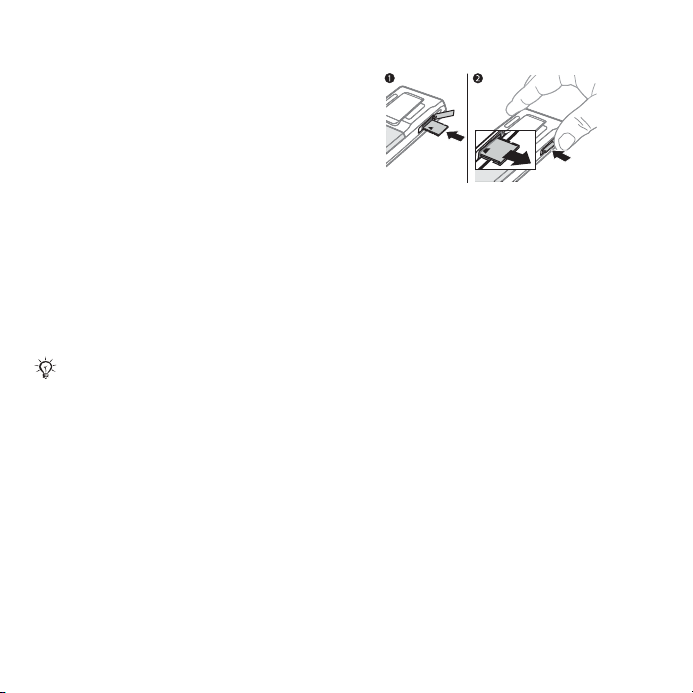
To insert and remove a memory card
1 Open the cover and insert as shown
(with the contacts facing down).
2 Press the edge to release and remove.
You can also move and copy files
between the phone, a computer and
a memory card. If you have a memory
card inserted, files are automatically
saved to it first and then to phone
memory.
Create subfolders to move or copy
files to. Games and applications can
be moved within the Games and
Applications folders and fro m the
phone memory to a memory card.
Unrecognized files are saved in the
Other folder. When handling files, you
can selec t seve ral or all fi les in a fol der
at the same time for all items except
Games and Applications.
All files are automatically saved in the
phone memory. If all available memory
is full, you cannot save any files until
content is removed.
This is the Internet version of the user's guide. © Print only for private use.
17Getting to know the phone

File manager menu tabs
The file manager is divided into three
tabs, and ico ns are includ ed to
indicate where the files are saved.
• All files - all co ntent in the phone
memory and on a Memory Stick
Micro™ (M2™).
• On Memory Stick - all co nte nt
on a Memory Stick Micro™ (M2™).
• In phone - all content in the phone
memory.
File information
View file information by highlighting
it } More } Information. Items th at ar e
downloaded, or received using one
of the available transfer methods,
may be copyright-protected. If a file
is protec te d, you ma y not be abl e
to copy or send that file. A DRMprotected file has a k ey symbol.
To use a file from the file manager
1 } File manager and open a folder.
2 Scroll to a file } More.
To mo ve or co py a file to memory
1 } File manager and sele ct a fold er.
2 Scroll to a file } More } Manage file
} Move to move the file or } More
} Manage file } Copy to copy the file.
3 Select to move or copy the file to
Phone or Memory Stick } Select.
To move or copy files to a computer
%
70 Transferring files using the USB
cable
.
To create a subfolder
1 } File manager and open a folder.
2 } More } New fo lder and enter
a name for the folder.
3 } OK to save the folder.
To select several files
1 } File manager and open a folder.
2 } More } Mark } Mark several.
3 Scroll to select files } Mark
or Unmark.
To select all files in a folder
} File manager and open a folder
} More } Mark } Mark all.
To delete a file or a subfolder from
the file manager
1 } File manager and open a folder.
2 Scroll to a file } More } Delete.
Memory card options
Check memory status or format a
memory card to delete all information.
To use memory card options
} File manager and select the
On Memory Stick tab } More
for options.
18 Getting to know the phone
This is the Internet version of the user's guide. © Print only for private use.

Calling
Calls, video calls, contacts, voice
control, call options.
Making and receiving calls
Before you can make or receive any
calls, you must turn on your phone
and be within range of a network.
%
6 Turning on your phone
a video call %
Networks
When you turn on the phone, it
automatically selects your home
net work if this is withi n range . If it is
not within range, you may use another
network, provided your network
operator has an agreem ent that allows
you to do so. This is called roaming.
Select the network to use, or you
can add a network to your preferred
networks. You can also change the
order in which networks are selected
dur ing an autom atic sear ch.
To view av ailable network options
} Settings and use or to sc rol l
to the Connectivity tab
} Mobile networks.
21 Video call
. To make
.
Your phone also switches
automatically between GSM and 3G
(UMTS) network s depending on
availability. Some network operators
allow you to switch networks
manually, as searching for unavailable
networks consumes battery power.
To switch networks
1 } Settings } Connectivity
} Mobile networks
} GSM/3G networks.
2 } GSM and 3G (automatic)
or } GSM only.
For more information, contact your
network operator.
To make a call
1 Enter a phone number (with
international country code and area
code, if applicable).
2 } Call to make a voice call or } More
to view options, such as
Make video call %
3 } End call to end the call.
You can call numbers from your contacts
and call list
%
25 Call list. You can also use your
voice to make calls
21 Video call
%
22 Contacts, and
%
26 Voice control.
.
This is the Internet version of the user's guide. © Print only for private use.
19Calling

To make international calls
1 Press until a + sign appears.
2 Enter the country code, area code
(without the first zero) and phone
number } Call to make a voice call
or } More } Make video call.
To re-dial a number
If a call connection fails and Retry?
appears } Yes.
Do not hold the phone to your ear when
waiting. When the call connects, the
phone gives a loud signal, unless muted.
To answer or reject a call
} Answer or } Busy.
To turn off the microphone
1 Press and hold .
2 To resume the conversation press
and hold again.
To turn the loudspeaker on or off
during a voice call
} More } Turn on speaker
or Turn off speaker.
Do not hold the phone to your ear when
using the loudspeaker. This could
damage your hearin g.
To change the ear speaker volume
Press to increase or to
decrease the ear speaker volume
during a call.
Missed calls
When the activity menu is set to
default missed calls appear in the
New events tab in standby. If po p-up
is set to default Missed calls: appears
in standby %
To check missed calls from standby
• If pop-up is set to default:
} Calls and use or to scroll
to the Missed tab. Scroll or
to sele ct a numb er } Call to call.
• If activity menu is set to default:
Press and use or to scroll
to the New events tab and use or
to select a number } Call to call.
16 Activity menu
.
Emergency calls
Your phone supp orts interna tiona l
emergency numbers, for example,
112, 911. These numbers can
normally be used to make emergency
calls in any country, with or without
a SIM car d inserted , if a 3G (UMTS)
or GSM network is within range.
20 Ca lling
This is the Internet version of the user's guide. © Print only for private use.

In some c ount ries, o ther emergency
numbers may also be promoted. Your
network operator may therefore have
saved additional local emergency
numbers on the SIM card.
To make an emergency call
Enter 112 (the international emergency
number) } Call.
To view your local emergency
numbers
} Contacts } More } Options
} Special numbers
} Emergency nos .
Video call
See a person on screen during calls.
Before you start
To make a vide o ca ll, both you and
the person you are calling need a
subscription that supports the 3G
(UMTS) service, and you need to be
within range of a 3G (UMTS) network.
3G (UMTS) service is available when
the 3G icon appears in the status bar.
Video call demo mode
You can use most video call functions
without making a ca ll, for ex ample,
to prepare a camera view before
calling. } Video call.
To make a video call
When 3G (UMTS) service is available,
you can make a video call in one of the
following ways:
• Enter a phone number (international
prefix and area code if applicable)
} More } Make video call.
• Contacts and sele ct the co ntac t to
call. Use or to select a number
} More } Make video call.
• Video call } Call... } Contacts
to retrieve a phone number } Call
or enter a phone number } Call.
To zoom the outgoing video in or out
Press to zoom in the outgoing
video and press to zoom out.
To accept an incoming video call
} Answer.
To end a video call
} End call.
Video call options
} More for the following options:
• Switch camera – to switch between
the main and video call cameras. Use
the main camera to show a full image
of your surroundings to the recipient.
This is the Internet version of the user's guide. © Print only for private use.
21Calling

• Stop camera/Start camera – turn the
video camera off or on. An alternative
picture is shown when off.
• Save picture – save the image shown
in th e large view, for ex ample ,
the incoming caller image.
• Camera – options
• Brightness – adjust the level for
the outgoing picture.
• Turn on night m. – use when
lighting conditions are poor. This
setting affects the outg oing video.
• Sound – options during a video call
• Turn off speaker/Turn on speaker
– incoming sound.
• Mute microphone/Unmute mic. –
microphone off or on.
• Transfer sound – to and from
Bluetooth handsfree equipment.
• Layout – options
• Switch pictures – show incoming
or outgoi ng video in full size view.
• Hide small pic./Show small pic.
• Mirror image – show the outg oing
cam era picture.
• Settings – when answering
• Answer mode – set the video call
camera to on or off.
• Alternative pic. – set a picture
to show to the recipient when
the ca mera is off.
• Audio options – select if
microphone, speaker phone,
or both should be on or off.
• Video quality – select picture
quality for video calls. Changes
do not take effect during an
ongoing call.
Contacts
You can save your contact information
in the phone memory or on a SIM card.
The following is available:
You can choose which contact
information – Phone contacts or
SIM contacts – is shown as default.
For useful information and settings
} Contacts } More } Options.
Default contact
If Phone contacts is selected as
default, your contacts show all the
information saved in Contacts. If you
select SIM contacts as d efa ult, your
contacts show information depending
on the SIM card.
To select default contacts
1 } Contacts } More } Options
} Advanced } Default contacts.
2 } Phone contacts or SIM contacts.
22 Ca lling
This is the Internet version of the user's guide. © Print only for private use.

Phone contacts
Save contacts in the phone with
name s, phone numbe rs a nd pe rsonal
information. You can also add pictures
and ringtones to contacts. Use , ,
and to scroll between tabs and
their information fields.
To add a phone contact
1 If Phone contacts is sele cte d as
default, } Contacts } New contact
} Add.
2 Enter the name } OK.
3 Enter the number } OK.
4 Select a number option.
5 Scroll between tabs and select the
fields to add information. To enter
symbols such as @, } More
} Add symbol and select a symbol
} Insert.
6 When all information is added } Save .
To delete a contact
1 } Contacts and scroll to a contact.
2 Press and select Yes.
To delete all phone contacts
} Contacts } More } Options
} Advanced } Delete all contacts
} Yes and } Yes. Names and numbers
on the SIM card are not deleted.
SIM contacts
Save contacts on your SIM card.
To add a SIM contact
1 If SIM contacts is selected as default,
} Contacts } New contact } Add.
2 Enter the name } OK.
3 Enter the number } OK and select
a number. Add more information,
if available } Save.
To automatically save names and
phone numbers on the SIM card
} Contacts } More } Options
} Advanced } Auto save on SIM
and sel ect On.
Memory status
The number of contacts you can save
in the phone or on the SIM card
depends on available memory.
To view memory status
} Contacts } More } Options
} Advanced } Memory status.
Using contacts
Contacts can be used in many ways.
Below you can see how to:
• c all pho ne and SIM co nt acts.
• send phone contacts to another
device.
This is the Internet version of the user's guide. © Print only for private use.
23Calling

• copy contacts to phone and
SIM card.
• add a picture or a ringtone
to a phone contact.
• ed it contacts.
• synchronize your contacts.
To call a phone contact
1 } Contacts. Scroll t o, o r e nter the first
letter or letters of the contact.
2 When the contact is highlighted press
or to select a number } Call
or } More } Make video call.
To call a SIM contact
• If SIM contacts is default } Contacts
and when the contact is highlighted
press or to select a number
} Call or } More } Make video call.
• If Phone contacts is set as default
} Contacts } More } Options
} SIM contacts and select the contact
} Call or } More } Make video call.
To send a contact
} Contacts and select a contact
} More } Send contact and select
a transfer method.
To send all contacts
} Contacts } More } Options
} Advanced } Send all contacts
and select a transfer method.
To copy names and numbers
to the SIM card
1 } Contacts } More } Options
} Advanced } Copy to SIM.
2 Select one of the alternatives.
When copying all contacts from the
phone to the SIM card, all existing
SIM card information is replaced.
To copy names and numbers
to phone contacts
1 } Contacts } More } Options
} Advanced } Copy from SIM.
2 Select one of the alternatives.
To add a picture, ringtone sound
or video to a phone contact
1 } Contacts and sele ct the co nta ct
} More } Edit contact.
2 Sel ect the re levant tab and then select
Picture or Ringtone } Add.
3 Select an option and an item } Save .
If your subscription supports Calling
Line Identification (CLI) service, you can
assign personal ringtones to contacts.
To edit a phone contact
1 } Contacts and sele ct a co nt ac t
} More } Edit contact.
2 Scroll to the relevant tab and select
the field to edit } Edit.
3 Edit the information } Save.
24 Ca lling
This is the Internet version of the user's guide. © Print only for private use.

To edit a SIM contact
1 If SIM contacts is default } Contacts
and select the name and number
to edit. If phone contacts is default
} Contacts } More } Options
} SIM contacts and select the name
and number to edit.
2 } More } Edit contact an d edi t
the name and number.
Synchronizing contacts
You can synchronize your contacts
with a contacts application on
the Web. For more information
%
65 Synchronizing
To save and restore contacts with
a mem or y car d
} Contacts } More } Options
} Advanced } Back up to M.S.
or Restore from M.S.
To select the sort order for contacts
} Contacts } More } Options
} Advanced } Sort order.
.
Call list
Information about most recent calls.
To call a number from the call list
1 From standby } Calls and select a tab.
2 Scroll to the name or number to call
} Call or } More } Make video call.
To add a call list number to contacts
1 From standby, } Calls and select a tab.
2 Scroll to the number to add } More
} Save number.
3 } New contact to cre ate a new
contact, or select an existing contact
to add the number to.
To clear the call list
} Calls and select the All tab } More
} Delete all.
Speed dial with pictures
Save numbers in positions 1-9 in your
phone to access them easily. Speed
dial is dependent on your de fault
contacts %
example, you can speed dial numbers
saved on the SIM card.
If you add contacts with pictures
to spee d di al positions, th e co ntact
pictures appear for easy reference
%
24 To ad d a pi ctur e, ringtone sound
or video to a phone contact
To edit speed dial numbers
1 } Contacts } More } Options
} Speed dial.
2 Scroll to the position } Add or } More
} Replace.
22 Default contact
.
, for
This is the Internet version of the user's guide. © Print only for private use.
25Calling

To speed dial
From standby, enter the position
number } Call.
Voicemail
If your subscription includes an
answering service, callers can leave
a voicemail message when you cannot
answer a cal l.
Contact your network operator for your
voicemail number or for more information.
To call your voicemail service
Press and hold . If you have
not entered a voicemail number,
} Yes and enter the number.
To edit your voicemail number
} Messaging } Settings
} Voicemail number.
Voice control
Manage calls with your voice
by creating voice commands to:
• Voice dial – call someone by saying
their name.
• Activate voice control by saying
a“magic word”.
• Answer an d reject calls when usi ng
a handsfree.
Before voice dialling
Activate the voice dialling function and
record your voice commands. An icon
appears next to a phone number that
has a voice command.
To activate voice dialling and
record names
1 } Settings } the General tab
} Voice control } Voice dialling
} Activate } Yes } New voice
and select a contact.
2 If the contact has more than one
number, use and to view the
numbers. Select the number to add
the voice command to. Record a voice
command such as “John mobile”.
3 Instructions appear. Wait for the tone
and say the command to record. The
voice command is played back to you.
4 If the recording sounds OK } Yes.
If not } No and repe at step 3.
To record another voice command for
a contact } New voice } Add again
and repeat steps 2-4 ab ove.
Caller name
Hear your recorded contact name
when you receive a call from that
contact.
26 Ca lling
This is the Internet version of the user's guide. © Print only for private use.

To t urn the caller name on or off
} Settings } the General tab
} Voice control } Play caller name.
Voice dialling
Start voice dialling from standby using
the phone, a portable handsfree,
a Bluetooth headset or by saying your
magic word.
To make a call
1 From standby, press and hold one
of the volume keys.
2 Wait for the tone and say a recorded
name, for example “John mobile”.
The name is played back to you and
the call is connected.
To make a call with a handsfree
From standby, press and hold
the handsfree button, or press
the Bluetooth headset button.
The magic word
Recor d and use a voi ce command as
a magic word to activate voice control
without pressing any keys. The magic
word can only be used with a
handsfree or a Bluetooth headset.
Choose a l ong, unus ual word or phrase
that can easily be distinguished from
ordinary background speech.
To activate and record the magic word
1 } Settings } the General tab
} Voice control } Magic word
} Activate.
2 Instructions appear. } Continue. Wait
for the tone and say the magic word.
3 } Yes to accept or } No to record a
new magic word.
4 Instructions appear. } Continue an d
select the environments in which your
magic word is to be activated.
Voice answering
Answer or reject incoming calls
by using your voice, when using
a handsfree.
You can use a MID I, WAV (16 kHz),
EMY or IMY file as a ringtone with voice
answering.
To activate voice answering and
record voice answer commands
1 } Settings } the General tab
} Voice control } Voice answer
} Activate.
2 Instructions appear. } Continue.
Wait for the tone and say “Answer”,
or another word.
3 } Yes to accept or } No for a new
recording.
This is the Internet version of the user's guide. © Print only for private use.
27Calling

4 Instructions appear } Continue.
Wait for the tone and say “Busy”,
or another word.
5 } Yes to accept or } No for a new
recording.
6 Instructions appear. } Continue and
select the environm ents in which voic e
answering is to be activated.
To answer or reject a call using voice
commands
When the phone rings, say:
• “Answer” to connect the call.
• “Busy” to reject the call.
To edit your voice commands
1 } Contacts and scroll to a contact.
2 } More } Edit contact and scroll
to the relevant tab.
To re-record a voice command
1 } Settings } the General tab
} Voice control } Voice dialling
} Edit names.
2 Select a command } More
} Replace voice.
3 Wait for the tone and say the
command.
Diverting calls
Divert calls, for example,
to an answering servi ce.
When the restrict call function is
activated, some divert call options are
not available.
Your phone has the following options:
• Divert always – all cal ls.
• When busy – if a call is ongoing.
• Not reachable – if turned o ff
or unreachable.
• No reply – if not answered
in a specified time.
To activate a call divert
1 } Settings } the Calls tab
} Divert calls.
2 Select a call type and divert option
} Activate.
3 Enter the phone number to divert your
calls to, or press Look up to find
acontact } OK.
To deactivate a call divert
Scroll to the divert option
} Deactivate.
%
31 Restricted dialling.
28 Ca lling
This is the Internet version of the user's guide. © Print only for private use.

More than one call
Handle more than one call
simultaneously.
Call waiting service
When this is activated you hear a beep
if you receive a second call.
To activate or deactivate the call
waiting service
} Settings } the Calls tab by using
or and } Manage calls
} Call waiting.
To make a second call
1 } More } Hold to hold the ongoing call.
2 Enter the number to call } More } Call.
Receiving a second voice call
When you receive a second call,
you can:
} Answer and put the ongoing call
on hold.
} Busy to reject and continue with
the ongoi ng call.
} Replace active call to answer
and end the ongoing call.
Handling two voice calls
If you have calls ongoing and on hold,
you can:
} More } Switch to switch between
the two calls.
} More } Join calls to join the two
calls.
} More } Transfer call to connect the
two calls. You are disconnected from
both calls, operator-dependent.
} End call and } Yes to retrieve
the call on hold.
} End call and } No to end both calls.
You cannot answer a third call without
ending one of the first two calls or
joining them into a conference call.
Conference calls
Start a conference call by joining
an ongoing call and a call on hold.
You then put the conference on hold
and add up to f ive participants, or c an
ma ke another cal l.
There may be additional charges for calls
involvin g mul tiple parties , co ntact your
network operator for more information.
To join the two calls into
a conference call
} More } Join calls.
This is the Internet version of the user's guide. © Print only for private use.
29Calling

To add a new participant
1 } More } Hold to put the joined calls
on hold.
2 } More } Add call and call the next
person to add to the conference call.
3 } More } Join calls.
4 Repeat steps 1-3 to add more
participants.
To release a participant
} More } Release part. and sele ct
the participant to release from the
conference call.
To have a private conversation
1 } More } Talk to and select the
participant to talk to.
2 } More } Join calls to resume
the conference call.
Two voice lines
Make separate calls with different
phone numbers if your subscription
supports alternate line service.
To select a line for outgoing calls
} Settings and use or to scroll
to the Calls tab. Select line 1 or 2.
To change the name of a line
} Settings and use or to scroll
to the Display tab } Edit line names.
Select the line to edit.
My numbers
View, add and edit your own phone
numbers.
To check your phone numbers
} Contacts } More } Options
} Special numbers } My numbers
and select one of the options.
Accept calls
Only receive calls from certain phone
numbers. If the divert calls option
When busy is activated, calls are
diverted.
To add numbers to the accepted
callers list
} Settings and use or to scroll
to the Calls tab } Manage calls
} Accept calls } Only from list } Edit
} Add. Select a contact or } Groups
%
32 Groups
To accept all calls
} Settings } the Calls tab
} Manage calls } Accept calls
} All callers.
.
30 Ca lling
This is the Internet version of the user's guide. © Print only for private use.
 Loading...